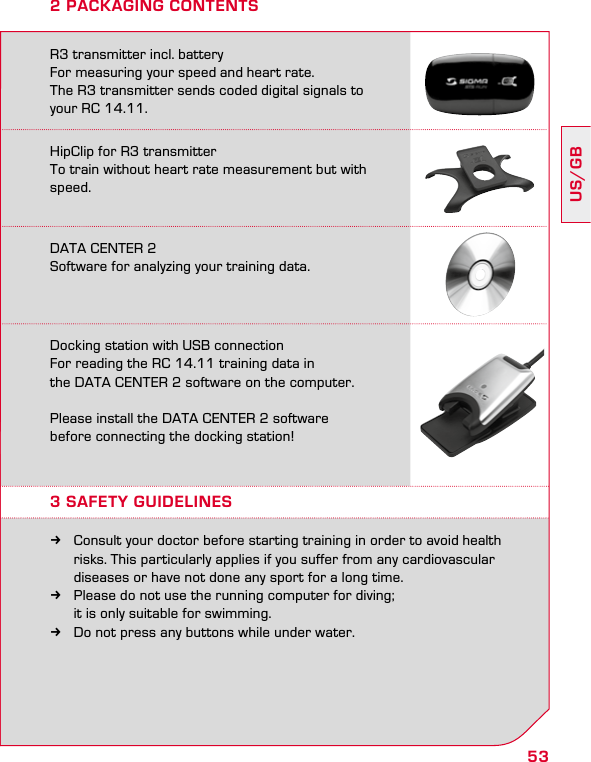
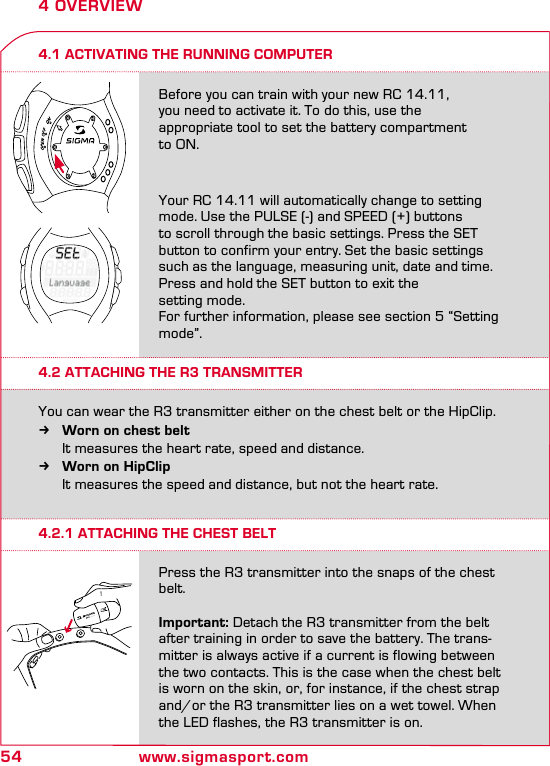
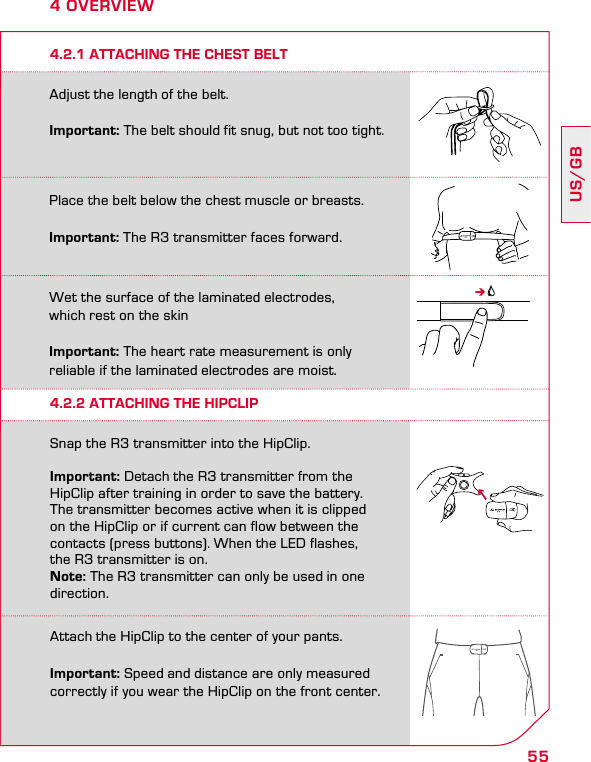
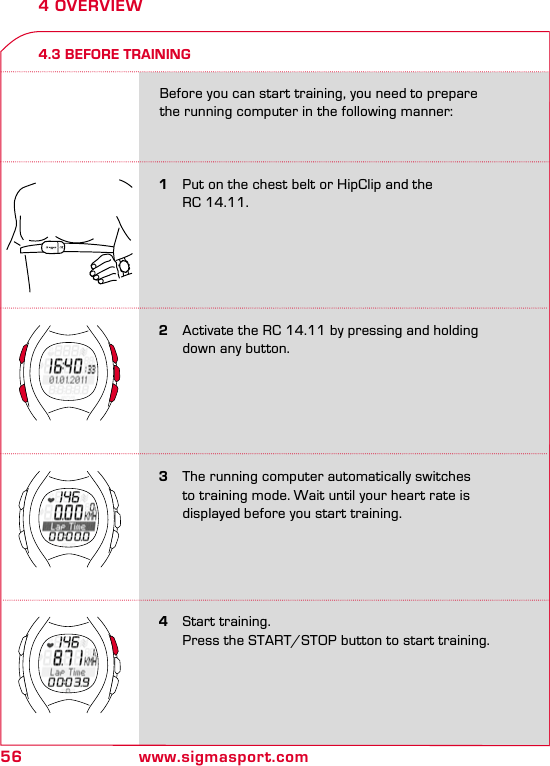
ZEITBIKE R3STS 112 kHz heart rate and speed transmitter User Manual

Sigma Sport USA 112 kHz heart rate and speed transmitter

Contents

user manual

PTRC 14.11    www.sigmasport.comRUNNING COMPUTERSPEED – DISTANCE – LAP  CouNTruNNINg CoMPuTErDEUS/GBFRITPT ESNL
50 www.sigmasport.com1  Foreword 522  Packaging contents 523  Safety guidelines 534  Overview 544.1  Activating the running computer  544.2  Attaching the R3 transmitter  544.2.1  Attaching the chest belt  544.2.2  Attaching the HipClip  554.3  Before training  564.4  Pressing and holding down buttons  574.5  Overview of modes and functions  584.5.1  Sleep mode  594.5.2  Training mode  594.5.3  Lap view  604.5.4  Setting mode  615  Setting mode 625.1  Activating the setting mode  625.2  Display setup  625.3  Button assignment in the setting mode  625.4  Brief guide to device settings  635.5  Establishing device settings  635.5.1  Setting the language  635.5.2  Setting the measuring unit  635.5.3 Calibration  635.5.4  Correction factor  635.5.5  Setting the date  645.5.6  Setting the time  655.5.7  Setting the gender  665.5.8  Setting the date of birth  665.5.9  Setting the weight  665.5.10  Setting the max. HR  665.5.11  Setting the training zone  675.5.12  Training with training zones  685.5.13  Setting up an individual training zone  685.5.14  Setting the total distance  705.5.15  Setting the total running time  715.5.16  Setting the total calories  715.5.17  Setting the contrast  715.5.18  Log interval  725.5.19 Logbook  73CONTENTS
51US/GB5.5.20  Setting the button tones  735.5.21  Turning the zone alarm on and off  736  Calibration and correction factor 746.1  Why calibrate?  746.2  Calibration function  746.3  Activating calibration  756.4 Calibrating  766.4.1  Preparing for calibration  776.4.2  Carrying out calibration runs  786.5  Correction factor  797  Training mode 807.1  Activating the training mode  807.2  Display setup  807.3  Button assignment in the training mode  817.4  Functions while training  827.5  Radio link with the R3 transmitter  827.6  Starting a training session  837.7  Interrupting a training session  847.8  Ending a training session  847.9  Training values after training  857.10  Resetting and saving the training values  858  Training with laps 868.1  Using lap training  868.2  Summary of the last lap  878.3  Lap view  878.3.1  Activating the lap view mode  888.3.2  Display setup  888.3.3  Button assignment for the lap view  898.3.4  Displaying values for individual laps  909  Data transfer 909.1  Connecting the RC 14.11 to the docking station watch  9110  Maintenance and cleaning 9210.1  Changing the battery  9210.2  Washing the COMFORTEX+ textile chest belt  9310.3 Disposal  9411  Technical data 9412  Warranty 97CONTENTS
52 www.sigmasport.com1 FOREWORDThank you for purchasing the SIGMA SPORT® RC 14.11 running computer. Your new running computer will be a faithful training partner for many years to come. You can use your running computer for many different activities, including:  kRunning kWalking and Nordic Walking kHiking kSwimming (HR measurement only)The RC 14.11 running computer is a technically advanced instrument that measures not only your heart rate but also your distance and speed. Please read these instructions carefully to familiarize yourself with the many functions of your new running computer and prepare for their use.SIGMA SPORT® wishes you the best of fun with your running computer.2 PACKAGING CONTENTSRC 14.11 running computer incl. batteryBattery compartment tool For activating the battery and battery changes.Tip: If you lose this tool, the battery compartment  can also be opened with the aid of a ballpoint pen.COMFORTEX+ chest belt  For heart rate measurement and attaching the R3 transmitter
53US/GB2 PACKAGING CONTENTSR3 transmitter incl. battery For measuring your speed and heart rate.  The R3 transmitter sends coded digital signals to  your RC 14.11.HipClip for R3 transmitter  To train without heart rate measurement but with speed.DATA CENTER 2  Software for analyzing your training data.Docking station with USB connection  For reading the RC 14.11 training data in  the DATA CENTER 2 software on the computer.Please install the DATA CENTER 2 software  before connecting the docking station!3 SAFETY GUIDELINES kConsult your doctor before starting training in order to avoid health    risks. This particularly applies if you suffer from any cardiovascular    diseases or have not done any sport for a long time. kPlease do not use the running computer for diving;    it is only suitable for swimming. kDo not press any buttons while under water.
54 www.sigmasport.com4 OVERVIEW4.2.1 ATTACHING THE CHEST BELTPress the R3 transmitter into the snaps of the chest belt. Important: Detach the R3 transmitter from the belt after training in order to save the battery. The trans-mitter is always active if a current is flowing between the two contacts. This is the case when the chest belt is worn on the skin, or, for instance, if the chest strap and/or the R3 transmitter lies on a wet towel. When the LED flashes, the R3 transmitter is on.Before you can train with your new RC 14.11,  you need to activate it. To do this, use the  appropriate tool to set the battery compartment  to ON.Your RC 14.11 will automatically change to setting mode. Use the PULSE (-) and SPEED (+) buttons to scroll through the basic settings. Press the SET button to confirm your entry. Set the basic settings such as the language, measuring unit, date and time. Press and hold the SET button to exit the  setting mode.For further information, please see section 5 “Setting mode”.You can wear the R3 transmitter either on the chest belt or the HipClip.  kWorn on chest belt   It measures the heart rate, speed and distance. kWorn on HipClip   It measures the speed and distance, but not the heart rate.4.1 ACTIVATING THE RUNNING COMPUTER4.2 ATTACHING THE R3 TRANSMITTER
55US/GB4 OVERVIEWPlace the belt below the chest muscle or breasts.Important: The R3 transmitter faces forward.Adjust the length of the belt. Important: The belt should fit snug, but not too tight.Wet the surface of the laminated electrodes,  which rest on the skinImportant: The heart rate measurement is only  reliable if the laminated electrodes are moist.Attach the HipClip to the center of your pants. Important: Speed and distance are only measured correctly if you wear the HipClip on the front center.4.2.1 ATTACHING THE CHEST BELT4.2.2 ATTACHING THE HIPCLIPSnap the R3 transmitter into the HipClip.  Important: Detach the R3 transmitter from the  HipClip after training in order to save the battery.  The transmitter becomes active when it is clipped on the HipClip or if current can flow between the contacts (press buttons). When the LED flashes,  the R3 transmitter is on. Note: The R3 transmitter can only be used in one direction.
56 www.sigmasport.com4 OVERVIEW4.3 BEFORE TRAINING3   The running computer automatically switches    to training mode. Wait until your heart rate is    displayed before you start training.1   Put on the chest belt or HipClip and the    RC 14.11.4   Start training.  Press the START/STOP button to start training.Before you can start training, you need to prepare the running computer in the following manner:2   Activate the RC 14.11 by pressing and holding   down any button.
57US/GB4 OVERVIEW4.3 BEFORE TRAINING5  To finish training, simply press the START/STOP    button. The stopwatch stops. To reset the values    to zero, press and hold the START/STOP button.    To exit the training mode, press and hold the    PULSE (-) button.4.4 PRESSING AND HOLDING DOWN BUTTONSThe buttons on the running computer perform different actions  depending on how long you press them: kPress button briefly   Activate or scroll through functions. kPress and hold  Switch to another mode, reset training values,    or synchronize the R3 transmitter and the RC 14.11.Example: You have finished training and want to activate the sleep mode.Hold down the PULSE (-) button.Keep the PULSE (-) button held down.  The display will flash twice, indicating that  the training mode is deactivated.
58 www.sigmasport.com4 OVERVIEW4.5 OVERVIEW OF MODES AND FUNCTIONSThe heart rate monitor has three main modes (training mode,  setting mode and sleep mode). You can switch between these  modes by pressing and holding a button.Sleep modeLap view Setting modeTraining modeThe sleep mode will be displayed.  Release the PULSE (-) button.4.4 PRESSING AND HOLDING DOWN BUTTONS
59US/GB4 OVERVIEWYou will train in this mode. *Note: To provide you with a clearer    overview while training, the total    values are only displayed if the    stopwatch is not running.PULSE  kAverage heart rate kMaximum heart rate kCalories kRemaining log time kTotal Kcal*SET kDistance (in km) kSpeed    (in km/h or min/km) kRunning timeSTART/STOP kStopwatchLAP kLaps/  intervalsSPEED kLap time kLap distance kAverage speed kMaximum speed kTime kTotal distance*  kTotal running time*4.5.1 SLEEP MODE4.5.2 TRAINING MODEIn sleep mode, only the time and date are displayed.  To switch from sleep mode to training mode,  press and hold down any button.
60 www.sigmasport.com4 OVERVIEW4.5.3 LAP VIEWThe RC 14.11 can be used for lap training.  The values for the individual laps or legs are saved  in the running computer. You can view the values in  the lap view after and during your training. You can only activate the lap view from the  training mode. To do this, hold down the LAP button.In lap view mode:Use the LAP and START/STOP buttons to navigate and scroll through the previous laps. Press the PULSE (-) and SPEED (+) buttons to view the  heart rate and distance values for each lap.While training, the running computer briefly shows you a summary of the last lap for each completed lap  (briefly press the LAP button). This enables you to directly determine whether you are close to values you are striving to achieve (pace table, target time).
61US/GBLanguage (ES, FR, IT, GB, DE)Zone alarm (On, Off)Button tones (On, Off)Log interval (5, 10, 20 or 30 sec.)Logbook (Cancel, Delete)Measuring unit  (km/h, mph, min/km, min/mile)Contrast  (5 levels)Calibration(Run/Walk)Total Kcal  (Enter)Date  (Enter, Format)Correction factor  (Enter)Total running time  (Enter)Time  (Enter, 12h, 24h)Total distance  (Enter)Gender  (Male, Female)Training zone  (Fat Burn, Fit Zone,  Individual)Year of birth  (Enter)Max. heart rate  (Calculated from gender,  age and weight.  Correction possible)Weight  (Enter)4.5.4 SETTING MODEThis mode enables you to adjust the device settings. kUse the SPEED (+) button to scroll forward    from the language to the zone alarm. kUse the PULSE (-) button to scroll backward    from the zone alarm to the language.4 OVERVIEW
62 www.sigmasport.com5 SETTING MODE5.1 ACTIVATING THE SETTING MODEPrerequisite: Your running computer must be in  training mode (see section 4.5 “Overview of modes and functions”).  Hold down the SET button. The display will flash twice to indicate that the setting mode is now active.5.2 DISPLAY SETUP5.3 BUTTON ASSIGNMENT IN THE SETTING MODE1st line  SET indicates that the setting mode    is active.3rd line/  Submenu or the setting to be 4th line changed.START/STOPPress: In calibration mode, start and stop the  measurementSETPress: Select function  Save valuePress and hold: Exit setting mode (in calibration mode,  cancel calibration)LIGHTPress:  Light onPULSE Press: Scroll  backwardPress and  hold:  Scroll continuouslySPEEDPress: Scroll forwardPress and hold: Scroll  continuously
63US/GB5.4 BRIEF GUIDE TO DEVICE SETTINGSDevice settings such as language, measuring unit, correction factor, gender, date of birth, weight, max. HR, contrast, log interval, logbook, button tones  and zone alarm are all set in the same manner: Select the device setting, change the value and save the modified setting.Prerequisite: Your running computer must be in setting mode (section 5.1).1  Press the PULSE (-) or SPEED (+) button    repeatedly until you reach the desired device setting.2  Press the SET button. The device setting value flashes. 3  Press the PULSE (-) or SPEED (+) button    repeatedly until the desired value is displayed.4  Press the SET button. The new device setting is saved.    You can now scroll to a different device setting.5 SETTING MODE5.5 ESTABLISHING DEVICE SETTINGS5.5.1 SETTING THE LANGUAGE5.5.2 SETTING THEMEASURING UNIT5.5.4 CORRECTION FACTOR5.5.3 CALIBRATIONFollow the steps described in section 5.4 “Brief guide to device settings”.Follow the steps described in section 5.4 “Brief guide to device settings”.The correction factor is described in a separate section.  See section 6 “Calibration and correction factor”.The calibration is described in a separate section.  See section 6 “Calibration and correction factor”.
64 www.sigmasport.com5.5.5 SETTING THE DATE5 SETTING MODEPrerequisite: Your running computer must be in setting mode.Press the SPEED (+) button repeatedly until “Date” appears on the display.Press the SET button. “Year” is displayed and below it the preset year flashes.Press the PULSE (-) or SPEED (+) button repeatedly to set the year.Press the SET button. “Month” is displayed. Press the PULSE (-) or SPEED (+) button repeatedly to set the month.Press the SET button. “Day” is displayed.Press the PULSE (-) or SPEED (+) button repeatedly to set the day.Press the SET button. A date format is displayed.Use the PULSE (-) or SPEED (+) button to choose  a different date format.Press the SET button. The data setting is saved.
65US/GBPress the SPEED (+) button repeatedly until “Clock” appears on the display.Hold down the SET button. “24H” is displayed and flashes.Use the PULSE (-) or SPEED (+) button to choosebetween 12-hour and 24-hour format.Press the SET button. The time is displayed.  The hours entry flashes.Press the SPEED (+) button. The hour increases  by one. Press the PULSE (-) button to decrease the displayed hour by one.Press the SET button. The minute entry flashes.Press the SET button. The new time is saved.5.5.6 SETTING THE TIMEExample: Winter time has changed to summer time and you want to adjust the time on your heart rate monitor. Prerequisite: Your running computer must be in setting mode.5 SETTING MODE
66 www.sigmasport.com5.5.7 SETTING THE GENDERFollow the steps described in section 5.4 “Brief guide to device settings”.This device setting is taken into account when calculating  the maximum heart rate and calories. You should therefore ensure  that you set this value correctly.5 SETTING MODE5.5.8 SETTING THE DATE OF BIRTH5.5.9 SETTING THE WEIGHT5.5.10 SETTING THE MAX. HRFollow the steps described in section 5.4 “Brief guide to device settings”.This device setting is taken into account when calculating  the maximum heart rate and calories. You should therefore ensure  that you set this value correctly.Follow the steps described in section 5.4 “Brief guide to device settings”.This device setting is taken into account when calculating  the maximum heart rate and calories. You should therefore ensure  that you set this value correctly.Follow the steps described in section 5.4 “Brief guide to device settings”.The maximum heart rate (max. HR) is determined by the  running computer on the basis of your gender, weight and date of birth.Caution: On changing this value, you also change the training zones.  Only change the max. HR value if it has been determined by a reliable  test, such as performance diagnostics, max. HR test, etc.
67US/GB5.5.11 SETTING THE TRAINING ZONEYou can choose from three training zones. The upper and lower limits for the zone alarm are determined by the zone that you select. Example: If you want to lose weight, select the “Fat Burn”.Prerequisite: Your running computer must be in setting mode.5 SETTING MODEPress the SPEED (+) button repeatedly until  “Train. Zone” appears on the display.Press the SET button. The set training zone is displayed.Use the SPEED (+) button to scroll to “Fat Burn”.Press the SET button. The training zone is set for all future training sessions.Tip: To return to the training mode, press and hold the SET button.
68 www.sigmasport.comPress the SPEED (+) button repeatedly to scroll until “Train. Zone” appears on the display.5.5.13 SETTING UP AN INDIVIDUAL TRAINING ZONE5 SETTING MODEExample: You would like to train in an individual training zone for a run with a change of pace. The pulse range should lie between 120 and 160.  Prerequisite: Your running computer must be in setting mode.5.5.12 TRAINING WITH TRAINING ZONESYour running computer has three training zones. The preset  training zones “Fat Burn” and “Fit Zone” are calculated from the  maximum heart rate. Each training zone has an upper and a lower  heart rate limit. kFat Burn   This training is for the aerobic energy metabolism. Thanks to the    long duration and low intensity, more fat than carbohydrates is    burned or converted into energy. Training in this zone will help you    lose weight. kFit Zone   Your training is considerably more intensive in the Fitness Zone.    Training in this zone enhances your basic endurance level. kIndividual Training Zone   This zone is set up by you. The procedure for selecting the training zone is described in section 5.5.11 “Setting the training zone”.
69US/GBPress the SET button. “Upper limit” is displayed.  The registered value flashes.Press the SPEED (+) button repeatedly until the value  is set to 160.Press the SET button. The upper and lower  limits are set.Press the SET button. The set training zone is displayed.5 SETTING MODEUse the SPEED (+) button to scroll to “Individual”.Press the SET button. “Lower limit” is displayed.  The registered value flashes.Press the PULSE (-) button repeatedly until the value is set to 120.
70 www.sigmasport.com5.5.14 SETTING THE TOTAL DISTANCE5 SETTING MODEExample: You have bought a running computer and want to take the total distance of 560 kilometers from your training diary. Prerequisite: Your running computer must be in setting mode.Press the SPEED (+) button repeatedly  to scroll until “Total Dist.” appears on the display.Press the SET button. You will see zeros below the total distance. The first digit flashes.Press the SET button twice. The digit for the  hundreds flashes.Press the SPEED (+) button five times until 5 is displayed.Press the SET button. The 5 is set and the tens flash.
71US/GBPress the PULSE (-) button repeatedly until 6 is displayed.Press the SET button. The 6 is set and the digit flashes.Press the SET button. The setting is saved.5.5.14 SETTING THE TOTAL DISTANCE5 SETTING MODE5.5.15 SETTING THE TOTAL RUNNING TIME5.5.16 SETTING THE TOTAL CALORIES5.5.17 SETTING THE CONTRASTFollow the steps described in section 5.5.14 “Setting the total distance”.Follow the steps described in section 5.5.14 “Setting the total distance”.Follow the steps described in section 5.4 “Brief guide to device settings”.Note: The contrast changes directly.
72 www.sigmasport.com5 SETTING MODE5.5.18 LOG INTERVALTo evaluate the training in the DATA CENTER 2 software, the RC 14.11 saves the speed and heart rate at specific time intervals, known as log intervals. You can change the log interval in line with your needs. To record multiple and long training units, select a long log interval. If the recording should be as detailed as possible, select a short log interval.The following log intervals can be set:5 sec., 10 sec., 20 sec. and 30 sec.Depending on the memory/log interval, the maximum memory timesare as follows: k5 seconds, approx. 15 hours k10 seconds, approx. 30 hours k20 seconds, approx. 60 hours k30 seconds, approx. 90 hours (Factory setting)The maximum duration of a training unit is 99:59:59 hours.Tip: The function “Remaining log” can be found in the RC 14.11’s  training menu. This indicates the current log capacity in hours.The memory interval can be set by following the steps described  in section 5.4 “Brief guide to device settings”. A description of how to download your logbook can be found in section 9 “Data transfer”.
73US/GB5 SETTING MODE5.5.19 LOGBOOKThe data stored in the logbook can be deleted here. Data stored in the logbook can only be viewed using the DATA CENTER 2 software. Deleting the logbook does not affect any other data. It is only possible to delete  the entire logbook; training units cannot be individually deleted.To delete the logbook, select the entry “logbook” in setting mode and then press the SET button. “Cancel” flashes. Press SET again to cancel the process. Press SPEED (+) to select “Delete”. Confirm the deletion by pressing the SET button. The logbook has now been irretrievably deleted.5.5.20 SETTING THE BUTTON TONES5.5.21 TURNING THE ZONE ALARM ON AND OFFFollow the steps described in section 5.4 “Brief guide to device settings”.Follow the steps described in section 5.4 “Brief guide to device settings”.
74 www.sigmasport.com6 CALIBRATION AND CORRECTION FACTOR6.1 DO I HAVE TO CALIBRATE?6.2 CALIBRATION FUNCTIONCalibration is not obligatory. If the deviation from the determined  distance is 5% or less, no calibration is necessary. If the deviation  is far more than 5%, we recommend calibrating your device.  The precise calibration process is described in the section below.The running computer has a calibration function. To calibrate, put on the R3 transmitter and the running computer and run a known distance. You can measure a distance in advance with a bike computer or run  on a 400-meter track. After you have run the distance, adjust the  measured value to the actual distance run.As your running or walking styles change as you change speed,  the calibration is carried out for both a slow and fast speed.For the sensor positions chest and hips, you can perform two  calibrations: kWalking kRunningImportant: Perform the calibration at least twice over a distance  of 800 m (800 m slow and 800 m fast).
75US/GB6 CALIBRATION AND CORRECTION FACTORPrerequisite: The device must be in training mode.  You are wearing the R3 transmitter and the running computer.6.3 ACTIVATING CALIBRATIONHold down the SET button until the setting mode is activated.Press the SPEED (+) button repeatedly until the “Calibration” function appears.Press the SET button. The RC 14.11 determines the position of the R3 sensor (chest or hip) and starts the calibration function. The RC 14.11 guides you through the calibration.
76 www.sigmasport.com6 CALIBRATION AND CORRECTION FACTOR6.4 CALIBRATIONCalibration is carried out for two speeds: kSlow running or slow walking   Run as slow as you would run in your slowest training. kFast running or fast walking  Run at the fastest pace that you would run in an endurance run   or a long tempo run (over 3000 m). The two speeds should ideally differ by 30%.Tip: If you only use the device for running and with heart rate  measurement (chest position) and therefore never wear it on  the hip, you only need to calibrate for the sensor position “Chest”  and for “Running”.
77US/GB6 CALIBRATION AND CORRECTION FACTOR6.4.1 PREPARING FOR CALIBRATION1  Put on the chest belt or attach the HipClip.2  Go to a measured distance of at least 800 meters. Tip: The inside lane of a track is 400 meters.3  Select “Calibration” in the setting mode.4  Press the SET button. The running computer detects whether    you are wearing the HipClip or the chest belt. The function “Running”    is displayed. Tip: If you want to calibrate the RC 14.11 for walking,    select the function “Walking” with the SPEED (+) button.5  Press the SET button. Instructions for what you have to do are    shown on the running computer’s display.
78 www.sigmasport.com6 CALIBRATION AND CORRECTION FACTOR6.4.2 CARRYING OUT CALIBRATION RUNS1  Always start 20 meters from the starting line of the measured    distance (flying start). 2  As you cross the starting line, press the START/STOP  button.    The measurement for the slow calibration run begins.3  After you have run the measured distance,    press the START/STOP button again.4  Now adjust the displayed value to the actual distance run by    pressing the PULSE (-) or SPEED (+) button.5  Press the SET button. The slow calibration run is saved. 6  The alternating prompt “Run (walk) fast/press Start” now    appears on the display. Repeat steps 1– 5 to calibrate the fast run.Note: After you have performed the first calibration, the calibration menu will change. If you re-access it, you can distinguish between the  following options at the start: ON, OFF and NEW. Select ON to run  in training mode with calibrated values. Select OFF to run with an  uncalibrated RC 14.11. Select NEW to re-calibrate the RC 14.11.
79US/GB6.5 CORRECTION FACTORIf you get good values with or without calibration, which vary only  minimally in one direction, you can manually correct these values  using the correction factor.Example:You know that you have run exactly 2000 m but the running computer always shows a little more, e.g. 2037 m. The factory setting for the  correction factor is 1.000 and does not effect a change.Please calculate the correction factor as follows:  kNew correction factor = 1.000 x 2000 / 2037 kNew correction factor = 0.982Please enter this new correction factor. For the setting, please see  section 5.4 “Brief guide to device settings”.6 CALIBRATION AND CORRECTION FACTORold correction factor (1.000) x actual distance (2000) displayed distance (2037)
80 www.sigmasport.com7.1 ACTIVATING THE TRAINING MODETo go to the training mode: kFrom sleep mode    Press and hold any button. kFrom setting mode    Press and hold the SET button.7 TRAINING MODE7.2 DISPLAY SETUP kArrow next to the HR value   In the example, the heart rate is below the selected training zone    and should be increased. If the heart rate is too high, the arrow    points down.  kArrow next to the speed   In the example, the speed is below the current training average.  kStopwatch icon   The training session has started and the stopwatch is running. kCurrent heart rate kSpeed, distance or    running time kSPEED (+) button:    Distance or time values  kPULSE (-) button:    Heart rate or calories burned
81US/GB7 TRAINING MODE7.3 BUTTON ASSIGNMENT IN THE TRAINING MODE START/STOPPress: Start/stop the stopwatchPress and hold: Set the  training values to zero  (reset and save)SETPress: Display  speed, distance  or running timePress and hold: Activate  the setting modeLAPPress:  Take the  lap timePress and  hold:  Open the lap viewPULSE Press: Display the  heart ratePress and hold: Activate sleep mode; exit training modeSPEEDPress: Display the time and speed valuesPress and hold: Reconnect the R3 transmitter with the RC 14.11 (synchronize) kStopwatch stopped - correct synchronization  The stopwatch icon disappears.  If the function has a gray background,    the R3 transmitter and RC 14.11 are    synchronized and the stopwatch has stopped. kStopwatch stopped - no synchronization    with the RC 14.11  The stopwatch icon disappears.  If the function has a light background,    the R3 transmitter and RC 14.11 are no longer    synchronized. Please synchronize by pressing    and holding down the SPEED (+) button.
82 www.sigmasport.com7.4 FUNCTIONS WHILE TRAININGThe running computer measures many different training statistics but cannot display them all at once. You can therefore view other functions  at the press of a button.7 TRAINING MODE7.5 RADIO LINK WITH THE R3 TRANSMITTERThe RC 14.11 receives the heart rate, speed and distance from the  R3 transmitter by means of a coded digital transmission.The coding ensures that other signals from other transmitters are ignored and only the signals from your chest belt are received.Press the SET button to switch between speed,  running time and distance in the middle line.Use the PULSE (-) or SPEED (+) buttons to select which function you want to see in the lower display area.Note: Calories, distance and average and maximum values are only calculated when the stopwatch is running.
83US/GB7 TRAINING MODESynchronizationIf you start the training mode, the RC 14.11  reconnects to the R3 transmitter; it is synchronized. During the synchronization, “SYNC” appears on the display. The synchronization is complete, when “SYnC” is no longer shown on the display.Message “Too many signals”This message appears when there are too many transmitters in the vicinity. In order to resynchronize, proceed as follows:1  Move about 10 m away from possible sources of    interference, such as other heart rate monitors,    power lines and antennas.2  Press any button to remove the message. 3  Press and hold the SPEED (+) button until    “Radio link reset” appears on the display.    The R3 transmitter and the RC 14.11 are    now re-synchronized. If the synchronization    is successful, the training mode is displayed    normally again. Note: The RC 14.11 cannot be disturbed after  a successful synchronizationPress the START/STOP button. The running time begins.  A stopwatch icon appears at the bottom of the  display and the name of the measured value has  a light background.Prerequisite: Your running computer must be in training mode.7.6 STARTING A TRAINING SESSION
84 www.sigmasport.comPress the START/STOP button. The stopwatch icon disappears. The stopwatch stops.Press the START/STOP button again. The stopwatch icon reappears. The stopwatch restarts.Immediately press the START/STOP button. This prevents your average values or running time from being distorted.Hold down the PULSE (-) button. You switch to  sleep mode. Only the time and date are displayed so as to save the battery. The current training values remain saved.  Note: If you have stopped training, your running  computer goes into sleep mode after five minutes.You have finished your training run and also want to end your training session on your running computer.7.7 INTERRUPTING A TRAINING SESSIONYou can pause and restart your training any time.7 TRAINING MODE7.8 ENDING A TRAINING SESSION
85US/GB7 TRAINING MODE7.9 TRAINING VALUES AFTER TRAININGPrerequisite: You must be in training mode.After training, you can view the measured values in the training mode at your leisure. Use the SET, PULSE (-) and SPEED (+) buttons to scroll through the individual values. In addition to the current training values, the running computer also shows summed values such as:  kTotal running time kTotal distance kTotal calories Note: Total values are available only when the stopwatch is stopped.7.10 RESETTING AND SAVING THE TRAINING VALUESBefore you begin a new training session, you should set the training values to zero as the running computer will otherwise continue to  count the values. The summed total values for distance, time and  calories remain saved. Resetting the training data to zero automatically stores it in the logbook.Prerequisite: You must be in training mode.Press and hold the START/STOP button. The display  flashes twice and all values are reset. You will then see the training mode again.
86 www.sigmasport.com8 TRAINING WITH LAPS8.1 USING LAP TRAINING1 Prerequisite:  You must be in training mode.    The stopwatch is not running and is set to zero.2  Start first lap.  Press the START/STOP button. The stopwatch    starts; the values are recorded.4  Stop the training after the last lap.  Press the START/STOP button.Tip: You can also use lap training when competing. If you start a new lap at the end of each kilometer, you can compare the values for each kilometer after your run.3  Start next lap.  Press the LAP button. A new lap starts.    The display flashes.Tip: While “Last lap” is flashing, a summary of the last lap is shown. Use the SET button to show further values. Example: You regularly run two laps around a lake and want to do so in different times. The RC 14.11 lap training function enables you to determine the values for each lap.
87US/GB8 TRAINING WITH LAPS8.2 SUMMARY OF THE LAST LAPIf you start a new lap, the current lap is ended and the message “Last lap” flashes. A summary of the last lap is shown for five seconds.8.3 LAP VIEWThe training values for the individual laps can be seen in the lap view.Summary of the last lap Average heart rateLap distance (km), lap speed (km/h, min/km),  running timeScroll using the SET buttonLap timeUse the SET button to show further values: kkm – distance of the last lap kkm/h or min/km – average speed    during the last lap kRunning time – total training time
88 www.sigmasport.com8 TRAINING WITH LAPS8.3.1 ACTIVATING THE LAP VIEW MODEPrerequisite: Your running computer must be in training mode.Hold down the LAP button. The display will flash twice to indicate that the lap view mode is now active.8.3.2 DISPLAY SETUP kLap number kValue
89US/GB8 TRAINING WITH LAPS8.3.3 BUTTON ASSIGNMENT FOR THE LAP VIEWHEART RATE  VALUES  kAverage heart rate kMaximum heart rate kCaloriesSPEED  VALUES kLap time kLap distance kAverage speed kMaximum speed kTime since start kDistance since   startLAP 10 LAP 1LAP 9 LAP 2LAP 8 LAP 3LAP 7 LAP 4LAP 6 LAP 5
90 www.sigmasport.com8 TRAINING WITH LAPS8.3.4 DISPLAYING VALUES FOR INDIVIDUAL LAPSYou can re-view the different measured values for the individual laps.Prerequisite: Your running computer must be in training mode.1  Hold down the LAP button until the lap view opens.    A value from the last lap is displayed.2  Select a lap.  Press the LAP or the START/STOP button to scroll through    the laps.3  View several heart rate values for the selected lap.  Press the PULSE (-) button.4  View several speed values for the selected lap.  Press the SPEED (+) button.5  Exit lap view.  Hold down the LAP button. The training mode is displayed.9 DATA TRANSFERIMPORTANT: to download the logbook and thus the training data from the last training session, you must have reset this training session and the RC 14.11 must be in sleep mode.A description of how to reset and save the training data on your RC 14.11 can be found in section 7.10 “Resetting the training values”.
91US/GB9 DATA TRANSFER9.1 CONNECTING THE RC 14.11 TO THE DOCKING STATION WATCHPrerequisites: the SIGMA DATA CENTER has already been installed and the docking station watch is con-nected to your computer via a free USB port.The docking station watch has an LED that helps you correctly connect the RC 14.11. The LED illustrates the following situations:Solid red:  docking station watch is     connected to your computer.Solid green:  you have correctly connected     your RC 14.11 to the docking     station watch.Flashing green:  the data is being transferred     from the RC 14.11 to the      SIGMA DATA CENTER.Tip: if you need help operating the SIGMA DATA CENTER, you can access the online help by clicking the button with the question mark (found in the bottom left-hand edge of the software).Note: once all data has been transferred, remove your RC 14.11 from the docking station watch to protect its battery.
92 www.sigmasport.com10 MAINTENANCE AND CLEANING10.1 CHANGING THE BATTERYThe running computer uses a CR2032 battery (ref. no. 00342) and the R3 sensor uses a CR2450 battery (ref. no. 20316).Prerequisite: You have a new battery and the battery compartment tool.1  Use the battery compartment tool to turn the    cover anti-clockwise until the arrow points to    OPEN. Alternatively, you can also use a ballpoint   pen.2  Remove the cover.3  Remove the battery.4  Insert the new battery. The plus sign points   upward. Important: Ensure the polarity is correct!5  Replace the cover. The arrow points to OPEN.6  Use the battery compartment tool to turn the    cover clockwise until the arrow  points to ON    (on the R3 transmitter, to Close).7  Correct the time and date.Important: Dispose of old batteries properly  (see section 9.4).
93US/GB10 MAINTENANCE AND CLEANING10.2 WASHING THE COMFORTEX+ TEXTILE CHEST BELTThe COMFORTEX+ textile chest belt can be washed in the washing machine at +40°C/104°F hand wash. Standard detergents may be used, but please do not use bleaching agents or detergents with bleach  additives. kDo not use soap or fabric softener  kDo not dry clean the COMFORTEX+  kDo not tumble dry the belt or the transmitter kLay the belt flat to dry out. Do not wring out,    stretch, or hang when wet kThe COMFORTEX+ must not be ironedCOMFORTEX+ textile chest belt
94 www.sigmasport.comLI = Lithium IonenLI10 MAINTENANCE AND CLEANING10.3 DISPOSALElectronic devices must not be disposed of with  household waste. Please give the device to a designated  disposal agency.Batteries must not be disposed of with the household waste (Battery Law)! Please give the batteries to a designated delivery station for their disposal.11 TECHNICAL DATARC 14.11 kBattery type: CR2032  kBattery life: Average of 1 year  kAccuracy of the clock: Higher than ± 1 second/day    at an ambient temperature of 20°C.  kHeart rate range: 40-240  kWatertightness: the RC 14.11 is watertight up to 3 ATM    (corresponds to a test pressure of 3 bar). The RC 14.11 is suitable    for swimming. Please note: Do not press the buttons underwater    as water can enter the housing. Avoid using in sea water as    malfunctions can occur.
95US/GB11 TECHNICAL DATAFCC INFORMATIONThis device complies with part 15 of the FCC Rules. Operation is subject to the following two conditions: (1) This device may not cause harmful interference, and (2) this device must accept any interference received, including    interference that may cause undesired operation.Changes or modifications not expressly approved by the party  responsible for compliance could void the user’s authority to operate  the equipment.Note: This equipment has been tested and found to comply with the limits for a Class B digital device, pursuant to Part 15 of the FCC Rules. These limits are designed to provide reasonable protection against harmful interference in a residential installation. This equipment  generates, uses, and can radiate radio frequency energy and, if not  installed and used in accordance with the instructions, may cause  harmful interference to radio communications. However, there is no guarantee that interference will not occur in a particular installation.  If this equipment does cause harmful interference to radio or television reception, which can be determined by turning the equipment off and on, the user is encouraged to try to correct the interference by one or more of the following measures: kReorient or relocate the equipment. kIncrease the separation between the equipment and receiver. kConnect the equipment into an outlet on a circuit different from    that to which the receiver is connected. kConsult an authorized dealer or service representative for help.
96 www.sigmasport.com11 TECHNICAL DATA11 TECHNICAL DATAR3 Transmitter kBattery type: CR2450  kBattery life: Average of 2 years  kDistance accuracy: Most runners obtain less than 5% variation in    the calibrated state. The result can also be further optimized by the    correction factor. The accuracy specifications assume constant   conditions.  kWatertightness: the R3 transmitter is watertight up to 1 ATM    (corresponds to a test pressure of 1 bar). The R3 transmitter    and the COMFORTEX+ are suitable for swimming. Avoid using in    sea water as malfunctions can occur.COMFORTEX+ textile chest belt kBelt material: Polyamide with elastane
97US/GB12 WARRANTYWarrantyWe are liable for damages in accordance with the statutory regulationsin respect to our contractual partners. Batteries are excluded from the warranty. For warranty claims, please contact the retailer from whom you purchased your running computer or send your running computer together with receipt of purchase and all accessory parts, with sufficient postage paid, to:SIGMA-ELEKTRO GmbHDr.- Julius -Leber-Straße 15D-67433 Neustadt/WeinstraßeGermanyTel. + 49 (0) 63 21-9120-118E-mail: service@sigmasport.comIf your warranty claim is valid, you will receive a replacement device.  A claim only exists for the current model at this time. The manufacturer reserves the right to make technical changes.12 WARRANTY
www.sigmasport.comruNNINg CoMPuTErSIGMA-ElEktro GmbHDr.-Julius-Leber-Straße 15D-67433 Neustadt/WeinstraßeTel.   + 49 (0) 63 21-9120-0Fax.   + 49 (0) 63 21-9120-34E-mail: info@sigmasport.comSIGMA SPort ASIAAsia, Australia, South America, Africa10F, No.192, Zhonggong 2nd Rd., Xitun Dist., Taichung City 407, TaiwanTel.    +886-4- 2358 3070Fax.   +886-4- 2358 7830SIGMA SPort USANorth America3487 Swenson AvenueSt. Charles, IL 60174, U.S.A.Tel.  +1 630 - 761-1106Fax.  +1 630 - 761-1107Service-Tel. 888-744-6277RC 14.11

Navigation menu