Contents
- 1. user manual
- 2. User Manual
user manual
1
Content
Announcement...............................................................................................2
Precautionary Information.................................................................2
ChapterOne:
Overview……
.
...........................................................................4
1.1
ProductOverview..............................................................................4
1.2
Back Overview..................................................................................4
1.3PowerOn
andOff...............................................................................5
1.4EnterandExit
StandbyMode............................................................6
1.5Home
Screen.......................................................................................6
1.6LockandUnlock
Screen......................................................................6
1.7Status
Bar............................................................................................7
1.8
TextInput………………...........................................................................8
1.9USBConnection(ConnectbetweenTablet&
Computer).................9
ChapterTwo:
Internet
&
Bluetooth...............................................................9
2.1Wi-Fiand
Network...........................................................................10
2.2
Browser..........................................................................................
...
11
2.3
Bluetooth.......................................................................................
...
12
ChapterThree:
Applications
..........................................................................
12
3.1
Camera............................................................................................
..
12
3.2
Gallery..........................................................................................
.....
13
3.3
Video..............................................................................................
...
14
3.4
Music.............................................................................................
....
14
3.5
Calendar............................................................................................15
3.6File
Manager
....................................................................................…
16
3.7
E-mail...........................................................................................
......
17
3.8
Download
............................................................................................
18
3.9
Clock................................................................................................
..
19
3.10
Phone, People and Messaging…….…………..............................
..
19
ChapterFour:System
Settings
......................................................................
20
4.1
InternetSettings..............................................................................20
4.2Sound
Settings..................................................................................22
4.3Display
Settings................................................................................23
4.4Apps
Settings...................................................................................24
4.5Date&Time
Settings
..........................................................................
24
4.6LanguageandInput
Settings............................................................24

2
Announcement
Version (V1.0)
Our company may modify and change the content of this manual whenever
necessary.
Please forgive for any error and omissions in this manual.
Please make the object as standard if contents in this manual are different from
the object.
Precautionary Information
Please read carefully the precautions and operations shall be in accordance with
the warnings, hints and instructions.
Please turn off the power and remove the power adapter before cleaning
your Tablet PC. Please do not clean the touch screen with any chemical
cleaner.
Connection of the power adapter shall be in accordance with the rated
voltage and current input marks. Correct power adapter shall be used and
please do not use any power adapter that not equipped by this product.
Before turning on the Tablet PC, please carefully check if all the peripheral
equipment of the Tablet PC is properly connected.
Please turn off the power before installing or remove a peripheral device
are not hot-pluggable.
Please do not try to disassemble and check the Tablet PC.It may cause
3
trouble to your Tablet PC and lose corresponding warranty rights.
Please keep the Tablet PC from direct sunlight to avoid advanced ageing of
the electric components.
Avoid using the Tablet PC in places with rising dust or in a dirty and untidy
environment (dust may cause system failure).
Please avoid placing the Tablet PC nearby the magnetic substance to avoid
influencing the touch performance; please do not click the touch screen
with nail or sharp articles; please do not click the touch screen or the keys
with gloves on.
Please do not place the Tablet PC under over cold (below 5℃) or over
heatenvironment(above 35℃), otherwise the Tablet PC may not be
normally started and operated.
Please do not stuff any objects into the Tablet PC to avoid short-circuit of
components or damage of circuit. Please do not splash any liquid on this
product.
The charging period of the rechargeable battery is limited, and the battery may
require changing someday. The client shall not change the battery by oneself, and
only an authorized facilitator may change the battery.
4
Chapter One: Overview
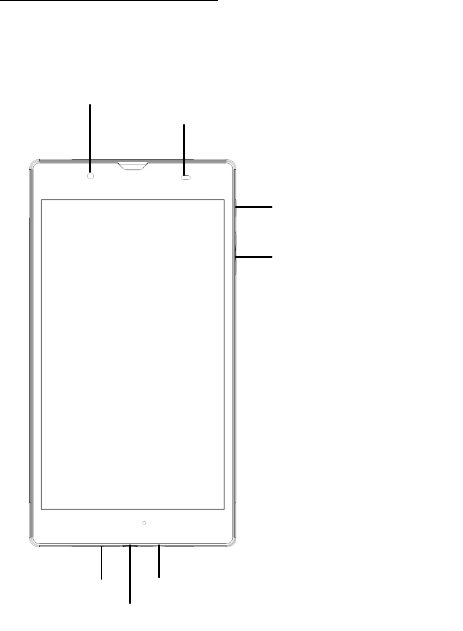
1.1 Product Overview
1.2 BACK Overview
POWER BUTTON
VOLUME CONTROL BUTTON
MIC
MICRO USB
AUDIO JACK
WEB CAM
ALS AND PROXIMITY SENSOR
5
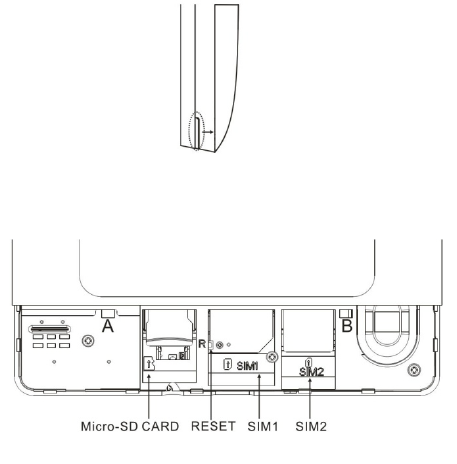
Open cover
Open cover by slot as picture shows.
Install cover
Install the cover in 45 degrees to point A and B as picture shows, press to fasten.
*Please turn off tabletPC , before installation or removal of micro-SD card or SIM
card .
Reset
Pinandholdtheresetbuttononthesideofthedevicefor3
seconds
torestartandresetthe
system.
1.3 Power On and Off
Power
on
6
Pressandholdthepowerbutton(seeProductOverviewimage)
for2-3
seconds,andthes
ystemwillbegintoboot.Whiletheunitis
off
andcharging,pressthepowerbuttontoseec
harging
notification.
1.4 Enter and Exit Standby Mode
Enterstandby
mode
Tosavepowerwhiletheunitisonbutinactive,tapthe
power
buttontoenterstandby
mod
e.
Exitstandby
mode
Whiletheunitisinstandbymode,tapthepowerbutton
to
resume
activity.
1.5 Home Screen
Addapplicationshortcuts:Pressandholdanapplicationicon
from
theApplicatio
nlistanddragtheicontothehomescreentoadd
asshortcut.

7
•Removeapplicationshortcuts:Pressandholdanapplicationicon
in
thehomes
creenasthetopofthescreendisplaysan“X”.Drag
the
applicationicontowardst
he“X”untilitturnsred,andthenrelease
the
holdtoremovetheapplication
shortcut.
1.6 Lock and Unlock Screen
Lock
Youmaysetanidletimeframeafterwhichtheunit
automaticallyenters
standby.Thesy
stemwillsleepandthescreenwilllockifit
is
inactiveforthesetamountof
time.
Unlock
Movethe icontounlocktheunit,asshown
below.
1.7 Status Bar

8
Thestatusbarislocatedatthebottomthe
screen and on the upper right corner.
•Back :Taptoreturntoprevious
screen.
•Home :Taptoreturntohome
screen.
•History :Taptoviewthemost-recentlyaccessed
applications.
TheiconsontherightsideofstatusbardisplayWi-Fisignal,
Wi-Fi
connectionstatus,batt
erypower/batterychargingstatus,USBandSDcardconnectionstatus.
1.8 Text Input
Whenusingthetablet,youmayuseitsvirtualkeyboardtoenter
text,
numbersandsymb
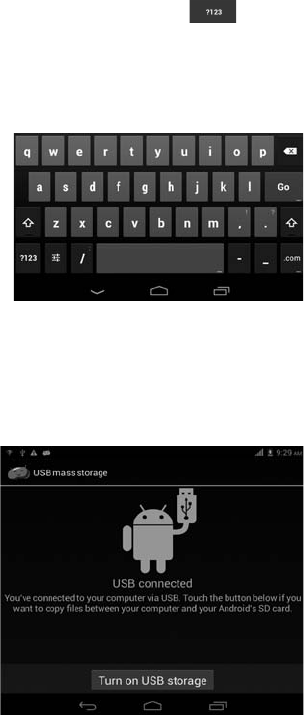
9
olsdirectlybytouchingthescreen.After
tapping
intoatextinputarea,thedefaultkeybo
ardwillappearas
shown
below:
Toalternatebetweennumbersandletters,
press
Toalternatebetweenuppercaseandlowercaseletter,
press
1.9 USB Connection (Connect between Tablet&Computer)
Whenconnectingthetablettoyourtablet
PCviathein-boxUSB
cable,
clickTurn
onUSB
storagetoconnectyourdevices.Thed
eviceofyour
tablet
shouldthenappearonyourPCunderMyComputeras
“ZTE”.
TurnoffUSBstoragetodisconnectyourtabletfromthePC
.
10
ChapterTwo: Internet& Bluetooth
2.1 Wi-Fi and Network
Networksupportisneededtousethewebbrowser.If
youexperience
anynetworkprob
lems,pleasecontactyour
wireless
serviceprovider.
Click
toenterSettings.TurnonWi-Fiand
find
yourwirelessnetwork.SigninwithyourWi-Fipas
sword.
Once
connected,Wi-Ficonnectivityiconwillbeshownattherightside
of
toolbar.Youmayalsoclick[+]Addnetworktomanuallyinput
your
wirelessnetworkifitd
oesnotappearonthelist,butiswithin
range.
OtherWi-Fi
Options
Tapthe
Advanced
iconontheupper-rightcornerofthescreen
to
displayadvancedoptionsandother
network
information.
WhentheNetworknotificationoptionischecked,the
system
automaticallyscans
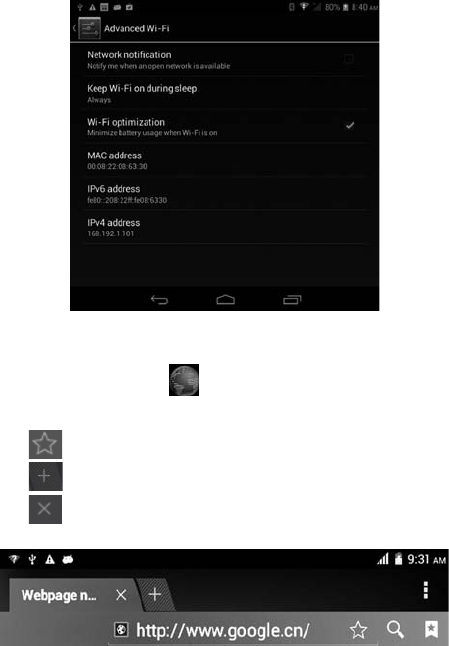
11
anddisplaysavailablenetworkswithinrange.Ifit
is
unchecked,youmusttapSCANt
omanuallyscanfornearby
networks
andtapADDNETWORKtomanuallydo
so.
2.2 Browser
FromyourApplicationlist,
click
toopentheweb
browser.
TouchtheURLinputareatodisplaythe
soft
keyboardtotypesiteaddress.
Click toaddsite
toBookmarks
Click toaddnewbrowser
tab
Click toclosethebrowser
tab
12
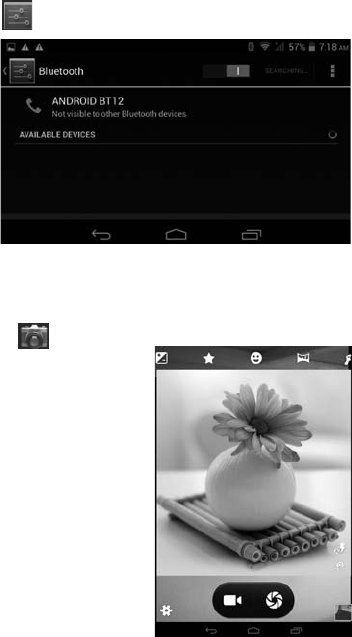
2.3 Bluetooth
Click
toopen the Bluetooth.
ChapterThree:
Applications
3.1Camera
Clickto enter the camera app.
13
Camera
Mode
Click totakea
picture.
Click toset whitebalance
and
scene
mode.
Video
Mode
Click toentervideomode.Pressthe
red
buttontorecord.
Click to
set white
balanceand scene
mode.
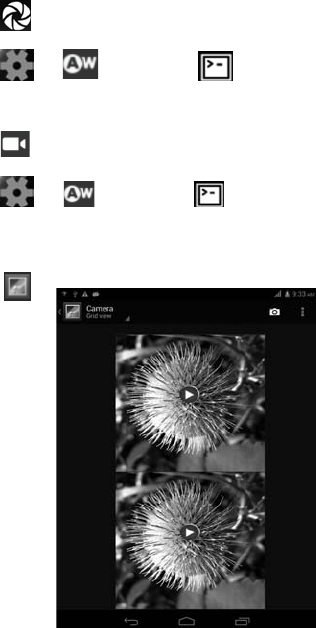
3.2
Gallery
Click

14
toviewallpicturessavedonto
thetablet.
Click todisplaythepicturesby different modes.
Click
to
enterCamera
mode.
Click tochooseanalbumtoeditor
delete.
3.3 Video
Click
toopenthevideo
player.
Youmayadjustvideoplaysettingsonthebottommenubarbyslightly
tap
thescreenwhil
eplaying
.
3.4 Music
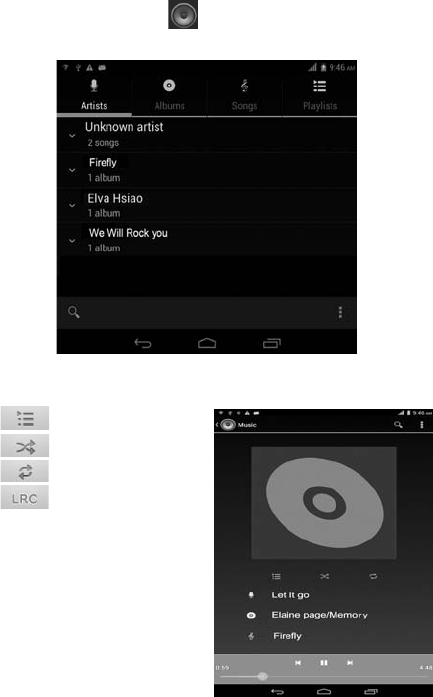
15
FromyourApplicationlist,
click
toopenthemusic
player.
Thesonglistmaybedisplayedalphabeticallybyartistname,alb
umname,
or
song
title.
Clickonasongtoplay
it.
Playlist
Random
Play(Shuffle)
Repeat
Lyrics
16
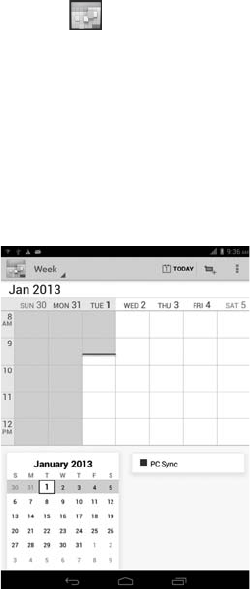
3.5 Calendar
FromyourApplicationlist,
click
toopenthe
calendar.
Onyourfirsttimeenteringthecalendarinterface,itwillremind
to
addyourGoogleaccou
nt,whichfacilitatesmoreoptions.Ifyou
do
notneedtosetit,click
Later
.
DateView:Pressandholdtoaneventtoview,edit,ordelete
it.Press
andholdablankarea
toaddanew
event.
WeekView:Pressandholdtoaneventtoview,edit,ordelete
it.
Pressandholdablankare
atoaddanew
event.
MonthView:Clickonadate,thenpressandholdtoaneventto
view,
edit,ordeleteit.Pres
sandholdablankareatoaddanew
event.
Agenda:Listsallsavedevents.Clicktoread
details.
Touchthe“Today”iconatanytimetoreturntothecurrent
date.
3.6 File Manager
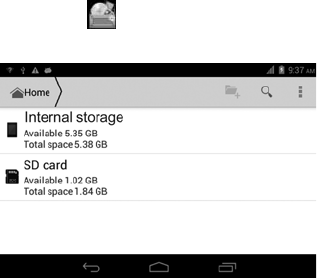
17
FromyourApplicationlist,
click
toviewandedityourfiles.It
allows
youtomanage/editallyourdocumentfileswithinthe
i
nternalstorage
andexternalSD
card.
3.7 E-mail
NetworksupportisneededtouseE-mail.Ifyouexperience
any
networkproble
ms,pleasecontactyourwirelessserviceprovider.
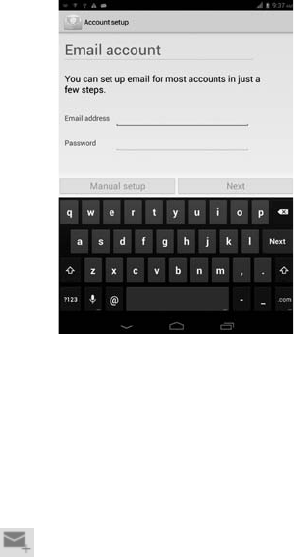
18
Add
account
UponyourfirsttimeenteringtheE-mailapp,
youwillbeaskedtosetup
an
E-mail
account.
Toaddmoreaccountsafterset-up,clickSettings
onthetop
right
cornerofthepage,thenselectAddaccount.
Compose
E-mail
Fromtheinbox,youcan
click
onthetopofthescreentocompose
anE-mail.
Entertherecipient’sE-mailaddressonthe“To”addressline,
then
proceedtofillinthesu
bjectandE-mail
content.
Add
Attachment
19
Toaddattachment(s)whilecomposinganE-mail,clickonthe on
thetoprightcornerofthescreen.SelectAttach
file
.
Replyand
Forward
ToforwardorreplytoanE-mail,openthemessagetofinda
blue
menubarnexttotheSen
der’snameandE-mailaddress.Click
reply
,
replyall,orforward
toperform
thosefunctions.
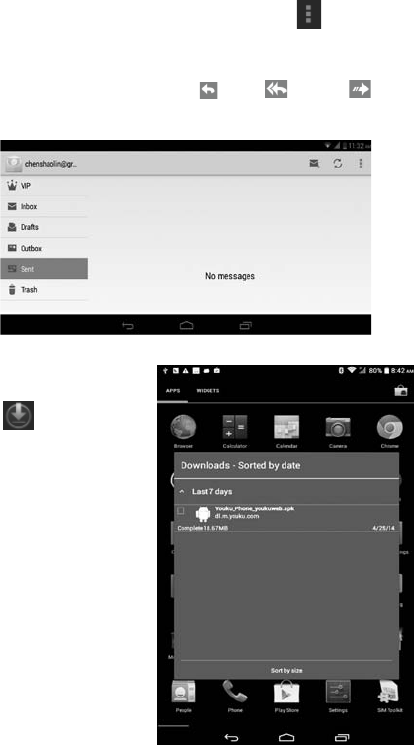
3.8 Download
click
toseeall
20
downloadeditemsand
in-progressdownloads.
Clicknexttoanitem,thenclick icontodelete
itscontents.
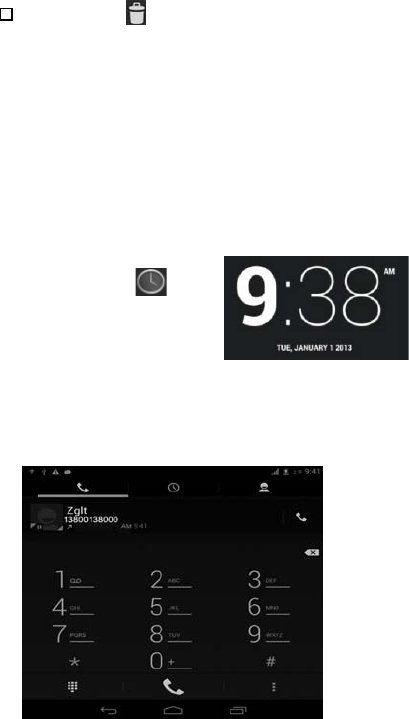
3.9 Clock
FromyourApplicationlist,
click
toenter
the
clockinterface.
Underthetimeand
date,click
Setalarmtoaddan
alarm.
3.10Phone, People and Messaging
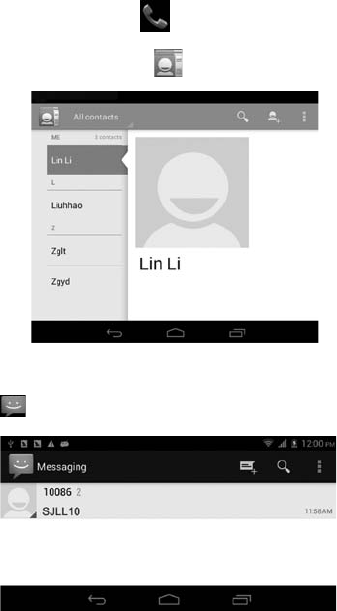
21
FromyourApplicationlist,
click
toenter
the
Phoneinterface.
FromyourApplicationlist,
click
toenter
the
Peopleinterface.
FromyourApplicationlist,
click
toenter
the
Messaginginterface.
22
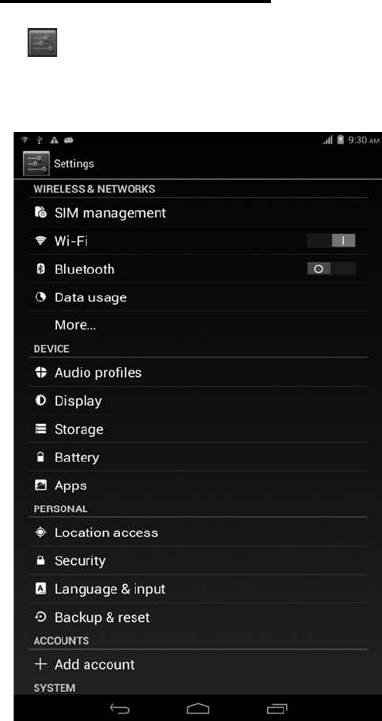
ChapterFour:SystemSettings
Click
toenterthesystemsettings
interface.
4.1 Internet Settings
(Pleaserefertosection2.1for
details)

23
4.2 Sound Settings
InSoundsettings,youmayadjustthevolume
of
notifications/alarms,choosethedefault
notificationringtone,aswellasmuteall
sounds.
Click ,
choose and enter setting as belowto
adjust“Volumes”.
24
4.3 Display Settings
Displaysettingsinclude:Brightness,Wallpaper,Sleepand
FontSize
Brightness
Adjustthebrightnessofthescreenbyslidingleftor
right.
25
Wallpaper
Changethewallpaperonyourhomescreenbyselecting
image
fromavailable
galleries.
Sleep
Adjustidletimebeforethescreenlocksandthetablet
enters
standby
mode.
Font
size
Setsystemfontsizewithfouroptions:Small,Normal,
Large,Huge.
4.4 Apps Settings
Application management
Thetablet’sappsarelistedherebycategory,under
Downloaded,Internal
storage
,Running,andAll.Clickanapptoseemoredetails
and
options,suchasForceSto
p,Disable,Uninstall,ClearData,
and
Clear
Cache
.
Running
Inthissetting,youcanforcestopsomeprogramsthatarerunningon
the
backgroundtos
ave
battery.
4.5 Date & Time Settings
YoumayselectAutomaticDate&Timewhileconnectedto
the
Internet,orcho
osetomanuallyinputthecorrectdateandtime.
You
mayalsochangethedispla
y
format.
4.6 Language and Input Settings
Language
Choosethesystemdisplaylanguageamongdifferent
options.
SelectSpellingCheckertoenablethesystemtocorrectspelling
errors.
Android
keyboard
26
TaptheSettingsiconnextto“Androidkeyboard(AOSP)”to
configure
theAndroidkeybo
ardsettings,suchasauto-capitalization,
sound,etc.
FCC statements:
This device complies with part 15 of the FCC rules. Operation is subject to
the following two conditions: (1) this device may not cause harmful
interference, and (2) this device must accept any interference received,
including interference that may cause undesired operation.
NOTE: The manufacturer is not responsible for any radio or TV interference
caused by unauthorized modifications or changes to this equipment. Such
modifications or changes could void the user’s authority to operate the
equipment.
NOTE: This equipment has been tested and found to comply with the limits
for a Class B digital device, pursuant to part 15 of the FCC Rules. These limits
are designed to provide reasonable protection against harmful interference
in a residential installation. This equipment generates uses and can radiate
radio frequency energy and, if not installed and used in accordance with the
instructions, may cause harmful interference to radio communications.
However, there is no guarantee that interference will not occur in a
particular installation. If this equipment does cause harmful interference to
radio or television reception, which can be determined by turning the
equipment off and on, the user is encouraged to try to correct the
interference by one or more of the following measures:
‐
Reorient or relocate the receiving antenna.
‐
Increase the separation between the equipment and receiver.
‐
Connect the equipment into an outlet on a circuit different from that to
which the receiver is connected.
‐
Consult the dealer or an experienced radio/TV technician for help.
RF
The SAR limit of USA (FCC) is 1.6 W/kg averaged over one gram of tissue.
Device
types ZTE K70(FCC ID:SRQ-K70) has also been tested against this SAR limit.
The highest SAR value reported under this standard during product
27
certification for use when properly worn on the body is 1.194 W/kg and for
head is 0.318 W/kg. Simultaneous RF exposure is 1.580W/Kg.
. This device was tested for
typical body
‐
worn operations with the back of the handset kept 5mm
from the body.
To maintain compliance with FCC RF exposure requirements, use
accessories that
maintain a 5mm separation distance between the user's body and the back
of the
handset. The use of belt clips, holsters and similar accessories should not
contain
metallic components in its assembly. The use of accessories that do not
satisfy these
requirements may not comply with FCC RF exposure requirements, and
should be
avoided.