Contents
- 1. User manual Part 1
- 2. User manual Part 2
User manual Part 2

ZXSDRR8119
PicoRemoteRadioUnit
HardwareInstallation
Version:V2.0
ZTECORPORATION
No.55,Hi-techRoadSouth,ShenZhen,P .R.China
Postcode:518057
Tel:+86-755-26771900
Fax:+86-755-26770801
URL:http://support.zte.com.cn
E-mail:800@zte.com.cn

LEGALINFORMATION
Copyright©2017ZTECORPORATION.
Thecontentsofthisdocumentareprotectedbycopyrightlawsandinternationaltreaties.Anyreproductionor
distributionofthisdocumentoranyportionofthisdocument,inanyformbyanymeans,withoutthepriorwritten
consentofZTECORPORATIONisprohibited.Additionally,thecontentsofthisdocumentareprotectedby
contractualcondentialityobligations.
Allcompany,brandandproductnamesaretradeorservicemarks,orregisteredtradeorservicemarks,ofZTE
CORPORATIONoroftheirrespectiveowners.
Thisdocumentisprovided“asis”,andallexpress,implied,orstatutorywarranties,representationsorconditions
aredisclaimed,includingwithoutlimitationanyimpliedwarrantyofmerchantability,tnessforaparticularpurpose,
titleornon-infringement.ZTECORPORATIONanditslicensorsshallnotbeliablefordamagesresultingfromthe
useoforrelianceontheinformationcontainedherein.
ZTECORPORATIONoritslicensorsmayhavecurrentorpendingintellectualpropertyrightsorapplications
coveringthesubjectmatterofthisdocument.ExceptasexpresslyprovidedinanywrittenlicensebetweenZTE
CORPORATIONanditslicensee,theuserofthisdocumentshallnotacquireanylicensetothesubjectmatter
herein.
ZTECORPORATIONreservestherighttoupgradeormaketechnicalchangetothisproductwithoutfurthernotice.
UsersmayvisittheZTEtechnicalsupportwebsitehttp://support.zte.com.cntoinquireforrelatedinformation.
TheultimaterighttointerpretthisproductresidesinZTECORPORATION.
RevisionHistory
RevisionNo.RevisionDateRevisionReason
R1.32016-08-18UpdatedChapter2DeviceInstallation.
R1.22016-03-30Modifedthewayofdescription
R1.12016–01–10lModifed“2DeviceInstallation”.Addthecaution:“Thedevice
doesnotneedtobegrounded.”
lModifed“3Cables”.Modied“CAT5Ethernetcables”to
“CAT5eUTPEthernetcables”.Addthecaution:“Donotuse
STPEthernetcables.”
R1.02015-09-22Firstedition
SerialNumber:SJ-20150805085318-002
PublishingDate:2016-08-18(R1.3)
SJ-20150805085318-002|2016-08-18(R1.3)ZTEProprietaryandCondential

Contents
AboutThisManual.........................................................................................I
Chapter1InstallationInterfaces...............................................................1-1
Chapter2InstallingtheZXSDRR8119.....................................................2-1
2.1InstallingtheDeviceonaPole............................................................................2-1
2.2InstallingtheDeviceonaConcreteWall..............................................................2-4
2.3InstallingtheDeviceonaConcreteCeiling..........................................................2-8
2.4InstallingaRemovableCeiling...........................................................................2-11
Chapter3InstallingaCable......................................................................3-1
Figures.............................................................................................................I
Tables............................................................................................................III
Glossary.........................................................................................................V
I
SJ-20150805085318-002|2016-08-18(R1.3)ZTEProprietaryandCondential

Thispageintentionallyleftblank.
II
SJ-20150805085318-002|2016-08-18(R1.3)ZTEProprietaryandCondential
AboutThisManual
Purpose
ThismanualdescribeshowtoinstalltheZXSDRR8119PicoRemoteRadioUnit.
IntendedAudience
lInstallationengineers
lDevicesupervisionengineers
lMaintenanceengineers
WhatIsinThisManual
Thismanualcontainsthefollowingchapters.
Chapter1,Installation
Interfaces
Describestheinterfacesinvolvedininstallation.
Chapter2,Installingthe
ZXSDRR8119
DescribeshowtoinstalltheZXSDRR8119.
Chapter3,InstallingaCableDescribeshowtoinstallcables.
Conventions
Thismanualusesthefollowingconventions.
Caution:indicatesapotentiallyhazardoussituation.Failuretocomply
canresultinmoderateinjury,equipmentdamage,orinterruptionof
minorservices.
Note:providesadditionalinformationaboutatopic.
I
SJ-20150805085318-002|2016-08-18(R1.3)ZTEProprietaryandCondential

Thispageintentionallyleftblank.
II
SJ-20150805085318-002|2016-08-18(R1.3)ZTEProprietaryandCondential
Chapter1
InstallationInterfaces
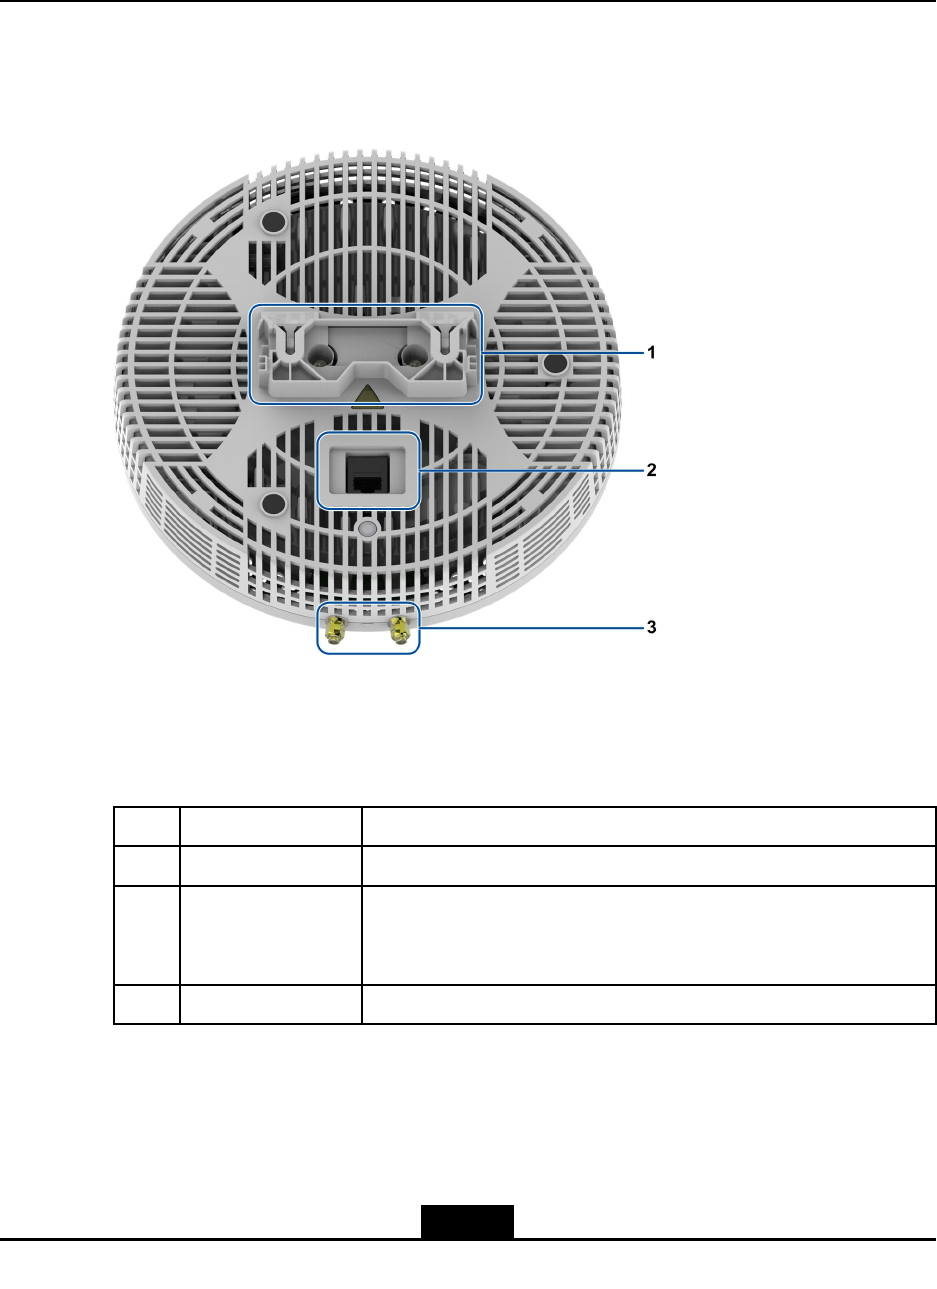
Figure1-1showstheexternalinterfacesoftheZXSDRR8119.
Figure1-1ExternalInstallationInterfaces
1.U-shapegroove2.ETHinterface3.ANTinterface
Foradescriptionoftheinterfaces,refertoTable1-1.
Table1-1InterfaceDescriptions
No.ExternalInterfacesDescription
1U-shapegroovesMountstheZXSDRR8119toinstallationcomponents.
2ETHinterfaceRJ45networkinterface,supportsthePoEfunction,usedforthe
ZXSDRR8119toconnecttotheETHinterfaceofthePbridge(a
remoteconvergenceunit)throughanEthernetcable.
3ANTinterfaceInterfacecompletewithexternalantennaconnection
1-1
SJ-20150805085318-002|2016-08-18(R1.3)ZTEProprietaryandCondential

ZXSDRR8119HardwareInstallation
Thispageintentionallyleftblank.
1-2
SJ-20150805085318-002|2016-08-18(R1.3)ZTEProprietaryandCondential
Chapter2
InstallingtheZXSDRR8119
ForinstallationmodesavailablefortheZXSDRR8119,refertoT able2-1.
Table2-1ZXSDRR8119InstallationMode
InstallationTypeInstallationMode
InstallingtheZXSDRR8119againstapole2.1InstallingtheDeviceonaPole
InstallingtheZXSDRR8119againstawall2.2InstallingtheDeviceonaConcreteWall
2.3InstallingtheDeviceonaConcreteCeiling InstallingtheZXSDRR8119againsta
ceiling2.4InstallingaRemovableCeiling
Caution!
Thedevicedoesnotneedtobegrounded.
TableofContents
InstallingtheDeviceonaPole...................................................................................2-1
InstallingtheDeviceonaConcreteWall.....................................................................2-4
InstallingtheDeviceonaConcreteCeiling.................................................................2-8
InstallingaRemovableCeiling.................................................................................2-11
2.1InstallingtheDeviceonaPole
ThisproceduredescribeshowtoinstalltheZXSDRR8119againstaverticalpole.The
diameterofapoleis8to30mm.
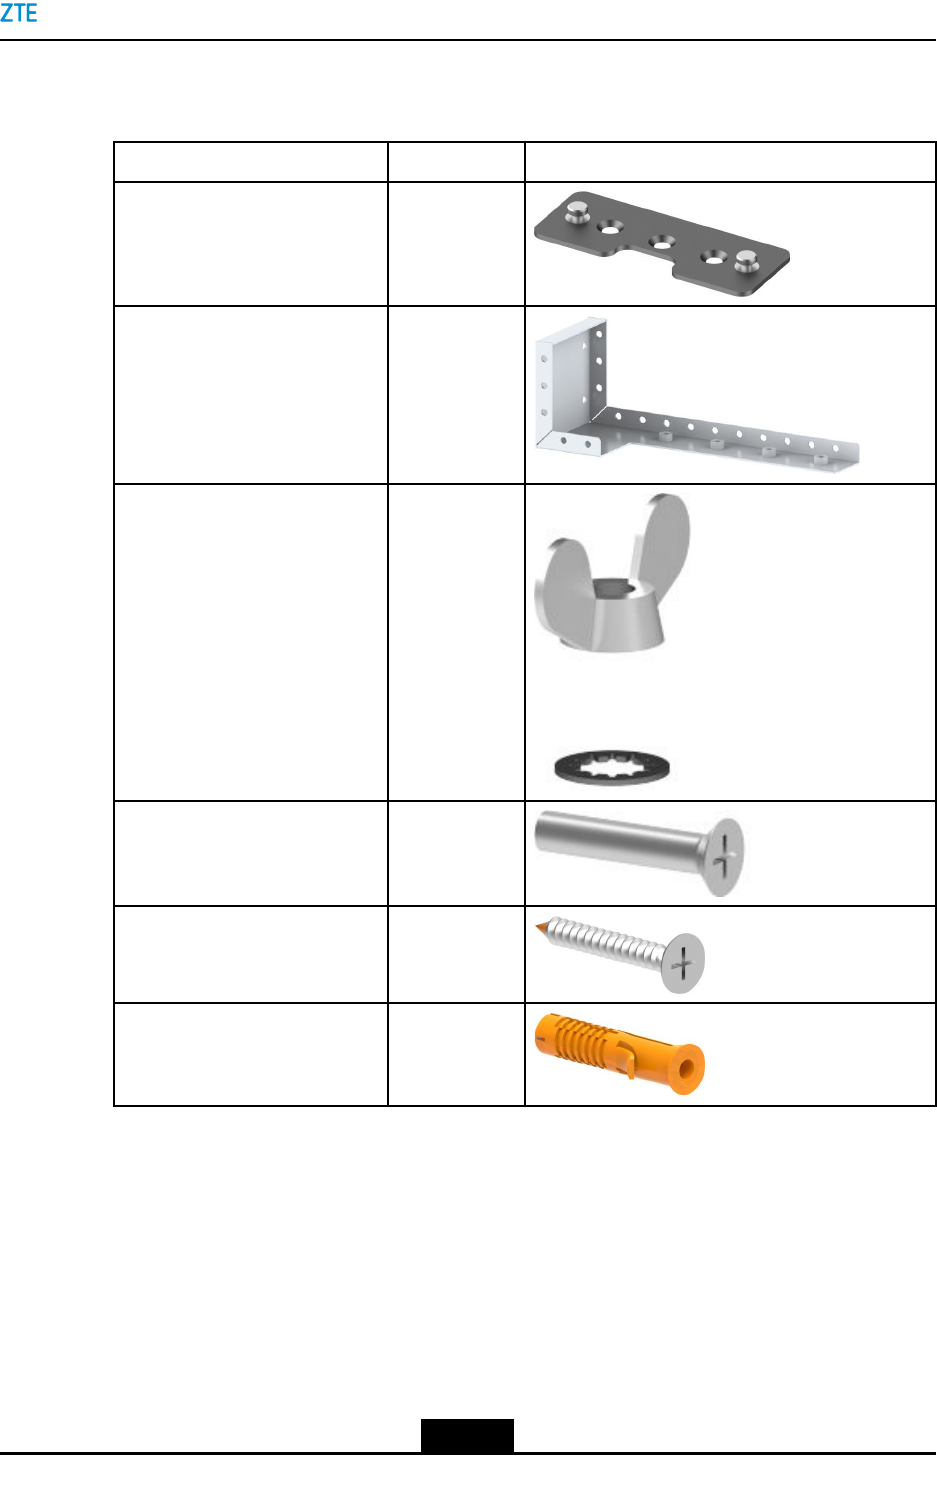
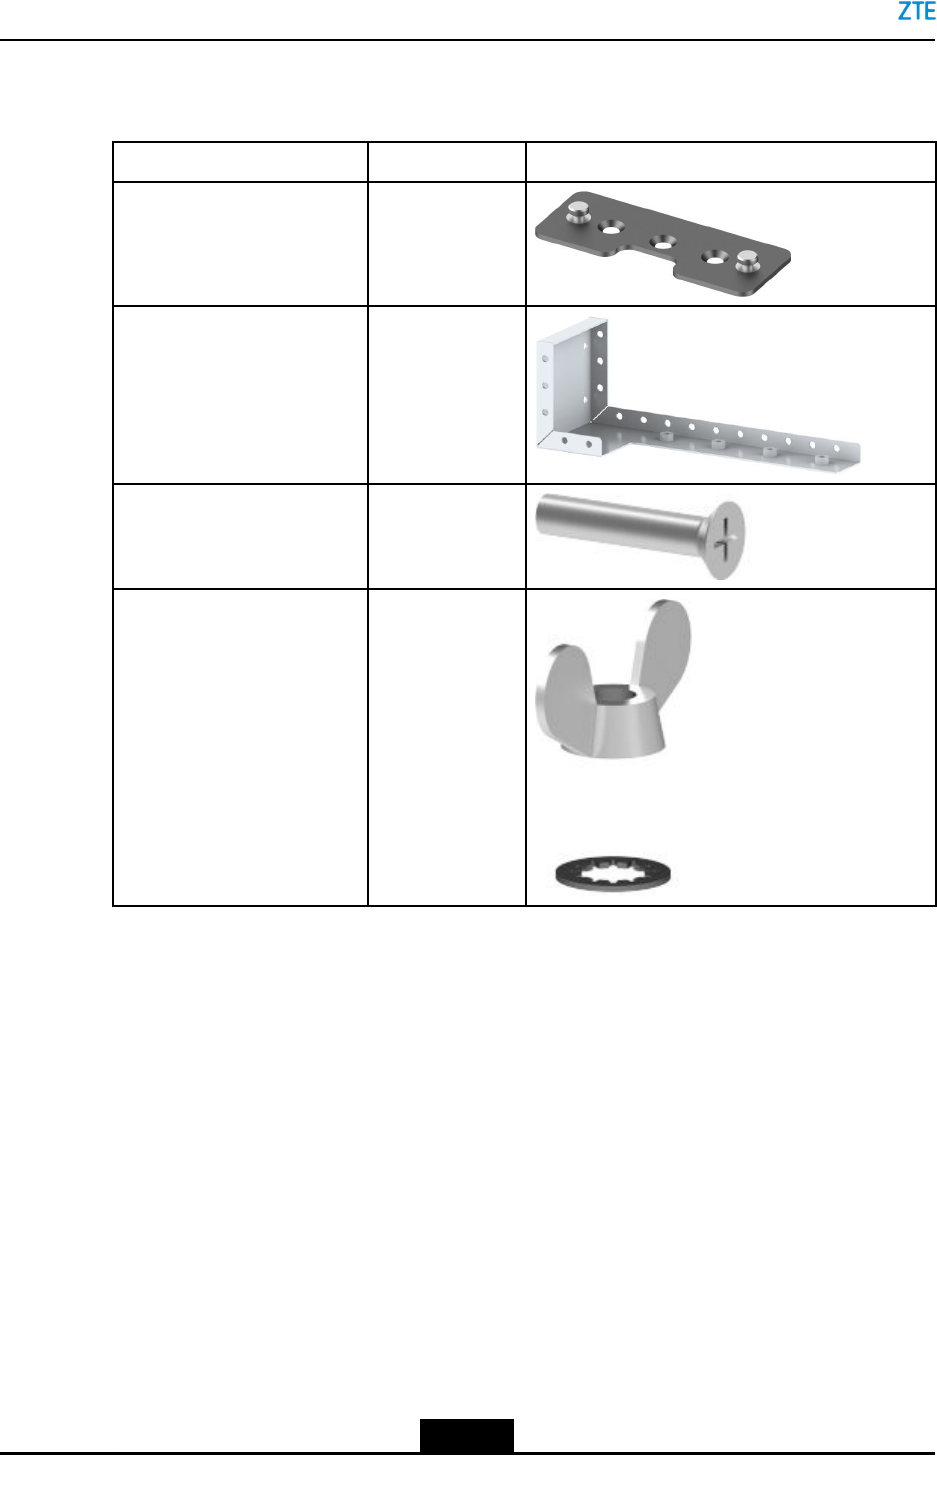
Fortheinstallationcomponents,refertothefollowingtable.
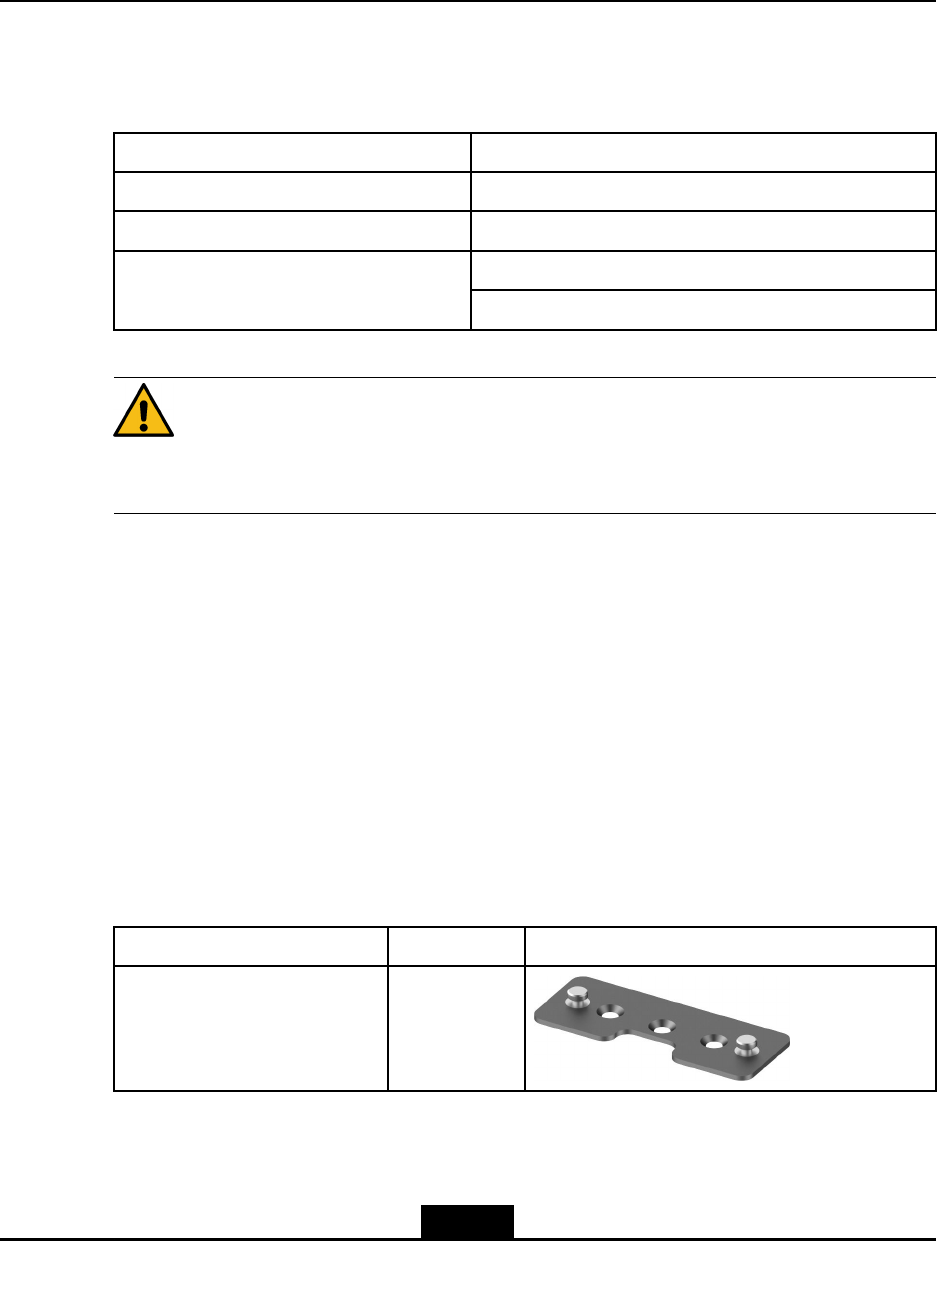
ComponentQuantityOverview
Two-pointhangingplate1
2-1
SJ-20150805085318-002|2016-08-18(R1.3)ZTEProprietaryandCondential
Chapter2InstallingtheZXSDRR8119
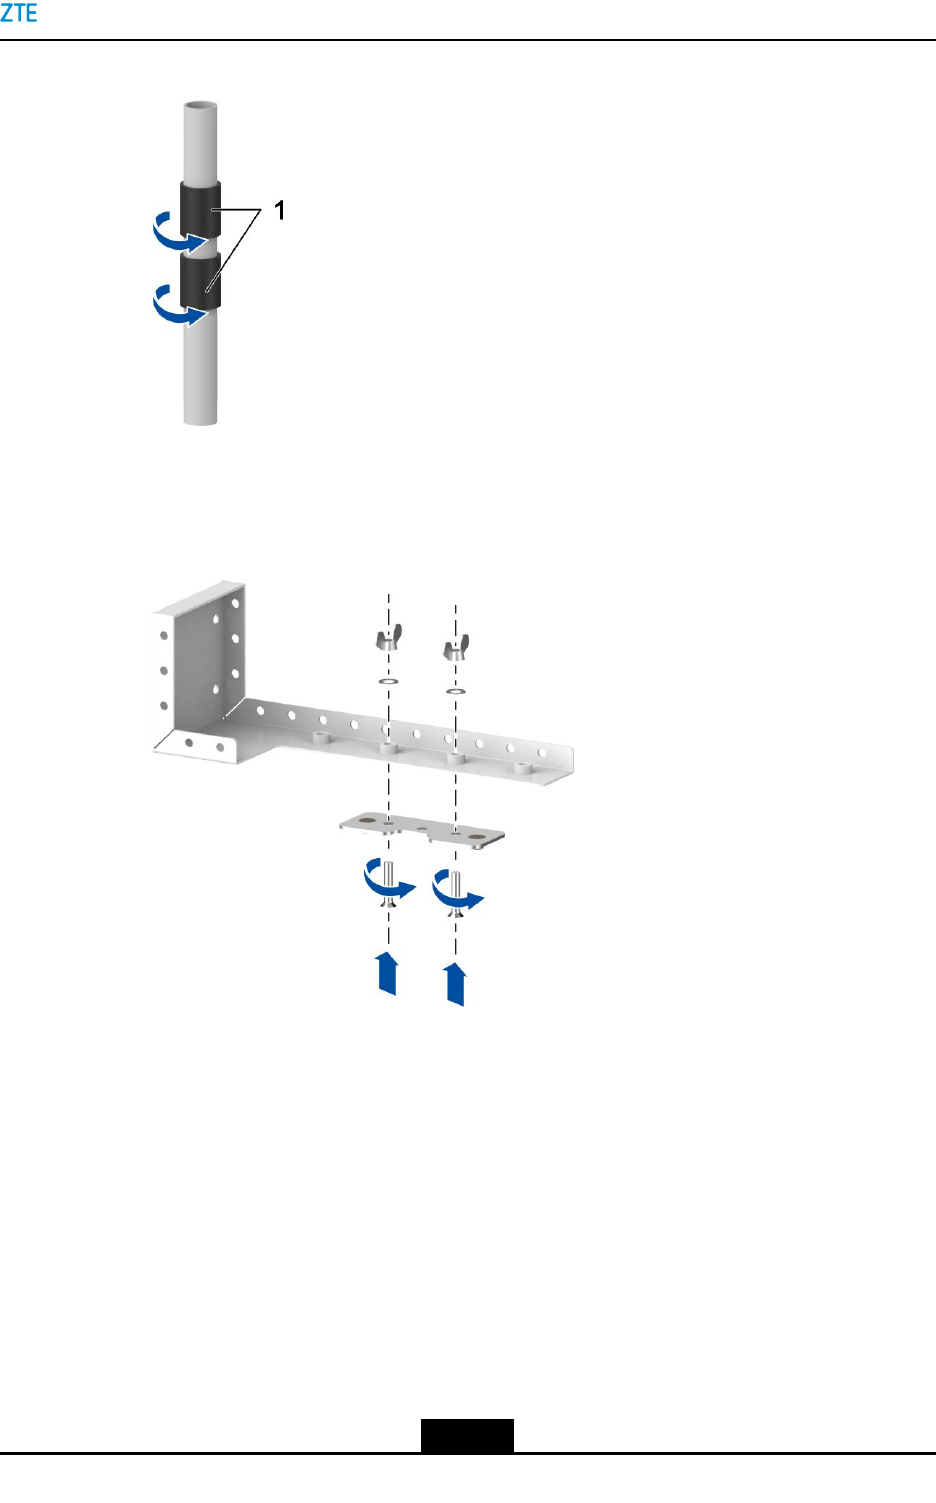
Figure2-1WrappingtheSlide-ProofRubberMatAroundthePole
2.Securethetwo-pointmountingplatetotheL-shapedbracketwithtwo
countersunk-headscrews(M5×25)andtwowingnutsandwashers,seeFigure2-2.
Figure2-2SecuringtheTwo-PointMountingPlatetotheL-shapedBracket
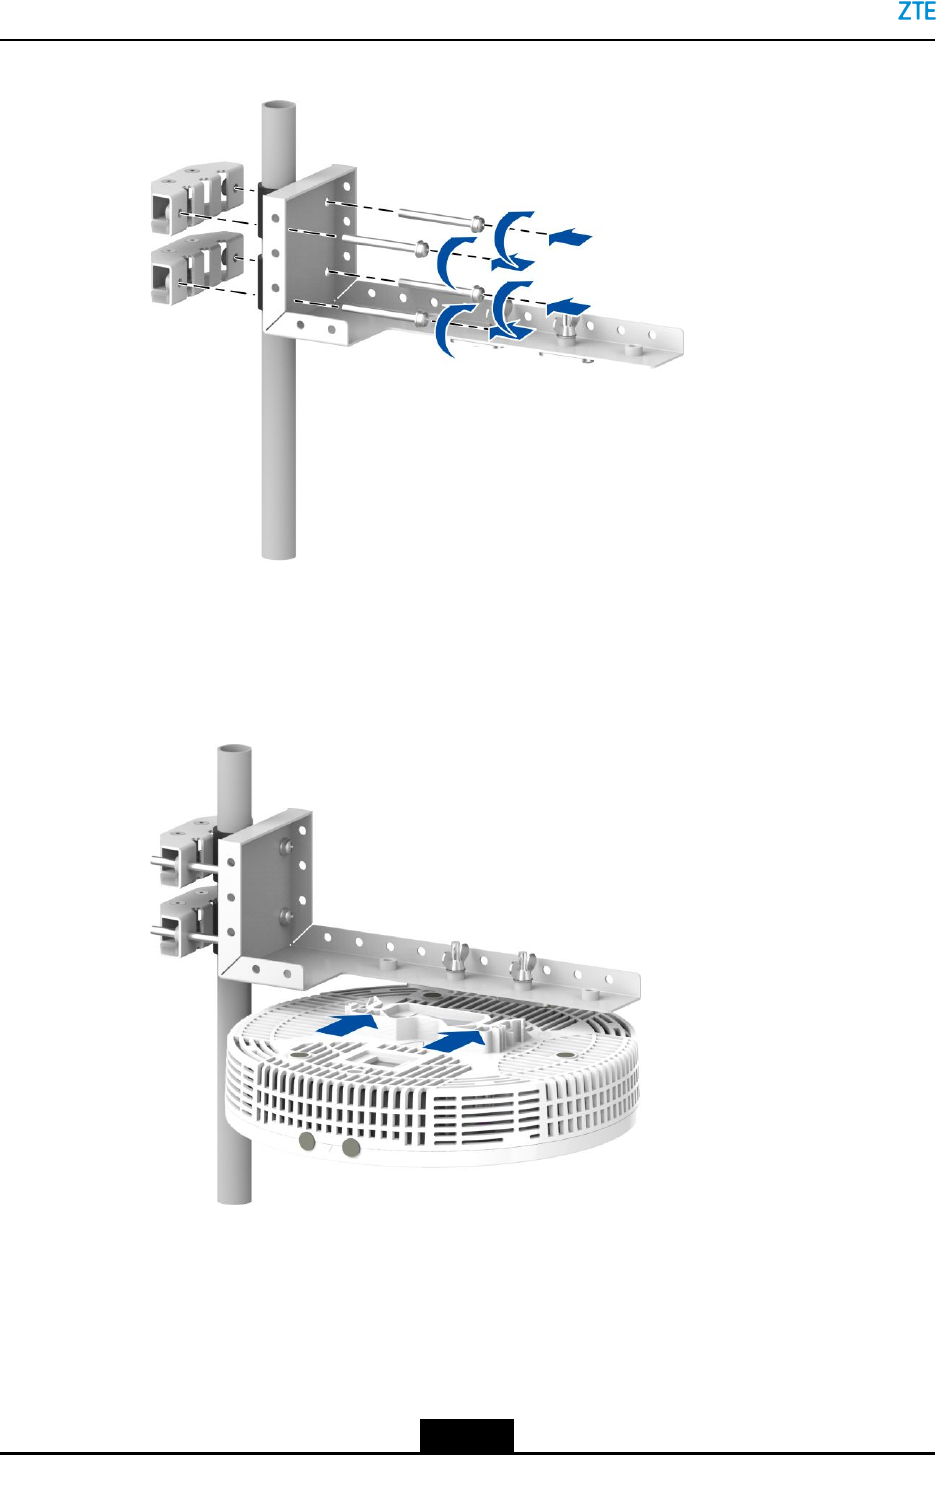
3.InstalltheL-shapedbracketandthePoleholderonthepoleandtightenthescrews,
seeFigure2-3.
2-3
SJ-20150805085318-002|2016-08-18(R1.3)ZTEProprietaryandCondential
ZXSDRR8119HardwareInstallation
Figure2-3SecuringthePoleBrackettothePole
4.AlignthetwoU-shapegroovesoftheZXSDRR8119withthetworivetsonthetwo-point
hangingboardandpushtheZXSDRR8119totheendtoxitonthetwo-pointhanging
plate,seeFigure2-4.
Figure2-4MountingtheZXSDRR8119
–EndofSteps–
2.2InstallingtheDeviceonaConcreteWall
ThisproceduredescribeshowtoinstalltheZXSDRR8119againstawall.
2-4
SJ-20150805085318-002|2016-08-18(R1.3)ZTEProprietaryandCondential
Chapter2InstallingtheZXSDRR8119
Context
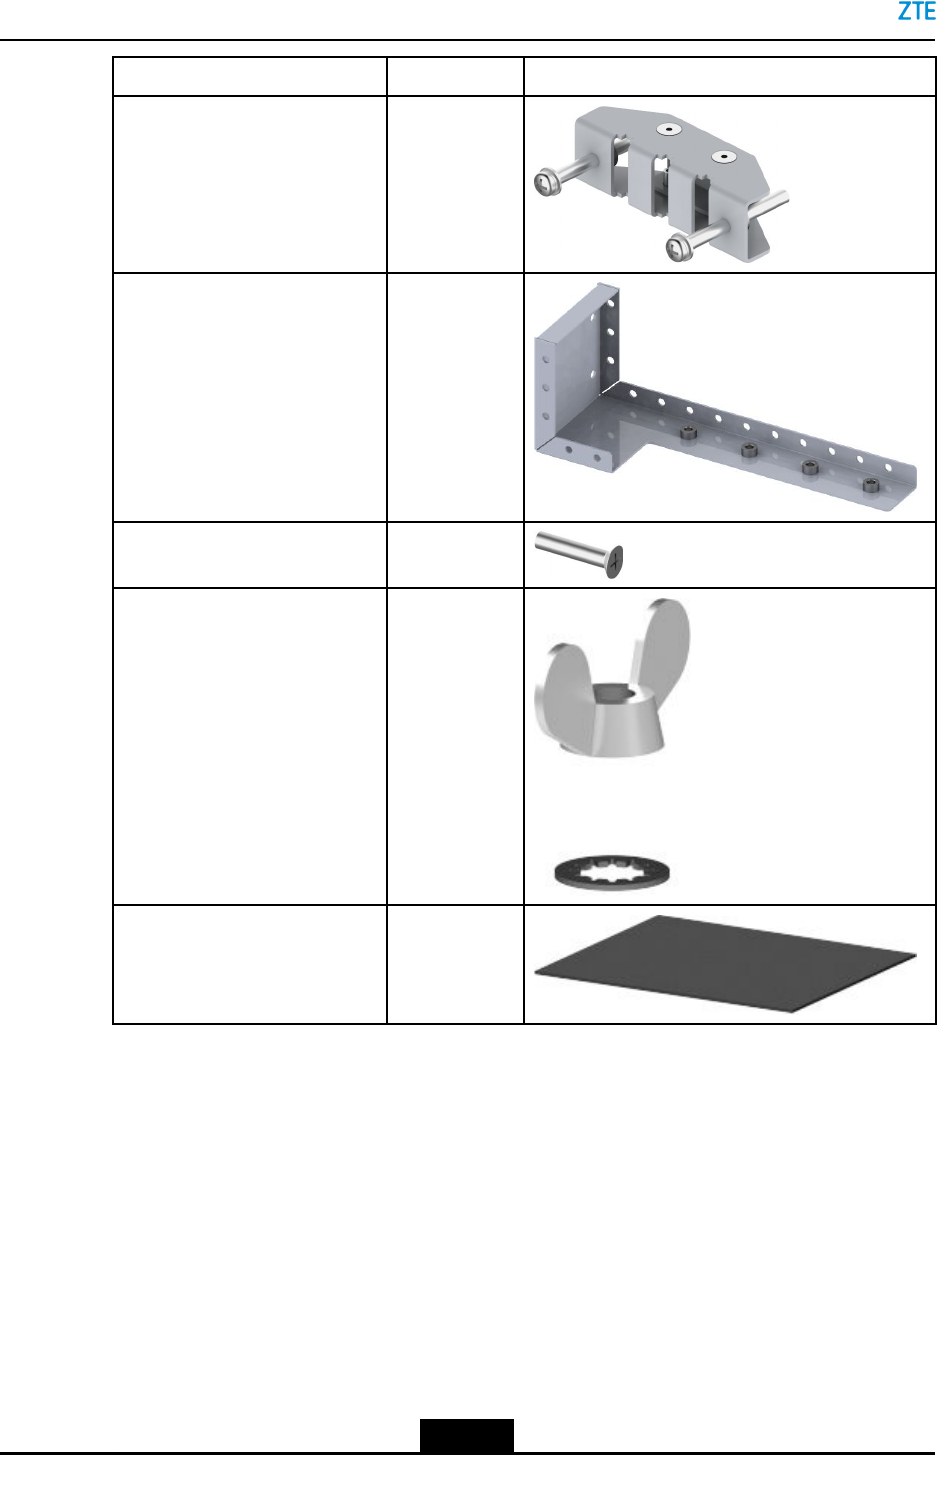
Fortheinstallationcomponents,refertothefollowingtable.
ComponentQuantityOverview
Two-pointhangingplate1
L-shapedbracket1
Wingnutandwasher2
M5×25countersunkscrew2
ST4.2×32countersunk
self-tappingscrews
3
φ6×30Expansionpipe3
Steps
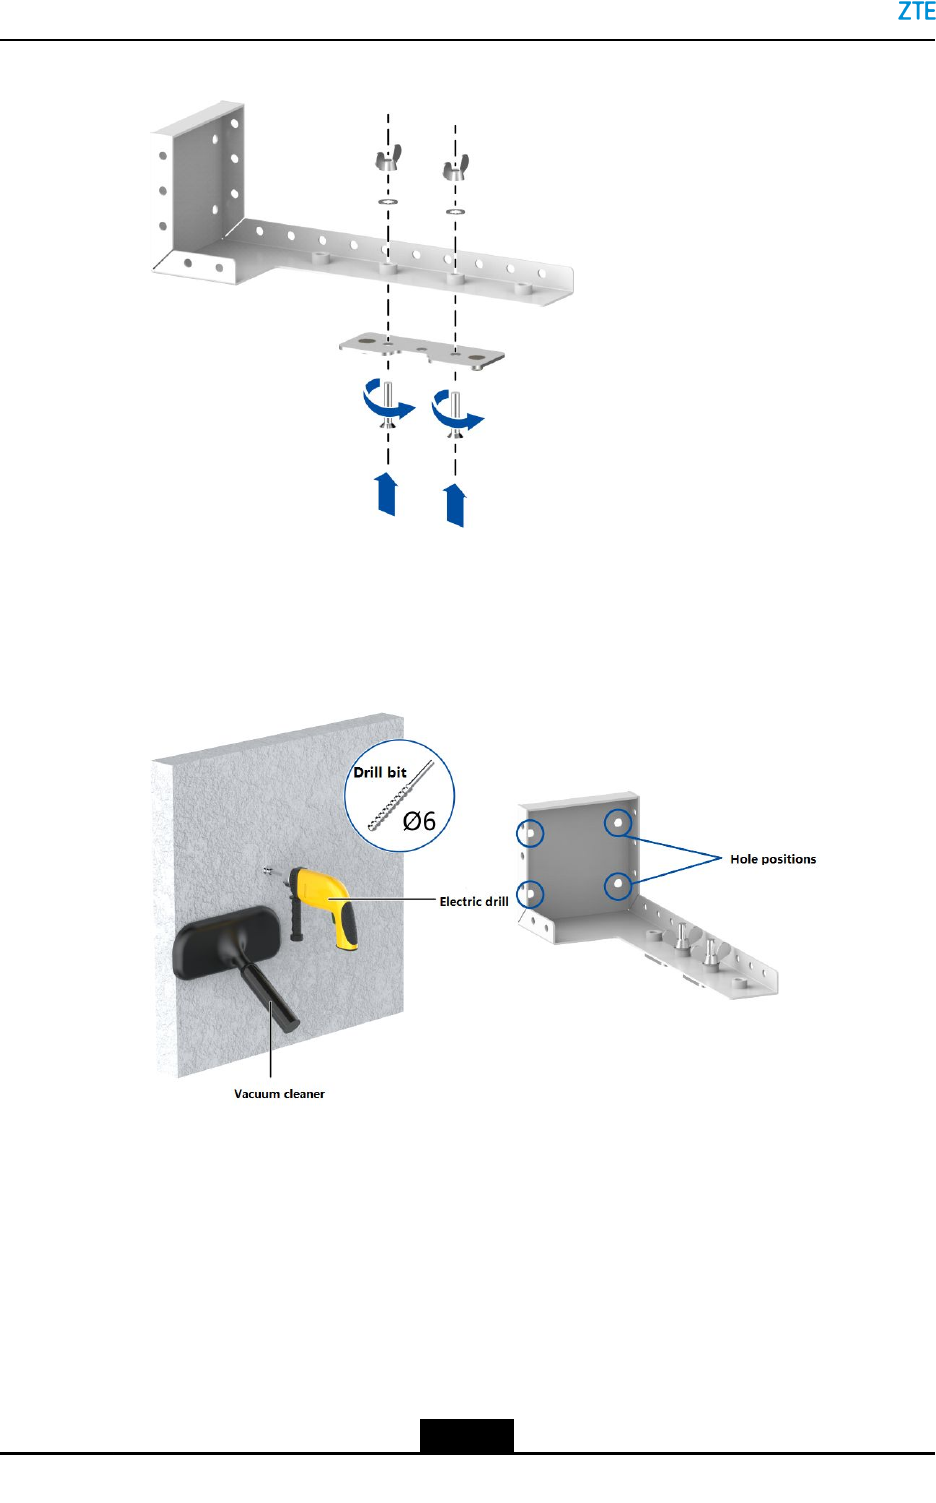
1.Securethetwo-pointmountingplatetothehorizontalmountingbracketwithtwo
countersunk-headscrews(M5×25)andtwowingnutsandwashers,seeFigure2-5.
2-5
SJ-20150805085318-002|2016-08-18(R1.3)ZTEProprietaryandCondential
ZXSDRR8119HardwareInstallation
Figure2-5SecuringtheTwo-PointMountingPlatetotheL—shapedBracket
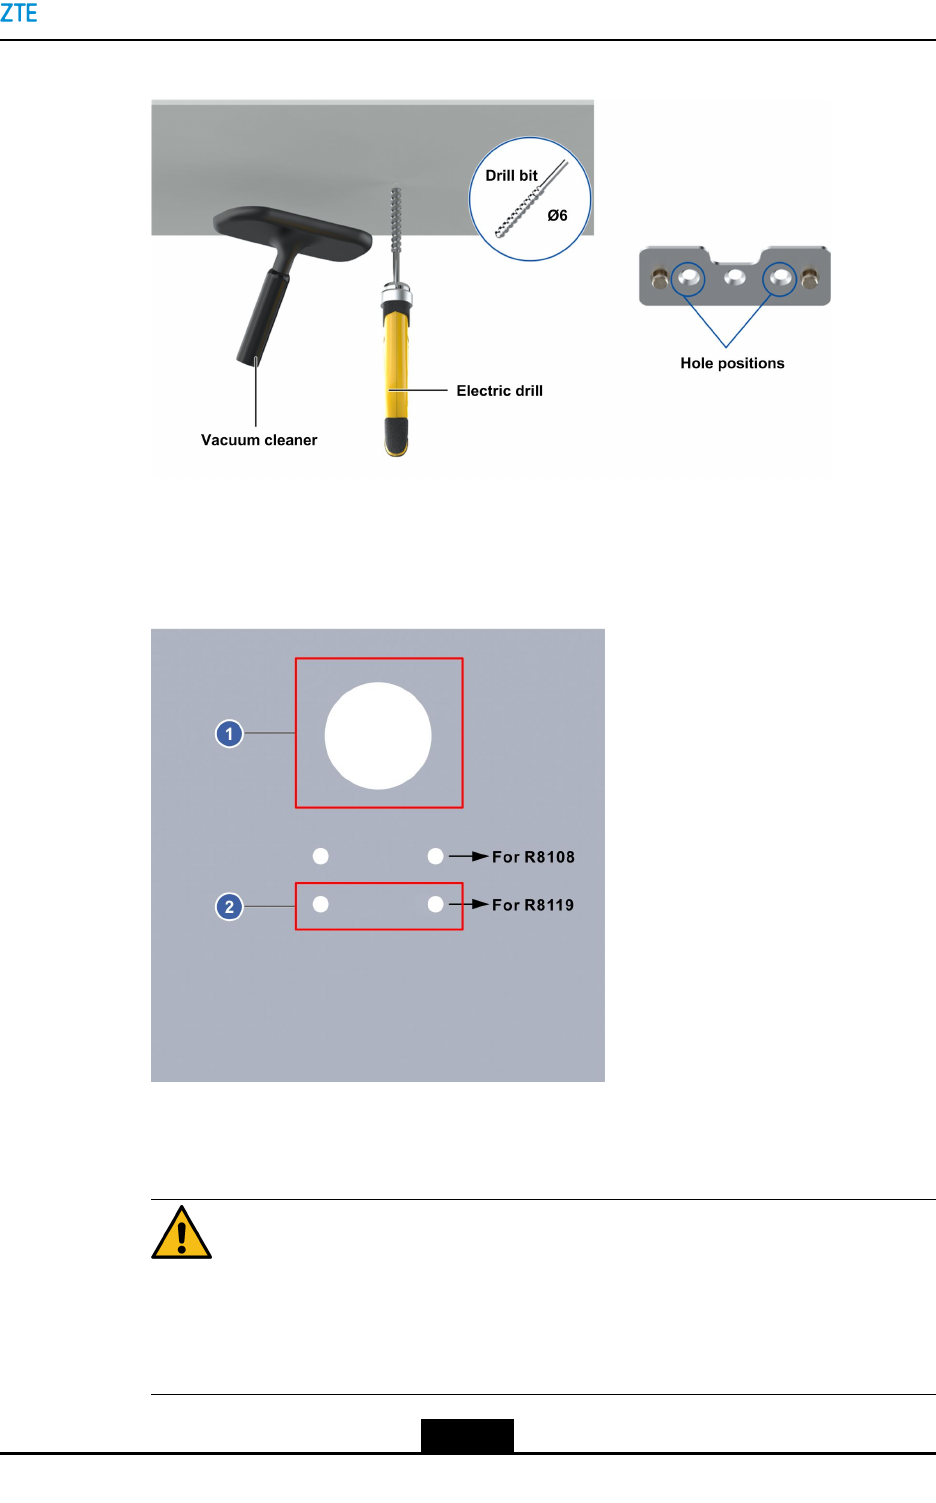
2.Onthewall,marklocationsfordrillingholesbasedontheholepositionsofthe
L-shapedbracket,anddrillfourholesatthemarkswithanelectricdrill.Theholes
mustbeatleast55mmdeep,seeFigure2-6.
Figure2-6DrillingHoles
3.Hammertheexpansiontubesintotheholeswitharubberhammer,seeFigure2-7.
2-6
SJ-20150805085318-002|2016-08-18(R1.3)ZTEProprietaryandCondential
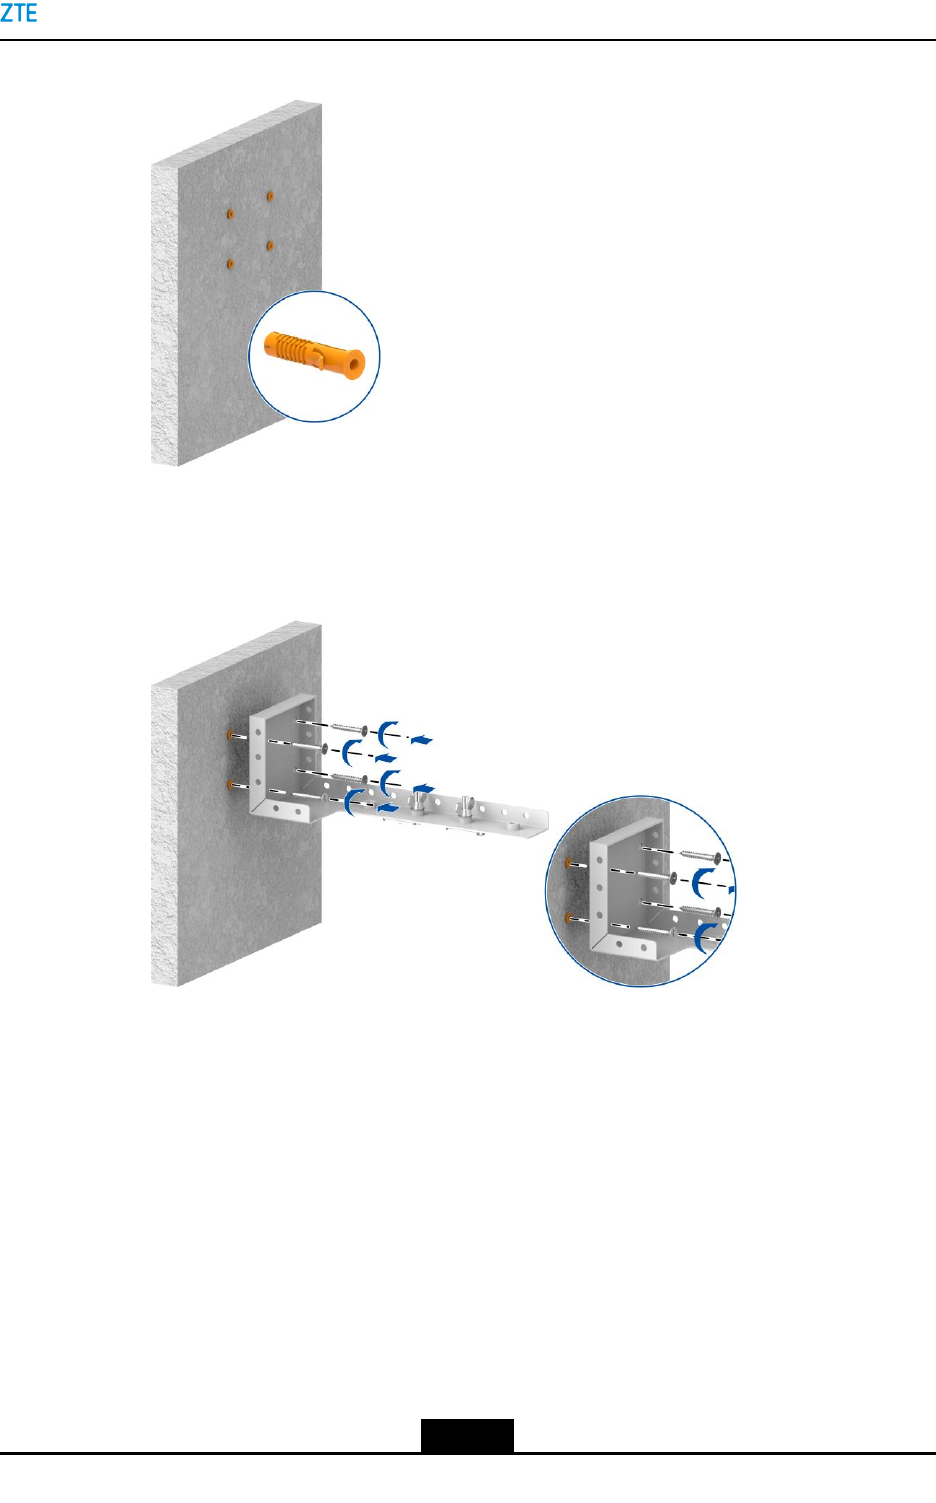
Chapter2InstallingtheZXSDRR8119
Figure2-7InstallingtheExpansionTubes
4.SecuretheL-shapedbrackettothewallwithfourcountersunk-headself-tapping
screws(ST4.2×32),seeFigure2-8.
Figure2-8SecuringtheL-shapedBrackettotheWall
5.AlignthetwoU-shapegroovesoftheZXSDRR8119withthetworivetsonthetwo-point
hangingplate,andpushtheZXSDRR8119totheendtoxitonthetwo-pointhanging
plate,seeFigure2-9.
2-7
SJ-20150805085318-002|2016-08-18(R1.3)ZTEProprietaryandCondential
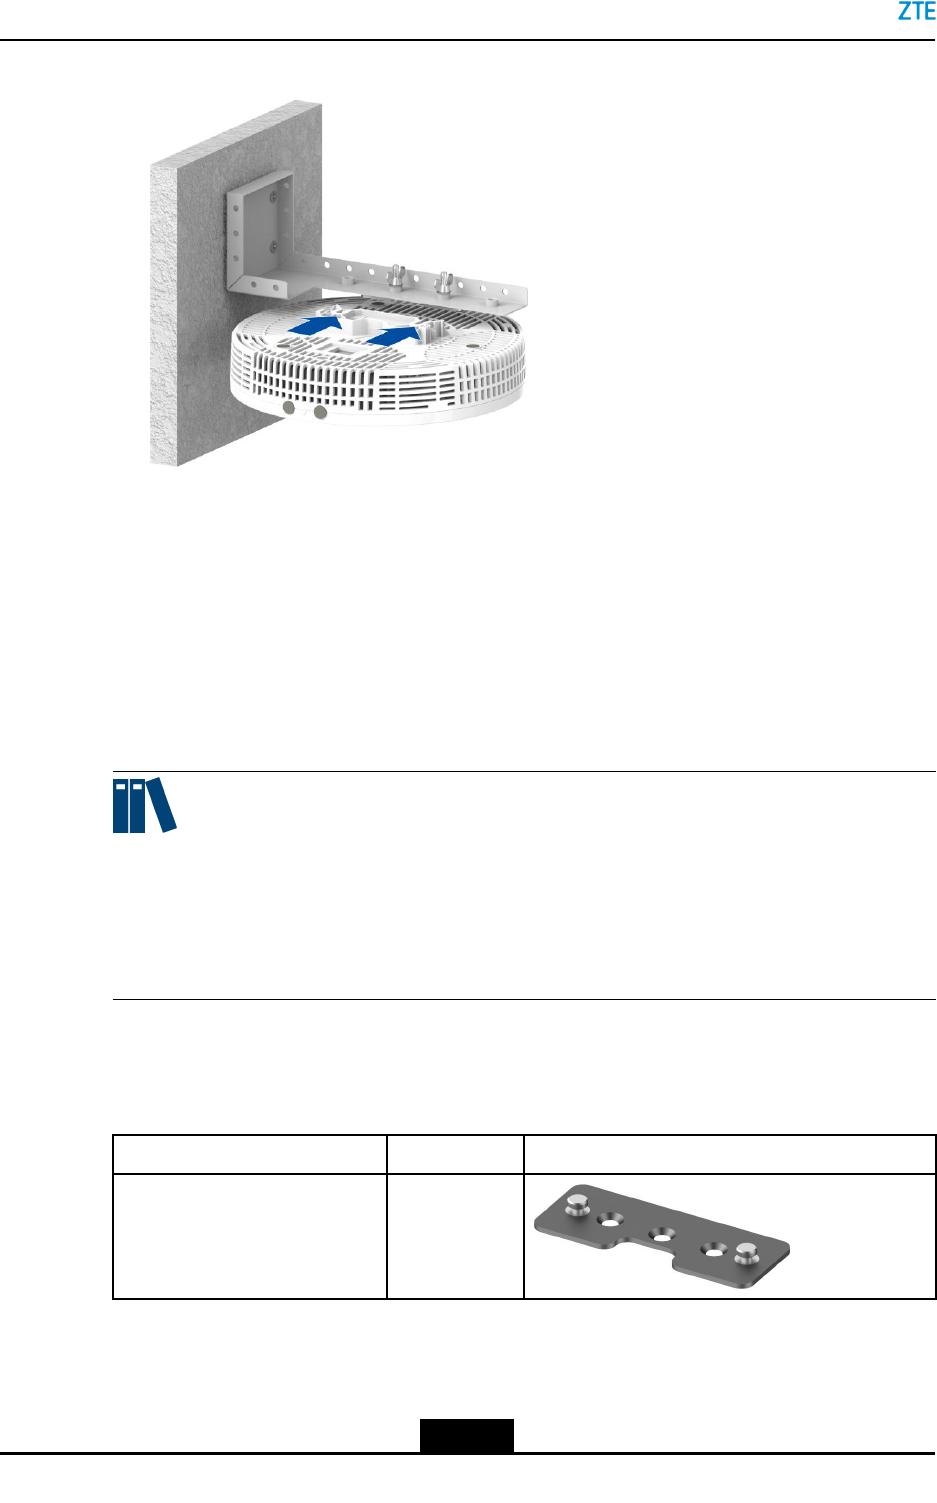
ZXSDRR8119HardwareInstallation
Figure2-9MountingtheZXSDRR8119
–EndofSteps–
2.3InstallingtheDeviceonaConcreteCeiling
WheninstallingtheZXSDRR8119againstacementceiling,ensurethatthedistance
betweentheplasticshelltopoftheZXSDRR8119andtheceilingisnotlessthan40mm.
Thisrequirementcanbemetthroughthewall-mountxturebetweentheZXSDRR8119
andthecementceiling.
Note:
Fornon-cementceilings,forexample,irremovableplasterboardceilingandPVCboard
ceiling,youmustxawoodenbarontheceiling.Forhowtoinstallthewoodenbar,refer
to“Figure2-15”.Itisnotallowedtoxthetwo-pointhangingboardtotheceilingbyusing
self-tappingscrews.
Context
Fortheinstallationcomponents,refertothefollowingtable.
ComponentQuantityOverview
Two-pointhangingplate1
2-8
SJ-20150805085318-002|2016-08-18(R1.3)ZTEProprietaryandCondential
Chapter2InstallingtheZXSDRR8119
ComponentQuantityOverview
Wall-mountxture1
ST4.2×19countersunk
self-tappingscrews
2
ST4.2×32countersunk
self-tappingscrews
3
φ6×30Expansionpipe3
Steps
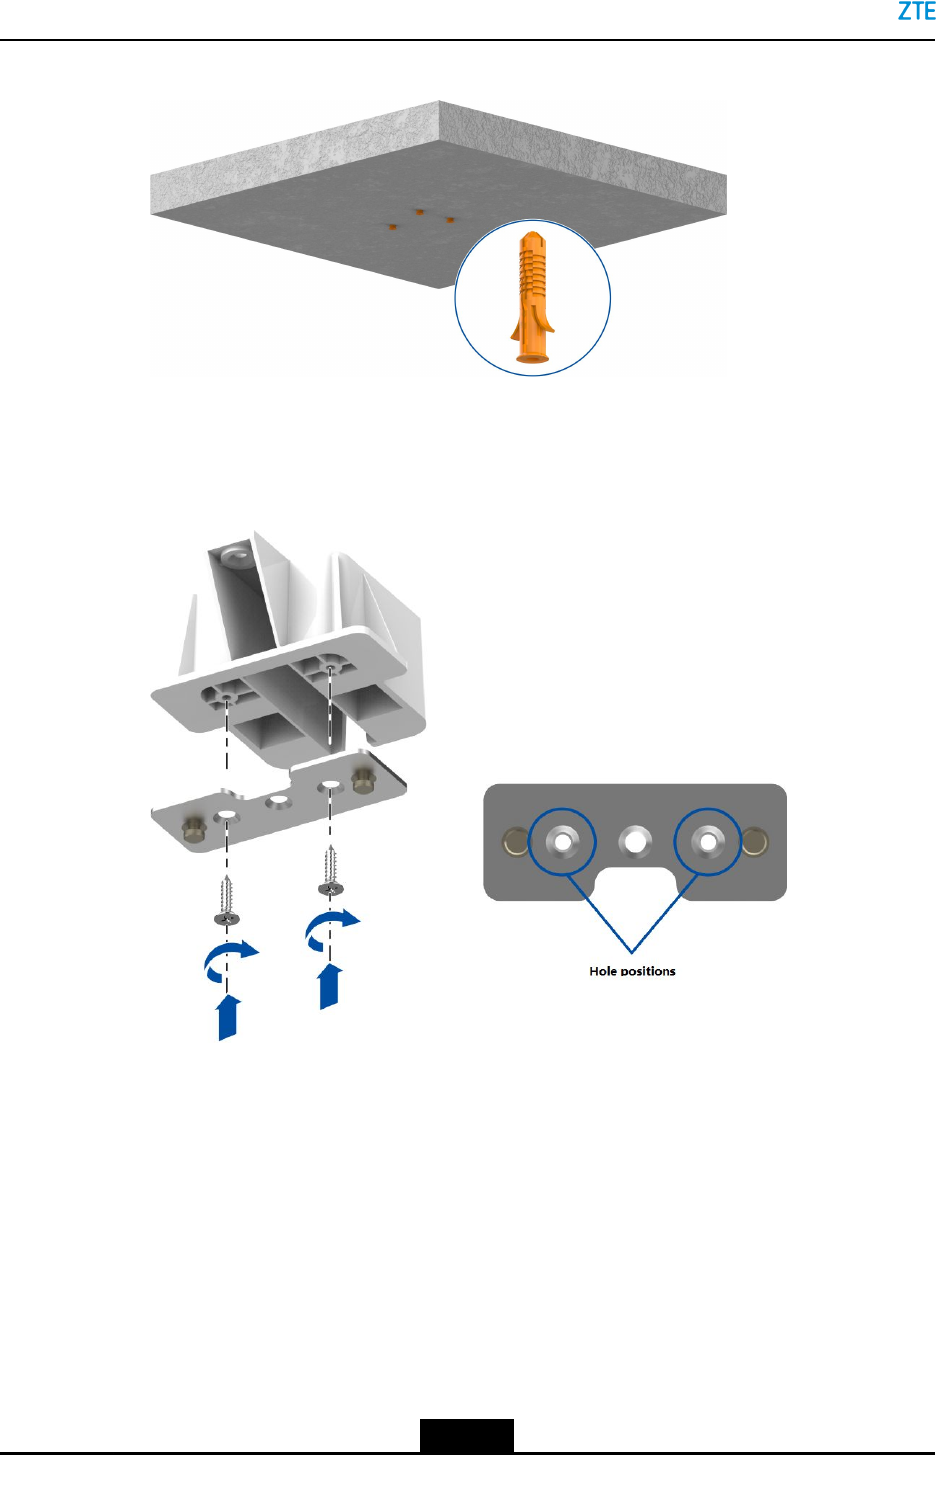
1.Drillholesintheceiling.
a.Makemarksonthecementceilinginaccordancewiththeholesofthewall-mount
xturetodeterminethelocationsoftheholestobedrilled.
b.Useanelectrichammerdrilltomakethreeholesinthecementceilingin
accordancewiththemarksmadeonthecementceiling.Theholesmustbeat
least35mmdeep.
Note:
Aftertheholesaredrilled,clearthedustbyusingadustcollector.
2.Hammerexpansionpipesintotheholesintheceilingbyusingarubberhammer,see
Figure2-10.
2-9
SJ-20150805085318-002|2016-08-18(R1.3)ZTEProprietaryandCondential
ZXSDRR8119HardwareInstallation
Figure2-10InstallingExpansionPipes
3.Usetwocountersunkself-tappingscrews(ST4.2×19)toxthetwo-pointhanging
boardtothewall-mountxture,seeFigure2-11.
Figure2-11FixingTwo-PointHangingPlatetotheWall-MountFixture
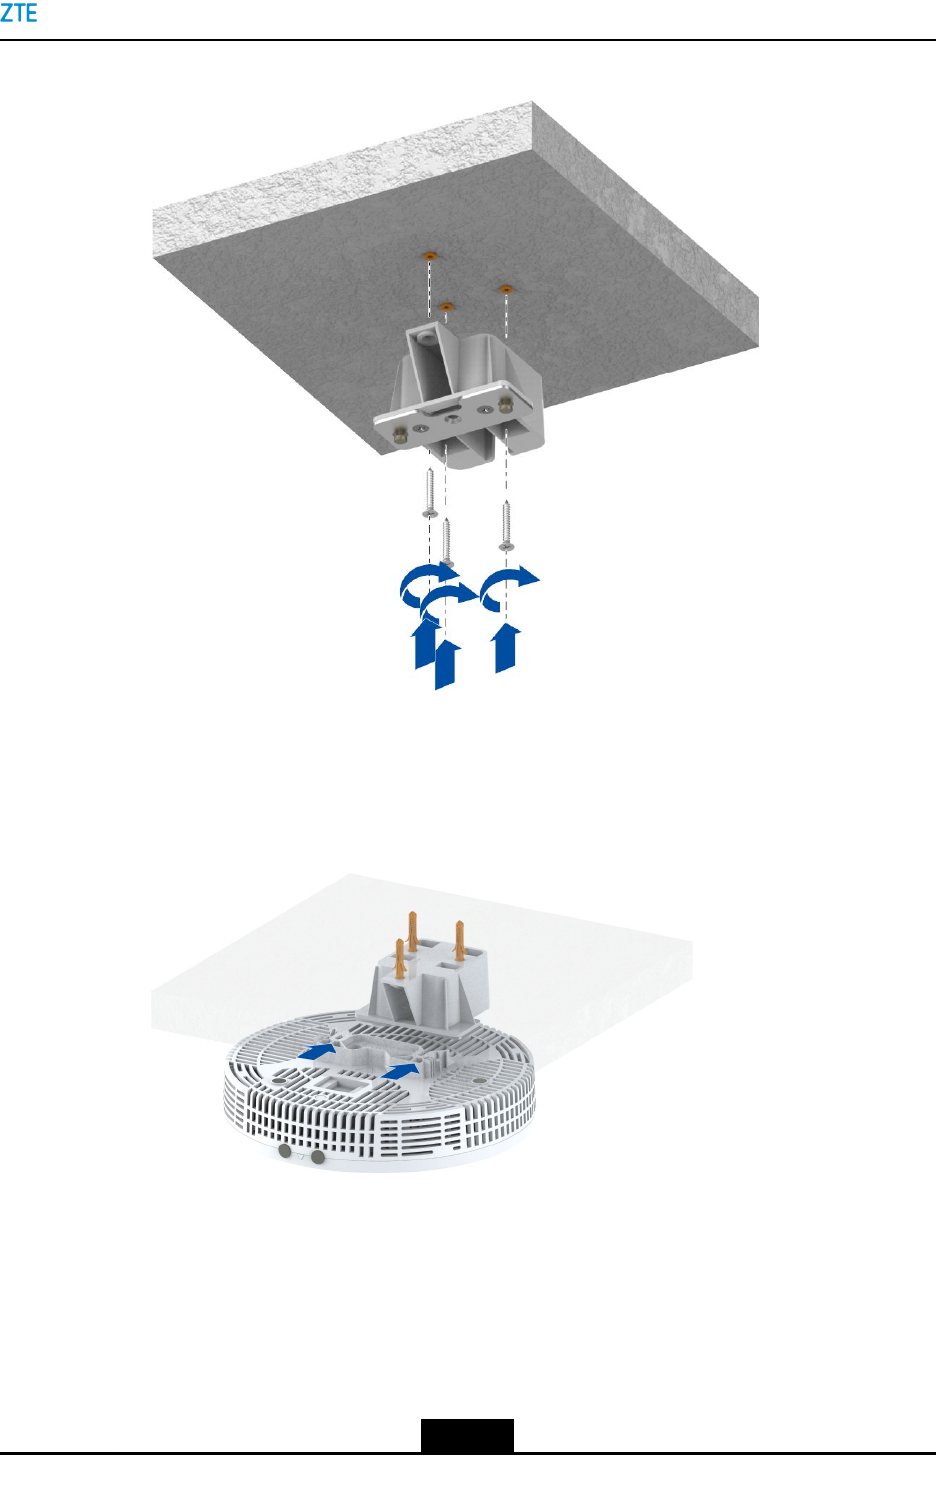
4.UsethreeST4.2×32countersunkself-tappingscrewstoxthewall-mountxtureto
theexpansionpipesontheceiling(torque:2.4N×m),seeFigure2-12.
2-10
SJ-20150805085318-002|2016-08-18(R1.3)ZTEProprietaryandCondential
Chapter2InstallingtheZXSDRR8119
Figure2-12FixingtheWall-MountFixturetotheCeiling
5.AlignthetwoU-shapegroovesoftheZXSDRR8119withthetworivetsonthetwo-point
hangingplate,andpushtheZXSDRR8119totheendtoxitonthetwo-pointhanging
plate,seeFigure2-13.
Figure2-13MountingtheZXSDRR8119
–EndofSteps–
2.4InstallingaRemovableCeiling
ThisproceduredescribeshowtoinstalltheZXSDRR8119againstaremovableceiling
board.
2-11
SJ-20150805085318-002|2016-08-18(R1.3)ZTEProprietaryandCondential
ZXSDRR8119HardwareInstallation
Context
Fortheinstallationcomponents,refertothefollowingtable.
ComponentQuantityOverview
Two-pointhangingboard1
L-shapedbracket1
M5×25countersunk-head
screw
2
Wingnutandwasher2
Steps
1.Removetheceiling,markthepositionsfordrillingholesonthewallbasedthehole
positionsoftheL-shapedbracket,seeFigure2-14.
2-12
SJ-20150805085318-002|2016-08-18(R1.3)ZTEProprietaryandCondential
Chapter2InstallingtheZXSDRR8119
Figure2-14MarkingHoles
2.Ontheremovedceiling,drilltwomountingholesandonenetworkcablehole,
seeFigure2-15.
Figure2-15HoleTemplateoftheRemovableCeilingBoard
1.Installationholeofthe
networkcable
2.Installationholeof
thetwo-pointhanging
board
Caution!
Thenetworkcableholemustbedrilledinaccordancewiththesizespeciedonthe
holetemplate.Iftheholesizeissmallerthanthatofthetemplatehole,thenetwork
cablewillbestuckwhentheZXSDRR8119isdismounted.
2-13
SJ-20150805085318-002|2016-08-18(R1.3)ZTEProprietaryandCondential
ZXSDRR8119HardwareInstallation
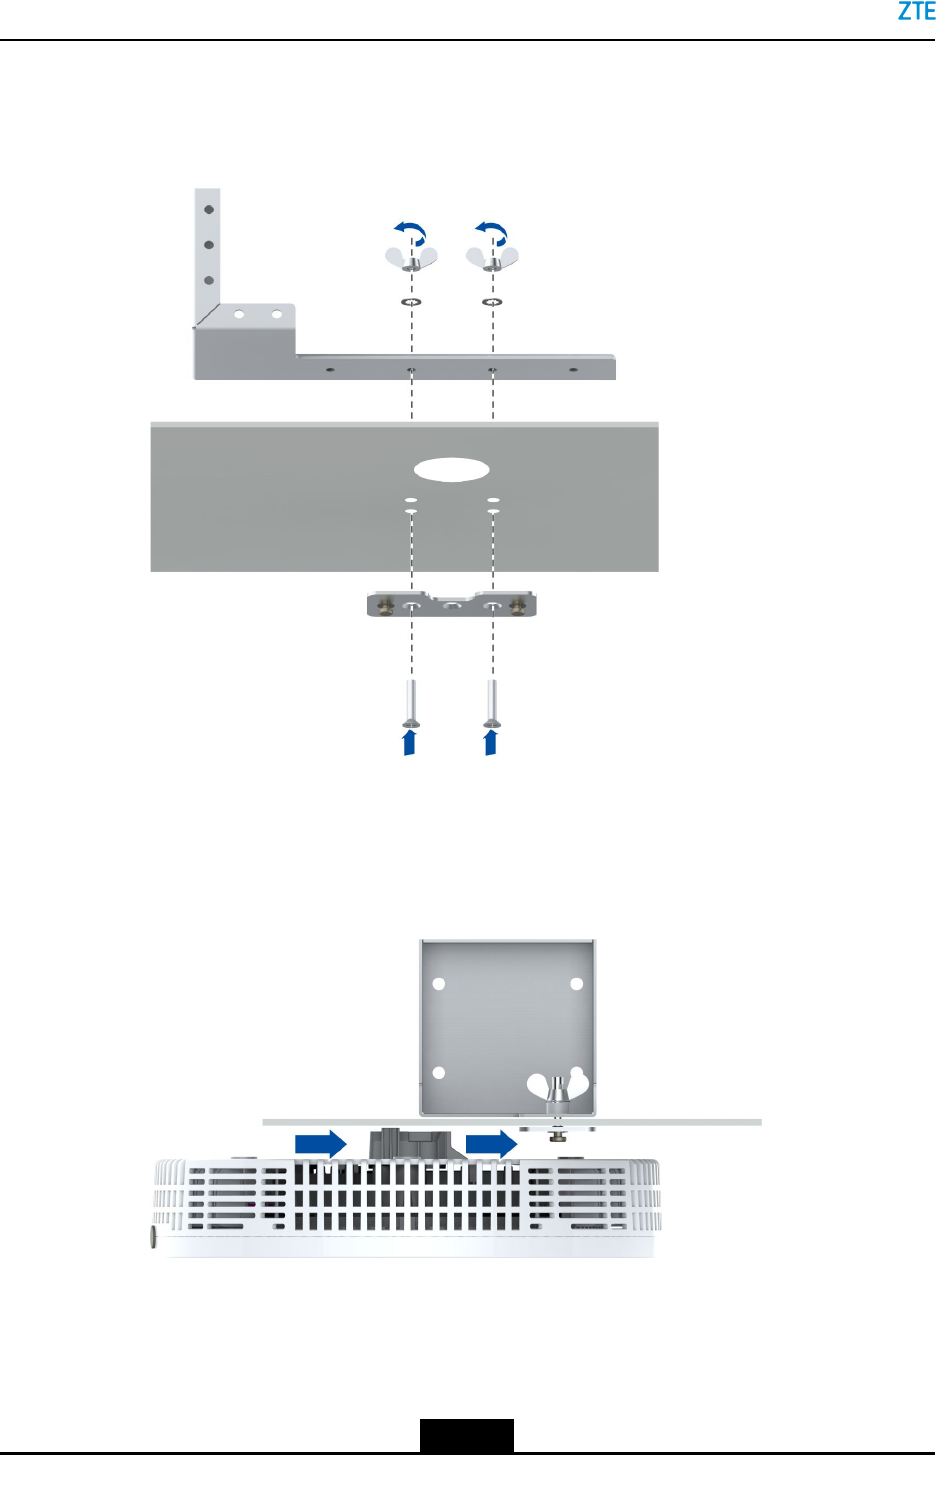
3.Securethetwo-pointmountingplateandtheL-shapedbrackettotheceilingwithtwo
countersunk-headscrews(M5×25)andtwowingnutsandwashers,seeFigure2-16.
Figure2-16SecuringtheBracket
4.AlignthetwoU-shapegroovesoftheZXSDRR8119withthetworivetsonthetwo-point
hangingplate,andpushtheZXSDRR8119totheendtoxitonthetwo-pointhanging
plate,seeFigure2-17.
Figure2-17MountingtheZXSDRR8119
5.Installtheceilingboardtotheoriginallocation.
–EndofSteps–
2-14
SJ-20150805085318-002|2016-08-18(R1.3)ZTEProprietaryandCondential
Chapter3
InstallingaCable
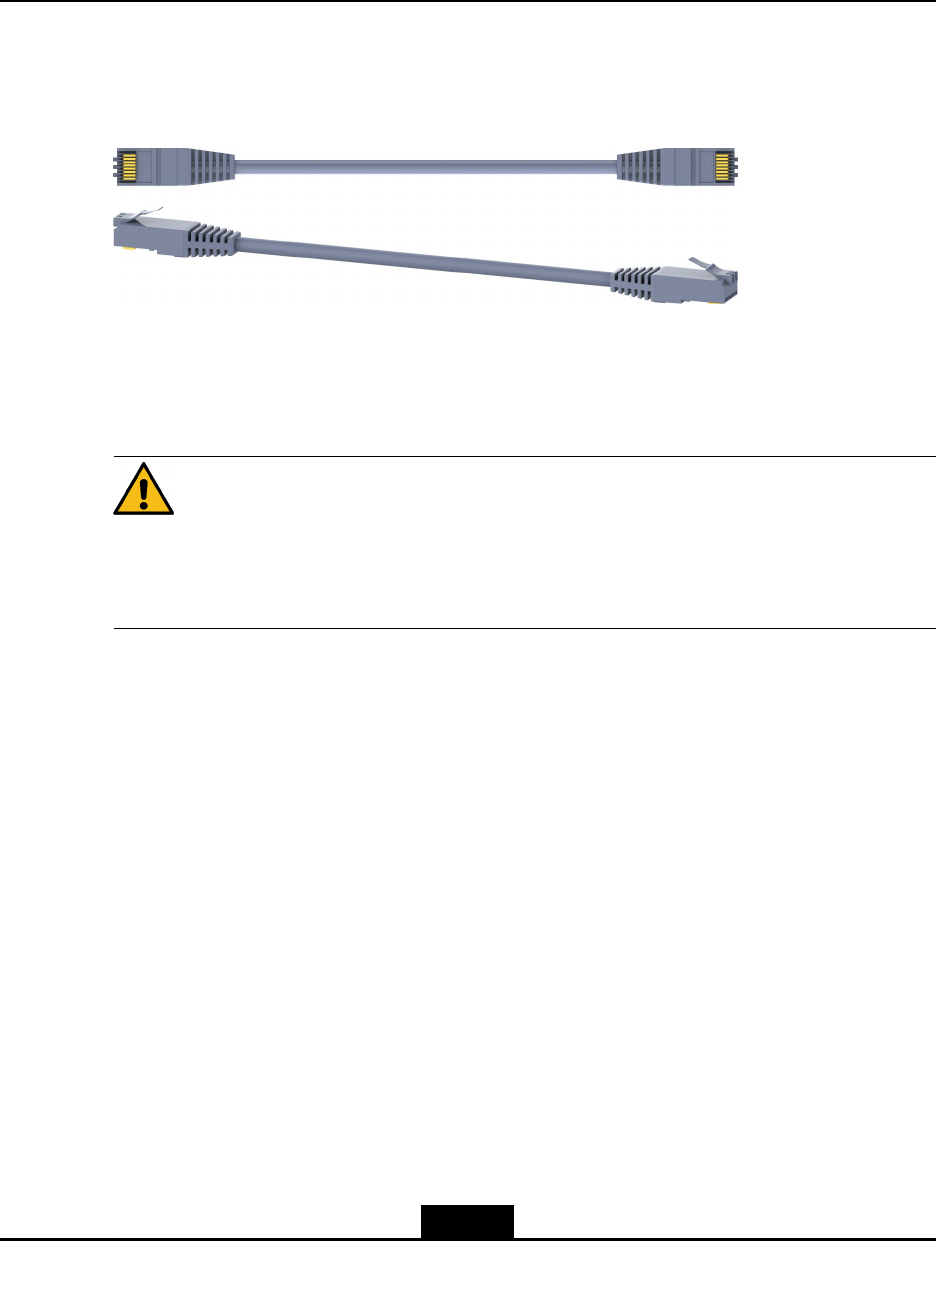
ACAT5eUTPcableisusedastheEthernetcable.Forthecableoverview,seeFigure3-1.
Figure3-1CAT5eEthernetCable
Prerequisite
TheEthernetcableisaslongasneeded.
Caution!
lDonotuseSTPEthernetcables.
lThemaximumlengthofanEthernetcablefromtheZXSDRR8119tothePbridge
shouldbelessthan100m.
Steps
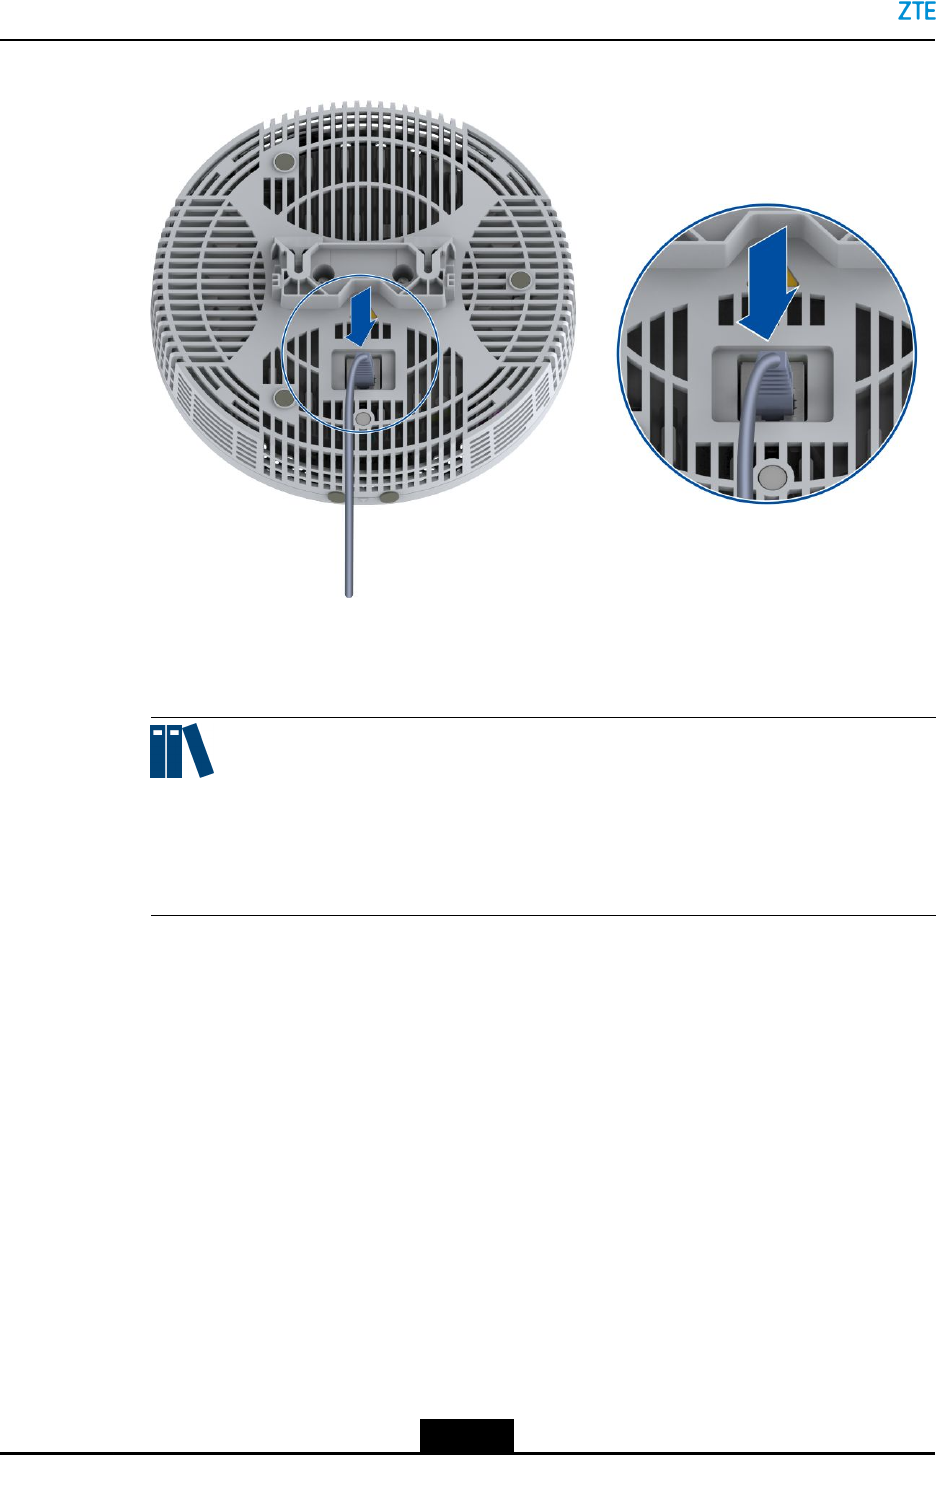
1.ConnectoneendoftheEthernetcabletotheETHinterfaceoftheZXSDRR8119,see
Figure3-2.
3-1
SJ-20150805085318-002|2016-08-18(R1.3)ZTEProprietaryandCondential
ZXSDRR8119HardwareInstallation
Figure3-2ConnectingtheEthernetCable
2.ConnecttheotherendoftheEthernetcabletotheEthernetelectricalinterfaceofthe
Pbridge,whichisaremoteconvergenceunit.
Note:
Bindthecablewithcabletiesorderly,reserveanequaldistancebetweeneverytwo
cableties,withapropertensionandtowardsthesamedirection.Cutupextraties
smoothlyandcleanly.
3.Rootandbindthecable.
4.StickalabelonthecoveroftheZXSDRR8119andwriteinformationonthelabelto
indicatetheportandPbridgethattheZXSDRR8119isconnected.
Forexample,PB1-PORT1indicatesthattheZXSDRR8119isconnectedtotherst
portontherstPbridge.
–EndofSteps–
3-2
SJ-20150805085318-002|2016-08-18(R1.3)ZTEProprietaryandCondential

Figures
Figure1-1ExternalInstallationInterfaces.................................................................1-1
Figure2-1WrappingtheSlide-ProofRubberMatAroundthePole............................2-3
Figure2-2SecuringtheTwo-PointMountingPlatetotheL-shapedBracket.............2-3
Figure2-3SecuringthePoleBrackettothePole......................................................2-4
Figure2-4MountingtheZXSDRR8119....................................................................2-4
Figure2-5SecuringtheTwo-PointMountingPlatetotheL—shapedBracket...........2-6
Figure2-6DrillingHoles...........................................................................................2-6
Figure2-7InstallingtheExpansionTubes.................................................................2-7
Figure2-8SecuringtheL-shapedBrackettotheWall...............................................2-7
Figure2-9MountingtheZXSDRR8119....................................................................2-8
Figure2-10InstallingExpansionPipes...................................................................2-10
Figure2-11FixingTwo-PointHangingPlatetotheWall-MountFixture....................2-10
Figure2-12FixingtheWall-MountFixturetotheCeiling.........................................2-11
Figure2-13MountingtheZXSDRR8119................................................................2-11
Figure2-14MarkingHoles......................................................................................2-13
Figure2-15HoleT emplateoftheRemovableCeilingBoard...................................2-13
Figure2-16SecuringtheBracket............................................................................2-14
Figure2-17MountingtheZXSDRR8119................................................................2-14
Figure3-1CAT5eEthernetCable.............................................................................3-1
Figure3-2ConnectingtheEthernetCable................................................................3-2
I
SJ-20150805085318-002|2016-08-18(R1.3)ZTEProprietaryandCondential

Figures
Thispageintentionallyleftblank.
II
SJ-20150805085318-002|2016-08-18(R1.3)ZTEProprietaryandCondential


Tables
Thispageintentionallyleftblank.
IV
SJ-20150805085318-002|2016-08-18(R1.3)ZTEProprietaryandCondential

Glossary
PoE
V
SJ-20150805085318-002|2016-08-18(R1.3)ZTEProprietaryandCondential