User manual

1
WF721
WCDMA/GSM Fixed Wireless Terminal
User Manual

2
Contents
Getting to Know Your Device ................................................. 4
Appearance ........................................................................... 4
LED Indicators ....................................................................... 5
Device Installation ................................................................... 6
Before You Begin .................................................................. 6
Installing the SIM Card and the Battery ................................. 7
Turning on Your Device ......................................................... 8
Checking the Wireless Signal ................................................ 8
Connecting the Device to a Phone ........................................ 9
Place a Test Call ................................................................. 10
Voice Mail ............................................................................ 11
Transferring a Phone Number ............................................. 12
Using Your Device ................................................................. 12
Making calls ......................................................................... 12
Three-Way Calling ............................................................... 13
Call Waiting .......................................................................... 13

3
Call Forwarding.................................................................... 14
Adjusting Volume ................................................................. 14
Powering On/Off .................................................................. 15
AT&T 3G MicroCell™ .......................................................... 15
TTY Support ........................................................................ 15
Troubleshooting ..................................................................... 17
Specification ........................................................................... 18
Safety Notes ........................................................................... 19
RF Exposure Information ...................................................... 21
FCC Regulations .................................................................... 21
Notes ....................................................................................... 22
4
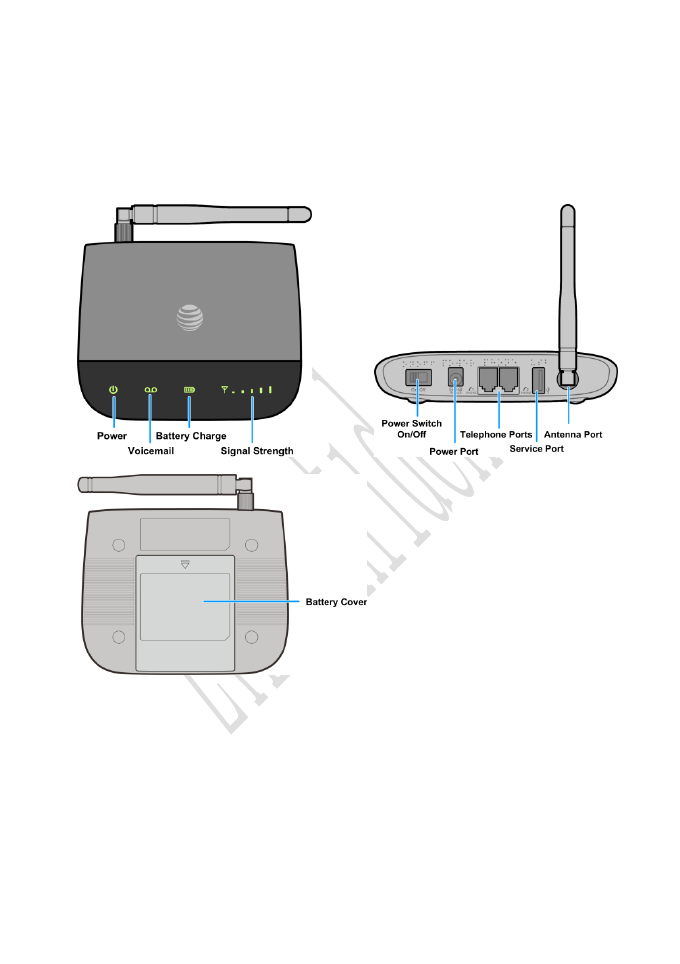
Getting to Know Your Device
Appearance
NOTE:
Service Port is designed for diagnostic purposes only, not for
customer use. Never place a USB-based device into the USB port of
the device under any circumstance. Doing so may damage the device
and negate its warranty.
5
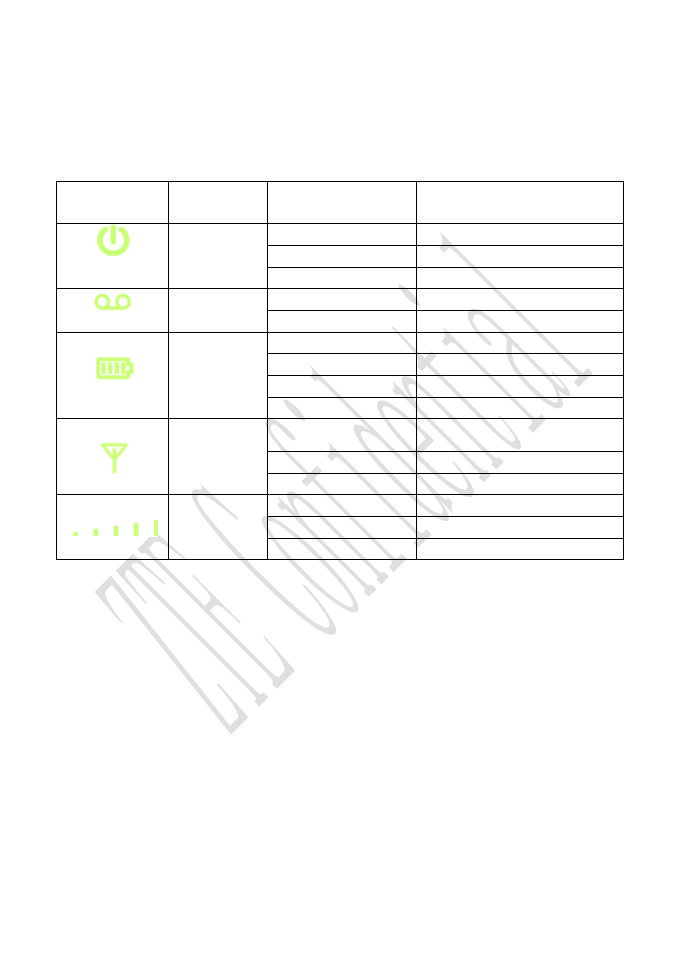
LED Indicators
The table below describes possible states for each of the LED
indicators.
Key
Icon
name
Indicator
Status
Power
Green
On
Off
No power
Red
FOTA
Voice
Mail
Green
New message
Off
No message
Battery
Charge
Green
High
Yellow
Medium
Red
Low
Off
No charge
Service
Red
No service
Blinking red
No SIM
Blinking green
Microcell
Signal
Strength
One Green Bar
Weak
Five Green Bar
Strong
Blinking green
Microcell
6
Device Installation
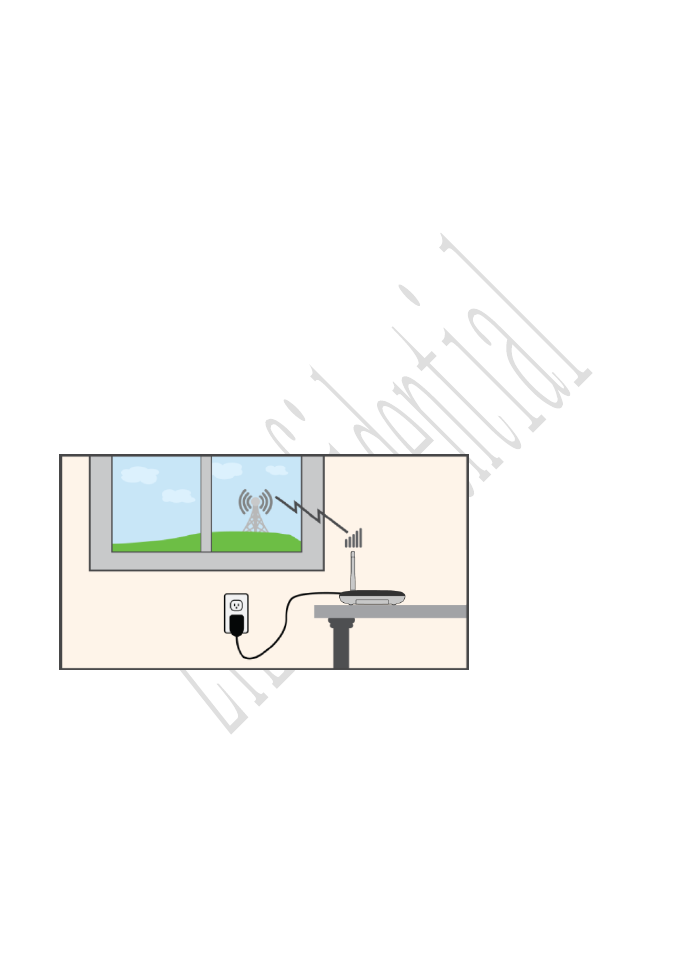
Before You Begin
Your device works exclusively with the AT&T cellular network and
DOES NOT use your home’s phone wall jacks.
Your device should be located:
Where you have a strong cellular signal from a cell tower,
typically near a window or outside wall. Signal strength may vary
in different parts of your home.
Near an electrical wall outlet.
Select which phone(s) you will use with the Wireless Home
Phone Base:
• A cordless phone system with multiple handsets should be used
to place phones throughout your home.
• If using an existing phone, unplug it from the wall jack.
7
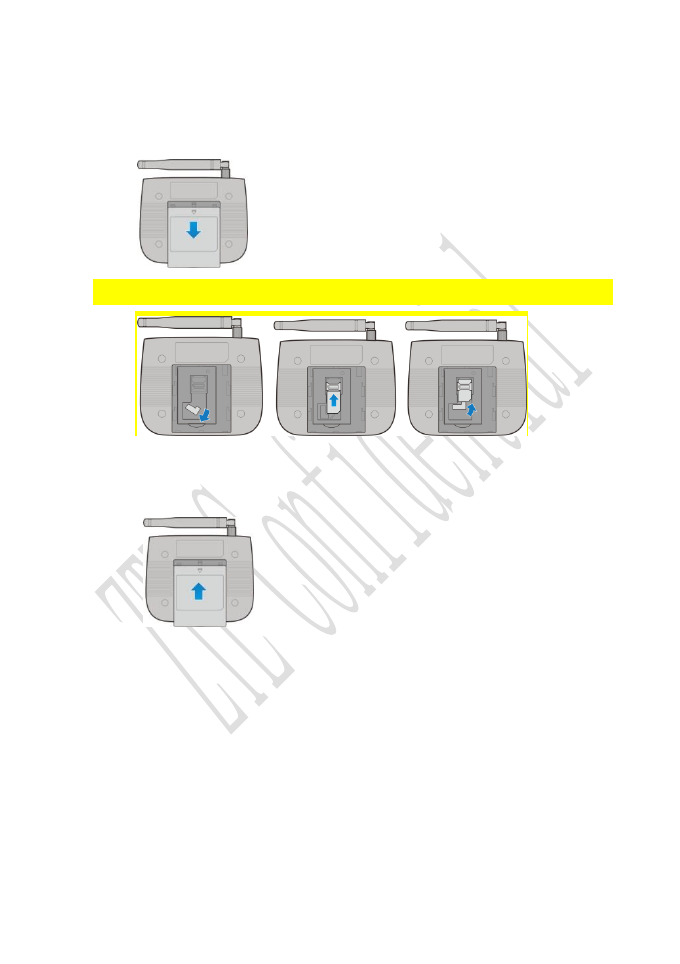
Installing the SIM Card and the Battery
1. Remove the cover from the battery compartment.
2. Follow the step in the following figure to install the SIM card.
3. Place the battery in the battery slot and replace the battery
cover.
NOTES:
The system will stop charging the battery when the ambient
temperature is outside of the temperature range allowed for
charging (0 °C ~ 55 °C).
When the power adapter is connected, the battery will
automatically be charged.
When fully charged, the battery will automatically stop charging.
8
Remove the battery if the device will be unused for a long period.
The battery is intended for backup purposes only (in the event of
a power failure).
The device takes about 5 hours to charge fully. The charge time
may be impacted by environmental factors.
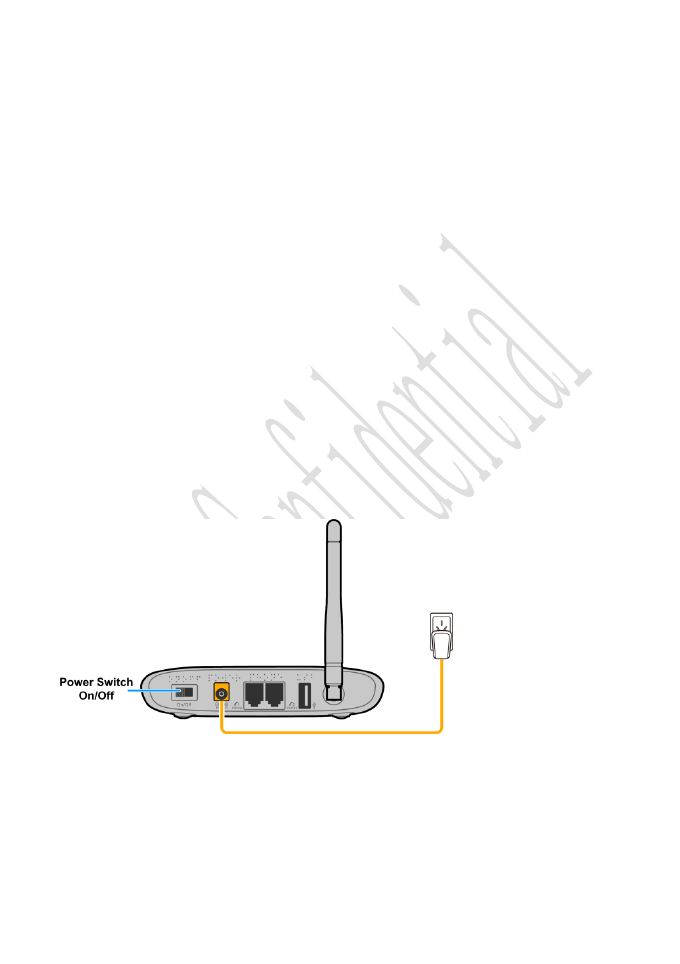
Turning on Your Device
Plug the power cord into an electrical wall outlet that is not controlled
by a wall switch.
Insert the small end of the power cord into the Power Input port on the
back of your Wireless Home Phone Base.
Slide the On/Off switch to On position.
Checking the Wireless Signal
1. Raise antenna to an upright position.
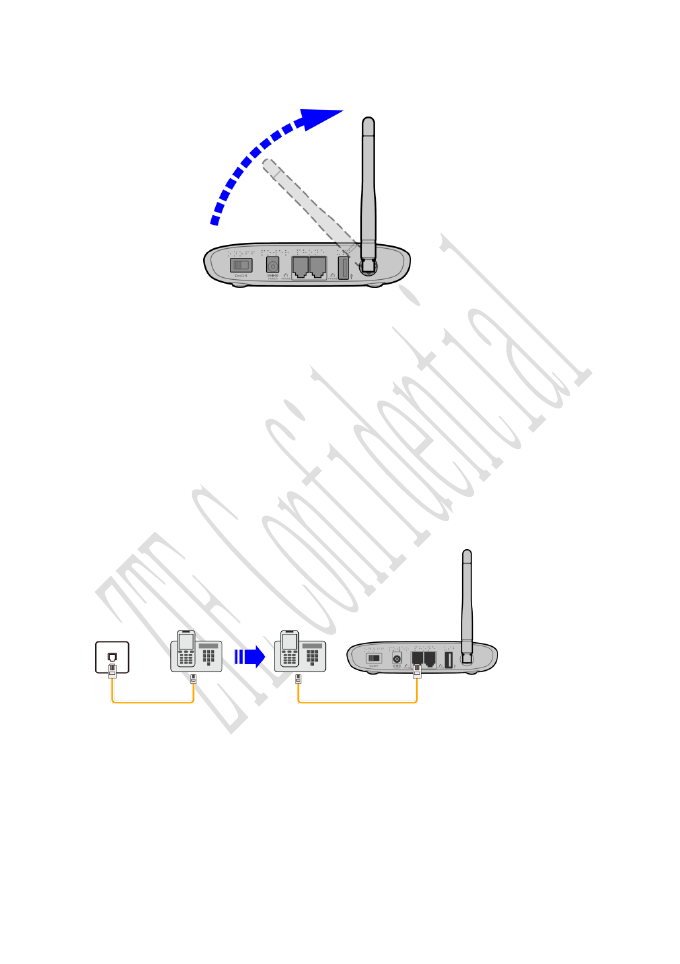
9
2. Confirm signal strength light is green for optimal performance.
NOTE: If you do not see a green light (signal strength), you may want
to choose an alternate installation location.
Connecting the Device to a Phone
1. Unplug your phone from the wall jack.
2. Plug your phone into the “Phone 1”port on the Wireless Home
Phone Base, using your existing phone cable or included phone
cable.
IMPORTANT: DO NOT plug the Wireless Home Phone Base into a
wall jack.
NOTE:
The “Phone 2” port can be used to connect an additional phone.
This port uses the same telephone number as the “Phone 1” port.
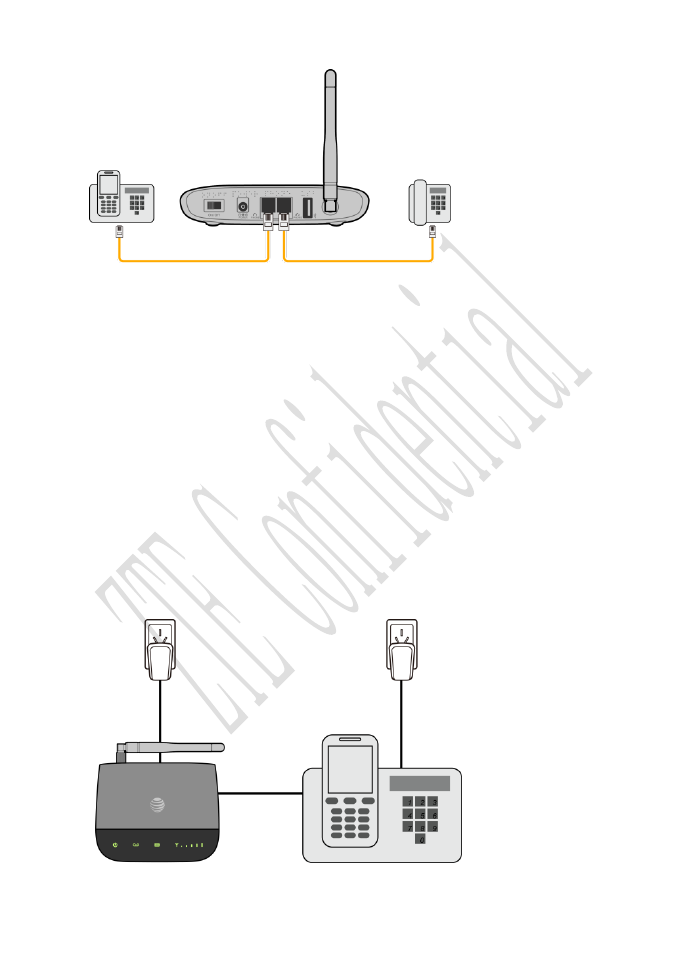
10
Put the device at least 2.5 meters away from the connected
phone, TV sets, radio and other electronic devices to avoid
electromagnetic interference.
Place a Test Call
1. Place a test call from your connected home phone. Before making
a call,Make sure to use 10-digit dialing even for local calls.
2. For best results, place the cordless phone base at least 12 inches
from the Wireless Home Phone Base. Lift the handset of your
home phone, enter the telephone number
Note: Keep your cordless phone plugged into a power outlet.

11
Voice Mail
Your Wireless Home Phone Base comes with standard wireless
voicemail. Follow the steps below to setup and use your voicemail.
Setup
Dial 1 on any home phone connected to the Wireless Home Phone
Base and wait four (4) seconds to connect to your AT&T wireless
voicemail. Simply follow the voice prompts to complete setup.
To enable remote voicemail retrieval and for added security be
sure to create a password during setup.
Message Waiting
There are two indicators for a new message waiting: 1) the voicemail
icon; and 2) an intermittent dial tone.
The voicemail icon on your Wireless Home Phone Base
flashes when a voicemail message is waiting. You will also hear an
intermittent dial tone on any connected phone handset before
placing a call.
Retrieving Messages
To retrieve voice messages, dial 1 on any home phone connected
to the Wireless Home Phone Base and wait four (4) seconds to
connect to your AT&T wireless voicemail box. Simply follow the
voice prompts to listen to and manage your messages. (Alternately,
you may dial your 10-digit home phone number to access your
voicemail box.)
Remote Retrieval

12
To retrieve voicemail messages from a phone not connected to
the Wireless Home Phone Base, dial the number associated with
your Wireless Home Phone Base service. When voicemail picks
up, press *. You will then be prompted to enter your password.
Simply follow the prompts to listen to and manage your voicemail
messages.
Transferring a Phone Number
Transferring a landline phone number to your Wireless Home
Phone Base can take up to five (5) days. Outgoing calls can
be made immediately using your Wireless Home Phone Base,
however incoming calls will continue through your old service until
the transfer is complete. It is recommended that a phone be kept
connected to your existing home wiring or prior service to continue
to receive incoming calls until the transfer is complete.
Using Your Device
Making calls
Using a phone connected to your Wireless Home Phone Base, place
and receive calls as you normally would. The Wireless Home Phone
Base supports both cordless and corded phone dialing methods.
Note: You will need to dial 10 digits even for local numbers.

13
Three-Way Calling
While on an existing call, press the Flash (or Talk) key on your
phone to put the first party on hold. When you hear a dial tone, dial
the second parties’ number (wait up to four [4] seconds). When
the second party answers, press the Flash (or Talk) key again to
complete the three-way connection. If the second party does not
answer, press the Flash (or Talk) key to end the connection and
return to the first party.
Note: If your phone does not have a Flash (or Talk) key, use the
off-hook mechanism supported by your phone instead.
Call Waiting
You will hear two tones if someone calls while you are already on
a call.
To hold the current call and accept the waiting call, press the Flash
(or Talk) key. You can press the Flash (or Talk) key anytime to switch
back and forth between calls.
To clear the current call and accept the waiting call, enter 1 and
press the Flash (or Talk) key.
To reject (User Busy) the waiting call, enter 0 and press the Flash
(or Talk) key.
Notes:
• Your Wireless Home Phone Base comes with standard threeway
calling and call waiting. Operation of these features will vary
depending on your home phone equipment.

14
• If your phone does not have a Flash (or Talk) key, then use the
off-hook mechanism supported by your phone.
Call Forwarding
To forward all calls, dial:
1) *21*
2) The 10-digit number to which you wish to forward your calls
3) # key
(Example: *21*1234567890# forwards your calls to the phone
number 123-456-7890)
Please wait at least three (3) seconds and you hear a confirmation
tone for the forwarding to complete before hanging up.
To un-forward calls, dial #21#, please wait at least three (3)
seconds and you hear a confirmation tone for the un-forwarding
to complete before hanging up.
Note: Applicable wireless minute plan rates apply to forwarded calls.
Adjusting Volume
Use your home phone’s volume adjustment if available. Alternately,
the volume of the Wireless Home Phone Base can be adjusted if
necessary. While on a call, press ** or ## to enter Volume Setting
Mode. Press * to decrease volume. Press # to increase volume.
To exit Volume Setting Mode press any other key or wait five (5)
seconds.
Notes:
• Four volume levels are available (level 1 to level 4); the default

15
setting is the highest at level 4.
• Your home phone(s) may have a separate volume level setting
function that is independent of the Wireless Home Phone Base.
Powering On/Off
The On/Off switch is used to turn your Wireless Home Phone Base
on or off. When powered off, the Wireless Home Phone Base will no
longer send or receive calls, but it will continue to charge the back-up
battery if still connected to the wall outlet.
To turn the Wireless Home Phone Base on, slide the On/Off switch to
On position to turn on. To turn it off, slide the On/Off switch to Off
position to turn off.
AT&T 3G MicroCell™
The Wireless Home Phone Base can be used with the AT&T 3G
MicroCell when it’s within range of the MicroCell signal and the
phone number associated with the Wireless Home Phone Base
has been added to the MicroCell’s approved user list.
The signal strength indicator on your Wireless Home Phone Base
will flash green when connected to the MicroCell and FemtoCell.
TTY Support
TTY (Text Telephony) and TDD (Telecommunications Device
for the Deaf) are supported by the Wireless Home Phone Base. In

16
order to use the TTY network, you must have a TTY-compatible
phone and be in TTY mode. Note that most digital wireless devices
are TTY-compatible.
Dial *983*889*n# to set the TTY mode.
• n = 0: TTY off mode. The standard voice speaking mode and
listening mode. This is the default setting.
• n = 1: TTY full mode. Transmit and receive the TTY characters.
• n = 2: VCO mode. Receive TTY characters but transmit by
speaking into the speaker.
• n = 3: HCO mode. Transmit TTY characters but receive by
listening to the receiver.
17
Troubleshooting
Fault
Solution
No dialing tone after off-
hook.
Check the antenna connection or
connection between the device and
telephone.
Phone is buzzing after
off-hook.
The telephone may be not compatible with
the device, change another one.
Phone alerts or gives
other prompt sounds
after off-hook.
Make sure that SIM card is inserted
properly, and valid (consult with the
network carrier).
You hear noise after off-
hook.
Make sure that the device is at least 2.5
meters away from other electronic devices.
If the device runs without antenna, and the
signal strength indicator is Yellow or Red,
install the antenna.
The system stops
sending dialing tone 30
seconds after off-hook.
Hook on, and then hook off again to make
a call.
Incoming call display is
abnormal.
Make sure the phone supports CLIP
function.
No response when
power on the device.
Power off the device, wait for seconds, and
re-power on.
Other abnormal
phenomenon.
Refer to the User Manual firstly, and then
check whether the parts, such as power
supply adapter and antenna, etc. are
connected properly or not. If there is no
problem, restart the device.

18
Specification
Dimension(W*D*H)
140 mm x 110 mm x30 mm
Weight
350 g (without battery)
Talk Time*
5 hours (GSM)
2.5 hours (WCDMA)
Standby Time*
25 hours
Battery Capacity
1900 mAh
NOTE:
The value of the talk time or standby time varies with the actual
environment.

19
Safety Notes
Keep the device and the external antenna at least 20 cm from
persons.
Disconnect external power supply and do not use the device
during a thunderstorm.
Some electronic devices are susceptible to electromagnetic
interference sent by the device if inadequately shielded; Try to
use the device at least 2.5 meters away from TV sets, radio and
other automated office equipment so as to avoid
electromagnetic interference.
Turn off the device in the hospital.
Do not use the device on board and aircrafts.
Operating of the device may interfere with medical devices like
hearing aids and pacemakers. Consult a physician or the
manufacturer of the medical device before using.
Be aware of the usage limitation when using the device at
places such as oil warehouses or chemical factories, where
there are explosive gases or explosive products being
processed, because even if your terminal is in idle state, it still
transmits radio frequency (RF) energy.
Do not touch the antenna while calling.
Keep the antenna free from obstructions and position the
antenna straight up. This will ensure best call quality.
Please put the device on the safe place. The device may cause

20
injury if used as a toy by children.
Do not put other things on the terminal to avoid overlaying
radiator.
Please use original accessories or accessories that are
approved by vendor. Using any unapproved accessories may
affect your device’s performance, damage your terminal or even
cause danger to your body and violate related national
regulations about telecom terminals.
As the device can produce electromagnetic field, do not place it
near magnetic items such as computer disks.
Do not expose the device to direct sunlight or store it in hot
areas. High temperatures can shorten the life of electronic
devices.
Prevent liquid from leaking into the device.
Do not attempt to disassemble the device by yourself. Non-
expert handling of the device may cause body injury or device
damage.
Keep length of line between the device and telephone at least
2.5 meters.
Do not install and remove SIM card when the power is on.

21
RF Exposure Information
This device meets the government’s requirements for exposure to
radio waves.
This device is designed and manufactured not to exceed the emission
limits for exposure to radio frequency (RF) energy set by the Federal
Communications Commission of the U.S. Government.
This device complies with FCC radiation exposure limits set forth for an
uncontrolled environment. In order to avoid the possibility of exceeding
the FCC radio frequency exposure limits, human proximity to the
antenna shall not be less than 20cm (8 inches) during normal
operation.
FCC Regulations
This device complies with part 15 of the FCC Rules. Operation is
subject to the following two conditions: (1) This device may not cause
harmful interference, and (2) this device must accept any interference
received, including interference that may cause undesired operation.
-Reorient or relocate the receiving antenna.
-Increase the separation between the equipment and receiver.
-Connect the equipment into an outlet on a circuit different from that to
which the receiver is connected.

22
-Consult the dealer or an experienced radio/TV technician for help.
Changes or modifications not expressly approved by the party
responsible for compliance could void the user‘s authority to operate
the equipment.
Notes