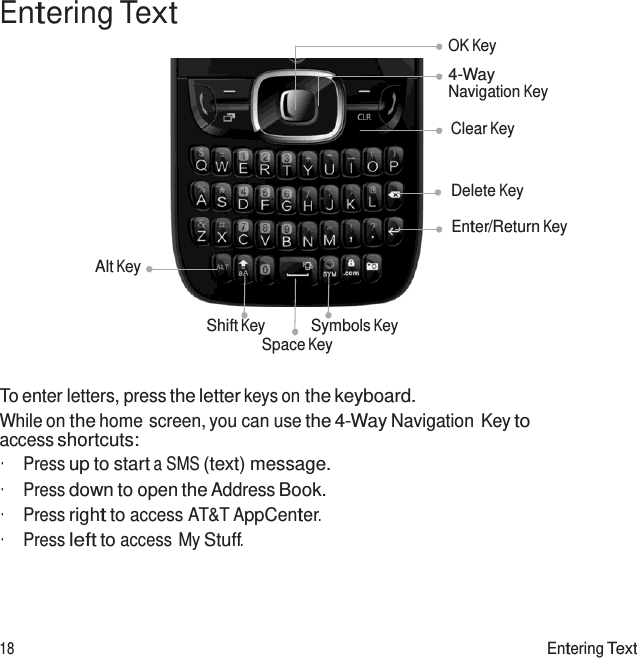
ZTE Z432 Wcdma Digital Mobile Phone User Manual

ZTE Corporation Wcdma Digital Mobile Phone

User manual

User Guide  AT&T Z432
 Devices purchased for use on AT&T’s system are designed for use exclusively on AT&T’s system. You agree that you won’t make any modifications to the Equipment or programming to enable the Equipment to operate on any other system. A voice plan is required on all voice-capable devices, unless specifically noted otherwise in the terms governing your agreement. Some devices or plans may require you to subscribe to a data plan. Your phone is designed to make it easy for you to access a wide variety of content. For your protection,  we want you to be aware that some applications that you enable may involve the location of your phone  being shared. For applications  available through AT&T, we offer privacy controls that let you decide how an application may use the location of your phone and other phones on your account. However, the AT&T privacy tools do not apply to applications available outside of AT&T. Please review the terms and conditions and the associated privacy policy for each location-based  service to learn how location information will be used and protected.  In addition, your AT&T phone may be used to access the Internet and to down- load, and/or purchase  goods, applications,  and services from AT&T or elsewhere from third parties. AT&T provides tools for you to control access to the Internet and certain Internet content. These controls may not be available for certain devices which bypass AT&T controls. AT&T may collect certain types of information from your device when you use AT&T services to provide customer support and to improve  its services. For more information on AT&T’s Privacy Policy, visit att.com/privacy. microSD™ is a trademark of SanDisk. The Bluetooth®  word mark and logos are registered trademarks owned by Bluetooth SIG, Inc.   Copyright © 2014 ZTE CORPORATION. All rights reserved. No part of this publication may be excerpted, reproduced, translated or utilized in any form or by any means, electronic or mechanical, including photocopying  and microfilm, without the prior written permission of ZTE Corporation. The manual is published  by ZTE Corporation. We reserve the right to make modifications on print errors or update specifications without prior notice.  Version No. : V1.0 Edition Time: Jan 2014 Manual No. : 079584504097
Contents i  Contents Getting Started ............................................................................................................................................1 Starting Up .................................................................................................................................................1 Charging the Battery............................................................................................................................4 Switching Your Phone On/Off .........................................................................................................5 Getting to Know Your Phone............................................................................................................6 Key Functions ......................................................................................................................................... 7 Home Screen ..........................................................................................................................................9 Main Menu................................................................................................................................................ 11 Phone Calls .................................................................................................................................................. 13 How to Make Calls ............................................................................................................................... 13 How to Receive Calls ......................................................................................................................... 13 Adjusting Your Call Settings ........................................................................................................... 13 Adjusting the Volume........................................................................................................................14 Using Call History.................................................................................................................................14 Address Book ............................................................................................................................................. 15 Adding a New Contact...................................................................................................................... 15 Searching Contacts ........................................................................................................................... 15 Configuring Speed Dial.....................................................................................................................16 Performing a Speed Dial ..................................................................................................................16 Entering Text ..............................................................................................................................................18 Messaging ....................................................................................................................................................20 SMS and  MMS Messages.................................................................................................................20 Voicemail................................................................................................................................................ 22
ii Contents  Email............................................................................................................................................................... 24 Setting Up Your Email Account ................................................................................................... 24 Browsing the Internet ..........................................................................................................................26 Using Mobile Web...............................................................................................................................26 Using the ATT.net Homepage ......................................................................................................26 Visiting a Website from within the Browser...........................................................................26 Bluetooth®................................................................................................................................................... 27 Enabling Bluetooth ............................................................................................................................ 27 Connecting to Other Devices ...................................................................................................... 27 Sending Data ........................................................................................................................................28 Receiving Data .....................................................................................................................................29 Entertainment..........................................................................................................................................30 Capturing and Viewing Pictures ..................................................................................................30 Capturing and Viewing Video .......................................................................................................30 Music ......................................................................................................................................................... 31 Voice Recorder....................................................................................................................................34 Social Networking .................................................................................................................................. 35 AT&T Social Net................................................................................................................................... 35 Yellow Pages .............................................................................................................................................. 37 YPmobile® .............................................................................................................................................. 37 AT&T Navigator®......................................................................................................................................39
Contents iii  Tools .............................................................................................................................................................. 40 Alarm ....................................................................................................................................................... 40 Calendar ................................................................................................................................................ 40 Calculator................................................................................................................................................41 Tip Calculator.......................................................................................................................................42 Stopwatch..............................................................................................................................................42 World Time ............................................................................................................................................42 Conversion ............................................................................................................................................43 Recent Calls ..........................................................................................................................................44 Notepad..................................................................................................................................................44 Settings.........................................................................................................................................................45 Display Settings...................................................................................................................................45 Phone Settings ....................................................................................................................................45 Profiles .....................................................................................................................................................46 Call Settings........................................................................................................................................... 47 Connection Settings.........................................................................................................................48 Security Settings.................................................................................................................................49 AT&T Software Update....................................................................................................................50 Customization ........................................................................................................................................... 51 Accessibility............................................................................................................................................... 52 TTY Mode............................................................................................................................................... 52 HAC (Hearing Aid Compatibility) Mode .................................................................................. 52
iv Contents  Care and Maintenance ........................................................................................................................ 53 General Care ........................................................................................................................................ 53 General Guidelines............................................................................................................................ 55 CTIA Requirements...........................................................................................................................56 Aircraft Safety ...................................................................................................................................... 57 Hospital Safety .................................................................................................................................... 57 Road Safety ...........................................................................................................................................58 Vehicles Equipped with Airbags..................................................................................................58 Declaration of Conformity ............................................................................................................59 Disposing of Your Phone ................................................................................................................59 Emergency Service ...........................................................................................................................59 HAC Mode............................................................................................................................................. 60 Troubleshooting and FAQs ................................................................................................................61 Specifications ...........................................................................................................................................64 FCC Compliance .....................................................................................................................................65 Radio Frequency  (RF) Energy..........................................................................................................66 Warranty ......................................................................................................................................................68 Limited Warranty. ...............................................................................................................................69 How to Get Warranty Service.......................................................................................................70 Other Warranty Program................................................................................................................70 Notes............................................................................................................................................................... 71
Getting Started 1  Getting Started Note: In this User Manual, “press a key” means to press the key and release it, while “hold a key” means to press the key for at least two seconds and then release it.  Starting Up  Removing the Back Cover and Installing the Battery Note: If you do not plan to use the battery for a long time, remove it from the phone and store it in a cool, dry place.  Hold the Power/End Key to power off the phone. Remove the back cover as shown. Carefully insert the battery with the contacts located against the metal springs. Push down the battery until fully seated. Replace the cover on the back of the phone. Removing the Battery Hold the Power/End Key to power off the phone. Remove the back cover. Lift the end of the battery near the bottom of the phone to remove it.
2 Getting Started  Inserting the SIM Card Note: You can obtain a SIM card from your service provider  when you sign on as a subscriber.  Caution: •    Do not bend, scratch, or touch the metal contacts of your SIM card. •    Keep the card away from electrical appliances and magnets. •    Disconnect the charger and other accessories from your phone and remove the battery before inserting or removing the SIM card. Failing to do so could cause information on the card to be lost or destroyed.  Hold the Power/End Key to power off the phone. Remove the back cover and battery. Insert the SIM card into the card slot with the cut corner facing outward as shown below. Insert the card into the card holder and push it until it clicks into position.  Make sure that the SIM card is fully seated in the slot.
Getting Started 3   Reinsert the battery and replace the back cover.  Removing the SIM Card Hold the Power/End Key to power off the phone. Remove the back cover and battery. Gently remove the SIM card from the card slot.  Inserting the microSD™ Card Note: This phone can support a memory  card with a capacity of up to 32 GB.  Hold the Power/End Key to power off the phone. Remove the back cover and battery. Insert the microSD card carefully with the metal contacts facing downward as shown. Make sure that the card is fully seated in the slot. Reinsert the battery and replace the back cover.
4 Getting Started  Caution: Do not attempt to use memory cards other than microSD cards with this phone. Attempting to use non-compatible memory cards might cause loss of data or damage to the phone, and may void your Warranty.  Removing the microSD Card Hold the Power/End Key to power off the phone. Remove the back cover and battery. Carefully slide the microSD card out of the slot.  Charging the Battery Note: For best performance,  charge the battery fully prior to using the phone for the first time.  Open the charging port cover. Insert the charger’s connector into the charging port. Be sure to insert the connector in the correct orientation. Do not force the connector into the port. Plug the charger into a standard  AC wall outlet.
Getting Started 5   When the battery is fully charged, unplug the charger and disconnect it from the phone.  Notes: •    The phone automatically powers off whenever the battery power is too low. •    Use only the charger supplied with the phone, or other chargers approved by  ZTE. Using an unapproved charger may cause damage to the phone and may void your Warranty. •    If the battery is completely discharged or has not been used for an extended  period of time, the screen may not display the charge indicator until the battery has been continuously  charged for 10 to 40 minutes. •    Do not attempt to charge the battery at temperatures lower than 32°F (0°C) or  higher than 113°F (45°C).  Switching Your Phone On/Off Note: Take care to observe  all posted signs and rules restricting or prohibiting the use of handheld mobile devices.  Hold the Power/End Key to turn your phone on or off.
6 Getting Started  Getting to Know Your Phone      Earpiece  3.5 mm Headset Jack Camera Lens    Micro  USB Charging Port  Left Soft Key Send Key Volume Up/Down Keys 4-Way Navigation Key OK Key Right Soft Key Power/End Key  Task Key  Clear Key Delete Key   Alt Key Shift Key     Microphone Space Key  Enter/Return  Camera Key  Lock Key Symbols Key       Back Cover       Speaker
Getting Started 7  Key Functions  Key Description OK Key In lists and menus:  This key will activate the currently selected option. From the home screen:  This key will launch the main menu. 4-Way Navigation Key In lists, messages, and menus: Used to scroll up, down, left, and right. From the home screen: Up: Press to start a SMS (text) message. Down:  Press to open the Address Book. Right: Press to access AT&T AppCenter.® Left: Press to access My Stuff. Left/Right Soft Keys The bottom line of the display shows the options that can be selected using the Left and Right Soft Keys. The options change depending on the application/function being used. Send Key Press to dial or answer a call. From the home  screen:  Press to show a list of recent calls. Power/End Key Hold to turn the phone on/off. Press to end a call, reject  an incoming  call, cancel dialing, or return to the home screen from any screen. Task Key Press to launch the Multitasking screen. Clear Key Delete characters when entering text. Volume Up/ Down Keys Adjust the volume of the phone.
  Key Description Camera Key From the home screen: Hold to activate the camera function. From within the Camera application in Camera mode: Take a photo. From within the Camera application in Camcorder mode: Start or stop recording. Space Key Add a space when entering text. From the home screen: Hold to activate/deactivate silent mode with vibration.                    8  Getting Started
Getting Started 9  Indicator What it means    New  SMS (text) message    New MMS (multimedia) message    New email message  Home Screen After powering on the phone, when the name of the network  is displayed on the screen, the phone  is in the home screen and ready for use. The display has four areas:  Indicators and Icons area  Date and Time area   Text and Graphics area      Indicators and Icons Soft Key function indicators  Indicator What it means   Signal strength   3G network   EDGE network   GSM network
10 Getting Started  Indicator What it means   Bluetooth on   Call forwarding active    Battery status   Missed call  GPRS in use (green and white)   Alarm  Indicators and Icons (continued)  Indicator What it means   Message memory full   Email inbox full   New voicemail   Mute   Headset mode   Vibrate mode
Getting Started 11  Main Menu From home screen, press the Right Soft Key for Menu to access the main menu.    Main Menu Icons  Icon Name Description   AT&T Navi Use the AT&T Navigator GPS application to get spoken turn-by-turn directions.   Messaging Send and read text (SMS) or multimedia (MMS) messages.    Email  Access mobile email.   Camera  Capture digital photos.
12 Getting Started  Main Menu Icons (continued)  Icon Name Description    Browser  Browse the Internet on your phone.   Music  Play the audio file.    Drive mode Send a customizable  reply to incoming messages when the vehicle starts moving 25 mph.   Social Net Access social networks  such as Facebook®, MySpace™,  and more.    Data Balance  Auto dials *777*3#    My Stuff View applications and tools such as Alarm, Calendar, and more.   Address Book  Add, edit, and manage your contacts.    Settings  Set up and personalize your phone.
Phone Calls 13  Phone Calls How to Make Calls From home screen, enter a phone number. Press the Send Key to place the call. Using the Address Book From the home screen, select Main Menu > Address Book. Highlight a contact and press the Send Key to call the contact. Refer to the Address Book section in this manual for more details.  How to Receive Calls Press the Send Key or OK Key to answer an incoming  call. Press the OK Key to activate the speakerphone.  Tip: If you have connected a headset to the phone, you can press the button on the headset to answer the call.  Adjusting Your Call Settings During a call, you can press the Left Soft Key to access in-call options. The options displayed on the menu will change when certain functions are activated. The options  below will be displayed by default. Record: Record the current call. Press the OK Key to start/stop recording. Create Note: Write a note for later retrieval via the Notepad application. Hold: Put the current call on hold or return to a call previously put on hold. Goto: Display the Contacts, Call Log, Messaging, Browser, or Main Menu during a call. DTMF off: Enable or disable DTMF tones (touch-tone sounds). End Call: Disconnect the current call.
14 Phone Calls  Adjusting the Volume During a call, press the Volume Up/Down Keys to adjust the earpiece or speaker volume.  Using Call History From the home screen, press the Send Key to check the All Calls log for a list of recent calls.
Address Book 15  Address Book You can store contacts with multiple  phone numbers  and email addresses, as well as a physical address and additional details. The phone can store up to 1000  items.  Your SIM card  can  store  contact information as well; however, a SIM card  may not be able to save all of the contact fields supported by the phone. Check with your service provider for more details about your SIM card, including its capacity.  Adding a New Contact Select Main Menu > Address Book > Left Soft Key for Options > New Contact. Enter the contact information into the appropriate fields. Press the OK Key to save the new contact.  Searching Contacts Select Main Menu > Address Book to view all contacts. Enter a letter, and the phone will display all contacts whose first names begin with that letter. For example, to search for “Sam Green,” press the S Key once. All first names  starting  with “S” or “s” will be displayed.  Note: If you have changed the Display Order setting on your phone to show last name first (e.g. “Green, Sam”),  then the search function will display all contacts whose last names begin with the letter(s) you enter. In this example, typing the G Key would result in the contact being displayed.  You can refine a search by entering one or more letters that appear subsequent to the first letter in the contact’s name. For example, typing “JN” into the search field will return contacts named “John” and “Julian,” but not “James.”
 Configuring Speed Dial From the home screen, select Main Menu > Address Book. Use the 4-Way Navigation Key to select a contact, press the Left Soft Key for Options and select Set as Speed Dial. Press Up or Down on the 4-Way Navigation Key to select an Unassigned slot. Press the OK Key > Left Soft Key for Yes to assign the speed dial number. Press the Right Soft Key for Back to return to the previous menu or press the End Key to return to the home screen.  Performing a Speed Dial Note: The 1 Key is reserved for the Voicemail number.  From the home screen, hold the corresponding Number Key (2 to 9) in the speed dial list to make the call. Press the End Key to end the call.  Using Address Book Entry Options From the home screen, select Main Menu > Address Book. Scroll to the desired contact and press the Left Soft Key for Options to reveal the following menu settings. Send Message: Send SMS or MMS messages to the highlighted contact. Call: Call the highlighted contact. New Contact: Create a new contact. Edit: Edit the highlighted contact’s information. Send Contact Info: Send the contact information formatted as a business card via MMS message or in an email.  16 Address Book
Address Book 17  Delete: Delete the highlighted contact. Add to Group: Add the highlighted contact to a group: Colleagues, Family, or Friends. Multi-Select: Apply an action to all of the contacts you select. You have three options: Send Message: Send an SMS or MMS message to all of the selected contacts. Send Email: Send an email to all of the selected contacts. Delete: Delete all of the selected contacts. Set as Speed  Dial: Assign the highlighted contact to one of the Speed Dial positions. Settings: Change global Address Book settings. You have four options: SIM Management: Copy contacts to or from the SIM card, or delete contacts from the SIM card. Display Order: Choose the order in which names are displayed and sorted (First&Last or Last&First). Speed Dial: View and edit the Speed Dial list. Memory Info: View current available memory  and total capacity of the phone’s internal memory as well as the SIM card.
18 Entering Text  Entering Text   OK Key 4-Way Navigation Key  Clear Key   Delete Key  Enter/Return Key  Alt Key   Shift Key Symbols Key Space Key  To enter letters, press the letter keys on the keyboard. While on the home screen, you can use the 4-Way Navigation Key to access shortcuts: •   Press up to start a SMS (text) message. •   Press down to open the Address Book. •   Press right to access AT&T AppCenter. •   Press left to access My Stuff.
Entering Text 19   Press  (Shift Key) to switch the uppercase  and lowercase  letters.  Press the Shift Key twice to change to all caps. Press  (Alt Key) to enter a number or alternate character shown on a key. Press the Alt Key twice to change to numeric mode. To enter symbols, press   (Symbols  Key), then use the 4-Way Navigation Key to locate a symbol. Press the OK Key to enter the symbol. To move the cursor, press the 4-Way Navigation Key. To delete the character before the cursor, press   (Delete Key) or the Clear Key. Hold the Delete Key or the Clear Key to delete all characters  before the cursor. To enter a carriage return, press   (Enter/Return Key). To enter a space, press (Space Key).
20 Messaging  Messaging This phone supports the following message types: •   Text Messages (SMS) •   Multimedia (Picture) Messages (MMS) Short Message Service (SMS) lets you send and receive text messages to and from other mobile phones and email addresses. Multimedia Message Service (MMS) lets you send and receive multimedia (picture and video) messages to and from other mobile phones and email addresses.  Note: These features require subscription-based messaging plans. Charges may apply. Contact your service provider for more information.  SMS and MMS Messages Sending  a New  SMS Message Select Main Menu > Messaging > New Message. Enter a name, mobile phone number, or press the OK Key to choose the message recipient(s) from the Address Book. Press down on the 4-Way Navigation Key to move the cursor to the text field. Enter your message. Use the 4-Way Navigation Key to add a picture, video, or audio file. Press the OK Key to send the message.  Note: To save an unfinished  message, press the Left Soft Key for Options > Save as Draft to save it to the Drafts folder. You can edit and send the message at a later time.
Messaging 21  Viewing a Message The envelope icon ( ) will appear at the top of the screen to notify you that you have received  a new message, and a message alert will pop up. Press the OK Key to view the message, or, from the home screen, select Main Menu > Messaging  > Conversation to check your messages.  Message Options From the home screen, select Main Menu > Messaging > Conversation to access your messages. While any single message is highlighted, press the Left Soft Key for Options to access the following menu items. Reply: Reply to the sender of the message via SMS or MMS. Call: Call the sender of the message. Message Menu: Return to the Messaging menu. Delete: Delete the message. Delete Multiple: Select multiple  messages to delete. Lock Message: This will prevent the message from being deleted. Save Contact: Save a new contact or update existing contact information. Sort By: Sort messages by Time, Unread/Read, or Sender.  Quick Text The phone  has 10 Quick Text templates for SMS and  MMS messages.  You can insert commonly  used Quick Text phrases into the body of a message for convenience. Follow these steps to insert Quick Text into an SMS or MMS message. From the home screen, select Main Menu > Messaging > New Message. Press down on the 4-Way Navigation Key to move the cursor into the Text field. Select Options > Insert Quick Text.
22 Messaging  Select a Quick Text message from the list and press the OK Key to insert it. Edit your message as desired. Text Message Settings Text Message center number: Service center number given to you by your service provider.  Multimedia Message Settings From the home screen, select Main Menu > Messaging > Settings > Multimedia Message Settings to access advanced settings for MMS messaging functionality. Retrieval Settings: Configure the phone to retrieve new messages automatically or manually. Slide Timing (sec): Set the play time of each  MMS image  when played as a slide show. Anonymous Message: Set the phone to accept or reject anonymous messages. Connection: Choose  MMS or WAP for your connection option.  Voicemail Voicemail Settings From the home screen, select Main Menu > Messaging > Settings > Voicemail# to determine the number to dial to retrieve  your voice messages. Your voicemail phone number is preset  by your service provider. You do not need to set it manually.
Messaging 23  Retrieving a Voicemail The new voicemail icon ( ) will appear at the top of the screen to notify you that you have received  a new voice message, and a message alert will pop up. Press the OK Key to listen to the voice message, or, from the home screen, hold the 1 Key to automatically dial the voice mailbox number.  Note: Voicemail features and options  vary depending on your service provider. Contact your service provider for more information.
24 Email  Email Setting Up Your Email Account With the Email application, you can access your email from various providers including AOL®,  Yahoo!® Mail, Gmail™, AIM,® and Hotmail.®   From the home screen, select Main Menu > Email. Select the name of your email provider. (The following steps will vary depending on your provider.) If your email provider  is not listed, scroll down and select Others. Follow the on-screen instructions. Enter your email address and password.
Email 25    Press the OK Key. Select POP3 or IMAP4 and press the OK Key. (If you are uncertain which option you should select, contact your email provider.) Enter a display name and press the OK Key. After you have logged into your account, you will be able to view your inbox. Select an email and press the OK Key to read it. Press the Left Soft Key to view additional options.
 Browsing the Internet Browse the web directly from your mobile phone. Check the weather, visit your favorite websites, and enjoy access to the Internet on the go.  Using Mobile Web From the home screen, select Main Menu > Mobile Web. Press the Left Soft Key for Options and select New Link [*] to enter a website address. Type a website address directly into the URL field, or, scroll down the list of recent websites using the 4-Way Navigation Key. Press the OK Key. While browsing, you can access a list of favorite sites by choosing Options > Goto > Bookmarks. To add a site to the list, select Options > Web Page Options > Add to Bookmarks > Save.  Using the ATT.net Homepage On the ATT.net homepage, you can search the Internet, access Yellow Pages, check the weather, read current news stories, and much more. Refer to the YPmobile section in this manual for more detail about how to use the Yellow Pages feature.  Visiting a Website from within the Browser From any web page, press the Left Soft Key and select New Link [*]. Enter a web address and press the OK Key. To follow a link on a website, scroll to it using the 4-Way Navigation Key and press the OK Key.  26 Browsing the Internet
 Bluetooth® Your phone includes support for Bluetooth, which can be used to connect your phone to a wireless headset. You can also use it to transfer files between your phone and other Bluetooth devices, such as another  phone or a laptop.  Note: Not all applications  and devices support Bluetooth.  Enabling Bluetooth By default, Bluetooth is disabled. If you enable Bluetooth and turn off the phone, Bluetooth will be automatically enabled when you turn the phone back on. From the home screen, select Main Menu > Settings > Connection Settings > Bluetooth. Press the OK Key to turn Bluetooth on. You will see   (Bluetooth icon) displayed at the top of the screen. Highlight Visibility and press the OK Key. Select Visible or Visible for 60 sec. Highlight My Device and enter the phone name.  Note: Setting Visibility to Visible or Visible for 60 sec will allow compatible devices to find your phone.  Connecting to Other Devices From the home screen, select Main Menu > Settings > Connection Settings > Bluetooth > Search for Devices. Press the OK Key to search for available Bluetooth devices. Wait 60 seconds for the phone to finish searching, or press the Right Soft Key for Stop if the target device appears in the list before 60 seconds have elapsed. Highlight a device from the list and press the OK Key for Pair. Press the OK Key to initiate device pairing. You may be asked to confirm a passkey. Bluetooth  27
28 Bluetooth   When you pair your phone  with another  device, you will be given the option to set incoming security. There are two options for incoming  security:  Always Ask and Always Connect. Always Ask: Require the other Bluetooth device that is connecting to your phone to request connections in the future. Always Connect: Authorize the other Bluetooth device to connect to the phone without requesting in the future.  Note: Some devices don’t support automatic Bluetooth connections. You will always need to connect manually with these devices.  Sending Data Before sending data, please confirm that: •   Bluetooth function is enabled. •   The device is visible and paired with the other device. Open the file you wish to send. Press the Left Soft Key for Options > Send  > Via Bluetooth. Select the destination device from the list, and press the OK Key to send the file.
Bluetooth 29  Receiving Data Enable Bluetooth function and pair the phone with the device from which you wish to receive the file. When the paired device tries to send a file to your phone, a popup dialogue will appear in your screen. Press the Left Soft Key for Yes to authorize the connection. You will see another popup asking you to accept or reject the specific file that the other device  is sending. Press the Left Soft Key for Yes to accept the incoming file, or press the Right Soft Key for No to reject the incoming file.
 Entertainment The Camera feature allows you to take photos  and shoot video clips. Z432also features a Voice Recorder for capturing notes.  Capturing and Viewing Pictures Your phone has an integrated digital camera, which allows you to capture images. Photos taken with the camera can be stored in the phone’s memory or on the microSD card. You can share these photos via MMS message,  email, or Bluetooth, or use them as the background wallpaper for the phone. The photo browser will allow you to move, rename, copy, and/or delete the photos stored on the phone and the microSD card.  Note: The preloaded photos on the phone cannot be shared or deleted.  Taking a Photo From the home screen, hold the Camera Key. Press the OK Key or Camera Key to take the photo.  Viewing Pictures From the home screen, select Main Menu > My Stuff > Pictures > My Pictures. Highlight a photo and press the OK Key to view it.  Capturing and Viewing Video Your phone allows you to record, store, and play back video files.  Recording a Video From the home screen, hold the Camera Key. Press right on the 4-Way Navigation Key to switch to video camera mode. Press the OK Key to start recording. 30   Entertainment
 Press the OK Key to stop recording. The video camera  will display a preview frame of the video with a “play” arrow. Press the OK Key to play back the video.  Playing Videos From the home screen, select Main Menu > My Stuff > Videos. Highlight a video and press the OK Key to play it.  Music Your phone includes a free music player to play your music files and create playlists. You can also purchase  songs right from your phone.    Playing Music From the home screen, select Main Menu > My Stuff > Music > Music  Player > All Music. Highlight a sound file and press the OK Key to play it.  Entertainment 31
32 Entertainment  Shop Music This option allows you to purchase and download  your favorite songs from a full music catalog. Choose from current top hits, or search by song title or artist, and preview before you buy.  Music Player The Music Player allows you to listen to the songs you have stored on your phone. There are six menus  in the Music Player.   All Music: Displays a complete list of all songs currently  on your phone. Playlists: Displays any playlists that you have created, and allows you to create new ones. Artists: Displays a list of the artists associated with the songs you have stored on your phone (if artist information is available).
Entertainment 33   Genres: Displays a list of the genres associated with the songs you have stored on your phone (if genre information is available). Albums:  Displays a list of the album names for the songs you have stored on your phone (if album names are available). Folders:  Allows you to create and manage folders on your phone for organizing music files.  AT&T Radio This feature allows you listen to radio stations on your phone. AT&T Radio lists stations  by Favorite, Local, Personal, and Genre, and includes  Premium  and Talk, News, and Sports options. From the home screen, select Main Menu > App Manager > AT&T Radio. To accept the End User License Agreement, press the Left Soft Key for Agree. Press the Right Soft Key for Continue after reading the warning. Use the 4-Way Navigation Key to scroll through the listed radio options. Press the OK Key to select.  Note: Eligible data plan subscription required.
34 Entertainment  Voice Recorder This function allows you to record a voice memo. You can also set the voice memo as a ringtone. From the home screen, select Main Menu > My Stuff > Tools > Voice Recorder. Select Start to start recording your voice memo. Select Pause to pause the recording. Select Continue to resume recording. Select Stop to stop recording and save the new audio file to My Recordings.  Notes: •    If you have installed a microSD card in your phone, you can choose to save recorded audio files to the phone or the memory  card. To change this setting, press the Left Soft Key for Options, then select Storage Location. •    If you choose to save recordings to the phone, you can access them from the  home screen by selecting Main Menu > My Stuff > File Manager > Audios  > My Records. •    I f you choose to save recordings to the memory card, you will only be able to  access them from within the Voice Recorder application. To do this, press the Left Soft Key for Options, then select My Recordings.
Social Networking 35  Social Networking AT&T Social Net Keep on top of your world with AT&T Social Net, which allows you to access the latest news as well as popular  social networks—including Facebook, Twitter™,  and MySpace—all in one place.    Setting Up a Social Network From the home screen, select Main Menu > Social Net. To accept the End User License Agreement, press the Left Soft Key for Accept. Select the social network of your choice and press the OK Key. Enter your email address and password. Select Sign In, and then select Done. Press the OK Key to dismiss the tip pop up.
36 Social Networking    You will see the icons for all of your configured social networks displayed. Select a social network with the 4-Way Navigation Key and press the OK Key to view recent updates.  Change Notification Settings To change your notification settings, from the Social Net home screen, press the Left Soft Key for Settings. Select Settings > Notification Settings. Use the 4-Way Navigation Key to highlight an option and press the OK Key to select/deselect the option. Press the Left Soft Key for Save.
 Yellow Pages YPmobile® YPmobile allows users to search for local information  and share search results with their online networks.   With map-based search and quick access to recently viewed businesses and events, YPmobile provides users with more convenient ways to find what they need. Users can broadcast  their newly discovered  local hot spots via Facebook and Twitter. From the home screen, select Main Menu > YPmobile. To set your location, highlight change and press the OK Key. Highlight the Set location field. When you see a thin red square around the text box, enter your location and press the OK Key. Press right on the 4-Way Navigation Key to highlight OK and then press the OK Key. Use the 4-Way Navigation Key to move the cursor to the box at the top of the screen (next to the Find button), enter the key words  (e.g. “Pizza”)  you want to search, and press the OK Key.  Yellow Pages 37
38 Yellow Pages     Press right on the 4-Way Navigation Key to highlight Find and press the OK Key. Scroll down to view search results. Use the 4-Way Navigation  Key to highlight an item from the search results, and press the OK Key to view details. On the next screen, you can make a phone call to the selected business, view a map, get directions, or share with a friend.
AT&T Navigator 39  AT&T Navigator® AT&T Navigator is a location-based service that can provide GPS navigation with turn-by-turn voice directions, full-color maps, and real-time traffic updates. You can also search for local  businesses  such  as gas stations and restaurants in your immediate vicinity. From the home screen, select Main Menu > AT&T Navi. Read the Terms of Service and press the Right Soft Key for Accept. You will be asked to take a brief tour. You can select from four basic options  within AT&T Navigator: Drive To: Enter a specific destination address. Search: Search for local businesses by name or by category. Maps & Traffic: View a map of your immediate surroundings with information about current traffic conditions. Extras: View weather conditions  and set up custom commute alerts, which will notify you of traffic conditions before you leave.
40 Tools  Tools Alarm This feature allows you to set an alarm to ring at a specific time. From the home screen, select Main Menu > My Stuff > Tools > Alarm. Press the OK Key to edit and configure the alarm as needed. Alarm Switch: Turns the alarm clock on or off. Alarm Time: Specifies the time when the alarm will sound. Recurrence: Configure the alarm to repeat daily, or only on certain days of the week if desired. Alarm Tone: Select the alarm tone. Snooze: Select the length of time for the snooze timer. When the snooze timer is activated after the alarm begins to sound, the alarm will be silent until the snooze timer elapses. Alarm Notes: Enter reminders or other information that will be displayed when the alarm sounds.  Note: Even if the phone is turned  off, the alarm will still sound.  Calendar With the Calendar feature you can set appointments and view events. From the home screen, select Main Menu > My Stuff > Tools > Calendar. Press the Left Soft Key for Options to access the following menu: New: Create a new appointment or task reminder. Appointment: Add an appointment. TO DO: Add a task. Weekly View: View the schedule for the current week.
Tools 41  Go to: Jump directly to a specified date on the Calendar. Today:  View the events of the current day. Date: Enter a date and view the scheduled events of that day. View All Events:  View a chronological  list of all appointments and tasks that have been scheduled. Delete: Delete some or all of the appointments and tasks on your phone. Before a Special Day: Delete all appointments and tasks scheduled prior to the date you select. All: Delete all appointments and tasks in the phone. Settings: Change the Default View or the first day of the week.  Calculator The Calculator provides the basic arithmetic functions: addition, subtraction, multiplication, and division. From the home screen, select Main Menu > My Stuff > Tools > Calculator. Enter the first number  using the Number Keys. Select the operator by using the 4-Way Navigation Key. Enter the second number. Press the OK Key to view the result. Tips: •    P   ress the Right Soft Key for Clear to clear digits and results. •    E   nter # to toggle the number between positive and negative. •    E   nter * to enter a decimal point.
 Tip Calculator The Tip Calculator will automatically calculate the tip at a restaurant, and it can also divide the bill according to the number of people in the party. From the home screen, select Main Menu > My Stuff > Tools > Tip Calculator. Enter the total bill by using the Number Keys. Enter the tip percentage you would  like to leave. If the cost will be shared by more  than one person, enter the number of the people in the Split field. At bottom of the screen, the amount you need to pay will be displayed.  Stopwatch The Stopwatch can measure time increments. It can also record lap measurements. From the home screen, select Main Menu > My Stuff > Tools > Stopwatch. Select Start to start timing. If desired, select Lap during the timing operation to capture  a lap time while the timer continues to run. Select Stop to stop the timing and view the total duration of time. If desired, select Continue to resume timing from the point at which the timer was stopped. Select Reset to reset the stopwatch.  World Time With this feature, you can check the current local time and date for major cities around the world.  42  Tools
Tools 43  From the home screen, select Main Menu > My Stuff > Tools > World Time. Press left or right on the 4-Way Navigation Key to select a city. Press the OK Key to search for a city by name. Press the Left Soft Key to access the Options screen for this feature. You can save the selected city time as the local time for your phone, and you can also set Daylight Savings Time preferences.  Conversion This feature allows you to convert between different units of measurement. From the home screen, select Main Menu > My Stuff > Tools > Conversion. Use the Type field to select the type of conversion to perform (Currency, Area, Length, Mass, Volume, or Temperature).  Currency Conversions Enter an exchange rate in the Rates field. Use the 4-Way Navigation Key to highlight the Home or Foreign field, and enter an amount depending on which conversion you need.  All Other Conversions Enter a number into one of the two fields, using the 4-Way Navigation Key to move between the fields. To change the unit of measurement, select the field whose unit you would like to change and press the OK Key. Highlight a unit of measurement and press the OK Key.  Tip: Press the Left Soft Key to select to enter a decimal point.
44 Tools  Recent Calls With this feature, you can check the call log and call duration. From the home screen, press the Left Soft Key for Go To and select Recent Calls. There are four tabs on the Screen: All Calls, Missed Calls, Dialed  Calls, and Received  Calls. Press the Left Soft Key for Options and select Call Timers to check the call timer.  Note: Call logs can also be accessed  by pressing the Send Key from the home screen.  Notepad Use the Notepad feature to quickly type and save ideas, notes, and even messages to be sent at a later time. From the home screen, select Main Menu > My Stuff > Tools > Notepad. If the Notepad is empty, press the OK Key to add a note. Type your note in the Text field and press the OK Key to save it. Notes will be listed on your notepad and can be viewed in full by highlighting the note entry and pressing the OK Key for Select. To change a note entry, press the OK Key twice for Edit. To add another new note, highlight any note in the notepad list. Press the Left Soft Key for Options and choose Add. To delete a note, or send a note via text, MMS, email, or Bluetooth, use the Options menu and navigate accordingly. You can also select multiple  notes to delete or send via Bluetooth by navigating to Multi-Select in the Options menu.
Settings 45  Settings Display Settings From the home screen, select Main Menu > Settings > Display Settings. •  Theme: Switch between display themes. •  Wallpaper:  Set the background wallpaper, which will be displayed on the home screen. You can select a photo saved in My Pictures, or you can choose from one of the default pictures, preloaded on the phone. •  Backlight: Adjust the backlight settings. You can change the screen and keypad backlight timers  as well as the screen brightness. •  Dialing Font: Choose the size of the numerals that display when using the phone dialer. •  Greetings: Enter a text greeting, which will display when the phone is first powered on.  Phone Settings From the home screen, select Main Menu > Settings > Phone Settings. •  Language: Set the current display language. •  T-9 Input: Toggle T-9 text input. T-9 text input makes messaging easier by predicting words for you and displaying them as options  as you type. •  Date and Time: Set the date, time, and date/time format. You can configure the phone to automatically synchronize its clock with the network, or you can choose to disable this function and set the clock manually. •  Shortcut Settings: Assign shortcuts to the 4-Way Navigation Key for phone functions. These shortcut assignments will work from the home screen only. For example,  you could  assign right on the 4-Way Navigation Key to start the Calculator.
 •  Auto Keypad Lock: Configure your phone to lock the keypad when it is not in use. You can select the time delay from the available choices. If you select Off, the phone will not lock the keypad automatically. •  Main Menu Style: Set the main menu to be displayed as a list or a grid. •  Default Storage Location: Assign either the phone or the memory  card as the location where the phone  will save downloaded files. •  TTY Setting: Toggle TTY functionality. Please refer to “TTY Mode” under Accessibility in this manual for more information about this feature. •   T-coil Setting: Enables you to hear the phone’s audio through a hearing aid with a telecoil. Please refer to “HAC Mode” under Accessibility in this manual for more information about this feature. •  Phone Info: View technical information about your phone, including  My Device Number, Version Info, Icon Glossary and Operating System.  Profiles A profile  is a set of configurations appropriate to a specific environment. Each profile allows you to set the ringtone volume/vibration, the earpiece volume, and the warning tone. From the home screen, select Main Menu > Settings > Profiles. Select a profile and press the Left Soft Key to edit that profile.              •   Voice Call Ringtone: Set the voice call ringtone.              •   Ringtone Volume:  Set the volume of the ringtone.              •   Alert Type: Set the ring type  (e.g. ring, vibrate and ring).              •   Receiver Volume:  Set the volume of the receiver.              •    Message Tone: Set the notification ringtone for an incoming SMS or MMS message.  46   Settings
              •   Key Tone: Enable or disable keypad tones when dialing.              •   Warning Tone: Turn the warning tone on or off.              •    Power On/Off Tone: Turn on/off the sound that plays while powering on/off the phone.              •  Missed Calls Alert: Enable, disable, and set timing for the missed calls audible notification. Call Settings From the home screen, select Main Menu > Settings > Call  Settings. Earphone Auto Answer: You can configure the phone to answer incoming calls automatically when an earphone is connected to the phone. Any Key to Mute: This option allows you to silence the ringtone by pressing any key when there  is an incoming call. Connection Reminder:  When a call connects,  you will hear a three-tone beep to notify you that the connection was successful. Minute Reminder: When this setting is enabled,  you will hear a short beep every minute  while a call is in progress. You will hear the first beep after 50 seconds, then 1 minute 50 seconds, etc. Send My Caller ID: This function allows you to prevent others from seeing your phone number  when making outbound calls. Off: The call recipient will not see your phone number. On: The call recipient will see your phone number. Set by Network: The network chooses whether to show/hide your phone number. Auto Redial: Sets the phone to repeatedly redial, in the event of a busy signal, until it successfully makes a connection.  Settings  47
  Call Forwarding: Allows you to reroute your incoming calls to another phone number. Contact your service provider for more information and availability. Call Waiting:  If a call comes in when you are already on a call, you will be notified with a call waiting tone. The phone will display the caller’s phone number. If the caller is in your Address  Book, their name will display also. Contact your service provider for more information and availability.  Connection Settings From the home screen, select Main Menu > Settings > Connection Settings. You can configure the following options: Bluetooth: Configure Bluetooth settings. See the Bluetooth section in this manual for details. Access Point: Add to, edit, or view the Access Point list. Internet Profiles: Create or edit the connection data for a service provider. Modem:  Set modem parameters. You can use a data cable to connect the phone to a computer and use the phone as a modem.  Consult your service provider for details on which modem settings to use. PC Connection: Choose whether to connect your phone to a computer via USB or Bluetooth. GPS: Turn on/off your GPS status,  or enable the Third-party GPS option.         48   Settings
 Security Settings Phone Password A password  can protect your phone and help prevent unauthorized use. When the phone is password protected, it will ask for the password every time the phone is turned on. Password protection is disabled  by default, and the default password is 0000. From the home screen, select Main Menu > Settings > Security Settings > Lock Settings > Phone Password to toggle password protection on and off. From the home screen, select Main Menu > Settings > Security Settings > Change Codes > Phone Password to change the phone’s password. It is recommended that you change the password to something  you will easily remember.  Note: Take care to remember  your password. If you forget it, you will not be able to use your phone. You will have to contact your service provider to unlock it.  PIN Code A PIN is attached to a SIM card. If the SIM card is moved to another phone, the same  PIN will still be required in order to make  calls. When  you assign a PIN to your  SIM card,  you  will need to enter the PIN code  when the phone is powered on. Without the PIN code, the phone will only be able to make emergency calls.The default PIN is assigned  by the service provider. From the home screen, select Main Menu > Settings > Security Settings > Lock Settings > PIN Lock to enable or disable the PIN code. From the home screen, select Main Menu > Settings > Security Settings > Change Codes > PIN code to change the PIN code.  Note: If you change the PIN code, please remember the new number. If you enter the wrong  PIN code ten times in a row, the phone will lock the SIM card  and  prompt you to enter a PUK code to unlock it. Settings 49
50 Settings  PIN2 and PUK Codes PIN2 codes are used for some settings. To change the PIN2 code,  use the same procedure as outlined  above for the PIN code. A PUK code  is the unlock code for the SIM card.  This code  can be used to unlock a SIM card  when  you have entered the wrong  PIN code  10 times.  When  you enter the correct PUK code,  you  will be able to re-assign  a new PIN code,  after  which the SIM card can be used normally. Contact your service provider for more information. A PUK code can only be entered 10 times  in a row. If you enter the wrong  PUK code more  than  10 times, the SIM card will be locked indefinitely.  Note: If a PUK code  is supplied  with your SIM card,  store  it securely.  Fixed Dialing If you set Fixed Dialing Status to On, you can only dial numbers  on the Fixed Dialing Numbers list. You will need to enter your PIN2 code to use this feature.  Master Clear/Reset The Master Clear function will clear all user data and reset the phone to factory default settings. The Master Reset function will only reset the phone to factory default settings.  AT&T Software Update This function will automatically check for updated software for the phone. If updated software is available, it will download  and install the software.
Customization 51  Customization My Menu allows you to customize shortcuts to frequently used functions on your phone. From the home screen, press the Left Soft Key for Go To. My Menu displays the list of menu shortcuts. Using the keypad, press the number of the shortcut to access it immediately. To add a shortcut, use the 4-Way Navigation Key to highlight a slot designated as Empty. Press the Left Soft Key for Options and press the OK Key to Assign. Choose from the list of Main Menu items and press the Left Soft Key to Assign the shortcut. To remove a feature from the My Menu list, press the Left Soft Key for Options and choose Remove > OK.
52 Accessibility  Accessibility TTY Mode Your handset  is a TTY-compatible  device. Simply connect the TTY equipment to the headset jack. From the home screen, select Main Menu > Settings > Phone Settings > TTY Setting. Select one of the following options and press the OK Key. Full: Users who cannot talk or hear may use this setting to send and receive text messages through  TTY equipment. Read & Talk: Users who can talk, but cannot hear, may use this setting to talk through the phone and receive responses  via text message. Write & Hear: Users who can hear, but cannot talk, may use this setting to listen to the other party and respond  via text message. Off: Disable TTY support.  HAC (Hearing Aid Compatibility) Mode This phone  supports  HAC (Hearing Aid Compatibility). When you turn on HAC Mode and use a hearing aid with a telecoil to answer the phone, it will help you hear more clearly. For more detailed information  on HAC, please refer to “Turn on the HAC Setting” under Care and Maintenance in this manual. From the home screen, select Main Menu > Settings > Phone Settings > T-coil Setting. Press the OK Key to enable or disable the T-coil Setting. Your Z432 has been tested for hearing-aid device compatibility  and has an M3/T3 rating.
Care and Maintenance 53  Care and Maintenance General Care Your handset contains delicate electronic circuitry, magnets, and a Lithium-Ion battery. You should treat it with care and give particular attention to the following points: •    Do not allow the handset, battery, or accessories to come into contact with  liquids or moisture at any time. Do not immerse the handset in any liquid. •    Do not place the handset alongside computer disks, credit cards, and other  magnetic media. The information contained on disks or cards may be affected by the handset. •    Do not paint the handset. •    Do not leave the handset or the battery in places where the temperature could  exceed 113°F (45°C), for example, on a car dashboard or a windowsill, behind  glass in direct sunlight, etc. •    Do not remove the handset’s battery while the handset is switched on. •    Take care not to allow metal objects, such as coins or key rings, to contact or  short-circuit the battery terminals. •    Do not dispose of battery packs in a fire. You can dispose of the handset’s  Lithium-Ion battery safely at a Lithium-Ion  recycling center. •    Do not put the handset’s battery in your mouth, as battery electrolytes may be  toxic if swallowed. •    Do not attempt to disassemble the handset or any of its accessories. •     Do not put a battery into a microwave oven, dryer, or high-pressure container. •    Do not connect a battery directly to an electrical outlet or the cigarette lighter  port of a car. Use only approved  charging units.
Care and Maintenance 53  •    Do not pierce a battery with a sharp object such as a needle.
 •    When disposing of a battery, be sure it is nonconducting by applying vinyl tape to  the (+) and (-) terminals. •    Do not attempt to disassemble or modify the battery. •    Do not drop or throw the handset. •    Do not subject the handset to harsh treatment. •    Stop using the battery if you notice it becoming abnormally hot, or if you notice  any odor, discoloration, deformation, or anything abnormal occurring when using the phone, charging the battery, or when the phone and/or battery are idle. •    In the unlikely event of a battery leak, keep the battery discharge away from your  eyes and skin. If the leakage does come into contact with your eyes or skin, flush thoroughly with clean water and seek immediate medical attention. •    Do not use a damaged or deformed battery. •    Do not solder a battery. •    When a battery has reached the end of its usable life cycle, immediately remove  it from any equipment. •    The earpiece may become warm during normal use. Also,the handset may  become  warm while the battery is being charged. •    When a handset is in vibration mode, the vibration can sometimes cause the  handset to move. •    Be careful not to place the handset near heat sources (such as a heater) or too  close to the edge of a table. •    Use a damp or anti-static cloth to clean the handset. Do not use an ordinary
 dry  cloth or electrostatic cloth. Do not use chemical or abrasive cleaners as these could damage the casing. •    The use of third-party equipment, cables, or accessories not made or  authorized by the manufacturer may invalidate the warranty of your handset and may damage the handset.  54 Care and Maintenance
 •    Remember to make backup copies of all important data stored on your handset. •    The cardboard packing supplied with this handset is recyclable.  Caution: There is a risk of explosion if the battery is replaced with an incorrect  type. Dispose of used batteries according to the instructions.  General Guidelines •    Unauthorized duplication of copyrighted material is prohibited by law in  most countries.  Please check the laws in your country  concerning the use of copyrighted material. •    Many jurisdictions have laws and regulations restricting or prohibiting the use  of camera and video equipment in public or private areas. Some jurisdictions restrict or prohibit the distribution, display, processing, and general use of photographs or videos based on where they were captured.  Users are strongly encouraged to obey all laws and to respect the personal rights of others. •    Please check with your service provider regarding roaming surcharges and  network availability. Coverage may not be available in some areas. •    The use of mobile phones is not allowed in some areas, such as hospitals,  research centers, and airplanes. The user is ultimately responsible for making sure that the device  is completely powered off. If there  is any uncertainty about this, remove the battery from the handset. •    Observe any signs that indicate a prohibition or restriction of mobile phone use  (such  as those  near gas stations or explosives) and when indicated, power off the handset or device immediately. •    If you have a heart condition, consult your physician before using a mobile  phone. •    Keep the handset, charger, and batteries away from children.
 •    Do not use the handset where blasting is in progress.  Care and Maintenance  55
56 Care and Maintenance  ]  •   Do not try to make a call while the temperature of the battery is above 113°F (45°C). •    Take care not to put your handset in your back pocket and then sit on it. Also,  do not put your phone at the bottom of a bag where it may be subjected to excessive weight or pressure. Doing so may damage the LCD and camera lens. •    The operation of some medical electronic devices, such as hearing aids and  pacemakers, may be affected if a handset  is used in close proximity with them. Observe any warnings and recommendations from the manufacturer of any such device. •    Do not leave the handset discharged or without a battery for a long time;  otherwise, data may be erased. •    Your phone contains metal; individuals with certain conditions have been known  to develop an itch, rash, or eczema from exposure to certain metals.  CTIA Requirements •    Do not disassemble or open, crush, bend or deform, puncture or shred. •    Do not modify or remanufacture, attempt to insert foreign objects into the  battery, immerse or expose to water or other liquids, expose to fire, explosion, or other hazards. •    Only use the battery in the system for which it is specified. •    Do not short-circuit a battery or allow metallic conductive objects to contact battery terminals. •    Replace the battery only with another battery that has been approved for the  device per this standard: IEEE-Std-1725-2006. Use of an unapproved battery may present the risk of fire, explosion,  leakage, or other hazard.
56 Care and Maintenance  •    Promptly dispose of used batteries in accordance with local regulations.
Care and Maintenance 57  •    Battery usage by children should be supervised. •    Avoid dropping the phone or battery. If the device or battery is dropped,  especially on a hard surface, take it to a service center for inspection. •    Improper battery use may result in a fire, explosion, or other hazard. •    For devices that utilize a USB port as a charging source, the device’s user manual  shall include a statement to the effect that the phone shall only be connected to CTIA certified adapters, products that bear the USB-IF logo, or products that have completed the USB-IF compliance program.  Aircraft Safety •    When traveling by air, power off your phone prior to takeoff. •    Obey all posted signs and crew instructions regarding the use of mobile phones  on the aircraft. •    Be sure to check the alarm settings to ensure that the phone will not  automatically power on during the flight.  Hospital Safety •    Switch off your phone and remove the battery in areas where the use of mobile  phones is prohibited. •    Follow all instructions regarding the use of handsets in a medical facility.
58 Care and Maintenance  Road Safety •    You must exercise proper control of your vehicle at all times. Give your full  attention to driving. •    Pull over to the side of the road and park before making or answering a call, if  driving conditions  require it. •    Obey all local laws regarding the use of handsets while driving. •    Do not stop on the hard shoulder of a highway to answer or make a call, except in  an emergency. •    Switch off your handset at a gas station, even if you are not refueling yourcar. •    Do not store or carry flammable or explosive materials near the handset. •    Electronic vehicle systems, such as anti-lock brakes, speed (cruise) control, and  fuel injection systems are not normally affected by radio transmissions. Observe all warnings from your vehicle’s manufacturer regarding the use of mobile phones and possible interference. If you observe your vehicle functioning incorrectly and suspect that it may be related to interference from the handset, do not switch on the handset in or near the vehicle until the vehicle has been checked by a qualified service technician.  Vehicles Equipped with Airbags An airbag inflates quickly and with great force. Do not place any objects, including installed or portable wireless equipment, in the area above the airbag or in the airbag deployment area. If in-vehicle  wireless equipment is improperly installed and the airbag inflates, serious injury or death could result.
Care and Maintenance 59  Declaration of Conformity We declare under our sole responsibility that the product(s)  detailed in this manual, and in combination  with our accessories, conform to the essential requirements of European Union Directive 1999/5/EC Radio and Telecommunications Terminal Equipment Directive requirements 3.1(a), 3.1(b), 3.2.  Disposing of Your Phone The   symbol on the equipment indicates that it must be collected separately from regular trash. Contact your local authorities for more information about approved disposal methods, or take it to a local electronics  retailer for proper disposal or recyclings.  Emergency Service Note: Emergency service numbers  vary by country.  To make an emergency call in any country: Ensure that your handset  is turned  on and in service. Press the End Key as many times as needed to return to the home screen. Enter the local emergency number for your current location (for example,  911). Press the Send Key to dial the number. Follow the instructions you receive and do not end the call until told to do so. When the SIM card  is not inserted or when the Phone Lock function is activated and you do not know the password, press the Left Soft Key for SOS and enter the emergency number for your location.  Press the Send Key to dial the number.
60 Care and Maintenance  Notes: •    Tell the operator which service you require: Police, Fire, or Ambulance. Tell them  where you are and remain stationary to maintain contact if possible. •    Due to the nature of the cellular system, emergency calls cannot be guaranteed.  You should never rely solely on any wireless device in emergency situations.  HAC Mode When HAC mode is active, your phone  sends the audio signals from your phone to the telecoil rather than to the microphone of your hearing aid. The HAC setting only improves the quality of sound transmitted through the earpiece; it does not affect the speakerphone or a headset. •    It is recommended that you disable Bluetooth functionality when HAC mode is in use. •    HAC mode consumes additional battery power. Pay close attention to the  battery’s charge level when using HAC mode.  Caution: Do not turn on the HAC setting unless you use a hearing aid with a telecoil. Using this setting without a hearing aid or with a hearing aid without a telecoil may be harmful to your hearing.
Troubleshooting and FAQs 61  Troubleshooting and FAQs Consult the following table for resolutions to common problems. If your particular problem  cannot  be resolved using the information in the table, take your phone to an authorized dealer or service center for assistance.  Problem Possible Causes Possible Solution Poor reception The network  signal is too weak at your current location, for example, in a basement or near a tall building. Move to a location  where the network  signal can be properly received. The network  is busy or overloaded. Wait a few minutes and try your call again. Echo or noise on the line Poor connection. End the call and dial again. Certain phone features not working Your service provider may not support some of the features on your phone (e.g. Call Waiting or Call Forwarding). 1.  Contact your service provider to determine if they support the features that are not working. 2. If your service provider supports the feature and it still does not work, take the phone to a service center for assistance.
  Problem Possible Causes Possible Solution Battery will not charge The battery or battery charger is damaged. Contact the dealer where you purchased the equipment. The phone’s temperature is below 32°F (0°C) or higher  than 113°F (45°C). 1.  Move the battery to an environment where the temperature is within operating range. 2. Allow time for the battery’s temperature to return to normal before attempting to charge again. Poor contact between the battery and charger. Check and clean all connectors to ensure good contact. Unusually short battery life Certain phone functions consume additional battery power, such as Bluetooth and HAC mode. Disable Bluetooth and/or HAC mode if you are not using these functions. Weak network signal. Turn off the phone until you reach an area with a strong network signal. Phone will not turn on Battery is depleted. Charge the battery.     62 Troubleshooting and FAQs
  Problem Possible Causes Possible Solution SIM card error SIM card is damaged or defective. Take the SIM card to a service center for testing. SIM card inserted improperly. Check to ensure that the SIM card  is facing the right direction and that it is fully inserted into the slot. Dirt or debris on the SIM card contacts. Use a soft, dry cloth to clean the SIM card contacts. PIN code is blocked You have entered an incorrect PIN code ten consecutive times. If you have the SIM card’s PUK code,  use the PUK code to unlock the SIM card. If you do not have the PUK code, contact your service provider. Unable to enter information into the Address Book The Address Book’s memory is already full. Delete unneeded data from the Address Book.         Troubleshooting and FAQs 63
 Specifications  Handset Standards WCDMA: 850 MHz, 1900  MHz GSM: 850 MHz, 900 MHz, 1800 MHz, and 1900 MHz Dimensions (H×W×D) 4.49" (H) x 2.4" (W) x 0.41" (D) Weight 3.34 oz. (with battery) Display 2.4" 262K TFT color screen Camera 2.0 megapixels, supports  images up to 1600 x 1200 pixels Video capture Up to 15fps (QVGA) Extended memory 32 GB microSD card Battery 1,000 mAh, Lithium-Ion (Li-Ion) Features MMS Video  and Picture,  Email, Calendar, Speakerphone, Voice Recorder, Bluetooth Supported file types Image: GIF, JPEG, PNG, BMP, Animated GIF, WBMP Video: MP4 Audio: MP3, AMR, WAV, ACC, ACC+, MIDI Continuous idle time Up to 12 days and 12 hours Continuous talk time Approximately 4.5 hours Charge time Approximately 3 hours Miscellaneous USB 2.0; JAVA MIDP 2.1  Note: Talk time and idle time are based on ideal working environments. Use of certain phone functions and network conditions can reduce battery life and talk/ idle time.  64   Specifications
 FCC Compliance This mobile phone complies  with part 15 of the FCC Rules. Operation is subject to the following two conditions: This device may not cause harmful interference, and This device must accept any interference received, including interference that may cause undesired operation. This device has been tested and found to comply with the limits for a Class B digital device, pursuant to Part 15 of the FCC Rules. These  limits  are designed to provide reasonable protection against harmful interference in a residential installation. This equipment generates, uses, and can radiate radio frequency energy, and if not installed and used in accordance with the instructions, may cause harmful interference to radio communications. However, there  is no guarantee that interference will not occur in a particular installation. If this equipment does cause harmful interference to radio or television reception, which can be determined by turning the equipment off and on, the user is encouraged  to try to correct the interference by one or more of the following measures: •    Reorient or relocate the receiving antenna. •    Increase the separation between the equipment and receiver. •    Connect the equipment to an outlet on a circuit different from that to which the receiver is connected. •    Consult the dealer or an experienced radio/TV technician for help. •    Changes or modifications not expressly approved by the party responsible for  compliance could void the user’s authority to operate the equipment. •    The antenna(s) used for this transmitter must not be co-located or operating in conjunction  with any other antenna or transmitter.     FCC Compliance  65
 Radio Frequency  (RF) Energy This model phone meets the government’s requirements for exposure to radio waves. This phone is designed and manufactured not to exceed the emission limits for exposure to radio frequency (RF) energy set by the Federal Communications Commission of the U.S. Government: The exposure standard for wireless mobile phones employs a unit of measurement known as the Specific Absorption Rate, or SAR. The  SAR limit set by the FCC is 1.6W/kg.* Tests for SAR are conducted using standard operating positions accepted by the FCC with the phone transmitting at its highest certified power level in all tested frequency bands. Although the SAR is determined at the highest certified power level, the actual SAR level of the phone while operating can be well below the maximum value. This is because the phone is designed to operate at multiple  power levels so as to use only the power required to reach the network. In general, the closer you are to a wireless base station antenna, the lower the power output. The highest SAR value for the model phone as reported to the FCC when tested for use at the ear is 1.30 W/kg, and when worn on the body, as described in this user  guide,  is 1.06 W/kg  (body-worn measurements differ among phone models, depending upon available enhancements and FCC requirements). While there may be differences between the SAR levels of various phones and at various positions,  they all meet the government requirement.  *In the United States and Canada, the SAR limit  for mobile phones used by the public is 1.6 watts/kg (W/kg) averaged over one gram of tissue. The standard incorporates a substantial margin of safety to give additional protection to the public and to account for any variations in measurements.  66  Radio Frequency  (RF) Energy
Radio Frequency  (RF) Energy 67   The FCC has granted an Equipment Authorization for this model phone with all reported SAR levels evaluated as in compliance with the FCC RF exposure guidelines. SAR information on this model phone is on file with the FCC and can be found under the Display Grant section of http://www.fcc.gov/oet/ea/fccid/ after searching on FCC ID: SRQ-Z432. For body-worn  operation, this phone has been tested and meets the FCC RF exposure guidelines for use with an accessory that contains no metal and positions the handset a minimum of 0.6 inches (1.5 cm) from the body. Use of other enhancements may not ensure compliance with FCC  RF exposure guidelines. If you do not use a body-worn  accessory and are not holding the phone at the ear, position the handset a minimum of 0.6 inches (1.5 cm) from your body when the phone is switched on.  Hearing Aid Compatibility (HAC) regulations for Mobile phones In 2003, the FCC adopted rules to make digital wireless telephones compatible with hearing aids and cochlear implants. Although analog wireless phones do not usually cause interference with hearing aids or cochlear implants, digital wireless phones sometimes do because of electromagnetic energy emitted by the phone's antenna, backlight, or other components. Your phone is compliant with FCC HAC regulations (ANSI C63.19- 2007). While some wireless phones are used near some hearing devices (hearing aids and cochlear implants), users may detect a buzzing, humming, or whining noise. Some hearing devices are more immune than others to this interference noise and phones also vary in the amount of interference they generate. The wireless telephone industry has developed a rating system for wireless phones to assist hearing device users in finding phones that may be compatible with their hearing
Radio Frequency  (RF) Energy 67  devices. Not all phones have been rated. Phones that are rated have the rating on their box or a label located on the box. The ratings are not guarantees. Results will vary depending on the user's hearing device and hearing loss. If your hearing device happens to be vulnerable to interference, you may not be able to use a rated phone successfully. Trying out the phone with your hearing device is the best way to evaluate it for your personal needs. This phone has been tested and rated for use with hearing aids for some of the wireless technologies that it uses. However, there may be some newer wireless technologies used in this phone that have not been tested yet for use with hearing aids. It is important to try the different features of this phone thoroughly and in different locations, using your hearing aid or cochlear implant, to determine if you hear any interfering noise. Consult your service provider or the manufacturer of this phone for information on hearing aid compatibility. If you have questions about return or exchange policies, consult your service provider or phone retailer. M-Ratings: Phones rated M3 or M4 meet FCC requirements and are likely to generate less interference to hearing devices than phones that are not labeled. M4 is the better/higher of the two ratings.
Radio Frequency  (RF) Energy 67   T-Ratings: Phones rated T3 or T4 meet FCC requirements and are likely to be more usable with a hearing device’s telecoil (“T Switch” or “Telephone Switch”) than unrated phones. T4 is the better/ higher of the two ratings. (Note that not all hearing devices have telecoils in them.)   Your phone meets the M3/T3 level rating. Hearing devices may also be rated. Your hearing device manufacturer or hearing health professional may help you find this rating. For more information about FCC Hearing Aid Compatibility, please go to http://www.fcc.gov/cgb/dro.
68 Warranty  Warranty ZTE offers you a limited  warranty that the enclosed subscriber unit and its enclosed  accessories  will be free from defects in material and workmanship for a period that expires one year from the date of sale of the Product to you, provided that you are the original enduser purchaser of the Product and provided that your purchase  was made from a supplier authorized  by the Seller. Transfer or resale of a Product  will automatically terminate warranty coverage with respect to that Product. This limited  warranty is not transferable to any third party, including but not limited to any subsequent purchaser or owner of the Product. This limited warranty is applicable  only to end users in the United States. 1.   This  product or phone is warranted for 12 (twelve) months from date of purchase. 2. For warranty service information, please call ZTE service number  (877) 817-1759 (Toll Free). The manufacturer’s  website, http://www.zteusa.com, is also available for assistance. 3.  This warranty only applies if the product has been used in accordance  with the manufacturer’s instructions under normal use and with reasonable care. 4. What this warranty does not cover: a) Defects or damages resulting from the misuse of this product. b) Defects or damages from abnormal  use, abnormal  conditions, improper storage, exposure to moisture, dampness or corrosive environments, unauthorized modifications, unauthorized repair, neglect, rough handling, abuse, accident, alteration, improper installation, incorrect voltage application, food or liquid spoilage, acts of God. c) Normal wear and tear.
Warranty 69   d) If the Product has been opened, modified or repaired by anyone other than a warranty service center or if it is repaired  using unauthorized spare parts. e) If the serial number or mobile accessory date code has been removed, erased, defaced, altered or are illegible in any way subject to sole judgment of ZTE.  LIMITED WARRANTY TO THE EXTENT PERMITTED BY APPLICABLE LAW, THIS LIMITED WARRANTY IS YOUR SOLE AND EXCLUSIVE REMEDY AGAINST  ZTE AND ZTE’S SOLE AND EXCLUSIVE LIABILITY IN RESPECT OF DEFECTS IN PRODUCT. HOWEVER, THIS LIMITED WARRANTY SHALL NOT EXCLUDE NOR LIMIT ANY OF YOUR LEGAL (STATUTORY) RIGHTS UNDER THE APPLICABLE NATIONAL LAWS. TO THE EXTENT PERMITTED BY APPLICABLE  LAW ZTE DOES NOT  ASSUME ANY LIABILITY FOR LOSS OF OR DAMAGE TO OR CORRUPTION OF DATA, FOR ANY LOSS OF PROFIT, LOSS OF USE OF PRODUCTS OR FUNCTIONALITY, LOSS OF BUSINESS, LOSS OF REVENUES OR LOSS OF ANTICIPATED PROFIT, INCREASED COSTS OR EXPENSES OR FOR ANY INDIRECT, OR SPECIAL OR CONSEQUENTIAL LOSS OR DAMAGE. TO THE EXTENT PERMITTED BY APPLICABLE LAW, ZTE’S LIABILITY SHALL BE LIMITED TO THE PURCHASE VALUE OF THE PRODUCT. THE ABOVE  LIMITATIONS  SHALL  NOT  APPLY TO DEATH OR PERSONAL INJURY CAUSED BY DEFECT OF PRODUCT IN MATERIAL, DESIGN AND WORKMANSHIP.
72 Notes  How to Get Warranty Service To obtain warranty service, please call (877) 817-1759. Please have the following information available when you send the phone in for repair: •    A valid Proof of Purchase •    Return address •    Daytime phone number or fax number •    Model # •    IMEI # (Look for the 15-digit IMEI # behind the battery of the device.) •    Complete description of the problem •    Transportation prepaid  Other Warranty Program You may have other warranty programs with your purchase, such as warranty exchange. If so, please refer to equipment package or the original point of sale.

Navigation menu