User manual
User
Guide
AT&T Z432
Devices purchased
for
use on AT&T’s system are designed
for
use exclusively on
AT&T’s
system. You agree
that
you won’t make any modifications
to the
Equipment
or pro
g
r
amming
to
enable
the
Equipment
to
operate on
any
other
system. A voice plan is required on
all
voice-capable devices, unless specifically
noted
otherwise in
the
terms
governing
your
ag
reemen
t
.
Some devices
or
plans may require you
to
subscribe
to
a
data
plan.
Your phone is designed
to
make
it
easy
for
you
to
access a wide variety
of
con
t
en
t
.
For
your
protection, we
w
an
t
you
to
be aware
that
some applications
that
you enable may involve
the
location
of
your phone being shared. For applications available through
A
T
&
T
,
we
offer privacy
controls
that let
you decide how an application may use
the
location
of
your phone
and
other
phones on your
accoun
t
.
Ho
w
e
v
er
,
the
AT&T privacy
tools
do not
apply
to applications
available outside
of
A
T
&
T
.
Please review
the terms and conditions and the
ass
ocia
t
ed
privacy
policy
for
each location-based service
to
learn how location information
will be used
and
protected. In addition, your AT&T phone may be used
to
access
the
Internet and
to down-
load, and/or purchase goods, applications, and services
from
AT&T
or
elsewhere
from third
parties. AT&T provides
tools
for
you
to control
access
to the
Internet and certain
Internet
con
t
en
t
.
These controls may
not
be available
for
certain
devices which bypass AT&T
controls.
AT&T may
collect certain types
of
information
from
your device when you use AT&T
services
to
provide customer
support
and
to
improve its services. For
more information on
AT&T’s
Privacy
P
olicy
,
visit
a
tt
.
com/priv
acy
.
microSD™ is a
trademark
of
SanDisk.
The Bluetooth
®
word mark and
logos are
registered
trademarks owned by Bluetooth
SIG,
Inc.
C
op
yrigh
t
©
2014 ZTE
CORPORA
TION.
All rights
reserved.
No
part of
this publication may be excerpted, reproduced, translated
or
utilized in any
f
orm
or
by any means, electronic
or
mechanical, including photocopying and microfilm,
without
the
prior written permission
of
ZTE
Corporation.
The manual is published by ZTE
Corporation. We reserve
the
righ
t
to
make modifications
on
print
errors
or
update specifications without prior
notice.
Version
No
.
:
V1.
0
Edition Time: Jan
2014
Manual
No
.
:
0
7
958450409
7
Contents
i
C
on
t
en
ts
Ge
t
ting
St
ar
t
ed
............................................................................................................................................
1
Starting
Up
.................................................................................................................................................
1
Charging
the
Ba
tt
ery
............................................................................................................................
4
Switching Your Phone
O
n/
Off
.........................................................................................................
5
Getting
to
Know Your
Phone
............................................................................................................
6
Key
Functions
.........................................................................................................................................
7
Home
Scr
een
..........................................................................................................................................
9
Main
Menu
................................................................................................................................................
11
Phone
C
alls
..................................................................................................................................................
13
How
to
Make
C
alls
...............................................................................................................................
13
How
to
Receive C
alls
.........................................................................................................................
13
Adjusting Your Call Settings
...........................................................................................................
13
Adjusting
the
V
olume
........................................................................................................................
14
Using Call
Hist
ory
.................................................................................................................................
14
Address
B
ook
.............................................................................................................................................
15
Adding a New
C
on
t
act
......................................................................................................................
15
Searching
Contacts
...........................................................................................................................
15
Configuring Speed
Dial
.....................................................................................................................
16
Performing a Speed
Dial
..................................................................................................................
16
E
n
t
ering
Text
..............................................................................................................................................
18
Mes
saging
....................................................................................................................................................
20
SMS and MMS
Mess
ag
es
.................................................................................................................
20
V
oicemail
................................................................................................................................................
22
ii
Contents
E
mail
...............................................................................................................................................................
24
Setting Up Your Email
A
ccoun
t
...................................................................................................
24
Browsing
the
In
t
erne
t
..........................................................................................................................
26
Using Mobile
W
eb
...............................................................................................................................
26
Using
the
A
TT
.
net
Homepage
......................................................................................................
26
Visiting a Website
from
within
the
Br
o
ws
er
...........................................................................
26
Bluet
oo
th
®
...................................................................................................................................................
27
Enabling
Bluet
oo
th
............................................................................................................................
27
Connecting
to
Other
D
e
vices
......................................................................................................
27
Sending D
a
t
a
........................................................................................................................................
28
Receiving
D
a
t
a
.....................................................................................................................................
29
E
n
t
er
t
ainmen
t
..........................................................................................................................................
30
Capturing and Viewing
Pictur
es
..................................................................................................
30
Capturing and Viewing
Video
.......................................................................................................
30
Music
.........................................................................................................................................................
31
Voice
Recor
der
....................................................................................................................................
34
Social
Networking
..................................................................................................................................
35
AT&T Social
Net
...................................................................................................................................
35
Yellow Pages
..............................................................................................................................................
37
YPmobile
®
..............................................................................................................................................
37
AT&T
Naviga
t
or
®
......................................................................................................................................
39
Contents
iii
T
ools
..............................................................................................................................................................
40
Alarm
.......................................................................................................................................................
40
C
alendar
................................................................................................................................................
40
C
alcula
t
or
................................................................................................................................................
41
Tip
C
alcula
t
or
.......................................................................................................................................
42
St
op
w
a
t
ch
..............................................................................................................................................
42
World Time
............................................................................................................................................
42
C
on
v
ersion
............................................................................................................................................
43
Recen
t
C
alls
..........................................................................................................................................
44
Not
epad
..................................................................................................................................................
44
Se
t
tings
.........................................................................................................................................................
45
Display Settings
...................................................................................................................................
45
Phone Settings
....................................................................................................................................
45
Pr
ofiles
.....................................................................................................................................................
46
Call
Settings
...........................................................................................................................................
47
Connection
Settings
.........................................................................................................................
48
Security
Settings
.................................................................................................................................
49
AT&T Software
Upda
t
e
....................................................................................................................
50
Cust
omiz
a
tion
...........................................................................................................................................
51
A
cces
sibilit
y
...............................................................................................................................................
52
TTY
Mode
...............................................................................................................................................
52
HAC (Hearing Aid
Compatibility)
Mode
..................................................................................
52
iv
Contents
Care
and
Main
t
enance
........................................................................................................................
53
General Care
........................................................................................................................................
53
General
Guidelines
............................................................................................................................
55
CTIA
Requir
emen
ts
...........................................................................................................................
56
Aircraft
Saf
ety
......................................................................................................................................
57
Hospital
Saf
ety
....................................................................................................................................
57
Road
Saf
ety
...........................................................................................................................................
58
Vehicles Equipped with
Airbags
..................................................................................................
58
Declaration
of
Conformity
............................................................................................................
59
Disposing
of
Your Phone
................................................................................................................
59
Emergency
Service
...........................................................................................................................
59
HAC
Mode
.............................................................................................................................................
60
Troubleshooting and
F
AQs
................................................................................................................
61
Specifica
tions
...........................................................................................................................................
64
FCC
Compliance
.....................................................................................................................................
65
Radio Frequency (RF)
E
ner
gy
..........................................................................................................
66
W
arr
an
t
y
......................................................................................................................................................
68
Limited
W
arr
an
ty
.
...............................................................................................................................
69
How
to
Get Warranty
Service
.......................................................................................................
70
Other Warranty
Pr
o
g
ram
................................................................................................................
70
No
t
es
...............................................................................................................................................................
71

Getting
Started
1
Ge
t
ting
St
ar
t
ed
No
t
e:
In this User Manual, “press a key” means
to
press
the
key and release
it
,
while
“hold a key” means
to
press
the
key
for at
least
two
seconds and then release
it
.
Starting Up
Removing
the
Back Cover and Installing
the Battery
No
t
e:
If you
do not
plan
to
use
the
battery
for
a long
time,
remove
it from the
phone and store
it
in a cool, dry
place.
Hold
the
Power/End
Key
to
power
off the phone.
Remove
the
back cover as
shown.
Carefully
insert
the
battery with
the contacts
located
against
the
metal
springs.
Push down
the
battery until
fully
seated.
Replace
the
cover on
the
back
of the phone.
Removing
the Battery
Hold
the
Power/End
Key
to
power
off the phone.
Remove
the
back
co
v
er
.
Lift the
end
of the
battery
near
the
bott
om
of the
phone
to
remove
it
.
2
Getting
Started
Inserting
the
SIM
Card
No
t
e:
You can obtain
a SIM card
from
your service provider when you sign on
as
a
sub
s
criber
.
C
aution:
•
D
o
no
t
bend,
scra
t
ch,
or
t
ouch
the
met
al
con
t
acts
of
y
our
SIM
card.
•
K
eep
the
card
awa
y
f
rom
electrical
appliances
and
magnets.
•
Disconnect
the
char
ger
and
o
ther
accessories
f
rom
y
our
phone
and
remo
v
e
the
ba
tt
er
y
bef
ore
inserting
or
remo
ving
the
SIM
card.
F
ailing
t
o
do
so
could
cause
inf
orma
tion
on
the
card
t
o
be
lo
st
or
destro
y
ed.
Hold
the
Power/End
Key
to
power
off the phone.
Remove
the
back cover and ba
tt
ery
.
Ins
er
t
the
SIM card
into the
card slot with
the cut
corner facing outward
as
shown
belo
w
.
Ins
er
t
the
card
into the
card holder and push
it
until
it
clicks
in
t
o
position. Make sure
that the
SIM
card is fully
seated
in
the
slot
.
Getting
Started
3
Reins
er
t
the
battery
and replace
the
back
co
v
er
.
Removing
the
SIM
Card
Hold
the
Power/End
Key
to
power
off the phone.
Remove
the
back cover and ba
tt
ery
.
Gently remove
the
SIM card
from the
card slot
.
Inserting
the
microSD™
Card
No
t
e:
This phone can
support
a memory card with a capacity
of up to
32
GB.
Hold
the
Power/End
Key
to
power
off the phone.
Remove
the
back cover and ba
tt
ery
.
Ins
er
t
the
microSD card carefully with
the
metal contacts
facing downward
as
shown. Make sure
that the
card is fully
seated
in
the
slot
.
Reins
er
t
the
battery
and replace
the
back
co
v
er
.
4
Getting
Started
C
aution:
D
o
no
t
a
tt
emp
t
t
o
use
memor
y
cards
o
ther
than
microSD
cards
with
this
phone.
A
tt
emp
ting
t
o
use
non-
compa
tible
memor
y
cards
migh
t
cause
lo
ss
of
da
t
a
or
damage
t
o
the
phone,
and
ma
y
v
oid
y
our
W
arran
t
y
.
Removing
the
microSD
Card
Hold
the
Power/End
Key
to
power
off the phone.
Remove
the
back cover and ba
tt
ery
.
Carefully slide
the
microSD card
out of the
slot
.
Charging the
Ba
tt
er
y
No
t
e:
For best performance, charge
the
battery
fully prior
to
using
the
phone
f
or
the first time.
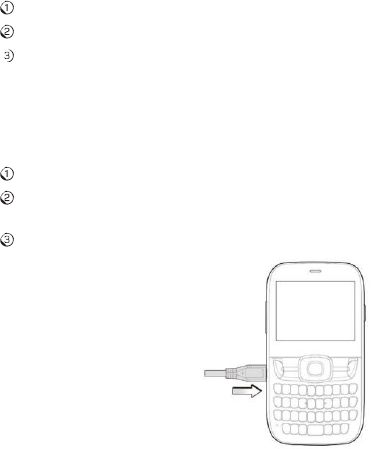
Open
the
charging
port co
v
er
.
Ins
er
t
the
charger’s
connector into the
charging por
t
.
Be sure
to
insert
the
connector
in
the correct
orientation.
Do
not force the connector into the por
t
.
Plug
the
charger
into
a standard AC wall
outlet
.

Getting
Started
5
When
the
battery
is fully charged, unplug
the
charger and disconnect
it
f
r
om
the phone.
No
t
es:
•
The
phone
automatically
po
w
ers
o
ff
whene
v
er
the
ba
ttery
po
w
er
is
t
oo
lo
w
.
•
Use
only
the
char
g
er
supplied
with
the
phone,
or
other
char
g
ers
appr
ov
ed
b
y
ZTE. Using
an unapproved charger may cause damage
to the
phone and
may
void your
W
arr
an
ty
.
•
If
the
ba
ttery
is
completely
dis
char
g
ed
or
has
not
been
us
ed
f
or
an
e
xt
ended
period
of
time,
the
screen may
not
display
the
charge
indicator until
the battery
has been continuously charged
for
10
to 40 minutes.
•
D
o
not
a
tt
empt
t
o
char
g
e
the
ba
ttery
a
t
t
emper
a
tur
es
lo
w
er
than
32°F
(0°C)
or
higher
than
113°F
(45°C).
Switching
Your Phone
O
n/Off
No
t
e:
Take care
to
observe all posted signs and rules restricting
or
prohibiting
the
use
of
handheld mobile
devices.
Hold
the
Power/End
Key
to turn
your phone on
or o
ff
.
6
Getting
Started
Getting
to
Know Your
Phone
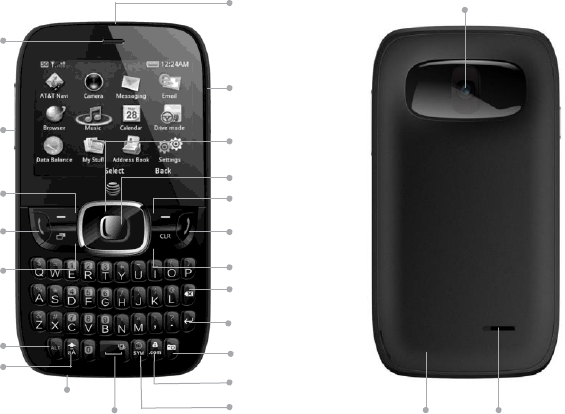
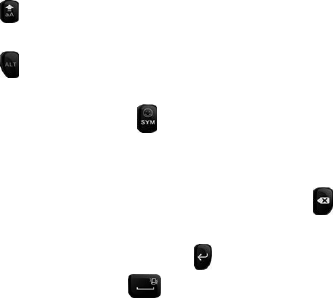
Earpiece
3.5
mm
Headset
Jack
Camera
Lens
Micro USB
Char
ging
Po
r
t
L
eft
Soft
K
e
y
Send
K
e
y
Volume
Up/Down
Keys
4-Way
Navigation
K
e
y
OK
K
e
y
Righ
t
Soft
K
e
y
Power/End
K
e
y
Task
K
e
y
Clear
K
e
y
Delete
K
e
y
Alt
K
e
y
Shift
K
e
y
Microphone
Space
K
e
y
Enter/Return
Camera
K
e
y
Lock
K
e
y
Symbols
K
e
y
Back
Cover
Speaker

Getting
Started
7
Key
Functions
Key
D
escrip
tion
OK
Key
In
lists and
menus: This key will
activate
the currently
selected
option.
From the home
screen: This key will launch
the
main
menu.
4-
W
a
y
Navigation
Key
In lists, messages,
and
menus: Used
to
scroll
up
,
down,
left
,
and
righ
t
.
From the home screen:
Up: Press
to
start
a SMS
(t
e
xt)
mess
age.
Down: Press
to
open
the
Address
Book.
Right: Press
to
access
AT&T
A
ppC
en
t
er
.
®
Le
f
t
:
Press
to
access My
Stuff
.
L
e
ft/
Righ
t
So
f
t
Keys
The
bottom
line
of
the display shows
the options that can
be
selected using the
Left
and
Righ
t
So
f
t
K
eys
.
The options change
depending on the application/function
being
used.
Send
Key
Press
to
dial or answer a
call.
From
the
home screen: Press
to
show a list
of
recent
calls.
Power/End
Key
Hold
to
turn the phone
on/
o
ff
.
Press
to
end a call, reject an incoming call, cancel
dialing
,
or
return
to
the home screen
from
any
screen.
Task
Key
Press
to
launch the Multitasking
screen.
Clear
Key
Delete characters when en
t
ering
t
e
xt
.
Volume
Up
/
Down
Keys
Adjust
the
volume
of the phone.

Key
D
escrip
tion
Camera
Key
From the home
screen: Hold
to
activate
the
camera
function.
From within the
Camera
application in
Camera
mode: Take
a
phot
o
.
From within the
Camera
application in Camcorder mode: Start
or stop recording.
Space
Key
Add a space when
en
t
ering
t
e
xt
.
From the home
screen: Hold
to
activate/deactivate
silen
t
mode
with
vibration.
8
Getting
Started

Getting
Started
9
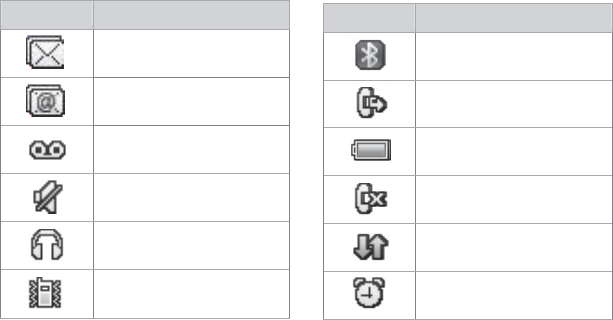
Indica
t
or
Wha
t
it means
New SMS
(t
e
xt)
message
New MMS
(multimedia)
message
New email
message
Home
Screen
After powering on
the
phone, when
the
name
of the
network is displayed on
the
screen,
the
phone is in
the
home screen and ready
for use.
The display has
four areas:
Indicators and Icons
area
Da
t
e
and Time
area
Text and Graphics
area
Indica
t
ors
and
Icons
Soft
Key
function indicators
Indica
t
or
Wha
t
it means
Signal
strength
3G
network
EDGE
network
GSM
network
10
Getting
Started
Indica
t
or
Wha
t
it means
Bluetooth
on
Call forwarding
active
Battery
status
Missed
call
GPRS in use
(
g
r
een
and
white)
Alarm
Indica
t
ors
and Icons
(con
tinued)
Indica
t
or
Wha
t
it means
Message
memory
full
Email inbox
full
New
voicemail
Mute
Headset
mode
Vibr
a
t
e
mode
Getting
Started
11
Main
Menu
From home screen, press
the
Righ
t
So
f
t
Key
for
Menu
to
access
the
main
menu.
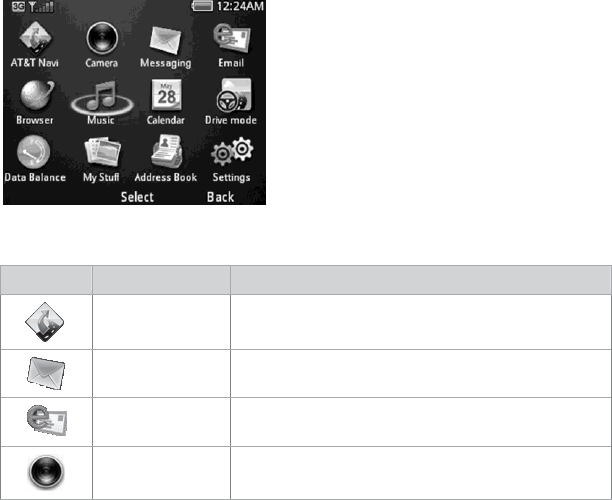
Main Menu
Icons
Icon
Name
D
escrip
tion
AT&T
Navi
Use
the
AT&T Na
vig
a
t
or
GPS
application
to
g
et
spoken
turn-by-turn directions.
Messaging
Send and read
text
(SMS)
or multimedia
(MMS)
messages.
Email
Access mobile
email.
Camera
Capture digital
phot
o
s.

12
Getting
Started
Main Menu Icons
(continued)
Icon
Name
D
escrip
tion
Browser
Browse
the
Internet on your
phone.
Music
Play
the
audio
file.
Drive
mode
Send a customizable reply
to incoming
messages when
the
vehicle starts moving
25
mph.
Social
Net
Access social networks such as
F
acebook
®
,
M
ySpace
™
,
and
more.
D
a
t
a
Balance
Auto dials
*777*3#
My
Stuff
View
applications and tools such
as
Alarm,
C
alendar
,
and
more.
Address
Book
Add, edit
,
and manage your
contacts.
Settings
Set
up
and personalize your
phone.

Phone
Calls
13
Phone
Calls
How
to
Make
Calls
From home screen,
enter
a phone
number
.
Press
the
Send Key
to
place
the call.
Using
the
Address
Book
From
the
home screen, select Main Menu
>
Address
B
ook
.
Highligh
t
a
contact
and press
the
Send Key
to
call
the
con
t
act
.
Refer
to the
Address Book section in this manual
for
more
details.
How
to
Receive
Calls
Press
the
Send Key
or
OK Key
to
answer an incoming call. Press
the
OK Key
to
activate
the speakerphone.
Tip: If you have connected
a headset
to the
phone, you can press
the button on
the
headset
to
answer
the call.
Adjusting
Your Call
Settings
During a call, you can press
the
L
e
f
t
So
f
t
Key
to
access in-call options. The
options
displayed on
the
menu will change when
certain functions
are
activ
a
t
ed.
The
options below will be displayed by def
ault
.
Record: Record
the
current
call. Press
the
OK Key
to start/stop recording.
Cr
ea
t
e
No
t
e:
Write a
note for
later
retrieval via
the
Notepad
application.
Hold: Put
the
current
call on hold
or
return
to
a call previously
put
on
hold.
G
o
t
o:
Display the
C
on
t
acts,
Call
L
o
g
,
Mess
aging
,
Br
o
ws
er
,
or Main Menu during a
call.
DTMF
o
ff
:
Enable
or
disable DTMF
tones
(touch-tone sounds).
End Call: Disconnect
the
current
call.
14
Phone
Calls
Adjusting the Volume
During a call, press
the
Volume Up/Down
Keys
to
adjust
the
earpiece
or
speaker
volume.
Using Call Hist
or
y
From
the
home screen, press
the
Send Key
to
check
the
All Calls log
for
a list o
f
recent
calls.

Address
Book
15
Address
Book
You
can store contacts
with multiple phone numbers and email addresses, as
well
as a physical address and additional
details.
The phone can store
up to
1000 items. Your SIM card can store
con
t
act
information
as well;
ho
w
e
v
er
,
a SIM card may
not
be able
to
save all
of the
con
t
act
fields
supported by
the
phone. Check with your service provider
for
more
details
about your
SIM
card, including its
capacity
.
Adding a
New
C
on
t
act
Select Main Menu
>
Address Book
>
L
e
f
t
So
f
t
Key
for Options
>
New
C
on
t
act
.
En
t
er
the contact
information
into the
appropriate
fields.
Press
the
OK Key
to
save
the
new
con
t
act
.
Searching
C
on
t
acts
Select Main Menu
>
Address Book
to
view all
contacts.
En
t
er
a
lett
er
,
and
the
phone will display all
contacts
whose
first
names
begin
with
that
lett
er
.
For example,
to
search
for
“Sam Green,” press
the
S Key
once.
All
first
names starting with “S”
or
“s” will be
displayed.
No
t
e:
If you have changed
the
Display Order setting on your phone
to
show
last
name
first
(e.g. “Green, Sam”), then
the
search
function
will display all
contacts
whose
last
names begin with
the
letter(s) you
en
t
er
.
In this example, typing
the
G Key would result in
the contact
being
displayed.
You can refine a search by
en
t
ering
one
or
more letters
that
appear
subsequent
to the first letter
in
the
contact’s
name. For example, typing “JN”
into the search
field will
return contacts named “John” and
“Julian,”
but not “James.”

Configuring
Speed
Dial
From
the
home screen, select Main Menu
>
Address
B
ook
.
Use
the 4-Way
Navigation Key
to
select a
con
t
act
,
press
the
L
e
f
t
So
f
t
Key
f
or
Options
and select
Se
t
as Speed
Dial
.
Press Up
or
Down on
the 4-Way
Navigation Key
to
select an Unassigned
slot
.
Press
the
OK Key
>
L
e
f
t
So
f
t
Key
for
Yes
to
assign
the
speed dial
number
.
Press
the
Righ
t
So
f
t
Key
for
Back
to
return
to the
previous menu
or
press
the
End Key
to
return
to the
home
screen.
Performing a
Speed
Dial
No
t
e:
The
1
Key is reserved
for the
Voicemail
number
.
From
the
home screen, hold
the
corresponding
Number
Key
(2 to 9)
in
the
speed dial list
to
make
the call.
Press
the
End Key
to
end
the call.
Using Address Book Entry
Options
From
the
home screen, select Main Menu
>
Address
B
ook
.
Scroll
to the
desired
contact
and press
the
L
e
f
t
So
f
t
Key
for Options to
reveal
the
following menu
settings.
Send Message: Send
SMS
or
MMS messages
to the
highligh
t
ed
con
t
act
.
Call: Call
the
highligh
t
ed
con
t
act
.
New
C
on
t
act:
Cr
ea
t
e
a new
con
t
act
.
Edit:
Edit
the
highligh
t
ed
contact’s
information.
Send
C
on
t
act
Info:
Send
the contact
information
formatted
as a business
card
via MMS message
or
in an
email.
16
Address
Book
Address
Book
17
D
ele
t
e:
Delete
the
highligh
t
ed
con
t
act
.
Add
to
Group: Add
the
highligh
t
ed
contact to
a
g
r
oup
:
Colleagues,
F
amily
,
or Friends.
Multi-Select:
Apply an action
to
all
of the
contacts you
s
elect
.
You
have
three
options:
Send Message: Send an
SMS
or
MMS message
to
all
of the
selected
contacts.
Send Email: Send an email
to
all
of the
selected
contacts.
D
ele
t
e:
Delete all
of the
selected
contacts.
Se
t
as Speed Dial: Assign
the
highligh
t
ed
contact to
one
of the Speed
Dial
positions.
Se
t
tings:
Change global Address Book settings. You have
four options:
SIM
Management: Copy
contacts
to or from the
SIM card,
or
delete
contacts
from the
SIM
card.
Display
Order:
Choose
the
order in which names are displayed and
sorted
(First&Last
or Last&First).
Speed Dial: View and
edit the
Speed Dial
list
.
Memory
Info:
View
current
available memory and
total
capacity
of the phone’s
internal memory
as well as
the
SIM
card.
18
En
t
ering
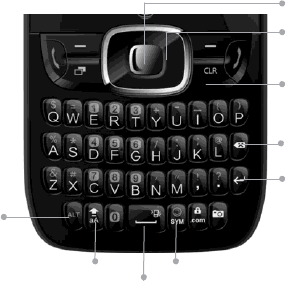
Text
E
n
t
ering
Te
xt
OK
K
e
y
4-Way
Navigation
K
e
y
Clear
K
e
y
Delete
K
e
y
En
t
er/Return
K
e
y
Alt
K
e
y
Shift
K
e
y
Symbols
K
e
y
Space
K
e
y
To enter
letters, press
the letter
keys on
the keyboard.
While on
the
home screen, you can use
the 4-Way
Navigation Key
to
access
shortcuts:
•
Press
up to
start
a SMS
(text) message.
•
Press
down to
open
the
Address
Book.
•
Press
righ
t
to
access AT&T
A
ppC
en
t
er
.
•
Press
left
to
access My
Stuff
.
En
t
ering
Text
19
Press
(
Shif
t
Key)
to
switch
the
uppercase and lowercase letters. Press
the
Shif
t
Key twice
to
change
to
all
cap
s.
Press
(Alt
Key)
to
enter
a number
or
alternate character
shown on a
k
e
y
.
Press
the Alt
Key twice
to
change
to
numeric
mode.
To enter
symbols,
press
(Symbols Key), then use
the 4-Way
Navigation Key
to
locate
a symbol. Press
the
OK Key
to
enter
the symbol.
To move
the
curs
or
,
press
the 4-Way
Navigation
K
e
y
.
To delete
the
character before
the
curs
or
,
press
(
D
ele
t
e
Key)
or the
Clear
K
e
y
.
Hold
the
D
ele
t
e
Key
or the
Clear Key
to
delete all characters before
the
curs
or
.
To enter
a carriage return,
press
(
E
n
t
er
/
Re
turn
Key).
To
enter
a space,
press
(Space
Key).

20
Mess
aging
Messaging
This phone supports
the
following message
types:
•
Text Messages
(SMS)
•
Multimedia (Picture)
Messages
(MMS)
Shor
t
Message Service (SMS) lets you send and receive
text
messages
to and
from other
mobile phones and email
addresses.
Multimedia
Message Service (MMS) lets you send and receive
multimedia
(picture
and video) messages
to
and
from other
mobile phones
and
email
addresses.
No
t
e:
These
features require subscription-based
messaging plans. Charges
may
apply
.
Contact your
service provider
for
more
information.
SMS
and
MMS
Messages
Sending a New SMS
Message
Select Main Menu
>
Messaging
>
New
Message
.
En
t
er
a name, mobile phone
number
,
or
press
the
OK Key
to
choose
the
message
recipient(s)
from the
Address
Book.
Press
down
on
the 4-Way
Navigation Key
to
move
the
cursor
to the text field.
En
t
er
your message. Use
the 4-Way
Navigation Key
to
add a picture,
video
,
or
audio
file.
Press
the
OK Key
to
send
the message.
No
t
e:
To save an unfinished message, press
the
L
e
f
t
So
f
t
Key
for Options
>
Save as
D
r
a
f
t
to
save
it to the
Drafts
f
older
.
You can
edit
and send
the
mess
ag
e
at
a
later
time.

Mess
aging
21
Viewing a
Message
The envelope icon
( )
will appear
at the top of the
screen
to notify
you
that you
have received a new message, and a message
aler
t
will
pop
up
.
Press
the
OK
Key
to
view
the
message,
or
,
from the
home screen, select Main Menu
>
Messaging >
Conversation to
check your
messages.
Message
Options
From
the
home screen, select Main Menu
>
Messaging
>
Conversation to access
your messages. While any single message is
highligh
t
ed,
press
the
L
e
f
t
So
f
t
Key
f
or
Options to
access
the
following menu
items.
Reply: Reply
to the
sender
of the
message via
SMS
or MMS.
Call: Call
the
sender
of the message.
Message Menu: Return
to the
Messaging
menu.
D
ele
t
e:
Delete
the message.
D
ele
t
e
Multiple:
Select multiple messages
to delete.
Lock Message: This will
prevent
the
message
from
being
deleted.
Save
C
on
t
act:
Save a new
contact or
update
existing
contact information.
Sor
t
By:
Sor
t
messages by Time, Unread/Read,
or
Sender
.
Quick
Text
The phone has 10 Quick
Text templates
for
SMS and MMS messages. You
can
ins
er
t
commonly used Quick Text phrases
into the
body
of
a message
f
or
convenience.
Follow these steps
to
insert
Quick Text
into
an SMS
or
MMS
mess
age.
From
the
home screen, select Main Menu
>
Messaging
>
New
Message
.
Press
down
on
the 4-Way
Navigation Key
to
move
the
cursor
into the Text
field. Select
Options
>
Inser
t
Quick Te
xt
.

22
Mess
aging
Select a Quick Text message
from the
list and press
the
OK Key
to
insert
it
.
Edit your message as
desired.
Text Message
Settings
Text
Message cen
t
er
number:
Service
center number
given
to
you by
your
service pro
vider
.
Multimedia
Message
Settings
From
the
home screen, select Main Menu
>
Messaging
>
Se
t
tings
>
Multimedia
Message
Se
t
tings to
access advanced settings
for
MMS messaging
f
unctionality
.
Retrieval
Se
t
tings:
Configure
the
phone
to
retrieve new messages
automatically
or
manually
.
Slide Timing
(sec):
Set
the
play
time of
each MMS image when played as
a
slide
sho
w
.
Anonymous
Message: Set
the
phone
to accept or
reject anonymous
messages.
Connection:
Choose MMS
or
WAP
for
your connection
option.
V
oicemail
Voicemail
Settings
From
the
home screen, select Main Menu
>
Messaging
>
Se
t
tings
>
V
oicemail#
to
determine
the
number
to
dial
to
retrieve your voice messages.
Y
our
voicemail phone number
is preset by your service pro
vider
.
You
do not need
to
set
it
manually
.

Mess
aging
23
Retrieving a
Voicemail
The new voicemail icon
( )
will appear
at the top of the
screen
to notify
you
that
you
have received a new voice message, and a message
aler
t
will
pop
up
.
Press
the
OK
Key
to
listen
to the
voice message,
or
,
from the
home screen, hold
the
1
Key
to
automatically dial
the
voice mailbox
number
.
No
t
e:
Voicemail features and options vary depending on your service pro
vider
.
Contact your
service provider
for
more
information.
24
Email
Email
Setting
Up Your
Email
A
ccoun
t
With
the
Email application, you can access your email
from
various
providers
including
A
O
L
®
,
Yahoo!
®
Mail,
Gmai
l
™
,
AIM
,
®
and
Hotmail
.
®
From
the
home screen, select Main Menu
>
E
mail
.
Select
the
name
of
your email provider
.
(The following steps will vary
depending
on your
provider.)
If your email provider is
not
listed, scroll down and select
Others
.
Follow
the
on-screen
instructions.
En
t
er
your email address and
password.
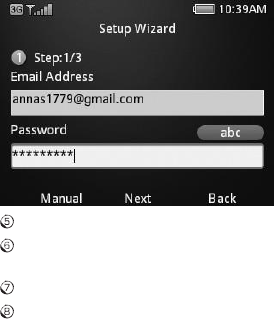
Email
25
Press
the
OK
K
e
y
.
Select POP3
or
IMAP4 and press
the
OK
K
e
y
.
(If
you are
uncertain which
option
you should
s
elect
,
contact
your email
provider.)
En
t
er
a display name and press
the
OK
K
e
y
.
After you have logged
into
your
accoun
t
,
you will be able
to
view your
inbo
x.
Select an email and press
the
OK Key
to
read
it
.
Press
the
L
e
f
t
So
f
t
Key
to view
additional
options.

Browsing
the
In
t
erne
t
Browse
the
web directly
from
your mobile phone. Check
the
wea
ther
,
visit
your
favorite websites, and enjoy access
to the
Internet on
the
g
o
.
Using Mobile
Web
From
the
home screen, select Main Menu
>
Mobile W
eb
.
Press
the
L
e
f
t
So
f
t
Key
for Options
and select New Link
[*] to
enter
a
website
address.
Type a website address directly
into the
URL field,
or
,
scroll down
the
list o
f
recent
websites using
the 4-Way
Navigation
K
e
y
.
Press
the
OK
K
e
y
.
While bro
wsing
,
you can access a list
of
favorite sites by choosing
Options
>
Goto
>
B
ookmarks
.
To add a site
to the
list
,
select
Options
>
Web Page
Options
>
Add
t
o
Bookmarks
>
S
a
ve
.
Using
the
A
TT
.
net
Homepage
On
the
A
TT
.
net
homepage, you can search
the
In
t
ernet
,
access Yellow
P
ages,
check
the
wea
ther
,
read current
news stories, and
much more.
Refer
to the
YPmobile section in this manual
for
more detail about how
to
use
the
Yellow Pages
feature.
Visiting a
Website
from
within the Browser
From any web page, press
the
L
e
f
t
So
f
t
Key and select New Link
[*]
.
En
t
er
a web address and press
the
OK
K
e
y
.
To follow a link on a website, scroll
to it
using
the 4-Way
Navigation Key
and
press
the
OK
K
e
y
.
26
Browsing
the Internet

Bluet
oo
th
®
Your phone includes
support for
Bluet
oo
th
,
which can be used
to connect your
phone
to
a wireless
heads
et
.
You can also use
it to
transfer files between
your
phone and
other
Bluetooth devices, such as another phone
or
a
lapt
op
.
No
t
e:
Not
all applications and devices
support
Bluet
oo
th
.
Enabling Bluet
oo
th
By def
ault
,
Bluetooth
is
disabled. If you enable Bluetooth and
turn off the phone,
Bluetooth will
be automatically enabled when you
turn the
phone back
on.
From
the
home screen, select Main Menu
>
Se
t
tings
>
Connection
Se
t
tings
>
Blue
t
oo
th
.
Press
the
OK Key
to turn
Bluetooth on. You will
see
(Bluetooth
icon)
displayed
at the top of the screen.
Highligh
t
Visibility
and press
the
OK
K
e
y
.
Select Visible
or
Visible
for
60
sec
.
Highligh
t
My
Device and enter
the
phone
name.
No
t
e:
Setting Visibility
to
Visible
or
Visible
for 60
sec will allow
compatible
devices
to find
your
phone.
Connecting
to
Other Devices
From
the
home screen, select Main Menu
>
Se
t
tings
>
Connection
Se
t
tings
>
Blue
t
oo
th
>
Search
for
D
evices
.
Press
the
OK Key
to
search
for
available Bluetooth
devices.
Wait
60
seconds
for the
phone
to
finish
s
earching
,
or
press
the
Righ
t
So
f
t
Key
for Stop if the
target device
appears in
the
list before
60
seconds have
elapsed.
Highligh
t
a device
from the
list and press
the
OK Key
for
P
air
.
Press
the
OK Key
to
initiate device
pairing. You may be asked
to confirm
a
passk
e
y
.
Bluetooth 27

28
Bluetooth
When you pair your phone with another device, you will be given
the option to set
incoming
s
ecurity
.
There are
two
options
for
incoming security: Always Ask
and
Always
C
onnect
.
Always Ask: Require
the other
Bluetooth device
that
is
connecting
to
your
phone
to
request connections in
the future.
Always
Connect:
Authorize
the other
Bluetooth device
to connect to the phone
without requesting in
the future.
No
t
e:
Some devices
don’t support
automatic Bluetooth connections.
You
will
always need
to connect
manually with these
devices.
Sending
D
a
t
a
Before sending
da
t
a,
please
confirm that:
•
Bluetooth
function
is
enabled.
• The
de
vice
is
visible
and
pair
ed
with
the
other
de
vice.
Open
the
file you wish
to
send. Press
the
L
e
f
t
So
f
t
Key
for Options
>
Send >
Via
Blue
t
oo
th
.
Select
the
destination device
from the
list
,
and press
the
OK Key
to send
the file.

Bluetooth
29
Receiving
D
a
t
a
Enable Bluetooth
function
and pair
the
phone with
the
device
from
which
you
wish
to
receive
the file.
When
the
paired device tries
to
send a file
to
your phone, a
popup
dialo
g
ue
will appear in your screen. Press
the
L
e
f
t
So
f
t
Key
for
Yes
to
authorize
the
connection.
You will see another
popup
asking you
to accept or
reject
the
specific
file
that the other
device is sending. Press
the
L
e
f
t
So
f
t
Key
for
Yes
to accept the
incoming file,
or
press
the
Righ
t
So
f
t
Key
for
No
to
reject
the
incoming
file.

E
n
t
er
t
ainmen
t
The Camera feature allows you
to
t
ak
e
photos and shoot video clips.
Z432also
features a Voice Recorder
for
capturing
notes.
Capturing and
Viewing
Pictures
Your phone has an
integrated
digital camera, which allows you
to
capture
images.
Photos
t
ak
en
with
the
camera can be stored in
the
phone’s memory
or
on
the
microSD card. You can share these photos
via MMS message, email,
or
Bluet
oo
th
,
or
use
them
as
the
background wallpaper
for the
phone. The
photo
browser
will
allow you
to
move, rename,
cop
y
,
and/or delete
the
photos stored on
the phone
and
the
microSD
card.
No
t
e:
The preloaded photos on
the
phone cannot be shared
or deleted.
Taking a
Photo
From
the
home screen, hold
the
Camera
K
e
y
.
Press
the
OK Key
or
Camera Key
to
t
ak
e
the
phot
o
.
Viewing
Pictures
From
the
home screen, select Main Menu
>
My
Stuff
>
Pictures
>
My
Pictur
es
.
Highligh
t
a
photo
and press
the
OK Key
to
view
it
.
Capturing and
Viewing
Video
Your phone allows you
to
record, store, and play back video
files.
Recording a
Video
From
the
home screen, hold
the
Camera
K
e
y
.
Press
righ
t
on
the 4-Way
Navigation Key
to
switch
to
video camera
mode.
Press
the
OK Key
to
start
recording.
30 Entertainment

Press
the
OK Key
to stop recording.
The video camera will display a preview frame
of the
video with a “play”
arr
o
w
.
Press
the
OK Key
to
play back
the
video
.
Playing
Videos
From
the
home screen, select Main Menu
>
My
Stuff
>
Videos
.
Highligh
t
a video and press
the
OK Key
to
play
it
.
Music
Your phone includes a free music player
to
play your music files and
create
playlists. You can also purchase songs righ
t
from
your
phone.
Playing
Music
From
the
home screen, select Main Menu
>
My
Stuff
>
Music
>
Music Player >
All
Music
.
Highligh
t
a sound file and press
the
OK Key
to
play
it
.
Entertainment
31
32
Entertainment
Shop
Music
This
option
allows you
to
purchase and download your favorite songs
from
a
full
music
ca
t
alo
g.
Choose
from
current
top
hits,
or
search by song
title or
ar
tist
,
and
preview before you
buy
.
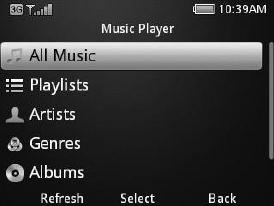
Music
Pla
y
er
The Music Player allows you
to
listen
to the
songs you have stored on your
phone.
There are six menus in
the
Music
Pla
y
er
.
All Music: Displays a
complete
list
of
all songs currently on your
phone.
Playlists: Displays any playlists
that
you have cr
ea
t
ed,
and allows you
to create
new
ones.
Artists:
Displays a list
of the
artists
ass
ocia
t
ed
with
the
songs you have stored
on
your phone
(if
artist information
is
available).

Entertainment
33
Genres: Displays a list
of the
genres
ass
ocia
t
ed
with
the
songs you have stored
on
your phone
(if
genre
information
is
available).
Albums: Displays a list
of the
album names
for the
songs you have stored on
your
phone
(if
album names are
available).
Folders: Allows you
to
create and
manage folders on your phone
for
or
g
anizing
music
files.
AT&T
Radio
This feature allows you listen
to
radio stations on your phone. AT&T Radio
lists
stations by Favorite, Local, Personal, and Genre, and includes Premium and
Talk,
News, and Sports
options.
From
the
home screen, select Main Menu
>
App
Manager
>
AT&T
Radio
.
To
accept the
End User License
Ag
reemen
t
,
press
the
L
e
f
t
So
f
t
Key
for
A
gr
ee
.
Press
the
Righ
t
So
f
t
Key
for Continue
after reading
the warning.
Use
the 4-Way
Navigation Key
to
scroll through
the
listed radio options.
Press
the
OK Key
to
s
elect
.
No
t
e:
Eligible
data
plan subscription
required.

34
Entertainment
Voice
Recorder
This
function
allows you
to
record a voice memo
.
You can also set
the
voice
memo
as a
ringtone.
From
the
home screen, select Main Menu
>
My
Stuff
>
Tools
>
Voice
Recor
der
.
Select
St
ar
t
to
start
recording your voice memo
.
Select Pause
to
pause
the recording.
Select
Continue to
resume
recor
ding.
Select
Stop to stop
recording and save
the
new audio file
to
My
Recordings.
No
t
es:
•
If
you have installed a microSD card in your phone, you can choose
to save
recorded audio files
to the
phone
or the
memory card. To change this
s
etting
,
press
the
L
e
f
t
So
f
t
Key
for
O
p
tions
,
then select Storage
L
oca
tion
.
•
If
y
ou
choo
s
e
t
o
s
a
v
e
r
ecor
dings
t
o
the
phone,
y
ou
can
access
them
f
r
om
the
home screen by selecting Main Menu
>
My
Stuff
>
File Manager
>
Audios >
My
Recor
ds
.
•
I
f
y
ou
choo
s
e
t
o
s
a
v
e
r
ecor
dings
t
o
the
memory
car
d,
y
ou
will
only
be
able
t
o
access
them from
within
the
Voice Recorder application. To
do
this, press
the
L
e
f
t
So
f
t
Key
for
O
p
tions
,
then select My
Recor
dings
.
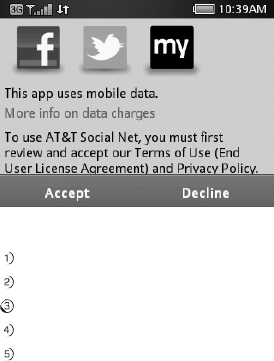
Social
Netw
orking
35
Social
Networking
AT&T Social
Net
Keep on
top of
your world with AT&T Social
Net
,
which allows you
to
access
the
latest
news as well as popular social
netw
orks
—
including
Facebook,
T
witt
er
™
,
and
M
ySpace
—
all
in one
place.
Setting Up a Social
Network
From
the
home screen, select Main Menu
>
Social
Ne
t
.
To
accept the
End User License
Ag
reemen
t
,
press
the
L
e
f
t
So
f
t
Key
for
A
ccep
t
.
Select
the
social network
of
your choice and press
the
OK
K
e
y
.
En
t
er
your email address and password. Select Sign
In
,
and then select
D
one
.
Press
the
OK Key
to
dismiss
the tip pop
up
.
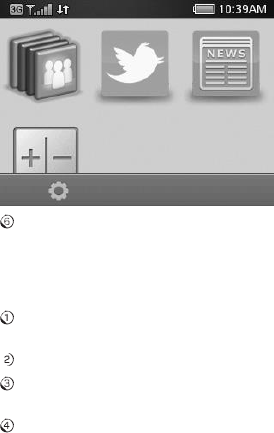
36
Social
Netw
orking
You will see
the
icons
for
all
of
your configured social networks displayed.
Select
a social network with
the 4-Way
Navigation Key and press
the
OK Key
to view
recent
updates.
Change
Notification Settings
To change your notification
settings,
from the
Social Net home screen,
press
the
L
e
f
t
So
f
t
Key
for
Se
t
tings
.
Select
Se
t
tings
>
Notification
Se
t
tings
.
Use
the 4-Way
Navigation Key
to
highligh
t
an
option
and press
the
OK Key
to
select/deselect
the option.
Press
the
L
e
f
t
So
f
t
Key
for
S
a
ve
.
Yellow
Pages
YPmobile®
YPmobile allows users
to
search
for
local information and share search results
with
their online
networks.
With map-based search and quick access
to
recently viewed businesses
and
events, YPmobile provides users
with more convenient
ways
to find
what
they
need. Users can broadcast their newly discovered local
hot
spots via
Facebook
and
T
witt
er
.
From
the
home screen, select Main Menu
>
YPmobile
.
To set your location,
highligh
t
change and press
the
OK
K
e
y
.
Highligh
t
the
Se
t
location
field
.
When you see a thin red square around
the
t
e
xt
box,
enter your location and
press
the
OK
K
e
y
.
Press
righ
t
on
the 4-Way
Navigation Key
to
highligh
t
OK and then press
the
OK
K
e
y
.
Use
the 4-Way
Navigation Key
to
move
the
cursor
to the
box
at the top of the
screen (next
to the
Find
button),
enter
the
key words (e.g. “Pizza”) you
w
an
t
t
o
search, and press
the
OK
K
e
y
.
Yellow Pages
37
38
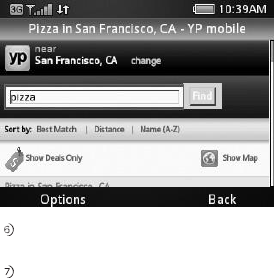
Yellow
P
ag
es
Press
righ
t
on
the 4-Way
Navigation Key
to
highligh
t
Find and press
the
OK
K
e
y
.
Scroll down
to
view search results. Use
the 4-Way
Navigation Key
to
highligh
t
an
item from the
search results, and press
the
OK Key
to
view details. On
the
next screen, you can make a phone call
to the
selected business, view a
map
,
get directions,
or
share with a
friend.

AT&T
Na
vig
a
t
or
39
AT&T
Naviga
t
or
®
AT&T Na
vig
a
t
or
is a
location-based service
that
can provide
GPS
navigation
with
turn-by-turn
voice directions, full-color maps, and real-time
traffic
upda
t
es.
Y
ou
can also search
for
local businesses such as gas
stations and restaurants in
your
immediate
vicinity
.
From
the
home screen, select Main Menu
>
AT&T
Na
vi
.
Read
the
Terms
of
Service and press
the
Righ
t
So
f
t
Key
for
A
ccep
t
.
You will be asked
to
t
ak
e
a brief
t
our
.
You can select
from four
basic options within AT&T Na
vig
a
t
or:
Drive To:
En
t
er
a specific destination
addr
ess.
Search: Search
for
local businesses by name
or
by
ca
t
eg
ory
.
Maps
& Traffic:
View a map
of
your immediate
surroundings with
information
about current
traffic conditions.
Extras: View weather conditions and set
up custom commute
alerts, which
will
notify
you
of traffic
conditions before you
leave.
40
Tools
Tools
Alarm
This feature allows you
to
set an alarm
to
ring
at
a specific
time.
From
the
home screen, select Main Menu
>
My
Stuff
>
Tools
> Alarm
.
Press
the
OK Key
to edit
and configure
the
alarm as
needed.
Alarm
Switch: Turns
the
alarm clock on
or o
ff
.
Alarm
Time: Specifies
the time
when
the
alarm will
sound.
Recurrence: Configure
the
alarm
to
repeat
daily
,
or
only
on certain
days
of the
week
if desired.
Alarm
Tone: Select
the
alarm
tone.
Snooze: Select
the
length
of time for the
snooze timer
.
When
the
snooze
timer is
activated after
the
alarm begins
to
sound,
the
alarm will be
silen
t
until
the snooze
timer elapses.
Alarm
No
t
es:
En
t
er
reminders
or other
information
that
will be displayed when
the
alarm
sounds.
No
t
e:
Even
if the
phone is turned o
ff
,
the
alarm will still
sound.
C
alendar
With
the
Calendar
feature you can set appointments and
view
events.
From
the
home screen, select Main Menu
>
My
Stuff
>
Tools
>
C
alendar
.
Press
the
L
e
f
t
So
f
t
Key
for Options to
access
the
following
menu:
New:
Cr
ea
t
e
a new
appointment
or
t
ask
reminder
.
Appointment:
Add an
appoin
tmen
t
.
TO DO: Add a
task.
Weekly View: View
the
schedule
for the
current
w
eek.

Tools
41
Go
t
o
:
Jump directly
to
a
specified date on
the
C
alendar
.
Today: View
the
events
of the
current
da
y
.
Date:
En
t
er
a
date and
view
the
scheduled events
of that
da
y
.
View All Events: View a chronological list
of
all
appointments and
t
asks
that have
been
scheduled.
D
ele
t
e:
Delete some
or
all
of the
appointments and
t
asks
on your
phone.
Before
a Special Day: Delete all
appointments and
t
asks
scheduled prior
to the
date you
s
elect
.
All: Delete all
appointments and
t
asks
in
the phone.
Se
t
tings:
Change
the
Default View
or the first
day
of the week.
C
alcula
t
or
The
C
alcula
t
or
provides
the
basic arithmetic functions: addition,
subtraction,
multiplication, and
division.
From
the
home screen, select Main Menu
>
My
Stuff
>
Tools
>
C
alcula
t
or
.
En
t
er
the first
number using
the Number
K
e
ys
.
Select
the
operator by
using
the 4-Way
Navigation
K
e
y
.
En
t
er
the
second
number
.
Press
the
OK Key
to
view
the
r
esult
.
Tips:
•
P
r
ess
the
Righ
t
So
f
t
Key
for
Clear
to
clear digits and
results.
•
E
n
t
er
#
to
t
o
g
gle
the
number between positive and
negative.
•
E
n
t
er
* to
enter
a decimal
poin
t
.

Tip
C
alcula
t
or
The Tip
C
alcula
t
or
will
automatically calculate
the tip at
a
rest
aur
an
t
,
and
it can
also divide
the
bill according
to the
number
of
people in
the
par
ty
.
From
the
home screen, select Main Menu
>
My
Stuff
>
Tools
>
Tip
C
alcula
t
or
.
En
t
er
the total
bill by using
the Number
K
e
ys
.
En
t
er
the tip
percen
t
ag
e
you would like
to leave.
If
the cost
will be shared by more than one person,
enter
the
number
of the
people in
the Split
field
.
At
bottom of the
screen,
the amount
you need
to
pay will be
displayed.
St
opwa
t
ch
The
Stopwatch can
measure
time
increments.
It
can also record
lap
measurements.
From
the
home screen, select Main Menu
>
My
Stuff
>
Tools
>
St
op
w
a
t
ch
.
Select
St
ar
t
to
start
timing.
If desired, select Lap during
the
timing operation
to
capture a lap
time
while
the
timer
continues
to run.
Select
Stop to stop the
timing and view
the total
duration
of time.
If desired, select
Continue to
resume timing
from the point at
which
the timer
was
stopped.
Select
Rese
t
to
reset
the stopwatch.
World Time
With this feature, you can check
the
current
local
time
and date
for
major
cities
around
the world.
42 Tools

Tools
43
From
the
home screen, select Main Menu
>
My
Stuff
>
Tools
>
World Time
.
Press
left
or
righ
t
on
the 4-Way
Navigation Key
to
select a
city
.
Press
the
OK Key
to
search
for
a city by
name.
Press
the
L
e
f
t
So
f
t
Key
to
access
the
Options screen
for
this feature. You
can
save
the
selected city
time
as
the
local
time for
your phone, and you can
also
set
D
a
yligh
t
Savings Time
preferences.
Conversion
This feature allows you
to
convert between
different
units
of
measur
emen
t
.
From
the
home screen, select Main Menu
>
My
Stuff
>
Tools
>
C
on
v
ersion
.
Use
the
Type
field to
select
the
type
of
conversion
to perform
(Currency
,
Area,
Length,
Mass, Volume,
or Temperature).
Currency
Conversions
En
t
er
an exchange
rate
in
the
Ra
t
es
field
.
Use
the 4-Way
Navigation Key
to
highligh
t
the
Home
or
Foreign
field
,
and
enter
an
amount
depending on which conversion you
need.
All
Other Conversions
En
t
er
a number
into
one
of the two
fields, using
the 4-Way
Navigation Key
to
move between
the fields.
To change
the
unit
of
measur
emen
t
,
select
the
field whose unit you would
like
to
change and press
the
OK
K
e
y
.
Highligh
t
a unit
of
measurement and
press
the
OK
K
e
y
.
Tip: Press
the
L
e
f
t
So
f
t
Key
to
select
to
enter
a decimal
poin
t
.

44
Tools
Recen
t
Calls
With this feature, you can check
the
call log and call
duration.
From
the
home screen, press
the
L
e
f
t
So
f
t
Key
for
Go
To
and
select
Recen
t
C
alls
.
There are
four
tabs on
the
Screen: All Calls, Missed Calls, Dialed Calls,
and
Received Calls. Press
the
L
e
f
t
So
f
t
Key
for Options
and select Call
Timers
to
check
the
call timer
.
No
t
e:
Call logs can also be accessed by pressing
the
Send Key
from the
home
screen.
No
t
epad
Use
the
Notepad feature
to
quickly type and save ideas, notes, and
even
messages
to
be sent
at
a
later
time.
From
the
home screen, select Main Menu
>
My
Stuff
>
Tools
>
No
t
epad
.
If
the
Notepad
is empty
,
press
the
OK Key
to
add a
note.
Type your
note
in
the Text field
and press
the
OK Key
to
save
it
.
Notes will be listed on your notepad and can be viewed in full by highligh
ting
the note
entry and pressing
the
OK Key
for
Select
.
To change a
note
en
try
,
press
the
OK Key twice
for
E
dit
.
To add another new note,
highligh
t
any
note
in
the
notepad
list
.
Press
the
L
e
f
t
So
f
t
Key
for Options
and choose
Ad
d
.
To delete a note,
or
send a
note
via
t
e
xt
,
MMS, email,
or
Bluet
oo
th
,
use
the
Options
menu and
na
vig
a
t
e
accor
dingly
.
You can also select multiple notes
t
o
delete
or
send via Bluetooth by navigating
to Multi-Select
in
the Options menu.
Settings
45
Se
t
tings
Display
Settings
From
the
home screen, select Main Menu
>
Se
t
tings
>
Display
Se
t
tings
.
•
Theme: Switch between display
themes.
•
Wallpaper: Set
the
background
w
allpaper
,
which will be displayed on
the home
screen. You can select a
photo
saved in My Pictures,
or
you can choose
f
r
om
one
of the
default pictures, preloaded on
the phone.
•
Backlight: Adjust
the
backligh
t
settings. You can change
the
screen and
keypad
backligh
t
timers as well as
the
screen
brightness.
•
Dialing
Font:
Choose
the
size
of the
numerals
that
display when using
the
phone
dialer
.
•
Greetings:
En
t
er
a
text
g
r
eeting
,
which will display when
the
phone is
first
powered
on.
Phone
Settings
From
the
home screen, select Main Menu
>
Se
t
tings
>
Phone
Se
t
tings
.
•
Language: Set
the
current
display
language.
•
T-9
Input
:
Toggle
T-9 text input
.
T-9 text input
makes messaging easier
by
predicting words
for
you and displaying
them
as options as you
type.
•
D
a
t
e
and
Time: Set
the
da
t
e,
time, and
date/time
f
orma
t
.
You can
configure
the
phone
to
automatically synchronize its clock with
the
network,
or
you
can
choose
to
disable this
function
and set
the
clock
manually
.
•
Shor
t
cut
Se
t
tings:
Assign
shortcuts
to the 4-Way
Navigation Key
for phone
functions. These
shortcut
assignments will work
from the
home screen only
.
For example, you could assign
righ
t
on
the 4-Way
Navigation Key
to start
the
C
alcula
t
or
.

•
Auto
Keypad Lock: Configure your phone
to
lock
the
keypad when
it
is
not in
use. You can select
the time
delay
from the
available choices. If you select
Off
,
the
phone will
not
lock
the
keypad
automa
tically
.
•
Main Menu Style: Set
the
main menu
to
be displayed as a list
or
a
g
rid.
•
Default
Storage
Location:
Assign either
the
phone
or the
memory card as
the
location where
the
phone will save
downloaded
files.
•
TTY
Se
t
ting:
Toggle TTY
f
unctionality
.
Please refer
to
“TTY Mode”
under
Accessibility in this manual
for
more information about this
feature.
•
T-coil
Se
t
ting:
Enables you
to
hear
the
phone’s audio through a hearing aid
with
a
t
elecoil.
Please refer
to
“HAC Mode” under Accessibility in this manual
for more
information about this
feature.
•
Phone
Info:
View
technical information about
your phone, including My
Device
Number
,
Version
Inf
o
,
Icon Glossary and Operating
S
yst
em.
Profiles
A profile is a set
of
configurations appropriate
to
a specific
en
vir
onmen
t
.
Each
profile allows you
to
set
the
ring
t
one
volume/vibration,
the
earpiece volume,
and
the
warning
tone.
From
the
home screen, select Main Menu
>
Se
t
tings
>
Pr
ofiles
.
Select a profile and press
the
L
e
f
t
So
f
t
Key
to edit that profile.
•
Voice Call
Ring
t
one:
Set
the
voice call
ringtone.
•
Ring
t
one
Volume: Set
the
volume
of the ringtone.
•
Aler
t
Type: Set
the
ring type (e.g.
ring
,
vibrate and
ring).
•
Receiver Volume: Set
the
volume
of the
r
eceiver
.
•
Message
Tone: Set
the
notification
ring
t
one
for
an incoming
SMS
or
MMS
message.
46 Settings
•
Key Tone: Enable
or
disable keypad
tones
when
dialing.
•
Warning Tone: Turn
the
warning
tone
on
or o
ff
.
•
P
o
w
er
On/Off
Tone: Turn
on/off the
sound
that
plays while powering
on/o
ff
the phone.
•
Missed Calls
Alert:
Enable, disable, and set timing
for the
missed
calls
audible
notification.
Call
Settings
From
the
home screen, select Main Menu
>
Se
t
tings
> Call
Se
t
tings
.
Earphone
Auto
Answer: You can configure
the
phone
to
answer incoming
calls
automatically when an earphone
is
connected
to the phone.
Any Key
to
Mute: This
option
allows you
to
silence
the
ring
t
one
by pressing any
key
when there is an incoming
call.
Connection
Reminder: When a call connects, you
will hear a
three-tone beep
t
o
notify
you
that the
connection
was
successful.
Minute
Reminder: When this setting
is enabled, you will hear a
short beep
every
minute while a call is in progress. You will hear
the first
beep after
50
seconds,
then
1
minute
50
seconds,
etc.
Send My Caller ID: This
function
allows you
to
prevent others
from
seeing
your
phone number when making
outbound calls.
Off:
The call
recipient
will
not
see your phone
number
.
On: The call
recipient
will see your phone
number
.
Se
t
by Network:
The network chooses whether
to
show/hide
your
phone
number
.
Auto
Redial: Sets
the
phone
to
repeatedly
redial, in
the
event
of
a busy signal,
until
it
successfully makes a
connection.
Settings 47
Call Forwarding:
Allows you
to
reroute your incoming calls
to
another
phone
number
.
Contact your
service provider
for
more information and
a
v
ailability
.
Call Waiting: If a call comes in when you are already on
a call, you will be
notified
with a call waiting
tone.
The phone will display
the
caller’s phone
number
.
If
the
caller is in your Address Book, their name will display als
o
.
Contact your
service
provider
for
more information and
a
v
ailability
.
Connection
Settings
From
the
home screen, select Main Menu
>
Se
t
tings
>
Connection
Se
t
tings
.
Y
ou
can configure
the
following
options:
Bluetooth:
Configure Bluetooth
settings. See
the
Bluetooth section in this
manual
for details.
Access Point: Add
t
o
,
edit
,
or
view
the
Access
P
oin
t
list
.
In
t
erne
t
Profiles:
Cr
ea
t
e
or edit the
connection data
for
a service pro
vider
.
Modem: Set
modem
parameters. You can use a
data cable
to connect the phone
to
a
computer
and use
the
phone as a modem. Consult your service provider
f
or
details on which
modem
settings
to use.
PC
Connection:
Choose whether
to connect
your phone
to
a
computer
via
USB
or
Bluet
oo
th
.
GPS: Turn
on/off
your GPS status,
or
enable
the
Third-party
GPS
option.
48 Settings
Security
Settings
Phone
P
asswor
d
A password can
protect
your phone and help prevent unauthorized
use. When
the
phone is
password protected,
it
will ask
for the
password every
time the
phone
is
turned on. Password
protection
is disabled by def
ault
,
and
the
default
password
is
0000
.
From
the
home screen, select Main Menu
>
Se
t
tings
>
Security
Se
t
tings
>
Lock
Se
t
tings
>
Phone Password
to
t
o
g
gle
password
protection
on and o
ff
.
From
the
home screen, select Main Menu
>
Se
t
tings
>
Security
Se
t
tings
>
Change
Codes
>
Phone Password
to
change
the
phone’s password.
It
is
recommended
that
you change
the
password
to
something you will easily
r
emember
.
No
t
e:
Take care
to
remember your password. If you forget
it
,
you will
not
be able
t
o
use your phone. You will have
to contact
your service provider
to
unlock
it
.
PIN
Code
A PIN is
attached
to
a SIM card. If
the
SIM
card is moved
to
another phone,
the
same PIN will still
be required in order
to
make calls. When you assign a PIN
t
o
your SIM card, you will need
to
enter
the
PIN code when
the
phone is powered
on.
Without
the
PIN code,
the
phone will only be able
to
make emergency
calls.The
default
PIN is assigned by
the
service pro
vider
.
From
the
home screen, select Main Menu
>
Se
t
tings
>
Security
Se
t
tings
>
Lock
Se
t
tings
>
PIN Lock
to
enable
or
disable
the
PIN
code.
From
the
home screen, select Main Menu
>
Se
t
tings
>
Security
Se
t
tings
>
Change Codes
> PIN
code to
change
the
PIN
code.
No
t
e:
If you change
the
PIN
code, please remember
the
new
number
.
If you
enter
the
wrong PIN code
ten
times in a
r
o
w
,
the
phone will lock
the
SIM card and pr
ompt
you
to
enter
a PUK
code
to
unlock
it
.
Settings
49
50
Settings
PIN2 and PUK Codes
PIN2 codes are used
for
some settings. To change
the
PIN2 code, use
the
same
procedure
as outlined above
for the
PIN
code.
A PUK
code is
the
unlock code
for the
SIM card. This code can be used
to
unlock
a
SIM card when you have
entered
the
wrong PIN code 10 times. When you
enter
the
correct
PUK code, you will be able
to
re-assign a new PIN code, after which
the SIM
card can be used normally
.
Contact your
service provider
for
more
information.
A PUK
code can only
be entered
10 times in a
r
o
w
.
If you enter
the
wrong PUK
code
more than 10 times,
the
SIM
card will be locked
indefinit
ely
.
No
t
e:
If a PUK
code is supplied with your
SIM card, store
it
s
ecur
ely
.
Fixed
Dialing
If you set Fixed Dialing Status
to
On, you can only dial numbers on
the
Fixed
Dialing
Numbers
list
.
You will need
to
enter your
PIN2 code
to
use this
feature.
Master
Clear/Reset
The Master Clear
function
will clear all user
data and reset
the
phone
to factory
default settings. The Master Rese
t
function
will only reset
the
phone
to factory
default
settings.
AT&T
Software Upda
t
e
This
function
will
automatically check
for
updated software
for the
phone.
If
updated software
is available,
it
will download and install
the software.

Customization
51
Cust
omiz
a
tion
My Menu allows you
to
customize shortcuts
to
frequently used functions
on
your phone. From
the
home screen, press
the
L
e
f
t
So
f
t
Key
for
Go
T
o
.
My
Menu
displays
the
list
of
menu
shortcuts.
Using
the
keypad, press
the
number
of the shortcut to
access
it
immedia
t
ely
.
To add a
shor
t
cut
,
use
the 4-Way
Navigation Key
to
highligh
t
a slot
designated
as E
m
pty
.
Press
the
L
e
f
t
So
f
t
Key
for Options
and press
the
OK Key
to
A
s
sign
.
Choose
from the
list
of
Main Menu items and press
the
L
e
f
t
So
f
t
Key
to Assign
the
shor
t
cut
.
To remove a feature
from the
My Menu
list
,
press
the
L
e
f
t
So
f
t
Key
for
O
p
tions
and choose Remove
>
OK
.

52
Accessibility
A
cces
sibilit
y
TTY
Mode
Your handset is a
TTY-compatible device. Simply
connect the
TTY
equipment
t
o
the
headset
jack.
From
the
home screen, select Main Menu
>
Se
t
tings
>
Phone
Se
t
tings
>
TTY
Se
t
ting
.
Select one
of the
following options and press
the
OK
K
e
y
.
Full: Users who cannot
t
alk
or
hear may use this setting
to
send and receive
t
e
xt
messages through TTY
equipmen
t
.
Read
&
Talk: Users who can
t
alk,
but
cannot
hear
,
may use this setting
to talk
through
the
phone and receive responses via
text message.
Write &
Hear: Users who can
hear
,
but
cannot
t
alk,
may use this setting
to listen
to the other
party and respond via
text message.
Off:
Disable TTY
suppor
t
.
HAC
(Hearing Aid Compatibility) Mode
This phone supports HAC
(Hearing Aid Compatibility). When you
turn
on
HAC
Mode and use a hearing aid with a
telecoil
to
answer
the
phone,
it
will help you
hear
more
clearly
.
For more detailed information on
HAC, please refer
to
“Turn on
the
HAC Setting” under Care and Main
t
enance
in this
manual.
From
the
home screen, select Main Menu
>
Se
t
tings
>
Phone
Se
t
tings
>
T-coil
Se
t
ting
.
Press
the
OK Key
to
enable
or
disable
the T-coil
Se
t
ting
.
Your Z432 has been
tested for
hearing-aid device compatibility and
has
an
M3/T3
rating.
Care and
Maintenance
53
Care
and
Main
t
enance
General
Care
Your
handset contains delicate electronic
cir
cuitry
,
magnets, and a
Lithium-Ion
ba
tt
ery
.
You should
treat it
with care and give
particular
attention to the following
points:
•
D
o
not
allo
w
the
hands
et
,
ba
ttery
,
or
access
ories
t
o
come
in
t
o
con
t
act
with
liquids
or
moisture
at
any time. Do
not
immerse
the
handset in any
liquid.
•
D
o
not
place
the
hands
et
alongside
comput
er
disks,
cr
edit
car
ds,
and
other
magnetic media. The
information contained on
disks
or
cards may be aff
ect
ed
by
the
hands
et
.
•
D
o
not
pain
t
the
hands
et
.
•
D
o
not
lea
v
e
the
hands
et
or
the
ba
ttery
in
places
wher
e
the
t
emper
a
ture
could
e
x
ceed
113°F
(45°C),
f
or
e
x
ample,
on
a
car
dashboar
d
or
a
windo
wsill,
behind
glass in
direct
sunligh
t
,
etc.
•
D
o
not
r
emo
v
e
the
hands
et’s
ba
ttery
while
the
hands
et
is
swit
ched
on.
•
T
ake
car
e
not
t
o
allo
w
metal
objects,
such
as
coins
or
k
e
y
rings,
t
o
con
t
act
or
short-circuit
the
battery
terminals.
•
D
o
not
dispo
s
e
o
f
ba
ttery
packs
in
a
fire.
Y
ou
can
dispo
s
e
o
f
the
hands
et’s
Lithium-Ion battery
safely
at
a Lithium-Ion recycling
cen
t
er
.
•
D
o
not
put
the
hands
et’s
ba
ttery
in
your
mouth,
as
ba
ttery
electr
oly
t
es
ma
y
be
toxic if swallowed.
•
D
o
not
a
tt
empt
t
o
dis
ass
emble
the
hands
et
or
any
o
f
its
access
ories.
•
D
o
not
put
a
ba
ttery
in
t
o
a
micr
o
w
a
v
e
ov
en,
dry
er
,
or
high-pr
essur
e
con
t
ainer
.
•
D
o
not
connect
a
ba
ttery
dir
ectly
t
o
an
electrical
outlet
or
the
cig
ar
ett
e
ligh
t
er
port of
a
car
.
Use
only approved charging
units.
Care and
Maintenance
53
•
D
o
not
pier
ce
a
ba
ttery
with
a
sharp
object
such
as
a
needle.
•
W
hen
dispo
sing
o
f
a
ba
ttery
,
be
sur
e
it
is
nonconducting
b
y
applying
vin
yl
t
ape
t
o
the
(+) and
(-) terminals.
•
D
o
not
a
tt
empt
t
o
dis
ass
emble
or
modify
the
ba
ttery
.
•
D
o
not
dr
op
or
thr
o
w
the
hands
et
.
•
D
o
not
subject
the
hands
et
t
o
harsh
tr
ea
tmen
t
.
•
St
op
using
the
ba
ttery
if
y
ou
notice
it
becoming
abnormally
hot
,
or
if
y
ou
notice
any odor
,
discoloration, deformation,
or
anything abnormal occurring
when
using
the
phone, charging
the
ba
tt
ery
,
or
when
the
phone and/or battery
are
idle.
•
In
the
unlik
ely
e
ven
t
o
f
a
ba
ttery
leak,
k
eep
the
ba
ttery
dis
char
g
e
aw
a
y
f
r
om
your
eyes and skin. If
the
leakage does
come into contact
with your eyes
or
skin,
flush
thoroughly with clean
w
a
t
er
and seek
immediate medical
attention.
•
D
o
not
us
e
a
damag
ed
or
def
ormed
ba
ttery
.
•
D
o
not
s
older
a
ba
ttery
.
•
W
hen
a
ba
ttery
has
r
eached
the
end
o
f
its
us
able
life
cycle,
immedia
t
ely
r
emo
v
e
it from
any
equipmen
t
.
•
The
earpiece
ma
y
become
w
arm
during
normal
us
e.
Als
o
,
the
hands
et
ma
y
become warm while
the
battery
is being
char
g
ed.
•
W
hen
a
hands
et
is
in
vibr
a
tion
mode,
the
vibr
a
tion
can
s
ometimes
caus
e
the
handset
to move.
•
Be
caref
ul
not
t
o
place
the
hands
et
near
hea
t
s
our
ces
(such
as
a
hea
t
er)
or
t
oo
close
to the
edge
of
a
table.
•
Use
a
damp
or
an
ti-sta
tic
cloth
t
o
clean
the
hands
et
.
D
o
not
us
e
an
or
dinary
dry
cloth or
electrostatic cloth. Do
not
use chemical
or
abrasive cleaners as
these
could damage
the casing.
•
The
us
e
o
f
thir
d-par
ty
equipmen
t
,
cables,
or
access
ories
not
made
or
authorized by
the
manufacturer may
in
valida
t
e
the
warranty
of
your
handset
and may damage
the
hands
et
.
54
Care and
Maintenance
•
Remember
t
o
make
backup
copies
o
f
all
impor
t
an
t
da
t
a
st
or
ed
on
your
hands
et
.
•
The
car
dboar
d
packing
supplied
with
this
hands
et
is
r
ecy
clable.
Caution:
There
is
a
risk
of
e
xplo
sion
if
the
ba
tt
er
y
is
replaced
with
an
incorrect
t
ype.
Dispo
se
of
used
ba
tt
eries
according
t
o
the
instructions.
General
Guidelines
•
Unauthorized
duplica
tion
o
f
cop
yrigh
t
ed
ma
t
erial
is
pr
ohibit
ed
b
y
law
in
most
countries. Please check
the
laws in your country concerning
the
use o
f
copyrighted
material.
•
Man
y
jurisdictions
ha
v
e
laws
and
r
eg
ula
tions
r
estricting
or
pr
ohibiting
the
us
e
of
camera and video equipment
in public
or
private
areas. Some
jurisdictions
restrict or
prohibit
the
distribution,
displa
y
,
pr
ocessing
,
and general use o
f
photographs
or
videos based on where they were captured. Users are
strongly
encouraged
to
obey all laws and
to
respect
the
personal rights
of others.
•
Pleas
e
check
with
your
s
ervice
pr
o
vider
r
eg
ar
ding
r
oaming
sur
char
g
es
and
network
a
v
ailability
.
Coverage may
not
be available in some
areas.
•
The
us
e
o
f
mobile
phones
is
not
allo
w
ed
in
s
ome
ar
eas,
such
as
ho
spit
als,
research
cen
t
ers,
and airplanes. The user is
ultimately
responsible
for making
sure
that the
device is
completely powered o
ff
.
If there is any
uncertainty
about
this, remove
the
battery
from the
hands
et
.
•
O
b
s
erve
any
sig
ns
tha
t
indica
t
e
a
pr
ohibition
or
r
estriction
o
f
mobile
phone
us
e
(such as those near gas
stations
or
explosives) and when
indicated, power o
ff
the
handset
or
device
immedia
t
ely
.
•
If
y
ou
ha
v
e
a
hear
t
condition,
consult
your
ph
ysician
befor
e
using
a
mobile
phone.
•
K
eep
the
hands
et
,
char
g
er
,
and
ba
tt
eries
aw
a
y
f
r
om
childr
en.
•
D
o
not
us
e
the
hands
et
wher
e
blasting
is
in
pr
o
g
r
ess.
Care and
Maintenance 55
56
Care and
Maintenance
]
•
D
o
not
try
t
o
make
a
call
while
the
t
emper
a
ture
o
f
the
ba
ttery
is
abo
v
e
113°F
(45°C).
•
T
ake
car
e
not
t
o
put
your
hands
et
in
your
back
pock
et
and
then
sit
on
it
.
Als
o
,
do not put
your phone
at the bottom of
a bag where
it
may be subjected
t
o
excessive w
eigh
t
or
pressure. Doing so may damage
the
LCD and camera
lens.
•
The
oper
a
tion
o
f
s
ome
medical
electr
onic
de
vices,
such
as
hearing
aids
and
pacemakers, may be
affected if
a handset is
used in close proximity with
them.
Observe any warnings
and recommendations
from the
manufacturer
of any
such
device.
•
D
o
not
lea
v
e
the
hands
et
dis
char
g
ed
or
without
a
ba
ttery
f
or
a
long
time;
otherwise,
data may be
erased.
•
Y
our
phone
con
t
ains
met
al;
individuals
with
cer
t
ain
conditions
ha
v
e
been
kno
wn
to
develop an itch, rash,
or
eczema
from
exposure
to
certain
metals.
CTIA
Requirements
•
D
o
not
dis
ass
emble
or
open,
crush,
bend
or
def
orm,
punctur
e
or
shr
ed.
•
D
o
not
modify
or
r
emanuf
actur
e,
a
tt
empt
t
o
ins
er
t
f
or
eig
n
objects
in
t
o
the
ba
tt
ery
,
immerse
or
expose
to
w
a
t
er
or other
liquids, expose
to
fire, explosion,
or
other hazards.
•
O
nly
us
e
the
ba
ttery
in
the
syst
em
f
or
which
it
is
specified.
•
D
o
not
shor
t-
cir
cuit
a
ba
ttery
or
allo
w
metallic
conductiv
e
objects
t
o
con
t
act
battery
terminals.
•
Replace
the
ba
ttery
only
with
another
ba
ttery
tha
t
has
been
appr
ov
ed
f
or
the
device per this standard:
IEEE-St
d-
1725-2006
.
Use
of
an unapproved
battery
may present
the
risk
of
fire, explosion, leakage,
or other hazard.
56
Care and
Maintenance
•
Pr
omptly
dispo
s
e
o
f
us
ed
ba
tt
eries
in
accor
dance
with
local
r
eg
ula
tions.
Care and
Maintenance
57
•
Ba
ttery
us
ag
e
b
y
childr
en
should
be
supervis
ed.
•
A
v
oid
dr
opping
the
phone
or
ba
ttery
.
If
the
de
vice
or
ba
ttery
is
dr
opped,
especially on a hard surface,
t
ak
e
it to
a service
center
for inspection.
•
Impr
oper
ba
ttery
us
e
ma
y
r
esult
in
a
fire,
e
xplo
sion,
or
other
haz
ar
d.
•
F
or
de
vices
tha
t
utiliz
e
a
USB
por
t
as
a
char
ging
s
our
ce,
the
de
vice’s
us
er
manual
shall include a
statement
to the effect that the
phone shall only be
connected
to
CTIA
certified adapters,
products that
bear
the
USB-IF
lo
g
o
,
or products
tha
t
have
completed the
USB-IF
compliance pro
g
r
am.
Aircraft
Saf
et
y
•
W
hen
tra
v
eling
b
y
air
,
po
w
er
o
ff
your
phone
prior
t
o
t
akeo
ff
.
•
O
bey
all
po
st
ed
sig
ns
and
cr
ew
instructions
r
eg
ar
ding
the
us
e
o
f
mobile
phones
on
the
air
cr
aft
.
•
Be
sur
e
t
o
check
the
alarm
s
ettings
t
o
ensure
tha
t
the
phone
will
not
automatically power on during
the
fligh
t
.
Hospital
Saf
et
y
•
Swit
ch
o
ff
your
phone
and
r
emo
v
e
the
ba
ttery
in
ar
eas
wher
e
the
us
e
o
f
mobile
phones is
prohibited.
•
F
ollo
w
all
instructions
r
eg
ar
ding
the
us
e
o
f
hands
ets
in
a
medical
f
acility
.
58
Care and
Maintenance
Road
Saf
et
y
•
Y
ou
must
e
x
ercis
e
proper
con
tr
ol
o
f
your
v
ehicle
a
t
all
times.
Give
your
f
ull
attention to driving.
•
Pull
ov
er
t
o
the
side
o
f
the
r
oad
and
park
befor
e
making
or
answ
ering
a
call,
if
driving conditions require
it
.
•
O
bey
all
local
laws
r
eg
ar
ding
the
us
e
o
f
hands
ets
while
driving.
•
D
o
not
st
op
on
the
har
d
shoulder
o
f
a
highw
a
y
t
o
answ
er
or
make
a
call,
e
x
cept
in
an
emer
g
ency
.
•
Swit
ch
o
ff
your
hands
et
a
t
a
g
as
st
a
tion,
e
ven
if
y
ou
ar
e
not
r
ef
ueling
your
car
.
•
D
o
not
st
or
e
or
carry
flammable
or
e
xplo
siv
e
ma
t
erials
near
the
hands
et
.
•
Electr
onic
v
ehicle
syst
ems,
such
as
an
ti-lock
brak
es,
speed
(cruis
e)
con
tr
ol,
and
fuel injection systems are
not
normally
affected
by radio transmissions.
Observe
all warnings
from
your vehicle’s manufacturer
regarding
the
use
of mobile
phones and possible in
t
er
f
er
ence.
If you observe your vehicle
functioning
incorrectly and suspect
that it
may be related
to
interference
from the
hands
et
,
do not
switch on
the
handset in
or
near
the
vehicle until
the
vehicle has
been
checked by a qualified service
technician.
Vehicles Equipped
with Airbags
An airbag
infla
t
es
quickly and with
g
r
ea
t
force. Do
not
place any objects,
including
installed
or
portable
wireless
equipmen
t
,
in
the
area above
the
airbag
or
in
the
airbag
deployment
area. If in-vehicle wireless
equipment
is
improperly
installed
and
the
airbag
infla
t
es,
serious injury
or
death could r
esult
.
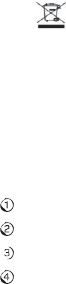
Care and
Maintenance
59
Declaration of
C
onf
ormit
y
We declare under our sole responsibility
that
the product(s) detailed in this
manual,
and in combination with our
accessories,
conform to
the essential
requirements
of
European Union Directive 1999/5/EC Radio
and Telecommunications
Terminal
Equipment
Directive requirements
3
.
1(a),
3
.
1(b),
3
.2.
Disposing
of
Your
Phone
The
symbol on
the
equipment indicates
that it must
be collected
separately
from
regular
trash.
Contact
your local authorities
for
more information about approved
disposal
methods,
or
t
ak
e
it to
a local electronics retailer
for
proper disposal
or
r
ecy
clings.
Emergency
Service
No
t
e:
Emergency service numbers vary by
coun
try
.
To make an emergency call in any
country:
Ensure
that
your handset is turned on and in
service.
Press
the
End Key as many times as needed
to
return
to the
home
screen.
En
t
er
the
local emergency number
for
your current location
(for
example, 911).
Press
the
Send Key
to
dial
the
number
.
Follow
the
instructions you receive
and
do not
end
the
call until
told to do
s
o
.
When
the
SIM card is
not
inserted
or
when
the
Phone Lock
function
is
activated
and you
do not
know
the
password, press
the
L
e
f
t
So
f
t
Key
for
SOS
and enter
the
emergency number
for
your location. Press
the
Send Key
to
dial
the
number
.
60
Care and
Maintenance
No
t
es:
•
T
ell
the
oper
a
tor
which
s
ervice
y
ou
r
equir
e:
P
olice,
F
ir
e,
or
A
mbulance.
T
ell
them
where you are and remain stationary
to
maintain
contact if possible.
•
D
ue
t
o
the
na
ture
o
f
the
cellular
syst
em,
emer
g
ency
calls
cannot
be
g
uar
an
t
eed.
You should never rely solely on any wireless device in emergency
situations.
HAC
Mode
When HAC
mode
is active, your phone sends
the
audio signals
from
your
phone
to the
telecoil rather than
to the
microphone
of
your hearing aid. The HAC
setting
only improves
the
quality
of
sound
transmitted
through
the
earpiece;
it
does
not
affect the
speakerphone
or
a
heads
et
.
•
It
is
r
ecommended
tha
t
y
ou
dis
able
Bluet
oo
th
functionality when
HAC
mode is
in
use.
•
HA
C
mode
consumes
additional
ba
ttery
po
w
er
.
Pa
y
clo
s
e
a
tt
en
tion
t
o
the
battery’s
charge level when using HAC
mode.
C
aution:
D
o
no
t
turn
on
the
HA
C
setting
unless
y
ou
use
a
hearing
aid
with
a
t
elecoil.
Using
this
setting
without
a
hearing
aid
or
with
a
hearing
aid
w
ithout
a
t
elecoil
ma
y
be
harmf
ul
t
o
y
our
hearing.

Troubleshooting and
FAQs
61
Troubleshooting and FAQs
Consult
the
following
table
for
resolutions
to common
problems. If your
particular
problem cannot be resolved using
the
information in
the
t
able,
t
ak
e
your phone
t
o
an authorized dealer
or
service
center
for assistance.
Problem
Possible
Causes
Possible
Solution
Poor
reception
The network signal is
too weak
at
your current location,
f
or
example, in a
basement
or
near a
t
all
building.
Move
to
a location where
the
network signal can be
properly
received.
The network is busy
or
overloaded.
Wait a few minutes and
try
your call
again.
Echo
or noise
on
the line
Poor
connection.
End the call and dial
again.
C
er
t
ain
phone
features
not
working
Your service provider may
not
support
some
of the features
on your phone
(e.g.
Call
Waiting
or
Call
Forwarding).
1.
Contact your
service
provider
to
determine
if
they
support the features
that
are
not working.
2.
If your service
provider
supports
the
feature and
it
still does
not
work,
t
ak
e
the
phone
to
a service
center
for assistance.

Problem
Possible
Causes
Possible
Solution
Battery
will
not
char
g
e
The
battery
or
battery
char
g
er
is
damaged.
Contact
the
dealer where
you
purchased
the
equipmen
t
.
The phone’s
temperature
is
belo
w
32°F
(0°C)
or
higher
than
113°F
(45°C).
1.
Move
the
battery
to an
environment
where
the
temperature
is
within
operating
range.
2.
Allow
time for the battery’s
temperature
to
return
t
o
normal before
attempting
to
charge
again.
Poor
contact
between
the
battery and char
g
er
.
Check and clean
all
connectors
to
ensure
g
ood
con
t
act
.
Unusually
short
battery
life
C
er
t
ain
phone
functions
consume additional
battery
po
w
er
,
such as
Bluetooth
and
HAC
mode.
Disable Bluetooth and/or
HAC
mode if
you are
not using
these
functions.
Weak network
signal.
Turn
off the
phone until
you
reach an area with a
strong
network
signal.
Phone will
not
turn on
Battery
is
depleted.
Charge
the
ba
tt
ery
.
62
Troubleshooting and
FAQs

Problem
Possible
Causes
Possible
Solution
SIM card
error
SIM
card is damaged
or
defective.
Take
the
SIM card
to
a
service
center
for testing.
SIM
card inserted
impr
operly
.
Check
to
ensure
that the
SIM card is
facing the
right
direction and
that it
is
fully
inserted into the
slot
.
Dirt or debris on the
SIM
card
contacts.
Use a s
o
ft
,
dry
cloth to clean
the
SIM card
contacts.
PIN code
is
blocked
You have
entered
an
incorrect
PIN code
ten consecutive
times.
If you have
the
SIM
card’s
PUK code, use
the
PUK
code
to
unlock
the
SIM
card.
If you
do not
have
the
PUK
code,
contact
your
service
pro
vider
.
Unable
to enter
information
into the
Address
Book
The Address Book’s
memory
is already
full.
Delete
unneeded data
f
r
om
the
Address
Book.
Troubleshooting and
FAQs 63

Specifica
tions
Handset
Standards
WCDMA:
850
MHz, 1900 MHz
GSM: 850 MHz, 900 MHz, 1800 MHz, and 1900 MHz
Dimensions
(H×W×D)
4.49" (H) x 2.4" (W) x
0
.
41"
(D)
Weight
3.34 oz. (with
battery)
Display
2.4" 262K TFT color
screen
Camera
2.0 megapixels, supports images up
to
1600
x
1200
pixels
Video
capture
Up
to
15fps
(QVGA)
Extended
memory
32 GB microSD
card
Battery
1,
000
mAh, Lithium-Ion
(Li-Ion)
Features
MMS Video and Picture, Email,
C
alendar
,
Speak
erphone,
Voice
Recor
der
,
Bluetooth
Supported file
types
Image: GIF,
JPE
G
,
PNG
,
BMP
,
Animated
GIF,
WBMP
Video
:
MP4
A
udio
:
MP3
,
AMR,
W
AV
,
ACC, ACC+,
MIDI
Continuous idle
time
Up
to
12
days and
12
hours
Continuous
t
alk
time
Approximately
4.5
hours
Charge
time
Approximately
3
hours
Miscellaneous
USB 2.0; JAVA MIDP
2.
1
No
t
e:
Talk
time
and idle
time
are based on ideal working environments.
Use o
f
certain phone functions and network conditions can reduce battery life and
talk/
idle
time.
64 Specifications

FCC
Compliance
This mobile phone complies with
part
15
of the
FCC Rules.
Operation
is subject
t
o
the
following
two conditions:
This device may
not
cause harmful in
t
er
f
er
ence,
and
This device
must accept
any
interference
received, including
interference tha
t
may cause undesired
operation.
This device has been
tested
and
found to
comply with
the
limits
for
a Class
B
digital device,
pursuant
to
P
ar
t
15
of the
FCC Rules. These limits are
designed
to
provide reasonable
protection
against
harmful interference
in a
residential
installation. This
equipment
g
ener
a
t
es,
uses,
and can radiate radio
frequency
ener
g
y
,
and
if not
installed and used in accordance with
the
instructions,
may
cause
harmful interference
to
radio communications. Ho
w
e
v
er
,
there is
no
g
uar
an
t
ee
that
interference
will
not occur
in a particular installation. If
this
equipment
does cause
harmful interference
to
radio or
t
elevision
reception,
which
can be determined by turning
the
equipment
off
and on,
the
user is encouraged
t
o
try to correct the
interference by one
or
more
of the
following
measures:
•
Reorien
t
or
r
eloca
t
e
the
r
eceiving
an
t
enna.
•
Incr
eas
e
the
s
epar
a
tion
betw
een
the
equipmen
t
and
r
eceiv
er
.
•
C
onnect
the
equipmen
t
t
o
an
outlet
on
a
cir
cuit
diff
er
en
t
f
r
om
tha
t
t
o
which
the
receiver is
connected.
•
C
onsult
the
dealer
or
an
experienced
r
adio
/T
V
t
echnician
f
or
help
.
•
Chang
es
or
modifications
not
expr
essly
appr
ov
ed
b
y
the
party
r
esponsible
f
or
compliance could void
the
user’s authority
to
operate
the
equipmen
t
.
•
The
an
t
enna(s)
us
ed
f
or
this
tr
ansmitt
er
must
not
be
co-locat
ed
or
oper
a
ting
in
conjunction with any
other
an
t
enna
or
tr
ansmitt
er
.
FCC
Compliance 65
Radio Frequency (RF)
Energy
This model phone meets
the
government’s requirements
for
exposure
t
o
radio
waves.
This phone is
designed and manufactured
not to
exceed
the
emission limits
f
or
exposure
to
radio frequency
(RF) energy set by
the
Federal
Communications
Commission
of the
U.S.
Government:
The exposure standard
for
wireless mobile phones employs a unit o
f
measurement
known as
the
Specific Absorption
Ra
t
e,
or
SAR. The SAR
limit
set
by
the
FCC is
1.
6W/k
g.*
Tests
for
SAR are
conducted
using standard
operating
positions accepted by
the
FCC with
the
phone transmitting
at
its highest
certified
power level in all
tested
frequency bands. Although
the
SAR is
determined
at the
highest certified power
level,
the
actual
SAR level
of the
phone while
operating
can be well below
the
maximum
value. This is because
the
phone is designed
t
o
operate
at
multiple power levels so as
to
use only
the
power required
to
reach
the
network. In general,
the
closer you are
to
a wireless base station
an
t
enna,
the lower
the
power
output
.
The highest
SAR
value for the model phone as reported to the FCC when
tested for use at the ear is 1.30 W/kg, and when worn on the body, as
described in this user guide, is 1.06 W/kg (body-
worn measurements
differ
among phone
models,
depending upon available
enhancements and
FCC
requirements).
While there may be differences between
the
SAR levels
of
various phones and
at
various positions, they all
meet the
government
r
equir
emen
t
.
*In
the
United
Sta
t
es
and Canada,
the
SAR limit
for
mobile phones used by
the public
is
1.
6
watts/kg (W/kg) averaged over one gram
of
tissue. The
standard incorporates
a
substantial margin
of
safety
to
give
additional
protection to the
public and
to
account
f
or
any variations in
measurements.
66
Radio Frequency (RF)
Ener
g
y
Radio Frequency (RF)
Ener
g
y
67
The FCC has
g
r
an
t
ed
an
Equipment Authorization
for
this model phone
with all
reported
SAR levels
e
valua
t
ed
as
in compliance with the FCC RF exposure
guidelines. SAR information on this model phone is on file with the FCC and
can
be
found
under
the
Display Gr
an
t
section
of
h
t
tp
://w
ww
.
f
cc.go
v/
oe
t/
ea/fccid/
after searching on FCC ID: SRQ-Z432.
For body-worn operation, this phone has been
tested
and meets
the FCC
RF e
xposure guidelines
for
use with an accessory
that
contains no metal
and
positions
the
handset a minimum
of
0
.
6
inches
(1.5
cm) from the
body
.
Use
of other
enhancements may
not
ensure compliance with
FCC RF
exposure
guidelines. If you do not use a body-worn accessory and are
not
holding
the phone
at the ear, position the
handset a minimum
of
0
.
6
inches
(1.5
cm) from
your
body
wh
en the phone is
switched
on.
Hearing Aid Compatibility (HAC) regulations for
Mobile phones
In 2003, the FCC adopted rules to make digital wireless telephones compatible with
hearing aids and cochlear implants. Although analog wireless phones do not usually
cause interference with hearing aids or cochlear implants, digital wireless phones
sometimes do because of electromagnetic energy emitted by the phone's antenna,
backlight, or other components. Your phone is compliant with FCC HAC regulations
(ANSI C63.19- 2007). While some wireless phones are used near some hearing
devices (hearing aids and cochlear implants), users may detect a buzzing, humming,
or whining noise. Some hearing devices are more immune than others to this
interference noise and phones also vary in the amount of interference they generate.
The wireless telephone industry has developed a rating system for wireless phones to
assist hearing device users in finding phones that may be compatible with their hearing
Radio Frequency (RF)
Ener
g
y
67
devices. Not all phones have been rated. Phones that are rated have the rating on
their box or a label located on the box. The ratings are not guarantees. Results will
vary depending on the user's hearing device and hearing loss. If your hearing device
happens to be vulnerable to interference, you may not be able to use a rated phone
successfully. Trying out the phone with your hearing device is the best way to evaluate
it for your personal needs.
This phone has been tested and rated for use with hearing aids for some of the
wireless technologies that it uses. However, there may be some newer wireless
technologies used in this phone that have not been tested yet for use with hearing aids.
It is important to try the different features of this phone thoroughly and in different
locations, using your hearing aid or cochlear implant, to determine if you hear any
interfering noise. Consult your service provider or the manufacturer of this phone for
information on hearing aid compatibility. If you have questions about return or
exchange policies, consult your service provider or phone retailer.
M-Ratings: Phones rated M3 or M4 meet FCC requirements and are likely to generate
less interference to hearing devices than phones that are not labeled. M4 is the
better/higher of the two ratings.
Radio Frequency (RF)
Ener
g
y
67
T-Ratings: Phones rated T3 or T4 meet FCC requirements and are likely to be more
usable with a hearing device’s telecoil (“T Switch” or “Telephone Switch”) than unrated
phones. T4 is the better/ higher of the two ratings. (Note that not all hearing devices
have telecoils in them.)
Your phone meets the M3/T3 level rating.
Hearing devices may also be rated. Your hearing device manufacturer or hearing
health professional may help you find this rating. For more information about FCC
Hearing Aid Compatibility, please go to http://www.fcc.gov/cgb/dro.
68
Warranty
W
arr
an
t
y
ZTE offers you a limited warranty
that the
enclosed subscriber unit and
its
enclosed accessories will be free
from
defects in
material and
workmanship
for a
period
that
expires one year
from the
date
of
sale
of the
Product
to
you,
provided
that
you are
the
original enduser purchaser
of the
Product and provided
that your
purchase was made
from
a supplier authorized by
the
Seller
.
Transfer
or resale
of
a Product will
automatically terminate
warranty coverage with respect
to
tha
t
Pr
oduct
.
This limited warranty is
not
transferable
to
any
third
par
ty
,
including
but
not
limited
to
any
subsequent purchaser
or
owner
of the
Pr
oduct
.
This
limited
warranty is applicable only
to
end users in
the
United
States.
1. This
product or
phone is
w
arr
an
t
ed
for
12
(twelve) months
from
date o
f
purchase.
2.
For warranty service information,
please call ZTE service number (877)
817
-
17
59
(Toll Free).
The manufacturer’s website,
h
ttp
://www
.z
t
eus
a.
com,
is
also
available
for assistance.
3
.
This warranty only applies
if the product
has been used in accordance with
the
manufacturer’s instructions under normal use and with reasonable
care.
4.
What this
warranty does
not cover:
a)
Defects
or
damages resulting
from the
misuse
of
this pr
oduct
.
b)
Defects
or
damages
from
abnormal use, abnormal conditions,
improper
storage, exposure
to
moisture, dampness
or
corrosive
environments,
unauthorized modifications, unauthorized r
epair
,
neglect
,
rough
handling
,
abuse,
acciden
t
,
alteration, improper installation, incorrect
voltage
application,
food or
liquid spoilage, acts
of God.
c)
Normal wear and
t
ear
.
Warranty
69
d)
If
the
Product has been opened, modified
or
repaired by anyone
other than
a warranty service
center
or if it
is repaired using
unauthorized spare
parts.
e)
If
the
serial number
or
mobile accessory
date code
has been
removed,
erased, defaced, altered
or
are illegible in any way subject
to
sole
judgment
of ZTE.
LIMITED
WARRANTY
TO THE EXTENT PERMITTED BY APPLICABLE
LA
W
,
THIS LIMITED
W
ARRANT
Y
IS
YOUR SOLE AND EXCLUSIVE REMEDY AGAINST ZTE AND ZTE’S SOLE
AND
EXCLUSIVE LIABILITY IN RESPECT OF DEFECTS IN
PRODUCT
.
HOWEVER,
THIS
LIMITED WARRANTY SHALL NOT EXCLUDE NOR LIMIT ANY OF YOUR
LEGAL
(STATUTORY) RIGHTS UNDER THE APPLICABLE NATIONAL
LAWS.
TO THE EXTENT PERMITTED BY APPLICABLE LAW ZTE DOES NOT ASSUME
ANY
LIABILITY FOR LOSS OF OR DAMAGE TO OR CORRUPTION OF
D
A
T
A
,
FOR
ANY
LOSS OF PROFIT
,
LOSS OF USE OF PRODUCTS OR
FUNCTIONALIT
Y
,
LOSS
OF
BUSINESS, LOSS OF REVENUES OR LOSS OF ANTICIPATED
PROFIT
,
INCREASED
COSTS OR EXPENSES OR FOR ANY
INDIRE
CT
,
OR SPECIAL OR
CONSEQUENTIAL
LOSS OR DAMAGE. TO THE EXTENT PERMITTED BY APPLICABLE
LA
W
,
Z
TE’
S
LIABILITY SHALL BE LIMITED TO THE PURCHASE VALUE OF THE
PRODUCT
.
THE ABOVE LIMITATIONS SHALL NOT APPLY TO DEATH OR PERSONAL
INJUR
Y
CAUSED BY DEFECT OF PRODUCT IN MATERIAL, DESIGN AND
W
ORKMANSHIP
.
72
Notes
How
to
Get
W
arran
t
y
Service
To obtain warranty service, please call (877)
817
-
17
59
.
Please have
the following
information
available when you send
the
phone in
for repair:
•
A
valid
Pr
oo
f
o
f
Pur
chas
e
•
Return
addr
ess
•
D
a
ytime
phone
number
or
f
ax
number
•
Model
#
•
IMEI
#
(L
ook
f
or
the
15-
digit
IMEI
#
behind
the
ba
ttery
o
f
the
de
vice.)
•
C
omplet
e
des
cription
o
f
the
pr
oblem
•
T
r
anspor
t
a
tion
pr
epaid
Other
W
arran
t
y
Program
You may have
other
warranty programs with your purchase, such as
warranty
exchange. If
s
o
,
please refer
to
equipment
package
or the
original
point of sale.