ZTE ZTE-TU25 TU25 USB Modem User Manual XCM UG fm7
ZTE Corporation TU25 USB Modem XCM UG fm7
UserManual.wiki
>
ZTE
>
ZTE-TU25 User Manual
>
Users Manual Revised
Contents
1.
Users Manual Quick Guide Revised
2.
Users Manual Revised
3.
Legal Info Insert Revised 092908
4.
Legal Guide Confirmation
Users Manual Revised
Navigation menu
Upload a User Manual
Namespaces
Wiki Guide
HTML
PDF
Info
Views
User Manual
Discussion / Help
Navigation


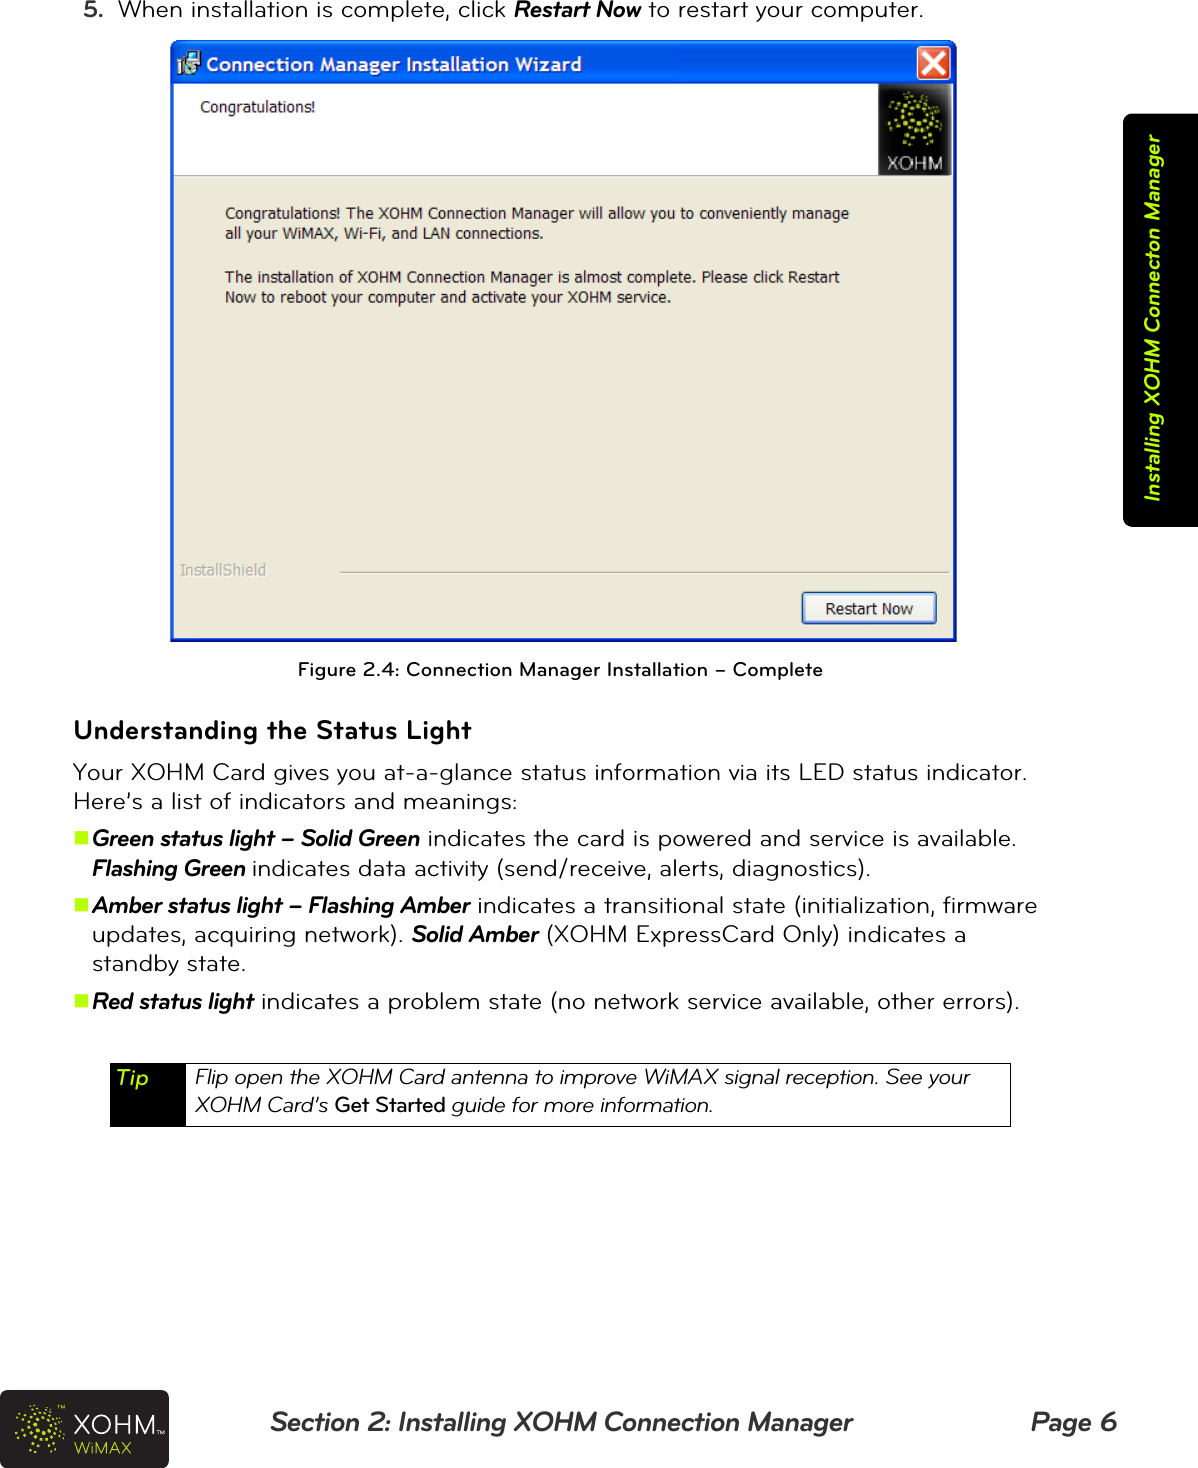
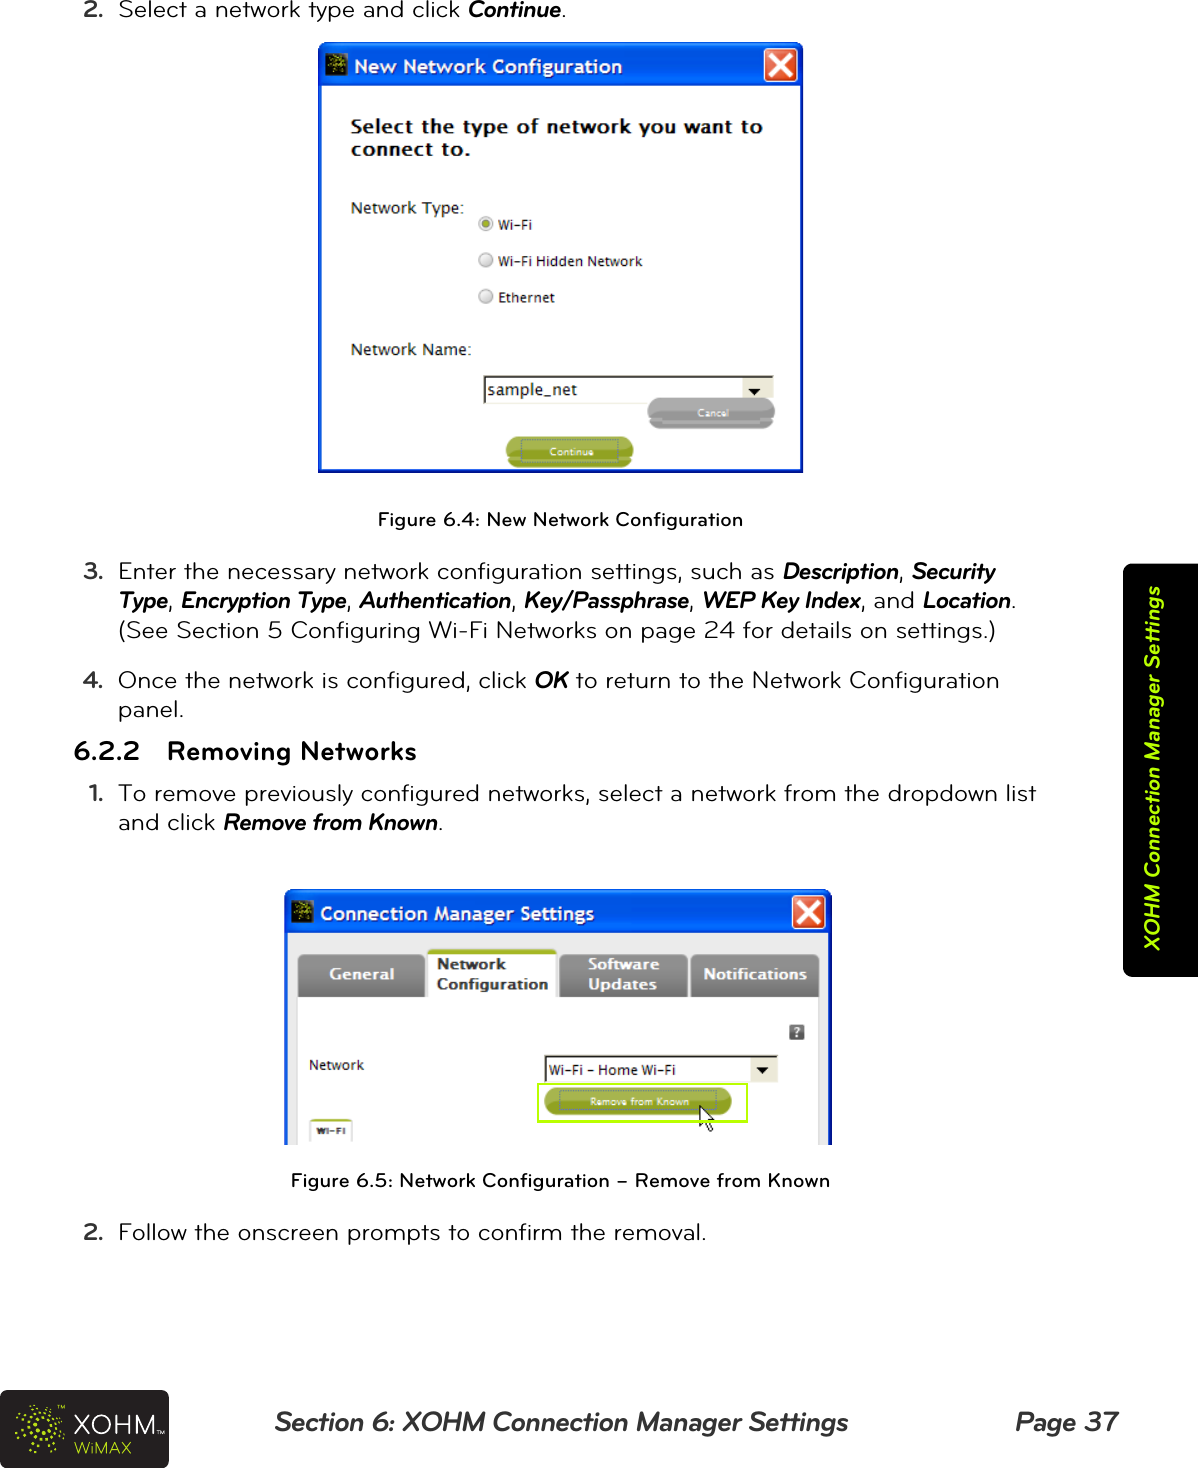
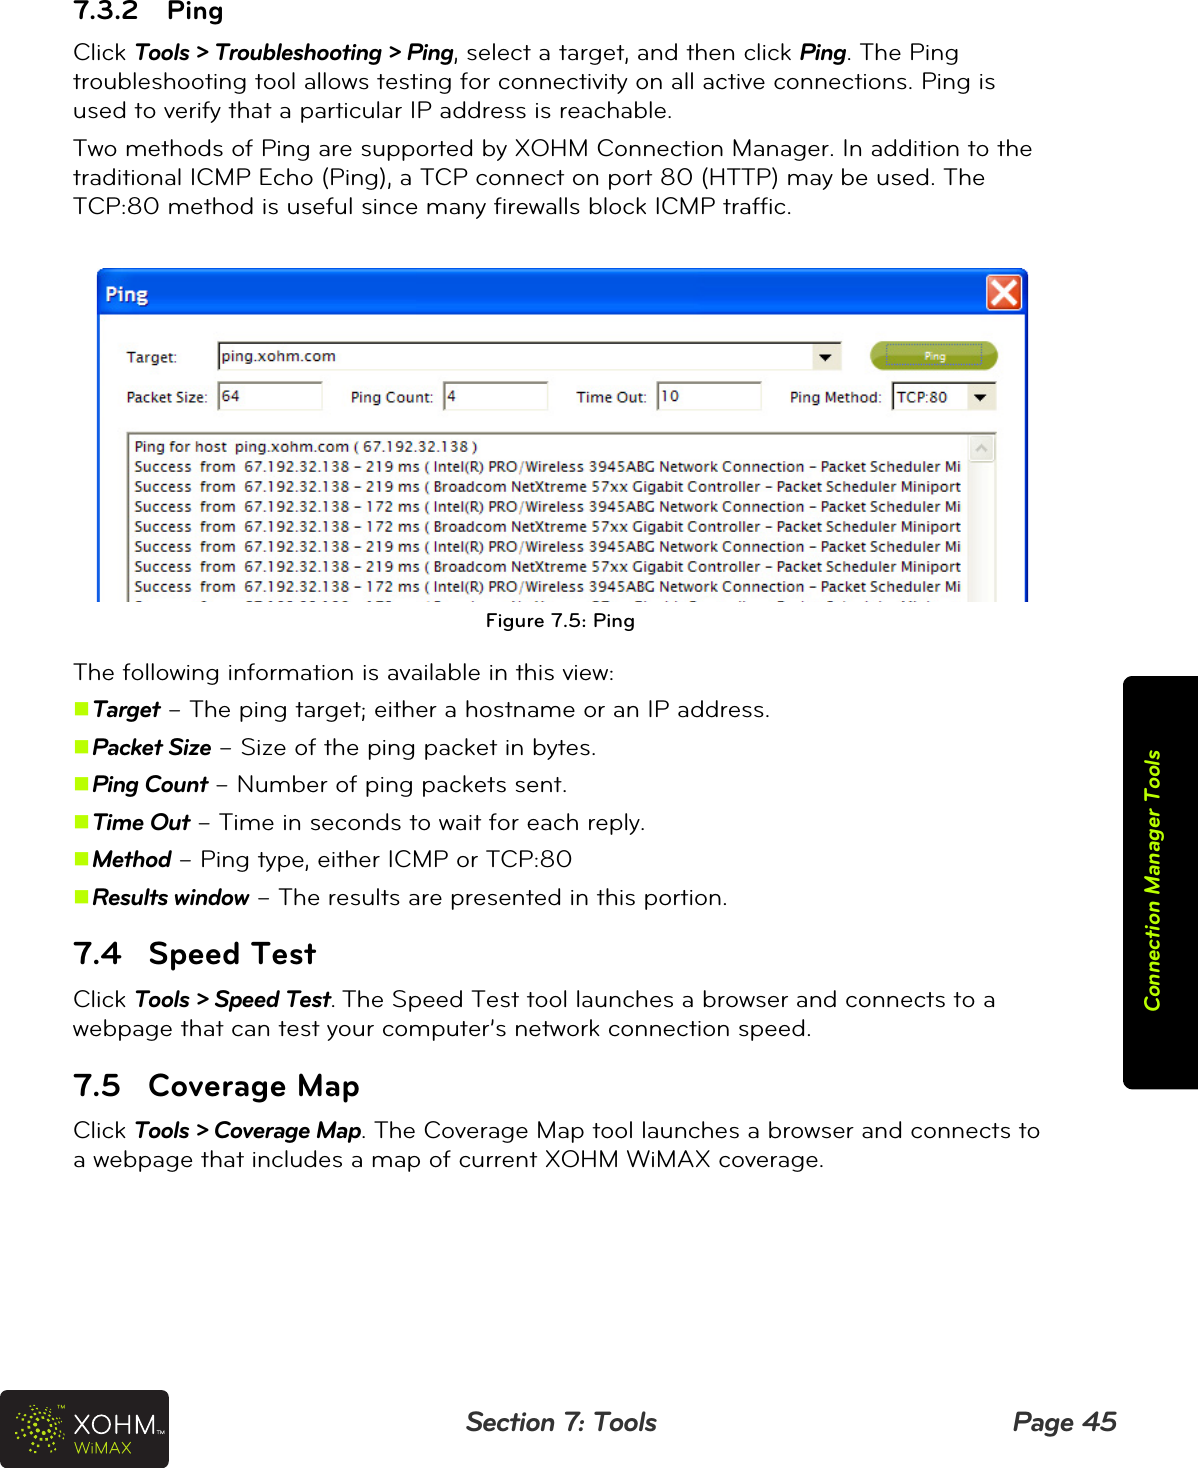
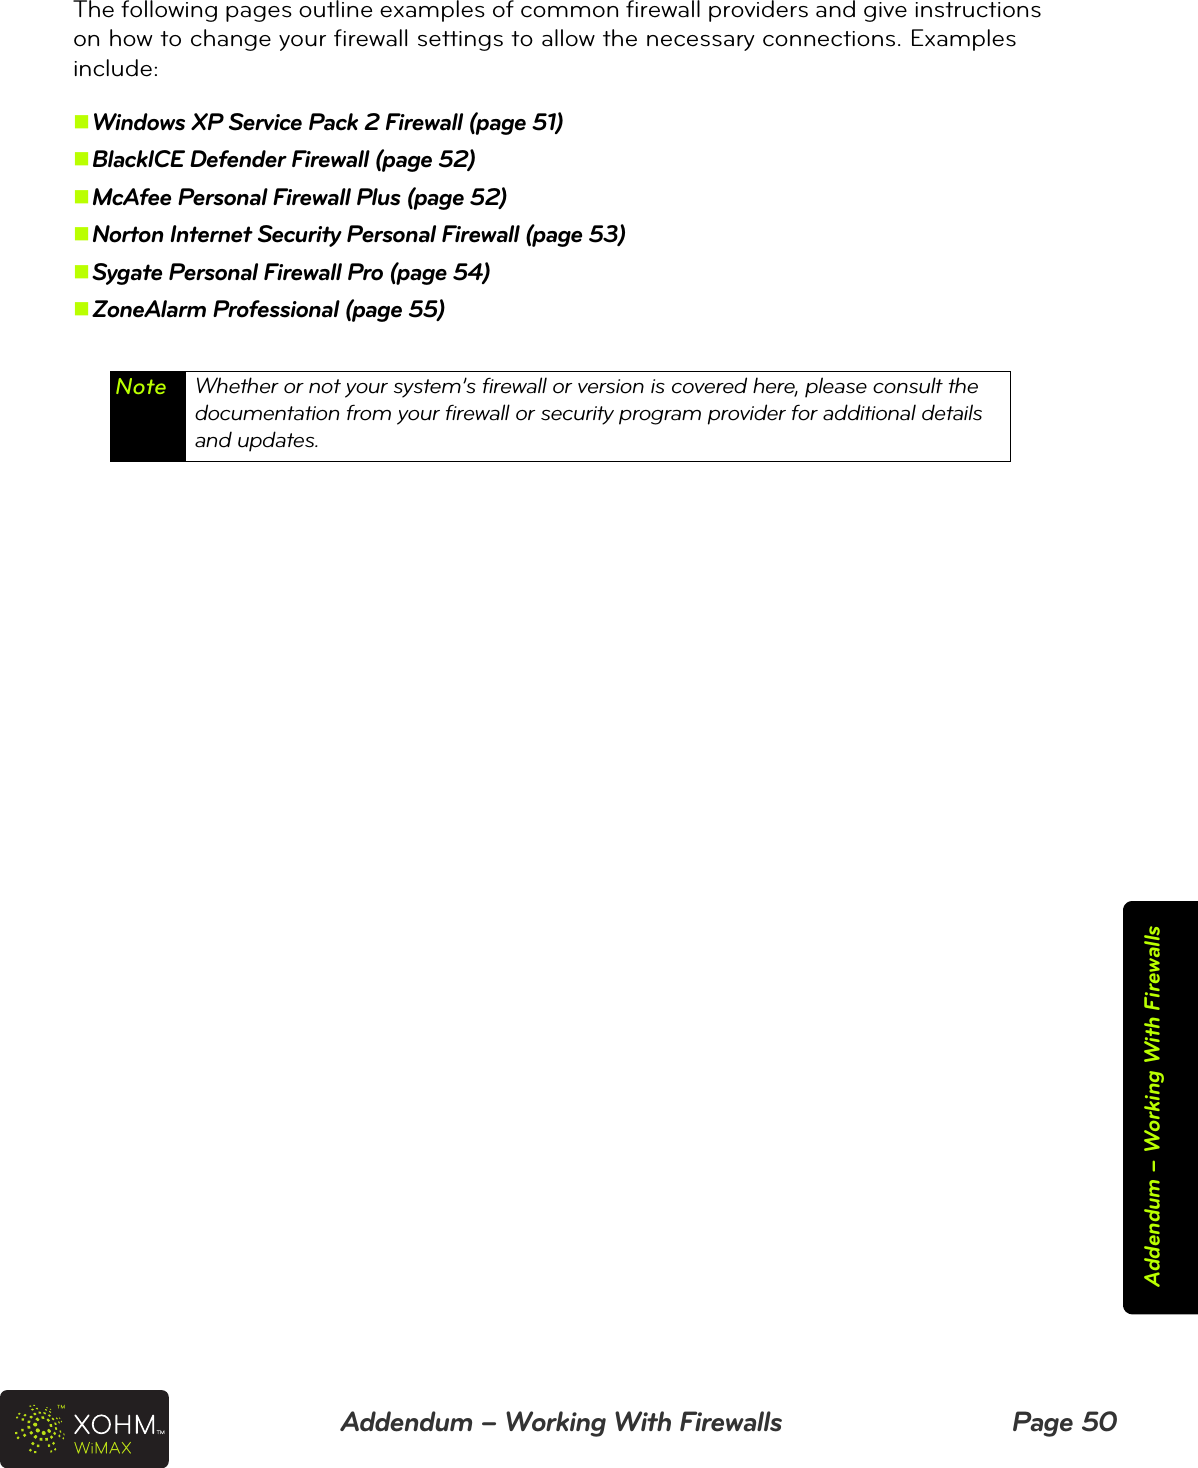
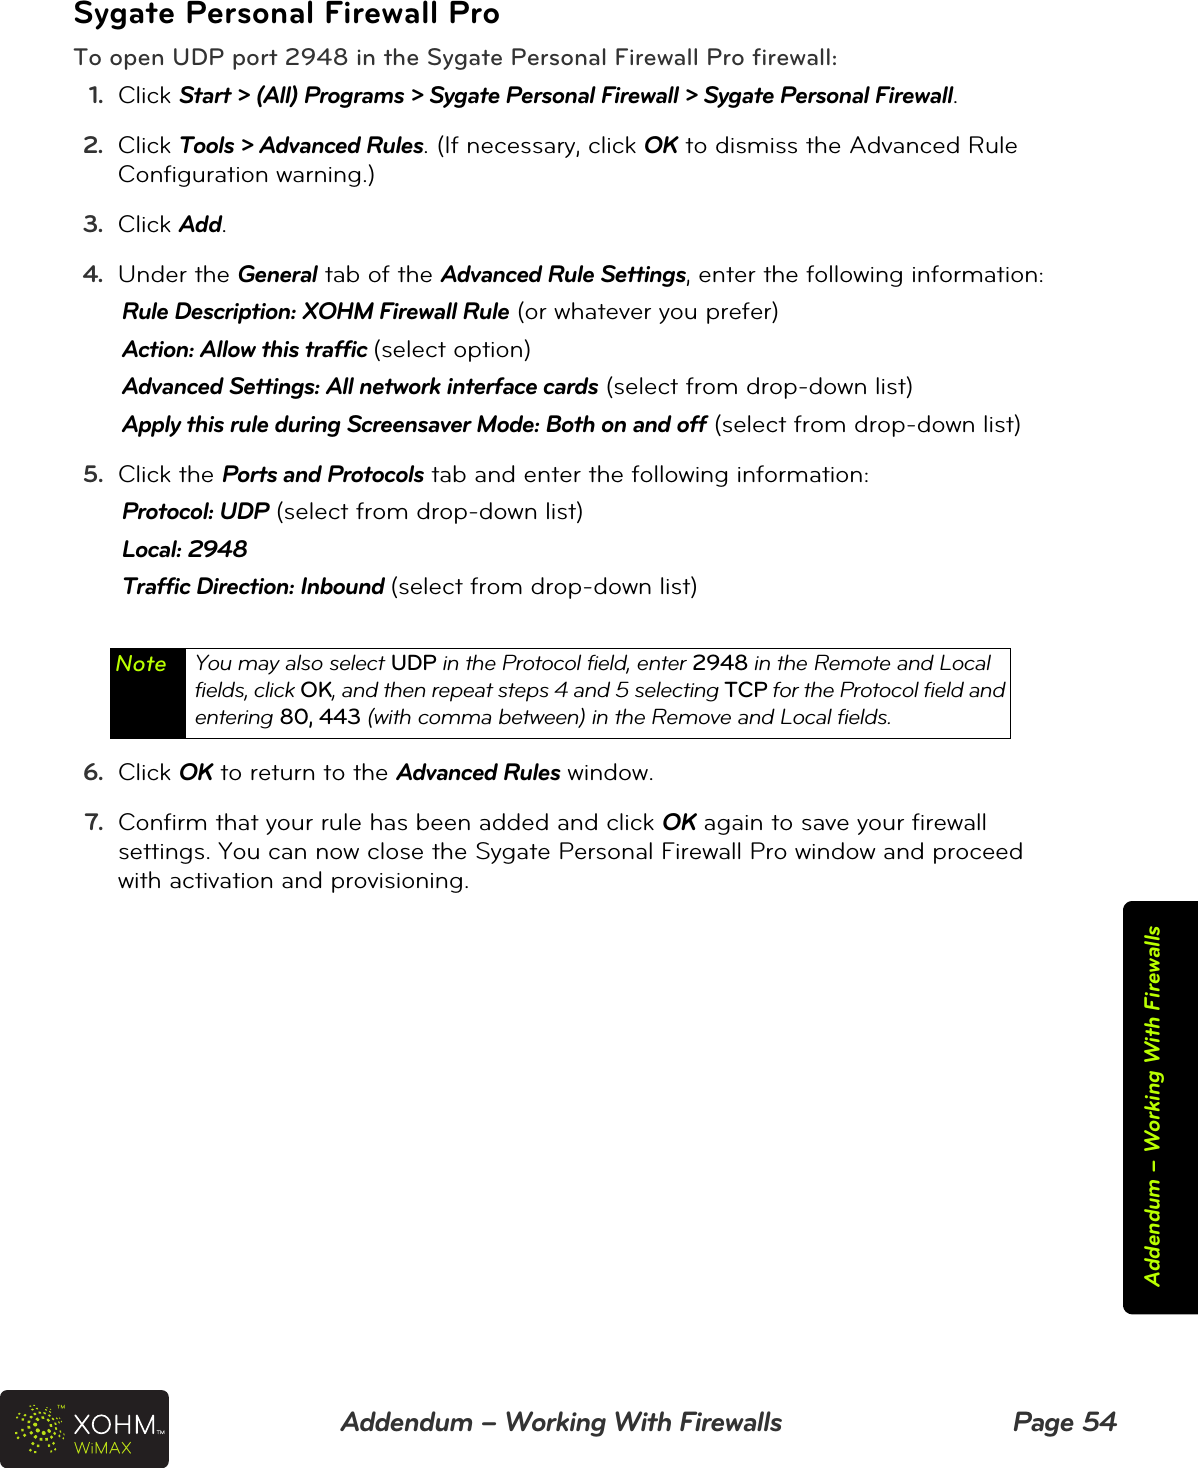
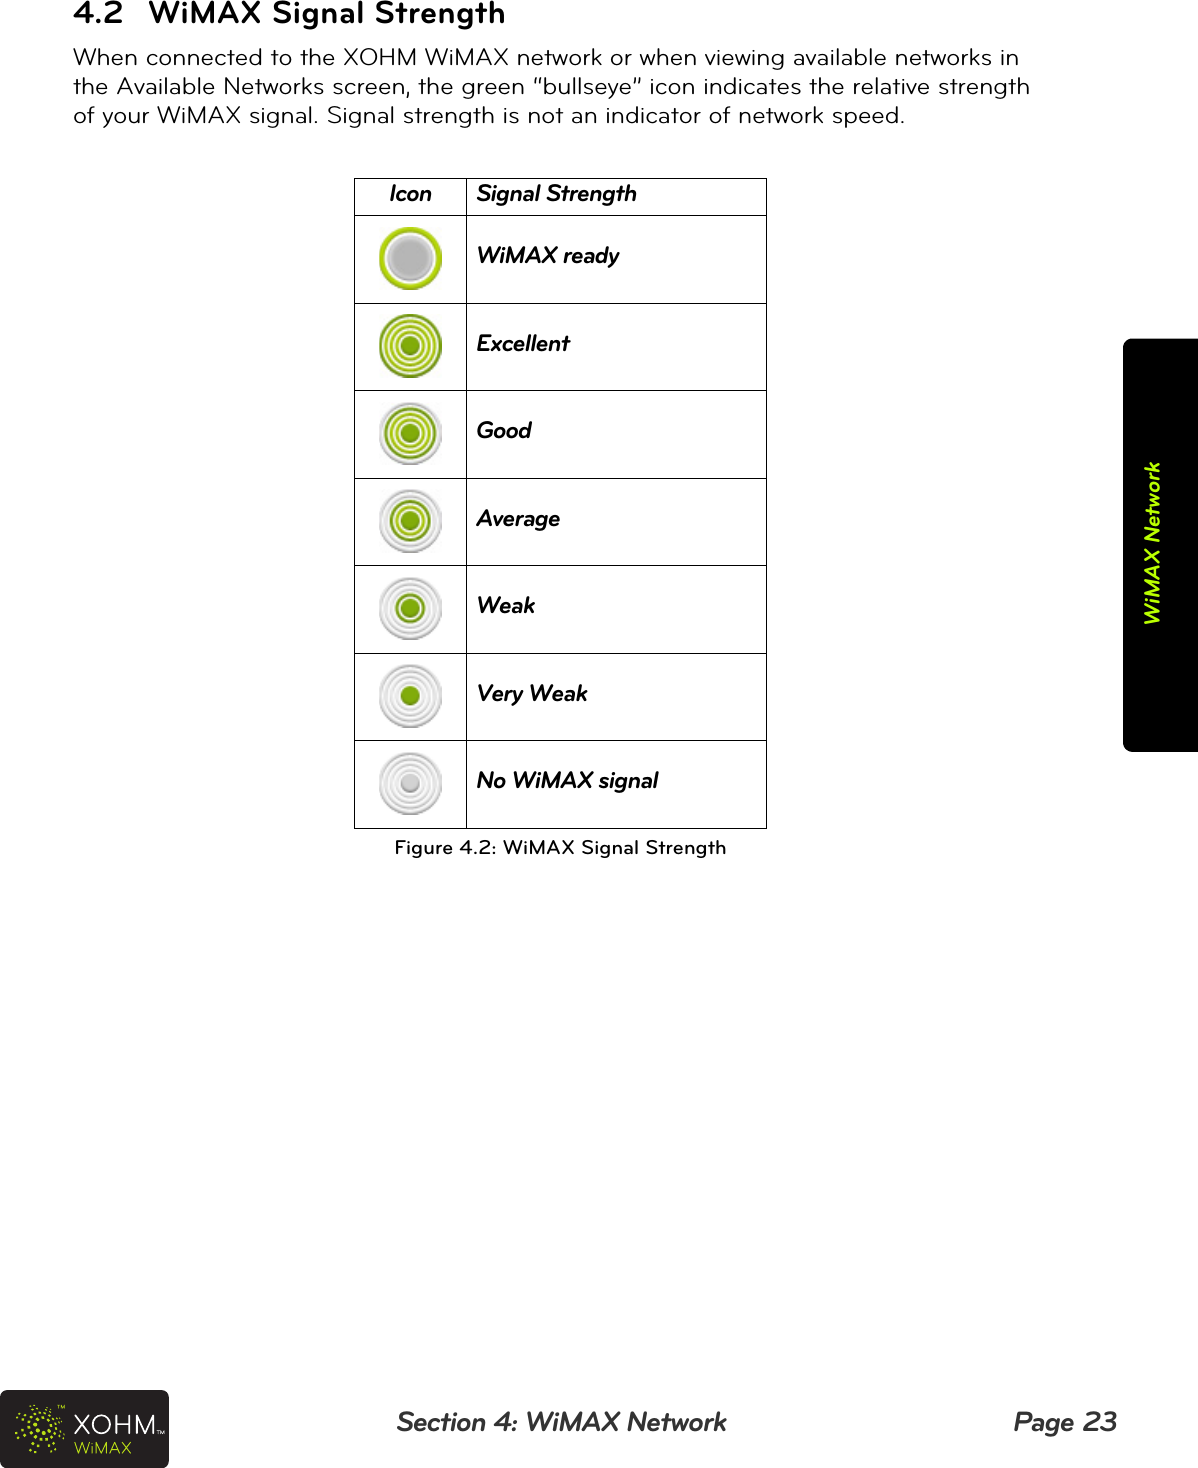
![Section 2: Installing XOHM Connection Manager Page 9Installing XOHM Connecton Manager2.5.2 Activate Outside of a XOHM Network Coverage AreaIf you are outside of an immediate XOHM WiMAX network coverage area and you have an alternate (Ethernet or Wi-Fi) Internet connection available, you can activate XOHM service once you have installed XOHM Connection Manager and inserted your XOHM Card. This lets you quickly connect to the XOHM WiMAX network once you’re in a XOHM network coverage area.1. When your computer restarts after installing XOHM Connection Manager, the program is designed to launch automatically and search for the XOHM network.zIf it is not already attached, insert your XOHM Card into your computer. The computer should automatically detect and recognize the new hardware and display an icon in the system tray.zIf your computer does not automatically launch XOHM Connection Manager, click Start > (All) Programs > XOHM > XOHM Connection Manager or double-click the XOHM Connection Manager icon ( ) on the desktop.2. When XOHM Connection Manager notifies you that the XOHM network is not available (see Figure 2.6-A), check Connect to a LAN or Connect to Wi-Fi, and then click Next. (If you select Connect to Wi-Fi, you will be prompted to set up a Wi-Fi connection). Make sure the selected Internet connection (Wi-Fi or Ethernet [LAN]) is active, and then click the onscreen Complete Registration link (see Figure 2.6-B) to go to the XOHM activation page. Figure 2.6-A: XOHM Network Not AvailableA](https://usermanual.wiki/ZTE/ZTE-TU25.Users-Manual-Revised/User-Guide-1008096-Page-12.png)
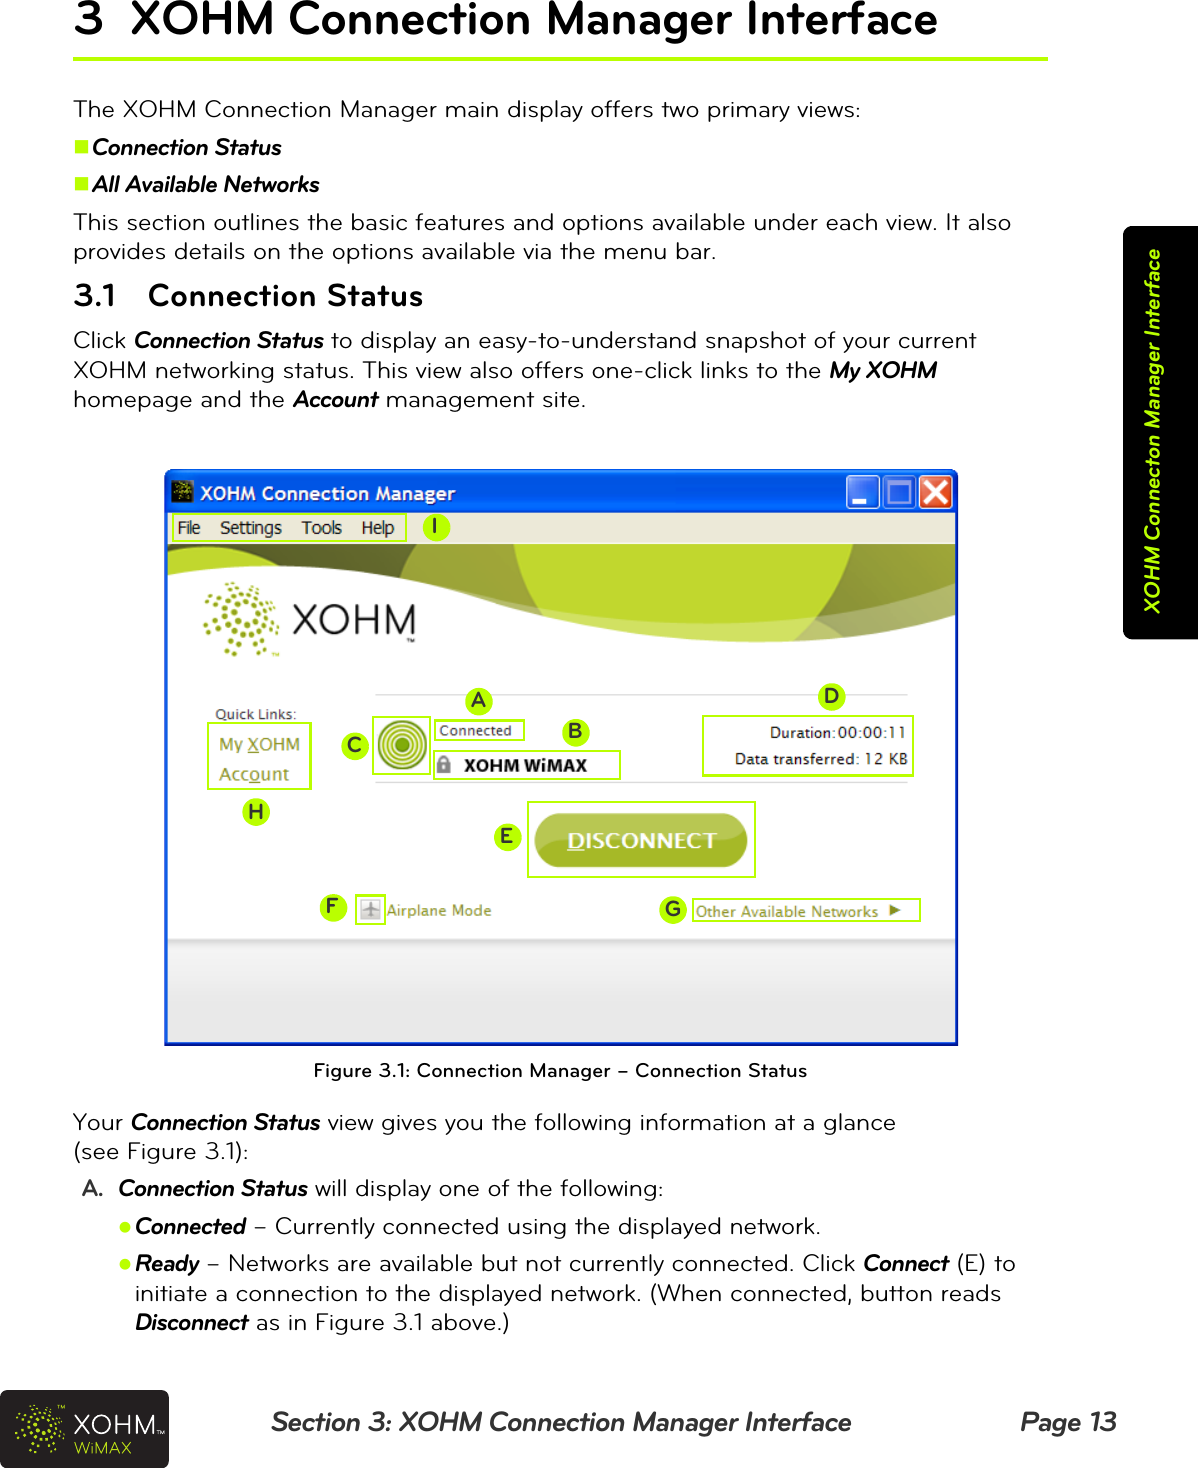
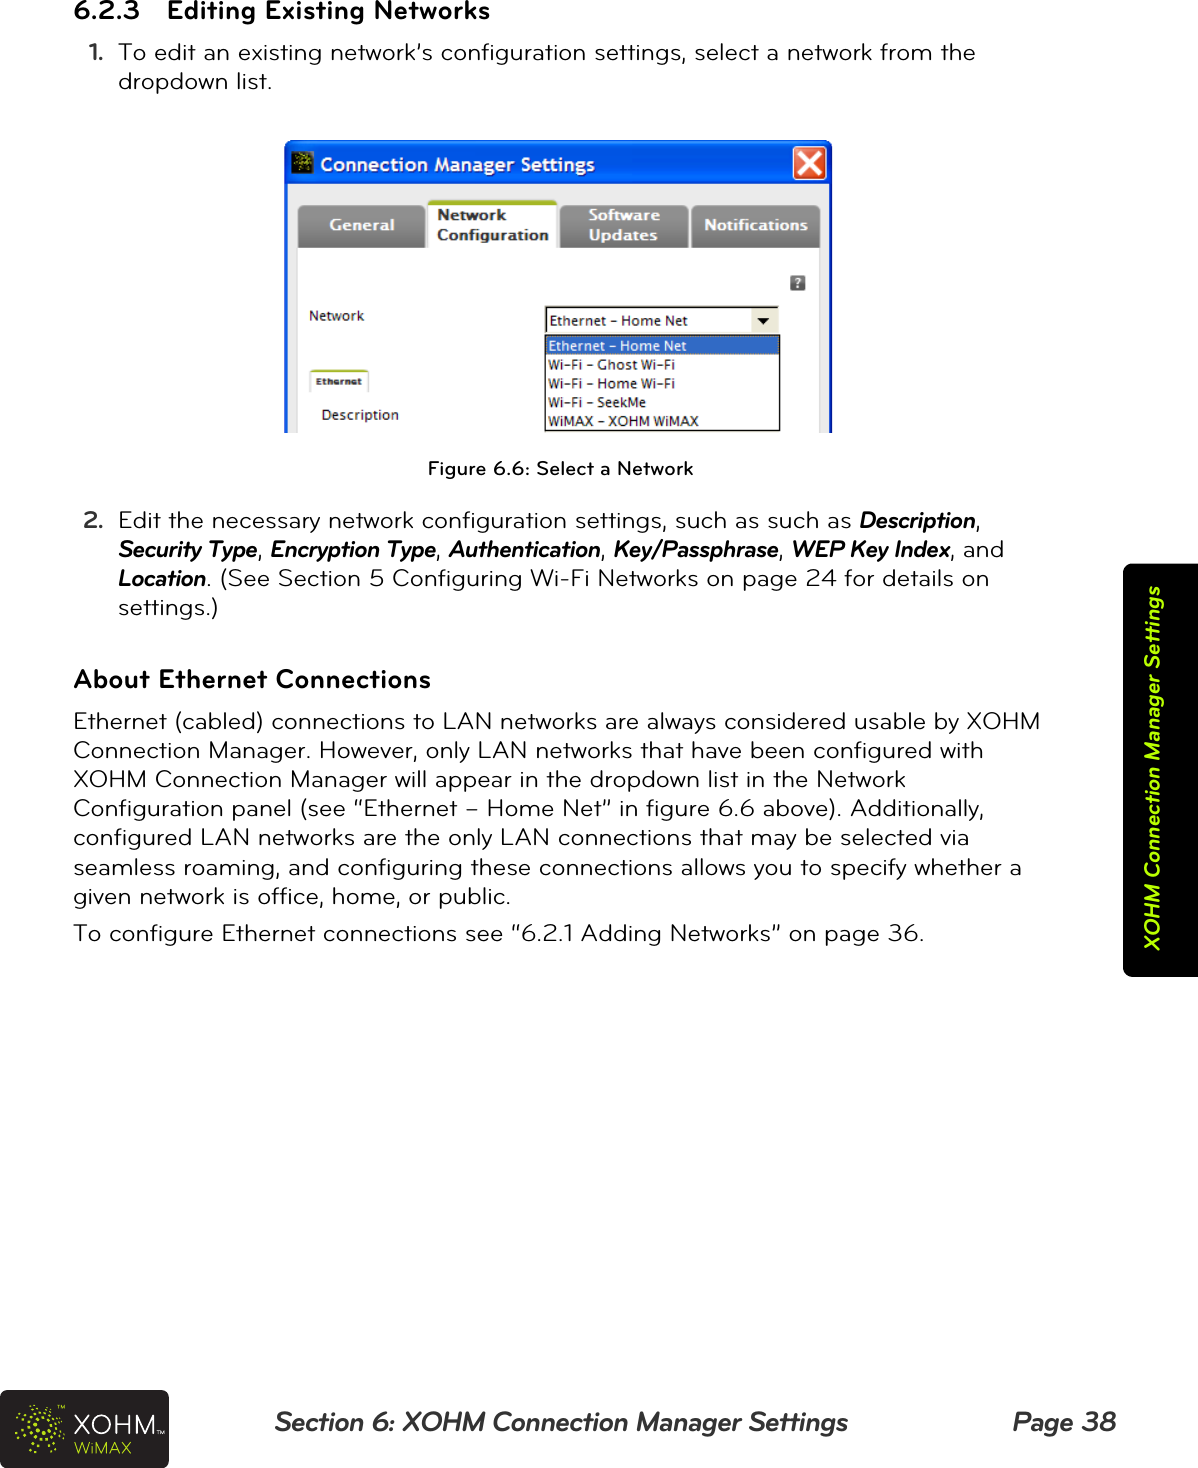
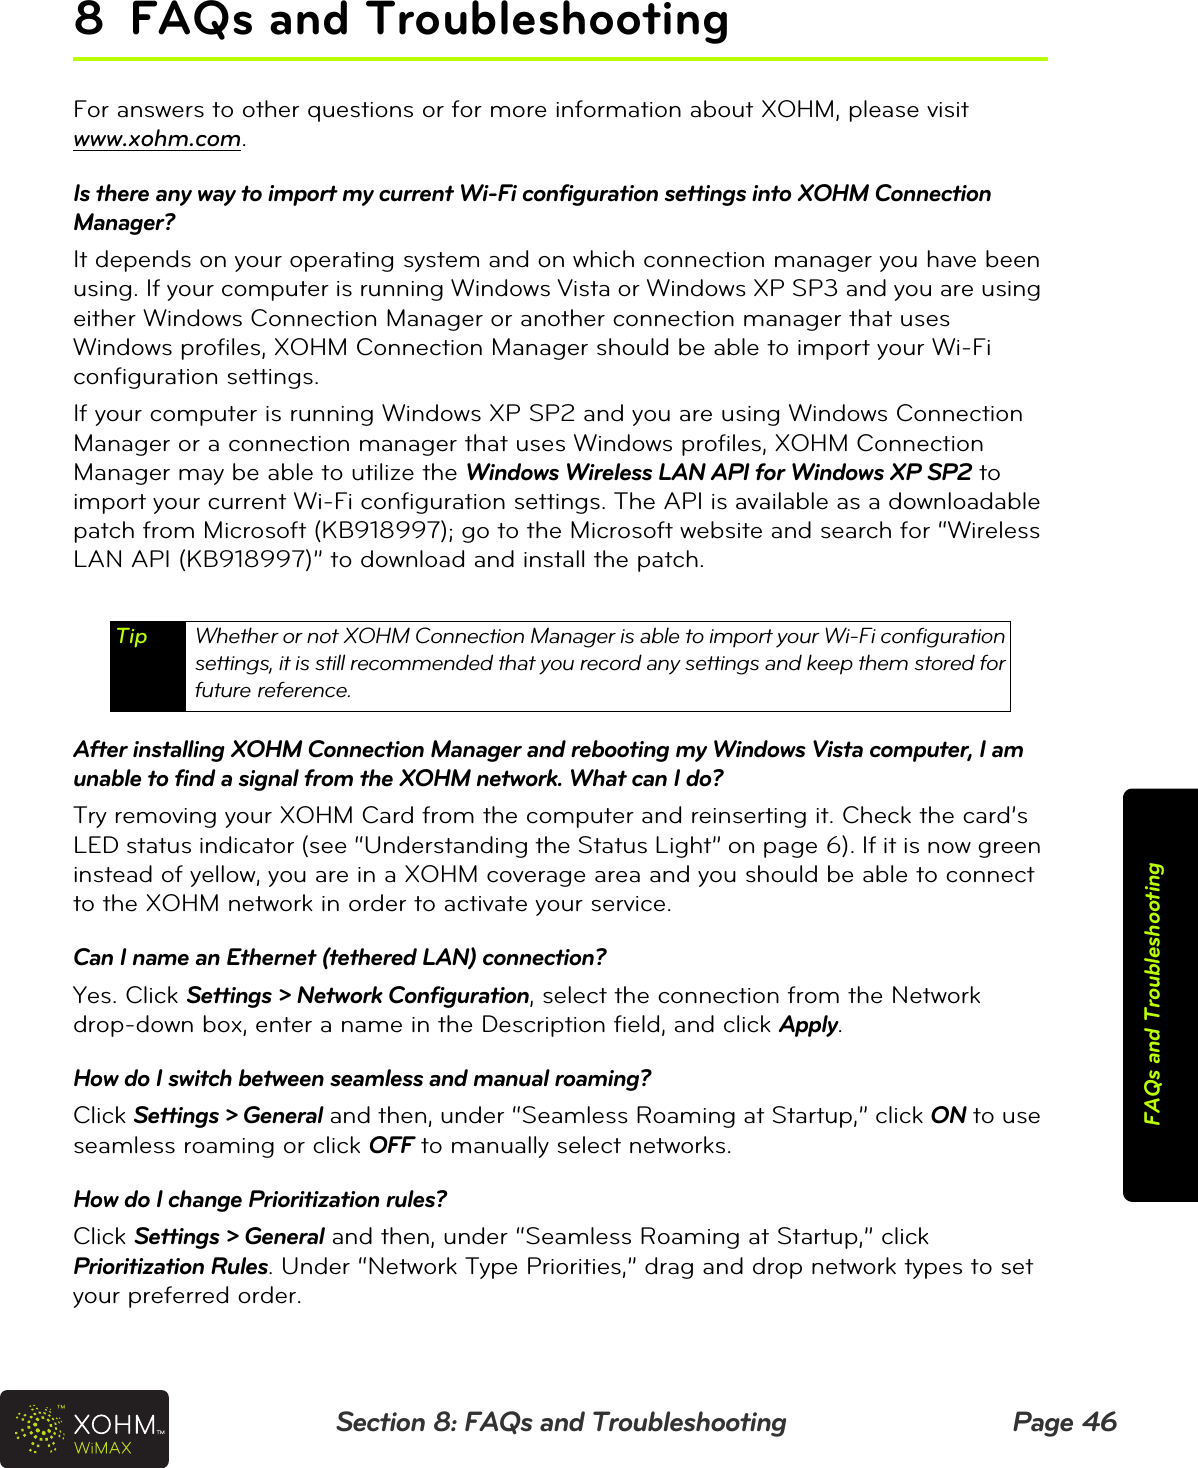
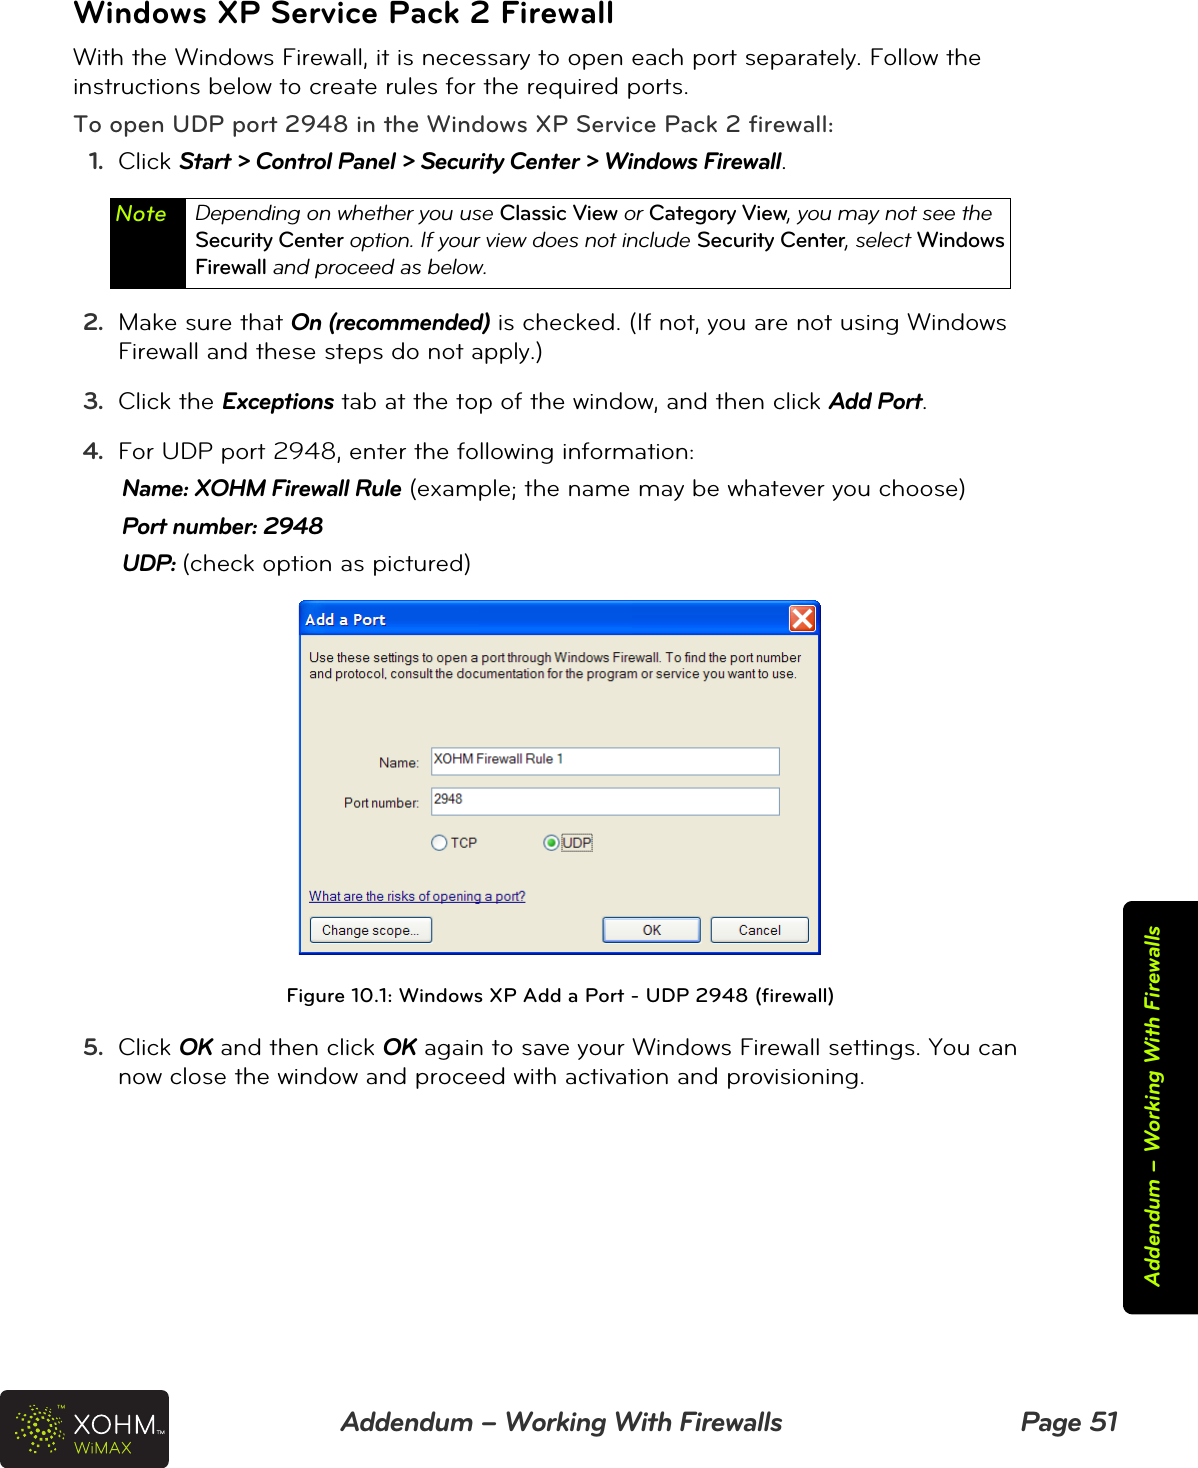
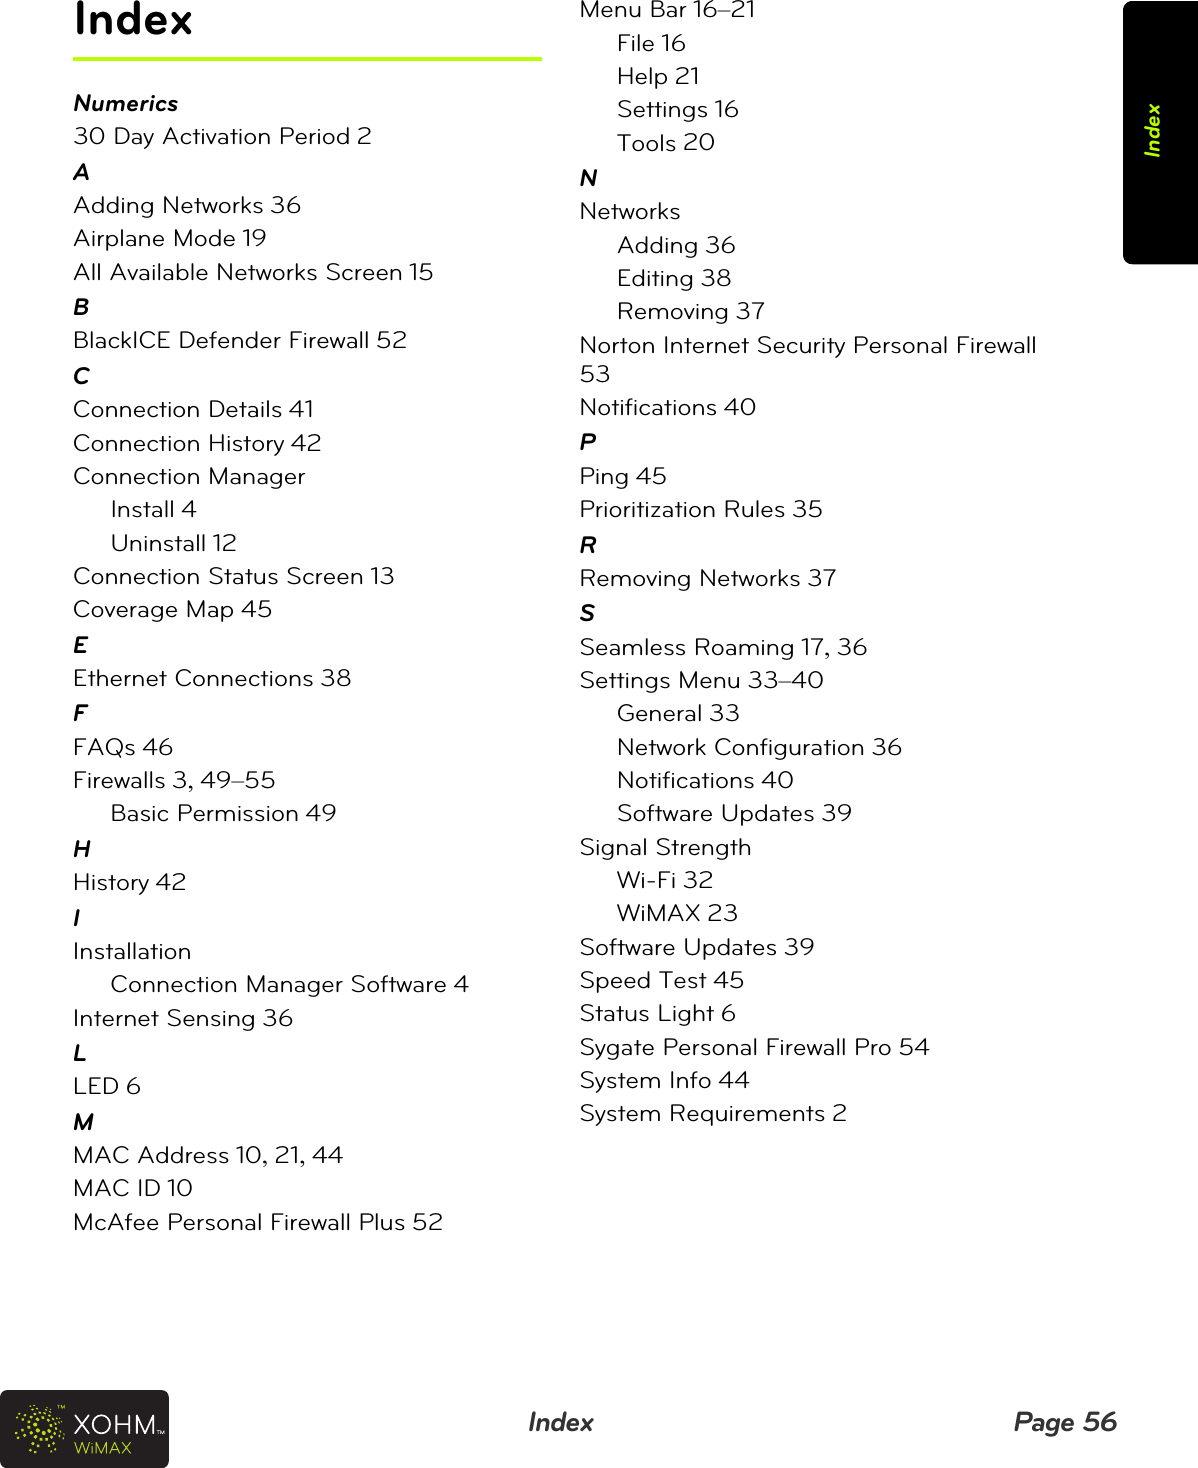
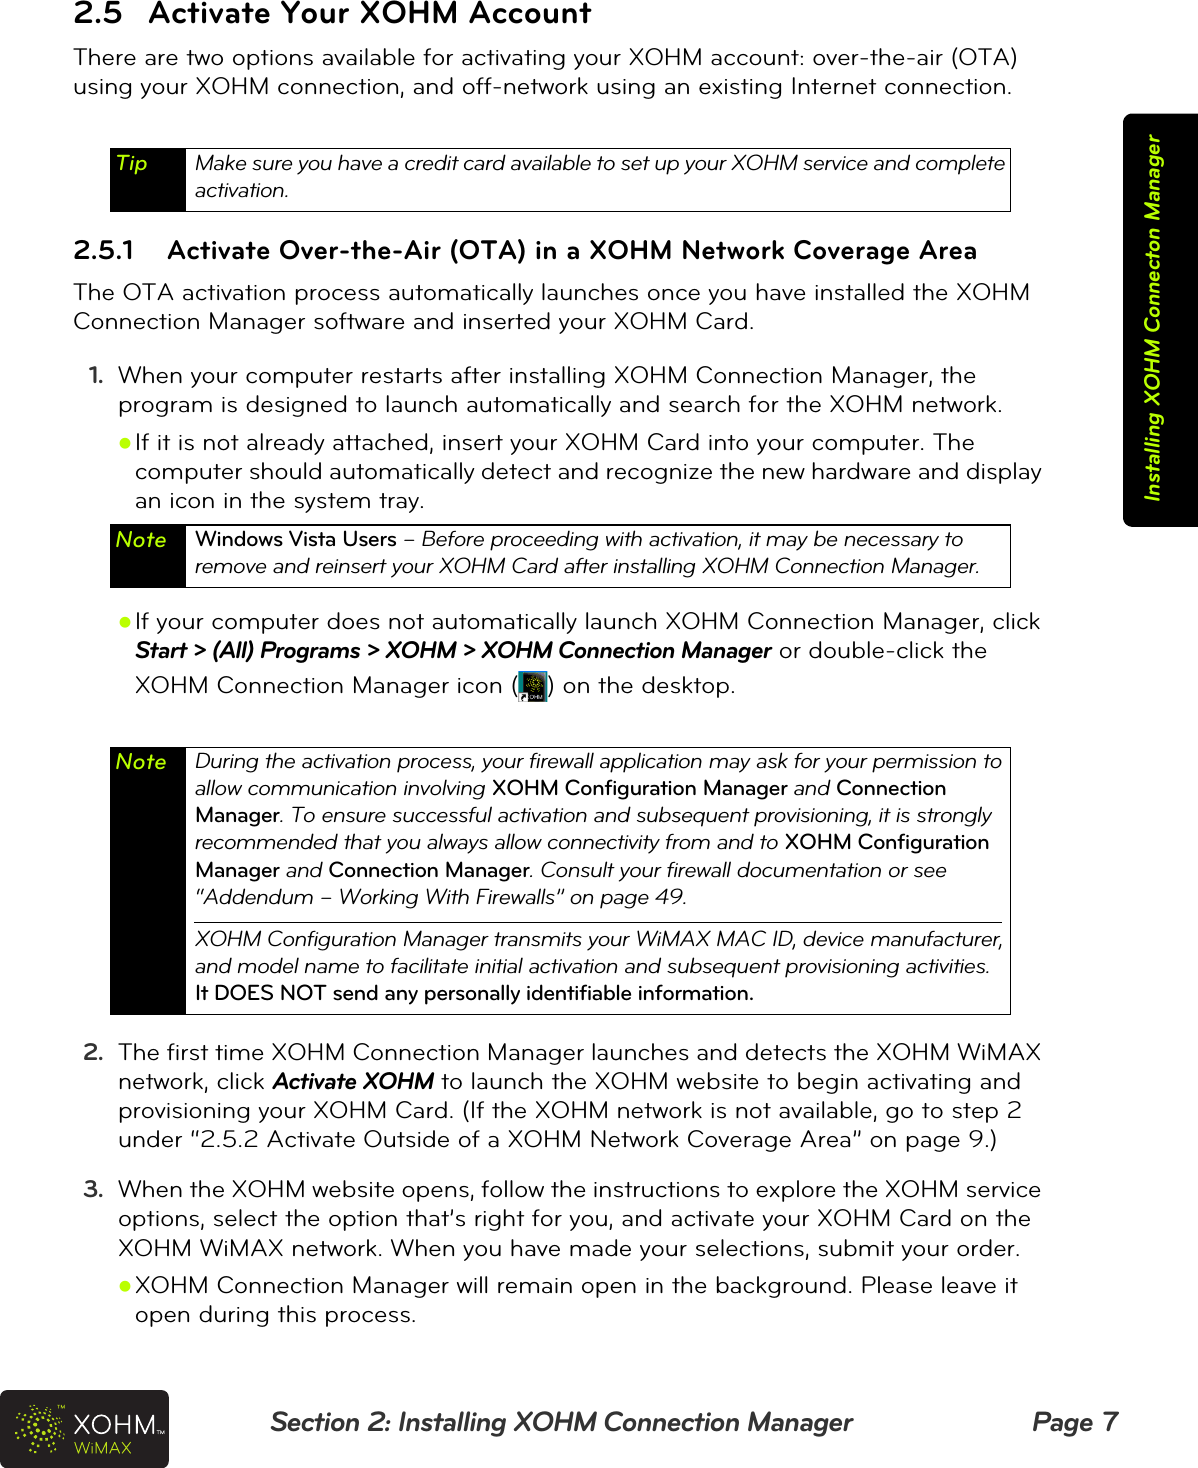
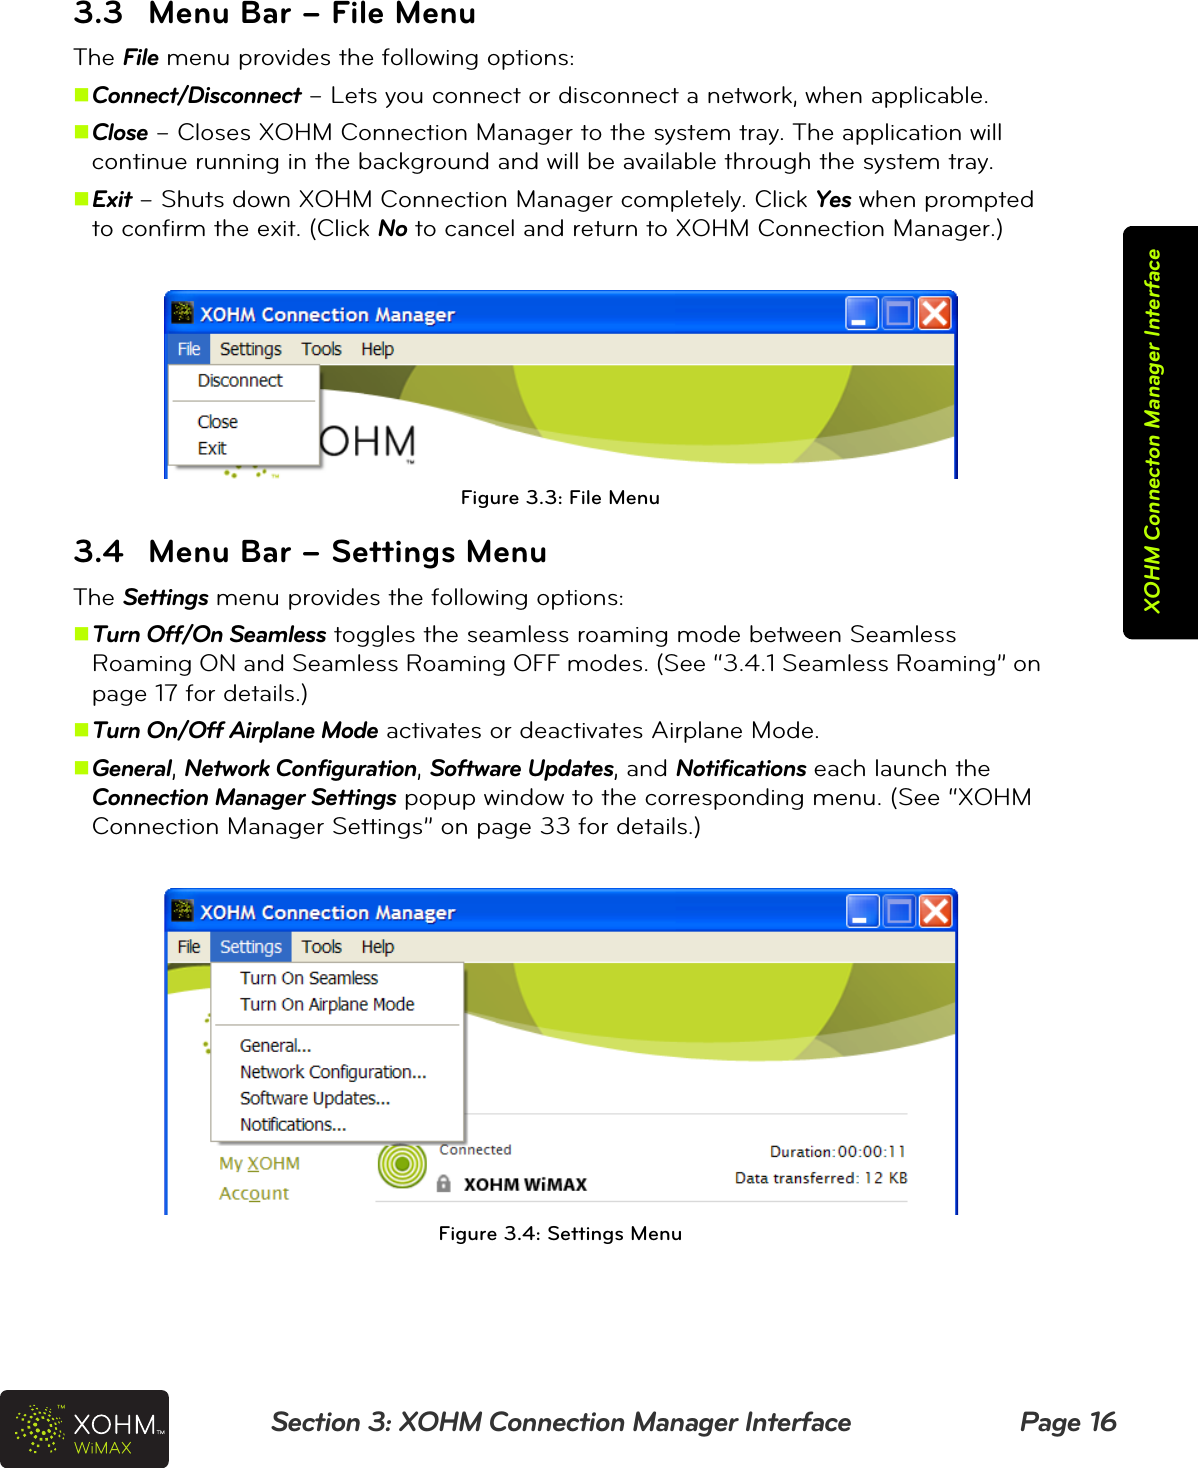
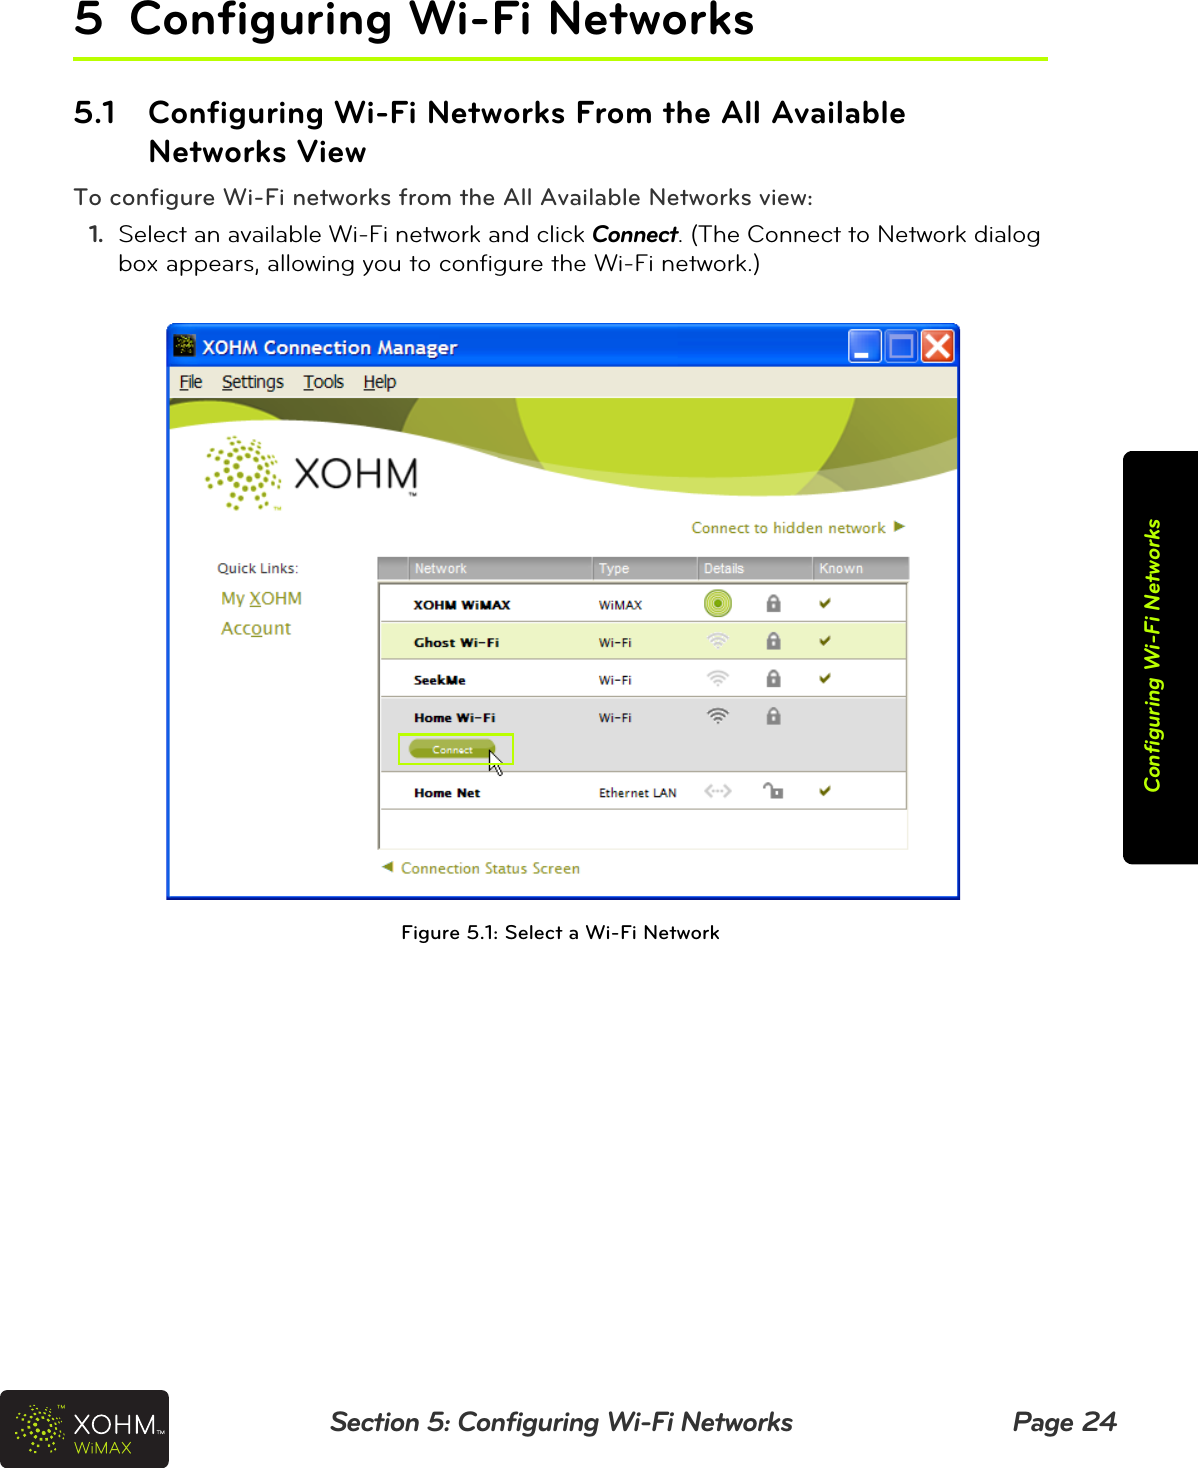
![Section 3: XOHM Connection Manager Interface Page 15XOHM Connecton Manager Interface3.2 All Available NetworksClick Other Available Networks to display a list of all networks currently detected by XOHM Connection Manager. As with the Connection Status window, this view also offers one-click links to the My XOHM homepage and the My Account management site.Figure 3.2: Connection Manager – All Available NetworksThe All Available Networks screen gives you the following information and options (see Figure 3.2):A. Network lists all the currently detected networks.B. Sort By – Click a header to sort the network list by the selected category. Click twice to reverse the sort.zNetwork – Sorts alphabetically by network name.zType – Sorts alphabetically by network type.zDetails – Sorts by signal strength.zKnown – Sorts by Known networks (networks that have already been configured in XOHM Connection Manager).C. Connect to hidden network launches a dialog box allowing you to configure a hidden Wi-Fi network (a network that does not broadcast its SSID [network name]).D. My XOHM and Account – Click to link to the XOHM homepage (My XOHM) or to your account management page (Account).E. Connection Status Screen – click to switch to the Connection Status view.ACEBD](https://usermanual.wiki/ZTE/ZTE-TU25.Users-Manual-Revised/User-Guide-1008096-Page-18.png)


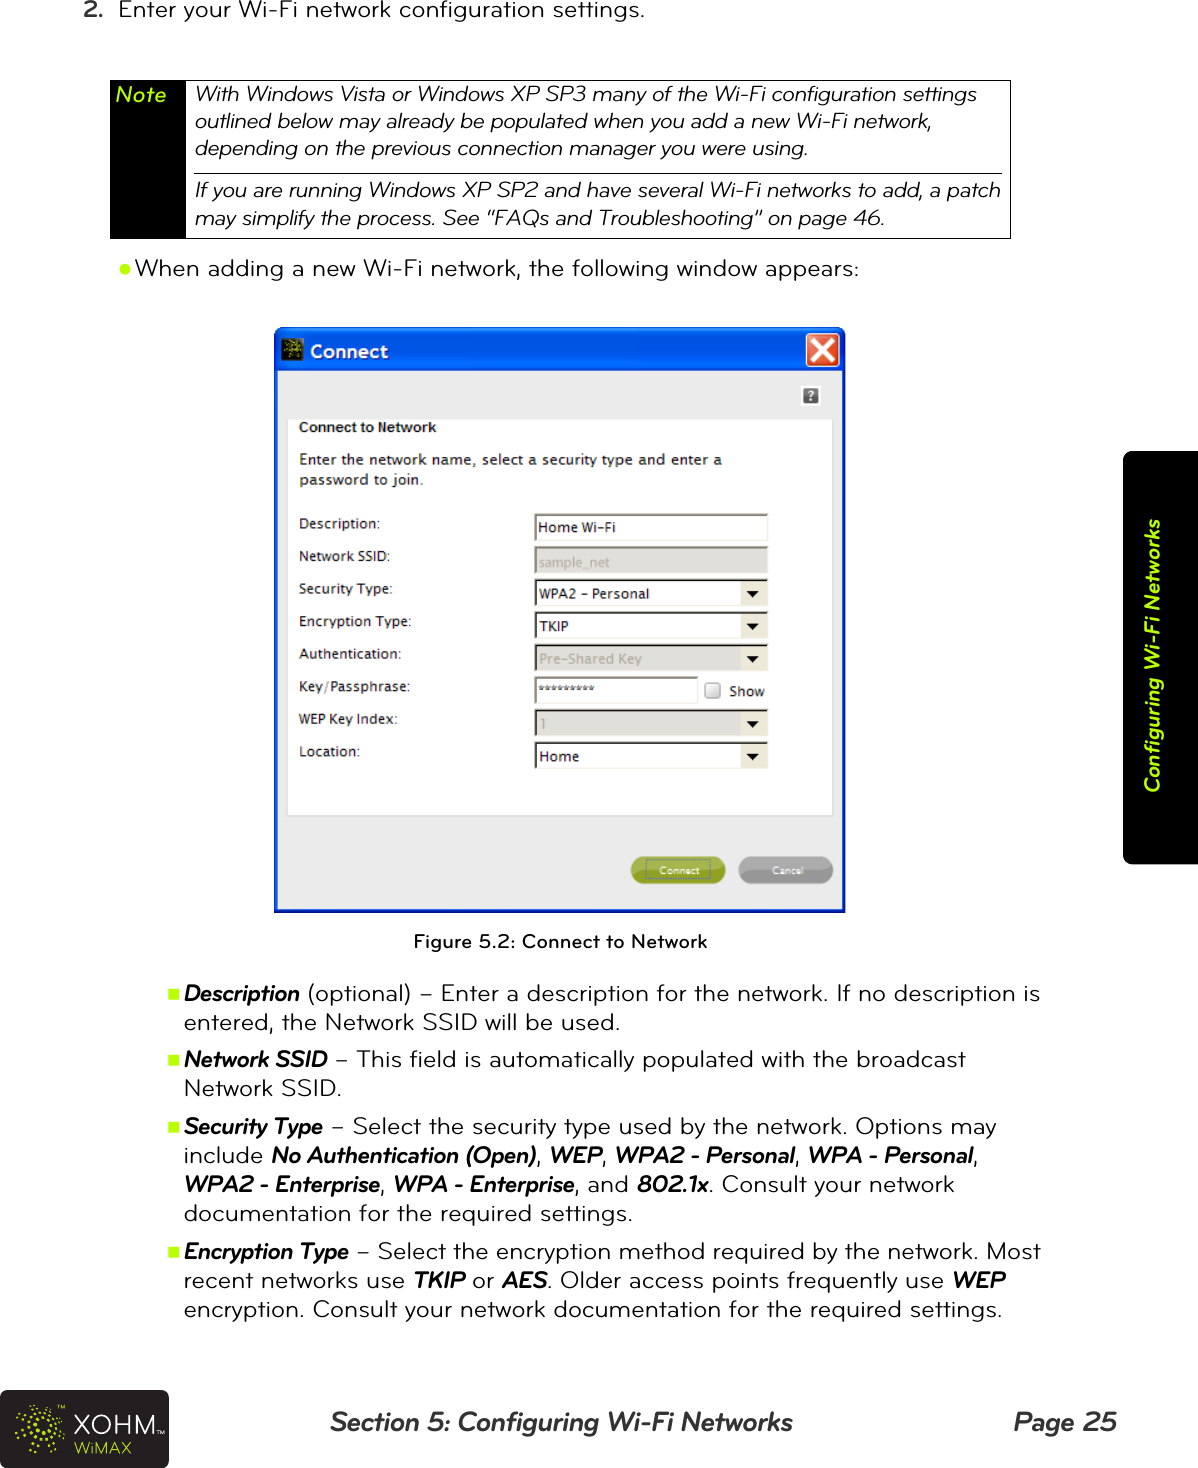
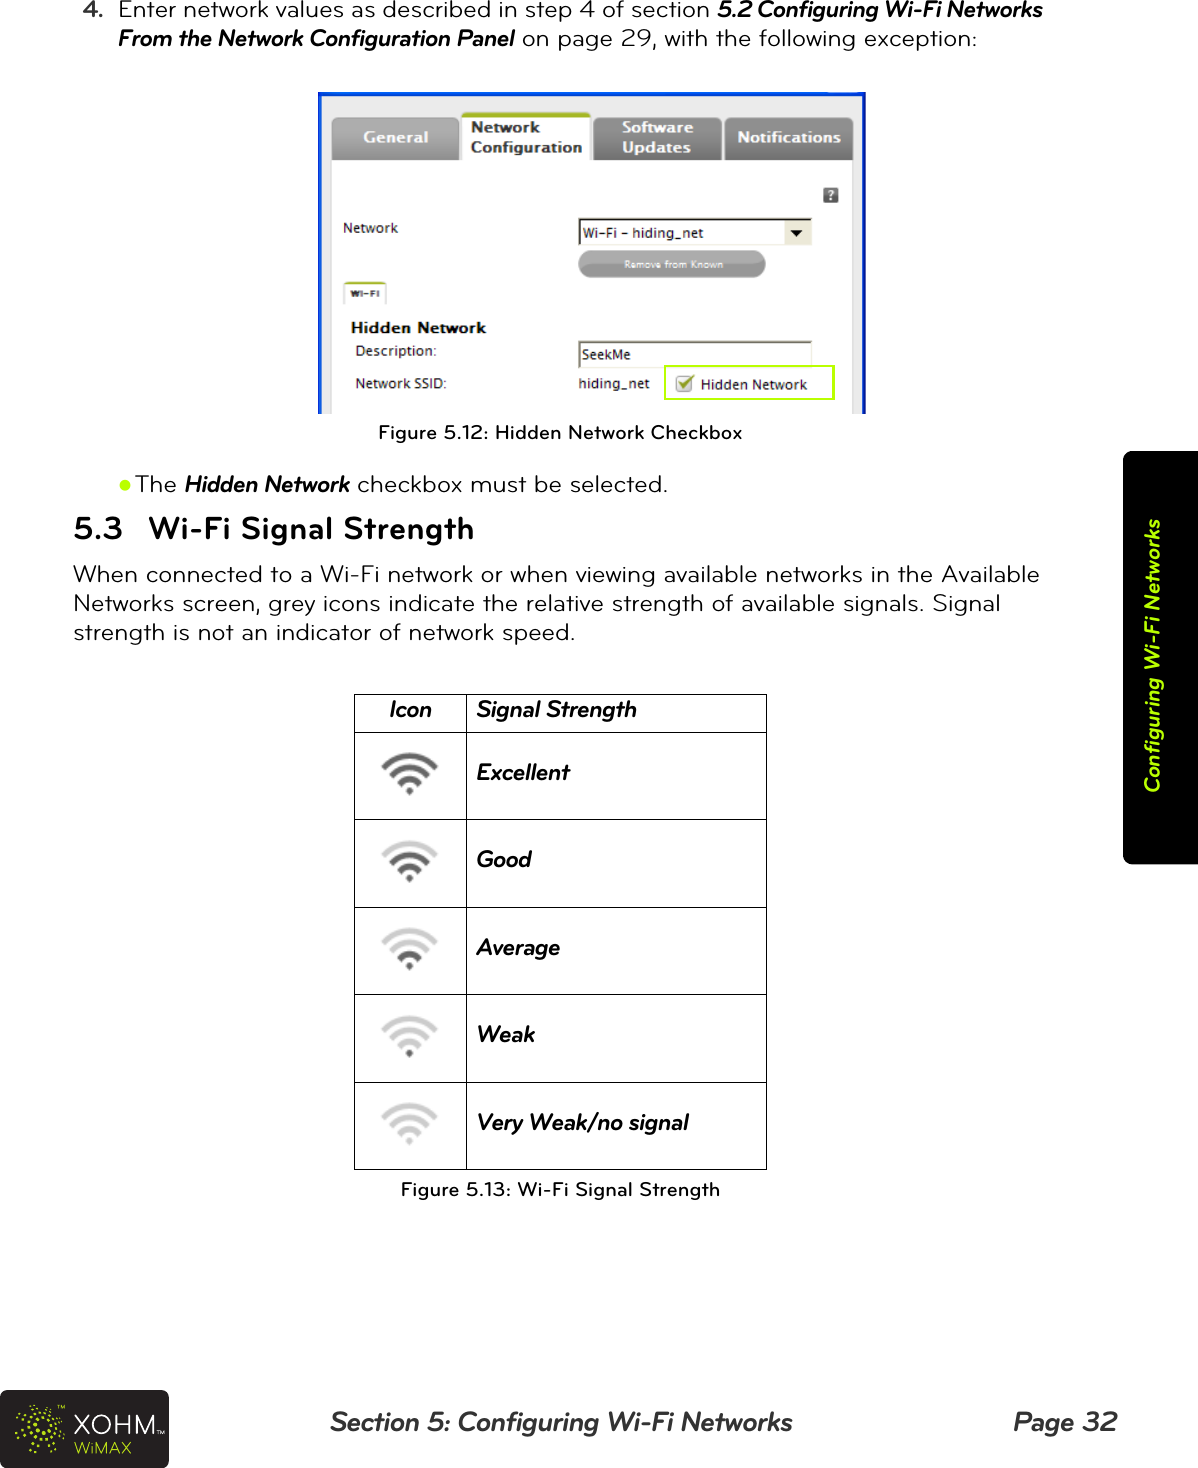
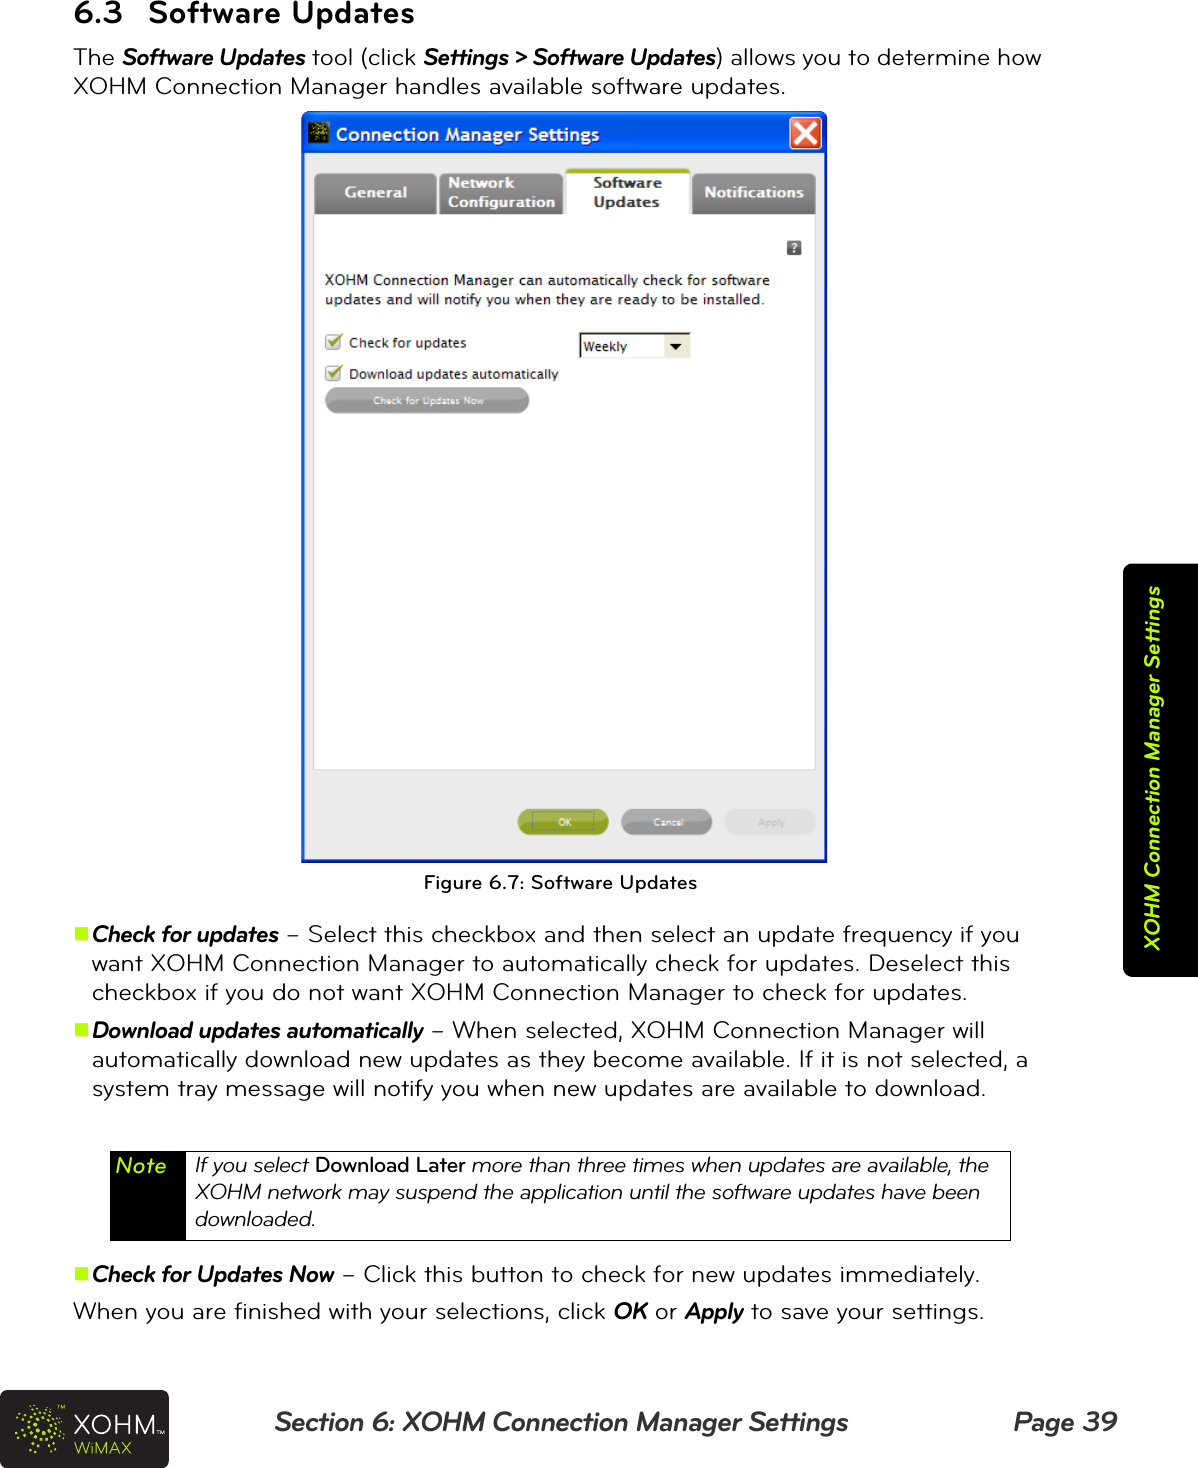
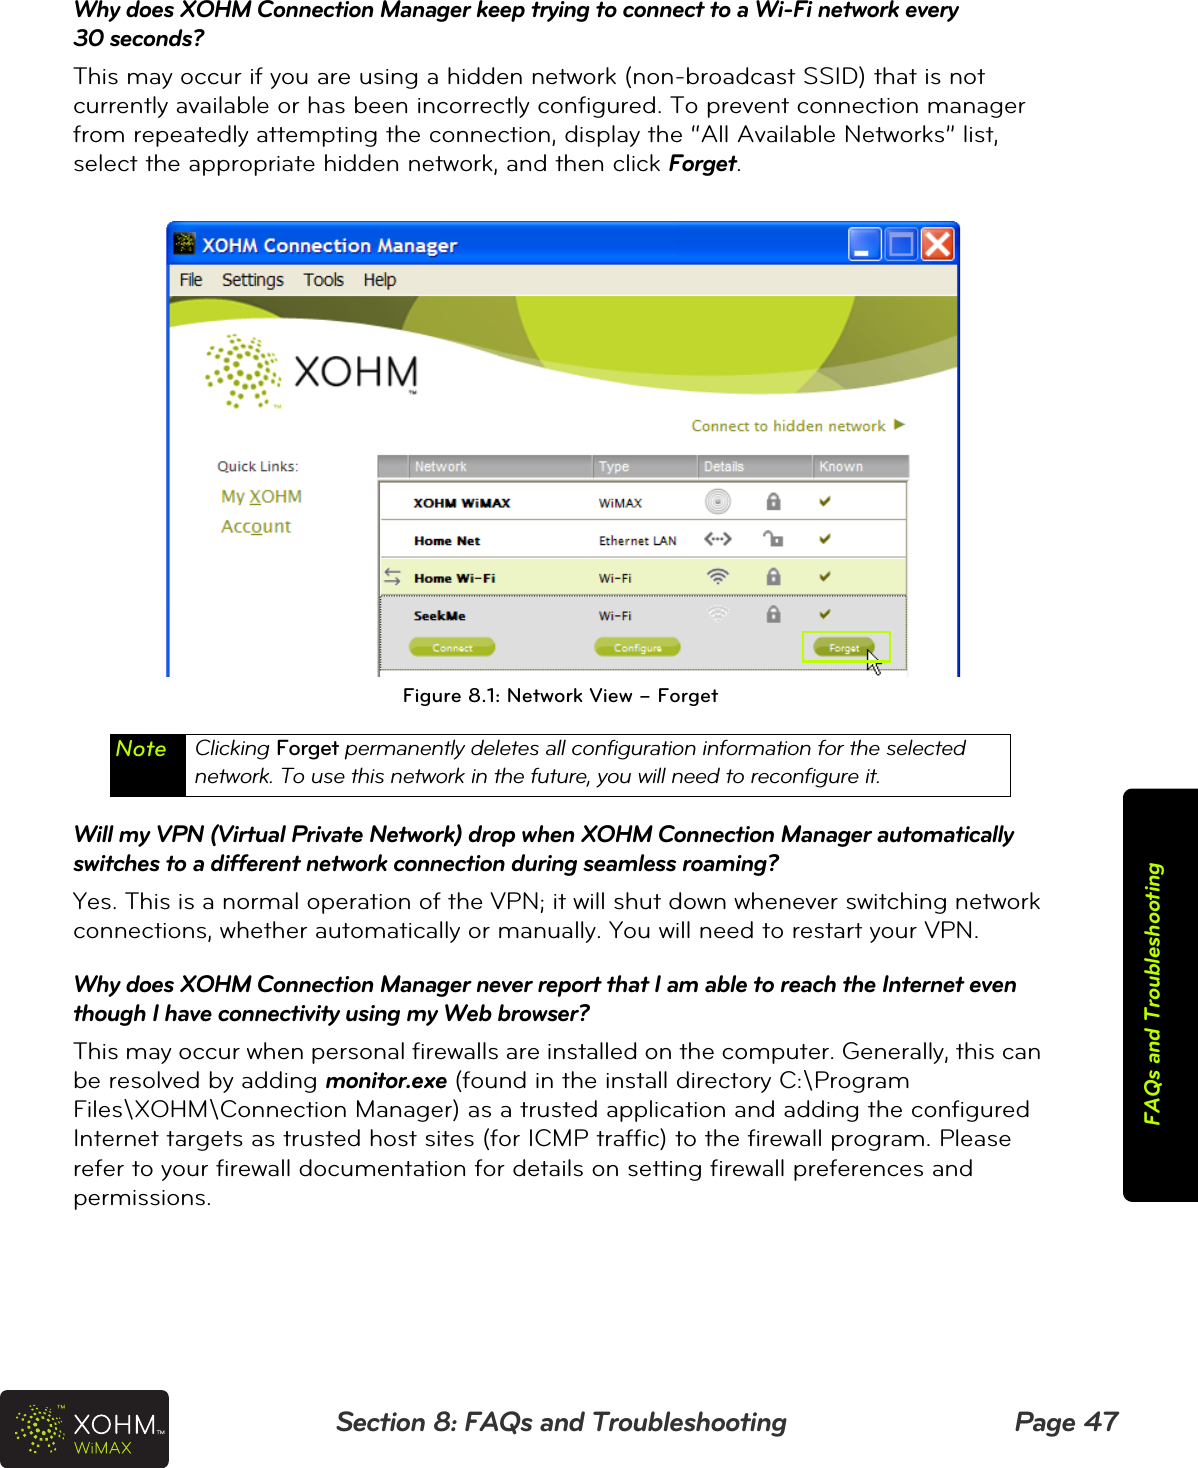
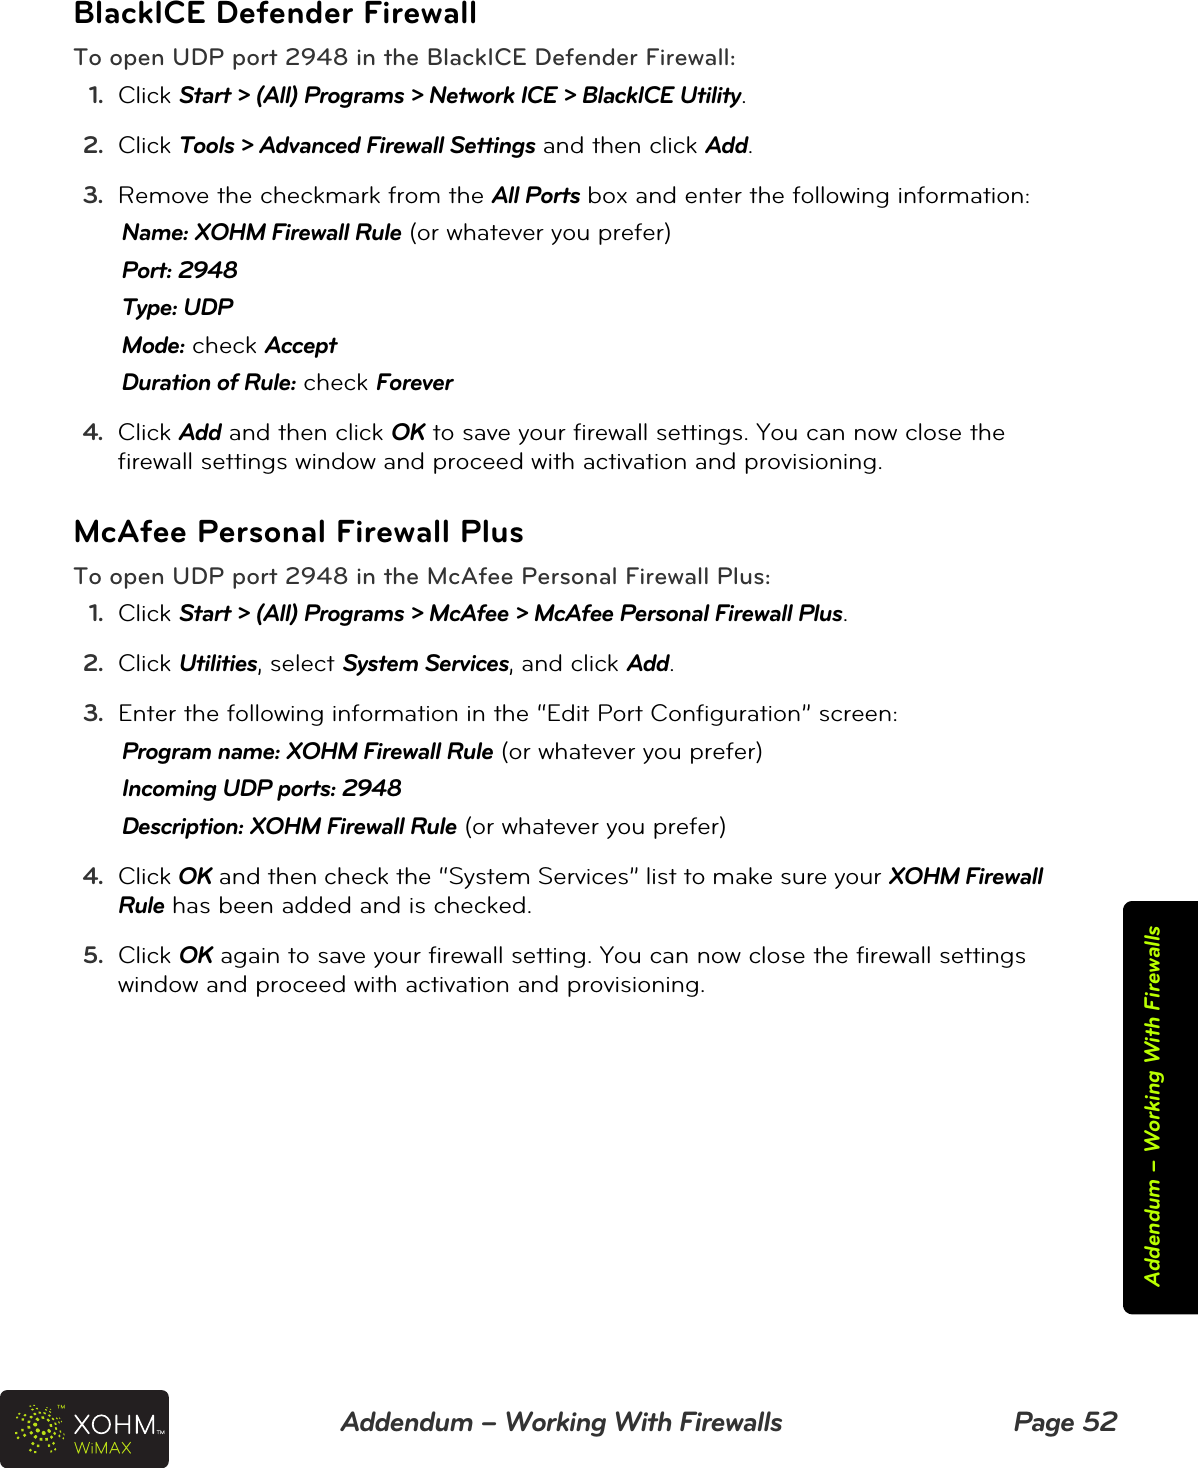
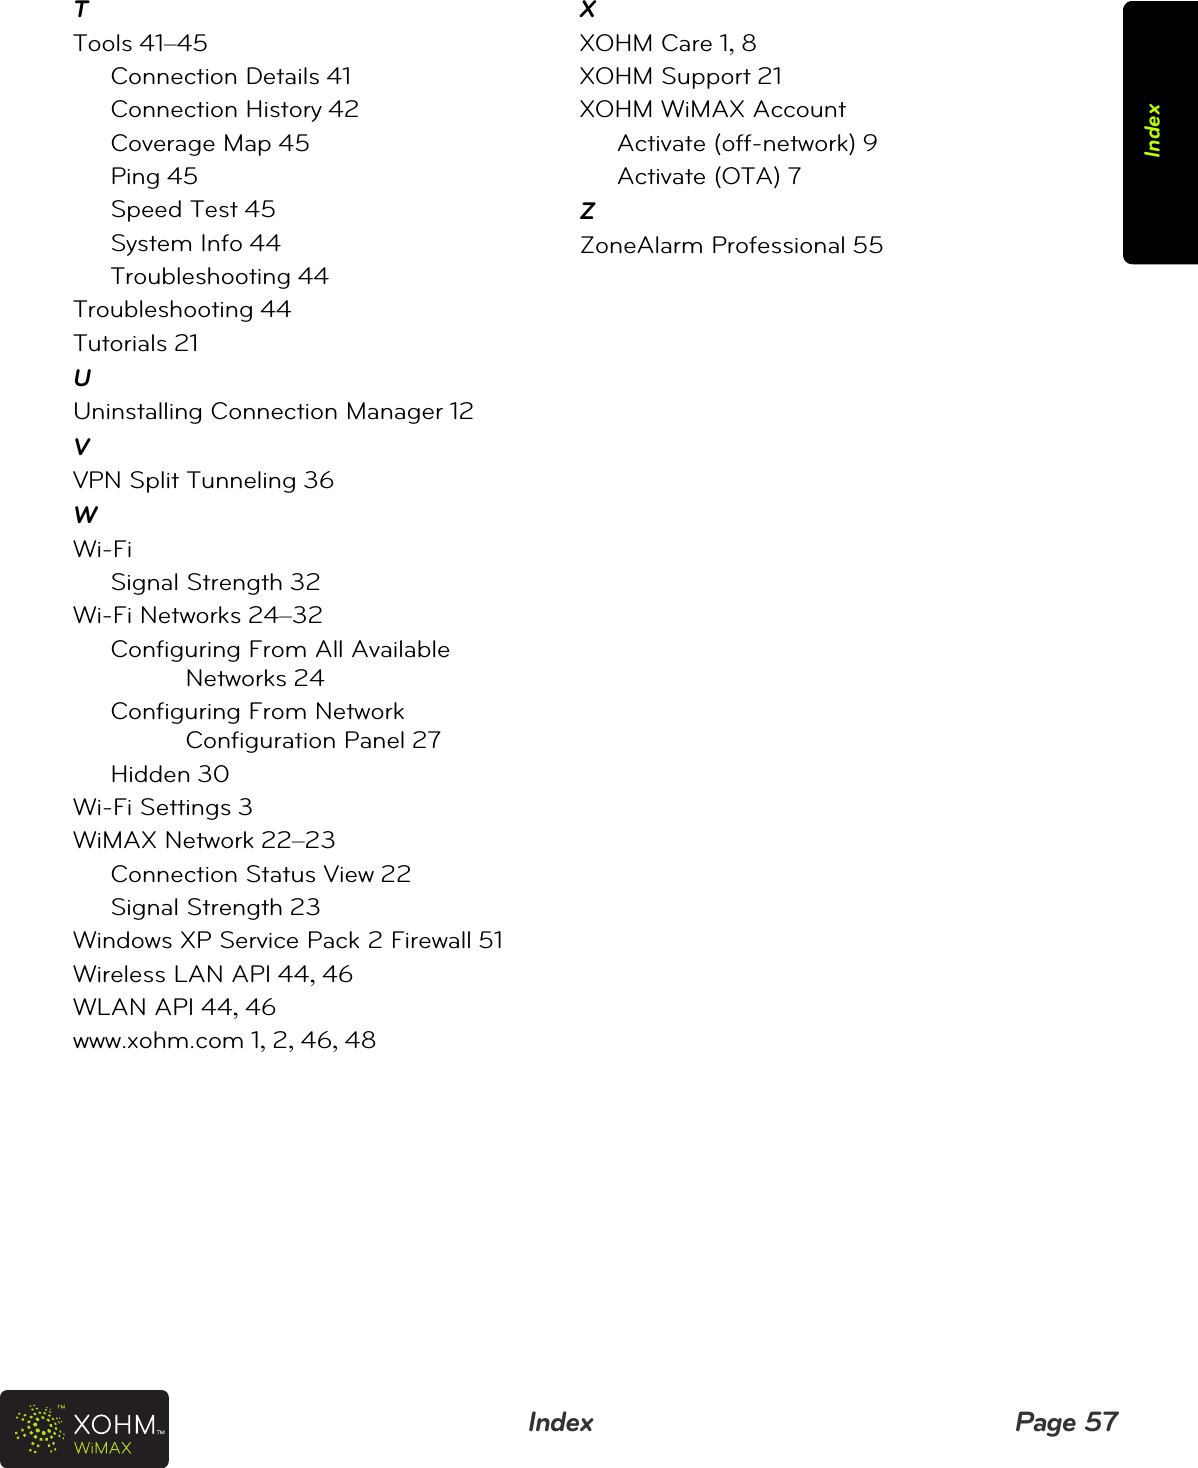
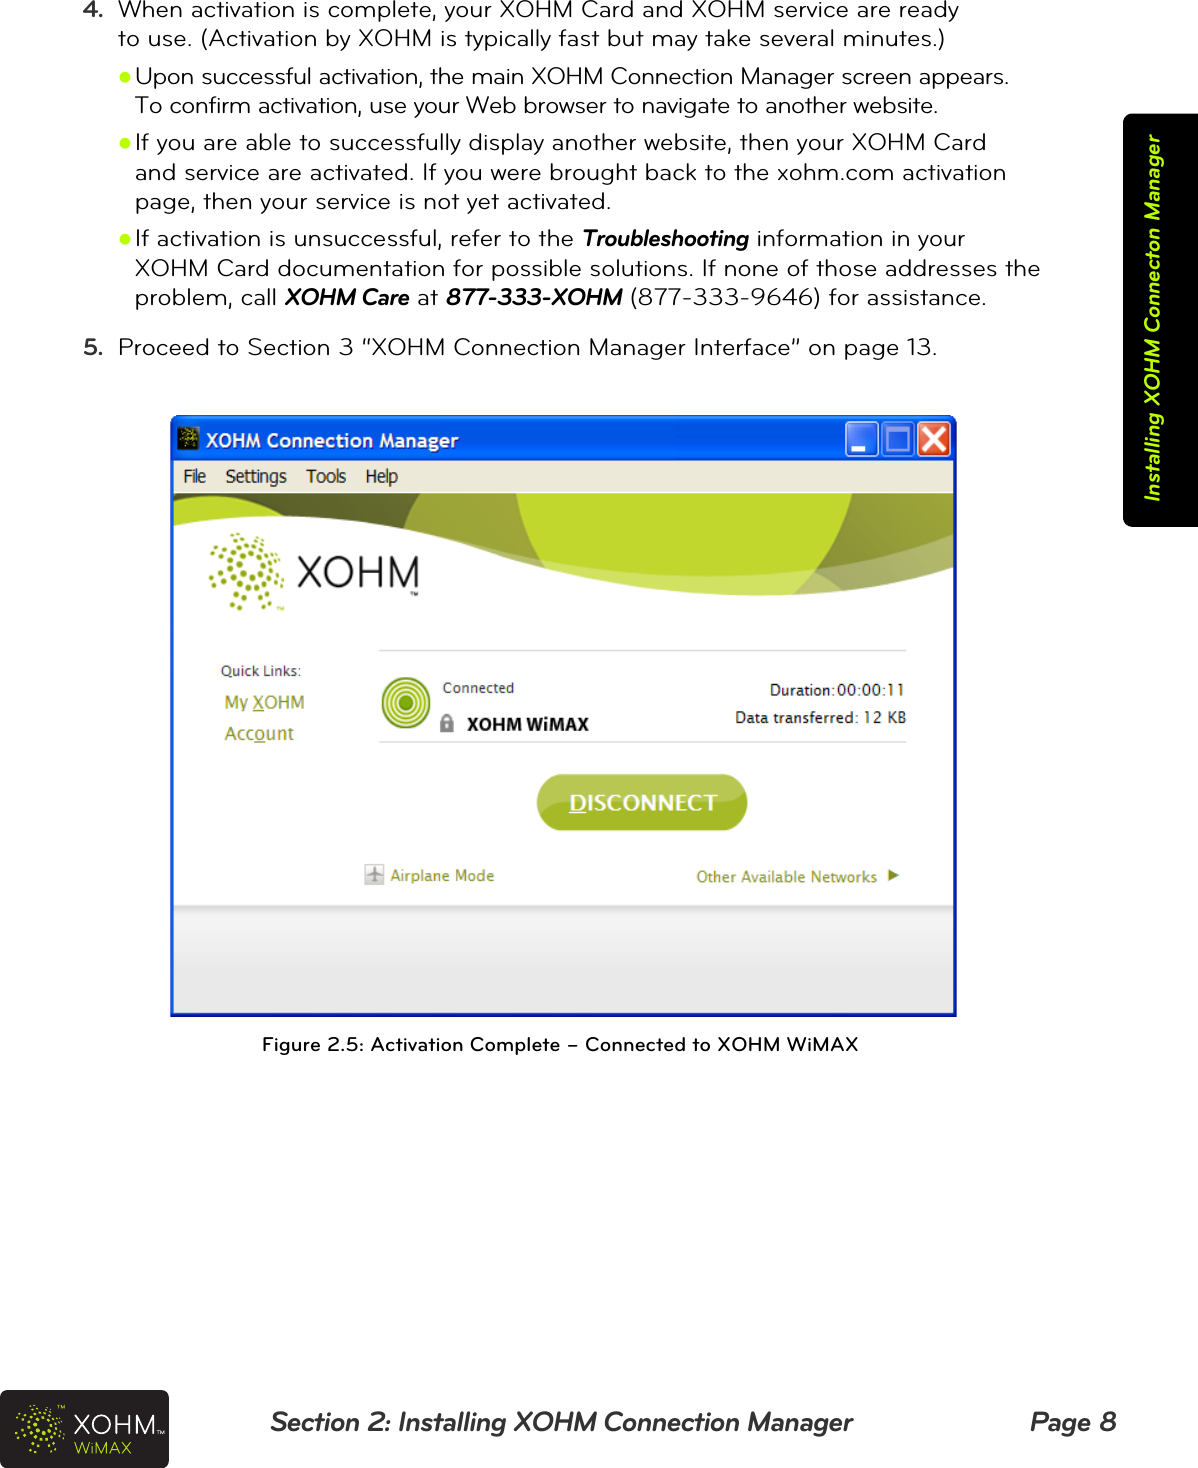
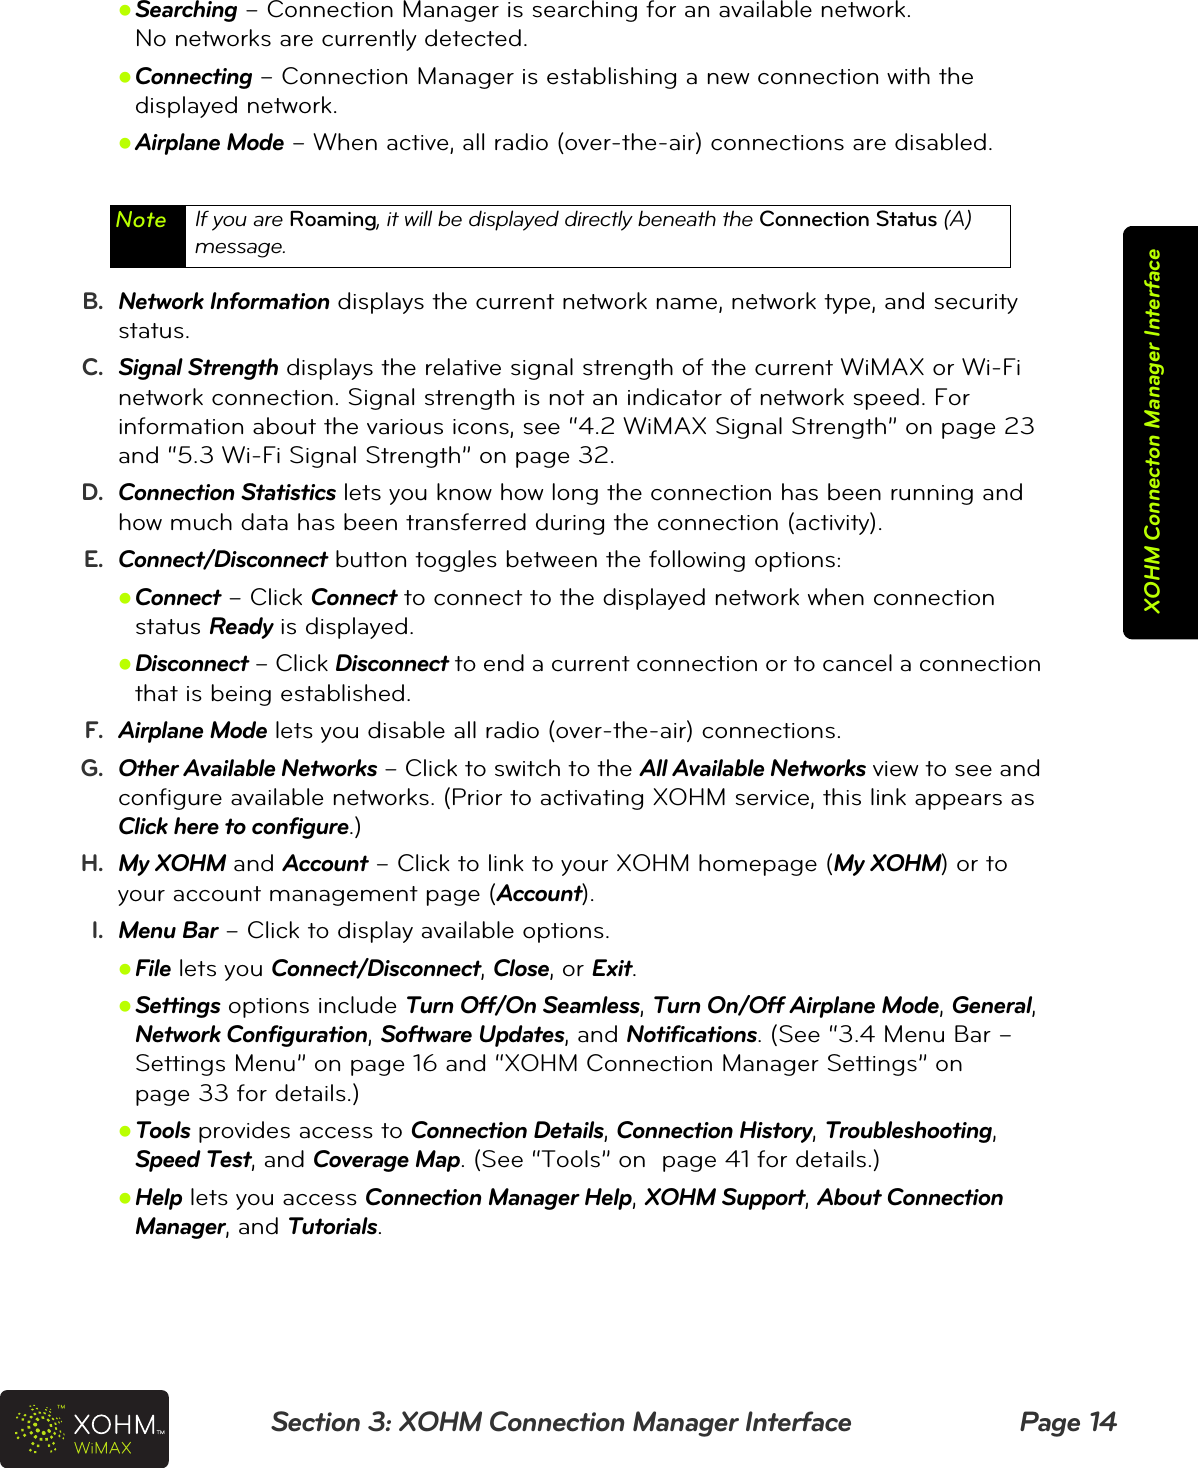
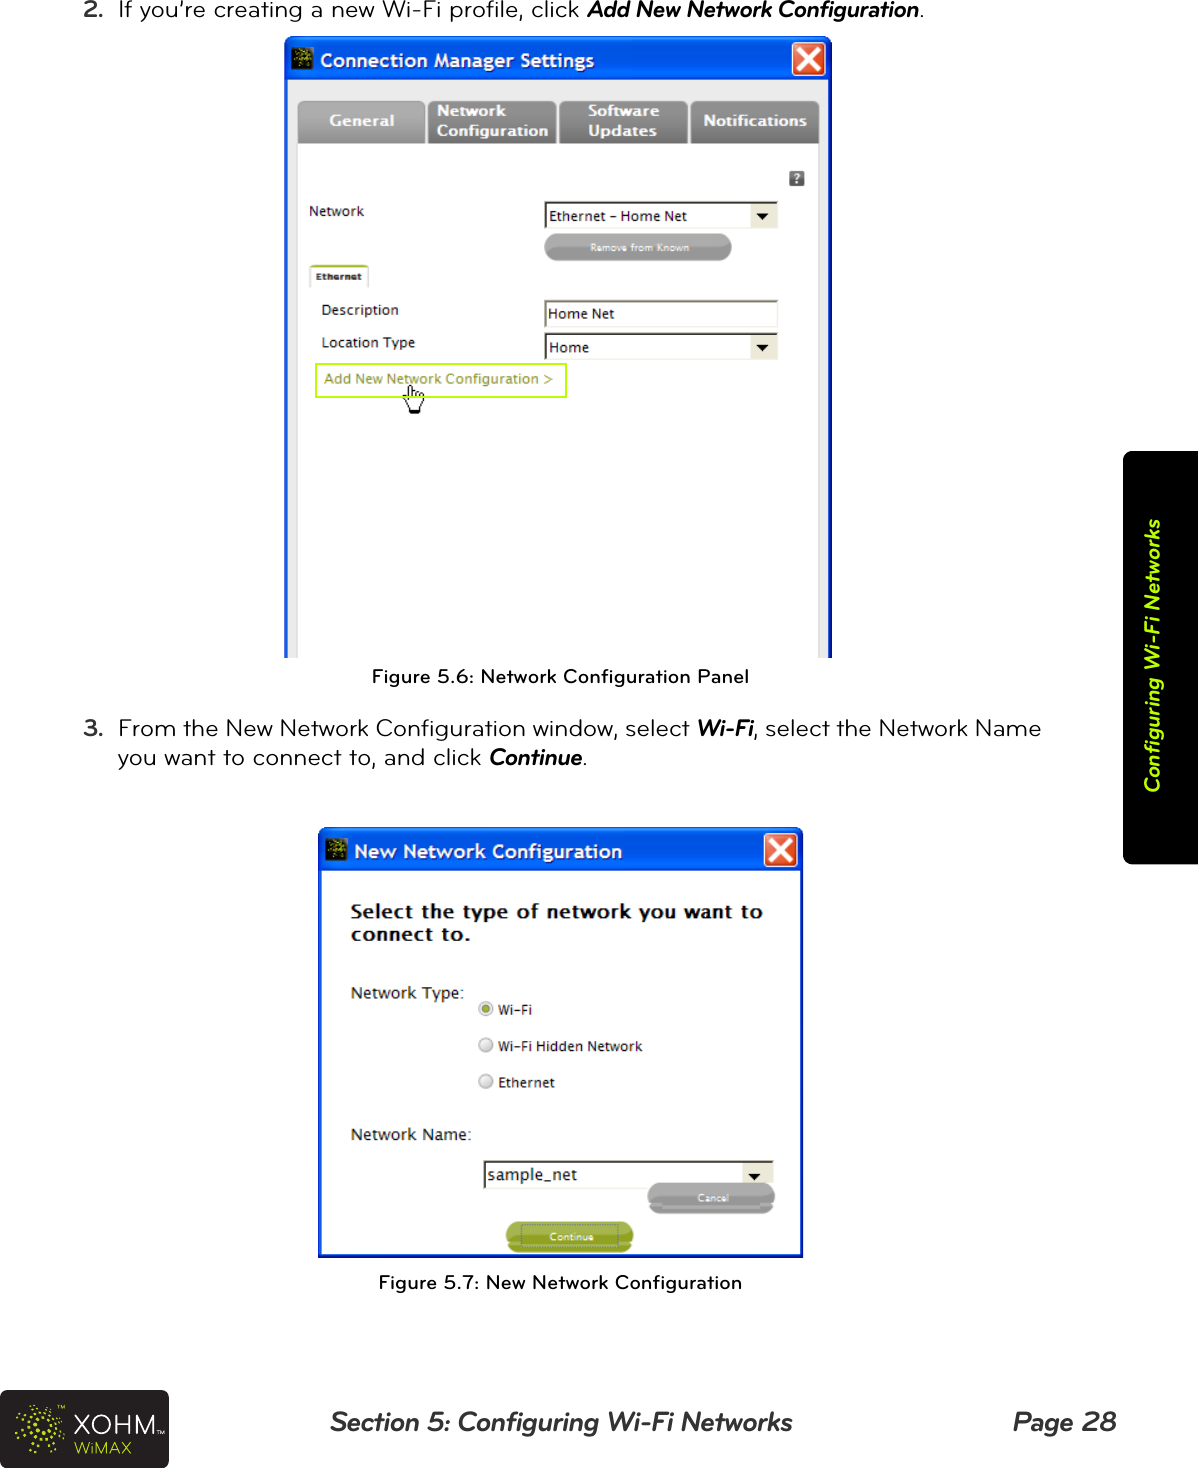
![Section 5: Configuring Wi-Fi Networks Page 26Configuring Wi-Fi NetworksAuthentication – Select the type of authentication credentials required by the Wi-Fi network. If the network uses a static key or a passphrase for authentication, select Pre-Shared Key and enter the value into the Password field. Other authentication options include PEAP [MSCHAPv2] and EAP-TLS. Consult your network documentation for the required settings.Key/Passphrase – If using Pre-Shared Key authentication, enter the static key or passphrase here.WEP Key Index – Select which WEP key index to use (only if WEP encryption is in use).Location – Select Public, Home, or Office for the network. This is used for seamless roaming prioritization (see “6.1.1 Prioritization Rules” on page 35).Once the values are configured, click Connect to initiate the Wi-Fi connection.3. Once the network is configured it appears with a checkmark in the “Known” column in the All Available Networks view. Figure 5.4: Wi-Fi Network AddedNote If the network uses Protected EAP [PEAP (MSCHAPv2)] or EAP-TLS, Windows will prompt for user credentials as required.](https://usermanual.wiki/ZTE/ZTE-TU25.Users-Manual-Revised/User-Guide-1008096-Page-29.png)
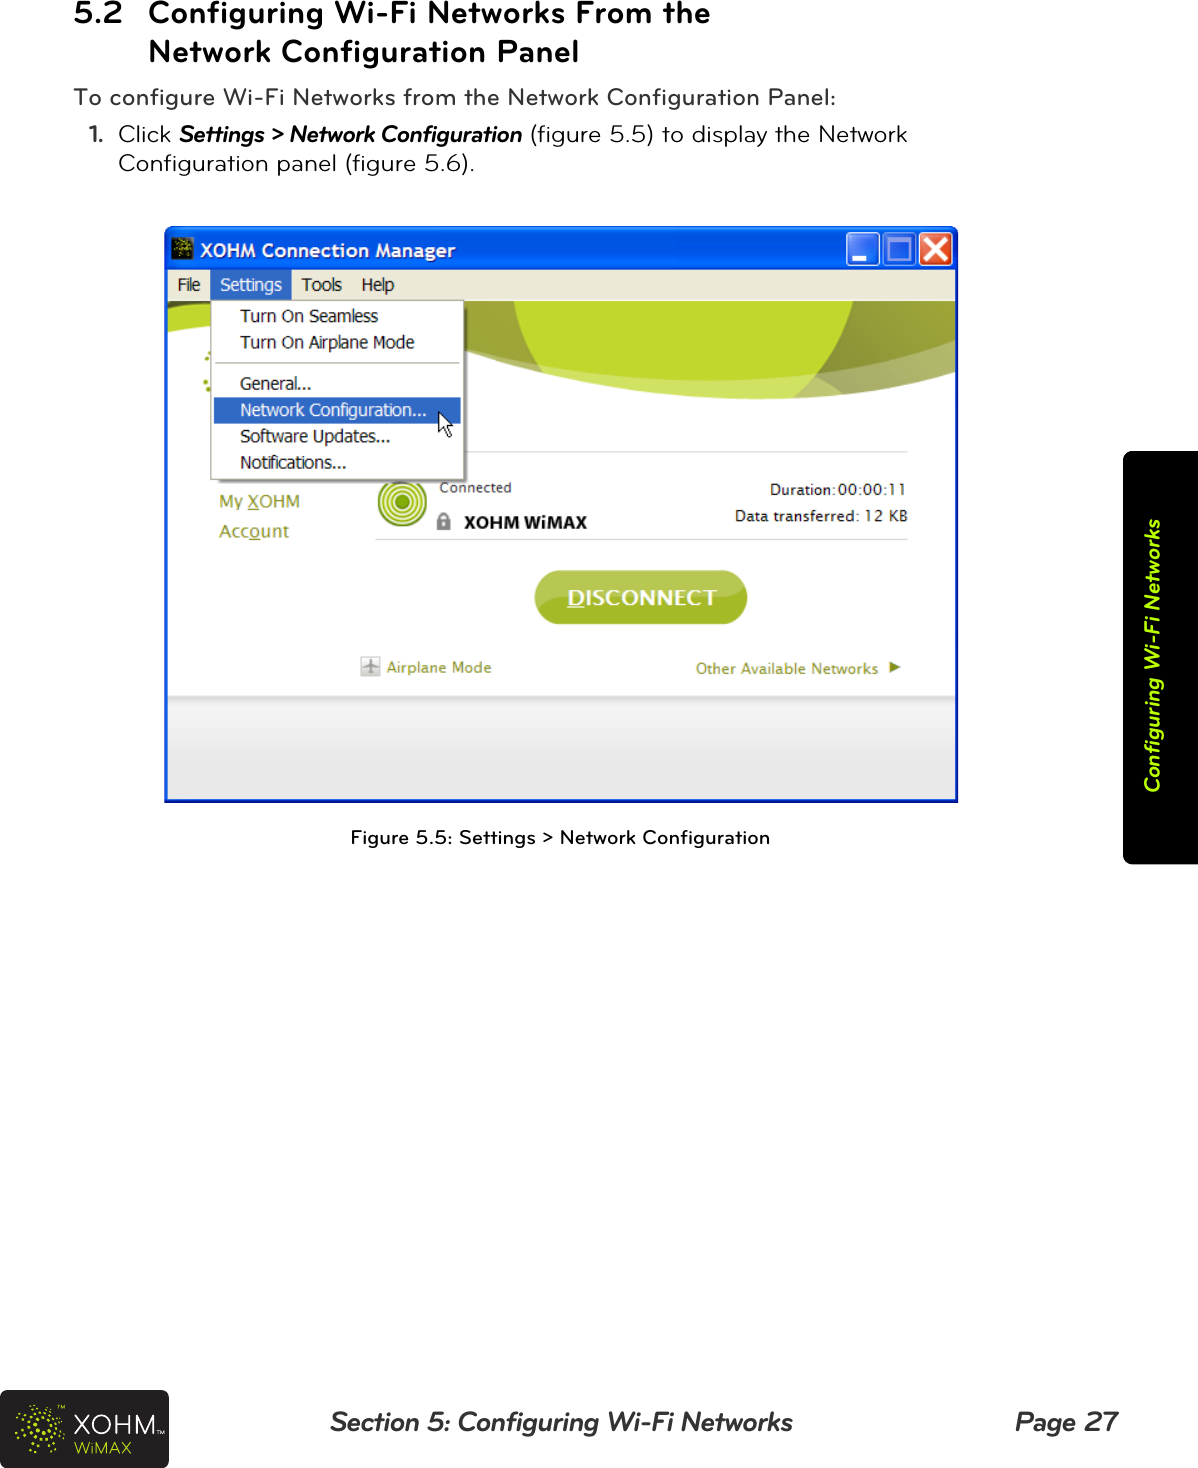
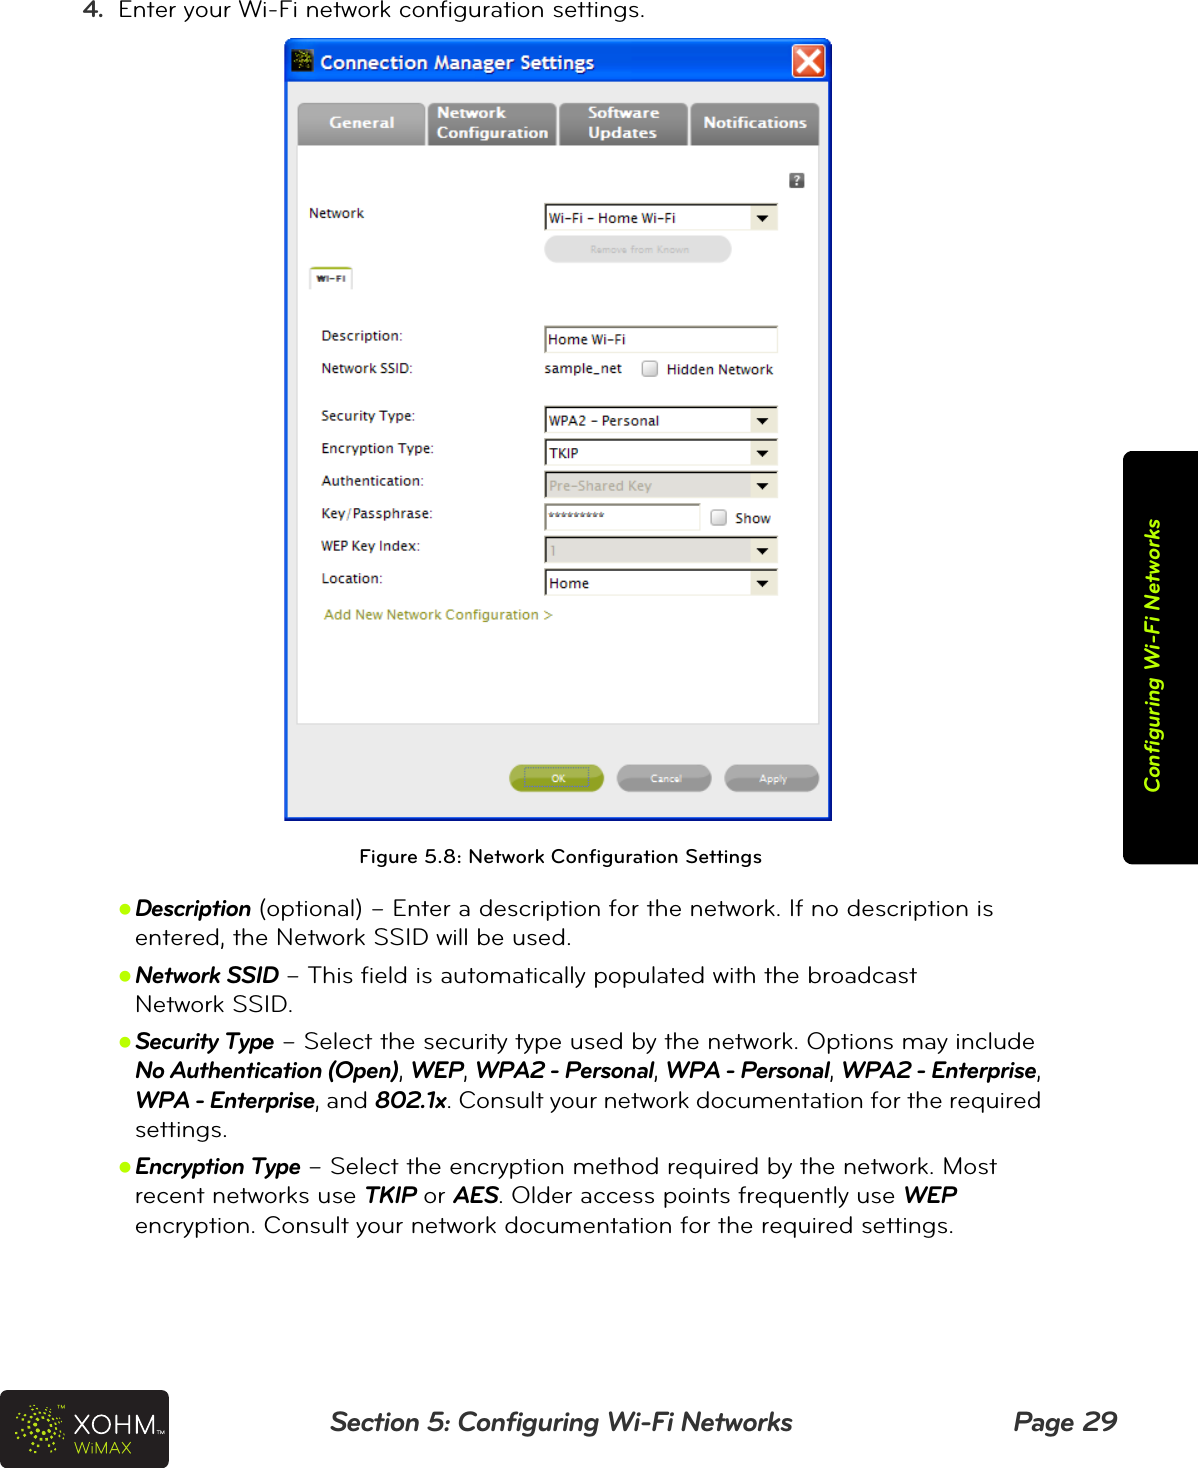
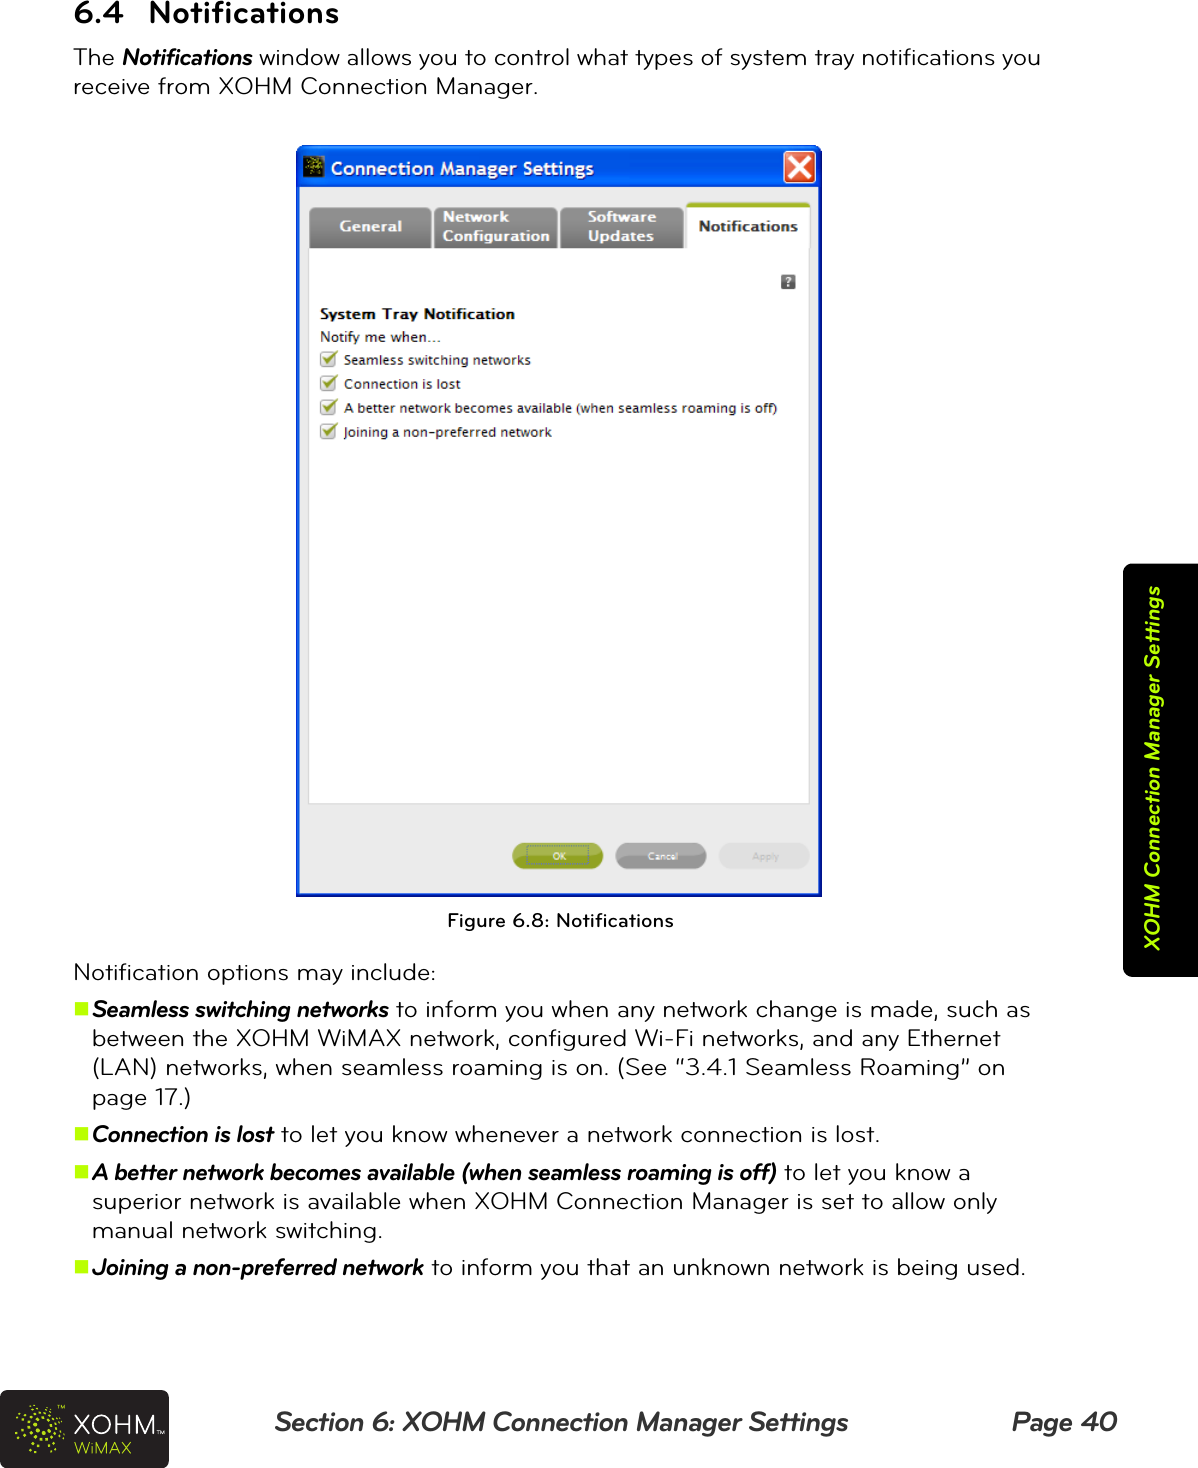
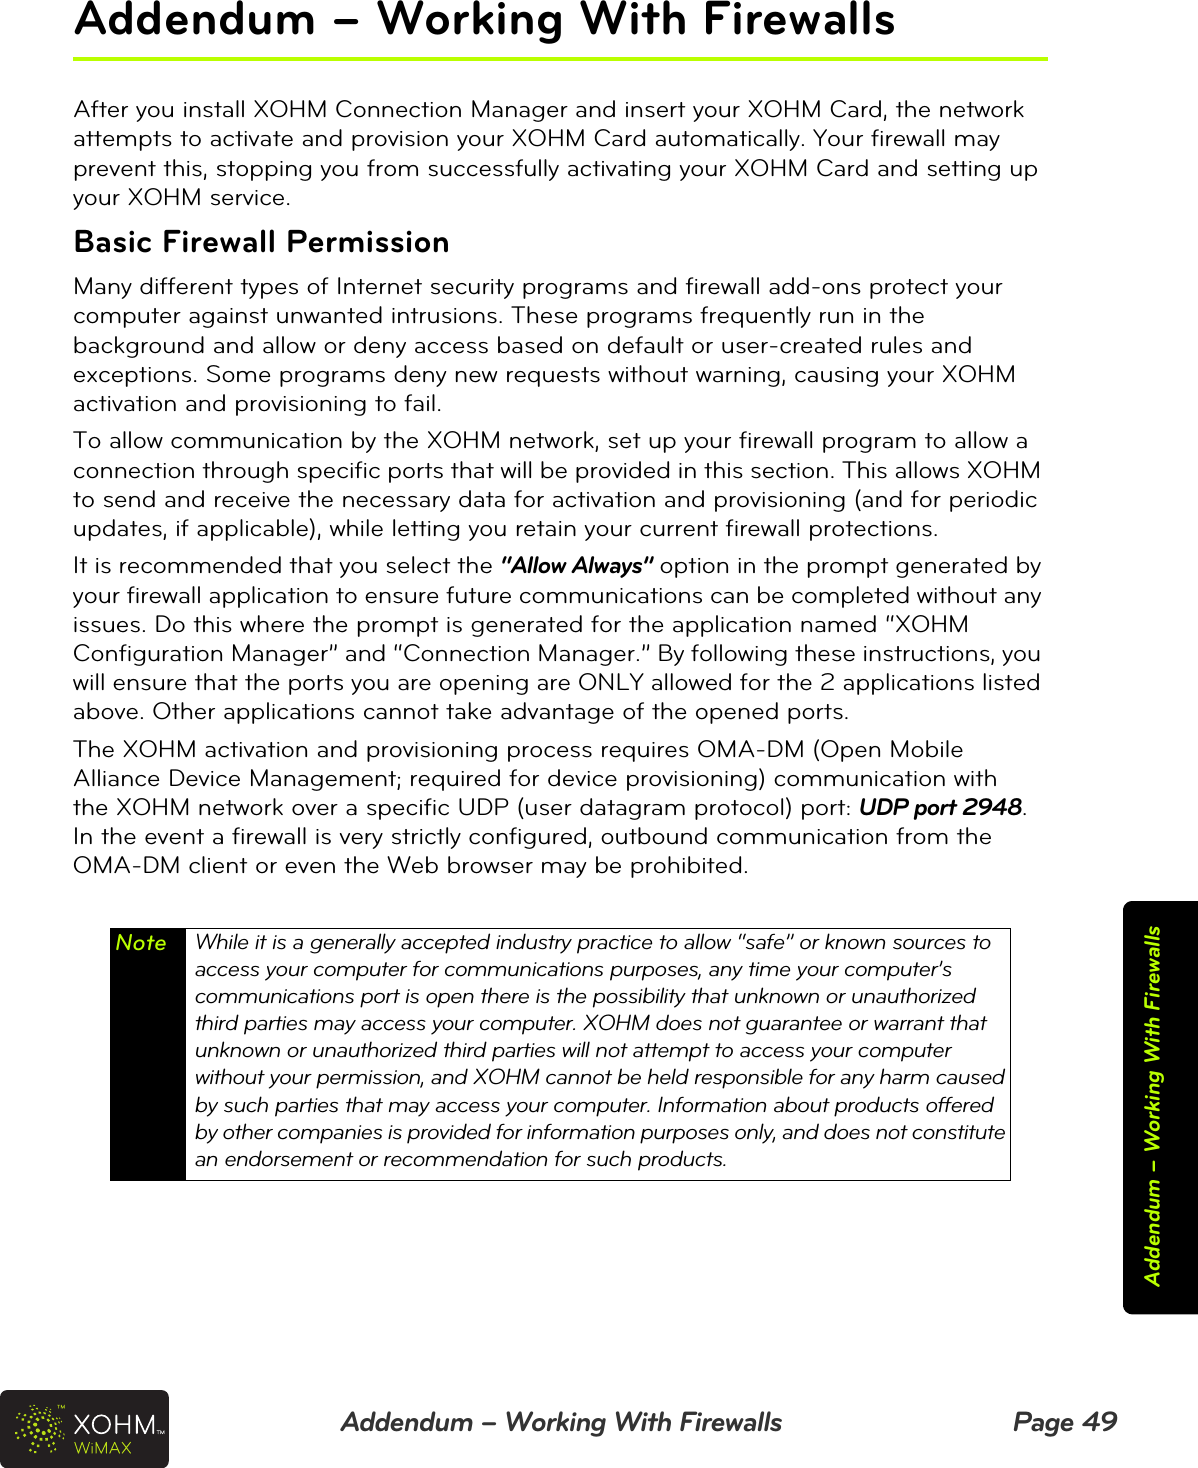
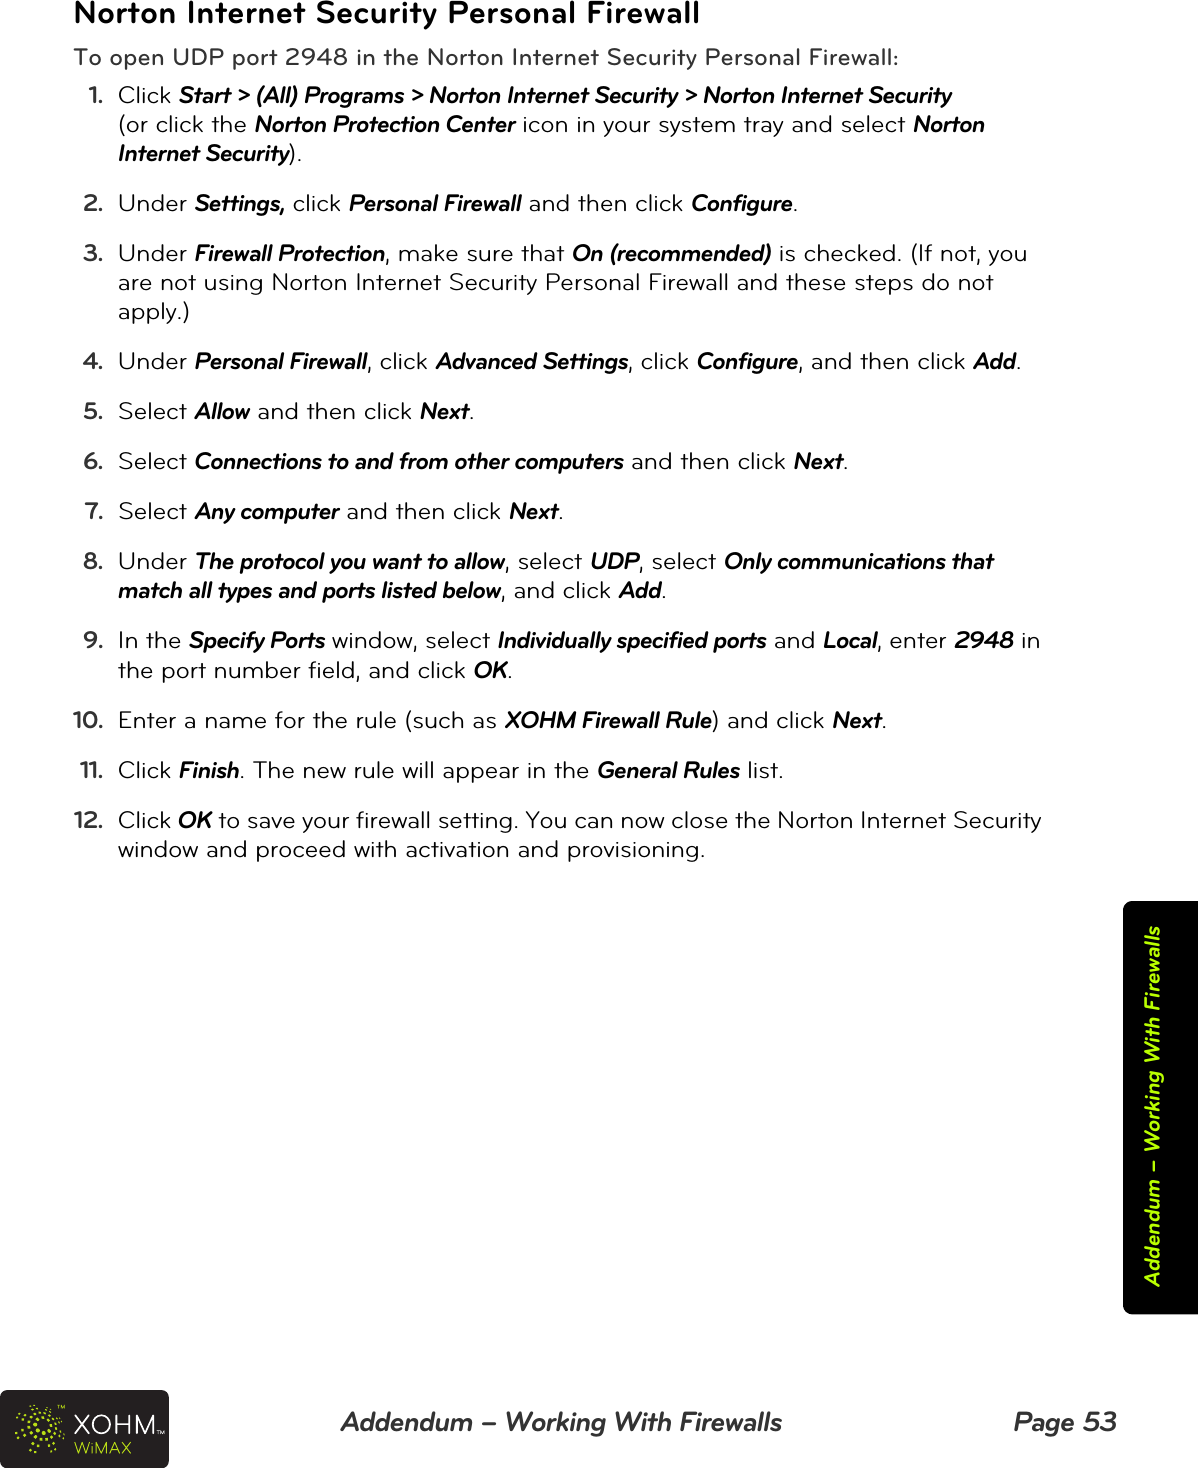
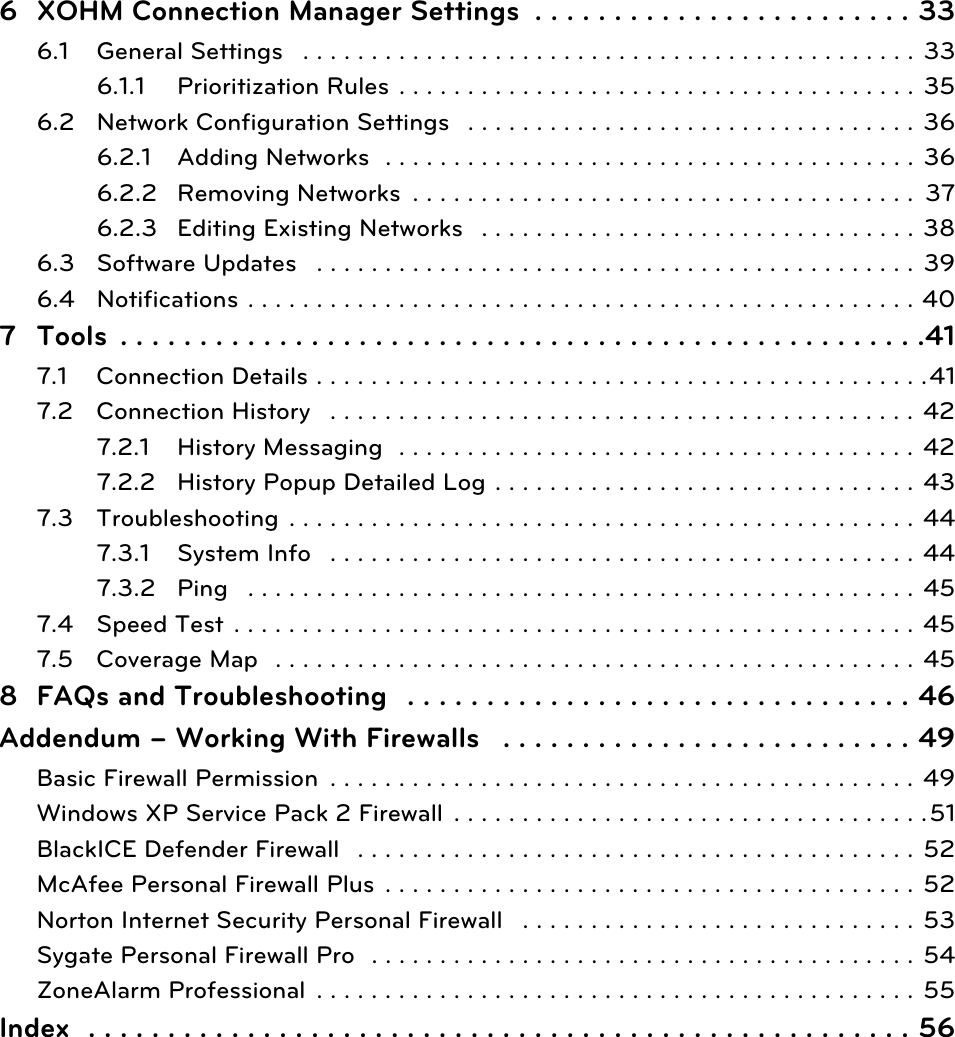
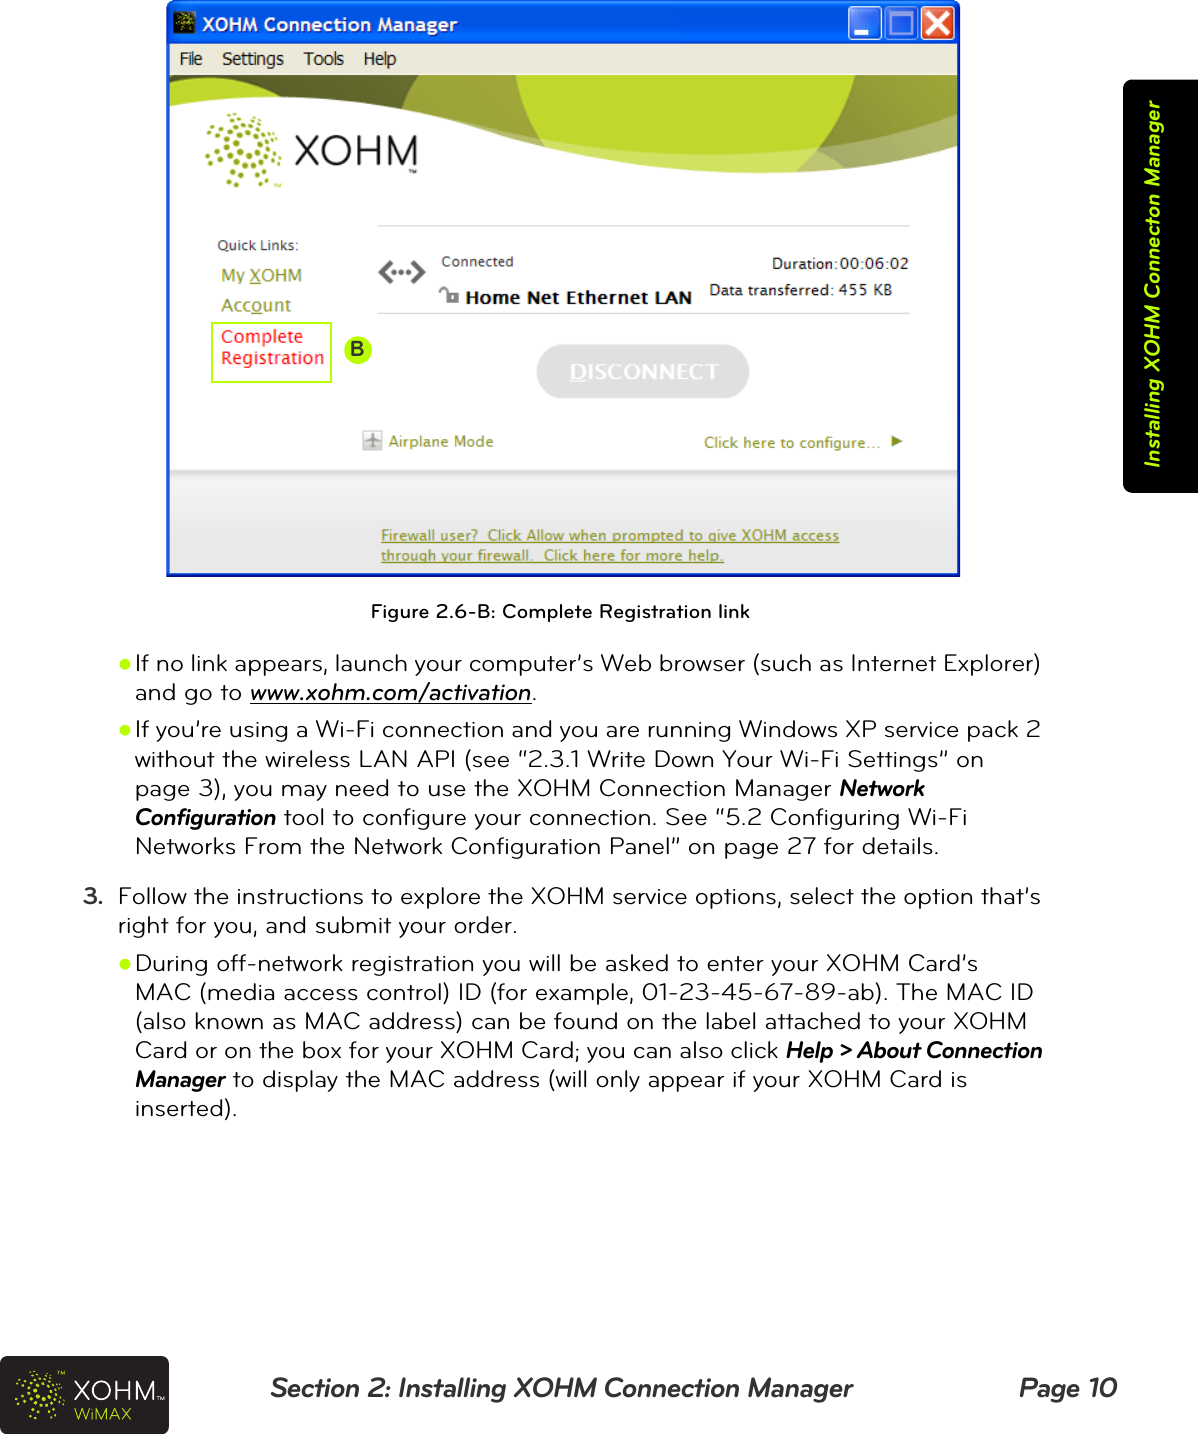
![Section 5: Configuring Wi-Fi Networks Page 30Configuring Wi-Fi NetworkszAuthentication – Select the type of authentication credentials required by the Wi-Fi network. If the network uses a static key or a passphrase for authentication, select Pre-Shared Key and enter the value into the Password field. Other authentication options include PEAP [MSCHAPv2] and EAP-TLS. Consult your network documentation for the required settings.zKey/Passphrase – If using Pre-Shared Key authentication, enter the static key or passphrase here.zWEP Key Index – Select which WEP key index to use (only if WEP encryption is in use).zLocation – Select Public, Home, or Office for the network. This is used for seamless roaming prioritization (see “6.1.1 Prioritization Rules” on page 35).5. Once your settings are configured, click OK.5.2.1 Hidden Wi-Fi NetworksHidden Wi-Fi networks are wireless networks that do not broadcast their SSID, or network name. Since these networks are not detectable by typical methods, specific settings must be used to allow XOHM Connection Manager to configure and use these hidden Wi-Fi networks.To configure hidden Wi-Fi networks from the All Available Networks view:1. From the All Available Networks view, click Connect to hidden network. Figure 5.9: All Available Networks – Connect to Hidden Network](https://usermanual.wiki/ZTE/ZTE-TU25.Users-Manual-Revised/User-Guide-1008096-Page-33.png)