ZTE ZTEA37 GSM Dual-Band Digital Mobile Phone User Manual 715892
ZTE Corporation GSM Dual-Band Digital Mobile Phone 715892
ZTE >
users manual
ZTE CORP
O
ZTE A37
GSM Dual-b
a
User Manual
Copyright © 2006 by ZT
E
All rights reserved.
No part of this publicatio
any form or by any means,
microfilm, without the prior writ
t
ZTE operates a policy o
f
the technical specifications in t
Edition: 1st edition, May., 2006
SW Edition: P103B2SWDV1.0
.
1 GENERAL INFO
R
1.1 WELCOME .....
1.2 SECURITY ......
1.3 SAFETY PREC
A
2 GETTING STAR
T
2.1 KEY DEFINITI
O
2.2 DISPLAY SYM
B
2.3 TECHNICAL P
A
2.4 BAT T E RY ........
2.4.1 Removin
g
2.4.2 Chargin
g
25
C
ONNECTING T

2.5.1 SIM Card.
.
2.5.2 Insertin
g
&
2.5.3
P
ower on/
o
2.5.4 Unlockin
g
2.5.5 Connectin
g
3 BASIC OPERATI
O
3.1 MAKING A CAL
L
3.2 ANSWERING A
C
3.3 CALL MENU.....
4 FUNCTION MEN
U
4.1 USAGE AND ST
R
4.2 PHONE MENUS.
4.2.1 Call Histo
r
422
CllDi t
4.2.3 Call Fire
w
4.2.4 Call Setti
n
4.3 PROFILES .......
4.4 MY FAVORITE
S
4.5 SETTINGS.......
4.5.1
P
hone Se
t
4.5.2 Clock Se
t
4.5.3
D
ispla
y
S
4.5.4 Securit
y
S
4.5.5
F
act. Set
t
4.6 MESSAGES .....
4.6.1
M
essa
g
e
s
4.6.2 MMS......
.
4.7 CAMERA ........
4.8 TOOLKIT ........

4.8.2 Full-
s
cree
n
4.8.3 Calculato
r
4.8.4 Stopwatch
.
4.8.5 World Clo
c
4.8.6 Games......
.
4.9 WAP ................
4.10 STK (SIM TOO
L
4.11 NAMES.............
4.11.1
A
ddin
g
Ne
w
4.11.2 Searching.
.
4.11.3 Editing.....
.
4.11.4 Deleting...
.
4.11.5
M
akin
g
an
4.11.6 Detail.......
.
4.11.7
A
dd New
N

4.11.9 Settings..
.
4.11.10 Batch Op
4.11.11 Adding t
o
5 TEXT INPUT ......
5.1 OVERVIEW .....
5.2 ABC AND ABC
5.3 123 MODE ......
5.4 PREDICTIVE T
E
5.5 CHARACTER
C
6 TROUBLESHOO
1
G
1.1 Welcome
Thank you for using ZTE
A
3
7
To guarantee the mobile ph
o
carefully and keep it for furth
e
The pictures, symbols and co
not be completely identical w
i
1.2 Security
If your mobile phone is
l
agencies to ban the us
e
losses resulted from u
n
To protect your mobile
p
¾ Set PIN code of the
S
¾ Set handset lock cod
e
¾ Take it with you as yo
1.3 Safety Precau
t
This section includes some im
p
read this information before us
Operational Precautions
Please use your phone p
r
phone as holding a wirel
centimeters) from your b
o
Do not touch the antenna
affects call quality and m
a
needed.
Keep the phone out of th
used as
atoy
Precautions While Driving
Please pay attention to
t
of your phone in the are
a
Pull off the road and pa
r
Precautions for Medical De
v
When using your phon
e
than 8 inches (20 centi
m
Not carry the phone in
t
minimize the potential
necessary.
Some phones may in
t
interference, you may
w
alternatives.
If you use any other pe
your device to determin
e
please pay attention to t
h
phone if required.
Mobile phone
Please use original
a
manufacturer. Using any
performance, hurt your
related national regulatio
Turn off your phone befo
r
phone. Do not use a
d
chemical or abrasive cle
a
A
s your mobile phone
c
magnetic items such as
c
Using the phone near
e
personal computer can
c
Do not expose your mo
b
Prevent liquid from lea
k
Do not drop, knock or
h
circuit boards.
Do not connect the ph
o
Do not attempt to disa
s
Do not store the phone
Do not charge the mob
Precautions for Potentially
Switch off your phon
e
atmospheres, such as
f
Do not remove, install,
explosive atmosphere
even death.
To avoid possible interf
e
you are near electrical
b
Precautions for Electronic D
e
Some electronic device
s
mobile phone if inadeq
u
Please consult the manu
f
Safety and General Use in V
e
Safety airbag, brake, s
p
affected by wireless tran
your automobile provide
r
the airbag deployment a
r
the airbag deployment
a
with great force and cau
s
Please turn off your mo
b
where the use of 2-way
r
Aircraft Safety
Please turn off your mo
b
mobile phone when it i
should get aircrew’s pe
If the mobile phone ha
your alarm setting to
e
during flight.
Battery use
Do not short-circuit the
Do not store battery i
n
explosion.
Do not disassemble o
r
overheating, explosion
Please store the batter
y
The battery can be rec
h
When the operating ti
m
normal, it is time to rep
l

evidence of aging.
Return the wear-out ba
t
environment regulations.
Exposure to radio frequency
Radio wave exposure and Spe
The handset is designed
waves. This requireme
n
margins designed to ass
u
The radio wave exposur
e
Specific Absorption Ra
standardized method wit
h
in all used frequency ba
n
While there may be diff
e
models, they are all desi
g
waves.
The SAR limit recomme
n
The highest SAR value f
o
is 1.492 W/kg(1g)
The hi
g
hest SAR value f
o

SAR compliance for b
o
similar accessories th
a
provide at least 1.5 cm
the users body
Warning: If the battery is da
m
come into contact the eyes
o
with a doctor.
2
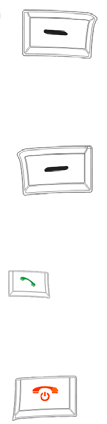
2.1 Key Definition
Left Soft key
Execute functions of the i
n
Right Soft key
Execute functions of the i
n
Dial key
Make and answer calls. B
r
End key
Finish or refuse a call. Po
w
th
it f
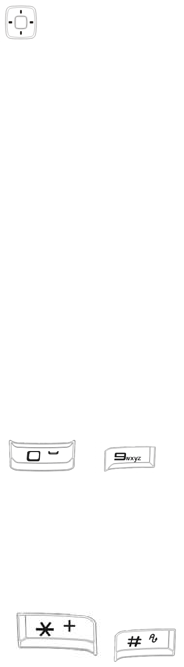
Up/Down/ Left/Right ke
y
Up/Down key: Roll the
p
down when editing. Th
e
direction keys in games.
Left/Right key: Roll th
e
shortcut keys in standby
OK key: The middle ke
operation.
~0~9 Number
k
Enter numbers and char
a
They could be set as dir
e
* key an
d

Note: In this manual pres
s
holding a key means you
2.2 Display Symbo
Signal strength
New message; No
Bar all calls
Bar black list
Only friends’ call
s
Indicate battery l
Activate call div
e
Enable mute mo
d
Keypad is locked
Indicates the phon

GPRS online
Roaming
2.3 Technical Pa
r
Handset
Type
DimensionsW×L×H
Weight
Battery
Continuous standby time
Continuous talk time
For other parameters abo
2.4 Battery
unpacking. A new battery
p
three times.
2.4.1 Removing & Inst
Remove: Push down the
and then lift the battery a
Install: Place the bottom
o
of the battery until it clic
k


2.4.2 Charging the Ba
t
Connect the handset an
d
with arrow.) Then plug t
outlet.
A charge indicator icon
battery is charged in
animation.
When the battery level in
d
it means charge has bee
the stop of charge anima
whole charge process n
e
for the first three times
)
charger may become ho
t
Please disconnect the c
h

Warning:
Please put the phon
e
40. Please use ch
a

Please charge the ba
t
displays a warning “L
o
The phone’s talking
environments. In pra
c
conditions, work envir
o
2.5 Connecting to
2.5.1 SIM Card
Please insert a valid SIM
c
used by any GSM mobile
p
Don’t touch the metal surf
a
be lost or destroyed. Kee
p
Warning: Please power
o
removing the SIM card is
f
2.5.2 Inserting & Rem
o
battery.
Pull the SIM card co
n
Put SIM card into th
e
Insert the SIM card
c


2.5.3 Power on/off Yo
u
Hold End key to power
o
The mobile phone will aut
o
valid after power on, then
t
Enter PIN Code ——if SI
M
Enter lock Code——if ha
n
Searching ——search fo
r
2.5.4 Unlocking the SI
By setting PIN (personal i
d
code, you can protect you
r
Method to unlock the
S
soft key [OK].
If you enter an incorrect P
I
by the network and the ph
o
Nt
Y
tk i
SIM card; please chang
e
Method to unlock th
e
or Left soft key [OK].
Note: If you forget your h
authorized local custom
e
2.5.5 Connecting to
t
A
fter the SIM card and th
e
search for the network.
After a few seconds, the ha
n
standby mode. Besides re
c
Press Right Soft key
Press Left Soft key
o
Note: If “Insert SIM car
d
calls.
3
3.1 Making a Call
You can make or answer
c
corner of the screen show
s
Making DDD: Enter tel
e
making a long distance
c
End key.
Dialing extension numbe
Method 1: Dial the telephone e
Method 2: Enter the telephone
e
enter the extension number,
a
extension automatically after g
e
Area code
Exchang
Making IDD: Hold * ke
preset symbol of an in
t
phone number and the
n
Dialing the number in t
saved in a list of the p
h
Calls and Missed Call
s
view all the call logs. W
You can check the list
b
¾ View All calls by pr
e
¾ View full screen Cal
¾ View Names by pre
s
¾ All the numbers in t
h
Note: Up/Down/Left/Right
k
Settings-Fastkey Settings.

3.2 Answering a C
a
If Anykey Answer is acti
v
key) to answer a call in ca
l
3.3 Call Menu
When in in-call mode, you
methods are the same as
t
process of communicatio
n
Multiparty need network t
o
network service provider.
If you couldn’t answer the
You can do the following
o
Hold/ Retrieve: Keep the
Names: Display informat
Earpiece Volume:
A
djust
Mt
D’t dl l
DTMF On/Off Enabl
e
Multiparty
¾ Answer: Hang on t
h
¾ Join All Calls: Add
¾ Hold All Calls: Han
¾ Private: Converse
w
one.
¾ Exclude: Keep one
¾ Busy: Send busy t
o
¾ End All Calls: End
u
Note: Some menu item
s
Swap will appear only
w
same time.
4
4.1 Usage and Str
u
Scrolling search functio
n
key in standby
In function menu, you c
a
Right Soft key according
4.2 Phone Menus
In standby mode, press
access the PhoneMenus interf
a
4.2.1 Call History
View calls list
Select All Calls to view
a
Select Missed Calls to
v
Select Received Calls t
o
Select Dialled Calls to v
In the calls list interface,
to delete all call records
detailed submenus:
¾ Send Message: Send
as creating messages.
¾ IP Dial: Dial an IP cal
l
number has been set be
f
¾ Detail: View the detail
¾ Save Number: Save t
¾ Add to Blacklist:
A
dd
t
Call Duration: You can
v
approximate total durati
o
can clear all call duratio
n
¾ All Calls Info:
Cost Setting: In the me
n
Cost to read or set the li
m
Note: This function need
s
SIM card, all numbers in
4.2.2 Call Diverting
This service enables yo
Please contact your ser
v
Set Diverts: Set diverts
¾
A
ll Calls: Divert all c
¾ When Busy: Divert
c
¾ No Answer: Divert c
a
¾ Unreachable: Diver
t
network.
When you have set co
n
chosen:
¾ On: Only registered
¾ Off: Delete the dive
r
¾
Status
Chec
k
:Query
A
fter choosing one of the
a
the following options, you
c
z All Services:
z Voice Calls:
O
z Data: Only di
v
z Fax: Only div
z Messages:
O
z
A
ll Except M
s
¾ Cancel All
Enter the divert interface,
services.
4.2.3 Call Firewall
4.2.3.1 Incoming Calls
Current Settings: Press
S
BAll
BBlkLit
Black List: Press Sele
c
¾ If you have not a
d
Option-Add to add the
¾ If you have added s
o
to select such options:
A
Friend List: Press Sele
c
¾ If you have not a
d
Option-Add to add the
¾ If you have added s
o
to select such options:
A
4.2.3.2 Outgoing Calls
Before entering the fun
c
phone password is 1234
Current Settings
:
¾ Bar All: Bar all outgoi
n
¾ Bar in List: Bar all nu
m
any number in the barre
d
¾ Cancel All: Cancel th
e
Barred List: Directly en
t
All. If you have not adde
d
to select Add, and then
p
4.2.4 Call Settings
Anykey Answer: If “On”
except End key, and Rig
h
Minute Minder: Choose
minute when answering
t
Connected Minder: Sele
c
DTMF Tones: Select On
/
Call Waiting:
Select
On/O
the current status of th
i
call if a third person
c
provider for detailed us
a
IP Settings: You can s
e
the Names or the calls
the phone number that
4.3 Profiles
In standby mode, press
M
profiles interface.
Select Profile: You can
s
options are: Normal, M
e
before leaving factory. Y
o
Edit Profile: Change the
d
¾ Alert Type: Select the
¾ Ringing Tone: Many
p
¾ Ringing Volume: Adju
s
¾ Speaker Volume: Adj
u
¾ Key Tone: Select to t
u
¾ Warn Tone: Select to
t
¾ Missed Alert: Select t
o
call.
¾ Message Alert: Sele
c
select to turn off the aler
t
¾ Power on/off Ring: S
e
4.4 My Favorites
In standby mode, press Men
u
My Favorites interface.
Photos: Press left soft
camera.
Pictures: Press left so
f
from a browser or from
Rin
g
tones:
p
ress left
Press Up/Down key to s
e
the following submenu:
¾ Play: Play the selected
m
¾ Set ringtone: Set the sel
e
¾ Information: View the att
r
¾ Delete: Delete the select
e
¾ Delete All: Delete the all
Others: press left soft ke
y
or received from attach
m
Space Usage: check th
e
4.5 Settings
setting interface.
4.5.1 Phone Settings
Select and enter the Pho
n
Language: Select the l
a
Own Number: Edit/vie
w
Fastkey Settings: Set t
h
key.
Auto Lock Keypad
S
automatically. If you se
screen is switched to s
prompt on the interfac
e
4.5.2 Clock Settings
You can set date and ti
m
Use Scroll key to switch

correctly inputting the dat
e
4.5.3 Display Settings
Wallpaper: Select your fa
v
Contrast: Adjust the scre
e
Brightness: Adjust the scr
4.5.4 Security Setting
s
Security features protect
y
Note: You need to input h
default handset lock code
as soon as possible.
PIN code: SIM password
Select On/Off to enable
o
set a new PIN code.
Note: Three consecutive
t
code may be provided t
o
your network service pr
o
soon as possible.
Handset Lock: Handset
L
Select On/Off to enable
to set a new handset lo
c
Note: The default hands
e
Network Call Bar: You c
a
to improve security le
v
detailed use. The netw
o
enable your call restricti
o
¾ International Call: B
a
¾ All Except Home: B
a
¾ Incoming Calls: Bar
¾ Incoming if Abroad:
A
fter choosing one of the
a
services:
z All Services: Res
t
z Voice Calls: Only
z Data: Only restric
t
z Fax: Only restrict
z Messages: Only
r
z All Except Msgs:
R
When you have set types
o
z On: The restrictio
n
z Off: Delete the re
s
z Status: Query if t
h
¾ Cancel All: Select C
a
Note: You need to input
Three consecutive times
4.5.5 Fact. Settings
In this menu, you can
s
settings.
4.6 Messages
If the network supports
receive text short mess
a
receive voicemail. Pleas
e
In standby mode, press
M
the message menu inter
f

4.6.1 Messages
New message
Please confirm messag
e
messages.
¾ In message interfac
e
message input interface
Input”.)
¾
When you finish enter
select Send to One, S
e
¾ Select Save to sa
v
destination number ac
c
select number in the
N
opposite party’s numb
e
select number. Select
S
numbers from the Nam
e
prompt information on
t
Note: The SMS centers
o
than 70 Chinese charact
e
Inbox/Outbox
¾ Select Inbox to che
messages saved in SI
M
¾ In the message list,
do the following operati
z Forward: Transfe
r
z Voice Call: Call t
h
messages in the Inbox.)
z Send (The menu
a
z Extract Number.:
the screen. If you select o
n
editing or dialing.
¾ Delete All: Delete all t
Message Settings
You must set up neces
s
Access Msg Settings sub
¾ Msg Centre: Input th
this number from your s
e
¾ Msg Validity: In the p
e
message till it is receive
d
¾ Templates: When e
d
key. In this menu, you
c
¾ Status Report: If th
e
inform you after the se
n
needs the network to s
u
¾ Save Edit: Select w
h
¾ Msg Firewall:
z Current Setting
s
all short messages, se
numbers in the messag
e
messages.
z Msg Black List:
I
empty”. Press Option-
A
press OK to save. If you
to access and then sele
c
Select and Access Voice
M
¾ Select Get Voice M
a
message.
¾ Voice Mail Num.: Se
t
Cell Information
¾ You can vie
w
¾ Select Setti
n
4.6.2 MMS
If your SIM card support
s
New Message
Press MMS-New Messa
g
following submenu:
¾ Edit Text: Select to e
d
Press left soft key [OK] to
enter the following submen
♦ Done: Press done t
o
z Send later: Sa
v
next time you send the
m
z Subject: Write
a
z To: One or mo
r
send the message
z CC: Phone nu
m
copy of the message
Press More to check
z BCC: phone nu
carbon copy of the mes
s
other addresses)
z Priority: Set th
e
z Lifetime: Selec
t
server while trying to de
♦ Edit Text: Go back to
♦ Add Picture: Select t
o
♦ Add Sound:
A
dd a m
♦ Delete Object: Delet
e
♦ Preview: Select to pr
e
Press More to check the
f
♦ Add Page
A
dd a ne
w
♦ Object Properties:
D
♦ Page Properties:
Inbox
Sent
Outbox
Drafts
Templates
Settings
¾ Read Reports:
z Send Report:
S
z Request Repo
r
message.
¾ Deliver Receipts
z Send Receipt:
S
z Request Recei
MMS.
¾ Lifetime: Set the m
a
¾ Advanced:
z Message Cent
e
z WAP Profile: S
e
z MMS Downloa
d
or download MMS after
z Span Filter: Se
t

4.7 Camera
The phone has a built-in came
r
In standby mode, press Men
u
camera interface.
The following icons appear on
Brightne
s
Zoom
Frame
key to adjust its param
e
Frame: Press Left/Rig
h
Up/Down key to adjust
Face: Press Left/Right
key to adjust its param
e
Large: Press Up/Down
Multiply Normal/Multipl
Up/Down key to select
Press OK key to catch
press Right soft key [b
a
4.8 Toolkit
In standby mode, press Men
u
interface

4.8.1 Alarm Clock
Your phone can set up t
o
Set Alarm: Select Set Al
a
to instructions: alarm ty
p
ring tone.
The alarm clock is valid only w
h
will powered on automaticall
y
automatically if you select
“
pow
List Alarms: Select Lis
t
clocks settings. Press
O
the alarm clock setting
s
enable/disable it.
Define Rest Day: Sele
Workday alarm will no
t
then press Select/Can
c
Clear All: Select Clear
A
4.8.2 Full-screen Cal
e
Use Scroll key to selec
January 1, 1901 to Dece
4.8.3 Calculator
Press 0~9 Number key
Press Up/Down/Left/Ri
g
calculator. Press Left sof
t
Note: This calculator has l
in long division.
4.8.4 Stopwatch
You can measure time and tak
e
Press OK key to start ti
m
Press OK key to stop th
e
Press Left soft key or O
4.8.5 World Clock
The world Clock function provi
d
You can view the time
o
navigation screen of Wo
r
Press Left soft key [Sa
v
Press End key to quit.
4.8.6 Games
Tetris: The options are
a
¾ New Game: Start a
n
¾ Set Lines: Select th
e
¾ Help: Check the rul
e
Push Box: The options
¾ New Game: Start a
n
¾ Load Game: Read t
h
¾ Help: Check the rul
e
4.9 WAP
Home: Press to go int
o
Resume: Press to ent
e
B
kk
D
il th
up/down key to choose t
h
address and delete.
Empty Temp.: Delete th
e
Enter address: Input t
h
page.
Settings:
¾ Connection Setting
s
edit, change name or delete
t
Press edit to enter the
z Homepage: Edit
t
z Image Settings:
S
z Connection Typ
e
z Connection Opti
z Gateway Setting
z Bearer: Set Data
¾ Security Cert.: Pre
s
¾ Push Security: Sel
e
Push Messages: Ent
e
the information, load th
e
GPRS Info: Press to c
h
Fastkey operation: in
s
And then press OK ke
y
¾ Stop: Stop web bro
w
¾ Go back: Move to t
h
¾ Bookmarks: Press
¾ Add bookmark: Ad
¾ Enter address: Ent
e
¾ Home: Move to the
¾ Top: Move to the to
p
¾ Refresh: Refresh t
h

page. Select to enter the ima
it.
4.10 STK (SIM Tool
k
In standby mode, press M
e
interface.
This service needs the ne
the network service provi
d
For more information, ple
a
4.11 Names
In standby mode, access
t
It shows List empty whe
n
pressing Left Soft key. Sa
v
the first character of the
n
In the names list interf
a
options are as follows:
¾ Search
¾ Edit
¾ Delete
¾ IP Dial
¾ Detail
¾ Add New Name
¾ Settings
¾ Batch Operation
In the names list interf
a
soft key [Option] to ac
c
¾ Send Message
¾ Edit
¾ Delete

¾ Add to Speed
¾ Copy to MS
¾ Move to MS
¾ Add to Blacklist
¾ Add to Friendlist
Press Left/Right key to s
w
be seen. Press End key
t
Whether saved in SIM car
d
number. Number types co
Office, Fax or Pager.
Records saved in the SI
M
doesn’t appoint the record
Besides, there are six gro
u
Society and VIP.
4.11.1 Adding New Na
In the names list interfac
e
to save new number into
If SIM Card is selected
Enter the name of the
n
Enter the phone numb
e
If Phone Memory is sel
e
Press OK key, enter th
e
Select the group.
Enter the phone numb
e
Select Caller Icon.
If the name is saved into
t
at least the name and
o
chosen, the default is m
g
rou
p
is the current
g
rou
4.11.2 Searching
In the names list interfa
c
you want to search.
Quick-search: In the Na
m
record of the name with
s
Sort principle: Sort by A
S
Match principle: If match
4.11.3 Editing
In the names list interfac
e
Name record.
4.11.4 Deleting
In the names list interfa
c
information of the current
r
4.11.5 Making an IP C
a
In the names list interfac
e
to the current chosen nu
m
4.11.6 Detail
In the names list interf
a
interface. You can press
4.11.7 Add New Name
Add a new record.
4.11.8 Sending Messa
g
In the names list interfac
e
the interface of editing
m
creating messages.
4.11.9 Settings
Ringing Tone: You can s
e
Save Nos. to: You can s
e
Used Space: You can vi
e
records in SIM card and
Copy/Move to MEM/SIM
or SIM card. When cop
y
destination space is full.
Speed Dial List: List the
s
4.11.10 Batch Operation
This function provides you to b
a
card or phone memory. Note:
Please be careful to use this f
u
.
4.11.11 Adding to Speed
Dial List. You can set at
standby mode, if you ho
automatically. Press Del
e
5.1 Overview
Your mobile phone provides t
h
numeric input and predictive t
e
When you are in a field that all
o
mode indicator in the upper ri
g
different input modes.
5.2 ABC and abc
m
Use the number key fro
m
Press the key labeled wi
t
z Once for the first le
z And so on
To insert a space, pres
s
the display.
Press * key to open a li
s
list, and press Ok key t
o
5.3 123 mode
The 123 mode enables
Press the keys corresp
o
5.4 Predictive te
x
You can enter any letter with
a
dictionary.
To write the desired wo
for one letter. For exam
K.

word is not correct, pres
s
found.
5.5 Character Cha
r
Refer to the table below for m
o
key
1 1
2
AB
3 D
E
4 G
5 J
K
6 M
7 P
Q
8 T
U
9
W

* key
P
k
# key
S
Up/Down key
R
Left/Right key
R
End key
E
6
Check the following refere
your distributor if you can
n
1. “Enter PIN code” i
s
Input the PIN or input the
set “off” if you do not want
2. “Insert SIM” is sho
w
Turn off your phone and
m
3. “Unlock” is shown
w
Press Unlock and then en
t
4. No key tone volum
e
Check the keypad setting
i
5. No incoming ring t
o
Check the ring
ing
tone and
6. No alarm tone w
h
Check the profile setting
7.
A
phone number
Check whether call restri
8.
A
phone call can
n
Check whether call restri
9. Short message c
a
Check the Msg centre s
e
10. Some menus rel
a
Check the profile setting
s