ZTE ZTEMF975S CDMA/LTE Ufi User Manual
ZTE Corporation CDMA/LTE Ufi Users Manual
UserManual.wiki
>
ZTE
>
ZTEMF975S User Manual
Users Manual
Navigation menu
Upload a User Manual
Namespaces
Wiki Guide
HTML
PDF
Info
Views
User Manual
Discussion / Help
Navigation
![MF975S User Guide [UG template version 14b_mbb] [draft version for review control] [carrier_OEM_model name or number_document type_language_date_draft number] example: [sprint_abc_XYZ-123_ug_en_050714_d1]](https://usermanual.wiki/ZTE/ZTEMF975S/User-Guide-2418820-Page-1.png)
![TOC ii Windows 7................................................................................................................................... 27 Connect Mac Computers with Wi-Fi ................................................................................................... 31 Connect iPhone/iPod Touch/iPad ....................................................................................................... 33 Connect an iPhone or and iPod Touch ....................................................................................... 33 Connect an iPad ......................................................................................................................... 36 Connect an Android™ Device ............................................................................................................. 39 Connect WPS Supported Wi-Fi Devices............................................................................................. 42 Connect with Micro USB Cable (Windows) ................................................................................................. 44 Device Recognition and Removal – Windows PC USB Connection .................................................. 44 Device Recognition – Windows PC USB Connection ................................................................ 44 Device Removal – Windows PC USB Connection ..................................................................... 45 Software Installation – Windows PC USB Connection ....................................................................... 46 Connect with Micro USB Cable (Mac) ........................................................................................................ 48 Device Recognition and Removal – Mac USB Connection ................................................................ 48 Device Recognition – Mac USB Connection .............................................................................. 48 Device Removal – Mac USB Connection ................................................................................... 49 Network Setup – Mac USB Connection .............................................................................................. 50 Settings ....................................................................................................................................................... 51 Web UI Overview ................................................................................................................................ 51 Web UI Window .................................................................................................................................. 51 Appendix ..................................................................................................................................................... 53 Troubleshooting .................................................................................................................................. 53 Specifications ...................................................................................................................................... 55 Warranty and Service [describe per carrier] ....................................................................................... 57 Warranty ...................................................................................................................................... 57 Services ...................................................................................................................................... 58 Safety and Notices ...................................................................................................................................... 59 Safety Precautions [describe per carrier] ............................................................................................ 59 Labels and Symbols [describe per carrier] ................................................................................. 59 [xxxxx] [describe per carrier] ....................................................................................................... 59 Mobile Broadband Device [describe per carrier]......................................................................... 61 USIM Card and Memory Card [describe per carrier] .................................................................. 63 AC Charger and Micro USB Cable [describe per carrier] ........................................................... 64 Mobile Broadband Device Use and Electronic Medical Equipment [describe per carrier] ......... 65 General Notes [describe per carrier] ................................................................................................... 66](https://usermanual.wiki/ZTE/ZTEMF975S/User-Guide-2418820-Page-3.png)
![TOC iii General Use [describe per carrier] .............................................................................................. 66 Handling the Device [describe per carrier] .................................................................................. 66 Wi-Fi (Wireless LAN) [describe per carrier] ................................................................................ 67 RF Exposure Information and Specific Absorption Rate (SAR) Information [describe per carrier] .... 67 Specific Absorption Rate (SAR) Information for this Product [describe per carrier] ................... 67 Electromagnetic Safety Information [describe per carrier] .......................................................... 67 European RF Exposure Information [describe per carrier] ......................................................... 68 Index ............................................................................................................................................................ 69](https://usermanual.wiki/ZTE/ZTEMF975S/User-Guide-2418820-Page-4.png)
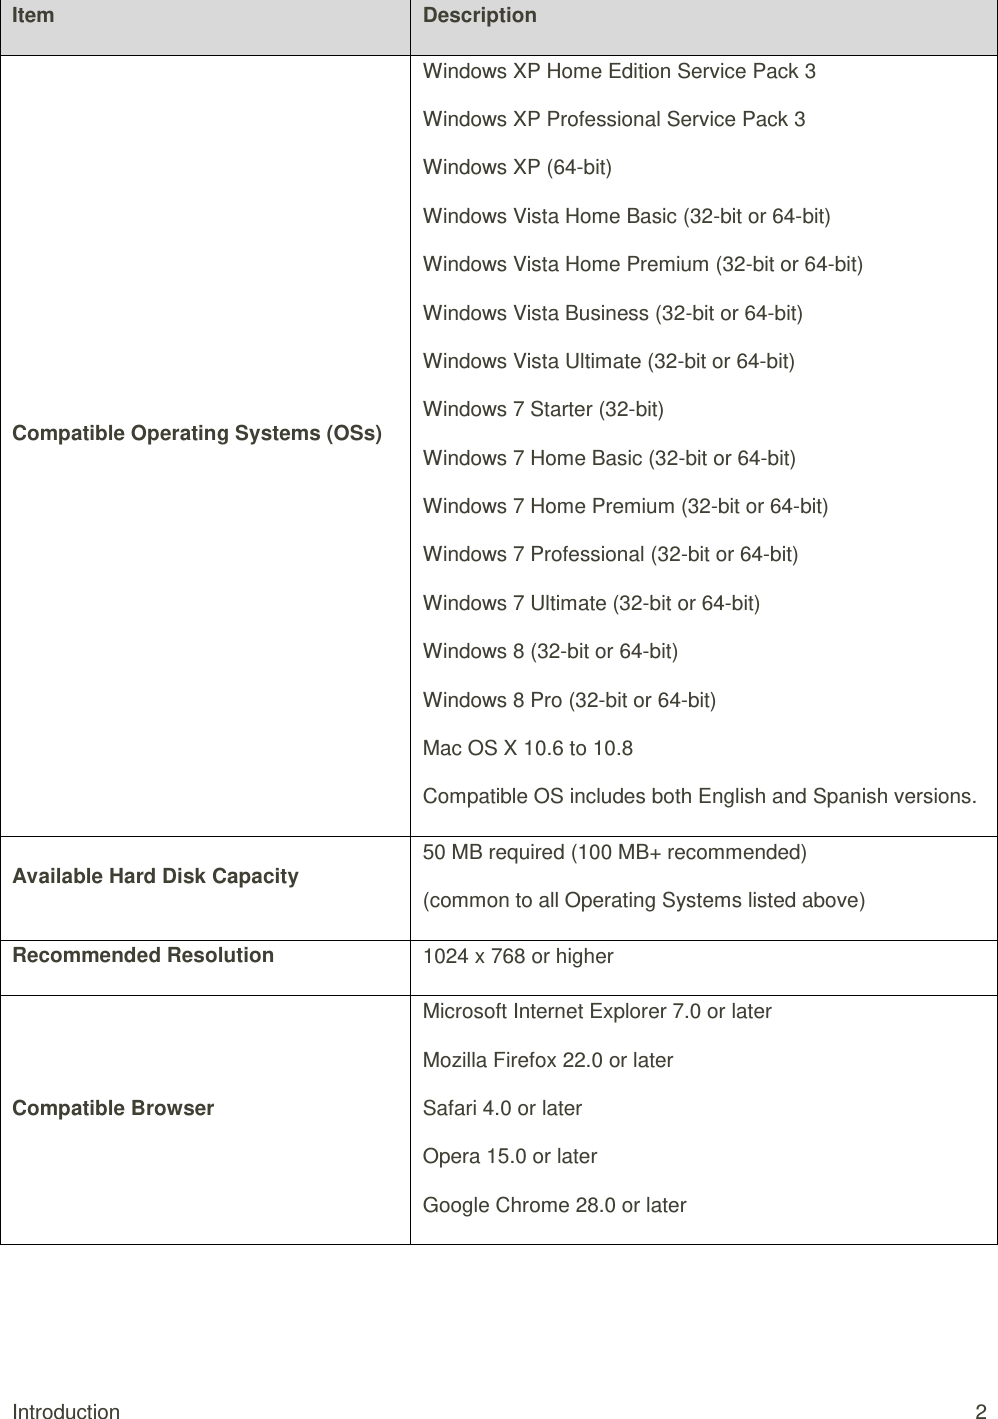
![Introduction 1 Introduction The following topics describe the basics of using this guide and your new mobile broadband device. Before You Begin Thank you for purchasing your new MF975S. The following topics explain how best to use this guide to get the most out of your mobile broadband device. Before Using Your Device Read "Safety and Notices" thoroughly for proper usage. Accessible services may be limited by subscription contract conditions. Guide Usage Notes Note that most descriptions in this guide are based on your device's default settings at the time of purchase. Screenshots and Key Labels Screenshots and Key labels are provided for reference only. Actual windows, menus, etc. may differ in appearance. Other Notations In the user guide, the mobile broadband device may be referred to either as "mobile broadband device," "hotspot," "device," or "Wi-Fi router." A microSD™ or microSDHC™ card is referred to as an "SD Card" or a "memory card." Operating Environment (Compatible OSs) The table below outlines the compatible operating environments for your device. Use outside these environments may affect performance. Additional factors (hardware, connected peripherals, installed applications, etc.) may also affect performance. ● For computer support, OS version upgrade information, etc., see the corresponding manufacturer's product support documentation. ● The information for operating environment (compatible OSs) listed below is the current information for your device sold as of [month year]. Check [xxxxxx] for the latest information in regards to operating environment.](https://usermanual.wiki/ZTE/ZTEMF975S/User-Guide-2418820-Page-5.png)
![Introduction 3 Package Contents See below for details on everything you will find in the box for your MF975S. ● Packet Wi-Fi ● Standard Lithium Ion (Li-ion) Battery ● AC Charger ● USB Cable ● Get Started Poster ● Important Information Booklet (including terms and conditions of service) ● Wireless Recycling Envelope SSID and Security Key Before connecting Wi-Fi devices to your MF975S, you will need to confirm the SSID (network name) and security key. ■ From home, select Wi-Fi. You will see the SSID (network name) and Security Key. Note: There are two SSIDs set for your [device name]. By default, [xxxxx] is set as security for [xxxxx]. Additional Information The following list describes additional information useful to know before you begin using your MF975S. ● Your mobile broadband device accommodates software updates. Always use the latest software.](https://usermanual.wiki/ZTE/ZTEMF975S/User-Guide-2418820-Page-7.png)
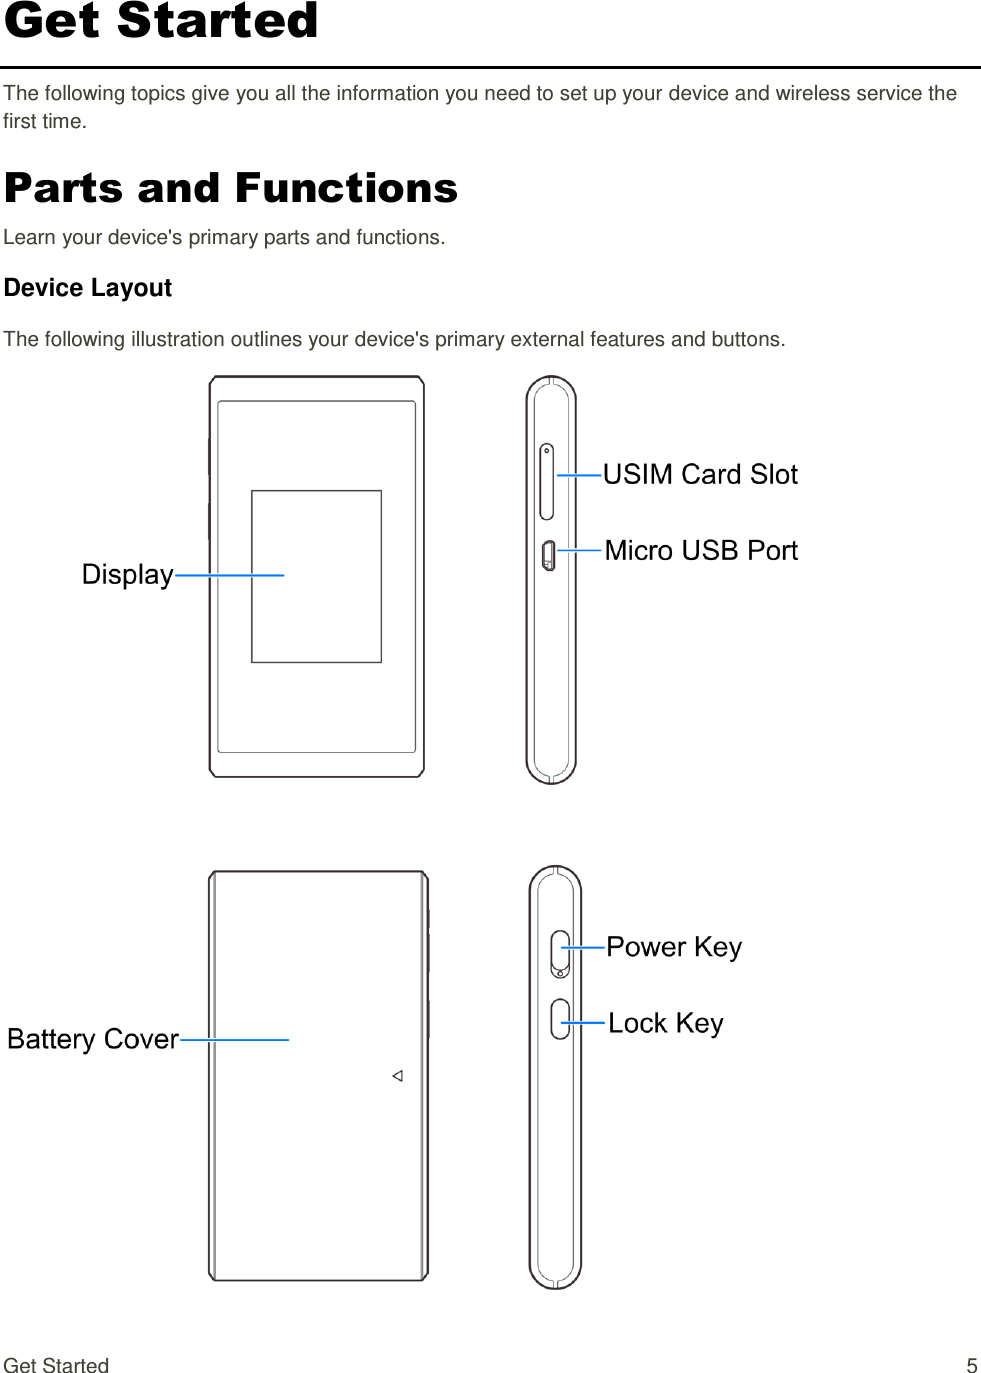
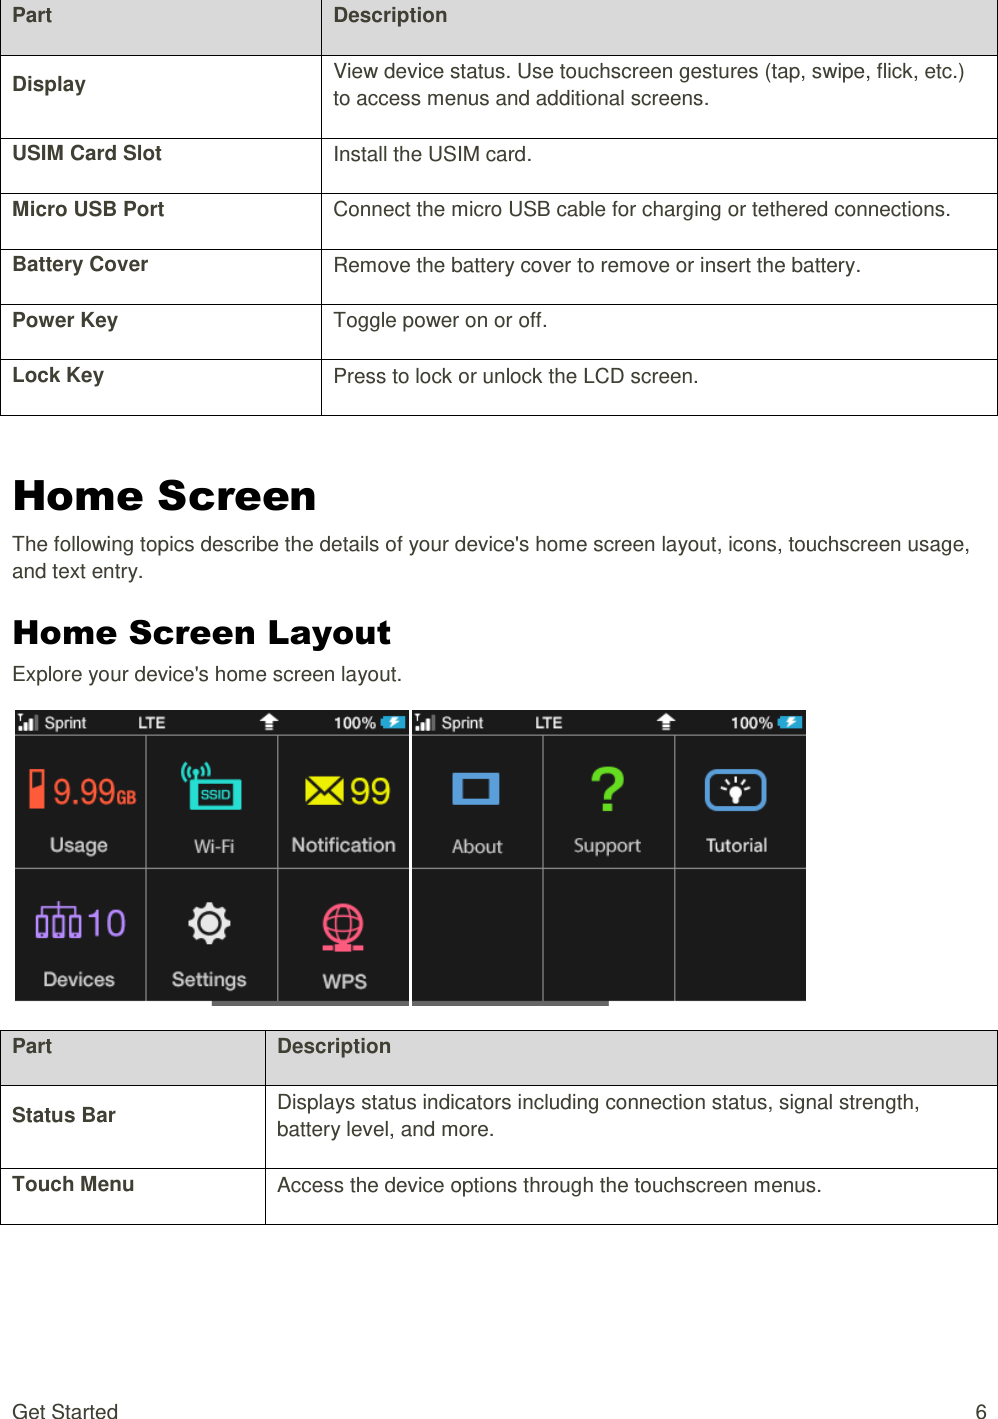
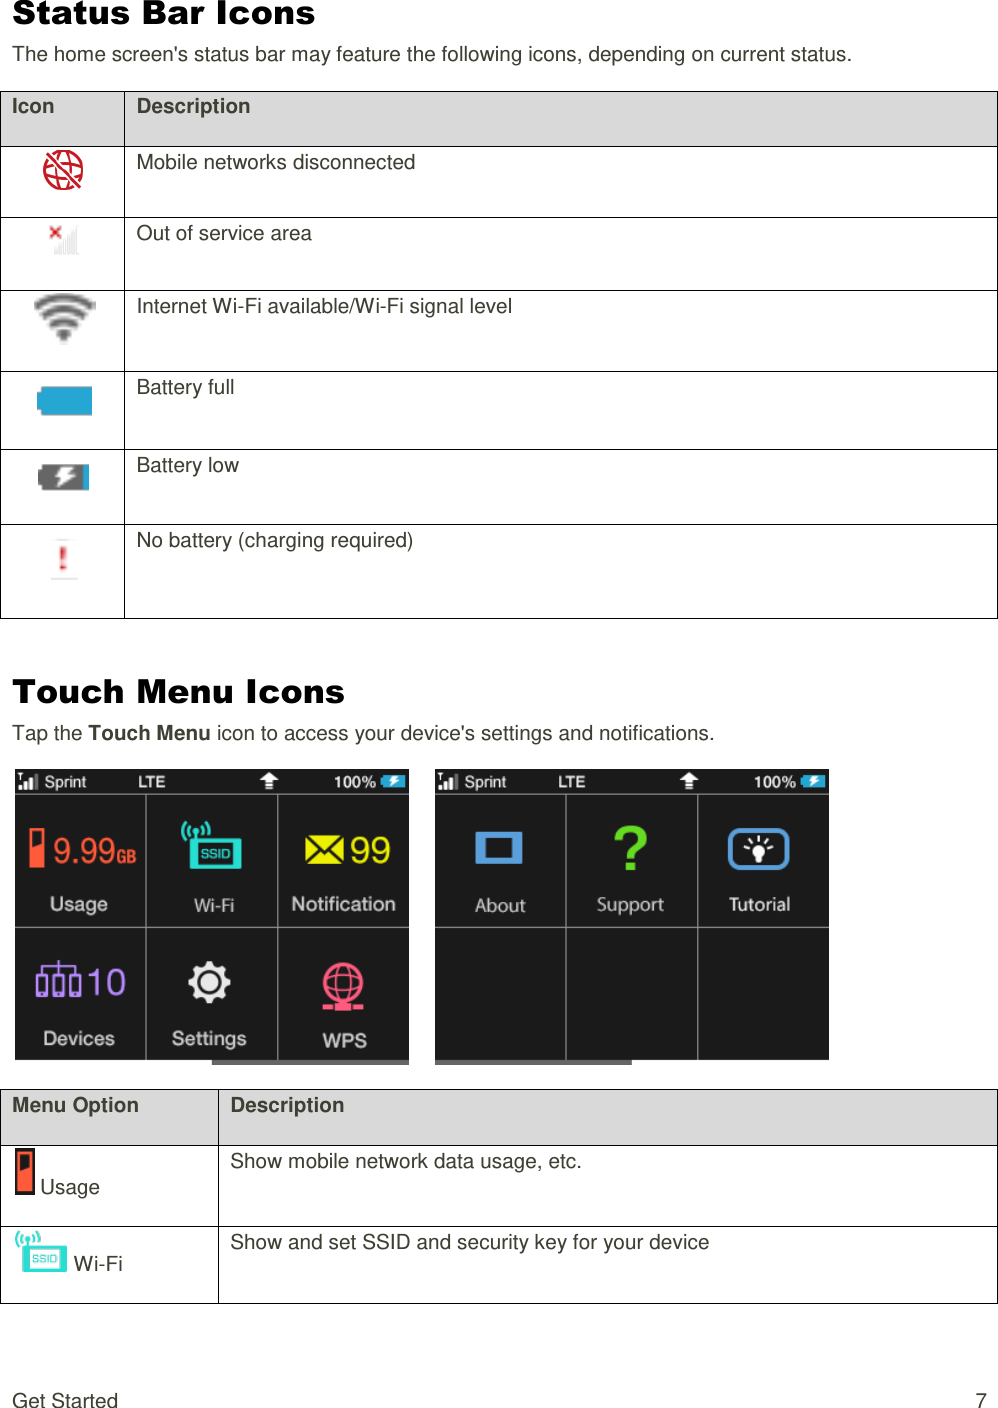
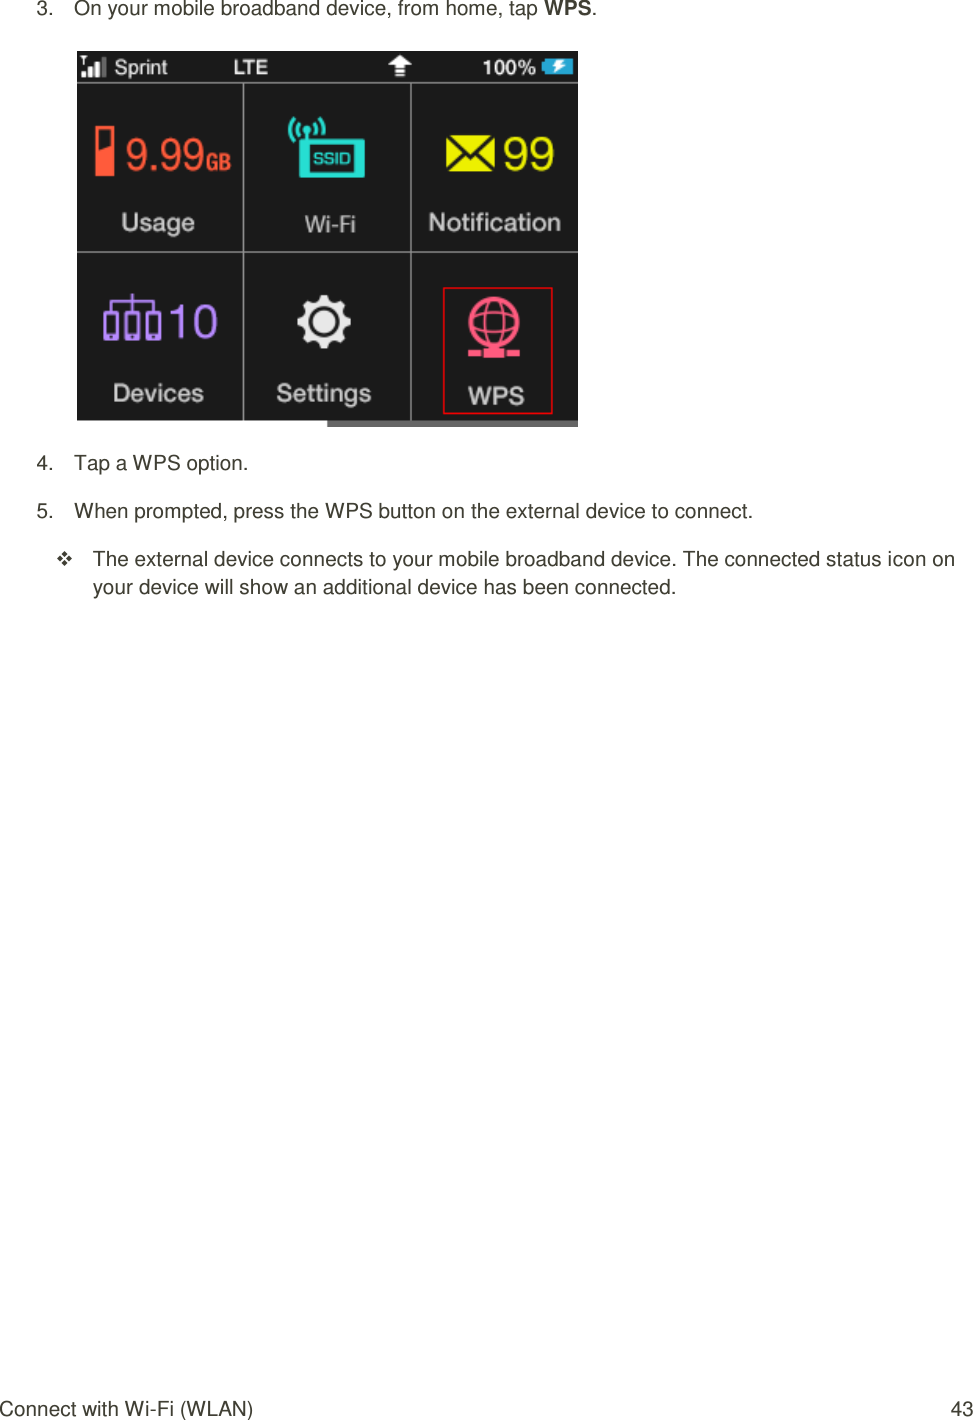
![Get Started 8 Menu Option Description Notification Show the messages received Devices Show the number of connected devices Settings Make settings for software update, roaming, display brightness, sleep mode, passcode for screen lock WPS Set the WPS function. Information Show your device's phone number, software version and URL for the WEB UI Support Show help for icons on display Tutorial Sleep Mode If your mobile broadband device is not used for a while, the display enters sleep mode and turns off automatically. ■ Press the lock key to wake the screen. The screen will illuminate and the touchscreen options will become active. If there have been no transmissions or operation of your device, or if the battery has not been charged, your device enters sleep mode to save power. In sleep mode, WLAN is disabled. Press the power key to turn the display on and exit sleep mode. WLAN function is enabled and Wi-Fi devices can reconnect to the [device name].](https://usermanual.wiki/ZTE/ZTEMF975S/User-Guide-2418820-Page-12.png)
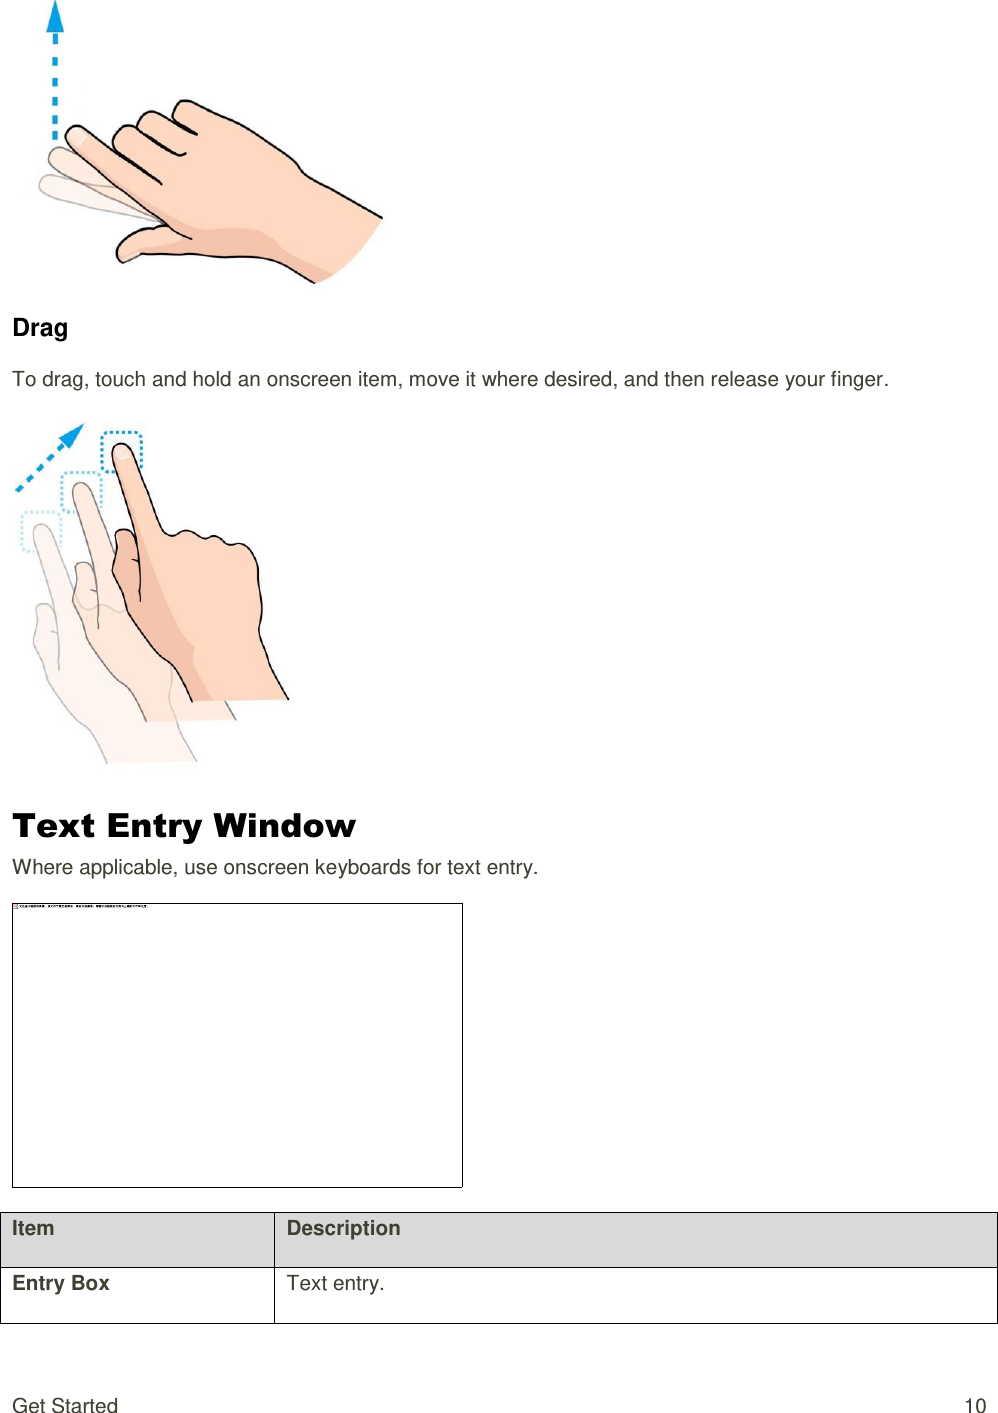
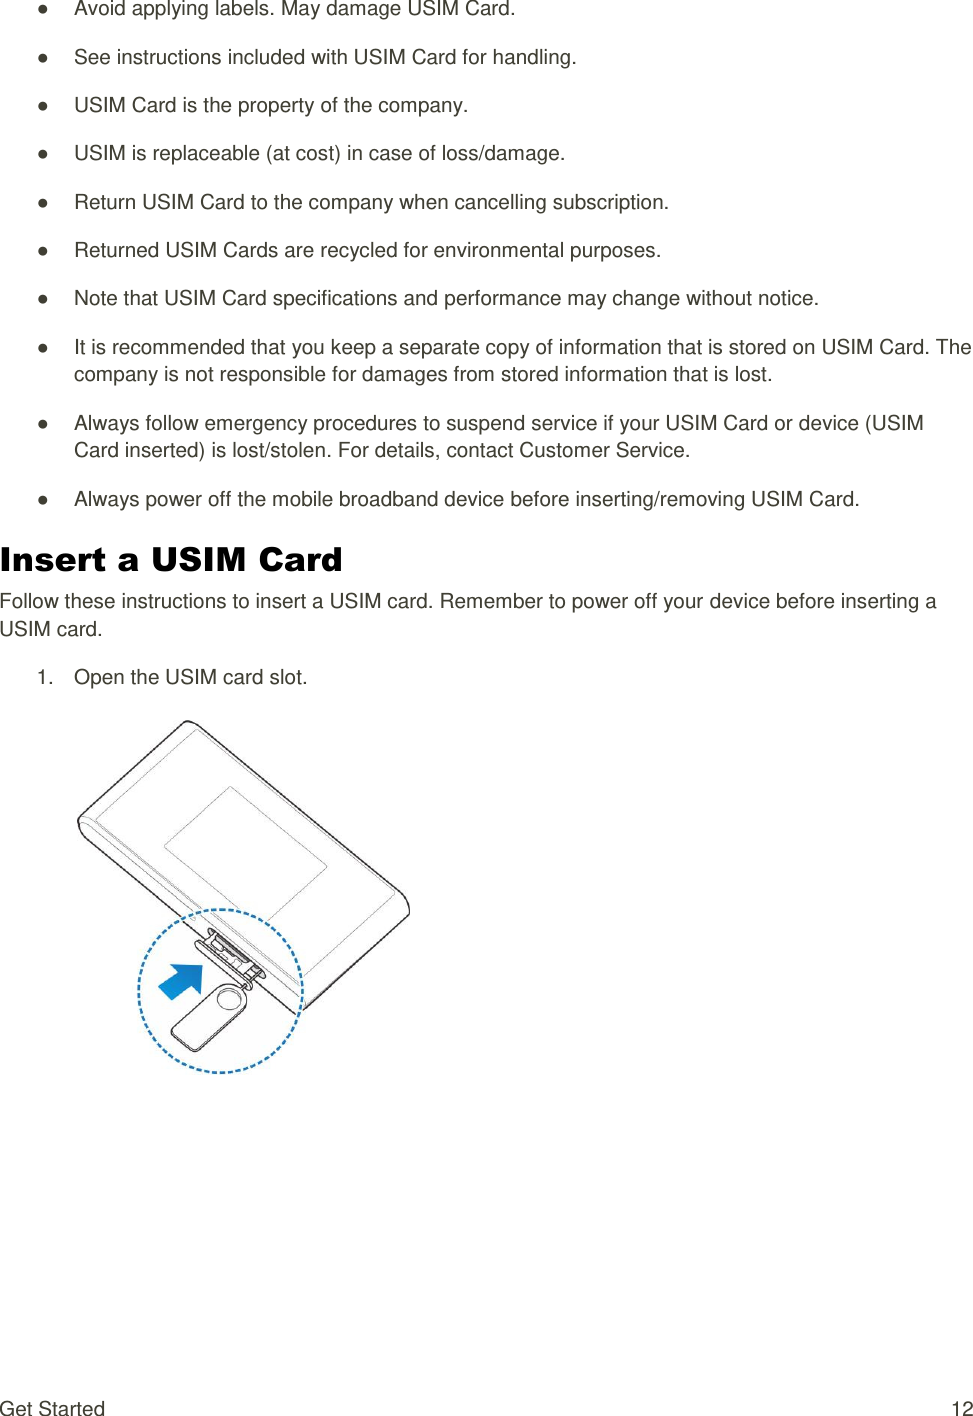
![Get Started 11 Item Description Cursor Show entry position. Keyboard Entry key. Entry mode (Symbol) Symbol entry window opens. Entry mode (alphabet, numbers) Toggle letters and numbers. Delete Delete a character before the cursor. Space Enter a space. Fix Confirm text entry. Data Transfer Volume and Transfer Speed [optional content describing data transfer speeds using various network types, e.g., 4GLTE, 3G, etc.] Wireless Mode Maximum Downlink Speed Typical Downlink Speed Sprint Spark Enhanced 4G LTE xx Mbps xx – xx Mbps 4G LTE xx Mbps xx – xx Mbps 3G xx Mbps xx – xx Mbps Note: Actual speeds depend on several factors, including network conditions. USIM Card The USIM card is an IC card containing phone number and other customer information. Handling a USIM Card Keep the following in mind when handling a USIM card. ● Customer is responsible for any damage caused by inserting USIM Card in another-brand IC card reader, etc. The company is not responsible in such case. ● Always keep the IC chip clean. ● Wipe clean with a dry, soft cloth.](https://usermanual.wiki/ZTE/ZTEMF975S/User-Guide-2418820-Page-15.png)
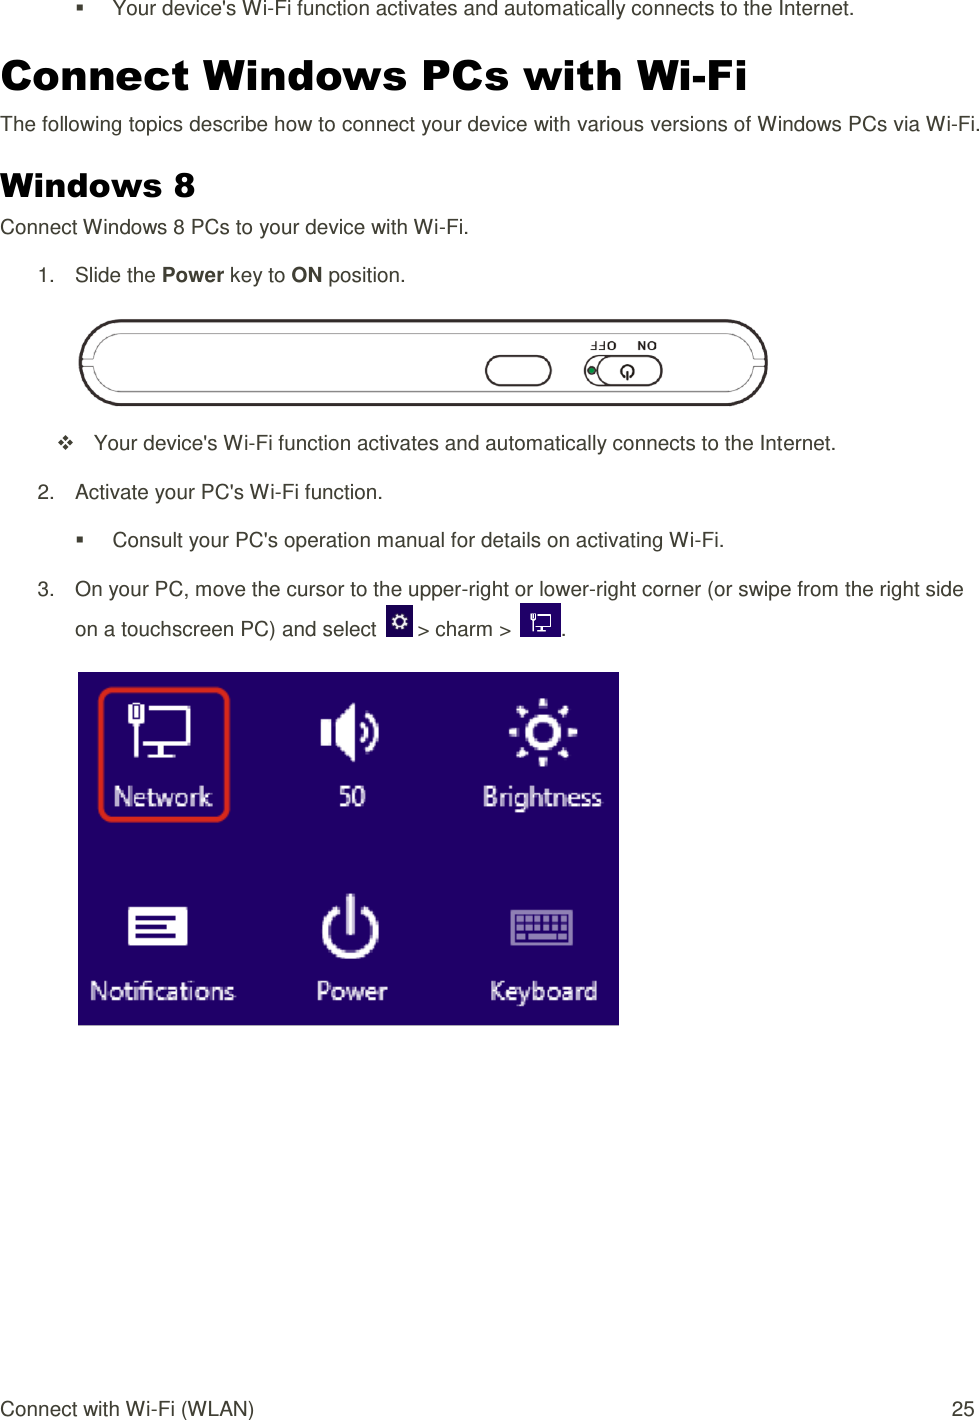
![Connect with Wi-Fi (WLAN) 24 Connect with Wi-Fi (WLAN) The following topics outline basic features and operations of your device's Wi-Fi (WLAN) connections, including connecting with various OS and device types. Wi-Fi (WLAN) Overview Below are some basics of your device's Wi-Fi (WLAN) function. Wi-Fi (WLAN) Information ● Advanced Settings: Change your devices Wi-Fi (WLAN) settings as required. See [xxxxx]. ● Simultaneous Connection: Use your device to connect up to 10 Wi-Fi devices simultaneously. ● Automatic Updates for Optimizing Wi-Fi Connection: When connected by Wi-Fi, connection optimizing settings may be automatically received and updated. Wi-Fi (WLAN) Usage Cautions For added security, it is recommended that you change the default network name (SSID) and security key (WPA) after setting up your device. Wi-Fi (WLAN) Overview ● Your device supports IEEE 802.11 b/g/n standards. Connect Wi-Fi devices (PC, game console, etc.) via Wi-Fi for wireless data transfers. ● Your device supports Wi-Fi Protected Setup (WPS), which allows Wi-Fi connection settings to be easily configured on any WPS-compliant device. ● Enter Wi-Fi router's SSID and WPA keys to connect non-WPS-compliant Wi-Fi devices. These settings should be performed when the device is connected the first time to another Wi-Fi device. Thereafter, simply activate Wi-Fi (WLAN) to automatically connect your mobile broadband device to the Wi-Fi (WLAN) device. Activate Wi-Fi (WLAN) Function Follow the instructions below to activate your device's Wi-Fi function and connect to the Internet via an available 4G LTE, 4G, or 3G connection. Your device searches for and makes a connection automatically upon powering up. Use the Web UI to select a network. ■ Slide the Power key to ON position.](https://usermanual.wiki/ZTE/ZTEMF975S/User-Guide-2418820-Page-28.png)
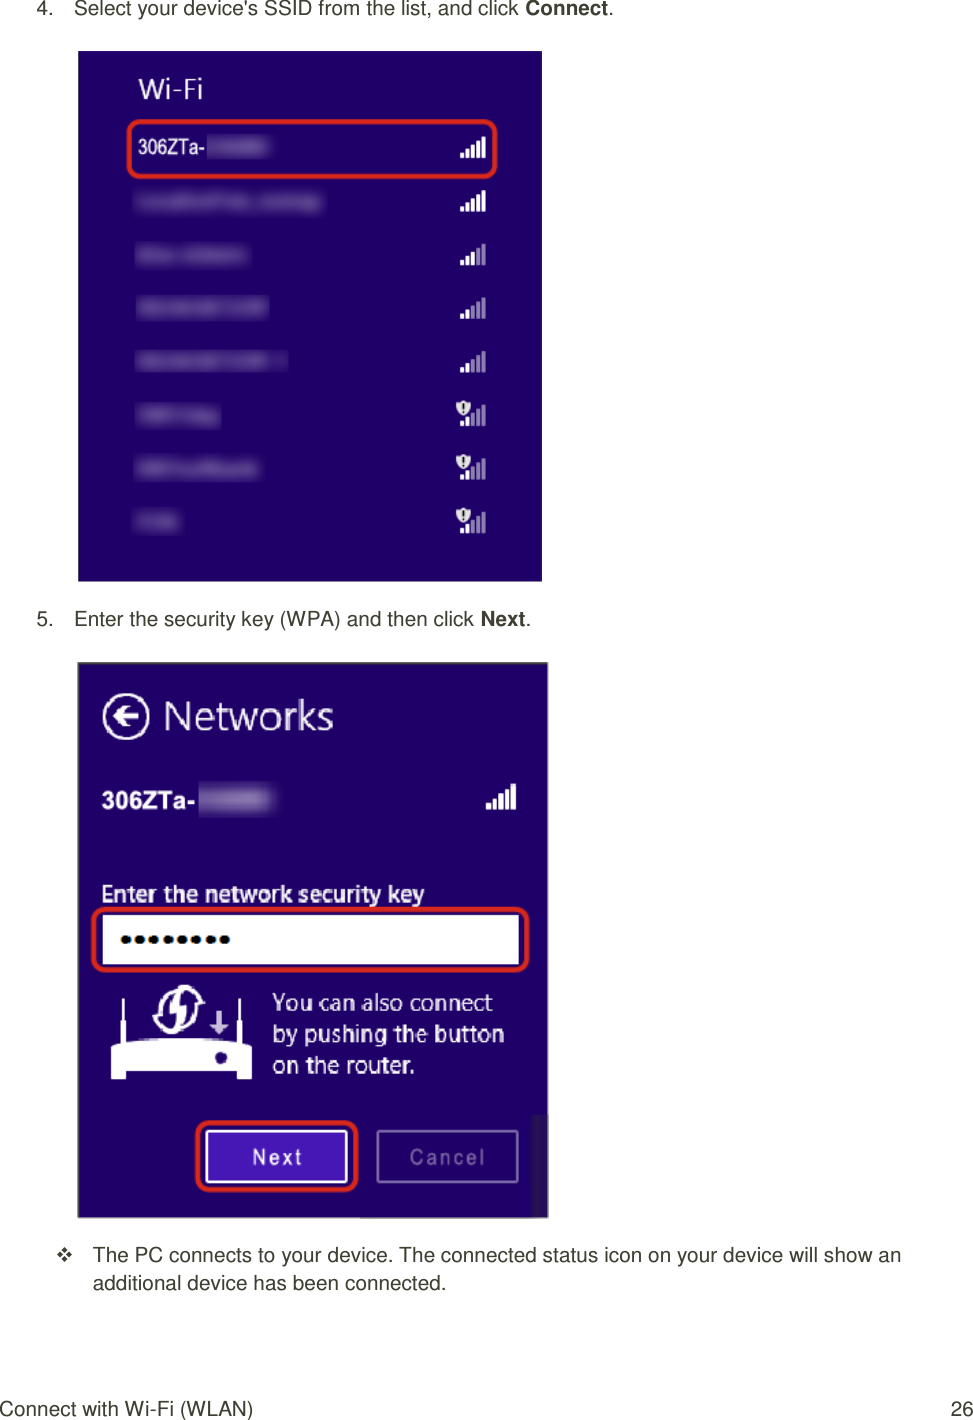
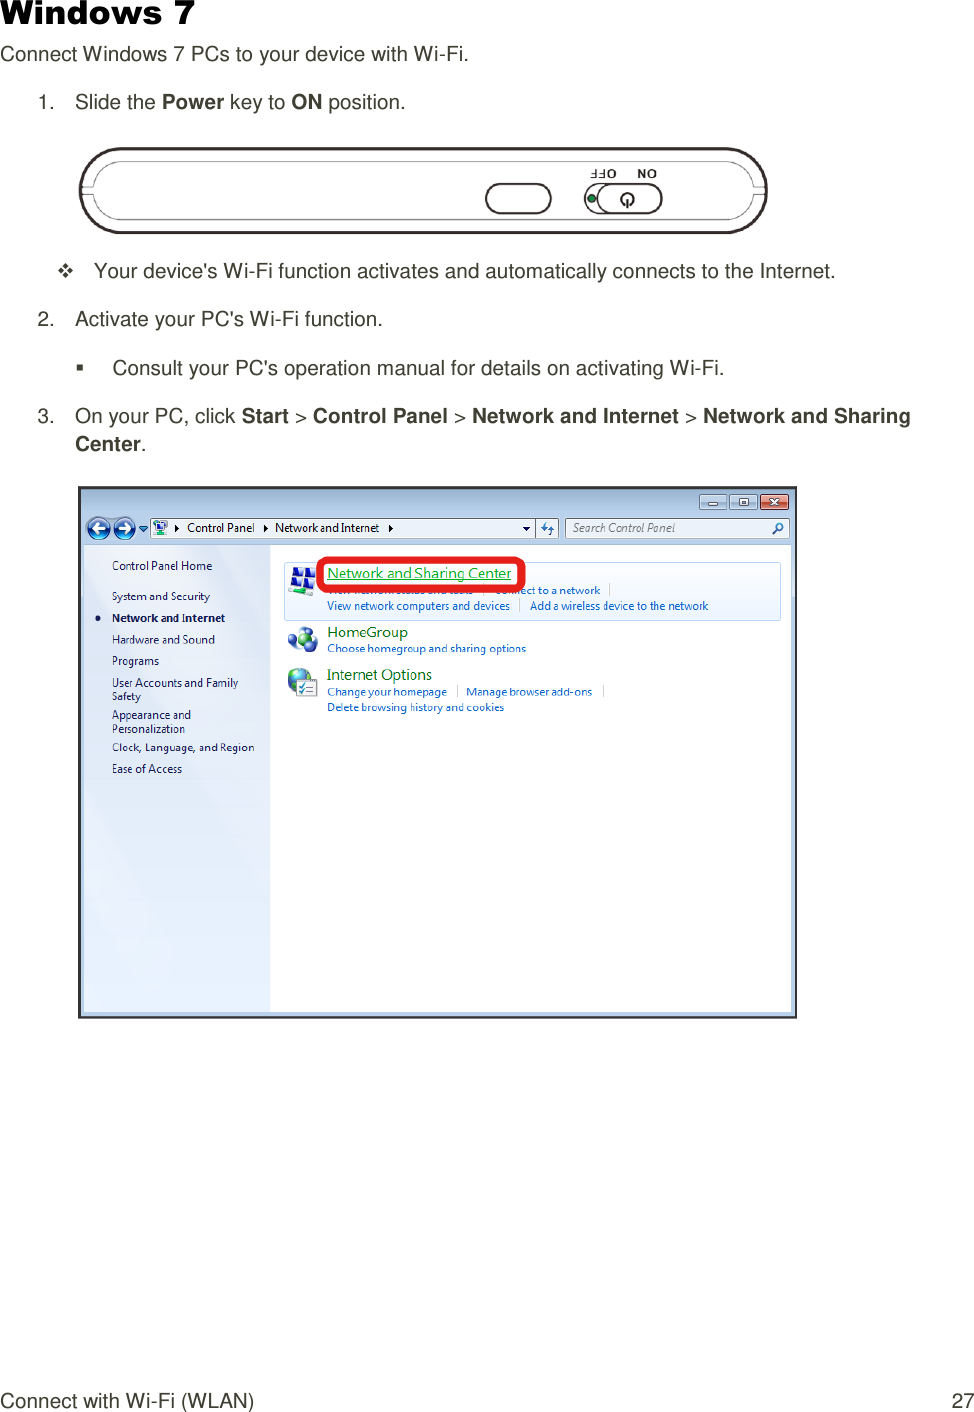
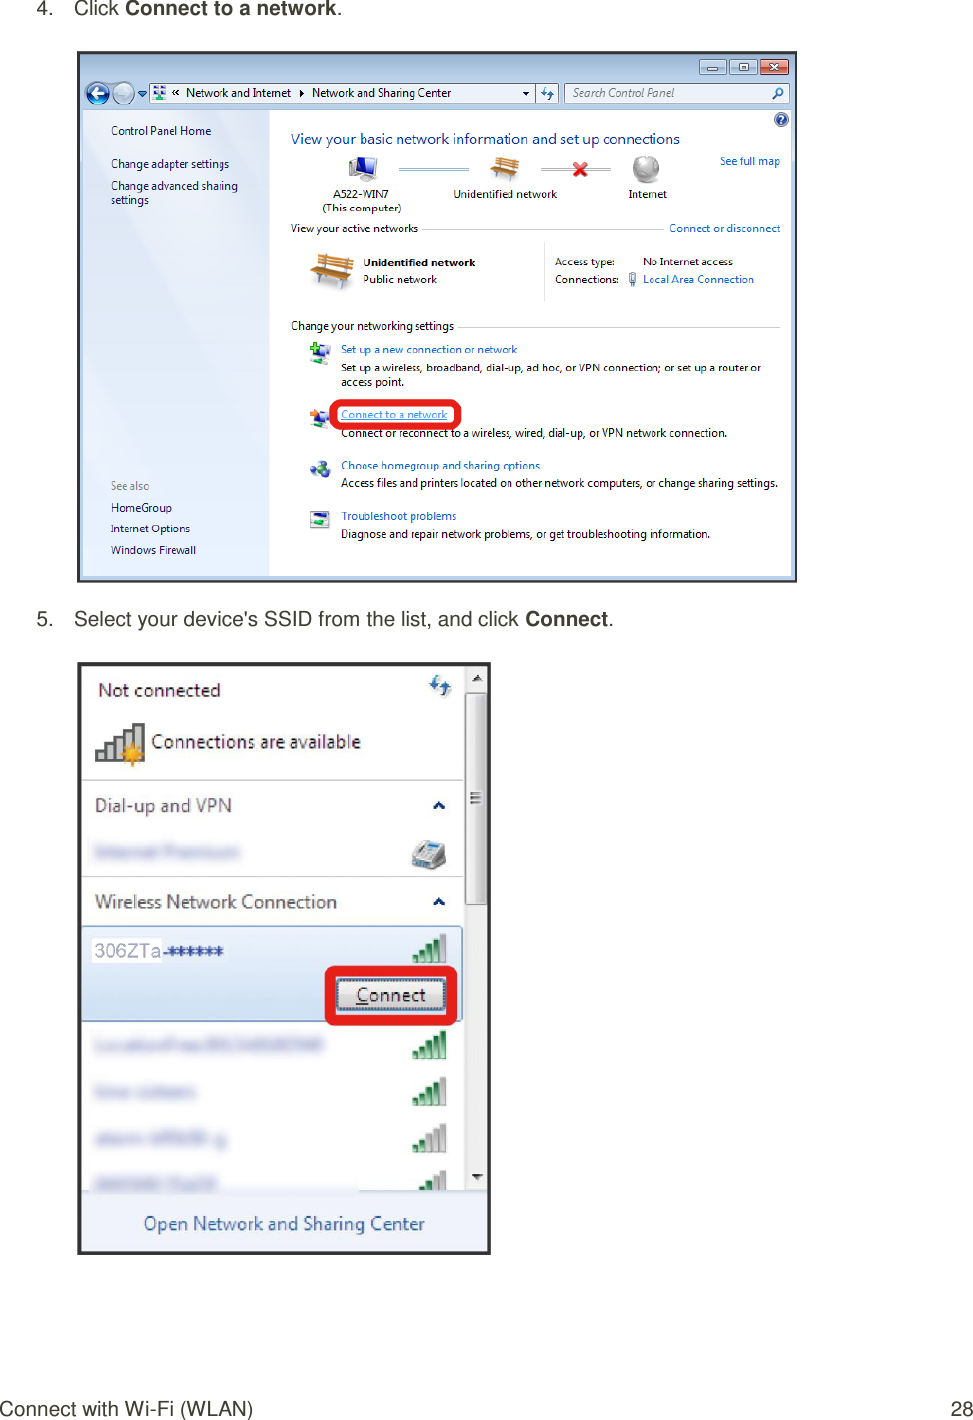
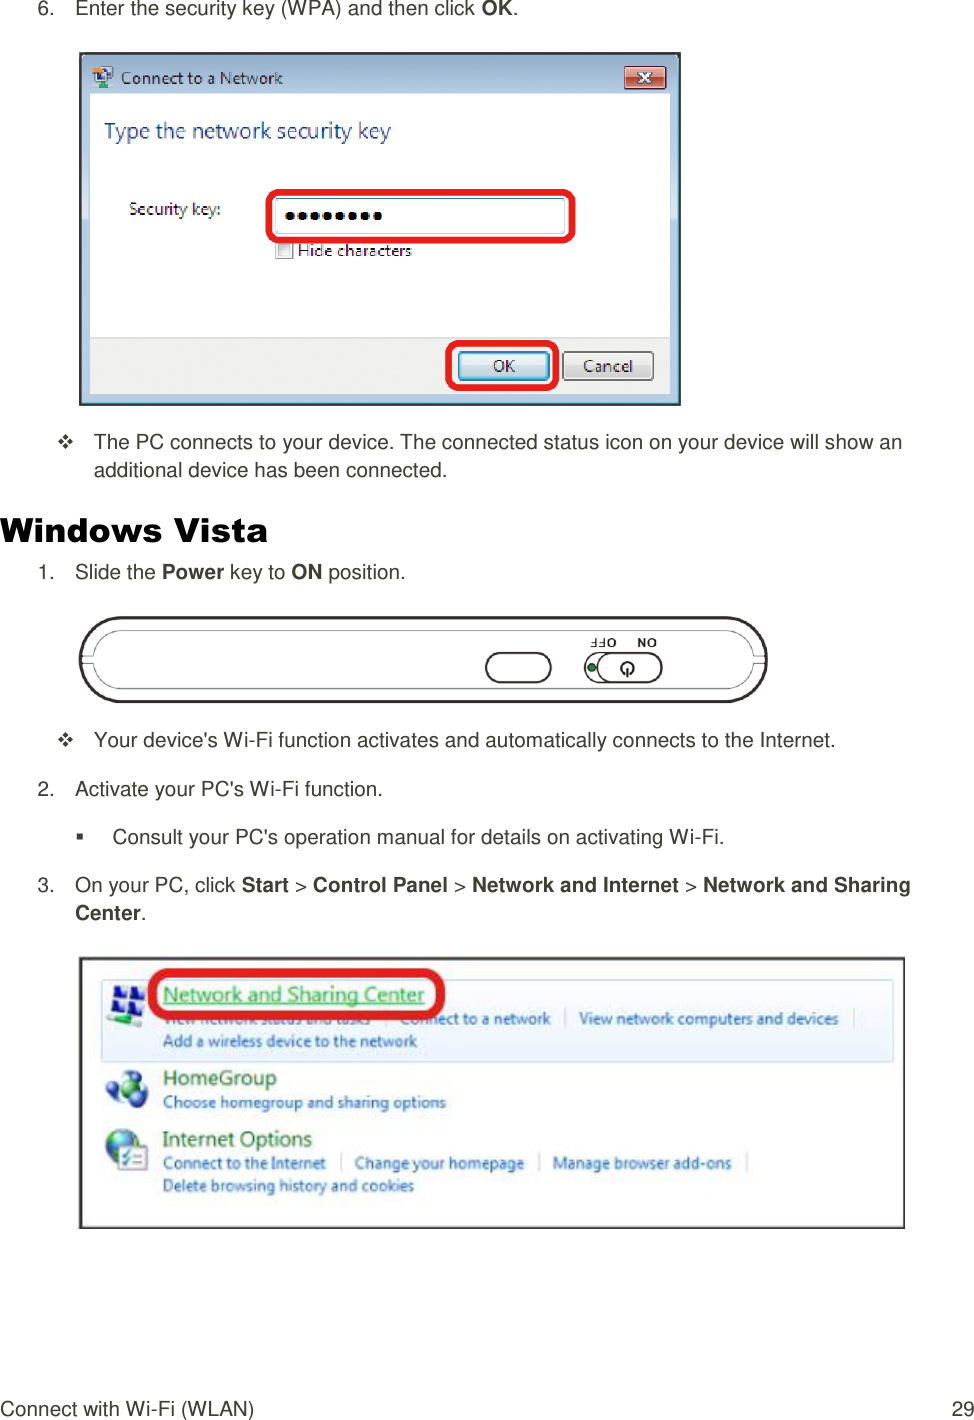
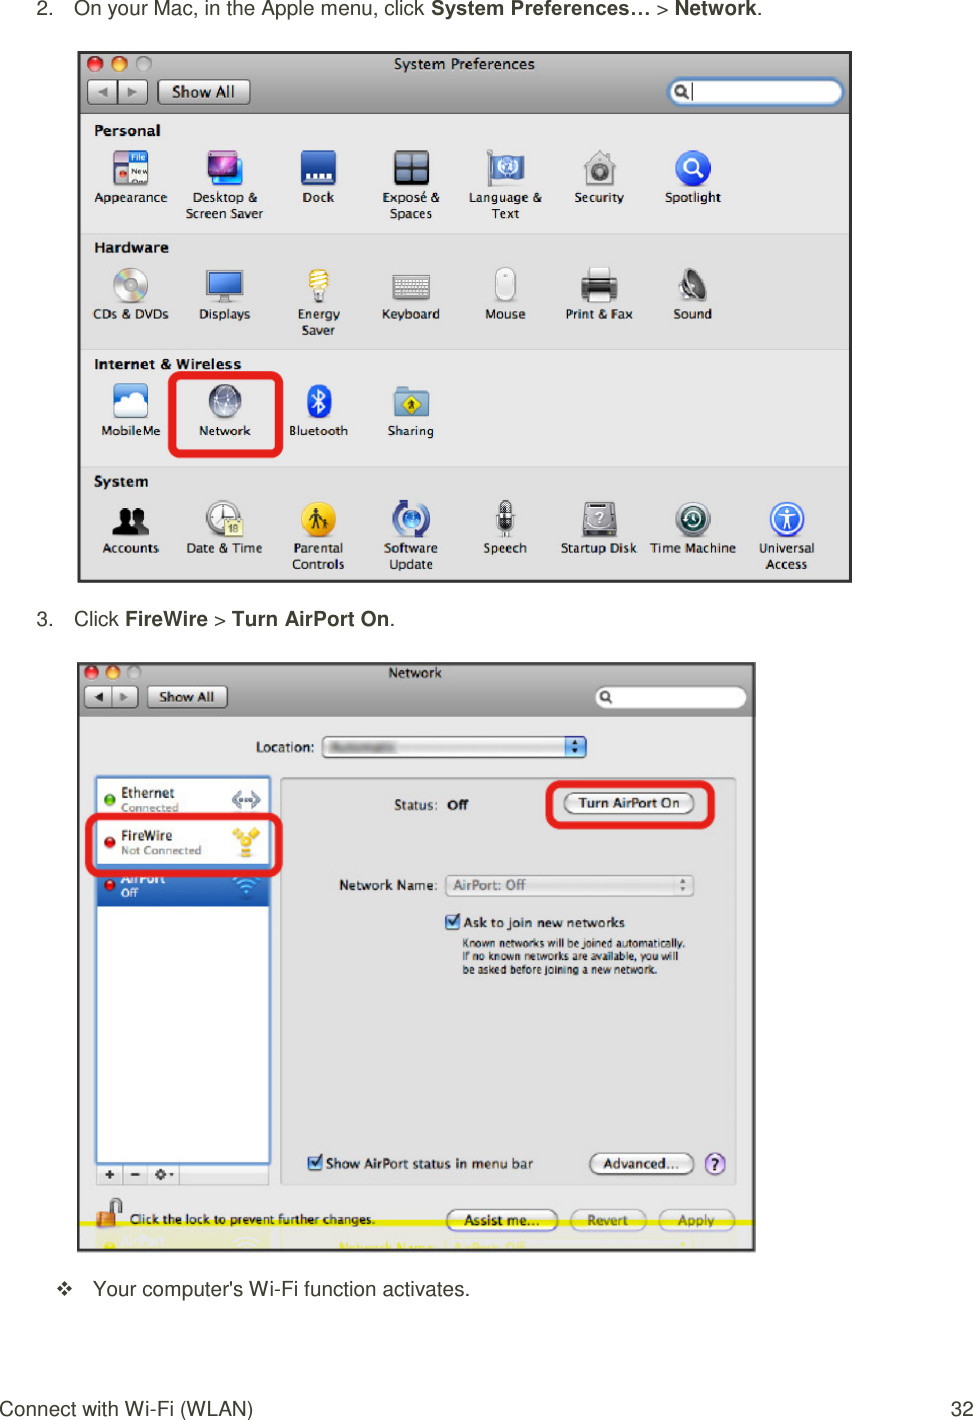
![Connect with Wi-Fi (WLAN) 31 6. Enter the security key (WPA) and then click Connect. 7. Click Close. The PC connects to your device. The connected status icon on your device will show an additional device has been connected. Connect Mac Computers with Wi-Fi Follow the instructions below to connect a Mac computer to your device via Wi-Fi. Note: The operations depicted are based on Mac OS X 10.xx, with Wi-Fi security set to [xxx]. 1. Slide the Power key to ON position. Your device's Wi-Fi function activates and automatically connects to the Internet.](https://usermanual.wiki/ZTE/ZTEMF975S/User-Guide-2418820-Page-35.png)
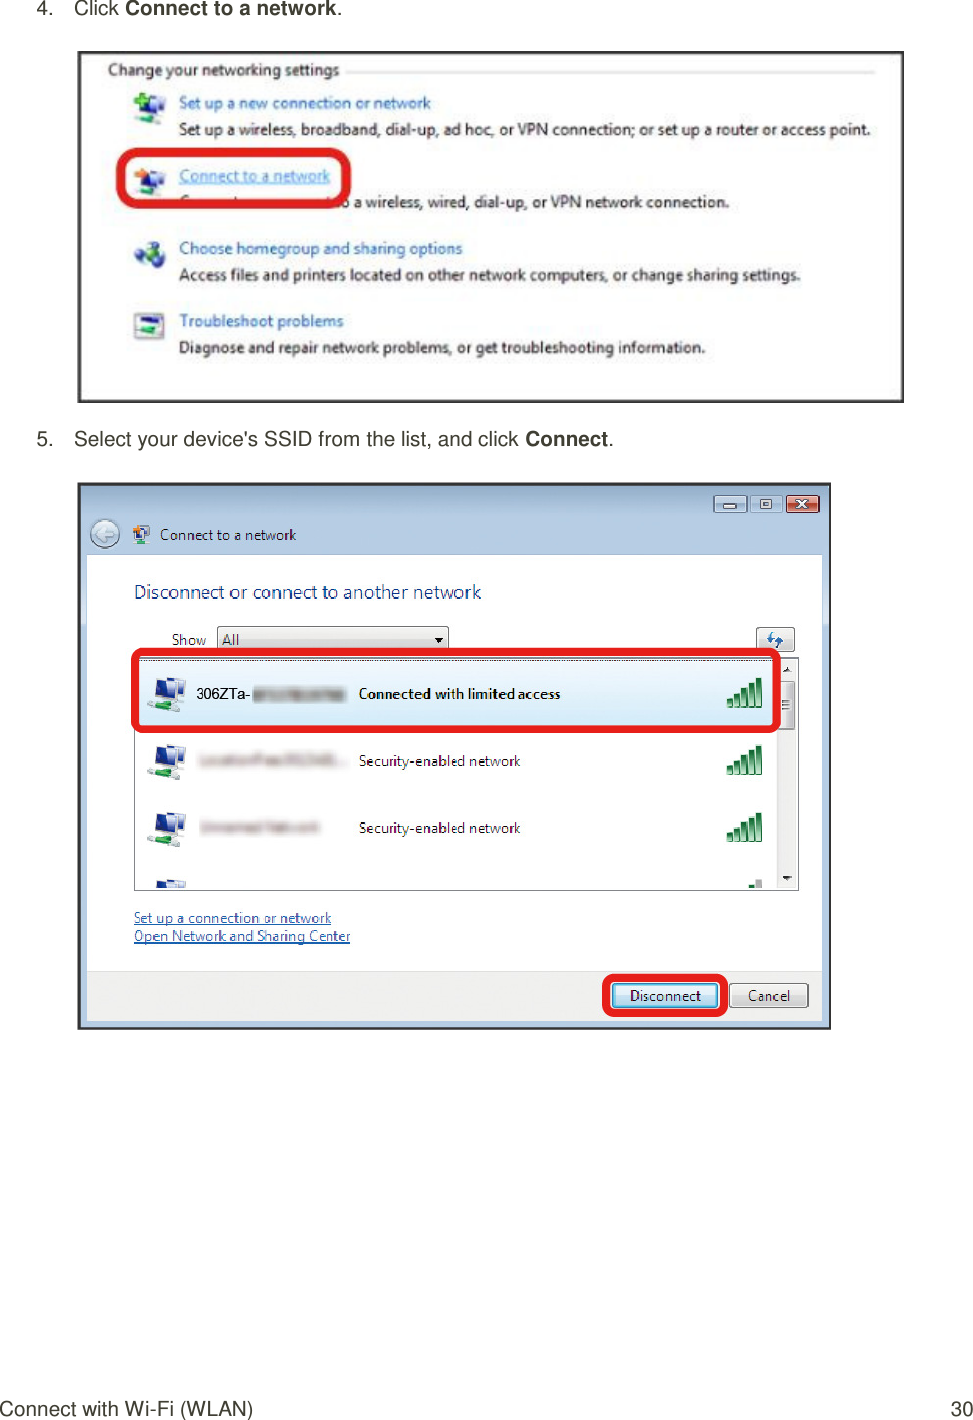
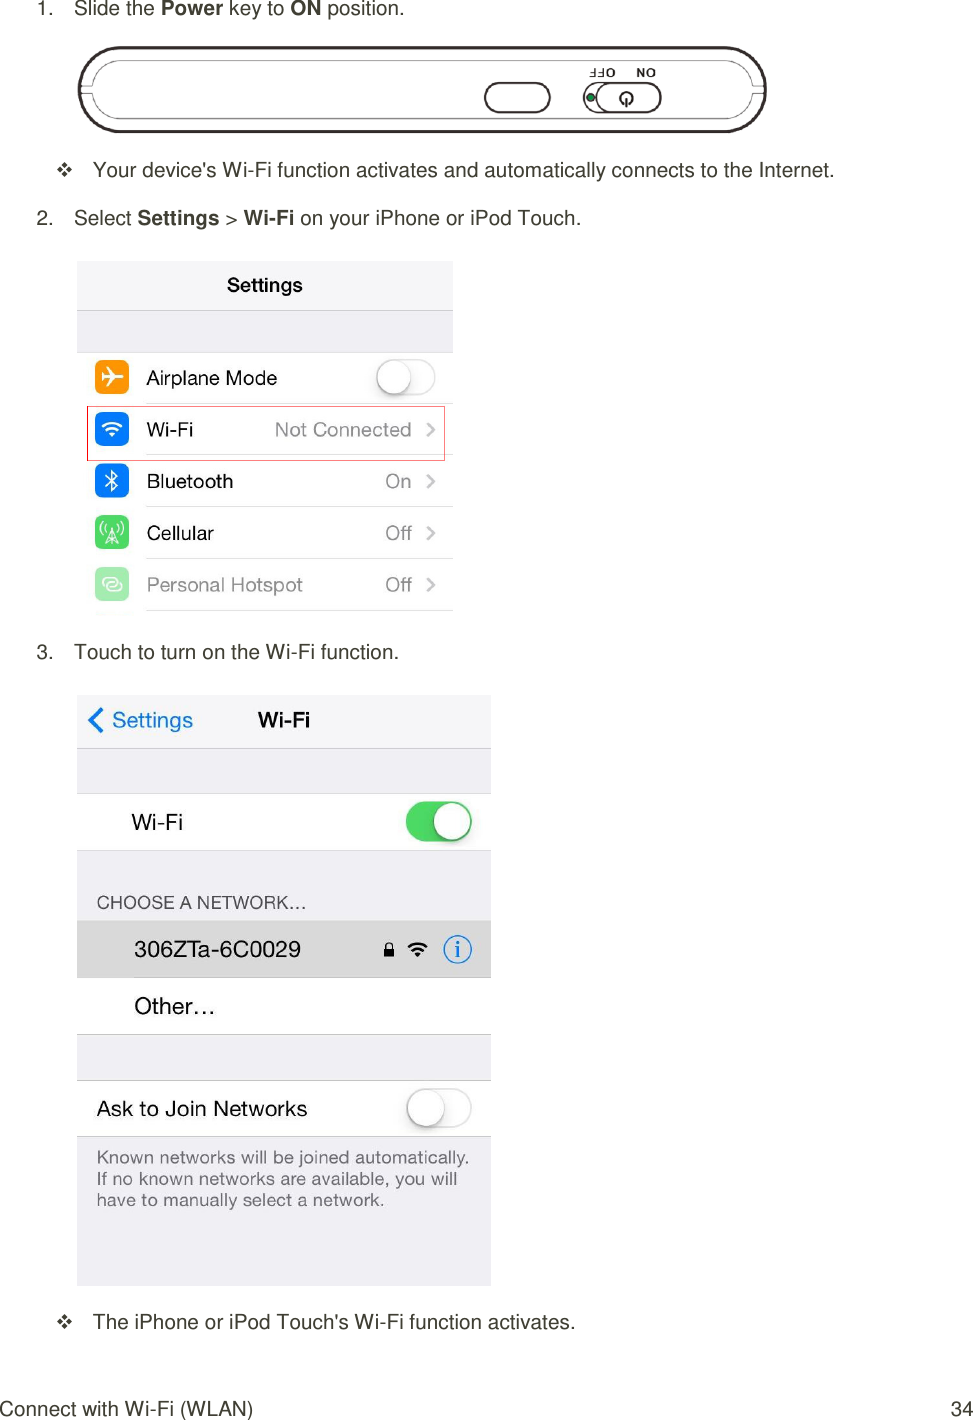
![Connect with Wi-Fi (WLAN) 33 4. Select your device's SSID from the Network Name pulldown list. 5. Enter the security key (WPA) in the Password field, check Remember this network, and then click Join. The computer connects to your device. The connected status icon on your device will show an additional device has been connected. Connect iPhone/iPod Touch/iPad The following topics outline how to connect your iPhone, iPod Touch, or iPad to your device via Wi-Fi. Connect an iPhone or and iPod Touch Follow the instruction to connect your iPhone or iPod Touch to your device using Wi-Fi. Note: The operations below are based on your iPhone or iPod Touch Wi-Fi security set to [xxx].](https://usermanual.wiki/ZTE/ZTEMF975S/User-Guide-2418820-Page-37.png)
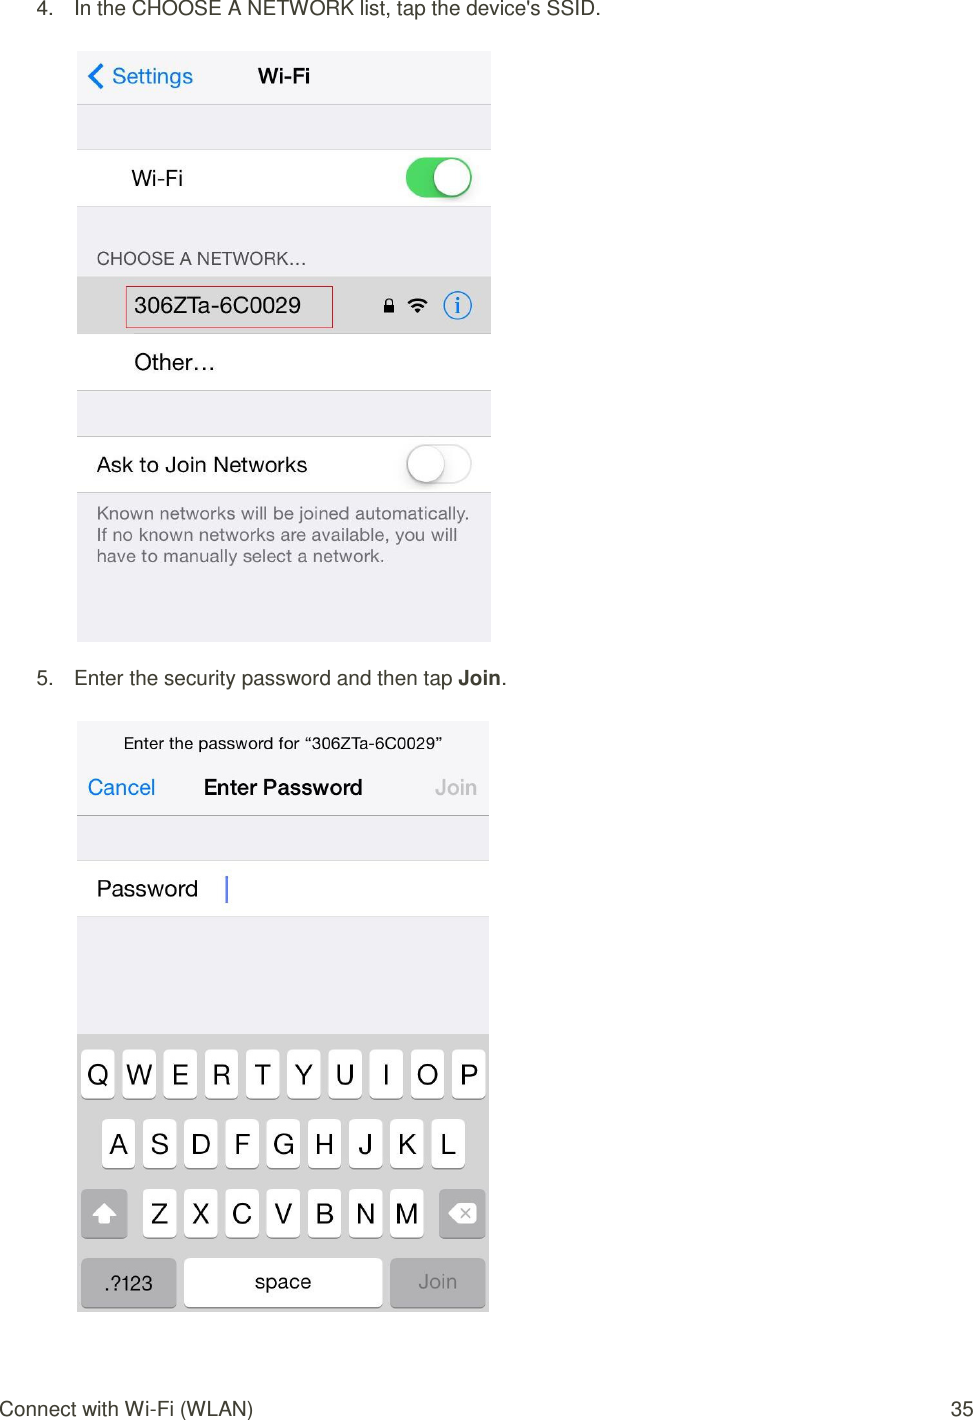
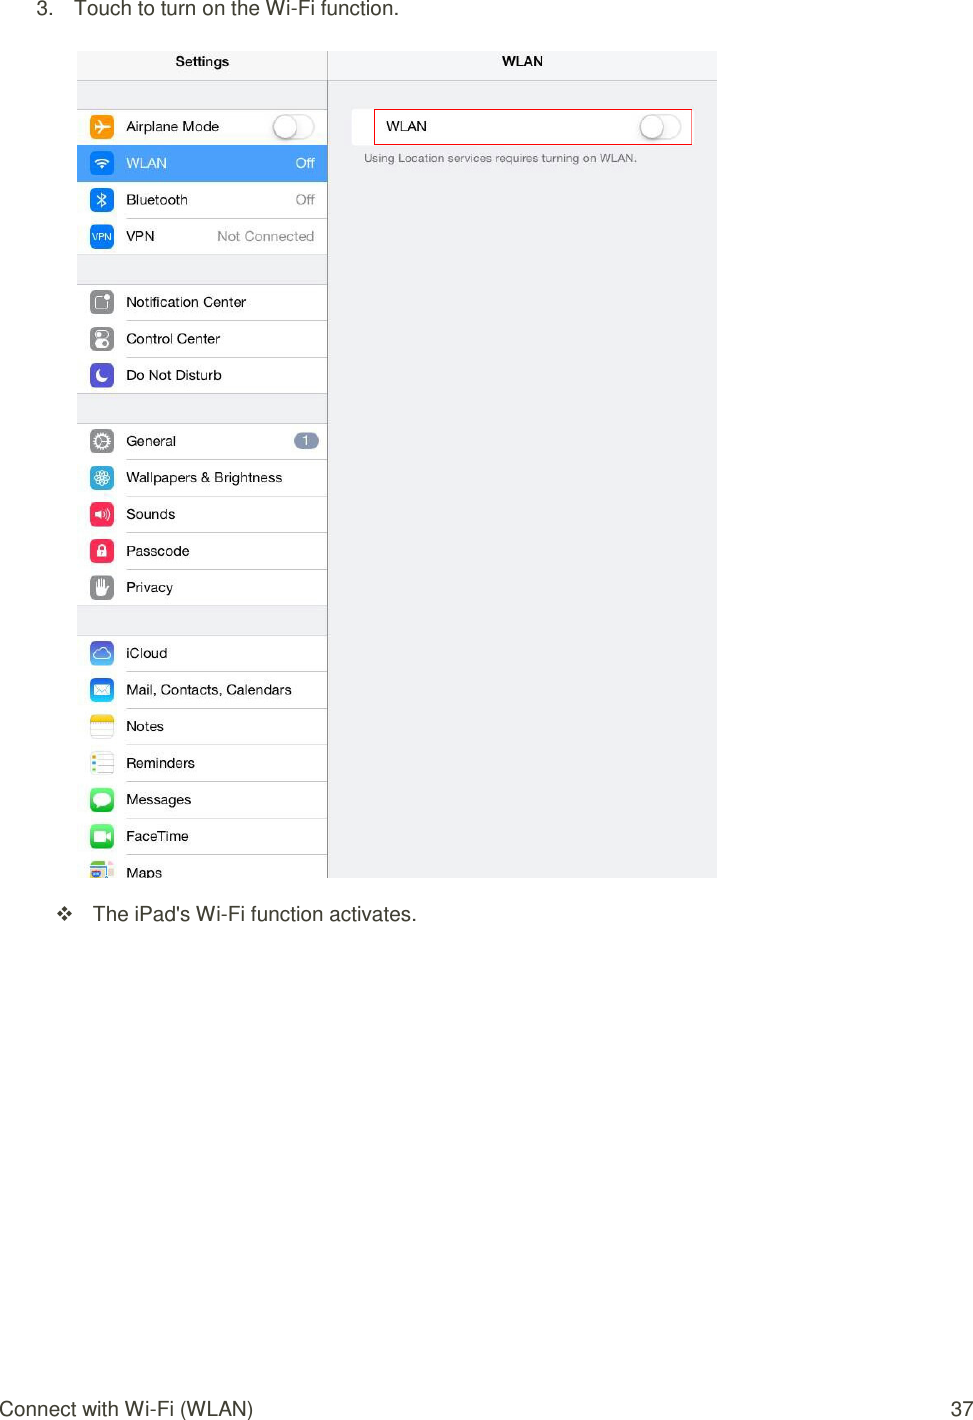
![Connect with Wi-Fi (WLAN) 36 The iPhone or iPod Touch connects to your device. The connected status icon on your device will show an additional device has been connected. Connect an iPad Follow the instruction to connect your iPad to your device using Wi-Fi. Note: The operations below are based on your iPad Wi-Fi security set to [xxx]. 1. Slide the Power key to ON position. Your device's Wi-Fi function activates and automatically connects to the Internet. 2. Select Settings > WLAN.](https://usermanual.wiki/ZTE/ZTEMF975S/User-Guide-2418820-Page-40.png)
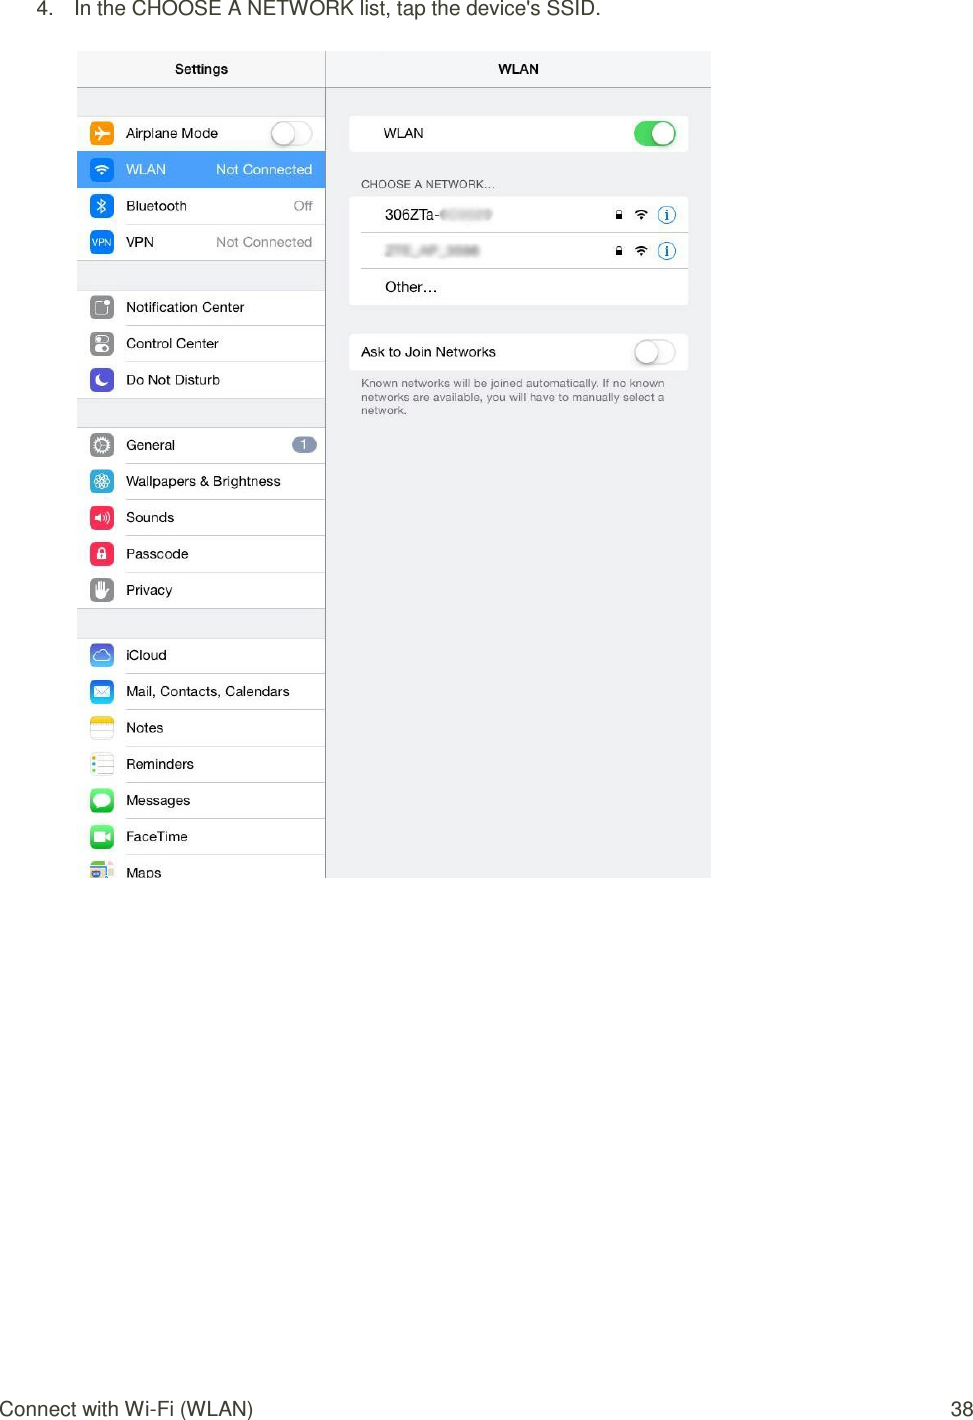
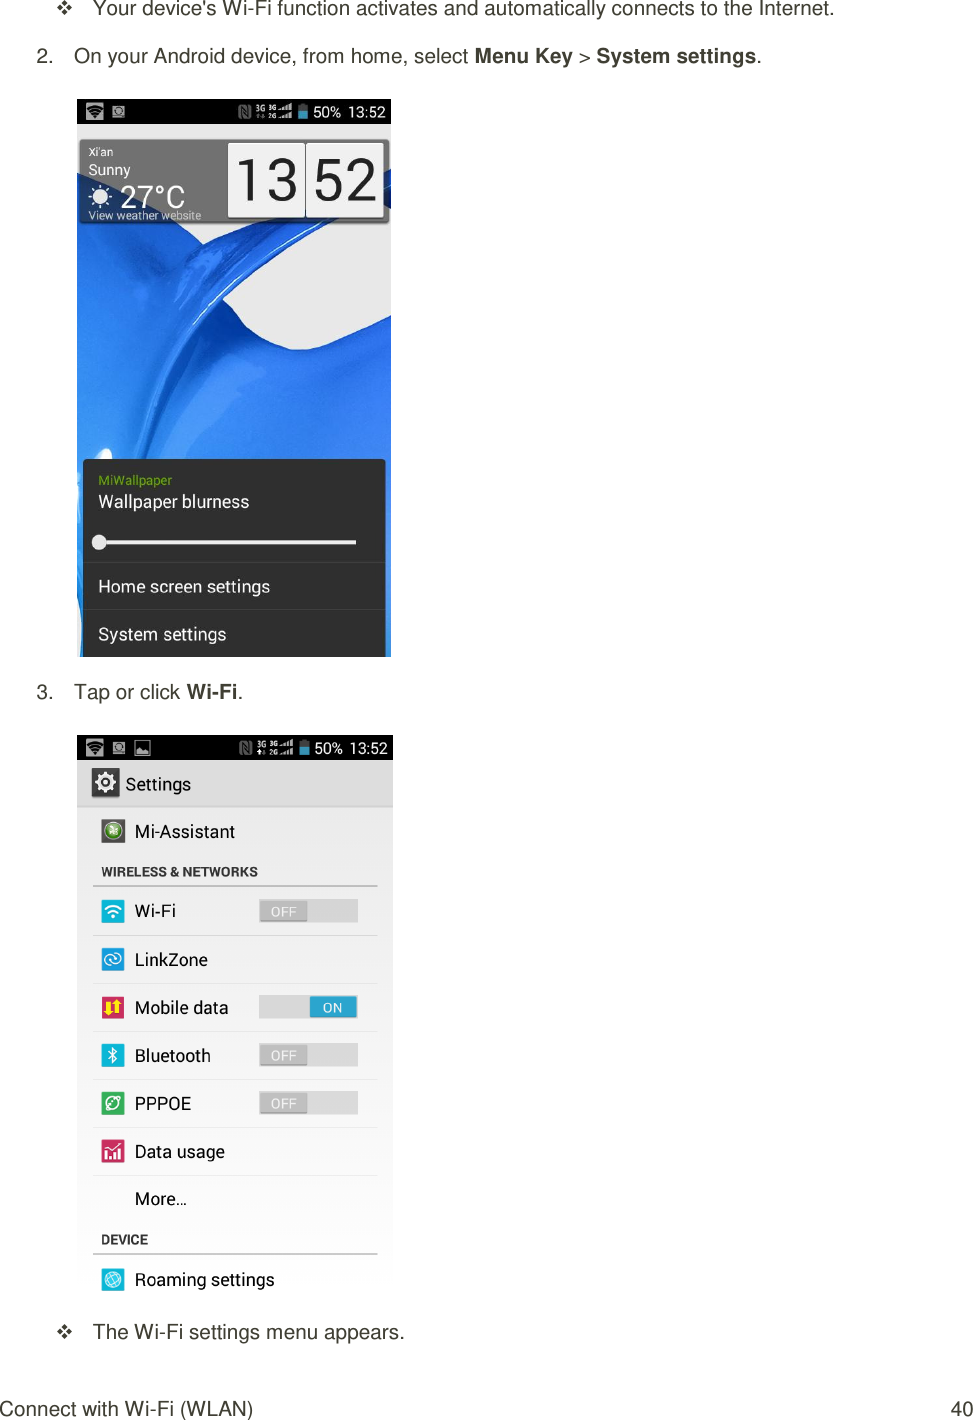
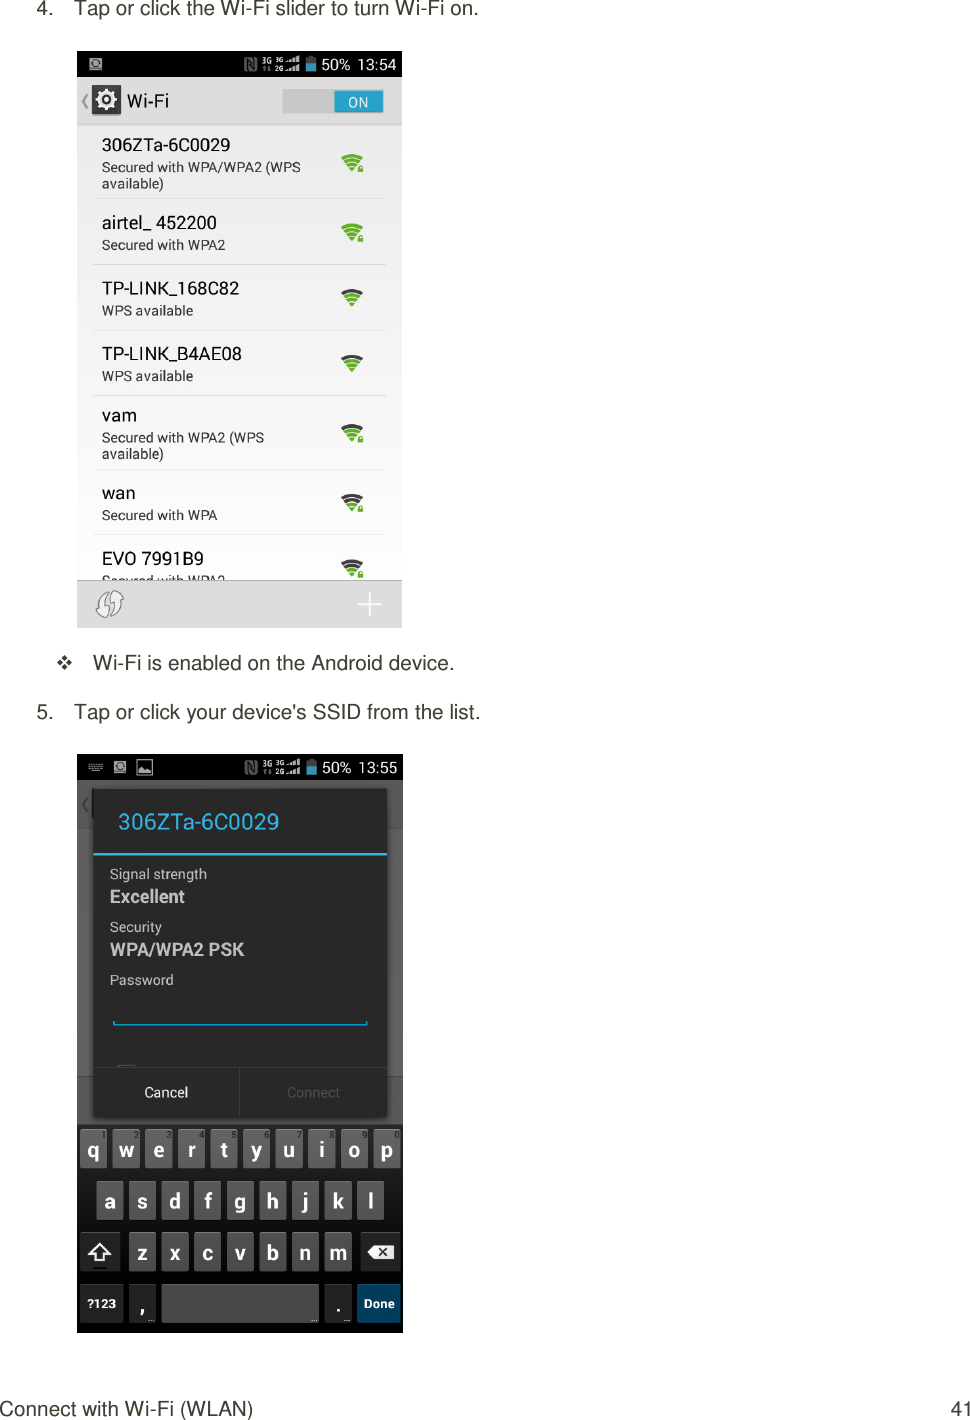
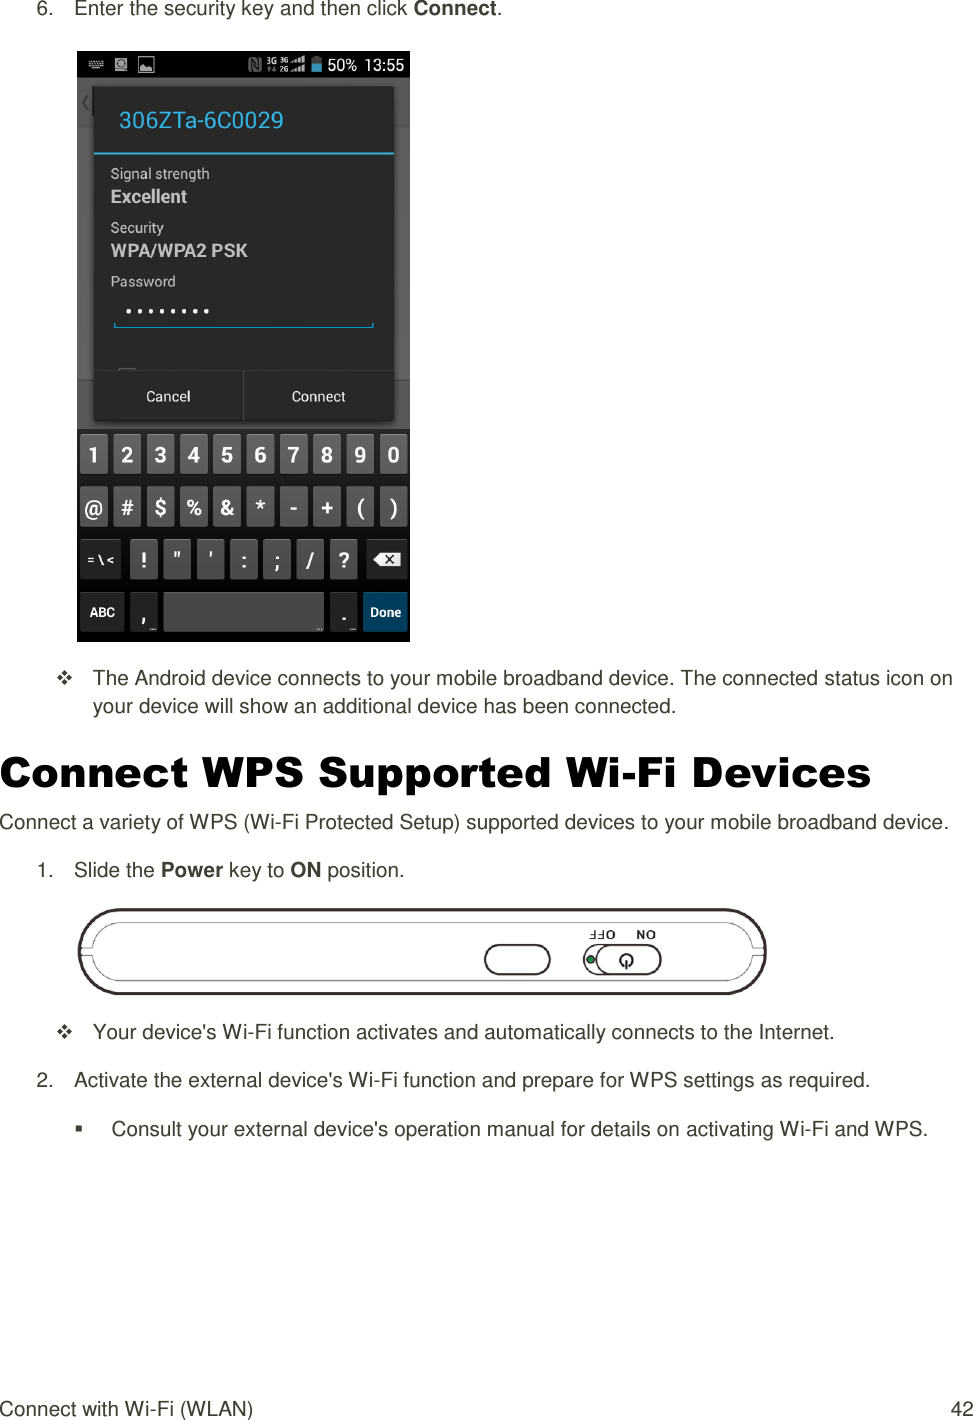
![Connect with Wi-Fi (WLAN) 39 5. Enter the security key (WPA) and then tap Join. The iPad connects to your device. The connected status icon on your device will show an additional device has been connected. Connect an Android™ Device You can share your device's connection with compatible Android devices, such as wireless phones, tablets, and Chromebook computers. Note: The operations below are based on generic Android devices with Wi-Fi security set to [xxx]. Operation may vary depending on Android device type. See your Android device user guide for details. 1. Slide the Power key to ON position.](https://usermanual.wiki/ZTE/ZTEMF975S/User-Guide-2418820-Page-43.png)
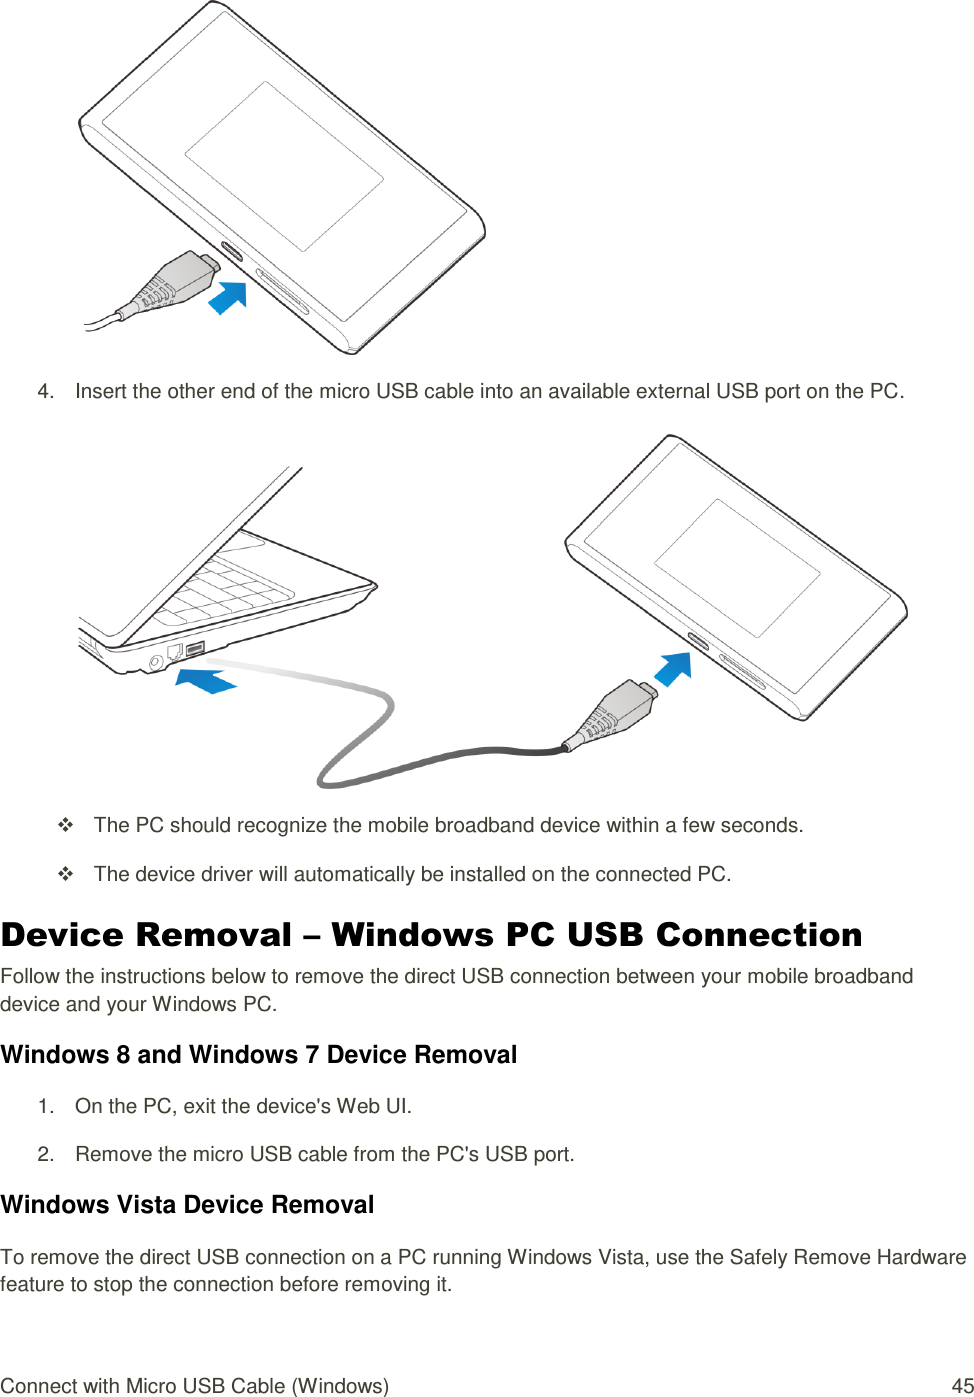
![Connect with Micro USB Cable (Windows) 46 1. On the PC, double-click in the task tray. The Safely Remove Hardware window appears. 2. Click USB Mass Storage Device > Stop. [illustration] The Stop a Hardware Device window appears. If multiple USB devices are connected to the PC, make sure to select the correct device to remove. 3. Click OK. [illustration] Confirm that the mobile broadband device can be safely removed from the PC. 4. Once you see confirmation that the device can be removed safely, remove the micro USB cable from the PC's USB port. [illustration] Removal is complete. Cautions for Removing the Mobile Broadband Device Standby/Hibernation: The mobile broadband device may malfunction if the PC enters standby (suspend/resume) or hibernation while connected. Be sure to remove the USB connection before leaving a PC unattended. The device may also malfunction if it is connected before the PC starts or restarts. Remove the USB connection before starting or restarting the PC. Web UI: Always exit the Web UI before removing the mobile broadband device USB connection. Do not remove the connection while any transmissions are active. Software Installation – Windows PC USB Connection When connecting for the first time, the device driver is designed to install automatically on the connected PC. If there are issues with the installation due to your PC's configuration, you can manually install or uninstall the device driver software. Cautions for Device Driver Installation Removal of Mobile Broadband Device: Do not remove the mobile broadband device during installation. Improper removal may cause installation failure, system malfunction, or other system errors.](https://usermanual.wiki/ZTE/ZTEMF975S/User-Guide-2418820-Page-50.png)
![Connect with Micro USB Cable (Windows) 47 Administrator Privileges: To install the device drivers manually, you may be required to log into an account with administrator privileges. Manual Device Driver Installation Note: Screenshots and operations are based on a Windows 8 PC. 1. Power on and connect your PC and your mobile broadband device using the supplied micro USB cable. See Device Recognition – Windows PC USB Connection. 2. On the PC desktop, activate Windows Explorer. 3. Select Computer. For Windows 7 or Windows Vista PCs, click Start menu > Computer. 4. Double-click [xxxxx]. [illustration] The User Account Control dialog box appears. 5. Click Yes. For Windows Vista PCs, click Continue. The device driver installation is complete. Uninstall the Device Driver Software If you need to uninstall the device driver software for any reason, you can do so from your PC. 1. On the PC desktop, activate Windows Explorer. 2. Select Computer > Uninstall or change a program. [illustration] For Windows 7 or Windows Vista PCs, click Start menu > Control Panel > Uninstall a program. 3. From the installed programs list, select [xxxxx] > Uninstall/Change. [illustration] The device driver software will be uninstalled.](https://usermanual.wiki/ZTE/ZTEMF975S/User-Guide-2418820-Page-51.png)
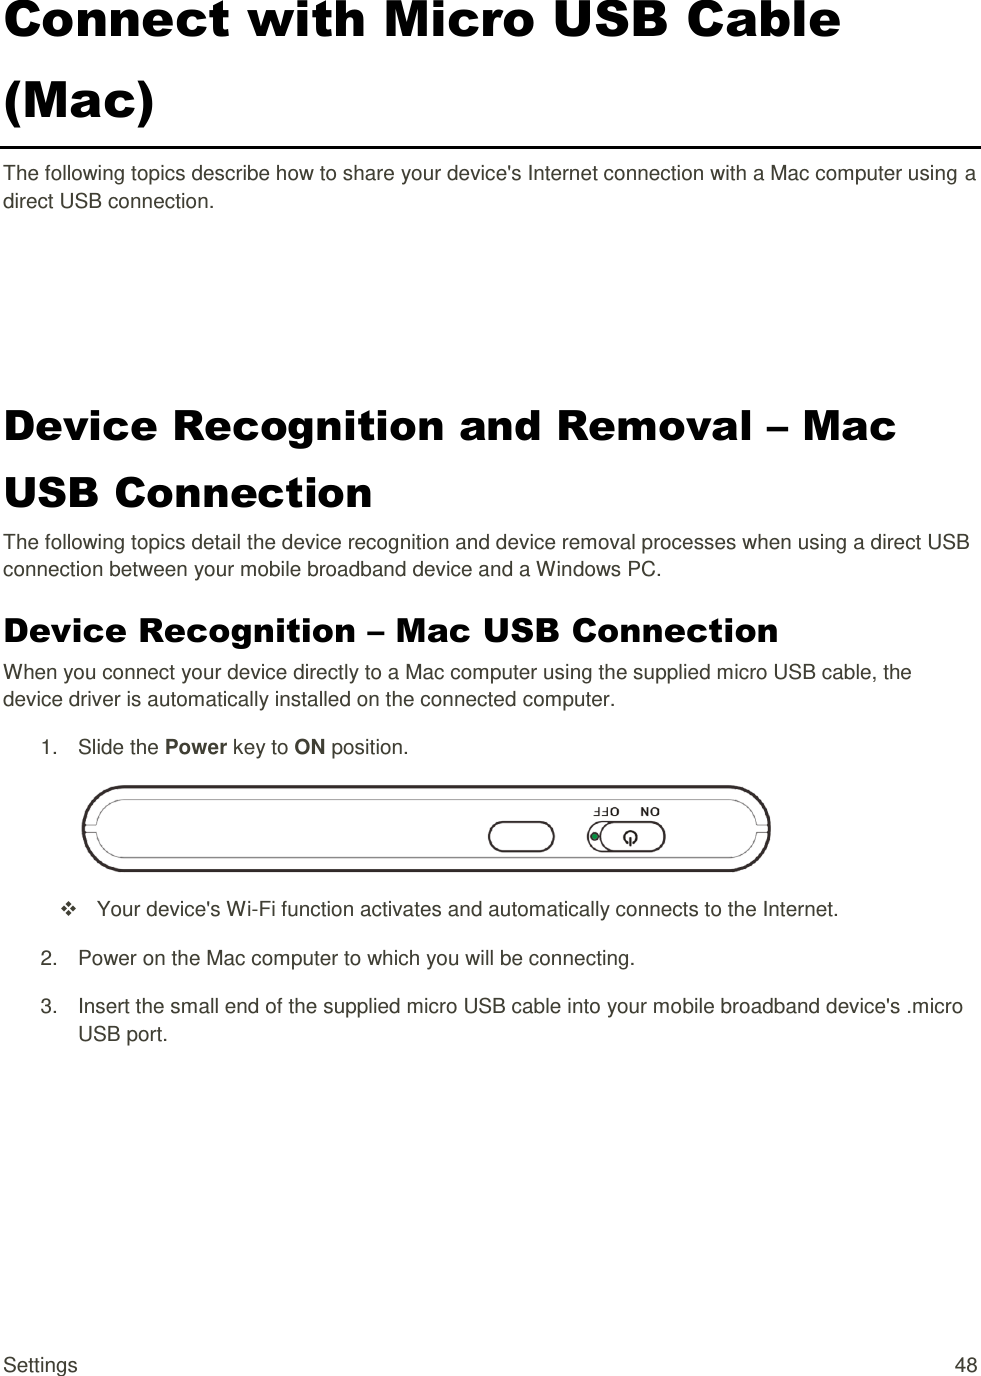
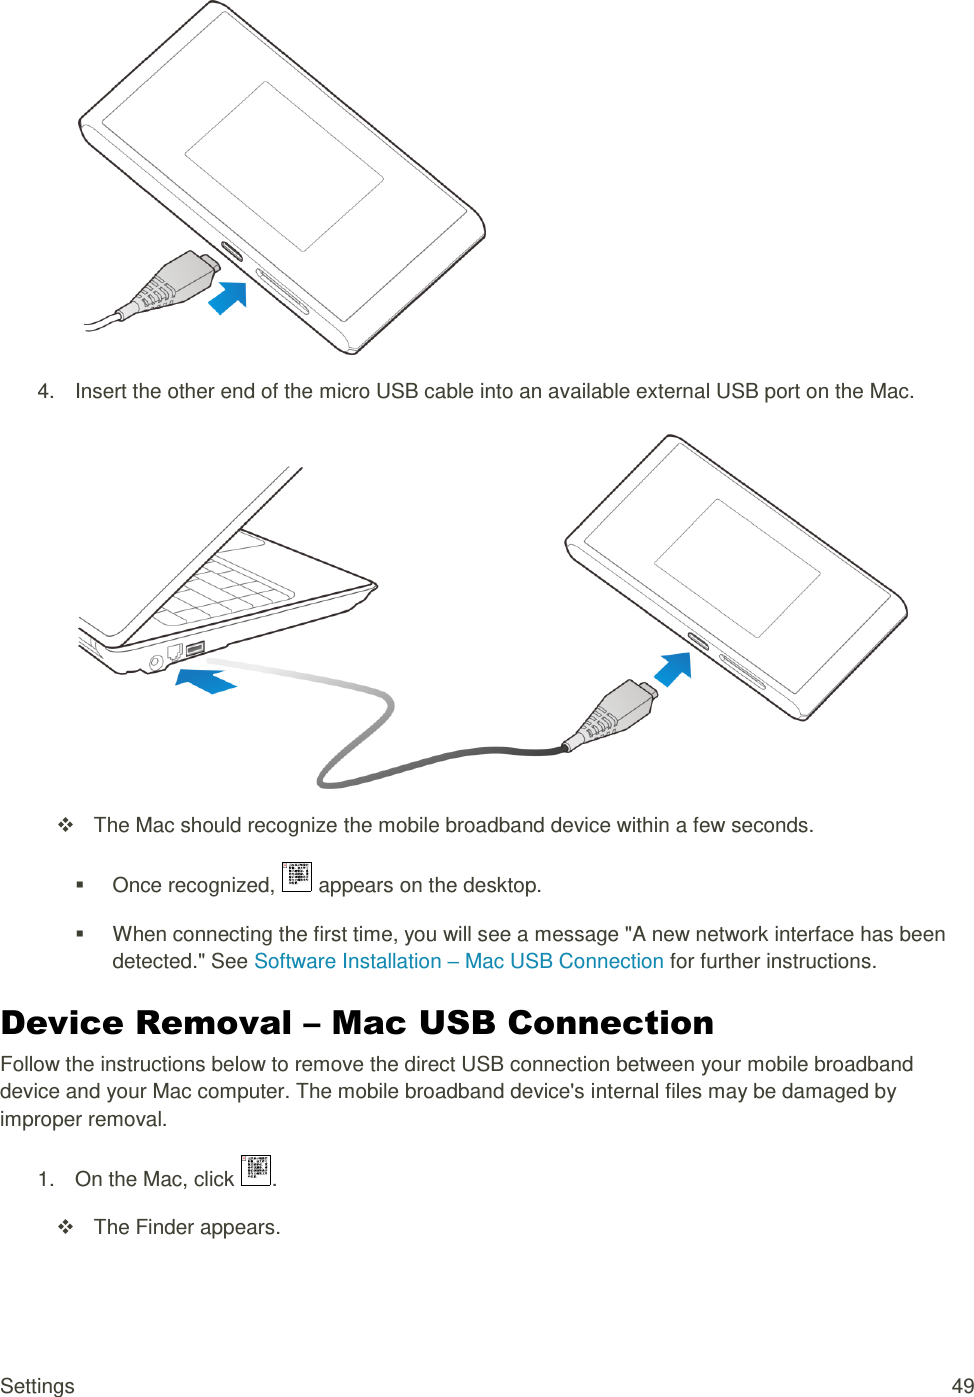
![Settings 50 2. Click for the Web UI. [illustration] If a memory card is installed, first click for Memory Card. 3. Remove the micro USB cable from the Mac's USB port. [illustration] Removal is complete. Cautions for Removing the Mobile Broadband Device Sleep Mode: The mobile broadband device may malfunction if the Mac enters sleep mode while connected. Be sure to remove the USB connection before leaving a Mac unattended. The device may also malfunction if it is connected before the Mac starts or restarts. Remove the USB connection before starting or restarting the Mac. Web UI: Always exit the Web UI before removing the mobile broadband device USB connection. Do not remove the connection while any transmissions are active. Network Setup – Mac USB Connection When connecting for the first time, your Mac computer will detect the mobile broadband device and prompt you to set up the device in Network Preferences. The message "A new network interface has been detected" will appear. Note: Screenshots and operations are based on Mac OS 10.xx. Screens and messages may differ depending on which OS your computer is running. Set Up the Network 1. Power on your Mac computer and your mobile broadband device. 2. Connect the mobile broadband device to the Mac using the supplied micro USB cable. [xxxxx] icon appears on the desktop, and the [xxxxx] folder automatically opens. 3. Double-click [xxxxx]. [illustration] 4. Enter the Mac name (user name) and Password, and click OK. [illustration] When complete, the [xxxxx] icon and [xxxxx] folder are removed from the computer desktop.](https://usermanual.wiki/ZTE/ZTEMF975S/User-Guide-2418820-Page-54.png)
![Settings 51 Settings The following topics provide an overview of items you can change using your device's Settings menus, accessed primarily through the Web UI. Web UI Overview Use the device Web UI in a browser to check or change your mobile broadband device settings from a device connected either via Wi-Fi or by direct USB connection. Launch the Web UI 1. Make sure the connection between your device and the client is correct. 2. Launch the Internet browser and enter http://192.168.43.1 or http://m.home in the address bar. The login page appears as follows. The following figure is only for your reference. Web UI Window Explore the options available through the device's Web UI window. 1. Connect your mobile broadband device to an external device via a Wi-Fi connection or a direct USB connection. 2. Launch a browser and access the Web UI via [xxxxx]. The Web UI launches and displays the main window. Item Description xxxxx Xxxxx xxxxx Xxxxx](https://usermanual.wiki/ZTE/ZTEMF975S/User-Guide-2418820-Page-55.png)
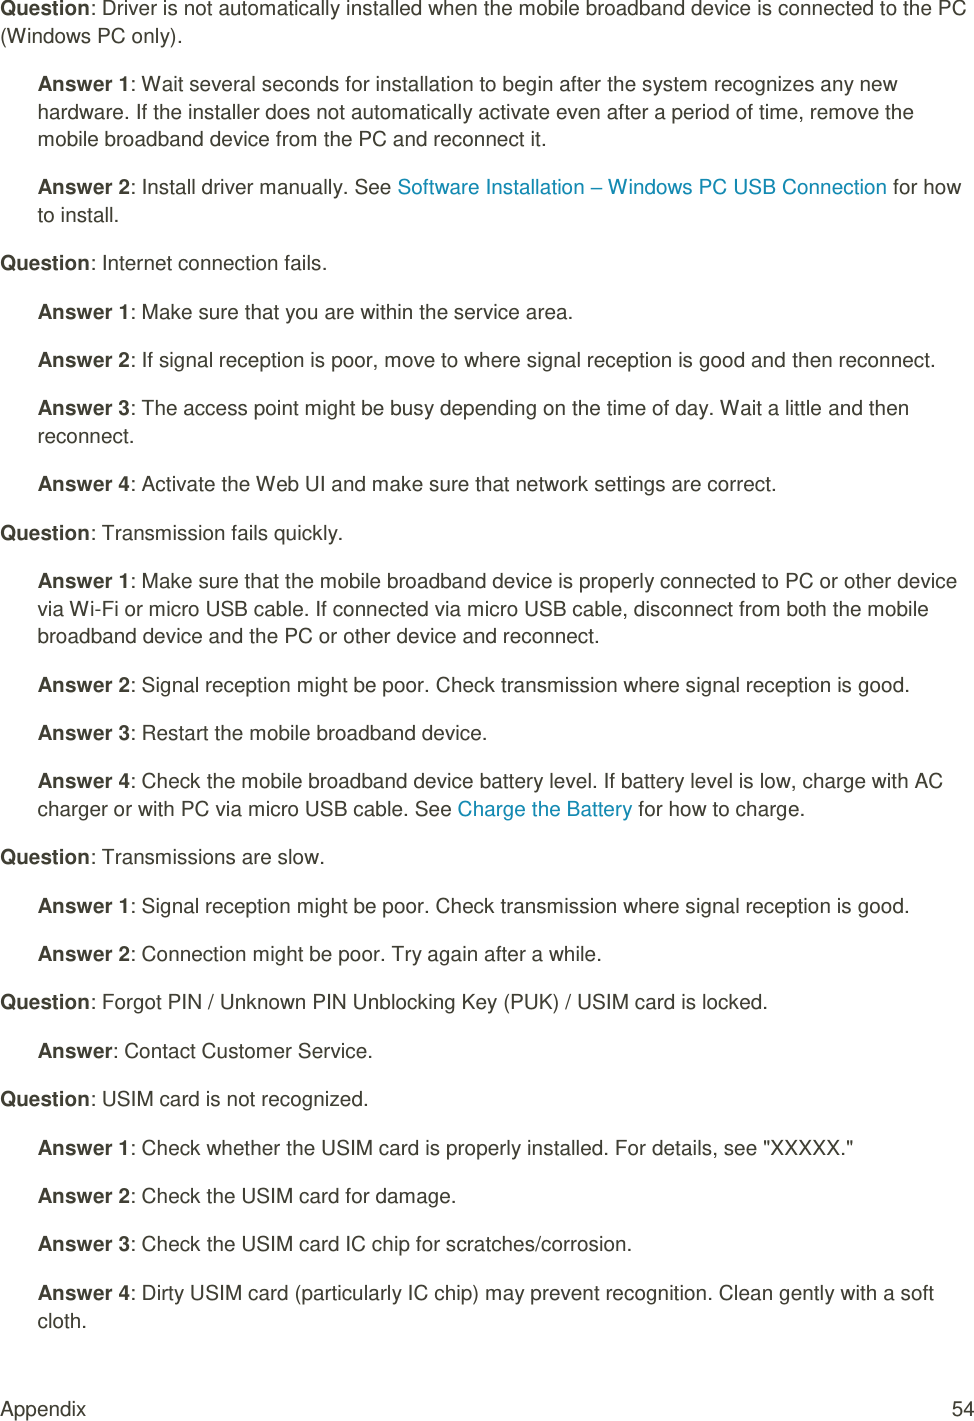
![Appendix 53 Appendix Troubleshooting Check the questions and answers below for troubleshooting solutions for common device issues. Check Here First Question: Unable to connect via Wi-Fi (WLAN) Answer 1: Check whether the mobile broadband device is properly connected to the computer or other external device. Answer 2: If a WPS (Wi-Fi Protected Setup) connection fails, see the Wi-Fi device user guide. If you're still unable to connect, set up the mobile broadband device Wi-Fi connection manually. See [xxxxx]. Answer 3: To connect a WPS Pin-specified Wi-Fi device, check whether the correct PIN has been used. For details, see [xxxxx]. Answer 4: If OPEN WEP is the security method being used, check whether the correct WEP key is entered. If the WEP key is unknown, see [xxxxx] to reset the WEP key and reconnect the device. Answer 5: Check whether the correct WPA key is set. If the WPA key is unknown, see [xxxxx] to rset the mobile broadband device or see the WLAN Initialization Sticker to reset the WPA key, and then reconnect the device. WPA/WPA2 security may not be supported depending on the Wi-Fi device. See the Wi-Fi device user guide for information. Question: Computer does not recognize the mobile broadband device. Answer 1: Check whether the mobile broadband device is properly connected to the computer or other external device. Answer 2: Remove the mobile broadband device from the PC, restart the PC, and then reconnect the mobile broadband device. Answer 3: For Windows 8, follow these steps to confirm proper the mobile broadband device installation. Open desktop window > Explorer > right-click Computer > Properties > System Properties > Hardware > Device Manager, and then check that [xxxxx] is shown. Answer 4: For Windows 7 and Windows Vista, follow these steps to check that the mobile broadband device is properly connected. Right-click Computer > Properties > Advanced system settings > User Account Control > System Properties > Hardware > Device Manager, and then check that [xxxxx] is shown.](https://usermanual.wiki/ZTE/ZTEMF975S/User-Guide-2418820-Page-57.png)
![Appendix 55 Answer 5: Contact Customer Service. Question: Unsure if logged on as an Administrator. Answer 1: For Windows 8, follow these steps to check. Move the pointer into the upper-right or lower-right corner and then click or tap charm > Control Panel. Click Change your account type in User Accounts, and then check that the type of account currently logged on to is "Administrator". Answer 2: For Windows 7, check by following these steps. Click Start menu > Control Panel > User Account and Family Safety > User Account, and then check that the type of account currently logged on to is "Administrator". Question: "Out of service area" indication appears when outside Japan. Answer: Power off and restart the device. Question: How do I return the mobile broadband device to the default settings (reset)? Answer 1: Use the device Reset key. Answer 2: Use the Web UI to reset the device. For details, see [xxxxx]. Question: An old phone number appears on the Web UI. Answer: The Web UI may display an old phone number depending on subscription terms or cancellation method. Question: The mobile broadband device operation is unstable. Answer 1: Avoid extremely high/low temperatures, high humidity, direct sunlight, dusty areas, etc. Read "Safety Precautions" for use in a proper environment. Answer 2: Avoid invalid software. Operation is unguaranteed for Internet connection, etc., using other-party software. Question: The connection suddenly failed. Answer 1: The connection method may have been changed. Check connection mode on the mobile broadband device display. Answer 2: Restart the mobile broadband device. Specifications The following tables list the specifications for the mobile broadband device, the AC charger, the micro USB cable, and the materials.](https://usermanual.wiki/ZTE/ZTEMF975S/User-Guide-2418820-Page-59.png)
![Appendix 56 Mobile Broadband Device Specifications Item Description Model Name MF975S Dimensions1 116.3 x 62.1mm x 13.9mm Weight 149.7g Interface LCD Power Consumption 4.5W Operating Environment -10℃ ~ 60℃ Frequency 1.2G Compatible Networks WAN: 4G (FDD-LTE/TDD -LTE), 3G ( CDMA) WLAN: IEEE802.11a/b/g/n/ac Charging Time2 AC charging 200 minutes, USB charging 380 minutes Continuous Standby Time3 450 hours Continuous Communication Time3 [xxxxx] Communication Speed [xxxxx] 1 Approximate values 2 Varies by ambient temperature, battery usage, etc. 3 Varies by environment, signal conditions, etc. AC Charger Specifications Item Description Model Name STC-A51A-Z Weight 30g Rated Voltage DC 5 V ± 5 % Rated Current 1.0 A - 1.2 A](https://usermanual.wiki/ZTE/ZTEMF975S/User-Guide-2418820-Page-60.png)
![Appendix 57 Item Description Input Voltage 100 V - 240 V, 50 Hz - 60 Hz Micro USB Cable Specifications Item Description Model Name USB-MU5-B-120-H (ZEDAD1) Cable Length 1200mm Plug Type Standard-A, micro-B Charging Temperature 0℃ ~ 55℃ Materials Specifications Parts Materials/Finishing MF975S Front Cover PC+SUS304 MF975S Back Cover PC+GF+SUS304 MF975S Battery Cover PC MF975S USIM Tray PC+Powder Metallurgy MF975S LCD Support Frame PC MF975S Power Key PC MF975S Lock Key PC+TPU Warranty and Service [describe per carrier] The following topics outline your device's warranty and service information. Warranty Your device purchase includes Warranty. ■](https://usermanual.wiki/ZTE/ZTEMF975S/User-Guide-2418820-Page-61.png)
![Safety and Notices 59 Safety and Notices The following topics address important safety precautions, general notes, and required RF exposure information for your mobile broadband device. Safety Precautions [describe per carrier] The following topics outline important safety precautions that must be observed when using your mobile broadband device. Labels and Symbols [describe per carrier] [xxxxx] [xxxxx] [describe per carrier] [xxxxx]: [xxxxxxxx] [xxxxx]: [xxxxxxxx] [xxxxx]: [xxxxxxxx] [xxxxx]: [xxxxxxxx] [xxxxx]: [xxxxxxxx]](https://usermanual.wiki/ZTE/ZTEMF975S/User-Guide-2418820-Page-63.png)
![Safety and Notices 60 [xxxxx]: [xxxxxxxx] [xxxxx]: [xxxxxxxx] [xxxxx]: [xxxxxxxx] [xxxxx]: [xxxxxxxx] [xxxxx]: [xxxxxxxx] [xxxxx]: [xxxxxxxx] [xxxxx]: [xxxxxxxx]](https://usermanual.wiki/ZTE/ZTEMF975S/User-Guide-2418820-Page-64.png)
![Safety and Notices 61 [xxxxx]: [xxxxxxxx] Mobile Broadband Device [describe per carrier] [xxxxx] [xxxxx]: [xxxxxxxx] [xxxxx]: [xxxxxxxx] [xxxxx]: [xxxxxxxx] [xxxxx]: [xxxxxxxx] [xxxxx]: [xxxxxxxx]](https://usermanual.wiki/ZTE/ZTEMF975S/User-Guide-2418820-Page-65.png)
![Safety and Notices 62 [xxxxx]: [xxxxxxxx] [xxxxx]: [xxxxxxxx] [xxxxx]: [xxxxxxxx] [xxxxx]: [xxxxxxxx] [xxxxx]: [xxxxxxxx] [xxxxx]: [xxxxxxxx] [xxxxx]: [xxxxxxxx]](https://usermanual.wiki/ZTE/ZTEMF975S/User-Guide-2418820-Page-66.png)
![Safety and Notices 63 [xxxxx]: [xxxxxxxx] [xxxxx]: [xxxxxxxx] USIM Card and Memory Card [describe per carrier] [xxxxx] [xxxxx]: [xxxxxxxx] [xxxxx]: [xxxxxxxx] [xxxxx]: [xxxxxxxx] [xxxxx]: [xxxxxxxx] [xxxxx]: [xxxxxxxx]](https://usermanual.wiki/ZTE/ZTEMF975S/User-Guide-2418820-Page-67.png)
![Safety and Notices 64 AC Charger and Micro USB Cable [describe per carrier] [xxxxx] [xxxxx]: [xxxxxxxx] [xxxxx]: [xxxxxxxx] [xxxxx]: [xxxxxxxx] [xxxxx]: [xxxxxxxx] [xxxxx]: [xxxxxxxx] [xxxxx]: [xxxxxxxx] [xxxxx]: [xxxxxxxx]](https://usermanual.wiki/ZTE/ZTEMF975S/User-Guide-2418820-Page-68.png)
![Safety and Notices 65 [xxxxx]: [xxxxxxxx] [xxxxx]: [xxxxxxxx] [xxxxx]: [xxxxxxxx] [xxxxx]: [xxxxxxxx] [xxxxx]: [xxxxxxxx] Mobile Broadband Device Use and Electronic Medical Equipment [describe per carrier] [xxxxx]](https://usermanual.wiki/ZTE/ZTEMF975S/User-Guide-2418820-Page-69.png)
![Safety and Notices 66 [xxxxx]: [xxxxxxxx] [xxxxx]: [xxxxxxxx] [xxxxx]: [xxxxxxxx] [xxxxx]: [xxxxxxxx] General Notes [describe per carrier] The following topics outline general usage and handling instructions for your mobile broadband device. General Use [describe per carrier] [xxxxx] ● [xxxxx] ● [xxxxx] ● [xxxxx] ● [xxxxx] ● [xxxxx] ● [xxxxx] ● [xxxxx] Handling the Device [describe per carrier] [xxxxx]](https://usermanual.wiki/ZTE/ZTEMF975S/User-Guide-2418820-Page-70.png)
![Safety and Notices 67 ● [xxxxx] ● [xxxxx] ● [xxxxx] ● [xxxxx] Wi-Fi (Wireless LAN) [describe per carrier] [xxxxx] ● [xxxxx] ● [xxxxx] ● [xxxxx] ● [xxxxx] ● [xxxxx] ● [xxxxx] ● [xxxxx] RF Exposure Information and Specific Absorption Rate (SAR) Information [describe per carrier] The following topics detail the specific absorption rate (SAR) information, electromagnetic safety information, and radiofrequency (RF) exposure information for you mobile broadband device. Specific Absorption Rate (SAR) Information for this Product [describe per carrier] [xxxxx] Electromagnetic Safety Information [describe per carrier] [xxxxx]](https://usermanual.wiki/ZTE/ZTEMF975S/User-Guide-2418820-Page-71.png)
![Safety and Notices 68 European RF Exposure Information [describe per carrier] [xxxxx]](https://usermanual.wiki/ZTE/ZTEMF975S/User-Guide-2418820-Page-72.png)