Users Manual

MF975S
User Guide
[UG template version 14b_mbb]
[draft version for review control]
[carrier_OEM_model name or number_document type_language_date_draft number]
example: [sprint_abc_XYZ-123_ug_en_050714_d1]

TOC i
Table of Contents
Introduction.................................................................................................................................................... 1
Before You Begin .................................................................................................................................. 1
Operating Environment (Compatible OSs) ........................................................................................... 1
Package Contents ................................................................................................................................. 3
SSID and Security Key ......................................................................................................................... 3
Additional Information ........................................................................................................................... 3
Trademarks ........................................................................................................................................... 4
Get Started .................................................................................................................................................... 5
Parts and Functions .............................................................................................................................. 5
Home Screen ........................................................................................................................................ 6
Home Screen Layout .................................................................................................................... 6
Status Bar Icons ............................................................................................................................ 7
Touch Menu Icons ........................................................................................................................ 7
Sleep Mode ................................................................................................................................... 8
Touchscreen Use .......................................................................................................................... 9
Text Entry Window ...................................................................................................................... 10
Data Transfer Volume and Transfer Speed ........................................................................................ 11
USIM Card .......................................................................................................................................... 11
Handling a USIM Card ................................................................................................................ 11
Insert a USIM Card ..................................................................................................................... 12
Remove the USIM Card .............................................................................................................. 13
Battery Use ......................................................................................................................................... 14
Insert the Battery ......................................................................................................................... 15
Remove the Battery .................................................................................................................... 16
Check the SSID and Security Key .............................................................................................. 17
Charge the Battery ...................................................................................................................... 19
Turn Your Device On and Off ............................................................................................................. 22
Connect with Wi-Fi (WLAN) ........................................................................................................................ 24
Wi-Fi (WLAN) Overview ...................................................................................................................... 24
Activate Wi-Fi (WLAN) Function ......................................................................................................... 24
Connect Windows PCs with Wi-Fi ...................................................................................................... 25
Windows 8................................................................................................................................... 25
TOC ii
Windows 7................................................................................................................................... 27
Connect Mac Computers with Wi-Fi ................................................................................................... 31
Connect iPhone/iPod Touch/iPad ....................................................................................................... 33
Connect an iPhone or and iPod Touch ....................................................................................... 33
Connect an iPad ......................................................................................................................... 36
Connect an Android™ Device ............................................................................................................. 39
Connect WPS Supported Wi-Fi Devices............................................................................................. 42
Connect with Micro USB Cable (Windows) ................................................................................................. 44
Device Recognition and Removal – Windows PC USB Connection .................................................. 44
Device Recognition – Windows PC USB Connection ................................................................ 44
Device Removal – Windows PC USB Connection ..................................................................... 45
Software Installation – Windows PC USB Connection ....................................................................... 46
Connect with Micro USB Cable (Mac) ........................................................................................................ 48
Device Recognition and Removal – Mac USB Connection ................................................................ 48
Device Recognition – Mac USB Connection .............................................................................. 48
Device Removal – Mac USB Connection ................................................................................... 49
Network Setup – Mac USB Connection .............................................................................................. 50
Settings ....................................................................................................................................................... 51
Web UI Overview ................................................................................................................................ 51
Web UI Window .................................................................................................................................. 51
Appendix ..................................................................................................................................................... 53
Troubleshooting .................................................................................................................................. 53
Specifications ...................................................................................................................................... 55
Warranty and Service [describe per carrier] ....................................................................................... 57
Warranty ...................................................................................................................................... 57
Services ...................................................................................................................................... 58
Safety and Notices ...................................................................................................................................... 59
Safety Precautions [describe per carrier] ............................................................................................ 59
Labels and Symbols [describe per carrier] ................................................................................. 59
[xxxxx] [describe per carrier] ....................................................................................................... 59
Mobile Broadband Device [describe per carrier]......................................................................... 61
USIM Card and Memory Card [describe per carrier] .................................................................. 63
AC Charger and Micro USB Cable [describe per carrier] ........................................................... 64
Mobile Broadband Device Use and Electronic Medical Equipment [describe per carrier] ......... 65
General Notes [describe per carrier] ................................................................................................... 66
TOC iii
General Use [describe per carrier] .............................................................................................. 66
Handling the Device [describe per carrier] .................................................................................. 66
Wi-Fi (Wireless LAN) [describe per carrier] ................................................................................ 67
RF Exposure Information and Specific Absorption Rate (SAR) Information [describe per carrier] .... 67
Specific Absorption Rate (SAR) Information for this Product [describe per carrier] ................... 67
Electromagnetic Safety Information [describe per carrier] .......................................................... 67
European RF Exposure Information [describe per carrier] ......................................................... 68
Index ............................................................................................................................................................ 69

Introduction 1
Introduction
The following topics describe the basics of using this guide and your new mobile broadband device.
Before You Begin
Thank you for purchasing your new MF975S. The following topics explain how best to use this guide to
get the most out of your mobile broadband device.
Before Using Your Device
Read "Safety and Notices" thoroughly for proper usage.
Accessible services may be limited by subscription contract conditions.
Guide Usage Notes
Note that most descriptions in this guide are based on your device's default settings at the time of
purchase.
Screenshots and Key Labels
Screenshots and Key labels are provided for reference only. Actual windows, menus, etc. may differ in
appearance.
Other Notations
In the user guide, the mobile broadband device may be referred to either as "mobile broadband device,"
"hotspot," "device," or "Wi-Fi router." A microSD™ or microSDHC™ card is referred to as an "SD Card" or
a "memory card."
Operating Environment (Compatible OSs)
The table below outlines the compatible operating environments for your device. Use outside these
environments may affect performance. Additional factors (hardware, connected peripherals, installed
applications, etc.) may also affect performance.
● For computer support, OS version upgrade information, etc., see the corresponding
manufacturer's product support documentation.
● The information for operating environment (compatible OSs) listed below is the current
information for your device sold as of [month year]. Check [xxxxxx] for the latest information in
regards to operating environment.

Introduction 2
Item
Description
Compatible Operating Systems (OSs)
Windows XP Home Edition Service Pack 3
Windows XP Professional Service Pack 3
Windows XP (64-bit)
Windows Vista Home Basic (32-bit or 64-bit)
Windows Vista Home Premium (32-bit or 64-bit)
Windows Vista Business (32-bit or 64-bit)
Windows Vista Ultimate (32-bit or 64-bit)
Windows 7 Starter (32-bit)
Windows 7 Home Basic (32-bit or 64-bit)
Windows 7 Home Premium (32-bit or 64-bit)
Windows 7 Professional (32-bit or 64-bit)
Windows 7 Ultimate (32-bit or 64-bit)
Windows 8 (32-bit or 64-bit)
Windows 8 Pro (32-bit or 64-bit)
Mac OS X 10.6 to 10.8
Compatible OS includes both English and Spanish versions.
Available Hard Disk Capacity
50 MB required (100 MB+ recommended)
(common to all Operating Systems listed above)
Recommended Resolution
1024 x 768 or higher
Compatible Browser
Microsoft Internet Explorer 7.0 or later
Mozilla Firefox 22.0 or later
Safari 4.0 or later
Opera 15.0 or later
Google Chrome 28.0 or later
Introduction 3
Package Contents
See below for details on everything you will find in the box for your MF975S.
● Packet Wi-Fi
● Standard Lithium Ion (Li-ion) Battery
● AC Charger
● USB Cable
● Get Started Poster
● Important Information Booklet (including terms and conditions of service)
● Wireless Recycling Envelope
SSID and Security Key
Before connecting Wi-Fi devices to your MF975S, you will need to confirm the SSID (network name) and
security key.
■ From home, select Wi-Fi.
You will see the SSID (network name) and Security Key.
Note: There are two SSIDs set for your [device name]. By default, [xxxxx] is set as security for [xxxxx].
Additional Information
The following list describes additional information useful to know before you begin using your MF975S.
● Your mobile broadband device accommodates software updates. Always use the latest software.
Introduction 4
● Note that connection speeds may drop or connections may be disabled depending on line traffic
or connection environments.
● When using WLAN overseas, change the settings according to the laws of those countries.
● To enhance security, it is recommended that you set a passcode for unlocking the screen.
Trademarks
● ZTE, ZTE 中兴, and ZTE logo are trademarks or registered trademarks of ZTE Corporation in
China/other countries. Copyright © 2014 ZTE Corporation. All rights reserved.
● Microsoft®, Windows®, Internet Explorer, Windows Vista® are registered trademarks of
Microsoft Corporation in the United States/other countries.
Microsoft Windows Operating System is indicated in its abbreviated form as Windows.
● The trademark "iPhone" is used with a license from Aiphone K.K., and iPhone, iPad, and
Multi-Touch are trademarks of Apple Inc. TM and © 2014 Apple Inc. All rights reserved.
● Apple is a trademark of Apple Inc.
● PlayStation, PSP, and PS3 are registered trademarks of Sony Computer Entertainment Inc.
PSVITA is a trademark of Sony Computer Entertainment Inc.
● Nintendo 3DS LL, Nintendo 3DS, Nintendo DS, Nintendo DSi LL, Nintendo DSi, and Nintendo
● Wi-Fi Connection are registered trademarks or trademarks of Nintendo.
● microSD and microSDHC logos are trademarks of SD-3C, LLC.
● "AndroidTM" is a trademark or registered trademark of Google Inc.
● The names of companies, products, and services use in this guide are registered trademarks or
trademarks of the respective companies.
Get Started 5
Get Started
The following topics give you all the information you need to set up your device and wireless service the
first time.
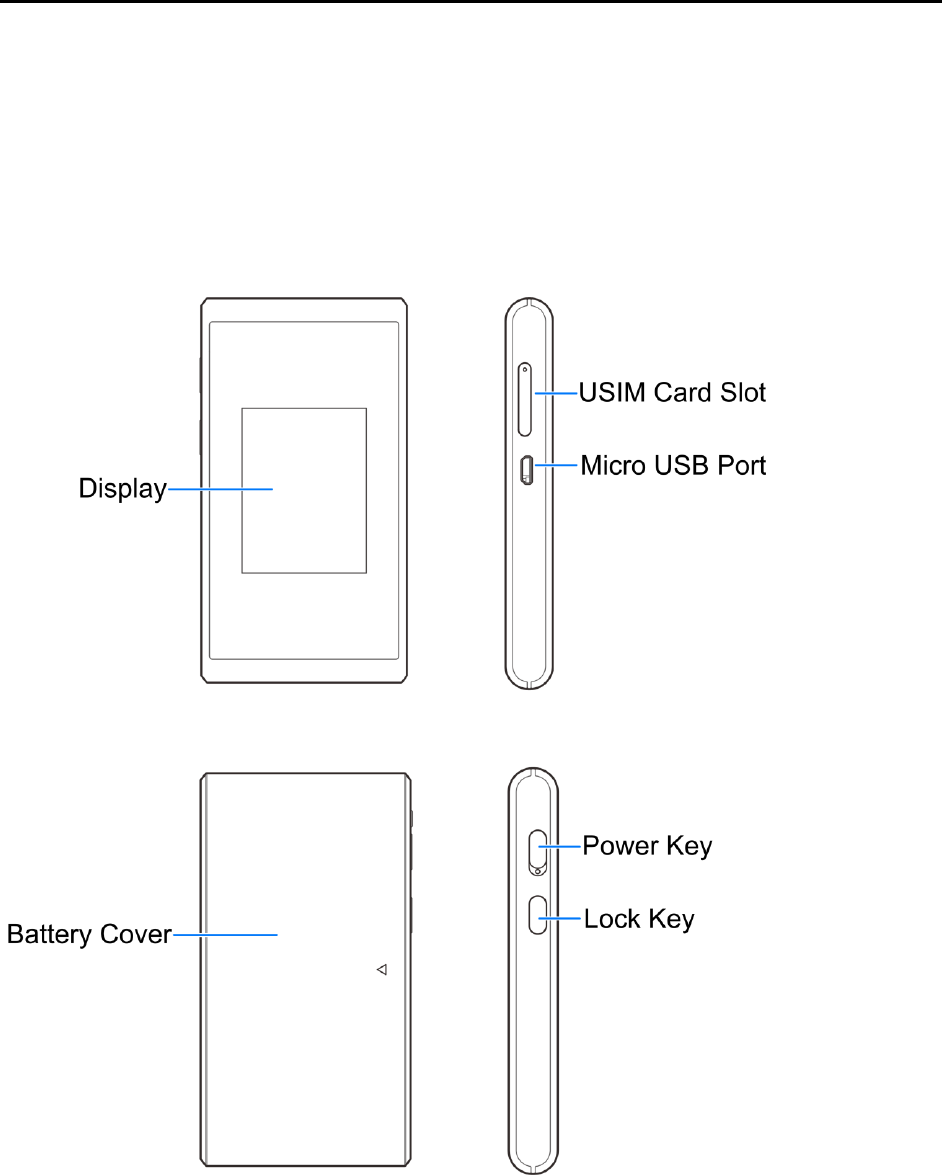
Parts and Functions
Learn your device's primary parts and functions.
Device Layout
The following illustration outlines your device's primary external features and buttons.

Get Started 6
Part
Description
Display
View device status. Use touchscreen gestures (tap, swipe, flick, etc.)
to access menus and additional screens.
USIM Card Slot
Install the USIM card.
Micro USB Port
Connect the micro USB cable for charging or tethered connections.
Battery Cover
Remove the battery cover to remove or insert the battery.
Power Key
Toggle power on or off.
Lock Key
Press to lock or unlock the LCD screen.
Home Screen
The following topics describe the details of your device's home screen layout, icons, touchscreen usage,
and text entry.
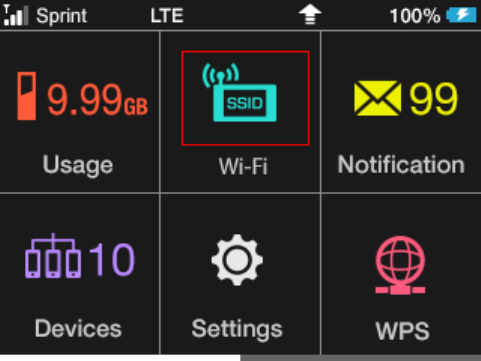
Home Screen Layout
Explore your device's home screen layout.
Part
Description
Status Bar
Displays status indicators including connection status, signal strength,
battery level, and more.
Touch Menu
Access the device options through the touchscreen menus.
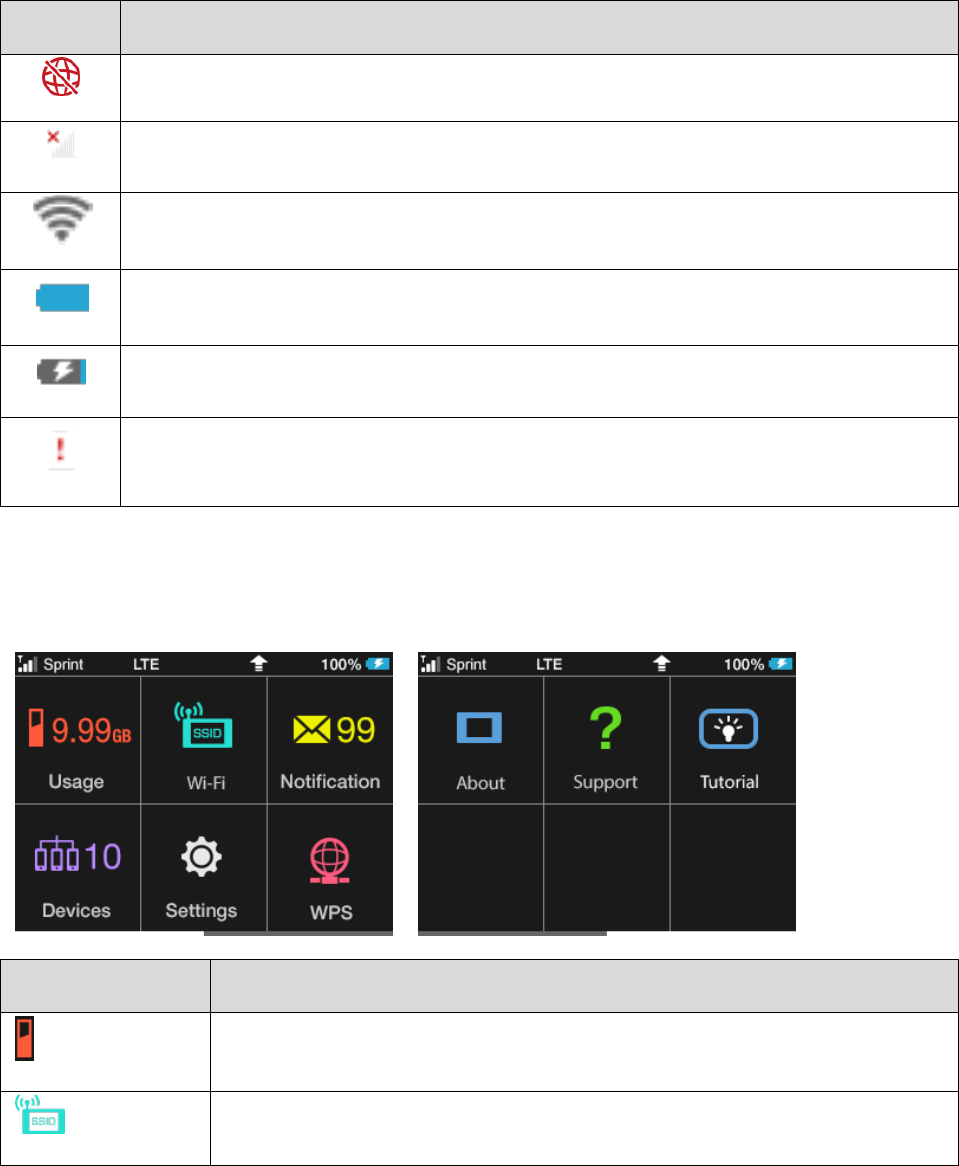
Get Started 7
Status Bar Icons
The home screen's status bar may feature the following icons, depending on current status.
Icon
Description
Mobile networks disconnected
Out of service area
Internet Wi-Fi available/Wi-Fi signal level
Battery full
Battery low
No battery (charging required)
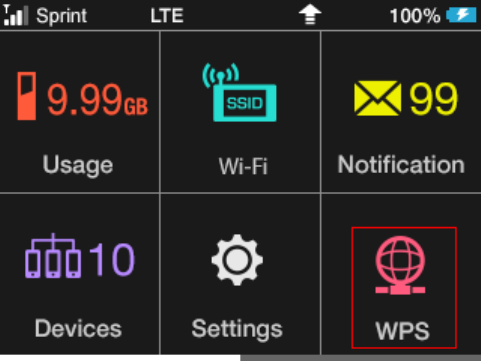
Touch Menu Icons
Tap the Touch Menu icon to access your device's settings and notifications.
Menu Option
Description
Usage
Show mobile network data usage, etc.
Wi-Fi
Show and set SSID and security key for your device
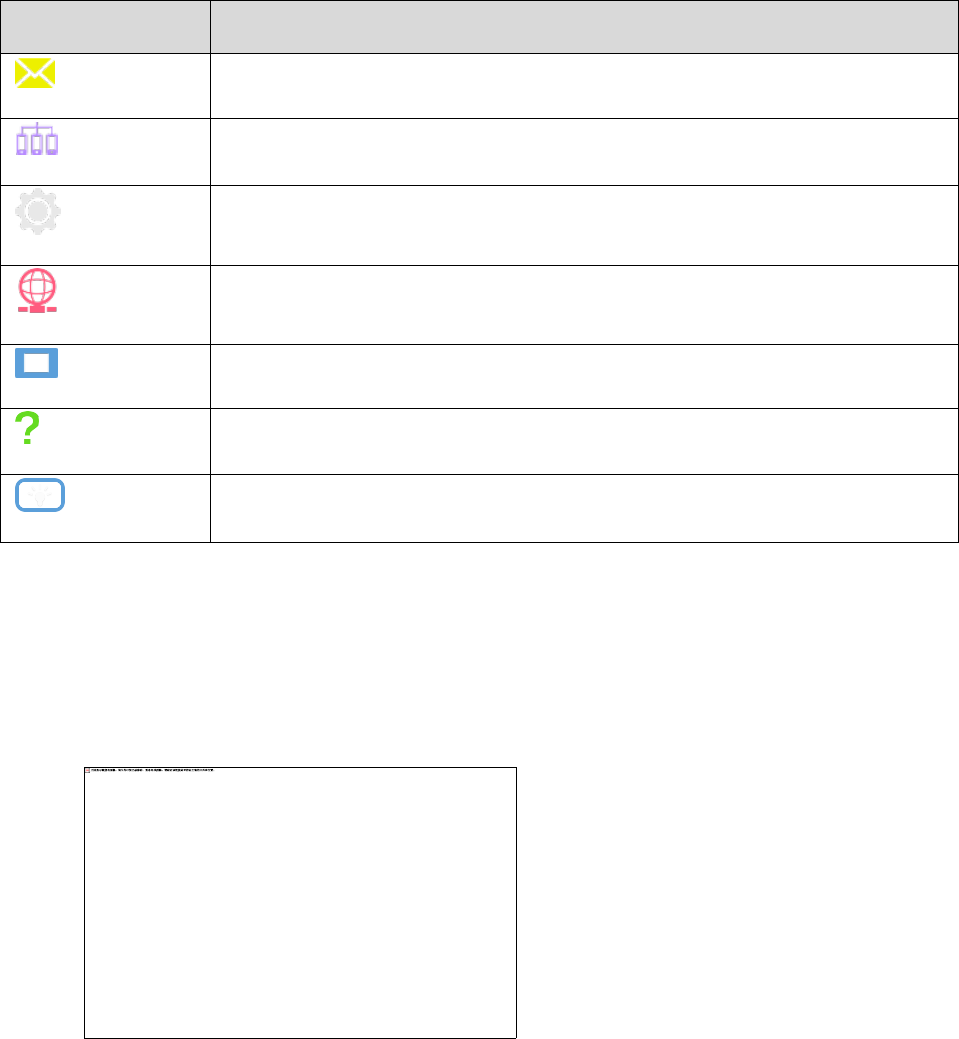
Get Started 8
Menu Option
Description
Notification
Show the messages received
Devices
Show the number of connected devices
Settings
Make settings for software update, roaming, display brightness, sleep mode,
passcode for screen lock
WPS
Set the WPS function.
Information
Show your device's phone number, software version and URL for the WEB UI
Support
Show help for icons on display
Tutorial
Sleep Mode
If your mobile broadband device is not used for a while, the display enters sleep mode and turns off
automatically.
■ Press the lock key to wake the screen.
The screen will illuminate and the touchscreen options will become active.
If there have been no transmissions or operation of your device, or if the battery has not been
charged, your device enters sleep mode to save power.
In sleep mode, WLAN is disabled.
Press the power key to turn the display on and exit sleep mode. WLAN function is enabled
and Wi-Fi devices can reconnect to the [device name].

Get Started 9
The time required to recover the network connection varies by environment, settings, etc.
Tip: Use the device settings menu to set a sleep activation timer.
Touchscreen Use
Your device's touchscreen lets you control actions through a variety of touch gestures.
Tap or Touch
When you want to select items onscreen such as menu icons, or press onscreen buttons, simply tap or
touch them with your finger.
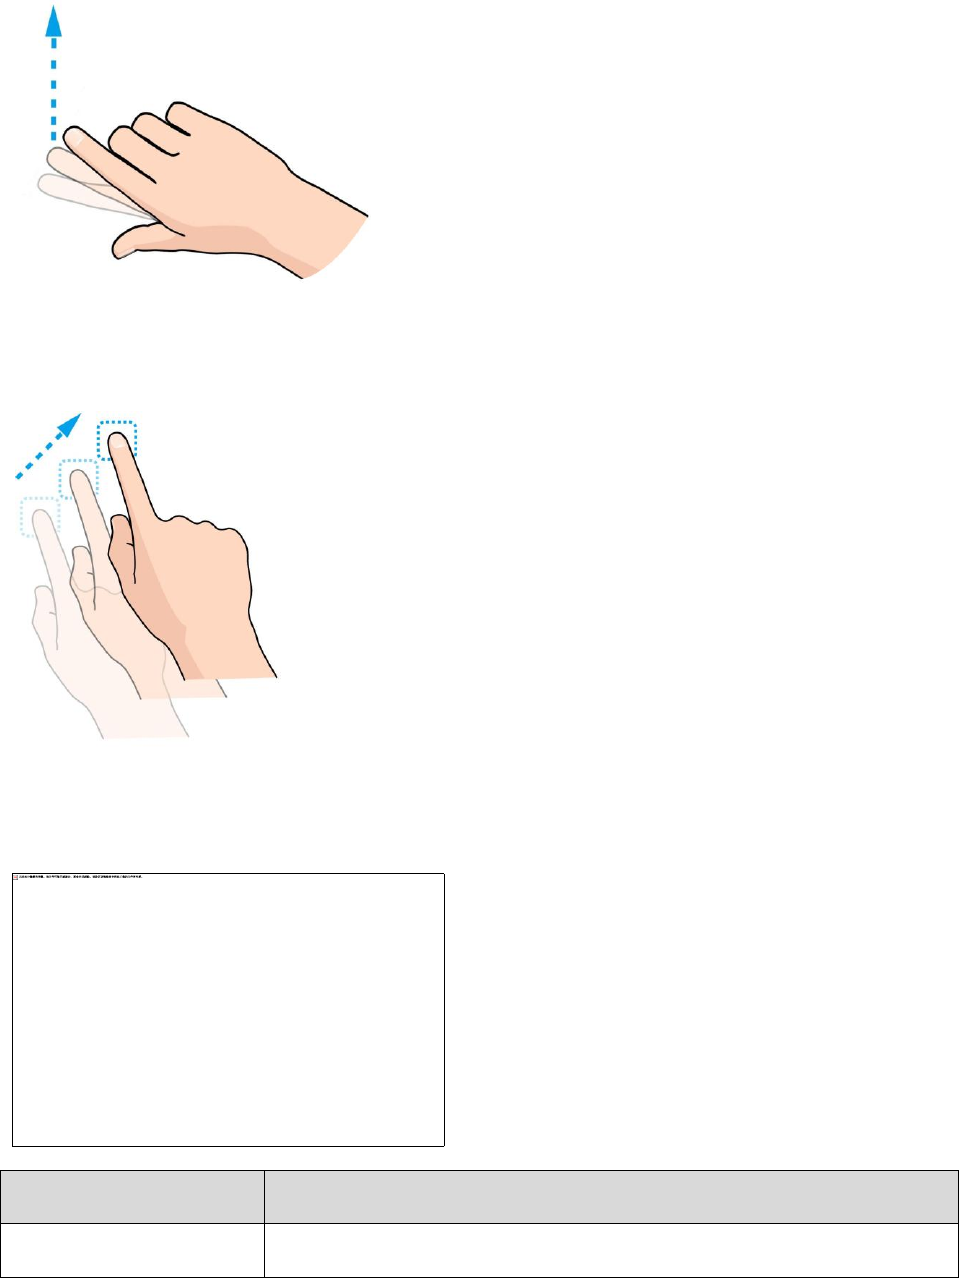
Swipe or Slide
To swipe or slide means to quickly drag your finger vertically or horizontally across the screen.
Flick
Flicking the screen is similar to swiping, except that you need to swipe your finger in light, quick strokes.
This finger gesture is always in a vertical direction, such as when flicking the contacts or message list.
Get Started 10
Drag
To drag, touch and hold an onscreen item, move it where desired, and then release your finger.
Text Entry Window
Where applicable, use onscreen keyboards for text entry.
Item
Description
Entry Box
Text entry.

Get Started 11
Item
Description
Cursor
Show entry position.
Keyboard
Entry key.
Entry mode (Symbol)
Symbol entry window opens.
Entry mode (alphabet,
numbers)
Toggle letters and numbers.
Delete
Delete a character before the cursor.
Space
Enter a space.
Fix
Confirm text entry.
Data Transfer Volume and Transfer Speed
[optional content describing data transfer speeds using various network types, e.g., 4GLTE, 3G, etc.]
Wireless Mode
Maximum Downlink Speed
Typical Downlink Speed
Sprint Spark Enhanced 4G LTE
xx Mbps
xx – xx Mbps
4G LTE
xx Mbps
xx – xx Mbps
3G
xx Mbps
xx – xx Mbps
Note: Actual speeds depend on several factors, including network conditions.
USIM Card
The USIM card is an IC card containing phone number and other customer information.
Handling a USIM Card
Keep the following in mind when handling a USIM card.
● Customer is responsible for any damage caused by inserting USIM Card in another-brand IC card
reader, etc. The company is not responsible in such case.
● Always keep the IC chip clean.
● Wipe clean with a dry, soft cloth.
Get Started 12
● Avoid applying labels. May damage USIM Card.
● See instructions included with USIM Card for handling.
● USIM Card is the property of the company.
● USIM is replaceable (at cost) in case of loss/damage.
● Return USIM Card to the company when cancelling subscription.
● Returned USIM Cards are recycled for environmental purposes.
● Note that USIM Card specifications and performance may change without notice.
● It is recommended that you keep a separate copy of information that is stored on USIM Card. The
company is not responsible for damages from stored information that is lost.
● Always follow emergency procedures to suspend service if your USIM Card or device (USIM
Card inserted) is lost/stolen. For details, contact Customer Service.
● Always power off the mobile broadband device before inserting/removing USIM Card.
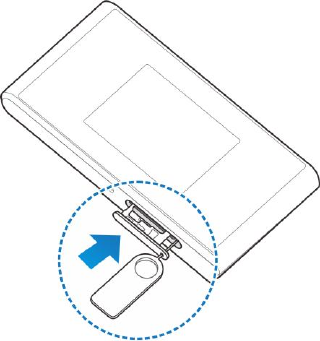
Insert a USIM Card
Follow these instructions to insert a USIM card. Remember to power off your device before inserting a
USIM card.
1. Open the USIM card slot.
Get Started 13
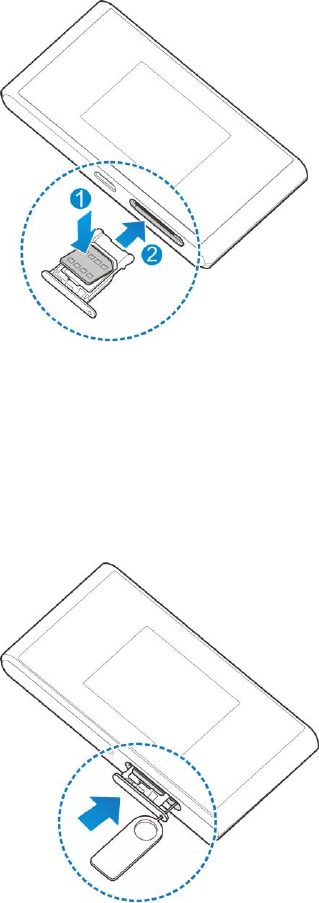
2. Insert USIM card.
Insert gently with gold IC chip facing up.
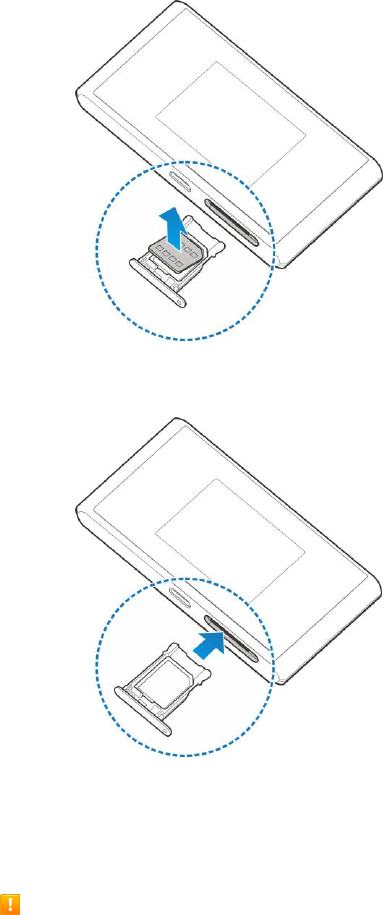
Remove the USIM Card
Follow these instructions to remove the device's USIM card.
1. Open the USIM card slot.
Get Started 14
2. Remove the USIM card.
3. Insert the USIM card tray.
Battery Use
The following topics explain how to insert and remove your device's battery.
Battery Cautions
Storage: Avoid storing or leaving battery with no charge remaining. Saved information and settings
may become lost or changed, or battery may become unusable. Charge once every six months
before storing or leaving unused for a long period.
Bulges: Depending on use, bulges may appear near end of battery life. This does not affect safety.
Replacing Battery: The battery is a consumable item. It needs to be replaced if operating time
shortens noticeably. Purchase a new battery.
Cleaning: Clean soiled terminals between battery and device with a clean, dry cotton swab. Soiled
terminals can result in a poor connection and prevent charging, etc.
Get Started 15
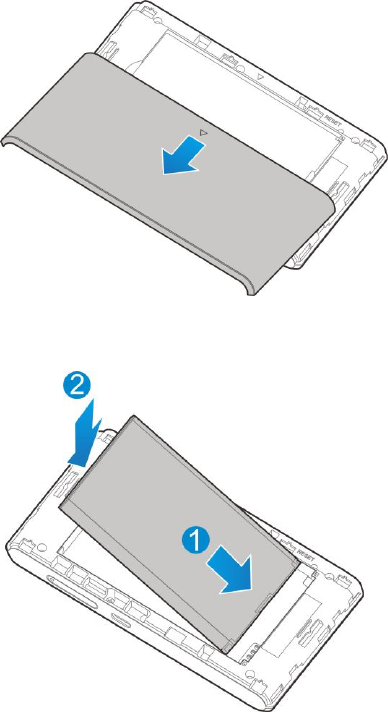
Insert the Battery
Follow these instructions to insert your device's battery safely and properly. Make sure the device is
turned off before
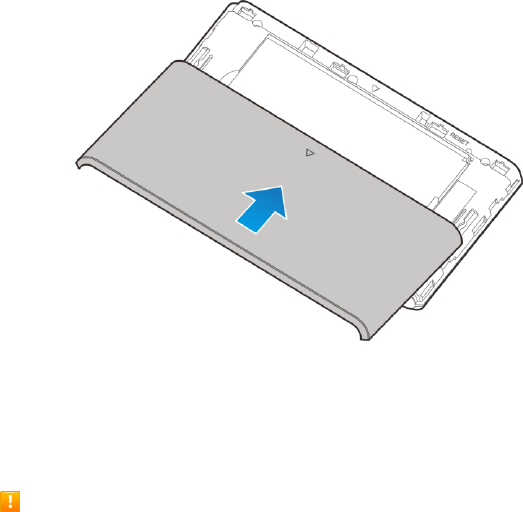
1. Remove the battery cover.
2. Insert the battery.
Align the contacts of the battery with the contacts in the device.
Get Started 16
3. Replace the battery cover.
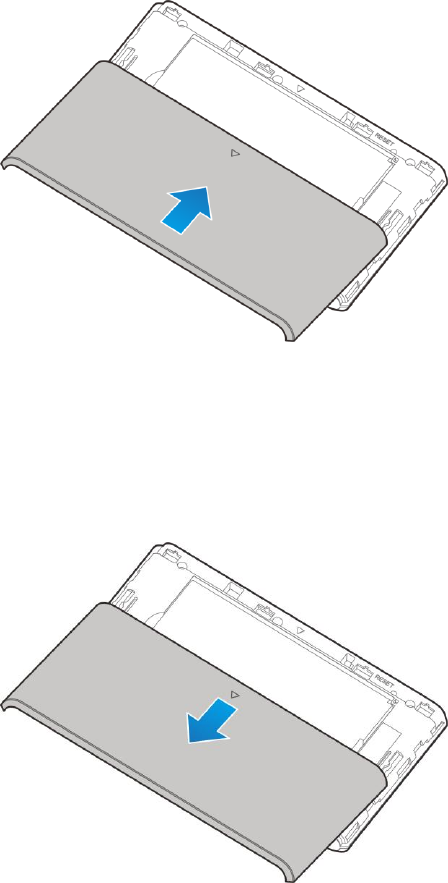
Remove the Battery
Follow these instructions to remove your device's battery. Always power the device off before removing
the battery.
1. Remove the battery cover.
Get Started 17
2. Remove the battery.
3. Replace the battery cover.
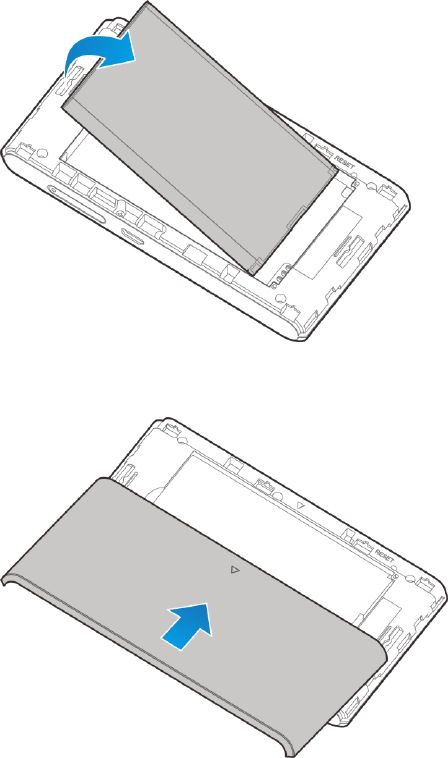
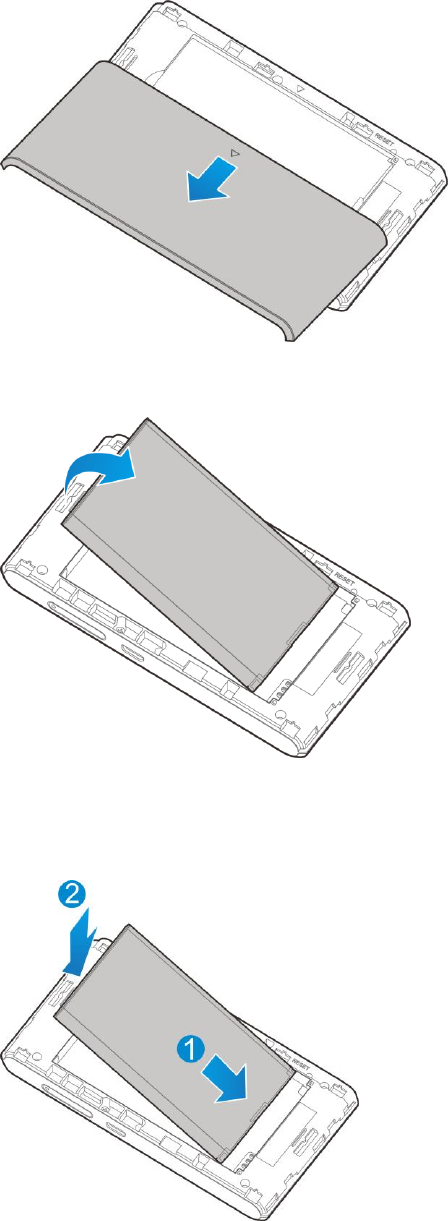
Check the SSID and Security Key
Your device's default SSID (network name) and security key are printed on a label beneath the device's
battery. Turn the device off and remove the battery to access this information.
Get Started 18
1. Remove the battery cover.
2. Remove the battery.
3. Check the SSID (network name) and security key printed on the label beneath the battery.
4. Reinsert the battery.
Get Started 19
Align the contacts of the battery with the contacts in the device.
5. Replace the battery cover.
Charge the Battery
Follow these instructions to charge your device's battery using either the included AC adapter or via a
USB connection on your computer.
Battery Charging Cautions
Charging Conditions: Under low temperatures charging performance decreases. Charge in
temperatures between 0°C – 55°C. Do not charge in places where there is high humidity. USB
charging may be unavailable depending on Wi-Fi router temperature.
Use Supplied Accessories: Always use the supplied AC adapter or micro USB cable.
Precaution for Extended Use: Your device may become hot when used for a long time or while
charging, especially in high temperatures. Prolonged contact with skin may cause low-temperature
burn injuries.
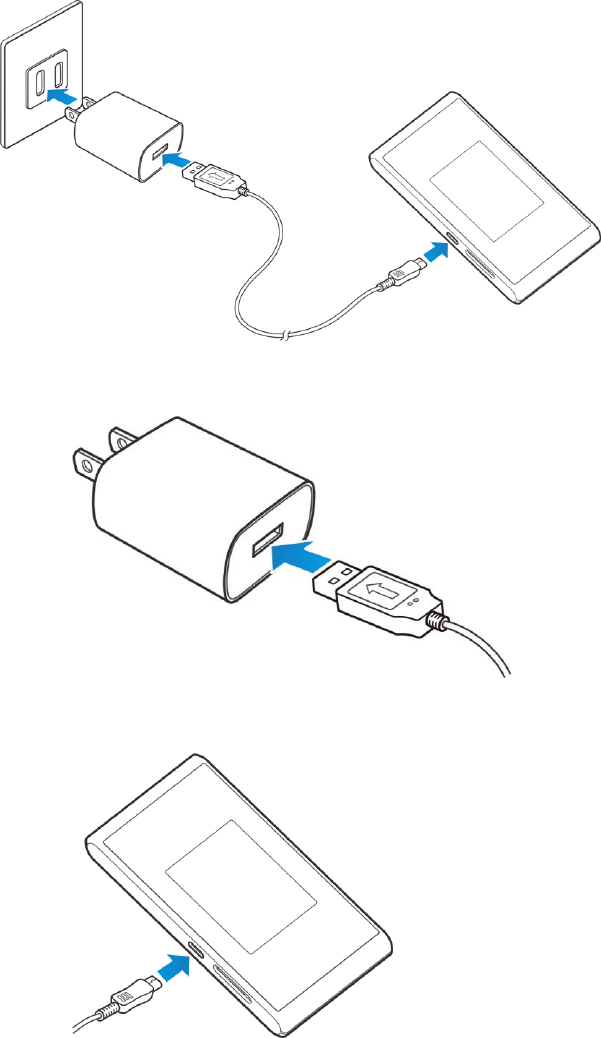
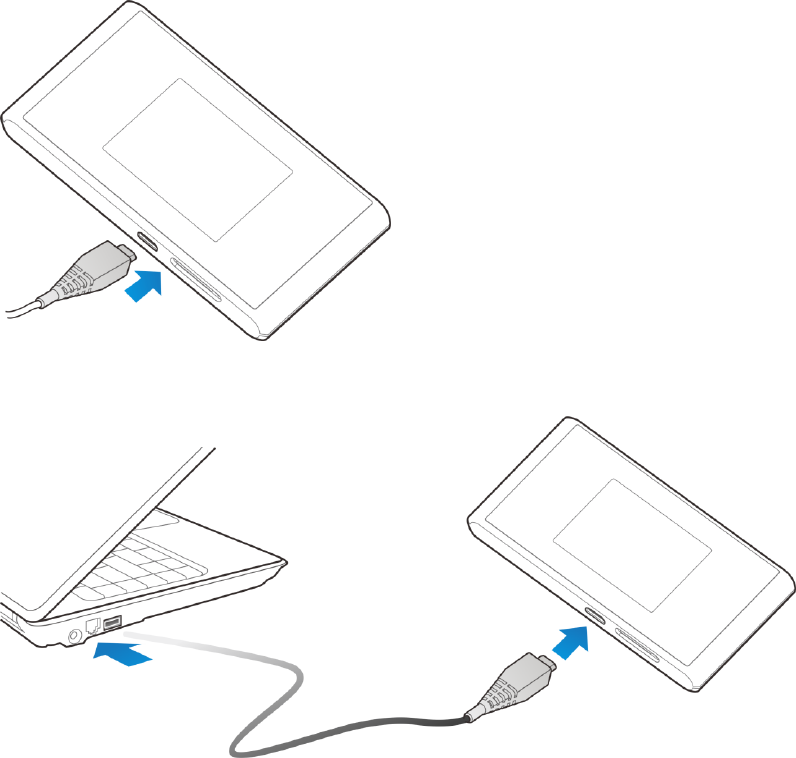
Charge Using the AC Adapter
Use the supplied AC adapter and micro USB cable.
Get Started 20
1. Insert the micro USB cable (USB plug) into the AC adapter.
2. Insert the other end of the micro USB cable into your device's micro USB port.
Get Started 21
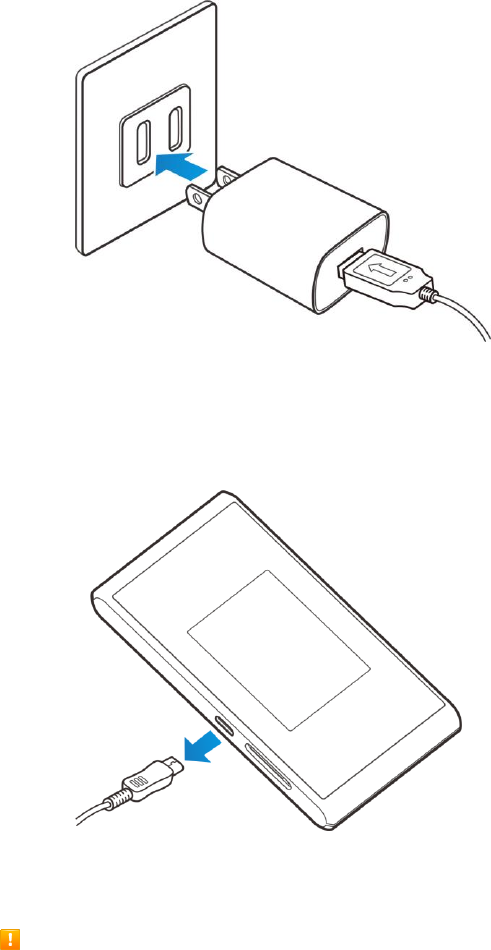
3. Plug the AC adapter into an electrical outlet.
The indicator light illuminates when charging starts. The light goes off when the battery is fully
charged. Fully charging a battery may take up to three hours.
4. After charging, disconnect the device from the charger.
Unplug the AC adapter from the outlet, and remove the micro USB cable from the device and
the AC adapter.
MF975S and AC Adapter Becoming Warm or Hot
Your device and the AC adapter may become warm while charging. This is not a malfunction.
However, stop using them immediately if they become extremely hot; this could indicate a malfunction.
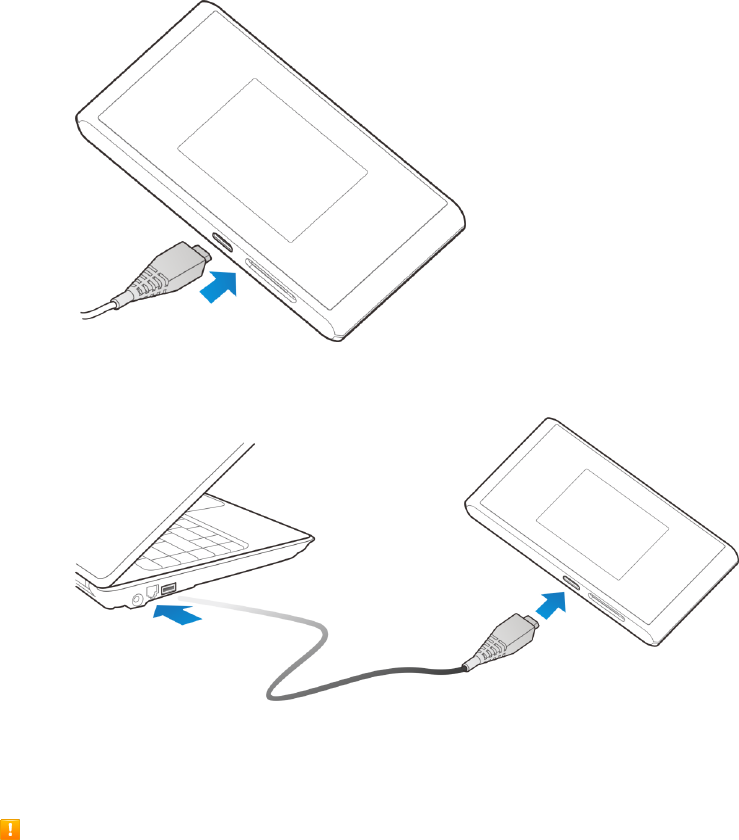
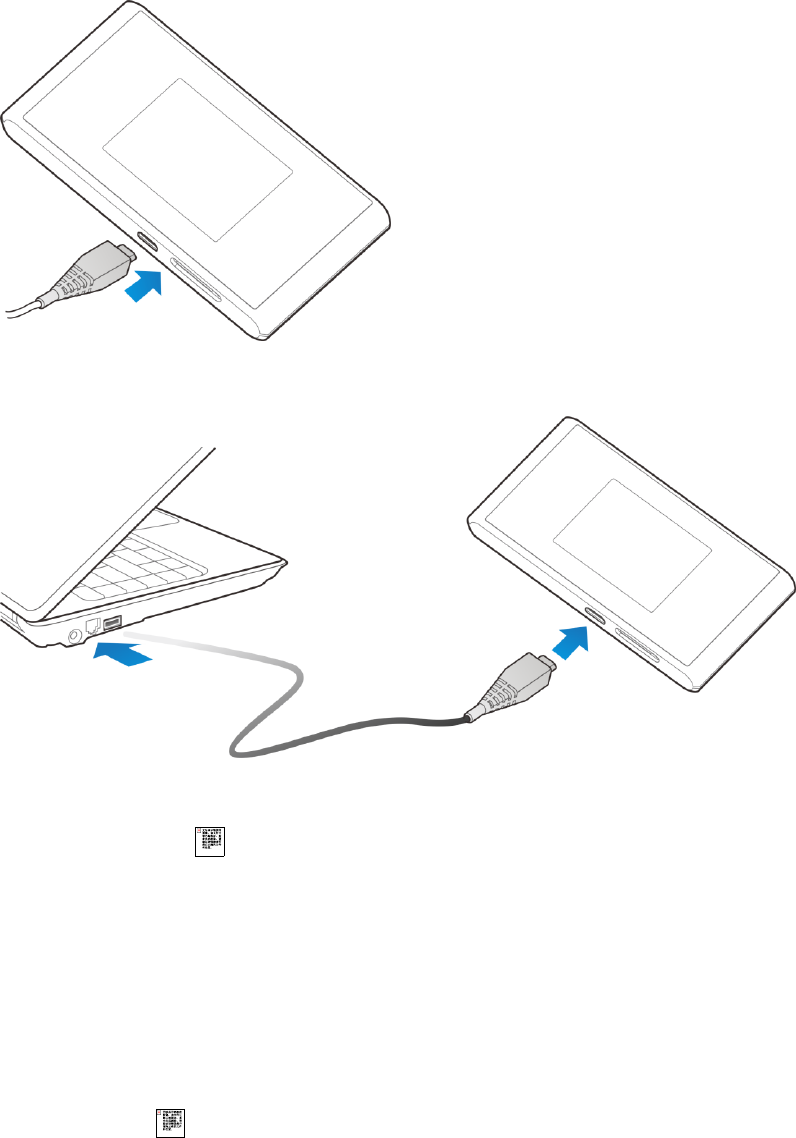
Charge Using a USB to PC Connection
Use the supplied micro USB cable when charging via a computer's USB port.
Before using a PC connection to charge your device, ensure that the computer is turned on. Depending
on the type of connection or port configuration, your device's battery may not charge.
Get Started 22
1. Insert the small end of the micro USB cord into your device's micro USB port.
2. Insert the large end of the micro USB cord into an external USB port on your computer.
Upon connecting the first time, the device driver will automatically install on your computer.
3. After charging, remove the micro USB cable from both the device and the computer.
Note About USB to PC Charging
Charging via a USB to PC connection takes longer than charging with the AC adapter. Charging time
is dependent on the connected PC.
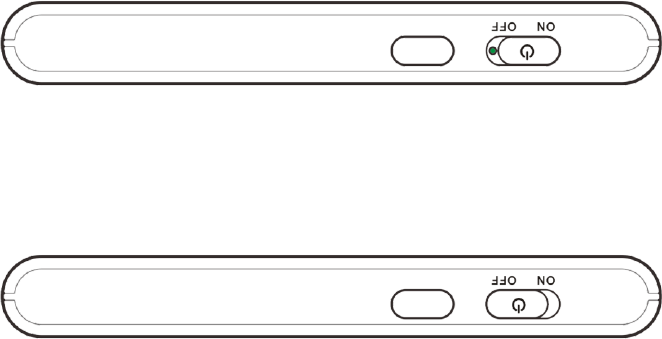
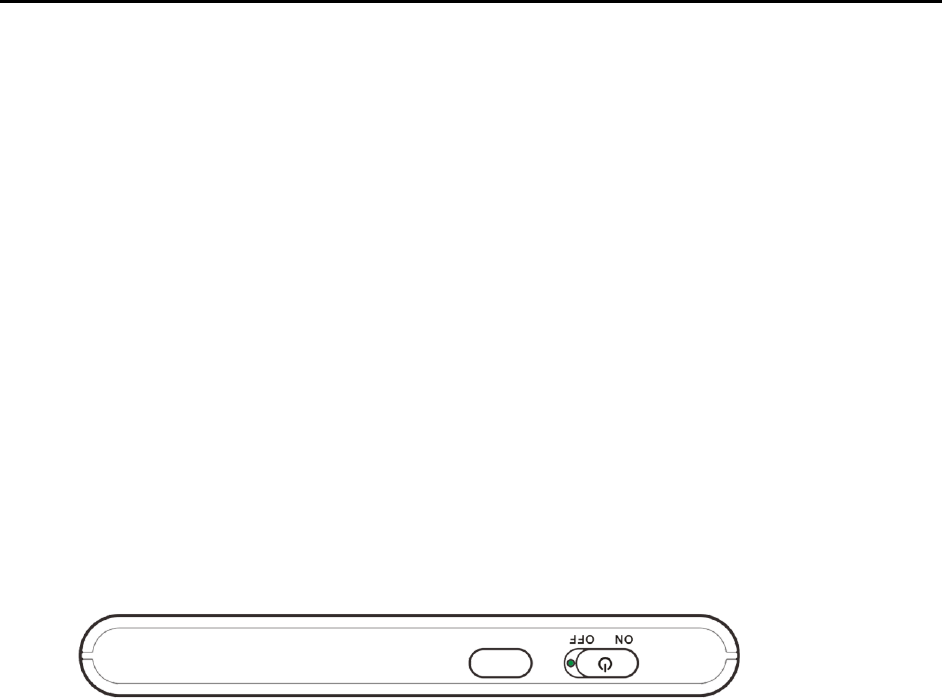
Turn Your Device On and Off
The instructions below explain how to turn your device on and off, or to restart your device if it cannot be
powered on and off using the Power key.
Turn Your Device On
■ Slide the Power key to ON position.
Get Started 23
Your device's Wi-Fi function activates and automatically connects to the Internet.
Turn Your Device Off
■ Slide the Power key to OFF position.
Your device will power off.
Your screen remains blank while your device is off (unless the battery is charging).

Connect with Wi-Fi (WLAN) 24
Connect with Wi-Fi (WLAN)
The following topics outline basic features and operations of your device's Wi-Fi (WLAN) connections,
including connecting with various OS and device types.
Wi-Fi (WLAN) Overview
Below are some basics of your device's Wi-Fi (WLAN) function.
Wi-Fi (WLAN) Information
● Advanced Settings: Change your devices Wi-Fi (WLAN) settings as required. See [xxxxx].
● Simultaneous Connection: Use your device to connect up to 10 Wi-Fi devices simultaneously.
● Automatic Updates for Optimizing Wi-Fi Connection: When connected by Wi-Fi, connection
optimizing settings may be automatically received and updated.
Wi-Fi (WLAN) Usage Cautions
For added security, it is recommended that you change the default network name (SSID) and security
key (WPA) after setting up your device.
Wi-Fi (WLAN) Overview
● Your device supports IEEE 802.11 b/g/n standards. Connect Wi-Fi devices (PC, game console,
etc.) via Wi-Fi for wireless data transfers.
● Your device supports Wi-Fi Protected Setup (WPS), which allows Wi-Fi connection settings to be
easily configured on any WPS-compliant device.
● Enter Wi-Fi router's SSID and WPA keys to connect non-WPS-compliant Wi-Fi devices.
These settings should be performed when the device is connected the first time to another
Wi-Fi device. Thereafter, simply activate Wi-Fi (WLAN) to automatically connect your mobile
broadband device to the Wi-Fi (WLAN) device.
Activate Wi-Fi (WLAN) Function
Follow the instructions below to activate your device's Wi-Fi function and connect to the Internet via an
available 4G LTE, 4G, or 3G connection. Your device searches for and makes a connection automatically
upon powering up. Use the Web UI to select a network.
■ Slide the Power key to ON position.
Connect with Wi-Fi (WLAN) 25
Your device's Wi-Fi function activates and automatically connects to the Internet.
Connect Windows PCs with Wi-Fi
The following topics describe how to connect your device with various versions of Windows PCs via Wi-Fi.
Windows 8
Connect Windows 8 PCs to your device with Wi-Fi.
1. Slide the Power key to ON position.
Your device's Wi-Fi function activates and automatically connects to the Internet.
2. Activate your PC's Wi-Fi function.
Consult your PC's operation manual for details on activating Wi-Fi.
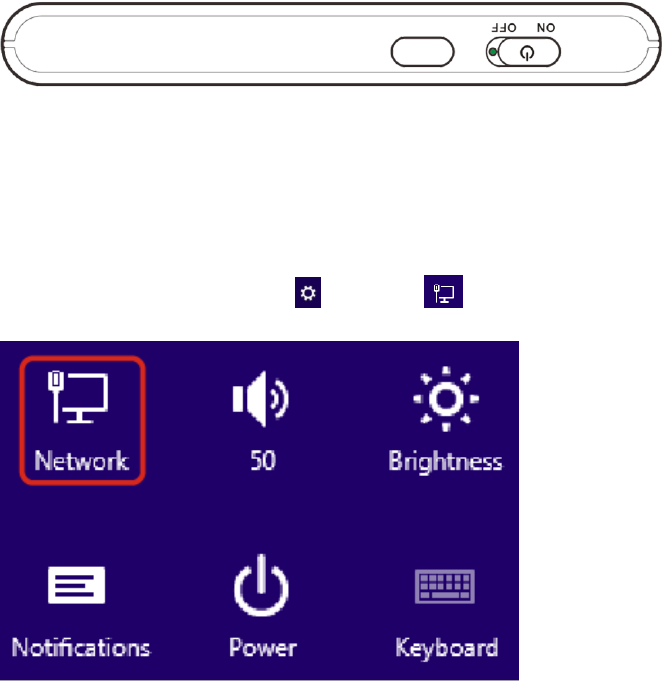
3. On your PC, move the cursor to the upper-right or lower-right corner (or swipe from the right side
on a touchscreen PC) and select > charm > .
Connect with Wi-Fi (WLAN) 26
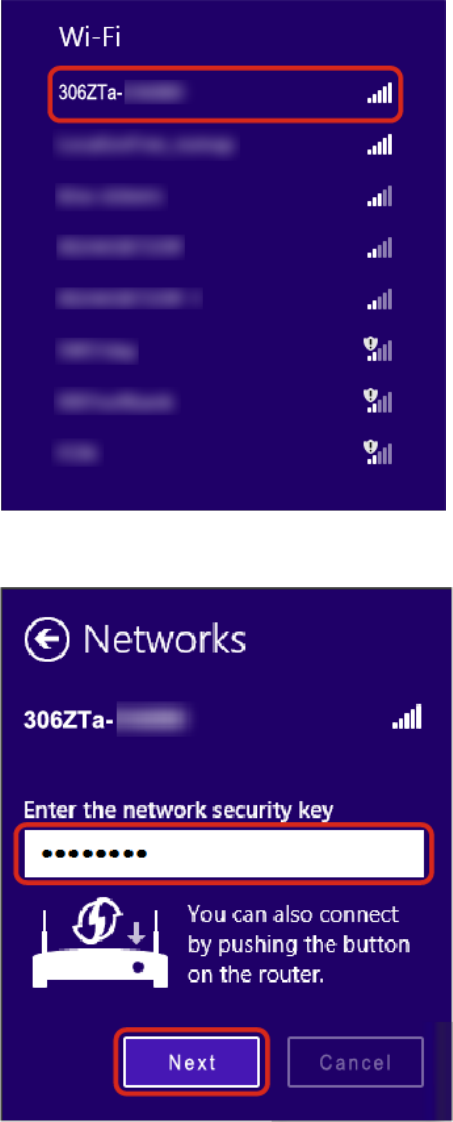
4. Select your device's SSID from the list, and click Connect.
5. Enter the security key (WPA) and then click Next.
The PC connects to your device. The connected status icon on your device will show an
additional device has been connected.

Connect with Wi-Fi (WLAN) 27
Windows 7
Connect Windows 7 PCs to your device with Wi-Fi.
1. Slide the Power key to ON position.
Your device's Wi-Fi function activates and automatically connects to the Internet.
2. Activate your PC's Wi-Fi function.
Consult your PC's operation manual for details on activating Wi-Fi.
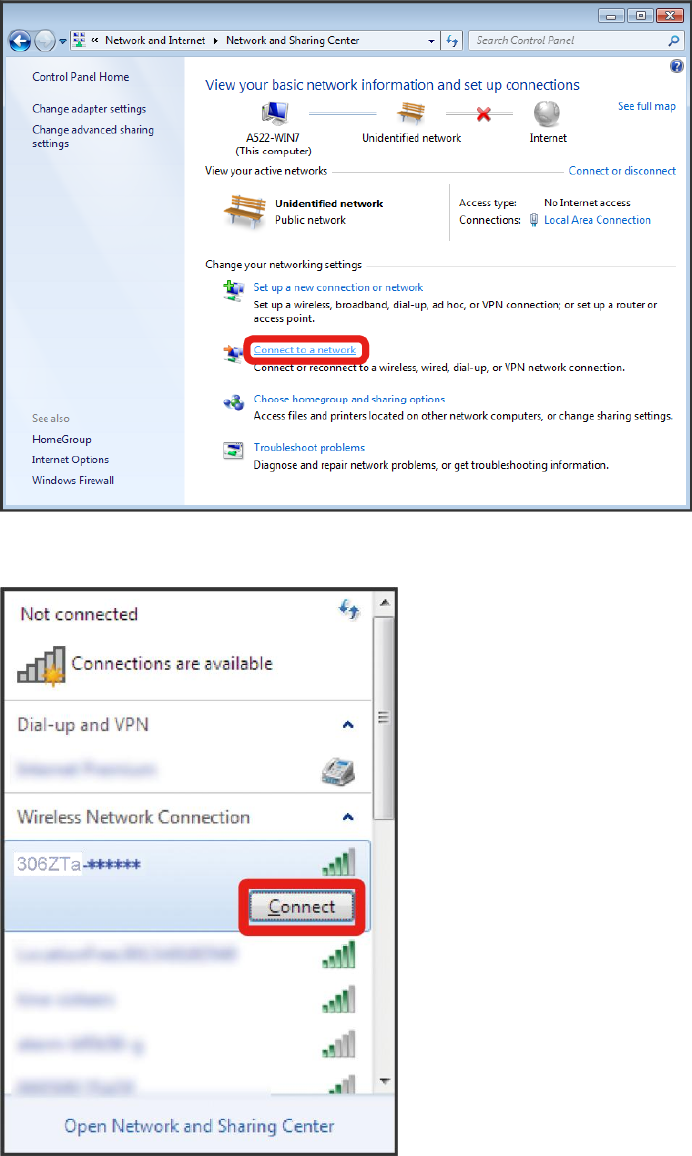
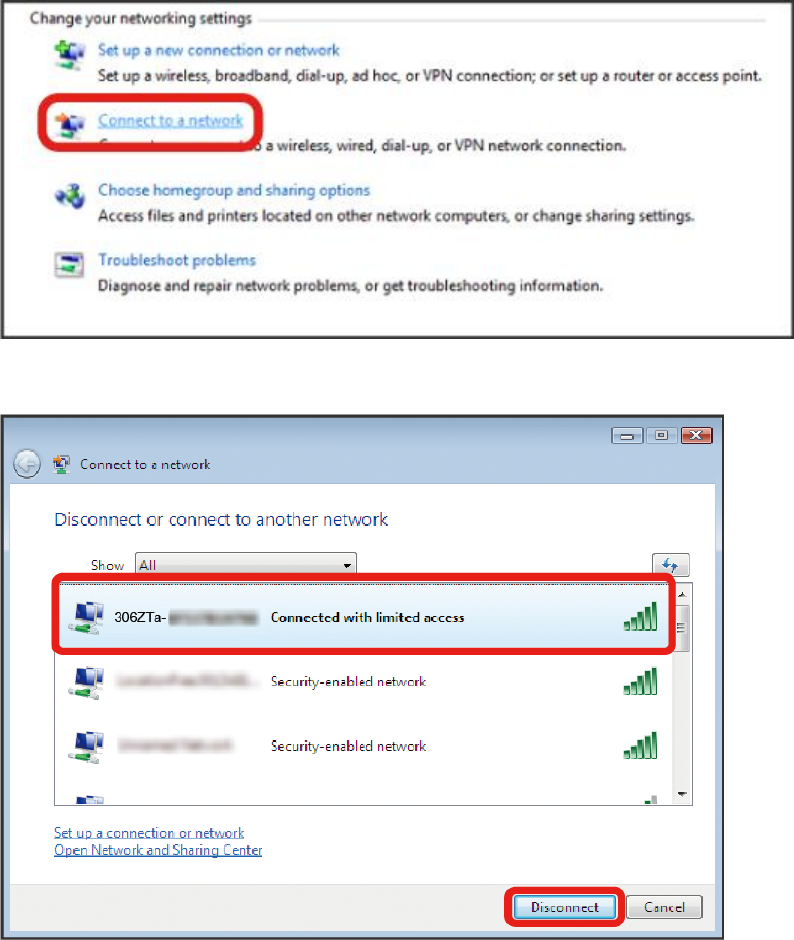
3. On your PC, click Start > Control Panel > Network and Internet > Network and Sharing
Center.
Connect with Wi-Fi (WLAN) 28
4. Click Connect to a network.
5. Select your device's SSID from the list, and click Connect.
Connect with Wi-Fi (WLAN) 29
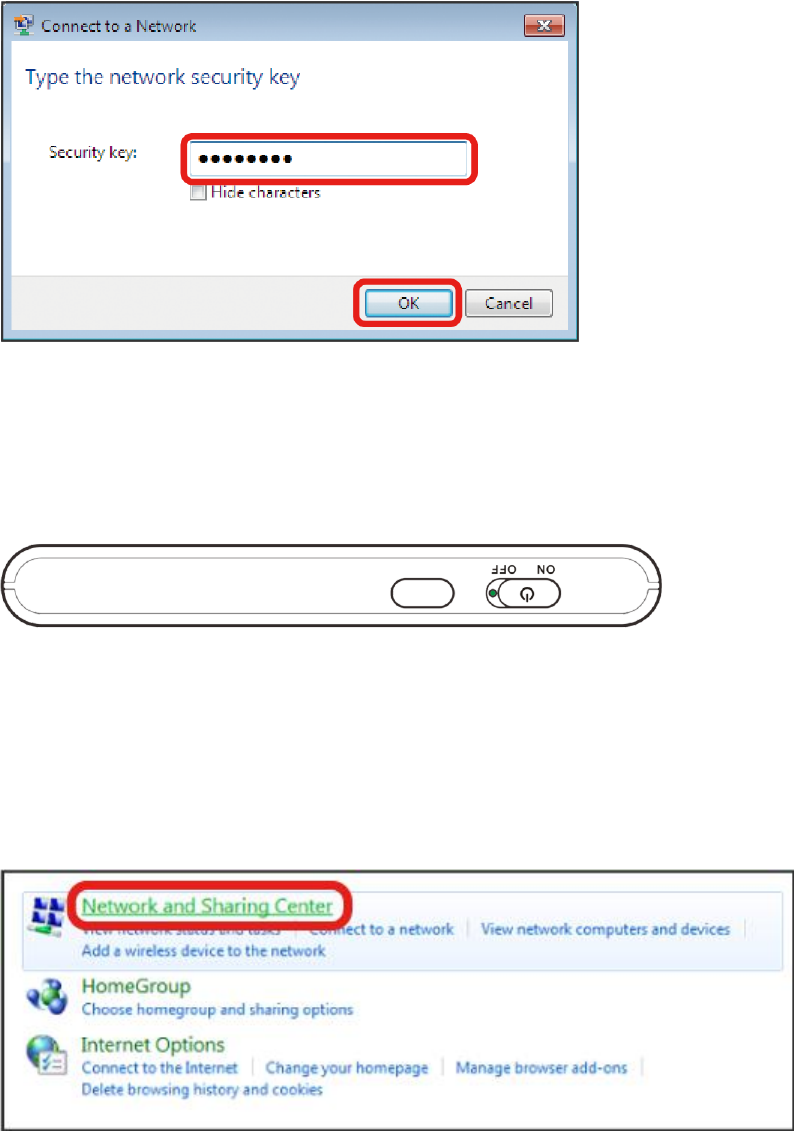
6. Enter the security key (WPA) and then click OK.
The PC connects to your device. The connected status icon on your device will show an
additional device has been connected.
Windows Vista
1. Slide the Power key to ON position.
Your device's Wi-Fi function activates and automatically connects to the Internet.
2. Activate your PC's Wi-Fi function.
Consult your PC's operation manual for details on activating Wi-Fi.
3. On your PC, click Start > Control Panel > Network and Internet > Network and Sharing
Center.
Connect with Wi-Fi (WLAN) 30
4. Click Connect to a network.
5. Select your device's SSID from the list, and click Connect.

Connect with Wi-Fi (WLAN) 31
6. Enter the security key (WPA) and then click Connect.
7. Click Close.
The PC connects to your device. The connected status icon on your device will show an
additional device has been connected.
Connect Mac Computers with Wi-Fi
Follow the instructions below to connect a Mac computer to your device via Wi-Fi.
Note: The operations depicted are based on Mac OS X 10.xx, with Wi-Fi security set to [xxx].
1. Slide the Power key to ON position.
Your device's Wi-Fi function activates and automatically connects to the Internet.
Connect with Wi-Fi (WLAN) 32
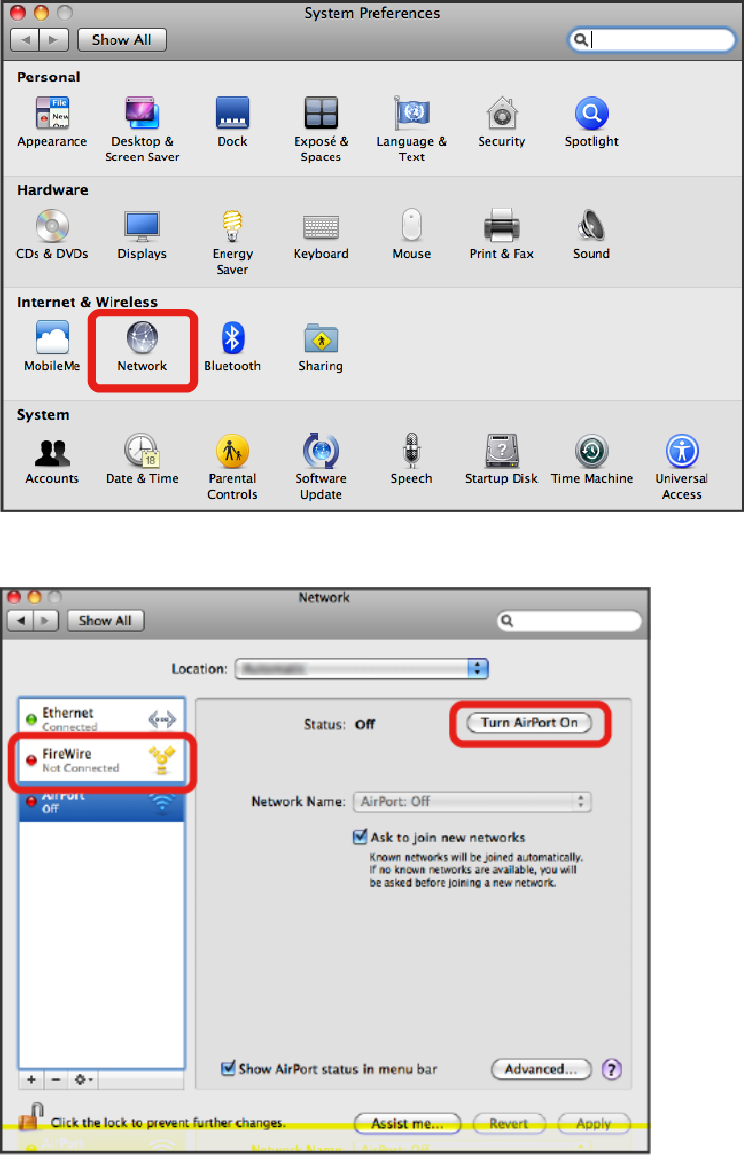
2. On your Mac, in the Apple menu, click System Preferences… > Network.
3. Click FireWire > Turn AirPort On.
Your computer's Wi-Fi function activates.
Connect with Wi-Fi (WLAN) 33
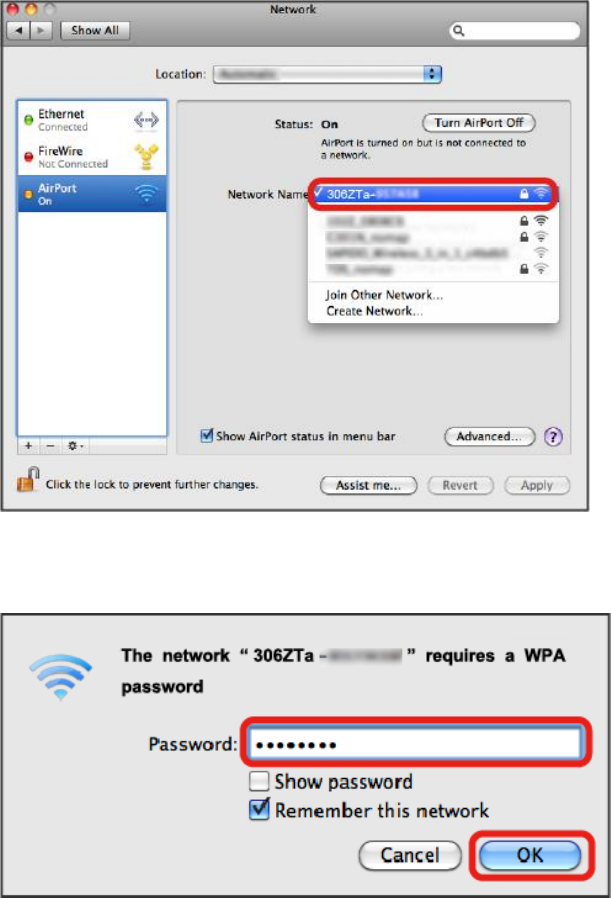
4. Select your device's SSID from the Network Name pulldown list.
5. Enter the security key (WPA) in the Password field, check Remember this network, and then
click Join.
The computer connects to your device. The connected status icon on your device will show an
additional device has been connected.
Connect iPhone/iPod Touch/iPad
The following topics outline how to connect your iPhone, iPod Touch, or iPad to your device via Wi-Fi.
Connect an iPhone or and iPod Touch
Follow the instruction to connect your iPhone or iPod Touch to your device using Wi-Fi.
Note: The operations below are based on your iPhone or iPod Touch Wi-Fi security set to [xxx].
Connect with Wi-Fi (WLAN) 34
1. Slide the Power key to ON position.
Your device's Wi-Fi function activates and automatically connects to the Internet.
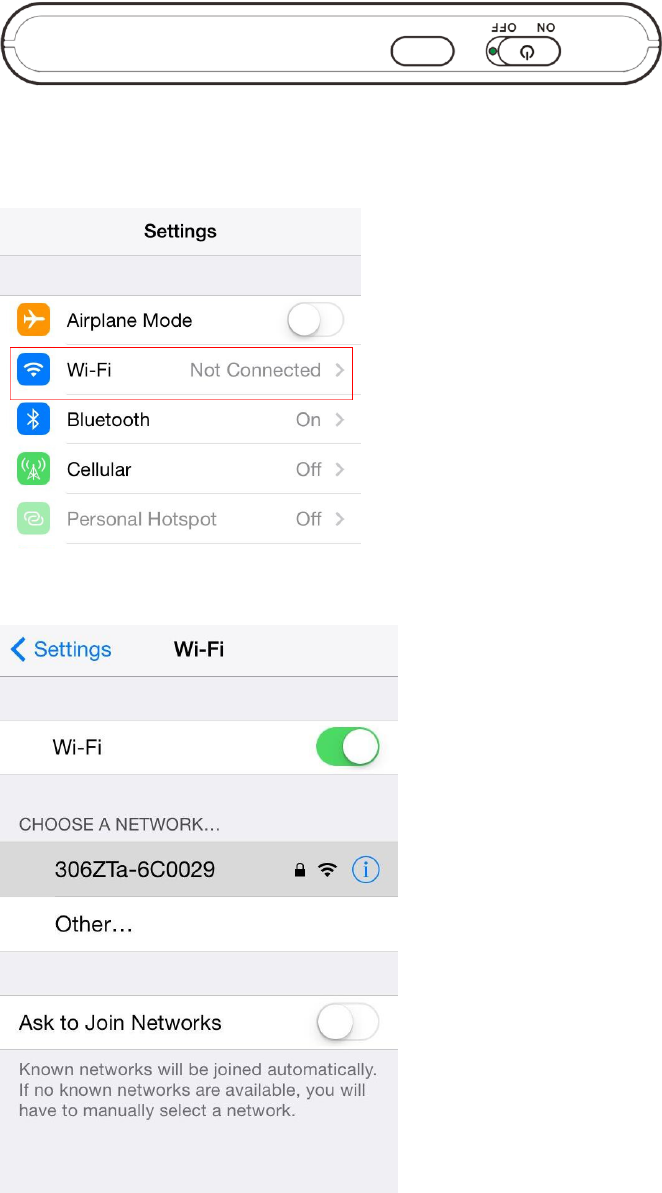
2. Select Settings > Wi-Fi on your iPhone or iPod Touch.
3. Touch to turn on the Wi-Fi function.
The iPhone or iPod Touch's Wi-Fi function activates.

Connect with Wi-Fi (WLAN) 35
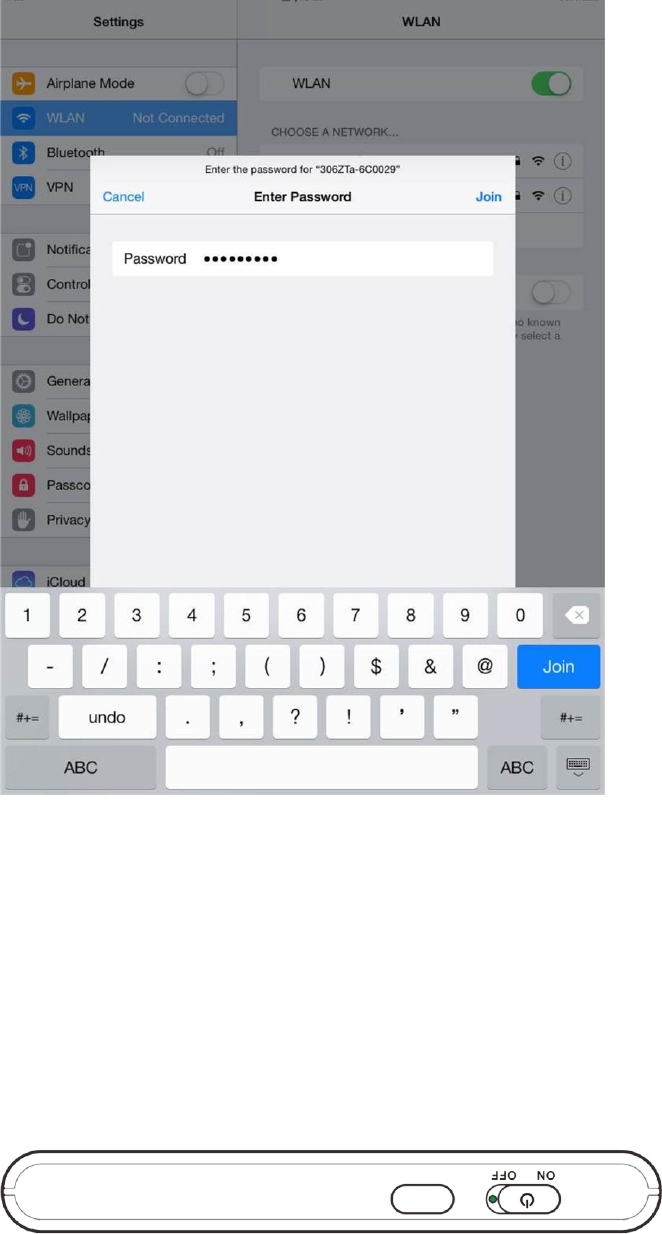
4. In the CHOOSE A NETWORK list, tap the device's SSID.
5. Enter the security password and then tap Join.
Connect with Wi-Fi (WLAN) 36
The iPhone or iPod Touch connects to your device. The connected status icon on your device
will show an additional device has been connected.
Connect an iPad
Follow the instruction to connect your iPad to your device using Wi-Fi.
Note: The operations below are based on your iPad Wi-Fi security set to [xxx].
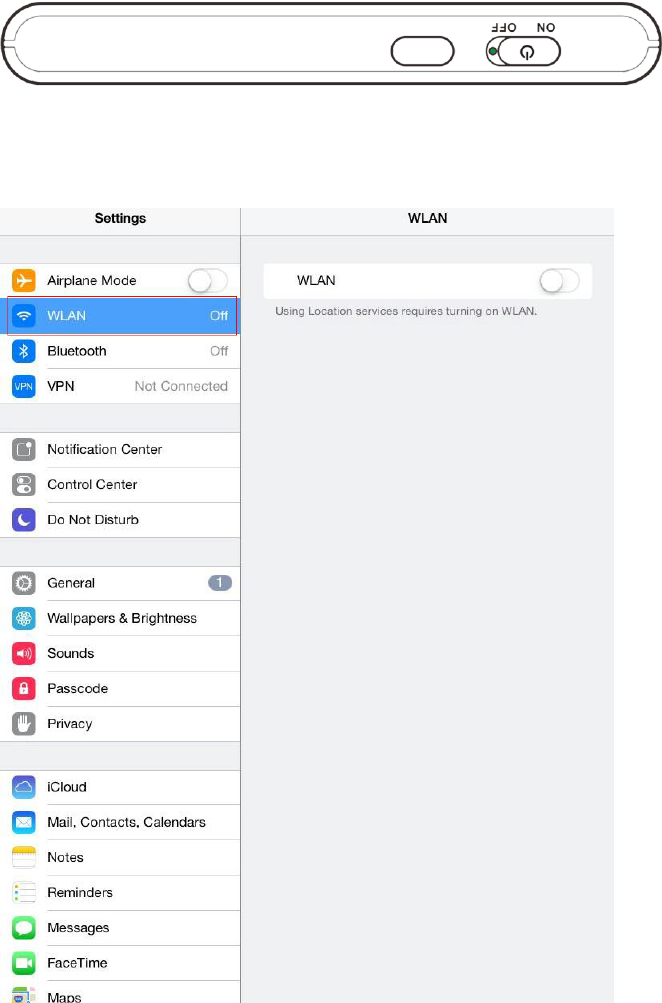
1. Slide the Power key to ON position.
Your device's Wi-Fi function activates and automatically connects to the Internet.
2. Select Settings > WLAN.
Connect with Wi-Fi (WLAN) 37
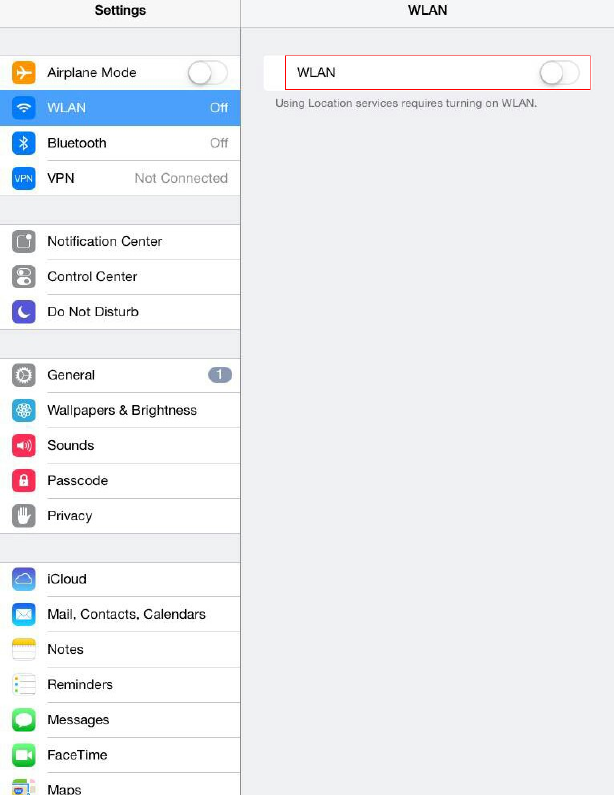
3. Touch to turn on the Wi-Fi function.
The iPad's Wi-Fi function activates.
Connect with Wi-Fi (WLAN) 38
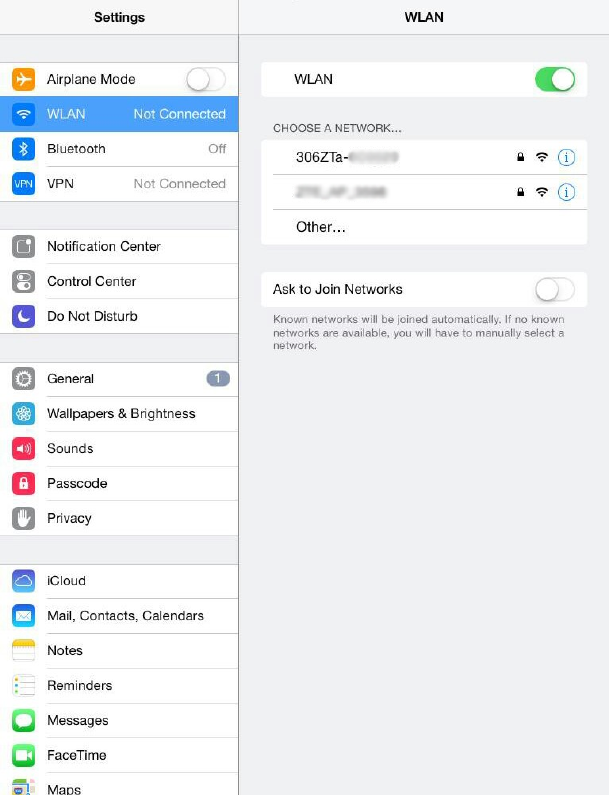
4. In the CHOOSE A NETWORK list, tap the device's SSID.
Connect with Wi-Fi (WLAN) 39
5. Enter the security key (WPA) and then tap Join.
The iPad connects to your device. The connected status icon on your device will show an
additional device has been connected.
Connect an Android™ Device
You can share your device's connection with compatible Android devices, such as wireless phones,
tablets, and Chromebook computers.
Note: The operations below are based on generic Android devices with Wi-Fi security set to [xxx].
Operation may vary depending on Android device type. See your Android device user guide for details.
1. Slide the Power key to ON position.
Connect with Wi-Fi (WLAN) 40
Your device's Wi-Fi function activates and automatically connects to the Internet.
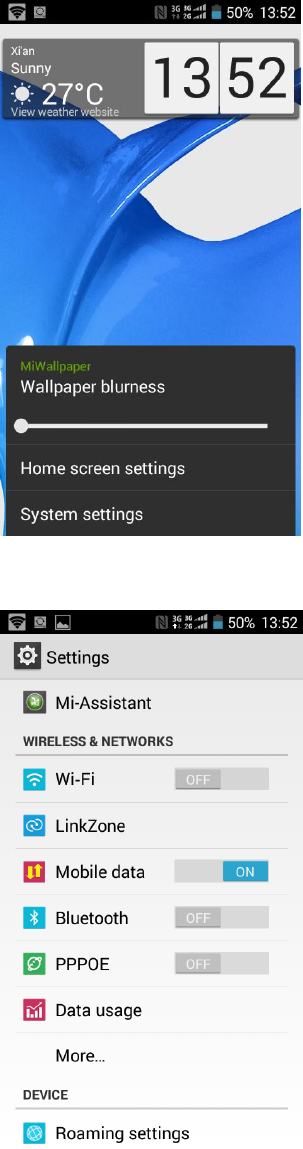
2. On your Android device, from home, select Menu Key > System settings.
3. Tap or click Wi-Fi.
The Wi-Fi settings menu appears.
Connect with Wi-Fi (WLAN) 41
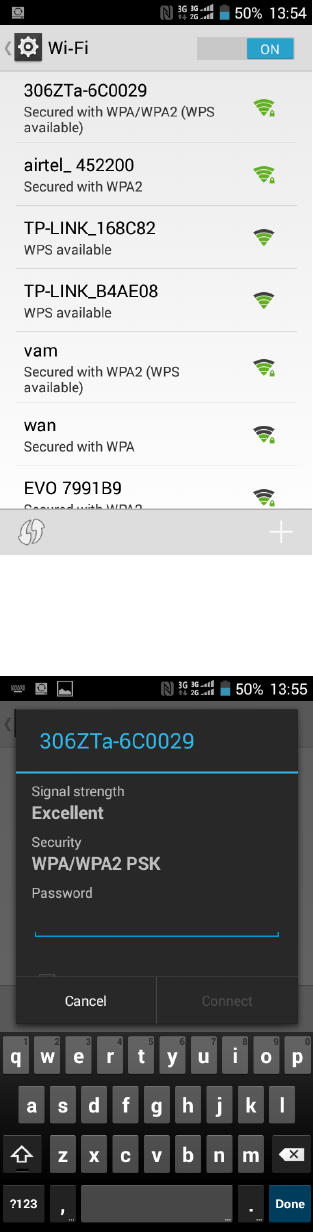
4. Tap or click the Wi-Fi slider to turn Wi-Fi on.
Wi-Fi is enabled on the Android device.
5. Tap or click your device's SSID from the list.
Connect with Wi-Fi (WLAN) 42
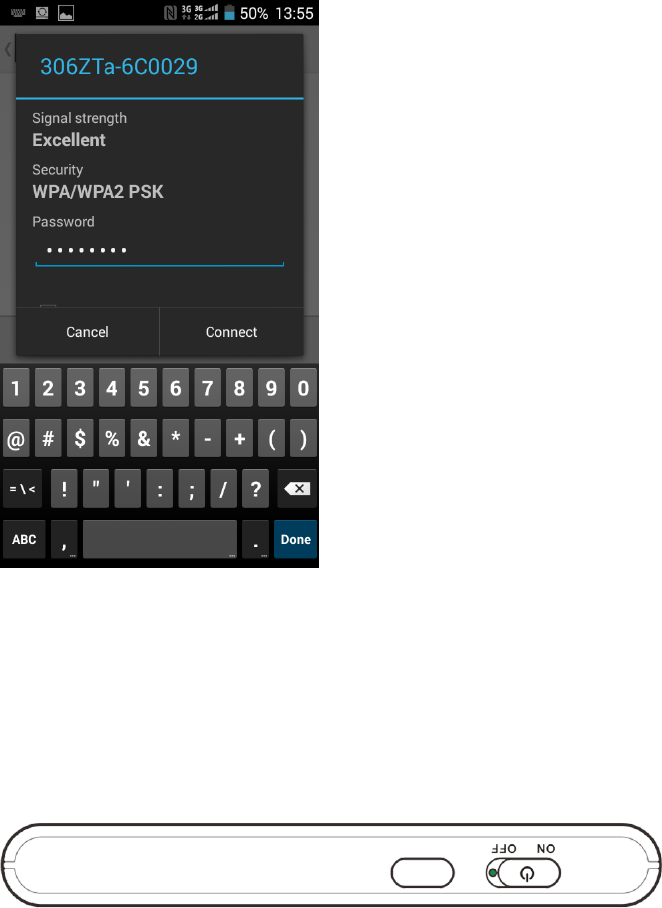
6. Enter the security key and then click Connect.
The Android device connects to your mobile broadband device. The connected status icon on
your device will show an additional device has been connected.
Connect WPS Supported Wi-Fi Devices
Connect a variety of WPS (Wi-Fi Protected Setup) supported devices to your mobile broadband device.
1. Slide the Power key to ON position.
Your device's Wi-Fi function activates and automatically connects to the Internet.
2. Activate the external device's Wi-Fi function and prepare for WPS settings as required.
Consult your external device's operation manual for details on activating Wi-Fi and WPS.
Connect with Wi-Fi (WLAN) 43
3. On your mobile broadband device, from home, tap WPS.
4. Tap a WPS option.
5. When prompted, press the WPS button on the external device to connect.
The external device connects to your mobile broadband device. The connected status icon on
your device will show an additional device has been connected.
Connect with Micro USB Cable (Windows) 44
Connect with Micro USB Cable
(Windows)
The following topics describe how to share your device's Internet connection with a Windows-based PC
using a direct USB connection.
Device Recognition and Removal –
Windows PC USB Connection
The following topics detail the device recognition and device removal processes when using a direct USB
connection between your mobile broadband device and a Windows PC.
Device Recognition – Windows PC USB Connection
When you connect your device directly to a Windows PC using the supplied micro USB cable, the device
driver is automatically installed on the connected PC.
1. Slide the Power key to ON position.
Your device powers on and automatically connects to the Internet.
2. Power on the PC to which you will be connecting.
3. Insert the small end of the supplied micro USB cable into your mobile broadband device's micro
USB port.
Connect with Micro USB Cable (Windows) 45
4. Insert the other end of the micro USB cable into an available external USB port on the PC.
The PC should recognize the mobile broadband device within a few seconds.
The device driver will automatically be installed on the connected PC.
Device Removal – Windows PC USB Connection
Follow the instructions below to remove the direct USB connection between your mobile broadband
device and your Windows PC.
Windows 8 and Windows 7 Device Removal
1. On the PC, exit the device's Web UI.
2. Remove the micro USB cable from the PC's USB port.
Windows Vista Device Removal
To remove the direct USB connection on a PC running Windows Vista, use the Safely Remove Hardware
feature to stop the connection before removing it.

Connect with Micro USB Cable (Windows) 46
1. On the PC, double-click in the task tray.
The Safely Remove Hardware window appears.
2. Click USB Mass Storage Device > Stop.
[illustration]
The Stop a Hardware Device window appears.
If multiple USB devices are connected to the PC, make sure to select the correct device to
remove.
3. Click OK.
[illustration]
Confirm that the mobile broadband device can be safely removed from the PC.
4. Once you see confirmation that the device can be removed safely, remove the micro USB cable
from the PC's USB port.
[illustration]
Removal is complete.
Cautions for Removing the Mobile Broadband Device
Standby/Hibernation: The mobile broadband device may malfunction if the PC enters standby
(suspend/resume) or hibernation while connected. Be sure to remove the USB connection before
leaving a PC unattended. The device may also malfunction if it is connected before the PC starts or
restarts. Remove the USB connection before starting or restarting the PC.
Web UI: Always exit the Web UI before removing the mobile broadband device USB connection. Do
not remove the connection while any transmissions are active.
Software Installation – Windows PC USB
Connection
When connecting for the first time, the device driver is designed to install automatically on the connected
PC. If there are issues with the installation due to your PC's configuration, you can manually install or
uninstall the device driver software.
Cautions for Device Driver Installation
Removal of Mobile Broadband Device: Do not remove the mobile broadband device during
installation. Improper removal may cause installation failure, system malfunction, or other system
errors.
Connect with Micro USB Cable (Windows) 47
Administrator Privileges: To install the device drivers manually, you may be required to log into an
account with administrator privileges.
Manual Device Driver Installation
Note: Screenshots and operations are based on a Windows 8 PC.
1. Power on and connect your PC and your mobile broadband device using the supplied micro USB
cable. See Device Recognition – Windows PC USB Connection.
2. On the PC desktop, activate Windows Explorer.
3. Select Computer.
For Windows 7 or Windows Vista PCs, click Start menu > Computer.
4. Double-click [xxxxx].
[illustration]
The User Account Control dialog box appears.
5. Click Yes.
For Windows Vista PCs, click Continue.
The device driver installation is complete.
Uninstall the Device Driver Software
If you need to uninstall the device driver software for any reason, you can do so from your PC.
1. On the PC desktop, activate Windows Explorer.
2. Select Computer > Uninstall or change a program.
[illustration]
For Windows 7 or Windows Vista PCs, click Start menu > Control Panel > Uninstall a
program.
3. From the installed programs list, select [xxxxx] > Uninstall/Change.
[illustration]
The device driver software will be uninstalled.

Settings 48
Connect with Micro USB Cable
(Mac)
The following topics describe how to share your device's Internet connection with a Mac computer using a
direct USB connection.
Device Recognition and Removal – Mac
USB Connection
The following topics detail the device recognition and device removal processes when using a direct USB
connection between your mobile broadband device and a Windows PC.
Device Recognition – Mac USB Connection
When you connect your device directly to a Mac computer using the supplied micro USB cable, the
device driver is automatically installed on the connected computer.
1. Slide the Power key to ON position.
Your device's Wi-Fi function activates and automatically connects to the Internet.
2. Power on the Mac computer to which you will be connecting.
3. Insert the small end of the supplied micro USB cable into your mobile broadband device's .micro
USB port.
Settings 49
4. Insert the other end of the micro USB cable into an available external USB port on the Mac.
The Mac should recognize the mobile broadband device within a few seconds.
Once recognized, appears on the desktop.
When connecting the first time, you will see a message "A new network interface has been
detected." See Software Installation – Mac USB Connection for further instructions.
Device Removal – Mac USB Connection
Follow the instructions below to remove the direct USB connection between your mobile broadband
device and your Mac computer. The mobile broadband device's internal files may be damaged by
improper removal.
1. On the Mac, click .
The Finder appears.

Settings 50
2. Click for the Web UI.
[illustration]
If a memory card is installed, first click for Memory Card.
3. Remove the micro USB cable from the Mac's USB port.
[illustration]
Removal is complete.
Cautions for Removing the Mobile Broadband Device
Sleep Mode: The mobile broadband device may malfunction if the Mac enters sleep mode while
connected. Be sure to remove the USB connection before leaving a Mac unattended. The device may
also malfunction if it is connected before the Mac starts or restarts. Remove the USB connection
before starting or restarting the Mac.
Web UI: Always exit the Web UI before removing the mobile broadband device USB connection. Do
not remove the connection while any transmissions are active.
Network Setup – Mac USB Connection
When connecting for the first time, your Mac computer will detect the mobile broadband device and
prompt you to set up the device in Network Preferences. The message "A new network interface has
been detected" will appear.
Note: Screenshots and operations are based on Mac OS 10.xx. Screens and messages may differ
depending on which OS your computer is running.
Set Up the Network
1. Power on your Mac computer and your mobile broadband device.
2. Connect the mobile broadband device to the Mac using the supplied micro USB cable.
[xxxxx] icon appears on the desktop, and the [xxxxx] folder automatically opens.
3. Double-click [xxxxx].
[illustration]
4. Enter the Mac name (user name) and Password, and click OK.
[illustration]
When complete, the [xxxxx] icon and [xxxxx] folder are removed from the computer desktop.

Settings 51
Settings
The following topics provide an overview of items you can change using your device's Settings menus,
accessed primarily through the Web UI.
Web UI Overview
Use the device Web UI in a browser to check or change your mobile broadband device settings from a
device connected either via Wi-Fi or by direct USB connection.
Launch the Web UI
1. Make sure the connection between your device and the client is correct.
2. Launch the Internet browser and enter http://192.168.43.1 or http://m.home in the address bar.
The login page appears as follows. The following figure is only for your reference.
Web UI Window
Explore the options available through the device's Web UI window.
1. Connect your mobile broadband device to an external device via a Wi-Fi connection or a direct
USB connection.
2. Launch a browser and access the Web UI via [xxxxx].
The Web UI launches and displays the main window.
Item
Description
xxxxx
Xxxxx
xxxxx
Xxxxx

Settings 52
Item
Description
xxxxx
Xxxxx
xxxxx
Xxxxx
xxxxx
Xxxxx

Appendix 53
Appendix
Troubleshooting
Check the questions and answers below for troubleshooting solutions for common device issues.
Check Here First
Question: Unable to connect via Wi-Fi (WLAN)
Answer 1: Check whether the mobile broadband device is properly connected to the computer or
other external device.
Answer 2: If a WPS (Wi-Fi Protected Setup) connection fails, see the Wi-Fi device user guide. If
you're still unable to connect, set up the mobile broadband device Wi-Fi connection manually. See
[xxxxx].
Answer 3: To connect a WPS Pin-specified Wi-Fi device, check whether the correct PIN has been
used. For details, see [xxxxx].
Answer 4: If OPEN WEP is the security method being used, check whether the correct WEP key is
entered. If the WEP key is unknown, see [xxxxx] to reset the WEP key and reconnect the device.
Answer 5: Check whether the correct WPA key is set. If the WPA key is unknown, see [xxxxx] to rset
the mobile broadband device or see the WLAN Initialization Sticker to reset the WPA key, and then
reconnect the device. WPA/WPA2 security may not be supported depending on the Wi-Fi device. See
the Wi-Fi device user guide for information.
Question: Computer does not recognize the mobile broadband device.
Answer 1: Check whether the mobile broadband device is properly connected to the computer or
other external device.
Answer 2: Remove the mobile broadband device from the PC, restart the PC, and then reconnect the
mobile broadband device.
Answer 3: For Windows 8, follow these steps to confirm proper the mobile broadband device
installation.
Open desktop window > Explorer > right-click Computer > Properties > System Properties >
Hardware > Device Manager, and then check that [xxxxx] is shown.
Answer 4: For Windows 7 and Windows Vista, follow these steps to check that the mobile broadband
device is properly connected.
Right-click Computer > Properties > Advanced system settings > User Account Control >
System Properties > Hardware > Device Manager, and then check that [xxxxx] is shown.
Appendix 54
Question: Driver is not automatically installed when the mobile broadband device is connected to the PC
(Windows PC only).
Answer 1: Wait several seconds for installation to begin after the system recognizes any new
hardware. If the installer does not automatically activate even after a period of time, remove the
mobile broadband device from the PC and reconnect it.
Answer 2: Install driver manually. See Software Installation – Windows PC USB Connection for how
to install.
Question: Internet connection fails.
Answer 1: Make sure that you are within the service area.
Answer 2: If signal reception is poor, move to where signal reception is good and then reconnect.
Answer 3: The access point might be busy depending on the time of day. Wait a little and then
reconnect.
Answer 4: Activate the Web UI and make sure that network settings are correct.
Question: Transmission fails quickly.
Answer 1: Make sure that the mobile broadband device is properly connected to PC or other device
via Wi-Fi or micro USB cable. If connected via micro USB cable, disconnect from both the mobile
broadband device and the PC or other device and reconnect.
Answer 2: Signal reception might be poor. Check transmission where signal reception is good.
Answer 3: Restart the mobile broadband device.
Answer 4: Check the mobile broadband device battery level. If battery level is low, charge with AC
charger or with PC via micro USB cable. See Charge the Battery for how to charge.
Question: Transmissions are slow.
Answer 1: Signal reception might be poor. Check transmission where signal reception is good.
Answer 2: Connection might be poor. Try again after a while.
Question: Forgot PIN / Unknown PIN Unblocking Key (PUK) / USIM card is locked.
Answer: Contact Customer Service.
Question: USIM card is not recognized.
Answer 1: Check whether the USIM card is properly installed. For details, see "XXXXX."
Answer 2: Check the USIM card for damage.
Answer 3: Check the USIM card IC chip for scratches/corrosion.
Answer 4: Dirty USIM card (particularly IC chip) may prevent recognition. Clean gently with a soft
cloth.

Appendix 55
Answer 5: Contact Customer Service.
Question: Unsure if logged on as an Administrator.
Answer 1: For Windows 8, follow these steps to check.
Move the pointer into the upper-right or lower-right corner and then click or tap charm >
Control Panel. Click Change your account type in User Accounts, and then check that the
type of account currently logged on to is "Administrator".
Answer 2: For Windows 7, check by following these steps.
Click Start menu > Control Panel > User Account and Family Safety > User Account,
and then check that the type of account currently logged on to is "Administrator".
Question: "Out of service area" indication appears when outside Japan.
Answer: Power off and restart the device.
Question: How do I return the mobile broadband device to the default settings (reset)?
Answer 1: Use the device Reset key.
Answer 2: Use the Web UI to reset the device. For details, see [xxxxx].
Question: An old phone number appears on the Web UI.
Answer: The Web UI may display an old phone number depending on subscription terms or
cancellation method.
Question: The mobile broadband device operation is unstable.
Answer 1: Avoid extremely high/low temperatures, high humidity, direct sunlight, dusty areas, etc.
Read "Safety Precautions" for use in a proper environment.
Answer 2: Avoid invalid software. Operation is unguaranteed for Internet connection, etc., using
other-party software.
Question: The connection suddenly failed.
Answer 1: The connection method may have been changed. Check connection mode on the mobile
broadband device display.
Answer 2: Restart the mobile broadband device.
Specifications
The following tables list the specifications for the mobile broadband device, the AC charger, the micro
USB cable, and the materials.

Appendix 56
Mobile Broadband Device Specifications
Item Description
Model Name MF975S
Dimensions
1
116.3 x 62.1mm x 13.9mm
Weight 149.7g
Interface LCD
Power Consumption 4.5W
Operating Environment -10℃ ~ 60℃
Frequency 1.2G
Compatible Networks WAN: 4G (FDD-LTE/TDD -LTE), 3G ( CDMA)
WLAN: IEEE802.11a/b/g/n/ac
Charging Time
2
AC charging 200 minutes, USB charging 380 minutes
Continuous Standby Time
3
450 hours
Continuous Communication Time
3
[xxxxx]
Communication Speed [xxxxx]
1 Approximate values
2 Varies by ambient temperature, battery usage, etc.
3 Varies by environment, signal conditions, etc.
AC Charger Specifications
Item Description
Model Name STC-A51A-Z
Weight 30g
Rated Voltage DC 5 V ± 5 %
Rated Current 1.0 A - 1.2 A
Appendix 57
Item
Description
Input Voltage
100 V - 240 V, 50 Hz - 60 Hz
Micro USB Cable Specifications
Item
Description
Model Name
USB-MU5-B-120-H (ZEDAD1)
Cable Length
1200mm
Plug Type
Standard-A, micro-B
Charging Temperature
0℃ ~ 55℃
Materials Specifications
Parts
Materials/Finishing
MF975S Front Cover
PC+SUS304
MF975S Back Cover
PC+GF+SUS304
MF975S Battery Cover
PC
MF975S USIM Tray
PC+Powder Metallurgy
MF975S LCD Support Frame
PC
MF975S Power Key
PC
MF975S Lock Key
PC+TPU
Warranty and Service [describe per carrier]
The following topics outline your device's warranty and service information.
Warranty
Your device purchase includes Warranty.
■
Appendix 58
■
■ Check warranty period in the Warranty.
Services
Before submitting your device for repairs, contact Customer Service or General Information; be prepared
■ During the warranty period, repairs will be made under the terms and conditions described in the
■ After the warranty period, repairs will be upon request; if said repairs can be made, you will be
charged for them.
Safety and Notices 59
Safety and Notices
The following topics address important safety precautions, general notes, and required RF exposure
information for your mobile broadband device.
Safety Precautions [describe per carrier]
The following topics outline important safety precautions that must be observed when using your mobile
broadband device.
Labels and Symbols [describe per carrier]
[xxxxx]
[xxxxx] [describe per carrier]
[xxxxx]: [xxxxxxxx]
[xxxxx]: [xxxxxxxx]
[xxxxx]: [xxxxxxxx]
[xxxxx]: [xxxxxxxx]
[xxxxx]: [xxxxxxxx]
Safety and Notices 60
[xxxxx]: [xxxxxxxx]
[xxxxx]: [xxxxxxxx]
[xxxxx]: [xxxxxxxx]
[xxxxx]: [xxxxxxxx]
[xxxxx]: [xxxxxxxx]
[xxxxx]: [xxxxxxxx]
[xxxxx]: [xxxxxxxx]
Safety and Notices 61
[xxxxx]: [xxxxxxxx]
Mobile Broadband Device [describe per carrier]
[xxxxx]
[xxxxx]: [xxxxxxxx]
[xxxxx]: [xxxxxxxx]
[xxxxx]: [xxxxxxxx]
[xxxxx]: [xxxxxxxx]
[xxxxx]: [xxxxxxxx]

Safety and Notices 62
[xxxxx]: [xxxxxxxx]
[xxxxx]: [xxxxxxxx]
[xxxxx]: [xxxxxxxx]
[xxxxx]: [xxxxxxxx]
[xxxxx]: [xxxxxxxx]
[xxxxx]: [xxxxxxxx]
[xxxxx]: [xxxxxxxx]
Safety and Notices 63
[xxxxx]: [xxxxxxxx]
[xxxxx]: [xxxxxxxx]
USIM Card and Memory Card [describe per carrier]
[xxxxx]
[xxxxx]: [xxxxxxxx]
[xxxxx]: [xxxxxxxx]
[xxxxx]: [xxxxxxxx]
[xxxxx]: [xxxxxxxx]
[xxxxx]: [xxxxxxxx]
Safety and Notices 64
AC Charger and Micro USB Cable [describe per
carrier]
[xxxxx]
[xxxxx]: [xxxxxxxx]
[xxxxx]: [xxxxxxxx]
[xxxxx]: [xxxxxxxx]
[xxxxx]: [xxxxxxxx]
[xxxxx]: [xxxxxxxx]
[xxxxx]: [xxxxxxxx]
[xxxxx]: [xxxxxxxx]
Safety and Notices 65
[xxxxx]: [xxxxxxxx]
[xxxxx]: [xxxxxxxx]
[xxxxx]: [xxxxxxxx]
[xxxxx]: [xxxxxxxx]
[xxxxx]: [xxxxxxxx]
Mobile Broadband Device Use and Electronic Medical
Equipment [describe per carrier]
[xxxxx]

Safety and Notices 66
[xxxxx]: [xxxxxxxx]
[xxxxx]: [xxxxxxxx]
[xxxxx]: [xxxxxxxx]
[xxxxx]: [xxxxxxxx]
General Notes [describe per carrier]
The following topics outline general usage and handling instructions for your mobile broadband device.
General Use [describe per carrier]
[xxxxx]
● [xxxxx]
● [xxxxx]
● [xxxxx]
● [xxxxx]
● [xxxxx]
● [xxxxx]
● [xxxxx]
Handling the Device [describe per carrier]
[xxxxx]
Safety and Notices 67
● [xxxxx]
● [xxxxx]
● [xxxxx]
● [xxxxx]
Wi-Fi (Wireless LAN) [describe per carrier]
[xxxxx]
● [xxxxx]
● [xxxxx]
● [xxxxx]
● [xxxxx]
● [xxxxx]
● [xxxxx]
● [xxxxx]
RF Exposure Information and Specific
Absorption Rate (SAR) Information
[describe per carrier]
The following topics detail the specific absorption rate (SAR) information, electromagnetic safety
information, and radiofrequency (RF) exposure information for you mobile broadband device.
Specific Absorption Rate (SAR) Information for this
Product [describe per carrier]
[xxxxx]
Electromagnetic Safety Information [describe per
carrier]
[xxxxx]
Safety and Notices 68
European RF Exposure Information [describe per
carrier]
[xxxxx]

Index 69
Index
Android Device
Connect Wi-Fi, 38
Battery
Charge, 19
Install, 14
Remove, 16
Customer Service, 76
Data Transfer Speed, 12
Device Driver Installation
Windows PC, 64
Device Layout (illustration), 5
Drag, 11
Electromagnetic Safety, 85
Enter Text, 11
Flick, 10
Home Screen, 6
iPad
Connect Wi-Fi, 35
iPhone
Connect Wi-Fi, 32
iPod Touch
Connect Wi-Fi, 32
Mac
Network setup, 68
Remove USB connection, 67
USB connection, 66
Network Name, 3
Nintendo 3DS LL / 3DS
Connect Wi-Fi, 41
Nintendo DS
Connect Wi-Fi, 49
Nintendo DSi LL / DSi
Connect Wi-Fi, 45
Operating Environment, 1
Package Contents, 3
PlayStation 4
Connect Wi-Fi, 60
PlayStation Vita
Connect Wi-Fi, 53
Power Key, 6
Power Off, 21
Power On, 21
PSP
Connect Wi-Fi, 55
RF Exposure Information, 86
Safety Precautions, 77
Security Key, 3, 17
Services, 75
Settings, 69
SIM Card, 12
Insert, 13
Remove, 14
Sleep Mode, 9
SoftBank Wi-Fi Spot, 22
Specific Absorption Rate (SAR), 85
Specifications
AC charger, 74
Materials, 75
Micro USB cable, 75
Mobile broadband device, 74
SSID, 3, 17
Status Bar Icons, 7
Swipe, 10
Tap, 9
Text Entry, 11
Touch, 9
Touch Menu Icons, 8
Touchscreen, 9
Transfer Speed, 12
Troubleshooting, 71
Turn Device Off, 21
Turn Device On, 21
USB Connection
Mac, 66
Remove Mac, 67
Remove Windows PC, 63
Windows, 62
USIM Card, 12
Insert, 13
Remove, 14
Warranty, 75
Web UI
Overview, 69
Window, 69
Wi-Fi
Activate, 23
Connect Windows Vista, 28
Overview, 23
Index 70
Wi-Fi Network Name, 3
Wii
Connect Wi-Fi, 53
Wii U
Connect Wi-Fi, 53
Windows PC
Remove USB connection, 63
Software Installation, 64
USB connection, 62
Windows Vista
Connect Wi-Fi, 28
WLAN
Activate, 23
Overview, 23
WPS
Connect Wi-Fi, 60
FCC Regulations:
This device complies with part 15 of the FCC Rules. Operation is subject to the
following two conditions: (1) This device may not cause harmful interference, and (2)
This device must accept any interference received, including interference that may
cause undesired operation.
This device has been tested and found to comply with the limits for a Class B digital
device, pursuant to Part 15 of the FCC Rules. These limits are designed to provide
reasonable protection against harmful interference in a residential installation. This
equipment generates, uses and can radiated radio frequency energy and, if not
installed and used in accordance with the instructions, may cause harmful
interference to radio communications. However, there is no guarantee that
interference will not occur in a particular installation If this equipment does cause
harmful interference to radio or television reception, which can be determined by
turning the equipment off and on, the user is encouraged to try to correct the
interference by one or more of the following measures:
-Reorient or relocate the receiving antenna.
-Increase the separation between the equipment and receiver.
-Connect the equipment into an outlet on a circuit different from that to which the
receiver is connected.
-Consult the dealer or an experienced radio/TV technician for help.
Caution:
Changes or modifications not expressly approved by the party responsible for
compliance could void the user‘s authority to operate the equipment.
FCC RF Exposure Information (SAR)
This device is designed and manufactured not to exceed the emission limits for
exposure to radio frequency (RF) energy set by the Federal Communications
Commission of the United States.
During SAR testing, this device is set to transmit at its highest certified power level in
all tested frequency bands, and placed in positions that simulate RF exposure in
usage near the body with the separation of 10 mm. Although the SAR is determined at
the highest certified power level, the actual SAR level of the while operating can be
well below the maximum value. This is because the device is designed to operate at
multiple power levels so as to use only the power required to reach the network. In
general, the closer you are to a wireless base station antenna, the lower the power
output.
The exposure standard for wireless employs a unit of measurement known as the
Specific Absorption Rate, or SAR. The SAR limit set by the FCC is 1.6W/kg.
The FCC has granted an Equipment Authorization for this model device with all
reported SAR levels evaluated as in compliance with the FCC RF exposure
guidelines. SAR information on this model device is on file with the FCC and can be
found under the Display Grant section of www.fcc.gov/oet/ea/fccid after searching
on FCC ID: SRQ-ZTEMF975S.
For this device, the highest reported SAR value for near the body is 1.36 W/kg.
While there may be differences between the SAR levels of various devices and at
various positions, they all meet the government requirement.
SAR compliance for body operation is based on a separation distance of 10 mm
between the unit and the human body. Carry this device, at least 10 mm away from
your body to ensure RF exposure level compliant or lower to the reported level. To
support body operation, choose the belt clips or holsters, which do not contain
metallic components, to maintain a separation of 10 mm between this and your body.