ZTE ZTEMY39 CDMA 1X-EVDO Wireless Card User Manual ZTE CORPORATION
ZTE Corporation CDMA 1X-EVDO Wireless Card ZTE CORPORATION
ZTE >
users manual

内部公开▲
ZTE CORPORATION
ZTE MY39
CDMA 1X-EVDO Wireless Data Card
User Manual
Retransmission and reproduction in any manner whatsoever without the permission of ZTE is strictly forbidden. All rights reserved.
内部公开▲
Copyright © 2005 by ZTE Corporation
All rights reserved.
No part of this publication may be excerpted, reproduced, translated or utilized in any
form or by any means, electronic or mechanical, including photocopying and microfilm,
without the prior written authorization of ZTE Corporation.
ZTE Corporation reserves the right to make modifications on print errors or update
specifications in this manual without notice.
Edition: 1
st edition, July, 2005
10 9 8 7 6 5 4 3 2 1
Retransmission and reproduction in any manner whatsoever without the permission of ZTE is strictly forbidden. All rights reserved.

内部公开▲
Contents
1 Welcome............................................................................................................................. 1
1.1 Introduction............................................................................................................ 1
1.2 Warning and Notice.............................................................................................. 1
1.3 Software Drivers License................................................................................... 2
1.4 System requirements........................................................................................... 3
1.5 Specification .......................................................................................................... 3
2 Installation......................................................................................................................... 4
2.1 Package Checking................................................................................................ 4
2.2 Outline and Part Introduction........................................................................... 4
2.3 Software Installation........................................................................................... 4
2.4 Hardware Installation.......................................................................................... 8
2.5 Safe removal of Hardware ................................................................................. 9
2.6 Getting started .................................................................................................... 10
2.7 Software Uninstallation.....................................................................................11
3 Functions & Operation..................................................................................................11
3.1 Interface introduction ........................................................................................11
3.1.1 Main Interface............................................................................................11
3.1.2 Description of Mini Icons........................................................................11
3.2 Connecting to Internet...................................................................................... 12
3.3 History.................................................................................................................... 13
3.4 Messages............................................................................................................... 13
3.4.1 Creating new message........................................................................... 14
3.4.2 Viewing Received Messages and Sent Messages......................... 14
3.4.3 Setting ......................................................................................................... 15
3.5 Contact................................................................................................................... 15
3.6 Setting.................................................................................................................... 16
3.6.1 Security Settings...................................................................................... 17
3.6.2 Networks..................................................................................................... 17
3.6.3 Ring tone..................................................................................................... 18
3.6.4 Default set.................................................................................................. 18
3.7 Help ......................................................................................................................... 18
4 FAQ & Answers .............................................................................................................. 19
Retransmission and reproduction in any manner whatsoever without the permission of ZTE is strictly forbidden. All rights reserved.

内部公开▲
1 Welcome
1.1 Introduction
Congratulations on purchasing ZTE MY39 Wireless PC Card!
ZTE MY39 is a type of hybrid mode wireless netcard, which is suitable for using under
CDMA1X-EVDO network. It fits into the PCMCIA card slot of most windows based laptop
computers. It allows you to send and receive SMS (Short Messages Service), connects to
internet and has an address book.
The manual will provide information needed to get started and effectively use your new
ZTE MY39.
1.2 Warning and Notice
Before using the ZTE MY39, you must review the Safety Information outlined in this
document.
General instructions
z Do not operate the wireless card in an area where prohibited by the law. Follow any special
rules and regulations and obey all signs and notices. Always turn off the host device and
remove the wireless card from the card slot when instructed to do so, or when you suspect
that it may cause interference or danger.
z Please use original accessories or accessories that are authorized by ZTE. Using any
unauthorized accessories may affect your wireless card’s performance, and violate related
national regulations about telecom terminals.
z Do not operate your wireless card in any area where a potentially explosive atmosphere
may exist. Sparks in such areas could cause an explosion or fire resulting in bodily injury or
even death. Be aware and comply with all signs and instructions.
z Users are advised not to operate the wireless card while at a refueling point or service
station. Users are reminded to observe restrictions on the use of radio equipment in fuel
depots (fuel storage and distribution areas), chemical plants or where blasting operations
are in progress. Areas with a potentially explosive atmosphere are often but not always
clearly marked. Potential locations can include gas stations, below deck on boats, chemical
transfer or storage facilities, vehicles using liquefied petroleum gas (such as propane or
butane), areas where the air contains chemicals or particles, such as grain, dust or metal
powders, and any other area where you would normally be advised to turn off your vehicle
engine.
Hospital safety
z Do not operate your wireless card in any area where medical equipment, life support
equipment, or near any equipment that may be susceptible to any form of radio
interference. In such areas, the host communications device must be turned off. The
Retransmission and reproduction in any manner whatsoever without the permission of ZTE is strictly forbidden. All rights reserved.
1

内部公开▲
wireless card may transmit signals that could interfere with this equipment.
Aircraft safety
z On an aircraft, either on the ground or airborne, in addition to FAA requirements, many
airline regulations state that you must suspend wireless operations before boarding an
airplane. Please ensure that the host device is turned off and your wireless card is removed
from the card slot prior to boarding aircraft in order to comply with these regulations. The
wireless card can transmit signals that could interfere with various onboard systems and
controls.
Road safety
z The driver or operator of any vehicle should not operate a wireless data device while in
control of a vehicle. Doing so will detract from the driver or operator's control and operation
of that vehicle. In some countries, operating such communications devices while in control
of a vehicle is an offence.
Caring for your ZTE MY39
z When not in use, fold the antenna down and store in a compartment where the card can be
protected from being crushed or broken.
z Do not apply adhesive labels to the wireless card. This may cause the card to jam inside
the PC Card slot of your notebook PC.
z The antenna extends freely, do not forcefully hyper-extend the antenna. This may cause it
to break.
z The wireless card should easily fit into the PC Card slot. Forcing the wireless card into the
PC Card slot may cause considerable damage.
z Your wireless card should be stored in a dry and clean place (Storage temperature: - 30° to
65°C [86° to 149°F]). Protect your card from liquids, dust and excessive heat.
Declaration of Conformity
z FCC: This device complies with Part 22 and Part 24 of the FCC Rules.
z SAR: This device meets government requirements for exposure to radio waves. Your
device is a radio transmitter and receiver. It is designed and manufactured not to exceed
limits for exposure to radio frequency (RF) energy. These limits are part of comprehensive
guidelines and establish permitted levels of RF energy for the population. The guidelines
were developed and confirmed by independent scientific organizations through periodic
and thorough evaluation of scientific studies. The limits include a substantial safety margin
designed to assure the safety of all persons, regardless of age and health. The exposure
standard for device employs a unit of measurement known as the Specific Absorption Rate,
or SAR. Under the guidelines for your device, the SAR limit is 1.6 W/kg .The highest tested
SAR values for this device compliance against FCC standard limit is less than 1.6 W/kg.
1.3 Software Drivers License
Proprietary Rights Provisions:
The software drivers provided with this product are copyrighted by ZTE Corporation. And
Retransmission and reproduction in any manner whatsoever without the permission of ZTE is strictly forbidden. All rights reserved.
2
内部公开▲
although copyrighted, the software drivers are unpublished and embody valuable trade secrets
proprietary to ZTE Corporation. The disassembly, Reverse Engineering of the software drivers
for any purpose is strictly prohibited by law. The copying of the software drivers, except for a
reasonable number of back-up copies, is strictly prohibited by international law. It is forbidden
by international law to provide access to the software drivers to any person for any purpose
other than processing the internal data for the intended use of the software drivers.
1.4 System requirements
Operating System: Windows 2000 / XP
CPU: Pentium 200MHz or above
Hard Disk: 5GByte or above(15MB free disc space for installation at least)
RAM: 64MByte or above
The performance of the card may be influenced if configuration under recommended
requirement.
1.5 Specification
Networks CDMA 800MHz CDMA 1900MHz
Dimension 118×54×5mm
Weight Less than 54g
Data Rate 2.4Mbps
Working
Voltage
3.3V(Using the laptop computer power supply)
Current Loss Sleep:30mA Max:800mA
Max
Emission
Power
27dbm
Retransmission and reproduction in any manner whatsoever without the permission of ZTE is strictly forbidden. All rights reserved.
3
内部公开▲
2 Installation
2.1 Package Checking
Double-check that the following items are included in the kit when you unpack it:
A ZTE MY39 Wireless NetCard.
An antenna
The Installation CD that contains the software & User Manual
User’s Quick Guide Brochure
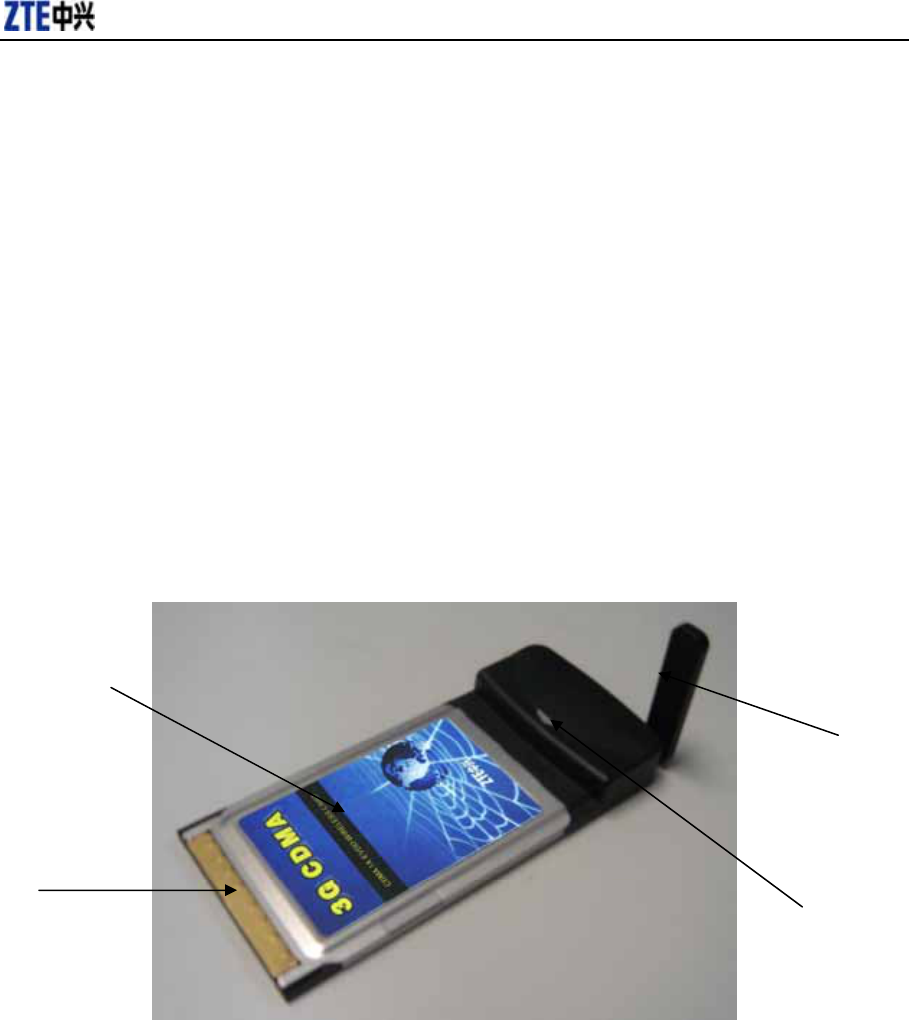
2.2 Outline and Part Introduction
Review the illustration below to familiarize yourself with the key components of the ZTE MY39.
Netcard
Antenna
Service LED
PCMCIA
interface
connector
68 pin
Netcard: This is the device provides wireless data solutions when plugged into a laptop.
Computer Interface Connector: Connects to your laptop via the computer PCMCIA slot.
Service LED: visual indicator that shows you service and data mode.
Indicator Light Status:
Green/Lighting: Netcard inserted to card slot and power on.
Green/Blink: Connecting to network.
2.3 Software Installation
Turn on your laptop, and insert the CD-ROM into your CD drive.
Retransmission and reproduction in any manner whatsoever without the permission of ZTE is strictly forbidden. All rights reserved.
4
内部公开▲
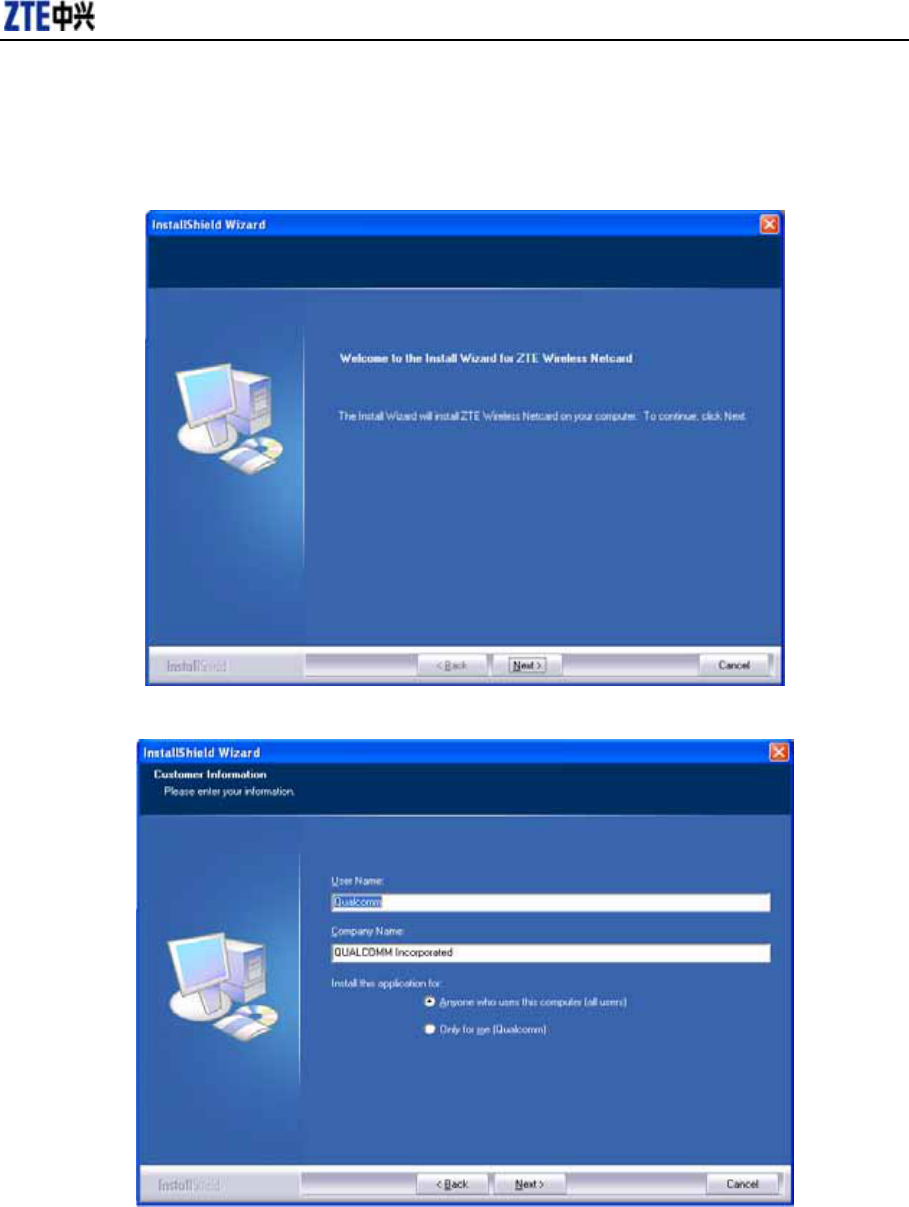
1. Double-click the installation setup program “setup.exe” in the CD. Click the “Next” button to
continue with the installation process.
2. Fill into the user information, and click the “Next” button to continue.
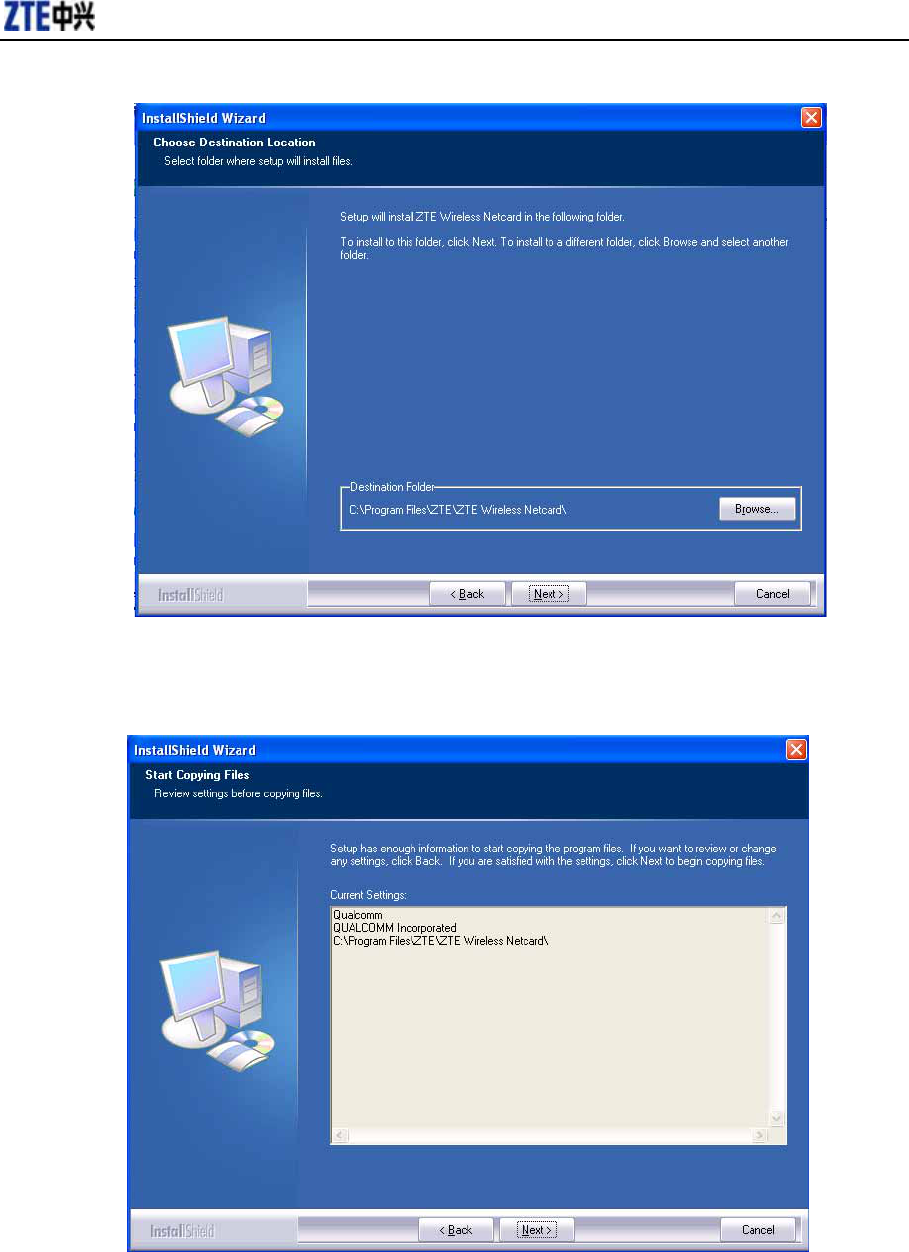
3. You are now ready to select the location on your laptop where the software should be installed,
and Click the “Next” button to continue.
Retransmission and reproduction in any manner whatsoever without the permission of ZTE is strictly forbidden. All rights reserved.
5
内部公开▲
4. Confirm the installation information. Click the “Next” button to continue. Click the “Cancel” button
to exit.
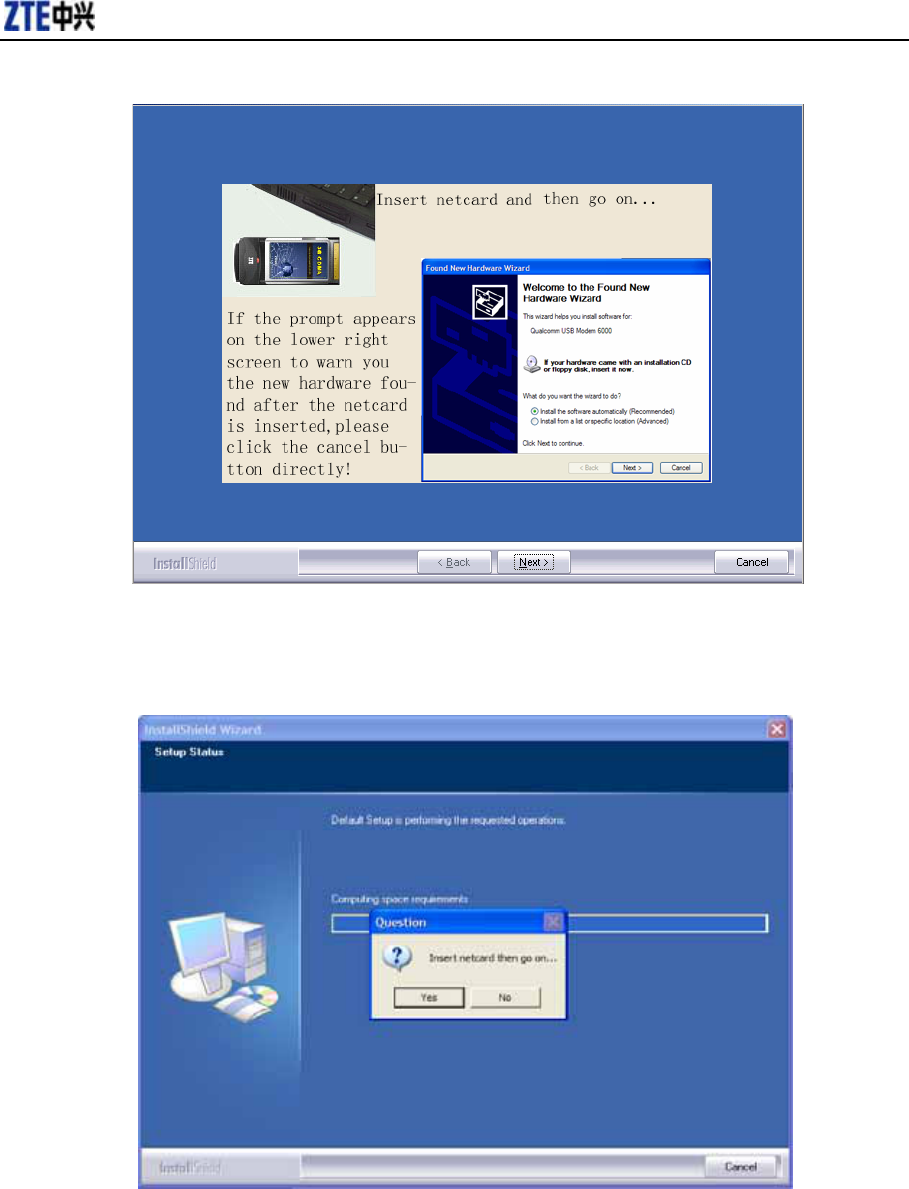
5. The software will now detect whether you have inserted your netcard. Insert the netcard and the
prompt appears on the lower right side of the screen, click the cancel button directly. Click “Next”
button on the main interface to continue.
Retransmission and reproduction in any manner whatsoever without the permission of ZTE is strictly forbidden. All rights reserved.
6
内部公开▲
6. If you have not inserted the netcard, “Insert the Netcard then go on” appears. Click “No” button to
exit installation directly. Otherwise, insert the netcard and click “Yes” button to continue.
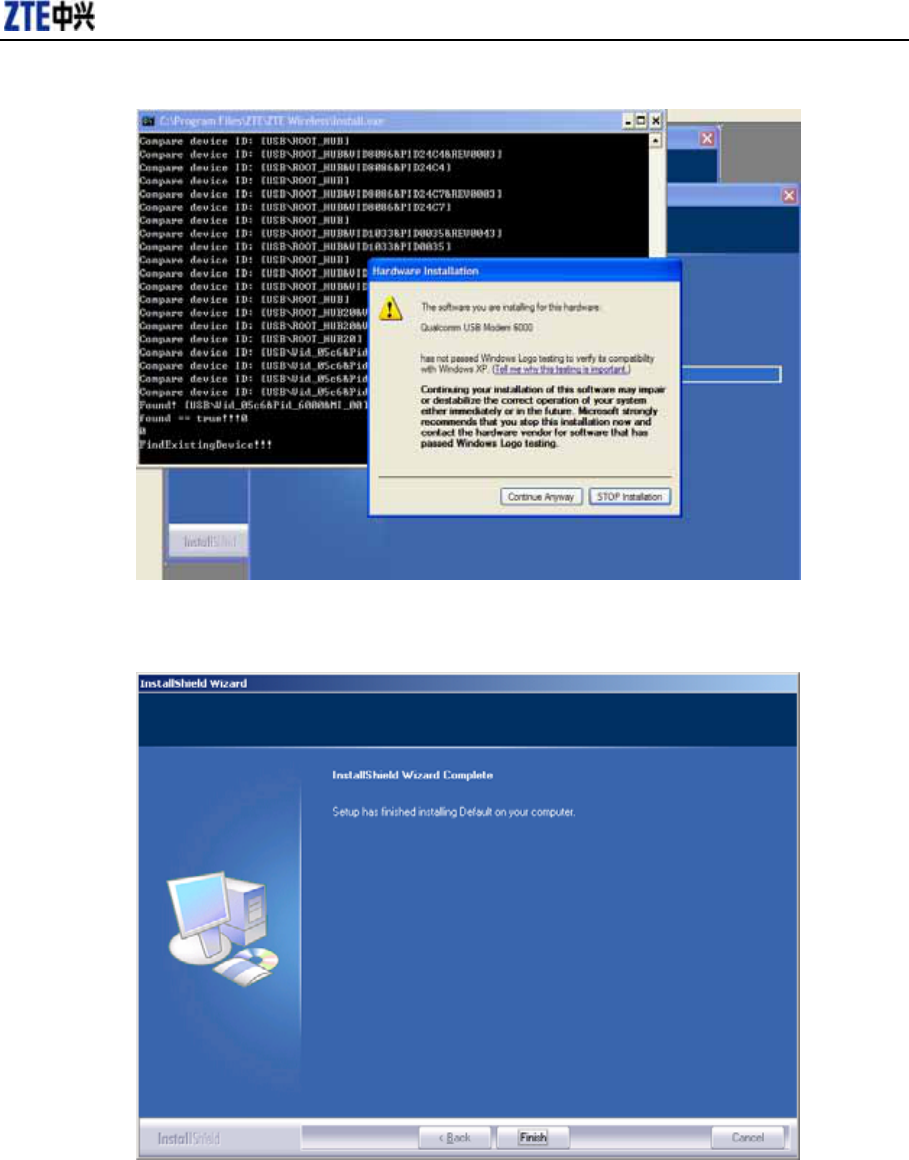
7. Select "Continue Anyway" and then click “Yes” to continue.
Retransmission and reproduction in any manner whatsoever without the permission of ZTE is strictly forbidden. All rights reserved.
7
内部公开▲
8. Installation is now complete. Click the “Finish” button to finish the installation of ZTE MY39
wireless card.
2.4 Hardware Installation
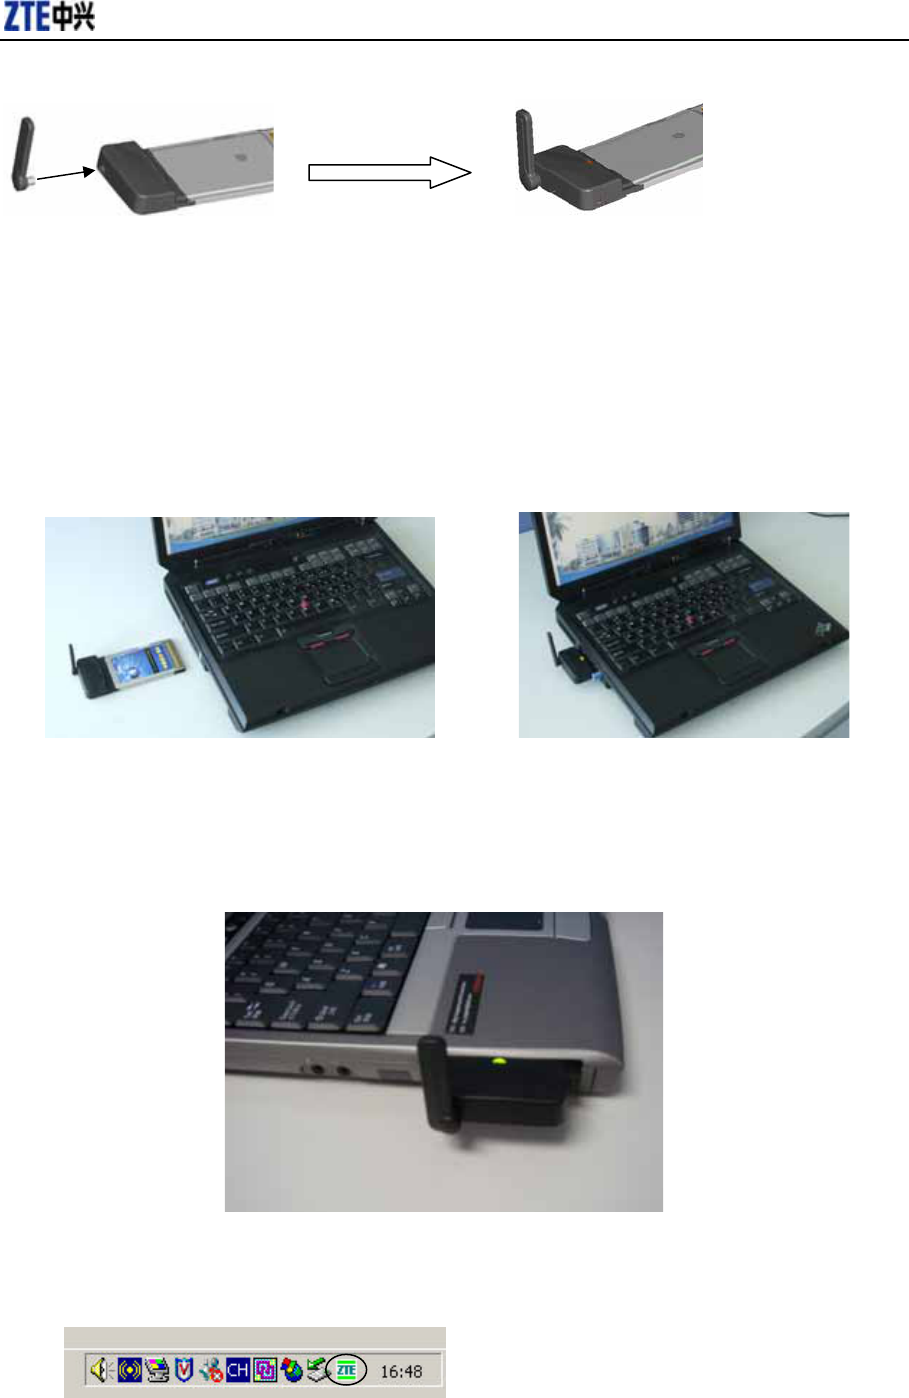
1. Install the antenna to the netcard main board.
Retransmission and reproduction in any manner whatsoever without the permission of ZTE is strictly forbidden. All rights reserved.
8
内部公开▲
2. Insert the ZTE MY39 into your laptop’s PC Card Slot with the label facing up. Adjust the
antenna to horizontal level when the netcard is not in use. Rotate the antenna to 90° angle to
ensure it can get the best intensity of the receiving signal.
3. Once you have inserted the card properly, your Windows operating system will notify
that new hardware has been detected.
4. Insert the netcard into the laptop’s card slot, if it works normally, the LED will light after 5s or
6s. If the LED does not light, it indicates that the laptop does not insert properly or there exists
some malfunction with the netcard or laptop.
2.5 Safe removal of Hardware
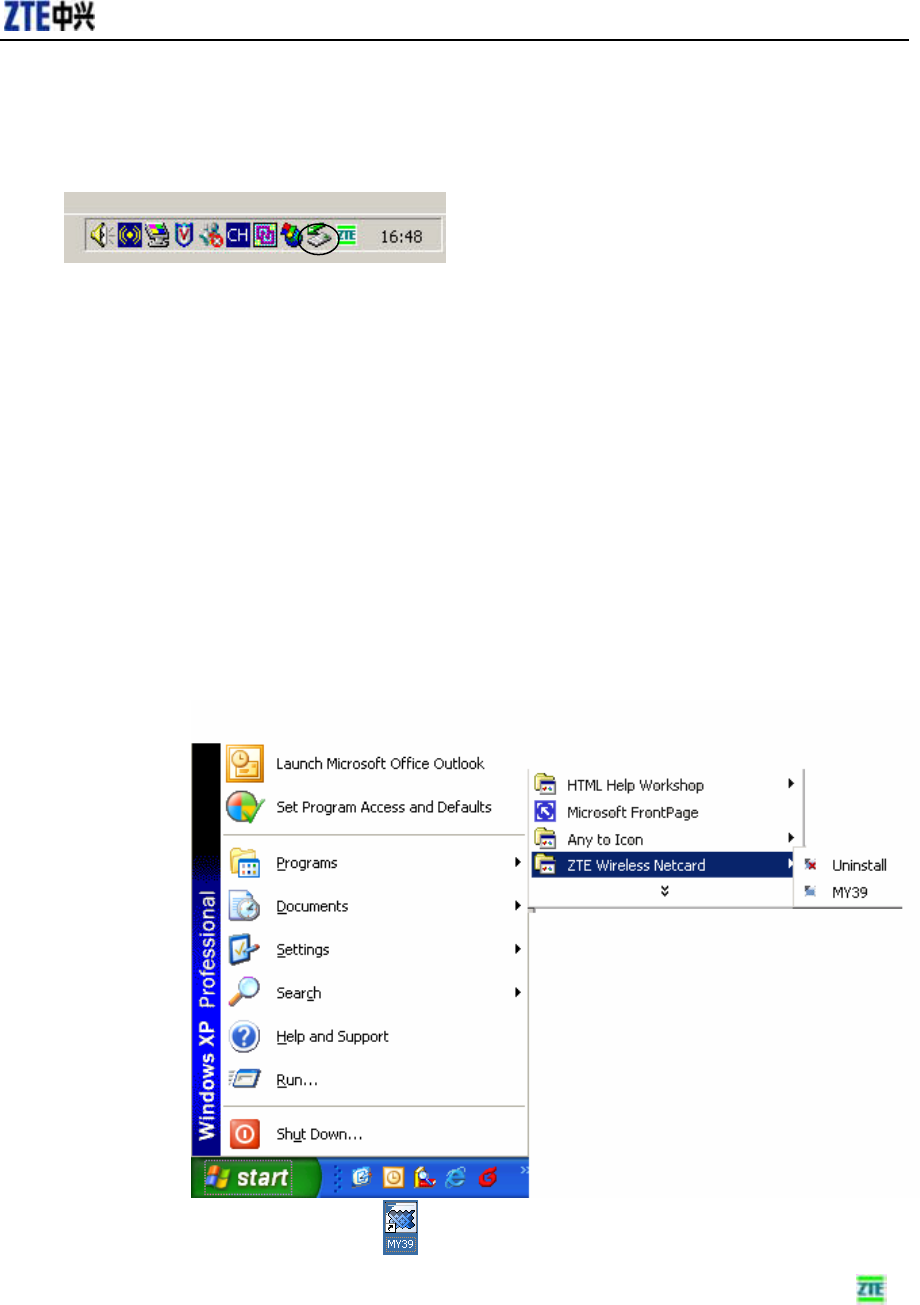
1. Close the software. Right click the tray icon circled below and left click close.
Retransmission and reproduction in any manner whatsoever without the permission of ZTE is strictly forbidden. All rights reserved.
9
内部公开▲
2. Remove the hardware. Right click on the PCMCIA icon circled below in your system
tray and left click close.
3. Select the NEC PCI to USB Open Host Controller.
4. Click Stop in the device pop-up screen.
5. Push the laptop latch release, and then pull the netcard out of the slot.
Note: Once the netcard is inserted, do not physically remove the ZTE MY39 from the Card slot
until you have completed the Unplug process. Removing the card improperly may cause a fatal
error to your laptop.
2.6 Getting started
After the software and hardware is installed and connected normally, the Service LED is
lighted. Click the windows Start menu and select ZTE WIRLESS CARD→ ZTE MY39 from the
list of programs.
Or double click on the shortcut icon on your desktop.
After wireless netcard is initialized, main interface appears. When the standby icon
appears, the card can work properly.
Retransmission and reproduction in any manner whatsoever without the permission of ZTE is strictly forbidden. All rights reserved.
10

内部公开▲
2.7 Software Uninstallation
1.Click Start → Programs→ ZTE WIRLESS CARD→ uninstall, then the system begins to
uninstall programs.
2. Left click “Yes”.
3 Functions & Operation
3.1 Interface introduction
3.1.1 Main Interface
There will show various function button icons. Press different function button to carry out
corresponding operation.
Main
Internet
History
Message
Contact
Setting
Help
: Signal strength
3.1.2 Description of Mini Icons
1. Tray Icons Description
The card hasn’t been connected.
The wireless card is initializing.
The wireless card has been connected.
Retransmission and reproduction in any manner whatsoever without the permission of ZTE is strictly forbidden. All rights reserved.
11
内部公开▲
The wireless card has been locked
2. The uses of Tray Icons:
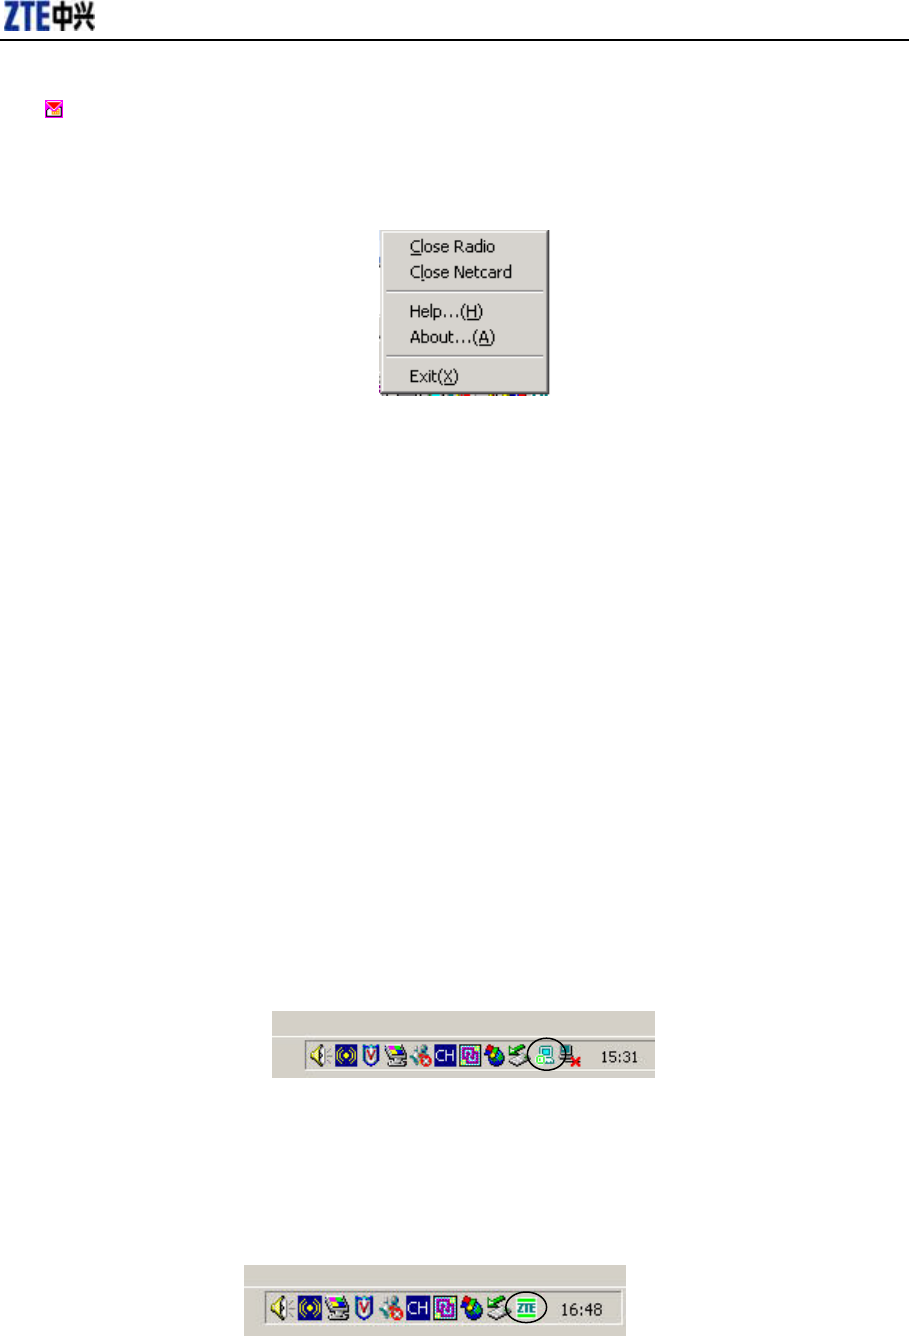
Right Click the tray icons, the following menu will appear:
Close Radio: Turns the radio on or off. Turn the radio off to comply with FAA regulations, where
radio devices must be off during flight.
Close Netcard: Turns the device power on or off. Turn the power off on the wireless device to
reduce the power consumption of the device, and to increase battery life when not using
wireless data.
Help:Enter the interface of Help.
About:View the information of the application software and hardware versions.
Exit: Shut down the application interface and stop the wireless card from working.
3.2 Connecting to Internet
You can browse web pages after you have accessed to Internet with the help of wireless
card, you can also receive SMS when surfing in the Internet.
1. Connecting to the Internet:
Click the Internet icon, and then click “Connect”.
When connected, “Status: connected successfully!” will appear together with data amount,
connected time and so on.
At the same time, an icon on tray area will appear to indicate the connection status.
When CDMA 1X appears on the interface, click “Connect” to connect with CDMA 1X
network. When EVDO appears on the interface, click “Connect” to connect with EVDO network.
Please contact with service operator for detailed billing price.
2. Disconnecting the Internet:
Click “Disconnect” button to disconnect the Internet. After disconnected, a normal standby
icon will appear on tray area.
Retransmission and reproduction in any manner whatsoever without the permission of ZTE is strictly forbidden. All rights reserved.
12
内部公开▲
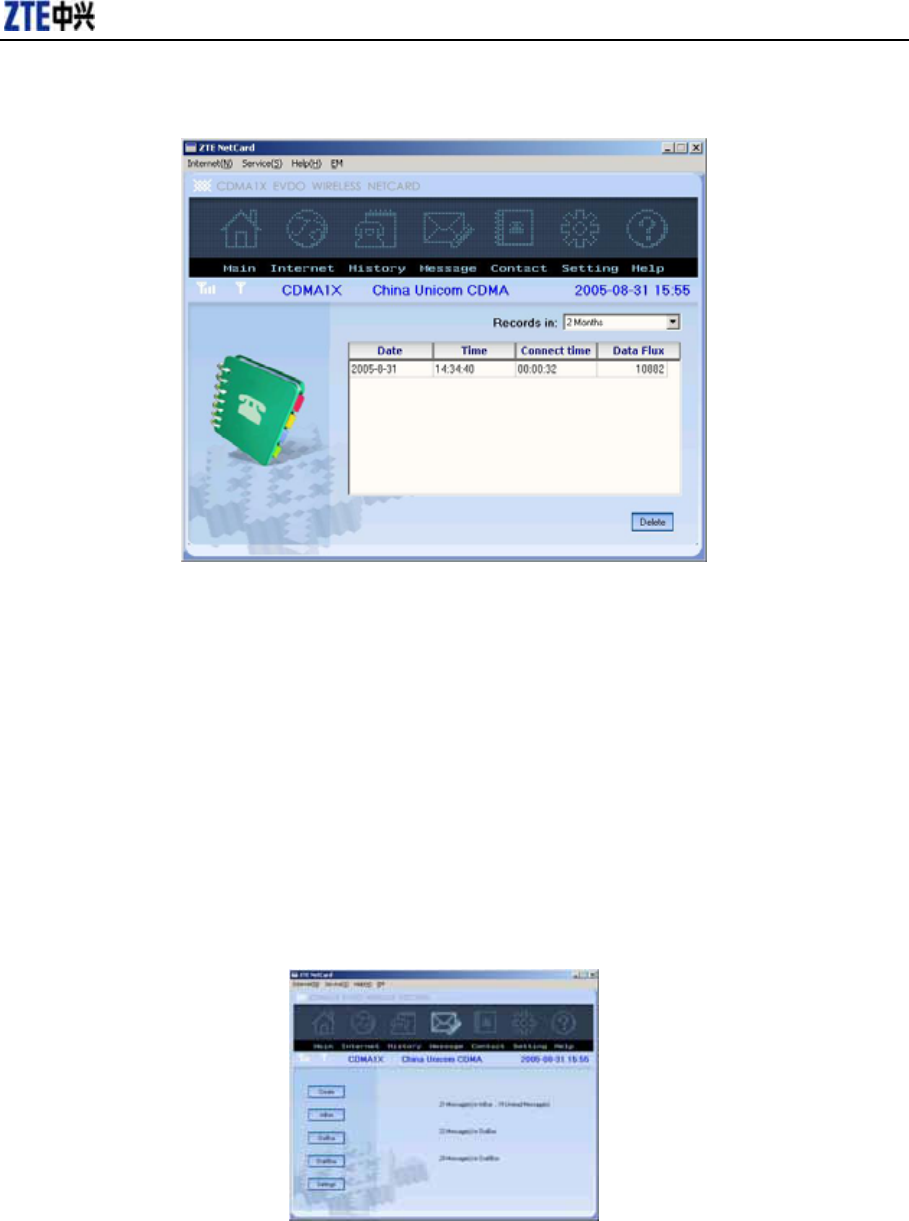
3.3 History
Select the time duration saving the records of connecting to the internet. The information
includes date, time, connect time, data flux. Select a record and click Delete to delete a record.
3.4 Messages
Click Message to switch to the Message interface. The number of messages saved in the
inbox, outbox and draft will appear. The user can click icons of “Create”, “InBox”, “OutBox”,
“Draftbox” to enter relative interface.
InBox:View the received SMS.
OutBox:View the sent SMS if you select “Auto Save Sent Message” in Settings
submenu.
Retransmission and reproduction in any manner whatsoever without the permission of ZTE is strictly forbidden. All rights reserved.
13

内部公开▲
Draft: View the saved messages.
3.4.1 Creating new message
Click Create to send a TXT to an individual or multiple subscribers.
You can enter the recipient’s number or numbers in the receiver address blank, use “;”
to separate recipients. Or click “Contact” button to open the contacts window, simply
double click on the name of the user and that individual automatically be added to the
“receiver” field. Holding down “ctrl” Key while you click names from the lists will allow
you to select multiple names at once. You can enter the group name directly in the
receiver address blank, the message will be sent to the all recipients saved in the
group.
The phone number and the message field are required.
Click Send. After sent successfully, the SMS will be saved into outbox automatically. If
send fails, the “Sending Failed” will appear on the interface, Click “Save” to save the
short message to the draft box.
Select Save to save messages to the Draftbox. When the message has been sent, it
will be saved in the Outbox automatically. “Sending success” appears after the
message is sent successfully, “sending failed” appears after the message is sent
unsuccessfully.
Note: The SMS centers of some cities and regions do not support a message longer than
140 English characters.
You can also send short messages while surfing the Internet.
3.4.2 Viewing Received Messages and Sent Messages
Click Inbox” button to check the received short messages, click the Outbox to check
the sent short messages, click the Draftbox to check the saved short messages.
¾ Read: Select a record, and click Read. You can read all the information of short
messages including the content of short messages, sender phone number,
delivered date and time.
¾ Reply: Select a record, and click Reply. The phone number of the sender will be
populated in the send area. Enter your message and Send to send the messages.
(appears only in Inbox)
¾ Forward: Send the short message to the other recipients.
¾ Delete: Delete the selected short messages.
¾ Delete All:Delete all saved messages.
¾ Quit: Return to the Message main interface.
When a new message arrives, “You have a new message from XXX” will appear.
When there are more than one message arriving at the same time, “You have new
messages” will appear. Click Read, the interface will automatically switch to Inbox, and
Retransmission and reproduction in any manner whatsoever without the permission of ZTE is strictly forbidden. All rights reserved.
14

内部公开▲
be displayed in red.
New message can not be accepted when the netcard is filled with short messages, the
system will indicate the inbox is full and make users clear the inbox while new
message can not be saved.
Note: Minimize the new message prompt box to read it later. It will not pop up again to
interfere with your work when other new messages come.
3.4.3 Setting
1. Common settings
Click Settings and then click Common Settings
You can select the time of saving your messages from 0 to 12 months.
Tick the “Auto Save Sent Messages” to save messages automatically in Outbox.
Click Apply to confirm setting, or click Cancel to original setting.
2. Group settings
This application enables you to create groups. You can send message to multiple
recipients saved in a group. You can edit up to 10 groups and up to 10 records in one group.
Each record consists of name and mobile phone number.
Add Group: add a new group. Remember to input the Group name in the first
step.
Edit Group: Edit a selected group
¾ Add: Add a new record
¾ Edit: Edit the selected record
¾ Delete: Delete the selected record
¾ Contact: Enter a new record selected from the contact
Delete Group: Delete a selected group
Click Apply to confirm setting, or click Cancel to original setting.
3.5 Contact
Click Contact to switch to the phone book interface. Each record includes contact name,
mobile phone number, family phone number, office phone number, email address.
Retransmission and reproduction in any manner whatsoever without the permission of ZTE is strictly forbidden. All rights reserved.
15

内部公开▲
Edit: Select a name from the list and click Edit button.
¾ Save: Save the edited record.
¾ SMS: Send a short message to mobile phone number written in the record.
¾ Cancel: Not save any changes you have made.
Append: Append a new record
¾ Save: Save the currently edited record
¾ Cancel: Cancel edited information.
Delete:Delete a selected record.
Send SMS:Send message to the mobile phone numbers written in the records.
Search: Input the characters or numbers or names in the blank and click search,
the records matching the terms will be displayed.
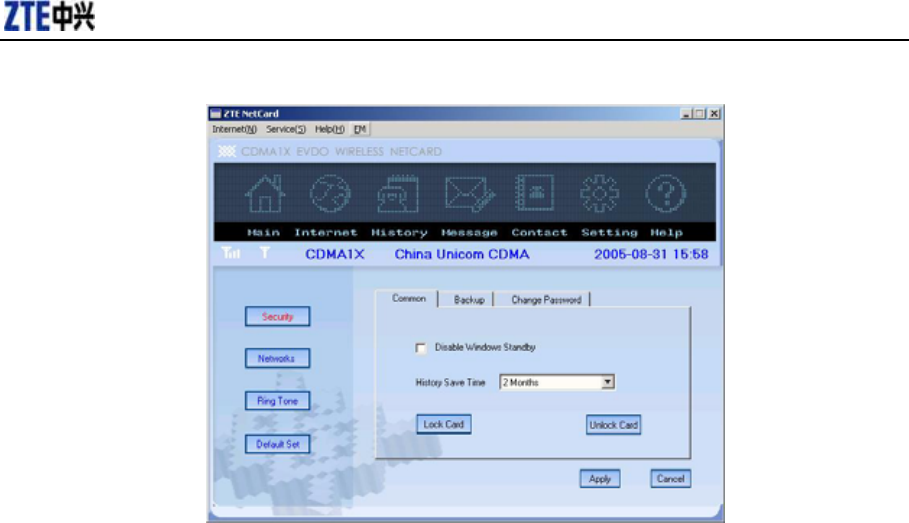
3.6 Setting
Click Setting to switch to the settings interface. It includes: security, networks, ring tone,
default set.
Retransmission and reproduction in any manner whatsoever without the permission of ZTE is strictly forbidden. All rights reserved.
16
内部公开▲
3.6.1 Security Settings
Common:
¾ Disable Windows Standby: Select to disable windows interface to standby
mode.
¾ History save time: Select the duration of saving the internet surfing records.
You can choose at most 12 months, the default setting is 2 months.
¾ Lock/unlock card: Input password to lock/unlock card. Lock card disables you
from connecting to internet. The default password is set to “1234”.
Backup:
¾ Backup contact: Click Browse to select a file to save contact records.
¾ Backup WMS: Click Browse to select a file to save SMS records.
Change password: Change the lock code.
¾ Input Original Password: Enter your current lock code.
¾ Input new Password: Enter your new lock code.
¾ Confirm Password: Re-type your new lock code.
Click Apply to confirm operation and click cancel to original setting.
3.6.2 Networks
To ensure that the wireless card can connect the Internet properly, you should configure the
user configuration information at first.
The user configuration information includes: user name, password, connect number.
Please consult the network service provider of UIM card for all above information. The user
configuration information may be different with the network supplier and network types.
Click Apply to confirm operation and click Cancel to original setting.
Retransmission and reproduction in any manner whatsoever without the permission of ZTE is strictly forbidden. All rights reserved.
17

内部公开▲
3.6.3 Ring tone
You can set Connection ringtone, Disconnect ringtone, Message ringtone by yourself.
The alert will sound on the laptop side. The audio file supports WAV format. If you select Mute,
you cannot hear corresponding alert.
Click Apply to confirm operation and click cancel to original setting.
3.6.4 Default set
Restore to original factory settings including network configuration and ringtone except
information saved in contacts and messages.
3.7 Help
Click the Help icon, and switch to the help interface. Under the help topic, you can get the
wireless card information about functions introduction, installation and usage guide and
published date of application software and hardware, etc.
Retransmission and reproduction in any manner whatsoever without the permission of ZTE is strictly forbidden. All rights reserved.
18

内部公开▲
4 FAQ & Answers
When you meet the following problems in service, please refer to the following answers to
solve it. If the problems still exist, please contact with your suppliers.
Problem
Description
Possible Causes Problem Solving
After restarted the
computer, there is no
signal all the time.
1. The position of the wireless
card antenna is unfitting.
1 Adjust the angle of the wireless
card antenna.
2.You are in the place where no
CDMA2000 1X or CDMA2000
EVDO network covered,such as
underground parking lot, tunnel
etc.
2. Change to the place to give
you better reception.
3. The wireless card isn’t
inserted well.
3. Pull out and insert the wireless
card safely again.
When the wireless
card is being
installed, the
notebook computer
cannot find it.
1. The installation programs of
the wireless card haven’t been
installed properly.
1. Insert the wireless card,then
run the installation program. If
you use the WinXP operating
system, install the drivers
according to the Windows
indication information to operate.
2. The wireless card isn’t
inserted well.
2. Restart the computer, or insert
the wireless card again.
Message sent failed. 1. The network is busy and other
reasons.
1. Try later.
Data connection
failed.
1. The position of the antenna
isn’t proper.
1. Adjust the angle of the
antenna.
2. You are in the place where no
CDMA network covered,such
as underground parking lot,
tunnel etc.
2. Change to the place where
have good signal.
3. The network at this time in
this place is busy now.
3. Try later.
4. The dial number, username
or the password in the user
config files is wrong.
4. Check the configuration in the
“Network settings”.
Retransmission and reproduction in any manner whatsoever without the permission of ZTE is strictly forbidden. All rights reserved.
19

内部公开▲
Connected to the
Internet, but it cannot
open any website
page.
1. The IE browser got problems. 1. If the IE got problems,
upgrade to the new version or
reinstall the IE browser.
2. The operating system is
infected by virus (Such as
Worm. Blaster which can take
up a quantity of upload data flow
and result that it can’t receive
download data flow so that you
cannot open any website.)
2. Use the professional anti-virus
software to check and kill the
virus in the operating system
completely.
No ringtone . No audio card is fixed in computer
or the volume is too small.
Check the audio card and adjust
the volume properly.
Retransmission and reproduction in any manner whatsoever without the permission of ZTE is strictly forbidden. All rights reserved.
20