ZTE ZXMBW-RA25 Agile 2.5G Remote Radio Frequency Unit User Manual Installation Manual
ZTE Corporation Agile 2.5G Remote Radio Frequency Unit Installation Manual
ZTE >
Installation Manual

ZXMBW RA25
Agile 2.5G Remote Radio Frequency Unit
Installation Manual
Version 2.00
ZTE CORPORATION
ZTE Plaza, Keji Road South,
Hi-Tech Industrial Park,
Nanshan District, Shenzhen,
P. R. China
518057
Tel: (86) 755 26771900 800-9830-9830
Fax: (86) 755 26772236
URL: http://support.zte.com.cn
E-mail: doc@zte.com.cn

LEGAL INFORMATION
Copyright © 2006 ZTE CORPORATION.
The contents of this document are protected by copyright laws and international treaties. Any reproduction or
distribution of this document or any portion of this document, in any form by any means, without the prior written
consent of ZTE CORPORATION is prohibited. Additionally, the contents of this document are protected by
contractual confidentiality obligations.
All company, brand and product names are trade or service marks, or registered trade or service marks, of ZTE
CORPORATION or of their respective owners.
This document is provided “as is”, and all express, implied, or statutory warranties, representations or conditions
are disclaimed, including without limitation any implied warranty of merchantability, fitness for a particular purpose,
title or non-infringement. ZTE CORPORATION and its licensors shall not be liable for damages resulting from the
use of or reliance on the information contained herein.
ZTE CORPORATION or its licensors may have current or pending intellectual property rights or applications
covering the subject matter of this document. Except as expressly provided in any written license between ZTE
CORPORATION and its licensee, the user of this document shall not acquire any license to the subject matter
herein.
The contents of this document and all policies of ZTE CORPORATION, including without limitation policies related to
support or training are subject to change without notice.
Revision History
Date Revision No. Serial No. Reason for Revision
09/27/2006
R1.0 Sjzl20061645 First edition
ZTE CORPORATION
Values Your Comments & Suggestions!
Your opinion is of great value and will help us improve the quality of our product
documentation and offer better services to our customers.
Please fax to: (86) 755-26772236; or mail to Documentation R&D Department,
ZTE CORPORATION, ZTE Plaza, A Wing, Keji Road South, Hi-Tech Industrial Park,
Shenzhen, P. R. China 518057.
Thank you for your cooperation!
Document
Name ZXMBW RA25 Agile 2.5G Remote Radio Frequency Unit Installation Manual
Product Version
V2.00 Document Revision
Number R1.0
Equipment Installation Date
Presentation:
(Introductions, Procedures, Illustrations, Completeness, Level of Detail, Organization,
Appearance)
£ Good £ Fair £ Average £ Poor £ Bad £ N/A
Accessibility:
(Contents, Index, Headings, Numbering, Glossary)
£ Good £ Fair £ Average £ Poor £ Bad £ N/A
Your evaluation
of this
documentation
Intelligibility:
(Language, Vocabulary, Readability & Clarity, Technical Accuracy, Content)
£ Good £ Fair £ Average £ Poor £ Bad £ N/A
Your
suggestions for
improvement of
this
documentation
Please check the suggestions which you feel can improve this documentation:
£ Improve the overview/introduction £ Make it more concise/brief
£ Improve the Contents £ Add more step-by-step procedures/tutorials
£ Improve the organization £ Add more troubleshooting information
£ Include more figures £ Make it less technical
£ Add more examples £ Add more/better quick reference aids
£ Add more detail £ Improve the index
£ Other suggestions
__________________________________________________________________________
__________________________________________________________________________
__________________________________________________________________________
__________________________________________________________________________
__________________________________________________________________________
# Please feel free to write any comments on an attached sheet.
If you wish to be contacted regarding your comments, please complete the following:
Name Company
Postcode Address
Telephone E-mail
This page is intentionally blank.

Contents
About this Manual ............................................................i
Purpose................................................................................. i
Intended Audience.................................................................. i
Prerequisite Skill and Knowledge............................................... i
What is in This Manual............................................................. i
Related Documentation........................................................... ii
Conventions..........................................................................iii
How to Get in Touch...............................................................iv
Chapter 1.........................................................................1
Overview .........................................................................1
Installation Flow ..............................................................2
Installation Components......................................................... 2
Hardware Installation Flow...................................................... 4
Installation Precautions ....................................................5
Chapter 2.........................................................................7
Installation Preparations ................................................7
Installation Environment Check .........................................8
Installation Location Check...................................................... 8
Temperature/Humidity Check.................................................. 8
Power Supply Check............................................................... 9
Grounding Check ................................................................... 9
Other Checks ........................................................................ 9
Tools and Instruments Preparation................................... 10
Technical Documents Preparation .................................... 12
Unpacking Inspection ..................................................... 13
Wooden Case Unpacking Procedure........................................ 13
Carton Unpacking Procedure ................................................. 14
Goods Acceptance and Handover ........................................... 14
Chapter 3.......................................................................15
Chassis Installation.......................................................15
Pole Mounting ............................................................... 16
Support Component Installation.............................................16
Sunshade Component Installation ..........................................18
Chassis Body Installation.......................................................18
Wall Mounting ............................................................... 21
Support Component Installation.............................................21
Sunshade Component Installation ..........................................24
Chassis Body Installation.......................................................24
Chassis Mounting Check ................................................. 26
Chapter 4.......................................................................27
Power and Grounding Cables Installation ....................27
Power Cable Installation ................................................. 28
Power Cable Types ...............................................................28
Power Cables Installation Procedure .......................................30
Grounding Cable Installation ........................................... 31
Installation Requirements ............................................... 33
Chapter 5.......................................................................35
External Power Cables Installation...............................35
Chassis External Interfaces ............................................. 36
Optical Fiber Installation................................................. 37
External Monitoring Cable Installation............................... 39
Cable/Fiber Installation Requirements .............................. 40
Cable Installation Requirements.............................................40
Fiber Installation Requirements..............................................40
Chapter 6.......................................................................41
Main Antenna Feeder System Installation....................41
Installation Preparation .................................................. 42
Installation Personnel Preparation ..........................................42
Installation Environment Check..............................................42
Safety Measure Check...........................................................43
Installation Tools Preparation.................................................43
Antenna Feeder System Structure.................................... 45
Installation Flow ............................................................ 46
Antenna Installation....................................................... 47
Technical Parameters ........................................................... 47
Antenna Installation Flow...................................................... 48
Installation Location............................................................. 48
Antenna Handling and Hoisting.............................................. 49
Directional Antenna Installation............................................. 50
Omni Antenna Installation..................................................... 52
Jumper and Antenna Connection and Sealing .......................... 53
Feeder Installation......................................................... 54
Feeder Route Determination.................................................. 54
Main Feeder Connector Making .............................................. 55
Feeders Cutting ................................................................... 58
Main Feeder Hoisting............................................................ 59
Main Feeder Laying and Fixing............................................... 60
Feeder Grounding Clip Installation ......................................... 61
Chassis Jumper Installation................................................... 64
SWR Test............................................................................ 65
Water Proof Treatment................................................... 66
Chapter 7.......................................................................69
Hardware Installation Check ........................................69
Chassis Installation Check............................................... 70
Cable Installation Check ................................................. 71
Power and Grounding Cables................................................. 71
Optical Fibers ...................................................................... 72
1/2’’ Jumper........................................................................ 72
Main Feeder ........................................................................ 72
Antenna Feeder Installation Check................................... 74
Environment Check........................................................ 75
BTS Information ............................................................ 75
Chapter 8.......................................................................77
Power- On/Off...............................................................77
Power – on/off Procedures .............................................. 78
Power - on Check................................................................. 78
Power - on.......................................................................... 78
Power - off.......................................................................... 78
Appendix A ....................................................................79
Technical Indices...........................................................79
Physical Indices............................................................. 79
Power Supply Indices ..................................................... 80
Power Consumption Indices...................................................80
Abbreviations ................................................................81
Index.............................................................................83
Figures...........................................................................85
Tables............................................................................87

Confidential and Proprietary Information of ZTE CORPORATION i
About this Manual
Purpose
This Manual provides procedures and guidelines that support the
installation of the ZXMBW RA25 Agile 2.5G Remote Radio
Frequency Unit.
Intended Audience
This document is intended for engineers and technicians who
perform installation activities on the ZXMBW RA25 Agile 2.5G
Remote Radio Frequency Unit.
Prerequisite Skill and Knowledge
To use this document effectively, users must have a general
understanding of wireless telecommunications technology.
Familiarity with the following is helpful:
n the ZXMBW system and its various components
n user interfaces on the AGW
n local operating procedures
What is in This Manual
This Manual contains the following chapters:
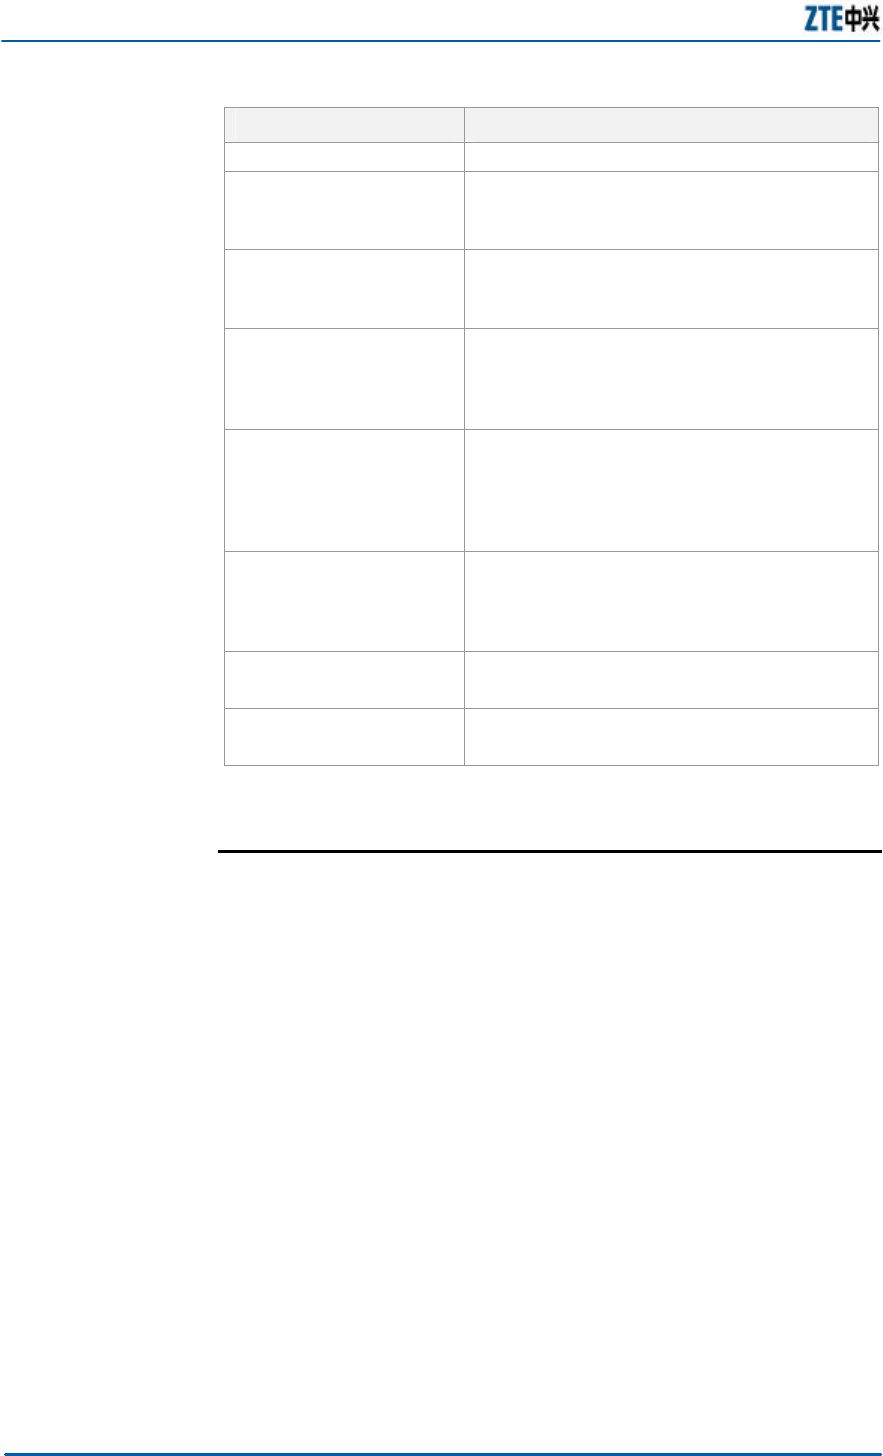
TABLE 1 CHAPTER SUMMARY
Chapter Summary
Chapter 1 Overview Describes the RA25 Agile 2.5 Remote
Radio Frequency Unit’s Installation flow
and precautions
Chapter 2 Installation
Preparations Describes the Installation environment
check, Tools and Instruments preparation,
Technical documents preparation, and
ZXMBW RA25 Agile 2.5G Remote Radio Frequency Unit Installation Manual
ii Confidential and Proprietary Information of ZTE CORPORATION
Chapter Summary
Unpacking check.
Chapter 3 Chassis
Installation Describes the Pole mounting installation
method, Wall mounting installation
method and Chassis mounting check.
Chapter 4 Power and
Grounding Cables
Installation
Describes the Power cable installation,
Grounding cable installation and
Installation requirements.
Chapter 5 External
Power Cables
Installation
Describes the Chassis external interfaces,
Optical fiber installation, External
monitoring cable installation and
Cable/fiber installation requirements.
Chapter 6 Main
Antenna Feeder System
Installation
Describes the Installation preparation,
Antenna feeder system structure,
Installation flow, Antenna installation,
Feeder installation and Water proof
treatment.
Chapter 7 Hardware
Installation Check Describes the Chassis installation check,
cable installation check, Antenna feeder
installation check, Environment check and
BTS Information check.
Chapter 8 Power-
On/Off Describes the Power- on/off procedures
Appendix A Technical
Indices Describes the RA25 Physical indices and
Power supply indices.
Related Documentation
The following documentation is related to this manual:
n ZXMBW RA25 Agile 2.5G Remote Radio Frequency Unit
Guide to Documentation
n ZXMBW RA25 Agile 2.5G Remote Radio Frequency Unit
Technical Manual
n ZXMBW RA25 Agile 2.5G Remote Radio Frequency Unit
Hardware Manual
n ZXMBW RA25 Agile 2.5G Remote Radio Frequency Unit
Maintenance Manual
About this Manual
Confidential and Proprietary Information of ZTE CORPORATION iii
Conventions
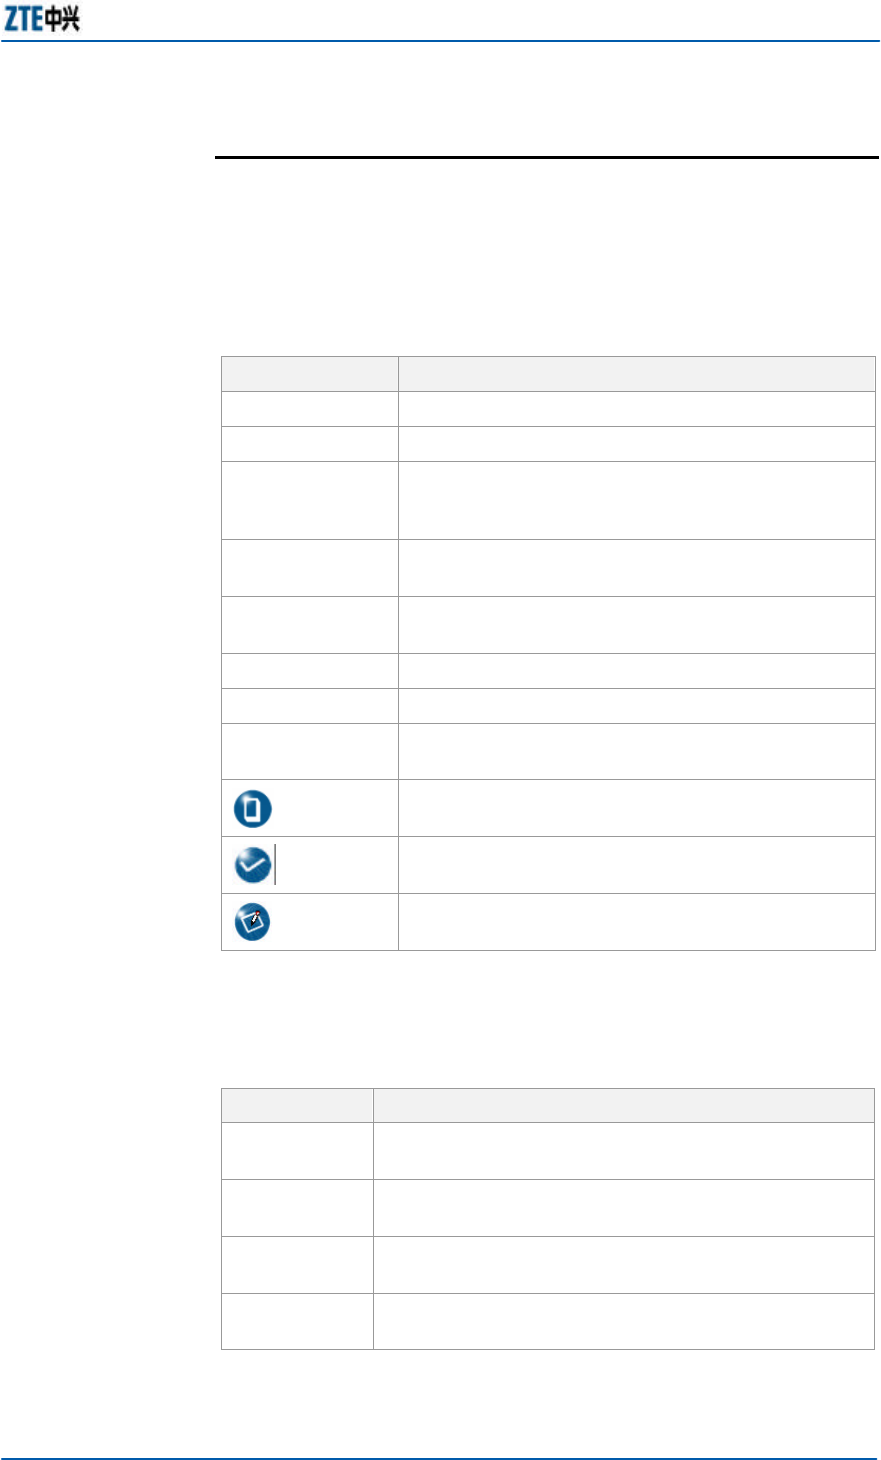
ZTE documents employ the following typographical conventions.
Typographical Conventions
TABLE 2 TYPOGRAPHICAL CONVENTIONS
Typeface Meaning
Italics References to other Manuals and documents.
“Quotes” Links on screens.
Bold Menus, menu options, function names, input
fields, radio button names, check boxes, drop-
down lists, dialog box names, window names.
CAPS Keys on the keyboard and buttons on screens
and company name.
Constant width
Text that you type, program code, files and
directory names, and function names.
[ ] Optional parameters.
{ } Mandatory parameters.
| Select one of the parameters that are delimited
by it.
Note: Provides additional information about a
certain topic.
Checkpoint: Indicates that a particular step needs
to be checked before proceeding further.
Tip: Indicates a suggestion or hint to make things
easier or more productive for the reader.
Mouse Operation Conventions
TABLE 3 MOUSE OPERATION CONVENTIONS
Typeface Meaning
Click Refers to clicking the primary mouse button (usually
the left mouse button) once.
Double-click Refers to quickly clicking the primary mouse button
(usually the left mouse button) twice.
Right-click Refers to clicking the secondary mouse button
(usually the right mouse button) once.
Drag Refers to pressing and holding a mouse button and
moving the mouse.

ZXMBW RA25 Agile 2.5G Remote Radio Frequency Unit Installation Manual
iv Confidential and Proprietary Information of ZTE CORPORATION
How to Get in Touch
The following sections provide information on how to obtain
support for the documentation and the software.
Customer Support
If you have problems, questions, comments, or suggestions
regarding your product, contact us by e-mail at
support@zte.com.cn. You can also call our customer support
center at (86) 755 26771900 and (86) 800-9830-9830.
Documentation Support
ZTE welcomes your comments and suggestions on the quality
and usefulness of this document. For further questions,
comments, or suggestions on the documentation, you can
contact us by e-mail at doc@zte.com.cn; or you can fax your
comments and suggestions to (86) 755 26772236. You can also
browse our website at http://support.zte.com.cn, which contains
various interesting subjects like documentation, knowledge base,
forum and service request.

Confidential and Proprietary Information of ZTE CORPORATION 1
Chapter 1
Overview
This chapter explains:
n Installation flow
n Installation precautions
ZXMBW RA25 Agile 2.5G Remote Radio Frequency Unit Installation Manual
2 Confidential and Proprietary Information of ZTE CORPORATION
Installation Flow
This section describes the RA25 components to be installed on
site and the RA25 installation flow.
Installation Components
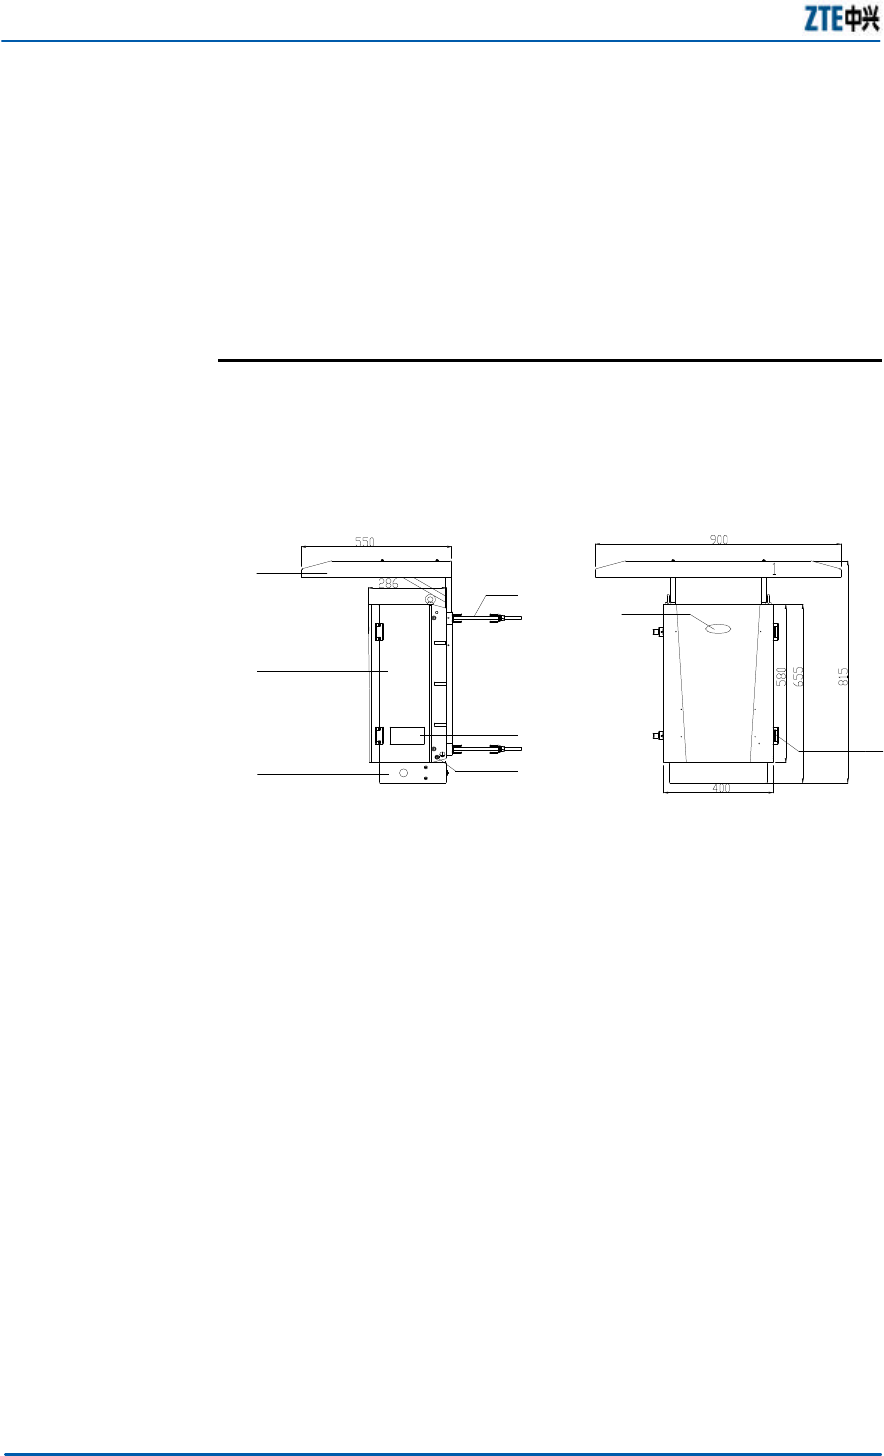
Figure 1 shows RA25 chassis overall installation schematic
diagram and dimensions.
FIGURE 1 RA25 CHASSIS OVERALL INSTALLATION SCHEMATIC DIAGRAM
Unit: mm
1
2
3
4
5
6
7
8
1 Sunshade 2 Chassis body 3 Base 4 Support 5 Name plate label
6 Chassis protection grounding terminal
7 RA25 label 8 Hinge
Figure 2 shows the operations to be performed on site.
Chapter 1 Overview
Confidential and Proprietary Information of ZTE CORPORATION 3
FIGURE 2 RA25 ON-SITE INSTALLATION OPERATION SCHEMATIC DIAGRAM
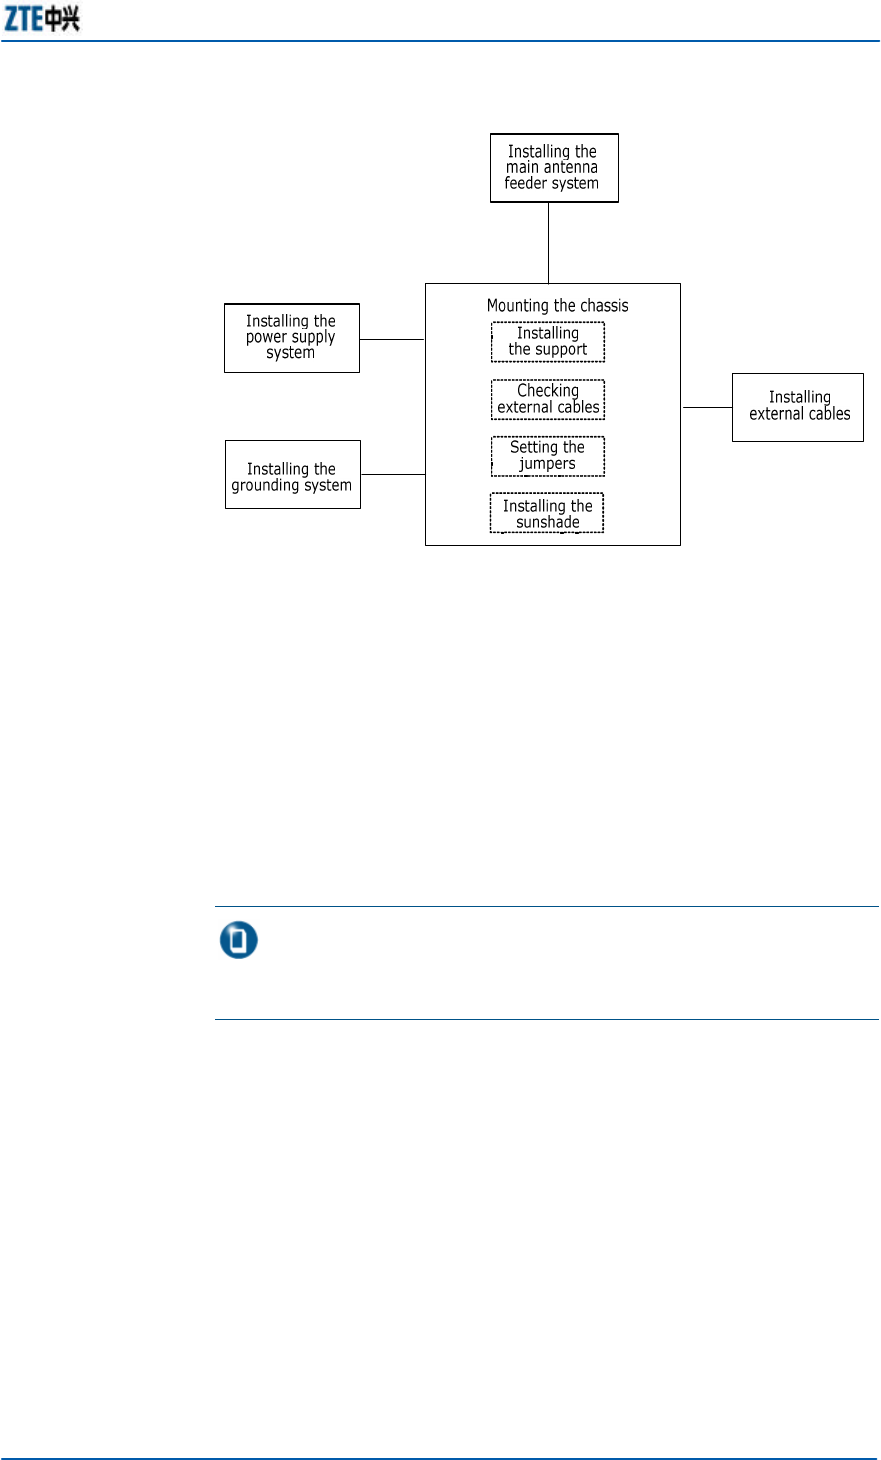
You need to install the following components of the RA25:
1. RA25 chassis, including:
n Support
n Chassis body
n Internal cables
n Module
n Sunshade
Note: The cables and functional modules inside the chassis have
already been installed before delivery. You only need to check whether
their installations meet the requirements.
2. Power supply system
3. Grounding system
4. Main antenna feeder system, including:
n Antenna
n Jumper
n Main feeder
5. External cable
ZXMBW RA25 Agile 2.5G Remote Radio Frequency Unit Installation Manual
4 Confidential and Proprietary Information of ZTE CORPORATION
Hardware Installation Flow
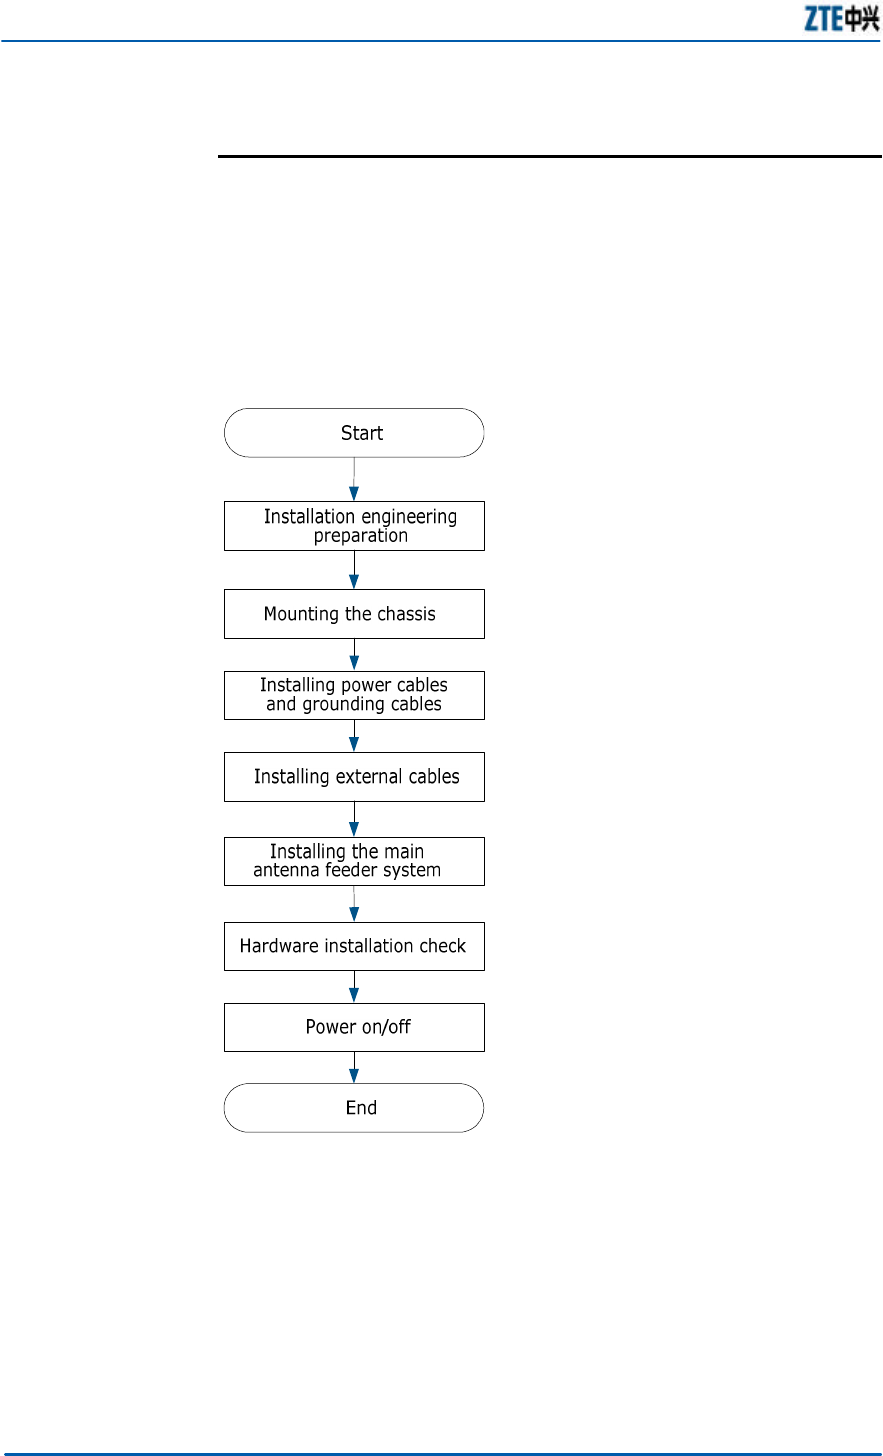
Figure 3 shows the general installation flow of the RA25.
However, you do not necessarily have to follow strictly this flow
on site. Some steps can be performed at the same time, and an
earlier or later step may be performed later or earlier, depending
on whichever is more convenient on site.
FIGURE 3 RA25 INSTALLATION FLOW

Chapter 1 Overview
Confidential and Proprietary Information of ZTE CORPORATION 5
Installation Precautions
The installation personnel of the RA25 must check the running
environment of the equipment and learn about the
communication networking and data configuration of the
operator, the status of the equipment in the network, the
interfaces of the line transmission equipment, and the lengths of
various cables prior to installation, for successful commissioning
of the project. The hardware installation personnel must read
carefully the installation manual before the installation.
In addition, pay attention to the following:
n Do not operate with the chassis or any module when it is
energized during the installation.
n Do not install the antenna feeder system in the case of
lightning.
n Verify the various lightning arresters (including the power
supply lightning arrester, RF lighting arrester, and main
antenna feeder arrester) are in good contact and good
condition. Replace any damaged ones.
n Lock the door in time after the chassis has been installed. If
any maintenance needs the door being opened, all
operations must be performed under the guidance of
professionals.

ZXMBW RA25 Agile 2.5G Remote Radio Frequency Unit Installation Manual
6 Confidential and Proprietary Information of ZTE CORPORATION
This page is intentionally blank.

Confidential and Proprietary Information of ZTE CORPORATION 7
Chapter 2
Installation Preparations
This chapter explains:
n Installation environment check
n Tools and instruments preparation
n Technical documents preparation
n Unpacking inspection
ZXMBW RA25 Agile 2.5G Remote Radio Frequency Unit Installation Manual
8 Confidential and Proprietary Information of ZTE CORPORATION
Installation Environment
Check
Prior to your installation of this equipment, check the installation
environment in accordance with the requirements provided in
the ZTE Environment Acceptance Report. The contents in this
section are for reference only.
Installation Location Check
The installation location of the RA25 must meet the following
requirements of engineering design:
n Stay away from the environment with heavy dust, poisonous
gases, and inflammables and explosives;
n Stay away from the places with great shock or strong noise.
n Stay away from transformer substations;
n Stay away from pollution sources;
n Stay away from industrial boilers and heating boilers;
n Stay away from large-power radio interference sources.
Temperature/Humidity Check
Table 4 lists the temperature/humidity requirements for the
operation of the RA25.
TABLE 4 TEMPERATURE AND HUMIDITY REQUIREMENTS
Name Working Conditions
Temperature Operating temperature: - 40 °C ~ + 50 °C
Storage temperature: -45 °C ~ +75 °C
Humidity Working humidity: 5% RH ~ 98% RH
Storage humidity: 5% RH ~ 98% RH

Chapter 2 Installation Preparations
Confidential and Proprietary Information of ZTE CORPORATION 9
Power Supply Check
Table 5 lists the power supply requirements for the RA25 chassis.
TABLE 5 POWER SUPPLY REQUIREMENTS
Type Nominal Value Operating Range
110 V AC 85 V AC~138 V AC
AC 220 V AC 150 V AC~300 V AC
DC -48 V DC -40 V~-57 V
Grounding Check
The RA25 must use the joint grounding mode, with the
grounding resistance less than 5 ohm.
Other Checks
n The support equipment or parts (for example, outdoor
cabling rack, antenna pole, iron tower, and grounding copper
busbar) must comply with the engineering design
requirements of the RA25;
n The equipment to be interconnected with the BBUA and
power equipment is ready.

ZXMBW RA25 Agile 2.5G Remote Radio Frequency Unit Installation Manual
10 Confidential and Proprietary Information of ZTE CORPORATION
Tools and Instruments
Preparation
Make available the installation tools and test instruments, as
listed in Table 6, and select the appropriate ones to use
according to the project and on-site requirements.
TABLE 6 TOOLS LIST
Category Name
Special-purpose
tools
Feeder knife
Coaxial cable stripper
Coaxial crimping pliers
Multi-functional crimping pliers
Drilling tools
Electrical percussion drill
Several appropriate drill bits
Dust cleaner
Power connector board (with 2-phase, 3-phase
sockets)
General-
purpose tools
Cross screwdriver (4?, 6?, 8?)
Straight screwdriver (4?, 6?, 8?)
Adjustable wrench (6", 8", 10", 12")
Combination benches (17", 19")
Socket wrench (one set)
Claw hammer, 5 kg
Electric iron, 300 W
Electric iron, 40 W
Solder wires
Hot air blower
Tin sucker
Tweezers
Paint brush
Electric knife
Paper cutter
Scissors
Measurement
tools
Ribbon tape, 50 m
Steel tape, 5 m
Horizontal ruler, 400m
Angle instrument
Plumb
Protection tools Antistatic wrist strap
Safety helmet, slip-proof glove, etc.
Small tools Hacksaw (with several spare saw blades)
Chapter 2 Installation Preparations
Confidential and Proprietary Information of ZTE CORPORATION 11
Category Name
Sharp-nose pliers (8?)
Diagonal pliers (8?)
Carp-nose pliers (8?)
Vice (8?)
Needle file (medium-sized)
Hydraulic crimper
Pry
Auxiliary tools
Pulley block
Rope
Ladder
Forklift
Crane
TABLE 7 INSTRUMENTS LIST
Instrument Name Manufacturer
VSWR tester SITE MASTER
Optical fiber tester -
Compass -
Multimeter -
Earth resistance tester -
Note: No instruments can be used unless they are first found to be
up to the standard in tests.

ZXMBW RA25 Agile 2.5G Remote Radio Frequency Unit Installation Manual
12 Confidential and Proprietary Information of ZTE CORPORATION
Technical Documents
Preparation
Read and prepare the following manuals before installation.
n ZXMBW RA25 Agile 2.5G Remote Radio Frequency Unit
Technical Manual
n ZXMBW RA25 Agile 2.5G Remote Radio Frequency Unit
Hardware Manual
n ZXMBW RA25 Agile 2.5G Remote Radio Frequency Unit
Maintenance Manual
n ZXMBW RA25 Agile 2.5G Remote Radio Frequency Unit
Guide to Documentation
Chapter 2 Installation Preparations
Confidential and Proprietary Information of ZTE CORPORATION 13
Unpacking Inspection
The ZTE Engineers must perform the unpacking inspection along
with operator’s side engineers.
1. Check whether the total pieces are correct, packages are in
good condition, and the destination location matches the
installation location. If the results are all normal, start
unpacking inspection.
2. The equipment inspection list and unpacking inspection
report are contained in package #1. First open the #1
package and take out the Unpacking Inspection Report.
Check the total number of the goods against the inspection
list and record it for filing.
3. If any item is missing, lack, incorrect, excessive or damaged,
the reason must be found out, and the engineering
supervisor should fill in the Unpacking Inspection Feedback
Table, which must be fed back to ZTE in time for handling.
Note: When the equipment is moved a hotter and damper place,
wait for 30 minutes before unpacking the equipment. Otherwise,
moisture may condense on the surface of the equipment and damage
the equipment as a result.
Wooden Case Unpacking Procedure
1. Insert the screwdriver or claw hammer into the tab hole on
the cover plate of the wooden case, and turn the tab straight;
2. Lift and remove the cover plate after all tabs have been
turned straight;
3. Turn straight the tabs of the plates on four sides of the
wooden boxes, and remove the plates.
ZXMBW RA25 Agile 2.5G Remote Radio Frequency Unit Installation Manual
14 Confidential and Proprietary Information of ZTE CORPORATION
Carton Unpacking Procedure
1. Cut the straps by using the diagonal pliers;
2. Cut the adhesive tape along the slits on the cover by using a
paper cutter. Note that the cut shall not be too deep to avoid
damaging the goods inside;
3. Open the carton and take out the foam pads;
4. Check the contents in the carton against the attached
delivery list.
Note: Do not damage the antistatic bags during the unpacking
inspection process, as they may be useful in future storage of spare
parts and return of failed parts.
Properly dispose of the desiccants to keep them away from children.
Goods Acceptance and Handover
1. Acceptance check
Check the goods carefully one by one for acceptance
according to the names, models, and quantities shown on
the packaging list:
n There must not be dents, bulges, scratches, peels, blithers,
blisters or stains on the outer surface of the chassis.
n The surface paint on the cabinet must not peel off or be
scratched.
n The fastening bolts must be tight, not fall off or be displaced;
n The accessories and fittings needed for installation shall be
complete.
n Arrange the inspected goods in good order by category.
2. Handover
After inspection, the user representative and the engineering
supervisor must sign on the Unpacking Inspection Report. In
accordance with the contract, if the goods are to be kept by
the equipment operator after inspection, the goods should be
handed over to the equipment operator after both parties
sign on the Unpacking Inspection Report.

Confidential and Proprietary Information of ZTE CORPORATION 15
Chapter 3
Chassis Installation
This chapter explains:
n Pole mounting
n Wall mounting
n Chassis mounting check
ZXMBW RA25 Agile 2.5G Remote Radio Frequency Unit Installation Manual
16 Confidential and Proprietary Information of ZTE CORPORATION
Depending on the installation environment, the RA25 chassis can
be installed in two ways: pole mounting and wall mounting.
Pole Mounting
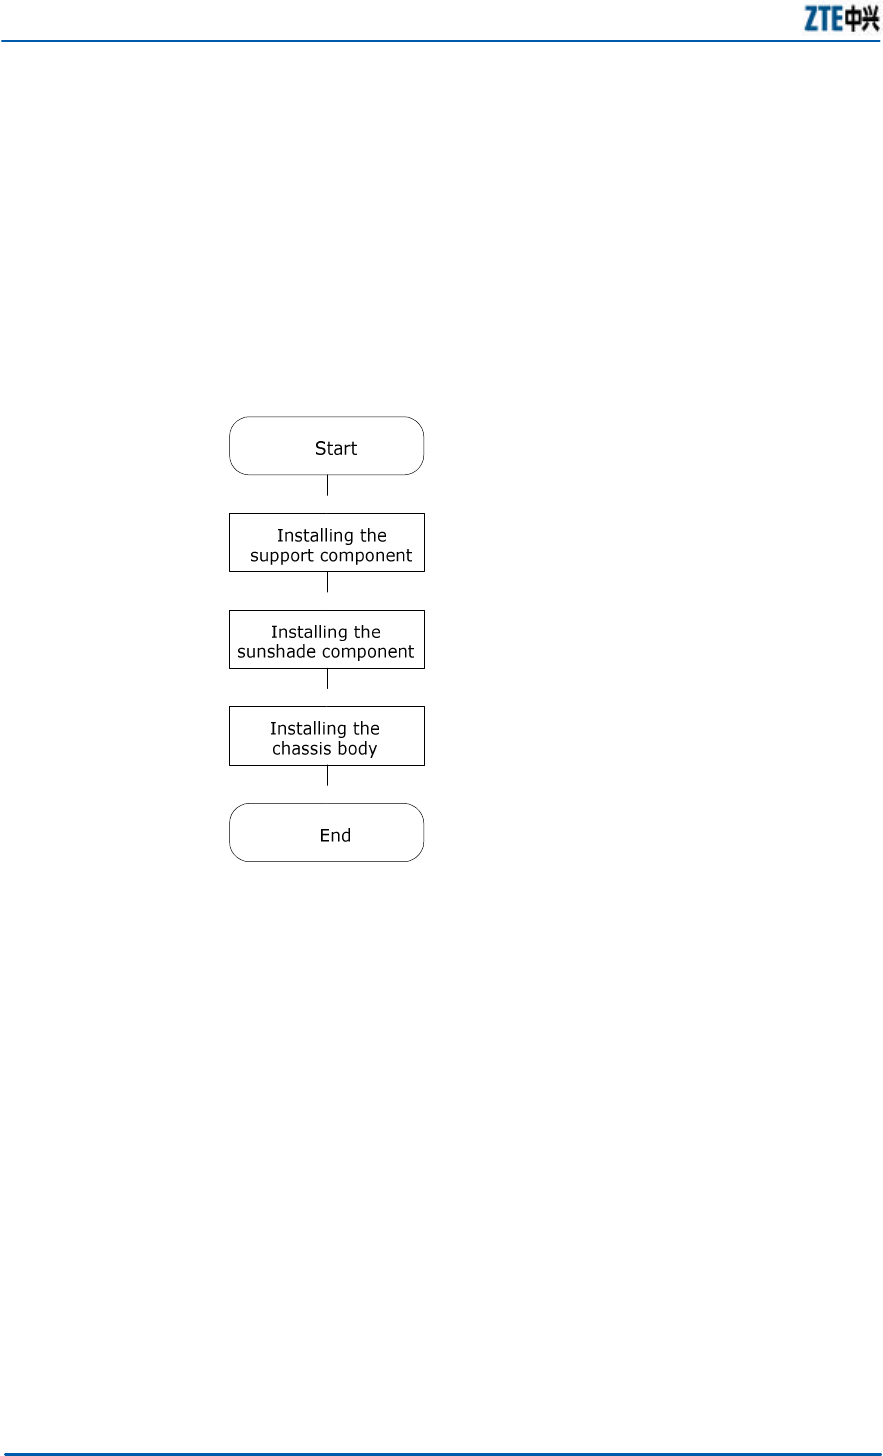
Figure 4 shows the installation flow for pole mounting of the
chassis.
FIGURE 4 INSTALLATION FLOW - POLE MOUNTING
Support Component Installation
For installing the support component perform the following steps:
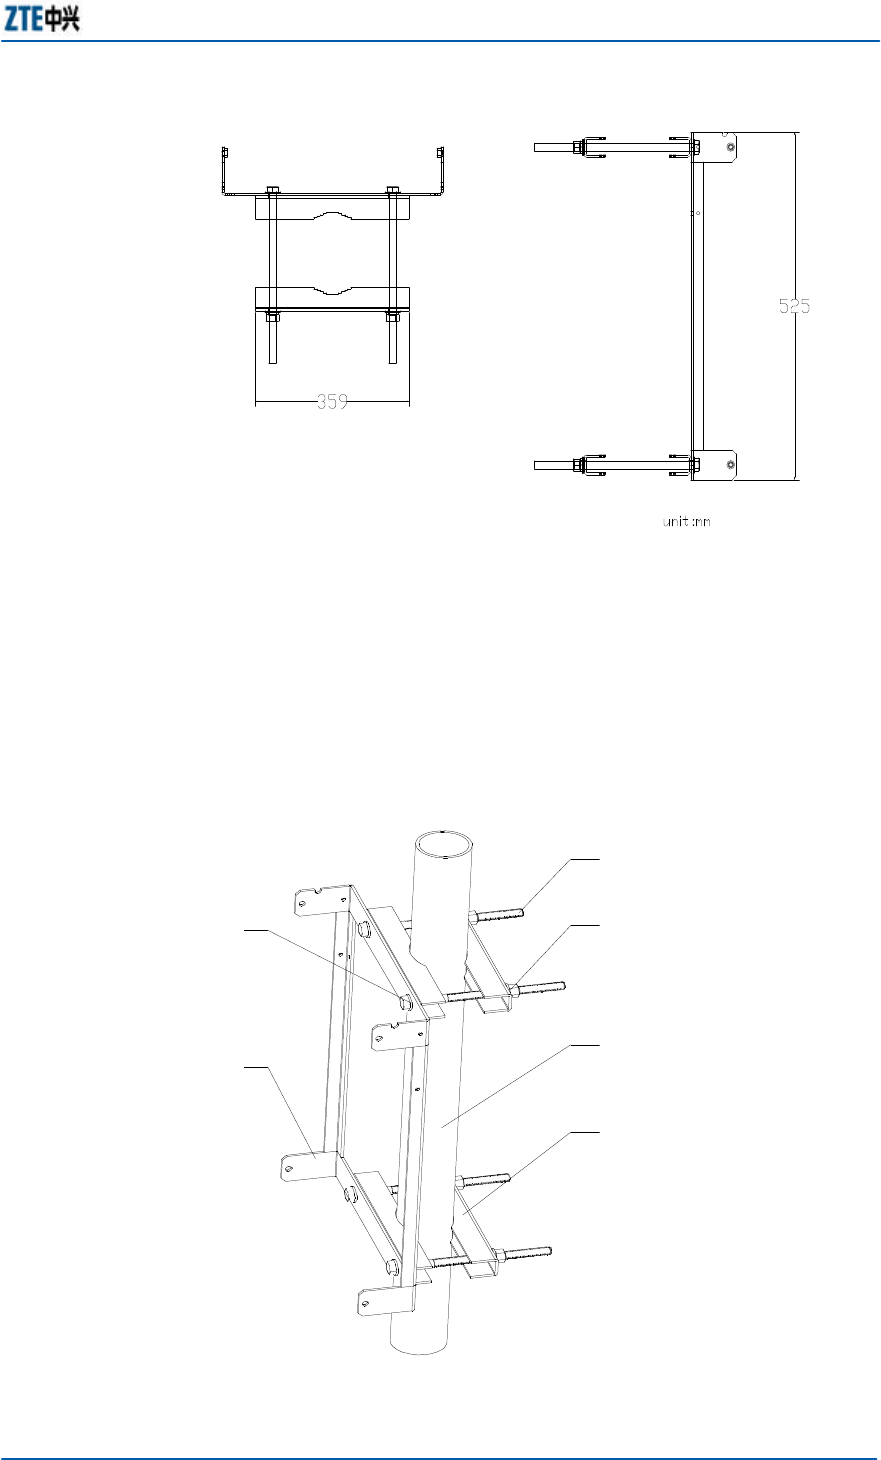
1. Take out the support component provided with the chassis.
Figure 5 shows the structure of this component;
Chapter 3 Chassis Installation
Confidential and Proprietary Information of ZTE CORPORATION 17
FIGURE 5 SUPPORT COMPONENT SCHEMATIC DIAGRAM
Top view Side view
2. Fasten the support component onto the pole by using the
fastening plate and bolts, as shown in Figure 6. The façade of
the equipment must face south and the back of the
equipment with the radiator face north. (This applies to the
Northern Hemisphere and the contrary to the Southern
Hemisphere).
FIGURE 6 SUPPORT COMPONENT FASTENING ONTO THE POLE
2
1
3
4
5
6
ZXMBW RA25 Agile 2.5G Remote Radio Frequency Unit Installation Manual
18 Confidential and Proprietary Information of ZTE CORPORATION
1. Plain washer 2. Support 3. Bolt 4. M12 nut, spring washer, plain
washer 5. Pole 6. Fastening plate
END OF STEPS
Note: The diameter of the post is usually 60 mm ~ 90 mm, with
75 mm recommended.
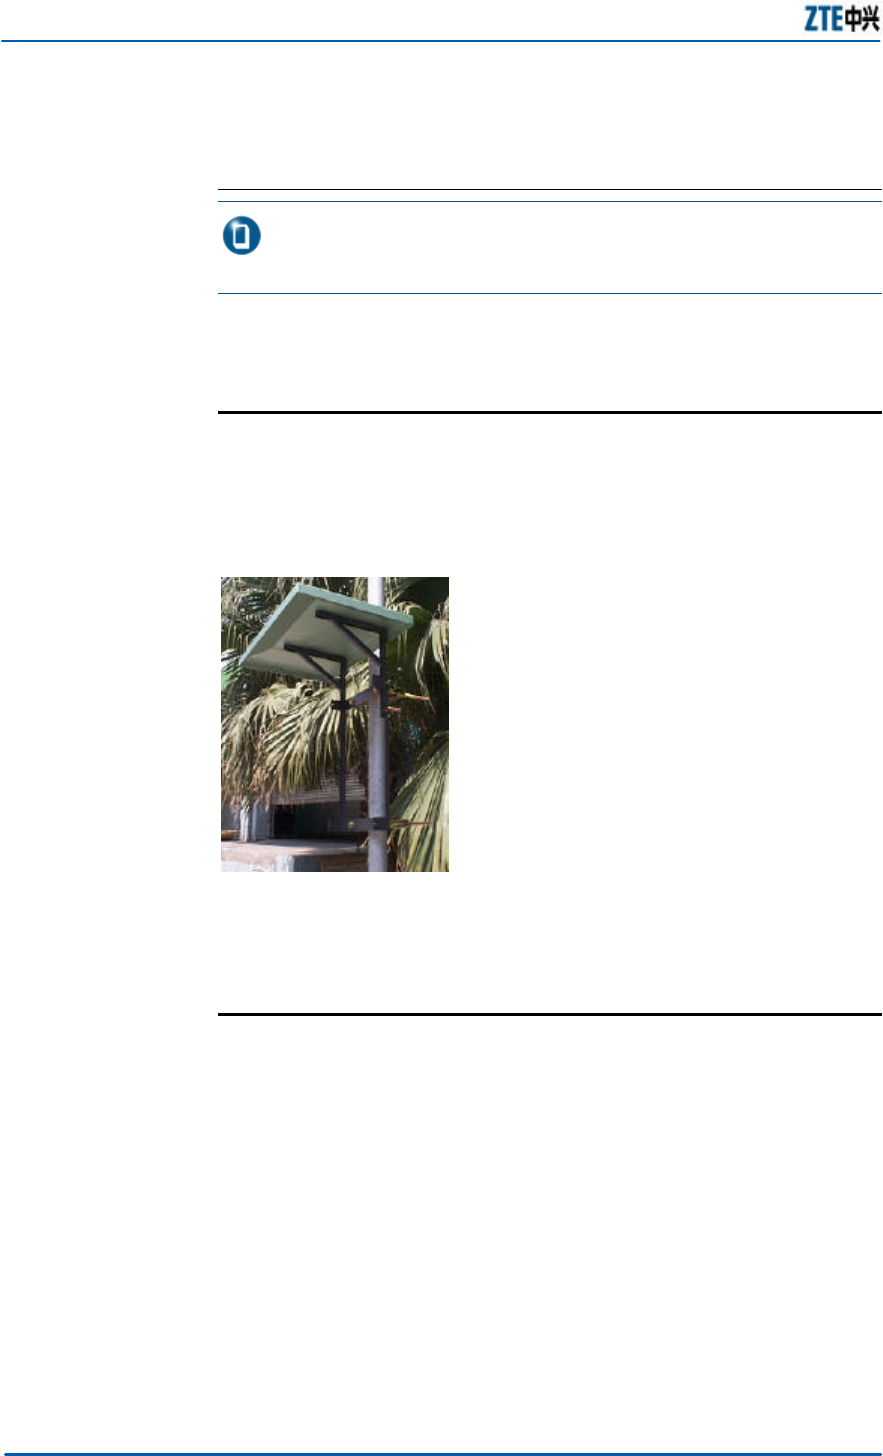
Sunshade Component Installation
As shown in Figure 7, fasten the sunshade onto the support with
four M4 bolts.
FIGURE 7 SUNSHADE INSTALLED -POLE MOUNTING
Chassis Body Installation
For installing the chassis body, perform the following steps:
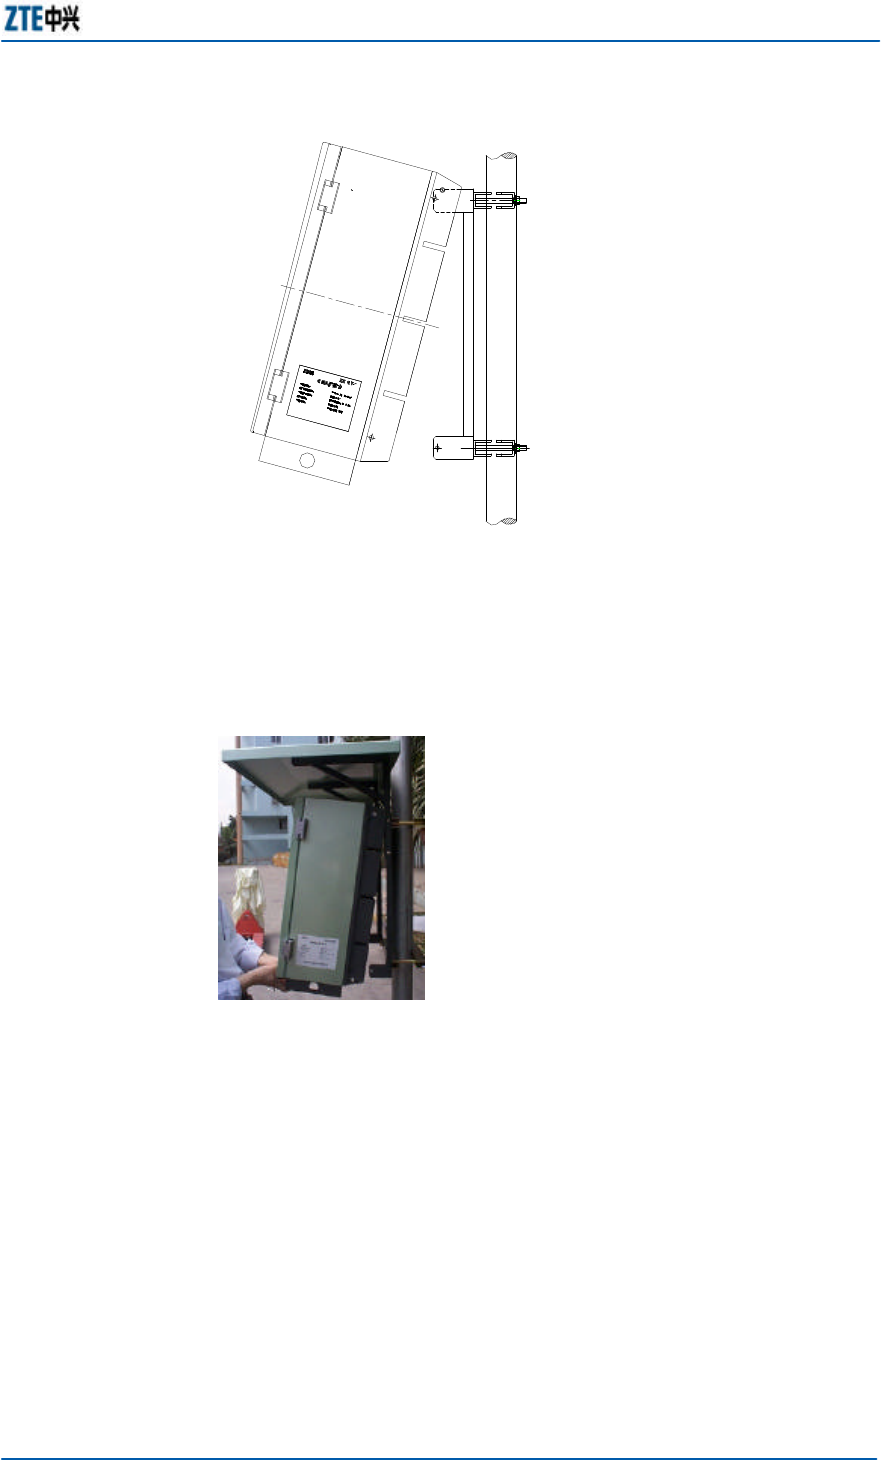
1. Lift the chassis body and hang the upper part of the chassis
onto the support component, as shown in Figure 8;
Chapter 3 Chassis Installation
Confidential and Proprietary Information of ZTE CORPORATION 19
FIGURE 8 HANGING THE CHASSIS ONTO THE SUPPORT-POLE MOUNTING
2. The lower part of the chassis drops naturally. Gently press
the chassis into position, as shown in Figure 9;
FIGURE 9 PUSHING CHASSIS INTO POSITION-POLE MOUNTING
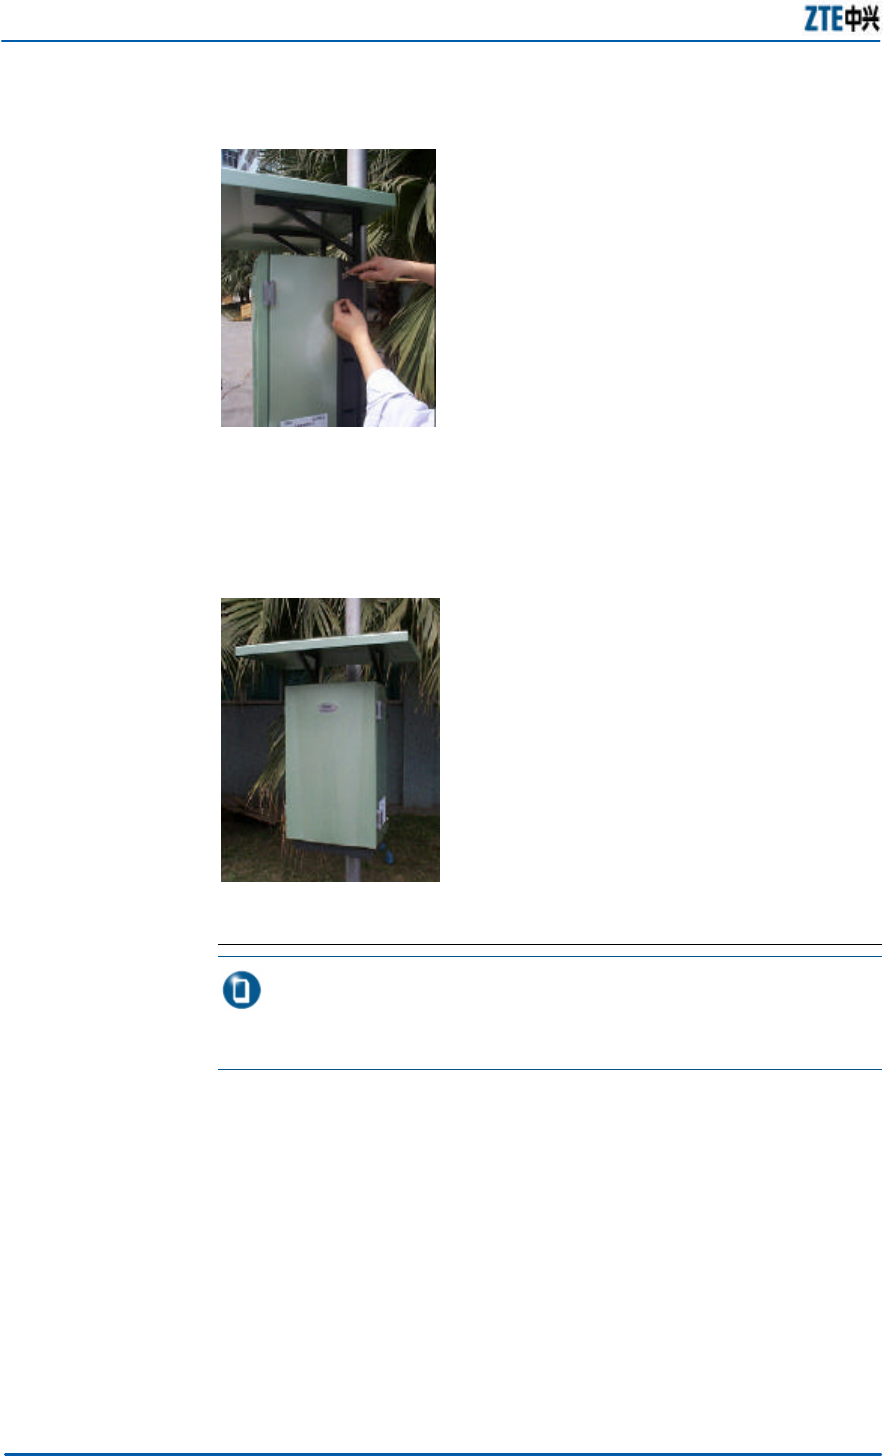
3. Align the support with the screw holes on the chassis, and
then tighten the four M8 internal hexagonal bolts, as shown
in Figure 10.
ZXMBW RA25 Agile 2.5G Remote Radio Frequency Unit Installation Manual
20 Confidential and Proprietary Information of ZTE CORPORATION
FIGURE 10 FASTENING THE CHASSIS BODY -POLE MOUNTING
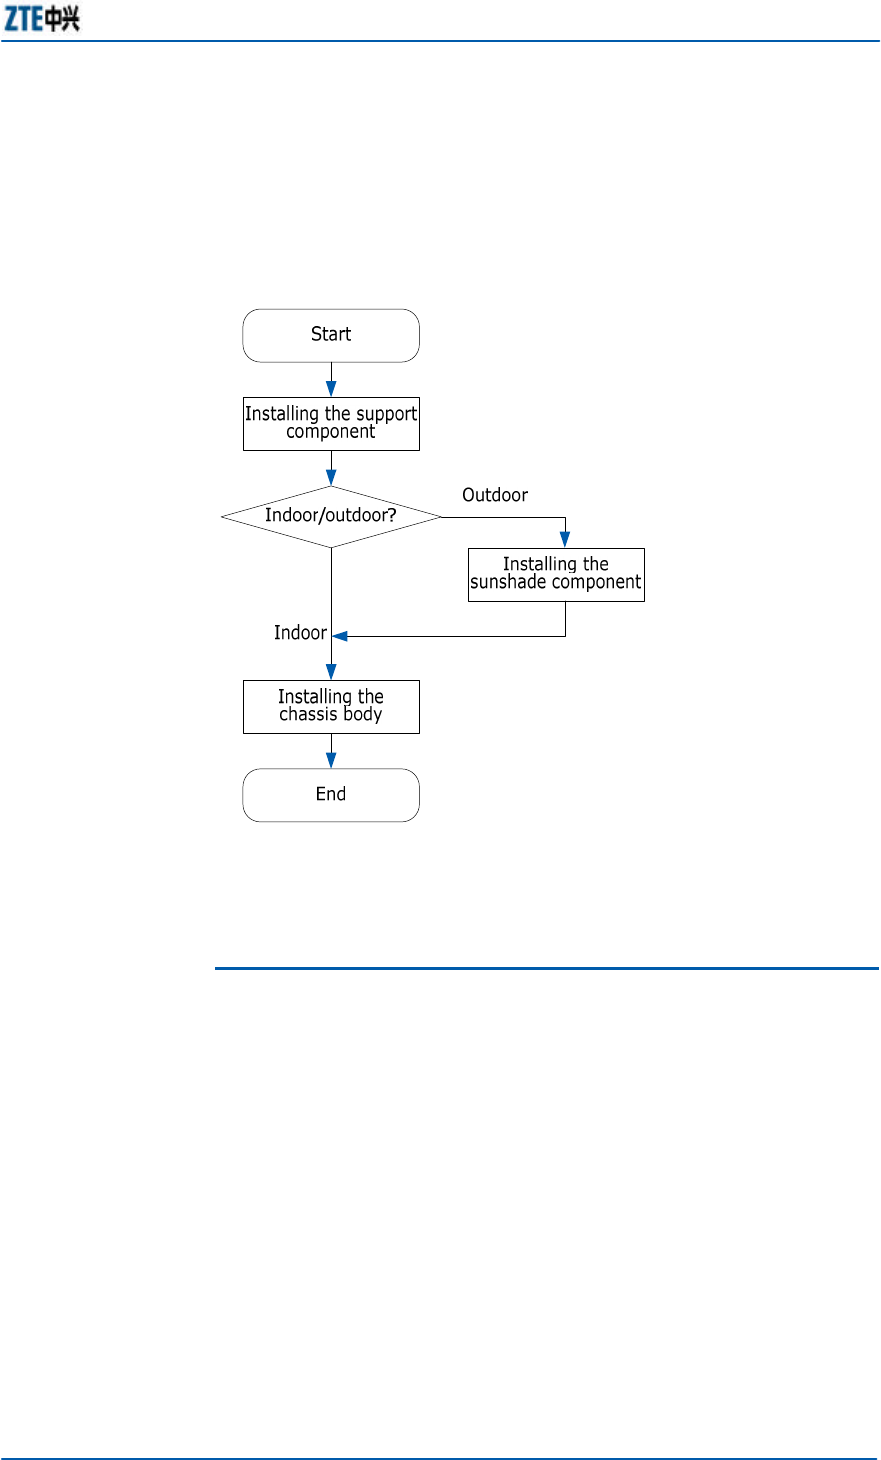
Figure 11 shows a mounted chassis.
FIGURE 11 MOUNTED CHASSIS-POLE MOUNTING
END OF STEPS
Note: The colors of the chassis and sunshade on the pictures in
this manual may be different from the actual colors. Those in the
diagrams are for reference only.
Chapter 3 Chassis Installation
Confidential and Proprietary Information of ZTE CORPORATION 21
Wall Mounting
Figure 12 shows the flow for wall mounting of the chassis.
FIGURE 12 INSTALLATION FLOW -WALL MOUNTING
Support Component Installation
For wall mounting, you need to fasten the support component
onto the wall.
1. Drilling
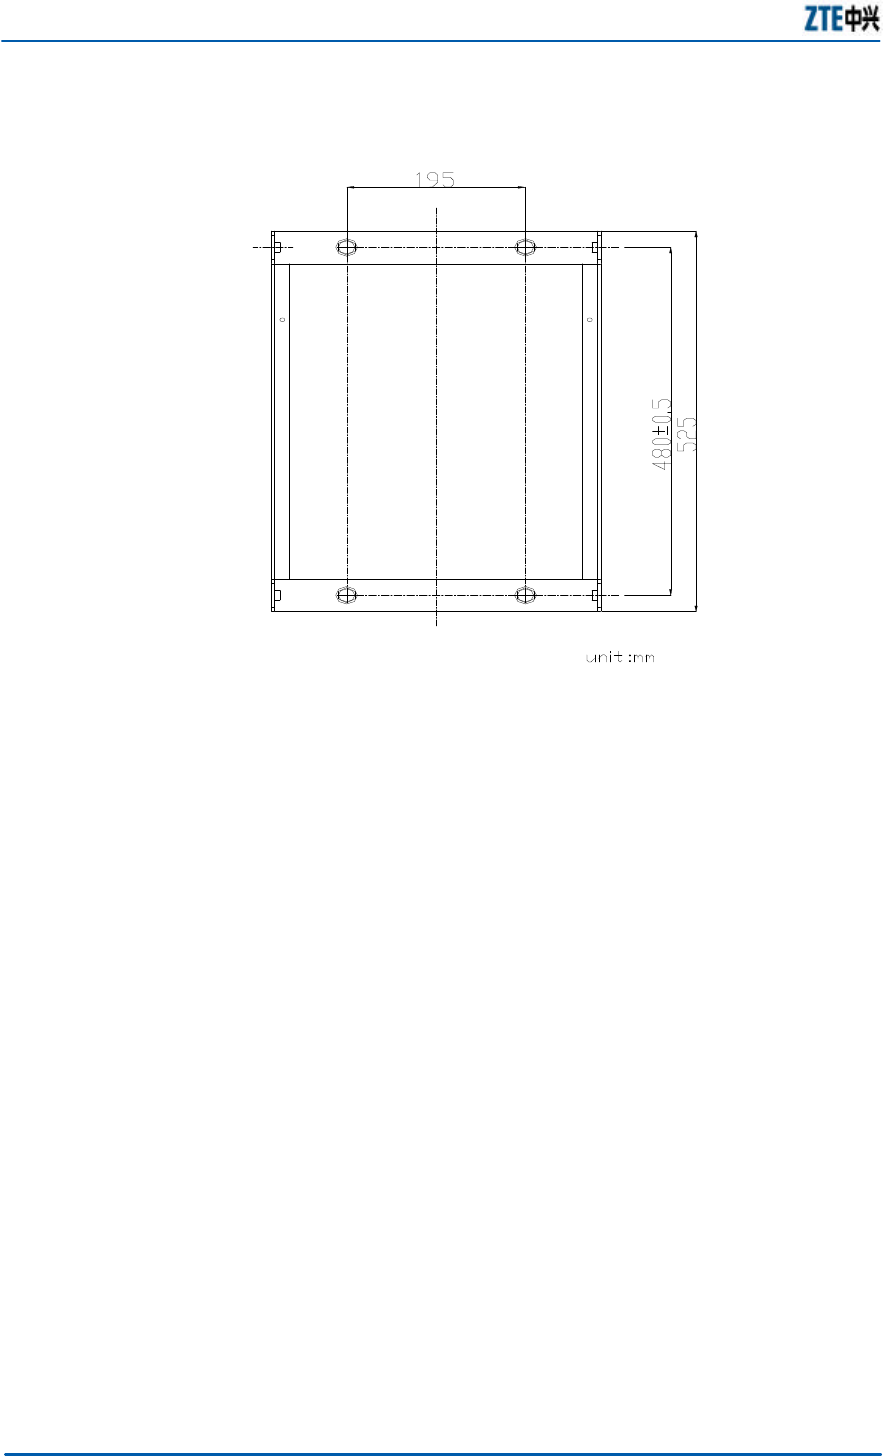
Drill holes on the target wall according to the hole sizes
shown in Figure 13.
ZXMBW RA25 Agile 2.5G Remote Radio Frequency Unit Installation Manual
22 Confidential and Proprietary Information of ZTE CORPORATION
FIGURE 13 SUPPORT HOLES LAYOUT
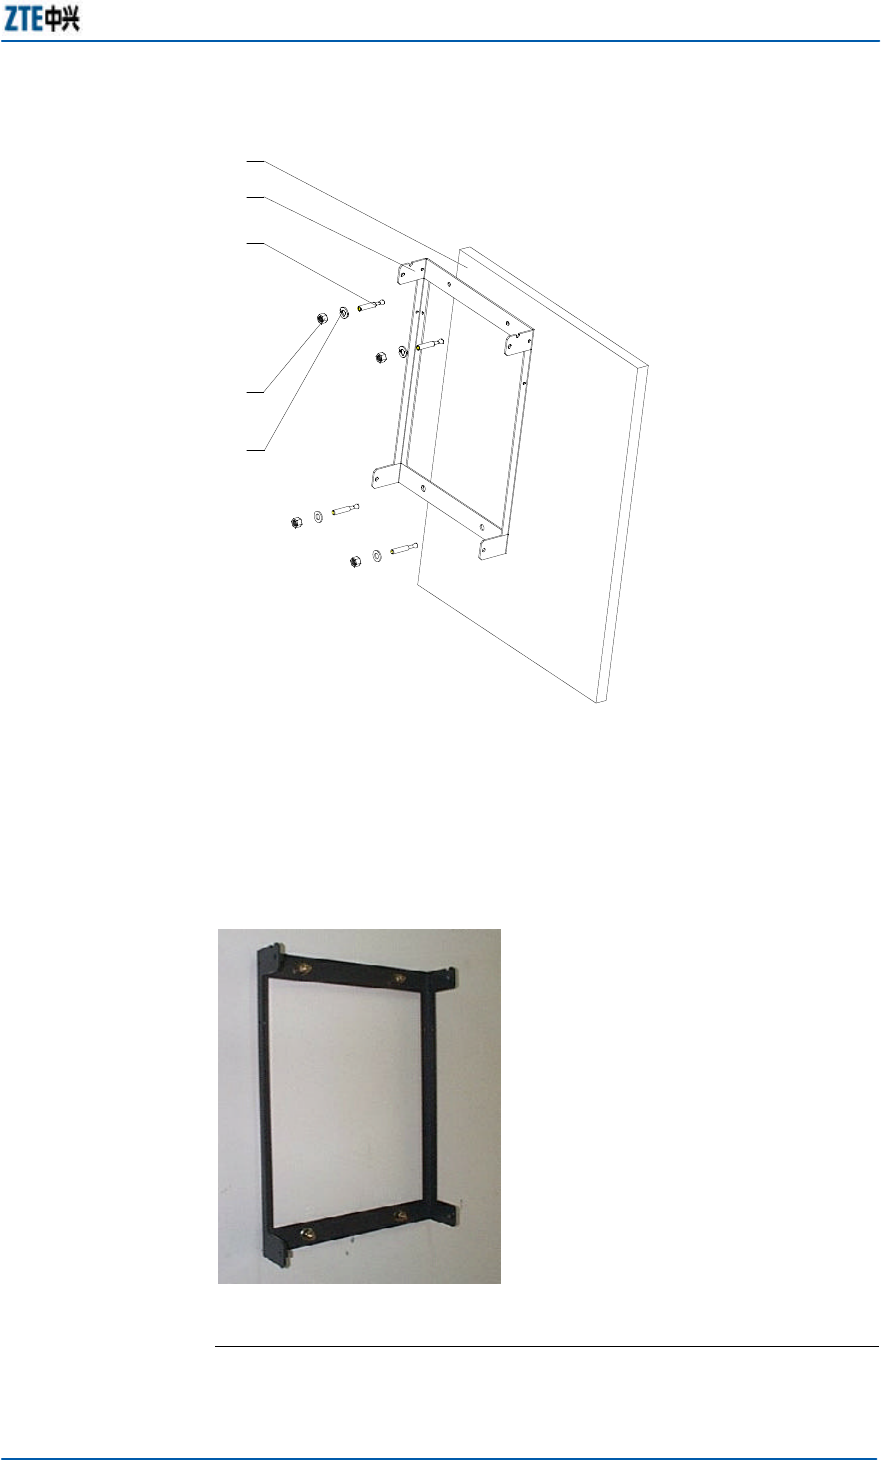
2. Fasten the support component onto the wall using four M10
expansion bolts, as shown in Figure 14.
Chapter 3 Chassis Installation
Confidential and Proprietary Information of ZTE CORPORATION 23
FIGURE 14 SUPPORT COMPONENT INSTALLATION SCHEMATIC DIAGRAM -
WALL MOUNTING
1
2
3
4
5
1.Washer 2. Nut 3. Expansion bolt 4. Support 5. Wall
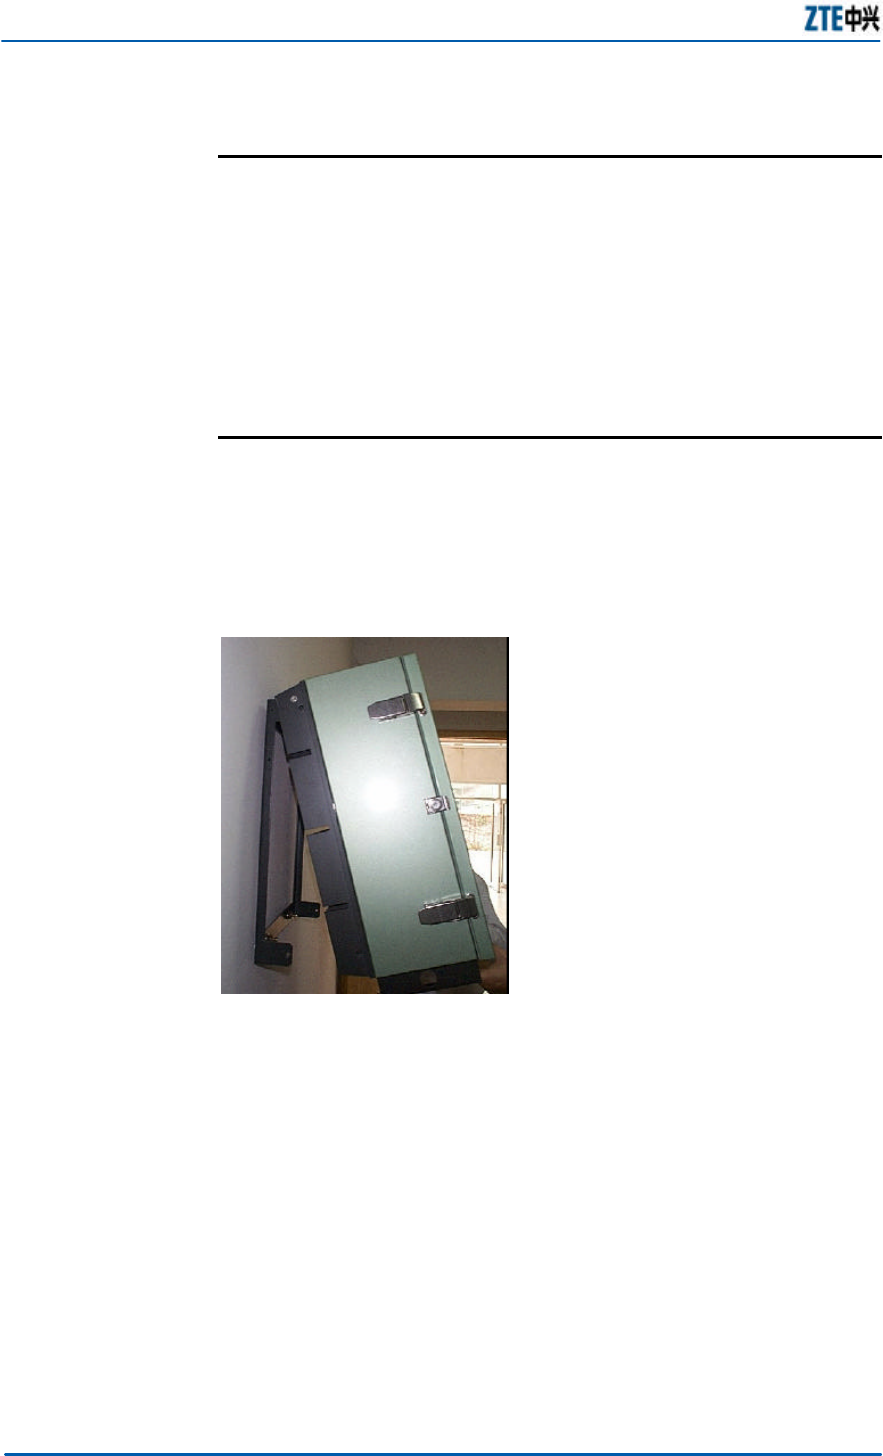
Figure 15 shows the installed support component.
FIGURE 15 INSTALLED SUPPORT COMPONENT SCHEMATIC DIAGRAM -WALL
MOUNTING
END OF STEPS
ZXMBW RA25 Agile 2.5G Remote Radio Frequency Unit Installation Manual
24 Confidential and Proprietary Information of ZTE CORPORATION
Sunshade Component Installation
You may choose not to install the sunshade component if the
chassis is mounted indoors. However, you must install the
sunshade component if the chassis is mounted outdoors.
The sunshade component can be installed in the same way as
the pole mounting mode. For details, see the Sunshade
Component.
Chassis Body Installation
For installing the chassis body ,perform the following steps:
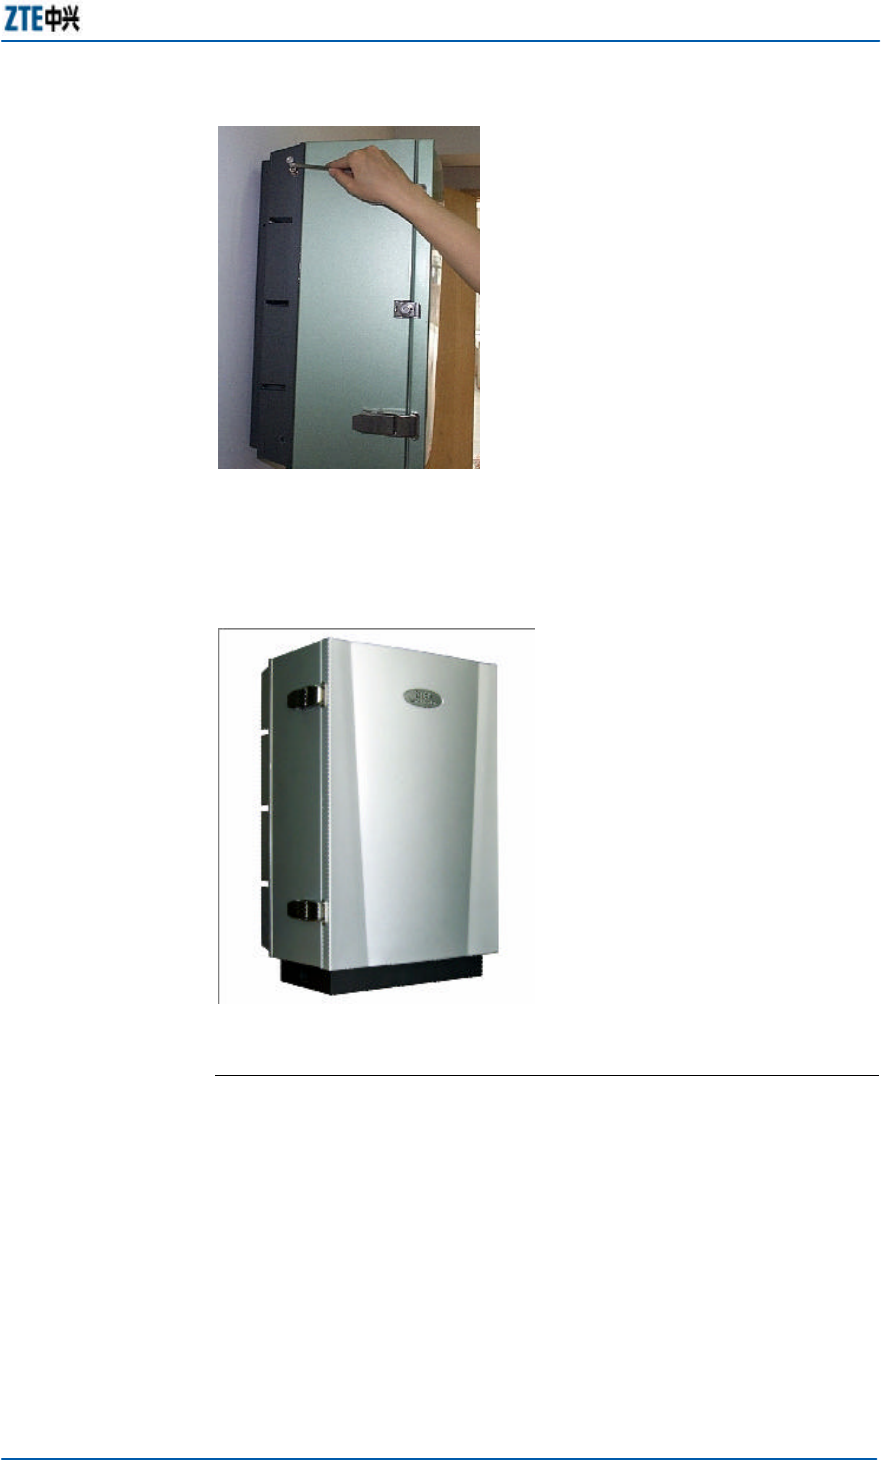
1. Hang the upper part of the chassis onto the support
component, as shown in Figure 16;
FIGURE 16 HANGING THE CHASSIS ONTO THE SUPPORT-WALL MOUNTING
2. Push the chassis body into position, align the support with
the screw holes on the chassis, and then tighten the four M8
internal hexagonal bolts, as shown in Figure 17.
Chapter 3 Chassis Installation
Confidential and Proprietary Information of ZTE CORPORATION 25
FIGURE 17 FASTENING THE CHASSIS BODY-WALL MOUNTING
Figure 18 shows a mounted chassis, with no sunshade installed.
FIGURE 18 MOUNTED CHASSIS-WALL MOUNTING
END OF STEPS

ZXMBW RA25 Agile 2.5G Remote Radio Frequency Unit Installation Manual
26 Confidential and Proprietary Information of ZTE CORPORATION
Chassis Mounting Check
After the chassis has been installed, must check the installation
quality, including:
n The arrangement, mounting location and direction of the
chassis must meet the requirements on the engineering
design drawing.
n The vertical deviation of the chassis must be less than 3 mm.
n The parts on the chassis must not come off or be damaged.
The paint coating must not peel off or be damaged.
Otherwise, the lost paint must be supplemented;
n All fastening screws must be tightened.

Confidential and Proprietary Information of ZTE CORPORATION 27
Chapter 4
Power and Grounding
Cables Installation
This chapter explains:
n Power cable installation
n Grounding cable installation
n Installation requirements
ZXMBW RA25 Agile 2.5G Remote Radio Frequency Unit Installation Manual
28 Confidential and Proprietary Information of ZTE CORPORATION
Power Cable Installation
The RA25 uses two types of power supplies.
n 220 V/110 V AC power supply
n -48 VDC power supply
Power Cable Types
This topic describes the following four types of power cables.
1. 220 V AC power cable of the RA25 chassis
The RA25 equipment is provided with one AC power cable
whose length is determined in the project survey. If cables of
special lengths are required or it is not easy to determine the
lengths needed on site, a coil of power cable and waterproof
connectors can be provided on site for assembly on site.
The AC power cable is a 3-core power cable, with a
waterproof connector.
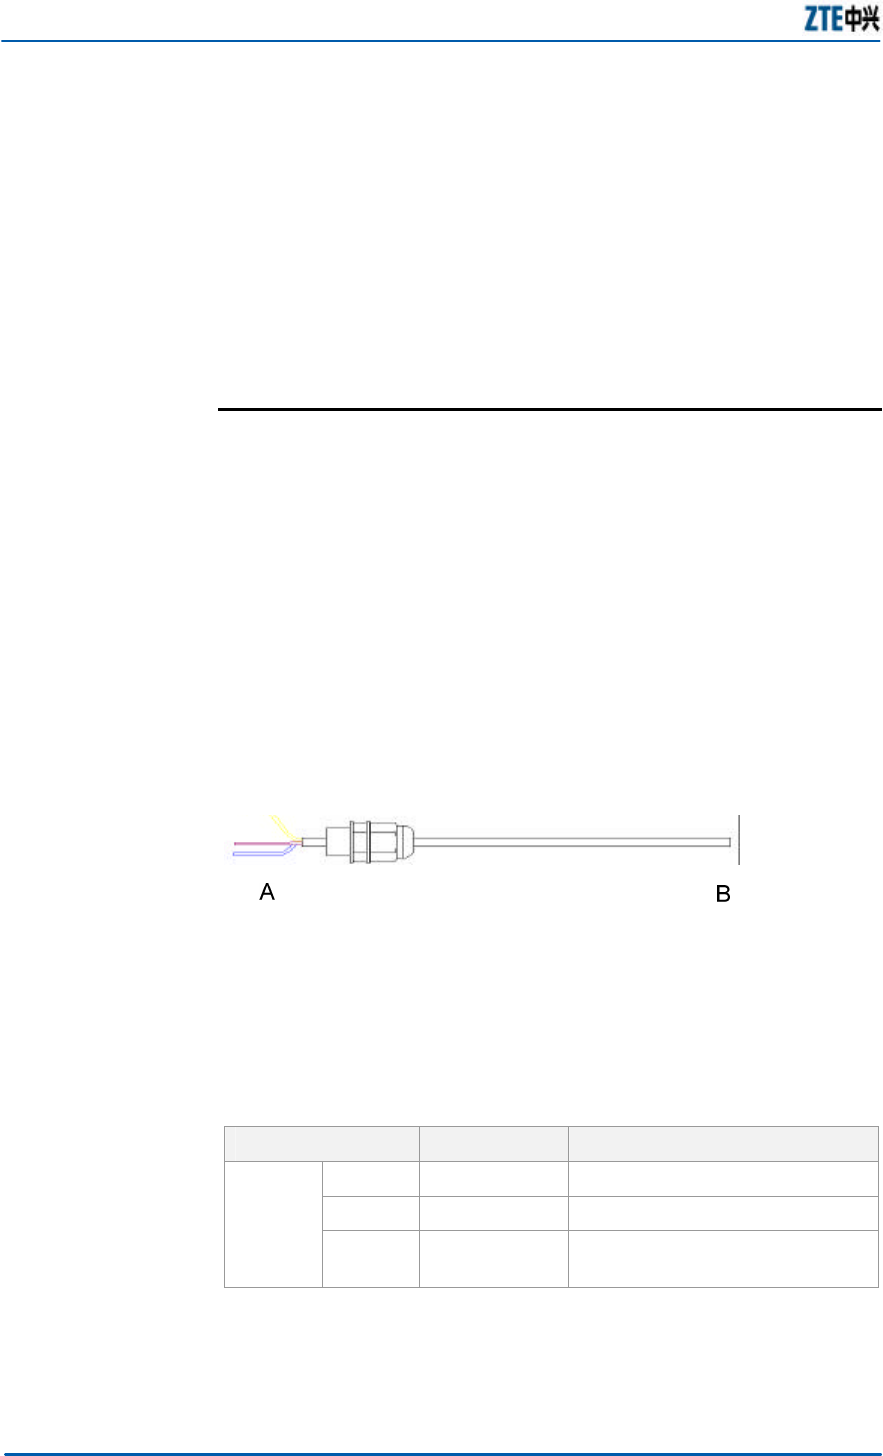
Figure 19 shows the structure of the cable.
FIGURE 19 AC POWER CABLE STRUCTURE
End A of the cable consists of three cores of different colors:
brown, blue, and yellow/green.
Table 8 shows the pinouts of the cable.
TABLE 8 220V AC POWER CABLE PINOUTS
Connector Name
Core Color Description
End A1 Blue AC lightning Arrester-N
End A2 Brown AC lightning Arrester-L
End A
End A3 Yellow/green AC lightning Arrester-PE
(protective earth)
Chapter 4 Power and Grounding Cables Installation
Confidential and Proprietary Information of ZTE CORPORATION 29
Note: As shown in Figure 19, the section within 60 mm on the
right of the waterproof connector must be wrapped with conducted
fabric in full shielding.
2. 110 V AC power cable of the RA25 chassis
The 110 V AC power cable have the same structure and
pinouts as the 220 V cable.
3. -48 V DC power cable of the RA25 chassis
Usually, the RA25 equipment is provided with a 10 m Dc
power cable. A ready cable can be provided by ZTE according
to the on-site survey data. Alternatively, it can also be made
on site as needed.
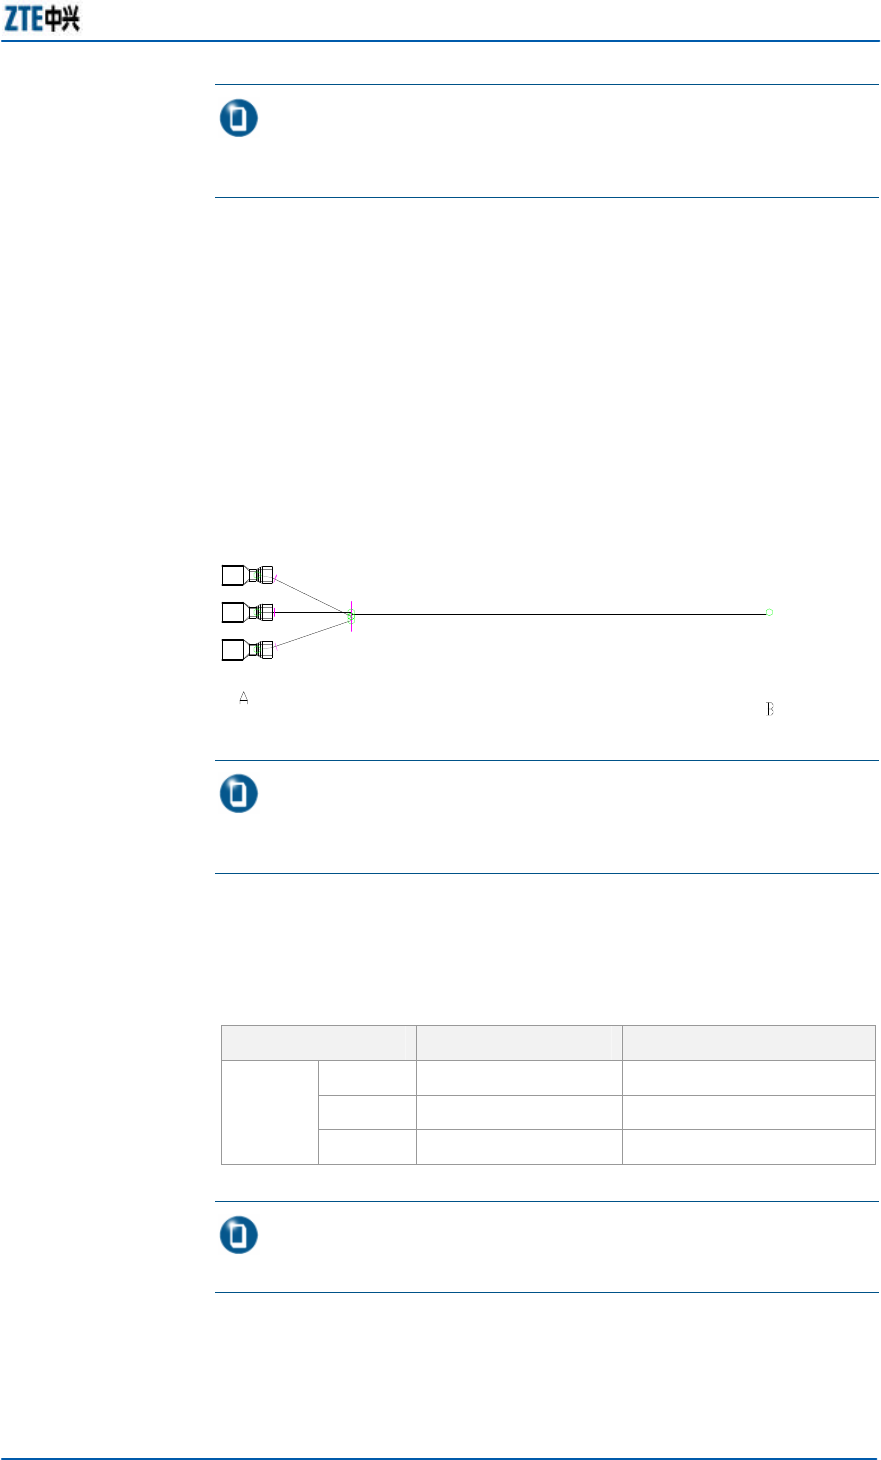
Figure 20 shows the structure of the DC power cable.
FIGURE 20 DC POWER CABLE STRUCTURE
Note: On End A are three fully insulated chip terminals. End B is
crimped with the appropriate type of wiring terminal, according to the
port type of the air switch of the user power distribution cabinet.
Table 9 shows the pinouts of the cable. For easy
identification, end A is referred to as A1, A2, and A3
respectively, corresponding to cores of different colors.
TABLE 9 -48V DC POWER CABLE PINOUTS
Connector Name
Core Color Description
End A1 Blue -48 V
End A2 Brown -48 VGND
End A
End A3 Yellow/green PE (protective earth)
Note: When the chassis of the equipment is mounted indoors, the
power cable must be protected with PVC tubes.
4. Fan power cable in the RA25 chassis
ZXMBW RA25 Agile 2.5G Remote Radio Frequency Unit Installation Manual
30 Confidential and Proprietary Information of ZTE CORPORATION
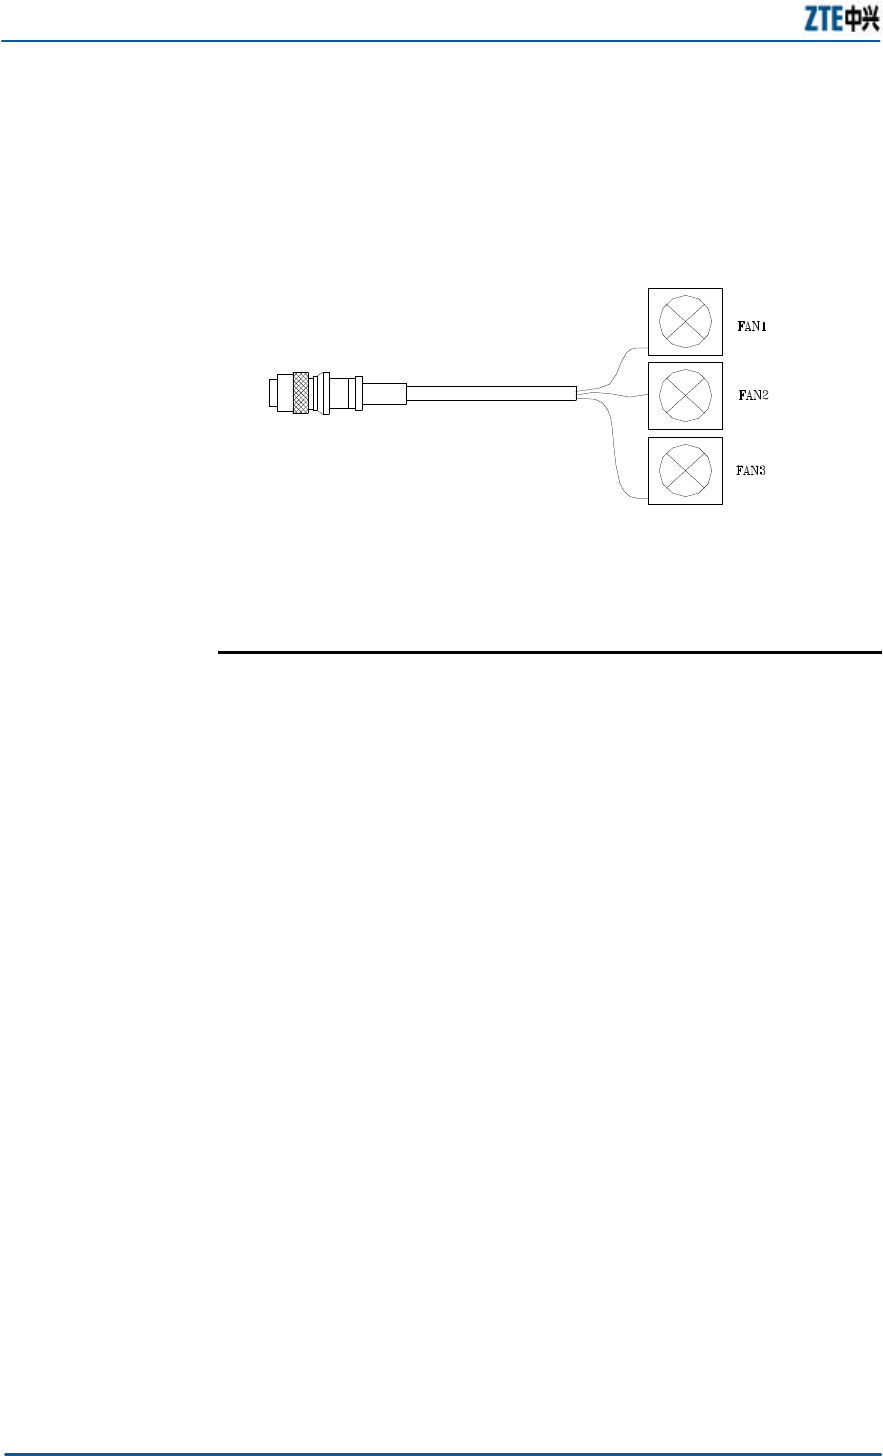
Three fans are installed on the base of the RA25 chassis, and
they are powered through the -24 V DC power supply
provided by the chassis. Figure 21 shows the structure of the
fan power cable.
FIGURE 21 FAN POWER CABLE STRUCTURE
Power Cables Installation Procedure
n External power cable of the chassis
Feed end A with a waterproof connector of the AC power
supply through the jack identified with POWER on the
transfer board at the bottom of the chassis, connect it to the
power lightning arrester in the chassis, and then tighten the
waterproof connector on the cable. Connect end B to the
AC/DC power distribution cabinet of the user. In this manual,
the typical installation and connection of the 220 VAC power
cable is given. Other power cables can be installed in similar
ways.
n Fan power cable in the chassis
Connect the 7-core round connector on end A to the FAN
socket on the transfer board. FAN1, FAN2, and FAN3 on end
B of the cable have already been connected to the three fan
power ports at the bottom of the chassis.
Chapter 4 Power and Grounding Cables Installation
Confidential and Proprietary Information of ZTE CORPORATION 31
Grounding Cable Installation
Usually, the user must be responsible for completing the basic
ground grid construction of the grounding system, the grounding
work of the iron tower and buildings, and the connection point
construction of the indoor/outdoor grounding busbars. The on-
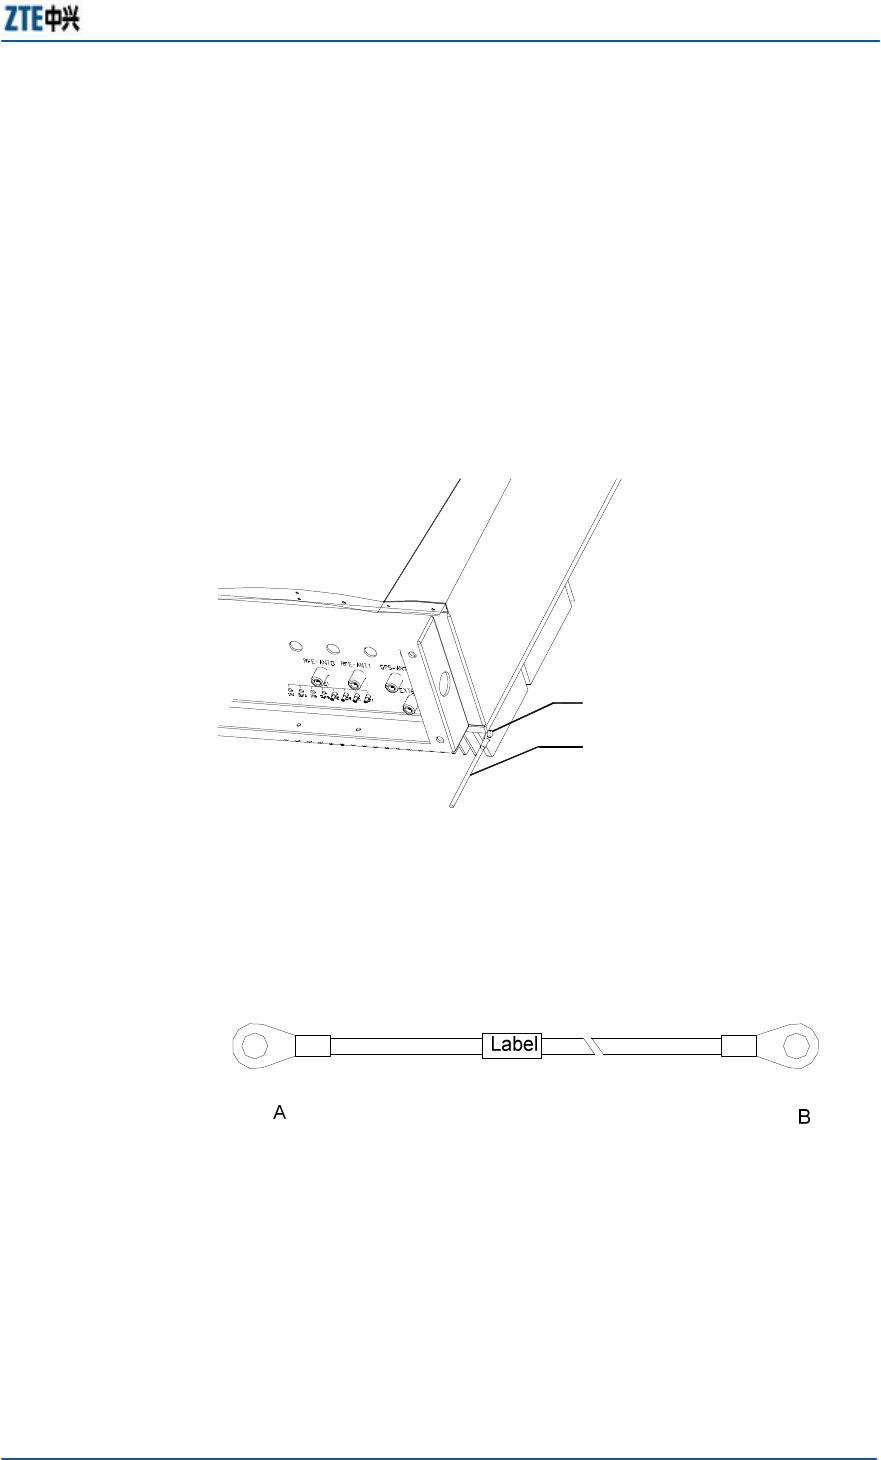
site engineers need to install the enclosure PE cable of the RA25
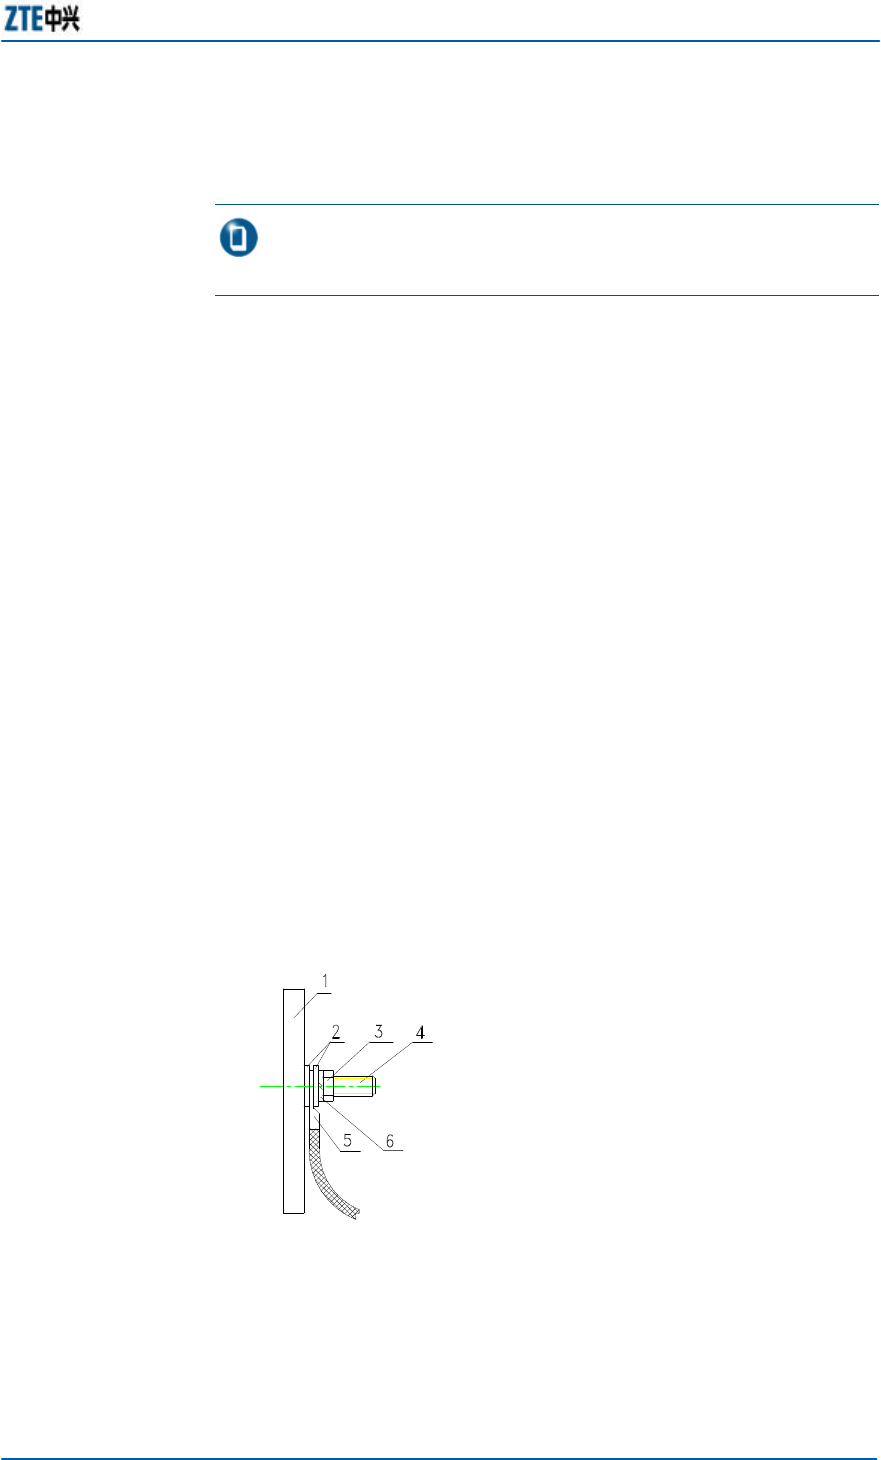
chassis. The RA25 enclosure has no PE terminal, as shown in
Figure 22.
FIGURE 22 CHASSIS PE CABLE INSTALLATION SCHEMATIC DIAGRAM
2
1
1 Chassis PE terminal 2 Grounding terminal
Figure 23 shows the structure of the grounding cable.
FIGURE 23 CHASSIS GROUNDING CABLE STRUCTURE
This cable is made of a 35 mm2 yellow/green copper wire, with
round metallic bare terminals (also known as lugs) crimped on
both ends.
End A of the grounding cable must be connected to the PE
terminal of the chassis, while end B can be connected in the
following two ways:

ZXMBW RA25 Agile 2.5G Remote Radio Frequency Unit Installation Manual
32 Confidential and Proprietary Information of ZTE CORPORATION
n If the chassis is installed indoors, the PE terminal is
connected to the specified indoor grounding copper busbar
through the grounding cable;
n If the chassis is installed outdoors, the PE terminal can be
connected to the specified iron tower grounding cable, roof
grounding cable or outdoor grounding copper bus bar.
Note: The grounding cable must be connected by crimping of
copper lugs.
Chapter 4 Power and Grounding Cables Installation
Confidential and Proprietary Information of ZTE CORPORATION 33
Installation Requirements
Note: When you install the power and grounding cables, you must
be extremely cautious to ensure your safety and that of the equipment.
Keep the following requirements in mind while installing the
cables:
n Before you connect the power cables, mark both ends of
each cable, and attach the label at the location about 2cm
from the lug. On one end, fill in the location of the power
supply. On the other end, fill in the location of the chassis;
n The power cables and grounding cables must be laid
separately from other cables. When they are laid side on side
with the signal cables, a horizontal spacing of 200 mm must
be maintained between them;
n Cable ties must be spaced 200 mm to protect the rocking
cable jackets from rubbing with the iron tower and thus
being damaged. Cable ties must cut flat.
n Measure the lengths needed before laying the cables. If a
cable is found not long enough in the laying process, replace
it with a longer one for redistribution. Do not connect or weld
it with another one to form a longer cable;
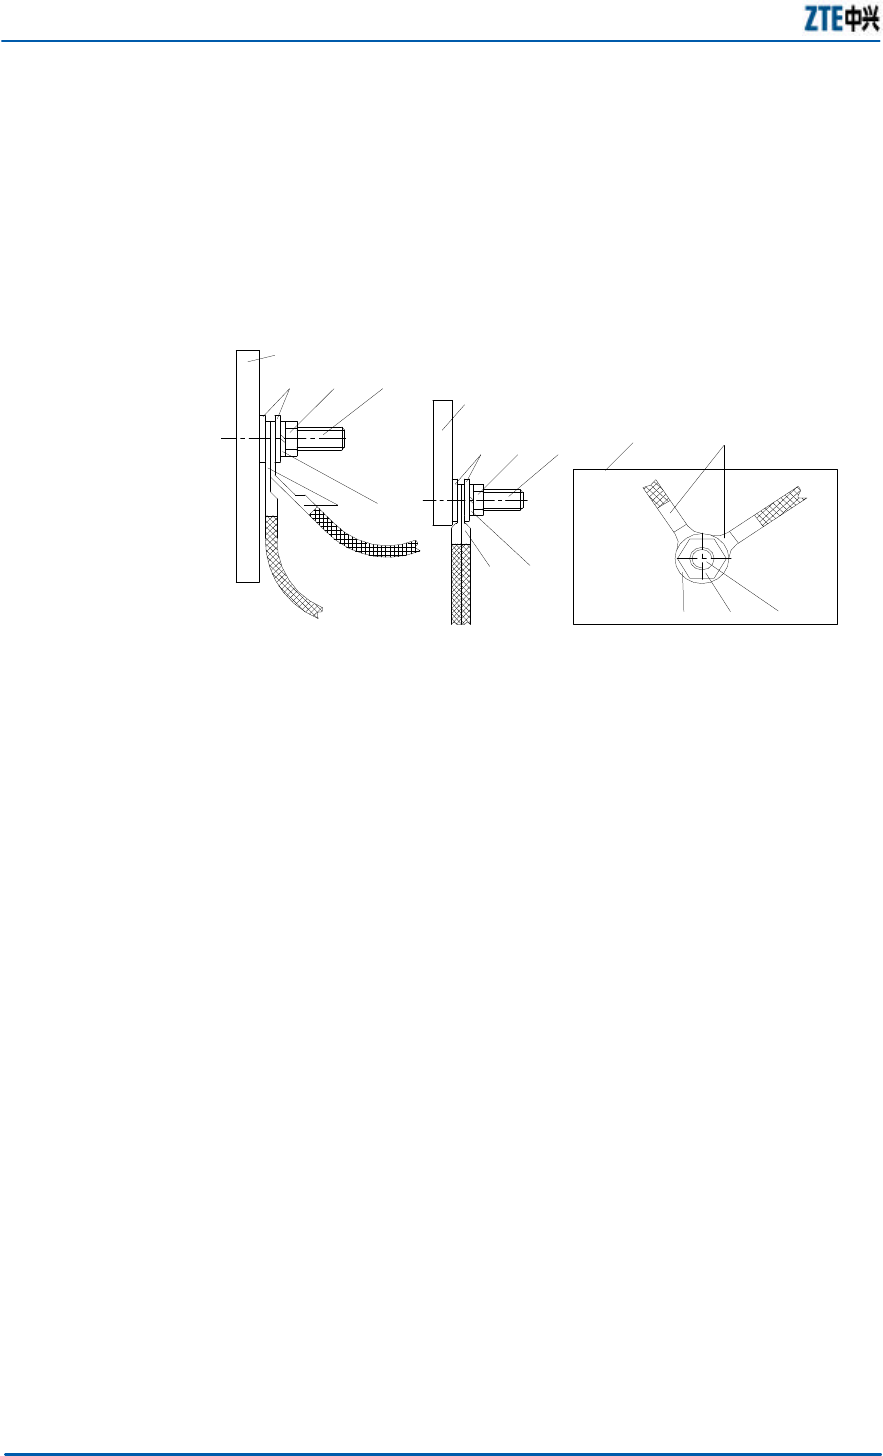
n When fixing the cable lugs, add plain washers and spring
washers to ensure secure fixation and good contact between
the cable and copper bar, as shown in Figure 24.
FIGURE 24 POWER CABLE CONNECTION METHOD 1
1. Copper busbar 2. Plain washer 3. Nut 4. Bolt 5. Lug 6. Spring
washer
If one wiring post needs to be connected with two or more
cables, the lugs of the cables cannot be installed in an
ZXMBW RA25 Agile 2.5G Remote Radio Frequency Unit Installation Manual
34 Confidential and Proprietary Information of ZTE CORPORATION
overlaid manner. Instead, they must be installed crossly or in
back-to-back manner. When they have to be overlaid, they
must be bent by 45º or 90º before the installation. The
bigger one must be underneath the smaller one. This method
is recommended for all cable installations with lugs. Figure
25 illustrates the specific connection method.
FIGURE 25 POWER CABLE CONNECTION METHOD 2
4
32
6
5
1
56
2 3 4
1
1
4
23
5
45° or 90° manner Back-to-back manner Crossed manner
1. Copper busbar 2. Plain washer 3. Nut 4. Bolt 5. Lug 6. Spring
washer

Confidential and Proprietary Information of ZTE CORPORATION 35
Chapter 5
External Power Cables
Installation
This chapter explains:
n Chassis external interfaces
n Optical fiber installation
n External monitoring cable installation
n Cable/fiber installation requirements
ZXMBW RA25 Agile 2.5G Remote Radio Frequency Unit Installation Manual
36 Confidential and Proprietary Information of ZTE CORPORATION
Chassis External Interfaces
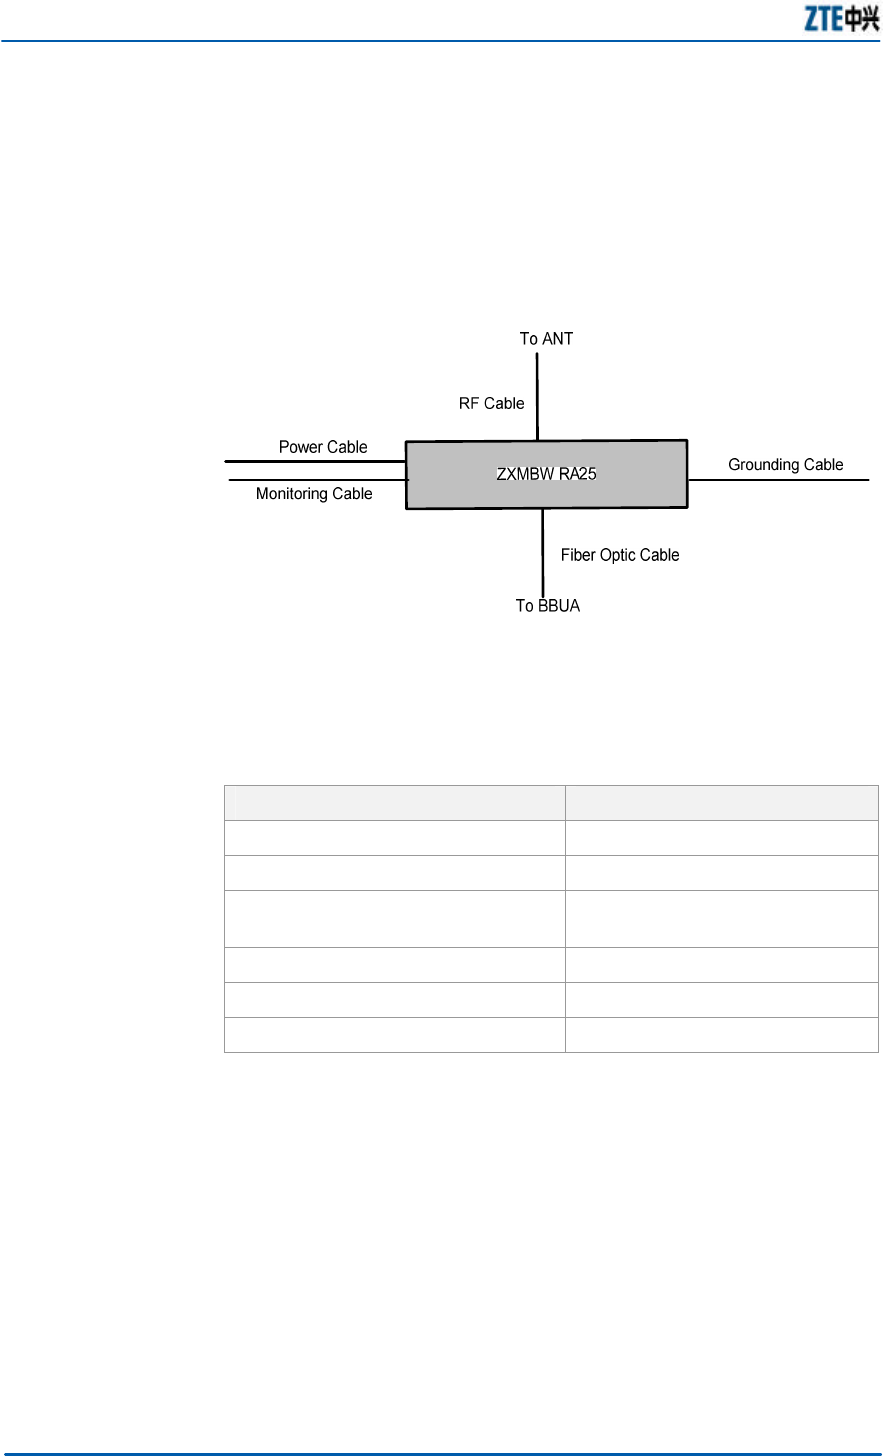
Figure 26 shows the external interfaces of the RA25.
FIGURE 26 RA25 EXTERNAL INTERFACES
Table 10 lists the external interfaces on the transfer board.
TABLE 10 EXTERNAL INTERFACES ON THE TRANSFER BOARD
Interface Name Description
POWER AC/DC power input
FIBER Optical interface
MONITOR 485/trunk node monitoring
interface
FAN External fan interface
RFE-ANT0 Antenna feeder interface
RFE-ANT1 Antenna feeder interface
Chapter 5 External Power Cables Installation
Confidential and Proprietary Information of ZTE CORPORATION 37
Optical Fiber Installation
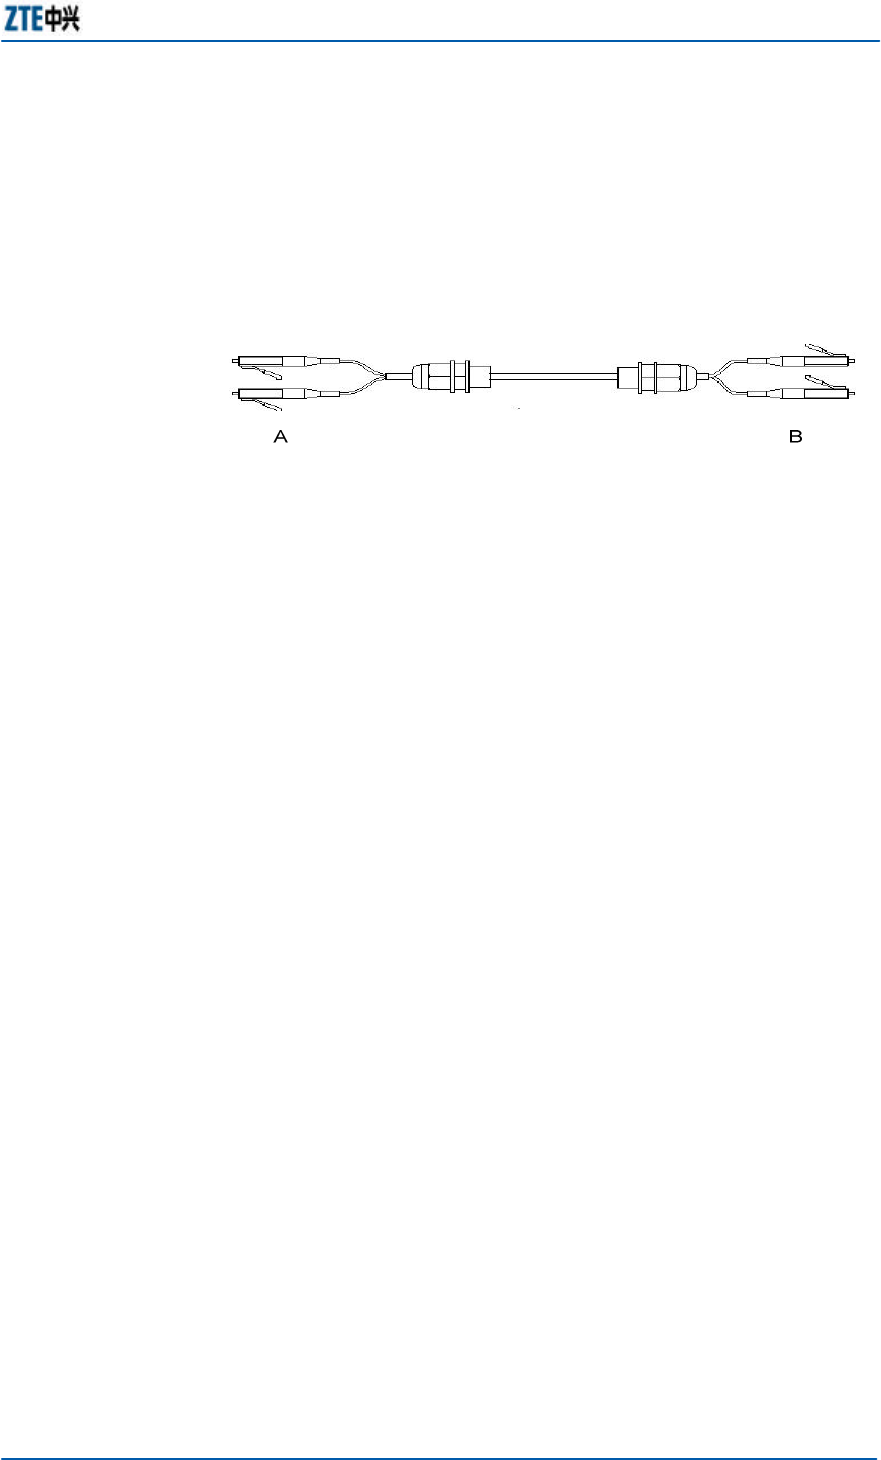
Figure 27 shows the structure of the optical fiber between the
BBUA and RA25.
FIGURE 27 OPTICAL FIBER STRUCTURE
The optical fiber is a two-core single-mode waterproof pigtail
fiber with a waterproof connector of the LC/PC type. The pigtail
fiber on end A is connected to the RA25, while that on end B is
connected to the BBUA.
The optical fiber between the BBUA and RA25 can be installed in
the following three ways:
n When the BBUA is close to the RA25
Also, when the BBUA is installed outdoors, they can be
connected directly with the optical fiber. The optical fiber is a
waterproof pigtail fiber, with waterproof end caps and LC
connectors at both ends. The length of the core at either end
is 0.7 m. End A is connected to the RA25, while the MGB16
waterproof connector is connected to the FIBER1 port on the
interface board of the chassis. End B is connected to the
BBUA, while the MGB20 waterproof connector is connected to
the OPT1 port on the OMU interface board.
n When the BBUA is far away from the RA25
When the BBUA is installed indoors and the RA25 is installed
outdoors, they can be connected directly with the optical
fiber. The middle of the optical fiber is a waterproof pigtail
fiber, with LC connectors on both ends. The waterproof end
cap on end B is removed. With a waterproof end cap, End A
is connected to the RA25, while end B is connected to the
BBUA.
n When the RA25 and the BBUA are installed at two different
places, and the ODF or optical fiber box is needed, two
optical fibers must be provided. One is for connection
between the BBUA and ODF, and the other is for connection
between the ODF and RA25.
i. BBUA to ODF
The optical fiber is an indoor fiber jumper, of which one
end is a square LC/PC connector, and other end is a

ZXMBW RA25 Agile 2.5G Remote Radio Frequency Unit Installation Manual
38 Confidential and Proprietary Information of ZTE CORPORATION
round FC/PC connector. The LC/PC end is connected to
the BBUA, while the FC/PC end is connected to the ODF.
ii. ODF to RA25
The optical fiber is a waterproof pigtail fiber. Its end with
a waterproof end cap is a square LC/PC connector, and
the other end without waterproof end cap is a round
FC/PC connector. The length of the core at the end with a
waterproof end cap is 0.7 m, and that at the other end is
3 m. The end with a waterproof end cap is connected to
the RA25, and the other end is connected to the ODF.
Note: The lengths of the pigtail fibers are available in 20 m, 50 m,
100 m, 130 m, 150 m, and 180 m. You can select the appropriate ones
to suit side conditions.
Chapter 5 External Power Cables Installation
Confidential and Proprietary Information of ZTE CORPORATION 39
External Monitoring Cable
Installation
The RA25 provides one external monitoring interface for
receiving/transmitting the 485 and trunk node signals.
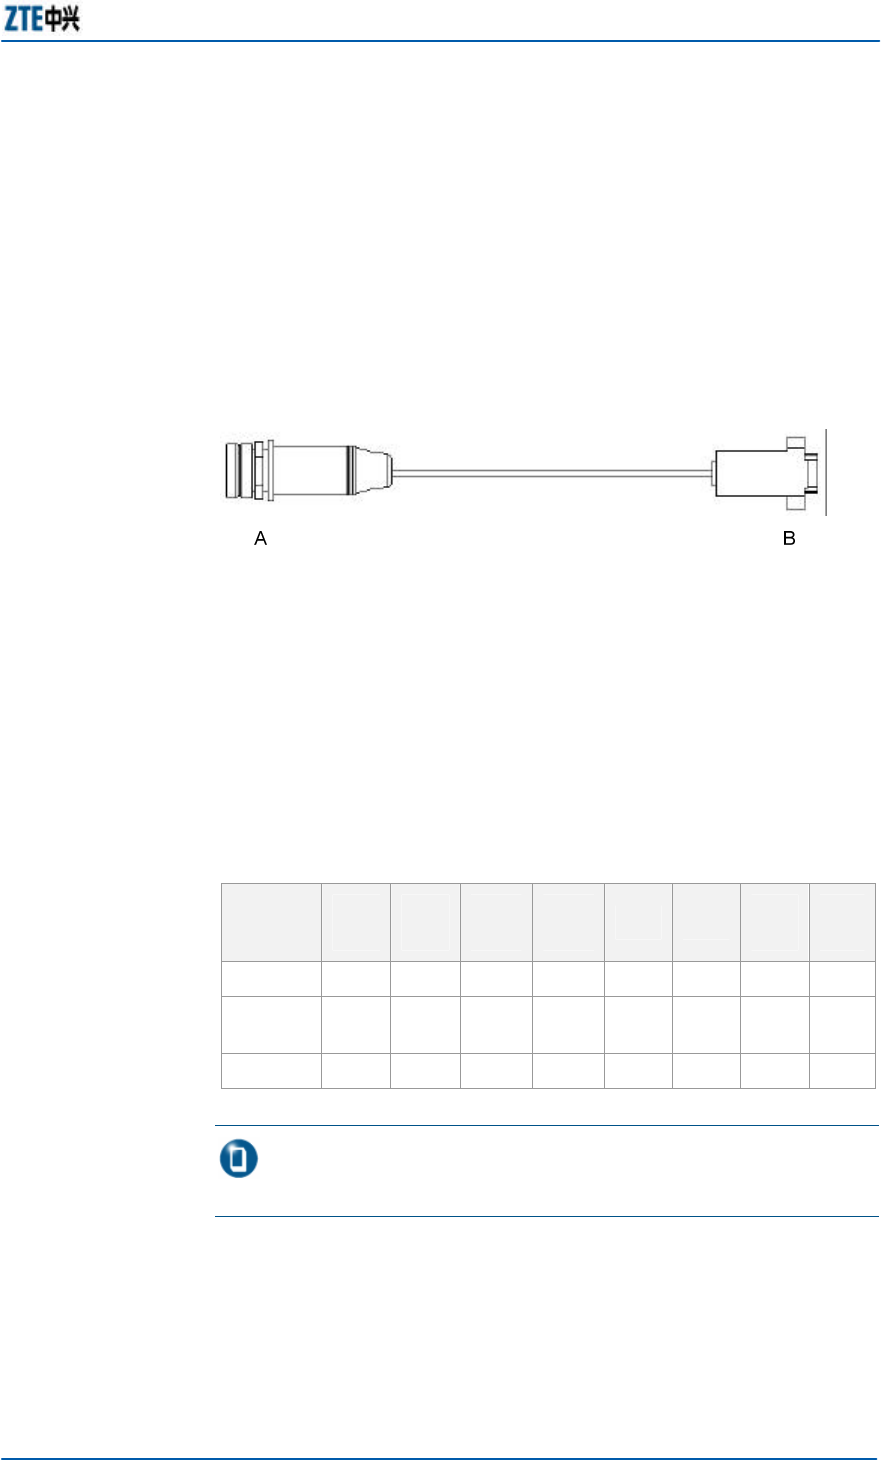
Figure 28 shows the structure of the external monitoring cable.
FIGURE 28 EXTERNAL MONITORING CABLE STRUCTURE
End B of the cable is a D-type 9-core straight welded connector
(male), connected to the monitored object, for example, the UPS
DB9 connector, which can be welded on site.
End A is a 7-core straight welded round connector (female),
connected to the MONITOR interface at the bottom of the
chassis. Table 11 lists the signal definitions of the 7-core
aeronautic connector cable.
TABLE 11 7-CORE AERONAUTIC CONNECTOR CABLE SIGNAL DEFINITIONS
Signal
Definiti
on
Dry
_0 Dry
_1 Dry_
2 Dry_
3 GND
GND
485
+ 485
-
End A 1 2 3 4 5 5 7 8
Cable Whit
e Blue Whit
e Oran
ge Whit
e Brow
n Whit
e Gree
n
End B 1 2 3 4 6 7 5 8
Note: The user can determine whether to install the external
monitoring cable according to the site condition.

ZXMBW RA25 Agile 2.5G Remote Radio Frequency Unit Installation Manual
40 Confidential and Proprietary Information of ZTE CORPORATION
Cable/Fiber Installation
Requirements
The following requirements must be met for the installation of
cables and optical fibers.
Cable Installation Requirements
n The cables installed outdoors must all be PE sheathed cables
in principle. If common cables need to be used in special
cases, the PVC tubes must be used to protect them.
n Cables must be laid in good order. Power cables and signal
cables must be laid separately, with spacing over 200 mm in
between.
n When cables are laid on the iron tower, the cable ties must
be spaced less than 0.5 m, to protect the rocking cable
jackets from rubbing with the iron tower and thus being
damaged.
Fiber Installation Requirements
n Do not bend optical fibers into right angles. The bend radius
of outdoor optical fibers must be 90 mm for the minimum,
and that of indoor optical fibers must be 30 mm for the
minimum.
n If an optical fiber is overlong, the excessive part must be
arranged in the fiber winder. Fibers must not entangle with
each other, for easy identification;
n The optical fibers must go naturally with minimum bends and
without being dragged violently. The binding must be in
proper tightness, and the spacing between cable items must
be less than 0.5 m.
n The marks on both ends of an optical fiber must be clear.

Confidential and Proprietary Information of ZTE CORPORATION 41
Chapter 6
Main Antenna Feeder
System Installation
This chapter explains:
n Installation preparation
n Antenna feeder system structure
n Installation flow
n Antenna installation
n Feeder installation
n Water proof treatment

ZXMBW RA25 Agile 2.5G Remote Radio Frequency Unit Installation Manual
42 Confidential and Proprietary Information of ZTE CORPORATION
This chapter describes the installation preparation for the RA25
main antenna feeder system, and its structure, installation flow,
installation procedure of each component, SWR test, and water
prevention treatment of the feeder connector.
Installation Preparation
Before the installation of the main antenna feeder system, verify
the installation persons for their qualifications of work high
above the ground, and prepare and check the installation
environment, measures, tools and accessories.
Installation Personnel Preparation
The installation of the antenna feeder is generally conducted by
the antenna feeder installation personnel under the supervision
of the installation supervisor.
1. Requirements for the installation supervisor:
n Familiar with the materials, tools and procedures for the
installation of the antenna feeder.
n Responsible for organizing and coordinating the installation
personnel, and reasonably assigning the work to the
appropriate personnel according to the safety as top
priority principle, particularly the work on the tower.
2. Requirements for the installation personnel:
n Skillfully installing the antenna feeder under the guidance of
the supervisor.
n Bearing the qualification certificate for work high above the
ground and being in good physical status (for personnel
working on the tower).
n Observing the regulations for the use of the safety tools and
having purchased the personal safety insurance.
n No drinking.
Installation Environment Check
The installation environment check of the main feeder includes
the following items:
n Lightning protection and grounding
The network operator must install lightning rod, lightning
prevention grounding pole, and outdoor lightning protection
grounding cable. The engineering supervisor must check if

Chapter 6 Main Antenna Feeder System Installation
Confidential and Proprietary Information of ZTE CORPORATION 43
the outdoor lightning protection grounding cable has been
connected to the position, and if the it has a sectional area
greater than 50 mm2.
n Pole and support
The antenna support and pole must have been installed
according to the engineering design requirements. The
firmness and wind resistance of the support and pole must
comply with the design requirements.
n Connecting the feeder
The cables must have been installed according to the
engineering design. Usually, the drilling on the walls and
ceiling required for the installation of the outdoor wiring rack
and feeder entry window must be completed by the network
operator as a condition of the equipment room, since it
involves the infrastructure of the equipment room.
n The outdoor construction of the antenna feeder must be
carried out in the sunny daytime without strong wind.
Safety Measure Check
The personnel working on the tower must use safety belts.
They must not wear loose clothes or slippery shoes when
working on the tower.
The personnel working under the tower must wear helmets.
Obvious signs must be set up in the installation site to notify
irrelevant people to keep away from the site.
n The personnel under the tower are responsible for urging
irrelevant persons, especially kids to stay away from the
construction site.
n Tools and metallic installation parts temporarily not used on
the tower must be reliably put into the canvas tool bag,
which must be opened only when taking tools from it and
closed immediately after.
Installation Tools Preparation
The installation tools include:
n Measurement tools
Compass, multimeter, angle meter, and tape;
n Lifting tools
Pulley, and rope for drawing the main feeder;
n Special-purpose tools

ZXMBW RA25 Agile 2.5G Remote Radio Frequency Unit Installation Manual
44 Confidential and Proprietary Information of ZTE CORPORATION
Tools/instruments for making the main feeder connector, and
for test;
n General-purpose tools
Adjustable wrench, sharp-nose pliers, diagonal pliers,
electrical knife, file, and hacksaw;
n Safety protection tools
Safety belt (for the personnel who step out of the platform
on the tower), helmet, safety rope, thick work clothes, RF-
proof clothes, canvas tool bag, gloves, and multi-purpose
power socket;
n Others
Trestle ladder, and lifting tool for the main feeder wooden
axle.
Chapter 6 Main Antenna Feeder System Installation
Confidential and Proprietary Information of ZTE CORPORATION 45
Antenna Feeder System
Structure
The main antenna feeder system consists of the antenna,
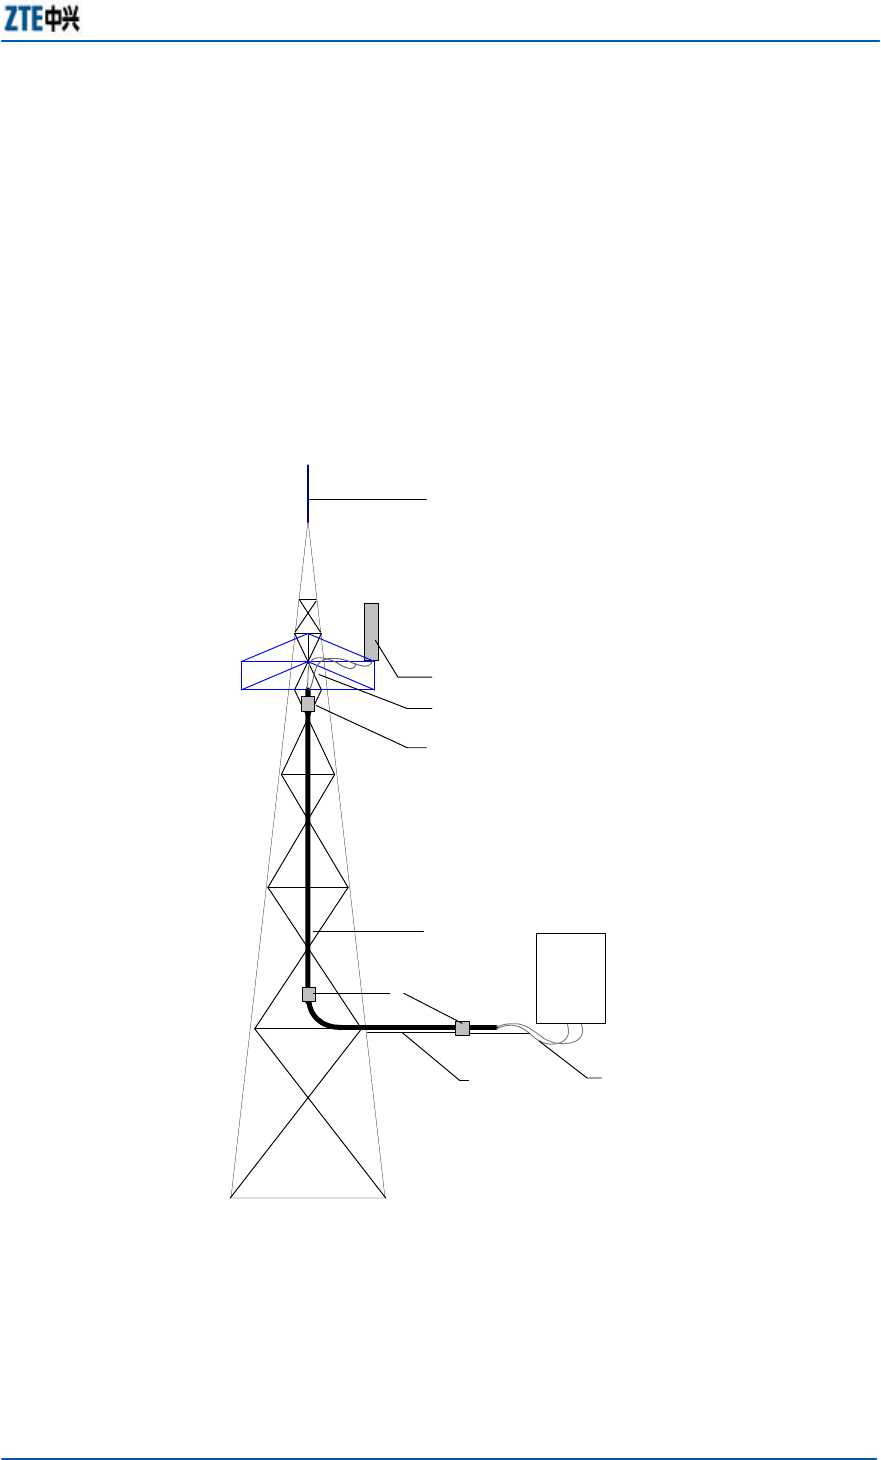
jumper, main feeder, and grounding part, as shown in Figure 29.
FIGURE 29 RA25 MAIN ANTENNA FEEDER SYSTEM STRUCTURE
RA25
1
2
3
6
78
5
4
Iron
tower
1. Lightning arrester 2. Antenna 3. Antenna jumper (1/2’’) 4.
Lightning protection grounding clip 5. Main feeder (7/8’’) 6. Lightning
protection grounding clip 7. Cable rack 8. Chassis jumper (1/2’’)
ZXMBW RA25 Agile 2.5G Remote Radio Frequency Unit Installation Manual
46 Confidential and Proprietary Information of ZTE CORPORATION
Installation Flow
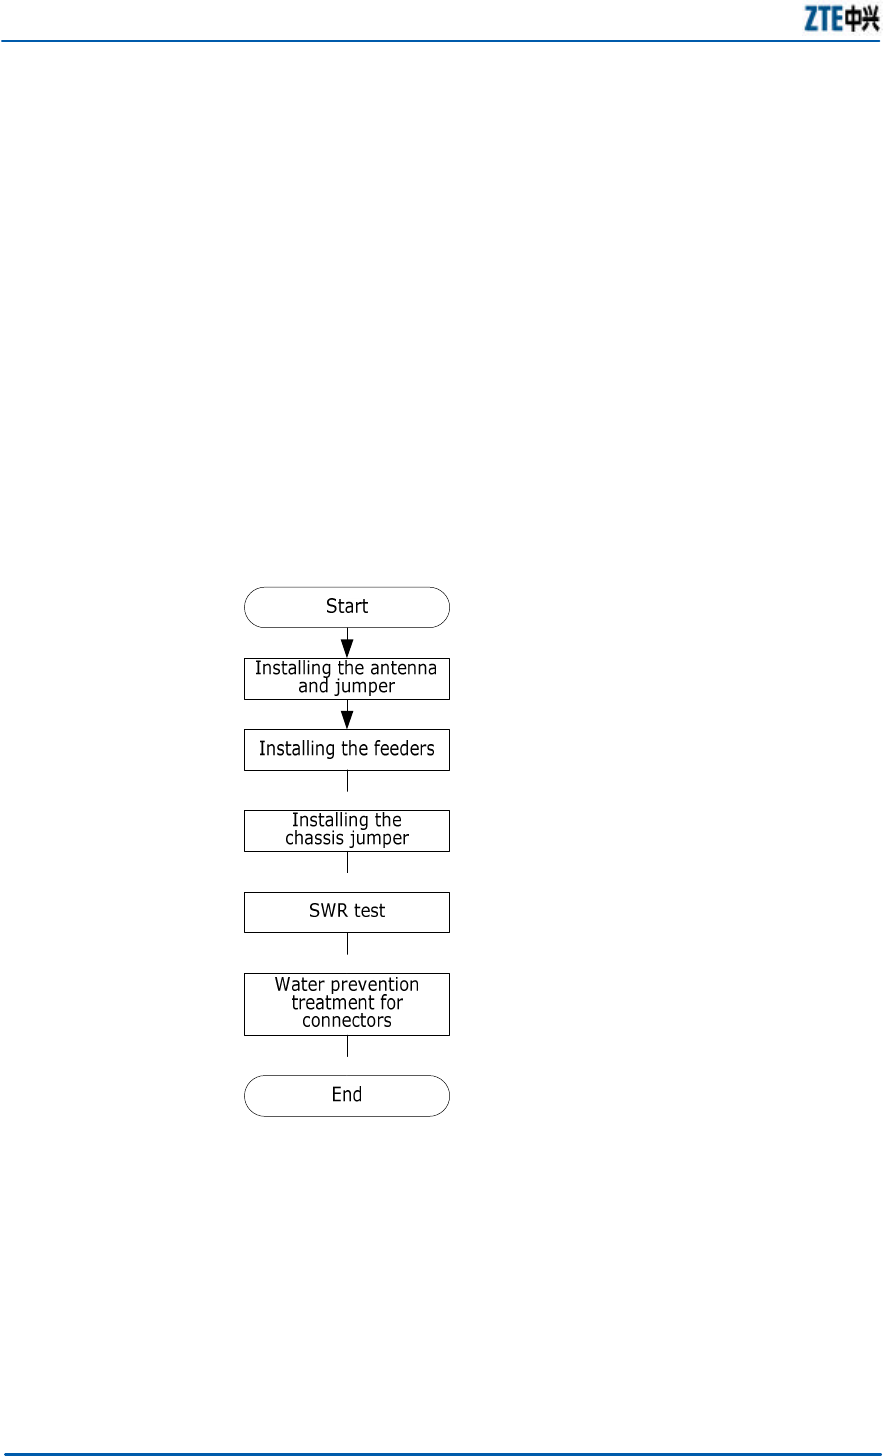
Figure 30 shows the installation flow of the antenna feeder
system.
FIGURE 30 INSTALLATION FLOW

Chapter 6 Main Antenna Feeder System Installation
Confidential and Proprietary Information of ZTE CORPORATION 47
Antenna Installation
Antennas of different models must be installed in different ways.
The installation supervisor should operate according to the
engineering design document and the safety instructions
provided with the antenna.
Caution: Take precaution for personal and equipment safety during
the whole antenna installation process;
When adjusting the antenna that is already in operation, take
appropriate measures (for example, wear radiation-shielding clothing)
to avoid the direct radiation from the antenna to human body.
Technical Parameters
n Mounting height of the antenna
It is determined by network planning.
n Azimuth of the antenna
It is determined by network planning.
n Pitch angle of the antenna
It is determined by network planning, usually 0° ~ 10°,
adjustable.
n Antenna direction
It is determined by the azimuth of the antenna. Two
antennas in the same sector must point to the same
direction.
n Distance between diversity antennas
When diversity antennas are used (that is, the two antennas
in the same sector serve as mutual diversity reception
antenna, and the two antennas have the same vertical
height), the horizontal distance (d) between two antennas
must be as large as possible, with the following requirement:
d=10?~20? (or H/d=11)
Where, where d is the horizontal distance between the
diversity antennas, and H is the vertical height from the
antenna to the ground, ? is the carrier wavelength in meters.
For example, when the carrier is 2.5 GHz, the diversity
distance must be greater than 1.2 m.
ZXMBW RA25 Agile 2.5G Remote Radio Frequency Unit Installation Manual
48 Confidential and Proprietary Information of ZTE CORPORATION
Antenna Installation Flow
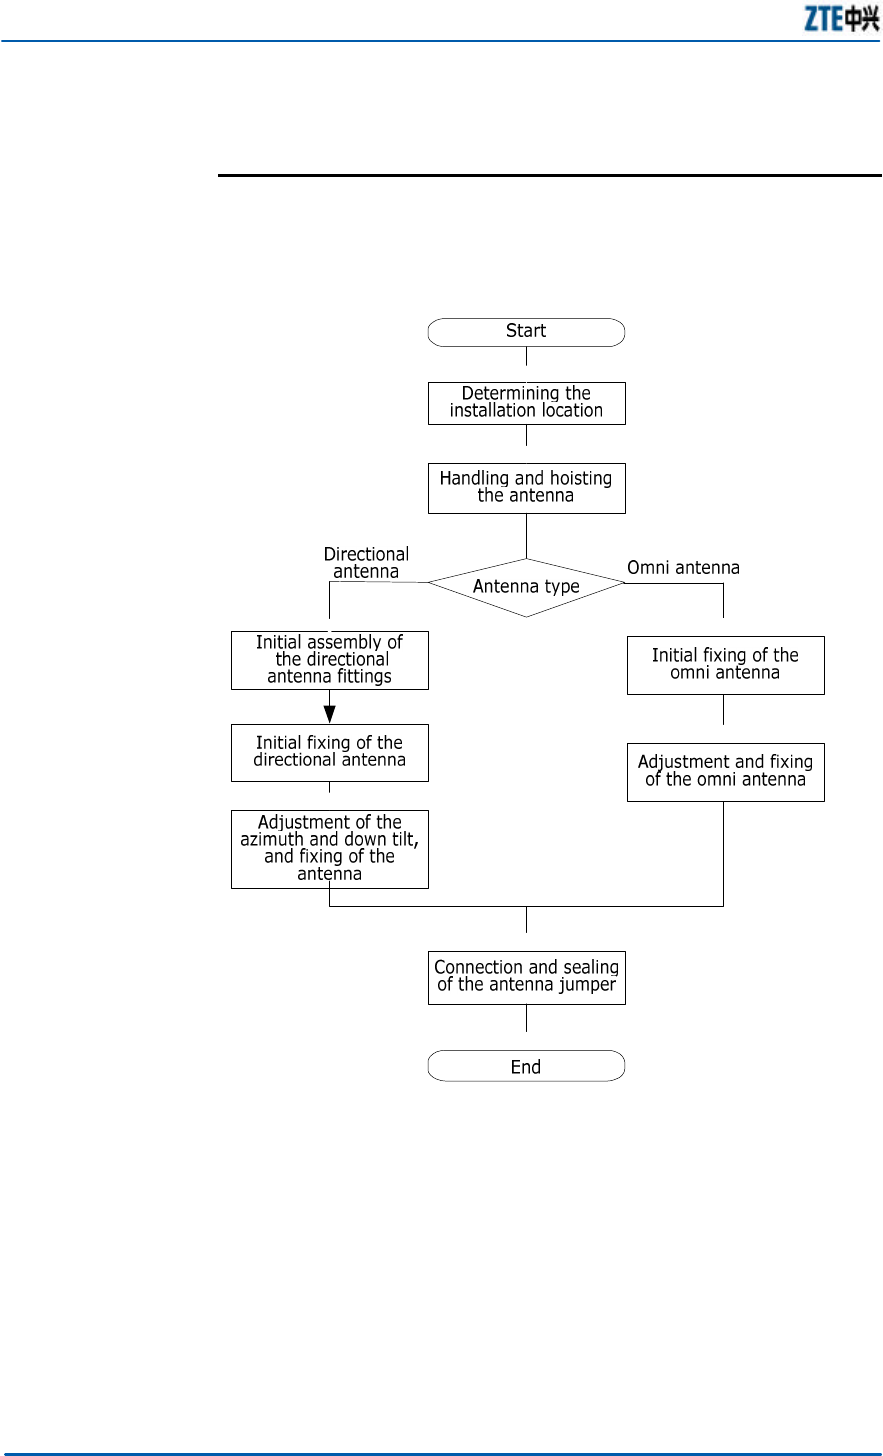
Figure 31 shows the antenna installation flow.
FIGURE 31 ANTENNA INSTALLATION FLOW
Installation Location
The installation location of the antenna must be determined
according to the antenna feeder installation diagram in the
engineering design drawing. If the installation location is to be
changed, consult with the user representative and propose the
changed design.
Chapter 6 Main Antenna Feeder System Installation
Confidential and Proprietary Information of ZTE CORPORATION 49
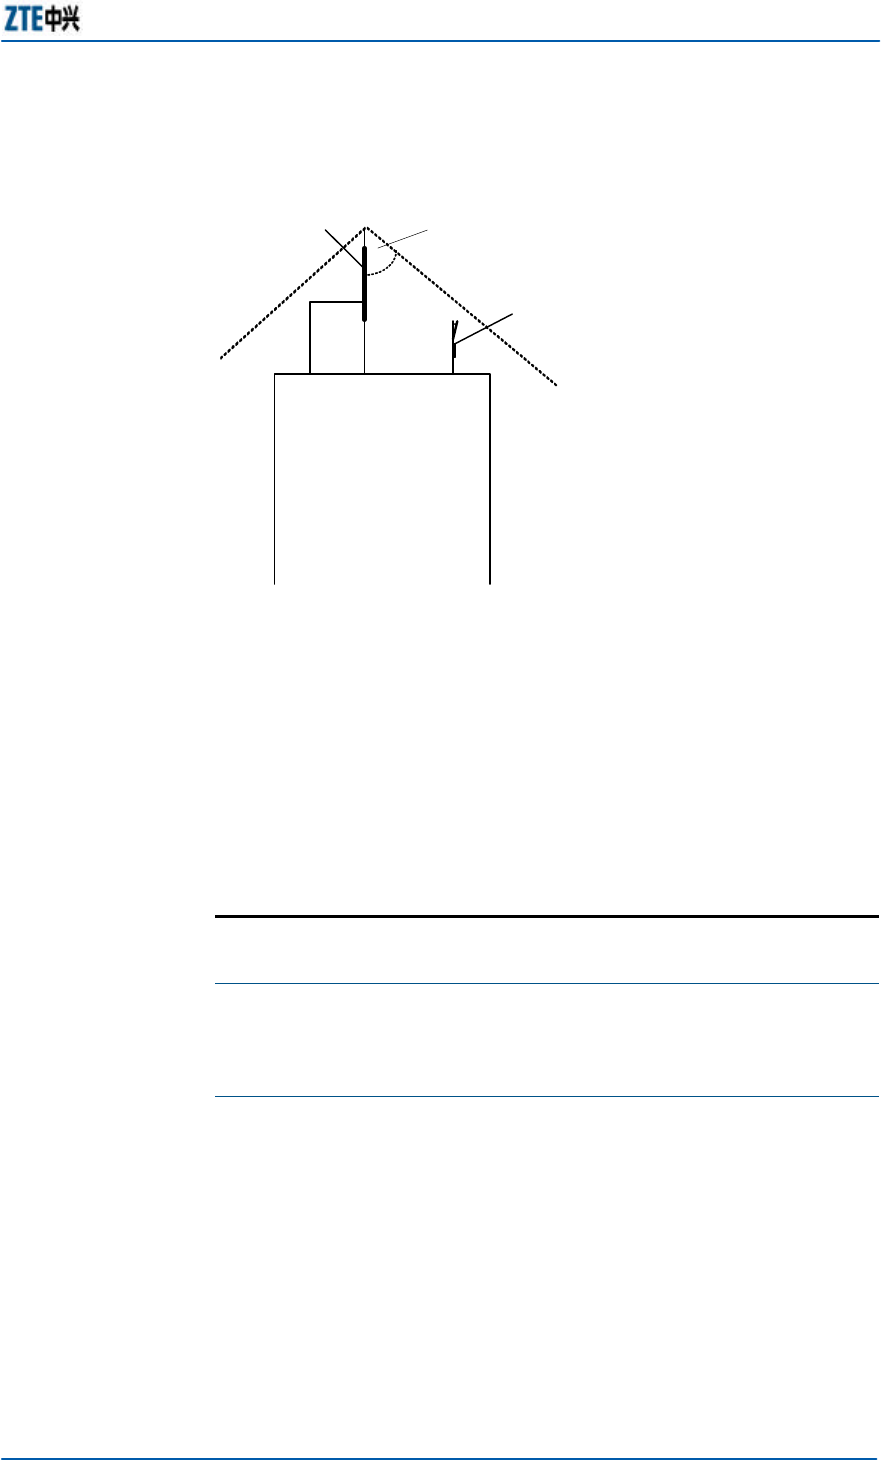
The installation location of the antenna must be provided with
good lightning protection, as shown in Figure 32.
FIGURE 32 ANTENNA LIGHTNING PROTECTION SCHEMATIC DIAGRAM
2
43
1
1. Lightning rod 2. 45°protection angle 3. Antenna 4. Grounding cable
The installation requirements are as follows:
n The antenna must be installed within the 45° protection
angle of the existing lightning rod;
n Where necessary, the antenna pole must be provided with a
separate lightning rod, which must be grounded reliably.
Antenna Handling and Hoisting
Caution: The personnel on and under the tower must work together to
hoist the antenna. During the hoisting process, the personnel under the
tower must pull the antenna away from the tower body by pulling the
rope, to avoid the crash between the antenna and the tower body.
n In the case the antenna is to be mounted on the tower, use
the rope and pulley block to hoist the antenna, the jumper
and all the accessories (such as tools, safety belts, adhesive
tapes and cable ties) to the tower-top platform and place
them in a safe place. Take appropriate safety measures
during the process. Small objects must be put into the
canvas bag before they can be hoisted.
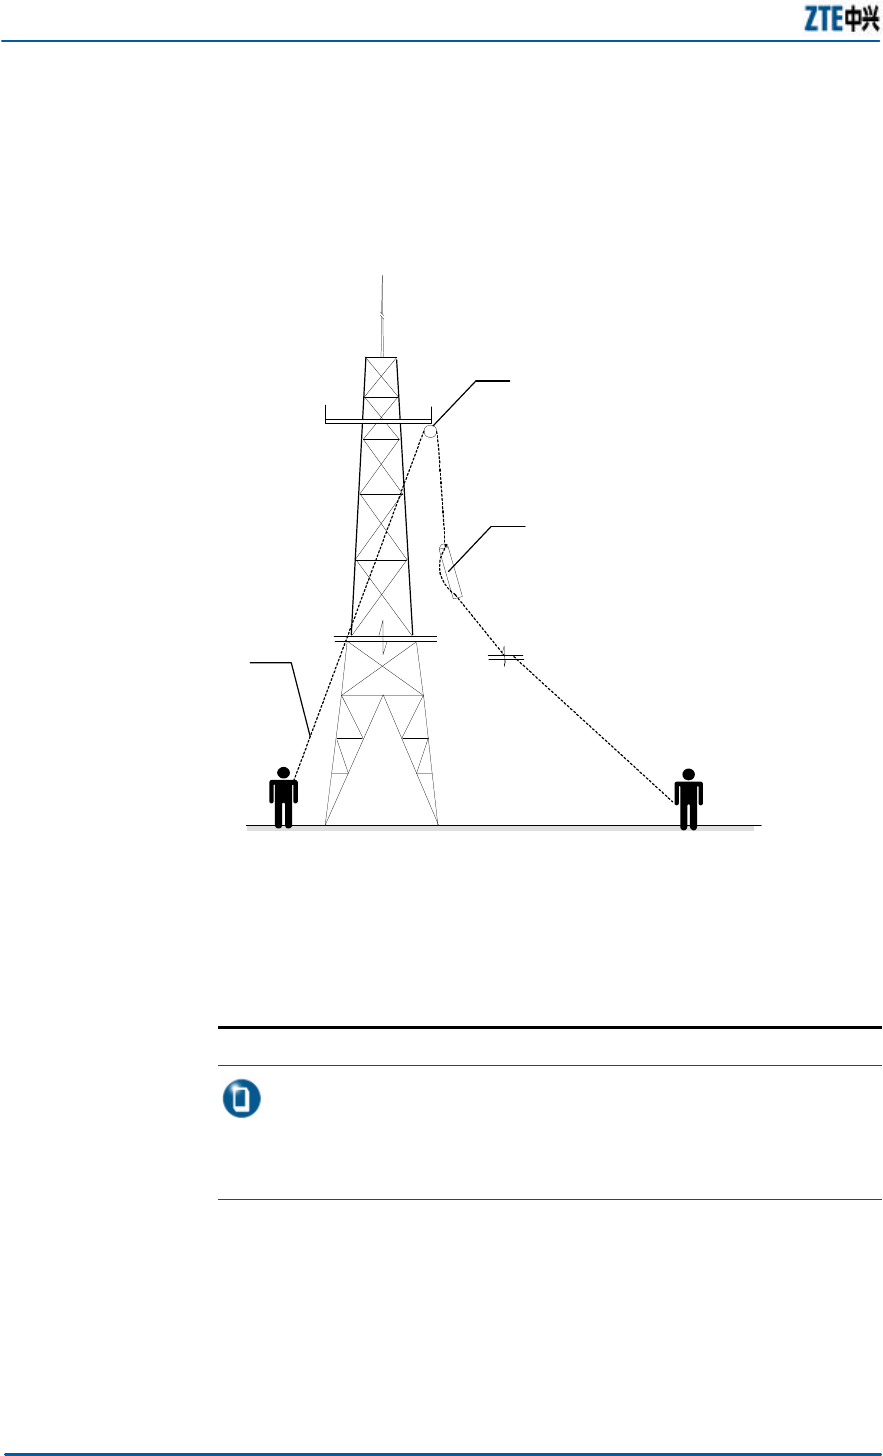
n Knots must be tied at both ends of the antenna during
hoisting, so that the personnel on the tower and those under
the tower can work together, as shown in Figure 33.
ZXMBW RA25 Agile 2.5G Remote Radio Frequency Unit Installation Manual
50 Confidential and Proprietary Information of ZTE CORPORATION
n In the case the antenna is to be mounted on a roof, move
the antenna and the installation materials to the installation
position manually.
FIGURE 33 ANTENNA HOISTING SCHEMATIC DIAGRAM
1
2
3
1. Lower pulling rope 2. Pulley block 3. Upper pulling rope tied with
knots at the upper/lower ends of the antenna
Directional Antenna Installation
Note: This section describes the install process as reference for
installation personnel. During the on-site installation process, please
carefully read the installation manual provided with the antenna, and
carry out the construction according to the actual conditions.
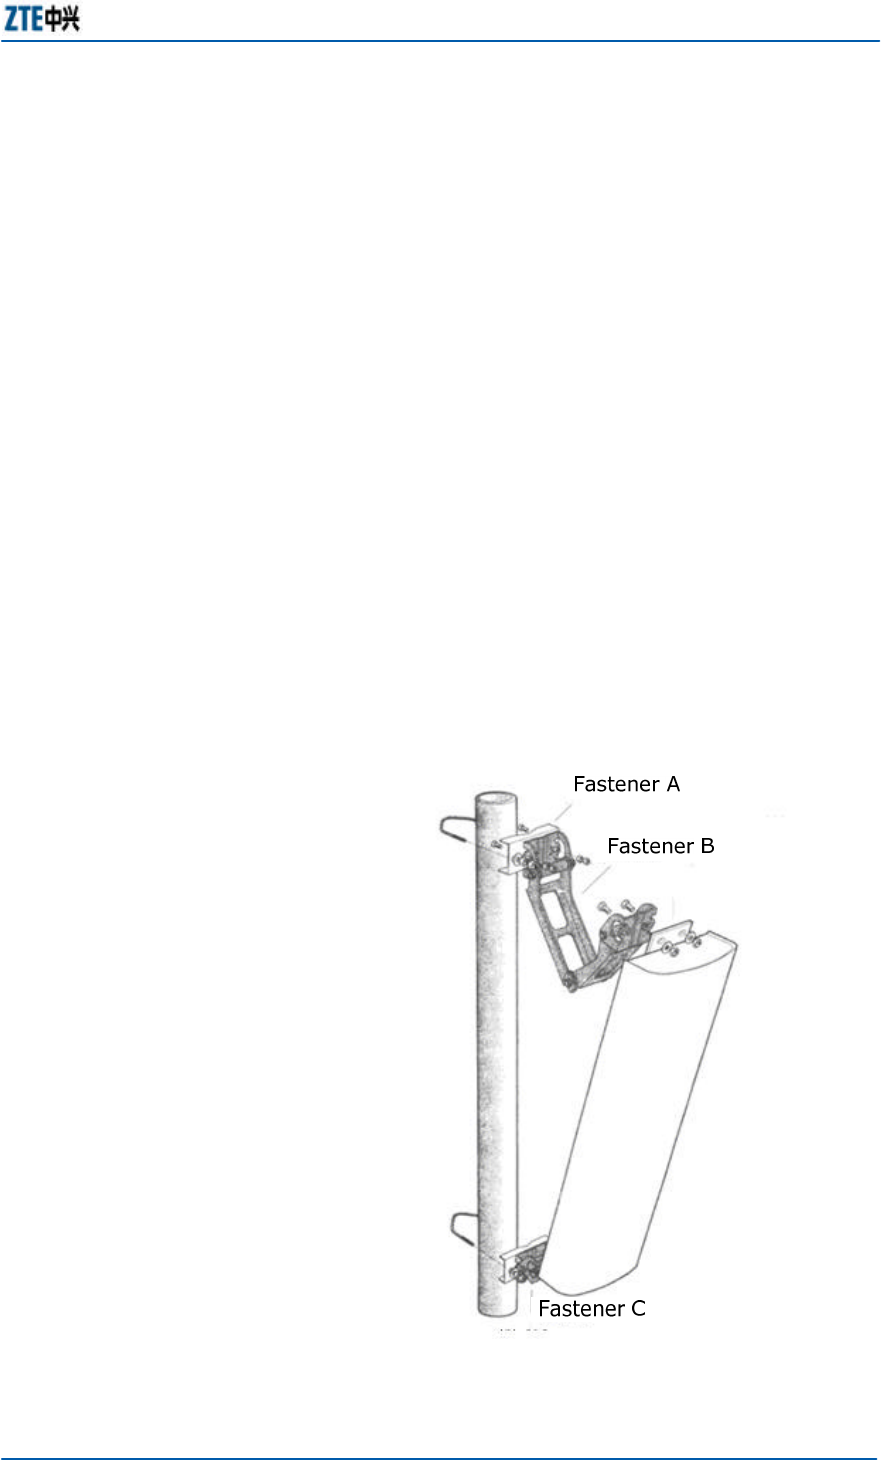
1. Initial assembly of the directional antenna fittings
Before fastening the antenna, assemble fastener C onto the
upper/lower ends of the antenna, as shown in Figure 34, and
then connect fasters B and A, to complete the initial
installation of the directional antenna. All accessories must
be installed with spring and plain washers.
Chapter 6 Main Antenna Feeder System Installation
Confidential and Proprietary Information of ZTE CORPORATION 51
Usually the antenna fastening accessories and the angle
adjustment device accessories have already been installed on
the antenna under the tower.
2. Initial fixing of the directional antenna on the pole
Attach the directional antenna installed with fixtures onto the
pole. First do not tighten the screws too tightly to allow easy
adjustment of the direction and down tilt of the antenna.
However, the tightness must be high enough to ensure that
the antenna does not slid downward.
3. Adjusting the azimuth of the antenna
i. Determine the azimuth of the antenna using a compass.
And determine the installation direction of the directional
antenna according to the engineering design drawing;
ii. Turn the antenna slightly to adjust its face direction, as
shown in Figure 34. At the same time, measure the
direction of the antenna with a compass until the error is
within the engineering design requirements (generally
not more than 5°);
iii. After adjusting the azimuth of the antenna, tighten
fastener A;
FIGURE 34 ANTENNA INSTALLATION
ZXMBW RA25 Agile 2.5G Remote Radio Frequency Unit Installation Manual
52 Confidential and Proprietary Information of ZTE CORPORATION
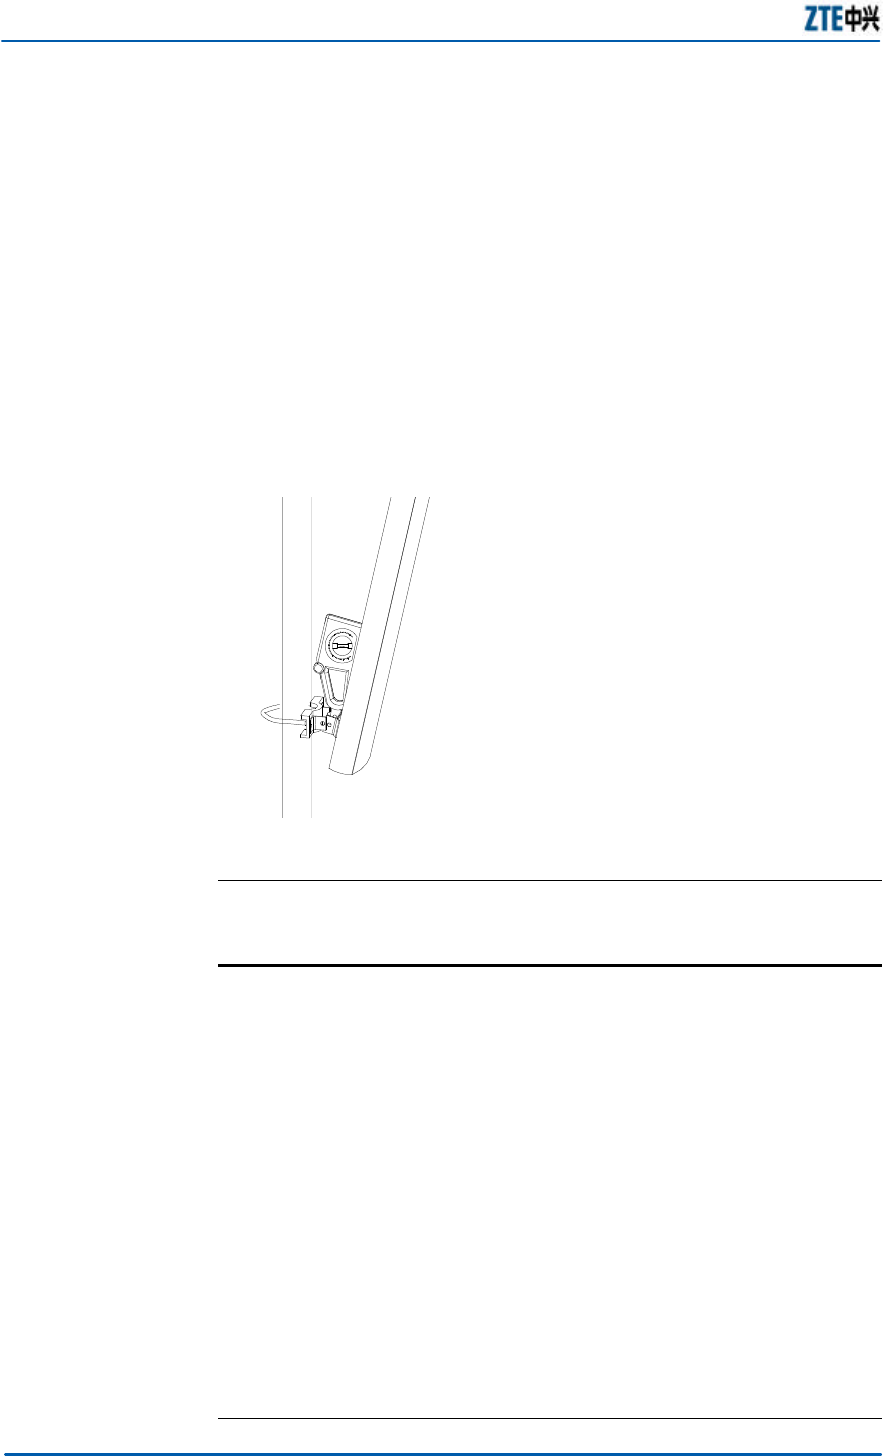
4. Adjusting the tilt angle of the antenna
i. Adjust the tilt angle of the measurement meter to the
angle required by the engineering design.
ii. Turn the top of the antenna slightly and loose or hold fast
the antenna at its top. Adjust the down tilt angle of the
antenna till the bubble is centered when the adjusted
measurement meter is close to the directional antenna,
as shown in Figure 35.
iii. After adjusting the tilt angle of the antenna, tighten
fastener B.
FIGURE 35 ANTENNA -DOWN TILT ANGLE ADJUSTMENT
END OF STEPS
Omni Antenna Installation
1. Put the jacket at the antenna lower part close to the support
backbone. The top of the jacket must be flush with or slightly
higher than the support top.
2. Fasten the antenna (the lower part with jacket) onto the
support with two fixing clips. Do not fasten it too tightly or
too loosely. If too tightly, the jacket might be damaged; if
too loosely, the weight-bearing and wind-resistance
requirements cannot met.
3. Check the verticality of the antenna. An omni antenna must
be kept vertical. After you verify that the antenna is vertical,
tighten the antenna onto the pole;.
4. Protrude the antenna support on which the antenna is
installed out of the tower platform. Adjust the support to
keep the antenna vertical.
END OF STEPS

Chapter 6 Main Antenna Feeder System Installation
Confidential and Proprietary Information of ZTE CORPORATION 53
Jumper and Antenna Connection
and Sealing
Note: The antenna jumper can be connected before the antenna
is mounted onto the pole and treated for water prevention. This reduces
the time of work high above the ground and improves the connection
and water prevention quality of the connector.
1. Connect the jumper connector to the antenna port and
tighten it.
2. After that, treat the connector for water prevention.
i. Wrap the antenna connector with waterproof tape from
its root in the same direction as the one in which the
jumper is tightened;
ii. Pull the waterproof tape to twice its length. Note that the
next circle must cover half of the previous circle, and the
wrap must stop at the position about 5 cm away from the
jumper connector.
iii. Grip the tape with your hands to make the tape tightly
adhered.
iv. Wrap PVC tapes on top of the waterproof adhesive tape.
During the process, make sure the upper layer overlaps
the lower layer by half the width of the tape.
END OF STEPS
ZXMBW RA25 Agile 2.5G Remote Radio Frequency Unit Installation Manual
54 Confidential and Proprietary Information of ZTE CORPORATION
Feeder Installation
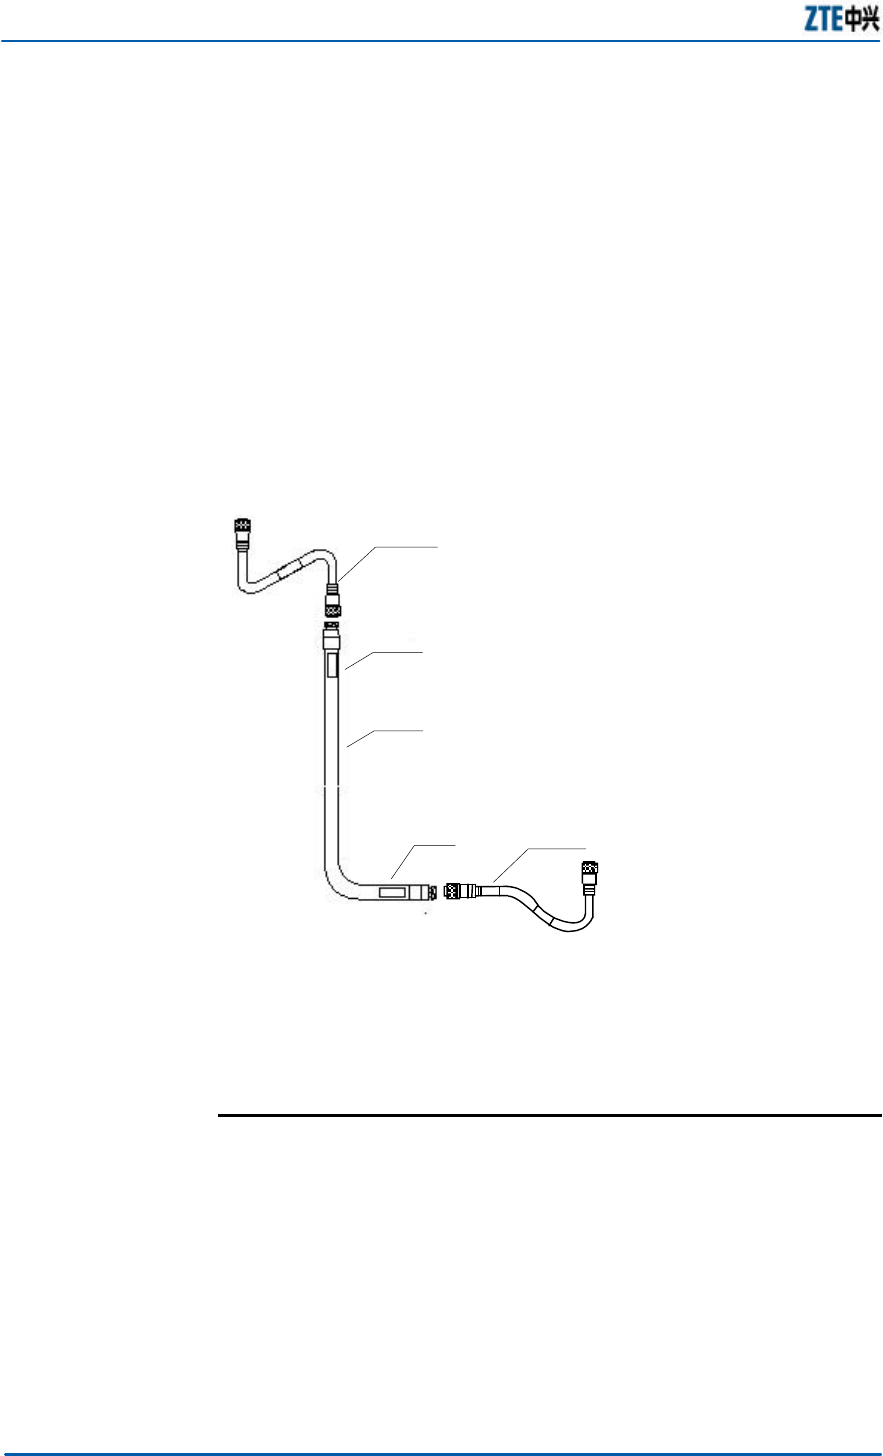
This section uses the 7/8’’ feeder as example. Figure 36 shows
the structure of one 7/8” feeder.
FIGURE 36 7/8” FEEDER STRUCTURE
2
3
45
1
1. Antenna jumper 2. Label 3. 7/8” feeder 4. Label 5. Chassis jumper
Feeder Route Determination
You must determine the route of the feeder according to the
feeder wiring diagram in the engineering deign drawing. If the
route needs to be changed due to the site conditions, consult
with the user representative as soon as possible for a solution.
The length of the main feeder must be determined according to
the final wiring route.
Chapter 6 Main Antenna Feeder System Installation
Confidential and Proprietary Information of ZTE CORPORATION 55
Main Feeder Connector Making
Caution: Making the feeder connectors is the most important procedure
in the installation of the antenna feeder system, since the quality of
them directly affects the performance of both the equipment and
network. Be cautious when using knives and cutters, for they are sharp
and may cause injury.
This section describes this process by using the ROSENBERGER
7/8" feeder connector as example. For the details on installing a
connector of another specification, please refer to the related
installation manual.
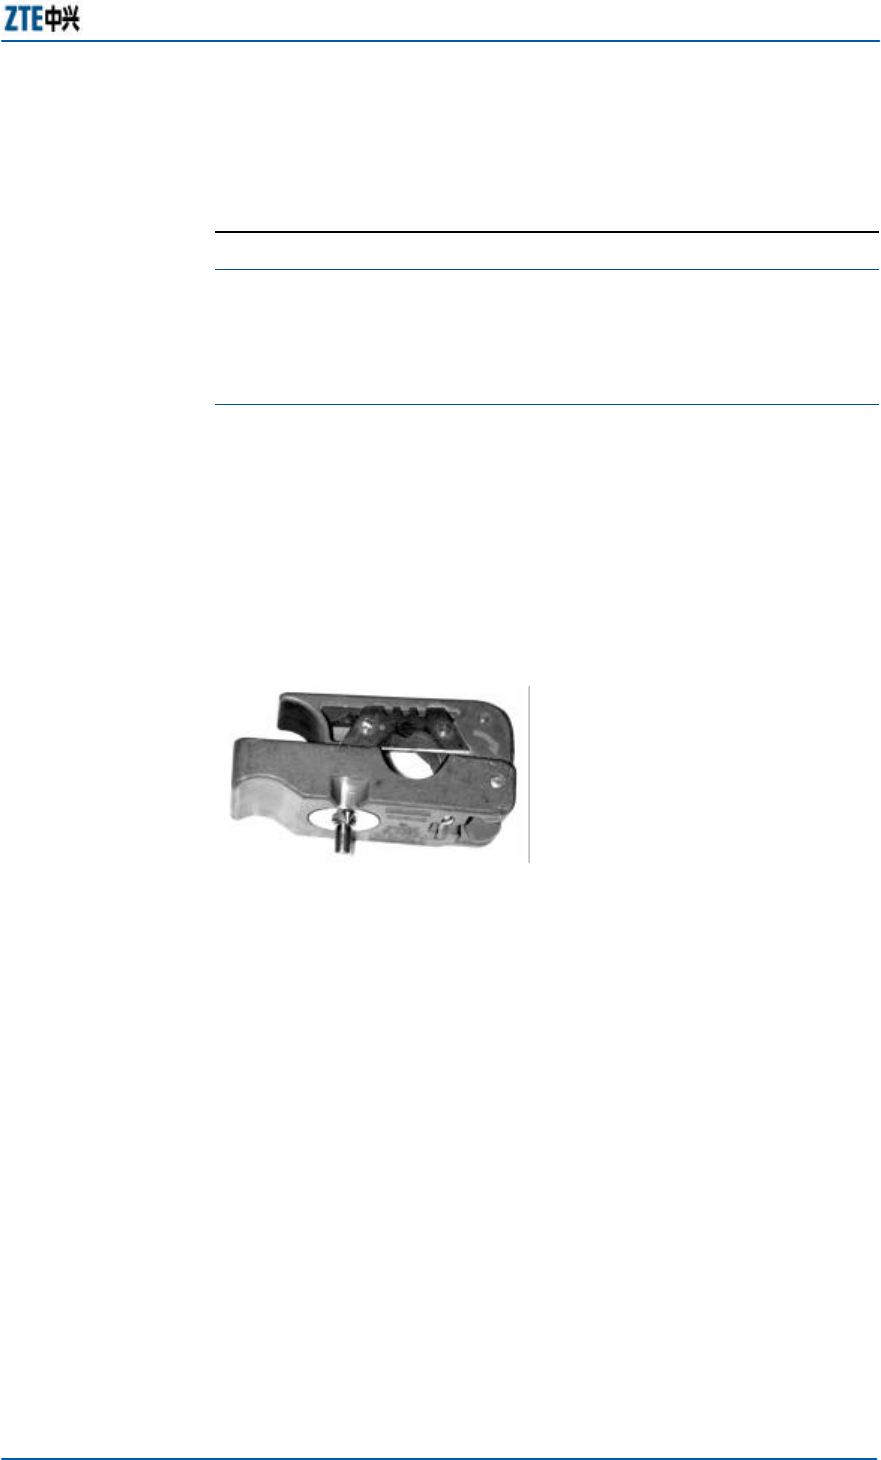
1. The common cutting tool to make the feeder connector is as
shown in Figure 37.
FIGURE 37 7/8" FEEDER CONNECTOR CUTTING TOOL
2. Measure a straight feeder section of about 150 mm to be
installed with the connector, and cut and strip the feeder
sheath 50 mm away from the end using a safety cutting tool.
3. Put the feeder into the notch of the cutter (EASIAX), leaving
a length of four sheath threads behind the main blade. And
then close the cutter handles. Since the position of the cutter
is determined by the threads on the external copper sheath
of the feeder, the main blade must just be aligned with the
crest at the center of a thread of the feeder.
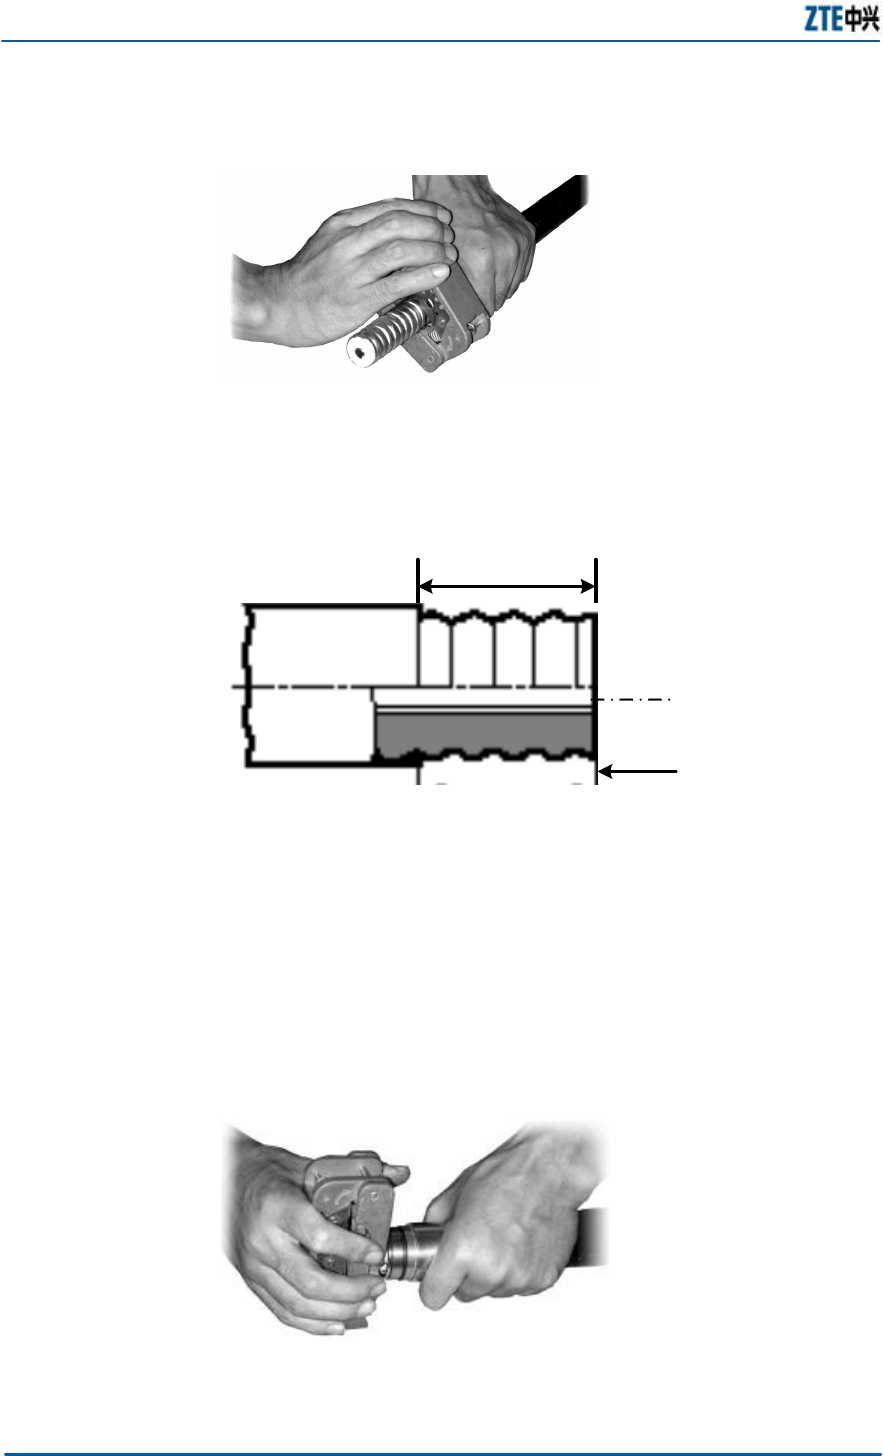
4. Turn the cutter in the direction as marked on the cutter until
the handles are completely closed by the protection cover
and the cutter cuts the internal and external copper
conductors of the feeder completely. At the same time, the
auxiliary blade of the cutter cuts the external plastic
protection sheath of the feeder, as shown in Figure 38.
ZXMBW RA25 Agile 2.5G Remote Radio Frequency Unit Installation Manual
56 Confidential and Proprietary Information of ZTE CORPORATION
FIGURE 38 FEEDER - CUTTING
5. Check the length of the feeder, as shown in Figure 39;
FIGURE 39 FEEDER LENGTH CHECKING
Corrugation
location
32 mm
6. Separate the front part and back part of the feeder connector,
and insert the back part into the feeder till it touches the first
corrugation of the feeder;
7. Firmly insert the tube expander of the cutter into the feeder
and turn it left and right to expand the external copper
conductor of the feeder, so that it presses against the back
part of the feeder connector, as shown in Figure 40;
FIGURE 40 FEEDER EXTERNAL CONDUCTOR EXPANSION
Chapter 6 Main Antenna Feeder System Installation
Confidential and Proprietary Information of ZTE CORPORATION 57
8. Check for any residual copper scraps. The external copper
sheath must be evenly expanded without burrs. Pull the back
part of the feeder connector outward, during which process
the connector must not slip away from the feeder. If these
requirements are not met, make it again.
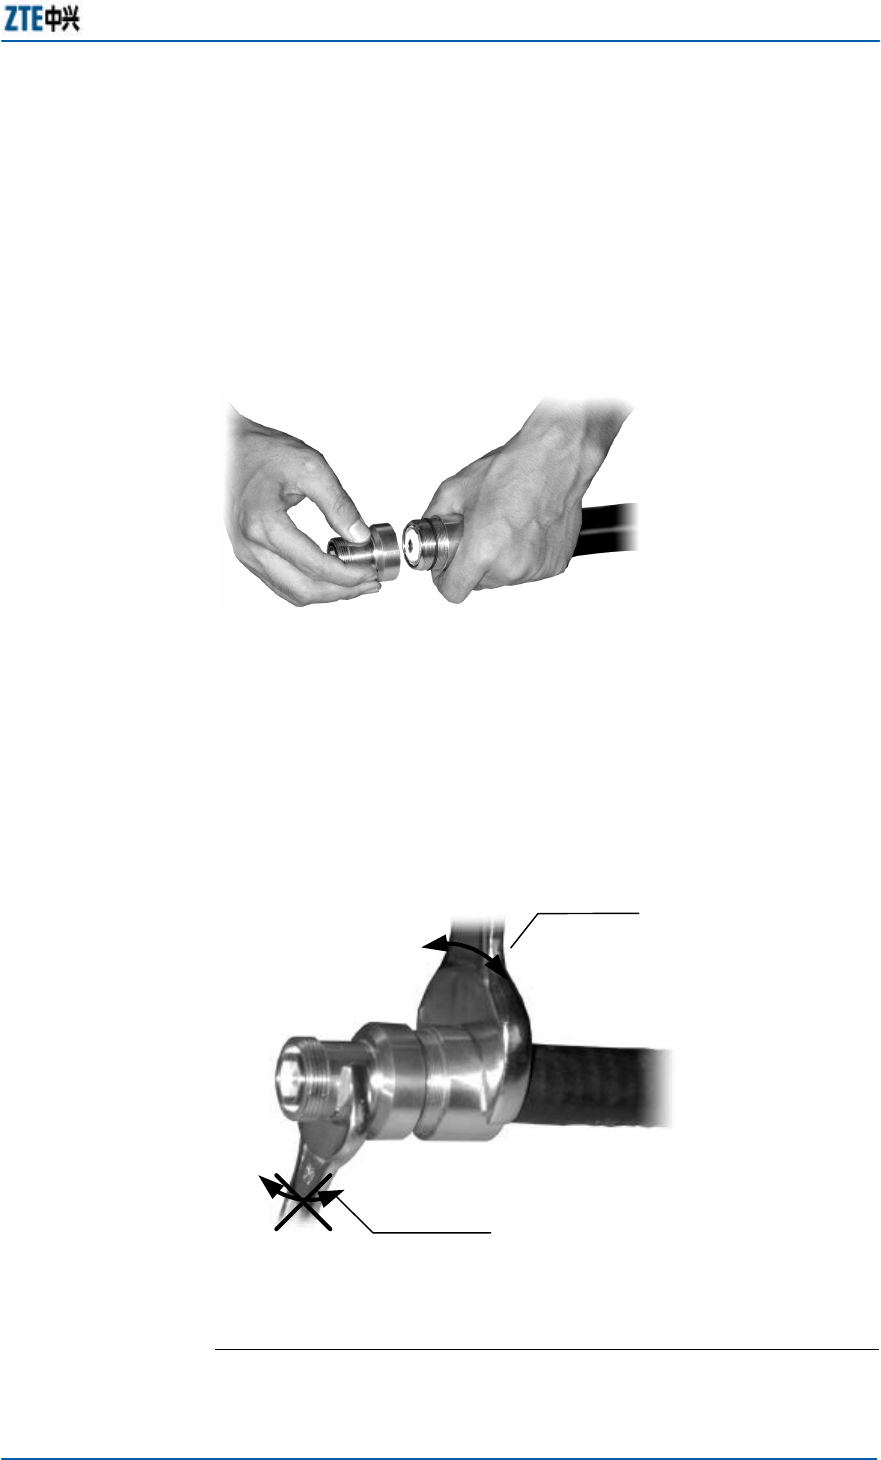
9. Connect the front part and the back part of the feeder
connector, as shown in Figure 41;
FIGURE 41 FEEDER CONNECTOR’S FRONT PART AND BACK PART
10. 1Screw the front part of the feeder connector in position, and
fix it with an appropriate wrench, so that it does not move
against the feeder. Then screw the back part of the feeder
connector with the wrench till it is fixed, as shown in Figure
42;
FIGURE 42 FEEDER CONNECTOR’S FRONT PART AND BACK PART FIXING
2QO\WXUQWKLVZUHQFK
.HHSWKLVZUHQFKVWLOO
END OF STEPS

ZXMBW RA25 Agile 2.5G Remote Radio Frequency Unit Installation Manual
58 Confidential and Proprietary Information of ZTE CORPORATION
Feeders Cutting
Caution: When cutting the main feeder, label it at both ends.
Temporary labels can also be attached to the middle of the feeder. All
the labels must be consistent. Otherwise, the feeder may not be
correctly connected and the sectors may not correspond to the feeder.
Determine the length of the feeder according to the final feeder
route determined together with the user on site, and cut the
feeders according to the needed length of each feeder.
1. If the antenna feeder system is to be installed on the roof of
a building
i. Measure the length of the main feeder for each sector
according to the feeder route;
ii. Add an appropriate margin (1m ~ 2m) to the measured
lengths when cutting the feeders.
iii. After cutting one main feeder, attach the appropriate
temporary labels onto both ends of the feeder, such as
ANT0 and ANT2. Attach the formal labels to the feeder
after it is installed;
iv. Carry the cut feeders to the roof of the building and
makes sure they are not squeezed or damaged during
the process.
2. If the antenna feeder system is to be installed on an iron
tower:
i. Hoist one end of the feeder to the top of the tower by
using a pulley block and pulling rope. Before hoisting,
make the upper main feeder connector;
ii. The personnel on the tower must cut the feeder
according to the distance from the point where the feeder
enters the room to the lightning arrester rack, with an
appropriate margin reserved. Make a temporary for the
lower part. Attach the formal labels to the feeder after it
is installed.
Chapter 6 Main Antenna Feeder System Installation
Confidential and Proprietary Information of ZTE CORPORATION 59
Main Feeder Hoisting
Caution: Hoist the primary feeder with care to avoid damaging its
sheath. Any local damage to a single main feeder may cause the entire
feeder to be discarded.
Ensure the personal safety during the hoisting process.
When the main feeder is to be installed on a tower, a pulley
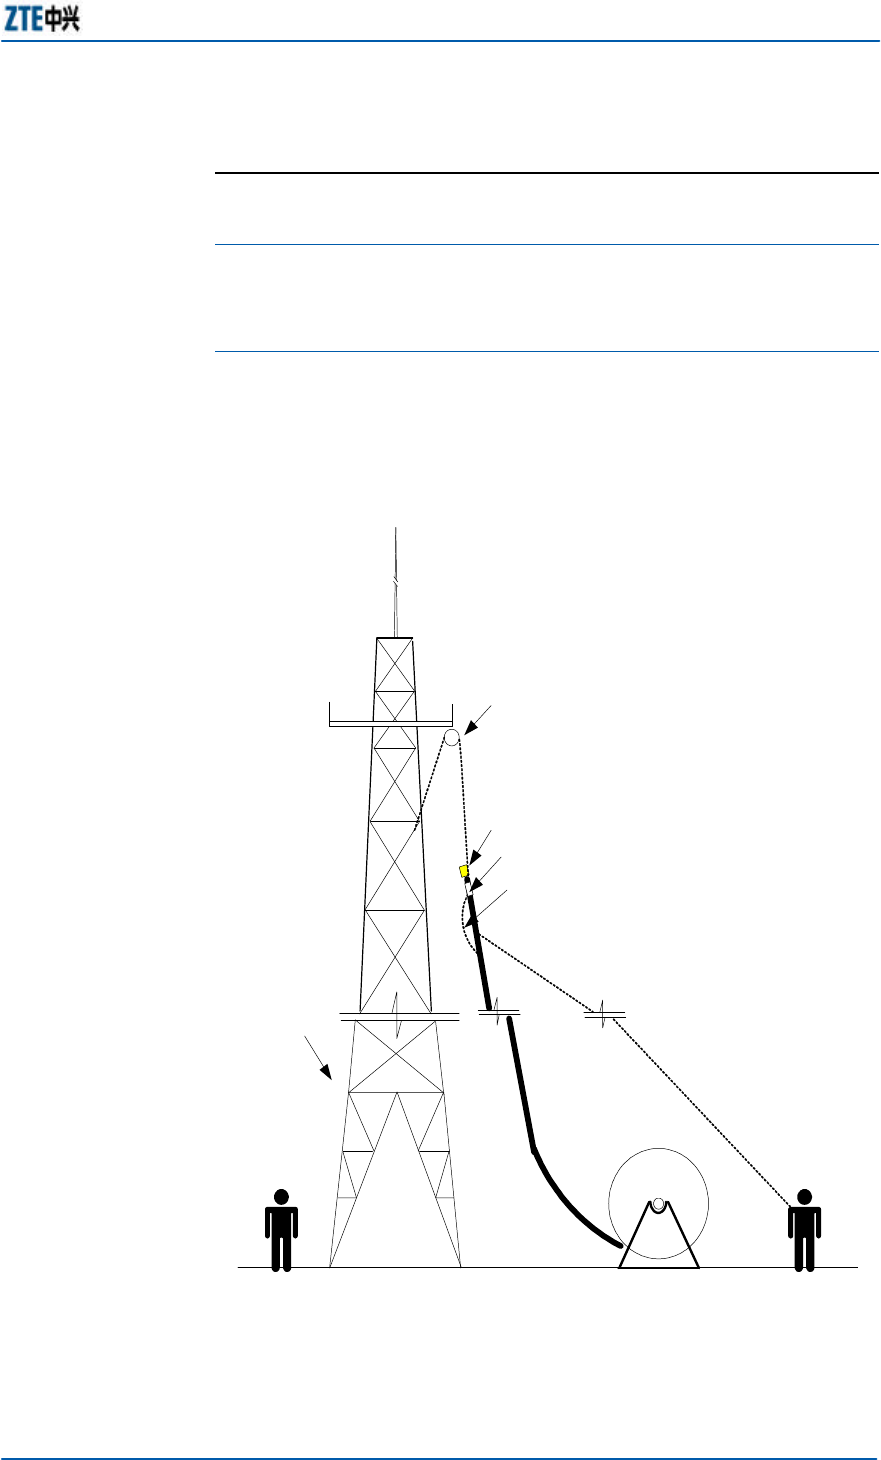
block is needed, as shown in Figure 43.
FIGURE 43 FEEDER HOISTING- SCHEMATIC DIAGRAM
1
5
2
4
3
1. Pulley block 2. Feeder head wrap 3. Feeder label 4. Knot for the
upper pulling rope 5. Lower pulling rope

ZXMBW RA25 Agile 2.5G Remote Radio Frequency Unit Installation Manual
60 Confidential and Proprietary Information of ZTE CORPORATION
1. Check the labels at both ends (0.3 m) of the primary feeder
to ensure that it is the right cable.
2. Wrap the main feeder connector with a piece of flax or an
antistatic plastic bag filled with foam, and then bind it tightly
with cable ties.
3. Knot the hoisting rope at the place about 0.4 m away from
the connector and knot the rope again at the place about 3.4
m away from the connector to allow cooperation between
personnel on the tower and ground and protect the feeder
and its connector from being damaged by hitting the tower.
4. After the feeder has been hoisted to the tower top, fasten it
tightly at multiple points to prevent it from sliding from the
tower.
END OF STEPS
Main Feeder Laying and Fixing
n Laying requirements
„ The main feeder must be laid in good order, without
crossing.
„ Learn its route before connecting the main feeder. You
are recommended to mark the actual route on the
drawing to avoid reworks due to crossings of the main
feeder.
„ The minimum bending radius of the main feeder must be
no less than 20 times of the radius of the main feeder.
The radius of a single bend must not be less than 90 mm.
The minimum bending radius of repeated bends must be
200 mm.
„ Spacing of the triple feeder clip: 1.65 m for the maximum.
n Main feeder connecting steps:
1. Triple feeder clips must be installed in advance along the
tower or cable rack at spacing of about 1.5 m. The spacing
can be lengthened or shortened depending on the actual
situation, but must not exceed 1.65 m. The spacing between
the triple feeder clips must be as even as possible and in the
same direction. If two rows of feeder clips are installed on
one cabling ladder, keep them in parallel and in good order.
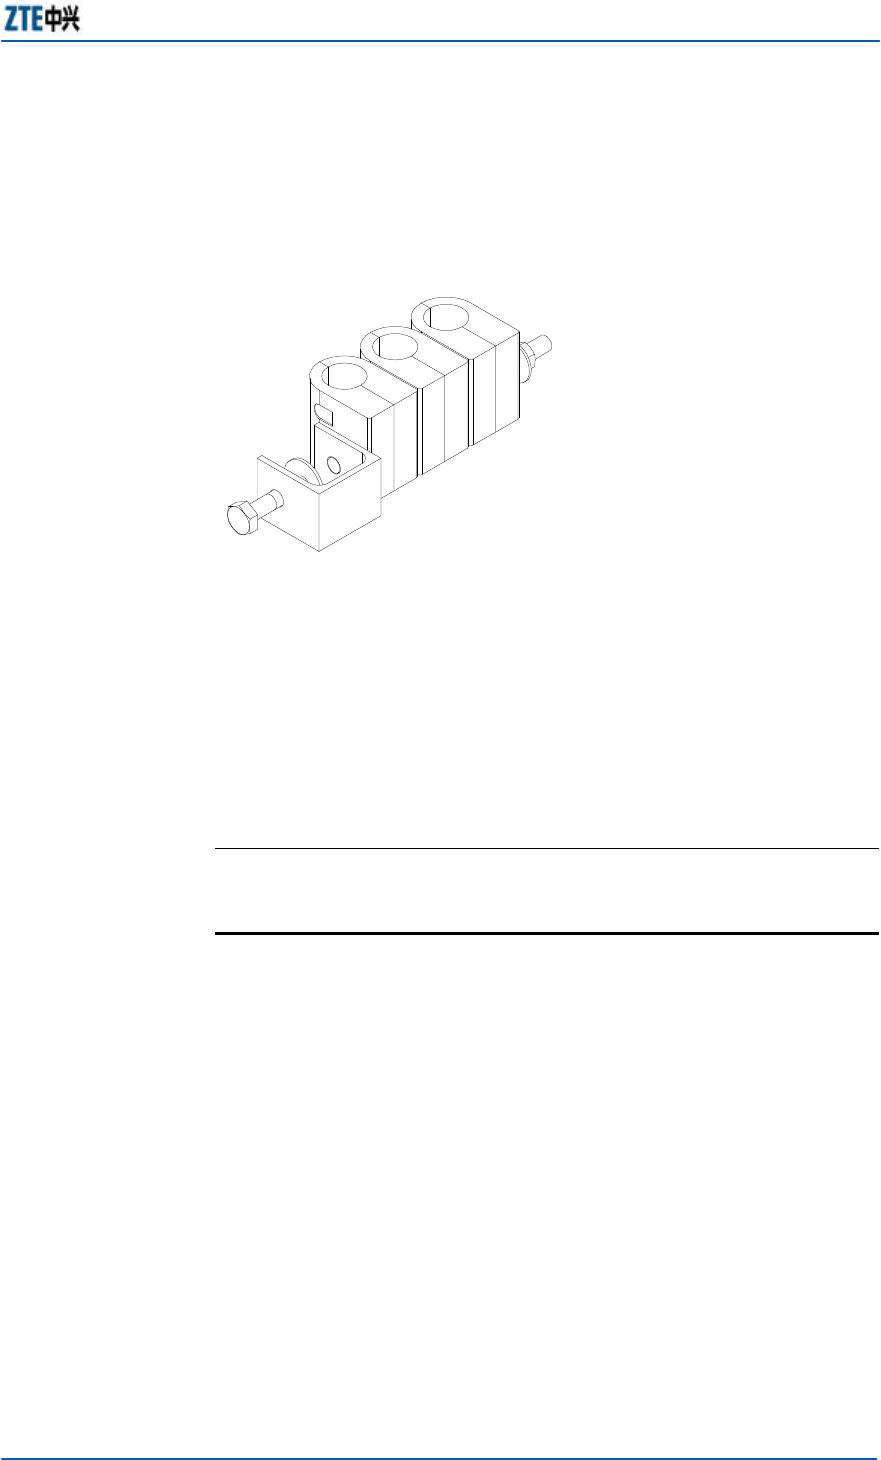
Figure 44 shows a triple feeder clip.
Chapter 6 Main Antenna Feeder System Installation
Confidential and Proprietary Information of ZTE CORPORATION 61
FIGURE 44 TRIPLE FEEDER CLIP
2. Arrange the main feeder in good order preliminarily;
3. Fasten the main feeders from top downward with the triple
feeder clips as you arrange the main feeders. When the main
feeders are arranged in good order, tighten the triple feeder
clips. The main feeders must be kept straight without bulge
between two triple feeder clips. Do not fasten the feeders at
both ends at the same time.
END OF STEPS
Feeder Grounding Clip Installation
n Main feeder grounding principles
„ For the antenna feeder system installed on the tower, the
main feeder must be installed with the feeder grounding
clips at least three places: tower platform, place where
the main feeder leaves the tower, and place before which
the main feeder is connected to the chassis. When the
main feeder is over 60 m in length, feeder grounding
clips must be added in the middle. Generally, a grounding
clip must be installed on the feeder every 20m, as shown
in Figure 45.
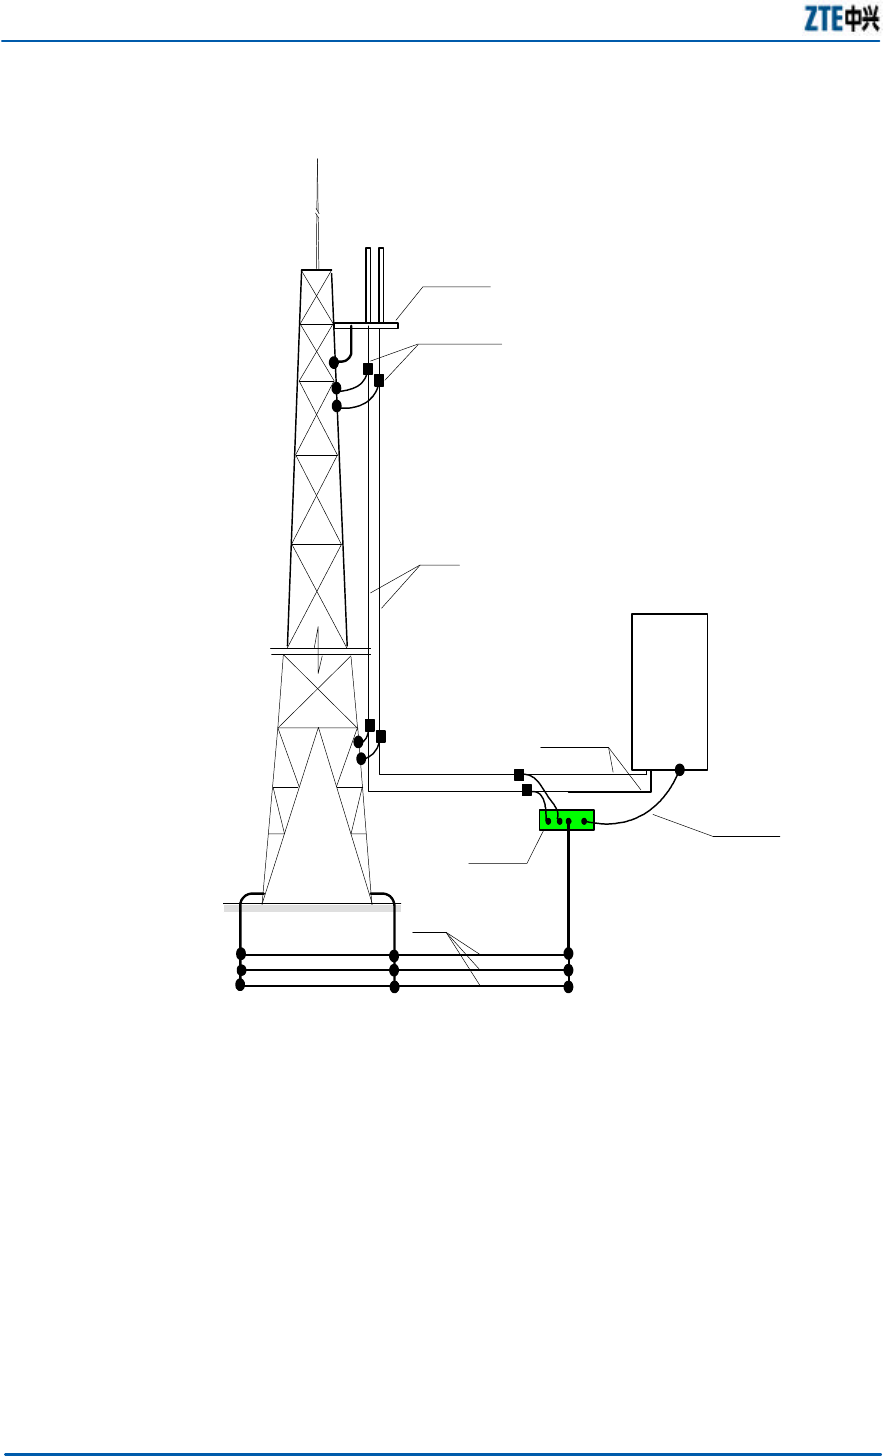
ZXMBW RA25 Agile 2.5G Remote Radio Frequency Unit Installation Manual
62 Confidential and Proprietary Information of ZTE CORPORATION
FIGURE 45 FEEDER GROUNDING –SCHEMATIC DIAGRAM
RA25
6
3
5
2
1
7
4
1. Tower platform 2. Feeder grounding clip 3. Feeder 4. Cabinet
jumper 5. Grounding cable 6. Grounding busbar 7. Ground grid
„ For the antenna feeder system installed on the roof, its
antenna support and cable rack must be welded to the
lightning protection grid of the building. The main feeder
must also be grounded at three places: the place where
the feeder leaves the pole, the place where the feeder
leaves the roof, and the place before which the main
feeder is connected to the jumper of the chassis.
„ The outdoor wiring ladder of the main feeder must be
grounded.
n Grounding clip installation steps:
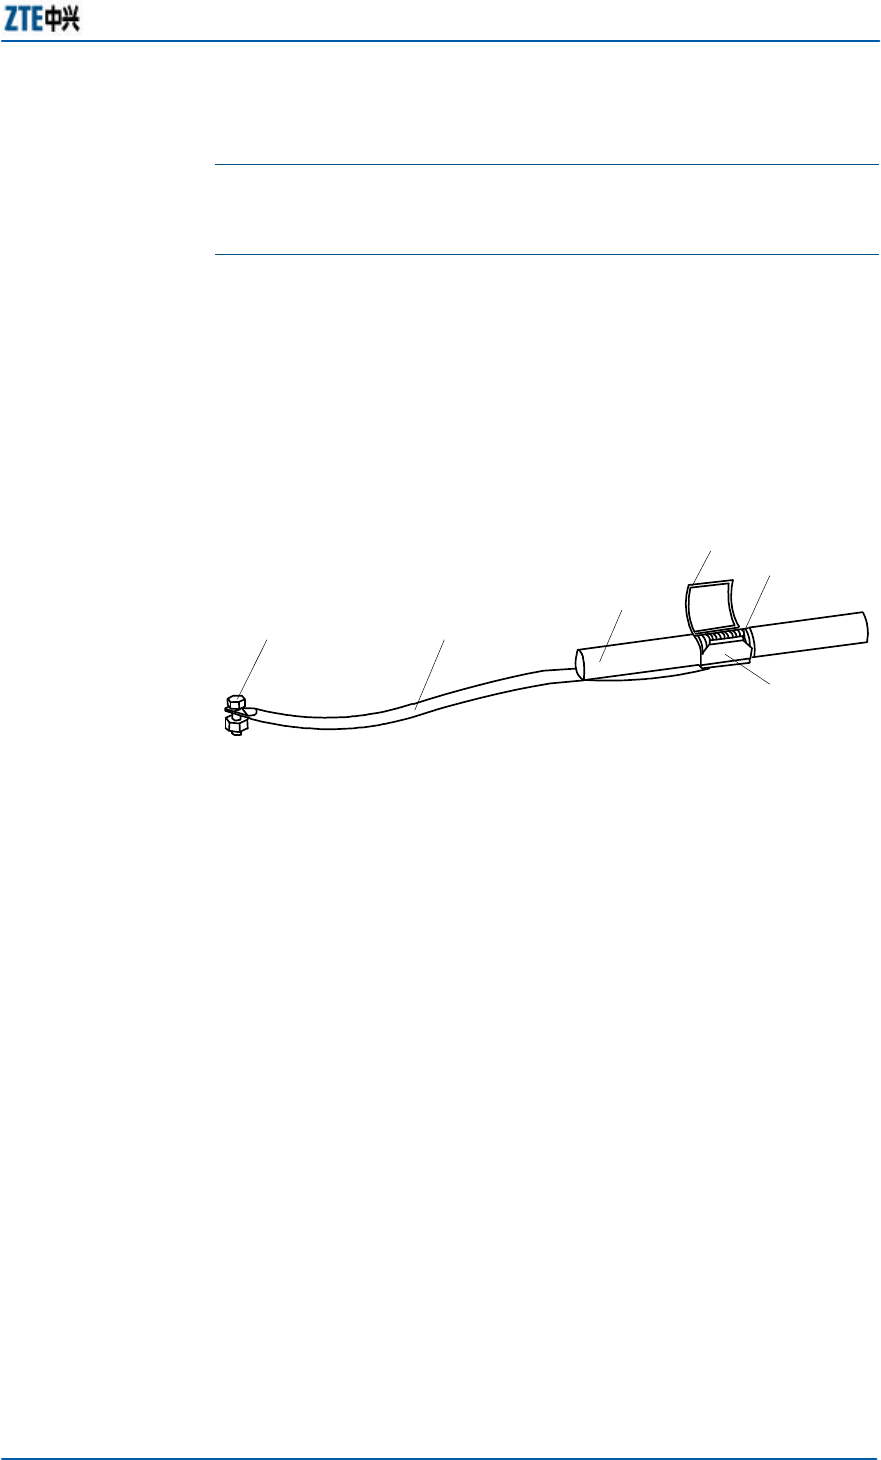
Chapter 6 Main Antenna Feeder System Installation
Confidential and Proprietary Information of ZTE CORPORATION 63
Caution: The grounding clip shall not be installed in lightning weather
to avoid personal injury. When installing the grounding clip, keep the
feeder at the joint of the grounding clip and the feeder straight.
1. Prepare the tools: Paper cutter, straight screwdriver, wrench
and sharp-nose pliers.
2. Select a proper installation position for the grounding clip,
and cut open the sheath of the 7/8" feeder according to the
size of the grounding clip. Figure 46 shows the structure of
the grounding clip.
FIGURE 46 THE GROUNDING CLIP STRUCTURE
1 2
3
4
5
6
1 Grounding end 2 Grounding cable 3 Feeder 4 Grounding cable cir
clip 5 Feeder outer copper core 6 Grounding cable sheet copper
3. Lead the grounding cable of the feeder lightning grounding
clip to the ground grid. No reverse direction is allowed. The
angle formed by the grounding cable and the main feeder
must not be more than 15°. No reverse folding is allowed.
„ In the case that the antenna feeder system is installed on
the tower, the grounding cable of the grounding clip must
be led downward along the tower body.
„ In the case that the antenna feeder system is installed on
the roof, the grounding cable of the grounding clip must
be led close to the building lightning protection grid.
4. Before installing the grounding clip, wrap the grounding wire
at the grounding clip end that is close to the grounding cable
sheet copper with the waterproof adhesive tape, as shown in
Figure 47. This can improve the sealing effect and prevent
the rain from falling into the feeder interior along the
grounding cable.
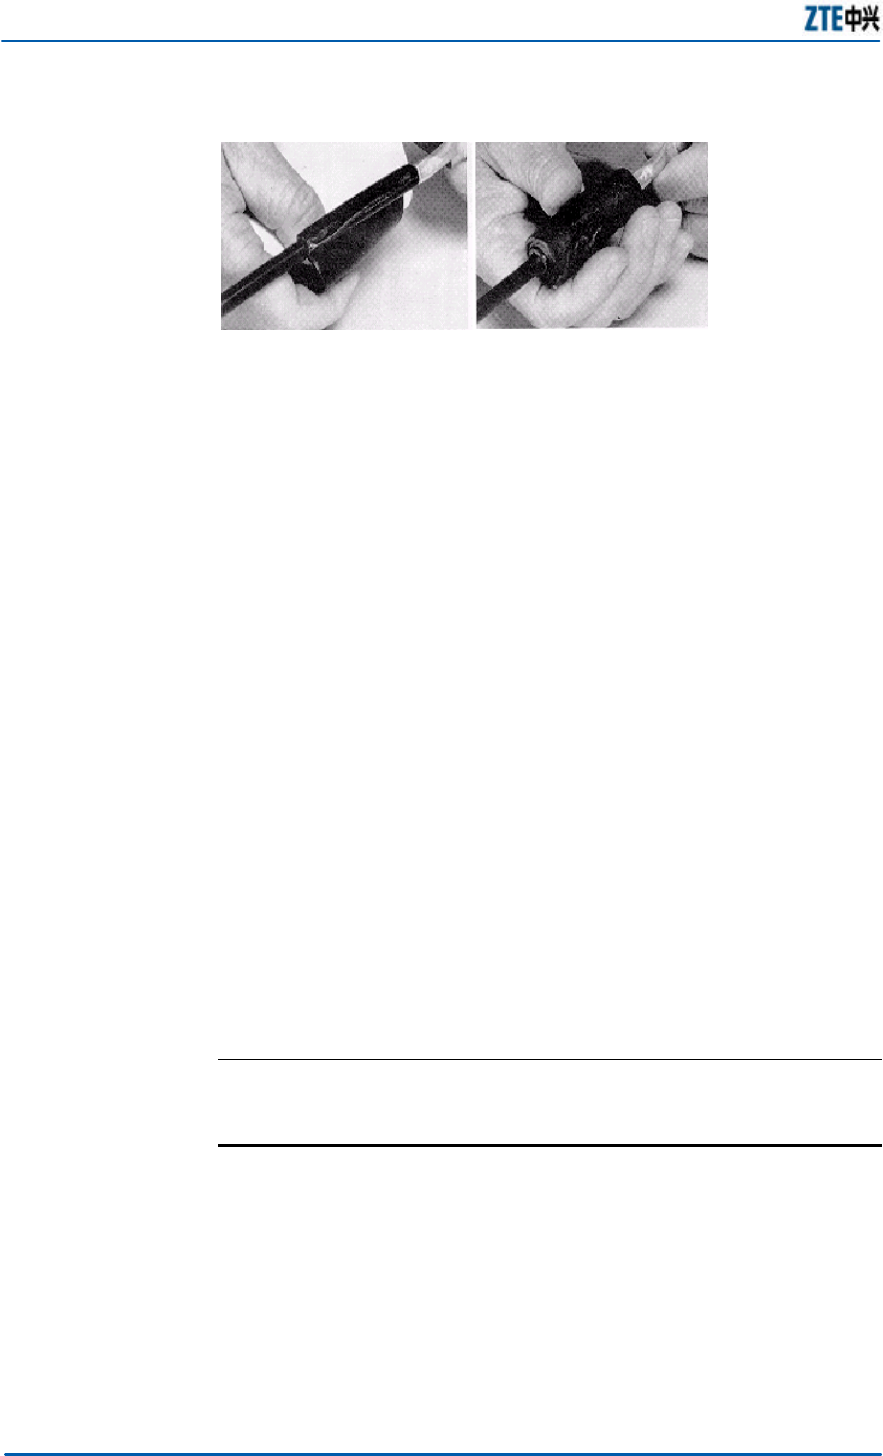
ZXMBW RA25 Agile 2.5G Remote Radio Frequency Unit Installation Manual
64 Confidential and Proprietary Information of ZTE CORPORATION
FIGURE 47 GROUNDING CABLE WRAPPING WITH WATERPROOF TAPE
5. Clamp the feeder external conductor with the grounding
cable sheet copper and the circlip, so that the grounding clip
sheet copper and the feeder external conductor are fully
locked together.
6. Conduct the water prevention treatment to the joint of the
grounding clip and the feeder by performing the following
steps:
i. First wrap the waterproof adhesive tapes and then the
PVC tapes.
ii. To wrap the waterproof adhesive tapes, wrap them layer
by layer from bottom to top first, then from top to
bottom once again, and finally from bottom to top, that is,
three layers of them. During the process, make sure the
upper layer overlaps the lower layer by about half the
width of the tapes.
7. The grounding end of the grounding clip can be connected to
the main tower body or the outdoor cable rack (connected to
the lightning protection grid of the building) on the roof.
Remove the paint and oxide within the radius of about 13
mm at the connection place, and cover the clean area with
antioxidant to ensure good electric contact. When the
grounding end is connected, apply another coating of
antirust paint.
END OF STEPS
Chassis Jumper Installation
The chassis jumper must be installed between the main feeder
and the chassis. Usually, the finished 2 m jumpers are used. You
can also prepare the jumpers on site as per the actual length
required.
n If the finished jumpers are used, they can be directly
installed between the feeder and the chassis.
n If the jumpers are prepared on site, 1/2'' feeders must be
prepared through cutting according to the specific length of
each jumper. Assemble the appropriate feeder connector

Chapter 6 Main Antenna Feeder System Installation
Confidential and Proprietary Information of ZTE CORPORATION 65
according to the feeder connector assembly instructions, and
connect the jumpers between the feeder and chassis.
SWR Test
After you have installed the antenna feeder system, you must
test the SWR of each antenna feeder, which must be no greater
than 1.3. If this requirement is not met, must check if the feeder
connector has been installed properly, and any fault or damage
in Antenna, feeder or jumper.
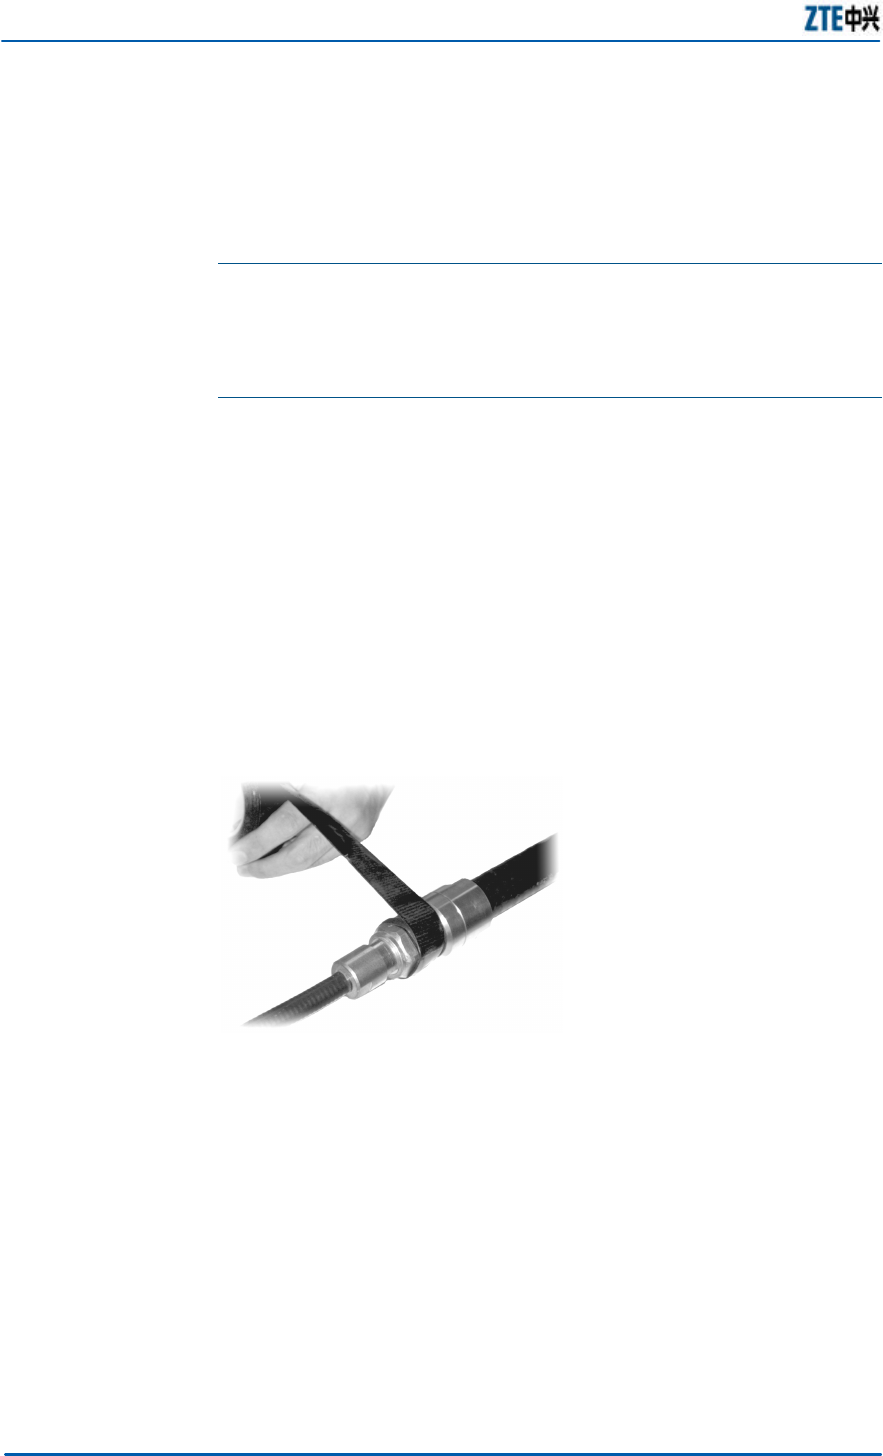
ZXMBW RA25 Agile 2.5G Remote Radio Frequency Unit Installation Manual
66 Confidential and Proprietary Information of ZTE CORPORATION
Water Proof Treatment
Caution: The water prevention sealing for the outdoor jumpers and the
feeder grounding clips of the antenna feeder system is an important
part of the antenna feeder installation. During the installation process,
must use waterproof tapes properly to ensure the quality of installing
the antenna feeder system.
Connect and seal the 1/2'' jumper and the feeder as follows:
1. Connect and lighten the antenna jumper and the main feeder
connector
2. Make water prevention treatment on the connectors in the
following steps
i. Wrap the waterproof adhesive tapes from a low position
where the connector is connected and wrap them about
200 mm to fill in the low-lying parts of the connector, as
shown in Figure 48.
FIGURE 48 WATERPROOF ADHESIVE TAPE WRAPPING (1)
ii. Extend the adhesive tapes to double their length when
wrapping them. The direction of wrapping must be the
same as the direction of screwing the feeder connector,
in case that the feeder connector may be loosened during
the wrapping process.
iii. As shown in Figure 49, wrap the adhesive tapes layer by
layer and then wrap them again in the reverse direction.
The upper layer must cover the lower layer by about 1/3
to avoid water penetration. Finally, wrap them layer by
layer again in the reverse direction. Wrap the tape with
three layers without any cut in the entire process. Wrap
the tapes around the feeder connector till they protrude
about 20 mm from the feeder connector.
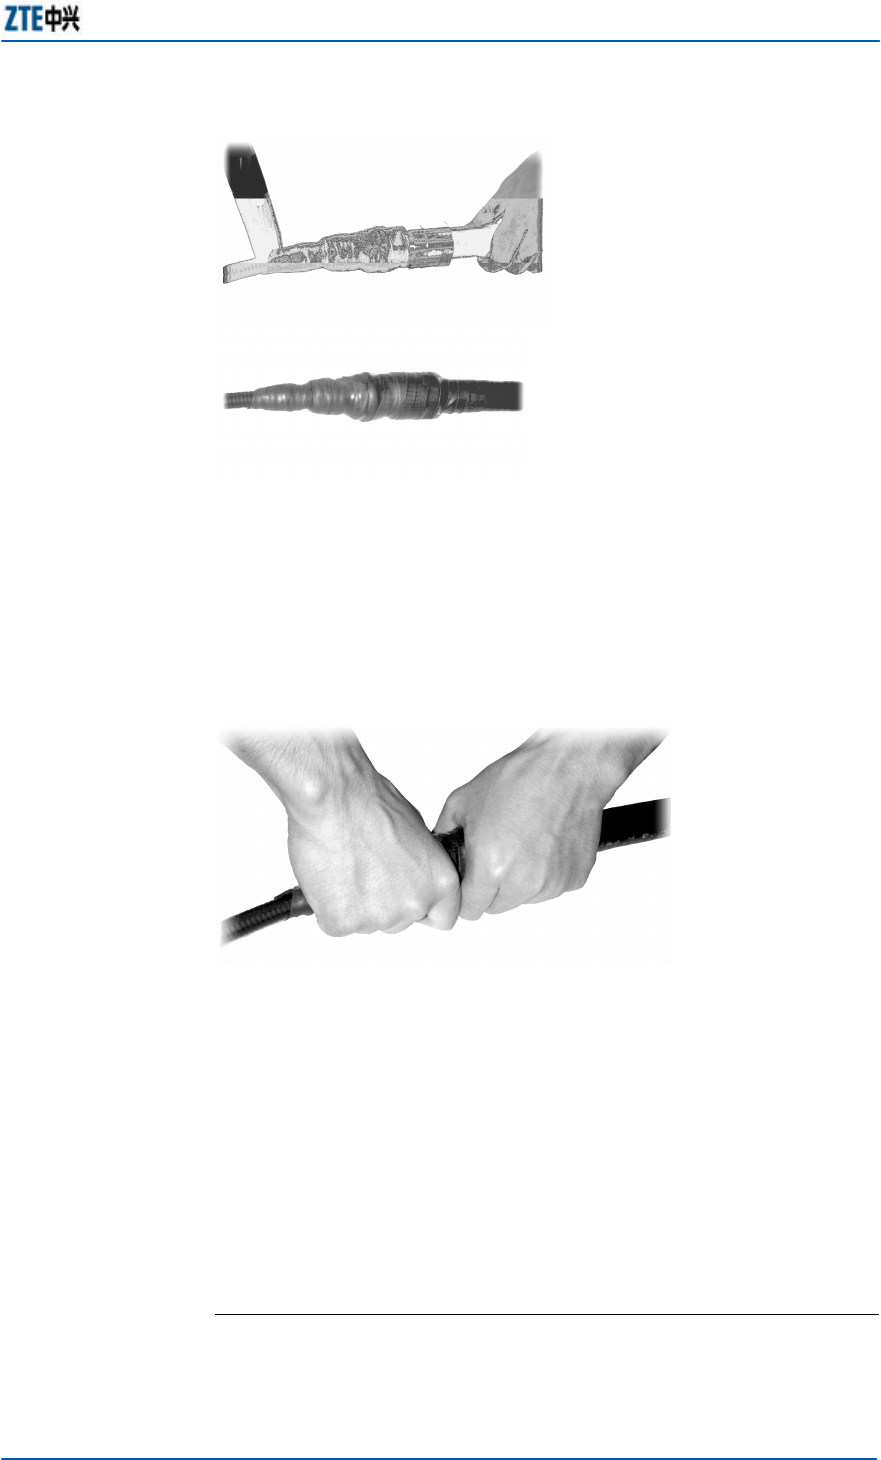
Chapter 6 Main Antenna Feeder System Installation
Confidential and Proprietary Information of ZTE CORPORATION 67
FIGURE 49 WATERPROOF ADHESIVE TAPE WRAPPING (2)
iv. Grip the waterproof adhesive tapes with your both ends
after wrapping them to ensure firm bonding between the
tapes and the feeders/feeder connectors, as shown in
Figure 50.
FIGURE 50 WATERPROOF ADHESIVE TAPE WRAPPING (3)
v. Apply two layers of the PVC tape on top of the waterproof
adhesive tape. During the process, make sure the upper
layer overlaps the lower layer by half the width of the
tape. Wrap two layers in total.
vi. Grip the PVC tapes and the waterproof adhesive tapes
with both hands to make them tightly adhered to each
other.
vii. Tie the two ends of the adhesive tape with straps to
prevent it from being aged or falling off.
END OF STEPS

ZXMBW RA25 Agile 2.5G Remote Radio Frequency Unit Installation Manual
68 Confidential and Proprietary Information of ZTE CORPORATION
This page is intentionally blank.

Confidential and Proprietary Information of ZTE CORPORATION 69
Chapter 7
Hardware Installation
Check
This chapter explains:
n Chassis installation check
n Cable installation check
n Antenna feeder installation check
n Environment check
n BTS information check

ZXMBW RA25 Agile 2.5G Remote Radio Frequency Unit Installation Manual
70 Confidential and Proprietary Information of ZTE CORPORATION
Chassis Installation Check
n The chassis installation position must match that on the
design drawing.
n The chassis must be installed securely, meeting the level 7
earthquake-resistant requirement.
n The horizontal and vertical deviation of the chassis must be
less than 3 mm.
n The surface must be clean and the paint must be in good
condition. No part must fall off or get damaged. Signs on the
chassis must be correct, clear and complete.
n The inside of the chassis must be clean. The corners inside
the chassis must be free from messes such as metallic scraps
and wires.
n All bolts must be tightened. No plain washer or spring
washer is placed in reverse.

Chapter 7 Hardware Installation Check
Confidential and Proprietary Information of ZTE CORPORATION 71
Cable Installation Check
The cables of the RA25 include power and grounding cables,
optical fibers, and RF cables.
The overall installation requirements are as below:
n Various cables are straight and level, without evident wave
or deflection. There is no crossover or space jumper.
n Cables must be bent smoothly and evenly and the outer part
of the bend must be as vertical or horizontal as a direct line.
n Various cables must be attached with labels on both ends,
which must indicate the purposes of the cables. Labels on
both ends must have the same contents;
n Every connector must be plugged reliably, correctly and in
good contact without being broken or bent.
n Cable ties must be in good order, even spacing, and
appropriate tightness, and face the same directions. Extra
ties must be cut off down from their roots, without pointed
ends.
n The connecting terminals must be equipped with plain
washers and spring washers.
Power and Grounding Cables
n Power cables and signal cables must be laid separately, keep
distance no less than 200 mm between the two types of
cable.
n Power and grounding cables must be made of a complete
piece of wire, without joints in the middle.
n Each grounding point on the grounding copper busbar must
be connected with one device only.
n The remaining length of each power/ground cable must cut
off, but not be coiled.
n The lugs at both ends of the power/ground cables must be
welded or crimped securely.
n The grounding cables must take the shortest route.
n The bare wires at the connecting terminals and lug handle
must be tightly wrapped with insulation tape or put in a
heat-shrink tube instead of being exposed.

ZXMBW RA25 Agile 2.5G Remote Radio Frequency Unit Installation Manual
72 Confidential and Proprietary Information of ZTE CORPORATION
Optical Fibers
n Do not bend optical fibers into right angles. The bend radius
of outdoor optical fibers must be 90 mm for the minimum,
and that of indoor optical fibers must be 30 mm for the
minimum.
n Optical fibers must not entangle with each other.
n The optical fibers must be arranged naturally, with binding
spacing less than 0.5 m.
n The marks on both ends of an optical fiber must be clear.
n Connectors on both ends of an optical fiber must not get
loose.
n The optical fibers must not be damaged.
1/2’’ Jumper
n The labels of the jumpers must be at conspicuous locations
and easily identifiable.
n Jumpers must be laid in a way that makes easy maintenance
and future expansion.
n Jumpers must be laid by layer and sector.
n The jumper at the joint with the equipment must keep
straight for 30 cm.
Main Feeder
n The cut of the main feeder must be smooth and free from
messes. The copper tube of the main feeder must be free
from messes such as copper scraps. The connector of the
feeder must be made properly, and must not get loose.
n The 7/8" feeder connector must be tightened with a big
spanner and installed in place to avoid any abnormal SWR
due to false connections, and ensure normal system running.
n The grounding clip must be installed correctly.
„ From the tower top to the equipment room, the feeder
must be grounded at three places: the place within 1 m
after the feeder leaves the tower top, the place within 1m
before led to the outdoor cable rack after leaving the
tower body, and the place within 1 m of the RA25.

Chapter 7 Hardware Installation Check
Confidential and Proprietary Information of ZTE CORPORATION 73
„ If a tower is above 60 m and needs a longer feeder,
another feeder grounding clip must be placed in the
middle of the tower.
„ If a feeder is routed for above 20 m at the building top or
on the cabling rack after leaving the tower before it
enters the room, another grounding clip for lightning
protection must be added at the building top or on the
cable rack.
Caution: When you install the grounding clip, must pay attention to
water prevention. The end with the grounding cable must face upward
to prevent the rainwater from flowing to the feeder along the grounding
cable.
n The terminals of the grounding clip of a feeder must be fixed
on the steel plate of a nearby tower.
n For a building without a tower, the antenna feeder at the top
must be grounded by connection to the nearby lightning
protection ground grid on the roof.
n The grounding cable of a feeder must be led up down, and
the angle between the feeder and grounding cable must be
no more than 15º
.
n The minimum bending radius of feeders must be 20 times of
the radius of feeder cables. The bending radius of the
primary feeder must be more than 0.3 m.
n There must be no bare copper sheet at each feeder
connector. Same labels must be attached to both ends of
each feeder to ensure it can be connected correctly to the
antenna, and each label must indicate the length of the cable.

ZXMBW RA25 Agile 2.5G Remote Radio Frequency Unit Installation Manual
74 Confidential and Proprietary Information of ZTE CORPORATION
Antenna Feeder Installation
Check
n The mounting height of the antenna must match the network
planning, and the installation location of the antenna must
comply with the design.
n The azimuth angle and down tilt of the antenna must match
the design.
n The antenna support must be firmly and reliably fastened to
the tower.
n The antenna must be located within the protection area of
the lightning rod.
n The SWR of the antenna feeder must be no more than 1.3.
n The connections between the antenna and the 1/2” jumper
and between the 1/2” jumper and the main feeder must be
correct.
n At the joint between the jumper and the antenna, the jumper
must be parallel to the antenna with 30 cm in between.
n All outdoor jumper connectors must undergo water
prevention sealing treatment.

Chapter 7 Hardware Installation Check
Confidential and Proprietary Information of ZTE CORPORATION 75
Environment Check
Any outdoor engineering waste must be cleaned. After the
installation is over, the outdoor work site must be restored to its
original status, without any cable strap, stub, waste paper box,
waste cable or waste plastic bag. The whole site must be clean
and tidy.
BTS Information
When you install the BTS, record the model and serial number of
each part to fill in the BTS information table required in the
engineering installation acceptance report.

ZXMBW RA25 Agile 2.5G Remote Radio Frequency Unit Installation Manual
76 Confidential and Proprietary Information of ZTE CORPORATION
This page is intentionally blank.

Confidential and Proprietary Information of ZTE CORPORATION 77
Chapter 8
Power- On/Off
This chapter explains:
n Power –on/off procedures

ZXMBW RA25 Agile 2.5G Remote Radio Frequency Unit Installation Manual
78 Confidential and Proprietary Information of ZTE CORPORATION
Power – on/off Procedures
Power - on Check
n Verify that the supply voltage meets the requirements of the
RA25.
n Verify that the power and grounding cables of the chassis
have been properly connected.
n Verify that the power connector of the chassis is
disconnected.
Power - on
n There is no additional power switch inside the RA25 chassis.
The equipment is powered on once you close the power
switch.
n If any abnormality occurs after power-on, turn off the power
switch immediately and check for the causes.
Power - off
n Disconnect the external AC/DC switch.

Confidential and Proprietary Information of ZTE CORPORATION 79
Appendix A
Technical Indices
Physical Indices
Table 12 lists the physical indices of the RA25.
TABLE 12 RA25 PHYSICAL INDICES
Category Specification Name
Specification
Outer dimensions 655 mm (H) × 400 mm (W)
× 285 mm (D)
Inner dimensions 580 mm (H) × 396 mm (W)
× 200 mm (D)
Dimensions
Base height 75 mm (with three base
fans)
Weight Weight of single
chassis 37 kg
Temperature
requirement
Operating temperature: - 40
°C ~ + 50 °C
Storage temperature: -45 °C
~ +75 °C
Temperature
/humidity
requirements
Humidity requirement
Working humidity: 5% RH ~
98% RH
Storage humidity: 5% RH ~
98% RH
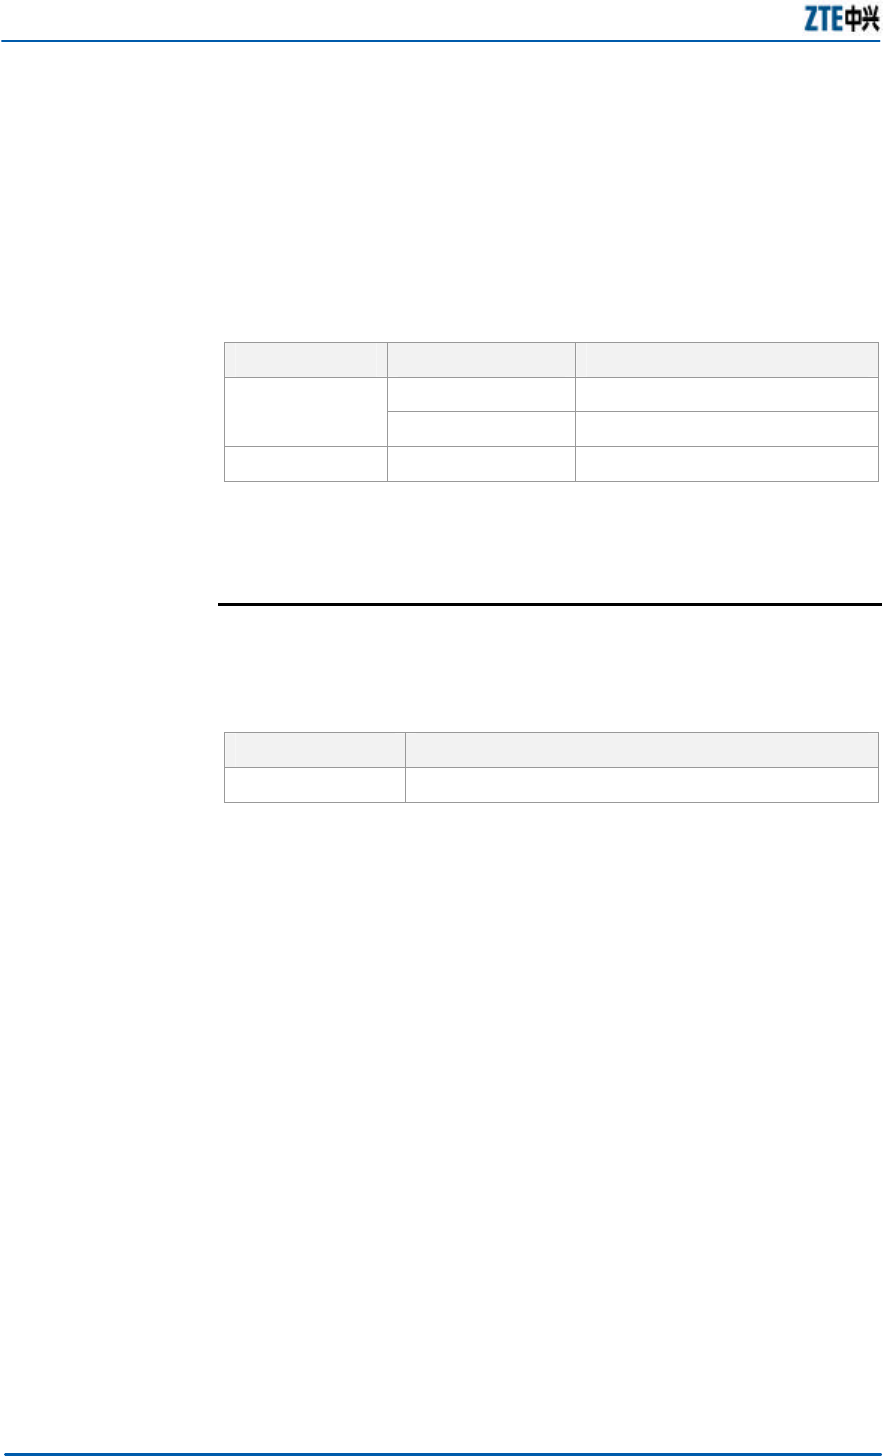
ZXMBW RA25 Agile 2.5G Remote Radio Frequency Unit Installation Manual
80 Confidential and Proprietary Information of ZTE CORPORATION
Power Supply Indices
Table 13 lists the normal AC/DC power supply indices of the
RA25.
TABLE 13 RA25 POWER SUPPLY INDICES
Type Nominal Value Operating Range
110 V AC 85 V AC~138 V AC
AC 220 V AC 150 V AC~300 V AC
DC -48 V DC -40 V~ -57 V
Power Consumption Indices
Table 14 lists the power consumptions of different carriers.
TABLE 14 RA25 POWER CONSUMPTION INDICES
Average Power
Maximum Power Consumption (at Full Load)
200 W 290 W

Confidential and Proprietary Information of ZTE CORPORATION 81
Abbreviations
Abbreviation Full Name
BBUA Agile Baseband Base Unit
BSC Base Station Controller
BSS Base Station subsystem
BTS Base Transceiver Station
GPS Global Position System
PE Protective Earth
SDH Synchronous Digital Hierarchy
UPS Uninterruptible Power Supply

ZXMBW RA25 Agile 2.5G Remote Radio Frequency Unit Installation Manual
82 Confidential and Proprietary Information of ZTE CORPORATION
This page is intentionally blank.

Index
AC, 2, 3
AC/DC, 2, 3
ANT0, 2
ANT1, 2
B, 2
BSC, 3
BSS, 3
BTS, 2, 3
CAPS, 1
DB9, 2
DC, 2, 3
E, 1, 2
FAN, 2
FAN1, 2
FAN2, 2
FAN3, 2
FIBER, 2
GND, 2
GPS, 3
INFORMATION, 1
LEGAL, 1
MASTER, 2
MONITOR, 2
N/A, 1
ODF, 2
P, 1
POWER, 2
R&D, 1
R1, 1
RF, 1, 2
RFE, 2
ROSENBERGER, 2
SDH, 3
SITE, 2
SWR, 2
URL, 1
V, 2, 3
VGND, 2
VSWR, 2

ZXMBW RA25 Agile 2.5G Remote Radio Frequency Unit Installation Manual
84 Confidential and Proprietary Information of ZTE CORPORATION
This page is intentionally blank.

Confidential and Proprietary Information of ZTE CORPORATION 85
Figures
Figure 1 RA25 Chassis Overall Installation Schematic Diagram..2
Figure 2 RA25 On-site Installation Operation Schematic Diagram
.........................................................................................3
Figure 3 RA25 Installation Flow............................................4
Figure 4 Installation Flow - Pole Mounting ............................ 16
Figure 5 Support Component Schematic Diagram.................. 17
Figure 6 Support Component Fastening onto the Pole............ 17
Figure 7 Sunshade Installed -Pole Mounting.......................... 18
Figure 8 Hanging the Chassis onto the Support-Pole Mounting 19
Figure 9 Pushing Chassis into Position-Pole Mounting............. 19
Figure 10 Fastening the Chassis Body -Pole Mounting............ 20
Figure 11 Mounted Chassis-Pole Mounting............................ 20
Figure 12 Installation Flow -Wall Mounting ........................... 21
Figure 13 Support Holes Layout .......................................... 22
Figure 14 Support Component Installation Schematic Diagram -
Wall Mounting................................................................... 23
Figure 15 Installed Support Component Schematic Diagram -
Wall Mounting................................................................... 23
Figure 16 Hanging the Chassis onto the Support-Wall Mounting
....................................................................................... 24
Figure 17 Fastening the Chassis Body-Wall Mounting............. 25
Figure 18 Mounted Chassis-Wall Mounting............................ 25
Figure 19 AC Power Cable Structure .................................... 28
Figure 20 DC Power Cable Structure.................................... 29
Figure 21 Fan Power Cable Structure ................................... 30
Figure 22 Chassis PE Cable Installation Schematic Diagram.... 31
Figure 23 Chassis Grounding Cable Structure....................... 31
Figure 24 Power Cable Connection Method 1......................... 33
Figure 25 Power Cable Connection Method 2......................... 34
Figure 26 RA25 External Interfaces ..................................... 36
Figure 27 Optical Fiber Structure......................................... 37

ZXMBW RA25 Agile 2.5G Remote Radio Frequency Unit Installation Manual
86 Confidential and Proprietary Information of ZTE CORPORATION
Figure 28 External Monitoring Cable Structure ...................... 39
Figure 29 RA25 Main Antenna Feeder System Structure......... 45
Figure 30 Installation Flow ................................................. 46
Figure 31 Antenna Installation Flow..................................... 48
Figure 32 Antenna Lightning Protection Schematic Diagram.... 49
Figure 33 Antenna Hoisting Schematic Diagram .................... 50
Figure 34 Antenna Installation ............................................ 51
Figure 35 Antenna -Down Tilt Angle Adjustment ................... 52
Figure 36 7/8” feeder Structure .......................................... 54
Figure 37 7/8" Feeder Connector Cutting Tool....................... 55
Figure 38 Feeder - Cutting.................................................. 56
Figure 39 Feeder Length Checking....................................... 56
Figure 40 Feeder External Conductor Expansion................... 56
Figure 41 Feeder connector’s Front Part and Back Part........... 57
Figure 42 Feeder connector’s Front Part and Back Part Fixing .57
Figure 43 Feeder hoisting- Schematic Diagram ..................... 59
Figure 44 Triple Feeder Clip................................................ 61
Figure 45 Feeder Grounding –Schematic Diagram ................. 62
Figure 46 the Grounding clip Structure................................. 63
Figure 47 Grounding Cable Wrapping with Waterproof Tape.... 64
Figure 48 Waterproof Adhesive Tape Wrapping (1)................ 66
Figure 49 Waterproof Adhesive Tape Wrapping (2)................ 67
Figure 50 Waterproof Adhesive Tape Wrapping (3)................ 67

Confidential and Proprietary Information of ZTE CORPORATION 87
Tables
Table 1 Chapter Summary....................................................i
Table 2 Typographical Conventions...................................... iii
Table 3 Mouse Operation Conventions.................................. iii
Table 4 Temperature and Humidity Requirements ...................8
Table 5 Power Supply Requirements......................................9
Table 6 Tools List .............................................................. 10
Table 7 Instruments List .................................................... 11
Table 8 220V AC Power Cable Pinouts.................................. 28
Table 9 -48V DC Power Cable Pinouts .................................. 29
Table 10 External Interfaces on the Transfer Board ............... 36
Table 11 7-core Aeronautic Connector Cable Signal Definitions39
Table 12 RA25 Physical Indices........................................... 79
Table 13 RA25 Power Supply Indices ................................... 80
Table 14 RA25 Power Consumption Indices .......................... 80