ZTE ZXV10W300 Wireless ADSL Router User Manual ZXV10 W300 Wireless ADSL Router User s Manual
ZTE Corporation Wireless ADSL Router ZXV10 W300 Wireless ADSL Router User s Manual
ZTE >
Users Manual
ZXV10 W300
Wireless ADSL Router
User's Manual
ZTE CORPORATION
ZXV10 W300 Wireless ADSL Router
User's Manual
Manual version 20050530-R1.0
Product version V1.0
Copyright © 2003 ZTE Corporation
All rights reserved.
No part of this documentation may be excerpted,
reproduced, translated, annotated or duplicated, in any
form or by any means without the prior written permission
of ZTE CORPORATION.
* * * *
ZTE CORPORATION
ZTE Plaza, Keji Road South, Hi-Tech Industrial Park,
Nanshan District, Shenzhen, P. R. China
Website: http://support.zte.com.cn
Post code: 518057
Customer Support Center: 86-0755-26770800
800-830-1118
Fax: 86-0755-26770801
E-mail: doc@zte.com.cn
* * * *
S.N.: ×××××××
Suggestions and Feedback
To improve the quality of ZTE product documentation and
offer better services to our customers, we hope you can give
us your suggestions and comments on our documentation
and fax this form to 0086-755-26770160; or mail to “ZTE
Plaza, Keji Road South, Hi-Tech Industrial Park, Nanshan
District, Shenzhen, P. R. China”. Our postcode is 518057.
Document
Name ZXV10 W300 Wireless ADSL Router User's Manual
Product
version V1.0 Document
version 20050530-R1.0
Equipment installation time
Your information
Name Company
Postcode Company
address
Telephone E-mail
Good Fair Average Poor Bad
Overall
Instructiveness
Index
Correctness
Completeness
Structure
Your
evaluation of
this
documentation
Illustration
Readability
Overall
Instructiveness
Index
Correctness
Completeness
Structure
Illustration
Your
suggestion on
the
improvement
of this
documentation
Readability
Your other
suggestions on
ZTE product
documentation
Contents
1 OVERVIEW.................................................................... 1
1.1 FEATURES......................................................................................... 1
1.2 PACKING........................................................................................... 3
1.3 SYSTEM REQUIREMENT.................................................................... 4
1.4 RF SAFETY ....................................................................................... 4
2 ZXV10 W300 HARDWARE .......................................... 5
2.1 EXTERNAL VIEW .............................................................................. 5
2.2 INDICATORS AND PORTS ................................................................... 6
3 FAST INSTALLATION.................................................. 9
3.1 HARDWARE CONNECTIONS .............................................................. 9
3.2 ZXV10 W300 FACTORY DEFAULTS................................................ 12
3.3 COMPUTER SETUP .......................................................................... 12
4 WIZARD ....................................................................... 15
4.1 LOGGING ON TO THE ZXV10 W300 DEVICE .................................. 15
4.2 CONFIGURING VPIS AND VCIS....................................................... 16
4.3 SELECTING CONNECTION TYPES .................................................... 17
4.4 SETTING CONFIGURATIONS ............................................................ 18
4.5 DISPLAYING CONFIGURATION DATA .............................................. 24
4.6 OTHER COMMON CONFIGURATIONS .............................................. 25
4.6.1 UPnP....................................................................................... 25
4.6.2 DMZ ....................................................................................... 26
5 TECHNICAL SPECIFICATIONS.............................. 30
5.1 HARDWARE SPECIFICATIONS.......................................................... 30
5.2 SOFTWARE SPECIFICATIONS ........................................................... 31
6 TROUBLESHOOTING ............................................... 34

Fehler! Formatvorlage nicht definiert. Fehler! Formatvorlage nicht definiert.
1
1 Overview
Thank you for using ZTE’s ZXV10 W300 Wireless ADSL
Router. Please read this manual carefully before using the
product.
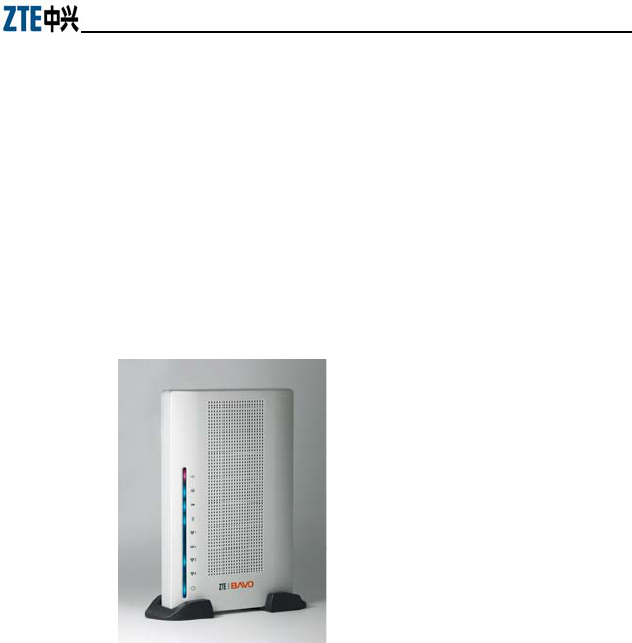
ZXV10 W300 is an enhanced wireless ADSL use-end
access device providing uplinks in multiple line
transmission modes. It provides four 10/100Base-T Ethernet
interfaces, one 802.11g/b wireless interface and one USB
interface (optional). ZXV10 W300 provides the users with
broadband Internet or enterprise network access services via
high-speed ADSL/ADSL2/ADSL2+ access.
ZTE CORPORATION reserves the right to modify technical
specifications in this manual without any notification in
advance.
Changes or modifications not expressly approved by the
party responsible for compliance could void the user's
authority to operate the equipment.
1.1 Features
Provide ADSL/ADSL2/ADSL2+ high-speed Internet
access over ordinary telephone lines.
Support G.992.1, G.992.2, G.992.3, G.992.5, T1.413
Provide four 10/100Base-T Ethernet interfaces

ZXV10 W300 Wireless ADSL Router User's Manual
2
supporting automatic identification of crossover cable
and straight-through cable.
Provide one IEEE 802.11g/b wireless interface
Provide one USB Slave interface (optional)
Provide wireless data security using WEP-64,
WEP-128, WEP-256, WPA-PSK and MAC address
filtering
Provide functional features including subscriber
isolation, ESSID hiding and multi-ESSID
Support Bridge and Router modes
Support eight PVC connections and auto-negotiation
Support RFC 2684 and PPPoE bridging function
Support RFC2684 routing and IPoA, PPPoA and
PPPoE dial-up
Support NAT and IP filtering functions, with built-in
firewall.
Support network configuration using DHCP
Support UPnP, SNTP, DMZ, IGMP Proxy and DNS
Proxy functions
Support ATM QoS and IP QoS functions
Support configuration via web and SNMP
management

Fehler! Formatvorlage nicht definiert. Fehler! Formatvorlage nicht definiert.
High reliability, ease of use and low power
consumption
High compatibility and interoperability with various
office-end DSLAMs
Note:
Corresponding ISP services are required for the above
functions.
1.2 Packing
The device list in the package contains:
ZXV10 W300 Wireless ADSL Router 1
External splitter 1
Power supply adapter 1
Telephone lines 2
Straight-through cable 1
Warranty card 1
Certificate of Quality 1
ZXV10 W300 Wireless ADSL Router User’s Manual
1
3

ZXV10 W300 Wireless ADSL Router User's Manual
4
1.3 System Requirement
Before using ZXV10 W300, please ensure the following
system requirement:
ADSL service has been subscribed. Your ADSL
Service Provider must provide you with at least 1
legal IP address (allocated dynamically via dial-up or
statically)
One or more PCs with 10M/100M Ethernet Network
Interface Card (NIC)
For wireless access, an external or built-in 802.11g/b
wireless NIC is required.
To set up the system via web, a browser is required,
e.g. Internet Explorer V5.0 or later, or Netscape V4.7
or later.
1.4 RF safety
FCC Radiation Exposure Statement:
This equipment complies with FCC radiation exposure
limits set forth for an uncontrolled environment. This
equipment should be installed and operated with minimum
distance 20cm between the radiator & your body.
ZXV10 W300 Wireless ADSL Router User's Manual
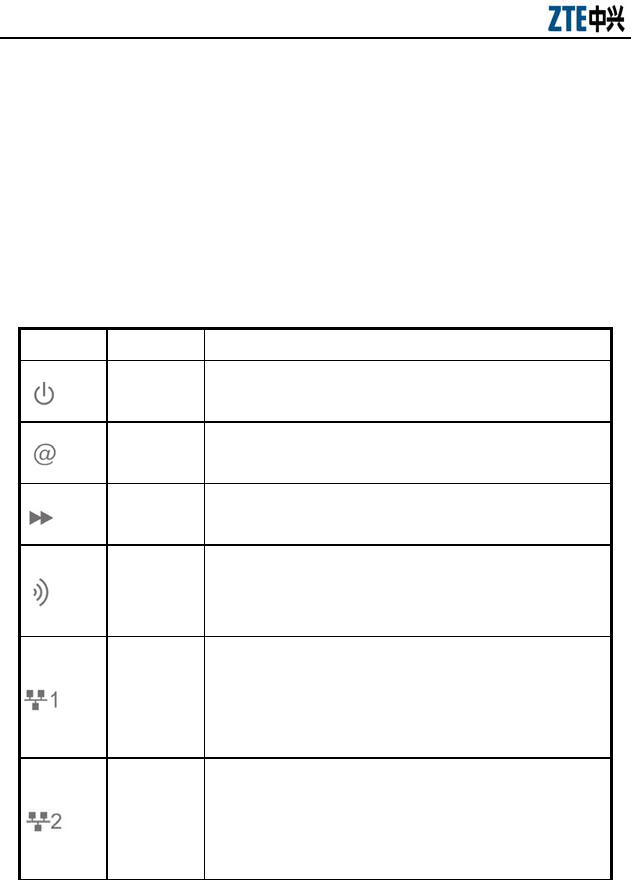
2.2 Indicators and Ports
See TABLE 1 for the front panel indicator description.
TABLE 1 FRONT PANEL INDICATOR DESCRIPTION
Indicator Color Functions
Red Steady ON: Indicates power-on. OFF: Indicates
power-off or failure
Green Steady ON: The device is connected to the Internet via
successful built-in dial-up.
Green Slow flashing: Indicates the device operates normally.
OFF: Indicates an operation failure.
Green
Steady ON: Indicates WLAN enabled. Flashing:
Indicates data sending/receiving on the WLAN port.
OFF: Indicates WLAN disabled.
Green
Steady ON: Indicates LAN1 connection established.
Flashing: Indicates data sending/receiving on the
LAN1 port. OFF: Indicates no connection is
established on the LAN1 port.
Green
Steady ON: Indicates LAN2 connection established.
Flashing: Indicates data sending/receiving on the
LAN2 port. OFF: Indicates no connection is
established on the LAN2 port.
6

Fehler! Formatvorlage nicht definiert. Fehler! Formatvorlage nicht definiert.
Indicator Color Functions
Green
Steady ON: Indicates LAN3 connection established.
Flashing: Indicates data sending/receiving on the
LAN3 port. OFF: Indicates no connection is
established on the LAN3 port.
Green
Steady ON: Indicates LAN4 connection established.
Flashing: Indicates data sending/receiving on the
LAN4 port. OFF: Indicates no connection is
established on the LAN4 port.
Green
Steady ON: Indicates an ADSL connection is
established and activated. Slow flashing: Indicates a
connection is being established on the ADLS line.
OFF: Indicates no ADSL connection can be
established.
See TABLE 2 for the back panel port description.
TABLE 2 BACK PANEL PORT DESCRIPTION
Port Functions
Power For connecting the power adaptor
On/Off Power On/Off
Reset
When the device is powered on and activated, inserting a needle in the hole
and pressing it for more than 10 seconds will reset the device to the factor
defaults.
Wi-Fi WLAN radio frequency ON/OFF
LAN1~4 NIC connected to a PC via RJ45 cable
DSL Connected to the ADSL line or splitter via RJ11 telephone line
7

ZXV10 W300 Wireless ADSL Router User's Manual
This page is intentionally blank.

Fehler! Formatvorlage nicht definiert. Fehler! Formatvorlage nicht definiert.
3 Fast Installation
This chapter tells you how to connect the ZXV10 W300 to a
PC, Intranet or the Internet.
It is assumed that you have signed up for the ADSL service
from the Service Provider. In addition, this chapter contains
only basic product setup, which is applicable to the network
environment of general subscribers or enterprise users.
3.1 Hardware Connections
It is recommended to install the device in practical
applications according to the first sample.
Note:
You can install the device according to the second sample if
the first sample is not applicable. A voice filter (which
cannot be replaced by the splitter) should be installed near
the telephone line terminal.
Phone sets connected in parallel before the splitter will
cause many problems, e.g. the ZXV10 W300 device cannot
be connected to office-end devices; networks cannot be
accessed or the network access speed will be slow. To
connect phone sets before the splitter, a voice filter should
be connected in serial before the phone sets. (In general,
9
ZXV10 W300 Wireless ADSL Router User's Manual
only one voice filter can be connected before the splitter to
reduce interference)
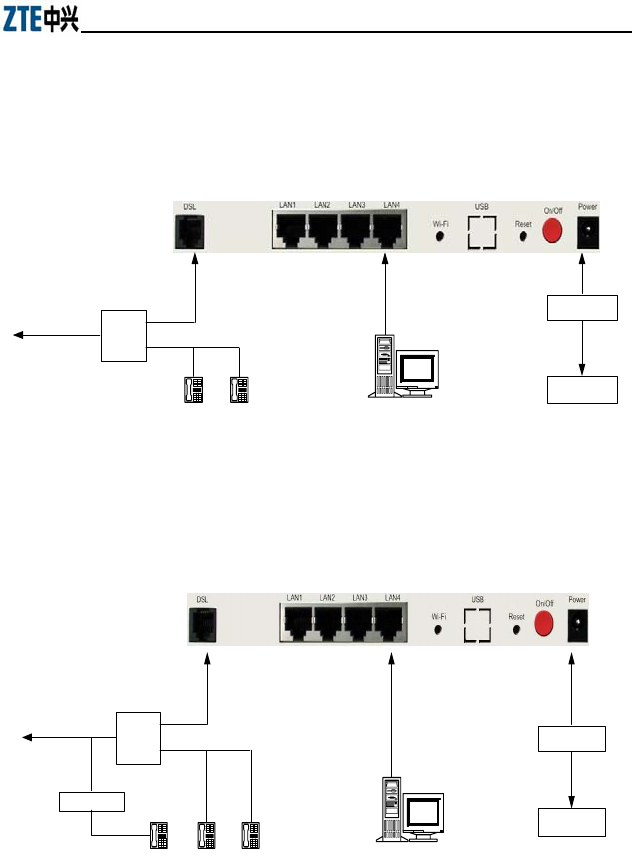
To connect the ZXV10 W300 device:
1. Connect the DSL port to the MODEM port of the
splitter using a telephone line. Connect a phone set to the
phone port of the splitter using another telephone line, and
then connect the subscriber telephone line providing the
ADSL service to the LINE port of the splitter, as shown in
FIGURE 2 and FIGURE 3.
The splitter has three ports, including:
LINE: Port connected to the subscriber telephone line
providing the ADSL service
MODEM: Port connected to the DSL port of the
ZXV10 W300 device
PHONE: Port connected to a phone set.
2. Connect the LAN port of the device to a PC with a
NIC using an RJ45 cable.
3. Connect the power adapter to the Power port of the
device, and plug the adapter to the AC power outlet. The
device will be powered on and operate after you pushing
the power switch button.
Note:
You can only use the power adapter provided with the
ZXV10 W300 device. Using other power adapter may
damage the device or cause device operation failures.
Fehler! Formatvorlage nicht definiert. Fehler! Formatvorlage nicht definiert.
FIGURE 2 Installation sample 1: When the splitter is
installed on the telephone line port
LINE
MODEM
PHONE
RJ-45
Line with
ADSL Service
RJ-11
Splitter
PC
PHONEPHONE
Power Adapter
Power Outlet
FIGURE 3 Installation sample 2: When the Splitter is
Installed near the Modem
LINE
MODEM
PHONE
RJ-45
Line with
ADSL Service
RJ-11
Splitter
PC
PHONEPHONE
Power Adapter
Power Outlet
MicroFilter
PHONE
11
ZXV10 W300 Wireless ADSL Router User's Manual
3.2 ZXV10 W300 Factory Defaults
Factory defaults are as follows:
Device IP address: 192.168.1.1; Subnet mask:
255.255.255.0
Use DHCP server by default. The IP address can be
obtained from the device via DHCP.
Line coding AUTO
(T1.413/G.DMT/G.LITE/ADSL2/ADSL2+
auto-sensing)
Note:
In the case that the device doesn’t work due to configuration
errors or the password is forgot, insert a needle into the
Reset hole on the back of the device and push the button for
more than 10 seconds to reset all the device configurations
to the factory defaults.
3.3 Computer Setup
If your computer uses Windows 95/98/ME/2000/XP, set up
your computer using the following two methods of which
the first one is recommended. The following examples use
Windows XP as the operating system. The setup of
computers using other operating systems is similar.
1. The PC can obtain an address from the device via
DHCP.
1) From the Windows taskbar, select Start > Control

Fehler! Formatvorlage nicht definiert. Fehler! Formatvorlage nicht definiert.
13
Panel.
2) Double-click the Network Connection icon.
3) From the right-button menu, select Local Area
Connection > Properties. Select Internet Protocol
(TCP/IP) > Properties.
4) From the Internet Protocol (TCP/IP) Properties
dialog box:
Ensure that Obtain IP address Automatically is checked.
Ensure that Obtain DNS server address automatically is
checked.
5) Click OK twice to confirm and save your settings.
2. Configure the PC to use a static address:
1) From the Windows taskbar, select Start > Control
Panel.
2) Double-click the Network Connection icon.
3) From the right-button menu, select Local Area
Connection > Properties. Select Internet Protocol
(TCP/IP) > Properties.
4) In the Internet Protocol (TCP/IP) Properties
dialog box, click Use the following IP address to
specify the local computer's IP address to the same
network segment as the LAN port address of the device,
i.e. 192.168.1.x (in which the "x" is a decimal integer
between 2~254). For example, 192.168.1.2, subnet mask
255.255.255.0. The Default Gateway is set to
ZXV10 W300 Wireless ADSL Router User's Manual
192.168.1.1.
5) Configure Use the following DNS server
addresses. To set the DNS server IP addresses, please
contact your local Service Provider, or set it to
192.168.1.1.
6) Click OK twice to confirm and save your settings.
After the completion of the above configuration:
1. If the device is set to the Bridging mode, you can
access the Internet according to the service provided by
the Service Provider.
2. If the device is set to the Routing mode, you can
access the Internet directly after a connection is
established between the ZXV10 W300 device and the
office-end device.
3. To check the device configurations, visit
http://192.168.1 via a browser and log on to the device.
Logged users are classified into 2 levels:
Administrator level, with "admin" as both username
and initial password. All functions of the ZXV10
W300 can be set up.
General user level, with "public" as both username
and initial password. General users can only monitor
the operating status of the device.
Note:
Be sure to remember the password of the ZXV10 W300.

Fehler! Formatvorlage nicht definiert. Fehler! Formatvorlage nicht definiert.
15
4 Wizard
Configuring the ZXV10 W300 device requires professional
technical knowledge and experience. To simplify your
procedures, it is recommended to use the Wizard.
In the Wizard, you need to configure only few data to
establish a connection and enable the basic functions.
However, to use advanced functions of the device, you need to
configure other options.
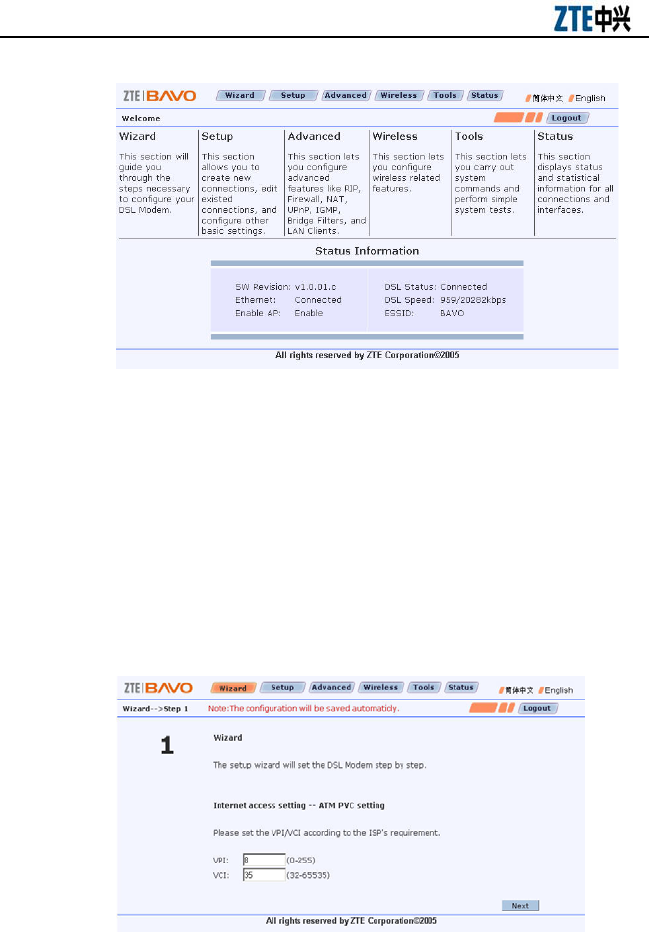
4.1 Logging on to the ZXV10 W300 Device
Visit http://192.168.1.1 via a browser and log on to the ZXV10
W300. Select Wizard to complete the basic configurations, as
shown in FIGURE 4.
FIGURE 4 Logging on to the ZXV10 W300 Device

Fehler! Formatvorlage nicht definiert. Fehler! Formatvorlage nicht definiert.
17
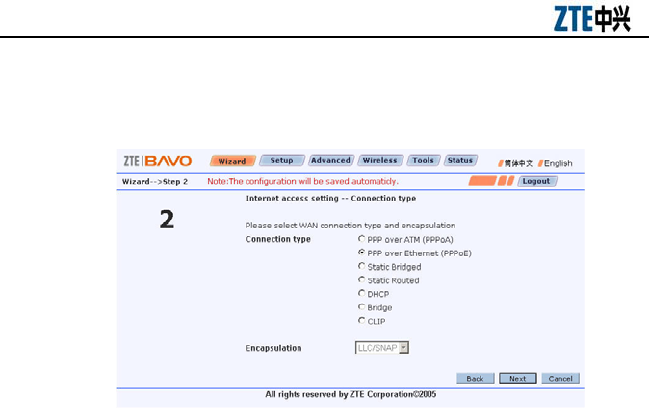
4.3 Selecting Connection Types
Seven types of connections are supported, including PPPoA,
PPPoE, Static Bridged, Static Routed, DHCP, Bridge and CLIP,
as shown in FIGURE 6. Select the type of connection to be
established in this window.
ZXV10 W300 Wireless ADSL Router User's Manual
FIGURE 6 Connection Type
After selecting an option, click Next to set the next options. To
modify the previous options, click Back to return to the
previous step.
4.4 Setting Configurations
Go to the configuration page depending on the connection
type selected.
Data to be configured including:
1. Set the username and password, as shown in

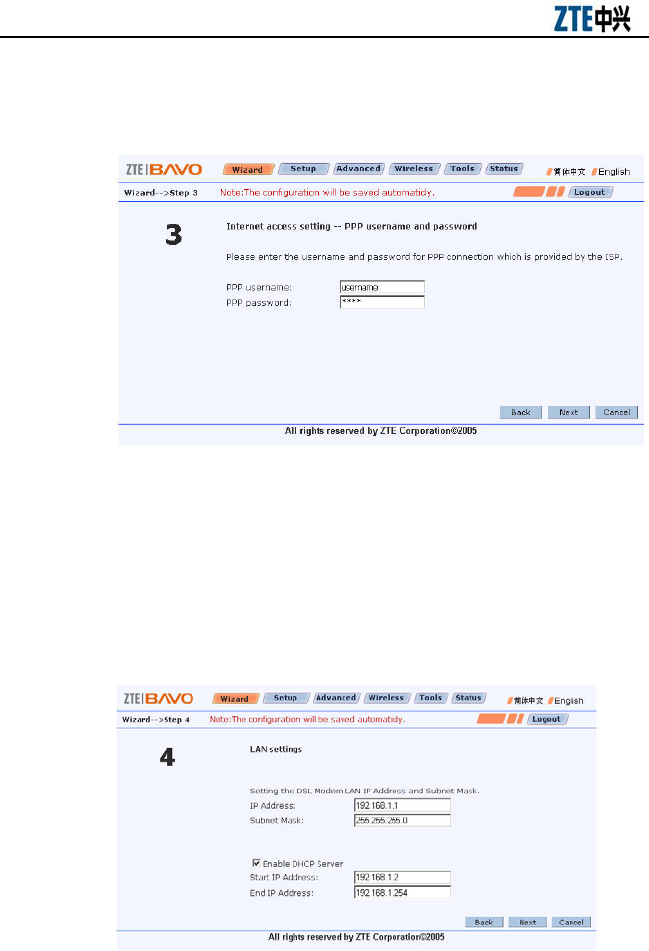
Fehler! Formatvorlage nicht definiert. Fehler! Formatvorlage nicht definiert.
This page configures the ZXV10 W300 IP address and subnet
mask on the LAN side.
Do not modify the configurations in this page if there are no
special requirements.
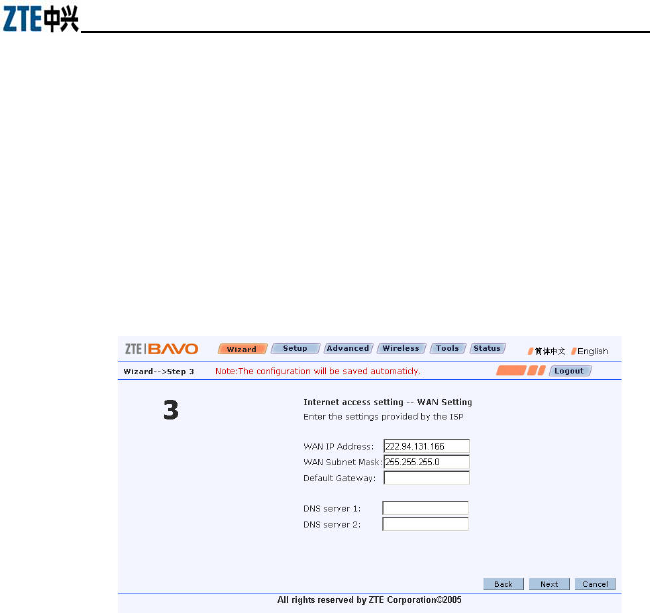
3. WAN settings, as shown in FIGURE 9.
FIGURE 9 WAN Setting
This page configures the ZXV10 W300 IP address and subnet
mask on the WAN side.
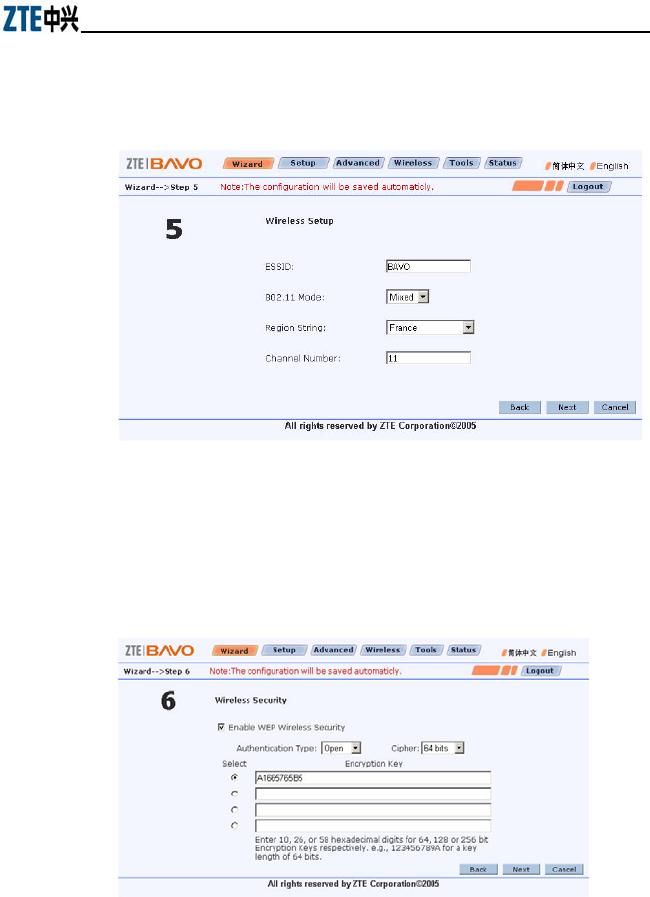
4. Wireless setup
1) Basic wireless LAN settings: Set basic data, as
shown in
21

ZXV10 W300 Wireless ADSL Router User's Manual
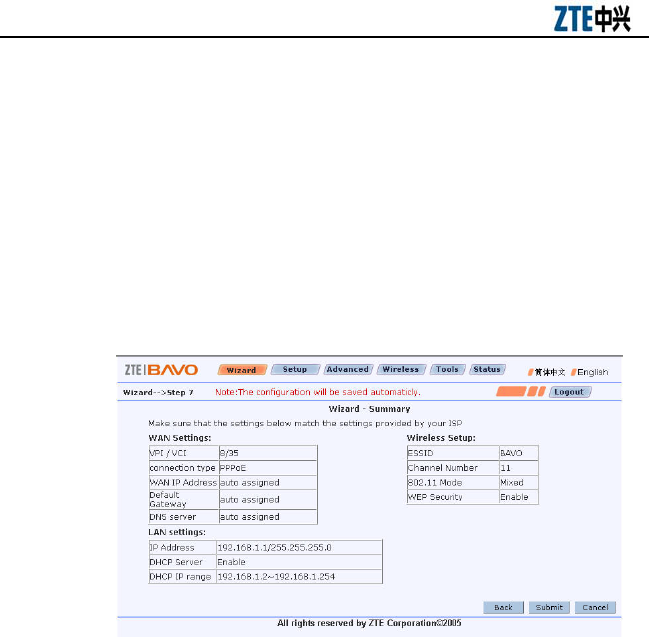
4.5 Displaying Configuration Data
Pages displayed are different depending on the connections
you configured.
FIGURE 12 Summary
FIGURE 12 shows the window that will appear when the
PPPoE configuration is completed. Click Submit to enable the
configuration.
In the seven types of connections:
Configure PPPoA and PPPoE in this order:
PVC Setting > Connection Type > PPP Username and
Password > LAN Settings > Wireless Setup > Summary
Configure Static Bridged, Static Routed and CLIP in
this order:

Fehler! Formatvorlage nicht definiert. Fehler! Formatvorlage nicht definiert.
PVC Setting > Connection Type > WAN Setting >
LAN Settings > Wireless Setup > Summary.
Configure DHCP and Bridge in this order:
PVC Setting > Connection Type > LAN Settings >
Wireless Setup > Summary
After successful configurations, a configuration successful
window appears as shown in FIGURE 13.
FIGURE 13 Configuration Successful Window
4.6 Other Common Configurations
4.6.1 UPnP
When the ZXV10 W300 device operates in Routing mode, if
the terminal user use special applications like BitComet or
BitSpirit, the UpnP function should be enabled to optimize the
device performance.
To configure this function:
25
ZXV10 W300 Wireless ADSL Router User's Manual
Log on to the device using the username “admin”. Click the
Advanced button on the web page to enter the Advanced ->
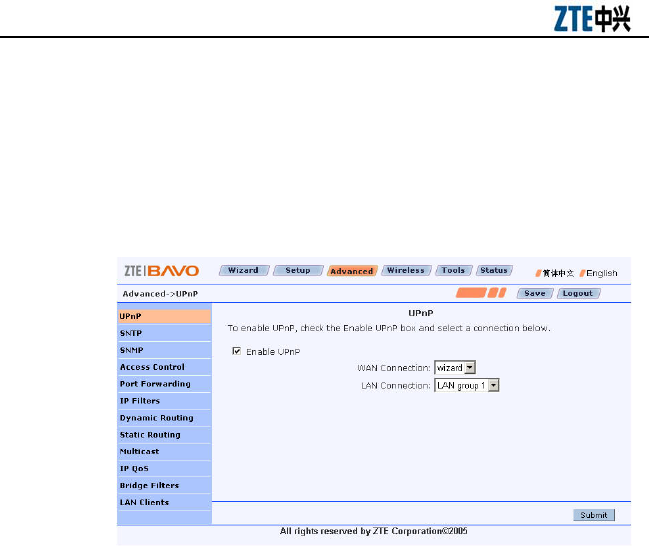
UpnP page, as shown in FIGURE 14.
FIGURE 14 Advanced->UPnP
Click UpnP on the left side of the page to enter the UPnP
configuration page. In this page, enable or disable the UPnP
function and specify the UPnP WAN and LAN connections.
To enable this function, check the Enable UPnP check box.
4.6.2 DMZ
When the device operates in Routing mode, if you try to
access a service on a host placed in the intranet from an
external network, the DMZ host function should be enabled.
To configure this function:
Fehler! Formatvorlage nicht definiert. Fehler! Formatvorlage nicht definiert.
Log on to the device using the username “admin”. Click the
Advanced button on the web page to enter the Advanced ->
UpnP page,
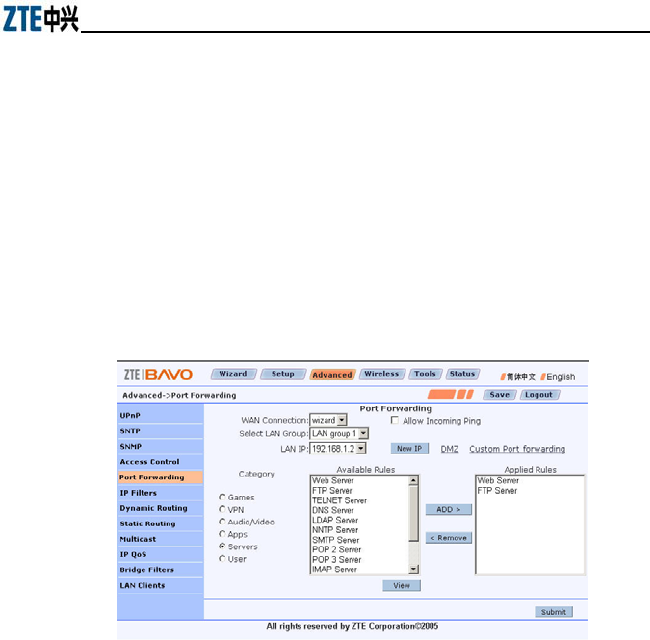
Click Port Forwarding on the left side of the page to enter
the Port Forwarding page, as shown in FIGURE 15.
FIGURE 15 Advanced Configuration of the DMZ Host
Function
To set DMZ, click the DMZ in this page.
Select the LAN host IP address to be accessed from the WAL
side. Check the Enable DMZ check box to enable this
function, as shown in
27

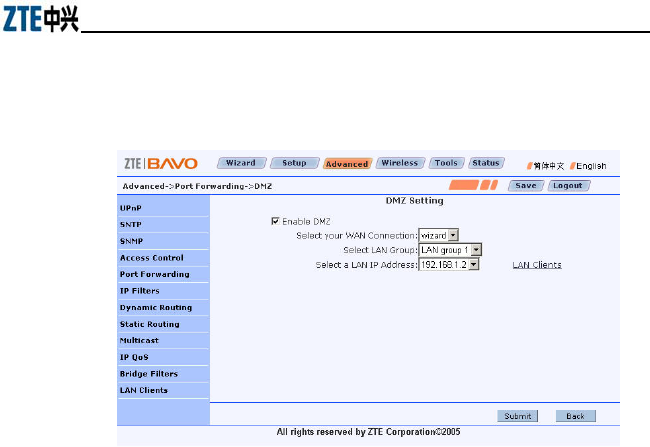
Fehler! Formatvorlage nicht definiert. Fehler! Formatvorlage nicht definiert.
FIGURE 16 DMZ Setting
29

ZXV10 W300 Wireless ADSL Router User's Manual
5 Technical Specifications
5.1 Hardware Specifications
1. ADSL interface
Compatible standards: ANSI T1.413, ITU G.992.1,
ITU G.992.2, ITU G.992.3, and ITU G.992.5
Line impedance: 100 Ω
Connection line: A pair of ordinary telephone lines
Connector: RJ-11
2. LAN interface
Interface: 4 10/100 Base-T, IEEE 802.3/802.3u
Connector: RJ-45
Automatic recognition of crossover cable and
straight-through cable
3. WLAN interface
Operating band: 2.4GHz – 2.4835GHz (varies
depending on country and area)
Compatible standards: IEEE 802.11g, IEEE 802.11b
Rates: 1/2/5.5/11/6/9/12/18/24/36/48/54Mbps
4. USB port: USB 2.0 Slave (optional)
5. Operation and Maintenance
WEB and SNMP

Fehler! Formatvorlage nicht definiert. Fehler! Formatvorlage nicht definiert.
6. Power supply
Power adapter: 220 VAC input, 50Hz, 18VAC
500mA output
Power: < 9 W
7. Safety
CCC, CE
5.2 Software Specifications
1. ATM
VPI: 0-255; VCI: 32-65535
Support 8 PVC connections and auto-negotiation
ATM Cell over ADSL, AAL5
Support UBR, CBR and VBR
Support OAM F4/F5
IPoA
PPPoA
PPPoE
2. Bridging
Transparent bridging (IEEE 802.1D)
RFC 2684
Spanning-tree protocol (IEEE 802.1D)
31

ZXV10 W300 Wireless ADSL Router User's Manual
Support 2048 MAC learning addresses
Support bridge filter
3. Routing
Static routing
Dynamic routing
NAT, ALGs
Firewall
DNS Proxy, IGMP Proxy
UPnP DMZ
4. Network management
WEB
SNMP
5. WLAN
IEEE 802.11g/b
WEP, WPA-PSK and MAC address filtering
Hidden ESSID, multiple ESSID domains
Subscriber isolation

Fehler! Formatvorlage nicht definiert. Fehler! Formatvorlage nicht definiert.
5-33
This page is intentionally blank.

6 Troubleshooting
This chapter describes how to troubleshoot problems in the
device installation and operations. For other problems not
contained in this chapter, please contact your Service
Provider for help.
Problem Troubleshooting
The indicator is OFF
when the device is
powered on
Make sure that you use the power adapter included in the
package and the adapter is connected properly to the device
and power outlet on the wall
DSL indicator is OFF
when the telephone
line is connected
Make sure you use standard telephone lines (e.g. those
contained in the device package). Make sure the lines are
connected properly according to the hardware connection
procedure described in Chapter 3. Check all the ports to
see if there are any loose connections. Wait for 30 seconds
for the device to establish a connection to your ADSL
Service Provider.
When the telephone
line is connected, the
DSL indicator
alternates between
slow and fast flashing.
The symptom indicates the failed connection between the
device and the office-end ADSL. Please make sure the
ZXV10 W300 device has been installed properly according
to the samples. (See the installation samples)
The first sample is recommended. If you use the second
sample, please make sure a voice filter is installed properly.
LAN indicator is OFF
when the Ethernet
cable is connected
Make sure the Ethernet cable is connected properly to the
hub/computer and the device. Make sure the computer/hub
is powered on.
WLAN unable to be
connected
Make sure the WLAN radio frequency is turned on and the
WLAN indicator is ON.

Fehler! Formatvorlage nicht definiert. Fehler! Formatvorlage nicht definiert.
35
Problem Troubleshooting
PC unable to access
the network
Use the Ping command to check if the network interface IP
address (preset to 192.168.1.1) of the device can be pinged
from the computer. If not, check the Ethernet cable
connection. Check if the indicator status is normal.
If the computer uses a private IP address (not a registered
illegal IP) specified manually, please check:
If the computer’s gateway IP address is an illegal address.
If not, use a correct gateway, or set the computer to obtain
IP information automatically.
Contact your ADSL Service Provider to confirm the DNS
server designated for the computer is valid. Otherwise, use
the correct DNS, or set the computer to obtain IP
information automatically.
Make sure you have set the NAT rule to convert the private
IP address into the legal address. The computer IP address
you specified must be contained in the range set in the
NAT rule.
A problem may occur in the office-end device of the ADSL
Service Provider.
Unable to browse
Internet web pages on
the computer
Make sure the DNS server designated for the computer is
correct. You can use the Ping command to check if the
computer can be connected to the DSN server of the ADSL
Service Provider.