Zebra Technologies 640I-UHF card Printer User Manual
Zebra Technologies Corporation card Printer Users Manual
Contents
- 1. user manual -1
- 2. user manual -2
- 3. user manual -3
- 4. user manual -4
user manual -1
980541-003 Rev. B
ZebraP630i & P640i
Card Printer
User’s Manual
Cover

Copyright Notice
© 2008 ZIH Corp.
This document contains information proprietary to Zebra Technologies Corporation. This document and the
information contained within is Copyrighted by Zebra Technologies Corporation and may not be duplicated in
full or in part by any person without written approval from Zebra.
While every effort has been made to keep the information contained within current and accurate as of the date of
publication, no guarantee is given that the document is error-free or that it is accurate with regard to any
specification. Zebra reserves the right to make changes, for the purpose of product improvement, at any time.
Trademarks
P630i and P640i are trademarks and Zebra is a registered trademark of Zebra Technologies Corporation.
Windows is a registered trademark of Microsoft Corporation in the United States and other countries. All other
trademarks or registered trademarks are marks of their respective holders.
Product Disposal
Product Disposal Information • Do not dispose of this product in unsorted municipal
waste. This product is recyclable, and should be recycled according to your local
standards. For more information, please see our web site at:
http://www.zebra.com/environment

980541-003 Rev. B Zebra P630i & P640i Card Printer User’s Manual iii
Contents
1 • Introduction. . . . . . . . . . . . . . . . . . . . . . . . . . . . . . . . . . . . . . . . . . . . . . . . . . . . . 1
Part Numbers . . . . . . . . . . . . . . . . . . . . . . . . . . . . . . . . . . . . . . . . . . . . . . . . . . . . . . . . . . . . . . . 2
Printer Features . . . . . . . . . . . . . . . . . . . . . . . . . . . . . . . . . . . . . . . . . . . . . . . . . . . . . . . . . . . . . 3
Controls and Indicators . . . . . . . . . . . . . . . . . . . . . . . . . . . . . . . . . . . . . . . . . . . . . . . . . . . . . . . . 4
Control Panel Buttons. . . . . . . . . . . . . . . . . . . . . . . . . . . . . . . . . . . . . . . . . . . . . . . . . . . . . .4
Icons . . . . . . . . . . . . . . . . . . . . . . . . . . . . . . . . . . . . . . . . . . . . . . . . . . . . . . . . . . . . . . . . . . . . . . 8
2 • Installation. . . . . . . . . . . . . . . . . . . . . . . . . . . . . . . . . . . . . . . . . . . . . . . . . . . . . . 9
Introduction . . . . . . . . . . . . . . . . . . . . . . . . . . . . . . . . . . . . . . . . . . . . . . . . . . . . . . . . . . . . . . . . . 9
Installation Procedure . . . . . . . . . . . . . . . . . . . . . . . . . . . . . . . . . . . . . . . . . . . . . . . . . . . . . . . . . 9
Removing the Printer from the Shipping Carton. . . . . . . . . . . . . . . . . . . . . . . . . . . . . . . . . . 9
Removing the Shipping Tape . . . . . . . . . . . . . . . . . . . . . . . . . . . . . . . . . . . . . . . . . . . . . . . 12
Attaching the Output Hopper . . . . . . . . . . . . . . . . . . . . . . . . . . . . . . . . . . . . . . . . . . . . . . . 13
Attaching the Ribbon Take-Up Spool . . . . . . . . . . . . . . . . . . . . . . . . . . . . . . . . . . . . . . . . . 14
Installing the Ribbon . . . . . . . . . . . . . . . . . . . . . . . . . . . . . . . . . . . . . . . . . . . . . . . . . . . . . .15
Installing the Cleaning Cassette . . . . . . . . . . . . . . . . . . . . . . . . . . . . . . . . . . . . . . . . . . . . . 17
Loading the Laminate . . . . . . . . . . . . . . . . . . . . . . . . . . . . . . . . . . . . . . . . . . . . . . . . . . . . . 18
Removing the Laminate Cassette(s) . . . . . . . . . . . . . . . . . . . . . . . . . . . . . . . . . . . . . . . . . 19
Loading the Laminate Cassette(s) . . . . . . . . . . . . . . . . . . . . . . . . . . . . . . . . . . . . . . . . . . . 21
Laminating Contact Smart Cards . . . . . . . . . . . . . . . . . . . . . . . . . . . . . . . . . . . . . . . . . . . . 23
Using Partial-Width Laminate . . . . . . . . . . . . . . . . . . . . . . . . . . . . . . . . . . . . . . . . . . . . . . . 24
Installing the Laminator Cassette(s) . . . . . . . . . . . . . . . . . . . . . . . . . . . . . . . . . . . . . . . . . . 26
Clearing the Laminate Channels . . . . . . . . . . . . . . . . . . . . . . . . . . . . . . . . . . . . . . . . . . . . 27
Loading Cards . . . . . . . . . . . . . . . . . . . . . . . . . . . . . . . . . . . . . . . . . . . . . . . . . . . . . . . . . .28
Connecting Power . . . . . . . . . . . . . . . . . . . . . . . . . . . . . . . . . . . . . . . . . . . . . . . . . . . . . . . 30
Connecting the Printer to your Computer . . . . . . . . . . . . . . . . . . . . . . . . . . . . . . . . . . . . . . 31
3 • Printer Driver Installation. . . . . . . . . . . . . . . . . . . . . . . . . . . . . . . . . . . . . . . . . 33
Overview . . . . . . . . . . . . . . . . . . . . . . . . . . . . . . . . . . . . . . . . . . . . . . . . . . . . . . . . . . . . . . . . . . 33
Installing the USB Printer Driver . . . . . . . . . . . . . . . . . . . . . . . . . . . . . . . . . . . . . . . . . . . . . . . .34
Installing the Ethernet Printer Driver . . . . . . . . . . . . . . . . . . . . . . . . . . . . . . . . . . . . . . . . . . . . . 40

iv Zebra P630i & P640i Card Printer User’s Manual 980541-003 Rev. B
Contents
4 • Settings and Adjustments . . . . . . . . . . . . . . . . . . . . . . . . . . . . . . . . . . . . . . . . 47
Introduction . . . . . . . . . . . . . . . . . . . . . . . . . . . . . . . . . . . . . . . . . . . . . . . . . . . . . . . . . . . . . . . . 47
Sensors and Interlock Switches . . . . . . . . . . . . . . . . . . . . . . . . . . . . . . . . . . . . . . . . . . . . . . . . 48
Printer Properties . . . . . . . . . . . . . . . . . . . . . . . . . . . . . . . . . . . . . . . . . . . . . . . . . . . . . . . . . . . 50
General Tab . . . . . . . . . . . . . . . . . . . . . . . . . . . . . . . . . . . . . . . . . . . . . . . . . . . . . . . . . . . . 51
Sharing Tab. . . . . . . . . . . . . . . . . . . . . . . . . . . . . . . . . . . . . . . . . . . . . . . . . . . . . . . . . . . . . 52
Ports Tab. . . . . . . . . . . . . . . . . . . . . . . . . . . . . . . . . . . . . . . . . . . . . . . . . . . . . . . . . . . . . . . 53
Advanced Tab. . . . . . . . . . . . . . . . . . . . . . . . . . . . . . . . . . . . . . . . . . . . . . . . . . . . . . . . . . .54
Color Management Tab . . . . . . . . . . . . . . . . . . . . . . . . . . . . . . . . . . . . . . . . . . . . . . . . . . . 55
Security Tab . . . . . . . . . . . . . . . . . . . . . . . . . . . . . . . . . . . . . . . . . . . . . . . . . . . . . . . . . . . . 56
Device Settings Tab . . . . . . . . . . . . . . . . . . . . . . . . . . . . . . . . . . . . . . . . . . . . . . . . . . . . . . 57
Printing Preferences . . . . . . . . . . . . . . . . . . . . . . . . . . . . . . . . . . . . . . . . . . . . . . . . . . . . . . . . . 62
Card Setup Tab. . . . . . . . . . . . . . . . . . . . . . . . . . . . . . . . . . . . . . . . . . . . . . . . . . . . . . . . . .63
Image Adjustment Tab . . . . . . . . . . . . . . . . . . . . . . . . . . . . . . . . . . . . . . . . . . . . . . . . . . . . 64
YMC (Color) Printing Tab . . . . . . . . . . . . . . . . . . . . . . . . . . . . . . . . . . . . . . . . . . . . . . . . . . 66
K (Black) Panel Tab . . . . . . . . . . . . . . . . . . . . . . . . . . . . . . . . . . . . . . . . . . . . . . . . . . . . . . 67
Adjustments . . . . . . . . . . . . . . . . . . . . . . . . . . . . . . . . . . . . . . . . . . . . . . . . . . . . . . . . . . . . . . . 69
Color Calibration. . . . . . . . . . . . . . . . . . . . . . . . . . . . . . . . . . . . . . . . . . . . . . . . . . . . . . . . . 69
Flip Station Routines. . . . . . . . . . . . . . . . . . . . . . . . . . . . . . . . . . . . . . . . . . . . . . . . . . . . . .71
Laminator Station Adjustments . . . . . . . . . . . . . . . . . . . . . . . . . . . . . . . . . . . . . . . . . . . . . . 72
5 • Printer Operation . . . . . . . . . . . . . . . . . . . . . . . . . . . . . . . . . . . . . . . . . . . . . . . 75
Creating a Sample Card . . . . . . . . . . . . . . . . . . . . . . . . . . . . . . . . . . . . . . . . . . . . . . . . . . . . . . 76
Printing a Sample Card . . . . . . . . . . . . . . . . . . . . . . . . . . . . . . . . . . . . . . . . . . . . . . . . . . . . . . . 77
6 • Cleaning . . . . . . . . . . . . . . . . . . . . . . . . . . . . . . . . . . . . . . . . . . . . . . . . . . . . . . 79
Cleaning the System . . . . . . . . . . . . . . . . . . . . . . . . . . . . . . . . . . . . . . . . . . . . . . . . . . . . . . . . . 79
Preventive Maintenance . . . . . . . . . . . . . . . . . . . . . . . . . . . . . . . . . . . . . . . . . . . . . . . . . . . 79
Card Cleaning . . . . . . . . . . . . . . . . . . . . . . . . . . . . . . . . . . . . . . . . . . . . . . . . . . . . . . . . . . . . . . 80
Printhead Cleaning . . . . . . . . . . . . . . . . . . . . . . . . . . . . . . . . . . . . . . . . . . . . . . . . . . . . . . . . . . 81
Platen Care and Cleaning . . . . . . . . . . . . . . . . . . . . . . . . . . . . . . . . . . . . . . . . . . . . . . . . . . . . .82
7 • Troubleshooting . . . . . . . . . . . . . . . . . . . . . . . . . . . . . . . . . . . . . . . . . . . . . . . . 83
Error Messages. . . . . . . . . . . . . . . . . . . . . . . . . . . . . . . . . . . . . . . . . . . . . . . . . . . . . . . . . . . . . 84
Indicator Light Status. . . . . . . . . . . . . . . . . . . . . . . . . . . . . . . . . . . . . . . . . . . . . . . . . . . . . . . . . 85
Print Quality Problems . . . . . . . . . . . . . . . . . . . . . . . . . . . . . . . . . . . . . . . . . . . . . . . . . . . . . . . 86
Unusual Noises/Unreported Events . . . . . . . . . . . . . . . . . . . . . . . . . . . . . . . . . . . . . . . . . . . . . 94
Printhead Failures. . . . . . . . . . . . . . . . . . . . . . . . . . . . . . . . . . . . . . . . . . . . . . . . . . . . . . . . . . . 97
Laminate Problems . . . . . . . . . . . . . . . . . . . . . . . . . . . . . . . . . . . . . . . . . . . . . . . . . . . . . . . . . . 99
System Related Issues . . . . . . . . . . . . . . . . . . . . . . . . . . . . . . . . . . . . . . . . . . . . . . . . . . . . . .101
8 • Technical Specifications . . . . . . . . . . . . . . . . . . . . . . . . . . . . . . . . . . . . . . . . 103
Specifications -- P630i / P640 . . . . . . . . . . . . . . . . . . . . . . . . . . . . . . . . . . . . . . . . . . . . . . . . . 103
Card Dimensions. . . . . . . . . . . . . . . . . . . . . . . . . . . . . . . . . . . . . . . . . . . . . . . . . . . . . . . . . . . 105
Declarations of Conformity . . . . . . . . . . . . . . . . . . . . . . . . . . . . . . . . . . . . . . . . . . . . . . . . . . .106

Contents
980541-003 Rev. B Zebra P630i & P640i Card Printer User’s Manual v
Appendix A • Magnetic Encoder. . . . . . . . . . . . . . . . . . . . . . . . . . . . . . . . . . . . . 107
Media Loading Orientation . . . . . . . . . . . . . . . . . . . . . . . . . . . . . . . . . . . . . . . . . . . . . . . . . . . 107
Magnetic Card Stripe Encoding. . . . . . . . . . . . . . . . . . . . . . . . . . . . . . . . . . . . . . . . . . . . . . . . 108
ISO Standard Encoding . . . . . . . . . . . . . . . . . . . . . . . . . . . . . . . . . . . . . . . . . . . . . . . . . . 108
AAMVA Standard Encoding . . . . . . . . . . . . . . . . . . . . . . . . . . . . . . . . . . . . . . . . . . . . . . . 108
Appendix B • Smart Card Contactless Encoder . . . . . . . . . . . . . . . . . . . . . . . . 109
Introduction . . . . . . . . . . . . . . . . . . . . . . . . . . . . . . . . . . . . . . . . . . . . . . . . . . . . . . . . . . . . . . . 109
Media Loading Orientation . . . . . . . . . . . . . . . . . . . . . . . . . . . . . . . . . . . . . . . . . . . . . . . . . . . 109
Printing Contactless Smart Cards . . . . . . . . . . . . . . . . . . . . . . . . . . . . . . . . . . . . . . . . . . . . . . 110
Appendix C • Smart Card Contact Station. . . . . . . . . . . . . . . . . . . . . . . . . . . . . 111
Introduction . . . . . . . . . . . . . . . . . . . . . . . . . . . . . . . . . . . . . . . . . . . . . . . . . . . . . . . . . . . . . . . 111
Media Loading Orientation . . . . . . . . . . . . . . . . . . . . . . . . . . . . . . . . . . . . . . . . . . . . . . . . . . . 111
Laminating Contact Smart Cards . . . . . . . . . . . . . . . . . . . . . . . . . . . . . . . . . . . . . . . . . . . . . . 112
Appendix D • Printer Security. . . . . . . . . . . . . . . . . . . . . . . . . . . . . . . . . . . . . . . 113
ID/Key . . . . . . . . . . . . . . . . . . . . . . . . . . . . . . . . . . . . . . . . . . . . . . . . . . . . . . . . . . . . . . . . . . . 113
Replacing a Lost ID/Key . . . . . . . . . . . . . . . . . . . . . . . . . . . . . . . . . . . . . . . . . . . . . . . . . . 113
Printer Parameters in the Driver . . . . . . . . . . . . . . . . . . . . . . . . . . . . . . . . . . . . . . . . . . . . . . . 114
ID/Code. . . . . . . . . . . . . . . . . . . . . . . . . . . . . . . . . . . . . . . . . . . . . . . . . . . . . . . . . . . . . . . 114
Update Backup Config . . . . . . . . . . . . . . . . . . . . . . . . . . . . . . . . . . . . . . . . . . . . . . . . . . . 114
Restoring the Backup Configuration Settings. . . . . . . . . . . . . . . . . . . . . . . . . . . . . . . . . . 114
Password Protection. . . . . . . . . . . . . . . . . . . . . . . . . . . . . . . . . . . . . . . . . . . . . . . . . . . . . 115
Appendix E • Worldwide Sales & Support. . . . . . . . . . . . . . . . . . . . . . . . . . . . . 117

vi Zebra P630i & P640i Card Printer User’s Manual 980541-003 Rev. B
980541-003 Rev. B Zebra P630i & P640i Card Printer User’s Manual 1
1
Introduction
Thank you for choosing the Zebra P630i or P640i Card Printer. This manual guides you to
efficient start up and operation of your new Card Printer.
The Zebra P630i and P640i Card Printers provide high speed, full color dual-sided card
printing. A micro-positioning card transport system provides enhanced color photos. A range
of interface, encoder/reader, and security options allow ordering the specific configuration
suitable for a particular application.
The difference between the P630i and the P640i is that the P630i has a single-sided
laminator (i.e., it lays down and seals a laminating film on the top surface of the
printed card), while the P640i has a dual-sided laminator (i.e., it lays down and seals
laminating film on both surfaces of the printed card).
References in this document that refer to either or both of the models will be in the form of
“the printer” or “the P630i/P640i Printer”; references that are specific to one or the other will
be in the form of “the P630i Printer” or “the P640i Printer.”

2Zebra P630i & P640i Card Printer User’s Manual 980541-003 Rev. B
Introduction
Part Numbers
Part Numbers
The Part Number of a particular Printer is shown on a label affixed to the bottom of the printer;
that Part Number identifies the specific configuration for that printer.
This chart shows the configurations that are available.
PART NUMBER DESCRIPTION
P 6 3 0 i
P 6 3 0 iS
-
-
_ _ _ _ _
_ _ _ _ _
-
-
_ _ _
_ _ _
Base Printer
P630i Dual-Sided Color Card Printer with Single Linerless
Laminator
P630iS Dual-Sided Color Card Printer with Single Linerless
Laminator and Advanced ID Key Security Feature
P 6 4 0 i
P 6 4 0 iS
-
-
_ _ _ _ _
_ _ _ _ _
-
-
_ _ _
_ _ _
Base Printer
P640i Dual-Sided Color Card Printer with Dual Linerless
Laminator
P640iS Dual-Sided Color Card Printer with Dual Linerless
Laminator and Advanced ID Key Security Feature
_ _ _ _ _
_ _ _ _ _
_ _ _ _ _
-
-
-
0 _ _ _ _
B _ _ _ _
E _ _ _ _
-
-
-
_ _ _
_ _ _
_ _ _
Smart Card Options
None
Contact Encoder
Contact Station
_ _ _ _ _
_ _ _ _ _ -
-
_ 0 0 _ _
_ M 3 _ _
-
-
_ _ _
_ _ _
Magnetic Encoder
None
Stripe Up, HiCo
_ _ _ _ _
_ _ _ _ _ -
-
_ 0 0 _ _
_ B 1 _ _
-
-
_ _ _
_ _ _
Barcode Reader
None
Linear
_ _ _ _ _ - _ _ _ 0 _ - _ _ _ Memory Expansion
None
_ _ _ _ _
_ _ _ _ _ -
-
_ _ _ _ A
_ _ _ _ C
-
-
_ _ _
_ _ _
Interface
USB Standard Configuration
USB and Built-In Ethernet 10/100T
_ _ _ _ _
_ _ _ _ _ -
-
_ _ _ _ _
_ _ _ _ _
-
-
I _ _
U _ _
Power Cords
102V AC U.S. and 230V AC Europe
U. K. and Australia
_ _ _ _ _ - _ _ _ _ _ - _ D _
Windows Drivers and User Documentation / Training
Windows Driver CD (Win 2K and XP) and User
Documentation & Training CD
_ _ _ _ _ - _ _ _ _ _ - _ _ G RoHS
Compliant
Introduction
Printer Features
980541-003 Rev. B Zebra P630i & P640i Card Printer User’s Manual 3
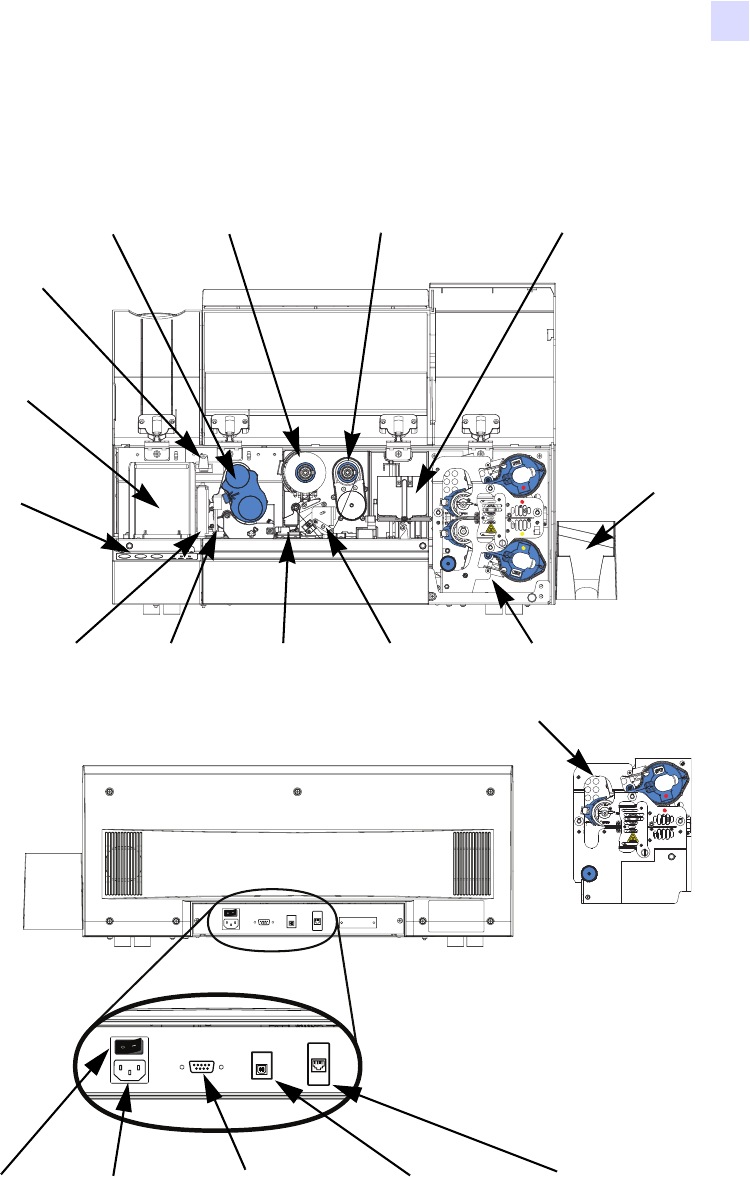
Printer Features
The following figure shows features of the P630i/P640i Printer.
Card
Feeder
Control
Panel
RibbonCleaning Cassette
Print
Head
Flip Station
Laminator Station (P640i)
Laminator Station (P630i)
Magnetic
Encoder
(Optional)
Output
Hopper
Ribbon Take-Up
Spool
Security
Key
(Optional)
Barcode
Reader
(Optional)
Smart Card
Encoder
(Optional)
Ethernet
Connector
(Optional)
USB
Connector
AC Power
Connector
Power
Switch
DB9 Serial Interface
Connector for Contact
Smart Card Contact
Station (Optional)
4Zebra P630i & P640i Card Printer User’s Manual 980541-003 Rev. B
Introduction
Controls and Indicators
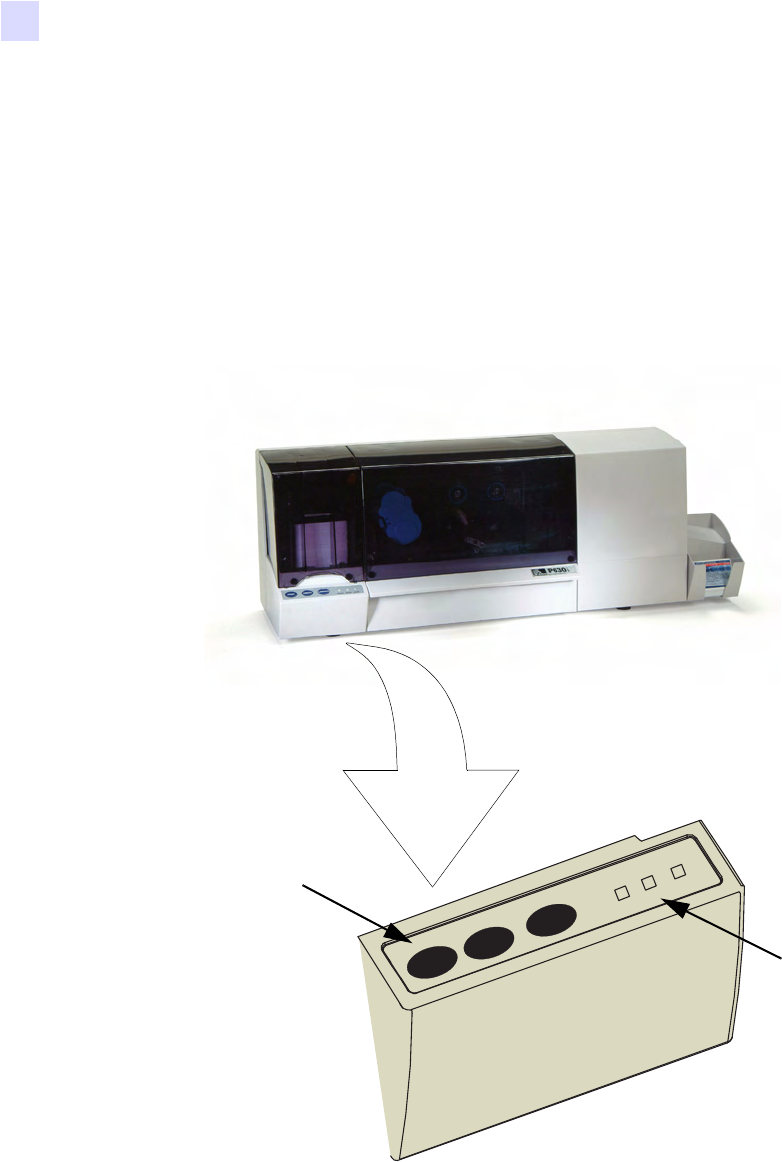
Controls and Indicators
Control Panel Buttons
A limited amount of control and status information is available at the Control Panel on the
front of the printer. Additional control functions and status information is available via the host
or networked computer(s).
PRINT RIBBON LAMINATE
READY
MEDIA
ALARM
Buttons
Indicators

Introduction
Controls and Indicators
980541-003 Rev. B Zebra P630i & P640i Card Printer User’s Manual 5
PRINT Button
Press the PRINT button to print the image stored in the printer’s memory. When the printer is
powered up, the memory is loaded with a checkerboard test pattern.
In regular on-line use, the PRINT button reprints the last image downloaded from the
computer to the buffer memory. If you hold the PRINT button down and power up the printer,
the Ribbon Synchronization feature (which normally forces a ribbon synchronization
whenever the door is closed or the printer is powered up) is disabled.
If you press and hold the PRINT button for more than two seconds, the printer will
continuously reprint the image in the buffer. Stop this action by pressing the button
momentarily while printing is in process
Note that pressing the PRINT button will have no effect if any of the following applies:
• An error condition exists
• You have set up the print driver to print color on both sides of the card
• The optional hardware lockout key, ID/Key, is missing (but this does not disable the
checkerboard printout available after power-up).

6Zebra P630i & P640i Card Printer User’s Manual 980541-003 Rev. B
Introduction
Controls and Indicators
RIBBON Button
This button is used to synchronize the ribbon – in other words, to position it correctly under
the print head. If you hold the RIBBON button down and power up the printer, it toggles on/off
the Ribbon Synchronization feature when the door is closed.
In standard applications, the ribbon type is YMCK, and the back of the card is printed first. In
such cases, pressing the RIBBON button will advance the color ribbon to bring the leading
edge of the next black panel under the print head.
If back side printing is not enabled, the printer will synchronize on the next yellow panel when
the RIBBON button is pressed.
LAMINATE Button
(For the P640i Printer, this applies to the Upper and Lower Laminator; the P630i Printer has
only the Upper Laminator.)
If either (or both) of the laminate transfer rollers is not loaded with a laminate patch, then
pressing the LAMINATE button will correct the condition, provided the cassette is not out of
laminate, and if the cassette latch is closed (locked).
If both transfer rollers are already loaded, the LAMINATE button has no effect.
If you hold the LAMINATE button down and power up the printer, it toggles on/off the
Ribbon Synchronization feature when the printer is powered up.
A standard use of the LAMINATE button is in reloading a transfer roller after removing the
first hand-cut patch of laminate following installation of a fresh roll.

Introduction
Controls and Indicators
980541-003 Rev. B Zebra P630i & P640i Card Printer User’s Manual 7
Control Panel Indicators
Depending on the condition they are reporting, the three indicator lights, READY, MEDIA,
and ALARM, can be in one of three states: Off, On (steady), or Flashing.
Note • The READY indicator is I-colored. Its two color channels, green and yellow, function
independently.
READY Indicator
Green: Steady = Ready to print.
Flashing = Printer busy.
Yellow: Steady = Laminator(s) in sleep mode.
Flashing = Laminator(s) not at operating temperature.
MEDIA Indicator
Orange: Off = Normal.
Steady = Any media outage.
Flashing = Magnetic encoding failure.
ALARM Indicator
Red: Off = Normal.
Steady = Error condition requiring intervention.
Flashing = Printhead temperature error, or major
internal control problem requiring power cycling of
the printer (OFF, pause, then ON).
8Zebra P630i & P640i Card Printer User’s Manual 980541-003 Rev. B
Introduction
Icons
Icons
Throughout this manual, different icons highlight important information, as follows:
Product Disposal
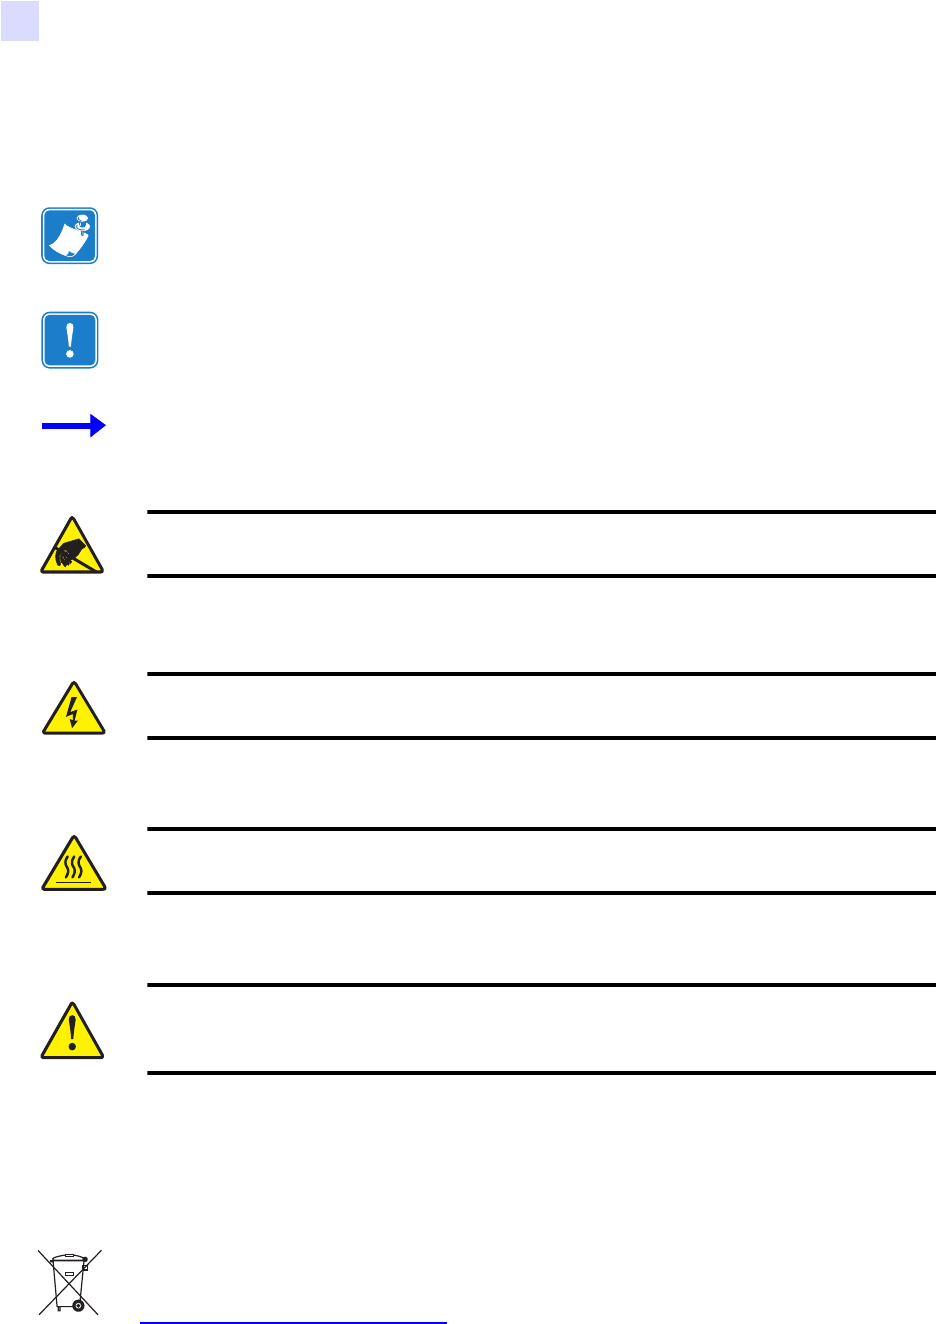
Note • Indicates information that emphasizes or supplements important points of the
main text.
Important • Advises you of information that is essential to complete a task, or points out the
importance of specific information in the text.
Provides an example or scenario to demonstrate or clarify a section of text.
Electrostatic Discharge Caution • Warns you of the potential for electrostatic discharge.
Electric Shock Caution • Warns you of a potential electric shock situation.
Hot Surface • Warns you of a situation where excessive heat could cause a burn.
Caution • Advises you that failure to take or avoid a specific action could result in physical
harm to you, or could result in physical damage to the hardware.
Product Disposal Information • Do not dispose of this product in unsorted municipal
waste. This product is recyclable, and should be recycled according to your local
standards. For more information, please see our web site at:
http://www.zebra.com/environment

980541-003 Rev. B10/15/2004 Zebra P630i & P640i Card Printer User’s Manual 9
2
Installation
Introduction
Installation includes setting up the printer, installing the printer driver in the computer(s) that
will be sending print jobs to the printer, connecting the interface, installing the Cleaning
Cartridge, loading the cards, ribbon, and laminate, and verifying that the printer can print a
test card.
Loading the Printer Driver software is described in Section 3.
Installation Procedure
Removing the Printer from the Shipping Carton
Step 1. Open and remove the plastic handle/latches on either end of the shipping carton.
Step 2. Lift the upper part of the shipping carton off the lower part.
Step 3. Remove the items from the cutouts in the foam block atop the printer.
Important • Execute the procedures that follow in the order given.
10 Zebra P630i & P640i Card Printer User’s Manual 980541-003 Rev. B
Installation
Installation Procedure
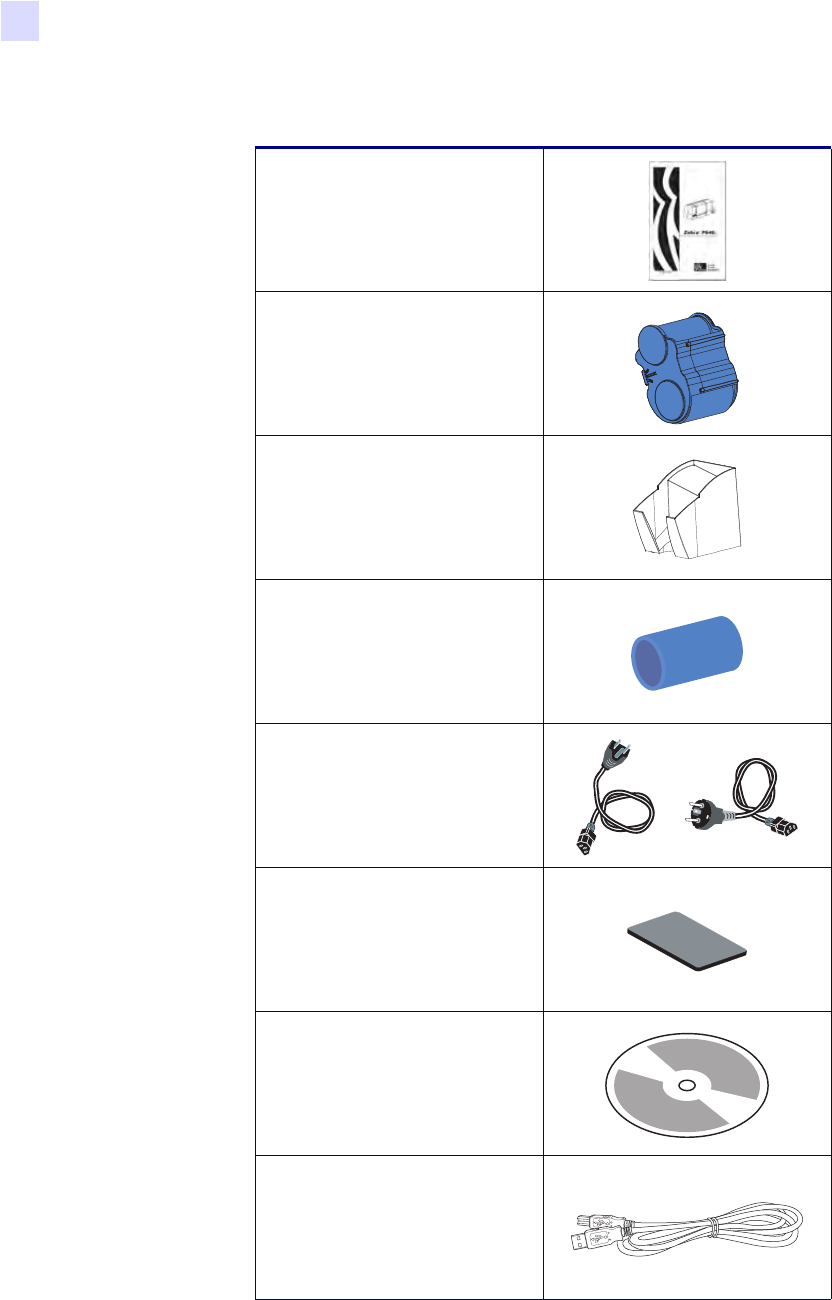
Step 4. Verify that the following items are included:
Printed Quick-Start Guide
Cleaning Cartridge
Output Hopper
Ribbon Take-up Spool
Two Power Cords
Card Weight
Documentation & Driver CD
USB Interface Cable

Installation
Installation Procedure
980541-003 Rev. B Zebra P630i & P640i Card Printer User’s Manual 11
Step 5. Remove the foam block from the top of the shipping carton.
Step 6. Lift the printer from the shipping carton.
Step 7. Remove the protective plastic bag from the printer.
Step 8. Place the printer in a location that meets the following requirements:
• A reasonably dust- and dirt-free environment will give better print quality.
• Flat surface at least 699 mm (27.5 in) x 246 mm (9.7 in) that can support the weight of the
printer; additional space preferred.
• Vertical clearance at least 450 mm (17 in). There should be easy access to all sides of
the printer.
• Temperature within the range of 10° to 35°C (50° to 95°F).
• Relative Humidity 20 to 80%, non-condensing.
• AC power accessible.
Caution • The printer weighs approximately 15.9 kg (35 lbs).
Important • Save all the packing material and the shipping carton in case the printer needs to
be moved or shipped. If the original material is lost or damaged, a replacement Shipping Kit
can be ordered from Zebra.
12 Zebra P630i & P640i Card Printer User’s Manual 980541-003 Rev. B
Installation
Installation Procedure
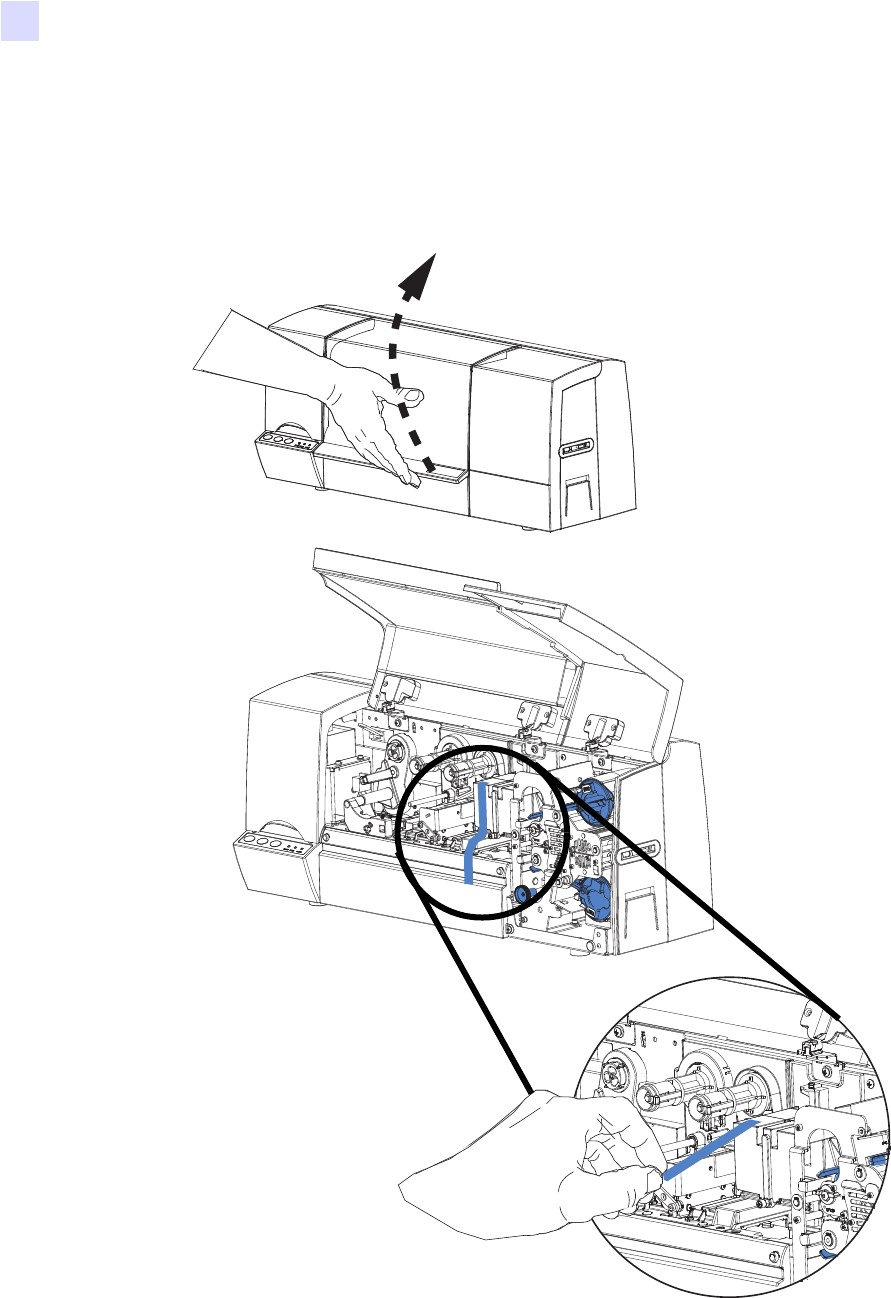
Removing the Shipping Tape
Step 1. Open the printer Main Cover. Locate and remove the blue tape that secures the flip
station in position.
Installation
Installation Procedure
980541-003 Rev. B Zebra P630i & P640i Card Printer User’s Manual 13
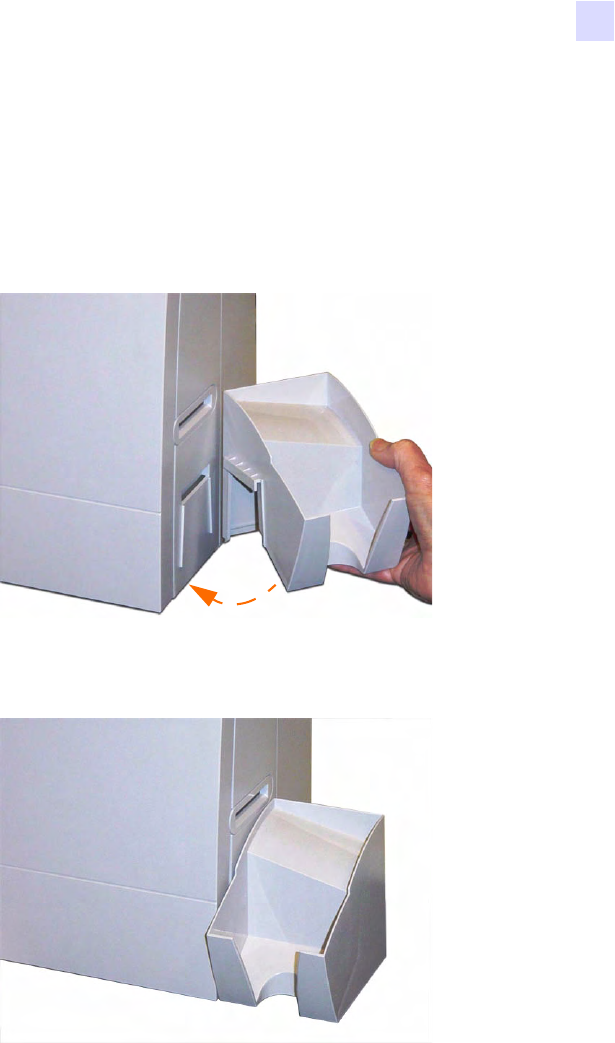
Attaching the Output Hopper
The Output Hopper is positioned on the right side of the printer to receive the printed cards.
Step 1. Install the Output Hopper by inserting the tab on the left side of the Output Hopper
into the slot on the right side of the printer.
Step 2. Ensure the lip on the Output Hopper locks securely in the slot in the Printer.
14 Zebra P630i & P640i Card Printer User’s Manual 980541-003 Rev. B
Installation
Installation Procedure
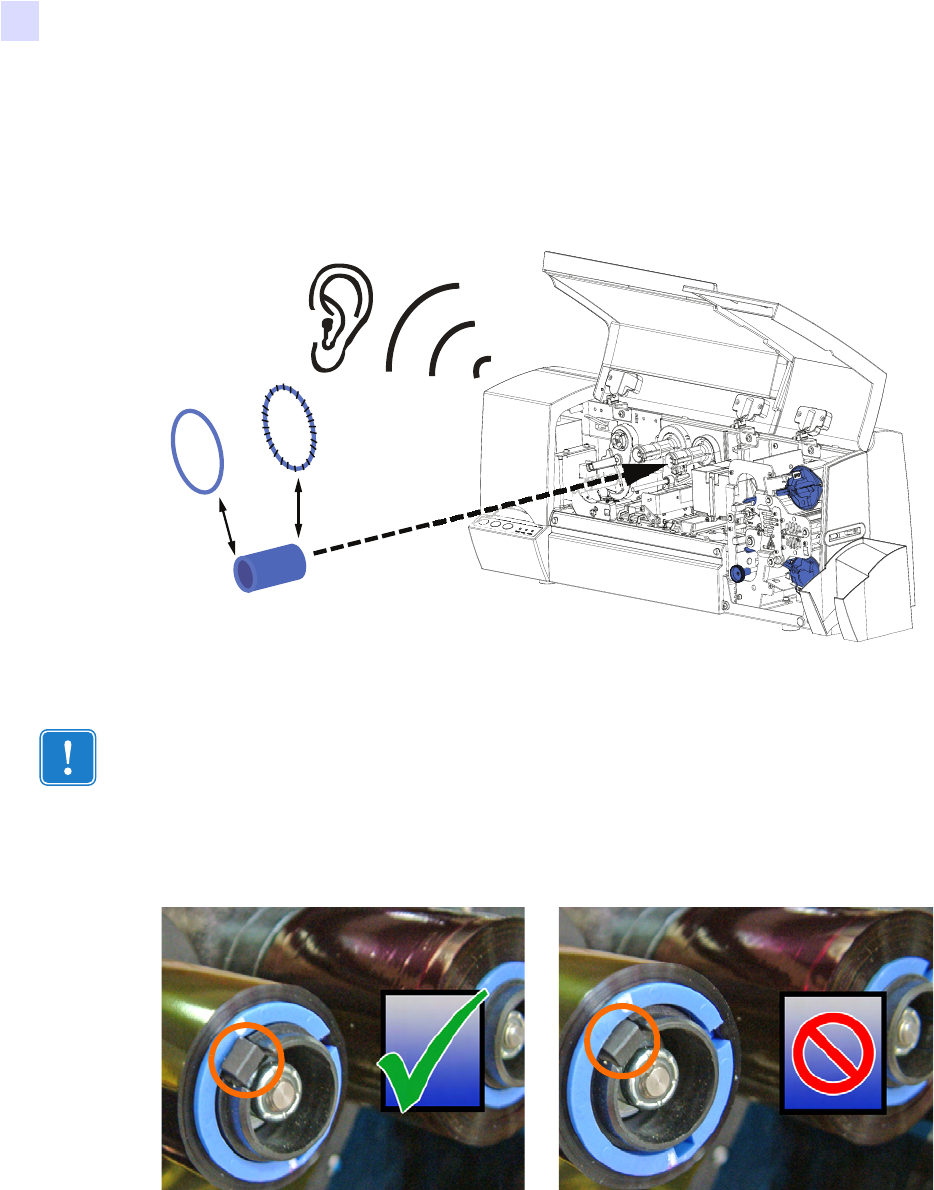
Attaching the Ribbon Take-Up Spool
Step 1. Attach the Ribbon Take-Up Spool by sliding it onto the Ribbon Take-Up Spindle and
pressing it straight back until in clicks into place.
The two figures below show the right and wrong ways to insert the printing ribbon on
either spindle.
Important • Make sure that the Ribbon Take-Up Spool is attached with its “toothed” end
toward the rear of the printer.
Right way: the clip is OVER the core. Wrong way: the core is not pushed fully against
the back side, resulting in a Y border on the
printed cards.