Zebra Technologies IAPWR63000902 Digital Spread Spectrum Device User Manual MEA Setup and Deployment User s Guide
Zebra Technologies Corporation Digital Spread Spectrum Device MEA Setup and Deployment User s Guide
Contents
- 1. users manual
- 2. users manual statements
users manual

Setup and Deployment
User’s Guide
Copyright 2002, MeshNetworks, Inc. All Rights Reserved

Setup and Deployment Guide
Foreword
This document describes in detail the confidential and proprietary technology of MeshNetworks’
™ Architecture. MeshNetworks products and technology are protected by US and
international patent and patent pending technology. MeshNetworks provides both the
Architecture as well as the MeshLAN 802.11b product. MeshLAN provides a mobile internet
solution intended for interior office and small campus deployments with pedestrian speeds. The
solution uses a proprietary technology to extend the mobile internet to wide area networks
and permits highway speed mobility.
This document represents the current OEM Evaluation Package, the contents are subject
to change at any time at the discretion of MeshNetworks, Inc. This document is a deliverable
associated with the OEM license package. This document is confidential and for the sole use of
the licensee and is not for general distribution. All provisions of the Non-Disclosure Agreement
associated with the license package apply to this document.
, MeshLAN, MeshManager, MeshTray, MeshView, and MeshNetworks’ logo are
trademarks or registered trademarks of MeshNetworks, Inc. Microsoft, Windows, Windows
2000 and Windows CE are registered trademarks of Microsoft Corporation. All other product
names and services identified throughout this publication are trademarks or registered
trademarks of their respective companies. No such uses or the use of any trade name is
intended to convey endorsement or other affiliation with this publication. Copyright 2002,
MeshNetworks, Inc. All Rights Reserved.
iii

Setup and Deployment Guide
Table of Contents
1 OVERVIEW.............................................................................................................. 1
1.1 Product Kit Overview .............................................................................................1
1.2 Document Overview...........................................................................................................1
1.3 Acronyms............................................................................................................................1
1.4 Related Documentation .....................................................................................................1
1.5 Overview of the System...........................................................................................2
1.5.1 Introduction...................................................................................................................2
1.6 Operational View of the System.............................................................................4
1.6.1 Network Architecture ...................................................................................................5
2 SUBSCRIBER DEVICE (SD)................................................................................... 7
2.1 Equipment ..........................................................................................................................7
2.2 Loading and Verifying Software ......................................................................................7
2.2.1 Windows 2000 Installation...........................................................................................7
2.3 Testing.................................................................................................................................7
3 INTELLIGENT ACCESS POINT (IAP) .................................................................... 8
3.1 Equipment ..........................................................................................................................8
3.2 IAP Assembly .....................................................................................................................9
3.3 Deployment.........................................................................................................................9
3.4 Initial IAP Configuration................................................................................................10
3.5 Testing...............................................................................................................................11
4 WIRELESS ROUTER (WR)................................................................................... 12
4.1 Equipment ........................................................................................................................12
4.2 WR Assembly ...................................................................................................................13
4.3 Deployment.......................................................................................................................13
4.4 Initial Configuration........................................................................................................13
4.5 Testing...............................................................................................................................14
iv

Setup and Deployment Guide
Table of Contents - Continued
5 MOBILE INTERNET SWITCHING CONTROLLER (MISC)................................... 15
5.1 Equipment ........................................................................................................................15
5.2 Network Setup Description .............................................................................................15
5.3 MiSC Assembly ................................................................................................................17
5.4 Onsite Configuration of Routers ....................................................................................17
5.4.1 EdgeRTR Configuration.............................................................................................17
5.4.2 EdgeRTR TEST..........................................................................................................18
5.4.3 CoreRTR Configuration .............................................................................................18
5.4.4 CoreRTR Test.............................................................................................................20
5.5 Network Configuration ...................................................................................................20
5.6 Testing...............................................................................................................................21
5.6.1 Basic MiSC Tests .......................................................................................................21
5.6.2 Wireless System Tests ................................................................................................21
5.6.3 Internet Test ................................................................................................................21
APPENDIX A SITE SELECTION/DEPLOYMENT GUIDELINES.............................. 22
A.1 General Guidelines...........................................................................................................22
A.2 Antenna Guidelines..........................................................................................................22
APPENDIX B NOTES ............................................................................................... 24
B.1 DNS Server .......................................................................................................................24
B.2 Tera Term Pro..................................................................................................................24
APPENDIX C LICENSE AND WARRANTY INFORMATION ................................... 25
C.1 IMPORTANT NOTICE..................................................................................................25
APPENDIX D FCC REGULATORY INFORMATION ................................................ 28
D.1 FCC Information .............................................................................................................28
D.2 FCC RF Radiation Exposure Statement........................................................................28
D.3 Safety Information for the ...................................................................................29
v

Setup and Deployment Guide
List of Figures
Figure 1. Elements of the System.......................................................................................2
Figure 2. Operational View of the System.........................................................................5
Figure 3. Network Architecture..........................................................................................6
Figure 4. IAP Connection Points.................................................................................................9
Figure 5. Optional Mounting Brackets........................................................................................9
Figure 6. IAP Enclosure Illustration..........................................................................................10
Figure 7. WR Connection Points...............................................................................................13
Figure 8. Basic MiSC Configuration.........................................................................................16
Figure 9. Antenna Mounting .....................................................................................................22
vi

Setup and Deployment Guide
1 Overview
1.1 Product Kit Overview
The Product Kit allows a network operator to deploy a wireless, multi-hopping ad hoc
network. The product kit supports up to 25 Subscriber Devices, allows mobility between IAPs,
and provides enhanced system management capabilities.
It is recommended that the Network Operator receive setup and deployment training at
MeshNetworks’ facility prior to deploying the network. MeshNetworks may provide the
Network Operator, as an option, assistance with site surveys and deployment.
1.2 Document Overview
This document describes how to setup, configure, and deploy a kit. The MWR6300
(Wireless Router) and IAP6300 (Intelligent Access Point) require “professional installation” to
ensure the installation is performed in accordance with FCC licensing regulations.
The components of a system are provided with a preinstalled “standard configuration”
provided by MeshNetworks. The configuration items described in this document allow the
system to be customized with site-specific information.
The document presents information on the current components. As the components
evolve, the document will be updated.
1.3 Acronyms
HAS Hardware Authentication Server
IAP Intelligent Access Point
Mesh Enabled Architecture
MiSC Mobile Internet Switching Controller
SD Subscriber Device (a host device with a WMC6300 installed and operational)
WMC Wireless Modem Card
WR Wireless Router
1.4 Related Documentation
WMC6300 Wireless Router User’s Guide
MeshView User’s Guide
MeshManager User’s Guide
Location Analyzer User’s Guide
1
Setup and Deployment Guide
1.5 Overview of the System
1.5.1 Introduction
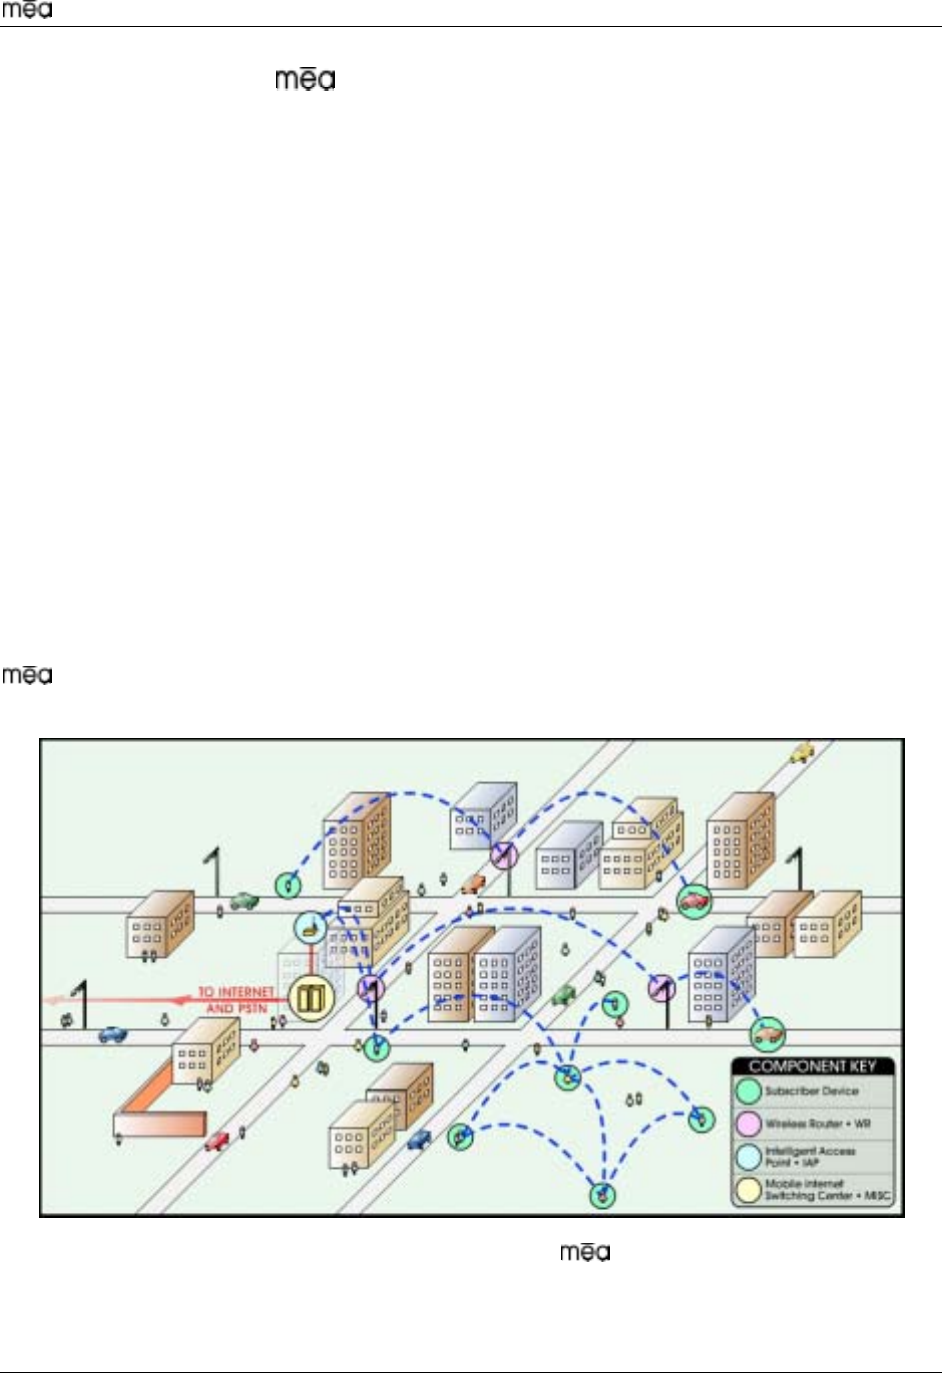
MeshNetworks develops Mobile Broadband communications systems with “meshed”
architectures. That is, each node can connect directly, or indirectly (by hopping through other
nodes), with any other node in the network. The peer-to-peer nature of the mesh architecture
combined with data rate control in each subscriber and infrastructure node in the network
insures reliable delivery while providing increased network capacity through geographic reuse of
the frequency spectrum.
The network comprises four distinct elements:
• Subscriber Devices (SDs)
• Wireless Routers (WRs)
• Intelligent Access Points (IAPs)
• Mobile Internet Switching Controllers (MiSCs)
The overwhelming portion of the value that MeshNetworks provides is in the Wireless Modem
Card (WMC). The WMC is used in Subscriber Devices as well as in the Wireless Router and
Intelligent Access Point (IAP), both of which are types of infrastructure equipment.
MeshNetworks provides a Mobile Internet Switching Controller (MiSC) which is assembled from
industry standard equipment and conform to industry standards. MeshNetworks also provides
the network applications which are required for proper operation and value extraction from the
mobile internet system.
Figure 1. Elements of the System
All network elements are designed to support mobile applications. Subscriber Devices can be
either mobile or fixed, while the remaining components are typically fixed. Wireless Routers and
2
Setup and Deployment Guide
IAPs can be mounted on utility poles, light poles, traffic apparatus, billboards, and buildings.
Their fixed positions allow the Subscriber Device to pinpoint its location within one second.
WRs and IAPs can also be mobile, attached to emergency vehicles, utility vehicles, or fleet
vehicles. It is important to note that the WMC technology within a Subscriber Device is identical
to the WMC technology in Wireless Routers and IAPs.
The system was designed to minimize the cost associated with deploying a mobile Internet
with end user data access rates on the order of DSL or Cable Modem. The chosen metric of
network efficiency for a data centric network is bits per second per Hertz per square kilometer
per dollar (bps/hz/km2/$). This metric balances the user data rates, allocated bandwidth,
coverage area, and cost. One of the most important factors in optimizing this metric is the
choice of network architecture.
1.5.1.1 Subscriber Devices (SDs)
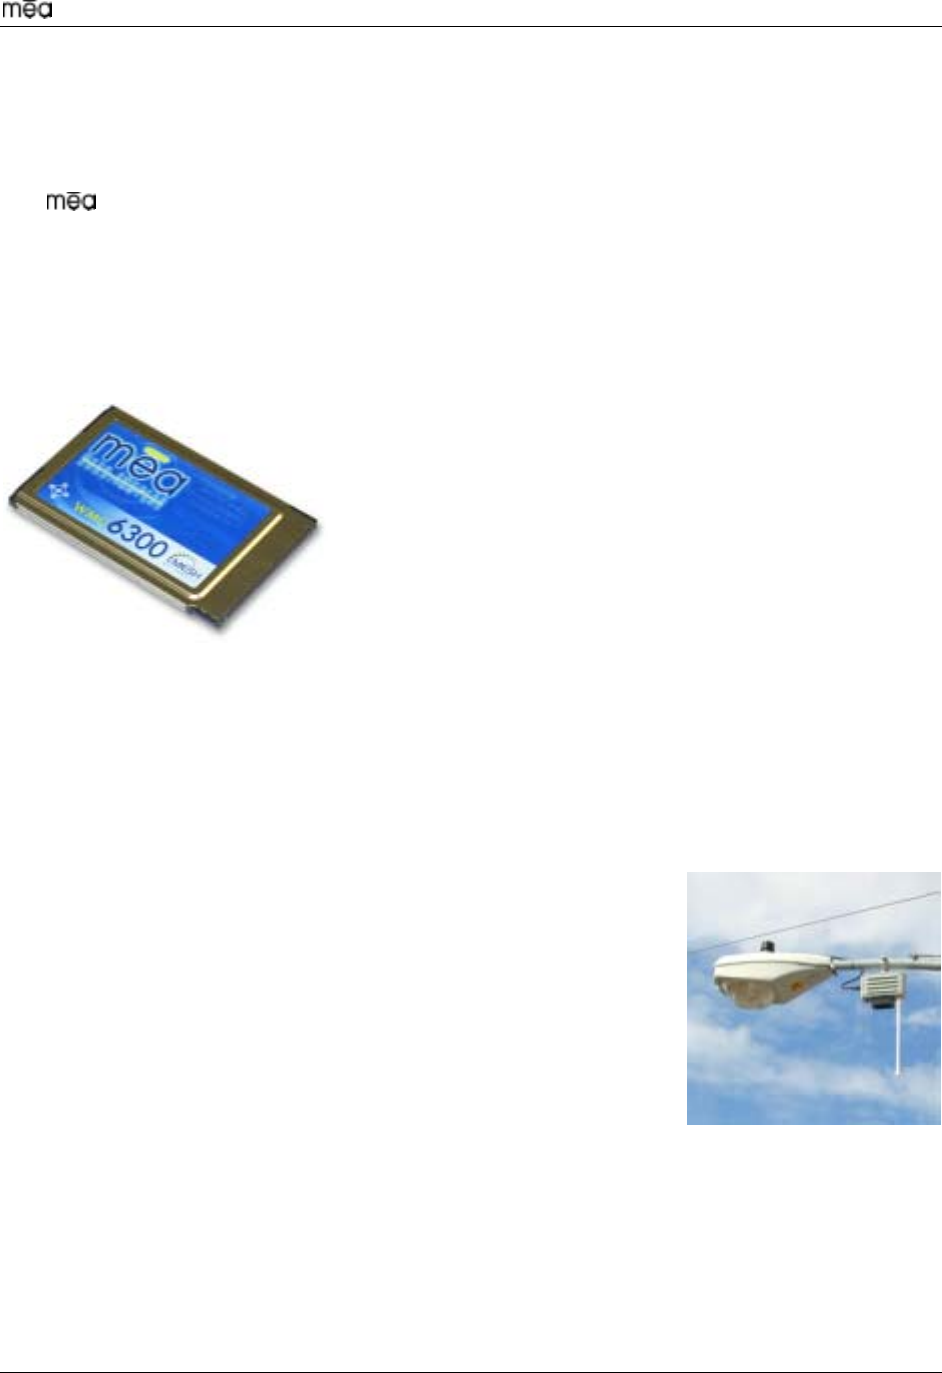
The MeshNetworks’ Wireless Modem Card (WMC) is
provided as a PCMCIA form factor device. The WMC is
used with an off-the-shelf IP-enabled laptop, handheld
computer, PDA, or entertainment device. These two devices
together make up a Subscriber Device (SD).
The WMC provides access to the fixed infrastructure network
and other networks, such as the Internet, and it can also
function as a Wireless Router and repeater for other SDs.
SDs can therefore be a key part of the network
infrastructure. Adding subscribers can effectively increase the number of Wireless Routers in
the network, which increases the number of alternative paths that subscribers may utilize. This
can reduce both the time and cost to deploy network infrastructure, while also increasing the
spectral efficiency and therefore the capacity of the network. And because SDs can also
operate in an ad hoc peer-to-peer mode, two or more SDs can form a network without the need
for any fixed infrastructure.
1.5.1.2 Wireless Routers (WRs)
The Wireless Router (WR) is a low-cost small-sized wireless device
that is primarily deployed to seed a geographical area, extending
the range between IAPs and subscribers, and to simultaneously
increase the network’s spectral efficiency. Wireless Routers provide
a number of functions in the network, such as:
• Range extension for Subscriber Devices and IAPs
• Hopping points for subscriber peer-to-peer networking
• Automatic load balancing
• Route selection
• Network capacity optimization through small packet consolidation
• Fixed reference for geo-location services
The Wireless Router's small size and light weight allow it to be mounted almost anywhere. No
towers are required.
3
Setup and Deployment Guide
1.5.1.3 Intelligent Ac icess Po nts (IAPs)
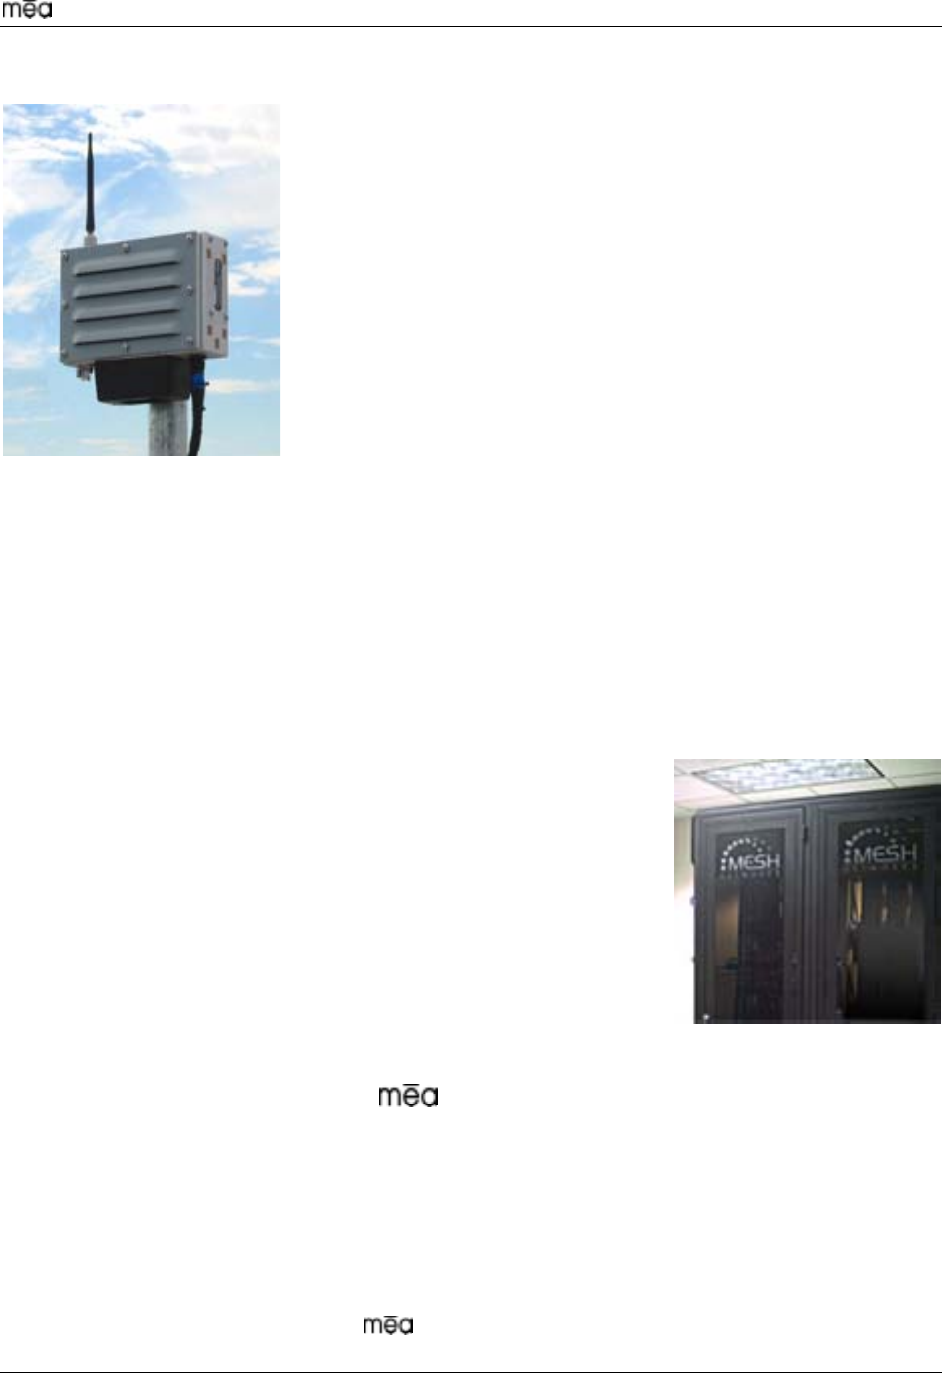
The Intelligent Access Point (IAP) is a low-cost shoebox-sized
device that acts as the transition point from the wireless network
to the wired core network and from there, through media
gateways, out to the Internet. Each IAP offers up to 6 Mbps burst
of data capacity to subscribers. IAPs support the 10/100 base-T
Ethernet interface. Other interfaces are supported through
commercially available media translation devices. If additional
network capacity is required, more IAPs can be easily deployed -
without the need for extensive RF or site planning. The location
of an IAP is non-critical due to the self-forming, self-balancing
nature of MeshNetworks’ technology. IAPs provide functions
such as:
• Local mobility management of SDs
• Fixed reference for geo-location services
• Hopping points for subscriber peer-to-peer networking
• Transition point from the wireless to the wired portions of the network
• Route selection
The IAP’s small size and light weight allow it to be mounted anywhere power and network
connectivity are available. No towers are required. IAP software can be updated via over-the-
wire downloads.
1.5.1.4 Mobile Internet Switching Controller (MiSC)
The Mobile Internet Switching Controller (MiSC) provides
connectivity between the IAPs and wired world, and hosts the
network’s management and provisioning functions. The MiSC is
composed of off-the-shelf hardware components, such as LAN
routers and application servers. MiSC software consists of both
off-the-shelf and MeshNetworks’ proprietary software,
MeshManager. The MeshManager software provides functions for
the network such as:
• Subscriber provisioning, management, and authentication
• Configuration and fault management
• Network monitoring and reporting
1.6 Operational View of the System
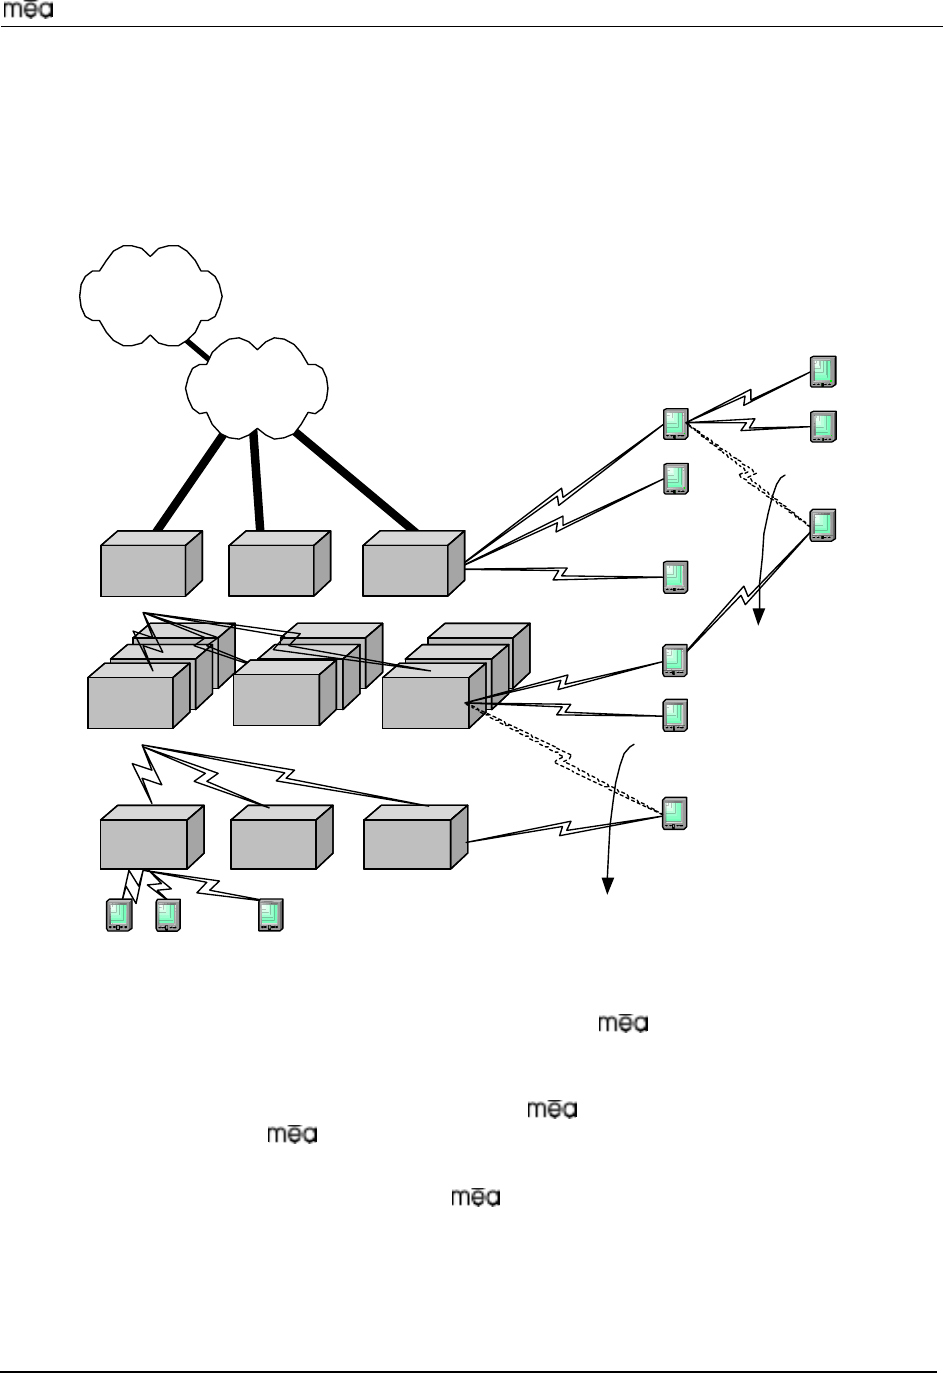
Figure 2 shows the different ways in which a subscriber can reach an IAP. It can connect
directly, or hop through any number or combination of WRs and SDs. Additionally, if the
subscriber wishes to execute a peer-to-peer application such as a file transfer, the subscriber
can communicate directly, or through any combination of SDs, WRs, and IAPs.
The ability to use ad hoc routing to forward traffic improves the scalability of the mobile wireless
Internet. In particular, the ability for the user to accomplish a peer-to-peer application without
the use of infrastructure has tremendous advantages. A significant problem in every mobile
wireless network is backhaul. The architecture provides the ability to route traffic from
4
Setup and Deployment Guide
applications through SDs and WRs without ever reaching an IAP or the wired Internet. This
reduces the amount of backhaul required by enabling the SDs to accomplish the backhaul
whenever the opportunity arises. This results in lower deployment costs, reduced backhaul,
and lower operating expenditures. The service provider can provide the same level of service
with less equipment by empowering the SDs with ad hoc networking capability.
WR 1
WR 2
WR k2
WR k1
WR 1
. . .
. . .
T
1
T
1
. . .
T1
. . .
SD 2
SD 1
SD 1
. . .
SD 2
SD 1
SD 2
. . .
SD 2
SD 1
SD 3
. . .
. . .
SD 2
SD 1
SD 4
. . .
MiSC
IAP
WR
SD
Handoff
Handoff
Router Mesh
Mobile Internet Switching Center
Intelligent Access Point
W ire le ss Router
Subscriber Device
MiSC
Global
Internet
IA P 1
IA P 2
IA P N
WR 2
Figure 2. Operational View of the System
1.6.1 Network Architecture
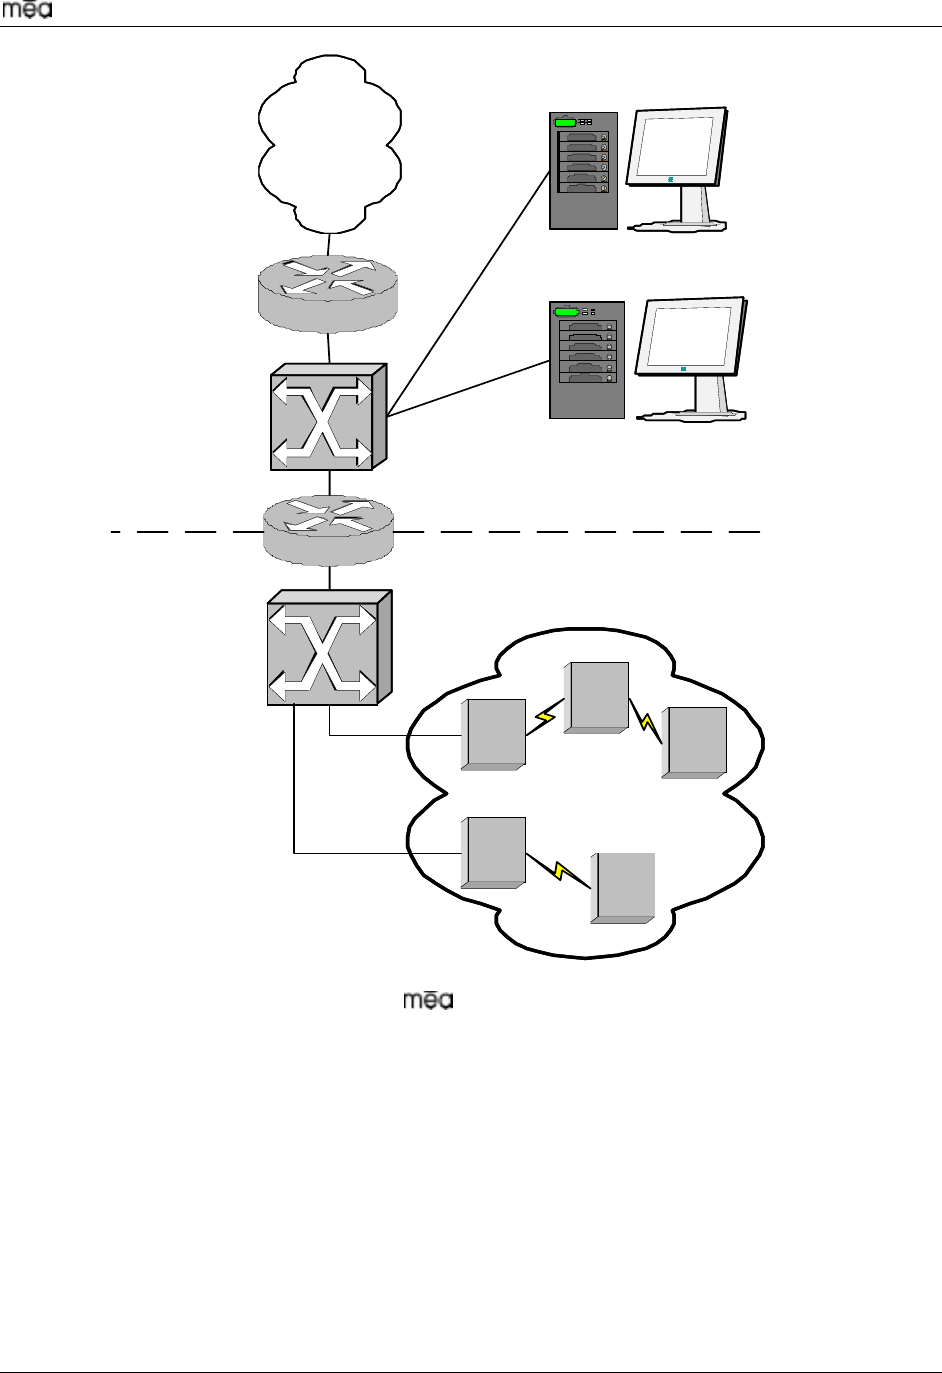
The mea network utilizes two subnets, one for the wireless elements and one for the
server elements. All of the wireless elements must be in a single subnet. The subnets are
connected together by the core router, and the edge router provides Internet connectivity.
Figure 3 shows the logical network layout of a deployment.
5
Setup and Deployment Guide
core router
edge router
Internet
server
switch
wireless
switch
MeshManager
server
`
other servers
mēa
wireless
domain
IAP1
IAPn
. . .
WR
SD
SD
server sub net
wireless
sub net
Figure 3. Network Architecture
6

Setup and Deployment Guide
2 Subscriber Device (SD)
A Subscriber Device consists of both a Wireless Modem Card (WMC6300) and a customer
provided host device such as a notebook computer.
2.1 Equipment
The following list defines the hardware components required to setup the WMC6300:
• WMC6300 Card
• 2.4 GHz Antenna with a MMCX connector
• Antenna Clip with adhesive backing
Equipment that must be supplied by the Subscriber includes the following:
• Notebook PCs running Microsoft Windows 2000™ Operating System
Optional Equipment
• External 2.4 GHz Automobile Antenna
2.2 Loading and Verifying Software
Refer to the WMC6300 User’s Guide for step-by-step details on the setup procedures.
A CD will be supplied with the software to load on the Subscriber’s equipment. It contains the
following files:
Windows 2000
Setupmeaclient.exe – installs the drivers and MeshTray
Setupmv.exe – installs MeshView
2.2.1 Windows 2000 Installation
To install the drivers for the first time on a notebook PC running Microsoft Windows 2000, run
the Setupmeaclient.exe from the CD-ROM. Note: The drivers must be installed before
inserting the wireless modem card).
If MeshView is desired on a Win2000 subscriber device, run the setupmv.exe from the CD-
ROM.
2.3 Testing
When the WMC6300 is inserted, you may receive an audible indicator that the device has been
recognized. (If there is a problem with the drivers, Windows will prompt you for a new device
installation.)
Click on the Windows “Start” button and select “Run” from the popup menu. Enter the
command “ipconfig“ in the text box and click on the “OK” button to check your IP address. If an
IP address in the range of 10.0.x.1 is displayed, the transceiver is working properly.
7

Setup and Deployment Guide
3 Intelligent Access Point (IAP)
The IAP is an infrastructure device that is positioned at a fixed location such as a building
rooftop. The IAP6300 requires “professional installation” to ensure the installation is performed
in accordance with FCC licensing regulations.
The antenna(s) used for this transmitter must be fixed-mounted on outdoor permanent
structures with a separation distance of at least 2 meters from all persons and must not be co-
located or operating in conjunction with any other antenna or transmitter. Users and installers
must be provided with antenna installation and transmitter operating conditions for satisfying RF
exposure compliance.
The principle function of the IAP is to provide access for Subscriber Devices in the coverage
area of the IAP to wired services. The IAP also provides a fixed location reference for Geo-
Location (optional feature), provides wireless routing for units in the IAPs coverage area, and is
the principal network management interface to transceivers within Wireless Routers and
Subscriber Devices.
All IAPs have mounting points for an optional mounting bracket. For a deployment, a
permanent AC power source for each IAP must be provided.
3.1 Equipment
The following list defines the standard hardware components for the IAP:
• IAP Box with N-type Male Antenna Connector
• A/C Power Cable with standard 3 prong plug
• 7.5 dBi Antenna with N-type Female Antenna Connector
The Network Operator must supply the following:
• Mounting Location
• A/C Power Source
• Ethernet connection between the IAP and the MiSC
Optional Equipment
• Mounting Bracket
• Pelco AB-3009-96 for attaching to poles up to 4” in diameter
• Pelco AB-3010 for poles greater than 4” in diameter
• Universal Mounting Bracket
• Net-to-net boxes for T1 deployment
• Power Cords terminating in PE cell connector
• Serial Cable with DB9 Male Connectors (for PC to IAP transceiver debug)
8
Setup and Deployment Guide
3.2 IAP Assembly
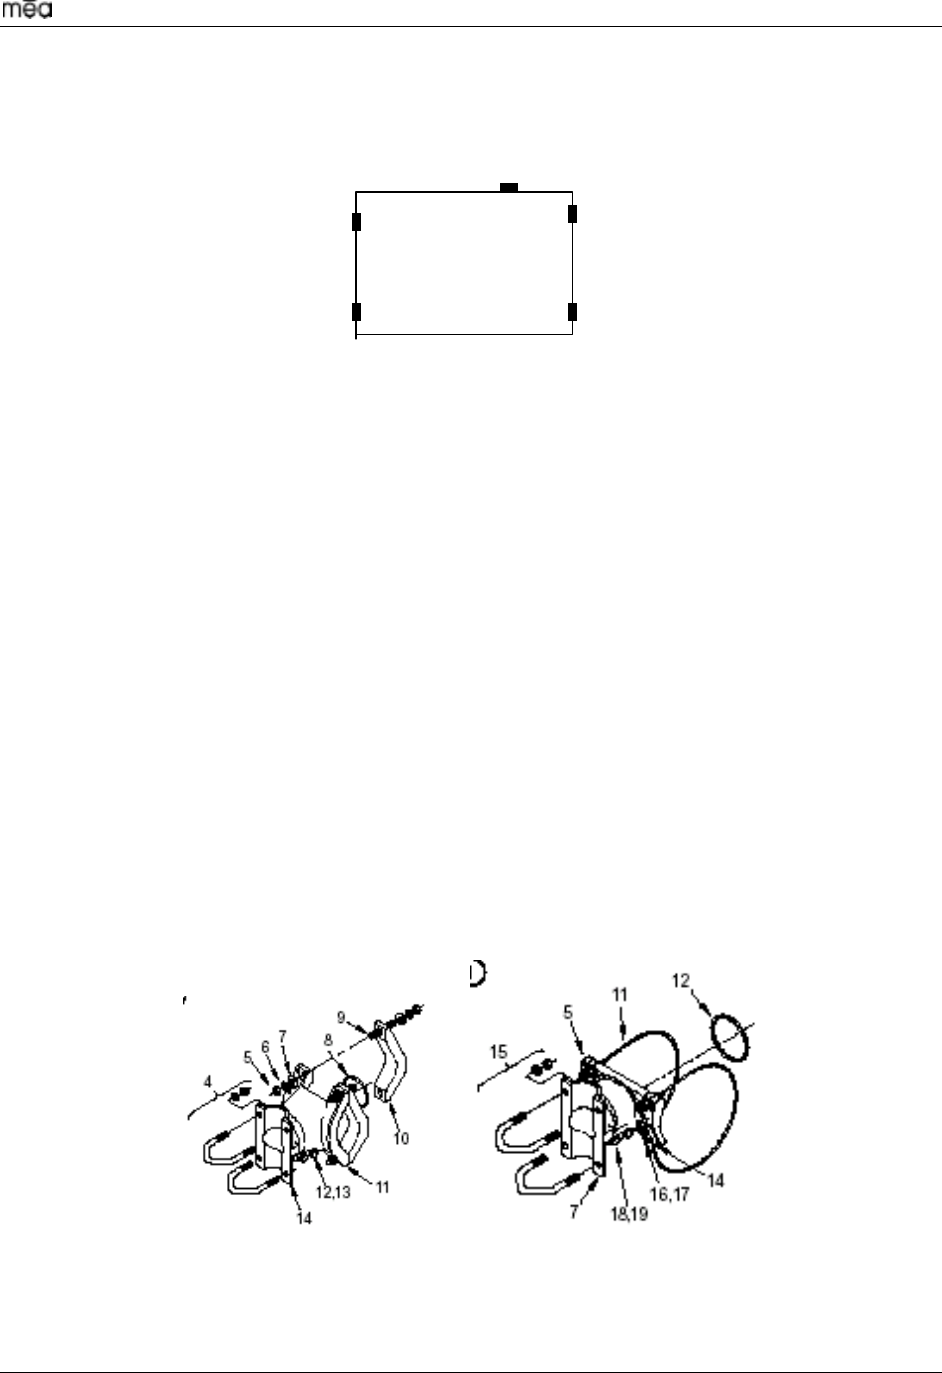
The Figure 4 shows the connection points on an IAP box.
Power Out (3 pin)
Serial Port
Power In (4 pin)
RJ45 (Data) Port
A
ntenna
Figure 4. IAP Connection Points
Assemble the IAP with the following steps:
1. Insert the antenna into the N-type Connector on the top of the box, and rotate to close.
2. Insert the IAP Power Plug into the 4-pin connector.
3. Insert the Ethernet Cable into the RJ45 connector.
4. If used, insert the Net-to-Net Power Cable into the 3-pin connector.
5. The Serial Port should remain unconnected; it is used for maintenance/debug purposes.
6. The transceiver number and the SBC number are recorded on the back of the IAP.
Record these numbers, as they will be required to configure and test the device.
3.3 Deployment
The IAP may be mounted on either a flat surface or a pole, depending on which optional bracket
is chosen. The antenna must also be fixed-mounted on outdoor permanent structures with a
separation distance of at least 2 meters from all persons and must not be co-located or
operating in conjunction with any other antenna or transmitter. Users and installers must be
provided with antenna installation and transmitter operating conditions for satisfying RF
exposure compliance.
See Figure 5 for an illustration of the optional brackets; Astro-brac Tenon Mount kit, Part
Number AB-3010 and Astro-brac Cable Mount Kit, Part Number AB-3009L, respectively.
Figure 5. Optional Mounting Brackets
When deploying the IAP, the antenna should be a minimum of 30 inches from any nearby metal
poles to avoid interference in the RF pattern.
9
Setup and Deployment Guide
The IAP must have an Ethernet connection to the MiSC. If the distance between the IAP and
the MiSC is greater than 100 meters, the Network Operator may utilize a T1 with Net-to-Net
boxes. The IAP has a 5V, 3-pin, power out connection on the side of the box to power the Net-
to-Net boxes.
The installation location must have AC power available for the IAP.
It is the responsibility of the Network Operator to ensure that the installation complies with any
local building codes.
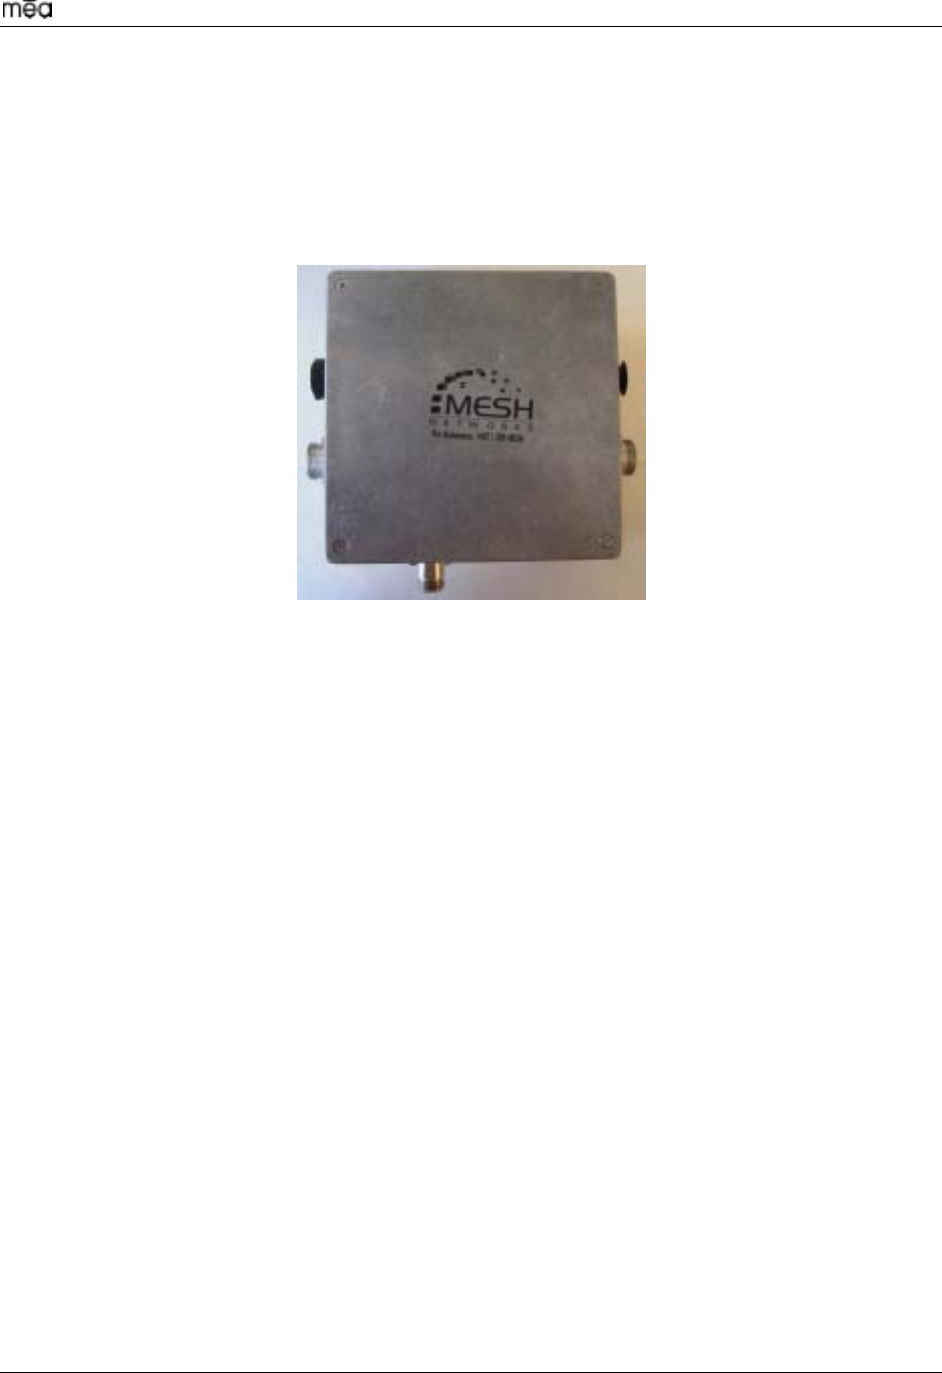
Figure 6. IAP Enclosure Illustration
3.4 Initial IAP Configuration
Geo-location may be entered into an infrastructure device via the Device Manager tool (refer to
the MiSC section of this document). Complete the following procedure to enter GPS data into
the device:
1. Click on the “DevMan” shortcut icon located on the desktop.
2. If the device is not listed in the Device Tree (the left window), then perform the following:
a.
b.
c.
Select “File/New Device”
Enter the device information (address type, device address, autoconfiguration button
selected, device type, and template name).
Click on the “Add” button.
3. Select the device in the Device Tree. This causes the device information to be displayed
in the Detail Pane.
4. Click on the “Configuration” tab.
5. Enter the latitude, longitude and altitude information in the Geo-location box.
Note: 5 digits following the decimal point is recommended.
6. Click on the “Save” button. The status bar will indicate if the save was successful or
failed.
7. Click on the “Status” tab.
8. Click the “Refresh” button.
9. Verify that the geo data displayed in the position box has been updated
10

Setup and Deployment Guide
3.5 Testing
Once deployed, verify the health of the IAP with the following procedure:
1. The transceiver number and the SBC number are recorded on the back of the IAP.
Record these numbers, as they will be required in Step 3.
2. Apply power to the IAP.
3. Obtain the transceiver number from the IAP box. Substitute the number for the “x” in the
following commands:
4. From a Subscriber Device, issue the ping command for the transceiver: ping 10.0.x.2.
5. Next ping the SBC: ping 10.0.x.1
This verifies that both the transceiver and SBC are alive.
11

Setup and Deployment Guide
4 Wireless Router (WR)
The MWR6300 (Wireless Router) is an infrastructure device positioned in a fixed location, such
as on a pole, wall, or rooftop. The MWR6300 requires “professional installation” to ensure the
installation is performed in accordance with FCC licensing regulations.
The antenna(s) used for this transmitter must be fixed-mounted on outdoor permanent
structures with a separation distance of at least 2 meters from all persons and must not be co-
located or operating in conjunction with any other antenna or transmitter. Users and installers
must be provided with antenna installation and transmitter operating conditions for satisfying RF
exposure compliance.
The Wireless Routers primary function is to provide range extension, but it also provides a
means to route around obstructions, and it provides a fixed and known location reference for
use in Geo-Location (optional feature).
All WRs have mounting points for an optional mounting bracket. For a deployment, a
permanent AC power source for each WR must be provided.
4.1 Equipment
The following list defines the hardware components needed to setup a WR:
• WR Box with N-type Antenna Connector
• A/C Power Cable with standard 3 prong plug
• 7.5 dBi Antenna with N-type Female Antenna Connector
The Network Operator must supply the following:
• Mounting Location
• A/C Power Source
Optional Configurations:
• Mounting Bracket
• Pelco AB-3009-96 for attaching to poles up to 4” in diameter
• Pelco AB-3010 for poles greater than 4” in diameter
• Power Cable to connect to a Fisher-Pierce 7570B photoelectric cell
• Serial Cable with DB9 Male Connectors (for PC to WR debug)
12

Setup and Deployment Guide
4.2 WR Assembly
Figure 7 shows the connection points on a WR box.
Antenna
Serial Port
Power In (4 pin)
Figure 7. WR Connection Points
Assemble the WR using the following procedure:
1. Insert the Antenna into the N-type Connector on the top of the box, and rotate to close.
2. Insert the Power Plug into the 4-pin Connector.
3. The Serial Port should remain unconnected; it is used for maintenance/debug purposes.
4. The transceiver number is recorded on the back of the WR. Record this number, as it
will be required to configure and test the device.
4.3 Deployment
The WR may be mounted on either a flat surface or a pole, depending on which optional bracket
is selected.
When deploying the WR, the antenna should be a minimum of 30 inches from any nearby metal
poles to avoid interference in the RF pattern. The antenna must also be fixed-mounted on
outdoor permanent structures with a separation distance of at least 2 meters from all persons
and must not be co-located or operating in conjunction with any other antenna or transmitter.
Users and installers must be provided with antenna installation and transmitter operating
conditions for satisfying RF exposure compliance.
The installation sight must have AC power available for the WR.
It is the responsibility of the Network Operator to ensure that the installation complies with any
local building codes.
4.4 Initial Configuration
The configuration process for Geo-Location is the same as for the IAP. Refer to Section 3.4.
13

Setup and Deployment Guide
4.5 Testing
Verify the operation of the WR with the following procedure:
1. The transceiver number is recorded on the back of the WR. Record this number, as it
will be required in Step 3.
2. Apply power to the WR.
3. Obtain the transceiver number from the WR box. Substitute the number for the “x” in the
following commands:
4. From a Subscriber Device, issue the ping command for the transceiver: ping 10.0.x.2.
14

Setup and Deployment Guide
5 Mobile Internet Switching Controller (MiSC)
The MiSC provides routing, switching and management functions for the wireless network, and
the connection to the wired world.
5.1 Equipment
The following list defines the standard components needed for the MiSC:
• SMC 24 Port Switch
• Cisco 1720 – Edge Router
• Cisco 1720 – Core Router
• MeshManager Server
• Monitor
• 5 Ethernet Cables
• 2 Ethernet Crossover Cables
The Network Operator must supply the following:
• Physical location and AC power, for routers, switch, server, monitor, keyboard, mouse,
etc.
• Ethernet connection(s) from switch to IAP(s)
• Ethernet connection to Internet or to Network Operator’s private network (Custom IP
network configuration may be required depending on Network Operator’s network
configuration)
• Public address for Edge Router, DNS resolver address
• PC running Windows 2000 with an Ethernet Port for MiSC Configuration and MeshView
Optional Equipment:
• Geo Server
• T1 Network Extenders
5.2 Network Setup Description
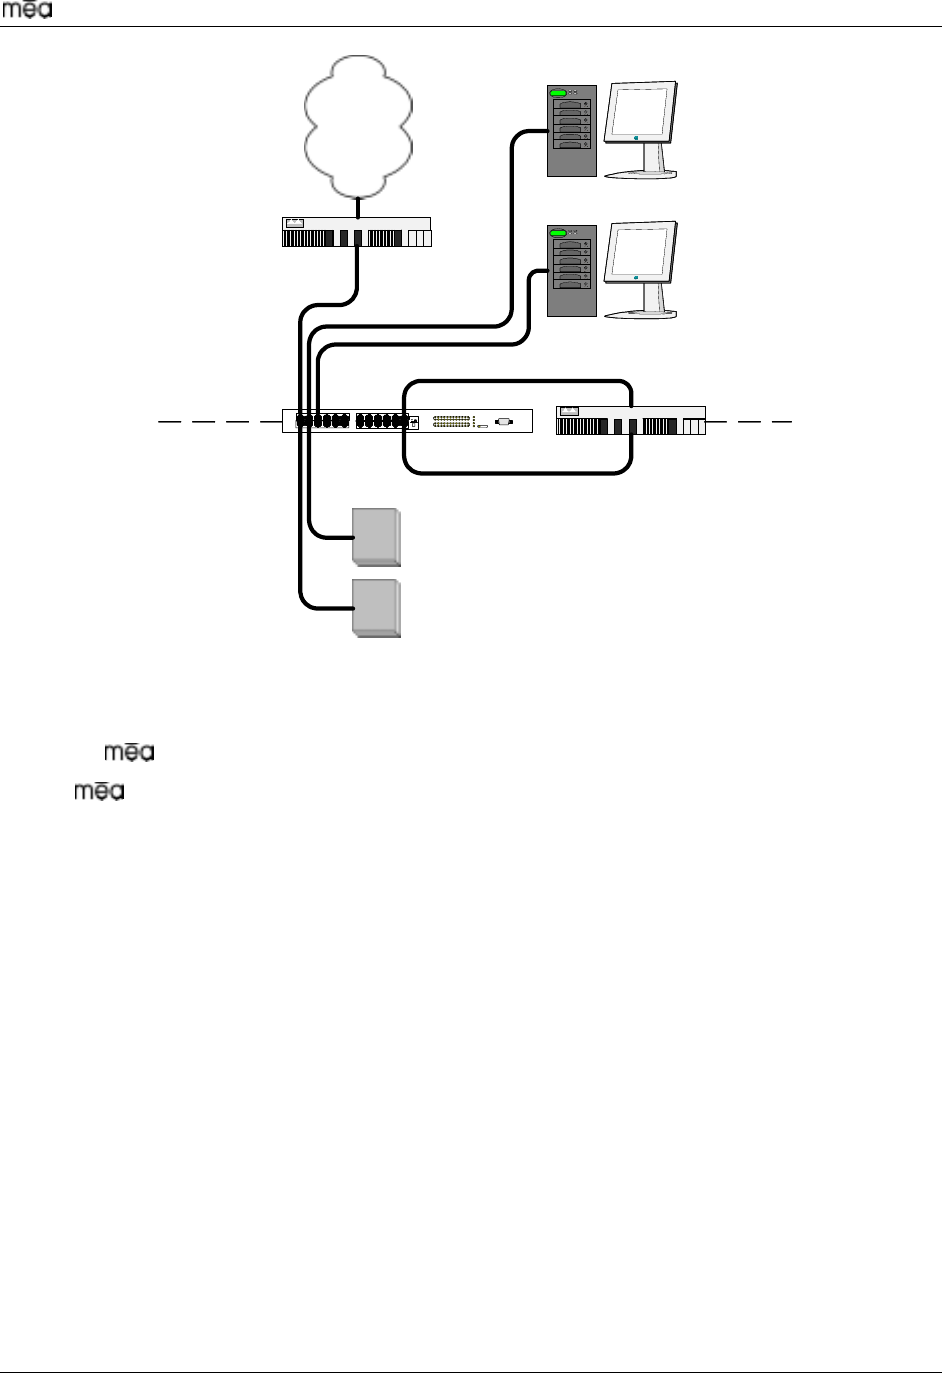
The basic MiSC hardware configuration is shown in Figure 8.
15
Setup and Deployment Guide
IAP1
IAP2
core
router
edge
router
internet
MeshManager server
switch
server subnet
wireless subnet
Geo server
CISCOSYSTEMS
CISCOSYSTEMS
Figure 8. Basic MiSC Configuration
The following describes the parameters for setting up the network:
• All wireless devices must be within the same subnet.
• currently uses the non-routable 10.x.x.x (8 bit) subnet as defined in RFC 1918.
• The IAP will use DHCP to obtain an address, and it must be returned a 10.x.x.x address.
• All MeshNetworks devices (other than the IAP) currently have fixed addresses of
10.0.x.x with a default gateway of 10.0.0.1.
• All Mesh devices (other than the IAP) currently expect a DNS server at the IP address
192.168.50.20. If a DNS server is not available at this address, subscriber device hosts
will be unable to resolve web URLs. (This can be overcome by manually setting a DNS
server address in the TCP/IP configuration for the subscriber device host. See Notes in
Appendix B.)
• A VPN needs to be set up between the Network Operator and MeshNetworks’ Support
group.
16

Setup and Deployment Guide
5.3 MiSC Assembly
The MiSC hardware consists of commercial off-the-shelf components. The components are
pre-configured with a basic configuration which requires minimal site-specific changes.
The SMC switch arrives configured as two virtual LANs. The upper row of Ethernet ports is for
the server subnet; the lower row of ports is for the wireless subnet.
Unpack the SMC switch and mount as desired (either in a rack or on a table top). Connect the
switch to a power source.
Unpack the Cisco router labeled “EdgeRTR” and connect to a power source. Plug interface
labeled “10BT Ethernet” into the ISP router using a crossover Ethernet cable. Plug interface
labeled “10/100 Ethernet” into the SMC switch on port 1.
Unpack the Cisco router labeled “CoreRTR” and connect to a power source. Plug interface
labeled “10BT Ethernet” into switch port 12. Plug interface labeled “10/100 Ethernet” into the
SMC switch on port 24.
Unpack the SunBlade/MeshManager server and monitor and connect to a power source. Plug
the network interface into any of the ports 2-11 on the SMC Switch.
Connect Network Operator supplied computer running Window 2000. Plug the network
interface into any of the ports 2-11 on the SMC Switch.
Apply power to each of the devices.
5.4 Onsite Configuration of Routers
5.4.1 EdgeRTR Configuration
The EdgeRTR must have on-site configuration done in order to connect to the Internet. Prior to
performing the following steps, obtain the IP address, netmask, and default gateway for the public
interface from the Internet Service Provider. These are shown as ip.ip.ip.ip, nm.nm.nm.nm, and
gw.gw.gw.gw, respectively, in the instructions below. Also, obtain the IP address of the edgeRTR, it will
be in the form of 172.xx.0.1.
Telnet into the EdgeRTR from a computer connected to the server subnet. Use the address 172.xx.0.1 to
connect to the EdgeRTR.
Update the public IP information using the commands below
Password:g0ld1.
EdgeRTR>enable
password:g0ld1.
EdgeRTR#configure terminal
Enter configuration commands, one per line. End with CNTL/Z.
EdgeRTR(config)#interface Ethernet0
EdgeRTR(config-if)#ip address
ip.ip.ip.ip
mm.nm.nm.nm
EdgeRTR(config-if)#exit
EdgeRTR(config)#no ip route 0.0.0.0 0.0.0.0
EdgeRTR(config)#ip route 0.0.0.0 0.0.0.0
gw.gw.gw.gw
EdgeRTR(config)#exit
EdgeRTR#write memory
17

Setup and Deployment Guide
Building configuration...
!!!!!!!!!!!!!!!!!!!!!!!!!!!!!!!!!!!!!!!!!!!!!!!!!!!!!!!!!!!!!!!!!!!!!!!!!!!!![OK]
EdgeRTR#copy running-config startup-config
Destination filename [startup-config]? <return>
Building configuration...
!!!!!!!!!!!!!!!!!!!!!!!!!!!!!!!!!!!!!!!!!!!!!!!!!!!!!!!!!!!!!!!!!!!!!!!!!!!![OK]
EdgeRTR#exit
Connect the IAPs to any of the ports 13-23.
5.4.2 EdgeRTR TEST
Use a computer connected to the switch (in either the server or wireless subnet) to ping to the
ISP gateway IP. Next, test access to the Internet using a web browser. If this fails troubleshoot
and retry.
Obtain the VPN peer address and the appropriate pre-shared key for the VPN.
5.4.3 CoreRTR Configuration
The CoreRTR must have on-site configuration performed to allow remote management of the
wireless devices. During this exercise, the wireless subnet address of each of the wireless
devices is mapped to a server subnet address.
The wireless address is of the form 10.0.x.y. The value of “x” is obtained from the ID number
found on the WMC, IAP or WR. The value of “y” is either 1 or 2; 1 indicates the host device
and 2 indicates the transceiver. Note that a SD and IAP have both a host device and an
transceiver, however a WR has a transceiver but not a host device.
The server subnet address is of the form 172.a.b.c. The value of ‘a’ is supplied by
MeshNetworks as part of the VPN setup. The default value is 31. The value of ‘b’ is the same
as the ‘x’ in the wireless address. Likewise, the value of ‘c’ is the same as the ‘y’ in the wireless
address.
For example, if there is an IAP with an id number of 69, the wireless subnet addresses for it will
be 10.0.69.1 and 10.0.69.2. MeshNetworks supplies the second value in the server subnet
access; this example will use the value of 22. The server subnet address corresponding to the
wireless subnet address will be 172.22.69.1 and 172.22.69.2, respectively. The table below
shows the address mapping which must be done for each IAP, WR and SD. A generic “xx” is
used in the server subnet address since it is a site-dependent value.
Telnet to the CoreRTR from a computer connected to the server subnet. Use the address
172.xx.0.2 to connect to the CoreRTR. Update the NAT information using the commands
below:
CoreRTR>
CoreRTR>enable
Password:<password>
CoreRTR#configure terminal
18

Setup and Deployment Guide
Table 1. Static NAT Mapping for an IAP, WR and SD
Wireless Subnet Address Server Subnet Address Device Type
10.0.201.1 172.xx.201.1 SD #1 Host
10.0.201.2 172.xx.201.2 SD #1 XCVR
10.0.100.2 172.xx.100.2 WR #1 XCVR
10.0.69.1 172.xx.69.1 IAP #1 Host
10.0.69.2 172.xx.69.2 IAP #1 XCVR
The following commands show how the example mapping is done. The commands must be
repeated for each device in the network. The actual address values will be based on the
equipment which is shipped in the kit.
CoreRTR#configure terminal
Enter configuration commands, one per line. End with CNTL/Z
CoreRTR(config)#ip nat inside source static 10.0.201.1 172.xx.201.1 ;#SD Host
CoreRTR(config)#ip nat inside source static 10.0.201.2 172.xx.201.2 ;#SD XCVR
CoreRTR(config)#ip nat inside source static 10.0.100.2 172.xx.100.2 ;#WR XCVR
CoreRTR(config)#ip nat inside source static 10.0.69.1 172.xx.69.1 ;#IAP HOST
CoreRTR(config)#ip nat inside source static 10.0.69.2 172.xx.69.2 ;#IAP XCVR
CoreRTR(config)#exit
CoreRTR#write memory
3d01h: %SYS-5-CONFIG_I: Configured from console by console
Building configuration...
!!!!!!!!!!!!!!!!!!!!!!!!!!!!!!!!!!!!!!!!!!!!!!!!!!!!!!!!!!!!!!!!!!!!!!!!!!!!!!!!!!
!![OK]
CoreRTR#copy running-config startup-config
Destination filename [startup-config]? <return>
Building configuration...
!!!!!!!!!!!!!!!!!!!!!!!!!!!!!!!!!!!!!!!!!!!!!!!!!!!!!!!!!!!!!!!!!!!!!!!!!!!!!!!!!!
!![OK]
CoreRTR#
19

Setup and Deployment Guide
5.4.4 CoreRTR Test
Test the configuration with MeshNetworks to verify operation of the VPN connection. You
should be able to ping specific addresses on MeshNetworks management network.
5.5 Network Configuration
The “Device Manager” is a utility located on the MeshManager server. It is used to configure
and monitor the deployed network. The following provides a basic overview for using the
Device Manager to perform network setup, refer to the Device Manager User’s Guide for
additional information on using this utility.
1. Start Device Manager by clicking on the shortcut key on the desktop
2. Perform initial device discovery:
a.
b.
c.
d.
e.
f.
a.
b.
a.
b.
Select “Tools/Network Discovery”
Inside the Wired Range box select the “Wildcard” button, and enter the address
10.0.x.1
Inside the Wireless Range box, select the Wildcard button, and enter the address
10.0.x.2
Inside the Discovery Timeout box, use the default 3 second SNMP timeout
Inside the Configuration Template box, select “Autoconfigure”. Select the desired
templates for the IAP, WR and SD.
Click the “Start” button.
3. The devices should now show up in the Device Tree pane on the left side of the window.
4. For each IAP and WR device in the Device Tree pane, double click on the address. This
brings up the status in the detailed window.
Click on the “Configuration” tab.
Enter the appropriate data in the General box (Contact, Location, Host Name, Node
Name)
5. If the geo location has not previously been entered, enter the latitude, longitude, and
altitude in the Geo Location box.
6. Enter the IP address to send traps to in the SNMP box
7. For each SD device in the Device Tree pane, double click on the address. This brings
up the status in the detailed window.
Click on the “Configuration” tab.
Enter the appropriate data in the General box. (Contact, Location, Host Name,
Node Name, and Default IAP MAC Address).
20

Setup and Deployment Guide
If Geo-location is to be demonstrated, then in the Geo Location box, select “Enable
Position Calculations”, and select the default interval of 10 seconds. Select
“Enable Position Reporting”, select the default interval of 10 seconds. Enter the
map server’s IP address.
c.
d.
Note: If Geo-location will not be demonstrated, ensure that both “Enable Position
Calculations” and “Enable Position Reporting” are not checked.
Enter the IP address to send traps to in the SNMP box.
8. Close the Device Manager utility.
Once the system components have been installed, there are two basic tests to verify correct
operation the system. The first test is to perform ping tests to each device and the second test
is to verify access the Internet.
5.6 Testing
5.6.1 Basic MiSC Tests
To verify the basic connectivity of the MiSC, conduct the following from the MeshManager
server:
• Ping an IAP
• Ping the NAT Router
• Ping the Edge Router
5.6.2 Wireless System Tests
From Device Manager, complete the following to verify correct operation of the system:
1. Ping the transceiver of the deployed IAPs (10.0.x.2)
• From the Device Manager drop down menu, select Preferences/Use Transceiver
Address
• For each IAP in the device tree, right click and select Ping Device
2. Ping the transceiver of the deployed WRs (10.0.x.2)
• From the Device Manager drop down menu, select Preferences/Use SBC Address
• For each WR in the device tree, right click and select Ping Device
3. Ping the transceiver of each Subscriber Devices (10.0.x.2)
• From the Device Manager drop down menu, select Preferences/Use Transceiver
Address
• For each SD in the device tree, right click and select Ping Device
5.6.3 Internet Test
If the system has been configured to access the Internet, complete the following to verify
correct network setup:
1. From a SD, start the web browser and enter a URL such as
http://www.MeshNetworks.com.
21

Setup and Deployment Guide
Appendix A Site Selection/Deployment Guidelines
General Guidelines A.1
A.2
The IAP location(s) should be selected first since they have the additional requirement of routing
information back to the MiSC. This may be done via an Ethernet cable if the IAP and MiSC are
located within 100 meters (the max length permitted for standard Ethernet) of each other. If the
distance is greater than 100 meters, a mechanism for extending the Ethernet connection will be
required, e.g., using fiber or T1. (MeshNetworks recommends T1 backhaul equipment from Net-
to-Net Technologies.)
Once the IAPs have been placed, then the location of the WRs can be determined. Optimally,
the devices should be distributed such that a SD has no more than 3 hops to an IAP.
AC power must be available for both IAPs and WRs.
Lastly, any local building/structure codes must be adhered to, as well as proper permits for
placing devices on structures that are not owned by the Network Operator (e.g., light poles).
MeshNetworks has developed the “Location Analyzer” tool to assist in the placement of
infrastructure. This tool runs on a Win2000 SD. The tool collects and analyzes data, ultimately
resulting in a deployment quality indication. Refer to the Location Analyzer documentation for
information on configuring and using this tool.
Antenna Guidelines
The location of fixed infrastructure antennas must address proper antenna orientation, selection
of elevation pattern for the specific locale, the avoidance of pattern distortion, and the impact of
obscuration and non-line-of-sight paths.
Polarization - Most of the antennas used in deployment will be vertically polarized. To maximize
line-of-sight signal reception, both the transmit and receive antenna should be vertically oriented
to avoid signal loss due to polarization mismatch. This applies to mobile and stationary
antennas. For example, placing a magnetically mounted vehicle antenna on a curved portion of
the vehicle roof so that its axis is not vertical risks a measure of signal loss at range, dependent
upon the specific elevation pattern details, as discussed above.
Local obstructions - Antennas should be mounted either above or below the plane of
obstructions as shown in Figure 9.
obstruction
antenna
antenna
obstruction
Figure 9. Antenna Mounting
22

Setup and Deployment Guide
Low gain “rubber duck” antennas that are mounted directly to Mesh transceivers are designed
for transmitting and receiving vertically polarized radiation. Hence, care must be taken to insure
close-to-vertical orientation of these antennas to avoid substantial signal loss due to polarization
mismatch. Additionally, attenuation sustained by use of these antennas inside vehicles can be
as high as 10 dB. Typically, losses are in the 4 to 7 dB range if the antenna is above the “metal
can” of the vehicle so that radiation and reception occur at window level.
23

Setup and Deployment Guide
Appendix B Notes
DNS Server B.1
The Wireless Modem Card returns a fixed IP address (192.168.50.20) to the SD host for the
DNS server. If there is no DNS server in the wired network at this address, the SD host will
be unable to resolve web URLs such as www.meshnetworks.com. To resolve this, the SD
host must be manually configured with a DNS server IP address.
Instructions to setup a Windows 2000 Host:
a.
b.
c.
d.
e.
f.
g.
h.
i.
j.
k.
l.
B.2
Start/Settings/Network and Dial-up Connections/Local Area Connection
(choose the Local Area Connection Corresponding to the Wireless Modem Card)
Click on the “Properties” button.
Highlight “Internet Protocol (TCP/IP)” in the Components window.
Click on the “Properties” button.
Click on the “Advanced” button.
Click on the “DNS” tab
Click on the DNS “Add” button.
Enter the “DNS Server IP Address” provided by the local network administrator and
then click the “Add” button.
Click the “OK” button to close the Advanced TCP/IP Settings windows.
Click the “OK” button to close the Internet Protocol (TCP/IP) Properties windows.
Click the “OK” button to close the Local Area Connection Properties windows.
Click the “Close” button to close the Local Area Connection Status window.
This configuration should remain in the Windows 2000 host.
Tera Term Pro
Tera Term Pro is a free-ware software emulation program that has more capabilities than HyperTerminal
(which is provided with the standard Windows suite of applications). It is recommended that Tera Term
be obtained so that in the event that MeshNetworks needs to assist the Network Operator with advanced
debugging, there is a common utility in place.
24

Setup and Deployment Guide
Appendix C License and Warranty Information
IMPORTANT NOTICE C.1
PLEASE READ THE FOLLOWING CAREFULLY BEFORE INSTALLING OR USING THE PRODUCT. IF
YOU AGREE WITH ALL OF THE TERMS OF THIS LICENSE AGREEMENT & LIMITED WARRANTY,
PROCEED WITH THE INSTALLATION OF THE PRODUCT FOLLOWING THE ONSCREEN
INSTRUCTIONS. IF YOU DO NOT AGREE, DO NOT INSTALL OR USE THE PRODUCT. BY
INSTALLING OR USING THE PRODUCT, YOU ARE AGREEING TO BE BOUND BY ALL OF THE
TERMS OF THIS LICENSE AGREEMENT & LIMITED WARRANTY. IF YOU DO NOT AGREE TO THE
TERMS OF THIS LICENSE AGREEMENT & LIMITED WARRANTY, PROMPTLY RETURN THE
UNUSED PRODUCT AND DOCUMENTATION TO MESHNETWORKS, INC. FOR A FULL REFUND OF
THE PURCHASE PRICE.
LICENSE AGREEMENT & LIMITED WARRANTY
Intelligent Access Point – IAP6300
Wireless Router – MWR6300
Wireless Modem Card – WMC6300
LICENSE GRANT
MeshNetworks, Inc. ("MeshNetworks") hereby licenses to the end-user (“You”) the software
accompanying this license ("Software"), regardless of the media on which it is distributed. You own the
medium on which the Software is recorded, but MeshNetworks retains title to the Software and related
documentation. The license is non-exclusive, non-transferable, non-sublicensable and confers a right to
use only the machine-readable, object code form of the Software for its normal and intended purpose by
a single-user. You may:
• make one copy of the Software in machine-readable form for backup purposes only. You must reproduce
on such copy the MeshNetworks’ copyright notice and any other proprietary legends that were on the
original copy of the Software.
• transfer all your license rights in the Software, the backup copy of the Software, the related documentation
and a copy of this License to another party, provided the other party reads and agrees to accept the terms
and conditions of this License.
RESTRICTIONS
You acknowledge that the product contains copyrighted material, trade secrets and other proprietary
material owned by MeshNetworks, and that unauthorized use of such material may cause serious loss or
damage to MeshNetworks. You agree that you will not:
• decompile, reverse engineer, disassemble, translate or reduce the Software to a human-perceivable form.
• modify, adapt, network, pledge, lease, rent, share, lend, distribute, disclose or create derivative works based
upon the Software in whole or in part.
• use the Software in a client-server environment or electronically transmit the Software from one computer to
another or over a network.
• transfer any of your rights in the Software, the backup copy of the Software, the media, the documentation,
or this License Agreement to another party.
• use the Software for any unlawful or harmful purpose.
TERMINATION
This license is effective until terminated. You may terminate this license at any time by destroying the
Software, related documentation and all copies thereof. This license will terminate immediately without
notice from MeshNetworks if you fail to comply with any provision of this License Agreement & Limited
Warranty. Upon termination you must destroy the Software, related documentation and all copies
thereof.
25

Setup and Deployment Guide
HARDWARE WARRANTY
MeshNetworks warrants to You that this hardware product will be substantially free from material defects
in workmanship and materials, under normal use and service, for a period of one (1) year from the date of
purchase from MeshNetworks or its authorized reseller.
MeshNetworks’ sole obligation under this express warranty will be, at MeshNetworks’ option and
expense, (1) to repair the defective product or part, (2) deliver to You an equivalent product or part to
replace the defective item, or (3) if neither of the two foregoing options is reasonably available, refund to
You the purchase price paid for the defective product. All products that are replaced will become the
property of MeshNetworks. Replacement products or parts may be new or reconditioned. MeshNetworks
warrants any replaced or repaired product or part for the greater of ninety (90) days from shipment, or the
remainder of the initial warranty period.
SOFTWARE WARRANTY
MeshNetworks warrants to You that the Software, except as noted below, will perform in substantial
conformance to its published program specifications, for a period of ninety (90) days from the date of
purchase from MeshNetworks or its authorized reseller. MeshNetworks warrants the media containing
software against failure during the warranty period. No updates are provided under this warranty.
MeshNetworks’ sole obligation under this express warranty will be, at MeshNetworks’ option and
expense, to refund the purchase price paid by You for any defective software product, or to replace any
defective media with software which substantially conforms to applicable MeshNetworks’ published
program specifications. You assume responsibility for the selection of the appropriate applications
program and associated reference materials.
MeshNetworks makes no warranty or representation that the Software will meet your requirements or
work in combination with any hardware or applications software products provided by third parties, that
the operation of the Software will be uninterrupted or error free, or that all defects in the Software will be
corrected.
WARRANTY SERVICE
You must contact the MeshNetworks’ Customer Service Center within the applicable warranty period to
obtain warranty service authorization. Dated proof of purchase from MeshNetworks or its authorized
reseller may be required. A Return Material Authorization (RMA) number will be issued. This number
must be marked on the outside of the package. The product must be packaged appropriately for safe
shipment and sent prepaid. It is recommended that returned products be insured or sent by a method
that provides for tracking of the package. Responsibility for loss or damage does not transfer to
MeshNetworks until the returned item is received by MeshNetworks. MeshNetworks will make
commercially reasonable efforts to ship the repaired or replaced item to You, at MeshNetworks’ expense,
not later than thirty (30) days after MeshNetworks receives the defective product. MeshNetworks will
retain risk of loss or damage until the item is delivered to You.
MeshNetworks will not be responsible for any software, firmware, information, or memory data belonging
to You contained in, stored on, or integrated with any products returned to MeshNetworks for repair,
whether under warranty or not.
Technical support via telephone is available for an additional charge. To obtain information regarding this
option, send an email to measupport@meshnetworks.com. During the warranty period stated above, You
may also obtain technical support by sending an email to support@meshnetworks.com.
The MeshNetworks’ website (www.meshnetworks.com) is available at no charge, and provides a bug list,
and technical information about MeshNetworks’ products.
WARRANTIES EXCLUSIVE, WARRANTY DISCLAIMER
TO THE FULL EXTENT ALLOWED BY LAW, THE FOREGOING WARRANTIES AND REMEDIES ARE
EXCLUSIVE AND ARE IN LIEU OF ALL OTHER WARRANTIES, TERMS, OR CONDITIONS, EXPRESS
OR IMPLIED, EITHER IN FACT OR BY OPERATION OF LAW, STATUTORY OR OTHERWISE,
INCLUDING, WITHOUT LIMITATION, WARRANTIES OF MERCHANTABILITY, FITNESS FOR A
PARTICULAR PURPOSE, SATISFACTORY QUALITY, CORRESPONDENCE WITH DESCRIPTION,
INFORMATIONAL CONTENT, ACCURACY, SYSTEM INTEGRATION, NON-INFRINGEMENT AND
26

Setup and Deployment Guide
QUIET ENJOYMENT, ALL OF WHICH ARE EXPRESSLY DISCLAIMED. . MESHNETWORKS DOES
NOT WARRANT THAT THE FUNCTIONS CONTAINED IN THE PRODUCT WILL MEET YOUR
REQUIREMENTS, THAT THE PRODUCT WILL BE COMPATIBLE WITH ANY OTHER SOFTWARE,
HARDWARE OR OPERATING SYSTEM, THAT THE OPERATION OF THE SOFTWARE WILL BE
UNINTERRUPTED OR ERROR-FREE. MESHNETWORKS NEITHER ASSUMES NOR AUTHORIZES
ANY OTHER PERSON TO ASSUME FOR IT ANY OTHER LIABILITY IN CONNECTION WITH THE
SALE, INSTALLATION, MAINTENANCE OR USE OF THIS PRODUCT.
MESHNETWORKS WILL NOT BE LIABLE UNDER THIS WARRANTY IF ITS TESTING AND
EXAMINATION DISCLOSE THAT THE ALLEGED DEFECT OR MALFUNCTION IN THE PRODUCT
DOES NOT EXIST OR WAS CAUSED BY YOUR OR ANY THIRD PERSON’S MISUSE, NEGLECT,
IMPROPER INSTALLATION OR TESTING, UNAUTHORIZED ATTEMPTS TO OPEN, REPAIR OR
MODIFY THE PRODUCT, OR ANY OTHER CAUSE BEYOND THE RANGE OF THE INTENDED USE,
OR BY ACCIDENT, FIRE, LIGHTNING, POWER CUTS OR OUTAGES, OTHER HAZARDS, OR ACTS
OF GOD.
LIMITATION OF LIABILITY
TO THE FULL EXTENT ALLOWED BY LAW, MESHNETWORKS EXCLUDES FOR ITSELF AND ITS
DIRECTORS, OFFICERS, EMPLOYEES, OR AGENTS, ANY LIABILITY, WHETHER BASED IN
CONTRACT OR TORT (INCLUDING NEGLIGENCE), FOR INCIDENTAL, CONSEQUENTIAL,
INDIRECT, SPECIAL, OR PUNITIVE DAMAGES OF ANY KIND, OR FOR LOSS OF REVENUE OR
PROFITS, LOSS OF BUSINESS, LOSS OF INFORMATION OR DATA, OR OTHER FINANCIAL LOSS
ARISING OUT OF OR IN CONNECTION WITH THE SALE, INSTALLATION, MAINTENANCE, USE,
PERFORMANCE, FAILURE, OR INTERRUPTION OF ITS PRODUCTS, EVEN IF MESHNETWORKS
OR ITS AUTHORIZED REPRESENTATIVE HAS BEEN ADVISED OF THE POSSIBILITY OF SUCH
DAMAGES, AND LIMITS ITS LIABILITY TO REPAIR, REPLACEMENT, OR REFUND OF THE
PURCHASE PRICE PAID, AT MESHNETWORKS’ OPTION. THIS DISCLAIMER OF LIABILITY FOR
DAMAGES WILL NOT BE AFFECTED IF ANY REMEDY PROVIDED HEREIN WILL FAIL OF ITS
ESSENTIAL PURPOSE.
Some jurisdictions do not allow the exclusion or limitation of implied warranties or the limitation of
incidental or consequential damages for certain products supplied to consumers, or the limitation of
liability for death or personal injury, so the above limitations and exclusions may be limited in their
application to you. When the implied warranties are not allowed to be excluded in their entirety, they will
be limited to the duration of the applicable written warranty. This warranty gives you specific legal rights
which may vary depending on local law.
EXPORT COMPLIANCE
The export laws and regulations of the United States control the Software and documentation provided by
MeshNetworks. You represent and agree that You will remain fully cognizant of and in compliance with
all export laws and regulations that may be or become applicable to your import, use, resale, export, or
re-export of the Software and technical data. In addition, the Software and technical data may not be
exported or re-exported to any country or person to which the United States prohibits the export of goods,
technology or services, or to any country that the United States government has deemed to be a terrorist-
supporting country. You represent and warrant that You are not a national of any country to which the
United States prohibits the export or re-export of goods, services or technology and that You are not a
person specially designated as ineligible to export, or otherwise receive or deal in, U.S.-origin goods,
services or technology. In addition, the Software and technical data may be subject to the export or
import laws and regulations of other countries. You agree to comply fully with all such laws and
regulations.
GOVERNING LAW
This License Agreement & Limited Warranty will be governed by the laws of the state of Florida, U.S.A.,
and by the laws of the United States, excluding their conflicts of laws principles. Both the Uniform
Computer Information Transactions Act and the United Nations Convention on Contracts for the
International Sale of Goods are hereby excluded in their entirety from application to this License
Agreement & Limited Warranty.
27

Setup and Deployment Guide
Appendix D FCC Regulatory Information
FCC Information D.1
D.2
This device complies with Part 15 of the FCC Rules. Operation is subject to the following two
conditions: (1) this device may not cause harmful interference, and (2) this device must accept
any interference received; including interference that may cause undesired operation.
Federal Communications Commission (FCC) Statement:
This Equipment has been tested and found to comply with the limits for a Class A digital device,
pursuant to Part 15 of the FCC rules. These limits are designed to provide reasonable
protection against harmful interference in a commercial installation. This equipment generates,
uses and can radiate radio frequency energy and, if not installed and used in accordance with
the instructions, may cause harmful interference to radio communications. However, there is no
guarantee that interference will not occur in a particular installation. If this equipment does
cause harmful interference to radio or television reception, which can be determined by turning
the equipment off and on, the user is encouraged to try to correct the interference by one or
more of the following measures:
• Reorient or relocate the receiving antenna.
• Increase the separation between the equipment and receiver.
• Connect the equipment into an outlet on a circuit different from that to which the receiver
is connected.
• Consult the dealer or an experienced radio/TV technician for help.
FCC RF Radiation Exposure Statement
1. CAUTION: This equipment complies with FCC RF radiation exposure limits set forth for
an uncontrolled environment. This equipment should be installed and operated with a
minimum distance of 2 meters between the antenna and your body.
2. This Transmitter must not be co-located or operating in conjunction with any other
antenna or transmitter.
7
28

Setup and Deployment Guide
29
D.3 Safety Information for the
The Federal Communications Commission (FCC) with its action in ET Docket 96-8 has adopted
a safety standard for human exposure to radio frequency (RF) electromagnetic energy emitted
by FCC certified equipment. MeshNetworks’ products meet the uncontrolled
environmental limits found in OET-65 and ANSI C95.1, 1991. Proper operation of this radio
according to the instructions found in this manual and the hardware and software guides on the
CD will result in user exposure that is substantially below the FCC recommended limits.
• Do not touch or move the antenna(s) while the unit is transmitting or receiving.
• Do not hold any component containing a radio such that the antenna is very close to or
touching any exposed parts of the body, especially the face or eyes, while transmitting.
• Do not operate a portable transmitter near unshielded blasting caps or in an explosive
environment unless it is a type especially qualified for such use.
• Do not operate the radio or attempt to transmit data unless the antenna is connected;
otherwise, the radio may be damaged.
• Antenna use:
• In order to comply with FCC RF exposure limits, dipole antennas should be located
at a minimum distance of 2 meters or more from the body of all persons.