Zebra Technologies LEX700 MISSION CRITICAL HANDHELD User Manual 700 Quick Start Guide
Zebra Technologies Corporation MISSION CRITICAL HANDHELD 700 Quick Start Guide
Contents
- 1. Quick Start Guide
- 2. Regulatory Guide
Quick Start Guide
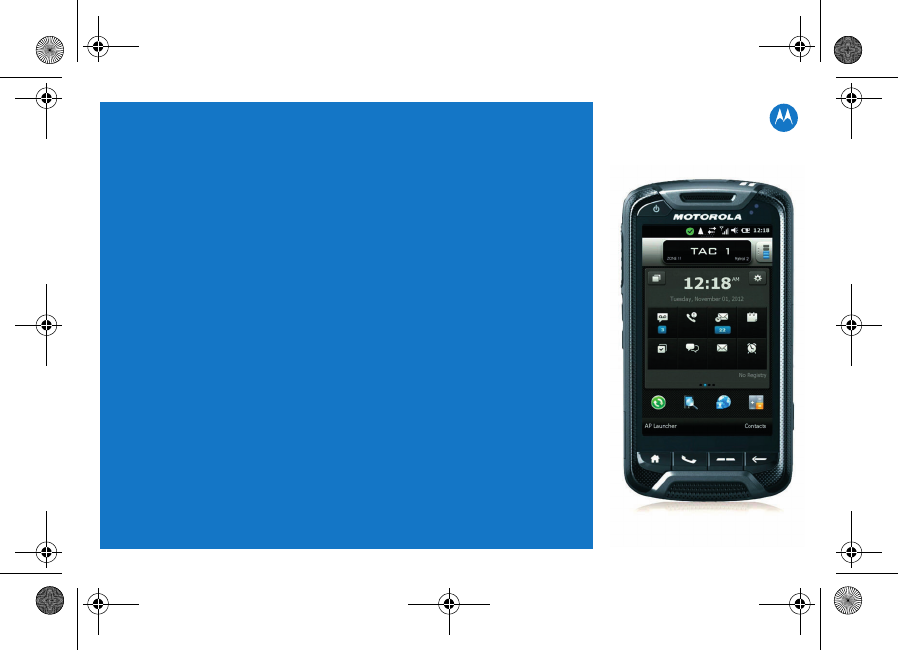
LEX 700
MISSION CRITICAL
HANDHELD
QUICK START GUIDE
700 Quick Start Guide.fm Page 1 Thursday, May 31, 2012 1:20 PM
Draft, 31 May, 2012

2
© 2012 Motorola Solutions, Inc. All rights reserved.
No part of this publication may be reproduced or used in any form, or by any electrical or mechanical
means, without permission in writing from Motorola. This includes electronic or mechanical means, such
as photocopying, recording, or information storage and retrieval systems. The material in this manual is
subject to change without notice.
The software is provided strictly on an “as is” basis. All software, including firmware, furnished to the user
is on a licensed basis. Motorola grants to the user a non-transferable and non-exclusive license to use
each software or firmware program delivered hereunder (licensed program). Except as noted below, such
license may not be assigned, sublicensed, or otherwise transferred by the user without prior written
consent of Motorola. No right to copy a licensed program in whole or in part is granted, except as
permitted under copyright law. The user shall not modify, merge, or incorporate any form or portion of a
licensed program with other program material, create a derivative work from a licensed program, or use a
licensed program in a network without written permission from Motorola. The user agrees to maintain
Motorola’s copyright notice on the licensed programs delivered hereunder, and to include the same on any
authorized copies it makes, in whole or in part. The user agrees not to decompile, disassemble, decode,
or reverse engineer any licensed program delivered to the user or any portion thereof.
Motorola reserves the right to make changes to any software or product to improve reliability, function, or
design.
Motorola does not assume any product liability arising out of, or in connection with, the application or use
of any product, circuit, or application described herein.
No license is granted, either expressly or by implication, estoppel, or otherwise under any Motorola
Solutions, Inc., intellectual property rights. An implied license only exists for equipment, circuits, and
subsystems contained in Motorola products.
700 Quick Start Guide.fm Page 2 Thursday, May 31, 2012 1:20 PM
3
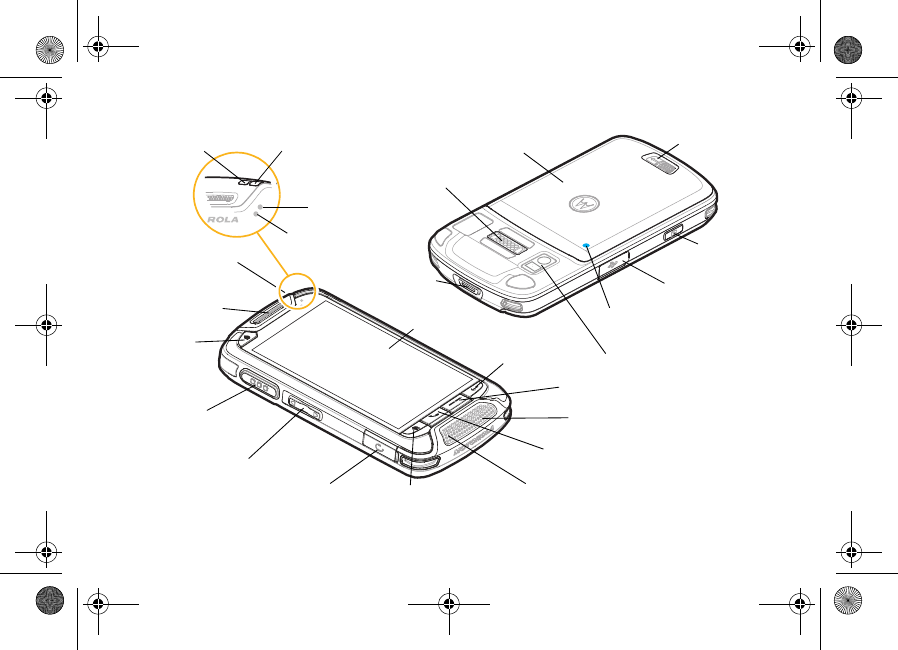
LEX 700
* This programmable button can be customized by your agency for other use.
B
PTT Button
(page 15)
Volume Buttons (page 13)
Headset Port Home Button (page 9)
Phone Button (page 14)
Programmable Button* (page 9)
Back/Ok Button
Quick Action
Request Button
(page 17)
Interface Connector
Battery Cover (page 5) Battery Cover Latch
Camera Lens and Flash (page 16)
Camera Button*
(page 16)
Speaker (page 14)
Primary Microphone
Secondary Microphone
microUSB Port (page 8)
Notification LED (page 11)
Power Button
(page 9)
Proximity Sensors
Touch Screen
Charge LED (page 11)
Earpiece Radio Remote Control
Pairing Point (page 17)
Ambient Light Sensor
700 Quick Start Guide.fm Page 3 Thursday, May 31, 2012 1:20 PM
4
Welcome
Greetings upon receiving your LEX 700 Mission Critical Handheld device. This state-of-the-art Windows®
Mobile 6.5 based device delivers many features and benefits in a mission critical environment, enabling
enhanced communication on the move.
Meet the LEX 700
The LEX 700 combines high-speed LTE data and phone services, in a rugged and intuitive device which
helps to monitor the environment, and gather information effectively.
With the LEX 700, mission critical data can be brought to the field on demand, while field information is
immediately available back at the command center.
The LEX 700 operates over Band 14 (Public Safety) LTE, Band 13 (Verizon Wireless) LTE, 3G cellular,
Wi-Fi® and uses Bluetooth® and Mission Critical Wireless technology to create personal area networks.
The LEX 700 can be used to remotely change volume and channels on an APX® 7000 radio, without
reaching for the radio. Push-To-Talk and Quick Action buttons can be used to notify a dispatcher or
command staff that the user needs assistance.
The device provides secure data exchange as a user roams across private and public networks, with a
mobile VPN connection.
The device has a 4-inch, high-resolution, capacitive touch screen that enables the user to easily read
maps and blueprints and to watch vibrant video. Noise-canceling technology is used to capture clear
audio from the incident scene and the 8 megapixel camera is capable of recording DVD-quality video.
For detailed information on the LEX 700 features and operation, refer to the LEX 700 User’s Guide p/n
6802988C27 at: motorolasolutions.com/LEX700. BEFORE USING THIS device, READ the Product
Regulatory, Safety & RF Exposure Guide (p/n 6802988C25) included with this package.
700 Quick Start Guide.fm Page 4 Thursday, May 31, 2012 1:20 PM

5
Getting Started for the First Time
The activation process is dependent upon your
carrier. If you are using a LTE carrier, you must
install a SIM card prior to installing the battery.
To get started, perform the following steps:
• Remove the battery cover.
• Install the microSD card (optional).
• Install the LTE SIM card.
• Install the battery.
• Charge the battery.
Remove the Battery Cover
To remove the battery cover:
1. Hold the LEX 700 firmly as shown.
2. Move the Battery Cover Latch to the right and
hold.
3. With your thumb, push the battery cover toward
the lower side of the LEX 700.
4. Lift the battery cover off the LEX 700.
AB
1
2
Battery Cover Latch
700 Quick Start Guide.fm Page 5 Thursday, May 31, 2012 1:20 PM
6
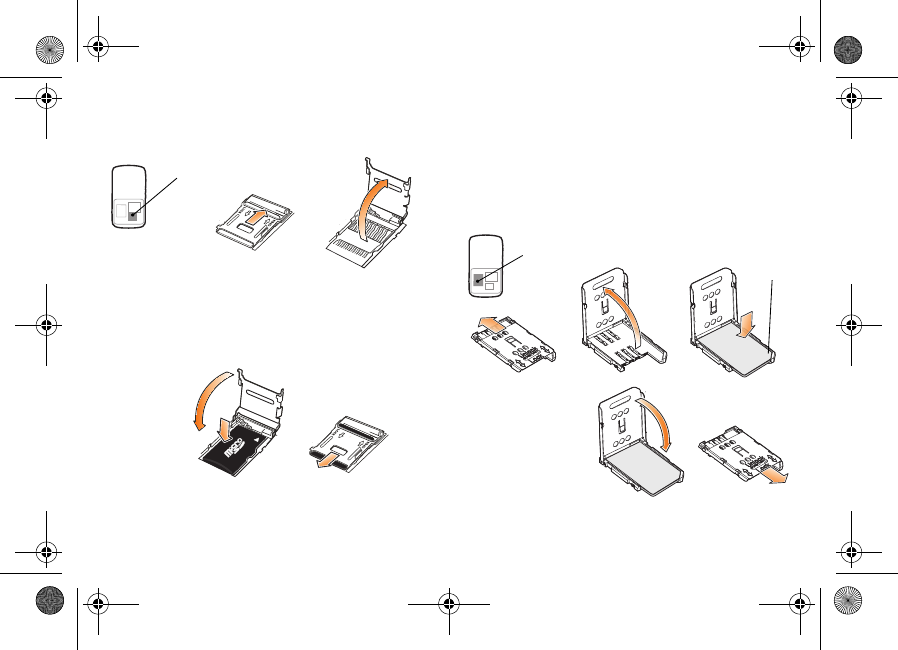
Install a microSD Card (Optional)
1. Slide the microSD Card Holder to Open.
2. Lift the microSD Card Holder.
3. Place the microSD card onto the holder with
contacts facing down and ensure that the SIM
card is fully seated and flat.
4. Close the microSD Card Holder.
5. Slide the microSD Card Holder to Lock.
Install a SIM Card
1. Slide the SIM Card Holder to Open.
2. Open the SIM Card Holder.
3. Slide the SIM Card onto the SIM Card Holder
with the contacts facing down. Note the Card
Notch position.
4. Close the SIM
Card Holder
and ensure that
the SIM card is
fully seated and
flat.
5. Slide the SIM
Card Holder to Lock.
12
microSD Card Holder Location
Open
3
4
Lock
5
1 23
SIM Card Holder Location
Card
Notch
Open
45
Lock
700 Quick Start Guide.fm Page 6 Thursday, May 31, 2012 1:20 PM
7
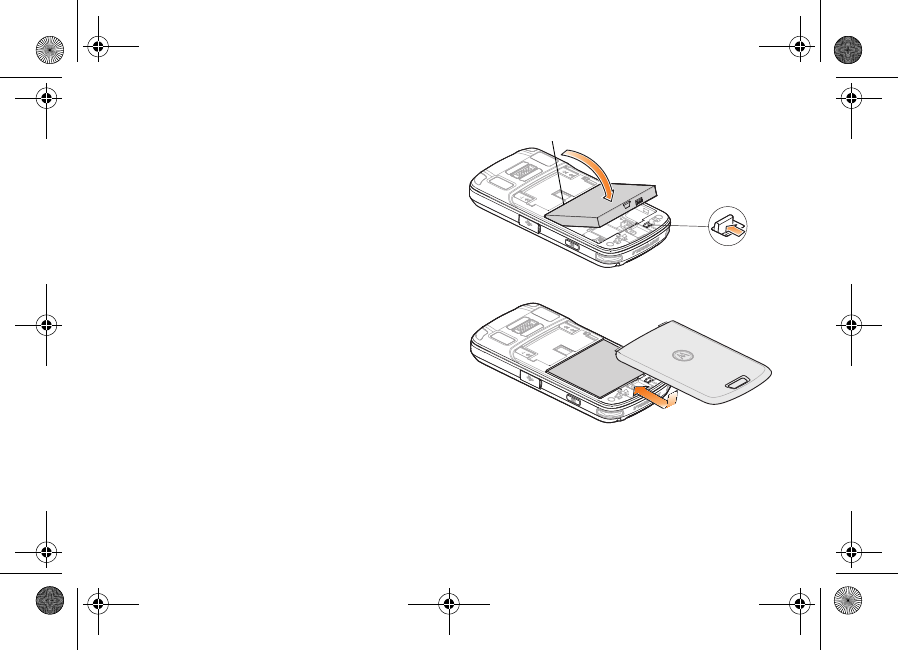
Install the Battery
1. Remove the battery from the packaging.
2. Locate the Battery Contacts.
3. Insert the battery into the battery compartment
with the Battery Contacts facing down.
4. Press the top of battery into place.
5. Slide the Battery Lock Latch up to secure the
battery.
6. Replace the battery cover - the LEX 700 starts.
NOTE: The LEX 700 will not charge until the
battery cover is locked in place.
Remove the Battery
To remove the battery:
1. Remove the Battery Cover (see page 5).
2. Slide the Battery Lock Latch down to unlock the
battery.
3. With the tip of your finger, lift up the battery from
the side closest to the lower side of the LEX
700.
AB
Battery Contacts Side
Battery Lock Latch
1
2
Lock
Unlock
AB
3
700 Quick Start Guide.fm Page 7 Thursday, May 31, 2012 1:20 PM
8
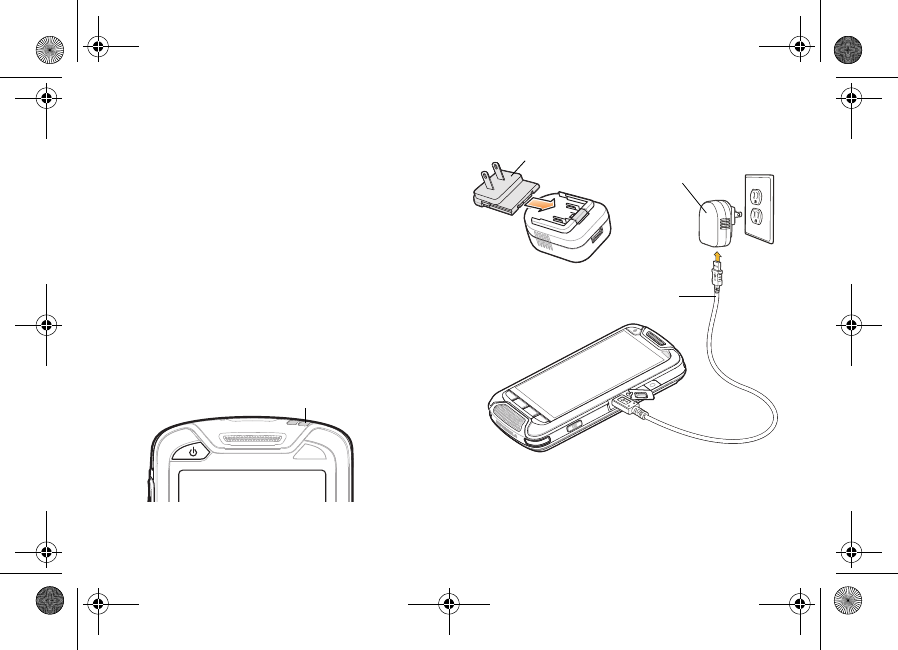
Charge the Battery
To charge the battery:
1. Install the plug head into the USB Charger.
2. Plug the supplied USB Cable into the rectangu-
lar slot in the USB Charger.
3. Plug the USB Charger into an AC wall outlet.
4. Lift the rubber flap that covers the USB port on
the side of the LEX 700.
5. Plug the microUSB connector into the USB port.
6. The Charge LED slowly blinks amber, indicating
that the battery is charging. When the battery is
fully charged, the LED becomes solid green.
NOTE: For charging indications, see page 11.
B
Charge LED
USB Charger
USB Cable
Plug Head
700 Quick Start Guide.fm Page 8 Thursday, May 31, 2012 1:20 PM
9
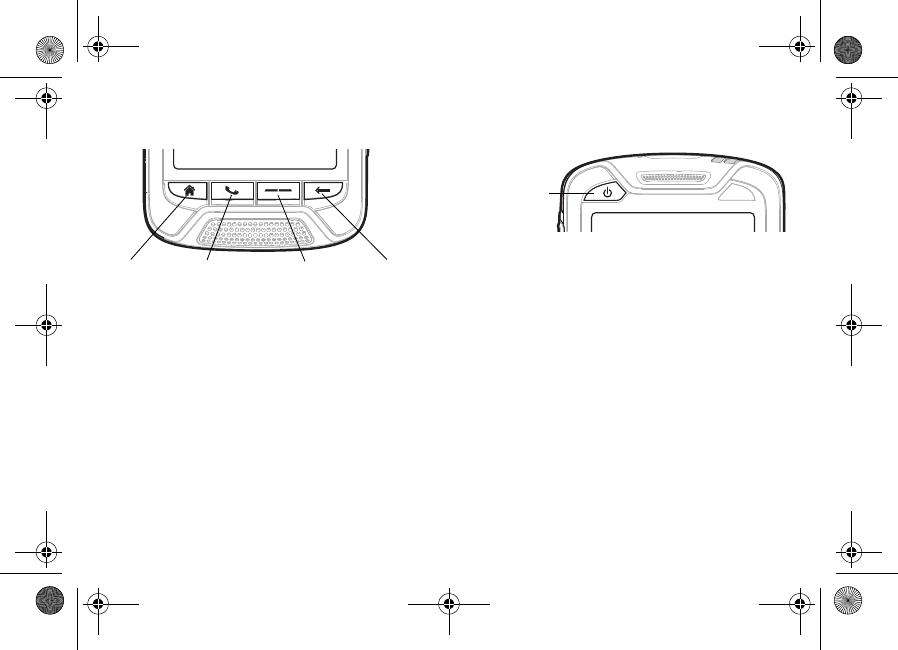
The Keys
• Home: Press briefly to minimize all active appli-
cations and return to the Home screen.
• Phone: Press to launch the phone dialer screen
with the last called contact in the dialer.
• Programmable Button: This programmable but-
ton is customized by your agency for a specific
use. Contact your system administrator for
details.
• Back/OK: Press to return to the previous screen.
In a Windows message, press to send a mes-
sage. In the Home Screen, press briefly to flip
cards.
Power On/Off and Suspend
Use the Power button for the following operations:
Power Off
To power off:
1. Press and hold the Power button for at least
two seconds.
2. When the dialog box appears, tap Power Off.
Power On
To power on:
Press and hold the Power button for at least two
seconds.
Suspend
To toggle between Suspend and On:
Press and release the Power button.
Phone Home Programmable Button Back/OK
B
Power Button
700 Quick Start Guide.fm Page 9 Thursday, May 31, 2012 1:20 PM
10
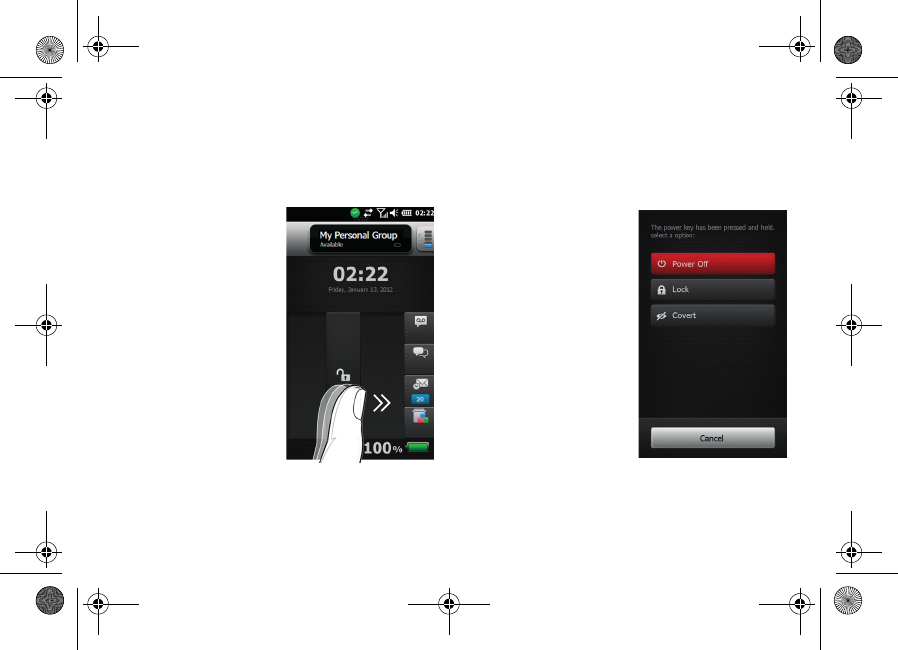
Lock/Unlock the LEX 700
Lock the device to protect your information and to
prevent unwanted key presses.
You can set the Lock to access the device with or
without a password.
To lock the LEX 700:
1. Press the Power but-
ton for at least two sec-
onds.
2. Select Lock.
When the LEX 700 is
locked, you will still be
notified of new mes-
sages, missed calls
and incidents.
To unlock the LEX 700:
Swipe your finger across
the screen from left to
right.
NOTE: A PIN may also be required to unlock your
device.
Covert Mode
In Covert mode, all audio is routed to your
headset. Sound, vibrating, LED indications and
the screen remain off. The display is blacked out,
the touch screen is disabled.
To enter Covert mode:
1. Press and hold the
Power button for at
least two seconds.
2. When the dialog box
appears, tap Covert.
You can also slide your
finger on the Home
screen to the Mode card
and tap Covert.
To exit Covert mode:
1. Press and hold the
Power button for at
least three seconds and release.
2. Select Exit Covert Mode.
700 Quick Start Guide.fm Page 10 Thursday, May 31, 2012 1:20 PM
11
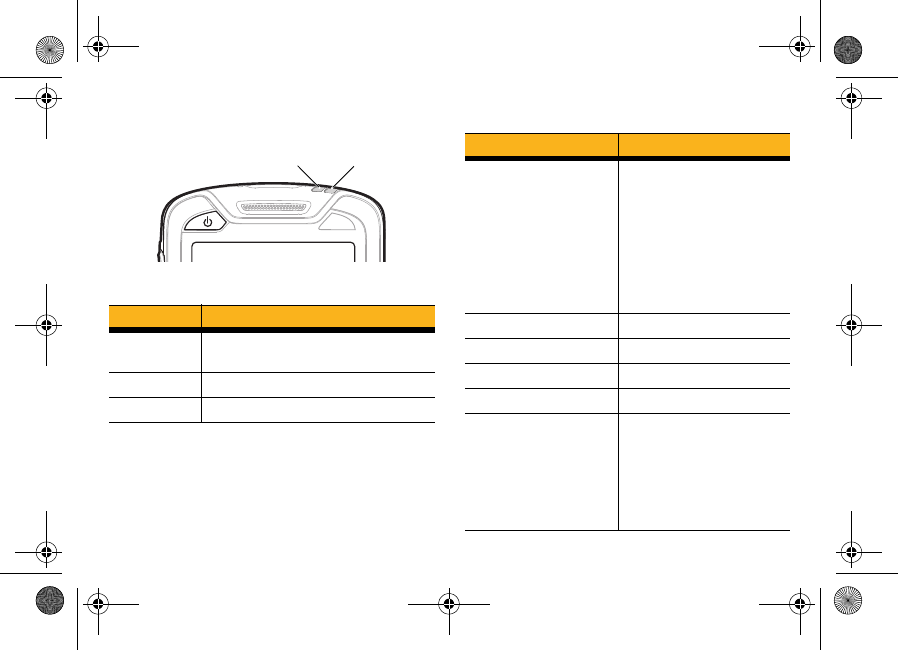
LED Indicators
Notification LED Indications
Charge LED Indications
State Description
Solid Green New notification (Voice mail, Text
message, Alarm etc.)
Solid Red Low battery power
Amber Incident notification
B
Charge LED Notification LED State Description
Off
Battery is not charging.
Could indicate that:
• The LEX 700 is not
connected correctly to
the cable of the USB
Charger.
• The USB Charger is
not powered.
Slow Blinking Amber Charging
Slow Blinking Red Damaged Battery
Solid Green Fully Charged
Solid Red Damaged Battery
Fast Blinking Amber
Could indicate that:
• The temperature is too
low or too high.
• Charging has gone on
too long without com-
pletion.
700 Quick Start Guide.fm Page 11 Thursday, May 31, 2012 1:20 PM
12
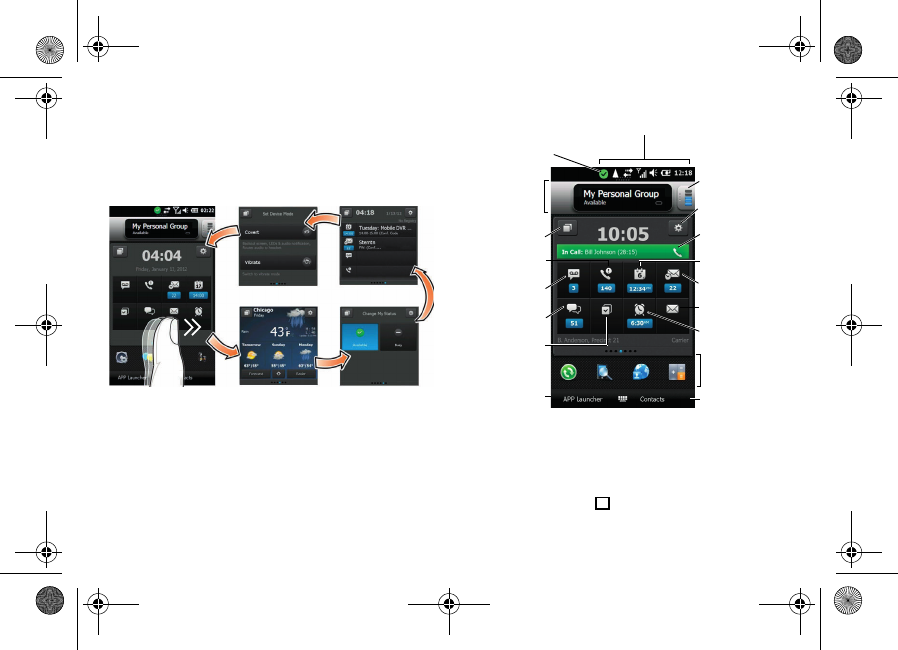
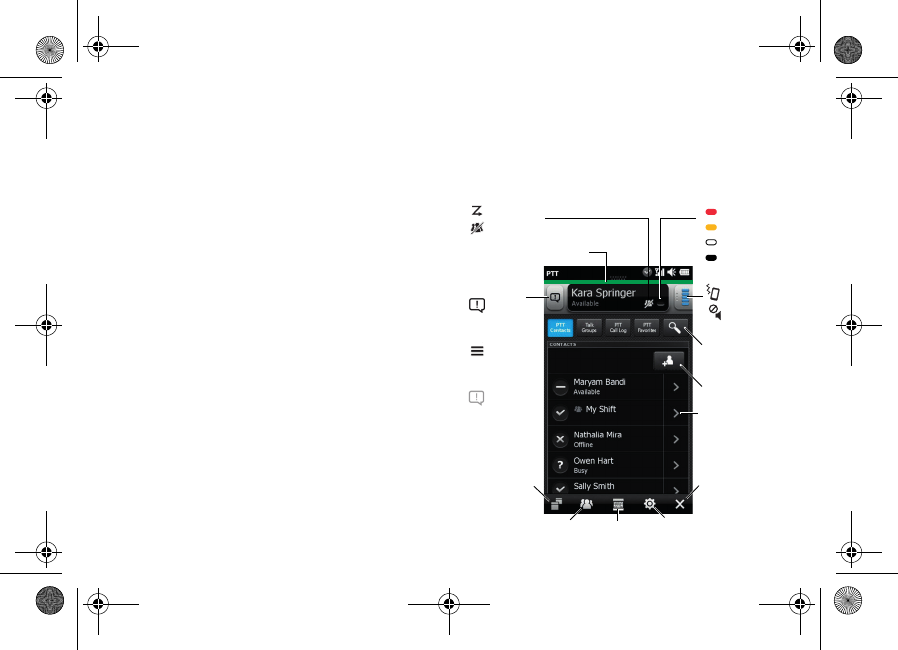
The Home Screen
The default Home screen contains five
customizable content cards to allow quick access
to information. Flick left or right to view cards.
• Full Messaging Card: View detailed communi-
cation activity.
• Simple Messaging Card: View summarized
communication activity.
• Device Mode Card: Set the LEX 700 to Covert
or Vibrate mode.
• Weather Card: View weather forecast.
• Change My Status Card: Change availability.
* The Application Shortcuts Tile Bar provides quick
access to applications. To change a favorite
application, press and hold on the Application
Shortcuts Bar > tap to remove icon > tap on
new icon to select > tap Save.
Full Messaging
Weather
Device Mode
Simple Messaging
Change My Status
Status Bar
Tap the bar to open/close the Device Management window
Configure Card
Tile Bar*
Tap to Launch
Applications Tap to Open
Contacts List
Home Screen
Setup
Voicemail
Missed Calls
Active Tasks
SMS/MMS
Agency Email
Active Alarm
Current Day
Personal Email
Tap to Change
My Status
In Call
Status Bar
Branding
Banner/PTT
Info
PTT Volume
Level
Slide left to toggle
low/last used volume
Level
-
700 Quick Start Guide.fm Page 12 Thursday, May 31, 2012 1:20 PM
13
Basic Operations
Change the Ring Volume
When not in a call, press the Up/Down Volume
buttons.
Change the Call Volume
During a call, press the Up/Down Volume buttons.
Use the Keypad
To use the on-screen QWERTY keypad, tap
or on a text entry field. The keypad pops up from
the lower side of the screen.
• To insert an upper case letter: tap .
• To use the numberpad: press and hold .
• To insert numbers and use punctuation: tap .
• To insert symbols: from the numbers and punctu-
ation keypad, tap .
• To change the keypad and dictionary, word Sug-
gestion and Auto- Correction settings: press and
hold .
Application Launcher
From the lower side of the Home screen, tap APP
Launcher to open the All Applications window.
Slide the window up and down to view more
applications. Tap an icon to open an application.
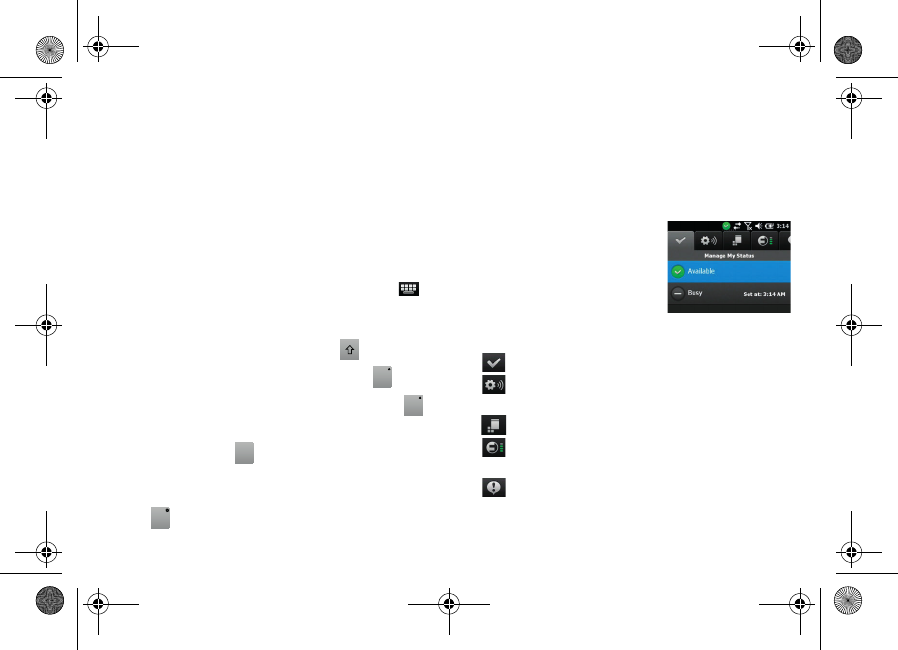
Device Management
To enter the Device
Management screens:
1. Tap the Status bar.
2. Slide your finger right/left
across the tabs and tap an
item to view specific information:
Manage my status.
View battery level, turn on/off radios,
change to Covert and Silent modes.
View/close running applications.
Connect and manage Wireless Local Area
Networks (WLAN)
Windows Mobile notification messages.
3. To exit, tap the Status bar.
!123
!123
sym
Tab
700 Quick Start Guide.fm Page 13 Thursday, May 31, 2012 1:20 PM
14
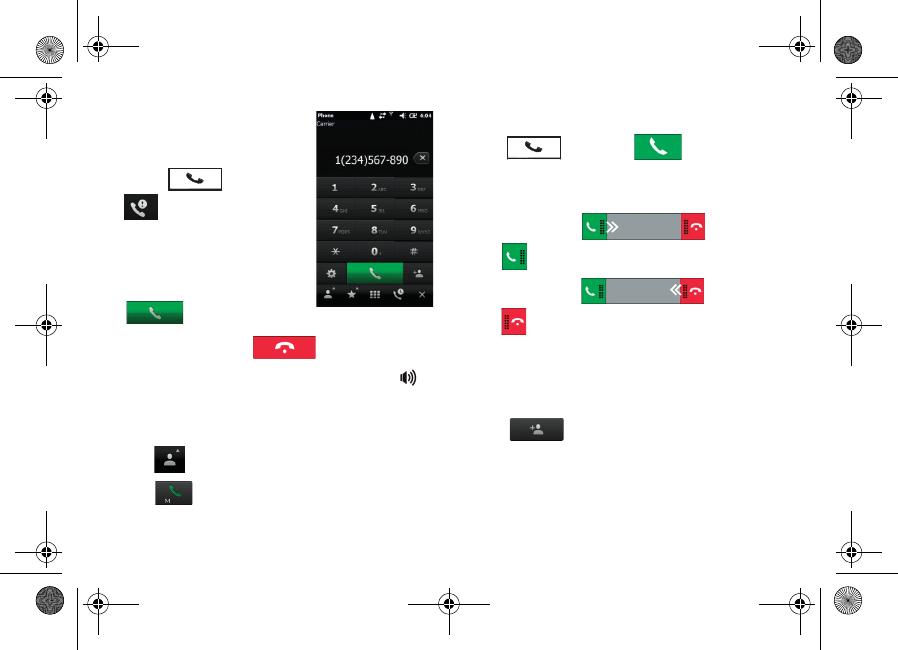
Phone Call
Make a call
1. Press key or tap
on the Home screen.
2. Use the dialpad to enter the
phone number. The num-
ber appears in the call line.
3. To start the call, tap
.
4. To end the call, tap .
NOTE: To use the speaker during a call, tap .
Make a call from contacts
1. Tap Contacts at bottom of the Home screen.
2. Tap .
3. Tap next to the contact person on the list.
Receive a call when device is unlocked
Press key or tap on the Home
screen.
Receive a call when device is locked
To receive a call:
Slide to the right on the Lock screen.
To ignore a call:
Slide to the left on the Lock screen.
Contacts
To add a new contact:
1. Tap Contacts at bottom of the Home screen.
2. Tap .
3. Select a contact type. Fill in the contact informa-
tion.
4. Tap OK when finished.
700 Quick Start Guide.fm Page 14 Thursday, May 31, 2012 1:20 PM
15
PTT Call
NOTE: PTT is an optional feature and may not be
available on your device.
To perform a PTT call:
1. Press and release the PTT button.
2. Tap to select a Contact from the list.
3. Press and hold the PTT button.
4. Begin talking after hearing a chirping sound.
5. Release the PTT button to listen.
Receive/Answer a PTT call
To receive and answer a PTT call:
1. When your device emits a tone or vibrates, wait
for the caller to finish speaking.
2. Press and hold the PTT button. Begin talking
after hearing a chirping sound.
3. Release the PTT button to listen.
Send Call Alert
Call Alert lets the recipient know you want to talk
on a PTT call.
To send a Call Alert:
1. Press and release the PTT button.
2. Select a PTT Contact from the list.
3. Tap the Call Alert button.
Volume Level
Vibrate
Silent
Contact Details
Minimizes
Create New Group Keyboard Settings
Application
Launcher
My Presence Indicator
(Drag down to change)
Search Contact
Add Contact
Scan On
Groups Off
Talking
Listening
Channel Clear
No Activity
Call Alert:
Enabled
(Individual & Dialed
Number)
Enabled
(Personal &
Temp Groups)
Disabled
700 Quick Start Guide.fm Page 15 Thursday, May 31, 2012 1:20 PM
16
Send an Email Message
To send an Email:
1. On the Home screen, tap for an agency
email or for a personal email account.
2. Tap To: to add a contact or type an Email
address.
3. Create the Email and then tap .
Send an SMS / MMS Message
To send a text (SMS) or picture/video (MMS)
message:
1. On the Home screen, tap .
2. Tap To: to add a contact or type a phone num-
ber.
3. Tap Menu > Insert to capture or attach a file,
audio, photo or video.
4. Tap Insert Text to create the message and then
tap Send.
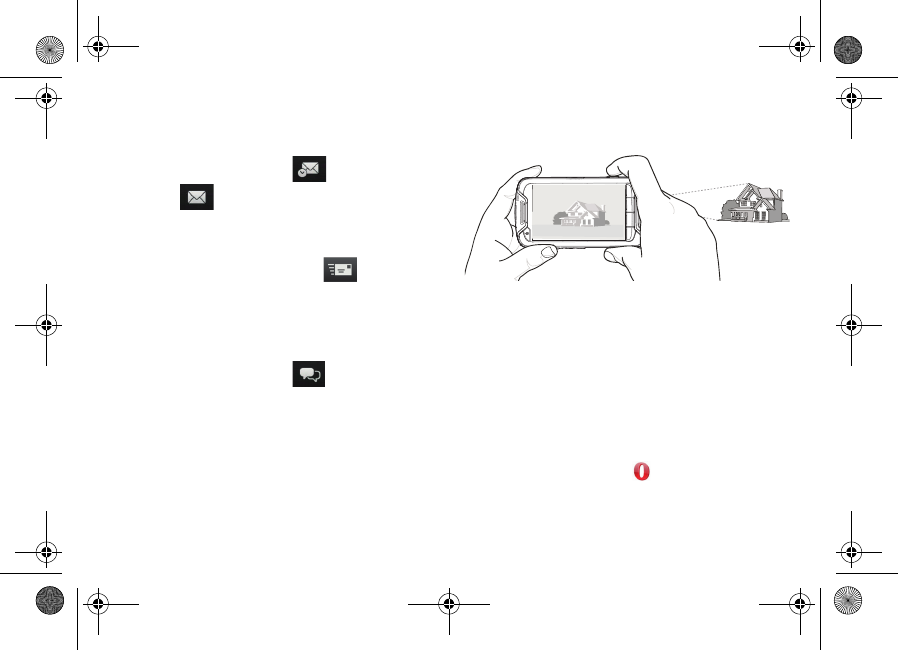
Take a Picture
To take a picture:
1. To activate the camera, press and hold the
Camera button on the right side of the LEX 700.
2. Rotate the LEX 700 to the horizontal position
(for landscape picture) and frame your subject.
3. Press the Camera button to capture the image.
Visit a Web Page
To open the browser window from the Home
screen:
1. Tap APP Launcher > .
2. In the Address field, enter a web address.
3. Press Enter.
Opera Mobile
700 Quick Start Guide.fm Page 16 Thursday, May 31, 2012 1:20 PM
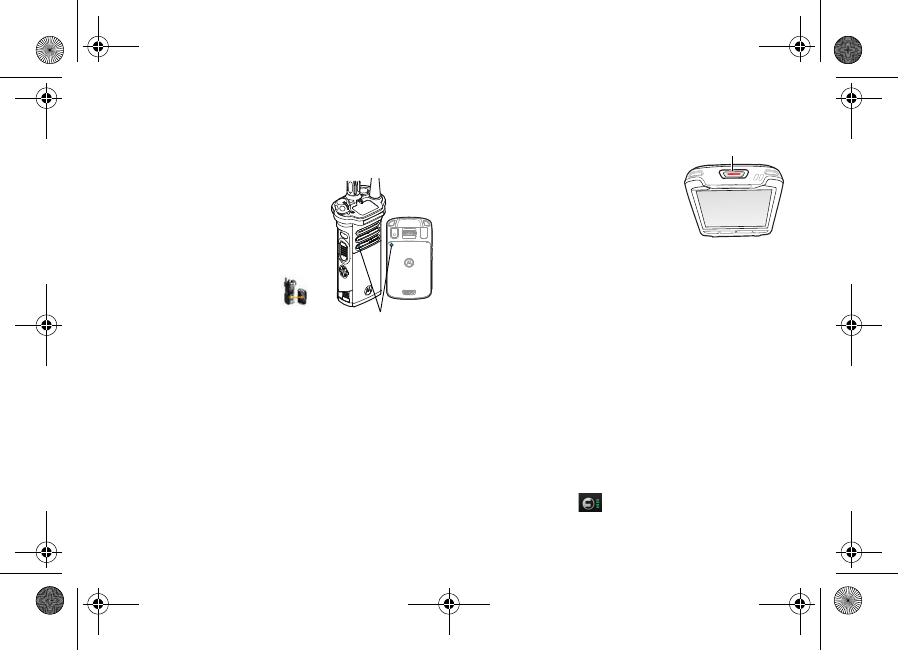
17
Pair LEX 700 with APX 7000 Radio
This feature allows the LEX 700 to pair with and
control an APX 7000 radio.
NOTE: Pairing is an optional
feature and some of the
functionality for this feature may
not be available on your device.
To connect to a radio:
1. Tap APP Launcher >
2. Tap the Pair to Radio button.
3. Turn on the radio and place it close to the LEX
700, aligning the blue Pairing Point on the LEX
700 with the blue pairing point on the radio.
4. If the pairing process is successful, you hear a
tone and the Remote Control screen is shown.
5. Tap the buttons on the screen to set Zone,
Channel and Radio Volume.
Quick Action Request
Press the Quick Action button
on the LEX 700 head to signal
that you need help.
A yellow banner with call and
GPS information is displayed
and an alert sound is activated.
When acknowledgment is received, request suc-
cessful indication is displayed. Tap Close to exit
and end the request.
NOTE: The Quick Action button is an optional
feature and may not be available on your device.
Connecting to a Wi-Fi Network
The LEX 700 supports managing the WLAN using
the Motorola Fusion software.
To manage a wireless network on the LEX 700:
1. Tap the Status Bar to open the Device Manage-
ment window.
2. Slide your finger to the right across the tabs and
tap the Fusion tab.
3. Tap the required option button.
Pairing Points
Remote_Control
Quick Action Button
700 Quick Start Guide.fm Page 17 Thursday, May 31, 2012 1:20 PM

18
Reset the LEX 700
To reset the LEX 700 after it has been running (for
example, after installing a program or to stop an
application):
Press and hold the Power button for at least 7
seconds. As soon as the LEX 700 restarts, release
the Power button. The LEX 700 closes all running
applications and restarts.
To reset the LEX 700 if it stops responding:
Simultaneously press the Power button, Home
button and Back/Ok button. The LEX 700 will
power off, power on and restart.
700 Quick Start Guide.fm Page 18 Thursday, May 31, 2012 1:20 PM
19
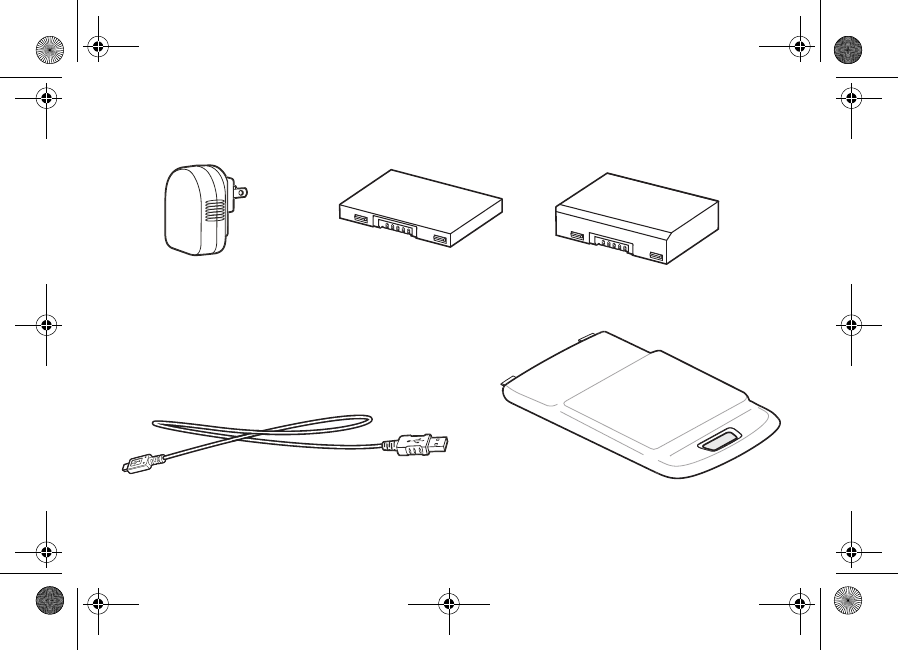
Accessories
Ab
Ab
USB Charger
(P/N:IU08-2050120-WP)
USB Cable
(P/N: 25-128458-01R)
1X Battery 1880mAh
(P/N:82-154162-01)
2X Battery 3760mAh (Optional)
(P/N:82-154162-02)
2X Battery Cover (Optional)
(P/N:82-154162-01)
700 Quick Start Guide.fm Page 19 Thursday, May 31, 2012 1:20 PM
Motorola Solutions, Inc.
1301 E. Algonquin Rd.
Schaumburg, IL 60196-1078, U.S.A.
http://www.motorolasolutions.com
MOTOROLA, MOTO, MOTOROLA SOLUTIONS and the Stylized M
Logo are trademarks or registered trademarks of Motorola Trademark
Holdings, LLC and are used under license. The Bluetooth trademarks
are owned by their proprietor and used by Motorola Solutions, Inc.
under license. Microsoft and Windows are registered trademarks of
Microsoft Corporation. All other trademarks are the property of their
respective owners.
© 2012 Motorola Solutions, Inc. All Rights Reserved.
@6802988C26@
6802988C26 Revision A - June 2012
700 Quick Start Guide.fm Page 20 Thursday, May 31, 2012 1:20 PM