Zebra Technologies MD-ZLAN11G Zebra Embedded 802.11b/g Radio User Manual CERTIFICATE OF COMPLIANCE
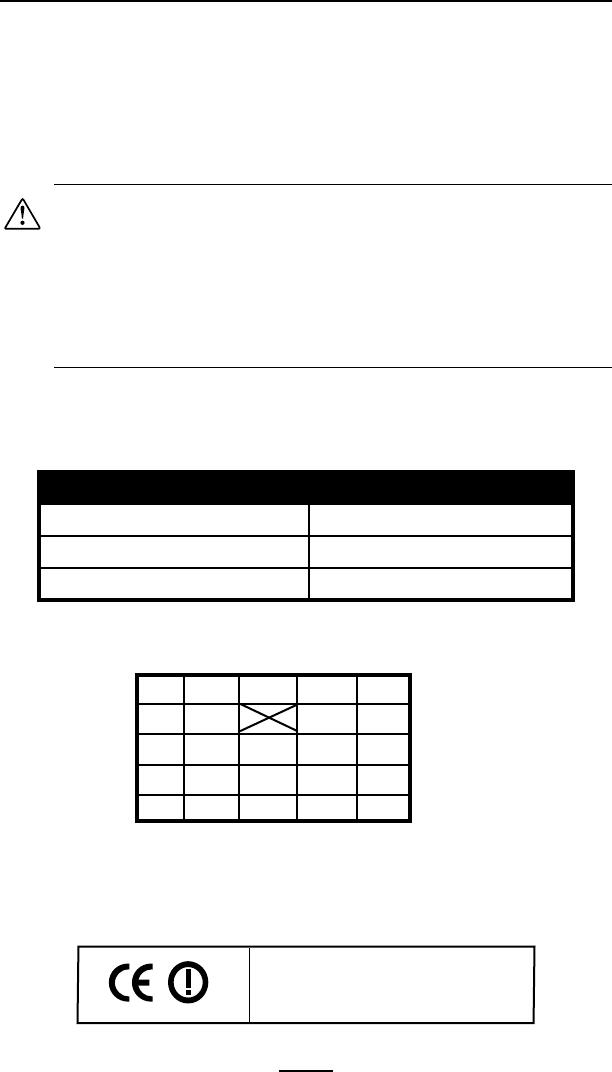
Zebra Technologies Corporation Zebra Embedded 802.11b/g Radio CERTIFICATE OF COMPLIANCE
Contents
- 1. manual
- 2. Manual
- 3. Host user manual
manual

Rhein Tech Laboratories, Inc. Client: Zebra Technologies
360 Herndon Parkway FCC: Part 15.247
Suite 1400 IC: RSS-210
FCC ID: I28MD-ZLAN11G Herndon, VA 20170
http://www.rheintech.com Model: ZLAN11G Radio Module
Page 58 of 72
Appendix K: Manual
Please see the following pages, particularly page 45 of the attached user manual.
UMAN-QLS-003 rev. A
May, 2006
UMAN-QLS-002 rev. A
May, 2006

3
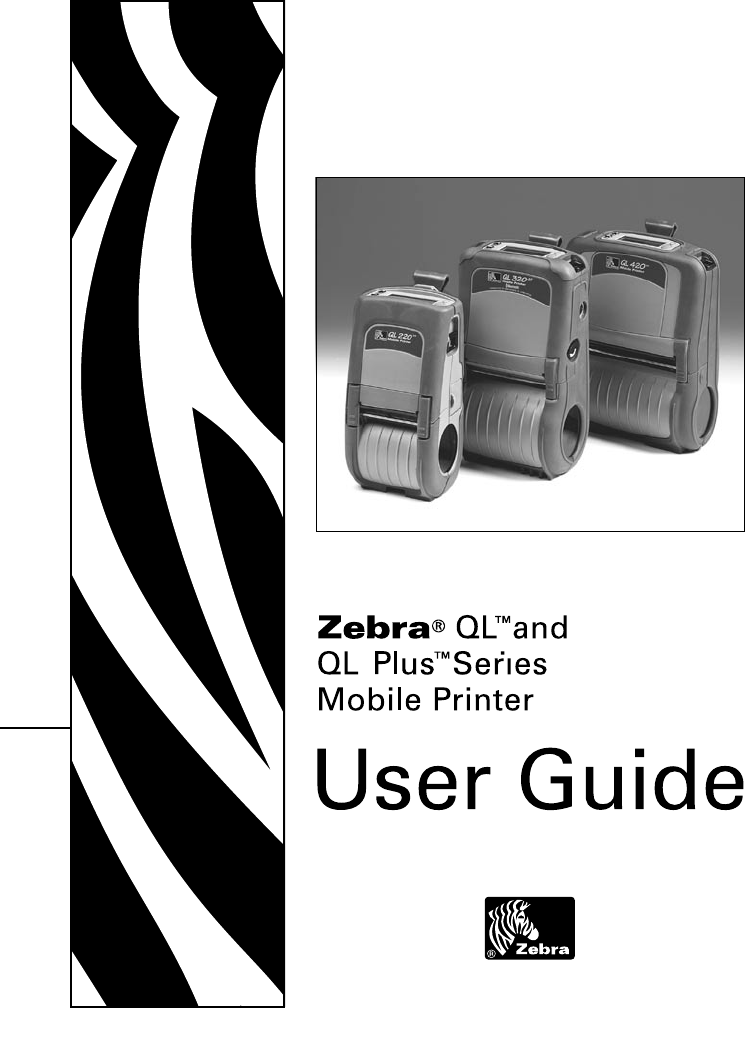
QL Series User Guide
continued
Table of Contents
Proprietary Statements .............................................................. 5
Document Conventions ..............................................................7
Introduction to the QL and QL Plus Series ............................... 8
Unpacking and Inspection ............................................................... 8
Reporting Damage ........................................................................... 8
QL 220 Introduction ...................................................................9
QL 320 Introduction .................................................................10
QL 420 Introduction ................................................................. 11
Getting Ready to Print .............................................................. 12
Battery ............................................................................................. 12
Installing the Battery .................................................................................. 12
QL 220 ......................................................................................................... 12
QL 420 ......................................................................................................... 12
QL 320 ......................................................................................................... 12
Charging the Battery .................................................................................. 13
Battery Safety ............................................................................................. 16
Charger Safety ............................................................................................ 16
Loading the Media .......................................................................... 17
Installing the Media .................................................................................... 17
QL 420 and QL 220 Printers ....................................................................... 17
QL 320 Printers ........................................................................................... 18
All models ................................................................................................... 19
QL 420 Printers Only .................................................................................. 20
Operator Controls ..........................................................................22
Standard Keypad ........................................................................................ 22
LCD Control Panel ...................................................................................... 24
Programmable LCD Settings ..................................................................... 25
Verify the Printer Is Working ......................................................... 27
Printing a Configuration Label ................................................................... 27
Connecting the Printer ................................................................... 27
Cable Communication ................................................................................ 28
IR Communications .................................................................................... 31
Wireless Communications with Bluetooth™ ............................................. 32
Bluetooth Networking Overview ............................................................... 32
WLAN Overview ........................................................................33
Setting Up the Software ............................................................................. 34
Radio Regulatory Information ..................................................35
Zebra Bluetooth Radios ZBR3 and QL+ZBR3 ........................................... 35
European Regulatory Information for this Radio ................................... 35
WLAN Module Using 802.11b CF Radio (North America) ........................ 36
WLAN Module Using 802.11b CF Radio (Asia & EU Countries) ............... 37
European Regulatory Information for this Radio ................................... 37
Zebra 802.11b WLAN Radio Module ......................................................... 39
European Regulatory Information for this Radio ................................... 39
QL 320 WLAN Module Using PCMCIA Radio ............................................ 41
European Regulatory Information for this Radio ................................... 41
QL 420 WLAN Module Using PCMCIA Radio ............................................ 43
European Regulatory Information for this Radio ................................... 43
WLAN Module Using 802.11g Radio ........................................................ 45
European Regulatory Information for this Radio ................................... 45

4
QL Series User Guide
Compact Flash (802.11b) and Bluetooth Co-located Radio Modules ...... 47
European Regulatory Information for Co-located Radios ..................... 47
Using the Accessories ............................................................... 49
Belt Clip ....................................................................................................... 49
Desk Stand .................................................................................................. 51
Carrying Strap ............................................................................................ 53
Kickstand .................................................................................................... 50
Preventive Maintenance ...........................................................54
Extending Battery Life ...................................................................54
General Cleaning Instructions ....................................................... 55
QL 220 Cleaning ...................................................................................... 56
QL 320 Cleaning ...................................................................................... 58
QL 420 Cleaning ...................................................................................... 60
Troubleshooting .........................................................................62
Standard Control Panel .................................................................. 62
Optional LCD Control Panel ........................................................... 62
Troubleshooting Topics ................................................................. 63
Troubleshooting Tests ...................................................................65
Printing a Configuration Label ................................................................... 65
Communications Diagnostics .................................................................... 65
Calling Technical Support .......................................................................... 66
Specifications ............................................................................. 72
Printing Specifications .............................................................................. 72
Memory and Communications Specifications .......................................... 72
Label Specifications ................................................................................... 73
Font and Bar Code Specifications for QL Series ....................................... 74
Communications Ports ............................................................................... 75
Font and Bar Code Specifications for QL Plus Series ............................... 74
Physical, Environmental and Electrical Specifications ............................. 76
QL Series Accessories .............................................................................. 80
Appendix A- Interface Cables ........................................................ 81
RS232 Cables .............................................................................................. 81
USB Cable (QL Plus Series only) ............................................................... 81
Other Interface Cables ............................................................................... 82
Appendix B-Media Supplies ..........................................................85
Appendix C- Maintenance Supplies ................................................86
Appendix D- Product Support .......................................................87
Appendix D .................................................................................88
Battery Disposal ......................................................................................... 88
Product Disposal ........................................................................................ 88
Appendix E- Using zebra.com ........................................................89
Index ............................................................................................ 92
Patent Numbers .........................................................................94

5
QL Series User Guide
Proprietary Statements
This manual contains proprietary information of Zebra Technologies Corporation. It is
intended solely for the information and use of parties operating and maintaining the equip-
ment described herein. Such proprietary information may not be used, reproduced, or dis-
closed to any other parties for any other purpose without the expressed written permission
of Zebra Technologies Corporation.
Product Improvements
Since continuous product improvement is a policy of Zebra Technologies Corporation, all
specifications and signs are subject to change without notice.
FCC Compliance Statement
NOTE: This equipment has been tested and found to comply with the limits or a Class B
digital device, pursuant to Part 15 of the FCC Rules. These limits are designed to provide
reasonable protection against harmful interference in a residential installation. This equip-
ment generates, uses and can radiate radio frequency energy and, if not installed and used
in accordance with the instructions, may cause harmful interference to radio communica-
tions. However, there is no guarantee that interference will not occur in a particular instal-
lation. If this equipment does cause harmful interference to radio or television reception,
which can be determined by turning the equipment off and on, the user is encouraged to
try to correct the interference by one or more of the following measures:
• Reorient or relocate the receiving antenna.
• Increase the separation between the equipment and receiver.
• Connect the equipment into an outlet or circuit different from that to which the re-
ceiver is connected.
• Consult the dealer or an experienced radio/TV technician for help.
WARNING: Exposure to Radio Frequency radiation. To conform to FCC RF exposure re-
quirements this device shall be used in accordance with the operating conditions and in-
structions listed in this manual. Note that there are several radio options available with this
printer. Additional regulatory information is contained in later sections devoted to each
radio individually.
NOTE: This unit was tested with shielded cables on the peripheral devices. Shielded
cables must be used with the unit to insure compliance.
Changes or modifications to this unit not expressly approved by Zebra Technologies Cor-
poration could void the user’s authority to operate this equipment.
Canadian Compliance Statement
This Class B digital apparatus complies with Canadian ICES-003.
Cet appareil numérique de la classe B est conforme á la norme NMB-003 du Canada.
“IC:” before the equipment certification number signifies that the Industry Canada techni-
cal specifications were met. It does not guarantee that the certified product will operate to
the user’s satisfaction.
Agency Approvals and Regulatory Information
• Design certified by CSA • FCC part 15
• Canadian STD RSS-210 • EN55024:1998 European Immunity Standard
• EN60950: 2000 Safety Standard • NOM/NYCE (Mexico)
• C-Tick (Australia) • EN55022:1998 Class B European
Electromagnetic Radiation Standard
Liability Disclaimer
Inasmuch as every effort has been made to supply accurate information in this manual,
Zebra Technologies Corporation is not liable for any erroneous information or omissions.
Zebra Technologies Corporation reserves the right to correct any such errors and disclaims
liability resulting therefrom.
No Liability for Consequential Damage
In no event shall Zebra Technologies Corporation or anyone else involved in the creation,
production, or delivery of the accompanying product (including hardware and software)
be liable for any damages whatsoever (including, without limitation, damages for loss of
business profits, business interruption, loss of business information, or other pecuniary
loss) arising out of the use of or the results of use of or inability to use such product, even
if Zebra Technologies Corporation has been advised of the possibility of such damages.
Because some states do not allow the exclusion of liability for consequential or incidental
damages, the above limitation may not apply to you.
continued

6
QL Series User Guide
Copyrights
The copyrights in this manual and the label print engine described therein are owned by
Zebra Technologies Corporation. Unauthorized reproduction of this manual or the software
in the label print engine may result in imprisonment of up to one year and fines of up to
$10,000 (17 U.S.C.506). Copyright violators may be subject to civil liability.
This product may contain ZPL®, ZPL II®, and ZebraLinktm programs; Element Energy Equal-
izer® Circuit; E3®; and AGFA fonts. Software © ZIH Corp. All rights reserved worldwide.
ZebraLink and all product names and numbers are trademarks, and Zebra, the Zebra logo,
ZPL, ZPL II, Element Energy Equalizer Circuit, and E3 Circuit are registered trademarks of
ZIH Corp. All rights reserved worldwide.
Monotype®, Intellifont® and UFST® are trademarks of Monotype Imaging, Inc. registered in
the United States Patent and Trademark Office and may be registered in certain jurisdic-
tions.
AndyTM , CG PalacioTM, CG Century SchoolbookTM, CG TriumvirateTM, CG TimesTM, Monotype
KaiTM, Monotype MinchoTM and Monotype SungTM are trademarks of Monotype Imaging,
Inc. and may be registered in some jurisdictions.
HY Gothic HangulTM is a trademark of Hanyang Systems, Inc.
AngsanaTM is a trademark of Unity Progress Company (UPC) Limited.
Andale®, Arial®, Book Antiqua®, Corsiva®, Gill Sans®, Sorts® and Times New Roman® are
trademarks of The Monotype Corporation registered in the United States Patent and Trade-
mark Office and may be registered in certain jurisdictions.
Century Gothic™, Bookman Old StyleTM and Century SchoolbookTM are trademarks of The
Monotype Corporation and may be registered in certain jurisdictions.
HGPGothicB is a trademark of the Ricoh company, Ltd. and may be registered in some ju-
risdictions.
UniversTM is a trademark of Heidelberger Druckmaschinen AG, which may be registered in
certain jurisdictions, exclusively licensed through Linotype Library GmbH, a wholly owned
subsidiary of Heidelberger Druckmaschinen AG.
Futura® is a trademark of Bauer Types SA registered in the United States Patent and Trade-
mark Office and may be registered in some jurisdictions.
TrueType® is a trademark of Apple Computer, Inc. registered in the United States Patent and
Trademark Office and may be registered in certain jurisdictions.
All other product names are the property of their respective owners.
All other brand names, product names, or trademarks belong to their respective holders.
©2006 ZIH Corp.
7
QL Series User Guide
Document Conventions
The following conventions are used throughout this docu-
ment to convey certain information:
If you are viewing this guide online, click the underlined text
to jump to a related Web site. Click on italic text (not under-
lined) to jump to that location in this manual..
Cautions, Important, and Note
Caution • Warns you of the potential for electrostatic discharge.
Caution • Warns you of a potential electric shock situation.
Caution • Warns you of a situation where excessive heat could cause
a burn
Caution • Advises you that failure to take or avoid a specific action
could result in physical harm to you.
Caution • Advises you that failure to take or avoid a specific action
could result in physical harm to the hardware.
Important • Advises you of information that is essential to complete a
task.
Note • Indicates neutral or positive information that emphasizes or
supplements important points of the main text.

8
QL Series User Guide
Introduction to the QL and QL Plus Series
Thank you for choosing one of our Zebra® QL™ series Mobile
Printers. These rugged printers are sure to become pro-
ductive and efficient additions to your workplace thanks to
their innovative design. Because they are made by Zebra
Technologies, you’re assured of world-class support for all of
your bar code printers, software, and supplies.
• This user’s guide gives you the information you will need
to operate all QL series printers.
• The QL series uses the CPCL programming language.
To create and print labels using the CPCL language, re-
fer to the Mobile Printer Programming Guide and our
Label Vista™ label creation program which are both avail-
able on our Web site at www.zebra.com.
• The QL series offers optional interpreters for the EPL™ and
ZPL II® (up to Version 30.8.4) Programming Languages.
The printer must be equipped with the optional mem-
ory upgrade and an appropriate application in order to
use this function. QL Plus™ series printers have EPL and
ZPL II emulation as a standard feature.
Manuals for the ZPL II or EPL2 label design programming
languages are also available on our Web site .
Unpacking and Inspection
Inspect the printer for possible shipping damage:
• Check all exterior surfaces for damage.
• Open the media cover (refer to “Loading the Media” in
the Getting Ready to Print section) and inspect the media
compartment for damage.
In case shipping is required, save the carton and all packing
material.
Reporting Damage
If you discover shipping damage:
• Immediately notify and file a damage report with the ship-
ping company. Zebra Technologies Corporation is not re-
sponsible for any damage incurred during shipment of
the printer and will not cover the repair of this damage
under its warranty policy.
• Keep the carton and all packing material for inspection.
• Notify your authorized Zebra re-seller.
9
QL Series User Guide
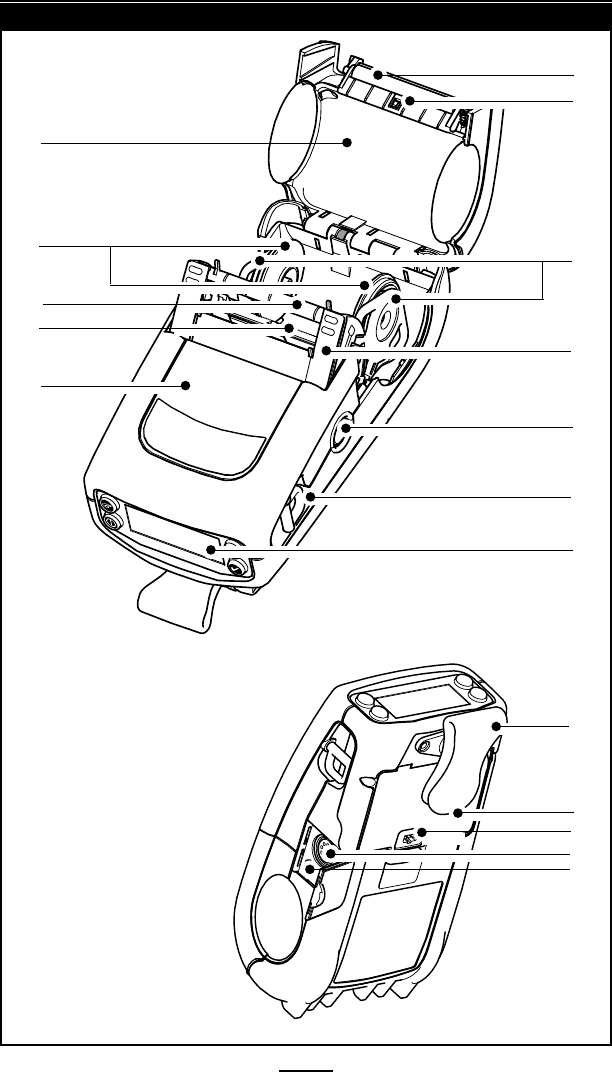
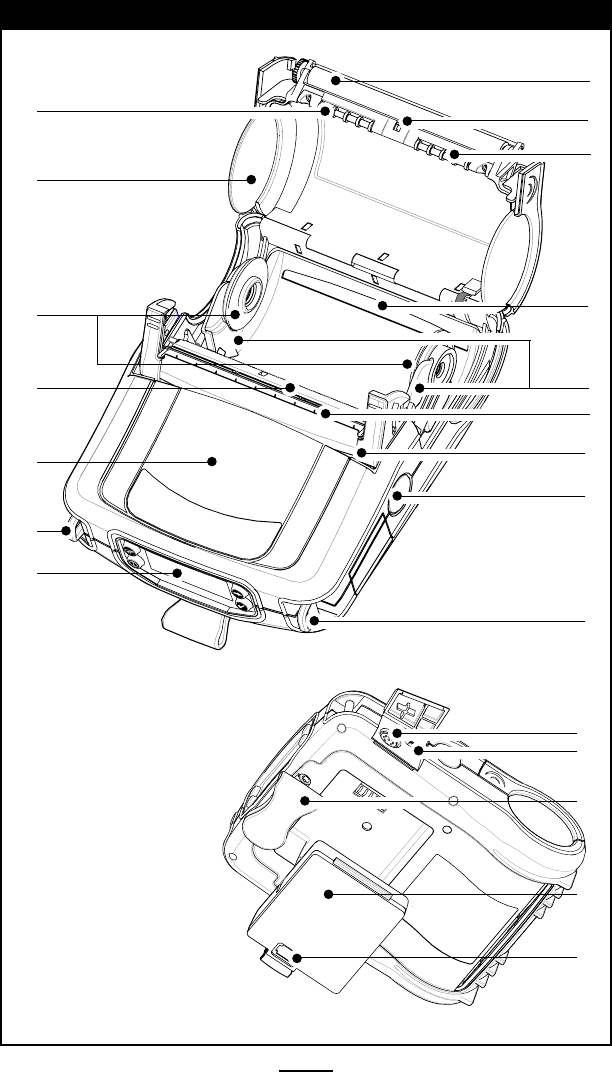
QL 220 Introduction
1
2
3
4
5
6
7
8
9
10
11
12
1 Platen Roller
2. Bar Sensor
3. Media Support
4. Latch
5. Latch Release Button
6. “D” Ring
7. Control Panel
8. QuickLink™ Module
9. Print Head
10. “E-Z Peel” Label
Peeler
11. Media Support Disks
12. Media Cover
13. Belt Clip
14. Battery
15. Battery Charging
Receptacle
16. RS-232
Communications Port
17. USB Port (available on
QL Plus series only)
Figure 1: QL 220 Overview
13
14
15
16
17
10
QL Series User Guide
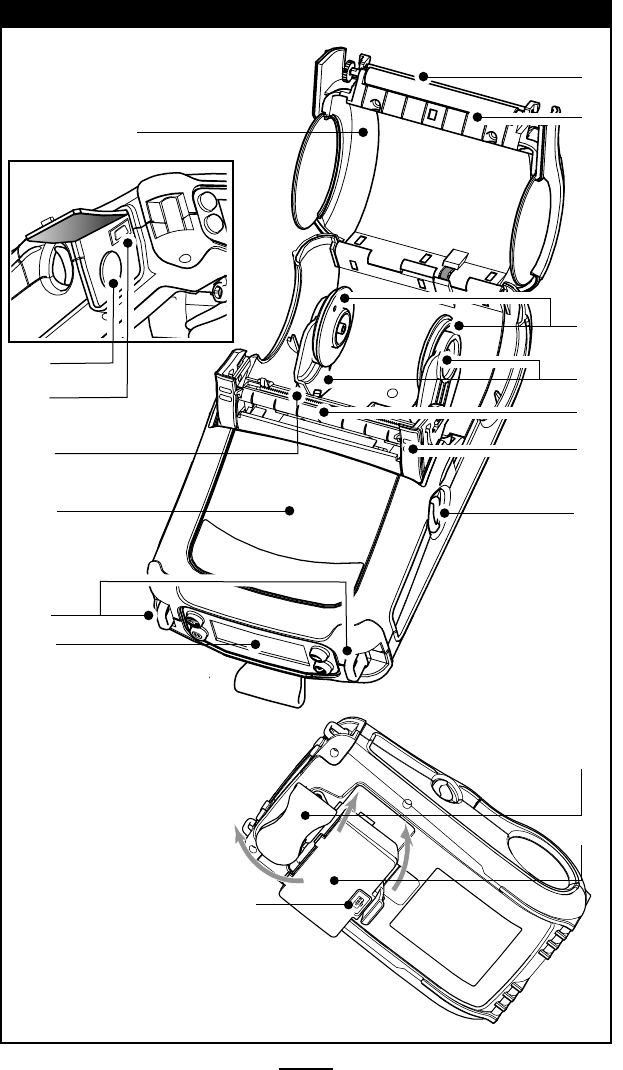
QL 320 Introduction
1 Platen Roller
2. Bar Sensor
3. Media Support Disks
4. Media Support
5. “EZ-Peel” Peeler
6. Latch
7. Latch Release Lever
8. Control Panel
9. “D” Rings
10. QuickLink™ Module
11. Print Head
12. Media Cover
13. Belt Clip
14. Battery
15. Battery Charging Receptacle
16. USB Port (available on QL Plus series only)
17. RS-232 Communications Port
9
8
11
4
12
13
14
15
10
Figure 1B: QL 320 Overview
1
2
3
5
6
7
16
17
11
QL Series User Guide
QL 420 Introduction
1 Platen Roller
2. Bar Sensor
3. Media Rollers
4. Rear Media Slot
5. Media Support
6. “EZ-Peel” Peeler
7. Latch
8. Latch Release Button
9. “D” Rings
10. Control Panel
11. QuickLink™ Module
12. Print Head
13. Media Support Disks
14. Media Cover
15. RS-232
Communications Port
16. USB Port (QL Plus
models only)
17. Belt Clip
18. Battery
19. Battery Charging
Receptacle
1
2
5
6
7
8
9
9
10
12
13
12
11
3
3
4
15
17
18
19
16
Figure 1C: QL 420 Overview
12
QL Series User Guide
Getting Ready to Print
Battery
Installing the Battery
Important • Batteries are shipped partially charged. Remove
protective shrink-wrap and labels from new battery packs prior to
use.
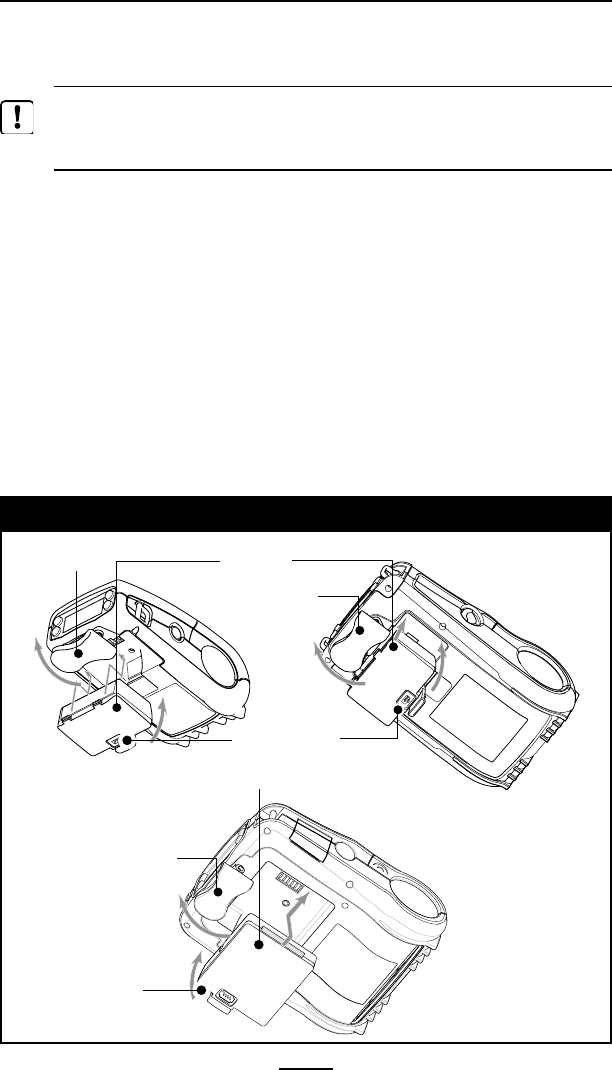
1. Rotate the Belt Clip to allow access to the Battery com-
partment.
2. Insert the battery into the printer as shown in Figure 2,
3. Rock the Battery into the printer as shown until it locks in
place.
When the battery is first installed, the Control Panel indica-
tors may briefly turn on and then go off which indicates the
battery is not fully charged (see “Charging the Battery” below
and “Operator Controls”).
You must charge the batteries fully before using them for
the first time. To ensure maximum battery capacity, new bat-
teries should go through two or three complete charge/dis-
Figure 2: Installing the Battery
Belt Clip
Charger Jack
Battery
Battery
Charger Jack
Belt Clip
QL 420
QL 320
QL 220
Belt Clip
13
QL Series User Guide
charge cycles when first put into service.
Charging the Battery
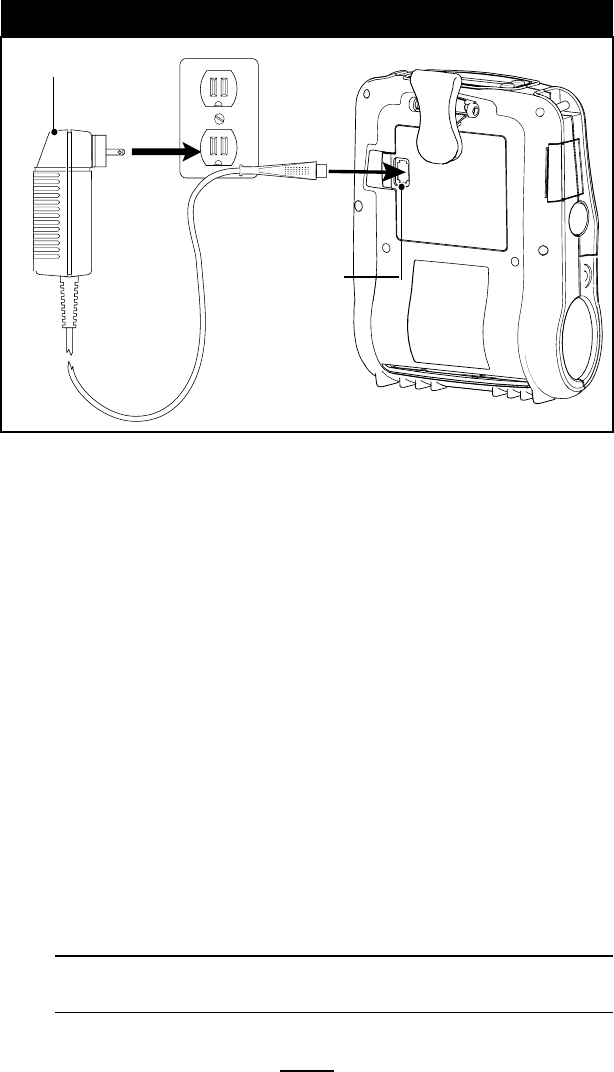
Model LI72 Single Battery Charger
Refer to Figure 3. Your battery charger may look slightly dif-
ferent from the one illustrated.
1. Install the battery in the printer and plug the Charger into
the appropriate A.C. wall receptacle. Then insert the
charge cable into the battery charger jack.
2. The charger LED will indicate the status of the charger as
follows:
• A steady light indicates the battery is undergoing a fast
charge.
• A blinking light indicates the charger is in trickle mode.
The battery is ready for use.
• A rapidly blinking light indicates a problem with the bat-
tery. The battery may have an internal short, or its charge
monitoring circuitry may be malfunctioning. The battery
should not be used any further.
• Battery Packs may be charged either when installed or
removed from the printer.
Caution • Do not use the printer while charging a battery with the
LI72 charger.
continued
LI72 Charger
Charger Jack
Figure 3: Single Charger
14
QL Series User Guide
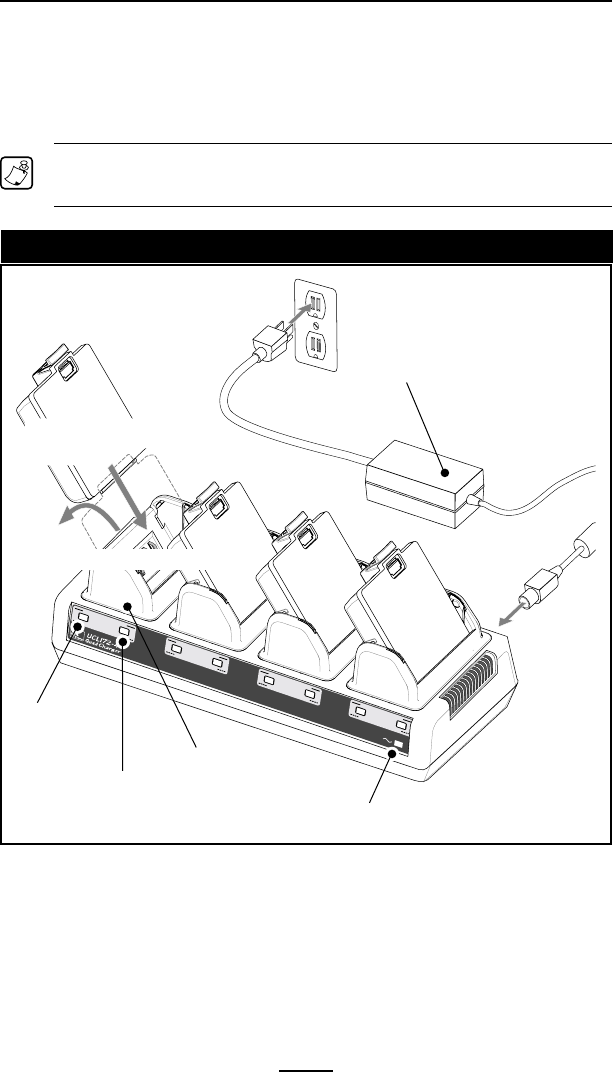
Model UCLI72-4 Quad Charger
The UCLI72-4 Quad Charger is designed to charge up to four
QL series battery packs simultaneously. Batteries must be re-
moved from the printer to be charged in the Quad Charger.
1. Ensure that the charger has been installed properly per
the Quad Charger instruction manual. Ensure that the power
indicator on the front panel is on.
2. Remove any protective shrink-wrap and labels from all
battery packs prior to use. Plug a battery pack into any one
of the four charging bays as shown in Figure 4, noting the ori-
entation of the battery pack. Slide the battery pack into the
charging bay until it stops. Then rock the battery pack back
until it snaps into place. The amber indicator directly under
the battery being charged will turn on if the battery is properly
inserted.
The indicators under the battery will allow you to monitor
the charging process per the table below:
Amber Green Battery Status
On Off Charging
On Flashing 80% charged (O.K. to use)
Off On Completely Charged
Flashing Off Fault
Important • A fault condition is caused by a problem with the battery.
The charger may indicate a fault because the battery is too hot or cold
to charge reliably. Try to charge the battery again when it returns to
the room’s ambient temperature. If the amber indicator starts flashing
on the second attempt, the battery should be discarded. Always
dispose of batteries in a proper manner. Refer to Appendix D.
Quad Charger Cycle Times :
Battery Status QL 220/320 QL 420
Battery 80% Charged 1.25 Hrs. 2.5 Hrs.
Battery Fully Charged 2.5 Hrs. 5 Hrs.
Note • These times are for completely discharged batteries.
Battery packs which are only partially discharged will take
15
QL Series User Guide
continued
less time to reach their charged state. Batteries which have
reached 80% of their charge capacity may be used, however,
it is recommended that you allow the batteries to reach a full
charge to maintain maximum battery life.
The UCLI72-4 Quad Charger has a safety feature which stops charging
a battery after six hours regardless of its charge state.
Fault
Fast Charge
Fault
Fast Charge
Fault
Fast Charge
Ready
Power
Full Charge
Ready
Full Charge
Ready
Full Charge
Full Charge
Fault
Fast Charge
Ready
Figure 4: Quad Charger
Charger Bay
Amber
Indicator
Green
Indicator Power Indicator
Power Supply
1. Slide Battery Pack into
Charger bay
2. Rock Battery Pack into place
16
QL Series User Guide
Battery Safety
Caution • Avoid accidental short circuiting of any battery. Allowing
battery terminals to contact conductive material will create a short
circuit which could cause burns and other injuries or could start a
fire.
Important • Always dispose of used batteries properly. Refer to
Appendix D for more battery recycling information.
Caution • Use of any charger not approved specifically by Zebra for
use with its batteries could cause damage to the battery pack or the
printer and will void the warranty.
Charger Safety
Do not place the Quad Charger in locations where liquids or metallic
objects may be dropped into the charging bays.
Use care when installing either the LI72 Single Charger or the
UCLI72-4 Quad Charger so that you do not block the ventilating slots
on the top and bottom covers.
Ensure that the Charger is plugged into a power source which will not
accidently be turned off if you will be charging batteries overnight.
17
QL Series User Guide
Loading the Media
You can operate QL series printers in one of two different
modes: Tear-Off or Peel-Off. Tear-Off mode allows you to tear
off each label (or a strip of labels) after it is printed. In Peel-Off
mode, the backing material is peeled away from the label as it
is printed. After you remove this label, the next one is printed.
Installing the Media
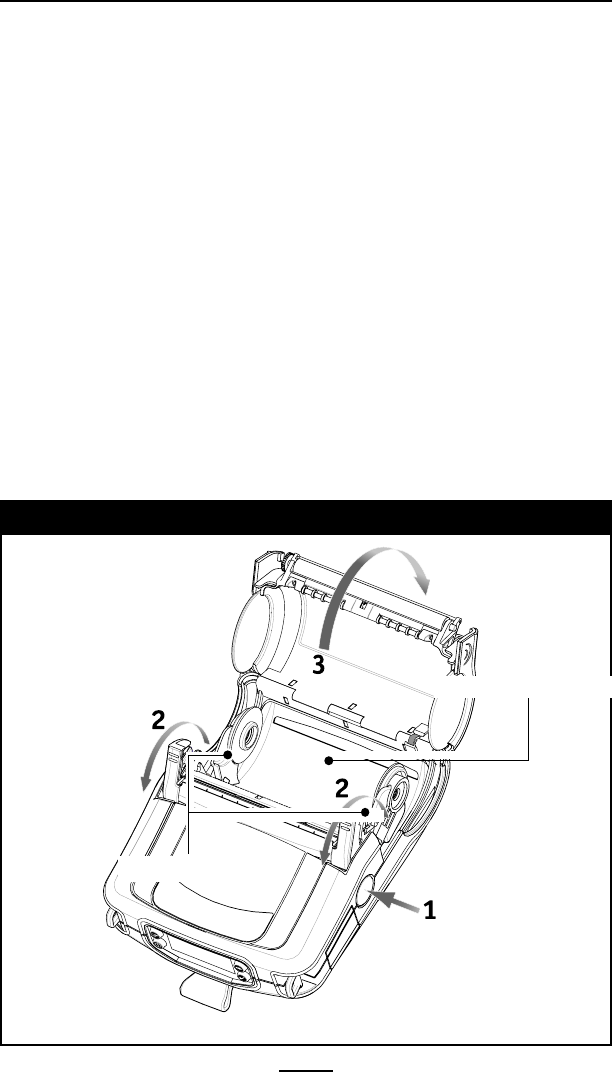
QL 420 and QL 220 Printers
1. Open the printer: Refer to Figure 5 (QL 420 shown).
• Press the latch release button on the side of the printer
as shown at “1” below. The latch assembly will flip open
automatically
• On the QL 420, pull up the latch assembly completely as
shown at “2” to unlatch the Media Cover. Omit this step
for the QL 220.
• Rotate the Media Cover back as shown at “3”, exposing
the media compartment and the adjustable media sup-
ports.
Media Supports
Figure 5: Opening the QL 420 & QL 220
Media Compartment
18
QL Series User Guide
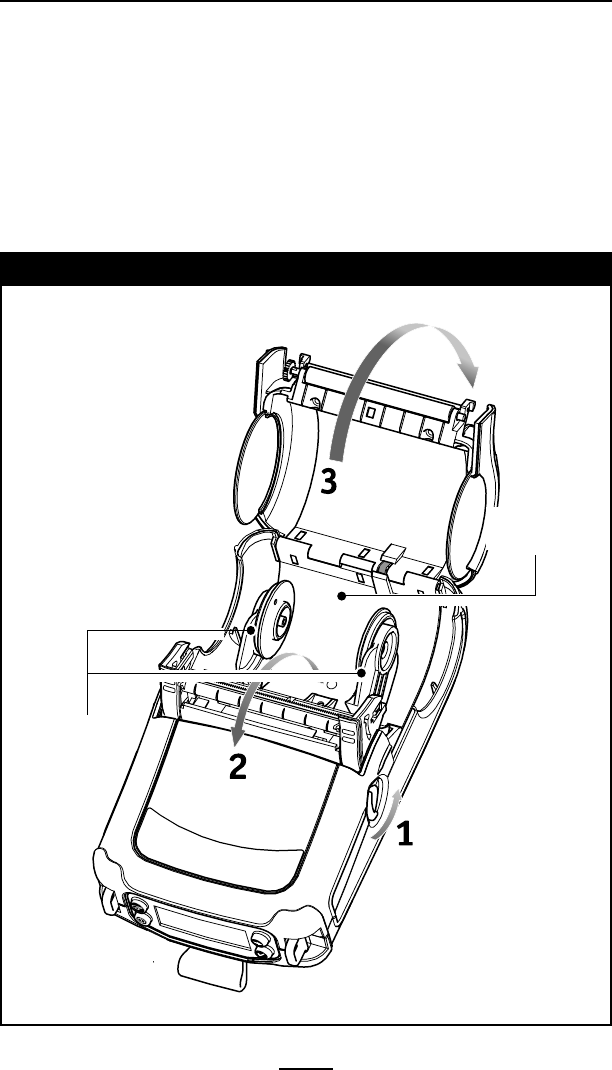
QL 320 Printers
1A. Open the printer: Refer to Figure 5a.
• Rotate the latch release levers on each side of the printer
as shown at “1” below. The latch assembly will flip open
automatically as shown at “2”.
• Rotate the Media Cover back as shown at “3”, exposing
the media compartment and the adjustable media sup-
ports.
continued
Media
Compartment
Figure 5a: Opening the QL 320
Media Supports
19
QL Series User Guide
All models
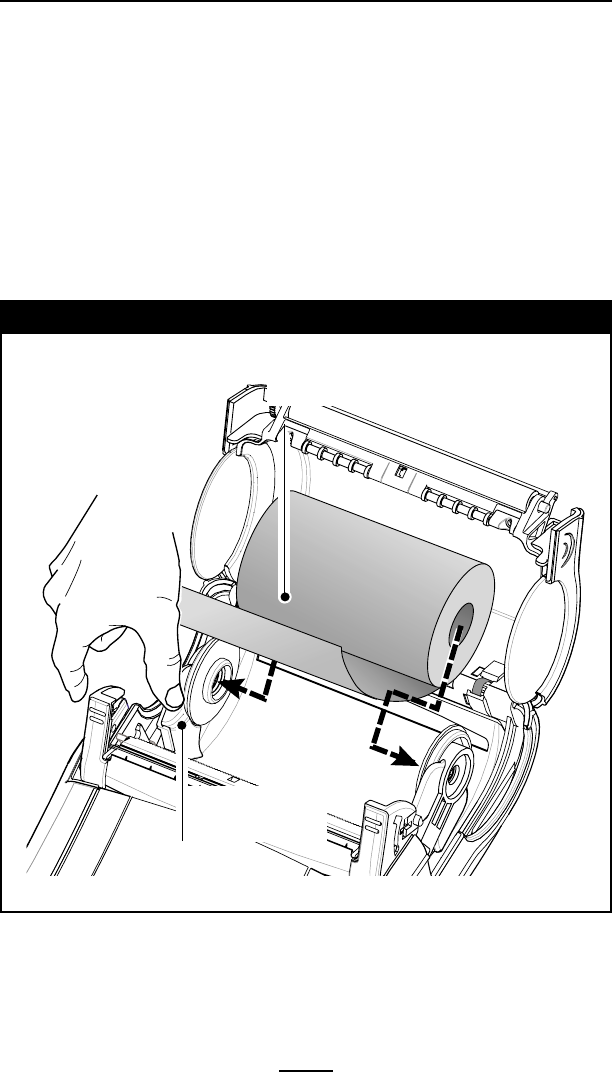
2. Load the media:
Loading media from an internal supply. Refer to Figure 6.
• Grasp the media supports where shown and pull them
apart. Insert the roll of media between them, and let the
media supports close. Ensure that the media pulls off the
core in the direction shown in Figure 6. The supports will
adjust themselves to the width of the media, and the me-
dia should be able to spin freely on the supports.
Figure 6: Installing Media
Grasp Media Supports
where shown and pull
apart.
Media Roll
Note direction media
pulls off the roll.
20
QL Series User Guide
QL 420 Printers Only
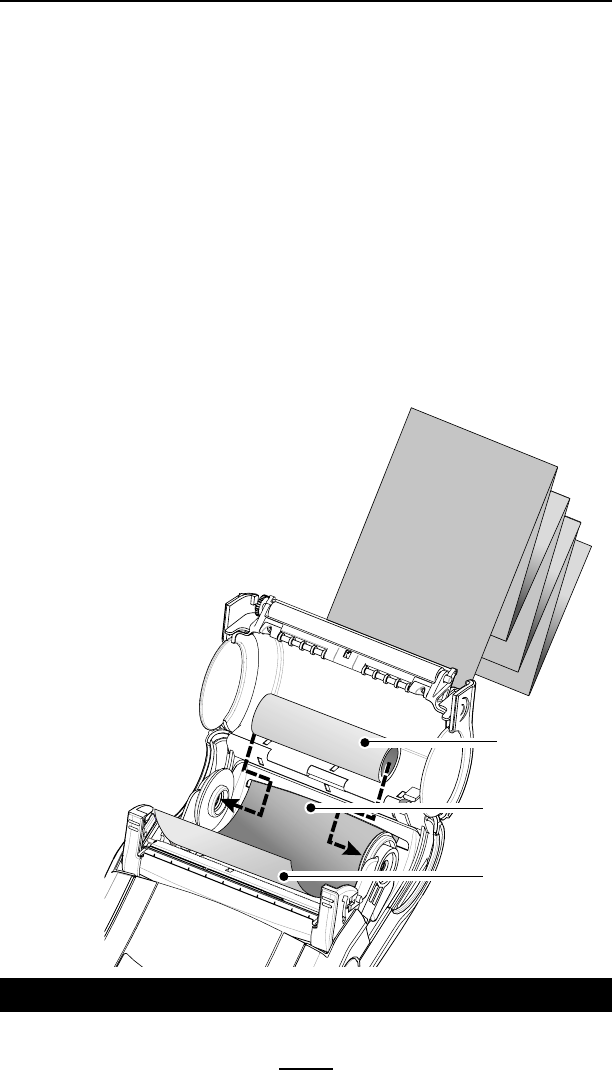
2A. Load the media (continued):
Loading media from an external supply. Refer to Figure 7.
The QL 420 has a loading slot in the rear of the media com-
partment which allows you to use standard 4” (101.6 mm)
wide fan-fold media from an external supply. The external
supply must be designed such that it does not exert excessive
drag as media is fed through the printer, which could result in
distorted printing.
Zebra can provide a vehicle mount (p/n DC16620-1) de-
signed specifically for the QL 420 which incorporates an exter-
nal media supply bin.
• Pull the media supports apart, insert a Media Spacer
(Zebra part number BA16625-1) between them, and let the
media supports close. Insert the
media from the external supply
through the rear feed slot, be-
tween the media guides and
up through the media com-
partment as shown. Make
sure the side of the media
you will be print-
ing on faces the
print head.
continued
Media Spacer
p/n BA16625-1
Feed media through
rear feed slot
Surface of media
to be printed must
face the printhead
Figure 7: Installing Media from an External Supply (QL 420 only)
21
QL Series User Guide
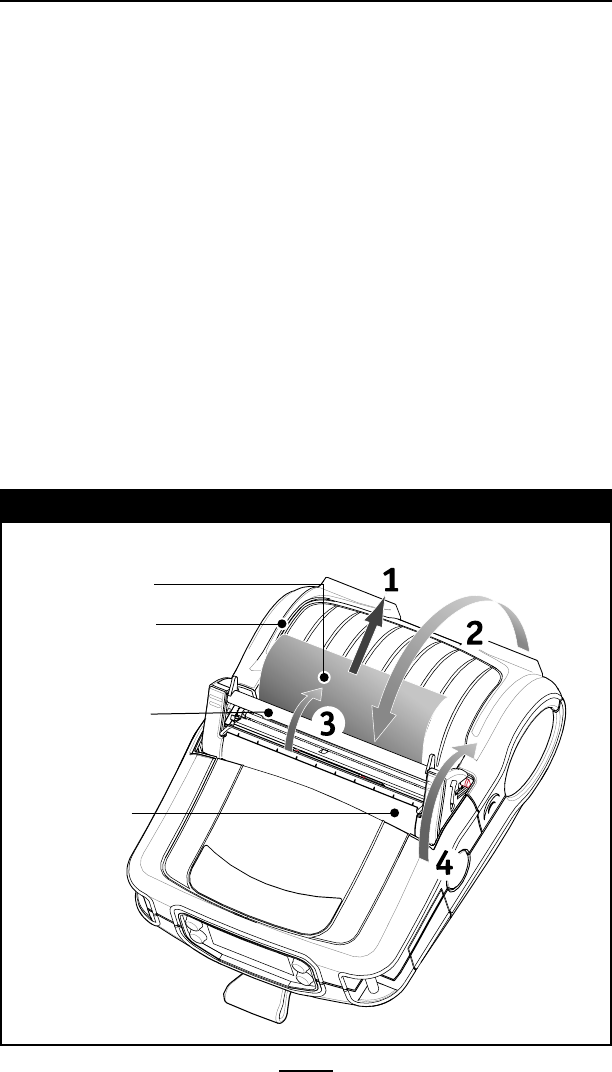
3. Close the Media Cover: Refer to Figure 8.
• If you plan to use the printer in the tear-off mode, close
the media cover as shown at “2”, then rotate the latch as-
sembly as shown until it locks into place, as shown at “4”.
• If you plan to use the printer in the peel-off mode, peel
a few labels off of the media and pull it out of the printer
as shown at “1”. Close the media cover as shown at “2”.
Rotate the “EZ-Peel” peeler bar until it locks into place on
the latch, as shown at “3”, then rotate the Latch as shown
until it locks into place, as shown at “4”.
• Turn on the printer or press the Feed button if the printer
is already on.
The printer will advance the media to the next label, if
printing labels. If you are printing on journal media, the
printer will advance a short strip of media and will then
be ready for printing.
Media Cover
“EZ-Peel” Peeler
Bar
Flip down if using media in
the peel-off mode.
Latch
Assembly
Pull Media out of
Printer
Figure 8: Closing the Media Cover

22
QL Series User Guide
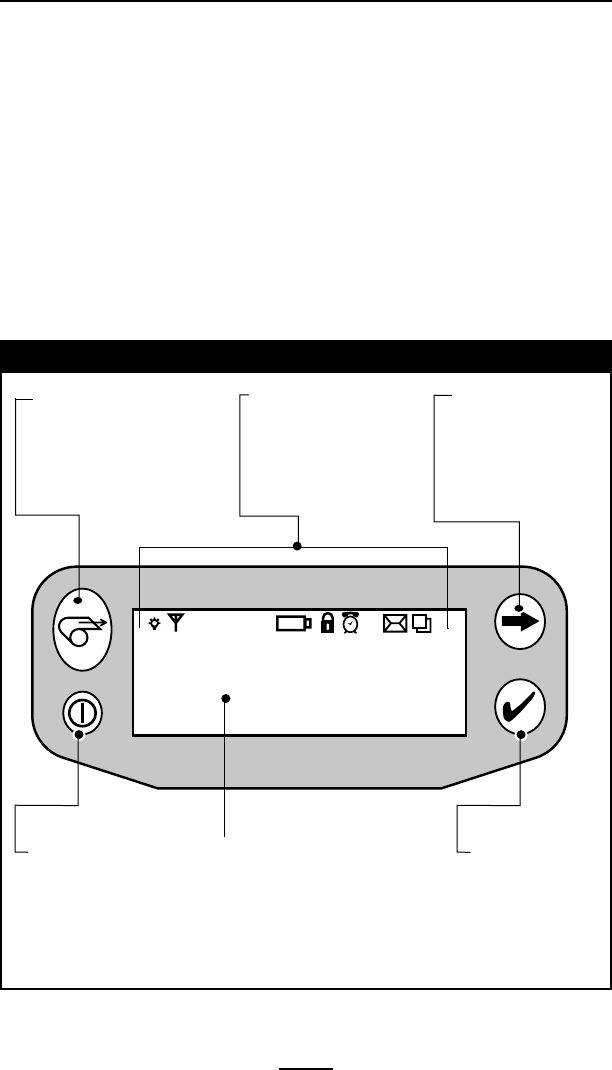
Operator Controls
QL series printers are available with one of two possible
control panels. The standard control panel is detailed below
and in Figure 9. The optional control panel (Figure 10) fea-
tures an LCD which allows easy display and selection of many
printer functions detailed on following pages.
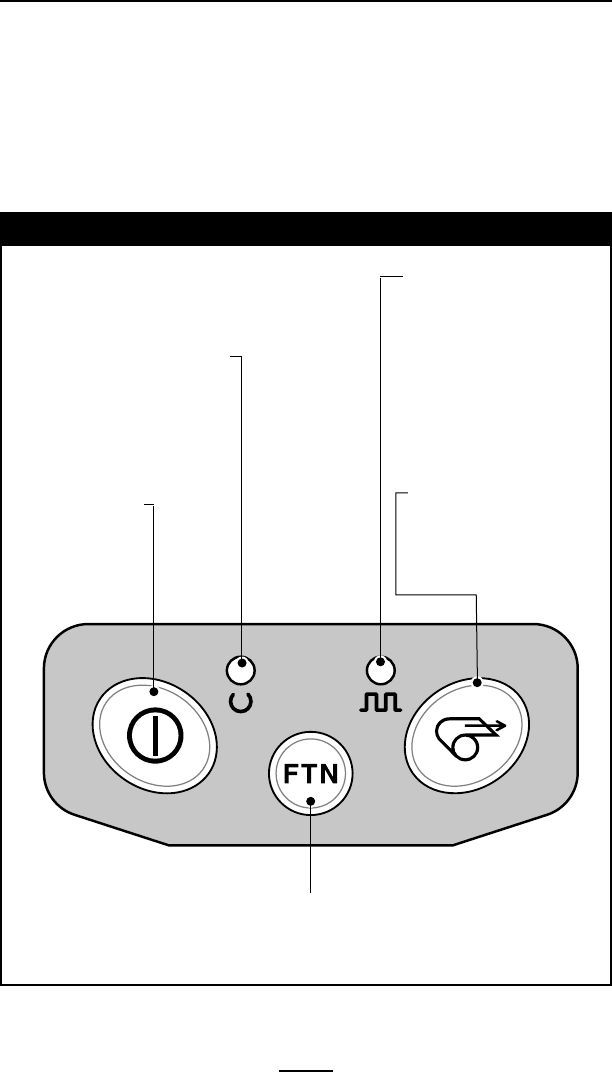
Standard Keypad
The standard keypad has three control buttons and two mul-
tipurpose indicators.
• The Power Button turns the printer on and off.
• The Feed Button advances a length of media which is
determined by the type of media being used. Label me-
dia will be advanced to the next gap or bar sense mark-
er. Journal (plain) media will be advanced a length deter-
mined by the printer’s software.
• The Function (FTN) Button is controlled by a printer’s
specific application to support such functions as:
Print a battery level report.
Print the Local Area Network (LAN) status
Print a Short Range Radio Frequency (SRRF) status
Print a media supply report
The Green LED on the left side of the control panel indicates
the status of several printer features:
• A slowly blinking sequence indicates the printer’s battery
needs charging.
• Printers with a wireless QuickLink module installed: a
quickly blinking sequence indicates the printer has not es-
tablished a link to either a Local Area Network or a com-
patible wireless equipped terminal.
• Printers with a wireless QuickLink module installed: A
steadily lit indicator shows that the printer has estab-
lished a wireless link, either to the LAN or to a compatible
terminal.
A steadily lit green indicator on a non-wireless printer is a
power-on indicator.
The Yellow LED on the right side of the control panel has
two indication conditions.
• A rapidly blinking yellow LED and a chime indicate that no
application has been loaded into the printer.
continued
23
QL Series User Guide
• Printers with a wireless QuickLink module installed: a rap-
idly blinking LED indicates normal data transmission.
• A steadily lit yellow LED indicates an error condition. This
can be caused by one of the following:
1. The media cover is not completely closed and latched.
2. The printer is out of media.
Figure 9: Standard Control panel
Yellow LED
Steady Light indicates error condi-
tion: out of media or media cover
not closed.
Fast Blink indicates RF activity (on
RF equipped units only)
Fast blink with beeper indicates no
application loaded
Feed Button
Press to advance the media one
blank label or a software deter-
mined length of journal media.
Function Button
Specific functions are under printer ap-
plication control.
Figure 9: Standard Control Panel
Power Button
Press to turn unit on.
Press again to turn
unit off
Green LED
Steady Light indicates power on
and/or established RF link.
Fast Blink indicates no RF link (on RF
equipped units only)
Slow Blink means low battery
24
QL Series User Guide
LCD Control Panel
The optional LCD control panel has buttons for the power
on/off and media feed functions just as in the standard con-
trol panel. In addition, it has two keys which allow easy navi-
gation and selection of menu options affecting many printer
functions.
The “Scroll” button allows scrolling through the various op-
tions and settings. The “Select” button allows selection of the
option or function displayed on the screen.
The top of the screen has a row of status icons which indi-
cate the state of various printer functions:
continued
Power Button
Press to turn unit on. Press
again to turn unit off
Feed Button
Press to advance the
media one blank label or a
software determined length
of journal media.
Scroll Button
Press to scroll through
the menu choices on
the LCD.
Select
Button
Press to select a
menu choice on the
LCD.
LCD
See LCD Functions Table for an overview
of menu options
NOTE: LCD options are under specific ap-
plication control. Not all options may be
available In your printer’s application.
Printer Status
Icons
Indicates the status of
several printer functions
Figure 10: Optional LCD Control Panel
25
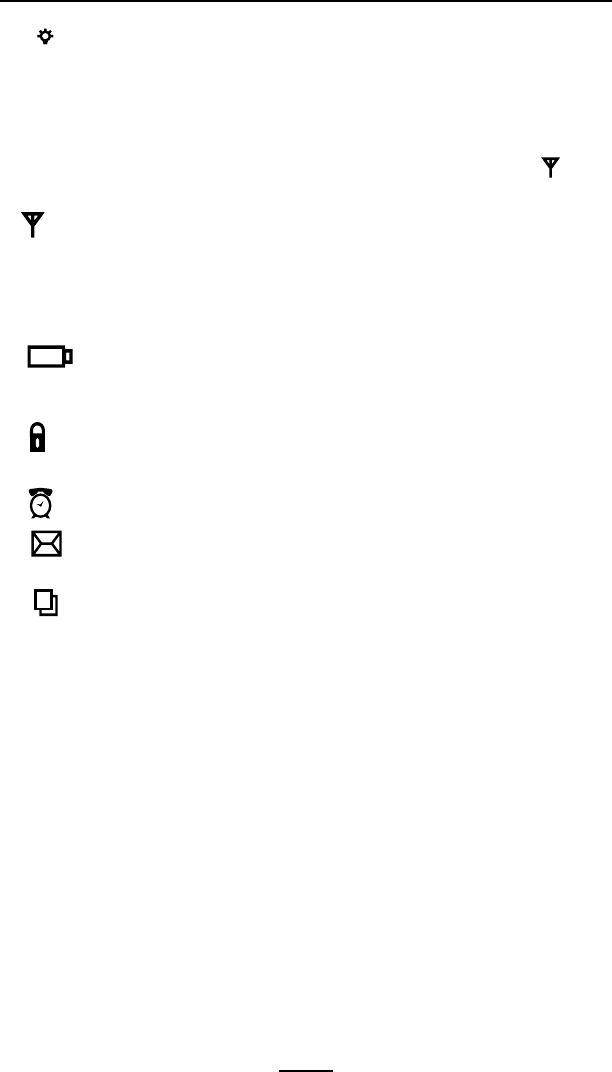
QL Series User Guide
Indicates that the printer is receiving or transmitting
data via a Bluetooth connection. A flashing icon indicates
data transmission.
This icon is functional only on printers with the Bluetooth
wireless option installed. Printers with earlier firmware
versions may not use this icon and will display the
icon instead. (See below)
Indicates that the printer is connected to a radio network
via the 802.11 protocol. It remains on steadily with an
802.11 connection.
If the icon is off, there is no connection to a radio net-
work.
A flashing icon indicates low battery status. You
should suspend any printing operations and recharge or
replace the Battery Pack as soon as is convenient.
A flashing icon indicates that the media cover is open or
not properly latched.
A flashing icon indicates normal printing activity.
A flashing icon indicates that a file is being download-
ed to the printer.
A flashing icon indicates that the printer does not de-
tect any media. This could indicate an out of media con-
dition, or improperly loaded media.
Programmable LCD Settings
In addition to the status icons, the LCD on the control pan-
el can display many of the printer’s settings and functions as
text. Applications can be written to allow the user to view and
/or modify these settings using the scroll and select keys on
the display. Refer to the tables on the following pages for a
partial set of printer features that can be programmed to dis-
play on the LCD.
The LCD has a backlighting option which allows viewing of
the screen in a dark environment, or provides better contrast
in a very bright environment. Use of the display backlight will
decrease the time the printer will run between charges. Refer
to the section “Extending Battery Life” for more information.
26
QL Series User Guide
Extended LCD Functions
Function Default setting Scroll & Select Options
Sensor Type Bar • Bar
• Gap
Baud Rate 19200 • 9600
• 19200
• 32400
Data Bits 8 • 7
• 8
WLAN ID* Factory Set N/A
Value
Label Top 000 • Increase (+120 dots
max.)
• Decrease (-120 dots
max.)
Left Position 000 • Increase (+120 dots
max.)
• Decrease (-120 dots
max.)
LCD Contrast 0 • Increase
• Decrease
No-activity Timeout* 60 sec. • 60 sec.
• 5 min.
• 10 min.
• 30 min
• Custom
Tear-off Position 00 • Increase (+120 dots
max.)
• Decrease (-120 dots
max.)
Media Type Label • Label
• Journal
• On
Media Width Sensing† Off • Off
• Display Width
• On
LCD Backlight Off • Off
• Momentary On w/
time delay
Factory Reset No • No
(Resets all to • Yes
factory set values)
* Some parameters, such as the WLAN ID number and non-standard no-activity time out values can be set
using a PC running Zebra’s Label Vista label creation program and a data cable link to the printer.
† Media width sensing is an option. Display for this option may not be visible, or selection options may
change, depending on the printer’s application.

27
QL Series User Guide
Verify the Printer Is Working
Before you connect the printer to your computer or portable
data terminal, make sure that the printer is in proper working
order. You can do this by printing a configuration label using
the “two key reset” method. If you can’t get this label to print,
refer to “Troubleshooting”.
Printing a Configuration Label
1. Turn the printer off. Load the media compartment with
journal media (media with no black bars printed on the
back)
2. Press and hold the Feed Button.
3. Press and release the Power button and keep the Feed
button pressed. When printing starts, release the Feed
button.
The unit will print a line of interlocking “x” characters to
ensure all elements of the print head are working, print out the
version of software loaded in the printer and then print two re-
ports.
The first report indicates model, ROM version, serial num-
ber, baud rate, etc. The second report prints out more de-
tailed information on the printer’s configuration and parameter
settings. If no second report appears, there is no application
loaded. (See the Troubleshooting Section for sample printouts
and a further discussion on how to use the configuration label
as a diagnostic tool.)
Connecting the Printer
The printer must establish communications with a host ter-
minal which sends the data to be printed. Communications
occur in four basic ways:
• By a cable between the printer and its host terminal. All
QL series printers communicate by the RS-232C protocol.
QL Plus series printers can communicate by either
RS-232C or USB 2.0 protocols. USB drivers are included
in the Zebra Universal Driver which can be downloaded
from www.zebra.com.
• Linking to a host terminal via Infrared (usually by means
of the industry standard IrDA protocol)
• By means of a Bluetooth™ short range radio frequency
link.
28
QL Series User Guide
• By means of a wireless LAN (Local Area Network) per
802.11b specifications.
Cable Communication
Caution • The printer should be turned off before connecting or
disconnecting the communications cable.
All QL series printers can communicate by cable; the specif-
ic cable supplied with your printer will vary with the host ter-
minal and your model printer.
RS-232C Communications
The 8- pin circular connector on your communications cable
plugs into the serial communications port on the side of the
printer. QL Plus model printers also have a USB port.
USB Communications (QL Plus units only)
The small connector on the USB cable plugs into the printer.
The connectors are keyed to assure correct alignment; do not
Communications Cable to Terminal
Part numbers vary. Refer to Appendix A.
RS-232C or USB Communications
Cable to Computer
Refer to Appendix A for part numbers.
Figure 11: Cable Communications
Figure 12: Communications with a P.C.
Communications
Port
29
QL Series User Guide
try to force the cable if it does not plug in. The other end of
the cable must be plugged into the host terminal as shown in
Figure 11, or to a serial or USB port on a computer (Figure 12.)
The QL Plus series is configured with the USB Open HCI inter-
face driver allowing it to communicate with Windows® based
devices.
USB drivers are included in the Zebra Universal Driver which
can be downloaded from the Zebra Web site. Other terminals
or communications devices may require the installation of
special drivers to use the USB connection. Consult the factory
for further details.
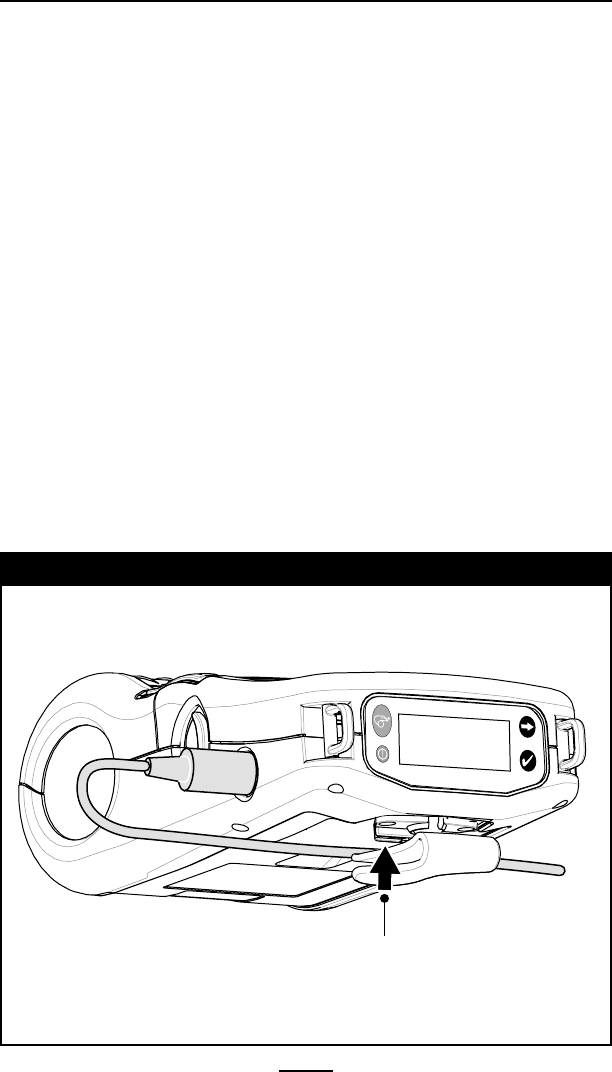
Providing Strain Relief for Communications Cable
If you are connecting a communications cable to the print-
er permanently, use the strain relief features built into the belt
clip retainer to prevent excessive strain on the communica-
tions connector. There are two kinds of strain relief features.
If you are using the printer with the standard belt clip, bend
the cable in a broad loop to relieve stress on the connector
and press it into the retaining feature on the belt clip retainer
as shown in figure 13.
Figure 13: Communications Strain Relief
Press communications
cable into strain relief
feature on Belt Clip
30
QL Series User Guide
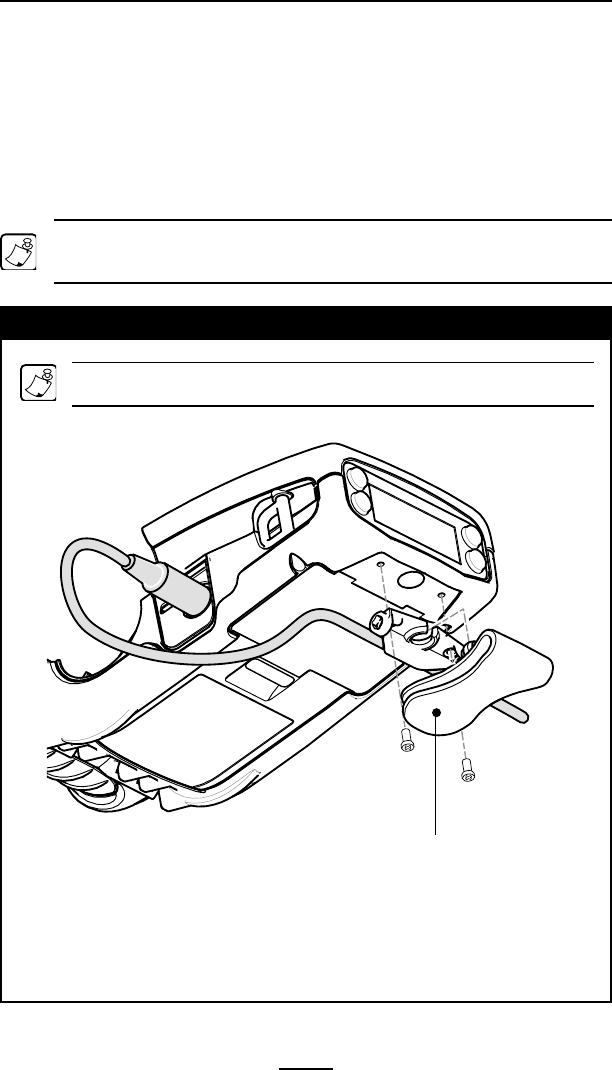
If you have a printer equipped with the Kickstand option,
you must first remove the belt clip retainer as shown in Figure
14, retaining the two screws holding the retainer to the lower
cover. Arrange the communications cable in a broad loop as
detailed above, and capture it in the strain relief feature on the
bottom of the belt clip retainer. Then re-secure the belt clip
retainer to the bottom cover of the printer.
Refer to the Using the Accessories section for more information on the
use of the Kickstand option
Figure 14: Communications Strain Relief with Kickstand option
1. Remove Belt Clip Retainer,
along with Belt Clip and
Kickstand.
2. Press communications
cable into strain relief feature
on bottom of Belt Clip
3. Reassemble Belt Clip to
bottom cover.
Kickstand is not shown in this view for clarity
31
QL Series User Guide
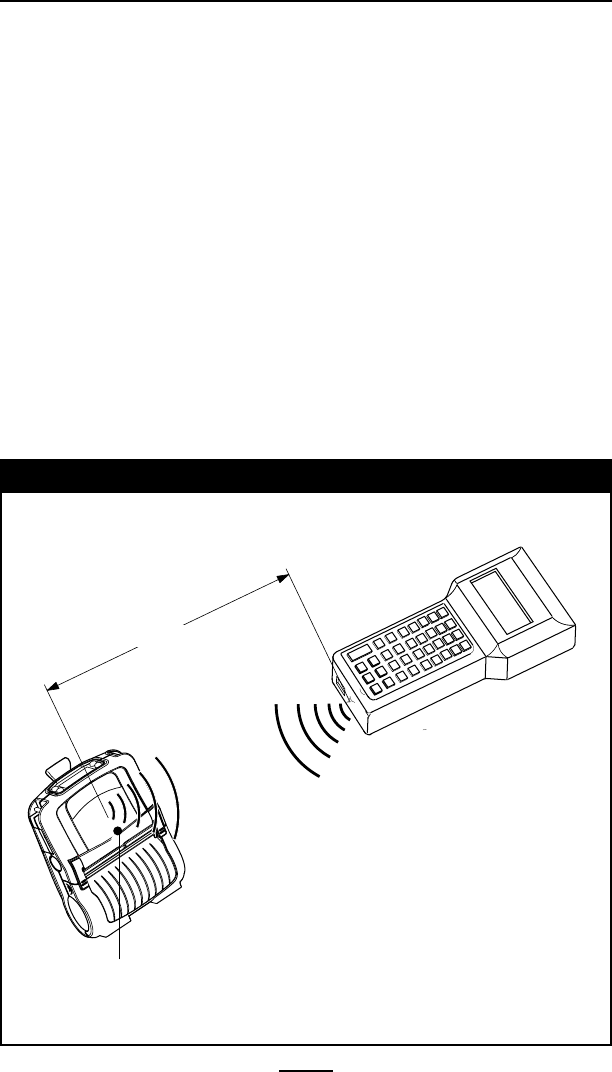
IR Communications
Printers equipped for infrared (IR) communications are iden-
tified by a small “IR” logo on the unit’s label. (IR functions are
disabled if a communications cable is used.) Printers with the
IR option conform to the IrDA communications protocol.
Ensure that there is a direct line of sight between the printer
and the terminal that will be sending data. The IR window on
the front of the printer must face the corresponding window
on the terminal to properly send and receive signals.
IrDA compliant terminals will automatically initiate com-
munications to the printer. An IrDA terminal will seek out
any linkable devices and establish communications between
them, even turning the printer on if necessary.
Figure 14: IR Communications
Area of IR Window
1M (39”)

32
QL Series User Guide
Wireless Communications with Bluetooth™
“Bluetooth” is a worldwide standard for the exchange of
data between two devices via radio frequencies. Bluetooth ra-
dios are relatively low powered to help prevent interference
with other devices running at similar radio frequencies. This
limits the range of a Bluetooth device to about 10 meters (32
feet). Both the printer and the device it communicates with
must follow the Bluetooth standard. Other than conditions
specified elsewhere in this manual, only one of the radio op-
tions can be installed in the printer at one time and the anten-
na used for these transmitters must not be co-located or must
not operate in conjunction with any other antenna.
Bluetooth Networking Overview
Each Bluetooth enabled QL series printer is identified by
a unique Bluetooth Device Address (BDA) loaded into its
QuickLink module when manufactured. In order to exchange
data, two Bluetooth enabled devices must establish a connec-
tion.
Bluetooth software is always running in the background,
ready to respond to connection requests. One device (known
as the master or the client) must request a connection with an-
other. The second device (the slave or the server) then accepts
or rejects the connection. A Bluetooth enabled QL series
printer will normally act as a slave creating a miniature net-
work with the terminal sometimes referred to as a “piconet.”.
For the most part, communications using the Bluetooth pro-
tocol are initiated and processed without any operator inter-
vention.
QL 220 and 420 Plus printers can be equipped with both a
Bluetooth and an 802.11b radio, allowing communications with
both Bluetooth enabled devices and a Wireless Local Area
Network (WLAN) (see WLAN discussion following).

33
QL Series User Guide
continued
WLAN Overview
All QL series printers can be equipped with radios using
the industry standard 802.11 protocols. QL series printers will
have the FCC I.D. number of the radio on the product label.
QL Plus series printers will have the FCC ID number on the se-
rial number label on the back of the unit.
• QL Wireless Network Printers with the CF module can
be identified by the text “Wireless Network Printer” and
FCC ID: I28MD-QL4137 on the front of the unit. QL Plus
series printers will have FCC ID: I28MD-RW4137 on the
serial number label on the back of the unit.
• QL series Wireless Network Printers with the Zebra
802.11b WLAN radio module can be identified by the text
“Wireless Network Printer” and FCC ID: I28MD-ZLAN11B
on the serial number label on the back of the printer.
• QL Plus series Wireless Network Printers with the Zebra
802.11g WLAN radio module can be identified by the text
“Wireless Network Printer” and FCC ID: I28MD-ZLAN11G
on the serial number label on the back of the printer.
• QL 320 and QL 420 printers with the PCMCIA module can
be identified by the text “Wireless Network Printer” and
FCC ID: I28-QL420352 on the front of the unit.
• QL 220 and 420 Plus printers can be configured with both
an 802.11b WLAN radio and a Bluetooth radio running in
the same unit. At present only one dual radio configu-
ration is offered, with Bluetooth radio FCC ID “I28MD-
BTCT2Y4” and 802.11b Compact flash radio FCC ID num-
ber “I28MD-RW4137”. The FCC ID numbers and other
regulatory information for both radios are located on the
serial number label on the back of the printer.
These printers allow wireless communication as a node
within a local area network, (LAN) and its wireless capabilities
allow communications from any point within the LAN’s perim-
eter. Printers equipped with the dual Bluetooth and 802.11b
WLAN radio configuration can be linked to both a WLAN and a
Bluetooth network. Methods of establishing communications
to the printer will vary with each LAN application.
Methods of establishing communications to QL series print-

34
QL Series User Guide
ers will vary with each LAN application. General informa-
tion on establishing WLAN communications can be found in
either the ”CPCL Programmers Manual” or the “Quick Start
Guide for Mobile Wireless Printers” both available on-line.
More information and LAN configuration utilities are included
in Zebra’s Label Vista™ program (version 2.8 and later). Label
Vista may be downloaded from the Zebra Web site.
Setting Up the Software
QL series printers use Zebra’s CPCL Programming language
which was designed for mobile printing applications. CPCL is
fully described in the ”CPCL Programmers Manual”, available
on-line from the Zebra Web site.
You can also use Label Vista™, Zebra’s Windows® based la-
bel creation program which uses a graphical interface to cre-
ate and edit labels in the CPCL language.
Refer to Appendix E for tips on downloading the Label Vista
application from Zebra’s Web site.
QL series printers with an optional memory upgrade can
support an interpreter for ZPL II®, or EPL programming lan-
guages. QL Plus series printers have these interpreters in-
cluded as a standard part of their operating system.
If you plan to use ZPL II or EPL, refer to the appropriate
Programming Guides available on-line from Zebra’s Web site.
If you choose to use a third party label preparation system,
follow the installation instructions included in the package.
35
QL Series User Guide
Important Notice:
This device is a portable RF printer
intended for commercial and industrial
use in all EU and EFTA member states.
0336 (ZBR3 Only)
Radio Regulatory Information
Zebra Bluetooth Radios ZBR3 and QL+ZBR3
Caution • Exposure to Radio Frequency Radiation. The radiated output
power of this internal Bluetooth radio is far below the FCC radio
frequency exposure limits. The internal Bluetooth radio operates
within guidelines found in radio frequency safety standards and
recommendations. Do not use the printer in an unauthorized manner.
Note • The following section only applies when the ZBR3
(FCC ID: I28MD-BTC2TY3) or QL+ZBR3 (FCC ID: I28MD-BTC2TY4)
Bluetooth Radio is installed in a QL series printer. Unless specified
elsewhere in this manual, the antenna used for this transmitter must
not be co-located or must not operate in conjunction with any other
antenna.
European Regulatory Information for this Radio
This device is intended for use in all EU and EFTA member states.
Europe – EU Declaration of Conformity
This device complies with the essential requirements of the R&TTE Directive
1999/5/EC. The following test methods have been applied in order to prove
presumption of compliance with the R&TTE Directive 1999/5/EC:
• EN55022:1998
European Immunity Standard
• EN 60950: 2000
Safety of Information Technology Equipment
• EN 300 328-2 V1.4.1 (2003-04)
Technical requirements for spread-spectrum radio equipment
• EN 301 489-1/-17 V1.5.1/1.2.1 (2003-12) -17 v1.2.1 (2002-08)
EMC requirements for spread-spectrum radio equipment.
This device is a 2.4 GHz wireless LAN transceiver, intended for indoor home and
office use in all EU and EFTA member states.
36
QL Series User Guide
WLAN Module Using 802.11b CF Radio (North America)
The following section only applies when the CF (Compact Flash) WLAN module
(With FCC ID: I28MD-RW4137) is installed in a QL series printer (note that only one of the radio options can
be installed in the printer at one time). Other than conditions specified elsewhere in this manual, only one of
the radio options can be installed in the printer at one time and the antenna used for these transmitters must
not be co-located or must not operate in conjunction with any other antenna.
QL model printers have the FCC ID number label on the front of the module, and QL Plus models have the
FCC ID number on a label on the back of the unit.
Caution • Use of a QL series printer with the radio module marked
with FCC ID: I28MD-RW4137 meets the FCC requirements for radio
frequency (RF) radiation exposure in the standard body worn
configuration with no minimum separation. In this configuration,
which applies whether the belt clip or shoulder strap is used, the face
of the printer from which paper is transported is facing away from the
user’s body. The standard configuration must always be used when
the printer is body worn.
The QL 220, QL 220 Plus, QL 320, QL 320 Plus, QL 420 and
QL 420 Plus printers with this radio option have been SAR
tested. The maximum SAR value measured for each model is
listed below:
Model SAR value W/Kg (1g average))
QL220 & 220 Plus 0.0618
QL 320 & 320 Plus 0.0500
QL 420 & 420 Plus 0.0432
37
QL Series User Guide
0168
Important Notice:
This device is a portable RF printer intended
for commercial and industrial use in all EU and
EFTA member states except in France where
restrictive use applies.
continued
WLAN Module Using 802.11b CF Radio
(Asia & EU Countries)
The following section only applies when the CF (Compact Flash) WLAN module (With FCC ID: H9PLA4137)
is installed in a QL series printer. Other than conditions specified elsewhere in this manual, only one of the
radio options can be installed in the printer at one time and the antenna used for these transmitters must not
be co-located or must not operate in conjunction with any other antenna.
QL model printers have the FCC ID number label on the front of the module, and QL Plus models have the
FCC ID number on a label on the back of the unit.
Caution • Use of a QL series printer with the radio module marked
with FCC ID:H9PLA4137 meets the FCC requirements for radio
frequency (RF) radiation exposure in the standard body worn
configuration with no minimum separation. In this configuration,
which applies whether the belt clip or shoulder strap is used, the face
of the printer from which paper is transported is facing away from the
user’s body. The standard configuration must always be used when
the printer is body worn.
European Regulatory Information for this Radio
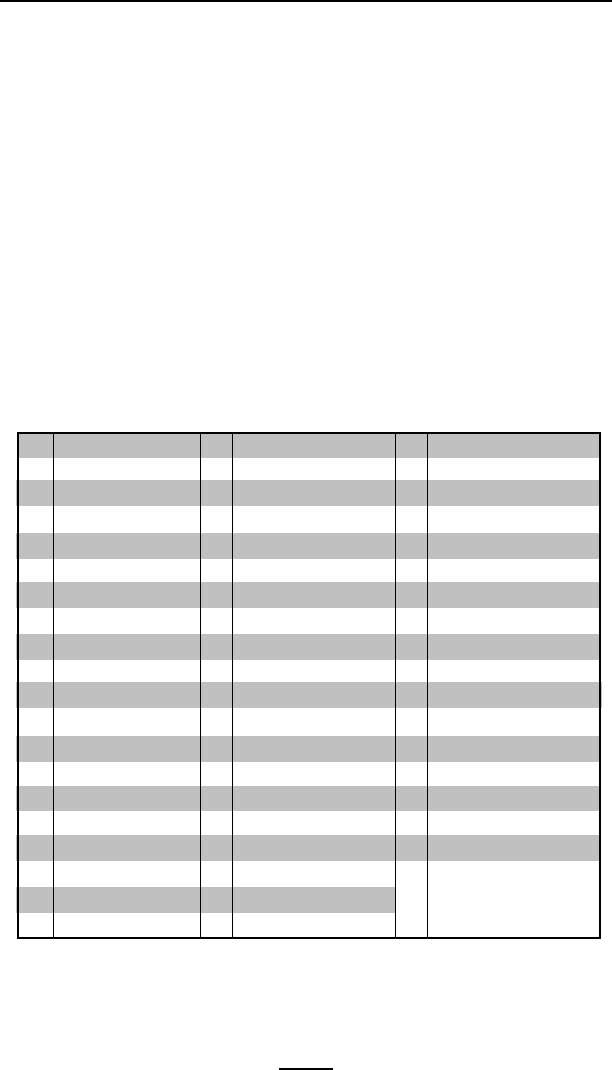
AT BE CY CZ DK
EE FI FR DE GR
HU IE IT LV LT
LU MT NL PL PT
SK SI ES SE GB
Note: -Member states in the EU with restrictive use for this device are crossed
out!
This device is also authorized for use in all EFTA member states (CH, IS, LI, NO)
38
QL Series User Guide
Europe – EU Declaration of Conformity
This device complies with the essential requirements of the R&TTE Directive
1999/5/EC. The following test methods have been applied in order to prove
presumption of compliance with the R&TTE Directive 1999/5/EC:
• EN55022:1998
European Immunity Standard
• EN 60950: 2000
Safety of Information Technology Equipment
• EN 300 328-2 V1.6.1 (2004-11)
Technical requirements for spread-spectrum radio equipment
• EN 301 489-1/-17 V1.5.1/1.2.1 (2003-12) -17 v1.2.1 (2002-08)
EMC requirements for spread-spectrum radio equipment.
This device is a 2.4 GHz wireless LAN transceiver, intended for indoor home and
office use in all EU and EFTA member states, except in France where restrictive
use applies.
The use of this frequency band in France is subject to restrictions. You may only
use channels 10 and 11 (2457 and 2462 MHz) on French territory, except in those
French departments as listed in the table below where channels 1-13 (2412-2472
MHz) may be used. For more information see http://www.anfr.fr/ and/or http://
www.art-telecom.fr
01 Ain 36 Indre 69 Rhone
02 Aisne 37 Indre et Loire 70 Haute Saone
03 Allier 39 Jura 71 Saone et Loire
05 Hautes Alpes 41 Loir et Cher 72 Sarthe
08 Ardennes 42 Loire 75 Paris
09 Ariege 45 Loiret 77 Seine et Marne
10 Aube 50 Manche 78 Yvelines
11 Aude 54 Meurthe et Moselle 79 Deux Sievres
12 Aveyron 55 Meuse 82 Tarn et Garonne
16 Charente 57 Moselle 84 Vaucluse
19 Correze 58 Nievre 86 Vienne
2A Corse Sud 59 Nord 88 Vosges
2B Haute Corse 60 Oise 89 Yonne
21 Cote d’Or 61 Orne 90 Territoire de Belfort
24 Dordogne 63 Puy de Dome 91 Essonne
25 Doubs 64 Pyrenees Atlantique 92 Hauts de Seine
26 Drome 65 Hautes Pyrenees 93 Seine St Denis
27 Eure 66 Pyrenees Orientales 94 Val de Marne
32 Gers 67 Bas Rhin
35 Ille et Vilaine 68 Haute Rhin
39
QL Series User Guide
0336
Important Notice:
This device is a portable RF printer intended
for commercial and industrial use in all EU
and EFTA member states except in France
where restrictive use applies.
continued
Zebra 802.11b WLAN Radio Module
The following section only applies when the Zebra 802.11b WLAN radio module
(With FCC ID: I28MD-ZLAN11B) is installed in a QL series printer (note that only one of the radio options can
be installed in the printer at one time). Other than conditions specified elsewhere in this manual, only one of
the radio options can be installed in the printer at one time and the antenna used for these transmitters must
not be co-located or must not operate in conjunction with any other antenna.
QL model printers have the FCC ID number label on the front of the module, and QL Plus models have the
FCC ID number on a label on the back of the unit.
Caution • The radiated output power of this internal 802.11b radio
is far below the FCC radio frequency exposure limits. Nevertheless,
this radio must be used in such a manner that the antenna is 2.5 cm.
or further from the human body. The radio and antenna are mounted
internally in this printer such that when the printer is worn with the
back of the printer against the body and the front of the printer (where
paper exits) away from the body, then the 2.5 cm distance between
the antenna and the users body will be met. Do not use the printer in
an unauthorized manner.
European Regulatory Information for this Radio
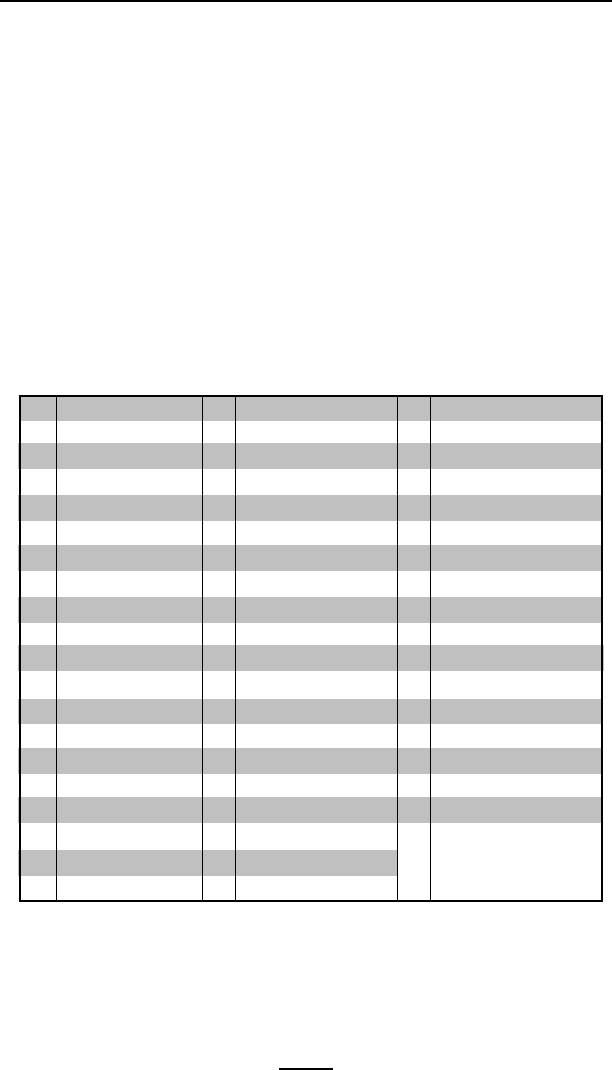
AT BE CY CZ DK
EE FI FR DE GR
HU IE IT LV LT
LU MT NL PL PT
SK SI ES SE GB
Note: -Member states in the EU with restrictive use for this device are crossed
out!
This device is also authorized for use in all EFTA member states (CH, IS, LI, NO)
40
QL Series User Guide
Europe – EU Declaration of Conformity
This device complies with the essential requirements of the R&TTE Directive
1999/5/EC. The following test methods have been applied in order to prove
presumption of compliance with the R&TTE Directive 1999/5/EC:
• EN55022:1998
European Immunity Standard
• EN 60950: 2000
Safety of Information Technology Equipment
• EN 300 328-2 V1.6.1 (2004-11)
Technical requirements for spread-spectrum radio equipment
• EN 301 489-1/-17 V1.5.1/1.2.1 (2003-12) -17 v1.2.1 (2002-08)
EMC requirements for spread-spectrum radio equipment.
This device is a 2.4 GHz wireless LAN transceiver, intended for indoor home and
office use in all EU and EFTA member states, except in France where restrictive
use applies.
The use of this frequency band in France is subject to restrictions. You may only
use channels 10 and 11 (2457 and 2462 MHz) on French territory, except in those
French departments as listed in the table below where channels 1-13 (2412-2472
MHz) may be used. For more information see http://www.anfr.fr/ and/or http://
www.art-telecom.fr
01 Ain 36 Indre 69 Rhone
02 Aisne 37 Indre et Loire 70 Haute Saone
03 Allier 39 Jura 71 Saone et Loire
05 Hautes Alpes 41 Loir et Cher 72 Sarthe
08 Ardennes 42 Loire 75 Paris
09 Ariege 45 Loiret 77 Seine et Marne
10 Aube 50 Manche 78 Yvelines
11 Aude 54 Meurthe et Moselle 79 Deux Sievres
12 Aveyron 55 Meuse 82 Tarn et Garonne
16 Charente 57 Moselle 84 Vaucluse
19 Correze 58 Nievre 86 Vienne
2A Corse Sud 59 Nord 88 Vosges
2B Haute Corse 60 Oise 89 Yonne
21 Cote d’Or 61 Orne 90 Territoire de Belfort
24 Dordogne 63 Puy de Dome 91 Essonne
25 Doubs 64 Pyrenees Atlantique 92 Hauts de Seine
26 Drome 65 Hautes Pyrenees 93 Seine St Denis
27 Eure 66 Pyrenees Orientales 94 Val de Marne
32 Gers 67 Bas Rhin
35 Ille et Vilaine 68 Haute Rhin

41
QL Series User Guide
0336
Important Notice:
This device is a portable RF printer intended for
commercial and industrial use in all EU and EFTA
member states except in France where restrictive
use applies.
continued
QL 320 WLAN Module Using PCMCIA Radio
The following section only applies when the PCMCIA WLAN module (FCC ID: I28-QL320352) is installed in
the QL 320 printer (note that only one of the radio options can be installed in the printer at one time). The
antenna used for this transmitter must not be co-located or must not operate in conjunction with any other
antenna.
The FCC ID number label is on the front of the QL 320. On all models the text can be read with the radio
module installed.
Caution • Use of the QL 320 with the radio module marked with FCC
ID: I28-QL320352 meets the FCC requirements for radio frequency
(RF) radiation exposure in the standard body worn configuration with
no minimum separation. In this configuration, which applies whether
the belt clip or shoulder strap is used, the face of the printer from
which paper is transported is facing away from the user’s body. The
standard configuration must always be used when the printer is body
worn. This configuration maintains the required 1 cm separation
distance.
The printer with this radio option has been SAR tested. The
maximum SAR value measured was .819 W/kg averaged over
1 gram.
European Regulatory Information for this Radio
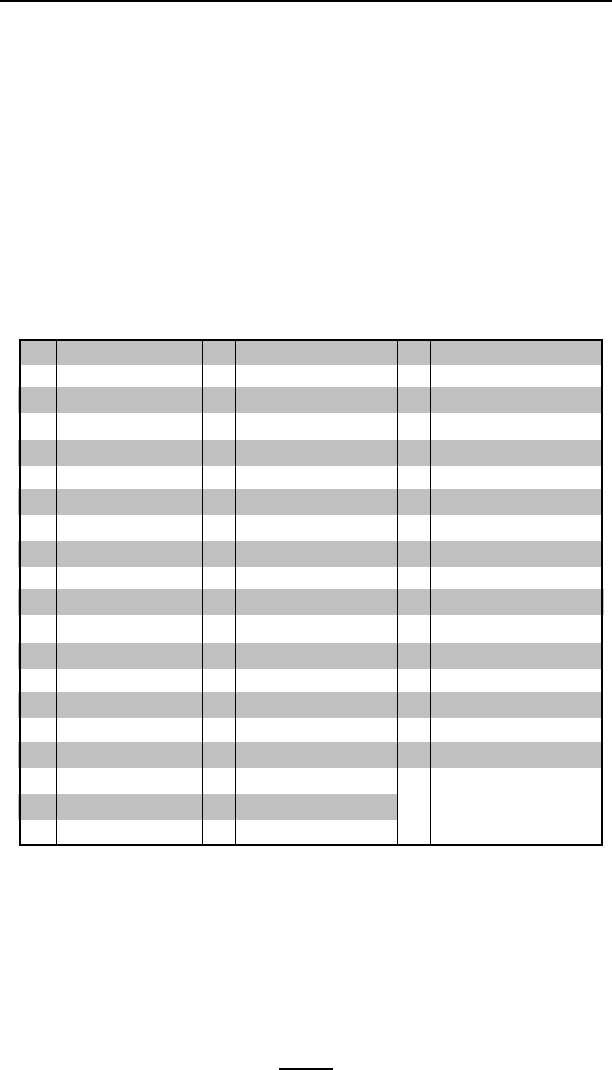
AT BE CY CZ DK
EE FI FR DE GR
HU IE IT LV LT
LU MT NL PL PT
SK SI ES SE GB
Note: -Member states in the EU with restrictive use for this device are
crossed out!
This device is also authorized for use in all EFTA member states (CH, IS, LI, NO)
42
QL Series User Guide
Europe – EU Declaration of Conformity
This device complies with the essential requirements of the R&TTE Directive
1999/5/EC. The following test methods have been applied in order to prove
presumption of compliance with the R&TTE Directive 1999/5/EC:
• EN55022:1998
European Immunity Standard
• EN 60950: 2000
Safety of Information Technology Equipment
• EN 300 328-2 V1.2.1 (2001-12)
Technical requirements for spread-spectrum radio equipment
• EN 301 489-17 V1.2.1 (2002-08)
EMC requirements for spread-spectrum radio equipment.
This device is a 2.4 GHz wireless LAN transceiver, intended for indoor home and
office use in all EU and EFTA member states, except in France where restrictive
use applies.
The use of this frequency band in France is subject to restrictions. You may only
use channels 10 and 11 (2457 and 2462 MHz) on French territory, except in those
French departments as listed in the table below where channels 1-13 (2412-2472
MHz) may be used. For more information see http://www.anfr.fr/ and/or http://
www.art-telecom.fr
01 Ain 36 Indre 69 Rhone
02 Aisne 37 Indre et Loire 70 Haute Saone
03 Allier 39 Jura 71 Saone et Loire
05 Hautes Alpes 41 Loir et Cher 72 Sarthe
08 Ardennes 42 Loire 75 Paris
09 Ariege 45 Loiret 77 Seine et Marne
10 Aube 50 Manche 78 Yvelines
11 Aude 54 Meurthe et Moselle 79 Deux Sievres
12 Aveyron 55 Meuse 82 Tarn et Garonne
16 Charente 57 Moselle 84 Vaucluse
19 Correze 58 Nievre 86 Vienne
2A Corse Sud 59 Nord 88 Vosges
2B Haute Corse 60 Oise 89 Yonne
21 Cote d’Or 61 Orne 90 Territoire de Belfort
24 Dordogne 63 Puy de Dome 91 Essonne
25 Doubs 64 Pyrenees Atlantique 92 Hauts de Seine
26 Drome 65 Hautes Pyrenees 93 Seine St Denis
27 Eure 66 Pyrenees Orientales 94 Val de Marne
32 Gers 67 Bas Rhin
35 Ille et Vilaine 68 Haute Rhin
43
QL Series User Guide
QL 420 WLAN Module Using PCMCIA Radio
The following section only applies when the PCMCIA WLAN module (FCC ID: I28-QL420352) is installed in
the QL 420 printer. (Note that only one of the radio options can be installed in the printer at one time). The
antenna used for this transmitter must not be co-located or must not operate in conjunction with any other
antenna.
The FCC ID number label is on the label on the front of the QL 420. On all models the text can be read with
the radio module installed.
Caution • Use of the QL 420 with the radio module marked with
“FCC ID: I28-QL420352” meets the FCC requirements for radio
frequency (RF) radiation exposure in the standard body worn
configuration with no minimum separation. In this configuration,
which applies whether the belt clip or shoulder strap is used, the face
of the printer from which paper is transported is facing away from the
user’s body. The standard configuration must always be used when
the printer is body worn. This configuration maintains the required 1
cm separation distance.
The printer with this radio option has been SAR tested. The
maximum SAR value measured was 1.04. W/kg averaged over
1 gram.
European Regulatory Information for this Radio
AT BE CY CZ DK
EE FI FR DE GR
HU IE IT LV LT
LU MT NL PL PT
SK SI ES SE GB
Note: -Member states in the EU with restrictive use for this device are
crossed out!
This device is also authorized for use in all EFTA member states (CH, ICE, LI,
NOR)
0336
Important Notice:
This device is a portable RF printer intended for
commercial and industrial use in all EU and EFTA
member states except in France where restrictive
use applies.
continued
44
QL Series User Guide
Europe EU Declaration of Conformity
This device complies with the essential requirements of the R&TTE Directive
1999/5/EC. The following test methods have been applied in order to prove
presumption of compliance with the R&TTE Directive 1999/5/EC:
• EN55022:1998
European Immunity Standard
• EN 60950: 2000
Safety of Information Technology Equipment
• EN 300 328-2 V1.3.1 (2001-12)- Technical requirements for spread-
spectrum radio equipment
• EN 301 489-17 V1.2.1 (2002-08)- EMC requirements for spread-spectrum
radio equipment
In France there are restrictions in the use of this device. A restricted frequency
band exists in France. When operating this device on French territory you
may only use channels 10 and 11 (2457 and 2463 MHz). It is not allowed to
operate this device at any other frequency supported by the device. For more
information see http://www.anfr.fr/
01 Ain 36 Indre 69 Rhone
02 Aisne 37 Indre et Loire 70 Haute Saone
03 Allier 39 Jura 71 Saone et Loire
05 Hautes Alpes 41 Loir et Cher 72 Sarthe
08 Ardennes 42 Loire 75 Paris
09 Ariege 45 Loiret 77 Seine et Marne
10 Aube 50 Manche 78 Yvelines
11 Aude 54 Meurthe et Moselle 79 Deux Sievres
12 Aveyron 55 Meuse 82 Tarn et Garonne
16 Charente 57 Moselle 84 Vaucluse
19 Correze 58 Nievre 86 Vienne
2A Corse Sud 59 Nord 88 Vosges
2B Haute Corse 60 Oise 89 Yonne
21 Cote d’Or 61 Orne 90 Territoire de Belfort
24 Dordogne 63 Puy de Dome 91 Essonne
25 Doubs 64 Pyrenees Atlantique 92 Hauts de Seine
26 Drome 65 Hautes Pyrenees 93 Seine St Denis
27 Eure 66 Pyrenees Orientales 94 Val de Marne
32 Gers 67 Bas Rhin
35 Ille et Vilaine 68 Haute Rhin
45
QL Series User Guide
WLAN Module Using 802.11g Radio
The following section only applies when the 802.11g WLAN module (With FCC ID: I28MD-ZLAN11G) is
installed in a QL Plus series printer (note that only one of the radio options can be installed in the printer at
one time). Other than conditions specified elsewhere in this manual, only one of the radio options can be
installed in the printer at one time and the antenna used for these transmitters must not be co-located or
must not operate in conjunction with any other antenna.
QL Plus models have the FCC ID number on a label on the back of the unit.
Caution • Use of a QL Plus series printer with the radio module
marked with FCC ID: I28MD-ZLAN11G meets the FCC requirements for
radio frequency (RF) radiation exposure in the standard body worn
configuration with no minimum separation. In this configuration,
which applies whether the belt clip or shoulder strap is used, the face
of the printer from which paper is transported is facing away from the
user’s body. The standard configuration must always be used when
the printer is body worn.
The QL 220 Plus, QL 320 Plus, and QL 420 Plus printers with
this radio option have been SAR tested. The maximum SAR
value measured for each model is listed below:
Model SAR value W/Kg (1g average))
QL220 Plus 0.005
QL 320 Plus 0.002
QL 420 Plus 0.004
European Regulatory Information for this Radio
AT BE CY CZ DK
EE FI FR DE GR
HU IE IT LV LT
LU MT NL PL PT
SK SI ES SE GB
Note: -Member states in the EU with restrictive use for this device are
crossed out!
This device is also authorized for use in all EFTA member states (CH, IS, LI, NO)
Important Notice:
This device is a portable RF printer intended
for commercial and industrial use in all EU and
EFTA member states except in France where
restrictive use applies.
continued
46
QL Series User Guide
Europe – EU Declaration of Conformity
This device complies with the essential requirements of the R&TTE Directive
1999/5/EC. The following test methods have been applied in order to prove
presumption of compliance with the R&TTE Directive 1999/5/EC:
• EN55022:1998
European Immunity Standard
• EN 60950: 2000
Safety of Information Technology Equipment
• EN 300 328-2 V1.2.1 (2001-12)
Technical requirements for spread-spectrum radio equipment
• EN 301 489-17 V1.2.1 (2002-08)
EMC requirements for spread-spectrum radio equipment.
This device is a 2.4 GHz wireless LAN transceiver, intended for indoor home and
office use in all EU and EFTA member states, except in France where restrictive
use applies.
The use of this frequency band in France is subject to restrictions. You may only
use channels 10 and 11 (2457 and 2462 MHz) on French territory, except in those
French departments as listed in the table below where channels 1-13 (2412-2472
MHz) may be used. For more information see http://www.anfr.fr/ and/or http://
www.art-telecom.fr
01 Ain 36 Indre 69 Rhone
02 Aisne 37 Indre et Loire 70 Haute Saone
03 Allier 39 Jura 71 Saone et Loire
05 Hautes Alpes 41 Loir et Cher 72 Sarthe
08 Ardennes 42 Loire 75 Paris
09 Ariege 45 Loiret 77 Seine et Marne
10 Aube 50 Manche 78 Yvelines
11 Aude 54 Meurthe et Moselle 79 Deux Sievres
12 Aveyron 55 Meuse 82 Tarn et Garonne
16 Charente 57 Moselle 84 Vaucluse
19 Correze 58 Nievre 86 Vienne
2A Corse Sud 59 Nord 88 Vosges
2B Haute Corse 60 Oise 89 Yonne
21 Cote d’Or 61 Orne 90 Territoire de Belfort
24 Dordogne 63 Puy de Dome 91 Essonne
25 Doubs 64 Pyrenees Atlantique 92 Hauts de Seine
26 Drome 65 Hautes Pyrenees 93 Seine St Denis
27 Eure 66 Pyrenees Orientales 94 Val de Marne
32 Gers 67 Bas Rhin
35 Ille et Vilaine 68 Haute Rhin