Zebra Technologies P100I P100i User Manual 980590 P100iUsersGuide
Zebra Technologies Corporation P100i 980590 P100iUsersGuide
Contents
- 1. User Manual 1 of 2
- 2. User Manual 2 of 2
User Manual 1 of 2
Zebra® P100i™
Card Printer
User’s Manual
980590-001 Rev. A Draft 1
Review Copy
Aug 10, 2007

2 P100i User’s Manual 980590-001 Rev. A Draft 1

980590-001 Rev. A Draft 1 P100i User’s Manual iii
Foreword
This manual contains installation and operation information for the Zebra P100i card printers
manufactured by Zebra Technologies Corporation.
Copyright Notice
© 2004 ZIH Corp.
This document contains information proprietary to Zebra Technologies Corporation. This
document and the information contained within is Copyrighted by Zebra Technologies
Corporation and may not be duplicated in full or in part by any person without written
approval from Zebra Technologies Corporation. While every effort has been made to keep the
information contained within current and accurate as of the date of publication, no guarantee is
given that the document is error-free or that it is accurate with regard to any specification.
Zebra Technologies Corporation reserves the right to make changes, for the purpose of product
improvement, at any time.
Trademarks
P100i is a trademark and Zebra is a registered trademark of Zebra Technologies Corporation.
Windows is a registered trademark of Microsoft Corp. All other trademarks or registered
trademarks are marks of their respective holders.

iv P100i User’s Manual 980590-001 Rev. A Draft 1
Foreword
Product Disposal
Product Disposal
Return Materials Authorization
Before returning any equipment to Zebra Technologies Corporation for in-warranty or out-of-
warranty repair, contact Repair Administration for a Return Materials Authorization (RMA)
number. Repack the equipment in the original packing material and mark the RMA number
clearly on the outside. Ship the equipment, freight prepaid, to the address listed below:
Declarations of Conformity
FCC Regulations
Model P100i has been tested and found to comply with the limits for a Class A digital device,
pursuant to Part 15 of the FCC Rules. These limits are designed to provide reasonable
protection against harmful interference when the equipment is operated in a commercial
environment. This equipment generates, uses, and can radiate radio frequency energy and, if
not installed and operated in accordance with the P100i User’s Manual, may cause harmful
interference to radio communications. Operation of this equipment in a residential area is
likely to cause harmful interference in which case the user will be required to correct the
interference at his own expense.
Pursuant to Part 15.21 of the FCC Rules, any changes or modifications to this equipment not
expressly approved by Zebra may cause harmful interference and void the FCC authorization
to operate this equipment.
Product Disposal Information • Do not dispose of this product in unsorted municipal
waste. This product is recyclable, and should be recycled according to your local
standards. For more information, please see our web site at:
http://www.zebra.com/environment
For USA, Latin America, and Asia / Pacific:
Zebra Technologies Corporation
Zebra Card Printer Solutions
1001 Flynn Road
Camarillo, CA. 93012-8706.USA
Phone: +1 (805) 578-5001
FAX: +1 (805) 579-1808
For Europe and Middle East:
Zebra Technologies Corporation
Zebra Card Printer Solutions
Pittman Way, Fulwood
Preston, PR2 9ZD
Lancashire, U.K.
Phone: +44 - 1 - 772 - 797555
FAX: +44 - 1 - 772 - 693000
Foreword
Declarations of Conformity
980590-001 Rev. A Draft 1 P100i User’s Manual v
Industry Canada Notice
This device complies with Industry Canada ICES-003 class A requirements.
Cet équipement est conforme à l’ICES-003 classe A de la Norm Industrielle Canadienne.
For a formal certificate, please contact the Compliance Office at Zebra’s Camarillo facility.
EUROPE: Norway Only: This product is also designed for IT power system with phase to phase
voltage 230V. Earth grounding is via the polarized, 3-wire power cord.
FI: “Laite on liitettävä suojamaadoitus koskettimilla varustettuun pistorasiaan”
SE: “Apparaten skall anslutas till jordat uttag”
NO: “Apparatet må tilkoples jordet stikkontakt”
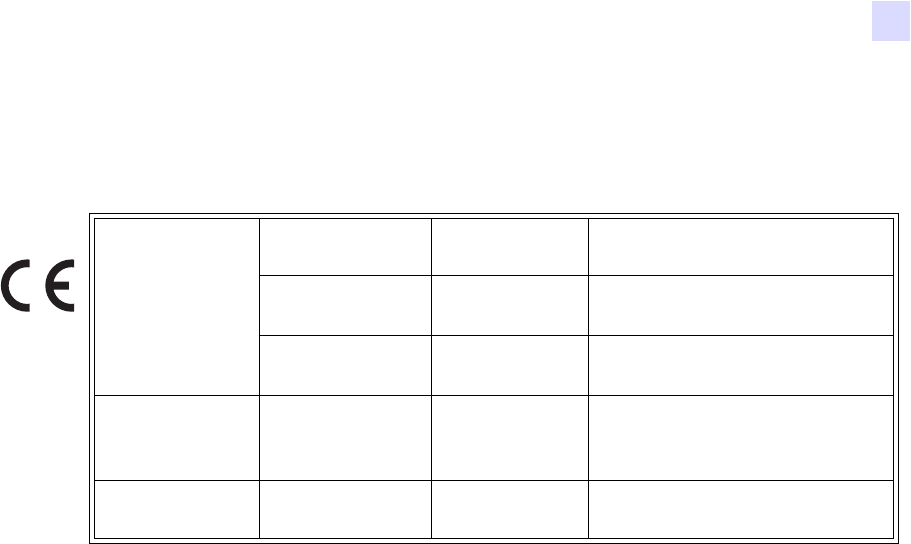
89/336/EEC
modified by
92/31/EEC and
93/68/EEC
EMC Directive EN 55022
(1998) RF Emissions control
EMC Directive EN 301489-3
V1.4.1 RF Emissions and Immunity for
radio equipment
EMC Directive EN55024
(2001) Immunity to Electro-Magnetic
Disturbances
73/23/EEC
modified by 93/
68/EEC
Low voltage
Directive EN 60950-1
(2001) Product safety
1999/5/CE R&TTE
Directive EN300330-2
V1.1.1 Radio Frequency Interferences
vi P100i User’s Manual 980590-001 Rev. A Draft 1
Foreword
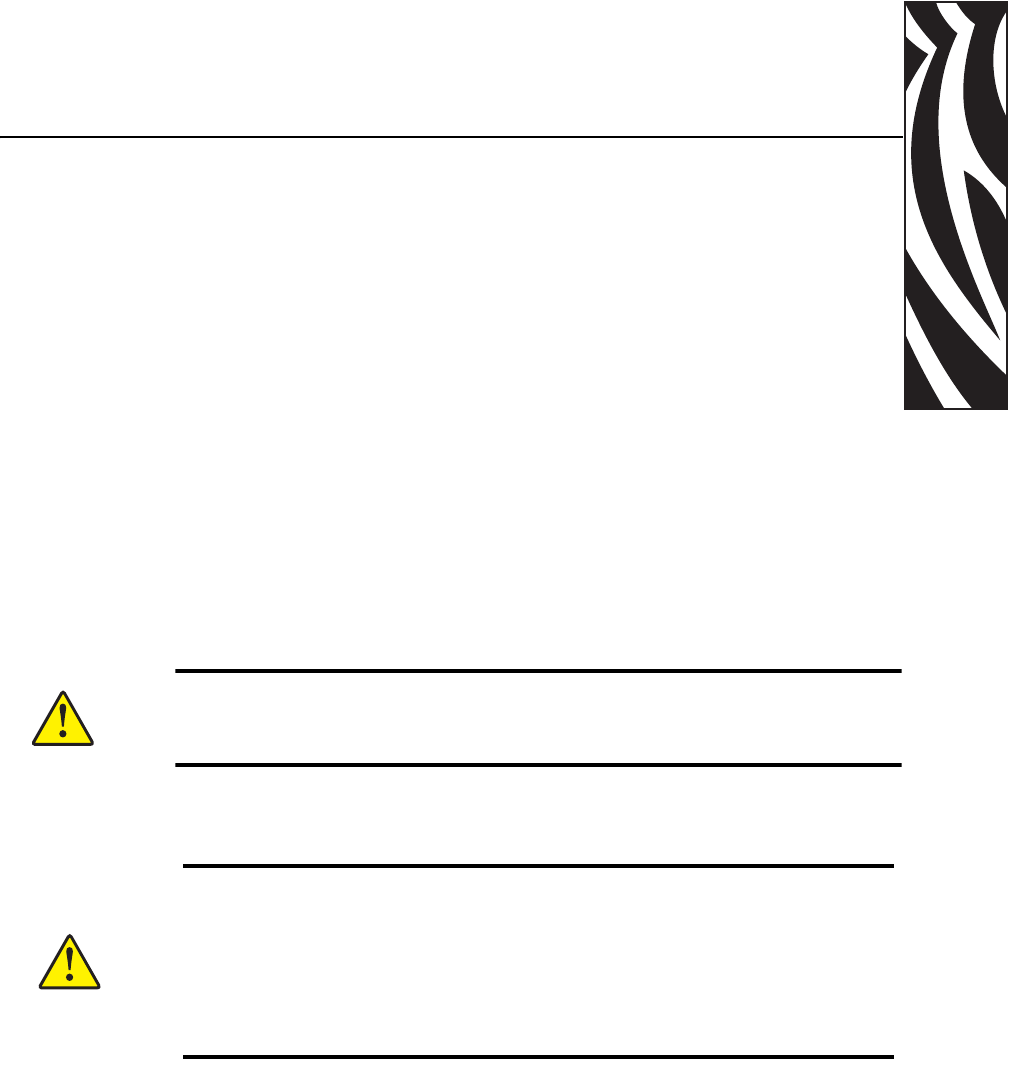
Icons
Icons
Throughout this manual, different icons highlight important information, as follows:
Note • Indicates information that emphasizes or supplements important points of the main
text.
Advises you of information that is essential to complete a task, or points out the importance
of specific information in the text.
Electric Shock Caution • Warns you of a potential electric shock situation.
Electrostatic Discharge Caution • Warns you of a situation where electrostatic
discharge could cause damage to electronic components.
Caution • Advises you that failure to take or avoid a specific action could result in
physical harm to you, or could result in physical damage to the hardware.

Foreword
P100i Printer Model
980590-001 Rev. A Draft 1 P100i User’s Manual vii
P100i Printer Model
The Zebra Product Number tells a story:
Here is a quick review of the Zebra Card Printer Series numbering and lettering system to help
you.
Model numbers include identifiers that specify options using the following lettering
conventions:
Part Number Description
P 1 0 0 i - _ _ _ _ _ - _ _ _
Base Printer
P100i Single Card Feed, Single Sided Color Card Printer
_ _ _ _ _ - 0 _ _ _ _ - _ _ _
_ _ _ _ _ - B _ _ _ _ - _ _ _
_ _ _ _ _ - D _ _ _ _ - _ _ _
_ _ _ _ _ - H _ _ _ _ - _ _ _
Smart Card Options
None
Contact Encoder
Contact Encoder & MIFARE contactless
MIFARE contactless
_ _ _ _ _ - _ 0 _ _ _ - _ _ _
_ _ _ _ _ - _ M _ _ _ - _ _ _
Magnetic Encoder
None
Yes (select defaults below)
_ _ _ _ _ - _ _ 0 _ _ - _ _ _
_ _ _ _ _ - _ _ 1 _ _ - _ _ _
Magnetic Encoder Defaults
None
Stripe Down, HiCo/LoCo
_ _ _ _ _ - _ _ _ 0 _ - _ _ _
Memory Expansion
None
_ _ _ _ _ - _ _ _ _ A - _ _ _
_ _ _ _ _ - _ _ _ _ C - _ _ _
Interface
USB Only
USB and Ethernet
_ _ _ _ _ - _ _ _ _ _ - I _ _
_ _ _ _ _ - _ _ _ _ _ - U _ _
Power Cords
U. S. and Europe
U. K. and Australia
_ _ _ _ _ - _ _ _ _ _ - _ D 0
Windows Drivers and User Documentation included on one CD
(Software & Documentation Package) which contains Multi-
language documentation - English, Spanish, French, German,
Chinese, Italian, and Portuguese
Example
P100i-0M10A-ID0 P100i Printer, Magnetic Stripe Encoder (Stripe Down, HiCo
), Standard Memory, USB Interface, US and Europe Power
Cords, Windows Driver and User Documentation CD

viii P100i User’s Manual 980590-001 Rev. A Draft 1

980590-001 Rev. A Draft 1 P100i User’s Manual 1
Contents
• Foreword . . . . . . . . . . . . . . . . . . . . . . . . . . . . . . . . . . . . . . . . . . . . .iii
Copyright Notice. . . . . . . . . . . . . . . . . . . . . . . . . . . . . . . . . . . . . . . . . . . . . iii
Trademarks . . . . . . . . . . . . . . . . . . . . . . . . . . . . . . . . . . . . . . . . . . . . . . . . iii
Product Disposal . . . . . . . . . . . . . . . . . . . . . . . . . . . . . . . . . . . . . . . . . . . . iv
Return Materials Authorization. . . . . . . . . . . . . . . . . . . . . . . . . . . . . . . . . . iv
Declarations of Conformity. . . . . . . . . . . . . . . . . . . . . . . . . . . . . . . . . . . . . iv
Icons. . . . . . . . . . . . . . . . . . . . . . . . . . . . . . . . . . . . . . . . . . . . . . . . . . . . . . vi
P100i Printer Model . . . . . . . . . . . . . . . . . . . . . . . . . . . . . . . . . . . . . . . . . .vii
1 • Getting Started . . . . . . . . . . . . . . . . . . . . . . . . . . . . . . . . . . . . . . . 1
Unpacking Your Card Printer . . . . . . . . . . . . . . . . . . . . . . . . . . . . . . . . . . . 1
Controls and Indicators . . . . . . . . . . . . . . . . . . . . . . . . . . . . . . . . . . . . . . . 2
Multi-Function LCD Panel . . . . . . . . . . . . . . . . . . . . . . . . . . . . . . . . . . 2
Rear Panel Connectors, Controls, and Indicators . . . . . . . . . . . . . . . . 4
2 • Printer Installation. . . . . . . . . . . . . . . . . . . . . . . . . . . . . . . . . . . . . 7
Installing the P100i Printer . . . . . . . . . . . . . . . . . . . . . . . . . . . . . . . . . . . . . 7
Installing the Printer Driver. . . . . . . . . . . . . . . . . . . . . . . . . . . . . . . . . . . . .11
Print Driver Installation. . . . . . . . . . . . . . . . . . . . . . . . . . . . . . . . . . . . 12
Change Printer Driver Options . . . . . . . . . . . . . . . . . . . . . . . . . . . . . . . . . 17
3 • P100i Printer Setup . . . . . . . . . . . . . . . . . . . . . . . . . . . . . . . . . . . 23
Printer Features . . . . . . . . . . . . . . . . . . . . . . . . . . . . . . . . . . . . . . . . . . . . 23
Loading Ribbon Cartridge . . . . . . . . . . . . . . . . . . . . . . . . . . . . . . . . . . . . 24
Installing the Cleaning Cartridge . . . . . . . . . . . . . . . . . . . . . . . . . . . . . . . 26
Inserting Cards. . . . . . . . . . . . . . . . . . . . . . . . . . . . . . . . . . . . . . . . . . . . . 29
Printing a Test Card . . . . . . . . . . . . . . . . . . . . . . . . . . . . . . . . . . . . . . . . . 30

2 P100i User’s Manual 980590-001 Rev. A Draft 1
Contents
4 • P100i Printer Operation . . . . . . . . . . . . . . . . . . . . . . . . . . . . . . . 33
Printing . . . . . . . . . . . . . . . . . . . . . . . . . . . . . . . . . . . . . . . . . . . . . . . . . . . 33
Creating a Sample Card. . . . . . . . . . . . . . . . . . . . . . . . . . . . . . . . . . . 33
Printing a Sample Card . . . . . . . . . . . . . . . . . . . . . . . . . . . . . . . . . . . 34
5 • Cleaning. . . . . . . . . . . . . . . . . . . . . . . . . . . . . . . . . . . . . . . . . . . . 37
Cleaning System . . . . . . . . . . . . . . . . . . . . . . . . . . . . . . . . . . . . . . . . . . . 37
When to Clean . . . . . . . . . . . . . . . . . . . . . . . . . . . . . . . . . . . . . . . . . . 37
How to Clean . . . . . . . . . . . . . . . . . . . . . . . . . . . . . . . . . . . . . . . . . . . 37
Cleaning the Print Head . . . . . . . . . . . . . . . . . . . . . . . . . . . . . . . . . . . . . . 39
6 • Troubleshooting . . . . . . . . . . . . . . . . . . . . . . . . . . . . . . . . . . . . . 41
Troubleshooting Procedures . . . . . . . . . . . . . . . . . . . . . . . . . . . . . . . . . . 41
Print Quality Issues . . . . . . . . . . . . . . . . . . . . . . . . . . . . . . . . . . . . . . 42
Troubleshooting the Ethernet Connection and Adapter . . . . . . . . . . . . . . 45
Resetting to Factory Defaults. . . . . . . . . . . . . . . . . . . . . . . . . . . . . . . 45
Ethernet Adapter Status Indicator . . . . . . . . . . . . . . . . . . . . . . . . . . . 46
Network Status/Activity Indicator . . . . . . . . . . . . . . . . . . . . . . . . . . . . 47
7 • Technical Specifications . . . . . . . . . . . . . . . . . . . . . . . . . . . . . . 49
Card Dimensions . . . . . . . . . . . . . . . . . . . . . . . . . . . . . . . . . . . . . . . . . . . 51
ISO standard dimensions for plain card. . . . . . . . . . . . . . . . . . . . . . . 51
ISO standard dimensions for magnetic stripe card . . . . . . . . . . . . . . 51
Appendix A • Magnetic Card Encoder . . . . . . . . . . . . . . . . . . . . . . 53
Magnetic Card Stripe Encoder . . . . . . . . . . . . . . . . . . . . . . . . . . . . . . . . . 53
Introduction . . . . . . . . . . . . . . . . . . . . . . . . . . . . . . . . . . . . . . . . . . . . . . . 53
Media Loading Orientation. . . . . . . . . . . . . . . . . . . . . . . . . . . . . . . . . 54
Magnetic Encoder Cleaning. . . . . . . . . . . . . . . . . . . . . . . . . . . . . . . . 54
ISO Standard Encoding . . . . . . . . . . . . . . . . . . . . . . . . . . . . . . . . . . . 55
Appendix B • Connecting to a Network . . . . . . . . . . . . . . . . . . . . . 57
Printer Sharing . . . . . . . . . . . . . . . . . . . . . . . . . . . . . . . . . . . . . . . . . . . . . 57
External Print Server . . . . . . . . . . . . . . . . . . . . . . . . . . . . . . . . . . . . . . . . 58
Internal Print Server . . . . . . . . . . . . . . . . . . . . . . . . . . . . . . . . . . . . . . . . . 58
Appendix C • Smart Card Contact Station . . . . . . . . . . . . . . . . . . . 59
Introduction . . . . . . . . . . . . . . . . . . . . . . . . . . . . . . . . . . . . . . . . . . . . . . . 59
Media Loading Orientation . . . . . . . . . . . . . . . . . . . . . . . . . . . . . . . . . . . . 59
Appendix D • Worldwide Sales & Support. . . . . . . . . . . . . . . . . . . 61
Sales and Support Locations . . . . . . . . . . . . . . . . . . . . . . . . . . . . . . . . . . 61
Website . . . . . . . . . . . . . . . . . . . . . . . . . . . . . . . . . . . . . . . . . . . . . . . . . . 62

980590-001 Rev. A Draft 1 P100i User’s Manual 1
1
Getting Started
Unpacking Your Card Printer
Your P100i printer ships in a cardboard carton, protected by styrofoam inserts and a
protective anti-static bag. Keep all packaging material in case you need to move or re-ship
the printer.
1. Before opening and unpacking the printer, inspect the carton to ensure that no damage
occurred during shipment.
2. Ensure that you have a clean and nearly dust free environment for proper operation
and storage of the printer.
3. Unlatch and remove the handle, open the carton, and remove the box containing the
printer accessories from the shipping carton.
4. Remove the styrofoam packing material from the top of the printer.
5. Lift the printer out of the carton by holding it on both sides of the bottom and lifting
the printer gently from the carton.
6. Make sure the following accessories are included with your P100i printer:
a. Software CD-ROM
b. Quick Start Guide
c. Cleaning Kit
d. 120 VAC and 230 VAC Power Cords
e. Power Transformer
f. USB Printer Cable
If any items are missing, please contact your dealer. To reorder, please refer to Appendix C
of this manual.
2 P100i User’s Manual 980590-001 Rev. A Draft 1
Getting Started
Controls and Indicators
Controls and Indicators
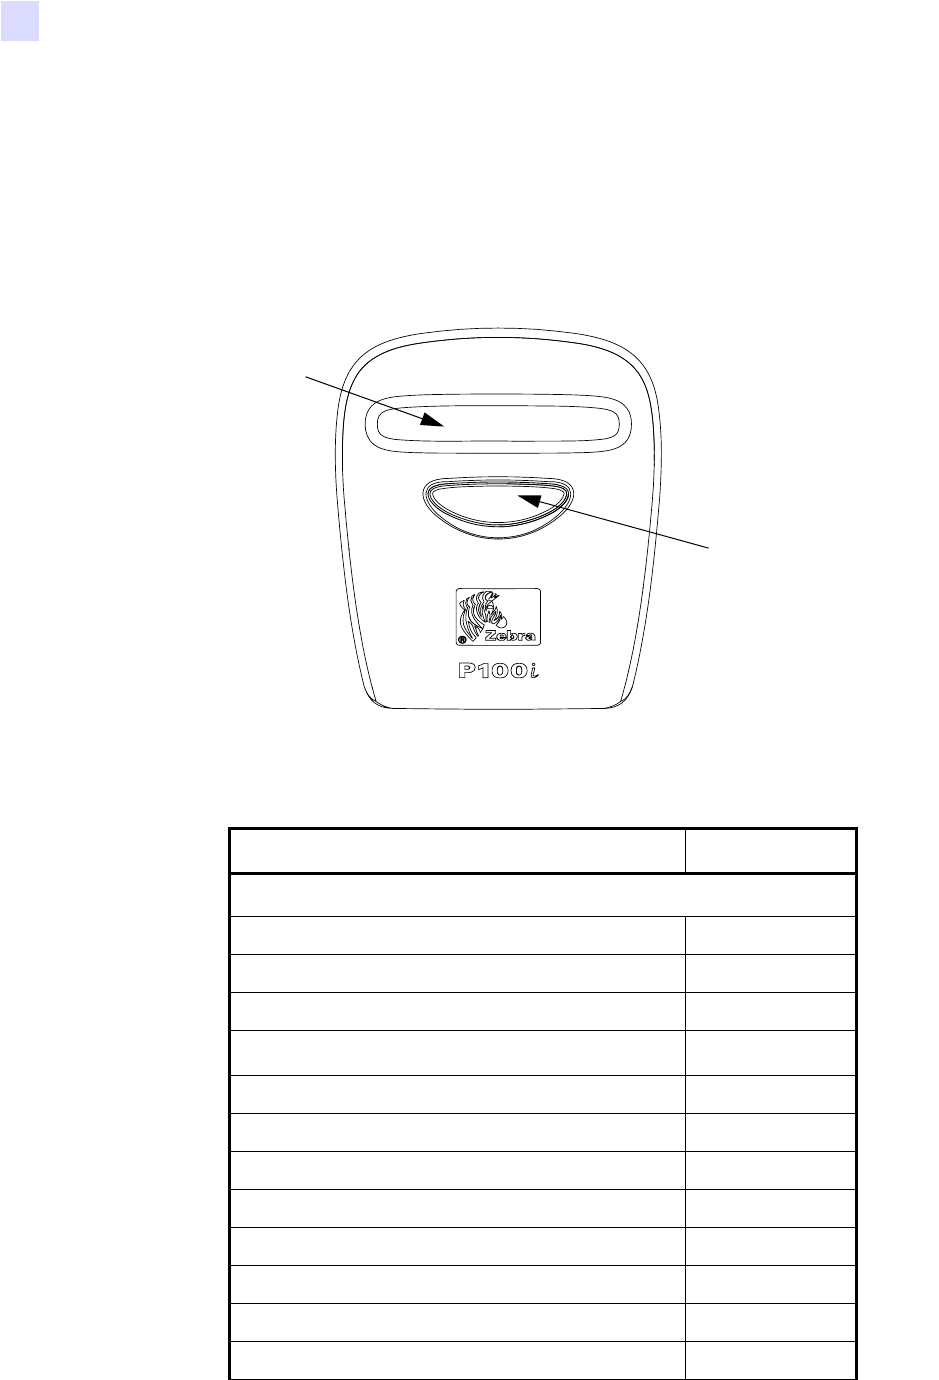
Multi-Function LCD Panel
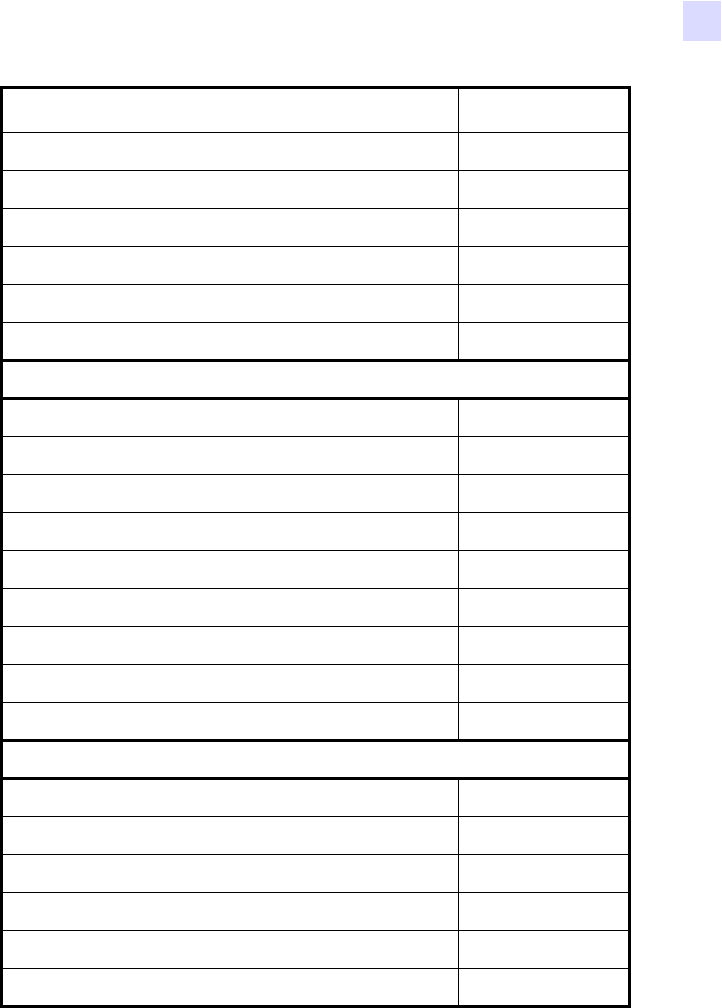
Your P100i printer is equipped with a Multi Function LCD Readout Panel to provide printer
status information. The readout is controlled by the multi-function control button directly
below the viewing window.
The LCD Panel can display the following messages:
Message Mode
Operational
Initializing Fixed
SELF TEST Fixed
READY Fixed
DOWNLOADING DATA Fixed
MAG ENCODING Fixed
PRINTING MONO Fixed
PRINTING CYAN Fixed
PRINTING YELLOW Fixed
PRINTING MAGENTA Fixed
PRINTING BLACK Fixed
PRINTING OVERLAY Fixed
DOWNLOADING FIRMWARE Fixed
Multi-Function
Control Button
Multi-Function
LCD Panel
Getting Started
Controls and Indicators
980590-001 Rev. A Draft 1 P100i User’s Manual 3
CLEANING Fixed
FEED LONG CLEANING CARD IN EXIT Scrolling
REMOVE LONG CLEANING CARD Scrolling
SINGLE CARD READY-PRINT OR EJECT Scrolling
INSERT CARD Fixed
PUSH BUTTON TO CONTINUE Scrolling
Warnings (Printer will still operate)
REMOVE CARD AT EXIT Scrolling
CLEAN PRINTER Fixed
CHECKING RIBBON Fixed
ENCODING ERROR Fixed
INVALID MAGNETIC DATA Scrolling
CHECK RIBBON Fixed
CLOSE LID Fixed
FLASH ERROR Fixed
READING ERROR Fixed
Errors (Printer will not operate)
OUT OF RIBBON Fixed
MECHANICAL ERROR Fixed
COVER OPEN Fixed
PARAMETERS ERROR Fixed
COMMAND ERROR Fixed
OUT OF RIBBON Fixed
Message Mode
4 P100i User’s Manual 980590-001 Rev. A Draft 1
Getting Started
Controls and Indicators
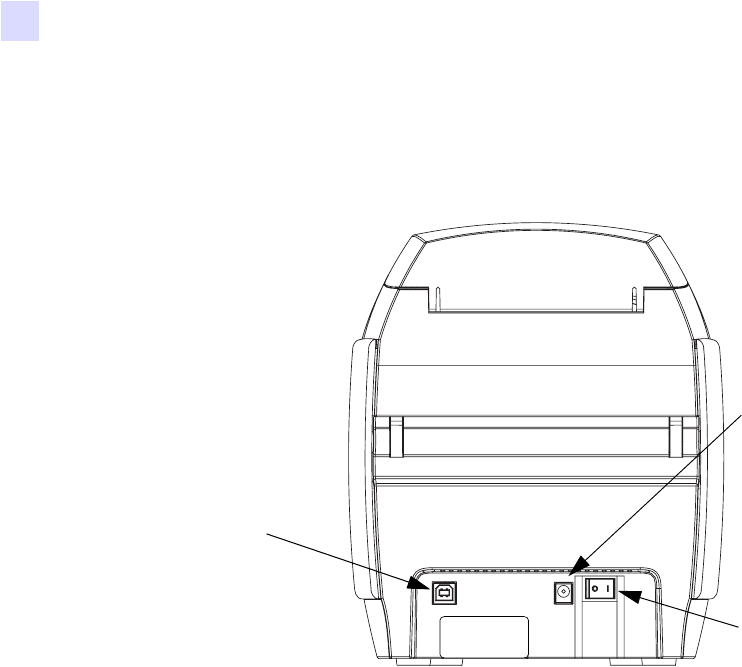
Rear Panel Connectors, Controls, and Indicators
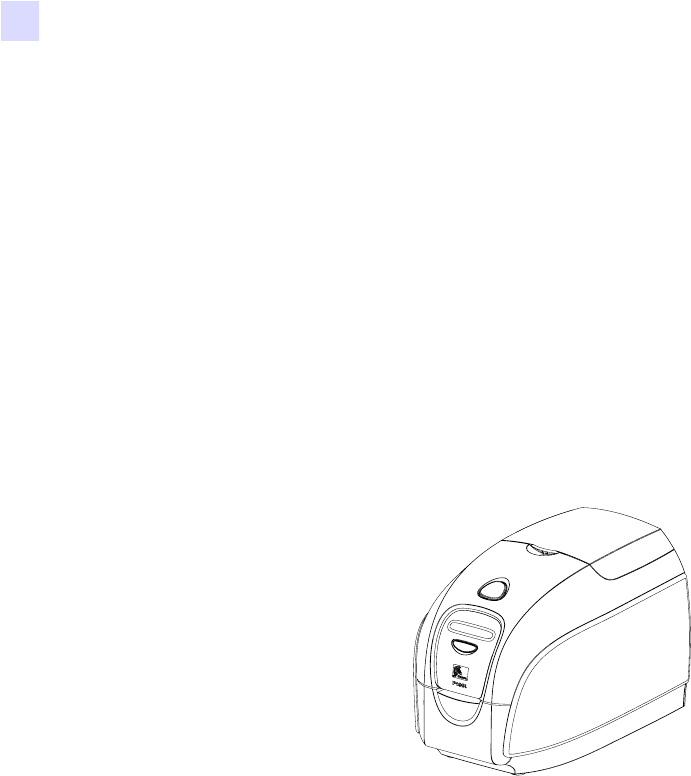
The figure below shows the rear of the P100i Printer.
Power Switch
The power switch is located at the rear of the printer unit, bottom right.
Power Socket
The power socket is located at the rear of the printer, to the left of the power switch.
USB Port
The USB port is located at the rear of the printer unit, bottom left.
Power
Switch
USB
Port
Power
Socket
Getting Started
Controls and Indicators
980590-001 Rev. A Draft 1 P100i User’s Manual 5
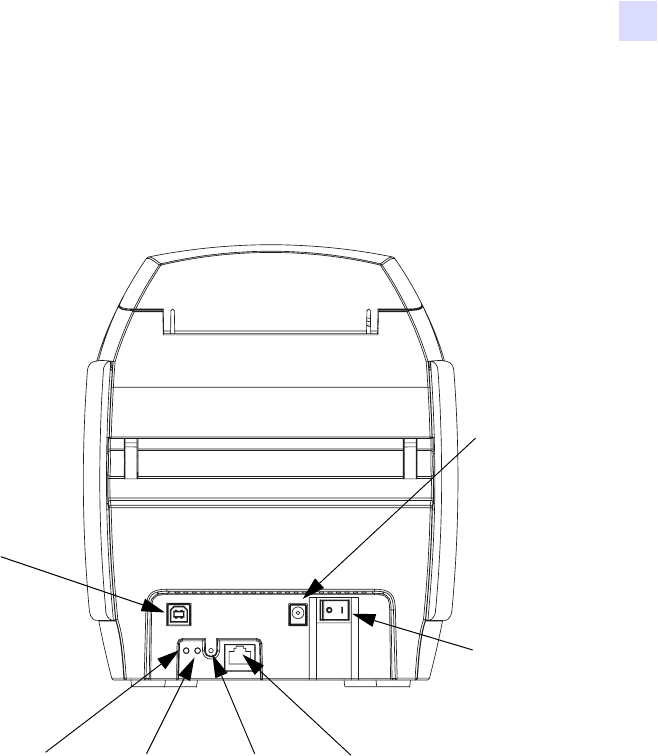
Ethernet Option
If your P100i Printer includes the Ethernet option, the rear of the printer will look like the
figure below.
Power
Switch
USB
Port
Power
Socket
Ethernet
Connector
Ethernet
Reset
Button
Network
Status /
Activity
Indicator
Ethernet
Adapter
Status
Indicator

6 P100i User’s Manual 980590-001 Rev. A Draft 1
980590-001 Rev. A Draft 1 P100i User’s Manual 7
2
Printer Installation
Installing the P100i Printer
1. Place the printer in a location that allows easy access to all sides. The printer should
never be operated while resting on its side or upside down
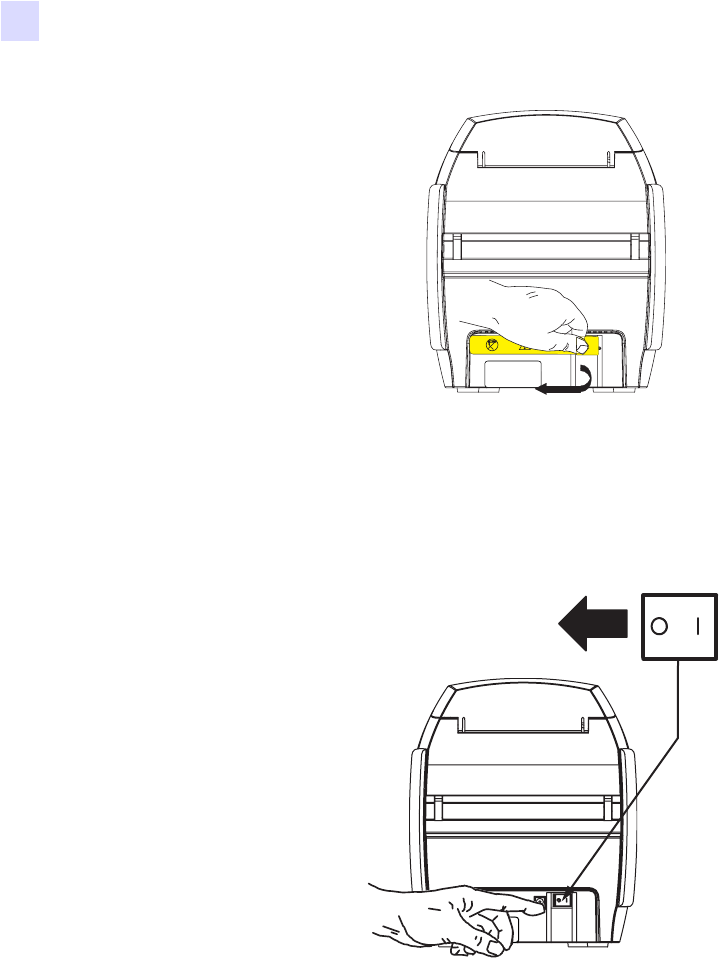
2. Remove the yellow CAUTION label from the back of the printer.
Caution • Do not power the printer with USB attached to your computer at this
time. THE DRIVER WILL PROMPT YOU WHEN IT IS TIME TO PLUG IN AND POWER
UP YOUR PRINTER.
Caution • Limit electrical power supplied to the P100i Printer to 24 VDC. Limit
excess current draw to 16 amps or less, using an associated circuit breaker or
other such device. Never operate the printer in a location where operator,
computer, or printer can get wet. Personal injury could result. The printer must be
connected to an earthed electrical power supply and properly protected against
electrical surges and grounding faults. The power supply pack can only be
replaced by the same product from the manufacturer.
8 P100i User’s Manual 980590-001 Rev. A Draft 1
Printer Installation
Installing the P100i Printer
3. Ensure that the printer’s power switch is in the OFF (O) position.
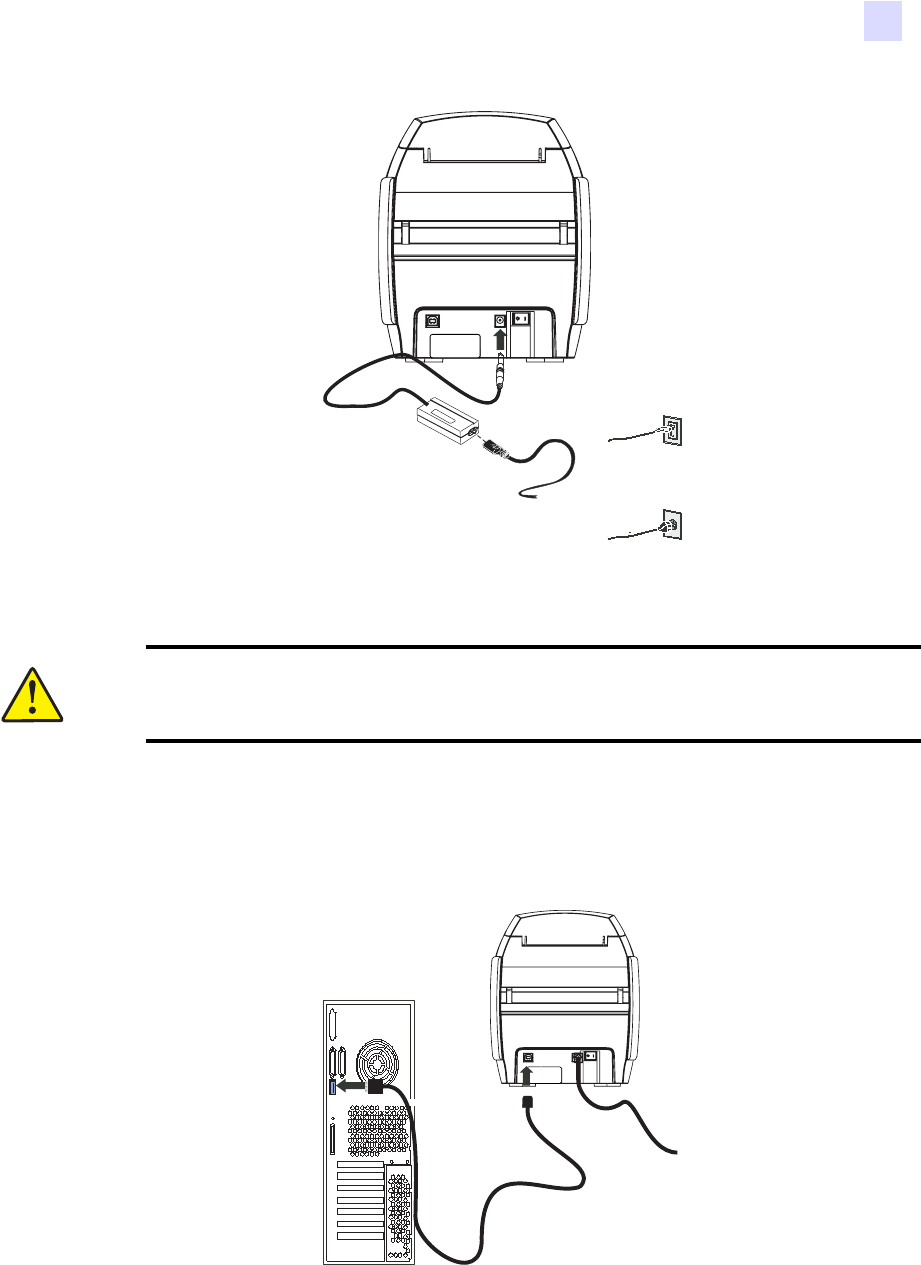
4. Insert the power supply plug into the power socket, attach the power cord (120VAC or
230VAC) to the power supply, then plug the power cord in to a grounded electrical socket
of the proper voltage and type.
Printer Installation
Installing the P100i Printer
980590-001 Rev. A Draft 1 P100i User’s Manual 9
5. If your printer has only the USB interface, attach the included USB cable to your
computer and the printer.
115 VAC
230 VAC
Caution • Intermittent or unpredictable operation may occur from unsecured
connectors. If damaged, the power cable must be replaced by an exact equivalent. The
socket should always be easily accessible to power off the printer.
10 P100i User’s Manual 980590-001 Rev. A Draft 1
Printer Installation
Installing the P100i Printer
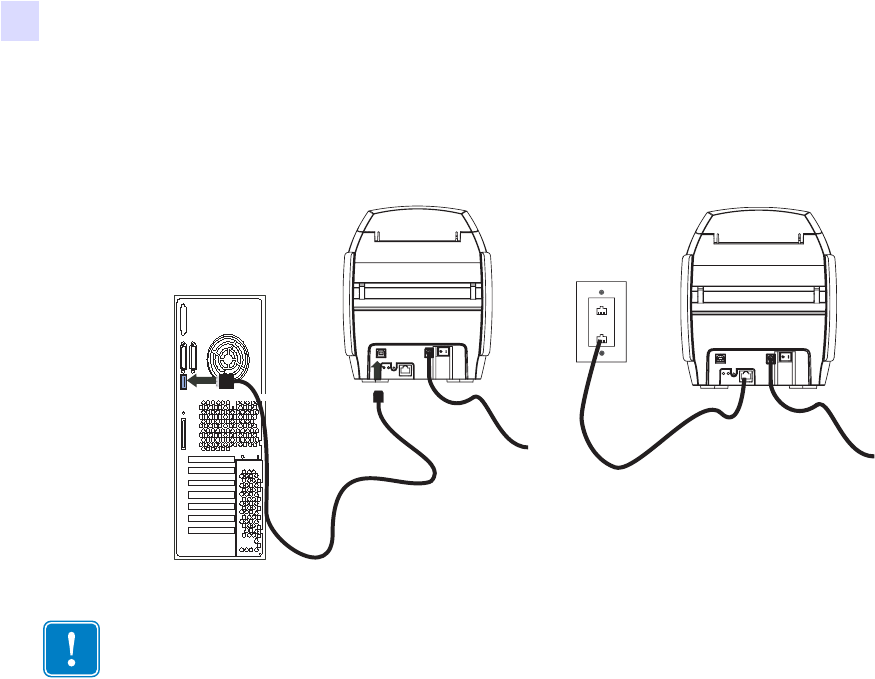
6. If your printer has the optional Ethernet interface (as well as the USB interface), connect
either the USB cable to printer and computer or the Ethernet cable to the printer and the
Ethernet network.
Important • Do not connect both the USB and the Ethernet interfaces at the same time!

Printer Installation
Installing the Printer Driver
980590-001 Rev. A Draft 1 P100i User’s Manual 11
Installing the Printer Driver
To install the P100i Printer on Windows 2000, Windows XP, or Windows Vista operating
systems, insert the User Documentation and Drivers CD, included with your printer, into your
computer and the InstallWizard will walk you through the required installation steps. The
InstallWizard will:
• Automatically install the User Interface when the driver CD is inserted.
• Start the installation process when the Install Printer Driver menu item is selected from
the Main Menu.
• Allow you to install Ethernet drivers, if you plan on networking your card printer via an
external print server
• Check to see which operating system you are using
• Detect previous versions of the driver and clean up any unnecessary Windows registry
entries. You must select “Remove” from the install options to remove any previous driver
versions.
• Install the new driver files
• Reboot your computer
Important • Do not power the printer with USB attached to your computer at this time. The
driver will prompt you when it is time to plug in and power up your printer.
12 P100i User’s Manual 980590-001 Rev. A Draft 1
Printer Installation
Installing the Printer Driver
Print Driver Installation
Install the P100i Printer driver as follows:
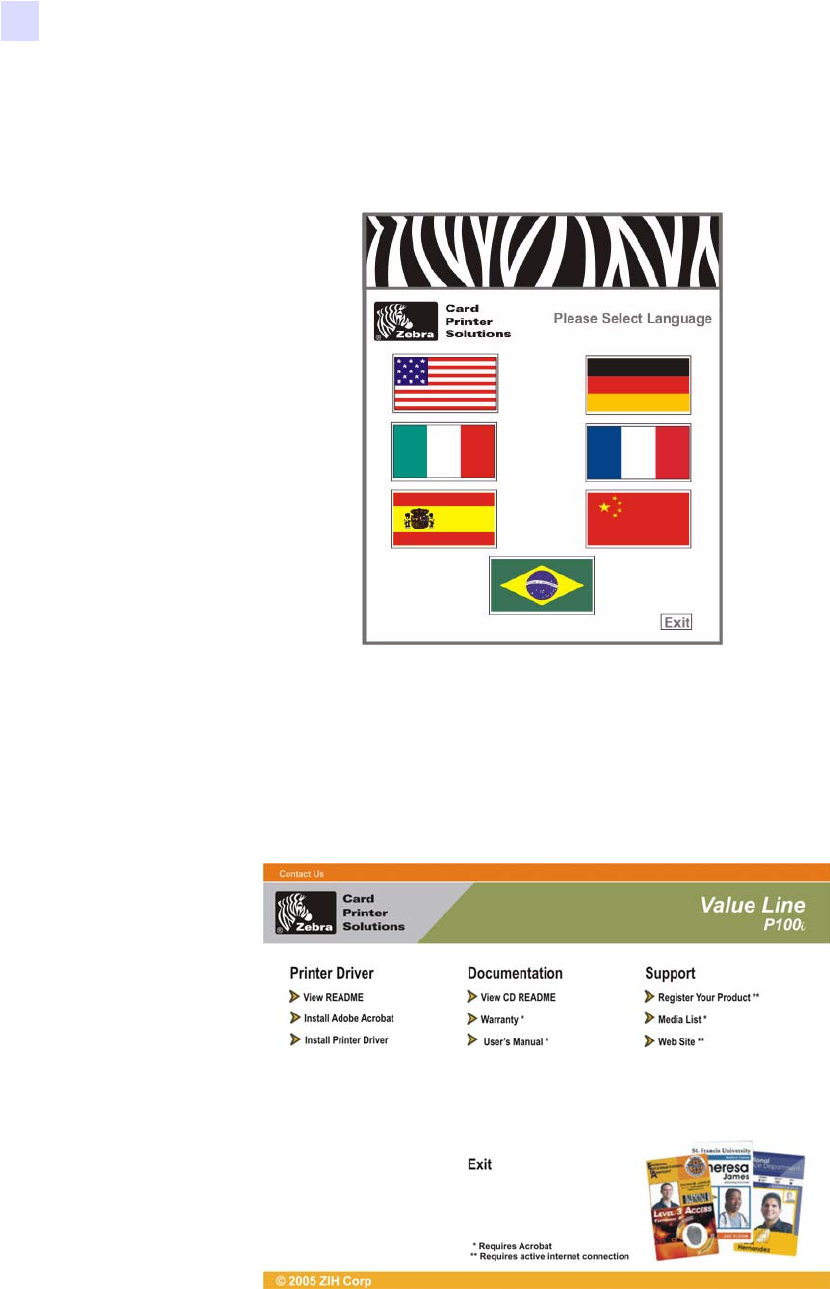
1. Insert the P100i User Documentation and Drivers CD into the CD drive of the host
computer. The Select Language window will open.
2. From the Select Language window, choose the appropriate language for your system. The
Main Menu will open in the selected language.
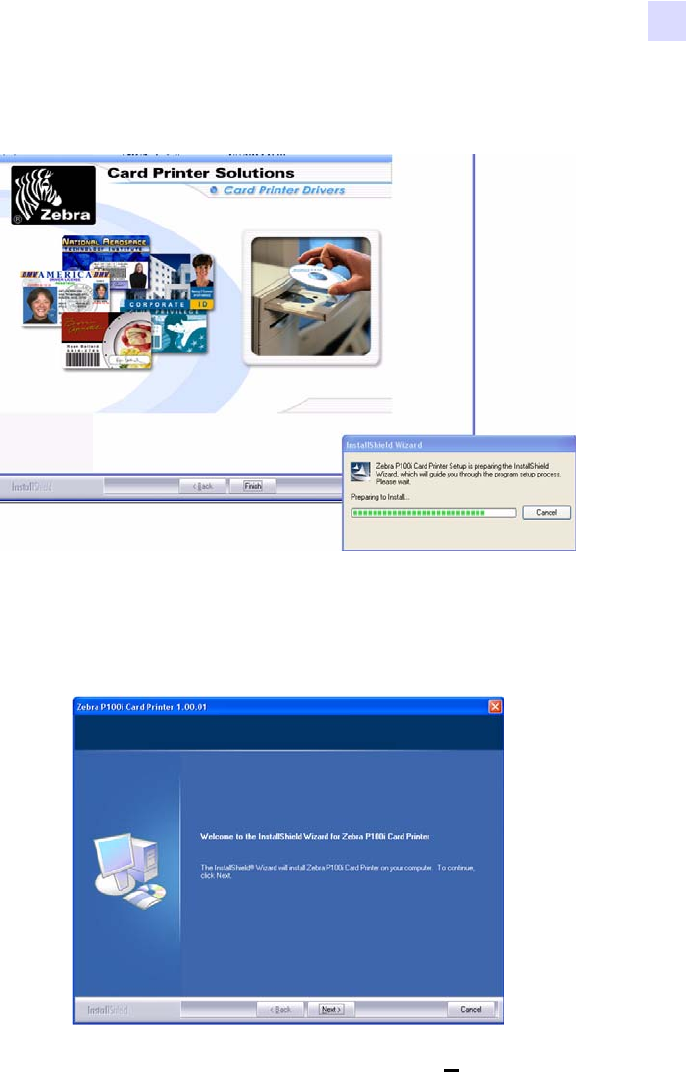
3. In the left column, select Install Printer Driver.
Printer Installation
Installing the Printer Driver
980590-001 Rev. A Draft 1 P100i User’s Manual 13
4. The InstallShield Wizard will be installed and a progress window will be displayed. Once
the InstallShield Wizard has been installed, the Welcome to InstallShield Wizard
window will open.
5. On the Welcome to InstallShield Wizard window, click the Next button.
14 P100i User’s Manual 980590-001 Rev. A Draft 1
Printer Installation
Installing the Printer Driver
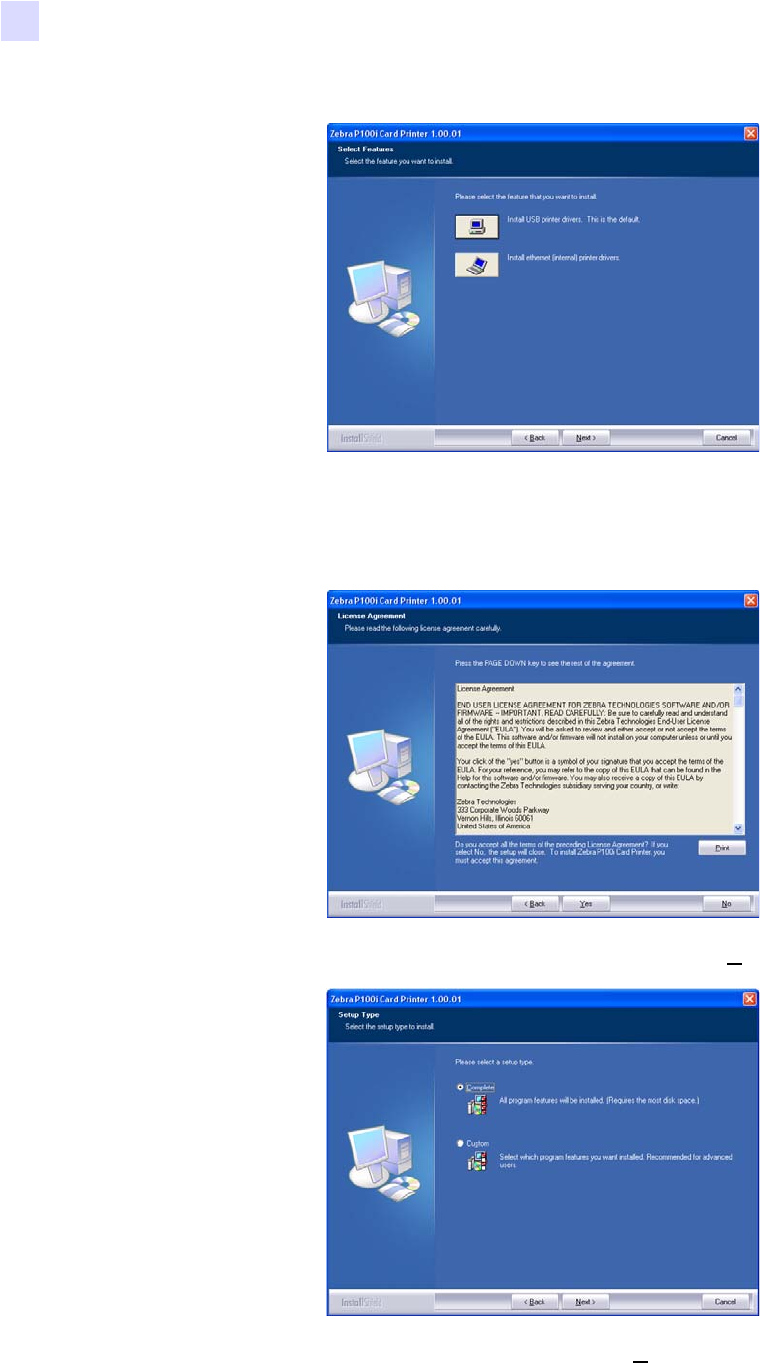
6. Select USB or Ethernet, click the Next button.
7. If you agree to the License Agreement, click the Yes button.
8. Most users should select the Complete setup type; then click the Next button.
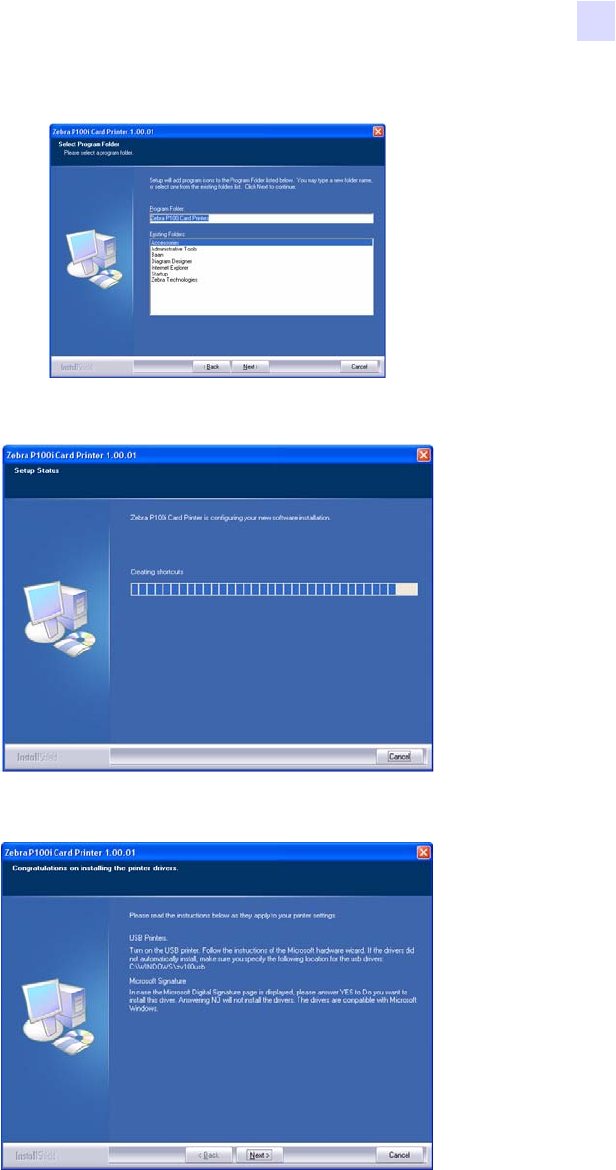
9. Specify the location to load the Driver, then click the Next button.
Printer Installation
Installing the Printer Driver
980590-001 Rev. A Draft 1 P100i User’s Manual 15
10. The Install Wizard will show the progress of the installation.
11. Read the appropriate information.
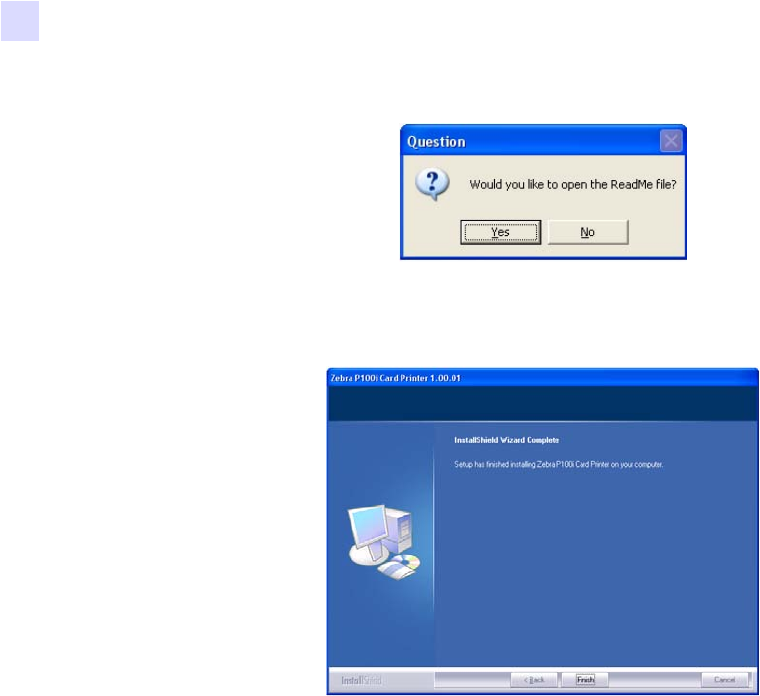
12. If you wish, you can open the ReadMe file, which has information about the driver version
you have installed.
16 P100i User’s Manual 980590-001 Rev. A Draft 1
Printer Installation
Installing the Printer Driver
13. Driver installation is now complete. Click the Finish button.
14. After installing the Driver, restart your computer.
15. When you apply power to the printer, the Windows New Hardware Found wizard will find
the printer.
Printer Installation
Change Printer Driver Options
980590-001 Rev. A Draft 1 P100i User’s Manual 17
Change Printer Driver Options
You can change the default settings for the P100i printer driver. Change the options as follows:
1. Select Start>Settings>Printers and Faxes to bring up a listing of connected printers.
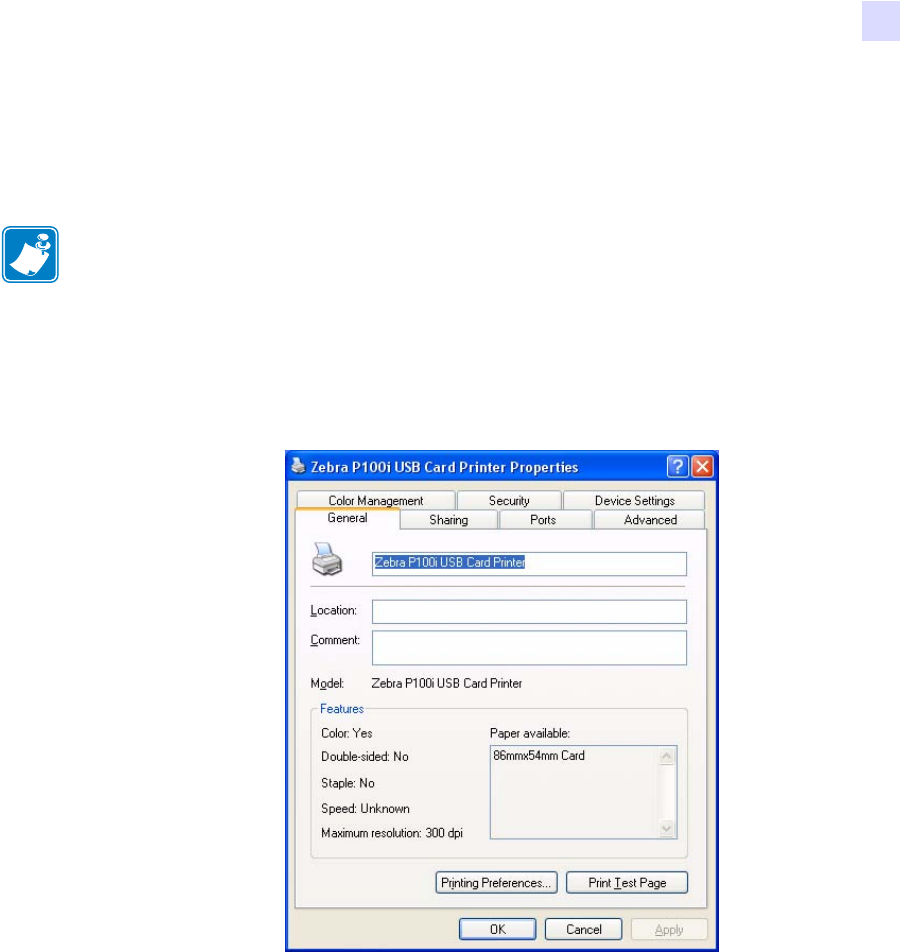
2. From the Printers and Faxes list, right click the P100i USB Card Printer and select
Properties from the pop-up menu. The Printer Properties window will open.
3. On the General tab, click on the Printing Preferences button to change the card orientation
settings, monochrome conversion settings, various ribbon settings, or to adjust the color
and head settings properties.
Note • The screen shots shown in this section are for the P100i Printer using the USB
interface. If you are using the Ethernet interface, the screens will refer to the “Zebra P100i
Network Printer.”
18 P100i User’s Manual 980590-001 Rev. A Draft 1
Printer Installation
Change Printer Driver Options
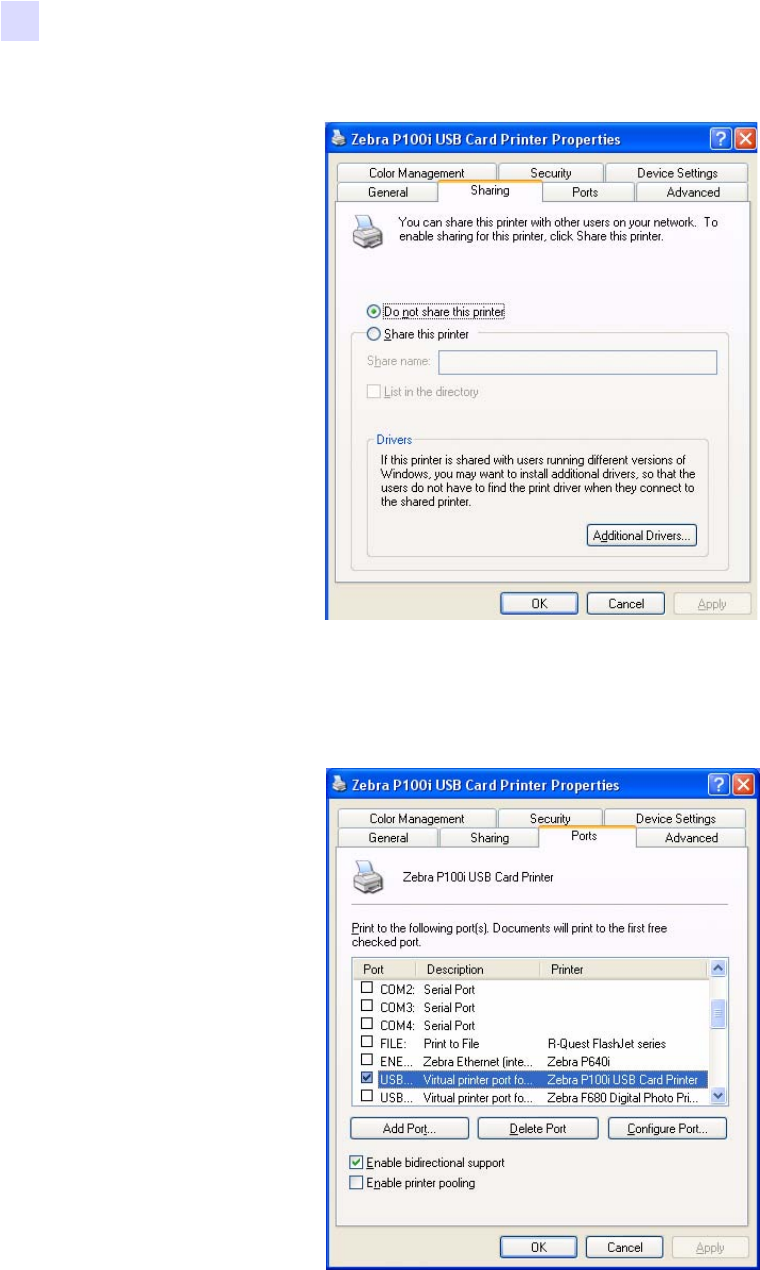
4. On the Sharing tab, you can choose to share the printer over the network, and install
additional drivers to accommodate different operating systems.
5. On the Ports tab, you can add, delete, and configure the printer ports, as well as choose
which port the P110i printer is assigned.
Printer Installation
Change Printer Driver Options
980590-001 Rev. A Draft 1 P100i User’s Manual 19
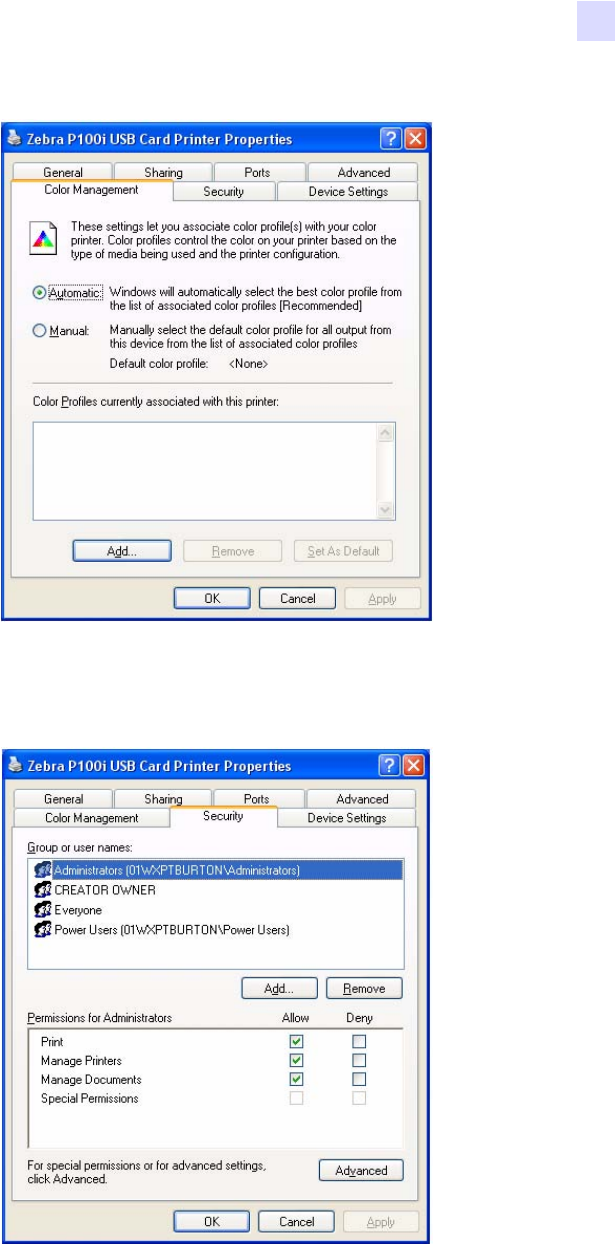
6. On the Color Management tab, you can add, remove, or change printer color profiles.
7. Use the Security tab to change permissions for the P100i printer.
20 P100i User’s Manual 980590-001 Rev. A Draft 1
Printer Installation
Change Printer Driver Options
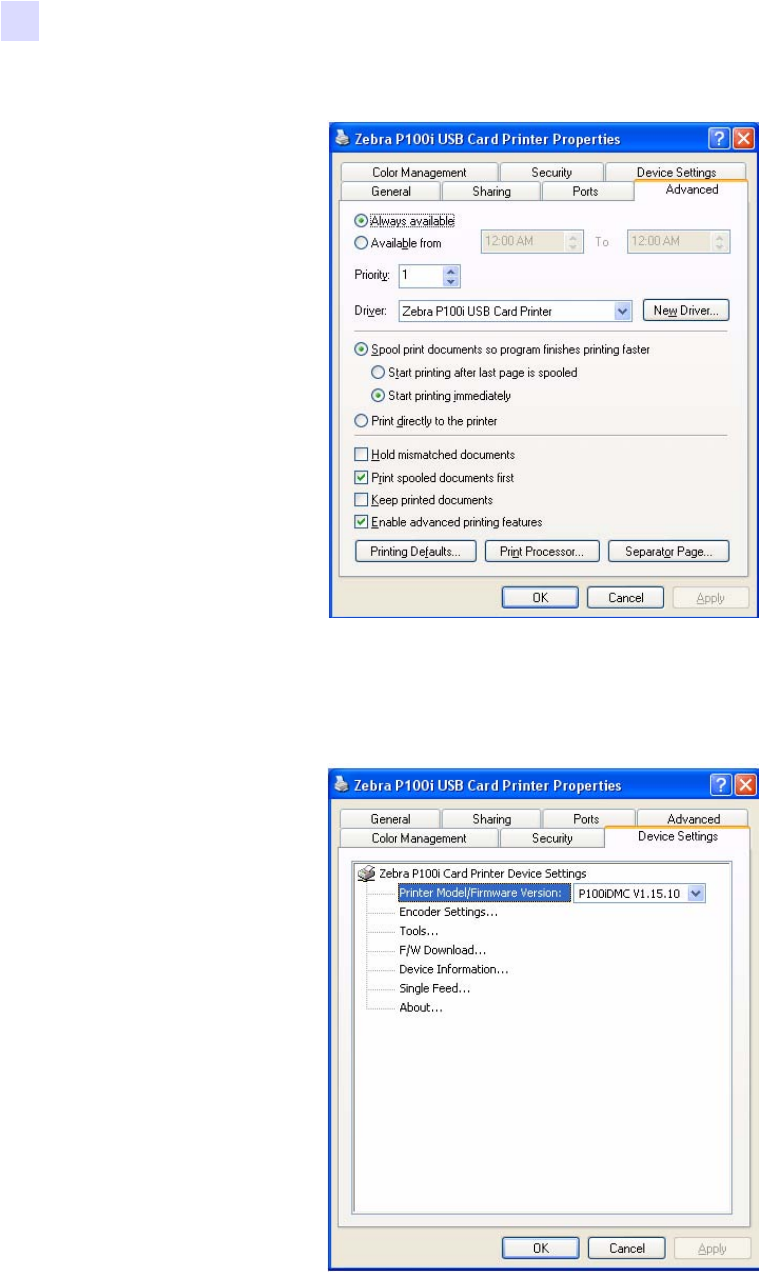
8. On the Advanced tab, you can choose various printer properties, install different printer
drivers, and change default printer settings.
9. On the Device Settings tab, you can change settings for a Magnetic Encoder. (Click on
Encoder Settings. A button “Properties” will open next to it. Click that button.)
Printer Installation
Change Printer Driver Options
980590-001 Rev. A Draft 1 P100i User’s Manual 21
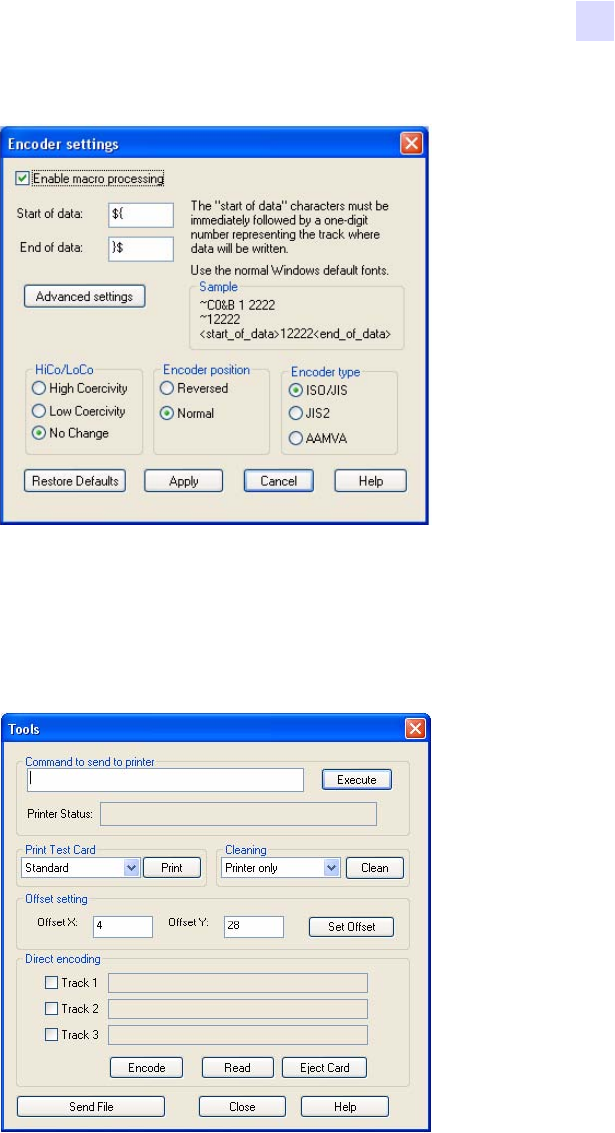
10. Again from the Device Settings tab, you can change various parameters and even send test
commands to the printer. (Click on Tools. A button “Properties” will open next to it. Click
that button.)
11. Once the P100i printer driver options are set to your satisfaction, click the OK button to
save your new configuration and close the Properties window.
22 P100i User’s Manual 980590-001 Rev. A Draft 1
Printer Installation
Change Printer Driver Options
980590-001 Rev. A Draft 1 P100i User’s Manual 23
3
P100i Printer Setup
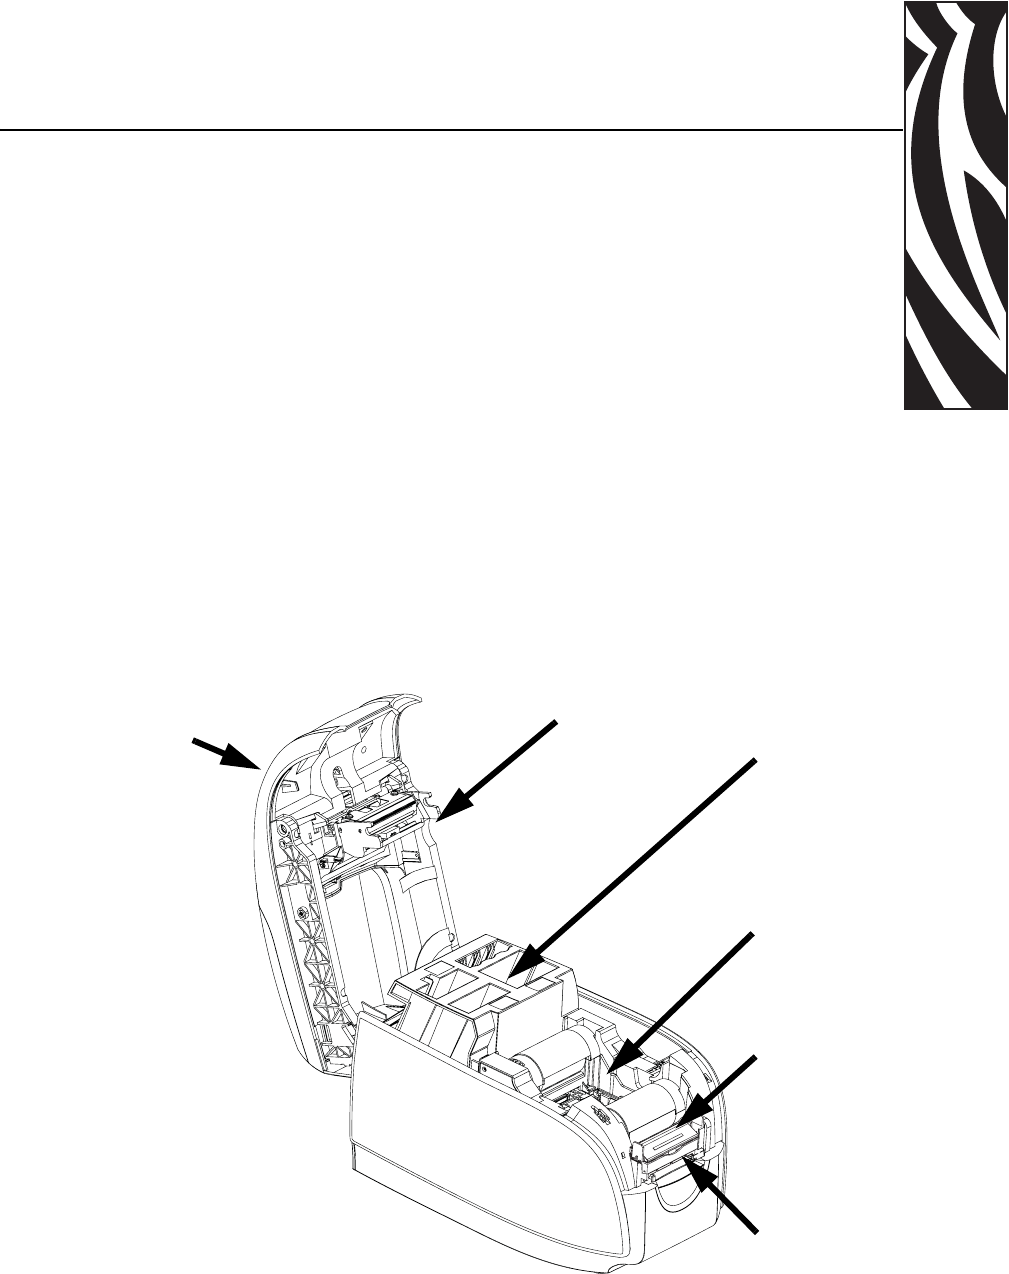
Printer Features
The following shows an interior view of your P100i Printer.
Lid
Print
Head
Ribbon
Cartridge
Card
Cleaning
Cartridge
Card and
Cleaning
Roller
Storage
Area
Card
Entry /
Exit
Slot
24 P100i User’s Manual 980590-001 Rev. A Draft 1
P100i Printer Setup
Loading Ribbon Cartridge
Loading Ribbon Cartridge
The P100i Printer requires approved ribbon cartridges (see Appendix C). The Resin Thermal
Transfer and Dye Sublimation ribbons are specifically designed for your P100i Printer.
•i Series Printers require the use of i Series ribbons for full color printing.
• Each ribbon cartridge includes an integrated adhesive cleaning roller assembly that is
used to clean the cards entering the printer. Improper cleaning will reduce printer life
and degrade print quality
• When the ribbon is completely used, change the whole cartridge assembly.
1. Open printer lid by pressing the Cover Release button on the top of your printer.
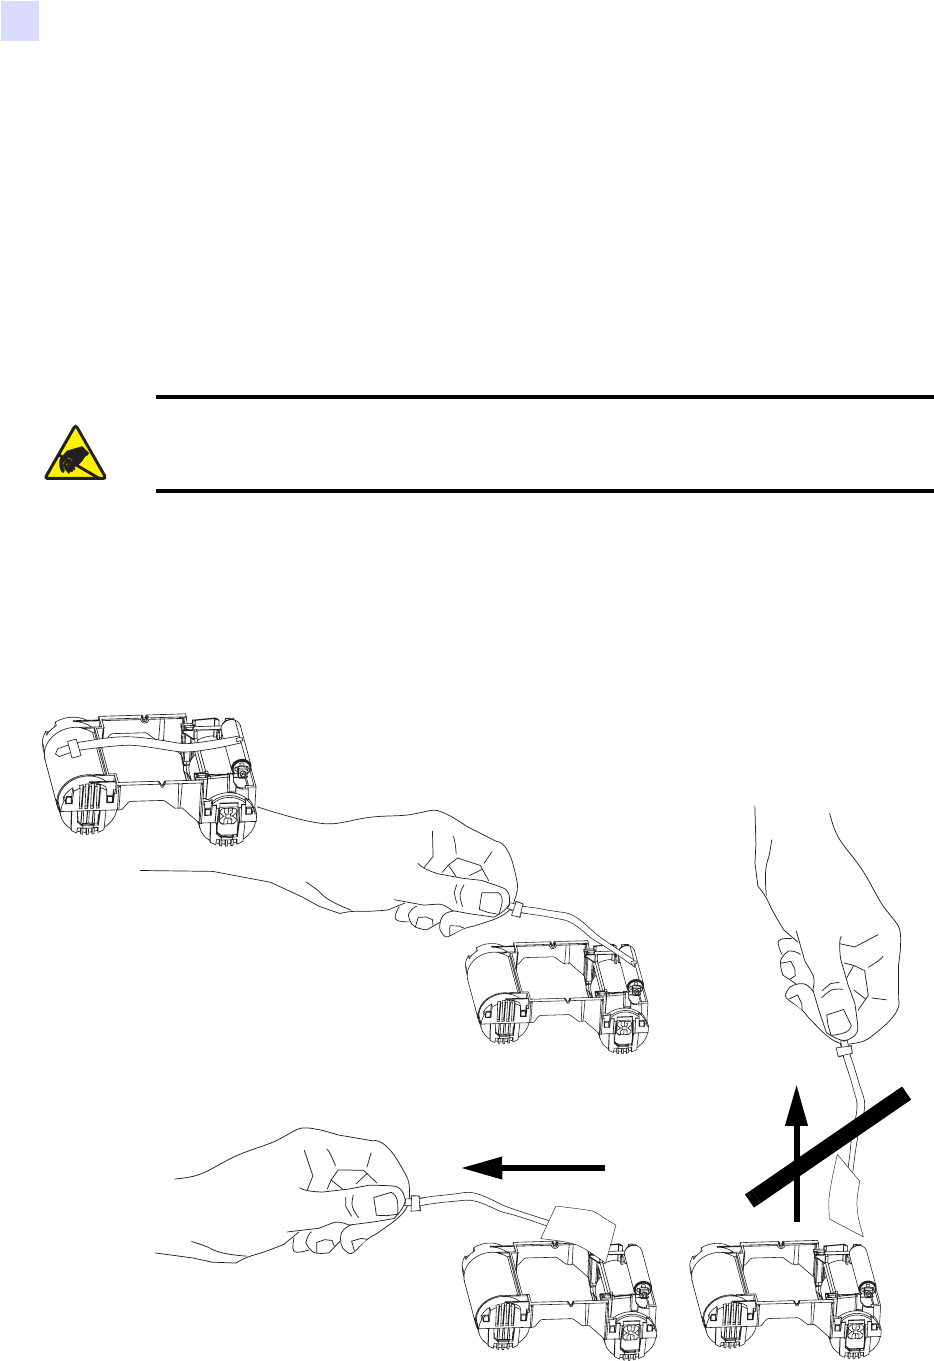
2. Peel protective wrapper from adhesive cleaning roller by gently pulling on the tape.
Discard the protective wrapper.
Electrostatic Discharge Caution • DO NOT TOUCH the print head or the electronic
components on the print head. Discharge of electrostatic charge from the human body or other
surfaces can damage the print head or other electronic components
✓
P100i Printer Setup
Loading Ribbon Cartridge
980590-001 Rev. A Draft 1 P100i User’s Manual 25
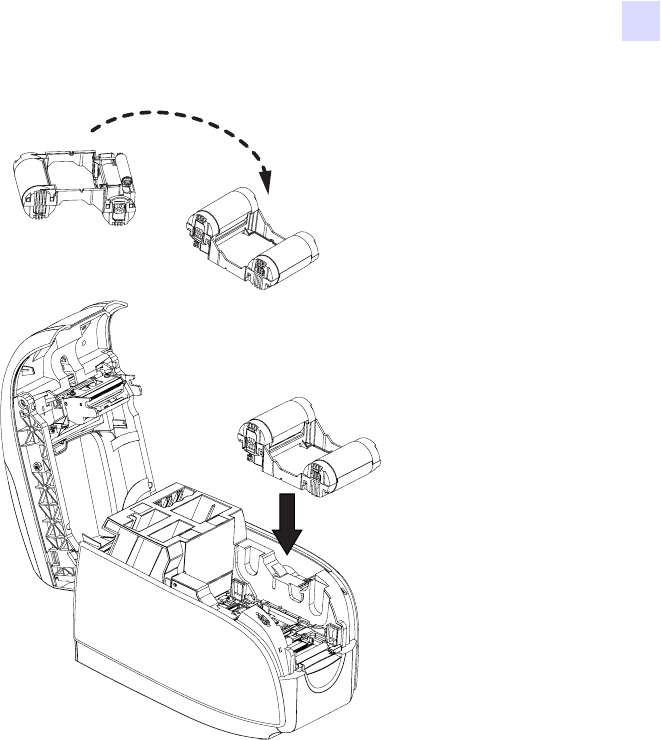
3. Insert the ribbon cartridge with the cleaning roller facing down, so the gears on the ends of the
rollers fit into the appropriate slots.
26 P100i User’s Manual 980590-001 Rev. A Draft 1
P100i Printer Setup
Installing the Cleaning Cartridge
Installing the Cleaning Cartridge
The Cleaning Cartridge removes surface dust particles and oil from the card surface, resulting
in better printing.
A new printer will have a Cleaning Cartridge installed, but its Cleaning Roller will have a
protective wrapper that must be removed.
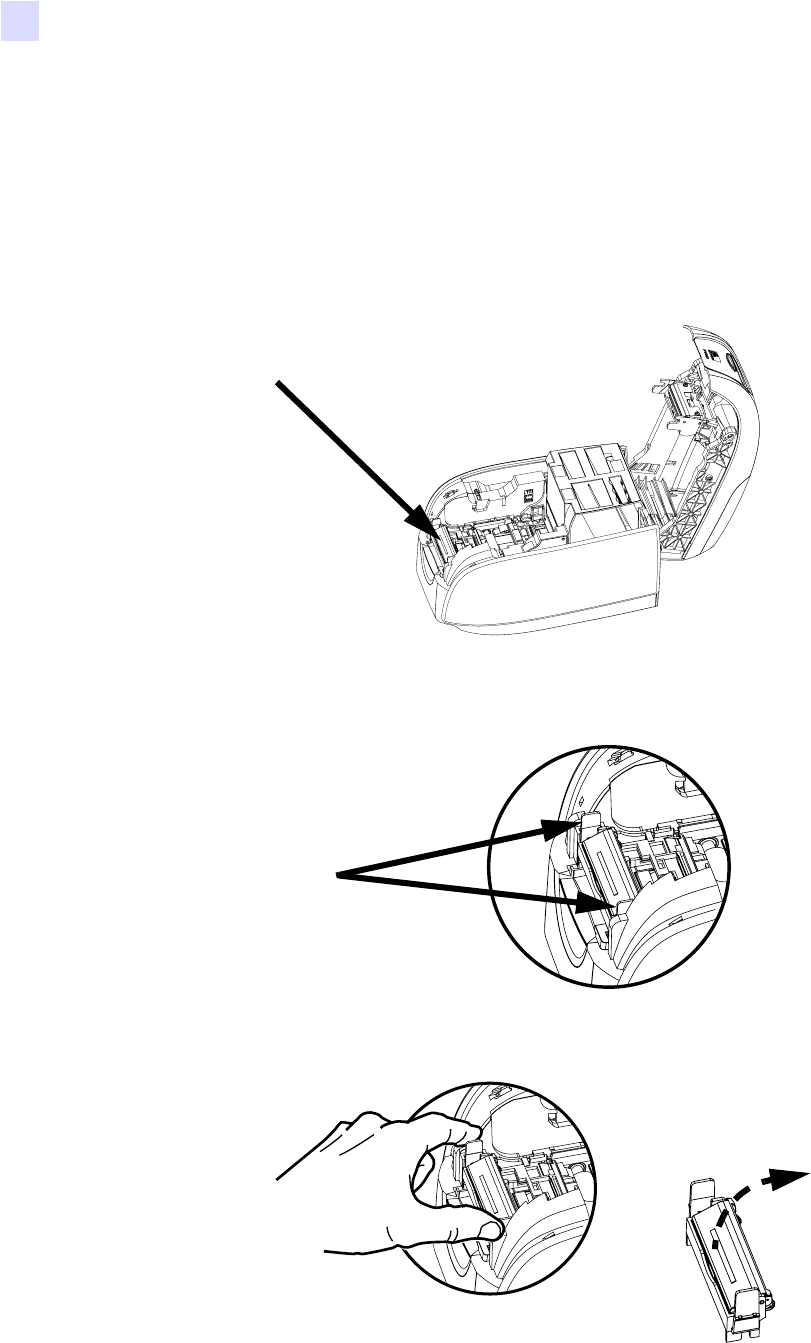
1. Locate the Cleaning Cartridge.
2. The Cleaning Cartridge is held in place by two clips.
3. Gently squeeze the clips and lift the Cleaning Cartridge free of the printer.
P100i Printer Setup
Installing the Cleaning Cartridge
980590-001 Rev. A Draft 1 P100i User’s Manual 27
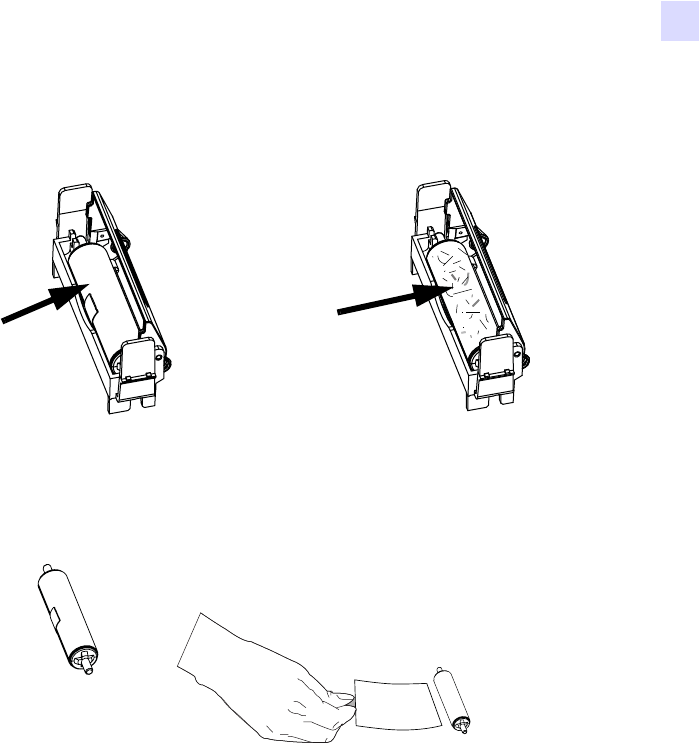
4. Lift the lid of the Cleaning Cartridge. A new printer will have a Cleaning Roller with its
protective wrapping. A dirty Cleaning Roller should be replaced.
5. Remove the Cleaning Roller from the Cleaning Cartridge. (Discard a dirty Cleaning
Roller and replace it with a new one.)
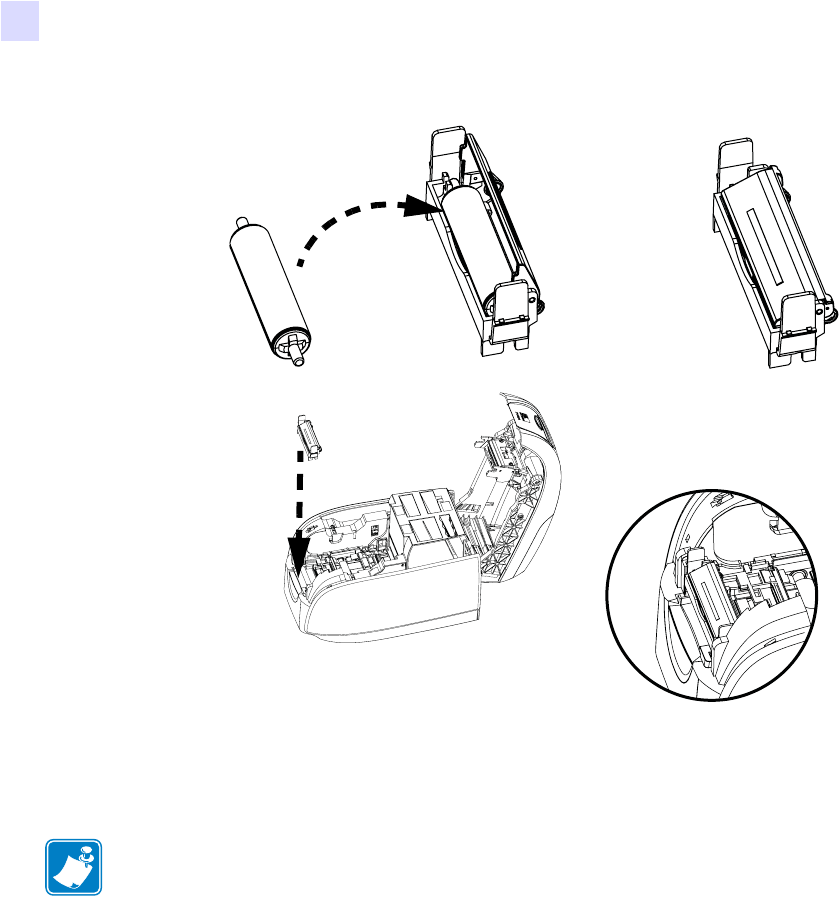
6. Remove the protective wrapper from the Cleaning Cartridge.
7. Place the Cleaning Roller in the Cartridge, close the lid, and insert it in place so the latches
engage.
New
Cleaning
Roller with
Protective
Wrapping
Dirty
Cleaning
Roller, Must
be Replaced
28 P100i User’s Manual 980590-001 Rev. A Draft 1
P100i Printer Setup
Installing the Cleaning Cartridge
Close the printer lid and push down until you hear an audible click.
Note • After the lid is closed, the ribbon automatically synchronizes when the printer power
is on.
P100i Printer Setup
Inserting Cards
980590-001 Rev. A Draft 1 P100i User’s Manual 29
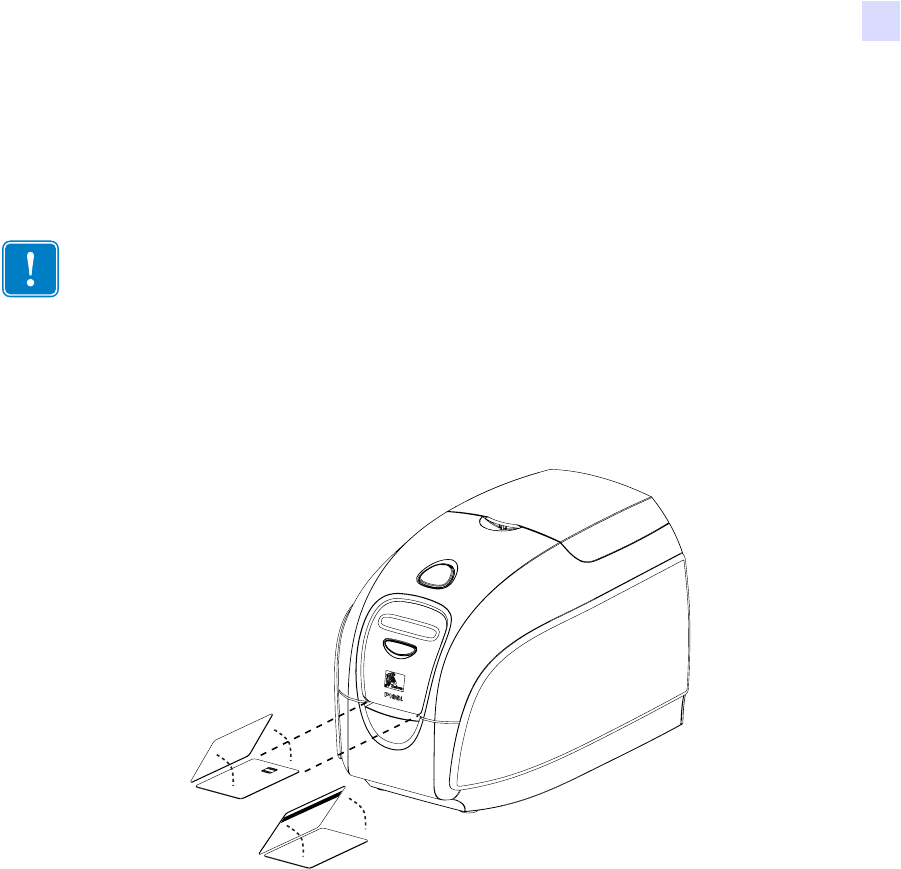
Inserting Cards
Cards are inserted one at a time into the slot on the front of the P100i. The card is printed (on
the top surface), and ejected out through the same slot.
The following figure shows the usual insertion orientation for contact smart-cards and cards
with a magnetic stripe. (Note that for magnetic-stripe cards, if printing is desired on the side
with the magnetic stripe, the card would be inserted stripe up, with the stripe toward the right
side of the printer as viewed from the front.)
Important • Handle the cards only by the edges.
30 P100i User’s Manual 980590-001 Rev. A Draft 1
P100i Printer Setup
Printing a Test Card
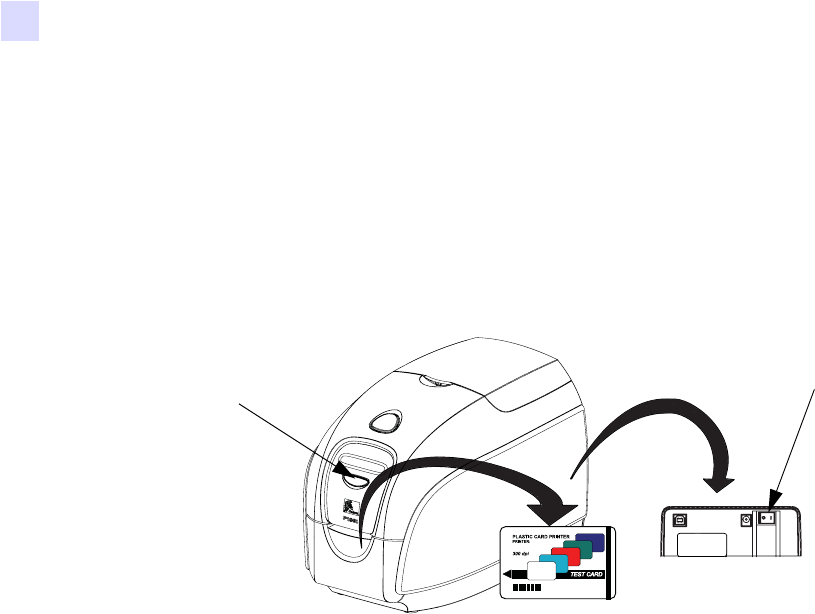
Printing a Test Card
With Ribbon Cartridge and Card Cleaning Cartridge loaded, your P100i printer is ready to
print. To check the operation of the printer, you should print a test card.
1. Place the printer power switch in the OFF (0) position.
2. While holding down the Multi Function Button, place the printer power switch in the
ON ( | ) position. The LCD status window will glow blue.
3. Keep pressing the Multi Function button until you are prompted to insert a card.
4. Insert a card into the card entry slot. At this point you can release the Multi Function
button. A test card will print after a few seconds and then exit the printer.
P520CEM
Serial N¡ 060376
Firmware: V1.50
Head resistance: 1568
Offset: X002 - Y015
EC: 0014
Printing Counter: 00002716
Multi-
Function
Switch
Power
Switch
P100i Printer Setup
Printing a Test Card
980590-001 Rev. A Draft 1 P100i User’s Manual 31
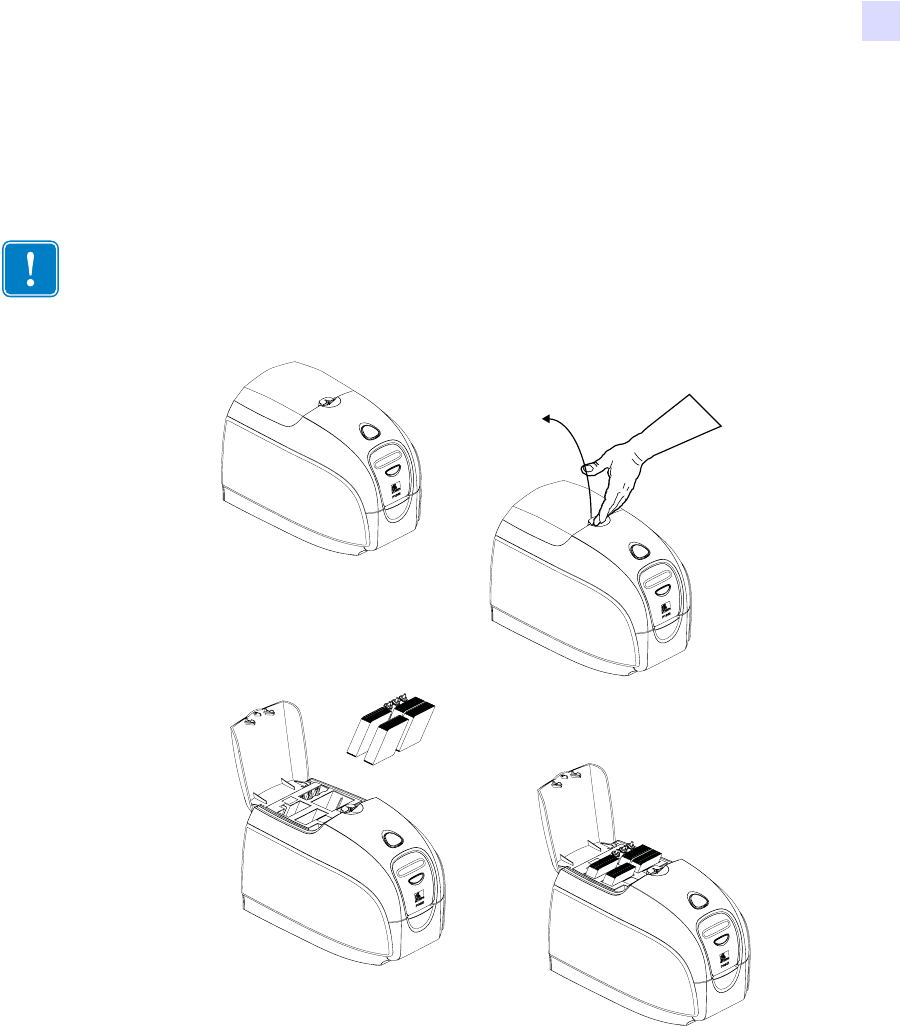
Storing Extra Cards and Cleaning Rollers
The P100i includes a storage area where you can keep up to 100 extra cards (four groups of 25
cards) and up to three extra Cleaning Rollers.
Important • Handle the cards only by the edges.

32 P100i User’s Manual 980590-001 Rev. A Draft 1

980590-001 Rev. A Draft 1 P100i User’s Manual 33
4
P100i Printer Operation
Printing
Printing with the P100i Printer requires the Windows Printer Driver, your card design/
issuing software or printer command level programming through the printer interface.
The P100i Card Printer can be used with any Windows 2000, Windows XP, or Windows
Vista software application program, using the drivers provided on CD with the printer.
Reference Chapter 2 for instructions on installing the P100i printer driver.
Creating a Sample Card
Before you begin a new printing session, print a sample card to ensure that the cards will
be printed correctly. Follow the steps below to print your first card using the True
ColoursTM Card Printer Ribbon Cartridge and the Windows printer driver.
1. Go to the Microsoft Word Software.
2. If the P100i printer was not selected as the default printer, go to File> Select Printer
and choose Zebra P100i Card Printer from the printer names list. Close the Print
dialog box.
3. Go to File>Page Setup.
4. Select the Size tab, and under Paper Size, choose Card. Under orientation, select
Landscape or Portrait.
5. Select the Margins tab, and set the Top, Bottom, Left and Right margins to O (zero).
6. Press OK to close Page Setup window.
7. The card appears on the window.
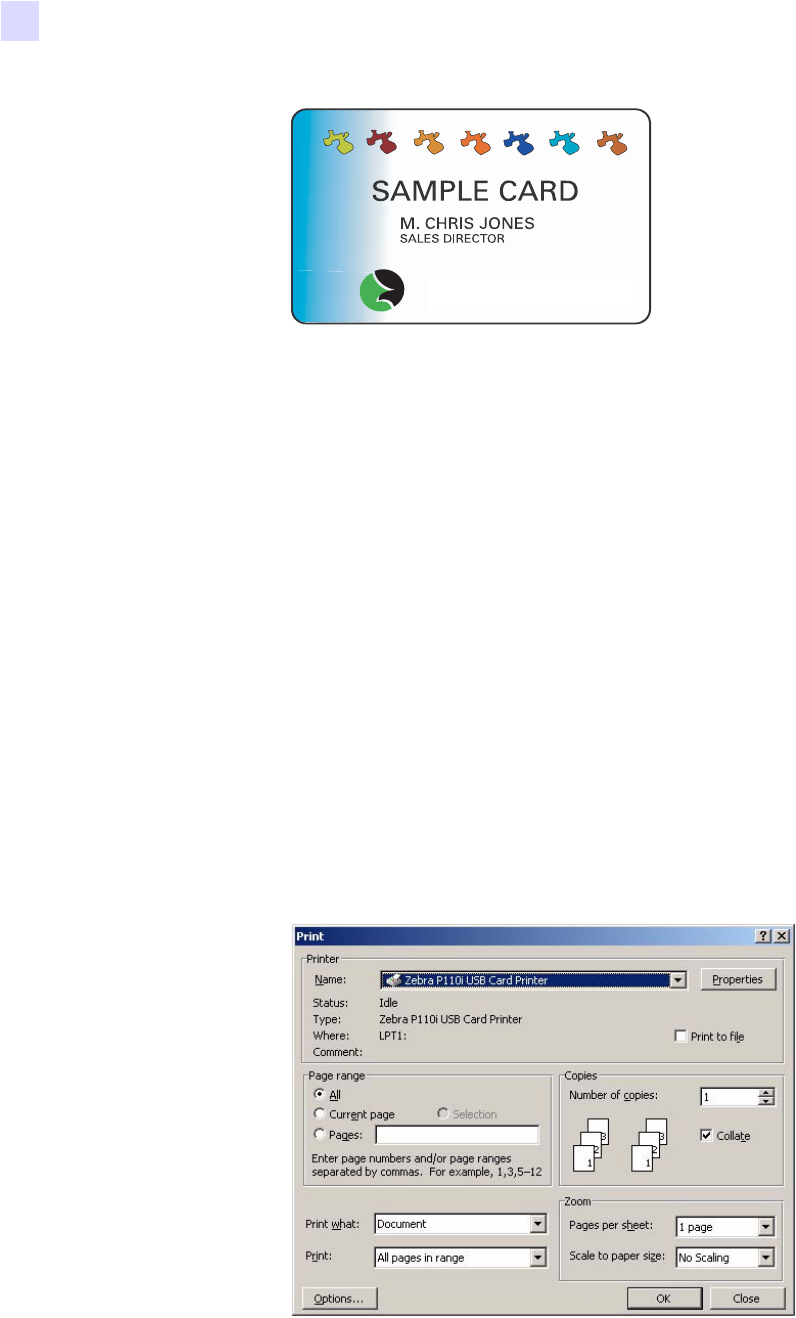
8. Design a card with both black and colored text and with colored pictures similar to the
sample card shown below.
34 P100i User’s Manual 980590-001 Rev. A Draft 1
P100i Printer Operation
Printing
Printing a Sample Card
Once you completed creating your sample card, you are ready to print. Ensure your printer has
a True Colours™ Card Printer Ribbon Cartridge installed and there is card stock in the card
feeder. Reference Chapter 3 for instructions on installing the ribbon and loading the cards Print
your sample card as follows:.
1. Select File>Print to open the Print dialogue box. Ensure the following settings in the Print
dialogue box:
• Printer Name: - Zebra P100i Card Printer
• Print to File: - Unchecked
• Page Range: - All
• Number of Copies: - 1
• Collate: - Unchecked
• Print What?: - Document
• Print: - All pages in range
• Pages per sheet: - 1 page
• Scale to paper size: - No scaling
2. Click the OK button.
http://www.zebracard.com

P100i Printer Operation
Printing
980590-001 Rev. A Draft 1 P100i User’s Manual 35
3. The printer will feed in a card and start printing. The data download time will vary
depending on the complexity of the card design and the processing speed of the computer.
4. Once the printing is completed, the card is ejected from the printer.
5. Check the card for any discrepancies. If the sample card is correct, your P100i card printer
is ready to produce more cards.

36 P100i User’s Manual 980590-001 Rev. A Draft 1