Zebra Technologies RFID-MAICD-01 Zebra Embedded RFID Radio-Media Auth User Manual Osprey UM RevA
Zebra Technologies Corporation Zebra Embedded RFID Radio-Media Auth Osprey UM RevA
Contents
- 1. Users Manual 1 of 3
- 2. Users Manual 2 of 3
- 3. Users Manual 3 of 3
Users Manual 2 of 3
12 Zebra ZXP Series 8 Card Printer User’s Manual P1011091-001 Rev. A
Installation and Setup
Installing the Card Cleaning Roller
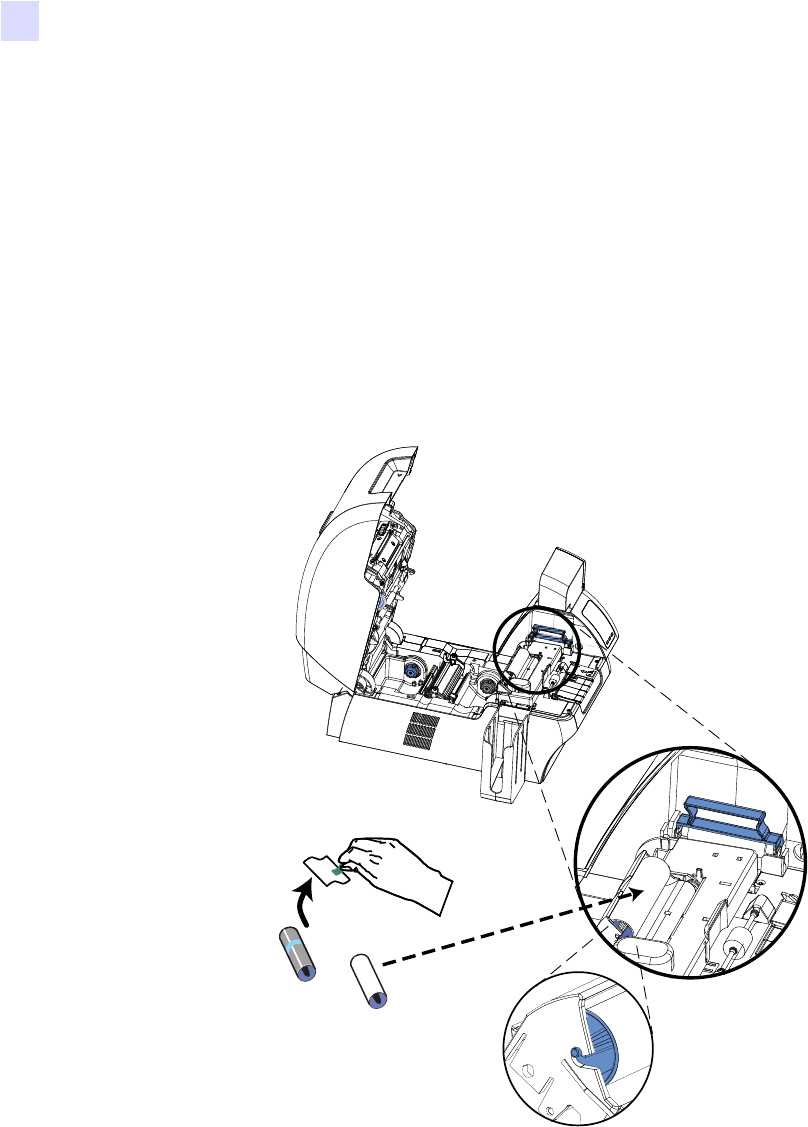
Installing the Card Cleaning Roller
The Card Cleaning Roller cleans the cards entering the Printer from either the Input Hopper or
the Single-Feed Input.
Step 1. Remove the Card Cleaning Roller from its packaging. To avoid contamination,
always hold the roller by the ends.
Step 2. Peel the protective wrapper from the Card Cleaning Roller.
Step 3. Open the Printer Door by pressing the Door Release button on the top of the Printer.
Step 4. Locate the area where the Card Cleaning Roller will be installed; circled below.
Step 5. Hold the Card Cleaning Roller by the ends.
Step 6. Position the ends of the Card Cleaning Roller in the slots. Push until the roller fully
seats and latches.
Step 7. Close the Printer’s Door.

Installation and Setup
Loading the Transfer Film
P1011091-001 Rev. A Zebra ZXP Series 8 Card Printer User’s Manual 13
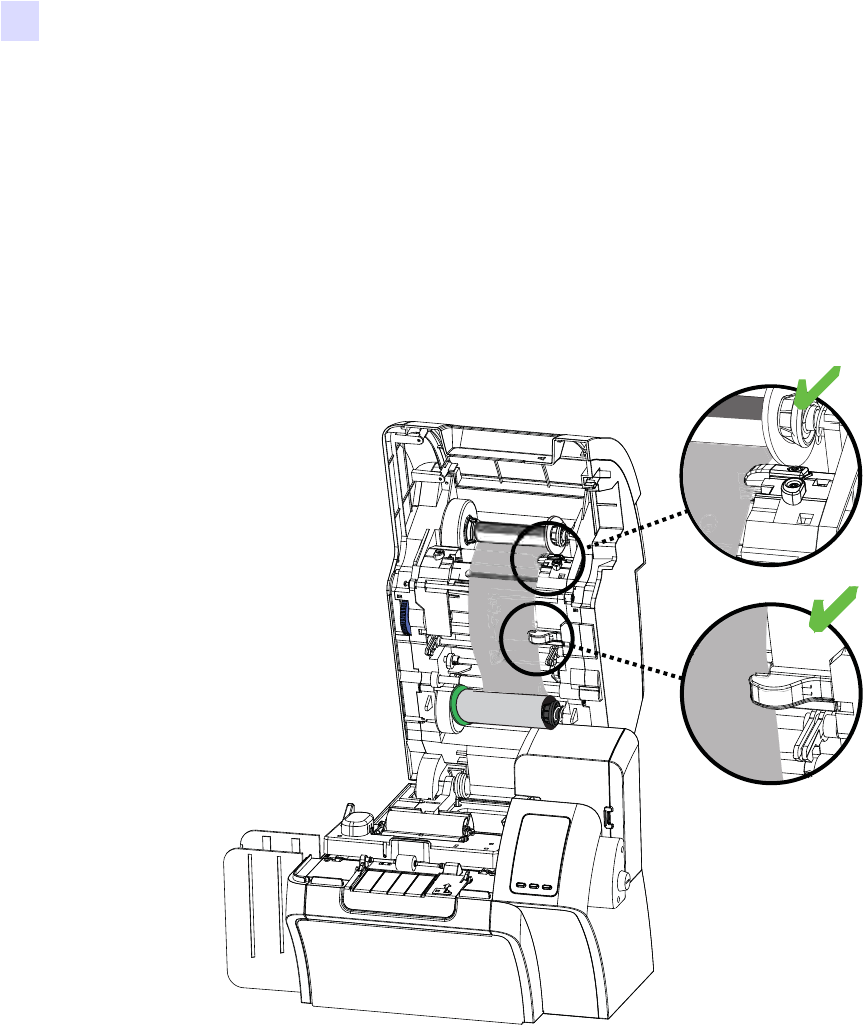
Loading the Transfer Film
The ZXP Series 8 printer is designed to work only with Zebra True Colours® i Series™
Transfer Film for near photographic print resolution and over-the-edge printing.
Step 1. Locate the transfer film supply spindles and the transfer film take-up spindles.
Step 2. Unroll about one foot from the full roll of transfer film (supply spool), and wind it
(2 wraps) onto the empty take-up spool.
Supply Spool
GREEN
Take-up Spool
WHITE
Take-up Spindle
GRAY
Supply Spindle
GRAY
Take-up Spindle
WHITE
Supply Spindle
GREEN
Flange
Flange
14 Zebra ZXP Series 8 Card Printer User’s Manual P1011091-001 Rev. A
Installation and Setup
Loading the Transfer Film
Step 3. Load transfer film supply spool onto the supply spindles, green flange side to
the left.
Step 4. Load the empty take-up spool onto the take-up spindles, white flange side to
the right.
Step 5. Make sure the transfer film comes off the bottom of the supply spool and feeds to the
bottom of the take-up spool.
Step 6. The figure below shows the proper installation of the transfer film.
Installation and Setup
Loading a Print Ribbon
P1011091-001 Rev. A Zebra ZXP Series 8 Card Printer User’s Manual 15
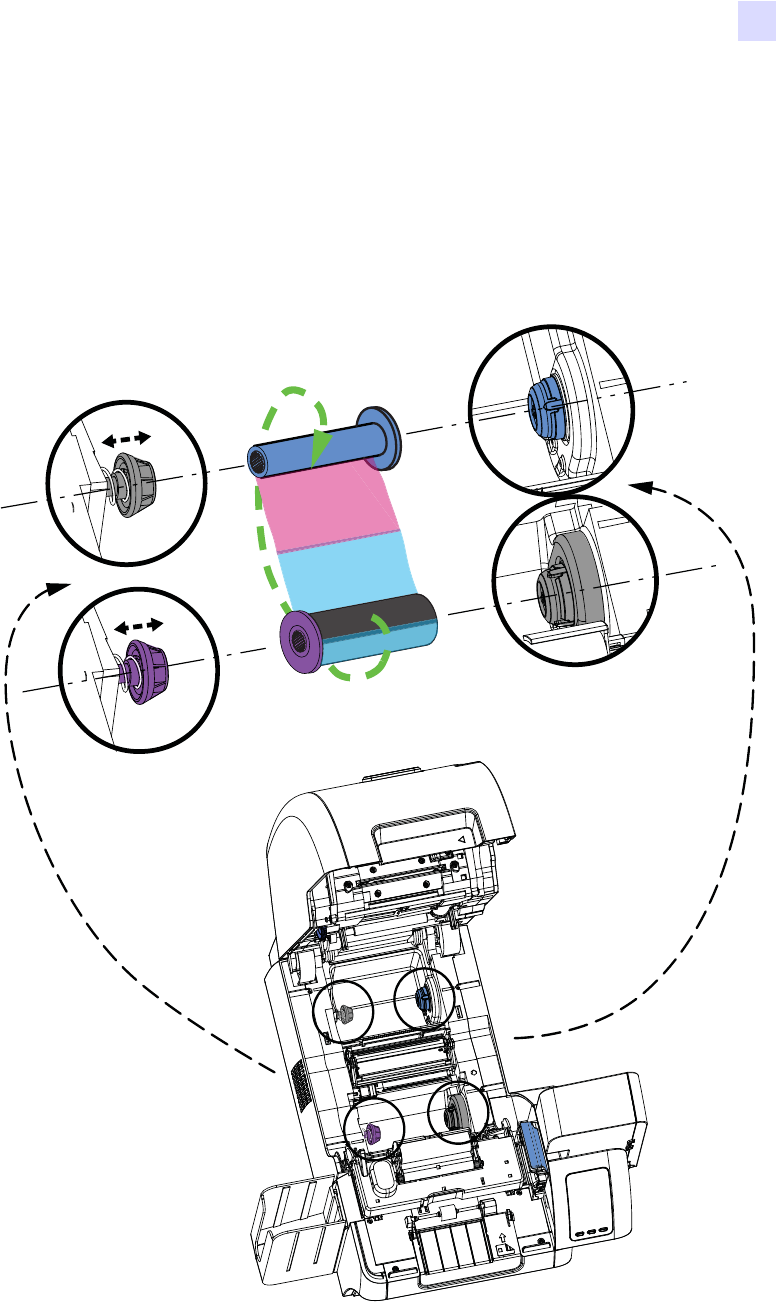
Loading a Print Ribbon
The ZXP Series 8 printer is designed to work only with Zebra True Colours® i Series™
Ribbons in order to achieve rich, vibrant, image production over the full-color spectrum.
Step 1. Locate the print ribbon supply spindles and the print ribbon take-up spindles.
Supply Spool
PURPLE
Take-up Spool
BLUE
Take-up Spindle
GRAY
Supply Spindle
PURPLE
Take-up Spindle
BLUE
Supply Spindle
GRAY
Flange
Flange
16 Zebra ZXP Series 8 Card Printer User’s Manual P1011091-001 Rev. A
Installation and Setup
Loading a Print Ribbon
Step 2. Load the print ribbon supply spool onto the supply spindles, purple flange side to
the left.
Step 3. Load the empty take-up spool onto the take-up spindle, blue flange side to the right.
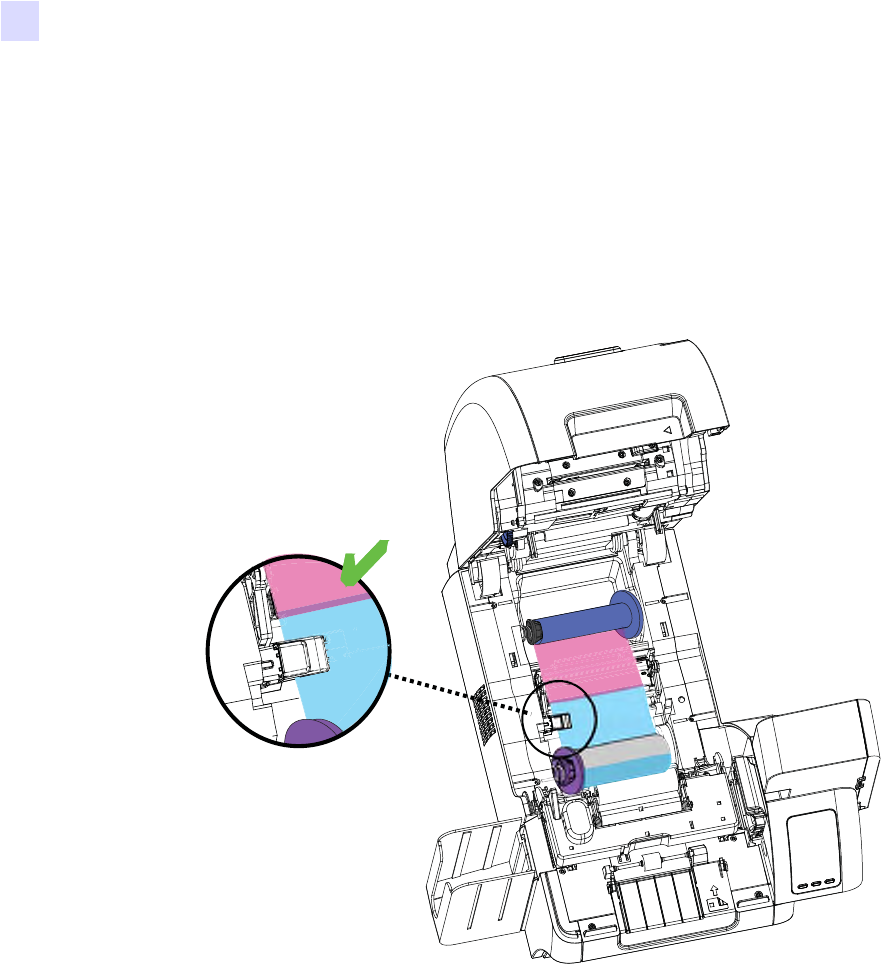
Step 4. Make sure the print ribbon comes off the bottom of the supply spool and feeds to the
bottom of the take-up spool.
Step 5. The figure below shows the proper installation of the print ribbon.
Installation and Setup
Connecting Power
P1011091-001 Rev. A Zebra ZXP Series 8 Card Printer User’s Manual 17
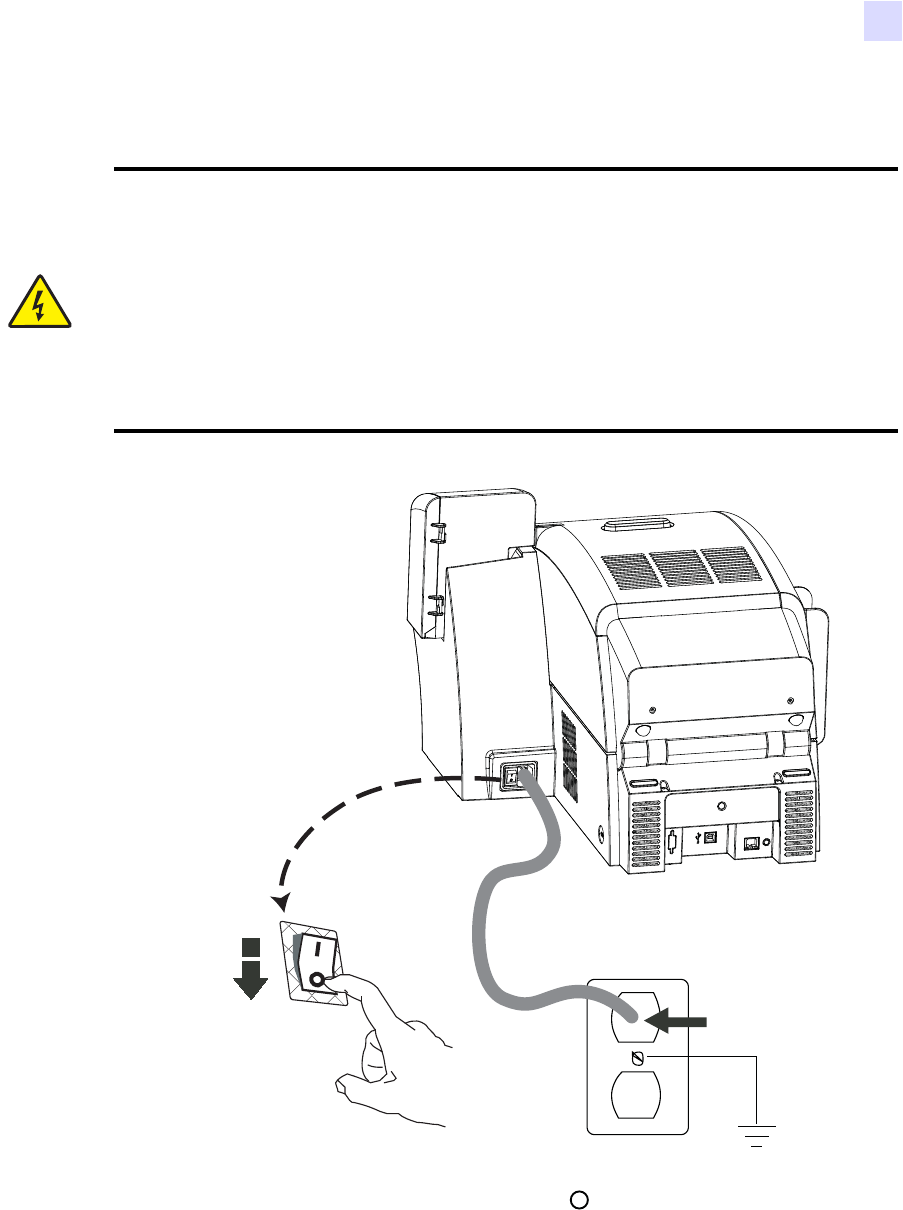
Connecting Power
Step 1. Place the Printer’s power switch in the OFF ( ) position.
Step 2. Depending on your local AC voltage, plug the appropriate power cord into the
Printer’s power connector and a grounded AC power source connection.
DO NOT SWITCH THE PRINTER ON.
Electric Shock Caution • Limit AC power supplied to the Printer to 100 – 230 volts,
60 ~ 50 Hertz. Limit excess current draw to 16 amps or less, using an associated circuit
breaker or other such device. Never operate the Printer in a location where operator,
computer, or printer can get wet. Personal injury could result. The Printer must be
connected to an earthed electrical power source and properly protected against electrical
surges and grounding faults; the electrical reliability of the Printer is based on the
reliability of the mains power source and with the earth connection.
The Printer’s power supply is an internal unit that can only be serviced or replaced by
trained and authorized personnel.
✓
1
2
18 Zebra ZXP Series 8 Card Printer User’s Manual P1011091-001 Rev. A
Installation and Setup
Connecting the Printer to your Computer
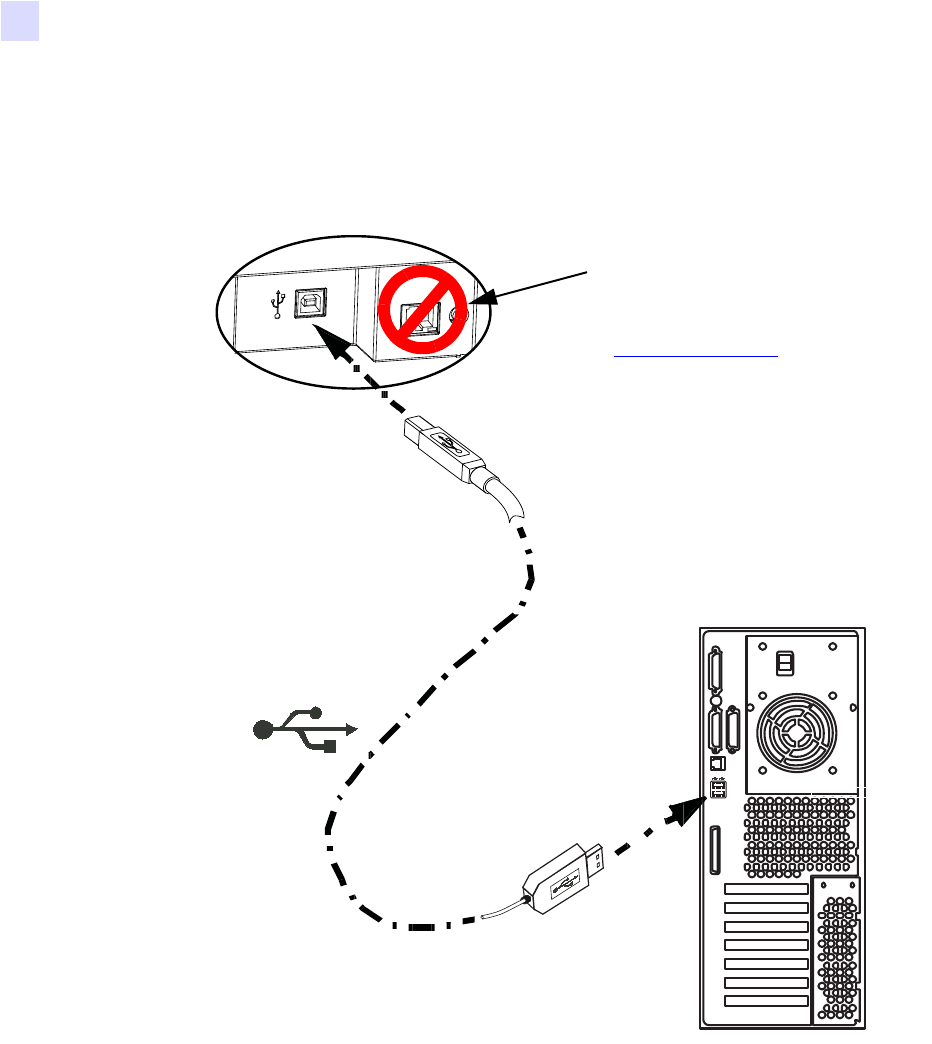
Connecting the Printer to your Computer
Connect the USB cable to the printer and the computer.
USB
Ethernet functionality requires a
firmware upgrade to be activated.
This firmware is pending release
and will be available for download
at www.zebracard.com. Please
check our website occasionally
for this and other upgrades.
Installation and Setup
Installing the Windows Printer Driver
P1011091-001 Rev. A Zebra ZXP Series 8 Card Printer User’s Manual 19
Installing the Windows Printer Driver
Overview
Each computer that will use the printer must have the Printer Driver installed.
If not already done, connect power to the printer; ensure that the printer’s power switch in the
OFF ( ) position, and connect the printer to the computer.
To install the Printer Driver, insert the User Documentation and Drivers CD, included with
your printer, into the host computer and the InstallShield Wizard will walk you through the
required installation steps. The InstallShield Wizard will:
• Automatically install the User Interface when the driver CD is inserted. (Autorun
must be enabled for your CD).
If Autorun is disabled:
a. Insert the Driver CD into the CD-ROM drive.
b. At the root (top) level of the CD, double-click on the RunCD.exe file.
• Start the installation process when the Install Printer Driver menu item is selected
from the Main Menu.
• Detect previous versions of the driver. If a previous version is detected, you will be
prompted to remove it, reboot, and then restart the install process.
• Install the new driver files.

20 Zebra ZXP Series 8 Card Printer User’s Manual P1011091-001 Rev. A
Installation and Setup
Installing the Windows Printer Driver
Installing the USB Printer Driver
Step 1. If not already done, connect power to the printer. Do not turn power ON.
Step 2. Connect the USB port on the rear of the printer to the computer’s USB port.
Step 3. Ensure that the Printer’s power switch in the OFF ( ) position.
Step 4. Insert the User Documentation and Drivers CD into the CD drive of the host
computer. The Main Menu will open.
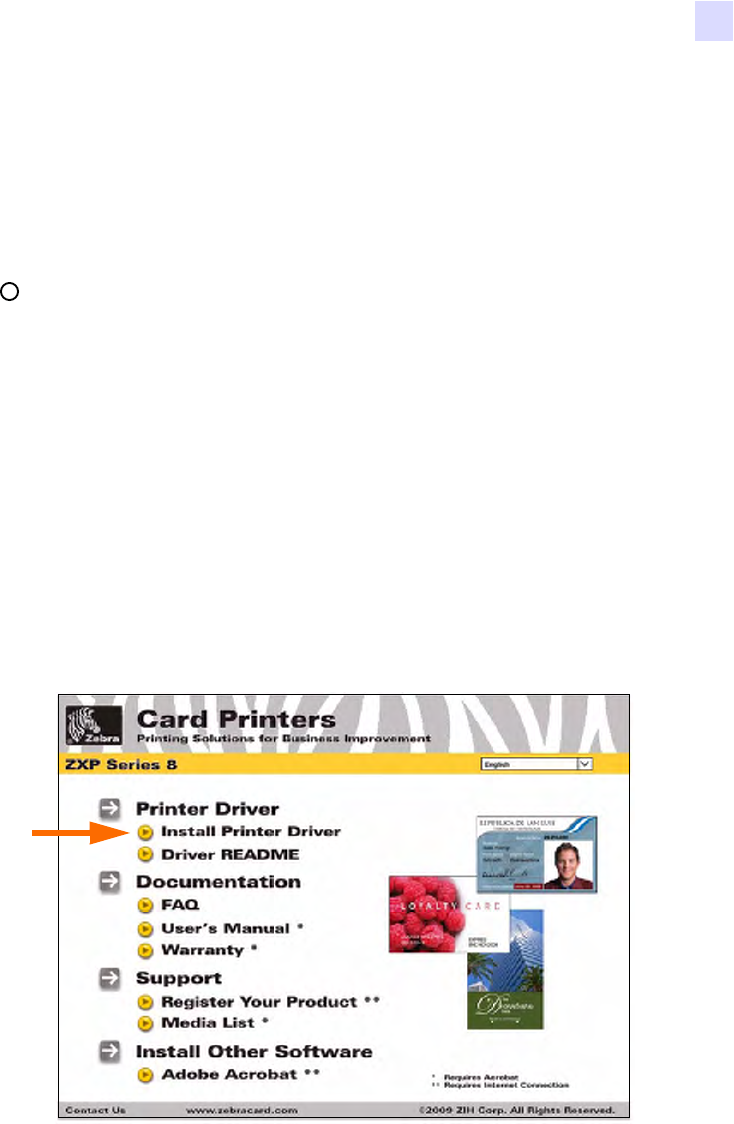
Step 5. From the drop-down menu in the upper-right corner of the Main Menu, choose the
appropriate language for your system.
Step 6. From the Main Menu, click Install Printer Driver.
Step 7. If an older Printer and Driver is installed on your computer, the Setup Type window
will be displayed; otherwise go to Step 9.
Step 8. In the Setup Type window, choose the maintenance operation to be performed:
a. Select Upgrade to upgrade the older printer driver, click the Next button, and
follow the screen prompts. At the end of the upgrade process, you will be asked
to re-boot your computer. Re-boot your computer. The upgrade is complete.
b. Select Remove to remove the older printer driver, click the Next button, and
follow the screen prompts. At the end of the uninstall process, you will be
asked to re-boot your computer. Re-boot your computer, and start over
with Step 1.
Installation and Setup
Installing the Windows Printer Driver
P1011091-001 Rev. A Zebra ZXP Series 8 Card Printer User’s Manual 21
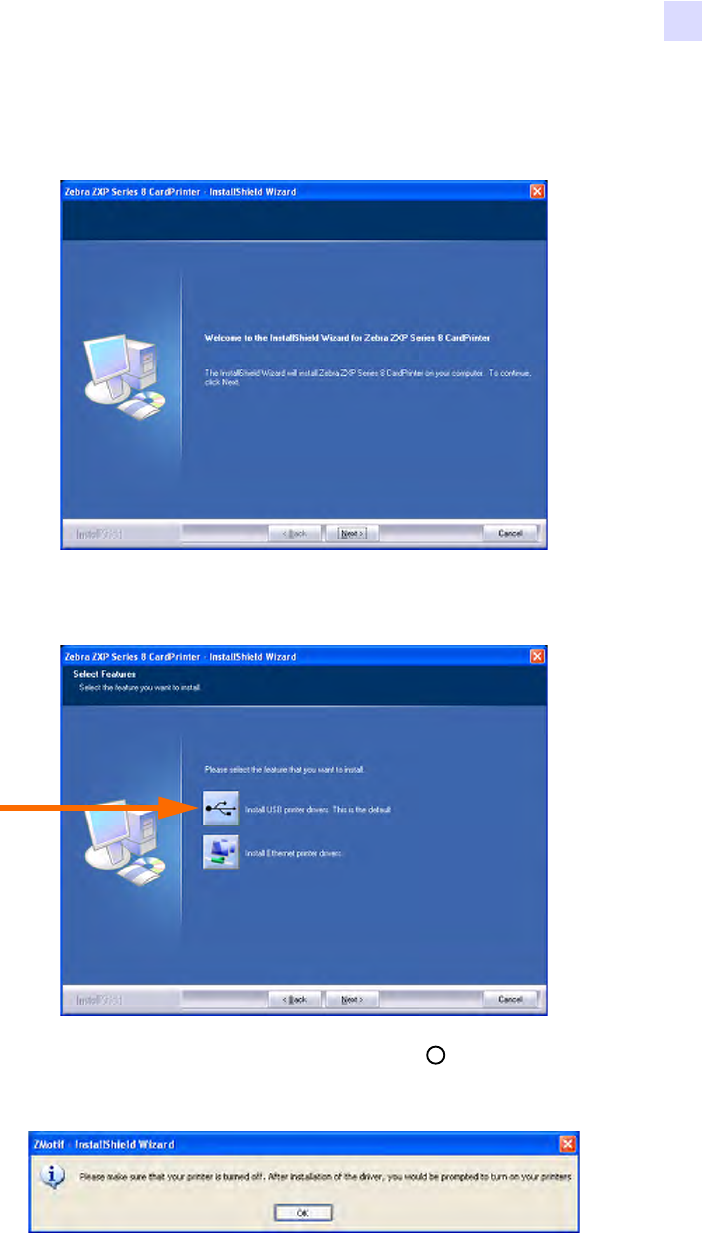
Step 9. The InstallShield Wizard window will open. To proceed with the installation, click
the Next button.
Step 10. Select Install USB printer drivers, and click the Next button.
Step 11. Ensure that the Printer’s power switch in the OFF ( ) position; and then click the
OK button.