Zebra Technologies ZXP-LM 13.56MHz RFID Laminator User Manual Osprey Lam UM RevA

Zebra Technologies Corporation 13.56MHz RFID Laminator Osprey Lam UM RevA

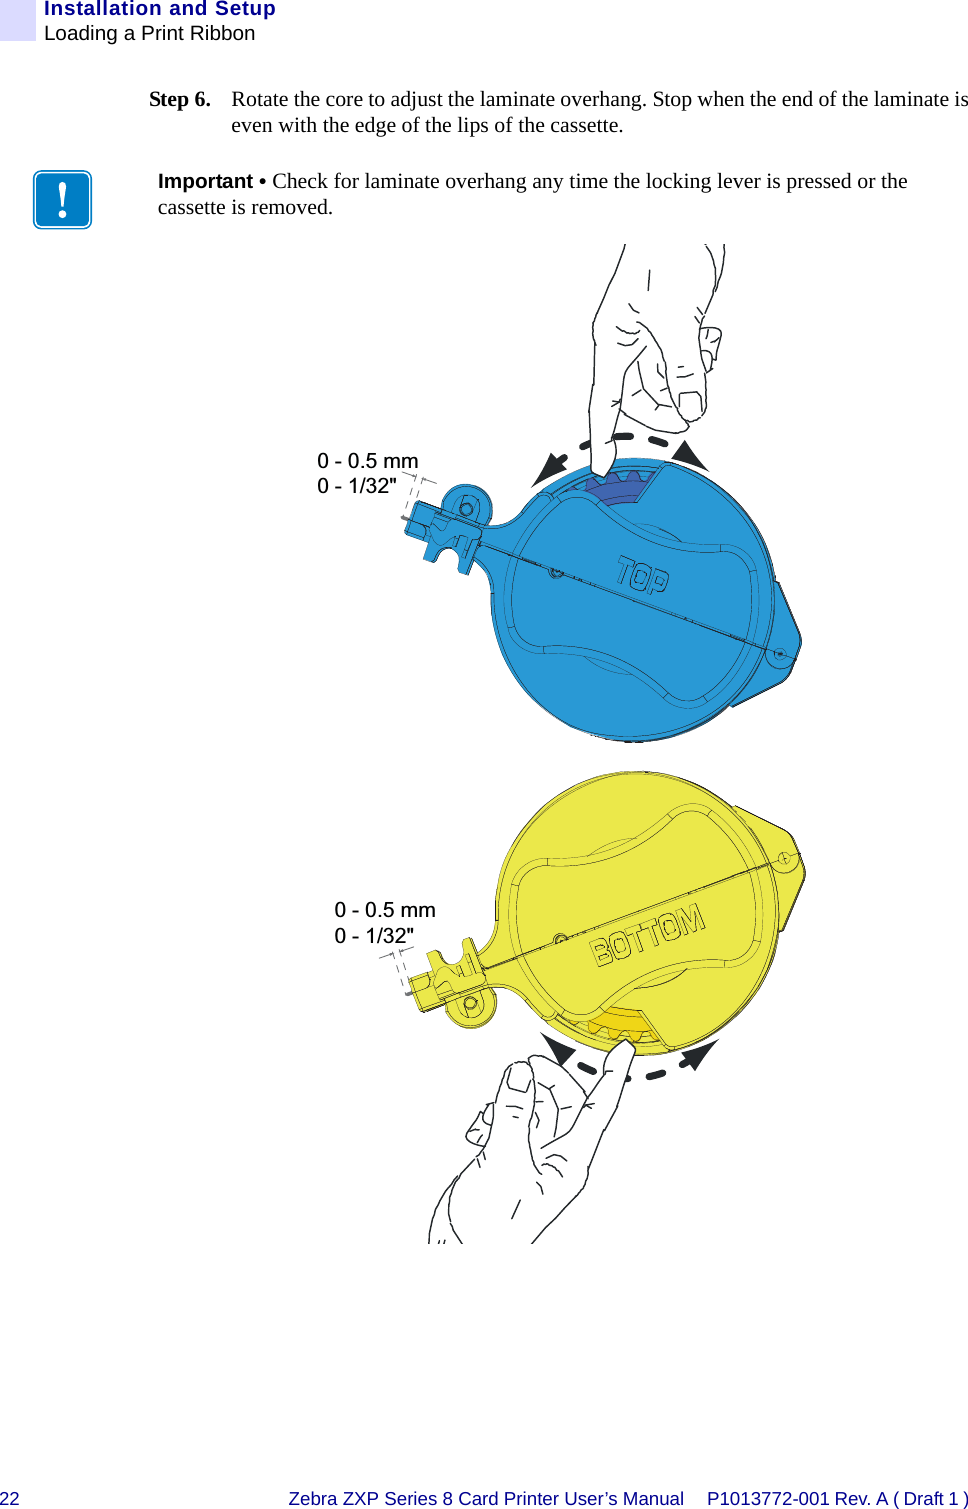
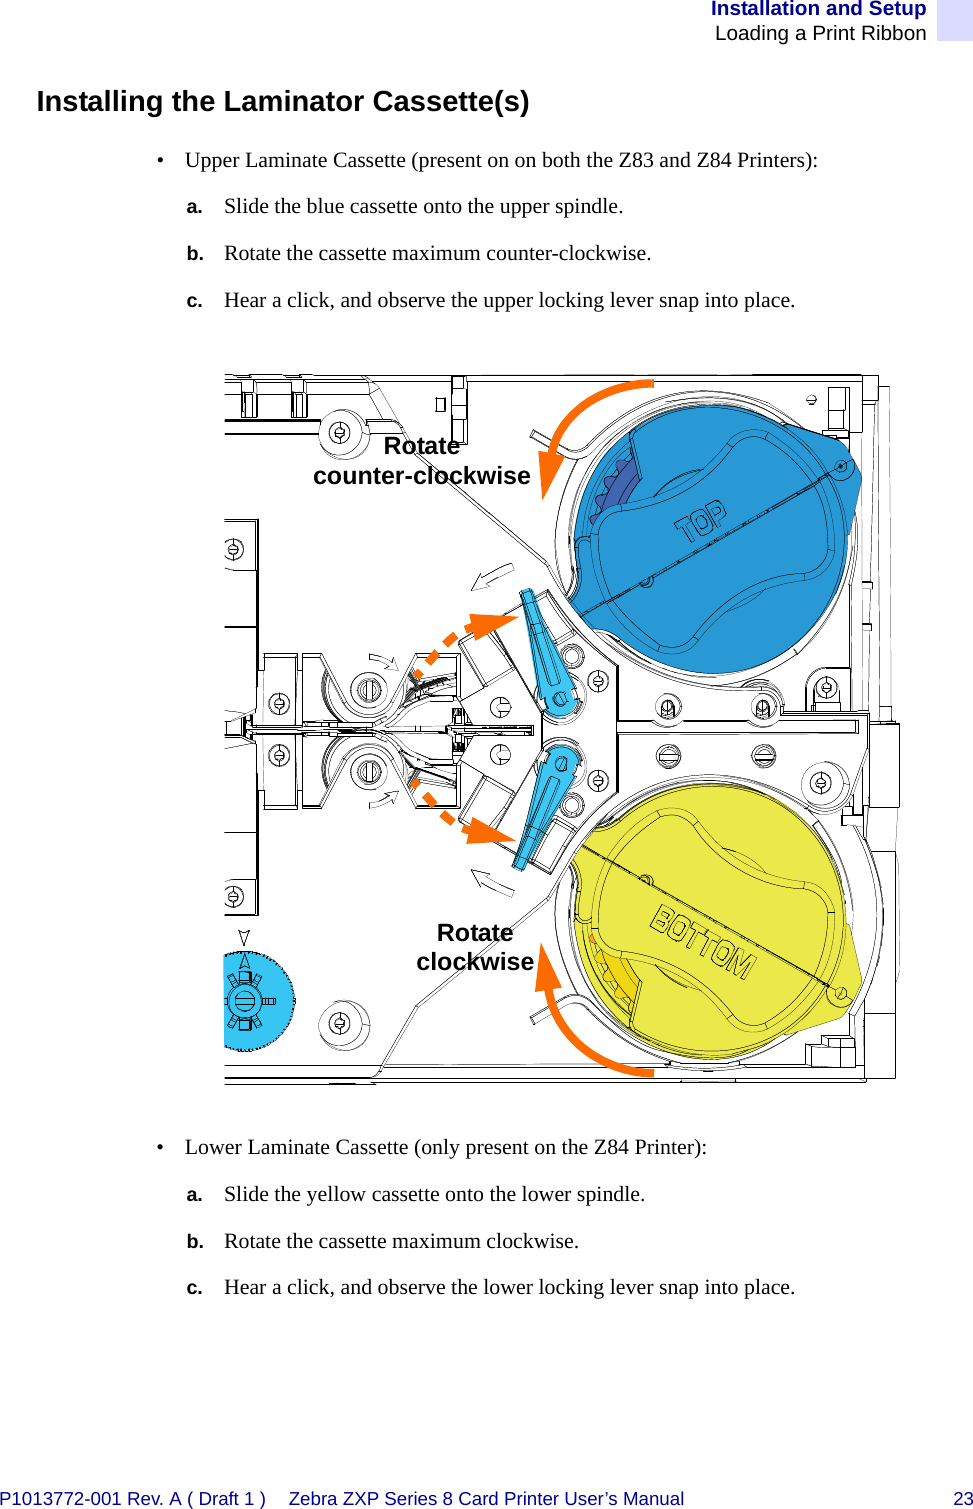
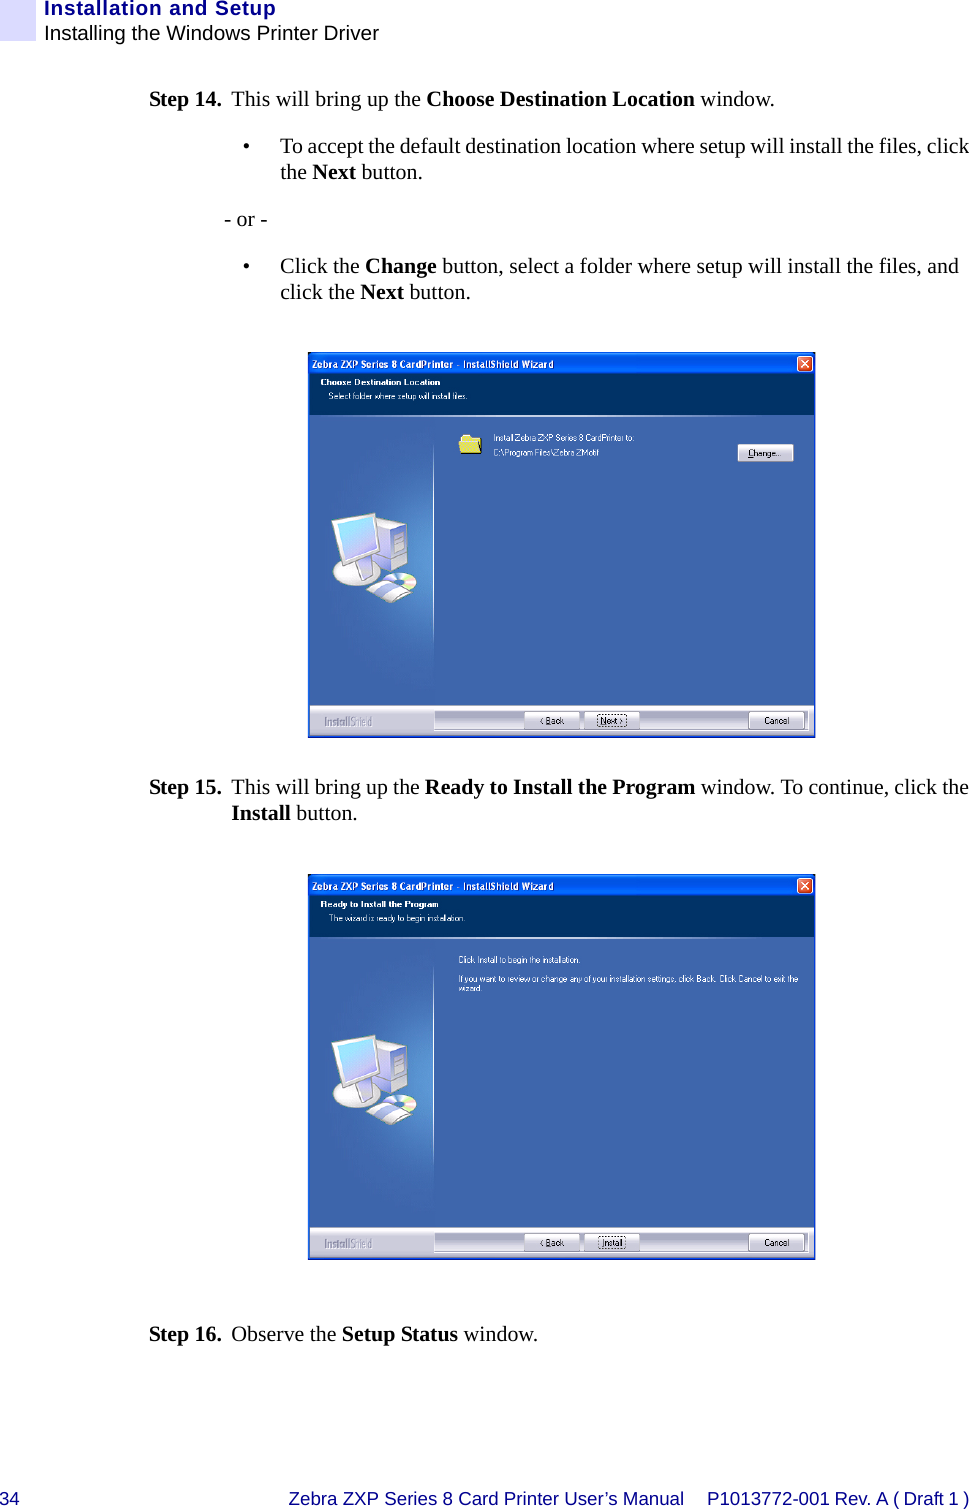
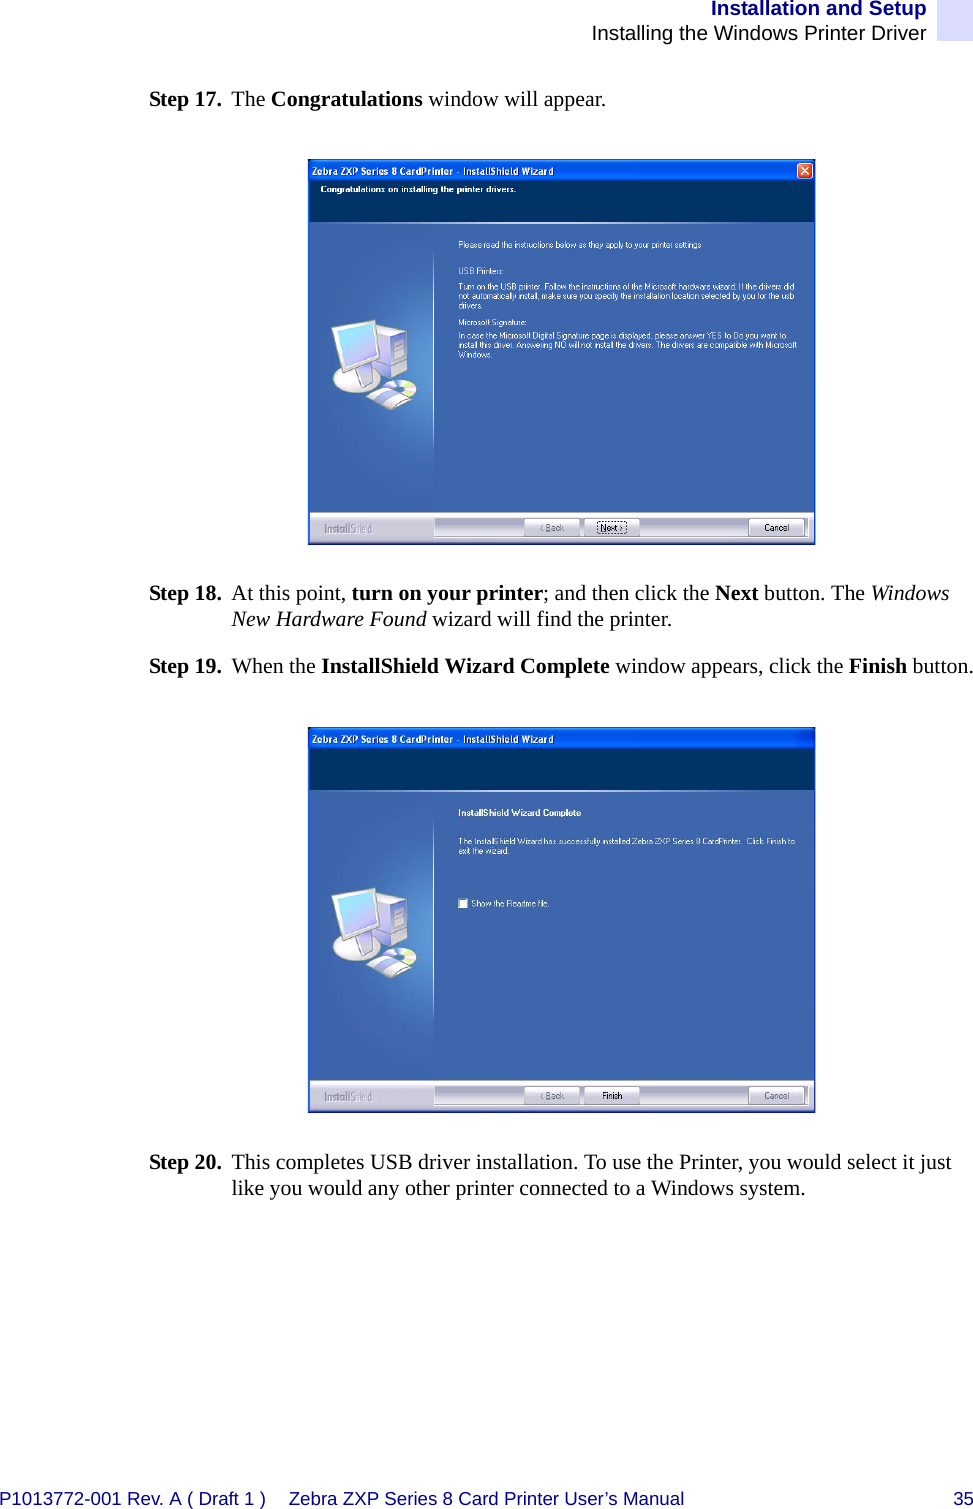
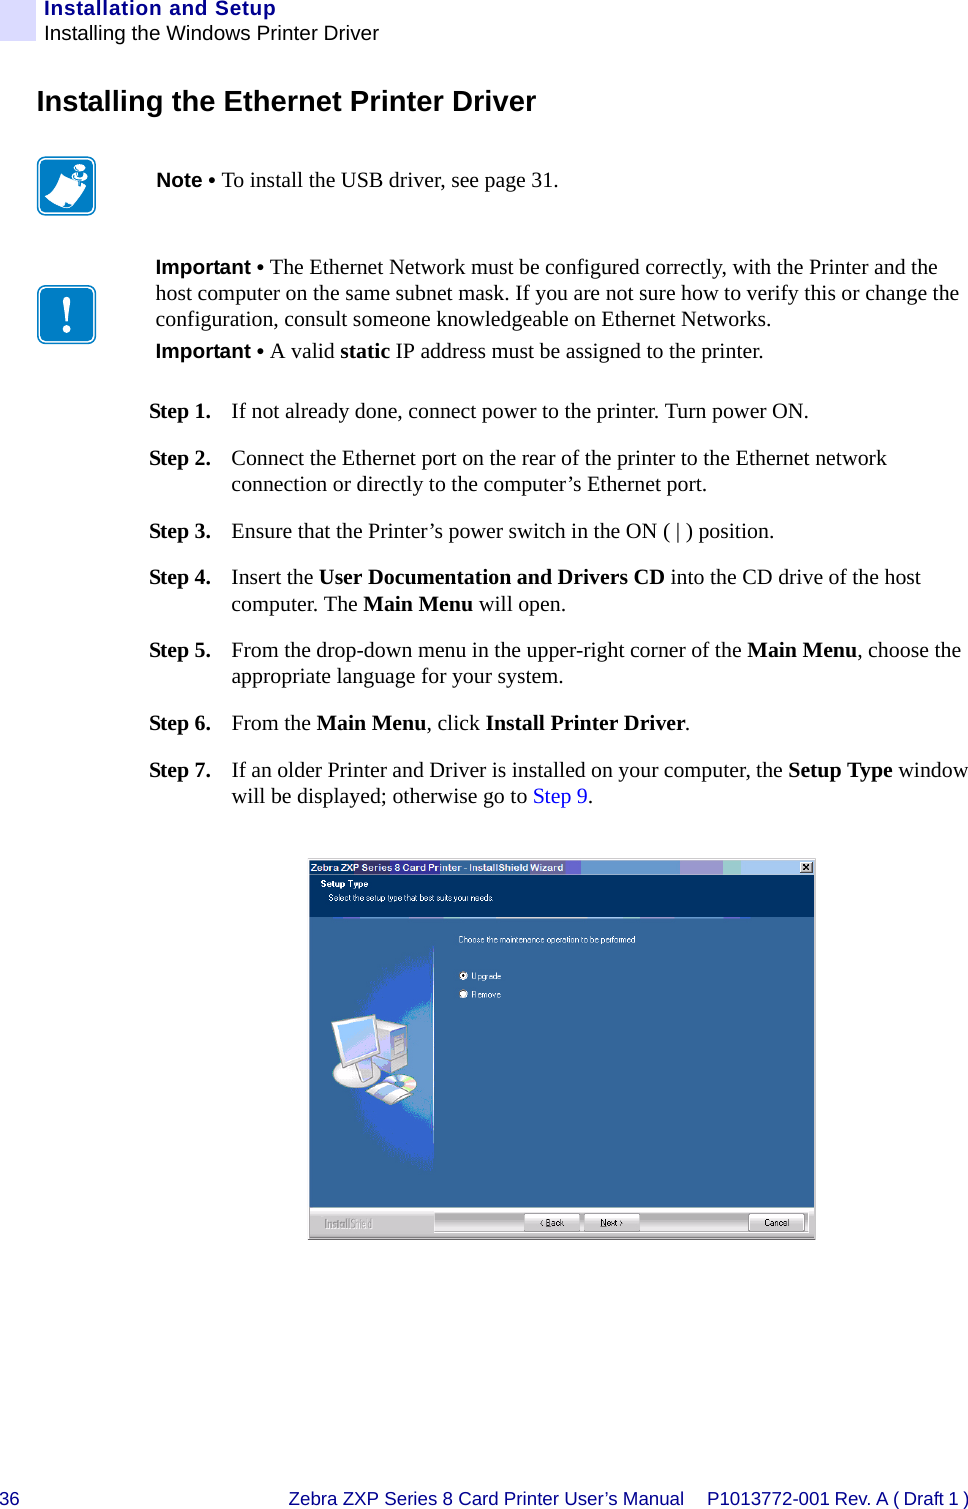
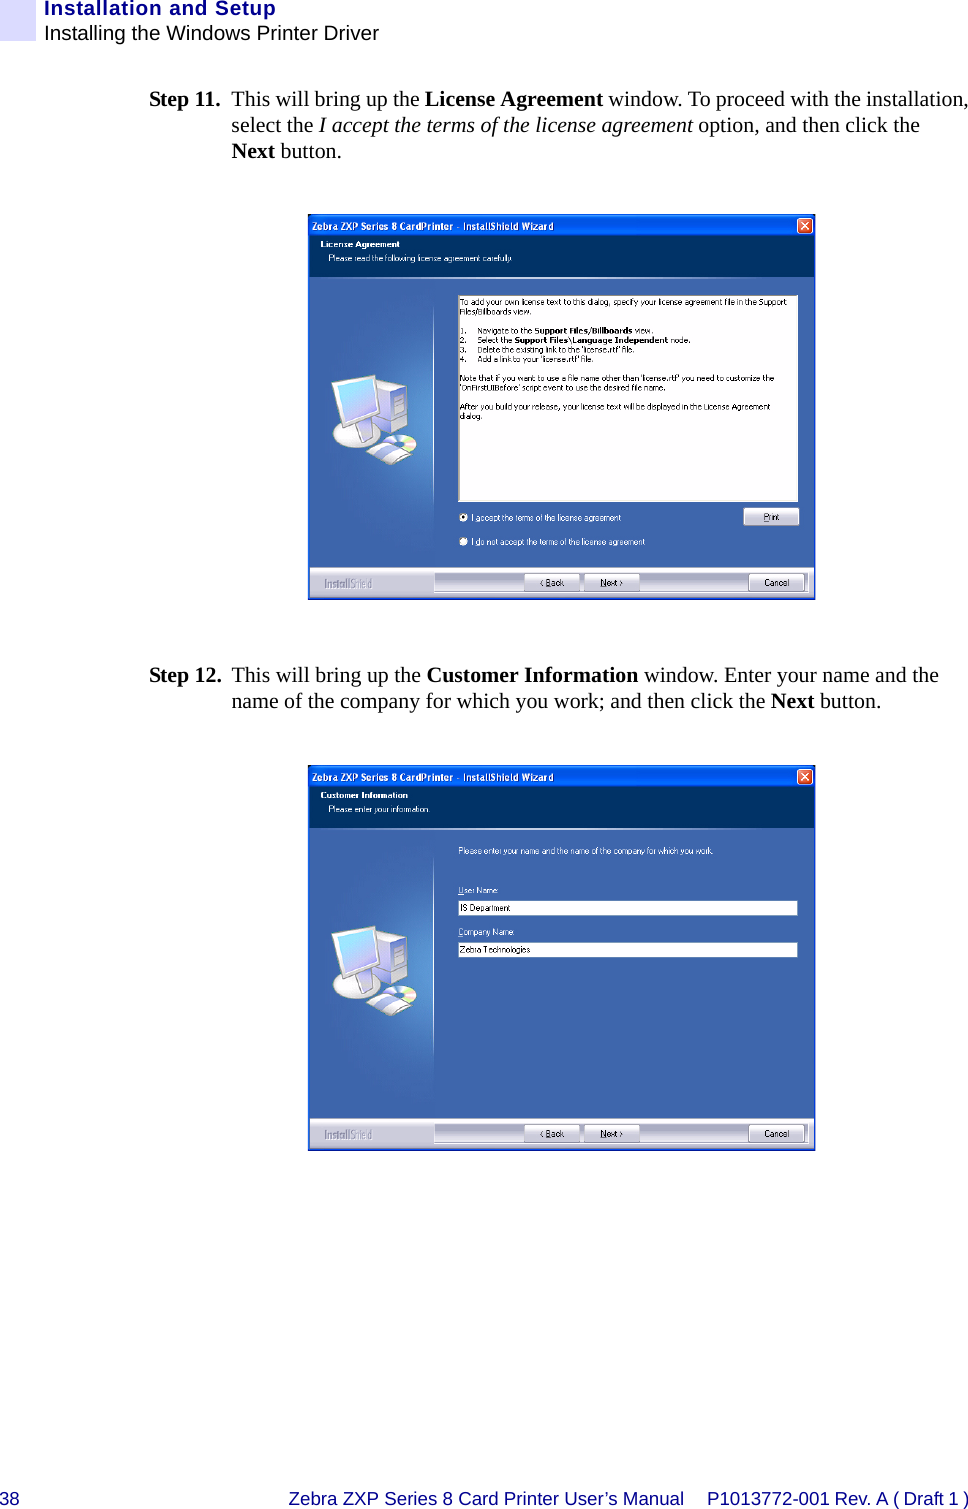
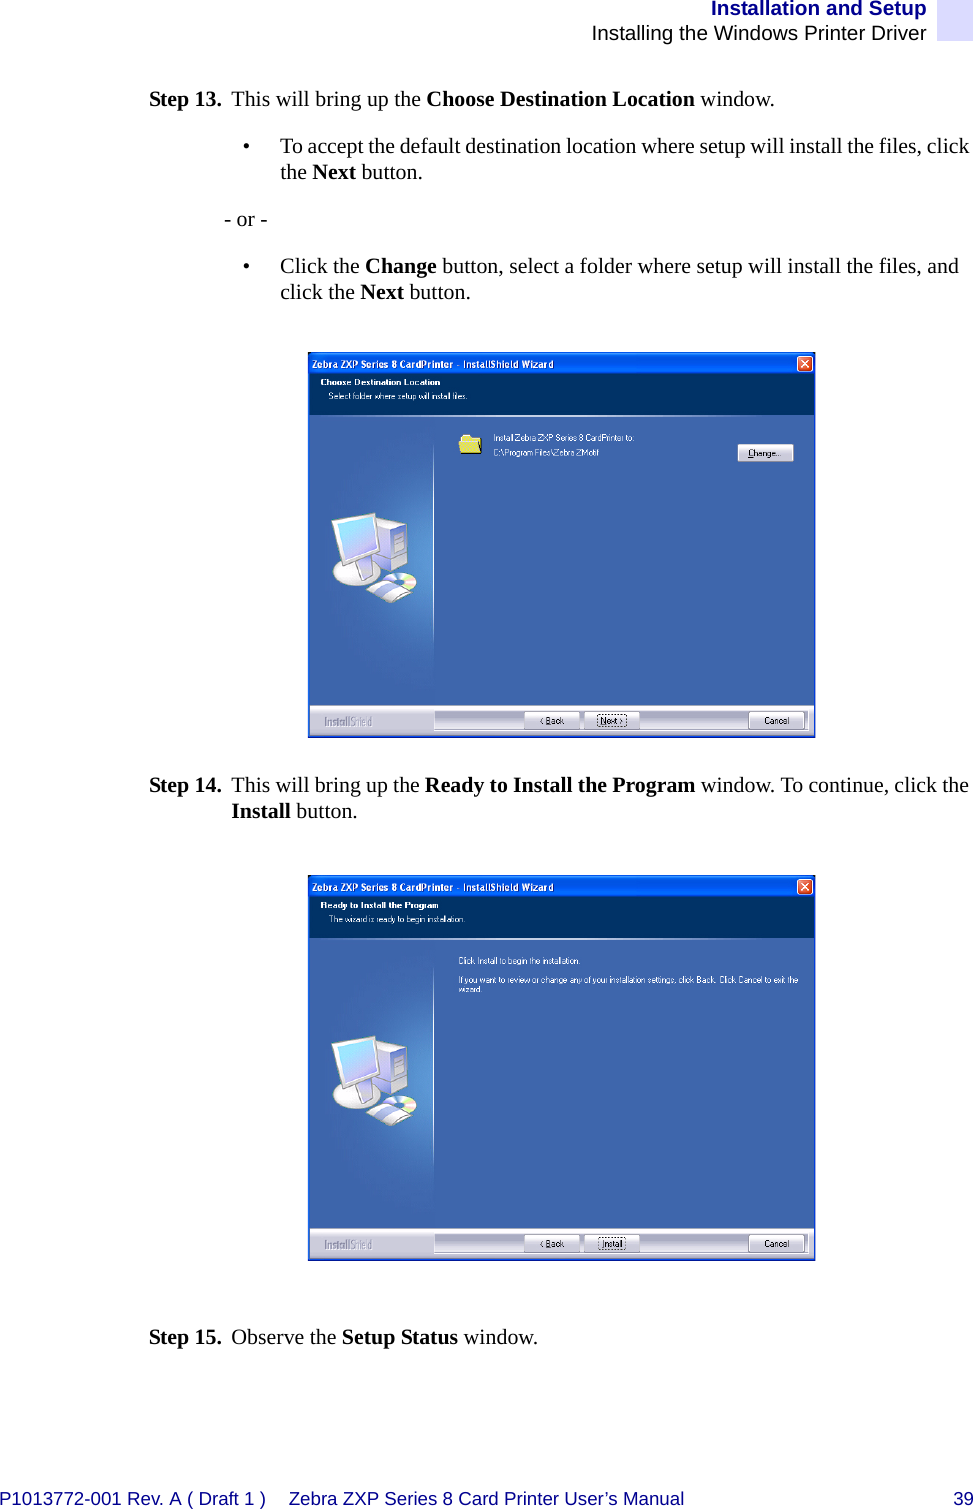
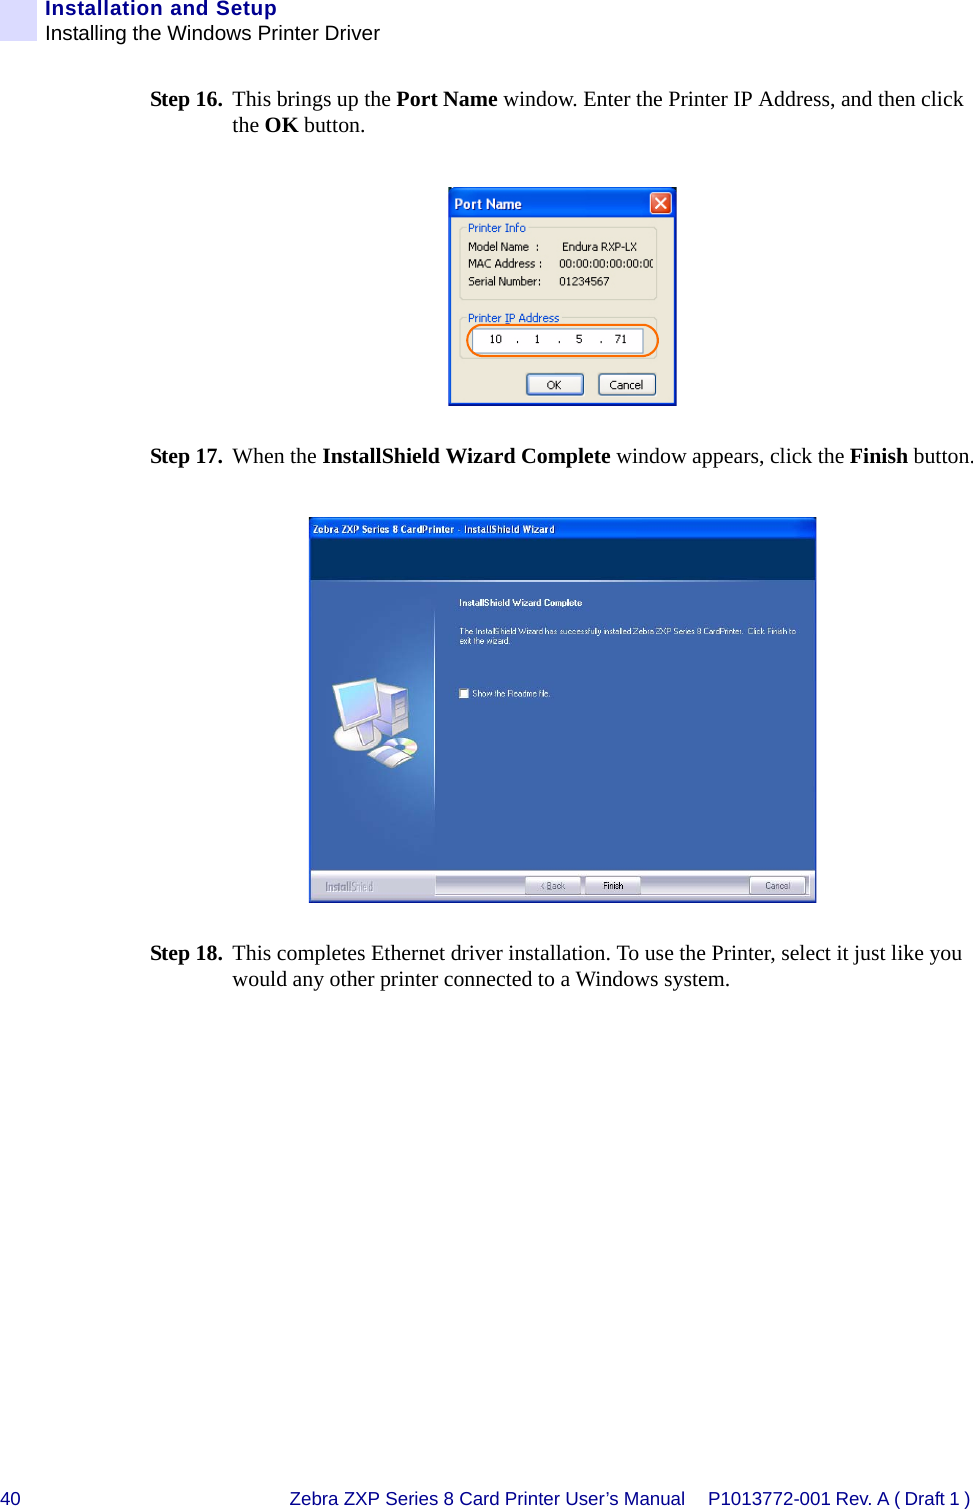
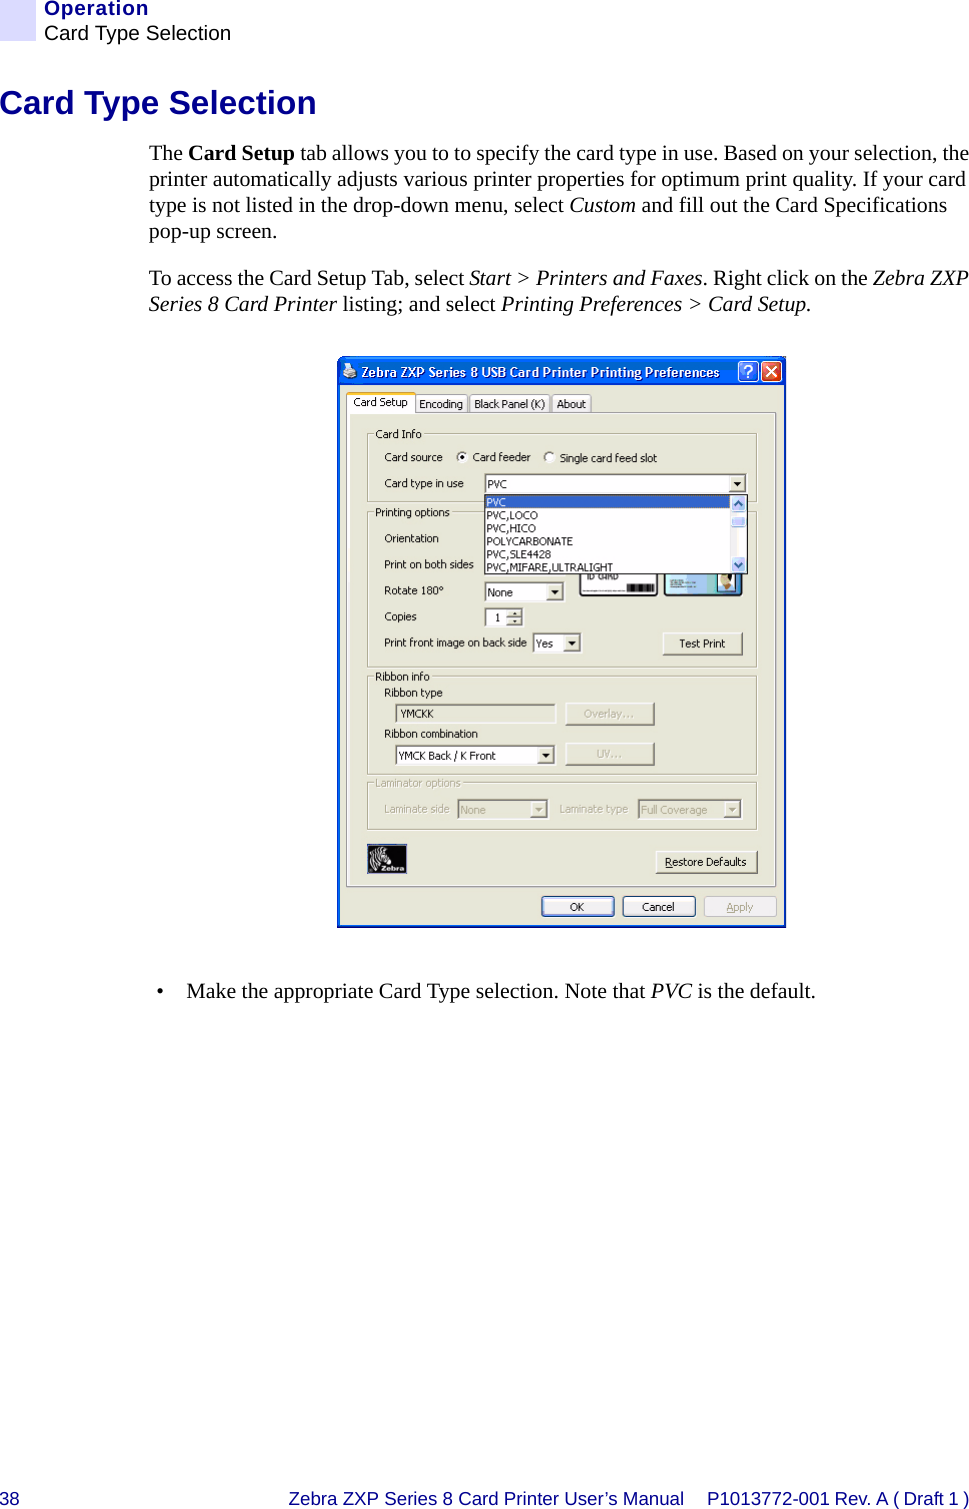
Users Manual Part 2 of 4

14 Zebra ZXP Series 8 Card Printer User’s Manual P1013772-001 Rev. A ( Draft 1 ) Installation and SetupLoading the Transfer FilmStep 3. Load transfer film supply spool onto the supply spindles, green flange side to the left.Step 4. Load the empty take-up spool onto the take-up spindles, white flange side to the right. Step 5. Make sure the transfer film comes off the bottom of the supply spool and feeds to the bottom of the take-up spool.Step 6. The figure below shows the proper installation of the transfer film.
Installation and SetupLoading a Print RibbonP1013772-001 Rev. A ( Draft 1 ) Zebra ZXP Series 8 Card Printer User’s Manual 15Loading a Print RibbonStep 1. Locate the print ribbon supply spindles and the print ribbon take-up spindles.Step 2. Load the print ribbon supply spool onto the supply spindles, purple flange side to the left.Supply SpoolPURPLETake-up SpoolBLUETake-up SpindleGRAYSupply SpindlePURPLETake-up SpindleBLUESupply SpindleGRAYFlangeFlange
16 Zebra ZXP Series 8 Card Printer User’s Manual P1013772-001 Rev. A ( Draft 1 ) Installation and SetupLoading a Print RibbonStep 3. Load the empty take-up spool onto the take-up spindle, blue flange side to the right. Step 4. Make sure the print ribbon comes off the bottom of the supply spool and feeds to the bottom of the take-up spool.Step 5. The figure below shows the proper installation of the print ribbon.
Installation and SetupLoading a Print RibbonP1013772-001 Rev. A ( Draft 1 ) Zebra ZXP Series 8 Card Printer User’s Manual 17Loading the LaminateThe Laminate is loaded into two cassettes.•The Upper Laminate Cassette, used on both the Z83 and Z84 Printers, has a label with the word “TOP” and is colored blue. •The Lower Laminate Cassette, used only on the Z84 Printer, has a label with the word “BOTTOM” and is colored yellow.Note • In this description of loading laminate, references to the Lower Laminate Cassette apply only to the Z84 Printer. The Z84 Printer can apply laminate to both surfaces of the card; the Z83 Printer only to the upper surface.
18 Zebra ZXP Series 8 Card Printer User’s Manual P1013772-001 Rev. A ( Draft 1 ) Installation and SetupLoading a Print RibbonRemoving the Laminate Cassette(s)Step 1. Release the cassette(s):• Upper Laminate Cassette (present on on both the Z83 and Z84 Printers): Press down on its locking lever.• Lower Laminate Cassette (only present on the Z84 Printer): Lift up on its locking lever.Hot Surface • If the printer has been in use, the Heater Cores area of the Laminator may be hot.Press downLift up
Installation and SetupLoading a Print RibbonP1013772-001 Rev. A ( Draft 1 ) Zebra ZXP Series 8 Card Printer User’s Manual 19Step 2. Rotate the cassette(s):• Upper Laminate Cassette: Rotate the cassette maximum clockwise.• Lower Laminate Cassette: Rotate the cassette maximum counter-clockwise.Rotate clockwiseRotate counter-clockwise
20 Zebra ZXP Series 8 Card Printer User’s Manual P1013772-001 Rev. A ( Draft 1 ) Installation and SetupLoading a Print RibbonStep 3. Remove the cassette(s) by pulling each cassette straight out from its spindle.Step 4. Open the cassette(s), like a clam shell, by separating its two halves. Grasp the two halves firmly with your fingers, then pull it apart. Do NOT use tools. (Upper Laminate Cassette shown.)Step 5. If there is an empty laminate core in the cassette, remove it.
Installation and SetupLoading a Print RibbonP1013772-001 Rev. A ( Draft 1 ) Zebra ZXP Series 8 Card Printer User’s Manual 21Loading the Laminate Cassette(s)Step 1. Remove the new roll of laminate from its packaging.Step 2. Carefully following the guidelines in the following figure, place the laminate in the cassette..Step 3. Pull out an inch or two of laminate past the lip of the cassette.Step 4. Close the cassette by firmly pressing the “clamshell” together. You will hear a click and feel a detent when the halves of the cassette seat together.Step 5. If the exposed end of the laminate is uneven or crinkled, cut it as square as you can with scissors.Upper Laminate Cassette (Used on Both Z83 and Z84)Lower Laminate Cassette (Used on Z84 Only)
22 Zebra ZXP Series 8 Card Printer User’s Manual P1013772-001 Rev. A ( Draft 1 ) Installation and SetupLoading a Print RibbonStep 6. Rotate the core to adjust the laminate overhang. Stop when the end of the laminate is even with the edge of the lips of the cassette.Important • Check for laminate overhang any time the locking lever is pressed or the cassette is removed.0 - 0.5 mm0 - 1/32"0 - 0.5 mm0 - 1/32"
Installation and SetupLoading a Print RibbonP1013772-001 Rev. A ( Draft 1 ) Zebra ZXP Series 8 Card Printer User’s Manual 23Installing the Laminator Cassette(s)• Upper Laminate Cassette (present on on both the Z83 and Z84 Printers): a. Slide the blue cassette onto the upper spindle.b. Rotate the cassette maximum counter-clockwise.c. Hear a click, and observe the upper locking lever snap into place.• Lower Laminate Cassette (only present on the Z84 Printer): a. Slide the yellow cassette onto the lower spindle.b. Rotate the cassette maximum clockwise.c. Hear a click, and observe the lower locking lever snap into place.Rotate clockwiseRotate counter-clockwise
24 Zebra ZXP Series 8 Card Printer User’s Manual P1013772-001 Rev. A ( Draft 1 ) Installation and SetupLoading a Print RibbonLaminating Contact Smart CardsTBD
Installation and SetupLoading a Print RibbonP1013772-001 Rev. A ( Draft 1 ) Zebra ZXP Series 8 Card Printer User’s Manual 25Using Partial-Width LaminateTBD
26 Zebra ZXP Series 8 Card Printer User’s Manual P1013772-001 Rev. A ( Draft 1 ) Installation and SetupLoading a Print RibbonClearing the Laminate ChannelsTBD
Installation and SetupConnecting PowerP1013772-001 Rev. A ( Draft 1 ) Zebra ZXP Series 8 Card Printer User’s Manual 27Connecting PowerStep 1. Place the Printer’s power switch in the OFF (   ) position.Step 2. Depending on your local AC voltage, plug the appropriate power cord into the Printer’s power connector and a grounded AC power source connection.DO NOT SWITCH THE PRINTER ON.Electric Shock Caution • Limit AC power supplied to the Printer to 100 – 230 volts, 60 ~ 50 Hertz. Limit excess current draw to 16 amps or less, using an associated circuit breaker or other such device. Never operate the Printer in a location where operator, computer, or printer can get wet. Personal injury could result. The Printer must be connected to an earthed electrical power source and properly protected against electrical surges and grounding faults; the electrical reliability of the Printer is based on the reliability of the mains power source and with the earth connection.The Printer’s power supply is an internal unit that can only be serviced or replaced by trained and authorized personnel.✓12
28 Zebra ZXP Series 8 Card Printer User’s Manual P1013772-001 Rev. A ( Draft 1 ) Installation and SetupConnecting the Printer to your ComputerConnecting the Printer to your ComputerUSB ConnectionStep 1. Connect the USB cable to the printer and the computer.Step 2. Ensure that the printer’s power switch in the OFF (   ) position.USB
Installation and SetupConnecting the Printer to your ComputerP1013772-001 Rev. A ( Draft 1 ) Zebra ZXP Series 8 Card Printer User’s Manual 29Ethernet ConnectionStep 1. Connect the Ethernet Port on the rear of the printer to an Ethernet Network Port. Step 2. Turn the printer’s power switch to the ON ( | ) position.10/100base-T10/100base-T
30 Zebra ZXP Series 8 Card Printer User’s Manual P1013772-001 Rev. A ( Draft 1 ) Installation and SetupInstalling the Windows Printer DriverInstalling the Windows Printer DriverOverviewEach computer that will use the printer must have the Printer Driver installed.If not already done, connect power to the printer; and connect the printer to the computer.• For USB Driver installation, turn the printer OFF (   ).• For Ethernet Driver installation, turn the printer ON ( | ).To install the Printer Driver, insert the User Documentation and Drivers CD, included with your printer, into the host computer and the InstallShield Wizard will walk you through the required installation steps. The InstallShield Wizard will:• Automatically install the User Interface when the driver CD is inserted. (Autorun must be enabled for your CD).If Autorun is disabled:d. Insert the Driver CD into the CD-ROM drive.e. At the root (top) level of the CD, double-click on the RunCD.exe file.• Start the installation process when the Install Printer Driver menu item is selected from the Main Menu.• Allow you to install USB and/or Ethernet drivers.• Detect previous versions of the driver. If a previous version is detected, you will be prompted to remove it, reboot, and then restart the install process.• Install the new driver files.
Installation and SetupInstalling the Windows Printer DriverP1013772-001 Rev. A ( Draft 1 ) Zebra ZXP Series 8 Card Printer User’s Manual 31Installing the USB Printer DriverStep 1. If not already done, connect power to the printer. Do not turn power ON.Step 2. Connect the USB port on the rear of the printer to the computer’s USB port. Step 3. Ensure that the Printer’s power switch in the OFF (   ) position.Step 4. Insert the User Documentation and Drivers CD into the CD drive of the host computer. The Main Menu will open.Step 5. From the drop-down menu in the upper-right corner of the Main Menu, choose the appropriate language for your system. Step 6. From the Main Menu, click Install Printer Driver.Step 7. If an older Printer and Driver is installed on your computer, the Setup Type window will be displayed; otherwise go to Step 9.Step 8. In the Setup Type window, choose the maintenance operation to be performed:a. Select Upgrade to upgrade the older printer driver, click the Next button, and follow the screen prompts. At the end of the upgrade process, you will be asked to re-boot your computer. Re-boot your computer. The upgrade is complete.b. Select Remove to remove the older printer driver, click the Next button, and follow the screen prompts. At the end of the uninstall process, you will be asked to re-boot your computer. Re-boot your computer, and start over with Step 1.Note • To install the Ethernet driver, see page 36.
32 Zebra ZXP Series 8 Card Printer User’s Manual P1013772-001 Rev. A ( Draft 1 ) Installation and SetupInstalling the Windows Printer DriverStep 9. The InstallShield Wizard window will open. To proceed with the installation, click the Next button.Step 10. Select Install USB printer drivers, and click the Next button.Step 11. Ensure that the Printer’s power switch in the OFF (   ) position; and then click the OK button.
Installation and SetupInstalling the Windows Printer DriverP1013772-001 Rev. A ( Draft 1 ) Zebra ZXP Series 8 Card Printer User’s Manual 33Step 12. This will bring up the License Agreement window. To proceed with the installation, select the I accept the terms of the license agreement option, and then click the Next button.Step 13. This will bring up the Customer Information window. Enter User Name and Company Name; and then click the Next button.
34 Zebra ZXP Series 8 Card Printer User’s Manual P1013772-001 Rev. A ( Draft 1 ) Installation and SetupInstalling the Windows Printer DriverStep 14. This will bring up the Choose Destination Location window. • To accept the default destination location where setup will install the files, click the Next button.- or -• Click the Change button, select a folder where setup will install the files, and click the Next button.Step 15. This will bring up the Ready to Install the Program window. To continue, click the Install button.Step 16. Observe the Setup Status window.
Installation and SetupInstalling the Windows Printer DriverP1013772-001 Rev. A ( Draft 1 ) Zebra ZXP Series 8 Card Printer User’s Manual 35Step 17. The Congratulations window will appear.Step 18. At this point, turn on your printer; and then click the Next button. The Windows New Hardware Found wizard will find the printer.Step 19. When the InstallShield Wizard Complete window appears, click the Finish button.Step 20. This completes USB driver installation. To use the Printer, you would select it just like you would any other printer connected to a Windows system.
36 Zebra ZXP Series 8 Card Printer User’s Manual P1013772-001 Rev. A ( Draft 1 ) Installation and SetupInstalling the Windows Printer DriverInstalling the Ethernet Printer DriverStep 1. If not already done, connect power to the printer. Turn power ON.Step 2. Connect the Ethernet port on the rear of the printer to the Ethernet network connection or directly to the computer’s Ethernet port. Step 3. Ensure that the Printer’s power switch in the ON ( | ) position.Step 4. Insert the User Documentation and Drivers CD into the CD drive of the host computer. The Main Menu will open.Step 5. From the drop-down menu in the upper-right corner of the Main Menu, choose the appropriate language for your system. Step 6. From the Main Menu, click Install Printer Driver.Step 7. If an older Printer and Driver is installed on your computer, the Setup Type window will be displayed; otherwise go to Step 9.Note • To install the USB driver, see page 31.Important • The Ethernet Network must be configured correctly, with the Printer and the host computer on the same subnet mask. If you are not sure how to verify this or change the configuration, consult someone knowledgeable on Ethernet Networks.Important • A valid static IP address must be assigned to the printer.
Installation and SetupInstalling the Windows Printer DriverP1013772-001 Rev. A ( Draft 1 ) Zebra ZXP Series 8 Card Printer User’s Manual 37Step 8. In the Setup Type window, choose the maintenance operation to be performed:a. Select Upgrade to upgrade the older printer driver, click the Next button, and follow the screen prompts. At the end of the upgrade process, you will be asked to re-boot your computer. Re-boot your computer. The upgrade is complete.b. Select Remove to remove the older printer driver, click the Next button, and follow the screen prompts. At the end of the uninstall process, you will be asked to re-boot your computer. Re-boot your computer, and start over with Step 1.Step 9. The InstallShield Wizard window will open. To proceed with the installation, click the Next button.Step 10. Select Install Ethernet printer drivers, and click the Next button.
38 Zebra ZXP Series 8 Card Printer User’s Manual P1013772-001 Rev. A ( Draft 1 ) Installation and SetupInstalling the Windows Printer DriverStep 11. This will bring up the License Agreement window. To proceed with the installation, select the I accept the terms of the license agreement option, and then click the Next button.Step 12. This will bring up the Customer Information window. Enter your name and the name of the company for which you work; and then click the Next button.
Installation and SetupInstalling the Windows Printer DriverP1013772-001 Rev. A ( Draft 1 ) Zebra ZXP Series 8 Card Printer User’s Manual 39Step 13. This will bring up the Choose Destination Location window. • To accept the default destination location where setup will install the files, click the Next button.- or -• Click the Change button, select a folder where setup will install the files, and click the Next button.Step 14. This will bring up the Ready to Install the Program window. To continue, click the Install button.Step 15. Observe the Setup Status window.
40 Zebra ZXP Series 8 Card Printer User’s Manual P1013772-001 Rev. A ( Draft 1 ) Installation and SetupInstalling the Windows Printer DriverStep 16. This brings up the Port Name window. Enter the Printer IP Address, and then click the OK button.Step 17. When the InstallShield Wizard Complete window appears, click the Finish button.Step 18. This completes Ethernet driver installation. To use the Printer, select it just like you would any other printer connected to a Windows system.
P1013772-001 Rev. A ( Draft 1 ) Zebra ZXP Series 8 Card Printer User’s Manual 373OperationIntroductionPrinting with the Card Printer is similar to printing with any other printer in a Windows environment.• The Printer Driver Software is installed on your computer (see Section 2).• The Printer is connected to the power source and the computer (see Section 2).• The Printer is selected by either the Operating System or the appropriate application software program.• Printer Properties are set (the factory default values will be appropriate for many applications).• Set the Card Type.• Print a Test Card.• Card printing is directed by the appropriate application software program.
38 Zebra ZXP Series 8 Card Printer User’s Manual P1013772-001 Rev. A ( Draft 1 ) OperationCard Type SelectionCard Type SelectionThe Card Setup tab allows you to to specify the card type in use. Based on your selection, the printer automatically adjusts various printer properties for optimum print quality. If your card type is not listed in the drop-down menu, select Custom and fill out the Card Specifications pop-up screen.To access the Card Setup Tab, select Start > Printers and Faxes. Right click on the Zebra ZXP Series 8 Card Printer listing; and select Printing Preferences > Card Setup.• Make the appropriate Card Type selection. Note that PVC is the default.
OperationPrinting a Sample CardP1013772-001 Rev. A ( Draft 1 ) Zebra ZXP Series 8 Card Printer User’s Manual 39Printing a Sample CardSample card designs are installed with the printer driver. To print a sample card:1. Access the Card Setup Tab, select Start > Printers and Faxes. Right click on the Zebra ZXP Series 8 Card Printer listing; and select Printing Preferences > Card Setup.2. Ensure that cards are in the Input Hopper.3. Click of the Test Print button (circled above).4. The printer will feed in a card and start printing.5. Once the printing job is complete, the card is ejected from the printer into the Output Hopper.

Navigation menu