Zhejiang Flashforge 3D Technology ADVENTURER3 3D PRINTER User Manual Adventurer 3 EN
Zhejiang Flashforge 3D Technology CO., Ltd. 3D PRINTER Adventurer 3 EN
UserManual.wiki
>
Zhejiang Flashforge 3D Technology
>
ADVENTURER3 User Manual
User manual
Navigation menu
Upload a User Manual
Namespaces
Wiki Guide
HTML
PDF
Info
Views
User Manual
Discussion / Help
Navigation
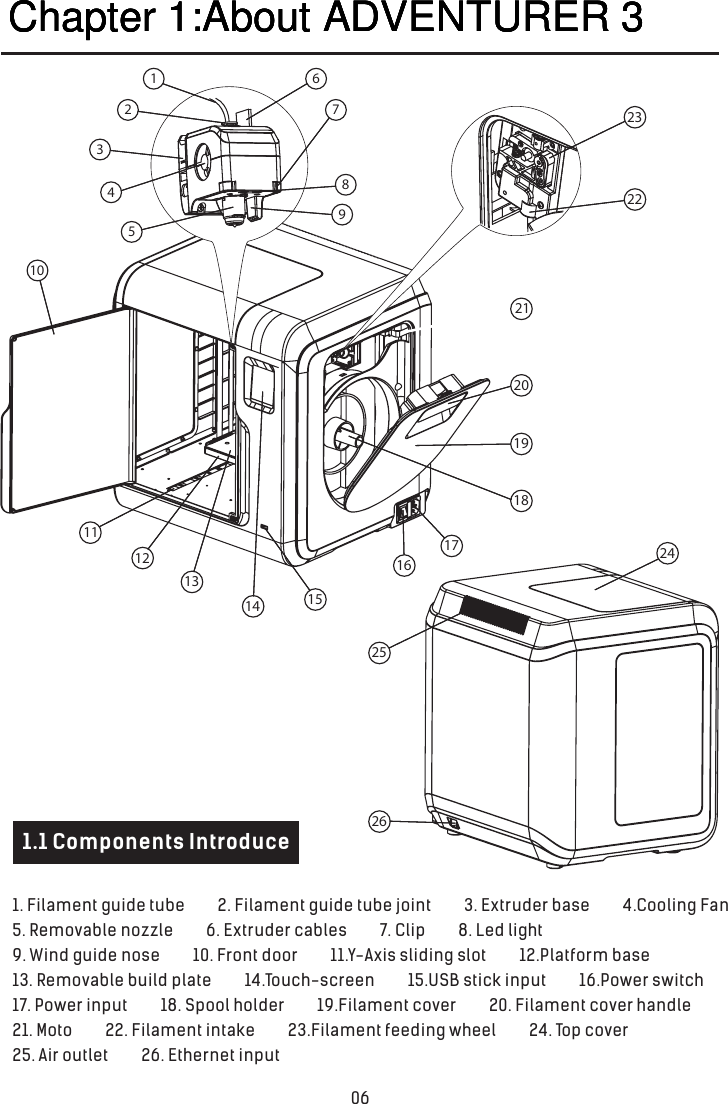
![2. Tap [Filament]--Tap [Load]--After Load completed--Tap [OK]3. Load completed when you see filament come out of extruder, Tap [OK].Put a spool of filament on the spool holder, close the filament cover.BuildToolsFilamentLoadReplace200 /220℃Extruder heating on...Cancel220 /220℃Preheating completed, Load begins.ok220 /220℃when filament load the extrudersteadily, replace completed.Mind the loading direction of filament, make sureto be clockwise as the picture showed.ok11](https://usermanual.wiki/Zhejiang-Flashforge-3D-Technology/ADVENTURER3/User-Guide-3814910-Page-11.png)
![After generating the Gcode file, you can transfer it to your ADVENTURER 3 with different communication methods. If use USB stick to print, please insert your USB stick with target .g/.gx file to your ADVENTURER 3, there will be no need to set new communication.WiFi Connection1. Tap [Tools]--Tap [Communication]--Tap [WIFI] ;2. Choose a network and input the password.CommunicationCommunication PreheatSetting AboutWiFi HotspotCloud EthernetWiFiChoose a networkFlashforgeChinaNet-AnCrTP-LINK_EDC2QS_12341/3<<<12abc123 %#1234567890,._WiFiChoose a networkFlashforgeChinaNet-AnCrTP-LINK_EDC2QS_12341/3<](https://usermanual.wiki/Zhejiang-Flashforge-3D-Technology/ADVENTURER3/User-Guide-3814910-Page-12.png)
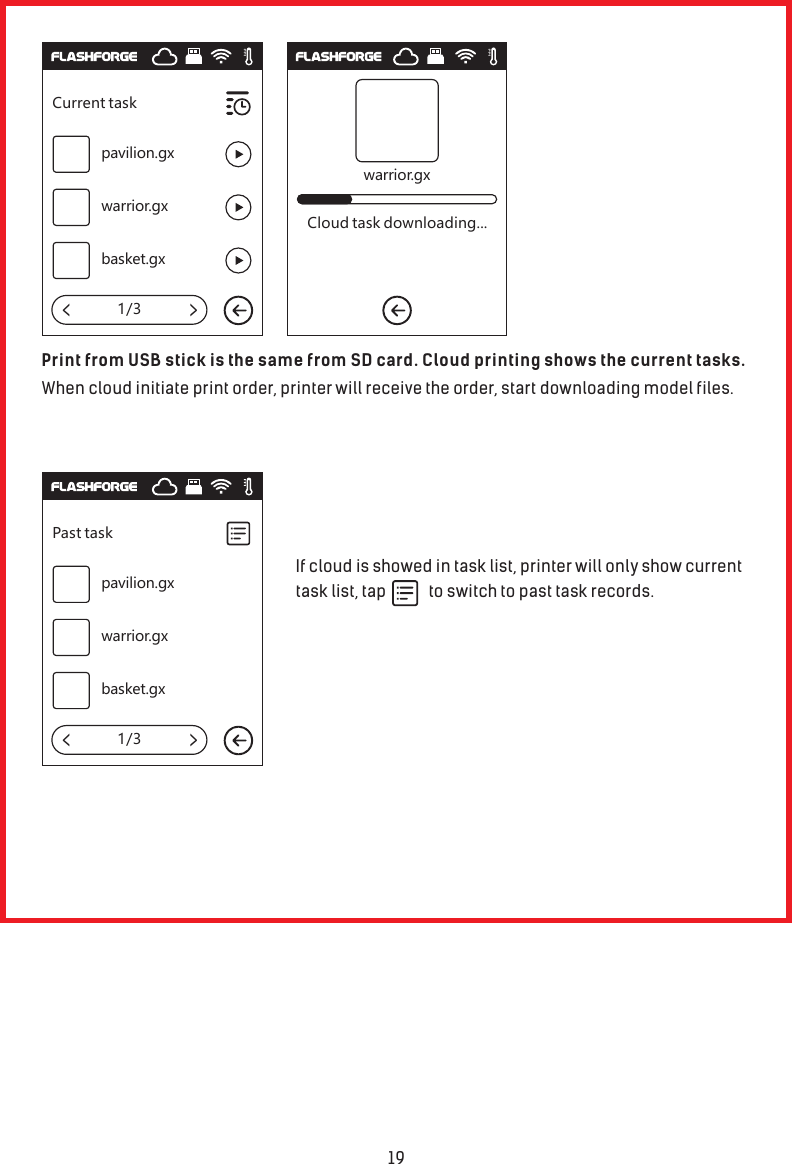
![1. Turn on the WiFi or Ethernet connection, connect the printer to internet.2. Tap[Tools]-Tap[Communication]-Tap[Cloud] on the printer;3. Turn on the Cloud Connection function;4. Register your cloud account and set your settings on www.flashcloud.com with the registration code on printer's touch screen.13Cloud ConnectionCommunication PreheatSetting AboutWiFi HotspotCloud EthernetCloud connectingPrinter Name:Registration Coad: JMTGZS](https://usermanual.wiki/Zhejiang-Flashforge-3D-Technology/ADVENTURER3/User-Guide-3814910-Page-13.png)
![141. Tap [Build], choose the file path: SD card, USB stick, Cloud.2. Choose the model file, tap on its right to start printing; or tap model picture or model name to enterdetail page, tap to start printing.3. Extruder will heat up automatically, when heating finishes, the printer will start to build the model. After printing completed, printer will sound a beep and pop out a notice on the touch screen.Model PrintBuildToolsFilament6.62GBNo taskNot Available1/3<<...0h0minBuild timem7.49Build completed!okBackkom.gChristmas stocking.gChristmas.gChristmas stocking(1).gBackkom.gBackkom.g](https://usermanual.wiki/Zhejiang-Flashforge-3D-Technology/ADVENTURER3/User-Guide-3814910-Page-14.png)
![Extruder heating on...Replace filament1. Tap [Filament]--Tap [Replace], extruder will start preheating.2. Pull out the filament as the picture showed above.4. When new filament come out of extruder steadily, replace is completed, Tap [OK].3. Insert new filament into the filament intake and push the filament into the feeding wheel until resistance is sensed.LoadReplace200/220℃Cancel220/220℃220/220℃OK220/220℃OK16Unloading the filament,please wait...Pull out old filament, insertnew filament, tap [ok] button.When filament load the extrudersteadily, replace completed.](https://usermanual.wiki/Zhejiang-Flashforge-3D-Technology/ADVENTURER3/User-Guide-3814910-Page-16.png)
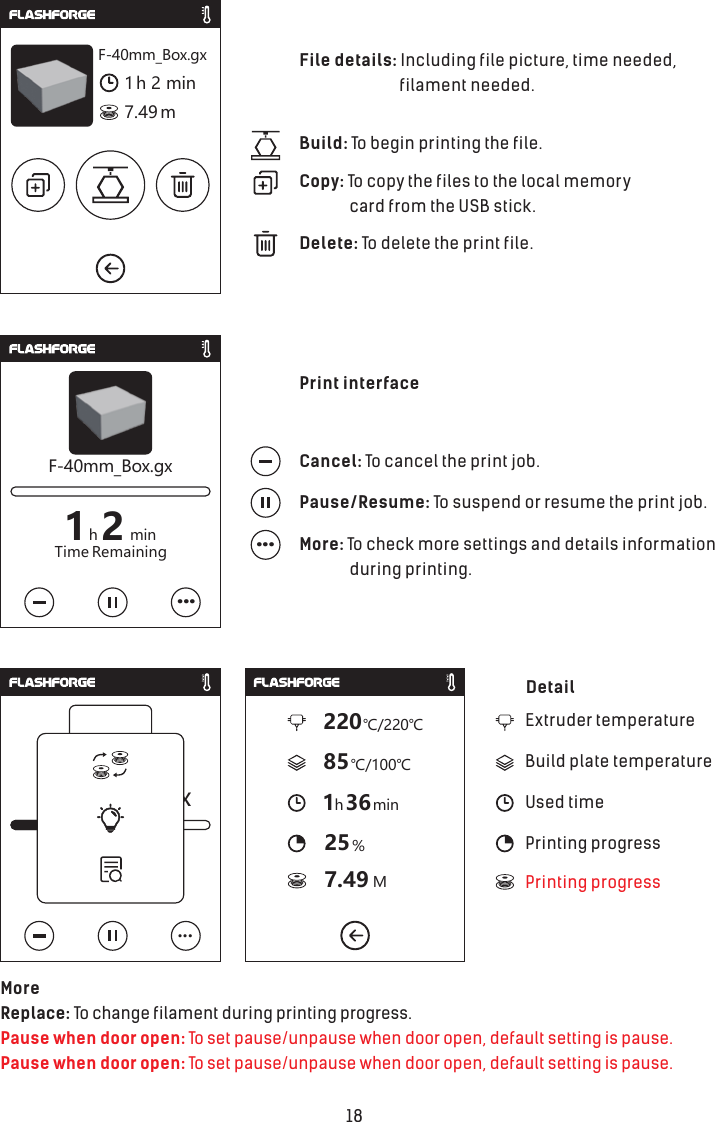
![Interface Menus Introduction1. Tap [Print].Build2. Choose the read path of the print file File list.Read the print file from:The local memory cardThe USB stickThe CloudBack: Back to upper interface3. File listTap to begin printing; tap the picture of the selected file to enter file details.Page-flip: Tap the left/right arrow. Long press the file picture or file name, quit out multi-selected interface, you can select all, copy ,delete .Tap to quit out multi-selected interface.BuildToolsFilament6.62GBNo taskNot Available1/3<<17<1/4<1/3<<Backkom.gChristmas stocking.gChristmas.gChristmas stocking(1).gBackkom.gChristmas stocking.gChristmas stocking(1).gcheck all](https://usermanual.wiki/Zhejiang-Flashforge-3D-Technology/ADVENTURER3/User-Guide-3814910-Page-17.png)
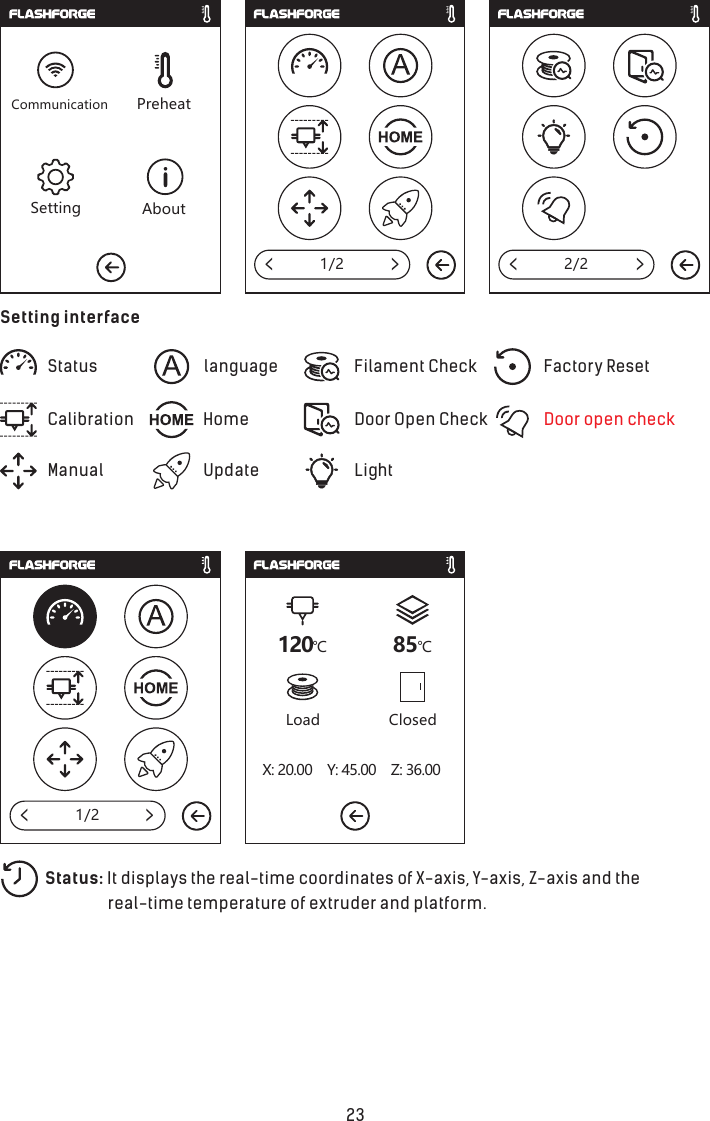
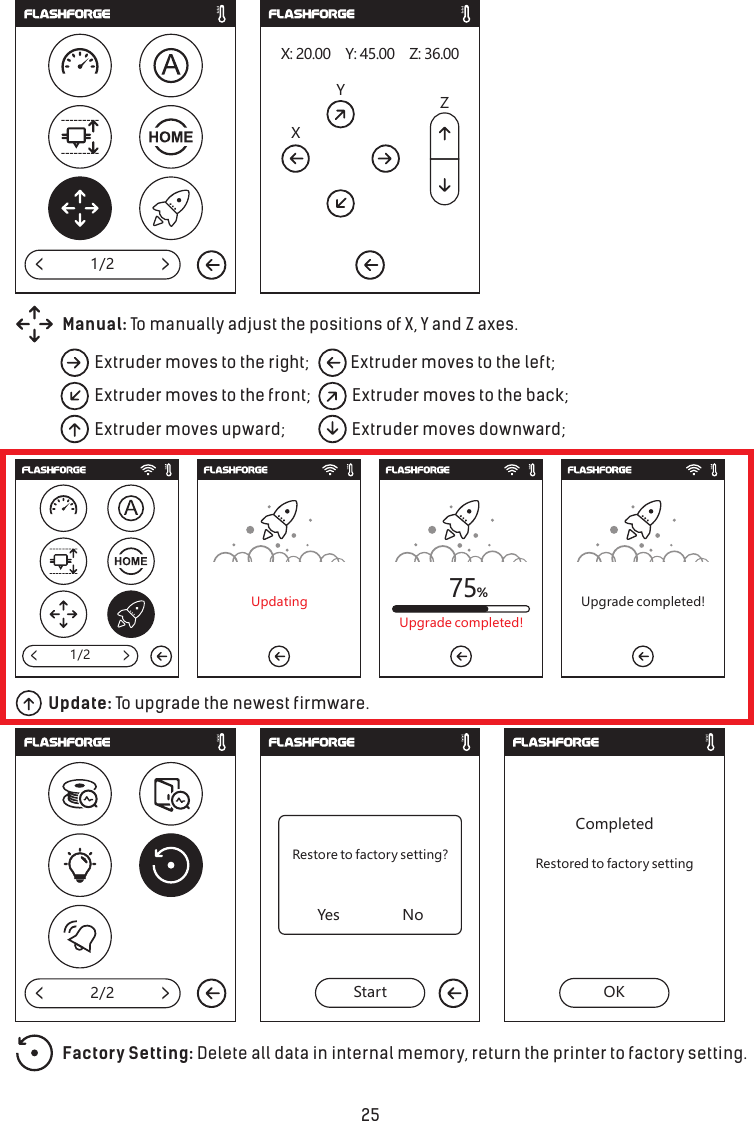
![1/2<<<<Language setting: Include Chinese, English, Japanese, Deutsch, French and Español.Home: To make the X, Y and Z axes back to the mechanical zero point.EnDeFr EsOKClick the arrow to adjust thenozzle so that it just touchesthe platformExtruderZ axis 0.00YesYesHoming, please wait... Homing completedUp arrow: Extruder will elevate, away from the platform;Down arrow: Extruder will descend, move close to the platform;CalibrationTo calibrate the initial distance between extruderand platform. Tap , after homing completed, manually tap up and down arrow to adjust the distance between extruder and platform until extruder is just about to touch platform. Tap[OK] to complete calibration.241/2<2/2<Ar1/2<<1/2<<](https://usermanual.wiki/Zhejiang-Flashforge-3D-Technology/ADVENTURER3/User-Guide-3814910-Page-24.png)
![ADVENTURER 3Filament check: To turn on/off the filament check, notice will pop out when filament is used up or suspended when the check is turned on.Door open check: To turn on/off the door open check, notice will pop out when door is open when the check is turned on.Light: To turn on/off the light.Light: To turn on/off the light.Shows the basic information about the printer.Notice: When contacting after-sales support, please give your Serial No to after-sales engineer, which is showed in the [About] interface.About:2/2<1/2<Machine Type:Serial No:RegisterCode:Firmware Version:123456WWNKDO1.0.0 201709092/2<Build Volume:Usage counter:IP Address:150 x 150 x 15012 hours10.90.243.184: 88992/2<<< <<26](https://usermanual.wiki/Zhejiang-Flashforge-3D-Technology/ADVENTURER3/User-Guide-3814910-Page-26.png)
![LoadReplace200/220℃Extruder heating on...CancelFilament• The extruder is heated up to 220℃.• After heat completed, insert the filament into the extruder at an upright angle until some resistance is sensed(as the filament is pushed through the feeding wheel).• Load will complete when you see filament come out of extruder.Load• The extruder is heated up to 220℃, after heat completed, filament will be unloaded from the extruder.• Pull out the filament according to the instruction.• Insert new filament into the filament intake, tap [OK] ;• New filament will be pushed into the extruder, replace will complete when you see new filament come out of extruder.Replace220/220℃okWhen filament load the extrudersteadily, replace completed.220/220℃Preheating completed,Load begins.okLoadReplace220/220℃Unloading the filament,please wait...Pull out old filament, insertnew filament, tap [ok] button.220/220℃okWhen filament load the extrudersteadily, replace completed.220/220℃ok27](https://usermanual.wiki/Zhejiang-Flashforge-3D-Technology/ADVENTURER3/User-Guide-3814910-Page-27.png)
![Chapter 3: Q&AQ1. How to solve if the nozzle is clogged?Q2. How to replace the nozzle ?Power off before replacing nozzle! Make sure power off operation!Please make filament tip smooth and flat when cutting off the filament.Notice28ClipsMethod 1: Tap [Preheat], heat up the extruder to 200℃, after heating completed, press the air tube joint and pull out the filament guide tube. Check to see whether the filament is bended or filament tip is not smooth, cut filament tip smooth and flat, install the guide tube and filament back, Tap [Load] .Method 2: If method 1 not improving, use an unclogging pin tool to unclog filament.Method 3: If method 1 and method 2 not improving, please replace the nozzle.1. Press the left and right clips and pull out the nozzle.2. Push in a length of filament through the filament intake manually, making it long enough to be cut off.3. Rotate the filament spool anti-clockwise manually, making filament retreat back a little.4. Press the left and right clips, install the new nozzle back into the extruder, making the nozzle slot and bottom of extruder are on the same level.5. Tap[Filament] -- Tap[Load], nozzle replace completed when you see filament come out of new nozzle.](https://usermanual.wiki/Zhejiang-Flashforge-3D-Technology/ADVENTURER3/User-Guide-3814910-Page-28.png)
![ADVENTURER 3ADVENTURER 3ingredients. ADVENTURER 3 tests out default settings according to the properties of Flashforge ADVENTURER 3 support normal ABS and PLA filament but different brand filament has different Q3. Do we need to do extruder calibration again after replacing nozzle?Yes , do extruder calibration again to ensure high print quality as minimal error may be caused by extruder installation.Q4. How to solve if displayed temperature is abnormal after replacing nozzle?Abnormal temperature indicates extruder sensor can not be read, please check the nozzle whether it is well installed.1. Check the filament guide tube, make sure filament has been pushed into the extruder, if not, please tap [Load]. Restart building model file after you see filament come out of extruder.2. Check the nozzle whether it is clogged or not, if so, please refer to Q1 for resolution.Q5. How to solve if no filament come out of extruder after tap [Build] model file and extruder begins moving normally?Q6: How to replace the filament ?Q7: How to take down the model ?1. Take out the removable build plate.2. Bend the build plate, the plate will produce certain deformation, seperating the plate away from the bottom of model. (Please use a scraper to assist removing when model is too small or too big).3.Take down the model.1. Tap[Filament]--Tap[Replace], after extruder heating up completed, filament will be unloaded, pull out the filament according to the instruction.2. Insert new filament into the filament intake and feeding wheel, tap [OK]; New filament will be pushed into the extruder.3. Replace will complete when you see new filament come out of extruder.Q8: How to solve if the distance between nozzle and platform is too large(far away) or too small(hit) during printing?1. Tap[Setting]--Calibration.2. The extruder homing automatically, moves down some height.3. Tap up and down arrow to adjust the distance between extruder and platform until extruder is just about to touch platform.4. Tap[OK], printer will memorize current calibration position and start homing automatically.Q9: Can we use other brand filament which is not produced by Flashforge ?ABS and PLA filament.Other brand filament is ok but not recommended for using, if that causes extruder clogging or bad printing quality or other failure, FlashForge will take no responsibility. These problems are not in the warranty of FlashForge .Q10. Is compatible with all kinds of AC power input ? is equipped with a built-in 24V/6.5A power supplier, suitable for 110V-240V input voltage.Q11. Is capable to be turned off automatically after printing job is finished ?No.29ADVENTURER 3ADVENTURER 3ADVENTURER 3ADVENTURER 3ADVENTURER 3ADVENTURER 3ADVENTURER 3](https://usermanual.wiki/Zhejiang-Flashforge-3D-Technology/ADVENTURER3/User-Guide-3814910-Page-29.png)