Zhejiang Flashforge 3D Technology FINDER 3D Printer User Manual Flashforge Finder User Guide V 20180414
Zhejiang Flashforge 3D Technology CO., Ltd. 3D Printer Flashforge Finder User Guide V 20180414
Contents
- 1. Users Manual
- 2. user manual
user manual

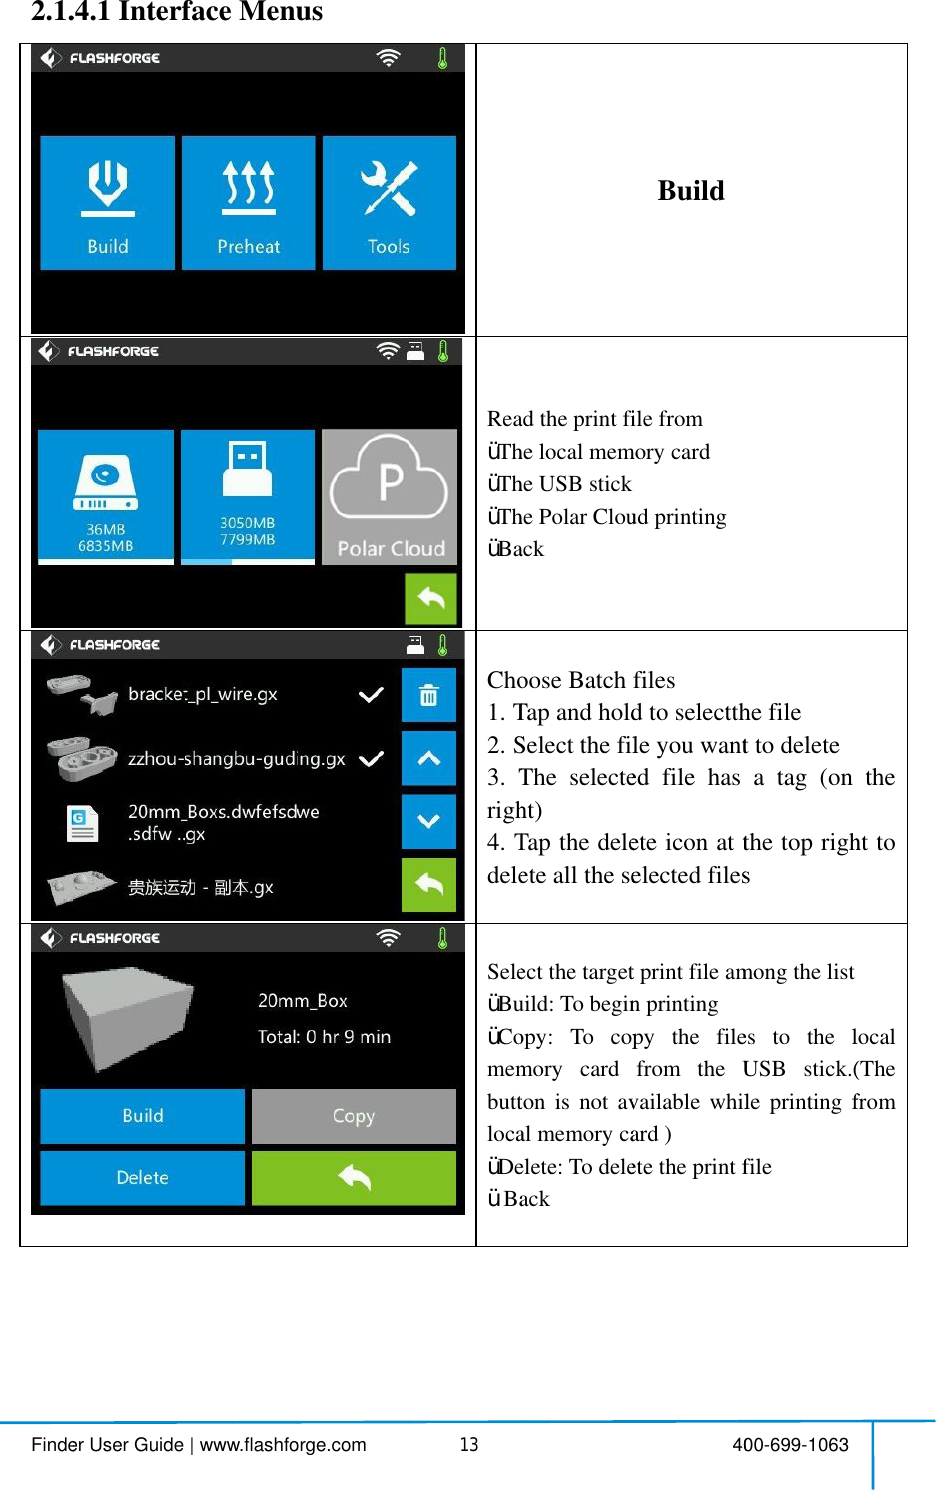
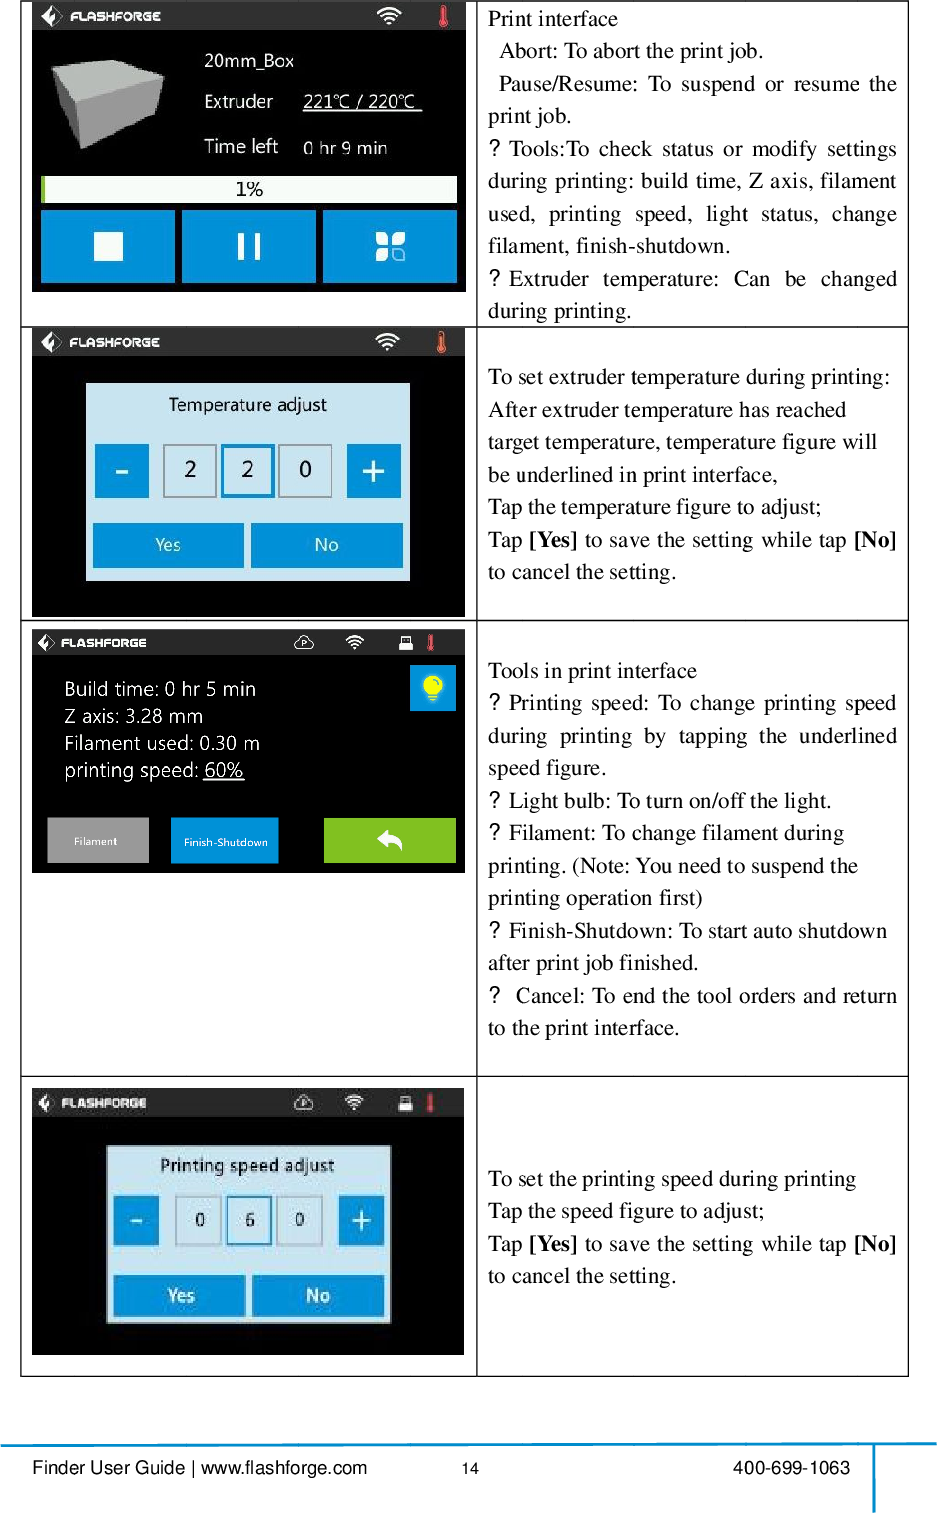
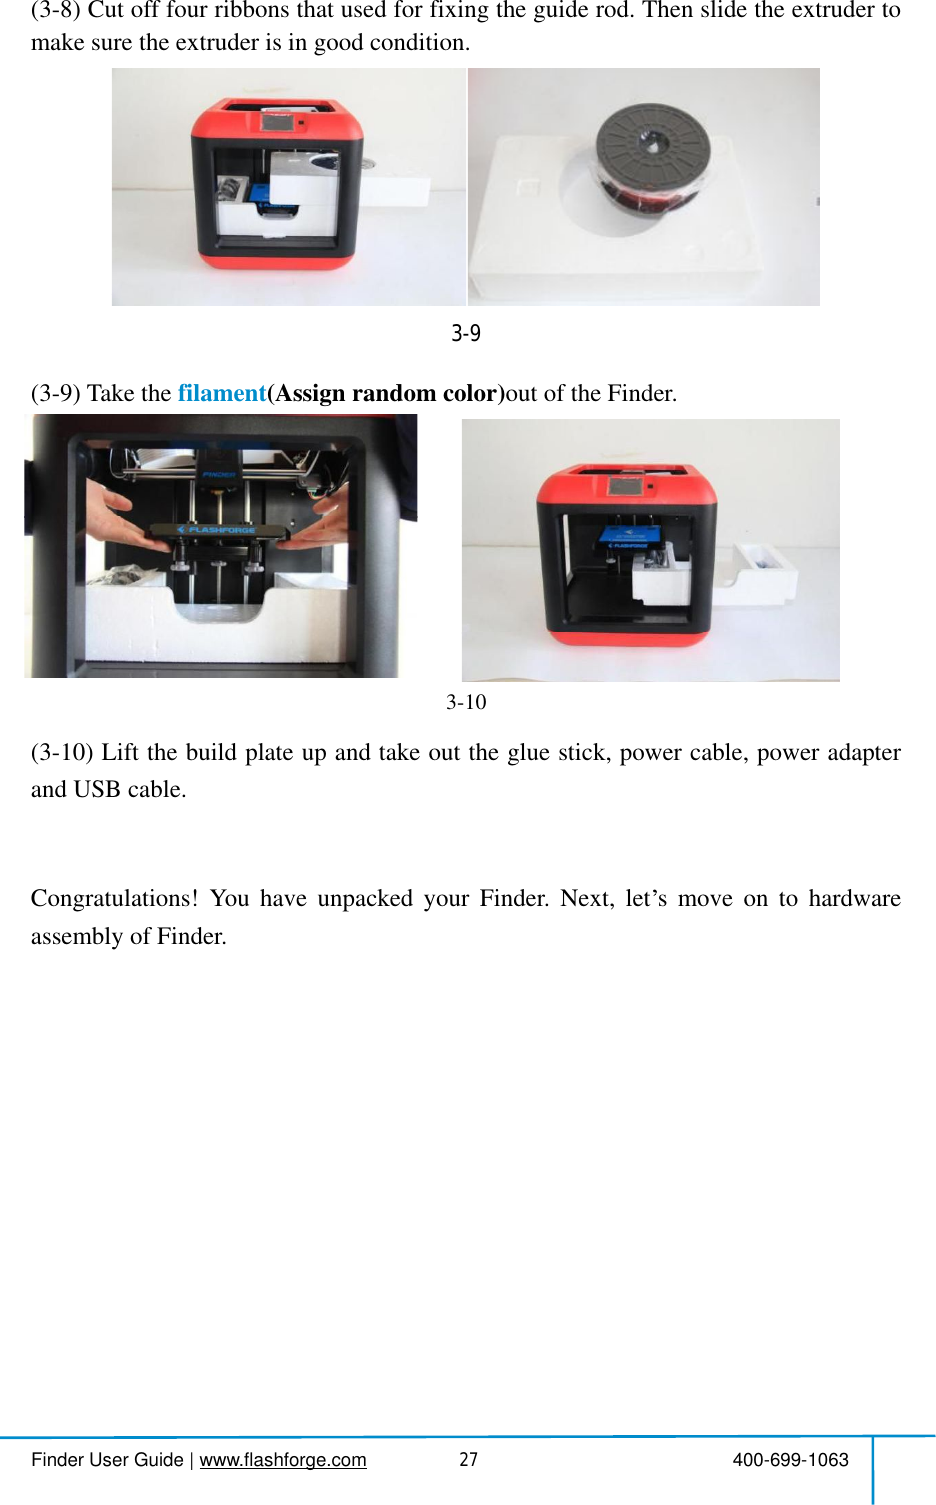
![Findender User Guide |www.flashfoorge.com 4 414PrinŸAboŸPauprin?Tooduriusedfilam?EduriTo set After etargbeundTap tTapto caToo?Pridurispee?Li?Fprinprin?Fiafter?Cto thTo set tTap tTapto ca 4nt interfacebort:To abort tuse/Resume:nt job.Tools:Tochecringprinting:d,printingment, finish-Extrudertemringprinting. set extrudertAfter extruder teget temperatuunderlined in the temperat[Yes] tosav cancel the settiools inprint inPrintingspeedringprintingeed figure.Lightbulb:Toilament:To cnting. (Note:ntingoperationFinish-Shutdoafterprint job finCancel:Toendheprint interfa set theprinting the speed figu[Yes] tosav cancel the setti 40rt theprintjob.e:Tosuspendeckstatusorbuildtime,speed,light-shutdown.mperature:Catemperatureemperaturehure, temperatnprint interface,erature figure tovethesettinge setting.nterfaceeed:Tochangebytappingoturnon/off t change filamYouneedto son first)down:To start anished.ndthetooloterface.ng speeddurigure to adjust;vethesettinge setting.00-699-1063ob.ndorresumemodifysettiZaxis,filamtstatus,chaCanbechangduringprintihas reachedature figure willace,o adjust;ngwhiletap[Neprintingspgtheunderlif the light.mentduring suspend thet auto shutdoordersandreringprintingst;ngwhiletap[Nethesettingsmentangengeding:re will[No]peederlinedownreturn[No]](https://usermanual.wiki/Zhejiang-Flashforge-3D-Technology/FINDER.user-manual/User-Guide-3901593-Page-15.png)
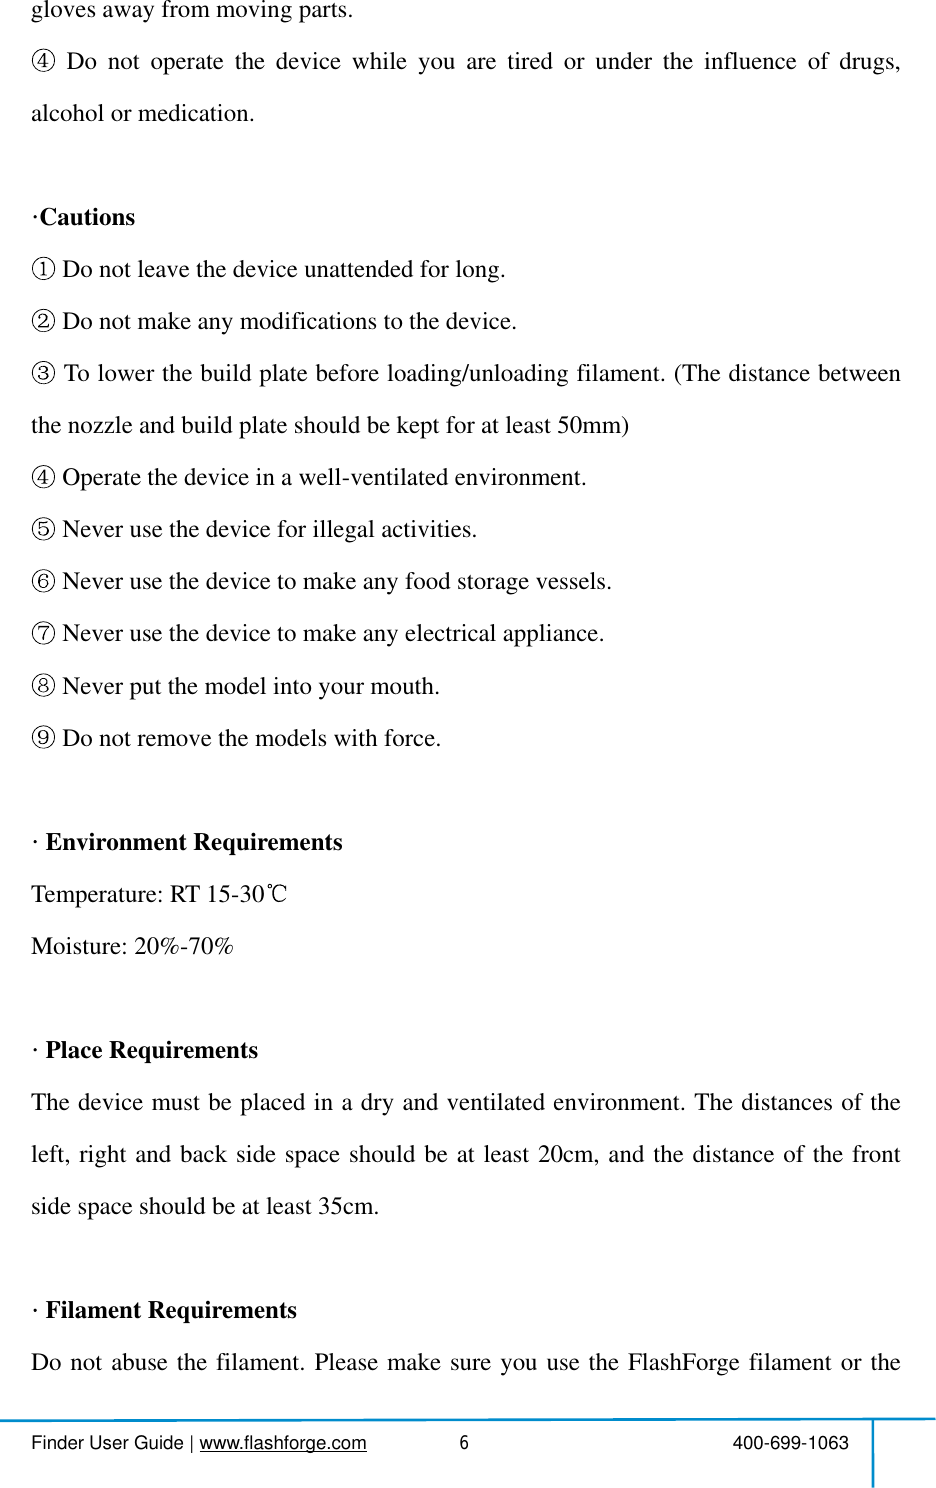
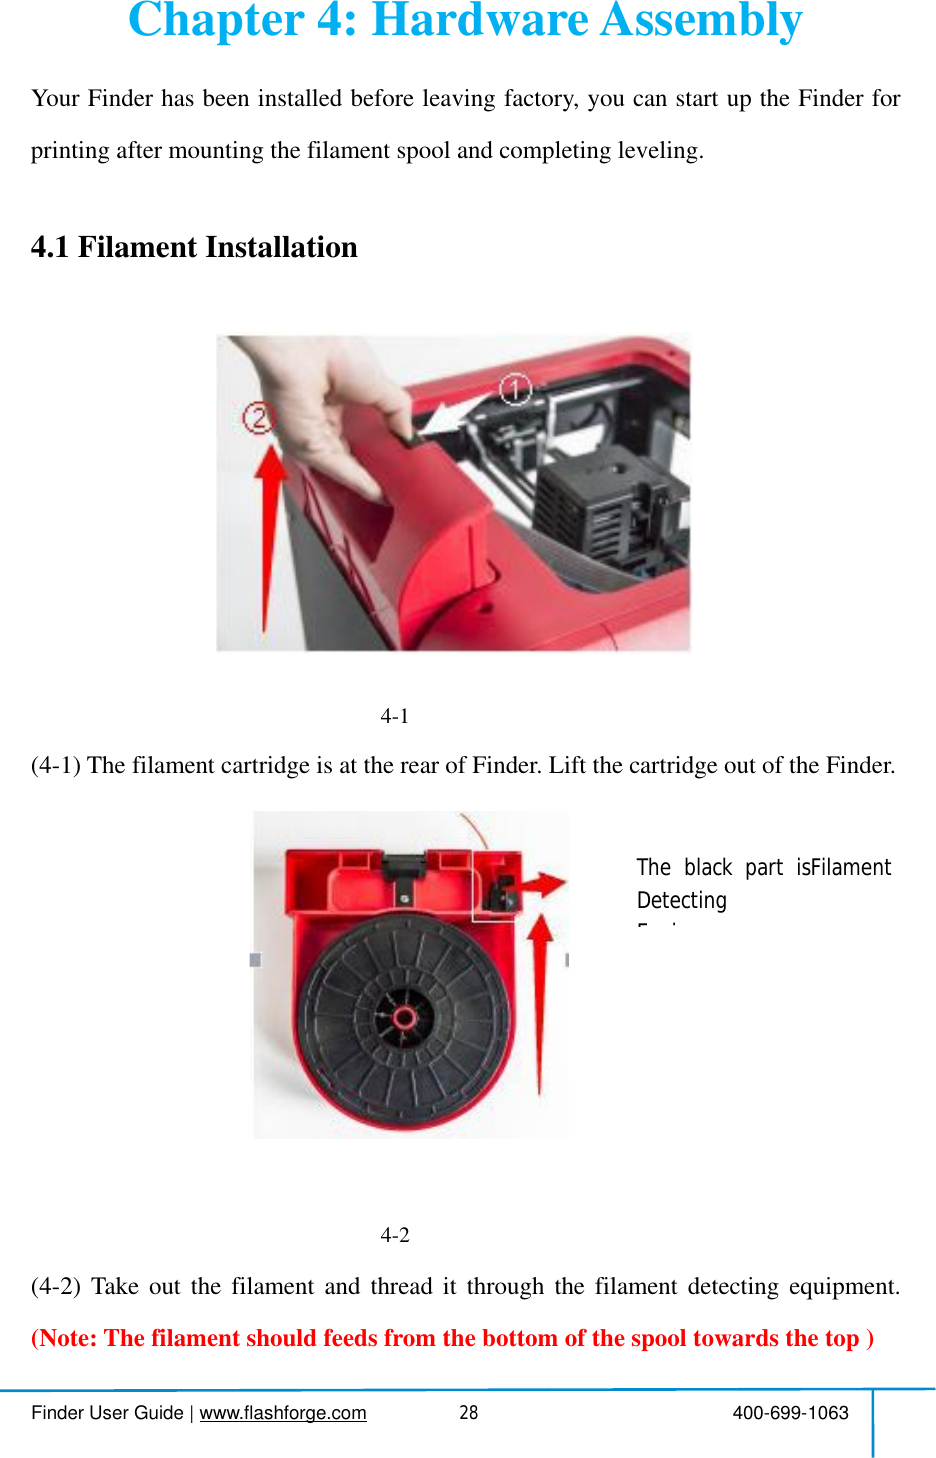
![Finder User Guide|www.flashforge.com 400-699-1063162.1.4.2Preheat MenusPreheatTapthe [Preheat] toenterthepreheatinterface.Tapthe [Start] toheatuptothesetting temperature.Thedefault temperature is220.Tapthetemperaturedisplaybartosetthetemperature.To set thepreheat temperature.Tap [Yes] tosave the setting ,[No] to cancel the setting.Thepicturedisplaysthepreheatinterface.Itshows thereal-timetemperature and thetargettemperature.Tapthe [Abort] buttontoabortthepreheatjob.Tap [Back] tobacktothepreviousinterfacebutnotabortthepreheat job.](https://usermanual.wiki/Zhejiang-Flashforge-3D-Technology/FINDER.user-manual/User-Guide-3901593-Page-17.png)
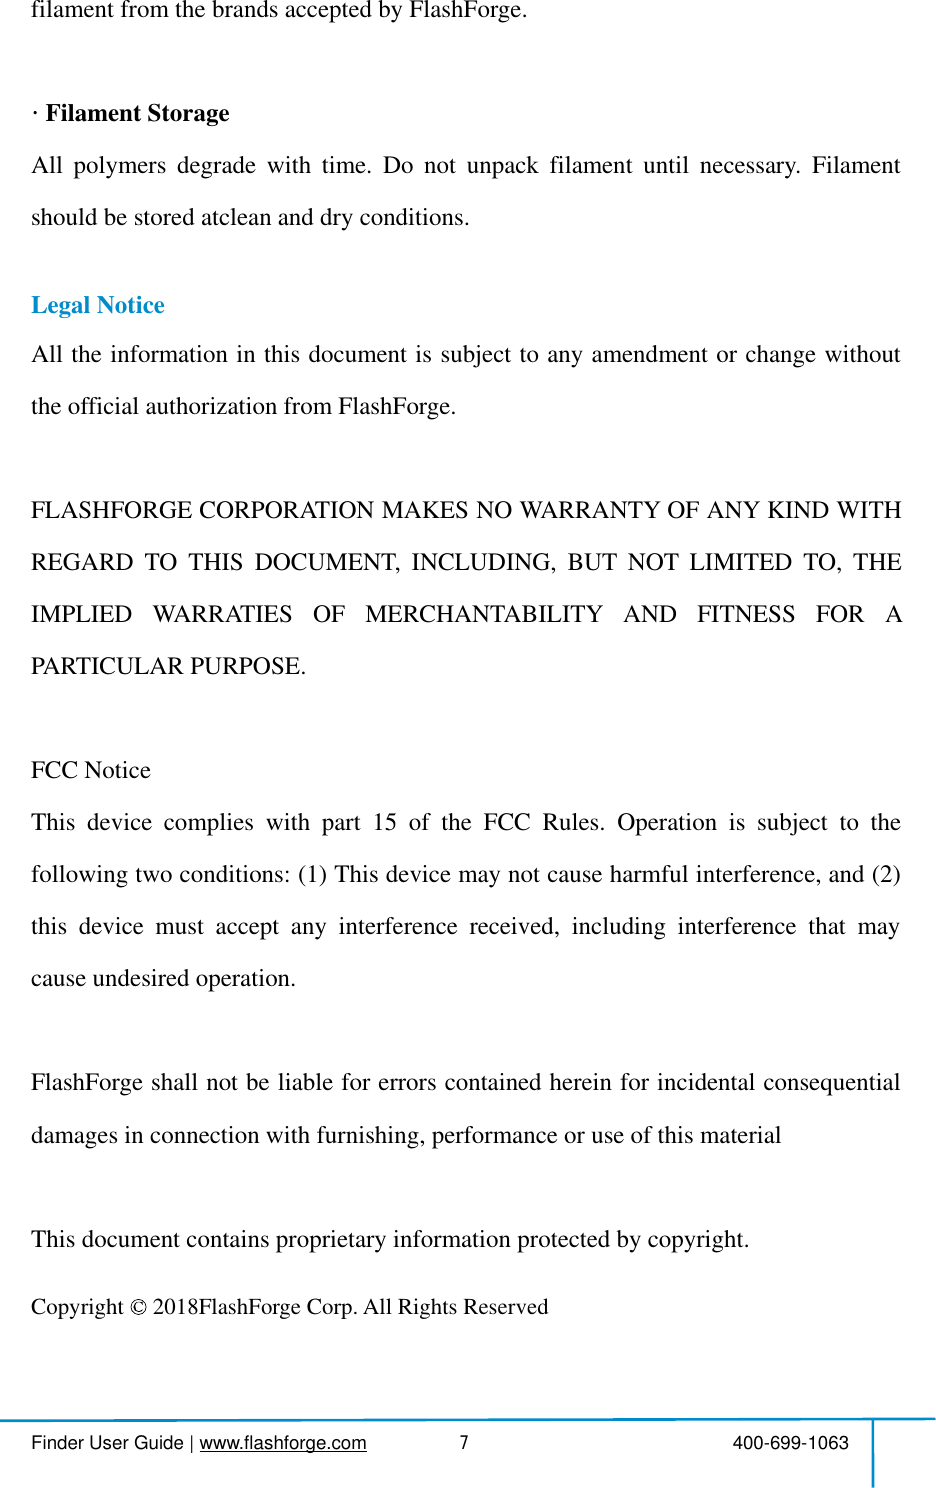
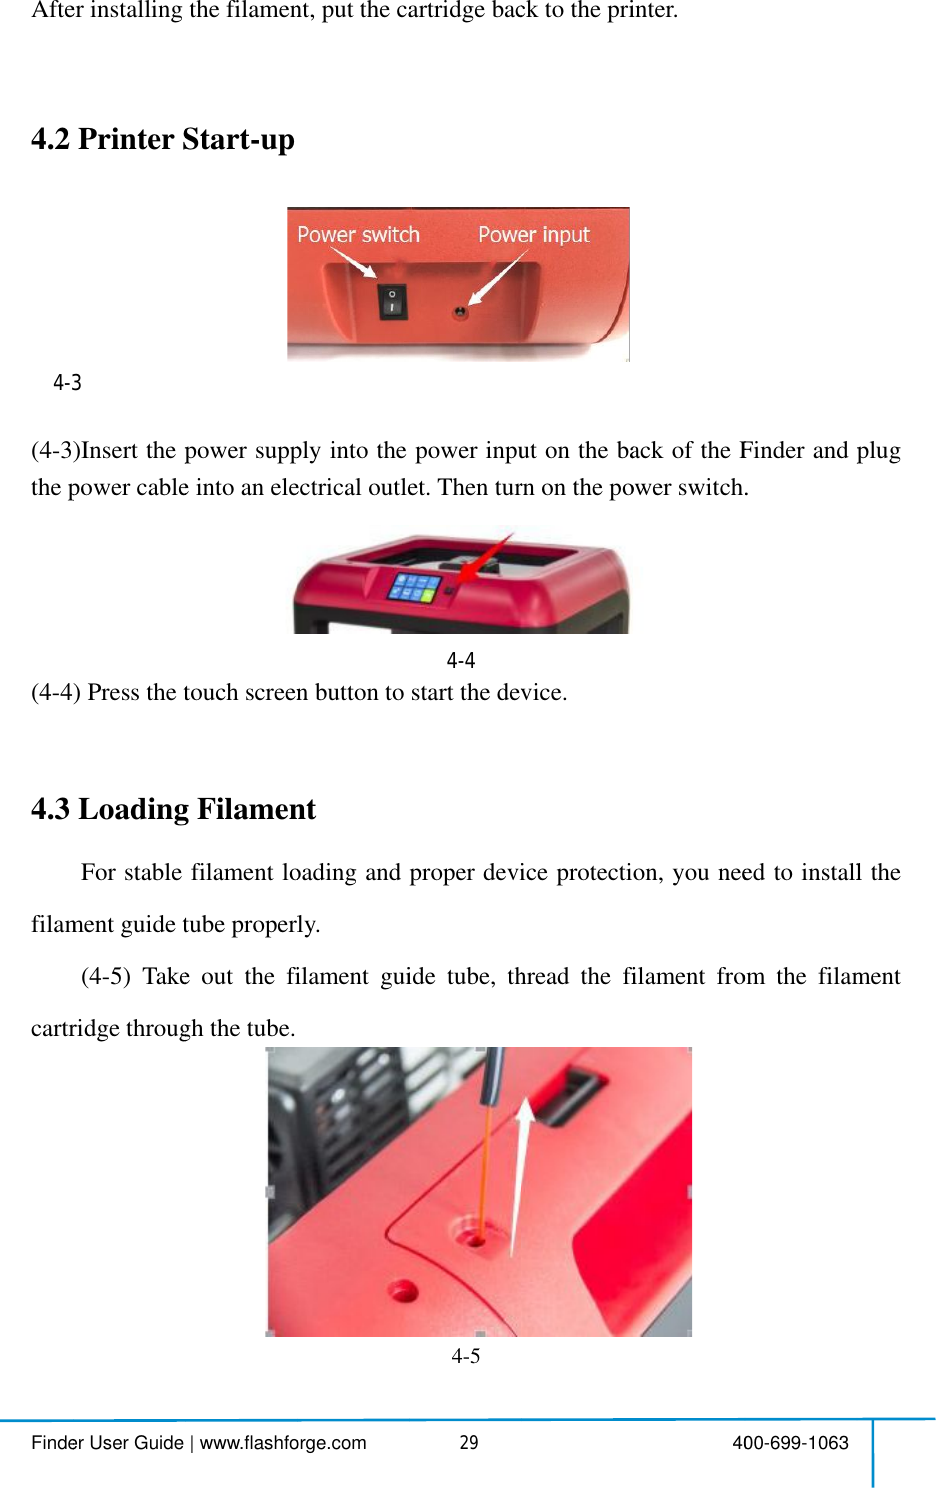
![Finder User Guide|www.flashforge.com 400-699-1063172.1.4.3Tool MenusToolsTap [Tools] to enter tool options.ŸFilament:To load/unloadthe filament.ŸLevel:To adjust thebuildplate.ŸHome:TomaketheX,YandZaxesbackto the zeropoint.ŸManual:Tomanuallyadjustthepositionsof X,Y and Z axes.ŸSetting:Toimplementrelevantfunctionsetups.ŸStatus:Thecheckthereal-timestatusoftheprinter.ŸAbout: Information abouttheprinter.ŸBackManual adjustmentŸY+:Theextrudermovestothezeropoint,that is, thebackof themachineŸY-:Theextrudermovestothedirectionopposite to theY+.ŸX+:Theextrudermovestothezeropoints,that is, to therightdirectionŸX-:Theextrudermovestothedirectionopposite to the X+.ŸZ+:Thebuildplate elevates.ŸZ-:Thebuildplatedescends.ŸBack](https://usermanual.wiki/Zhejiang-Flashforge-3D-Technology/FINDER.user-manual/User-Guide-3901593-Page-18.png)
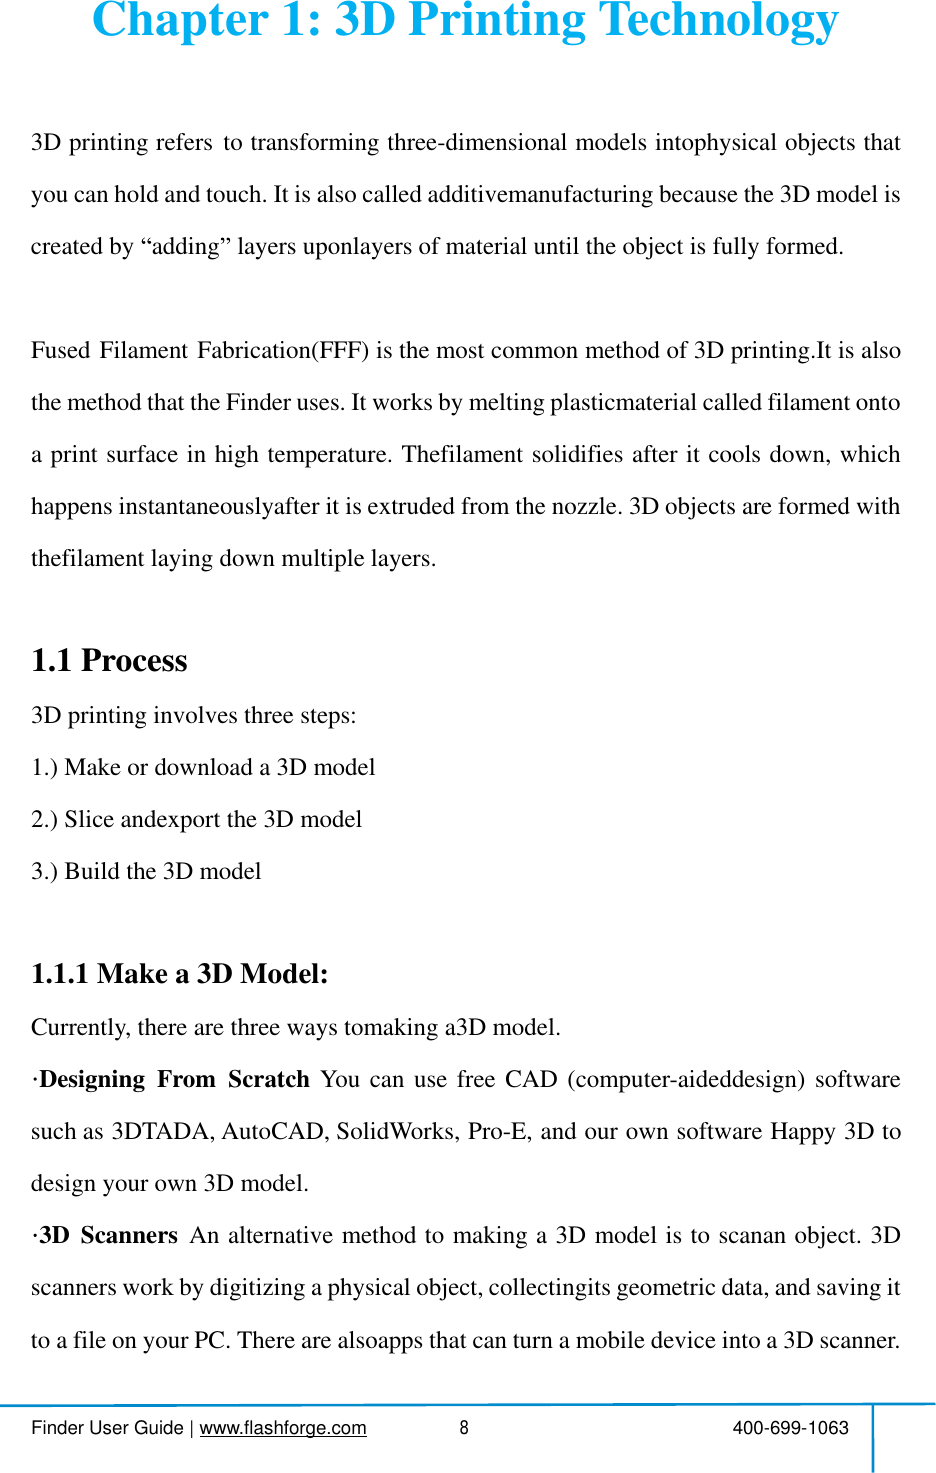
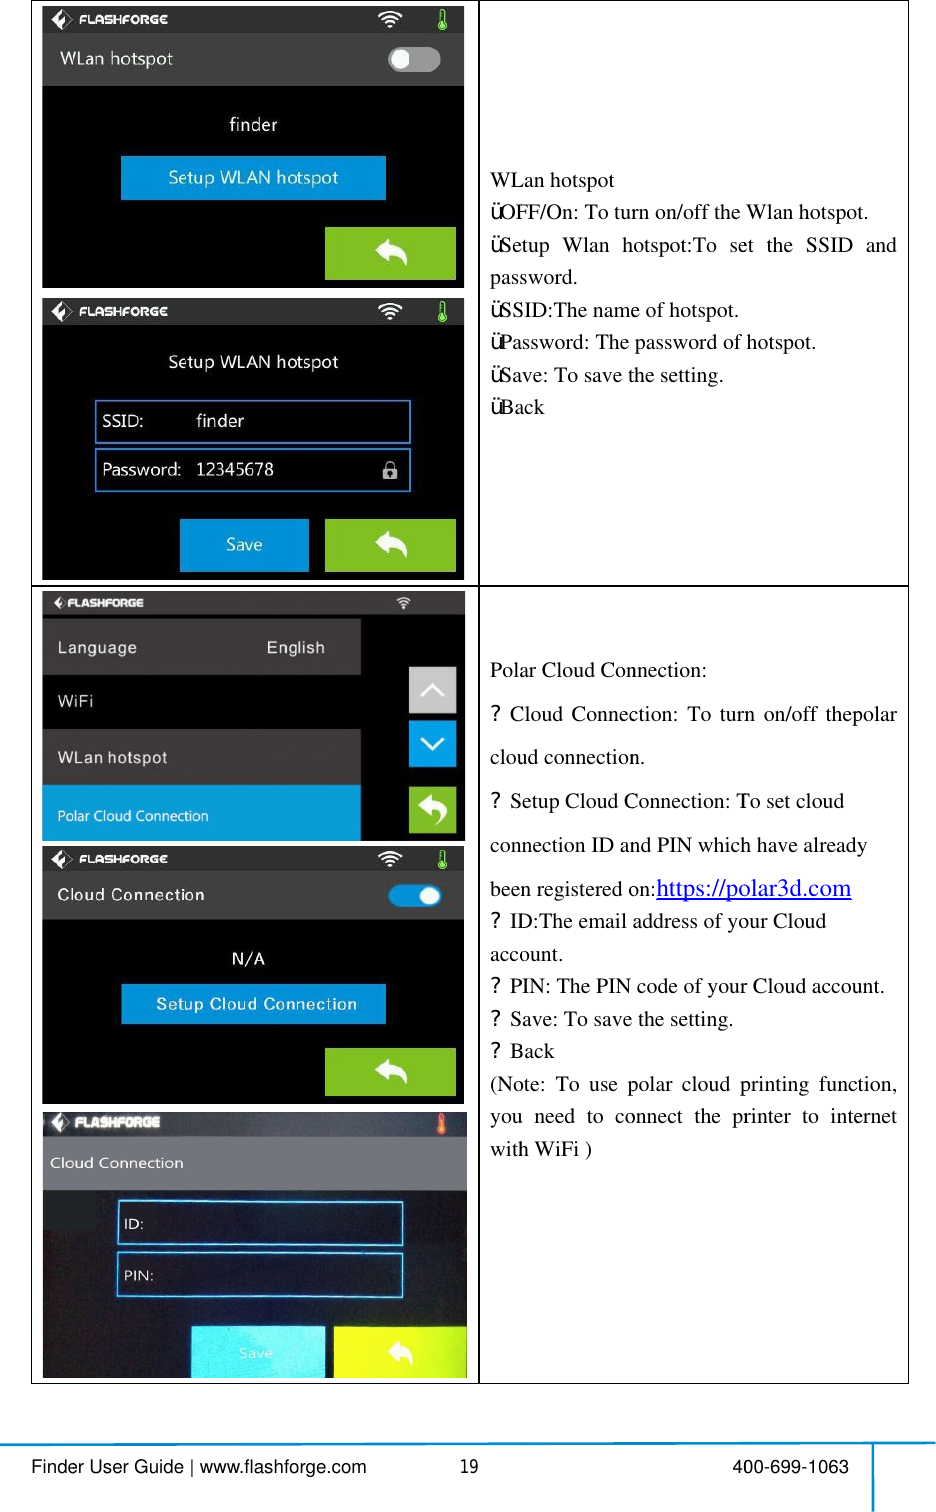
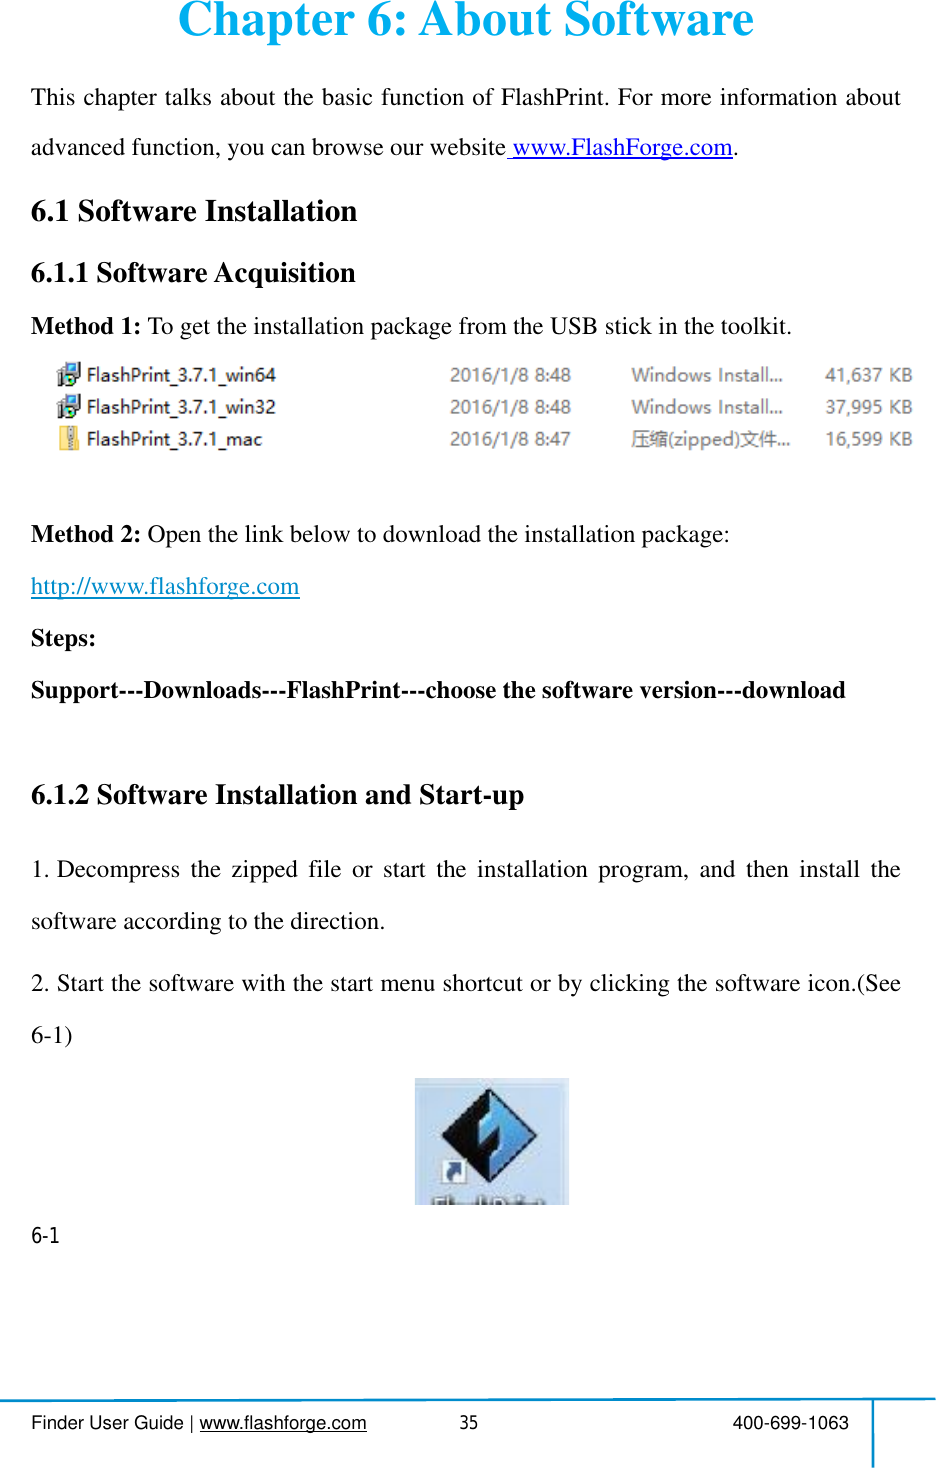
![Findender User Guide |www.flashfoorge.com 4 418TapŸLaŸWŸWlahotsŸPoTo tŸFlasTo tConnŸExdistaplateŸStartSoundŸFilfilamŸPopower saŸLibarŸFactŸUpdŸBackWiFiŸTuthecomŸBack 4p[Setting] toLanguage:To set tWiFi:Toturnon/Wlanhotspot:tspot.olar CloudConn turnon/off thFlashForgeCl turnon/off thonnection.xtruderCalibratiistancebetweelate.StartupSoundound.Filament Checment check.owerSavingwer savingmLightBarConcontrol.Factory Resetpdate:ToupdBackiFi:urnonWiFiWiFihotsmputer.Back 40o enter the setti set thedisplaon/off theWt:Toturnononnection:he Polar CloudCloud ConnectiheFlashForgeration:Toaetweentheextrudnd:Toturnoneck: To tungMode:Tomode.ontrol:ToturnReturn to factupdate the firm:Turnonthtspotandset00-699-1063e setting interfaceay languageWiFi.on/offtheWlaud Connection.ection:ge Cloudadjusttheinderandthebn/offtheStarturn on/offturnon/offnon/offthe factory settinmwareversion.heWiFi,releassettheWiFiterfaceWlanon.nitialbuildStartupthefthelight setting.n.releaseiFion](https://usermanual.wiki/Zhejiang-Flashforge-3D-Technology/FINDER.user-manual/User-Guide-3901593-Page-19.png)
![Findender User Guide |www.flashfoorge.com 4 420ExtrAdj[OK]Ÿ+:Ÿ-:TŸOK:menuŸBackThepapNote:contTurŸTaConnTurŸTatheFilaThe filNote:bedrighnormFilaThe filNote:cannotworthe fil 4truder Calibratijust Z-axistOK]Thebuildplate eleThebuildplateOK:Tosavethnus.Backeproperdistaper s thickness.te:Pleasentacting with rnon/off [FlaTaptoturnon/oonnection.rnon/off [StaTaptoturnon/oprinter.ament Checke filamentdetectite:Filamentedetected.Onghtplace,thmally.ament Checke filamentdetectite:Filamentnnotbedetectedrknormallye filamentcartri 40rationtotherightpolate elevates.latedescends.hesettingandistancemaybess.do thiso with ourafter-sashForge Cln/off theFlashartupSoundn/offthe soundk On:etection is turexhaustedorncethefilamheprintjobk Off:etection is turtexhaustedtected.Thepriwhenfilameartridge.00-699-1063positionands.s.ndbacktosettibeoneordinoperationasale engineee Cloud]:hForgeCloudnd]:dwhen restartrnedon.rinterruptedmentisnotinbcannotwrnedoff.edorinterruprintjobcanentisnotsetdtapsettingnaryafterr.dtwillntheworkuptedstillinto](https://usermanual.wiki/Zhejiang-Flashforge-3D-Technology/FINDER.user-manual/User-Guide-3901593-Page-21.png)
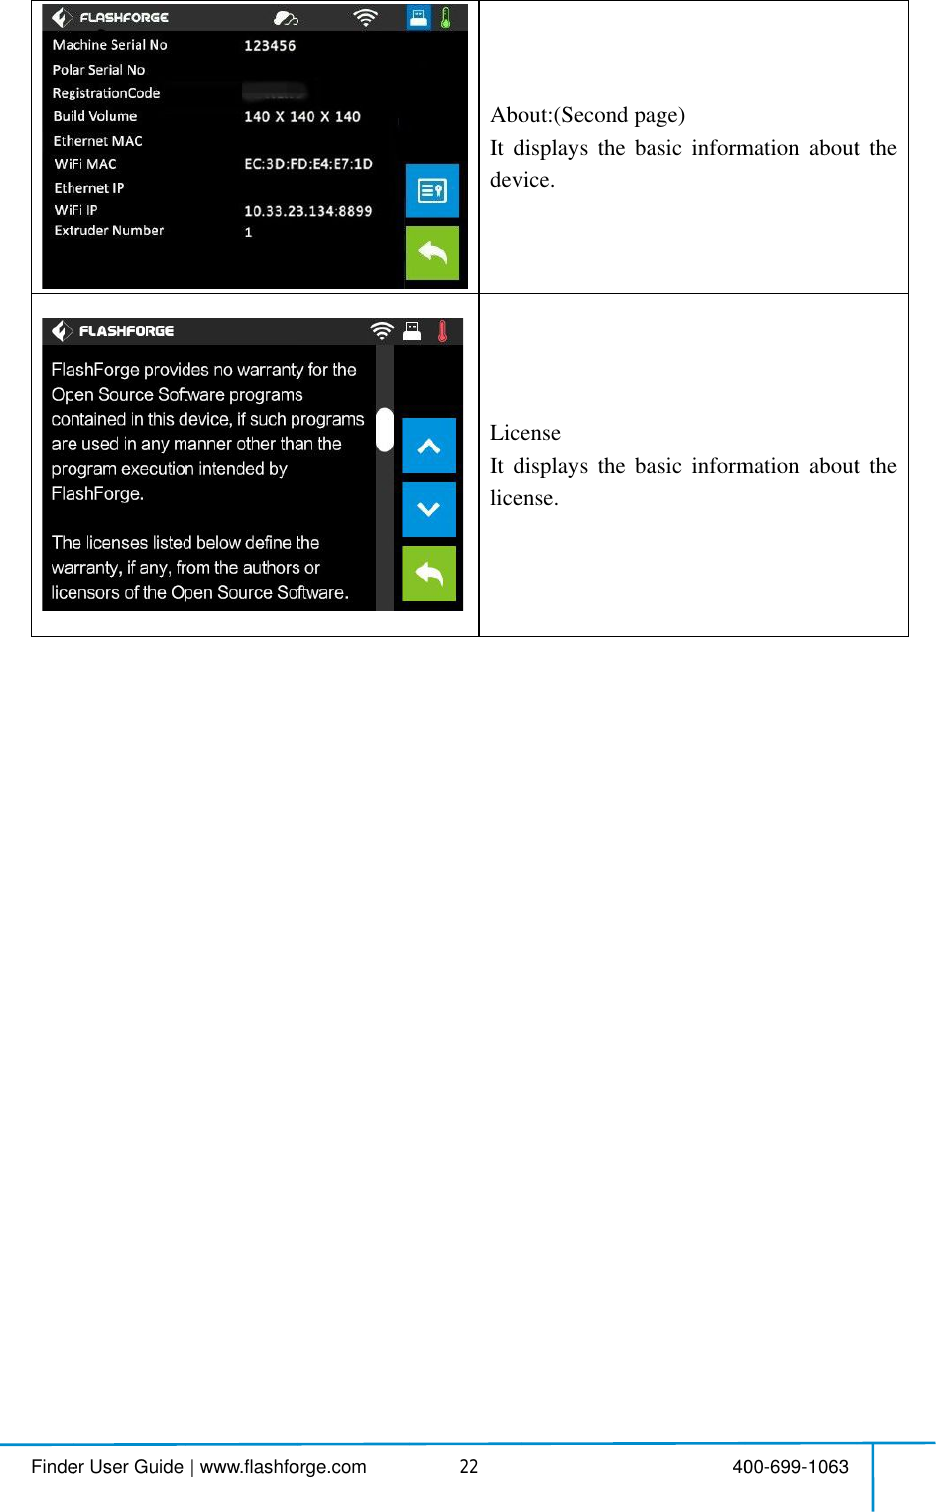
![Findender User Guide |www.flashfoorge.com 4 421Power SaTheIfththedownthePower SaTheAutŸTuTaptheŸFactŸUpdŸBackStatItextrAbouItddev 4wer Saving Mepowersavihereisnoopprinterwn.(Powersaprocessofpwer Saving Mepowersavingtomatically surnon/off [Liptoturnon/oprinter.Factory Resetpdate:ToupdBackStatus:displays thtruder temperatbout:(Firstpagdisplaysthevice. 40 Mode Oningmodestatoperationwithwill automsavingmodeprinting) Mode Offngmodestat shutdownwillLight Bar Con/offthe lightReturn to factupdate the firmereal-timeerature and filge)basicinform00-699-1063statusisturnedhinhalfanhmaticallywillnotworatusisturnedwillnot work.ontrol]:bar whenre factory settingmwareversion.status of filament.mationaboutdon.hour,shutrkindoff.estartng.n.thetthe](https://usermanual.wiki/Zhejiang-Flashforge-3D-Technology/FINDER.user-manual/User-Guide-3901593-Page-22.png)
![Finder User Guide|www.flashforge.com 400-699-106330(4-6)Insertthefilamentfromthefilament guidetubeintothefilamentintake.Next,wewillloadtheFlashForgefilament.(Note:Pleaselowerthebuildplatetoincreasethedistancebetweenthenozzleandbuildplateto50mmatleastforavoiding nozzlejam.)(4-7)Tap[Tools].4-64-8(4-8)Tap [Filament]--[Load]4-74-6](https://usermanual.wiki/Zhejiang-Flashforge-3D-Technology/FINDER.user-manual/User-Guide-3901593-Page-31.png)
![Finder User Guide|www.flashforge.com 400-699-1063314-94-9 Afterthe extruder stemperaturereaches220 ,the printerwill sound a beep toprompt youtoloadthefilamentintothe extruder.4-104-10 Pressthespringpresser,andtheninsertthefilamentintotheextruderatanuprightangle.Thenthefilamentwillbedrawnthroughtheextruder.Donottap[Cancel] untilthefilamentloadtheextrudersteadily.4.4 UnloadingFilament4-11](https://usermanual.wiki/Zhejiang-Flashforge-3D-Technology/FINDER.user-manual/User-Guide-3901593-Page-32.png)
![Finder User Guide|www.flashforge.com 400-699-106332(4-11)Tap [Tools]-[Filament]-[Unload] and the extruder starts heatingup.4-12(4-12)Aftertheextruderreaches220 ,theprinterwillsoundabeepto promptyoutounloadthefilamentfromtheextruder.Pressthespringpresser,pressdownthefilamentforaboutthreeseconds andgently pullthefilament out.Note:Donotpulloutthefilamentwithforceasitwilldamagethegears.Ifthemeltedfilament has cooled downinthe extruder, pleaserepeatthesteps above.](https://usermanual.wiki/Zhejiang-Flashforge-3D-Technology/FINDER.user-manual/User-Guide-3901593-Page-33.png)
![Finder User Guide|www.flashforge.com 400-699-106333Chapter 5:BuildPlate LevelingFindercreativelyadoptsthree-pointintelligentlevelingsystem,whichwillgiveclearandcomprehensivefeedbacktousers.Therearethreespring-loadedknobsunderthebuildplatform.Thedistancebetweentheplateandnozzleincreaseswhiletighteningthe knobs. Onthe contrary,the distancereduces.(5-1)Tap [Tools]-[Level] onyour Findertouchscreen.Pleasewaitwhiletheextruderandplatformfinishinitialmovements.Afterthat,operateaccordingtotheguideonthetouch screen.5-25-1](https://usermanual.wiki/Zhejiang-Flashforge-3D-Technology/FINDER.user-manual/User-Guide-3901593-Page-34.png)
![Finder User Guide|www.flashforge.com 400-699-106334(5-2)Aftertapping [Yes],theextruderstartstomovetowardsthefirstpointandtheplatemoves up and downto verifythe distance betweennozzle and plate.5-3(5-3)Whenitshowsthatthedistanceistoobig,pleaseunscrewcorrespondingnutunder platform clockwise until hearing a steadybeep and the [Verify] button appears.5-4(5-4)Ifthedistanceisappropriate,tap [OK] tosecondpointleveling.Ifstillnot,pleasefollowthe promptsto adjust againtill yousee [OK] button.5-5(5-5)Repeatsteps2through4abovetocompletesecondandthirdpointslevelingandthenTap [Finish] to exit.](https://usermanual.wiki/Zhejiang-Flashforge-3D-Technology/FINDER.user-manual/User-Guide-3901593-Page-35.png)
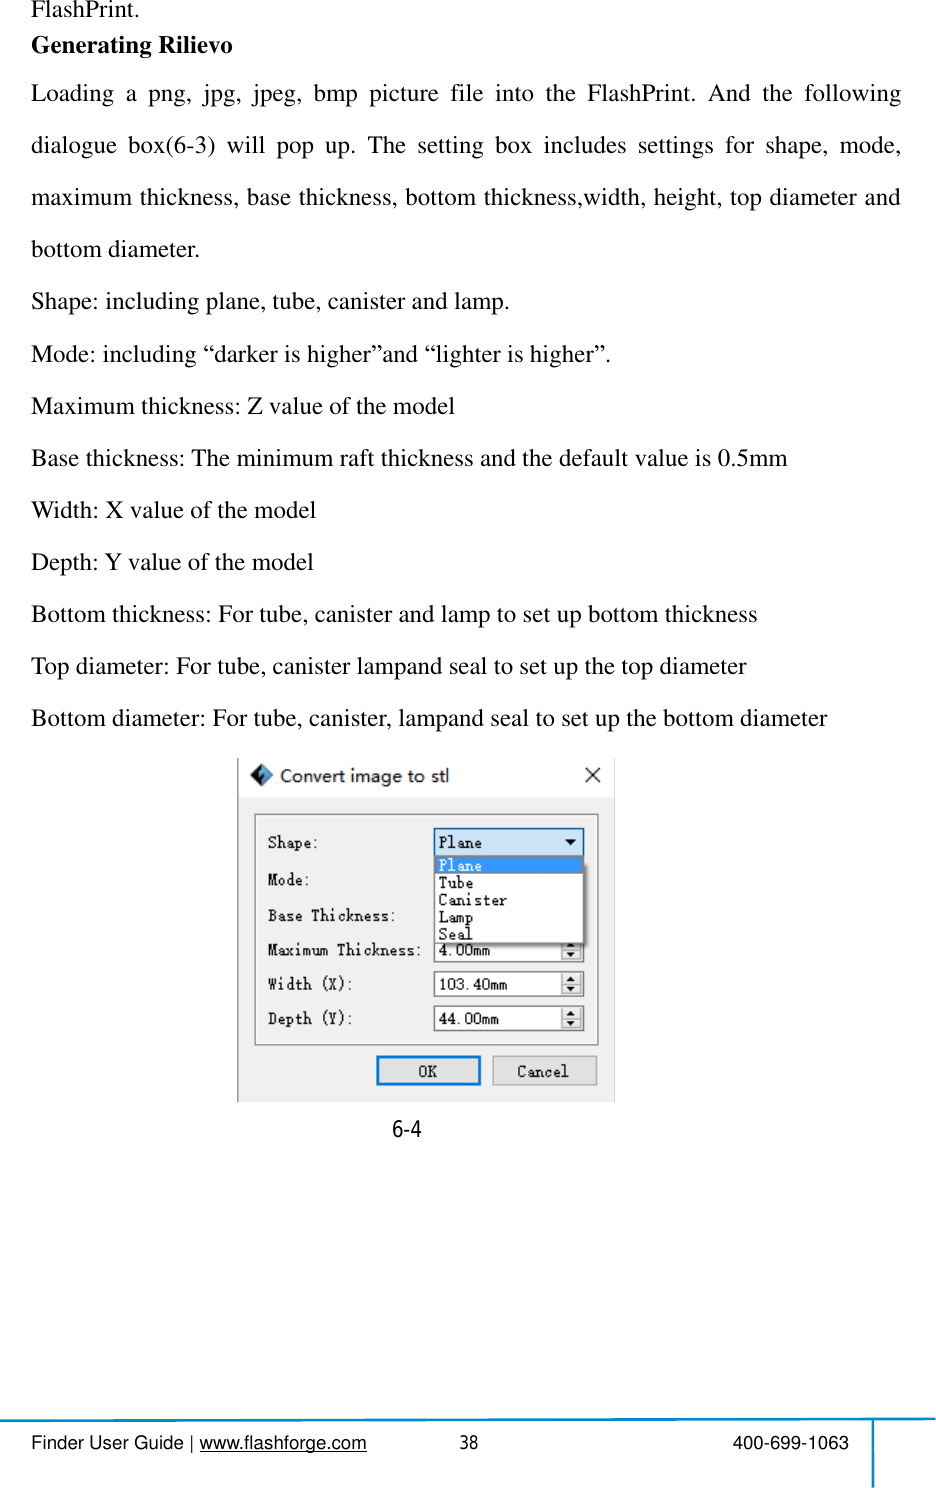
![Finder User Guide|www.flashforge.com 400-699-1063366.2ExploringFlashPrint6.2.1 MachineTypeSelectionNote! Afterstarting FlashPrint, youneedto selectthetargetmachinetypefirst.WhenyoustartFlashPrint,adialogboxwillpopup.JustselectFlashForgeFinderinthemachinetypelistandclick [OK].Youcanalsochangethemachinetypeviaclicking [Print]--[Machinetype].See graphic6-2:6-26.2.2SoftwareIntroduction6-3](https://usermanual.wiki/Zhejiang-Flashforge-3D-Technology/FINDER.user-manual/User-Guide-3901593-Page-37.png)
![Finder User Guide|www.flashforge.com 400-699-106337Loadfiles.Enterthe support editmode.Printit directlywith your Finderorexportto yourUSB Stick.View FlashPrint home screenfromone of six viewing angles.Movemodel around onXY-plane;shift+clicktomove along Z axis.Turn and rotate yourmodel.Scalethe size of your object.Cutmodelinto severalparts.6.2.3LoadingYoucanloadamodelfileorGcodefileintoyourFlashPrintbythefollowingsixmethods:Method 1: Clickthe [Load] onthemaininterface.Then selectthe objectfile.Method2: Selectthefileforloadinganddragthefiletothemaininterfaceofthesoftware.Method 3: Click [File]--[Load File].Then selectthe objectfileforloading.Method 4: Click [File]--[Examples]toloadtheexamplefilesMethod 5: Click [File]--[Recent Files]toloadthefiles openedrecently.Method 6: Selectanddragthetargetfiletotheicon of FlashPrint.Note:3Dmodelscanbestoredas.STL,.OBJ,or.FPPfileand supporteditingby](https://usermanual.wiki/Zhejiang-Flashforge-3D-Technology/FINDER.user-manual/User-Guide-3901593-Page-38.png)
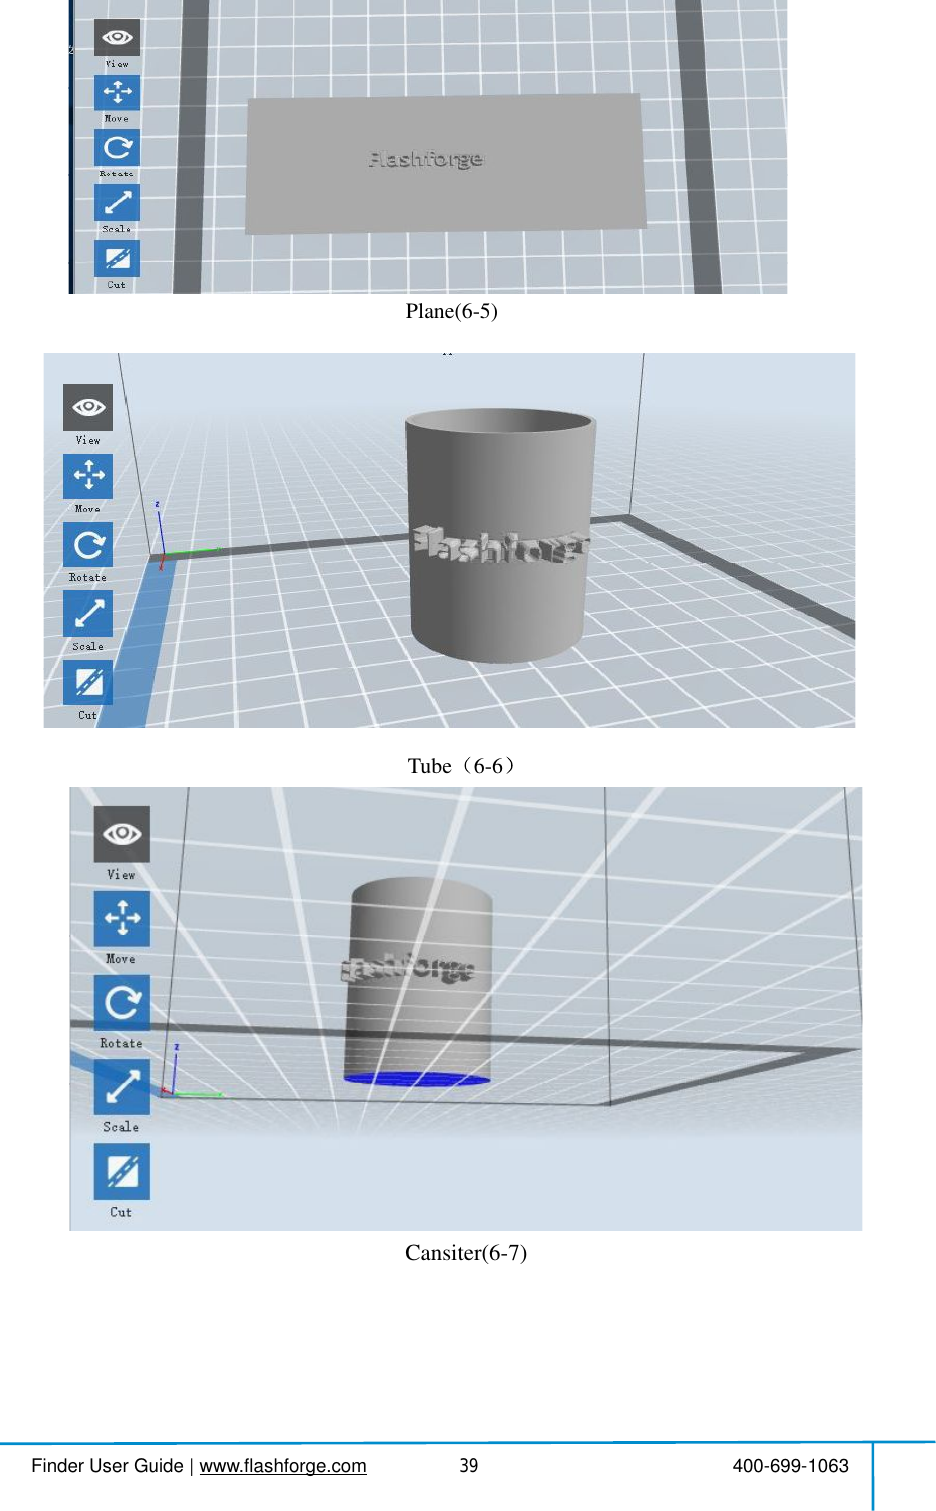
![Finder User Guide|www.flashforge.com 400-699-106340Lamp(6-8)Seal(6-9)6.2.4ViewsChanging viewsChangemodel views bymoving,rotating, scaling.DragClickthe [View] icon andthen you canmovethe object bythefollowingthreemethods:Method 1: Hold downtheleftmouse button and drag.](https://usermanual.wiki/Zhejiang-Flashforge-3D-Technology/FINDER.user-manual/User-Guide-3901593-Page-41.png)
![Finder User Guide|www.flashforge.com 400-699-106341Method 2: Hold downthemousewheel and scroll up and down.Method 3: Hold downtheShift key, hold downtherightmouse buttonand drag.RotateClickthe [View] iconandthen you canrotatethe object bythefollowingtwomethods:Method 1. Hold downtherightmouse buttonand drag.Method 2. Hold downtheShiftkey,hold downtheleftmouse button and drag.ScaleRotatethemousewheelto enlarge orshrinkthebuild plate.SetViewAllows usersto viewthe object on the buildplate.Sixviewsareundertheviewmenu,thatis,homeview,bottomview,topview,frontview,backview,leftviewandrightview.Method 1: Clickthethe [View] button,thereare six viewsinthe drop-downlistMethod2: Clickthethe[Look] icon ontheleft,clickitagainandasubmenuwill appearwith sixviewsfor selecting.ResetViewAllow userstoreset views by thefollowingtwomethods:Method 1: Clickthe [View] menu and select [HomeView]Method2:Clickthe [View]buttonontheleft,clickitagainandyouwillseetheviewing options, you can click [Reset].Show ModelOutlineClick[View]--[Show ModelOutline],itwill highlightthe yellow borderofthe object](https://usermanual.wiki/Zhejiang-Flashforge-3D-Technology/FINDER.user-manual/User-Guide-3901593-Page-42.png)
![Finder User Guide|www.flashforge.com 400-699-106342Show SteepOverhangClick[View]--[ShowSteepOverhang].Whentheintersectionanglebetweenthemodelsurfaceandhorizontallineiswithintheoverhangthresholdvalue,thesurfacehassteepoverhanganditbecomesredinthesoftware.Overhangthresholdvaluecould be setas needed. The defaultvalueis 45 degree.6.2.5 MoveSelecttheobjectandmovethe object by thefollowingtwomethods:Method1: Clickthe [Move] iconontheleft,holddowntheleftmousebuttonanddragtoadjustthelocationofthemodelinXYdirection.Holddownthe Shiftkey,holddowntheleftmousebuttonanddragtoadjustthelocationofthemodelinZdirection.The distance and the direction ofthemovement shall be displayed.Method2: Clickthe [Move]buttonontheleftandthenenterthedistancevalue.Click[Reset]toreset distancevalues.Note: Usersshallclick [Center] and [OnPlatform] afterthelocationadjustmenttoensurethemodel(s)bewithinthebuildareaandonthebuildplatform.Ifaspecifiedpositionisneeded, onlyto click[On Platform].6.2.6 RotateSelectthetarget object androtatethe object bythefollowingtwomethods:Method1: Clickthe [Rotate] iconontheleftandthreemutuallyperpendicularringsappeararoundtheobjectClickoneringandrotateonthepresentaxis,youwillseetherotationangleanddirectioninthecenterofcircle.Inthisway,youcouldmakethemodelrotate on X/Y/Z axis.Method2: Clickthe [Rotate] iconontheleft,andthenenterintorotatingangelvaluesinX/Y/Z axes positioning.Click [Reset] toresetrotating angel values.](https://usermanual.wiki/Zhejiang-Flashforge-3D-Technology/FINDER.user-manual/User-Guide-3901593-Page-43.png)
![Finder User Guide|www.flashforge.com 400-699-1063436.2.7 ScaleSelectthetarget object and scaletheobject bythefollowingtwomethods:Method1: Clickthe [Scale] iconontheleft,holddowntheleftmousebuttonandscalethemodel.The correspondingvalueswilldisplaynearthe object.Method2: Clickthe [Scale] iconontheleftandthenenterintoscalevaluesinX/Y/Zaxes positioning.Clickthe [Maximum] buttonto getlargest size possiblefor building.Click [Reset] toresetthe size ofmodel.Note: Ifthe[UniformScaling] radiobuttonisclicked,itwillscalethemodelinequalproportionwhenchanging value inanypositioningofthemodel.Otherwiseitwillonly changethe value ofthe corresponding positioning.6.2.8CutLeft-clickonthemodeltoselectitanddouble-clickonthe [Cut] tosetthecutplane.The direction and position are availablefor setting.Drawwith MouseX PlaneY Plane](https://usermanual.wiki/Zhejiang-Flashforge-3D-Technology/FINDER.user-manual/User-Guide-3901593-Page-44.png)
![Finder User Guide|www.flashforge.com 400-699-106344Z Plane6.2.9SupportsAfterloadingthemodel,click [Edit]--[Supports]orclickthe Supports icondirectly,then you willenterthesupport editmode(asshowninthepicturebelow).Click [Back]to exitwhen you finishediting.SupportOptions](https://usermanual.wiki/Zhejiang-Flashforge-3D-Technology/FINDER.user-manual/User-Guide-3901593-Page-45.png)
![Finder User Guide|www.flashforge.com 400-699-106345ClicktheSupportOptions,anoptionboxwillappear,supportsoptionsincludetreelike and linear ,whenchoose treelike ,click [OK],thenitwillgeneratetreelikestructure;whenchoose linear ,click [OK],thenitwillgeneratelinearstructure;ifitisamodelwithsupports,whenyouchooseoneofthesupportsoptions,softwarewilljudgewhetherexistingsupportsneedtobedeletedornotonthebasisof thetypeofexistingsupport,andwillpopupthecorrespondingprompttoletyoumakethe choice.Auto SupportsClickthe [AutoSupports] button,thesoftwarewilljudgethepositionwheresupportsareneededandgeneratecorrespondingtreelikeorlinearsupports.Ifitisamodelwithsupports,the existing supportswill be deleted andnew supportswill be generated.Add SupportsSupportswillbeaddedonceclickingthe [Add]button.Movethecursortothepositionwhere supportsneeded,left-clickto choosethe starting point of supports, holddowntheleftmousebuttonanddragthemousethesupportspreviewwillshowup(ifsupportsurfacedoesn tneedsupportorthesupportcolumnangleistoolarge,willhighlightthesupportreview).Loosentheleftmousebutton,ifsupportcolumndoesn t6-11](https://usermanual.wiki/Zhejiang-Flashforge-3D-Technology/FINDER.user-manual/User-Guide-3901593-Page-46.png)
![Finder User Guide|www.flashforge.com 400-699-106346meetwithmodel,thensupportwillbegeneratedonoriginandterminalpoint(thehighlightedpreview supportwon tgenerate support structure)Clear SupportsClick [ClearSupports],allsupportswillbedeleted.Theoperationcanberepealedvia clicking [Undo] orpressingtheshortcut key Ctrl+Z.Delete SupportsSupportswillbedeletedonceclickingthe [Delete]button.Movethecursortothesupportsneededdeleting,currentsupportsanditssubnodesupportwillbehighlighted,clicktheleftmouse buttonto deletethesehighlighted support.6.2.10PrintPreview: Choosetoenter previewinterface ornot6-12](https://usermanual.wiki/Zhejiang-Flashforge-3D-Technology/FINDER.user-manual/User-Guide-3901593-Page-47.png)
![Finder User Guide|www.flashforge.com 400-699-106347Printwhen slice done: Print ornotwhen slice done Materialtype: Choose accordingtothetypeofmodelSupports: Whenprintsuspendedstructuremodels,supportisnecessary.Click[supports] to create support partforthe printing.Raft: Thisfunctionwillhelpthemodelto stickwell on the platform.Wall: Duringdualcolorprinting,thisfunctionwillhelptocleartheleakingfilament ofanother extruder.Brim: Expandtheoutlineofmodel sbottomlayerstoaBrimwhichhelpsanchorthe edges ofthemodeltothe platetoavoidwarping.Resolution You havethreeresolution solution(with default setting)tochoosefrom,highresolutioniscorrespondingwithslowprintingspeed,oppositeforthelowresolution.For PLA printing, an extra solution Hyper isavailable.Moreoptions: Click [Moreoptions] tosetforlayer,shell,infill,speedandtemperature.Differentresolutionsolutioniscorrespondingtodifferentdefaults,click[RestoreDefaults] to backto default setting.Layera.Layer: Layerthicknessoftheprintingmodel.Withasmallvalue,thesurfaceofthemodelwill besmoother.b.FirstLayerHeight: Thisisthefirstlayerofthemodel,whichwillaffectthestickingperformancebetweenthemodelandplatform.Maximizeis0.4mm,usuallythe defaultisOK.c.Shell: Containstheoutsideshellvalue,cappinglayervalue(undervasepattern,top solidlayer settingisinvalid). Primeter Shells: Maximizeis 10 a.TopSolidLayer: Maximizeis 30, minimumis 1.](https://usermanual.wiki/Zhejiang-Flashforge-3D-Technology/FINDER.user-manual/User-Guide-3901593-Page-48.png)
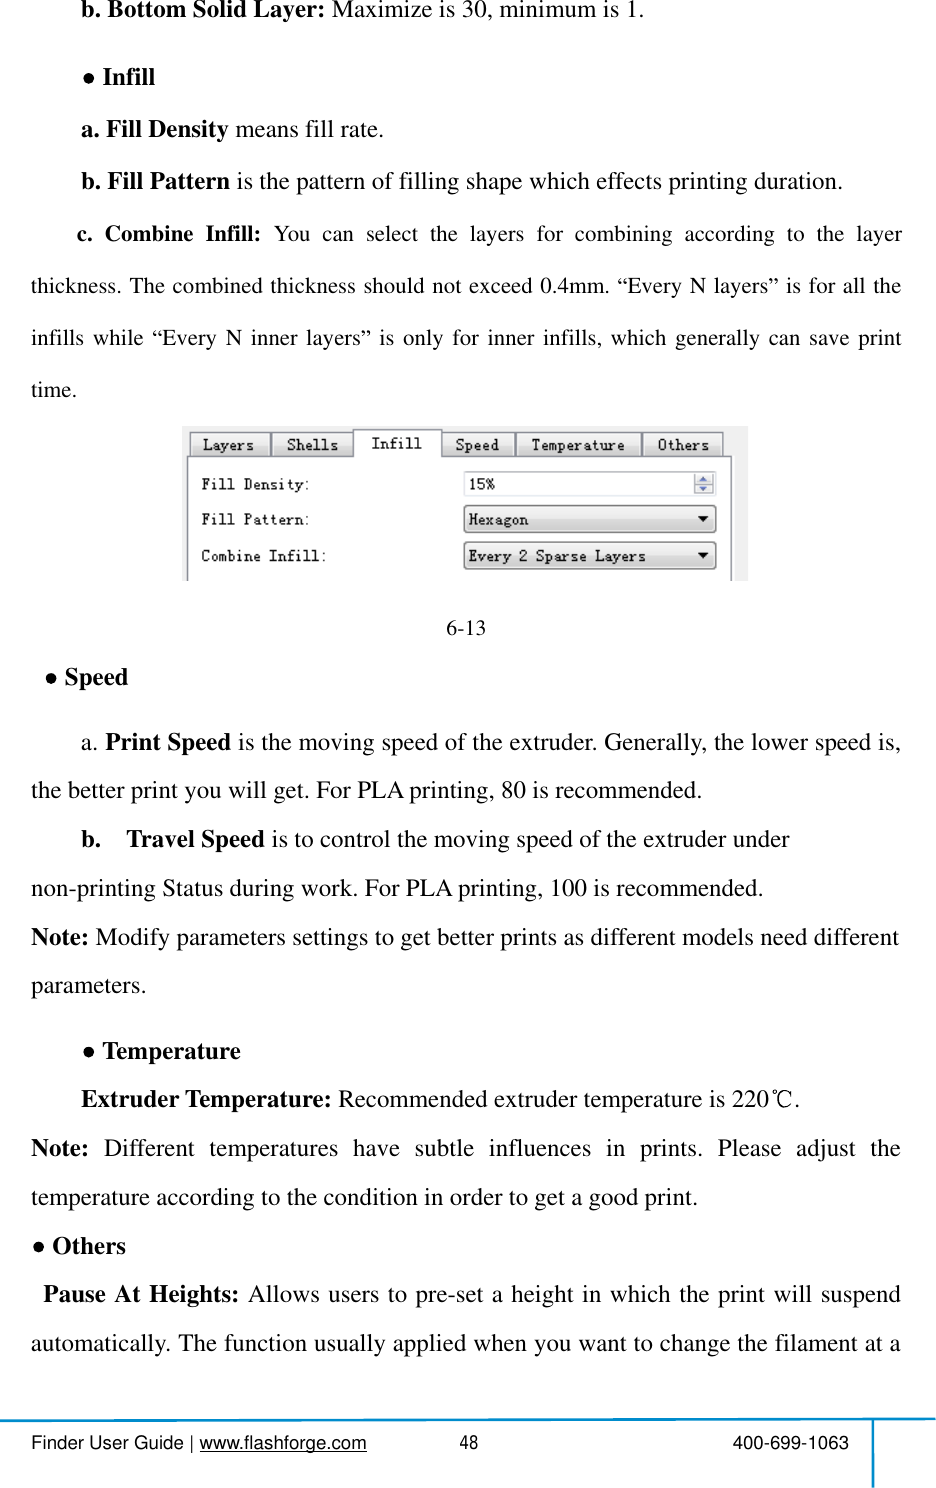
![Finder User Guide|www.flashforge.com 400-699-106349certain point.(6-14)Click[Edit],thenyou can addorremove a height.6.2.11File MenusNew ProjectClick [File]--[NewProject]canbuildablankproject.Ifthereisanunsavedmodificationonpreviousproject,thenitwillinformyouwhetherthemodificationneedstobesavedornot.Click [Yes]willsavethemodification,click [No]willabandonit.If click [Cancel] or closetooltip,thenwill cancelthe new project.SavingAfterfinishingthemodeleditandadjustment,therearetwowaysbelowtosaveallmodelsinthe scene.Method 1:Click [File]--[SaveProject] inthemenubartosavethefileasaprojectfilewiththe.fpp suffix,allmodelsinthescene(includesupport)areindependent.Afterreloadingthefiles,extruderconfigurationinformationandmodelpositionwillbethesameas6-156-14](https://usermanual.wiki/Zhejiang-Flashforge-3D-Technology/FINDER.user-manual/User-Guide-3901593-Page-50.png)
![Finder User Guide|www.flashforge.com 400-699-106350the configuration duringsaving.Method 2:Clickon [File]--[Saveas...] tosavethemodelasprojectfile.fppor.stland.obj.For.stland.boj,modelsareintegratedasone(includesupportpart).Ifloaditagain,onlythe position ofthemodelwas saved, notincludedtheprinting parameters.PreferencesClick [File]--[Preferences],youcanchooselanguageandifneedsdetectingupdatewhen start.Language: Thesoftwaresupportssixlanguages,namely,Chinese(simplifiedChinese andtraditionalChinese),English, French,Korean,JapaneseandRussian.Font Size: Setthefont size.Autolayout newly-importedmodel:SetYes orNo.PrintingWindowType: IncludingBase Mode and Expert ModeCheckforUpdateafterstartup: Itis used topresetifitis necessaryto activatetheonlineautomaticupdatefunction,ifchooseyes,everytimewhenyouopensoftware,itcanonlinedetectifitisanewversionsoftware,oncenewversionfound,itwillreminds usersto download and install new versionfirmware.6-16](https://usermanual.wiki/Zhejiang-Flashforge-3D-Technology/FINDER.user-manual/User-Guide-3901593-Page-51.png)
![Finder User Guide|www.flashforge.com 400-699-1063516.2.12Edit MenusUndoAllows usersto undo therecent edits by thefollowingtwomethods:Method 1:Click [Edit]--[Undo].Method 2: Presstheshortcut Ctrl+Z.RedoAllowsuserstoredothemostrecentedityouhaveundonetoyourmodelfilebythefollowingtwomethodsMethod 1: Click [Edit]--[Redo]Method 2: PresstheshortcutCtrl+Y.Empty Undo-stackTo clean uptherecorded operating steps so as toreleasethememory.SelectAllBythefollowingtwomethods, youcould selectallmodelsinthe scene.(Whenmodels aretoo smallto be seen orout of viewing scope, please click[Center]and[Scale]buttonsto adjustthemodel.)Method 1: Click [Edit]--[SelectAll].Method 2: Presstheshortcut Ctrl+A.DuplicateSelecttheobjectand duplicatetheobjectthroughthefollowingtwomethods:Method 1: Click [Edit]--[Duplicate]Method 2: Presstheshortcut Ctrl+DDelete](https://usermanual.wiki/Zhejiang-Flashforge-3D-Technology/FINDER.user-manual/User-Guide-3901593-Page-52.png)
![Finder User Guide|www.flashforge.com 400-699-106352Selecttheobjectand deletethe objectthroughthefollowingtwomethods:Method 1: Click [Edit]--[Delete]Method 2: Presstheshortcut DeleteAutoLayoutAllClick [Edit]--[AutoLayoutAll]afterloadingoneormorethanonemodels,allmodelswillbe placedautomaticallyas automatic placementrule.RepairModelsClick [Edit]--[RepairModels] torepairmodels.SupportsClick [Edit]--[Supports] to enter supports setting interface.6.2.13Print MenusConnectMachineYou can connectthe Finderwith your PC via a USB cable orWiFi.Note: Themachineicononthebottomrightdisplaystheconnectionstatus:ConnectedDisconnectedMethod 1 ConnectViaUSBCablea.Connectyour Finderwith yourPC via an USB cable.b.Turn on your Finderand start FlashPrint.c.Click [Print]--[Connect Machine],then select USB in the [ConnectionMode]optionandselectmachineyouwanttoconnectin [SelectMachine] option.Ifyoucannotfindyourmachine,clickthe [Rescan] buttontoscanyourmachineandselectit.Finallyclick[Connect] buttontoconnecttotheprinter.Ifyoustillcannotfindyourmachineafterrescan,itmeansyouhaven tinstalledthedriverinthe](https://usermanual.wiki/Zhejiang-Flashforge-3D-Technology/FINDER.user-manual/User-Guide-3901593-Page-53.png)
![Finder User Guide|www.flashforge.com 400-699-106353software.6-18Method 2 ConnectVia WiFiConnectFinderwith your PCunderAPmodea.Turn on your Finderb.Tap [Tools]-[Setting]-[Wlan]-[WlanON]c.Clickonthewirelessnetworkontheleftbottomofyourcomputer,andfindthewireless signal- Finder .Click [Connect] to connect your computerwith Finder .d.Click[Print]-[ConnectMachine]onFlashPrint.Thenthefollowingdialogboxpopsup.Youneedtoselect Wi-Fi inConnectMode. EnterintotheIPAddressshown on the Findertouch screen and then click [Connect].10.10.100.254:8899maynotbethecorrectIPaddressaccordingtoyourprinter present status.6-19](https://usermanual.wiki/Zhejiang-Flashforge-3D-Technology/FINDER.user-manual/User-Guide-3901593-Page-54.png)
![Finder User Guide|www.flashforge.com 400-699-106354If successfully connected, you will seethefollowingredmark.ConnectFinderwith your PCunder STAmodea.Tap [Tools]-[Setting]-[WiFi]-[WiFiON]to turnontheWiFiofFinderandconnect your PC and FinderwiththesameWiFi network.b.Click[Print]-[ConnectMachine]onFlashPrint.Thenthefollowingdialogboxpopsup.Youneedtoselect Wi-Fi inConnectMode. EnterintotheIPAddressshown on the Findertouch screen and then click [Connect].10.10.100.254:8899maynotbethecorrectIPaddressaccordingtoyourprinter present status.If successfully connected, you will seethefollowingredmark.Disconnect FinderClick[Print]--[Disconnect] todisconnect yourPC and Finder.](https://usermanual.wiki/Zhejiang-Flashforge-3D-Technology/FINDER.user-manual/User-Guide-3901593-Page-55.png)
![Finder User Guide|www.flashforge.com 400-699-1063556.2.14Tool MenusControlPanelAfterconnectingPCwithFinder,click[Tools]--[ControlPanel] toopenthecontrolpanel.6-23JogControlsa. Jog Mode Selectthe distancethat extruder/build platemove a singletime(thatis,the distanceextruder/build platemove upon yoursingleclick).b.Sixbluearrowdirectionbutton: ControlthemovealongX/Y/Zaxis.X/Yaxisbuttoncontrolextrudermove,Zaxisbuttoncontrolbuildplatemove.ClickX-,extruderwillmoveleftwardaspecifieddistance;ClickX+,extruderwillmoveaspecifieddistancerightward.ClickY-,extruderwillmoveforwardaspecifieddistance;ClickY-,extruderwillmovebackwardaspecifieddistance.ClickZ-,buildplatewillmoveupwardaspecifieddistance;ClickZ-,buildplatewillmovedownwardaspecifieddistance.(SpecifieddistancereferstothemovedistanceyousetinJogMode.c. Stop: Click [Stop] buttontoabortthe currentmovement.d.XYZcoordinateframeontherightside: Showthecurrentpositionof](https://usermanual.wiki/Zhejiang-Flashforge-3D-Technology/FINDER.user-manual/User-Guide-3901593-Page-56.png)
![Finder User Guide|www.flashforge.com 400-699-106356extruder/build plate.e. MakeCurrent PositionZero button: Setthecurrent position oftheextruder/buildplateas(0,0,0). (NOTE: X,Y,andZboxesarefordisplaypurposes.Changingthe valueinthe boxes willnot affect anything.f.CenterX/Y/Zbutton: Extruderandbuildplatformwillbacktothezero(0,0,0)you setlasttime.g.X/Y Speed andZSpeed: Setthemove speed of extruder/build platform.LimitSwitch: InordertoprotectyourFinder,threelimitswitchesareequippedtocontrolthemaximumposition,andthethreelimitswitchescorrespondingtoX/Y/Zaxislimit switch.It hastwo status:a.NotTriggered: Iftheextruder/buildplatedon tmovetoitsmaximum,X/Y/Zaxislimit switchis nottriggered, and shows NotTriggered .b.Triggered: Iftheextruder/buildplatemovestoitsmaximum,X/Y/Zaxislimitswitchistriggered, andshows Triggered .StepperMotorControls: Allowsuserstocontroltosteppermotor.Click [Enable],andlockthemotorsoitdoesnotallowanymovement;click [Disable],andunlockthemotortobecontrolledmanually.LEDColor: Allowsuserstochangethe LED color of Finder.ExtruderControls: Youcansetthevalueof MotorSpeed(RPM) ,whichcancontroltherotationspeedoffilamentfeedingwheel.Themotorrotationtimecanbecontrolledviasettingthevalueof ExtruderDuration .Generallywesuggesttheuserschooseoptionofcontinuoustime60seconds.Thefilamentmustloadedintheextruderbeforemotorstarts. Therefore,donotstartrotationoperationuntiltheextrudertemperaturereachestotheprintingtemperatureoffilament.ForPLAfilament,theextrudertemperatureshouldreach200 ,afterreachingtheextrudertemperature,clickthe [Forward]/[Reverse]rotationbuttontocontrolfilamentload](https://usermanual.wiki/Zhejiang-Flashforge-3D-Technology/FINDER.user-manual/User-Guide-3901593-Page-57.png)
![Finder User Guide|www.flashforge.com 400-699-106357andfilamentunload.Furthermore,ifyouwanttostopfilamentloadandunload,youcan click[Stop].TemperatureControl: Inputthetemperatureyouwanttogetintheleftframe,click[Apply],theprinterwillautomaticallyheatthecorrespondingpart,therightsideshowsthecurrentactualtemperatureofcorrespondingpart.Afterstartingheating,thebelowcurveoftemperatureformwillstarttochange,differentcolorcorresponddifferent parts temperaturesUpdateFirmwareEverytimewhenyoustartFlashPrint,itwillautomaticallydetectanddownloadtheup-to-datefirmware.Ifanyupdateisavailable,adialogboxwillpopupforremindingthe userstoupdate.Step1: Click [Tools]--[Updatefirmware].Itneedstocutoffconnectionbeforeupdatingfirmware.Ifsoftwareandprinterarealreadyinconnection,itremindsyoucutting offthe connection, choose [Yes] and go ontothe next step.Step2: Choosecorrespondingprintertypeandfirmwareversionandclick [OK] inthefirmwareupdatingbox.Afterconfirmingtheprinterisinfreestate,thesoftwarewillautomatically updatethefirmware6-24Step 3 RebootyouFinderandwaitfor4-5seconds,thenyoucanseetheupdate](https://usermanual.wiki/Zhejiang-Flashforge-3D-Technology/FINDER.user-manual/User-Guide-3901593-Page-58.png)
![Finder User Guide|www.flashforge.com 400-699-106358process bar.Whenthe updatefinishes,itwill go backtothemaininterface.Step 4 Tap[Tools]--[About]to checkwhetherthe updatedversionisright.OnBoard PreferencesWhen the computer and printer are in connection, click[Tools]--[On BoardPreferences], you can checktheprinter name.MachineinformationWhenthecomputerandprinterareinconnectionstate,click [Tools]--[Machineinformation], you can checkthemachinetype,machine name andfirmware etc.6.2.15Help MenusFirstRun WizardHelpContents Click [Help]--[HelpContents], you canreadthehelp contents.CheckforUpdates Click[Help]--[CheckforUpdate]todetecttheavailableupdates online.AboutFlashPrint Click [Help]--[AboutFlashPrint],thesoftwareinformationboxwillpopup.Thecontentsincludethecurrentsoftwareversionandcopyrightinformation.](https://usermanual.wiki/Zhejiang-Flashforge-3D-Technology/FINDER.user-manual/User-Guide-3901593-Page-59.png)
![Finder User Guide|www.flashforge.com 400-699-106359Chapter 7:BasicPrintingThischapterwillprovideastep-by-stepguideonturninga3Dmodelintoaphysicalreality.Beforeproceeding,itisrecommendedthatyou dbettergooverpriorchaptersonloading/unloadingfilament,levelingthebuildplatform,andthefunctionsandcapabilitiesof FlashPrint.7.1Generate aGcode(7-1)Double-clicktheicon of FlashPrintto startthe software.7-1(7-2)Click[Print]--[MachineType] to selectFlashForge Finder7-2(7-3)Clickthe [Load] icontoloada.stlmodelfileandtheobjectwilldisplayonthebuildarea.7-37-4 Click[Edit]--[SurfacetoPlatform] tomakeyourmodelperfectlypositioned34](https://usermanual.wiki/Zhejiang-Flashforge-3D-Technology/FINDER.user-manual/User-Guide-3901593-Page-60.png)
![Finder User Guide|www.flashforge.com 400-699-106360onthebuildarea.Click[Back]anddouble-clickthe Moveiconagain,thenclick [Onthe Platform] and [Center]toensurethemodel be on the platform.7-4Note If you ve placeyourmodelin a right place, you can skipthe step above. (7-5)Clickthe[Print]icon on thetop, you shouldmake somesetupsforyour printjob.Preview: Ifyoucheckthe [Preview]box,youcanpreviewyourmodelafterslicingisdone.7-5](https://usermanual.wiki/Zhejiang-Flashforge-3D-Technology/FINDER.user-manual/User-Guide-3901593-Page-61.png)
![Finder User Guide|www.flashforge.com 400-699-106361PrintWhenSliceDone: IfyouprintviaUSBcable,youcancheckthebox,whileifyou printviaUSB stick, you shouldnot checkthe box. MachineType: FlashForge FinderSupports: Ifyouprintamodelwithsupports,youshouldclicktheinvertedtriangleand select [Enable].Raft: Youare suggestedto select [Enable].Resolution: You are suggestedto select [Standard]MoreOptions: You aresuggestedto keep them default.Click[OK] toselectthepathtosavetheGcodefile.Youcanrenamethefileasyoulike andsaveitas a .g or .gx file, click [Save] togenerate a Gcodefile.Note:.gxfilesareavailableforpreviewwhilethe.gfilesarenot.Theyaredisplayingasfollows:g. Files gx. Files 7-7Next,we are goingto printthemodel.](https://usermanual.wiki/Zhejiang-Flashforge-3D-Technology/FINDER.user-manual/User-Guide-3901593-Page-62.png)
![Finder User Guide|www.flashforge.com 400-699-1063627.2Print MethodsAftergeneratingtheGcodefile,youcantransferittoyourFinder.YoucantransferthefilethroughUSB cable and USB stick.7.2.1 PrintfromComputer(USB connection)Connectyour Finderwith yourPC via a USB cable.Turn on your Finder,levelthe build plateandloadthefilament.Click [Print]andtransferyourGcodefiletoyourFinder.Aftercompletingtransference,theprinterwillheatupautomatically.Andwhenheatingfinishes,theprintwillstartto buildthemodel. 7-8WhenyourPCconnectswithFlashPrintsuccessfully.Thestatusboxonthebottomrightdisplaysthereal-timenozzletemperature.Afterfinishingpreheating,your Finderstartsthe printjob directly.7.2.2 PrintfromComputer(WiFiconnection)Connectyour Finderwith yourPC viaWiFi.(Pleasereferto 6.1.13)Turn on your Finder,levelthe build plateandloadthefilament.Click [Print]andtransferyourGcodefiletoyourFinder.Aftercompletingtransference,theprinterwillheatupautomatically.Andwhenheatingfinishes,theprinterwillstartto buildthemodel.](https://usermanual.wiki/Zhejiang-Flashforge-3D-Technology/FINDER.user-manual/User-Guide-3901593-Page-63.png)
![Finder User Guide|www.flashforge.com 400-699-106363IfyouwanttoprintaGcodefromalocalfolder,youjustneedtoloadthefileintoFlashPrintatthestatusofUSBconnectionorWiFiconnection,thenclickthe [Print]button on thetop-right. Load thetargetGcodefileintoFlashPrint.7-9Clickthe [Print]button,the PCwilltransfertheGcodefiletothe printer.7-10Afterfinishingtransferring,theprinterwillheatupautomatically.Andwhenheatingfinishes,theprintwillstartto buildthemodel.](https://usermanual.wiki/Zhejiang-Flashforge-3D-Technology/FINDER.user-manual/User-Guide-3901593-Page-64.png)
![Finder User Guide|www.flashforge.com 400-699-1063647.2.3PrintfromUSB StickInsert yourUSB stickwithtarget.g or .gx fileto your Finder..TurnontheFinder.Makesurethebuildplatehasbeenleveledandthefilamentisloaded.Tap[Print]andthentaptheUSBStickCard iconinthemiddle.Thefile(s)willbedisplayedonthescreen.Selectthefileyouwanttoprintandtap[Print].Thefilewillbetransferredtotheprinter.Andtheprinterwillheatupthenozzleautomaticallyandstarttoprintafterthenozzlereachestheaimedtemperature.,Abort To stop heatingand printing.Once you tap [Abort],the processisirreversible.Pause Tosuspendtheprintjob,youcantapitagaintoresumeit.Youcanusethisfunctionwhen you wantto changethefilament halfway.7-11](https://usermanual.wiki/Zhejiang-Flashforge-3D-Technology/FINDER.user-manual/User-Guide-3901593-Page-65.png)
![Finder User Guide|www.flashforge.com 400-699-1063657.2.4 Printfrom FlashForgeCloud connection1)Turnon[WiFi]connectiononprinter ssettinginterfacetoconnecttheprintertoInternetwithWiFi.( Make suretheprinter has connectedtoInternet.)Turn on [FlashForgeCloud] connection on printer s settinginterface.2)Register a FlashForgeCloud accountwith your computer, onwebsite:https://cloud.sz3dp.com/ 3)RegisteryouraccountonFlashForgecloud:Afteractivateyouraccountthroughyour email box, logininFlashforgecloudwith your account.4)Afterloginin cloudwith your own account,click[My printer] click[Add printer].InputyourPrinter'sNameandFlashcloudRegistrationCodein[Addprinter]interface.Printer'sNameiseditandinputbyyourself,itcanhelpyouidentifyprintertype,username or using date.RegistrationCodeis showedin your printer's[About]interface.](https://usermanual.wiki/Zhejiang-Flashforge-3D-Technology/FINDER.user-manual/User-Guide-3901593-Page-66.png)
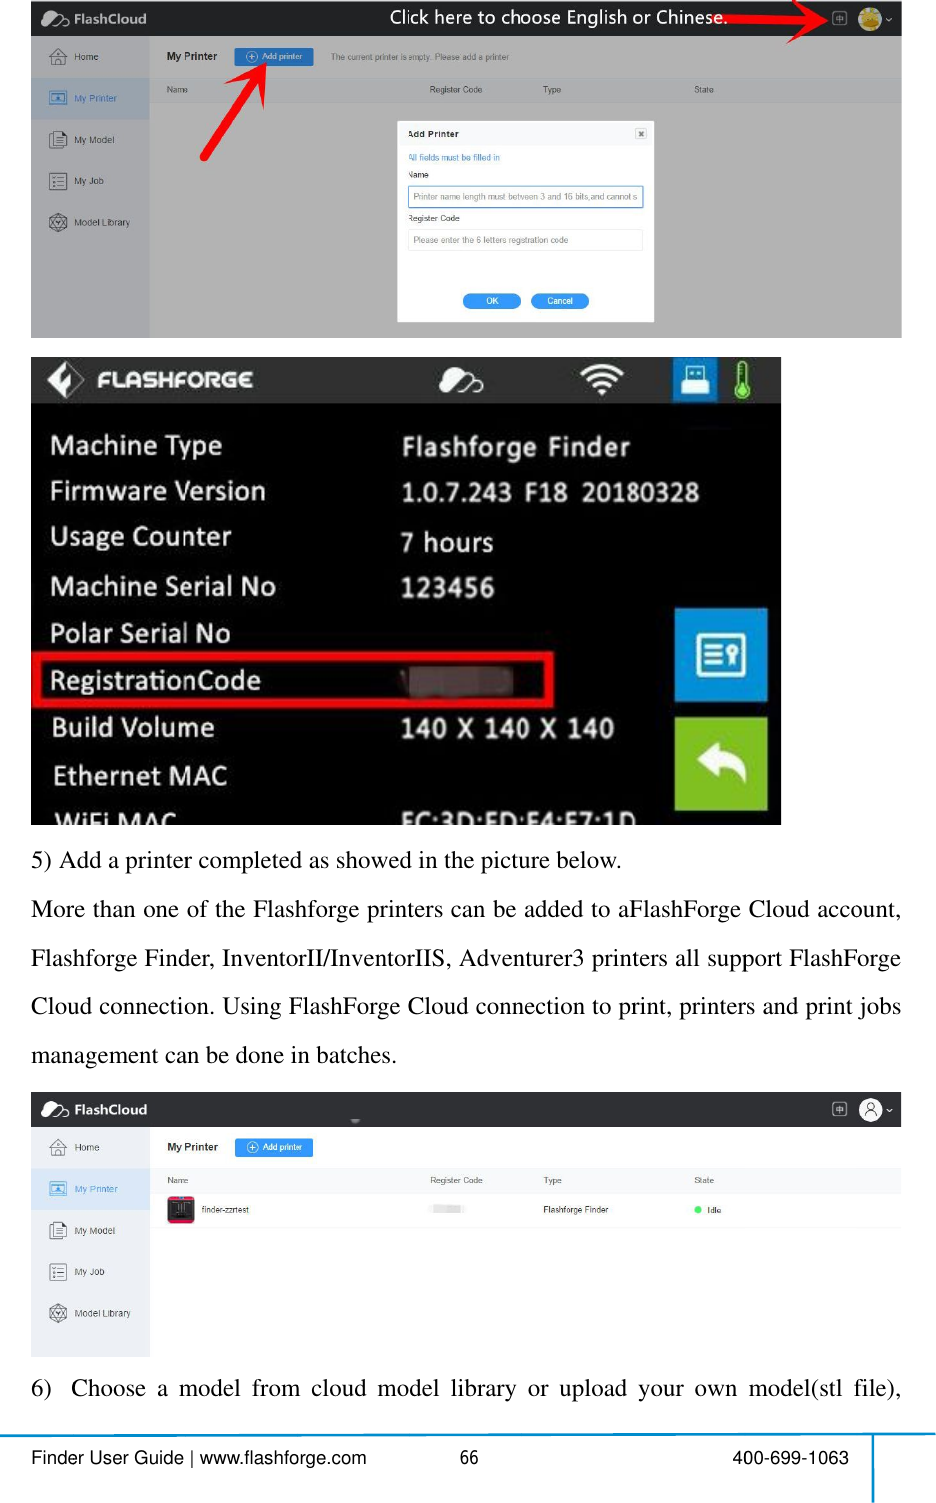
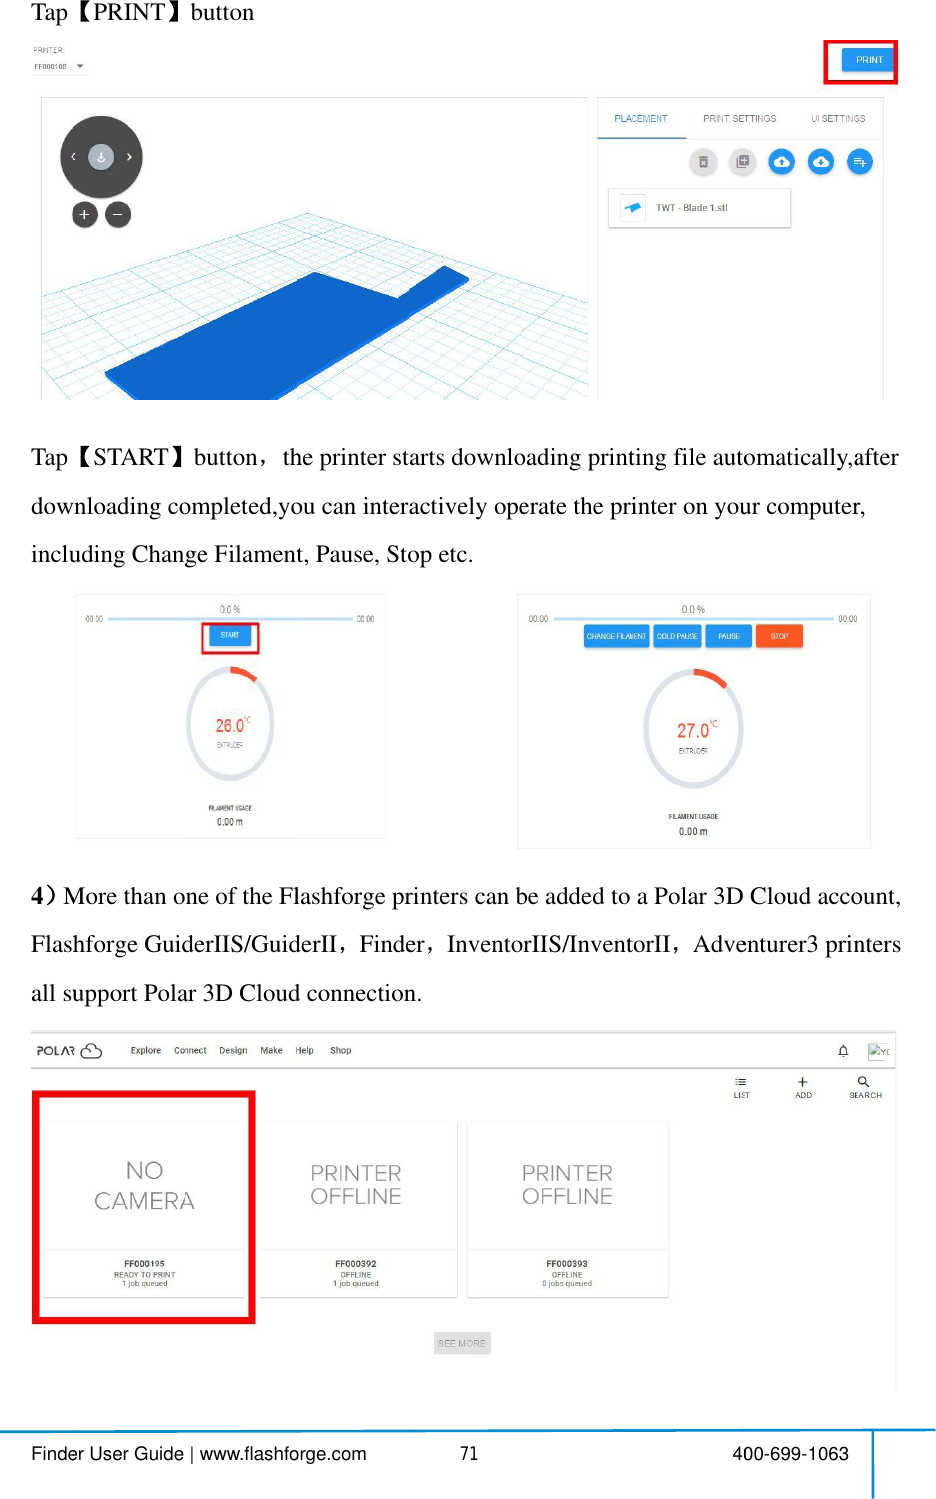
![Findeclick7)SeClickTimeprintjob any nder User Guideck[Print],enteSelectthe prick[Start]to steremainingtingdetailsob anytimeduri|www.flashfoerthe editminterforthitart printing,ngforthispareallshowring printing porge.com 4modelinterfs printjob ong,the selectprintjob,iwedinthisng process. 467rfaceto editmob onleft uppeted printerwinstantextrwebpage,y 4model. upperposition, Cwillstart priruder/buildpyoucanalso 40on, Click[Print]inting automplatetempesopauseorca00-699-1063t].matically.peratureorocancelthispotherprint](https://usermanual.wiki/Zhejiang-Flashforge-3D-Technology/FINDER.user-manual/User-Guide-3901593-Page-68.png)
![Finde7.2.51RRegilive o2Entherdrag donder User Guide5PrintfromRegistera Pohttps://polaister your accouve optionas an exaEnterthe Poredicon(onag downthe page |www.flashfomPolarCla PolarCloud accounar3d.com/ account using one os an example, ce PolarCloud htheright uppehe page tobottorge.com 4oud connecd accountwing one ofthee, create yourd homepage a uppercornerttom, copy do 468ectionwith your comhefourfollowr new Polarepage after you creshowedin, copy down yourE 4mputer, on wwing optionCloud accoreate your PothepictureEmail addre 40website: ns,taketheoud account. olarCloud acbelow),thenss and your00-699-1063thirdmicrosooud account.enTap[settirPINCode.osoft Tapttings],](https://usermanual.wiki/Zhejiang-Flashforge-3D-Technology/FINDER.user-manual/User-Guide-3901593-Page-69.png)
![FindeConnecTapInpunder User Guideonnectthepri[Tools]-[Senput yourpola|www.flashfontertointerSettings]-[Poar 3D cloud accountorge.com 4rnetwithWPolarCloudcd accountsE 469WiFi ;onnection]Email addre 4onprintersss(asID) an 40stouch scrend PINCode, Tap00-699-1063een;ode, Tap[savesave] .](https://usermanual.wiki/Zhejiang-Flashforge-3D-Technology/FINDER.user-manual/User-Guide-3901593-Page-70.png)
![Finde3Enleft uppeEnteTapnder User GuideEnterthe Po upper corneerthe object3DPRINT|www.flashfoe PolarCloud hner showedints page, choose a NTbuttonorge.com 4d homepagewnthepicture behoose a mode 470with your coe below,theel you arego 4omputer agaenTap [Objoingto prin 40 again.Tap[Expects]nt.00-699-1063Explore] on thehe](https://usermanual.wiki/Zhejiang-Flashforge-3D-Technology/FINDER.user-manual/User-Guide-3901593-Page-71.png)
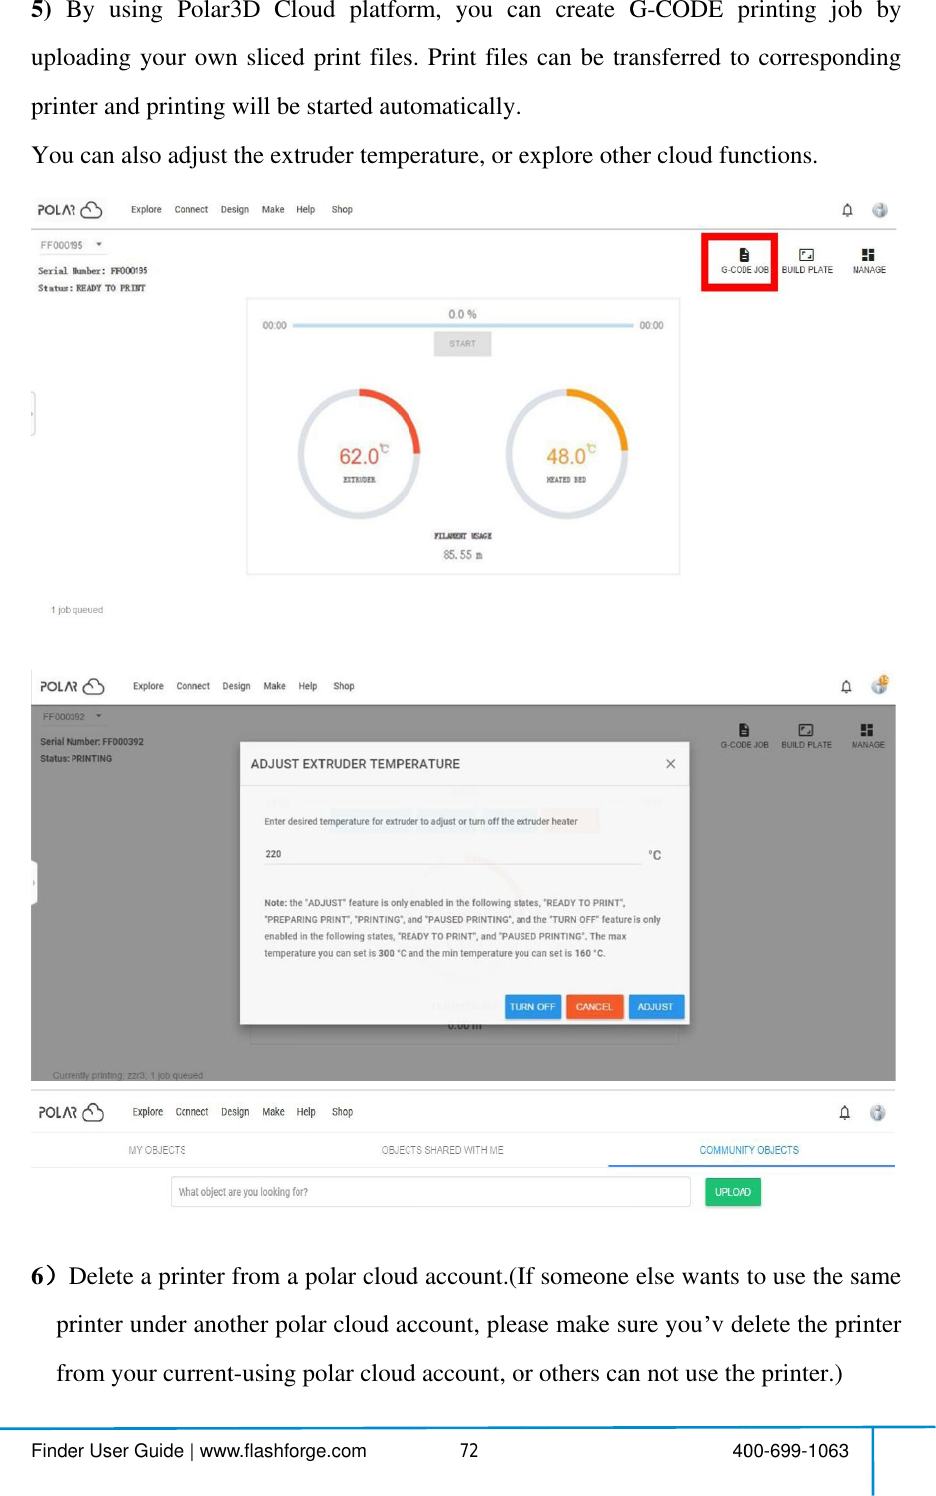
![FindeClickClickThen cFinaAfteundender User Guidecktheprinteck[MANAGThen click[SETTnally,dragthe nexeryou vcomunder hisown po|www.flashfoer you wantAGE] button on SETTINGS] buhe nextpagempletedthen polar cloud accounorge.com 4to delete.on on theright button on thegeto bottom doheabovedeleud account. 473t upper positeright uppe down, clicketesteps,th 4tion ofthis upper positionok[DELETEhisprinterc 40printer sdeofthe nextwPRINTEcannowbe00-699-1063etailswebpage.webpage.R] button.usedbyotebpage.thers](https://usermanual.wiki/Zhejiang-Flashforge-3D-Technology/FINDER.user-manual/User-Guide-3901593-Page-74.png)