Zhejiang Flashforge 3D Technology FINDER 3D Printer User Manual Flashforge Finder User Guide V 20180414
Zhejiang Flashforge 3D Technology CO., Ltd. 3D Printer Flashforge Finder User Guide V 20180414
Contents
- 1. Users Manual
- 2. user manual
user manual
Fi
nd
nd
er User Gui
d
Fl
as
FlashFor
ge
d
e
|
www.flas
h
as
hF
o
ge
Corpor
a
h
forge.com
o
rge
F
Us
e
a
tion
F
in
de
e
r
Gu
de
r3D
Gu
ide
0086
-
Pri
nter
-
0579-82273
9
nter
9
89

Fi
nd
U
se
Th
i
s su
U
Ja
Ja
Ja
Ja
Ja
A
p
A
p
A
p
A
p
nd
er User Gui
d
se
rGuideU
pda
is user gui
de
s su
itablef
or
U
pdateDa
te
Ja
n13th,20
18
Ja
n13th,20
18
Ja
n13th,20
18
Ja
n13th,20
18
Ja
n13th,20
18
p
r14th,20
18
p
r14th,20
18
p
r14th,20
18
p
r14th,20
18
FlashFor
ge
d
e
|
www.flas
h
pda
tingD
e
de
or
F
i
r
m
201
te
U
pda
18
Cha
pter
18
Cha
pter
18
Cha
pter
18
Cha
pter
18
Cha
pter
18
Cha
pter
18
Cha
pter
18
Cha
pter
18
Cha
pter
ge
Corpor
a
h
forge.com
e
tails:
Finder
m
w
a
r
e
E
d
iti
201
80409
pda
teChapt
er
pter
11.1
.2
pter
22.1
.3
pter
22.1
.4
pter
22.1
.4
pter
77.2
.5
pter
11.1
.4
pter
22.1
.3
pter
77.2
.4
pter
77.2
.5
a
tion
iti
on
er
.2
AddF
.3
Adds
upport
conne
c
.4
Modi
f
y
tempe
r
.4
AddP
Control
.5
Add
print
.4
Add:
B
.3
Adds
upport
.4
AddF
.5
Modi
f
y
(Pola
r
Fl
ashpr
U
pda
ind
ersupport
S
upport
Simpli
f
y
c
tioninreferen
f
y
Printinterfac
e
r
atureand
print
ol
arCloud
Conn
Control
, ExtruderCa
l
print
fromPolar
B
asic3DP
rintin
upport
Flashfo
r
l
ashforgec
loud
f
y
:PrintfromP
ol
r
cloudpri
nting
0086
-
ashpr
intSoft
w
E
d
iti
on
3.22.0
pda
teCont
ent
S
implify3Ds
oftw
f
y
3Dsoftware,
c
elis
t.
e
andToolsint
e
print
speedsetting
in
Conn
ection,Sta
rtup
l
ibrationsett
ing
Cloud connec
t
ion.
rintin
gProcess
r
ge cloudinref
e
loud
connection
prin
ol
arCloudc
onn
nting
instructions&
-
0579-82273
9
w
are
ent
oftw
ar
e.
supportPolar
e
rface, adde
xtrud
in
terfa
ce.
rtup
Sound,Ligh
t
ing
sinstruction
s.
ion.
e
rencelis
t.
prin
tdetailinstru
onn
ection
websiteaddre
ss
9
89
cloud
xtrud
er
t
Bar
ctions
ss
.)

Finder User Guide|www.flashforge.com 400-699-1063
2
Content
Content............................................................................................................................2
Preface............................................................................................................................3
Introduction.....................................................................................................................4
Notice..............................................................................................................................5
Chapter 1:3D PrintingTechnology................................................................................8
Chapter 2:About Finder...............................................................................................10
2.1AboutYour Finder...........................................................................................10
Chapter 3:Unpacking...................................................................................................24
Chapter 4:HardwareAssembly....................................................................................28
4.1 FilamentInstallation........................................................................................28
4.2 Printer Start-up................................................................................................29
4.3 LoadingFilament.............................................................................................29
4.4Unloading Filament........................................................................................31
Chapter 5:Build Plate Leveling....................................................................................33
Chapter 6:About Software...........................................................................................35
6.1 SoftwareInstallation........................................................................................35
6.2 Exploring FlashPrint........................................................................................36
Chapter 7:Basic Printing..............................................................................................59
7.1Generate a Gcode............................................................................................59
7.2 Print Methods..................................................................................................62
Chapter 8 Supports andService....................................................................................72

Finder User Guide|www.flashforge.com 400-699-1063
3
Preface
Note:Eachdevicemustbetestedbeforeleavingfactory.Iftherearesomeresiduesinextruder
or some tinyscratcheson thebuildtape, it isnormaland won taffect theprintingquality.
OnthecompletionofthisUserGuide,thanksallFlashForgeengineersandthe
FlashForge3D printerusersfortheir unremitting efforts and sincere assistance.
TheFlashForgeFinderUserGuideisdesignedfortheFinderuserstostarttheir
printingjourneywithFlashForgeFinder.Evenifyouarefamiliarwithearlier
FlashForgemachinesor3Dprintingtechnology,westillrecommendthatpleaseread
thisguide,asthereislotsofimportantinformationabouttheFinderforyoutogeta
better 3D experience.
Forabetterandmoresuccessfulprintingexperience,youcanrefertothefollowing
materials:
(1)Quick StartGuide
UserswillfindtheQuickStartGuidetogetherwiththeprinteraccessories.TheQuick
StartGuidewill help you start yourprintjourney as soon aspossible.
(2)OfficialFlashForgeWebsite:http://www.flashforge.com
TheofficialFlashForgewebsitecontainstheup-to-dateinformationconcerning
FlashForgesoftware,firmware,devicemaintenanceandsoon.Usersarealsoableto
getthecontactinformationfromthere.

Finder User Guide|www.flashforge.com 400-699-1063
4
Introduction
Notes
The FlashForgeFinder3DPrinterUserGuide containstheinformationneededfor
youto setup and use this device.
ThisUserGuideincludingthefollowingparts:Preface,IntroductionandAfter-sale
service.
ThePrefacesectionincludesresourceacquisitionchannel,theoverallframeworkof
themanual, and the problemsthat should be paid attentiontowhile printing.
Theintroductionsectioncontainstheoverviewof3Dprintingtechnology,equipment
introduction, unpackingandinstallation of equipment, softwareinstallation and use.
After-sale section containsthe userhowto getthe support and help.
Pleaseread FlashForgeFinder 3D PrinterUserGuide carefully beforeuse.
TheUserGuideiswritten based onWindows 7OS.
The version ofthe FlashPrintislatest.

Finder User Guide|www.flashforge.com 400-699-1063
5
Notice
SafetyNotice
!Notices:Readalltheinstructionsinthemanualandfamiliarizeyourselfwiththe
FlashForgeFinderUserGuidebeforesetting-upandusing.Failuretocomplywiththe
warningandinstructionsmayresultinindividualinjury,fire,equipmentdamageor
propertydamage.
PLEASESTRICTLYFOLLOWALLTHESAFETYWARNINGSANDNOTICE
BELOWALLTHETIME.
WorkEnvironmentSafety
Keep yourwork placetidy.
Do not operate Finderinthe presence offlammableliquids, gases ordust.
Keep Finder out of children and untrained people sreach.
ElectricalSafety
Always use the Finderwith a properly grounded outlet.Do notrefitFinder plug.
Do not use Finderindamp orwetlocations.Do not expose Findertoburning sun.
In case of device damage, please use the power supplyprovided byFlashForge.
Avoid usingthe device during an thunderstorm.
In case of uncertain accident, please unplugthe deviceif you do not useitforlong.
PersonalSafety
Do nottouchthe nozzle and buildplate duringprinting.
Do nottouchthe nozzle afterfinishing printing.
Dressproperly.Donot wearlooseclothingorjewelry.Keepyourhair,clothingand

Finder User Guide|www.flashforge.com 400-699-1063
6
gloves awayfrommoving parts.
Donotoperatethedevicewhileyouaretiredorundertheinfluenceofdrugs,
alcoholormedication.
Cautions
Do notleavethe device unattendedforlong.
Do notmake any modificationstothe device.
Tolowerthebuildplatebeforeloading/unloadingfilament.(Thedistancebetween
the nozzleand build plate should bekeptfor atleast 50mm)
Operatethe deviceinawell-ventilated environment.
Never usethe deviceforillegal activities.
Never usethe devicetomake any food storage vessels.
Never usethe devicetomake any electricalappliance.
Never putthemodelinto yourmouth.
Do notremovethemodelswithforce.
EnvironmentRequirements
Temperature:RT 15-30
Moisture:20%-70%
PlaceRequirements
Thedevicemustbeplacedinadryandventilatedenvironment.Thedistancesofthe
left,rightandbacksidespaceshouldbeatleast20cm,andthedistanceofthefront
side spaceshould be atleast 35cm.
FilamentRequirements
Donotabusethefilament.PleasemakesureyouusetheFlashForgefilamentorthe

Finder User Guide|www.flashforge.com 400-699-1063
7
filamentfromthe brands acceptedby FlashForge.
FilamentStorage
Allpolymersdegradewithtime.Donotunpackfilamentuntilnecessary.Filament
should be stored atcleanand dry conditions.
LegalNotice
Alltheinformationinthisdocumentissubjecttoanyamendmentorchangewithout
the officialauthorizationfrom FlashForge.
FLASHFORGECORPORATIONMAKESNOWARRANTYOFANYKINDWITH
REGARDTOTHISDOCUMENT,INCLUDING,BUTNOTLIMITEDTO,THE
IMPLIED WARRATIES OF MERCHANTABILITY AND FITNESS FOR A
PARTICULAR PURPOSE.
FCCNotice
Thisdevicecomplieswithpart15oftheFCCRules.Operationissubjecttothe
followingtwoconditions:(1)Thisdevicemaynotcauseharmfulinterference,and(2)
thisdevicemustacceptanyinterferencereceived,includinginterferencethatmay
cause undesired operation.
FlashForgeshallnotbeliableforerrorscontainedhereinforincidentalconsequential
damagesin connectionwithfurnishing, performance or useofthismaterial
This document containsproprietaryinformation protected by copyright.
Copyright 2018FlashForge Corp.AllRights Reserved

Finder User Guide|www.flashforge.com 400-699-1063
8
Chapter 1:3DPrintingTechnology
3Dprintingreferstotransformingthree-dimensionalmodelsintophysicalobjectsthat
youcanholdandtouch.Itisalsocalledadditivemanufacturingbecausethe3Dmodelis
created by adding layers uponlayers ofmaterial untilthe objectisfullyformed.
FusedFilamentFabrication(FFF)isthemostcommonmethodof3Dprinting.Itisalso
themethodthattheFinderuses.Itworksbymeltingplasticmaterialcalledfilamentonto
aprintsurfaceinhightemperature.Thefilamentsolidifiesafteritcoolsdown,which
happensinstantaneouslyafteritisextrudedfromthenozzle.3Dobjectsareformedwith
thefilamentlaying downmultiplelayers.
1.1Process
3D printinginvolvesthree steps:
1.) Make ordownload a 3Dmodel
2.) Slice andexportthe 3Dmodel
3.)Buildthe 3Dmodel
1.1.1 Makea3DModel:
Currently,therearethreewaystomaking a3Dmodel.
DesigningFromScratch YoucanusefreeCAD(computer-aideddesign)software
such as3DTADA,AutoCAD, SolidWorks,Pro-E,andourownsoftwareHappy3Dto
design yourown 3Dmodel.
3DScanners Analternativemethodtomakinga3Dmodelistoscananobject.3D
scannersworkbydigitizingaphysicalobject,collectingitsgeometricdata,andsavingit
toafileonyourPC.Therearealsoappsthatcanturnamobiledeviceintoa3Dscanner.

Finder User Guide|www.flashforge.com 400-699-1063
9
FromtheCloud Themostpopularwayofobtaininga3Dmodelistodownloadit
fromwebsitesthat allow usersto upload 3Dmodelsthattheydesigned.
E.g. :www.thingiverse.com
1.1.2SliceandExportthe3DModel:
Slice softwareisthesoftwarethatprepares3Dmodelsforprintingandturnstheminto
instructionsforthe3Dprinters.FlashPrintistheslicingsoftwareusedforthe
FlashForgeFinder.
UsingFlashPrint,youcanturnstl.filesintog.orgx.filesforprinting.Thenthefiles
can be transferredto yourFinderviaUSB cable,USB stick orWiFi.
Finder supportSimplify3Dsoftware,softwarenotdevelopedbyFlashForgemayneed
registerorcharge extrafee, please chooseto use(or not)accordingto your needs.
1.1.3Buildthe3DModel:
OncetheoutputfilehasbeentransferredtoyourFinder,itwillstarttoturnthe3Dmodel
into a physical object bylaying downlayers offilament.
Fi
nde
2.1
A
2.1
.
nde
r User Guide
A
boutY
ou
.
1Views
Fr
1.T
ouch sc
2.T
ouch sc
3.Nozzle
4. Z-axi
s g
5.Buil
d p
|www.flashf
o
Cha
p
ou
rFind
er
Fr
ont
Right
ouch sc
reen
ouch sc
reen butt
on
s g
uiderod
d p
late
o
rge.com
4
p
ter
2:
er
on
6. Leve
7. F
8
. E
9
. Fila
10
. X
4
10
2:
Ab
o
Back
6. Leve
ling
knob
7. F
ilament
ca
. E
xtruder
. Fila
mentin
ta
. X
-axisgui
d
4
o
utFi
knob
ca
rtridge
ta
ke
d
e rod
4
0
n
der
Top
11. Sp
ri
12.
US
13.U
S
14. Po
w
15. Po
w
0
0-699-1063
ri
ngpresse
r
US
B sticki
npu
S
Bcablei
np
w
erinput
w
er switch
r
npu
t
np
ut
14
15

Finder User Guide|www.flashforge.com 400-699-1063
11
2.1.2Terms
Build Plate The surfaceonwhichthe Finder builds an object.
BuildTape ThebluetapethatcoversFinder sbuildplatesothat
the object can sticktothe buildplatewell.
BuildVolume
Thethreedimensionalamountofspacethatanobject
willuseonceitiscompleted.Thelargestbuildvolume
of Finderis140*140*140mm.
LevelingKnobs
Knobsunderthebuildplatformthatareusedfor
adjustingthedistancebetweenthenozzleandbuild
plate.
Extruder
Thedevicethatdrawsthefilamentfromthespool,
meltsitandpushesitthroughanozzleintothebuild
plate.
Nozzle Alsocalled printhead ,whichlocatedatthebottom
ofthe extruderwhere heatedfilamentis squeezedout.
Cooling Fan Tocooltheouterassemblyoftheextruderandgear
motor.
FilamentIntake An openinglocated atthetop oftheextruder.
FilamentGuideTube Ablackplasticpiecethatguidesthefilamentfromthe
filament box tothefilamentintake.
FilamentCartridge A specificboxfor placing FlashForgefilament.
SolidGlueStick Asolidadhesiveusedformakingthemodelsticktothe
build platefirmly.
UncloggingPinTool Atoolthatusedforcleaninganduncloggingthe
extruder.
StampingWrench Atoolthatusedfor seizingthe nozzle smetal cube.

Finder User Guide|www.flashforge.com 400-699-1063
12
2.1.3 Reference
Name Finder
Number ofExtruder 1
PrintTechnology Fused Filament Fabrication(FFF)
Screen Size 3.5 colorIPSTouch Screen
BuildVolume 140 140 140mm
LayerResolution 0.05- 0.4mm
BuildAccuracy 0.1-0.2mm
PositioningAccuracy Z axis 0.0025mm;XYaxis 0.011mm
FilamentDiameter 1.75mm 0.07
NozzleDiameter 0.4mm
Build Speed 10-200mm/s
Software FlashPrintt Support Simplify3D
Support Formats Input:3MF/STL/OBJ/FPP/BMP/PNG/JPG/JPEG
Output:GX/G
OS Win xp/Vista/7/8/10 MacOS Linux
Device Size 420*420*420mm
NetWeight 10Kg
ACInput Input: 100V-240V, 50-60Hz Power: 65W
Connectivity USB cable,USB stick,WiFi,
FlashForgeCloud, PolarCloud
Fi
nde
2.1
.4
nde
r User Guide
.4
.1Inter
fac
|www.flashf
o
fac
eM
enus
o
rge.com
4
enus
4
13
Rea
ŸT
h
ŸT
h
ŸT
h
Ÿ
Back
C
hoose
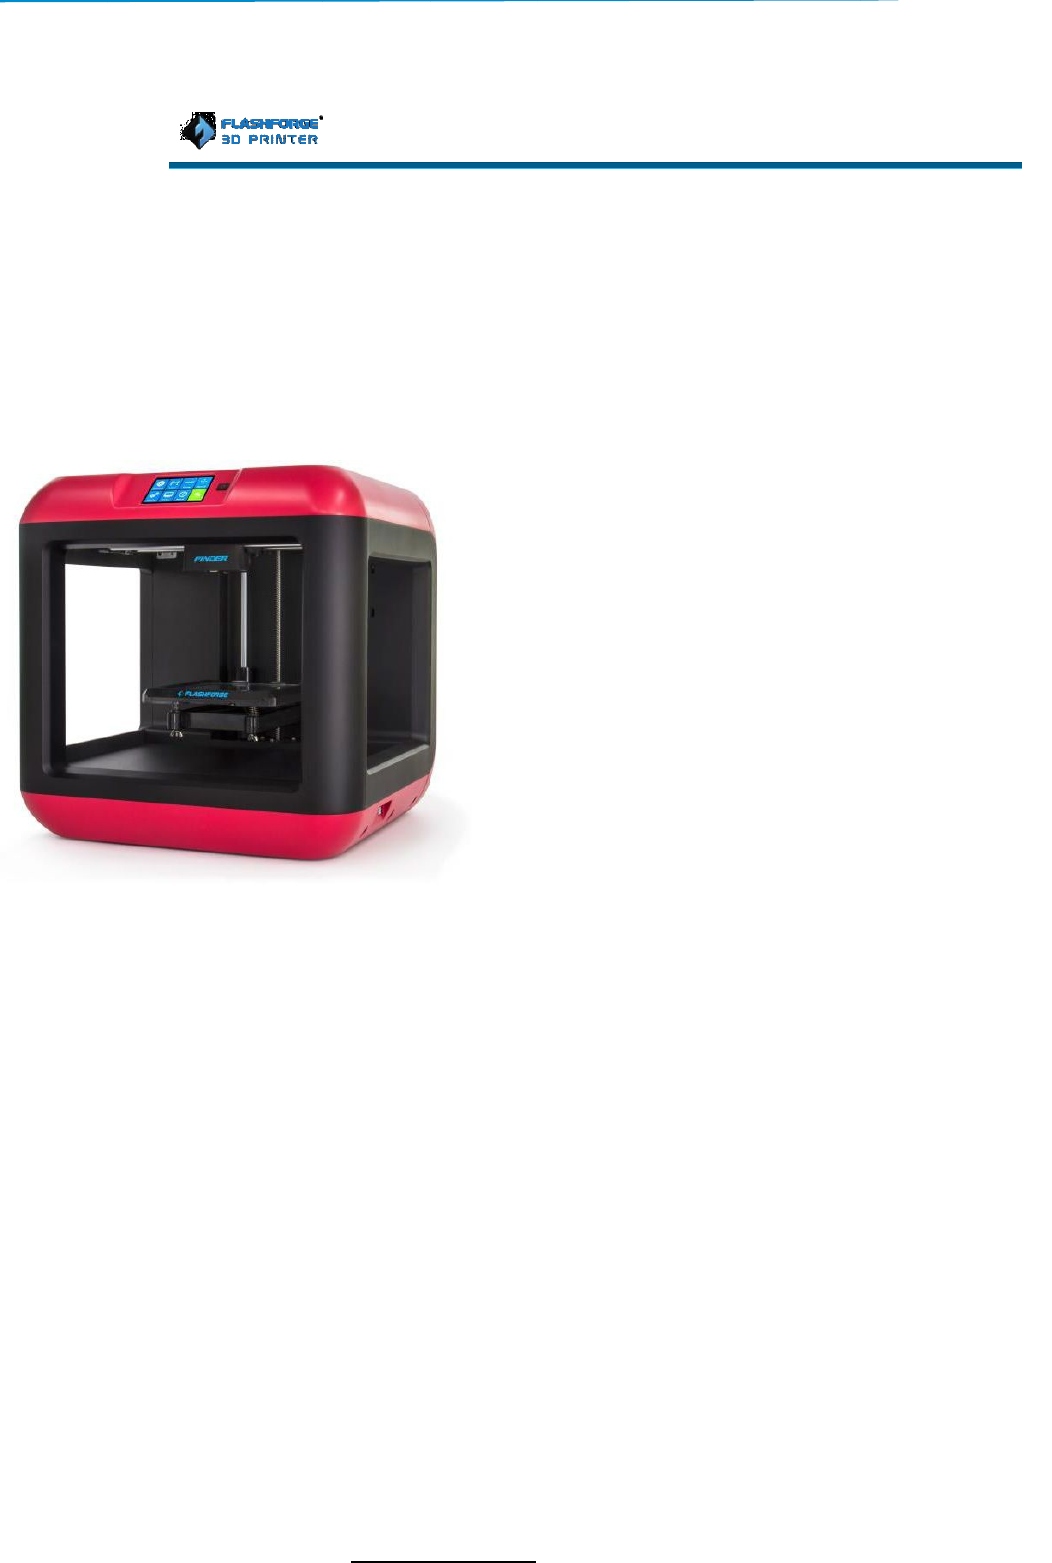
1.
T
2.
Se
3.
The
ri
gh
4.
T
del
e
Select t
ŸB
u
ŸC
o
me
m
bu
tt
lo
cal
Ÿ
Delete:
Ÿ
Back
4
Rea
d theprin
t file fr
h
e localme
m
h
e USB stick
h
ePolar Cl
oud
Back
hoose
Batch
T
apand hol
d
Se
lectthefi
l
The
select
ed
gh
t)
T
apthedel
e
e
te allthe
se
Select t
he targ
et
u
ild:Tobegi
n
o
py:Toco
p
m
orycard
tt
onisnota
v
cal
memory
car
Delete:
Tod
elete t
Back
4
0
Build
t file fr
om
m
ory card
oud
printing
f
iles
d
to selectt
h
l
e you wan
t
ed
filehas
e
teiconat
t
se
lectedfil
es
et
print filea
m
n
printing
p
ythefil
es
fromthe
USB
v
ailablewh
ile
car
d )
elete t
heprin
t file
0
0-699-1063
h
efile
t
to delete
atag(on
t
hetoprig
h
es
m
ong the list
es
to the
l
USB
stick
.(T
ile
printing
fr
t file
the
h
tto
l
ocal
.(T
he
fr
om
Fi
nde
nde
r User Guide |www.flashf
o
o
rge.com
4
4
14
Pri
n
ŸA
bo
ŸPa
u
pri
n
?T
oo
du
ri
use
d
fila
m
?
E
du
ri
To
set
After e
tar
g
be
und
Tap
t
Tap
to
ca
T
oo
?
Pri
du
ri
sp
ee
?
Li
?F
pri
n
pri
n
?
Fi
after
?
C
to t
h
To
set t
Tap
t
Tap
to
ca
4
n
t interface
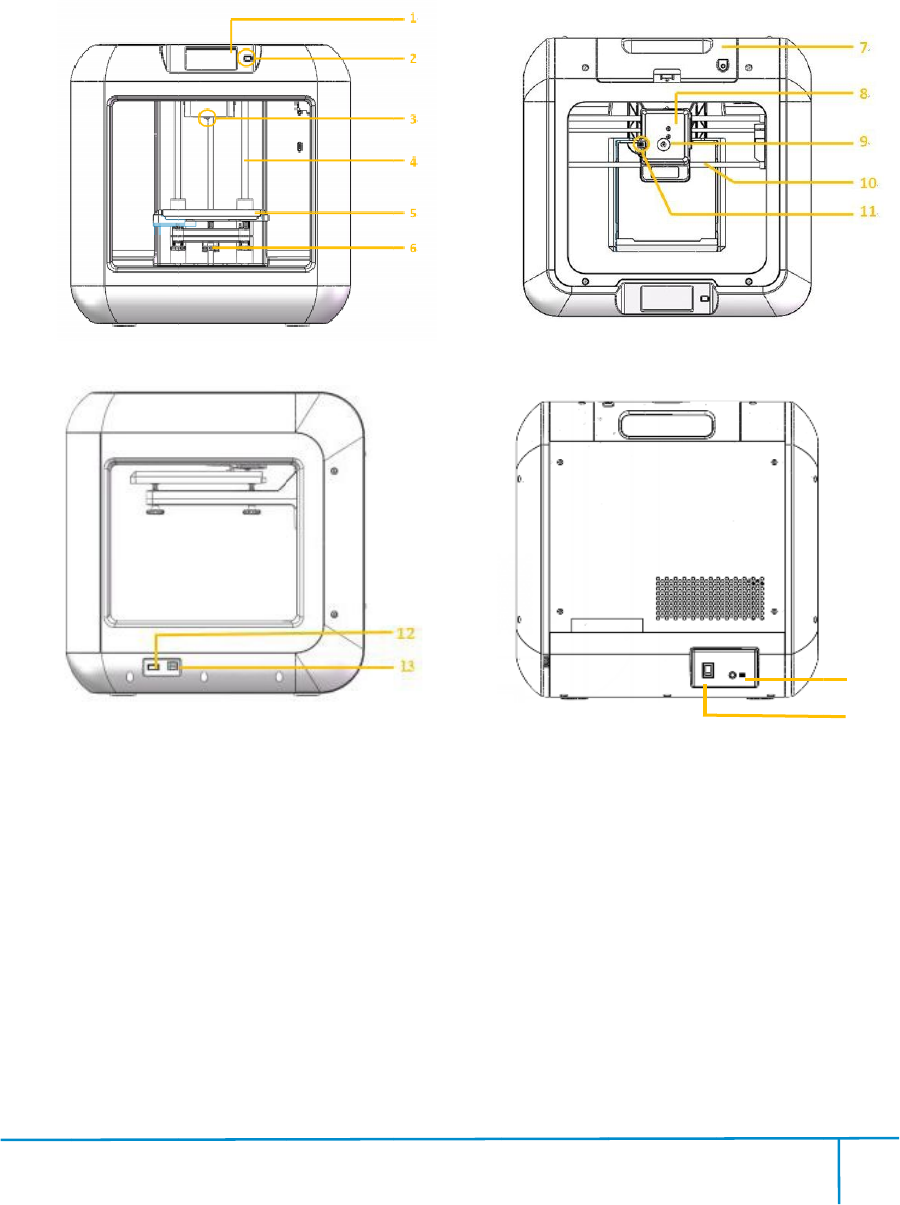
bo
rt:To abo
rt t
u
se/Resum
e:
n
t jo
b.
T
oo
ls:Toch
ec
ri
ngprinting:
d
,printing
m
ent, finish
-
E
xtruderte
m
ri
ngprintin
g.
set
extruder
t
After e
xtruder t
e
g
et temperat
u
und
erlined i
n
the temp
erat
[Yes] tosa
v
ca
ncel th
e setti
oo
ls inprint i
n
Pri
ntingsp
eed
ri
ngprinting
ee
d figure.
Li
ghtbulb:T
o
il
ament:To
c
n
ting. (Note:
n
tingoperati
on
Fi
nish-Shut
do
after
print job fi
n
C
ancel:Toe
nd
h
eprint in
terfa
set t
heprinti
ng
the speed fi
gu
[Yes] tosa
v
ca
ncel th
e setti
4
0
rt t
heprintj
ob.
e:
Tosuspe
nd
ec
kstatusor
buildtime,
speed,ligh
t
-
shutdown.
m
perature:
Ca
t
emperature
e
mperature
h
u
re, temper
at
n
print interf
ace,
erat
ure figure t
o
v
ethesetti
ng
e setti
ng.
n
terface
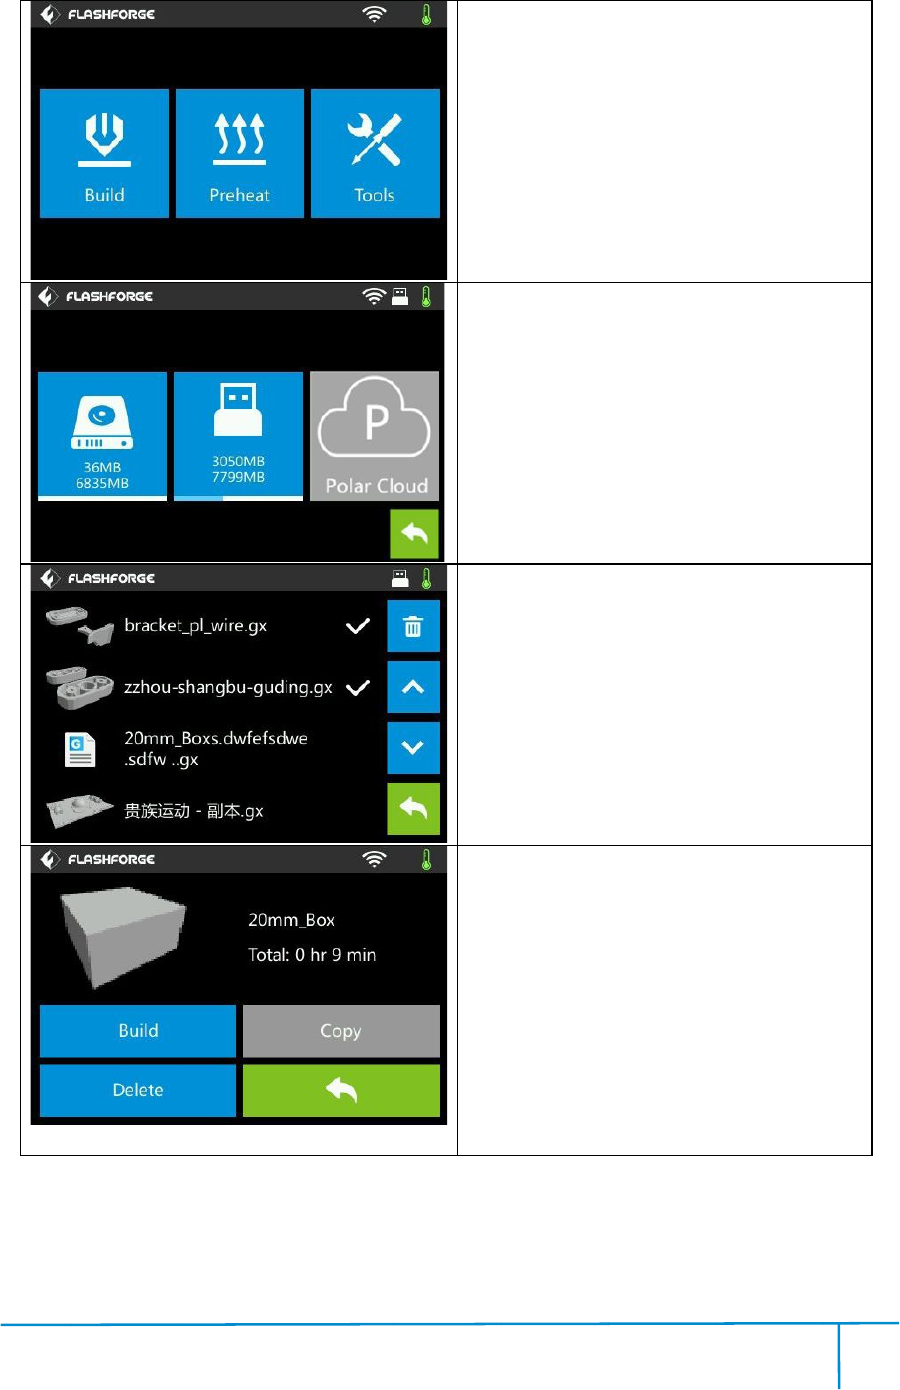
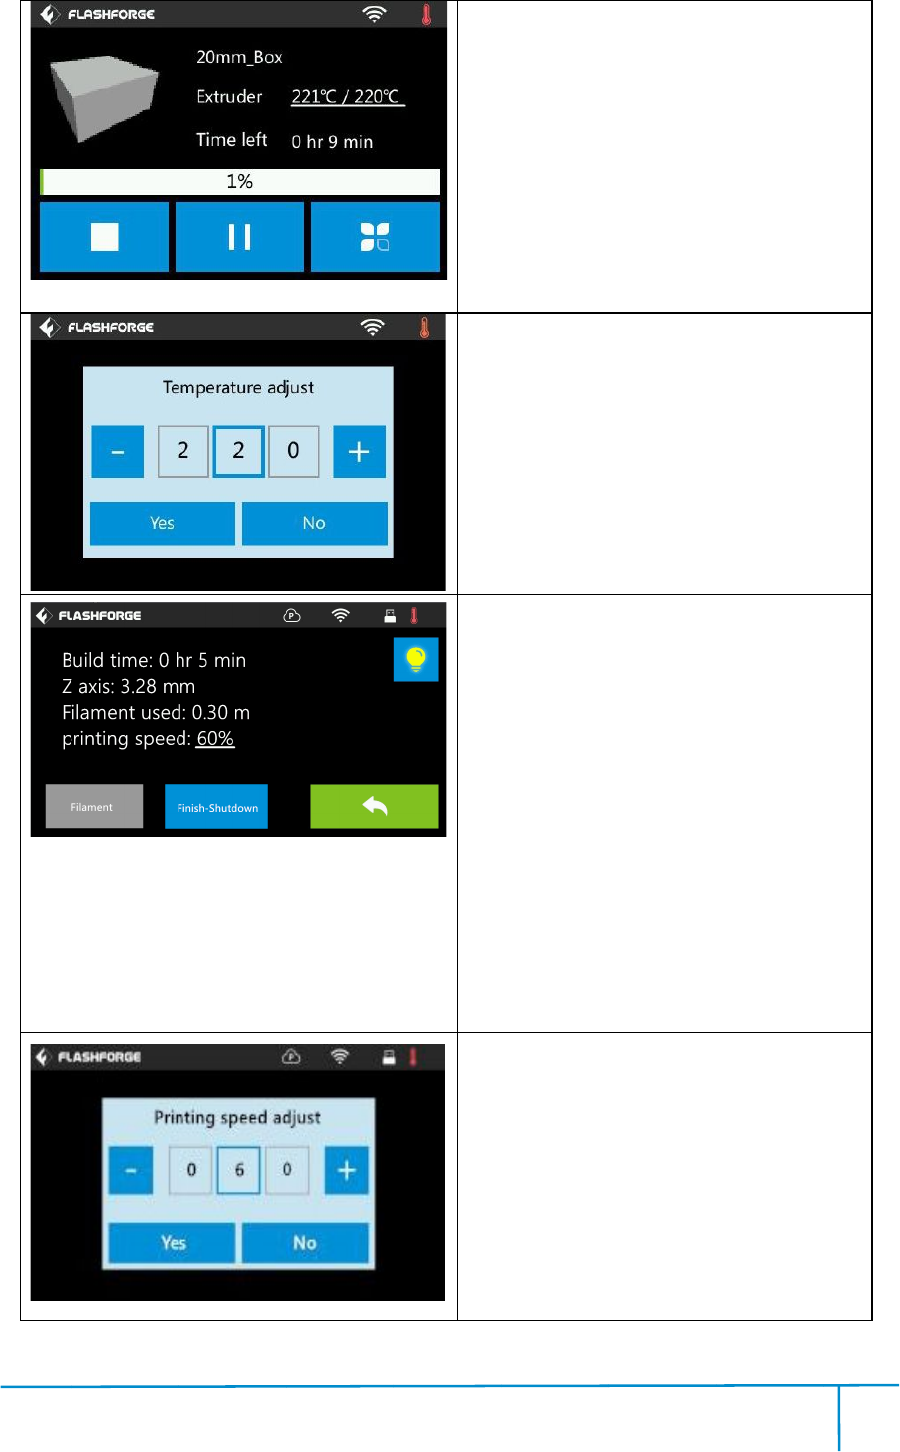
eed
:Tochang
e
bytappin
g
o
turnon/of
f t
c
hange fila
m
Youneedto
s
on
first)
do
wn:To star
t a
n
ishe
d.
nd
thetool
o
terfa
c
e.
ng
speeddu
ri
gu
re to adju
st;
v
ethesetti
ng
e setti
ng.
0
0-699-1063
ob.
nd
orresum
e
modify
setti
Zaxis,fila
m
t
status,ch
a
Ca
nbecha
ng
duringprint
i
h
as reached
at
ure figu
re will
ace,
o
adjust;
ng
whiletap
[N
e
printings
p
g
theund
erli
f t
he light.
m
entduring
s
uspend the
t a
uto shutd
o
o
rdersand
re
ri
ngprinting
st;
ng
whiletap
[N
e
the
setti
ngs
m
ent
a
nge
ng
ed
i
ng:
re will
[N
o]
p
eed
erli
ned
o
wn
re
turn
[N
o]

Finder User Guide|www.flashforge.com 400-699-1063
16
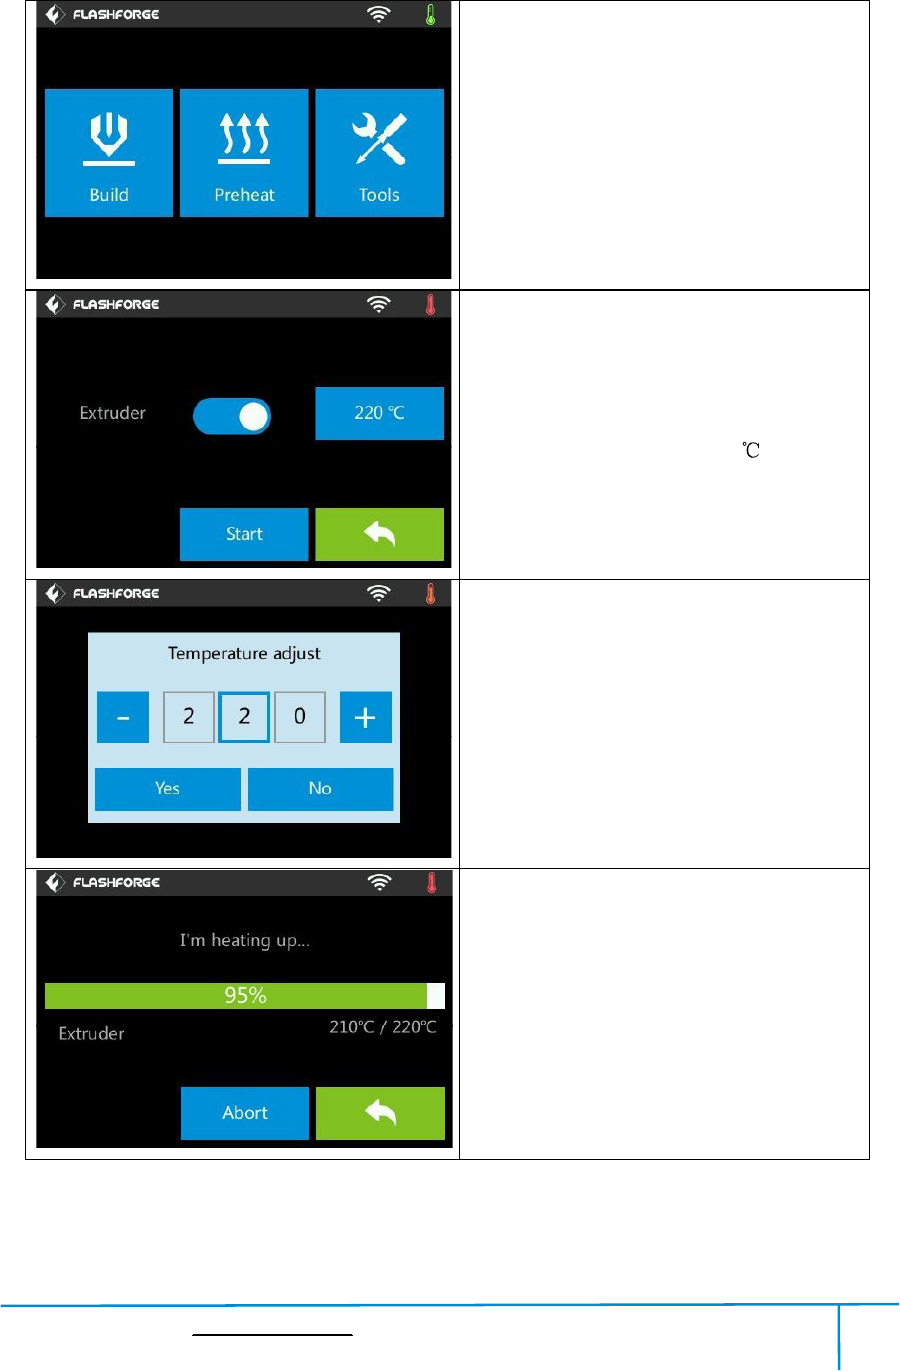
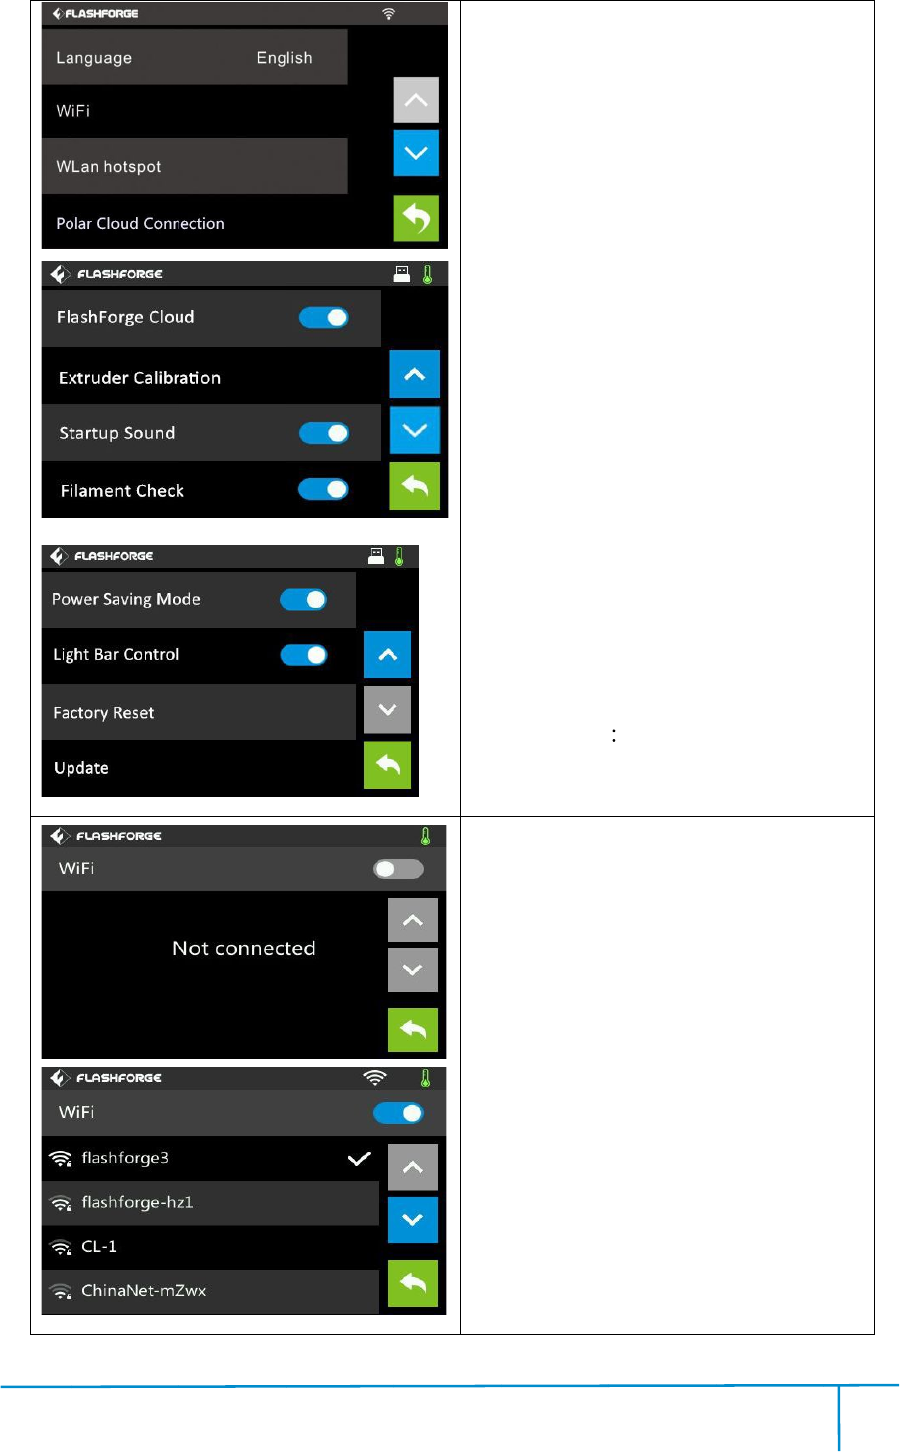
2.1.4.2Preheat Menus
Preheat
Tapthe [Preheat] toenterthepreheat
interface.Tapthe [Start] toheatuptothe
setting temperature.
Thedefault temperature is220.
Tapthetemperaturedisplaybartosetthe
temperature.
To set thepreheat temperature.
Tap [Yes] tosave the setting ,
[No] to cancel the setting.
Thepicturedisplaysthepreheatinterface.It
shows thereal-timetemperature and the
targettemperature.Tapthe [Abort] button
toabortthepreheatjob.Tap [Back] toback
tothepreviousinterfacebutnotabortthe
preheat job.
Finder User Guide|www.flashforge.com 400-699-1063
17
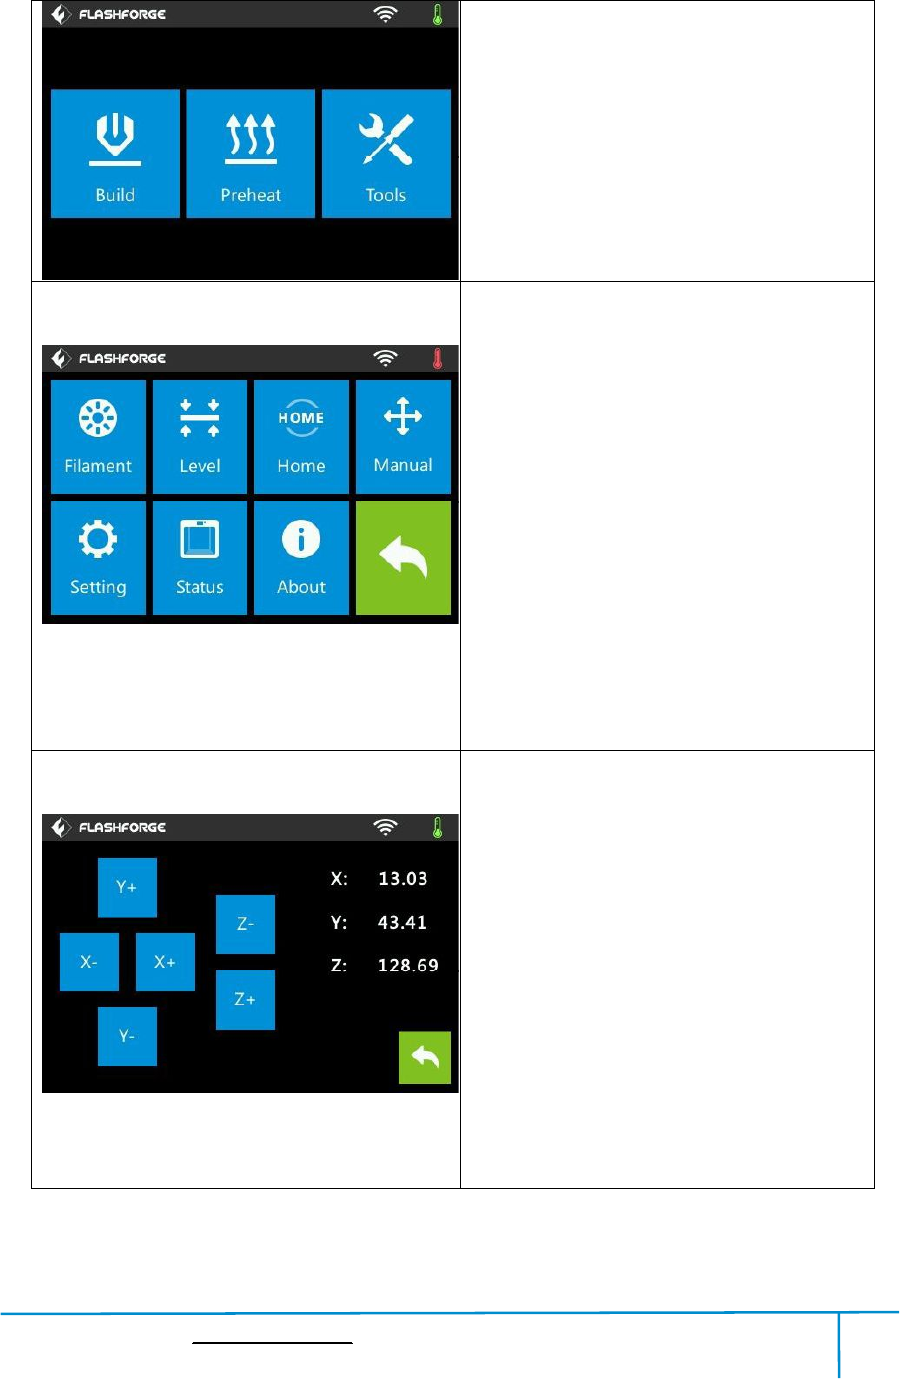
2.1.4.3Tool Menus
Tools
Tap [Tools] to enter tool options.
ŸFilament:To load/unloadthe filament.
ŸLevel:To adjust thebuildplate.
ŸHome:TomaketheX,YandZaxesback
to the zeropoint.
ŸManual:Tomanuallyadjustthepositions
of X,Y and Z axes.
ŸSetting:Toimplementrelevantfunction
setups.
ŸStatus:Thecheckthereal-timestatusof
theprinter.
ŸAbout: Information abouttheprinter.
ŸBack
Manual adjustment
ŸY+:Theextrudermovestothezeropoint,
that is, thebackof themachine
ŸY-:Theextrudermovestothedirection
opposite to theY+.
ŸX+:Theextrudermovestothezeropoints,
that is, to therightdirection
ŸX-:Theextrudermovestothedirection
opposite to the X+.
ŸZ+:Thebuildplate elevates.
ŸZ-:Thebuildplatedescends.
ŸBack
Fi
nde
nde
r User Guide |www.flashf
o
o
rge.com
4
4
18
Ta
p
Ÿ
La
Ÿ
W
Ÿ
Wla
ho
ts
ŸP
o
To
t
Ÿ
Flas
To
t
C
onn
ŸE
x
d
ista
p
late
Ÿ
Start
S
ound
Ÿ
Fil
fila
m
ŸP
o
po
wer sa
Ÿ
Li
bar
Ÿ
Fact
ŸU
pd
Ÿ
Back
W
iFi
ŸT
u
the
co
m
Ÿ
Back
4
p
[Setting] t
o
La
nguage:To
set t
W
iFi:Toturn
on/
Wla
nhotspo
t:
ts
po
t.
o
lar CloudC
onn
t
urnon/off t
h
Flas
hForge
Cl
t
urnon/off t
h
onn
ecti
on.
x
truderCalib
rati
ista
nceb
etwee
late
.
Start
upSou
nd
ound
.
Fil
ament Ch
ec
m
ent check.
o
werSavi
ng
wer sa
ving
m
Li
ghtBarC
on
control.
Fact
ory Reset
pd
ate:To
upd
Back
iFi
:
u
rnonWiFi
WiFiho
ts
m
puter.
Back
4
0
o
enter th
e setti
set t
hedispl
a
on/
off the
W
t:
Toturn
on
onn
ection:
h
e Polar Clo
ud
Cl
oud Conn
ecti
h
eFlashFor
ge
rati
on:To
a
etwee
ntheextru
d
nd
:Toturno
n
ec
k: To t
u
ng
Mode:To
m
od
e.
on
trol:Totur
n
Return to
fact
upd
ate the fir
m
:Turnont
h
ts
potand
set
0
0-699-1063
e setti
ng in
terface
a
y language
W
iFi.
on
/offthe
Wla
ud
Connecti
on.
ecti
on:
ge
Cloud
a
djustthei
n
d
erandthe
b
n
/offthe
Start
u
rn on/off
turnon/of
f
n
on/offthe
fact
ory
settin
m
wareversio
n.
h
eWiFi,
releas
set
theW
iFi
terface
Wla
n
on.
n
itial
b
uild
Start
up
the
f
the
l
ight
settin
g.
n.
releas
e
iFi
on
Fi
nde
nde
r User Guide |www.flashf
o
o
rge.com
4
4
19
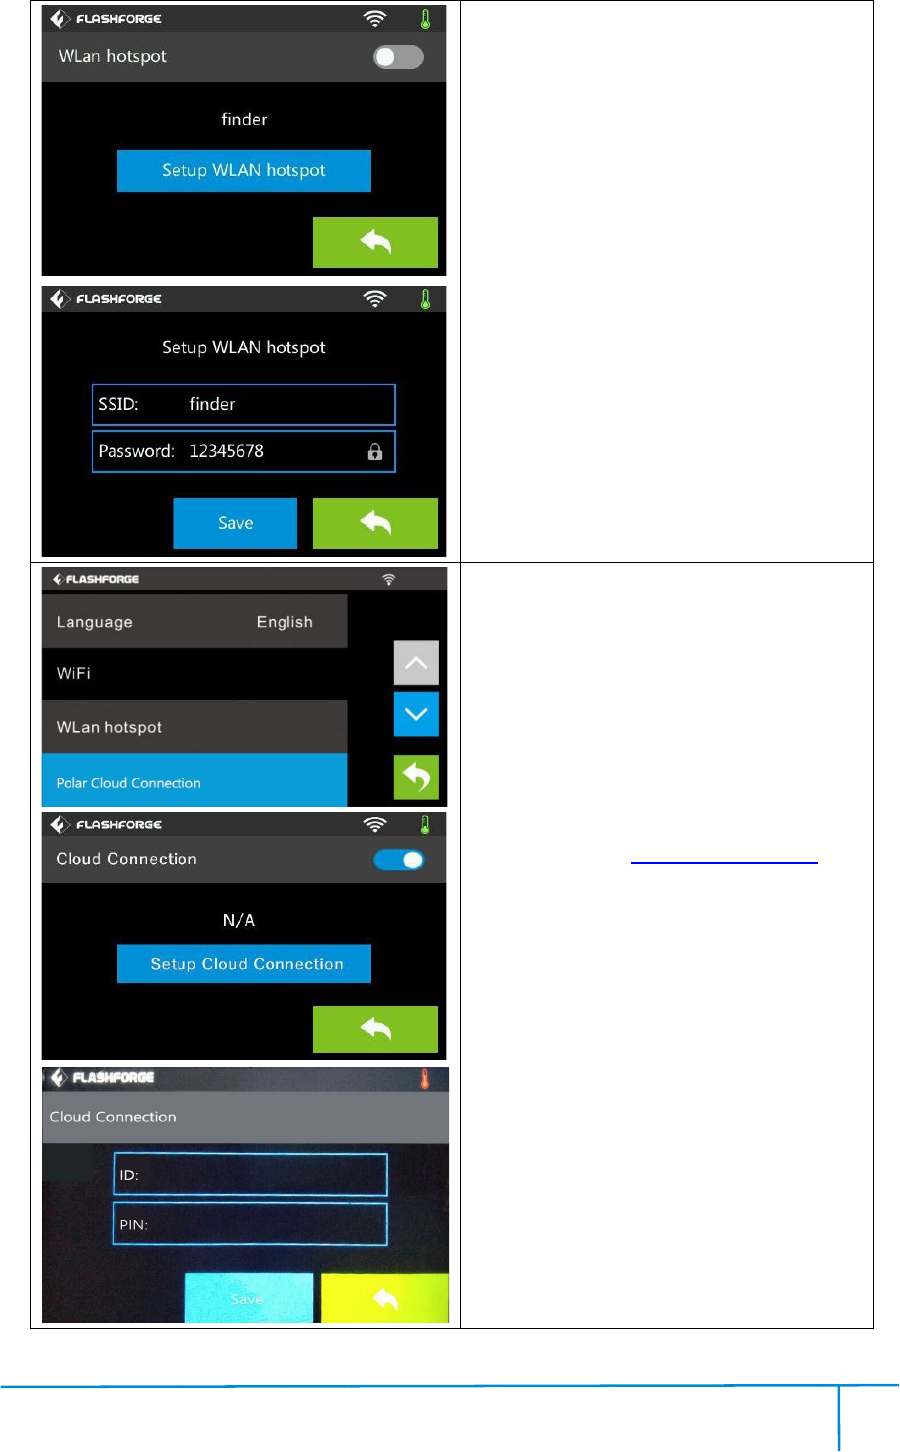
WLa
ŸO
FF
ŸSe
p
ass
Ÿ
SSI
Ÿ
Pass
Ÿ
Sa
Ÿ
Back
Pol
ar
?
C
clo
ud
?
Se
co
n
bee
n
?I
D
acc
o
?
P
?
Sa
?
Back
(N
ote
y
ou
w
ith
4
WLa
nhotspot
FF
/On: Totu
r
Se
tupWlan
h
ass
wor
d.
SSI
D:Thenam
e
Pass
word:The
Sa
ve:Tosave
t
Back
ar
Cloud Co
n
C
loudConne
c
ud
connectio
n.
Se
tupCloud
C
n
nection ID a
n
n
registered
o
D
:Theemail
o
un
t.
P
IN: ThePIN
c
Sa
ve:To save
Back
ote
:Touse
p
ou
needtoc
o
ith
WiFi)
4
0
r
non/offthe
W
h
otspot:To
se
e
ofhotspo
t.
password of
t
he settin
g.
n
nection:
c
tion:Totur
n
n.
C
onnection:
T
n
dPINwhic
h
o
n:https://p
o
a
ddressofy
ou
c
odeofyou
r C
the settin
g.
p
olarcloud
p
o
nnectthep
r
0
0-699-1063
W
lanhotspo
se
ttheSSID
hotspo
t.
n
on/offthe
po
T
o setcloud
h
have alread
y
o
lar3d.com
ou
rCloud
r C
loudacco
u
p
rintingfunc
r
intertoint
er
t.
and
po
lar
y
u
nt.
nc
tion,
er
net
Fi
nde
nde
r User Guide |www.flashf
o
o
rge.com
4
4
20
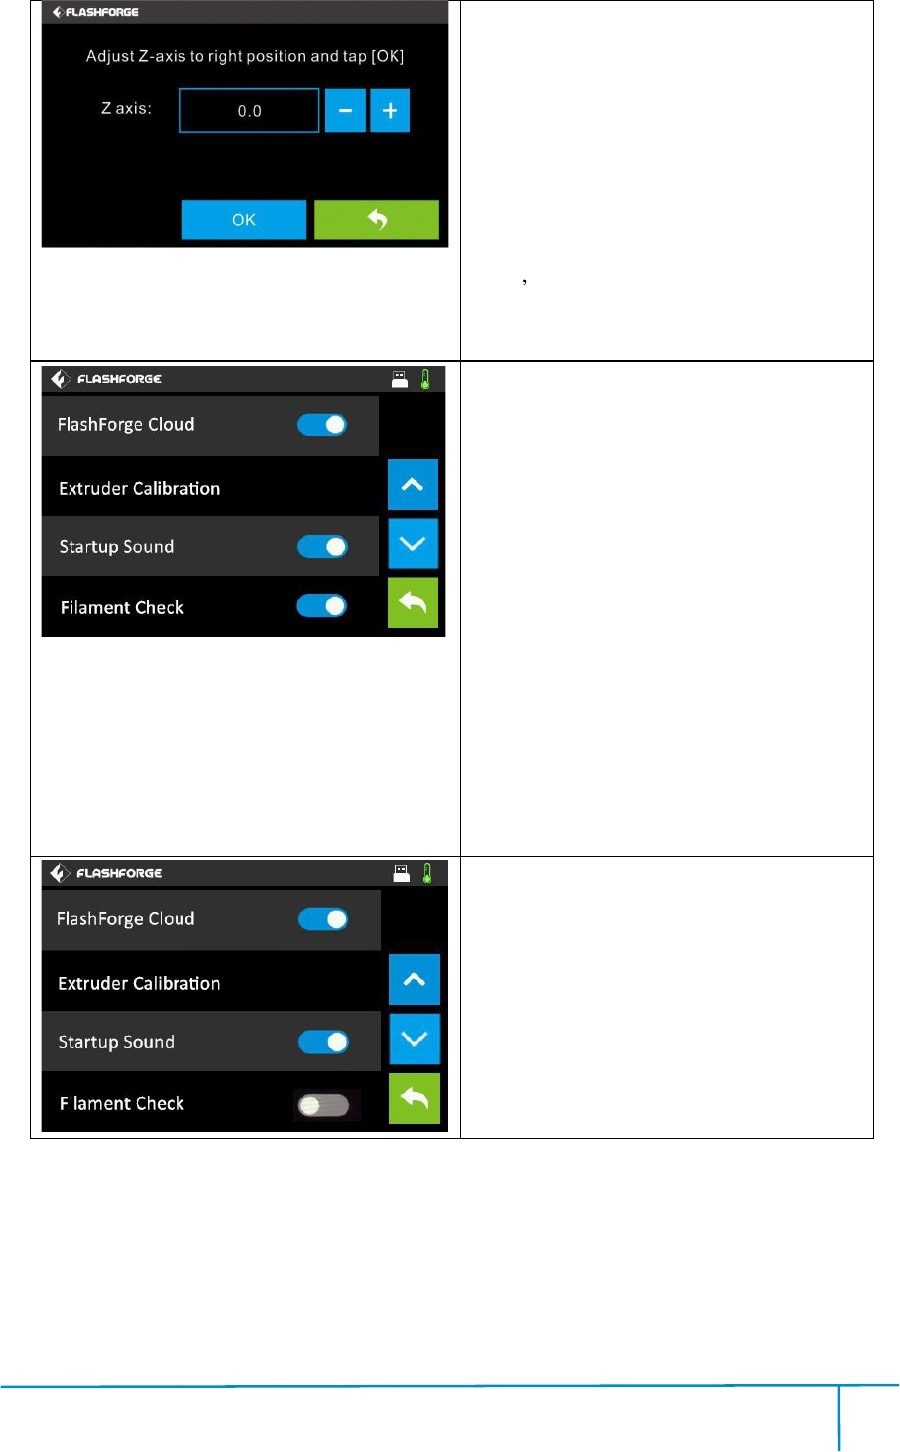
Ex
tr
Ad
j
[
OK]
Ÿ+:
Ÿ-:
T
Ÿ
OK:
me
nu
Ÿ
Back
Th
e
pa
p
No
te:
co
nt
Tu
r
Ÿ
Ta
C
onn
Tu
r
Ÿ
Ta
the
Fil
a
Th
e fil
No
te:
be
d
ri
gh
nor
m
Fil
a
Th
e fil
No
te:
ca
nnot
wo
r
th
e fil
4
tr
uder Calib
rati
j
ust Z-axis
t
OK]
Thebuildp
late ele
T
hebuildp
late
OK:
Tosavet
h
nu
s.
Back
e
properd
ista
p
er s thickn
ess.
te:
Please
nt
acting
with
r
non/off [Fl
a
Ta
ptoturno
n/o
onn
ecti
on.
r
non/off [St
a
Ta
ptoturno
n/o
print
er.
a
ment Chec
k
e fil
amentd
etecti
te:
Filament
e
d
etected.O
n
gh
tplace,t
h
m
all
y.
a
ment Chec
k
e fil
amentd
etecti
te:
Filamen
t
nnot
bede
tected
r
knormally
e fil
amentc
artri
4
0
rati
on
t
otheright
po
late ele
vate
s.
late
descend
s.
h
esettinga
nd
ista
ncemay
b
ess.
do this
o
with
ourafter-
s
a
shForg
e Cl
n/o
ff theFlash
a
rtupSou
nd
n/o
ffthe soun
d
k
On:
etecti
on
is
tu
r
e
xhaustedo
r
n
cethefila
m
h
eprintjob
k
Off:
etecti
on
is
tu
r
t
exhaust
ed
tected
.Thep
ri
whenfilam
e
artri
dg
e.
0
0-699-1063
po
sitionan
d
s.
s.
nd
backto
setti
b
eoneordi
n
o
peration
a
s
ale enginee
e Cl
oud]:
h
ForgeClou
d
nd
]:
d
when restar
t
r
nedon.
r
interrupted
m
entisnoti
n
b
cannot
w
r
nedoff.
ed
orinterr
up
ri
ntjobcan
e
ntisnotset
d
tap
setti
ng
n
ary
a
fter
r.
d
t
will
n
the
w
ork
up
ted
still
into
Fi
nde
nde
r User Guide |www.flashf
o
o
rge.com
4
4
21
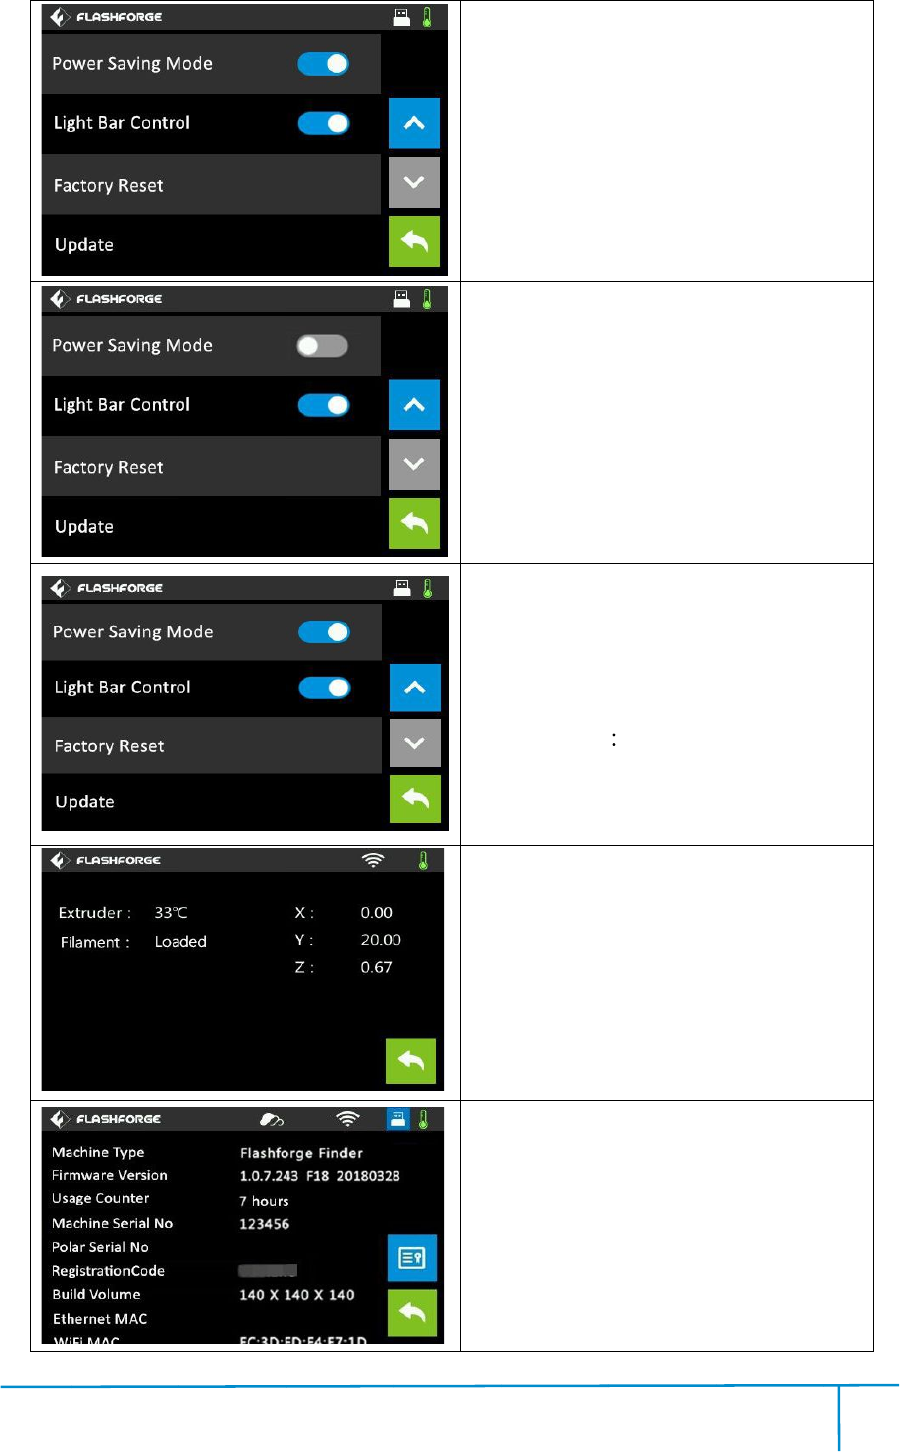
Po
wer Sa
Th
e
Ift
h
the
do
wn
the
Po
wer Sa
Th
e
Au
t
ŸT
u
Ta
p
the
Ÿ
Fact
ŸU
pd
Ÿ
Back
Stat
It
ex
tr
A
bou
It
d
de
v
4
wer Sa
ving
M
e
powersav
i
h
ereisno
op
printer
wn
.(Power
sa
processof
p
wer Sa
ving
M
e
powersavi
ng
t
omatically
s
u
rnon/off [
Li
p
toturno
n/o
print
er.
Fact
ory Reset
pd
ate:To
upd
Back
Stat
us:
displays th
tr
uder temp
erat
bou
t:(Firstpa
g
d
isplaysthe
v
ice.
4
0
M
ode On
i
ngmode
stat
op
erationwit
h
will auto
m
sa
vingmode
p
rinting)
M
ode Off
ngmodest
at
s
hutdown
will
Li
ght Bar C
o
n/o
ffthe light
Return to
fact
upd
ate the fir
m
ereal-time
erat
ure and
fil
g
e)
basicinfor
m
0
0-699-1063
stat
usisturne
d
h
inhalfan
h
m
atically
willnotwo
r
at
usisturne
d
will
not wor
k.
o
ntrol]:
bar whenr
e
fact
ory setti
ng
m
wareversio
n.
status of
fil
ament.
m
ationabou
t
d
on.
h
our,
shut
r
kin
d
off.
e
start
ng
.
n.
the
t
the

Fi
nde
nde
r User Guide |www.flashf
o
o
rge.com
4
4
22
A
bou
It
d
de
v
Lice
It
d
lice
4
bou
t:(Second
d
isplaysthe
v
ice.
Lice
nse
d
isplaysthe
lice
n
se.
4
0
page)
basicinfor
m
basicinfor
m
0
0-699-1063
m
ationabou
t
m
ationabou
t
t
the
t
the
Fi
nde
2.2
Q
After
nde
r User Guide
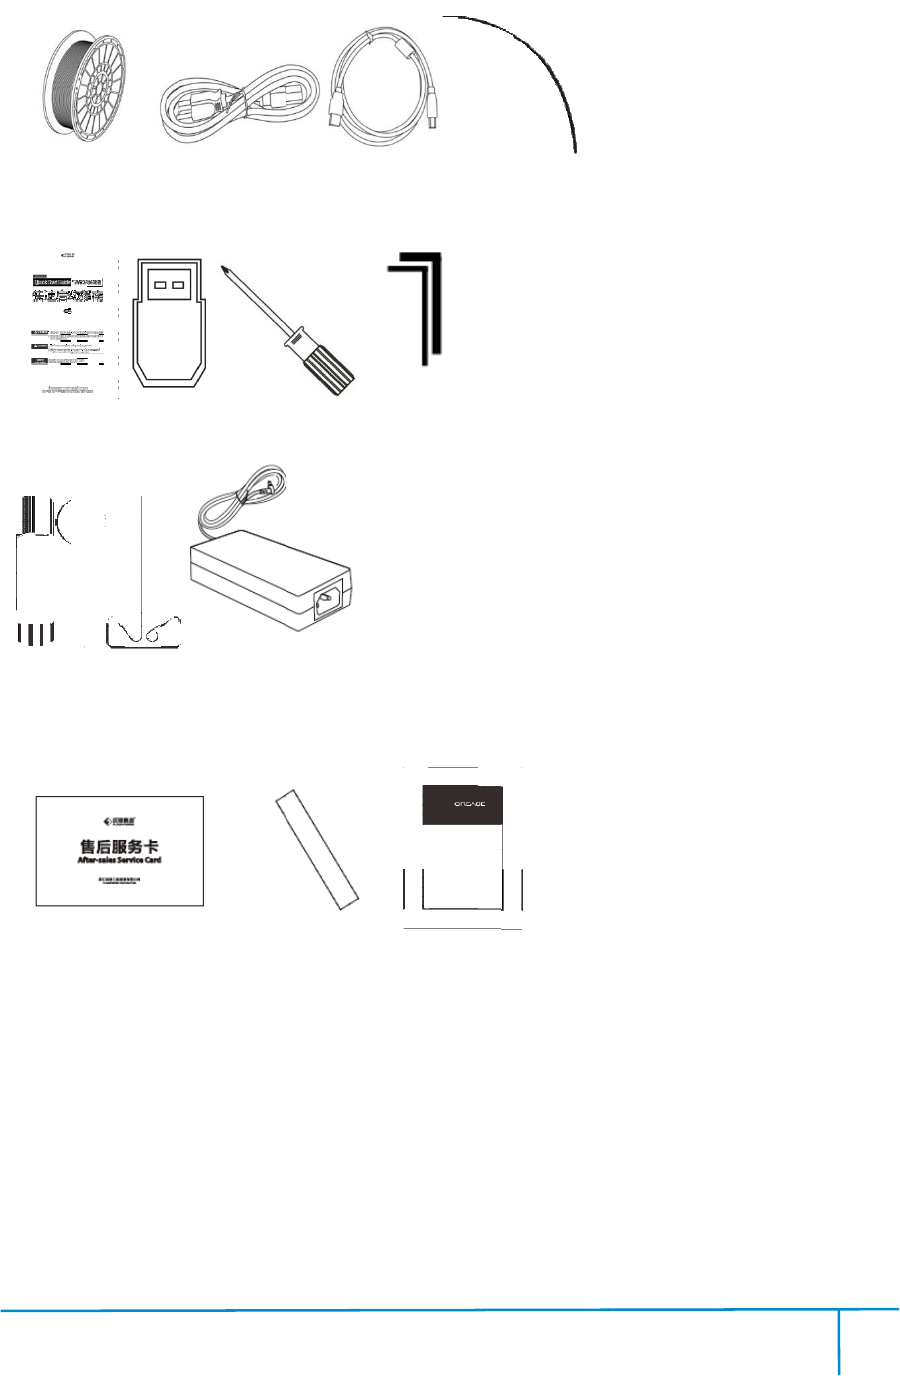
Accesso
r
Filament
*1
Q
uickSt
art G
GlueStick
After
-saleCa
r
|www.flashf
o
r
ies
*1
PowerCab
art G
uide
USB stic
Sta
m
rdPTFET
ub
o
rge.com
4
le
USB Ca
USB stic
k
Screw
m
pingWrenc
h
ub
eGrease
4
23
USB Ca
ble
Screw
driver
Alle
h
Uncl
og
4
Filam
en
Alle
nWrench(
M
og
ging Pin
T
4
0
en
t GuideTu
b
M
2.0/2.5)
T
ool P
o
0
0-699-1063
b
e
o
werAdap
ter
ter
Finder User Guide|www.flashforge.com 400-699-1063
24
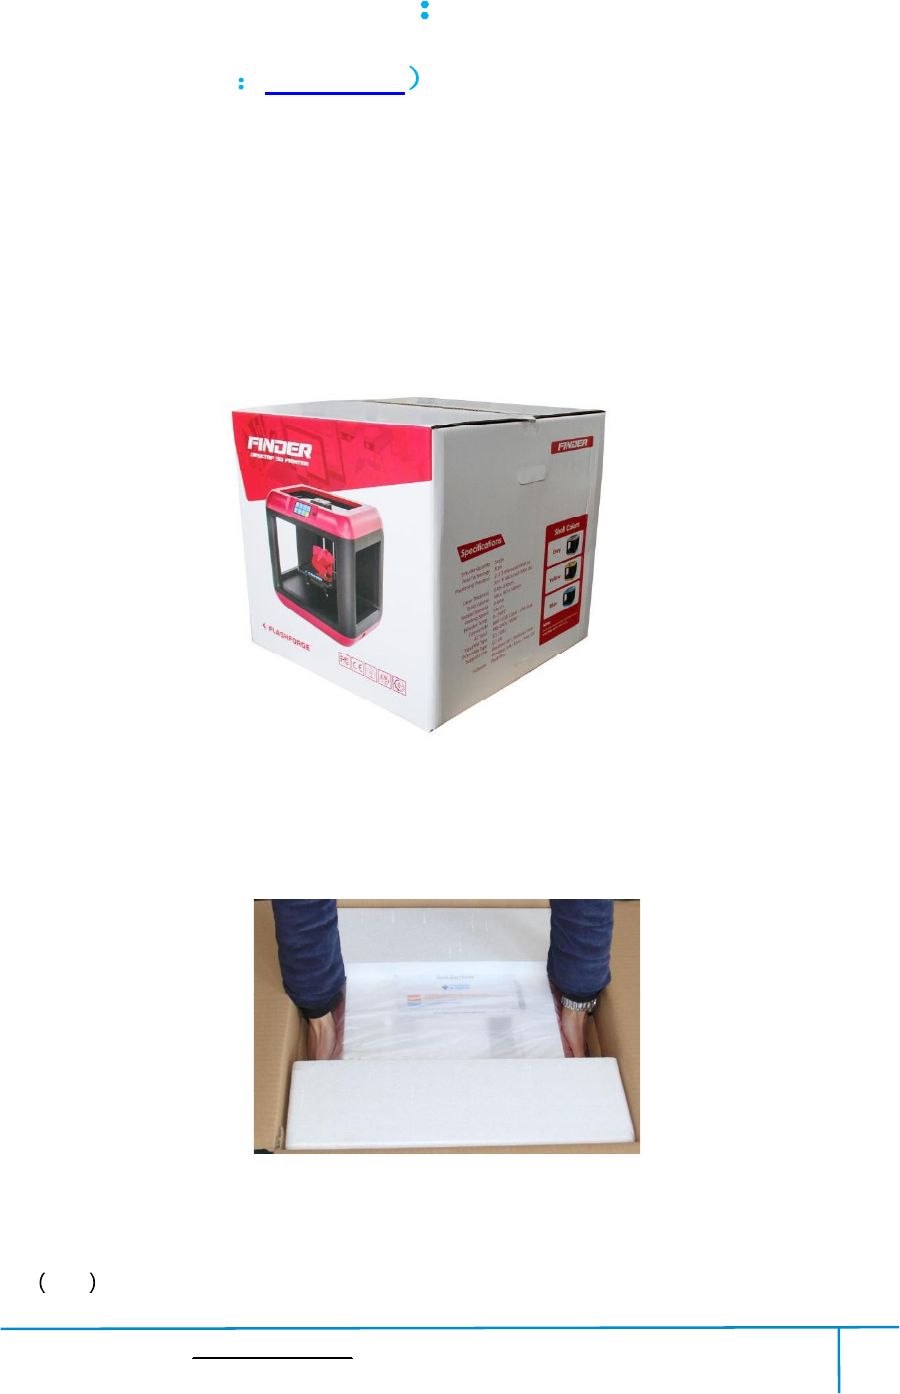
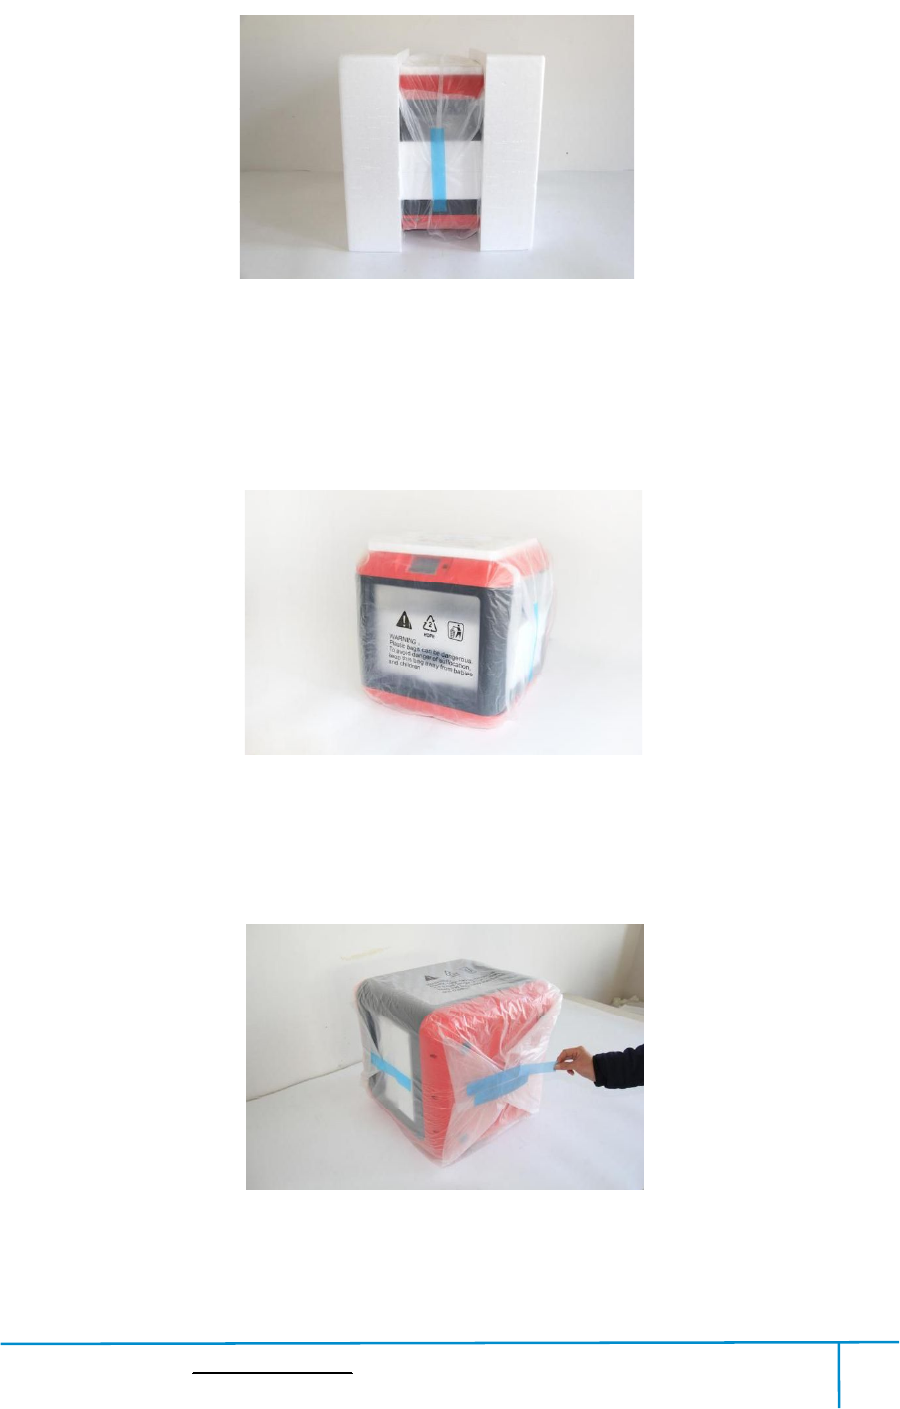
Chapter 3 Unpacking
(referencevideo Unpacking
ThischapterwillpresentyouthewholeunpackingprocedureofFinder3D
printer.(Note: Make sure you readthewhole unpacking guide)
3-1
(3-1)Placethe packaging box on a cleanwork surface.
3-2 Openthe box, graspthetwo handles andthenlift your Finder outofthe box.
3-2
Finder User Guide|www.flashforge.com 400-699-1063
26
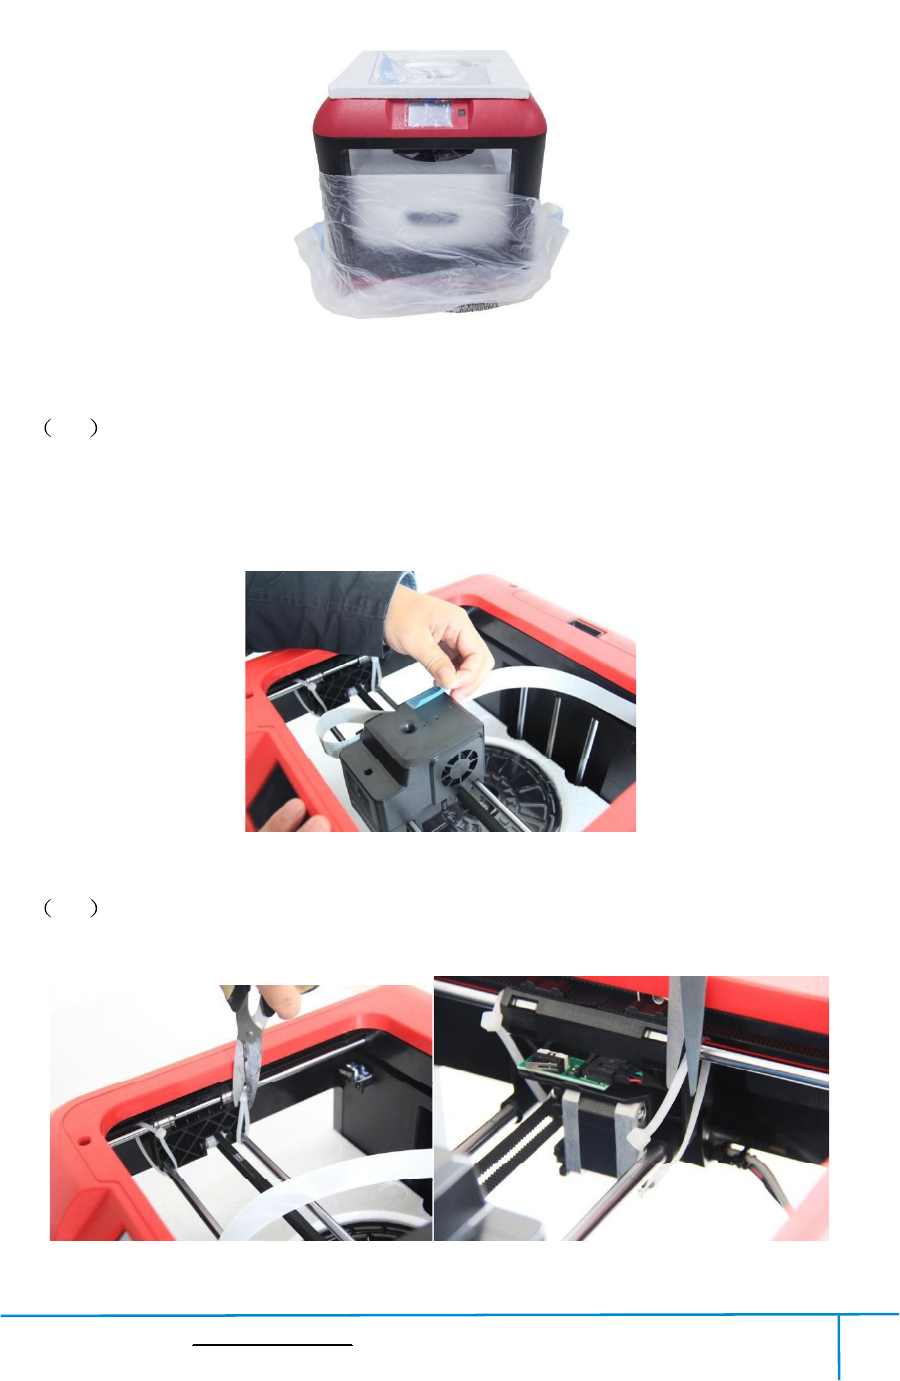
(3-5)Remove allprotectivewrapping, and thenyouwill seeyour Finder.
3-6 Onthetopfoamsheet, you can see oneQuick StartGuide and atool bag(USB
stick*1,levelingknob*1,Allenwrenches*2,stampingwrench*1,uncloggingpin
tool*1, grease*1, and screwdriver*1).
3-7 Removethetape on the extruderforfixingtheflatcable
.
3-6
3-7
3-8
Finder User Guide|www.flashforge.com 400-699-1063
27
(3-8)Cutofffourribbonsthatusedforfixingtheguiderod.Thenslidetheextruderto
make surethe extruderisin good condition.
3-9
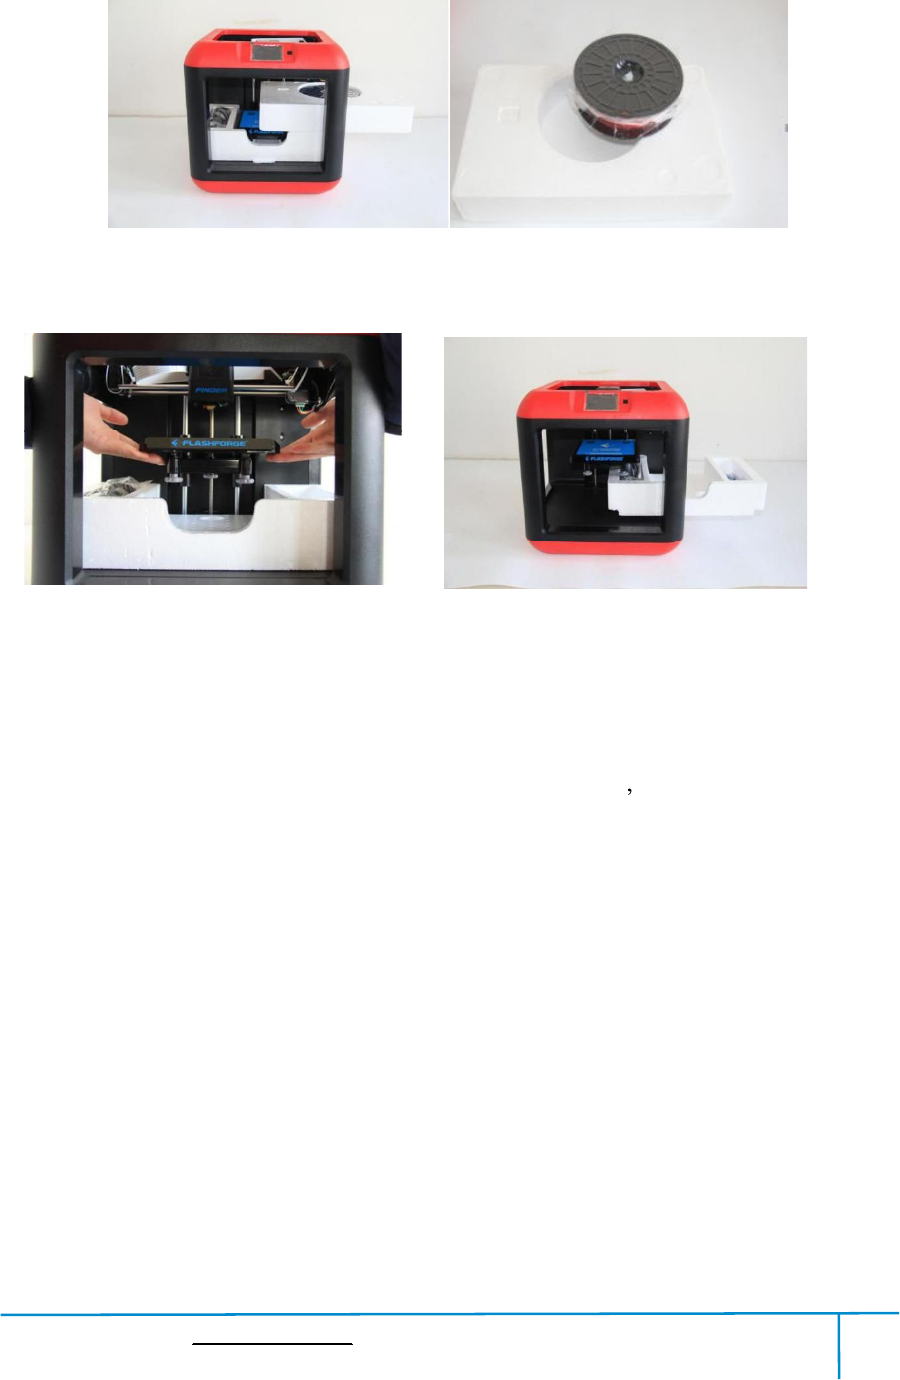
(3-9)Takethe filament(Assign random color)out ofthe Finder.
3-10
(3-10)Liftthebuildplateupandtakeoutthegluestick,powercable,poweradapter
andUSB cable.
Congratulations!YouhaveunpackedyourFinder.Next,let smoveontohardware
assembly ofFinder.
Finder User Guide|www.flashforge.com 400-699-1063
28
Chapter 4:HardwareAssembly
YourFinderhasbeeninstalledbeforeleavingfactory,youcanstartuptheFinderfor
printing aftermountingthefilament spool and completingleveling.
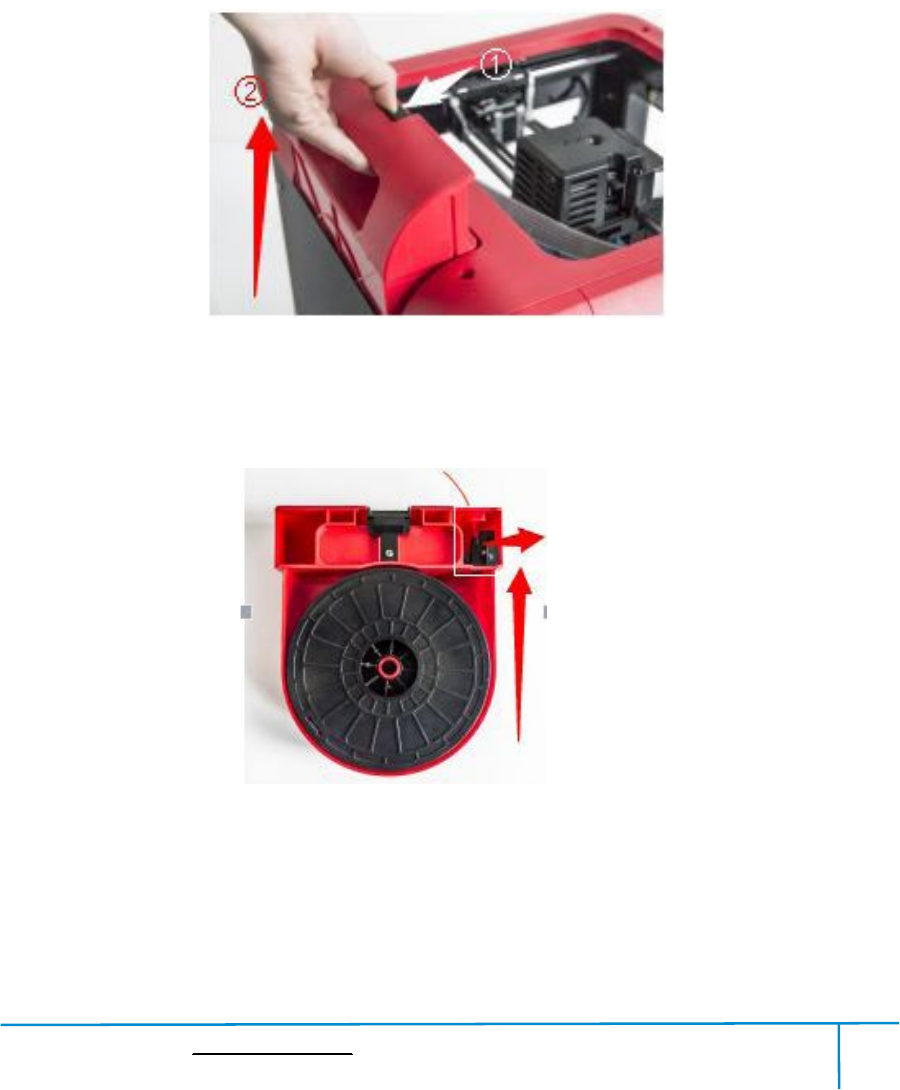
4.1FilamentInstallation
4-1
(4-1)Thefilament cartridgeisattherear of Finder. Liftthe cartridge outofthe Finder.
4-2
(4-2)Takeoutthefilamentandthreaditthroughthefilamentdetectingequipment.
(Note:Thefilament shouldfeedsfromthe bottom ofthespooltowardsthetop)
TheblackpartisFilament
Detecting
E
ip
Fi
nde
Aft
e
4.2
(4-
3)
t
he po
(4-4
4.3
fila
m
cart
ri
4-
3
nde
r User Guide
e
rinstalling
Printer
Start
3)
Insertthe
po
he po
wercab
le
)
Pressthe
t
Loadi
ng
Forstable
m
ent guide
t
(4-5)Tak
e
ri
dgethr
ough
3
|www.flashf
o
thefilam
en
Start
-up
po
wersu
pp
le
into an el
ec
t
ouch scr
een
ng
Fil
ament
filamentl
oad
t
ube prope
rl
e
outthe
fi
ough
thetube.
o
rge.com
4
en
t, putthe
ca
pp
lyintothe
ec
trical outl
e
een
buttont
o s
ament
oad
ingand
rl
y.
fi
lamentgu
i
4
29
ca
rtridgeba
ck
powerinp
u
e
t.Thentu
r
o s
tartthed
ev
properdev
i
i
detube,t
h
4-5
4
-
4
4
ck
tothepr
i
u
tonthe
ba
r
n on the p
o
ev
ice.
i
ceprotecti
h
readthe
f
il
4
0
i
nter.
ba
ckofthe
F
o
wer swit
ch.
on,you
need
f
il
amentfro
0
0-699-1063
F
inderand
p
ch.
need
toinstal
l
o
mthefila
m
p
lug
l
the
m
ent
Finder User Guide|www.flashforge.com 400-699-1063
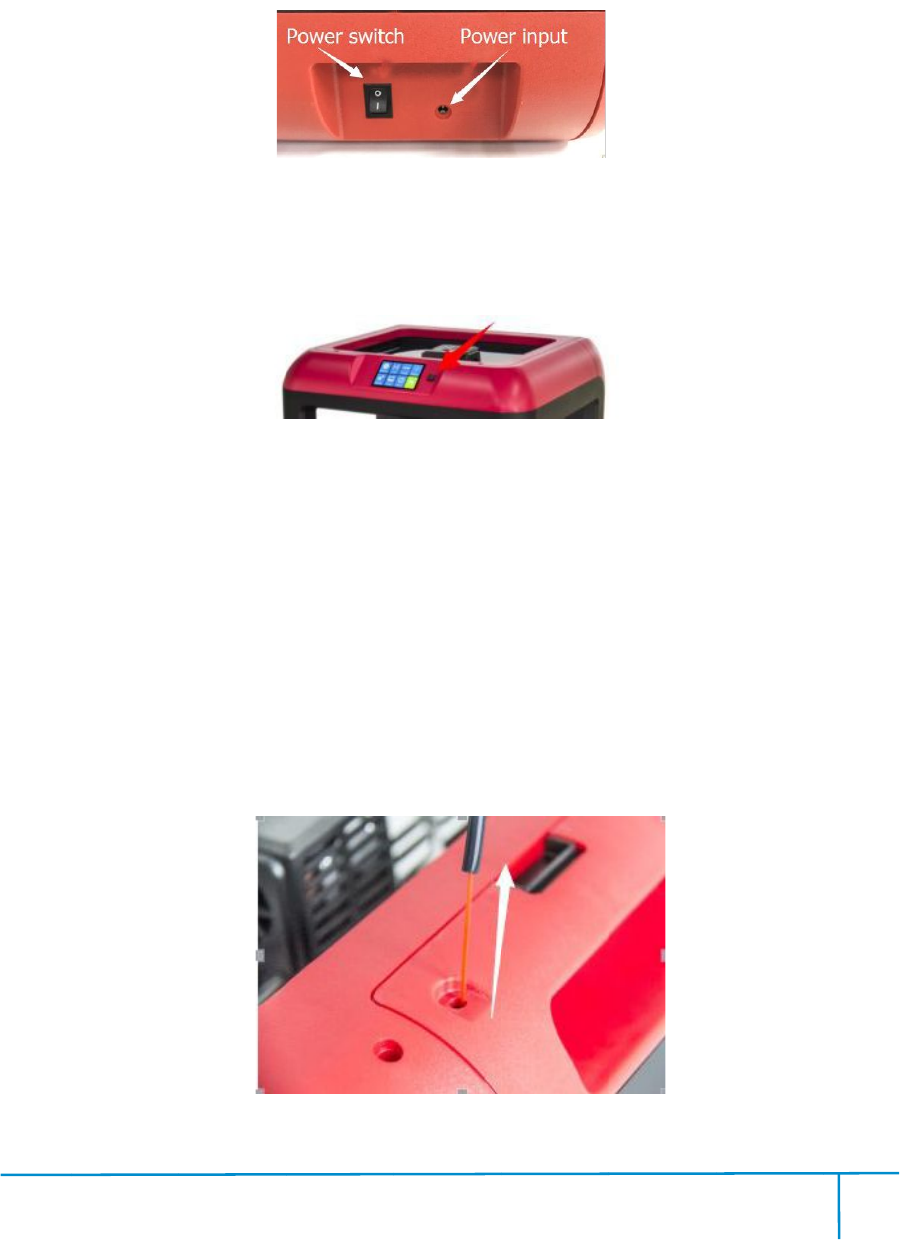
30
(4-6)Insertthefilamentfromthefilament guidetubeintothefilamentintake.
Next,wewillloadtheFlashForgefilament.(Note:Pleaselowerthebuildplateto
increasethedistancebetweenthenozzleandbuildplateto50mmatleastfor
avoiding nozzlejam.)
(4-7)Tap[Tools].
4-6
4-8
(4-8)Tap [Filament]--[Load]
4
-
7
4-6
Finder User Guide|www.flashforge.com 400-699-1063
31
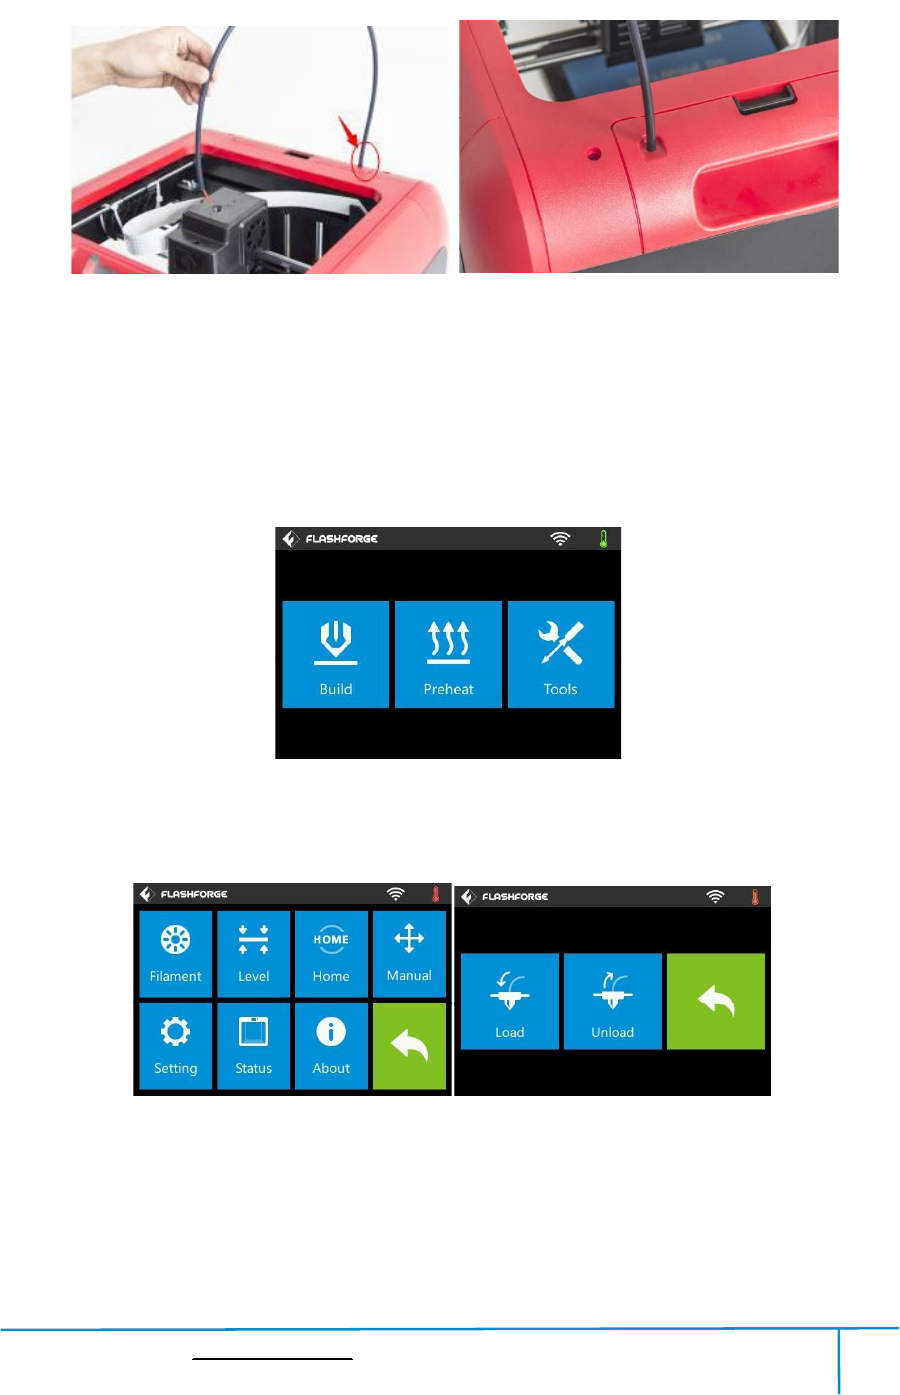
4-9
4-9 Afterthe extruder stemperaturereaches220 ,the printerwill sound a beep to
prompt youtoloadthefilamentintothe extruder.
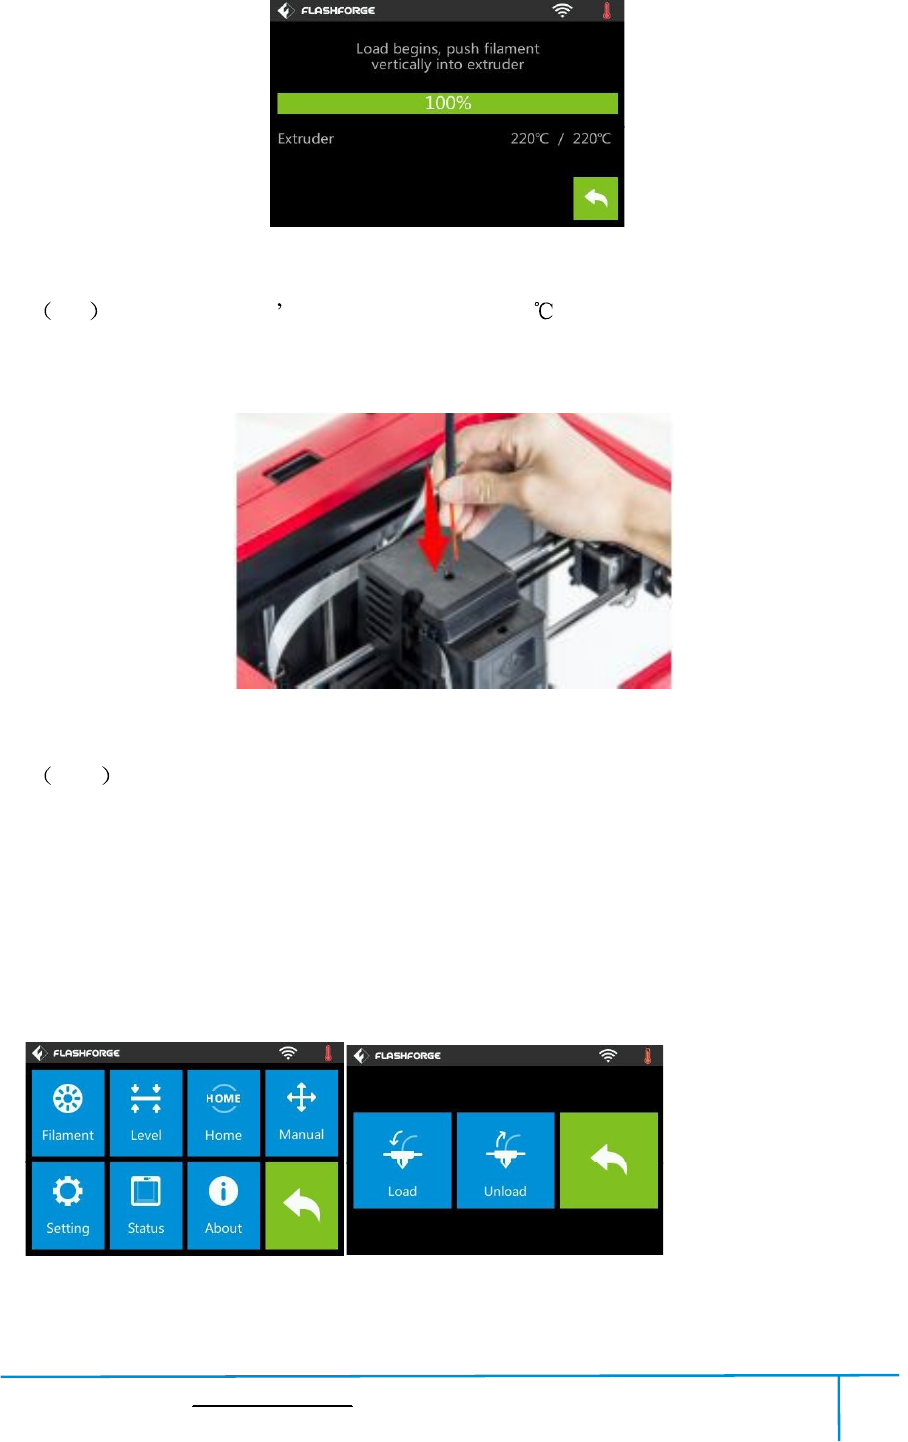
4-10
4-10 Pressthespringpresser,andtheninsertthefilamentintotheextruderatan
uprightangle.Thenthefilamentwillbedrawnthroughtheextruder.Donottap
[Cancel] untilthefilamentloadtheextrudersteadily.
4.4 UnloadingFilament
4-11
Finder User Guide|www.flashforge.com 400-699-1063
32
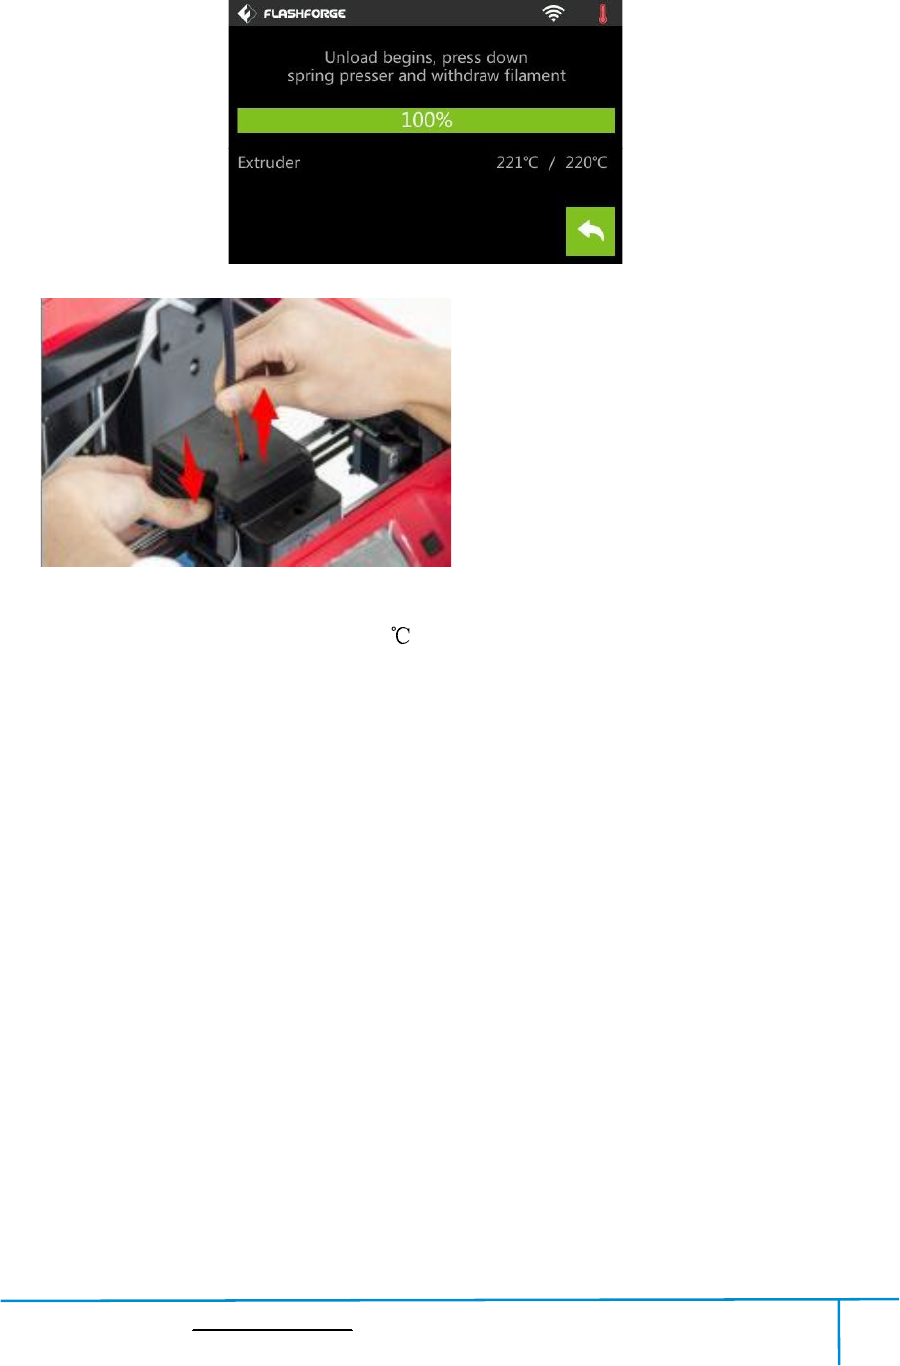
(4-11)Tap [Tools]-[Filament]-[Unload] and the extruder starts heatingup.
4-12
(4-12)Aftertheextruderreaches220 ,theprinterwillsoundabeepto promptyouto
unloadthefilamentfromtheextruder.Pressthespringpresser,pressdownthe
filamentforaboutthreeseconds andgently pullthefilament out.
Note:Donotpulloutthefilamentwithforceasitwilldamagethegears.Ifthe
meltedfilament has cooled downinthe extruder, pleaserepeatthesteps above.
Finder User Guide|www.flashforge.com 400-699-1063
33
Chapter 5:BuildPlate Leveling
Findercreativelyadoptsthree-pointintelligentlevelingsystem,whichwillgiveclear
andcomprehensivefeedbacktousers.Therearethreespring-loadedknobsunderthe
buildplatform.Thedistancebetweentheplateandnozzleincreaseswhiletightening
the knobs. Onthe contrary,the distancereduces.
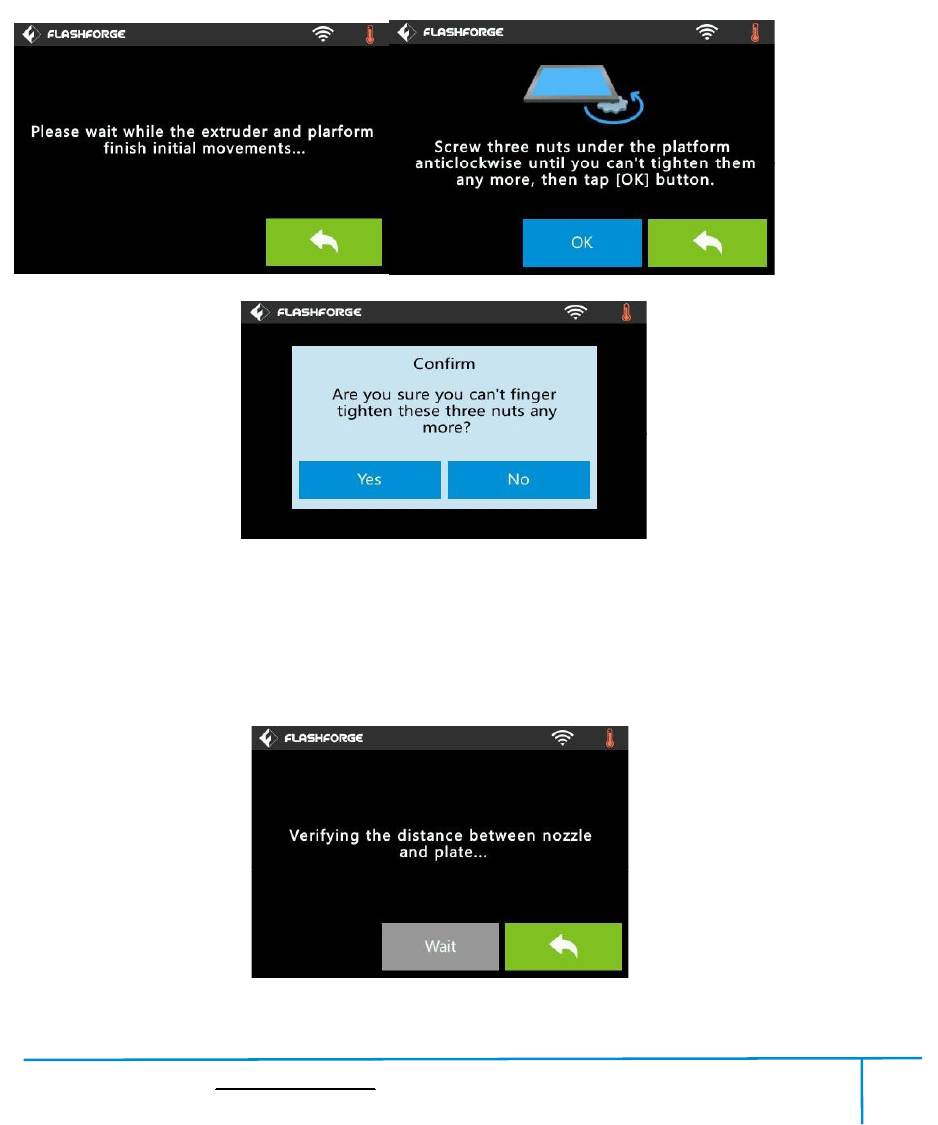
(5-1)Tap [Tools]-[Level] onyour Findertouchscreen.Pleasewaitwhiletheextruder
andplatformfinishinitialmovements.Afterthat,operateaccordingtotheguideonthe
touch screen.
5-2
5-1
Finder User Guide|www.flashforge.com 400-699-1063
34
(5-2)Aftertapping [Yes],theextruderstartstomovetowardsthefirstpointand
theplatemoves up and downto verifythe distance betweennozzle and plate.
5-3
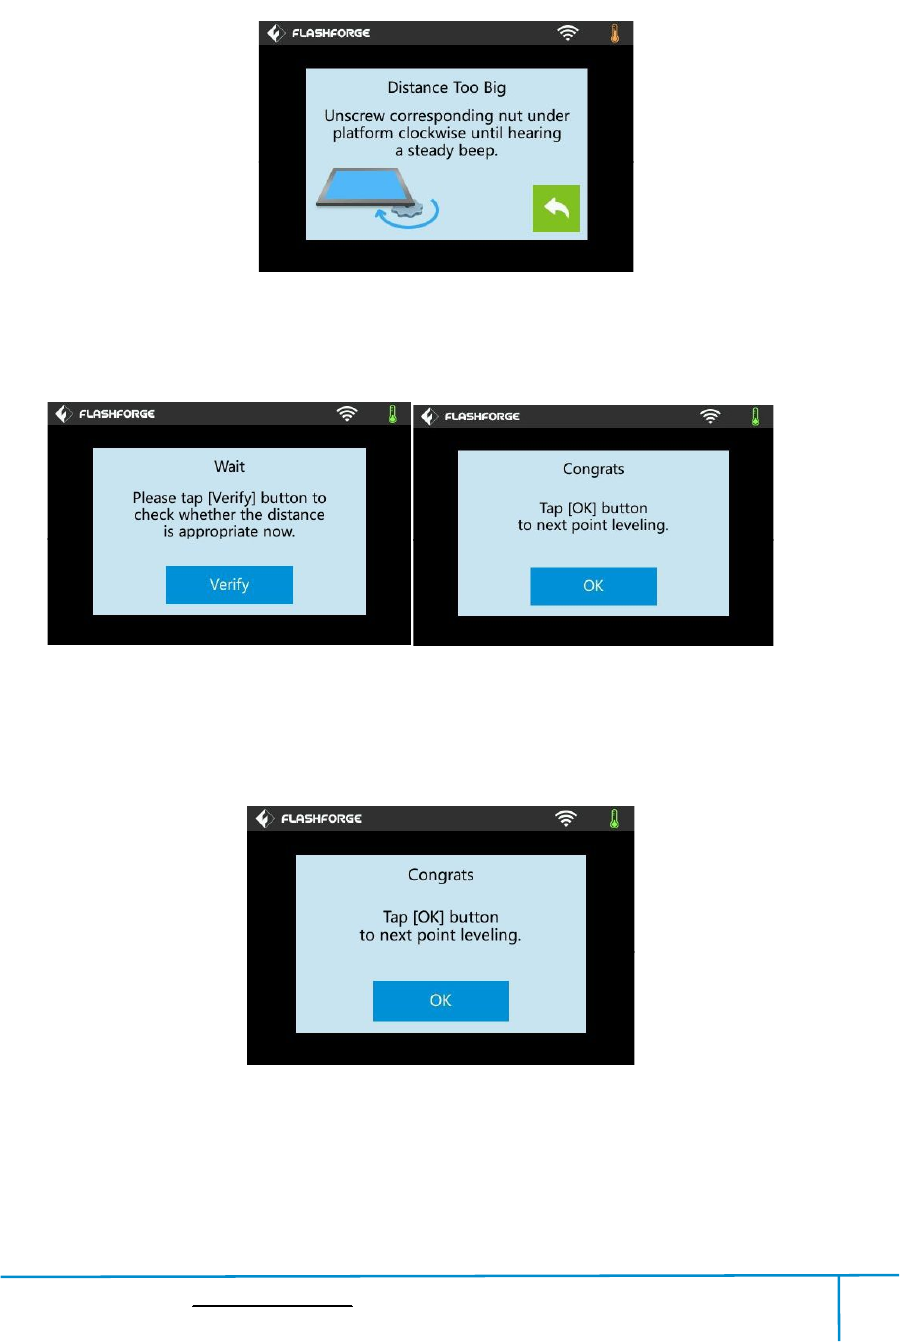
(5-3)Whenitshowsthatthedistanceistoobig,pleaseunscrewcorrespondingnut
under platform clockwise until hearing a steadybeep and the [Verify] button appears.
5-4
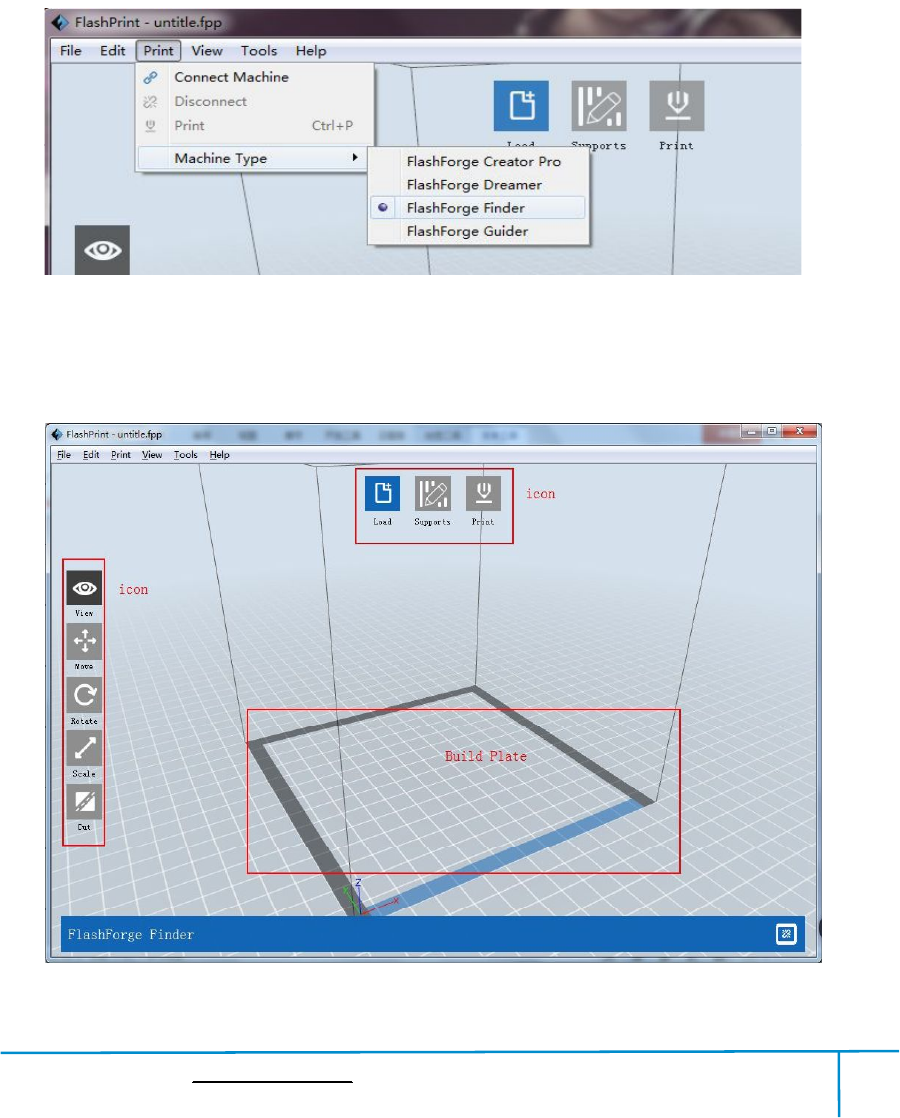
(5-4)Ifthedistanceisappropriate,tap [OK] tosecondpointleveling.Ifstillnot,
pleasefollowthe promptsto adjust againtill yousee [OK] button.
5-5
(5-5)Repeatsteps2through4abovetocompletesecondandthirdpointslevelingand
thenTap [Finish] to exit.

Finder User Guide|www.flashforge.com 400-699-1063
35
Chapter 6:AboutSoftware
ThischaptertalksaboutthebasicfunctionofFlashPrint.Formoreinformationabout
advancedfunction, youcan browseourwebsite www.FlashForge.com.
6.1SoftwareInstallation
6.1.1SoftwareAcquisition
Method 1: To gettheinstallation packagefromtheUSB stickinthetoolkit.
Method 2: Openthelink belowtodownloadtheinstallationpackage:
http://www.flashforge.com
Steps:
Support---Downloads---FlashPrint---choosethe software version---download
6.1.2SoftwareInstallationandStart-up
1.Decompressthezippedfileorstarttheinstallationprogram,andtheninstallthe
software accordingtothe direction.
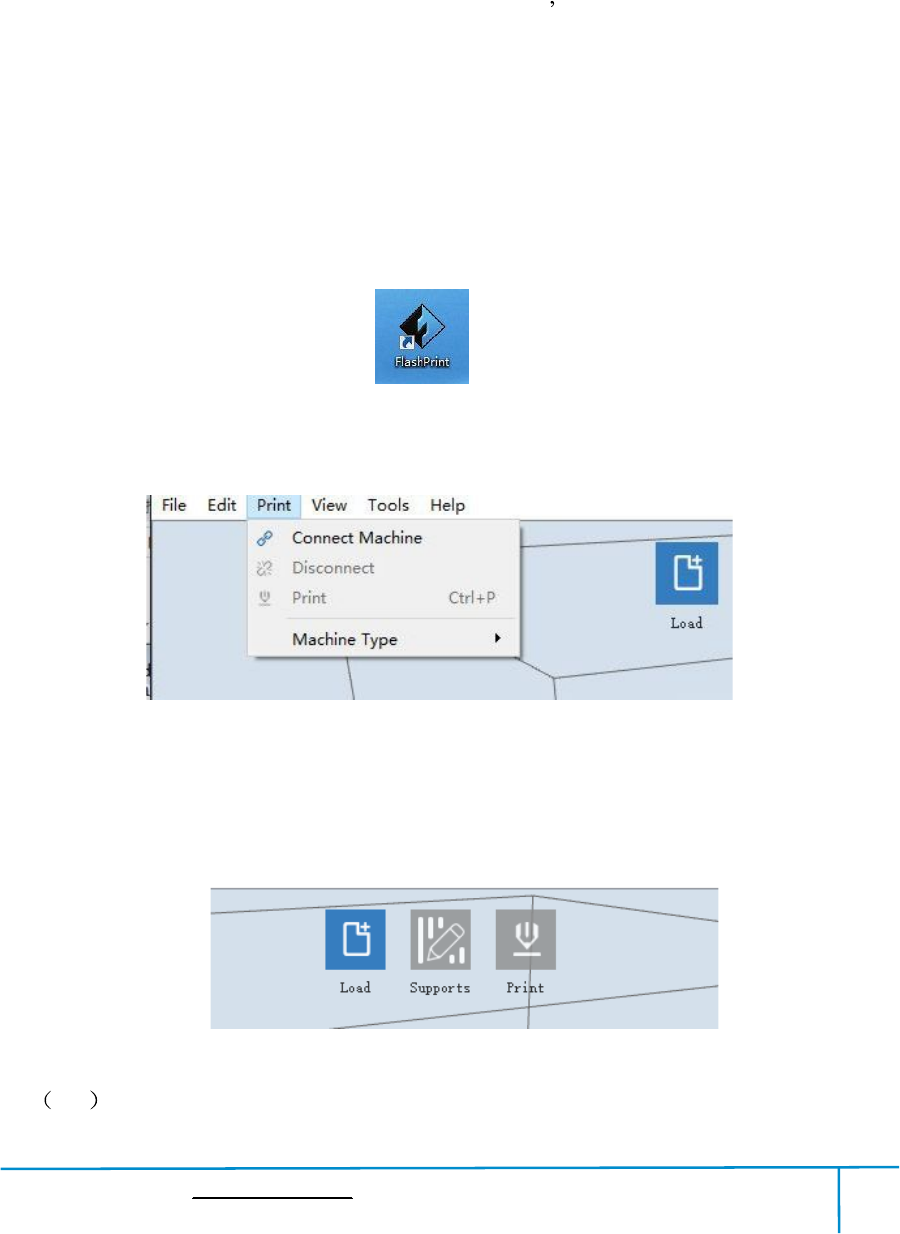
2.Startthesoftwarewiththestartmenushortcutorbyclickingthesoftwareicon.(See
6-1)
6-1
Finder User Guide|www.flashforge.com 400-699-1063
36
6.2ExploringFlashPrint
6.2.1 MachineTypeSelection
Note! Afterstarting FlashPrint, youneedto selectthetargetmachinetypefirst.
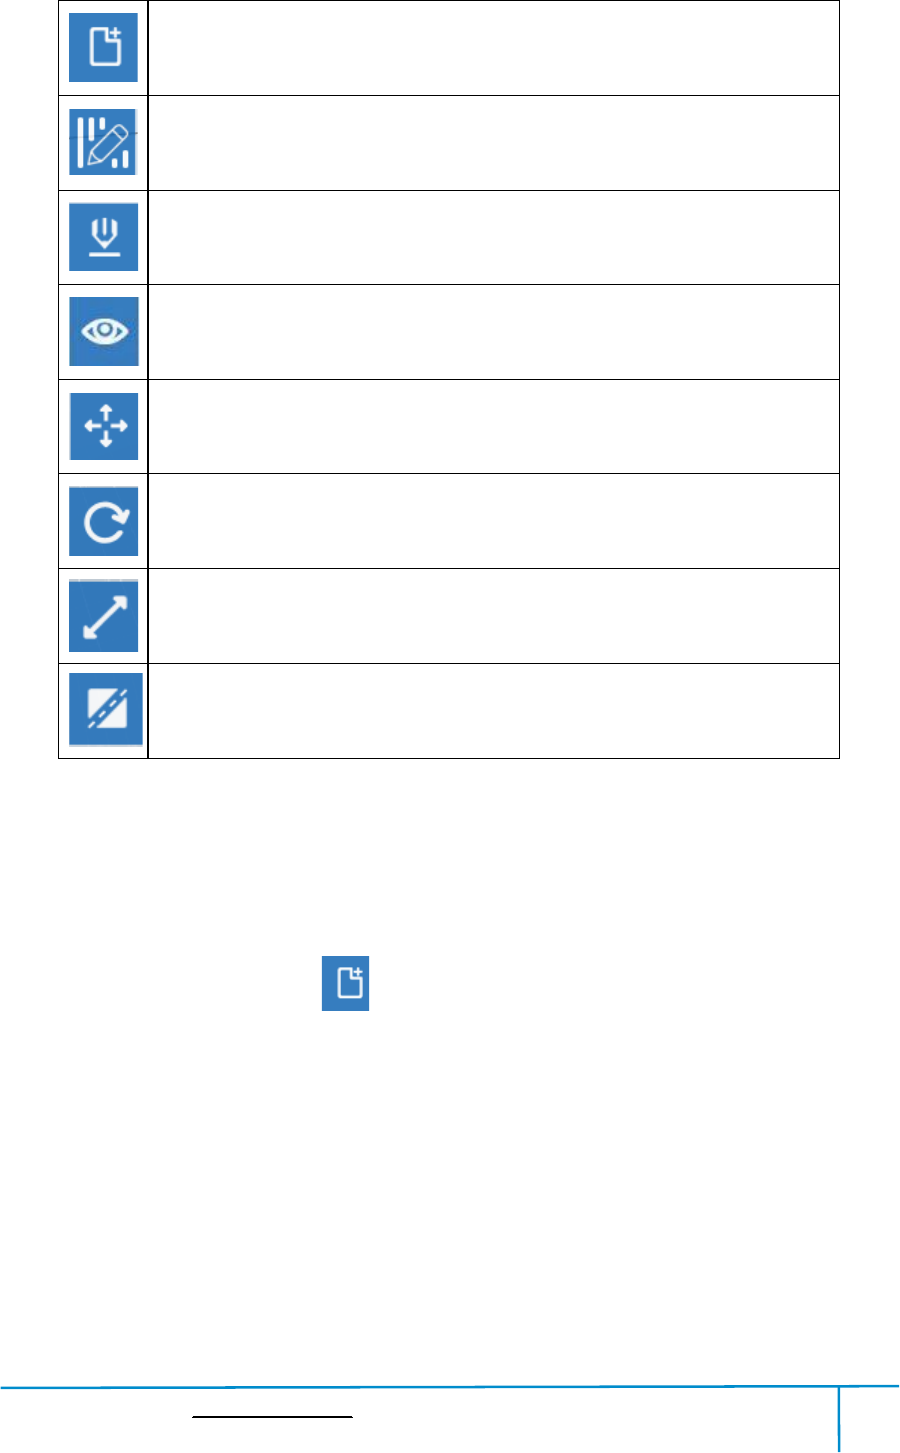
WhenyoustartFlashPrint,adialogboxwillpopup.JustselectFlashForgeFinderin
themachinetypelistandclick [OK].Youcanalsochangethemachinetypevia
clicking [Print]--[Machinetype].See graphic6-2:
6-2
6.2.2SoftwareIntroduction
6-3
Finder User Guide|www.flashforge.com 400-699-1063
37
Loadfiles.
Enterthe support editmode.
Printit directlywith your Finderorexportto yourUSB Stick.
View FlashPrint home screenfromone of six viewing angles.
Movemodel around onXY-plane;shift+clicktomove along Z axis.
Turn and rotate yourmodel.
Scalethe size of your object.
Cutmodelinto severalparts.
6.2.3Loading
YoucanloadamodelfileorGcodefileintoyourFlashPrintbythefollowingsix
methods:
Method 1: Clickthe [Load] onthemaininterface.Then selectthe objectfile.
Method2: Selectthefileforloadinganddragthefiletothemaininterfaceofthe
software.
Method 3: Click [File]--[Load File].Then selectthe objectfileforloading.
Method 4: Click [File]--[Examples]toloadtheexamplefiles
Method 5: Click [File]--[Recent Files]toloadthefiles openedrecently.
Method 6: Selectanddragthetargetfiletotheicon of FlashPrint.
Note:3Dmodelscanbestoredas.STL,.OBJ,or.FPPfileand supporteditingby
Finder User Guide|www.flashforge.com 400-699-1063
38
FlashPrint.
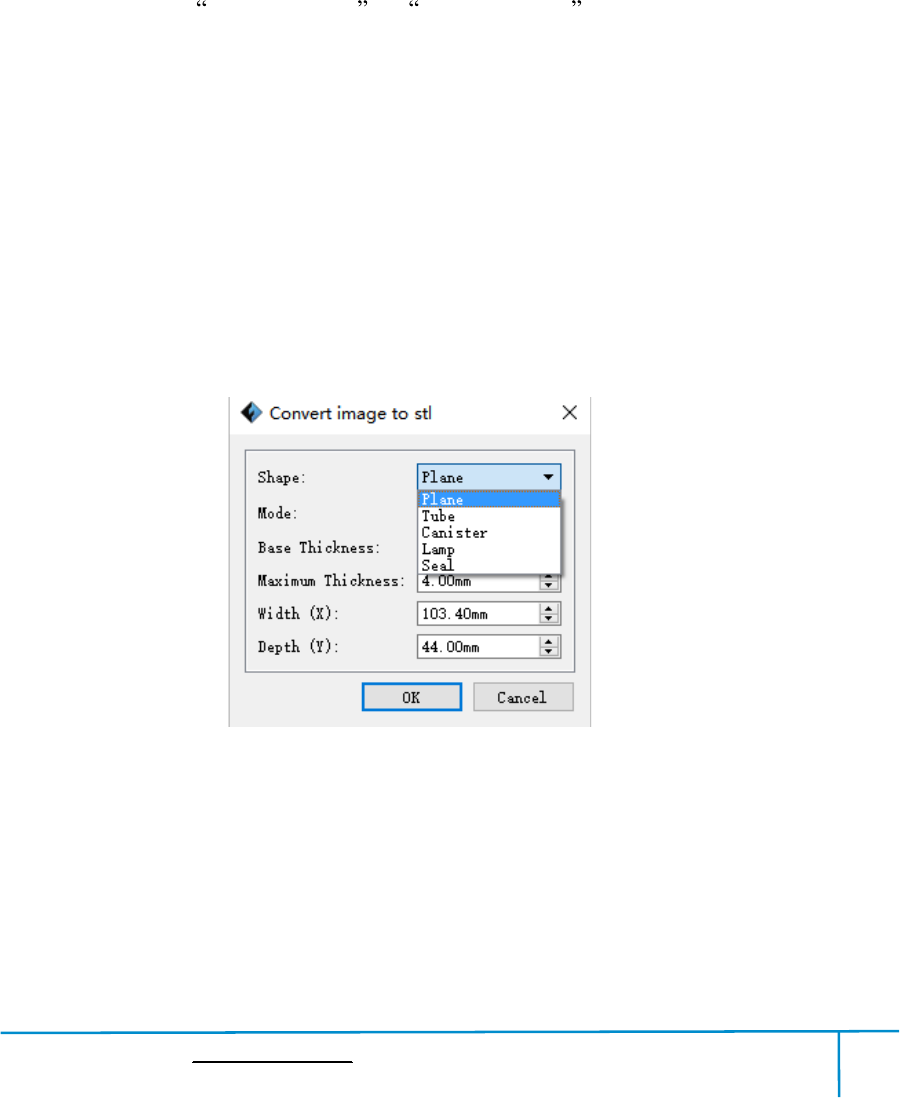
GeneratingRilievo
Loadingapng,jpg,jpeg,bmppicturefileintotheFlashPrint.Andthefollowing
dialoguebox(6-3)willpopup.Thesettingboxincludessettingsforshape,mode,
maximumthickness,basethickness,bottomthickness,width,height,topdiameterand
bottom diameter.
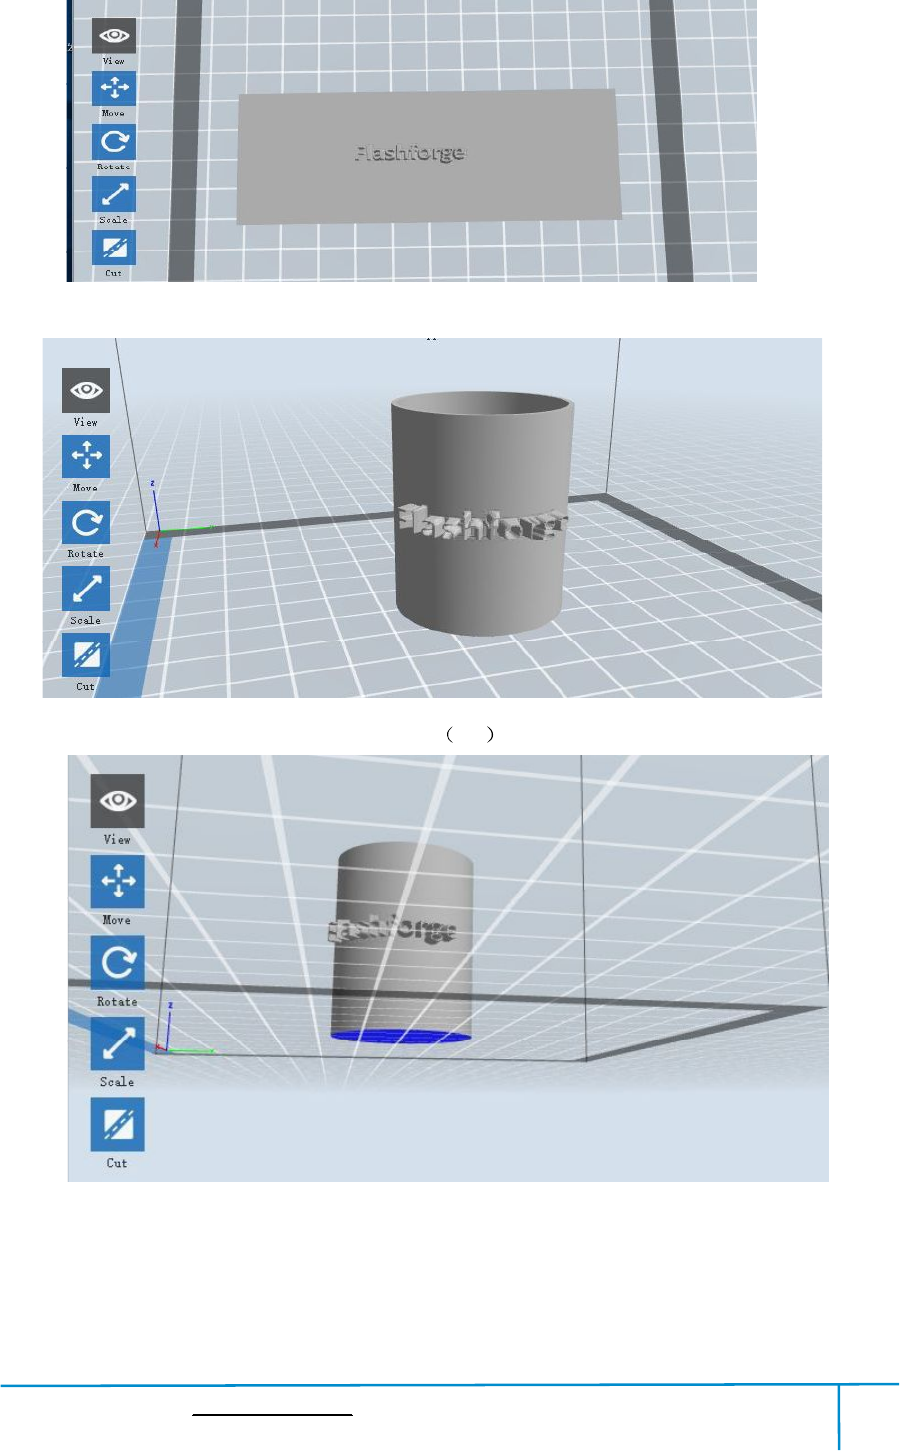
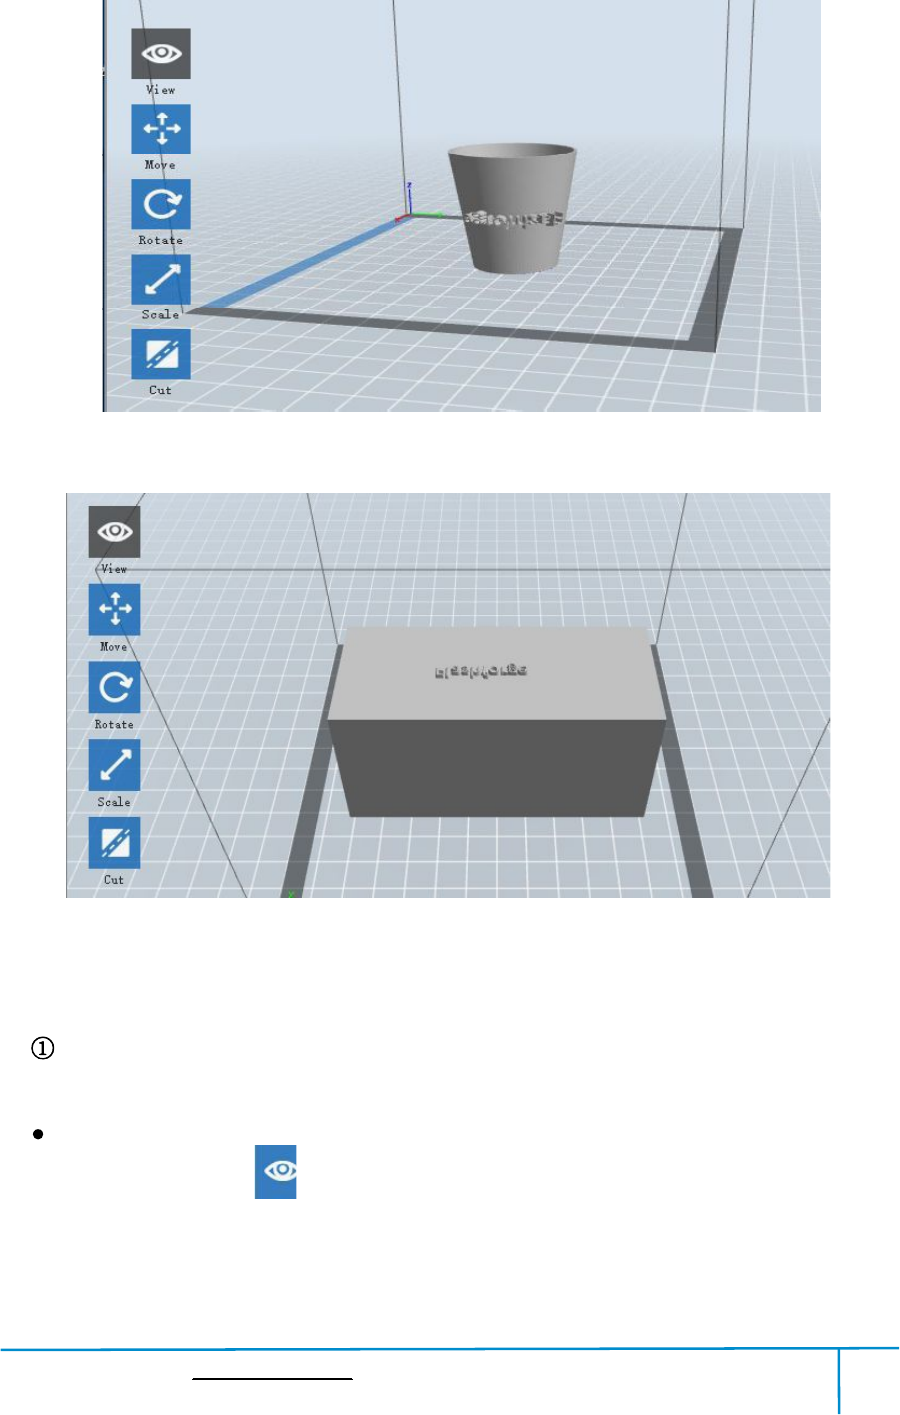
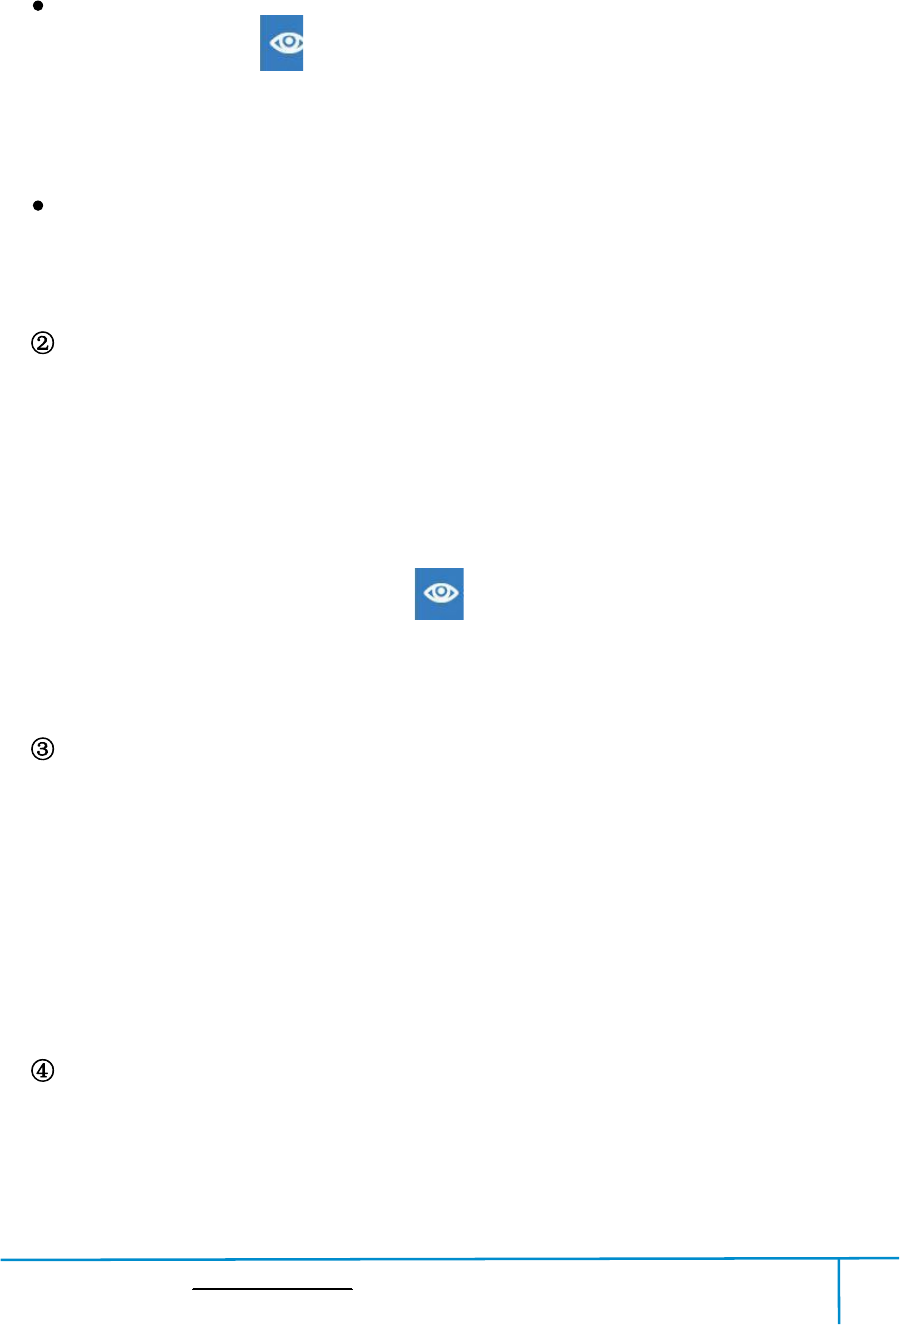
Shape:including plane,tube, canister and lamp.
Mode:including darkeris higher and lighterishigher .
Maximumthickness: Zvalue ofthemodel
Basethickness:Theminimumraftthickness andthe defaultvalueis 0.5mm
Width:X value ofthemodel
Depth:Y value ofthemodel
Bottomthickness: Fortube, canister and lampto set up bottomthickness
Top diameter: Fortube,canisterlampand sealtoset up thetop diameter
Bottom diameter: Fortube, canister,lampand sealtoset up the bottom diameter
6-4
Finder User Guide|www.flashforge.com 400-699-1063
41
Method 2: Hold downthemousewheel and scroll up and down.
Method 3: Hold downtheShift key, hold downtherightmouse buttonand drag.
Rotate
Clickthe [View] iconandthen you canrotatethe object bythefollowingtwomethods:
Method 1. Hold downtherightmouse buttonand drag.
Method 2. Hold downtheShiftkey,hold downtheleftmouse button and drag.
Scale
Rotatethemousewheelto enlarge orshrinkthebuild plate.
SetView
Allows usersto viewthe object on the buildplate.Sixviewsareundertheviewmenu,
thatis,homeview,bottomview,topview,frontview,backview,leftviewandright
view.
Method 1: Clickthethe [View] button,thereare six viewsinthe drop-downlist
Method2: Clickthethe[Look] icon ontheleft,clickitagainandasubmenu
will appearwith sixviewsfor selecting.
ResetView
Allow userstoreset views by thefollowingtwomethods:
Method 1: Clickthe [View] menu and select [HomeView]
Method2:Clickthe [View]buttonontheleft,clickitagainandyouwillseethe
viewing options, you can click [Reset].
Show ModelOutline
Click[View]--[Show ModelOutline],itwill highlightthe yellow borderofthe object

Finder User Guide|www.flashforge.com 400-699-1063
42
Show SteepOverhang
Click[View]--[ShowSteepOverhang].Whentheintersectionanglebetweenthe
modelsurfaceandhorizontallineiswithintheoverhangthresholdvalue,thesurface
hassteepoverhanganditbecomesredinthesoftware.Overhangthresholdvalue
could be setas needed. The defaultvalueis 45 degree.
6.2.5 Move
Selecttheobjectandmovethe object by thefollowingtwomethods:
Method1: Clickthe [Move] iconontheleft,holddowntheleftmousebuttonand
dragtoadjustthelocationofthemodelinXYdirection.Holddownthe Shiftkey,hold
downtheleftmousebuttonanddragtoadjustthelocationofthemodelinZdirection.
The distance and the direction ofthemovement shall be displayed.
Method2: Clickthe [Move]buttonontheleftandthenenterthedistancevalue.Click
[Reset]toreset distancevalues.
Note: Usersshallclick [Center] and [OnPlatform] afterthelocationadjustmentto
ensurethemodel(s)bewithinthebuildareaandonthebuildplatform.Ifaspecified
positionisneeded, onlyto click[On Platform].
6.2.6 Rotate
Selectthetarget object androtatethe object bythefollowingtwomethods:
Method1: Clickthe [Rotate] iconontheleftandthreemutuallyperpendicularrings
appeararoundtheobjectClickoneringandrotateonthepresentaxis,youwillseethe
rotationangleanddirectioninthecenterofcircle.Inthisway,youcouldmakethe
modelrotate on X/Y/Z axis.
Method2: Clickthe [Rotate] iconontheleft,andthenenterintorotatingangel
valuesinX/Y/Z axes positioning.Click [Reset] toresetrotating angel values.
Finder User Guide|www.flashforge.com 400-699-1063
43
6.2.7 Scale
Selectthetarget object and scaletheobject bythefollowingtwomethods:
Method1: Clickthe [Scale] iconontheleft,holddowntheleftmousebuttonand
scalethemodel.The correspondingvalueswilldisplaynearthe object.
Method2: Clickthe [Scale] iconontheleftandthenenterintoscalevaluesinX/Y/Z
axes positioning.Clickthe [Maximum] buttonto getlargest size possiblefor building.
Click [Reset] toresetthe size ofmodel.
Note: Ifthe[UniformScaling] radiobuttonisclicked,itwillscalethemodelinequal
proportionwhenchanging value inanypositioningofthemodel.Otherwiseitwill
only changethe value ofthe corresponding positioning.
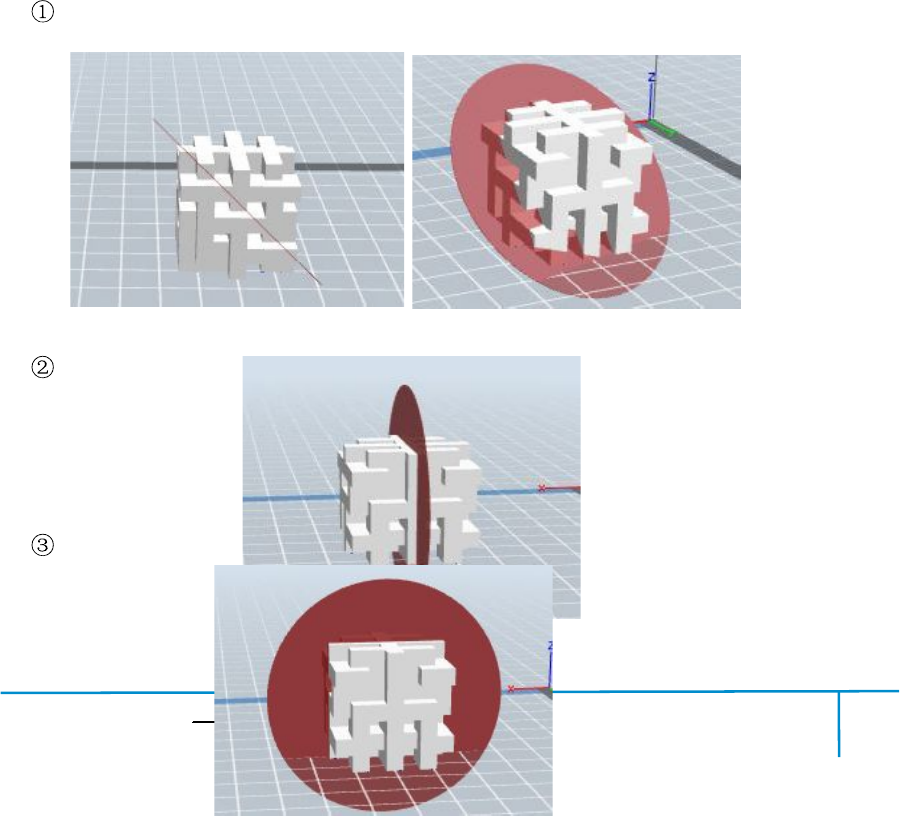
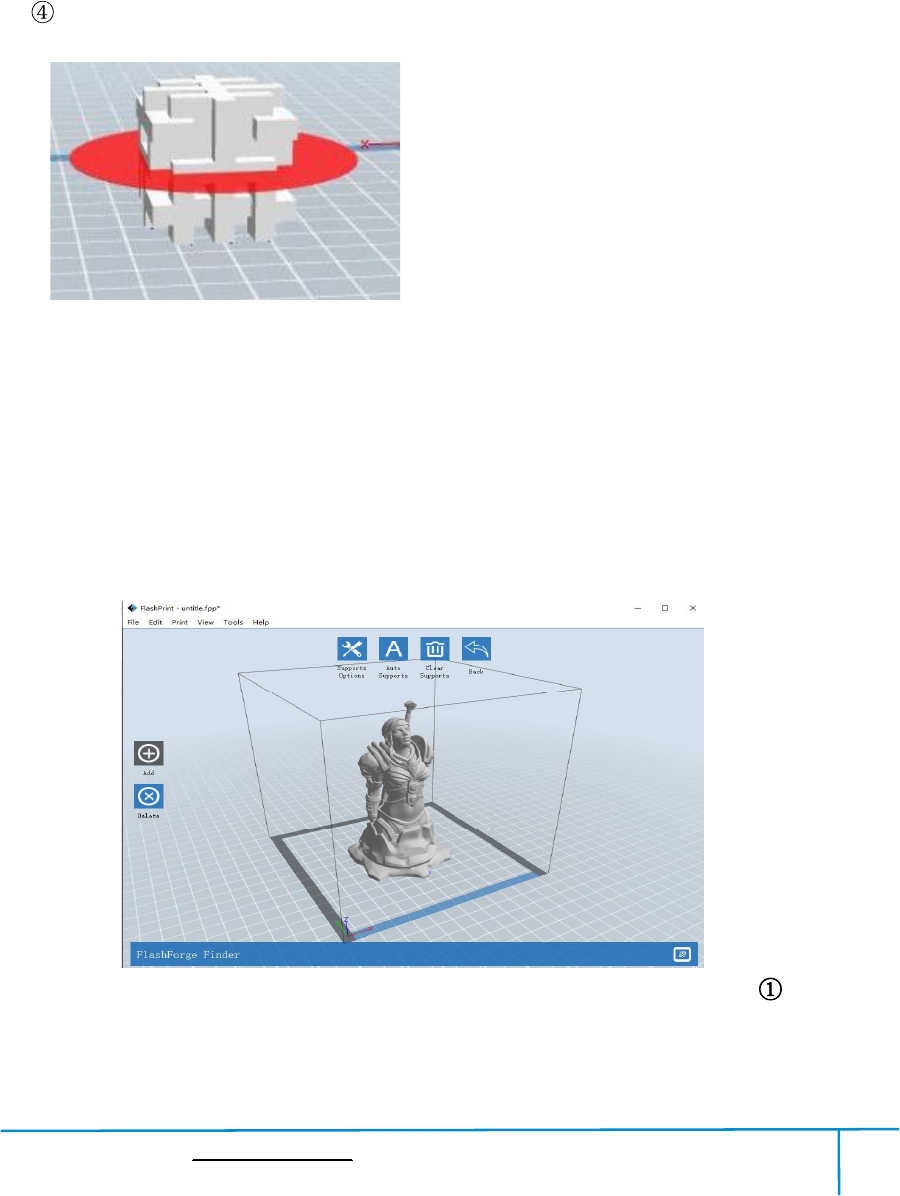
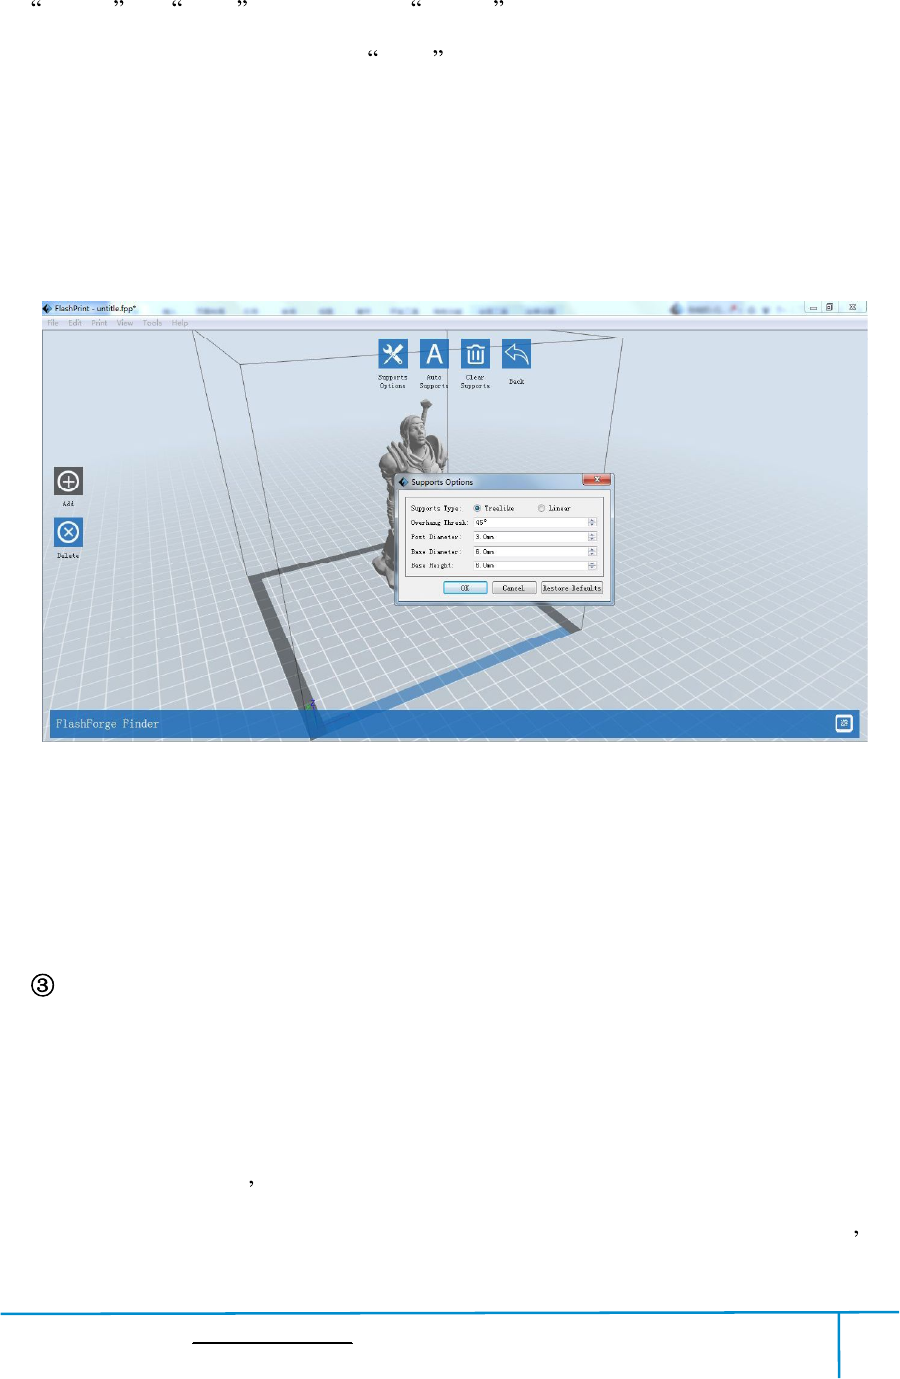
6.2.8Cut
Left-clickonthemodeltoselectitanddouble-clickonthe [Cut] tosetthecutplane.
The direction and position are availablefor setting.
Drawwith Mouse
X Plane
Y Plane
Finder User Guide|www.flashforge.com 400-699-1063
45
ClicktheSupportOptions,anoptionboxwillappear,supportsoptionsinclude
treelike and linear ,whenchoose treelike ,click [OK],thenitwillgenerate
treelikestructure;whenchoose linear ,click [OK],thenitwillgeneratelinear
structure;ifitisamodelwithsupports,whenyouchooseoneofthesupports
options,softwarewilljudgewhetherexistingsupportsneedtobedeletedornotonthe
basisof thetypeofexistingsupport,andwillpopupthecorrespondingprompttolet
youmakethe choice.
Auto Supports
Clickthe [AutoSupports] button,thesoftwarewilljudgethepositionwheresupports
areneededandgeneratecorrespondingtreelikeorlinearsupports.Ifitisamodelwith
supports,the existing supportswill be deleted andnew supportswill be generated.
Add Supports
Supportswillbeaddedonceclickingthe [Add]button.Movethecursortothe
positionwhere supportsneeded,left-clickto choosethe starting point of supports, hold
downtheleftmousebuttonanddragthemousethesupportspreviewwillshowup(if
supportsurfacedoesn tneedsupportorthesupportcolumnangleistoolarge,will
highlightthesupportreview).Loosentheleftmousebutton,ifsupportcolumndoesn t
6-11
Finder User Guide|www.flashforge.com 400-699-1063
46
meetwithmodel,thensupportwillbegeneratedonoriginandterminalpoint(the
highlightedpreview supportwon tgenerate support structure)
Clear Supports
Click [ClearSupports],allsupportswillbedeleted.Theoperationcanberepealed
via clicking [Undo] orpressingtheshortcut key Ctrl+Z.
Delete Supports
Supportswillbedeletedonceclickingthe [Delete]button.Movethecursortothe
supportsneededdeleting,currentsupportsanditssubnodesupportwillbehighlighted,
clicktheleftmouse buttonto deletethesehighlighted support.
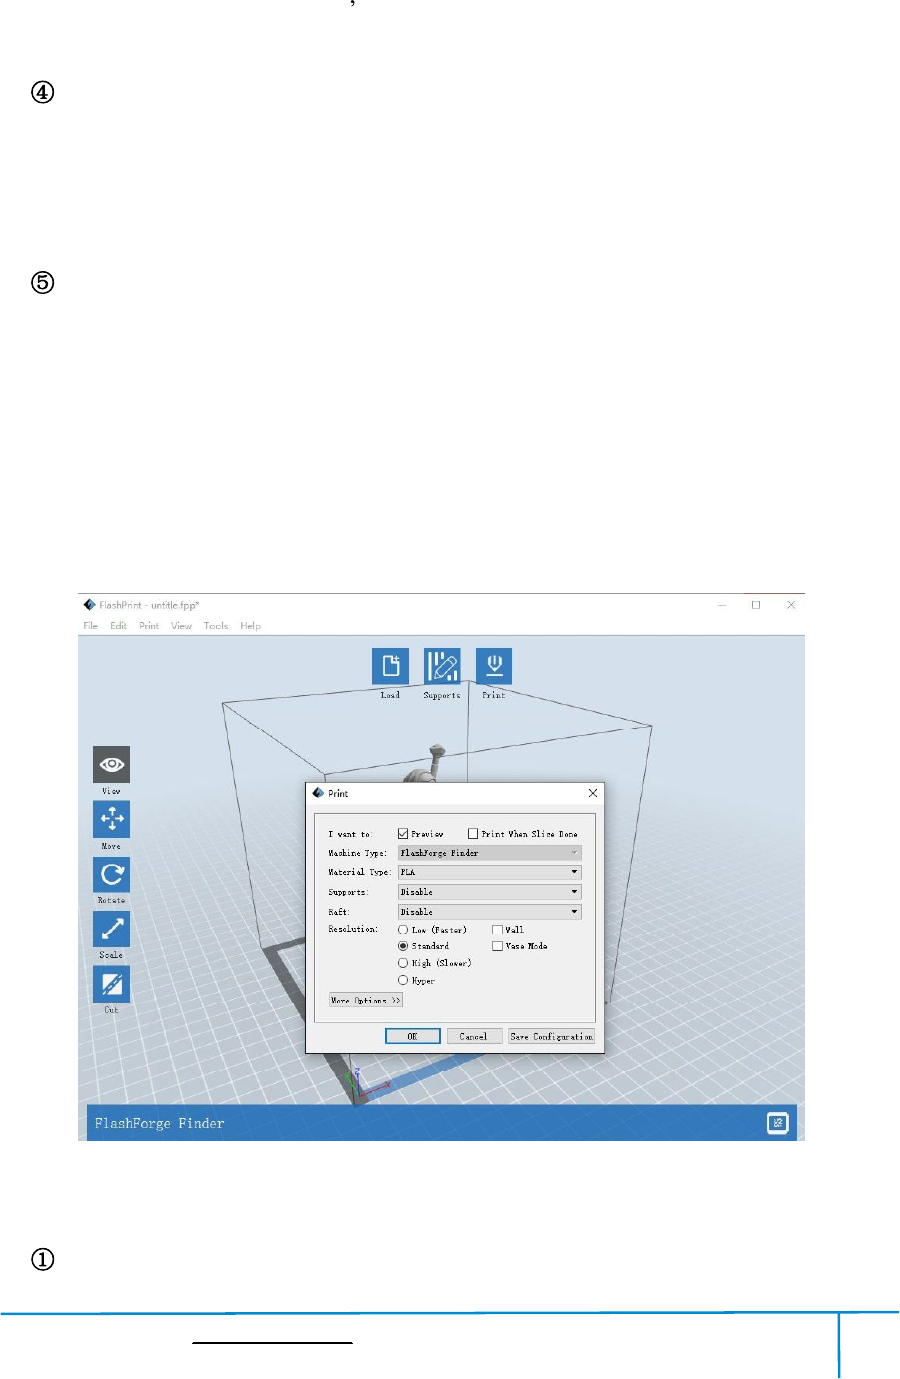
6.2.10Print
Preview: Choosetoenter previewinterface ornot
6-12

Finder User Guide|www.flashforge.com 400-699-1063
47
Printwhen slice done: Print ornotwhen slice done
Materialtype: Choose accordingtothetypeofmodel
Supports: Whenprintsuspendedstructuremodels,supportisnecessary.Click
[supports] to create support partforthe printing.
Raft: Thisfunctionwillhelpthemodelto stickwell on the platform.
Wall: Duringdualcolorprinting,thisfunctionwillhelptocleartheleaking
filament ofanother extruder.
Brim: Expandtheoutlineofmodel sbottomlayerstoaBrimwhichhelpsanchor
the edges ofthemodeltothe platetoavoidwarping.
Resolution You havethreeresolution solution(with default setting)tochoosefrom,
highresolutioniscorrespondingwithslowprintingspeed,oppositeforthelow
resolution.For PLA printing, an extra solution Hyper isavailable.
Moreoptions: Click [Moreoptions] tosetforlayer,shell,infill,speedand
temperature.Differentresolutionsolutioniscorrespondingtodifferentdefaults,click
[RestoreDefaults] to backto default setting.
Layer
a.Layer: Layerthicknessoftheprintingmodel.Withasmallvalue,thesurface
ofthemodelwill besmoother.
b.FirstLayerHeight: Thisisthefirstlayerofthemodel,whichwillaffectthe
stickingperformancebetweenthemodelandplatform.Maximizeis0.4mm,usually
the defaultisOK.
c.Shell: Containstheoutsideshellvalue,cappinglayervalue(undervasepattern,
top solidlayer settingisinvalid).
Primeter Shells: Maximizeis 10
a.TopSolidLayer: Maximizeis 30, minimumis 1.
Finder User Guide|www.flashforge.com 400-699-1063
48
b.Bottom SolidLayer: Maximizeis 30, minimumis 1.
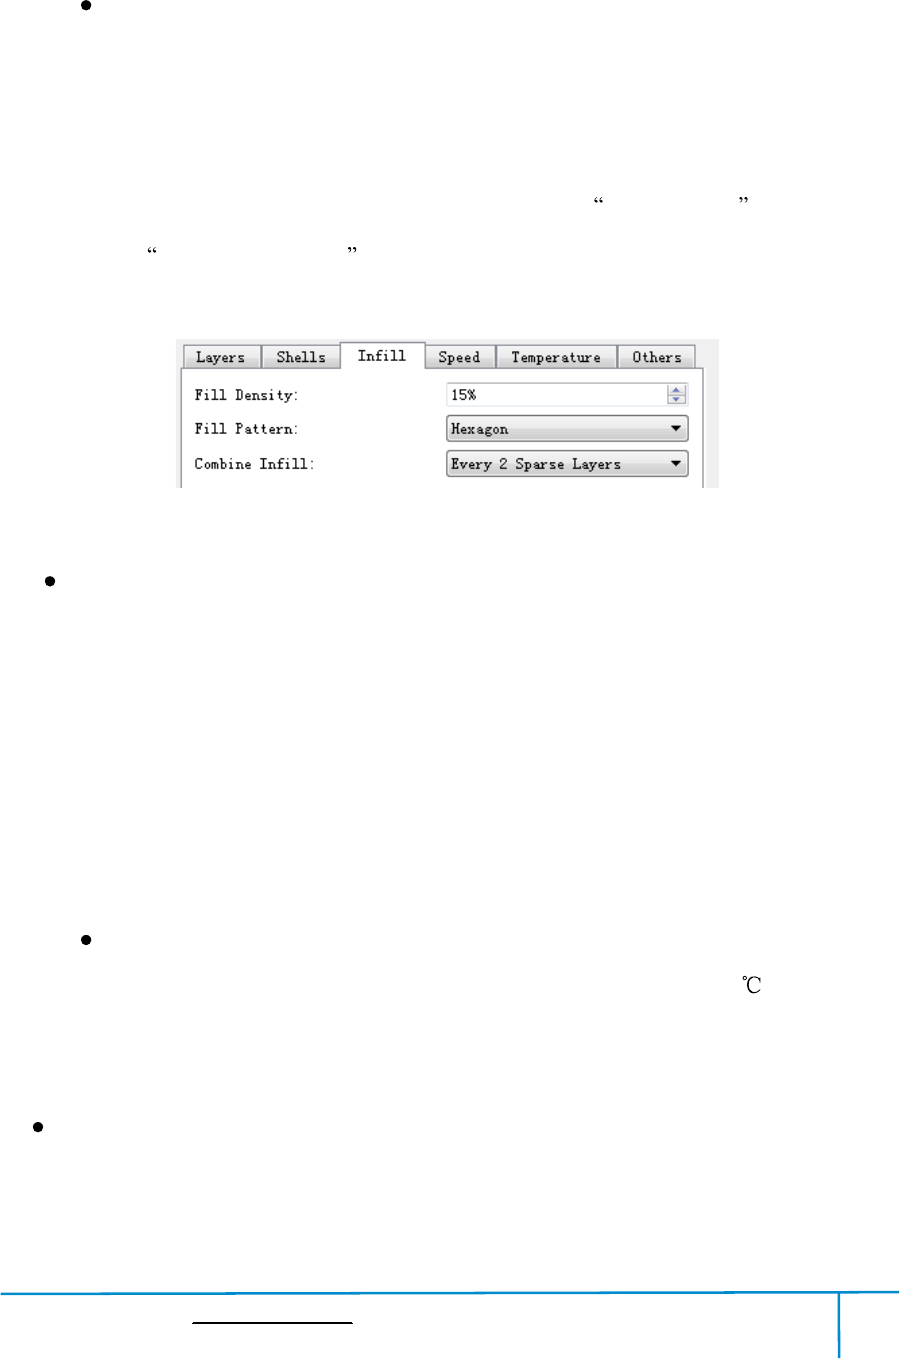
Infill
a. FillDensity meansfillrate.
b. Fill Pattern isthepattern offilling shape which effects printing duration.
c.CombineInfill: Youcanselectthelayersforcombiningaccordingtothelayer
thickness.Thecombinedthicknessshouldnotexceed0.4mm. EveryNlayers isforallthe
infillswhile EveryNinnerlayers isonlyforinnerinfills,whichgenerallycansaveprint
time.
6-13
Speed
a. PrintSpeed isthemovingspeedoftheextruder.Generally,thelowerspeedis,
the betterprint you willget. For PLA printing, 80isrecommended.
b. Travel Speed istocontrolthemoving speed ofthe extruder under
non-printing Status duringwork. For PLA printing, 100 isrecommended.
Note: Modify parameters settingstoget betterprints as differentmodels need different
parameters.
Temperature
ExtruderTemperature: Recommended extrudertemperatureis220.
Note: Differenttemperatureshavesubtleinfluencesinprints.Pleaseadjustthe
temperatureaccordingtothe conditionin orderto get a goodprint.
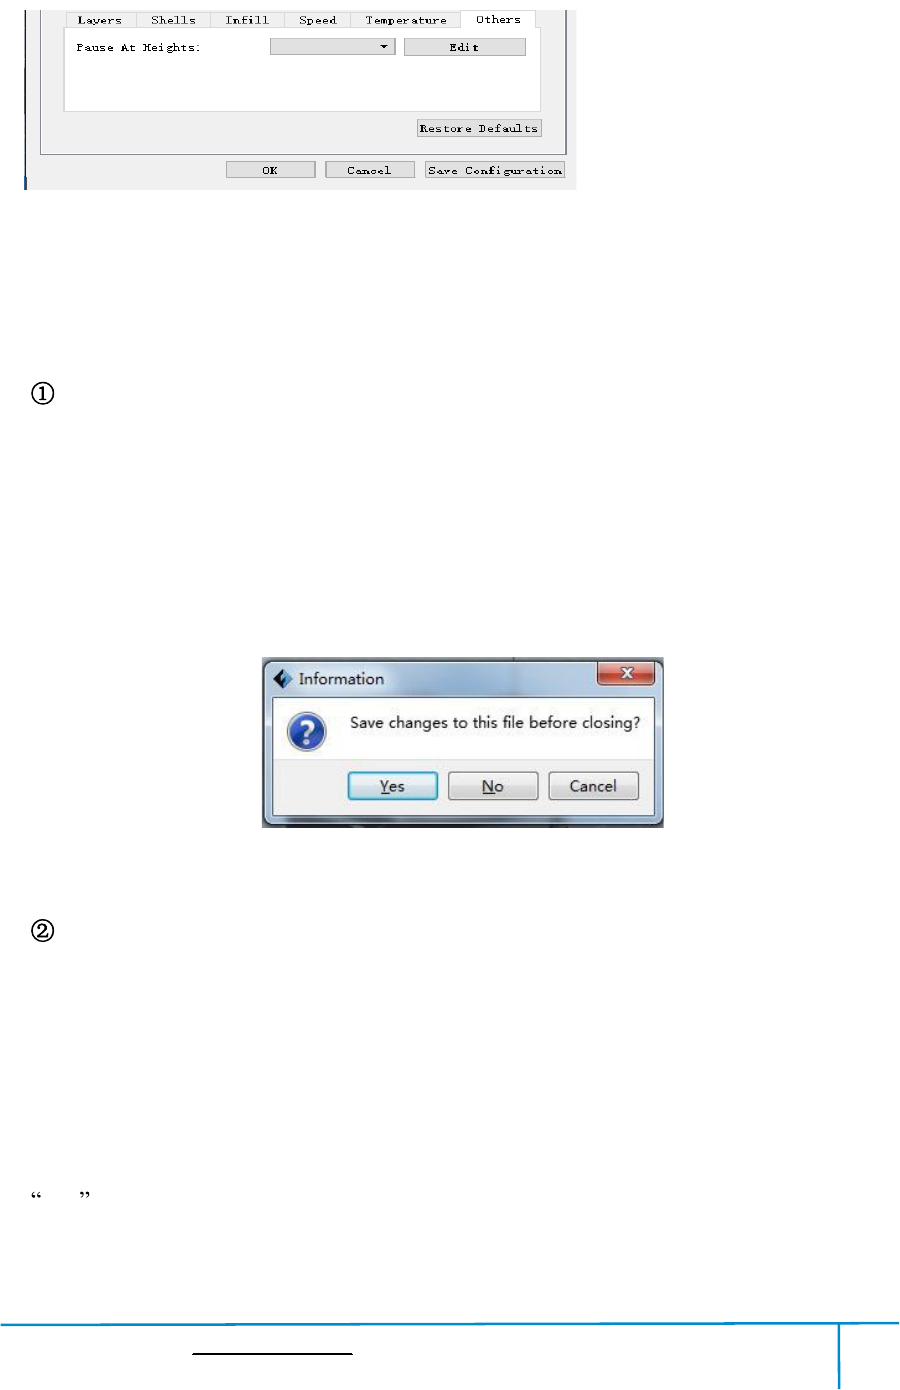
Others
PauseAtHeights: Allowsuserstopre-setaheightinwhichtheprintwillsuspend
automatically.Thefunctionusuallyappliedwhenyouwanttochangethefilamentata
Finder User Guide|www.flashforge.com 400-699-1063
49
certain point.
(6-14)Click[Edit],thenyou can addorremove a height.
6.2.11File Menus
New Project
Click [File]--[NewProject]canbuildablankproject.Ifthereisanunsaved
modificationonpreviousproject,thenitwillinformyouwhetherthemodification
needstobesavedornot.Click [Yes]willsavethemodification,click [No]will
abandonit.If click [Cancel] or closetooltip,thenwill cancelthe new project.
Saving
Afterfinishingthemodeleditandadjustment,therearetwowaysbelowtosaveall
modelsinthe scene.
Method 1:
Click [File]--[SaveProject] inthemenubartosavethefileasaprojectfilewiththe
.fpp suffix,allmodelsinthescene(includesupport)areindependent.Afterreloading
thefiles,extruderconfigurationinformationandmodelpositionwillbethesameas
6-15
6-14
Finder User Guide|www.flashforge.com 400-699-1063
50
the configuration duringsaving.
Method 2:
Clickon [File]--[Saveas...] tosavethemodelasprojectfile.fppor.stland.obj.
For.stland.boj,modelsareintegratedasone(includesupportpart).Ifloaditagain,
onlythe position ofthemodelwas saved, notincludedtheprinting parameters.
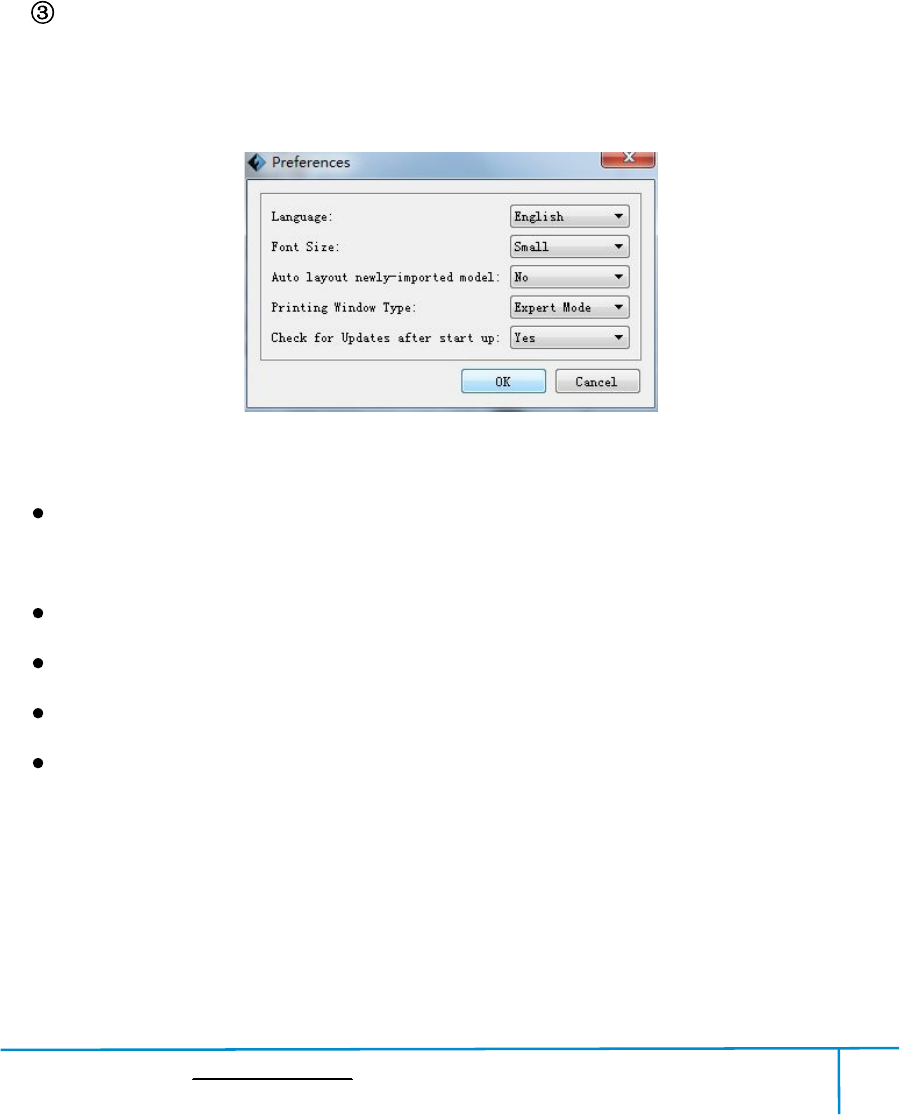
Preferences
Click [File]--[Preferences],youcanchooselanguageandifneedsdetectingupdate
when start.
Language: Thesoftwaresupportssixlanguages,namely,Chinese(simplified
Chinese andtraditionalChinese),English, French,Korean,JapaneseandRussian.
Font Size: Setthefont size.
Autolayout newly-importedmodel:SetYes orNo.
PrintingWindowType: IncludingBase Mode and Expert Mode
CheckforUpdateafterstartup: Itis used topresetifitis necessaryto activatethe
onlineautomaticupdatefunction,ifchooseyes,everytimewhenyouopensoftware,it
canonlinedetectifitisanewversionsoftware,oncenewversionfound,itwill
reminds usersto download and install new versionfirmware.
6-16

Finder User Guide|www.flashforge.com 400-699-1063
51
6.2.12Edit Menus
Undo
Allows usersto undo therecent edits by thefollowingtwomethods:
Method 1:Click [Edit]--[Undo].
Method 2: Presstheshortcut Ctrl+Z.
Redo
Allowsuserstoredothemostrecentedityouhaveundonetoyourmodelfilebythe
followingtwomethods
Method 1: Click [Edit]--[Redo]
Method 2: PresstheshortcutCtrl+Y.
Empty Undo-stack
To clean uptherecorded operating steps so as toreleasethememory.
SelectAll
Bythefollowingtwomethods, youcould selectallmodelsinthe scene.(When
models aretoo smallto be seen orout of viewing scope, please click
[Center]and[Scale]buttonsto adjustthemodel.)
Method 1: Click [Edit]--[SelectAll].
Method 2: Presstheshortcut Ctrl+A.
Duplicate
Selecttheobjectand duplicatetheobjectthroughthefollowingtwomethods:
Method 1: Click [Edit]--[Duplicate]
Method 2: Presstheshortcut Ctrl+D
Delete
Finder User Guide|www.flashforge.com 400-699-1063
52
Selecttheobjectand deletethe objectthroughthefollowingtwomethods:
Method 1: Click [Edit]--[Delete]
Method 2: Presstheshortcut Delete
AutoLayoutAll
Click [Edit]--[AutoLayoutAll]afterloadingoneormorethanonemodels,all
modelswillbe placedautomaticallyas automatic placementrule.
RepairModels
Click [Edit]--[RepairModels] torepairmodels.
Supports
Click [Edit]--[Supports] to enter supports setting interface.
6.2.13Print Menus
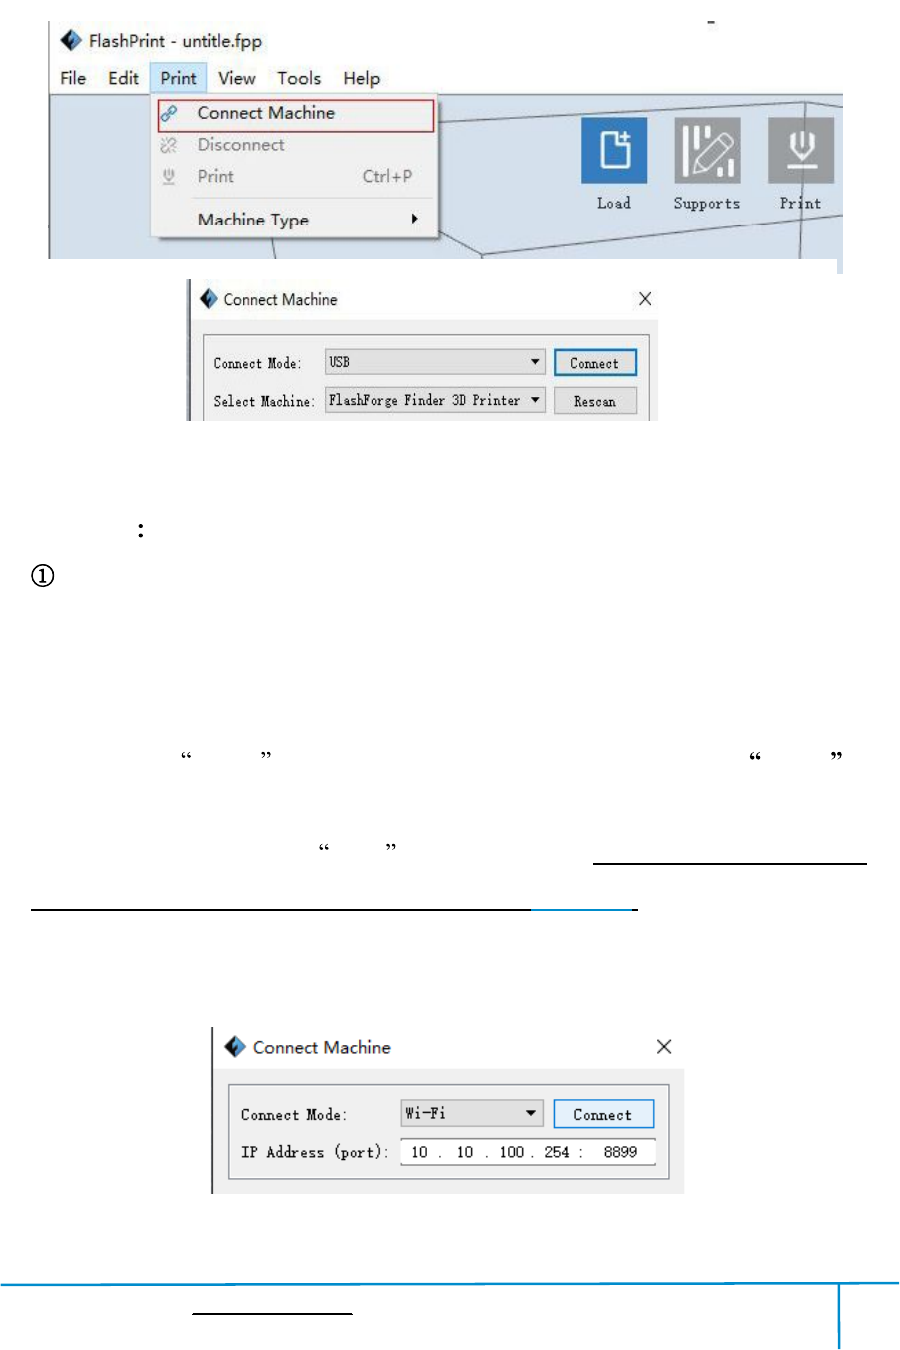
ConnectMachine
You can connectthe Finderwith your PC via a USB cable orWiFi.
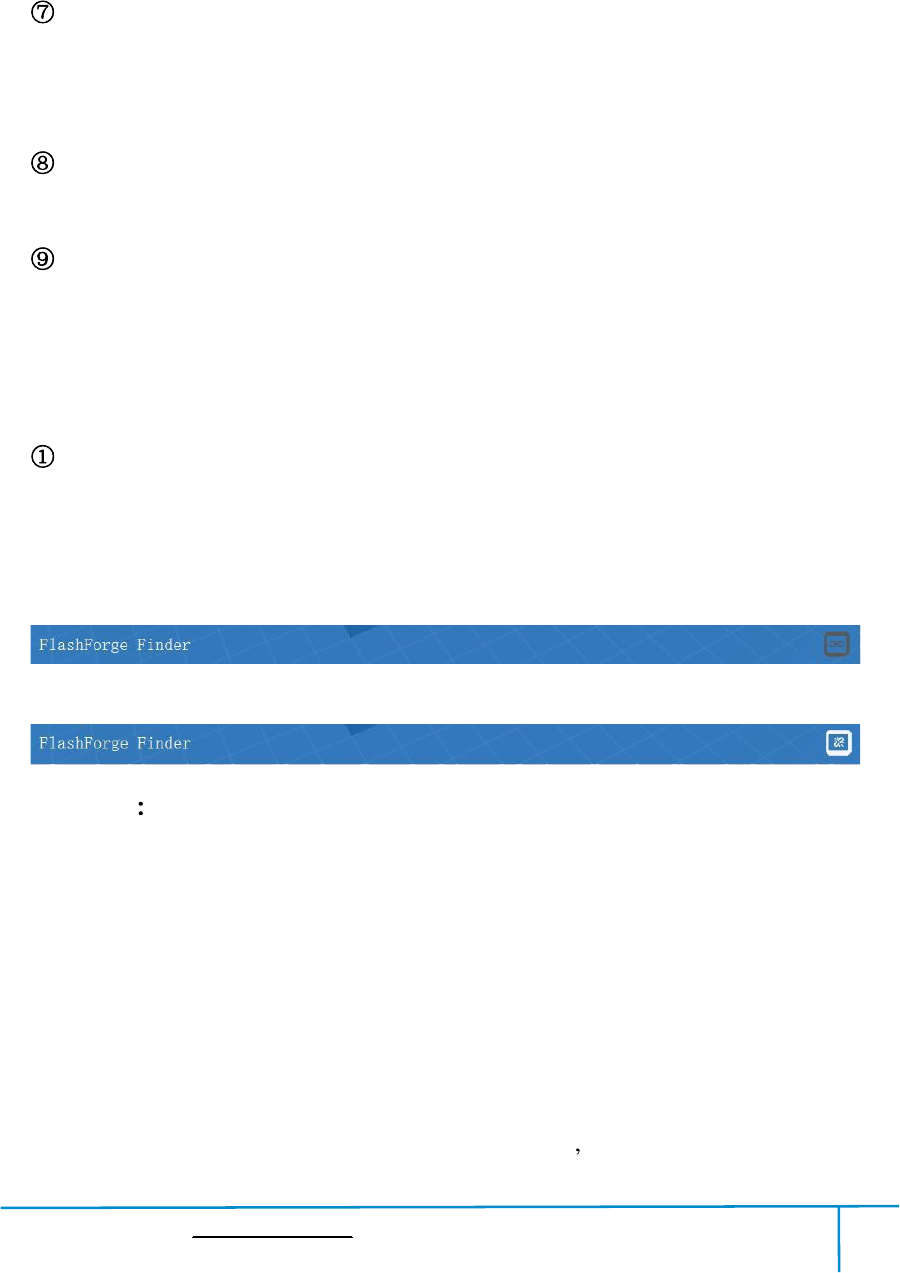
Note: Themachineicononthebottomrightdisplaystheconnectionstatus:
Connected
Disconnected
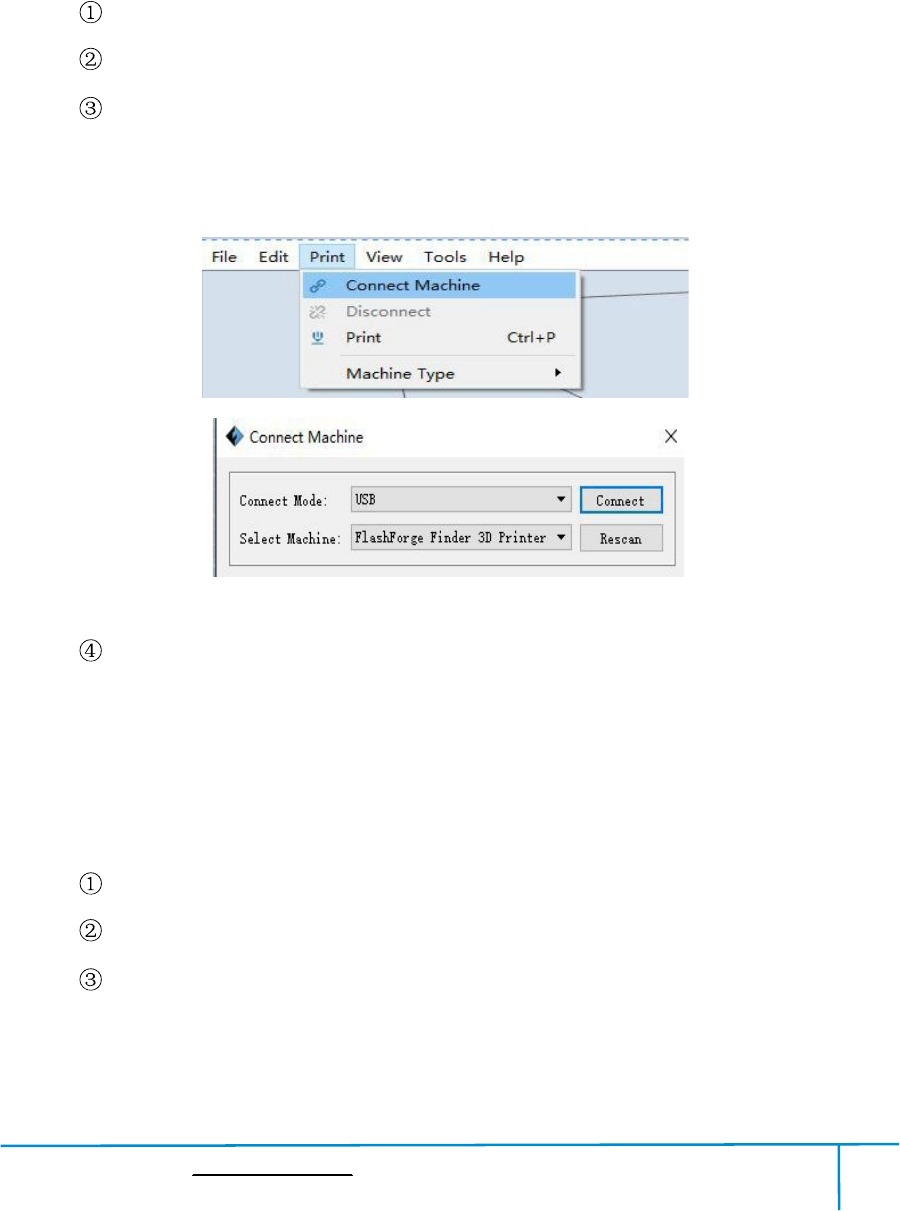
Method 1 ConnectViaUSBCable
a.Connectyour Finderwith yourPC via an USB cable.
b.Turn on your Finderand start FlashPrint.
c.Click [Print]--[Connect Machine],then select USB in the [Connection
Mode]optionandselectmachineyouwanttoconnectin [SelectMachine] option.If
youcannotfindyourmachine,clickthe [Rescan] buttontoscanyourmachineand
selectit.Finallyclick[Connect] buttontoconnecttotheprinter.Ifyoustillcannot
findyourmachineafterrescan,itmeansyouhaven tinstalledthedriverinthe
Finder User Guide|www.flashforge.com 400-699-1063
53
software.
6-18
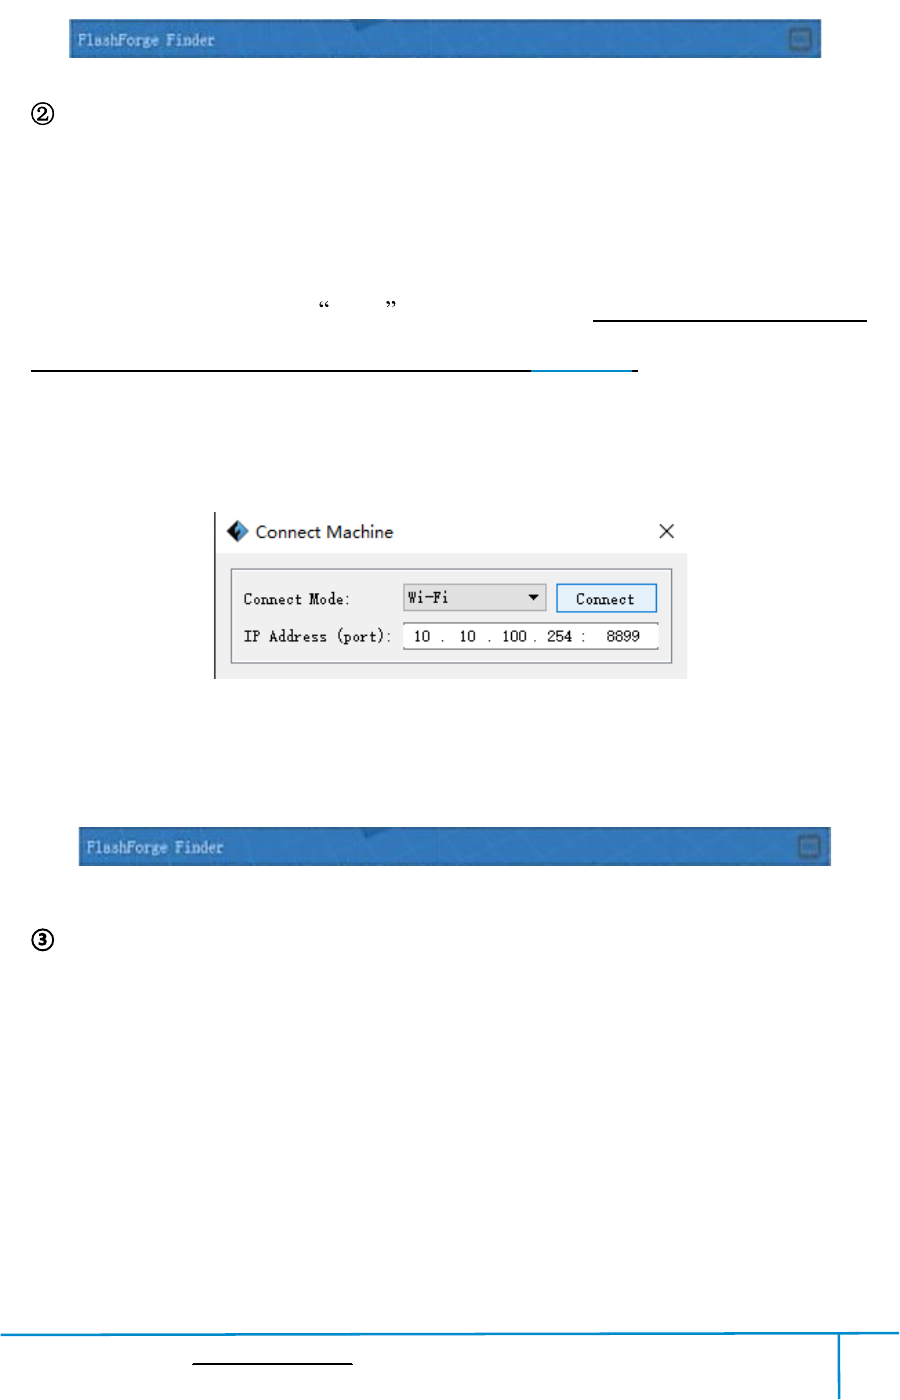
Method 2 ConnectVia WiFi
ConnectFinderwith your PCunderAPmode
a.Turn on your Finder
b.Tap [Tools]-[Setting]-[Wlan]-[WlanON]
c.Clickonthewirelessnetworkontheleftbottomofyourcomputer,andfindthe
wireless signal- Finder .Click [Connect] to connect your computerwith Finder .
d.Click[Print]-[ConnectMachine]onFlashPrint.Thenthefollowingdialogbox
popsup.Youneedtoselect Wi-Fi inConnectMode. EnterintotheIPAddress
shown on the Findertouch screen and then click [Connect].
10.10.100.254:8899maynotbethecorrectIPaddressaccordingtoyour
printer present status.
6-19
Finder User Guide|www.flashforge.com 400-699-1063
54
If successfully connected, you will seethefollowingredmark.
ConnectFinderwith your PCunder STAmode
a.Tap [Tools]-[Setting]-[WiFi]-[WiFiON]to turnontheWiFiofFinderand
connect your PC and FinderwiththesameWiFi network.
b.Click[Print]-[ConnectMachine]onFlashPrint.Thenthefollowingdialogbox
popsup.Youneedtoselect Wi-Fi inConnectMode. EnterintotheIPAddress
shown on the Findertouch screen and then click [Connect].
10.10.100.254:8899maynotbethecorrectIPaddressaccordingtoyour
printer present status.
If successfully connected, you will seethefollowingredmark.
Disconnect Finder
Click[Print]--[Disconnect] todisconnect yourPC and Finder.
Finder User Guide|www.flashforge.com 400-699-1063
55
6.2.14Tool Menus
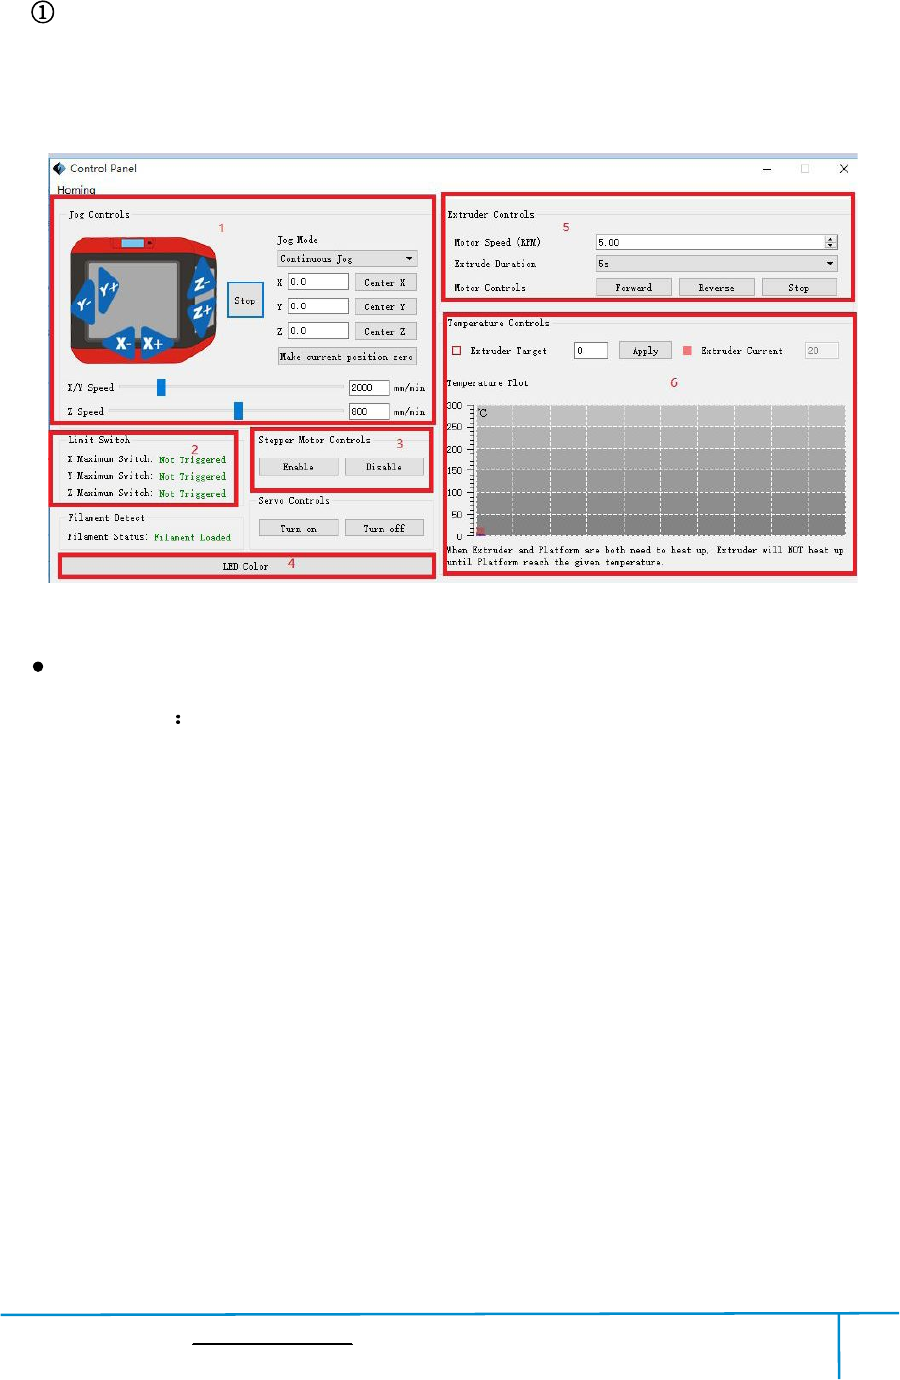
ControlPanel
AfterconnectingPCwithFinder,click[Tools]--[ControlPanel] toopenthecontrol
panel.
6-23
JogControls
a. Jog Mode Selectthe distancethat extruder/build platemove a singletime(thatis,
the distanceextruder/build platemove upon yoursingleclick).
b.Sixbluearrowdirectionbutton: ControlthemovealongX/Y/Zaxis.X/Yaxis
buttoncontrolextrudermove,Zaxisbuttoncontrolbuildplatemove.ClickX-,
extruderwillmoveleftwardaspecifieddistance;ClickX+,extruderwillmovea
specifieddistancerightward.ClickY-,extruderwillmoveforwardaspecifieddistance;
ClickY-,extruderwillmovebackwardaspecifieddistance.ClickZ-,buildplatewill
moveupwardaspecifieddistance;ClickZ-,buildplatewillmovedownwarda
specifieddistance.(SpecifieddistancereferstothemovedistanceyousetinJog
Mode.
c. Stop: Click [Stop] buttontoabortthe currentmovement.
d.XYZcoordinateframeontherightside: Showthecurrentpositionof

Finder User Guide|www.flashforge.com 400-699-1063
56
extruder/build plate.
e. MakeCurrent PositionZero button: Setthecurrent position ofthe
extruder/buildplateas(0,0,0). (NOTE: X,Y,andZboxesarefordisplaypurposes.
Changingthe valueinthe boxes willnot affect anything.
f.CenterX/Y/Zbutton: Extruderandbuildplatformwillbacktothezero(0,0,0)
you setlasttime.
g.X/Y Speed andZSpeed: Setthemove speed of extruder/build platform.
LimitSwitch: InordertoprotectyourFinder,threelimitswitchesareequippedto
controlthemaximumposition,andthethreelimitswitchescorrespondingtoX/Y/Z
axislimit switch.It hastwo status:
a.NotTriggered: Iftheextruder/buildplatedon tmovetoitsmaximum,X/Y/Zaxis
limit switchis nottriggered, and shows NotTriggered .
b.Triggered: Iftheextruder/buildplatemovestoitsmaximum,X/Y/Zaxislimit
switchistriggered, andshows Triggered .
StepperMotorControls: Allowsuserstocontroltosteppermotor.Click [Enable],
andlockthemotorsoitdoesnotallowanymovement;click [Disable],andunlockthe
motortobecontrolledmanually.
LEDColor: Allowsuserstochangethe LED color of Finder.
ExtruderControls: Youcansetthevalueof MotorSpeed(RPM) ,whichcan
controltherotationspeedoffilamentfeedingwheel.Themotorrotationtimecanbe
controlledviasettingthevalueof ExtruderDuration .Generallywesuggestthe
userschooseoptionofcontinuoustime60seconds.Thefilamentmustloadedinthe
extruderbeforemotorstarts. Therefore,donotstartrotationoperationuntilthe
extrudertemperaturereachestotheprintingtemperatureoffilament.ForPLA
filament,theextrudertemperatureshouldreach200 ,afterreachingtheextruder
temperature,clickthe [Forward]/[Reverse]rotationbuttontocontrolfilamentload
Finder User Guide|www.flashforge.com 400-699-1063
57
andfilamentunload.Furthermore,ifyouwanttostopfilamentloadandunload,you
can click[Stop].
TemperatureControl: Inputthetemperatureyouwanttogetintheleftframe,
click[Apply],theprinterwillautomaticallyheatthecorrespondingpart,therightside
showsthecurrentactualtemperatureofcorrespondingpart.Afterstartingheating,the
belowcurveoftemperatureformwillstarttochange,differentcolorcorrespond
different parts temperatures
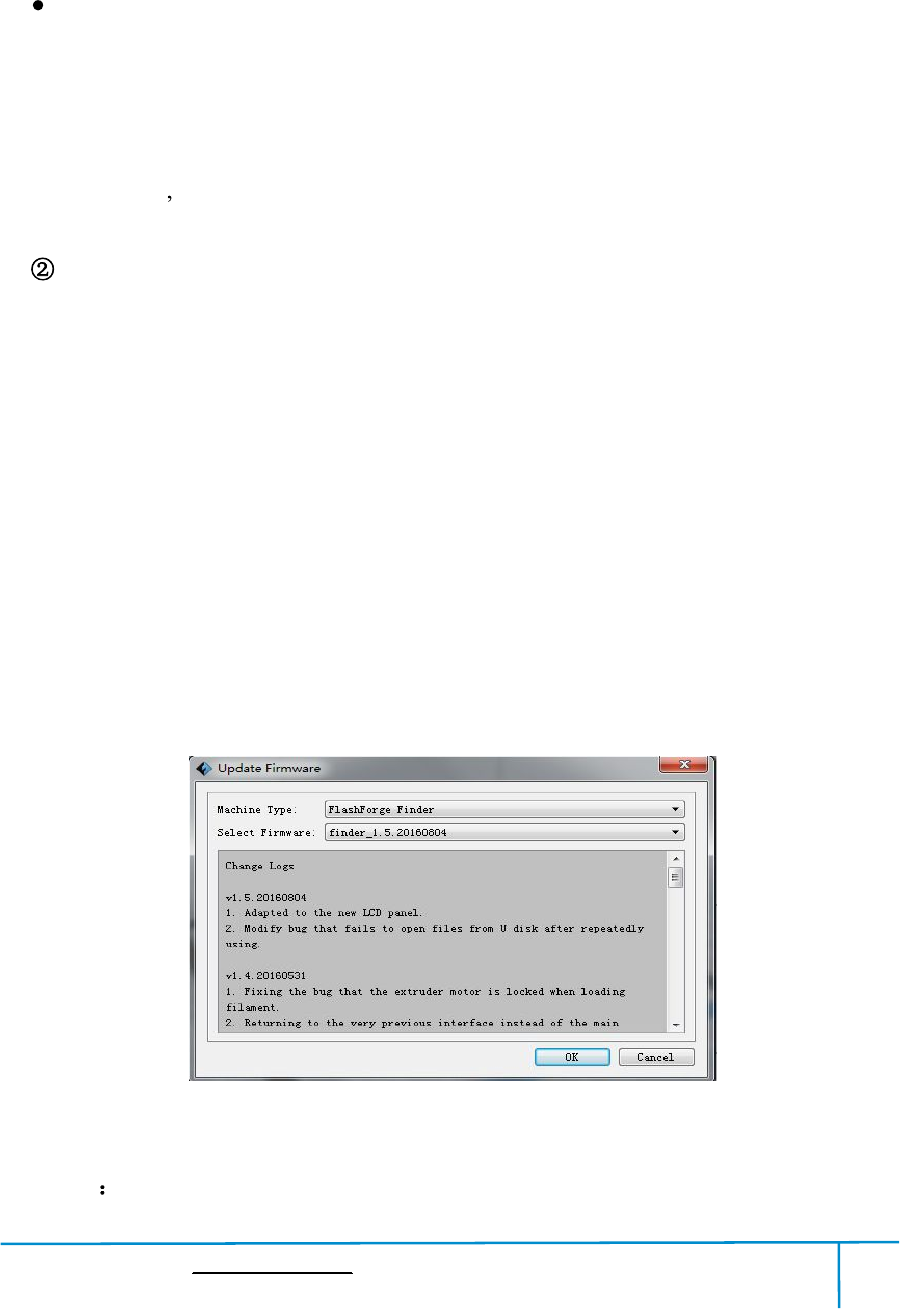
UpdateFirmware
EverytimewhenyoustartFlashPrint,itwillautomaticallydetectanddownloadthe
up-to-datefirmware.Ifanyupdateisavailable,adialogboxwillpopupforreminding
the userstoupdate.
Step1: Click [Tools]--[Updatefirmware].Itneedstocutoffconnectionbefore
updatingfirmware.Ifsoftwareandprinterarealreadyinconnection,itremindsyou
cutting offthe connection, choose [Yes] and go ontothe next step.
Step2: Choosecorrespondingprintertypeandfirmwareversionandclick [OK] inthe
firmwareupdatingbox.Afterconfirmingtheprinterisinfreestate,thesoftwarewill
automatically updatethefirmware
6-24
Step 3 RebootyouFinderandwaitfor4-5seconds,thenyoucanseetheupdate

Finder User Guide|www.flashforge.com 400-699-1063
58
process bar.Whenthe updatefinishes,itwill go backtothemaininterface.
Step 4 Tap[Tools]--[About]to checkwhetherthe updatedversionisright.
OnBoard Preferences
When the computer and printer are in connection, click[Tools]--[On Board
Preferences], you can checktheprinter name.
Machineinformation
Whenthecomputerandprinterareinconnectionstate,click [Tools]--[Machine
information], you can checkthemachinetype,machine name andfirmware etc.
6.2.15Help Menus
FirstRun Wizard
HelpContents Click [Help]--[HelpContents], you canreadthehelp contents.
CheckforUpdates Click[Help]--[CheckforUpdate]todetecttheavailable
updates online.
AboutFlashPrint Click [Help]--[AboutFlashPrint],thesoftwareinformation
boxwillpopup.Thecontentsincludethecurrentsoftwareversionandcopyright
information.
Finder User Guide|www.flashforge.com 400-699-1063
59
Chapter 7:BasicPrinting
Thischapterwillprovideastep-by-stepguideonturninga3Dmodelintoaphysical
reality.Beforeproceeding,itisrecommendedthatyou dbettergooverpriorchapterson
loading/unloadingfilament,levelingthebuildplatform,andthefunctionsand
capabilitiesof FlashPrint.
7.1Generate aGcode
(7-1)Double-clicktheicon of FlashPrintto startthe software.
7-1
(7-2)Click[Print]--[MachineType] to selectFlashForge Finder
7-2
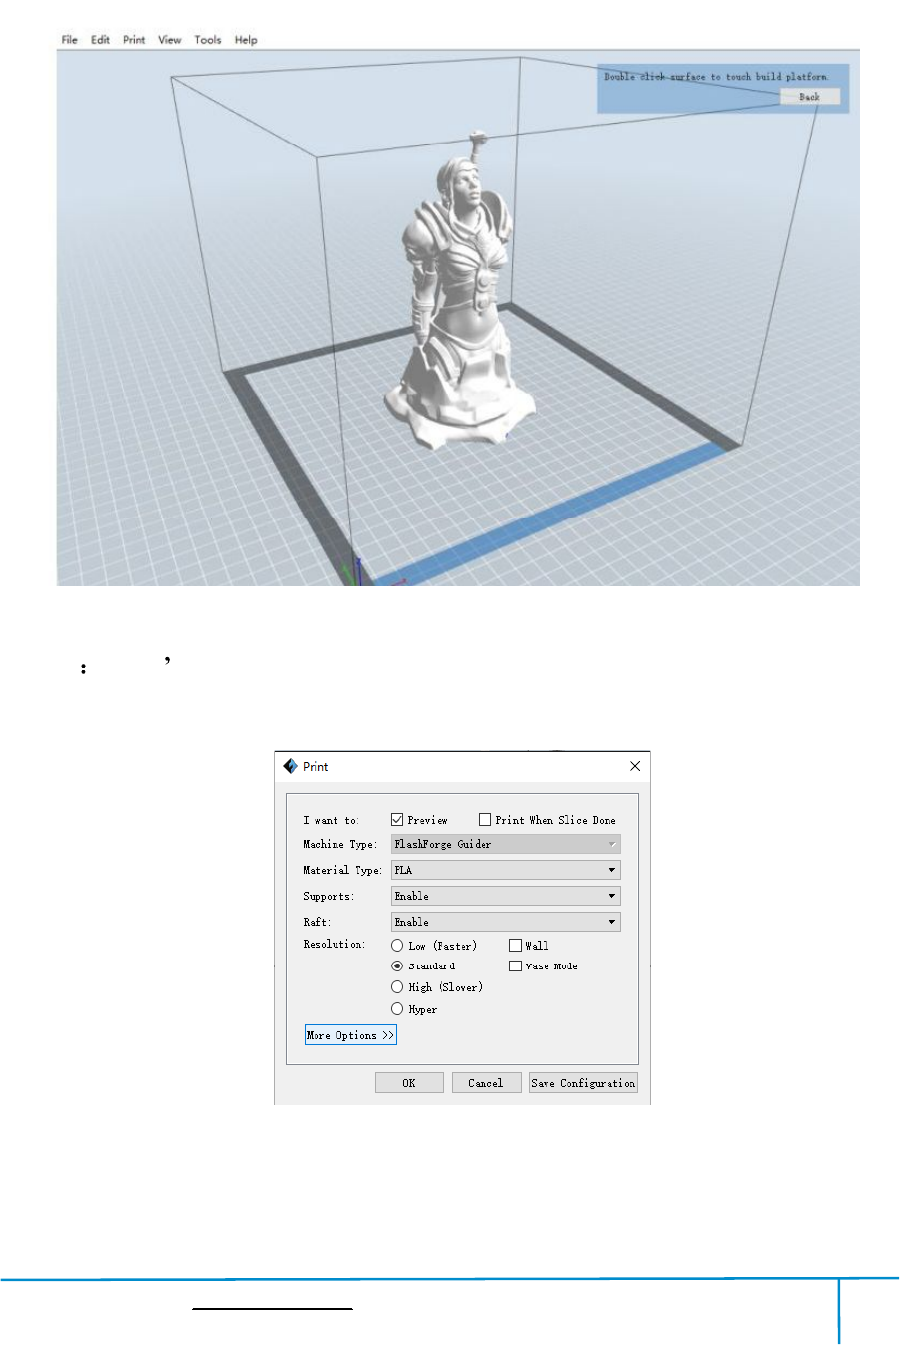
(7-3)Clickthe [Load] icontoloada.stlmodelfileandtheobjectwilldisplayonthe
buildarea.
7-3
7-4 Click[Edit]--[SurfacetoPlatform] tomakeyourmodelperfectlypositioned
34
Finder User Guide|www.flashforge.com 400-699-1063
60
onthebuildarea.Click[Back]anddouble-clickthe Moveiconagain,thenclick [On
the Platform] and [Center]toensurethemodel be on the platform.
7-4
Note If you ve placeyourmodelin a right place, you can skipthe step above.
(7-5)Clickthe[Print]icon on thetop, you shouldmake somesetupsforyour printjob.
Preview: Ifyoucheckthe [Preview]box,youcanpreviewyourmodelafterslicingis
done.
7-5

Finder User Guide|www.flashforge.com 400-699-1063
61
PrintWhenSliceDone: IfyouprintviaUSBcable,youcancheckthebox,whileif
you printviaUSB stick, you shouldnot checkthe box.
MachineType: FlashForge Finder
Supports: Ifyouprintamodelwithsupports,youshouldclicktheinvertedtriangle
and select [Enable].
Raft: Youare suggestedto select [Enable].
Resolution: You are suggestedto select [Standard]
MoreOptions: You aresuggestedto keep them default.
Click[OK] toselectthepathtosavetheGcodefile.Youcanrenamethefileasyou
like andsaveitas a .g or .gx file, click [Save] togenerate a Gcodefile.
Note:.gxfilesareavailableforpreviewwhilethe.gfilesarenot.Theyaredisplaying
asfollows:
g. Files gx. Files
7-7
Next,we are goingto printthemodel.
Finder User Guide|www.flashforge.com 400-699-1063
62
7.2Print Methods
AftergeneratingtheGcodefile,youcantransferittoyourFinder.Youcantransferthe
filethroughUSB cable and USB stick.
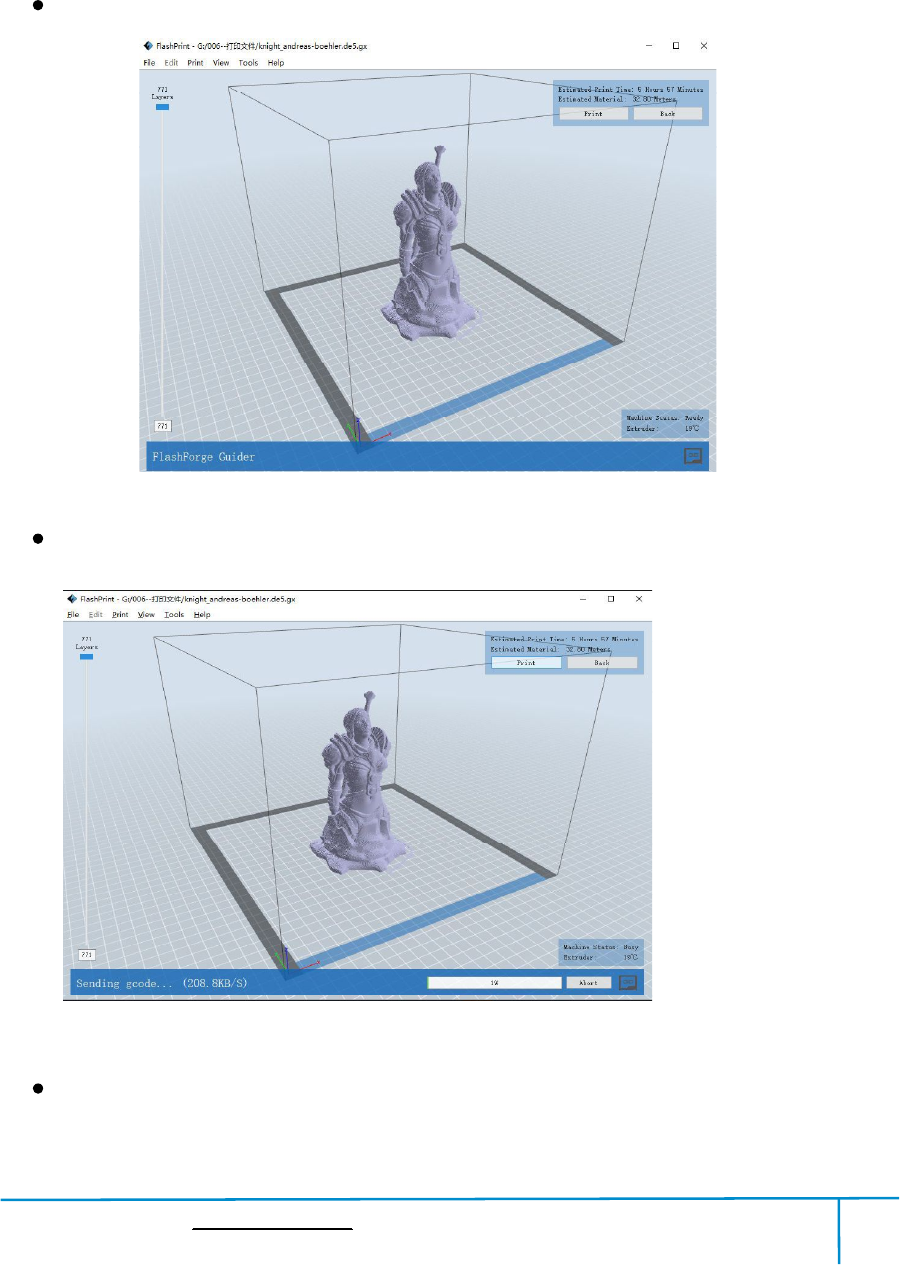
7.2.1 PrintfromComputer(USB connection)
Connectyour Finderwith yourPC via a USB cable.
Turn on your Finder,levelthe build plateandloadthefilament.
Click [Print]andtransferyourGcodefiletoyourFinder.Aftercompleting
transference,theprinterwillheatupautomatically.Andwhenheatingfinishes,the
printwillstartto buildthemodel.
7-8
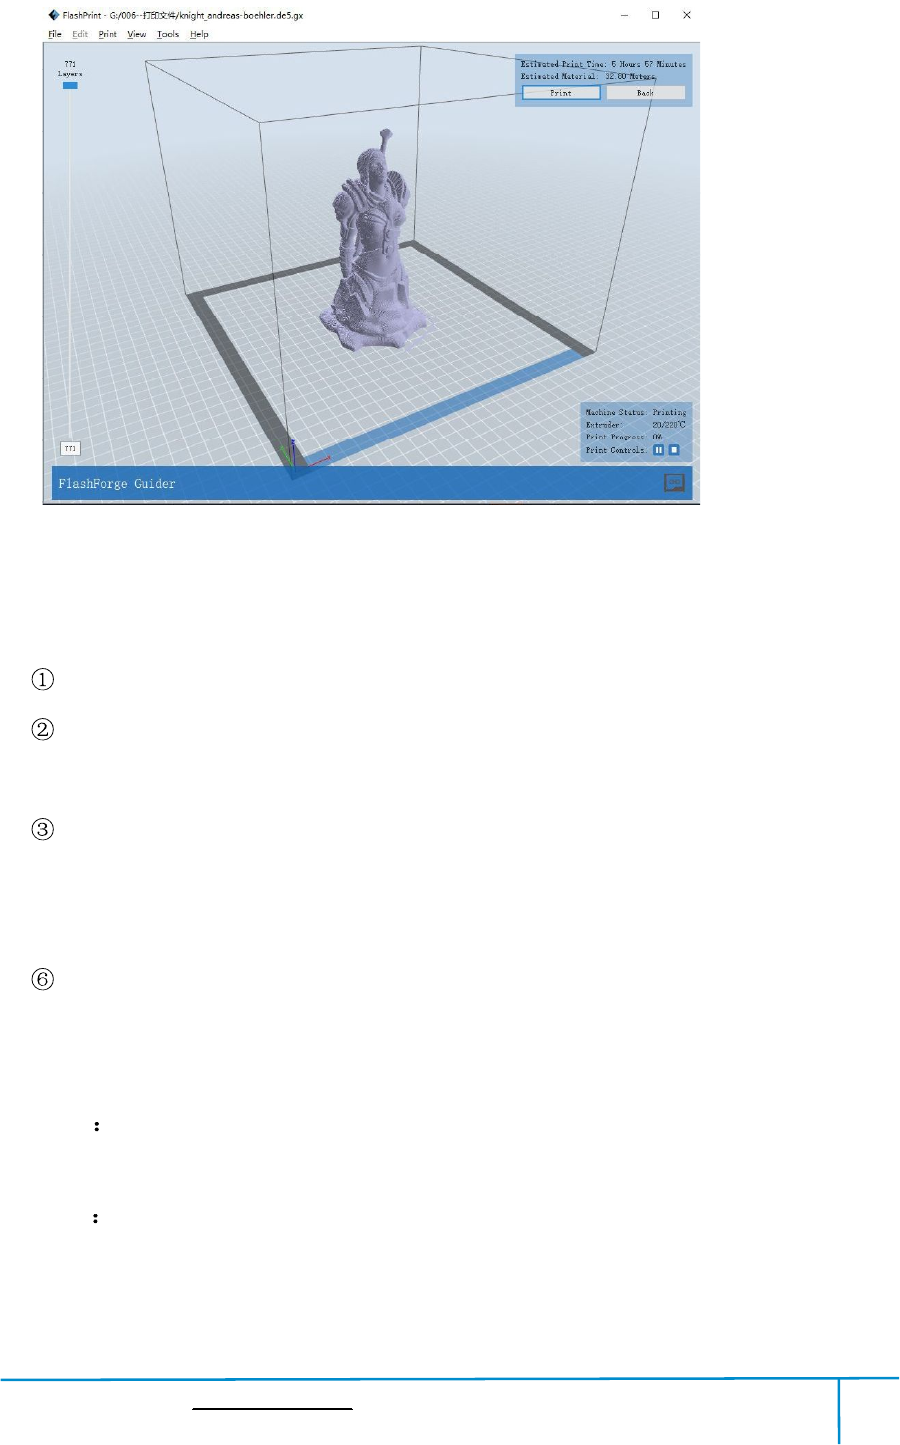
WhenyourPCconnectswithFlashPrintsuccessfully.Thestatusboxonthe
bottomrightdisplaysthereal-timenozzletemperature.Afterfinishingpreheating,
your Finderstartsthe printjob directly.
7.2.2 PrintfromComputer(WiFiconnection)
Connectyour Finderwith yourPC viaWiFi.(Pleasereferto 6.1.13)
Turn on your Finder,levelthe build plateandloadthefilament.
Click [Print]andtransferyourGcodefiletoyourFinder.Aftercompleting
transference,theprinterwillheatupautomatically.Andwhenheatingfinishes,the
printerwillstartto buildthemodel.
Finder User Guide|www.flashforge.com 400-699-1063
63
IfyouwanttoprintaGcodefromalocalfolder,youjustneedtoloadthefileinto
FlashPrintatthestatusofUSBconnectionorWiFiconnection,thenclickthe [Print]
button on thetop-right.
Load thetargetGcodefileintoFlashPrint.
7-9
Clickthe [Print]button,the PCwilltransfertheGcodefiletothe printer.
7-10
Afterfinishingtransferring,theprinterwillheatupautomatically.Andwhenheating
finishes,theprintwillstartto buildthemodel.
Finder User Guide|www.flashforge.com 400-699-1063
64
7.2.3PrintfromUSB Stick
Insert yourUSB stickwithtarget.g or .gx fileto your Finder..
TurnontheFinder.Makesurethebuildplatehasbeenleveledandthefilamentis
loaded.
Tap[Print]andthentaptheUSBStickCard iconinthemiddle.Thefile(s)willbe
displayedonthescreen.Selectthefileyouwanttoprintandtap[Print].Thefilewill
betransferredtotheprinter.
Andtheprinterwillheatupthenozzleautomaticallyandstarttoprintafterthe
nozzlereachestheaimedtemperature.,
Abort To stop heatingand printing.Once you tap [Abort],the processisirreversible.
Pause Tosuspendtheprintjob,youcantapitagaintoresumeit.Youcanusethis
functionwhen you wantto changethefilament halfway.
7-11
Finder User Guide|www.flashforge.com 400-699-1063
65
7.2.4 Printfrom FlashForgeCloud connection
1)Turnon[WiFi]connectiononprinter ssettinginterfacetoconnecttheprinterto
InternetwithWiFi.( Make suretheprinter has connectedtoInternet.)
Turn on [FlashForgeCloud] connection on printer s settinginterface.
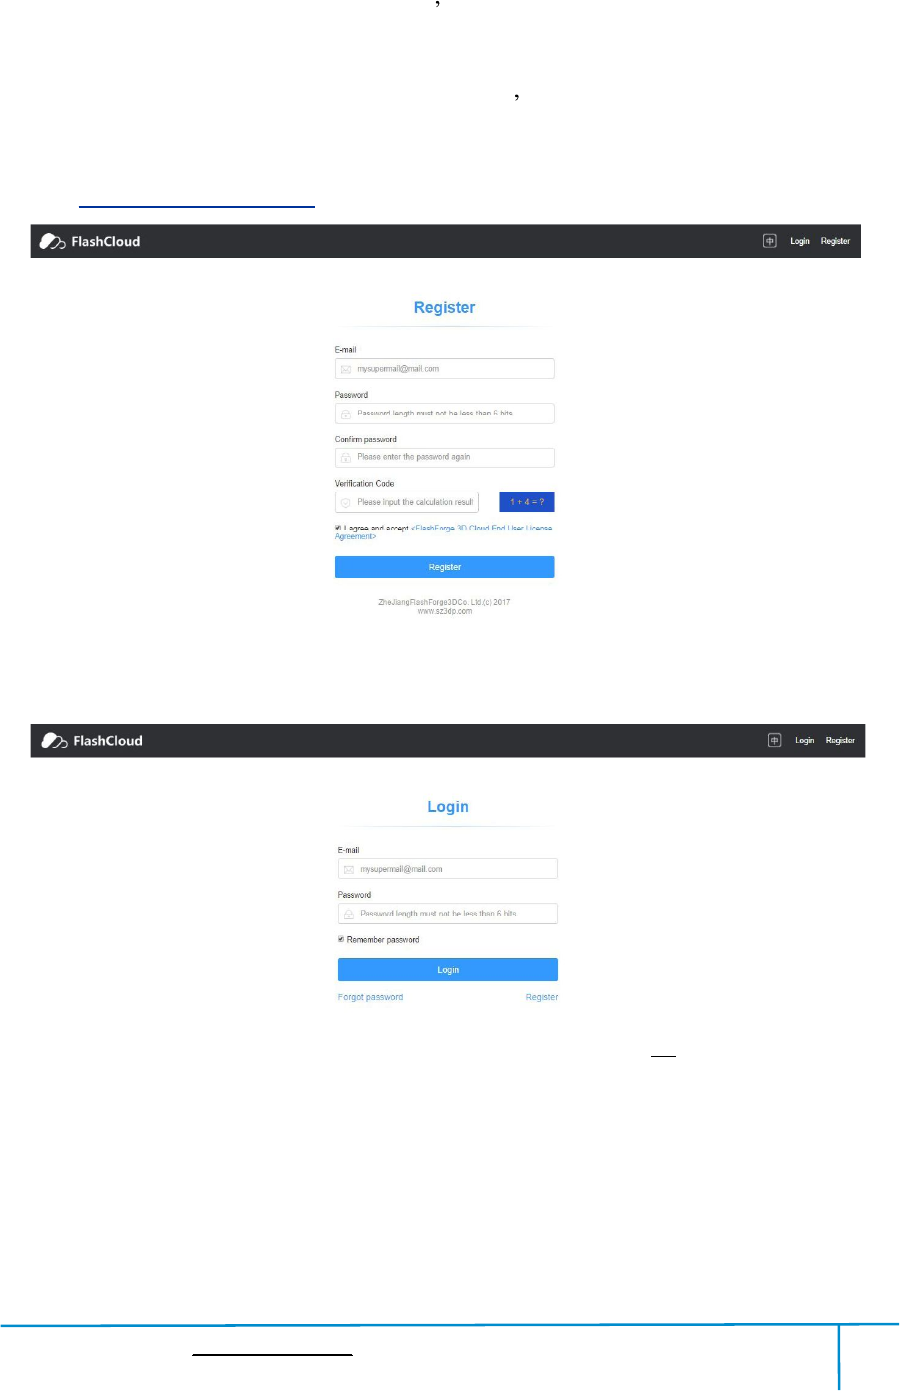
2)Register a FlashForgeCloud accountwith your computer, onwebsite:
https://cloud.sz3dp.com/
3)RegisteryouraccountonFlashForgecloud:Afteractivateyouraccountthrough
your email box, logininFlashforgecloudwith your account.
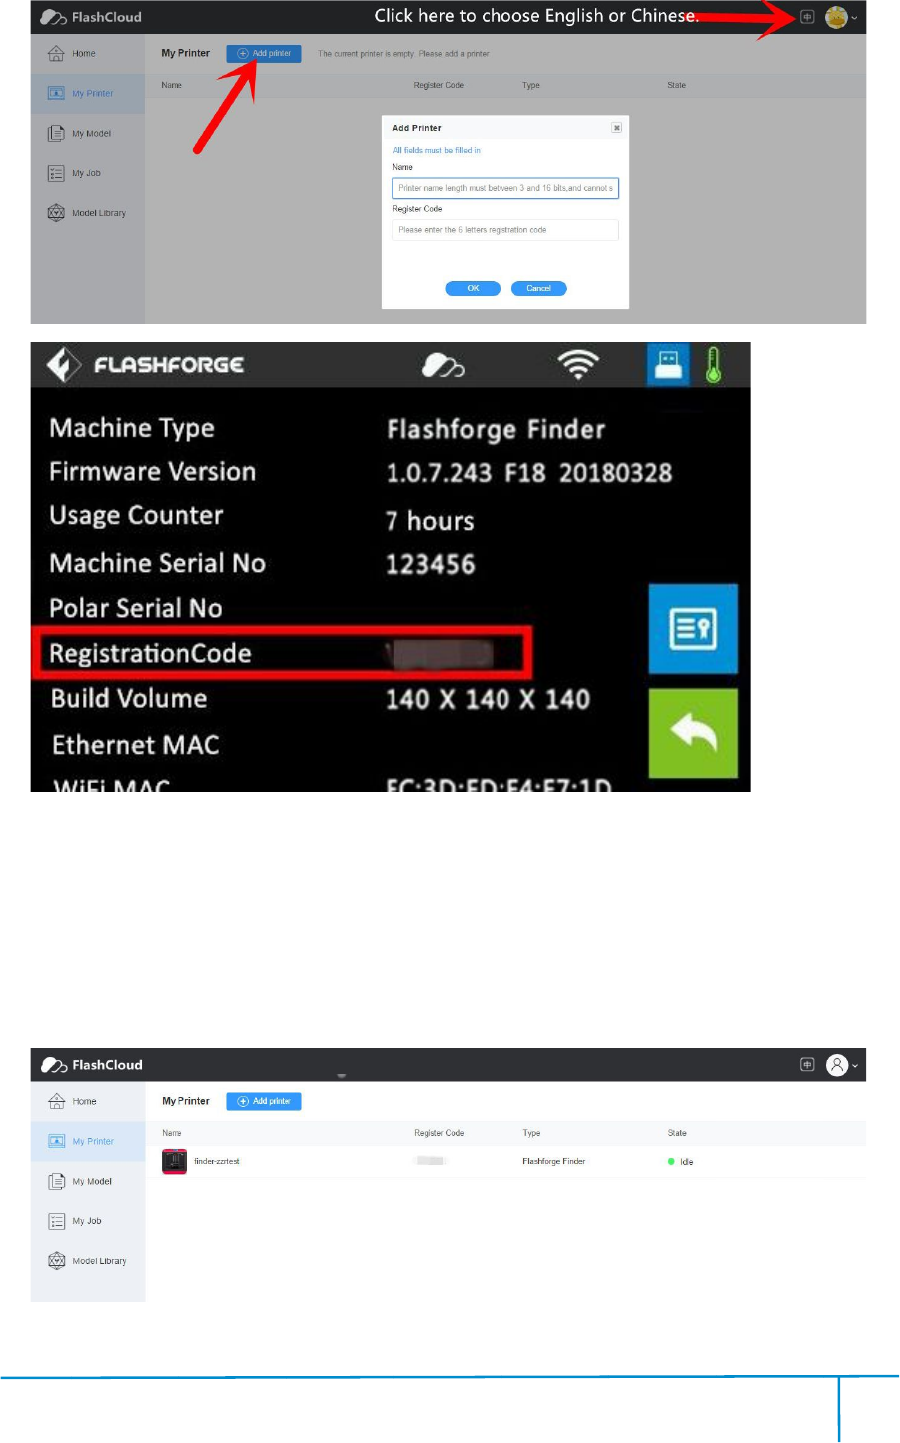
4)Afterloginin cloudwith your own account,click[My printer] click[Add printer].
InputyourPrinter'sNameandFlashcloudRegistrationCodein[Addprinter]interface.
Printer'sNameiseditandinputbyyourself,itcanhelpyouidentifyprintertype,user
name or using date.RegistrationCodeis showedin your printer's[About]interface.
Fi
nde
5)
A
Mo
r
Fl
ash
Cl
oud
m
anag
6)
C
nde
r User Guide
A
ddaprinte
r
r
ethanone
ash
forgeFi
nde
oud
connecti
on.
anag
ement
can be don
C
hoosea
m
|www.flashf
o
r
complet
ed
oftheFl
ash
nde
r,Invent
o
on.
Using
F
can be don
ei
m
odelfro
m
o
rge.com
4
ed
as show
ed
ash
forgeprin
t
o
rII/Invento
rII
F
lashForge
C
n batches.
m
cloudm
ode
4
66
ed
inthe pict
u
t
erscanbe
rII
S,A
dven
C
loud
conn
ode
llibrary
4
u
re below.
addedtoa
F
dven
turer3prin
t
conn
ectiontop
ri
orupload
4
0
F
lashForge
t
ersall
suppo
ri
nt,printe
r
yourown
0
0-699-1063
Cloud
accou
suppo
rtFl
ashFo
r
sandprint
model(stl
fi
accou
nt,
ashFo
rge
jobs
fi
le),
Fi
nde
cli
ck
7)
Se
Cli
ck
Tim
e
prin
t
j
ob any
nde
r User Guide
ck
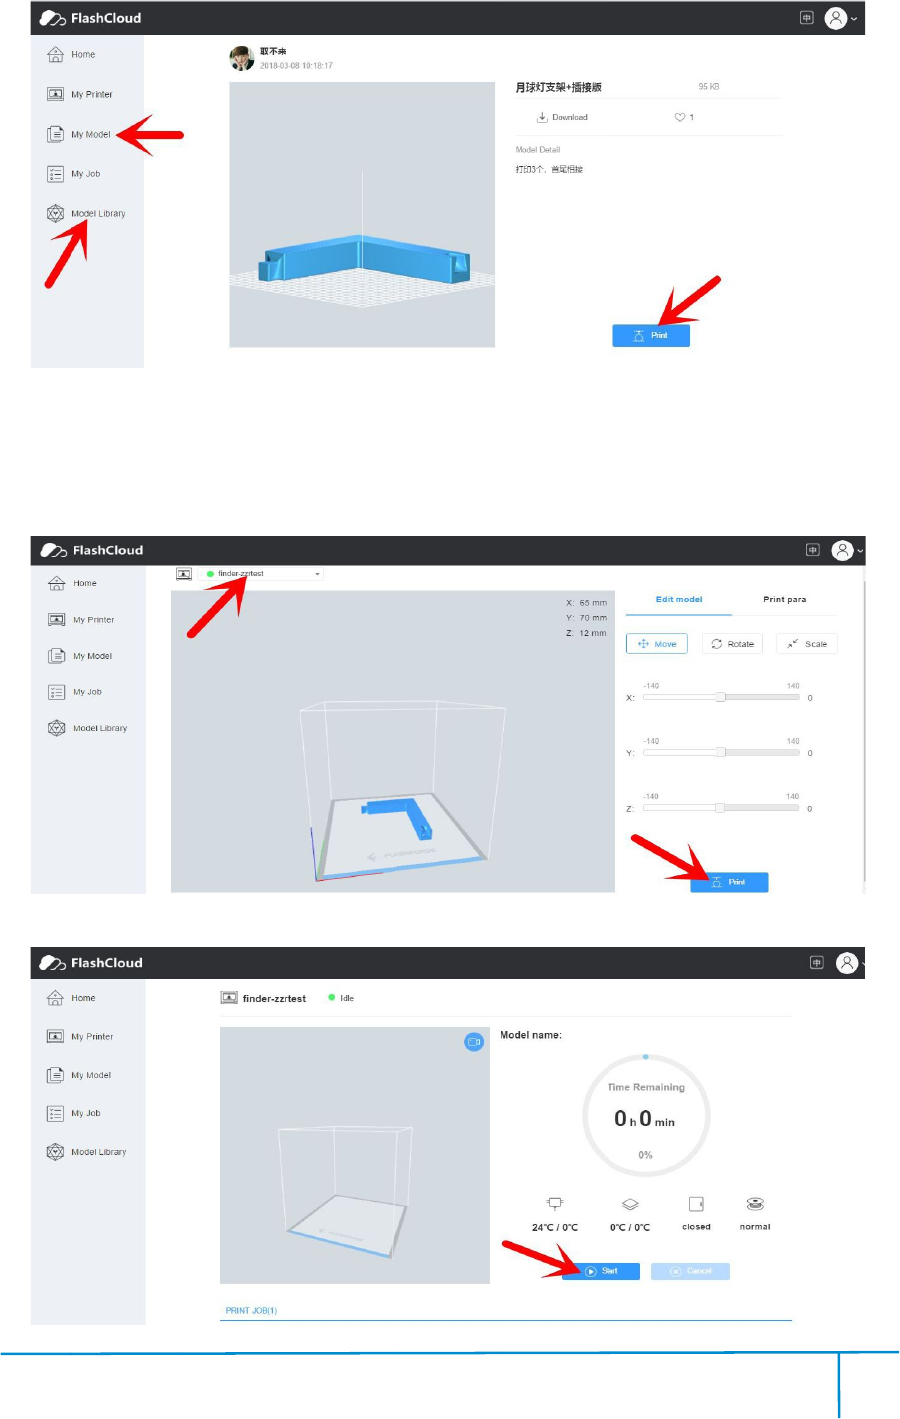
[Print],ent
e
Se
lectthe pr
i
ck
[Start]to s
t
e
remaini
ng
t
ingdetails
ob any
timedu
ri
|www.flashf
o
e
rthe edit
m
i
nterforthi
t
art printi
ng,
ng
forthis
p
areallsho
w
ri
ng printi
ng p
o
rge.com
4
m
odelinte
rf
s printj
ob o
ng,
the selec
t
p
rintjob,
i
w
edinthis
ng p
rocess.
4
67
rf
aceto edit
m
ob o
nleft
uppe
t
ed printer
w
i
nstantext
r
webpage,
y
4
m
odel.
uppe
rpositi
on, C
w
illstart pr
i
r
uder/build
p
y
oucanal
so
4
0
on, C
lick[Prin
t]
i
nting auto
m
p
latetem
pe
so
pauseor
ca
0
0-699-1063
t]
.
m
atically.
pe
ratureor
o
ca
ncelthis
p
o
ther
p
rint
Fi
nde
7.2.
5
1
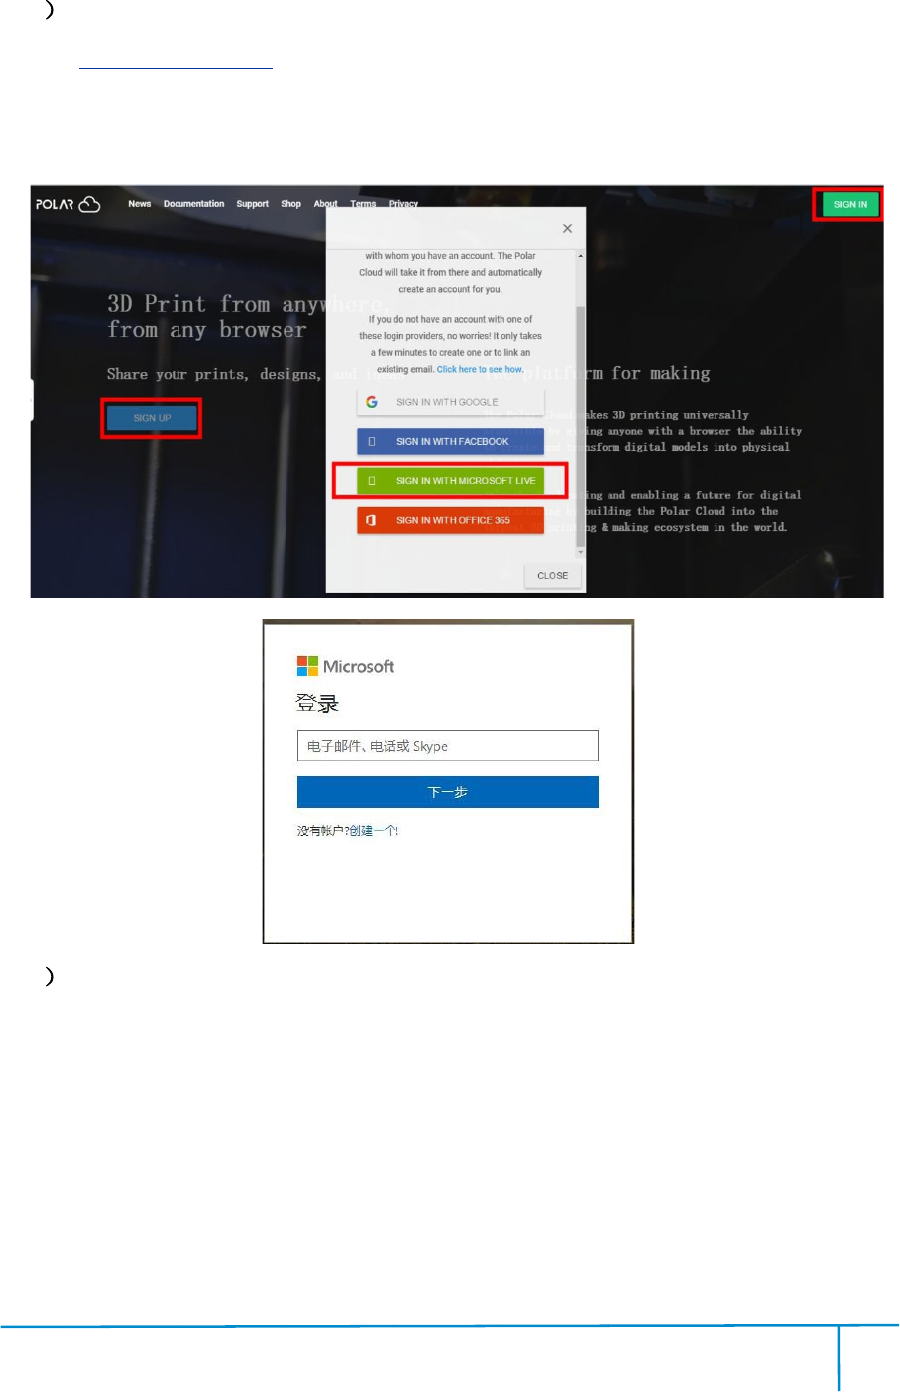
R
Reg
i
li
ve o
2
En
the
r
dr
ag do
nde
r User Guide
5
Printfro
m
R
egister
a Po
https://pol
a
i
ster your
accou
ve o
ptiona
s an exa
En
terth
e Po
r
edicon(on
ag do
wnt
he page
|www.flashf
o
m
PolarCl
a Po
larClou
d accoun
a
r3d.com/
accou
nt usi
ng one o
s an exa
mpl
e, c
e Po
larClou
d h
theright
uppe
he page
tobo
tt
o
rge.com
4
oud con
n
ec
d accoun
t
wi
ng one o
ft
he
e, c
reate you
r
d h
om
epage a
uppe
rcorner
tt
om
, copy do
4
68
ec
tion
wi
th your co
m
he
fourfollo
w
r
new Polar
epage a
fter you c
re
showedin
, copy do
wn your
E
4
m
puter, on
w
w
ing optio
n
Cl
oud acco
re
ate your P
o
thepicture
E
mail addre
4
0
w
ebsite:
n
s,takethe
oud acco
unt.
o
larCl
oud ac
below),th
en
ss and you
r
0
0-699-1063
thirdmicr
oso
oud ac
count.
en
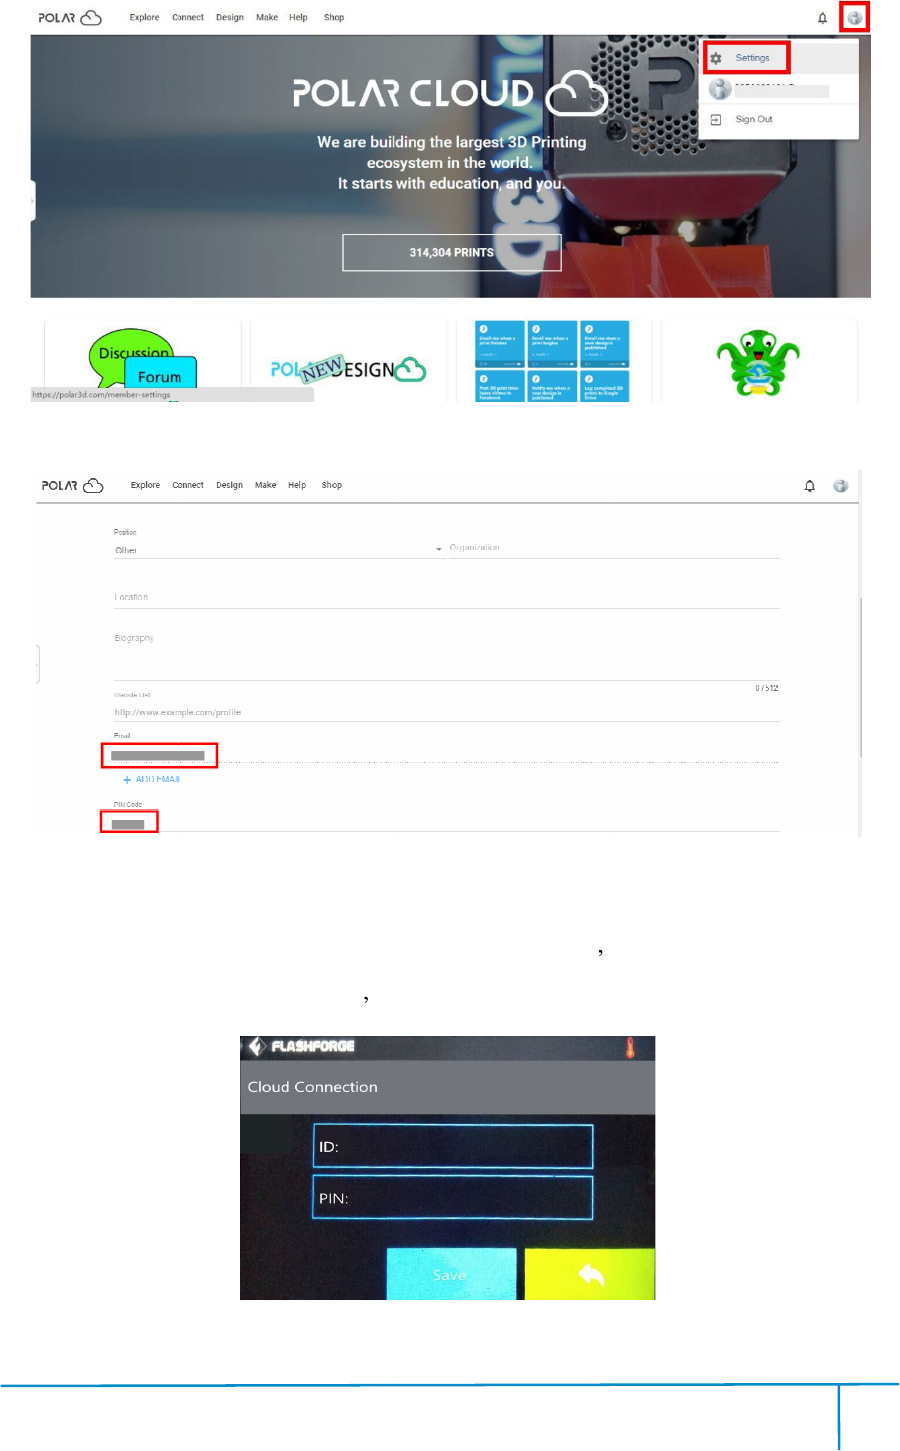
Tap[se
tti
r
PINC
ode.
oso
ft
Tap
tti
ngs],
Fi
nde
C
onnec
Tap
I
npu
nde
r User Guide
onnec
tthepri
[Tools]-[
Se
npu
t yourpola
|www.flashf
o
ntertointe
r
Se
ttings]-[
Po
a
r 3D clou
d account
o
rge.com
4
r
netwith
W
Po
larCloudc
d account
s
E
4
69
W
iFi ;
onnection]
E
mail addre
4
onprinter
s
ss(asID) a
n
4
0
s
touch scr
e
n
d PINC
ode, Tap
0
0-699-1063
e
en;
ode, Tap
[
save
save
] .
Fi
nde
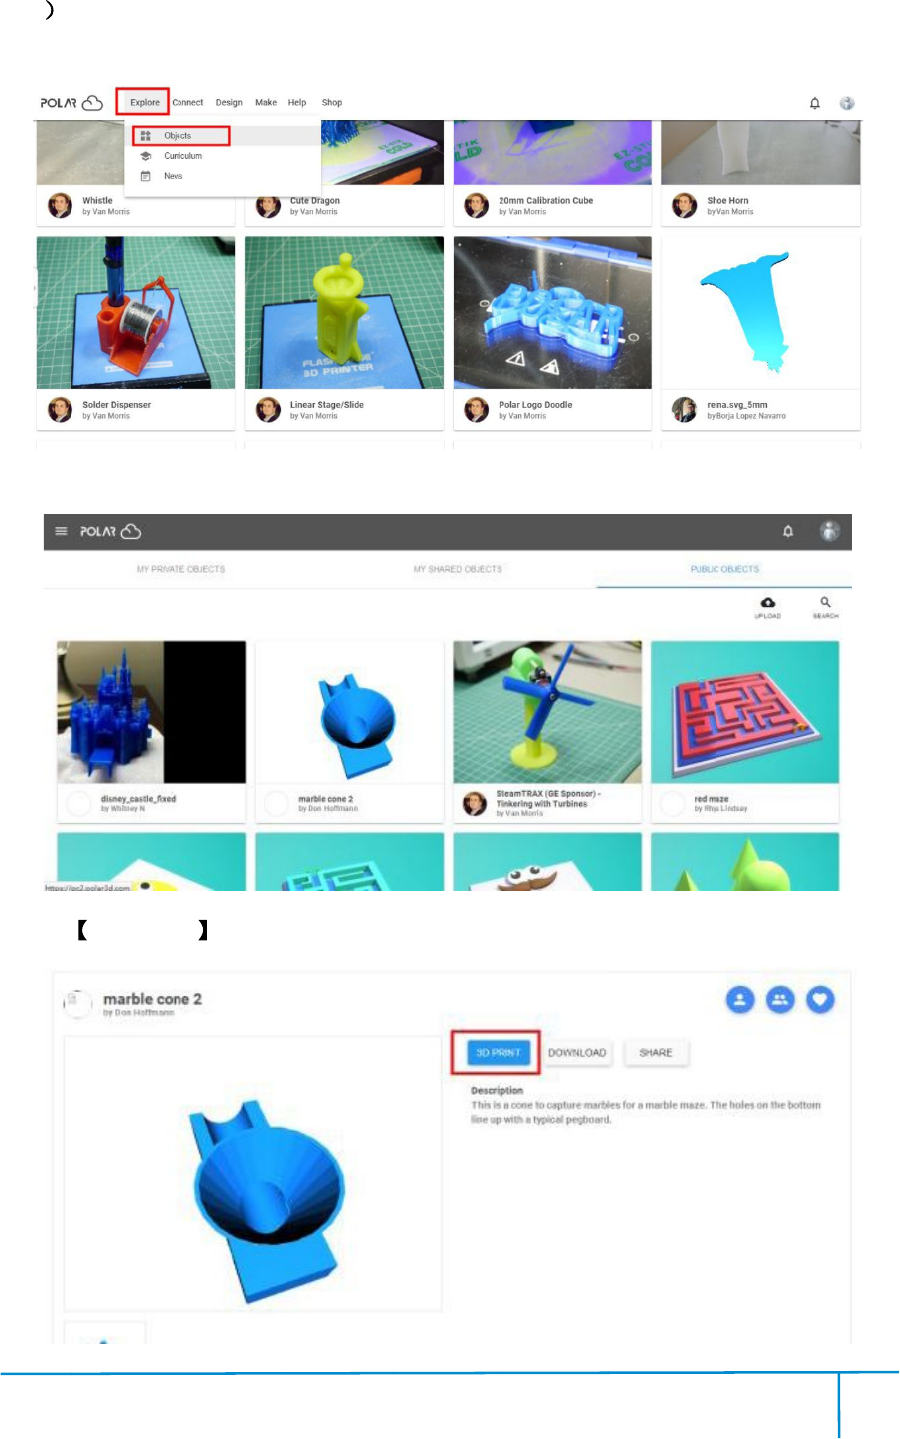
3
En
left
uppe
Ent
e
Tap
nde
r User Guide
En
terth
e Po
uppe
r cor
ne
e
rthe objec
t
3DPRI
NT
|www.flashf
o
e Po
larClou
d h
ne
r showedi
n
t
s page, c
hoose a
NT
button
o
rge.com
4
d h
omepage
w
n
thepictur
e be
hoose a
mod
e
4
70
w
ith your c
o
e be
low,th
e
e
l you areg
o
4
o
mputer
aga
e
nTap [Ob
j
o
ingto pri
n
4
0
aga
in.Tap[
Exp
ects]
n
t.
0
0-699-1063
Exp
lore] on t
he
he
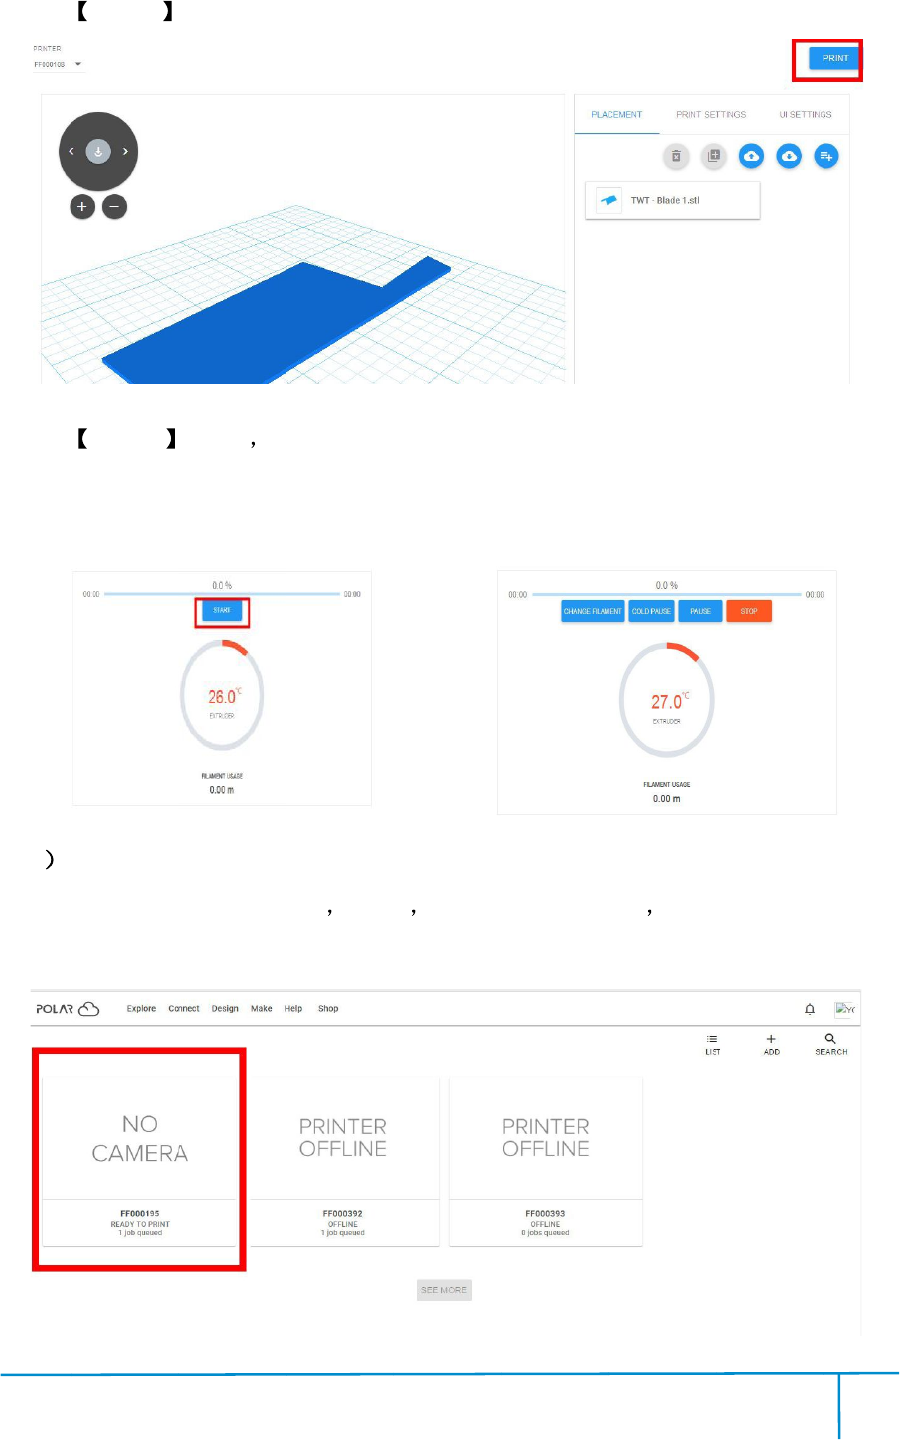
Fi
nde
Tap
Tap
do
w
incl
u
4
Mo
Fl
ash
all
supp
nde
r User Guide
PRINT
START
w
nloadin
g co
u
dingC
hange F
Mo
retha
n one o
ash
forgeGui
de
supp
ortPol
a
|www.flashf
o
button
button t
he p
g co
mplet
ed,you can
hange F
ilamen
t
n one o
fthe F
l
de
rIIS/Gui
de
a
r 3DClo
ud connec
o
rge.com
4
he p
rinter st
ed,you can
inter
t
, Pause, St
op e
l
ashforgep
ri
de
rII Fin
der
ud connec
ti
on.
4
71
t
arts downl
oad
a
ctivelyo
pe
op e
tc.
ri
nterscan
b
der
Invent
o
on.
4
oad
ingprin
ti
pe
ratethepr
i
b
e added t
o a
o
rIIS/Invent
4
0
ti
ngfileaut
o
i
nter on yo
u
o a
Polar 3D
t
orII A
dve
0
0-699-1063
o
matically,
af
u
r compute
r
Cl
oud accoun
dve
nturer3pri
n
af
ter
r
,
oud accoun
t,
n
ters
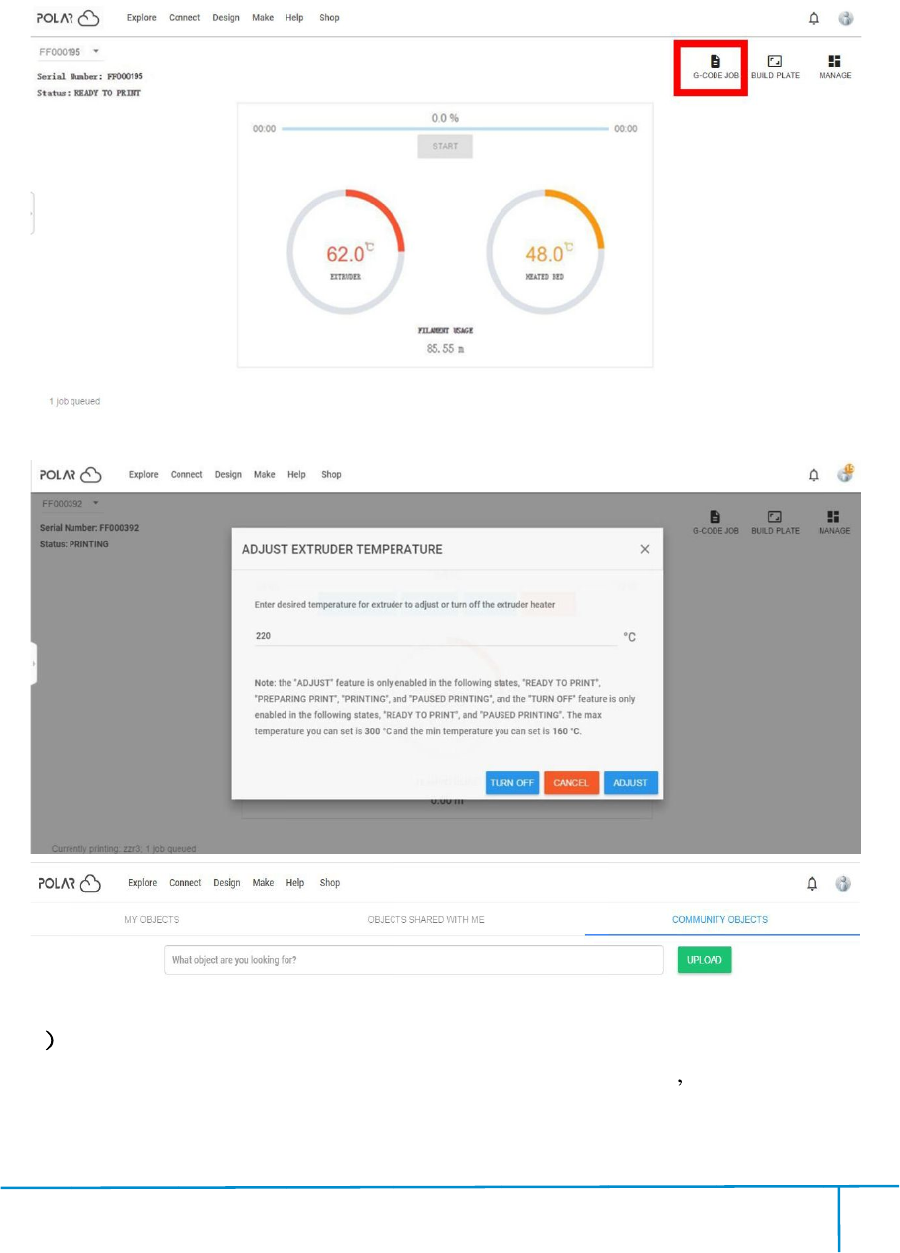
Fi
nde
5)
B
upl
oad
prin
t
Y
ou can a
6
D
p
ri
fr
nde
r User Guide
B
yusing
Po
oad
ingyou
r
t
er and pri
n
ou can a
ls
o ad
D
eleteap
ri
ri
nterunde
r
o
m your
cu
|www.flashf
o
Po
lar3DCl
r
ownsli
ced
n
tingwill
be s
o ad
justtheex
tr
ri
nterfrom
a
r
anotherp
o
cu
rrent-using
po
o
rge.com
4
l
oudplatfo
r
ced
printfil
es.
be s
tarted au
t
tr
udertem
pe
a
polarclou
d
o
larclouda
c
po
larcl
oud
4
72
r
m,you
can
es.
Printfile
s
t
omaticall
y.
pe
rature, or
exp
d
account.(
If
c
count,ple
as
oud
account,
o
4
can
create
G
s
canbetr
a
exp
loreoth
e
If
someone
as
emake
su
o
rothersc
an
4
0
G
-CODE
p
a
nsferredt
o
e
r cloudf
unc
elsewants
su
reyou v
de
an
not use th
0
0-699-1063
p
rintingj
ob
o
correspon
unc
tions.
tousethe
sa
de
letethep
ri
e p
rinter.)
ob
by
ding
sa
me
ri
nter
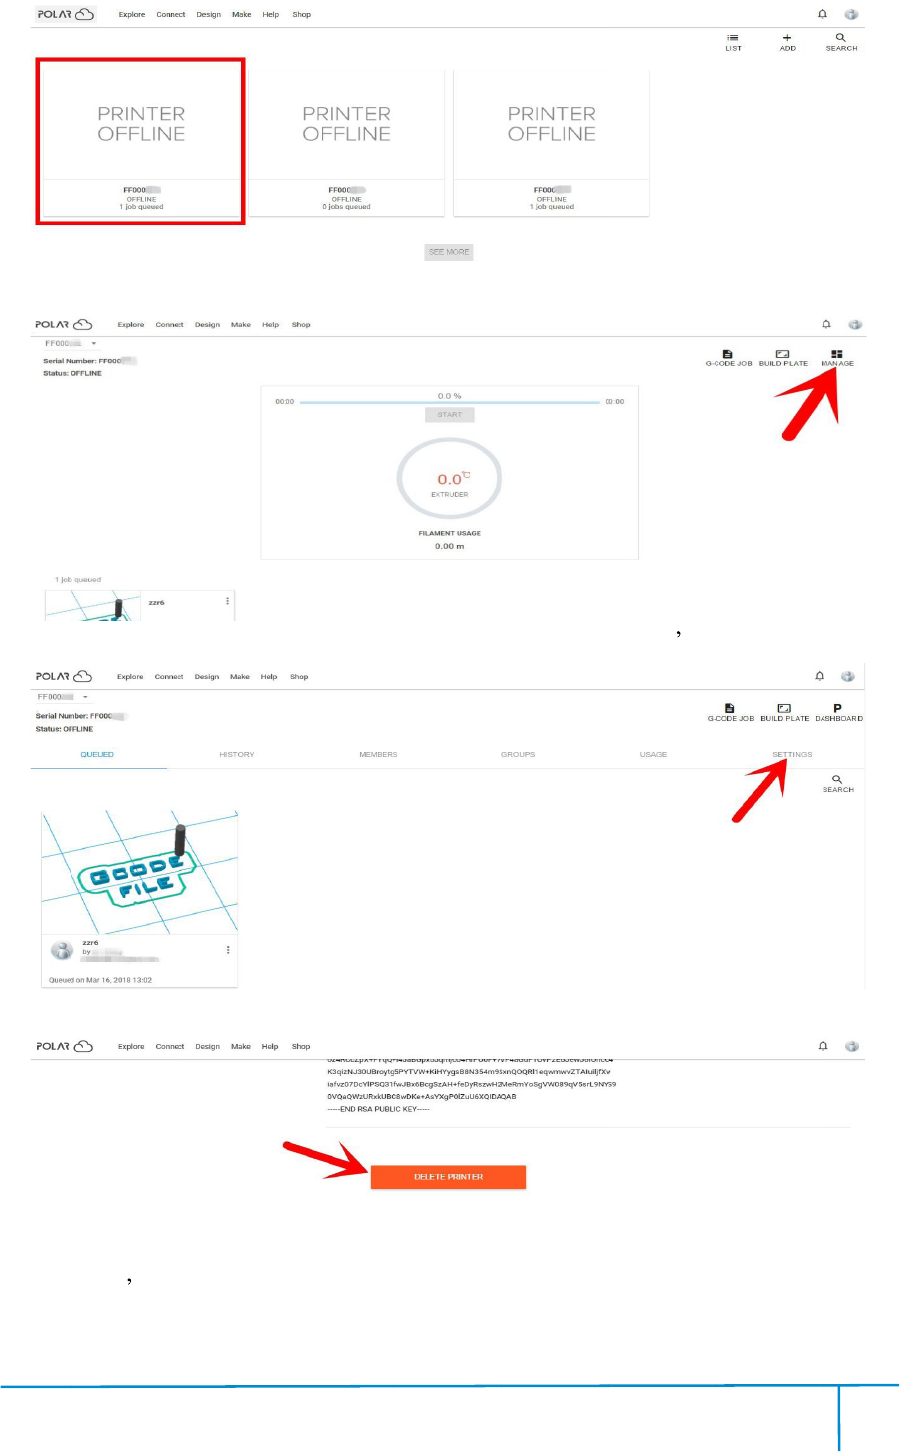
Fi
nde
Cli
ck
Cli
ck
Then c
Fi
na
Aft
e
unde
nde
r User Guide
ck
theprint
e
ck
[MAN
AG
Then c
lick[
SETT
na
lly,dragt
he nex
e
ryou vco
m
unde
r hisow
n po
|www.flashf
o
e
r you want
AG
E] butt
on on
SETT
INGS]
bu
he nex
tpa
ge
m
pletedt
he
n po
lar clo
ud accoun
o
rge.com
4
to delete.
on on
therigh
t
bu
tton on th
e
ge
to bottom
do
he
abovedel
e
ud accoun
t.
4
73
t
upper posi
t
e
right
uppe
do
wn, clic
k
e
testeps,t
h
4
t
ion ofthis
uppe
r position
o
k
[DELETE
h
isprinter
c
4
0
printer sd
e
o
fthe next
w
PRINTE
c
annowbe
0
0-699-1063
e
tailsw
ebpage.
w
ebpage.
R] butt
on.
usedbyo
t
ebpage.
t
hers

Finder User Guide|www.flashforge.com 400-699-1063
74
Chapter 8SupportsandService
FlashForgeteamisonstandbyandreadytohelpyouwithanychallengesyoumayhave
withyourFinder.IftheissuesorquestionsarenotcoveredinthisUserGuide,youcan
seekfor solutions on ourofficialwebsiteor contact us viatelephone.
Therearesolutionsandinstructionstocommonissuesthatcanbefoundin
ourknowledge base. Have a lookfirst as most basic questions are answeredthere.
http://www.FlashForge.com
TheFlashForgesupportteamcanbereachedbye-mailorphonebetweentheworking
hoursof8:00a.m.to5:00p.m.PSTMondaythroughSaturday.Incaseyoucontact
usduring off-dutytime,yourinquirywill be answeredthefollowing business day.
Note:Becauseofchangingdifferentfilamenttheextrudermaybeblockaded.It s
notowingtoqualityissue,andoutsidethescopeof400hourslife.Ifusers
encounterthisproblem,pleasecontactourafter-saledepartmentandfinishclean
work accordingtotheirinstruction.
Tel 400-699-1063
QQ 2850862986 28508630002853382161
Email support@ff3dp.com
ADD No.518,XianyuanRoad,Jinhua,Zhejiang
*Whencontactingsupport,pleasehaveyourserialnumberready.The
serialnumber isa barcode onthebackofyourFinder.