Zhejiang Flashforge 3D Technology POLAR3D20 POLAR 3D PRINTER User Manual part 1
Zhejiang Flashforge 3D Technology CO., Ltd. POLAR 3D PRINTER part 1
Contents
- 1. user manual part 1
- 2. user manual part 2
user manual part 1
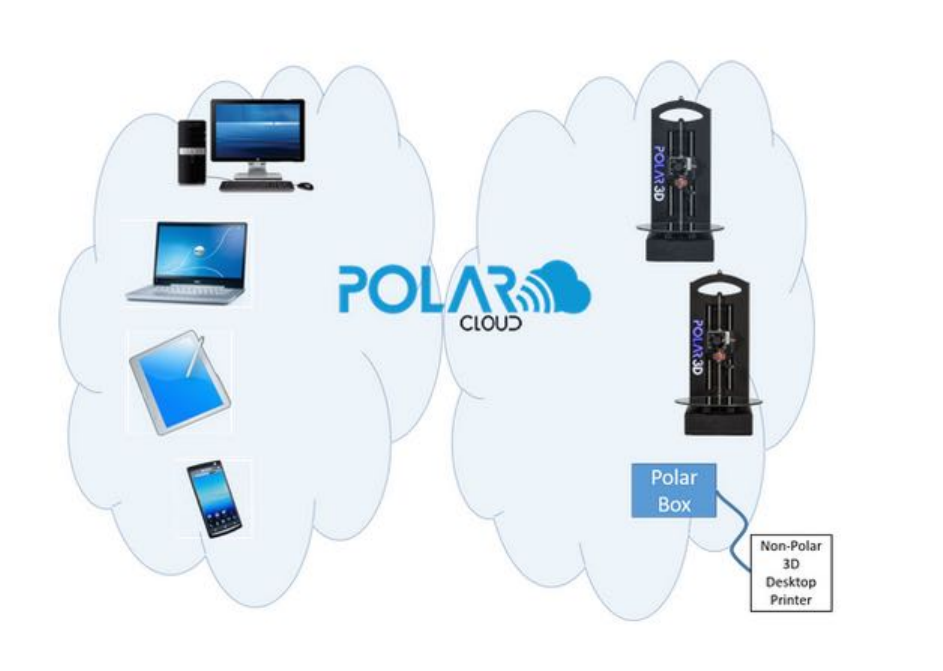
Polar 3D Implementation Guide
Maximizing the Polar 3D Environment
Kristin Hubner
April, 2017
Copyright ©2017, Kristin Hubner.
MakerBot and The Replicator are trademarks of MakerBot Industries, LLC.
Simplify3D is a trademark of Simplify3D LLC.
Contents
List of Figures .............................. v
1 Get connected to the Polar Cloud ................ 1
1.1 Connecting the printer to the Polar Cloud via WiFi ...... 3
1.2 Connecting the printer to the Polar Cloud via Ethernet cable .19
1.3 Network issues and solutions ................... 20
1.3.1 Static IP address for printer ............... 21
1.3.2 MAC address for the printer ............... 23
1.3.3 Open HTTP ports .................... 24
1.3.4 Solving network connectivity problems ......... 25
2 Start printing ............................. 27
2.1 Load filament ........................... 28
2.2 An object to print ........................ 32
2.2.1 Find an object in the Polar Cloud ............ 33
2.2.2 Experiment with adjusting object placement and print
settings .......................... 37
2.3 Start the print job ........................ 43
2.4 Monitor the printing ....................... 44
3 Understanding the Polar 3D 2.0 Environment ........ 46
3.1 The process of 3D design and printing ............. 48
4 The Polar Cloud ........................... 51
4.1 Polar Cloud account ....................... 52
4.1.1 Creating your Polar Cloud account ........... 53
4.1.2 Polar Cloud account settings ............... 56
4.1.3 Polar Cloud account dashboard ............. 60
4.2 Objects in the Polar Cloud .................... 61
i
CONTENTS ii
4.2.1 Uploading and downloading objects ........... 65
4.2.2 Sharing objects ...................... 71
4.2.3 Searching for objects ................... 77
4.2.4 Object description, print recommendations, photos .. 80
4.2.5 Deleting an object .................... 82
4.2.6 Object LIKEs....................... 82
4.3 Creating objects using CAD software within the Polar Cloud .84
4.4 Groups in the Polar Cloud .................... 85
4.4.1 Creating a group ..................... 86
4.4.2 Group settings ...................... 88
4.4.3 Inviting Polar Cloud members to join a group ..... 92
4.4.4 Requesting to join a group ................ 98
4.4.5 Sharing objects within a group ............. 98
4.4.6 Sharing printers within a group .............102
4.4.7 Searching for a group ...................106
4.5 Managing and sharing printers ..................109
4.5.1 Adding a printer to your Polar Cloud account .....111
4.5.2 Changing printer ownership ...............112
4.5.3 Printer settings: name, description, and location of
printer ...........................115
4.5.4 Searching for a printer ..................118
4.5.5 Allowing access to a printer ...............118
4.5.6 Managing the printer queue ...............121
4.5.7 Printer job history ....................126
4.5.8 Updating the printer ...................129
4.5.9 Printer local web interface accessed from the Polar Cloud131
4.6 Printing through the Polar Cloud ................132
4.6.1 The build plate screen (3D PRINT), and adjusting your
print ............................135
4.6.2 Submit your print job to a printer and begin printing .141
4.6.3 Printer dashboard control buttons ............142
4.6.4 Print queues in the Polar Cloud .............146
4.6.5 Real-time video or updated snapshots of jobs in-progress158
4.7 Notifications in the Polar Cloud .................159
4.7.1 Responding to an invitation notification ........161
4.8 Viewing other Polar Cloud members ..............165
4.9 Collaborating through the Polar Cloud .............167
4.10 Navigating through the Polar Cloud user interface .......168
CONTENTS iii
4.10.1 Navigating the printers ..................169
4.10.2 Navigating the objects ..................172
4.10.3 Navigating the groups ..................176
5 The printer local web interface ..................177
5.1 Navigating through the printer local web interface .......180
6 CAD software – create your own objects ............187
7 STEAMtrax curriculum ......................190
7.1 STEAMtrax Star Portal .....................191
7.1.1 STEAMtrax Star Portal teacher dashboard .......192
7.1.2 STEAMtrax module teacher view ............194
7.1.3 STEAMtrax Star Portal student dashboard ......198
7.1.4 STEAMtrax module student view ............199
7.2 STEAMtrax user import .....................200
7.3 STEAMtrax user password management ............201
8 Operational tips ...........................206
8.1 Positioning objects ........................206
8.1.1 Position objects towards the edge of the build plate ..207
8.1.2 Print multiple small objects at once ...........207
8.1.3 Avoid straight-line extrusion runs through the center
of the build plate .....................208
8.2 Adhesion and adhesion problems ................209
8.2.1 Making the build plate sticky ..............210
8.2.2 First layer height calibration ...............211
8.2.3 First layer print speed and thickness ..........212
8.2.4 Temperature and adhesion ................212
8.2.5 Brims, rafts, and skirts ..................213
8.3 Removing objects from the build plate .............218
8.4 Filament ..............................219
8.4.1 Types of filament .....................220
8.4.2 Loading and unloading (and changing) filament ....223
9 Updating the printer ........................226
10 Printer maintenance .........................230
10.1 Cleaning your build plate .....................230
CONTENTS iv
10.2 Lubrication ............................231
10.3 Clean filament drive gear .....................231
10.4 Replace the nozzle on the extruder ...............232
10.5 Replace a corrupted SD card ...................232
10.6 Printer calibration ........................233
11 Troubleshooting ...........................237
11.1 Printer LED lights ........................237
11.2 Clogged or leaky nozzle ......................239
11.3 Flaws in printed objects .....................239
11.4 Camera color balance .......................242
Appendices ................................244
A Polar3D printer specification sheet ...............244
B Polar3D printer diagram ......................245
C Connecting the printer directly to your device ........246
C.1 Wireless direct connection and printing .............247
C.1.1 Wireless direct connection ................248
C.1.2 Wireless direct printing ..................250
C.2 Cable direct connection and printing ..............254
C.2.1 Cable direct connection ..................256
C.2.2 Cable direct printing ...................267
Glossary ..................................269
Index ....................................282
List of Figures
1.1 Printer in shipping box ...................... 2
1.2 Back of printer: serial number and spool holder arm ...... 6
1.3 Mac prompt for printer hotspot WiFi password ........ 7
1.4 Use the printer’s WiFi hotspot to connect to the printer’s web
interface .............................. 8
1.5 Select local WiFi network .................... 9
1.6 Enter local WiFi password .................... 9
1.7 Local Wifi configured as network ................ 10
1.8 Printer Configured Network configuration completed ..... 10
1.9 Restart the printer for local network connection attempt ... 11
1.10 First time login to Polar Cloud ................. 13
1.11 First time classroom permissions screen ............. 14
1.12 Polar Cloud home page ...................... 14
1.13 Polar Cloud expand top menu and click PRINTERS ....... 15
1.14 Polar Cloud printers THUMBNAILS VIEW,ADD printer button .. 15
1.15 Polar Cloud ADD A PRINTER: enter make and serial number .. 16
1.16 Polar Cloud ADD A PRINTER make submenu .......... 16
1.17 Polar Cloud ADD A PRINTER security color check ........ 17
1.18 Polar Cloud ADD A PRINTER congratulations .......... 18
1.19 Polar Cloud added printer listed in THUMBNAILS VIEW ..... 19
1.20 WiFi static IP address ...................... 22
1.21 Ethernet static IP address .................... 23
2.1 Load filament onto the Polar3D printer ............. 28
2.2 Snip end of filament ....................... 29
2.3 Manual Printer Controls screen: set the temperature .... 31
2.4 Polar Cloud top menu OBJECTS tab ............... 32
2.5 Polar Cloud PUBLIC OBJECTS screen .............. 33
2.6 Searching for “calibration”onthePUBLIC OBJECTS screen .34
v
LIST OF FIGURES vi
2.7 PUBLIC OBJECTS listing of William Steele’s CALIBRATIONKEY .34
2.8 CALIBRATIONKEY object detail screen .............. 35
2.9 3D PRINT screen (build plate screen) for CALIBRATIONKEY object 36
2.10 Build plate screen: MOVE object ................. 38
2.11 Build plate screen: MOVE to center CALIBRATIONKEY ...... 39
2.12 Builld plate screen: SCALE object ................ 40
2.13 Polar Cloud check the print temperature ............ 42
2.14 Printer dashboard: job submitted to the print queue ..... 44
4.1 Polar Cloud account management drop down menu ...... 53
4.2 Polar Cloud login screen ..................... 54
4.3 Polar Cloud account access screen ................ 55
4.4 Polar Cloud home page ...................... 55
4.5 Polar Cloud account settings ................... 57
4.6 Polar Cloud account POSITION .................. 58
4.7 Polar Cloud account ACTIVITY screen .............. 60
4.8 Polar Cloud top menu OBJECTS tab ............... 62
4.9 Polar Cloud PUBLIC OBJECTS screen .............. 63
4.10 Polar Cloud sample object detail screen ............. 64
4.11 Polar Cloud MY PRIVATE OBJECTS screen ............ 66
4.12 Polar Cloud object upload screen ................ 66
4.13 Polar Cloud object upload object selected ........... 68
4.14 Polar Cloud object upload progress ............... 69
4.15 Polar Cloud uploaded object build plate screen ......... 69
4.16 Polar Cloud MY PRIVATE OBJECTS screen after upload ..... 70
4.17 Polar Cloud object SHARE button Share with Members option 71
4.18 Polar Cloud object SHARE WITH MEMBERS screen ........ 72
4.19 Polar Cloud object Share with Everyone ........... 72
4.20 Polar Cloud confirm Share with Everyone action ....... 73
4.21 Polar Cloud object Share with Groups ............ 74
4.22 Polar Cloud SHARE WITH GROUPS screen ............ 75
4.23 Polar Cloud SHARE WITH GROUPS screen with FRIENDS group
selected .............................. 76
4.24 Polar Cloud PUBLIC OBJECTS screen .............. 78
4.25 Polar Cloud search for a box object ............... 79
4.26 Polar Cloud example FRIENDS group’s OBJECTS screen ..... 79
4.27 Polar Cloud object EDIT screen ................. 81
4.28 Polar Cloud OWL STATUE object detail screen .......... 83
LIST OF FIGURES vii
4.30 Polar Cloud LIKE heart is red for personally liked object ... 83
4.29 Polar Cloud OWL STATUS object’s LIKES ............ 84
4.31 Polar Cloud BlocksCAD ..................... 85
4.32 Polar Cloud top menu GROUPS tab ................ 85
4.33 Polar Cloud GROUPS screen .................... 86
4.34 Polar Cloud group create screen ................. 87
4.35 Polar Cloud MY GROUPS screen .................. 88
4.36 Polar Cloud searching PUBLIC GROUPS ............. 89
4.37 Polar Cloud sample FRIENDS group’s SETTINGS screen ..... 90
4.38 Polar Cloud example FRIENDS group SUMMARY screen ..... 93
4.39 Polar Cloud example FRIENDS group MEMBERS screen ..... 94
4.40 Polar Cloud group member invitation .............. 95
4.41 Polar Cloud group member invitation .............. 96
4.42 Polar Cloud group member invitation pending ......... 97
4.43 Sharing an object with a group ................. 99
4.44 List of objects to consider sharing with a group ........100
4.45 Selecting which objects to share with a group .........101
4.46 The shared OBJECTS in the example FRIENDS group ......102
4.47 Sharing a printer with a group ..................103
4.48 List of printers to consider sharing with a group ........103
4.49 Selecting which printers to share with a group .........104
4.50 The FRIENDS group’s shared printers ..............104
4.51 Allowing CONTROL PRINTERS access to FRIENDS group .....105
4.52 Polar Cloud SEARCH for library groups ............107
4.53 Polar Cloud: request to JOIN a group ..............108
4.54 Polar Cloud top menu PRINTERS tab ..............109
4.55 Polar Cloud PRINTERS screen in THUMBNAILS VIEW .......110
4.56 Polar Cloud sample printer dashboard screen ..........110
4.57 Polar Cloud printer CHANGE OWNER button ...........113
4.58 Polar Cloud printer PROMOTE PRINTER MEMBERS pop-up screen 113
4.59 Polar Cloud printer MANAGE tab .................115
4.60 Polar Cloud printer manage screen ...............116
4.61 Polar Cloud printer SETTINGS screen ..............116
4.62 Polar Cloud printer description and location fields .......117
4.63 Polar Cloud printer MEMBERS screen ...............119
4.64 Polar Cloud printer INVITE MEMBERS screen ..........120
4.65 Polar Cloud printer queue with two jobs queued ........121
4.66 Polar Cloud printer dashboard with two jobs queued .....122
LIST OF FIGURES viii
4.67 Polar Cloud printer dashboard with multiple jobs queued ...123
4.68 Polar Cloud print queue job edit menu .............124
4.69 Polar Cloud printer HISTORY screen ...............126
4.70 Printer history of an object ...................127
4.71 Printer history of an object: SNAPSHOT .............128
4.72 Printer history of an object: TIME LAPSE video .........128
4.73 Polar Cloud printer dashboard UPDATE button .........129
4.74 Polar Cloud printer management screen UPDATE button ....130
4.75 Polar Cloud UPDATE PRINTER confirmation screen .......130
4.76 Polar Cloud printer Status: UPDATING PRINTER .......131
4.77 Polar Cloud build plate screen while object is loading .....134
4.78 Polar Cloud build plate (3D PRINT)screen ...........135
4.79 Polar Cloud build plate MOVE of object .............137
4.80 Polar Cloud build plate PRINT SETTINGS ............138
4.81 Polar Cloud build plate UI SETTINGS ..............140
4.82 Polar Cloud build plate screen: progress loading job to printer 142
4.83 Printer dashboard: job submitted and START button active ..143
4.84 Printer dashboard: control buttons active during job print ..144
4.85 Polar Cloud printer dashboard ADJUST EXTRUDER TEMPERATURE
screen ...............................145
4.86 Printer dashboard: printer owner’s view of job queue .....147
4.87 Printer dashboard: printer owner’s job modification menu ...148
4.88 Printer dashboard: a member queued job waiting while an-
other member’s job prints ....................149
4.89 Printer dashboard: member options for editting their own
queued job .............................150
4.90 Two jobs in the print queue ...................151
4.91 Edit a job in the print queue ...................152
4.92 Build plate screen: load another object from queue ......153
4.93 Polar Cloud LOAD OBJECTS FROM QUEUE screen ........153
4.94 Selecting which objects to load from the print queue ......154
4.95 Build plate: additional queued object loaded ..........155
4.96 Build plate: choose whether merged job replaces original job
or becomes a new job .......................156
4.97 Merged job present in print queue ................157
4.98 Remove redundant jobs from the print queue ..........157
4.99 Polar Cloud notifications .....................160
4.100Polar Cloud notifications: three pending ............160
LIST OF FIGURES ix
4.101Polar Cloud invitations ......................161
4.102Polar Cloud ACCEPT a group invitation .............162
4.103Polar Cloud confirmation of joining a group ..........163
4.104Polar Cloud SUMMARY display of group upon accepting invita-
tion to join ............................163
4.105Polar Cloud: invitation to manage a printer ..........164
4.106Polar Cloud confirmation of printer access ...........164
4.107Polar Cloud object detail, by Van Morris ............165
4.108Polar Cloud member Van Morris ................166
4.109Polar Cloud top menu ......................169
4.110Polar Cloud PRINTERS list view screen .............170
4.111Polar Cloud printer DASHBOARD screen ..............171
4.112Polar Cloud printer management screen .............172
5.1 Polar Cloud printer dashboard shows LOCAL UI tab ......178
5.2 Printer local web interface as viewed from Polar Cloud ....179
5.3 Printer local web interface Print File (Project Details)
screen ...............................181
5.4 Printer local web interface Controls screen ..........182
5.5 Printer local web interface Calibration screen ........182
5.6 Printer local web interface Camera screen ............183
5.7 Printer local web interface Network screen ...........184
5.8 Printer local web interface Update screen ............186
5.9 Printer local web interface Restart screen ...........186
8.1 Polar Cloud build plate PRINT SETTINGS ............215
8.2 Polar Cloud build plate Support .................216
8.3 Polar Cloud build plate Platform Adhesion Type .......217
8.4 Polar Cloud build plate Skirt Settings ............218
8.5 Loading filament onto the Polar3D printer ...........223
9.1 Polar Cloud printer dashboard UPDATE button .........226
9.2 Polar Cloud printer management screen UPDATE button ....227
9.3 Printer local web interface shows Update tab ..........227
9.4 Printer update description and confirmation screen ......228
11.1 Printer camera color balance gets strange ............242
B.1 Polar3D printer diagram .....................245
LIST OF FIGURES x
C.1 Printer local web interface network status ...........249
C.2 Printer local web interface Project Details screen ......251
Chapter 1
Get connected to the Polar
Cloud
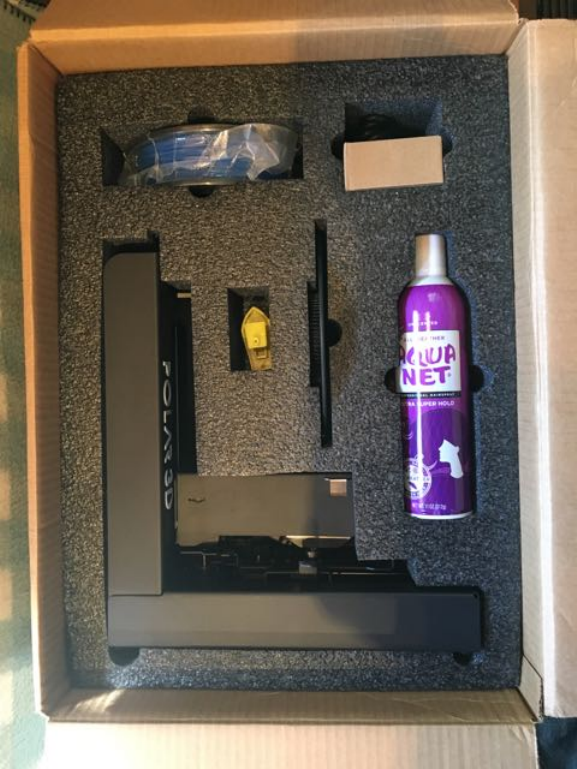
When you open up your printer shipping box, you will see con-
tents such as shown in Figure 1.1: the printer frame (with print
head mounted), a spool of (blue) PLA filament, a power adapter
and cord, a can of Aqua Net hair spray, a build plate,andasam-
ple object test-printed on this printer at the factory (namely, a
yellow boat).
There are two ways to setup your Polar3D printer to connect
through a local network to the Polar Cloud:
1. Wireless (WiFi): see Section 1.1.
2. Ethernet cable: see Section 1.2
Setting up your Polar3D printer as a network printer con-
nected to the Polar Cloud is strongly recommended, as it per-
mits full access to the power of the Polar Cloud interface and
features. However, for times when you don’t have an Inter-
net connection (or even access to a local network), the Polar3D
1
CHAPTER 1. GET CONNECTED TO THE POLAR CLOUD 2
printer can instead be controlled directly from your device for
printing: see Appendix C.
Figure 1.1: Printer in shipping box
CHAPTER 1. GET CONNECTED TO THE POLAR CLOUD 3
1.1 Connecting the printer to the Polar Cloud
via WiFi
Overview of getting your printer connected to the Polar Cloud
via WiFi:
Details on getting your printer connected to the Polar Cloud
CHAPTER 1. GET CONNECTED TO THE POLAR CLOUD 4
via WiFi:
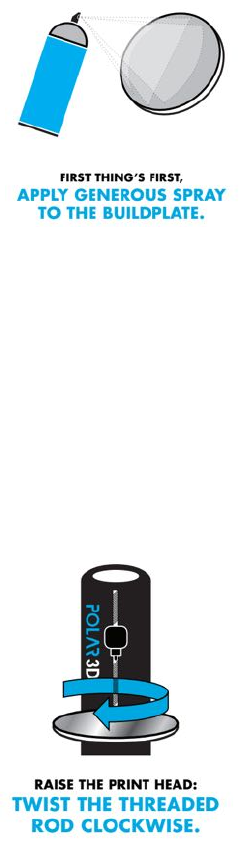
1. Unpack the build plate; it is a mirrored glass
disk, that will arrive detached from the printer,
shipped in its own slot in the foam padding ma-
terial.
Apply a generous quantity of Aqua Net Extra
Hold hair spray (included in the shipping box with
your Polar3D printer) to the build plate of your
new printer. You should apply a smooth and heavy
coat, so that the surface looks milky; for a video demonstration,
see:
https:/www.instagram.com/p/BJBaWwrjCwF/
This will put a slightly sticky, but water soluble, layer on
the build plate, giving better adhesion when objects are print-
ing.
2. The printer arrives in its shipping box with the
print head completely lowered, and the build plate
(which is made of mirrored glass) not installed on
the printer build plate shuttle.Youwillneedtoraise
the print head in order to have room to place the
build plate on the printer build plate shuttle.
Twist the threaded Zrodclockwise to raise the
print head. Raising the print head one to two inches
will give you room to install the build plate.
After you have unwrapped the build plate and
prepared its surface by applying a coat of hair spray (see above),
and raised the print head to make room for installing the build
CHAPTER 1. GET CONNECTED TO THE POLAR CLOUD 5
plate, you are ready to install the build plate on the printer
build plate shuttle.
The bottom center of the build plate has a gear affixed. Place
the build plate so that the center of the gear seats over the
bearing on the build plate shuttle, and the gear teeth engage
with the geared axle of the printer build plate shuttle.
Hint: pull the build plate shuttle out towards the front of the
printer to give yourself more access. Tip the build plate slightly
and engage the gear on its bottom with the drive gear on the
shuttle; then push the build plate down onto the shuttle so that
it seats onto the center bearing of the shuttle.
3. Insert the power cord into the adapter, and
the adapter plug into your Polar3D printer. Note:
Do not force the adapter plug; it will not be flush
with the printer.
Plug in to a power outlet.
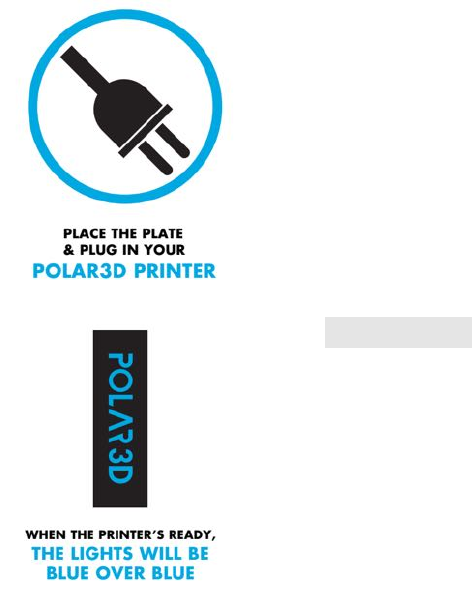
4. When the printer has finished powering up,
the POLAR3D LED lights along the side of the
printer will be entirely blue.
CHAPTER 1. GET CONNECTED TO THE POLAR CLOUD 6
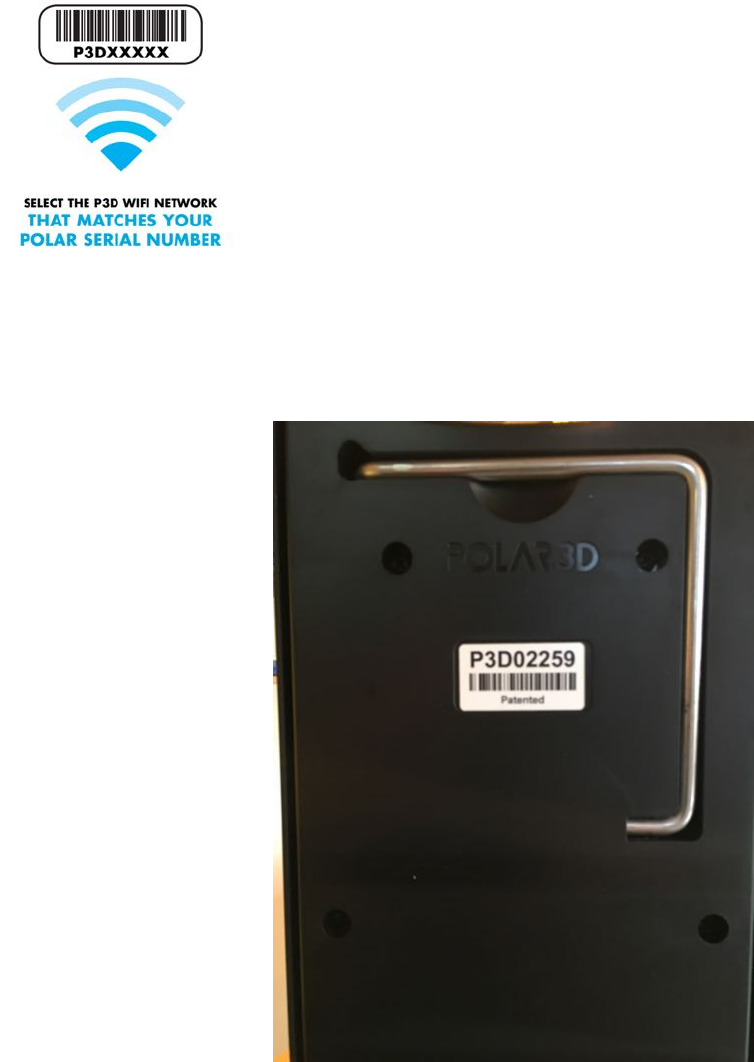
5. From your device (computer, tablet, or
phone), select its WiFi network controls. From the
list of WiFi networks your device displays, select the
network named after your printer’s serial number, as
found on the back of the printer (see Figure 1.2); for
example, “P3D02259-WIFI”. You will be prompted
for a password: that password is the 8-character se-
rial number consisting of P3D and five digits, in this
example “P3D02259”; (Figure 1.3 shows an example of entering
this password on a Mac computer).
Figure 1.2: Back of printer: serial number and spool holder arm
CHAPTER 1. GET CONNECTED TO THE POLAR CLOUD 7
Figure 1.3: Mac prompt for printer hotspot WiFi password
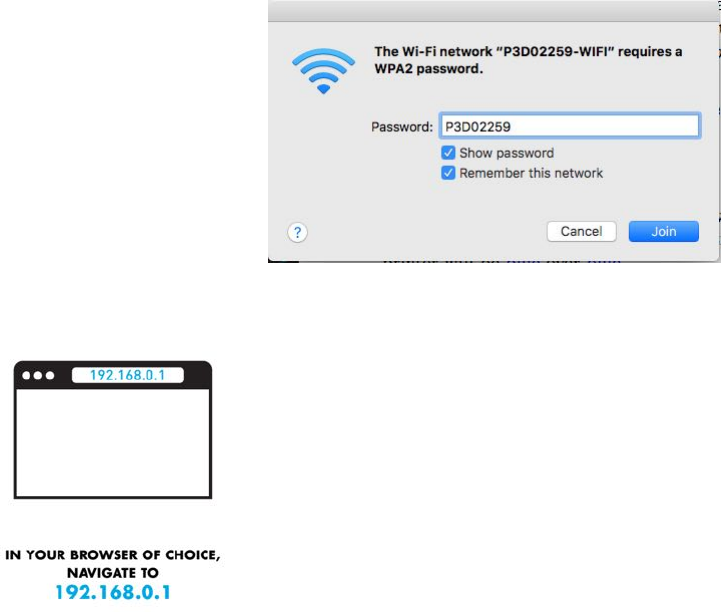
6. In your browser (Chrome, Internet Explorer,
Safari, Firefox, etc.), enter 192.168.0.1 into the
navigation bar. You are now connected to the
printer and should see the printer’s web interface,
as in Figure 1.4.
At this stage, in the printer web interface, note
that there is no blue highlighted network shown un-
der Configured Network, meaning that the printer
is not (yet) connected to any local WiFi and through
that to the Internet, but rather is in HotSpot mode. (Aside:
The Polar3D WiFi listed, which your printer is not on, is the
Polar 3D corporate WiFi.) Once you connect to your site’s lo-
cal WiFi network, then instead under Configured Network you
will see your local WiFi highlighted in blue (seen later in Figure
1.7).
CHAPTER 1. GET CONNECTED TO THE POLAR CLOUD 8
Figure 1.4: Use the printer’s WiFi hotspot to connect to the printer’s web
interface
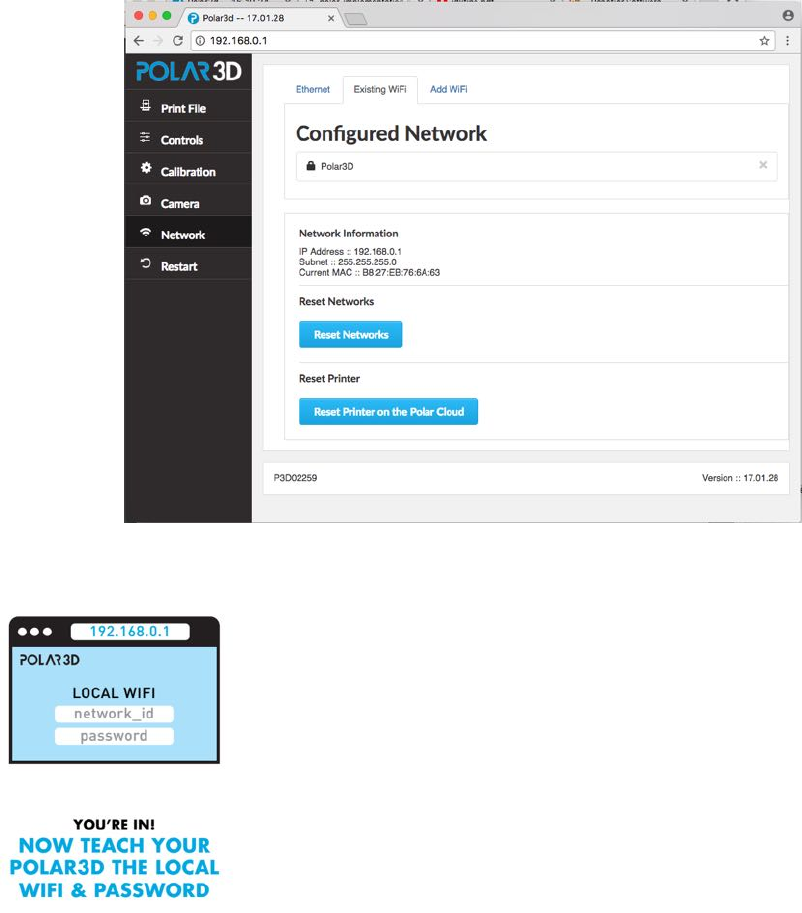
7. Click the “Add WiFi” tab and choose the
WiFi network to which you would like to connect
the printer; see Figure 1.5.Youwillneedtotell
your printer the name of the local WiFi network
you wish to use, and (likely also) its password; see
Figure 1.6.(Atsomesites,localnetworkingmay
require some additional configuration work here: if
you know that your site uses static IP addresses
or requires configuration assistance by the network
administrator to allow your printer’s MAC address
onto the local network or allow your printer access
to outgoing HTTP ports, this is the time to perform such steps:
see Section 1.3. Also, please note that captive portal network
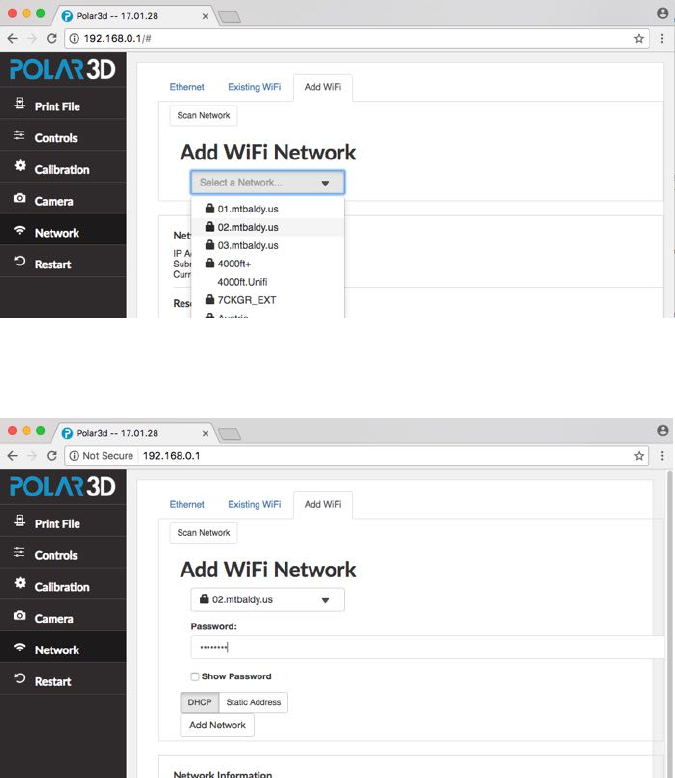
CHAPTER 1. GET CONNECTED TO THE POLAR CLOUD 9
access is not supported.)
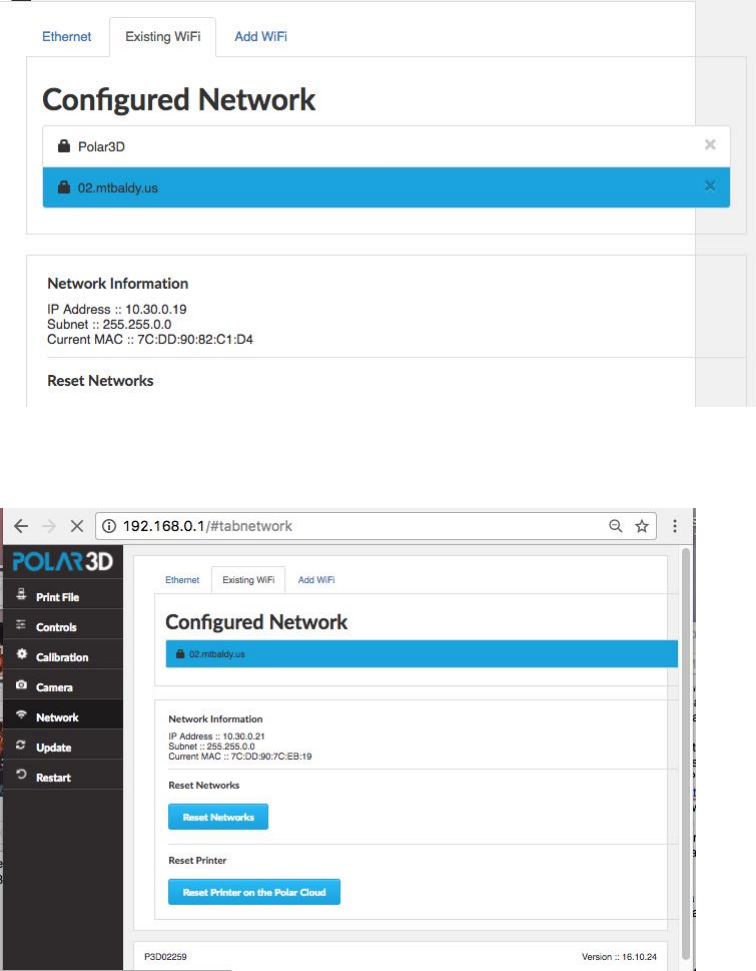
Once you have configured the printer to know about your
local WiFi network, go back to the “Existing WiFi” screen; as
shown in Figure 1.7, your local network should now be listed,
highlighted in blue, under Configured Network.
Figure 1.5: Select local WiFi network
Figure 1.6: Enter local WiFi password
CHAPTER 1. GET CONNECTED TO THE POLAR CLOUD 10
Figure 1.7: Local Wifi configured as network
Figure 1.8: Printer Configured Network configuration completed
While not strictly necessary, we recommend that you remove
CHAPTER 1. GET CONNECTED TO THE POLAR CLOUD 11
the “Polar3D” WiFi network from the Configured Network list
by clicking on the Xmark right of it; see Figure 1.7. (Removing
the “Polar3D” network will prevent your printer from attempt-
ing to connect to that network after power cycles; you want
your printer to attempt to connect first to your local network
when it powers on.) After removing Polar3D WiFi network,
your Configured Network screen should look similar to Figure
1.8.
You have now configured your 3D printer with a network
profile for your local network. But incorrect values, such as for
the local network password (see Figure 1.6), won’t be detected
until your printer attempts to actually connect...
Figure 1.9: Restart the printer for local network connection attempt
Once your printer is configured to know how to connect to the
local network (and if necessary, the local network has been con-
figured by your network administrator to permit your printer
to connect), click the “Restart” tab on the left navigation
pane, and then click the “Confirm” button, see Figure 1.9,to
have your printer attempt to connect to the local network, and
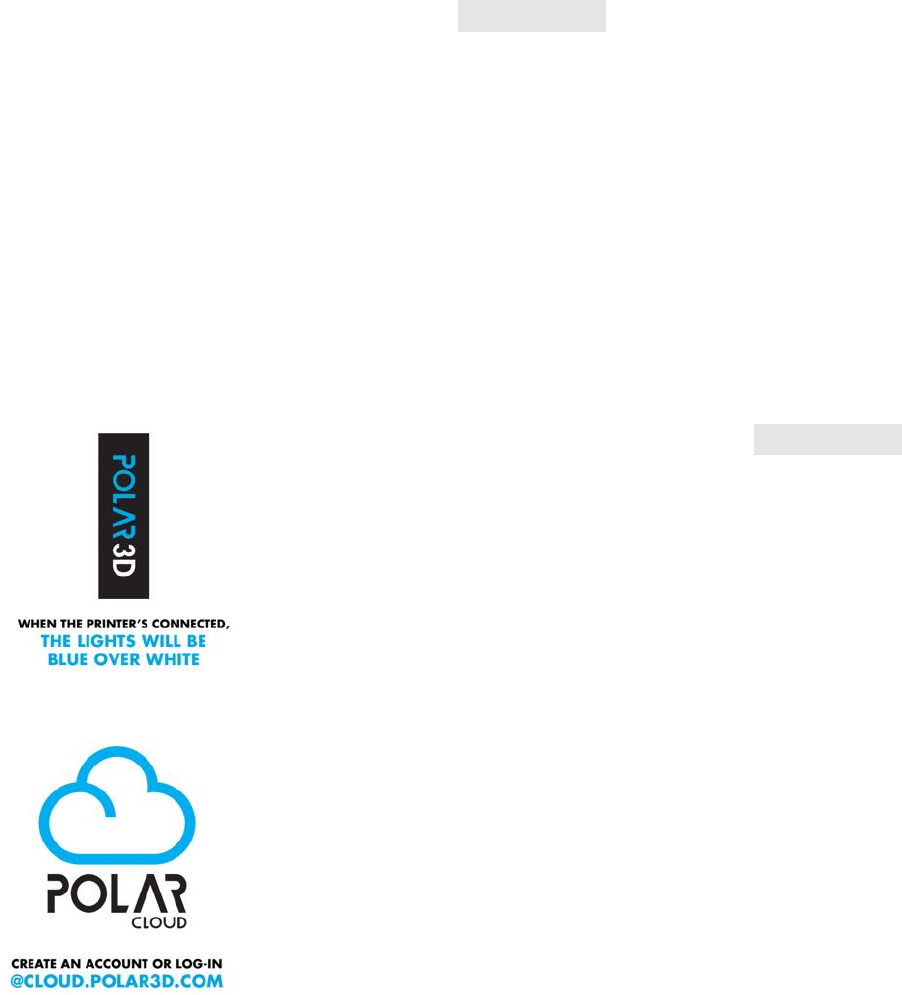
CHAPTER 1. GET CONNECTED TO THE POLAR CLOUD 12
through it to the Polar Cloud; upon success, the LED lights on
the side of the printer will go through a progression of colors
ending as blue over white: POLAR3D .
If the connection attempt does not succeed, check that you
properly entered the local WiFi password (see Figure 1.6), and
attempt connection again. If the connection attempt still does
not succeed, then at your site local networking may require some
additional configuration work, such as configuring static IP ad-
dress information rather than use of DHCP,andpossiblyas-
sistance from your local IT administrator to permit your 3D
printer onto the local network and permit it access to outgoing
HTTP ports: see Section 1.3.
8. Once the printer is connected through your
local network to the Polar Cloud, its POLAR3D
LED lights will be blue over white.
You may now close the browser window that
had been used to connect to the printer’s local
web interface (the browser window connected to
192.168.0.1,openedinstep 6).
9. Creating a Polar Cloud account is a first step
in establishing your Polar 3D environment, as the
Polar Cloud is the central hub and command center
of the environment.
For Polar Cloud, you will need a Google account,
a Facebook account, or a Microsoft Live account. If
you do not already have any such account, you will
need to make one. (For instance, a Google account
CHAPTER 1. GET CONNECTED TO THE POLAR CLOUD 13
is very easy to create: go to www.gmail.com.) The Polar 3D sup-
port article Linking Your Current Email Address to a Google,
Microsoft, or Facebook Account has additional details.
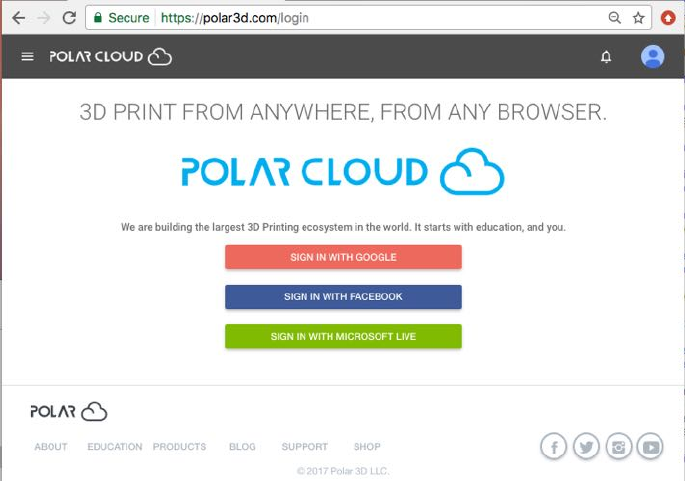
Go to polar3d.com on your device (computer, tablet, or phone);
see Figure 1.10.
Figure 1.10: First time login to Polar Cloud
Click on the account that you’re going to use for Polar Cloud
access (Google, Facebook, or Microsoft Live). That will create
your Polar Cloud account.
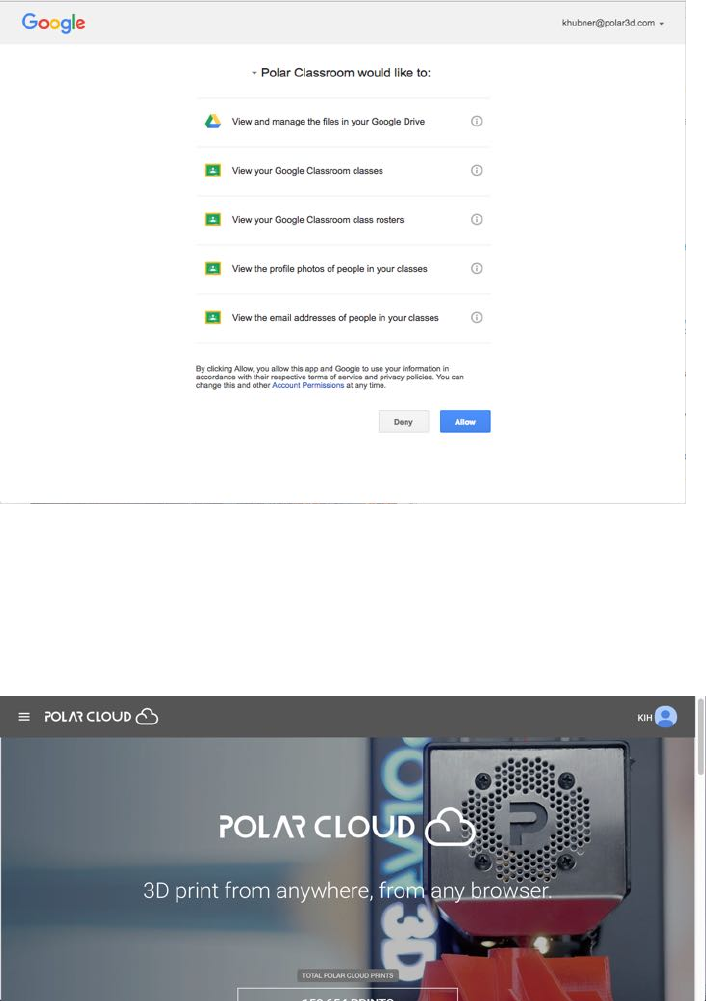
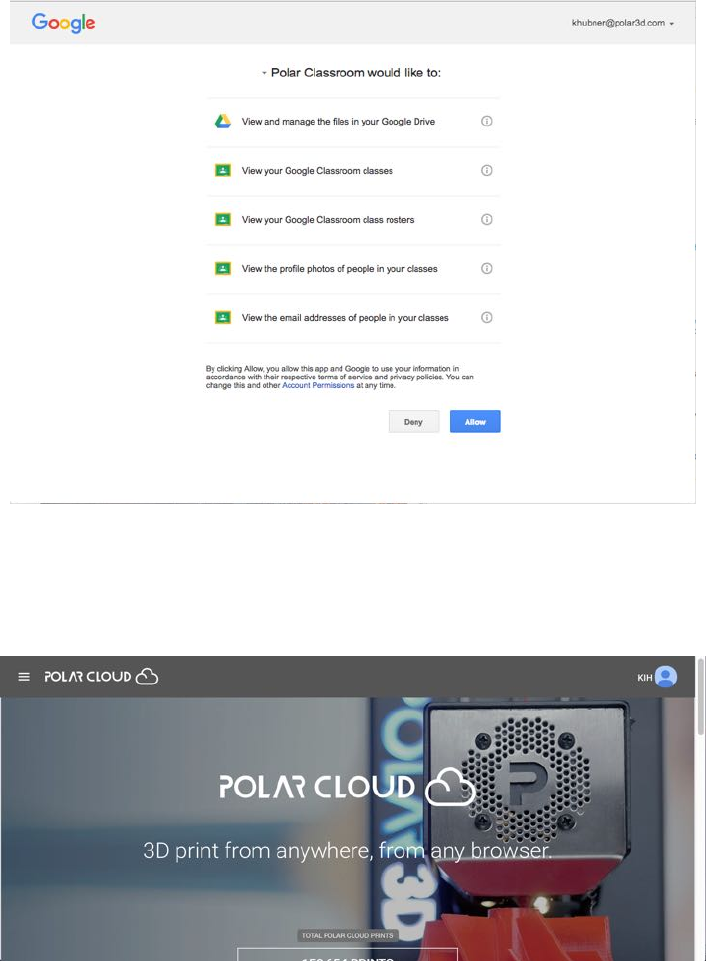
If this is your first time signing into the Polar Cloud, you will
next see a screen asking for permission to access Polar Cloud
sharing and classroom features:
CHAPTER 1. GET CONNECTED TO THE POLAR CLOUD 15
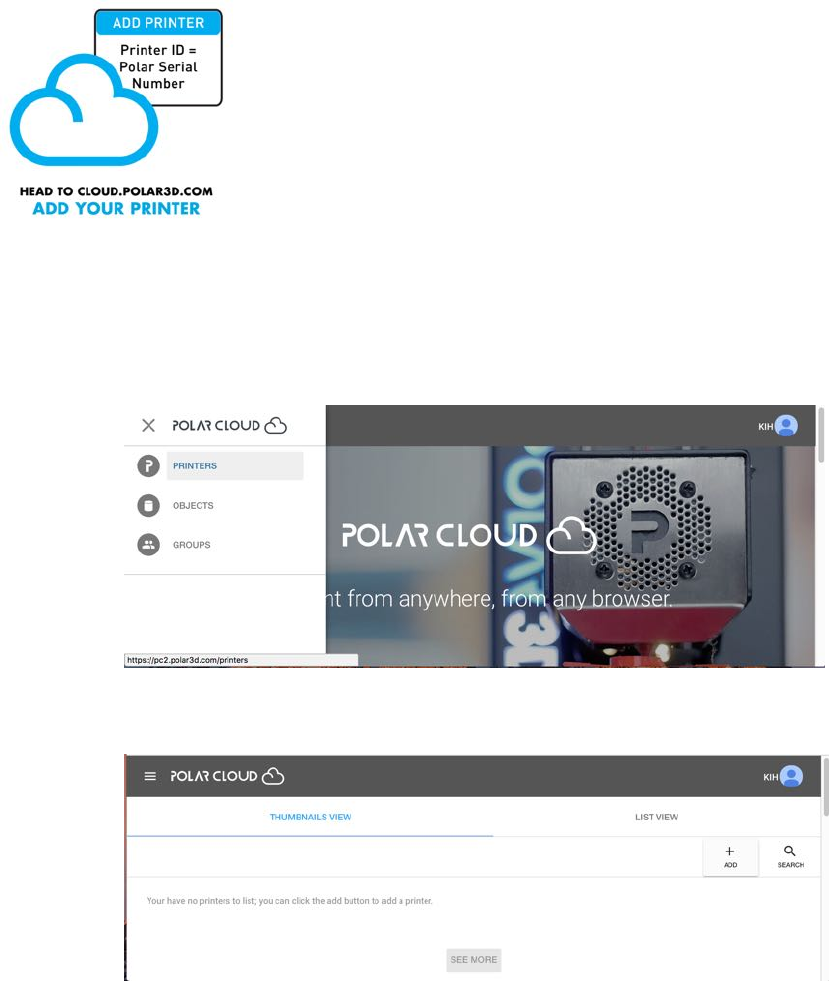
10. Now, with the printer turned on and con-
nected to the Polar Cloud, and with you logged in
to your Polar Cloud account:
(i) From the Polar Cloud main menu, expand the
menu lines at the upper left, click the “PRINTERS”
tab, as shown in Figure 1.13,andthenclickthe
“ADD”(“+”) button (towards the upper right),
shown in Figure 1.14.
scale=0.35 was good in pdf
Figure 1.13: Polar Cloud expand top menu and click PRINTERS
Figure 1.14: Polar Cloud printers THUMBNAILS VIEW,ADD printer button
(ii) On the ADD A PRINTER screen shown in Figure 1.15,at
“Printer Make”, select Polar3D if this is a Polar3D printer. If
CHAPTER 1. GET CONNECTED TO THE POLAR CLOUD 16
this is a Polar3D printer, also enter the printer’s serial number
(the same “P3D” and five digits that you entered in step 5), as
shown in Figure 1.15.
Figure 1.15: Polar Cloud ADD A PRINTER:entermakeandserialnumber
The Polar Cloud is printer-independent, being designed to
operate with other desktop 3D printers as well as Polar3D print-
ers; so if this is not a Polar3D menu, there is a drop down menu
under “Make” for entering alternate types of printer makes, as
shown in Figure 1.16.
Figure 1.16: Polar Cloud ADD A PRINTER make submenu
CHAPTER 1. GET CONNECTED TO THE POLAR CLOUD 17
(Note that later, using the Polar Cloud printer management
interface, you will also be able to change the printer’s name
and enter a longer text description and location for the printer,
should you wish: perhaps describing the printer’s location, its
primary intended purpose, the class for whose use it is intended,
etc.;seeSection4.5.3.)
(iii) If the Polar Cloud located the printer with the serial
number you entered, a message will appear, see Figure 1.17,
saying
Printer was found. Please select the colors to register the printer.
(If you do not see this message nor see the screen shown in
Figure 1.17, return to step (ii) and make sure that the printer
is plugged in and connected to the Internet with POLAR3D
LED lights blue over white; then check that you correctly input
the printer’s serial number.)
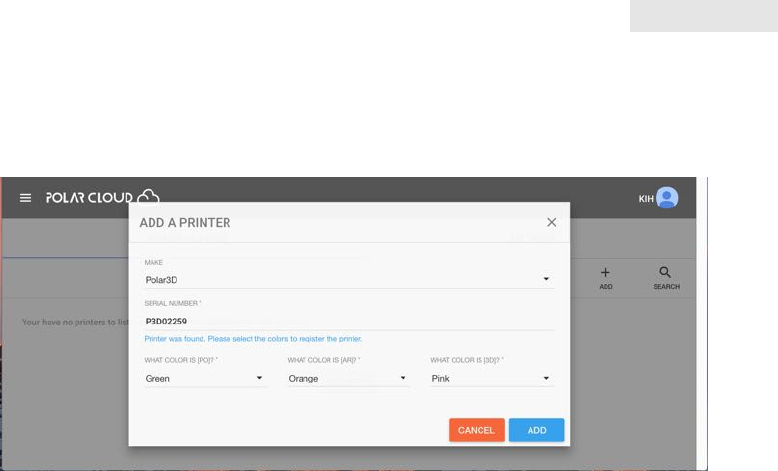
Figure 1.17: Polar Cloud ADD A PRINTER security color check
The color of the LED lights spelling out “POLAR3D” along the
side of the printer will now form a security check: at each of
the three drop down menus, enter the color that your printer’s
CHAPTER 1. GET CONNECTED TO THE POLAR CLOUD 18
lights are showing for the corresponding letters, for “PO”, “AR”,
and for “3D”, as in the example PORAR3D shown in Figure
1.17,andclick“ADD”.
Note that you have a limited amount of time (several min-
utes) to enter these colors; if you do not enter the colors prop-
erly, you will be “locked out” of adding the printer for a short
time.
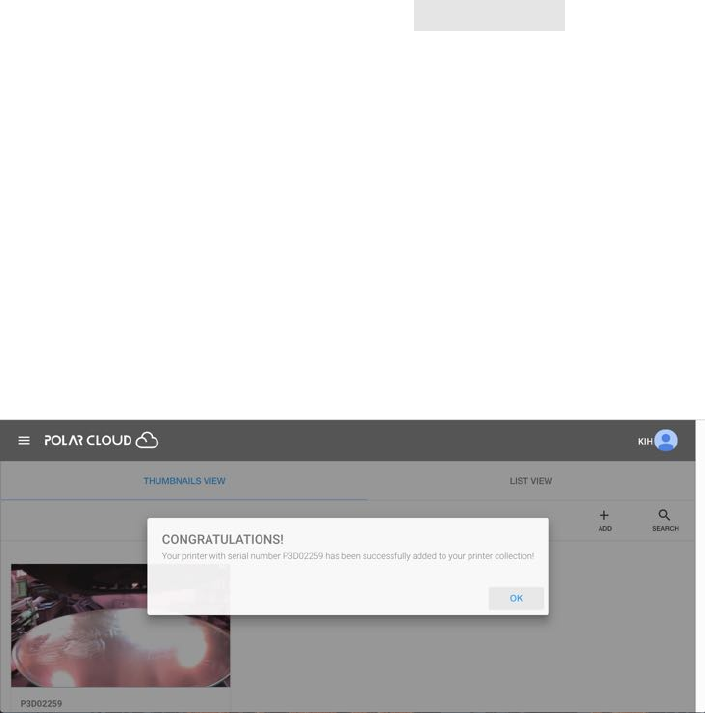
If you entered the colors successfully, you will get a confir-
mation that your printer was successfully added, as shown in
Figure 1.18.
Figure 1.18: Polar Cloud ADD A PRINTER congratulations
Click “OK” to dismiss this confirmation and move to the
printer listing screen (THUMBNAILS VIEW), as shown in Figure
1.19.
CHAPTER 1. GET CONNECTED TO THE POLAR CLOUD 19
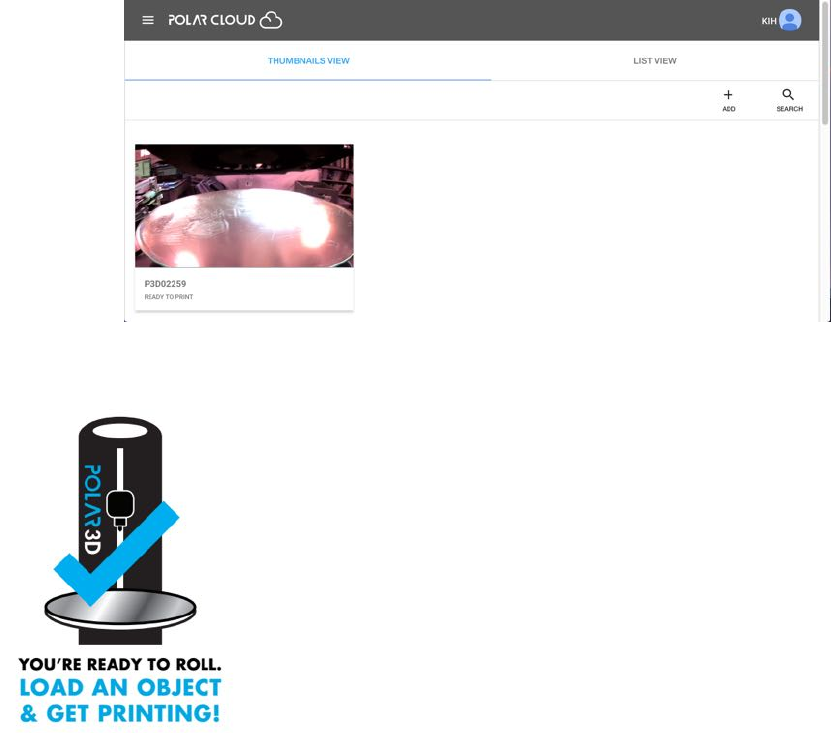
Figure 1.19: Polar Cloud added printer listed in THUMBNAILS VIEW
11. The printer is now connected and ready to
print! See Chapter 2for an example of performing
a first print through the Polar Cloud!
1.2 Connecting the printer to the Polar Cloud
via Ethernet cable
Connecting the printer to your network via an Ethernet cable
is similar in functionality, from a Polar Cloud perspective, as a
wireless connection. The only di↵erence is in the portability of
the printer, as with an Ethernet cable connection, the printer
will be physically connected to the network.

CHAPTER 1. GET CONNECTED TO THE POLAR CLOUD 20
Perform steps 1 through 4 from Section 1.1.
But instead of steps 5 through 8 from Section 1.1, simply plug
in the Ethernet cable to both the printer, and to an Ethernet
jack for your local network. If the POLAR3D LED lights on
the printer become blue over white, it indicates that your printer
has successfully connected to the Polar Cloud!
However, if the printer could not successfully connect to the
Polar Cloud, see Section 1.3:youmayneedtoenterastatic IP
address for your printer, or ask your IT or network administrator
to open up local network access to your printer.
Once the LED lights on the printer show as POLAR3D (blue
over white), then perform steps 9 and 10 from Section 1.1; that
is, log in to your Polar Cloud account, and add the printer to
your Polar Cloud account.
1.3 Network issues and solutions
Note that captive portal network access is not supported.
If your site does not use DHCP and instead assigns static
IP addresses to network devices (such as your 3D printer), you
will need to configure your 3D printer to know its static IP
information; see Section 1.3.1.
If your site uses advanced networking requiring authentica-
tion of a MAC address, then your IT or network administrator
will need to add your 3D printer’s MAC address to the list of
hardware on the network in order for your printer to successfully
connect to the local network; see Section 1.3.2.
CHAPTER 1. GET CONNECTED TO THE POLAR CLOUD 21
In order for your 3D printer to successfully connect to the
Polar Cloud, outgoing HTTP ports 80 and 443 must be open to
your printer. If your local network does not allow the printer
to access those outgoing ports, then the printer’s attempts to
connect to the Polar Cloud will not fully succeed. In this case,
you will need your IT or network administrator to allow your
printer to access those outgoing ports; see Section 1.3.3.
For a general overview of network connectivity diagnosis and
solutions, see Section 1.3.4.
1.3.1 Static IP address for printer
Many networks automatically assign IP addresses (via DHCP)
to network devices such as your 3D printer, but if your local net-
work does not have a DHCP server, then you will need to man-
ually configure your printer with a static IP address. If your lo-
cal network requires a static IP address, then after connecting to
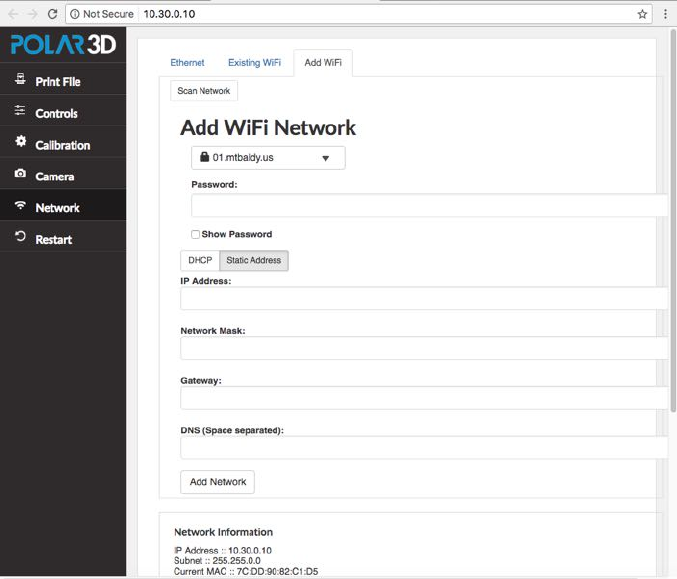
192.168.0.1 (and if necessary clicking the “NETWORK” tab to get
to a screen such as Figure 1.4), either click on “Add WiFi”and
then select a WiFi network name from the drop down menu (if
you are configuring a WiFi connection), or click on “Ethernet”
(if you are configuring an Ethernet connection).
Instead of leaving the “DHCP” button highlighted, click the
“Static Address” button. This will bring up a display such as
shown in Figure 1.20 (WiFi) or Figure 1.21 (Ethernet).
CHAPTER 1. GET CONNECTED TO THE POLAR CLOUD 22
Figure 1.20: WiFi static IP address
Enter specific values for:
1. IP Address
2. Network Mask
3. Gateway
4. DNS servers (space separated if your site has more than
one)
If you are used to adding network devices to your network,
you’re probably familiar with the sorts of values to enter. Oth-
erwise, ask your IT or network administrator for details on what
values to enter.

CHAPTER 1. GET CONNECTED TO THE POLAR CLOUD 23
Figure 1.21: Ethernet static IP address
Once you have finished entering appropriate values for your
site, click the “Add Network” button (WiFi – see Figure 1.20)
or “Save Settings” button (Ethernet – see Figure 1.21).
Then click the “RESTART” tab on the left navigation pane
to have the printer attempt to use your newly configured local
network information to connect to your local network, and then
through it to the Polar Cloud.
1.3.2 MAC address for the printer
Some advanced networks require di↵erent types of authentica-
tion. In this case, your IT or network administrator will need to

CHAPTER 1. GET CONNECTED TO THE POLAR CLOUD 24
add your 3D printer’s MAC address to the list of hardware on the
network – similarly to how they would add a laser printer.
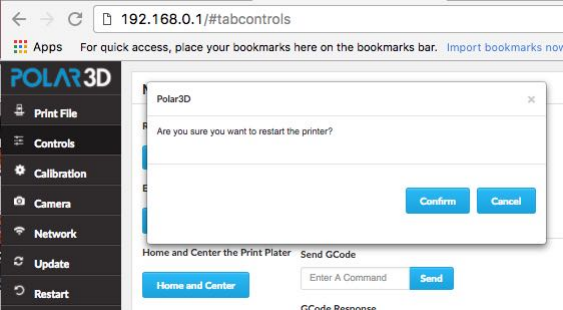
Make a note of the MAC address of your printer, as your
network administrator will likely need it! The MAC address is
printed on the backside of the “GETTING STARTED” sheet shipped
with your Polar3D printer. The MAC address may also be found
displayed by the printer local web interface: after connecting to
192.168.0.1,lookundertheheader“Network Information”
for the value in the “Current MAC” field; see for instance Figure
1.8.(Indeed,theprinterlocalwebinterfaceshowstheMAC
address in multiple places; see also for example Figure 1.20 or
Figure 1.21.)
Note that if you have left your Polar3D printer configured to
potentially use multiple WiFi networks, then the MAC address
displayed may di↵er in its final digit from the value printed on
the “GETTING STARTED” sheet.
1.3.3 Open HTTP ports
Outgoing HTTP ports 80 and 443 must be open to the printer.
If your local network does not allow the printer to access those
outgoing ports, then the printer’s attempts to connect to the
Polar Cloud will not fully succeed.
In terms of LED lights, the symptom you will see when the
rest of configuration was successful but now the printer can’t
access the outgoing HTTP ports is that the LED lights will be
blue over yellow: POLAR3D .
Make a note of your printer’s IP address (if you are using a

CHAPTER 1. GET CONNECTED TO THE POLAR CLOUD 25
static IP address) and its MAC address and contact your IT or
network administrator to ask them to open up access for your
printer.
1.3.4 Solving network connectivity problems
If your printer’s LED lights are not showing as POLAR3D
(blue over white), then the printer is not connected to the Polar
Cloud.
If the LED lights cycled:
1. POLAR3D !POLAR3D !POLAR3D (the LED lights
cycled from entirely blue, to blue over red, before returning
to entirely blue): the printer searched for the specified local
network, but could not successfully connect.
(a) For WiFi connection, first go back to the network pro-
file configuration (step 7 in Section 1.1;seeinpartic-
ular Figure 1.6), and check that you entered the local
network password correctly!
(b) If using a static IP address, check that all those net-
working parameters were correctly entered; see Section
1.3.1.
(c) On an advanced network, check with your network ad-
ministrator that he or she has used your printer’s MAC
address to permit it access; see Section 1.3.2.
2. POLAR3D !POLAR3D !POLAR3D (the LED lights
cycled from entirely blue, to blue over red, before ending
as blue over yellow): the printer successfully connected to
CHAPTER 1. GET CONNECTED TO THE POLAR CLOUD 26
your local network, but has not been able to connect over
the Internet to the Polar Cloud.
(a) Confirm with your network administrator that the printer
is being allowed access to outgoing HTTP ports 80
and 443;ifyourlocalnetworknormallyblocksaccess
to those ports, the network administrator will need to
open up access for the printer.
(b) Check whether your site is having general Internet con-
nectivity problems – the printer can’t connect to the
Polar Cloud unless your Internet connection is operat-
ing!

Chapter 2
Start printing
Once you have your printer connected to the Polar Cloud (see
Chapter 1), you can start your first print through the Polar
Cloud!1
For your first print, you’ll want to load filament (Section 2.1),
get an object (Section 2.2), and then start a print job (Section
2.3); you can monitor the printing of your object through the
Polar Cloud, including via real-time video (Section 2.4)ofthe
printer as it prints your object.
1If you want to print without connecting through the Internet to the Polar Cloud, see
Appendix Cwhich explains how to get started printing when directly connected to the
printer.
27
CHAPTER 2. START PRINTING 28
2.1 Load filament
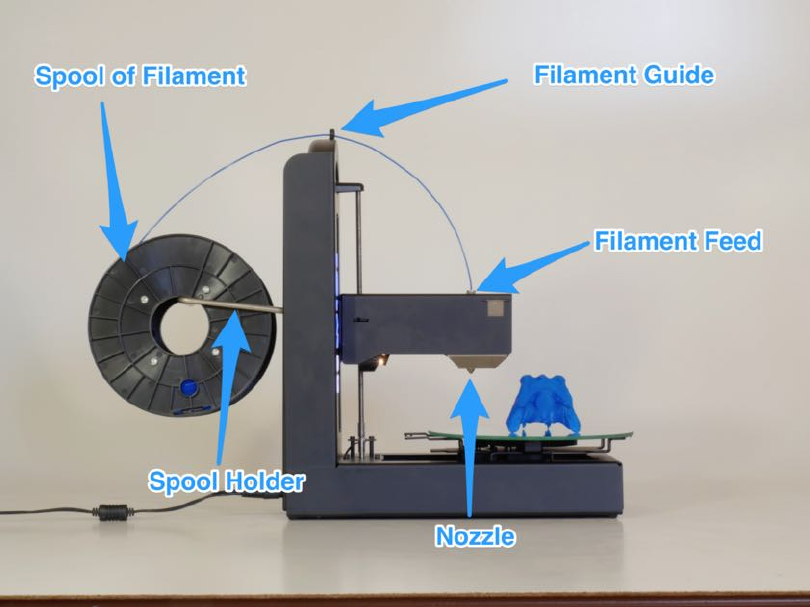
Figure 2.1: Load filament onto the Polar3D printer
1. Swing out the spool holder arm from the back (see Figure
1.2) of the Polar3D printer.
2. Unwrap the spool of filament and place it onto the spool
holder; see Figure 2.1.
3. Find the end of the string of filament.
4. Snip o↵the end of the filament – perhaps an inch or two –
with a pair of scissors or wire clippers to get a good, clean
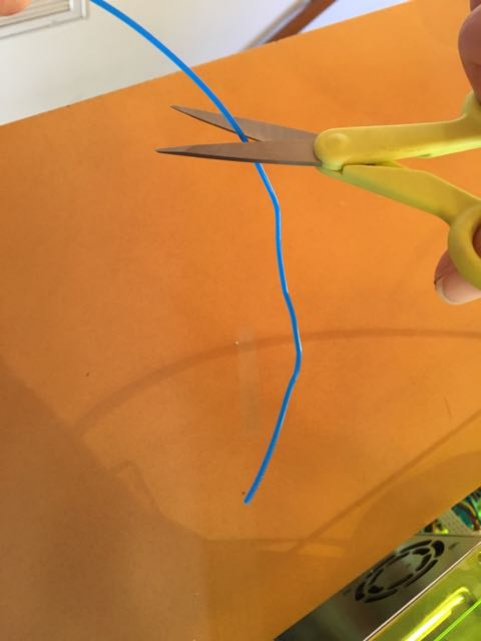
CHAPTER 2. START PRINTING 29
end to feed into the printer (especially if the end is kinked,
or melted, or blobby); see Figure 2.2.
Figure 2.2: Snip end of filament
5. Feed the filament through the filament guide (the hole at
the top of the Polar3D printer); see Figure 2.1.
6. Stick the end of the filament into the filament feed hole at
the top of the print head.The“feel”ofthistakesabitof
getting used to: when sticking the filament into the feed,
you must push past some initial resistance: you must push
the filament in far enough to engage with the filament drive
CHAPTER 2. START PRINTING 30
gear inside the print head, and then down past that into
the throat of the extruder. The Polar 3D support site has
a clip of this process:
Polar 3D support document “Loading and Unloading Fila-
ment”
7. Check that the filament is properly inserted and engaged
with the filament drive gear as follows:
(a) From your device (phone, tablet, computer), connect
to the printer’s local IP address to access the printer’s
local web interface.(Ifyourlocalnetworkpermits
access from the Internet back to your printer’s local
IP address, you may instead conveniently access the
printer local web interface and perform such settings
while within the Polar Cloud. From the Polar Cloud
main menu, expand the left-hand menu and click on
“PRINTERS”, then click on the image of the printer you
are loading with filament; this will take you to the
printer’s dashboard screen; see Figure 4.56.Atthat
screen, click on the “LOCAL UI” tab (gear icon) at the
upper right, to navigate to the printer’s local web in-
terface.)
At the printer local web interface, see Figure 5.7,click
on the “Controls” tab from the vertical menu on the
right. At the “Manual Printer Controls” screen, en-
ter a temperature of 180°Candclickthe“SET” button;
see Figure 2.3.
(b) Once the extruder has warmed up, which you can see on
the Manual Printer Controls screen just underneath
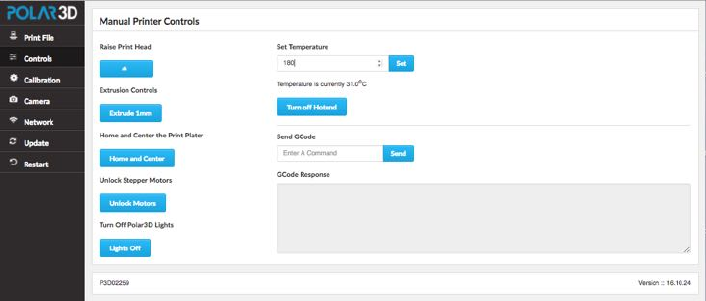
CHAPTER 2. START PRINTING 31
Figure 2.3: Manual Printer Controls screen: set the temperature
where you set the desired temperature, on that same
screen click the “Extrude 1mm” button several times,
to extrude a few millimeters of filament.
(c) Note that if the printer already had a bit of filament in
the extruder – and the Polar3D printers get a test print
performed at the factory so even a brand-new printer
may have a bit of filament in the extruder – you may see
molten plastic leaking out as the printer heats up, even
before you tell it to extrude filament. But you want to
see the printer feeding in and extruding your filament
– the filament you just loaded. Seeing a string of your
filament get extruded as now molten plastic confirms
that your filament is properly loaded, and you’re ready
to print!

CHAPTER 2. START PRINTING 32
Figure 2.4: Polar Cloud top menu OBJECTS tab
2.2 An object to print
To print using the Polar Cloud, you need an ob ject (one or more
.stl files) in the Polar Cloud; you may:
1. Search for and find in the Polar Cloud an object shared by
someone else,
2. Upload an existing object (from outside the Polar Cloud)
into the Polar Cloud,
3. Create a new object yourself, using CAD software,
4. Print any object already in your Polar Cloud collection
(though if you’re a new Polar Cloud member, you prob-
ably won’t have any such objects yet).
AquickwaytogetstartedistofindanobjectinthePolar
Cloud, as will be demonstrated in Section 2.2.1.
CHAPTER 2. START PRINTING 33
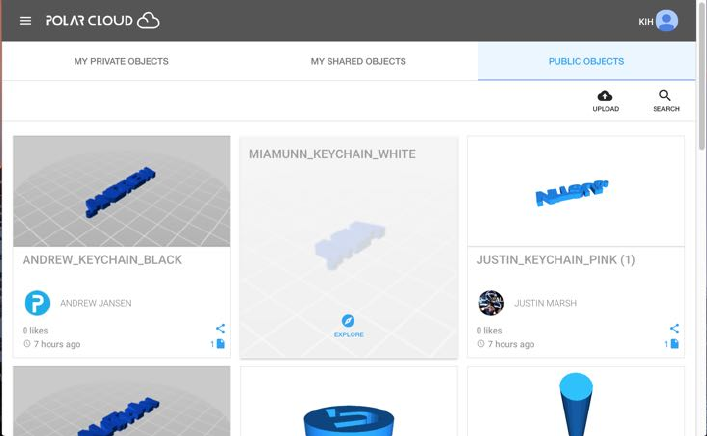
2.2.1 Find an object in the Polar Cloud
From the Polar Cloud main screen, expand the top left menu
and click on “OBJECTS”; see Figure 2.4.Thenclickon“PUBLIC
OBJECTS”; this will bring up a screen such as shown in Figure
2.5. Scrolling to the bottom of the screen and clicking “SEE
MORE” will load additional objects. You may click on an object
to select it.
Figure 2.5: Polar Cloud PUBLIC OBJECTS screen
Note that you may also search these objects by clicking on
“SEARCH”. For instance, if you don’t see any object that particu-
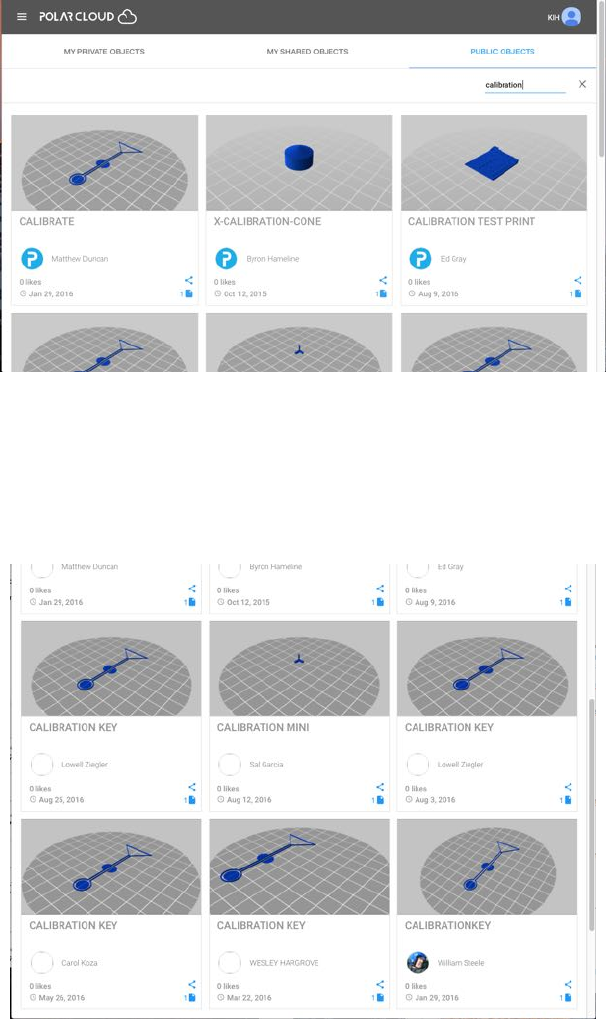
larly appeals to you as your first print, you might try searching
for “calibration” (to find objects intended for checking cal-
ibration) and try one of those objects as your first print; see
Figure 2.6.
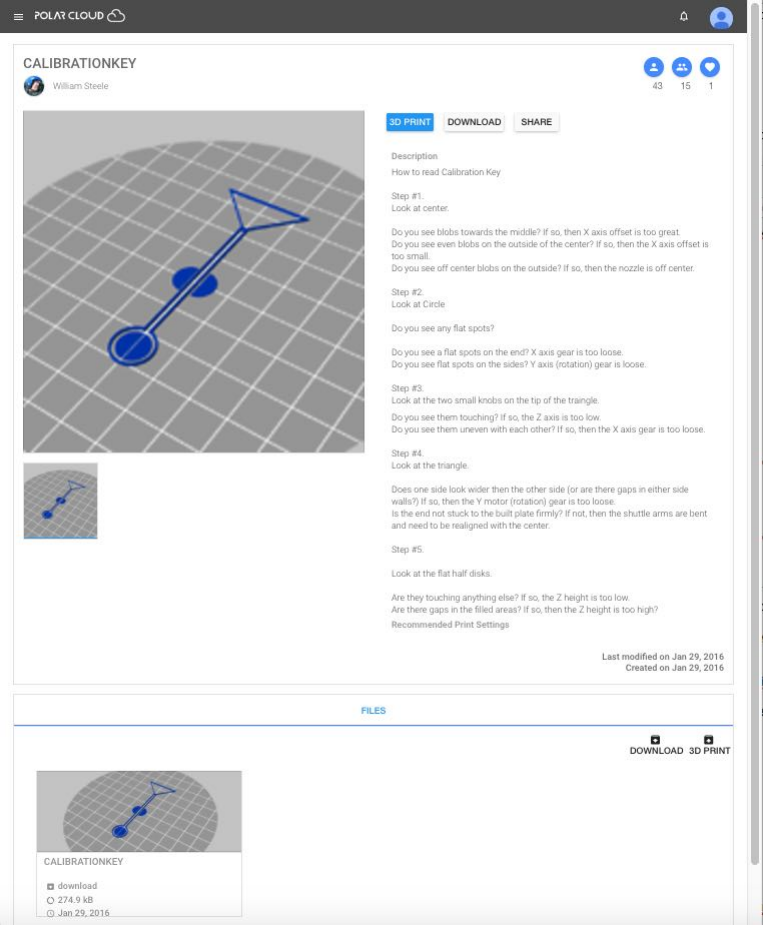
CHAPTER 2. START PRINTING 36
Figure 2.9: 3D PRINT screen (build plate screen) for CALIBRATIONKEY object
complex objects, objects with multiple or large .stl files,the
process of loading the object’s image to the screen may take a
minute or so; you will see a blue swirling loading icon towards
the bottom right of the screen.)
Then clicking on the “3D PRINT” button will take you to the
build plate screen, as shown in Figure 2.9.
At the “3D PRINT” screen, also referred to as the build plate
screen, you may optionally make numerous adjustments to the
object; see Section 2.2.2.
Once you are content with the planned object, click the “PRINT”
button (at screen’s upper right) to submit the print job to the
printer; this will automatically take you (after possibly a minute
CHAPTER 2. START PRINTING 37
or so with a blue swirling loading icon towards the lower right of
the screen) to the printer dashboard screen; see Figure 2.14.
2.2.2 Experiment with adjusting object placement and
print settings
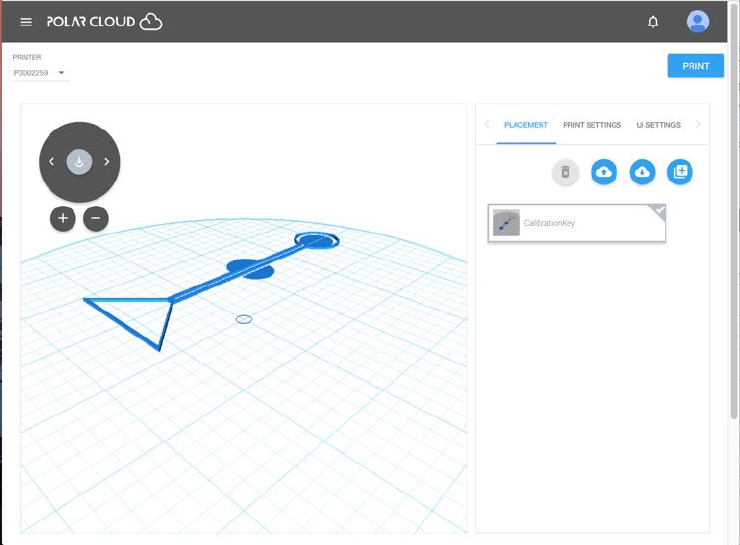
Once you choose an object to print and click the “3D PRINT”
button on the object’s display screen (see Figure 2.8), you will
be at a screen such as shown in Figure 2.9,whereyouhavethe
opportunity to adjust your object, and adjust printer settings,
if you wish.
There are many ways to adjust your object, as well as adjust
printer settings, before printing. (The variety of possible adjust-
ments are discussed in detail in Section 4.6.1.) For now, you may
merely want to experiment with, and check, the following:
1. Move the position of the object on the build plate.
2. Change the size of the object, making it bigger or smaller.
3. Rotate your view of the object.
4. Check that your extruder temperature is set sensibly for the
filament that you are using; for the PLA filament supplied
by Polar 3D, the proper temperature is 185°C.
2.2.2.1 Experiment with moving the object on the build plate
At the object build plate screen, see Figure 2.9,checkthat
“PLACEMENT” is highlighted (in blue), meaning that placement
is the active mode; if necessary, click on “PLACEMENT” to select
it.

CHAPTER 2. START PRINTING 38
Click on the object image on the build plate screen, or click
on the object name on the right underneath “PLACEMENT.Click-
ing either place will bring up a set of colored axes (red X-
axis, green Y-axis, blue Z-axis) superimposed on the object
image, and three tabs will appear in the right window under
“PLACEMENT”: “MOVE (W)”, “SCALE (E)”, and “ROTATE (R)”.
Check that “MOVE” is highlighted (in blue), meaning that it is
selected; clicking on “MOVE”, or typing W, will select it; see Figure
2.10.
Figure 2.10: Build plate screen: MOVE object
To move the ob ject’s desired placement on the build plate,
you may do whichever is most convenient:
1. Click on the axis arrow in the left-hand, object view win-
CHAPTER 2. START PRINTING 39
dow, and then drag the object to a desired position.
2. Move the slider position on desired axes in the right-hand
window.
3. Enter a numeric value for how much to move along the
desired axis in the right-hand window; such a numeric value
can be entered at the far right of the right hand window
level with the axis name.
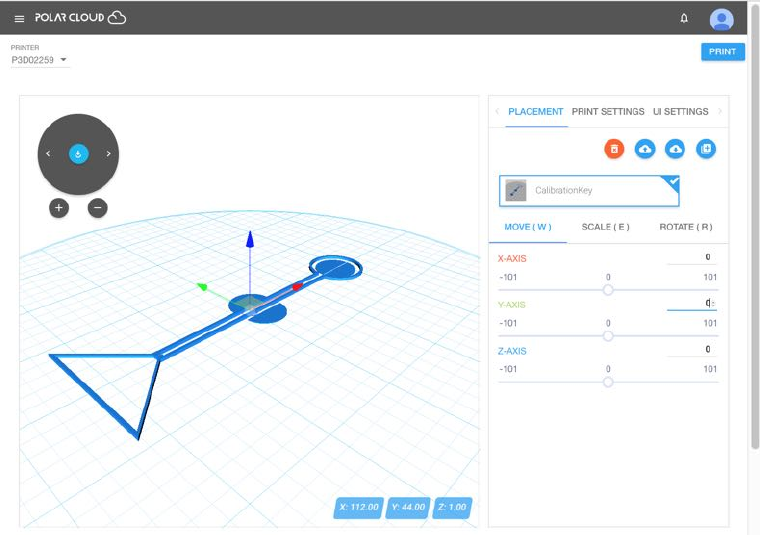
Figure 2.11: Build plate screen: MOVE to center CALIBRATIONKEY
While in general objects are best printed o↵set from the cen-
ter of the build plate (thereby avoiding blemishes from any sub-
optimal calibration at the build plate center – see Section 8.1.1),
the CALIBRATIONKEY object, as it intended to test and display
any calibration issues, is best printed with its center at the cen-
CHAPTER 2. START PRINTING 40
ter of the build plate. Figure 2.11 shows the CALIBRATIONKEY
moved to be centered on the build plate.
2.2.2.2 Experiment with changing the size of the object
At the object build plate screen, see Figure 2.9,checkthat
“PLACEMENT” is highlighted (in blue), meaning that placement
is the active mode; if necessary, click on “PLACEMENT” to select
it.
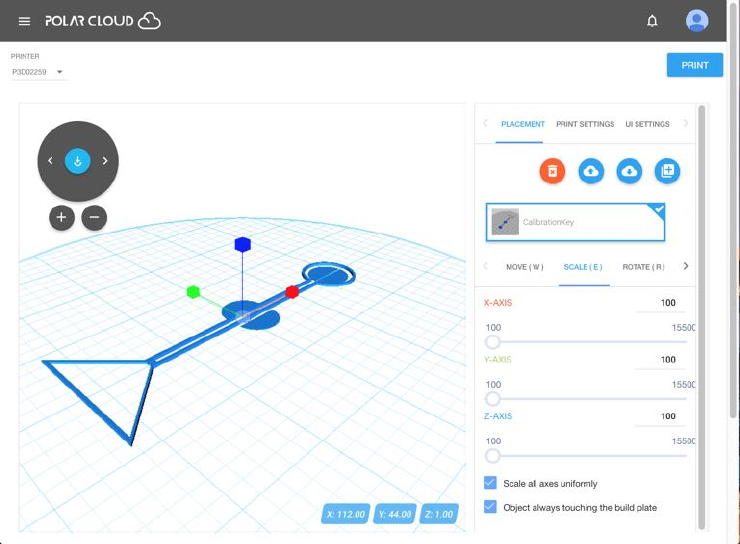
Figure 2.12: Builld plate screen: SCALE object
Click on the screen where the object image is shown on the
build plate. This will bring up a set of colored axes (red X-
axis, green Y-axis, blue Z-axis) superimposed on the object
CHAPTER 2. START PRINTING 41
image, and three tabs will appear in the right window under
“PLACEMENT”: “MOVE (W)”, “SCALE (E)”, and “ROTATE (R)”.
Click on “SCALE”(ortype“E”) to select it (when selected, it
will show as blue); see Figure 2.12.
You may choose to scale the ob ject’s overall size uniformly
along all axes, or scale the object di↵erently along di↵erent
axes: see the “Scale of axes uniformly”checkboxbelowthe
“SCALE” tab. To adjust the object’s size, you may either move
the slider position on an axis in the right-hand window, or you
may click on an axis in the left-hand, object view window, and
then drag to change the size along that axis as desired.
2.2.2.3 Experiment with rotating your view of the object
At the object build plate screen, see Figure 2.9, the dial towards
the upper left of the left-hand (object on build plate) screen in
e↵ect “rotates the build plate” – it rotates your view of the
object. The two small buttons underneath the dial allow you
to zoom in and zoom out on your view of the object and build
plate.
(Note that this rotation of your view of the build plate and
the object on it is distinct from rotating the object’s placement
on the build plate – that operation, rotating the placement of
the object while keeping the build plate stationary, is instead
controlled via the “ROTATE (R)” tab under “PLACEMENT”.)
Try clicking on the left arrow and right arrow on the dial to
rotate the build plate (and the object on it), and try clicking on
the left button below the dial (to zoom in) and the right button
below the dial (to zoom out).

CHAPTER 2. START PRINTING 42
2.2.2.4 Check temperature
At the object build plate screen, see Figure 2.9,clicking“PRINT
SETTINGS” in the right-hand window will bring up three tabs:
“BASIC”, “ADVANCED”, and “G-CODE”. The temperature which
the printer is set to use for printing is displayed under the
“BASIC” display, as shown in Figure 2.13.
Figure 2.13: Polar Cloud check the print temperature
The proper temperature for the PLA filament provided by
Polar 3D is 185°C. (If you are using a di↵erent type of filament,
see the filament manufacturer’s recommendation for what tem-
perature to use for it.)
CHAPTER 2. START PRINTING 43
2.3 Start the print job
Are you ready to submit your object for printing? (Note that
if you don’t like any adjustments you tried making in Section
2.2.2, you may go back to the list of objects, and simply select
the object again to have it back in its original location, size,
etc.: that is, return to Section 2.2.1 and repeat the initial steps
of selecting an object.)
Once you are ready to submit a print job – that is, once
you have completed any adjustments you wished to make at the
build plate (“3D PRINT”) screen overviewed in Section 2.2.2 (and
discussed in detail in Section 4.6.1)–thenclickingthe“PRINT”
button towards the upper right of the “3D PRINT” screen will
submit your job to your selected printer. (Note that, especially
with complicated object models, the loading of the .stl file to
the printer may take some time – it is normal for this stage to
take a minute or two: a blue swirling loading icon will appear
towards the lower right of the screen.) Once the submission has
completed, you will be shown a printer dashboard screen such
as Figure 2.14.
CHAPTER 2. START PRINTING 44
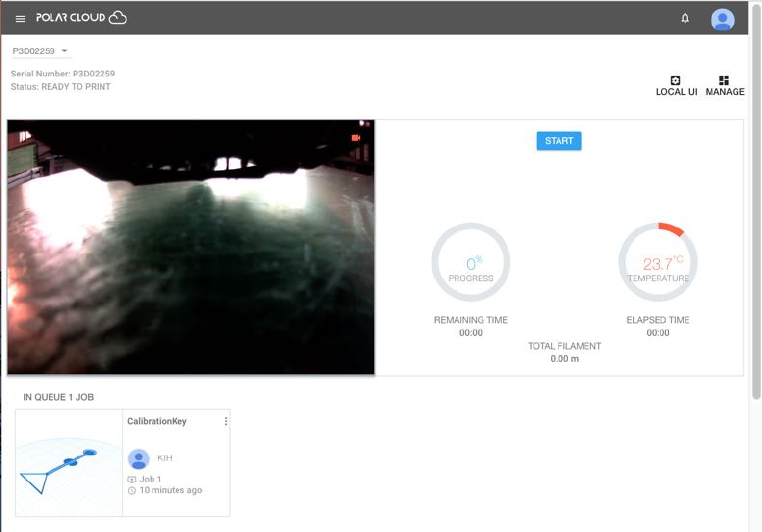
Figure 2.14: Printer dashboard: job submitted to the print queue
Click the “START” button (towards the upper right of the
printer dashboard screen) to begin the print.
2.4 Monitor the printing
Having submitted your job and clicked “START” (see Section
2.3), the Polar Cloud printer dashboard screen (see Figure 2.14)
will begin updating, showing you a camera view of the printer
(on the left) and status data on the progress of the printer (on
the right).
Note that after you have clicked “START”, the status line un-
derneath the printer name (towards the top left of the printer
CHAPTER 2. START PRINTING 45
dashboard screen) will cycle (fairly rapidly) through: WAITING
FOR RESPONSE,PREPARING PRINT,andthenPRINTING.
At 175°C, the printer will home (i.e., move the build plate
and print head into proper position for the beginning of the
print). Then the printer will continue to heat up to 185°C (the
proper temperature for extruding Polar 3D PLA filament). At
185°C, the printer will begin extruding melted filament and your
print is in progress!
Once the object has finished printing, the status line un-
der the printer name (towards the top left of the screen) will
cycle through: COMPLETING PRINT JOB,FINISHING PRINTING,
and then READY TO PRINT (when it is ready for a new job).
Chapter 3
Understanding the Polar 3D
2.0 Environment
Welcome to Polar 3D 2.0! If you have used Polar 3D 1.0, you
will find use of Polar 3D 2.0 enhanced but familar! Older docu-
mentation on Polar 3D 1.0 can be found at:
Polar 3D Support Documents
The Polar 3D environment is not just about high quality,
reliable, cost e↵ective 3D printers, but also provides a collabo-
rative and flexible inventor space that supports management of
printing from anywhere in the world. The Polar 3D environment
includes many features supporting and enhancing classroom use,
and Polar 3D o↵ers the innovative, NGSS-aligned STEAMtrax
curriculum to aid in bringing the excitement and learning op-
portunities of 3D printing directly into the classroom.
Polar Cloud – The Polar Cloud is the central hub of the Polar
3D environment. It is a free, web-based platform for collabo-
ration, design, class assignments, and lab management. Polar
Cloud groups allow teachers to group students by subject, and
46
CHAPTER 3. UNDERSTANDING THE POLAR 3D 2.0 ENVIRONMENT47
allows members to find groups with mutual interests. Within
the Polar Cloud, members collect and share objects to print
using in-site CAD software to alter and adjust their .stl files.
The Polar Cloud also allows for remote printing: you can control
your printer from the office next door, a lab in another country,
or 30,000 feet in the air.
Polar3D Printer – The Polar3D printer is unique in ways
which make it very desirable, not just novel. The narrow foot-
print, simplicity of the hardware, quality print results, and ro-
bust, web-based printing control software are all tops on its list
of positives.
Polar Box – (under development) This brings the remote
printer management capabilities of the Polar 3D environment
to any desktop 3D printer.
STEAMtrax – Curriculum is another component of maxi-
mizing the educational benefit from classroom 3D printers, or a
3D printer lab. The STEAMtrax curriculum provides modules
that are easy to align to NGSS or state standards, so whether
you’re a teacher new to 3D printing, or a long-time “maker”,
STEAMtrax can aid you in incorporating 3D printing into your
classroom for a rich and exciting learning experience for your
students.

CHAPTER 3. UNDERSTANDING THE POLAR 3D 2.0 ENVIRONMENT48
3.1 The process of 3D design and printing
The process of designing and printing an object includes many
possible stages.
1. Identify and define the objective: Identify a need, define
a problem, and generate and develop ideas for a solution.
A personal goal, or group project, or engineering task may
give rise to an objective. Or a curriculum such as STEAM-
trax may present a student or group of students with a task;
CHAPTER 3. UNDERSTANDING THE POLAR 3D 2.0 ENVIRONMENT49
see Chapter 7. Note that STEAMtrax materials include a
breakdown of the engineering design process that goes into
additional detail, in particular further breaking down the
“define” and “develop” stages. Note also that education-
ally, promoting the practices of science and engineering –
promoting the cognitive, social, and physical practices of
scientific inquiry and modeling, and engineering design and
construction – is a key component of the NGSS (Next Gen-
eration Science Standards).
2. Select an idea for something to build: Step 1may have
generated several potential solution ideas; choose an object
or part to try creating.
3. Design 3D model: Generate a 3D model of the object using
available CAD (Computer Aided Design) software such as
OpenSCAD, BlocksCAD, or Tinkercad; (see Chapter 6for
additional CAD software options); use the CAD software
to generate an industry-standard .stl file. Or find, shared
in the Polar Cloud, an already created .stl file.
4. Print: Load the generated .stl file(s) onto a 3D printer
for printing. See Section 4.6 for details of using the Polar
Cloud to submit a print job. (Or when you don’t have
network access to the Internet, see Appendix C.)
5. Solve any printing problems: See Chapter 8and Chapter
11.
6. Test: Try using the ob ject; test and evaluate it.
7. Refine: As needed, revise, improve, or refine the design;
then return to step 3to generate an updated 3D model.
CHAPTER 3. UNDERSTANDING THE POLAR 3D 2.0 ENVIRONMENT50
8. Present/communicate/share: Report back to your group or
teacher, as appropriate. If you wish, you may share your
model, photos of your object, and any comments in the
Polar Cloud.
9. Extend and apply: Return to step 1if your objective is
a large enough task to require several components for its
solution. Or, during the process above, you may have come
up with additional ideas you would like to further explore!
Chapter 4
The Polar Cloud
The Polar Cloud is the central hub, or “command and control
center”, for the Polar 3D ecosystem.
As a Polar Cloud member, you may conveniently view a his-
tory of your printing activity and communicate with other Polar
Cloud members; see Section 4.1.
The Polar Cloud provides a convenient and powerful platform
for managing and storing 3D objects, and for collaborating with
other Polar Cloud members. You may store 3D object files (as
well as supplementary information such as photographs) in the
Polar Cloud (Section 4.2), share objects with other Polar Cloud
members (Section 4.2.2 and Section 4.2.3), and give and receive
printing and usage tips and feedback on objects (Section 4.2.4
and Section 4.2.6).
Polar Cloud groups provide a way to collaborate, sharing
printers and objects, amongst a student class, maker space club,
or library members, etc.; see Section 4.4.
The Polar Cloud provides mechanisms for managing and shar-
51

CHAPTER 4. THE POLAR CLOUD 52
ing 3D printers; see Section 4.5. Polar3D printers arrive Polar
Cloud enabled. But the Polar Cloud is printer neutral – other
3D printers can become part of the Polar Cloud!
The Polar Cloud lets you submit, monitor, and manage your
print jobs, regardless of your physical location; see Section 4.6.
You can even watch real-time video of your print job in progress;
see Section 4.6.5.
The Polar Cloud provides a platform for various forms of
collaborating and sharing 3D model work with others, whether
with particular Polar Cloud members, or through classroom or
club Polar Cloud groups. In particular, you may share objects
(such as .stl files), photos and printing tips about objects, give
and receive feedback on objects, and share 3D printer use; see
Section 4.9.
The Polar Cloud has access to CAD software for creating
your own 3D models; see Section 4.3.
For an overview of navigating through the Polar Cloud user
interface, see Section 4.10.
4.1 Polar Cloud account
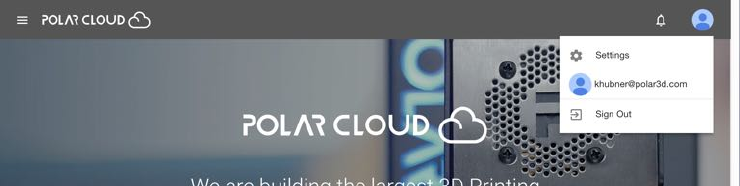
To perform Polar Cloud account1tasks, click on your account
name at the top right-hand side of the Polar Cloud bar at the
top of Polar Cloud screens to access the drop down menu shown
in Figure 4.1.
1If you do not yet have a Polar Cloud account, see Section 4.1.1 or Section 1.1,step 9.
CHAPTER 4. THE POLAR CLOUD 53
Figure 4.1: Polar Cloud account management drop down menu
Via this menu, you may perform various account tasks, in-
cluding:
1. Change your account settings and customize your profile;
see Section 4.1.2.
2. Track your account activity; see Section 4.1.3.
3. Log out; click the “Sign Out” tab.
4.1.1 Creating your Polar Cloud account
Creating a Polar Cloud account is a first step in establishing
your Polar 3D environment, as the Polar Cloud is the central
hub and command center of the environment. (Note that initial
Polar Cloud account creation is also described in Section 1.1;
see step 9.)
1. For Polar Cloud, you will need a Google account, a Face-
book account, or a Microsoft Live account. If you do not
already have any such account, you will need to make one.
(For instance, a Google account is very easy to create: go
to www.gmail.com.) The Polar 3D support article Link-
ing Your Current Email Address to a Google, Microsoft, or
Facebook Account has additional details.
CHAPTER 4. THE POLAR CLOUD 54
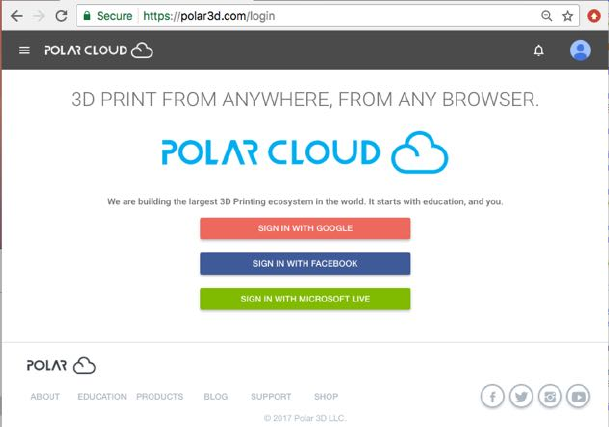
Figure 4.2: Polar Cloud login screen
2. Got to polar3d.com on your device (computer, tablet, or
phone) to get to the login screen shown in Figure 4.2.
Click on the account that you’re going to use for Polar
Cloud access (Google, Facebook, or Microsoft Live): that
will create your Polar Cloud account!
3. The first time you log in to the Polar Cloud (and possibly
on occasion afterward, if the Polar Cloud has been updated
with new sharing features), you may get asked whether you
wish to permit the Polar Cloud to make use of certain shar-
ing/access and classroom features; an example such screen
is shown in Figure 4.3.(Permittingsuchaccessisrecom-
mended.) After you make your choice, you’re done creating
your account!
Once you’re signed in, the Polar Cloud home page should
appear, looking similar to that shown in Figure 4.4.
CHAPTER 4. THE POLAR CLOUD 55
Figure 4.3: Polar Cloud account access screen
Figure 4.4: Polar Cloud home page
CHAPTER 4. THE POLAR CLOUD 56
(Note that you can always return to this home page by click-
ing on the cloud icon towards the upper left of Polar Cloud
screens.)
If you have a brand new Polar3D printer, go to Chapter 1to
get started on setting up your new printer.
If you are a new Polar Cloud member at a site that al-
ready has 3D printers ready to share, go to Section 4.5 to learn
how to possibly use and share existing 3D printers in the Polar
Cloud.
4.1.2 Polar Cloud account settings
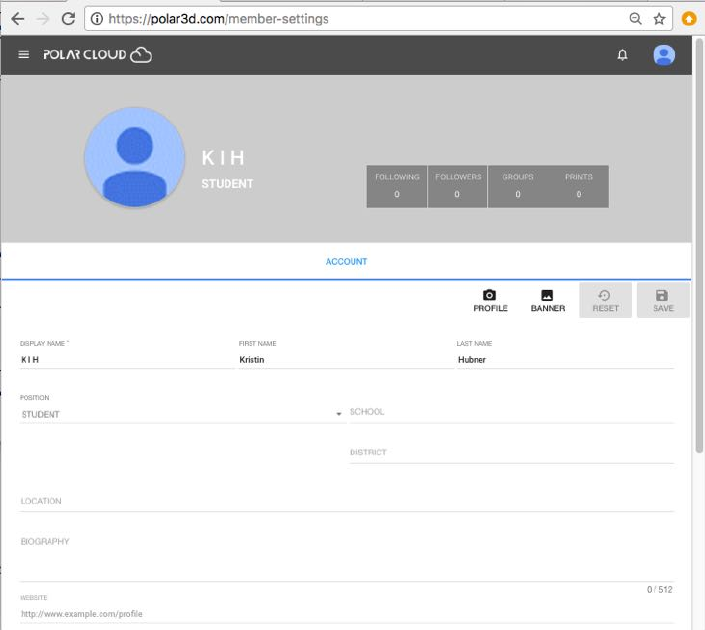
To mo dify settings for your Polar Cloud account, at the account
drop down menu (see Figure 4.1)clickon“Settings”togetto
a screen such as shown in Figure 4.5.
CHAPTER 4. THE POLAR CLOUD 57
Figure 4.5: Polar Cloud account settings
Your display name is the name that will be displayed through-
out the Polar Cloud on objects you post, when you are a member
of a group, if another Polar Cloud member is SEARCHing for you
to share an object with you, etc. As such, put some thought into
what you would like displayed: consider whether you wish to be
easily identifiable when other members search or view objects
you posted, or whether you prefer a more obscure or symbolic
name. Teachers may also wish to advise students on “appro-
priate” choice of display name. To set or modify your display
name, click on the field underneath “DISPLAY NAME”.
CHAPTER 4. THE POLAR CLOUD 58
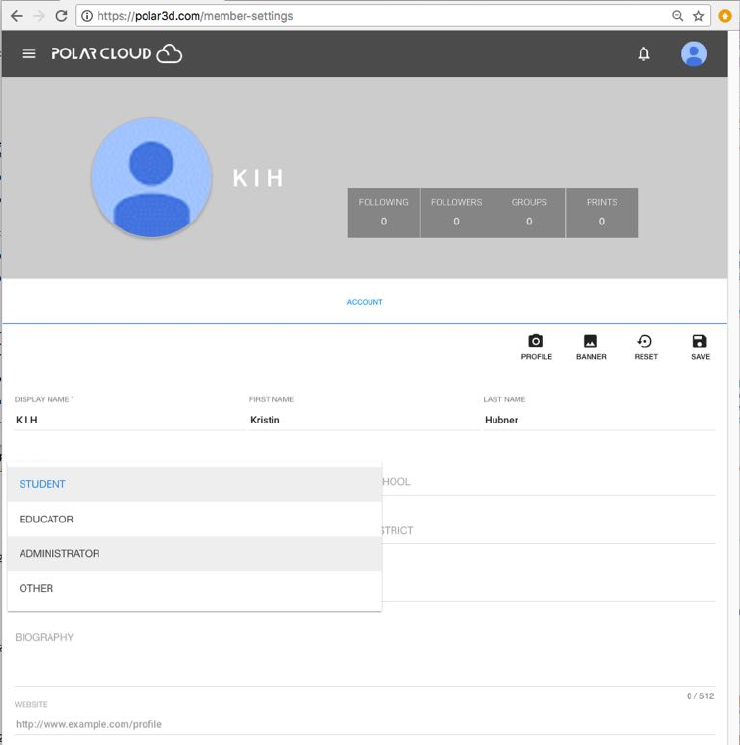
While the default “POSITION” value for newly created Polar
Cloud accounts is STUDENT, if you are a teacher or administrator
(or IT support person or other non-student), you will probably
wish to set the “POSITION” field to properly represent your sta-
tus; see Figure 4.6.
Figure 4.6: Polar Cloud account POSITION
You may upload a profile picture of yourself, to be displayed
in small fingernail size along with your account display name
CHAPTER 4. THE POLAR CLOUD 59
when other Polar Cloud members search for you, or see you
listed in a group, and displayed at full size when other Polar
Cloud members view your member page.Seethe“PROFILE”
tab.
You may upload a photo to use as the banner background
for your Polar Cloud account screens, displayed when you are
viewing your own account screens or when other Polar Cloud
members view your member page.Seethe“BANNER” tab.
Make sure to click the “SAVE” tab (toward the upper right of
the account screen) after making any changes to your account
settings.
CHAPTER 4. THE POLAR CLOUD 60
Figure 4.7: Polar Cloud account ACTIVITY screen
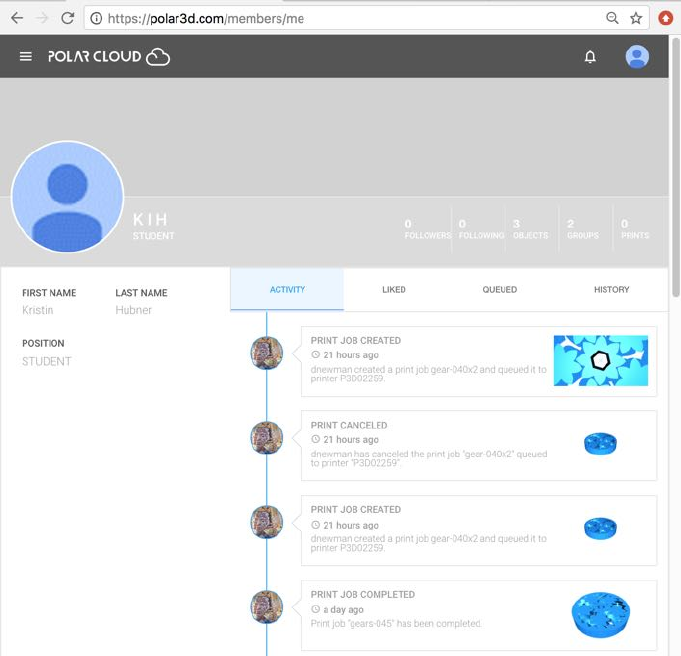
4.1.3 Polar Cloud account dashboard
From the Polar Cloud account drop down menu (see Figure 4.1),
clicking on your Polar Cloud account email (the second item in
the drop down list) will take you to your account dashboard
screen, with the “ACTIVITY” tab highlighted, displaying your
recent account activity; see Figure 4.7. Account activity may
include operations such as adding a new printer, your own print
jobs getting created and cancelled or completed, other users
CHAPTER 4. THE POLAR CLOUD 61
of your printer(s) submitting jobs, you creating a new group,
etc.
The tabs and screens available under your account dashboard
(members/me page) are:
1. “ACTIVITY – all your account’s activity, including other Po-
lar Cloud member interactions (such as other members’ jobs
on your printers).
2. “LIKED” – list of objects you have liked.
3. “QUEUED” – list of your own currently queued print jobs.
4. “HISTORY” – list of all your own print jobs.
4.2 Objects in the Polar Cloud
Through the Polar Cloud, you may create your own objects,
search for and find objects created by others, and print objects.
You may share ob ject files (e.g.,.stl files), descriptions and
comments regarding object creation and use, recommendations
for print settings to aid in successful printing, photos of printed
objects, and videos of printing objects, with other Polar Cloud
members. You may also download object files from the Polar
Cloud, or upload into the Polar Cloud object files created outside
the Polar Cloud.
CHAPTER 4. THE POLAR CLOUD 62
Figure 4.8: Polar Cloud top menu OBJECTS tab
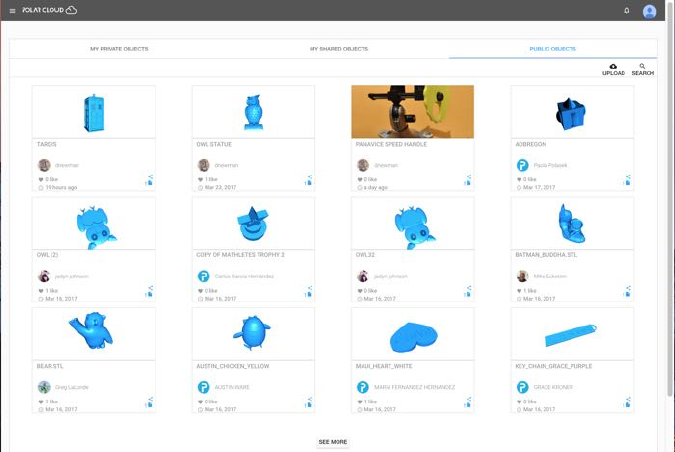
One of the Polar Cloud top menu’s main tabs is “OBJECTS”;
see Figure 4.8. Clicking on the “OBJECTS” tab will take you to
the OBJECTS screen, such as shown in Figure 4.9,withtabsfor
“MY PRIVATE OBJECTS”, “MY SHARED OBJECTS”, and “PUBLIC
OBJECTS”. You will go directly to (see highlighted) whichever
of “MY PRIVATE OBJECTS”, “MY SHARED OBJECTS”, or “PUBLIC
OBJECTS” you most recently viewed – with “PUBLIC OBJECTS”
the default if this is your first login to the Polar Cloud.
Objects are listed in order from most recent to oldest.
CHAPTER 4. THE POLAR CLOUD 63
Figure 4.9: Polar Cloud PUBLIC OBJECTS screen
If you wish to “CREATE” an object, you may use CAD pack-
ages available within the Polar Cloud itself to design an object
and generate its .stl file(s); see Section 4.3. Or if you already
have some .stl file(s) describing an object available from else-
where, you may upload the file(s) into the Polar Cloud using the
“UPLOAD” tab.
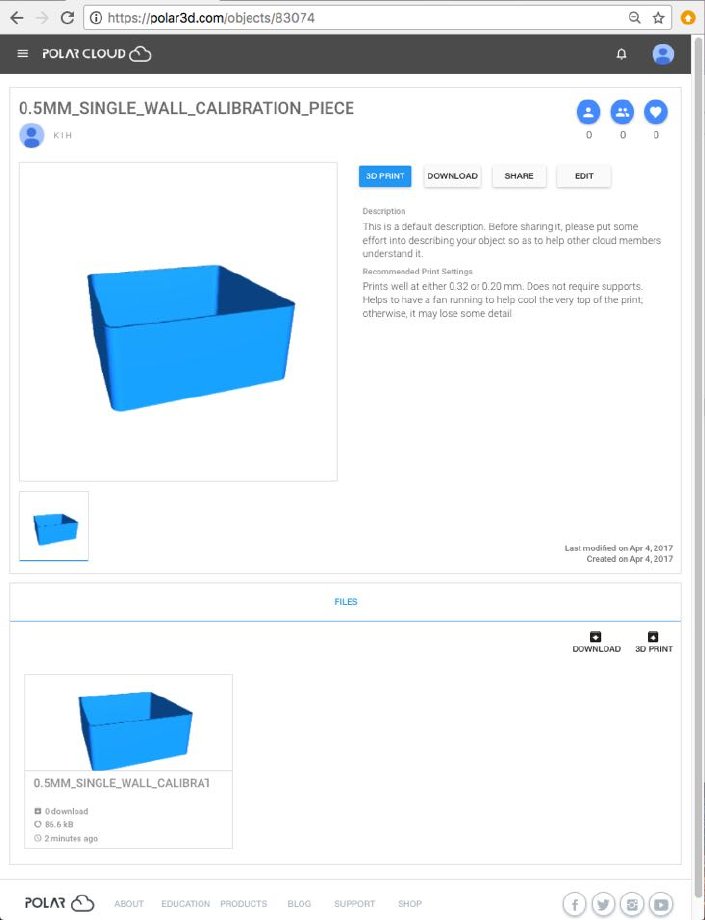
To print or otherwise manage an ob ject already in your set
of objects (under “MY PRIVATE OBJECTS”), click on the icon for
the object itself. That will take you to a screen such as shown in
Figure 4.10 where you may: “3D PRINT”, “DOWNLOAD”, “SHARE”,
(or in the case of private objects, “EDIT” the text description
of) your object.
CHAPTER 4. THE POLAR CLOUD 64
Figure 4.10: Polar Cloud sample object detail screen
To print or otherwise access a shared (under “MY SHARED
OBJECTS)orpublicobject(under“PUBLIC OBJECTS”), click on
CHAPTER 4. THE POLAR CLOUD 65
the icon for the object itself. For shared or public objects, you
may: “3D PRINT”, “DOWNLOAD”, or “SHARE” the object; see Fig-
ure 4.24.
To print or otherwise access an ob ject shared with you due
to your membership in a group, navigate to the group, select
“OBJECTS”, and then click on the icon for the object itself; see
Section 4.4.
From the ob ject’s detail screen, clicking “3D PRINT” will take
you to the build plate screen where you may adjust placement
and print settings, and when ready click “PRINT” to actually
submit the print job; see Section 4.6 and in particular Section
4.6.1.
4.2.1 Uploading and downloading objects
You may upload objects into your Polar Cloud collection of ob-
jects. Such objects might be ones you yourself created using
your choice of external CAD software (note that objects you
create using CAD software while inside the Polar Cloud are al-
ready in your object collection in the Polar Cloud and do not
need to be uploaded), or objects you found or purchased o↵the
Internet. Any normal .stl file can be uploaded into the Polar
Cloud.
Note that when you upload an object into the Polar Cloud,
the object is always uploaded to your private collection of ob-
jects, (as shown under “MY PRIVATE OBJECTS”), regardless of
what context you may be in when you perform the upload. If
you wish, subsequently you may choose to share your uploaded
object with particular Polar Cloud members, or groups, or make
CHAPTER 4. THE POLAR CLOUD 66
the object publicly available in the Polar Cloud.
Figure 4.11: Polar Cloud MY PRIVATE OBJECTS screen
Figure 4.12: Polar Cloud object upload screen
To upload an existing ob ject .stl file from your device into
your private collection of objects in the Polar Cloud, at the
Polar Cloud’s top menu select “OBJECTS”, as shown in Figure
4.8.ThiswilltakeyoutothePolarCloud“objects” screen,
CHAPTER 4. THE POLAR CLOUD 67
highlighting whichever of “MY PRIVATE OBJECTS”, “MY SHARED
OBJECTS”, or “PUBLIC OBJECTS” you most recently viewed. (If
this is your very first time in the Polar Cloud, clicking “OBJECTS”
will take you to the Polar Cloud PUBLIC OBJECTS screen such
as shown in Figure 4.9.)
Though for your upload, it does not matter which list of
objects you are viewing, if you wish, you may go to the MY
PRIVATE OBJECTS screen: at the Polar Cloud’s top menu select
“OBJECTS”, then click MY PRIVATE OBJECTS (towards the left of
the screen). If you do not yet have any private objects, you will
see a screen such as shown in Figure 4.11.
At the MY PRIVATE OBJECTS screen (or at the MY SHARED
OBJECTS screen or the PUBLIC OBJECTS screen), click the “UPLOAD”
button; see Figure 4.11. This will open up a window, as shown in
Figure 4.12, where you may drag-and-drop a file, or click inside
the window to search the files on your device.
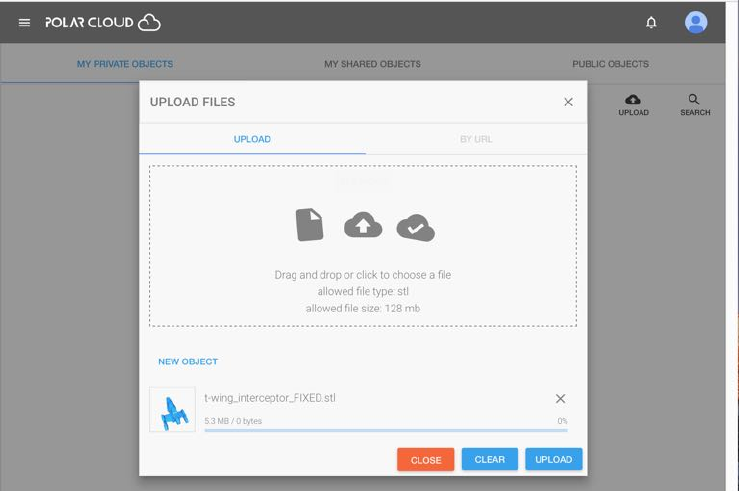
Once you have specified the file(s) you wish to upload, see
Figure 4.13,clickthe“UPLOAD” button. The progress of the
upload will be displayed; see Figure 4.14.
Note that you do not need to pause your work while the up-
load occurs; clicking either the “CLOSE” button or the “X” mark
at the upper right of the ‘UPLOAD FILES” screen shown in Figure
4.14 will close that window, but your upload will continue, and
you will continue to see the progress icon in the lower right of
whatever Polar Cloud screen you are at. Clicking on the upload
progress icon from a di↵erent Polar Cloud screen will re-open the
“UPLOAD FILES” progress window, should you wish to return to
it.
CHAPTER 4. THE POLAR CLOUD 69
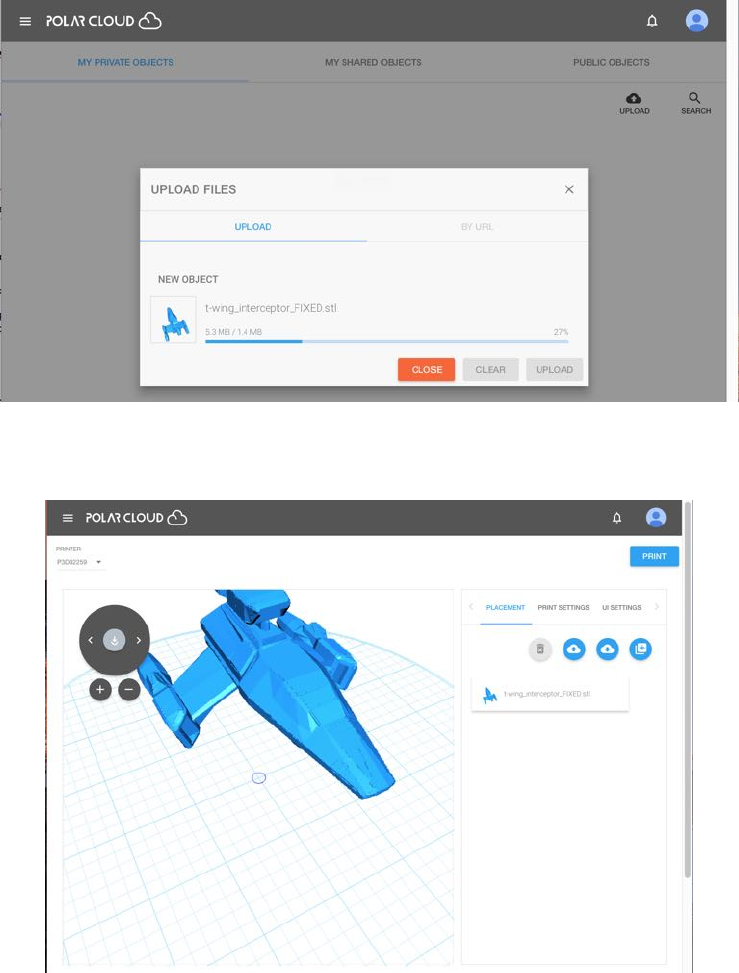
Figure 4.14: Polar Cloud object upload progress
Figure 4.15: Polar Cloud uploaded object build plate screen
From the object’s build plate screen, you may perform all the
CHAPTER 4. THE POLAR CLOUD 70
normal modifications of the object or its print settings (discussed
in detail in Section 4.6.1), and then click the “PRINT” button
when you are ready to print the object.
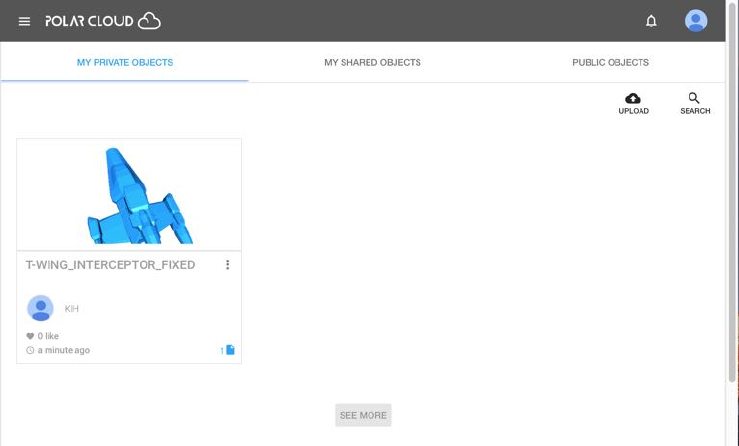
After uploading, the object is now in your collection of ob-
jects, and will be included in your listing at the MY PRIVATE
OBJECTS screen, as shown in Figure 4.16.
Figure 4.16: Polar Cloud MY PRIVATE OBJECTS screen after upload
To download, from a Polar Cloud ob ject detail screen, such
as shown in Figure 4.10,youmayclickthe“DOWNLOAD” button
to save the object (.stl file(s)) to your device. (Note that you
may download to your device any type of object in the Polar
Cloud: private object, shared object, or public object.)
Downloading can also be performed on objects accessible to
you from within a print queue using the print queue job edit
menu,orfromprinter history,orfromyouraccount history.
CHAPTER 4. THE POLAR CLOUD 71
Figure 4.17: Polar Cloud object SHARE button Share with Members option
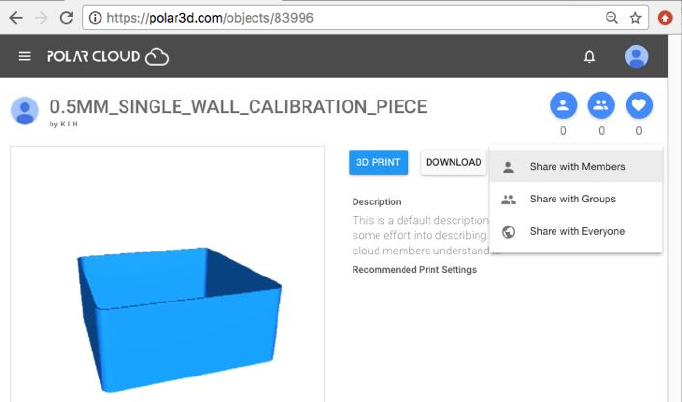
4.2.2 Sharing objects
There are three types of sharing of objects: sharing an object
only with specified members, making an object public (any Polar
Cloud member may access it), or sharing an object with mem-
bers of particular groups (only members in those groups may
access it).
To share an ob ject with specified members, from the ob ject
detail page click the “SHARE” button and select “Share with
Members”; see Figure 4.17.Thiswillbringupa“SHARE WITH
MEMBERS” search screen, where you may search for and add the
Polar Cloud members with whom you wish to share your ob-
ject; see Figure 4.18. Note that the searching is by Polar Cloud
account display name.
To make an ob ject of yours public, so that all others in the
Polar Cloud may copy and use it, from the object’s screen, see
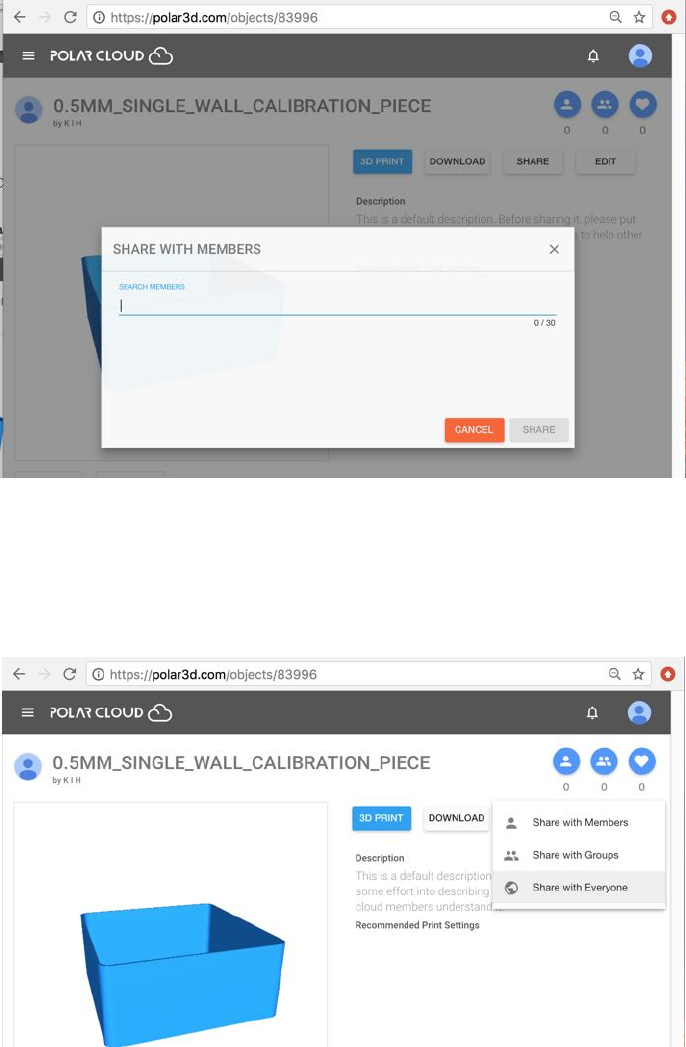
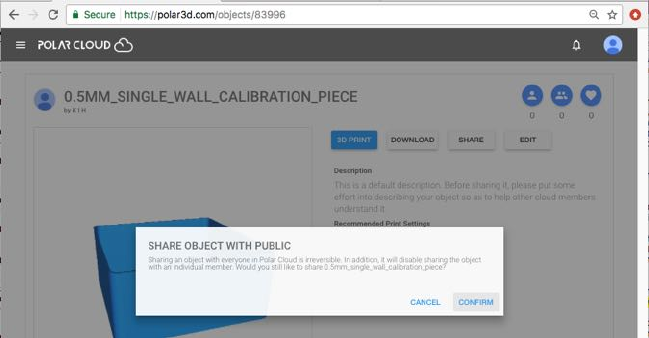
CHAPTER 4. THE POLAR CLOUD 73
Since making an object public is an irrevocable action, you
will be asked to confirm this action; see Figure 4.20.Oncean
object is shared publicly, note that it cannot then be shared
to specific Polar Cloud members nor re-shared to everyone (as
either would serve little purpose – any Polar Cloud member
can access any public object regardless); however, public objects
can be shared with groups, for convenience in drawing group
members’ attention to an object.
Figure 4.20: Polar Cloud confirm Share with Everyone action
Note that sharing an object with everyone in the Polar Cloud,
that is, making it a public object, means that your Polar Cloud
display name is associated publicly with that object. In particu-
lar, if a student member shares an object publicly, that student
(and any biographical data they have included in their account
biography) thereby becomes somewhat more publicly visible in
the Polar Cloud. Teachers may wish to discuss this aspect of
public posting of objects with their students.
To share an ob ject with specific groups, there are two ap-
proaches. The first approach is to perform the sharing from the
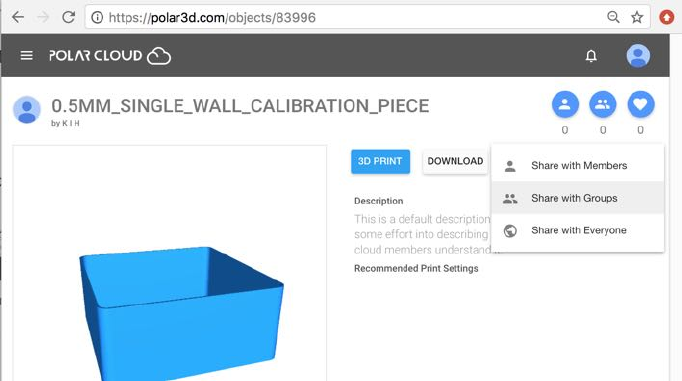
CHAPTER 4. THE POLAR CLOUD 74
Figure 4.21: Polar Cloud object Share with Groups
object detail page, analogous to the approaches discussed above
for sharing an object with specific members or publicly. The
second approach is to perform the sharing from the group’s own
“OBJECTS” screen. The approaches have an equivalent e↵ect,
and will be discussed respectively below.
To share an ob ject with a group from the ob ject detail page,
click the “SHARE” button and then select “Share with Groups”;
see Figure 4.21.Thiswillbringupa“SHARE WITH GROUPS”
screen, where you may select (or search) among the groups of
which you are a member for groups with which you wish to
share your object; see Figure 4.22.Onceyouhaveclickedthe
checkbox(es) of a group or groups with which to share the object,
you must click the blue “SHARE” button (towards the bottom
right of the “SHARE WITH GROUPS” screen) to share the object;
see Figure 4.23.
To share an ob ject of yours with a specific group from the
group’s own “OBJECTS” screen, navigate to that group, click
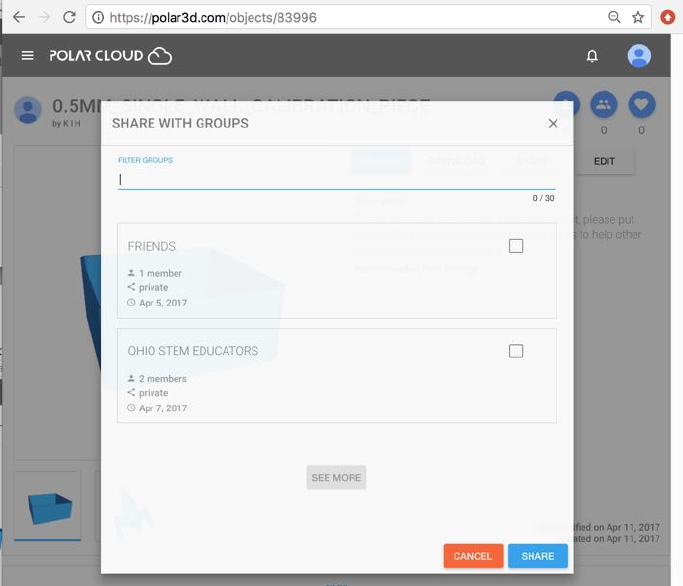
CHAPTER 4. THE POLAR CLOUD 75
Figure 4.22: Polar Cloud SHARE WITH GROUPS screen
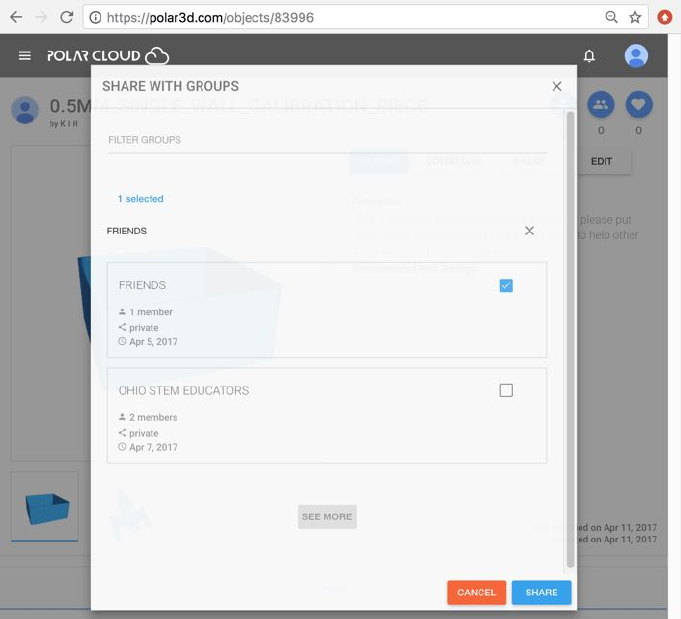
CHAPTER 4. THE POLAR CLOUD 76
Figure 4.23: Polar Cloud SHARE WITH GROUPS screen with FRIENDS group
selected
CHAPTER 4. THE POLAR CLOUD 77
the “OBJECTS” tab for the group, and click “SHARE”; this will
bring up a window in which you may search your own objects
and select some to share. Select which objects by clicking the
checkbox to the left of the desired object(s), and click “SHARE”
in this object selection window. See Section 4.4.5 for an example
of this process.
Note that you may “UNSHARE” objects that you have shared
with specific other Polar Cloud members.
A group manager may “UNSHARE” from a group any object
that any group member has shared with the group; however, to
reduce the chance that a group member inadvertently “UNSHARE”s
an object intended to be shared as part of a class assignment,
ordinary group members can not “UNSHARE” any group objects,
even ones they themselves shared with the group. (However, if
a group member shared one of their own objects with a group,
that member may “DELETE” the object, thereby e↵ectively re-
moving it from the group.)
You can neither “UNSHARE” nor “DELETE” any public ob-
ject.
4.2.3 Searching for objects
To find ob jects that others have shared publicly in the Polar
Cloud, from the “OBJECTS” screen shown in Figure 4.9,click
the “PUBLIC OBJECTS” tab to go to a screen of publicly shared
objects, shown in Figure 4.24,andclickonthe“SEARCH” button
(or magnifying glass icon); then enter search terms for the sort
of object you wish to find. Object name and description are
compared when searching.

CHAPTER 4. THE POLAR CLOUD 78
Figure 4.24: Polar Cloud PUBLIC OBJECTS screen
For instance, searching for “box” will result in a more specific
list of objects, as shown in Figure 4.25.
To find objects shared within a group of which you are a
member, select “GROUPS” from the Polar Cloud top menu (see
Figure 4.32), click on a particular group to go to that group’s
menu (see for instance Figure 4.38), click on the “OBJECTS”tab
to take you to a screen such as shown in Figure 4.26.
To find ob jects shared personally with you, select “OBJECTS”
from the Polar Cloud top menu, click the “MY SHARED OBJECTS”
tab to go to a screen of objects shared individually with you, and
click the “SEARCH” button (or magnifying glass icon); then enter
search terms for the sort of object you wish to find.

CHAPTER 4. THE POLAR CLOUD 79
Figure 4.25: Polar Cloud search for a box object
Figure 4.26: Polar Cloud example FRIENDS group’s OBJECTS screen
CHAPTER 4. THE POLAR CLOUD 80
4.2.4 Object description, print recommendations, pho-
tos
To add or change the description of an object, or add recommen-
dations on printing it, click on the “EDIT” tab from the object
detail page; see Figure 4.10.“EDIT” will take you to a screen
such as shown in Figure 4.27,whereyoumayenterormodifya
description of the object, recommend print settings, upload ad-
ditional .stl files or remove existing files, or upload (or remove)
your own photos of a printed object.
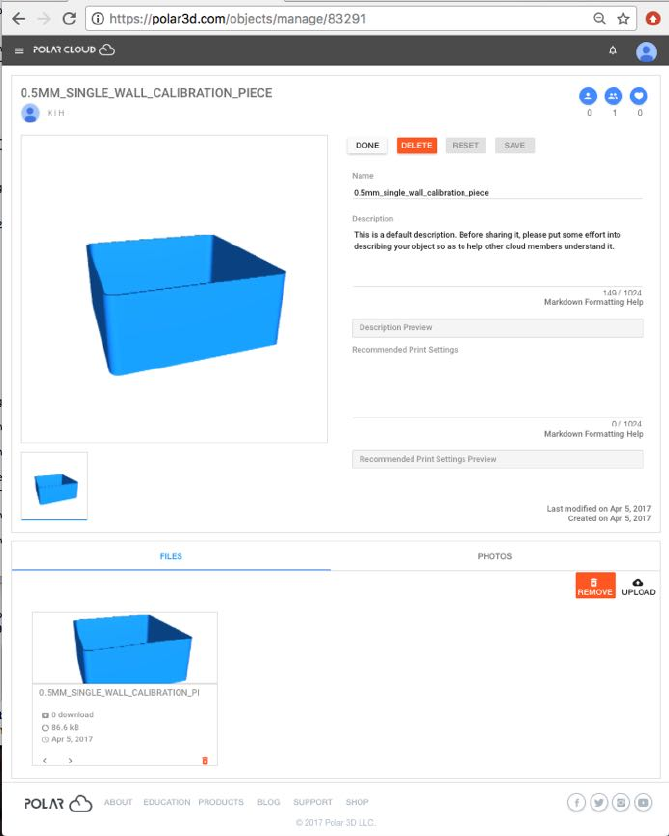
CHAPTER 4. THE POLAR CLOUD 81
Figure 4.27: Polar Cloud object EDIT screen
Once you are satisfied with your description or other details,
click the “SAVE” button towards the top of the screen. (If you do
not like your edits, you may click “RESET”.) Then click “DONE”
to finish editting and return to the object page.
CHAPTER 4. THE POLAR CLOUD 82
4.2.5 Deleting an object
In general, there is little need to delete objects from the Polar
Cloud, and you may wish to retain them in your Polar Cloud
account for future reference. However, if you have an object
whose .stl files are deeply flawed, or which was quite unsat-
isfactory in other ways, you may wish to remove it from your
Polar Cloud account, so that you don’t unintentionally refer to
it and perhaps start printing it again in future.
To delete one of your ob jects, whether entirely private, shared
with some specific other Polar Cloud members, or shared with
a group, select it (from where it is listed under “MY PRIVATE
OBJECTS,or“MY SHARED OBJECTS, or a group’s “OBJECTS”) to
get to the object’s detail page, see Figure 4.10.Thenclick
“EDIT” to get to the object’s manage page; see Figure 4.27.
Then click the red “DELETE” button towards the top.
Objects that have been shared publicly can not be deleted.
4.2.6 Object LIKEs
To LIKE an object, at the object’s screen, see Figure 4.28,click
on the heart icon towards the upper right. Note that the number
of LIKEsanobjecthasalreadyreceivedistalliedundertheheart
icon. You may not “LIKE” your own objects.
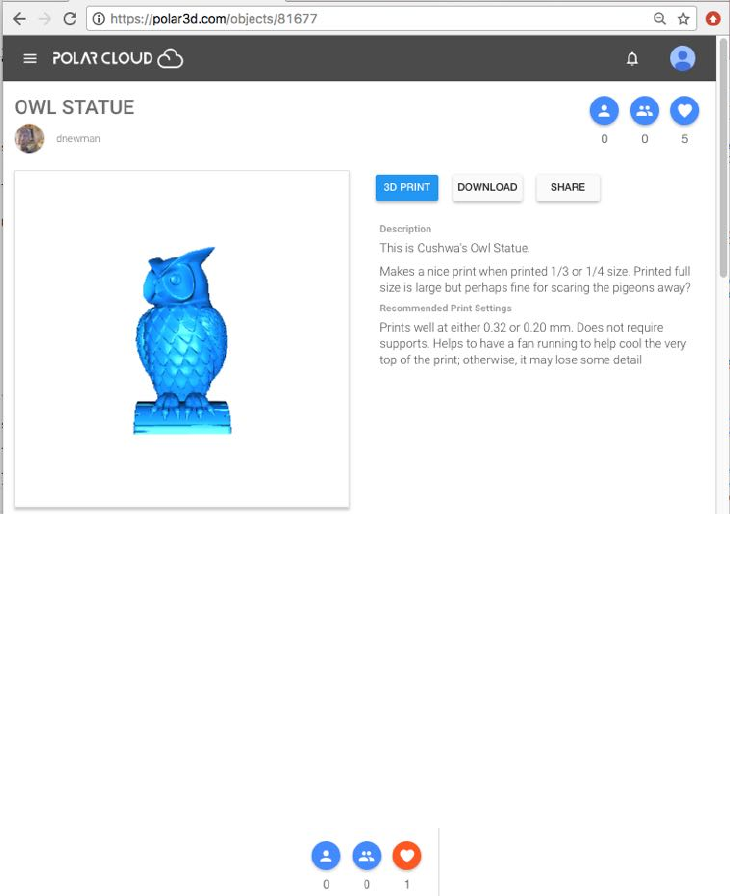
CHAPTER 4. THE POLAR CLOUD 83
Figure 4.28: Polar Cloud OWL STATUE object detail screen
When an object is listed on the OBJECTS screen, the number
of LIKEsanobjecthasreceivedisdisplayedtowardsthelower
left; see Figure 4.29.
Once you personally have clicked to “LIKE” an object, the
heart icon will then appear in red; see Figure 4.30.
Figure 4.30: Polar Cloud LIKE heart is red for personally liked object
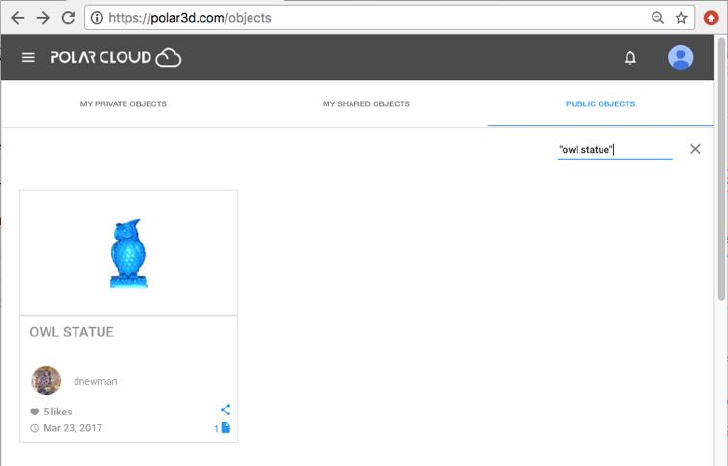
CHAPTER 4. THE POLAR CLOUD 84
Figure 4.29: Polar Cloud OWL STATUS object’s LIKES
4.3 Creating objects using CAD software within
the Polar Cloud
The Polar Cloud itself provides access to some convenient CAD
software. Under the main Polar Cloud screen, go to “OBJECTS”,
then “YOUR OBJECTS”, and then “CREATE”.
(Note that if you prefer to use external CAD software and
then import the .stl files you generate into the Polar Cloud,
that is fully supported too. See Chapter 6for a list of some
suggested CAD packages, and see Section 4.2.1 for a discussion
of uploading object files, once you create them.)
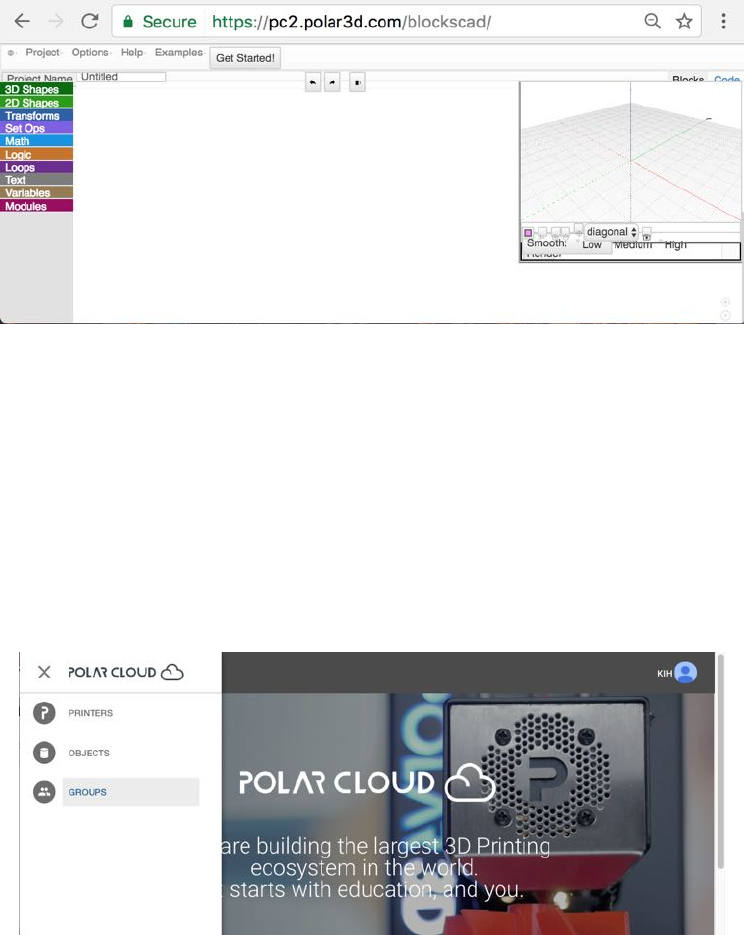
CHAPTER 4. THE POLAR CLOUD 85
Figure 4.31: Polar Cloud BlocksCAD
4.4 Groups in the Polar Cloud
Polar Cloud groups provides a convenient means of sharing printer
access, printer control, and objects with group members. Cre-
ating a group is typically the most convenient way to configure
class, lab, school, library, or club access to a printer.
Figure 4.32: Polar Cloud top menu GROUPS tab
From the Polar Cloud main screen, expanding the left-hand
menu lists “GROUPS” as one of the choices; see Figure 4.32.
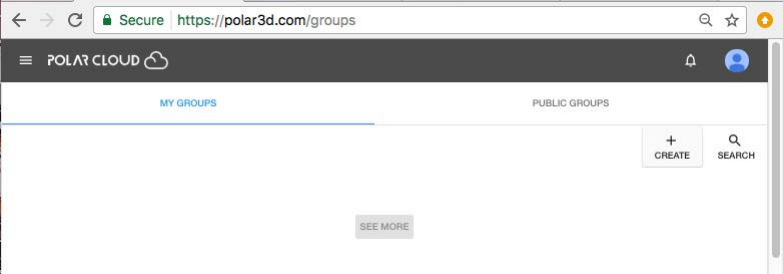
CHAPTER 4. THE POLAR CLOUD 86
Clicking “GROUPS” will take you to the GROUPS screen, with
tabs to list either “MY GROUPS”or“PUBLIC GROUPS”, as shown
in Figure 4.33.
Figure 4.33: Polar Cloud GROUPS screen
Note that when you click “GROUPS”, you will see highlighted
whichever of “MY GROUPS”or“PUBLIC GROUPS” you most re-
cently viewed.
4.4.1 Creating a group
To create your own group (whether that be a class group, a
club group, or simply a group of like-minded makers), click the
“CREATE” button shown in Figure 4.33, and fill in the fields de-
scribing the group on the group creation screen shown in Figure
4.34;clickthe“CREATE” tab (towards the lower right of the
“CREATE A GROUP” pop-up screen) once you have filled in the
fields.
Note that if you intend to set your group to allow it to
be visible and searchable within the Polar Cloud, see Section
4.4.2, then including informative text in the “DESCRIPTION”and
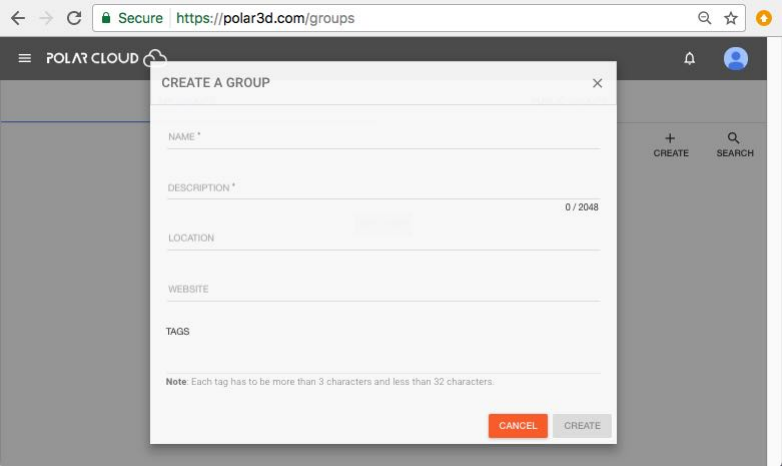
CHAPTER 4. THE POLAR CLOUD 87
“LOCATION” fields will aid other Polar Cloud members in search-
ing for your group – so especially if you are planning to change
this group from the default “PRIVATE”setting to instead make
it “MODERATED”or“PUBLIC”, consider adding informative text
to these fields.
Figure 4.34: Polar Cloud group create screen
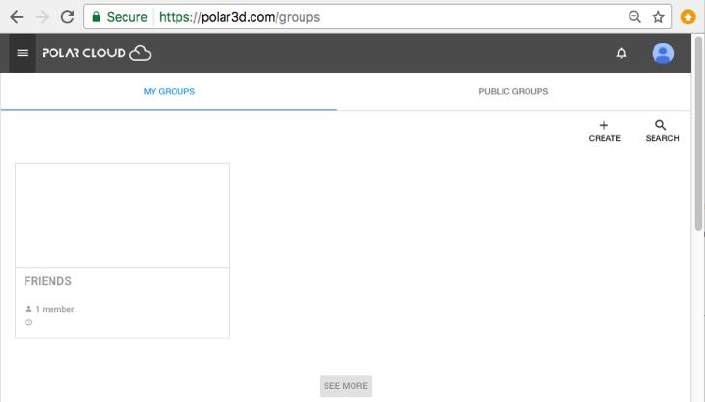
CHAPTER 4. THE POLAR CLOUD 88
Figure 4.35: Polar Cloud MY GROUPS screen
Once you have created a group, it will show up under the “MY
GROUPS” list; for example, Figure 4.35 shows a group “FRIENDS”.
4.4.2 Group settings
When you create a group, by default it is PRIVATE: only mem-
bers of the group can see details about the group, or find it by
searching via the “SEARCH” button at the Polar Cloud GROUPS
screen; see Figure 4.36.

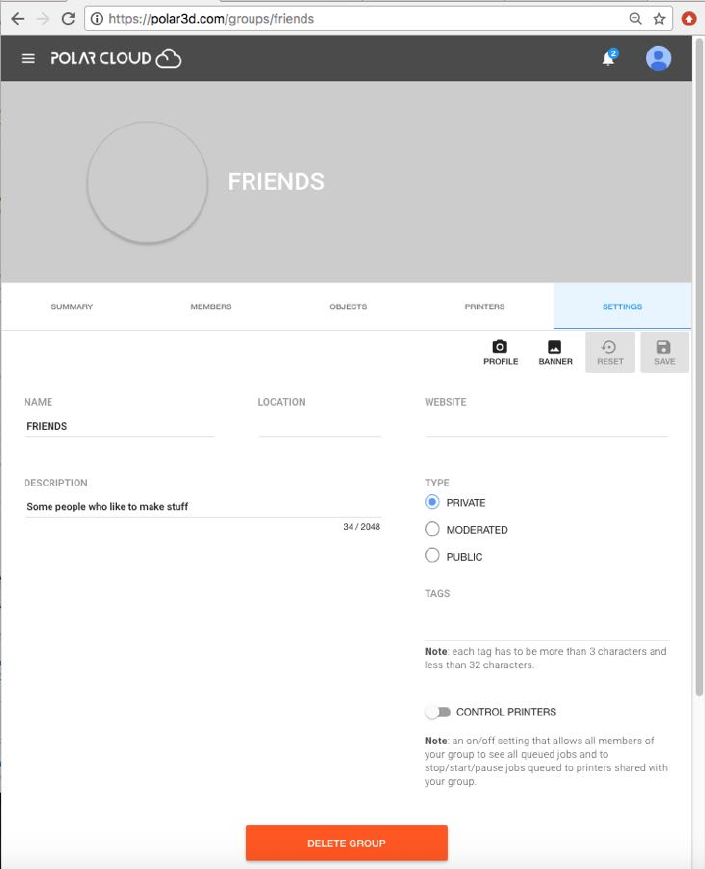
CHAPTER 4. THE POLAR CLOUD 90
Figure 4.37: Polar Cloud sample FRIENDS group’s SETTINGS screen
At the group’s SETTINGS screen, click “PUBLIC”ifyouwould
like any Polar Cloud member to be able to join the group (with
no approval required), view full group membership, and find the
group by searching via the “SEARCH” button at the Polar Cloud
CHAPTER 4. THE POLAR CLOUD 91
GROUPS screen. Click “MODERATED” if you would like requests
to “JOIN” the group to require either knowledge of the group’s
join code or approval by you (the group owner), limit viewing
of the full membership list of the group to the group’s members
(outsiders able to see only the group’s manager(s)), and have
the group’s existence and name findable via “SEARCH.
For privacy reasons, typically school or class groups includ-
ing student members should not be set “PUBLIC”. However, if
you wish the existence of your group to be visible while keep-
ing the membership list private, you may set the group to be
“MODERATED”: with this setting, only your group’s existence and
your status as manager of the group will be visible within the
Polar Cloud, and anyone wishing to join the group will either
need the group’s join code or have to make a request which will
come to you.
Another group setting that may be of interest is the “CONTROL
PRINTERS” switch. When you first create a group, by default
group members do not have operation control of any group
printers: that is, by default group members cannot see other
members’ jobs queued to such a printer nor start nor stop jobs
on the printer. If you wish all group members to have limited
operation control over group printers – see all queued jobs, and
be able to start and stop jobs – then move this switch to the on
position; see Figure 4.51.
Note that “CONTROL PRINTERS” access may be particularly
suitable for classes or groups of experienced, reliable students
(whereas printer manager access, in contrast, has further privi-
leges, such as the ability to invite or delete Polar Cloud member
access to the printer, and access the printer local web interface
CHAPTER 4. THE POLAR CLOUD 92
from within the Polar Cloud, privileges which may not be ap-
propriate to delegate to students). For classroom or lab printers,
whether or not you wish to configure a printer so that class group
members may control the printer themselves may depend on the
age and maturity of your students. For younger students, you
may wish to retain all printer control yourself, whereas it may
be convenient to allow printer control to an entire class of expe-
rienced or older students. If you wish to permit printer control
to only a few, selected students in a class, consider defining two
groups of students, those with control access and those without,
sharing use of the printer with both groups.
4.4.3 Inviting Polar Cloud members to join a group
To invite individually other Polar Cloud members to join your
group, click on the specific group from your list of groups, see
Figure 4.35.Selectingaspecificgroupwilltakeyoutoadisplay
screen for that group, as shown in Figure 4.38;atthisscreen
you may perform various group management operations.
To invite a fellow Polar Cloud member, or members, to join a
group you have created, from the group’s menu (such as shown
in Figure 4.38), select “MEMBERS”, to take you to a screen such
as shown in Figure 4.39.
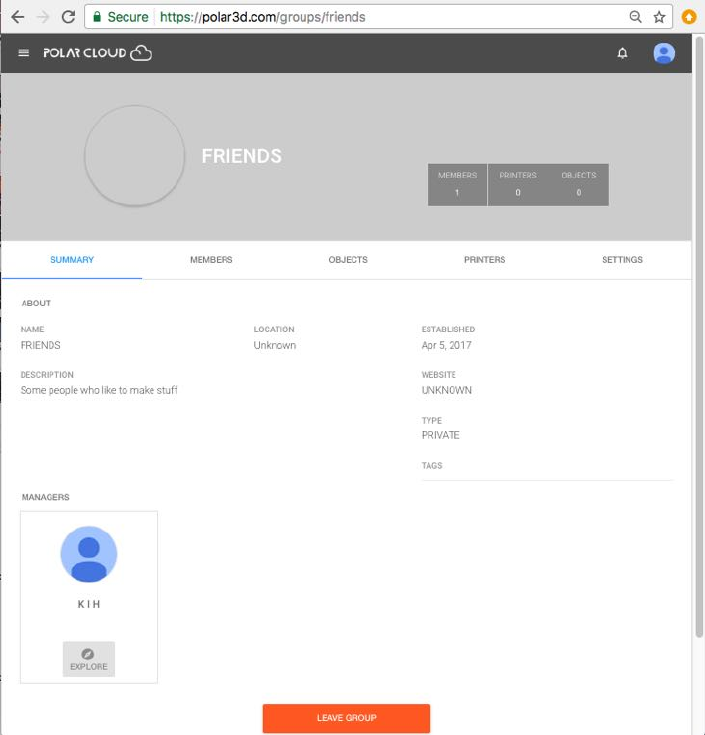
CHAPTER 4. THE POLAR CLOUD 93
Figure 4.38: Polar Cloud example FRIENDS group SUMMARY screen
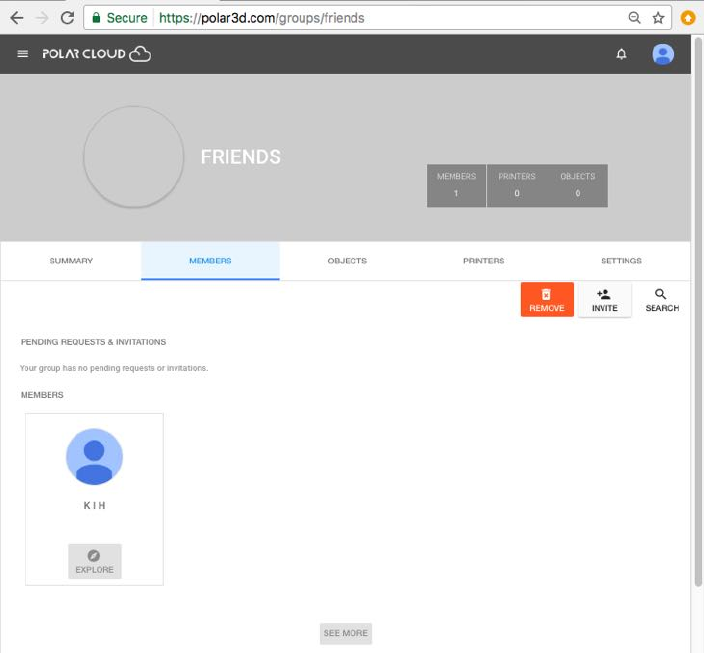
CHAPTER 4. THE POLAR CLOUD 94
Figure 4.39: Polar Cloud example FRIENDS group MEMBERS screen
Then click on the “INVITE” button (towards the middle right
of the group members screen, Figure 4.39). This will take you
to an “INVITE MEMBERS” screen. Filling in the search field to-
wards the top will show you only the Polar Cloud members who
meet the search criteria – see Figure 4.40.Clickonthecheckbox
to the left of the Polar Cloud member(s) who you wish to in-
vite to join your group, as shown in Figure 4.41,andthenclick
“INVITE” (towards the bottom right of the “INVITE MEMBERS”
screen, Figure 4.41).
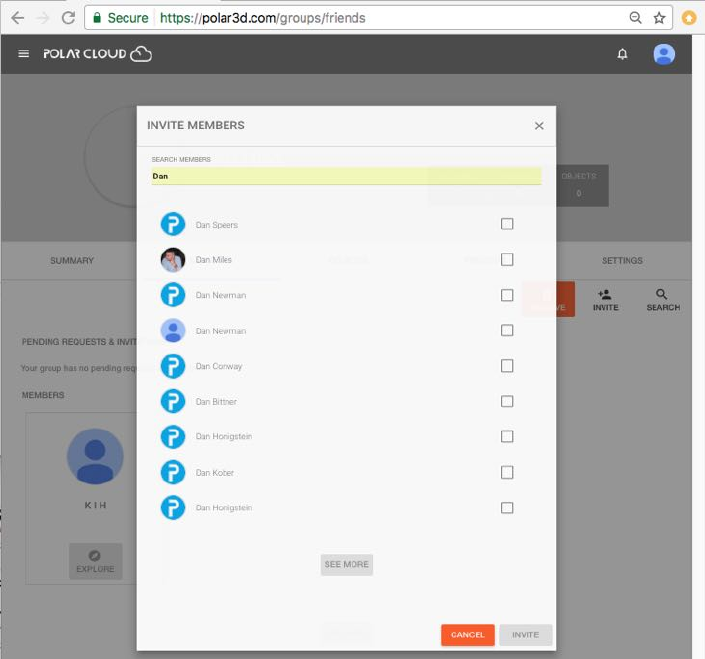
CHAPTER 4. THE POLAR CLOUD 95
Figure 4.40: Polar Cloud group member invitation
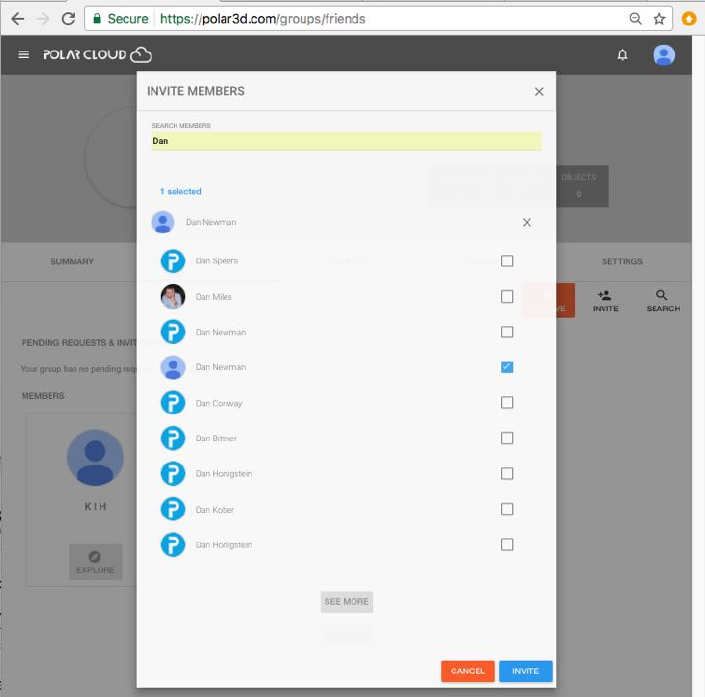
CHAPTER 4. THE POLAR CLOUD 96
Figure 4.41: Polar Cloud group member invitation
The Polar Cloud member(s) you have invited will be sent an
invitation notification to join your group. Such invited Polar
Cloud members who have not yet accepted your invitation will
show up as pending in your group’s member list, as shown in
Figure 4.42.
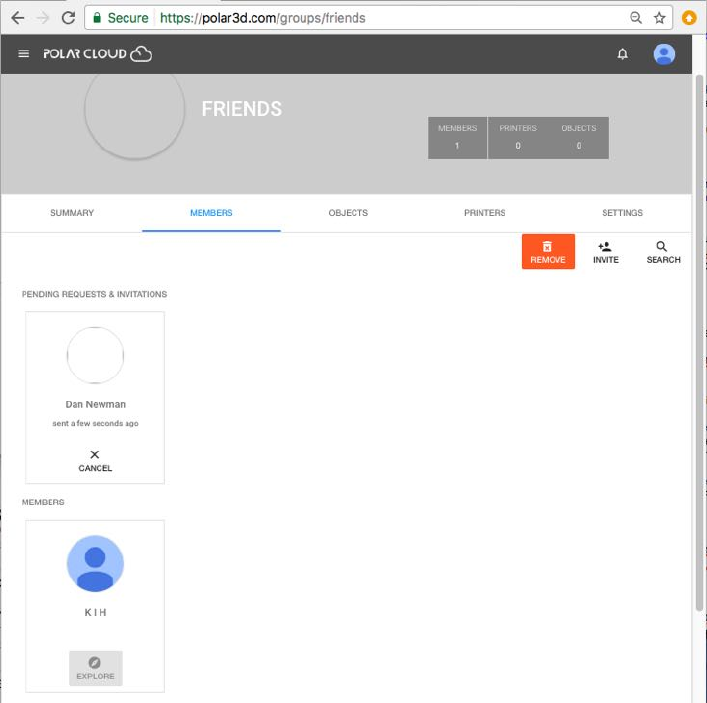
CHAPTER 4. THE POLAR CLOUD 97
Figure 4.42: Polar Cloud group member invitation pending
Rather than individually inviting Polar Cloud members to
join your group, you may set the group to have “MODERATED”
type, and then inform certain Polar Cloud members of the group
join code. Those other Polar Cloud members may then join
your group using the group join code, without you having to
individually select them in the Polar Cloud. For instance, a
classroom teacher might inform all students in a class of the
group join code for the class group, telling the students to go
CHAPTER 4. THE POLAR CLOUD 98
use that group join code to join.
4.4.4 Requesting to join a group
A group’s “TYPE”, under the groups “SETTINGS” (see Section
4.4.2), controls how a group may be joined.
For a PUBLIC group, clicking the “JOIN” button will add you
immediately to the group.
For a MODERATED group, a group join code is generated by
the Polar Cloud, visible to the group owner on the group’s
“SUMMARY” screen. The group owner may choose to pass this
code along to Polar Cloud members whom the group owner
wishes to allow to join the group: for instance, for a class group,
a teacher might pass out the group join code to all the students
in the class.
When a Polar Cloud member clicks the “JOIN” button for a
“MODERATED” group, the member has the opportunity to enter
the group join code. Entering the group join code will add the
member to the group. If a Polar Cloud member does not know
the group join code (or does not enter it correctly), then the
Polar Cloud member’s join request will result in a request no-
tification to the group owner for the group owner to accept or
decline.
4.4.5 Sharing objects within a group
The group manager or any members of the group may share
within a group any objects to which they have access: such ac-
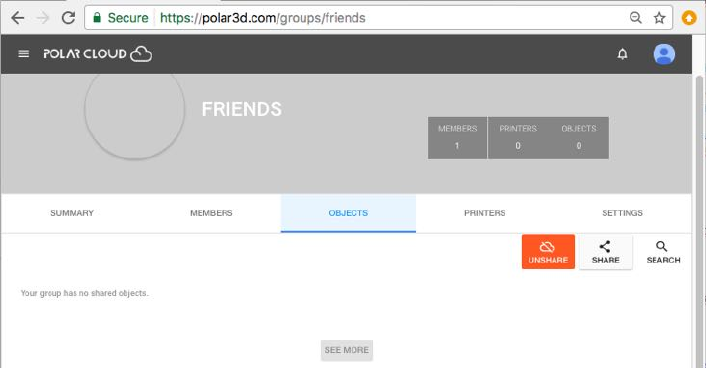
CHAPTER 4. THE POLAR CLOUD 99
cessible objects includes public objects, and any objects shared
with them by another Polar Cloud member (“MY SHARED OBJECTS”).
There are two approaches: (1) navigate to the object’s detail
page, click “SHARE”, and then “Share with Groups” and select
the desired group(s) – see Section 4.2.2 for a discussion; or (2)
navigate to the group’s own “OBJECTS” page, click “SHARE”, and
then select the desired object(s), as discussed below. The e↵ect
is the same either way; selecting an object and then group(s) to
share it with may be more convenient when you are sharing a
single object with multiple groups, whereas from within a group
selecting object(s) to share may be more convenient when you
wish to share multiple objects to a single group.
Figure 4.43: Sharing an object with a group
To share an ob ject using the group’s own “OBJECTS” page,
from the group’s menu – see Figure 4.38 – click on “OBJECTS”
to bring up a screen such as shown in Figure 4.43.Thenclickon
“SHARE” (at center right) to bring up a list of objects which you
may choose to share with the group as shown in Figure 4.44;
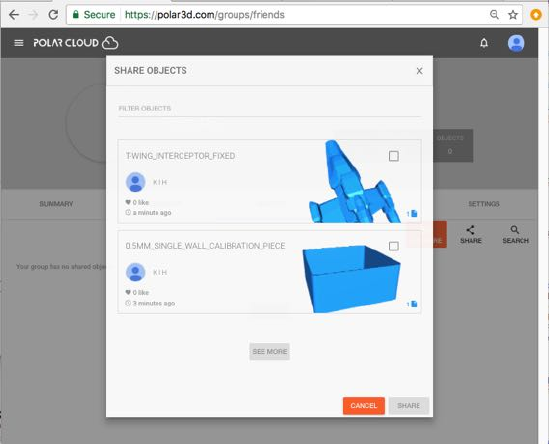
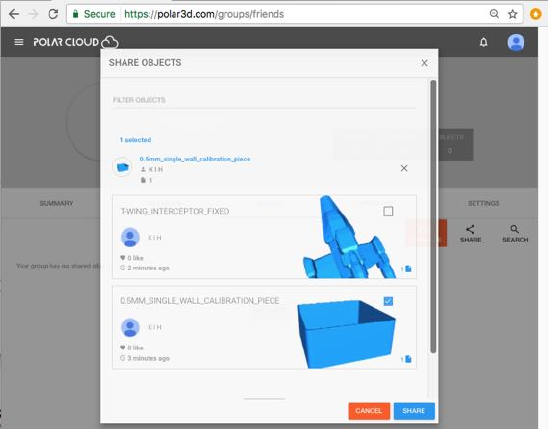
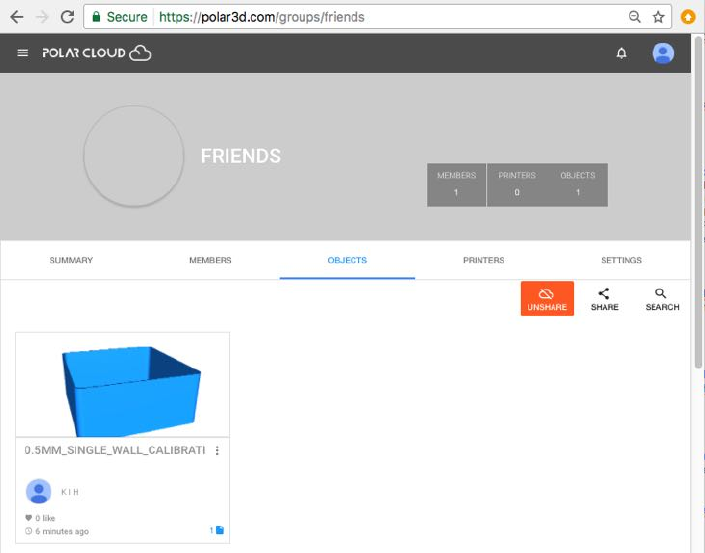
CHAPTER 4. THE POLAR CLOUD 102
Figure 4.46: The shared OBJECTS in the example FRIENDS group
Note that if you wish to create a new object specifically for
a group, or upload an object to a group, you will first need to
create or upload that object to your own private collection of
objects, and then share your object to the group.
4.4.6 Sharing printers within a group
A group member who manages a printer may share access to
that printer across the group. From the group’s menu – see
Figure 4.38 –clickon“PRINTERS” to bring up a screen such as
shown in Figure 4.47.Thenclickon“SHARE” (at center right)
to bring up a list of printers which you may choose to share with
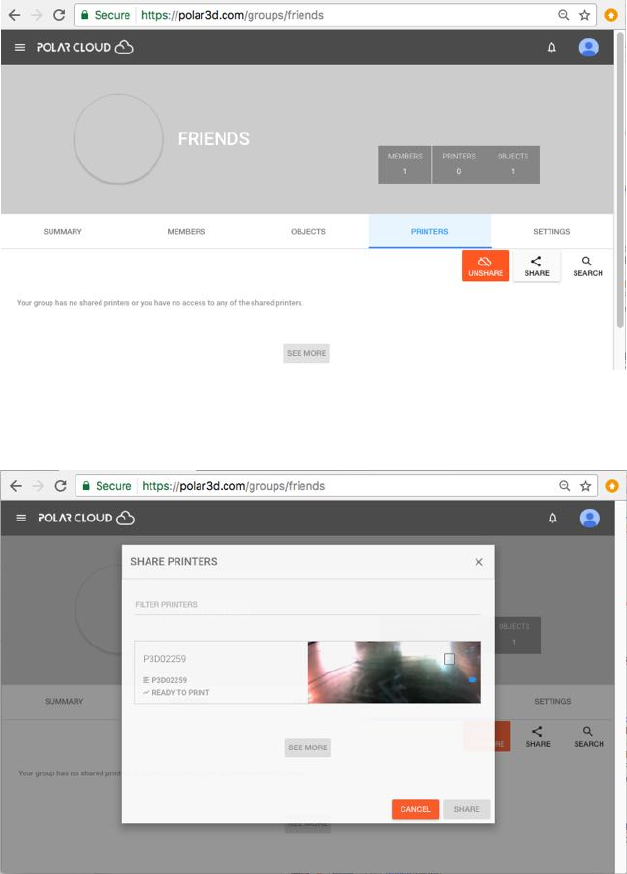
CHAPTER 4. THE POLAR CLOUD 103
the group (see Figure 4.48); click the checkbox to the left of the
printer(s) you wish to share, and then click on “SHARE”(bottom
right, Figure 4.49)whenyouhaveselectedwhichprintersto
share.
Figure 4.47: Sharing a printer with a group
Figure 4.48: List of printers to consider sharing with a group
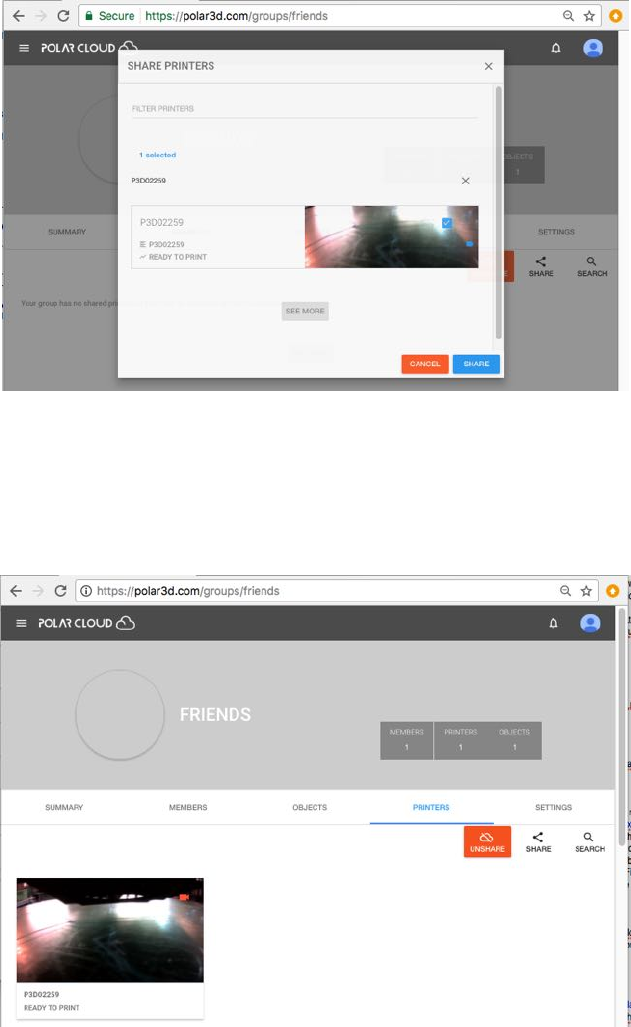

CHAPTER 4. THE POLAR CLOUD 105
Figure 4.51: Allowing CONTROL PRINTERS access to FRIENDS group
By default, access to a printer shared with a group does not
include printer operation control access: group members will
have to wait for the printer owner or a manager to “START”
or “STOP” the print jobs. To allow the members of a group to
CHAPTER 4. THE POLAR CLOUD 106
control printer operation, see the “CONTROL PRINTERS” switch
under the group’s “SETTINGS” tab; Figure 4.51 shows allow-
ing “CONTROL PRINTERS” access to members of the FRIENDS
group.
4.4.7 Searching for a group
There may be existing groups within the Polar Cloud that you
would like to join. To find a group of possible interest, you may
scroll through or “SEARCH” under the “PUBLIC GROUPS” screen;
Figure 4.52 shows an example.
As discussed in Section 4.4.2,youwillonlybeabletosee
listed and find via searching those groups defined as “PUBLIC”
(non-members can see full group details) or “MODERATED” (non-
members can only see an overview and the group manager(s),
but may not see a list of group members).
Clicking on a group will take you to the group’s summary
page. Typically, school or class groups will have been defined as
“PRIVATE” (in which case you won’t be able to see them at all –
not even that such a group exists), or as at most “MODERATED”
(in which case you can see the group’s existence and a few details
such as its manager(s), but not its list of members).
To request to join a group, click on the “JOIN” button (at
the upper right of the group’s summary screen); see Figure
4.53.
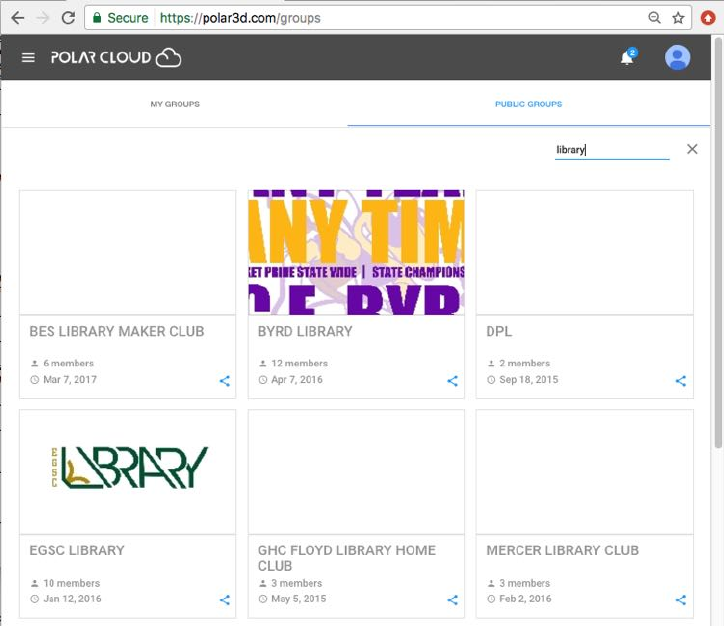
CHAPTER 4. THE POLAR CLOUD 107
Figure 4.52: Polar Cloud SEARCH for library groups
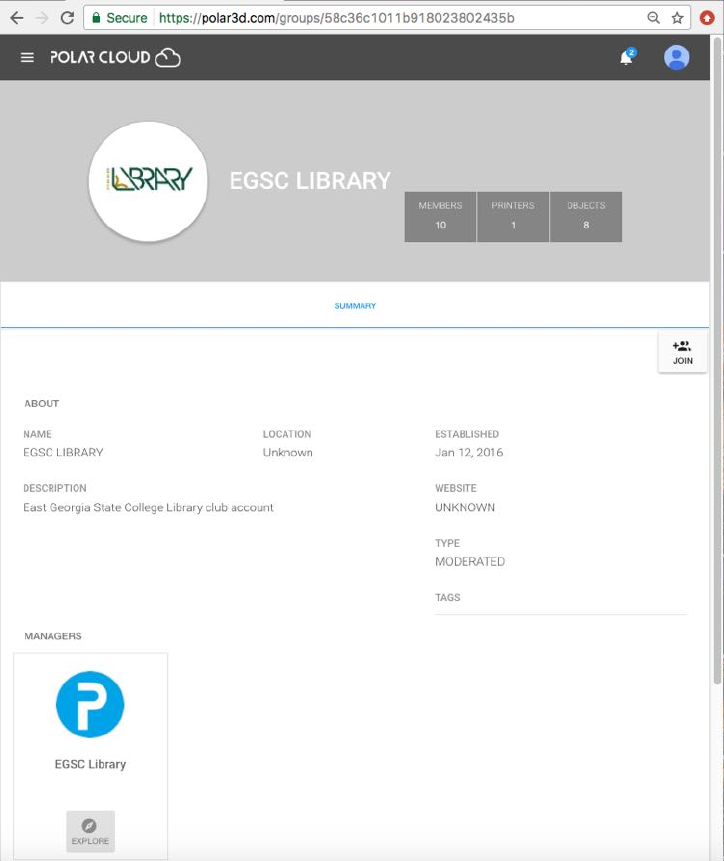
CHAPTER 4. THE POLAR CLOUD 108
Figure 4.53: Polar Cloud: request to JOIN a group
If it is a group configured for “PUBLIC”access,youwillau-
tomatically be added to the group. If it is a group configured
for “MODERATED” access and you know the group join code, you
will be added to the group; without the group join code, the
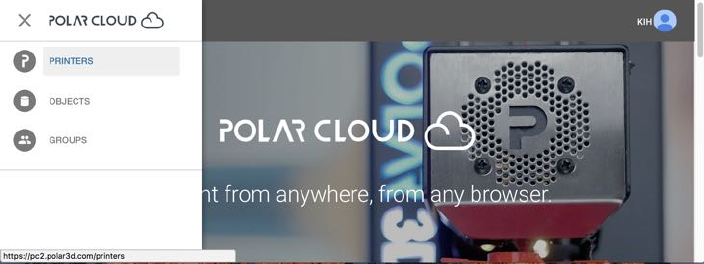
CHAPTER 4. THE POLAR CLOUD 109
group owner will receive a notification of your request to join
the group, and it will then be up to the group owner whether or
not to approve your join request.
4.5 Managing and sharing printers
Figure 4.54: Polar Cloud top menu PRINTERS tab
One of the Polar Cloud top menu’s main sections is “PRINTERS”;
see Figure 4.54. Under that tab, you will see a list of accessible
printers (displayed either via icons or via text descriptions), a
SEARCH button (magnifying glass), and an ADD button (+); Fig-
ure 4.55 shows an example of what the list of printers display
might look like with only one printer accessible to you.
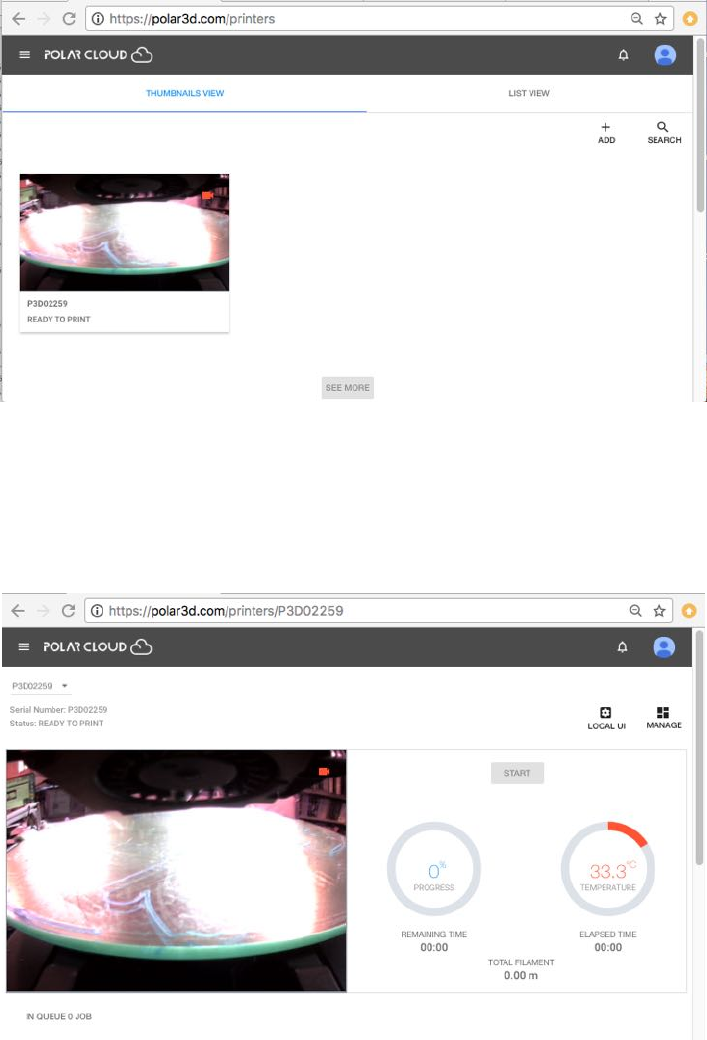
CHAPTER 4. THE POLAR CLOUD 111
4.5.1 Adding a printer to your Polar Cloud account
Typically, a printer is first connected to the Polar Cloud by the
printer’s owner when the printer is first acquired; see the detailed
instructions in Chapter 1. And while Polar Cloud members
might share management of a printer, that is typically achieved
via the printer owner granting manager access to their print-
ers; see Section 4.5.5. That is, printer management can be
shared without altering printer ownership, and without alter-
ing the printer registration to a particular account in the Polar
Cloud.
If you have acquired a previously used printer, especially if
it is a printer previously used at your site, see the discussion of
changing printer ownership in Section 4.5.2;forsomecircum-
stances (in particular, if either the network configuration is still
the same or you wish to retain the printer’s existing job history
and job queues), it may be simpler and more satisfactory to
re-assign printer ownership rather than going through the pro-
cess of adding the printer to your account as a “new” printer
(completely re-configuring the printer’s network profile and re-
registering the printer in the Polar Cloud).
Note that if you attempt to add a printer to your account
while it is still registered in the Polar Cloud as having a di↵erent
Polar Cloud member as its owner, the e↵ect will be that you are
added as a manager of the printer, not as the printer’s owner,
and the printer’s existing job history and print queue will be
una↵ected. This is intentional behavior, as it allows for cases
such as a substitute teacher managing the printer while the usual
teacher is unavailable: the substitute teacher “adds” the printer
and thereby becomes merely a new manager, rather than wiping
CHAPTER 4. THE POLAR CLOUD 112
out the primary teacher’s ownership.
If you wish to “wipe out” a prior printer owner’s ownership
and printer history and print queues (such as when you have
acquired a printer from a di↵erent school district or other orga-
nization) so that you can register yourself as the owner of the
printer in the Polar Cloud, first connect to the printer’s local web
interface and click the “Reset Printer on the Polar Cloud”
tab. Then go through the steps to add a printer to your account,
as if it were a brand new printer, as discussed in Chapter 1.
4.5.2 Changing printer ownership
Occasionally it may be necessary or useful to switch printer own-
ership, or to attach a printer originally connected by some other
Polar Cloud member to your Polar Cloud account: for instance,
if you are taking over or acquiring a previously used printer from
another teacher.
If you are merely switching ownership at the same site, with-
out changing connection details (network details), and without a
desire to obsolete the existing printer queue and history of print
jobs – as for instance, when a new teacher is assigned to take
over an existing class and printer – the “CHANGE OWNER” but-
ton on the printer’s MEMBERS screen under the printer manage
screen, see Figure 4.57,allowstheoldmanagertoconveniently
reassign printer ownership to another Polar Cloud member; see
Figure 4.58. Note that in this case the print queue and printer
history will remain unchanged: any pending print jobs can con-
tinue without interruption, and the printer history will retain
its list of jobs performed.
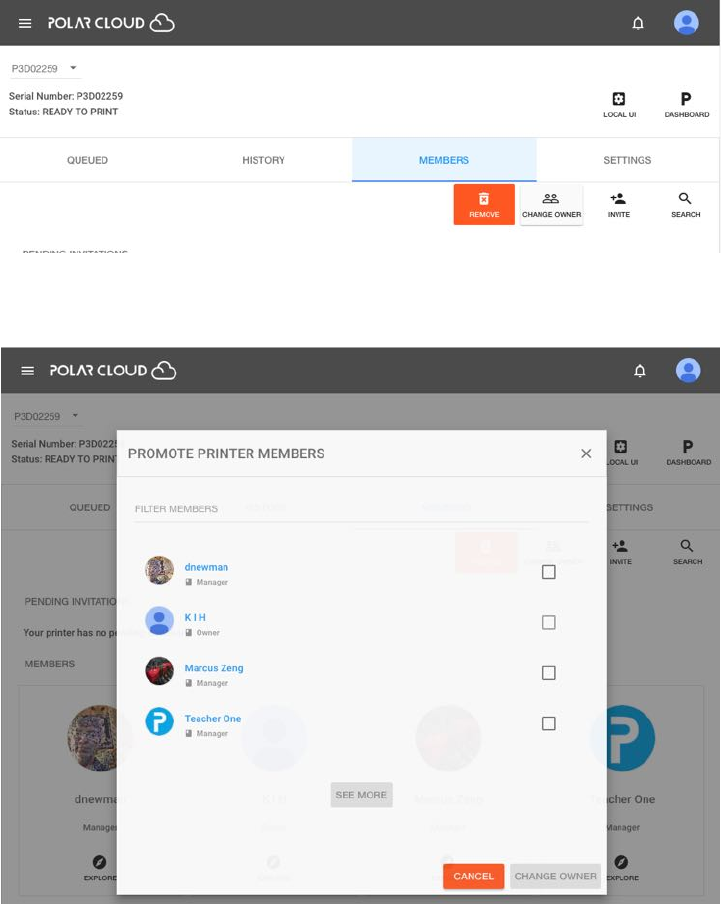
CHAPTER 4. THE POLAR CLOUD 113
Figure 4.57: Polar Cloud printer CHANGE OWNER button
Figure 4.58: Polar Cloud printer PROMOTE PRINTER MEMBERS pop-up screen
However, when a printer previously registered in the Polar
Cloud is moved to an entirely di↵erent site or organization, or is
being drastically re-purposed, then the printer’s new owner may
CHAPTER 4. THE POLAR CLOUD 114
wish to re-register the printer and e↵ectively ”start afresh” with
the printer. The process for starting afresh with a printer, at-
taching a previously used printer at a di↵erent site, is essentially
that of attaching a new printer, already discussed in Chapter 1:
adding a printer to your Polar Cloud account.
When a printer is moved to a new site, the prior owner may
have chosen to delete their local network profile information
from the printer via the Reset Networks button of the Network
screen of the printer local web interface,andmay have obsoleted
their ownership of the printer in the Polar Cloud via that same
screen’s Reset Printer on the Polar Cloud button. Per-
forming Reset Printer on the Polar Cloud in particular is
recommended when changing ownership of a printer in high use
as it means that any remaining print jobs queued to the printer
remain visible to members, so that members can move such old
jobs to another printer to which they have access – it is less
disruptive to the printer’s members. However, it is possible to
“take over” a printer even without such steps, as when the for-
mer printer owner is no longer available to aid by performing
such a “clean handover” step.
If the printer was previously connected via some other local
network (as when you have acquired a printer formerly used at a
di↵erent site), you will need to start at the steps for configuring
local network use.
If, however, the printer was already in use in your 3D printer
lab or classroom, so already properly configured to use your
local network (and the prior owner didn’t click Reset Networks
thereby deleting the local network profile), and you merely need
to take over as its owner, then you should start instead at step 10
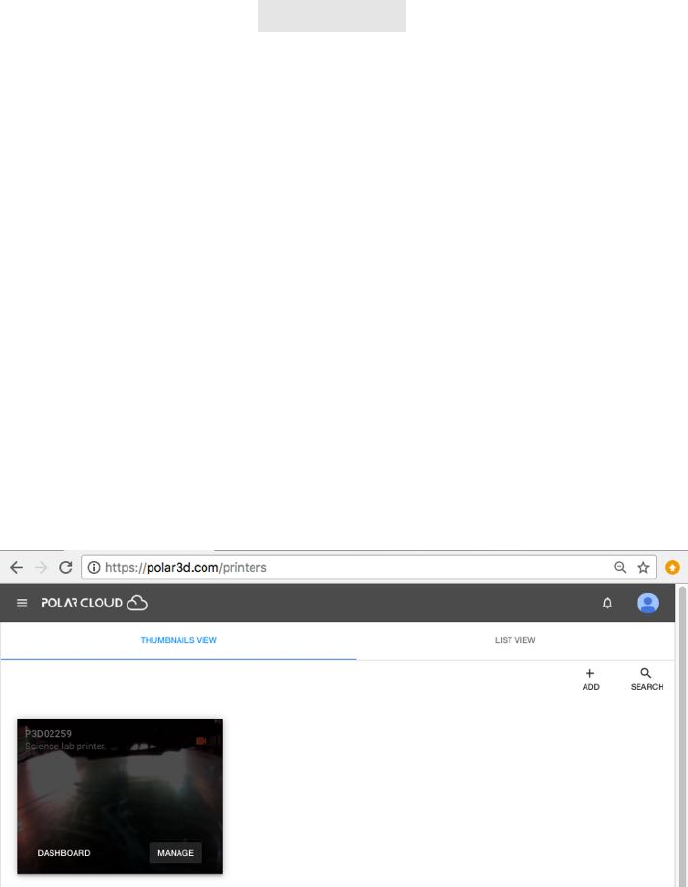
CHAPTER 4. THE POLAR CLOUD 115
(discussed in detail in Section 1.1 but which is identical whether
connecting via WiFi or Ethernet cable), to add the printer to
your Polar Cloud account. With the printer turned on (and its
LED lights appearing as POLAR3D ,i.e., blue over white, then
from the Polar Cloud main menu select “PRINTERS” and then
on that screen click the “ADD” button (“+”); see Figure 4.55.
Then continue on, entering the make and the serial number of
the printer, and going through the colored light security check,
etc.,asdiscussedinChapter1.
4.5.3 Printer settings: name, description, and location
of printer
From the THUMBNAILS list of printers, hover over the printer of
interest and click on its “MANAGE” tab, see Figure 4.59,togetto
a view such as Figure 4.60.
Figure 4.59: Polar Cloud printer MANAGE tab
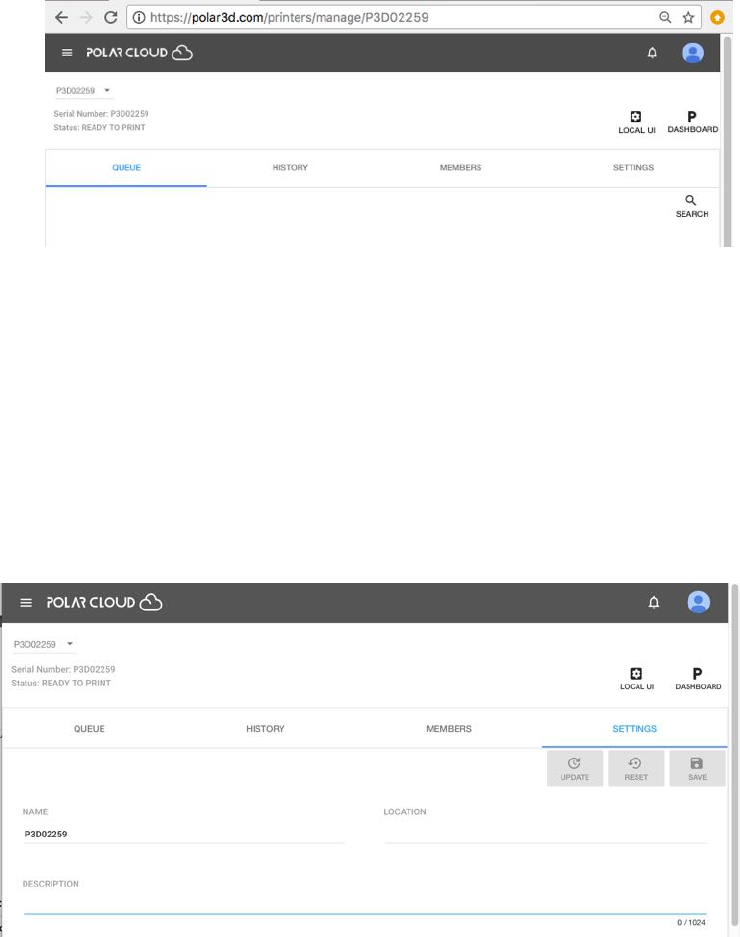
CHAPTER 4. THE POLAR CLOUD 116
Figure 4.60: Polar Cloud printer manage screen
From the printer manage screen, Figure 4.60,clickon“SETTINGS”
to get to a screen such as shown in Figure 4.61. When your
printer is first registered with the Polar Cloud, its NAME field is
set to match its serial number. At the “SETTINGS” screen, you
may change the printer name, as well as enter a text description
of your printer and where it is located; see Figure 4.62.
Figure 4.61: Polar Cloud printer SETTINGS screen
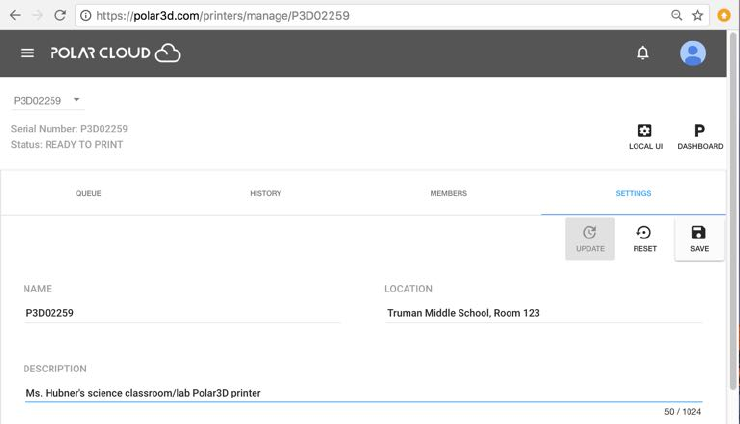
CHAPTER 4. THE POLAR CLOUD 117
Figure 4.62: Polar Cloud printer description and location fields
The printer NAME will be the name displayed when listing
printers, e.g.,displayedintheTHUMBNAILS VIEW icon or in the
drop-down printer list on the build plate screen.Thusmany
printer owners, if they change the NAME from its default serial-
number value, find it useful to incorporate the serial-number into
the printer name: e.g.,Physics-lab-P3D02259,orMedia-Center-P3D02265
or the like. Especially if your site owns multiple 3D printers
accessible to many students or other Polar Cloud members,
consider entering some information in the DESCRIPTION and
LOCATION fields to aid in locating and identifying the purpose of
this particular printer. In particular, note that when searching
for a printer, see Section 4.5.4,theserialnumber,name,descrip-
tion, and location fields are all compared for a match.
Click the SAVE button when you have finished entering your
desired information; see Figure 4.62.

CHAPTER 4. THE POLAR CLOUD 118
4.5.4 Searching for a printer
Under either the “THUMBNAILS VIEW”or“LIST VIEW” of print-
ers (see Figure 4.55 or Figure 4.110, respectively), the “SEARCH”
tab allows searching for accessible-to-you printers, matching upon
serial number, name, description, or location text (see Section
4.5.3), which may be useful if you have access to a large number
of printers.
4.5.5 Allowing access to a printer
Access to a printer through the Polar Cloud is controlled by the
printer’s manager(s). Initially, the only manager of a printer
is the printer’s owner – the person who initially connected the
printer to the Polar Cloud – but the printer owner (and only the
printer owner) can authorize additional Polar Cloud members to
become managers.2
A manager may add Polar Cloud members to a list of mem-
bers allowed to use the printer, or may share a printer with a
group.
To authorize printer access for an additional Polar Cloud
member or authorize an additional printer manager, select (click
on) the specific printer from the list of printer(s) (see Figure
4.55), and then from the printer’s dashboard screen (see Figure
4.56), click on the “MANAGE” tab (see Figure 4.59)totakeyou
to the manage page for the printer, shown in Figure 4.60. (An
alternate way to get to the selected printer’s summary page:
2Note that Section 4.5.2 discusses how to change the printer owner, for cases where
you want to reassign who is in charge of determining the printer’s managers; in particular,
the printer owner may reassign ownership to another user of the printer.
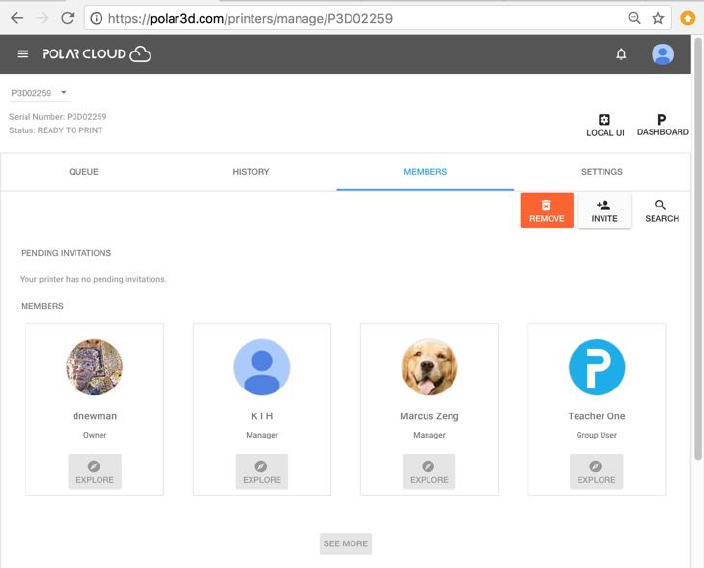
CHAPTER 4. THE POLAR CLOUD 119
at the printer list view screen, see Figure 4.110, click the square
button icon on the right-hand of the printer line in the list.)
On the selected printer’s manage screen (see Figure 4.60),
click on the “MEMBERS” tab to take you to the members screen
for the printer, shown in Figure 4.63.
Figure 4.63: Polar Cloud printer MEMBERS screen
Then click on the “INVITE” button to bring up a screen, see
Figure 4.64,atwhichtheprinterowneroraprintermanagercan
invite another Polar Cloud member to access the printer (“ADD
USER” button), or the printer owner can invite another another
Polar Cloud member to become a manager for the printer (“ADD
MANAGER” button). The invited member will receive a Polar
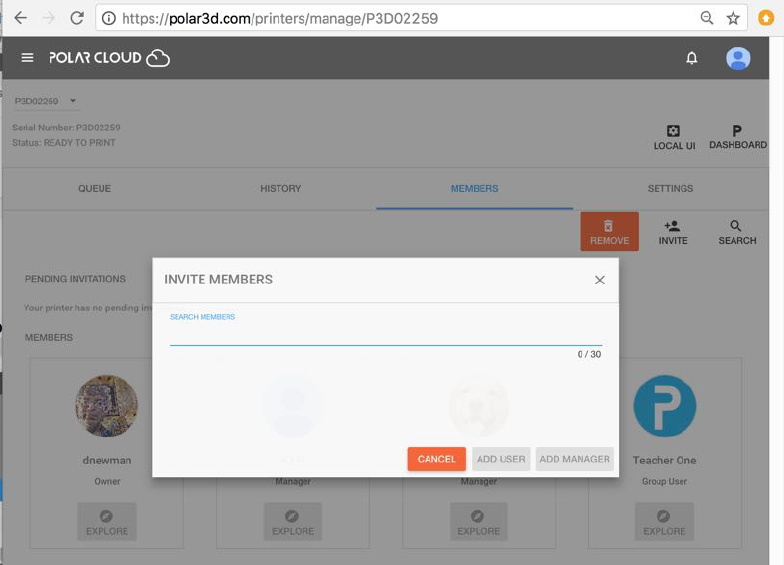
CHAPTER 4. THE POLAR CLOUD 120
Cloud notification inviting him or her to access or manage the
printer; the Polar Cloud member may ACCEPT or DECLINE that
invitation.
The red “REMOVE” button, see Figure 4.64,allowsyoutore-
move members or managers from such access to the printer.
The “SEARCH” button may be used to search within those
Polar Cloud members granted access to the printer; for printers
with a large number of members allowed access, this may be
more convenient than scrolling through the icons on the MEMBERS
screen.
Figure 4.64: Polar Cloud printer INVITE MEMBERS screen
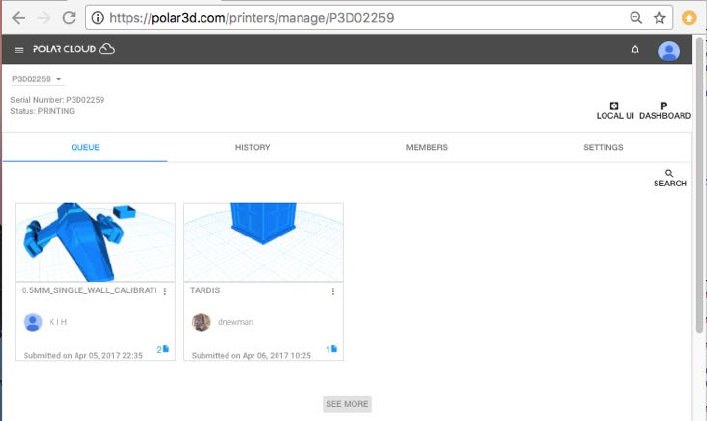
CHAPTER 4. THE POLAR CLOUD 121
4.5.6 Managing the printer queue
From a printer MANAGE screen, see Figure 4.60,youcanaccess
the printer’s current queue of pending jobs (as well as the history
of what jobs it has performed, as will be discussed in Section
4.5.7). Clicking the “QUEUE” tab shows a screen of any cur-
rently pending jobs in the printer’s queue; Figure 4.60 shows
an empty queue. Figure 4.65,incontrast,showsaprinterwith
two jobs queued. Note that the print queue is also displayed on
the printer dashboard; see Figure 4.66 which shows the printer
dashboard view of those same two queued jobs.
Figure 4.65: Polar Cloud printer queue with two jobs queued
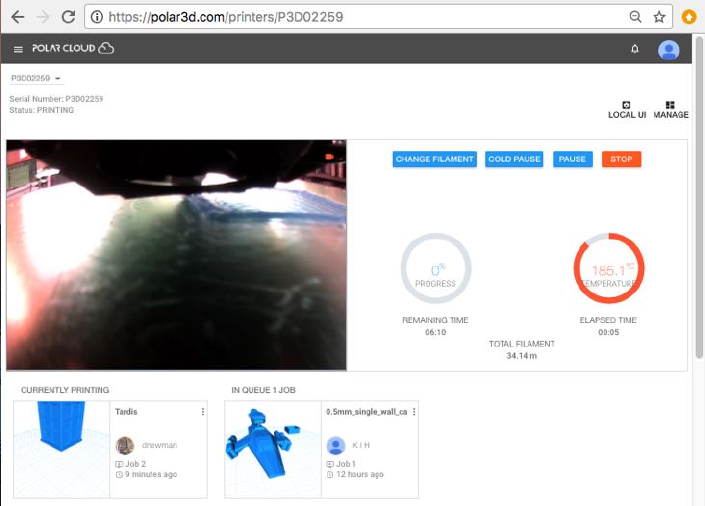
CHAPTER 4. THE POLAR CLOUD 122
Figure 4.66: Polar Cloud printer dashboard with two jobs queued
Since jobs are not started until the “START” button is clicked,
note that the order in which jobs begin printing is not solely
based on which job was submitted first. In the case of the print
queue displayed in Figures 4.65 and 4.66, the job submitted later
(the Tardis) has been started printing while the job submitted
earlier remains waiting on the print queue.
As the owner or as a manager of a printer, (or if you are
a member of a group granted CONTROL PRINTERS access to a
shared printer) you have quite a bit of control over the jobs
in the print queue. The owner or any manager (or any group
member with control access) may:
1. Tell the printer to begin a job: click the “START” button.
2. “PAUSE”or“STOP” a currently printing job.
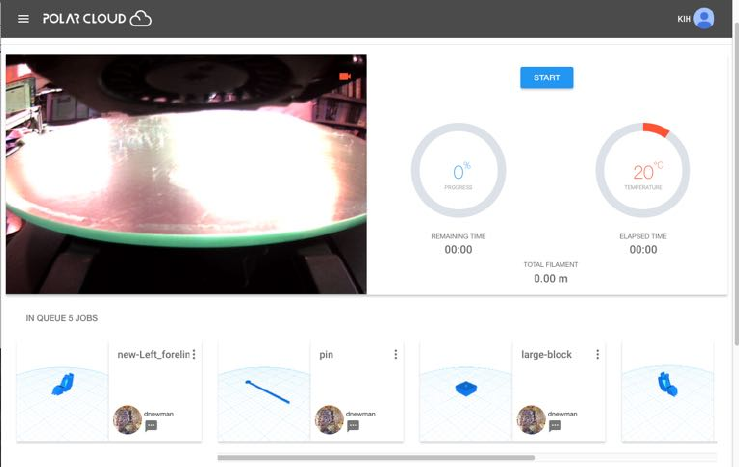
CHAPTER 4. THE POLAR CLOUD 123
3. Modify a job in the queue, perhaps adding additional ob-
jects to the build plate.
4. Delete a job from the print queue.
5. Shu✏e the order of jobs in the print queue, moving a job
to the head of the queue (if currently elsewhere) or to the
tail of the queue (if currently at the head of the queue).
6. Download the .stl files or configuration (print settings)
for a job.
Figure 4.67: Polar Cloud printer dashboard with multiple jobs queued
When at a printer dashboard screen such as shown in Figure
4.67, clicking on the three dots towards the upper right of the
icon for a job will bring up a menu for performing job modifica-
tions; see Figure 4.68.
The printer owner and any other printer managers (or any
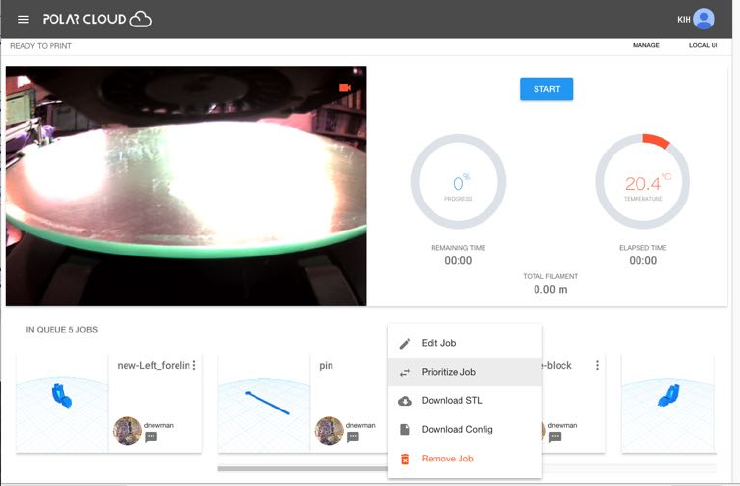
CHAPTER 4. THE POLAR CLOUD 124
Figure 4.68: Polar Cloud print queue job edit menu
group members with control access to a shared printer)canuse
the “START” control button on the printer dashboard to begin
the actual execution of a queued job; once a job is printing, con-
trol buttons to “CHANGE FILAMENT”, “COLD PAUSE”, “PAUSE”,
and “STOP” become active for the owner and managers (and
group members with control access); see Figure 4.86.Theprinter
owner and managers (and group members with control access)
also have the full range of job modification menu options shown
in Figure 4.68 available for all pending jobs in the queue:
1. “Edit Job”, which takes you back to the job’s build plate
screen, where you may perform any of the usual modifica-
tions, including:
(a) Changing the PLACEMENT of the object: MOVE,SCALE,
or ROTATE.
CHAPTER 4. THE POLAR CLOUD 125
(b) Changing the PRINT SETTINGS for the object: BASIC,
ADVANCED,orG-CODE.
(c) Changing the UI SETTINGS for build plate controls.
(d) Deleting an object from the build plate (which as there
may be multiple objects on the build plate, submitted
as single print job, is not necessarily the same thing as
deleting the entire print job via the “Remove Job”tab
discussed below).
(e) Uploading an object on the build plate to the Polar
Cloud.
(f) Downloading an object from the build plate to your
device.
(g) Merging (loading onto the build plate) the objects from
other print jobs queued to the printer.
2. “Prioritize Job”, which switches the order of queued
jobs.
3. “Download STL”, which downloads the object .stl file to
your device.
4. “Download Config”, which downloads the slicer settings
(the job’s “PRINT SETTINGS”) to your device.
5. “Remove Job”, which of course removes the entire job from
the queue. (In the case of a job which includes multiple ob-
jects, if you only wish to remove particular object(s) from
the print job rather than removing the entire job, see in-
stead the “Edit Job” tab, discussed above.)
In contrast, the printer dashboard control buttons are not
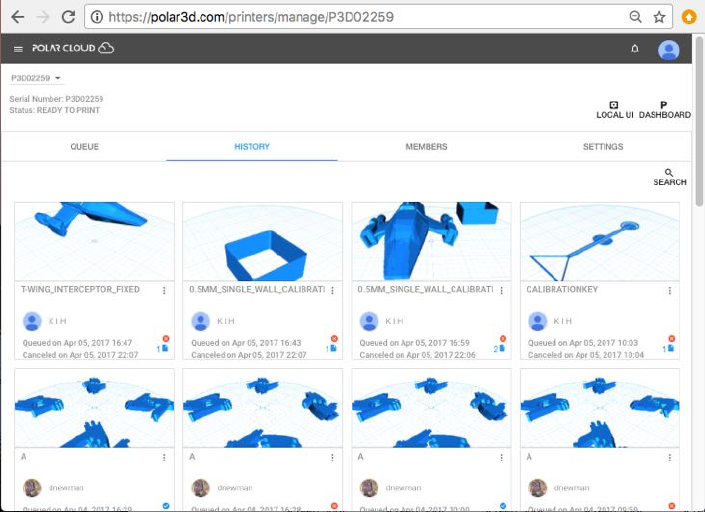
CHAPTER 4. THE POLAR CLOUD 126
active for general members, nor may general members modify
print queue jobs other than their own.
4.5.7 Printer job history
From a printer MANAGE screen, see Figure 4.60, clicking the
“HISTORY” tab shows the history of what print jobs the printer
has performed; see Figure 4.69.
Figure 4.69: Polar Cloud printer HISTORY screen
Clicking on a particular object in the printer history will bring
up a screen with information regarding that print job; see Figure
4.70. Besides “DETAILS” (the objects in that job, when it was
queued and by whom, and when completed), other information
about a print job includes a “SNAPSHOT” showing the completed
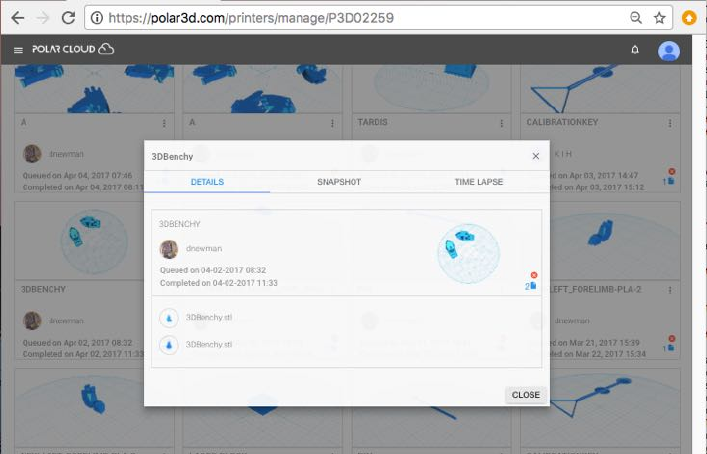
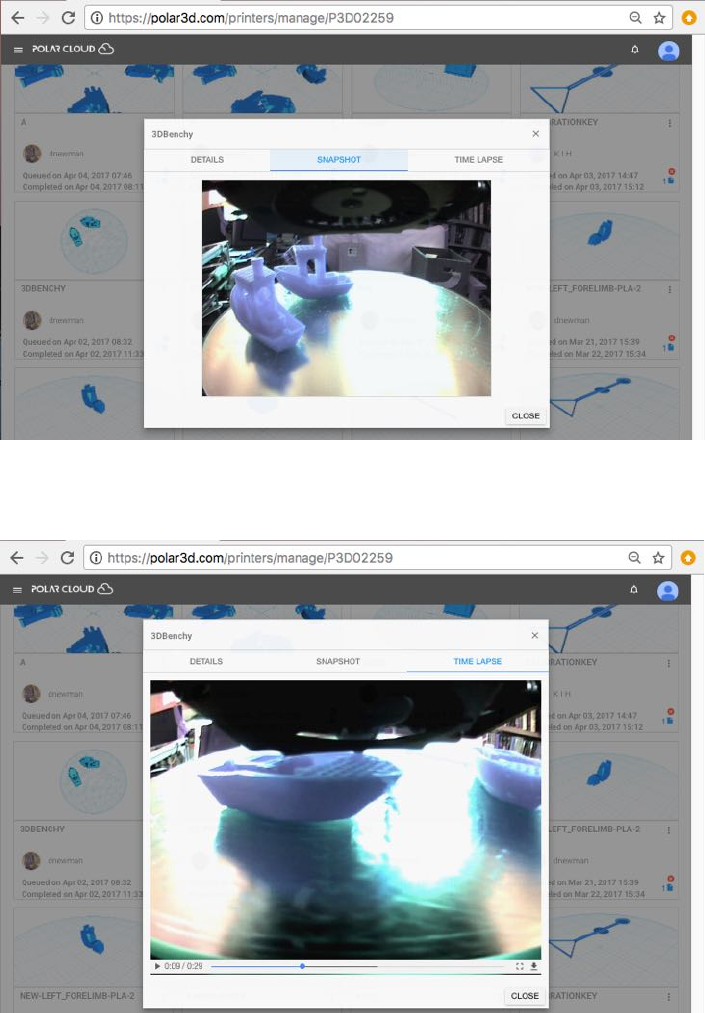
CHAPTER 4. THE POLAR CLOUD 128
Figure 4.71: Printer history of an object: SNAPSHOT
Figure 4.72: Printer history of an object: TIME LAPSE video
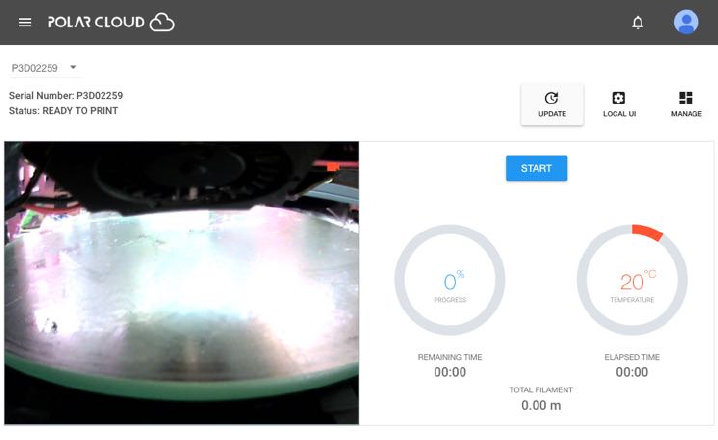
CHAPTER 4. THE POLAR CLOUD 129
4.5.8 Updating the printer
Occasionally, an update to the printer firmware will be avail-
able. When an update is available, you will see an active UPDATE
button appear on both the printer dashboard screen, see Fig-
ure 4.73, and the printer management screen, see Figure 4.74.
Clicking the “UPDATE” button from either location will bring
up a confirmation screen, see Figure 4.75;clickthe“UPDATE
PRINTER” button to perform the update.
Figure 4.73: Polar Cloud printer dashboard UPDATE button
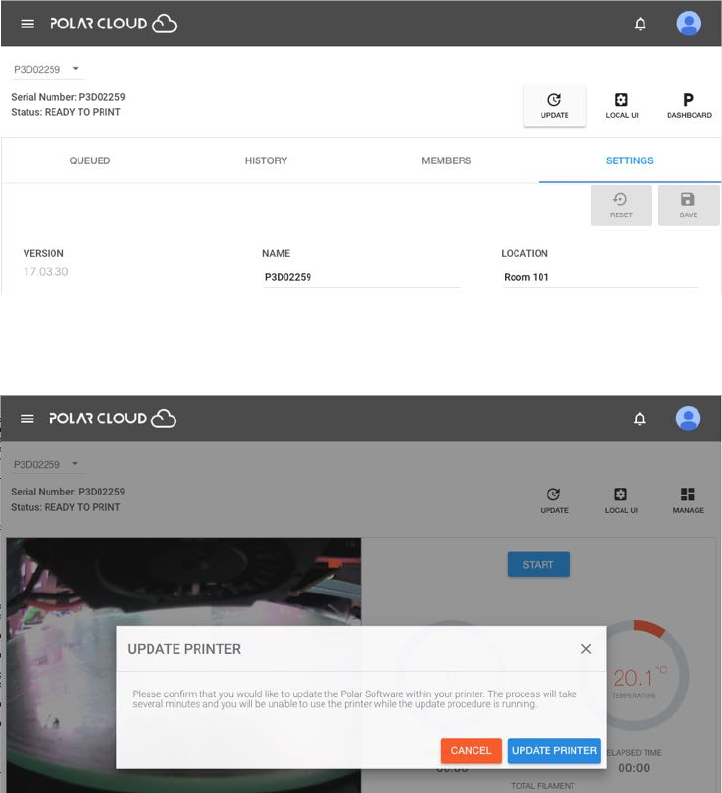
CHAPTER 4. THE POLAR CLOUD 130
Figure 4.74: Polar Cloud printer management screen UPDATE button
Figure 4.75: Polar Cloud UPDATE PRINTER confirmation screen
Note that when you click the “UPDATE PRINTER” button to
begin the update, the printer’s Status: will cycle through WAITING
FOR RESPONSE,UPDATING PRINTER (see Figure 4.76 –thismay
take several minutes), and possibly OFFLINE (if the update re-
quires the printer to restart), before getting back to READY TO
PRINT.
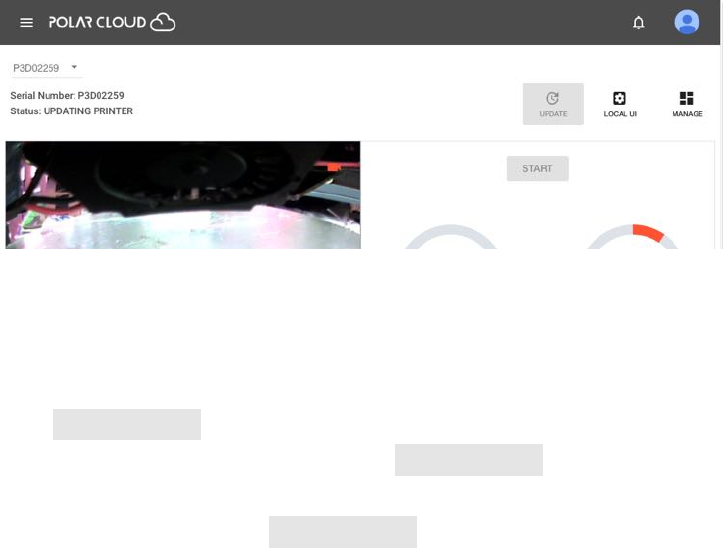
CHAPTER 4. THE POLAR CLOUD 131
Figure 4.76: Polar Cloud printer Status: UPDATING PRINTER
Note that when the printer is performing an update, the LED
lights along the left-hand side of the printer will go through a
color change: the LED lights towards the bottom (3D) will turn
green, POLAR3D , and then the green color will gradually move
up until all the lights are green, POLAR3D , indicating that
the update is complete, before the lights return to their normal
colors (blue over white, POLAR3D ,foraprinterconnectedto
the Polar Cloud).
(Note that it is also possible to perform an update directly to
the printer, without going through the Polar Cloud; see Chapter
9for details.)
4.5.9 Printer local web interface accessed from the Po-
lar Cloud
Clicking on the “LOCAL UI” tab (or gear icon towards the upper
right) of a specific printer’s screen (see Figure 4.56)willcause
the Polar Cloud to attempt to open a connection itself to the
printer’s local web interface, using what the Polar Cloud be-
lieves to be the printer’s IP address on your local network. Note
CHAPTER 4. THE POLAR CLOUD 132
that only a printer owner or manager, or a member of a group
configured to share operational control of the printer,maycon-
nect to the printer local web interface through the Polar Cloud.
If your local network allows such access back from the Internet
(which may or may not be the case), then you can access all of
the printer’s local web interface while still in the Polar Cloud.
(However, if your local network does not allow such Internet ac-
cess, then the Polar Cloud connection attempt to the printer’s
local web interface will not succeed; in that case, you will only
be able to access the printer’s local web interface by connecting
directly to the printer while on your local network; see Chapter
5.)
However, note that once you have initially connected your
printer to the Polar Cloud (as discussed in Chapter 1), there
is seldom much subsequent need or interest in accessing the
printer’s local web interface; for printers managed through the
Polar Cloud, use of the printer local web interface might oc-
cur only for occasional manual operations or for printer re-
configuration purposes. Sustained use of the printer’s local web
interface occurs primarily when instead controlling the printer
directly from a device connected via local WiFi (as discussed in
Section C.1).
See Chapter 5for details on the features and use of the
printer’s local web interface.
4.6 Printing through the Polar Cloud
When you print through the Polar Cloud:
CHAPTER 4. THE POLAR CLOUD 133
1. You may print your own ob jects, and other objects shared
or objects shared in groups in the Polar Cloud.
2. Your print request is automatically placed in a print job
queue, reducing the need for manual coordination with
other users of shared printers.
3. You may remotely manage your queued print jobs,and(for
a printer you own or manage or share in a group), you may
remotely trigger the initiation of the print job,orpause or
stop the printing.
4. You may remotely view the progress and status of your
print job.
5. You may remotely view real-time video of your print as it
occurs.
6. The printer history of jobs is updated.
7. Your own account activity and history of what you have
printed is updated.
To print an ob ject already in your Polar Cloud ob ject collec-
tion (or a shared object or a public object in the Polar Cloud),
from the Polar Cloud’s main menu, select “OBJECTS” (see Fig-
ure 4.8), then “MY PRIVATE OBJECTS” (see Figure 4.9)–oryou
may select “SHARED OBJECTS”or“PUBLIC OBJECTS” – and then
click on the specific object that you wish to print.
To print an ob ject shared in a group of which you are a
member, navigate to the group (see Section 4.4), and then select
“OBJECTS” (see Figure 4.46), and then click on the specific object
that you wish to print.
Selecting one of your own objects will take you to a screen
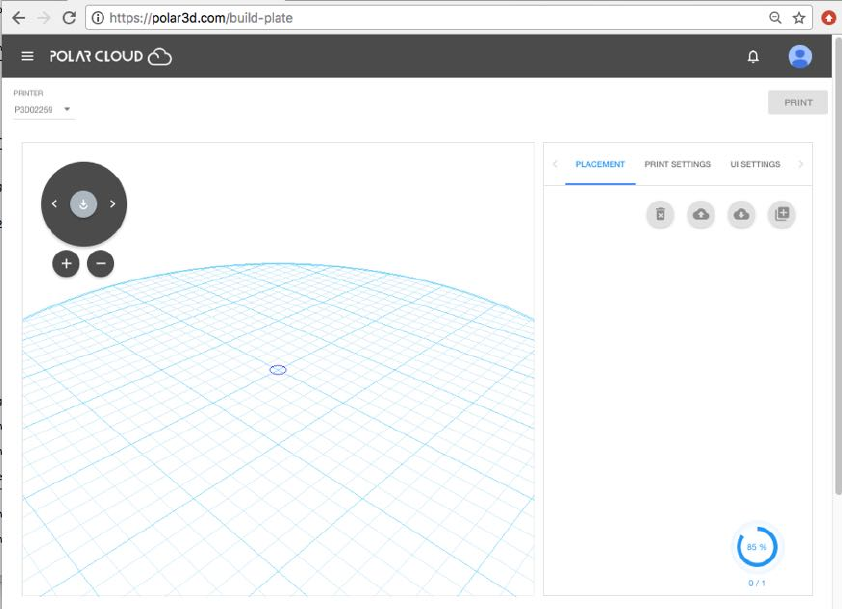
CHAPTER 4. THE POLAR CLOUD 134
such as shown in Figure 4.10;selectinganytypeofsharedobject
will take you to an analogous screen. From the object’s display
screen, click on “3D PRINT”; this will take you to the build plate
screen, where as the object’s .stl files are loading you may see
a blue progress icon in the lower right corner, as shown in Figure
4.77; once the object is fully loaded, the build plate screen will
become active, such as shown Figure 4.78.
Figure 4.77: Polar Cloud build plate screen while object is loading
You may add objects to your Polar Cloud collection: up-
loading an object created elsewhere, or creating a new object
through CAD software in the Polar Cloud, will both automati-
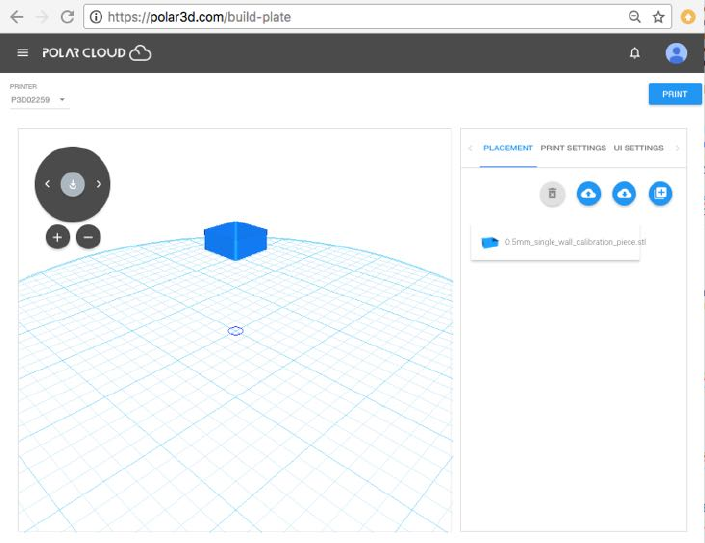
CHAPTER 4. THE POLAR CLOUD 135
cally add the object to your collection – and when you upload
or create an object, you will automatically be taken to the build
plate screen, such as shown in Figure 4.78.
Figure 4.78: Polar Cloud build plate (3D PRINT)screen
4.6.1 The build plate screen (3D PRINT), and adjusting
your print
There are a number of features of interest on the build plate 3D
PRINT) screen; see Figure 4.78.
1. Towards the upper left is the 3D printer currently selected;
if multiple printers are accessible to you, you may select
which one you want to print on via this drop-down menu.

CHAPTER 4. THE POLAR CLOUD 136
2. Towards the upper right is the “PRINT” button; press that
button when your object is ready, and you wish to submit
it for printing. Note that when you press “PRINT”, you
will see a swirling loading icon towards the lower left of
the screen as your job (with its underlying .stl files)is
submitted to the printer , and then you will automatically
go to the printer dashboard screen; see Section 4.6.5.
3. The object or objects are shown positioned on the build
plate, towards the middle-left of the screen.
4. A dial for rotating your view of the object and build plate
(and a central double-down-arrow for restoring the object
to flat on the build plate), and “+”and“-” buttons for
zooming the view in or out, is available on the left, above
the view of the object itself.
5. On the right, underneath “PLACEMENT”,“PRINT SETTINGS”,
and “UI SETTINGS”, is a list of one or more objects. Click
on an object to activate the “PLACEMENT”and“PRINT SETTINGS”
for that object.
When there is only one object on the build plate, the “PLACEMENT”
and “PRINT SETTINGS” apply to that object, and the ob-
ject need not be explicitly selected (clicked on). However,
when there is more than one object, clicking on the object
in the list selects which object will have “PLACEMENT”and
“PRINT SETTINGS” adjustments applied.
6. When “PLACEMENT” is highlighted, four buttons appear un-
derneath it, above the list of objects.

CHAPTER 4. THE POLAR CLOUD 137
Their functions are:
(a) Delete Selected Object – delete the selected object
from the build plate. (The icon will only be colored
red, meaning active, if one or more objects are actually
selected from the list of objects.)
(b) Upload Selected Objects to the Cloud – upload the
selected object(s) to your private collection of objects.
(c) Load Objects from the Cloud – load additional Po-
lar Cloud objects to the build plate.
(d) Load Objects from your Queue – that is, add an ob-
ject currently on the print queue to the build plate
(that is, merge print queue jobs).
Figure 4.79: Polar Cloud build plate MOVE of object

CHAPTER 4. THE POLAR CLOUD 138
index
7. Once an object has been selected by clicking on it (from
the list on the right, underneath “PLACEMENT”and“PRINT
SETTINGS”), the “PLACEMENT” tab becomes active. Three
axes of movement will appear centered within the object
on the build plate, and three choices of type of move-
ment, “MOVE”, “SCALE”, or “ROTATE”, along with three
slider scales corresponding to the axes, will appear on the
right, under “PLACEMENT” and the object list. You may
move the object on the build plate, change its size, or
rotate it about an axis, either by dragging and dropping
on the image of the object, or via the slider scales, while
“PLACEMENT” is selected. Figure 4.79 shows an example of
the appearance of axes when “MOVE” has been selected.
Figure 4.80: Polar Cloud build plate PRINT SETTINGS
CHAPTER 4. THE POLAR CLOUD 139
8. Once an object has been selected by clicking on it (in the list
on the right, under “PLACEMENT”and“PRINT SETTINGS”),
the “PRINT SETTINGS” tab also becomes active. Under
“PRINT SETTINGS” are many settings, (corresponding to
slicer settings) which may be used to adjust aspects of the
print, such as the temperature, speed of printing, thickness
of exterior walls on the object, whether to add a brim,raft,
or skirt,etc.; see Figure 4.80.
In particular, under “PRINT SETTINGS”, there are three
screens of settings:
(a) The “BASIC” settings include extruder temperature (185°C
is normal for the PLA filament provided by Polar 3D,
but the temperature should always be adjusted for the
type of filament you are actually using), and whether
to add a brim,raft,orskirt when printing the object.
(b) The “ADVANCED” settings include infill settings (den-
sity of the object’s interior), filament diameter, retrac-
tion settings (raising the print head during non-printing
moves), “Quality” settings (adjusting the thickness
of the exterior of the object), “Speed” settings (e.g.,
for fine-tuning the speed of printing the initial layer –
which may be relevant for getting good adhesion, and
a good initial flow of material), and some cooling set-
tings.
(c) The “G-CODE” settings allow you to modify the starting
and ending Gcode (actual instructions to the printer).
9. The “UI SETTINGS” are several setting adjusting the oper-
ation of the build plate user interface; see Figure 4.81.