Zhongshan Senjia Electrical Appliances TS-1809 2.0 Sound System User Manual 1
Zhongshan Senjia Electrical Appliances Co., Ltd. 2.0 Sound System 1
User Manual
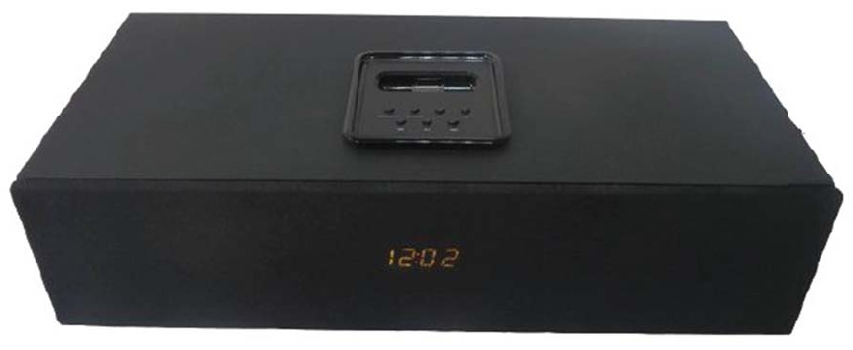
T
i
w
S-1
pho
w
it
h
809
ne
/
h
Bl
S
o
/
ip
o
uet
o
un
d
o
d
t
oo
t
d
B
a
Do
c
t
h,
a
r
f
c
ki
n
Au
x
f
or
n
g
x
i
n
n

IMPORTANT SAFETY INSTRUCTIONS
1. Read these instructions.
2. Keep these instructions.
3. Heed all warnings.
4. Follow all instructions.
5. Do not use this apparatus near water.
6. Clean only with a dry cloth.
7. Do not block any ventilation openings.Install in accordance with the manufacturer’s
instructions.
8. Do not install near any heat sources such as radiators,heat registers,stoves,or other
apparatus(including amplifiers) that produce heat.
9. Do not defeat the safety purpose of the polarized or grounding - type plug. A polarized plug has
two blades with one wider than the other. A grounding type plug has two blades and a third
grounding prong. The wide blade or the third prong are provided for your safety. When the
provided plug does not fit into your outlet, consult an electrician for replacement of the obsolete
outlet.
10. Protect the power cord from being walked on or pinched particularly at plugs, convenience
receptacles, and the point where they exit from the apparatus.
11. Only use attachments/accessories specified by the manufacturer.
12. Use only with a cart, stand, tripod, bracket, or table specified by the manufacturer, or sold with
the apparatus. When a cart is used, use caution when moving the cart/apparatus combination to
avoid injury from tip-over. Unplug this apparatus during lightning storms or when unused for
long periods of time.
13. Refer all servicing to qualified service personnel. Servicing is required when the apparatus has
been damaged in any way, such as power-supply cord or plug is damaged, liquid has been
spilled or objects have fallen into the apparatus, the apparatus has been exposed to rain or
moisture, does not operate normally, or has been dropped.
FCC Warnings
Warning: Changes or modifications to this unit not expressly approved by the party responsible for
compliance could void the user’s authority to operate the equipment.
NOTE: This equipment has been tested and found to comply with the limits for a Class
B digital device, pursuant to Part 15 of the FCC Rules. These limits are designed to
provide reasonable protection against harmful interference in a residential installation.
This equipment generates, uses, and can radiate radio frequency energy and, if not
installed and used in accordance with the instructions, may cause harmful interference
to radio communications. However, there is no guarantee that interference will not occur
in a particular installation. If this equipment does cause harmful interference to radio or
television reception, which can be determined by turning the equipment off and on, the user is
encouraged to try to correct the interference by one or more of the following measures:
• Reorient or relocate the receiving antenna.
• Increase the separation between the equipment and receiver.
• Connect the equipment into an outlet on a circuit different from that to which the receiver is

connected.
• Consult the dealer or an experienced radio/TV technician for help.
Additional Warnings
• The apparatus shall not be exposed to dripping or splashing and that no objects filled with liquids,
such as vases, shall be placed on apparatus.
L’appareil ne doit pas être exposé aux écoulements ou aux éclaboussures et aucun
objet ne contenant de liquide, tel qu’un vase, ne doit être placé sur l’objet.
• Main plug is used as disconnect device and it should remain readily operable during
intended use. In order to disconnect the apparatus from the mains completely, the
mains plug should be disconnected form the mains socket outlet completely.
La prise du secteur ne doit pas être obstruée ou doit être facilement
accessible pendant son utilisation. Pour être complètement déconnecté de
l’alimentation d’entrée, la prise doit être débranchée du secteur.
• Battery shall not be exposed to excessive heat such as sunshine, fire or the like.
Les piles ne doivent pas être exposées à de forte chaleur, tel qu’à la
lumière du soleil, au feu ou autres choses de semblable.
• Caution marking is located at the rear or bottom of the apparatus.
Attention marquage est situé sur le paneau arrière ou inférieur de l’unité.
• The marking information is located at the rear or bottom of apparatus.
Le marquage est situé sur le paneau arrière ou inférieur de l’unité.
WARNINGS AND PRECAUTIONS
• CAUTION: TO PREVENT ELECTRIC SHOCK, MATCH WIDE BLADE OF PLUG TO WIDE SLOT, FULLY
INSERT.
• WARNING: To reduce the risk of fire or electric shock, do not expose this apparatus to rain or
moisture.
• Avertissement: Pour réduire le risque d’incendie ou de choc électrique, ne pas exposer cet appareil
sous la pluie et l’humidité.
• CAUTION: Use of controls or adjustments or performance of procedures other than those specified
may result in hazardous radiation exposure.
• WARNING: Changes or modifications to this unit not expressly approved by the party
responsible for compliance could void the user’s authority to operate the equipment.
• WARNING: Do not place the unit on top of any soft, porous, or sensitive surfaces to avoid
damaging the surface. Use a protective barrier between the unit and surface to protect the surface.
• WARNING: Use of this unit near fluorescent lighting may cause interference regarding use of the
remote. If the unit is displaying erratic behavior move away from any fluorescent lighting, as it may
be the cause.
• CAUTION: Danger of explosion if battery is incorrectly replaced. Replace only with the same or
equivalent type.
• PRÉCAUTION: Danger d’explosion si les piles sont remplacées de façon incorrect.
Remplacer les piles seulement par le même type de pile ou l’équivalent.
• WARNING: There is a danger of explosion if you attempt to charge standard
Alkaline batteries in the unit. Only use rechargeable NiMH batteries.
• W
A
inst
e
• W
A
or d
i
pra
c
• W
A
• A
V
Mai
n
In o
r
disc
La
p
La
p
acc
e
l’ali
m
Do
n
Do
n
No
m
No
m
WA
R
ELE
C
COV
PAR
T
SER
V
PER
S
The
e
trian
g
pres
e
(ser
v
acco
m
A
RNING: The
r
e
ad recycle o
r
A
RNING: Lithi
i
sposed of in
c
tices in your
A
RNING: Sho
c
V
IS: RISQUE
D
n
s plug is us
e
r
der to disco
n
onnected for
m
p
rise du secte
u
p
rise du secte
u
e
ssible penda
m
entation d’e
n
n
ot mix old a
n
n
ot mix alkali
n
m
ezcle baterí
a
m
ezcle baterí
a
R
NING: TO RE
D
C
TRIC SHOCK
,
ER (OR BACK
)
T
S INSIDE. RE
V
ICING TO QU
S
ONNEL.
e
xclamation poi
g
le is intended
t
e
nce of importa
n
v
icing) instructio
m
panying the
a
r
emote contr
o
r
dispose of
a
um batteries,
normal hous
e
area. They s
h
c
k hazard - D
o
D
E CHOC ÉL
E
e
d as disconn
e
n
nect the app
a
m
the mains
s
u
r est utilisé
p
u
r ne doit pa
s
nt son utilisa
n
trée, la pris
e
n
d new batteri
n
e, standard (
a
s viejas y nu
e
a
s alcalinas,
e
D
UCE THE RIS
,
DO NOT RE
M
)
. NO USERSE
R
FER
ALIFIED SER
V
nt within an eq
u
t
o alert the use
r
n
t operating an
d
ns in the literat
u
a
ppliance.
o
l’s button ce
a
s hazardous
w
like all recha
e
hold waste.
C
h
ould never b
e
o
Not Open.
E
CTRIQUE
- N
E
e
ct device an
d
a
ratus from t
h
s
ocket outlet
c
p
our déconn
e
s
être obstrué
t
ion. Pour êtr
e
e
doit être dé
b
es.
carbon-zinc),
e
vas.
e
stándar (car
b
K
OF
OVE
R
VICEABLE
V
ICE
u
ilateral
to the
d
maintenance
u
re
e
ll battery con
w
aste.
rgeable batte
C
ontact your
e
incinerated
E
PAS OUVR
I
d it should re
h
e mains co
m
c
ompletely.
e
cter le systè
m
é
e ou doit êtr
e
re
complètem
e
b
ranchée du
s
or recharge
a
b
ono-zinc) o
r
tains mercur
y
ries are recy
c
local govern
m
since they m
i
IR
main readily
o
m
pletely, the
m
m
e.
e
facilemen
t
e
nt déconne
c
s
ecteur.
a
ble (ni-cad, n
r
ecargables (
n
The lightning f
l
within an equil
a
the user to the
voltage” within
be of sufficien
t
electric shock
This symbol in
incorporates d
o
mains voltage
y
. Do not put
i
c
lable and sh
o
m
ent for disp
o
i
ght explode.
o
perable duri
n
m
ains plug sh
o
té de
i-mh, etc) bat
t
ni
-cad, ni-mh,
ash with arrow
h
a
teral triangle, i
s
presence of un
the product’s
e
magnitude to
c
t
o persons.
d
icates that thi
s
o
uble insulatio
n
and user acce
s
in the trash,
o
uld be recyc
o
sal or recycl
ng intended
u
o
uld be
teries.
etc.).
h
ead symbol
s intended to a
l
n
insulated “dan
g
e
nclosure that
m
c
onstitute a risk
s
product
n
between haza
s
sible parts.
led
ing
u
se.
ert
g
erous
m
ay
of
rdous
6HAMPTONBAY.COM
Please contact 1-877-527-0313 for further assistance.
Assembly (continued)
AUDIO/VIDEO ASSEMBLY
VIDEO
R L
DC 15V
OUTPUT AUDIO
INPUT
“
‹
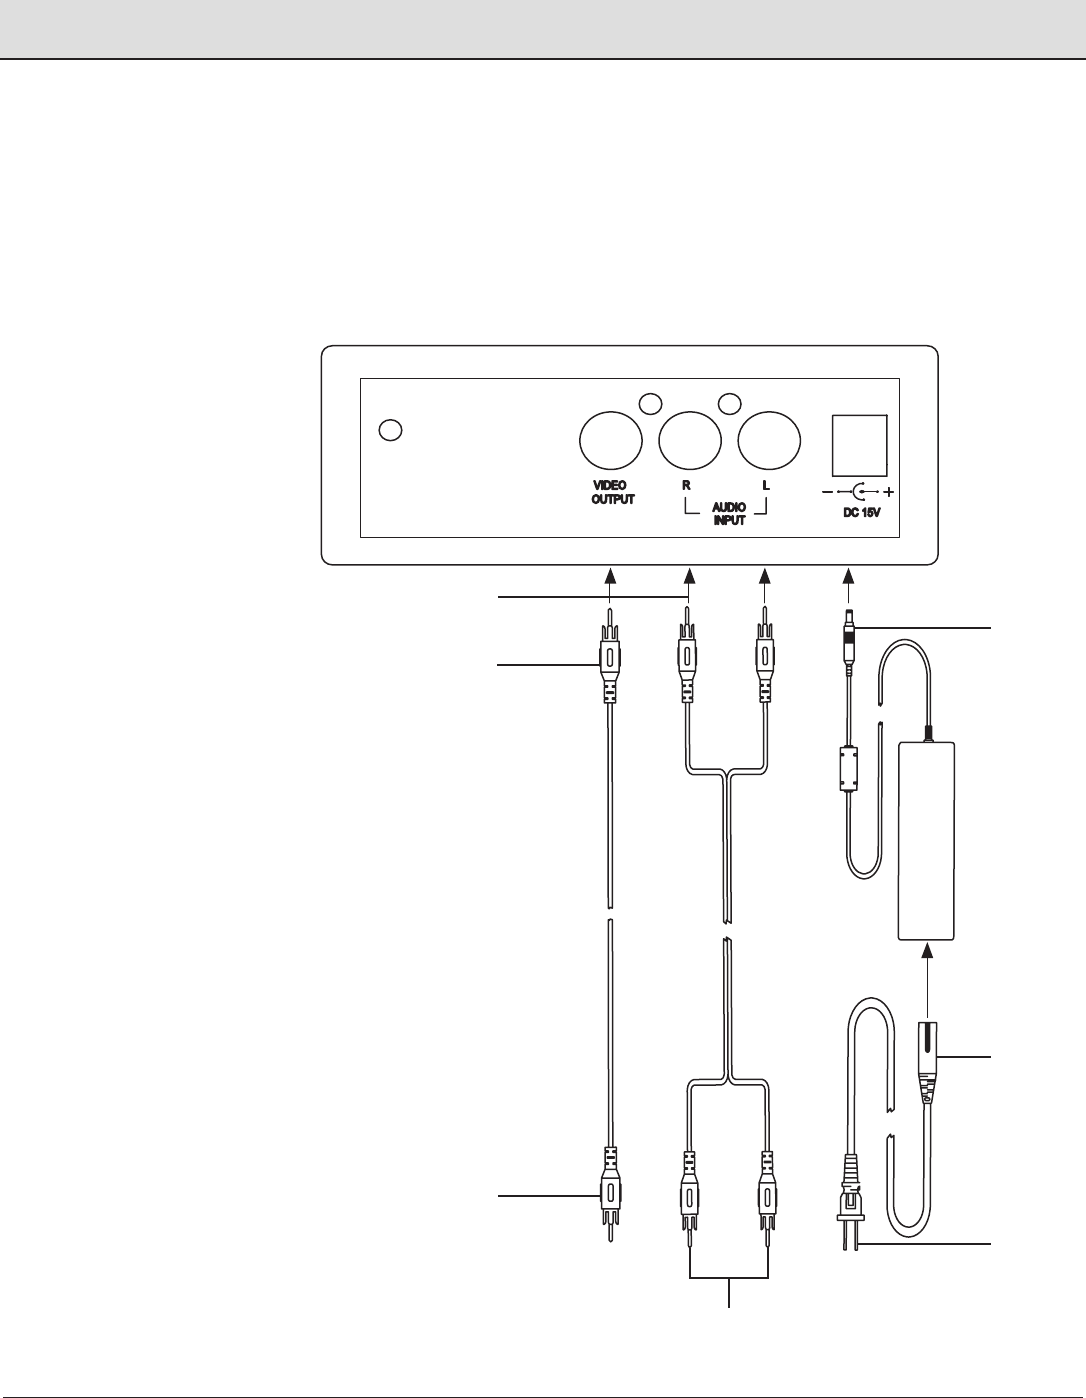
The Audio/Video Dock can stream video to a T.V. and accept incoming audio. Follow the wiring guide below to
connect the Audio/Video dock.
1. Plug the RCA audio
cables in the the audio
dock input R/L.
2. Plug the RCA video cable
into the video output.
3. Plug the RCA video cable
into the video input
source.
4. Plug the RCA audio
cables into the audio
source input R/L.
5. Plug the power cable into
a standard outlet.
6. Insert the power cable
into the DC transformer.
7. Plug the DC power
source into the DC 15V
port.
1.
2.
2.
3.
4.
5.
6.
7.
7
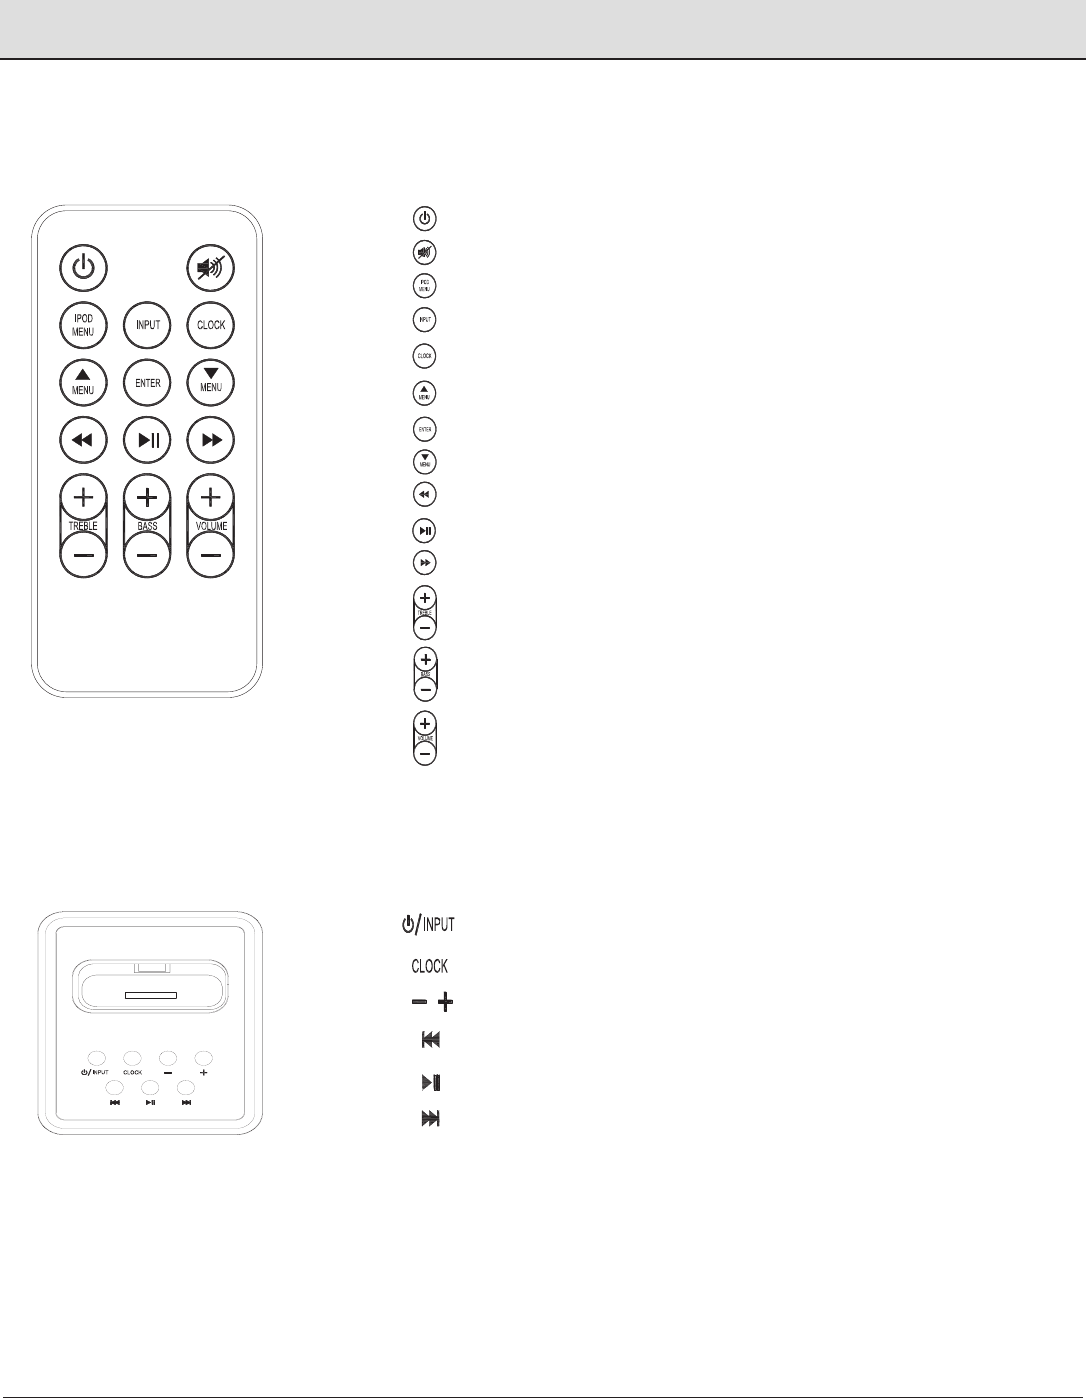
- Power / Standby
- Mute
- Access the menu of the docked iPhone/ iPod
- Scroll through source input options
- Display time
- Scroll the docked iPhone/ iPod menu or preset radio station
- Conrm selection from the docked iPhone/ iPod menu
- Scroll the docked iPhone/ iPod menu or preset radio station
- Back (Previous)/ In FM mode to search the radio channel
- Play/Pause
- Forward (Next)/ In FM mode to search the radio channel
- Adjust Treble
- Adjust Bass
- Adjust Volume
- Main Power / Scroll through source input options
- Display / Set Time
- Adjust Volume
- Back (Previous)
- Play/Pause
- Forward (Next)
Audio/Video Dock Remote
Audio/Video Dock
Audio/Video Dock Operation
8HAMPTONBAY.COM
Please contact 1-877-527-0313 for further assistance.
Power
The POWER button on the Audio/Video Dock or Remote supplies power to all of the functions of the sound system.
1. Insert the iPod or iPhone to the dock connector.
2. The docked iPod or iPhone begins charging.
1. Automatic Time Set:
The console will read and sync the clock to the time from your docked iPhone or iPod (at standby mode).
2. Manual Time Set:
Hold "CLOCK
Press the "volume / " buttons to set the hour.
Press "CLOCK
Press the "volume / " buttons to set the minutes.
Press "CLOCK
3. The clock display will fade after 10 seconds. Press "CLOCK" to continously display the time.
1. Power on the unit by pressing the power button.
2. Press the INPUT button to switch to FM mode.
3. Press the and buttons to adjust the radio to the desired frequency.
4. Press and hold the and buttons to search for a next available frequency.
Automatic Pre-Set
1.The unit will automatically scan and save up to 30 preset stations by pressing and holding the button.
Manual Pre-Set
1.Tune to the desired station.
3. Press the and buttons (on the Audio/Video remote control) to select the desired station.
4. Up to 30 stations may be saving as presets P01-P30.
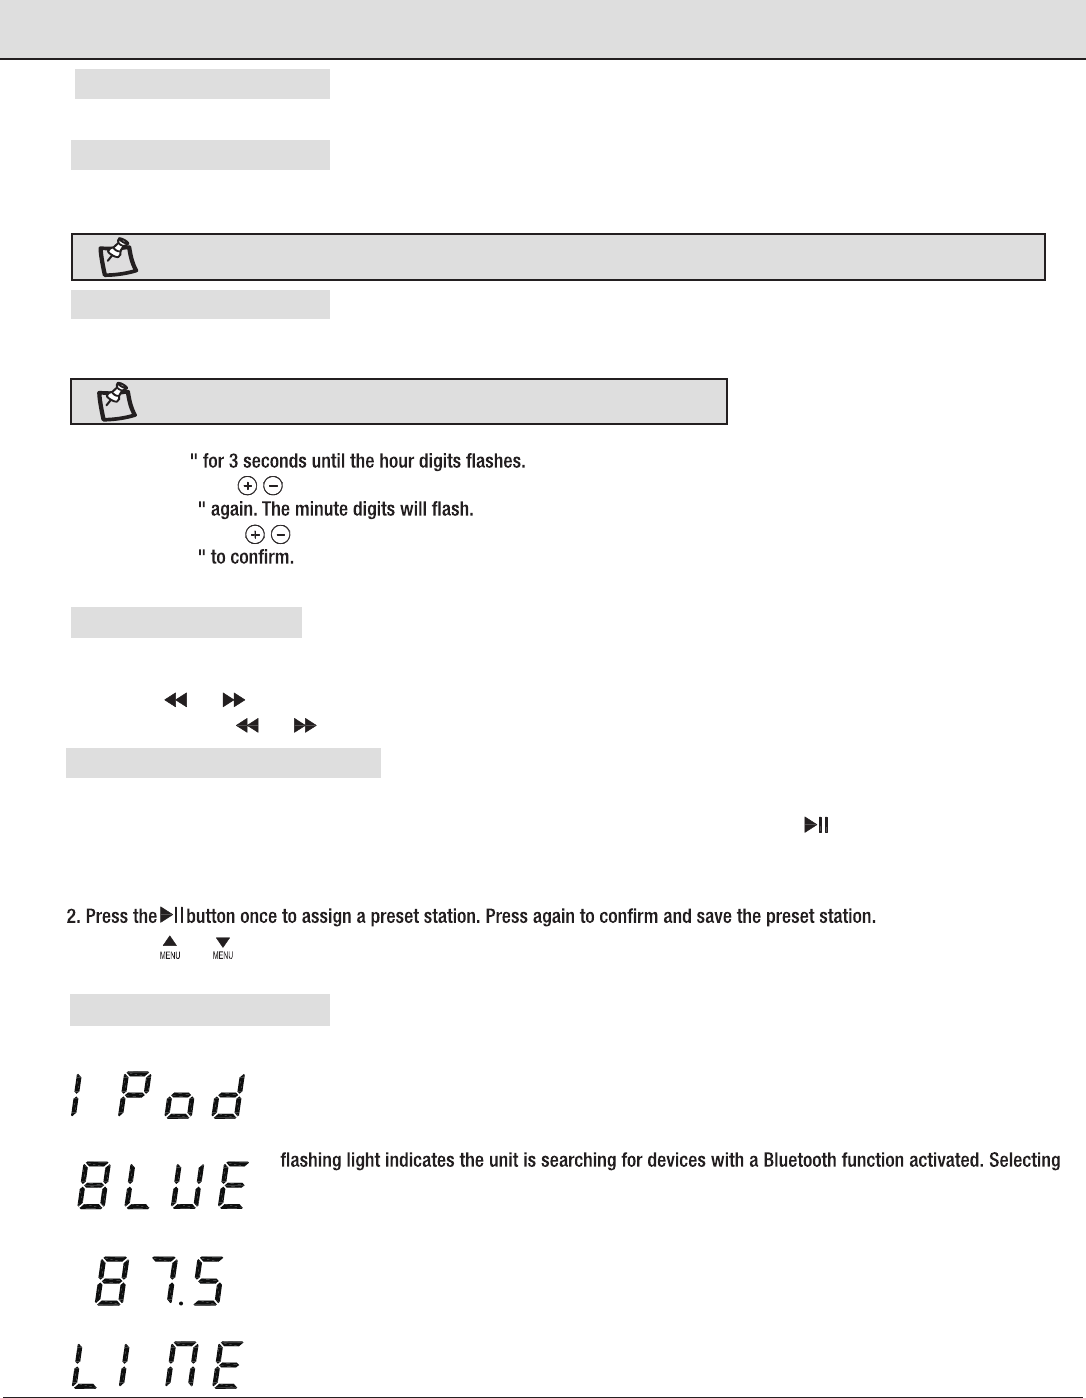
Press the "INPUT" button to scroll through the different input options:
When IPOD is displayed. The Audio/ Video Dock will play sound and/or video from your docked IPod or
IPhone device.
When BLUE is displayed. The Audio/Video Dock will scan for other smartphones or devices. The blue
"sound system" from your device will link it to the console and allow to play audio and/or video from
up to 10 meters away. The light will stay continuously lit once a connection has been made to the
device.
When LINE is displayed, the Audio Video Dock will play audio and/or video from your television or
other device connected to the console by RCA cables.
When radio analog is displayed, the Audio/Video Dock will play FM radio stations.
Charging
Clock
Tuning the FM Radio
Saving a Station as a Preset
Input Setting
Audio/Video Dock Operation (continued)
NOTE:
Certain irregular shaped or large phone covers may need to be removed for use with the docking station.
NOTE:
Automatic time sync will not work with some older model iPods.