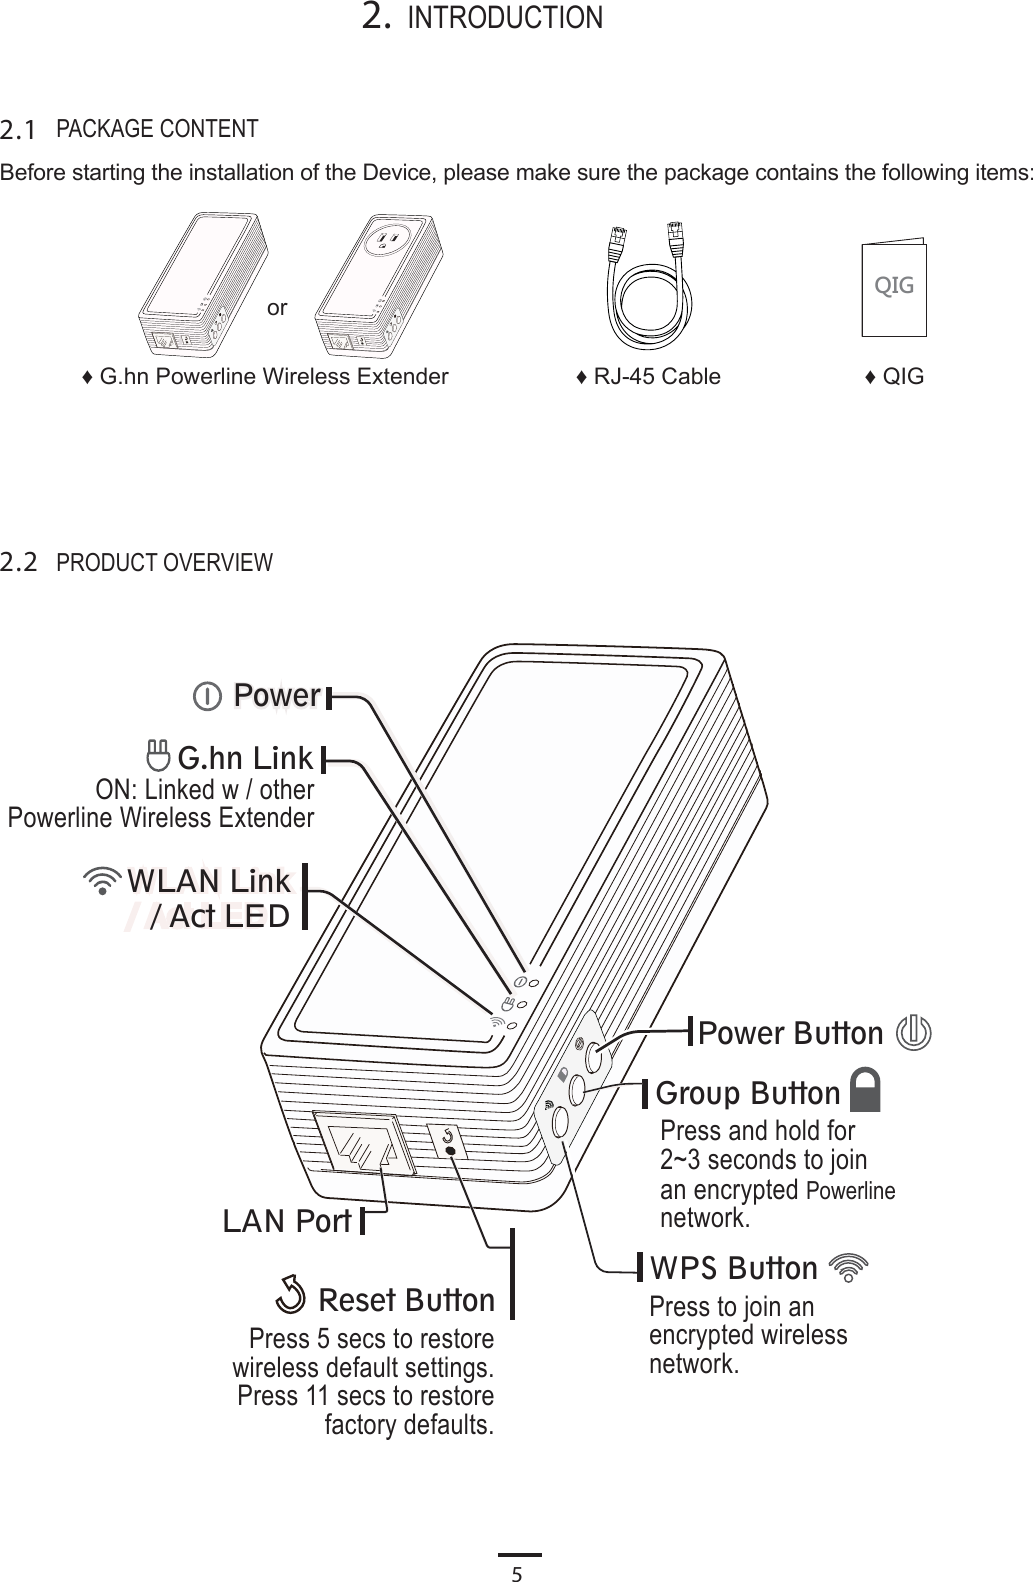
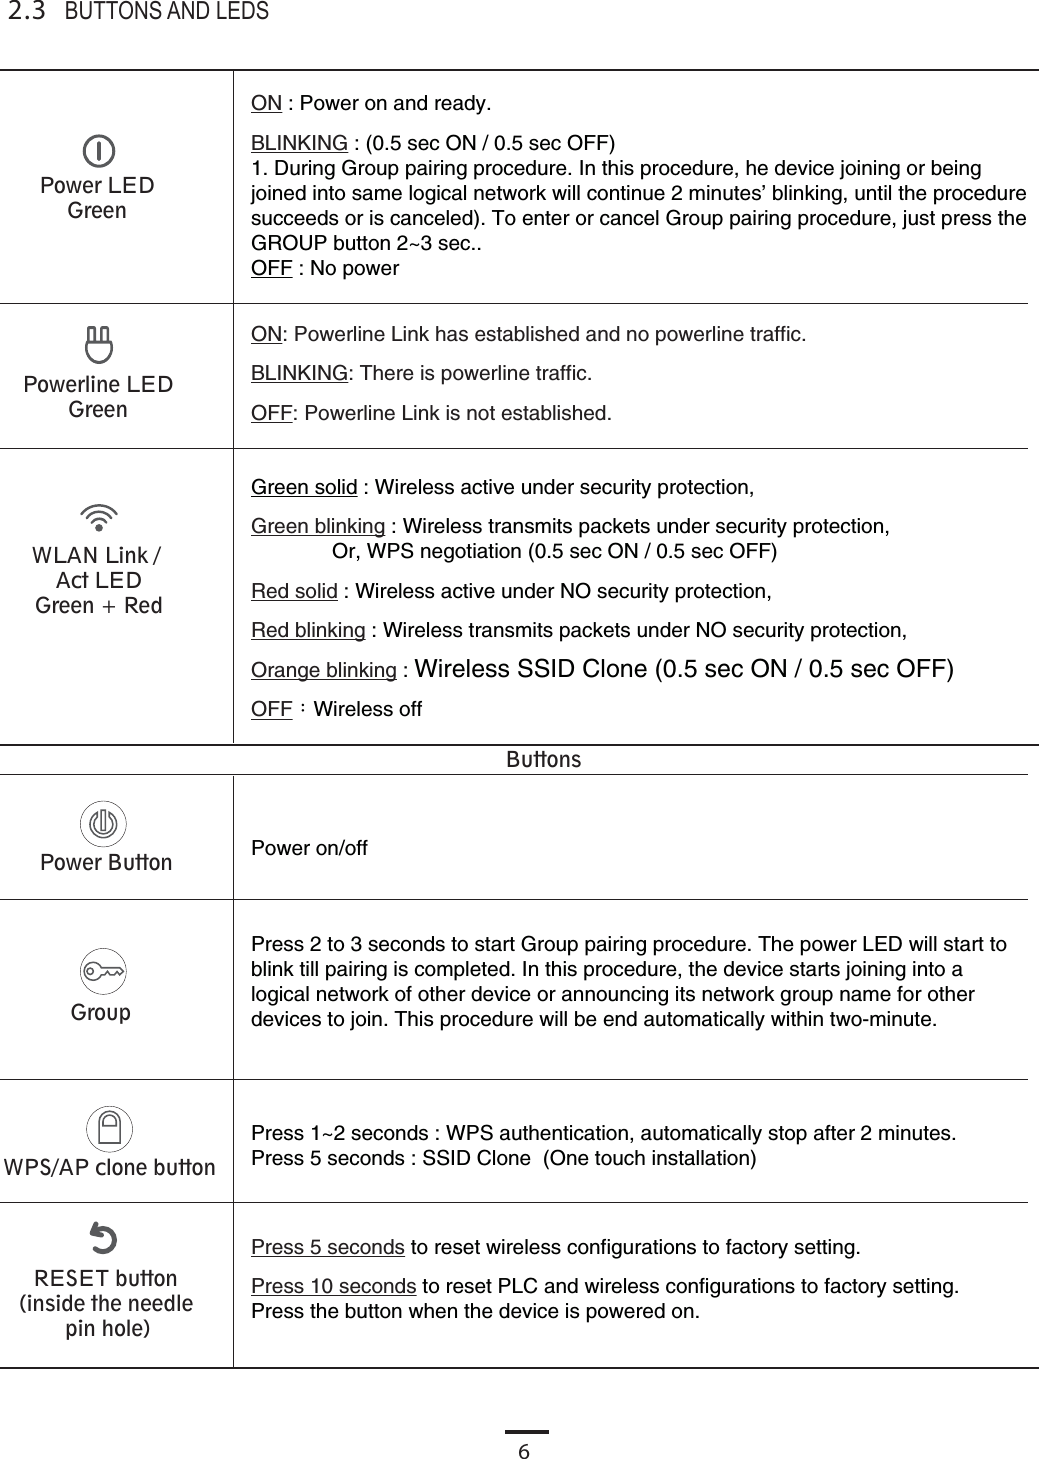
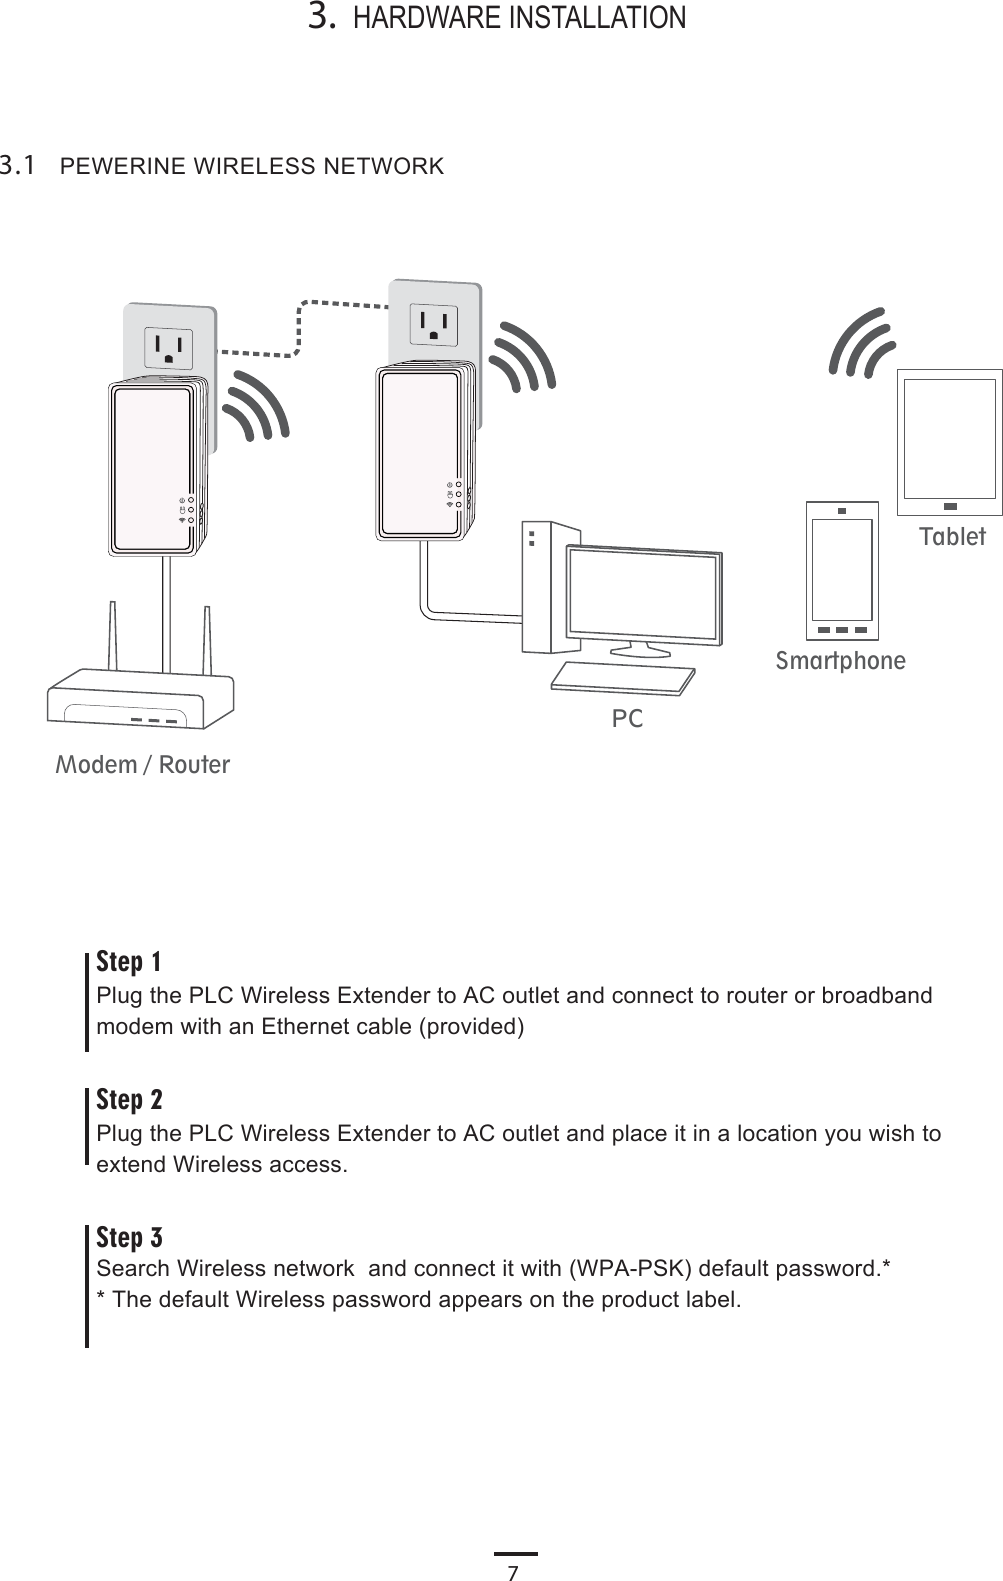
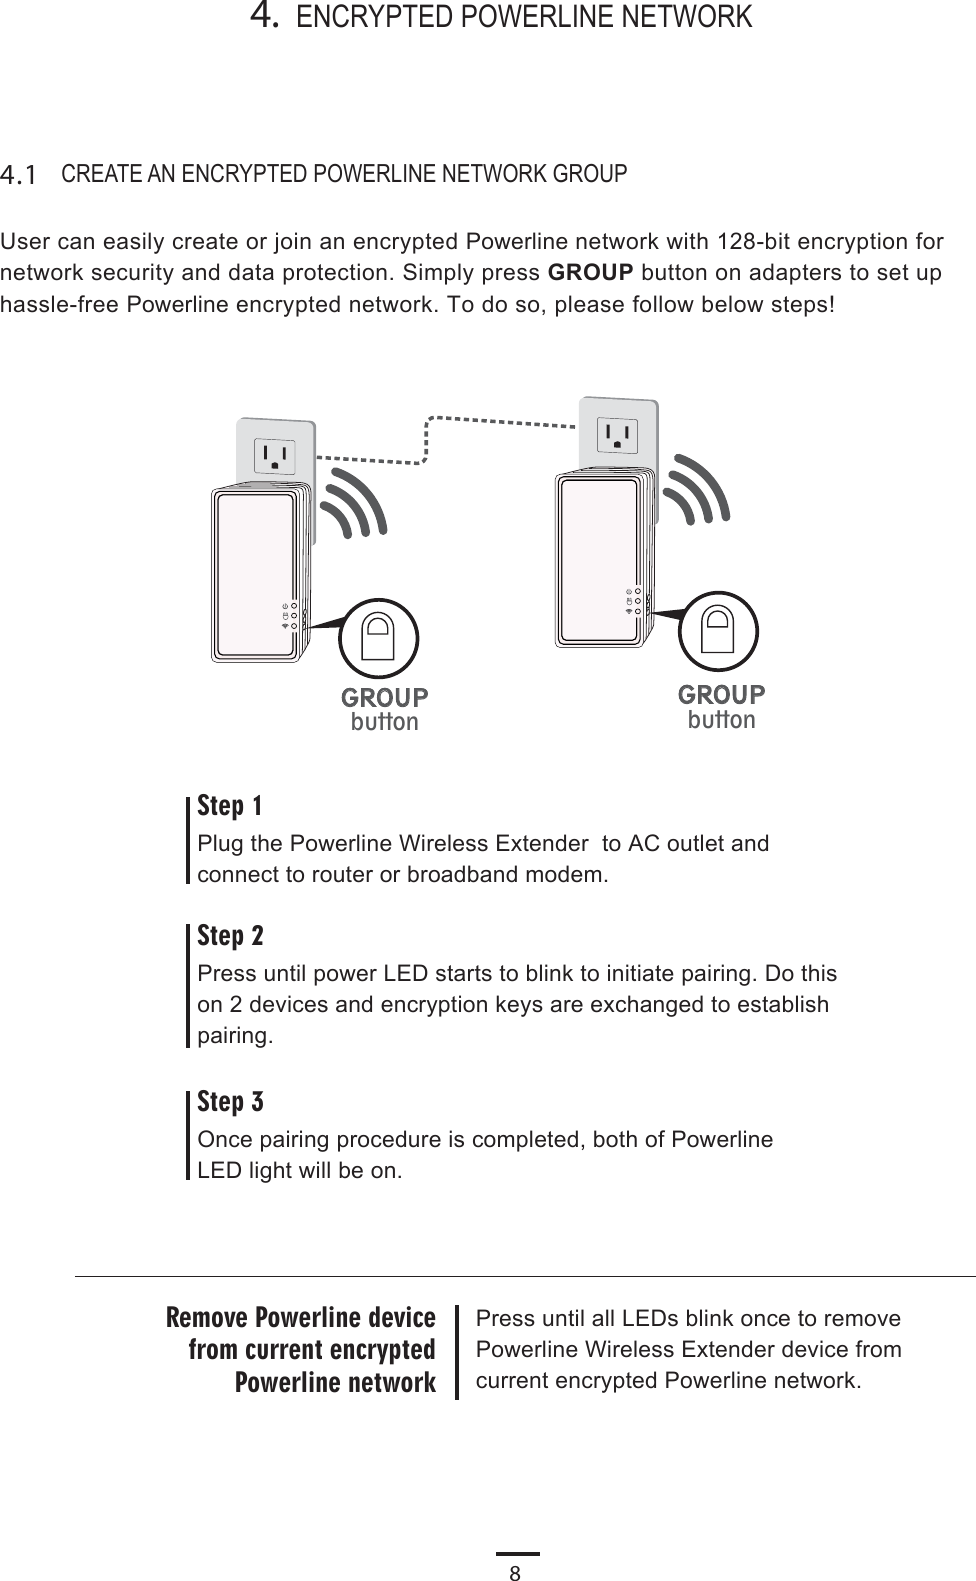
Zinwell PWS812131 G.hn Powerline Wireless Extender User Manual NB PWS 8121 PWS 8131 UM 20170531

Zinwell Corporation G.hn Powerline Wireless Extender NB PWS 8121 PWS 8131 UM 20170531

(PWS-8121, PWS-8131) UserMan_20170727

User’s ManualG.hn Powerline Wireless ExtenderPWS-8121                           PWS-8131
1. IMPORTANT INFORMATION1.1  IMPORTANT SAFETY NOTES1.2 2.  INTRODUCTION2.1  PACKAGE CONTENT2.2  PRODUCT OVERVIEW2.3  BUTTONS AND LEDS3.  HARDWARE INSTALLATIONEAST-SYNCPEWERINE WIRELESS NETWORK 3.13.24.  ENCRYPTED PLC NETWORK4.1  CREATE AN ENCRYPTED PLC NETWORK GROUP4.2 4.3  REMOVE DEVICE FROM AN EXISTING NETWORK GROUP4.4  CREATE ADDITIONAL ENCRYPTED NETWORK6. SPECIFICATIONS3345556778895.1  LOGIN TO SETTING PAGE 1099125. ADVANCED WI-FI SETTINGS VIA WEB BROWER 10Table of ContentFEDERAL COMMUNICATIONS COMMISSION INTERFERENCE STATEMENTJOIN TO AN ENCRYPTED PLC NETWORK GROUP
31. IMPORTANT INFORMATION1.1  IMPORTANT SAFETY NOTES♦ Please read all instructions before installing and operating this product.♦ Please keep all instructions for later reference.♦ Please follow all warnings and instructions marked on the product.♦ For safety reason, when device is being powered on, this product should NOT be installed in any electric socket which makes the surface with venting holes on the product to face downward (facing the floor).♦ Unplug the Powerline device from the wall outlet before cleaning. Use a dry cloth for cleaning. DO NOT use liquid cleaners or aerosol cleaners.♦ DO NOT operates this product near water.♦ This product should never be placed near or over a radiator, or heat register.♦ This product relies on the building’s electrical installation for short-circuit (over current) protection.♦ DO NOT allow anything to rest on the product interconnect plug. DO NOT locates this product where people may walk on the cords.♦ Because this product sends data over the power line, it is recommended that you plug directly into a power outlet. Do not plug the Device into a UPS or power strip with surge protection. The product has its own power filter for protection against surges.♦ Only a qualified technician should service this product. Opening or removing covers may result in exposure to dangerous voltage points or other risks.♦ Unplug the product from the wall outlet and refer the product to qualified service personnel for the following conditions:▪ When the interconnect cords are damaged or frayed.▪ If liquid has been spilled into the product.▪ If the product has been exposed to rain or water.▪ If the product does not operate normally when the operating instructions are followed.▪ If the product exhibits a distinct change in performance.The Device is intended for connection to the AC power line. For installation instructions, refer to the Installation section. The following precautions should be taken when using this product.
41.2 This equipment has been tested and found to comply with the limits for a Class B digital device, pursuant to part 15 of the FCC Rules. These limits are designed to provide reasonable protection against harmful interference in a residential installation. This equipment generates, uses and can radiate radio frequency energy and, if not installed and used in accordance with the instructions, may cause harmful interference to radio communications. However, there is no guarantee that interference will not occur in a particular installation. If this equipment does cause harmful interference to radio or television reception, which can be determined by turning the equipment off and on, the user isencouraged to try to correct the interference by one or more of the following measures:♦ Reorient or relocate the receiving antenna.♦ Increase the separation between the equipment and receiver.♦ Connect the equipment into an outlet on a circuit different from that to which the receiver isconnected.♦ Consult the dealer or an experienced radio/ TV technician for help. CAUTION:Any changes or modifications not expressly approved by the grantee of this device could void the user's authority to operate the equipment. Labeling RequirementsThis device complies with Part 15 of the FCC Rules. Operation is subject to the following two condi-tions: (1) this device may not cause harmful interference, and (2) this device must accept any interfer-ence received, including interference that may cause undesired operation. RF Exposure WarningThis equipment must be installed and operated in accordance with provided instructions and the antenna(s) used for this transmitter must be installed to provide a separation distance of at least 20 cm from all persons and must not be co-located or operating in conjunction with any other antenna or transmitter. End-users and installers must be provide with antenna installation instructions and trans-mitter operating conditions for satisfying RF exposure compliance. Canada, Industry Canada (IC) NoticesThis Class B digital apparatus complies with Canadian ICES-003. Operation is subject to the following two conditions: (1) this device may not cause interference, and (2) this device must accept any interference, including interference that may cause undesired operation of the Device. Radio Frequency (RF) Exposure InformationThe radiated output power of the Wireless Device is below the Industry Canada (IC) radio frequency exposure limits. The Wireless Device should be used in such a manner such that the potential for human contact during normal operation is minimized.This device has also been evaluated and shown compliant with the IC RF Exposure limits under mobile exposure conditions. (antennas are greater than 20cm from a person's body). Canada, avis d'Industry Canada (IC)Cet appareil numérique de classe B est conforme aux normes canadiennes ICES-003.Son fonctionnement est soumis aux deux conditions suivantes : (1) cet appareil ne doit pas causer d'interférence et (2) cet appareil doit accepter toute interférence, notamment les interférences qui peuvent affecter son fonctionnement. Informations concernant l'exposition aux fréquences radio (RF)La puissance de sortie émise par l’appareil de sans fil est inférieure à la limite d'exposition aux fréquences radio d'Industry Canada (IC). Utilisez l’appareil de sans fil de façon à minimiser les contacts humains lors du fonctionnement normal.Ce périphérique a également été évalué et démontré conforme aux limites d'exposition aux RF d'IC dans des conditions d'exposition à des appareils mobiles (les antennes se situent à moins de 20 cm du corps d'une personne).FEDERAL COMMUNICATIONS COMMISSION INTERFERENCE STATEMENT
5Reset ButtonPress 5 secs to restore wireless default settings.Press 11 secs to restore factory defaults. LAN PortWPS ButtonPress to join an encrypted wireless network.Press and hold for 2~3 seconds to join an encrypted Powerline network.    Group Button WLAN Link/ Act LEDWLAN Link/ Act LEDG.hn LinkPower QIG♦ QIG♦ G.hn Powerline Wireless Extenderor♦ RJ-45 Cable2.  INTRODUCTION2.1  PACKAGE CONTENT2.2  PRODUCT OVERVIEWBefore starting the installation of the Device, please make sure the package contains the following items:Power ButtonON: Linked w / otherPowerline Wireless Extender
62.3  BUTTONS AND LEDSWPS/AP clone button Power Button ButtonsGroup RESET button (inside the needle pin hole)Power LEDGreenPowerline LEDGreenWLAN Link / Act LEDGreen + RedON : Power on and ready.BLINKING : (0.5 sec ON / 0.5 sec OFF)1. During Group pairing procedure. In this procedure, he device joining or being joined into same logical network will continue 2 minutes’ blinking, until the procedure succeeds or is canceled). To enter or cancel Group pairing procedure, just press the GROUP button 2~3 sec..OFF : No powerGreen solid : Wireless active under security protection,Green blinking : Wireless transmits packets under security protection,              Or, WPS negotiation (0.5 sec ON / 0.5 sec OFF)Red solid : Wireless active under NO security protection,Red blinking : Wireless transmits packets under NO security protection,Orange blinking : Wireless SSID Clone (0.5 sec ON / 0.5 sec OFF)OFF:Wireless offON: Powerline Link has established and no powerline traffic.BLINKING: There is powerline traffic.OFF: Powerline Link is not established.Press 1~2 seconds : WPS authentication, automatically stop after 2 minutes.Press 5 seconds : SSID Clone  (One touch installation)Power on/offPress 2 to 3 seconds to start Group pairing procedure. The power LED will start to blink till pairing is completed. In this procedure, the device starts joining into a logical network of other device or announcing its network group name for other devices to join. This procedure will be end automatically within two-minute. Press 5 seconds to reset wireless configurations to factory setting.Press 10 seconds to reset PLC and wireless configurations to factory setting.Press the button when the device is powered on.
73.  HARDWARE INSTALLATIONPEWERINE WIRELESS NETWORK               3.1 Modem / RouterPCSmartphoneTabletPlug the PLC Wireless Extender to AC outlet and connect to router or broadband modem with an Ethernet cable (provided)Plug the PLC Wireless Extender to AC outlet and place it in a location you wish to extend Wireless access.Step 1Step 2Search Wireless network  and connect it with (WPA-PSK) default password.** The default Wireless password appears on the product label. Step 3
84.  ENCRYPTED POWERLINE NETWORK4.1  CREATE AN ENCRYPTED POWERLINE NETWORK GROUPUser can easily create or join an encrypted Powerline network with 128-bit encryption for network security and data protection. Simply press GROUP button on adapters to set up hassle-free Powerline encrypted network. To do so, please follow below steps! Step 1Step 2Once pairing procedure is completed, both of Powerline LED light will be on.Step 3Remove Powerline device from current encrypted Powerline networkPlug the Powerline Wireless Extender  to AC outlet and connect to router or broadband modem. Press until all LEDs blink once to remove Powerline Wireless Extender device from current encrypted Powerline network.Press until power LED starts to blink to initiate pairing. Do this on 2 devices and encryption keys are exchanged to establish pairing.GROUPbuttonGROUPbutton
94.2 4.3  REMOVE DEVICE FROM AN EXISTING NETWORK GROUP4.4  CREATE ADDITIONAL ENCRYPTED NETWORKIf you want to create additional private network for your powerline devices that co-existence with your existing powerline private network group, please repeat the Step 4 to generate new private network group for selected powerline devices.P.S. Users can press the RESET button to reset the network name back to its factory default.JOIN TO AN ENCRYPTED PLC NETWORK GROUPSimply press GROUP button on 1 of encrypted Powerline adapter until power LED starts to blink to initiate pairing. Do this on 2 devices and encryption keys are exchanged to establish pairing.If you would like to remove Powerline adapter from an existing encrypted network group, you can reset Powerline adapter to stop communication with an existing group. To reset Powerline adapter, press RESET button until all LEDs blink once to return to default settings.
105.1  LOGIN TO SETTING PAGE5. ADVANCED WI-FI SETTINGS VIA WEB BROWERDefault user name: rootDefault  password: rootPCTo setup advanced Wireless features such as SSID or pass-word, please connect to Powerline Wireless N Extender via Ether-net or wireless connection, and login to setting page through web browser.Before login to the setting page, PC or mobile device should be in the same subnet as this device. To do so, please manually change PC or mobile's IP address.Go to Network Connections -  Local Area Connection - Connection Status and choose the Internet Protocol (TCP/IP) and click on Properties.Enter  IP address such as 10.10.10.XXX (XXX can be set from 1-128) and click OKGo to Settings - Wireless - Selected SSID - advanced settings , then click on Static to enter IP address such as 10.10.10.XXX. (XXX can be set from 1-128) and Subnet Mask 255.255.255.0Go to Settings - Wireless - press &  hold Selected SSID to modify network - then click on Show advanced options. Click IP settings to choose Static to enter address such as 10.10.10.XXX.(XXX can be set from 1-128) Mobile device   iOS Mobile device   Android
11Step 1Step 3Step 2PCRunning Web browser and type the IP address of this device 10.10.10.253When see the login window, enter root in both user name and password fields.Note: After the setup process is completed, DO NOT forget to set the PC or mobile device's IP address back to the original settings (DHCP) for web surfing.Mobile device   iOS Mobile device   AndroidNote: you can change user name and password in Administration tab.The Powerline Wireless Extender Adapter setting page will show up after successfully login.
126. SPECIFICATIONSItems DescripionProduct TypeRJ-45 portPLC PHY RateFrequency BandAccess MethodsModulationPowerline FeatureDistanceComputer OSMax. dev in a network GroupIGMPEncryptionLAN StandardsWireless PHY RateLEDWireless StandardWireless FrequencyAntennaWireless FeaturesTemperatureRelative HumidityPower SourceWireless 5GHz rangeAC Pass-ThroughG.hn Powerline Wireless Extender1 GbE port1 Gbps2 to 50 MHzCSMA/CA, and TDMA AC Wire : up to 300 metersITU-T Recommendation G.9960 - Physical LayerITU-T Recommendation G.9961 - Data Link LayerITU-T Recommendation G.9962 - Management specificationITU-T Recommendation G.9963 - MIMOITU-T Recommendation G.9964 - Spectral componentsOS independent16, in the same Single-Phase Powerline LoopSupport for IPv4/IGMP v1,v2,v3 snooping |IPv6 Transparent (not including multicast)128-bit AES Link Encryption with key management1000 BASE-TX, 100 BASE-TX1200MbpsIEEE 802.11 a/b/g/n/ac2.4GHz, 5GHz2x2• Support dual band concurrent• Support IEEE 802.11ac MIMO• Support TxBFOperating: 10~85% Non-CondensingStorage: 5~90% Non-CondensingOperating: -10~40 ℃; Storage: -20~60 ℃AC 100~240V, 50/60HzPWS-8131Power, Powerline Link/Activity, Ethernet Link/Activity4096/1024/512/256/128/64/32/16/ 8-QAM, QPSK5 GHz     5.15-5.25 + 5.725-5.85GHz(US)     5.15-5.25 GHz(Europe ETSI)

Navigation menu