87295 NZ 20012NZ SD Extreme WR Handryer
2016-12-16
: Zip Water 87295 - Wr Handryer 20012Nz Sd Extreme Nz 87295 - WR_Handryer 20012NZ SD Extreme_NZ zenithwater. manuals zenithwater. washroom zenithwater.products zenithwater.nz
Open the PDF directly: View PDF ![]() .
.
Page Count: 4
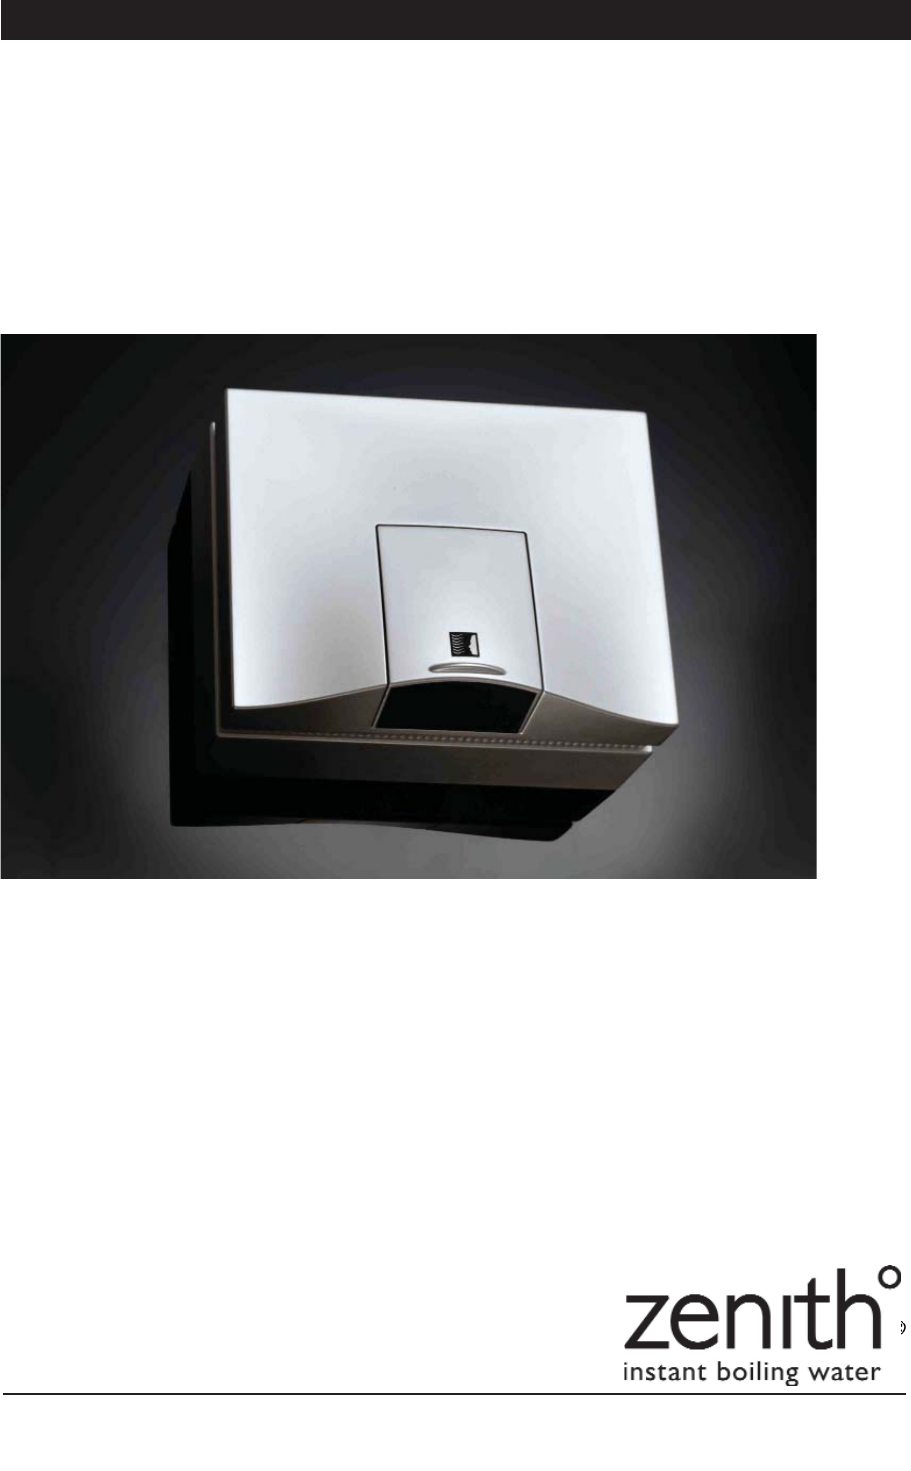
Superdry Installation & Operating Instructions 87295 - February 2010 Page 1
Installation Instructions and Operating Procedure
20012NZ - Superdry Extreme with Cast Alloy Case
Superdry Extreme
Touch-free automatic electric hand dryer
Page 2 Superdry Installation & Operating Instructions 87295 - February 2010
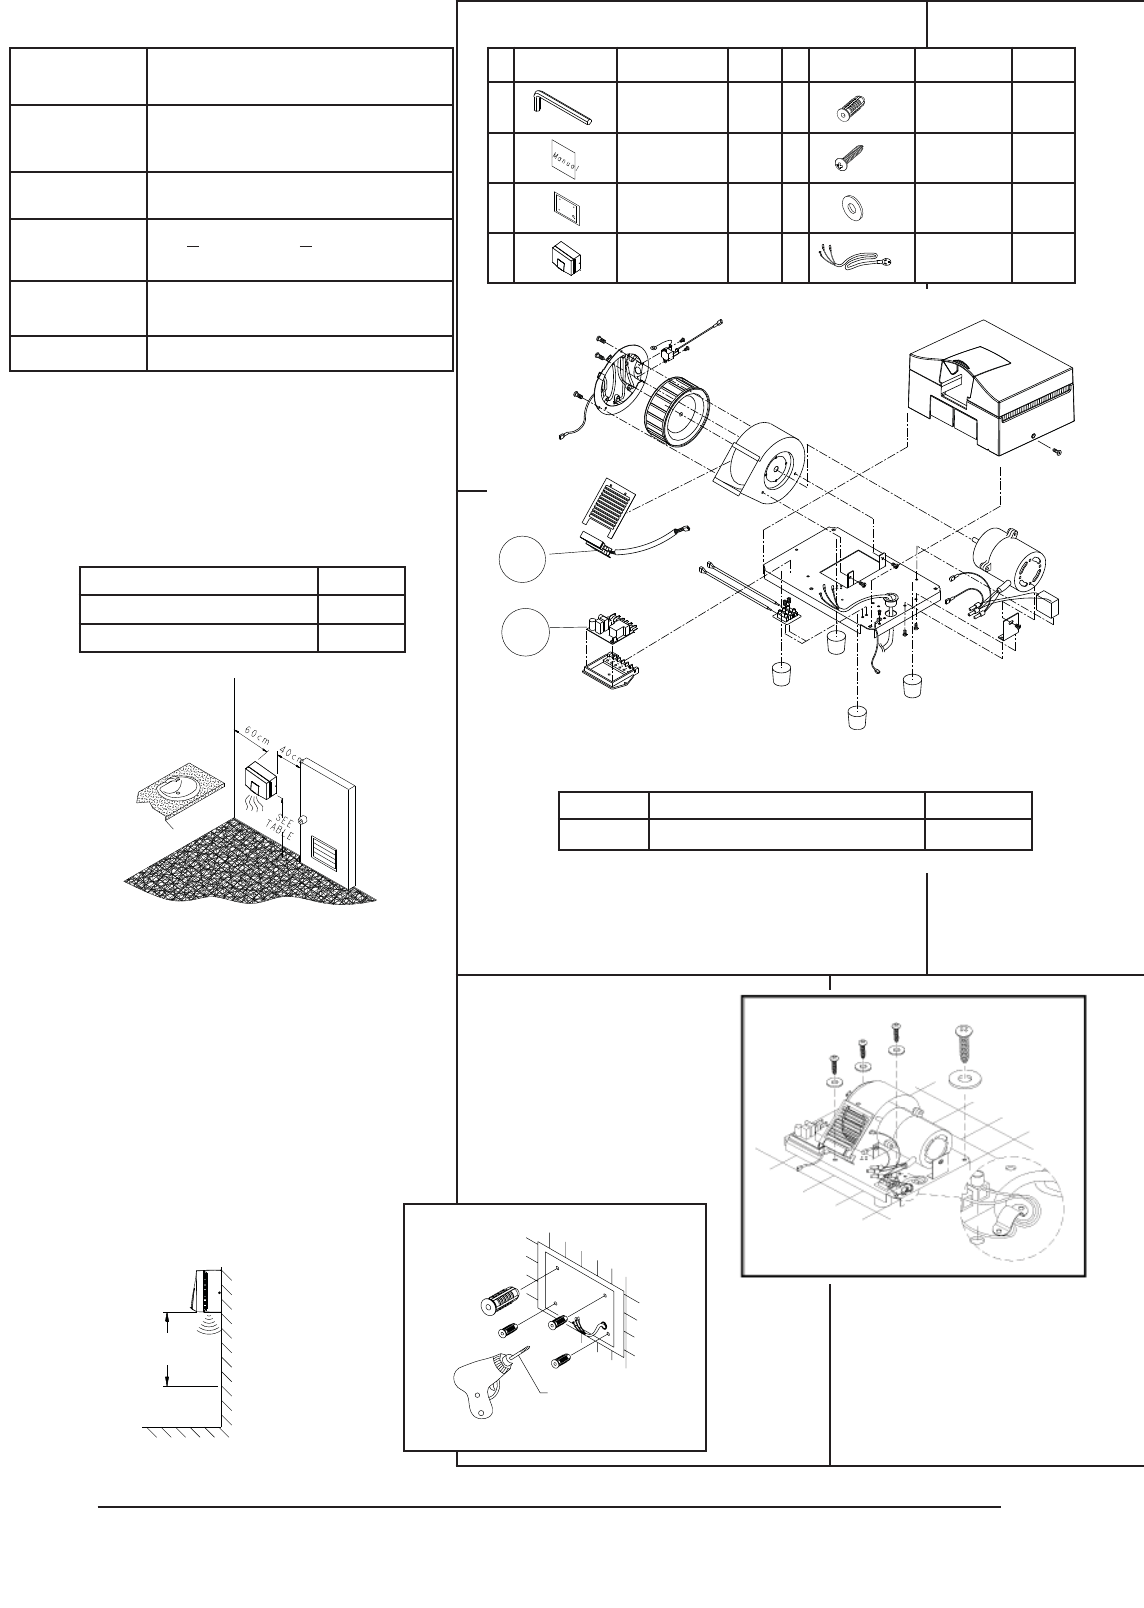
4.1 Make sure the sensor is located 60cm
(23inches) above everything below to
prevent false triggers due to reflection.
4.2 Never install hand dryer onto a wooden or
plastic wall finish.
4.3 Before installation, make sure the power
source complies with specification of the
machine and local requirement and that
the power cord can reach the power outlet.
Mens’ washroom 1065 mm
Ladies’ washroom 1015 mm
Disabled washroom 800 mm
Illustration Description Qty Illustration Description Qty
1Security
Wrench 1 Pc 5Plastic
Dowel 4 Pcs
2Installation
Instruction 1 Pc 6Fixing
Screw 4 Pcs
3Installation
Template 1 Pc 7 Washer 4 Pcs
4Hand Dryer 1 Set 8Power Cord 1 Pc
Activation Activated by an Infrared sensor. The
machine operates automatically.
Dimensions
W x H x D
326 x 254 x 188 mm
(12.8” x 10” x 7.4”)
Voltage/Power 220-240V, 50Hz, 2000- 2200W
Detection
Distance
180 + 20mm (7.0” + 0.78”)
Kodak White Scale
Operation
Duration
60 sec (Self protection automatic
shutoff)
Motor Type Induction Type (Brushless)
This machine is equipped with Infrared sensor for
automatic activation.
1. SPECIFICATIONS : 2. PACKING LIST :
3. STANDARD INSTALLATION :
4. BEFORE INSTALLATION :
ITEM DESCRIPTION KIT NO.
1 PCB CONTROL KIT 99128
EMPTY ZONE
Min 60cm
1
2
5. INSTALLATION STEPS:
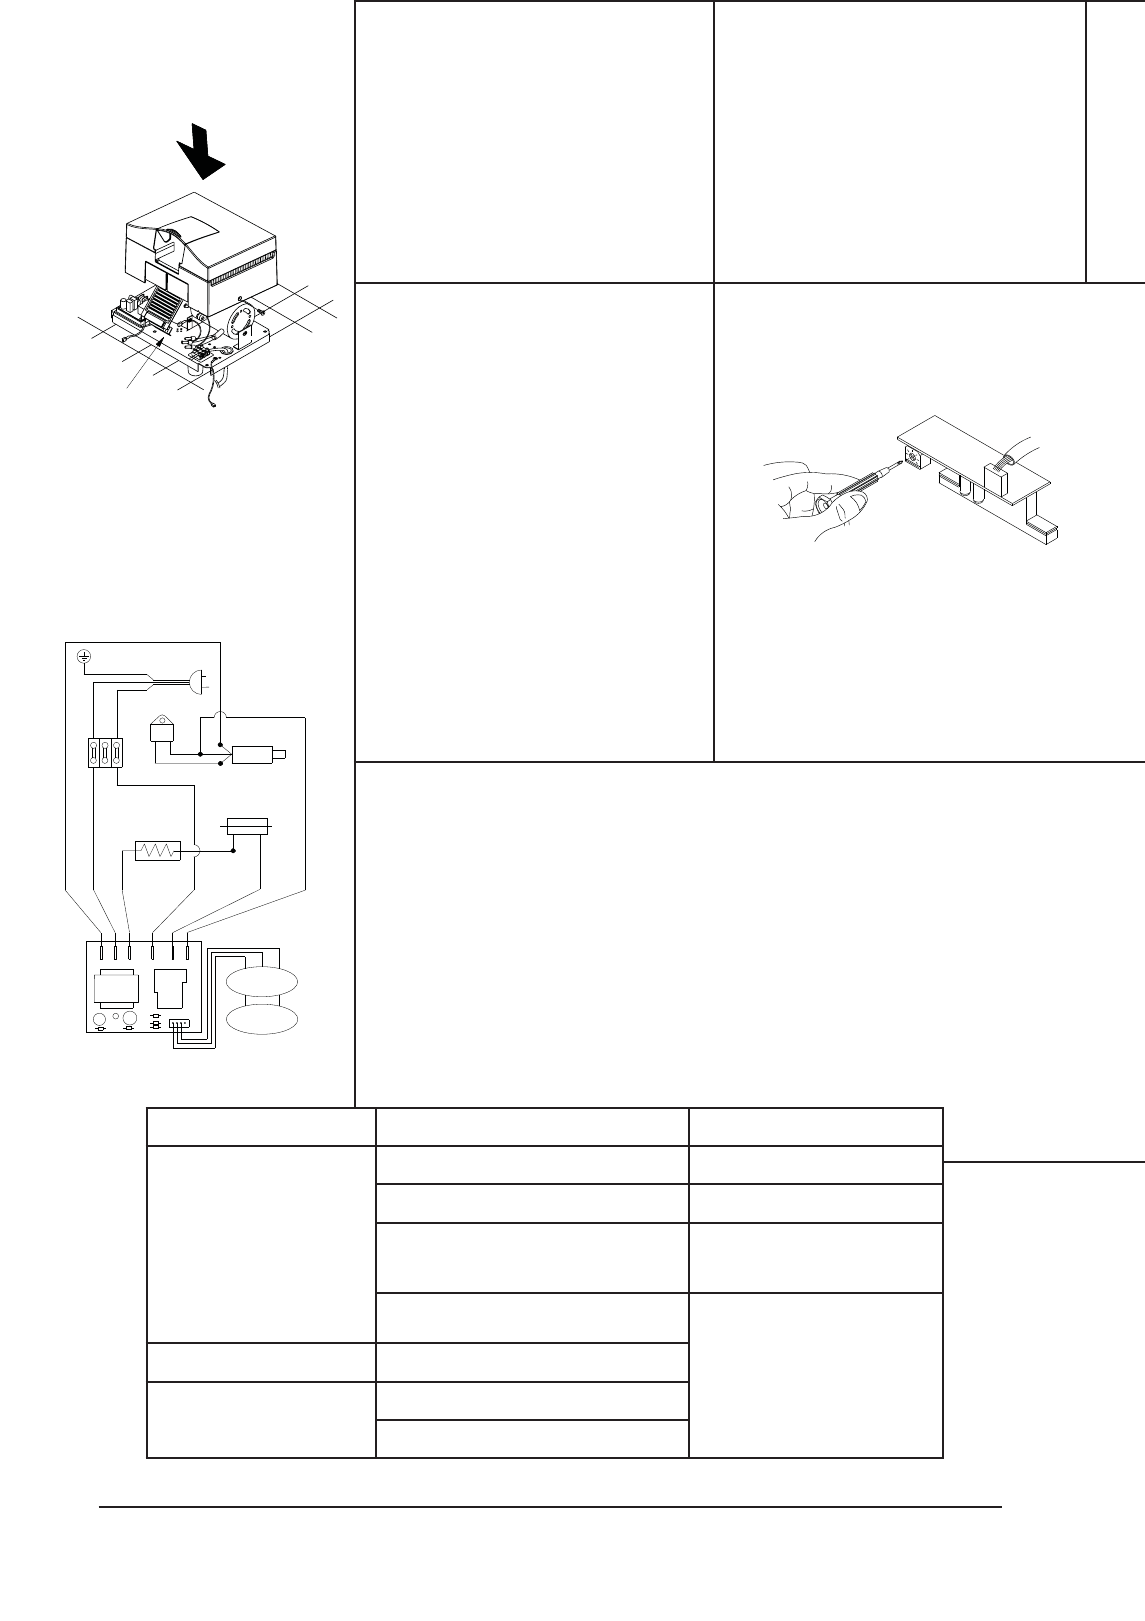
5.1.1 Remove the cover from the hand dryer
by unscrewing the two side screws and
lift the cover off.
5.1.2 Paste the Installation Template at the
appropriate location on the wall.
5.1.3 Drill four ø9mm holes and insert plastic
dowels.
5.2 Insert Screws into dowels and tighten
them.
ø9mm
5.3 The hand dryer unit comes with a
flexible power cord and plug.
5.4 For concealed wiring, drill hole on wall
using template for rear cable entry.
Wire to 220-240V AC power source
rated at 10 Amps.
Superdry Installation & Operating Instructions 87295 - February 2010 Page 3
7.1 The machines starts operating
automatically when user’s hands are
put approximately 80mm (3.15”) below
the sensor located next to the air louvre.
Whenever the hands are moved out of
the sensing range, the machine will stop
after approximately 0.5 seconds
7.2 The 0.5 second time delay helps avoid
false triggers by unexpected movements.
7.3 When the air temperature is over 120ºC
or any fault has occurred, the thermal
cut-out will shut off the power to the
heater.
7.4 For safety reasons, the machine will
immediately stop operating when it is
used continuously for 60 seconds. The
machine returns to standard function
when hands are moved away.
6.1 Insert security screws and tighten them.
6.2 Plug into power outlet and check power
is ON.
6. INSTALLATION CHECK : 8. ADJUSTMENT OF SENSOR :
7. OPERATION INSTRUCTIONS :
11. TROUBLE SHOOTING (FOR QUALIFIED ELECTRICIAN USE ONLY) :
Problem Diagnosis Solution
Hand dryer does not work.
Check power supply is on. Turn on the power
The sensor cable is unplugged. Connect the cable properly.
Sensing distance too short. Adjust sensing distance as per
Section 8.
Sensor Assy or Power cord out of order.
Contact the vendor for service.
Cold air without heat. Heater out of order.
No air but heat.
Motor out of order.
Motor condenser out of order.
Adjust sensor range
here
9. WIRING DIAGRAM :
Gray
Blue
HEATER
Black
OVERLOAD
MOTOR
SENSOR
PCB
INFRARED
SENSOR
C
Blue
Green/Yellow POWER
Gray
White
Red
Black
Black
Black
Brown
Red Bk
PCB
NL
White
10.1 Turn off power supply prior to removing outer case.
10.2 Turn off power supply before maintenance or cleaning. If aluminium housing or air
louvre are covered with dust, do not splash water onto it. Use only damp sponge or cloth
to wipe dirt off.
10.3 Never try to put a small screwdriver or any other object into the holes of the air louvre
from outside. This might cause damage to the interior parts, and electric shock may
occur.
10.4 Keep sensor case clean, never use any abrasive cleaning agent, rough surface articles,
steel brush or sand paper to rub the sensor case. This will make the sensor case dull
and decrease the sensitivity of the sensor.
10.5 For safety, do not dry other objects except hands.
10.6 Do not allow young children, handicapped or infirm persons to use the Hand Dryer
without supervision.
10.7 If any cord or plug is damaged, it must be repaired only by a qualified technician.
10.8 To avoid hazards, all installation procedures must be carried out by a suitably qualified
tradesperson.
10. IMPORTANT NOTICE :
8.1 Turn off power first.
8.2 Loosen Security Screws and remove the
Aluminum Housing. (Use the Security
Wrench from the supplied package in
the carton.)
8.3 Refer to drawing shown in Section 6
for the location of the sensor range
adjustment device .
8.4 Use a tiny flat screw driver to turn
adjustment screw in clockwise
direction to lengthen the sensing
distance. To shorten the sensing
distance turn in counter-clockwise
direction.
8.5 After finishing the adjustment, put back
the aluminum housing and fasten it.
Sensor range adjustment

Page 4 Superdry- Installation & Operating Instructions - 87295 - February 2010
Contact Information
Head Office
Zenith Heaters Limited,
Unit 2/15 Moselle Avenue,
Henderson.
Auckland. 0610
New Zealand.
www.zenithheaters.co.nz
Telephone: 0800 558055
Facsimile: 0800 559055
Registering your product:
Registering your installation on the Zenith Heaters Limited website may help
to establish date of installation, should it become necessary to service the
appliance, under the terms of Zenith Heaters Limited warranty. To register
your installation go to www.zenithheaters.co.nz and look under the heading
“Warranty”.
The use of this crossed out wheeled bin logo indicates that this product needs
to be disposed of separately to any other household waste.
Within each of the European Union member countries, provisions have been
made for the collection and recycling of unwanted electrical and electronic
equipment. Outside of the EU it will be necessary to dispose of this product at
your local community waste collection or recycling centre.
In order to help preserve our environment we ask that you dispose of this
product correctly. Please contact your local city council for collection centre
details
As Zenith Heaters Limited policy is one of continuous product improvement,
changes to specifications may be made without prior notice. Images in this
booklet have been modified and may not be true representations of the
finished goods.
