Zipit Wireless ZWP1 Z3 Wireless Messenger 3 User Manual
Zipit Wireless, Inc. Z3 Wireless Messenger 3
User Manual
Zipit Wireless, Inc. – Confidential – Rev. .92 December 30, 2010 – Page 1 of
33
Zipit Now User’s Guide
Dual Mode Messenger (Wi-Fi & Cellular)
Model Z3

Zipit Wireless, Inc. – Confidential – Rev. .92 December 30, 2010 – Page 2 of
33
Table of Contents
I. Important Information ................................................................................................................................... 3
Operating Temperature ................................................................................................................................. 3
Battery Pack CAUTION ............................................................................................................................... 3
FCC Regulations........................................................................................................................................... 3
RF Exposure Information (SAR) .................................................................................................................. 3
II. Device Functional Requirements ................................................................................................................. 5
Design Requirements .................................................................................................................................... 5
Power On / Off.............................................................................................................................................. 5
Charging / AC Adapter ................................................................................................................................. 5
III. User Interface.............................................................................................................................................. 6
Menu Structure: ............................................................................................................................................ 6
Messaging: .................................................................................................................................................... 9
Contacts: ..................................................................................................................................................... 11
Call Log: ..................................................................................................................................................... 13
Tools: .......................................................................................................................................................... 14
Keyboard and Volume Controls ................................................................................................................. 19
Interrupts – Incoming Call / Call in Progress ............................................................................................. 22
Interrupts – Incoming Zipit Direct Alert (Priority 1 or 2) .......................................................................... 23
Interrupts – Incoming Message Notifications (Bubbles) ............................................................................ 24
Interrupts – No Network Available / Network Lost ................................................................................... 25
Interrupts – New Wi-Fi Connections / Manual Connections...................................................................... 26
Interrupts – Battery Level Critically Low................................................................................................... 26
One Time Interrupt – Initial Authorization Screen (CAC)......................................................................... 27
Interrupts - Enter Lock Code (after Power-up or inactivity time out) ........................................................ 28
Interrupts – Find Device Feature ................................................................................................................ 29
On-Screen Indicators, Icons, and LED ....................................................................................................... 29
Message Types and Icons ........................................................................................................................... 30
On Call Function......................................................................................................................................... 30
Initiate call or conversation from keyboard (from Home Menu) ............................................................... 31
Initiate a Critical Alert from the Device ..................................................................................................... 33

Zipit Wireless, Inc. – Confidential – Rev. .92 December 30, 2010 – Page 3 of
33
I. Important Information
Operating Temperature
- Operate the Zipit Now in temperatures between 0° and 50° C (32° to 155° F).
Battery Pack CAUTION
- RISK OF EXPLOSION IF BATTERY IS REPLACED BY AN INCORRECT TYPE.
- DISPOSE OF USED BATTERIES ACCORDING TO THE INSTRUCTIONS
- DO NOT INCINERATE
- DO NOT DISASSEMBLE
- DO NOT EXPOSE TO HIGH TEMPERATURES (113° F/45° C)
FCC Regulations
- This mobile device complies with part 15 of the FCC Rules. Operation is subject to the following two conditions: (1)
This device may not cause harmful interference, and (2) this device must accept any interference received, including
interference that may cause undesired operation.
- This mobile device has been tested and found to comply with the limits for a Class B digital device, pursuant to Part 15
of the FCC Rules. These limits are designed to provide reasonable protection against harmful interference in a residential
installation. This equipment generates, uses, and can radiate radio frequency energy and, if not installed and used in
accordance with the instructions, may cause harmful interference to radio communications. However, there is no
guarantee that interference will not occur in a particular installation. If this equipment does cause harmful interference to
radio or television reception, which can be determined by turning the equipment off and on, the user is encouraged to try
to correct the interference by one or more of the following measures:
o
Reorient or relocate the receiving antenna.
o
Increase the separation between the equipment and receiver.
o
Connect the equipment into an outlet on a circuit different from that to which the receiver is connected.
o
Consult the dealer or an experienced radio/TV technician for help.
o
Changes or modifications not expressly approved by the party responsible for compliance could void the user‘s
authority to operate the equipment.
- The antenna(s) used for this transmitter must not be co-located or operating in conjunction with any other antenna or
transmitter.
RF Exposure Information (SAR)
- This device meets the government’s requirements for exposure to radio waves.
- This device is designed and manufactured not to exceed the emission limits for exposure to radio frequency (RF) energy
set by the Federal Communications Commission of the U.S. Government.
- The exposure standard for wireless mobile devices employs a unit of measurement known as the Specific Absorption
Rate, or SAR. The SAR limit set by the FCC is 1.6W/kg. *Tests for SAR are conducted using standard operating
positions accepted by the FCC with the device transmitting at its highest certified power level in all tested frequency
bands. Although the SAR is determined at the highest certified power level, the actual SAR level of the device while
operating can be well below the maximum value. This is because the device is designed to operate at multiple power
levels so as to use only the power required to reach the network. In general, the closer you are to a wireless base station
antenna, the lower the power output.
- The highest SAR value for the device as reported to the FCC when tested for use when worn on the body, as described in
this user guide, is 1.24 W/kg. (Body-worn measurements differ among device models, depending upon available
accessories and FCC requirements.)
- While there may be differences between the SAR levels of various devices and at various positions, they all meet the
government requirement.
- The FCC has granted an Equipment Authorization for this device with all reported SAR levels evaluated as in
compliance with the FCC RF exposure guidelines. SAR information on this device is on file with the FCC and can be
found under the Display Grant section of
www.fcc.gov/oet/ea/fccid/ after
searching on FCC ID: VGUZWP1.

Zipit Wireless, Inc. – Confidential – Rev. .92 December 30, 2010 – Page 4 of
33
- This device is in compliance with SAR for general population /uncontrolled exposure limits in ANSI/IEEE C95.1-1999
and had been tested in accordance with the measurement methods and procedures specified in OET Bulletin 65
Supplement C.
- For body worn operation, this device has been tested and meets the FCC RF exposure guidelines for use with an
accessory that contains no metal and positions the handset a minimum of 1.5 cm from the body. Use of other accessories
may not ensure compliance with FCC RF exposure guidelines.

Zipit Wireless, Inc. – Confidential – Rev. .92 December 30, 2010 – Page 5 of
33
II. Device Functional Requirements
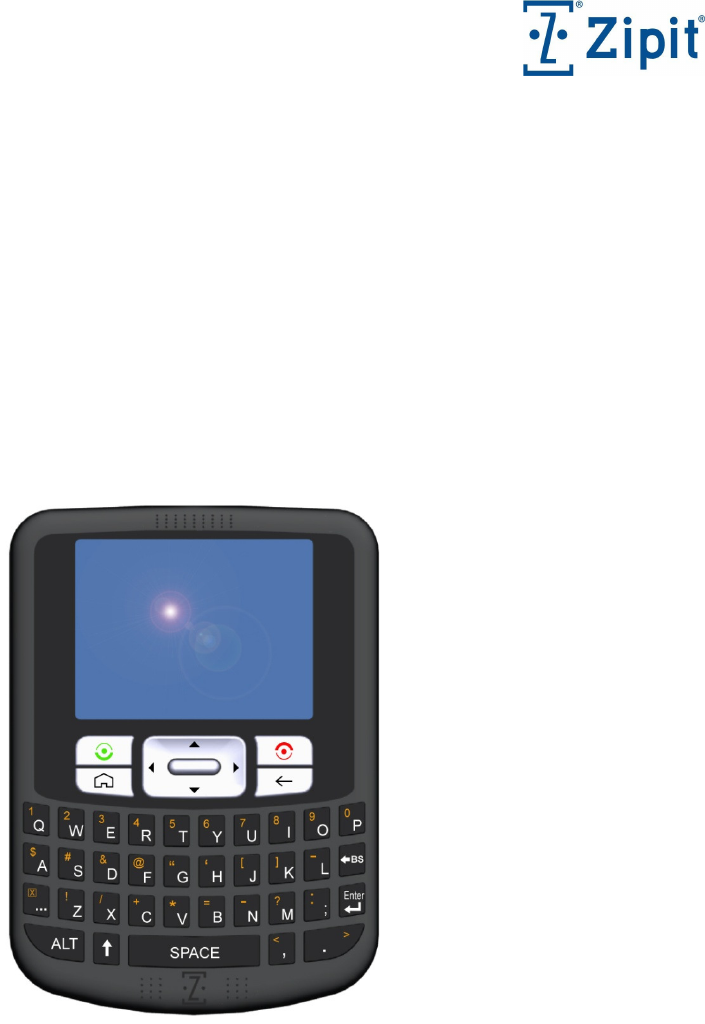
Design Requirements
- Color screen. 2.4” 320x240 TFT LCD
- Durable – ability to withstand drops, long life keyboard
- Battery Life
(targets)
o
Battery life is comparable to existing VoIP phones. The goal is to provide a minimum of 2 days (preferably 3)
of typical use prior to needing to recharge the battery.
3 days of standby regardless of network type (assume 10 network switches per day),
or
42 hours of standby, 2 hours of VoIP calls, and 4 hours of sending or reviewing messages, or
42 hours of standby and 6 hours of sending and reviewing messages
- Easy for adults to type
o
Full Qwerty keyboard
o
High contrast keys – letters, numbers, and symbols
o
Backlit keys
o
Slightly wider than a typical Blackberry or similar Smartphone to enable a great typing experience
- Easy for adults to see
o
Adjustable font sizes
- Pocket sized – 4.2” x 3.1” x 0.5”
- Volume control buttons
- Power On/Off handled through End key
- USB charging port
Power On / Off
- If the AC Adapter is plugged in:
o
If the device is Off when the AC adapter is attached, the device will automatically come to life enough to show
a graphic of the charging indicator and the device will charge the battery as fast as possible.
o
If the device is On, the device stays On and operates as it would normally.
o
If the device is On, pressing the End Button for 1.5 seconds brings up a menu with two choices – 1) lock the
keyboard, or 2) power off the device. If #2 is selected, the device is shut off – including both radios – but goes
into the fast charging state as described above. If #1 is selected, the screen shuts off and the user can unlock the
device by pressing the Send and End keys simultaneously.
- If the device is not plugged into the AC Adapter:
o
If device is Off, press End for .5 seconds to turn the device On. The device should show a splash screen
(preferably animated GIF) within 1.5 seconds of turning the device On. Full boot within 7 seconds.
o
If the device is On, pressing the End Button for 1.5 seconds brings up a menu with two choices – 1) lock the
keyboard, or 2) power off the device. If #2 is selected, the device is shut off completely. The only function that
needs to be enabled is the ability to press the End button to turn the device on again. If #1 is selected, the screen
shuts off and the user can unlock the device by pressing the Send and End keys simultaneously.
- If the device is locked up, the user needs to remove and then reinstall the battery.
- When the device is On, the device must always seeks to be in the lowest power consumption mode possible. The user
can influence the settings of the LCD time out and the keyboard backlight timeout from the tools menu. Otherwise, all
power management should be managed by the software.
- If the battery is completely dead, the unit won’t turn on until it is plugged in to the AC Adapter.
Charging / AC Adapter
- If device is On when the AC Adapter is connected, the device stays on and the on screen battery indicator indicates that
the device is being charged. The on screen battery indicator also indicates when the battery is fully charged.
- If the device is Off when the AC Adapter is connected, the screen is turned on and a battery charger status graphic is
displayed. The unit won’t turn fully On unless the user presses the power button.

Zipit Wireless, Inc. – Confidential – Rev. .92 December 30, 2010 – Page 6 of
33
III. User Interface
Menu Structure:
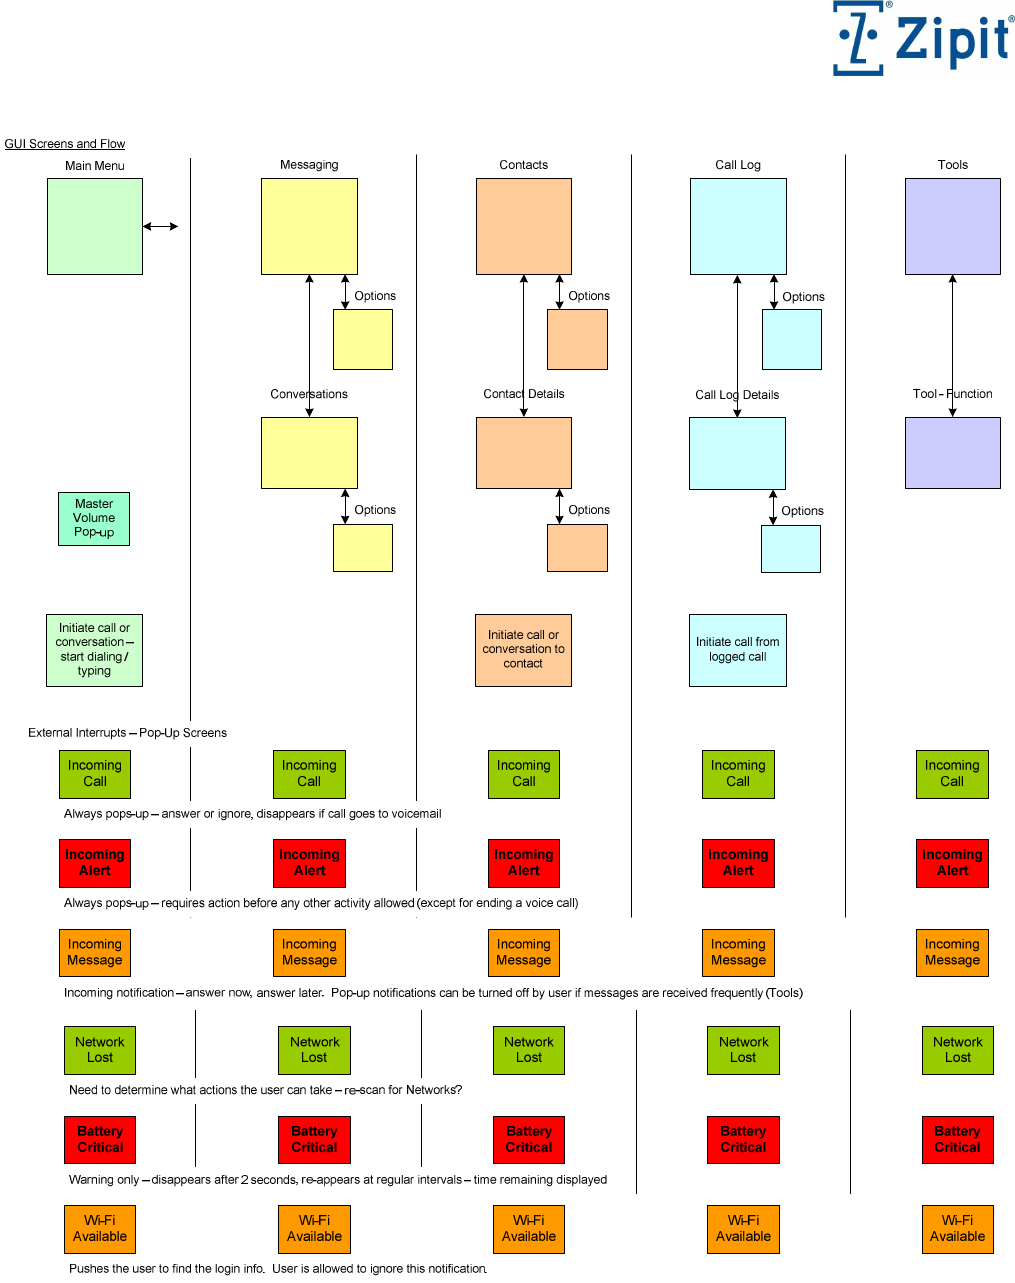
Main Menu (Home)
The Main Menu / Home displays 4 or 5 simple menu choices. These can be implemented with icons with titles or in list form. As new events
occur, the Messages menu item and the Call Log menu item are updated to display receipt of new messages or missed calls.
The new message count is reduced as the new messages are opened. The missed call
count is removed when missed calls are viewed in the call log.
• Use Left and Right to scroll through the menu items. The highlight moves left and right as the user scrolls.
• Press SELECT or ENTER to go to the highlighted menu option.
• Press number or letter keys to automatically bring up the dialer/contact list to initiate a call or send a new message.
• To speed dial, press and hold one number until the call sequence is initiated or press one number followed by pressing and holding
another number until the call is initiated. Pressing more than two numbers will start a 7 or 10 digit dialing sequence.
• Pressing a series of letters will bring up names in the contact list.
• Press Send at any time to start dialing or press Select or Enter to see a list of choices for the number or name that has been entered (Call
Mobile, Send Text, Call Home, Call Office).
• Press Send to bring up the dialer screen (same as previous bullet).
• Press Volume keys to bring up the master volume control.
Current Time and Date are displayed at the bottom of the Main Menu screen.

Zipit Wireless, Inc. – Confidential – Rev. .92 December 30, 2010 – Page 7 of
33
Main Menu
Messaging
Contacts
Call Log
Primary Navigation Flow
Messages (4 new)
Contacts
Call Log (2 missed)
Tools
Main Menu
Conversations
Contact Details
Call Details
Tools Tool Details
Press Back to Return to Previous Screen
or End to Return to Main Menu
Press End or Back to Return to
Main Menu
Press Select or Enter
Press Select or
Enter on Menu Item
Zipit Wireless, Inc. – Confidential – Rev. .92 December 30, 2010 – Page 8 of
33
Zipit Wireless, Inc. – Confidential – Rev. .92 December 30, 2010 – Page 9 of
33
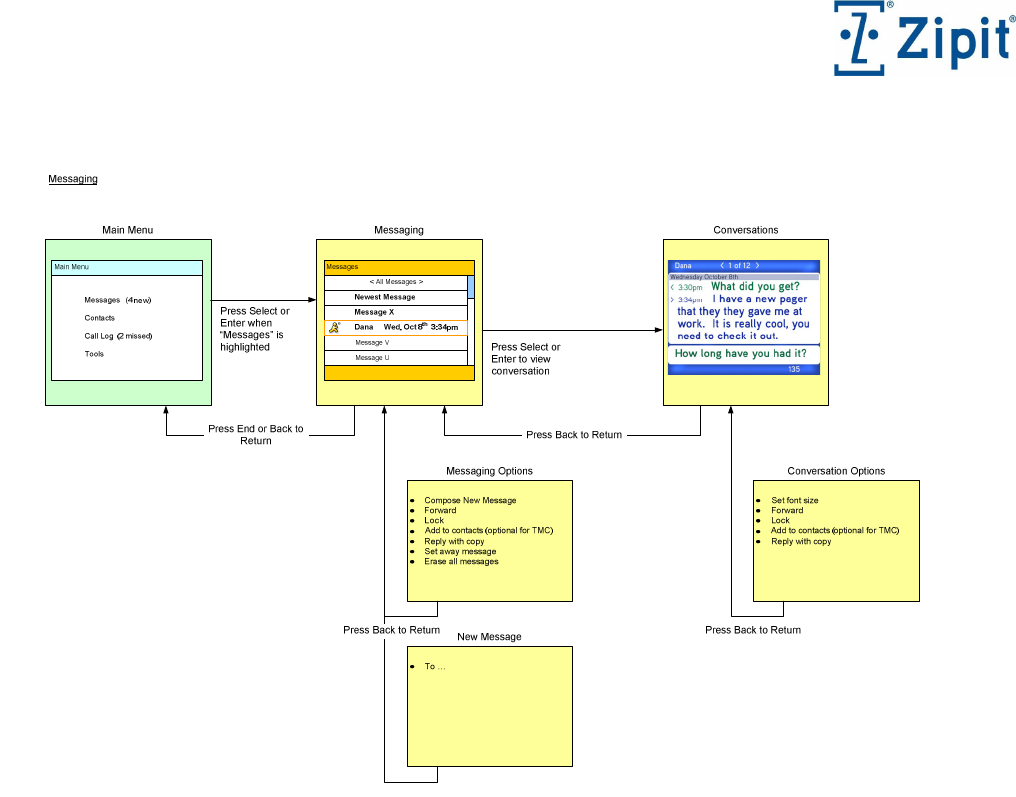
Messaging:
Message View
The Message View is organized by active conversations and voicemail. Each entry points to a conversation which contains all of the exchanges
(threads) that have transpired since the conversation started or to a voicemail. The time and date indicates when the last thread was sent or
received or when the voicemail was received. The message is Bold only if it has been received but not viewed (opened).
• Use Up, Down to scroll through messages. The highlight moves up and down as the user scrolls.
• Press SELECT or ENTER to open a highlighted message and display the Conversation Window / Voicemail player.
• Use Left, Right to filter messages – All, Alerts, Zipit to Zipit Chat, SMS, Voicemail, MS Live Office, AOL, Yahoo, MSN Messenger, and
Google Talk
• Press END or BACK to return to the Main Menu
• Press Options Key to view options
• Press Alt-Delete to delete the highlighted message or select Delete Message from the Options menu.
• Sorted by Date and Time Received
• A scroll indicator is provided to show the relative position of the highlighted message within the list if messages extend beyond the visible
area of the screen
• When a voicemail message is selected, player functions are provided within the conversation style screen.
• The date and time associated with a message refers to the date and time of the last thread received for that conversation. Each thread in a
conversation does not create a new entry in the Inbox. Opening a message / conversation shows each thread in that conversation since the
thread was started. A conversation will stay active until it is deleted.
If a new message is received while viewing the Message View screen, a bubble window briefly appears < 2 seconds > announcing a new
message has been received and shows how many total unopened messages are in the Inbox. If it is part of an open conversation, that
conversation will be moved to the top of the Message queue. If the message is the start of a new conversation, the new conversation will be
placed at the top of the queue.

Zipit Wireless, Inc. – Confidential – Rev. .92 December 30, 2010 – Page 10 of
33
Message View Options:
• Compose New Message
• Forward
• Lock / Unlock – prevents the highlighted conversation from being deleted
• Add to Contacts (if personal contact, only add if allowed by admin)
• Set away message
• Erase message
• Erase all messages
Conversation Window:
• Left and Right keys are used to move between conversations
• Notifications are popped up when a new message comes in
• Close and delete a conversation with the Option menu or immediately with Alt-
key.
Voicemail conversation windows have player control features. (Play / Pause,
Replay, Rewind, Fast Forward). Allow for auto dial to respond.
• Each thread shows the time it was sent or received.
• Text sent by the user is preceded by an outgoing arrow and text received is preceded
by an incoming arrow. Sent text and received text are shown in two different colors
as determined by the end user - Tools and Options.
• If you’re viewing a conversation and a new thread arrives, you will see it appear in
your conversation history area.
• If you’re viewing a conversation and a new thread arrives from another conversation
or a new message arrives, you can ignore it, press the LEFT or RIGHT key to cycle through conversations to get to it, or go back to the
Message screen to select it.
• For SMS or proprietary formats, the character count is shown on the lower right corner of the screen and is constantly updated as the user
types to insure that the user can’t go over 160 characters. The count starts at 160 and, when it reaches 0, no more characters are allowed.
Conversations are retained (even IM) until deleted by the user or until the allotted size of storage buffer is exceeded.
Conversation View Options:
• Forward
• Lock / Unlock – prevents the conversation from being deleted
• Add to Contacts (if personal contact, only add if allowed by admin)
Zipit Wireless, Inc. – Confidential – Rev. .92 December 30, 2010 – Page 11 of
33
Contacts:
Main Menu Contacts
Contacts
Messages (4 new)
Contacts
Call Log (2 missed)
Tools
Main Menu
Press Select or
Enter when
“Contacts” is
highlighted
Call Mobile
Call Home
Call Office
Text Mobile
IM
Select Method to Communicate
Press Select or
Enter to initiate
contact
View
Edit (if allowed by admin)
Delete (if allowed by admin)
Search Global Address Book
Add New Contact (if allowed)
Manage Groups (if allowed by admin)
Manage Speed Dial List
Contacts Options
Name _______________
Cell _______________
Office _______________
Home _______________
IM _______________
Speed Dial ____
Default
New Contact – Entry, Edit
Press Back to Return
Press Back to Return
Press End or Back to
Return
Contacts
<All Contacts >
Bill < >
Frank < >
Ralph < >
Dana < >
Aaron < >
Contacts View
The Contacts View is organized in Alphabetical order. Each entry shows the contact’s name.
• Use Up, Down to scroll through contacts. The highlight moves up and down as the user scrolls.
• By default, all contacts will be shown.
• With All Contacts available and a name highlighted, press SELECT or ENTER to open a dialog that allows the user to select an action –
Send Zipit Chat, Send AIM Message Call Mobile, Call Home, Send SMS to Mobile, Send SMS to Pager, IM {Facebook, Twitter}.
• Contacts that are online with their Z3 will have a status indicator that indicates their device is on. If they are online with an IM service, a
similar indicator will be provided beside the dialog entry – such as “Send AOL IM”.
• Use Left, Right to filter contacts by Address Books, fields that define a user’s communications capabilities, and by personal (contacts that a
user added themselves – if allowed) – All, Address Books, Personal Contacts, Zipit to Zipit Contacts, Mobile Phone Contacts, Work Phone
Contacts, Home Phone Contacts, AIM Contacts, Yahoo Contacts, MSN Contacts, MS Live Contacts, and Google Talk Contacts.
• While highlighting a contact in a filtered view of the contacts, press SEND to immediately initiate a call or a new conversation – based on
the communication type enabled by the filter. Pressing SEND when the contact list is not filtered acts the same as pressing SELECT or
ENTER as defined above.
• Press END or Back to return to the Main Menu
• To search for a name or go to a name while viewing the contact list, start typing the first characters of the name. A character entry field
will replace the “<All Contacts>” field and the list of names will immediately start being filtered as characters are typed. For example, if
you type a D – all names that don’t start with D are removed from the list. If you type Da – all names that don’t start with Da are removed
from the list. Backspace at any time to remove characters and to reduce the filter. The highlight will move to the first name that matches
the characters typed in. The user can move the cursor down to select names below the first name. Select “Back” to exit the search.

Zipit Wireless, Inc. – Confidential – Rev. .92 December 30, 2010 – Page 12 of
33
Contacts View Options
• View
• Edit
• Delete – allows the user to delete individual users, user created groups, and Address Books. When an Address Book is deleted, a warning
will pop-up to warn the user that all users in the address book will also be deleted from the Contact List.
• Search Global Address Book
- A text entry field is provided for entering a query, press enter to start the search (noted in the query filed <press enter to start> ) after
entering characters
- While the search results are being retrieved from the server, a wait dialog appears with a Cancel button (there will be a graphic that is
in motion showing that the function is in process). Selecting Cancel will stop the search and return to the Search query screen
- Search returns up to 20 results, includes users and address books. The first result will be highlighted.
- Selecting a name or address book from the list will allow the user the option to add the name to the contact list or to cancel – which
returns the user to the search list. Going Back returns the user to the query view and going back again returns the user to the Contact
option list. If an address book is selected, a popup about the address book is displayed along with the option to add the address book
or cancel.
• Add New Contact (manually enter information)
• Manage Groups (Personal groups)
• Manage Speed Dial List
Zipit Wireless, Inc. – Confidential – Rev. .92 December 30, 2010 – Page 13 of
33
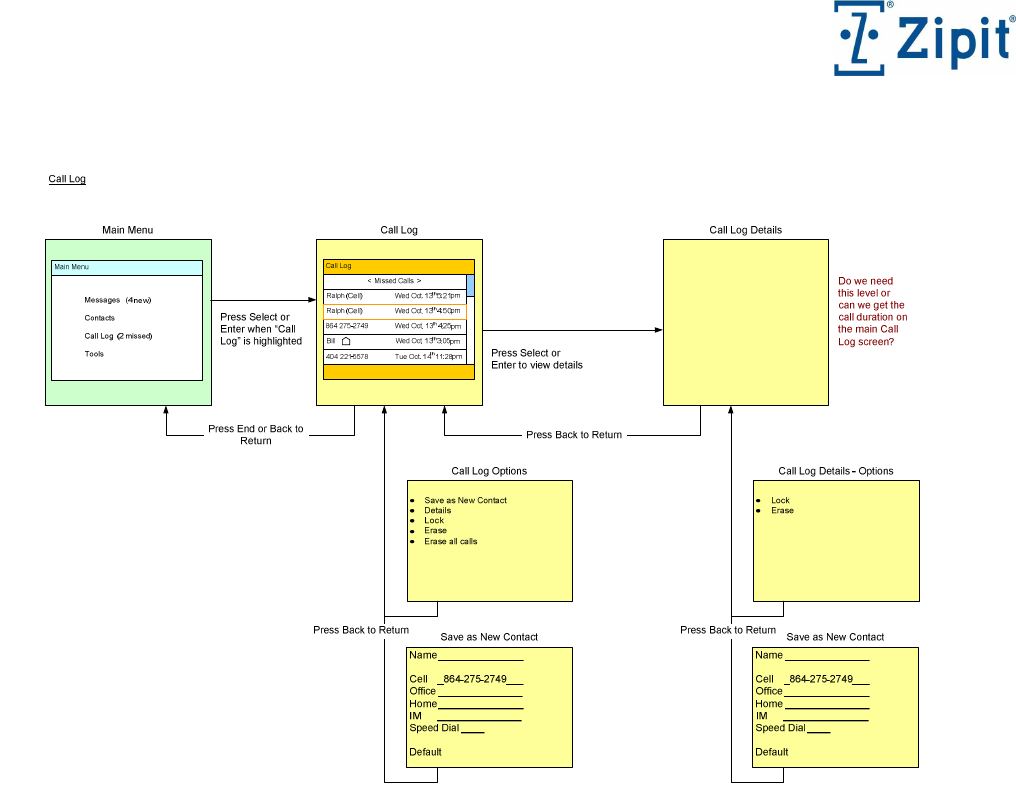
Call Log:
Call Log View
The Call Log View is organized by the time and date – with the most recent call displayed at the top of the list. Each entry shows the name of
the contact if it is included in the Contacts List, the phone number of the caller if it is not in the Contacts List, an indicator showing whether the
call was dialed, received, or missed, and the time and date of the call.
• Use Up, Down to scroll through the call log. The highlight moves up and down as the user scrolls.
• Press SELECT or ENTER to open a highlighted call to review details – such as call duration.
• To filter the call log, use Left, Right to scroll through the options – All, Missed, Received, Dialed
• While highlighting a log, press SEND to initiate a call the number that has been logged.
• Press END or BACK to return to the Main Menu
Call Log Options
• Save as New Contact
• Lock / Unlock
• Erase
• Erase all
Zipit Wireless, Inc. – Confidential – Rev. .92 December 30, 2010 – Page 14 of
33
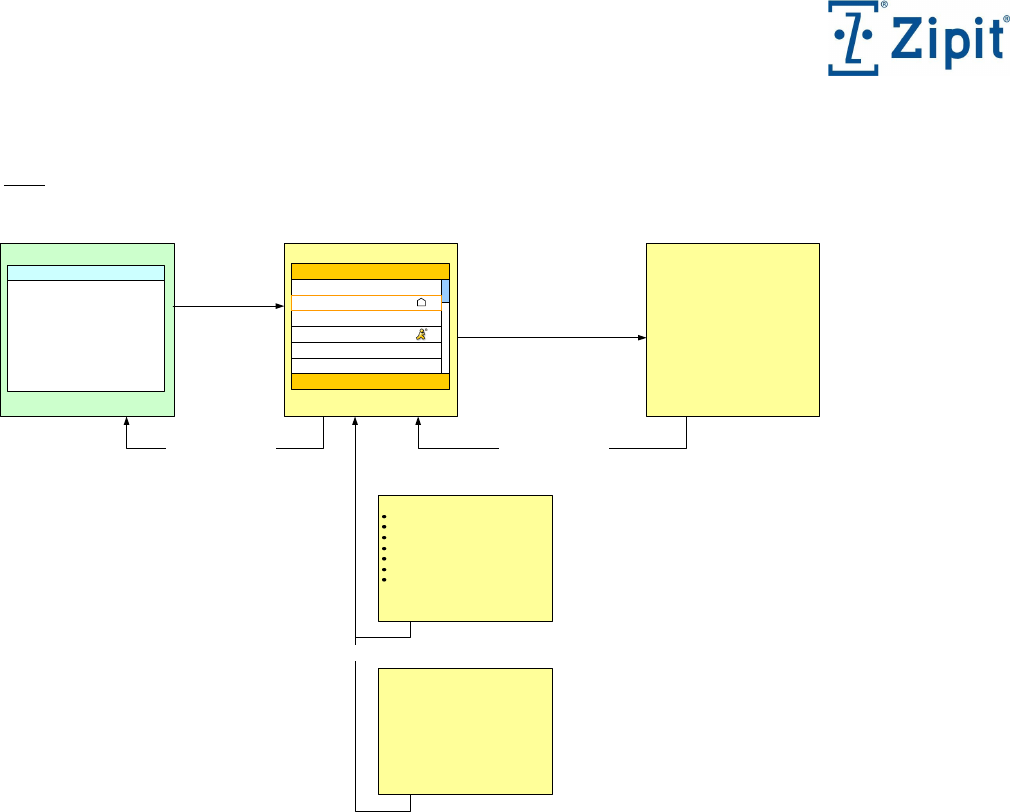
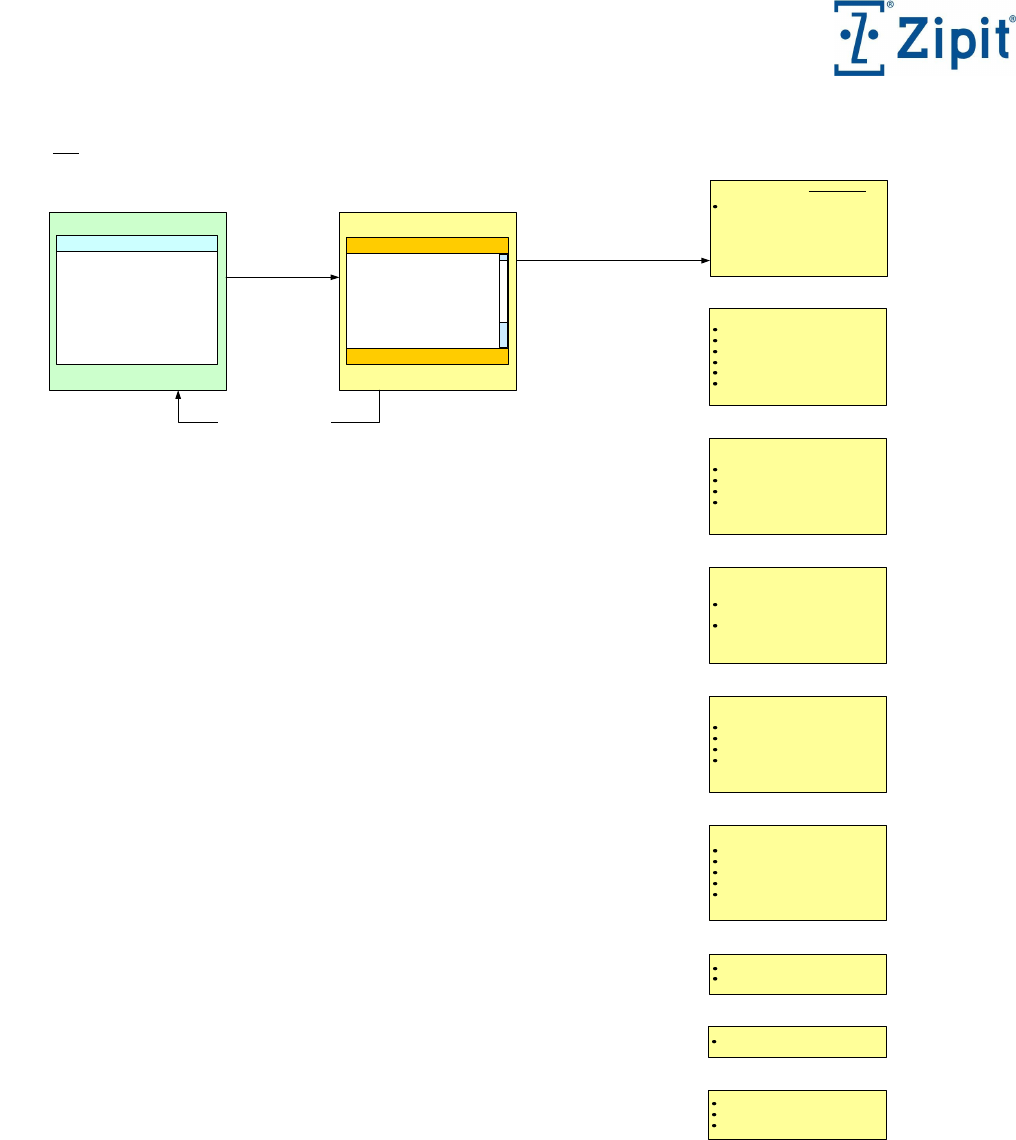
Tools:
Main Menu Tools
Tools
Messages (4 new)
Contacts
Call Log (2 missed)
Tools
Main Menu
Press Select or
Enter when “Tools”
is highlighted
Currently connected to: Cellular or Wi-Fi
Available Wi-Fi networks:
Linksys – Open
McDonalds – Open
D-Link JGH – WEP
HomeTW – WPA
Refresh Networks ……….
Wireless Networks
Tools
Back
Press Select or
Enter to view
highlighted tool
Press End to Return
Wireless Networks
Sound Settings
Display Settings
Font Sizes
Security
System Info
Master Volume
Call Sounds
Messaging Sounds
Alert Sounds
Keypad volume
Earpiece Volume
Sound Settings
Backlight Brightness
Backlight Timeout
Keyboard Brightness
Keyboard Timeout
Display Settings
Conversations < Medium, Large,
Small >
Menus < Medium, Large, Small >
Font Sizes
User
Serial Number
Current Network
...
System Info
Enable Device Locking
Set inactivity timer
Enter Password
Change Password
Confirm Password
Security
Turn Off/On Screen Pop-ups
Reduce or Extend Display Time
Message Notifications
Select Language (for menus)
Languages
Enable AIM (optional)
Enable MS IM (optional)
Enable Yahoo IM (optional)
IM Account Setup
Zipit Wireless, Inc. – Confidential – Rev. .92 December 30, 2010 – Page 15 of
33
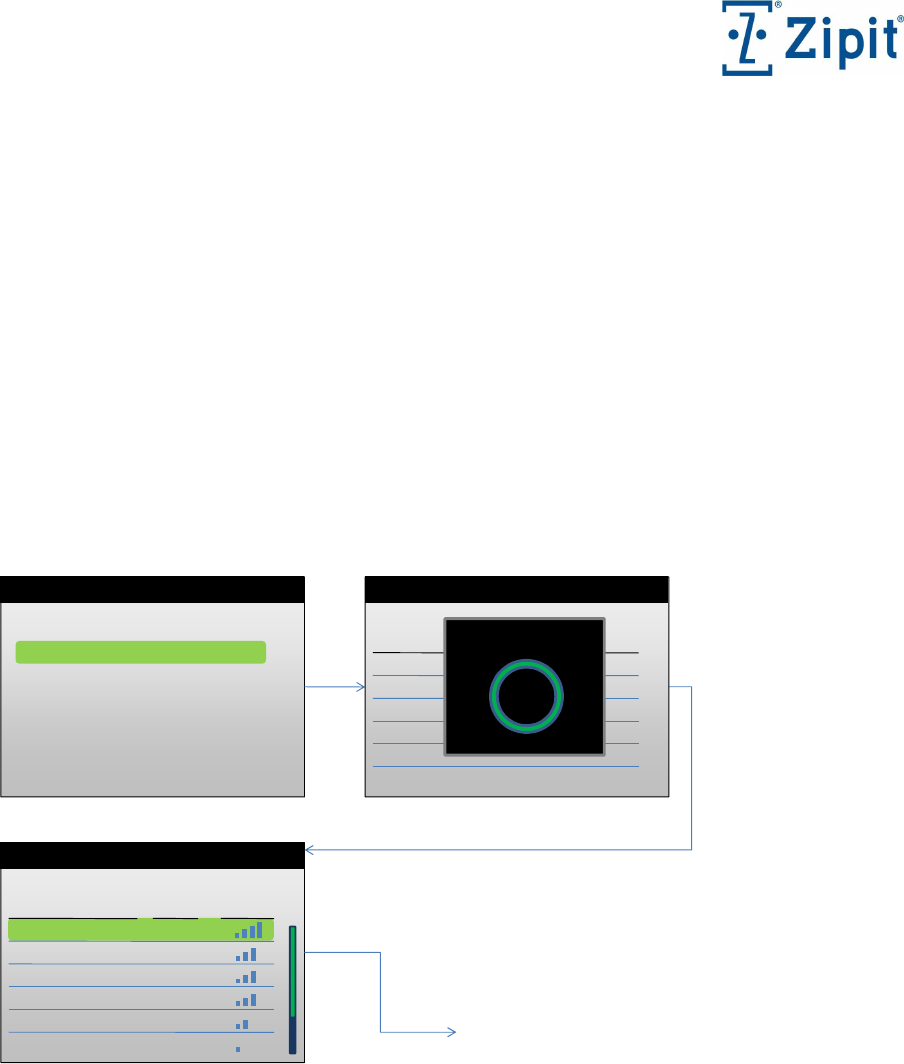
Wireless Networks
This network tool is used to manually search for and connect to Wi-Fi networks and to manage existing network information. This tool is also
provided when no network connections are automatically found. (The user will be presented with a screen that says “No Networks Available”
and 2 choices – 1) Try Manual Wi-Fi Connection or 2) Continue to Attempt Auto-Connection)
• Scan for Wi-Fi Networks - Identifies all networks within range – including hidden networks where the SSID is unknown
1) Device scans for networks. Top of screen in the header bar reads - “Select Wi-Fi Network”
2) A busy box appears over the middle of the screen with the text “Scanning …”
3) When the scan is complete, the screen is populated with a list of networks sorted by the following priorities – Strength,
Pre-approved Networks, Manually Added Networks, Open Networks, Secure Networks.
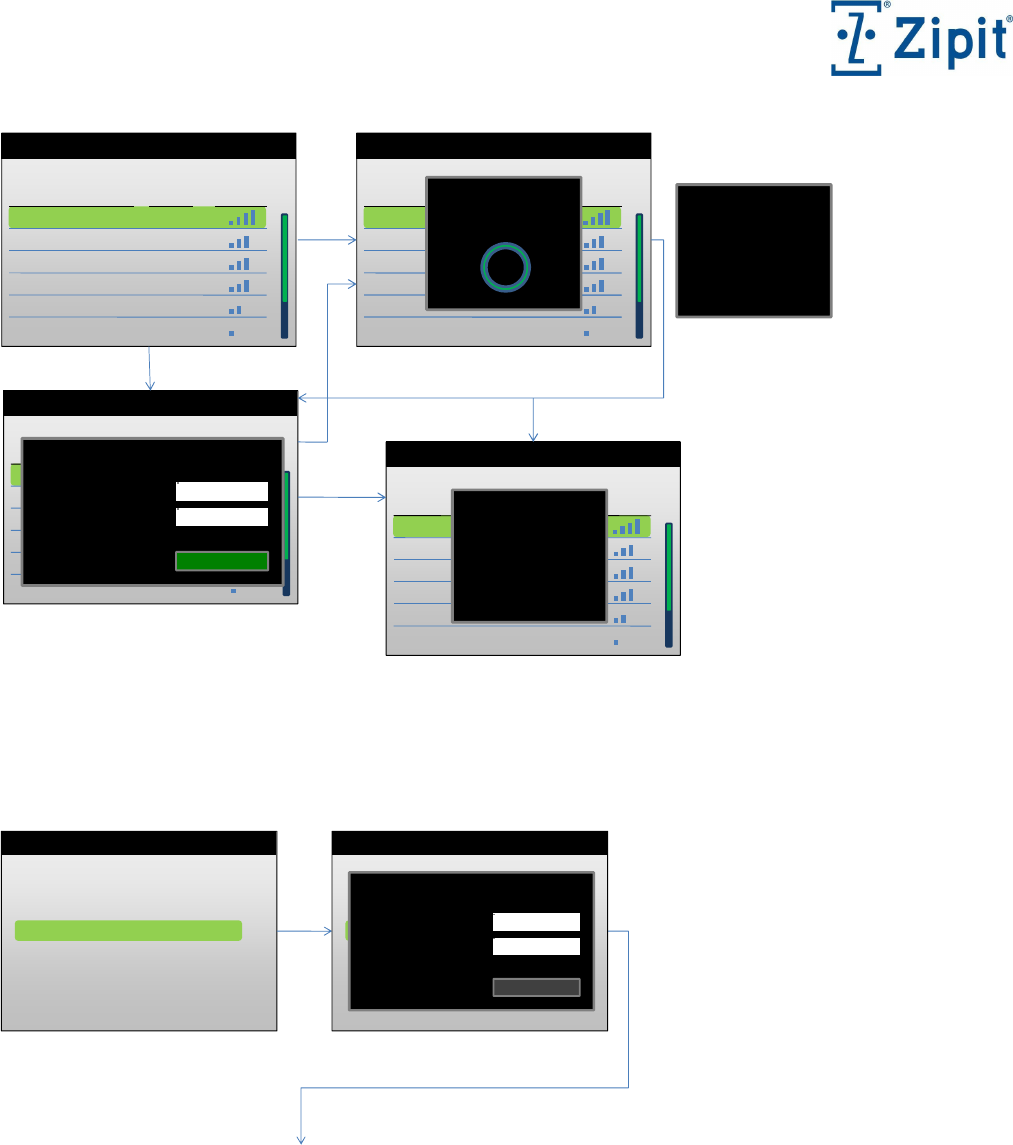
4) The user must select a network from the list and the device will attempt to connect.
a. If successful, a brief dialog will appear showing that the connection was successful and the tools menu will be
closed and the user will be taken back to the home menu with the Tools icon highlighted.
b. If unsuccessful, the user will be presented with a screen that allows the user to review the network details and
provide a way to change the password if one is required.
c. If the network is hidden, the user will be asked to enter the SSID.
Wireless Networks
•Scan for Wi-Fi Networks
•Manually Add a Network
•Manage Existing Networks
Press back to return to prev screen (1)
Network Name Security Strength
Linksys-ABC
Network 2
nd
Floor
Network 3
rd
Floor
McDonalds
My Wi-Fi
Guest Account
Press back to return to Wi-Fi Networks screen (1)
(1) (2)
(3)
Connecting …
Press back to return to Select a Network (3)
(4)
If connection completes successfully, display
“Connected to Linksys-ABC” for 2 seconds
then return to home menu.
If the network needs an SSID or a password,
prompt the user to enter what is needed.
If connection fails, display “Connection
failed.” and return to previous screen in 2
seconds.
The check mark indicates that the network has been
connected to previously and/or the information needed
for the network is already stored in the device. The
right facing arrow indicates that the network is currently
connected. The connected network name is also bold.
Network Name Security Strength
Select a Network
Scanning …
Select a Network
Zipit Wireless, Inc. – Confidential – Rev. .92 December 30, 2010 – Page 16 of
33
Network Name Security Strength
Linksys-ABC
Network 2
nd
Floor
Network 3
rd
Floor
McDonalds
My Wi-Fi
Guest Account
Select a Network
Press back to return to prev screen (3)
Network Name Security Strength
Linksys-ABC
Network 2
nd
Floor
Network 3
rd
Floor
McDonalds
My Wi-Fi
Guest Account
Press back to return to Select a Network screen (3)
(3) (4a)
(4b)
(4c)
Network Name Security Strength
Select a Network
Select a Network
Network Name Security Strength
Linksys-ABC
Network 2
nd
Floor
Network 3
rd
Floor
McDonalds
My Wi-Fi
Guest Account
Select a Network
Connecting to
Linksys-ABC … Successfully
Connected to
Linksys-ABC
Please enter network information:
Network Name / SSID:
Security Key (WPA2):
Linksys-ABC
Connect
Network Name Security Strength
Linksys-ABC
Network 2
nd
Floor
Network 3
rd
Floor
McDonalds
My Wi-Fi
Guest Account
Automatically returns to previous screen in 2 seconds.
Select a Network
Connection Failed!
• Manually Add a Network – allows the user to add a network manually (expected to be used mostly for adding hidden networks)
•Scan for Wi-Fi Networks
•Manually Add a Network
•Manage Existing Networks
Press back to return to prev screen (1)
(1) (2)
Connecting …
If connection completes successfully, display
“Connected to name” for 2 seconds then
return to home menu.
If connection fails, display “Connection
failed.” and return to previous screen in 2
seconds.
Wireless Networks
•Scan for Wi-Fi Networks
•Manually Add a Network
•Manage Existing Networks
Wireless Networks
Please enter the network information:
Network Name / SSID:
Security Key (WPA2):
|
Connect
Zipit Wireless, Inc. – Confidential – Rev. .92 December 30, 2010 – Page 17 of
33
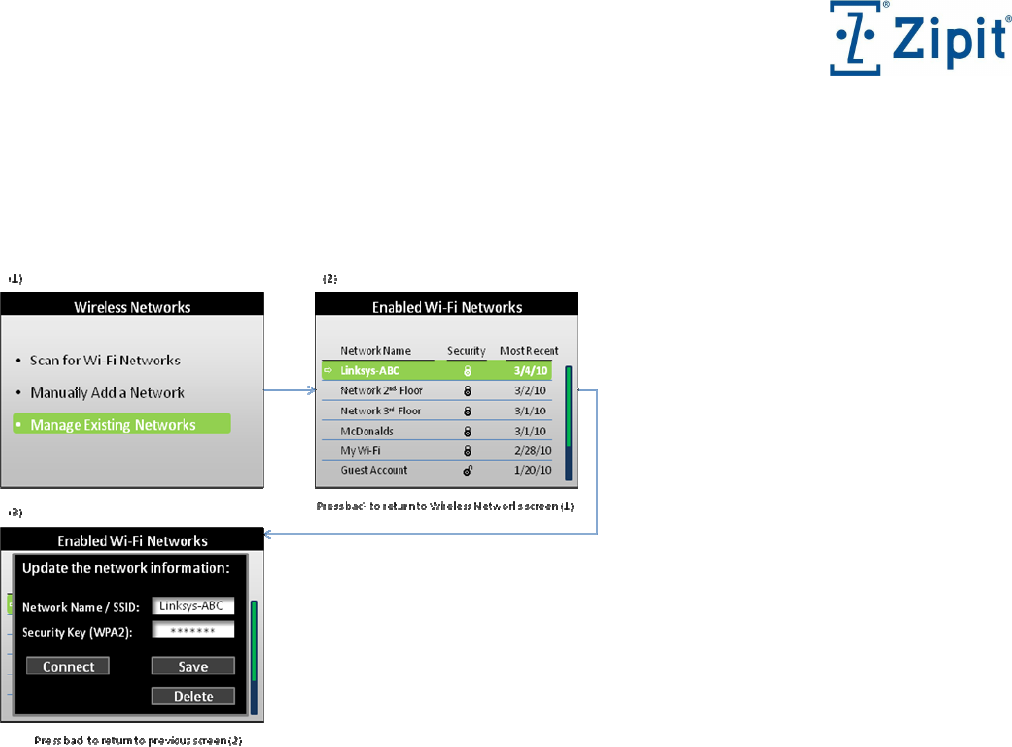
• Manage Wi-Fi Networks – allows the user to review a list of all of their manually added networks and networks that have previously
successfully connected. APs that have been added by the hospital admin can be viewed or modified by the end user. The list will be sorted
by the most recently connected.
1) The user can delete a network from the list. This is useful if you don’t want to automatically connect to that network
again.
2) The user can modify the SSID and the password - if the network is secure.

Zipit Wireless, Inc. – Confidential – Rev. .92 December 30, 2010 – Page 18 of
33
Sound Settings
• Master Volume (also accessible by pressing one of the two volume keys while accessing the Home menu)
Set the sound level – Loudest, Loud, Medium, Soft, Softest, Silent
Enable or Disable Vibrate Mode – On or Off (If on when sound is enabled, vibration precedes initial ring by .5 to 1 seconds)
• Call Sounds
Select the ringer type for calls (provide 10 – 20 ring tone options)
Select the relative volume for the ringers for calls (100% of master volume is default, 75%, 50%, 25%, Off - Try Now)
• Messaging Sounds
Select the ringer type for text and IM messages (provide 10 – 20 ring tone options)
Select the relative volume for the ringers for text and IM messages (100% of master volume is default, 75%, 50%, 25%, Off
- Try Now)
Enable during VoIP calls – Yes or No
• Alert Sounds
Select the ringer type for Alerts (provide 10 – 20 ring tone options)
Select the relative volume for the ringers for Alerts (100% of master volume is default, 75%, 50%, 25%, Off - Try Now)
• Keyboard Volume
• Earpiece Volume
Display Settings (power management)
• Set LCD Brightness
• Set the inactivity timer to turn off the LCD: 15s, 30s, 1m, 2m, 5m, or 10 minutes
• Set Keyboard backlight brightness
• Set the inactivity timer to turn off the keyboard backlight: 15s, 30s, 1m, 2m, 5m, or 10 minutes
Font Sizes
• Select the font size for conversations: Small, Normal, or Large
System Info
• Username
• Serial Number
• Current Network
• Software Version
• IP Address
Security
• (Lock the device after a period of inactivity or power-up)Select the inactivity timer setting: Off (not available if this feature is required by
the admin), 1, 5, 10, 15, 30, or 60 minutes of inactivity
Message Notifications
• Turn message notification pop-ups (bubbles) on or off
• Select length of message notification display time (1, 15., 2 , or 3 seconds)
• Turn message notification LED on or off.
IM Account Setup
• AIM Support, partial

Zipit Wireless, Inc. – Confidential – Rev. .92 December 30, 2010 – Page 19 of
33
Keyboard and Volume Controls
Keys Main Menu Messaging Contacts Call Log Tools
Select
Jump to highlighted
function
Open highlighted
conversation
Opens dialog to
allow user to select
communication type
Open highlighted
call
Open highlighted
tool
Up / Down
Move between
menu items as
indicated by
highlight
Scroll through
messages, highlight
moves
Scroll through
contacts, highlight
moves
Scroll through calls,
highlight moves
Left / Right
No action Filters messages by
type – All, SMS,
Voice, and IM
Filters contacts by
type
Filters calls by type
– All, Missed,
Incoming, Outgoing
No action
End
Press and hold for
1.5 seconds during
any activity to turn
device Off. (Also
acts as a reset if
ever needed). If
device is off, press
to turn device On.
No action
Return to Main
Menu
Return to Main
Menu
Return to Main
Menu
Return to Main
Menu
Send
Open Dialer screen
with auto-fill
contacts
Initiates a call or a
conversation to the
highlighted contact
Initiates a call to the
highlighted caller
Option Key
No Action Open Message
Options
Open Contact
Options (if allowed
by admin)
Open Call Log
Options
No Action
Back Key No Action Back one level Back one level Back one level Back one level
Enter
Jump to highlighted
function
Open highlighted
conversation
Opens dialog to
allow user to select
communication type
Open highlighted
call
Open highlighted
tool
Backspace No Action No Action No Action No Action No Action
Alt-Delete
No action Delete highlighted
message
Delete highlighted
contact (if allowed
by admin)
Delete highlighted
call
No action
Alpha Keys
Open Dialer screen
with auto-fill
contacts
Jump to contacts as
letters are typed.
Character entry
field replaces the
“All Contacts”
header.
Number Keys
Open Dialer screen
with auto-fill
contacts
Symbol Key No action No action No Action No Action No Action
Volume Keys
Show Master
Volume Screen (or
volume bar) –
controls incoming
call sounds and
incoming message
notification. Sets
volume levels and
enables vibrate
mode. *
Zipit Wireless, Inc. – Confidential – Rev. .92 December 30, 2010 – Page 20 of
33
* Pressing a volume key while at the Main Menu provides a simple Master Volume editor screen. From this screen, the user can
turn the overall sound level up or down, put the device in Vibrate only mode, or Silent mode by pressing the up or down volume
keys. The normal vibrate setting is used if sound is enabled. The Volume screen includes a vertical dialog with the following
choices:
Sound Settings
Vibrate On
Silent
Keys Conversation Contact Details Call Log Details Tool (specific) Options
Select No Action No Action No Action Depends on Tool in
use
Use highlighted
option
Up / Down
Left / Right
Cycles through
conversations
unless text is being
entered in the text
entry window. In
that case, moves
the cursor back and
forth through the
text.
End
Press and hold for
1.5 seconds during
any activity to turn
device Off. (Also
acts as a reset if
ever needed). If
device is off, press
to turn device On.
Return to Main
Menu
Return to Main
Menu
Return to Main
Menu
Return to Main
Menu
Return to Main
Menu
Send
Options Key
Back Key Back to Messaging
View
Back to Contacts
View
Back to Call Log Back to Tools Menu
Back one level
Enter
Backspace
Alt-Delete
Alpha Keys
Starts adding text to
the text entry
window.
Number Keys
Symbol Key
Pop-up an on-
screen keyboard for
special symbols not
available on the
keyboard
Volume Keys
Zipit Wireless, Inc. – Confidential – Rev. .92 December 30, 2010 – Page 21 of
33
Keys Call In-Progress
Dialog
Select No Action
Up / Down
Left / Right
End
Press and hold for
1.5 seconds during
any activity to turn
device Off. (Also
acts as a reset if
ever needed). If
device is off, press
to turn device On.
End Call
Send
Place the current
call on hold and 1)
switch to another
incoming call, or 2)
initiate another call
Options Key
Back Key
Back to previous
screen – call
continues.
Enter
Backspace
Alt-Delete
Alpha Keys
Number Keys
Symbol Key
Volume Keys
Raise or lower
earpiece volume –
on-screen volume
bar appears and
times out, other
functions are not
affected
Zipit Wireless, Inc. – Confidential – Rev. .92 December 30, 2010 – Page 22 of
33
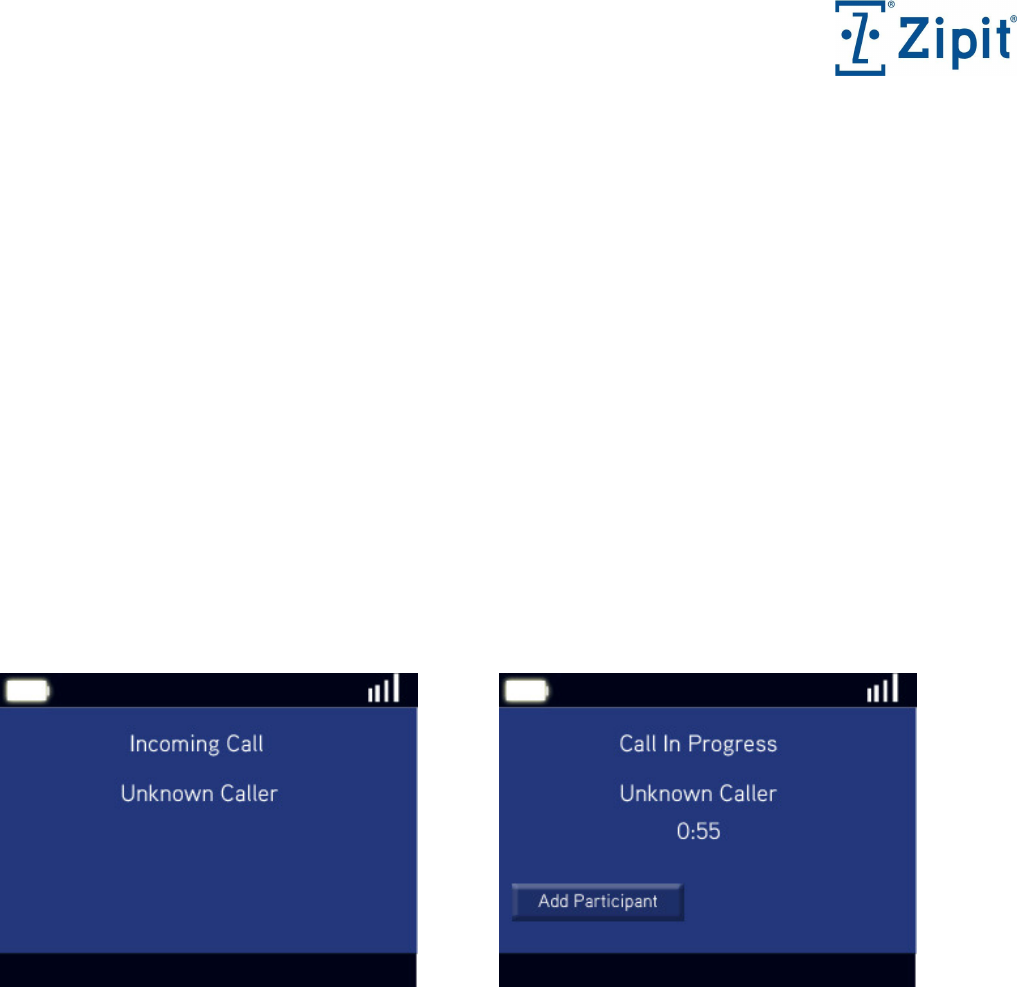
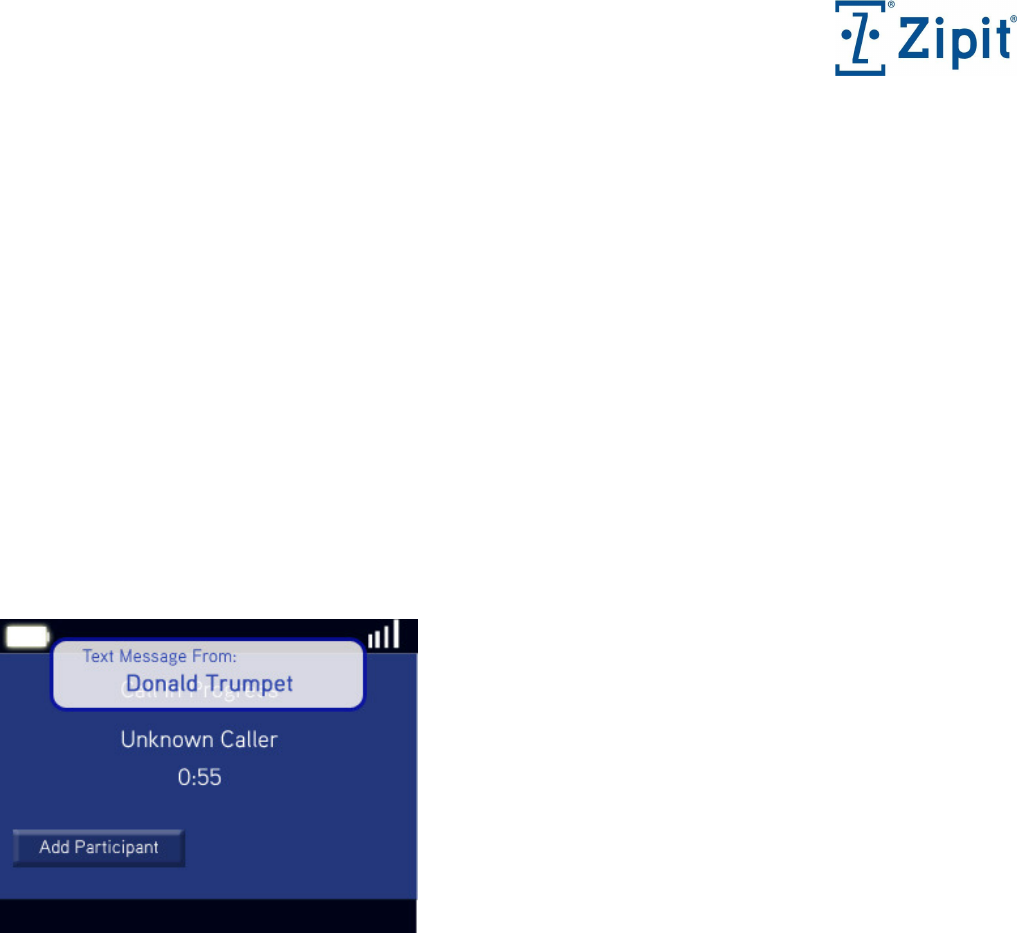
Interrupts – Incoming Call / Call in Progress
The top and bottom of this screen should be the same as the main menu - including the standard header at
the top of the window with the network indicators, etc. and the footer with the date and time.
Just below the top header, “Incoming Call” should be displayed until the call is answered, at which time
“Call in Progress” should be displayed.
Just below the call indicator, the name (obtained through a caller ID match with the contact list), the phone
number, or “Unknown Caller” should appear centered.
Next, a timer showing how long the call has been in progress should be displayed from the time the call is
answered until the time the call is ended.
The user should have the ability to add a participant to the call (3-way calling) or to accept another
incoming call while putting the original caller on hold.
The user should have the ability to mute the call.
< Add menu items / buttons to this screen >
Zipit Wireless, Inc. – Confidential – Rev. .92 December 30, 2010 – Page 23 of
33
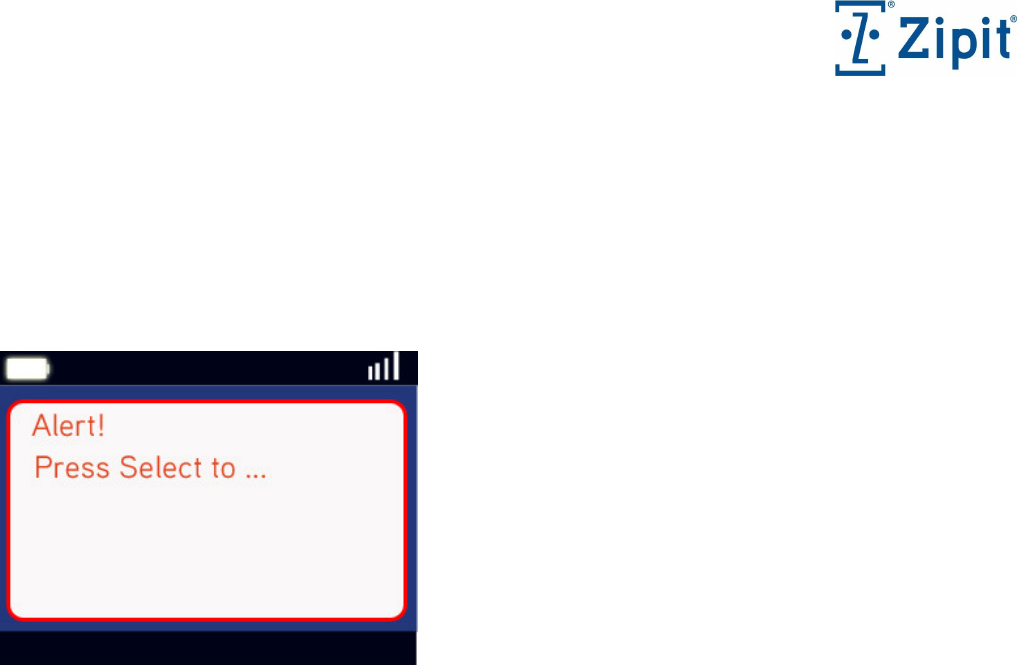
Interrupts – Incoming Zipit Direct Alert (Priority 1 or 2)
A Priority 1 or 2 Alert is presented as a special conversation style window that appears in front of any
screen that is currently displayed. All other functions are blocked (with the exception of an in-progress
phone call), until the Alert is acknowledged. [fg refine definition of times] If a critical page is not answered
within 15 seconds, an audible and vibration alert is generated and then repeated at 15 second intervals
indefinitely or until the user presses any key. If a call is in progress, the Alert appears, but the user can end
the call when done and then address the Alert.
A high priority alert will block the screen from any other activity until acknowledged or until the message
expires. Once a high priority alert expires, the alert will disappear from the screen but will still be available
for review from the message list.
Priority 1 and 2 alerts have the following attributes:
The user can not cycle left or right to get to a new conversation unless the alert had previously been
acknowledged and the alert was accessed through the message list.
The header will include a red emergency icon and the word “Emergency”.
The message area will be preceded by the Time, Date, and Name of the Sender (or type of sender in
the event of a 3rd party process – Amcom, dial-back, etc.)
Messages of 250 characters or less will be fully visible on the screen. Messages that are between
250 and 500 characters will be viewable within a scrollable window.
Each P1 and P2 alert will always include a list of 1 or more canned responses that the recipient is
required to choose from in order to remove the Alert. The list is created by the sender. If no list is
provided, the recipient will be presented with the words “OK” that they must select. The canned
responses can be viewed by pressing the left or right keys to cycle through the possible responses.
After the user has responded to the message, the window will disappear and the device will return to
the screen that was displayed prior to the alert.
Once an alert has been read and is later accessed from the message list, it will operate similarly to any other
conversation window. The user can cycle to the previous and next conversations by pressing left or right.
The response that was selected by the user will be displayed in the response area but will no longer be
editable. If the message expired before a response was given, the response area will be replaced with the
text “This message expired – no response provided.”
Zipit Wireless, Inc. – Confidential – Rev. .92 December 30, 2010 – Page 24 of
33
Note: Priority 3 and 4 messages also require a response to a canned set of options. When they are accessed
from the message list or reached when the user cycles to them from the conversation view, the standard left
and right conversation cycle function will not be accessible until the user sends the response. Prior to
sending the response, the user can exit the message by pressing the “back” key and will be taken to the
message list. As soon as the user responds, the response that was selected by the user will be displayed in
the response area but will no longer be editable and the conversation will now allow the user to cycle to
previous and next messages.
Interrupts – Incoming Message Notifications (Bubbles)
The incoming message notifications indicate a Priority 3 alert, Zipit chat, SMS/text message, instant
message, or voicemail has been received. The notifications appear on top of any current activity but do not
affect navigation, typing, or any other user interface response. The background of the alert is alpha-blended
so that the active screen can be seen. The text on the notification is not alpha-blended.
In the Tools/Message Notification menu, the user can turn message notifications on or off and can select
the duration of the notification on the screen (1, 1.5, 2, or 3 seconds).
Zipit Wireless, Inc. – Confidential – Rev. .92 December 30, 2010 – Page 25 of
33
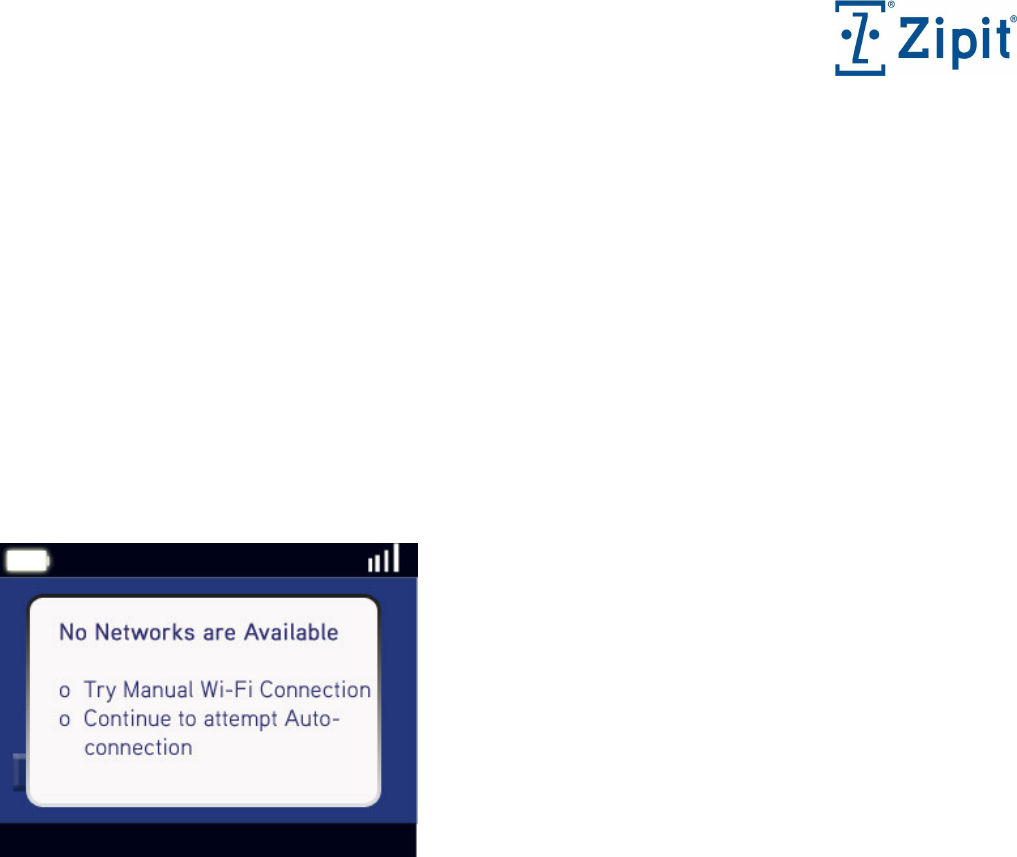
Interrupts – No Network Available / Network Lost
If both networks (cellular and Wi-Fi) are dropped, this message is presented to the user after < 3 attempts >
to automatically re-connect to each network type < or x amount of time without a connection >. If the user
chooses to manually scan, they will have the ability to connect to protected and/or hidden Wi-Fi networks
that the device can not automatically connect to. If they choose to continue to Automatically attempt to
reconnect, the device will continue to retry the cellular network at regular intervals and continue to try open
and known Wi-Fi networks.
The manual connection screen will be the same as the utility available from Tools/Wireless Networks.
If the user chooses “Continue to attempt Auto-connection”, they will not see this screen again until the next
time a network is lost. (Therefore, a network connection or a power-off or power lost must happen before
this message could ever be seen again.)
Zipit Wireless, Inc. – Confidential – Rev. .92 December 30, 2010 – Page 26 of
33
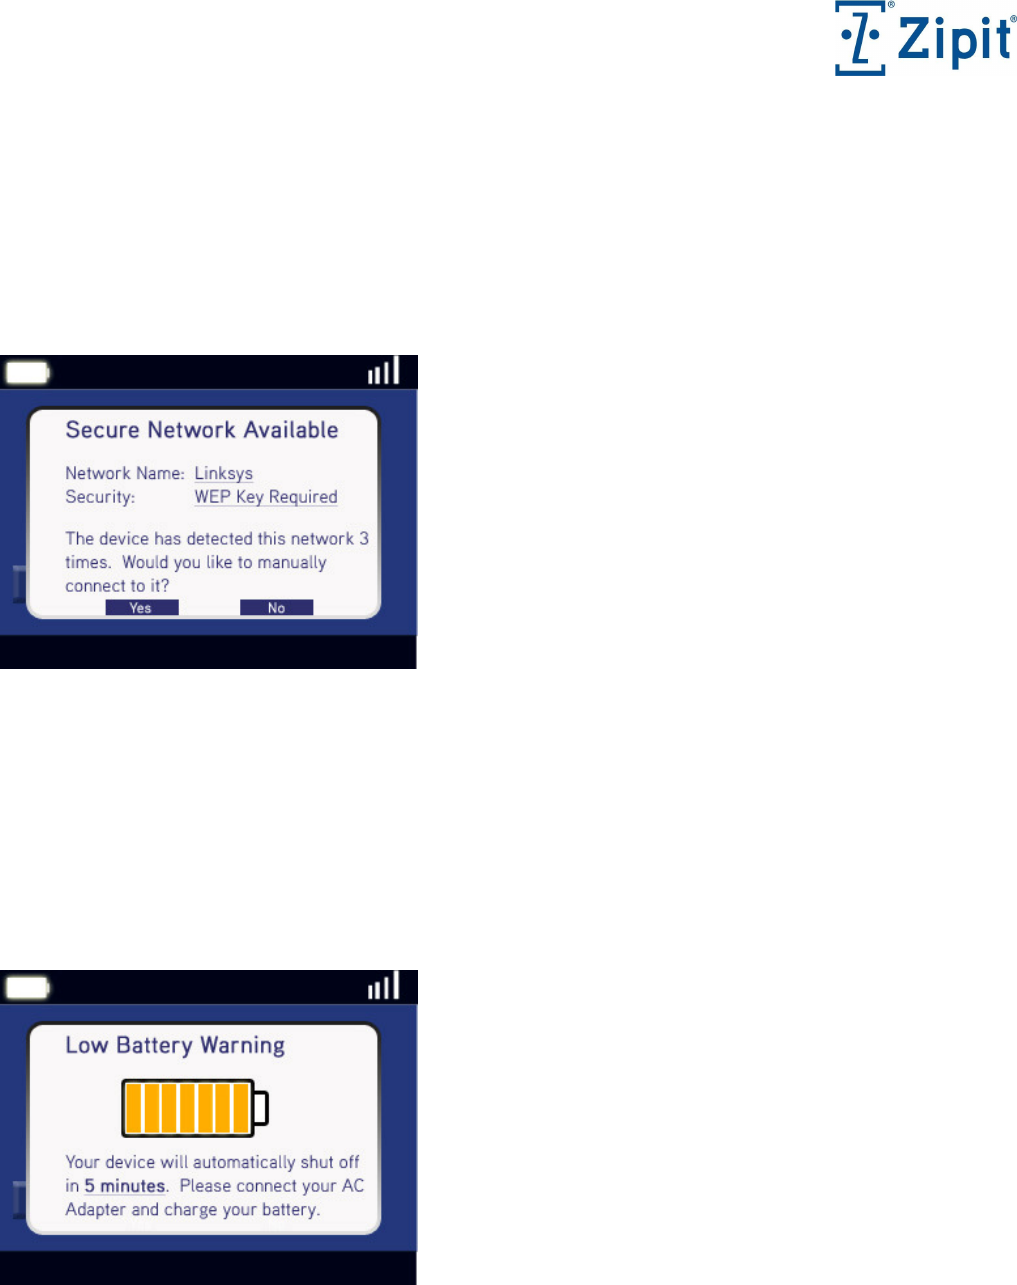
Interrupts – New Wi-Fi Connections / Manual Connections
If the device detects a protected and/or hidden Wi-Fi network(s) (3) separate times, with a minimum of 24
hours between detection, when it can’t connect to any other Wi-Fi network, ask the user if they want to
connect to the network manually and tell them what they need to do to connect – such as fill in the WEP key.
If the user chooses not to connect, they will be given the option not to be asked again about the listed
networks.
Interrupts – Battery Level Critically Low
If the device reaches the point where the battery is low and has determined (through calculations) that 5
minutes of battery life remain, the following screen will be displayed for 3 seconds. Subsequently, at 4
minutes, 3 minutes, and 2 minutes, this screen will be displayed again for 3 seconds each time (with the
minutes remaining updated each time). With 1 minute to go, the screen will remain visible until the device
cuts off. Any keyboard activity removes this screen (any key press only clears the screen – it does not get
passed through to the underlying function). All other functions work without interruption – including phone
calls, etc.
Zipit Wireless, Inc. – Confidential – Rev. .92 December 30, 2010 – Page 27 of
33
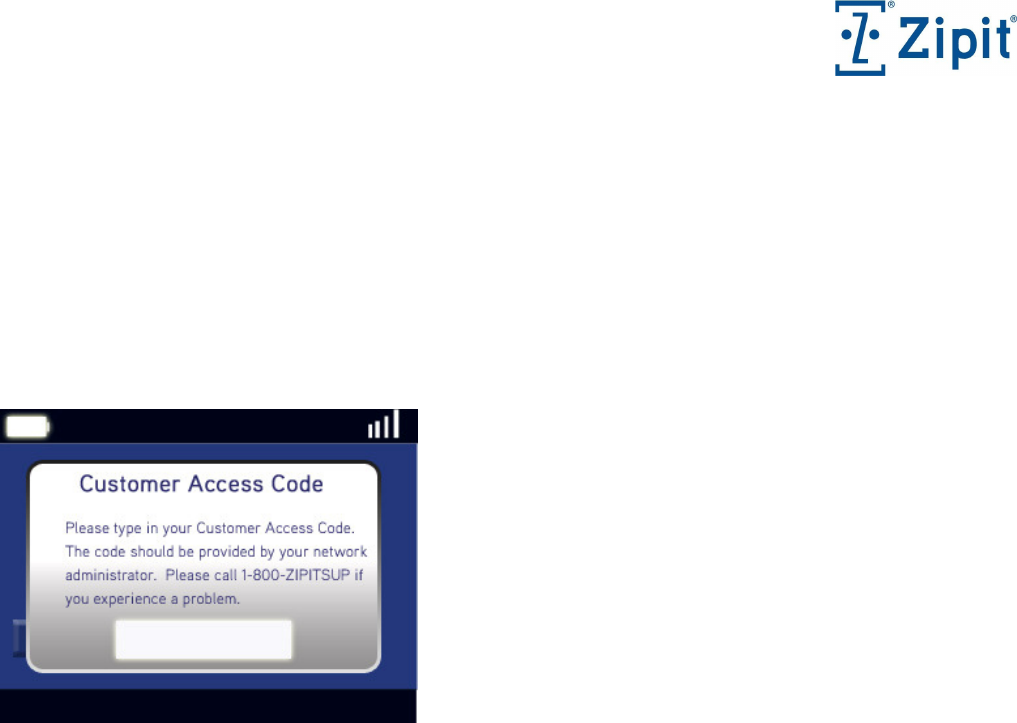
One Time Interrupt – Initial Authorization Screen (CAC)
Before a device is authorized for access, the end user must type in a Customer Access Code (CAC) provided
by Zipit Wireless. The CAC will confirm that the device being enabled can only be controlled / accessed by
the intended customer’s administrators.
When the device is turned on for the first time (after the manufacturing stage), as soon as the device
connects to a network for the first time and connects to Zipit’s servers – the following screen will be
displayed:
Once this code is entered, it will not be required again unless the unit is “Wiped” by Zipit’s support team.
If the code typed in does not match the code that we expect and require, a note will be added that says the
code is incorrect, please try again. After three unsuccessful attempts, the unit will be shut off and the
customer (business account) will have to call Zipit. Our servers should store a flag for this case and it
should only be cleared if an authorized representative of the customer calls Zipit and provides the correct
code.
Zipit Wireless, Inc. – Confidential – Rev. .92 December 30, 2010 – Page 28 of
33
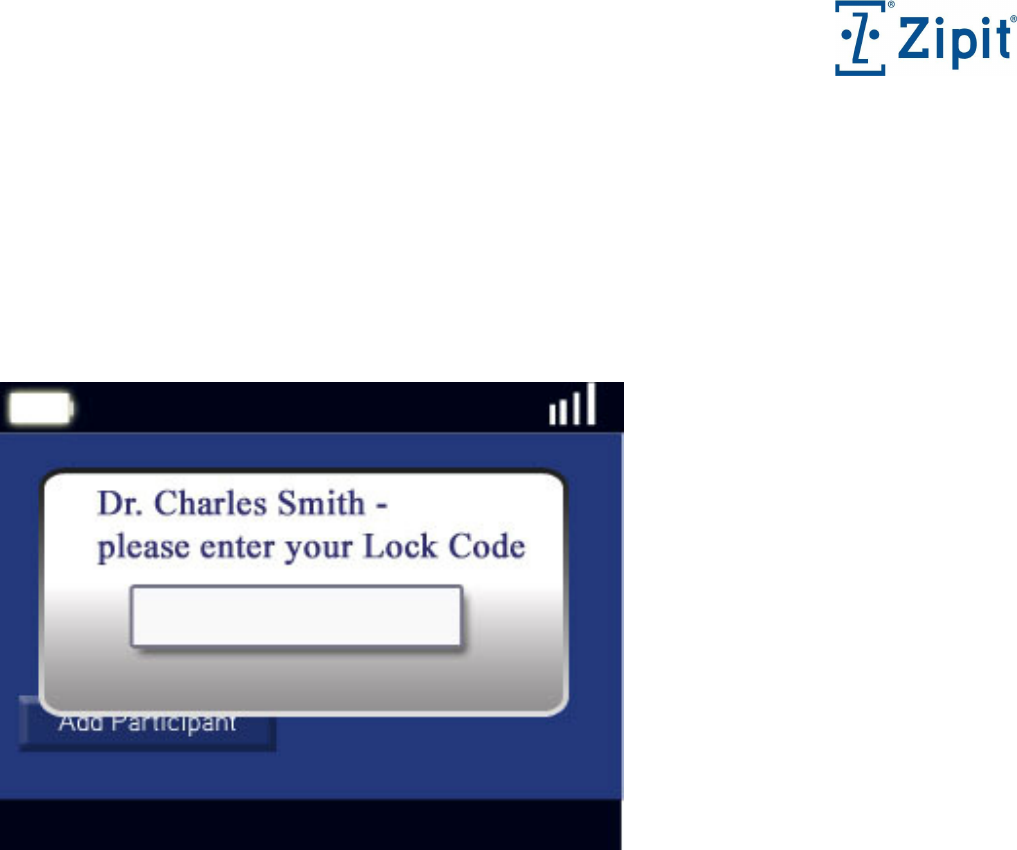
Interrupts - Enter Lock Code (after Power-up or inactivity time out)
If the user or administrator has setup password controlled access, each time the device is powered on or is
accessed after a period of inactivity - the user must type in their Lock code. An incorrect Lock code will
cause a message to be displayed on the following screen: Invalid Lock code. If the user tries again, the
“Invalid Lock code” warning will be removed as soon as the first character is typed and will not be shown
again (if necessary) until the user presses Enter. The screen will display “Please enter the Lock code for
Username”. (This is to minimize the chances of devices getting mixed up between users.)

Zipit Wireless, Inc. – Confidential – Rev. .92 December 30, 2010 – Page 29 of
33
Interrupts – Find Device Feature
If the administrator sets the find me flag for a user’s device, the device will generate a unique “distress” tone
for5 seconds, wait 5 seconds and then repeat. After 60 cycles, the wait period will increase to 15 seconds.
After 30 more cycles, the wait period will increase to 35 seconds. After 15 more cycles, the wait period will
increase to 55 seconds. After 10 more cycles, the wait period will increase to 75 seconds. Thereafter, the
distress tone will be played once every 2 minutes until the device is located or until the battery power is
drained. While the device is in this mode, the display, keyboard backlight, and all power management
settings will be in their lowest power state (radios should be minimized or turned off as well). When the
device is located, press the Select key to disable the distress tone and bring up a screen that requires the user
to enter their Password (the admin should remind the user they have to do this when they receive the request
to put the device in Find Device mode). The screen will display “Please enter the Password for Username”.
If the device was locked from an inactivity timeout, the user will not have to enter the lockcode since they
must enter their password. If someone other than the owner finds the device, the sounds can be stopped by
pressing Select but they won’t be able to enter the password. The device will request the password
continuously until entered or until the device is Wiped by the admin.
On-Screen Indicators, Icons, and LED
Top Bar / Header:
o
Battery /Charging status on far left
o
List Descriptor in middle (Messages, Call Log, Contacts, or Tools)
o
Wi-Fi connection and signal strength or Cellular connection and signal strength on far right.
Bottom Bar / Footer:
o
Time on far left, Date on far right
o
Option List Available indicator in middle (when one or more options are available)
o
New Message Flag, Missed Call Flag, New Voicemail Flag (if supported by VoIP) on the
right of the Option indicator. The New Message Flag will disappear immediately when the
Message List is accessed (either by selecting it from the Home Menu, going back to it from a
conversation, or if the message List is currently being viewed). The Missed Call Flag will
disappear immediately when the Call Log is accessed. The New Voicemail Flag will
disappear as soon as the Message List is accessed.
Message Icon (from Home Menu): The number of unread messages appears in the upper right corner
of this icon. The count is decreased as each unread message is opened.
Call Log Icon: The number of missed calls appears in the upper right corner of this icon. The count
is removed immediately any time the call log is accessed.
On Call Icon (from Home Menu): A green dot is displayed in the upper right corner of this icon
when the user is “On Call”. If the user is “Off Call”, a red dot appears in the upper right corner of
this icon and text below the row of Home Menu icons displays: “Off Call until 8:00pm Fri. Apr. 20”
LED: The red LED on the top right face of the unit blinks to indicate a new message, missed call,
and new voicemail. It follows the behavior of the 3 flags on the footer – meaning that the LED stops
blinking when the flags are removed. The LED can be enabled or disabled from Tools / Message
Notifications.
Zipit Wireless, Inc. – Confidential – Rev. .92 December 30, 2010 – Page 30 of
33
Message Types and Icons
The following icons will appear beside a message in the message list allowing the end user to quickly
ascertain the message type. The icons will also appear in the header for the conversation view to the left
of the user’s name. If the message type supports presence detection, the icon will be in color if the user
is online and gray if the user is offline.
Priority 1 and 2 Alerts (Mayday and High Priority) – Red emergency icon (circle with a plus sign in
it)
Priority 3 and 4 Alerts (Normal and Low Priority) – Gold emergency icon
Pager to Pager Chat – Zipit icon
SMS Messages – cell phone icon
AOL
Voicemail Message – (Alan will create an icon)
On Call Function
The On Call function lets the end user easily set a flag that notifies administrators and other users when they
are On Call (working or responsible for function) and when they are Off Call. This feature must be enabled
by the administrator and can be used to prevent sending pages to end users that aren’t available.
Usage: If the feature is enabled by the administrator, the On Call icon will by default contain a green dot in
the upper right corner indicating that the end user is available. If the user selects the On Call icon when it
contains a green dot, they will be presented with the following screen:
If the user selects “Switch to Off Call”, they will be required to
select a time and date for the next time they are On Call. This forces the user to set the device ahead of time
rather than inadvertently forgetting to change the setting manually the next time they are on call. A pop up
will be provided for the user to set the time and date. The user can move left and right to select the digit or
filed to change and can move up or down to cycle through the list of numbers or fields. At the far right of
this pop-up will be an OK button to select.
If the user selects the On Call icon when it contains a red dot, they will be presented with the following
screen:
Username is currently “Off Call”
Switch to On Call
Modify next On Call time and date
Cancel
Username is currently “On Call”
Switch to “Off Call”
Cancel
Zipit Wireless, Inc. – Confidential – Rev. .92 December 30, 2010 – Page 31 of
33
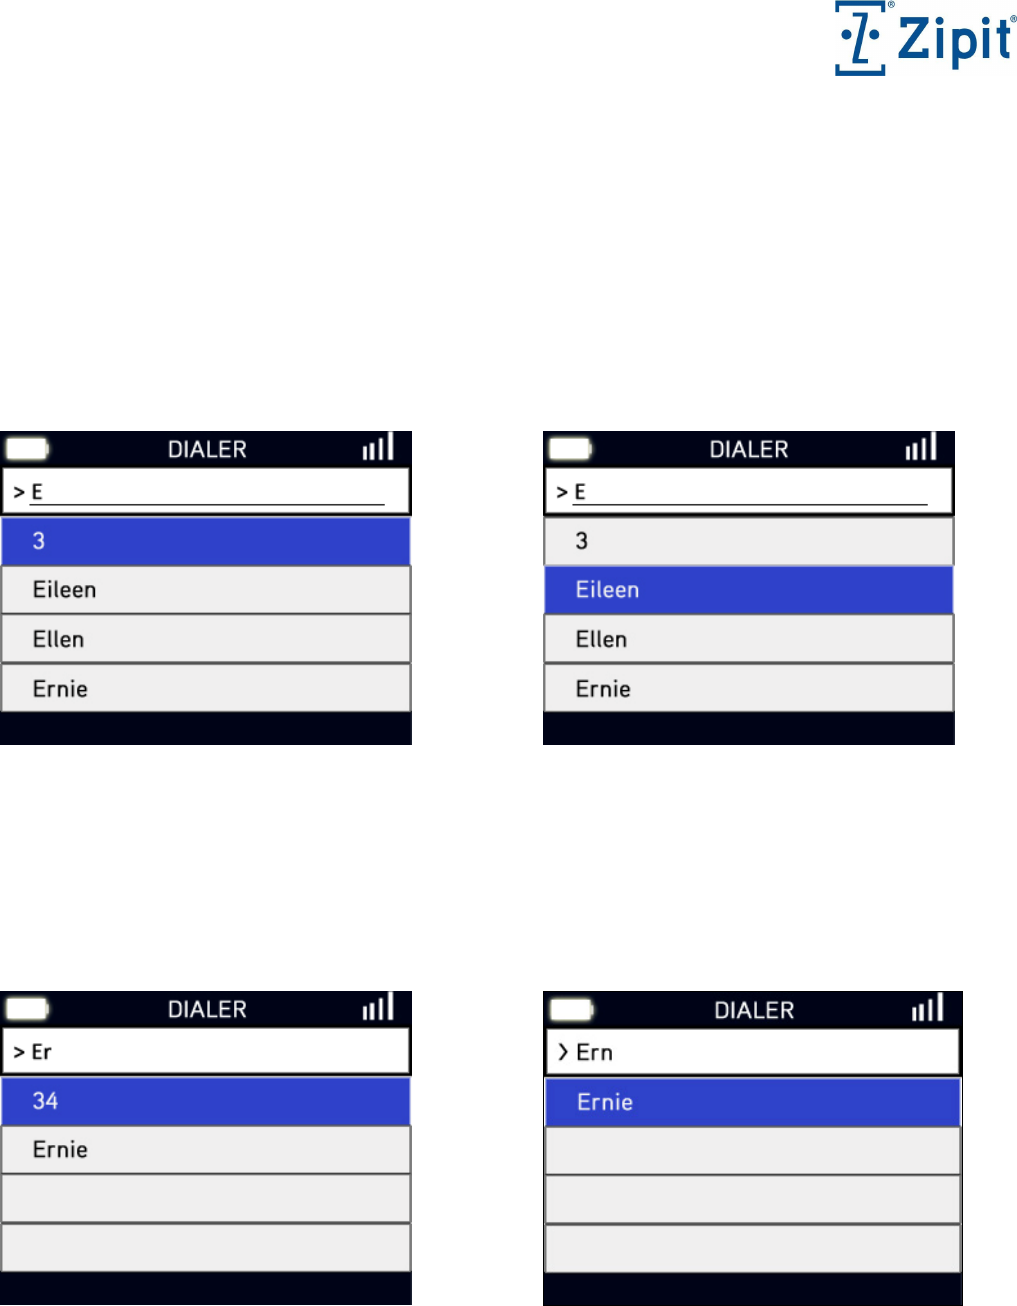
Initiate call or conversation from keyboard (from Home Menu)
From the home menu, pressing any alpha or alpha-numeric key, will display the contact list / initiate call screen. As the
user presses characters, the device will automatically determine if the user is typing a phone number or a name. The
character entry field will show letters – unless the user has used the Alt function to specify numeric entry.
For example, in the following screen shot (Figure 1), the user has pressed the “E/3” key. “E” will be shown in the text
entry field and “3” will be shown in the first “match” row (which is always highlighted by default), and possible name
matches from the contact list are shown in the subsequent rows. At this point, the user can 1) press additional number or
letter keys, 2) press Send to dial “speed dial 3”, or 3) use the cursor to go directly to a contact as shown in Figure 2.
Figure 1
Figure 2
If the user presses another letter/number key, the screen will continue to show the letters in the text entry field, numbers in
the first row below the text entry field, and subsequent rows will show any names that continue to match – as shown in
Figure 3. If there are less than 4 matches, rows without matches will be blank. If the user keeps entering characters, as
soon as a letter only key is hit, the number row is removed and the character entry field shows only letters as shown in
Figure 4. From Figure 4, the user can 1) press additional letter keys, 2) press Send to call Ernie < automatically call default
number or do we provide a menu of call choices – business, mobile, home? >, or 3) press Select to get a menu of contact
options – Call Ernie’s mobile, Call Ernie’s home, Send SMS to Ernie, etc.
Figure 3
Figure 4
Zipit Wireless, Inc. – Confidential – Rev. .92 December 30, 2010 – Page 32 of
33
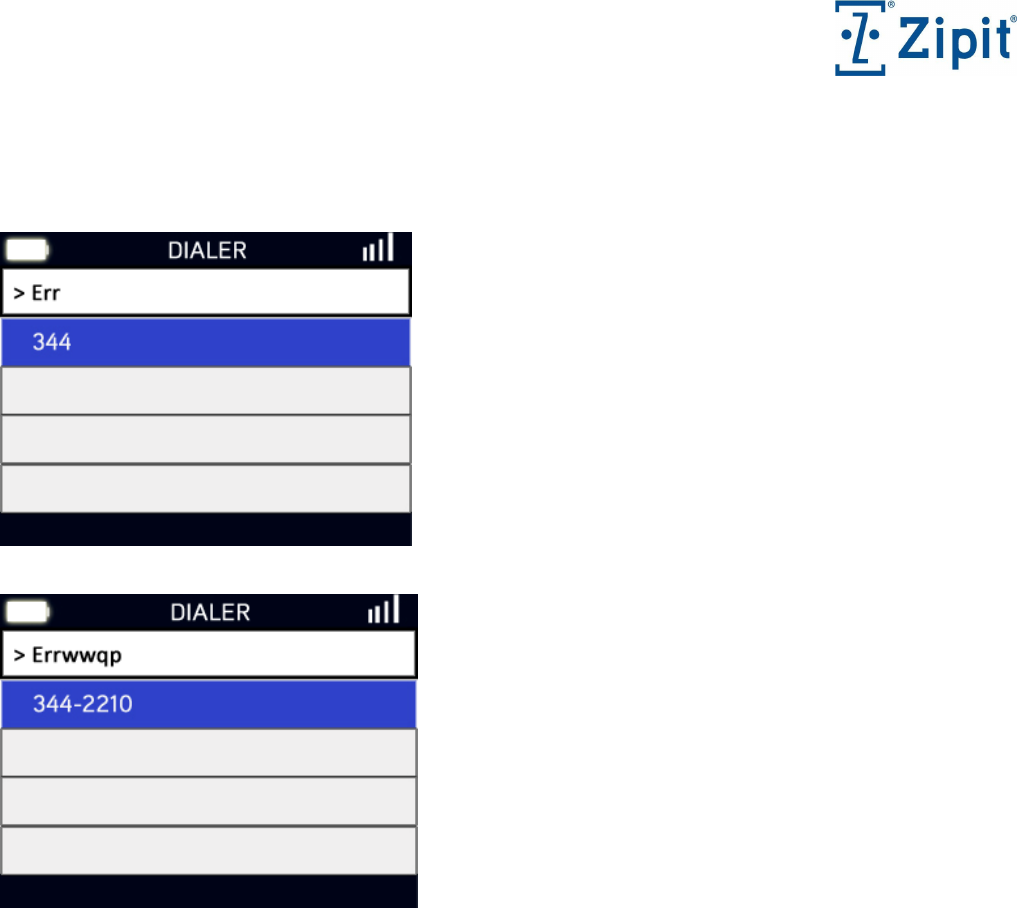
If the user presses another number key and there are no more text matches, all remaining rows will be blank
as shown in Figure 5. As more numbers are typed, dashes that correspond to standard phone number
appearance will be inserted automatically – as shown in Figure 6.
Figure 5
Figure 6

Zipit Wireless, Inc. – Confidential – Rev. .92 December 30, 2010 – Page 33 of
33
Initiate a Critical Alert from the Device
If this capability is made available by the administrator, end users can initiate critical alerts (pages) directly from their
device.
Select the paging group from the contacts list as if selecting any other user or group. These groups
are distinct from user created groups and by design generate a special conversation window that
allows the user to define characteristics of the message.
If paging an individual, select Create Critical Alert from the options menu then select the individual
from the contacts list.
Select the priority level for the message
a. Mayday Alert (Priority 1) – response required, the device function is locked until a response is sent
by the user, the device is forced into a pre-defined audible and vibration notification
b. High Priority Alert (Priority 2) – response required, the device function is locked until a response is
sent by the user, the device uses notifications specified by the user.
c. Normal Priority (Priority 3) – no response required, the message appears in the standard message list,
the device uses notifications specified by the user
d. Mailbox Alert (Priority 4) – no response required, the message appears in the standard message list,
the device doesn’t provide any type of notification
The only accepted response to a Critical Alert from a device is “OK”.
Set message expiration time: 10 minutes, 30 minutes, 1 hour, no expiration.
Enter message
Send message