Zoom Telephonics 1093WL Zoom ADSL MODEM / Router w/ Wireless-N User Manual
Zoom Telephonics Inc Zoom ADSL MODEM / Router w/ Wireless-N
UserManual.wiki
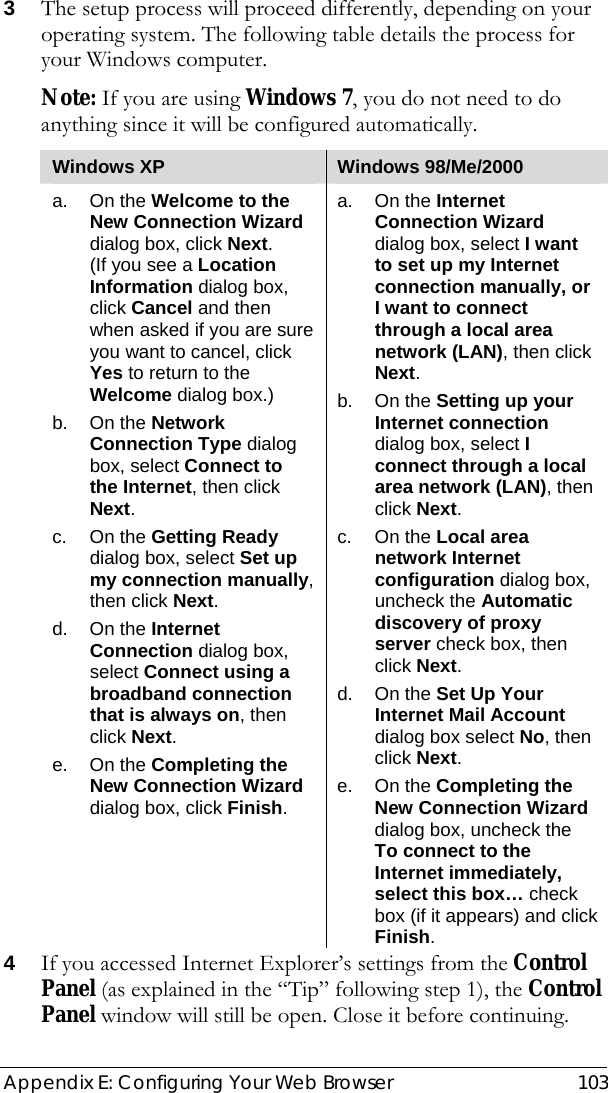
>
Zoom Telephonics
>
1093WL User Manual
User Manual
Navigation menu
Upload a User Manual
Namespaces
Wiki Guide
HTML
PDF
Info
Views
User Manual
Discussion / Help
Navigation


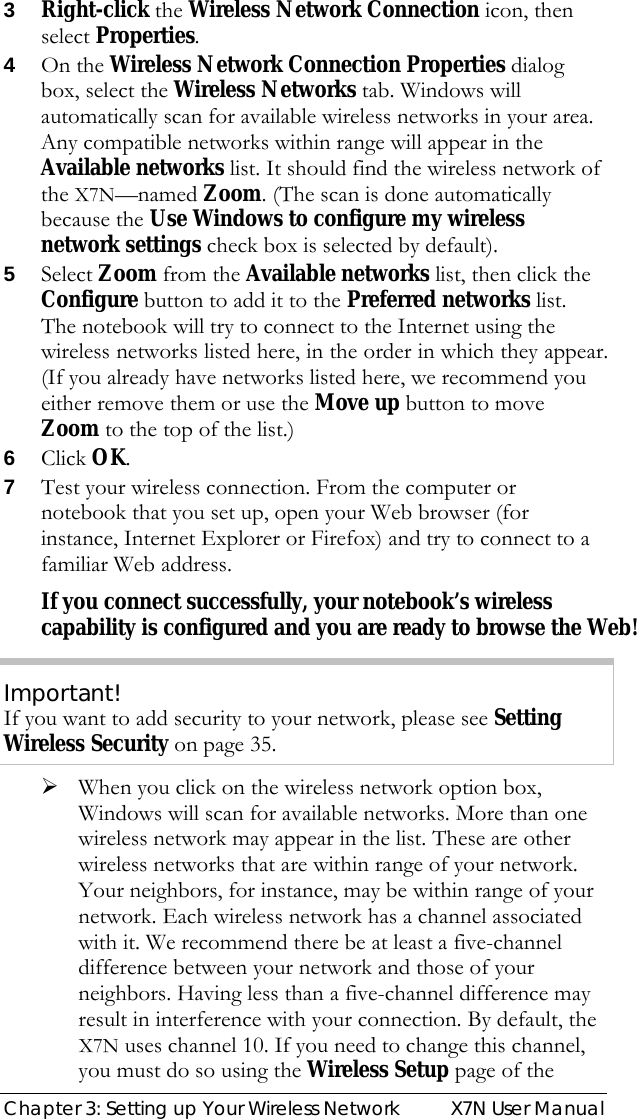
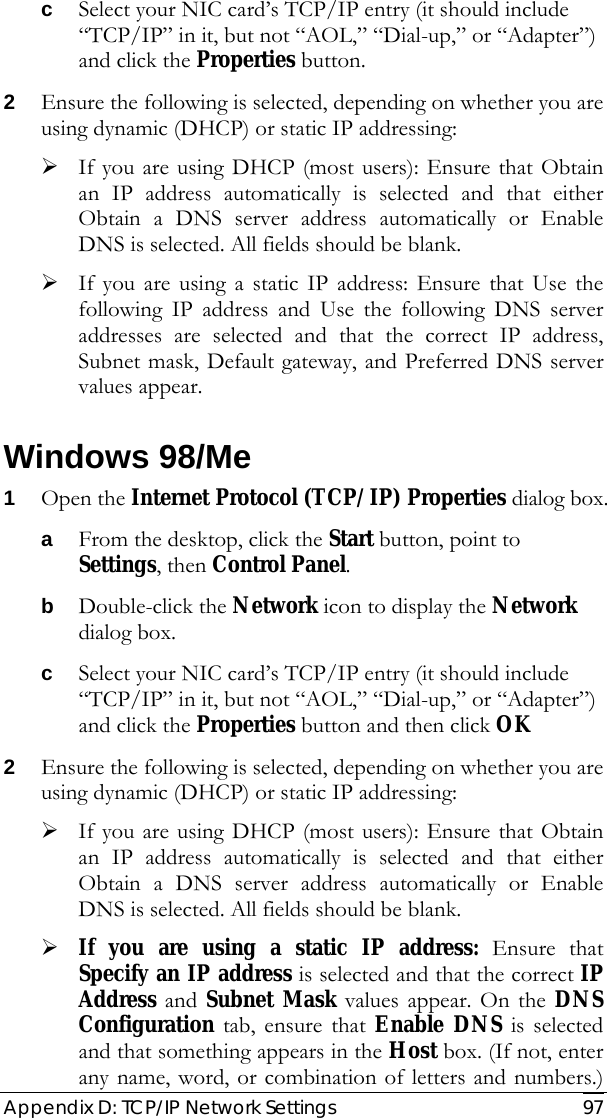
![15 If the X7N finds a 1483 Bridged or 1483 Routed connection, you have the option of using either dynamic or static IP addressing. Depending on your situation, select the appropriate option button: − [MOST USERS] Ensure that Obtain an IP address Automatically is selected if you are using Dynamic Host Configuration Protocol (also known as DHCP or dynamic IP addressing). This option is selected by default because most Internet service providers use DHCP. − Select Use the following IP Address only if you are using a static IP address. (You should know if you are using static IP addressing. There is typically an extra charge for a static IP address and you usually have to make special arrangements with your Internet service provider to get one.) Then enter the IP Address, Subnet Mask, Default Gateway, and DNS that you plan to use. Click Save/Reboot. Continue with step 3 to test your network. • To configure your settings manually if Automatic Configuration does not work, follow these instructions: a On the Basic Setup page, enter your Protocol, Encapsulation, VPI, and VCI settings in the appropriate boxes. Your service provider should supply these values. If you do not know these settings, refer to the tables starting on page 73. b NAT (Network Address Translation) is Enabled by default. This feature lets multiple users access the Internet sharing a single IP address. Enabled is typically the right setting. Select Disable in the unlikely event that you want to assign different public IP addresses to each network user. c Depending on the Protocol setting you selected the bottom half of the page will change so that you can enter additional information. If you selected PPPoA or PPPoE, enter your ADSL User Name and Password in the appropriate boxes. Your Internet service provider should have given this information to you. (Your](https://usermanual.wiki/Zoom-Telephonics/1093WL/User-Guide-1555953-Page-15.png)
![Chapter 1: Installation Instructions X7N User Manual User Name is typically your email address or the characters preceding the @ sign in your email address. This is NOT the same User Name and Password that you used earlier to open the Zoom Configuration Manager.) If you selected 1483 Bridged or 1483 Routed, you have the option of using either dynamic or static IP addressing. Depending on your situation, select the appropriate option button: − [MOST USERS] Ensure that Obtain an IP address Automatically is selected if you are using Dynamic Host Configuration Protocol (also known as DHCP or dynamic IP addressing). This option is selected by default because most Internet service providers use DHCP. − Select Use the following IP Address only if you are using a static IP address. (You should know if you are using static IP addressing. There is typically an extra charge for a static IP address and you usually have to make special arrangements with your Internet service provider to get one.) Then enter the IP Address, Subnet Mask, Default Gateway, and DNS that you plan to use. Click Save/Reboot. 3 Verify that you Internet connection is working. Open your Web browser (for instance, Internet Explorer, Firefox, or Chrome) and try to connect to a familiar Web address. If you connect successfully, you are ready to set up the rest of your network. (If you do not connect, see Appendix A: Troubleshooting Tips on page 73.)](https://usermanual.wiki/Zoom-Telephonics/1093WL/User-Guide-1555953-Page-16.png)
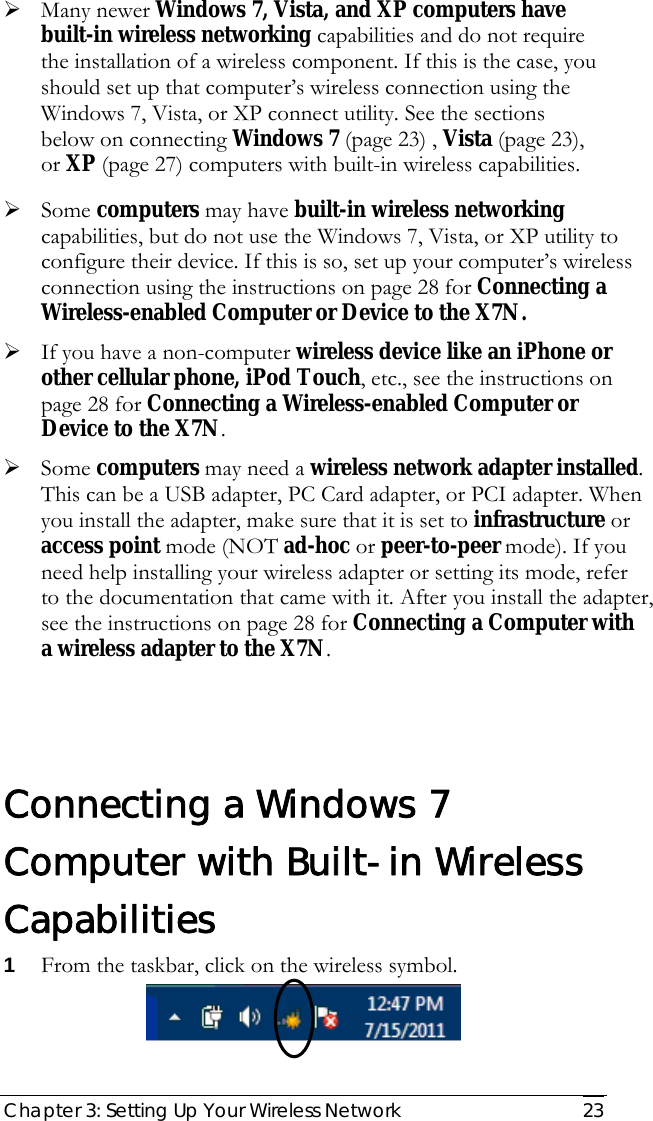
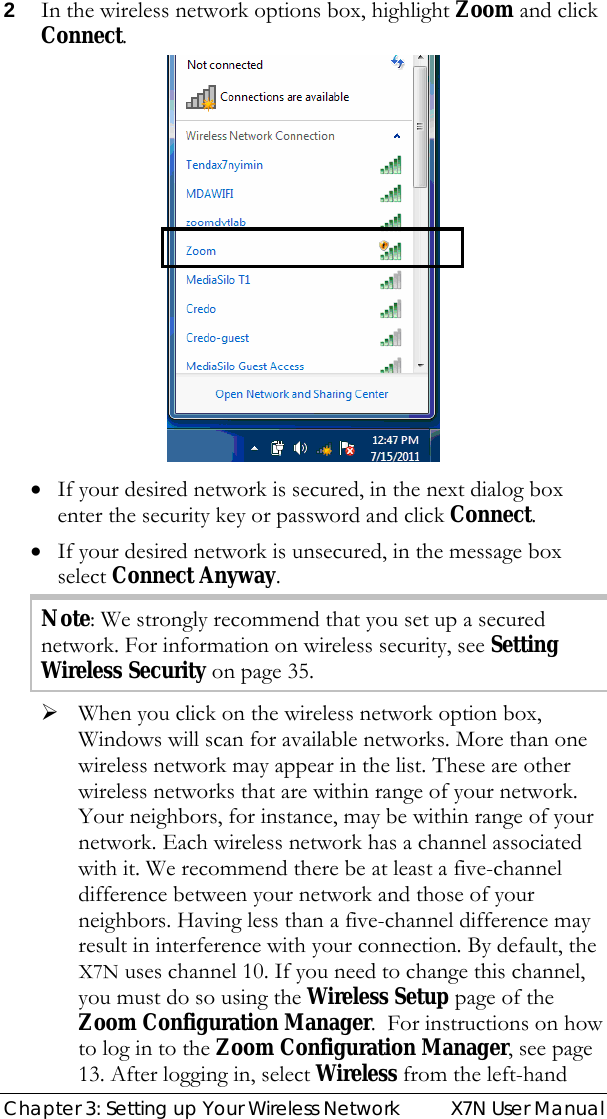
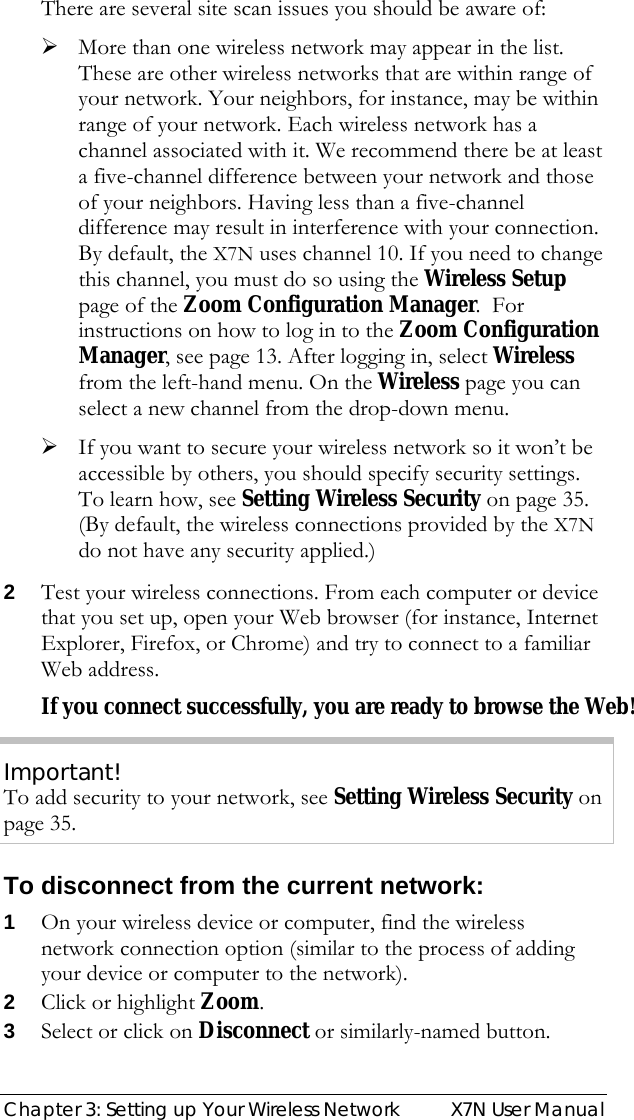
![Chapter 3: Setting Up Your Wireless Network 25 menu. On the Wireless page you can select a new channel from the drop-down menu. If you have difficulty connecting, make sure you have entered the correct password (if security is enabled). Otherwise refer to Appendix A: Troubleshooting Tips on page 73. 3 In the Successfully connected to [desired network] dialog box, you have three options. You can: • Select Save the network and Start this connection automatically if you always want to connect to the same network. Then click Close. The next time you start your computer you will automatically connect to the selected network. • Select Save the network and clear the Start this connection automatically check box if you don't want to automatically connect to this network every time you start your computer but you will want to connect in the future. Click Close to display the Select a location . . . dialog box where you choose a location. Windows 7 automatically applies the correct network security settings. If the User Account Control dialog box appears, click Continue. • Click Close to complete the connection procedure. Select this option if you are connecting to this network only one time. To disconnect from the current network: 1 Right-click the wireless network icon in the notification area of the Windows taskbar. 2 Right-click Zoom and select Disconnect.](https://usermanual.wiki/Zoom-Telephonics/1093WL/User-Guide-1555953-Page-25.png)
![Chapter 3: Setting Up Your Wireless Network 27 3 In the Successfully connected to [desired network] dialog box, you have three options. You can: • Select Save the network and Start this connection automatically if you always want to connect to the same network. Then click Close. The next time you start your computer you will automatically connect to the selected network. • Select Save the network and clear the Start this connection automatically check box if you don't want to automatically connect to this network every time you start your computer but you will want to connect in the future. Click Close to display the Select a location . . . dialog box where you choose a location. Windows Vista automatically applies the correct network security settings. If the User Account Control dialog box appears, click Continue. • Click Close to complete the connection procedure. Select this option if you are connecting to this network only one time. To disconnect from the current network: 1 From the Start menu, select Connect to. 2 In the Disconnect or Connect to another network dialog box, select the current network and click Disconnect. 3 In the Are You Sure? message box, click Disconnect again. 4 In the next dialog box, you can connect to another network or click Close to complete the disconnect procedure. Connecting a Windows XP Computer with Built-in Wireless Capabilities 1 On your Windows desktop, click the Start button then click SettingsÆControl Panel. 2 Double-click the Network Connections icon.](https://usermanual.wiki/Zoom-Telephonics/1093WL/User-Guide-1555953-Page-27.png)


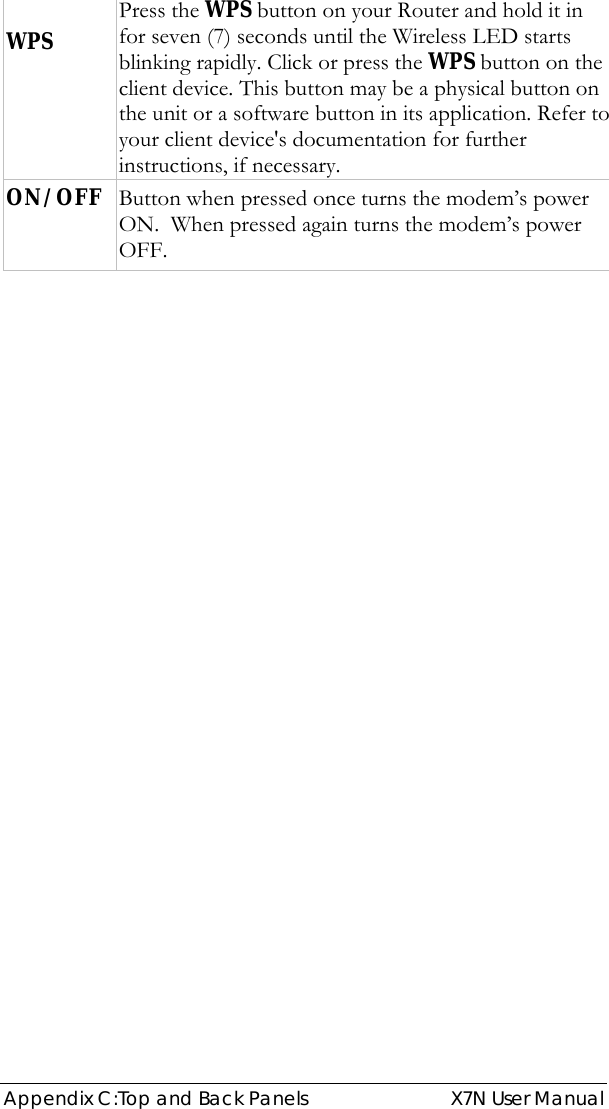
![Appendix C: Top and Back Panels 91 Appendix C: Top and Back Panels The following table describes each light on the top panel. Light Description Power Lights when the X7N is plugged into a power source. DSL Blinks when the X7N is performing its startup sequence. Stays on solid when the unit has synched up with its ADSL connection. Note: If the light fails to switch from blinking to steady after a minute or two, check with your ADSL provider that the ADSL connection is activated, or refer to Appendix A: Troubleshooting Tips on page 73. Internet Blinks when data is sent and received. Ethernet [1-4] Lights when the Ethernet port of the X7N is plugged into the Ethernet port of a powered-up device. Blinks when there is data activity. WLAN Lights when the Wireless Local Area Network is running and enabled. Blinks when data is sent. The following table describes each item on the back panel. Port Description DSL Jack to connect the modem to the ADSL telephone wall jack. Ethernet [1-4] LAN ports that can connect the unit to access points, network hubs, or the Ethernet ports of a computer. Power Port to connect the unit to the X7N’s power cube. RESET In the unlikely event that you need to reset the modem to its system default settings (necessary if communication link is lost), you can press the RESET button for 5 seconds.](https://usermanual.wiki/Zoom-Telephonics/1093WL/User-Guide-1555953-Page-91.png)


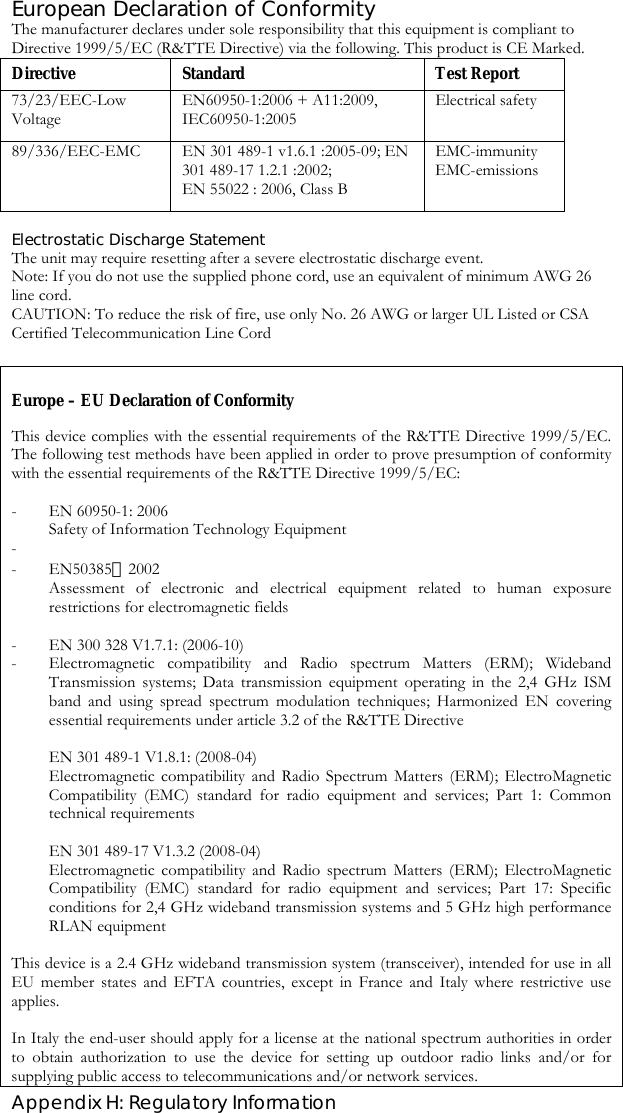
![Appendix H: Regulatory Information This device may not be used for setting up outdoor radio links in France and in some areas the RF output power may be limited to 10 mW EIRP in the frequency range of 2454 – 2483.5 MHz. For detailed information the end-user should contact the national spectrum authority in France. Česky [Czech] [Jméno výrobce] tímto prohlašuje, že tento [typ zařízení] je ve shodě se základními požadavky a dalšími příslušnými ustanoveními směrnice 1999/5/ES. Dansk [Danish] Undertegnede [fabrikantens navn] erklærer herved, at følgende udstyr [udstyrets typebetegnelse] overholder de væsentlige krav og øvrige relevante krav i direktiv 1999/5/EF. Deutsch [German] Hiermit erklärt [Name des Herstellers], dass sich das Gerät [Gerätetyp] in Übereinstimmung mit den grundlegenden Anforderungen und den übrigen einschlägigen Bestimmungen der Richtlinie 1999/5/EG befindet. Eesti [Estonian] Käesolevaga kinnitab [tootja nimi = name of manufacturer] seadme [seadme tüüp = type of equipment] vastavust direktiivi 1999/5/EÜ põhinõuetele ja nimetatud direktiivist tulenevatele teistele asjakohastele sätetele. English Hereby, [name of manufacturer], declares that this [type of equipment] is in compliance with the essential requirements and other relevant provisions of Directive 1999/5/EC. Español [Spanish] Por medio de la presente [nombre del fabricante] declara que el [clase de equipo] cumple con los requisitos esenciales y cualesquiera otras disposiciones aplicables o exigibles de la Directiva 1999/5/CE. Ελληνική [Greek] ΜΕ ΤΗΝ ΠΑΡΟΥΣΑ [name of manufacturer] ΔΗΛΩΝΕΙ ΟΤΙ [type of equipment] ΣΥΜΜΟΡΦΩΝΕΤΑΙ ΠΡΟΣ ΤΙΣ ΟΥΣΙΩΔΕΙΣ ΑΠΑΙΤΗΣΕΙΣ ΚΑΙ ΤΙΣ ΛΟΙΠΕΣ ΣΧΕΤΙΚΕΣ ΔΙΑΤΑΞΕΙΣ ΤΗΣ ΟΔΗΓΙΑΣ 1999/5/ΕΚ. Français [French] Par la présente [nom du fabricant] déclare que l’appareil [type d’appareil] est conforme aux exigences essentielles et aux autres dispositions pertinentes de la directive 1999/5/CE. Italiano [Italian] Con la presente [nome del costruttore] dichiara che questo [tipo di apparecchio] è conforme ai requisiti essenziali ed alle altre disposizioni pertinenti stabilite dalla direttiva 1999/5/CE. Latviski Ar šo [name of manufacturer / izgatavotāja nosaukums] deklarē, ka [type of](https://usermanual.wiki/Zoom-Telephonics/1093WL/User-Guide-1555953-Page-113.png)
![Appendix H: Regulatory Information [Latvian] equipment / iekārtas tips] atbilst Direktīvas 1999/5/EK būtiskajām prasībām un citiem ar to saistītajiem noteikumiem. Lietuvių [Lithuanian] Šiuo [manufacturer name] deklaruoja, kad šis [equipment type] atitinka esminius reikalavimus ir kitas 1999/5/EB Direktyvos nuostatas. Nederlands [Dutch] Hierbij verklaart [naam van de fabrikant] dat het toestel [type van toestel] in overeenstemming is met de essentiële eisen en de andere relevante bepalingen van richtlijn 1999/5/EG. Malti [Maltese] Hawnhekk, [isem tal-manifattur], jiddikjara li dan [il-mudel tal-prodott] jikkonforma mal-ħtiġijiet essenzjali u ma provvedimenti oħrajn relevanti li hemm fid-Dirrettiva 1999/5/EC. Magyar [Hungarian] Alulírott, [gyártó neve] nyilatkozom, hogy a [... típus] megfelel a vonatkozó alapvetõ követelményeknek és az 1999/5/EC irányelv egyéb elõírásainak. Polski [Polish] Niniejszym [nazwa producenta] oświadcza, że [nazwa wyrobu] jest zgodny z zasadniczymi wymogami oraz pozostałymi stosownymi postanowieniami Dyrektywy 1999/5/EC. Português [Portuguese] [Nome do fabricante] declara que este [tipo de equipamento] está conforme com os requisitos essenciais e outras disposições da Directiva 1999/5/CE. Slovensko [Slovenian] [Ime proizvajalca] izjavlja, da je ta [tip opreme] v skladu z bistvenimi zahtevami in ostalimi relevantnimi določili direktive 1999/5/ES. Slovensky [Slovak] [Meno výrobcu] týmto vyhlasuje, že [typ zariadenia] spĺňa základné požiadavky a všetky príslušné ustanovenia Smernice 1999/5/ES. Suomi [Finnish] [Valmistaja = manufacturer] vakuuttaa täten että [type of equipment = laitteen tyyppimerkintä] tyyppinen laite on direktiivin 1999/5/EY oleellisten vaatimusten ja sitä koskevien direktiivin muiden ehtojen mukainen. Svenska [Swedish] Härmed intygar [företag] att denna [utrustningstyp] står I överensstämmelse med de väsentliga egenskapskrav och övriga relevanta bestämmelser som framgår av direktiv 1999/5/EG.](https://usermanual.wiki/Zoom-Telephonics/1093WL/User-Guide-1555953-Page-114.png)
