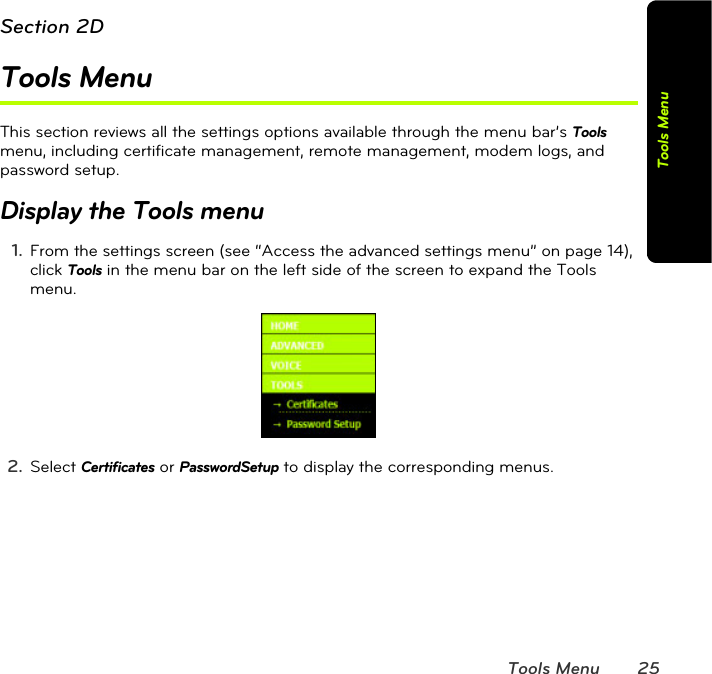
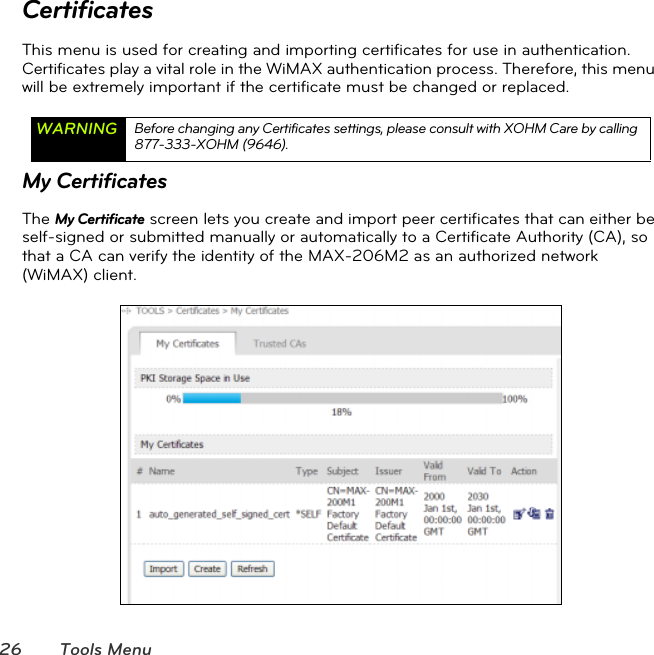
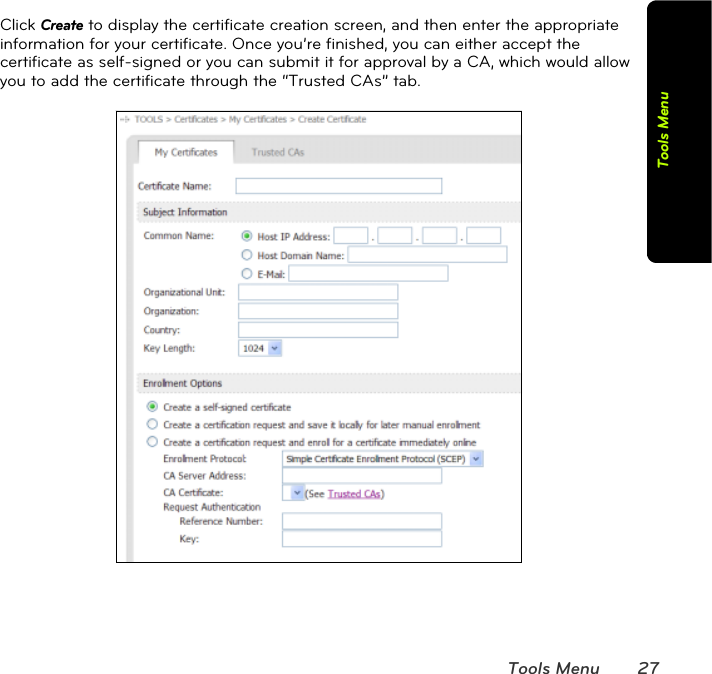
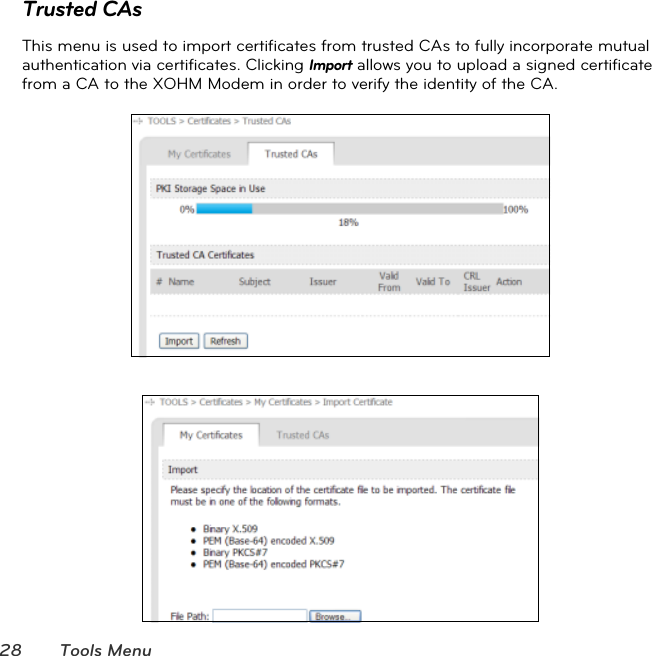
ZyXEL Communications MAX206M2 WiMax MIMO Indoor CPE User Manual Users Manua
ZyXEL Communications Corporation WiMax MIMO Indoor CPE Users Manua
UserManual.wiki
>
ZyXEL Communications
>
MAX206M2 User Manual
Users Manua
Navigation menu
Upload a User Manual
Namespaces
Wiki Guide
HTML
PDF
Info
Views
User Manual
Discussion / Help
Navigation

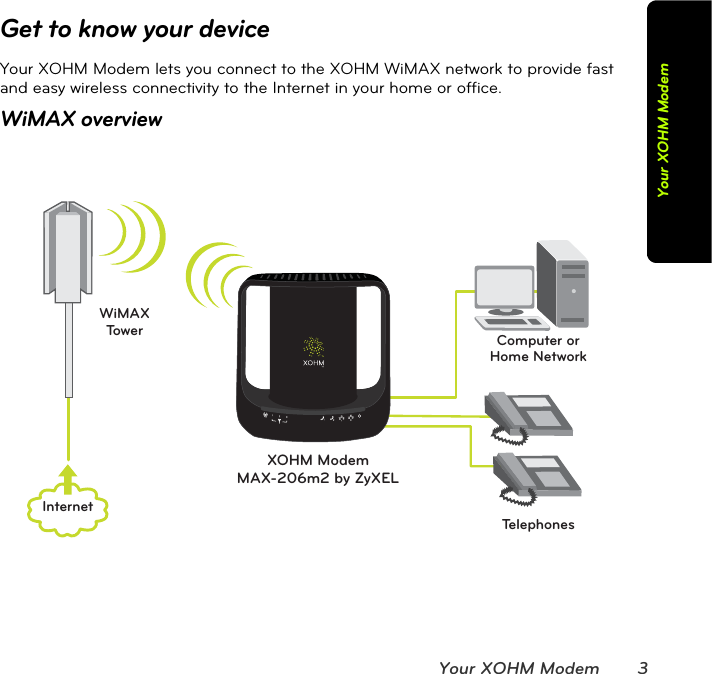
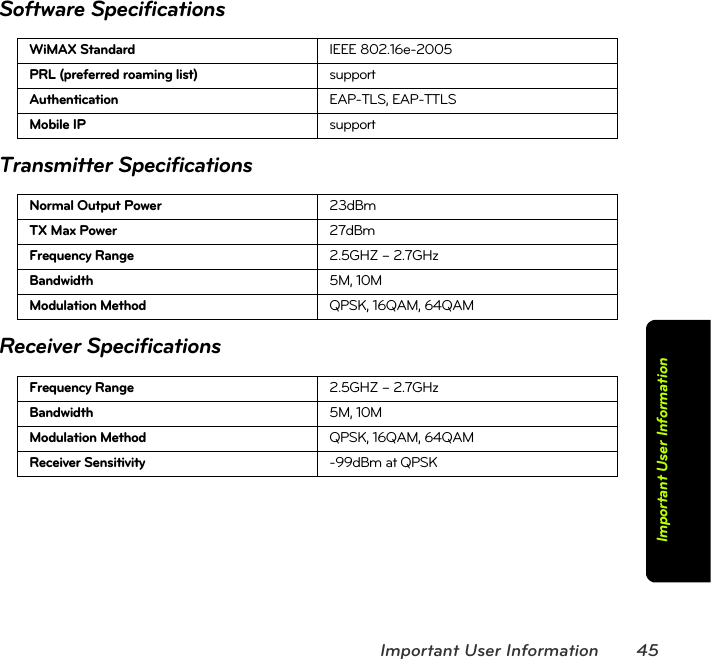
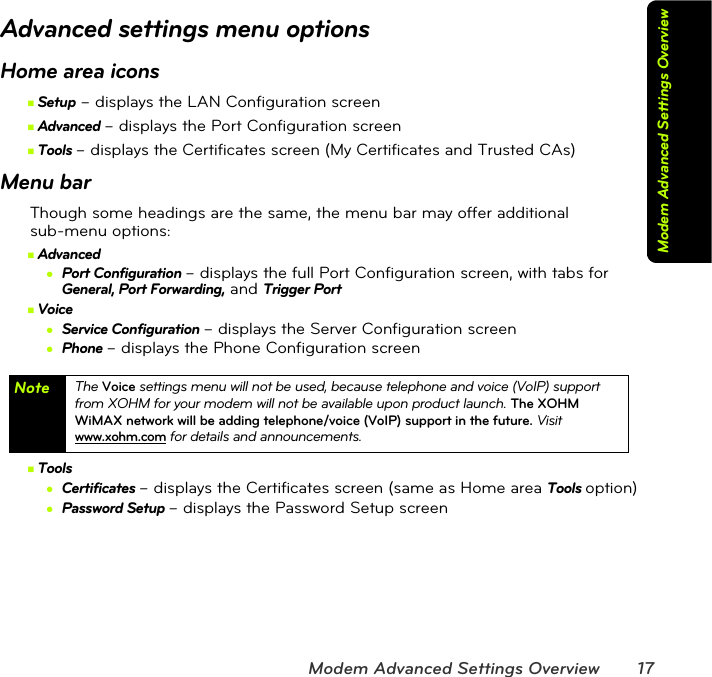
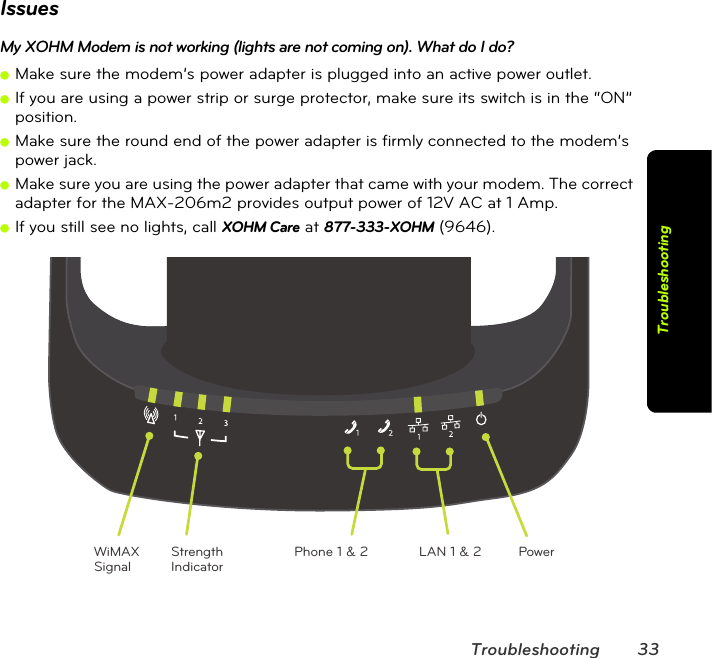
![4 Your XOHM ModemDevice connectors (back of device)1. Power jack (black): Connects the power adapter to power the modem.2. Reset button (red): Resets the unit back to factory defaults (use ONLY as a last resort).3. Antenna connectors (gold): Connect a remote antenna (available separately) to extend a signal from a strong area (such as near a window) to a weaker area where it may be more convenient to place the modem.4. Phone ports 1 / 2 (gray): Connect telephones to the modem. [Future service.]5. Ethernet ports 1/2 (yellow): Connects the modem to computers and/or a Wi-Fi router.PowerAdapterResetButtonRemote Antenna[optional]Telephones[future service]Computer/Wi-Fi Router](https://usermanual.wiki/ZyXEL-Communications/MAX206M2/User-Guide-925381-Page-12.png)
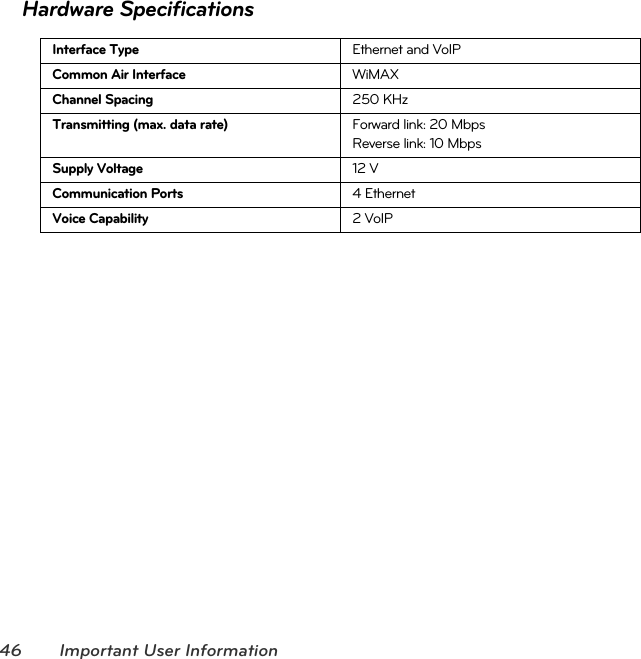
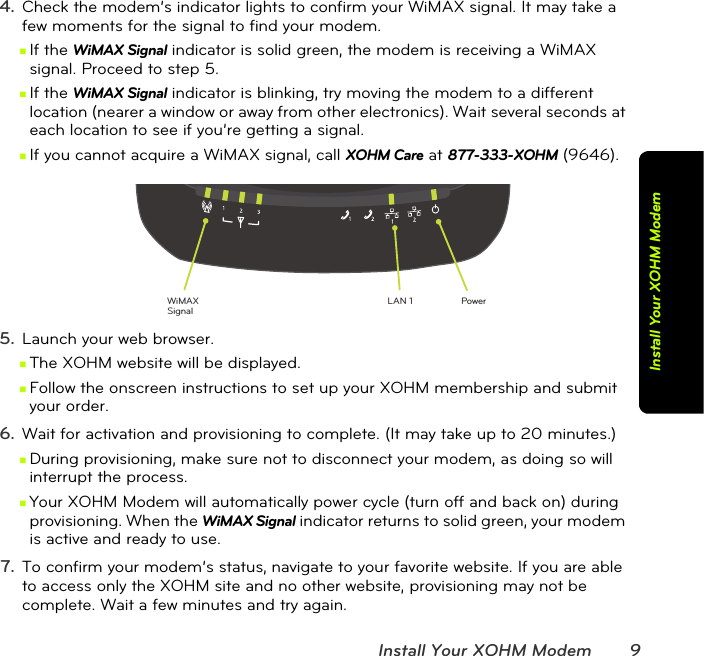
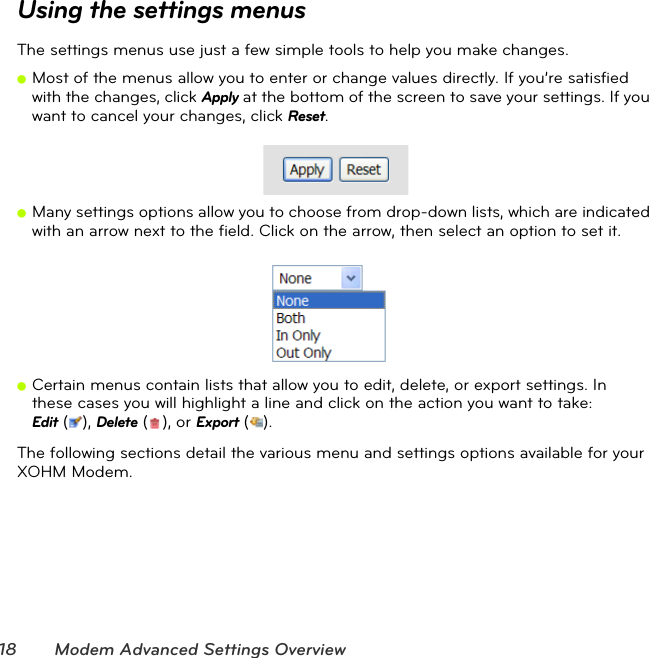
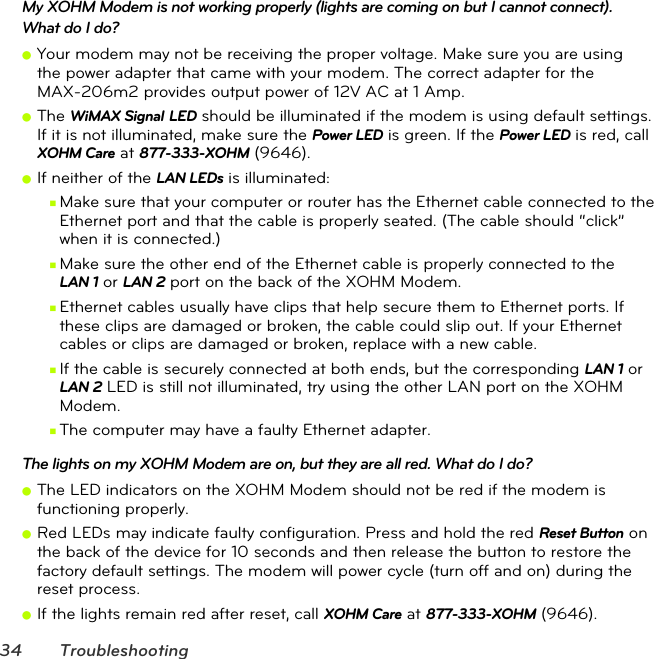
![Your XOHM Modem 5Your XOHM ModemModem LED display (front panel)1. WiMAX LEDs: The leftmost LED indicates WiMAX connectivity. A blinking LED indicates that the unit is ranging, while a solid LED indicates that a connection has been established and that the modem is ready to transmit and receive. The three LEDs to the right indicate the signal strength of the reception (1-3). These LEDs will be green when illuminated. 2. Phone 1 / Phone 2 LEDs: Illuminates when the VoIP “line” is in use. If no voice accounts are configured, the LED will be off. If a voice account is configured and registered, the LED will be green. When the connected phone is off-hook, the LED will blink. When there is new voicemail on the account, the LED will be amber (optional). [Future service.]3. LAN 1 / LAN 2 LEDs: Illuminates when the modem is connected to the computers or other networking devices. This LED will be green, and will flash as data is sent through the connection.Note Signal Strength LEDs: The number of signal strength LEDs illuminated reflects the strength of the WiMAX signal being received by the XOHM Modem; however, the strength of signal does not affect the speed of your connection. As long as there is sufficient signal strength to make a connecton, you may achieve maximum connection speed.StrengthIndicatorWiMAXSignalPhone 1 & 2 LAN 1 & 2 Power](https://usermanual.wiki/ZyXEL-Communications/MAX206M2/User-Guide-925381-Page-13.png)
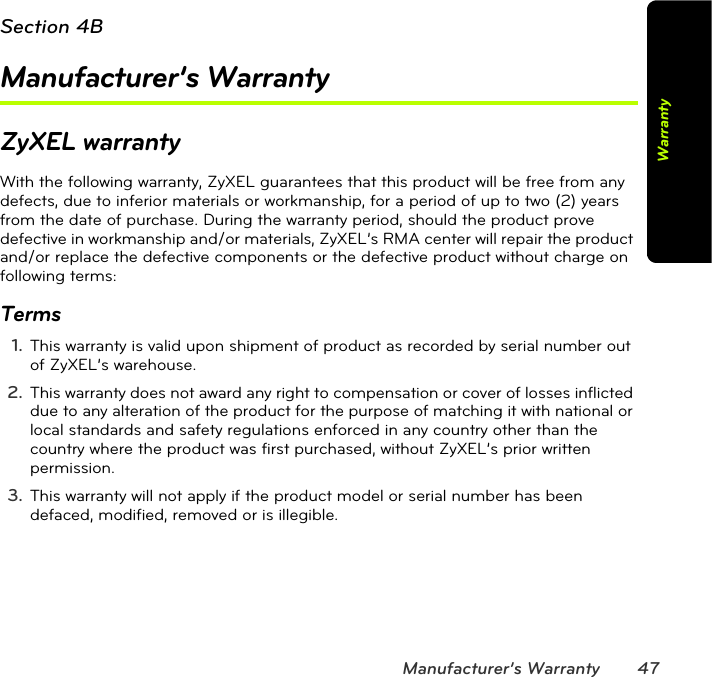
![Troubleshooting 35TroubleshootingThe lights on my XOHM Modem are on, but they are blinking. What do I do?Blinking lights indicate that the modem is in a process. It may be powering up, searching for a WiMAX connection, or connecting to an attached computer. For an overview of the modem’s LEDs, see “Modem LED display (front panel)” on page5.If blinking persists and you are not able to connect with your XOHM Modem, call XOHM Care at 877-333-XOHM (9646).What do I do if my browser is not working properly?The web interface for the XOHM Modem, MAX-206m2 (http://192.168.100.1) should be accessible to any computer connected to the modem. If you cannot display this page, you will not be able to reach any network device or the internet.ⅢFirst, check the LEDs on the modem and make sure the problem is not a basic or wired problem. (See earlier FAQs.)ⅢIf you have other wired or wireless adapters (802.11a/b/g/n, Ethernet, cellular [3G laptop adapters]) connected to other networks at the same time, your computer may not be sending traffic to the XOHM Modem. If your computer has multiple network adapters, try disabling or removing all except the XOHM Modem connection.ⅢMake sure that the computer is set to obtain an IP address automatically using DHCP (Dynamic Host Control Protocol). These settings may vary by operating system. By default, you should obtain an IP address from the XOHM Modem starting at 192.168.100.33.ⅢIf your computer cannot obtain an IP address from the XOHM Modem, you may try to set a static IP address on the computer to see if you can access the modem. If the modem is using default LAN settings, the IP address on the client computer will need to be 192.168.100.2–254, with a subnet mask of 255.255.255.0, and a gateway address of 192.168.100.1.ⅢIf all else fails, reset the modem to factory defaults by pressing and holding the red Reset Button on the back of the device for 10 seconds.](https://usermanual.wiki/ZyXEL-Communications/MAX206M2/User-Guide-925381-Page-43.png)