ZyXEL Communications MAX206M2 WiMax MIMO Indoor CPE User Manual Users Manua
ZyXEL Communications Corporation WiMax MIMO Indoor CPE Users Manua
Users Manua

XOHM Modem User Guide
MAX-206m2 by ZyXEL
© 2008 Sprint. XOHM and the XOHM logo are trademarks of Sprint.
ZyXEL is a registered trademark of ZyXEL Communications Co.
2/29/08

Table of Contents
Welcome to XOHM. . . . . . . . . . . . . . . . . . . . . . . . . . . . . . . . . . . . . . . . . . . . . . . . i
Section 1: Get Started . . . . . . . . . . . . . . . . . . . . . . . . . . . . . . . . . . . . . . . . . . . . . 1
1A. Your XOHM Modem . . . . . . . . . . . . . . . . . . . . . . . . . . . . . . . . . . . . . . . . . 2
What’s in the box . . . . . . . . . . . . . . . . . . . . . . . . . . . . . . . . . . . . . . . . . . . . . . . . . . . . . . . 2
Modem requirements . . . . . . . . . . . . . . . . . . . . . . . . . . . . . . . . . . . . . . . . . . . . . . . . . . . 2
Get to know your device . . . . . . . . . . . . . . . . . . . . . . . . . . . . . . . . . . . . . . . . . . . . . . . . . 3
WiMAX overview . . . . . . . . . . . . . . . . . . . . . . . . . . . . . . . . . . . . . . . . . . . . . . . . . . . . . . . 3
Device connectors (back of device) . . . . . . . . . . . . . . . . . . . . . . . . . . . . . . . . . . . . . . . . 4
Modem LED display (front panel) . . . . . . . . . . . . . . . . . . . . . . . . . . . . . . . . . . . . . . . . . 5
Positioning your modem . . . . . . . . . . . . . . . . . . . . . . . . . . . . . . . . . . . . . . . . . . . . . . . . . 6
Accessories . . . . . . . . . . . . . . . . . . . . . . . . . . . . . . . . . . . . . . . . . . . . . . . . . . . . . . . . . . . . . 7
1B. Install Your XOHM Modem . . . . . . . . . . . . . . . . . . . . . . . . . . . . . . . . . . . . 8
Set up the modem . . . . . . . . . . . . . . . . . . . . . . . . . . . . . . . . . . . . . . . . . . . . . . . . . . . . . . 8
Connect to your router or network . . . . . . . . . . . . . . . . . . . . . . . . . . . . . . . . . . . . . . . . . 10
1C. Telephone (VoIP) Settings . . . . . . . . . . . . . . . . . . . . . . . . . . . . . . . . . . . 11
Section 2: Your XOHM Modem Settings . . . . . . . . . . . . . . . . . . . . . . . . . . . . . 13
2A. Modem Advanced Settings Overview . . . . . . . . . . . . . . . . . . . . . . . . . . . 14
Access the advanced settings menu . . . . . . . . . . . . . . . . . . . . . . . . . . . . . . . . . . . . . . . 14
Advanced settings menu options . . . . . . . . . . . . . . . . . . . . . . . . . . . . . . . . . . . . . . . . . . 17
Home area icons . . . . . . . . . . . . . . . . . . . . . . . . . . . . . . . . . . . . . . . . . . . . . . . . . . . . . . 17
Menu bar . . . . . . . . . . . . . . . . . . . . . . . . . . . . . . . . . . . . . . . . . . . . . . . . . . . . . . . . . . . . 17
Using the settings menus . . . . . . . . . . . . . . . . . . . . . . . . . . . . . . . . . . . . . . . . . . . . . . . . 18
2B. Advanced Menu . . . . . . . . . . . . . . . . . . . . . . . . . . . . . . . . . . . . . . . . . . . . 19
Display the Advanced menu . . . . . . . . . . . . . . . . . . . . . . . . . . . . . . . . . . . . . . . . . . . . . . 19
Port Configuration . . . . . . . . . . . . . . . . . . . . . . . . . . . . . . . . . . . . . . . . . . . . . . . . . . . . . 20
General . . . . . . . . . . . . . . . . . . . . . . . . . . . . . . . . . . . . . . . . . . . . . . . . . . . . . . . . . . . . . .20
Port Forwarding . . . . . . . . . . . . . . . . . . . . . . . . . . . . . . . . . . . . . . . . . . . . . . . . . . . . . . . 21
Trigger Port . . . . . . . . . . . . . . . . . . . . . . . . . . . . . . . . . . . . . . . . . . . . . . . . . . . . . . . . . .23
2C. Voice Menu . . . . . . . . . . . . . . . . . . . . . . . . . . . . . . . . . . . . . . . . . . . . . . 24
2D. Tools Menu . . . . . . . . . . . . . . . . . . . . . . . . . . . . . . . . . . . . . . . . . . . . . . 25
Display the Tools menu . . . . . . . . . . . . . . . . . . . . . . . . . . . . . . . . . . . . . . . . . . . . . . . . . 25
Certificates . . . . . . . . . . . . . . . . . . . . . . . . . . . . . . . . . . . . . . . . . . . . . . . . . . . . . . . . . . . 26
My Certificates . . . . . . . . . . . . . . . . . . . . . . . . . . . . . . . . . . . . . . . . . . . . . . . . . . . . . . . . 26
Trusted CAs . . . . . . . . . . . . . . . . . . . . . . . . . . . . . . . . . . . . . . . . . . . . . . . . . . . . . . . . . 28
Password Setup . . . . . . . . . . . . . . . . . . . . . . . . . . . . . . . . . . . . . . . . . . . . . . . . . . . . . . . 29
Section 3: Troubleshooting . . . . . . . . . . . . . . . . . . . . . . . . . . . . . . . . . . . . . . . . 31
3A. Troubleshooting . . . . . . . . . . . . . . . . . . . . . . . . . . . . . . . . . . . . . . . . . . . 32
Frequently Asked Questions . . . . . . . . . . . . . . . . . . . . . . . . . . . . . . . . . . . . . . . . . . . . . 32
System . . . . . . . . . . . . . . . . . . . . . . . . . . . . . . . . . . . . . . . . . . . . . . . . . . . . . . . . . . . . . . 32
Issues . . . . . . . . . . . . . . . . . . . . . . . . . . . . . . . . . . . . . . . . . . . . . . . . . . . . . . . . . . . . . . . 33
General . . . . . . . . . . . . . . . . . . . . . . . . . . . . . . . . . . . . . . . . . . . . . . . . . . . . . . . . . . . . . . 37
Section 4: User Information and Warranty. . . . . . . . . . . . . . . . . . . . . . . . . . . 39
4A. Important User Information . . . . . . . . . . . . . . . . . . . . . . . . . . . . . . . . . 40
Regulatory Notices . . . . . . . . . . . . . . . . . . . . . . . . . . . . . . . . . . . . . . . . . . . . . . . . . . . . . 40
Important Notice . . . . . . . . . . . . . . . . . . . . . . . . . . . . . . . . . . . . . . . . . . . . . . . . . . . . . . 42
General Precautions . . . . . . . . . . . . . . . . . . . . . . . . . . . . . . . . . . . . . . . . . . . . . . . . . . . . 42
Technical Specifications . . . . . . . . . . . . . . . . . . . . . . . . . . . . . . . . . . . . . . . . . . . . . . . . 43
Environmental Specifications . . . . . . . . . . . . . . . . . . . . . . . . . . . . . . . . . . . . . . . . . . . . 43
Mechanical Specifications . . . . . . . . . . . . . . . . . . . . . . . . . . . . . . . . . . . . . . . . . . . . . . 43
Software Specifications . . . . . . . . . . . . . . . . . . . . . . . . . . . . . . . . . . . . . . . . . . . . . . . . 45
Transmitter Specifications . . . . . . . . . . . . . . . . . . . . . . . . . . . . . . . . . . . . . . . . . . . . . . 45
Receiver Specifications . . . . . . . . . . . . . . . . . . . . . . . . . . . . . . . . . . . . . . . . . . . . . . . . . 45
Hardware Specifications . . . . . . . . . . . . . . . . . . . . . . . . . . . . . . . . . . . . . . . . . . . . . . . . 46
4B. Manufacturer’s Warranty . . . . . . . . . . . . . . . . . . . . . . . . . . . . . . . . . . . . 47
ZyXEL warranty . . . . . . . . . . . . . . . . . . . . . . . . . . . . . . . . . . . . . . . . . . . . . . . . . . . . . . . . 47
Index . . . . . . . . . . . . . . . . . . . . . . . . . . . . . . . . . . . . . . . . . . . . . . . . . . . . . . . . . 49

Welcome to XOHM i
Welcome to XOHM
XOHM is a wireless Internet service that lets you get online at broadband speed. The
XOHM WiMAX network connects you to the people you need, the entertainment you
love and the information you can’t live without. You’ll connect to the Internet using your
choice of computer without long-term contracts or complications.
Getting started with XOHM is simple: just connect your XOHM Modem MAX-206m2 by
ZyXEL (XOHM Modem) to your computer and activate your XOHM membership, and
you’ve got broadband.
This guide covers all the information required to set up, install, and configure your
XOHM Modem.
ⅷGet Started
ⅷYour XOHM Modem Settings
ⅷTroubleshooting
ⅷUser Information and Warranty
For more information about XOHM WiMAX, visit www.xohm.com.
ii

Section 1
Get Started

2 Your XOHM Modem
Section 1A
Your XOHM Modem
This section outlines the basic layout of your modem and connections.
What’s in the box
XOHM Modem MAX-206m2 by ZyXEL
Power adapter
Ethernet cable
Get Started Guide
User Guide
Before setting up your XOHM Modem, make sure you have all the items listed
above. If any items are missing, contact your XOHM retailer or call XOHM Care at
877-333-XOHM (877-333-9646).
Modem requirements
Credit card for activation
32MB RAM minimum (64MB recommended)
20MB available hard disk space
One available 10/100Mbps Ethernet port
Compatible with web browsers Internet Explorer 6 and higher, Firefox 1.5 and higher,
and Safari 2.0. Other browser engines may also be sufficient.
Your XOHM Modem 3
Your XOHM Modem
Get to know your device
Your XOHM Modem lets you connect to the XOHM WiMAX network to provide fast
and easy wireless connectivity to the Internet in your home or office.
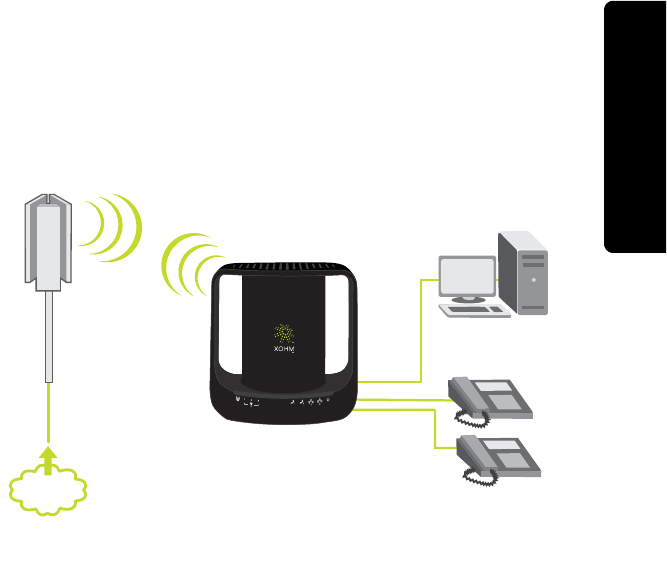
WiMAX overview
Computer or
Home Network
Telephones
WiMAX
Tower
XOHM Modem
MAX-206m2 by ZyXEL
Internet
4 Your XOHM Modem
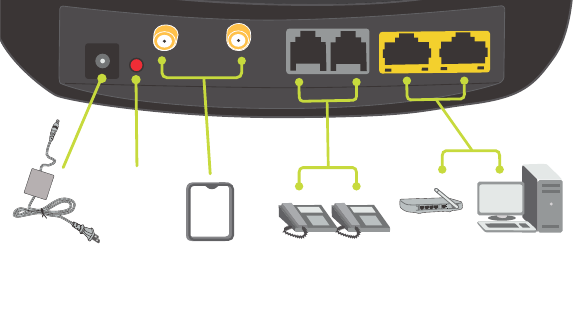
Device connectors (back of device)
1. Power jack (black): Connects the power adapter to power the modem.
2. Reset button (red): Resets the unit back to factory defaults (use ONLY as a last
resort).
3. Antenna connectors (gold): Connect a remote antenna (available separately) to extend
a signal from a strong area (such as near a window) to a weaker area where it may
be more convenient to place the modem.
4. Phone ports 1 / 2 (gray): Connect telephones to the modem. [Future service.]
5. Ethernet ports 1/2 (yellow): Connects the modem to computers and/or a Wi-Fi router.
Power
Adapter
Reset
Button
Remote
Antenna
[optional]
Telephones
[future service]
Computer/
Wi-Fi Router
Your XOHM Modem 5
Your XOHM Modem
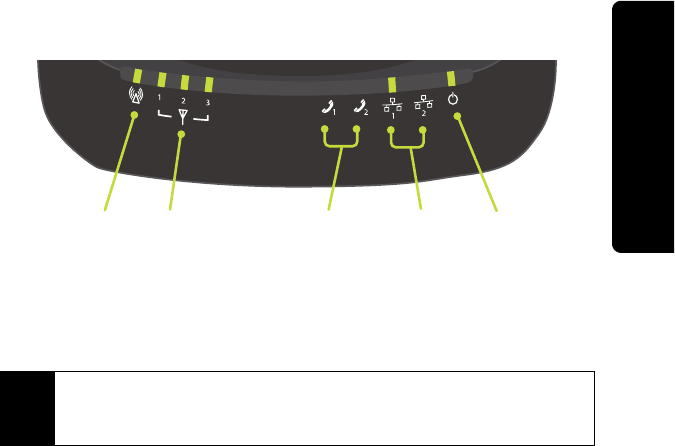
Modem LED display (front panel)
1. WiMAX LEDs: The leftmost LED indicates WiMAX connectivity. A blinking LED
indicates that the unit is ranging, while a solid LED indicates that a connection has
been established and that the modem is ready to transmit and receive. The three
LEDs to the right indicate the signal strength of the reception (1-3). These LEDs
will be green when illuminated.
2. Phone 1 / Phone 2 LEDs: Illuminates when the VoIP “line” is in use. If no voice
accounts are configured, the LED will be off. If a voice account is configured and
registered, the LED will be green. When the connected phone is off-hook, the LED
will blink. When there is new voicemail on the account, the LED will be amber
(optional). [Future service.]
3. LAN 1 / LAN 2 LEDs: Illuminates when the modem is connected to the computers or
other networking devices. This LED will be green, and will flash as data is sent
through the connection.
Note Signal Strength LEDs: The number of signal strength LEDs illuminated reflects the strength
of the WiMAX signal being received by the XOHM Modem; however, the strength of signal
does not affect the speed of your connection. As long as there is sufficient signal strength to
make a connecton, you may achieve maximum connection speed.
Strength
Indicator
WiMAX
Signal
Phone 1 & 2 LAN 1 & 2 Power
6 Your XOHM Modem
4. Power LED: Indicates if the unit has power and is operating correctly. A blinking LED
indicates the unit is loading the firmware and configuration, while a solid LED
indicates the unit is ready for operation. This LED will be green.
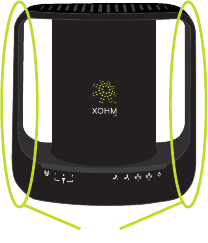
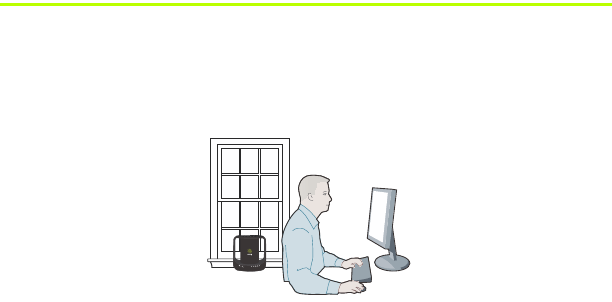
Positioning your modem
Your XOHM Modem has a convenient, contemporary design that allows for simple
setup. Some things to keep in mind when setting up your modem:
Only use your XOHM Modem indoors. Avoid
moisture or extreme temperatures.
For improved reception, place the modem near a
closed window.
Position the modem within easy access of a
reliable power supply.
Make sure the modem is near enough to your
computer to easily connect the modem to the
computer using the supplied Ethernet cable.
The unit’s omnidirectional antennas are built into
the sides (“handles”) of the modem case. Make
sure to provide ample space around the device to
ensure maximum WiMAX signals.
Make sure the modem is near enough to your
computer to easily connect the modem to the
computer using the supplied Ethernet cable.
Where possible, keep your modem at least one foot away from other electronic
devices, such as Wi-Fi routers and cordless phones, to avoid potential signal
interference.
6dBi Omnidirectional Antennas

Your XOHM Modem 7
Your XOHM Modem
Accessories
Go to www.xohm.com to find accessories for your device, such as remote antennas and
battery packs.
Tip If you wish to place the XOHM Modem in a location where it does not receive an adequate signal,
we recommend that you purchase the optional remote antenna to extend the signal from a
stronger area (such as near a window).
8 Install Your XOHM Modem
Section 1B
Install Your XOHM Modem
Set up the modem
1. Find a place for your XOHM Modem. See “Positioning your modem” on page6 for
details and suggestions.
2. Disconnect any existing LAN (Ethernet) connections or routers from the computer
you are going to be using for your XOHM Modem. (Don’t worry: We’ll get you
hooked up to your router when we’re finished.)
3. Plug in the modem and connect it to your computer.
ⅢInsert the round end of the power adapter into the modem’s power port and plug
the other end into a power source. (The Power LED should illuminate.)
ⅢInsert one end of the supplied Ethernet cable to your computer and the other
end into the yellow LAN 1 port. (The LAN 1 LED should illuminate.)

Install Your XOHM Modem 9
Install Your XOHM Modem
4. Check the modem’s indicator lights to confirm your WiMAX signal. It may take a
few moments for the signal to find your modem.
ⅢIf the WiMAX Signal indicator is solid green, the modem is receiving a WiMAX
signal. Proceed to step 5.
ⅢIf the WiMAX Signal indicator is blinking, try moving the modem to a different
location (nearer a window or away from other electronics). Wait several seconds at
each location to see if you’re getting a signal.
ⅢIf you cannot acquire a WiMAX signal, call XOHM Care at 877-333-XOHM (9646).
5. Launch your web browser.
ⅢThe XOHM website will be displayed.
ⅢFollow the onscreen instructions to set up your XOHM membership and submit
your order.
6. Wait for activation and provisioning to complete. (It may take up to 20 minutes.)
ⅢDuring provisioning, make sure not to disconnect your modem, as doing so will
interrupt the process.
ⅢYour XOHM Modem will automatically power cycle (turn off and back on) during
provisioning. When the WiMAX Signal indicator returns to solid green, your modem
is active and ready to use.
7. To confirm your modem’s status, navigate to your favorite website. If you are able
to access only the XOHM site and no other website, provisioning may not be
complete. Wait a few minutes and try again.
WiMAX
Signal
LAN 1 Power
10 Install Your XOHM Modem
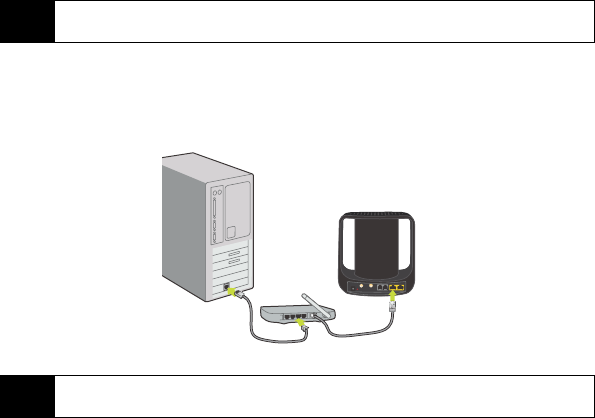
Connect to your router or network
Once you have set up your XOHM Modem and confirmed your web connection, you
can set up your router or network as needed.
1. Consult your router’s documentation for setup details.
2. Disconnect the Ethernet cable from your computer and connect it to the router’s
Internet port. (It will go directly from the XOHM Modem’s LAN 1 port to the router.)
3. Connect an Ethernet cable from the router to your computer.
4. Make sure the modem’s LAN 1 indicator is illuminated and test connectivity by
launching the web browser. If you are having difficulties, double-check your
router’s settings.
Note Be sure to keep a minimum distance of 1 foot between the XOHM Modem and your Wi-Fi
router to avoid signal interference.
Tip For added security, you may wish to change your modem password after setting up your
router. See “Access the advanced settings menu” on page14 for more information.

Telephone (VoIP) Settings 11
Telephone (VoIP) Settings
Section 1C
Telephone (VoIP) Settings
Your XOHM Modem is able to support VoIP (Voice over Internet Protocol) telephony,
meaning you will be able to use your XOHM WiMAX connection to provide both voice
and Internet services.
Coming soon: Telephone and voice (VoIP) service from XOHM will be available in the future. Visit
www.xohm.com frequently for details and announcements.
12

Section 2
Your XOHM Modem Settings
14 Modem Advanced Settings Overview
Section 2A
Modem Advanced Settings Overview
This section reviews all the basic settings options available through the XOHM
advanced settings menu.
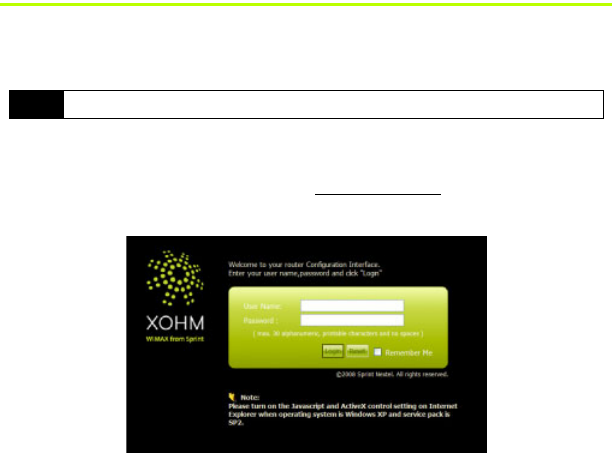
Access the advanced settings menu
1. Open the computer’s web browser, type http://192.168.100.1 in the address bar, and
press Enter. The modem login screen will be displayed.
2. Enter the User Name, leave the Password blank, and then click Login.
ⅢThe default User Name is user1. The password remains blank.
Note The screen images in this user guide are illustrative and may not reflect the final software.
Modem Advanced Settings Overview 15
Modem Advanced Settings Overview
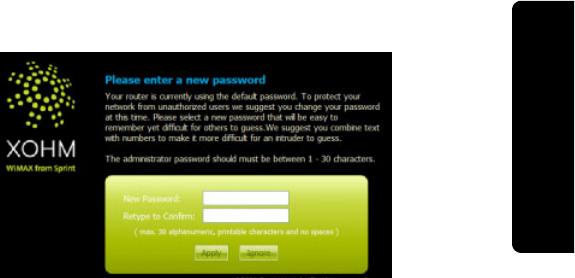
3. You may be prompted to enter a new password.
ⅢTo keep using the default password, click Ignore or Clear and continue to the
next steps.
ⅢTo change the password, enter and retype a new password and click Apply to
change the password. You will need to complete step 2 again to log in with your
new password before continuing.
16 Modem Advanced Settings Overview
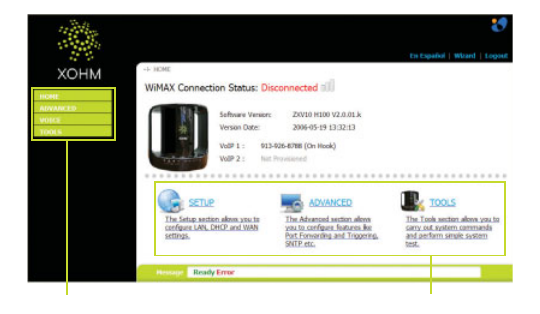
4. The advanced settings Home screen appears.
5. From the advanced settings screen, you can access your settings options either
through the Home area icons in the middle of the window or through the menu
bar options on the left side of the window.
While it’s a good idea to familiarize yourself with these menus and options, rest
assured that you may never need to use any of them. Your XOHM Modem’s initial
setup, detailed in the previous sections, is designed to automatically detect and assign
the correct settings for the majority of installations.
menu bar Home area icons

Modem Advanced Settings Overview 17
Modem Advanced Settings Overview
Advanced settings menu options
Home area icons
ⅢSetup – displays the LAN Configuration screen
ⅢAdvanced – displays the Port Configuration screen
ⅢTools – displays the Certificates screen (My Certificates and Trusted CAs)
Menu bar
Though some headings are the same, the menu bar may offer additional
sub-menu options:
ⅢAdvanced
●Port Configuration – displays the full Port Configuration screen, with tabs for
General, Port Forwarding, and Trigger Port
ⅢVoice
●Service Configuration – displays the Server Configuration screen
●Phone – displays the Phone Configuration screen
ⅢTools
●Certificates – displays the Certificates screen (same as Home area Tools option)
●Password Setup – displays the Password Setup screen
Note The Voice settings menu will not be used, because telephone and voice (VoIP) support
from XOHM for your modem will not be available upon product launch. The XOHM
WiMAX network will be adding telephone/voice (VoIP) support in the future. Visit
www.xohm.com for details and announcements.
18 Modem Advanced Settings Overview
Using the settings menus
The settings menus use just a few simple tools to help you make changes.
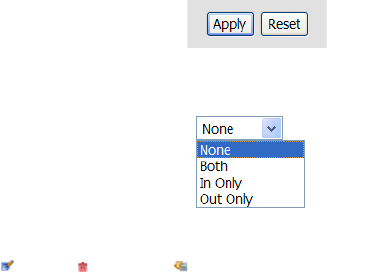
ⅷMost of the menus allow you to enter or change values directly. If you’re satisfied
with the changes, click Apply at the bottom of the screen to save your settings. If you
want to cancel your changes, click Reset.
ⅷMany settings options allow you to choose from drop-down lists, which are indicated
with an arrow next to the field. Click on the arrow, then select an option to set it.
ⅷCertain menus contain lists that allow you to edit, delete, or export settings. In
these cases you will highlight a line and click on the action you want to take:
Edit (), Delete (), or Export ().
The following sections detail the various menu and settings options available for your
XOHM Modem.

Advanced Menu 19
Advanced Menu
Section 2B
Advanced Menu
This section reviews all the settings options available through the menu bar’s Advanced
menu.
Display the Advanced menu
1. From the settings screen (see “Access the advanced settings menu” on page14),
click Advanced in the menu bar on the left side of the screen to expand the
Advanced menu.
2. Select Port Configuration to display the NAT Configuration menu.
20 Advanced Menu
Port Configuration
The Port Configuration menus allow you to control which modem ports are open for
incoming traffic, such as applications and game hosting. There are 3 submenus.
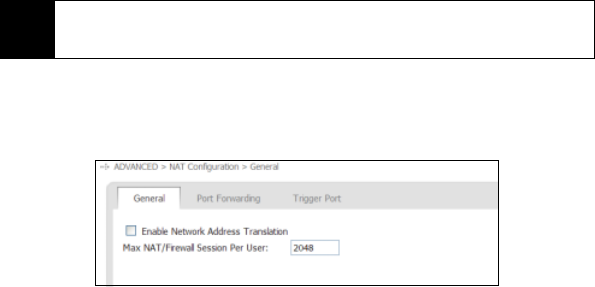
General
The General tab lets you enable or disable Network Address Translation (NAT) and set
the maximum NAT session per user.
Note The Port Configuration settings do not apply for remote management of the modem. For
any questions regarding remote management or similar advanced functioning please call
XOHM Care at 877-333-XOHM (9646).
Advanced Menu 21
Advanced Menu
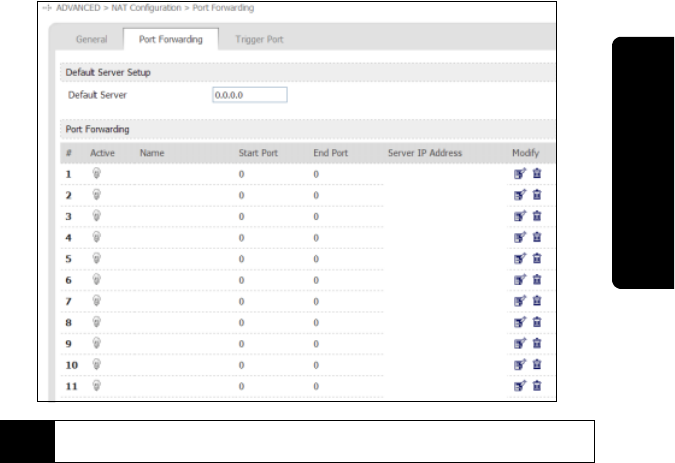
Port Forwarding
The Port Forwarding menu lets you forward outside ports to inside devices so that
users from the Internet can use shared resources such as web servers, remote
workstations, gaming platforms, etc.
Note Port forwarding does NOT apply to normal browsing or downloading by users behind the
modem, and no additional settings are needed for those functions on this menu.
22 Advanced Menu
There are 11 configurable rules and one “Default Rule.” When the modem receives an
unsolicited packet from the Internet, it will first look at rules 1-11 to see if the traffic’s
port matches a rule. If not, the modem will see if a Default Server is present, and if so,
pass the packet to the Default Server. If no Default Server exists, the traffic is dropped.
The modem can use one port or a port range for forwarding traffic, depending on
which port(s) the application being forwarded uses. If only one port is needed, the Start
and End ports should be set to the same value.
Port forwarding entries can be edited by clicking on the Edit ( ) icon in the Action
column. You can also use the Delete ( ) icon to remove a port forwarding rule.
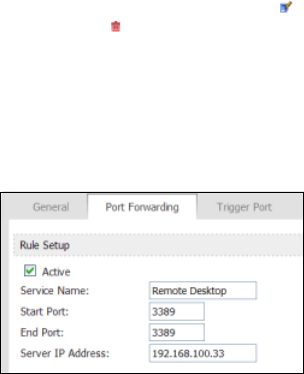
In the screenshot below, a user has Windows Remote Desktop set up on his computer,
which is assigned IP address 192.168.100.33. Rule 1 is Edited (opening the Edit menu
for the rule) and set to Active. A Service Name is given to it for reference. The Start
and End Ports specified at port 3389, the default communication port for Remote
Desktop. Finally, the Server IP Address of the computer is specified. Now, the user can
access their Remote Desktop from the Internet, so long as they know the WAN
(public) IP or DNS address that the modem is using.
Advanced Menu 23
Advanced Menu
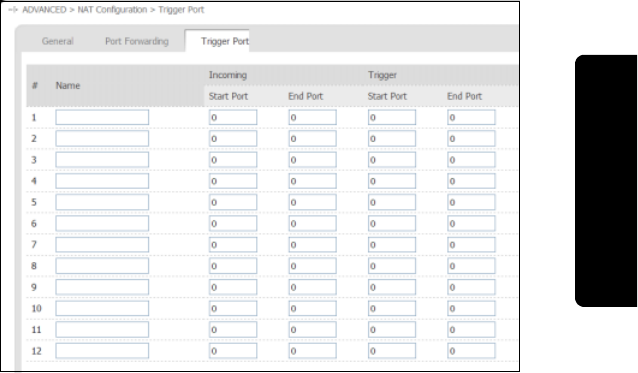
Trigger Port
The Trigger Port allows you to configure up to 12 “trigger” ports that can open and close
as necessary, instead of being always open.

24 Voice Menu
Section 2C
Voice Menu
Reminder Though your modem is capable of supporting VoIP (Voice over Internet Protocol)
telephony, telephone and voice (VoIP) support from XOHM will not be available
upon product launch. The XOHM WiMAX network will add telephone/voice (VoIP)
support in the future. Visit www.xohm.com for details and announcements.
Tools Menu 25
Tools Menu
Section 2D
Tools Menu
This section reviews all the settings options available through the menu bar’s Tools
menu, including certificate management, remote management, modem logs, and
password setup.
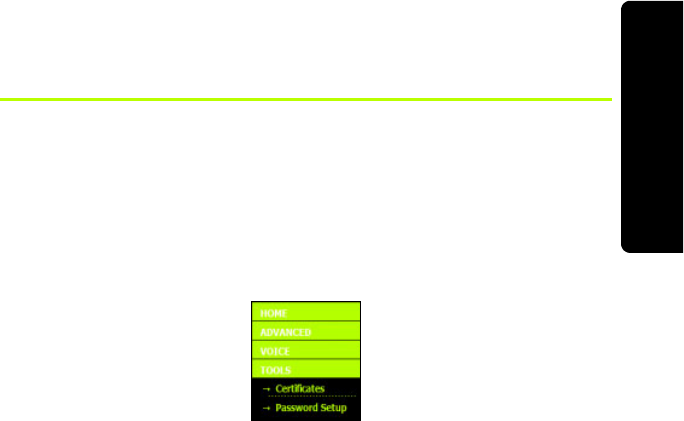
Display the Tools menu
1. From the settings screen (see “Access the advanced settings menu” on page14),
click Tools in the menu bar on the left side of the screen to expand the Tools
menu.
2. Select Certificates or PasswordSetup to display the corresponding menus.
26 Tools Menu
Certificates
This menu is used for creating and importing certificates for use in authentication.
Certificates play a vital role in the WiMAX authentication process. Therefore, this menu
will be extremely important if the certificate must be changed or replaced.
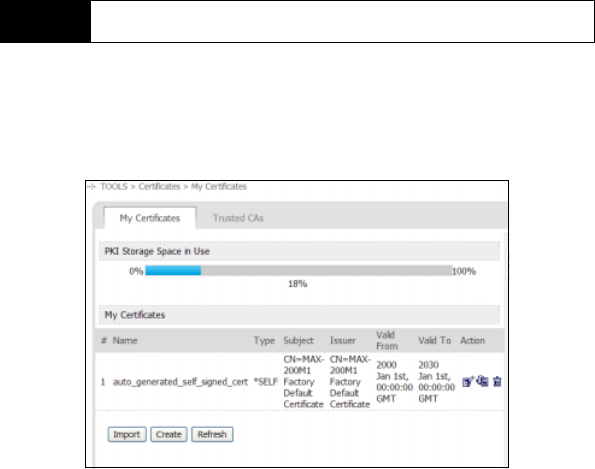
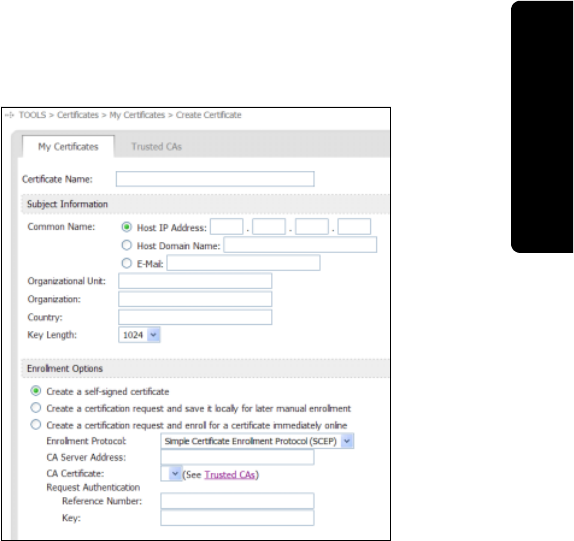
My Certificates
The My Certificate screen lets you create and import peer certificates that can either be
self-signed or submitted manually or automatically to a Certificate Authority (CA), so
that a CA can verify the identity of the MAX-206M2 as an authorized network
(WiMAX) client.
WARNING Before changing any Certificates settings, please consult with XOHM Care by calling
877-333-XOHM (9646).
Tools Menu 27
Tools Menu
Click Create to display the certificate creation screen, and then enter the appropriate
information for your certificate. Once you’re finished, you can either accept the
certificate as self-signed or you can submit it for approval by a CA, which would allow
you to add the certificate through the “Trusted CAs” tab.
28 Tools Menu
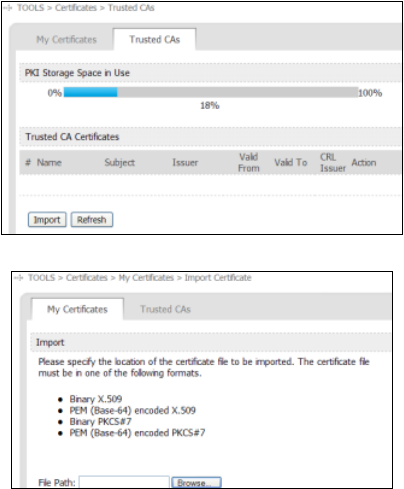
Trusted CAs
This menu is used to import certificates from trusted CAs to fully incorporate mutual
authentication via certificates. Clicking Import allows you to upload a signed certificate
from a CA to the XOHM Modem in order to verify the identity of the CA.
Tools Menu 29
Tools Menu
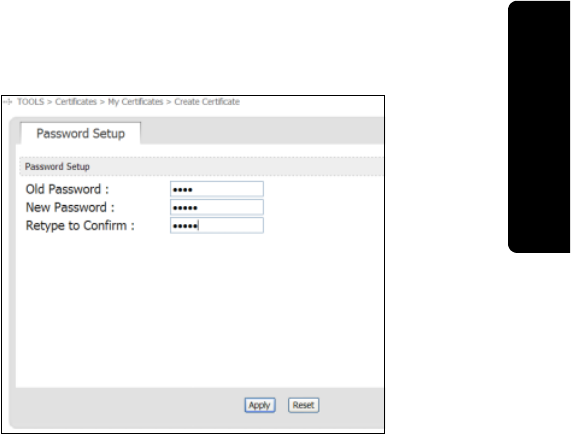
Password Setup
The Password Setup screen lets you reset your XOHM Modem password.
Enter your old password, and then enter and reenter the new password and click Apply
to save the new password.
30

Section 3
Troubleshooting

32 Troubleshooting
Section 3A
Troubleshooting
This section addresses common problems and solutions for use with your
XOHM Modem. For more information, visit www.xohm.com.
Frequently Asked Questions
System
What are the minimum system requirements to be able to run the XOHM Modem,
MAX-206m2 by ZyXEL?
The minimum system requirements are:
Ⅲ32MB RAM (64MB recommended)
Ⅲ20MB available hard disk space
ⅢAvailable 10/100Mbps Ethernet port
ⅢWeb browser: XOHM Internet service has been tested with Internet Explorer 6 and 7,
Firefox 1.5 and 2.0, and Safari 2.0. Other browsers may also be compatible.
What operating systems are supported?
The XOHM Modem is designed to support any current operating system.
Can I use the XOHM Modem with my Wi-Fi router?
Yes. Most commercially available Wi-Fi routers can be connected to the XOHM
Modem. For information about connecting a router, see “Connect to your router or
network” on page10.

Troubleshooting 33
Troubleshooting
Issues
My XOHM Modem is not working (lights are not coming on). What do I do?
ⅷMake sure the modem’s power adapter is plugged into an active power outlet.
ⅷIf you are using a power strip or surge protector, make sure its switch is in the “ON”
position.
ⅷMake sure the round end of the power adapter is firmly connected to the modem’s
power jack.
ⅷMake sure you are using the power adapter that came with your modem. The correct
adapter for the MAX-206m2 provides output power of 12V AC at 1 Amp.
ⅷIf you still see no lights, call XOHM Care at 877-333-XOHM (9646).
Strength
Indicator
WiMAX
Signal
Phone 1 & 2 LAN 1 & 2 Power
34 Troubleshooting
My XOHM Modem is not working properly (lights are coming on but I cannot connect).
What do I do?
ⅷYour modem may not be receiving the proper voltage. Make sure you are using
the power adapter that came with your modem. The correct adapter for the
MAX-206m2 provides output power of 12V AC at 1 Amp.
ⅷThe WiMAX Signal LED should be illuminated if the modem is using default settings.
If it is not illuminated, make sure the Power LED is green. If the Power LED is red, call
XOHM Care at 877-333-XOHM (9646).
ⅷIf neither of the LAN LEDs is illuminated:
ⅢMake sure that your computer or router has the Ethernet cable connected to the
Ethernet port and that the cable is properly seated. (The cable should “click”
when it is connected.)
ⅢMake sure the other end of the Ethernet cable is properly connected to the
LAN 1 or LAN 2 port on the back of the XOHM Modem.
ⅢEthernet cables usually have clips that help secure them to Ethernet ports. If
these clips are damaged or broken, the cable could slip out. If your Ethernet
cables or clips are damaged or broken, replace with a new cable.
ⅢIf the cable is securely connected at both ends, but the corresponding LAN 1 or
LAN 2 LED is still not illuminated, try using the other LAN port on the XOHM
Modem.
ⅢThe computer may have a faulty Ethernet adapter.
The lights on my XOHM Modem are on, but they are all red. What do I do?
ⅷThe LED indicators on the XOHM Modem should not be red if the modem is
functioning properly.
ⅷRed LEDs may indicate faulty configuration. Press and hold the red Reset Button on
the back of the device for 10 seconds and then release the button to restore the
factory default settings. The modem will power cycle (turn off and on) during the
reset process.
ⅷIf the lights remain red after reset, call XOHM Care at 877-333-XOHM (9646).

Troubleshooting 35
Troubleshooting
The lights on my XOHM Modem are on, but they are blinking. What do I do?
Blinking lights indicate that the modem is in a process. It may be powering up,
searching for a WiMAX connection, or connecting to an attached computer. For an
overview of the modem’s LEDs, see “Modem LED display (front panel)” on page5.
If blinking persists and you are not able to connect with your XOHM Modem, call
XOHM Care at 877-333-XOHM (9646).
What do I do if my browser is not working properly?
The web interface for the XOHM Modem, MAX-206m2 (http://192.168.100.1) should
be accessible to any computer connected to the modem. If you cannot display this
page, you will not be able to reach any network device or the internet.
ⅢFirst, check the LEDs on the modem and make sure the problem is not a basic or
wired problem. (See earlier FAQs.)
ⅢIf you have other wired or wireless adapters (802.11a/b/g/n, Ethernet, cellular [3G
laptop adapters]) connected to other networks at the same time, your computer
may not be sending traffic to the XOHM Modem. If your computer has multiple
network adapters, try disabling or removing all except the XOHM Modem
connection.
ⅢMake sure that the computer is set to obtain an IP address automatically using
DHCP (Dynamic Host Control Protocol). These settings may vary by operating
system. By default, you should obtain an IP address from the XOHM Modem
starting at 192.168.100.33.
ⅢIf your computer cannot obtain an IP address from the XOHM Modem, you may
try to set a static IP address on the computer to see if you can access the
modem. If the modem is using default LAN settings, the IP address on the client
computer will need to be 192.168.100.2–254, with a subnet mask of
255.255.255.0, and a gateway address of 192.168.100.1.
ⅢIf all else fails, reset the modem to factory defaults by pressing and holding the
red Reset Button on the back of the device for 10 seconds.
36 Troubleshooting
ⅢIf the Reset option does not work, your XOHM Modem could have corrupted
firmware. Replace the modem.
My XOHM Modem is broken. How do I replace it?
ⅷFirst, try the Reset Button. Press and hold the red Reset Button on the back of the
device for 10 seconds and then release the button to restore the factory default
settings. The modem will power cycle (turn off and on) during the reset process.
ⅷIf the Reset option does not work, please call XOHM Care at 877-333-XOHM (9646).
How do I reset my XOHM Modem?
Press and hold the red Reset Button on the back of the device for 10 seconds and
then release the button to restore the factory default settings. The modem will power
cycle (turn off and on) during the reset process.

Troubleshooting 37
Troubleshooting
General
Can I use my XOHM Modem with more than one computer? Will that impact the quality of
the service I am receiving?
With XOHM, you can connect to the Internet in more than one location, and extend
your service to multiple users throughout your location. You can connect up to two
computers directly to the two Ethernet ports of the XOHM Modem, or you can attach
a standard Wi-Fi router to one of the Ethernet ports to create a wireless local area
network. Wi-Fi-enabled computers can connect to the modem over the Wi-Fi
connection. The use of more than one computer will not impact the speed of your
connection. Each user will be able to connect at the same speed.
Why does my XOHM WiMAX signal vary?
Interference due to materials between the cell tower and the modem, including
buildings and trees, could cause the signal to be weak in specific areas, even within
the coverage area.
How do I receive the strongest signal possible?
Use the signal strength LEDs on the modem to find the room or location with the
strongest signal. For more information about finding a location for your XOHM
Modem, see “Positioning your modem” on page6.
38

Section 4
User Information and
Warranty

40 Important User Information
Section 4A
Important User Information
Regulatory Notices
The design of the ZyXEL MAX-206m2 Modem complies with U.S. Federal
Communications Commission (FCC) guidelines respecting safety levels of radio
frequency (RF) exposure for portable devices, which in turn are consistent with the
following safety standards previously set by U.S. and international standards bodies:
ⅷANSI / IEEE C95.1-1999, IEEE Standard for Safety Levels with Respect to Human
Exposure to Radio Frequency Electromagnetic Fields, 3kHZ to 300 GHz
ⅷNational Council on Radiation Protection and Measurements (NCRP) Report 86, 1986,
Biological Effects and Exposure Criteria for Radio Frequency Electromagnetic Fields
ⅷInternational Commission on Non-Ionising Radiation Protection (ICNIRP) 1998, Guidelines for
limiting exposure to time-varying electric, magnetic, and electromagnetic fields (up
to 300 GHz)
FCC ID: I88MAX206M2
Caution: The ZyXEL MAX-206m2 Modem has been tested for compliance with FCC
RF exposure limits. The ZyXEL MAX-206m2 Modem should not be used with external
antennas that are not approved for use with this device. Use of this device in any other
configuration may exceed the FCC RF exposure compliance limits.
This device has been tested and found to comply with the FCC limits for a Class B
computing device peripheral, in accordance with the FCC’s Rules. These limits are
designed to provide reasonable protection against harmful interference in a residential
installation.

Important User Information 41
Important User Information
This equipment generates, uses, and can radiate radio frequency energy and, if not
installed and used in accordance with the instructions, may cause harmful interference
to radio communication. There is no guarantee that interference will not occur in a
particular installation.
If this equipment does cause harmful interference to radio or television reception,
which can be determined by turning the equipment off and on, the user is encouraged
to try to correct the interference by one or more of the following measures:
ⅷReorient or relocate the receiving antenna
ⅷIncrease the separation between the equipment and receiver
ⅷConnect the equipment into an outlet on a circuit different from that to which the
receiver is connected
ⅷConsult the dealer or an experienced radio or television technician for help
This device complies with Part 15 of the FCC’s Rules. Operation is subject to the
following two conditions:
1. This device may not cause harmful interference, and
2. This device must accept any interference received, including interference that may
cause undesirable operation.
FCC guidelines stipulate that the antenna should be more than 1.8 cm from the user.
Caution: Any changes or modifications not expressly approved by Sprint could void the
user’s authority to use the equipment.
If you have purchased this product under a United States Government contract, it shall
be subject to restrictions as set forth in subparagraph (c)(1)(ii) of Defense Federal
Acquisitions Regulations (DFARs) Section 252.227-7013 for Department of Defense
contracts, and as set forth in Federal Acquisitions Regulations (FARs) Section 52.227-
19 for civilian agency contracts or any successor regulations. If further government
regulations apply, it is your responsibility to ensure compliance with such regulations.
This device complies with part 15 of the FCC Rules. Operation is subject to the condition
that this device does not cause hamful interference.
To comply with FCC RF exposure compliance requirements, a separation distance of at
least 20 cm must be maintained between the antenna of this device and all persons.
42 Important User Information
Important Notice
Because of the nature of wireless communications, transmission and reception of data
can never be guaranteed. Data may be delayed, corrupted (i.e., have errors) or be
totally lost. Although significant delays or losses of data are rare when wireless devices
such as the ZyXEL MAX-206m2 Modems are used in a normal manner, they should
not be used in situations where failure to transmit or receive data could result in
damage of any kind to the user or any other party, including but not limited to
personal injury, death, or loss of property. User accepts responsibility for damages
of any kind resulting from delays or errors in data transmitted or received using the
ZyXEL MAX-206m2 Modem, or for failure of the ZyXEL MAX-206m2 Modem to
transmit or receive such data.
General Precautions
ⅷDo not operate the ZyXEL MAX-206m2 Modem in areas where blasting is in
progress, where explosive atmospheres may be present, near medical equipment,
life support equipment, or any equipment which may be susceptible to any form of
radio interference. In such areas, the ZyXEL MAX-206m2 Modem MUST BE
POWERED OFF. It can transmit signals that could interfere with this equipment.
ⅷDo not operate the ZyXEL MAX-206m2 Modem in any aircraft, whether the aircraft
is on the ground or in flight. In aircraft, the ZyXEL MAX-206m2 Modem MUST BE
POWERED OFF. When operating, it can transmit signals that could interfere with
various onboard systems.
ⅷThe driver or operator of any vehicle should not operate the ZyXEL MAX-206m2
Modem while in control of a vehicle. Doing so will detract from the driver or
operator’s control and operation of that vehicle. In some jurisdictions, operating such
communications devices while in control of a vehicle is an offense.

Important User Information 43
Important User Information
Technical Specifications
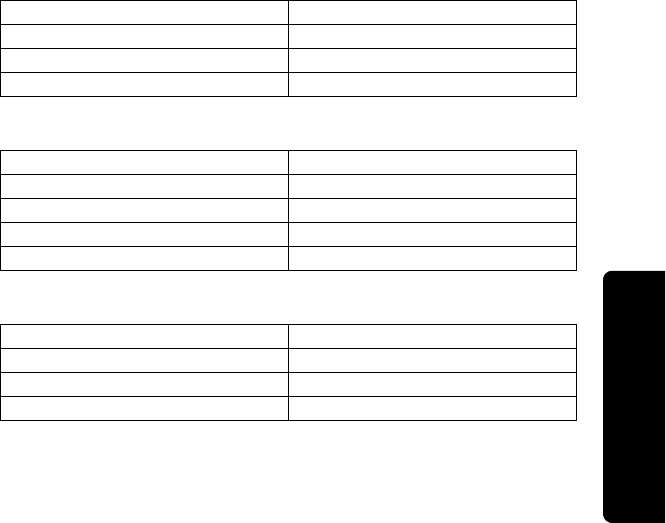
Environmental Specifications
Mechanical Specifications
LED table
Operating Temperature 0°C – 55°C
Storage Temperature -30°C – 85°C
Humidity 5% to 90% (non-condensing)
Drop 75cm drop, no damage – fully operational
Dimensions (W x D x H) 160mm x 118mm x 167mm
Weight 480g
Battery Pack n/a
LED Yes (see table below)
Antenna Internal 6dBi omnidirectional (MIMO)
Interface Status LED Color
Power ON Solid Green
Power input low (Battery) Yellow
Modem Error Red
OFF OFF (no light)

44 Important User Information
LAN Not Connected OFF (no light)
10 or 100Mbps (Ethernet) Solid Green
Activity Stay Solid Green
VoIP 1 & VoIP 2 When the phone port’s defined SIP account
for outgoing calls is registered
Solid Green
When the voice port is off-hook Flashing Green (slow)
When the phone port’s defined SIP account
for outgoing calls is registered and there is a
voice message in the SIP account
Solid Yellow
When the voice port is off-hook and there is a
voice message in the SIP account
Flashing Yellow
No registered SIP accounts or device power
OFF
OFF (no light)
WAN Signal Strength: RSSI (Power level reception)
0 LED: no signal/
1 LED: </= -70dBm
2LED: </= -50 dBm
3LED: </= -30 dBm
Green LED ON
indicates signal
strength level
LINK: WiMAX connection current
Searching for a channel
WiMAX network entry in progress (data being
transferred)
Solid Green
Flashing Green (slow)
Flashing Green (fast)
Interface Status LED Color
Important User Information 45
Important User Information
Software Specifications
Transmitter Specifications
Receiver Specifications
WiMAX Standard IEEE 802.16e-2005
PRL (preferred roaming list) support
Authentication EAP-TLS, EAP-TTLS
Mobile IP support
Normal Output Power 23dBm
TX Max Power 27dBm
Frequency Range 2.5GHZ – 2.7GHz
Bandwidth 5M, 10M
Modulation Method QPSK, 16QAM, 64QAM
Frequency Range 2.5GHZ – 2.7GHz
Bandwidth 5M, 10M
Modulation Method QPSK, 16QAM, 64QAM
Receiver Sensitivity -99dBm at QPSK

46 Important User Information
Hardware Specifications
Interface Type Ethernet and VoIP
Common Air Interface WiMAX
Channel Spacing 250 KHz
Transmitting (max. data rate) Forward link: 20 Mbps
Reverse link: 10 Mbps
Supply Voltage 12 V
Communication Ports 4 Ethernet
Voice Capability 2 VoIP

Manufacturer’s Warranty 47
Warranty
Section 4B
Manufacturer’s Warranty
ZyXEL warranty
With the following warranty, ZyXEL guarantees that this product will be free from any
defects, due to inferior materials or workmanship, for a period of up to two (2) years
from the date of purchase. During the warranty period, should the product prove
defective in workmanship and/or materials, ZyXEL’s RMA center will repair the product
and/or replace the defective components or the defective product without charge on
following terms:
Terms
1. This warranty is valid upon shipment of product as recorded by serial number out
of ZyXEL’s warehouse.
2. This warranty does not award any right to compensation or cover of losses inflicted
due to any alteration of the product for the purpose of matching it with national or
local standards and safety regulations enforced in any country other than the
country where the product was first purchased, without ZyXEL’s prior written
permission.
3. This warranty will not apply if the product model or serial number has been
defaced, modified, removed or is illegible.
48 Manufacturer’s Warranty
4. This warranty does not cover:
4.1 Any adaptation and/or modification for the purpose of improvement and
enhancement of the product’s usual range of application as described in the
user guide without ZyXEL prior written permission.
4.2 Damages due to:
a) misuse, including but not limited to: (1) use of the product for the purpose
other that that it is deigned for, or failure to follow ZyXEL user guide, and (2)
product installation or operation in conditions other than specified by the
standards and safety regulations enforced in the country of operation;
b) repair by anyone except for ZyXEL RMA center or dealers;
c) accident, lightning, water, fire, improper ventilation and other causes that
does not come under ZyXEL control;
d) shipment except for the cases when it is carried our by the RMA;
e) Defects of the system in which the product was operated.
5. This warranty does not infringe upon customer’s legal rights given to him by the
laws currently enforced in his country as well as consumer’s rights toward the
dealer arising from the sale contract.

49
Index
A
accessories 7
advanced menu 19–23
advanced settings menu
access 14
home screen 16
options 17
password 14
user name 14
antenna connectors 4
C
certificates menu 26
connectors (illus.) 4
E
Ethernet ports 4
F
front panel display (illus.) 5
I
installation 8–10
L
LED display (illus.) 5
M
modem setup 8
P
password 14
change 15
password setup 29
phone ports 4
port configuration 20
port forwarding 21
positioning your modem 6
power jack 4
R
regulatory notices 40
reset button 4
router 10
T
telephone (VoIP) settings 11
tools menu 25–29
trigger port 23
troubleshooting 32–37
trusted CAs 28
U
user name 14
V
voice menu 24
VoIP 11
W
Welcome i
Z
ZyXEL warranty 47
50