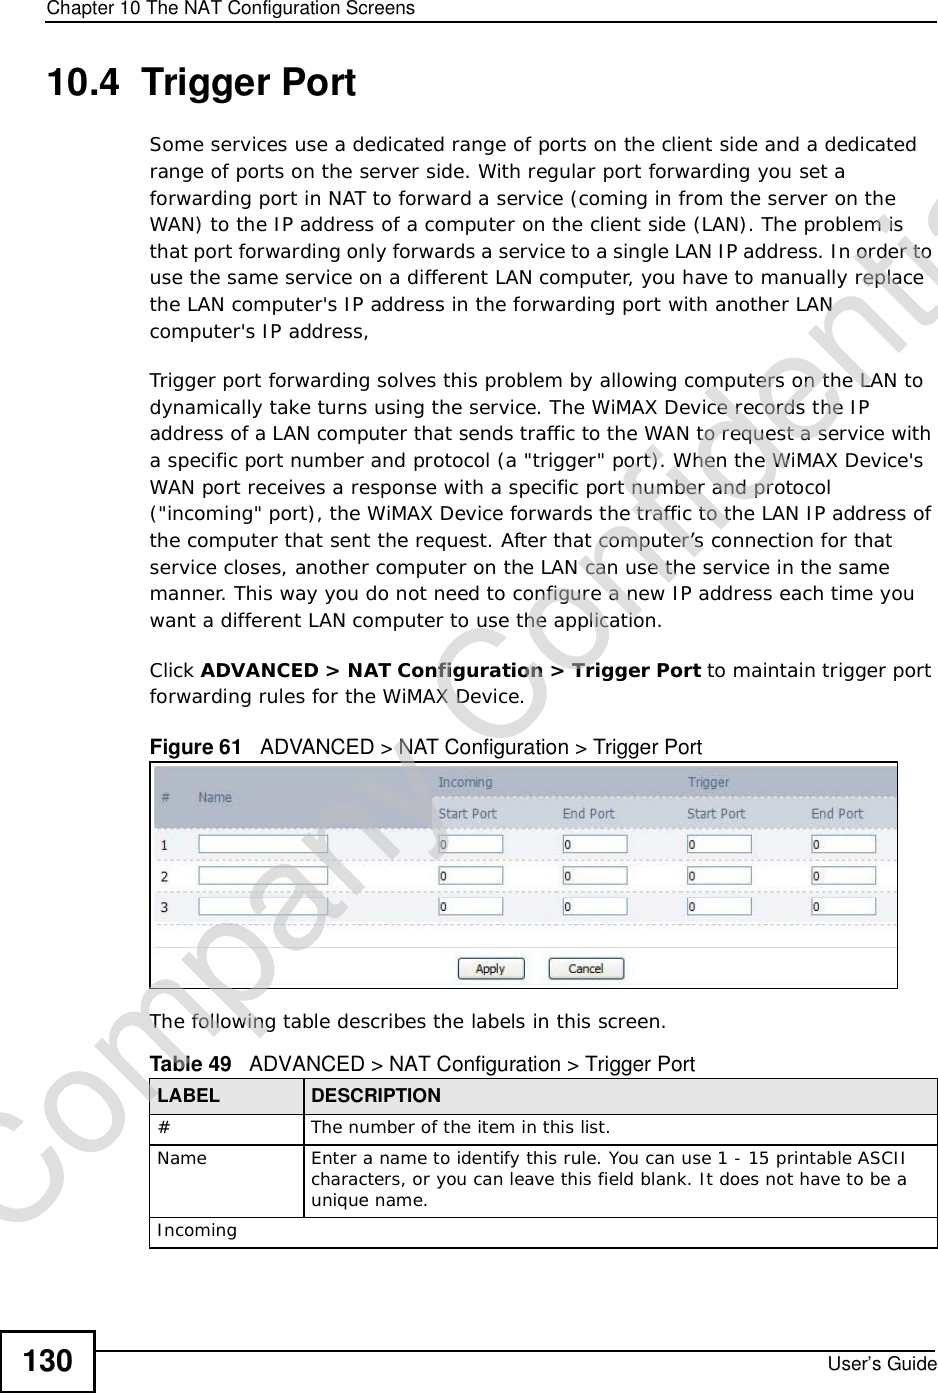
ZyXEL Communications MAX306 2.5GHz MIMO Outdoor CPE User Manual MAX 306HW2 Series UG v1 ed1 2009 06 29
ZyXEL Communications Corporation 2.5GHz MIMO Outdoor CPE MAX 306HW2 Series UG v1 ed1 2009 06 29
Contents
- 1. Manual Part 1
- 2. Manual Part 2
Manual Part 1

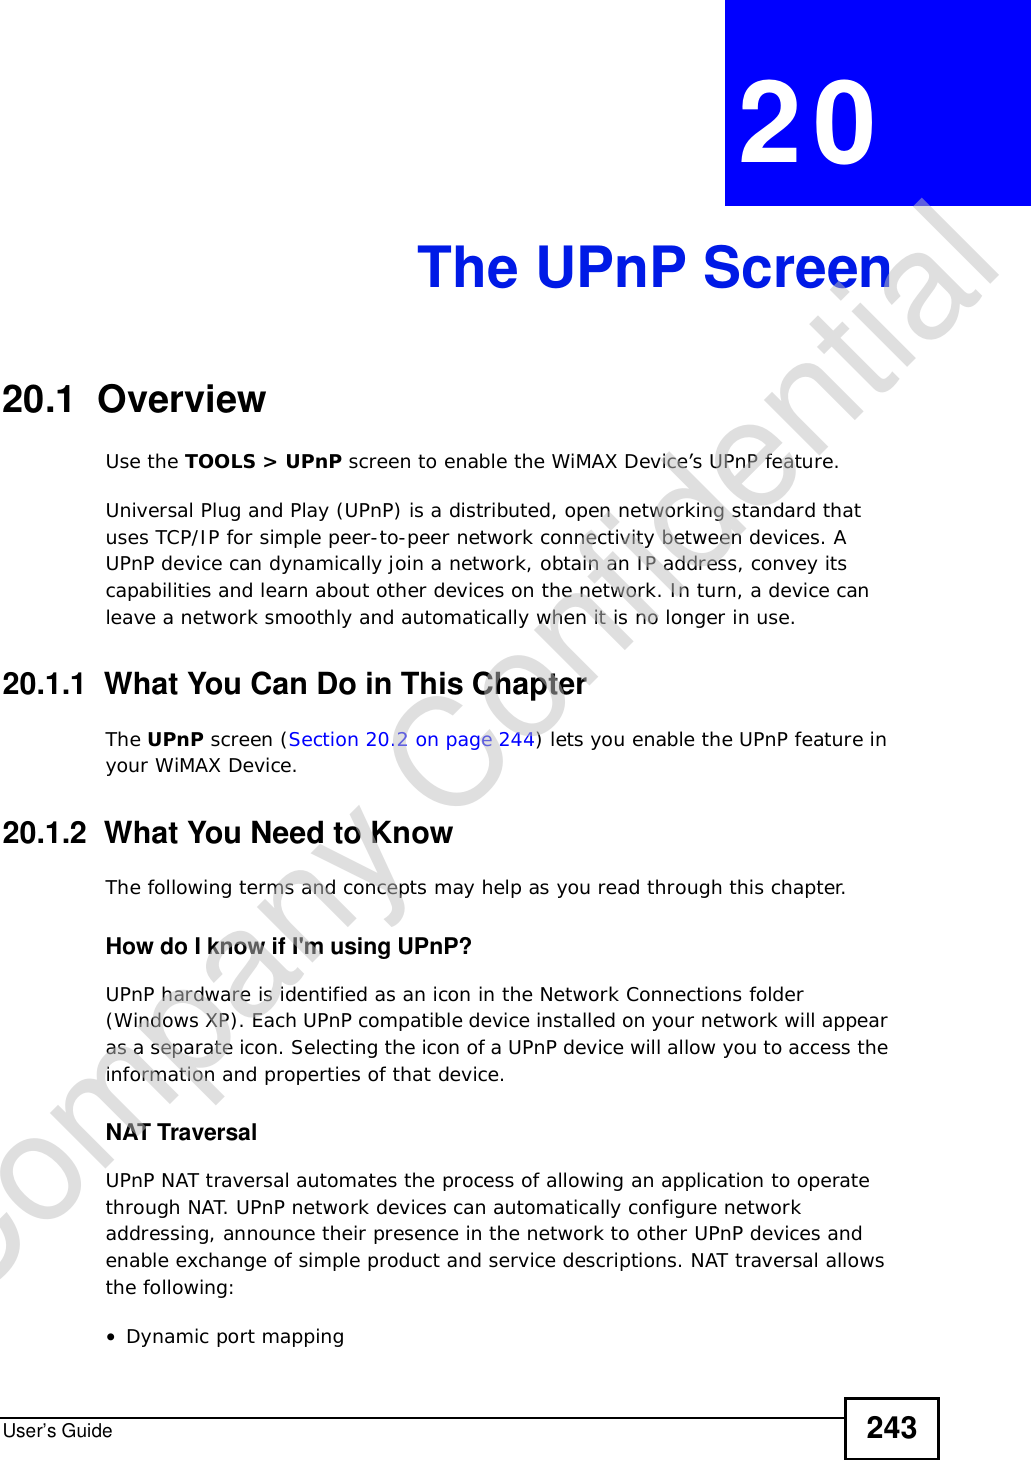
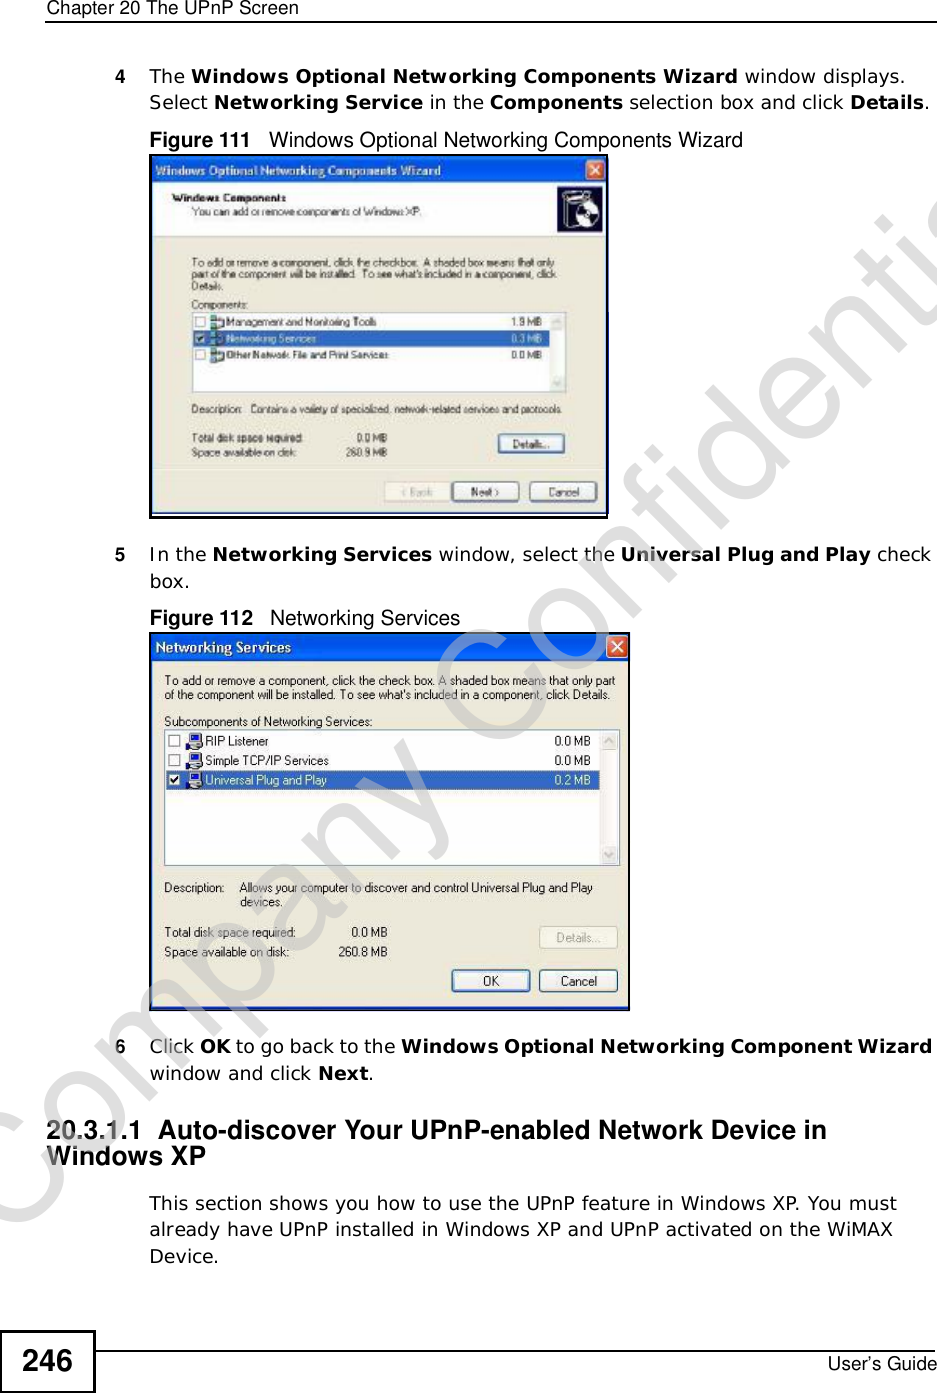
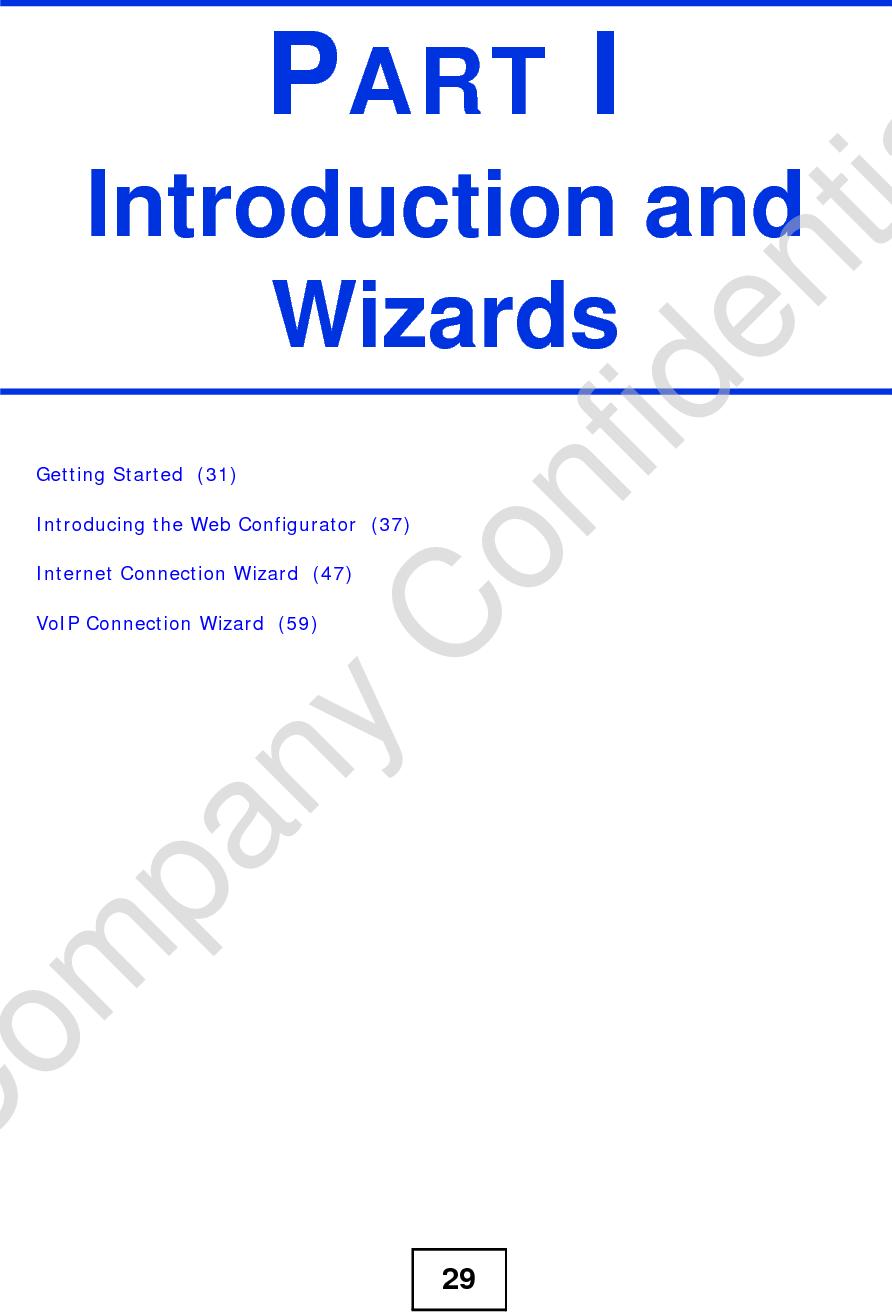
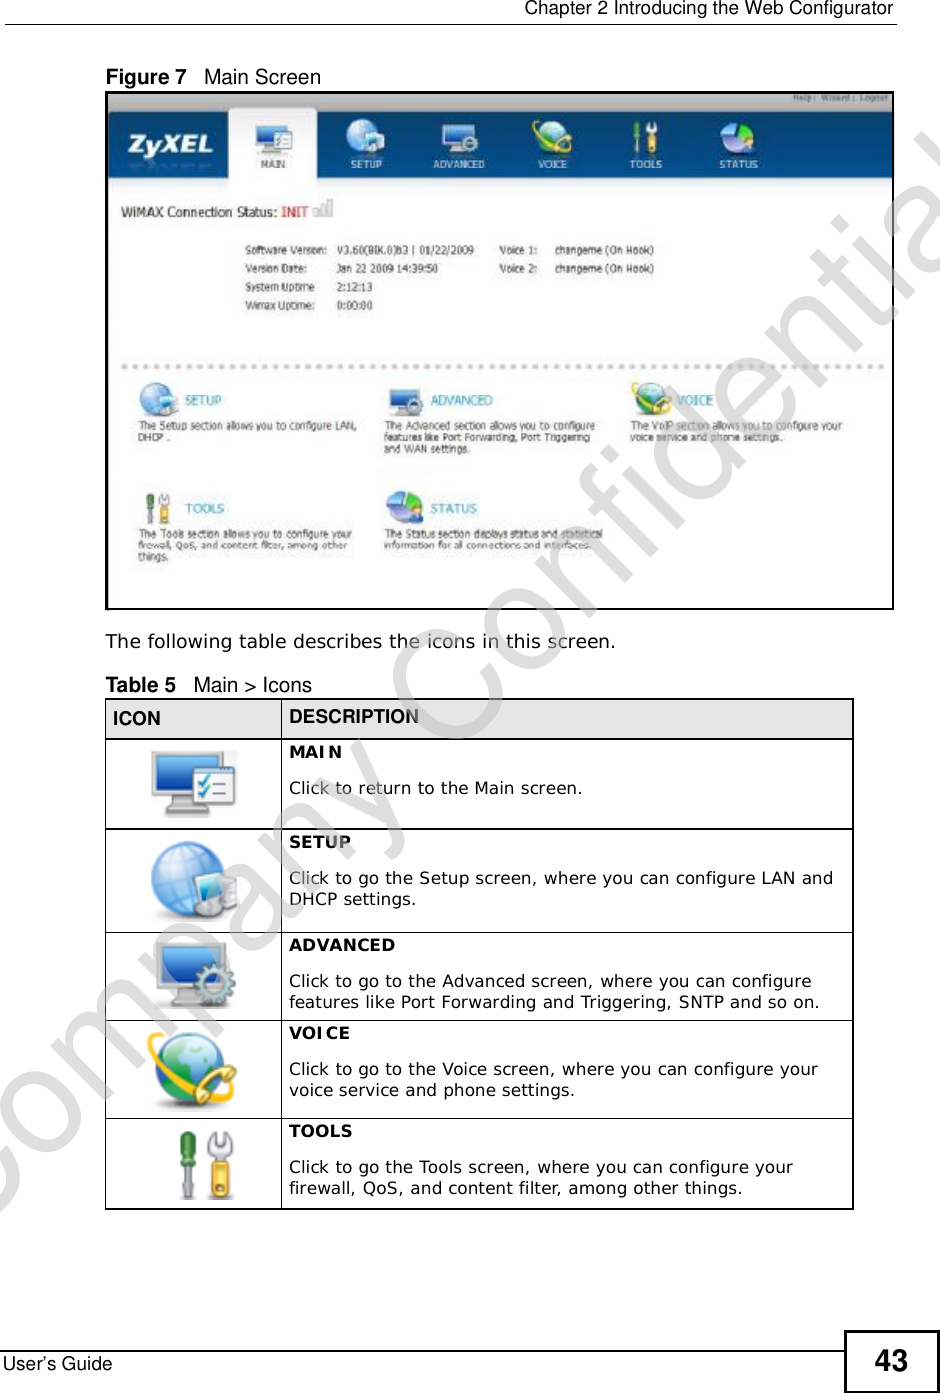
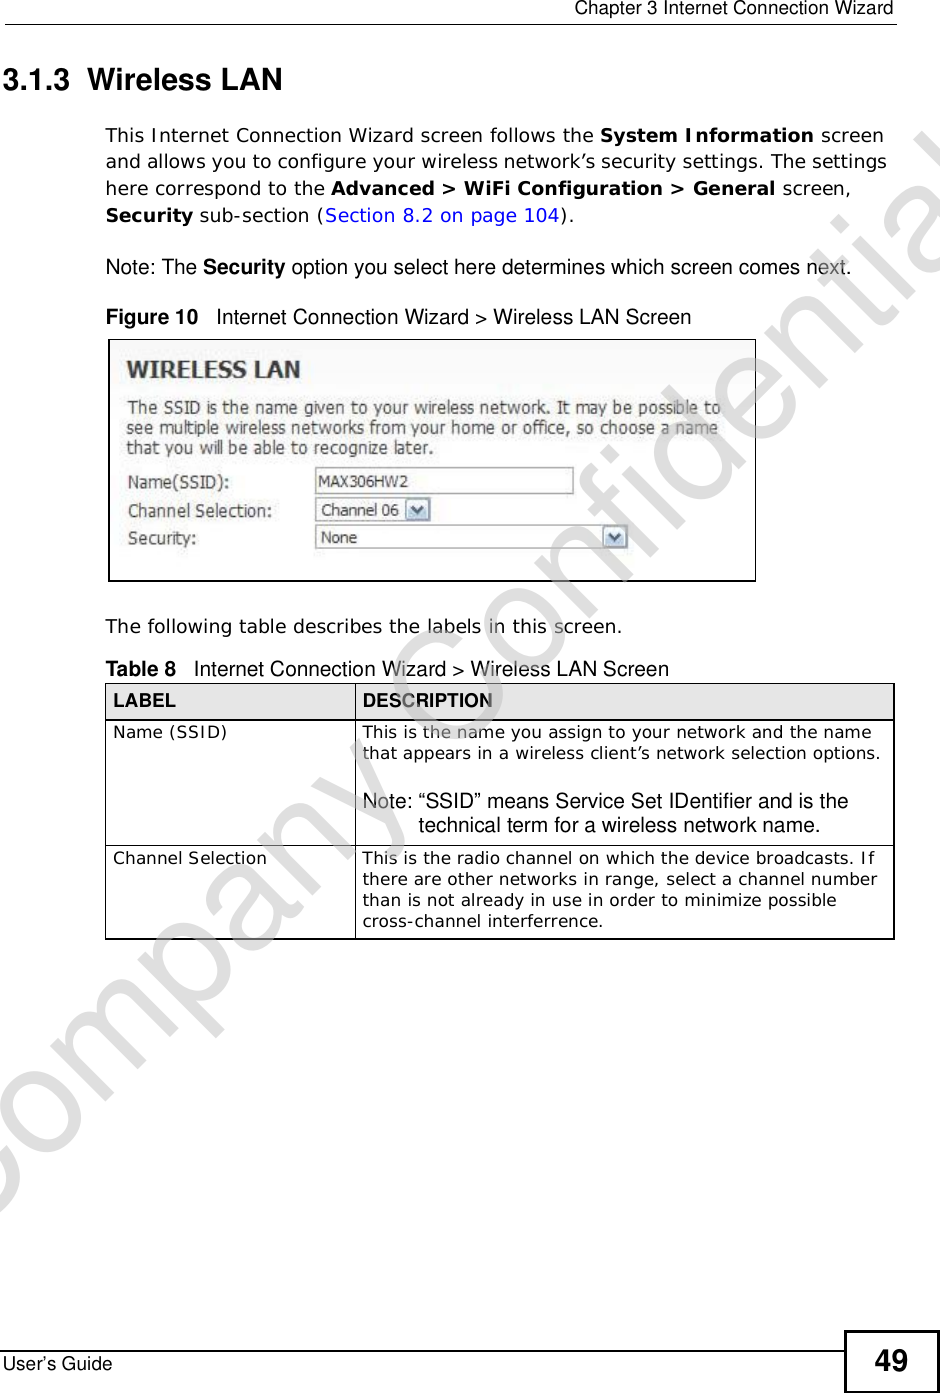
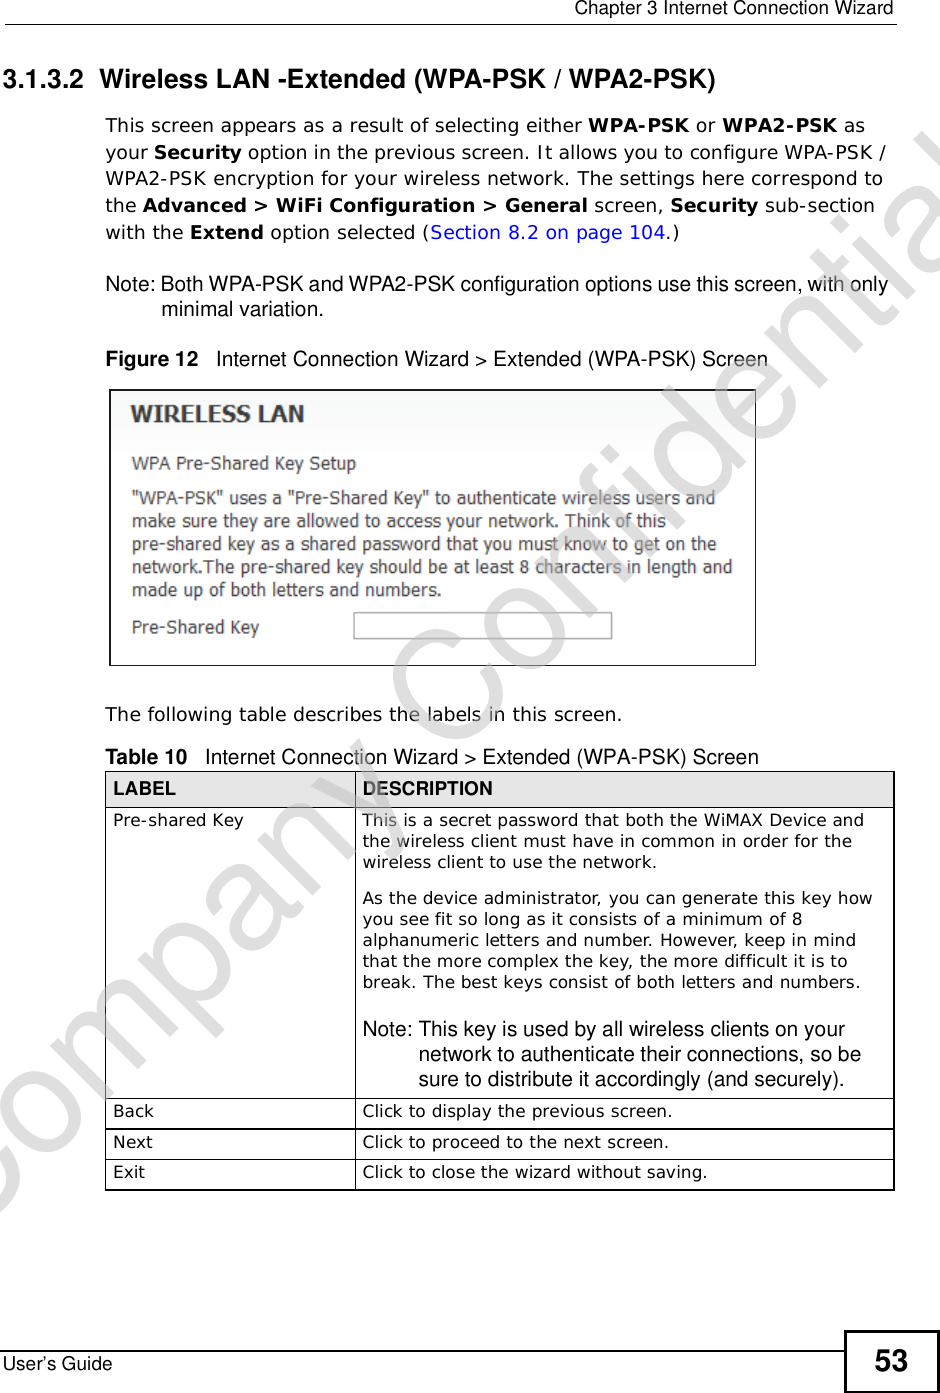
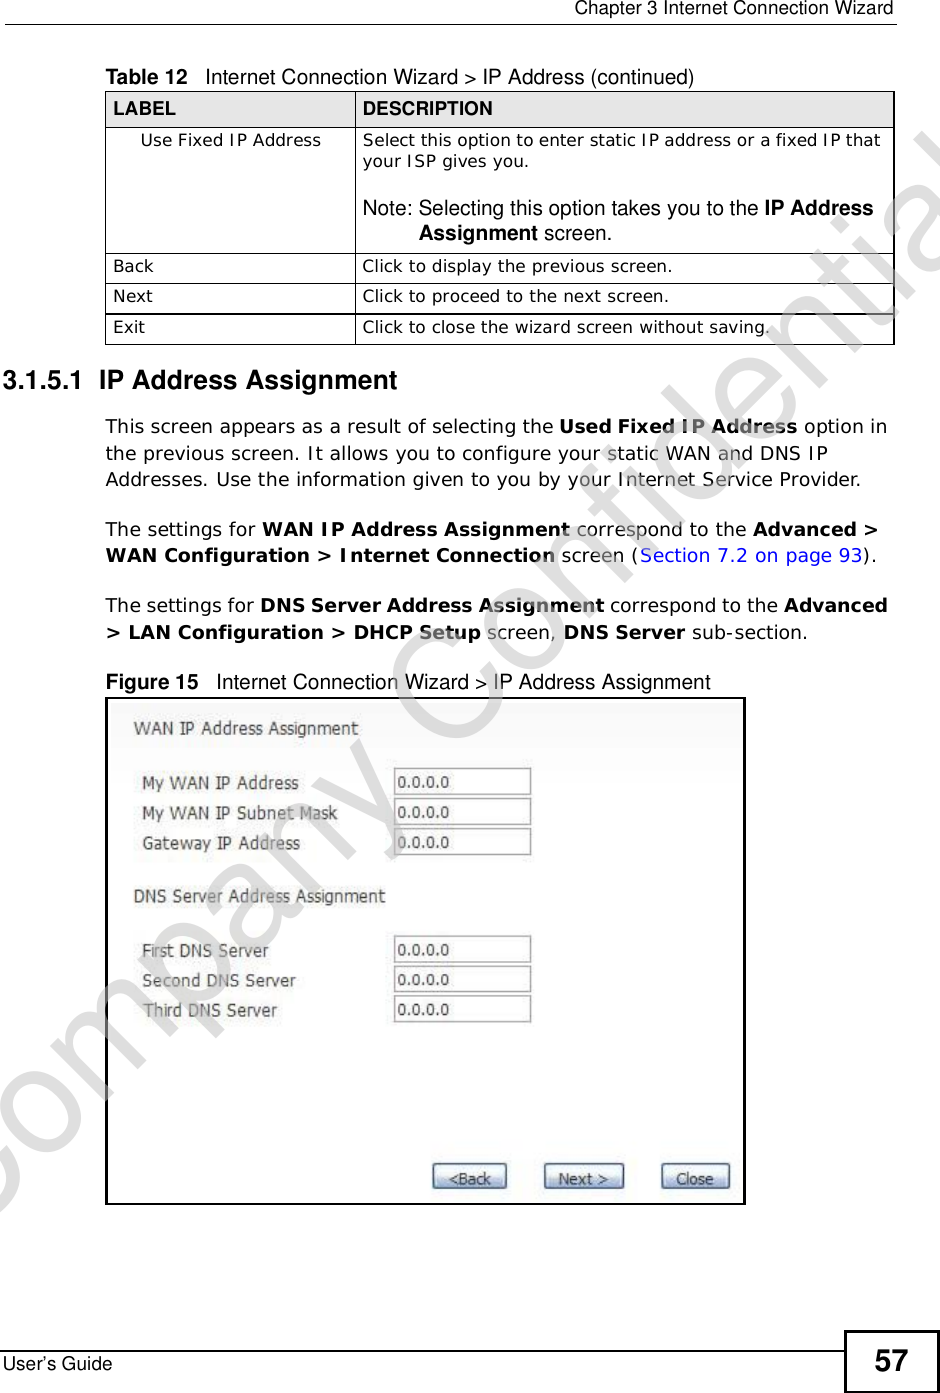
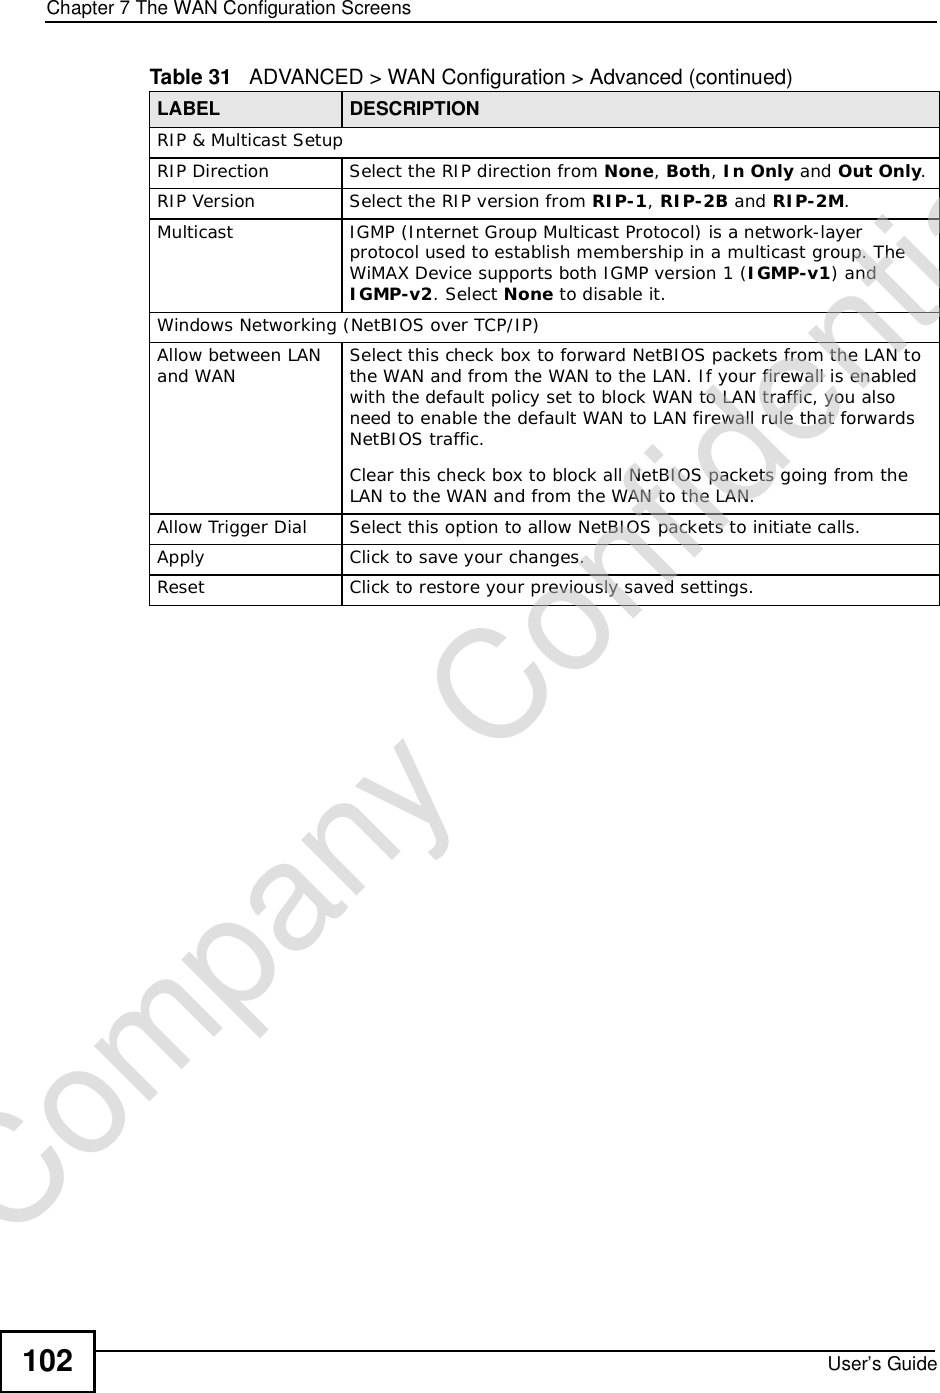
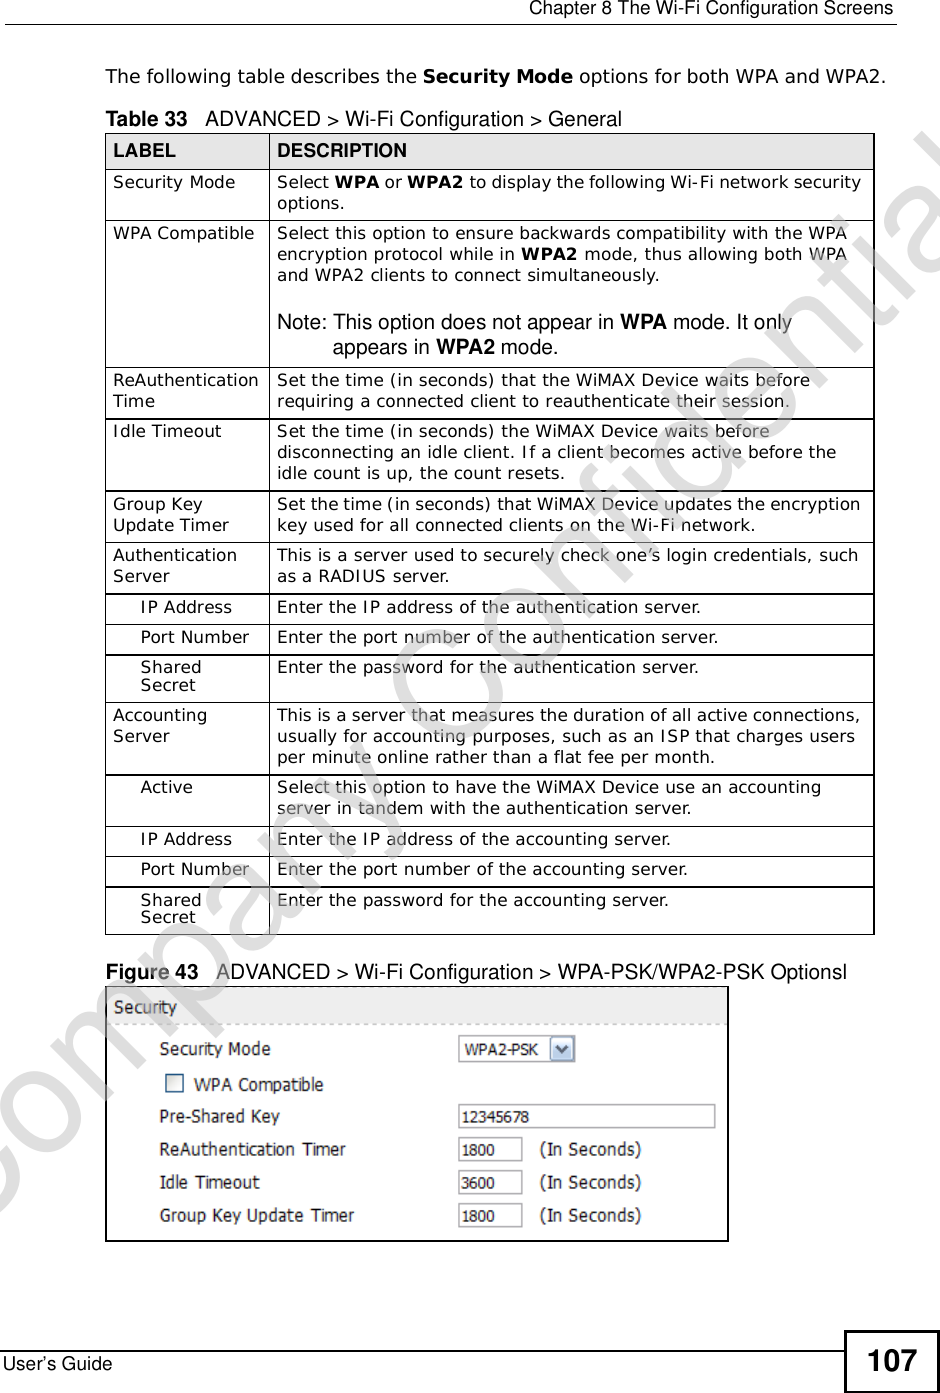
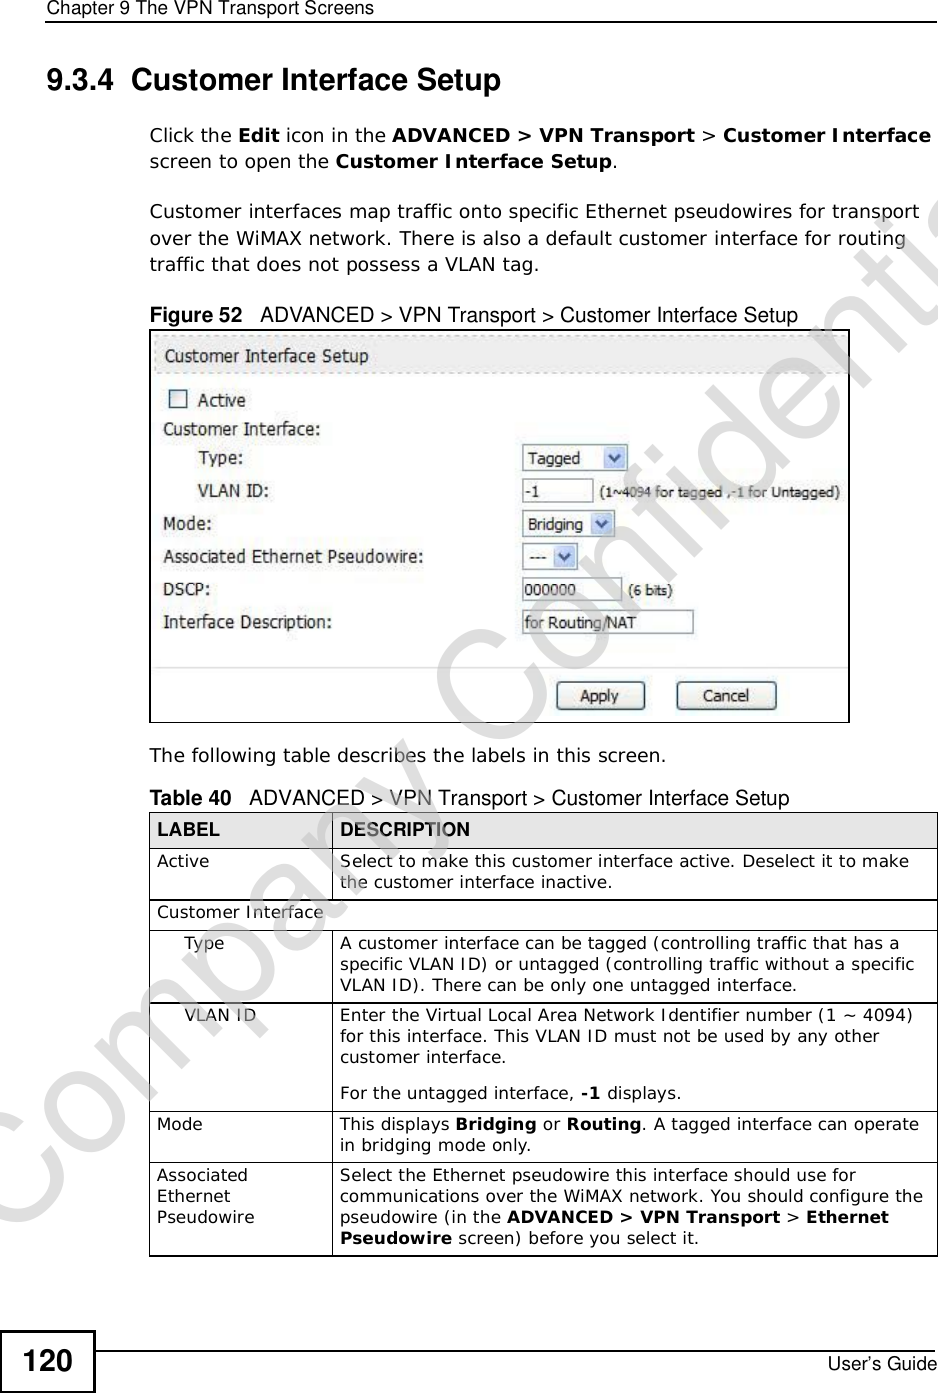
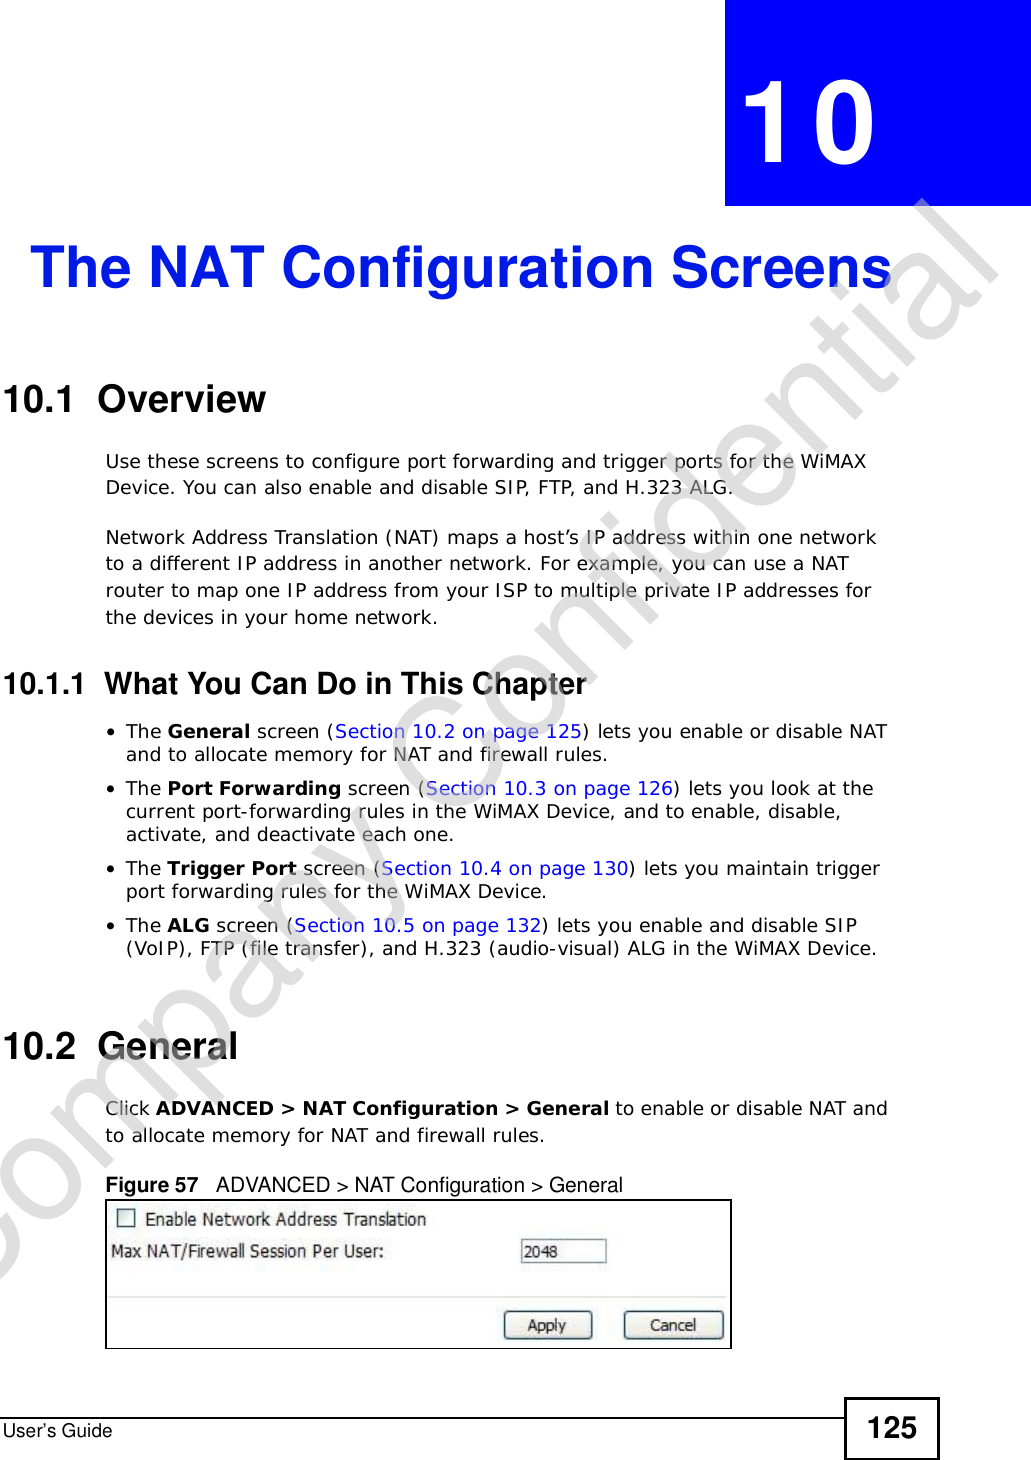
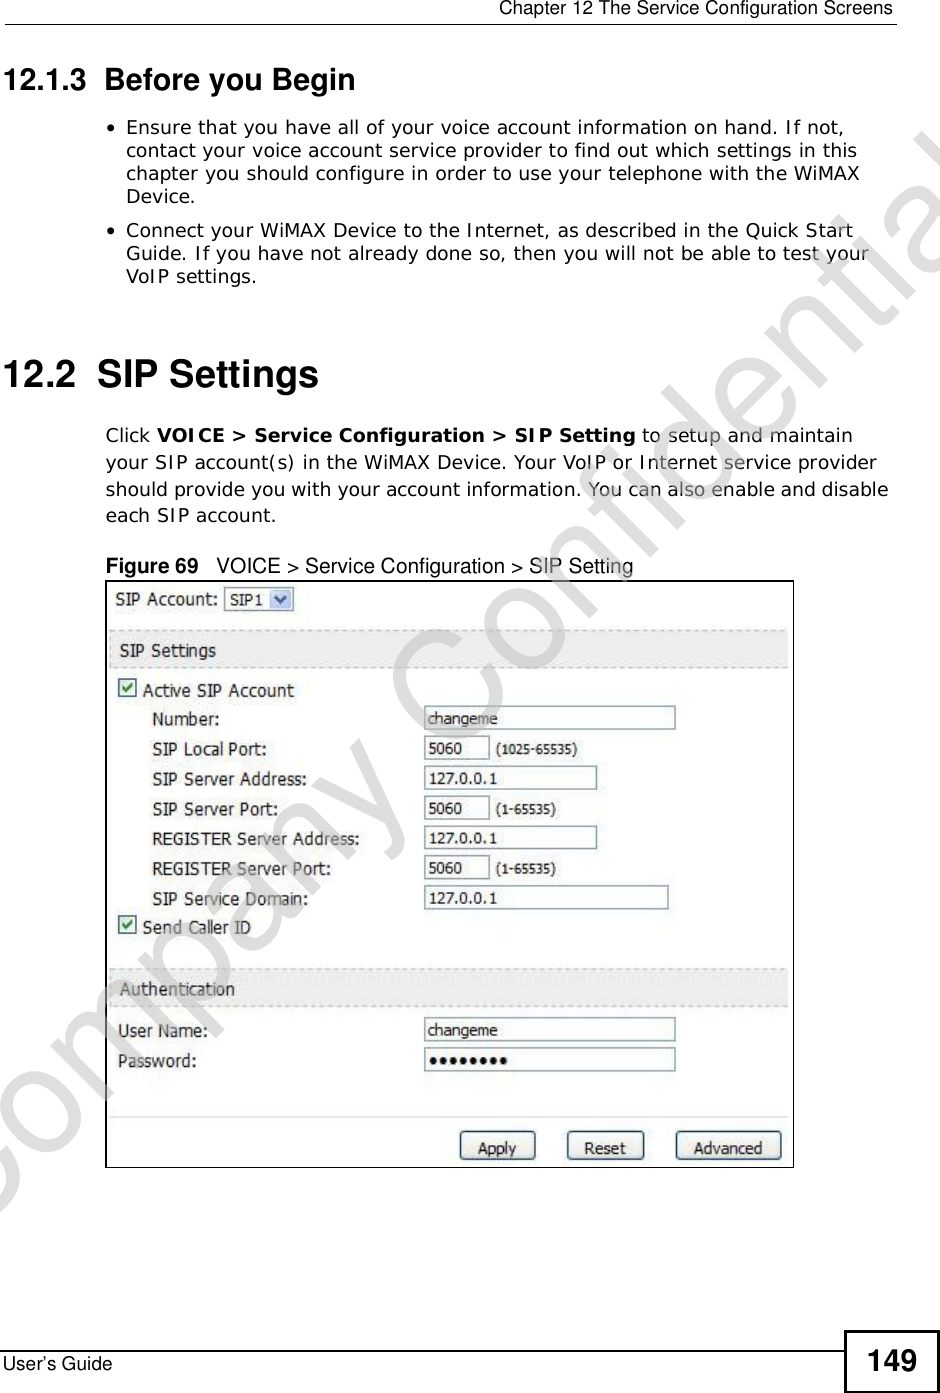
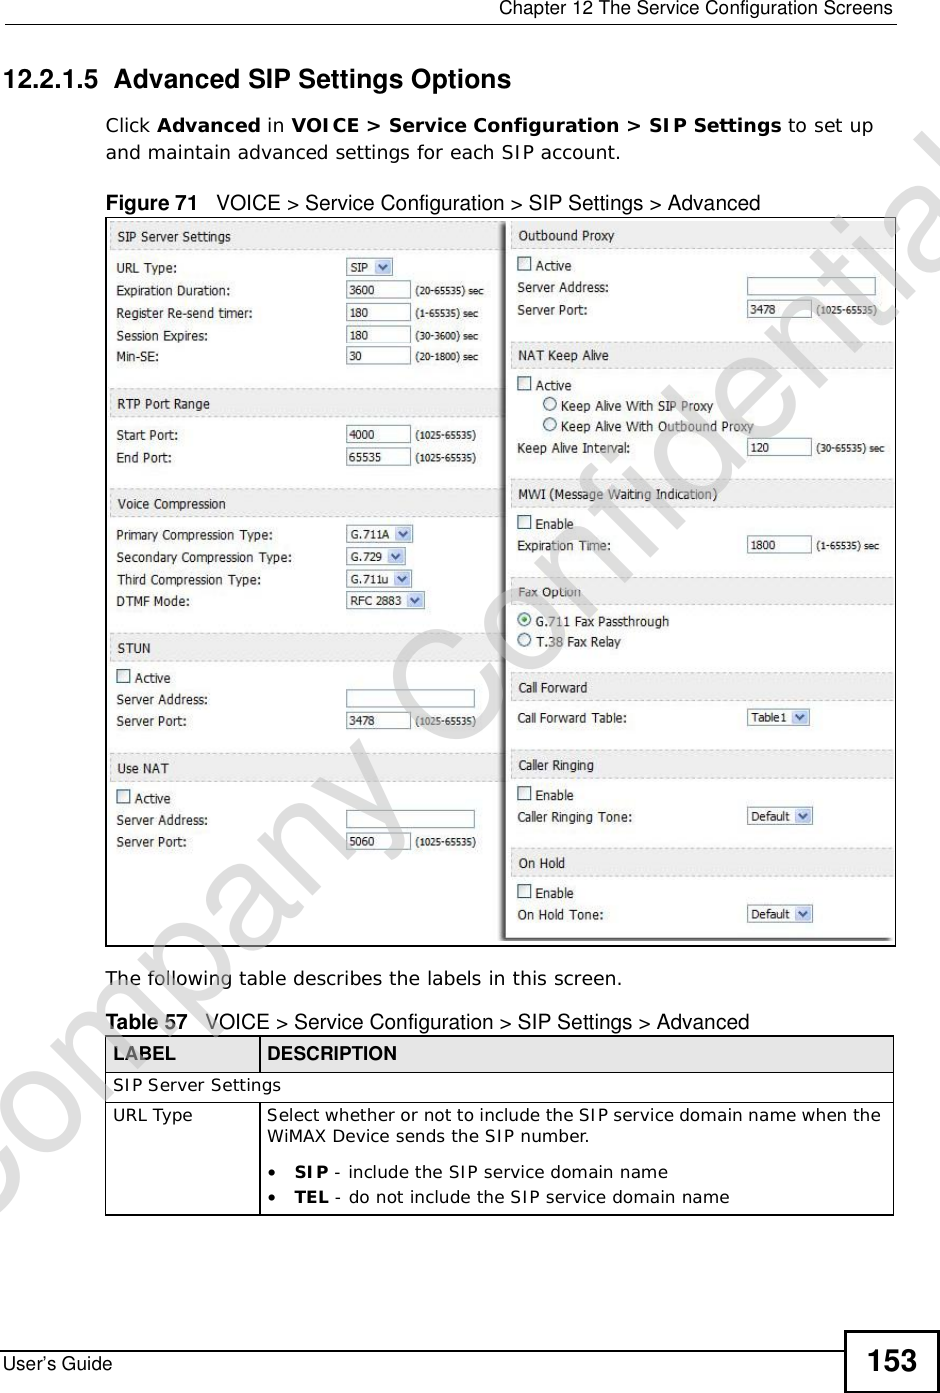
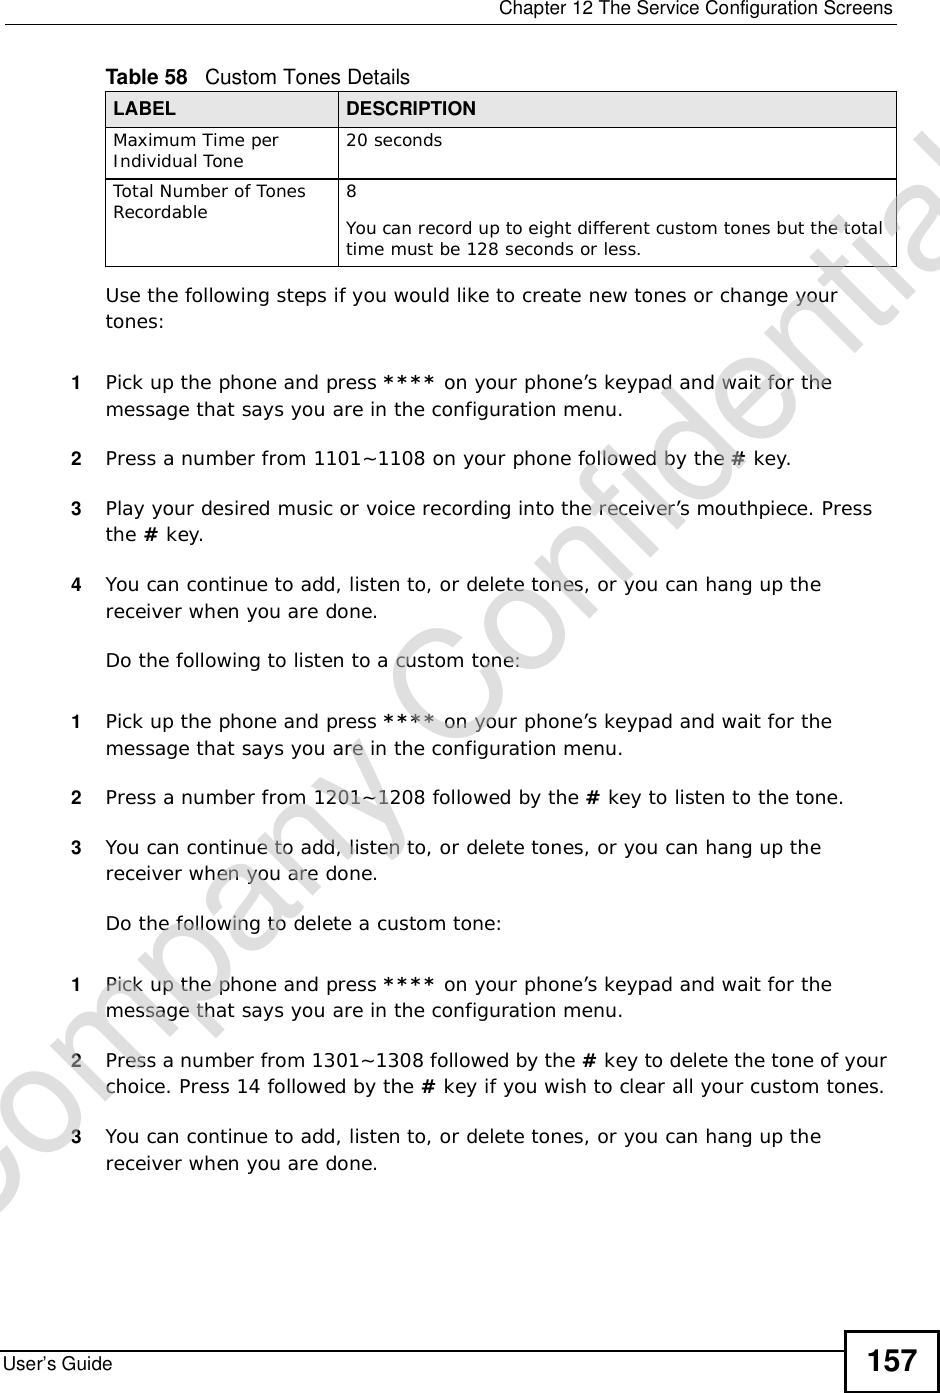
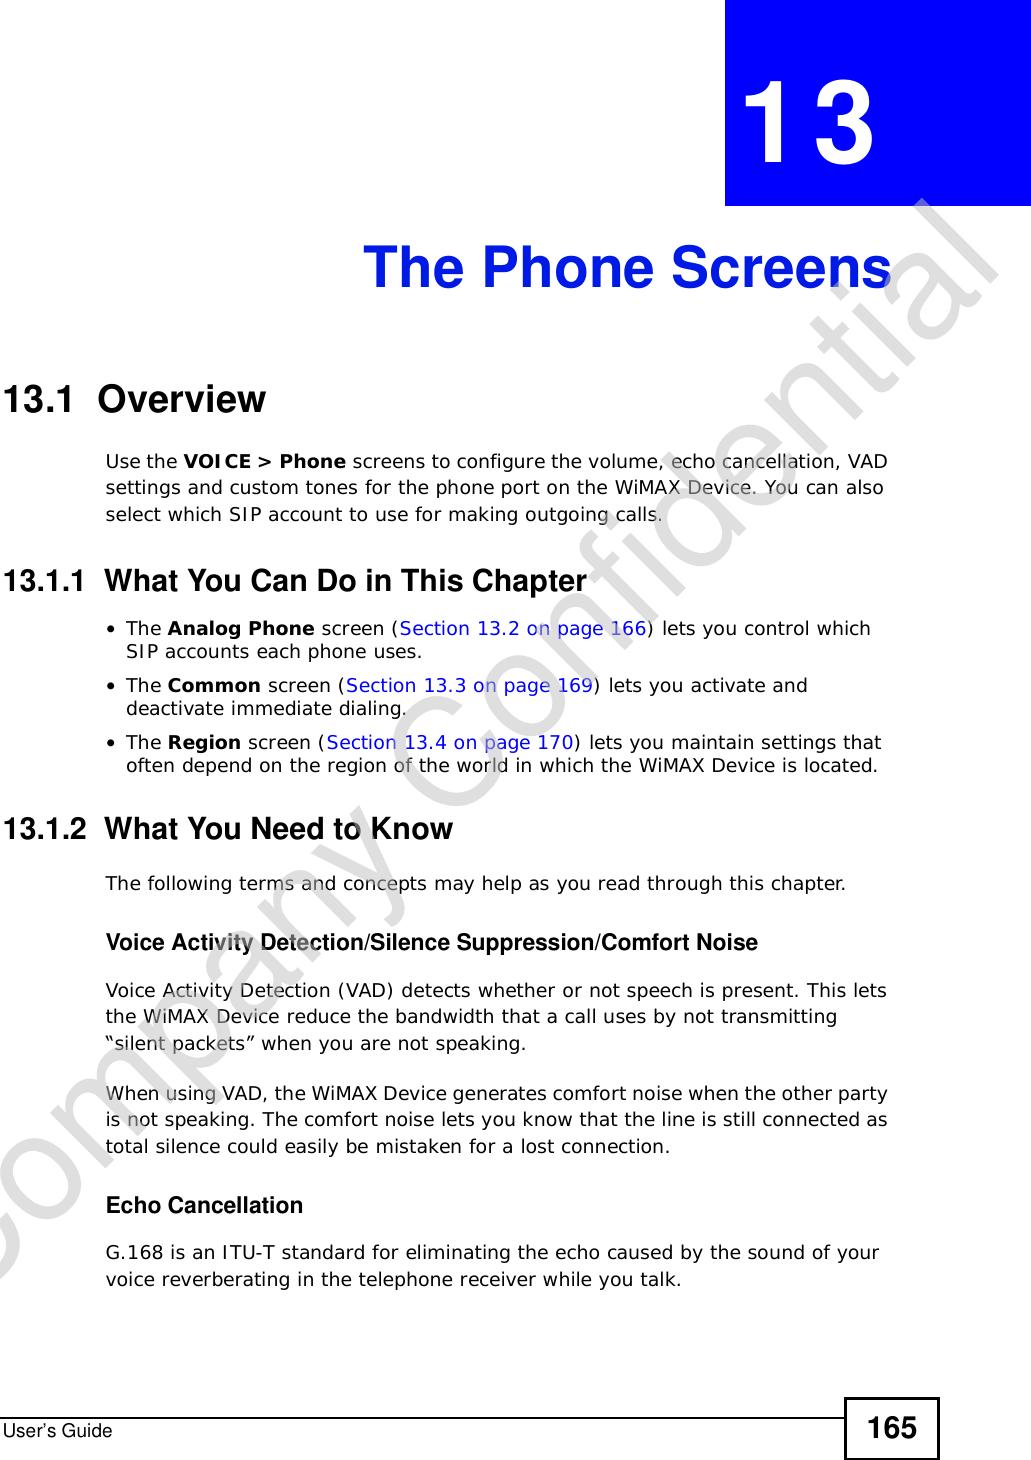
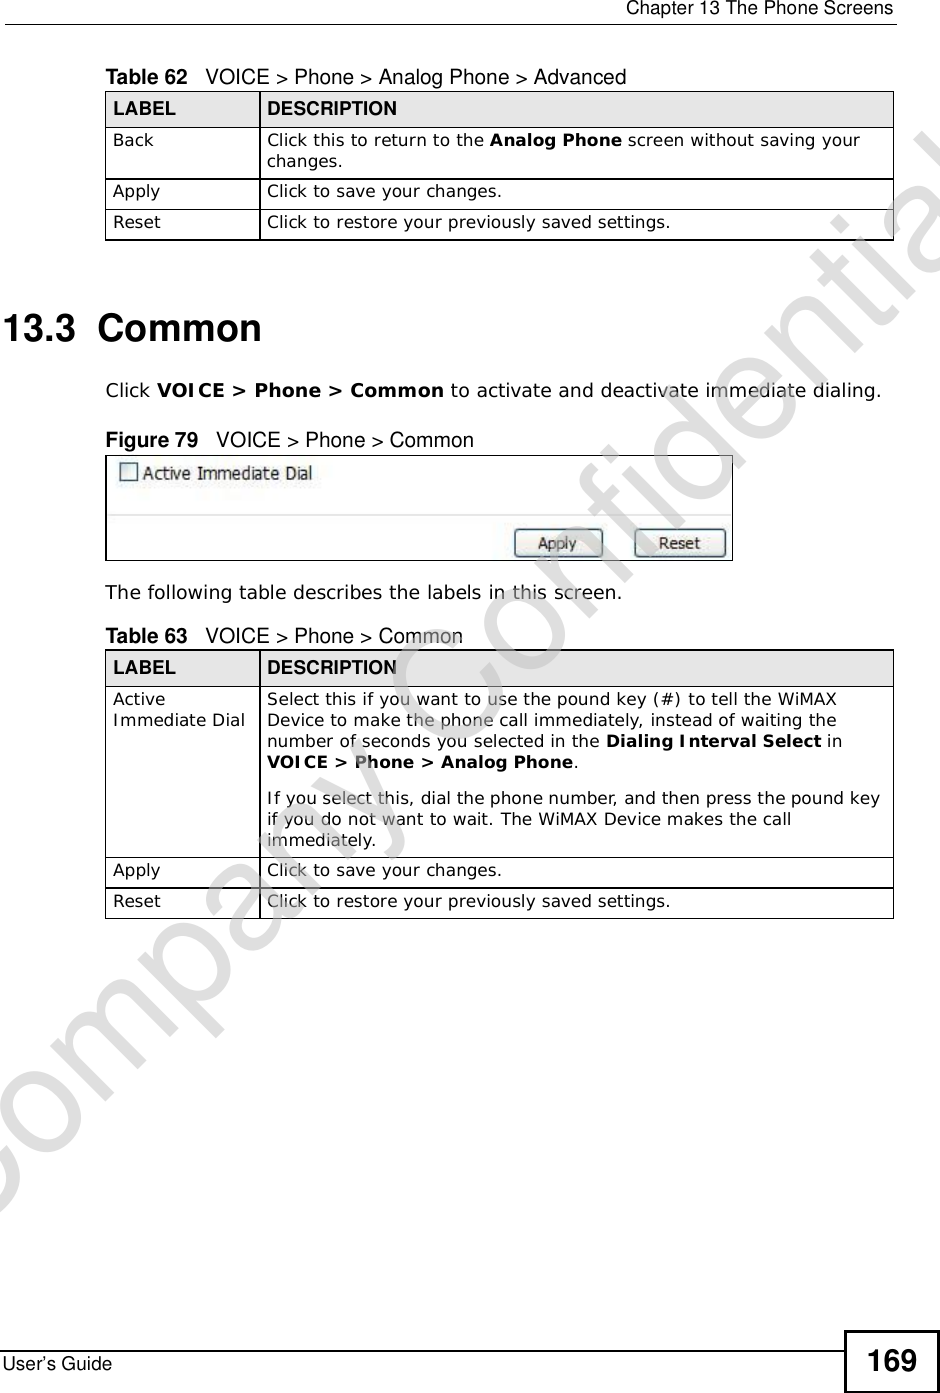
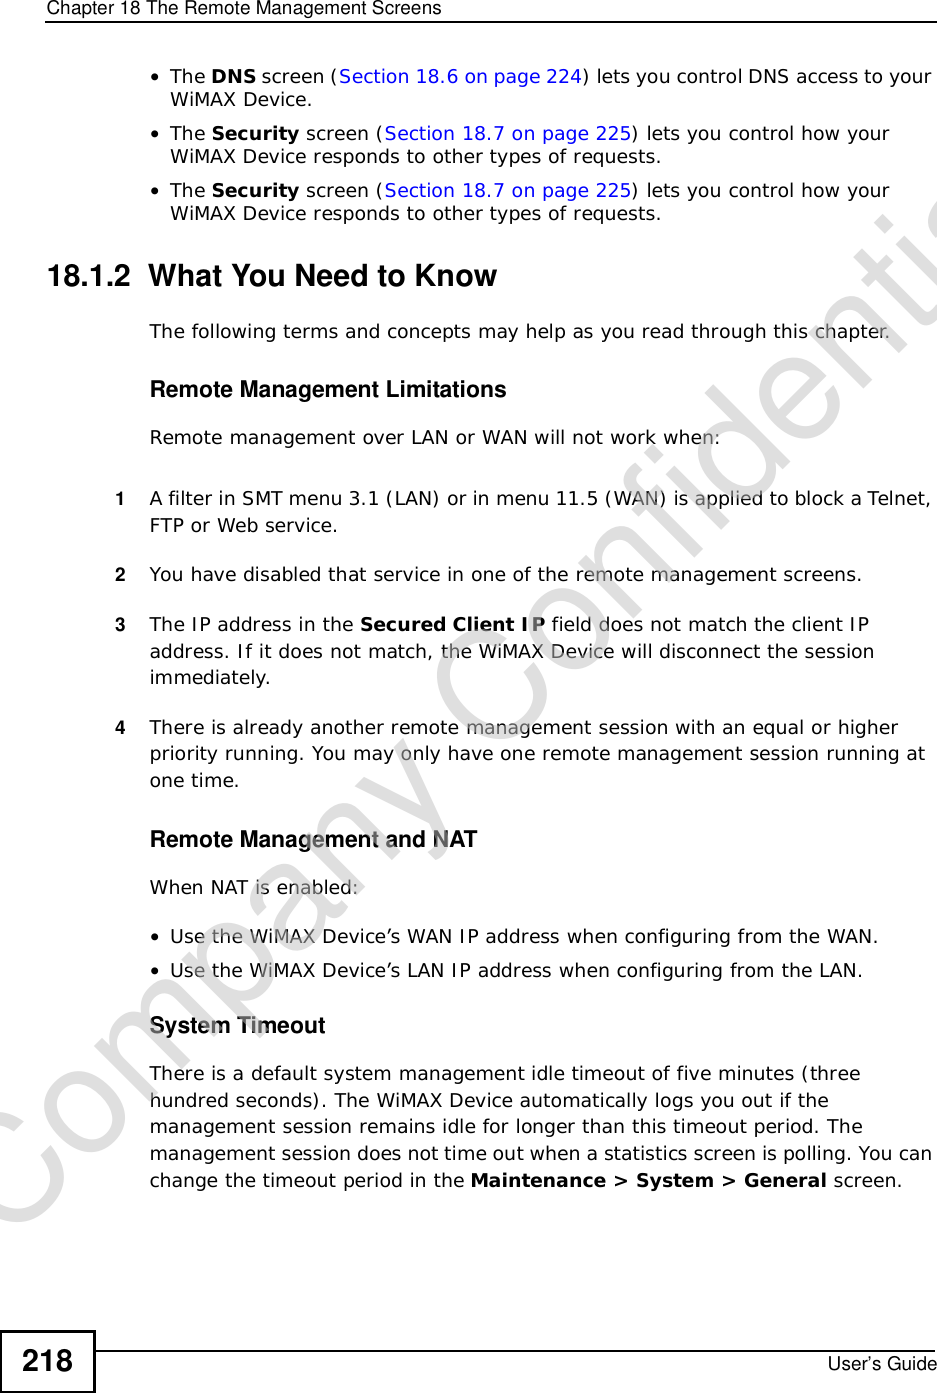
![Document ConventionsUser’s Guide4Document ConventionsWarnings and NotesThese are how warnings and notes are shown in this User’s Guide. Warnings tell you about things that could harm you or your WiMAX Device.Note: Notes tell you other important information (for example, other things you may need to configure or helpful tips) or recommendations.Syntax Conventions•This product may be referred to as the “WiMAX Device”, the “ZyXEL Device”, the “device”, the “system” or the “product” in this User’s Guide.•Product labels, screen names, field labels and field choices are all in bold font.•A key stroke is denoted by square brackets and uppercase text, for example, [ENTER] means the “enter” or “return” key on your keyboard.•“Enter” means for you to type one or more characters and then press the [ENTER] key. “Select” or “choose” means for you to use one of the predefined choices.•A right angle bracket ( > ) within a screen name denotes a mouse click. For example, TOOLS > Logs > Log Settings means you first click Tools in the navigation panel, then the Logs sub menu and finally the Log Settings tab to get to that screen.•Units of measurement may denote the “metric” value or the “scientific” value. For example, “k” for kilo may denote “1000” or “1024”, “M” for mega may denote “1000000” or “1048576” and so on.•“e.g.,” is a shorthand for “for instance”, and “i.e.,” means “that is” or “in other words”.Company Confidential](https://usermanual.wiki/ZyXEL-Communications/MAX306.Manual-Part-1/User-Guide-1135851-Page-4.png)
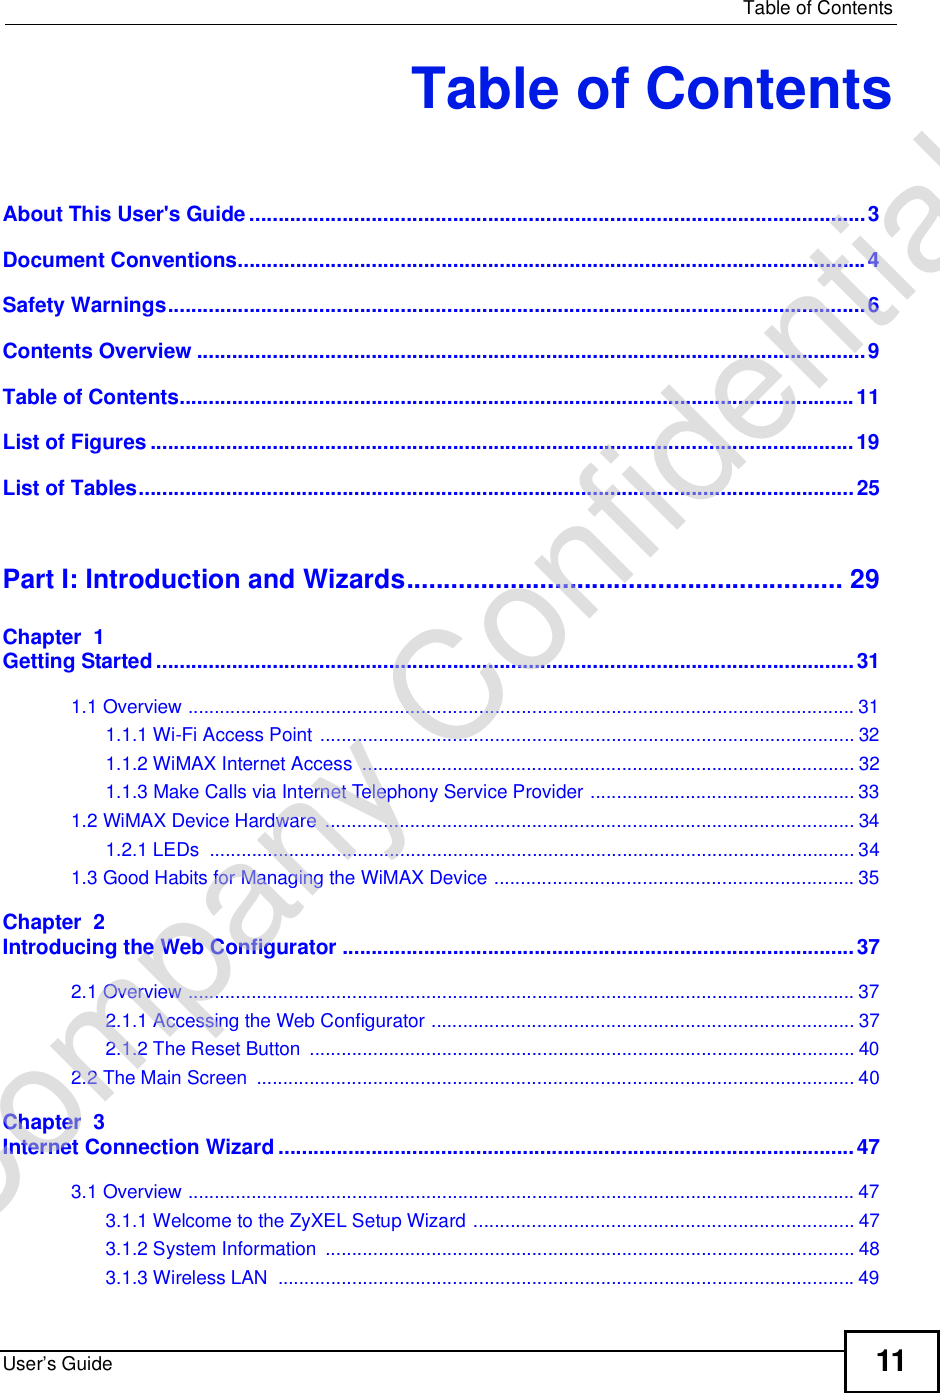
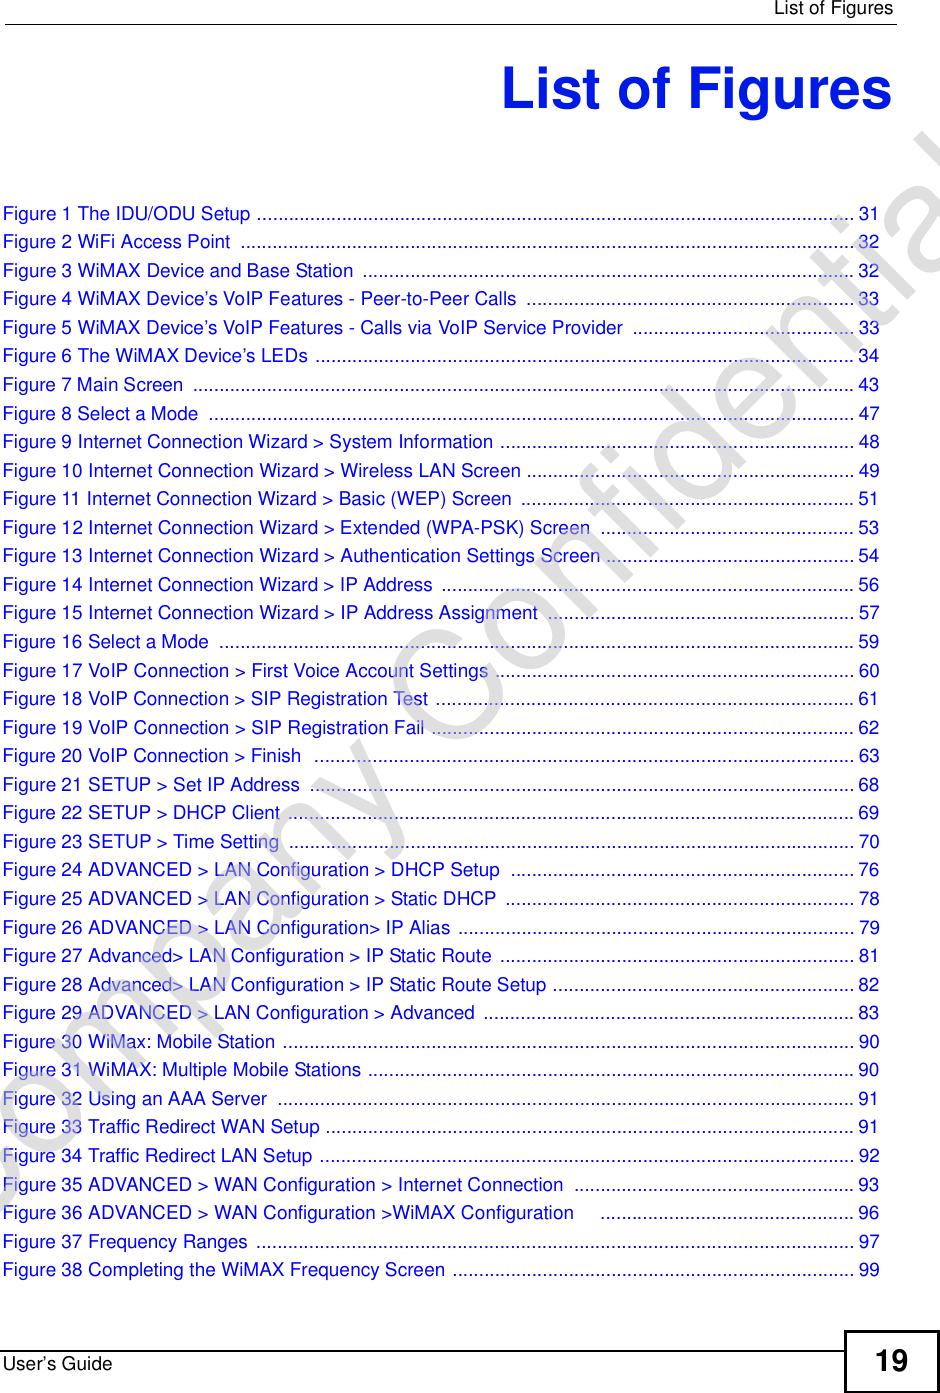
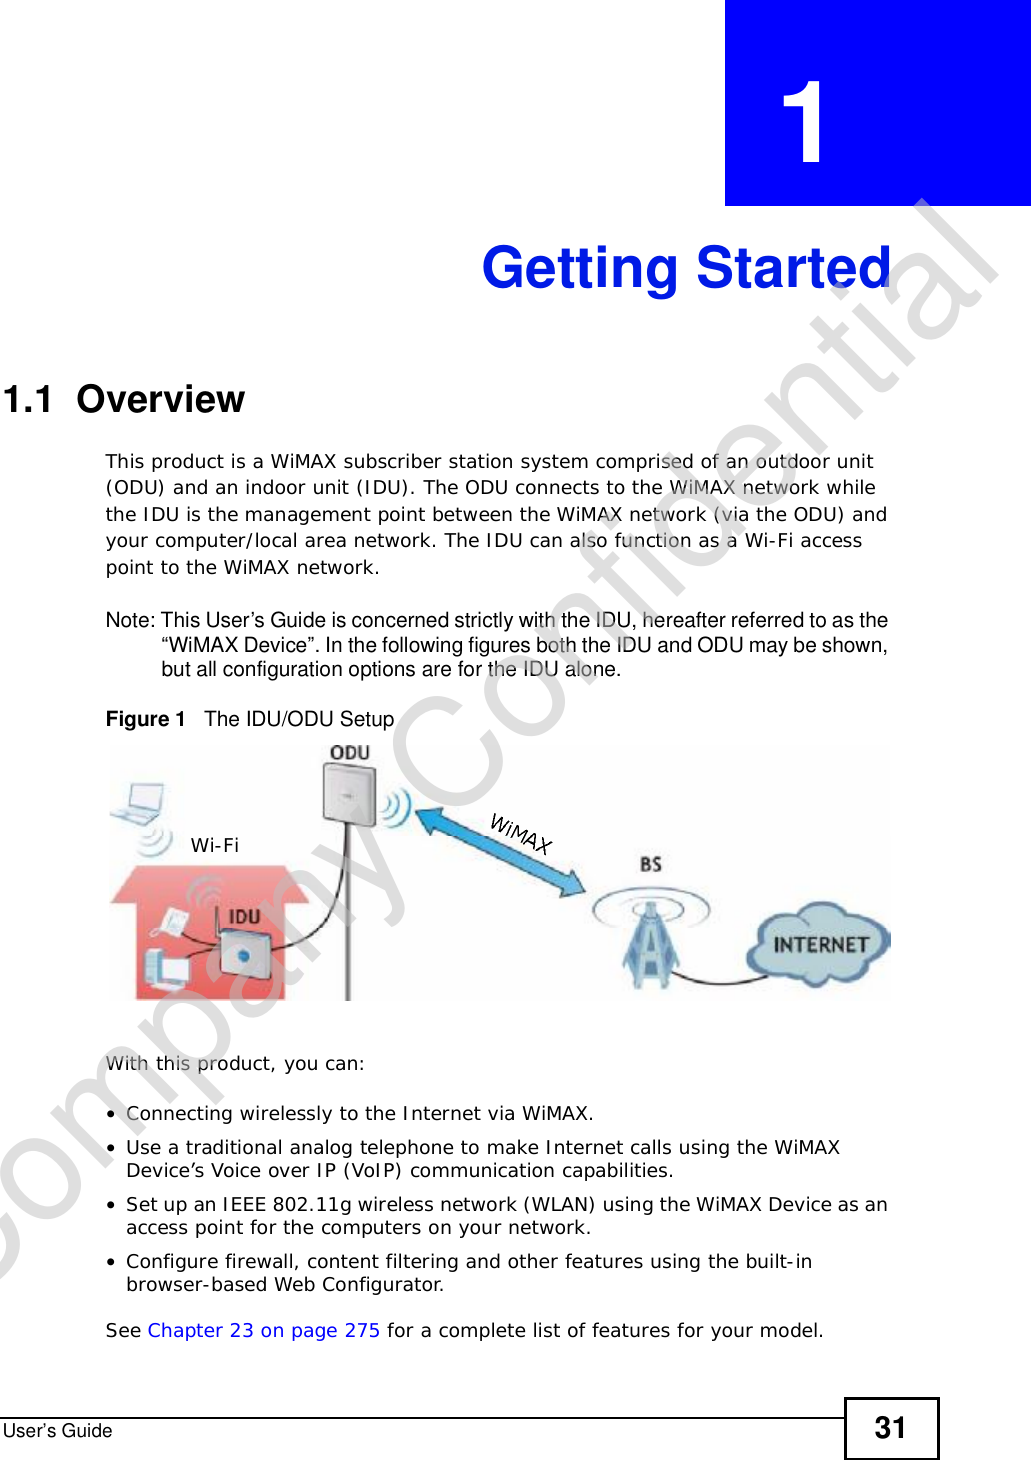

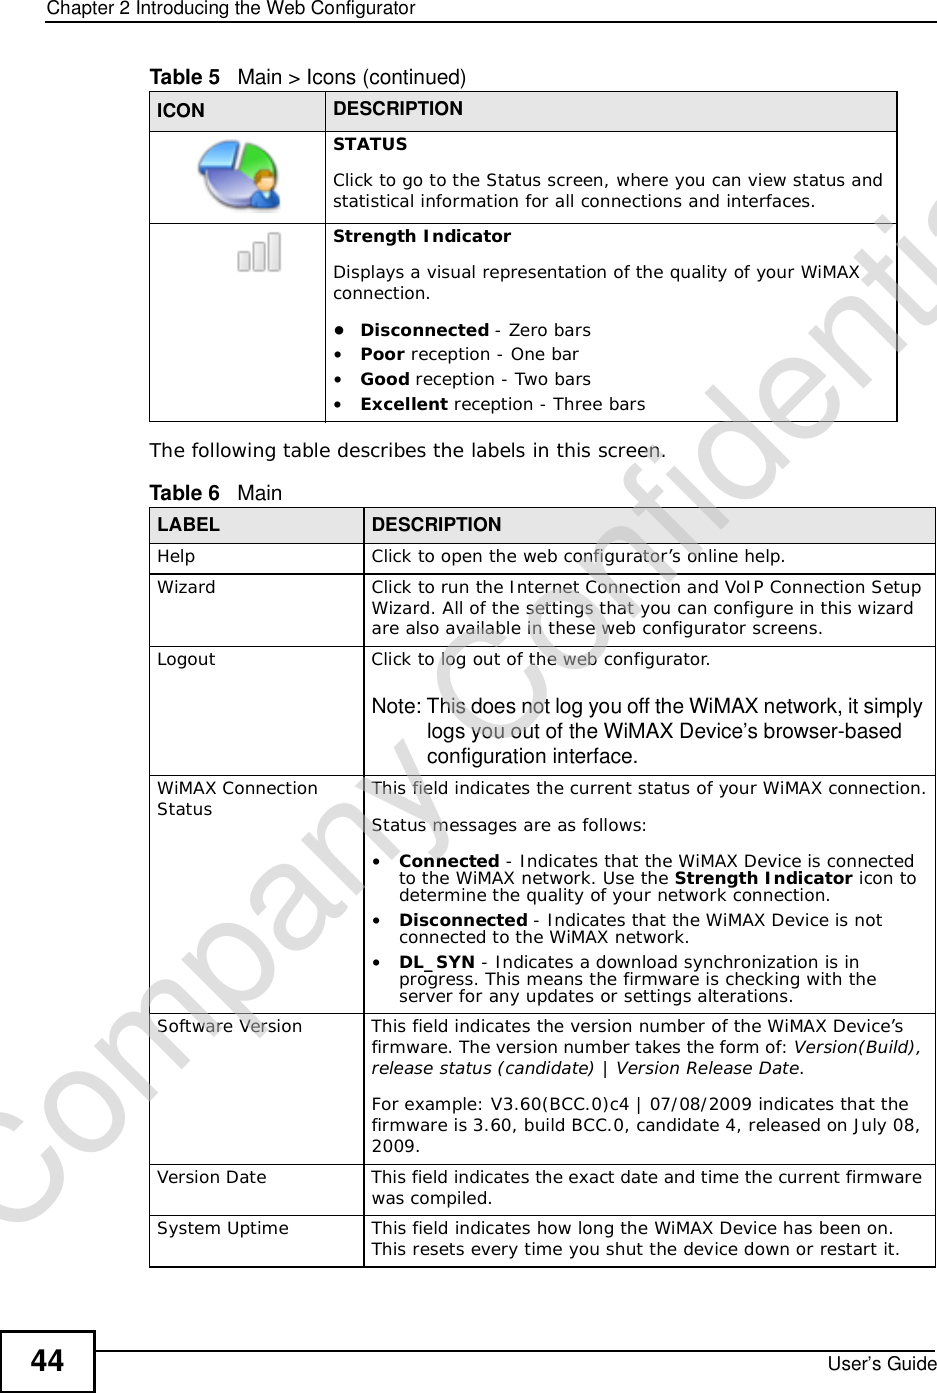


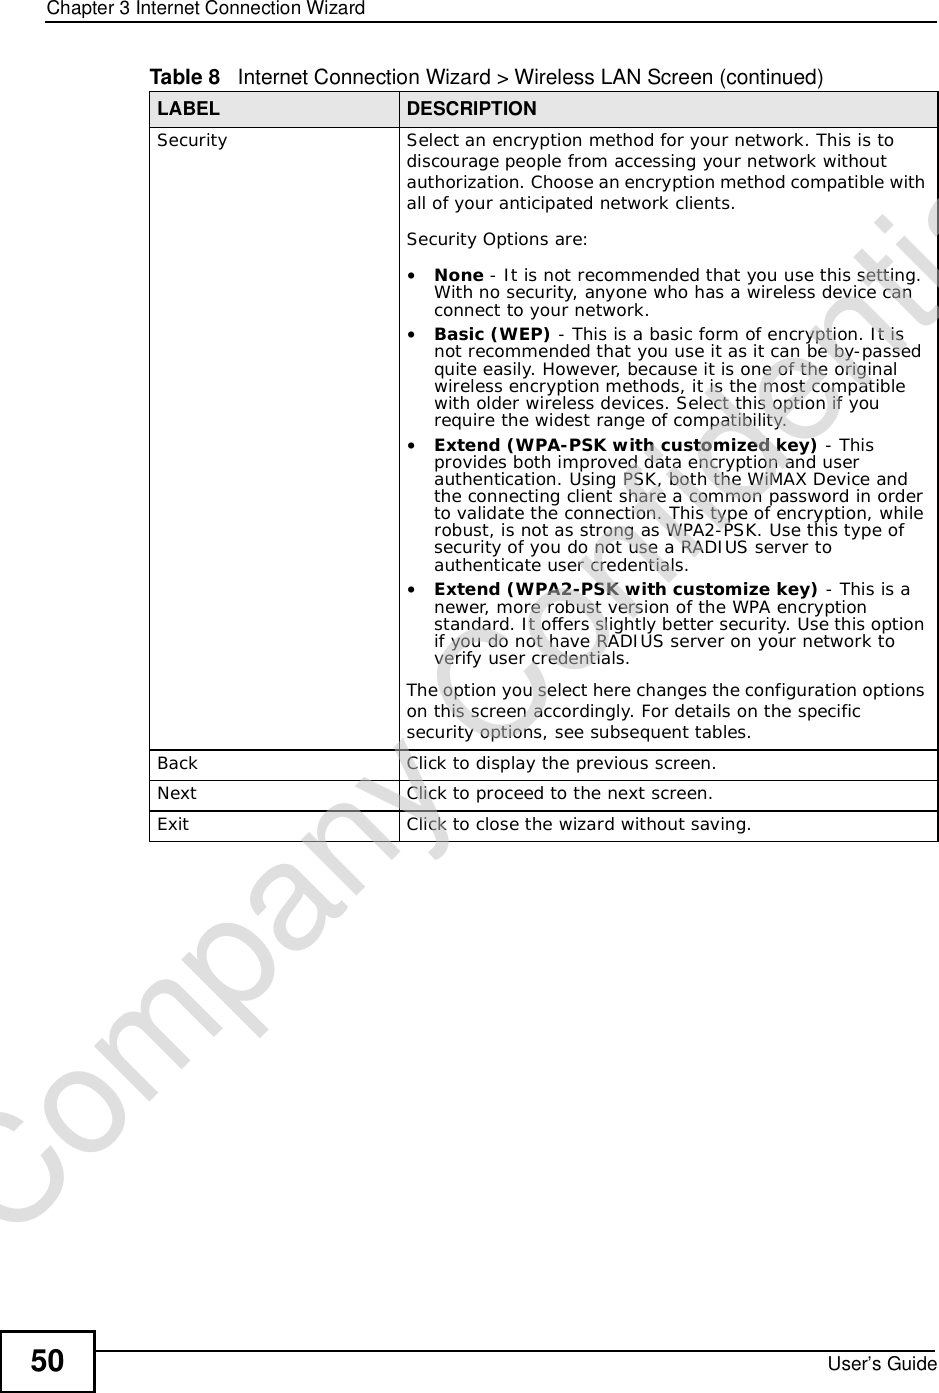
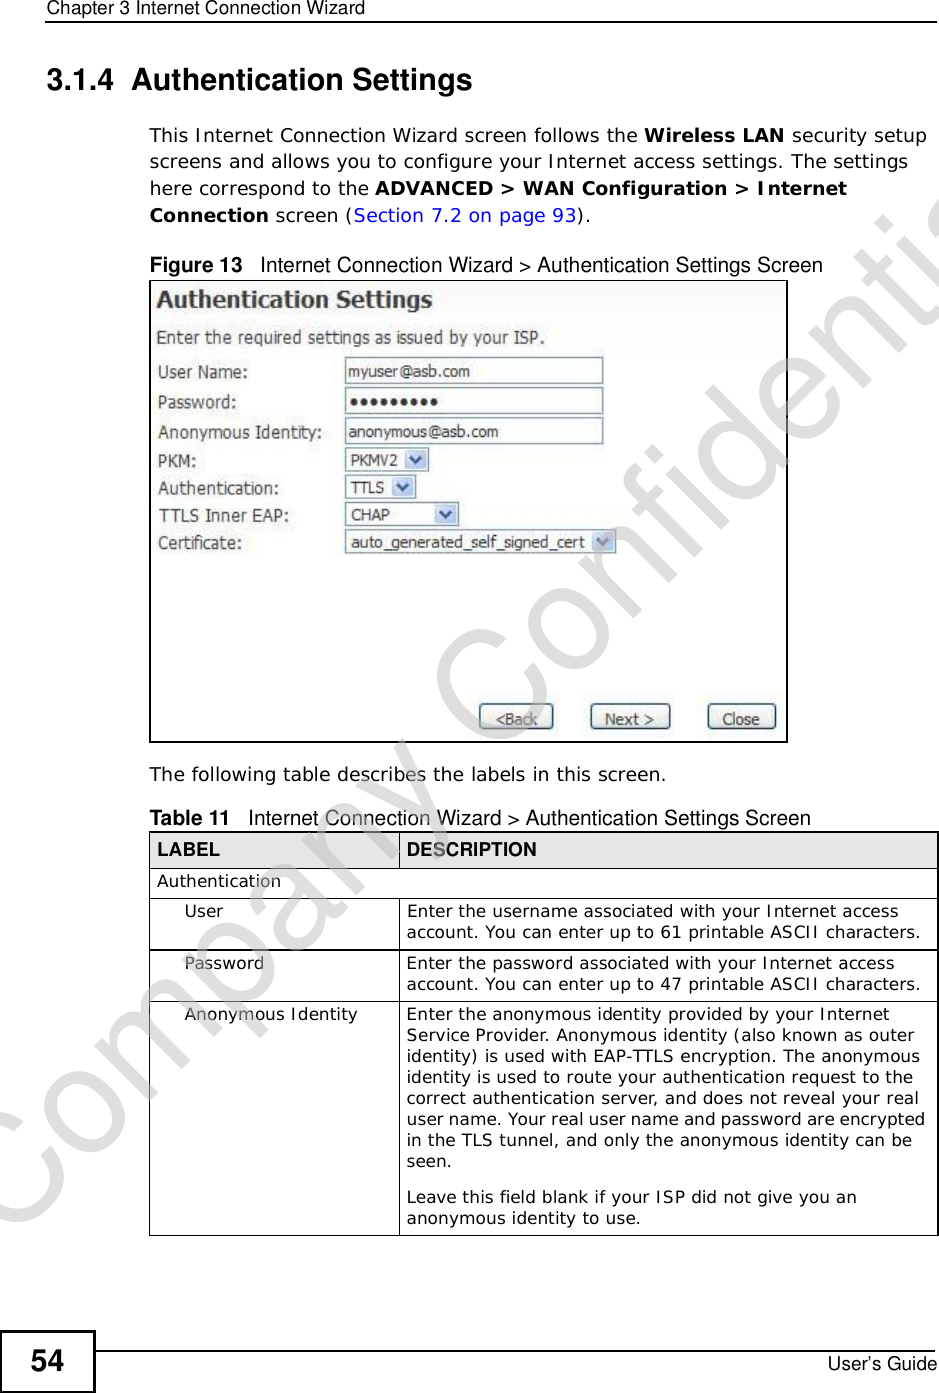
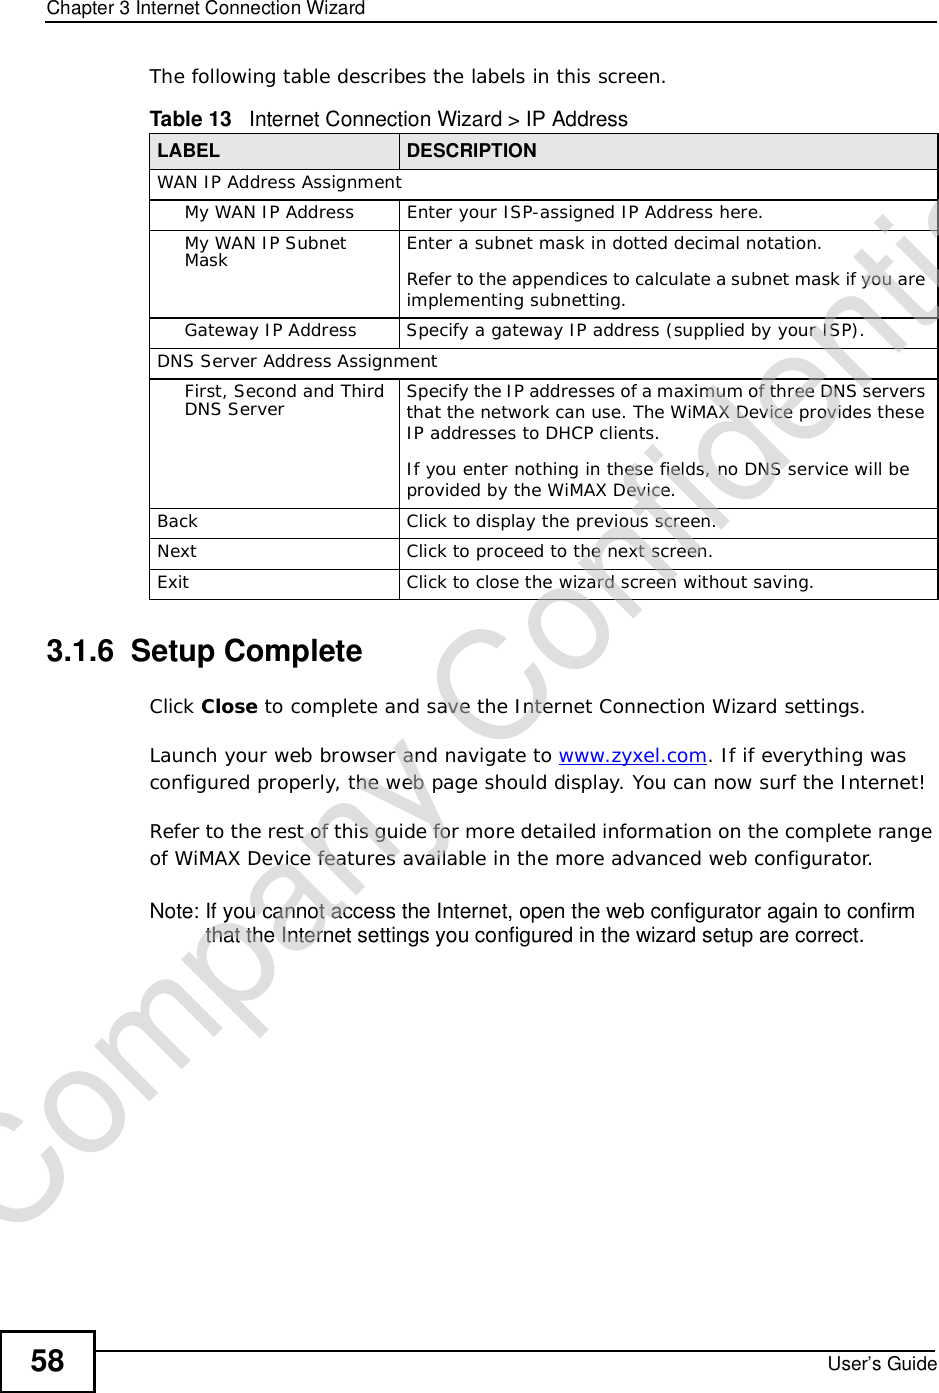
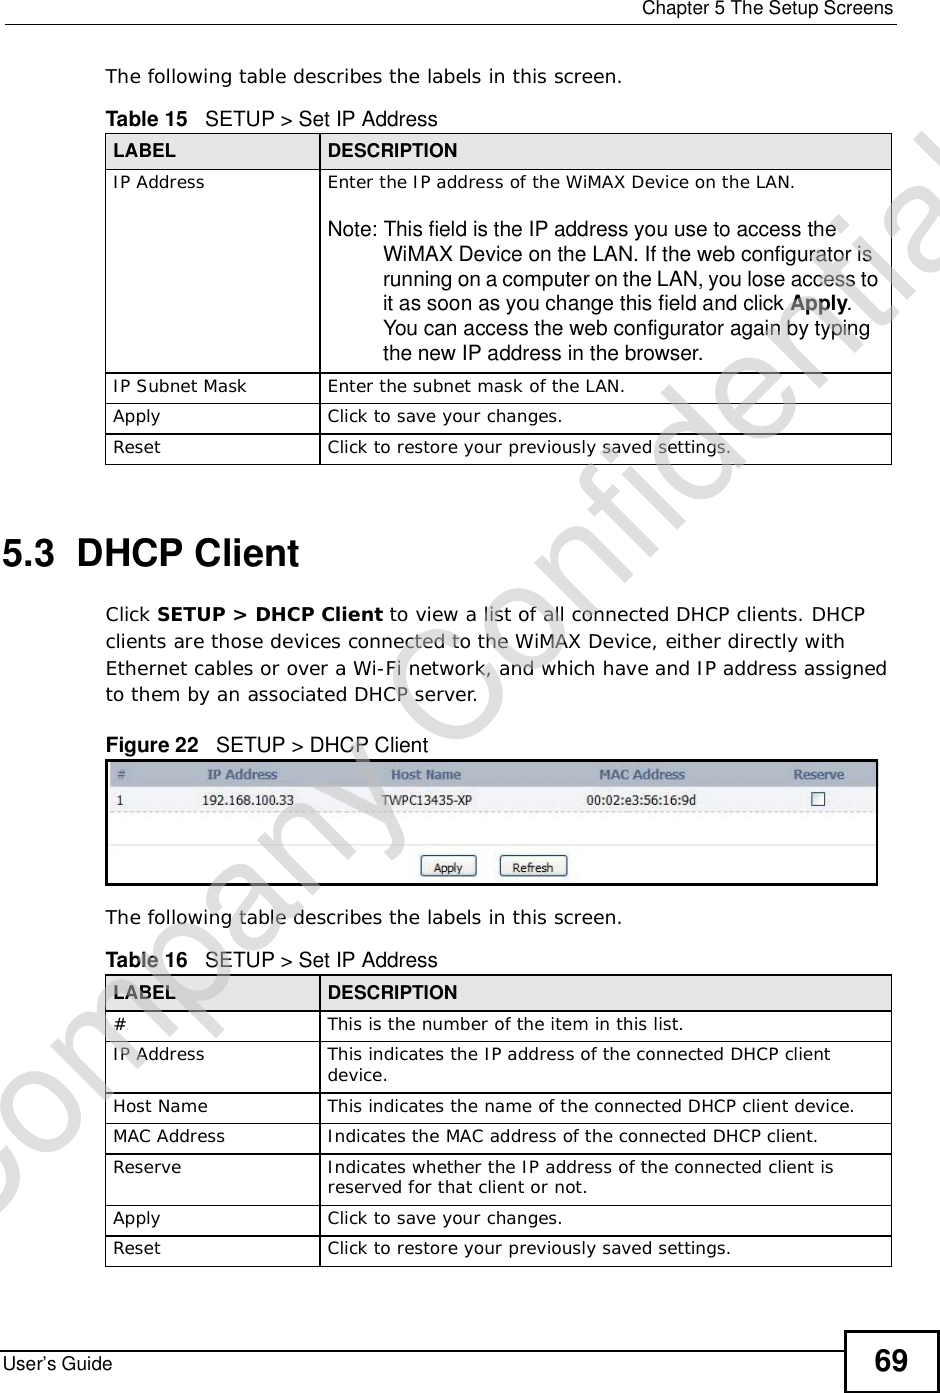
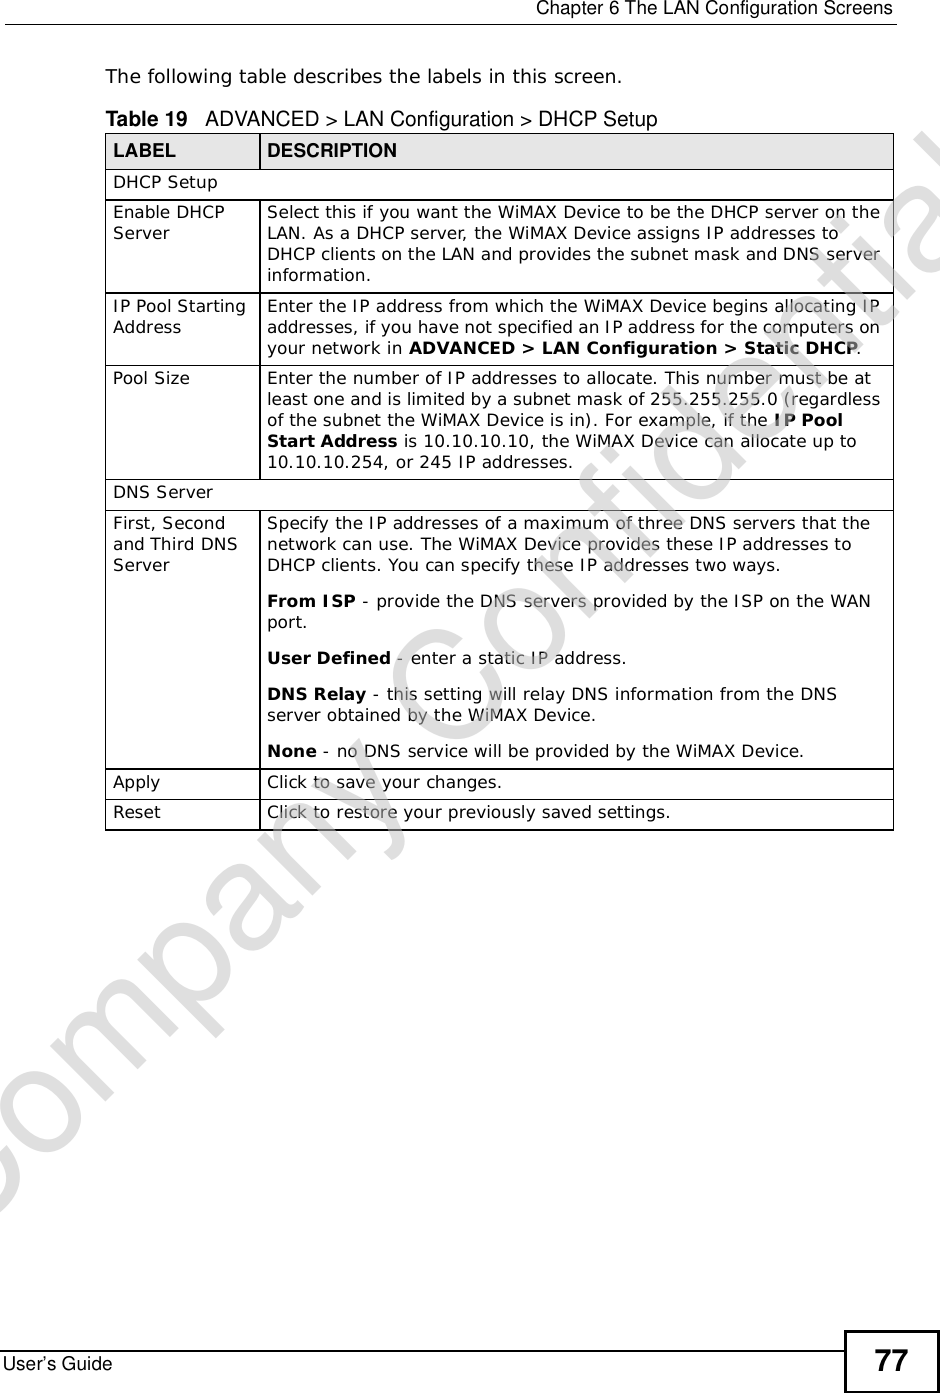
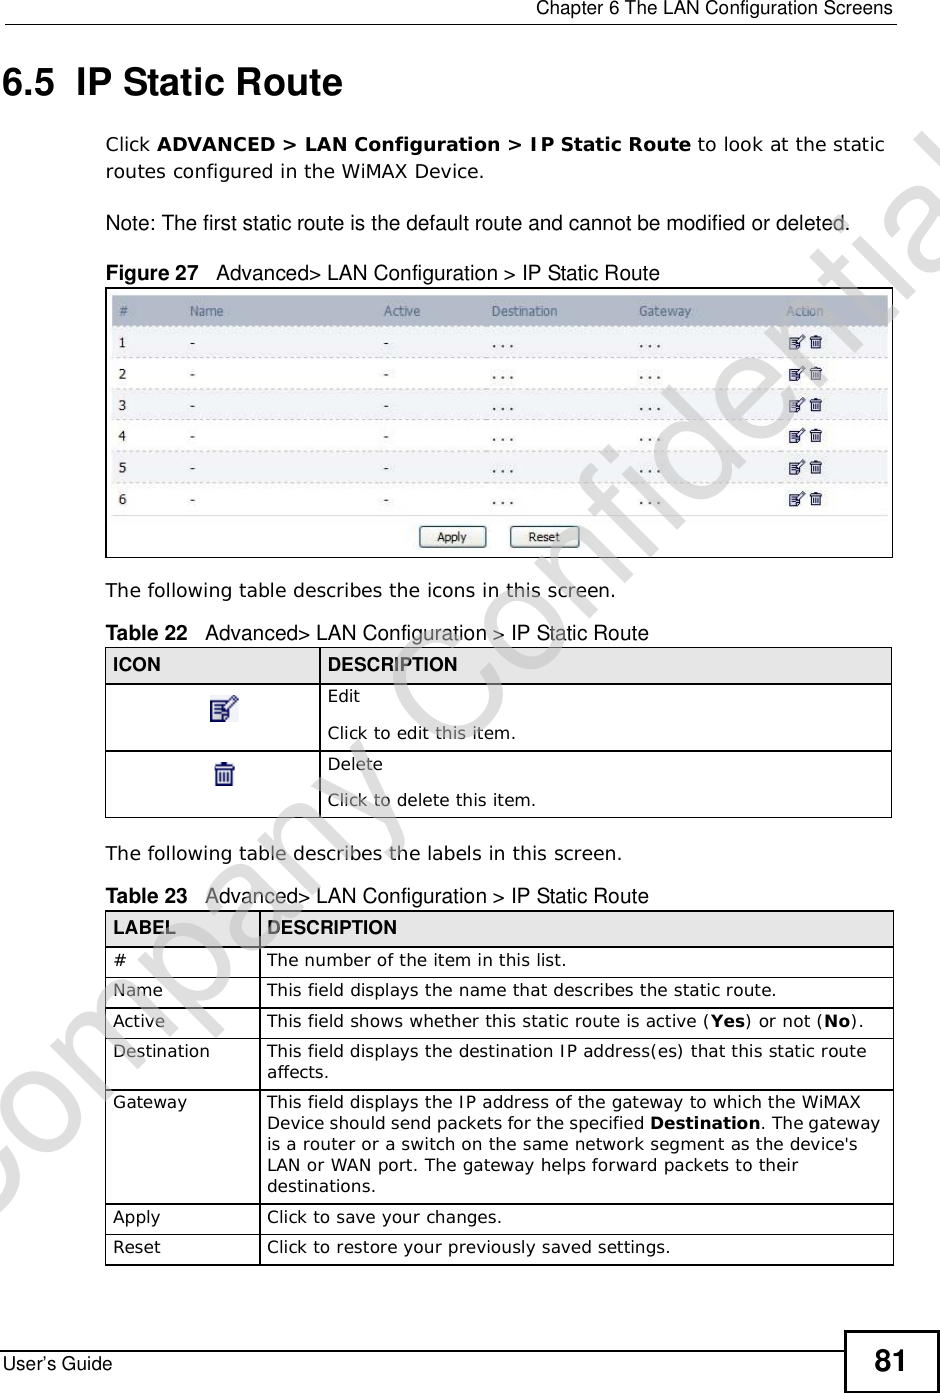


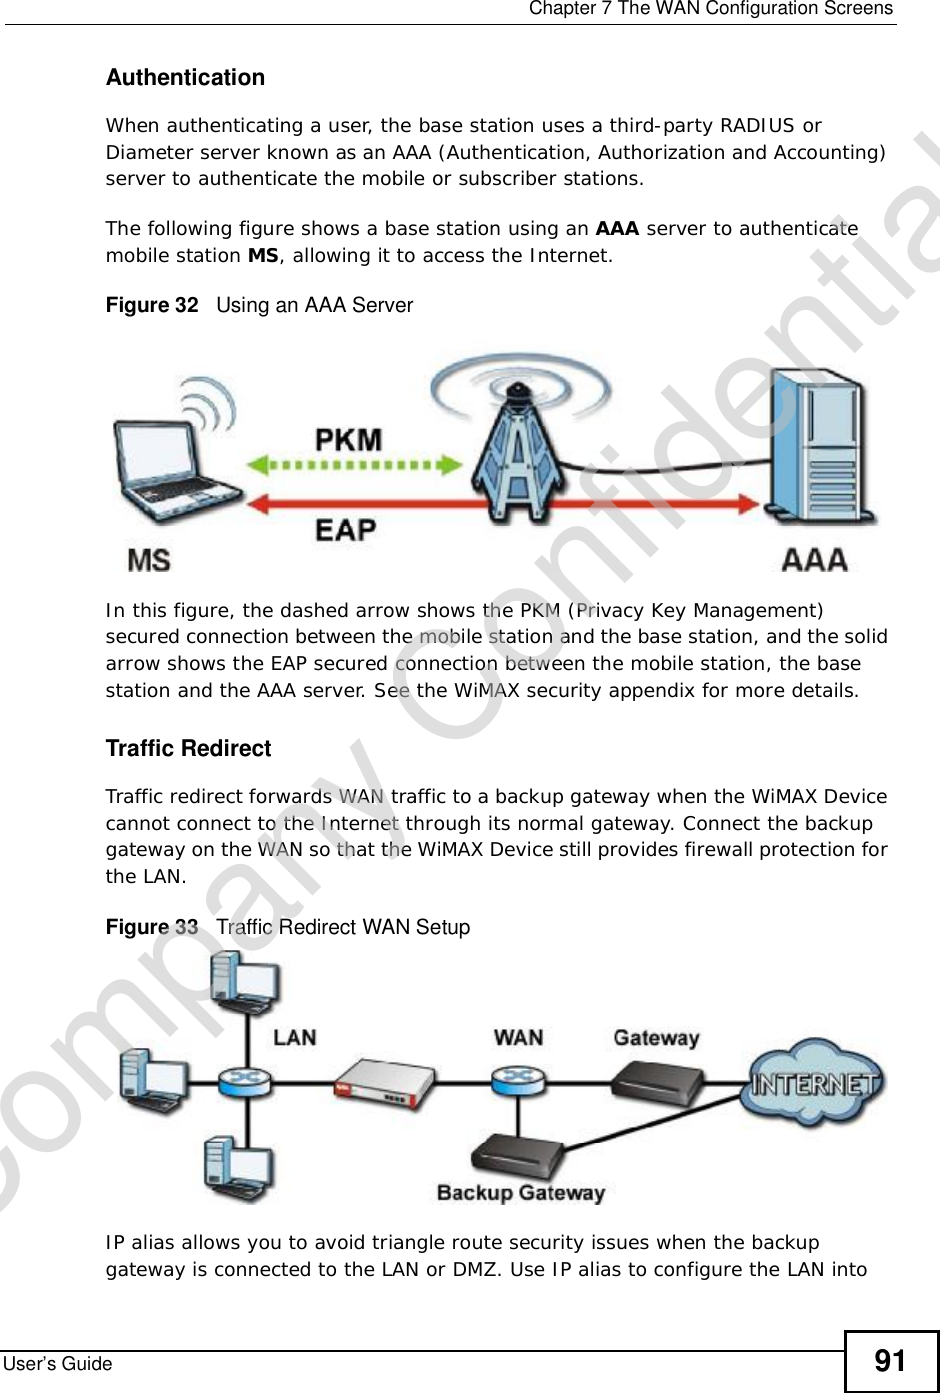
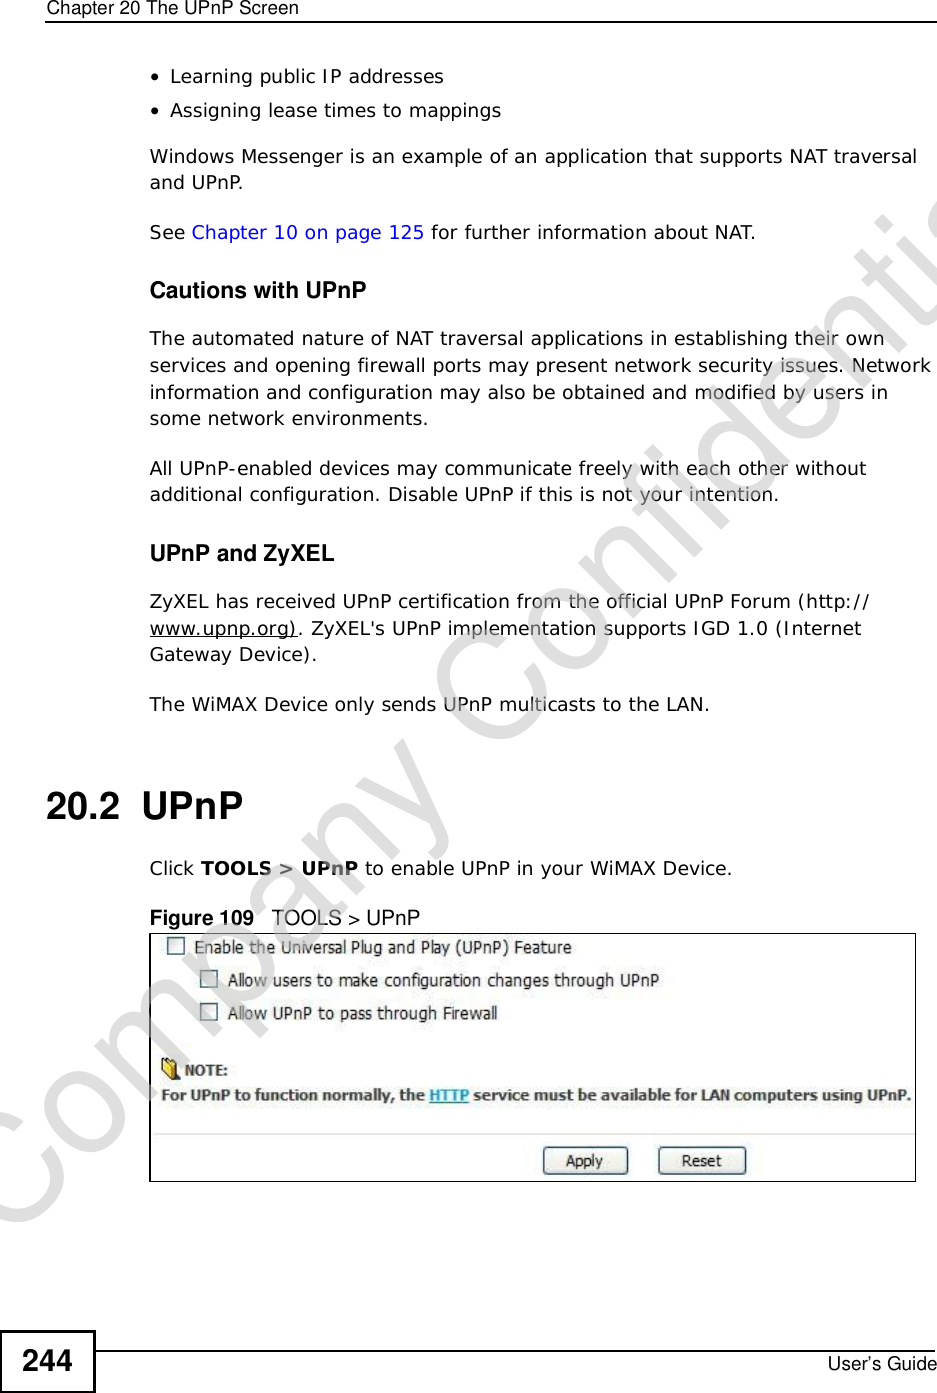
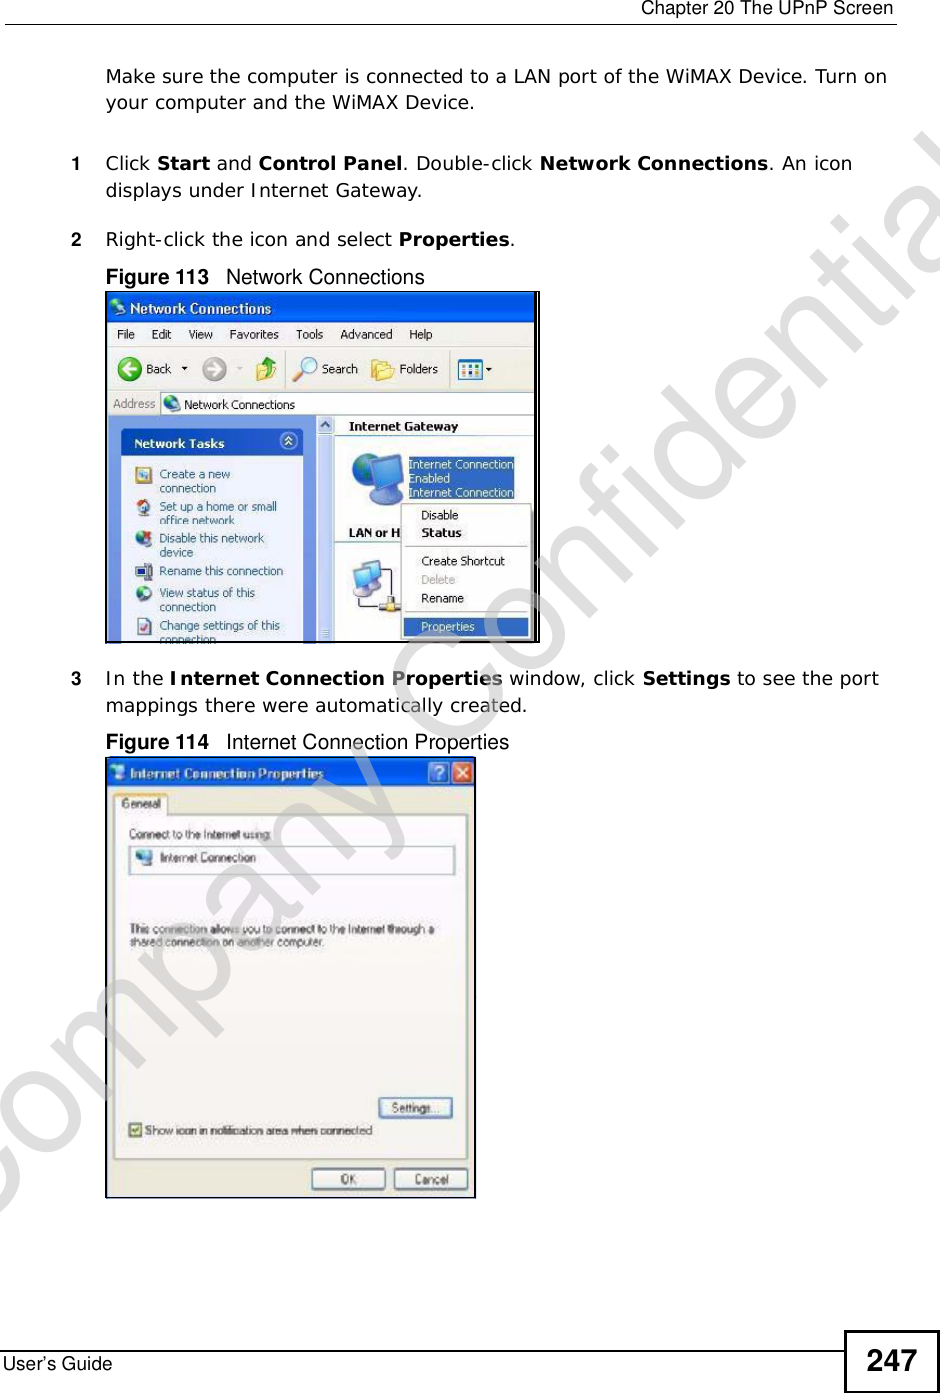
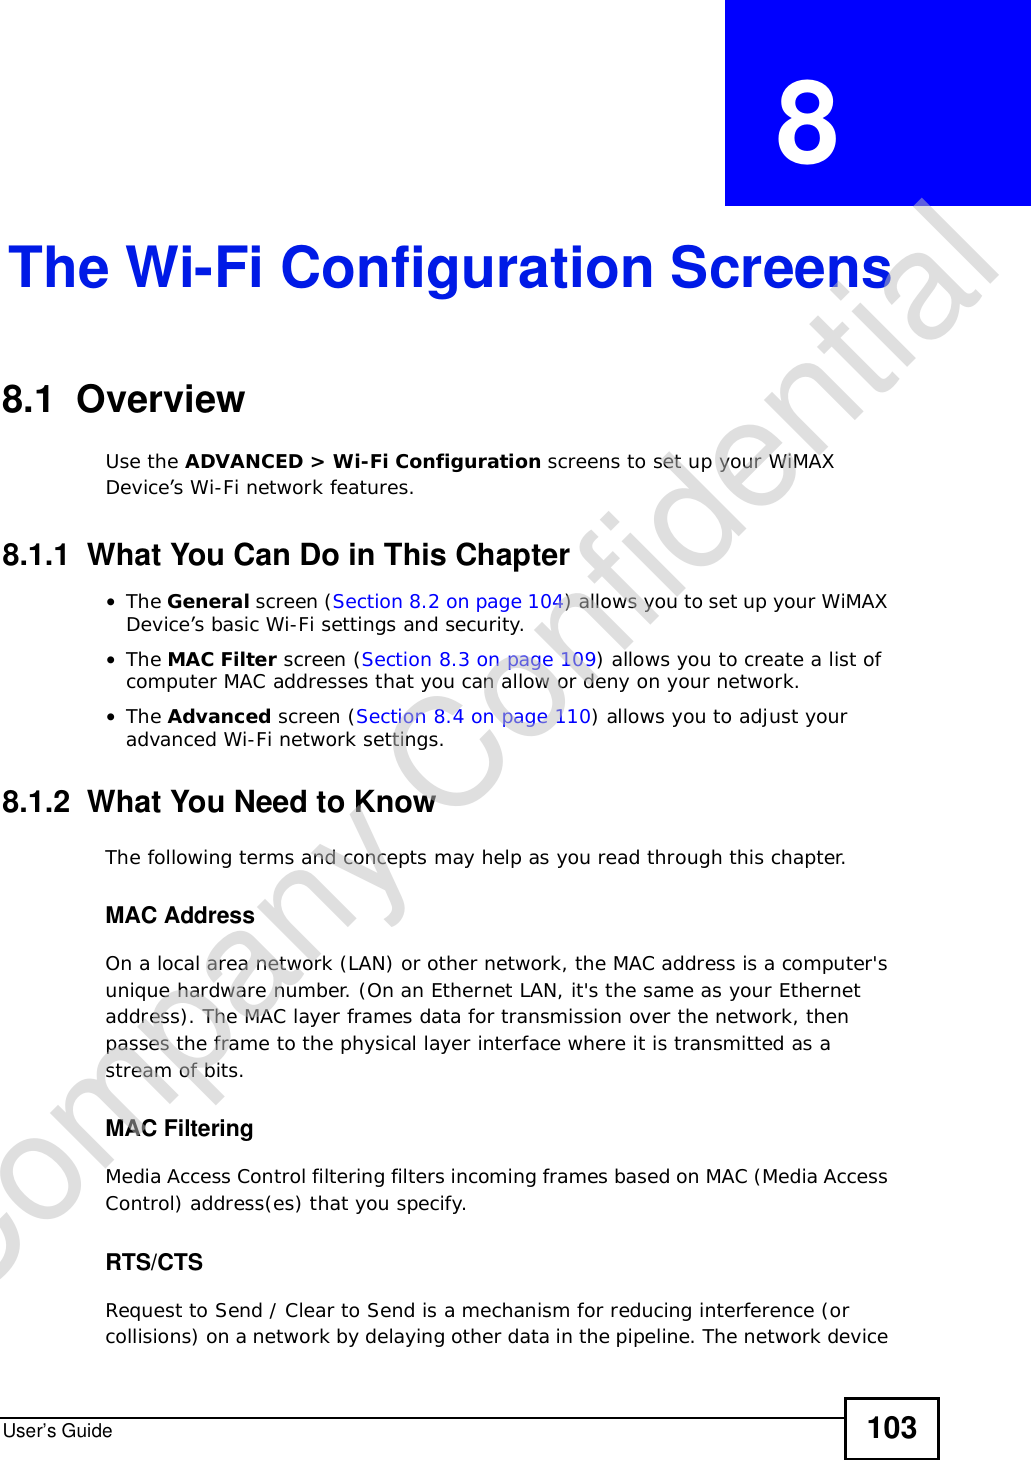
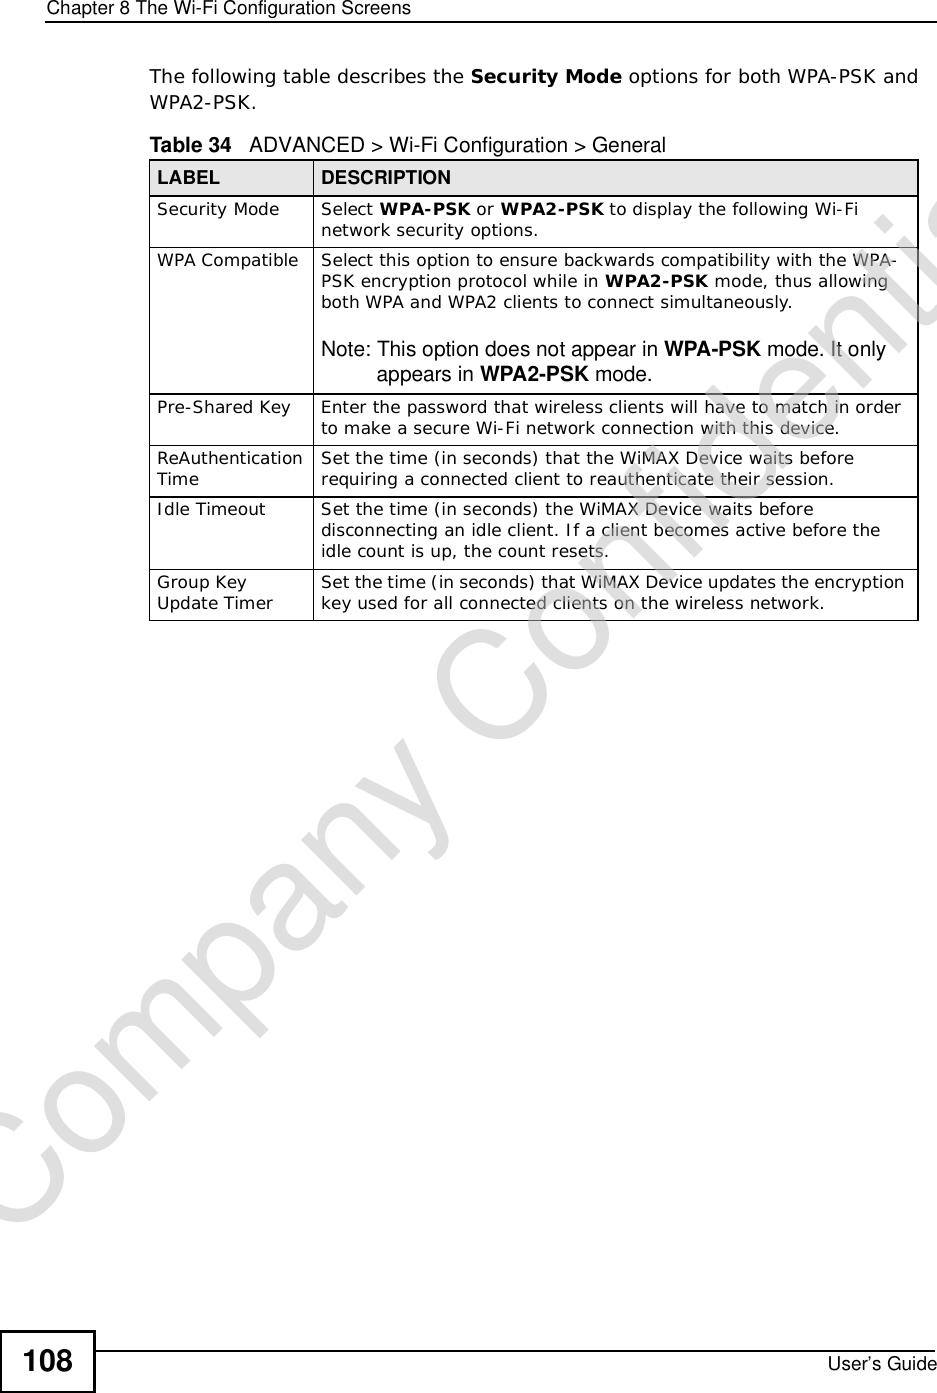
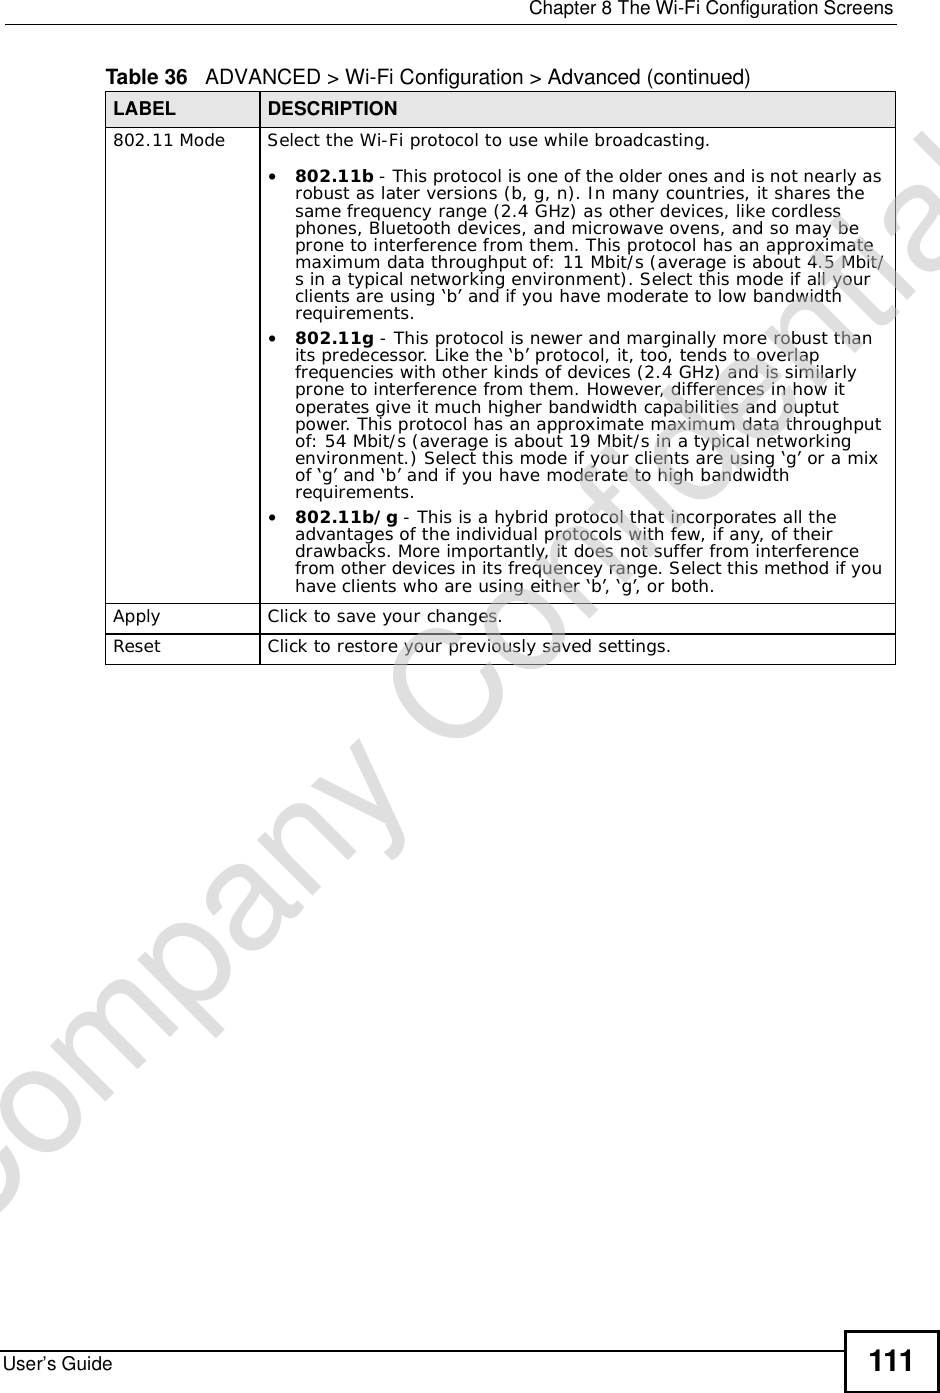
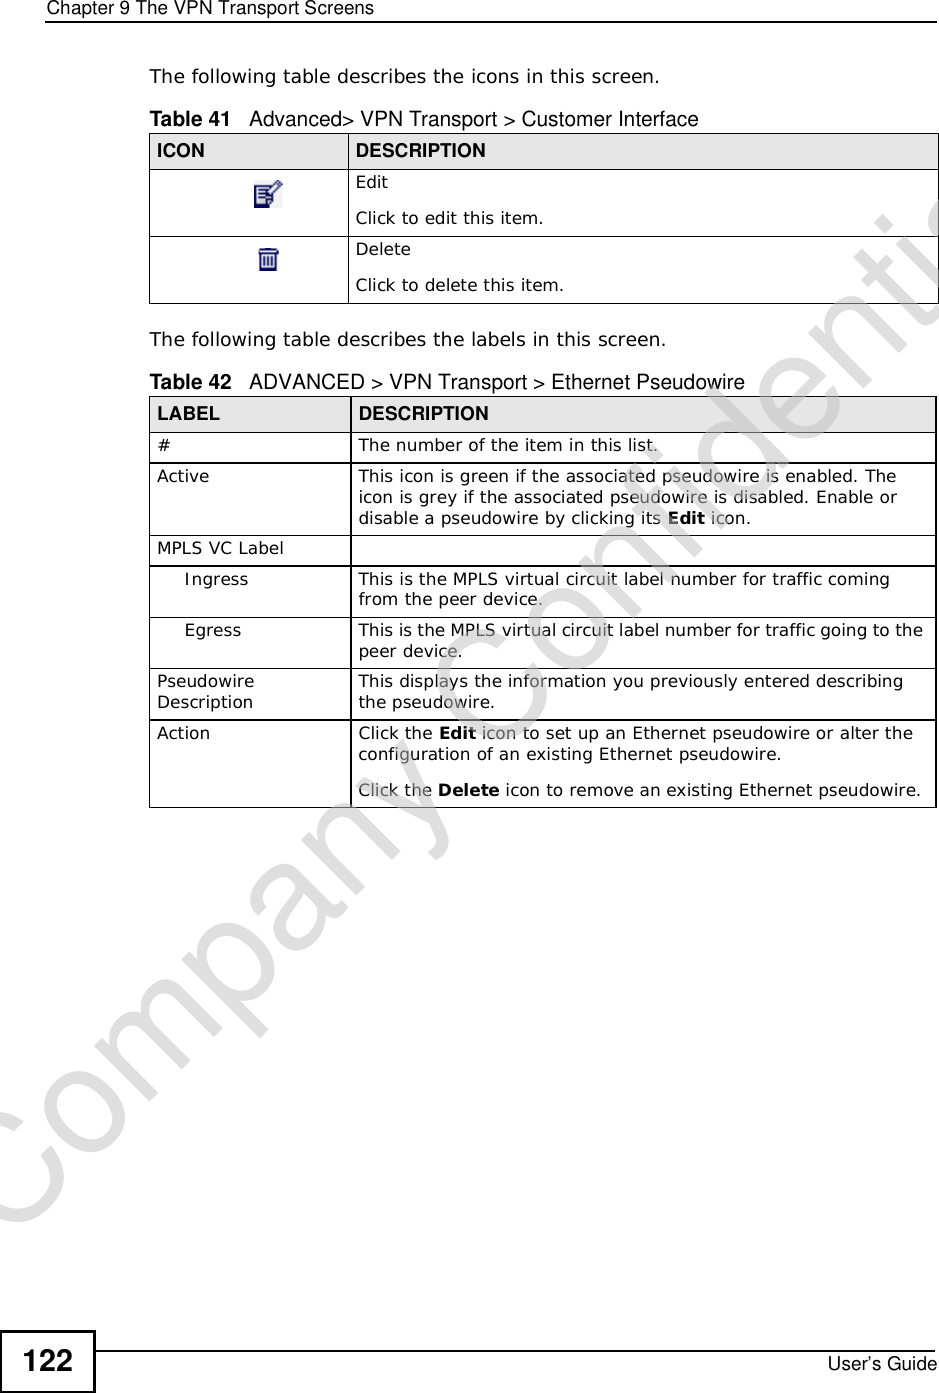
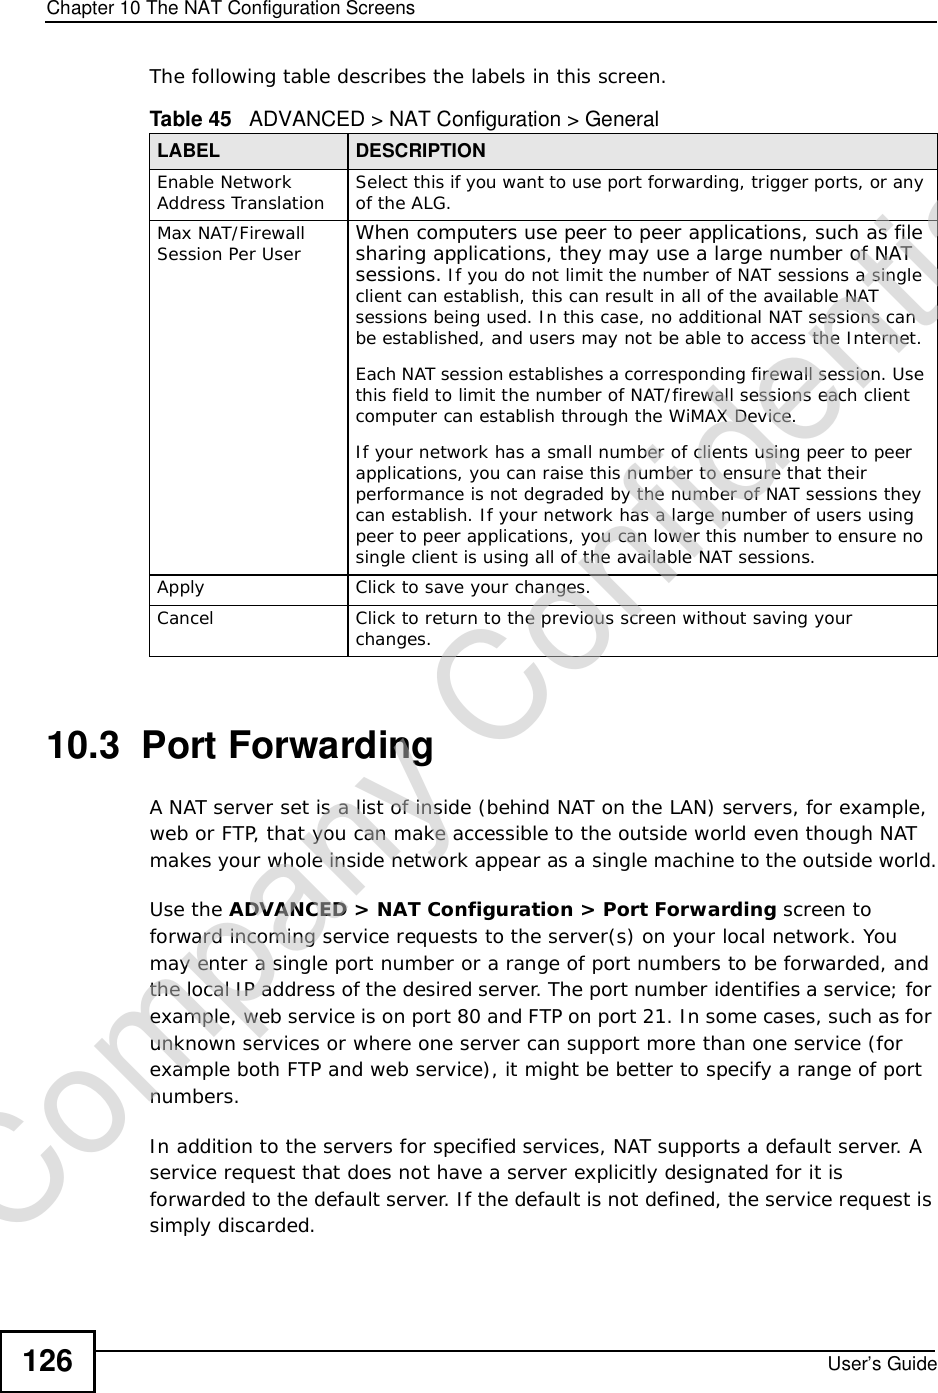
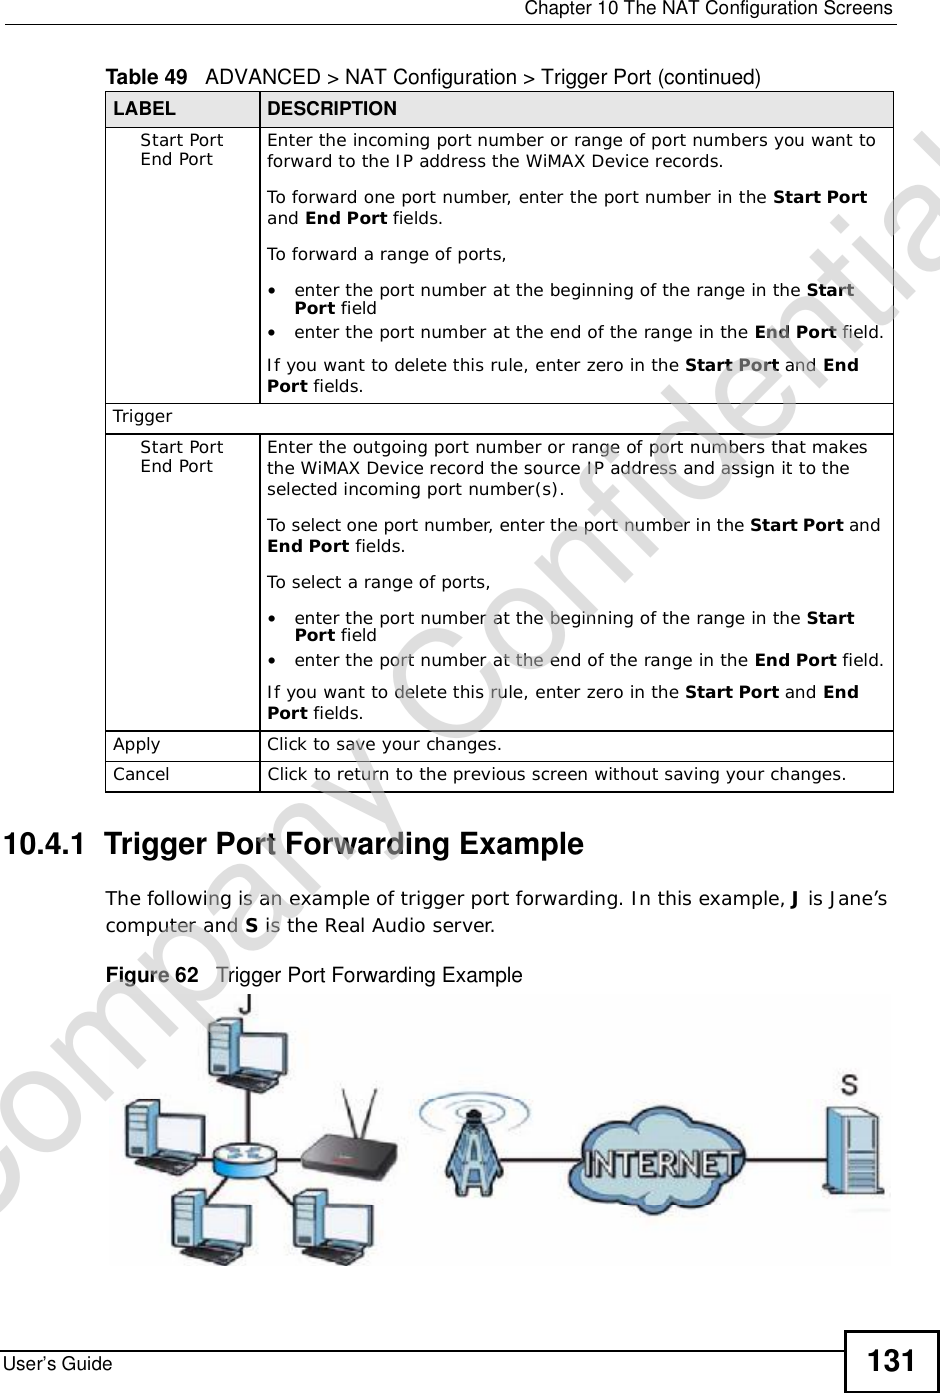
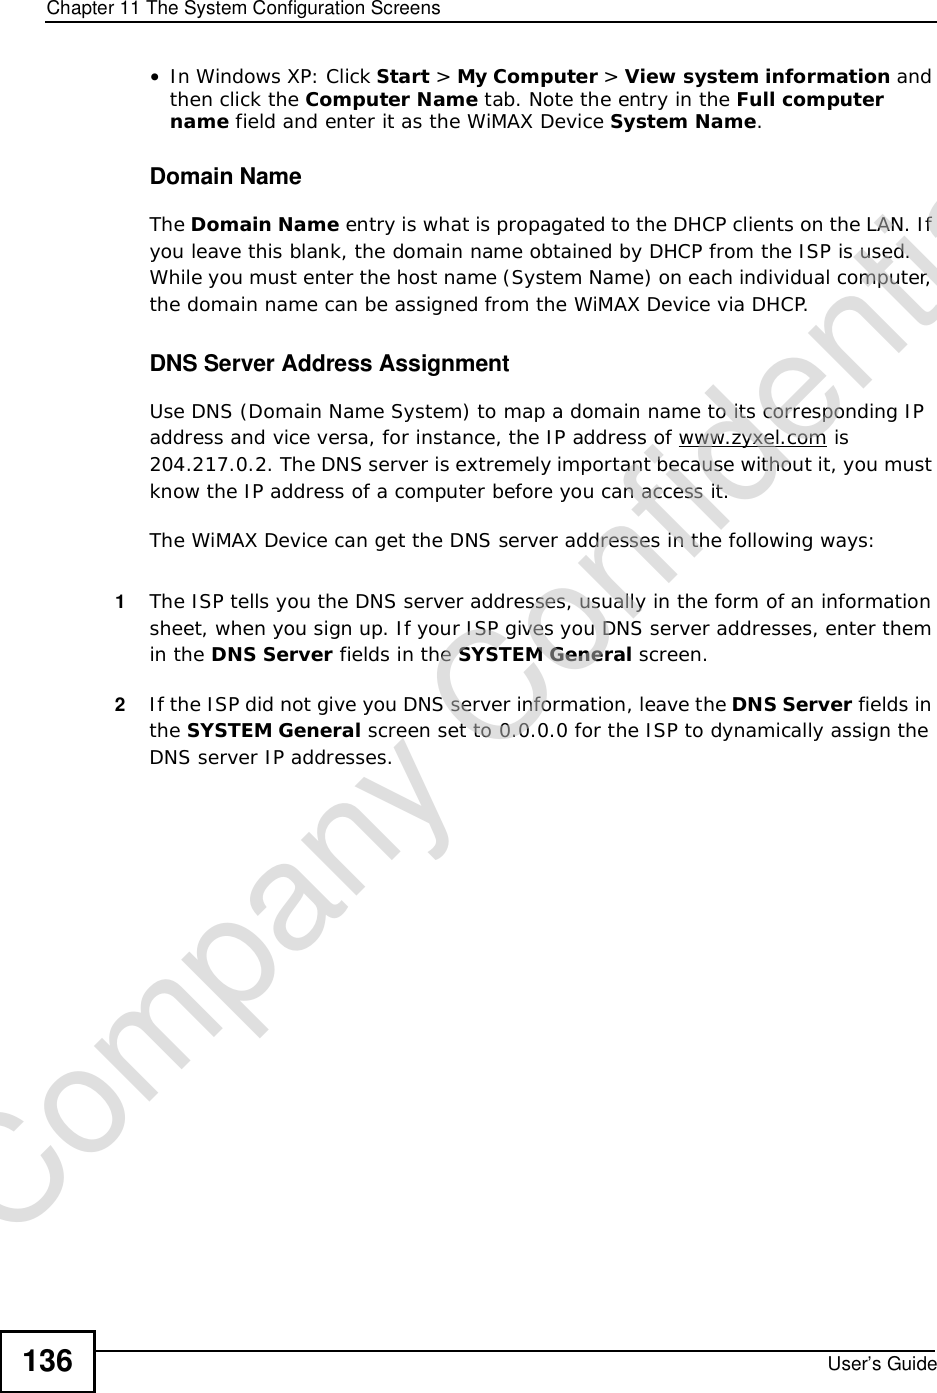
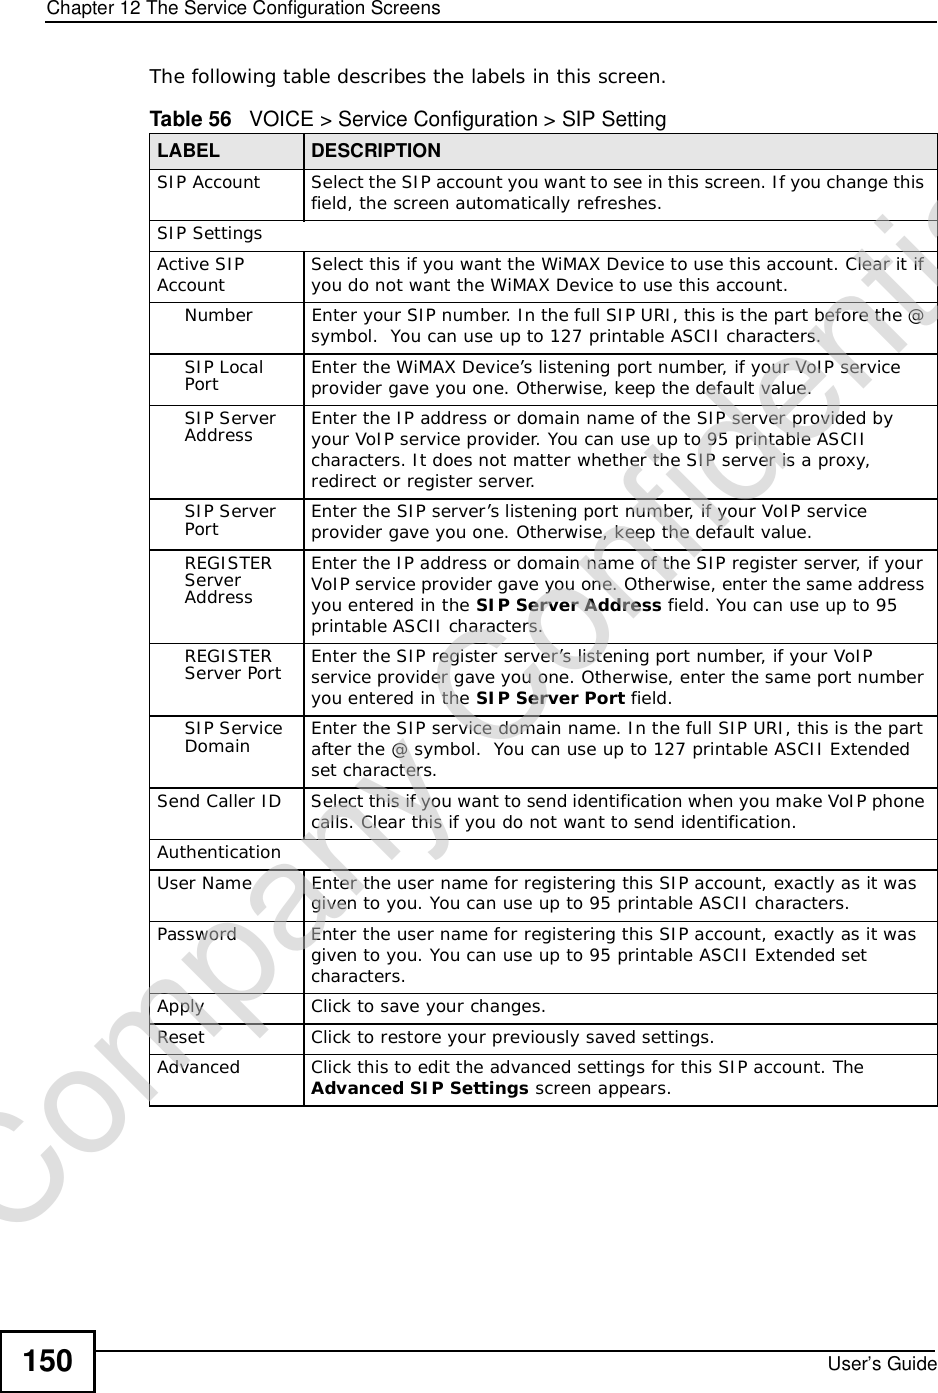
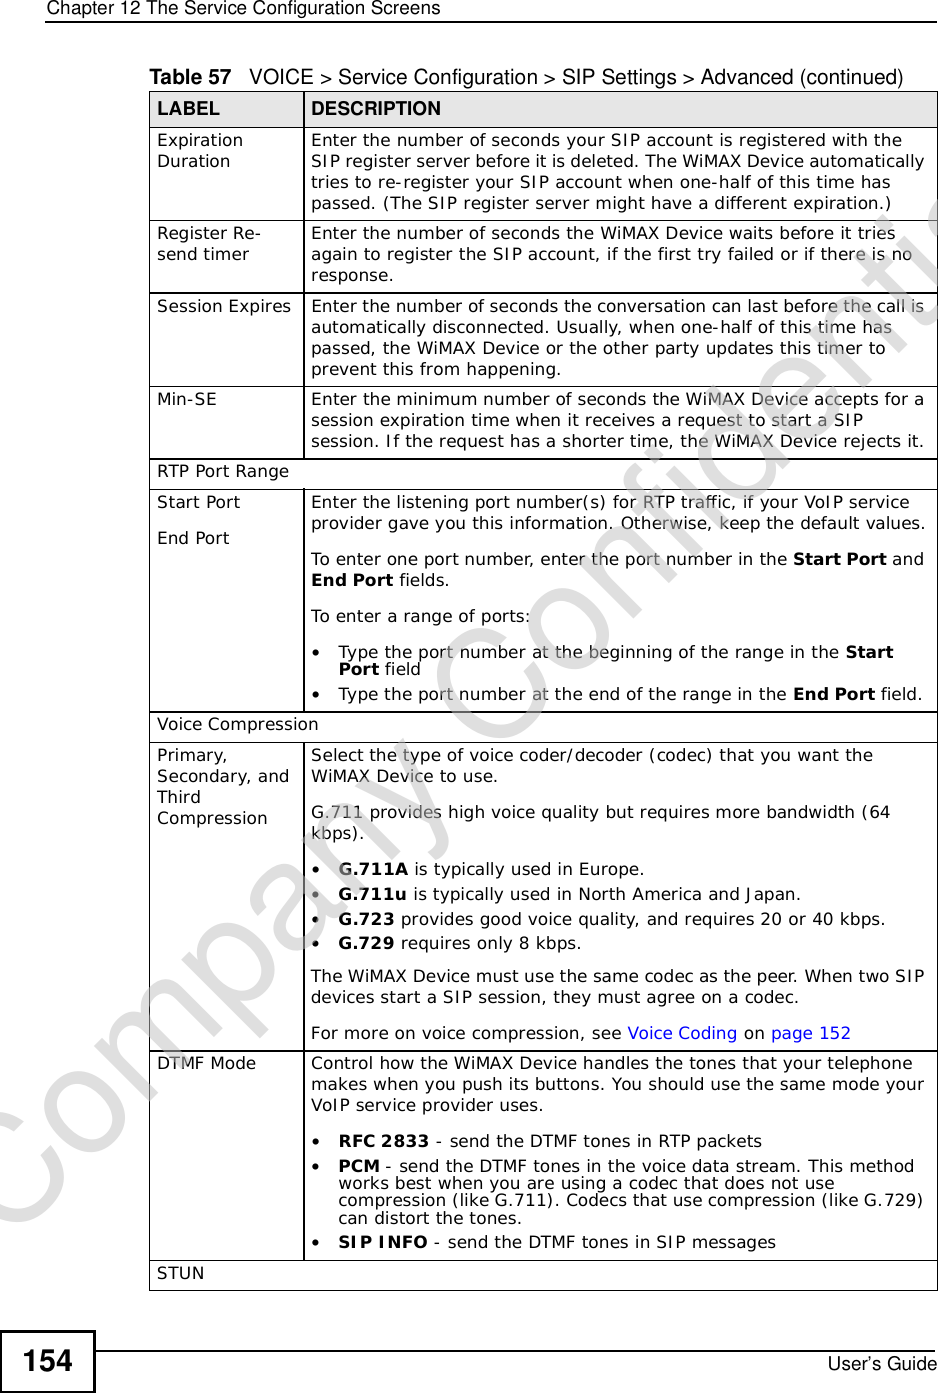
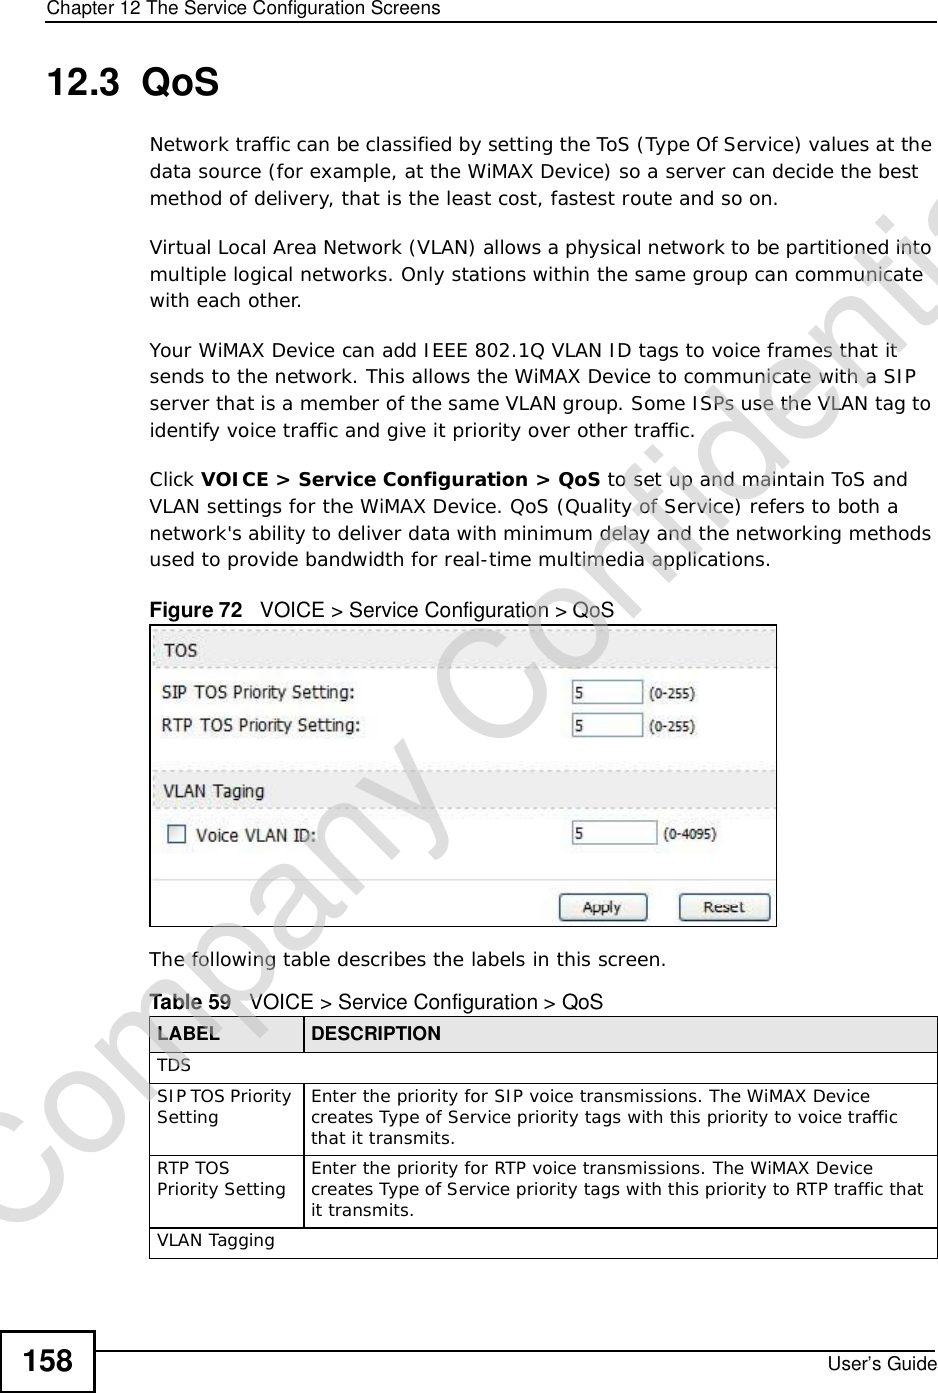
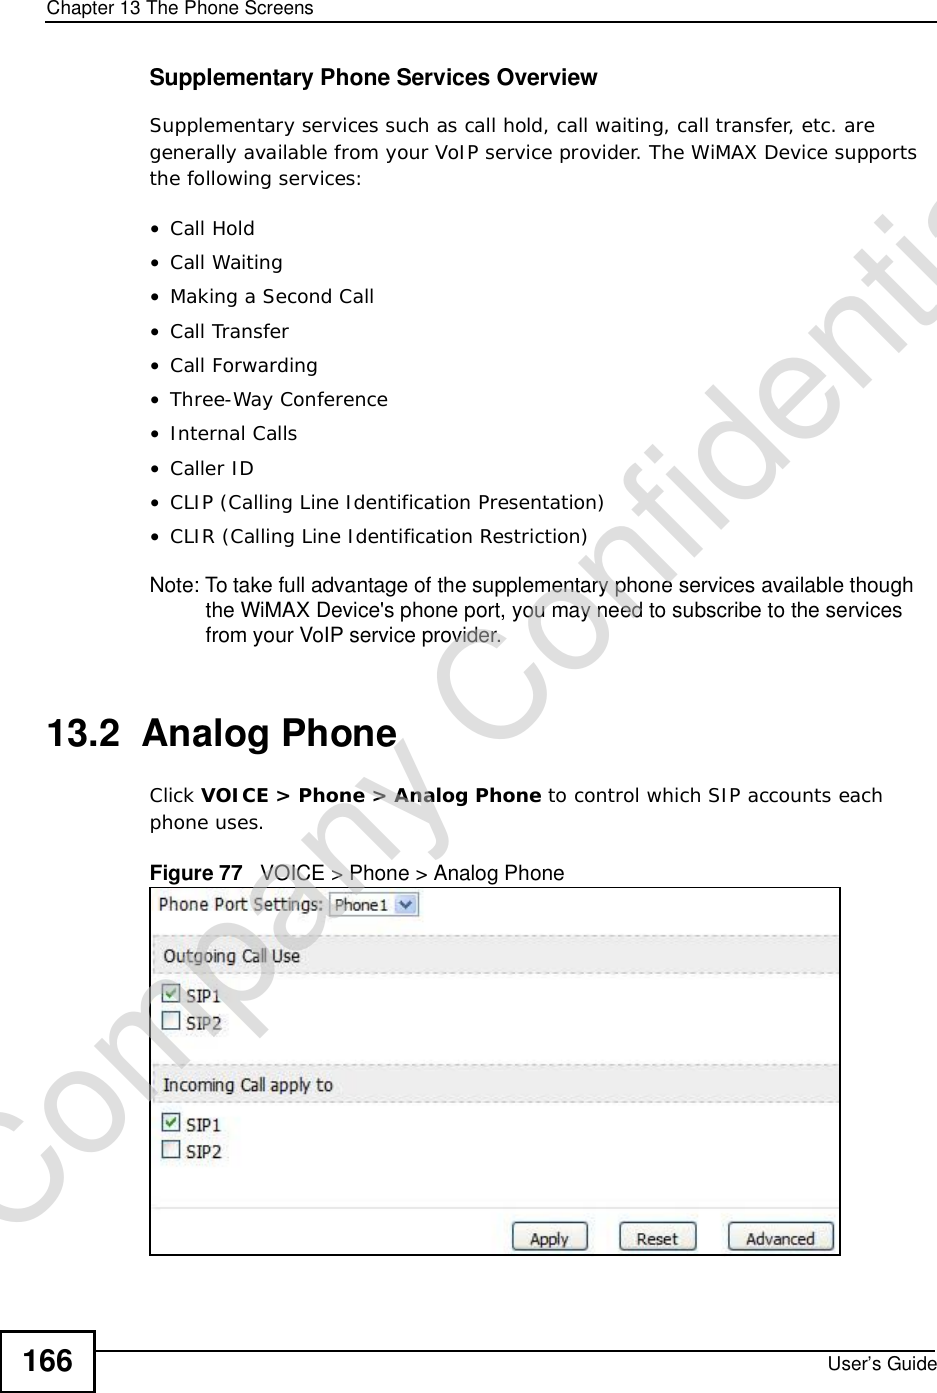
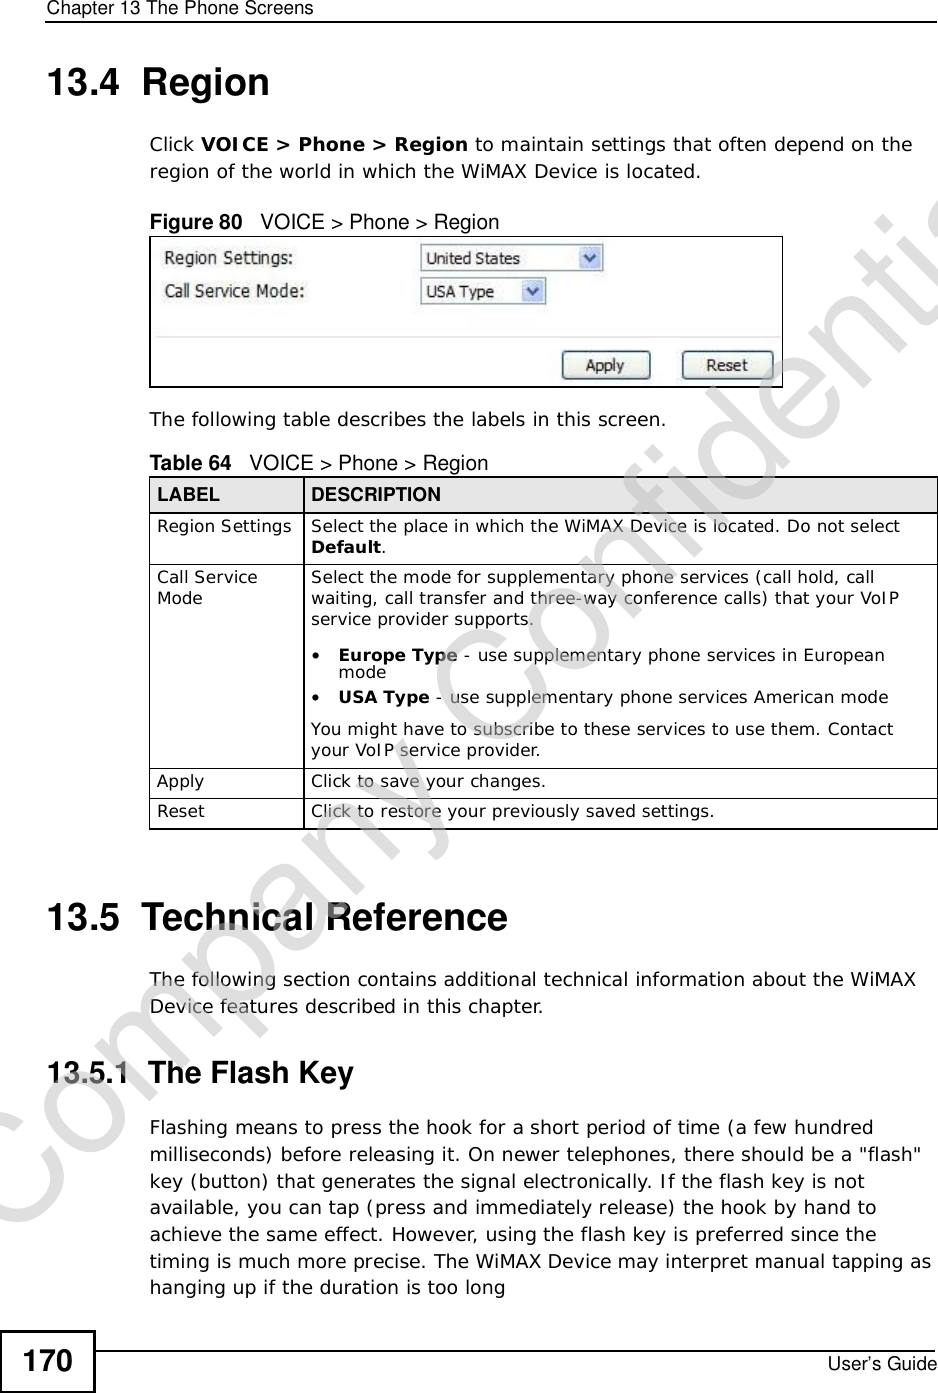
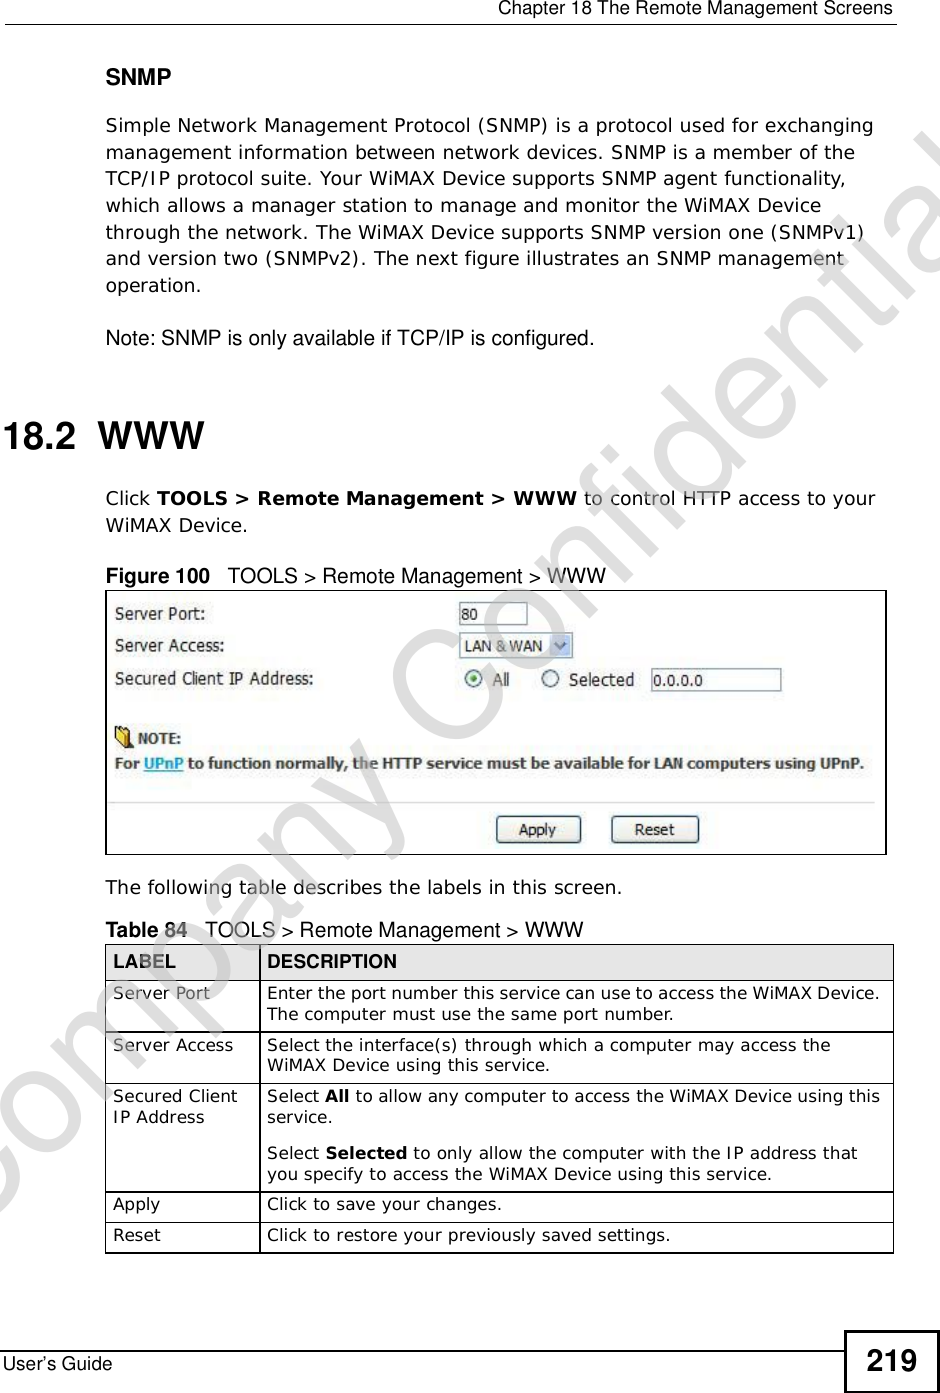
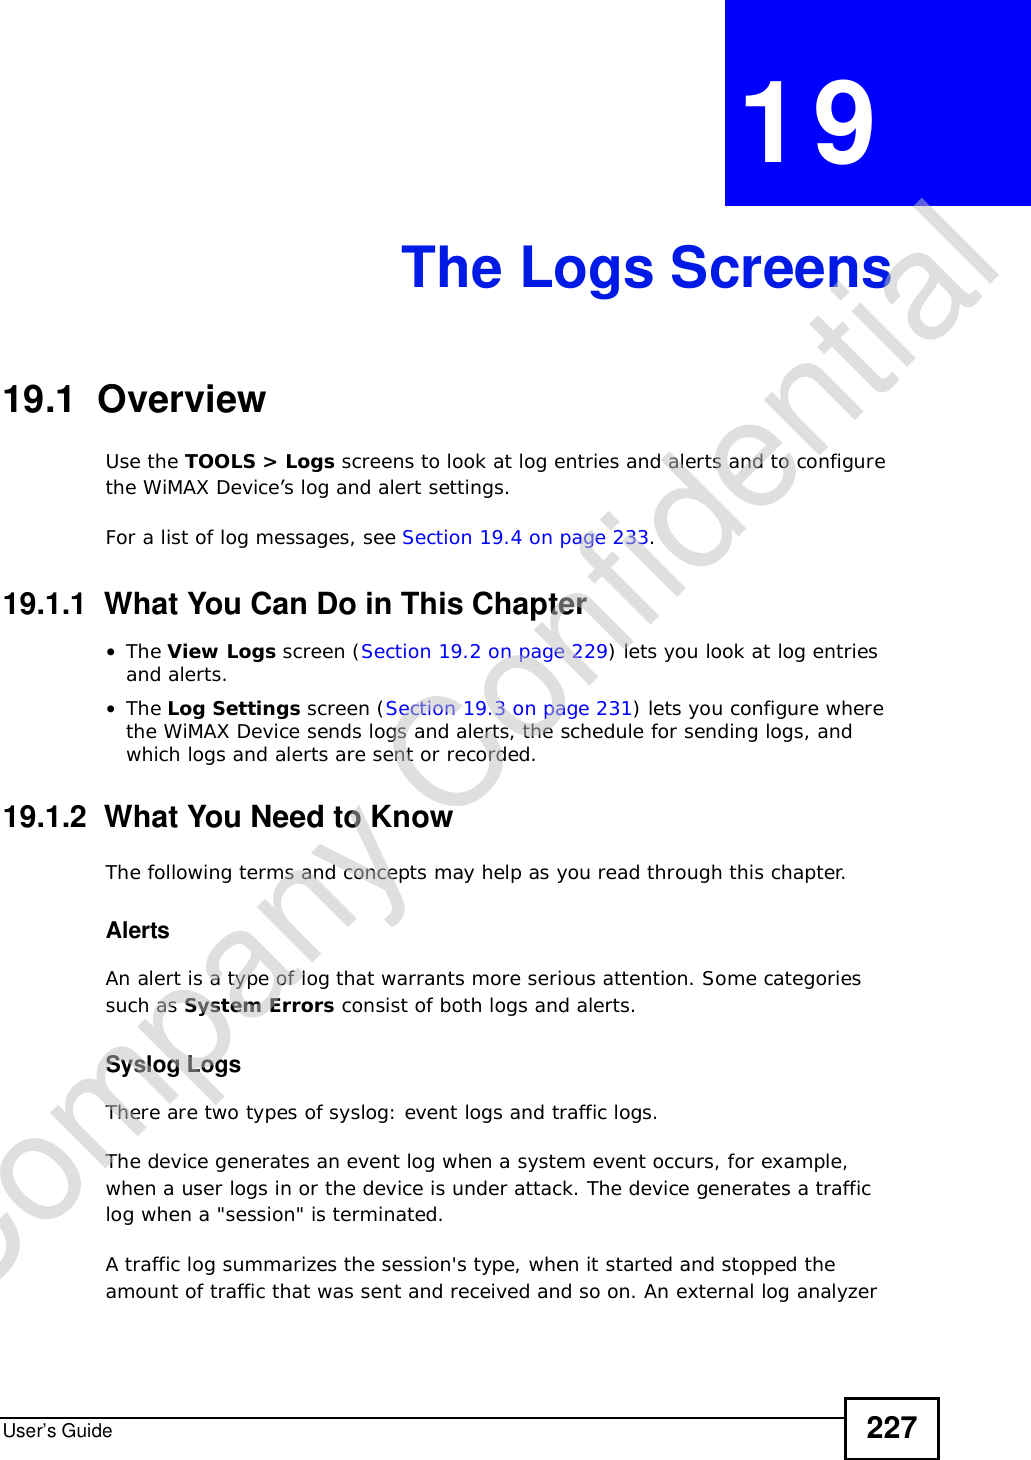
![Chapter 7The WAN Configuration ScreensUser’s Guide96Radio frequency is measured in Hertz (Hz). Figure 36 ADVANCED > WAN Configuration >WiMAX Configuration The following table describes the labels in this screen.Table 27 Radio Frequency Conversion1 kHz = 1000 Hz1 MHz = 1000 kHz (1000000 Hz)1 GHz = 1000 MHz (1000000 kHz)Table 28 ADVANCED > WAN Configuration >WiMAX ConfigurationLABEL DESCRIPTIONDL Frequency / Bandwidth [1~19] These fields show the downlink frequency settings in kilohertz (kHz). Enter values in these fields to have the WiMAX Device scan these frequencies for available channels in ascending numerical order.Note: The Bandwidth field is not user-configurable; when the WiMAX Device finds a WiMAX connection, its frequency is displayed in this field.Contact your service provider for details of supported frequencies.ApplyClick to save your changes.ResetClick to restore your previously saved settings.Company Confidential](https://usermanual.wiki/ZyXEL-Communications/MAX306.Manual-Part-1/User-Guide-1135851-Page-96.png)
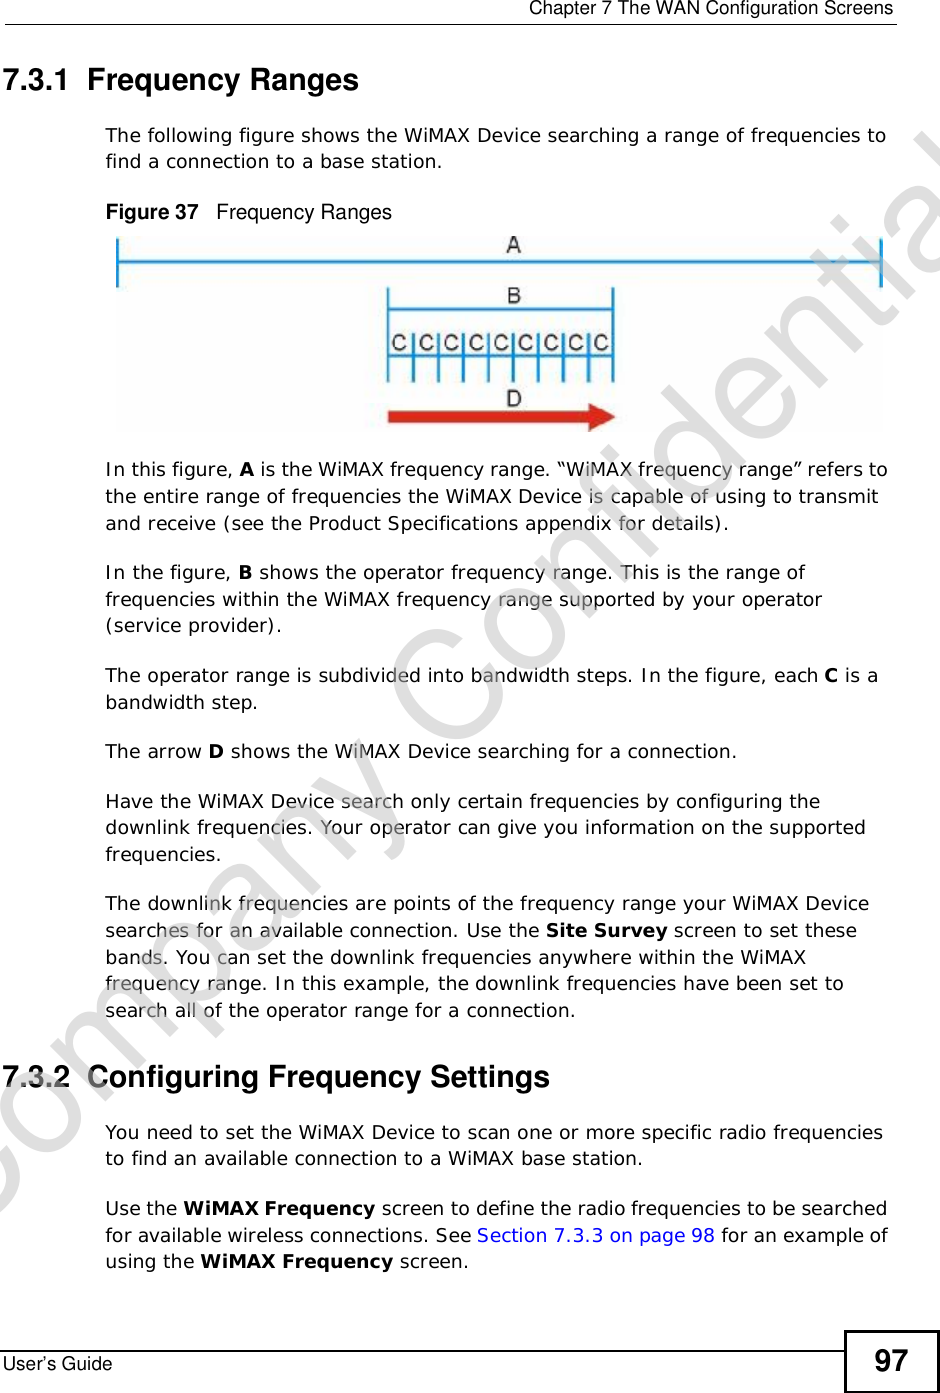
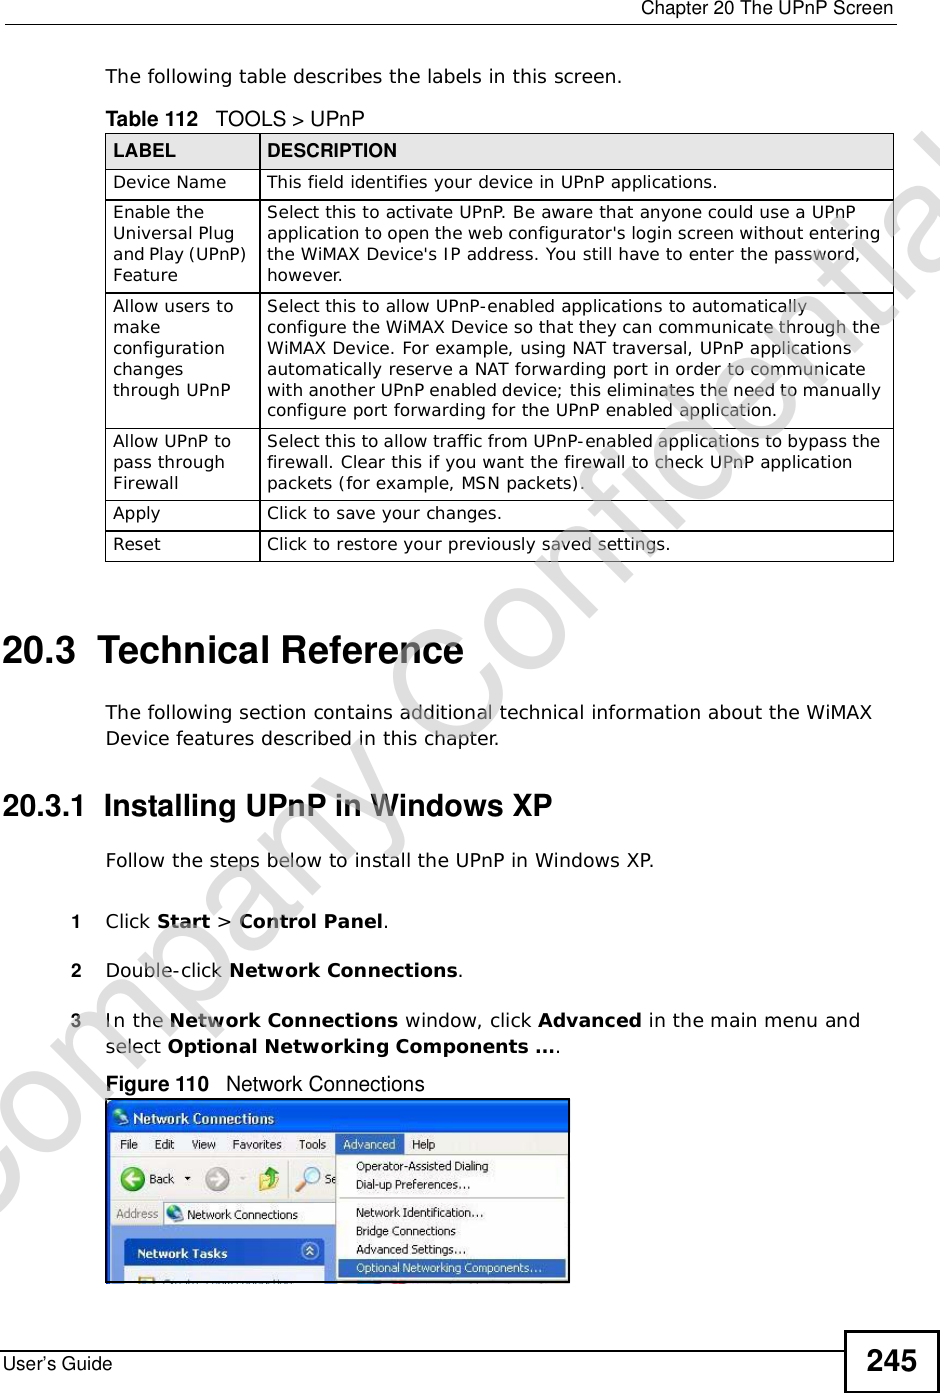
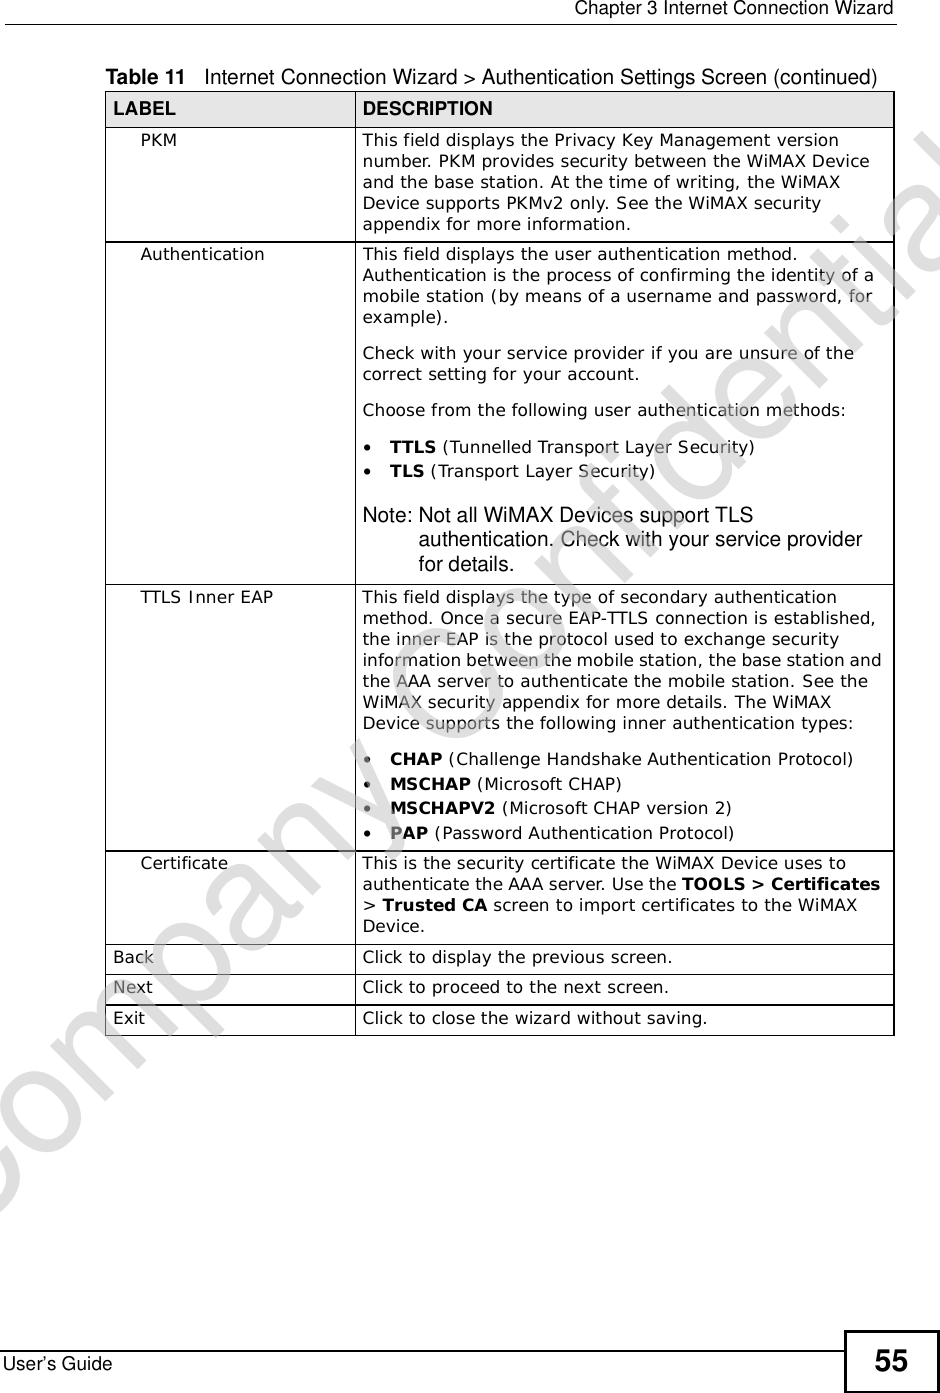
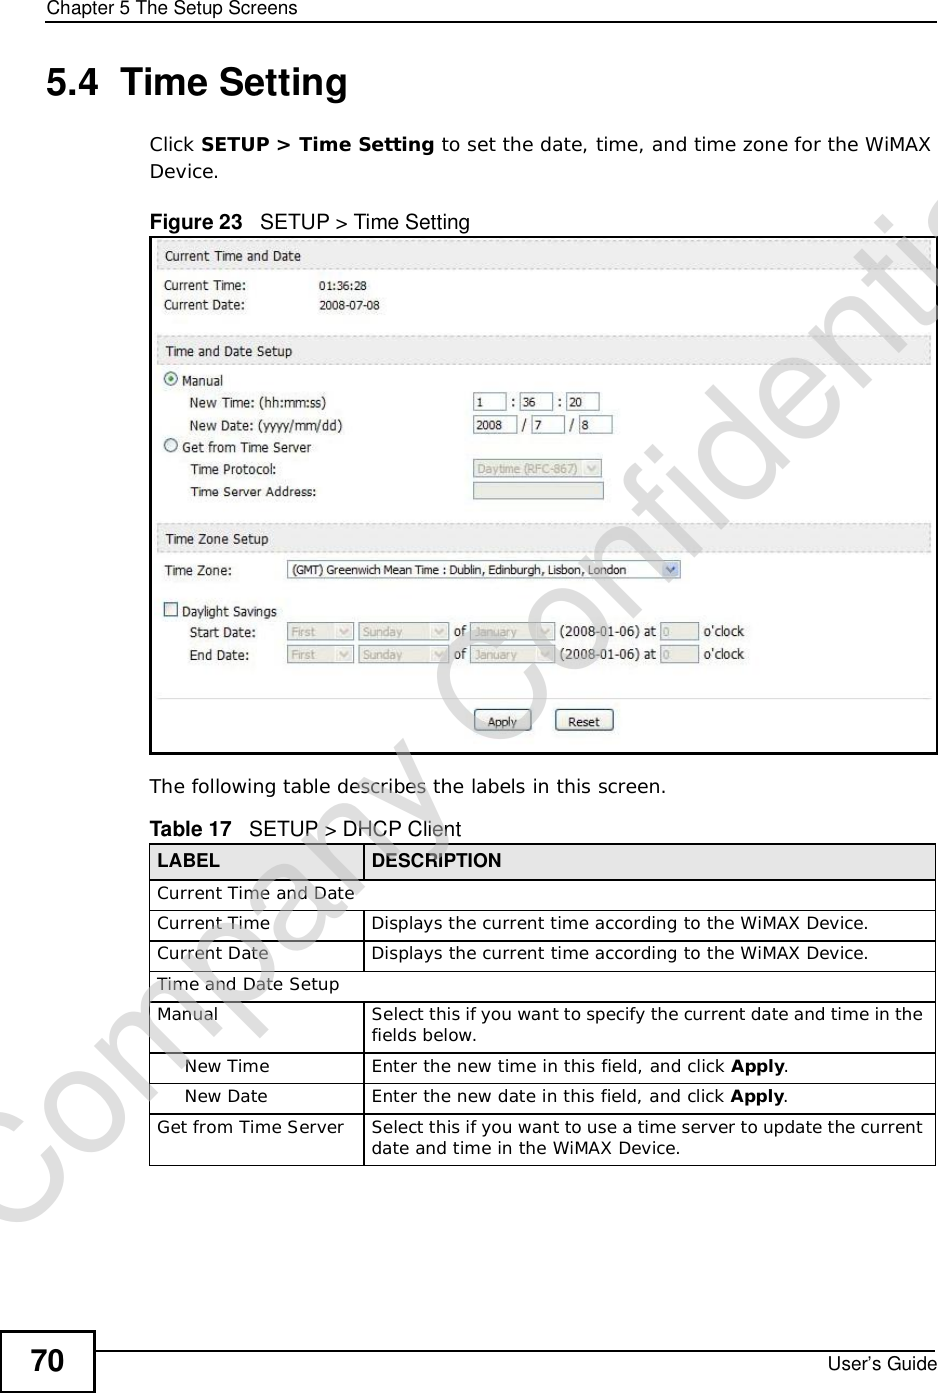
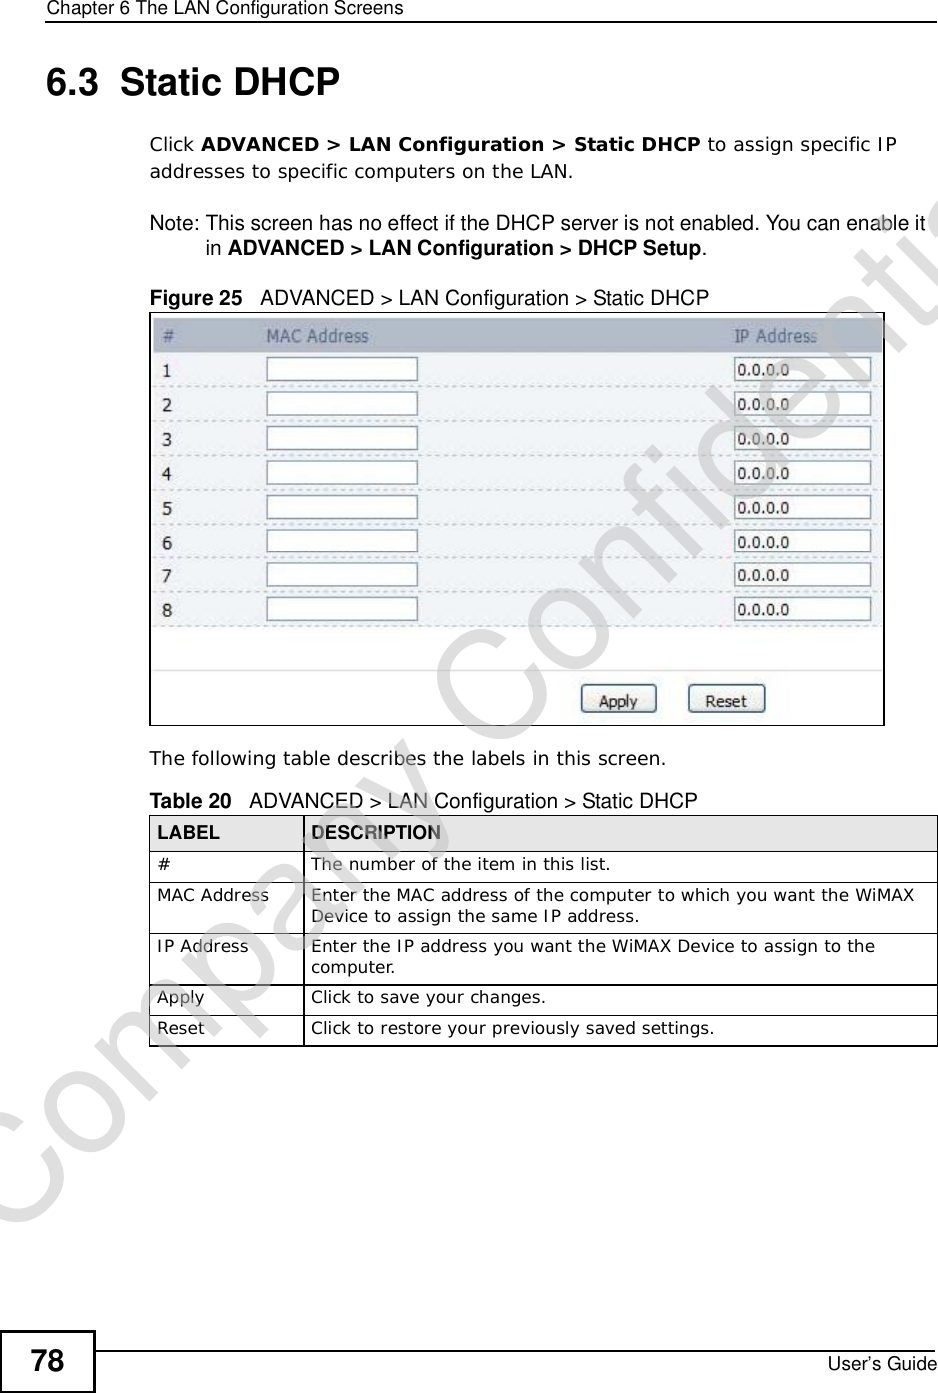
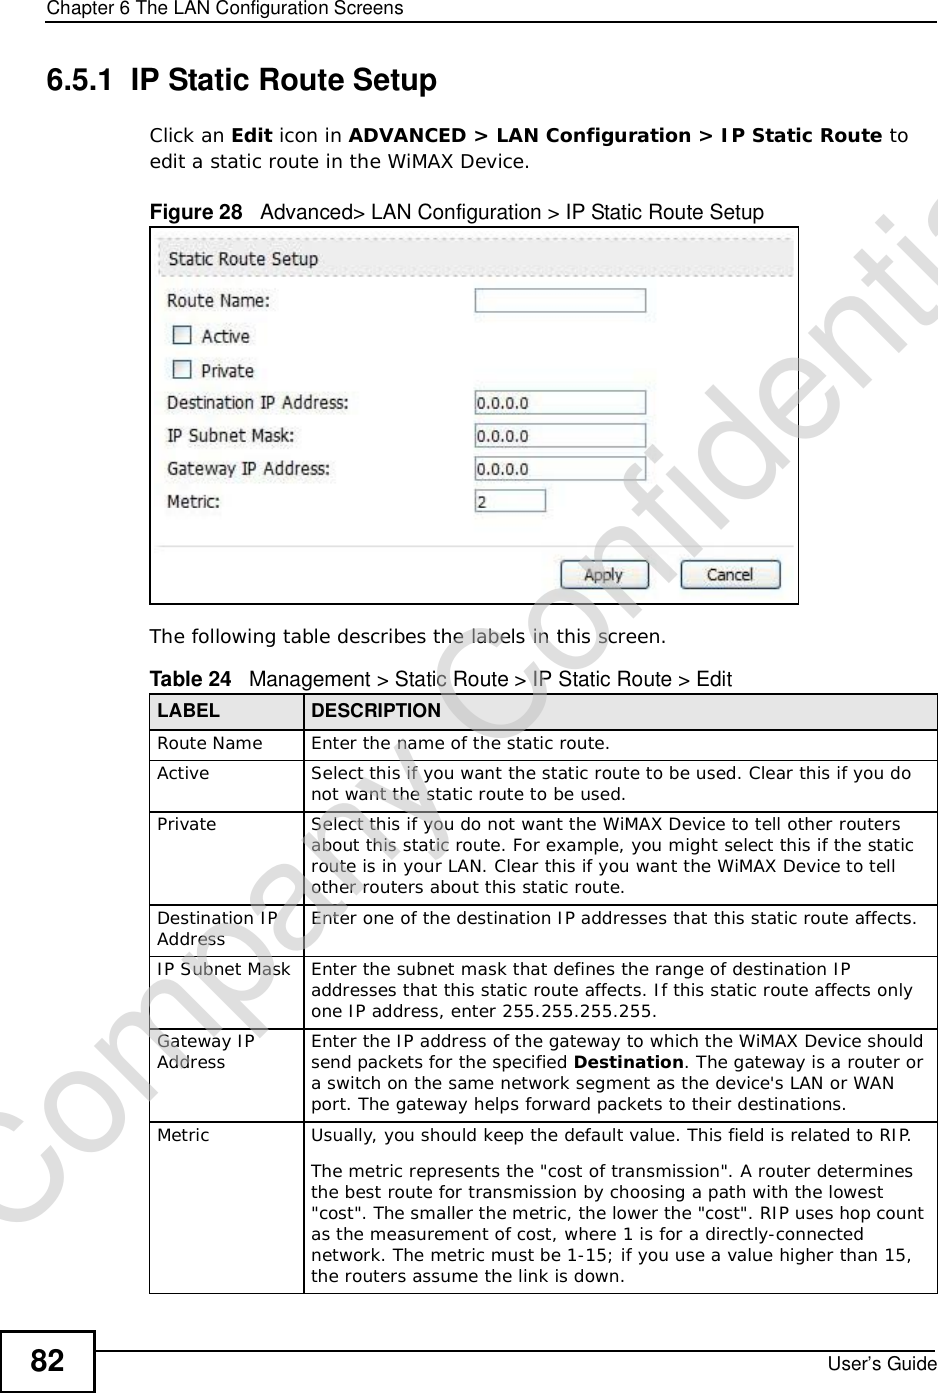
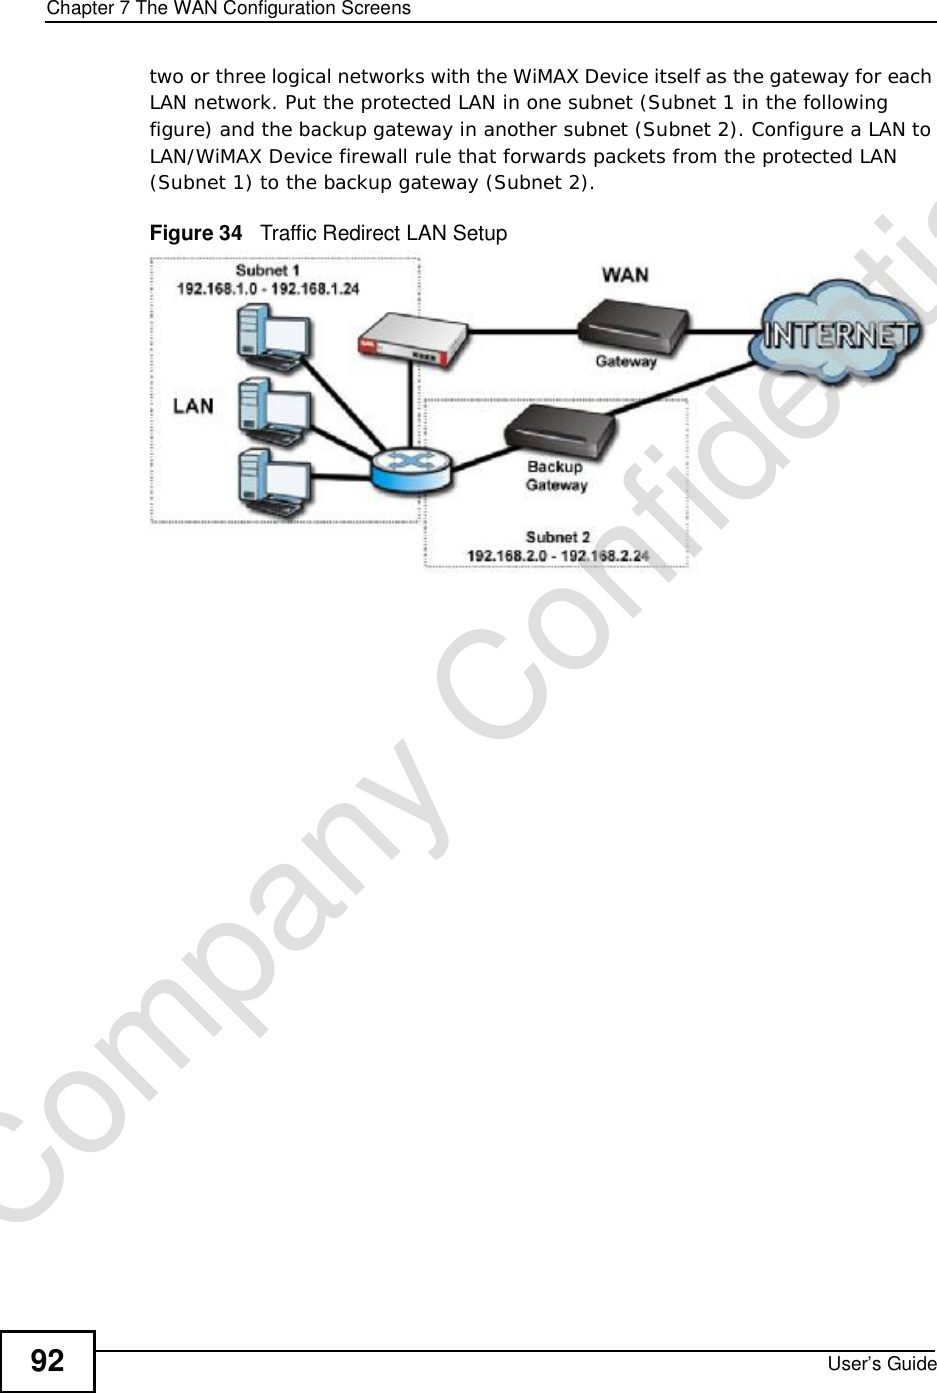
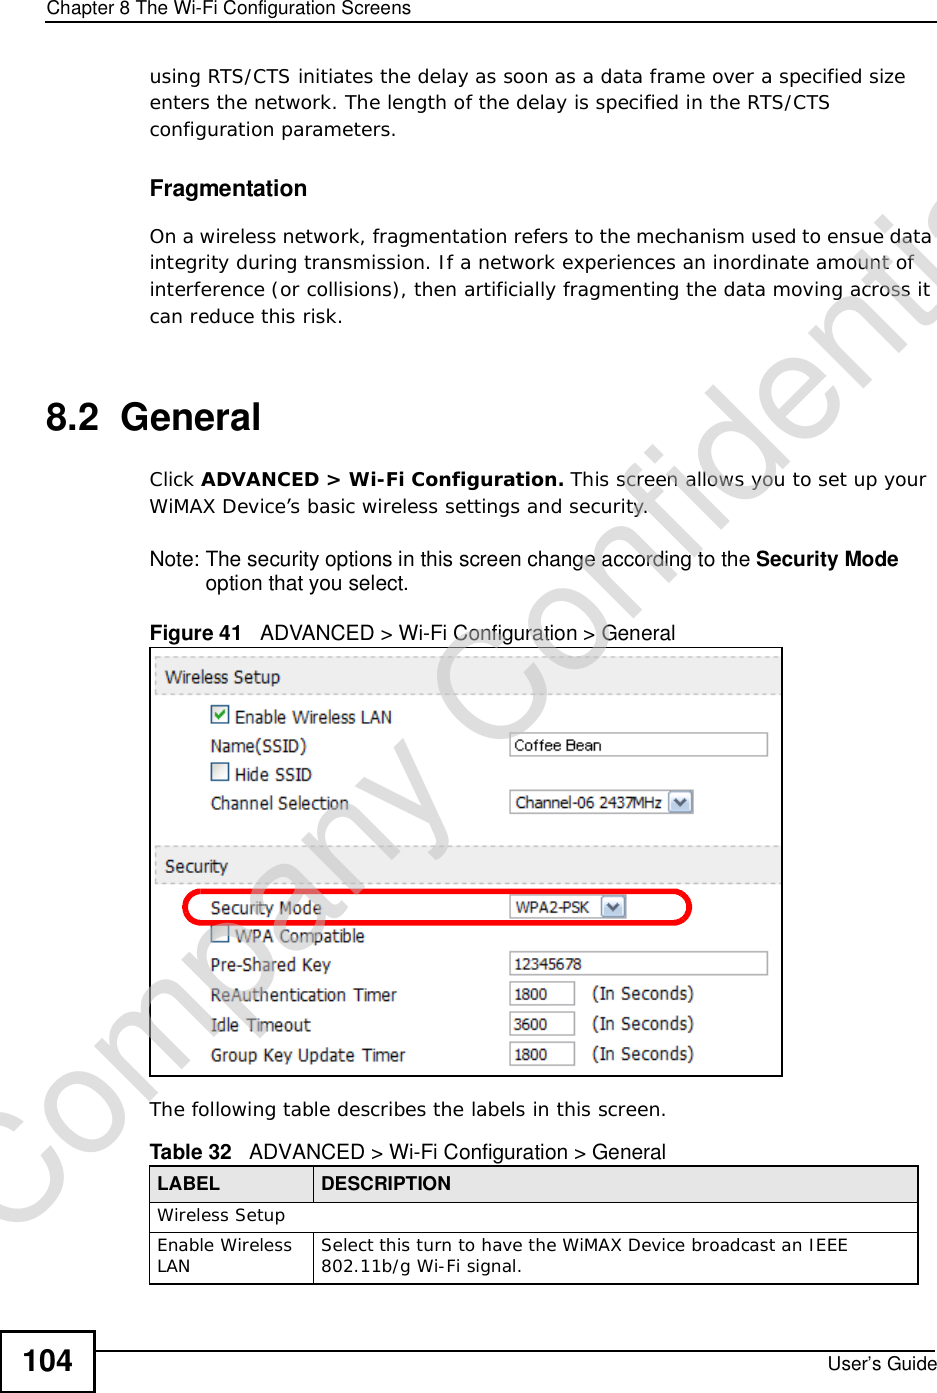
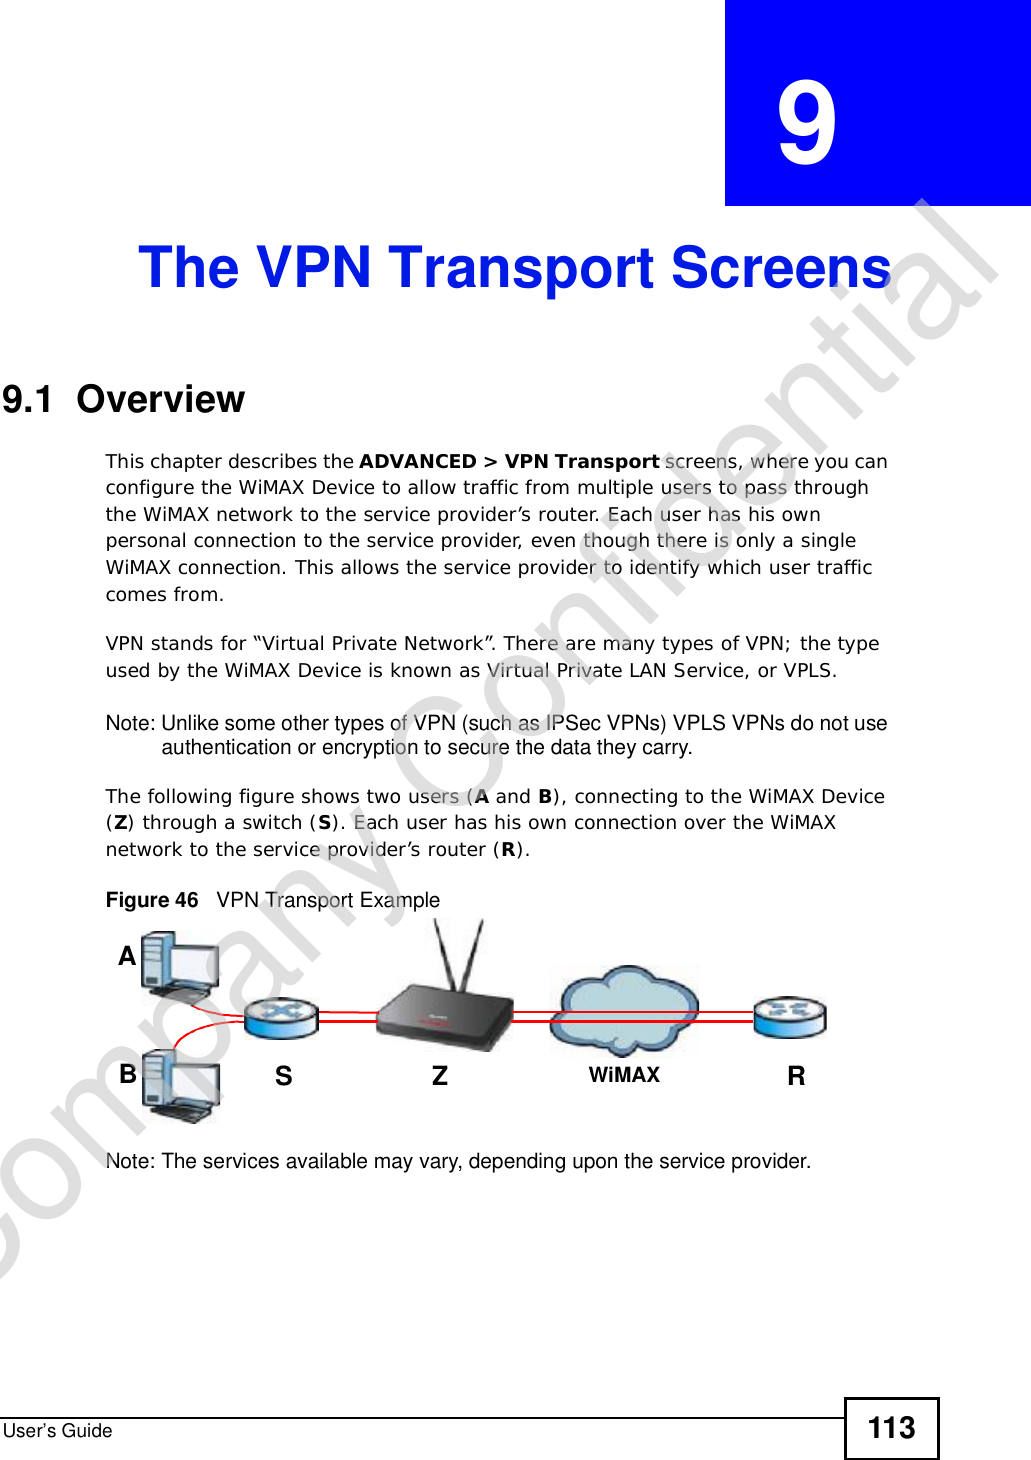
![Chapter 7The WAN Configuration ScreensUser’s Guide98Note: It may take several minutes for the WiMAX Device to find a connection.•The WiMAX Device searches the DL Frequency settings in ascending numerical order, from [1] to [19].Note: The Bandwidth field is not user-configurable; when the WiMAX Device finds a WiMAX connection, its frequency is displayed in this field.•If you enter a 0 in a DL Frequency field, the WiMAX Device immediately moves on to the next DL Frequency field.•When the WiMAX Device connects to a base station, the values in this screen are automatically set to the base station’s frequency. The next time the WiMAX Device searches for a connection, it searches only this frequency. If you want the WiMAX Device to search other frequencies, enter them in the DLFrequency fields.The following table describes some examples of DL Frequency settings.7.3.3 Using the WiMAX Frequency ScreenIn this example, your Internet service provider has given you a list of supported frequencies: 2.51, 2.525, 2.6, and 2.625. 1In the DL Frequency [1] field, enter 2510000 (2510000 kilohertz (kHz) is equal to 2.51 gigahertz).2In the DL Frequency [2] field, enter 2525000.3In the DL Frequency [3] field, enter 2600000.Table 29 DL Frequency Example SettingsEXAMPLE 1 EXAMPLE 2Bandwidth: 25000002500000DL Frequency [1]: 25500002550000DL Frequency [2] 02600000DL Frequency [3]: 00DL Frequency [4]: 00The WiMAX Device searches at 2500000 kHz, and then searches at 2550000 kHz if it has not found a connection.The WiMAX Devicesearches at 2500000 kHz and then at 2550000 kHz if it has not found an available connection. If it still does not find an available connection, it searches at 2600000 kHz.Company Confidential](https://usermanual.wiki/ZyXEL-Communications/MAX306.Manual-Part-1/User-Guide-1135851-Page-98.png)
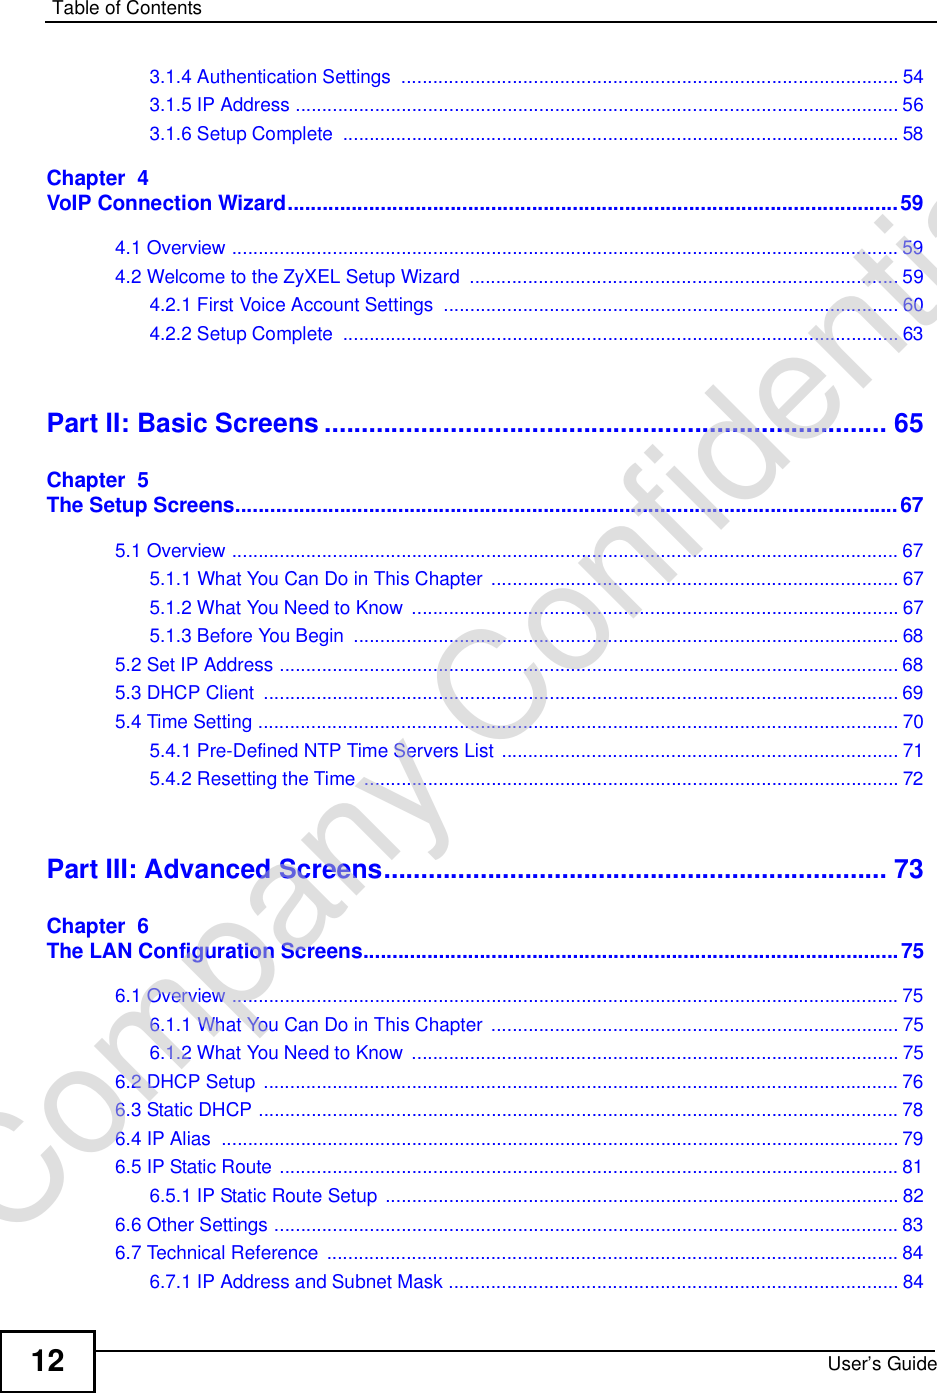
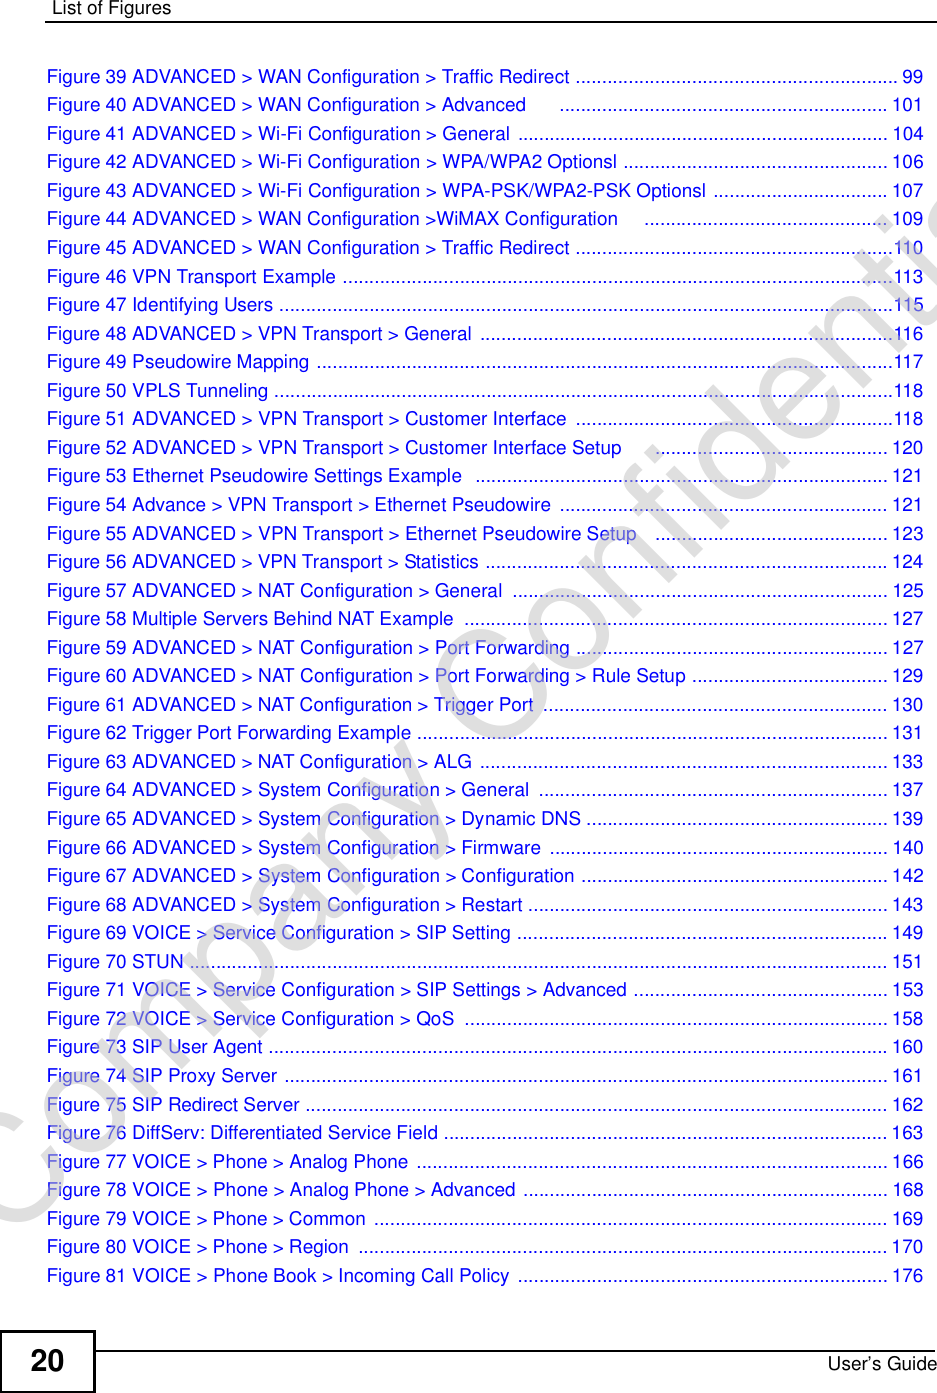
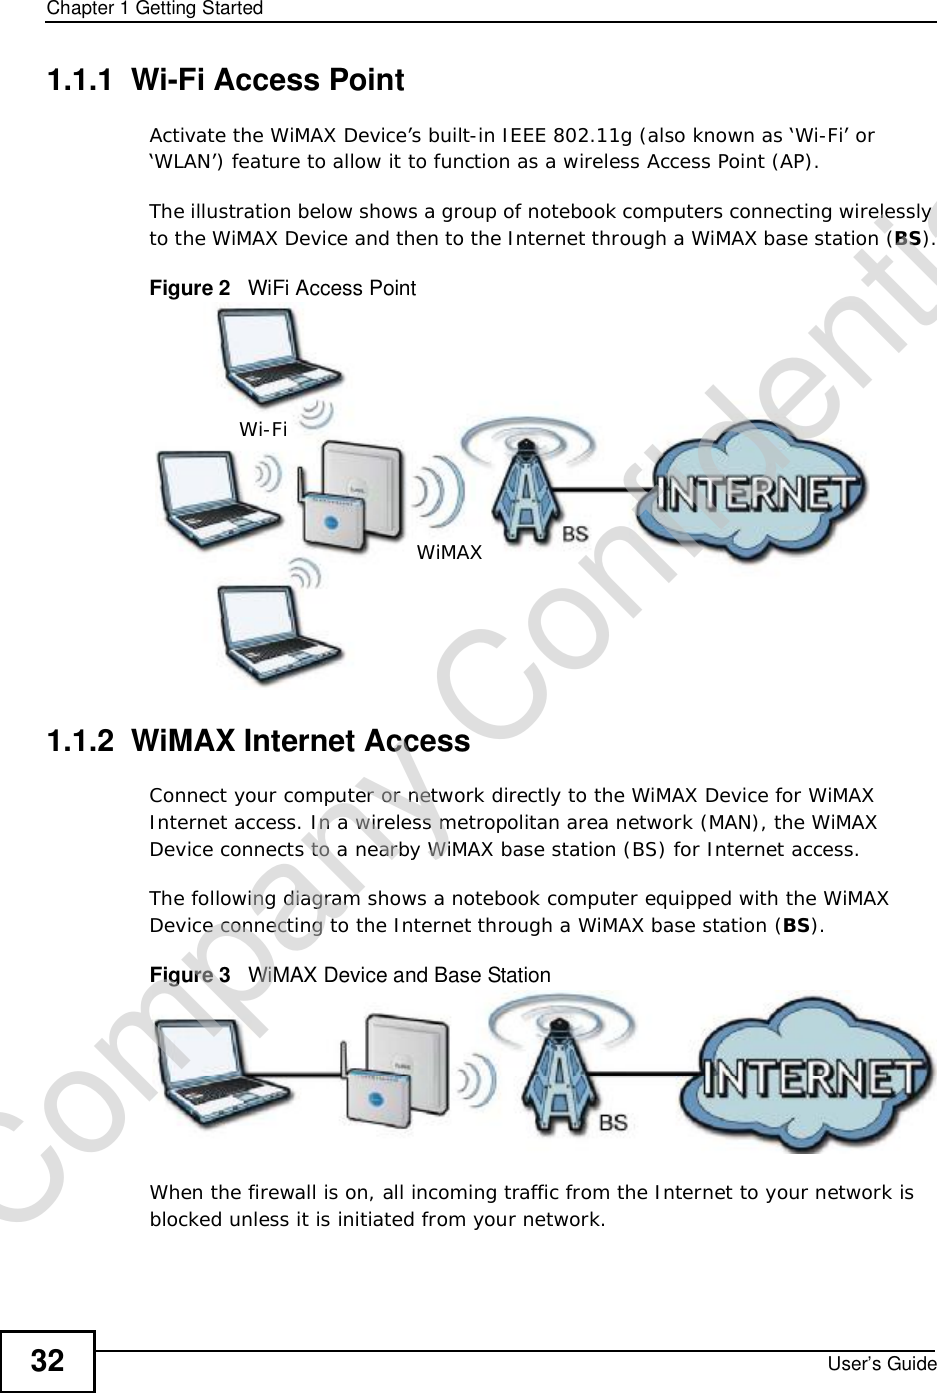
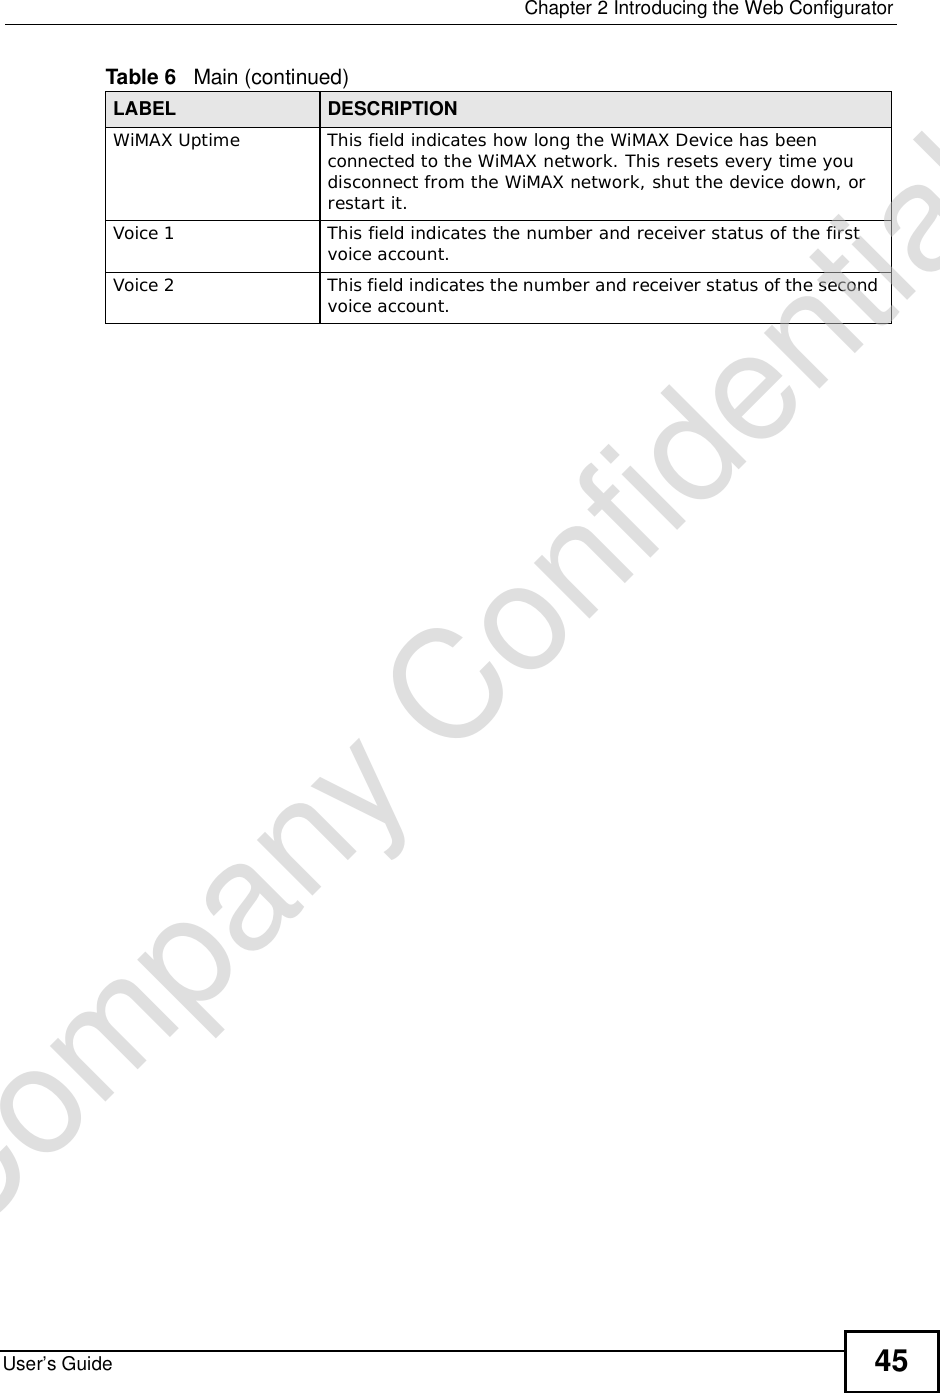
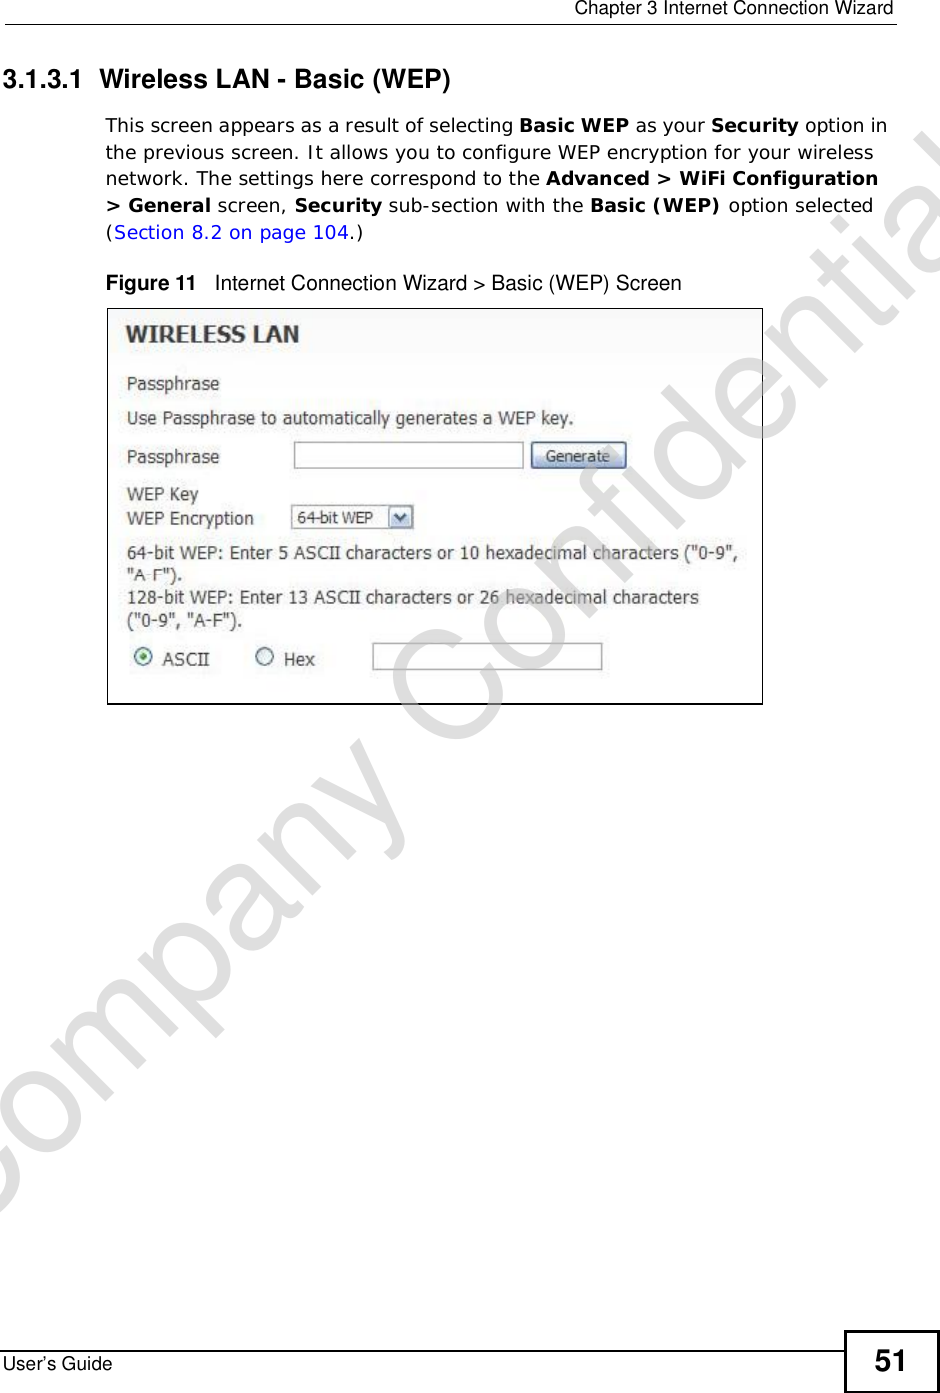
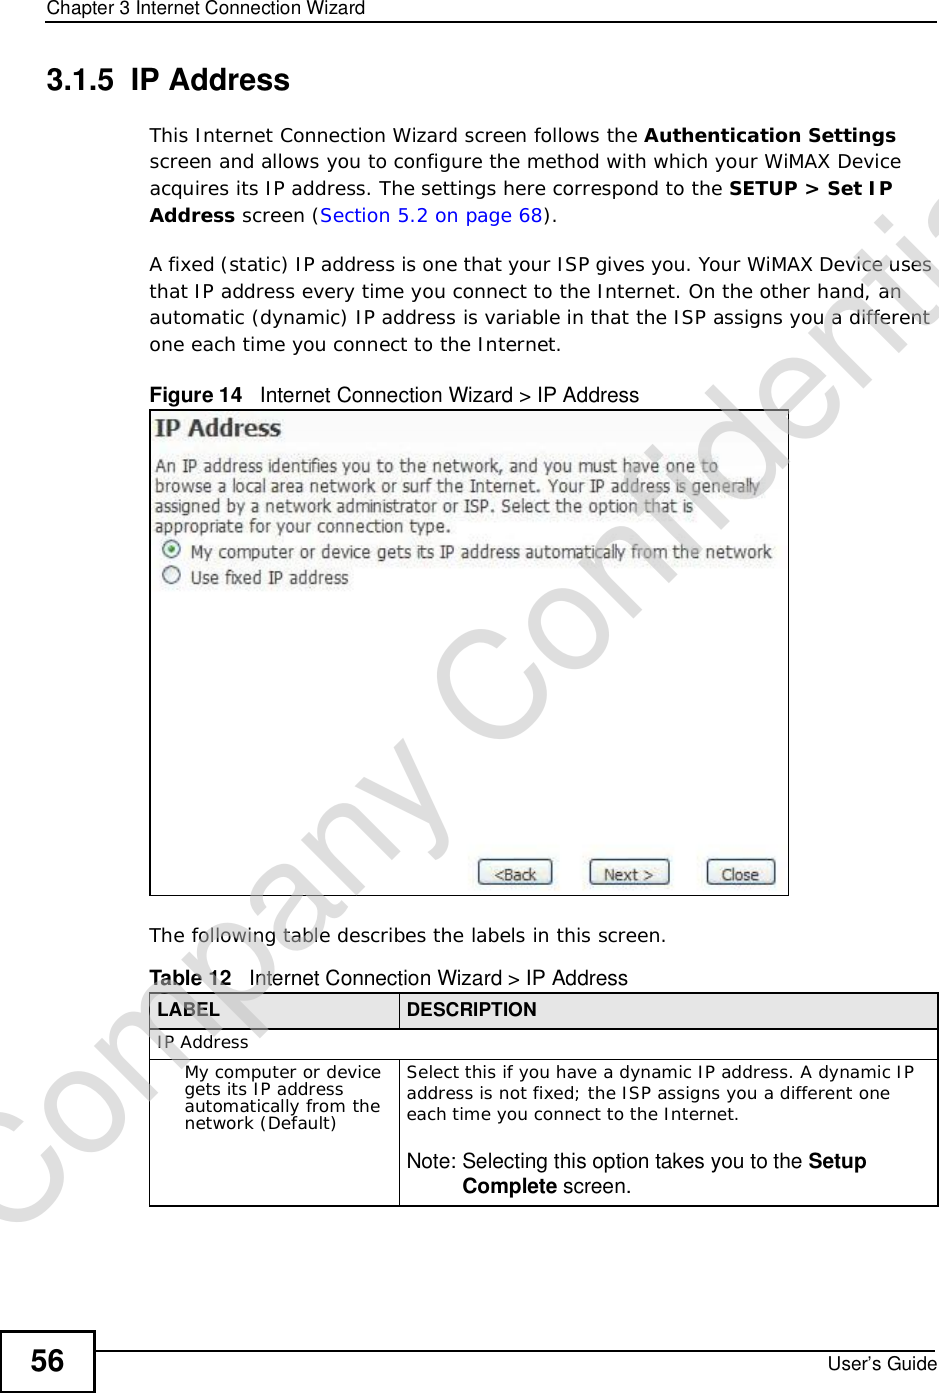
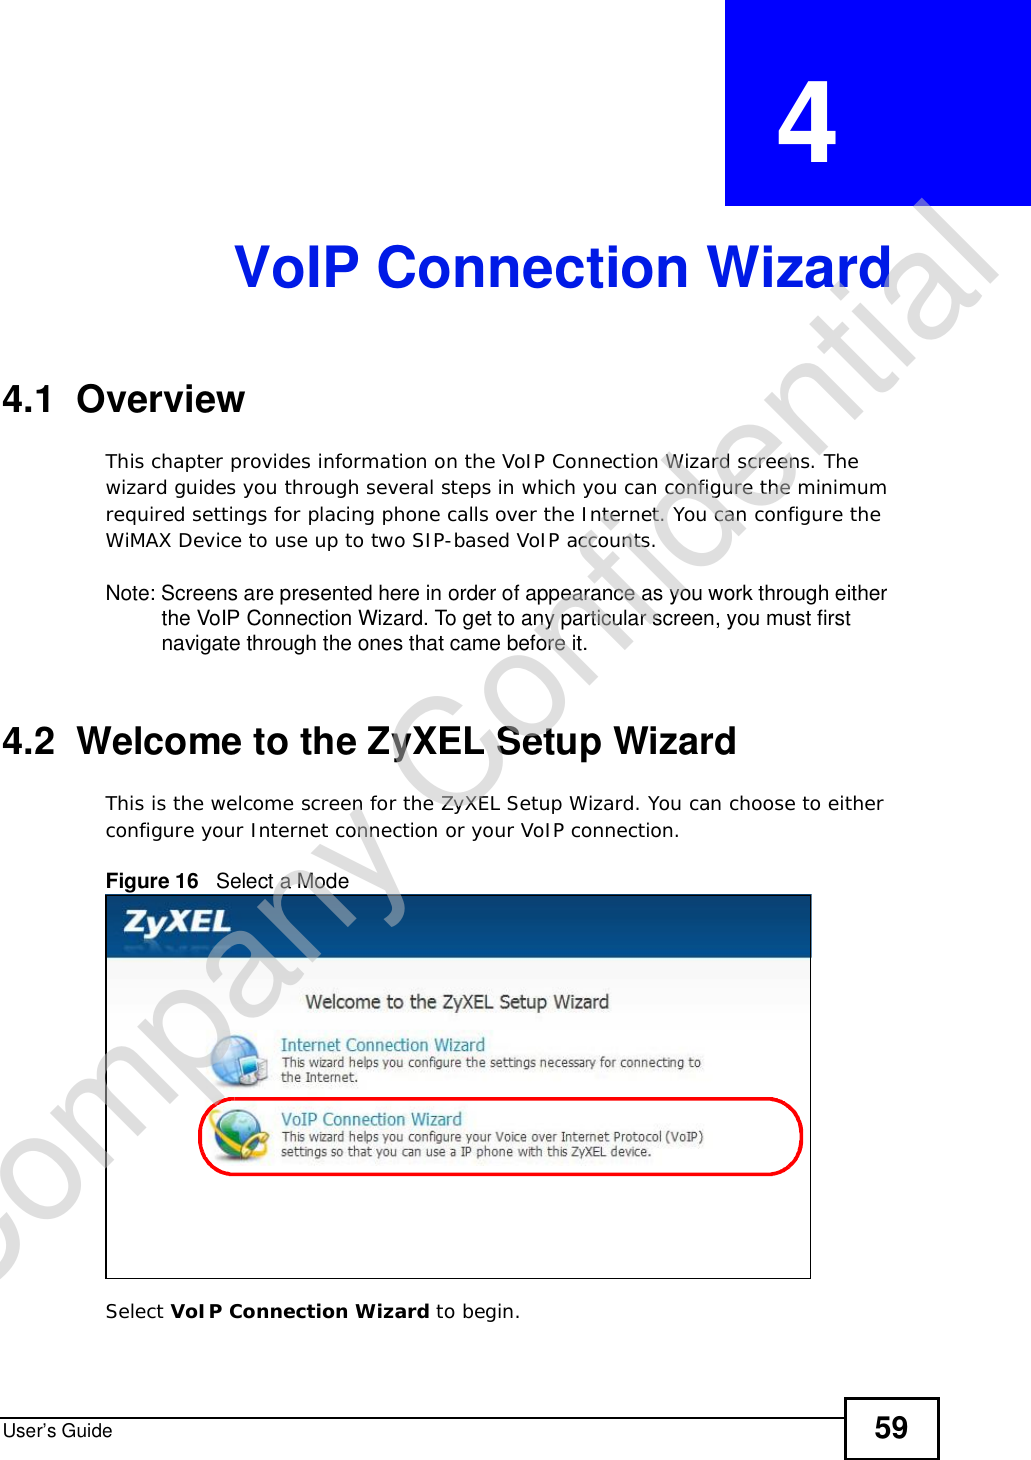
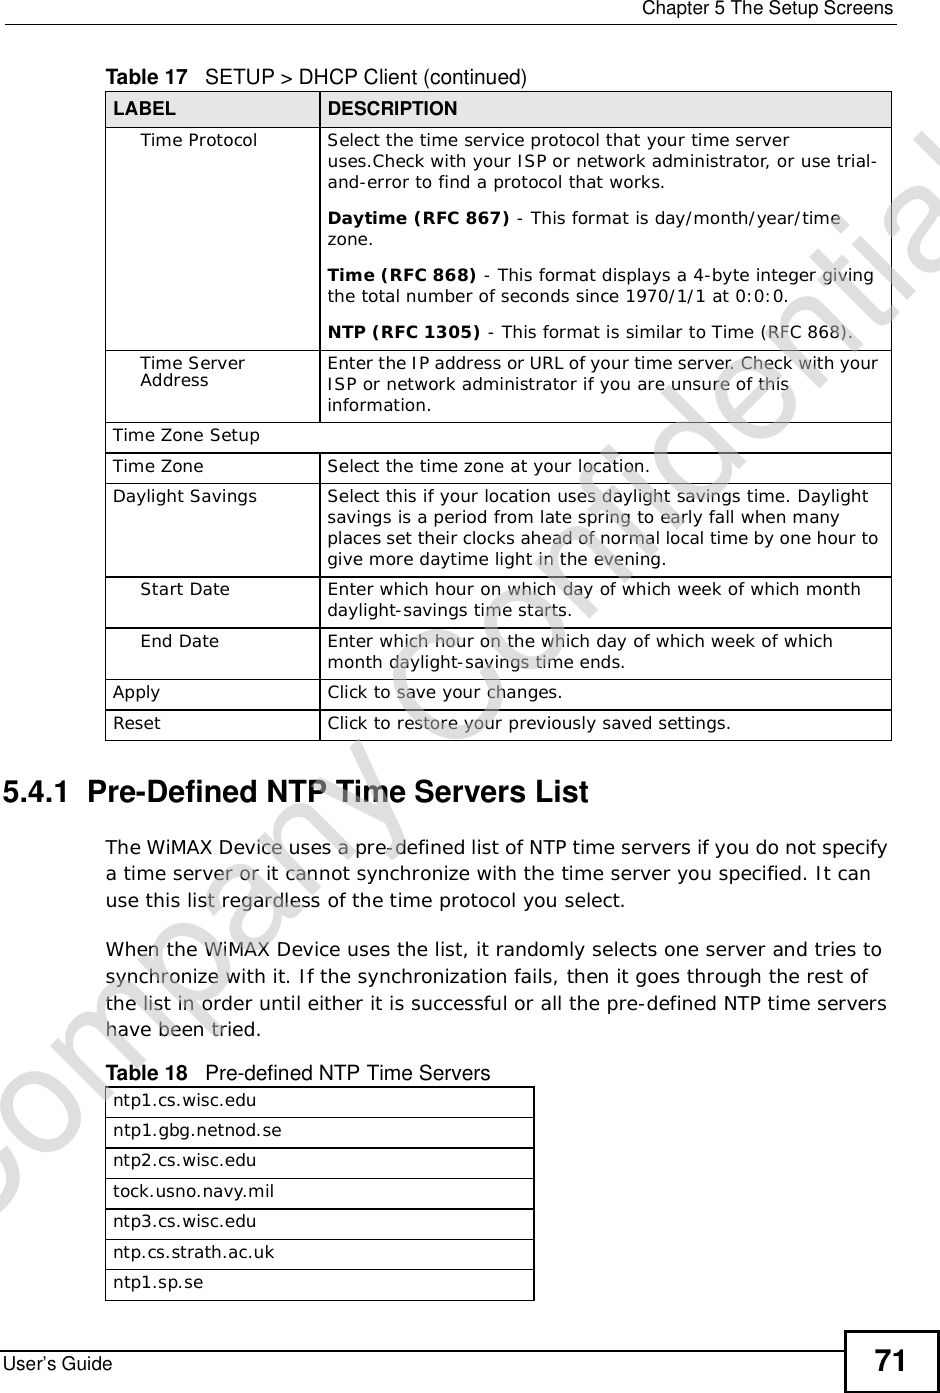
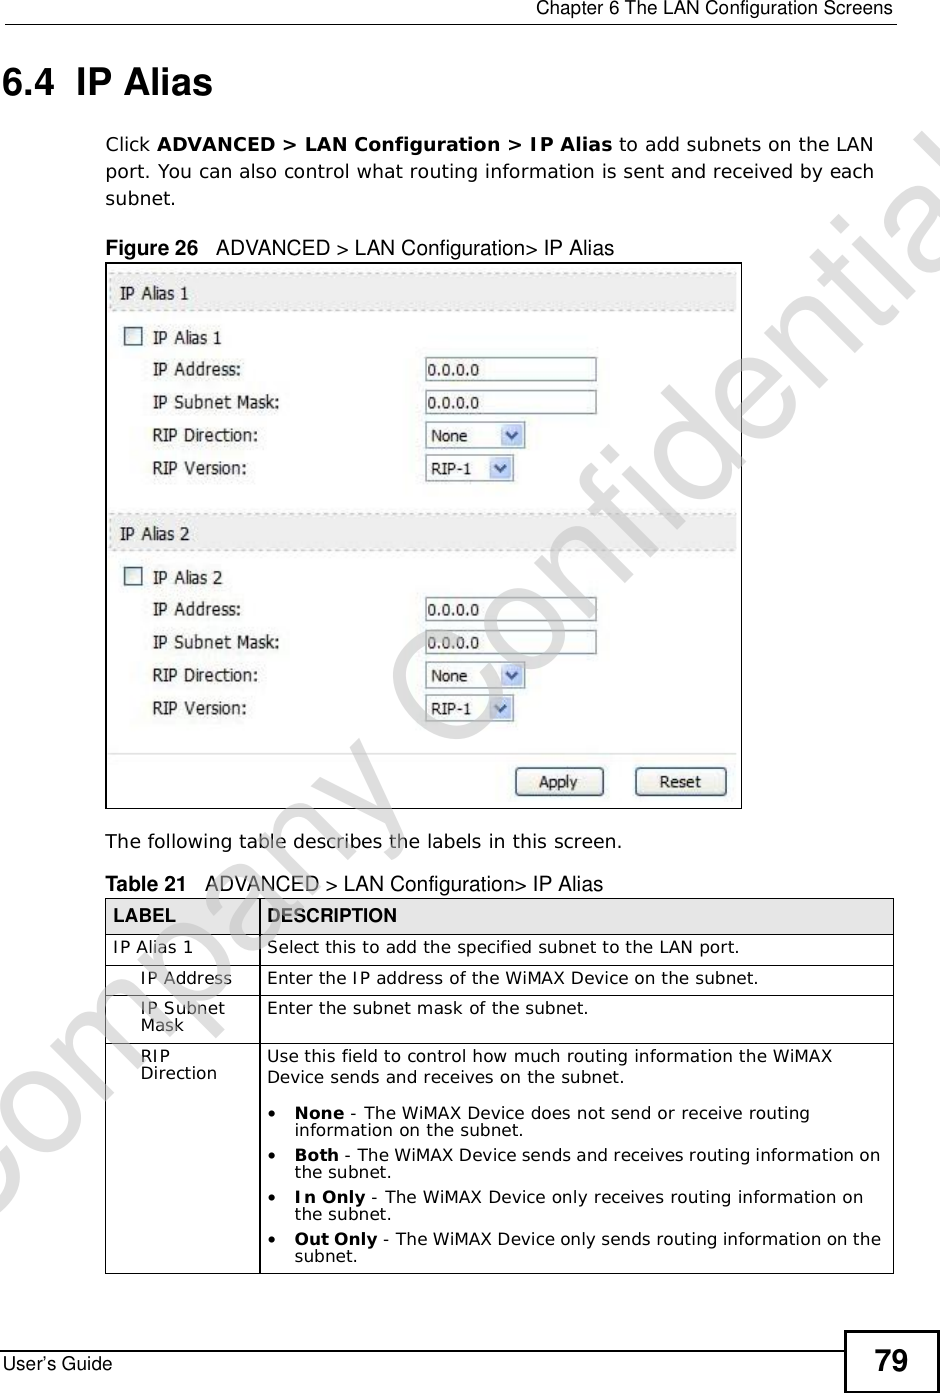
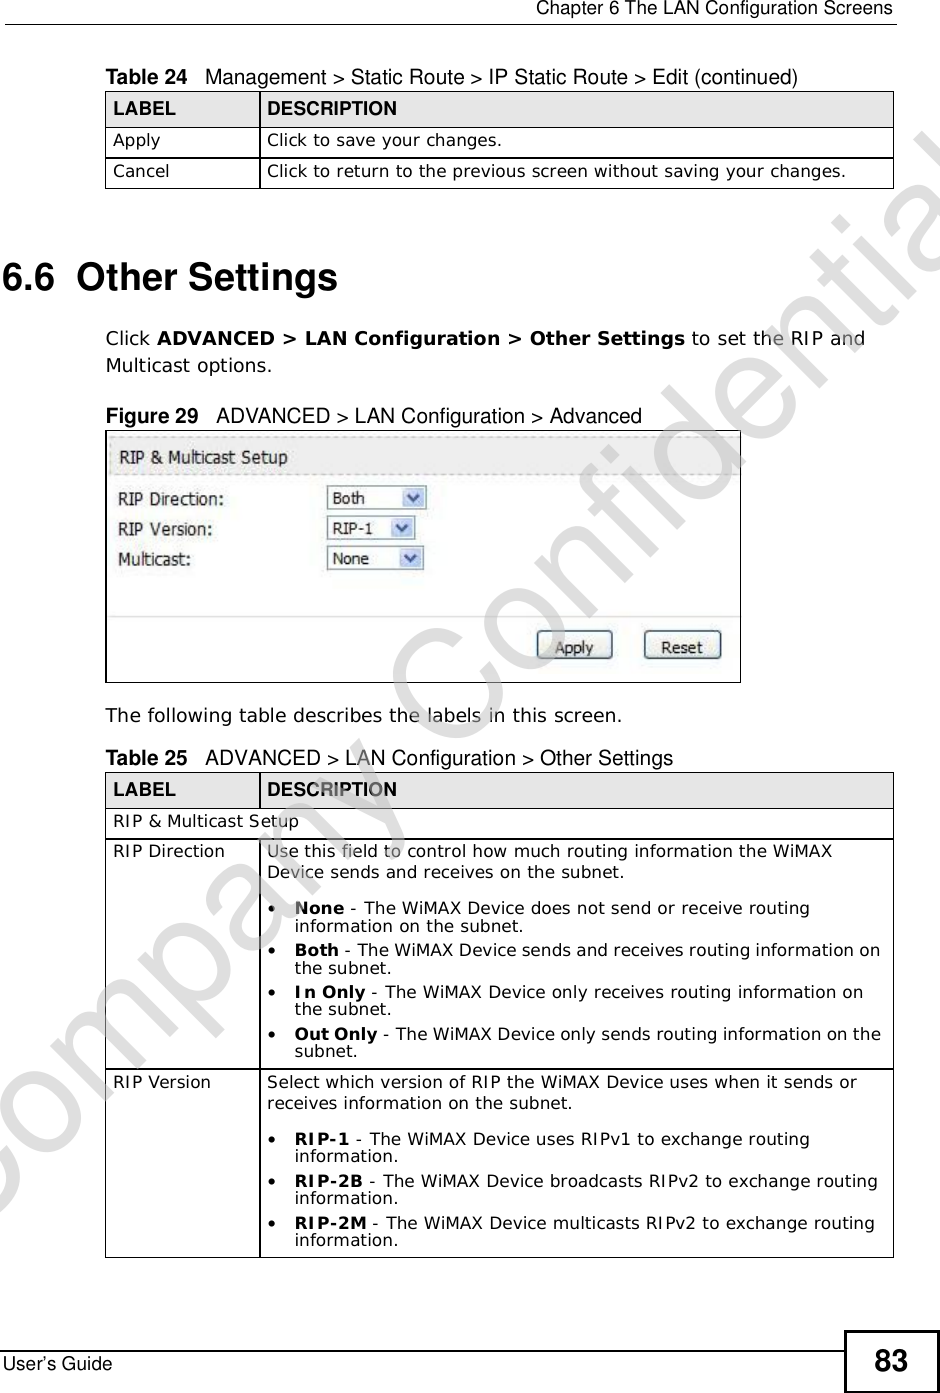
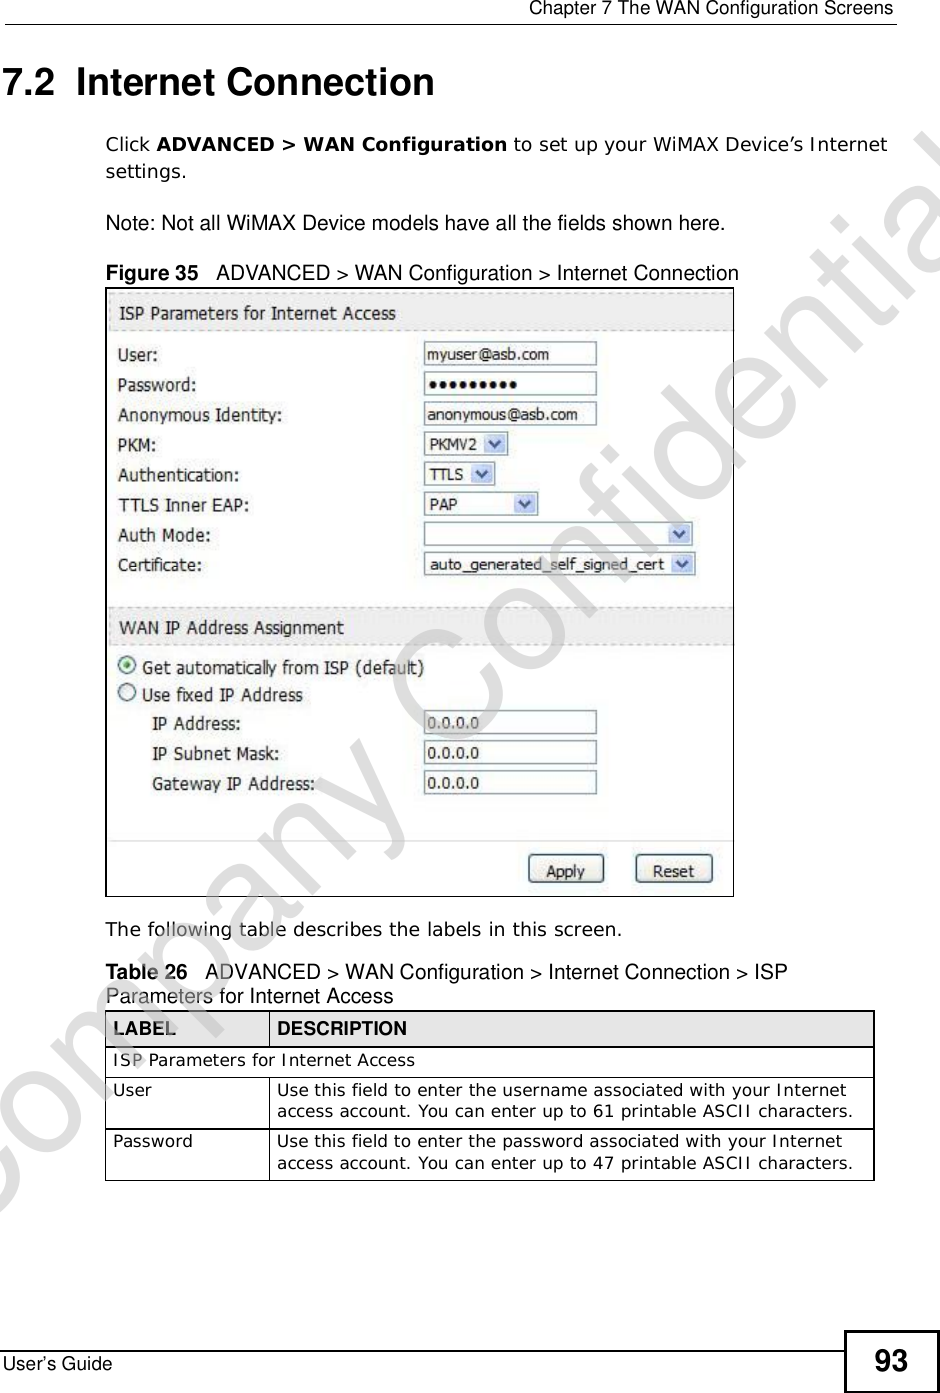
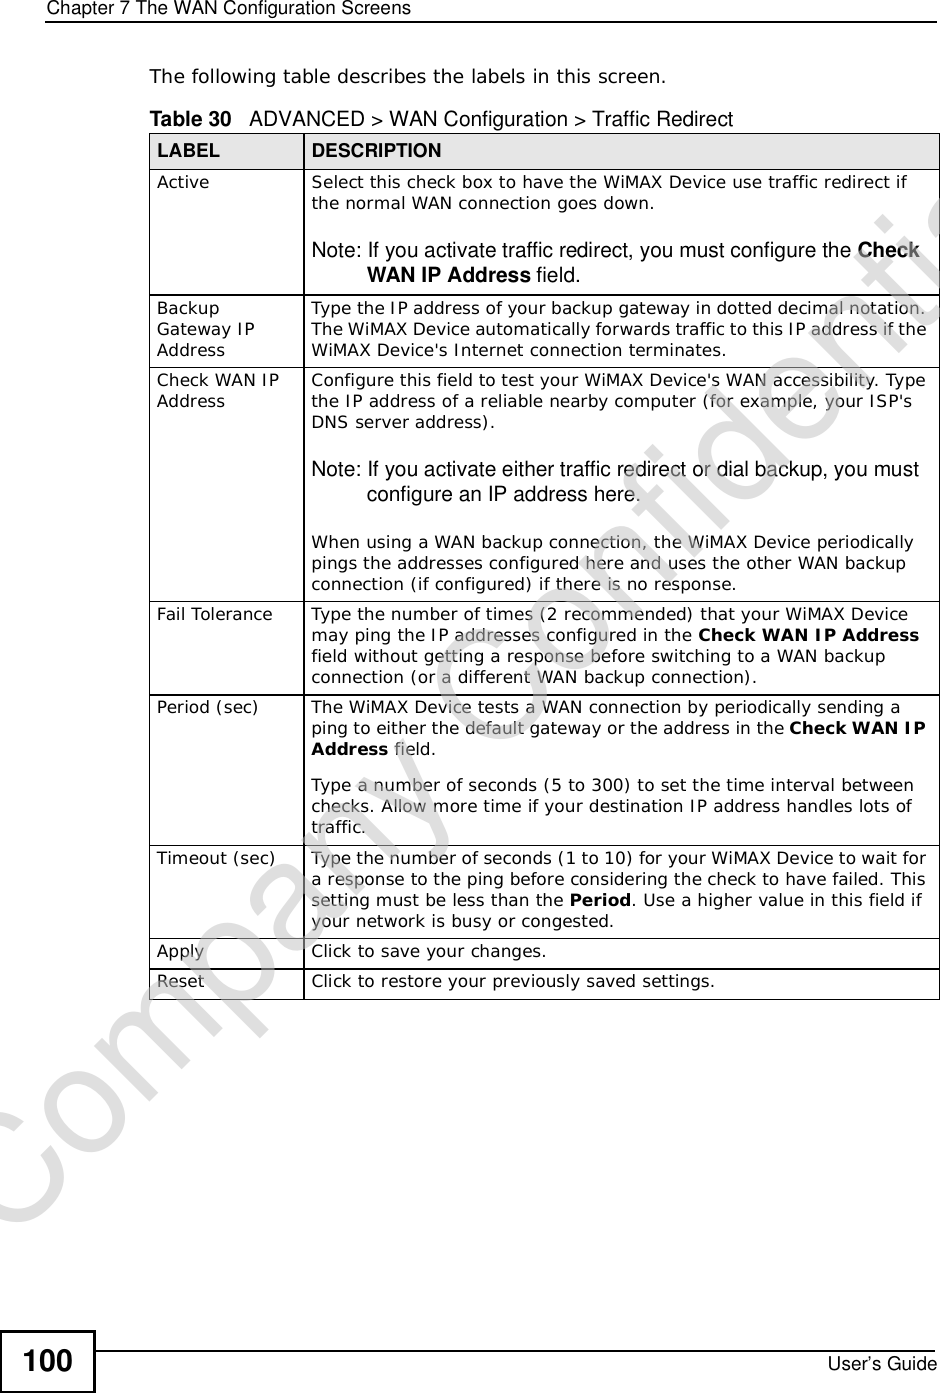
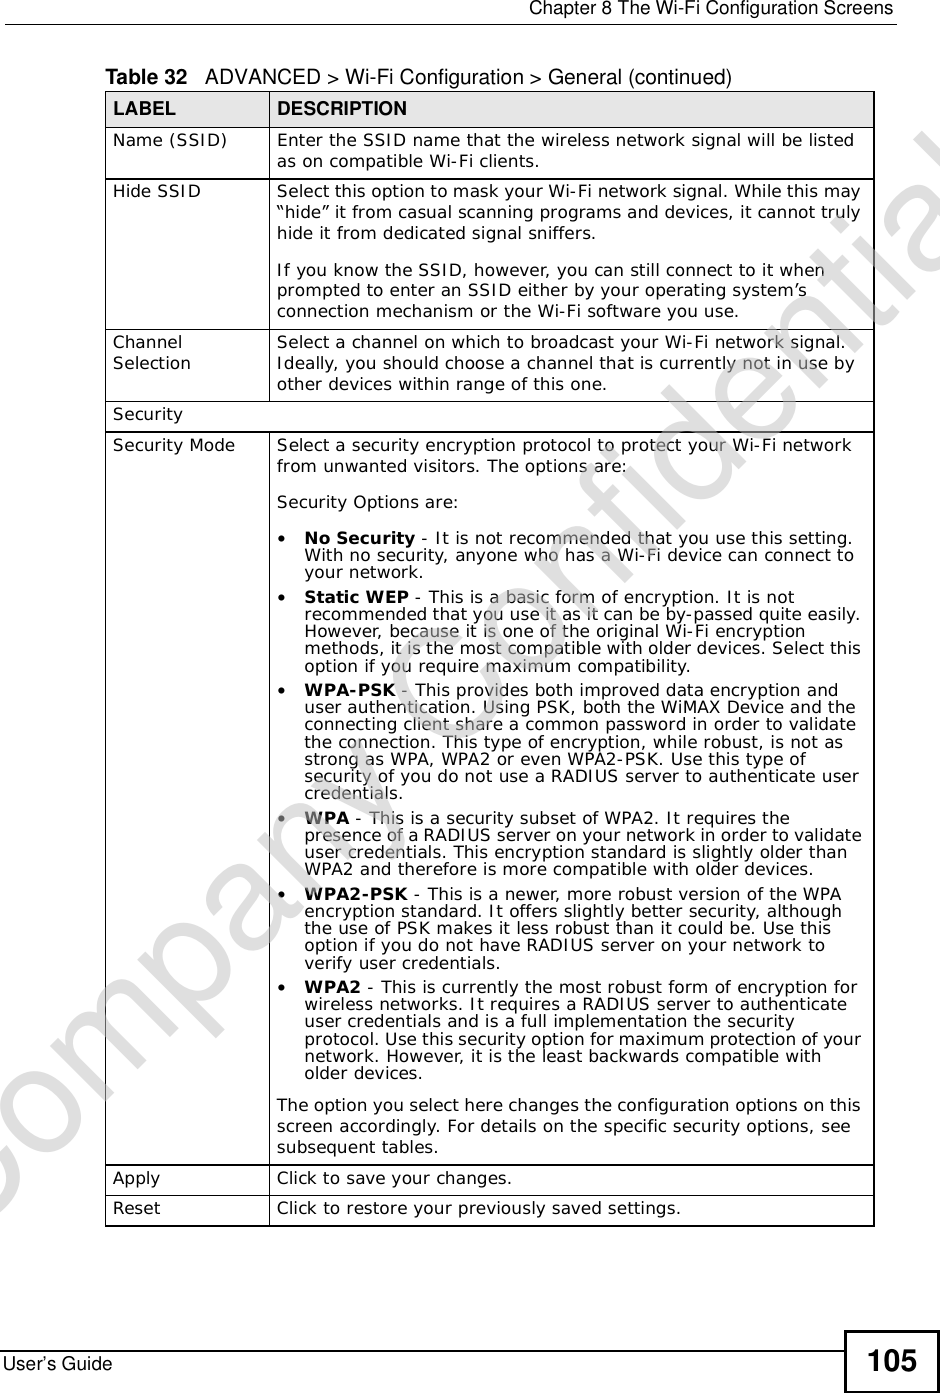
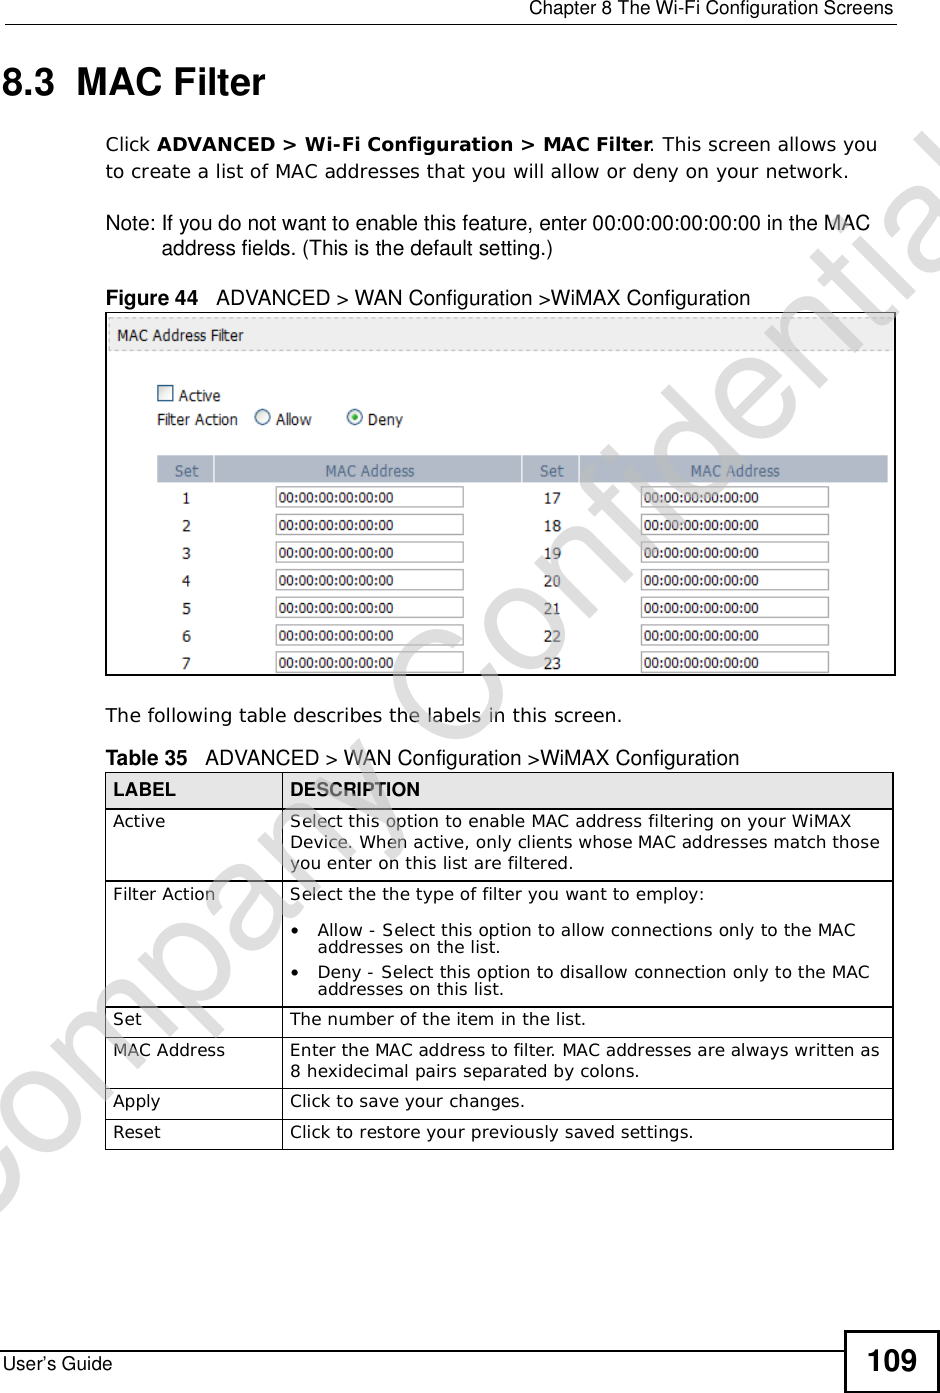
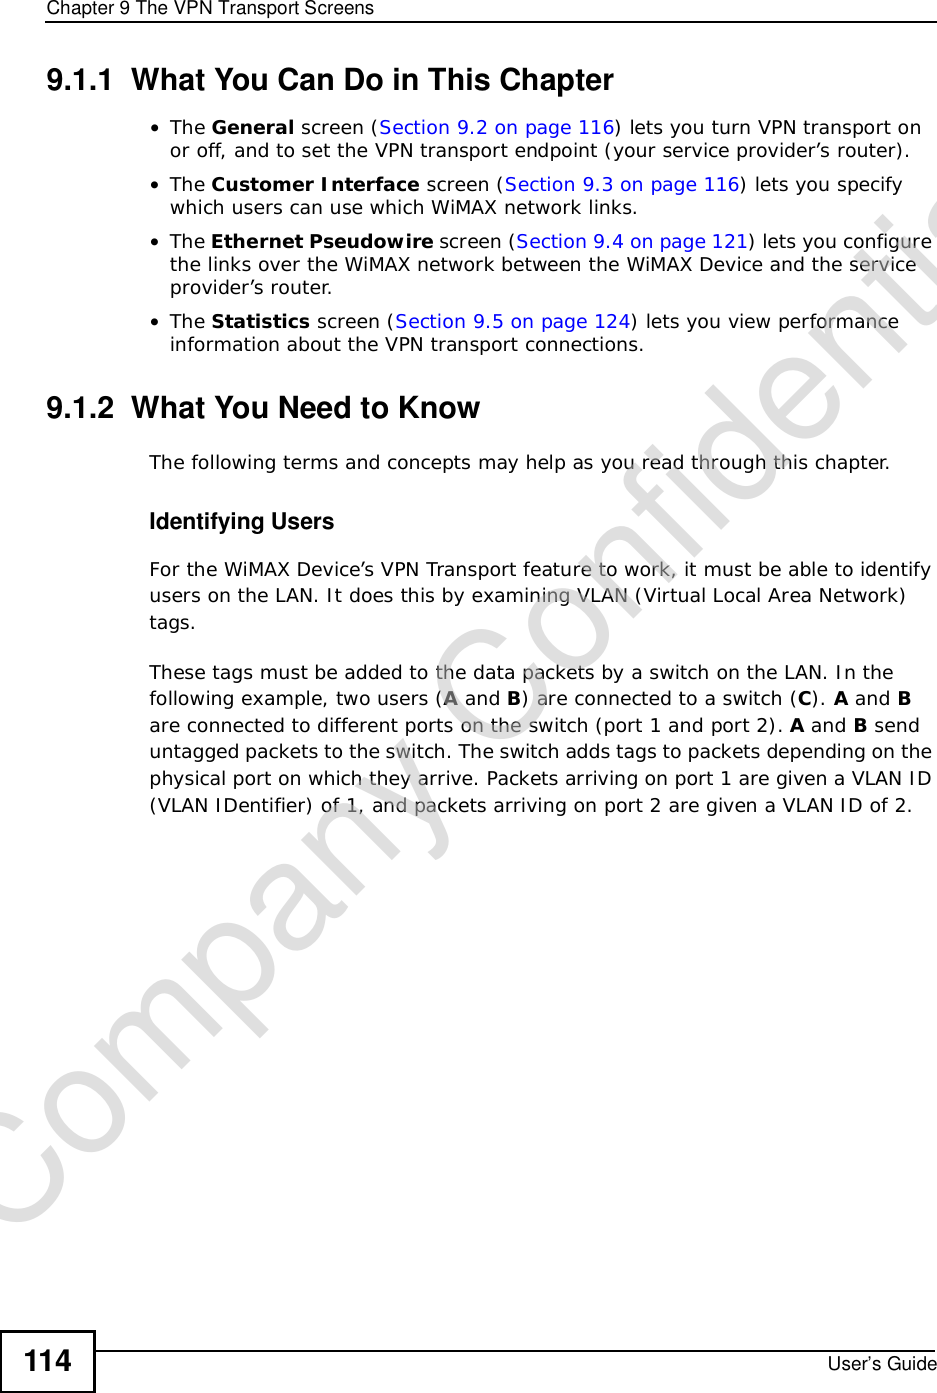
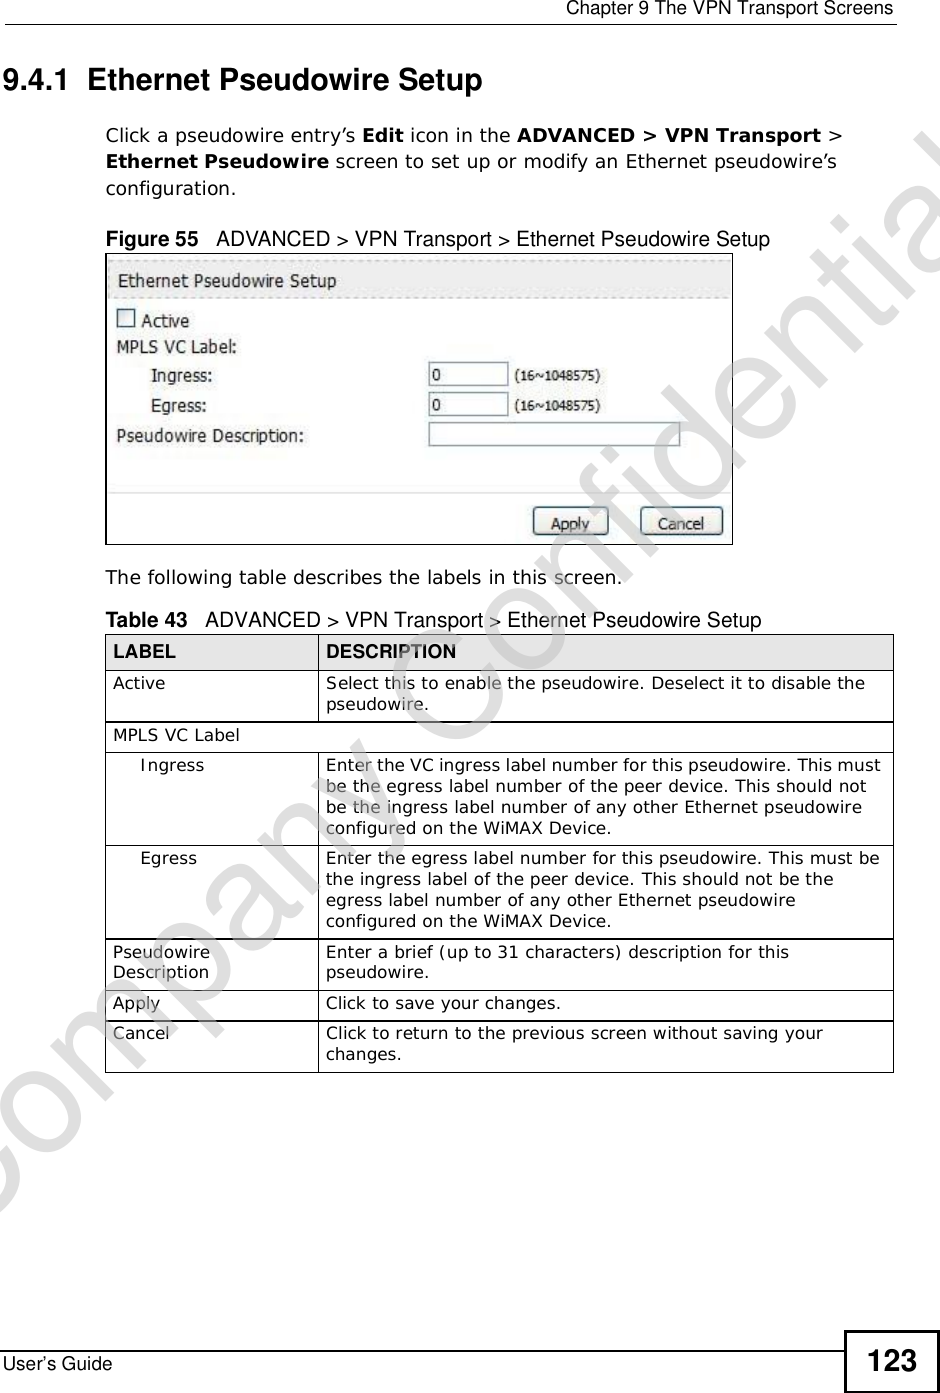
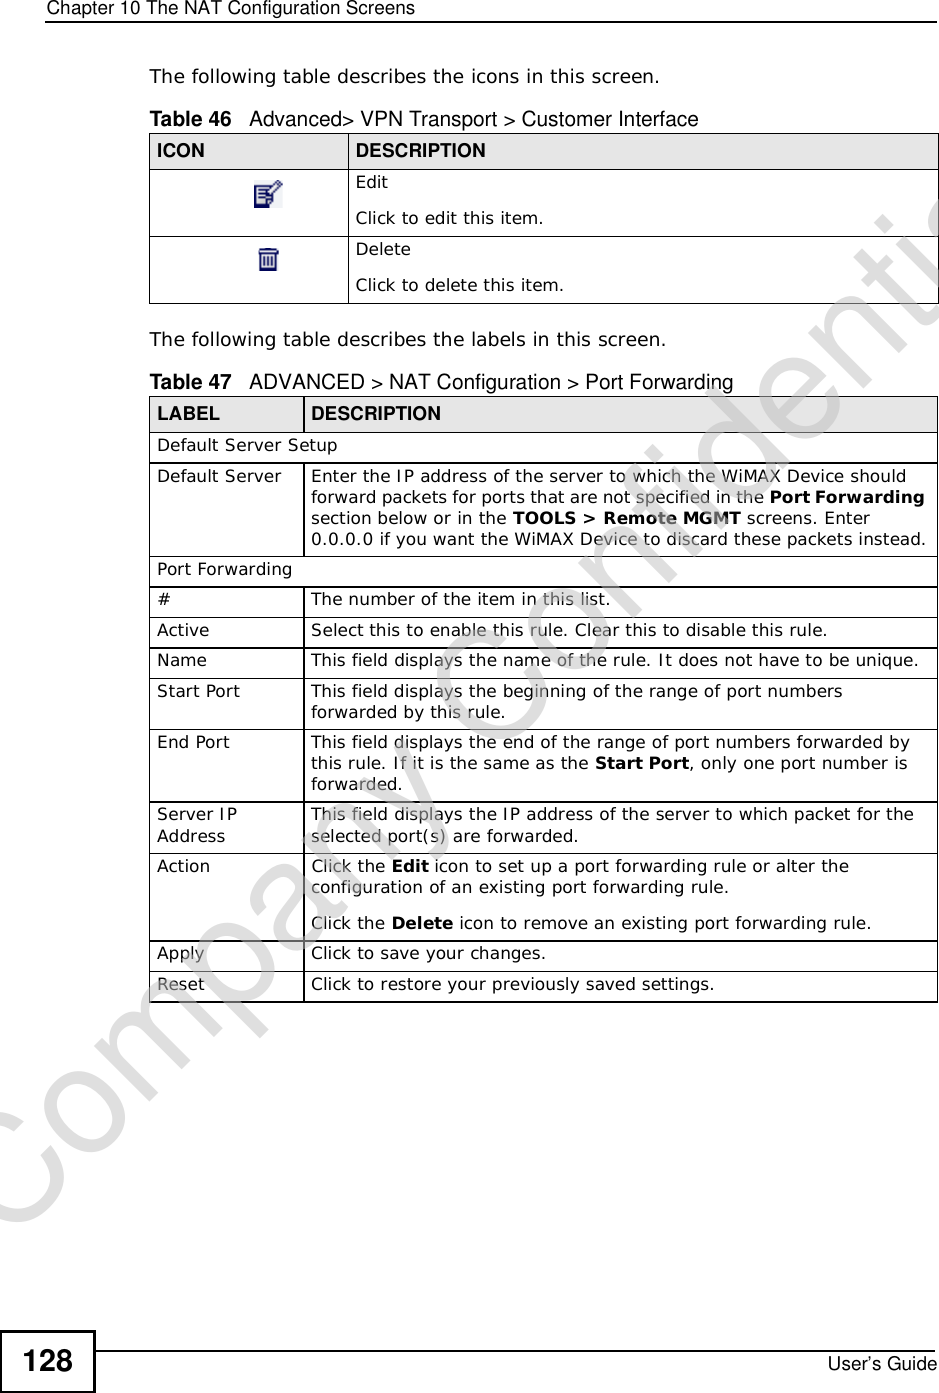
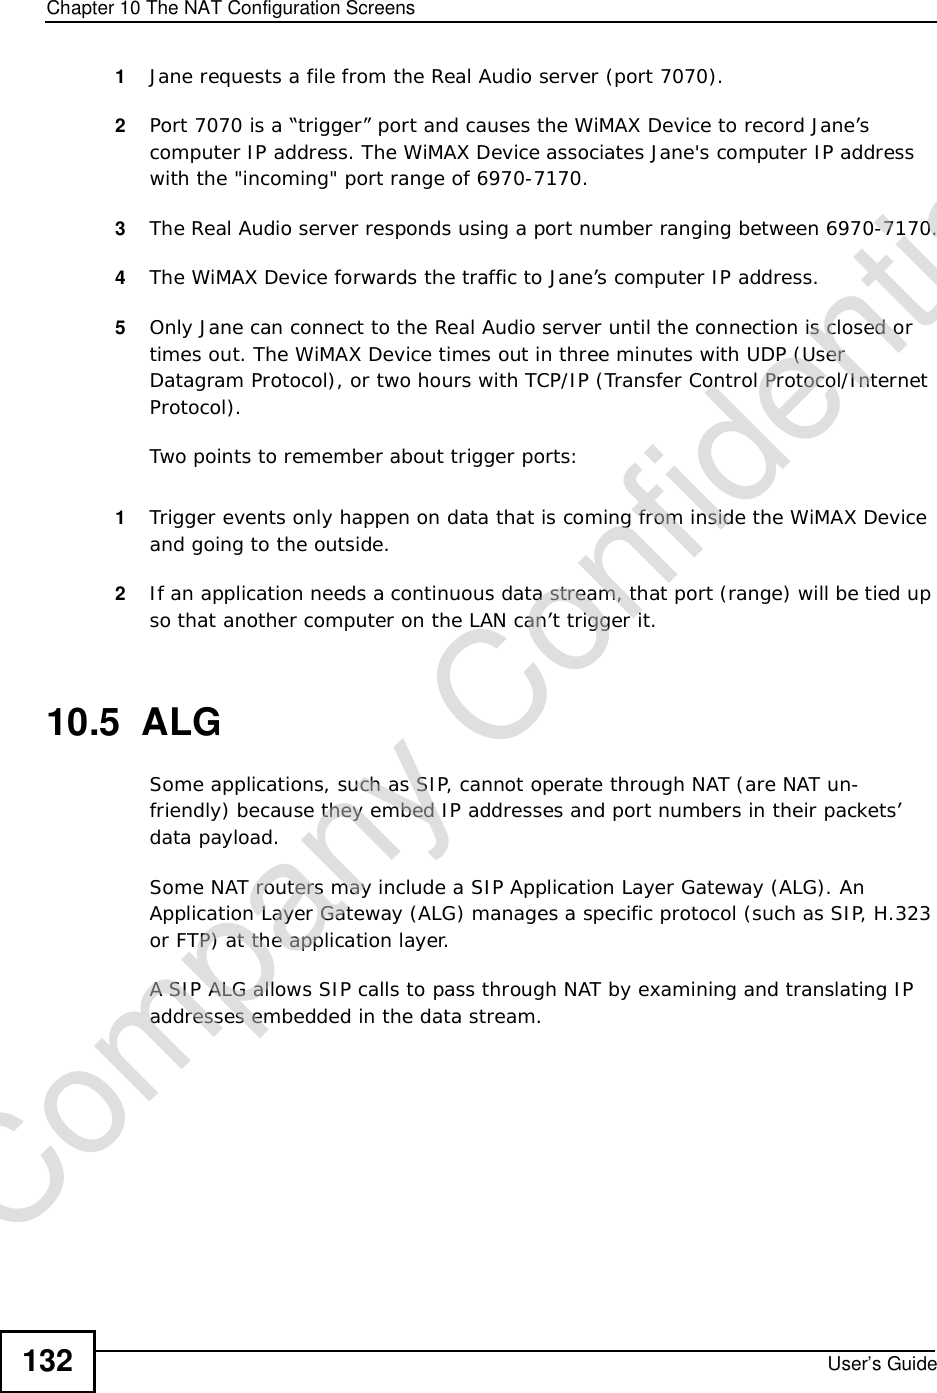
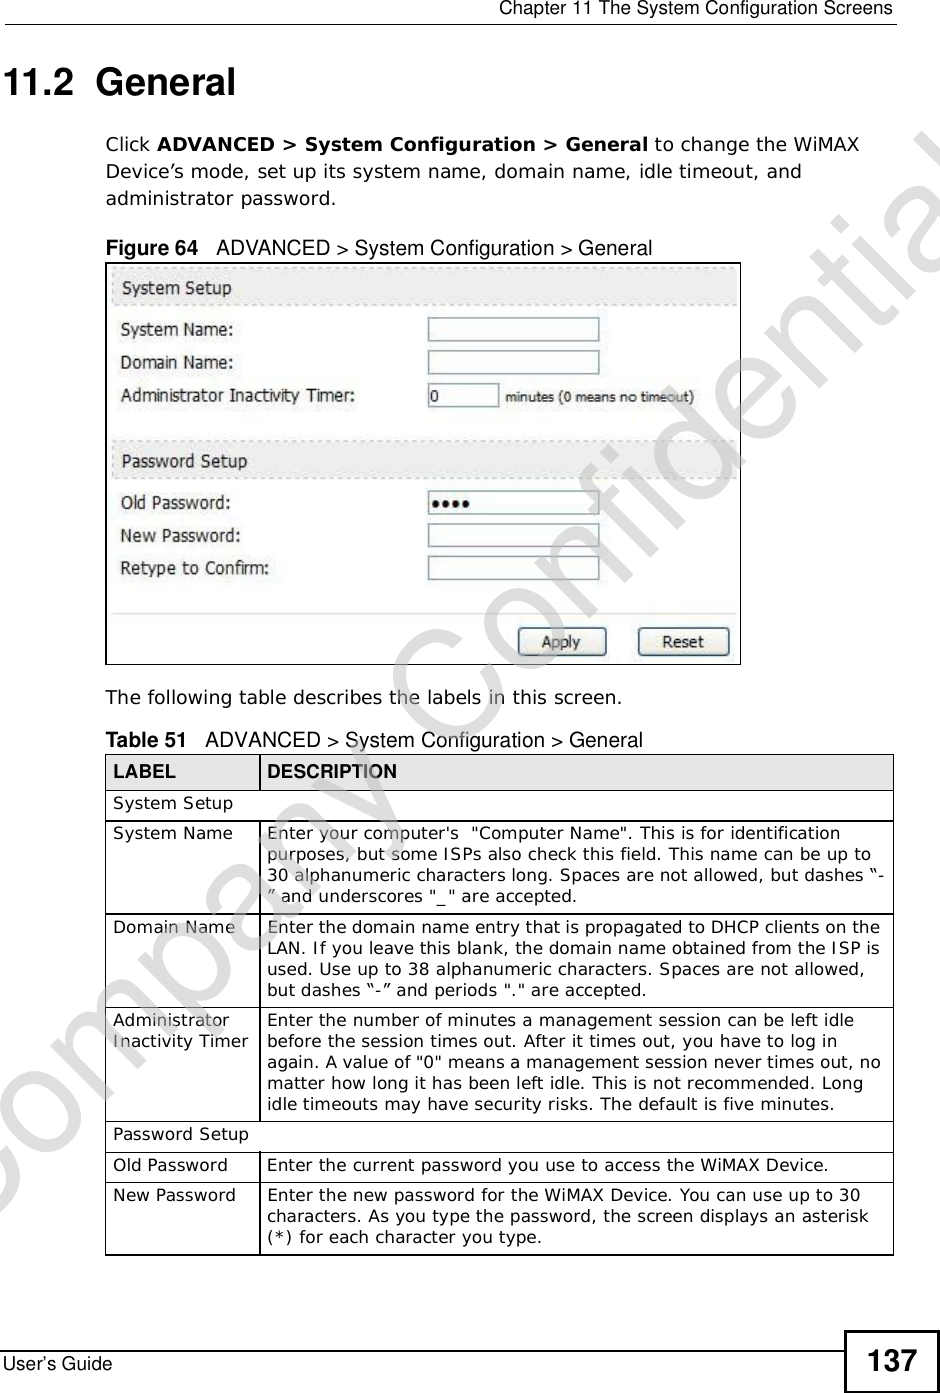
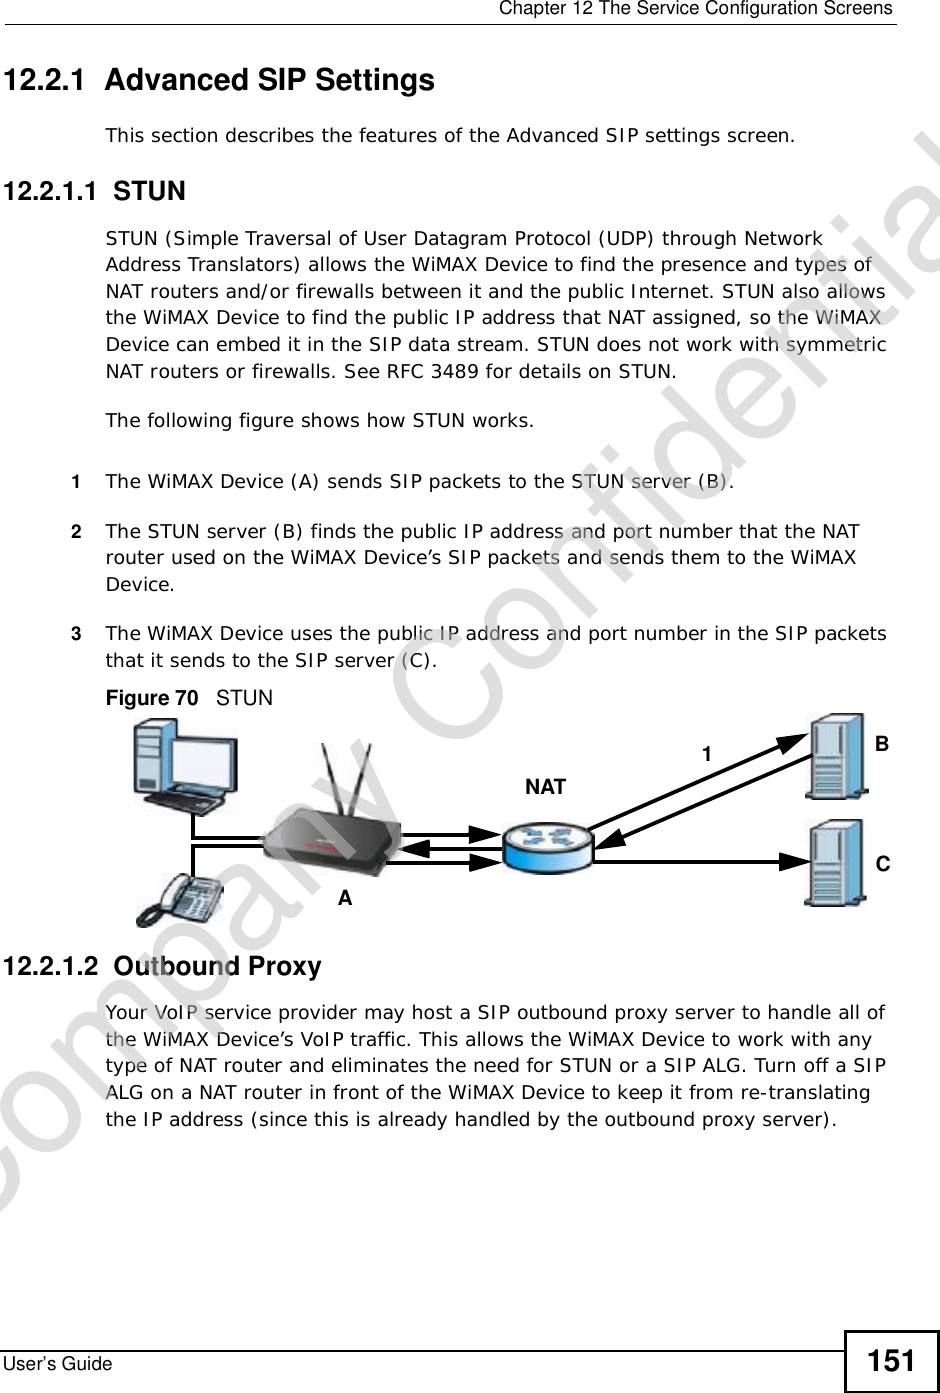
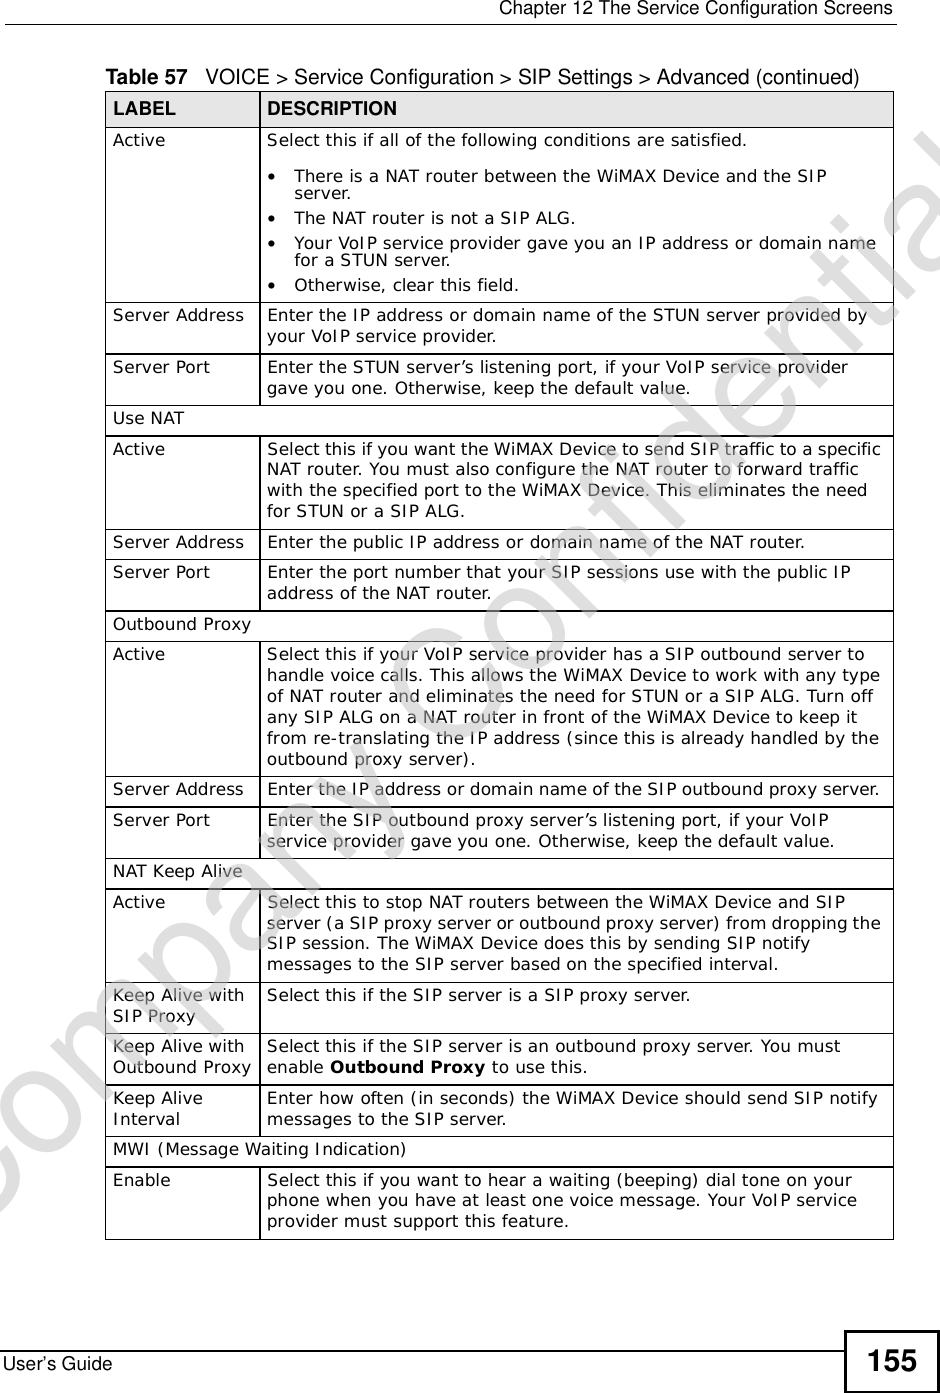
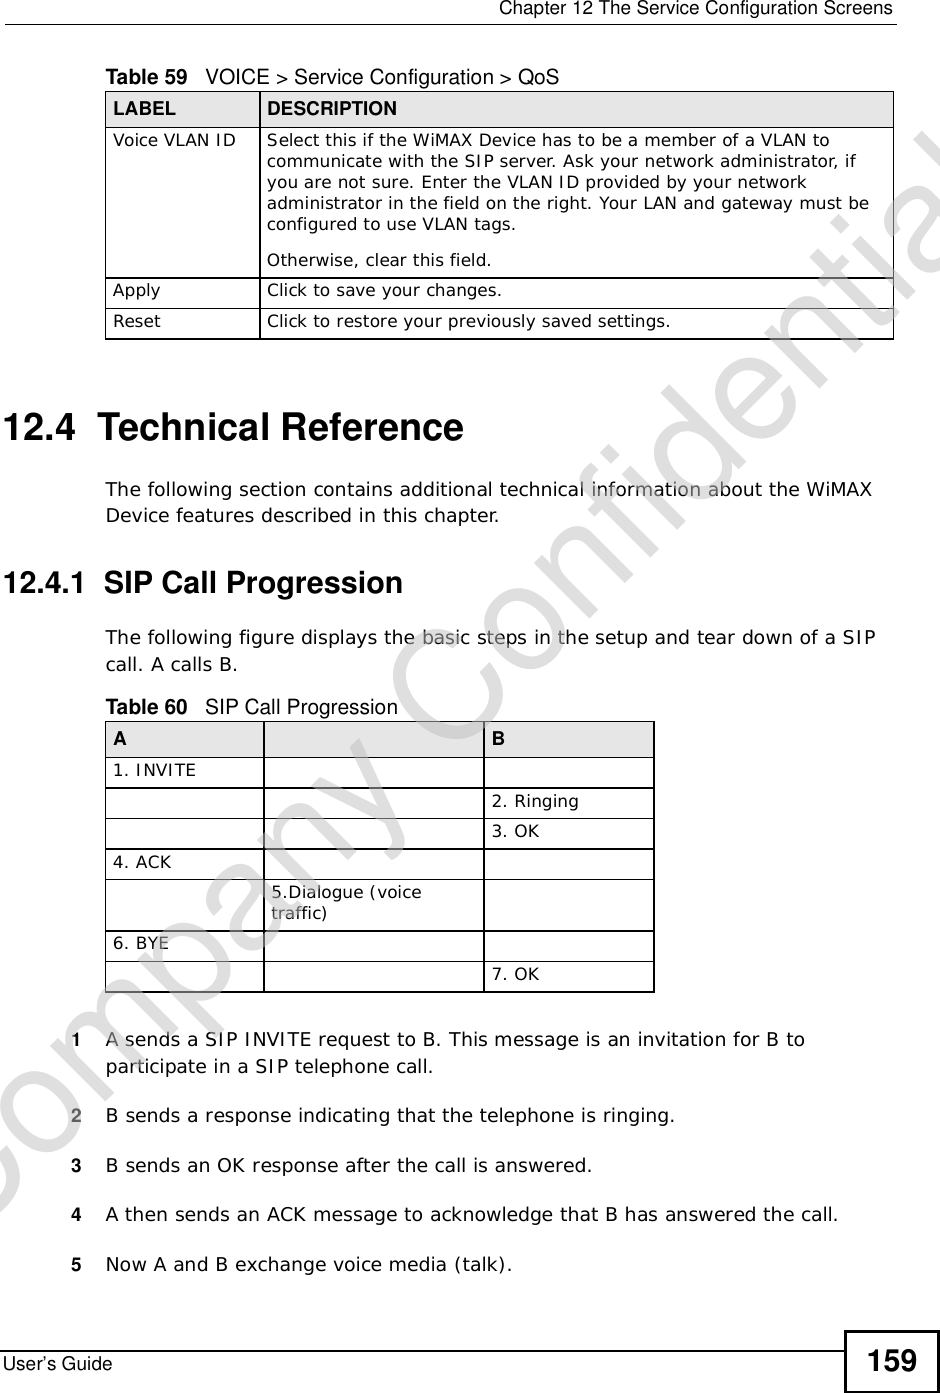
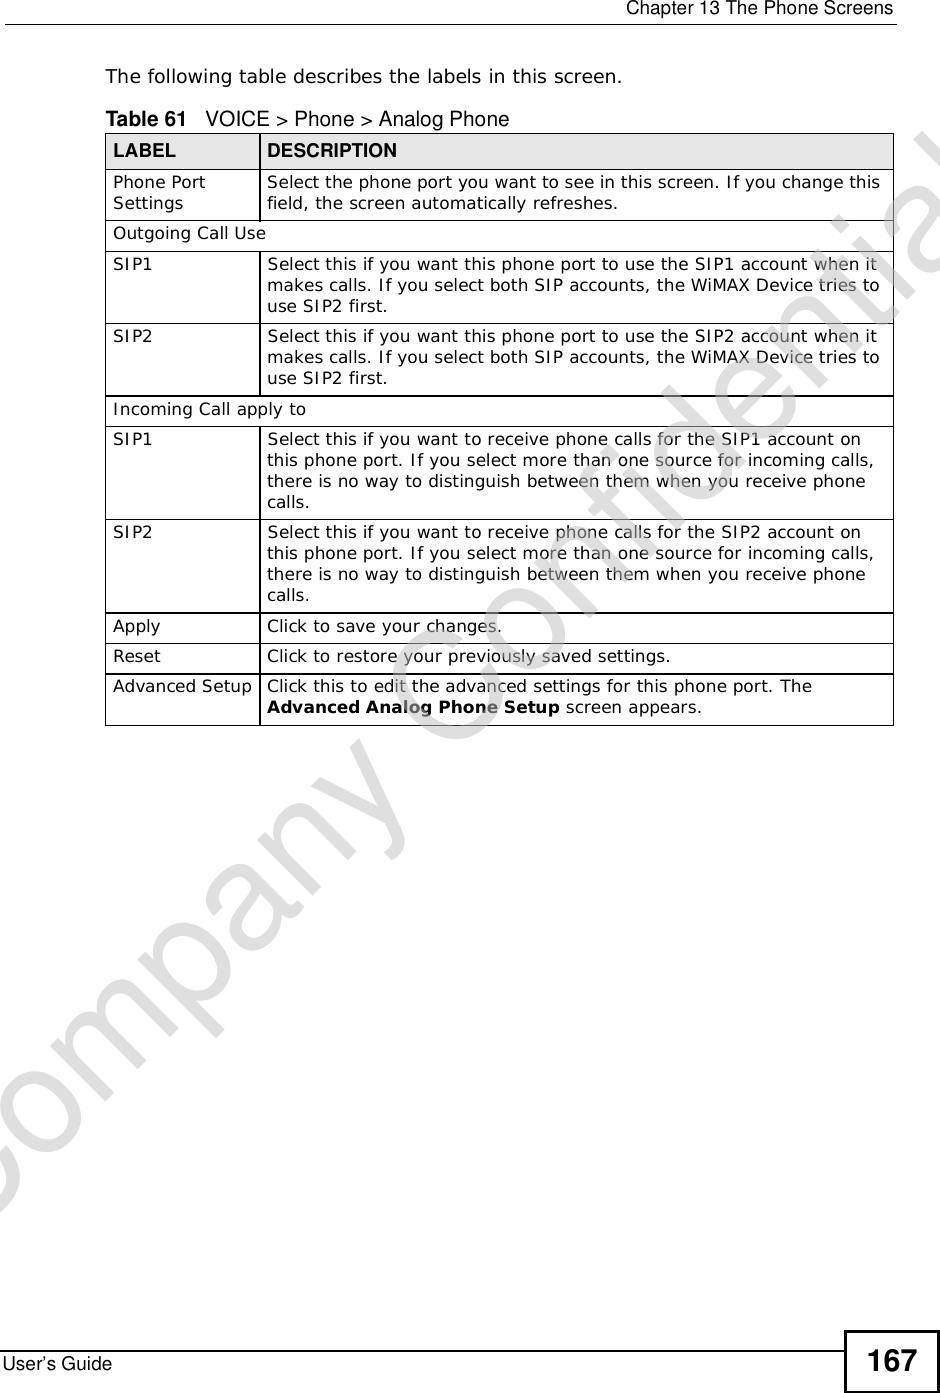
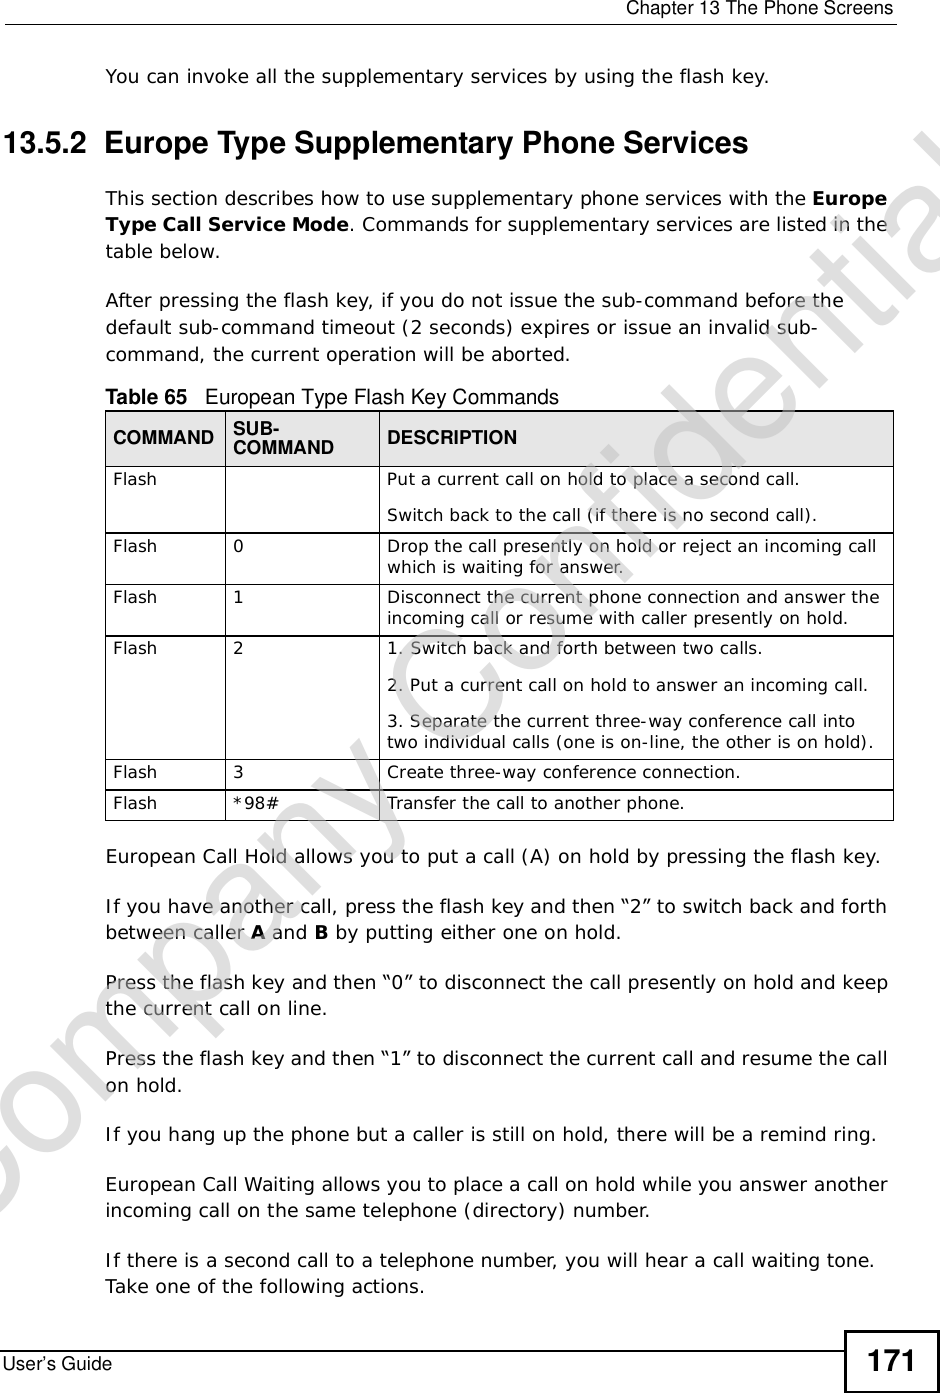
![Chapter 7The WAN Configuration ScreensUser’s Guide 994In the DL Frequency [4] field, enter 2625000.Leave the rest of the DL Frequency fields at zero. The screen appears as follows.Figure 38 Completing the WiMAX Frequency Screen5Click Apply. The WiMAX Device stores your settings. When the WiMAX Device searches for available frequencies, it scans all frequencies from DL Frequency [1] to DL Frequency [4]. When it finds an available connection, the fields in this screen will be automatically set to use that frequency.7.4 Traffic RedirectClick ADVANCED > WAN Configuration > Traffic Redirect to change your WiMAX Device’s traffic redirect settings.Figure 39 ADVANCED > WAN Configuration > Traffic RedirectCompany Confidential](https://usermanual.wiki/ZyXEL-Communications/MAX306.Manual-Part-1/User-Guide-1135851-Page-99.png)


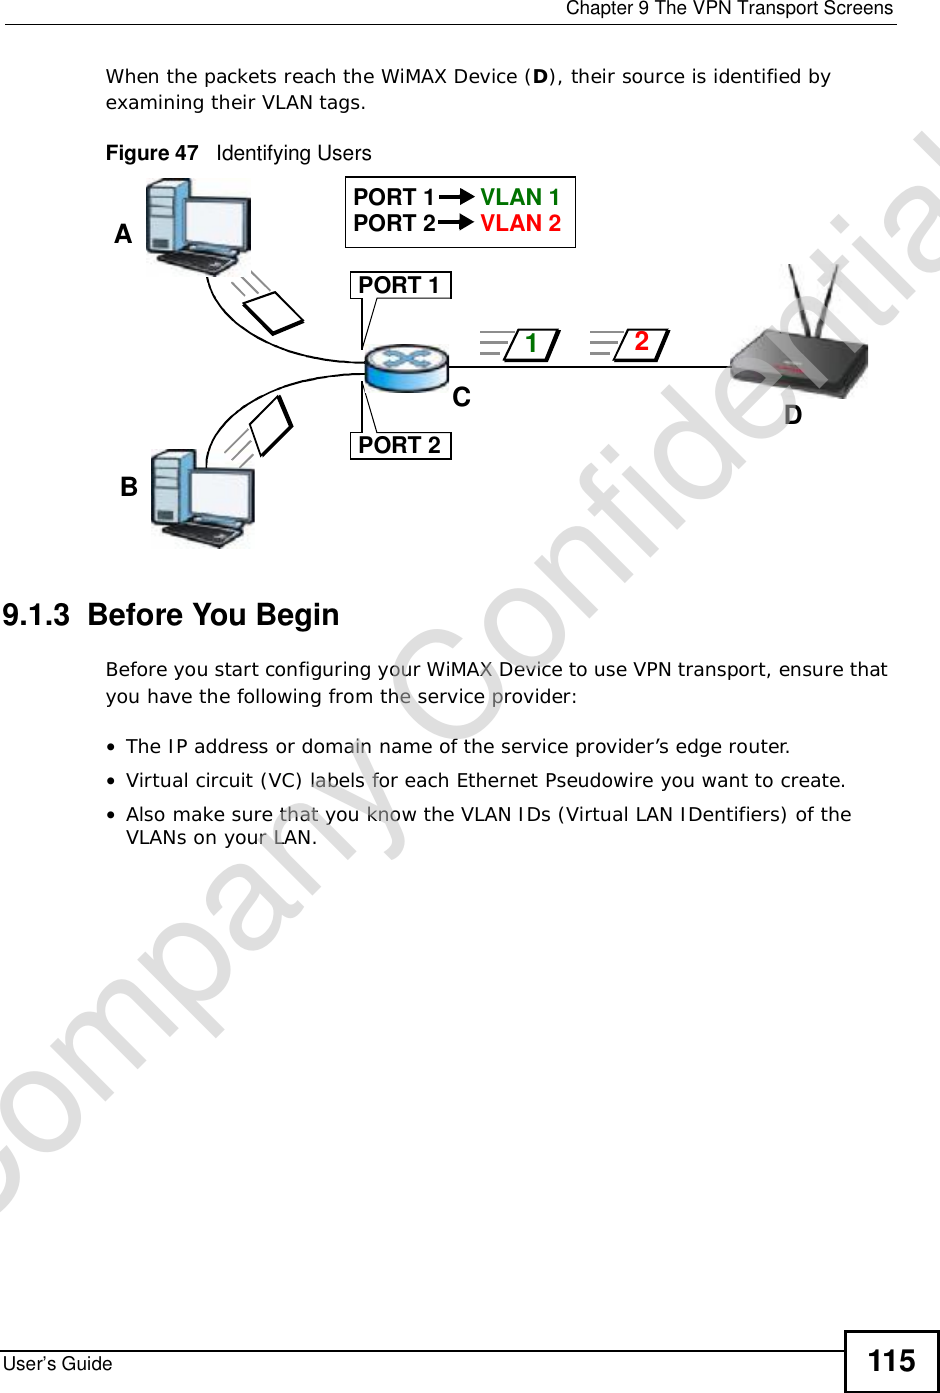

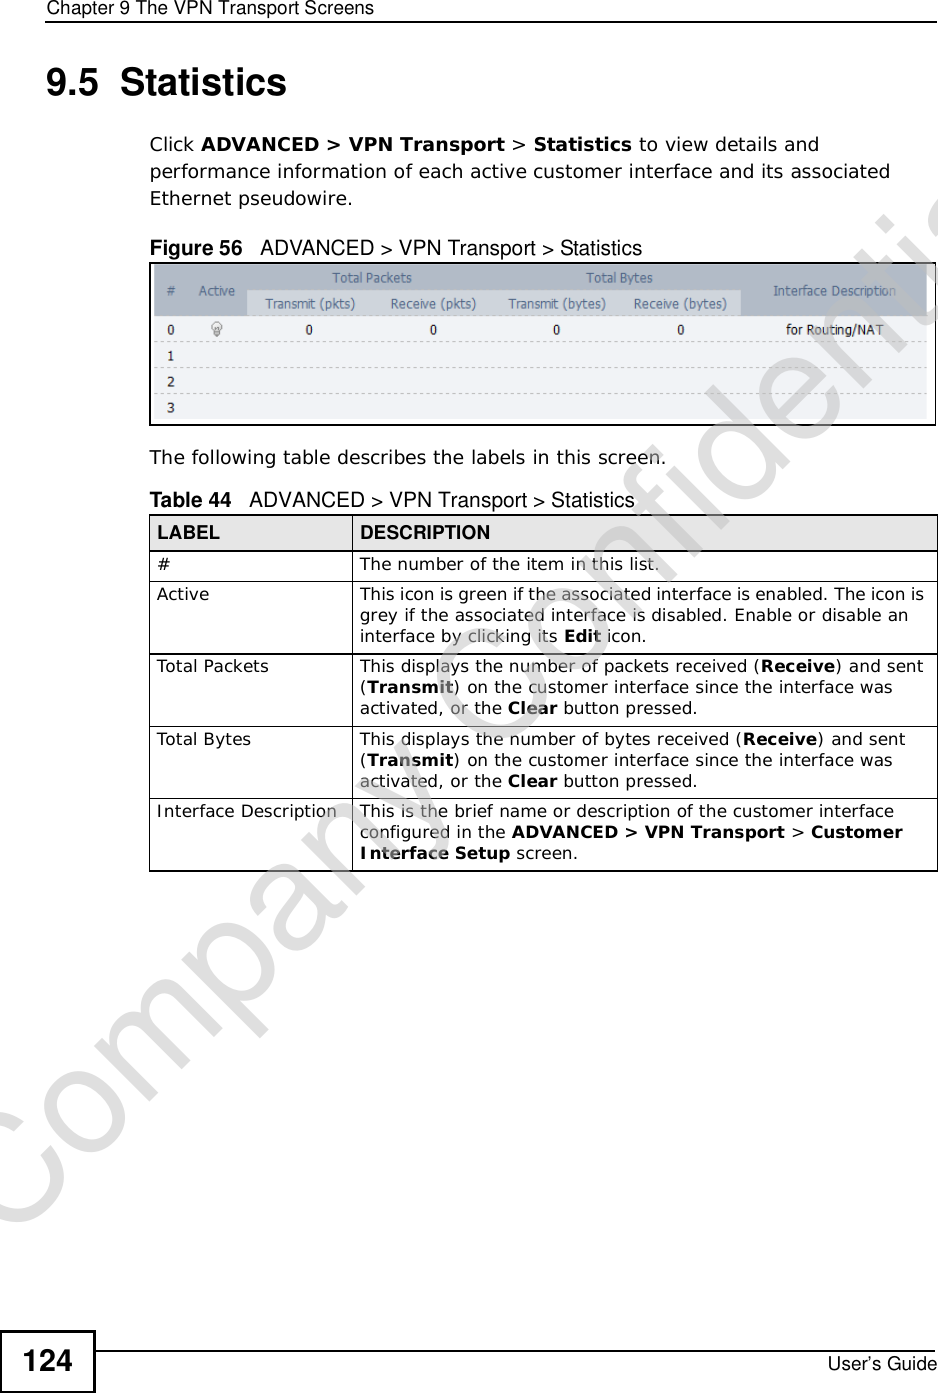


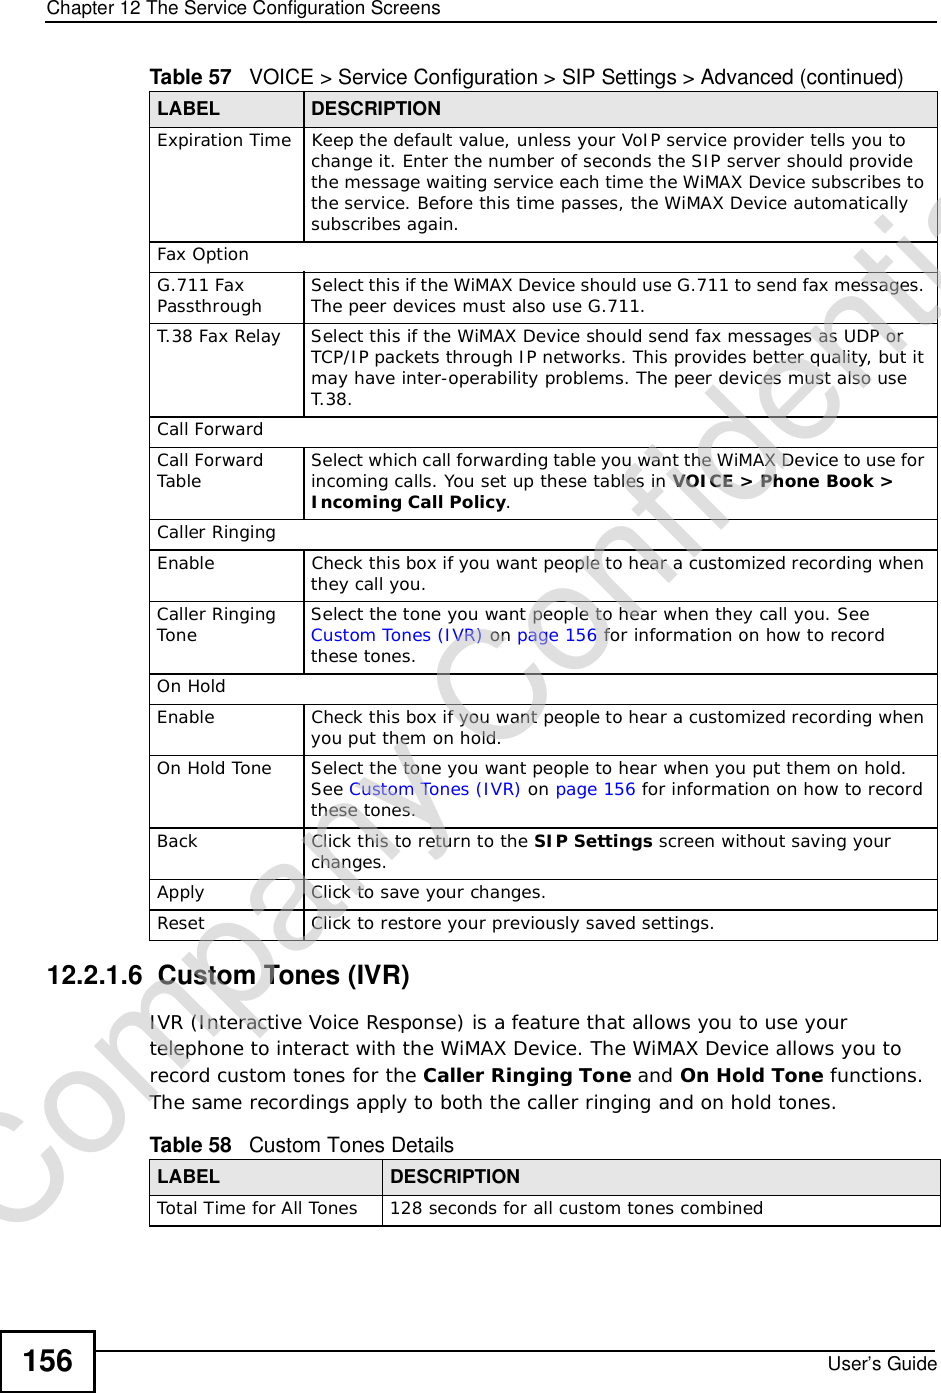
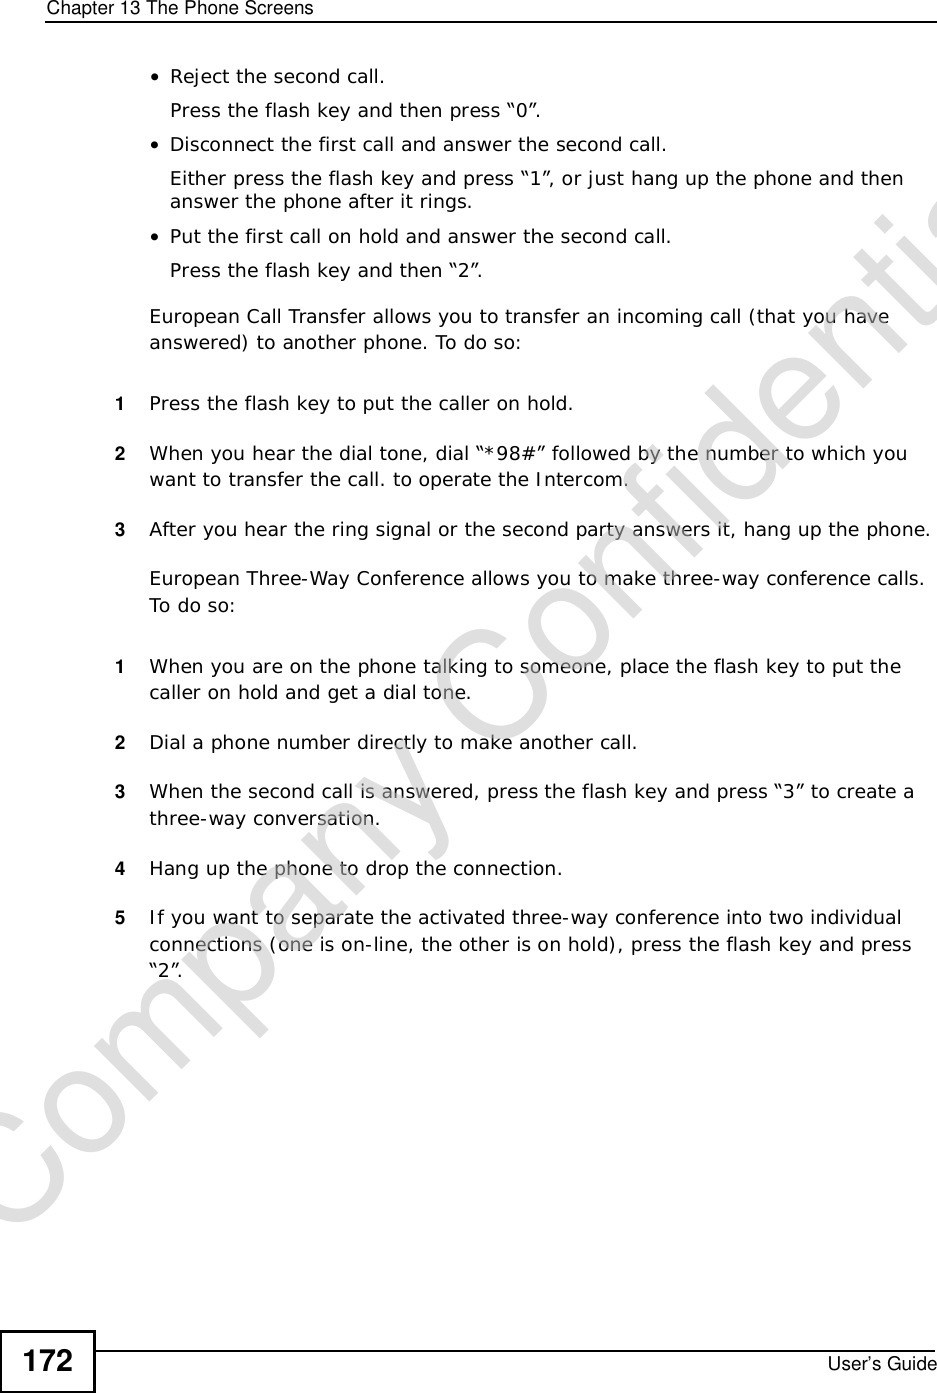

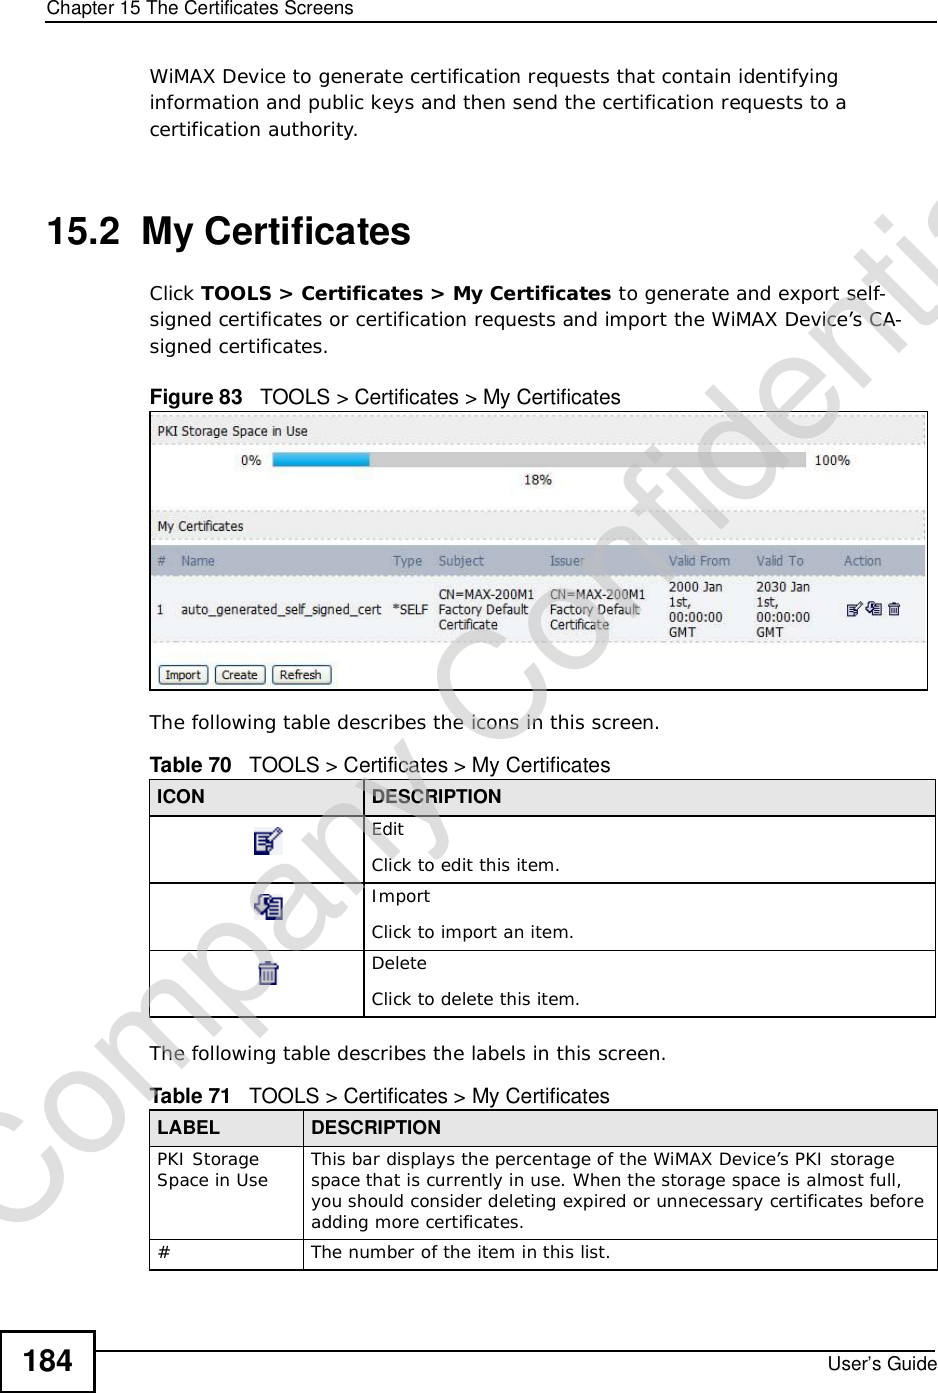
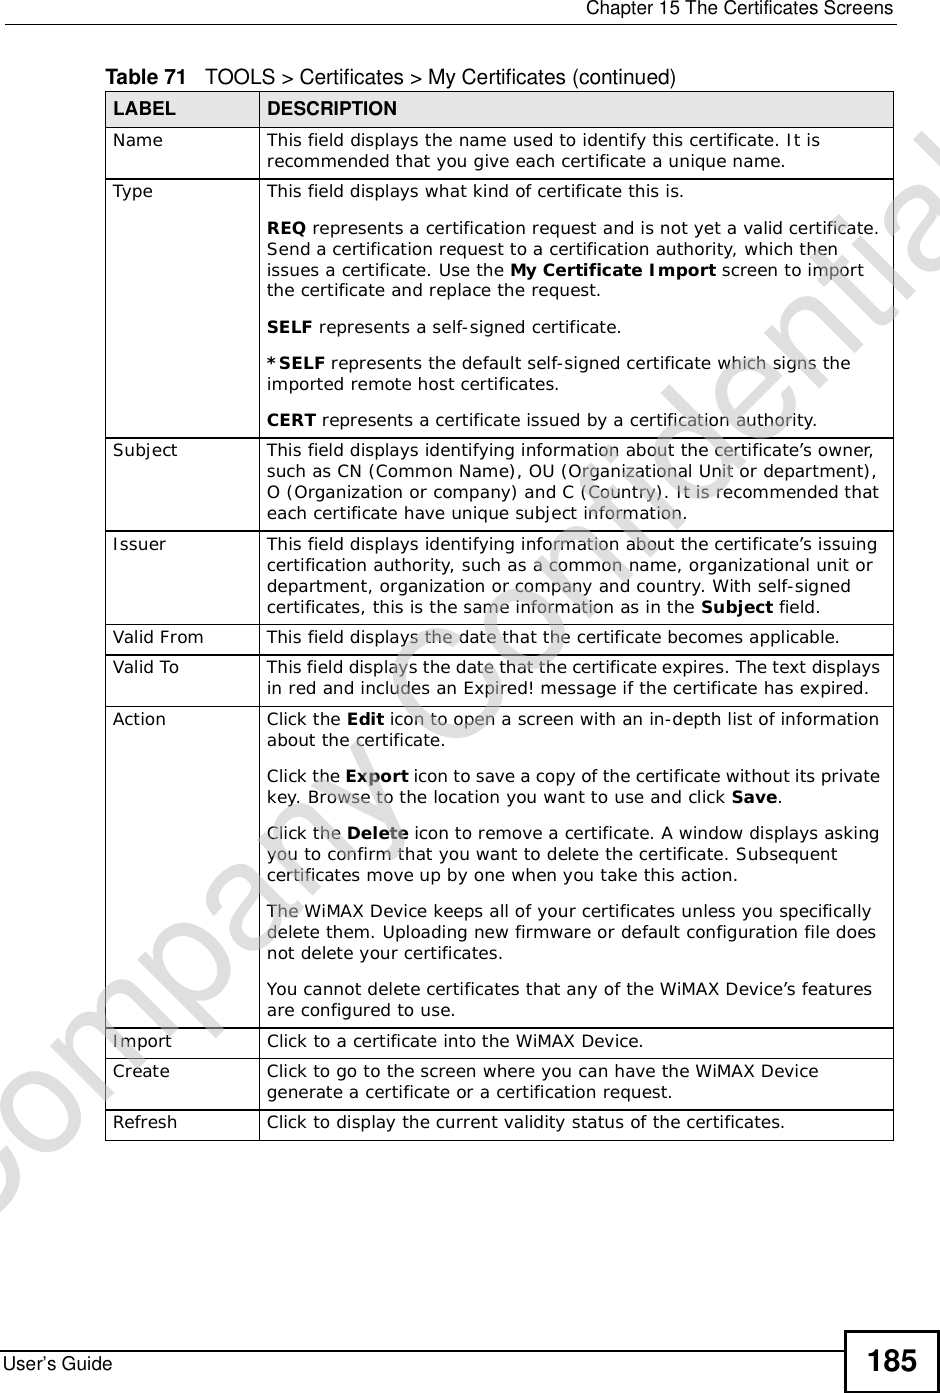
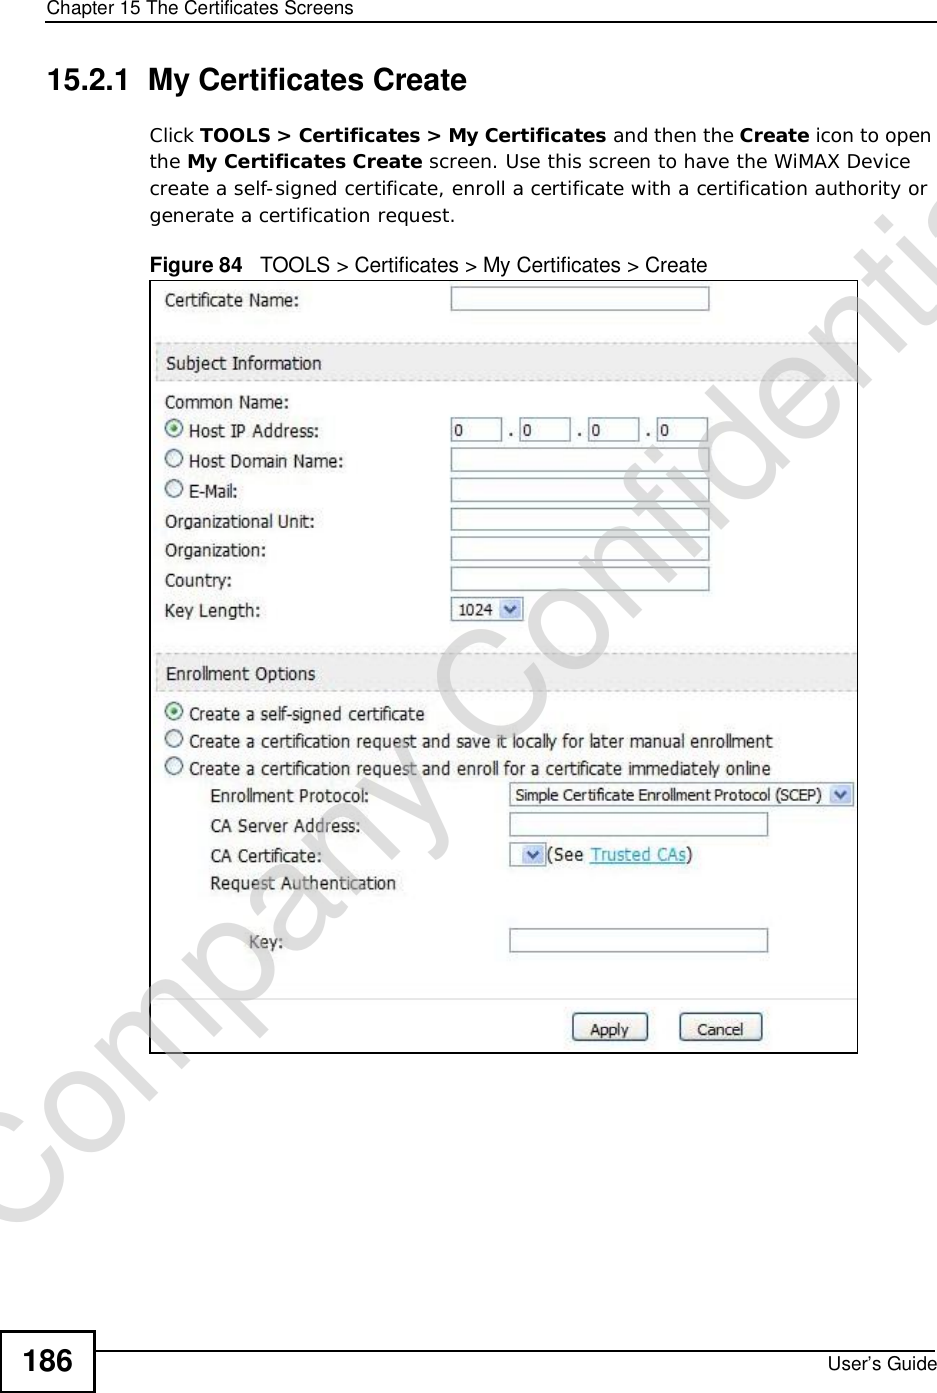
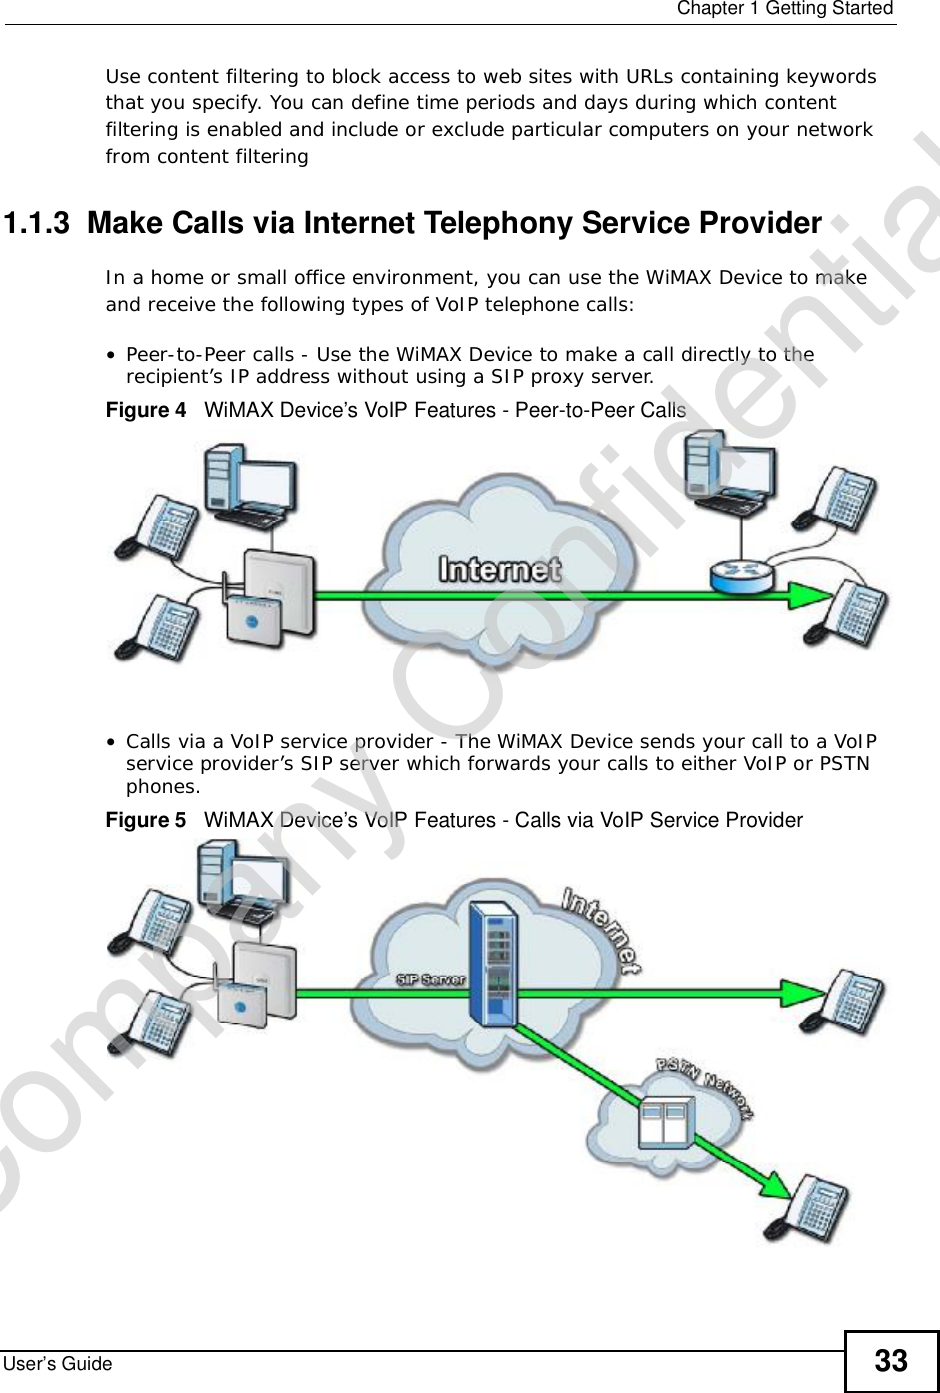
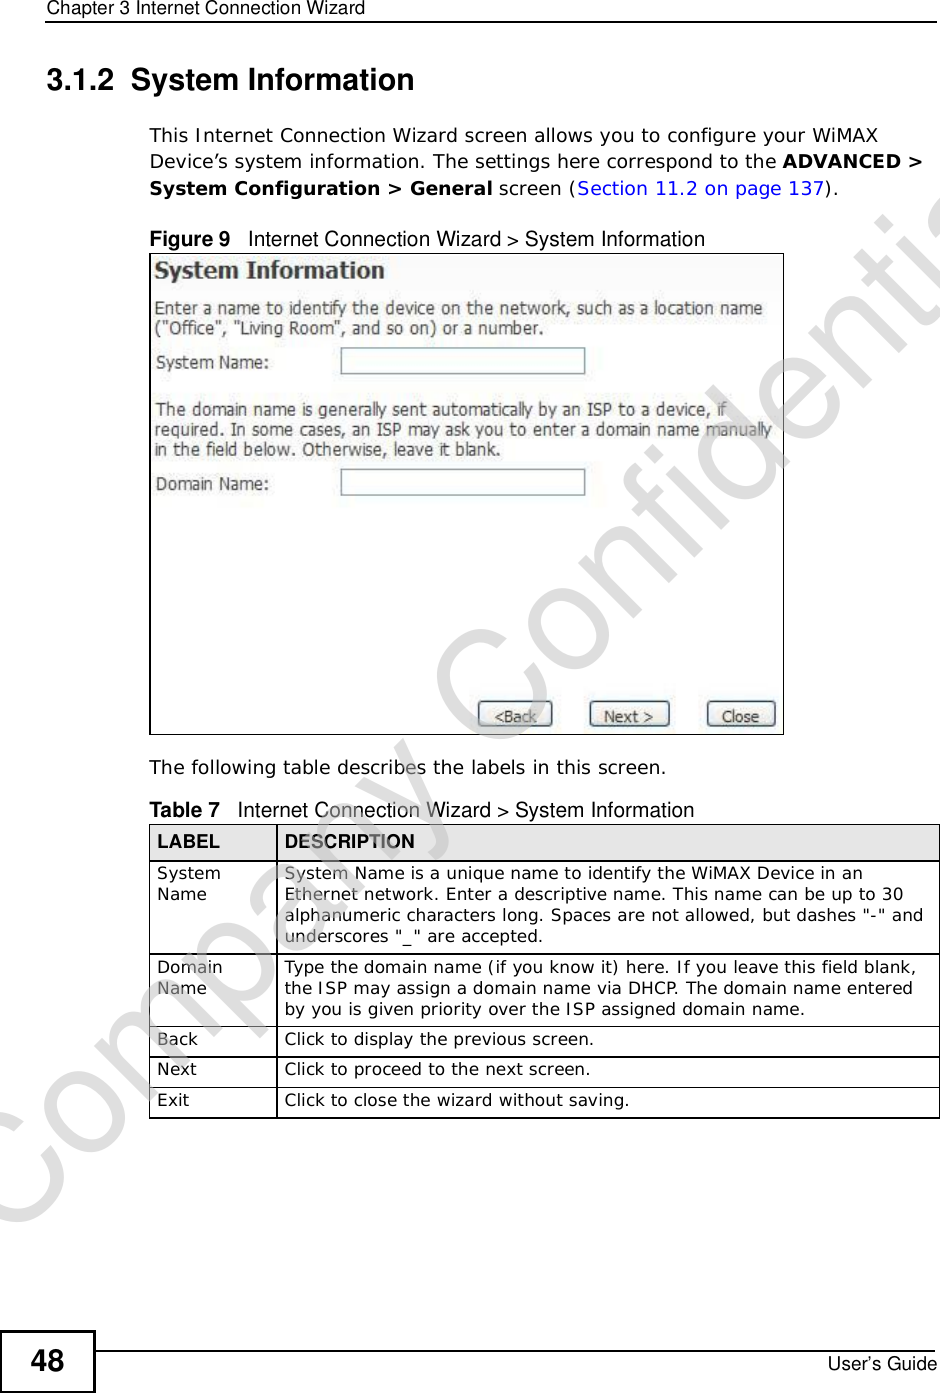
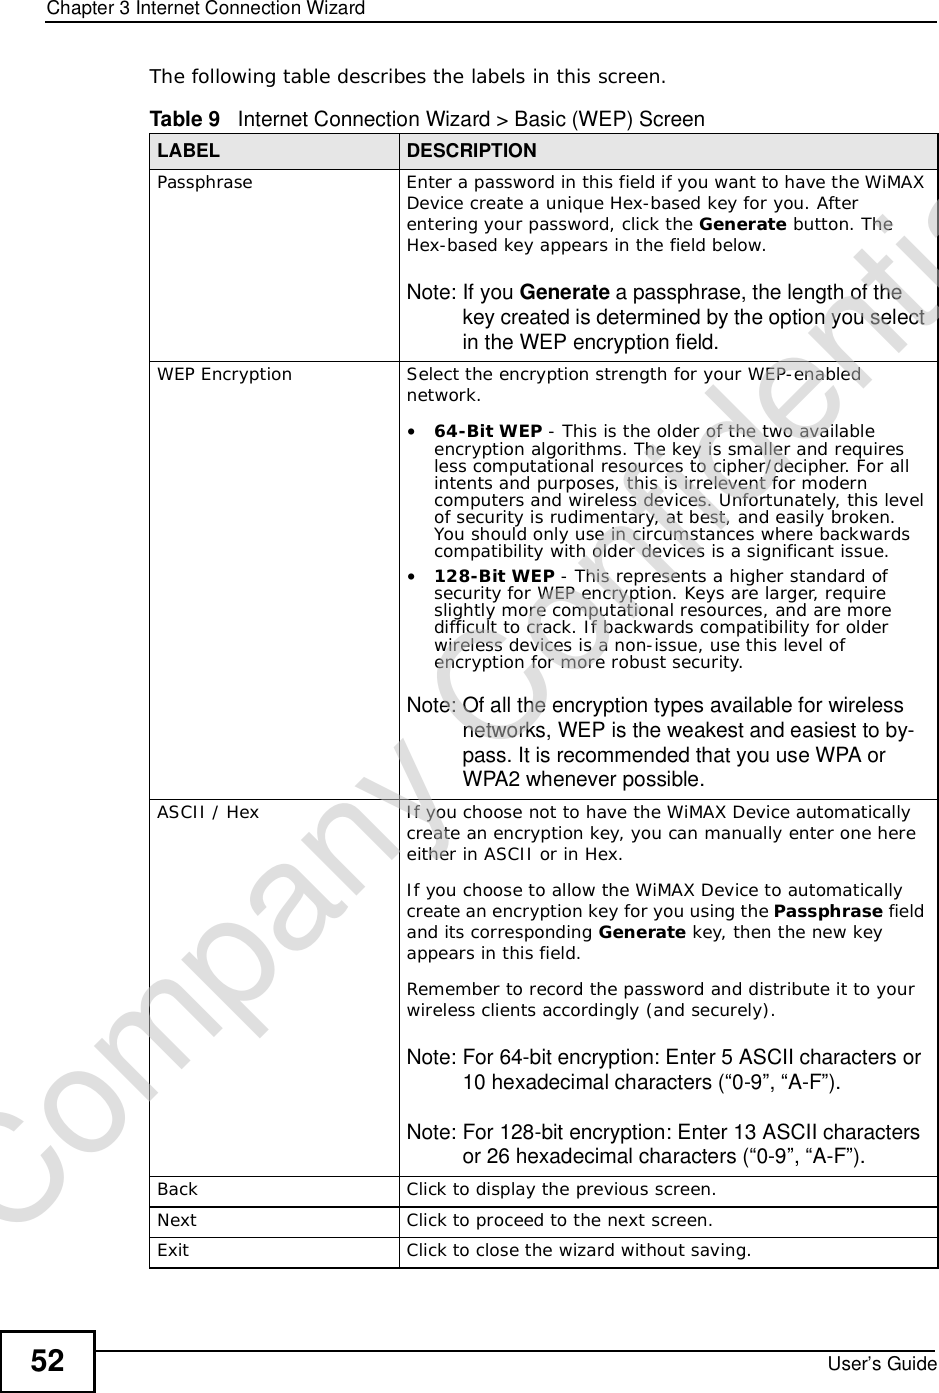
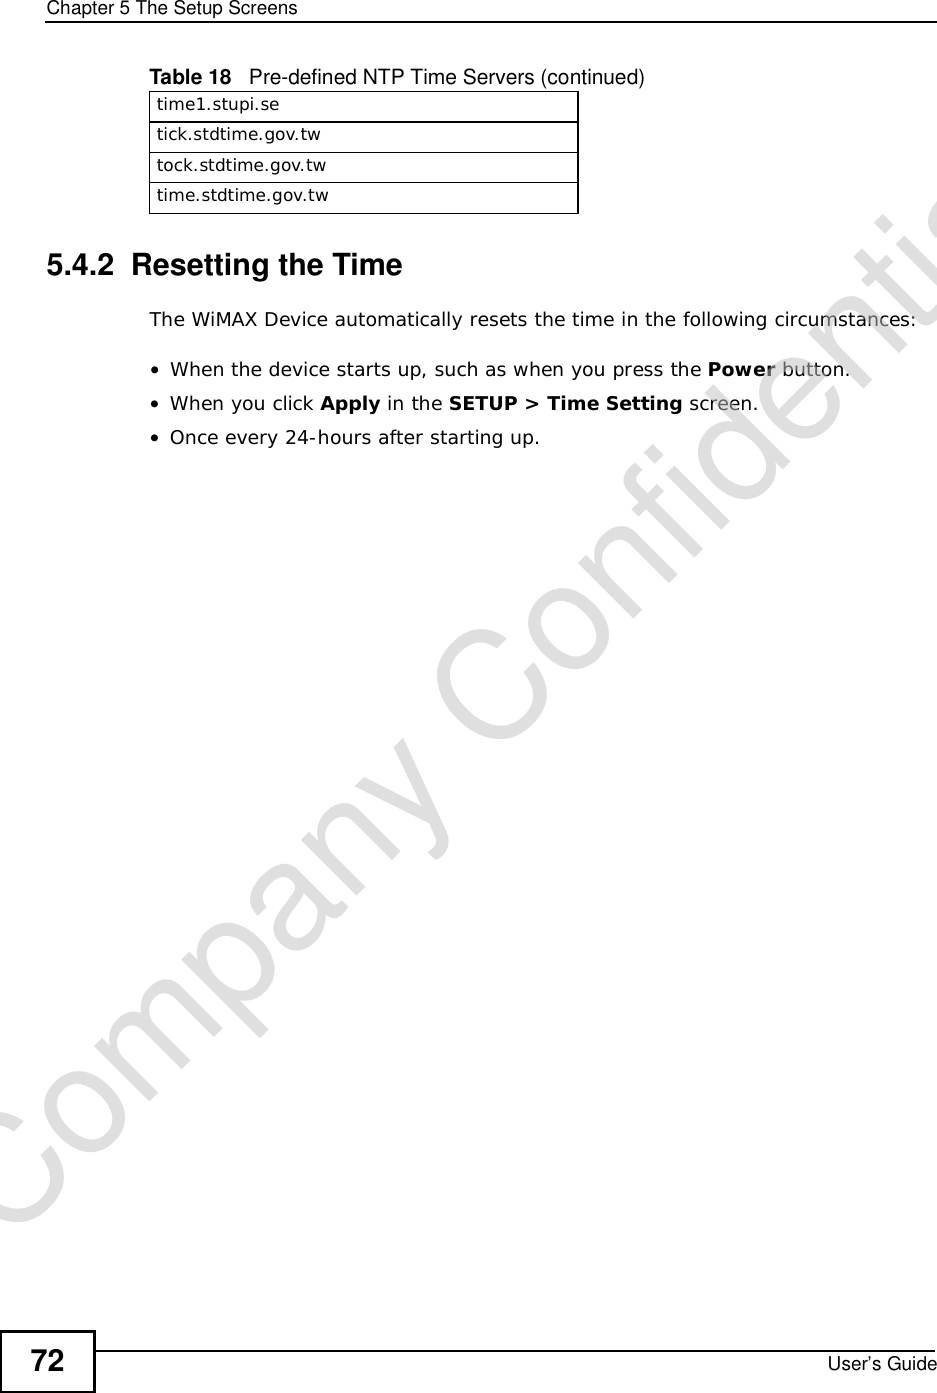
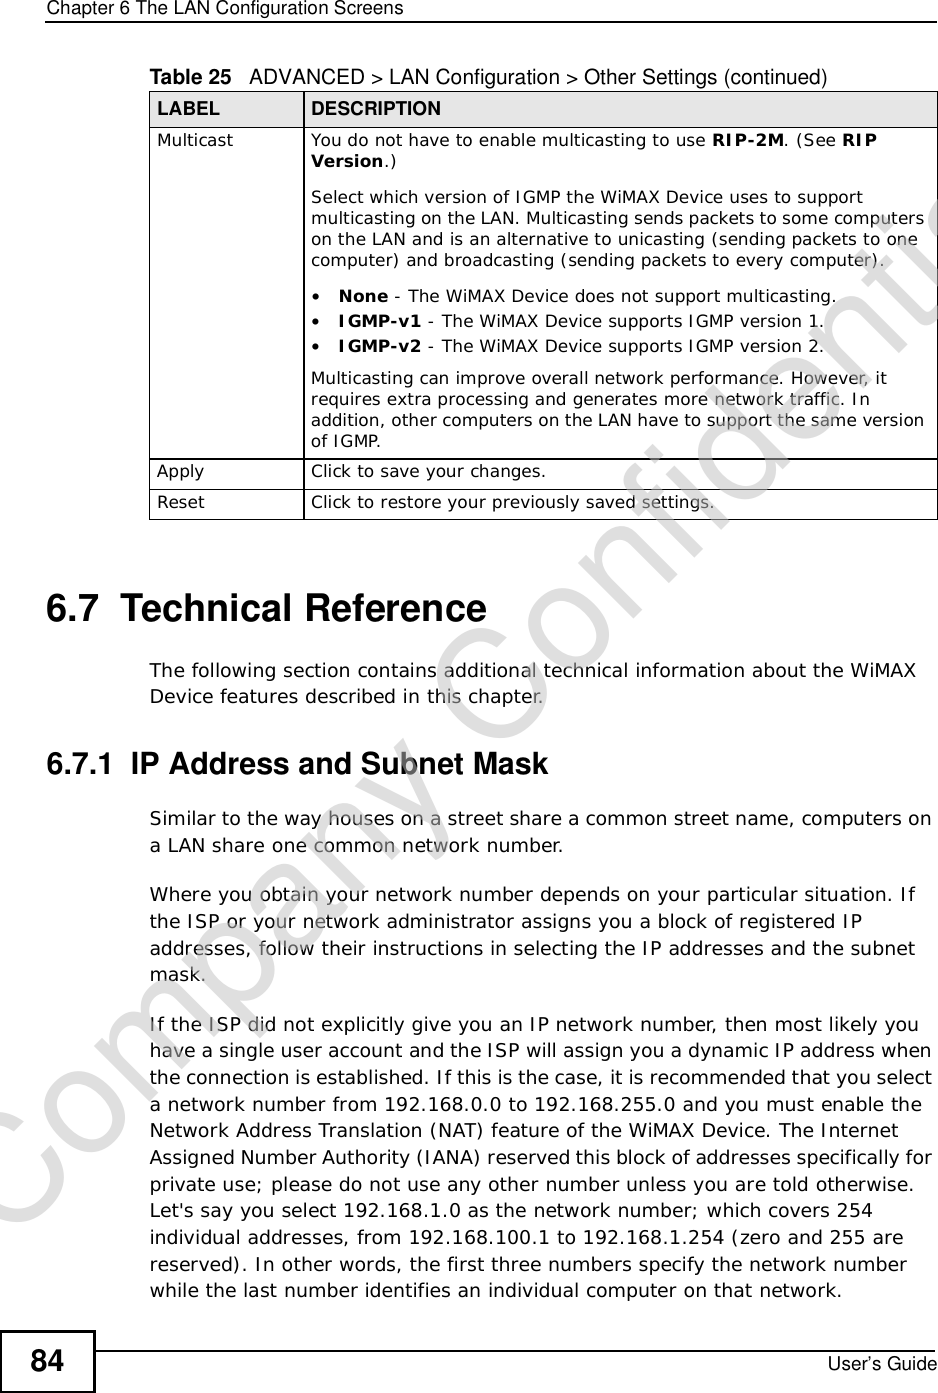
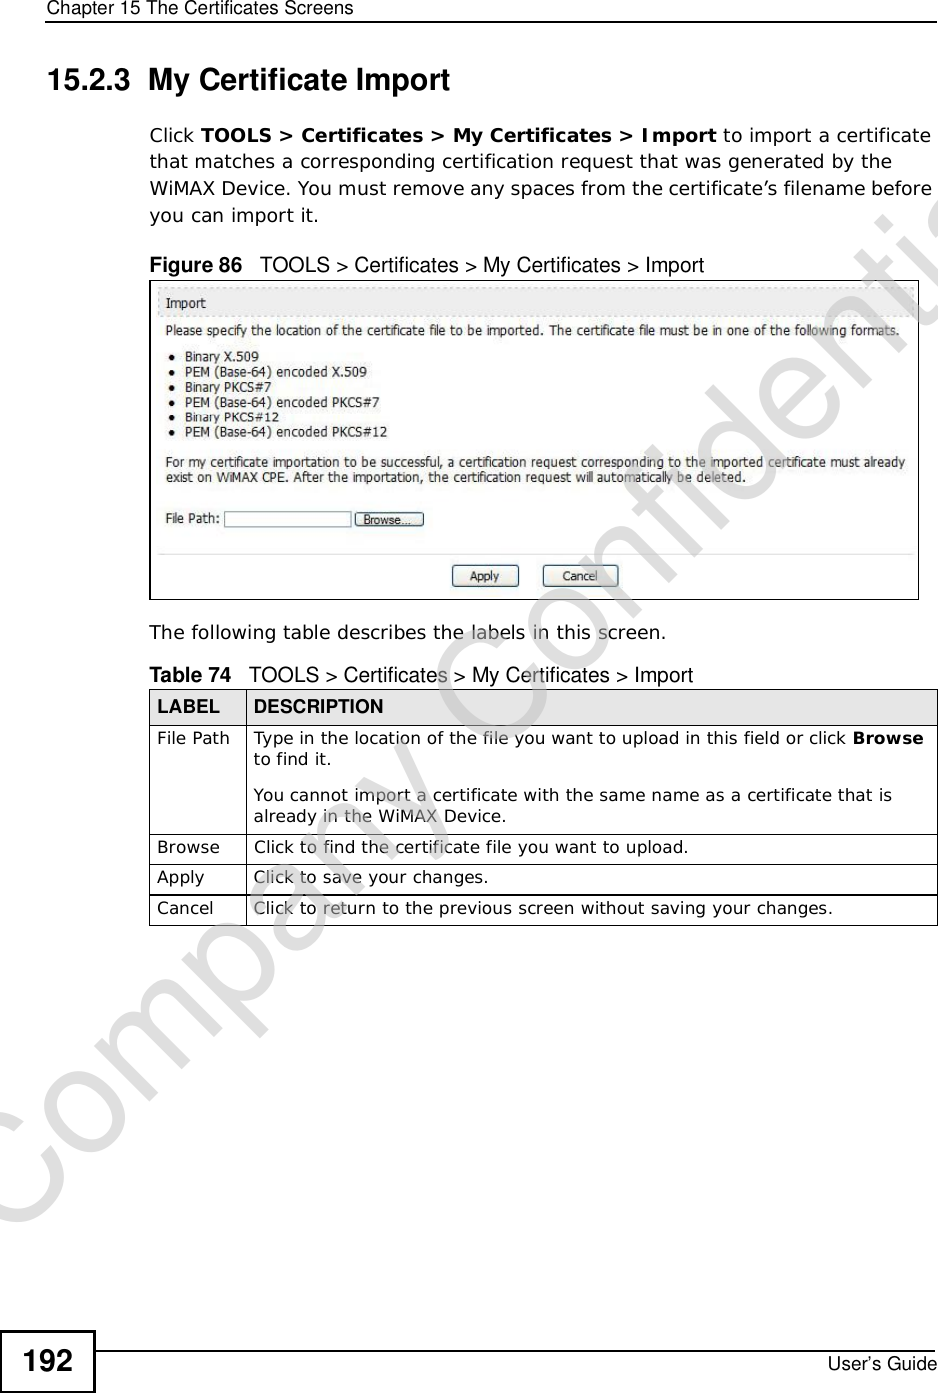
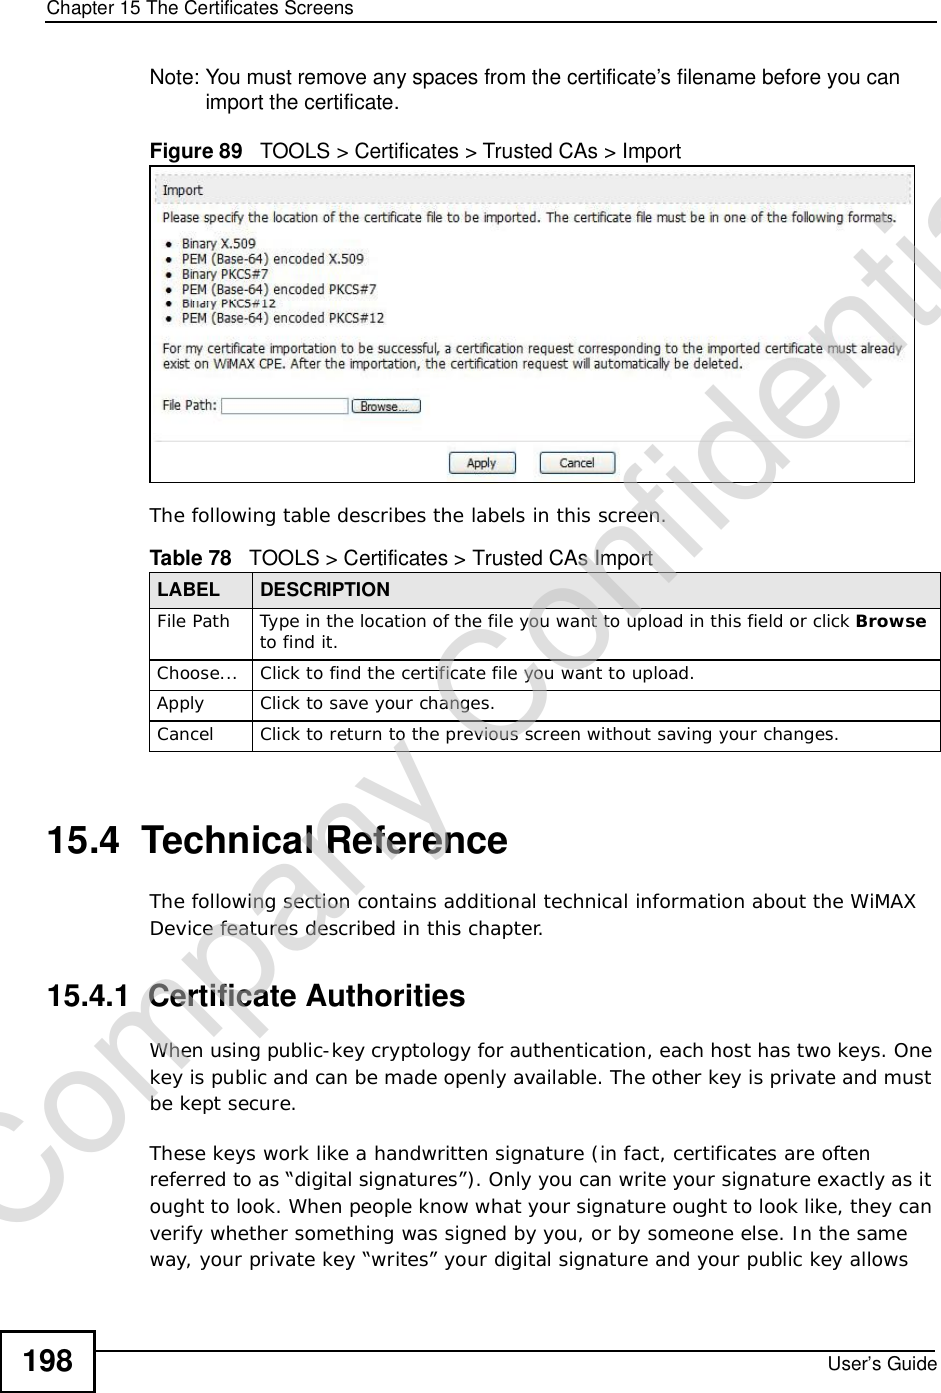
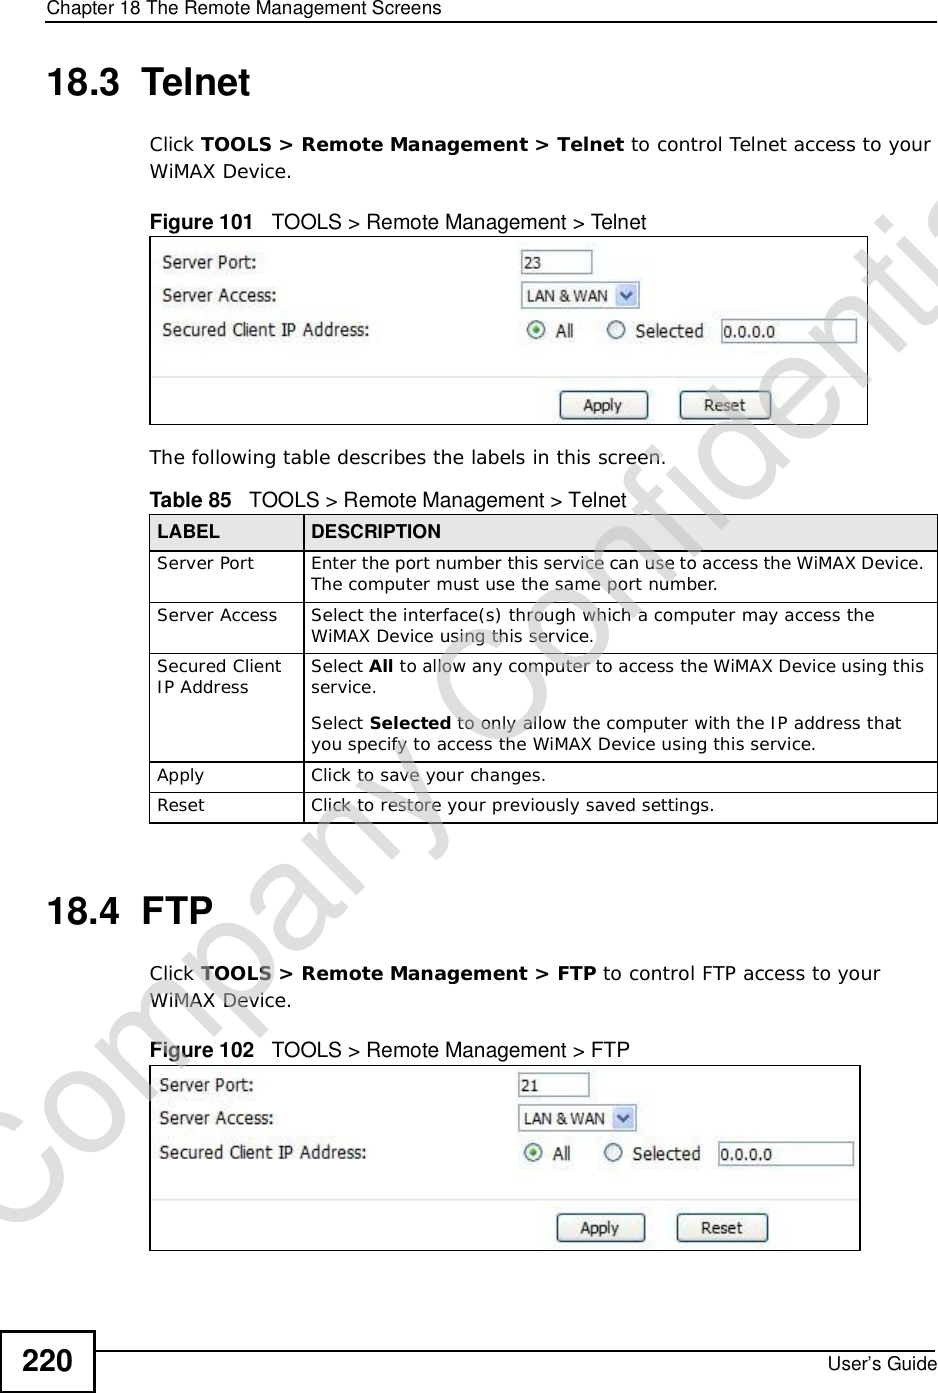
![Chapter 15The Certificates ScreensUser’s Guide 187The following table describes the labels in this screen. Table 72 TOOLS > Certificates > My Certificates > CreateLABEL DESCRIPTIONCertificate NameType a name to identify this certificate. You can use up to 31 alphanumeric and ;‘~!@#$%^&()_+[]{}’,.=- characters.Subject Information Use these fields to record information that identifies the owner of the certificate. You do not have to fill in every field, although the Common Name is mandatory. The certification authority may add fields (such as a serial number) to the subject information when it issues a certificate. It is recommended that each certificate have unique subject information.Common Name Select a radio button to identify the certificate’s owner by IP address, domain name or e-mail address. Type the IP address (in dotted decimal notation), domain name or e-mail address in the field provided. The domain name or e-mail address is for identification purposes only and can be any string.A domain name can be up to 255 characters. You can use alphanumeric characters, the hyphen and periods.An e-mail address can be up to 63 characters. You can use alphanumeric characters, the hyphen, the @ symbol, periods and the underscore.Organizational UnitIdentify the organizational unit or department to which the certificate owner belongs. You can use up to 63 characters. You can use alphanumeric characters, the hyphen and the underscore.OrganizationIdentify the company or group to which the certificate owner belongs. You can use up to 63 characters. You can use alphanumeric characters, the hyphen and the underscore.CountryIdentify the state in which the certificate owner is located. You can use up to 31 characters. You can use alphanumeric characters, the hyphen and the underscore.Key LengthSelect a number from the drop-down list box to determine how many bits the key should use (512 to 2048). The longer the key, the more secure it is. A longer key also uses more PKI storage space.Enrollment OptionsThese radio buttons deal with how and when the certificate is to be generated.Create a self-signed certificate Select Create a self-signed certificate to have the WiMAX Device generate the certificate and act as the Certification Authority (CA) itself. This way you do not need to apply to a certification authority for certificates.Create a certificationrequest and save it locally for later manual enrollmentSelect Create a certification request and save it locally for later manual enrollment to have the WiMAX Device generate and store a request for a certificate. Use the My Certificate Detailsscreen to view the certification request and copy it to send to the certification authority.Copy the certification request from the My Certificate Detailsscreen and then send it to the certification authority.Company Confidential](https://usermanual.wiki/ZyXEL-Communications/MAX306.Manual-Part-1/User-Guide-1135851-Page-187.png)
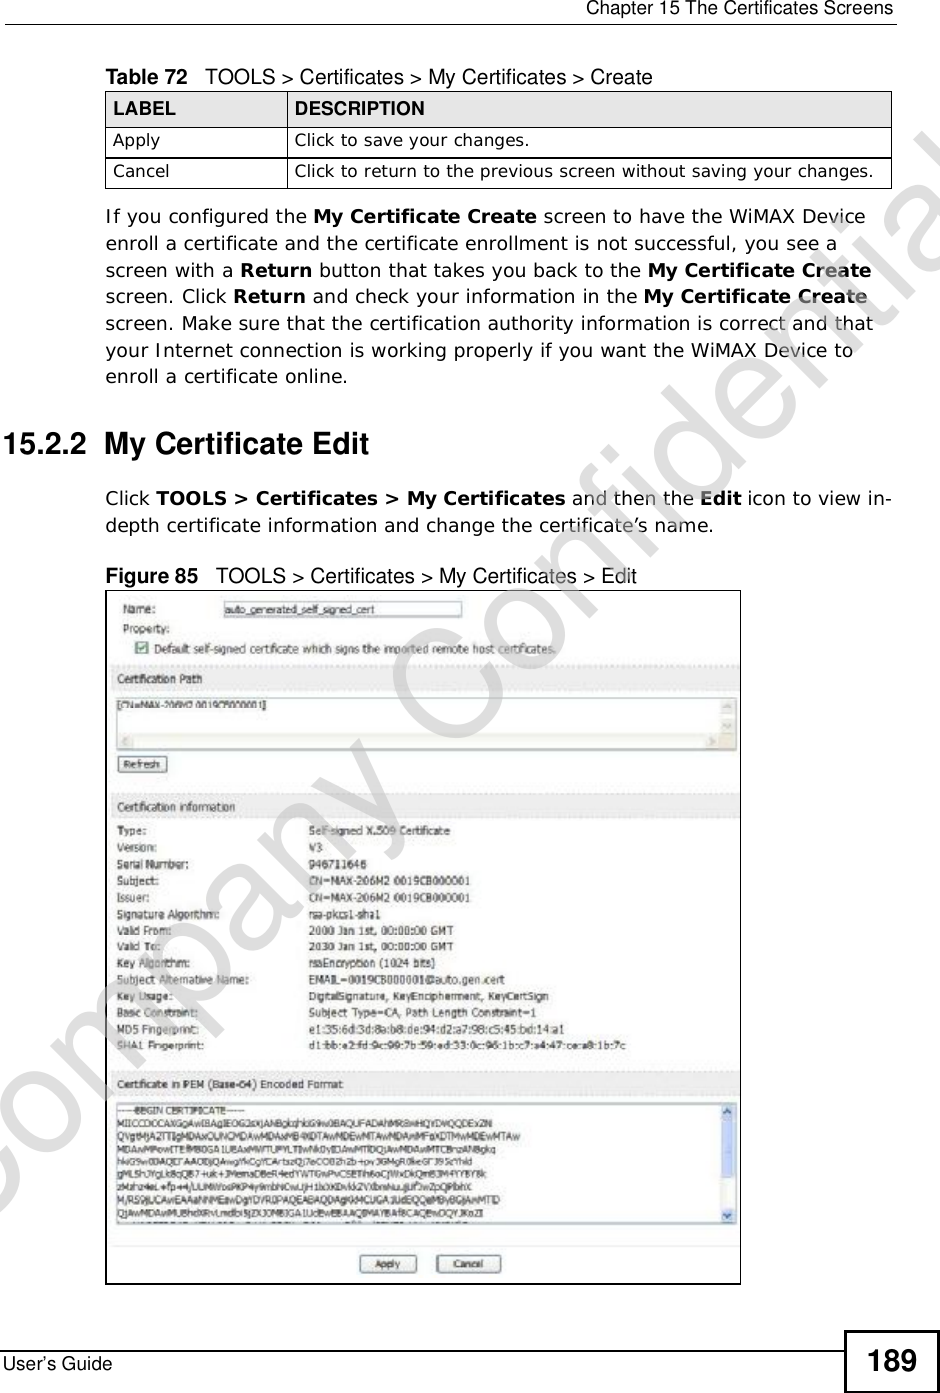
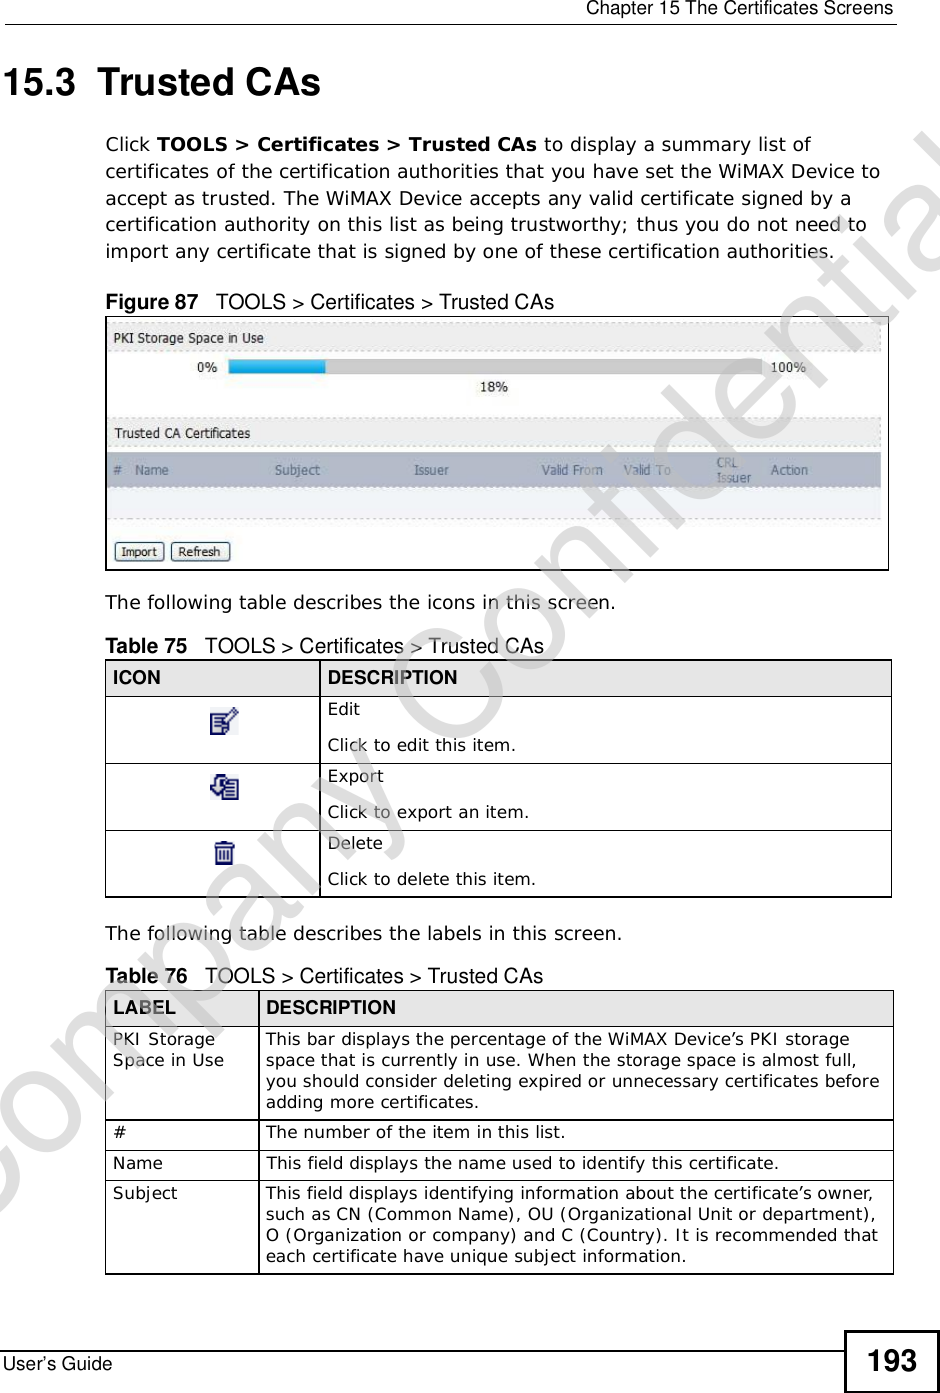
![Chapter 15The Certificates ScreensUser’s Guide190The following table describes the labels in this screen. Table 73 TOOLS > Certificates > My Certificates > EditLABEL DESCRIPTIONNameThis field displays the identifying name of this certificate. You can use up to 31 alphanumeric and ;‘~!@#$%^&()_+[]{}’,.=- characters.PropertySelect Default self-signed certificate which signs the imported remote host certificates to use this certificate to sign the remote host certificates you upload in the TOOLS > Certificates >TrustedCAs screen.Certification PathThis field displays for a certificate, not a certification request.Click the Refresh button to have this read-only text box display the hierarchy of certification authorities that validate the certificate (and the certificate itself).If the issuing certification authority is one that you have imported as a trusted certification authority, it may be the only certification authority in the list (along with the certificate itself). If the certificate is a self-signed certificate, the certificate itself is the only one in the list. The WiMAX Device does not trust the certificate and displays “Not trusted” in this field if any certificate on the path has expired or been revoked.RefreshClick to display the certification path.Certification InformationTypeThis field displays general information about the certificate. CA-signed means that a Certification Authority signed the certificate. Self-signed means that the certificate’s owner signed the certificate (not a certification authority). “X.509” means that this certificate was created and signed according to the ITU-T X.509 recommendation that defines the formats for public-key certificates.VersionThis field displays the X.509 version number. “Serial NumberThis field displays the certificate’s identification number given by the certification authority or generated by the WiMAX Device.SubjectThis field displays information that identifies the owner of the certificate, such as Common Name (CN), Organizational Unit (OU), Organization (O) and Country (C).IssuerThis field displays identifying information about the certificate’s issuing certification authority, such as Common Name, Organizational Unit, Organization and Country. With self-signed certificates, this is the same as the Subject Namefield.“none” displays for a certification request. SignatureAlgorithm This field displays the type of algorithm that was used to sign the certificate. The WiMAX Device uses rsa-pkcs1-sha1 (RSA public-private key encryption algorithm and the SHA1 hash algorithm). Some certification authorities may use rsa-pkcs1-md5 (RSA public-private key encryption algorithm and the MD5 hash algorithm).Valid FromThis field displays the date that the certificate becomes applicable. “none” displays for a certification request. Company Confidential](https://usermanual.wiki/ZyXEL-Communications/MAX306.Manual-Part-1/User-Guide-1135851-Page-190.png)
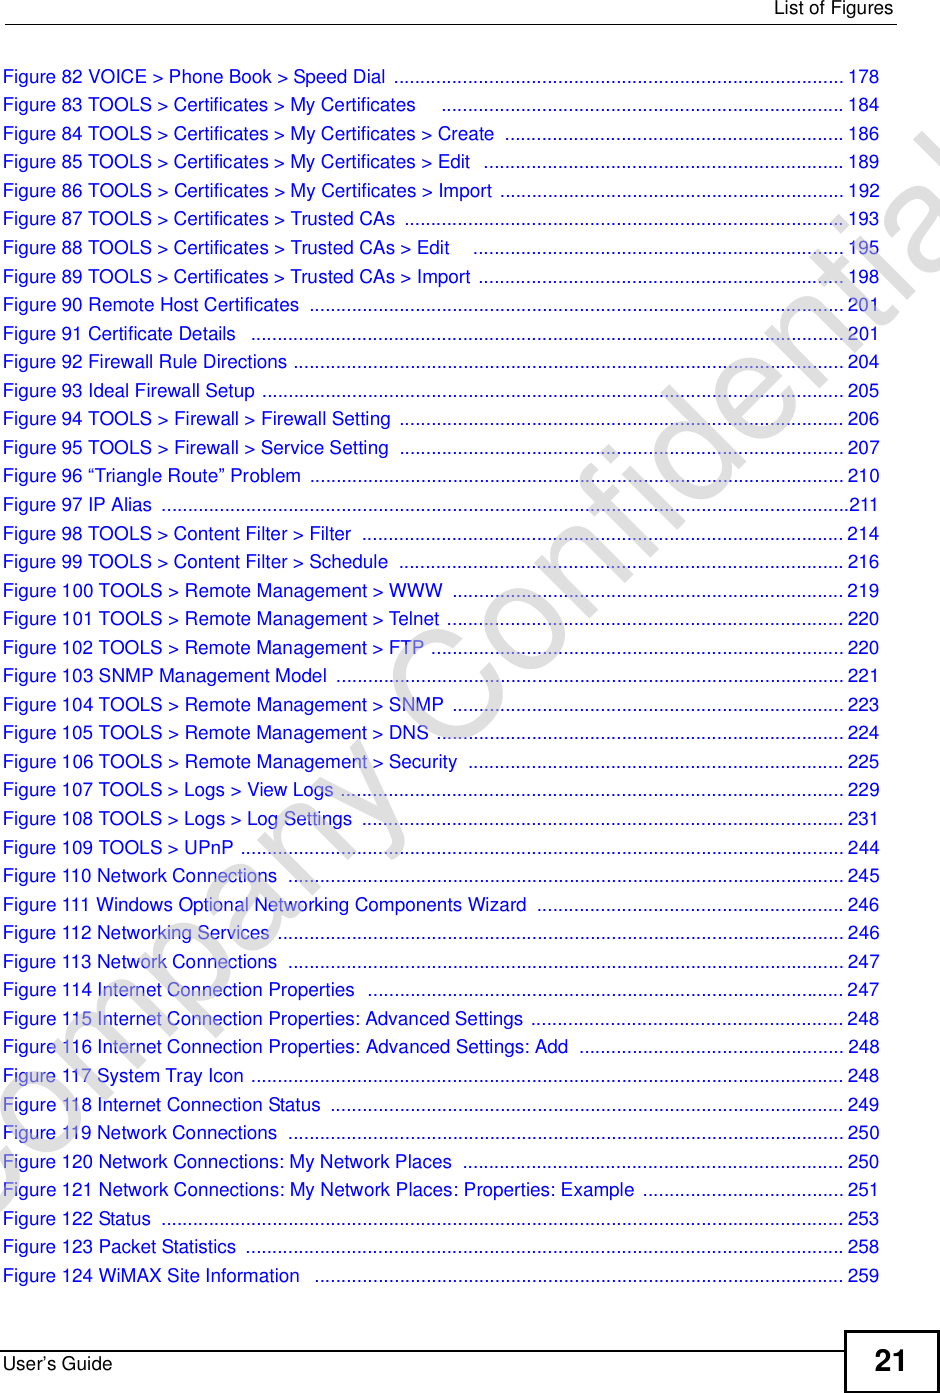
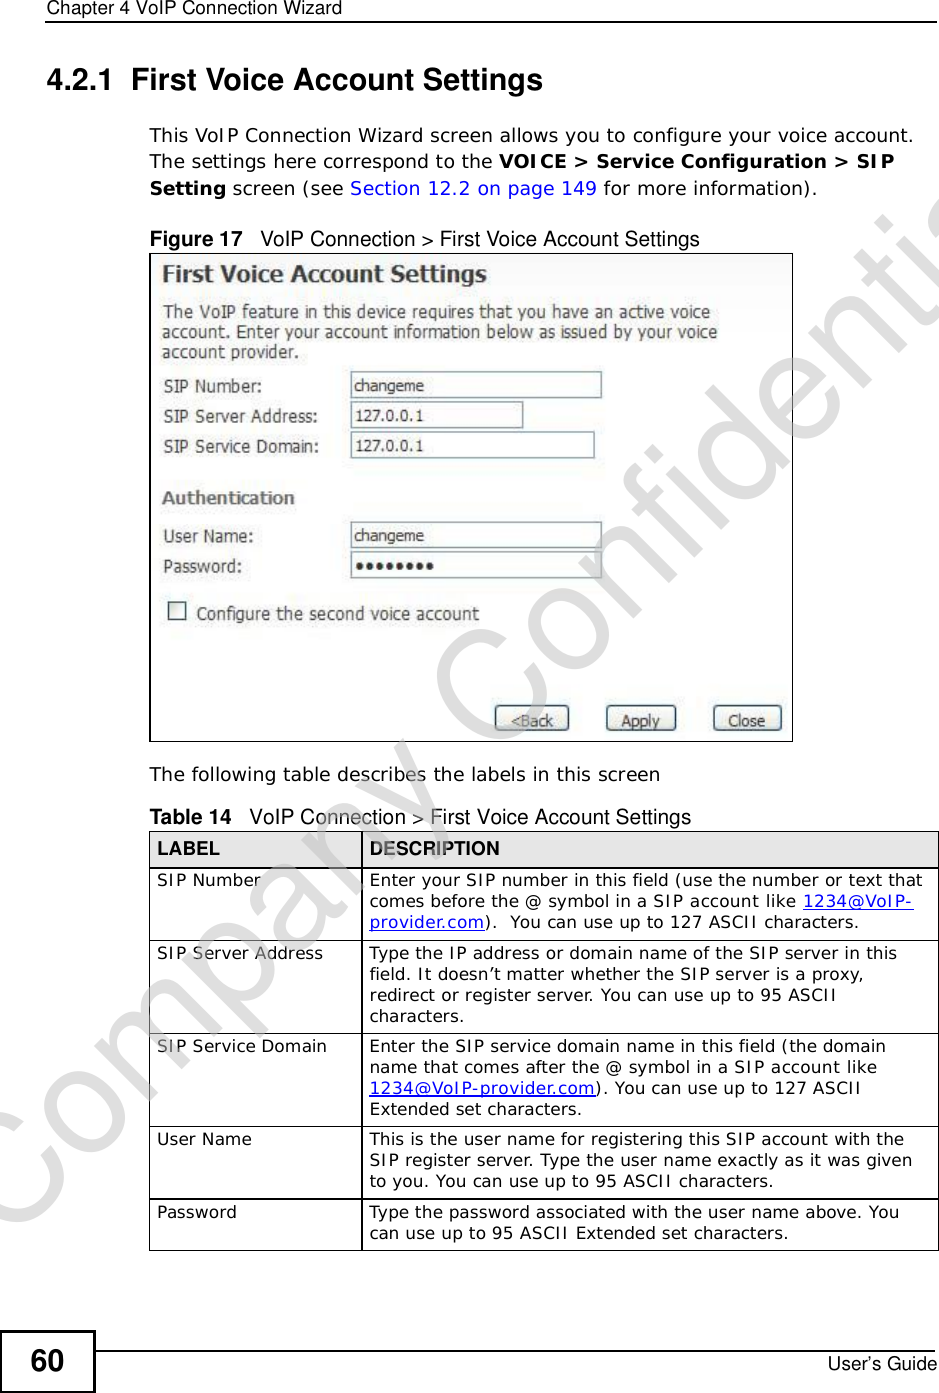
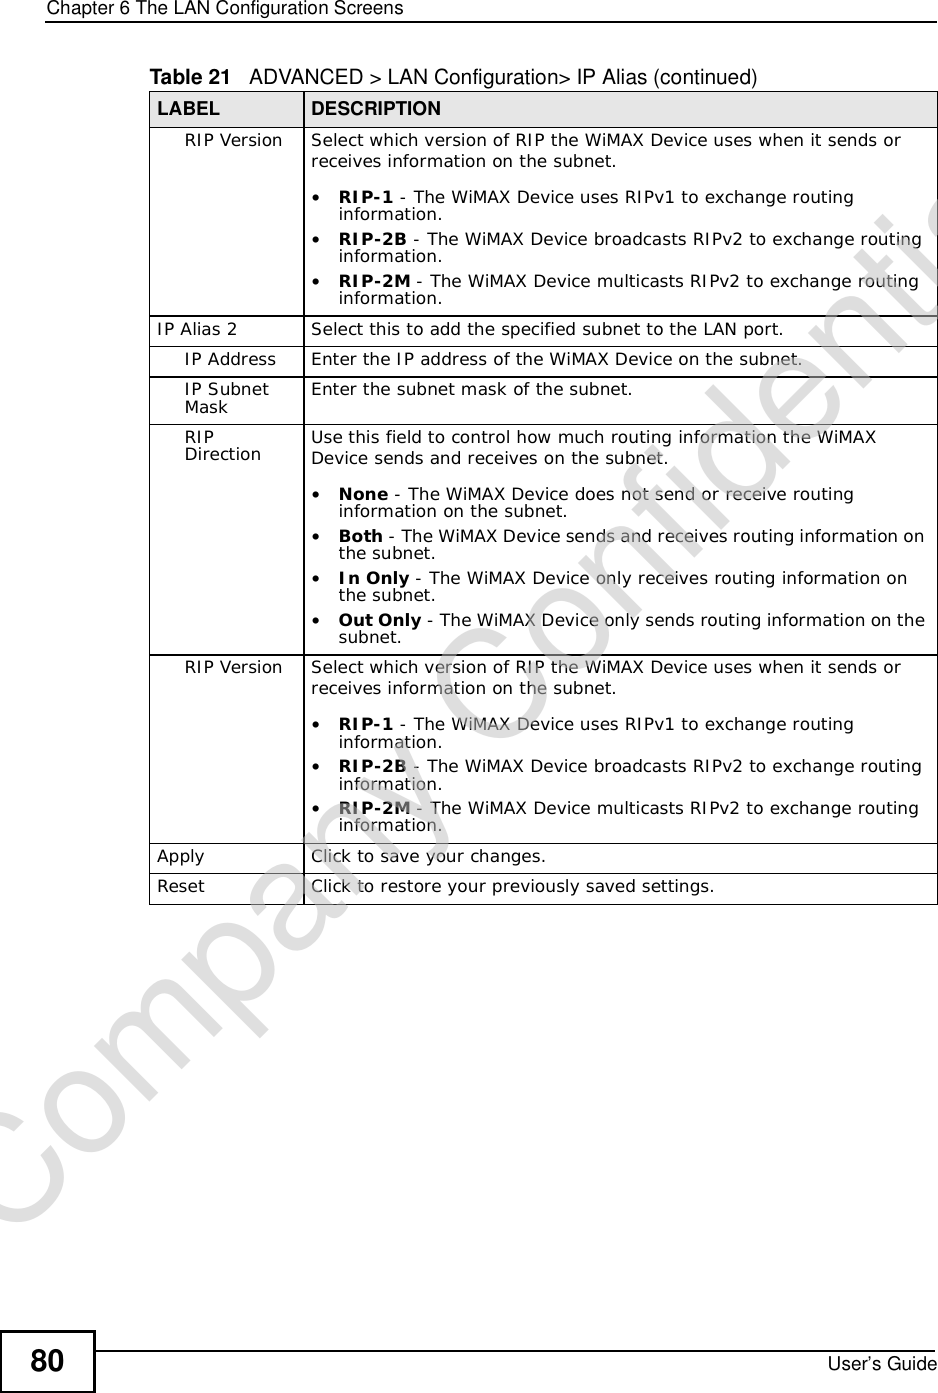
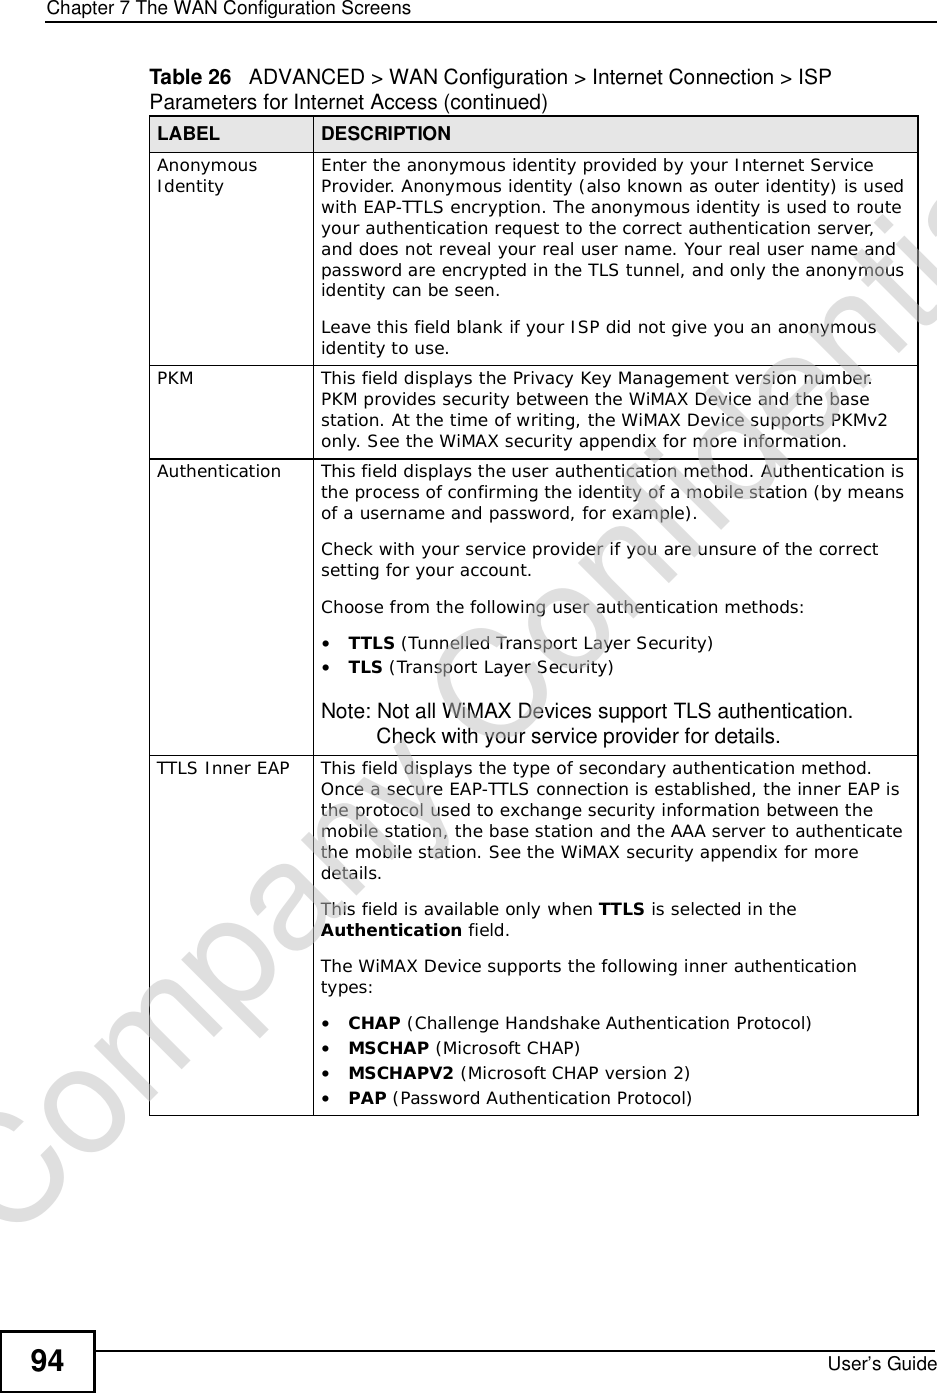
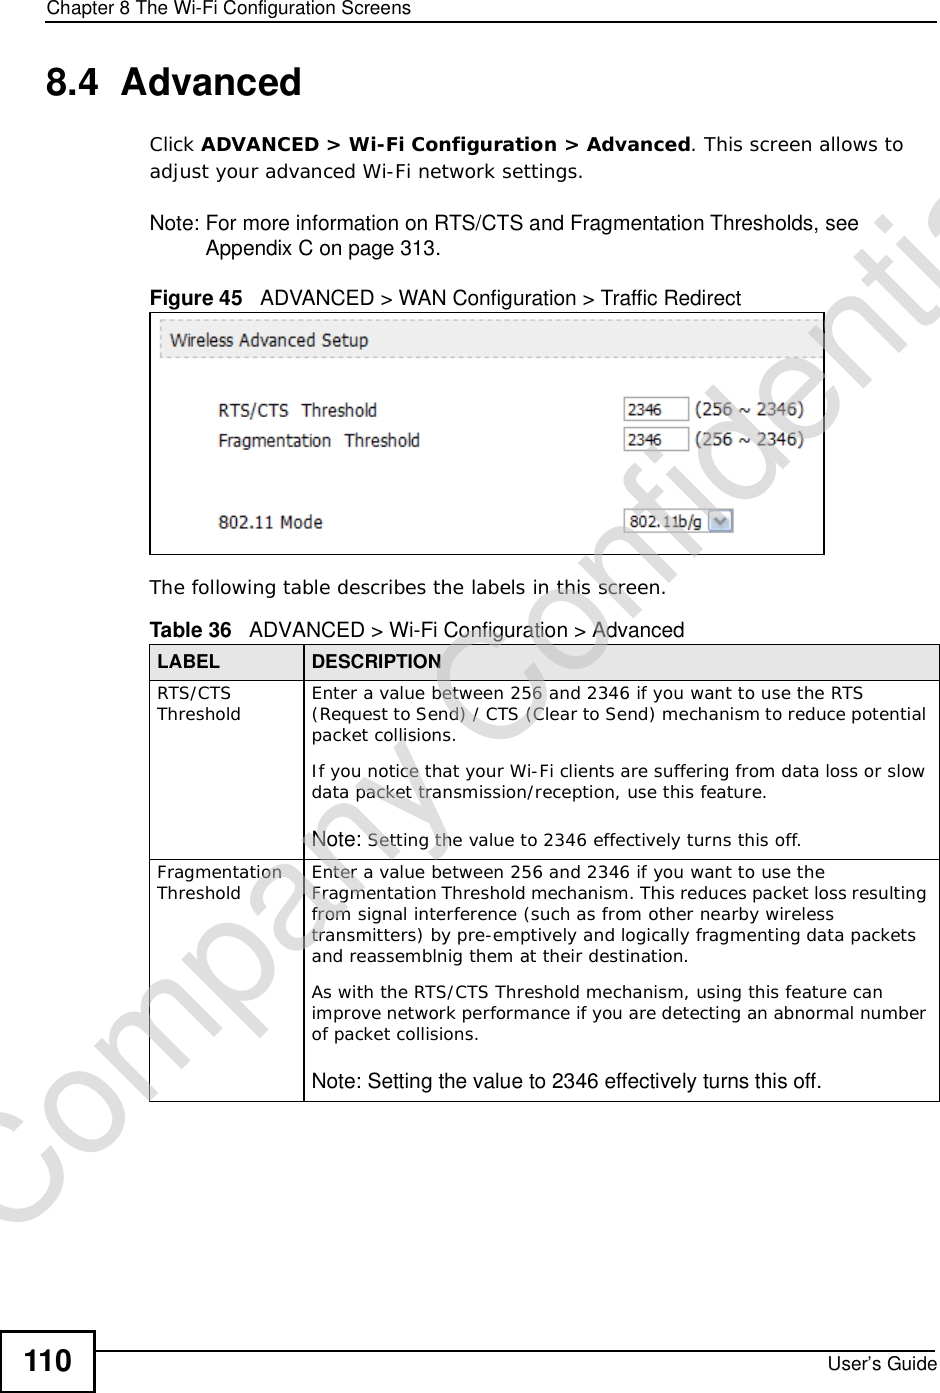
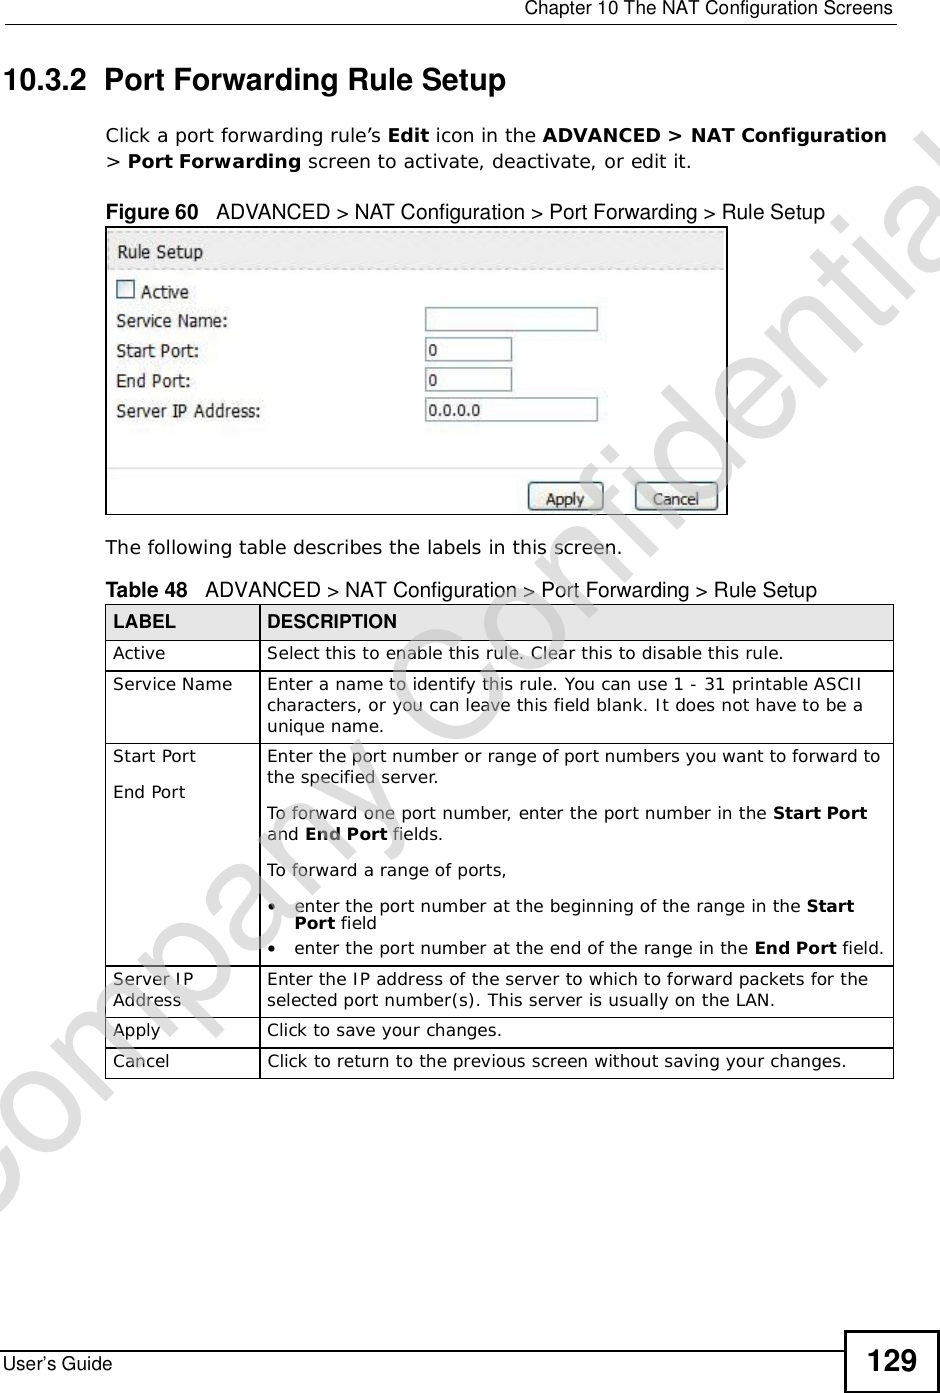
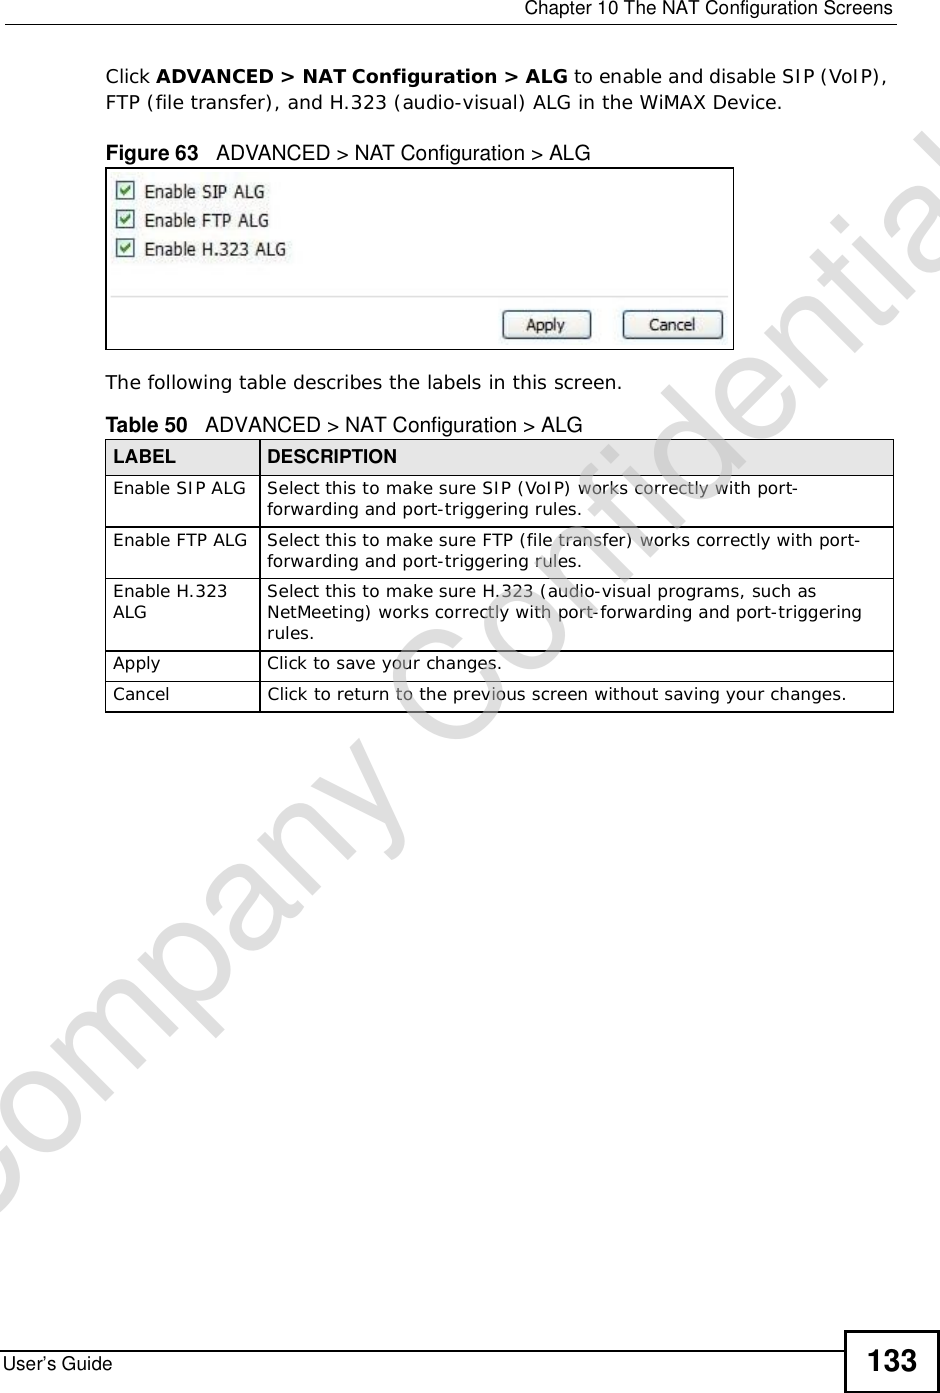
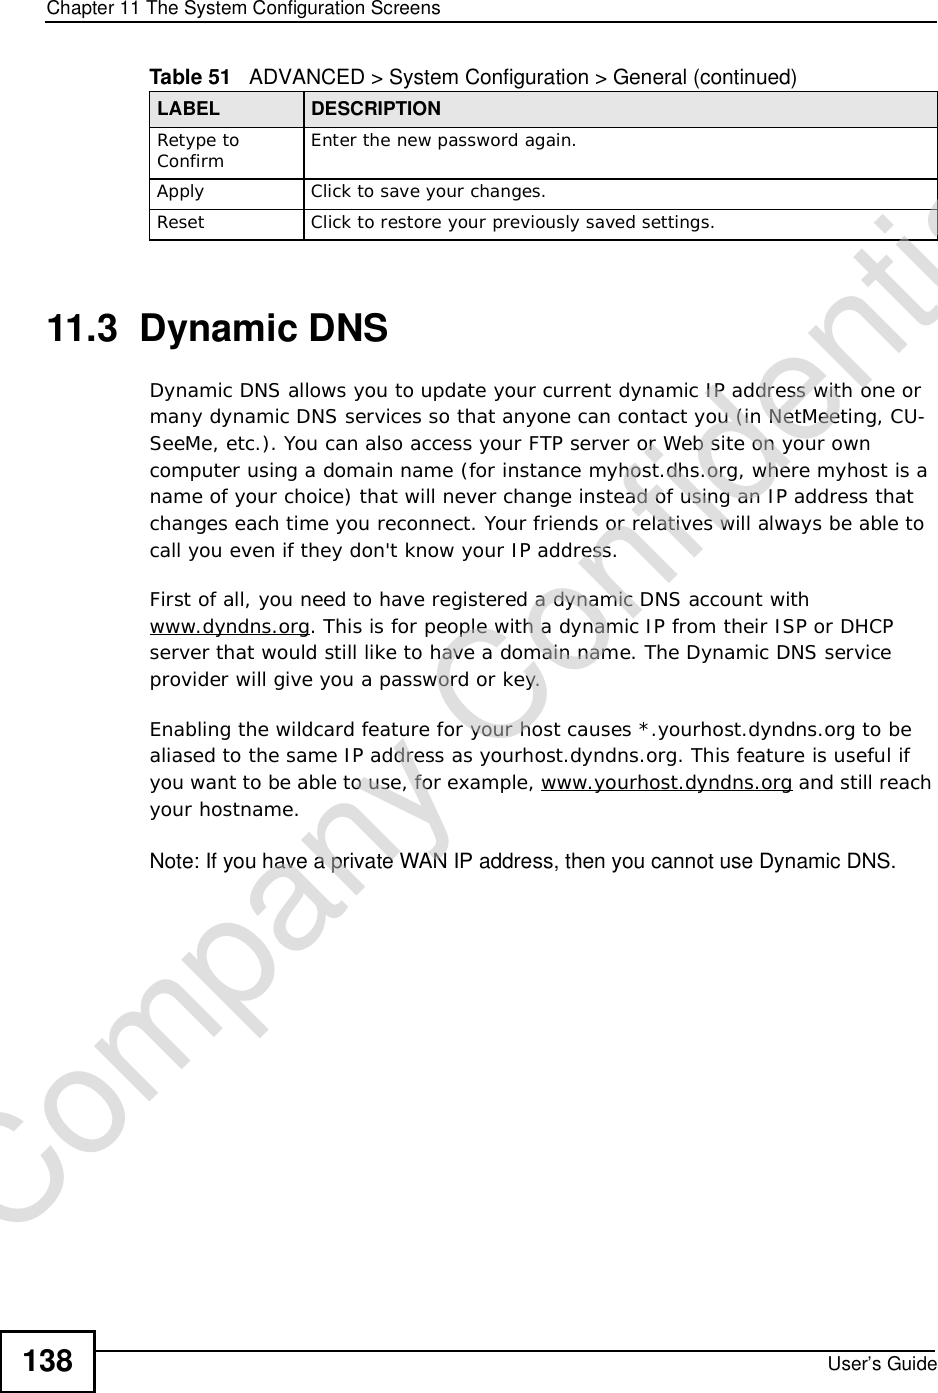
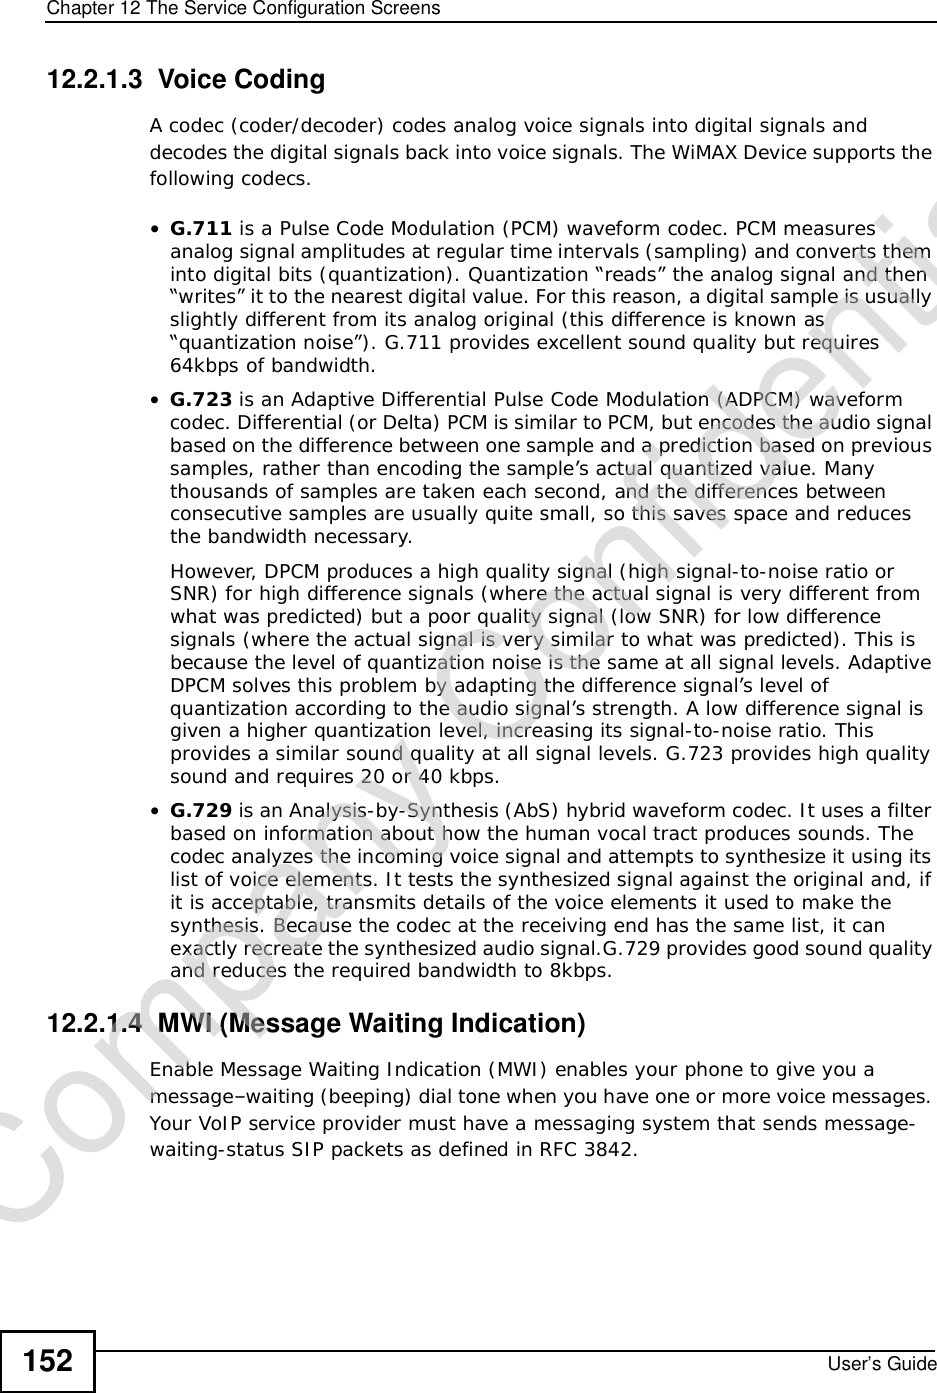
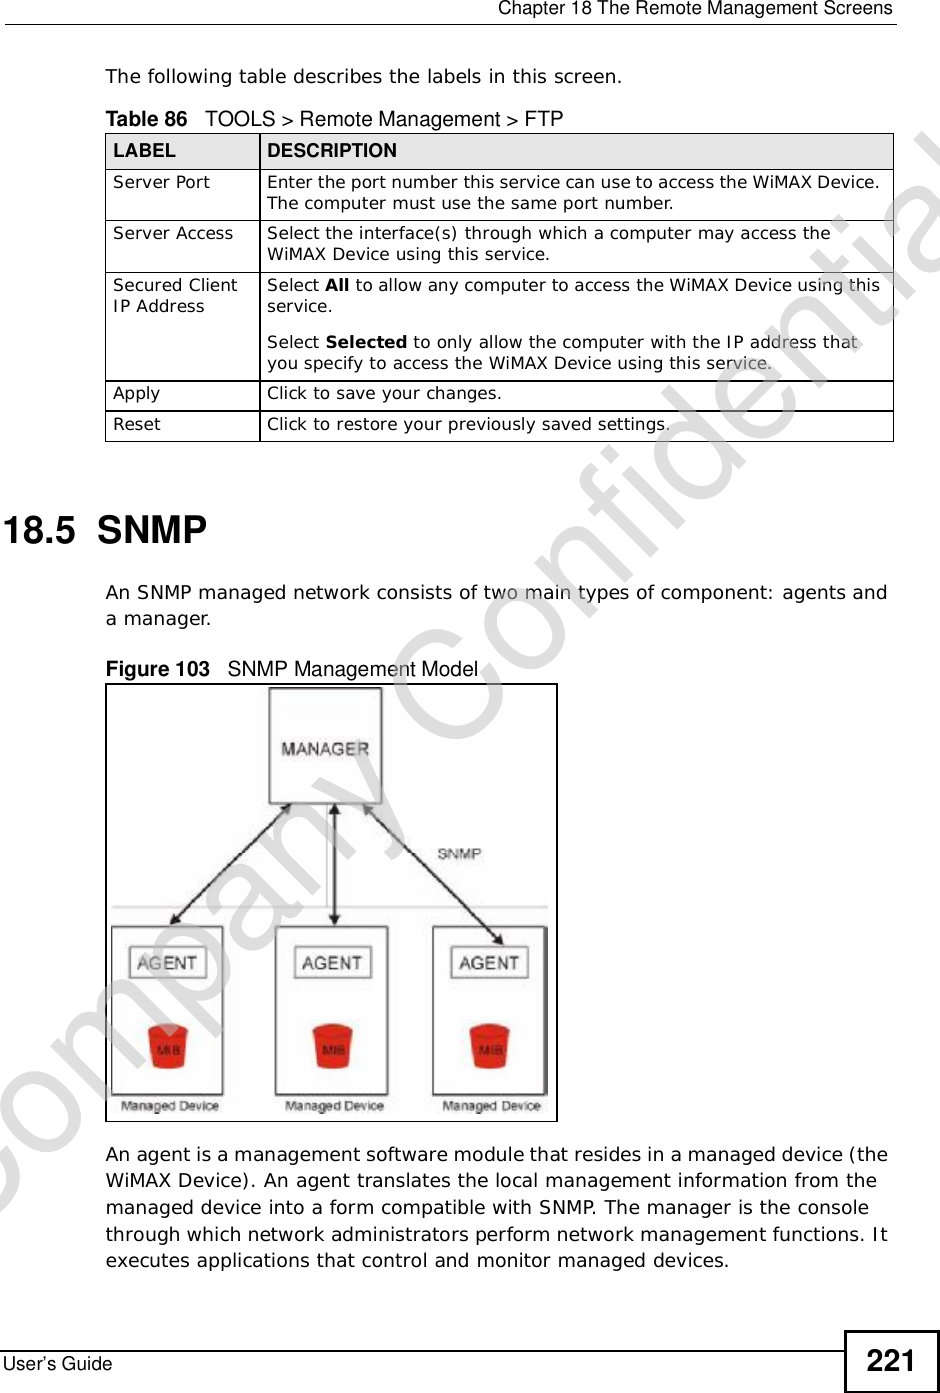
![Chapter 15The Certificates ScreensUser’s Guide 19515.3.1 Trusted CA EditClick TOOLS > Certificates >Trusted CAs and then click the Edit icon to open the Trusted CAs screen to view in-depth certificate information and change the certificate’s name.Figure 88 TOOLS > Certificates > Trusted CAs > Edit The following table describes the labels in this screen. Table 77 TOOLS > Certificates > Trusted CAs > EditLABEL DESCRIPTIONNameThis field displays the identifying name of this certificate. You can use up to 31 alphanumeric and ;‘~!@#$%^&()_+[]{}’,.=- characters.PropertySelect Default self-signed certificate which signs the imported remote host certificates to use this certificate to sign the remote host certificates you upload in the TOOLS > Certificates >TrustedCAs screen.Company Confidential](https://usermanual.wiki/ZyXEL-Communications/MAX306.Manual-Part-1/User-Guide-1135851-Page-195.png)


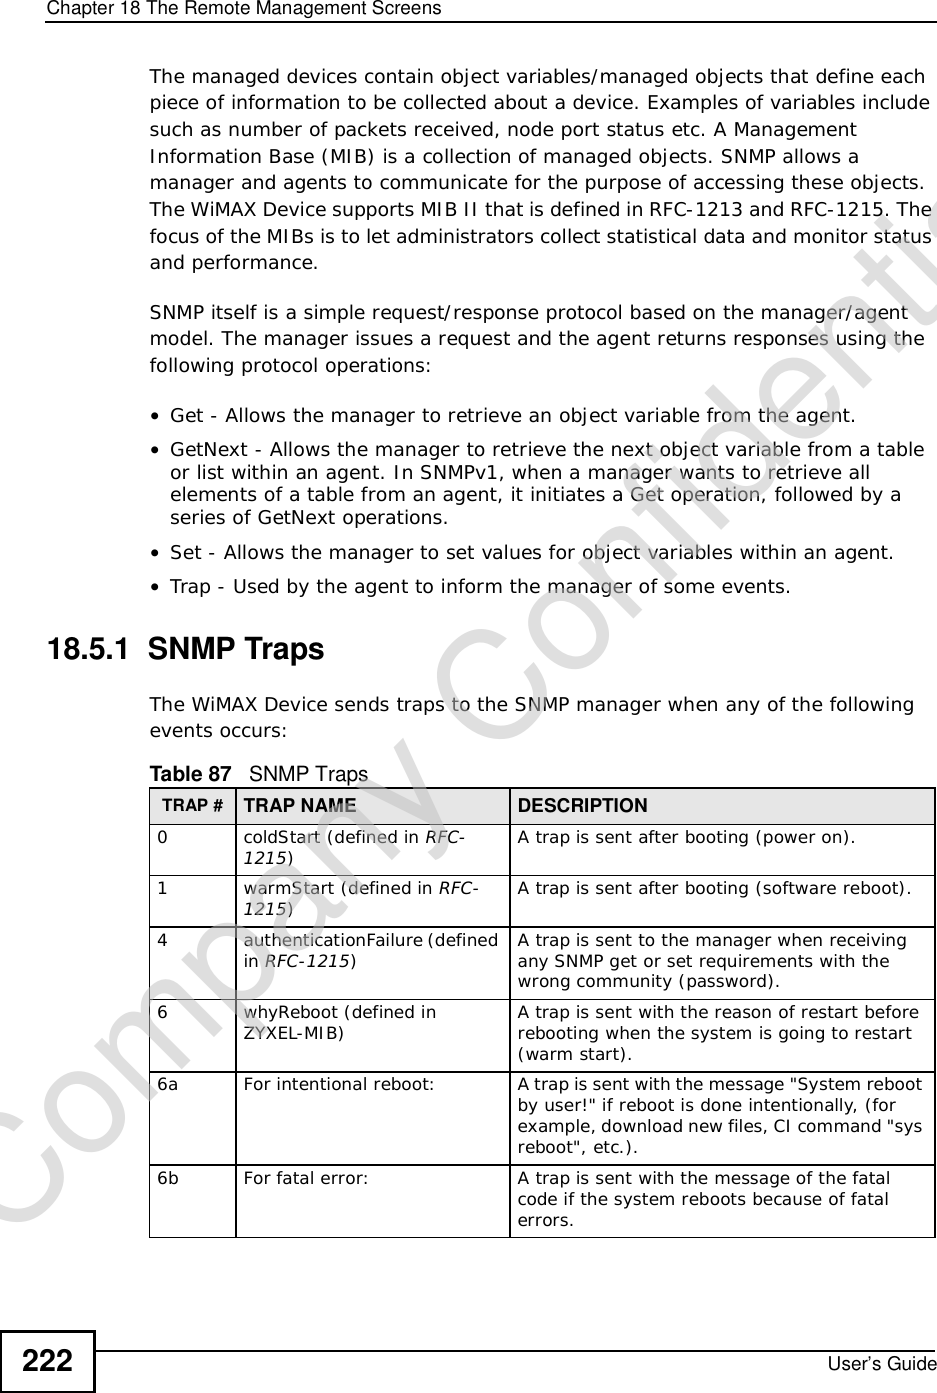
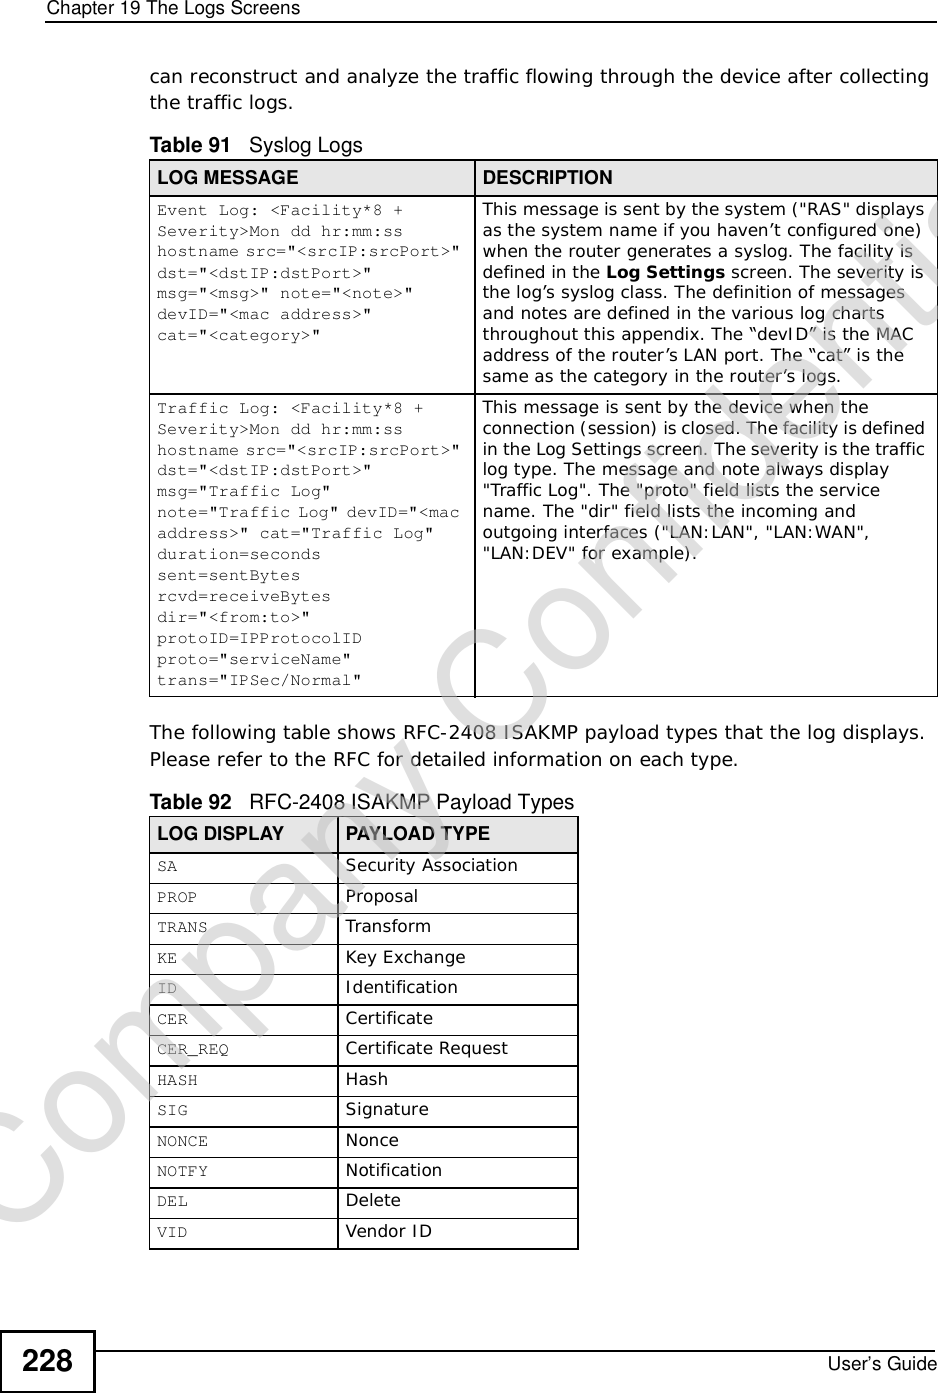
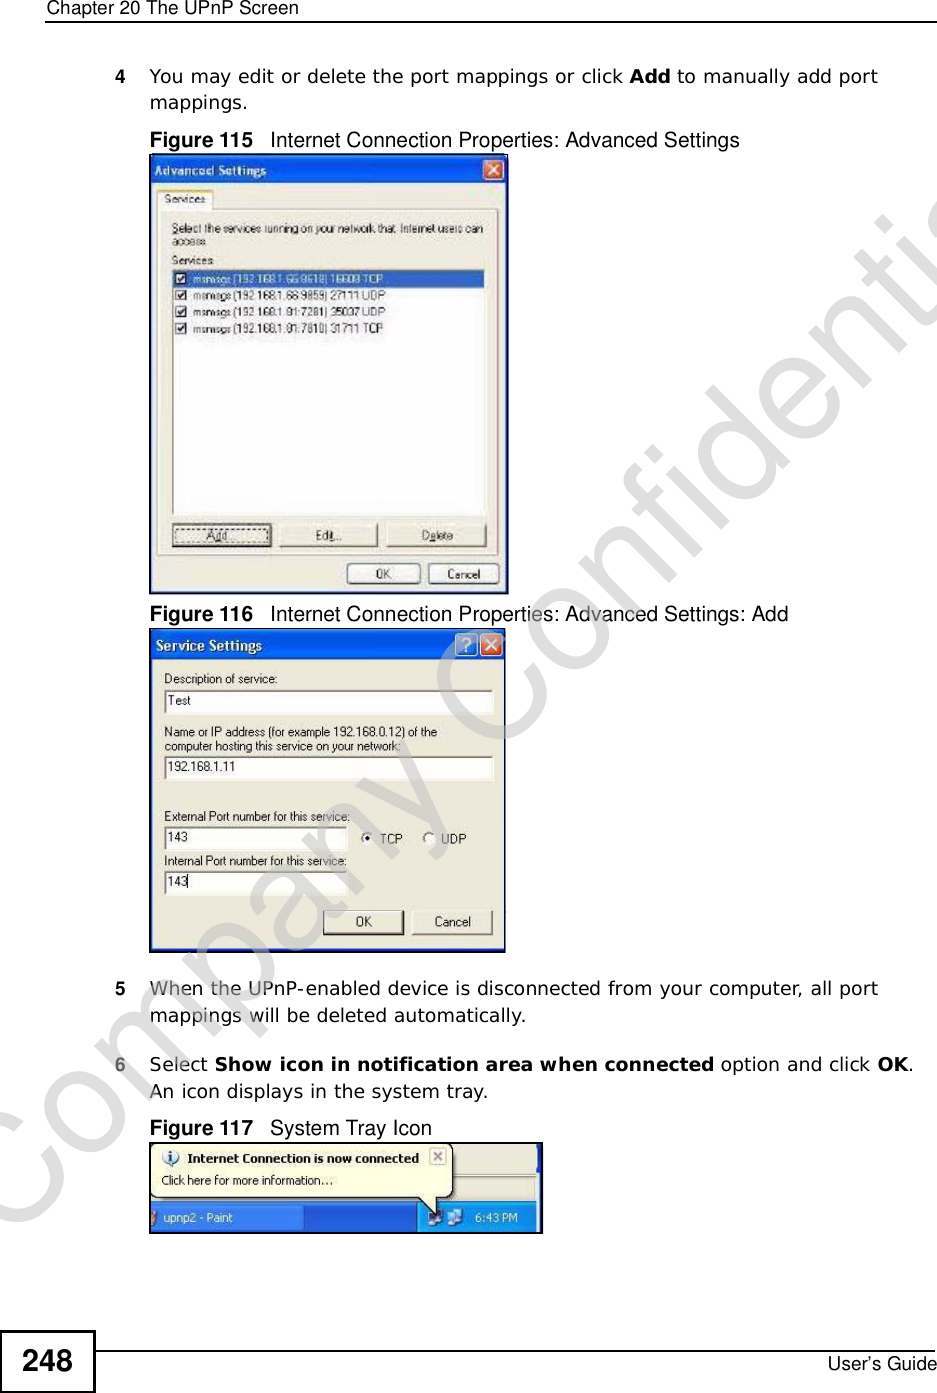
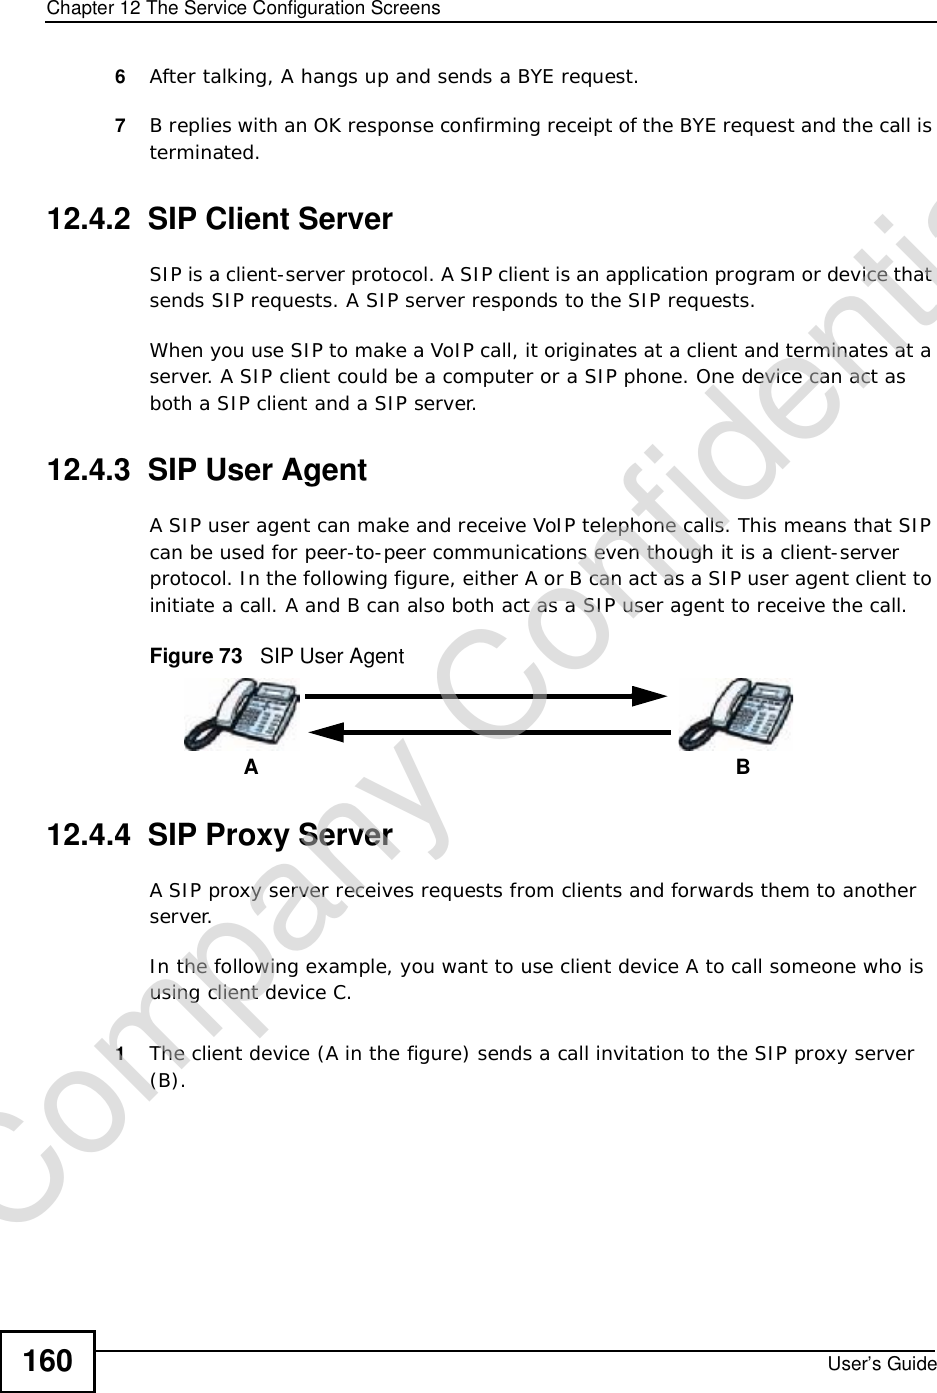
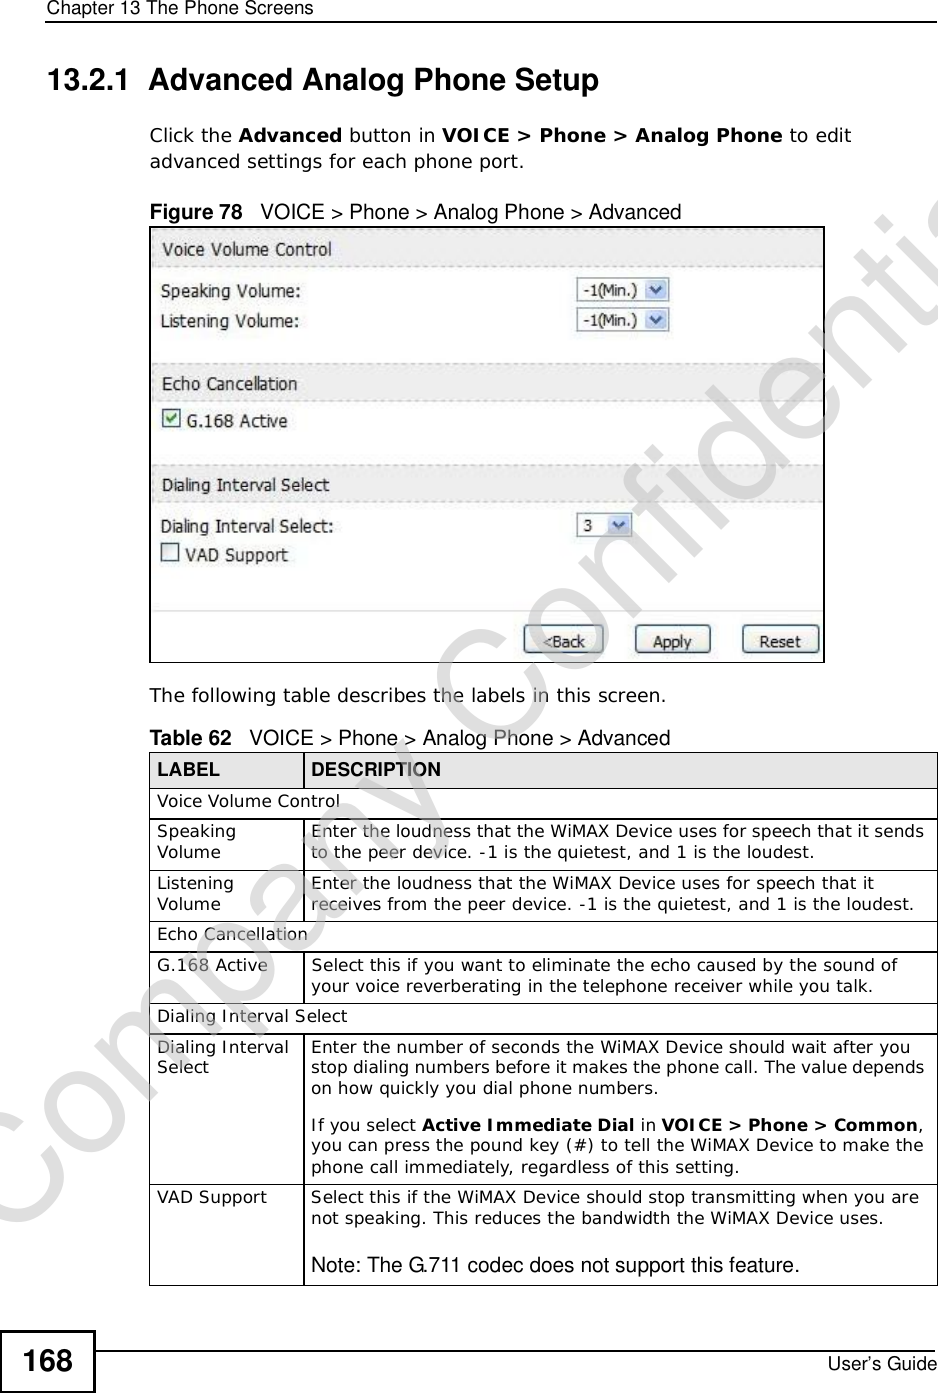
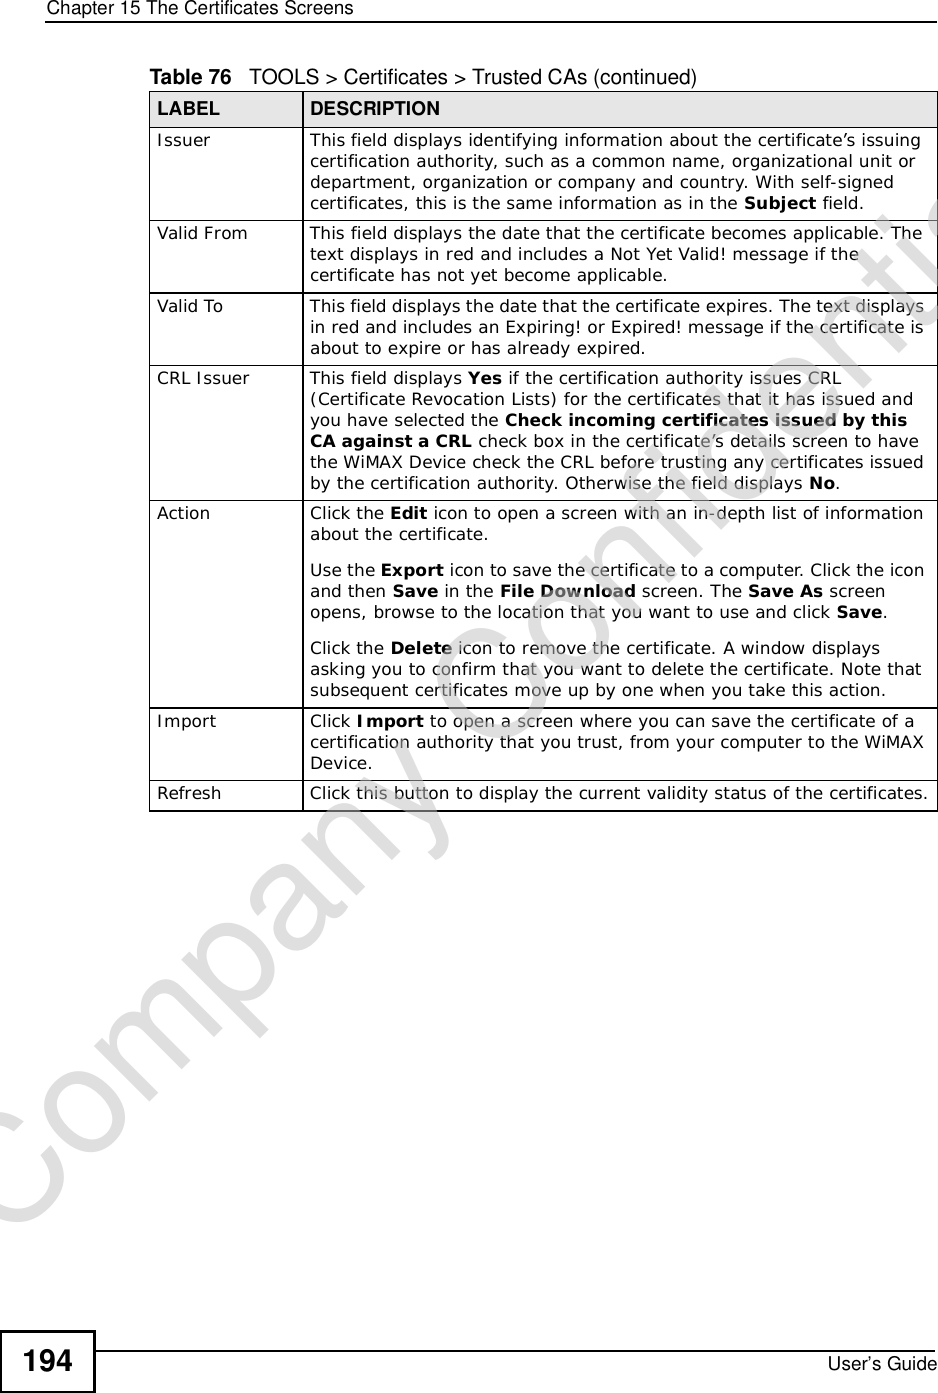
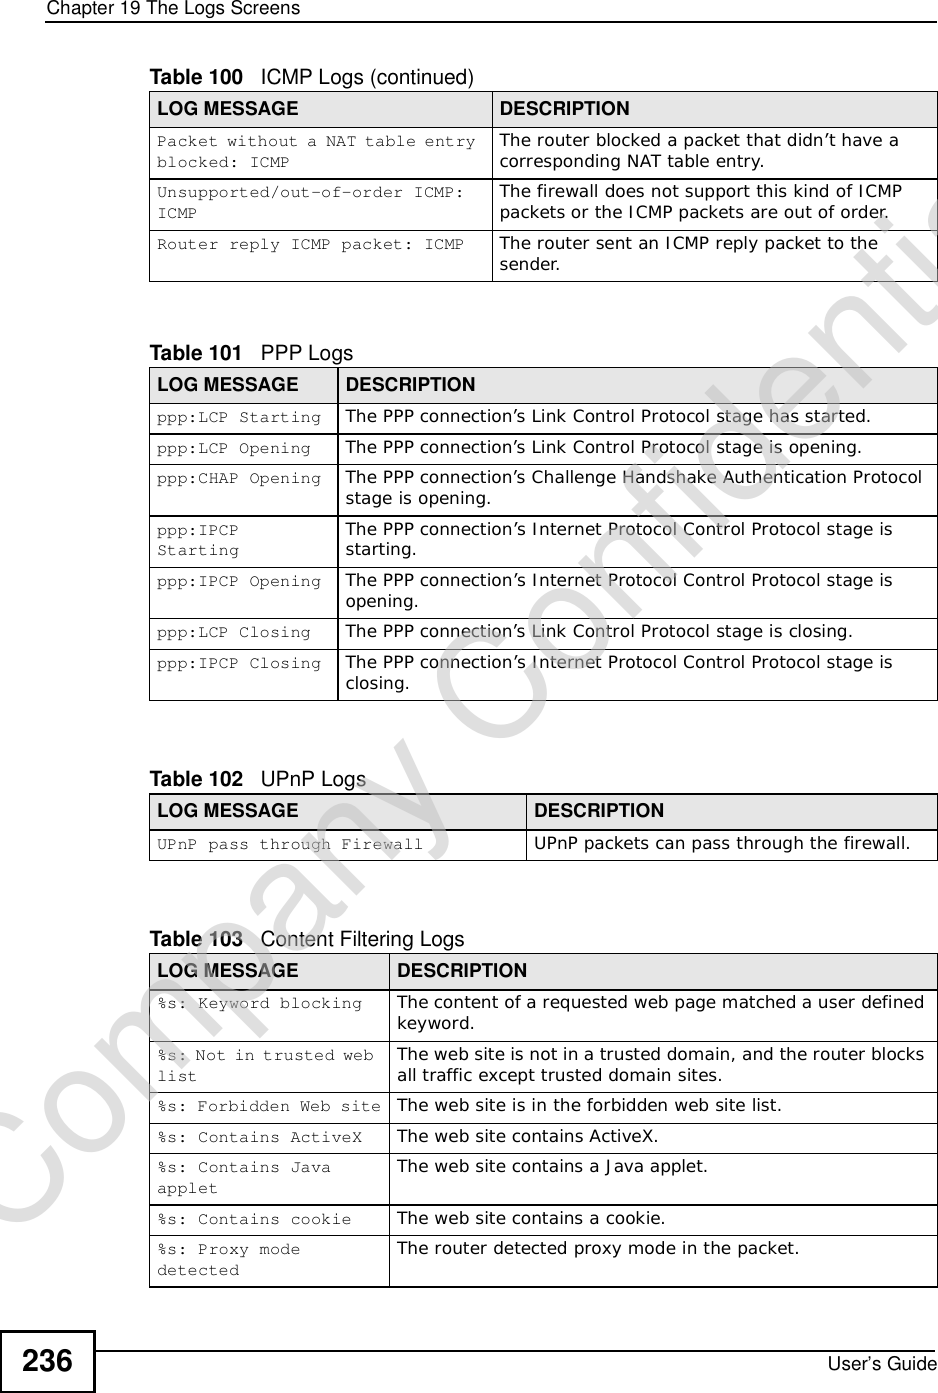
![Chapter 19The Logs ScreensUser’s Guide234Connect to NTP server fail The device was not able to connect to the NTP server.Too large ICMP packet has been dropped The device dropped an ICMP packet that was too large.Configuration Change: PC = 0x%x, Task ID = 0x%x The device is saving configuration changes.Table 97 Access Control LogsLOG MESSAGE DESCRIPTIONFirewall default policy: [ TCP | UDP | IGMP | ESP | GRE | OSPF ] <Packet Direction>Attempted TCP/UDP/IGMP/ESP/GRE/OSPF access matched the default policy and was blocked or forwarded according to the default policy’s setting.Firewall rule [NOT] match:[ TCP | UDP | IGMP | ESP | GRE | OSPF ] <Packet Direction>, <rule:%d>Attempted TCP/UDP/IGMP/ESP/GRE/OSPF access matched (or did not match) a configured firewall rule (denoted by its number) and was blocked or forwarded according to the rule. Triangle route packet forwarded: [ TCP | UDP | IGMP | ESP | GRE | OSPF ]The firewall allowed a triangle route session to pass through.Packet without a NAT table entry blocked: [ TCP | UDP | IGMP | ESP | GRE | OSPF ]The router blocked a packet that didn't have a corresponding NAT table entry.Router sent blocked web site message: TCP The router sent a message to notify a user that the router blocked access to a web site that the user requested.Exceed maximum sessions per host (%d). The device blocked a session because the host's connections exceeded the maximum sessions per host.Firewall allowed a packet that matched a NAT session: [ TCP | UDP ]A packet from the WAN (TCP or UDP) matched a cone NAT session and the device forwarded it to the LAN.Table 98 TCP Reset LogsLOG MESSAGE DESCRIPTIONUnder SYN flood attack, sent TCP RST The router sent a TCP reset packet when a host was under a SYN flood attack (the TCP incomplete count is per destination host.) Exceed TCP MAX incomplete, sent TCP RST The router sent a TCP reset packet when the number of TCP incomplete connections exceeded the user configured threshold. (the TCP incomplete count is per destination host.) Peer TCP state out of order, sent TCP RST The router sent a TCP reset packet when a TCP connection state was out of order.Note: The firewall refers to RFC793 Figure 6 to check the TCP state.Table 96 System Maintenance Logs (continued)LOG MESSAGE DESCRIPTIONCompany Confidential](https://usermanual.wiki/ZyXEL-Communications/MAX306.Manual-Part-1/User-Guide-1135851-Page-234.png)
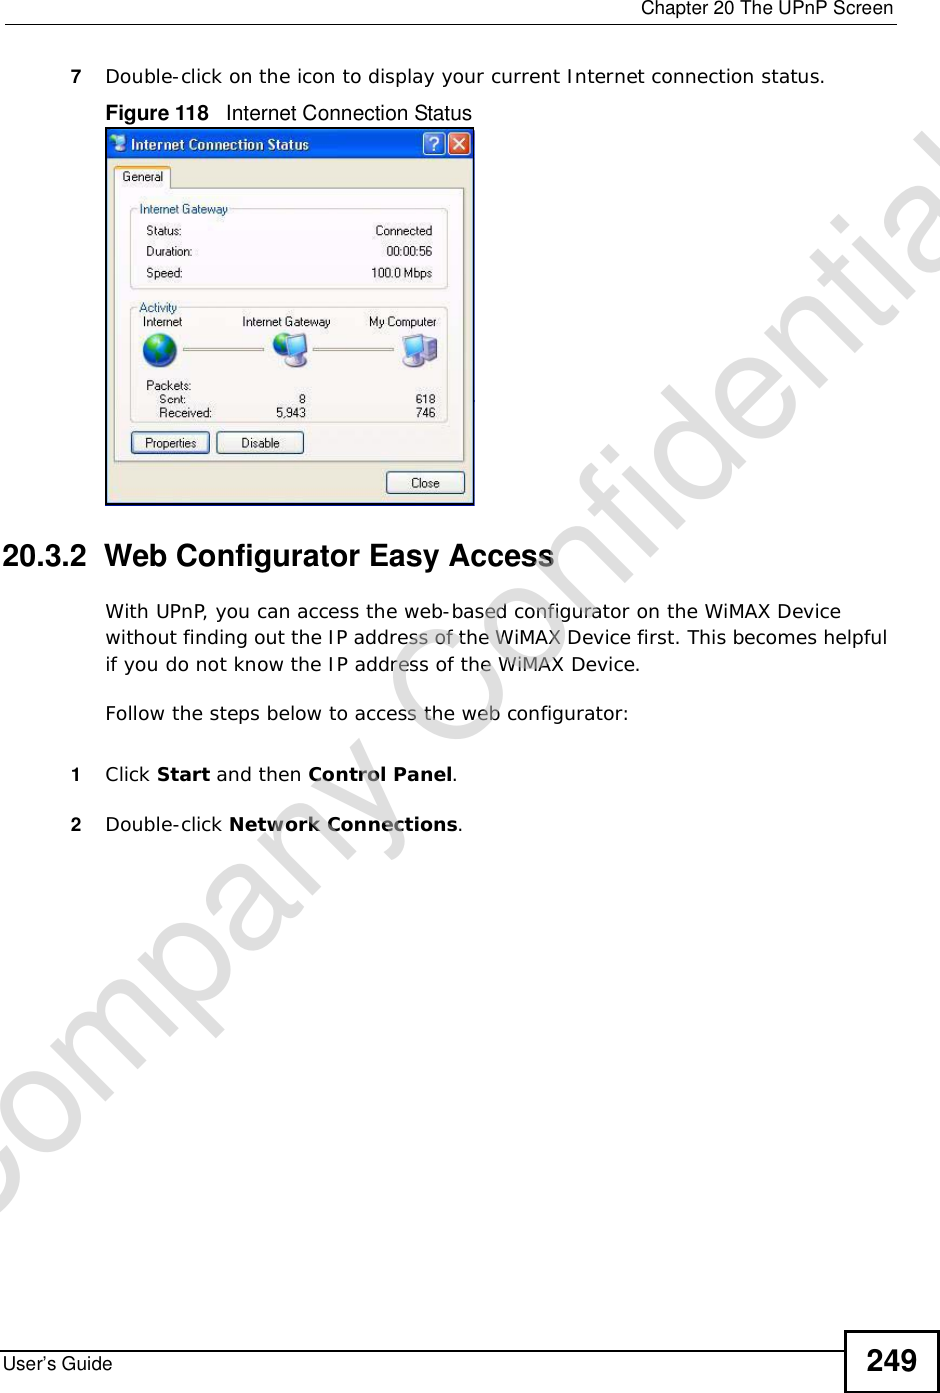
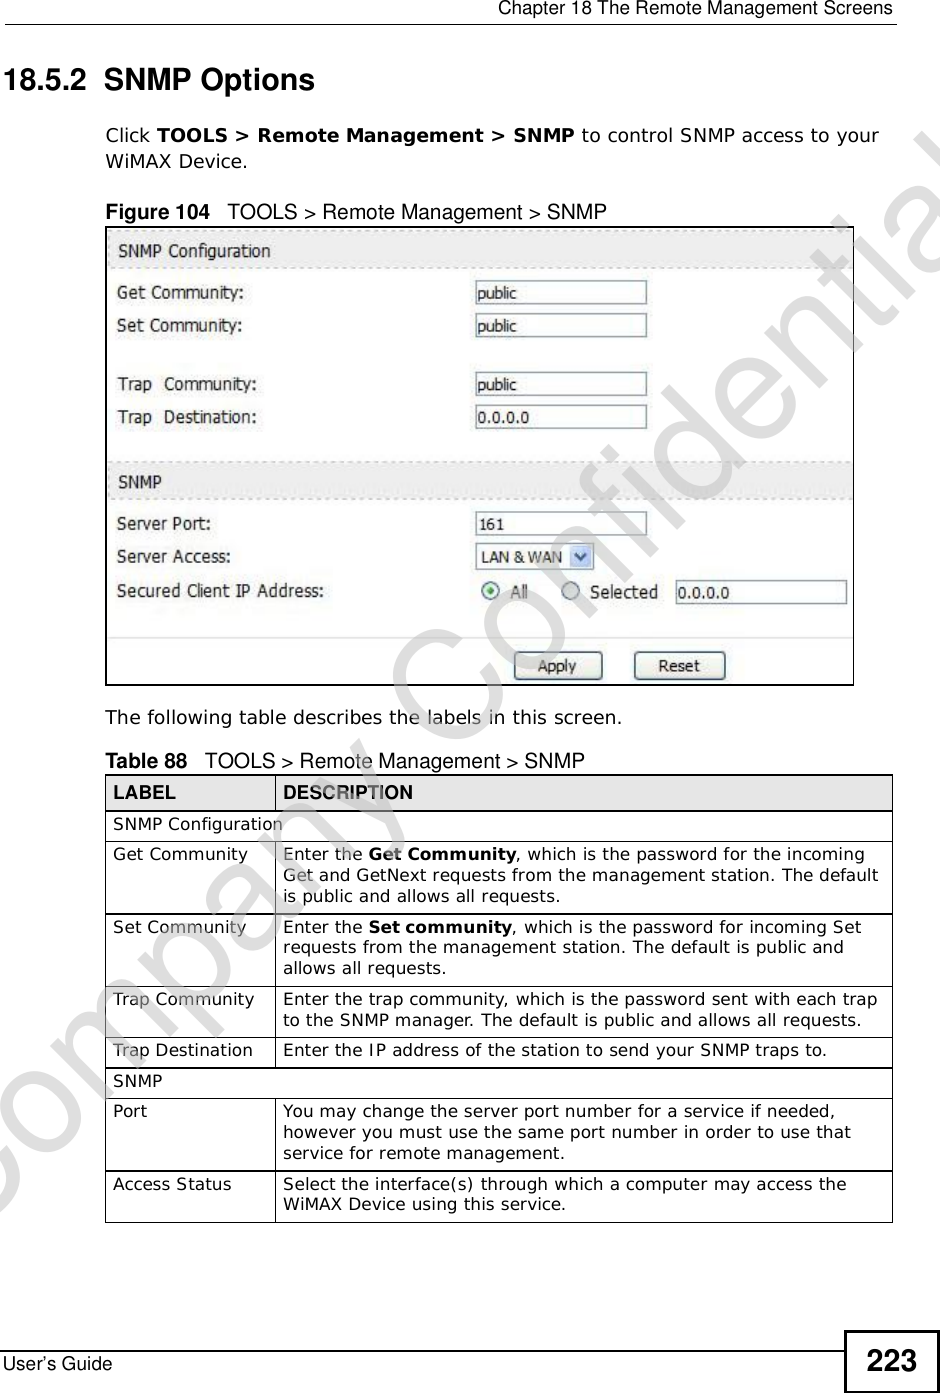
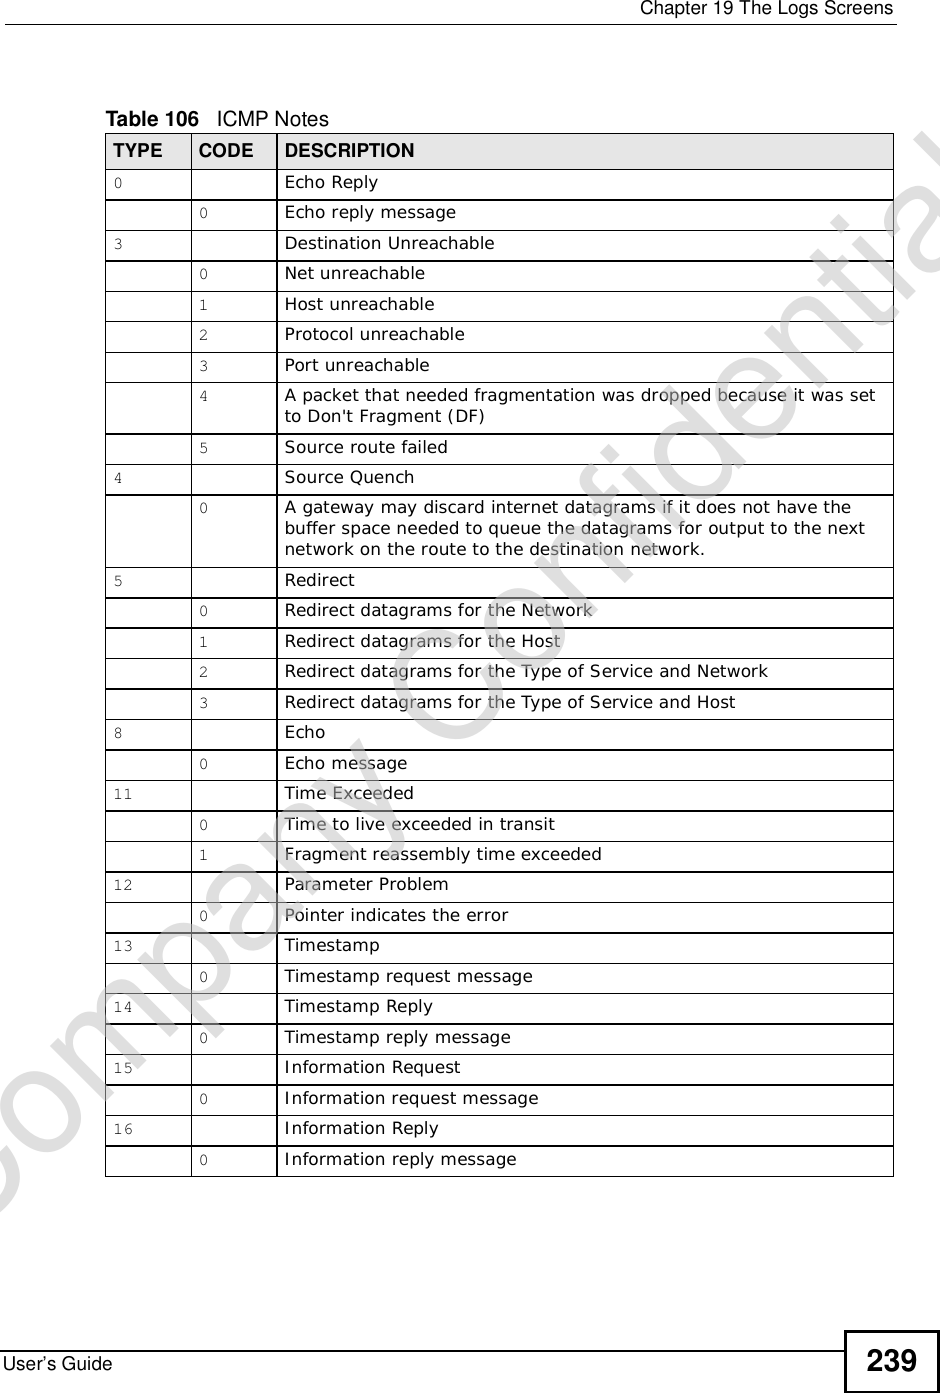
![Chapter 19The Logs ScreensUser’s Guide 235 For type and code details, see Table 106 on page 239.Firewall session time out, sent TCP RST The router sent a TCP reset packet when a dynamic firewall session timed out.The default timeout values are as follows:ICMP idle timeout: 3 minutesUDP idle timeout: 3 minutesTCP connection (three way handshaking) timeout: 270 secondsTCP FIN-wait timeout: 2 MSL (Maximum Segment Lifetime set in the TCP header).TCP idle (established) timeout (s): 150 minutesTCP reset timeout: 10 secondsExceed MAX incomplete, sent TCP RST The router sent a TCP reset packet when the number of incomplete connections (TCP and UDP) exceeded the user-configured threshold. (Incomplete count is for all TCP and UDP connections through the firewall.)Note: When the number of incomplete connections (TCP + UDP) > “Maximum Incomplete High”, the router sends TCP RST packets for TCP connections and destroys TOS (firewall dynamic sessions) until incomplete connections < “Maximum Incomplete Low”.Access block, sent TCP RST The router sends a TCP RST packet and generates this log if you turn on the firewall TCP reset mechanism (via CI command: sys firewall tcprst).Table 99 Packet Filter LogsLOG MESSAGE DESCRIPTION[ TCP | UDP | ICMP | IGMP | Generic ] packet filter matched (set: %d, rule: %d)Attempted access matched a configured filter rule (denoted by its set and rule number) and was blocked or forwarded according to the rule.Table 100 ICMP LogsLOG MESSAGE DESCRIPTIONFirewall default policy: ICMP <Packet Direction>, <type:%d>, <code:%d>ICMP access matched the default policy and was blocked or forwarded according to the user's setting.Firewall rule [NOT] match: ICMP <Packet Direction>, <rule:%d>, <type:%d>, <code:%d>ICMP access matched (or didn’t match) a firewall rule (denoted by its number) and was blocked or forwarded according to the rule. Triangle route packet forwarded: ICMP The firewall allowed a triangle route session to pass through.Table 98 TCP Reset Logs (continued)LOG MESSAGE DESCRIPTIONCompany Confidential](https://usermanual.wiki/ZyXEL-Communications/MAX306.Manual-Part-1/User-Guide-1135851-Page-235.png)
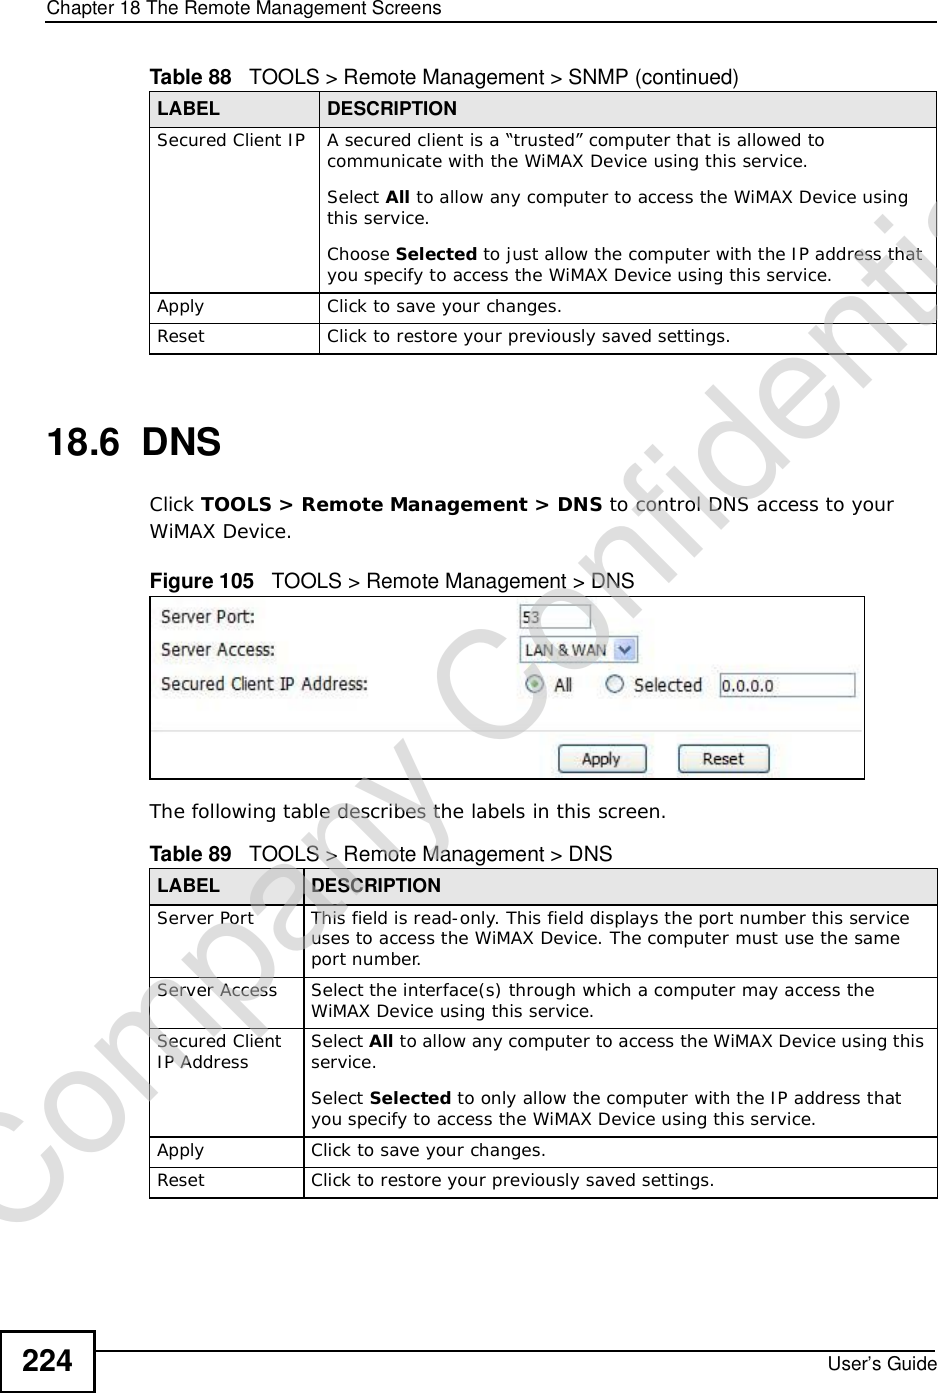
![Chapter 19The Logs ScreensUser’s Guide 237For type and code details, see Table 106 on page 239.%s: Trusted Web site The web site is in a trusted domain.%s When the content filter is not on according to the time schedule:Waiting content filter server timeoutThe external content filtering server did not respond within the timeout period.DNS resolving failed The WiMAX Device cannot get the IP address of the external content filtering via DNS query.Creating socket failed The WiMAX Device cannot issue a query because TCP/UDP socket creation failed, port:port number.Connecting to content filter server failThe connection to the external content filtering server failed.License key is invalid The external content filtering license key is invalid.Table 104 Attack LogsLOG MESSAGE DESCRIPTIONattack [ TCP | UDP | IGMP | ESP | GRE | OSPF ] The firewall detected a TCP/UDP/IGMP/ESP/GRE/OSPF attack.attack ICMP (type:%d, code:%d) The firewall detected an ICMP attack. land [ TCP | UDP | IGMP | ESP | GRE | OSPF ] The firewall detected a TCP/UDP/IGMP/ESP/GRE/OSPF land attack.land ICMP (type:%d, code:%d) The firewall detected an ICMP land attack. ip spoofing - WAN [ TCP | UDP | IGMP | ESP | GRE | OSPF ]The firewall detected an IP spoofing attack on the WAN port.ip spoofing - WAN ICMP (type:%d, code:%d) The firewall detected an ICMP IP spoofing attack on the WAN port. icmp echo : ICMP (type:%d, code:%d) The firewall detected an ICMP echo attack. syn flood TCP The firewall detected a TCP syn flood attack.ports scan TCP The firewall detected a TCP port scan attack.teardrop TCP The firewall detected a TCP teardrop attack.teardrop UDP The firewall detected an UDP teardrop attack.teardrop ICMP (type:%d, code:%d) The firewall detected an ICMP teardrop attack. illegal command TCP The firewall detected a TCP illegal command attack.NetBIOS TCP The firewall detected a TCP NetBIOS attack.Table 103 Content Filtering Logs (continued)LOG MESSAGE DESCRIPTIONCompany Confidential](https://usermanual.wiki/ZyXEL-Communications/MAX306.Manual-Part-1/User-Guide-1135851-Page-237.png)
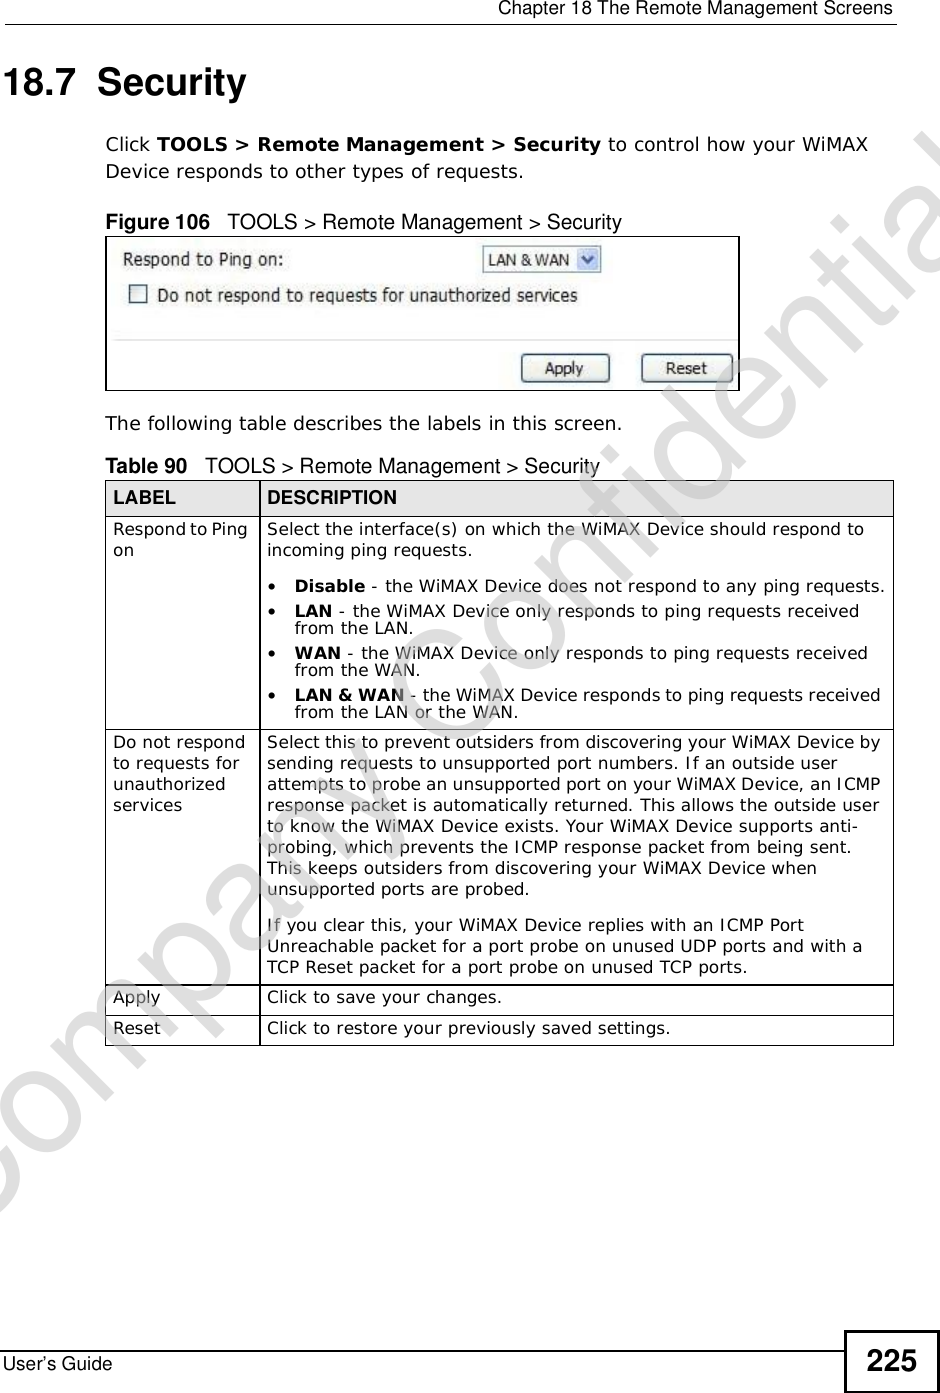
![Chapter 19The Logs ScreensUser’s Guide238ip spoofing - no routing entry [ TCP | UDP | IGMP | ESP | GRE | OSPF ]The firewall classified a packet with no source routing entry as an IP spoofing attack.ip spoofing - no routing entry ICMP (type:%d, code:%d)The firewall classified an ICMP packet with no source routing entry as an IP spoofing attack.vulnerability ICMP (type:%d, code:%d) The firewall detected an ICMP vulnerability attack. traceroute ICMP (type:%d, code:%d) The firewall detected an ICMP traceroute attack. ports scan UDP The firewall detected a UDP port scan attack.Firewall sent TCP packet in response to DoS attack TCPThe firewall sent TCP packet in response to a DoS attackICMP Source Quench ICMP The firewall detected an ICMP Source Quench attack.ICMP Time Exceed ICMP The firewall detected an ICMP Time Exceed attack.ICMP Destination Unreachable ICMP The firewall detected an ICMP Destination Unreachable attack.ping of death. ICMP The firewall detected an ICMP ping of death attack.smurf ICMP The firewall detected an ICMP smurf attack.Table 105 Remote Management LogsLOG MESSAGE DESCRIPTIONRemote Management: FTP denied Attempted use of FTP service was blocked according to remote management settings.Remote Management: TELNET denied Attempted use of TELNET service was blocked according to remote management settings.Remote Management: HTTP or UPnP denied Attempted use of HTTP or UPnP service was blocked according to remote management settings.Remote Management: WWW denied Attempted use of WWW service was blocked according to remote management settings.Remote Management: HTTPS denied Attempted use of HTTPS service was blocked according to remote management settings.Remote Management: SSH denied Attempted use of SSH service was blocked according to remote management settings.Remote Management: ICMP Ping response denied Attempted use of ICMP service was blocked according to remote management settings.Remote Management: DNS denied Attempted use of DNS service was blocked according to remote management settings.Table 104 Attack Logs (continued)LOG MESSAGE DESCRIPTIONCompany Confidential](https://usermanual.wiki/ZyXEL-Communications/MAX306.Manual-Part-1/User-Guide-1135851-Page-238.png)
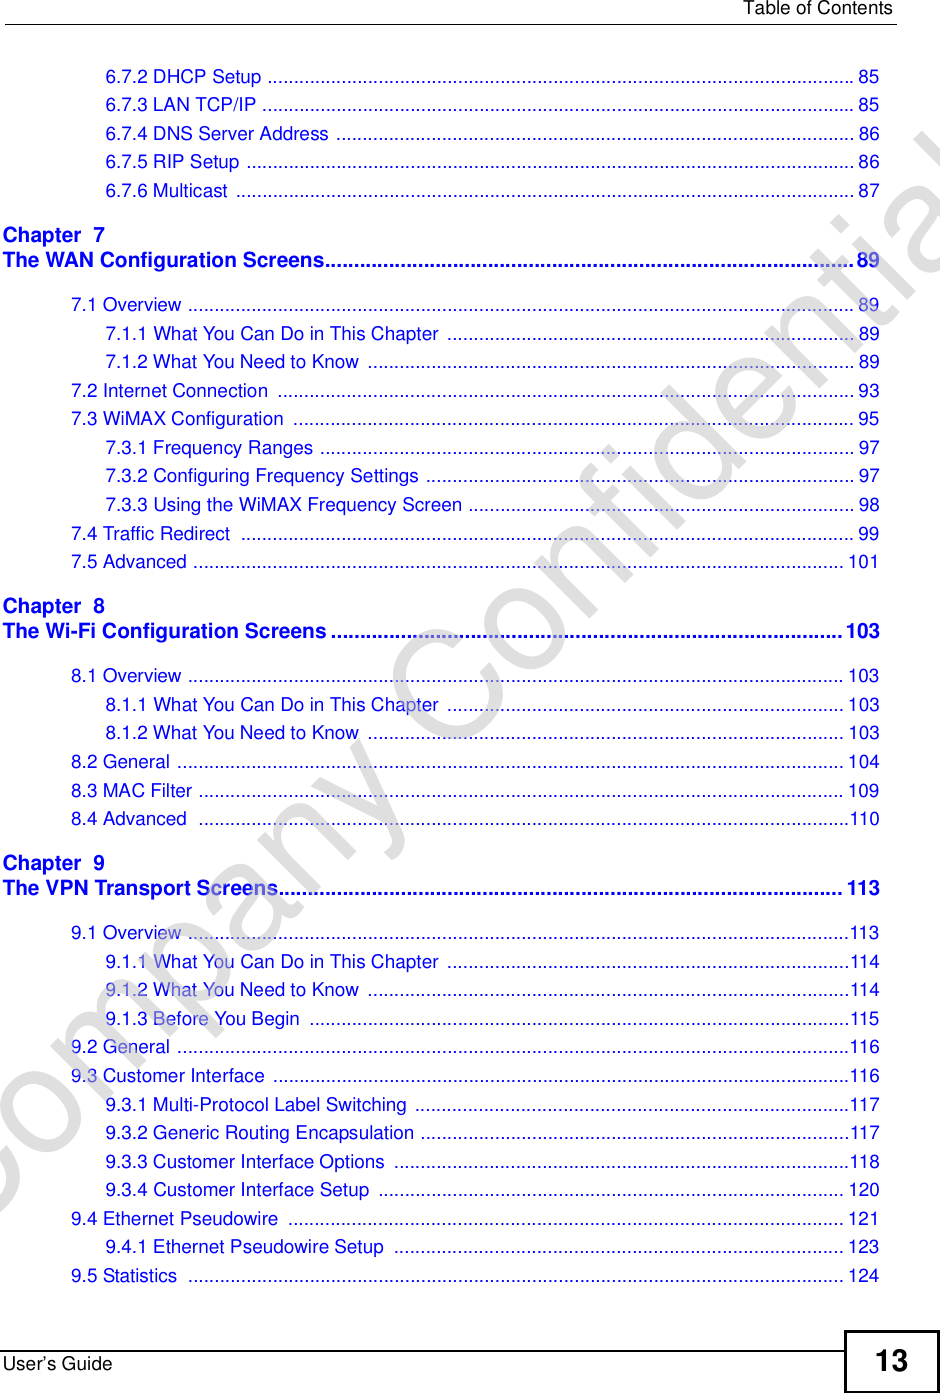
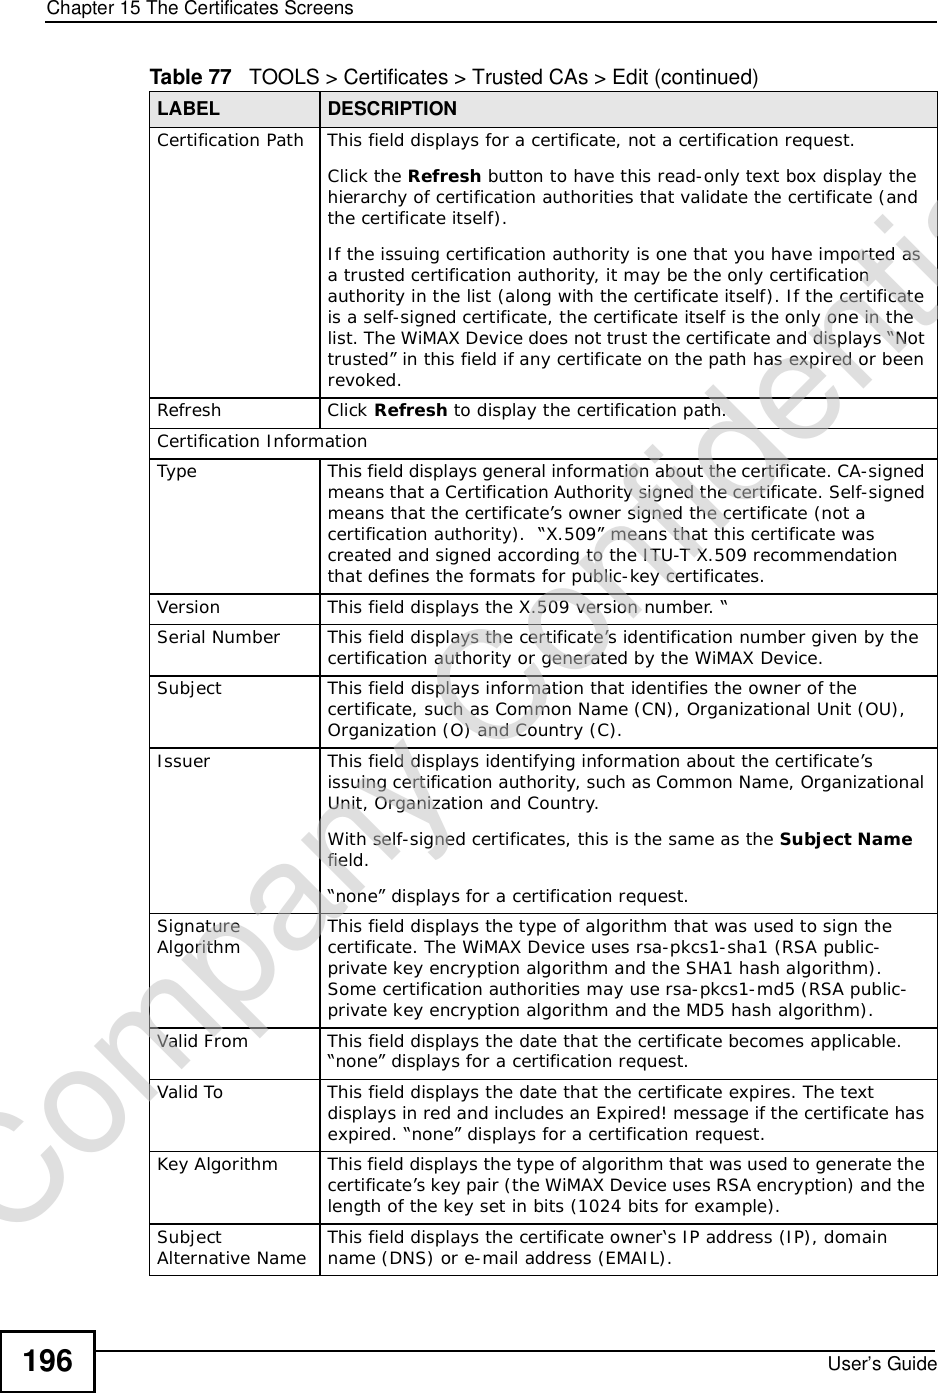
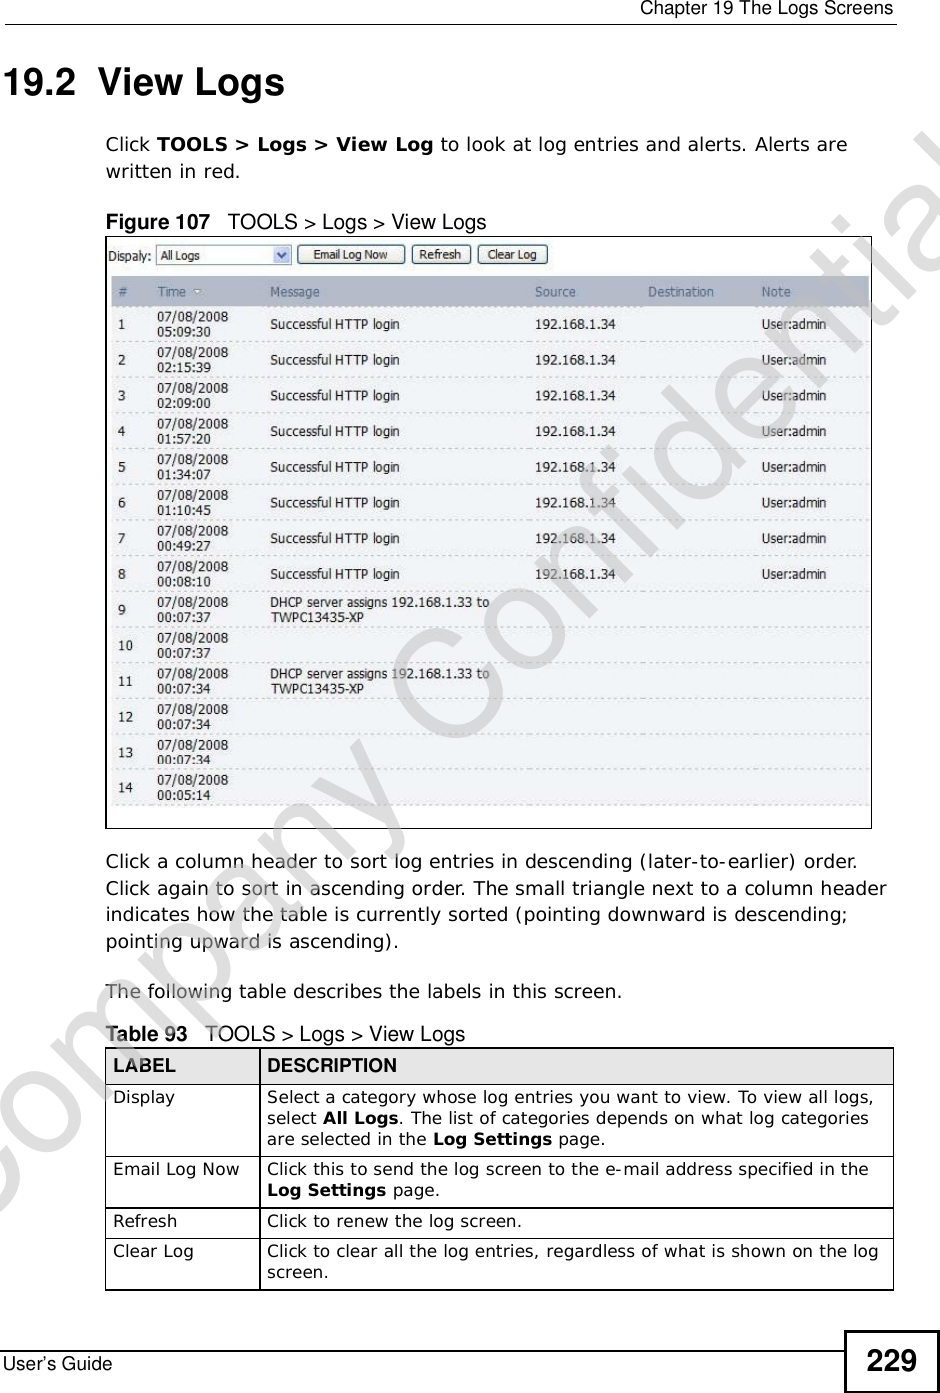
![Chapter 19The Logs ScreensUser’s Guide240Table 107 SIP LogsLOG MESSAGE DESCRIPTIONSIP Registration Success by SIP:SIP Phone Number The listed SIP account was successfully registered with a SIP register server.SIP Registration Fail by SIP:SIP Phone Number An attempt to register the listed SIP account with a SIP register server was not successful.SIP UnRegistration Success by SIP:SIP Phone NumberThe listed SIP account’s registration was deleted from the SIP register server.SIP UnRegistration Fail by SIP:SIP Phone Number An attempt to delete the listed SIP account’s registration from the SIP register server failed.Table 108 RTP LogsLOG MESSAGE DESCRIPTIONError, RTP init fail The initialization of an RTP session failed.Error, Call fail: RTP connect fail A VoIP phone call failed because the RTP session could not be established.Error, RTP connection cannot close The termination of an RTP session failed.Table 109 FSM Logs: Caller SideLOG MESSAGE DESCRIPTIONVoIP Call Start Ph[Phone Port Number] <- Outgoing Call NumberSomeone used a phone connected to the listed phone port to initiate a VoIP call to the listed destination.VoIP Call Established Ph[Phone Port] -> Outgoing Call NumberSomeone used a phone connected to the listed phone port to make a VoIP call to the listed destination.VoIP Call End Phone[Phone Port] A VoIP phone call made from a phone connected to the listed phone port has terminated.Table 110 FSM Logs: Callee SideLOG MESSAGE DESCRIPTIONVoIP Call Start from SIP[SIP Port Number] A VoIP phone call came to the WiMAX Device from the listed SIP number.Company Confidential](https://usermanual.wiki/ZyXEL-Communications/MAX306.Manual-Part-1/User-Guide-1135851-Page-240.png)
![Chapter 19The Logs ScreensUser’s Guide 241VoIP Call Established Ph[Phone Port] <- Outgoing Call NumberA VoIP phone call was set up from the listed SIP number to the WiMAX Device.VoIP Call End Phone[Phone Port] A VoIP phone call that came into the WiMAX Device has terminated.Table 111 Lifeline LogsLOG MESSAGE DESCRIPTIONPSTN Call Start A PSTN call has been initiated.PSTN Call End A PSTN call has terminated.PSTN Call Established A PSTN call has been set up.Table 110 FSM Logs: Callee Side (continued)LOG MESSAGE DESCRIPTIONCompany Confidential](https://usermanual.wiki/ZyXEL-Communications/MAX306.Manual-Part-1/User-Guide-1135851-Page-241.png)