ZyXEL Communications NBG334SH 802.11 G Wireless Router / Firewall User Manual
ZyXEL Communications Corporation 802.11 G Wireless Router / Firewall
UserManual.wiki
>
ZyXEL Communications
>
NBG334SH User Manual
user manual
Navigation menu
Upload a User Manual
Namespaces
Wiki Guide
HTML
PDF
Info
Views
User Manual
Discussion / Help
Navigation
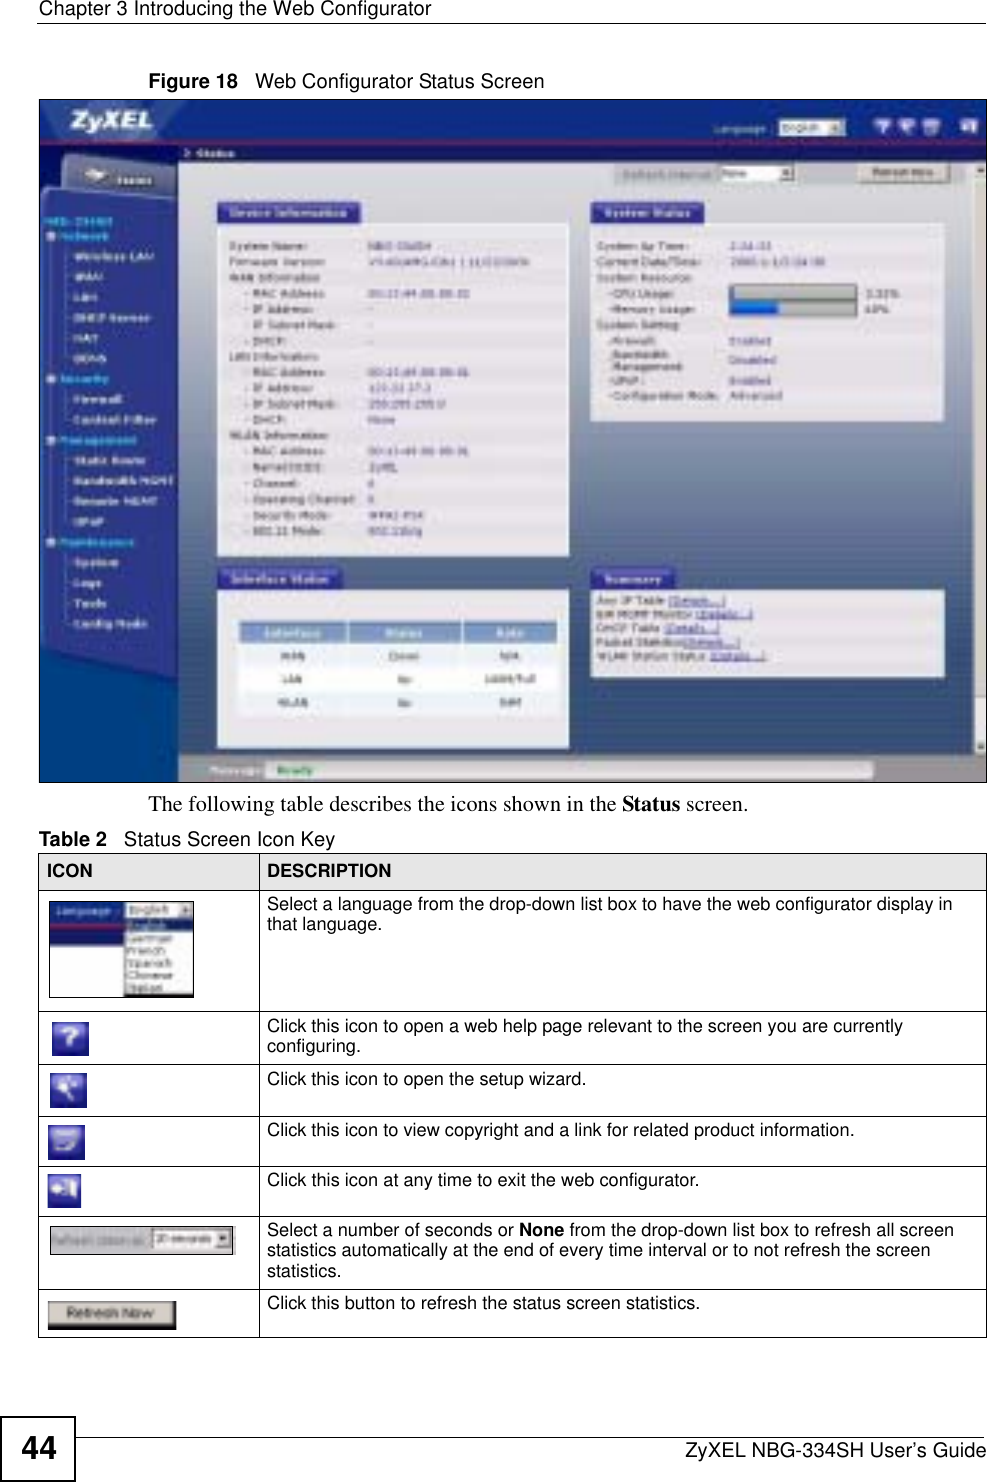
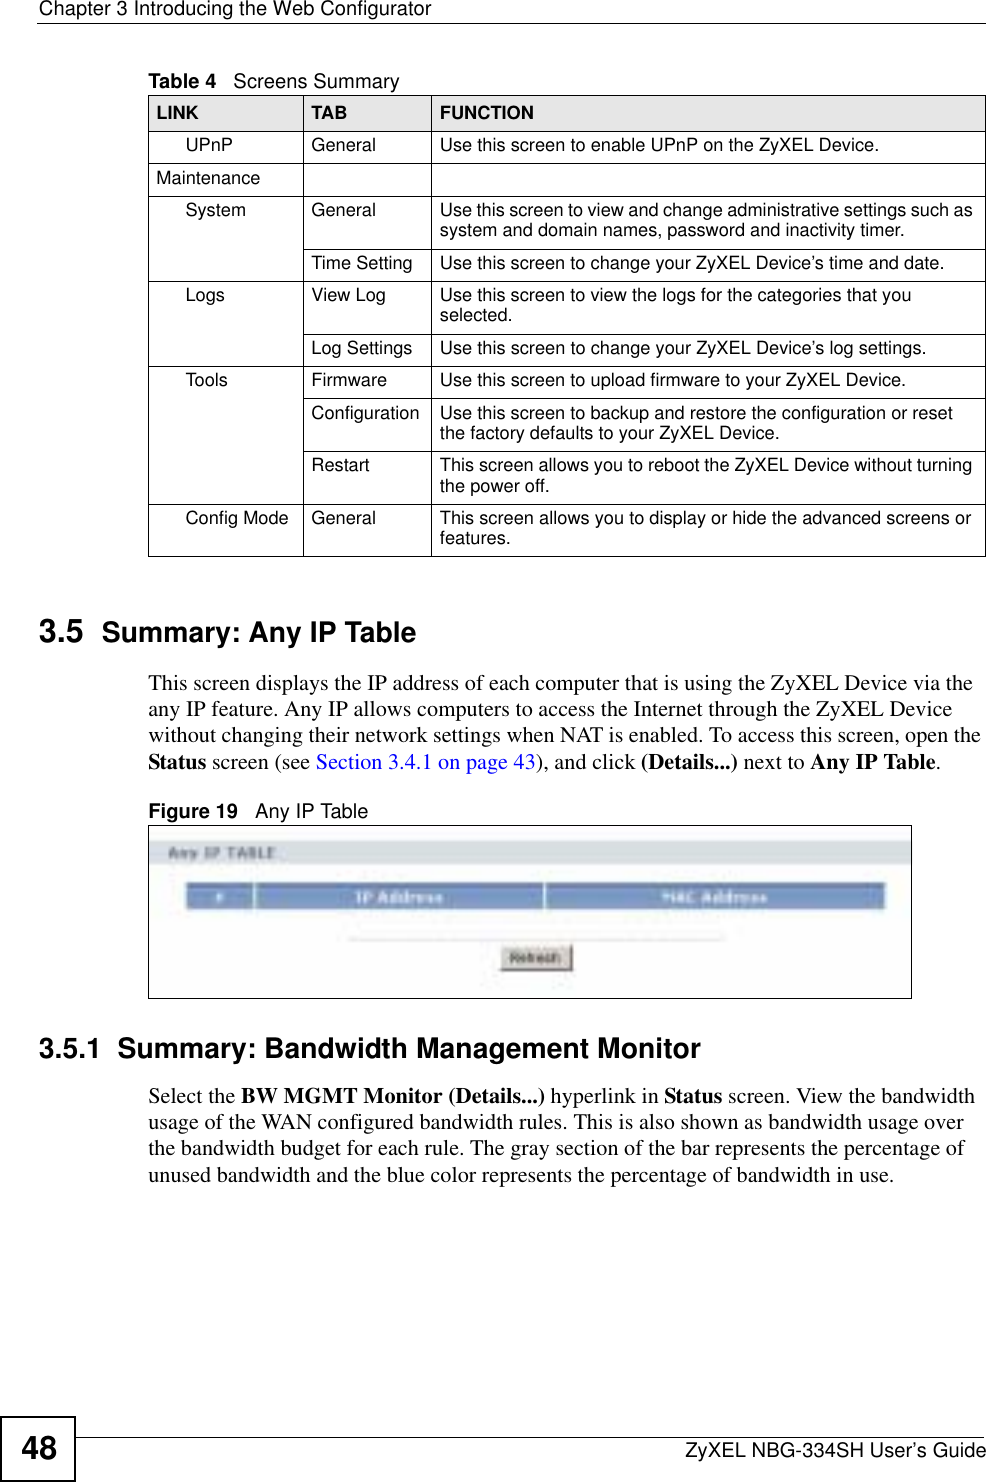
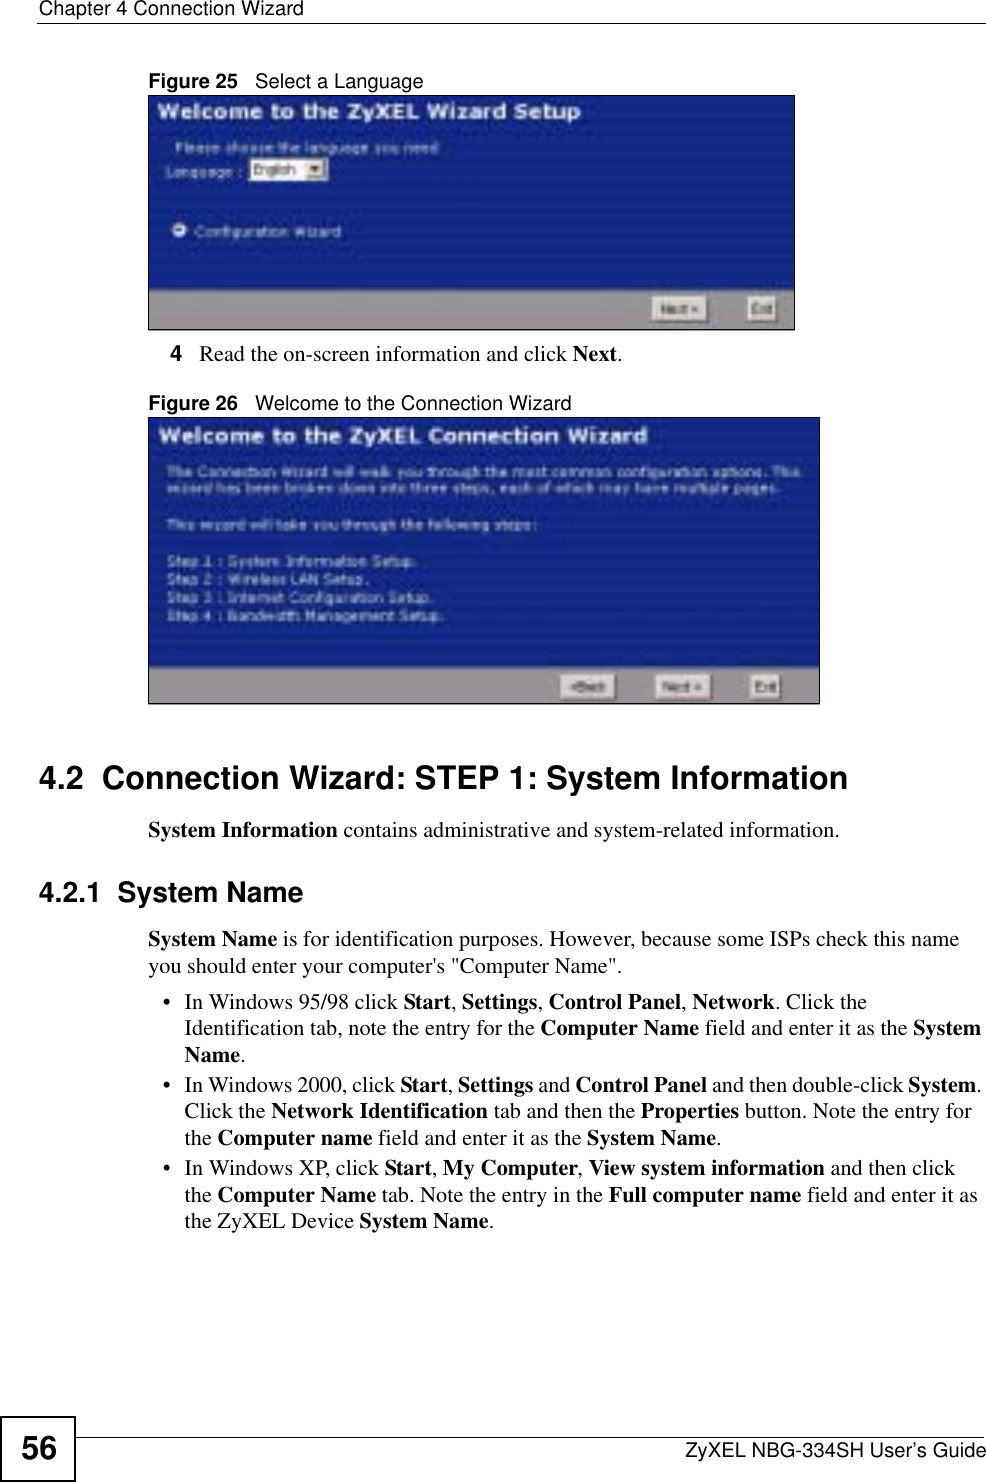
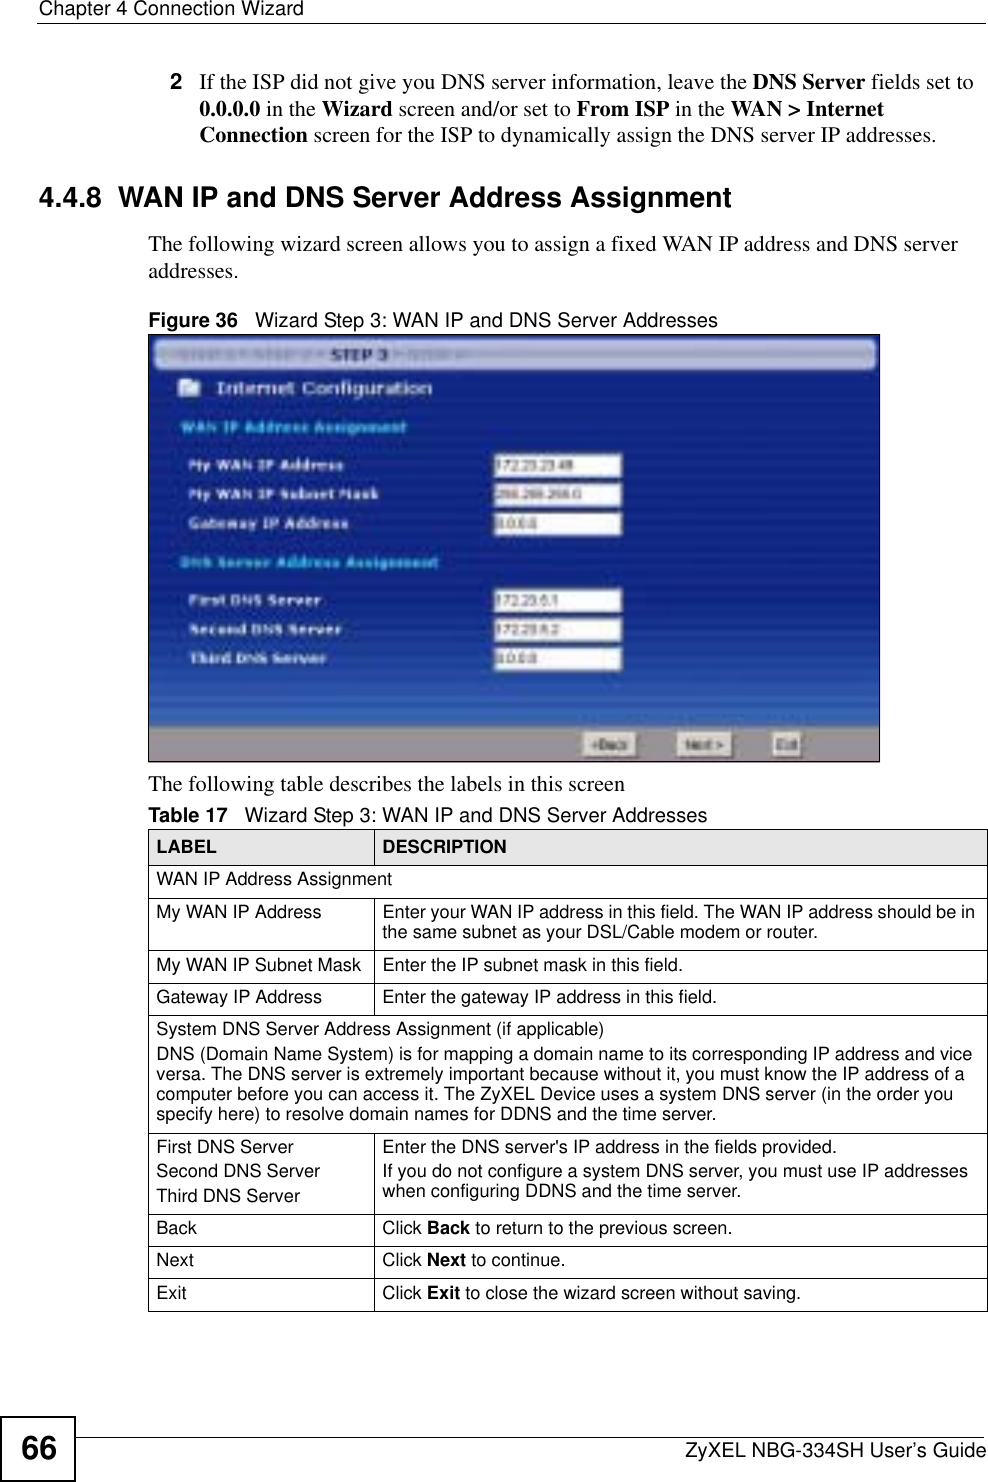
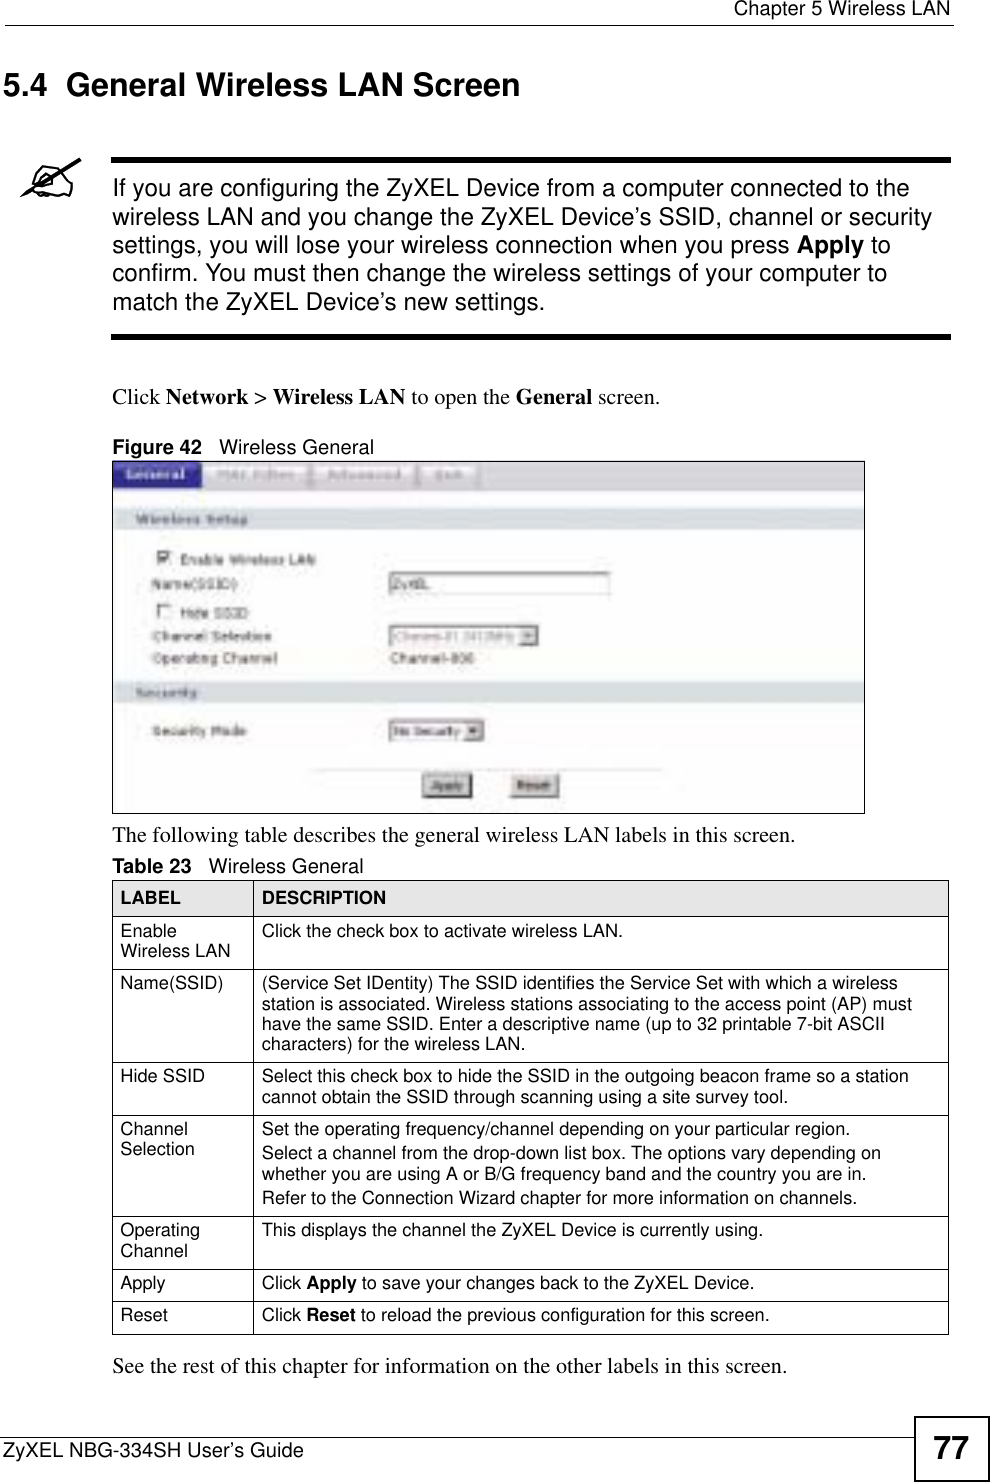
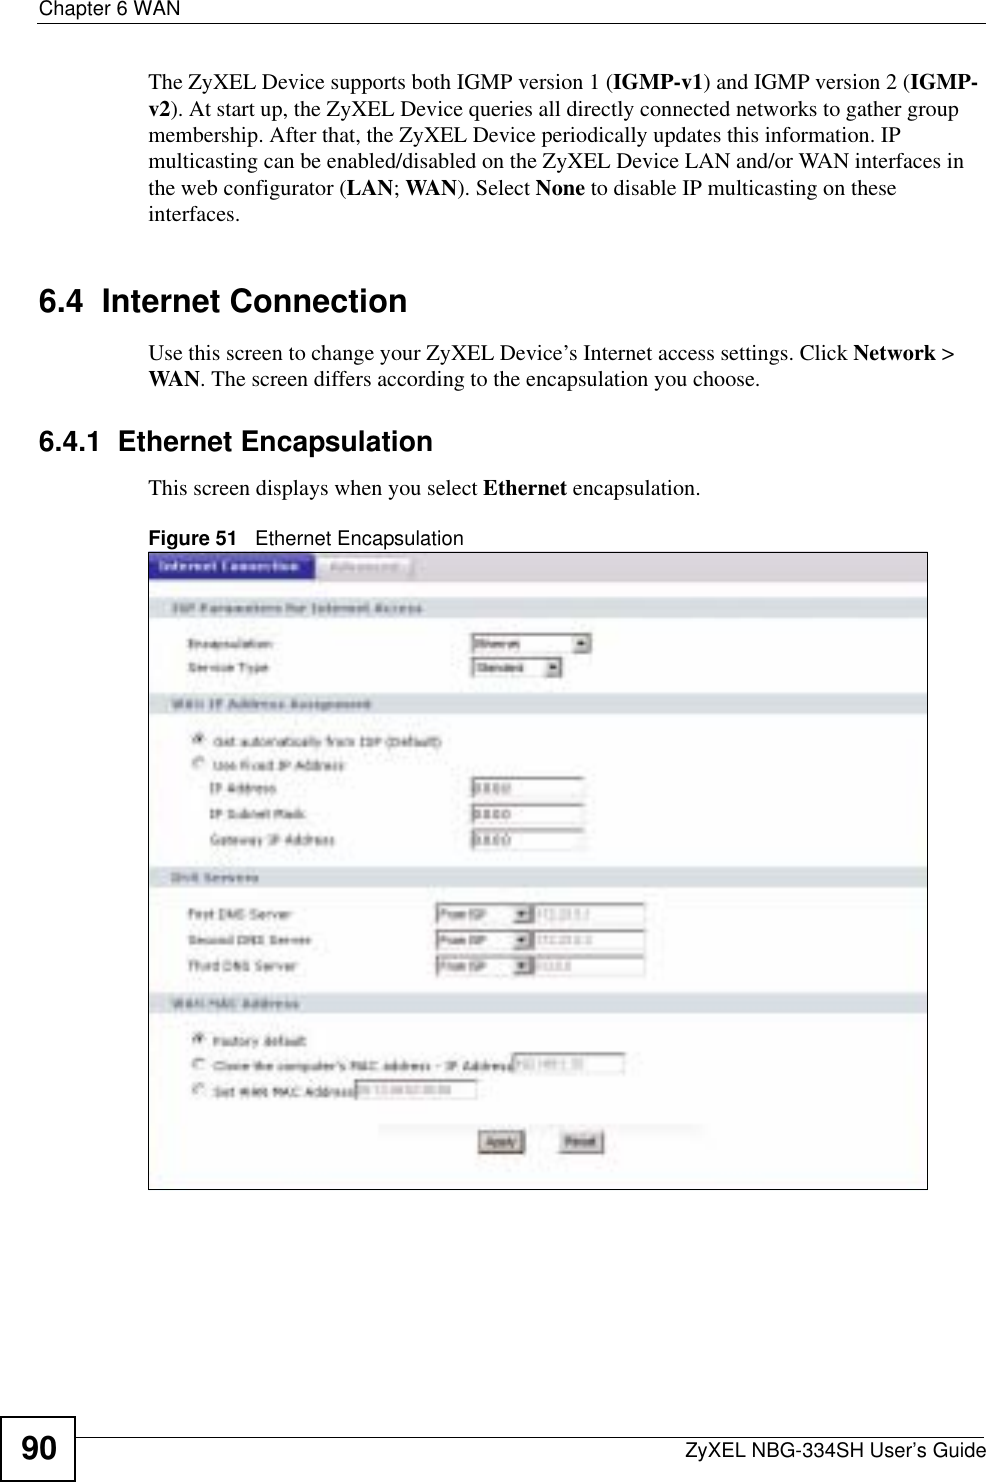
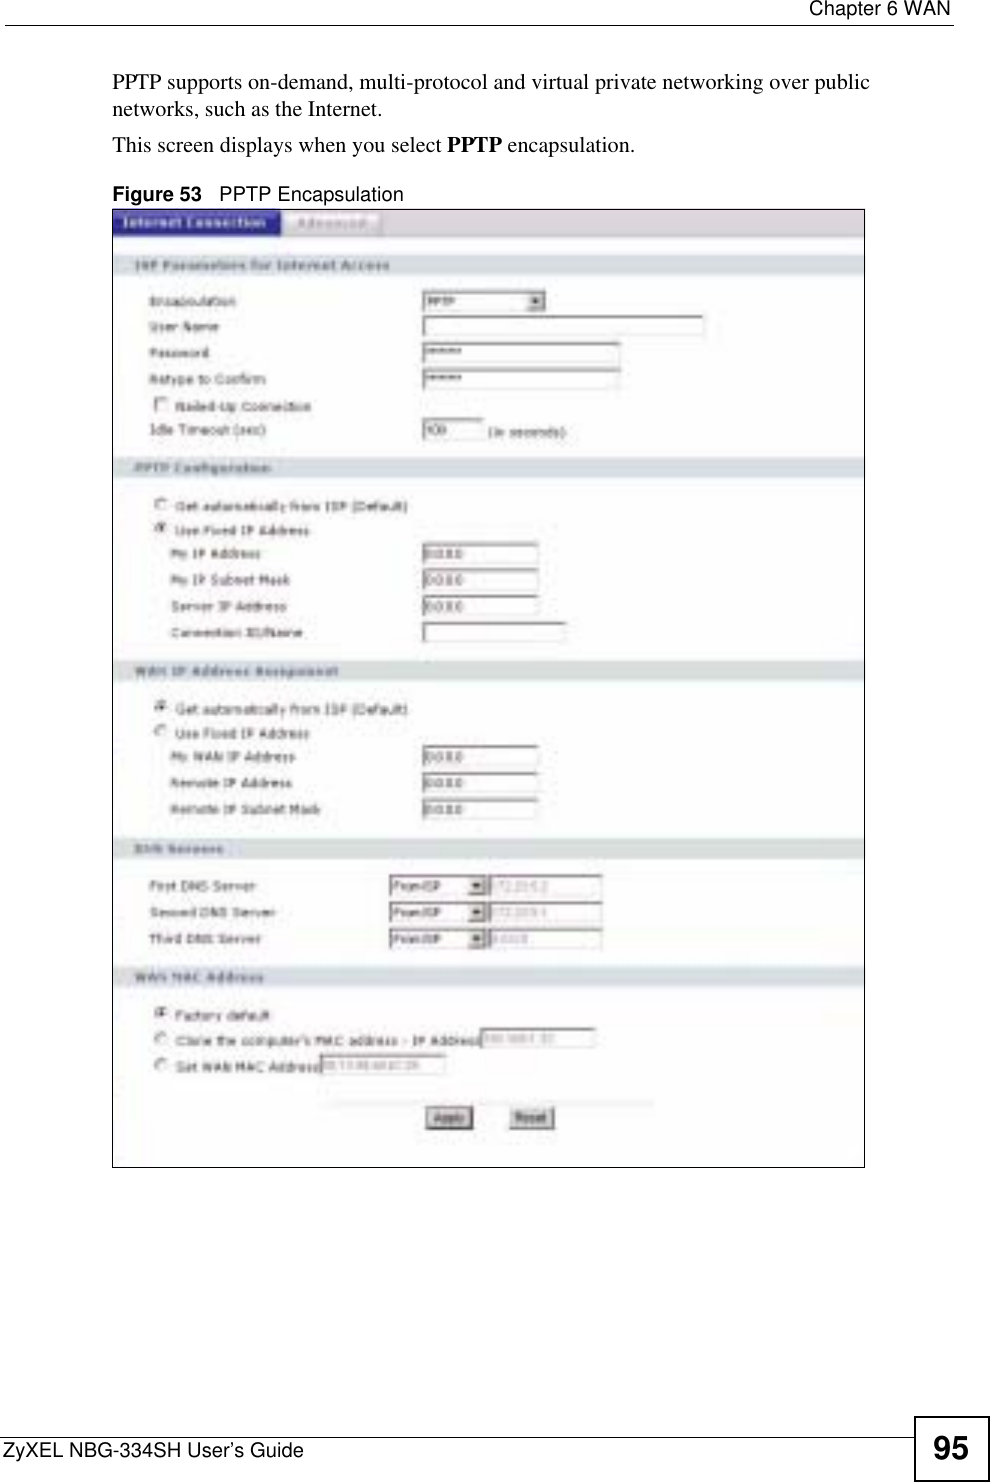
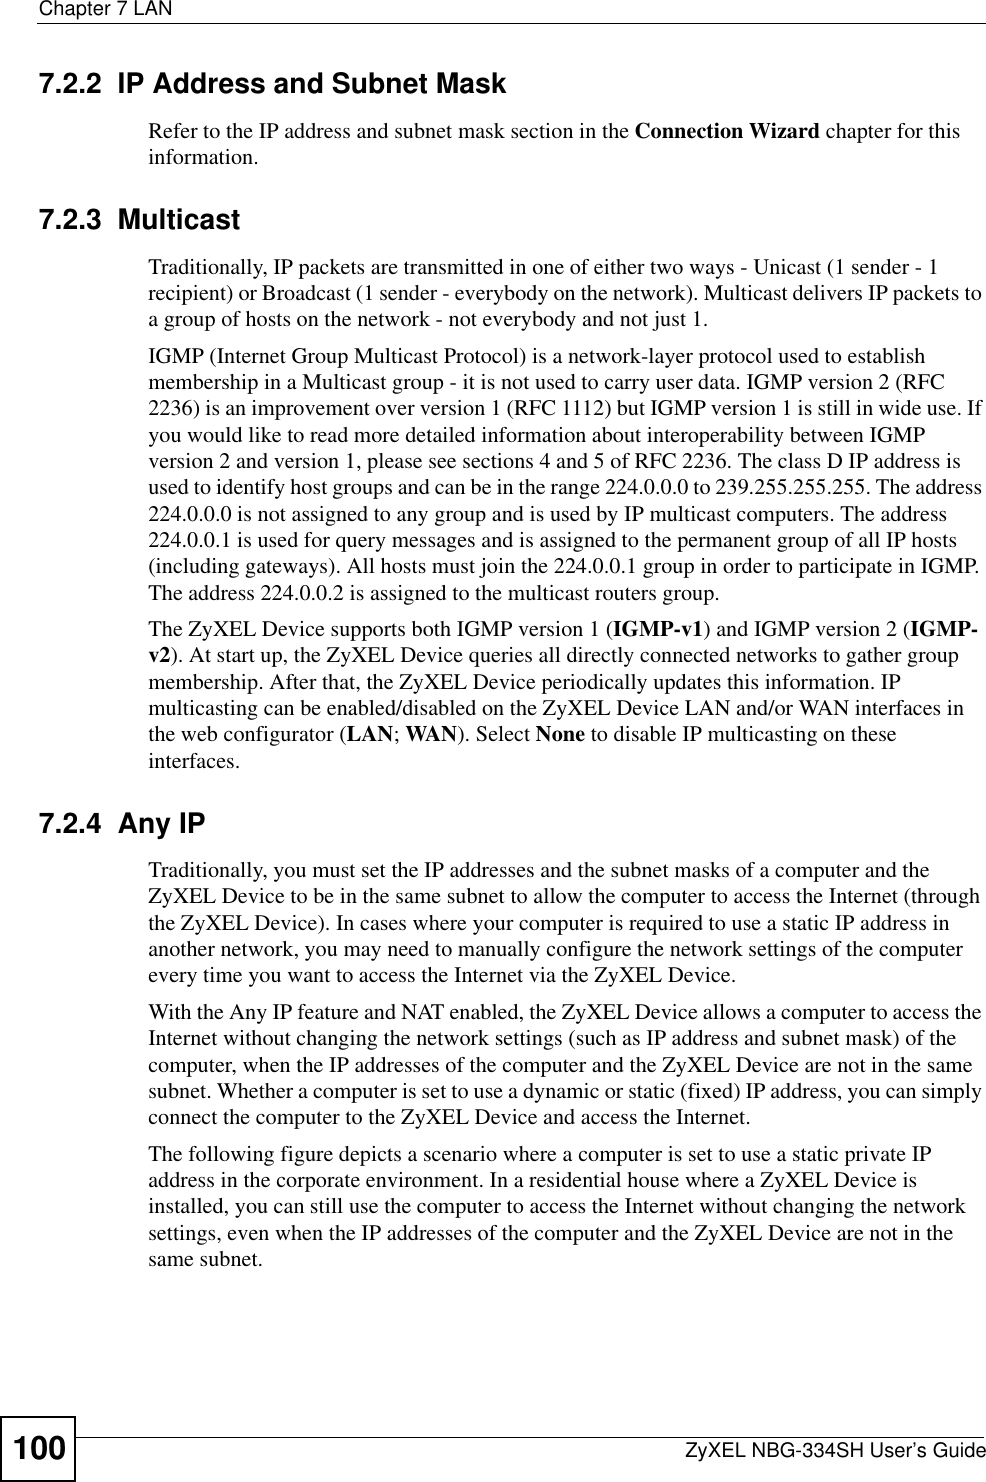
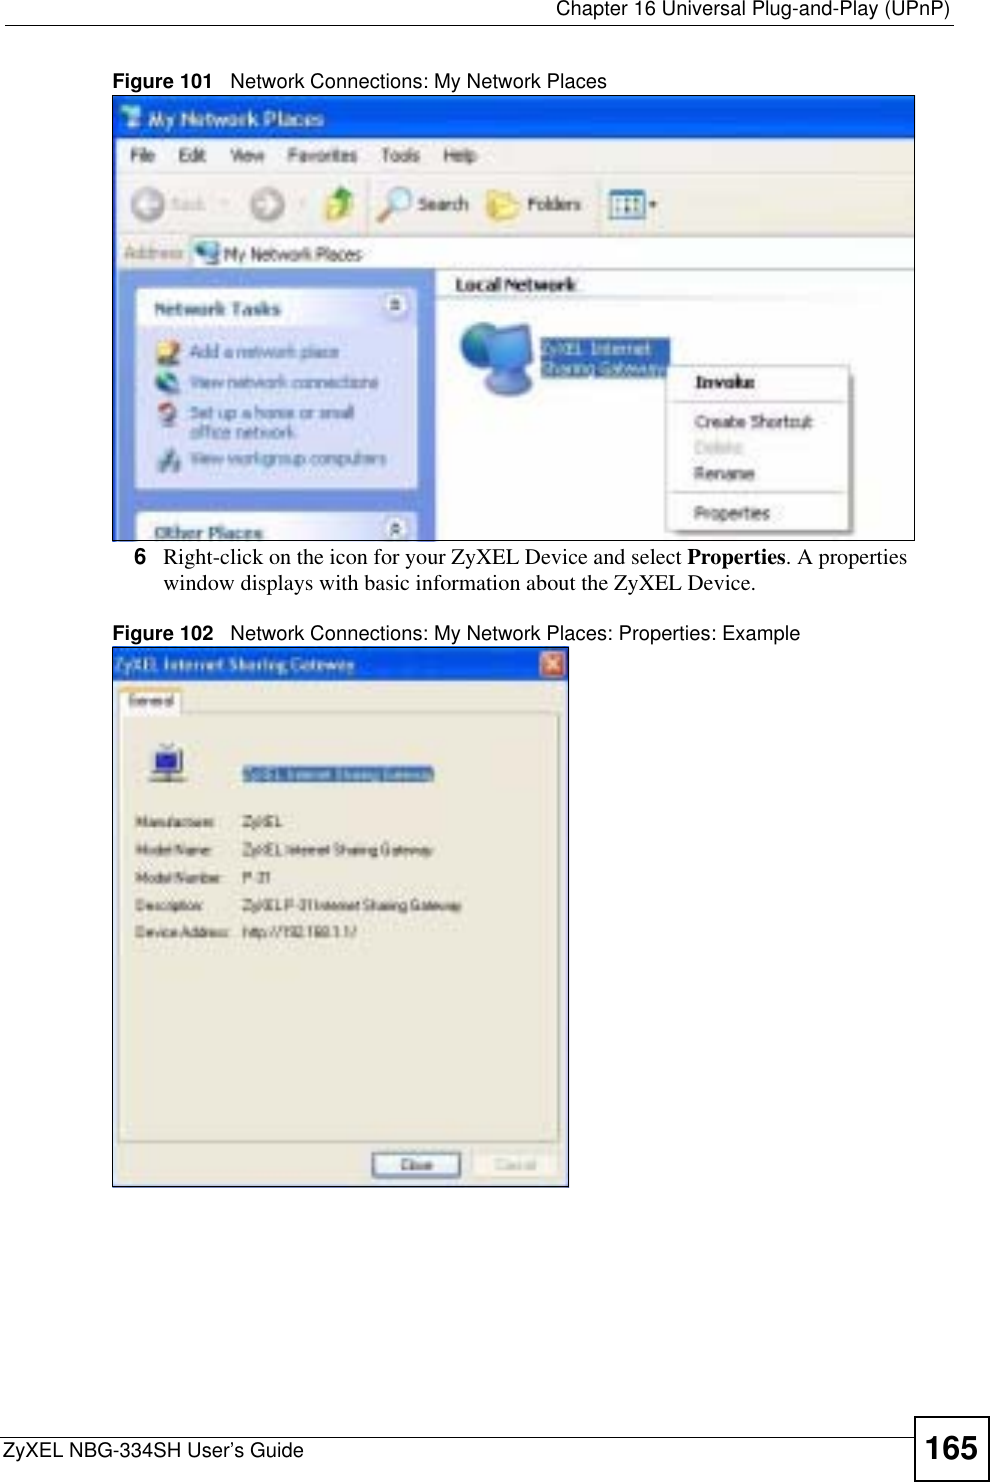
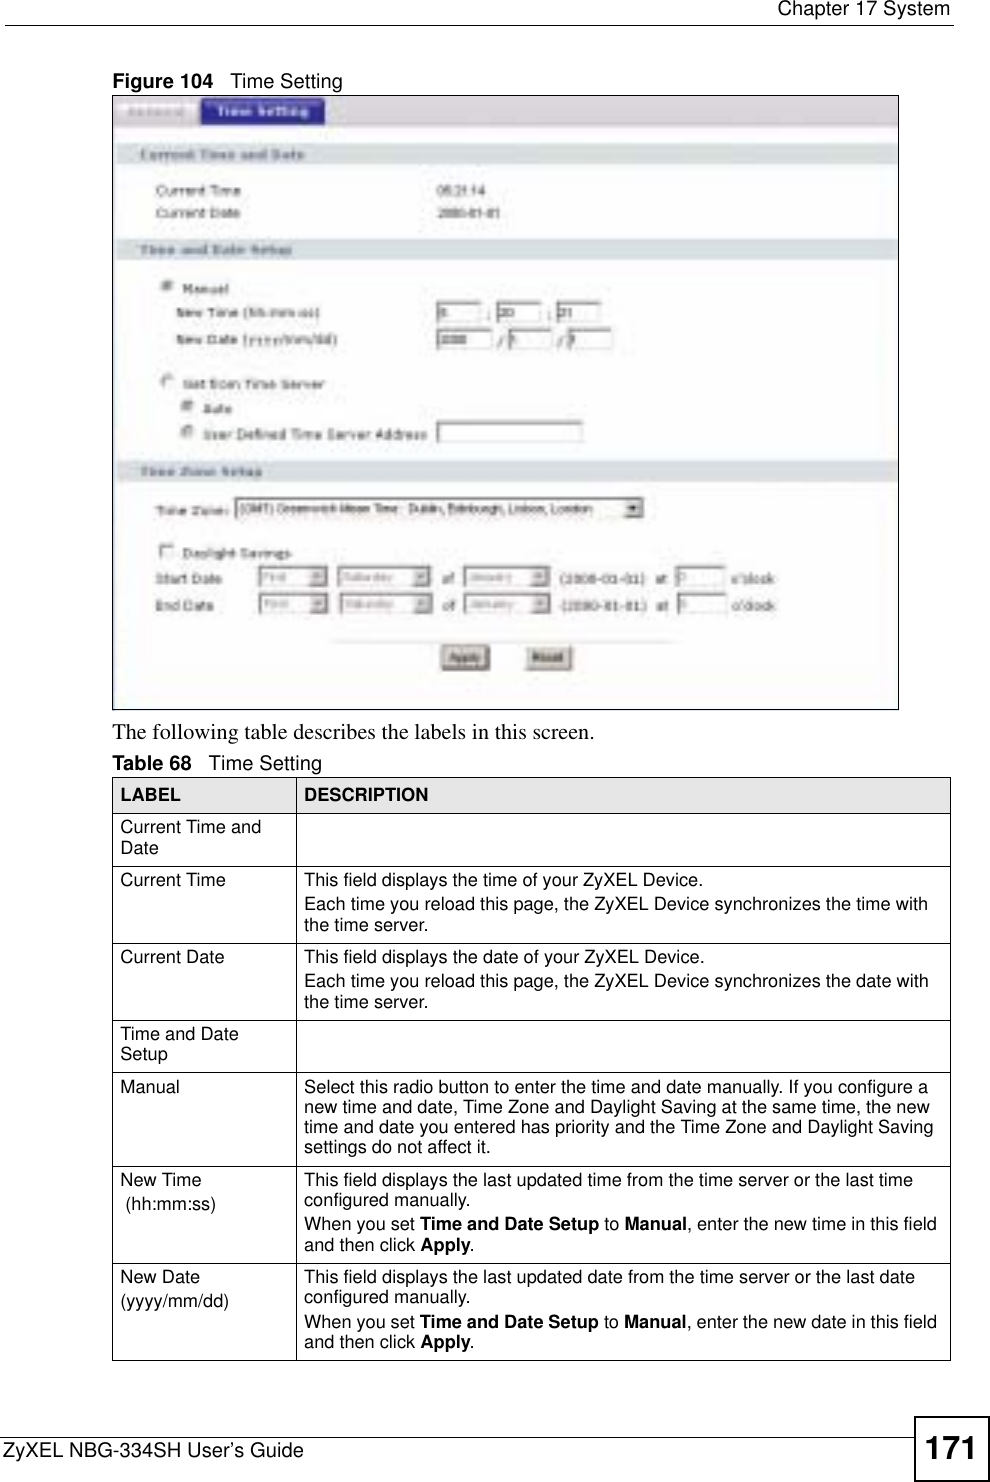
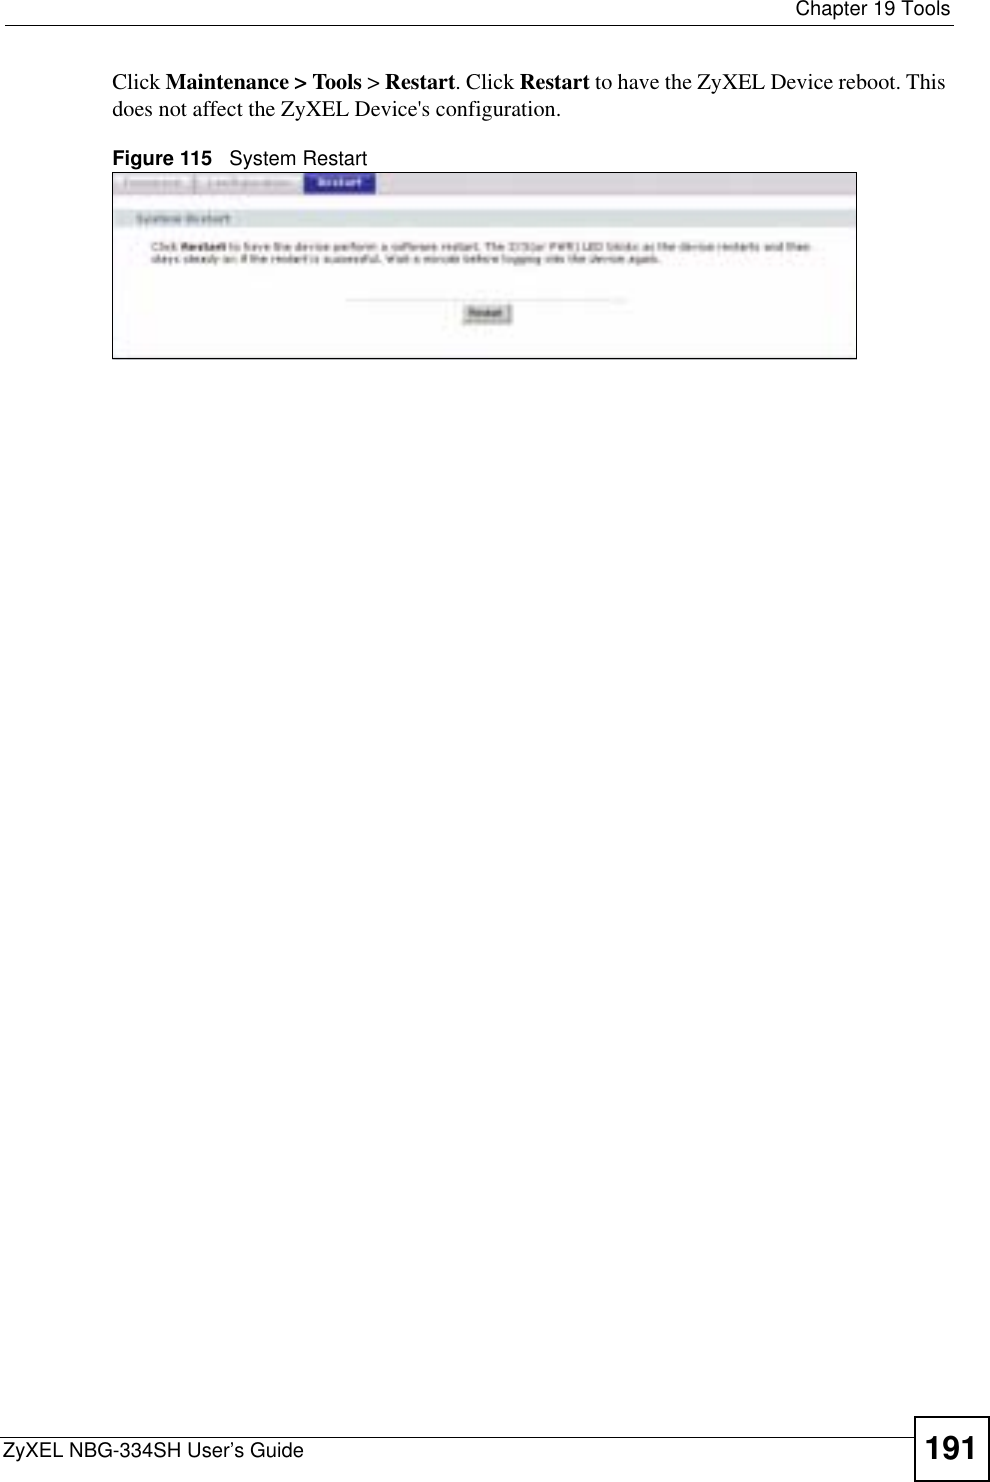
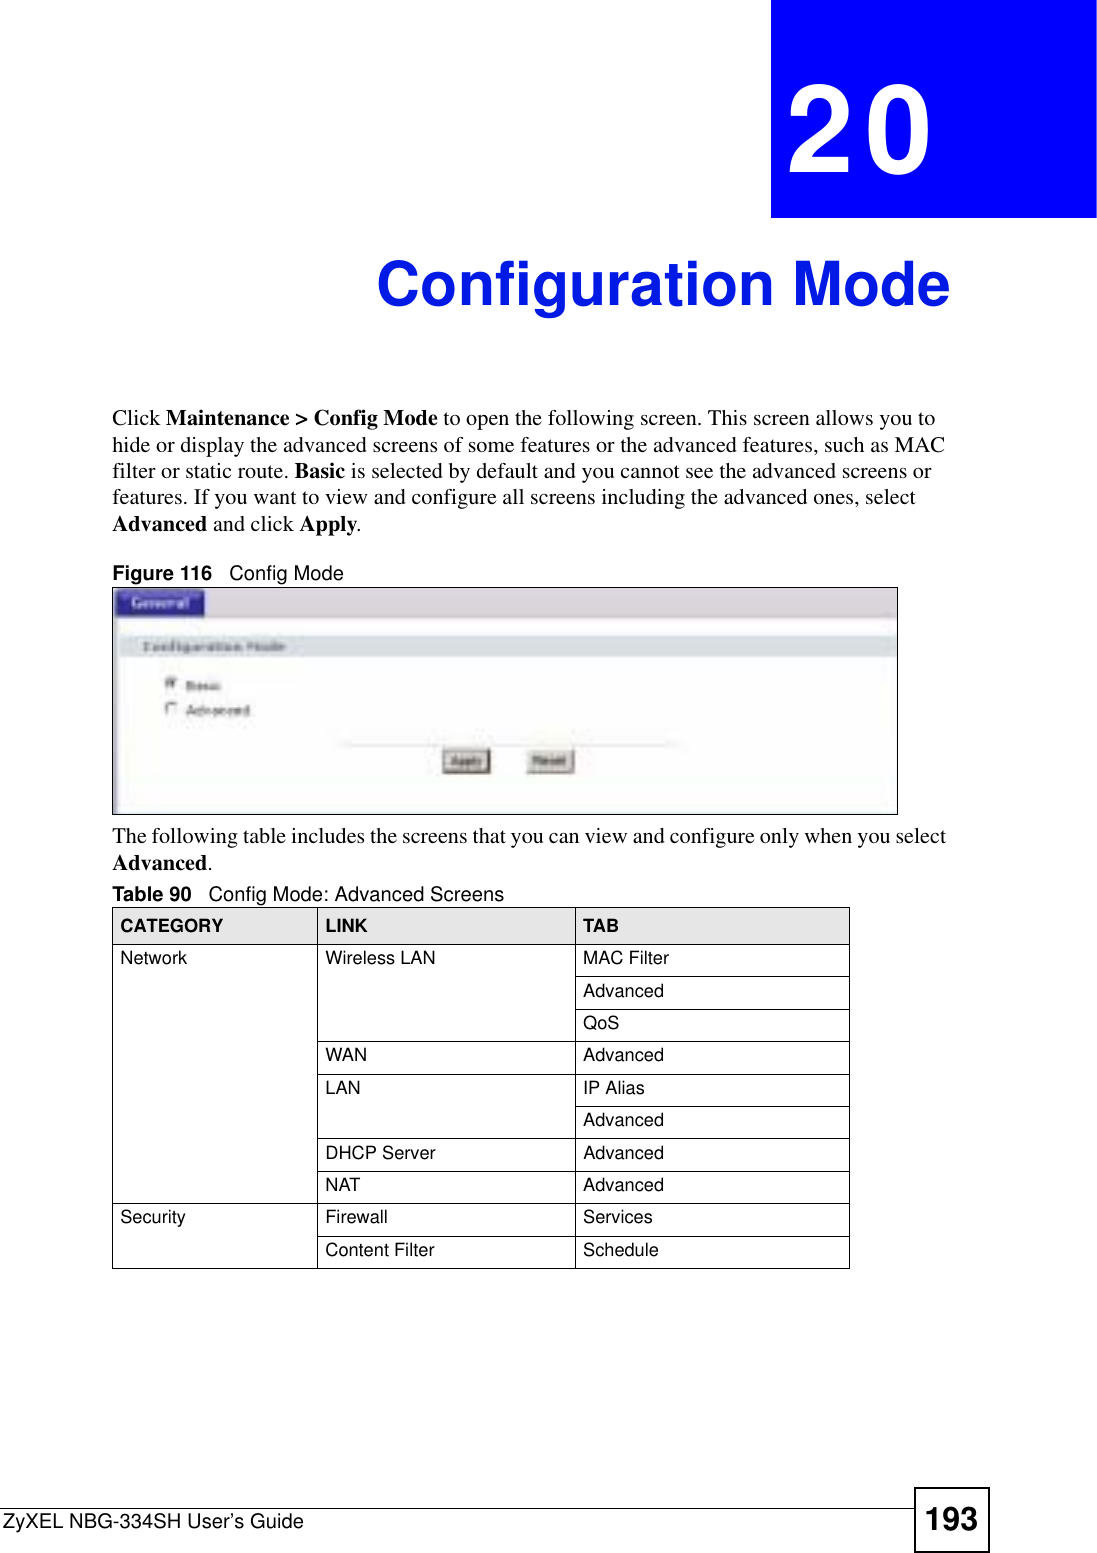
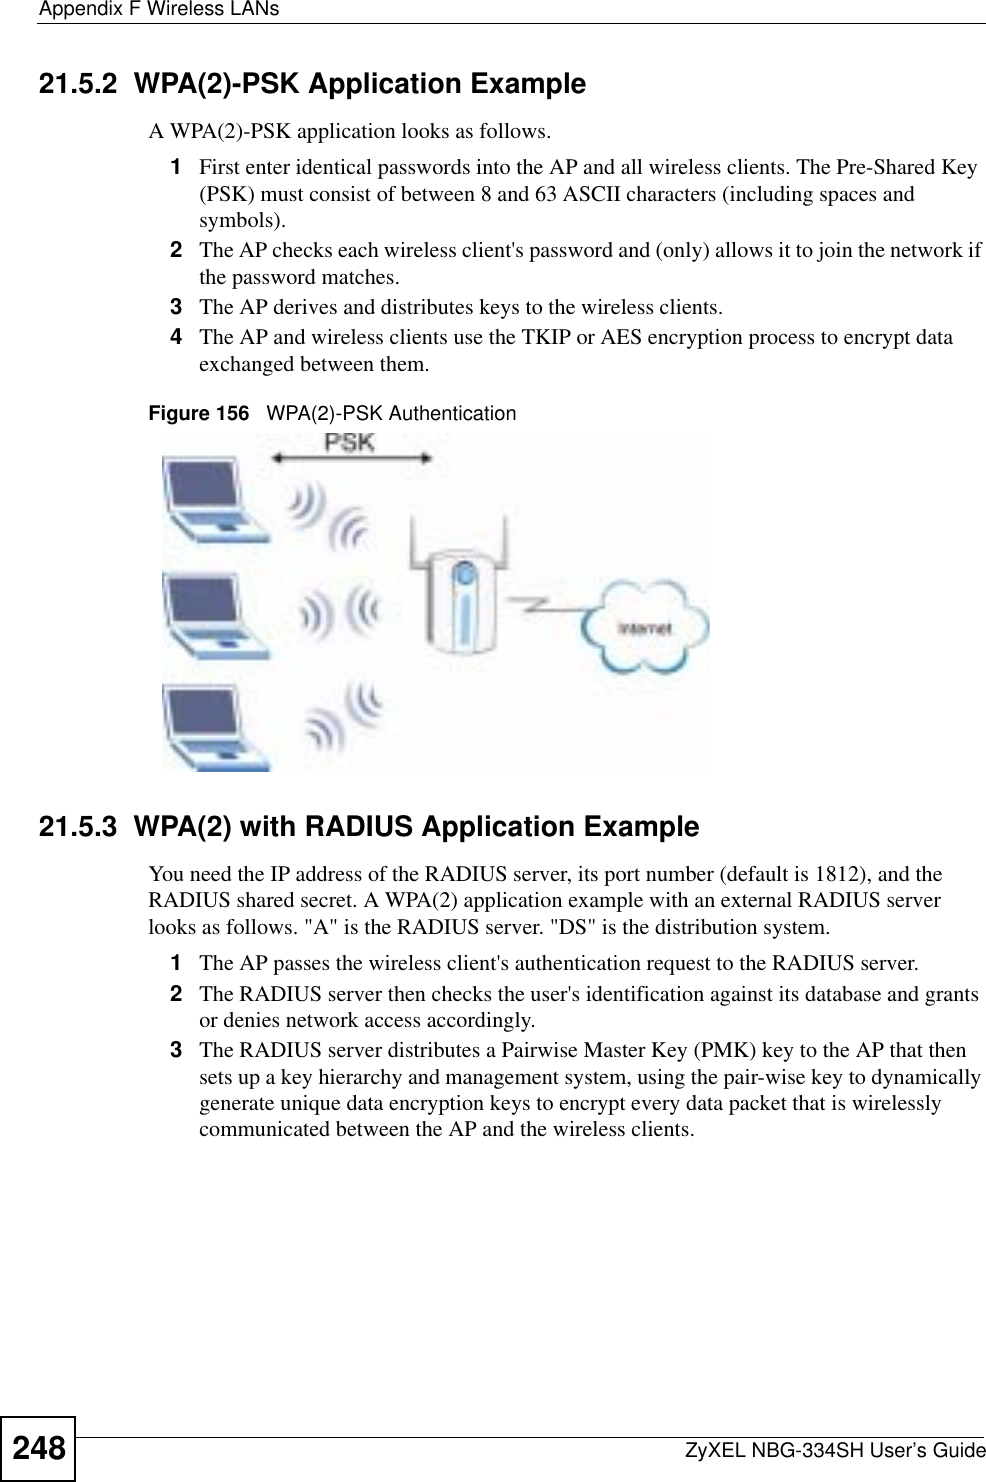
![Document ConventionsZyXEL NBG-334SH User’s Guide4Document ConventionsWarnings and NotesThese are how warnings and notes are shown in this User’s Guide. 1Warnings tell you about things that could harm you or your device."Notes tell you other important information (for example, other things you may need to configure or helpful tips) or recommendations.Syntax Conventions• The NBG-334SH may be referred to as the “ZyXEL Device”, the “device”, the “product” or the “system” in this User’s Guide.• Product labels, screen names, field labels and field choices are all in bold font.• A key stroke is denoted by square brackets and uppercase text, for example, [ENTER] means the “enter” or “return” key on your keyboard.• “Enter” means for you to type one or more characters and then press the [ENTER] key. “Select” or “choose” means for you to use one of the predefined choices.• A right angle bracket ( > ) within a screen name denotes a mouse click. For example, Maintenance > Log > Log Setting means you first click Maintenance in the navigation panel, then the Log sub menu and finally the Log Setting tab to get to that screen.• Units of measurement may denote the “metric” value or the “scientific” value. For example, “k” for kilo may denote “1000” or “1024”, “M” for mega may denote “1000000” or “1048576” and so on.• “e.g.,” is a shorthand for “for instance”, and “i.e.,” means “that is” or “in other words”.](https://usermanual.wiki/ZyXEL-Communications/NBG334SH/User-Guide-749078-Page-4.png)


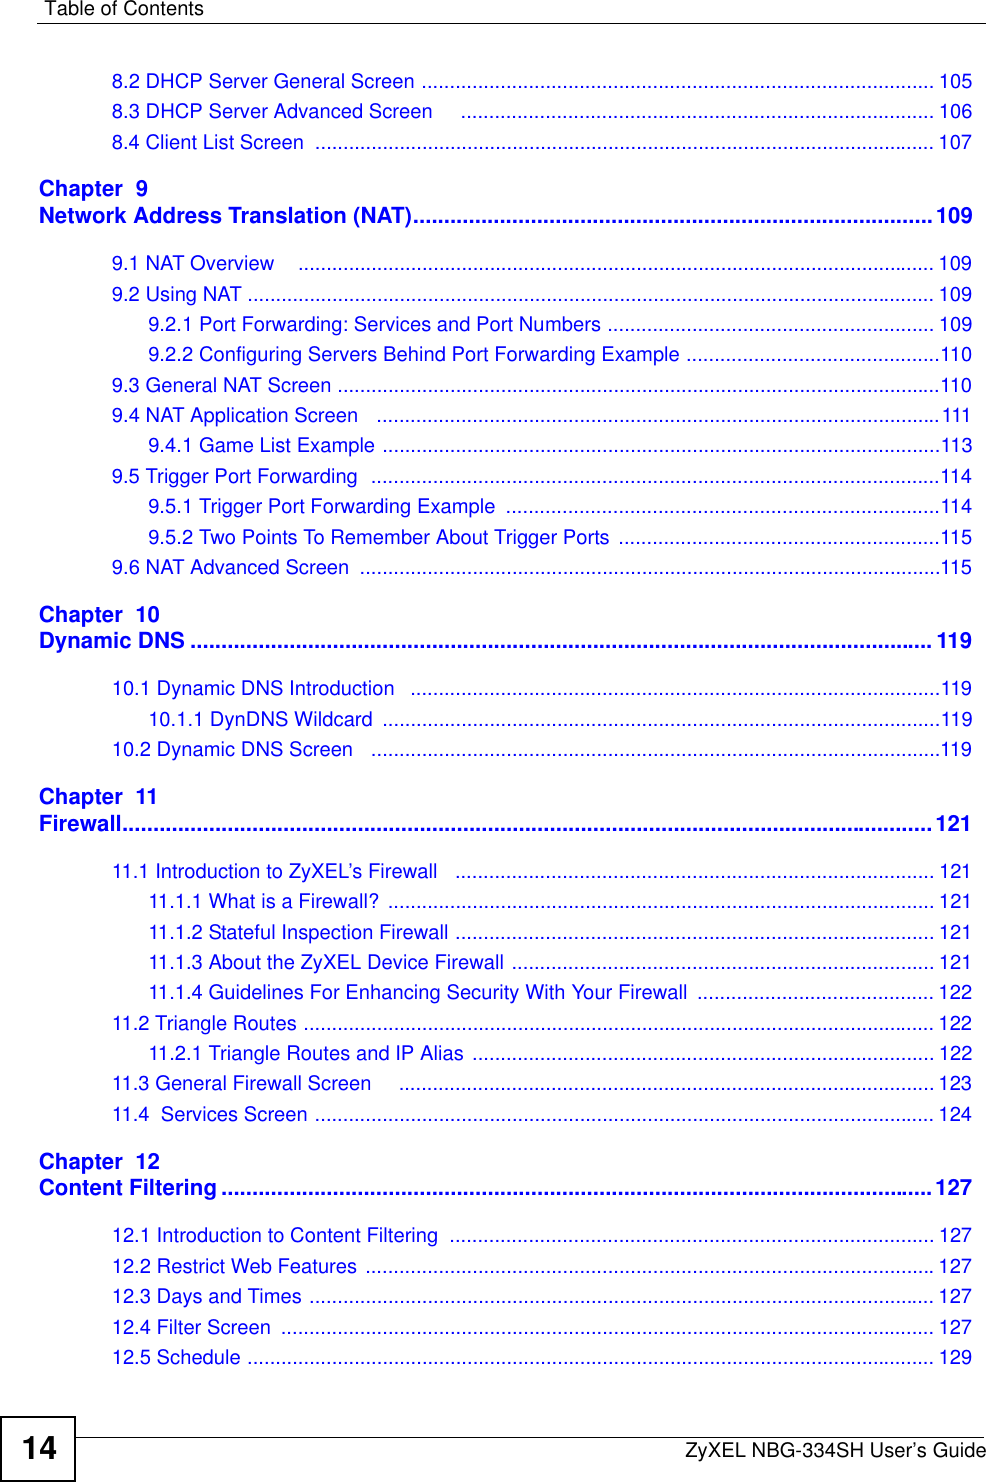


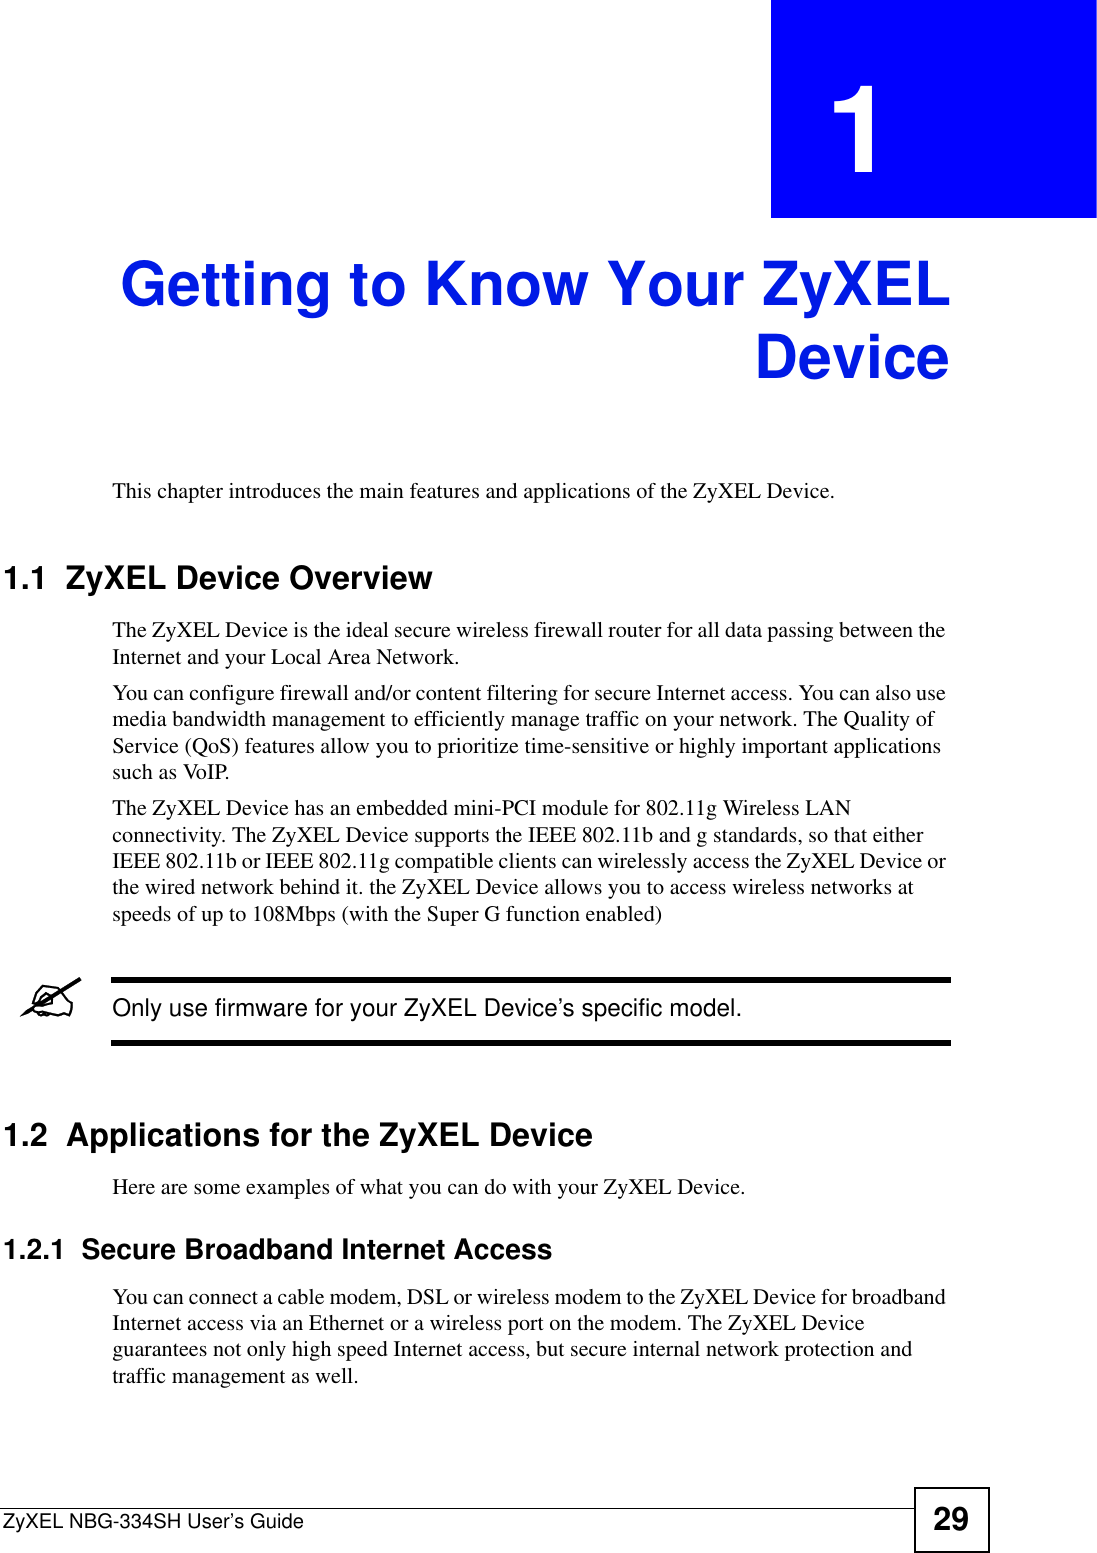
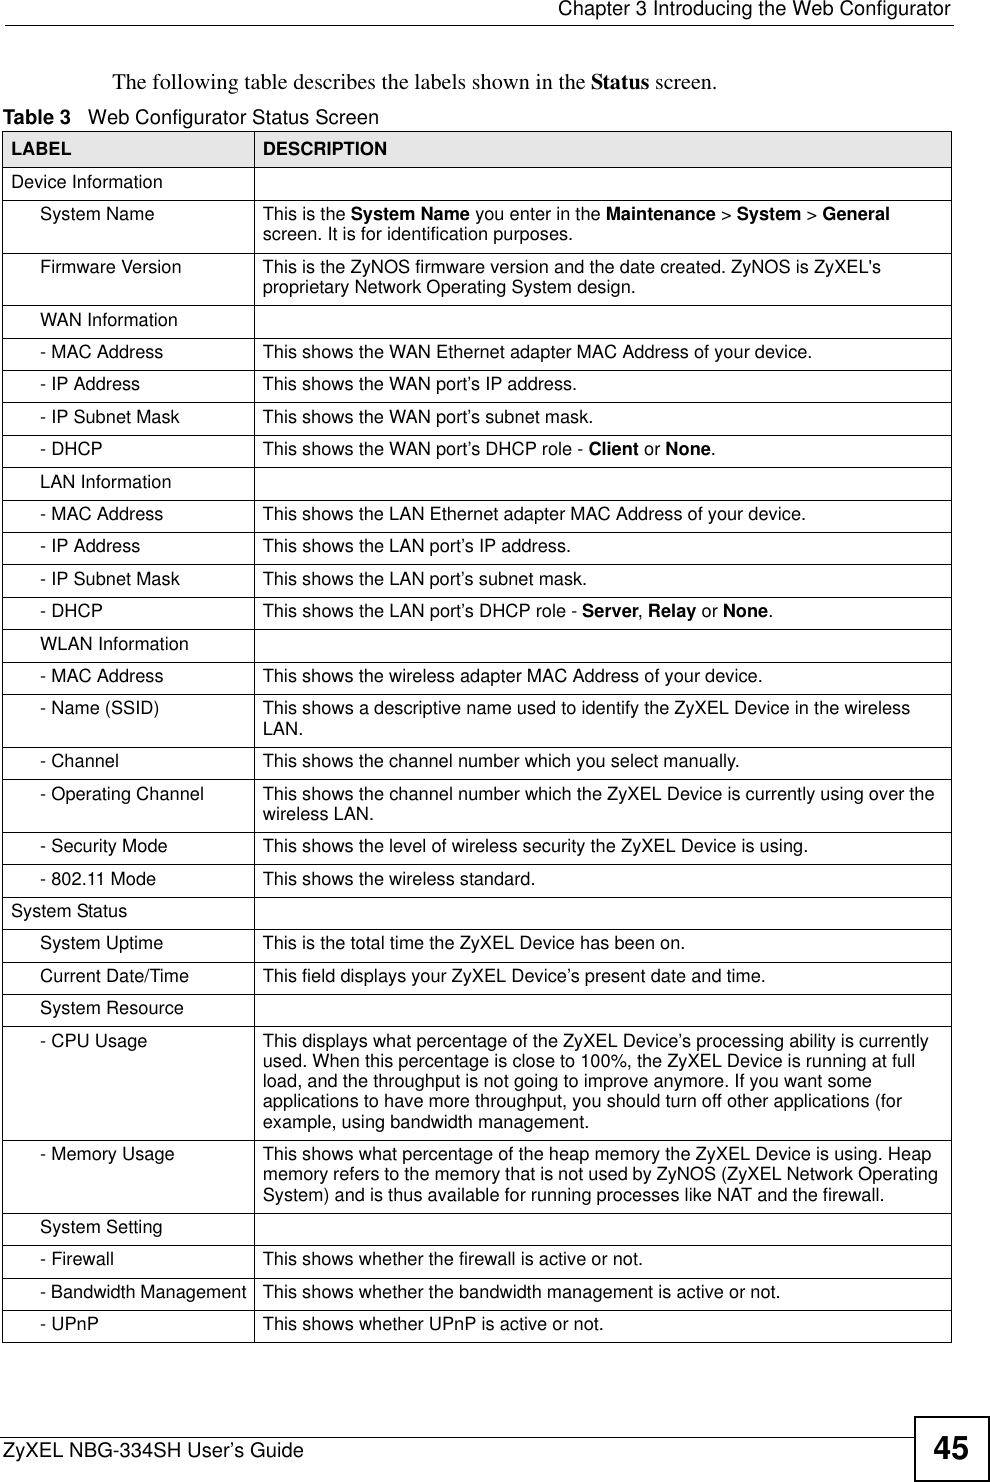
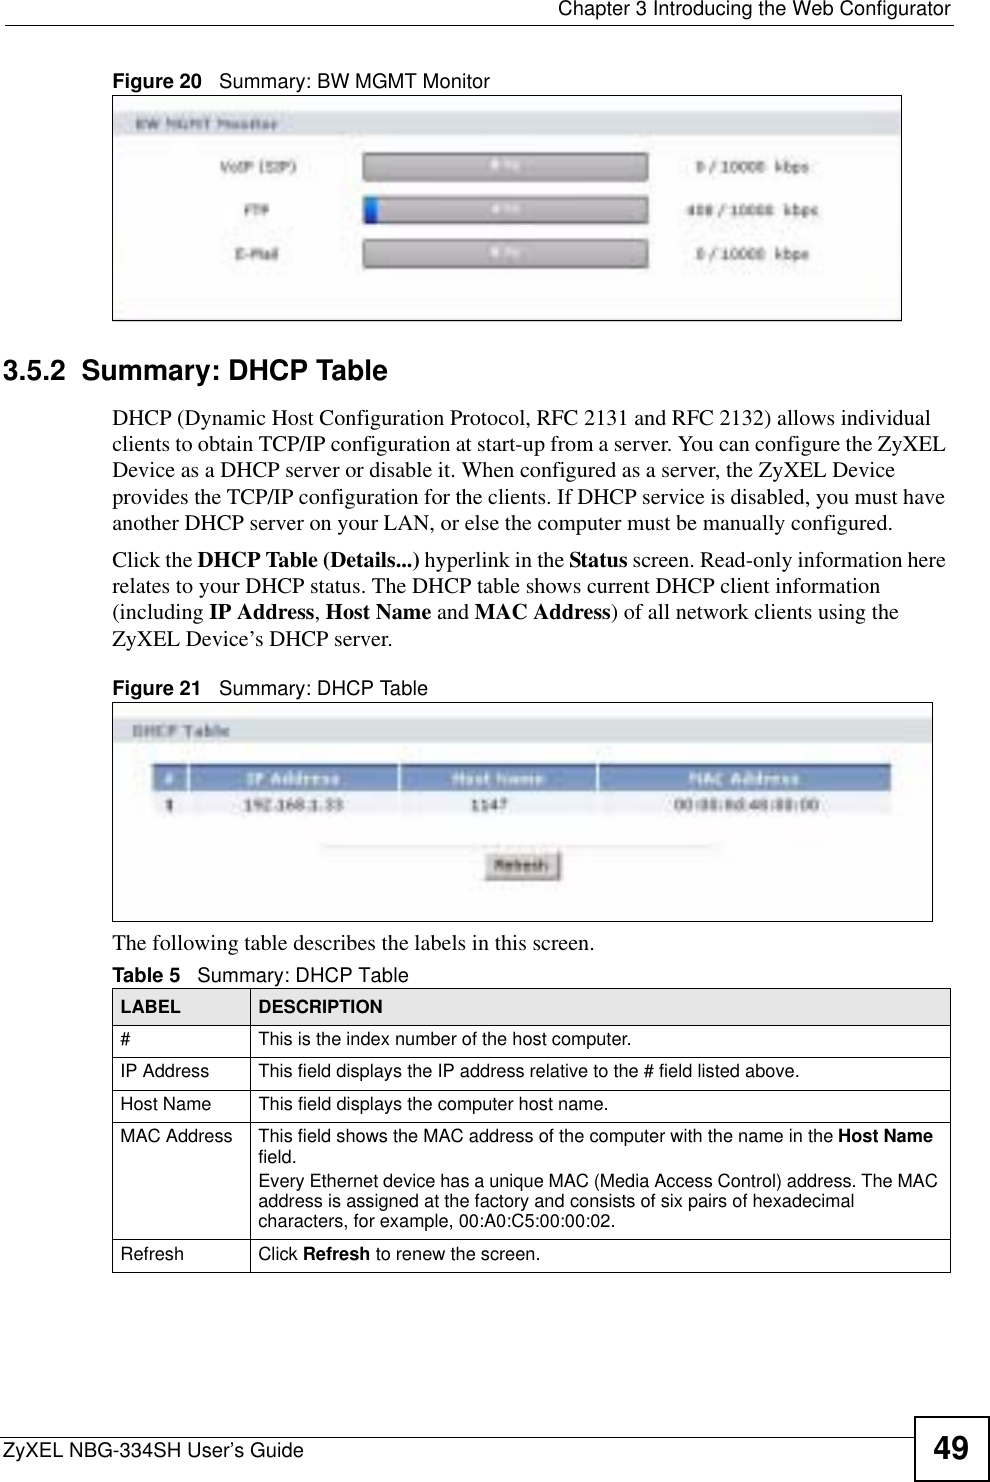


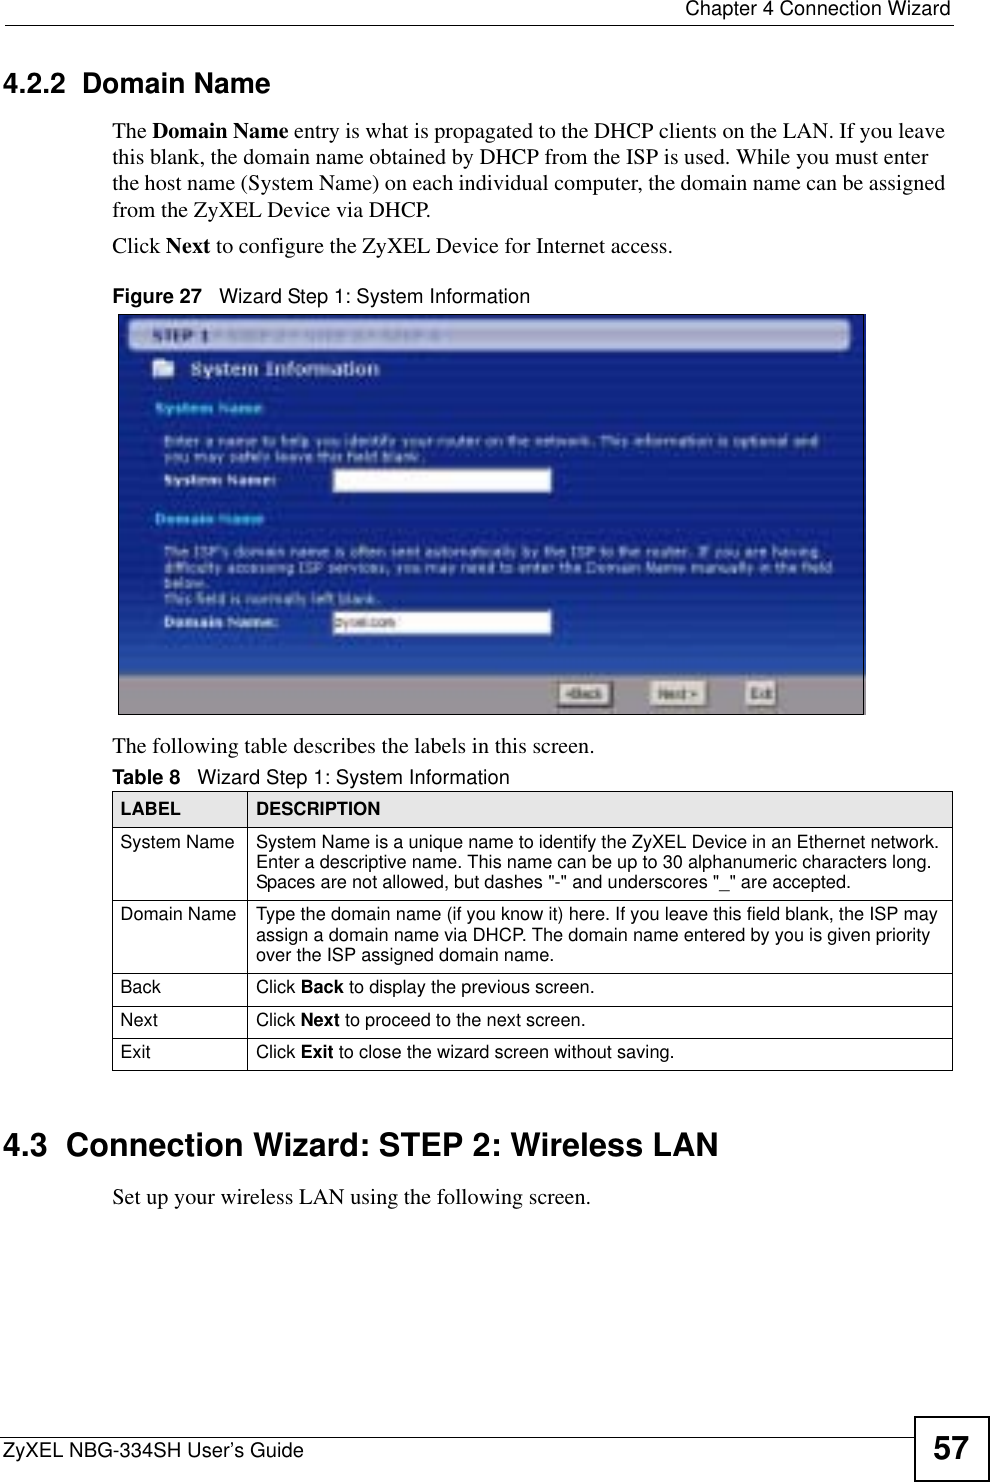


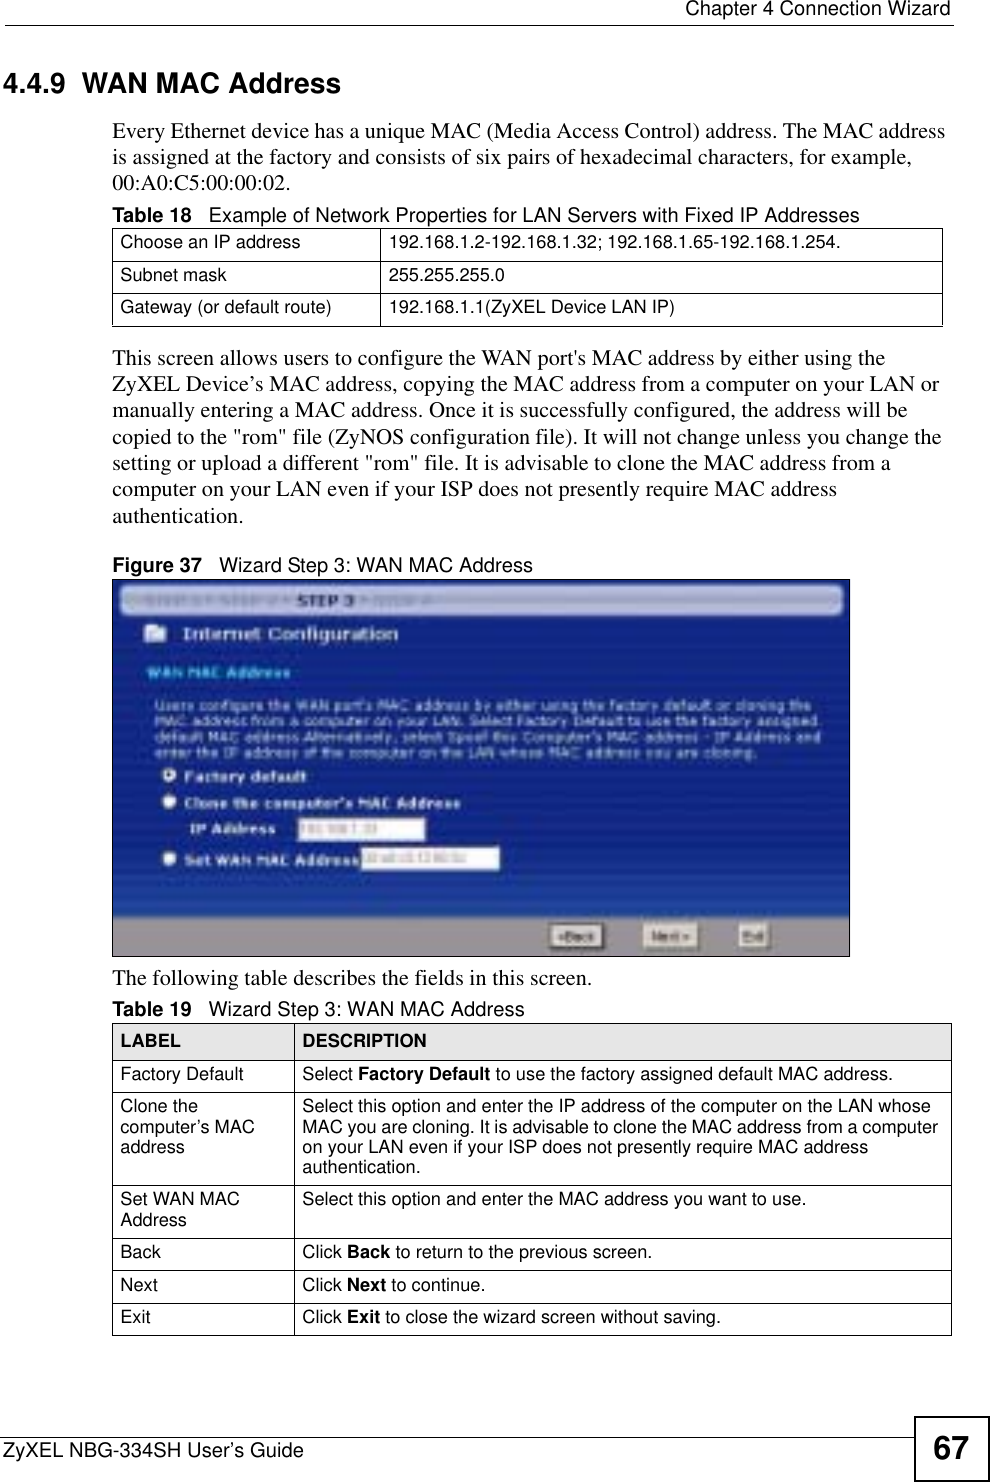


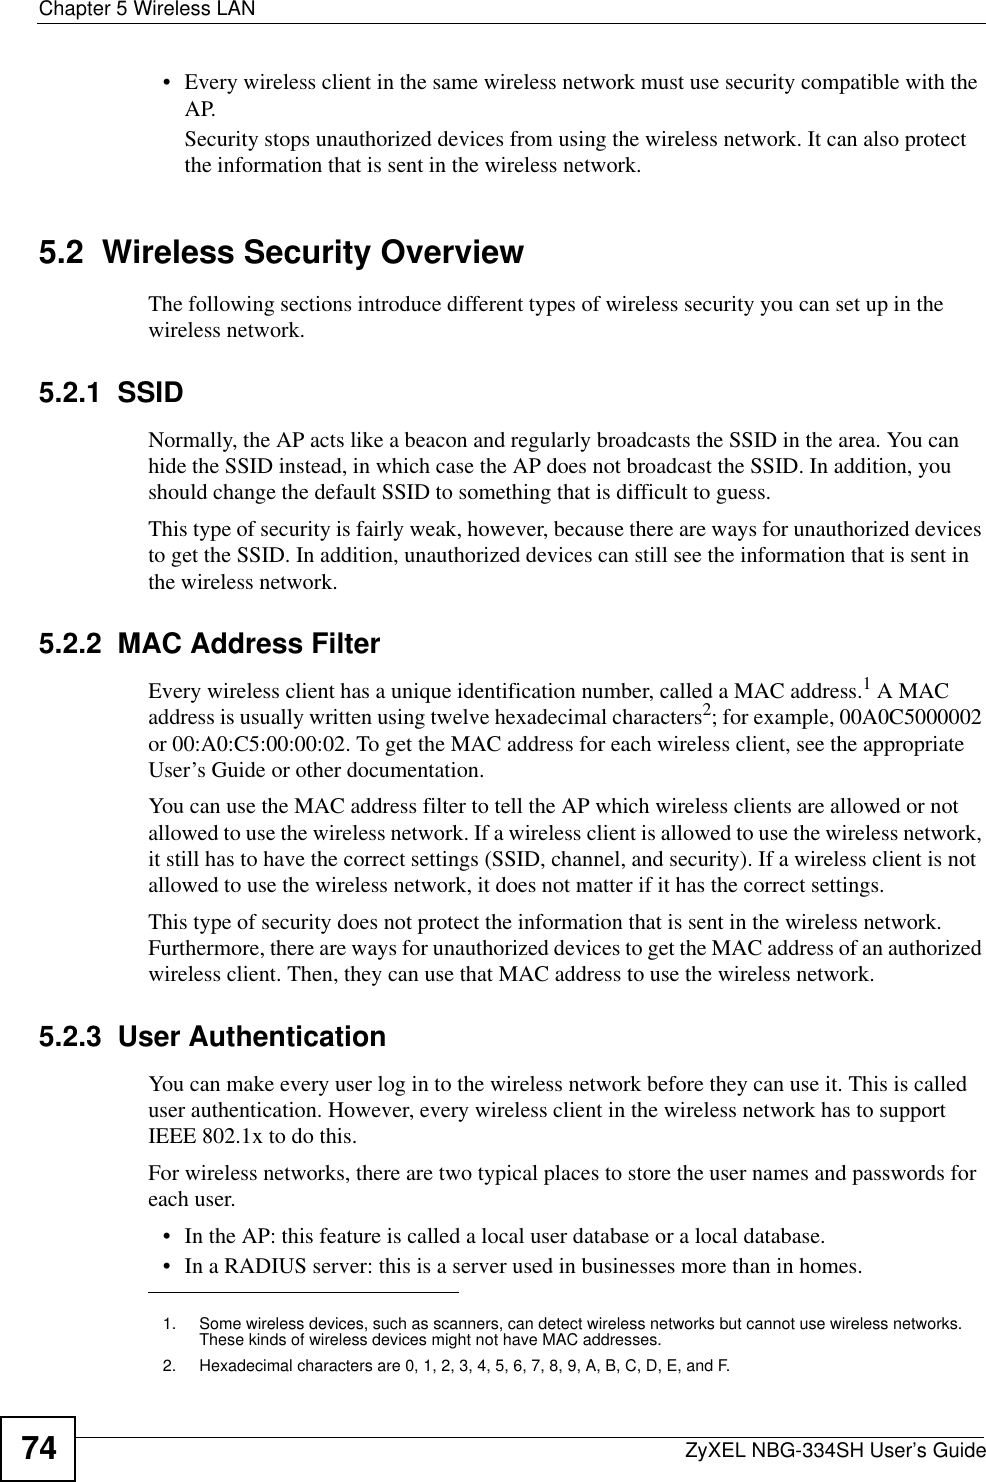
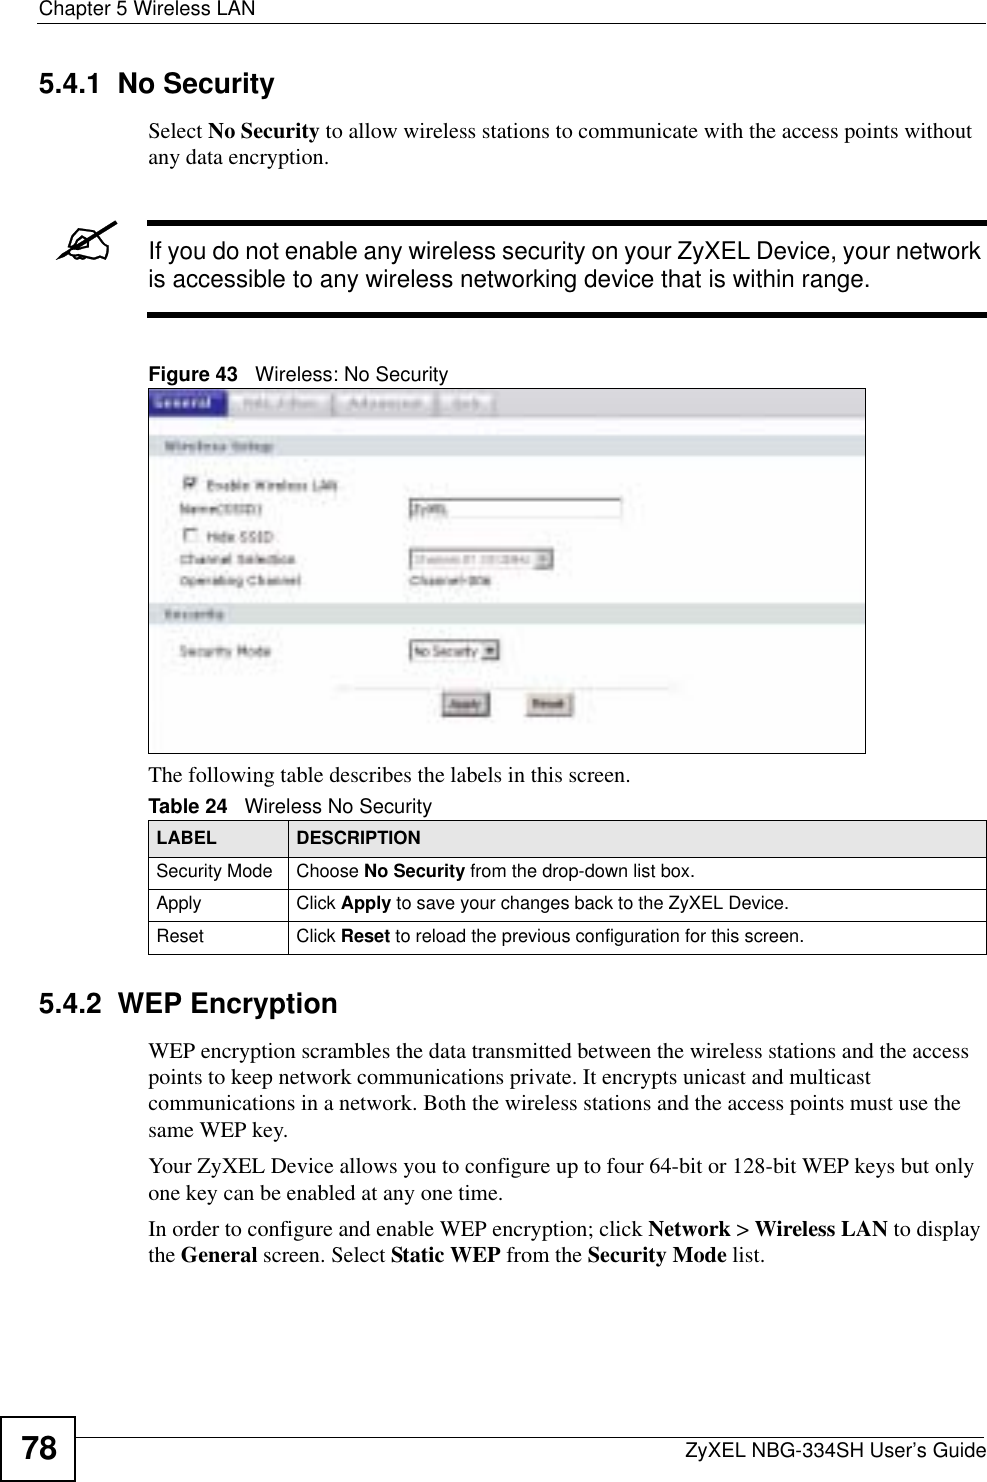

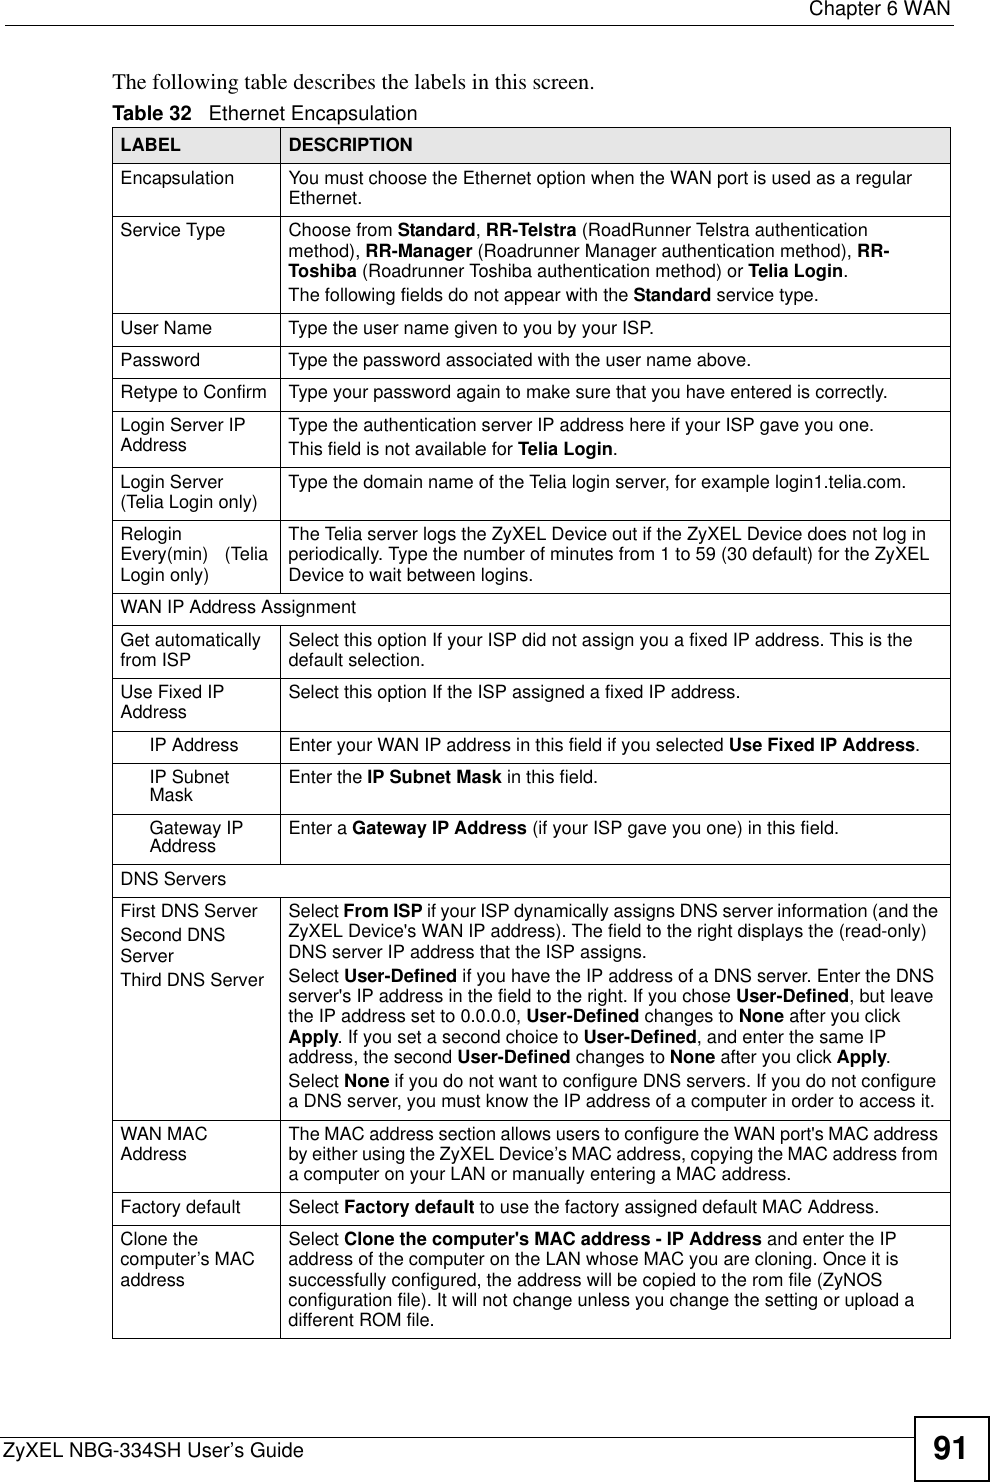

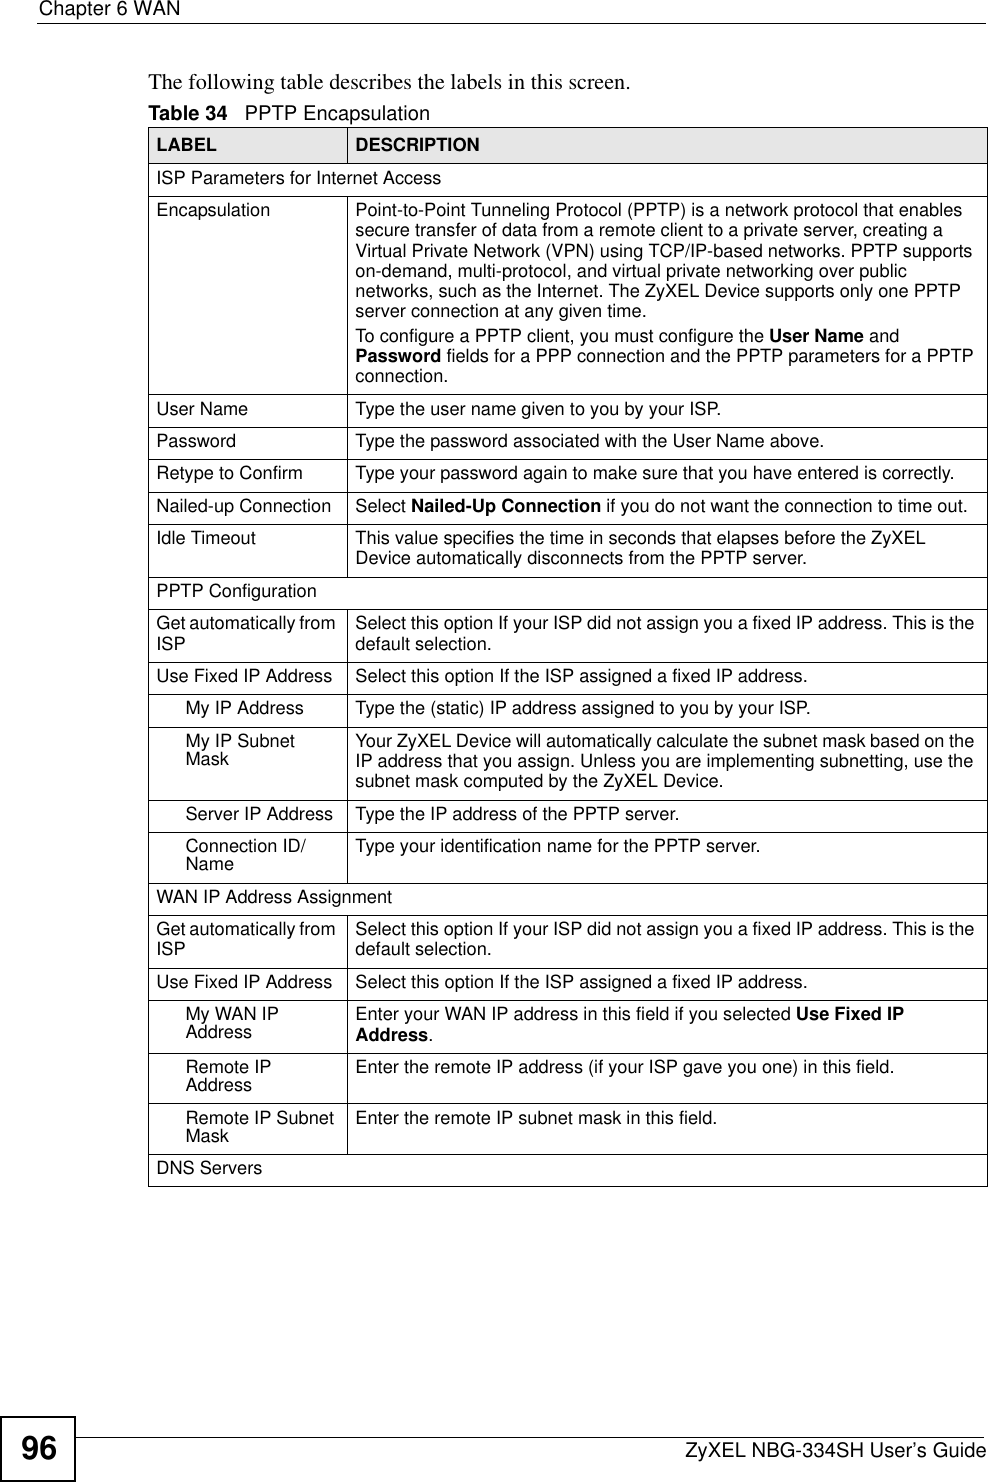

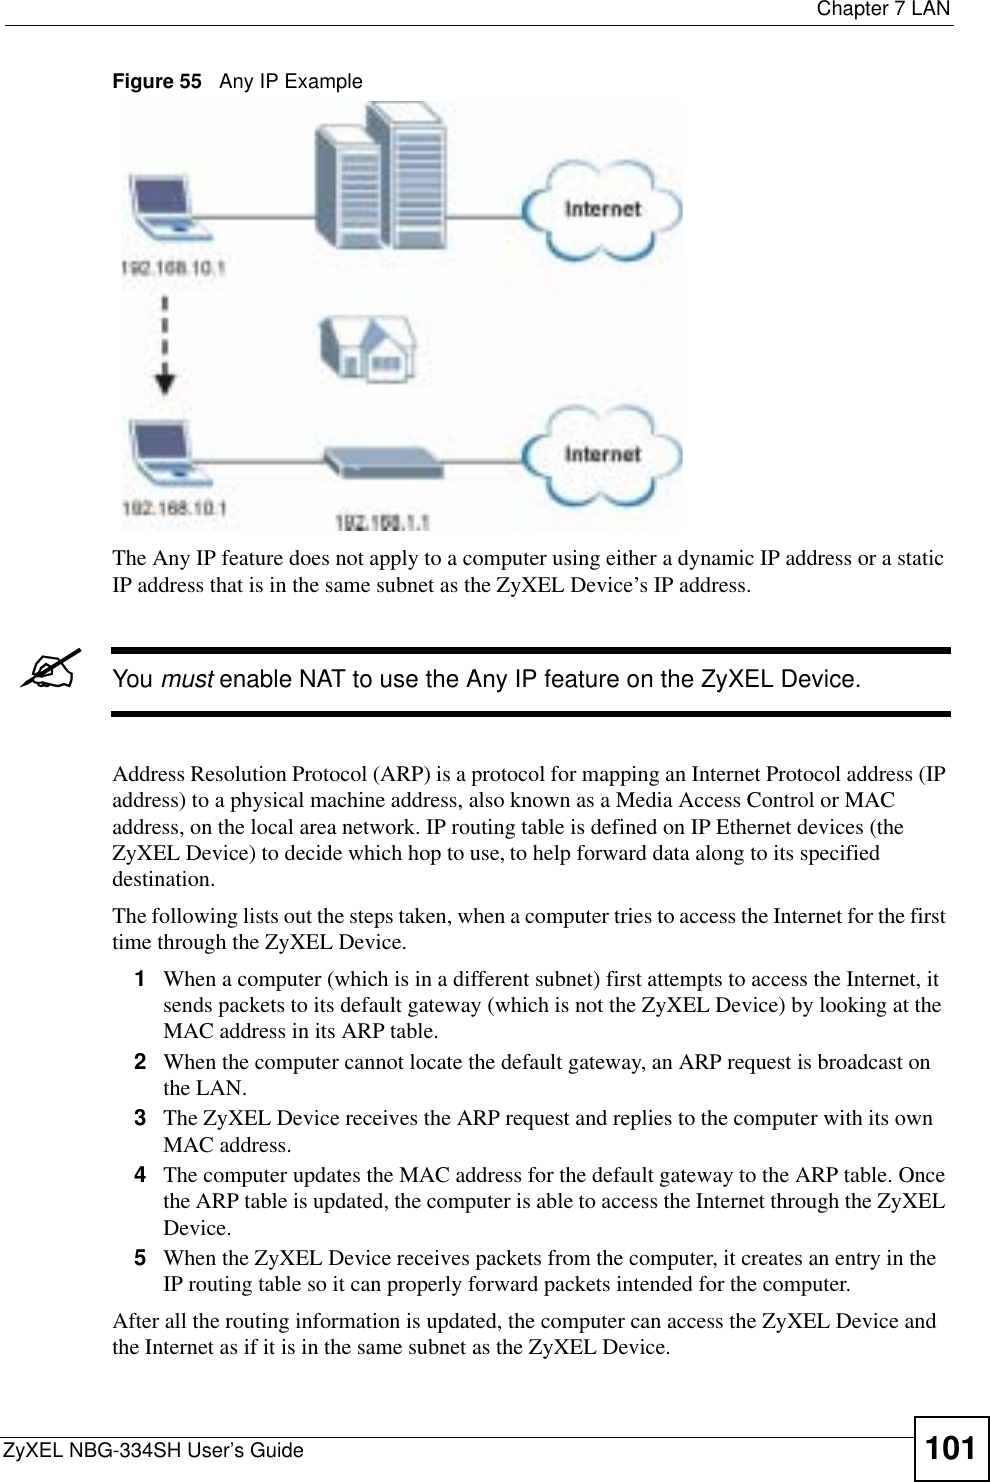
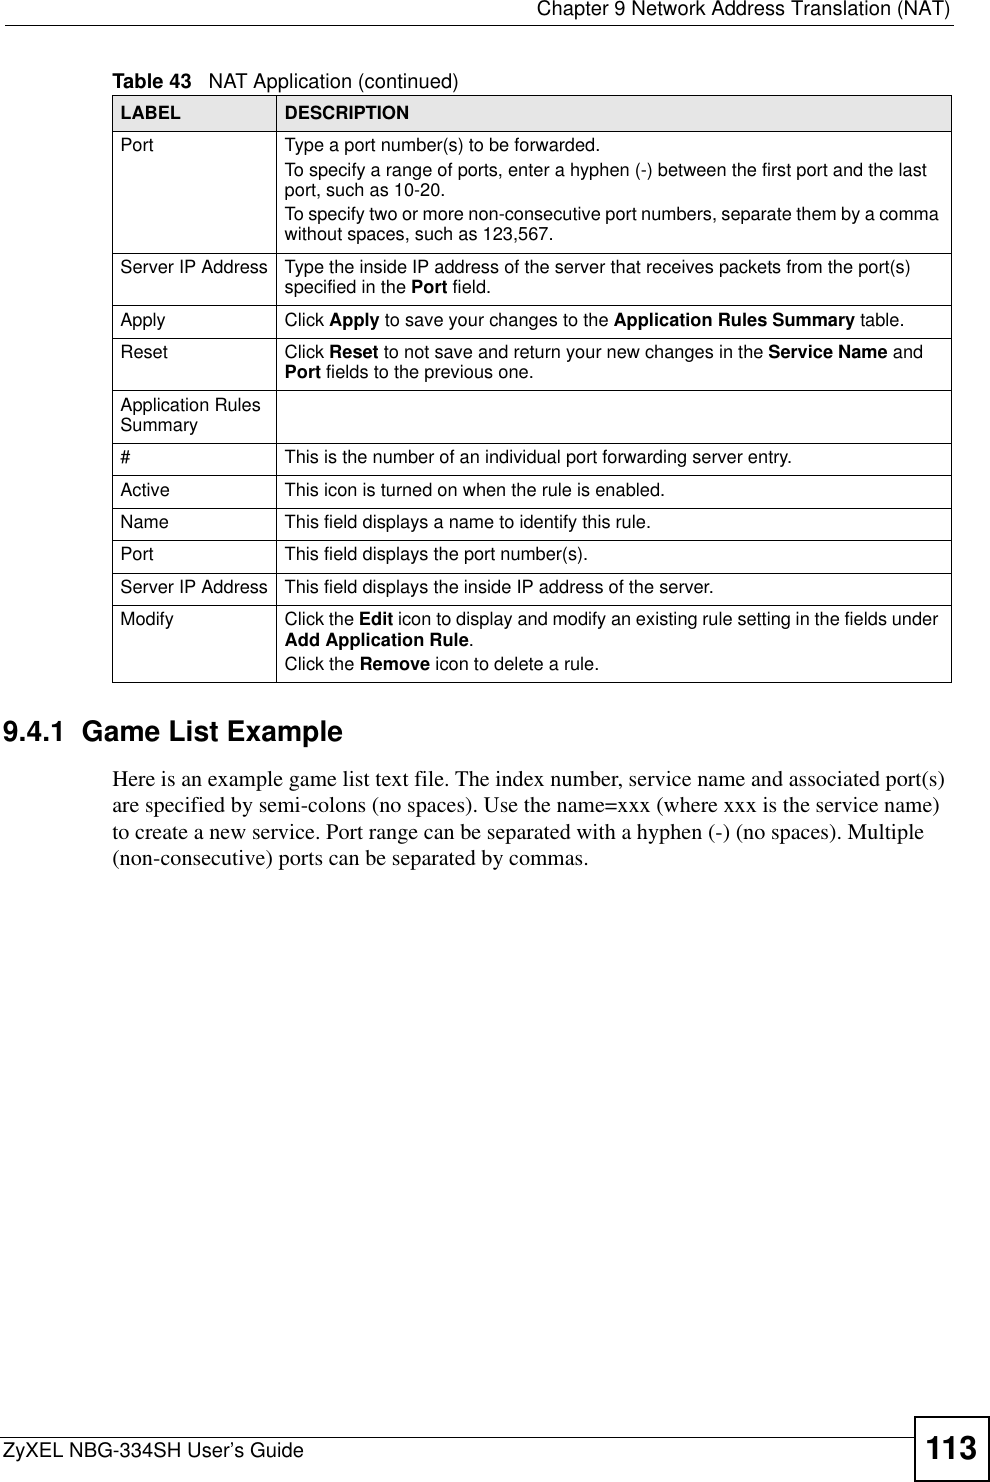
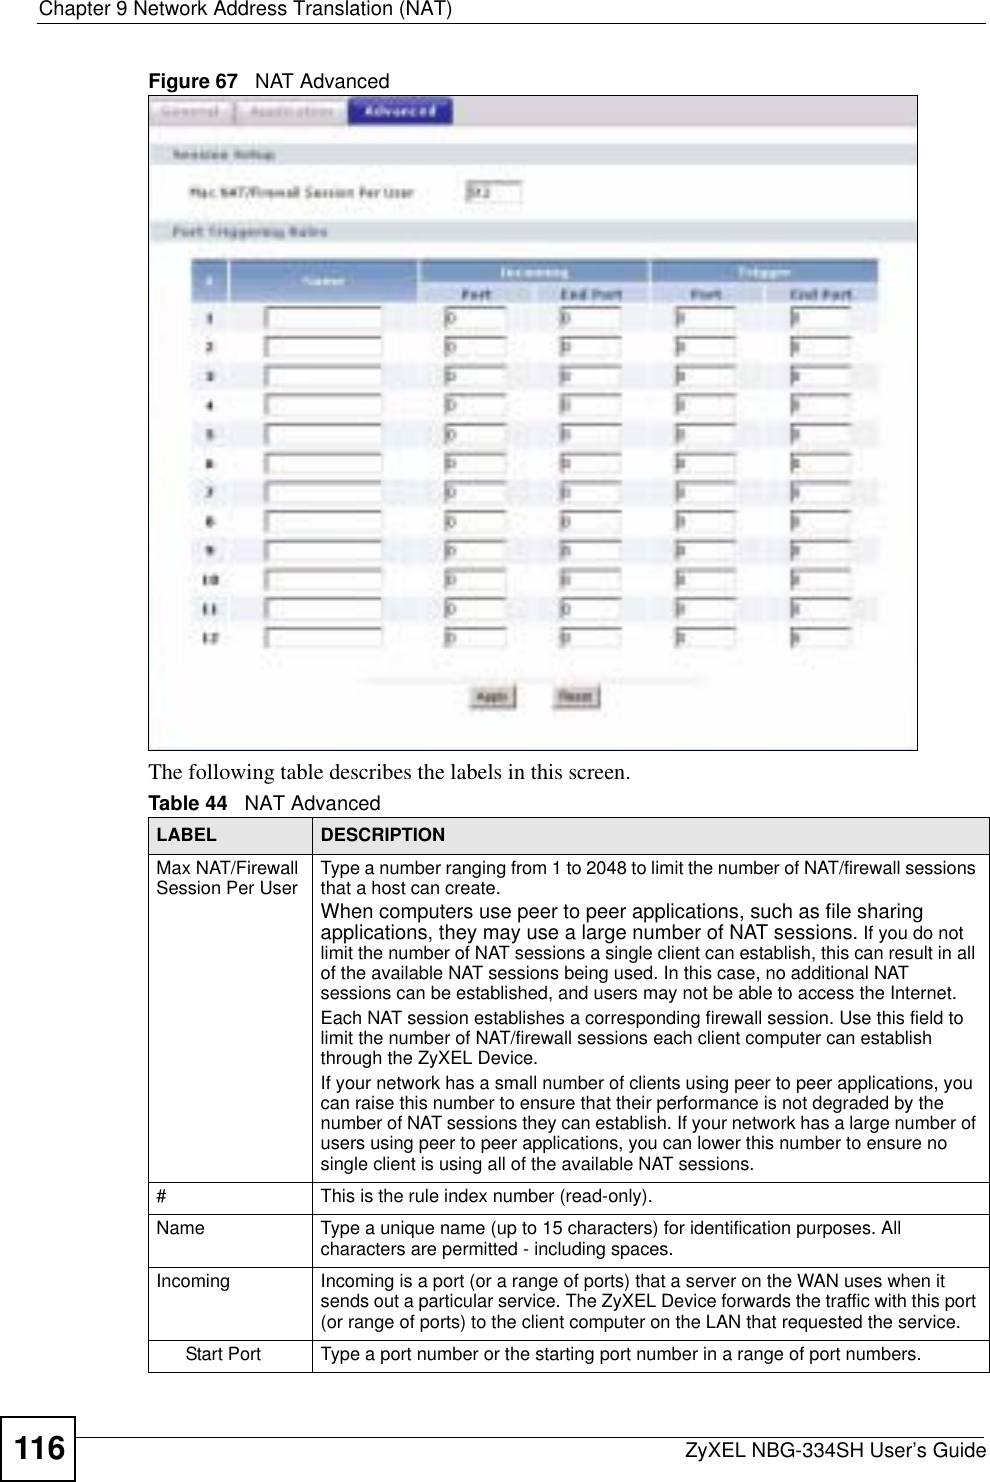
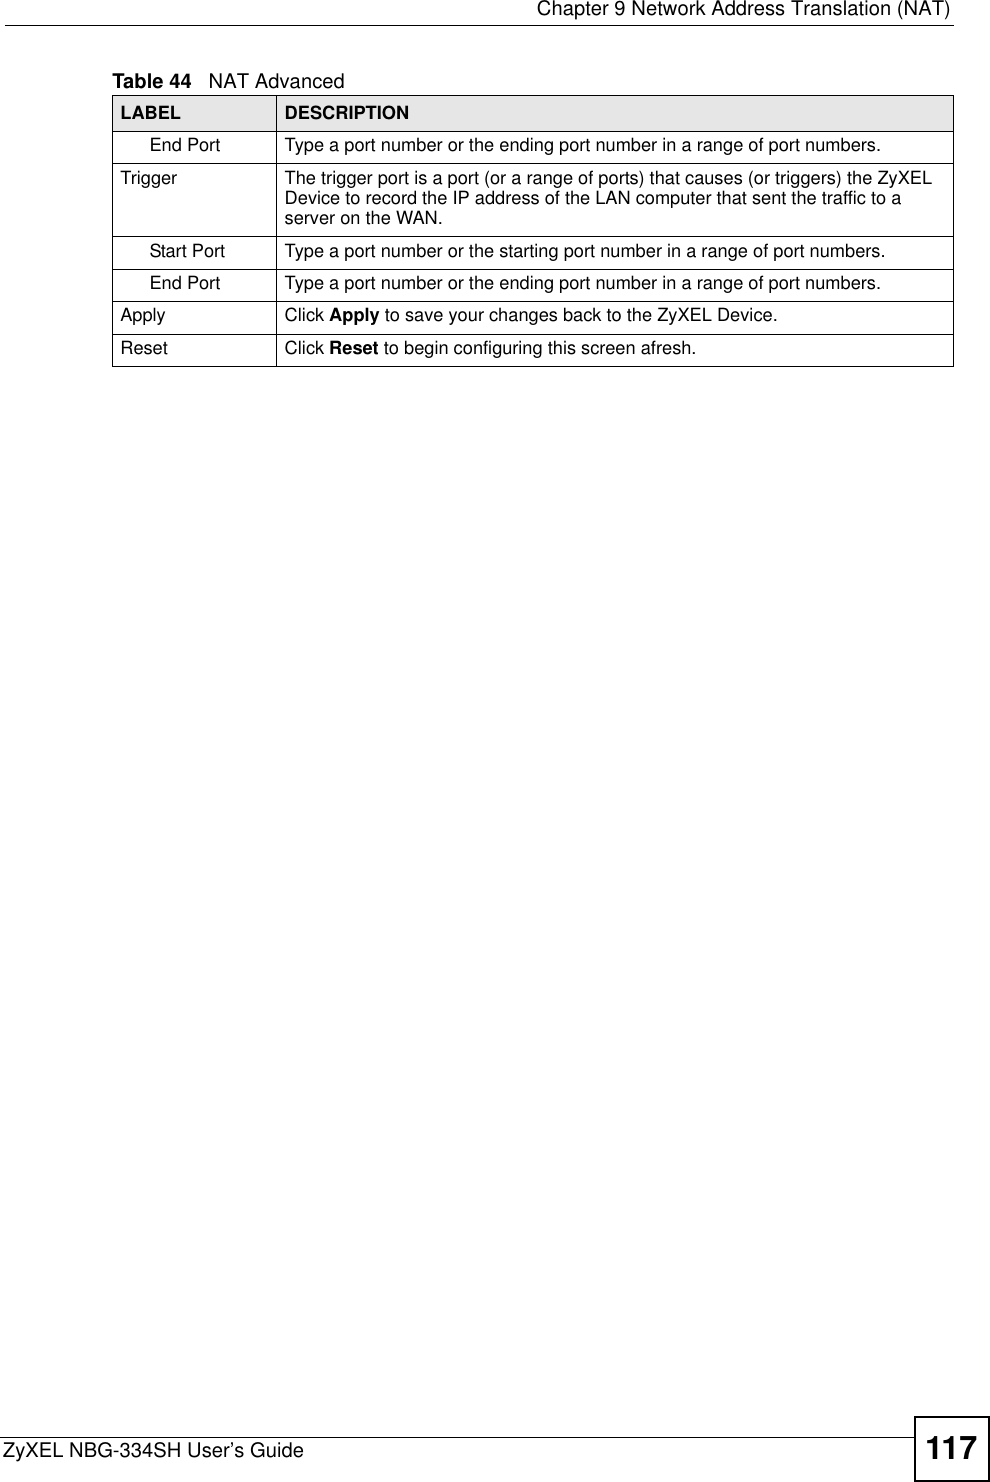

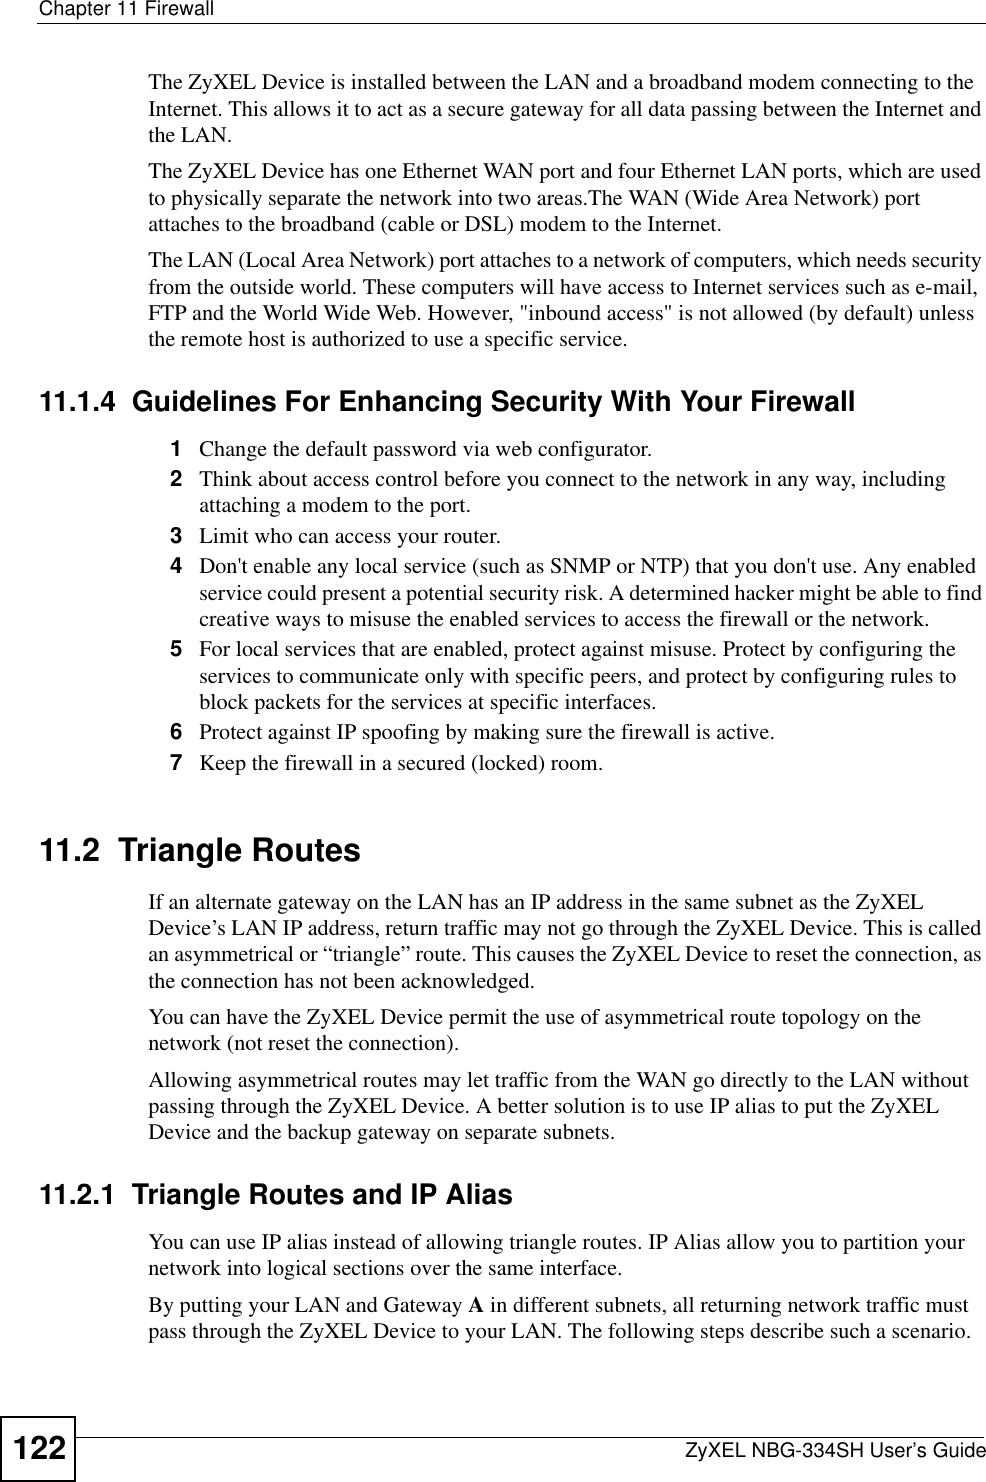

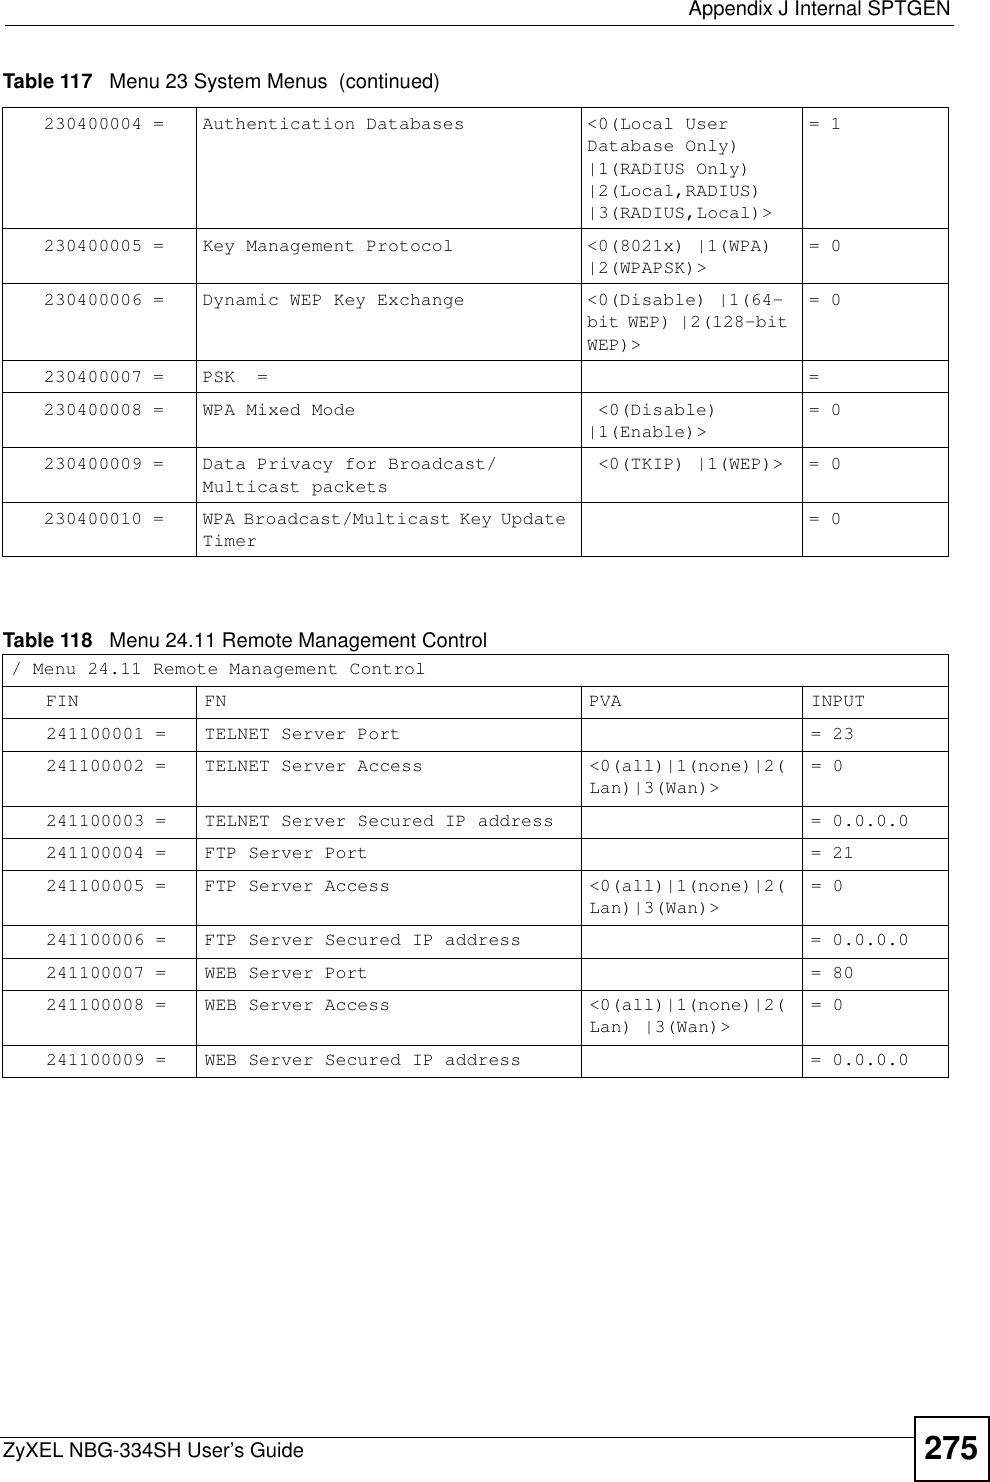
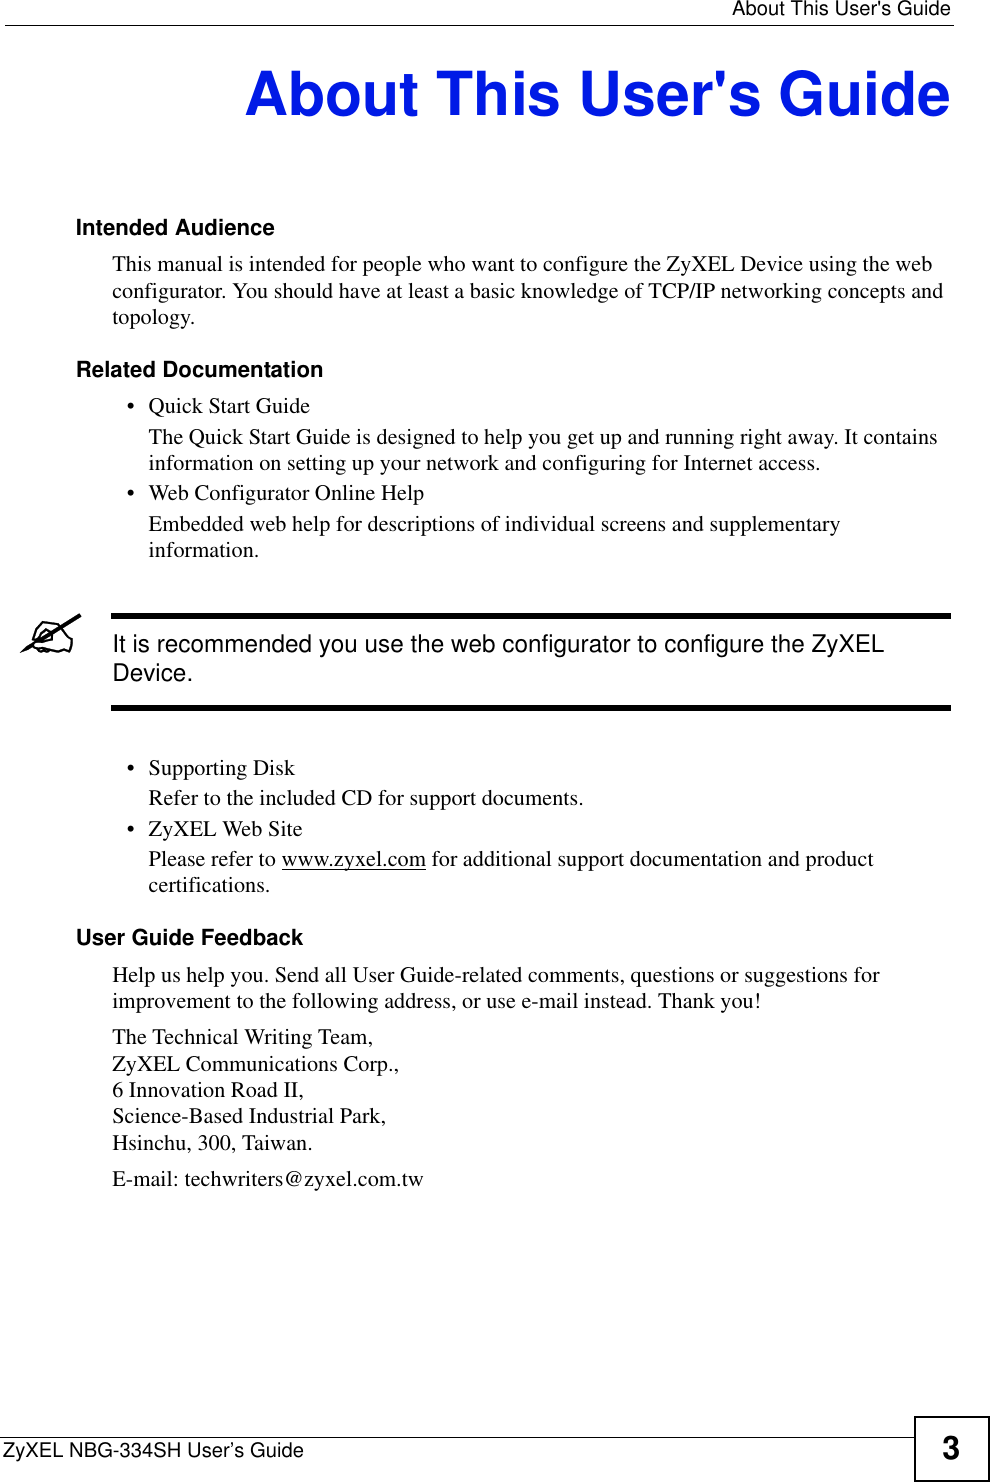
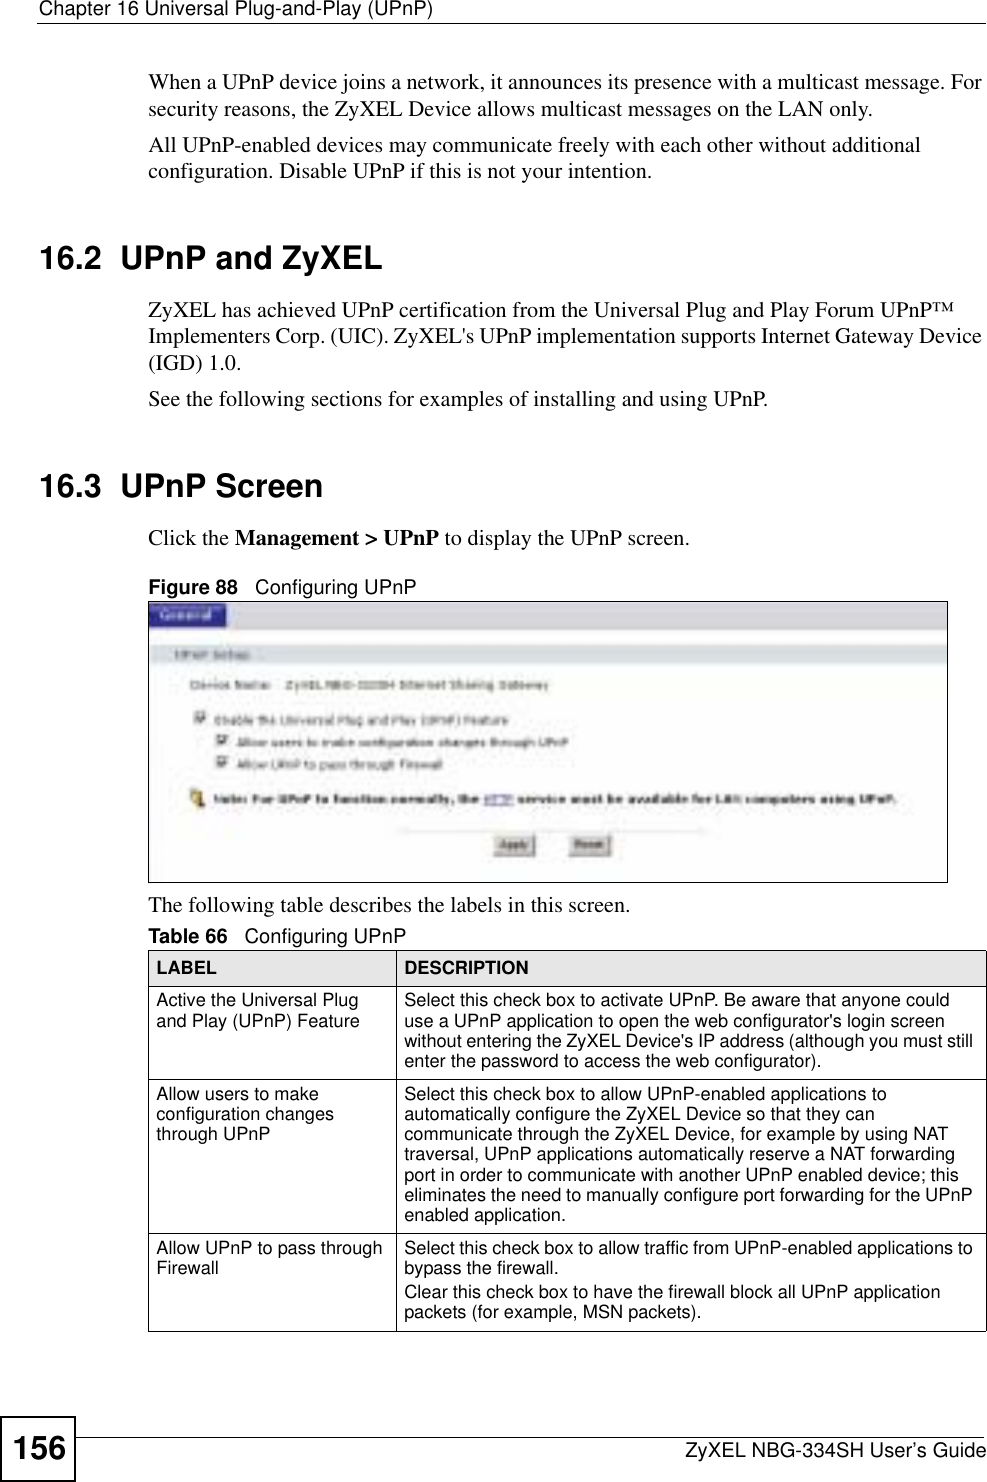
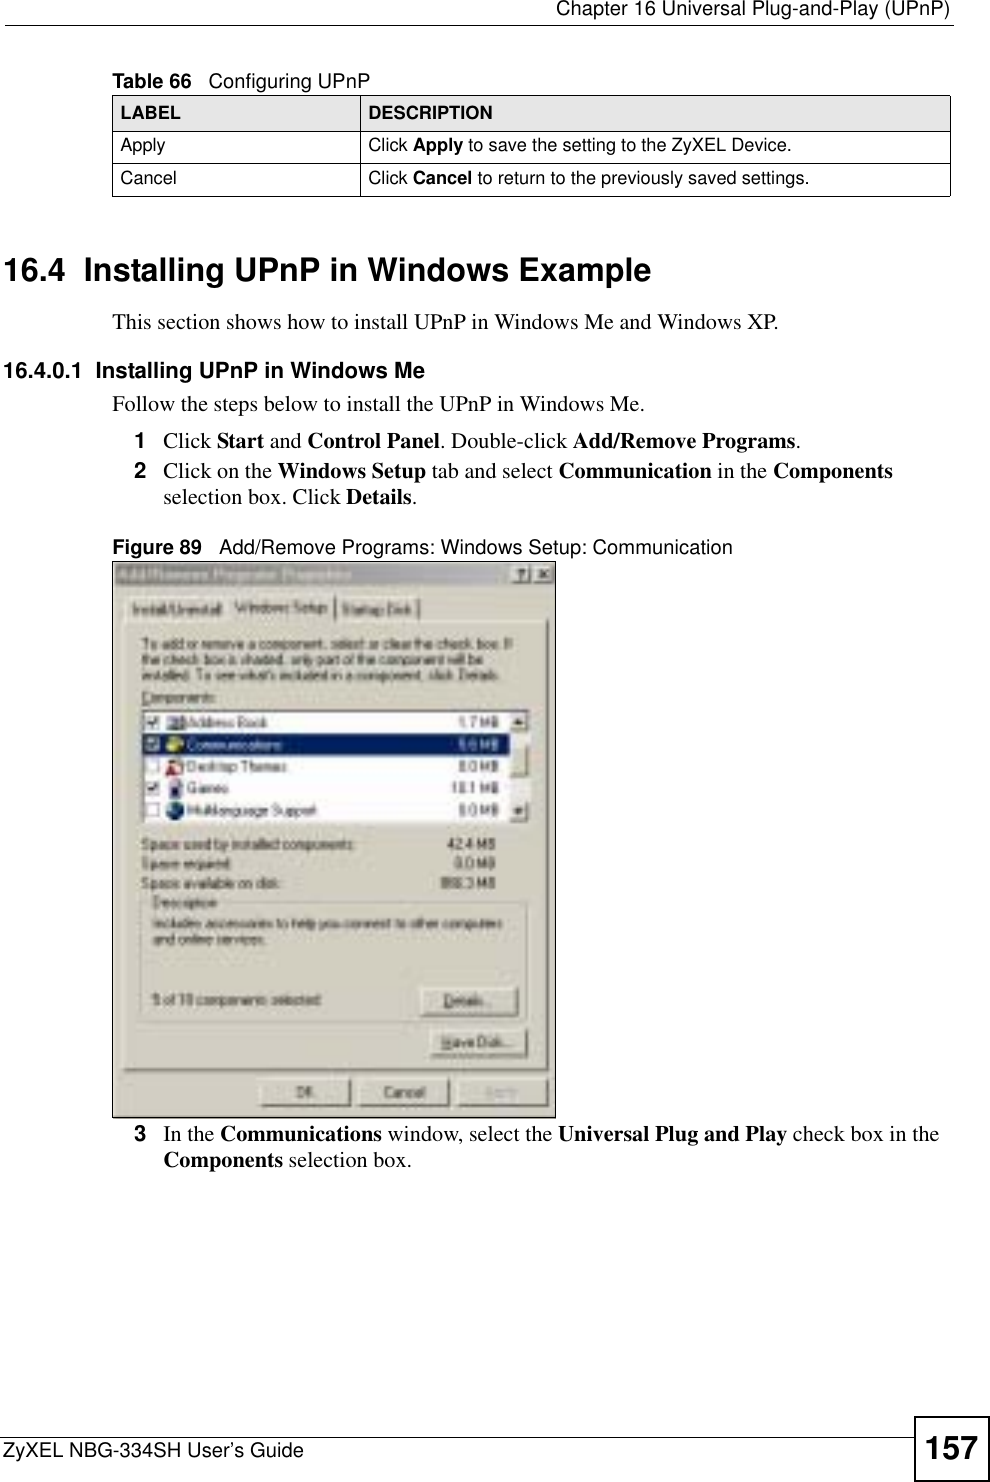
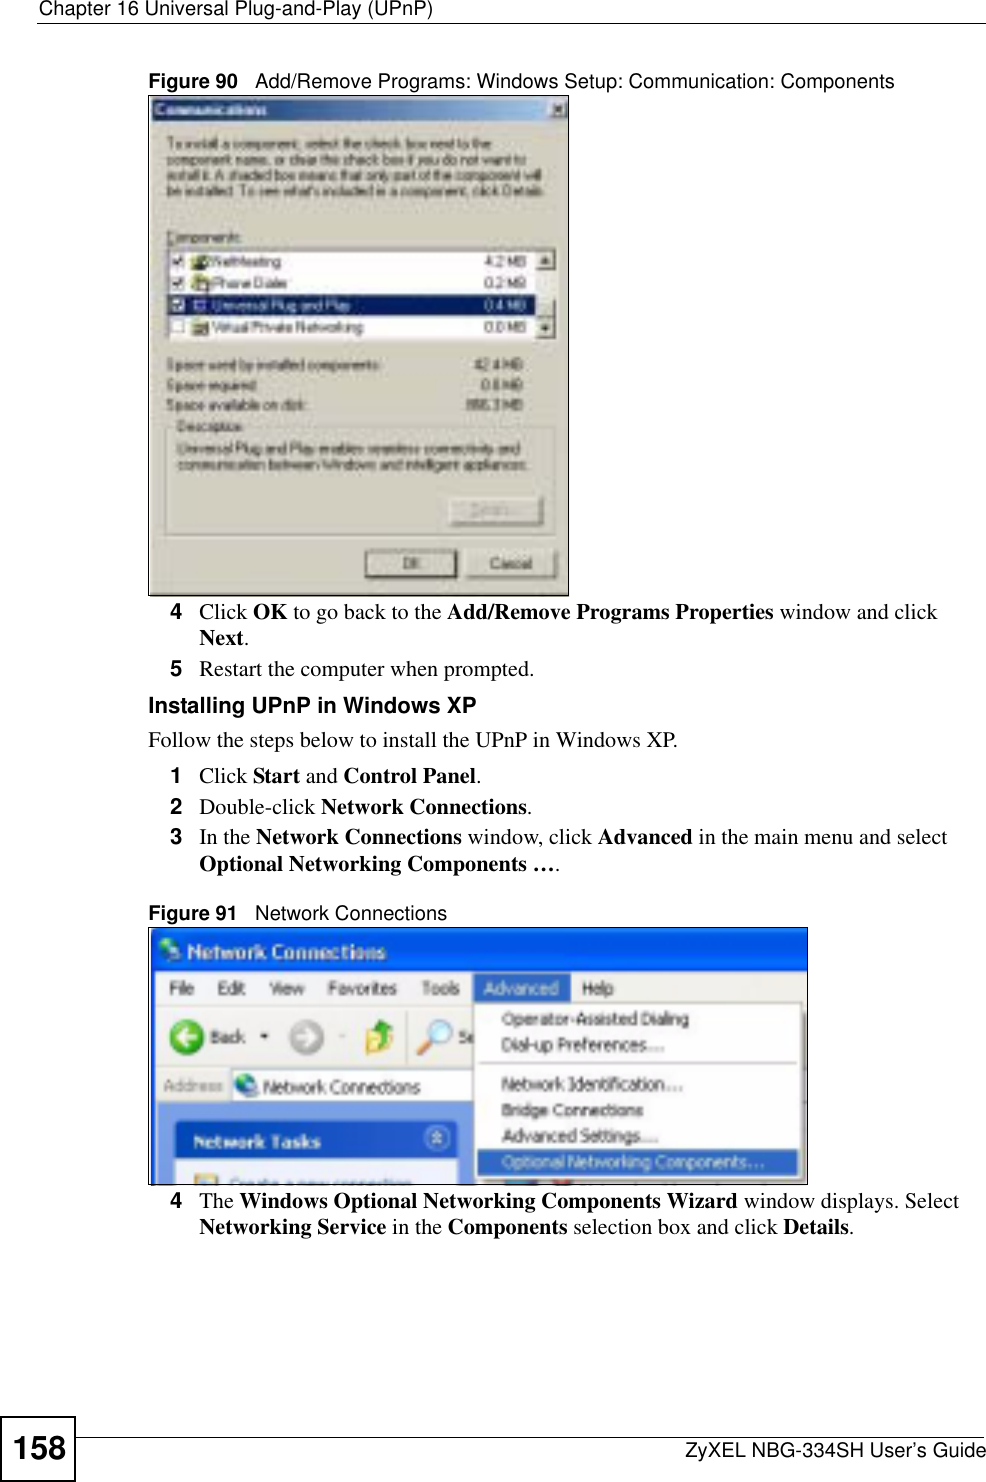
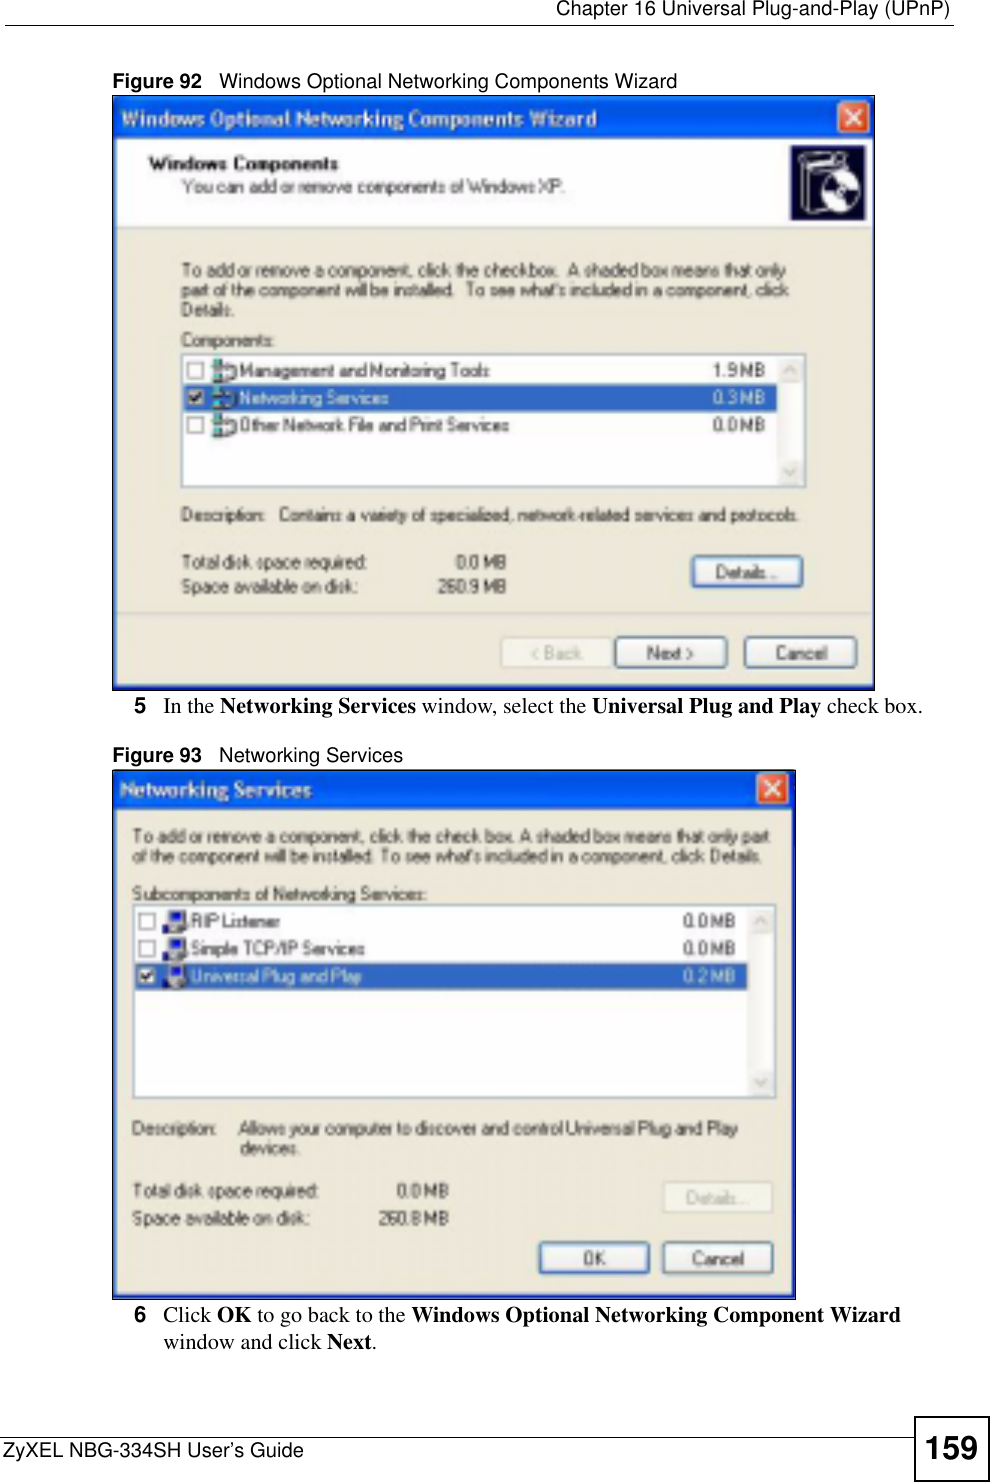
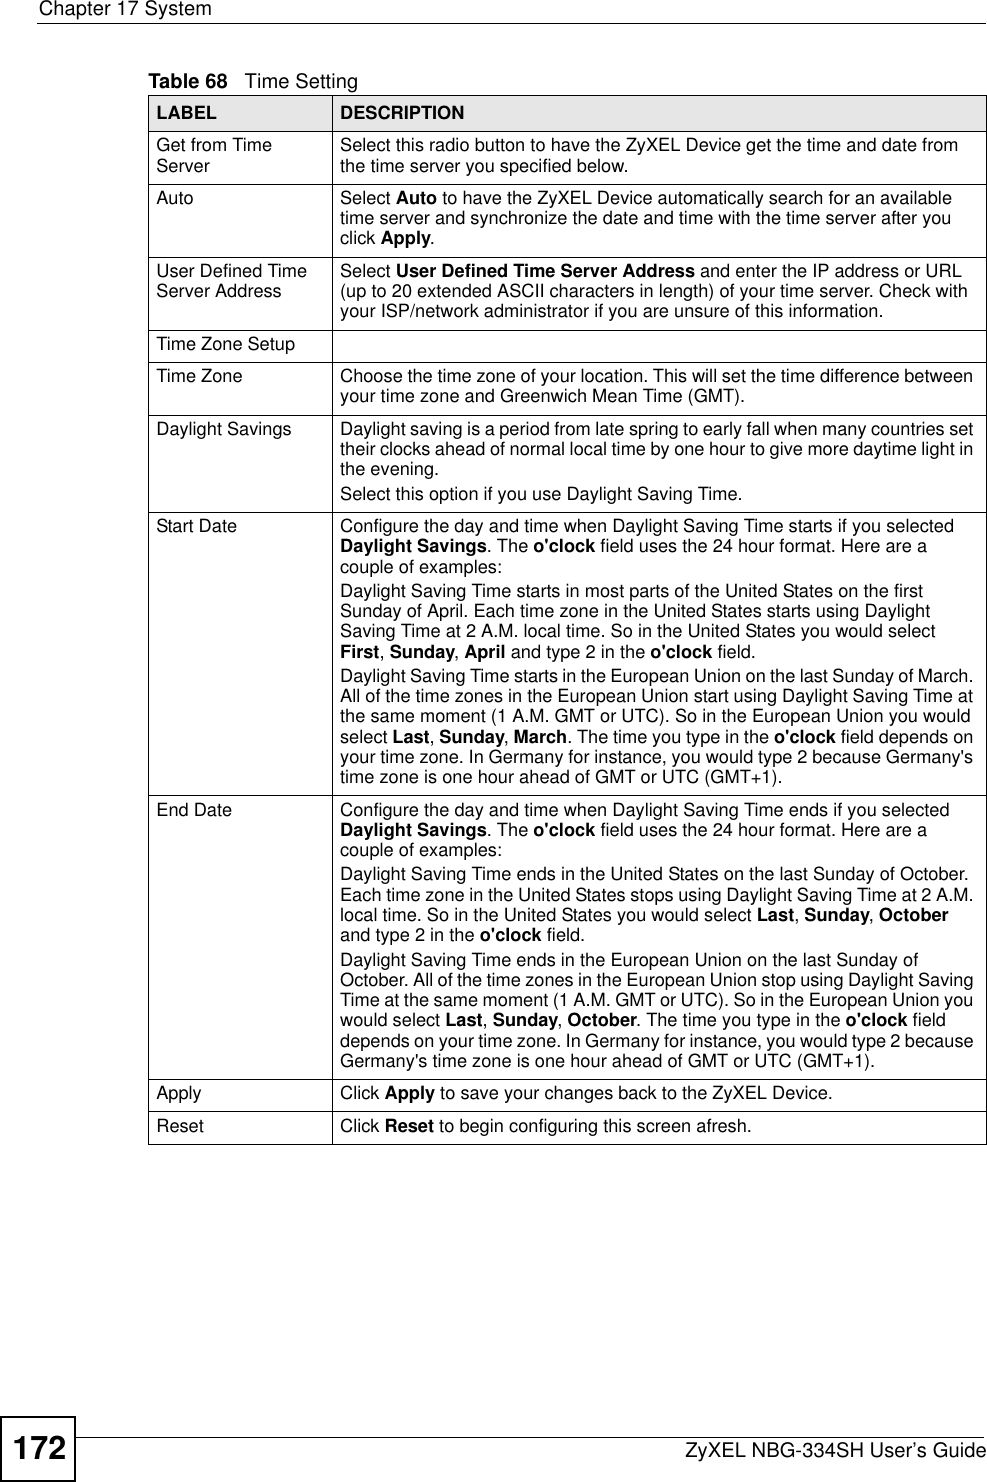
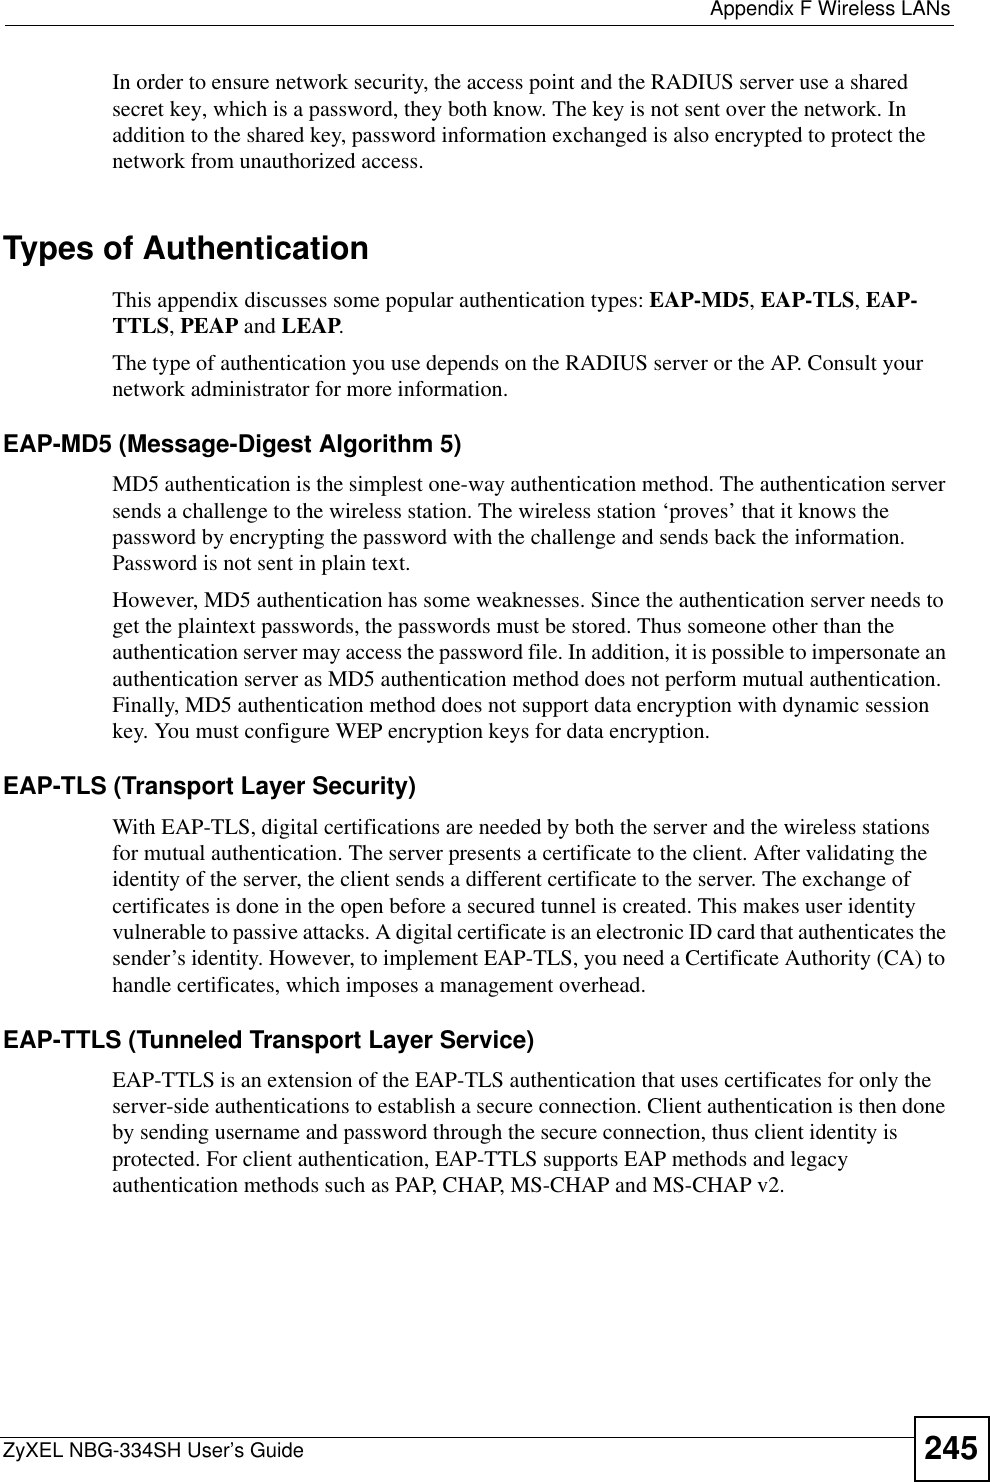
![Chapter 11 FirewallZyXEL NBG-334SH User’s Guide126Do not respond to requests for unauthorized servicesSelect this option to prevent hackers from finding the ZyXEL Device by probing for unused ports. If you select this option, the ZyXEL Device will not respond to port request(s) for unused ports, thus leaving the unused ports and the ZyXEL Device unseen. By default this option is not selected and the ZyXEL Device will reply with an ICMP Port Unreachable packet for a port probe on its unused UDP ports, and a TCP Reset packet for a port probe on its unused TCP ports. Note that the probing packets must first traverse the ZyXEL Device's firewall mechanism before reaching this anti-probing mechanism. Therefore if the firewall mechanism blocks a probing packet, the ZyXEL Device reacts based on the firewall policy, which by default, is to send a TCP reset packet for a blocked TCP packet. You can use the command "sys firewall tcprst rst [on|off]" to change this policy. When the firewall mechanism blocks a UDP packet, it drops the packet without sending a response packet.Enable Services Blocking Select this check box to enable this feature.Available Services This is a list of pre-defined services (ports) you may prohibit your LAN computers from using. Select the port you want to block using the drop-down list and click Add to add the port to the Blocked Services field.Blocked Services This is a list of services (ports) that will be inaccessible to computers on your LAN once you enable service blocking. Custom Port A custom port is a service that is not available in the pre-defined Available Services list and you must define using the next two fields.Type Choose the IP port (TCP or UDP) that defines your customized port from the drop down list box.Port Number Enter the port number range that defines the service. For example, if you want to define the Gnutella service, then select TCP type and enter a port range from 6345 to 6349.Add Select a service from the Available Services drop-down list and then click Add to add a service to the Blocked ServicesDelete Select a service from the Blocked Services list and then click Delete to remove this service from the list.Clear All Click Clear All to empty the Blocked Services.Day to Block: Select a check box to configure which days of the week (or everyday) you want service blocking to be active. Time of Day to Block (24-Hour Format)Select the time of day you want service blocking to take effect. Configure blocking to take effect all day by selecting All Day. You can also configure specific times by selecting From and entering the start time in the Start (hour) and Start (min)fields and the end time in the End (hour) and End (min) fields. Enter times in 24-hour format, for example, "3:00pm" should be entered as "15:00".Bypass Triangle Route Select this check box to have the ZyXEL Device firewall ignore the use of triangle route topology on the network. Max NAT/Firewall Session Per User Type a number ranging from 1 to 2048 to limit the number of NAT/firewall sessions that a host can create.Apply Click Apply to save the settings. Reset Click Reset to start configuring this screen again. Table 47 Firewall ServicesLABEL DESCRIPTION](https://usermanual.wiki/ZyXEL-Communications/NBG334SH/User-Guide-749078-Page-126.png)

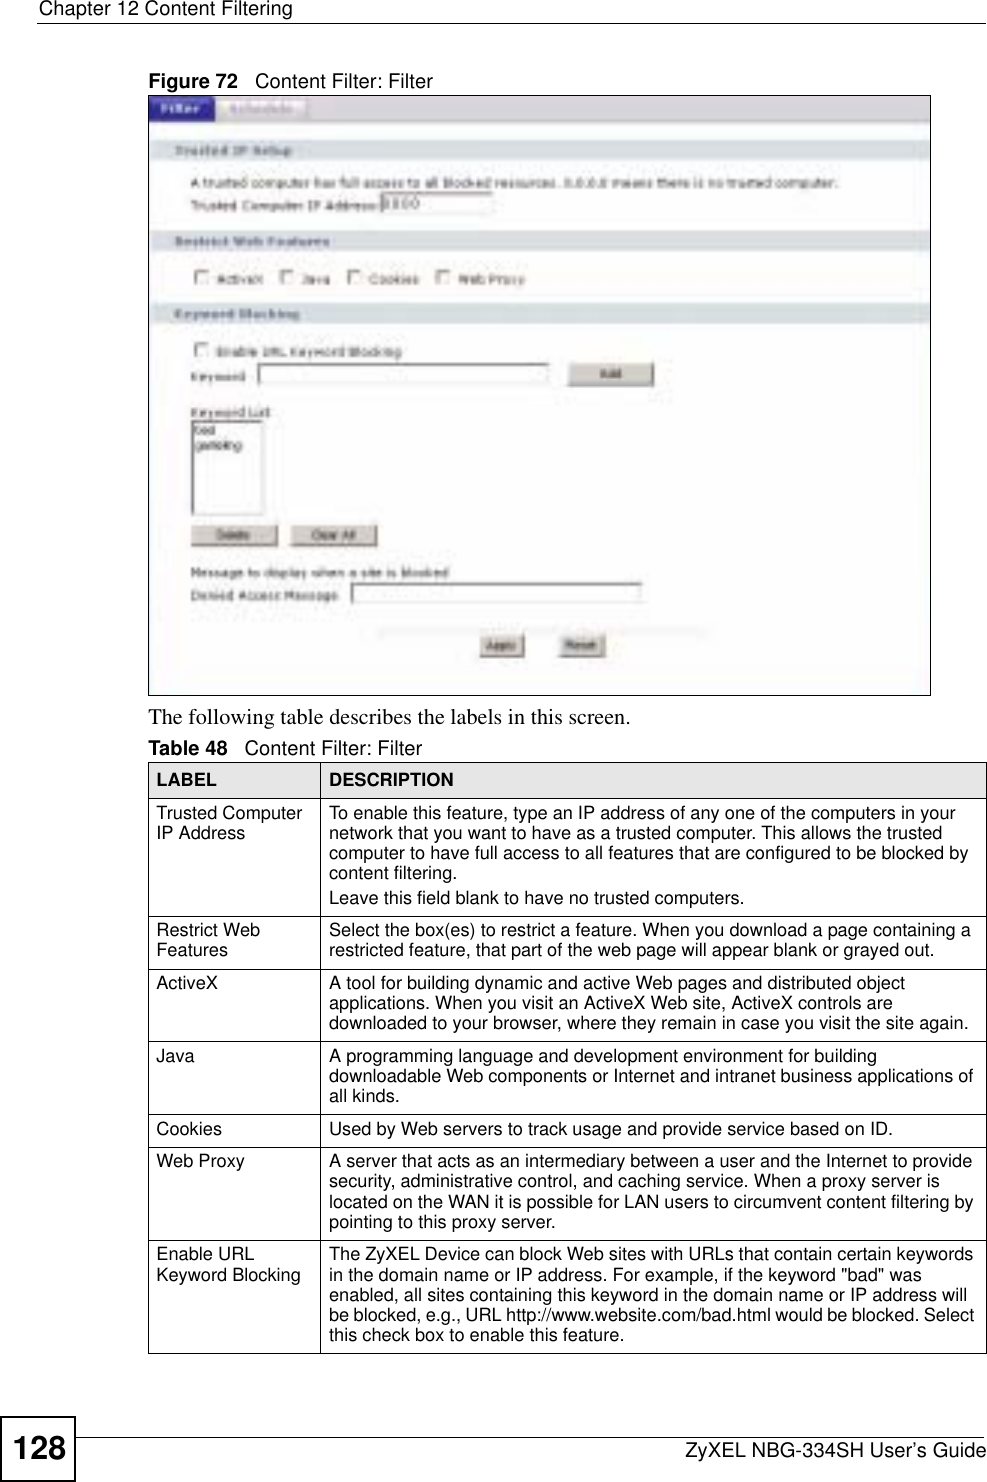

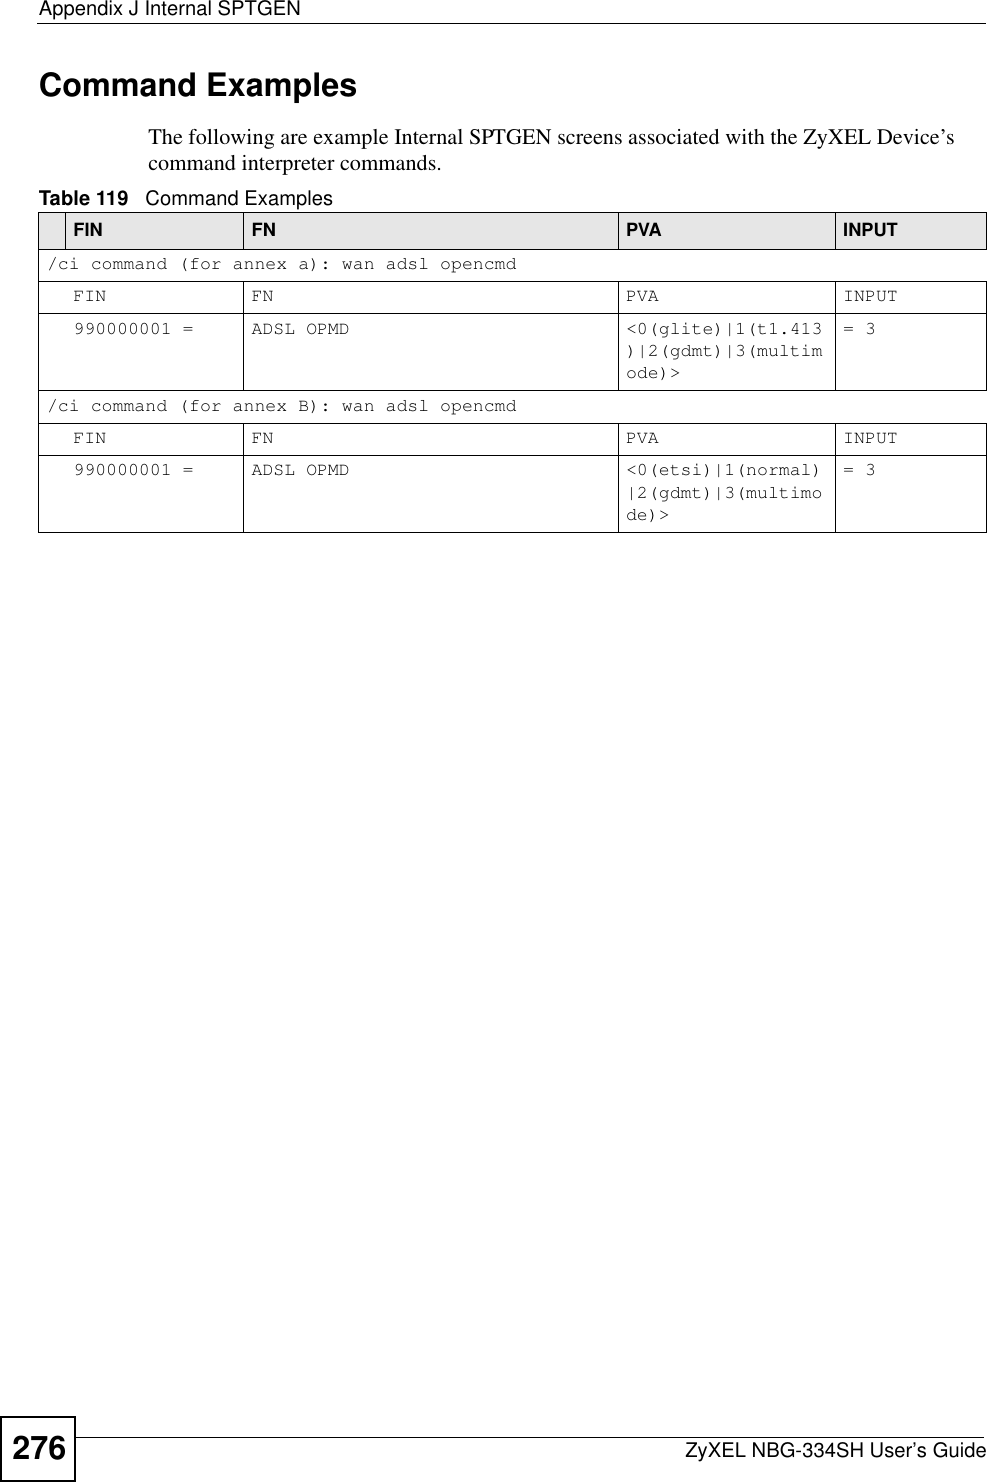
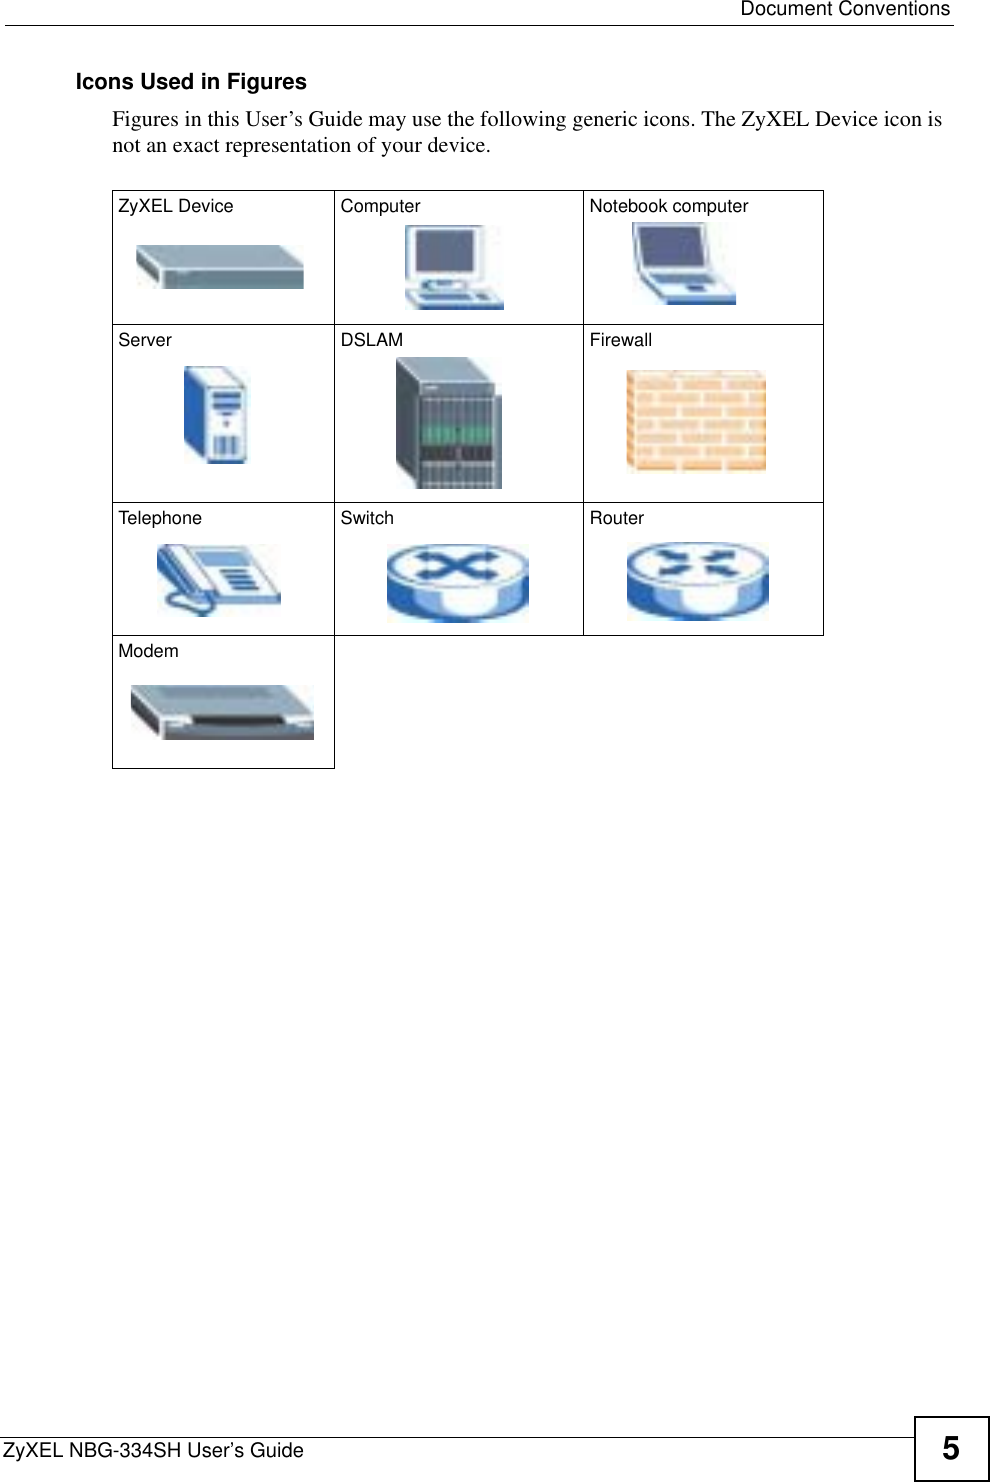
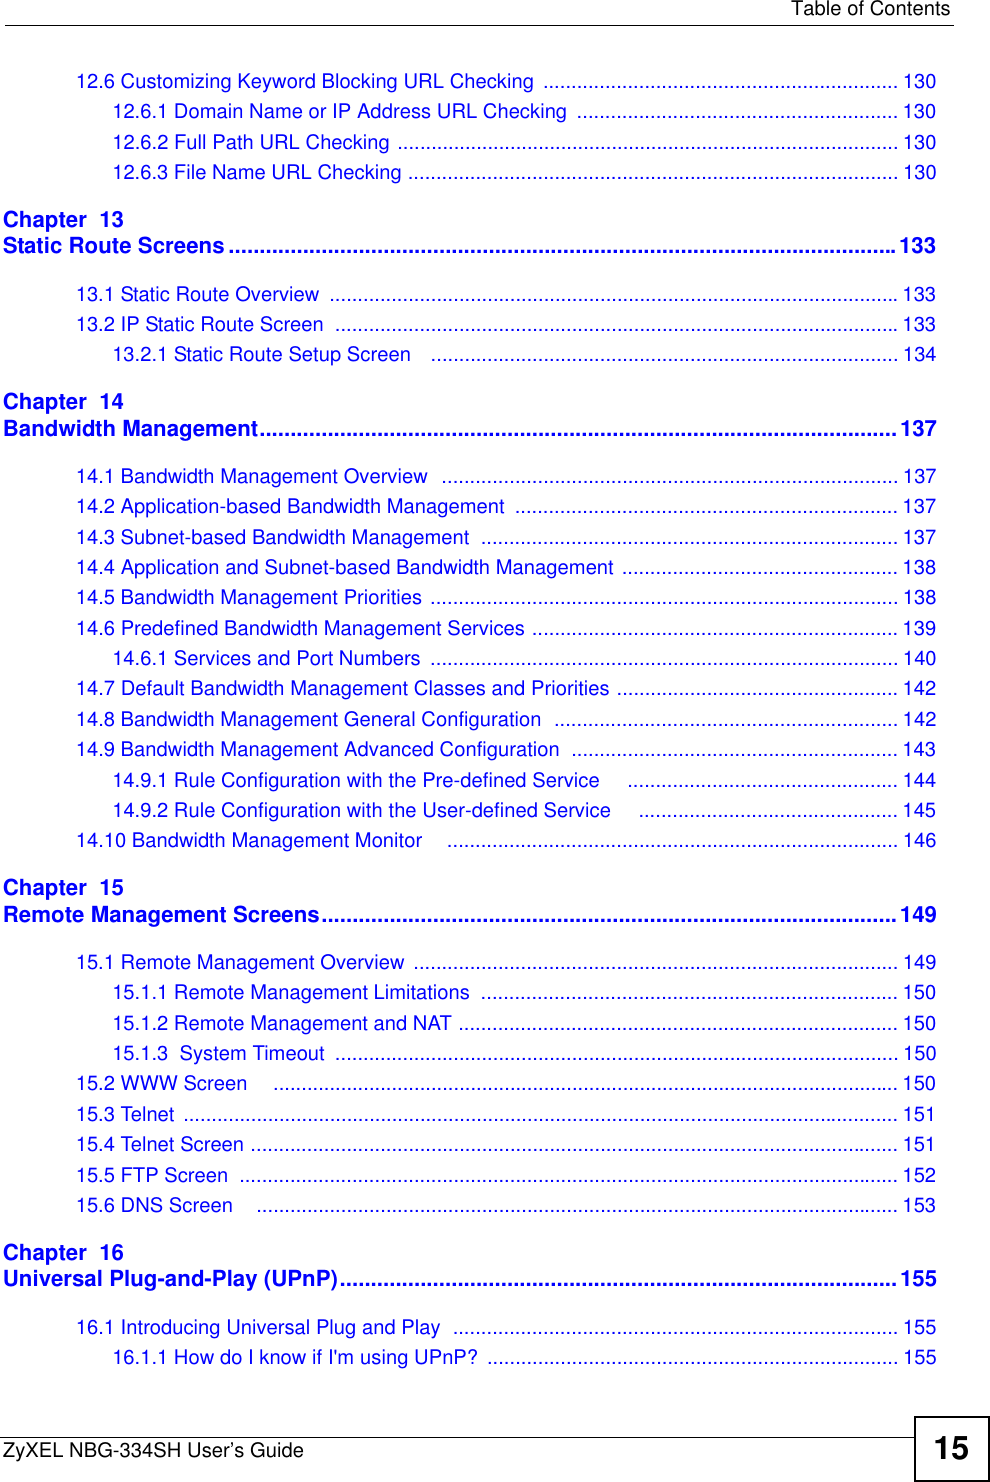
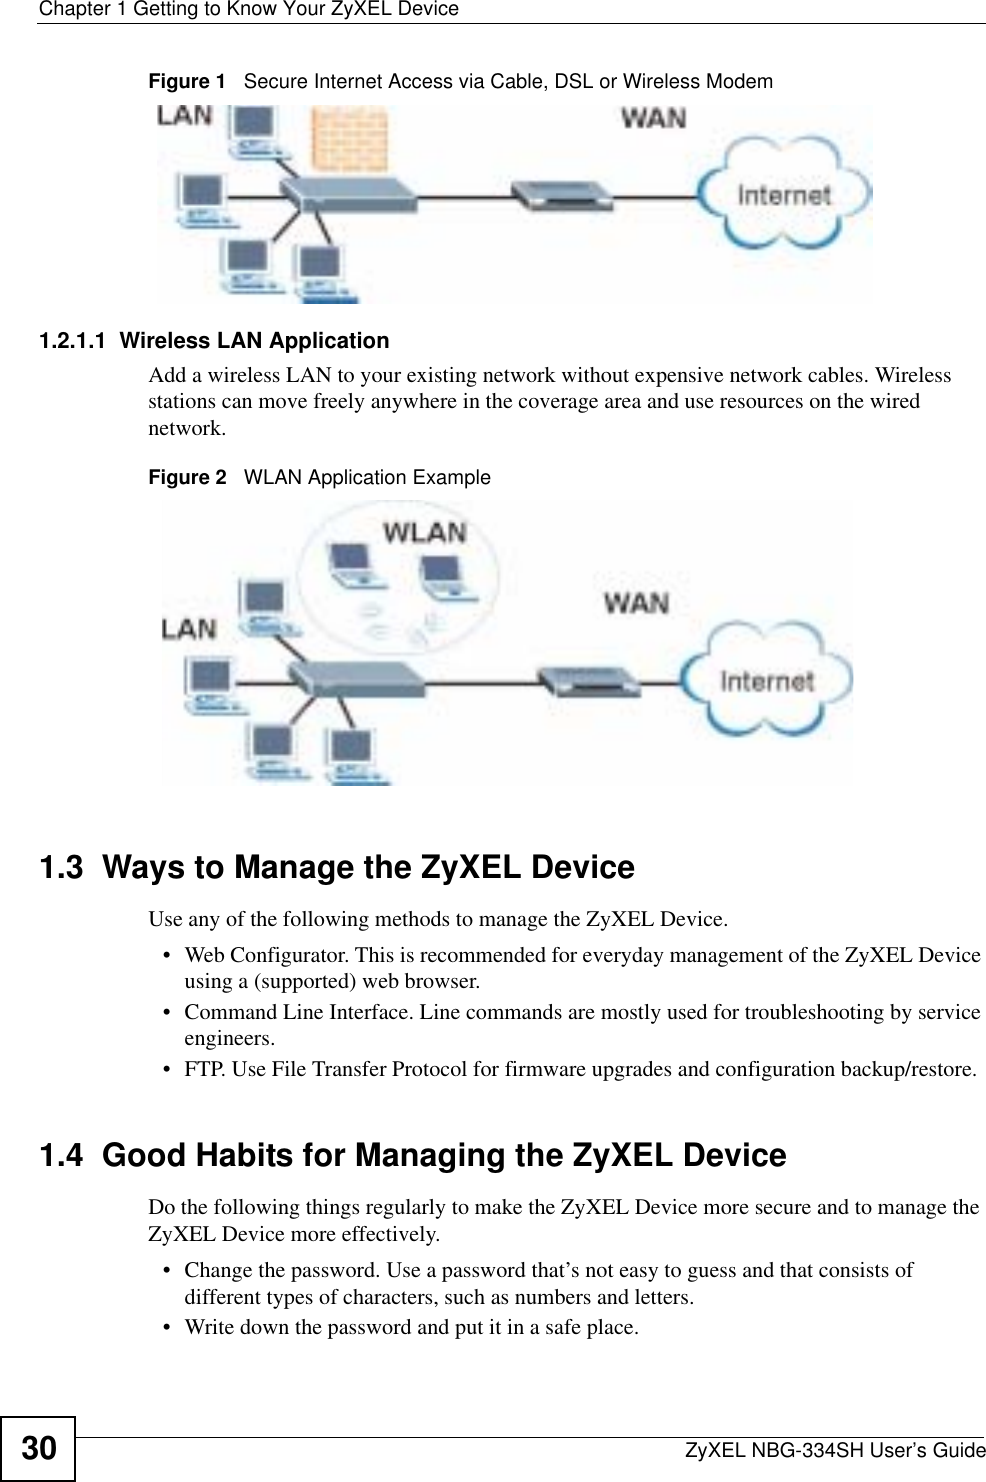
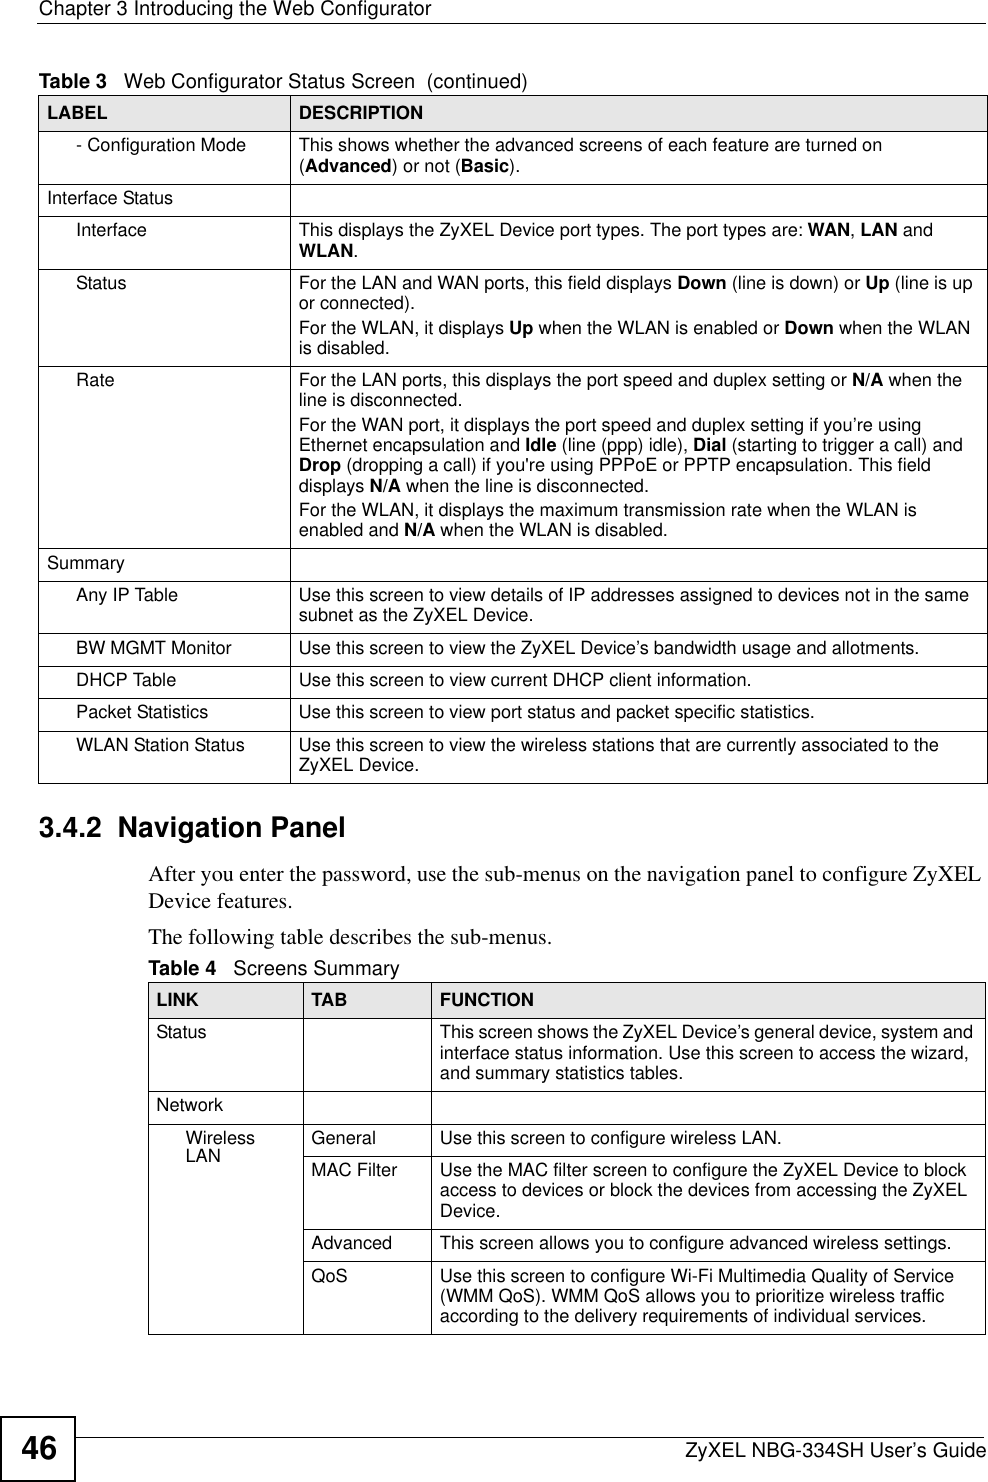
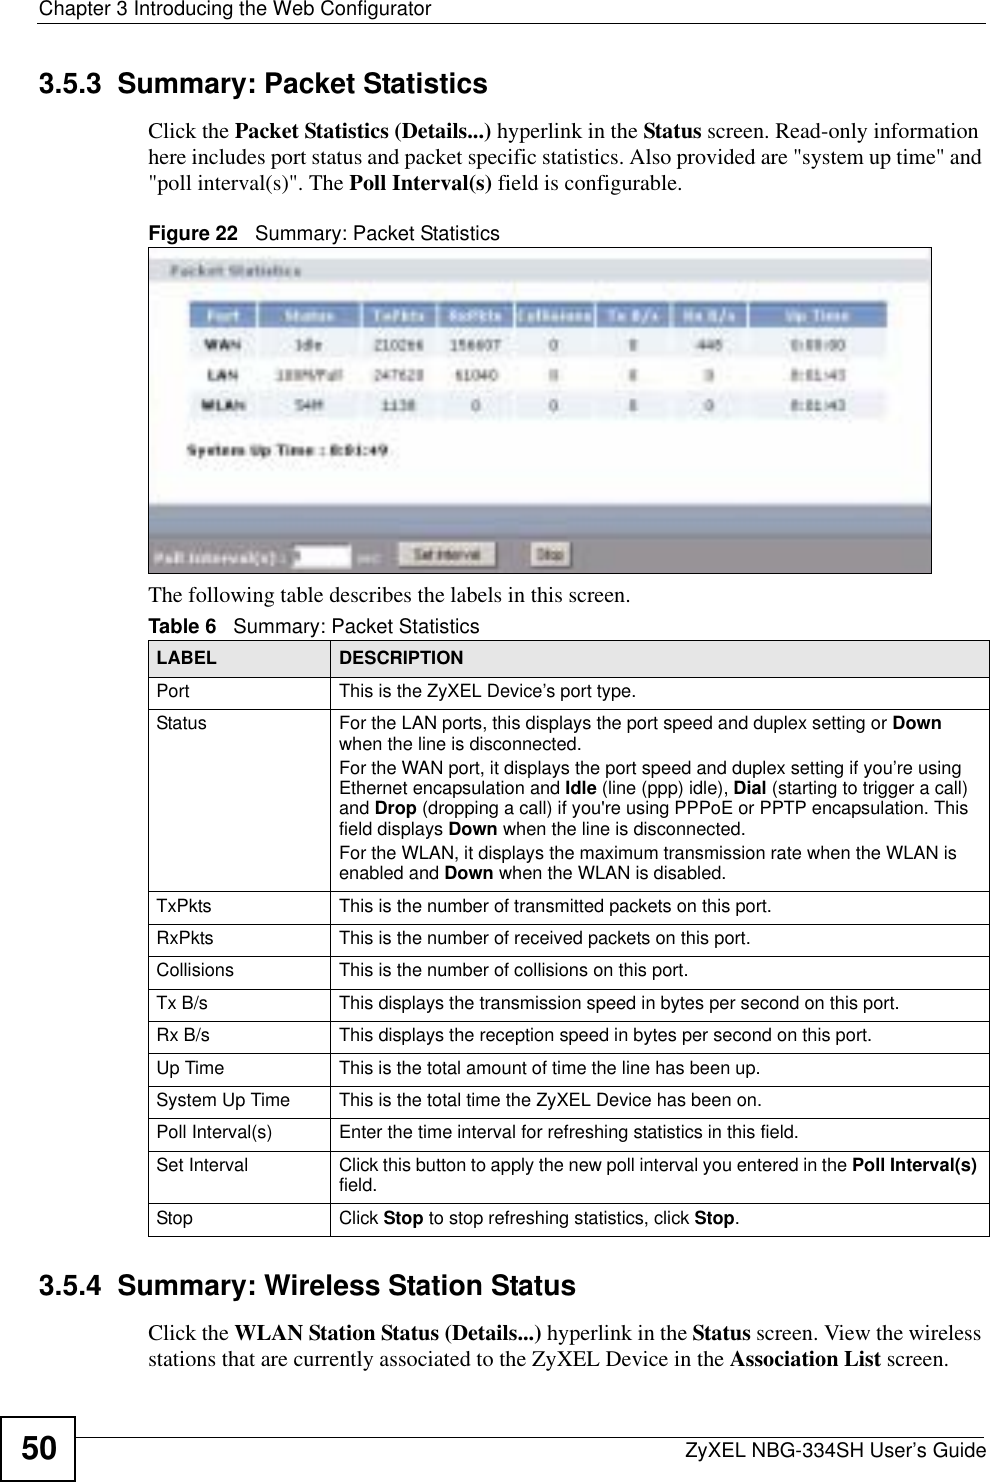
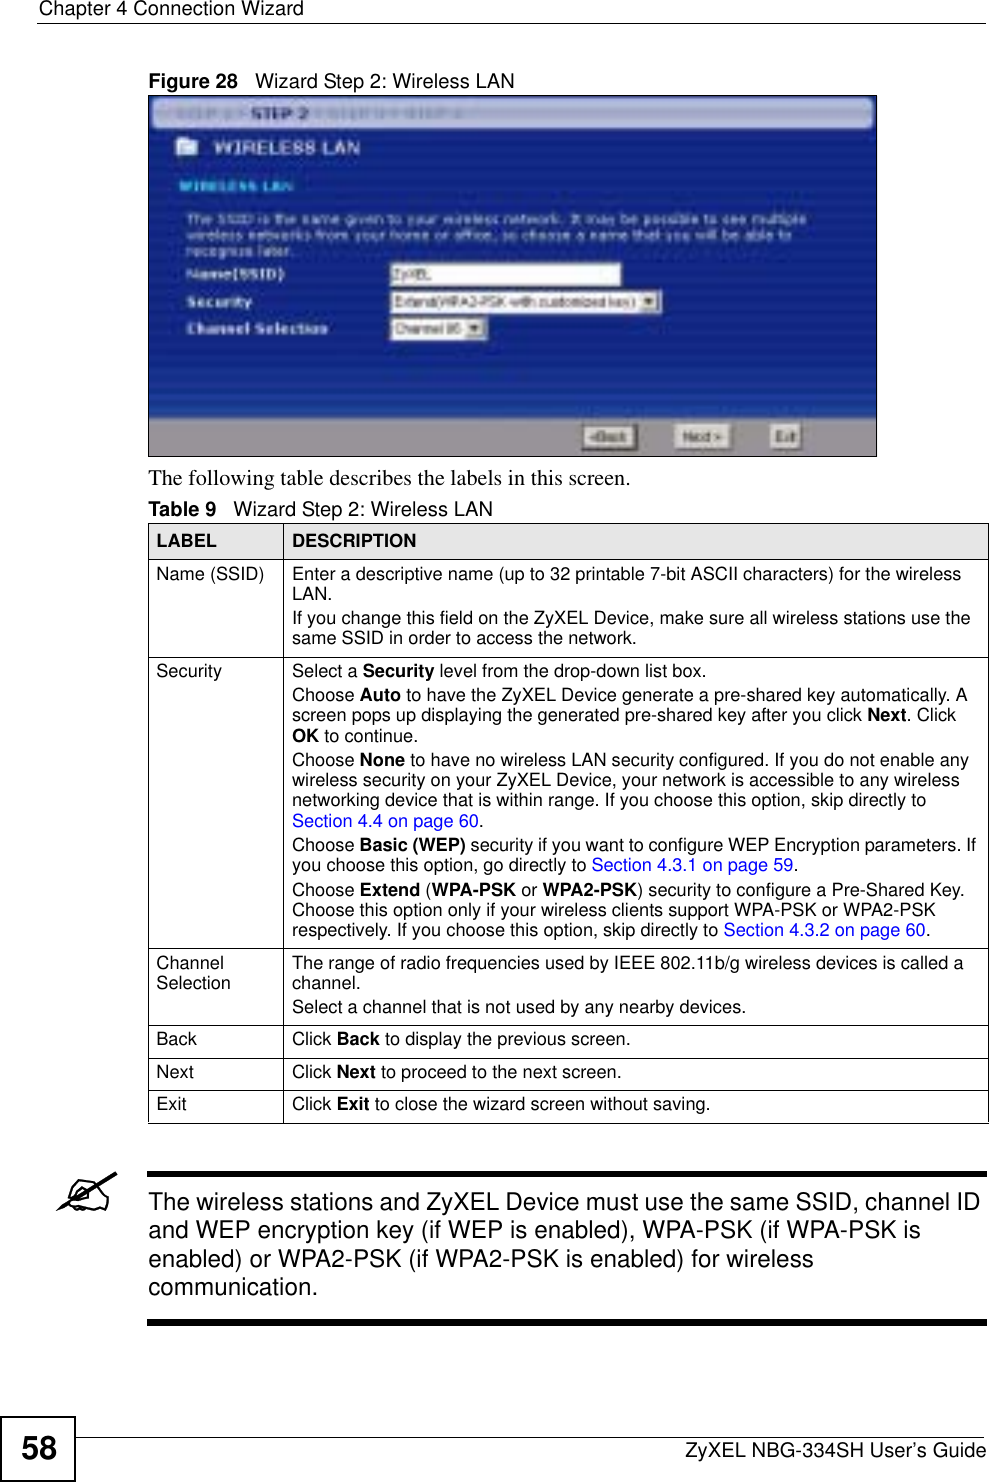
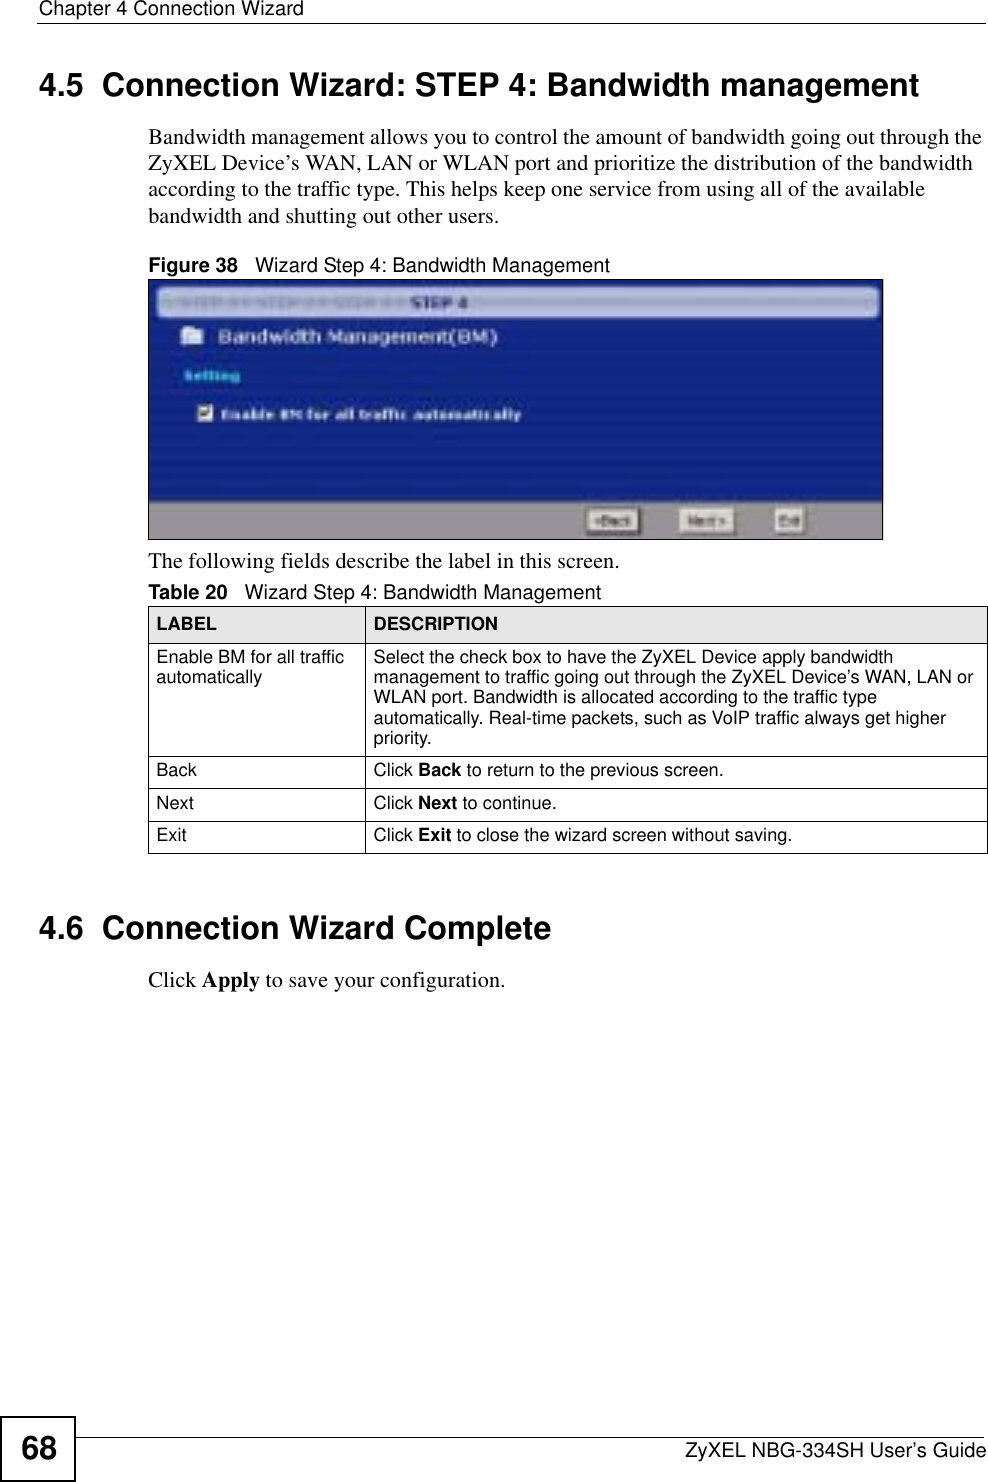
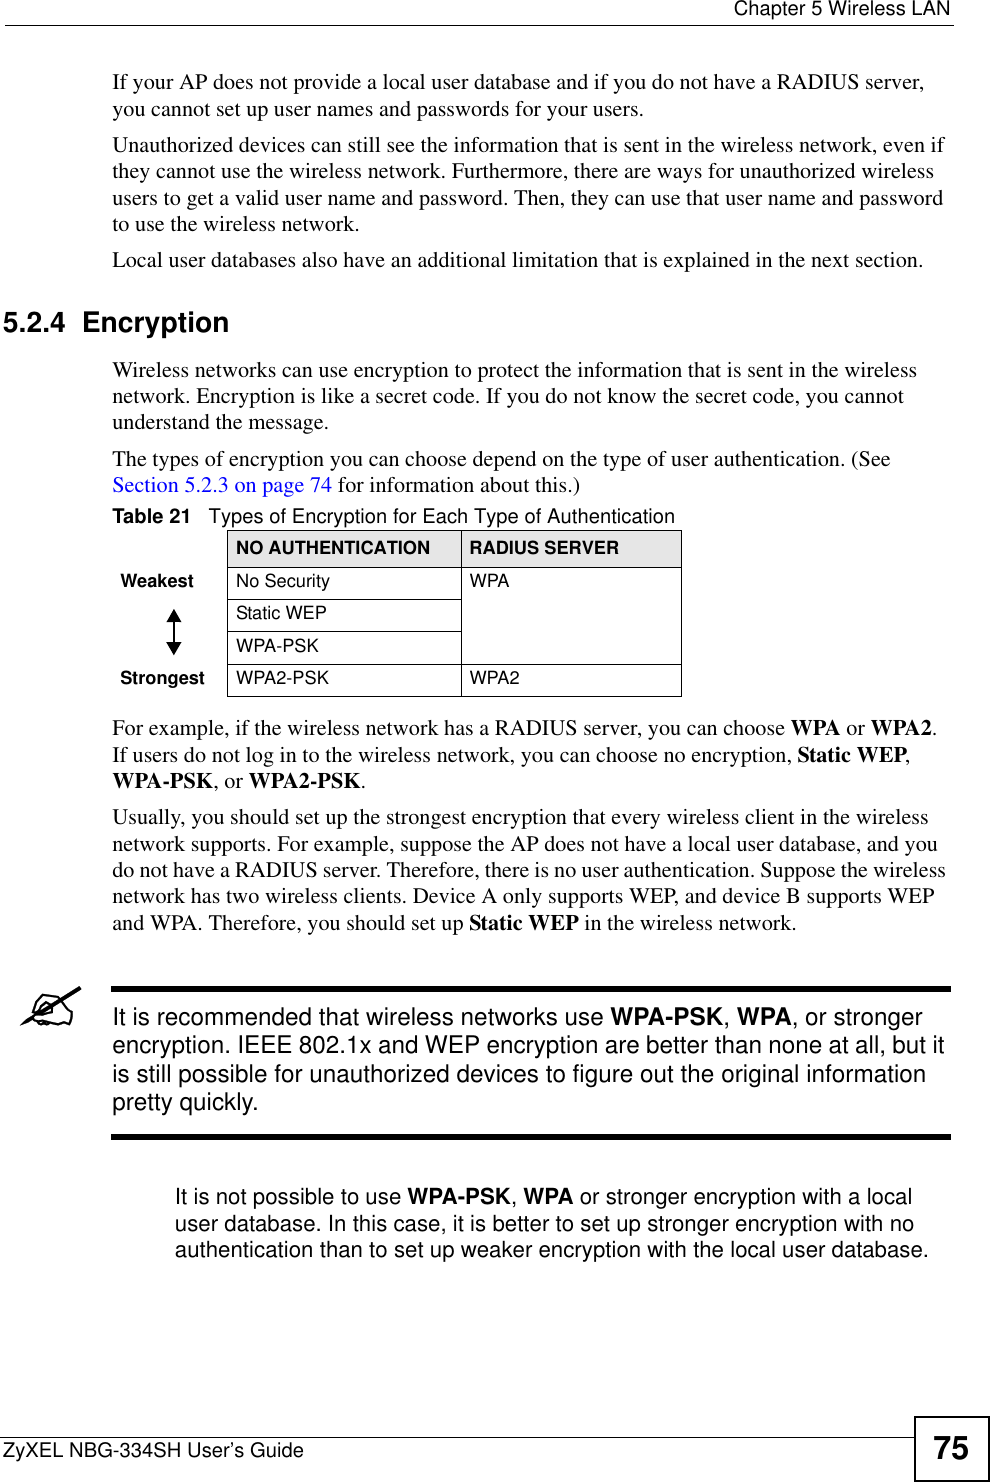
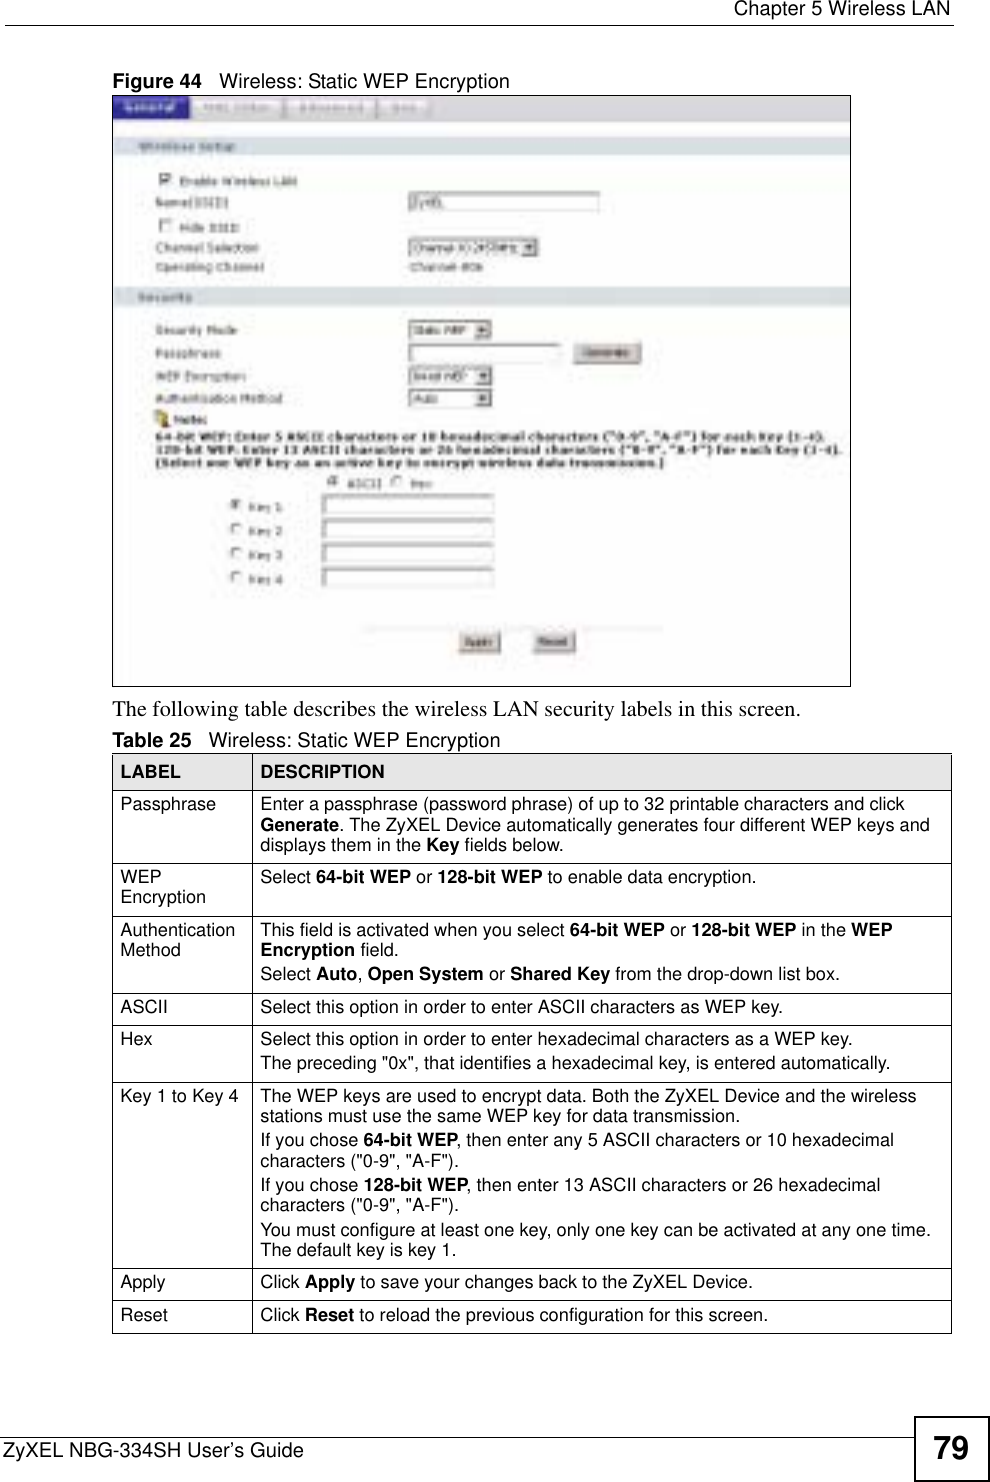
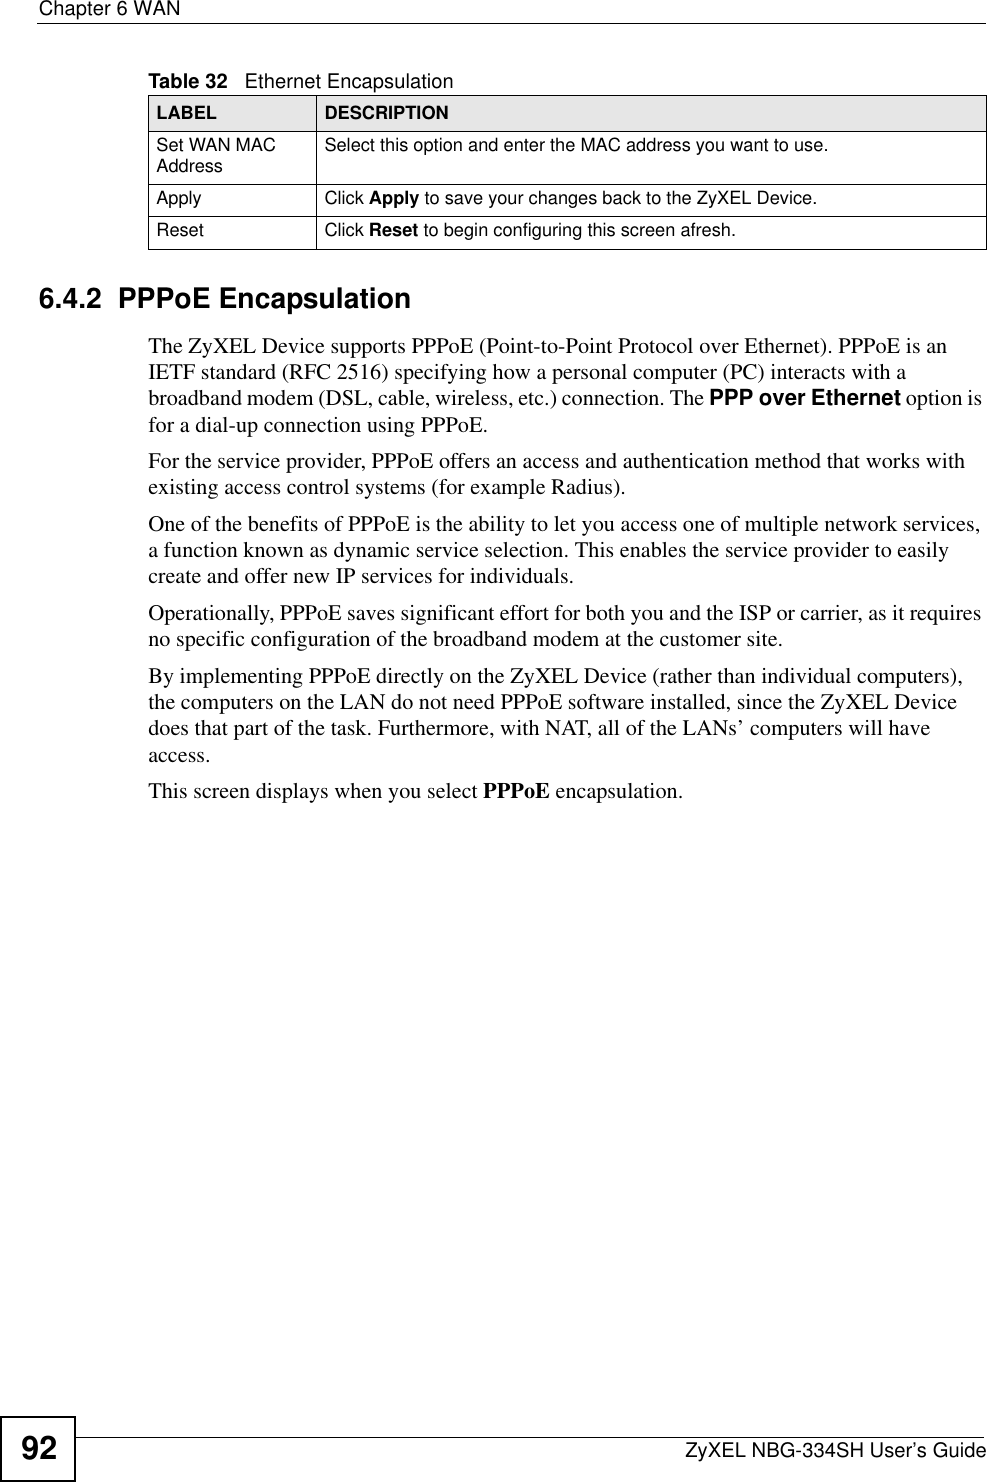
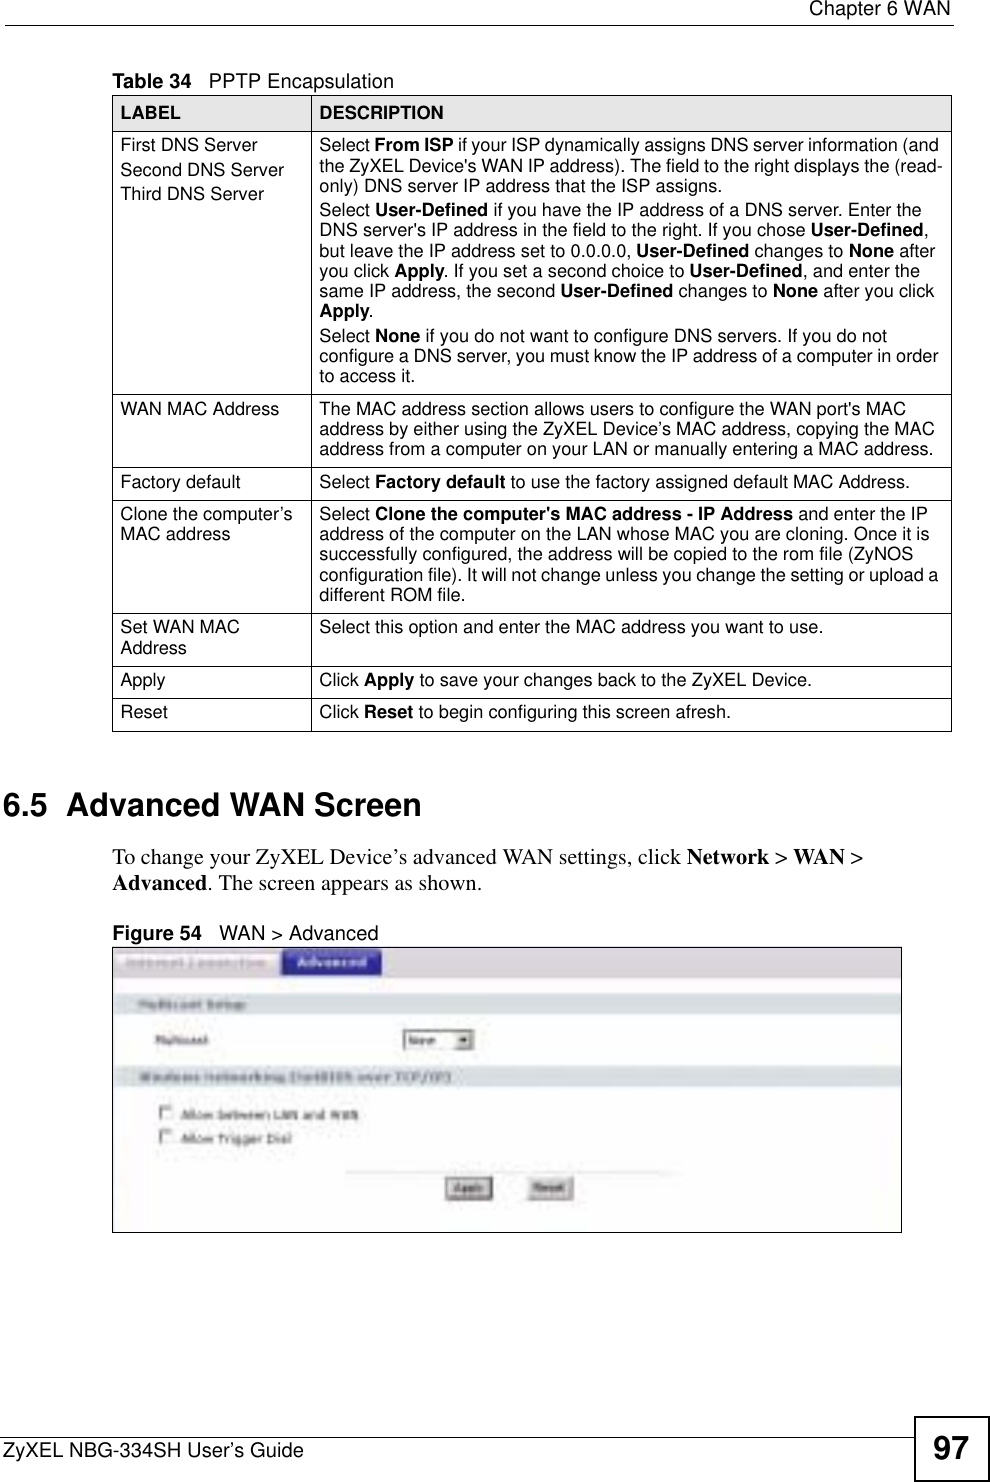
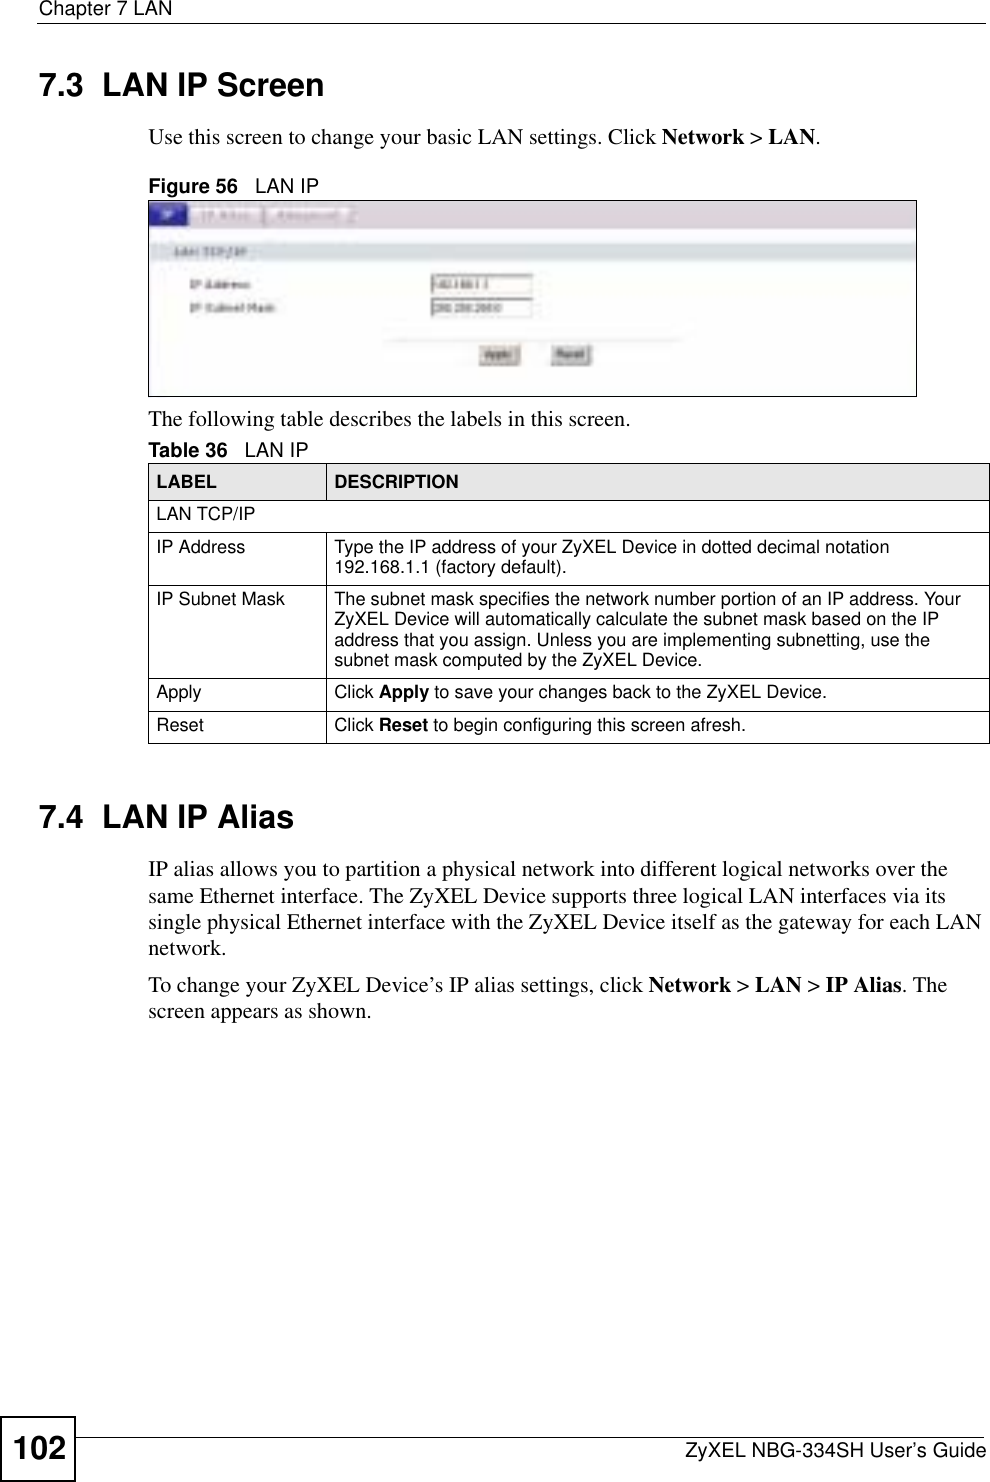
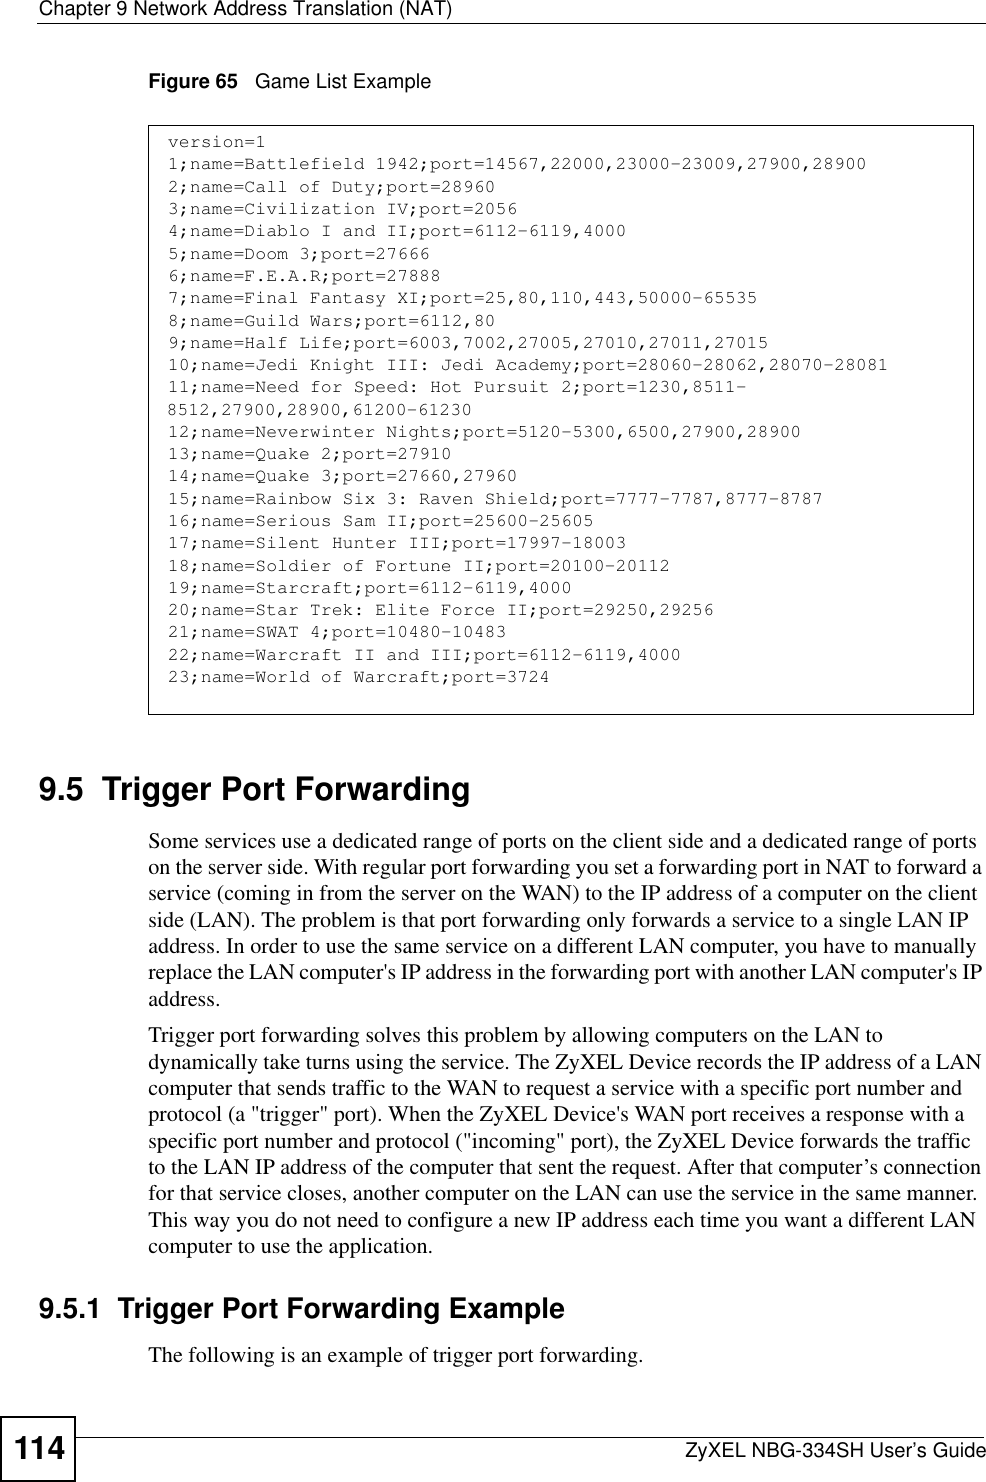
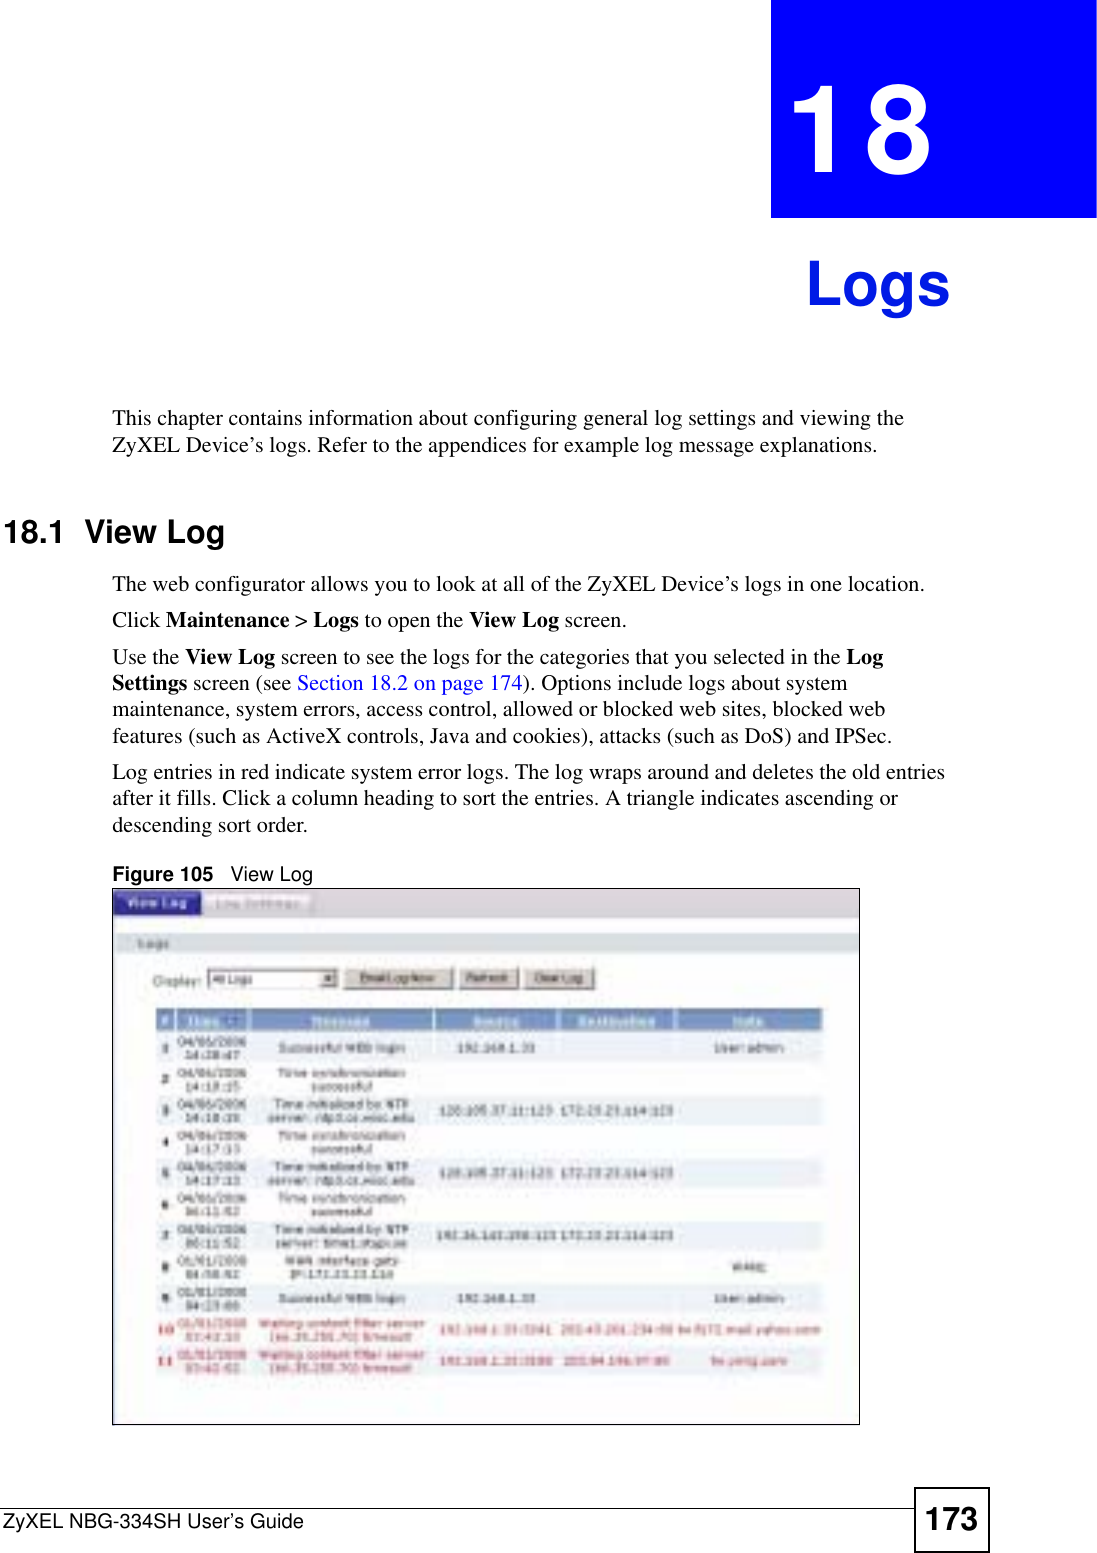
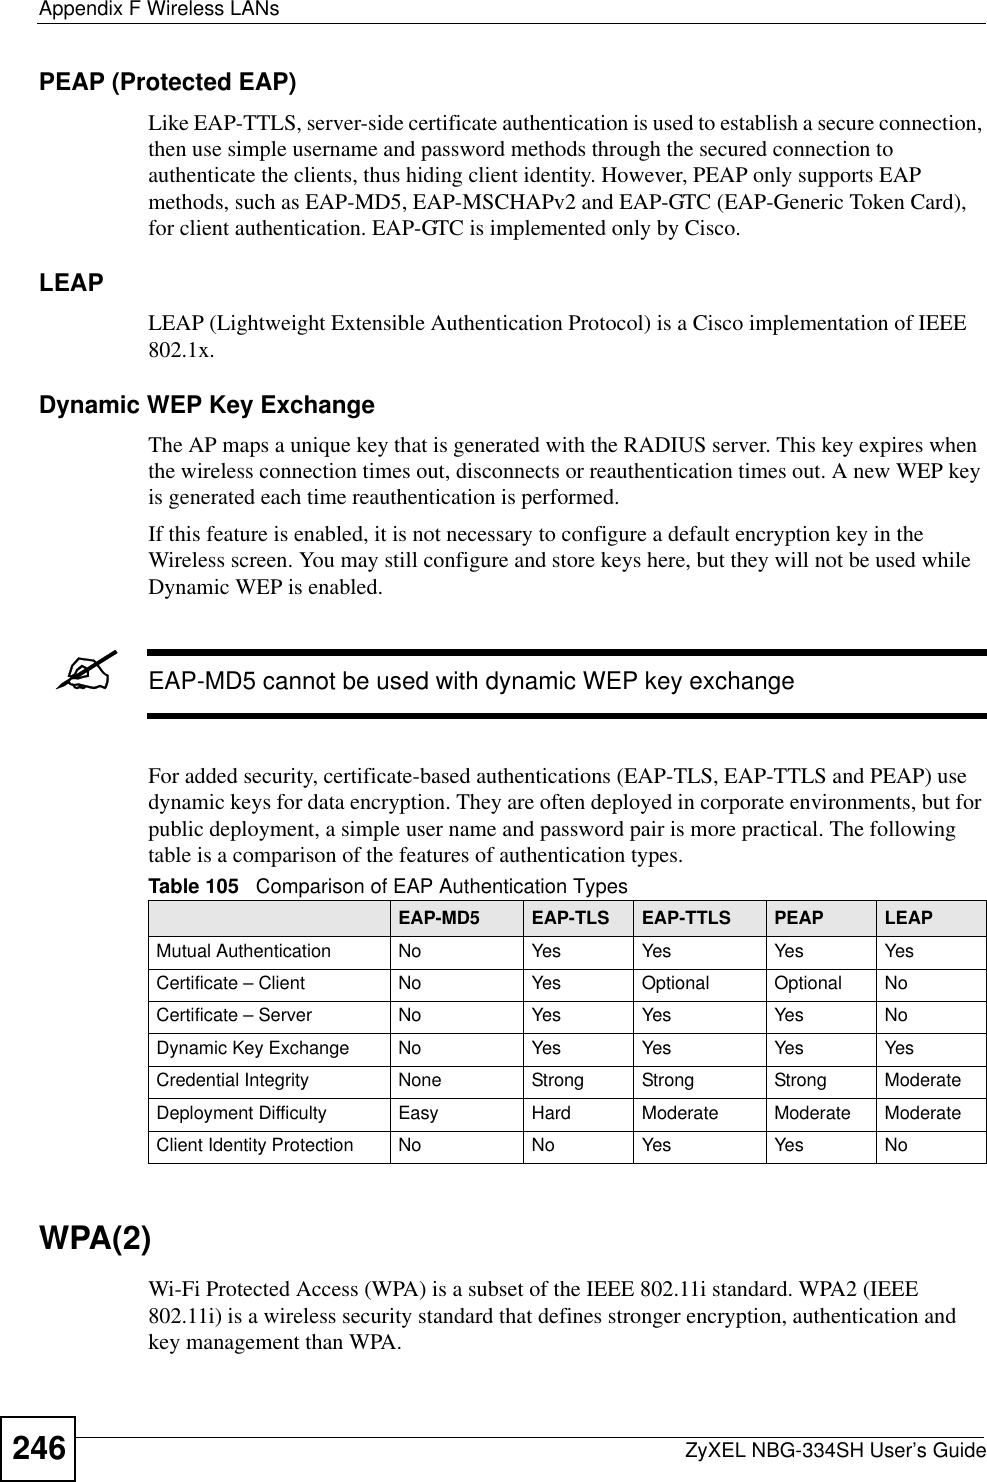
![Chapter 12 Content FilteringZyXEL NBG-334SH User’s Guide130The following table describes the labels in this screen.12.6 Customizing Keyword Blocking URL CheckingYou can use commands to set how much of a website’s URL the content filter is to check for keyword blocking. See the appendices for information on how to access and use the command interpreter.12.6.1 Domain Name or IP Address URL CheckingBy default, the ZyXEL Device checks the URL’s domain name or IP address when performing keyword blocking.This means that the ZyXEL Device checks the characters that come before the first slash in the URL.For example, with the URL www.zyxel.com.tw/news/pressroom.php, content filtering only searches for keywords within www.zyxel.com.tw.12.6.2 Full Path URL CheckingFull path URL checking has the ZyXEL Device check the characters that come before the last slash in the URL.For example, with the URL www.zyxel.com.tw/news/pressroom.php, full path URL checking searches for keywords within www.zyxel.com.tw/news/.Use the ip urlfilter customize actionFlags 6 [disable | enable]command to extend (or not extend) the keyword blocking search to include the URL's full path.12.6.3 File Name URL CheckingFilename URL checking has the ZyXEL Device check all of the characters in the URL.Table 49 Content Filter: ScheduleLABEL DESCRIPTIONDay to Block Select check boxes for the days that you want the ZyXEL Device to perform content filtering. Select the Everyday check box to have content filtering turned on all days of the week.Time of Day to Block (24-Hour Format) Time of Day to Block allows the administrator to define during which time periods content filtering is enabled. Time of Day to Block restrictions only apply to the keywords (see above). Restrict web server data, such as ActiveX, Java, Cookies and Web Proxy are not affected.Select All Day to have content filtering always active on the days selected in Day to Block with time of day limitations not enforced.Select From and enter the time period, in 24-hour format, during which content filtering will be enforced. Apply Click Apply to save your customized settings and exit this screen.Reset Click Reset to begin configuring this screen afresh](https://usermanual.wiki/ZyXEL-Communications/NBG334SH/User-Guide-749078-Page-130.png)
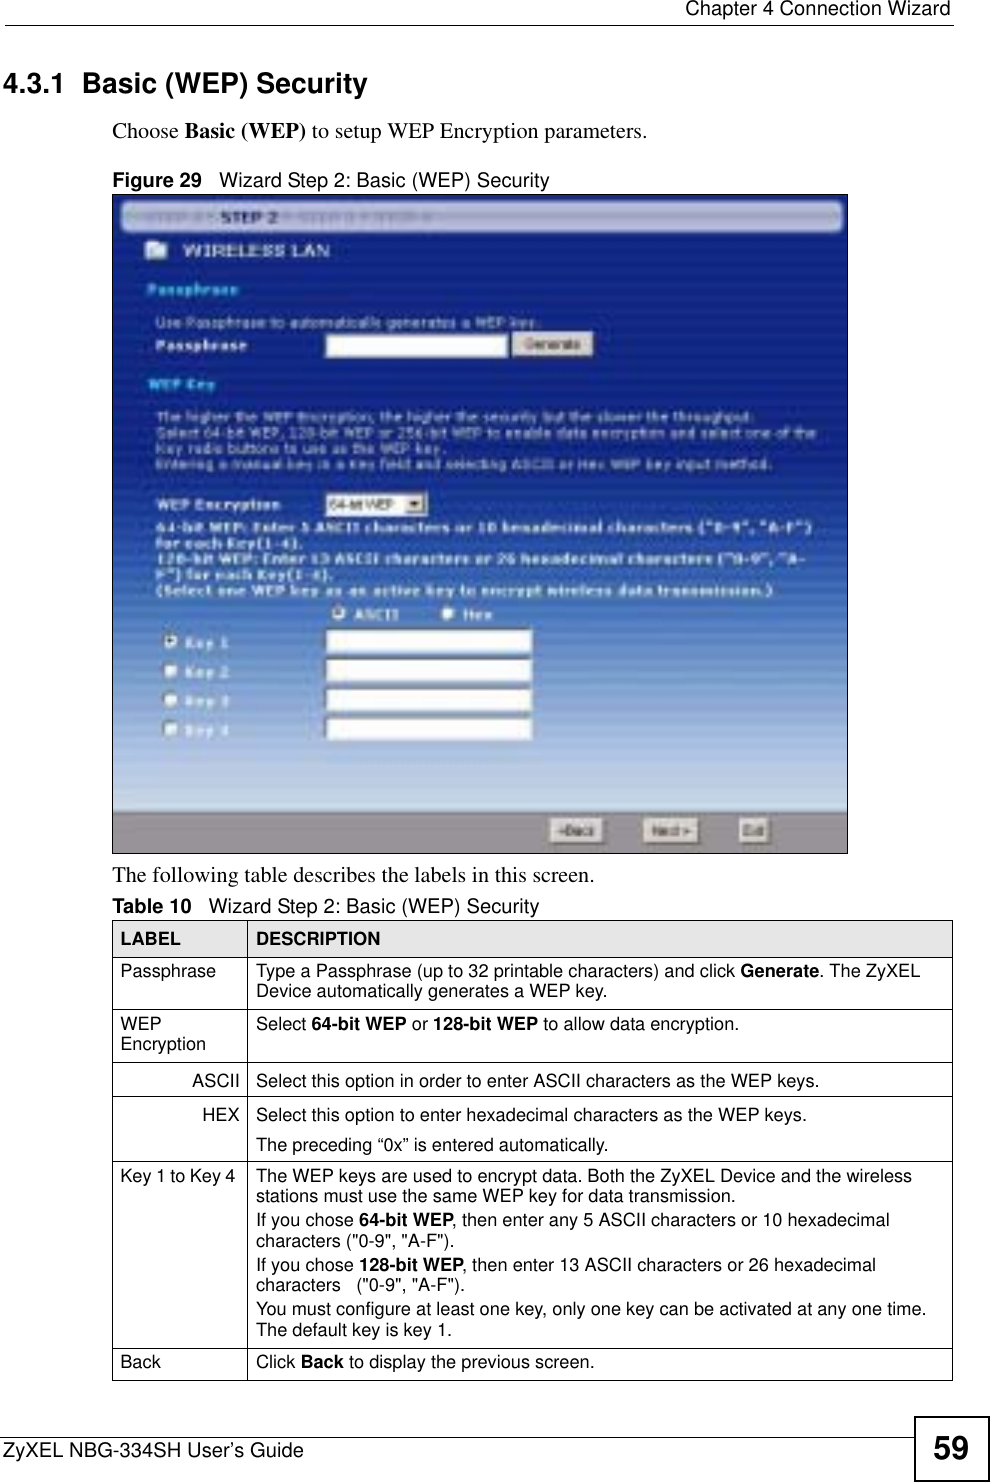
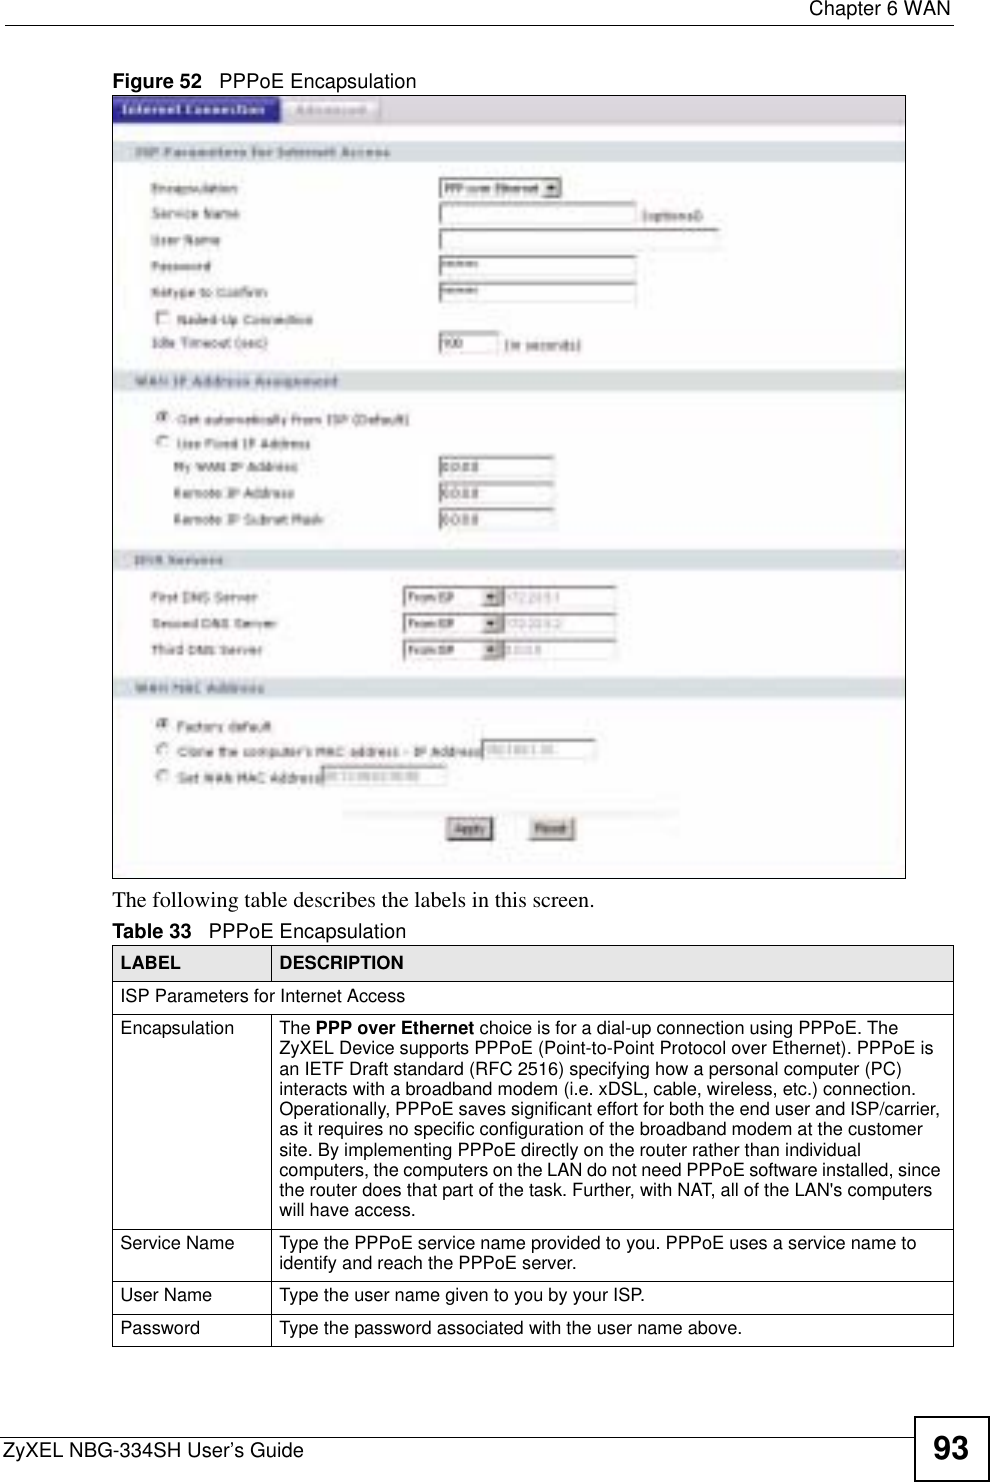
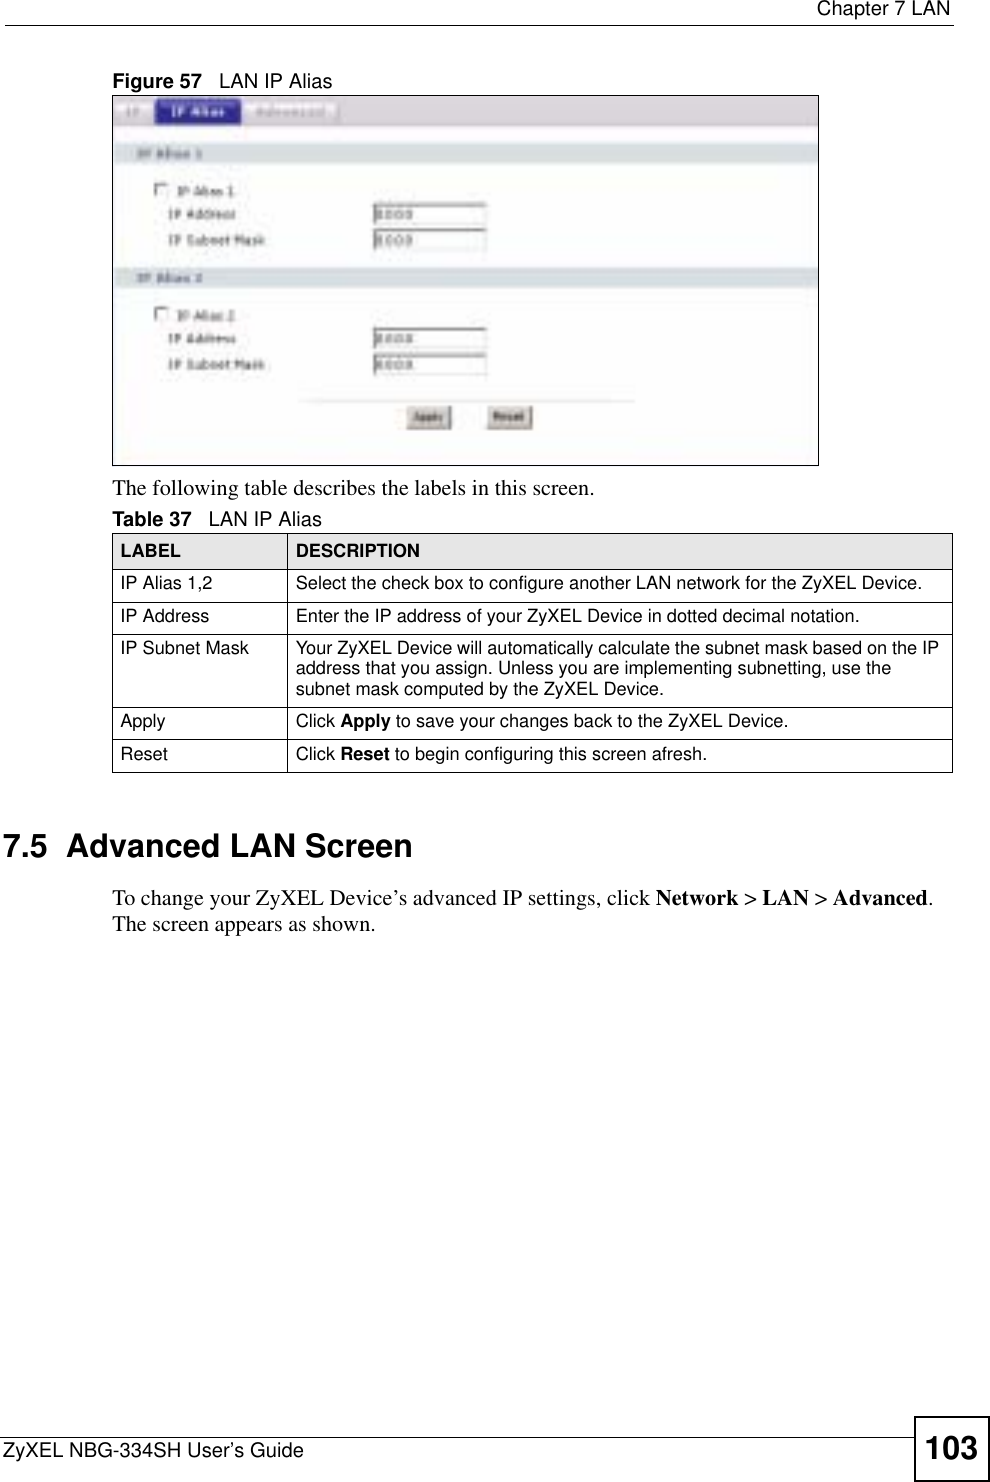
![Chapter 12 Content FilteringZyXEL NBG-334SH User’s Guide 131For example, filename URL checking searches for keywords within the URL www.zyxel.com.tw/news/pressroom.php.Use the ip urlfilter customize actionFlags 8 [disable | enable] command to extend (or not extend) the keyword blocking search to include the URL's complete filename.](https://usermanual.wiki/ZyXEL-Communications/NBG334SH/User-Guide-749078-Page-131.png)


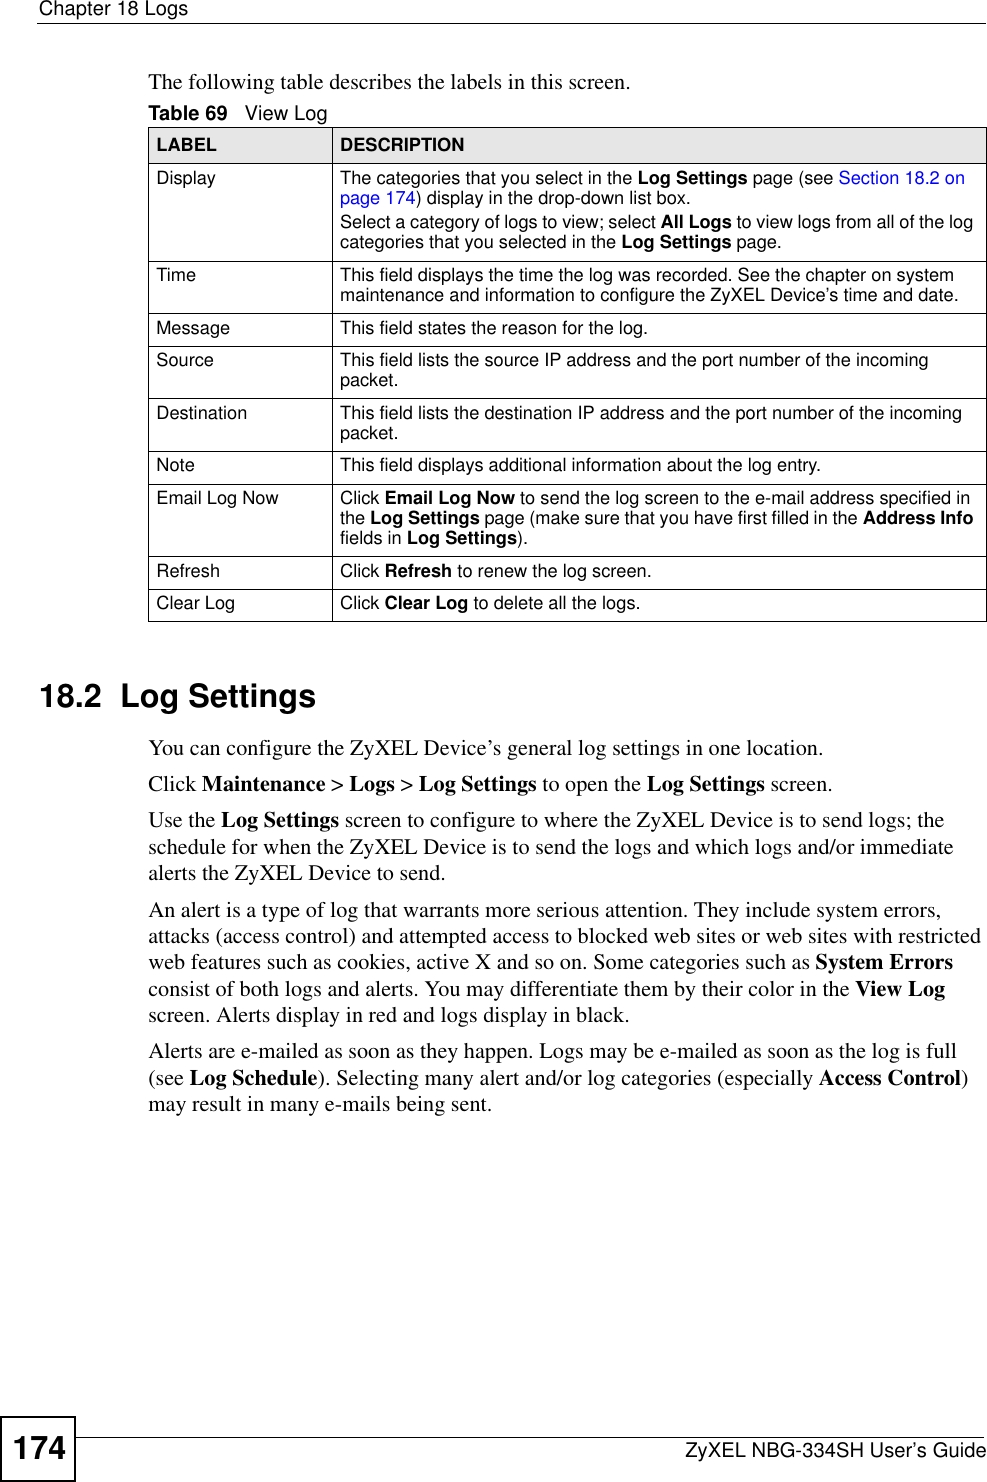
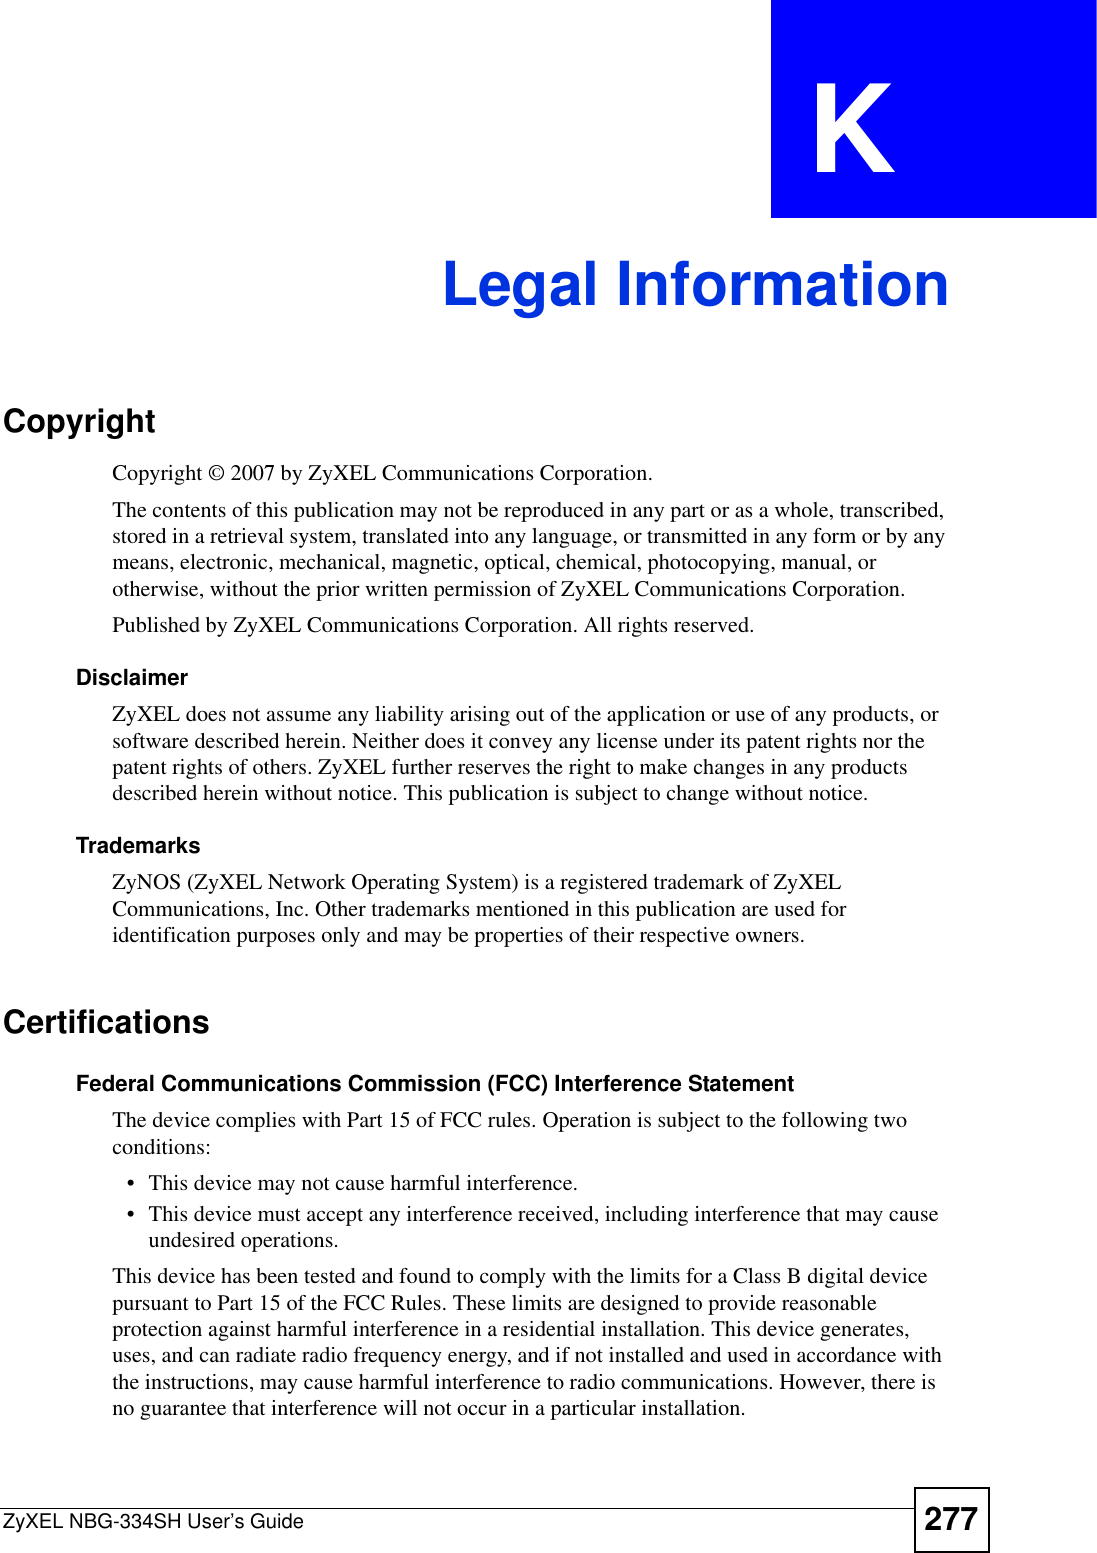
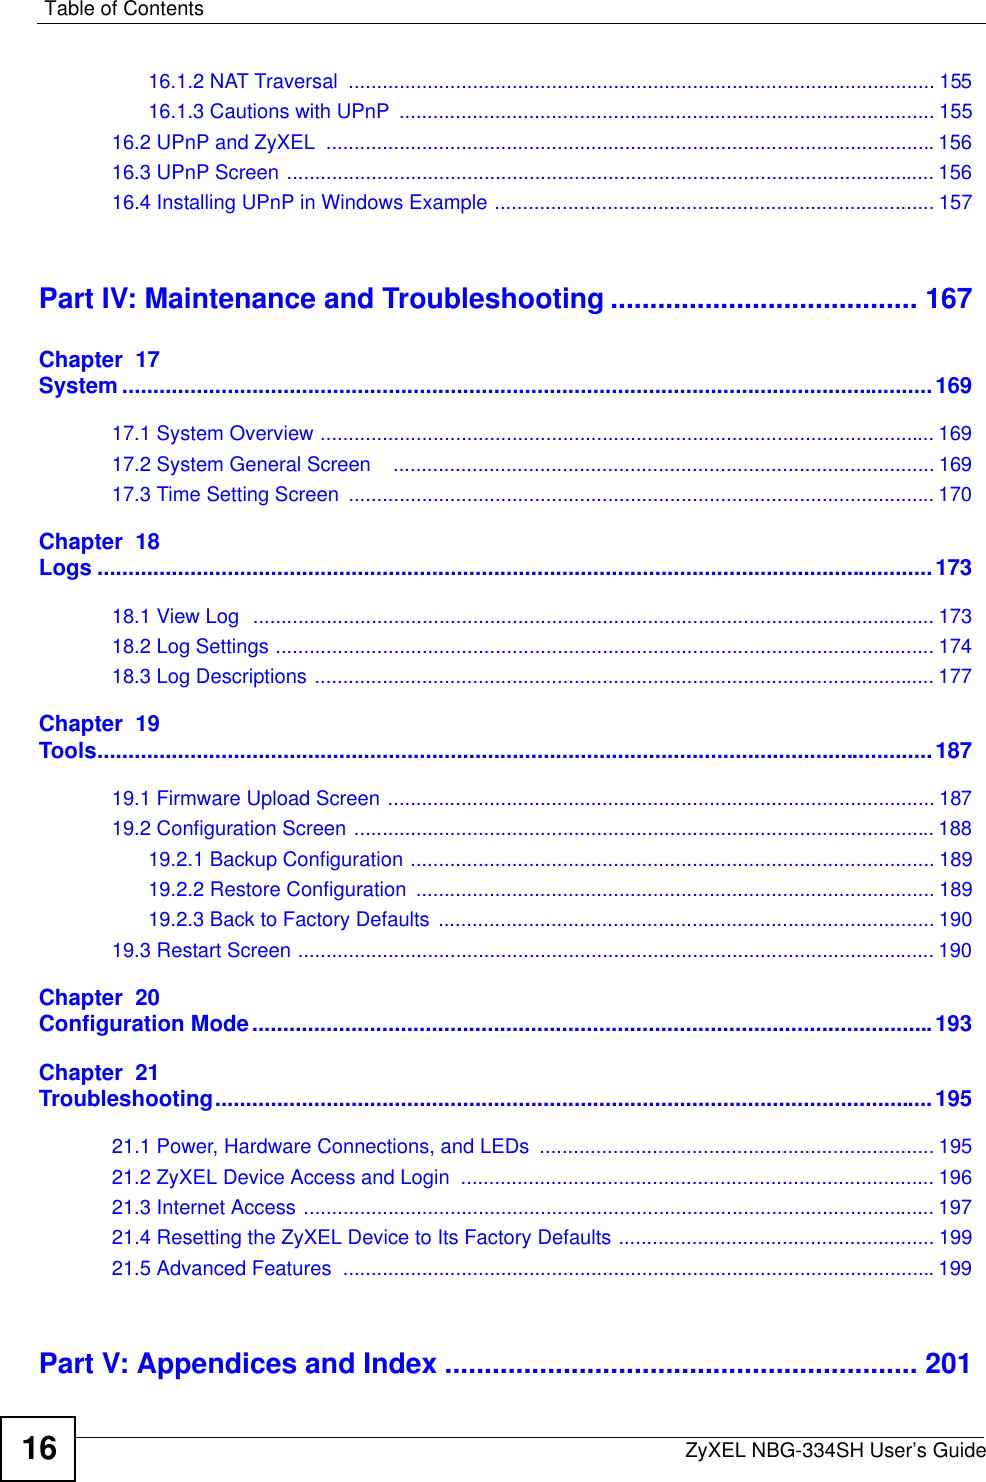
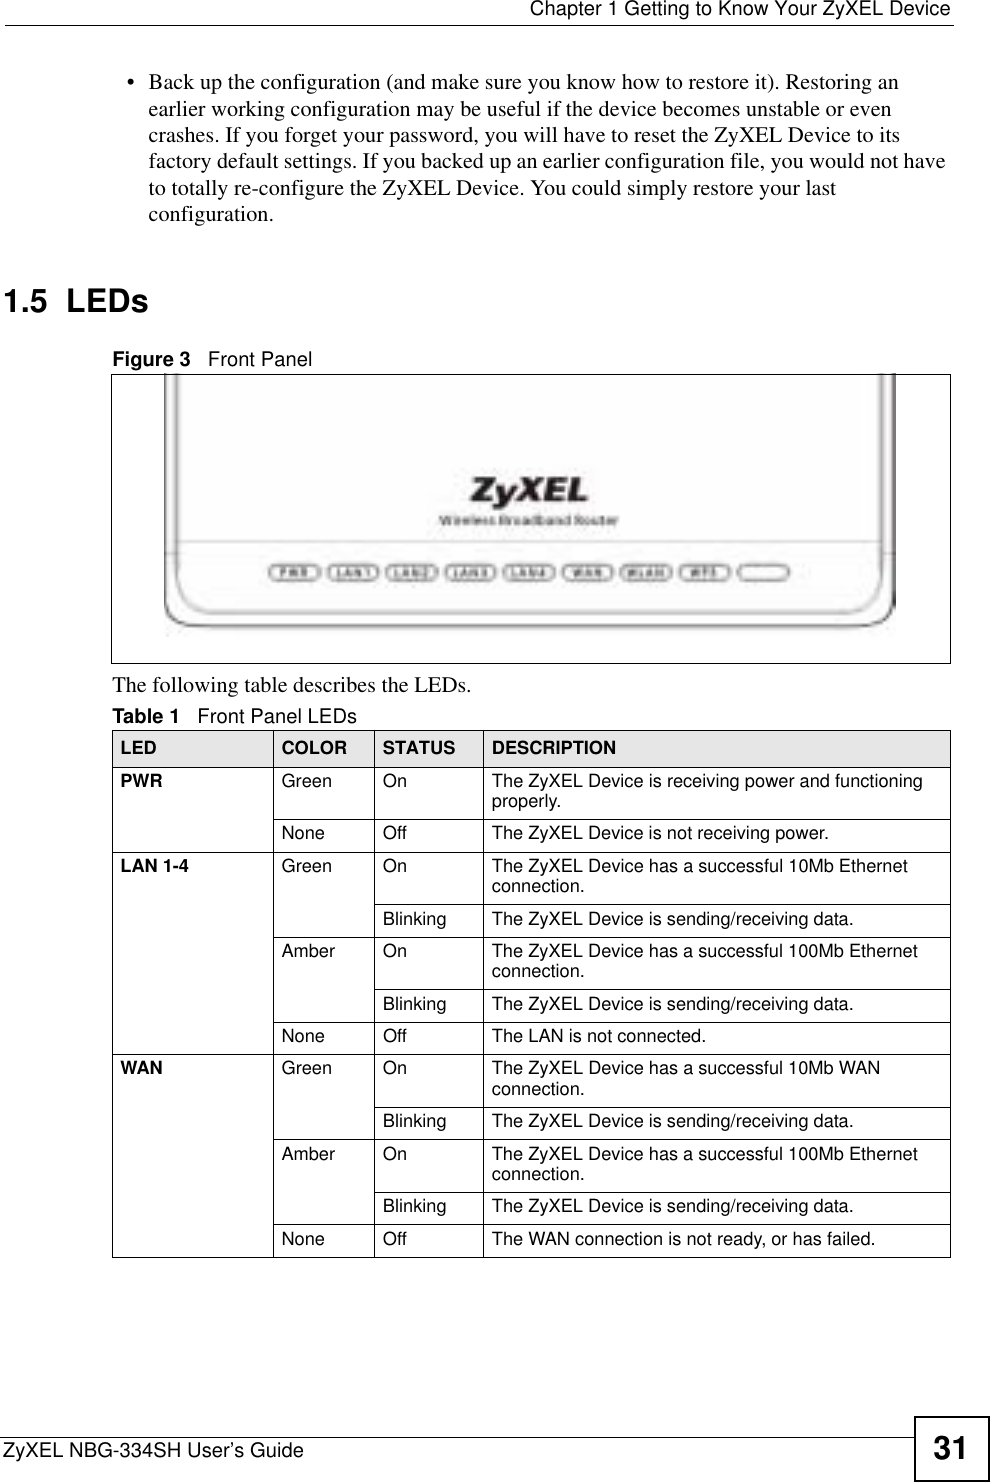
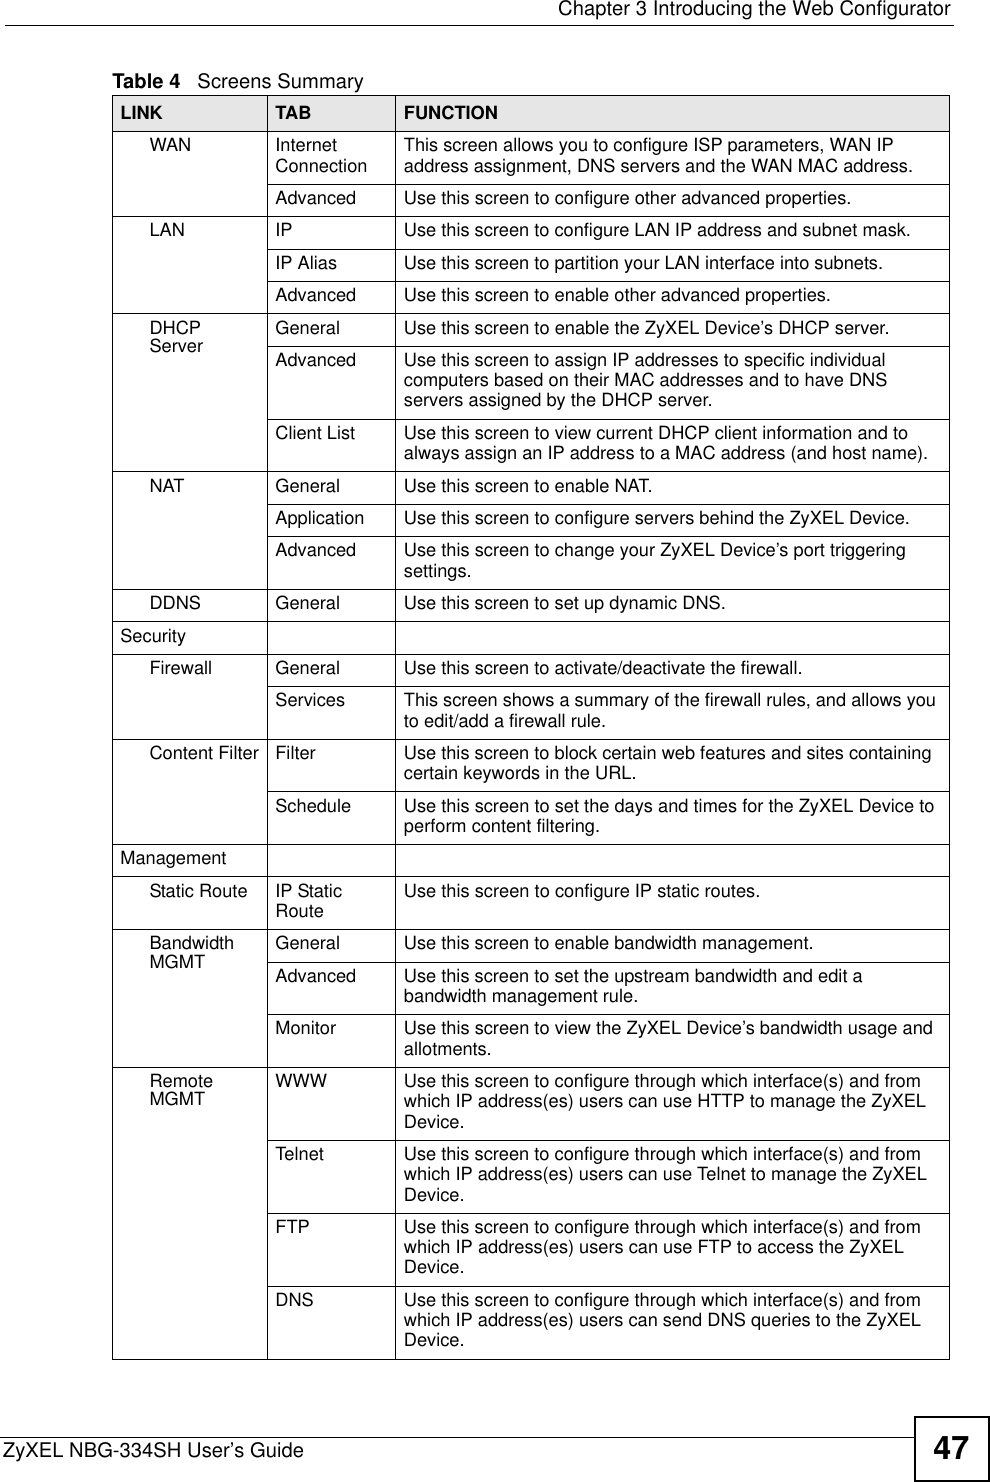
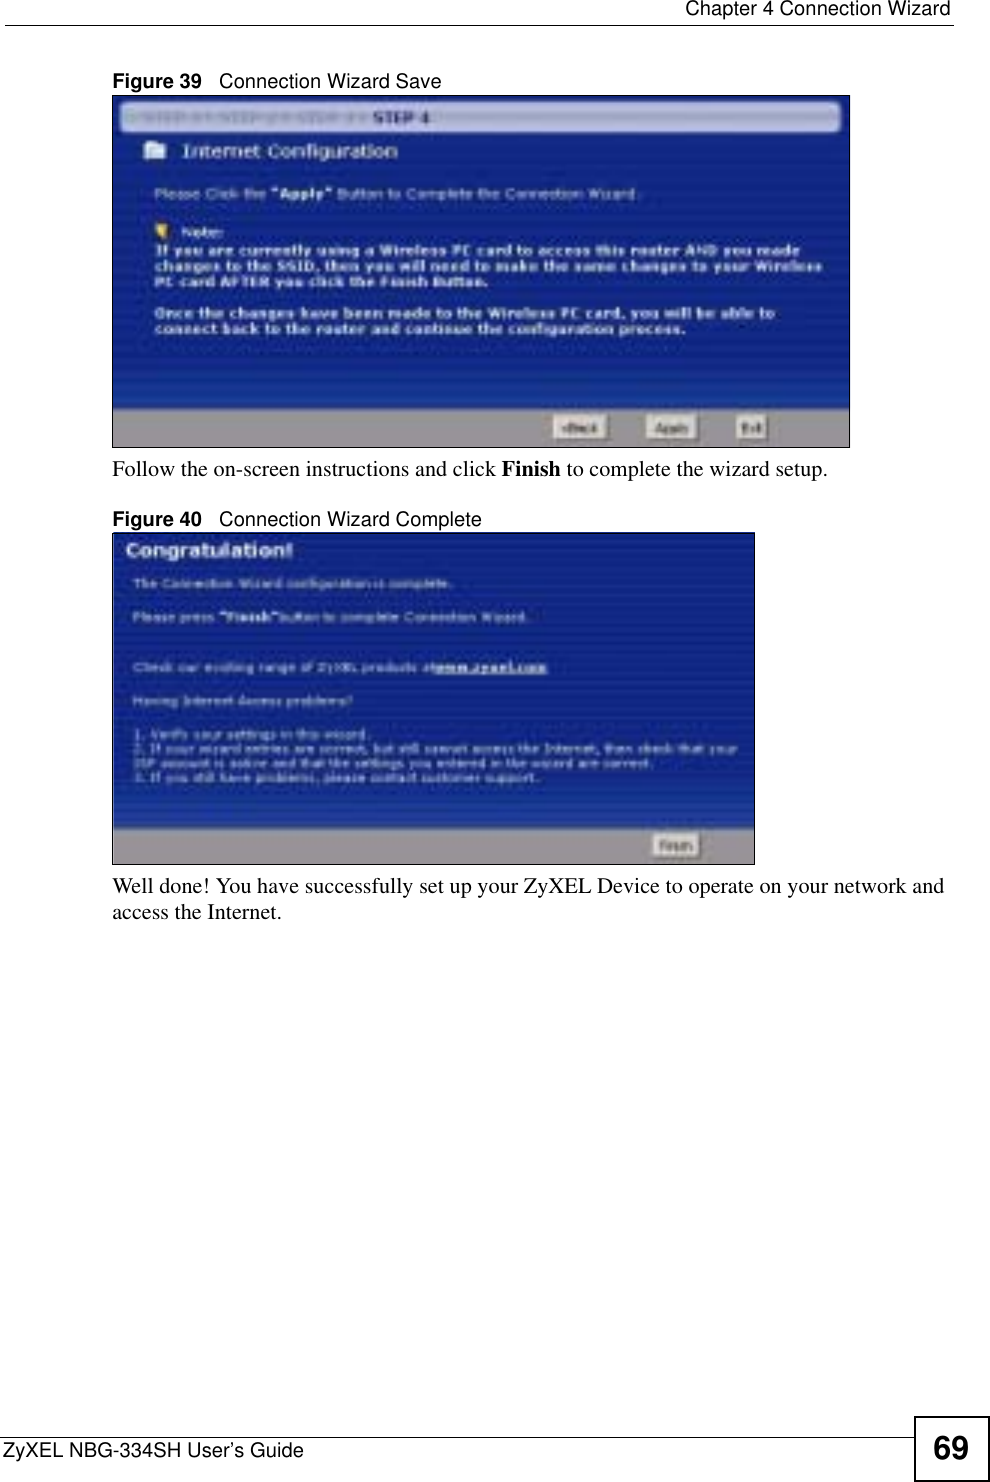
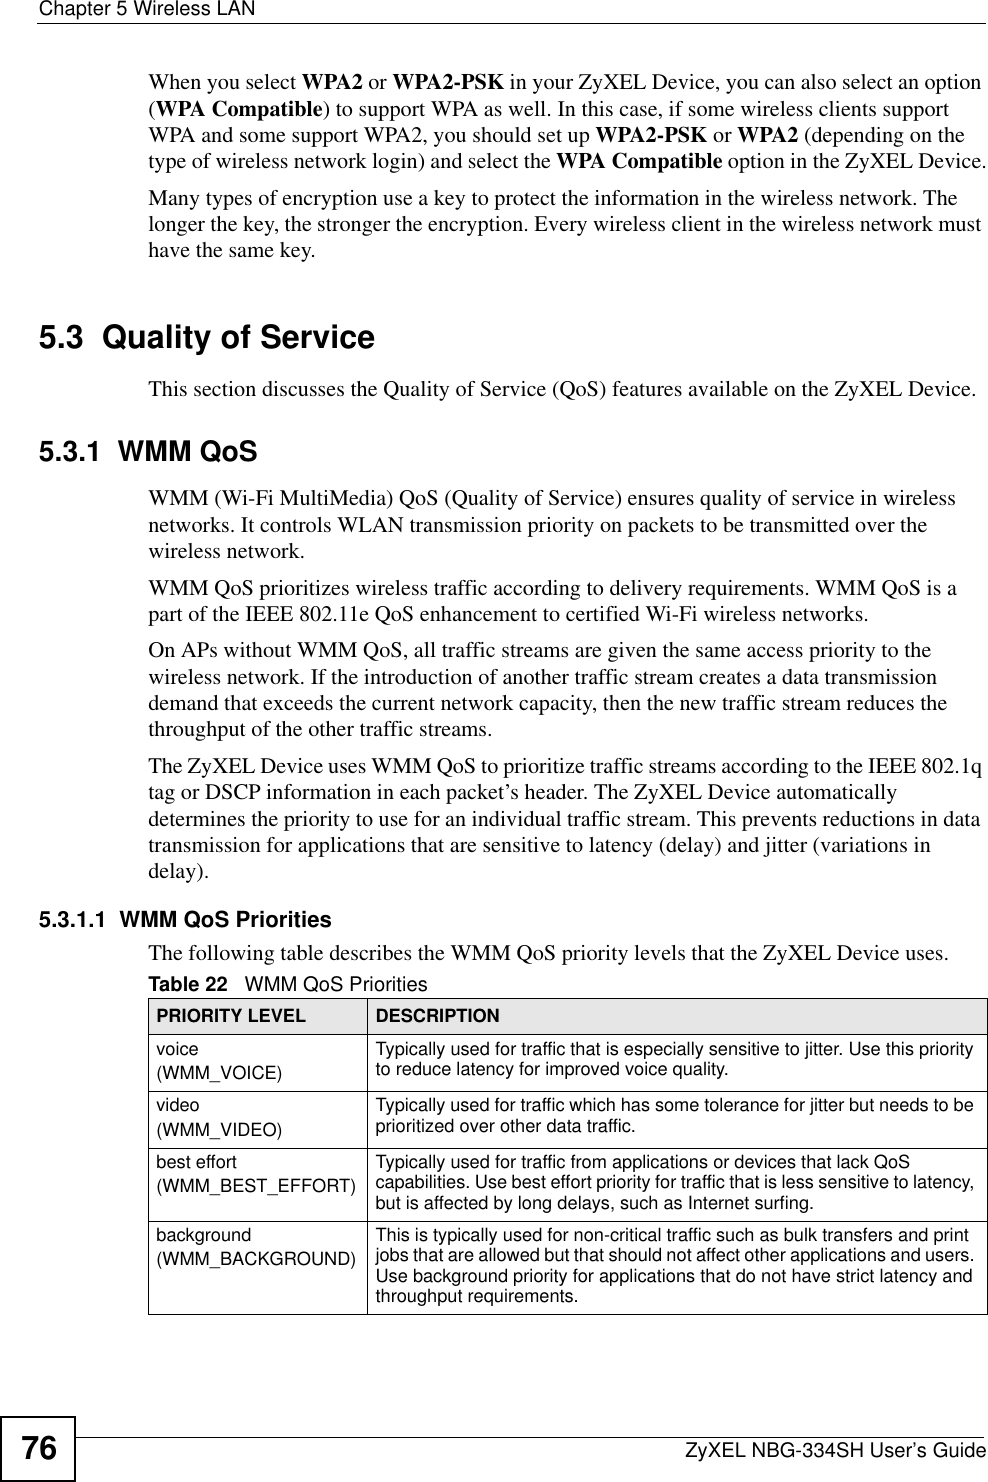
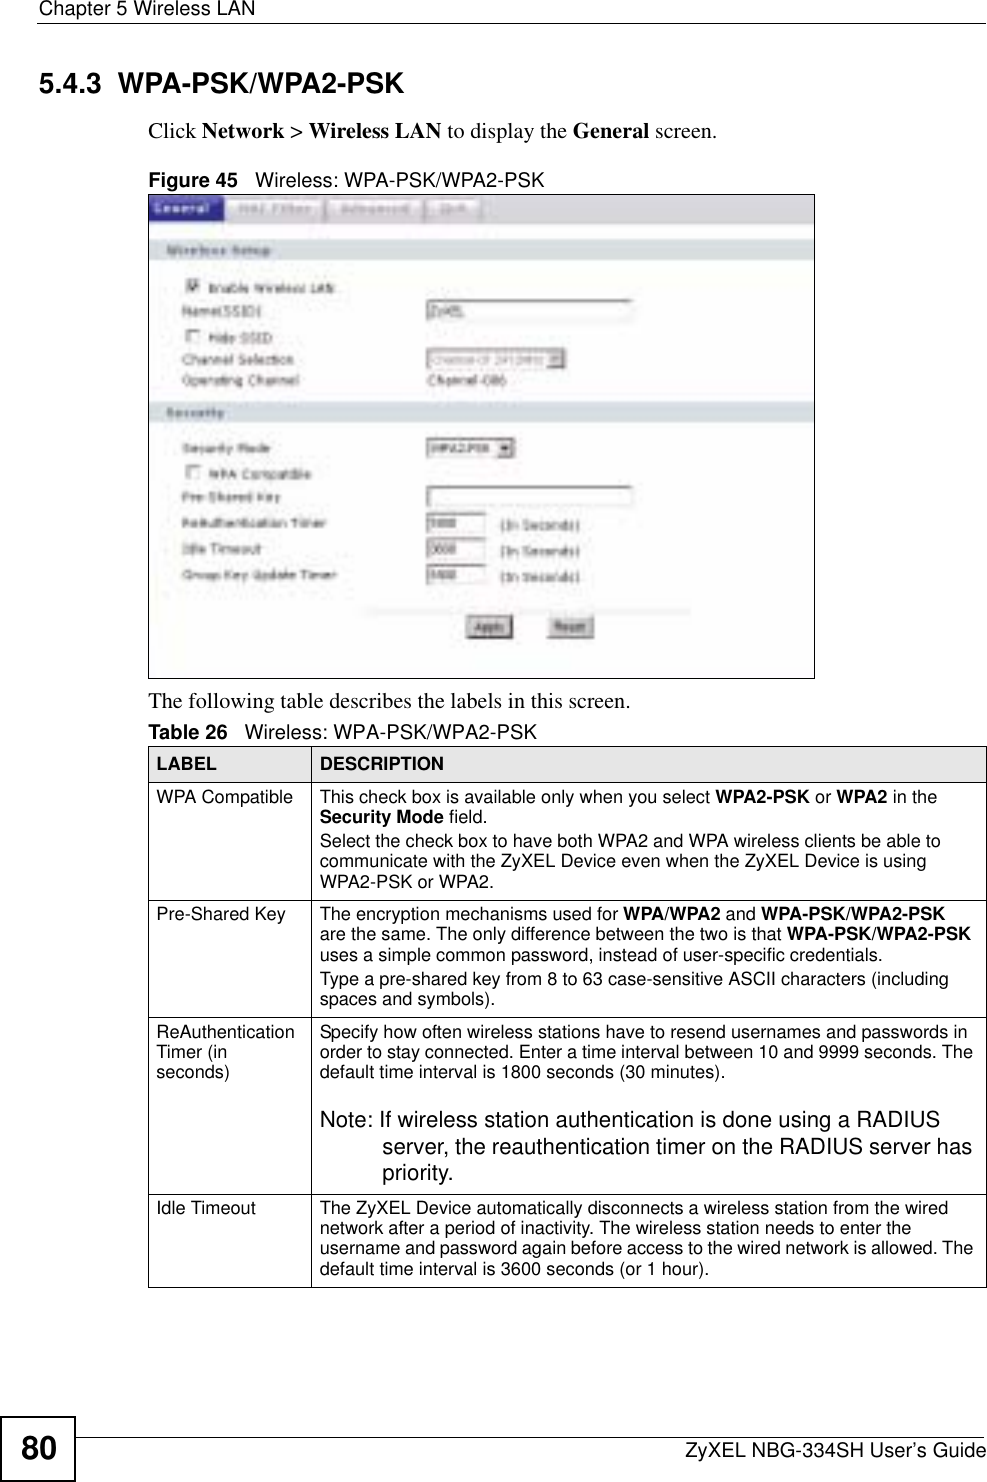
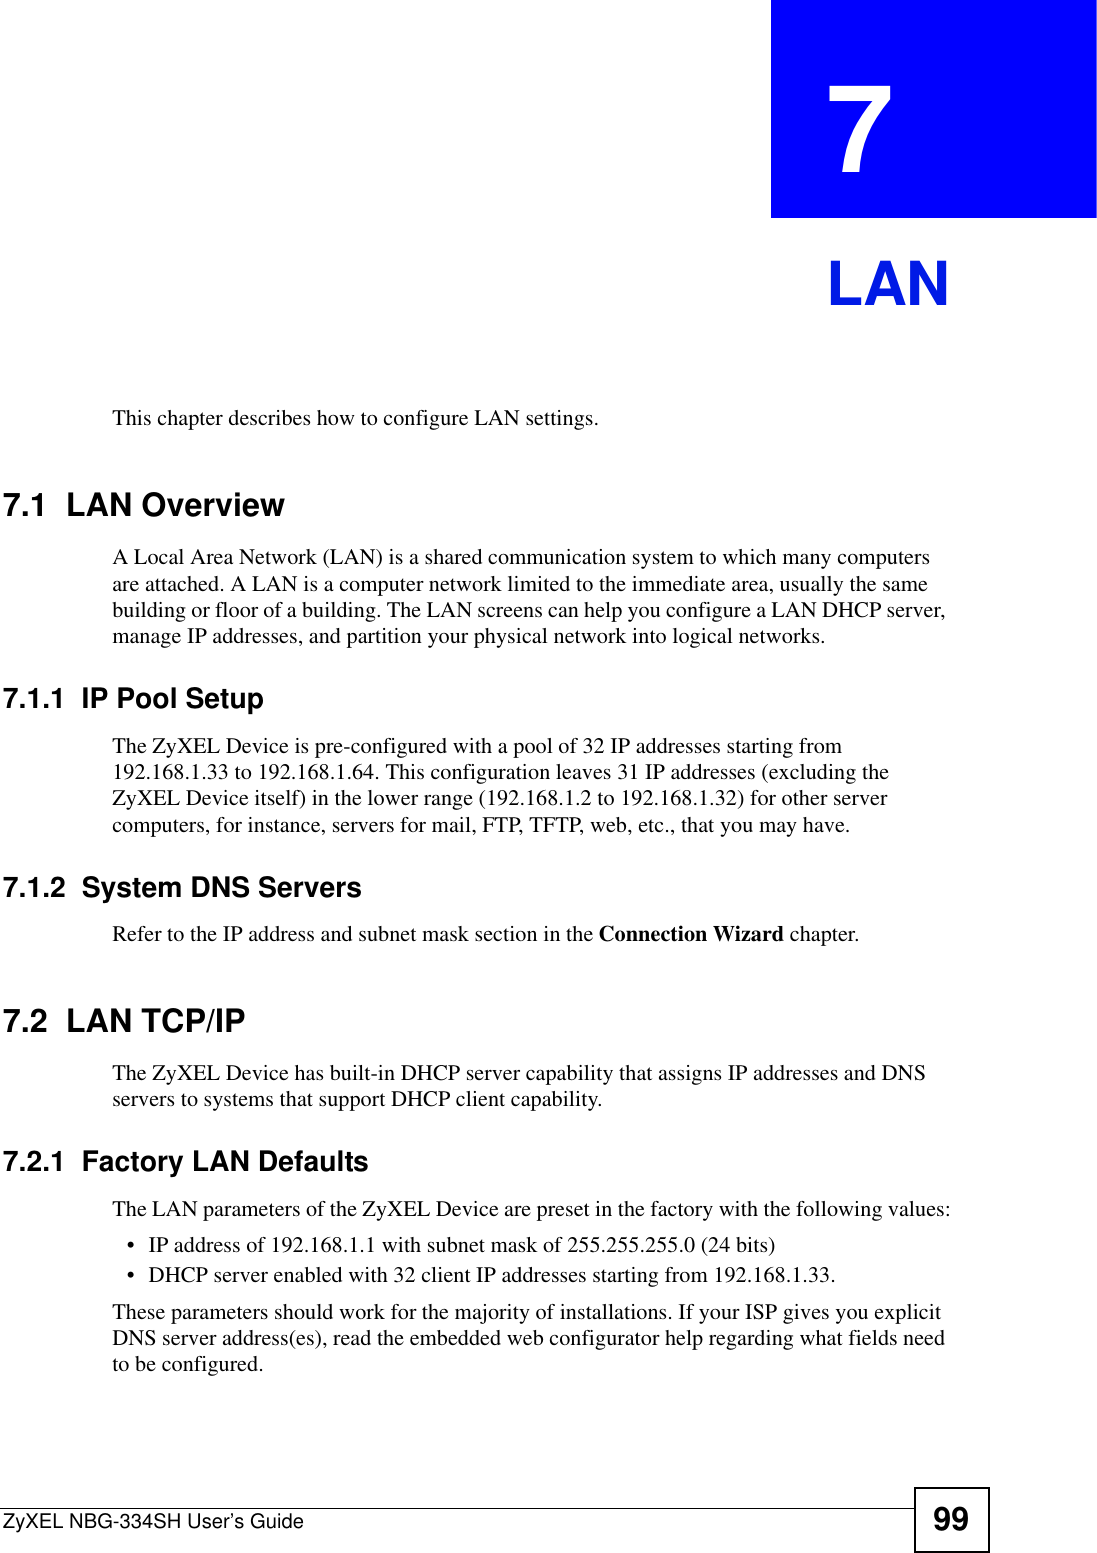
![Chapter 18 LogsZyXEL NBG-334SH User’s Guide178Table 72 System Error LogsLOG MESSAGE DESCRIPTION%s exceeds the max. number of session per host!This attempt to create a NAT session exceeds the maximum number of NAT session table entries allowed to be created per host.setNetBIOSFilter: calloc errorThe router failed to allocate memory for the NetBIOS filter settings.readNetBIOSFilter: calloc errorThe router failed to allocate memory for the NetBIOS filter settings.WAN connection is down. A WAN connection is down. You cannot access the network through this interface.Table 73 Access Control LogsLOG MESSAGE DESCRIPTIONFirewall default policy: [TCP | UDP | IGMP | ESP | GRE | OSPF] <Packet Direction>Attempted TCP/UDP/IGMP/ESP/GRE/OSPF access matched the default policy and was blocked or forwarded according to the default policy’s setting.Firewall rule [NOT] match:[TCP | UDP | IGMP | ESP | GRE | OSPF] <Packet Direction>, <rule:%d>Attempted TCP/UDP/IGMP/ESP/GRE/OSPF access matched (or did not match) a configured firewall rule (denoted by its number) and was blocked or forwarded according to the rule. Triangle route packet forwarded: [TCP | UDP | IGMP | ESP | GRE | OSPF]The firewall allowed a triangle route session to pass through.Packet without a NAT table entry blocked: [TCP | UDP | IGMP | ESP | GRE | OSPF]The router blocked a packet that didn't have a corresponding NAT table entry.Router sent blocked web site message: TCPThe router sent a message to notify a user that the router blocked access to a web site that the user requested.Table 74 TCP Reset LogsLOG MESSAGE DESCRIPTIONUnder SYN flood attack, sent TCP RSTThe router sent a TCP reset packet when a host was under a SYN flood attack (the TCP incomplete count is per destination host.) Exceed TCP MAX incomplete, sent TCP RSTThe router sent a TCP reset packet when the number of TCP incomplete connections exceeded the user configured threshold. (the TCP incomplete count is per destination host.) Note: Refer to TCP Maximum Incomplete in the Firewall Attack Alerts screen. Peer TCP state out of order, sent TCP RSTThe router sent a TCP reset packet when a TCP connection state was out of order.Note: The firewall refers to RFC793 Figure 6 to check the TCP state.](https://usermanual.wiki/ZyXEL-Communications/NBG334SH/User-Guide-749078-Page-178.png)
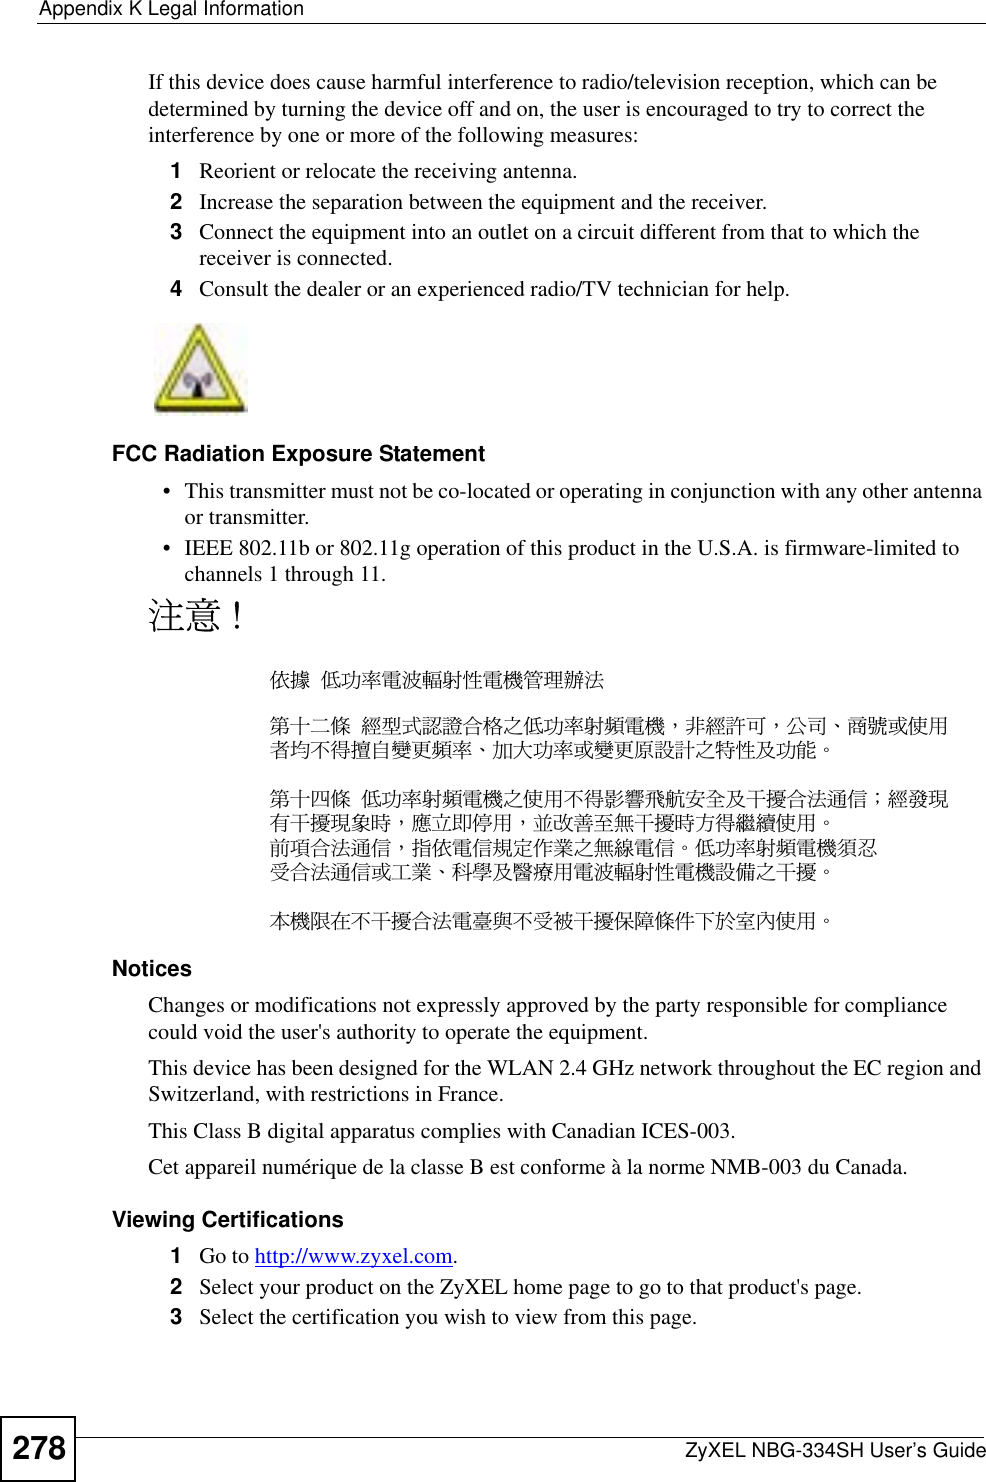
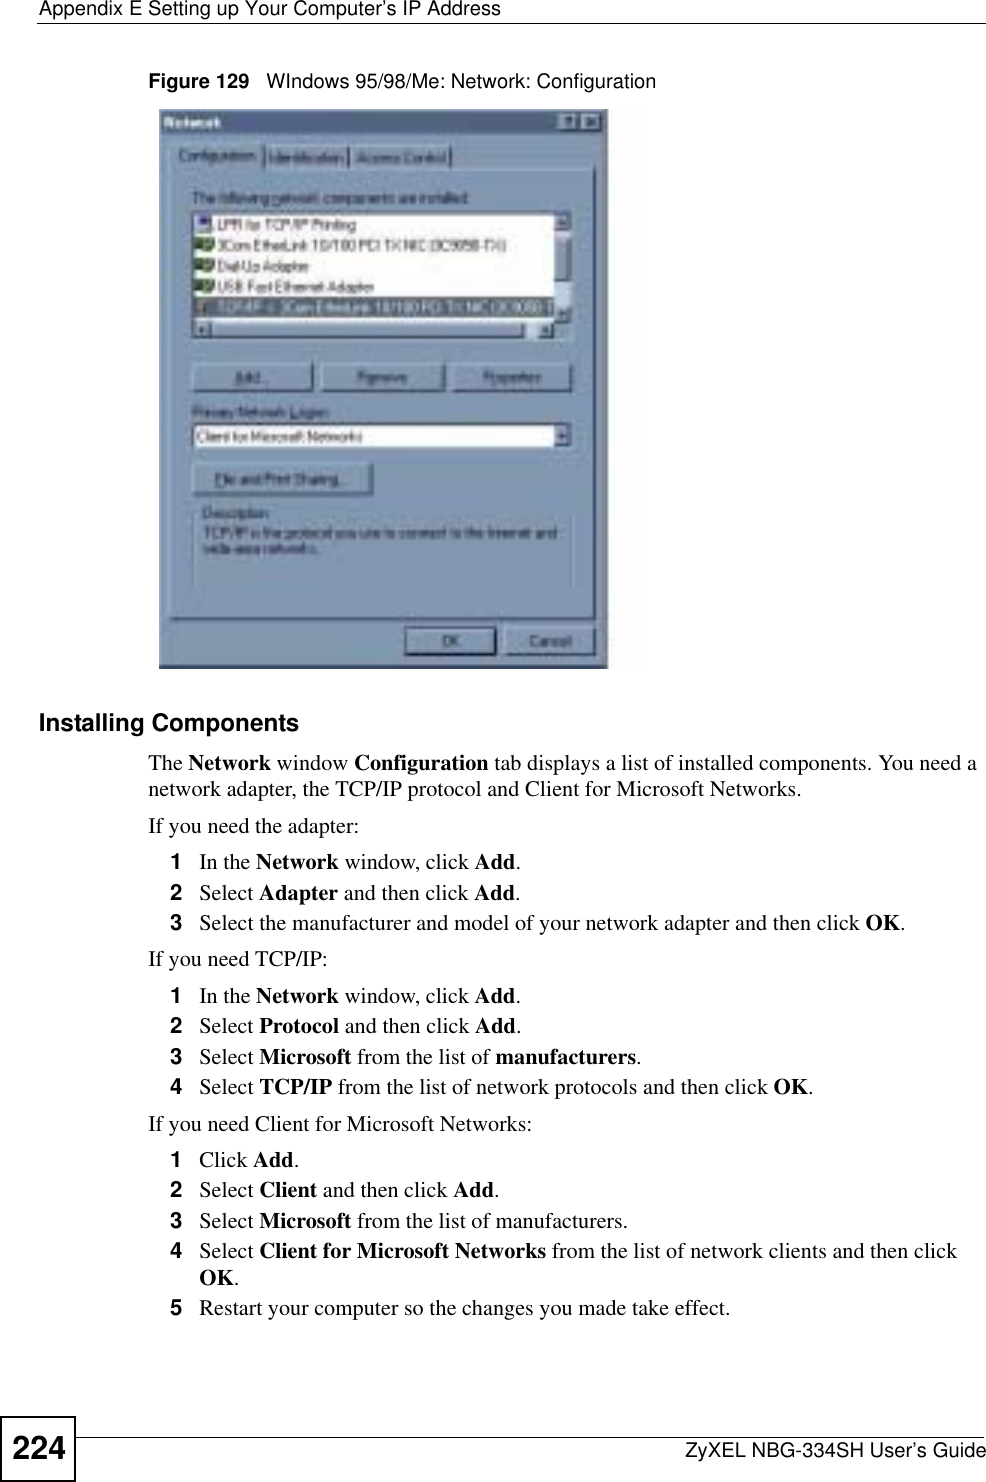
![Chapter 18 LogsZyXEL NBG-334SH User’s Guide 179Firewall session time out, sent TCP RSTThe router sent a TCP reset packet when a dynamic firewall session timed out.The default timeout values are as follows:ICMP idle timeout: 3 minutesUDP idle timeout: 3 minutesTCP connection (three way handshaking) timeout: 270 secondsTCP FIN-wait timeout: 2 MSL (Maximum Segment Lifetime set in the TCP header).TCP idle (established) timeout (s): 150 minutesTCP reset timeout: 10 secondsExceed MAX incomplete, sent TCP RSTThe router sent a TCP reset packet when the number of incomplete connections (TCP and UDP) exceeded the user-configured threshold. (Incomplete count is for all TCP and UDP connections through the firewall.)Note: When the number of incomplete connections (TCP + UDP) > “Maximum Incomplete High”, the router sends TCP RST packets for TCP connections and destroys TOS (firewall dynamic sessions) until incomplete connections < “Maximum Incomplete Low”.Access block, sent TCP RSTThe router sends a TCP RST packet and generates this log if you turn on the firewall TCP reset mechanism (via CI command: "sys firewall tcprst").Table 75 Packet Filter LogsLOG MESSAGE DESCRIPTION[TCP | UDP | ICMP | IGMP | Generic] packet filter matched (set:%d, rule:%d)Attempted access matched a configured filter rule (denoted by its set and rule number) and was blocked or forwarded according to the rule.Table 76 ICMP LogsLOG MESSAGE DESCRIPTIONFirewall default policy: ICMP <Packet Direction>, <type:%d>, <code:%d>ICMP access matched the default policy and was blocked or forwarded according to the user's setting. For type and code details, see Table 85 on page 184.Firewall rule [NOT] match: ICMP <Packet Direction>, <rule:%d>, <type:%d>, <code:%d>ICMP access matched (or didn’t match) a firewall rule (denoted by its number) and was blocked or forwarded according to the rule. For type and code details, see Table 85 on page 184.Triangle route packet forwarded: ICMPThe firewall allowed a triangle route session to pass through.Packet without a NAT table entry blocked: ICMPThe router blocked a packet that didn’t have a corresponding NAT table entry.Unsupported/out-of-order ICMP: ICMPThe firewall does not support this kind of ICMP packets or the ICMP packets are out of order.Router reply ICMP packet: ICMP The router sent an ICMP reply packet to the sender.Table 74 TCP Reset Logs (continued)LOG MESSAGE DESCRIPTION](https://usermanual.wiki/ZyXEL-Communications/NBG334SH/User-Guide-749078-Page-179.png)
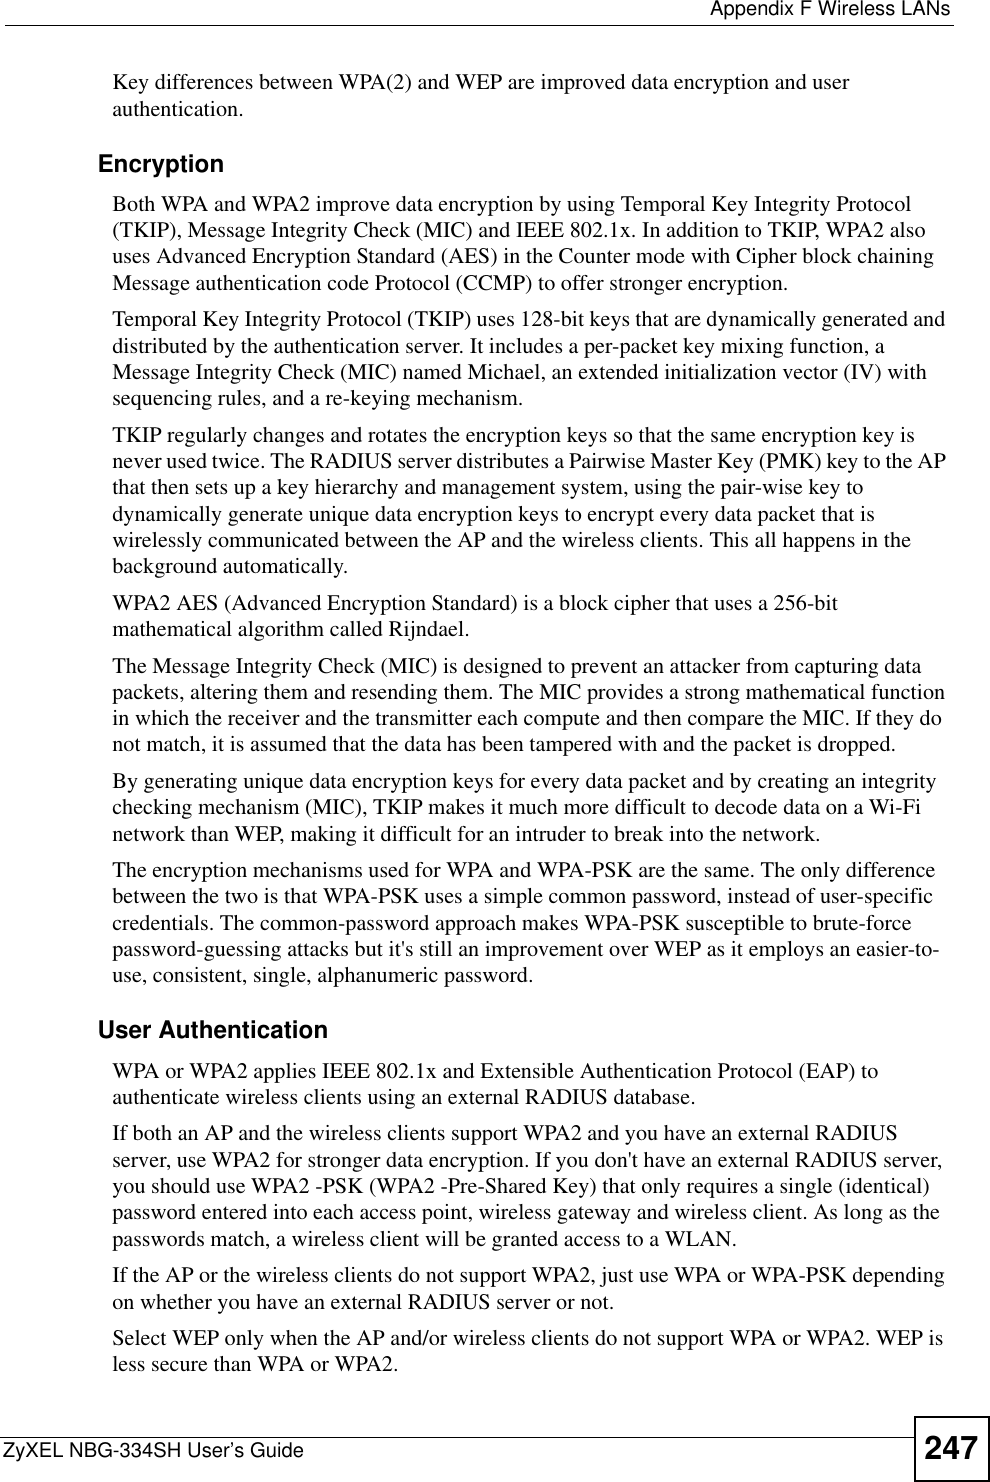
![Chapter 18 LogsZyXEL NBG-334SH User’s Guide 181%s: Proxy mode detectedThe router detected proxy mode in the packet.%s The content filter server responded that the web site is in the blocked category list, but it did not return the category type.%s:%s The content filter server responded that the web site is in the blocked category list, and returned the category type.%s(cache hit) The system detected that the web site is in the blocked list from the local cache, but does not know the category type.%s:%s(cache hit) The system detected that the web site is in blocked list from the local cache, and knows the category type.%s: Trusted Web site The web site is in a trusted domain.%s When the content filter is not on according to the time schedule or you didn't select the "Block Matched Web Site” check box, the system forwards the web content.Waiting content filter server timeoutThe external content filtering server did not respond within the timeout period.DNS resolving failed The ZyXEL Device cannot get the IP address of the external content filtering via DNS query.Creating socket failed The ZyXEL Device cannot issue a query because TCP/IP socket creation failed, port:port number.Connecting to content filter server failThe connection to the external content filtering server failed.License key is invalid The external content filtering license key is invalid.Table 81 Attack LogsLOG MESSAGE DESCRIPTIONattack [TCP | UDP | IGMP | ESP | GRE | OSPF]The firewall detected a TCP/UDP/IGMP/ESP/GRE/OSPF attack.attack ICMP (type:%d, code:%d)The firewall detected an ICMP attack. For type and code details, see Table 85 on page 184.land [TCP | UDP | IGMP | ESP | GRE | OSPF]The firewall detected a TCP/UDP/IGMP/ESP/GRE/OSPF land attack.land ICMP (type:%d, code:%d)The firewall detected an ICMP land attack. For type and code details, see Table 85 on page 184.ip spoofing - WAN [TCP | UDP | IGMP | ESP | GRE | OSPF]The firewall detected an IP spoofing attack on the WAN port.ip spoofing - WAN ICMP (type:%d, code:%d)The firewall detected an ICMP IP spoofing attack on the WAN port. For type and code details, see Table 85 on page 184.icmp echo: ICMP (type:%d, code:%d)The firewall detected an ICMP echo attack. For type and code details, see Table 85 on page 184.syn flood TCP The firewall detected a TCP syn flood attack.ports scan TCP The firewall detected a TCP port scan attack.teardrop TCP The firewall detected a TCP teardrop attack.Table 80 Content Filtering Logs (continued)LOG MESSAGE DESCRIPTION](https://usermanual.wiki/ZyXEL-Communications/NBG334SH/User-Guide-749078-Page-181.png)
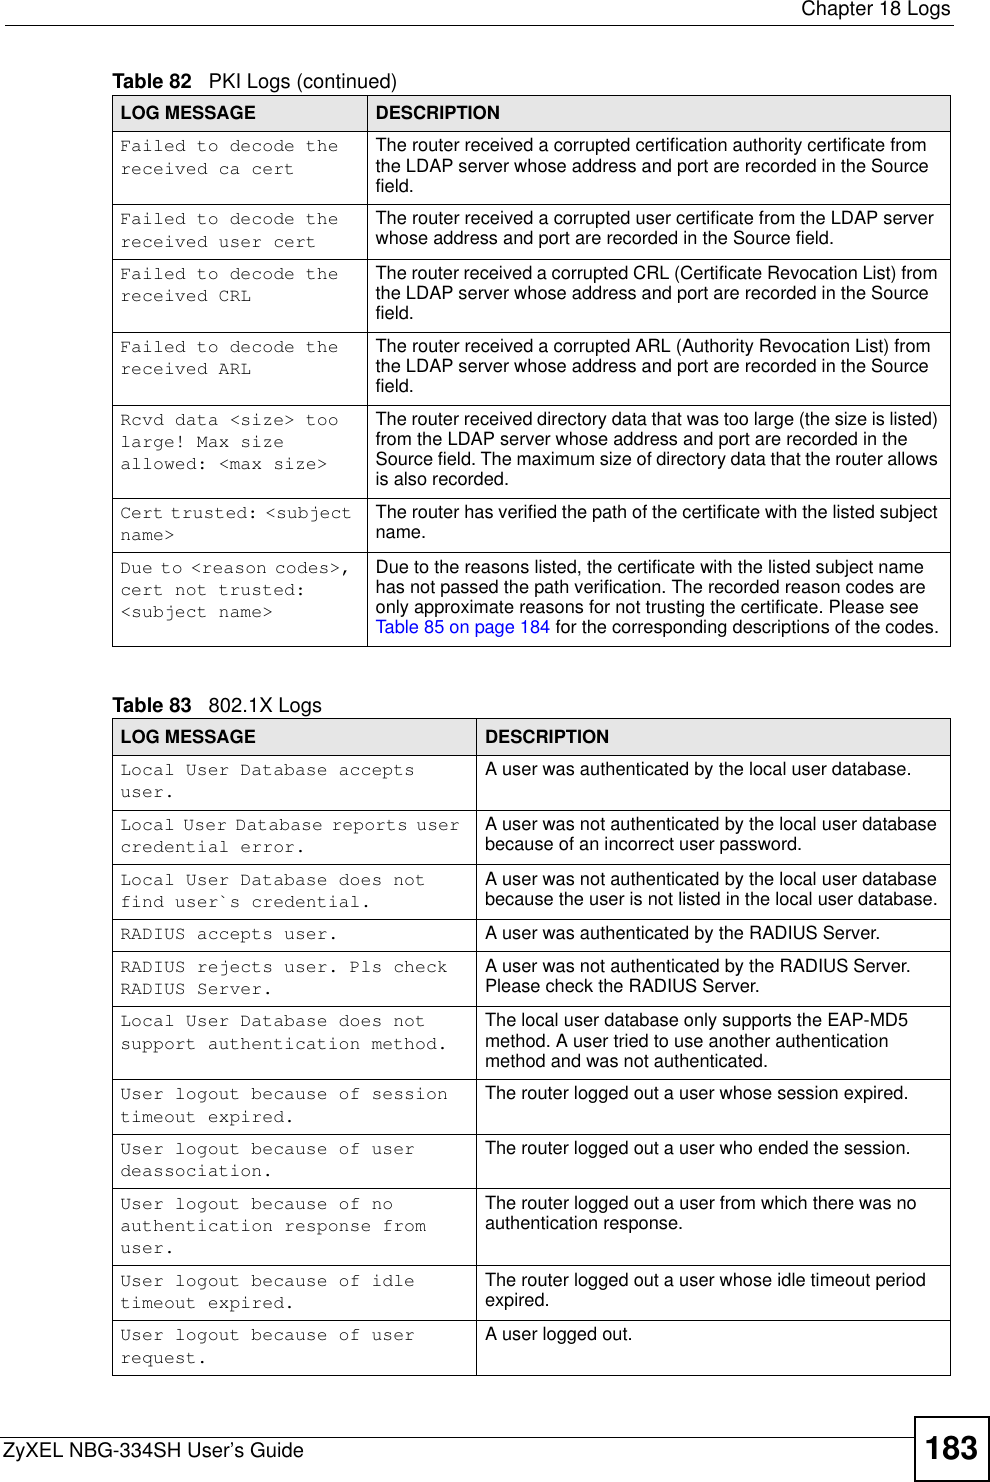
![Chapter 18 LogsZyXEL NBG-334SH User’s Guide182teardrop UDP The firewall detected an UDP teardrop attack.teardrop ICMP (type:%d, code:%d)The firewall detected an ICMP teardrop attack. For type and code details, see Table 85 on page 184.illegal command TCP The firewall detected a TCP illegal command attack.NetBIOS TCP The firewall detected a TCP NetBIOS attack.ip spoofing - no routing entry [TCP | UDP | IGMP | ESP | GRE | OSPF]The firewall classified a packet with no source routing entry as an IP spoofing attack.ip spoofing - no routing entry ICMP (type:%d, code:%d)The firewall classified an ICMP packet with no source routing entry as an IP spoofing attack.vulnerability ICMP (type:%d, code:%d)The firewall detected an ICMP vulnerability attack. For type and code details, see Table 85 on page 184.traceroute ICMP (type:%d, code:%d)The firewall detected an ICMP traceroute attack. For type and code details, see Table 85 on page 184.Table 82 PKI LogsLOG MESSAGE DESCRIPTIONEnrollment successful The SCEP online certificate enrollment was successful. The Destination field records the certification authority server IP address and port.Enrollment failed The SCEP online certificate enrollment failed. The Destination field records the certification authority server’s IP address and port.Failed to resolve <SCEP CA server url>The SCEP online certificate enrollment failed because the certification authority server’s address cannot be resolved.Enrollment successful The CMP online certificate enrollment was successful. The Destination field records the certification authority server’s IP address and port.Enrollment failed The CMP online certificate enrollment failed. The Destination field records the certification authority server’s IP address and port.Failed to resolve <CMP CA server url>The CMP online certificate enrollment failed because the certification authority server’s IP address cannot be resolved.Rcvd ca cert: <subject name>The router received a certification authority certificate, with subject name as recorded, from the LDAP server whose IP address and port are recorded in the Source field.Rcvd user cert: <subject name>The router received a user certificate, with subject name as recorded, from the LDAP server whose IP address and port are recorded in the Source field.Rcvd CRL <size>: <issuer name>The router received a CRL (Certificate Revocation List), with size and issuer name as recorded, from the LDAP server whose IP address and port are recorded in the Source field.Rcvd ARL <size>: <issuer name>The router received an ARL (Authority Revocation List), with size and issuer name as recorded, from the LDAP server whose address and port are recorded in the Source field.Table 81 Attack Logs (continued)LOG MESSAGE DESCRIPTION](https://usermanual.wiki/ZyXEL-Communications/NBG334SH/User-Guide-749078-Page-182.png)

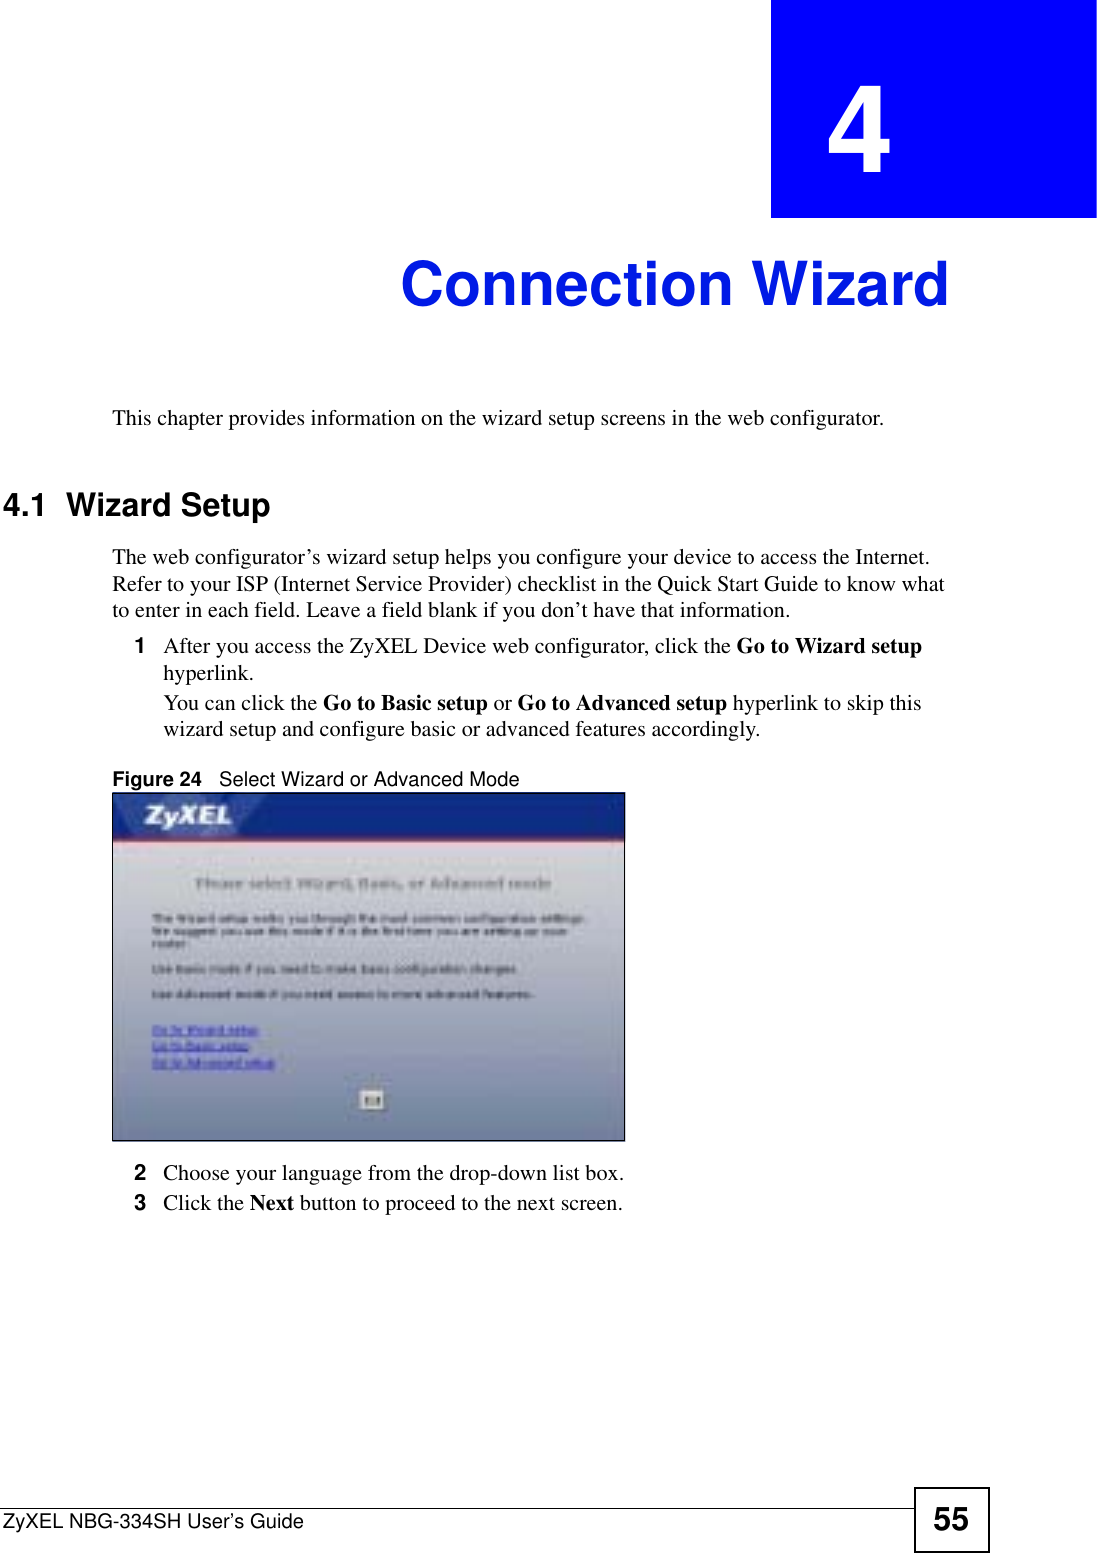
![Chapter 21 TroubleshootingZyXEL NBG-334SH User’s Guide 1976If the problem continues, contact the network administrator or vendor, or try one of the advanced suggestions.Advanced Suggestions• Try to access the ZyXEL Device using another service, such as Telnet. If you can access the ZyXEL Device, check the remote management settings and firewall rules to find out why the ZyXEL Device does not respond to HTTP.• If your computer is connected to the WAN port or is connected wirelessly, use a computer that is connected to a LAN/ETHERNET port.VI can see the Login screen, but I cannot log in to the ZyXEL Device.1Make sure you have entered the password correctly. The default password is 1234. This field is case-sensitive, so make sure [Caps Lock] is not on. 2You cannot log in to the web configurator while someone is using Telnet to access the ZyXEL Device. Log out of the ZyXEL Device in the other session, or ask the person who is logged in to log out. 3Disconnect and re-connect the power adaptor or cord to the ZyXEL Device. 4If this does not work, you have to reset the device to its factory defaults. See Section21.4 on page 199.VI cannot Telnet to the ZyXEL Device. See the troubleshooting suggestions for I cannot see or access the Login screen in the web configurator. Ignore the suggestions about your browser.VI cannot use FTP to upload / download the configuration file. / I cannot use FTP to upload new firmware. See the troubleshooting suggestions for I cannot see or access the Login screen in the web configurator. Ignore the suggestions about your browser.21.3 Internet AccessVI cannot access the Internet.](https://usermanual.wiki/ZyXEL-Communications/NBG334SH/User-Guide-749078-Page-197.png)
![Chapter 21 TroubleshootingZyXEL NBG-334SH User’s Guide1981Check the hardware connections, and make sure the LEDs are behaving as expected. See the Quick Start Guide.2Make sure you entered your ISP account information correctly in the wizard. These fields are case-sensitive, so make sure [Caps Lock] is not on.3If you are trying to access the Internet wirelessly, make sure the wireless settings in the wireless client are the same as the settings in the AP. 4Disconnect all the cables from your device, and follow the directions in the Quick Start Guide again. 5If the problem continues, contact your ISP.VI cannot access the Internet anymore. I had access to the Internet (with the ZyXEL Device), but my Internet connection is not available anymore.1Check the hardware connections, and make sure the LEDs are behaving as expected. See the Quick Start Guide and Section 1.5 on page 31.2Reboot the ZyXEL Device.3If the problem continues, contact your ISP. VThe Internet connection is slow or intermittent.1There might be a lot of traffic on the network. Look at the LEDs, and check Section 1.5 on page 31. If the ZyXEL Device is sending or receiving a lot of information, try closing some programs that use the Internet, especially peer-to-peer applications. 2Check the signal strength. If the signal strength is low, try moving the ZyXEL Device closer to the AP if possible, and look around to see if there are any devices that might be interfering with the wireless network (for example, microwaves, other wireless networks, and so on).3Reboot the ZyXEL Device.4If the problem continues, contact the network administrator or vendor, or try one of the advanced suggestions.Advanced Suggestions• Check the settings for bandwidth management. If it is disabled, you might consider activating it. If it is enabled, you might consider changing the allocations. • Check the settings for QoS. If it is disabled, you might consider activating it. If it is enabled, you might consider raising or lowering the priority for some applications.](https://usermanual.wiki/ZyXEL-Communications/NBG334SH/User-Guide-749078-Page-198.png)


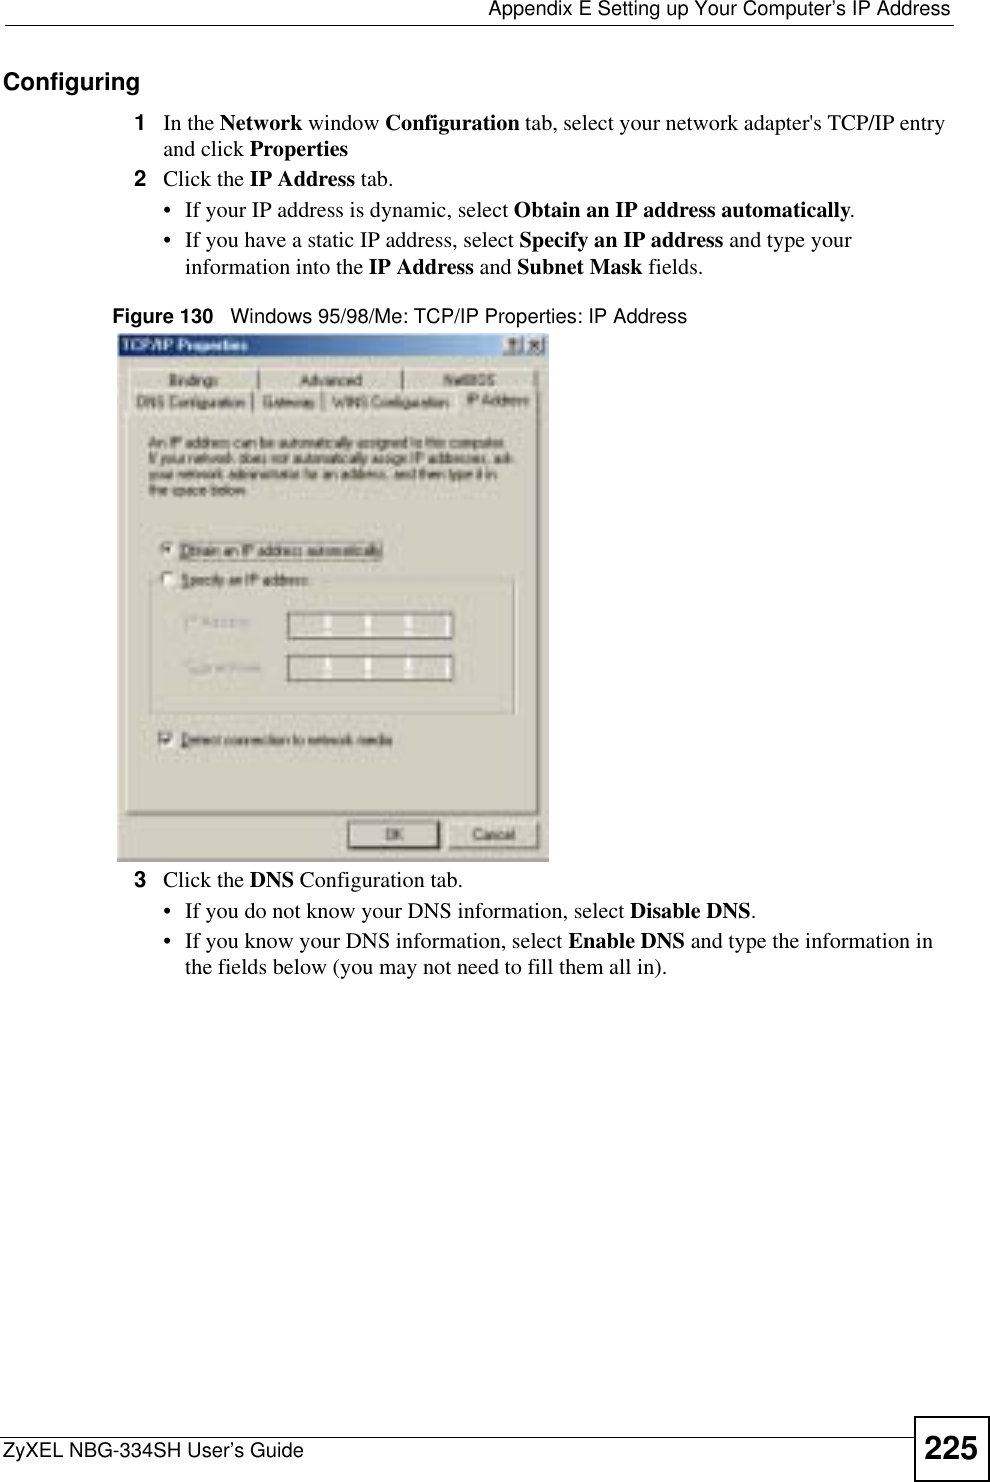
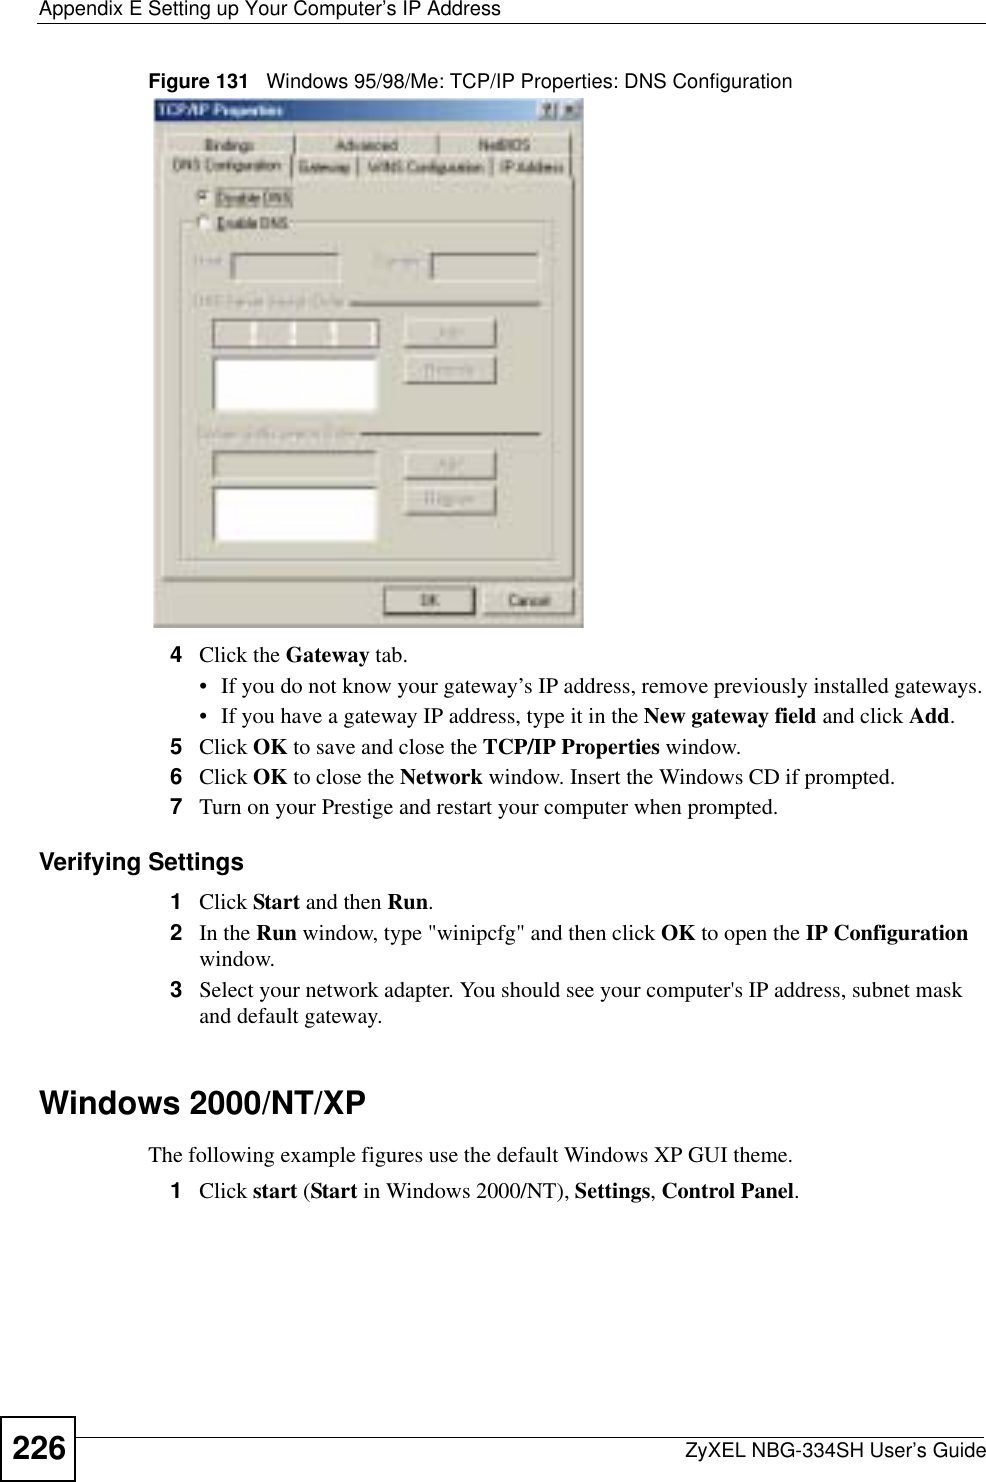
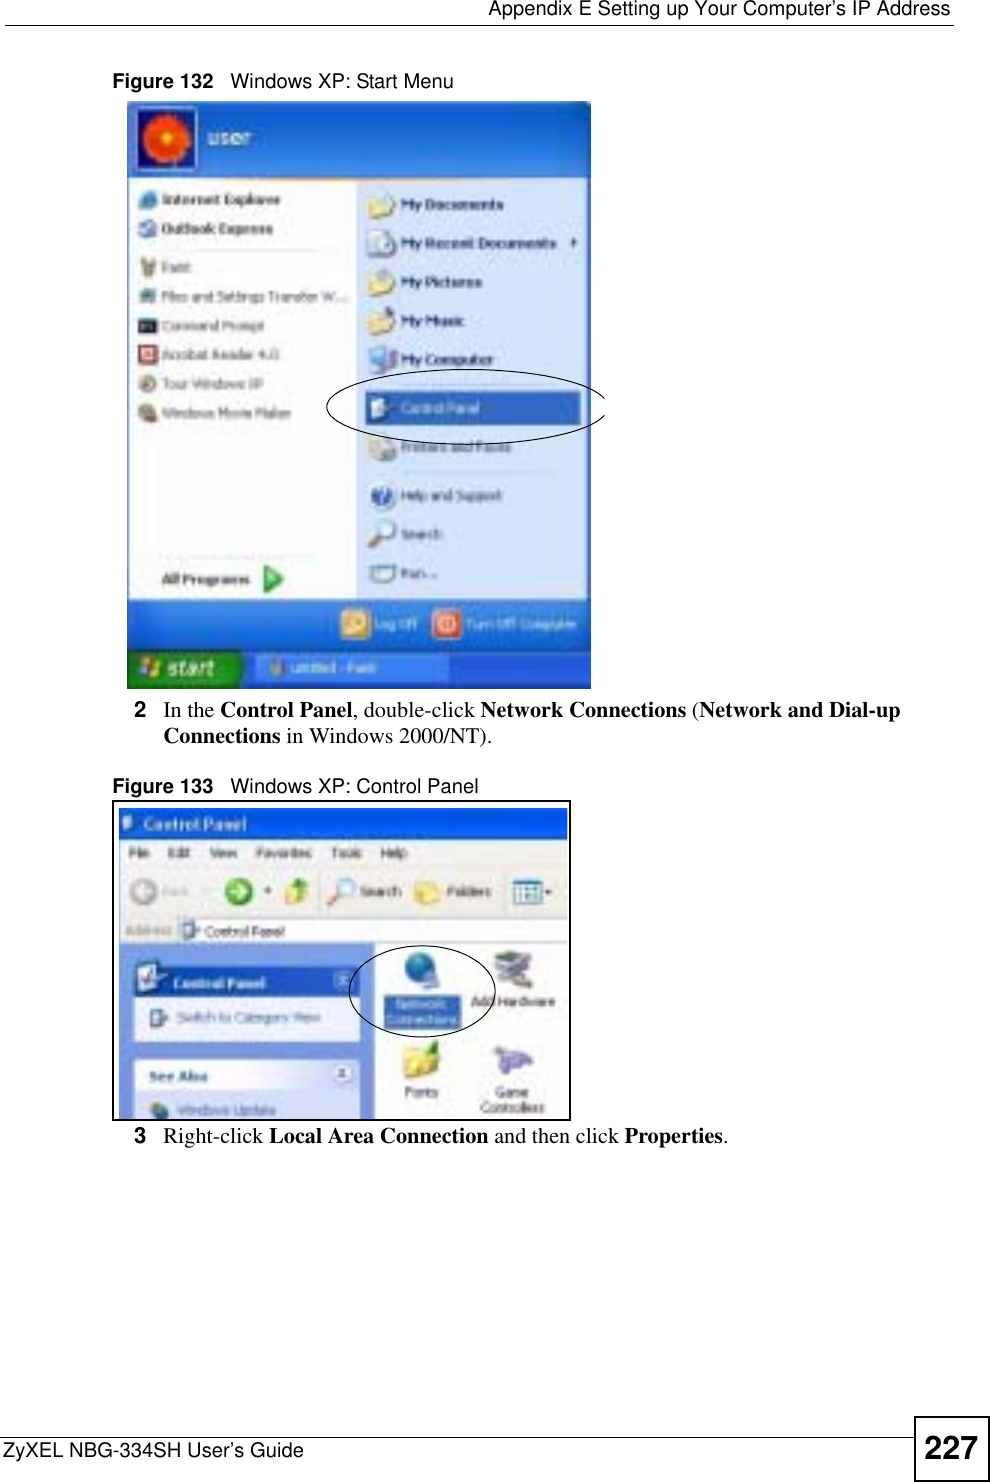
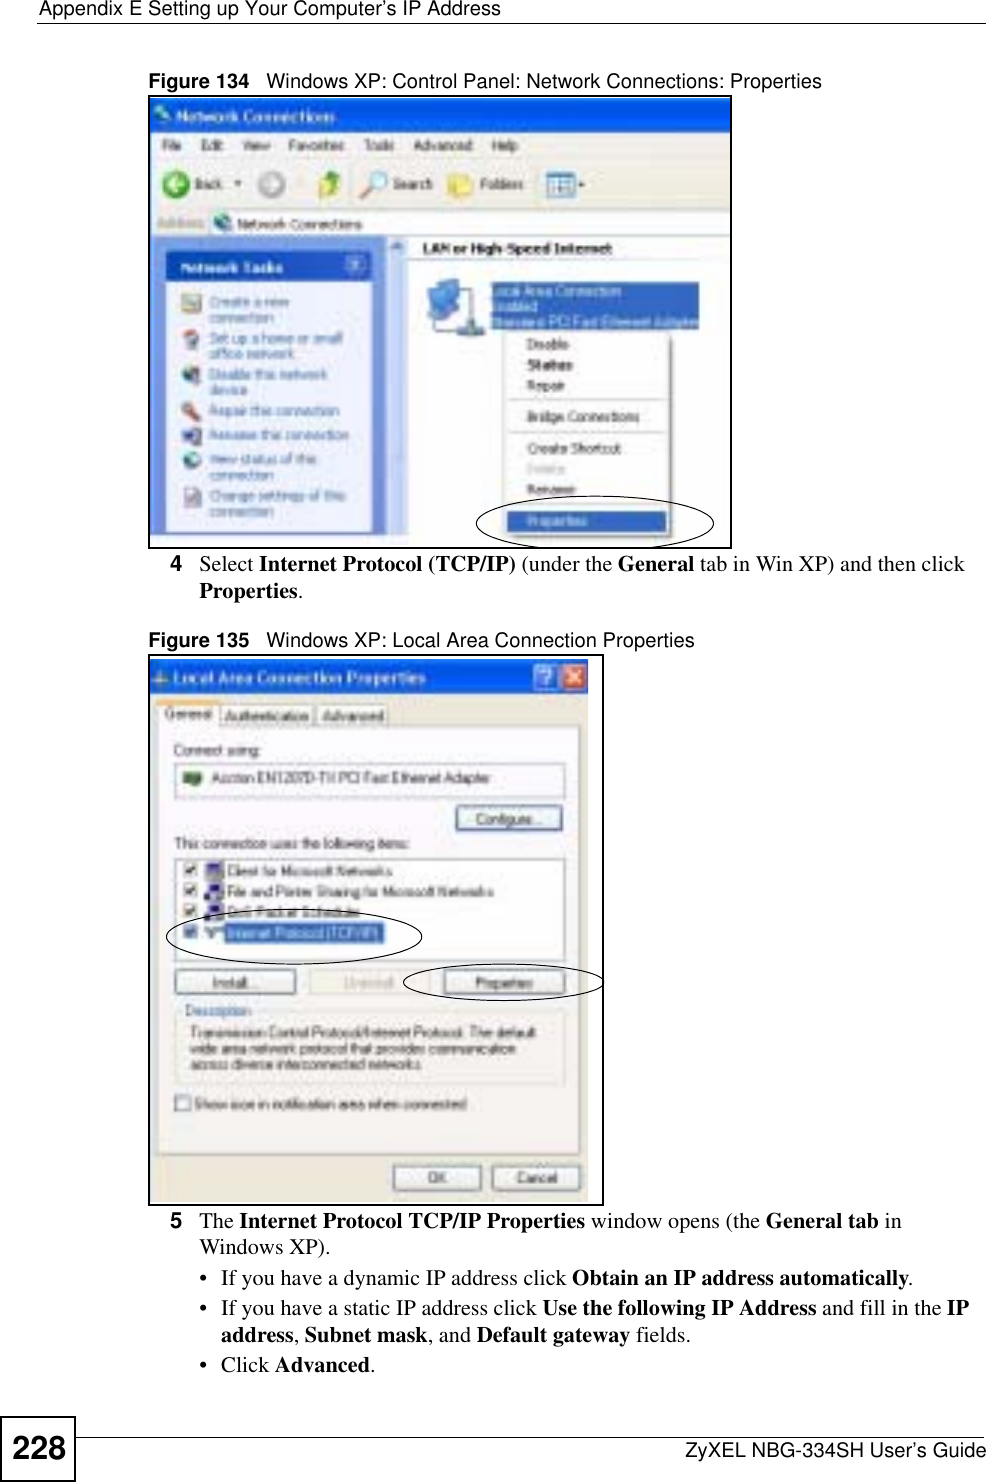
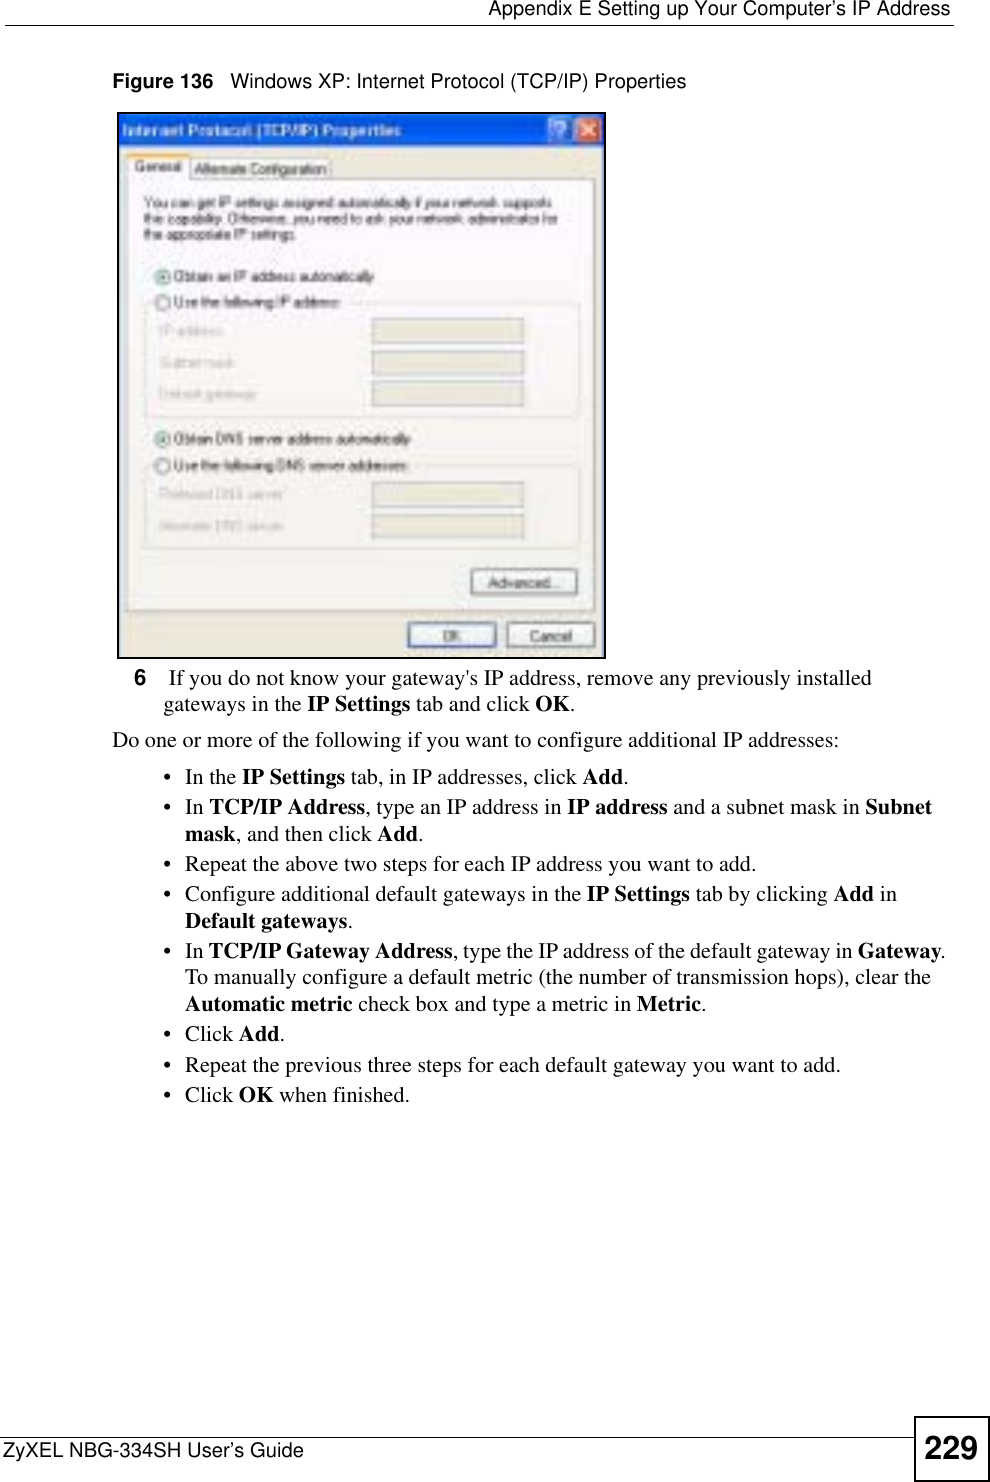
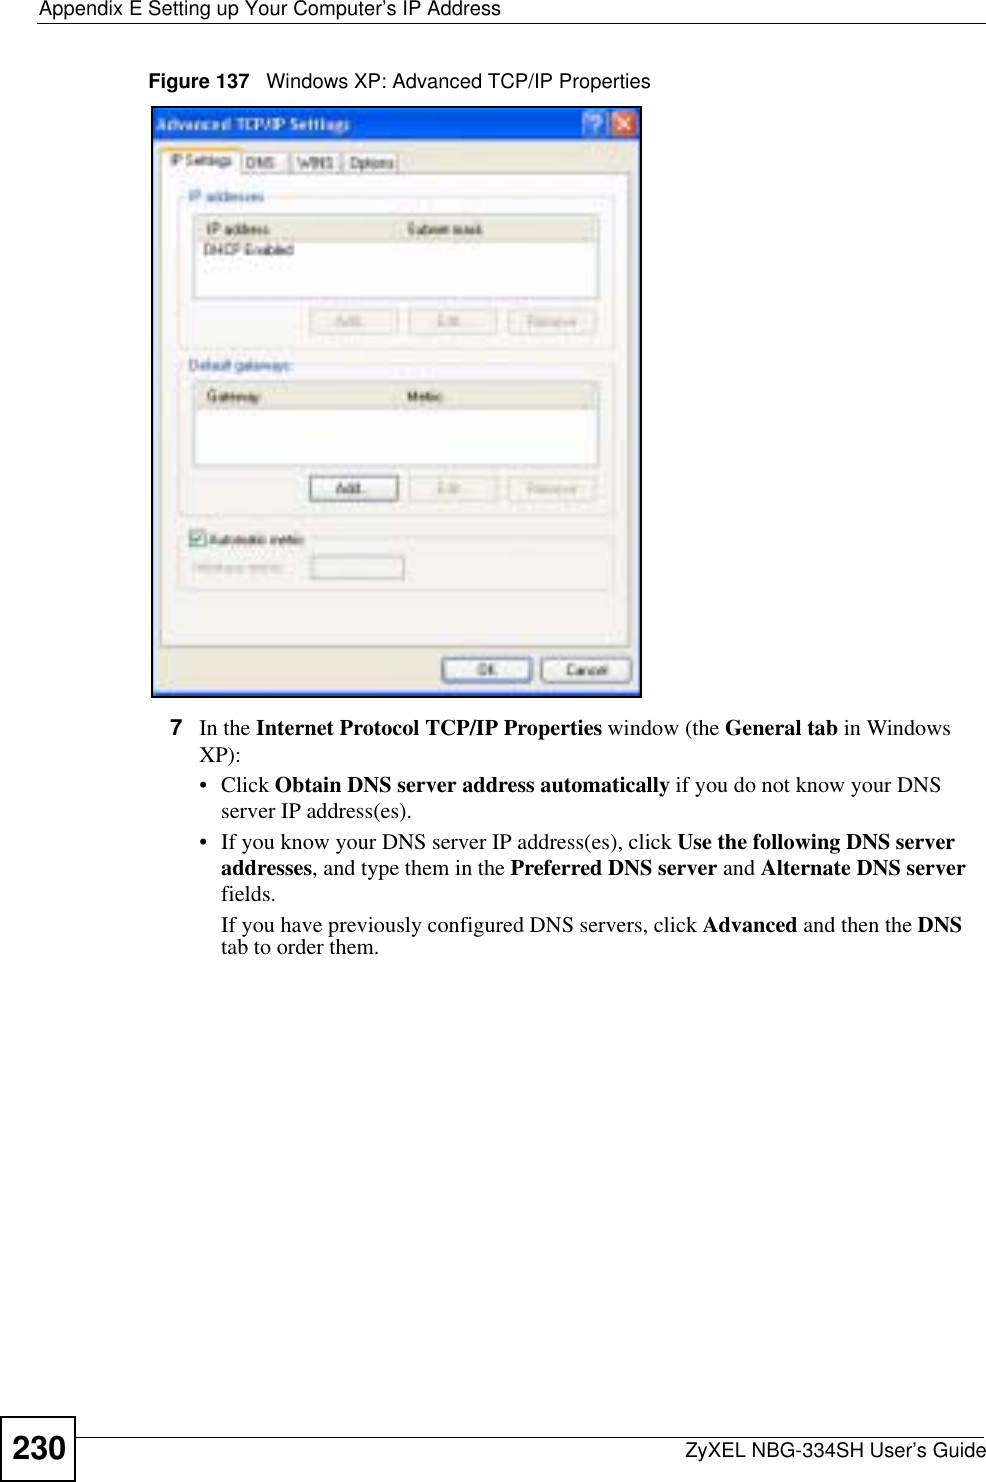
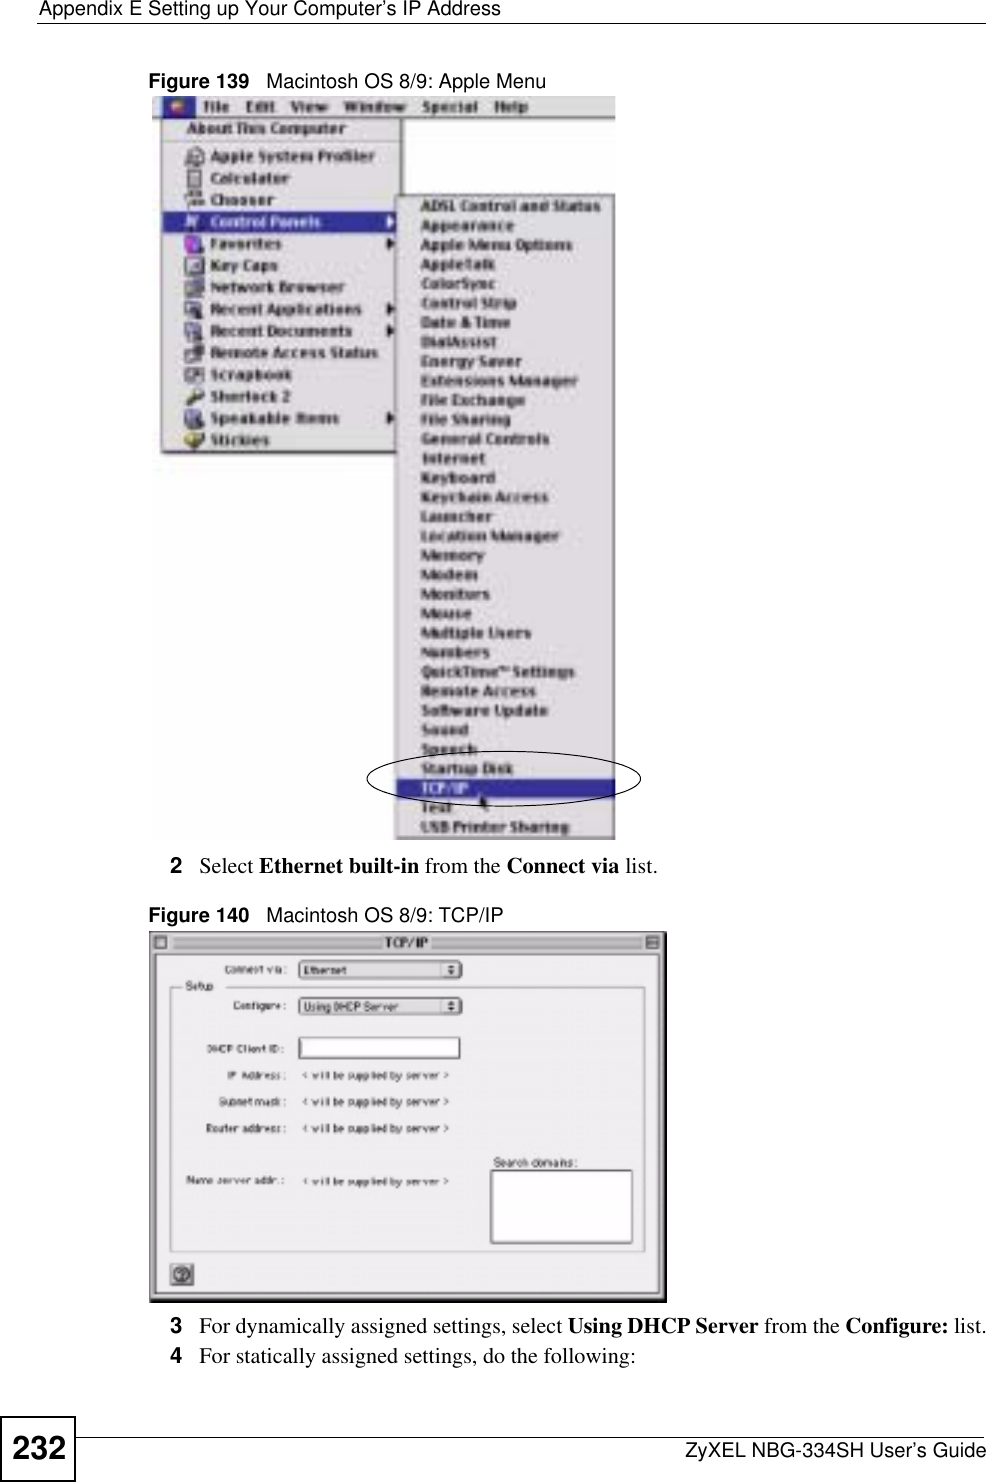
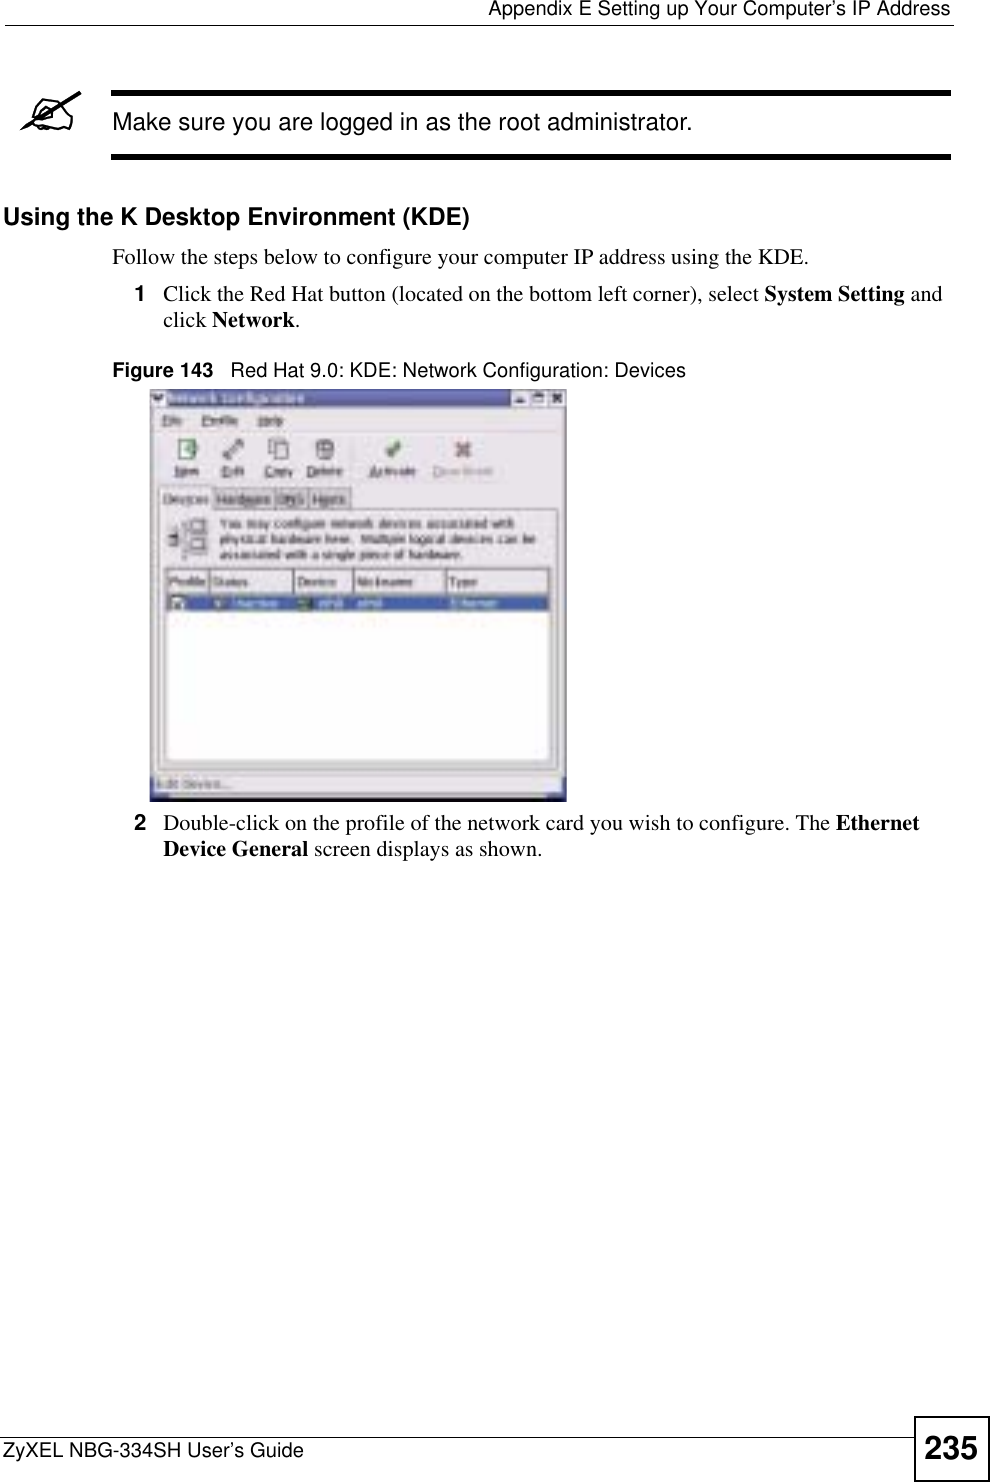
![Appendix E Setting up Your Computer’s IP AddressZyXEL NBG-334SH User’s Guide 231Figure 138 Windows XP: Internet Protocol (TCP/IP) Properties8Click OK to close the Internet Protocol (TCP/IP) Properties window.9Click Close (OK in Windows 2000/NT) to close the Local Area Connection Properties window.10 Close the Network Connections window (Network and Dial-up Connections in Windows 2000/NT).11 Turn on your Prestige and restart your computer (if prompted).Verifying Settings1Click Start,All Programs,Accessories and then Command Prompt.2In the Command Prompt window, type "ipconfig" and then press [ENTER]. You can also open Network Connections, right-click a network connection, click Status and then click the Support tab.Macintosh OS 8/9 1Click the Apple menu, Control Panel and double-click TCP/IP to open the TCP/IPControl Panel.](https://usermanual.wiki/ZyXEL-Communications/NBG334SH/User-Guide-749078-Page-231.png)
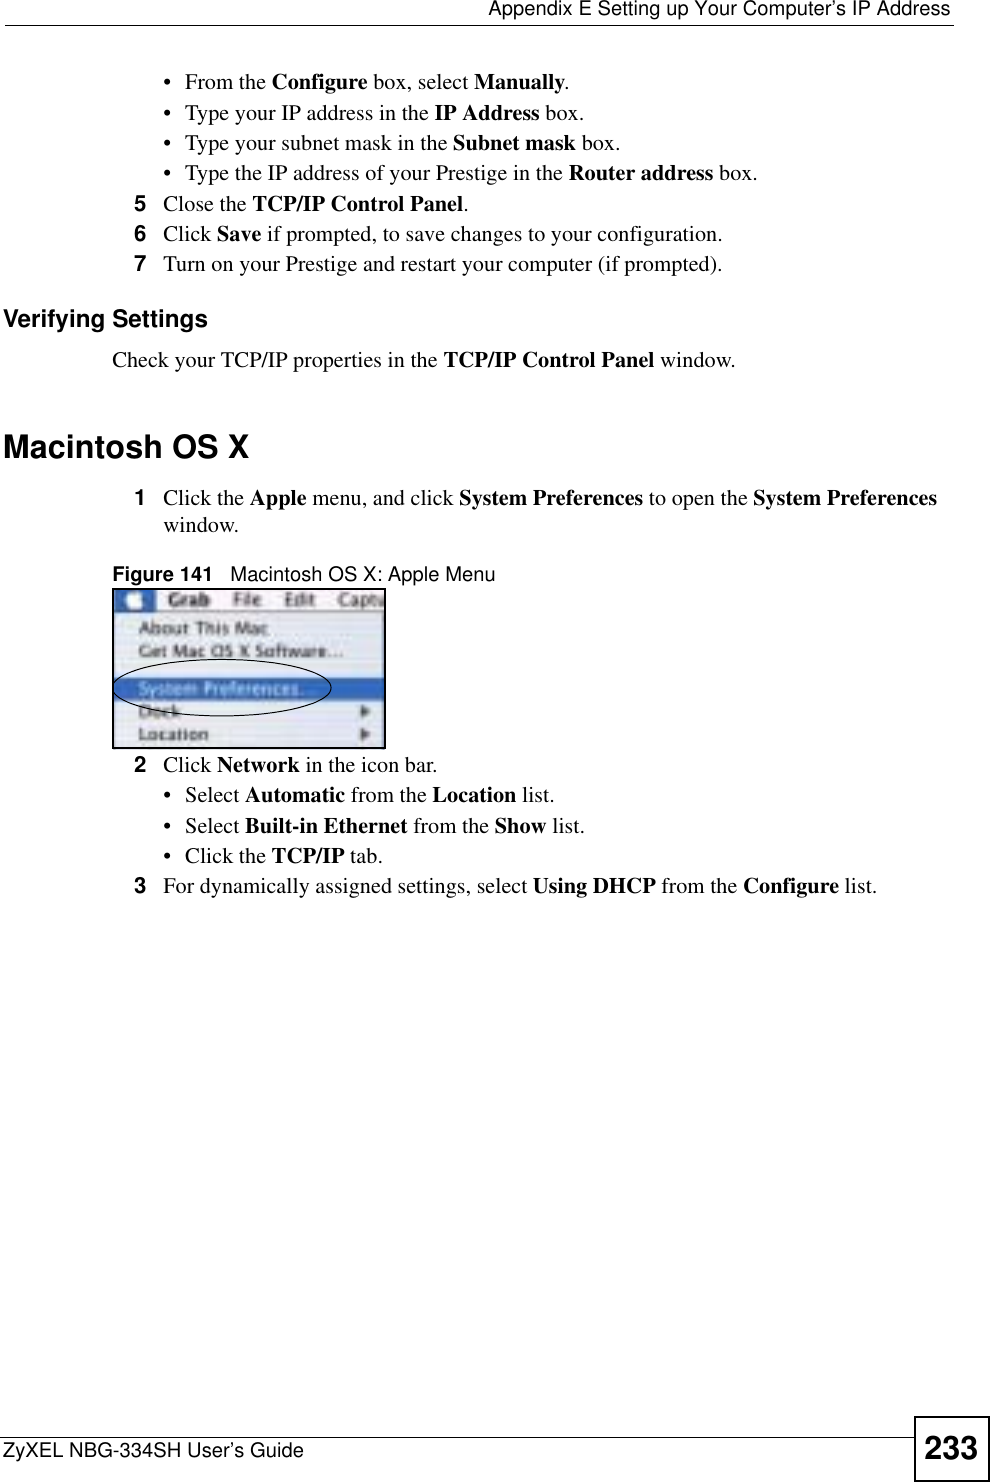
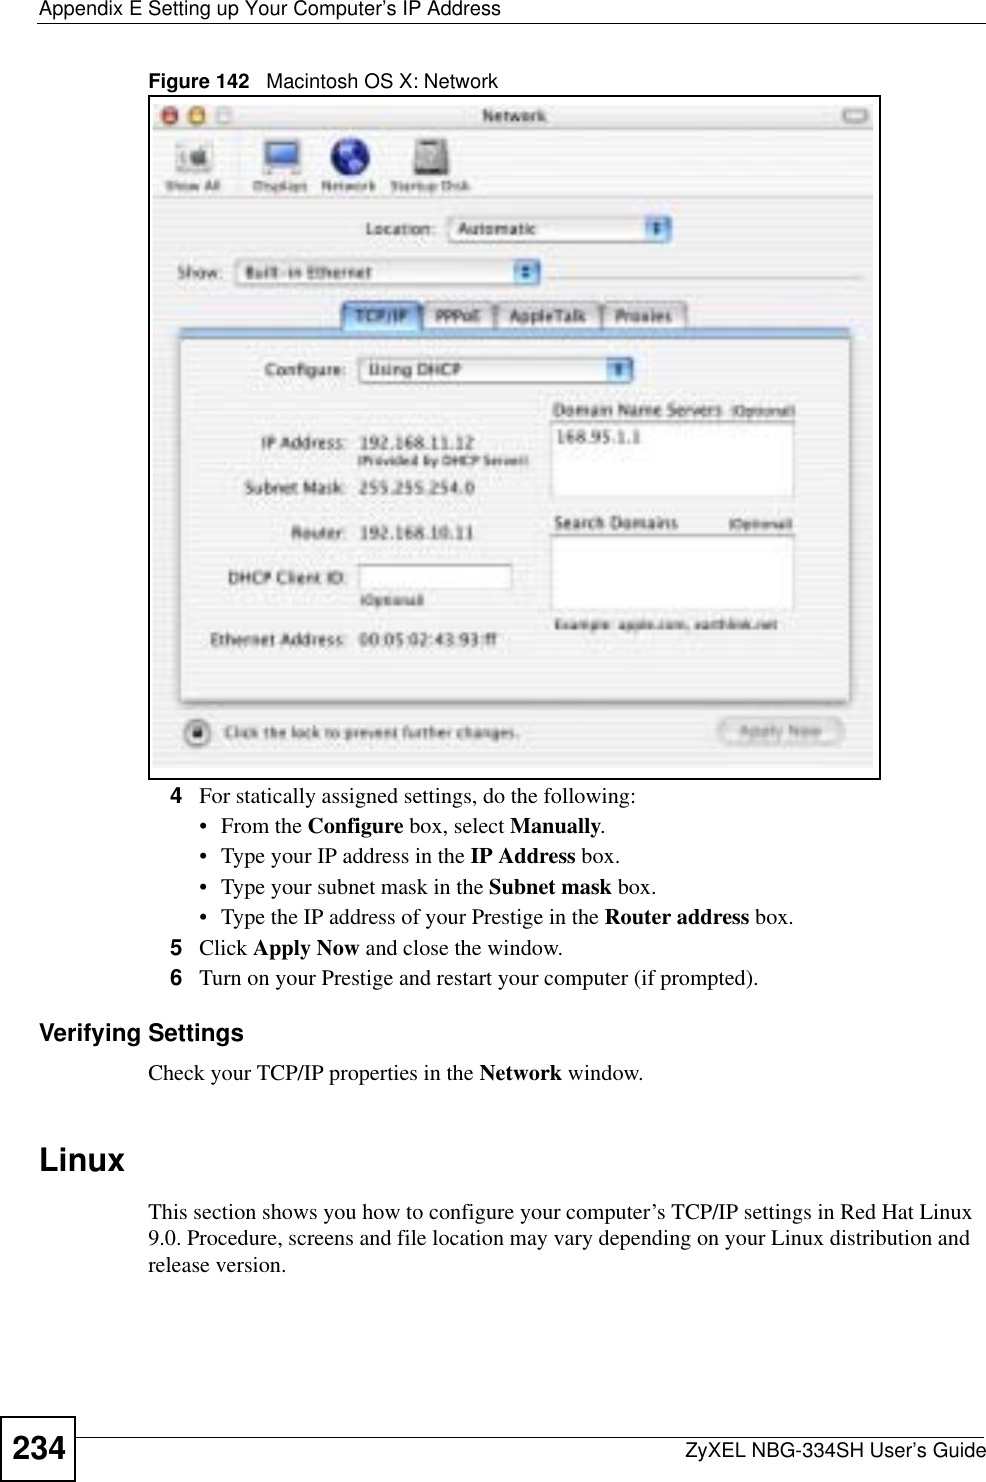
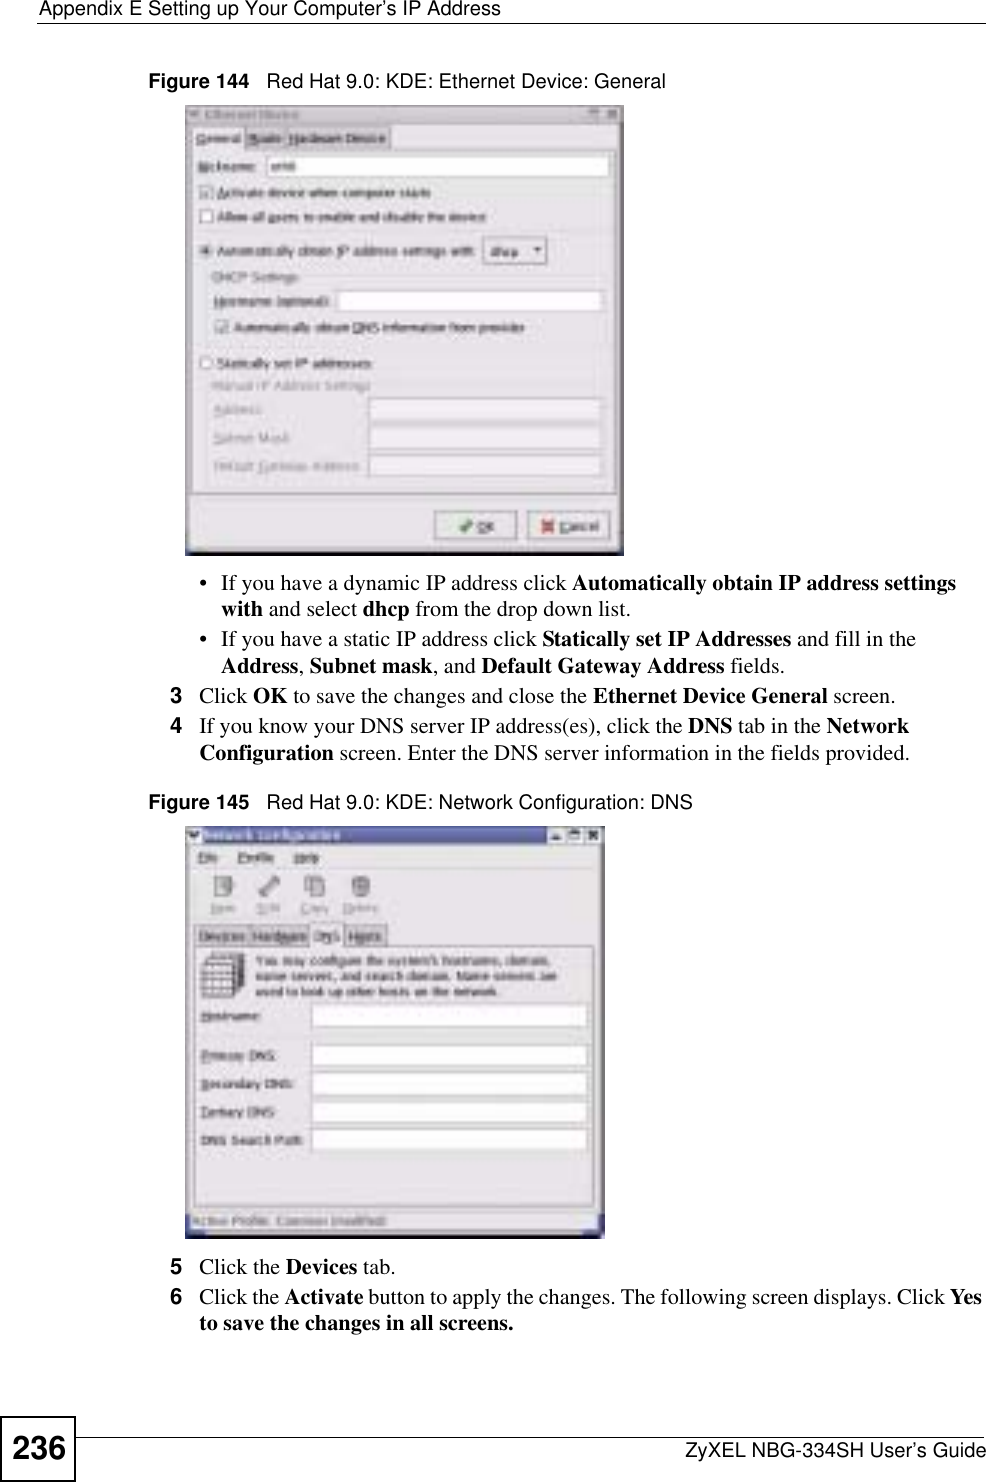
![Appendix E Setting up Your Computer’s IP AddressZyXEL NBG-334SH User’s Guide2382If you know your DNS server IP address(es), enter the DNS server information in the resolv.conf file in the /etc directory. The following figure shows an example where two DNS server IP addresses are specified.Figure 149 Red Hat 9.0: DNS Settings in resolv.conf 3After you edit and save the configuration files, you must restart the network card. Enter ./network restart in the /etc/rc.d/init.d directory. The following figure shows an example.Figure 150 Red Hat 9.0: Restart Ethernet Card 21.5.1 Verifying SettingsEnter ifconfig in a terminal screen to check your TCP/IP properties. Figure 151 Red Hat 9.0: Checking TCP/IP Properties nameserver 172.23.5.1nameserver 172.23.5.2[root@localhost init.d]# network restartShutting down interface eth0: [OK]Shutting down loopback interface: [OK]Setting network parameters: [OK]Bringing up loopback interface: [OK]Bringing up interface eth0: [OK][root@localhost]# ifconfig eth0 Link encap:Ethernet HWaddr 00:50:BA:72:5B:44 inet addr:172.23.19.129 Bcast:172.23.19.255 Mask:255.255.255.0 UP BROADCAST RUNNING MULTICAST MTU:1500 Metric:1 RX packets:717 errors:0 dropped:0 overruns:0 frame:0 TX packets:13 errors:0 dropped:0 overruns:0 carrier:0 collisions:0 txqueuelen:100 RX bytes:730412 (713.2 Kb) TX bytes:1570 (1.5 Kb) Interrupt:10 Base address:0x1000 [root@localhost]#](https://usermanual.wiki/ZyXEL-Communications/NBG334SH/User-Guide-749078-Page-238.png)
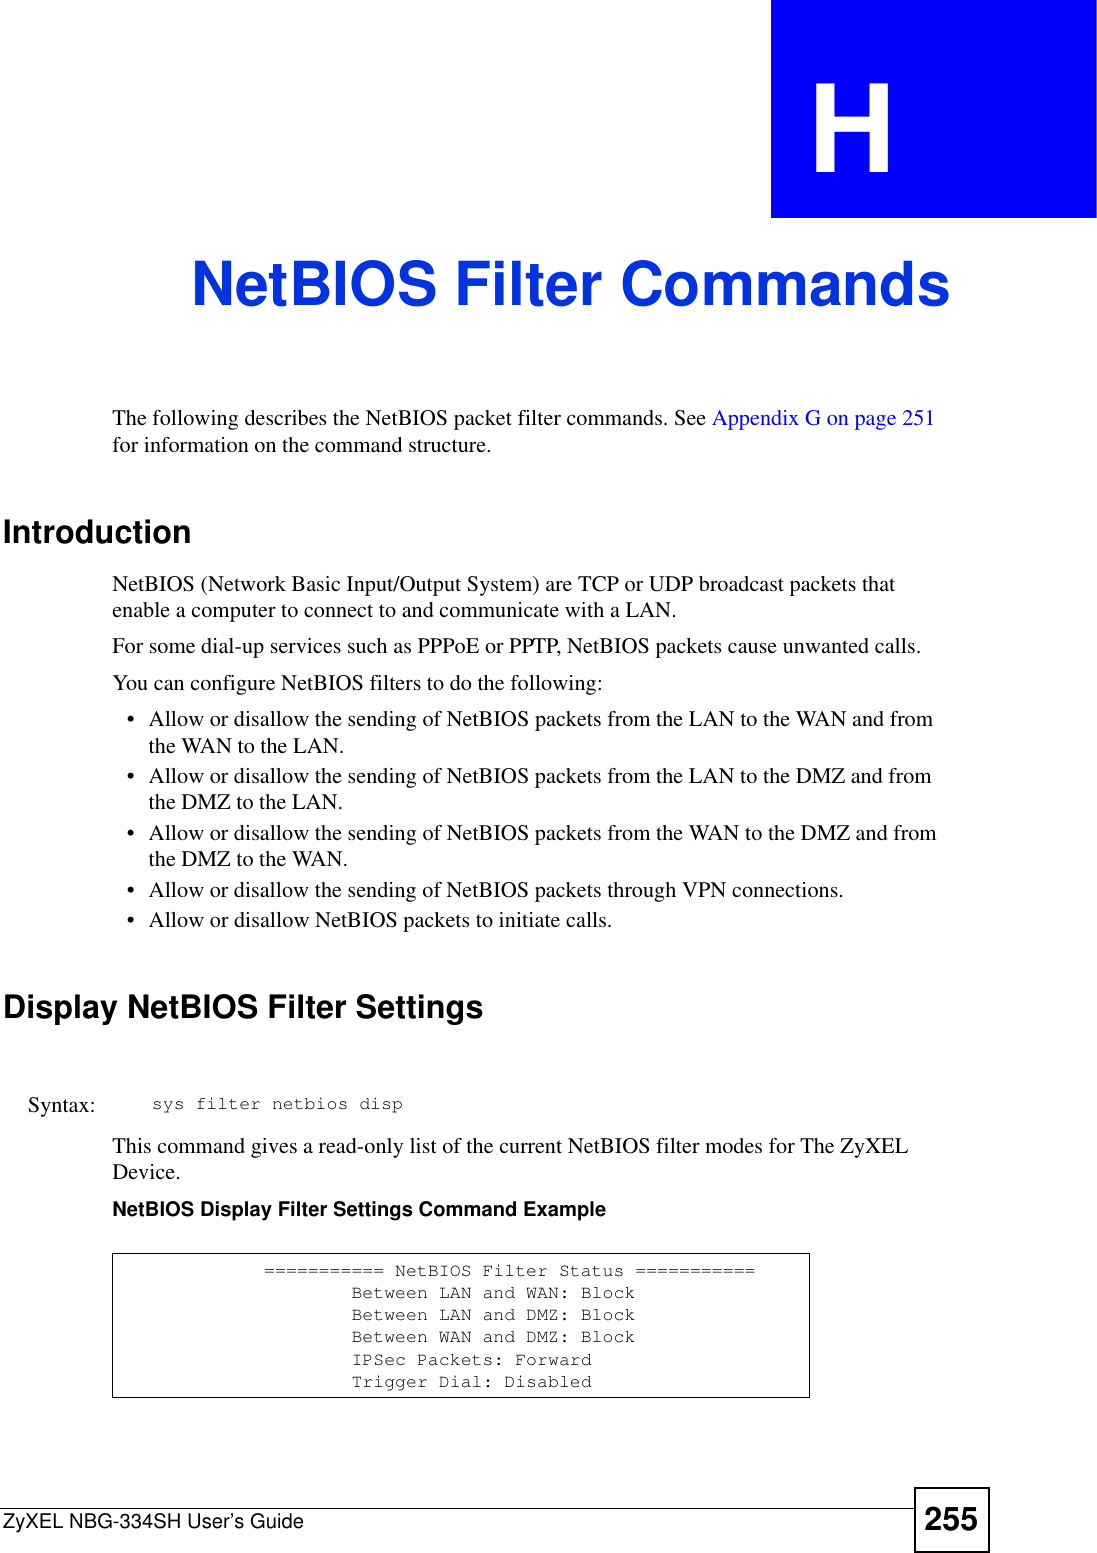
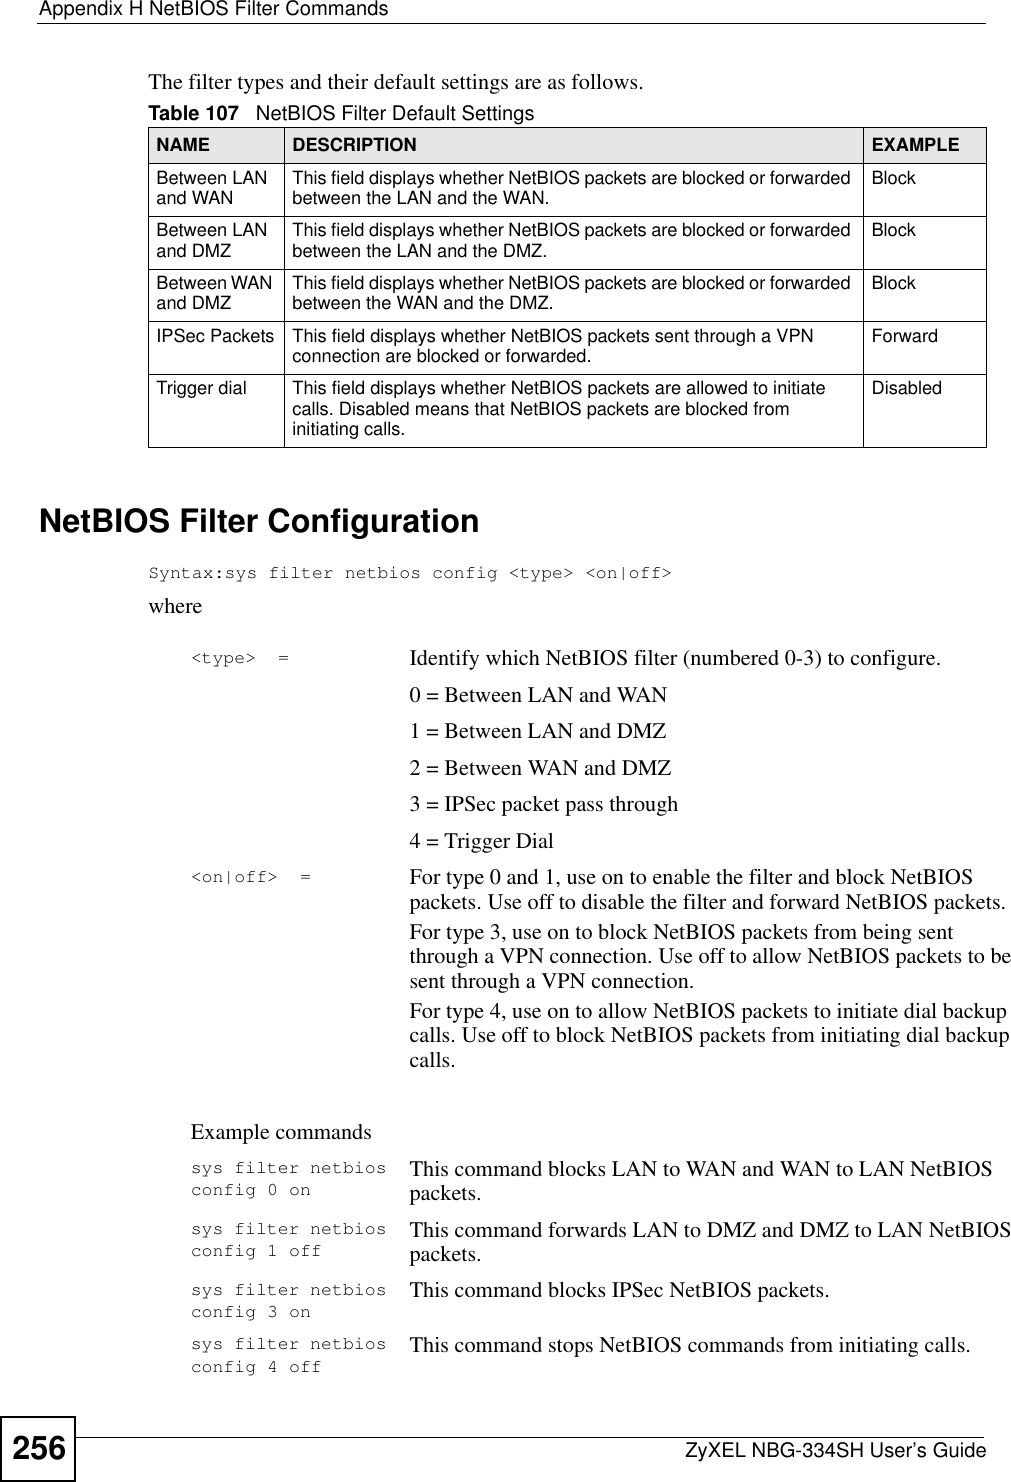
![ZyXEL NBG-334SH User’s Guide 251APPENDIX G Command InterpreterThe following describes how to use the command interpreter. See the included disk or zyxel.com for more detailed information on these commands."Use of undocumented commands or misconfiguration can damage the unit and possibly render it unusable.Accessing the Command InterpreterIf your device has SMT, enter 24 in the main menu to bring up the system maintenance menu. Enter 8 to go to Menu 24.8 - Command Interpreter Mode.If your device does not have SMT, simply Telnet to the ZyXEL Device’s IP address. You will log directly into the command interpreter. Command Syntax• The command keywords are in courier new font.• Enter the command keywords exactly as shown, do not abbreviate.• The required fields in a command are enclosed in angle brackets <>.• The optional fields in a command are enclosed in square brackets [].•The |symbol means or.For example,sys filter netbios config <type> <on|off>means that you must specify the type of netbios filter and whether to turn it on or off.Command UsageA list of valid commands can be found by typing help or ? at the command prompt. Always type the full command. Type exit when finished.](https://usermanual.wiki/ZyXEL-Communications/NBG334SH/User-Guide-749078-Page-251.png)
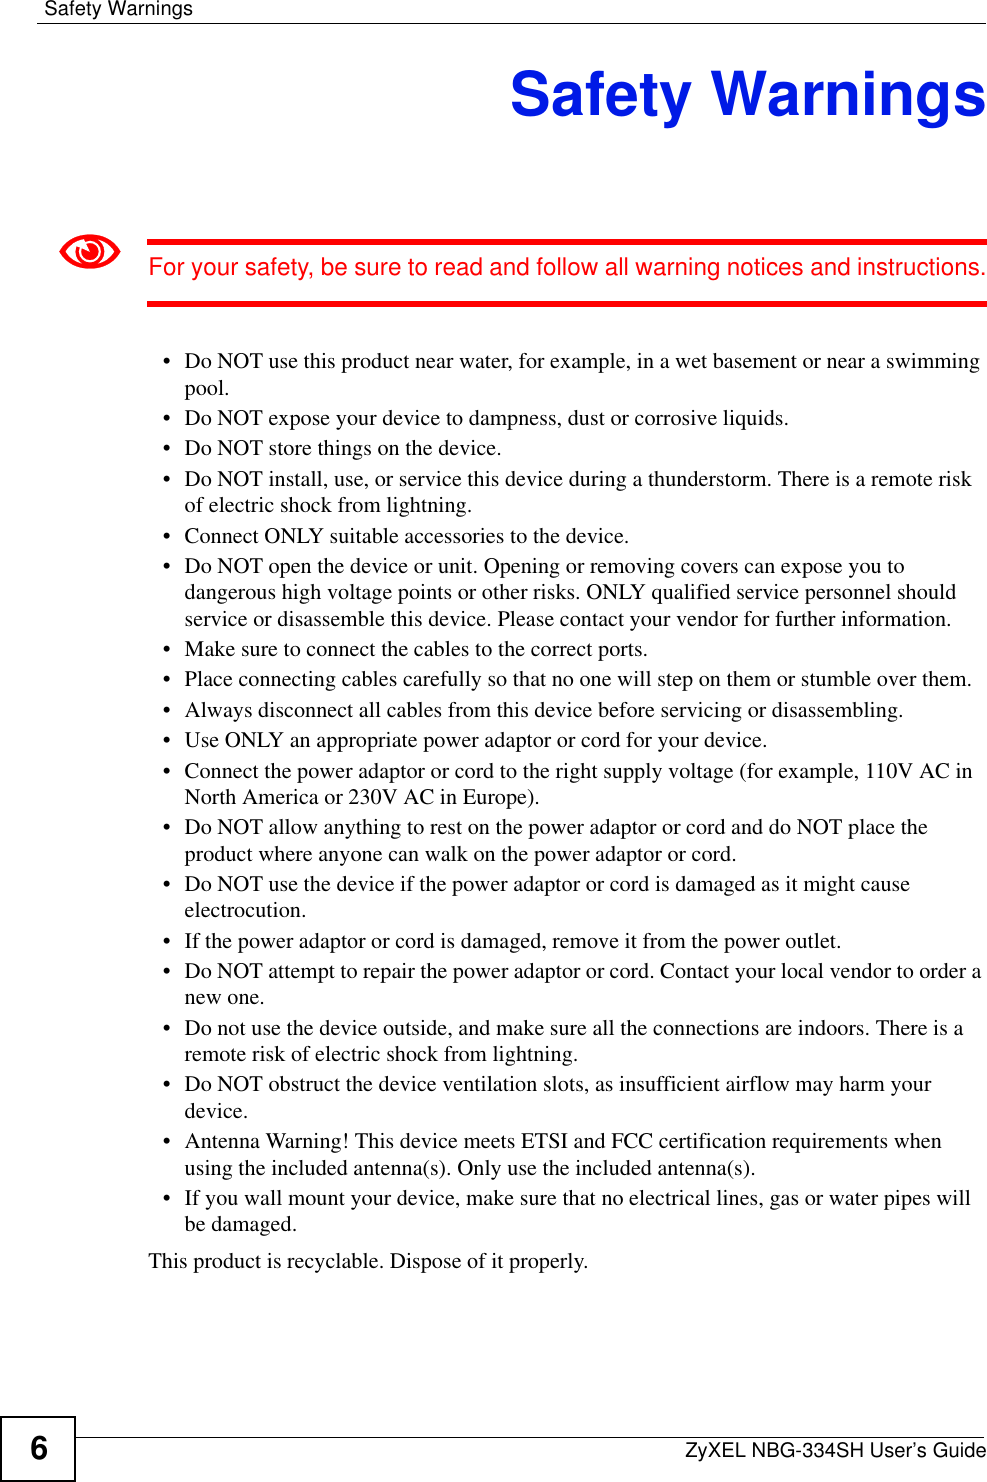
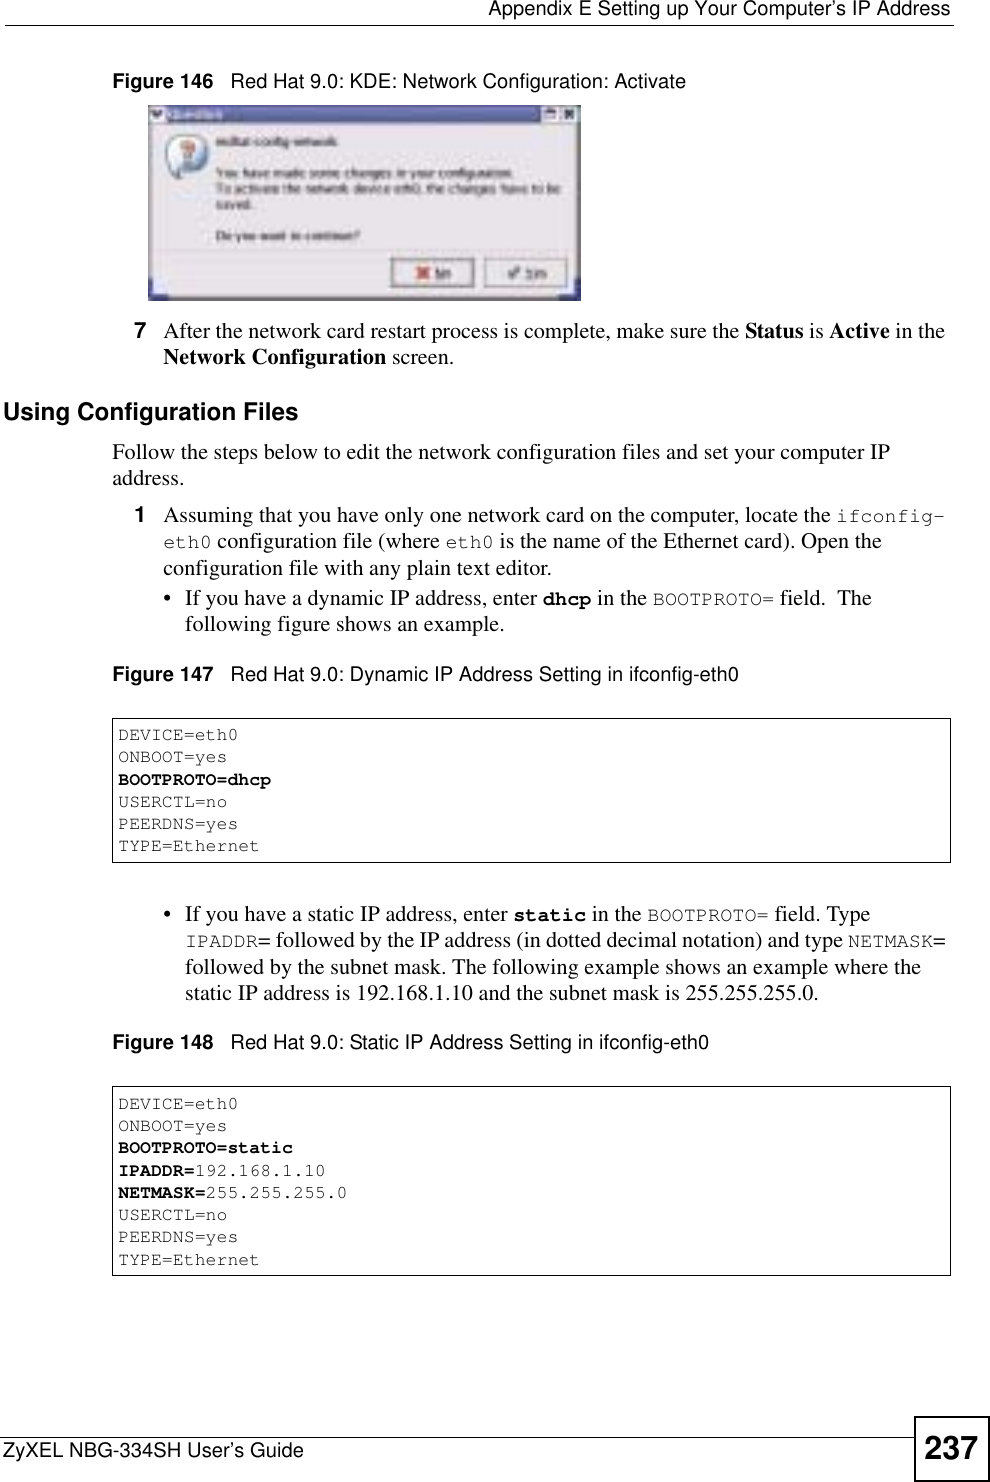
![Appendix G Command InterpreterZyXEL NBG-334SH User’s Guide252Log CommandsThis section provides some general examples of how to use the log commands. The items that display with your device may vary but the basic function should be the same. Go to the command interpreter interface. Configuring What You Want the ZyXEL Device to Log1Use the sys logs load command to load the log setting buffer that allows you to configure which logs the ZyXEL Device is to record. 2Use sys logs category to view a list of the log categories.Figure 157 Displaying Log Categories Example3Use sys logs category followed by a log category to display the parameters that are available for the category.Figure 158 Displaying Log Parameters Example4Use sys logs category followed by a log category and a parameter to decide what to record.Use 0 to not record logs for that category, 1 to record only logs for that category, 2 to record only alerts for that category, and 3 to record both logs and alerts for that category. Not every parameter is available with every category.5Use the sys logs save command to store the settings in the ZyXEL Device (you must do this in order to record logs).Displaying Logs•Use the sys logs display command to show all of the logs in the ZyXEL Device’s log.• Use the sys logs category display command to show the log settings for all of the log categories.Copyright (c) 1994 - 2006 ZyXEL Communications Corp.ras> sys logs category8021x access attack displayerror icmp javablocked mtenpacketfilter ppp cdr remotetcpreset traffic upnp urlblockedurlforward wirelessras>ras> sys logs category accessUsage: [0:none/1:log/2:alert/3:both] [0:don't show debug type/1:show debug type]](https://usermanual.wiki/ZyXEL-Communications/NBG334SH/User-Guide-749078-Page-252.png)
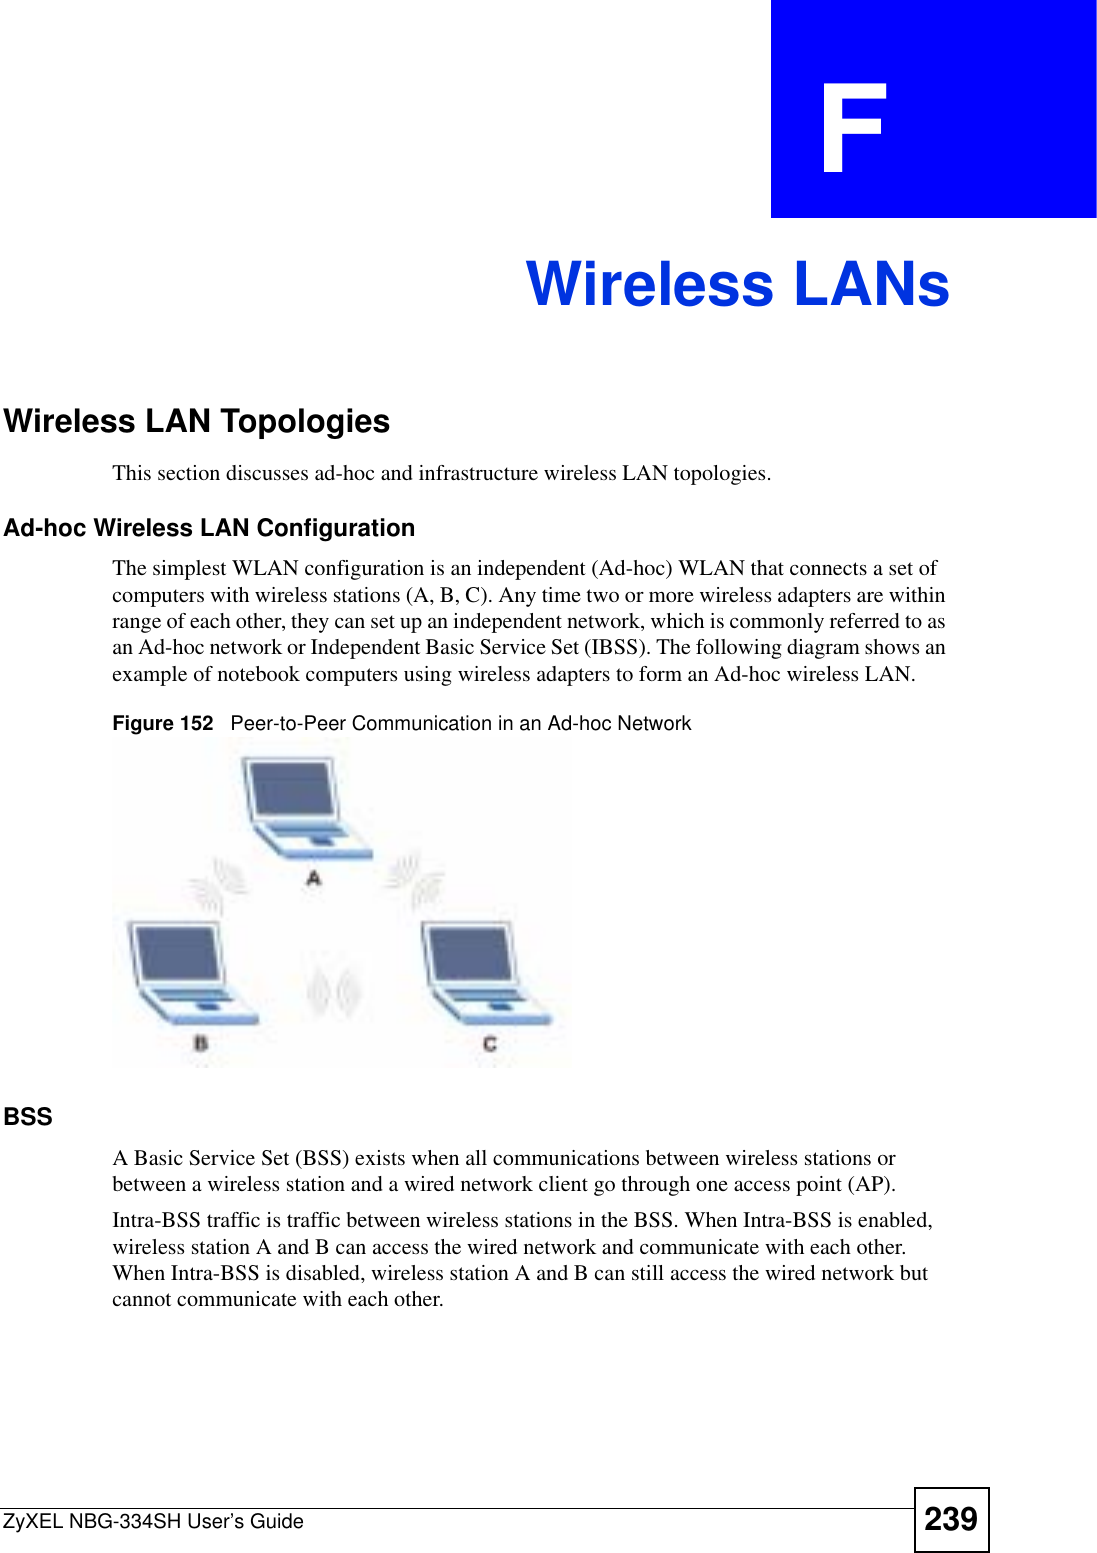
![Appendix G Command InterpreterZyXEL NBG-334SH User’s Guide 253•Use the sys logs display [log category] command to show the logs in an individual ZyXEL Device log category.•Use the sys logs clear command to erase all of the ZyXEL Device’s logs.Log Command ExampleThis example shows how to set the ZyXEL Device to record the access logs and alerts and then view the results.ras> sys logs loadras> sys logs category access 3ras> sys logs saveras> sys logs display access#.time source destination notes message 0|01/02/2000 04:06:35 |192.168.1.33:2190 |207.69.188.186:135 |ACCESS FORWARD Firewall default policy: TCP (L to W) 1|01/02/2000 04:06:28 |192.168.1.33:2190 |207.69.188.186:135 |ACCESS FORWARD Firewall default policy: TCP (L to W) 3|01/02/2000 04:06:25 |192.168.1.33:2190 |207.69.188.186:135 |ACCESS FORWARD Firewall default policy: UDP (L to W) 4|01/02/2000 04:06:16 |192.168.1.33:2187 |207.69.188.186:80 |ACCESS FORWARD Firewall default policy: TCP (L to W)](https://usermanual.wiki/ZyXEL-Communications/NBG334SH/User-Guide-749078-Page-253.png)