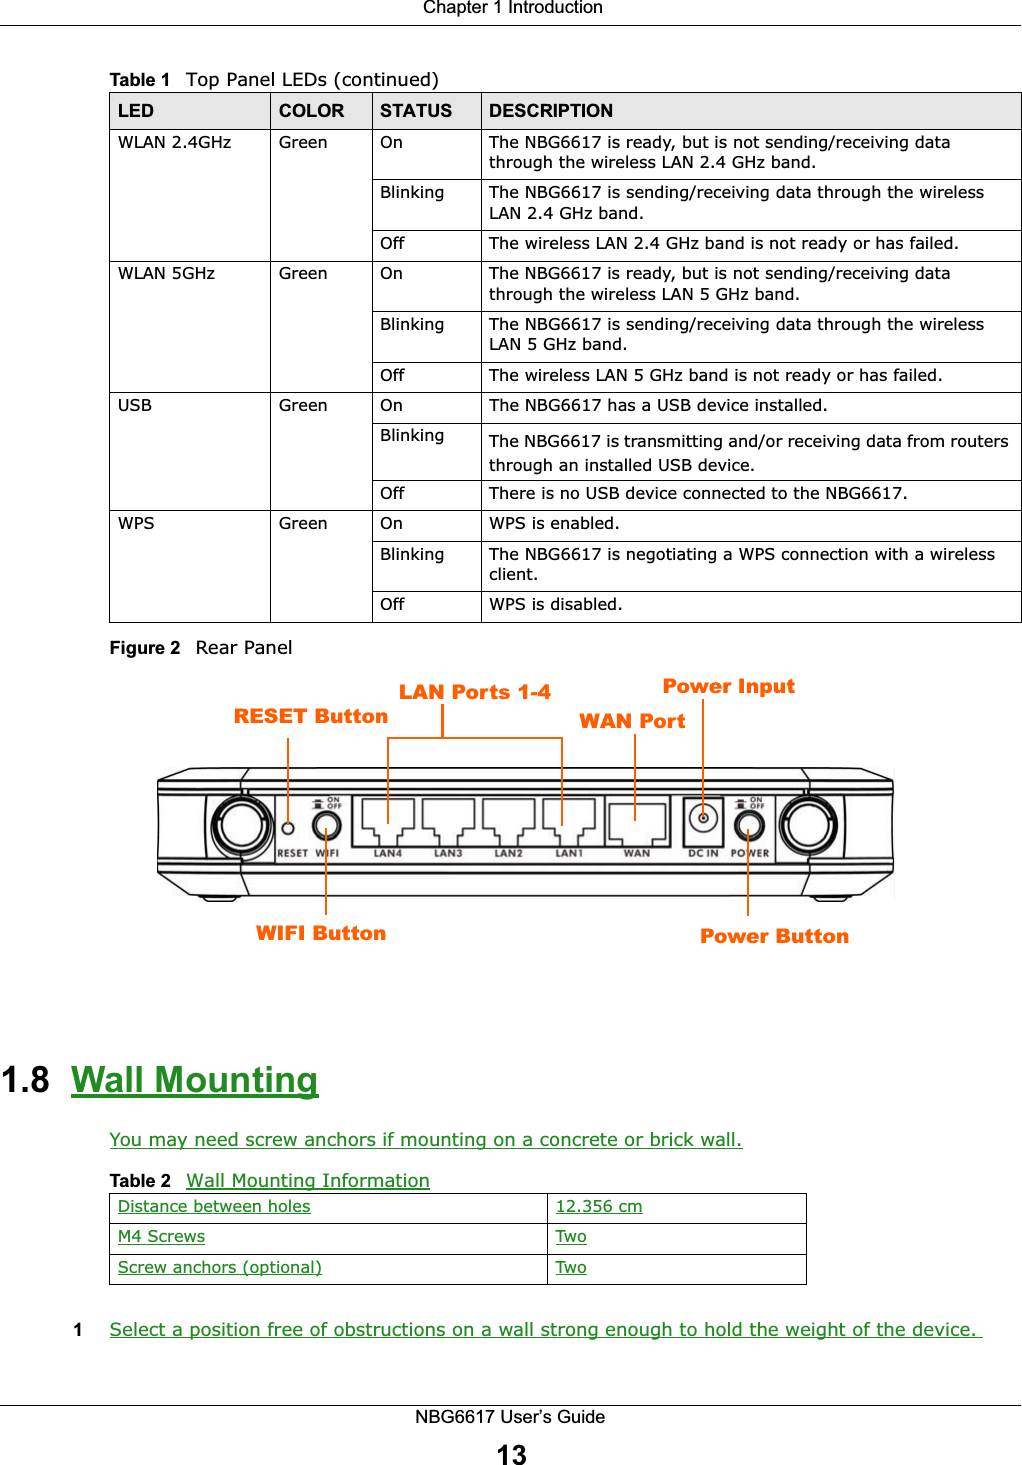
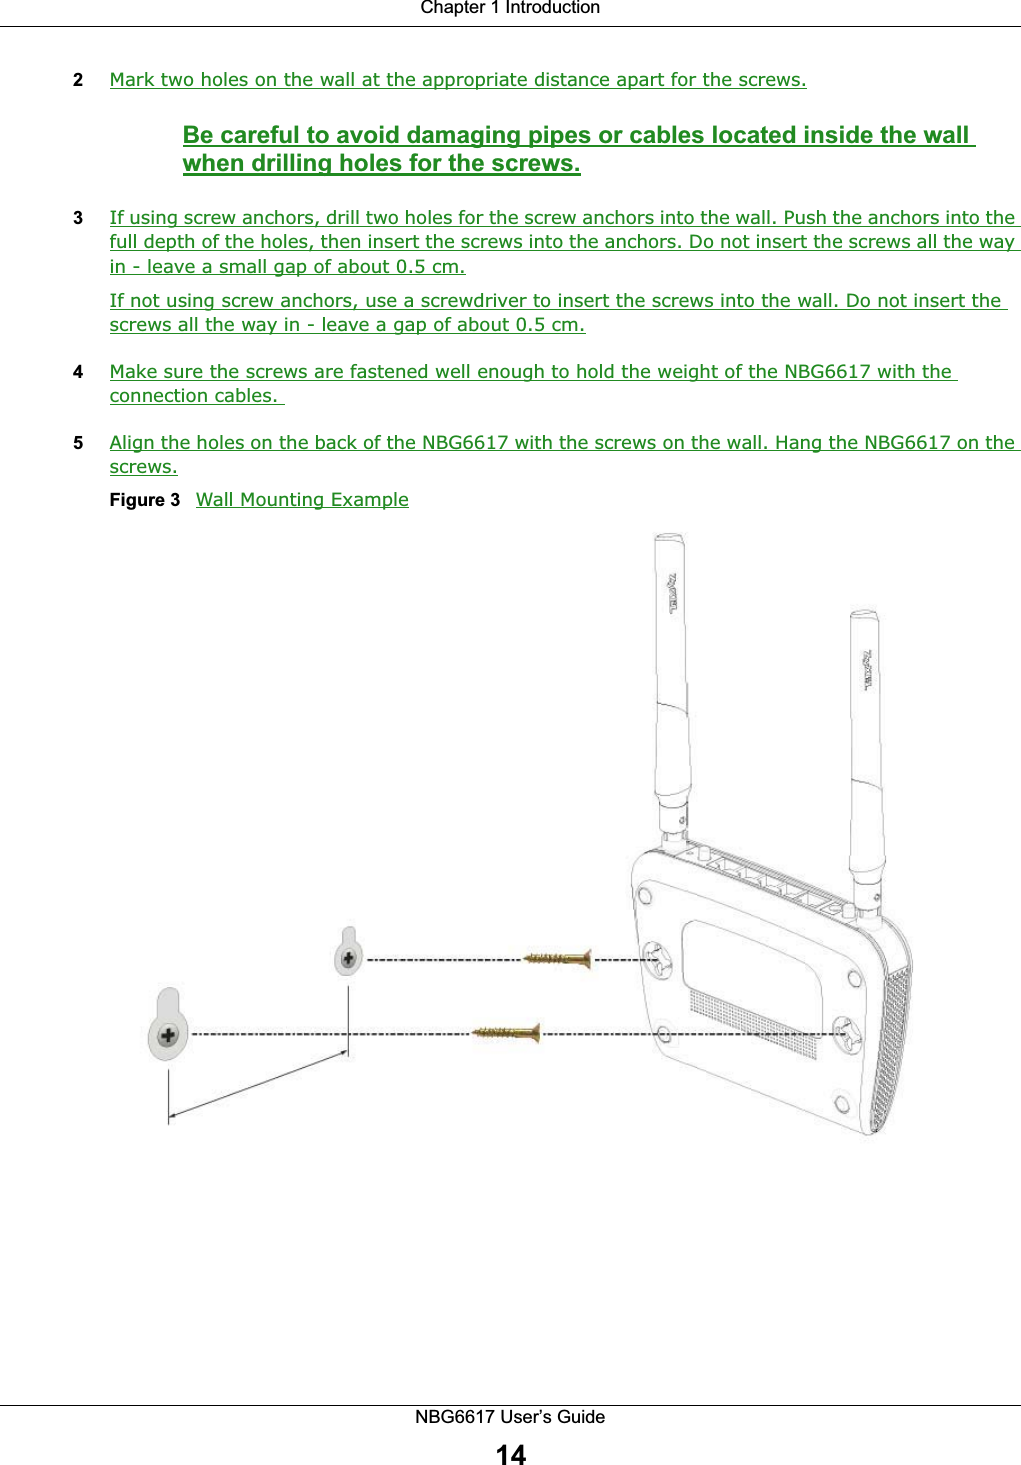
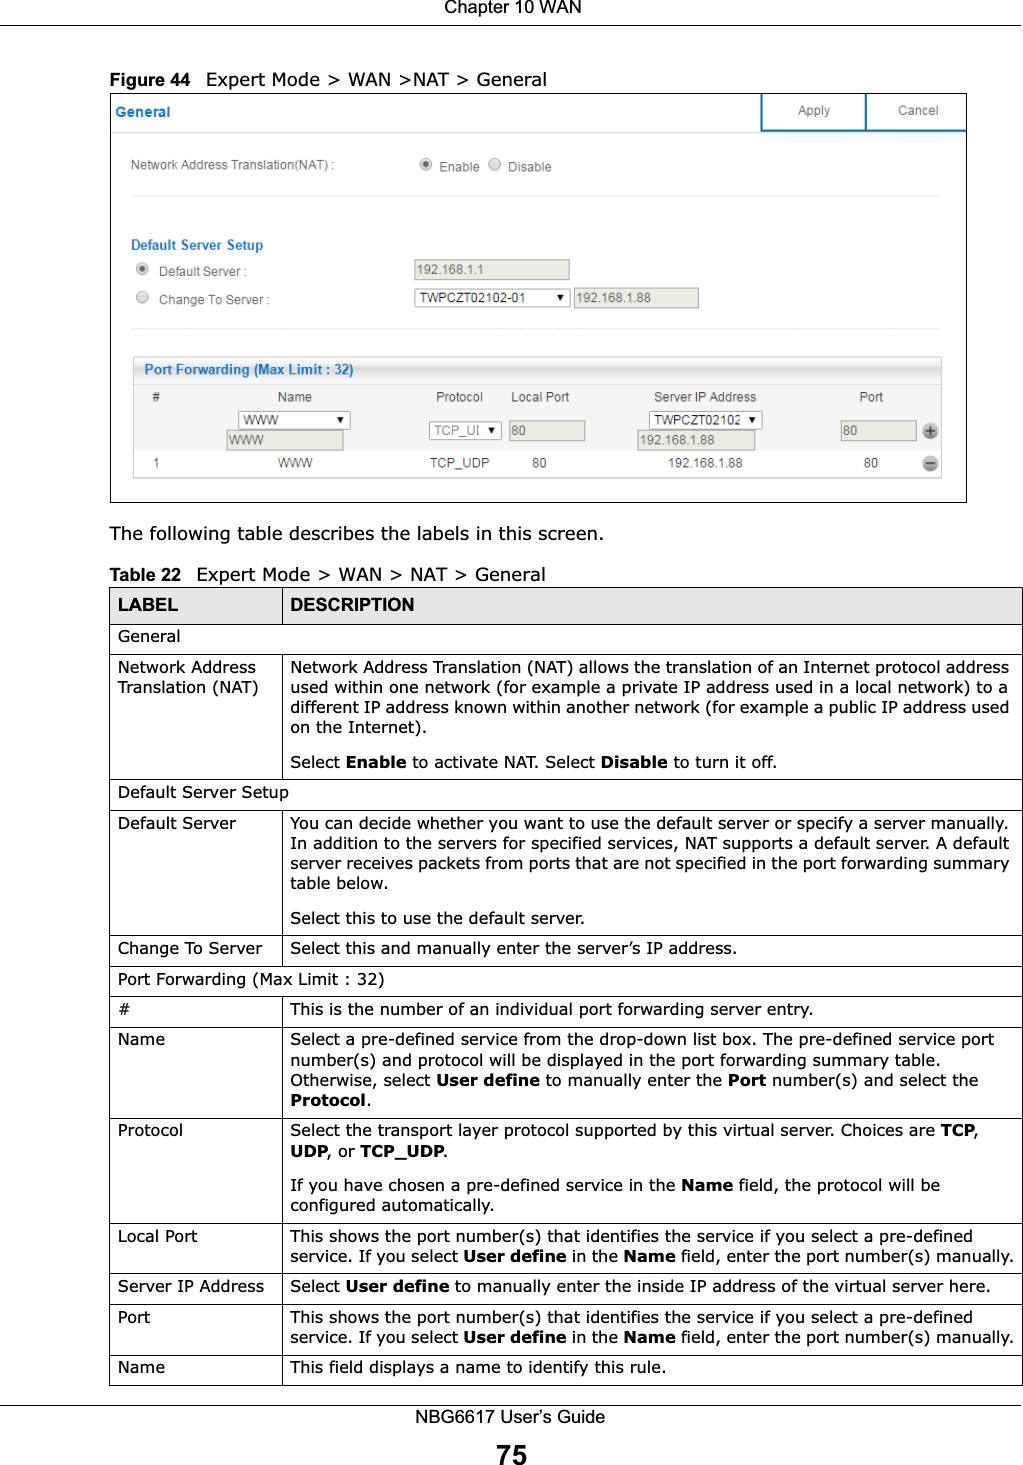
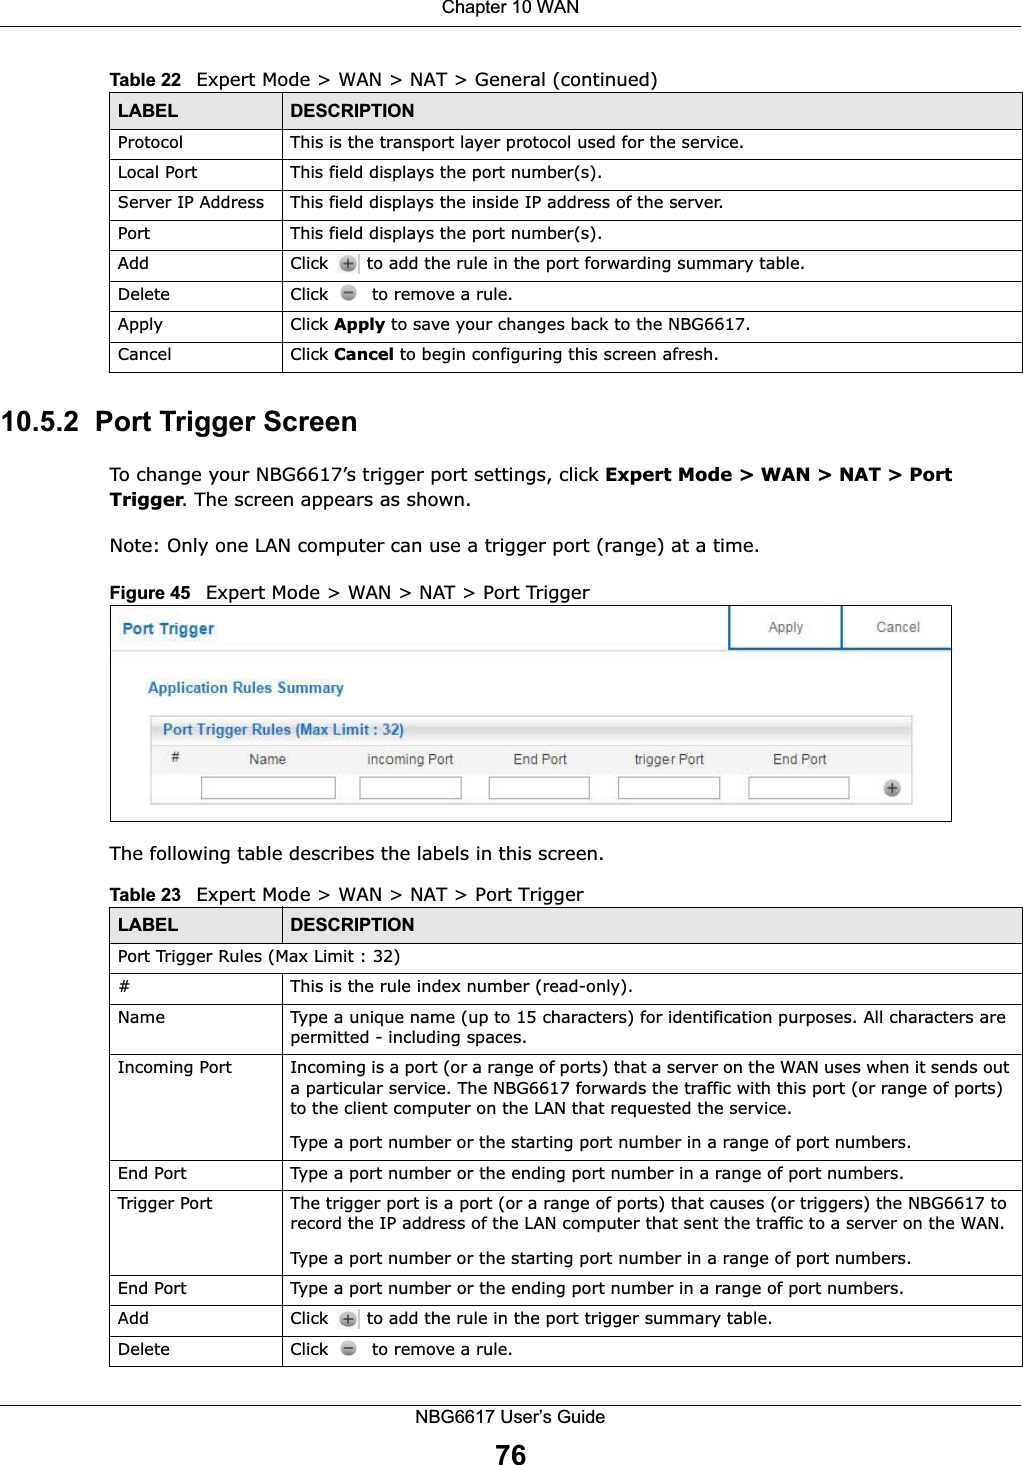
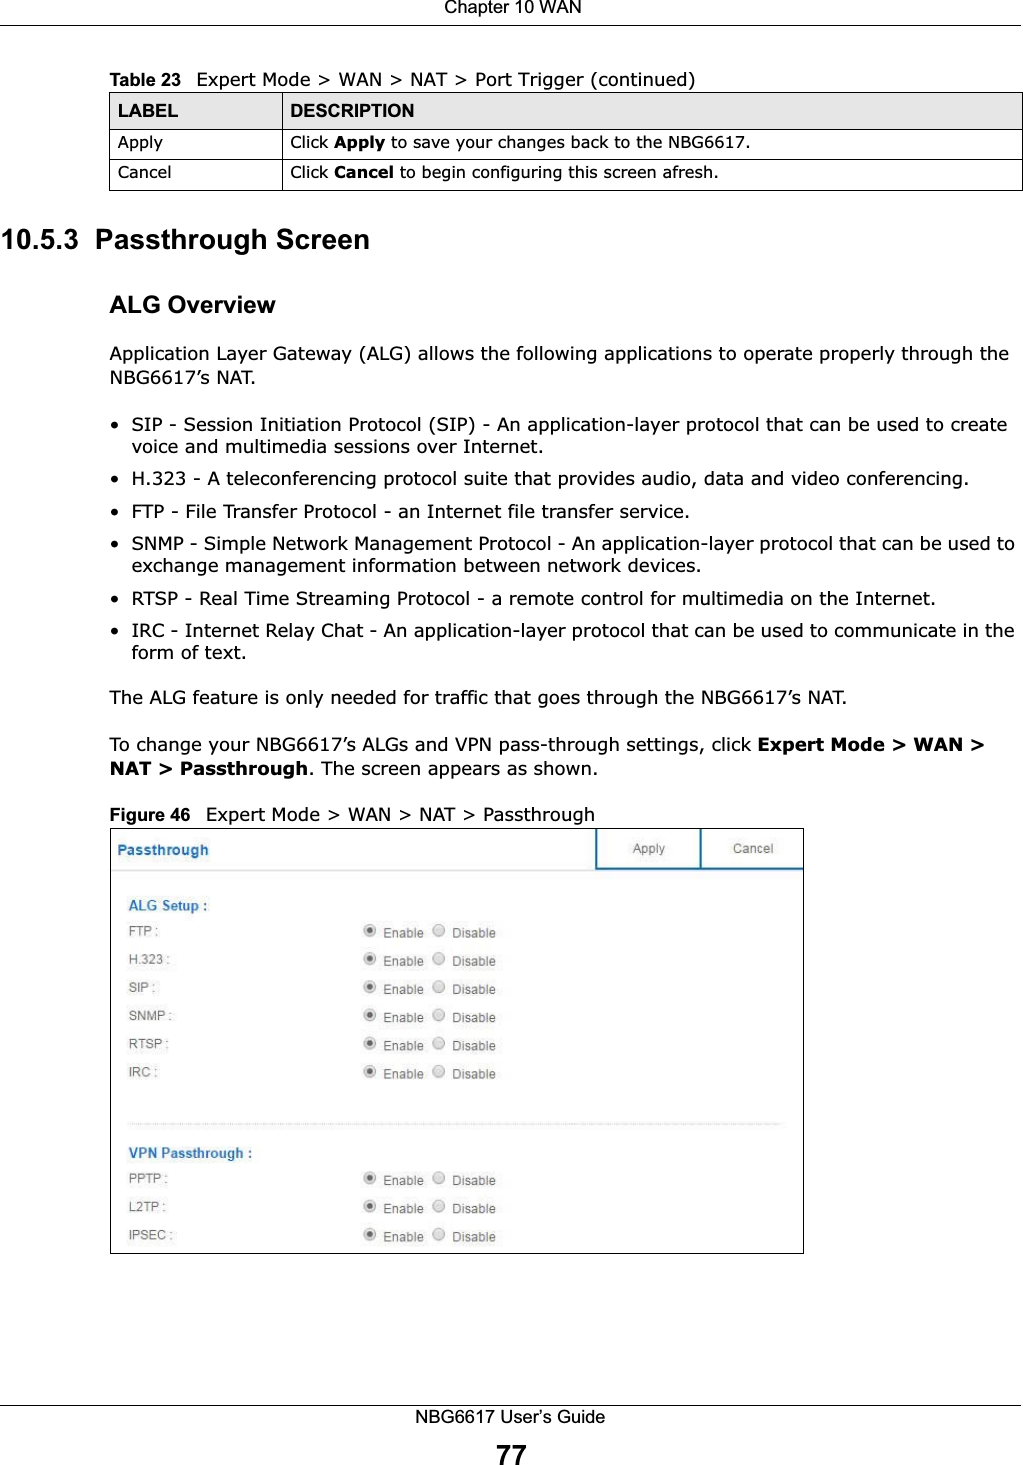
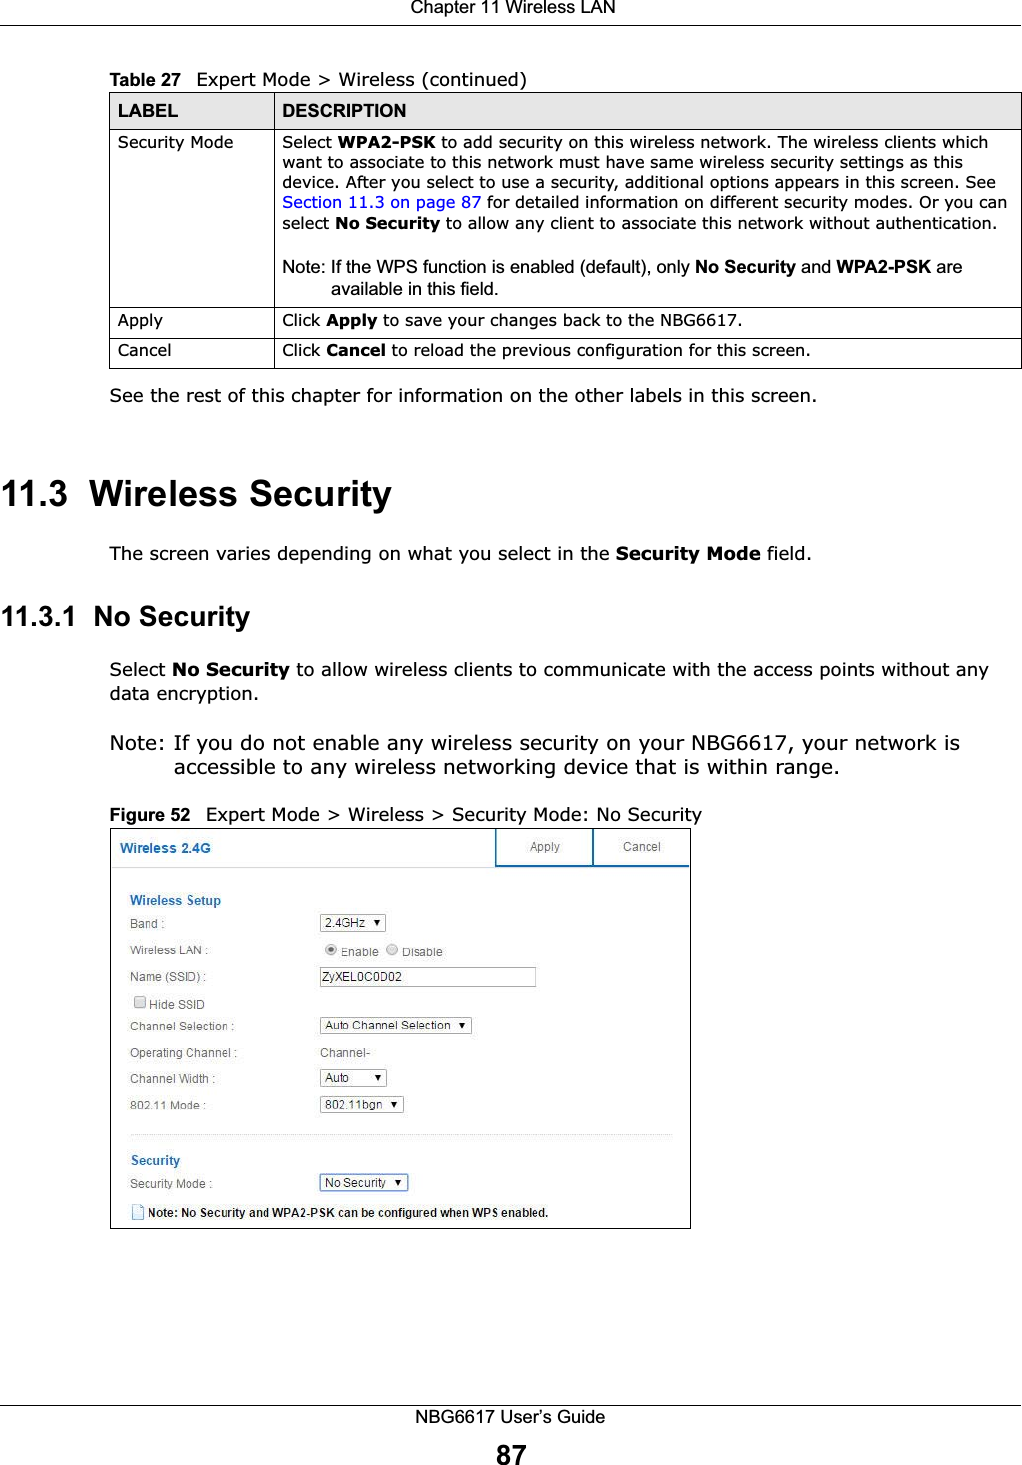
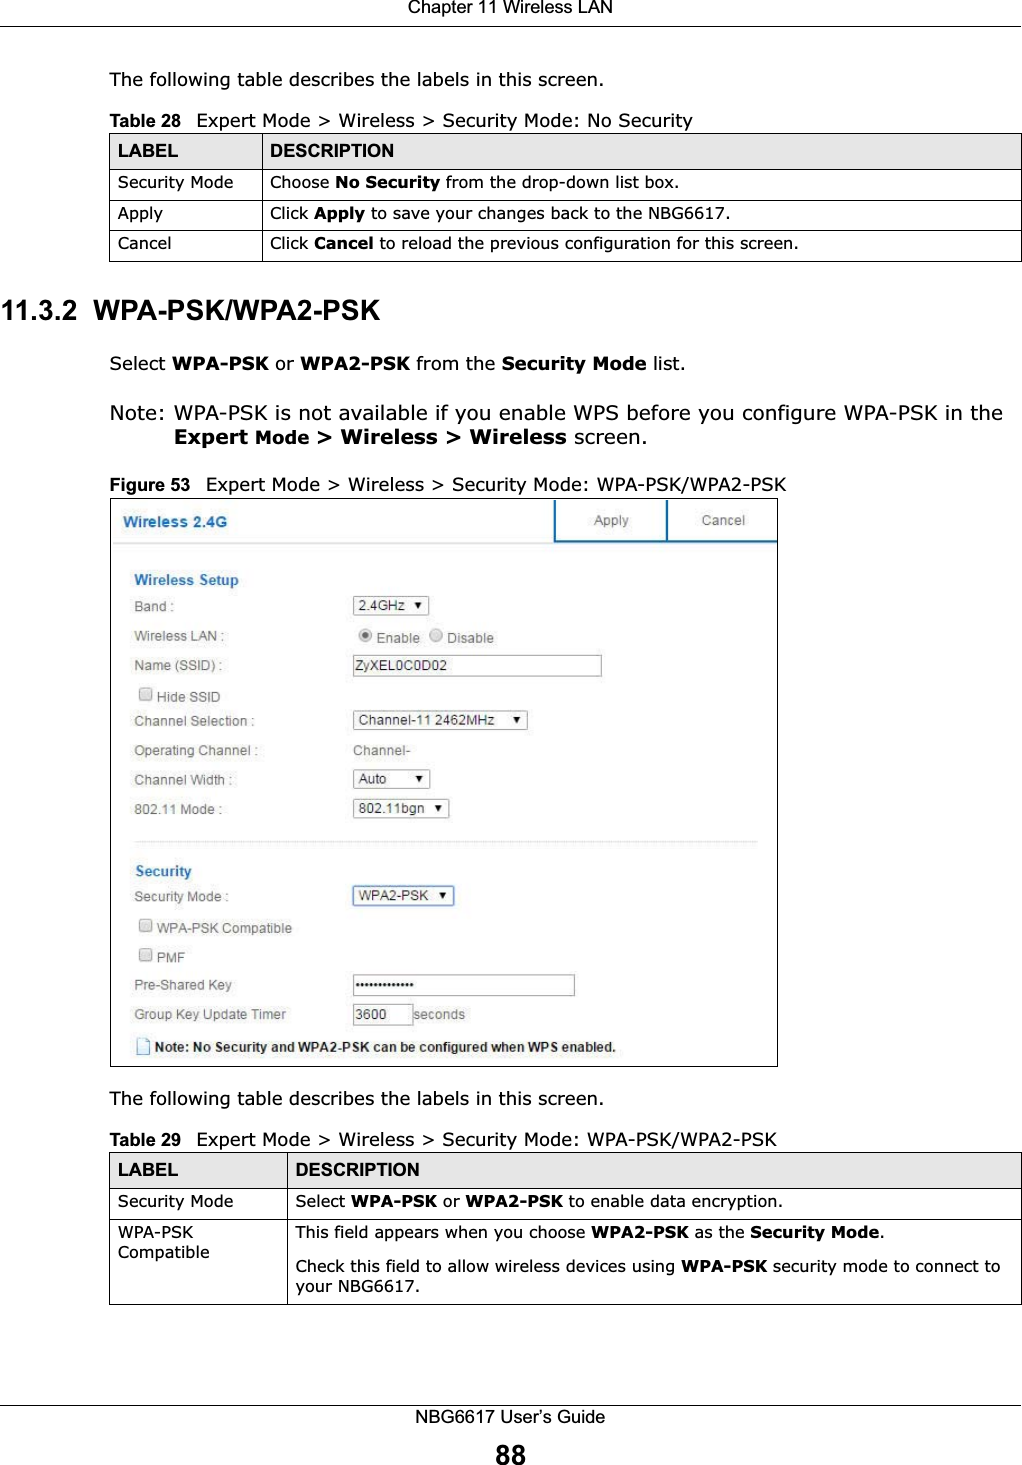
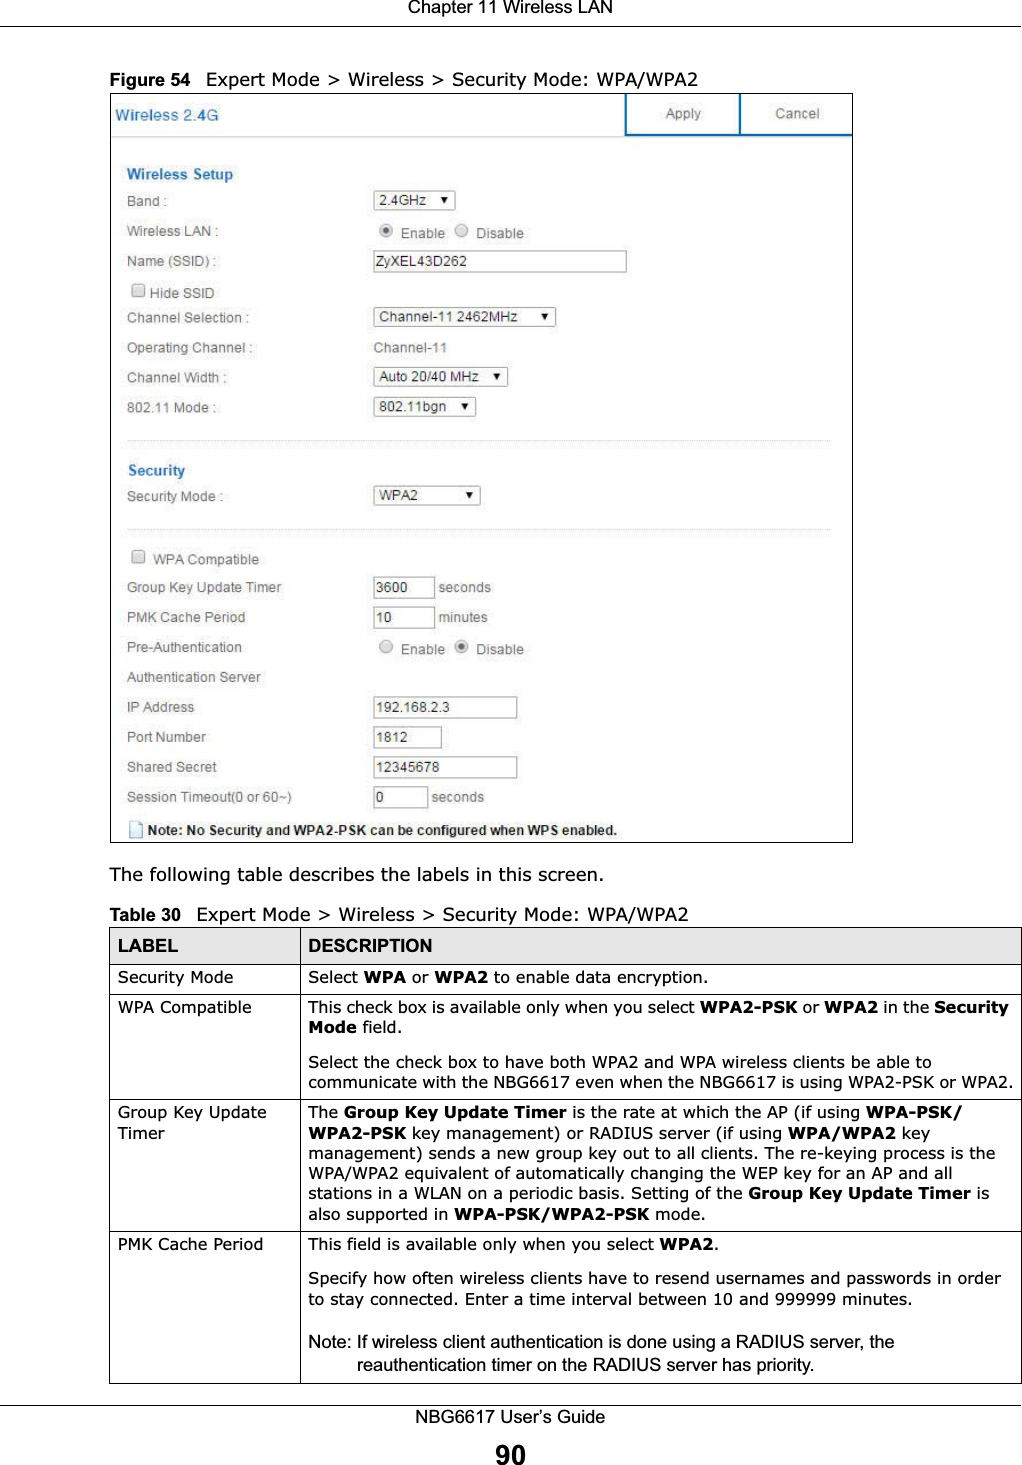
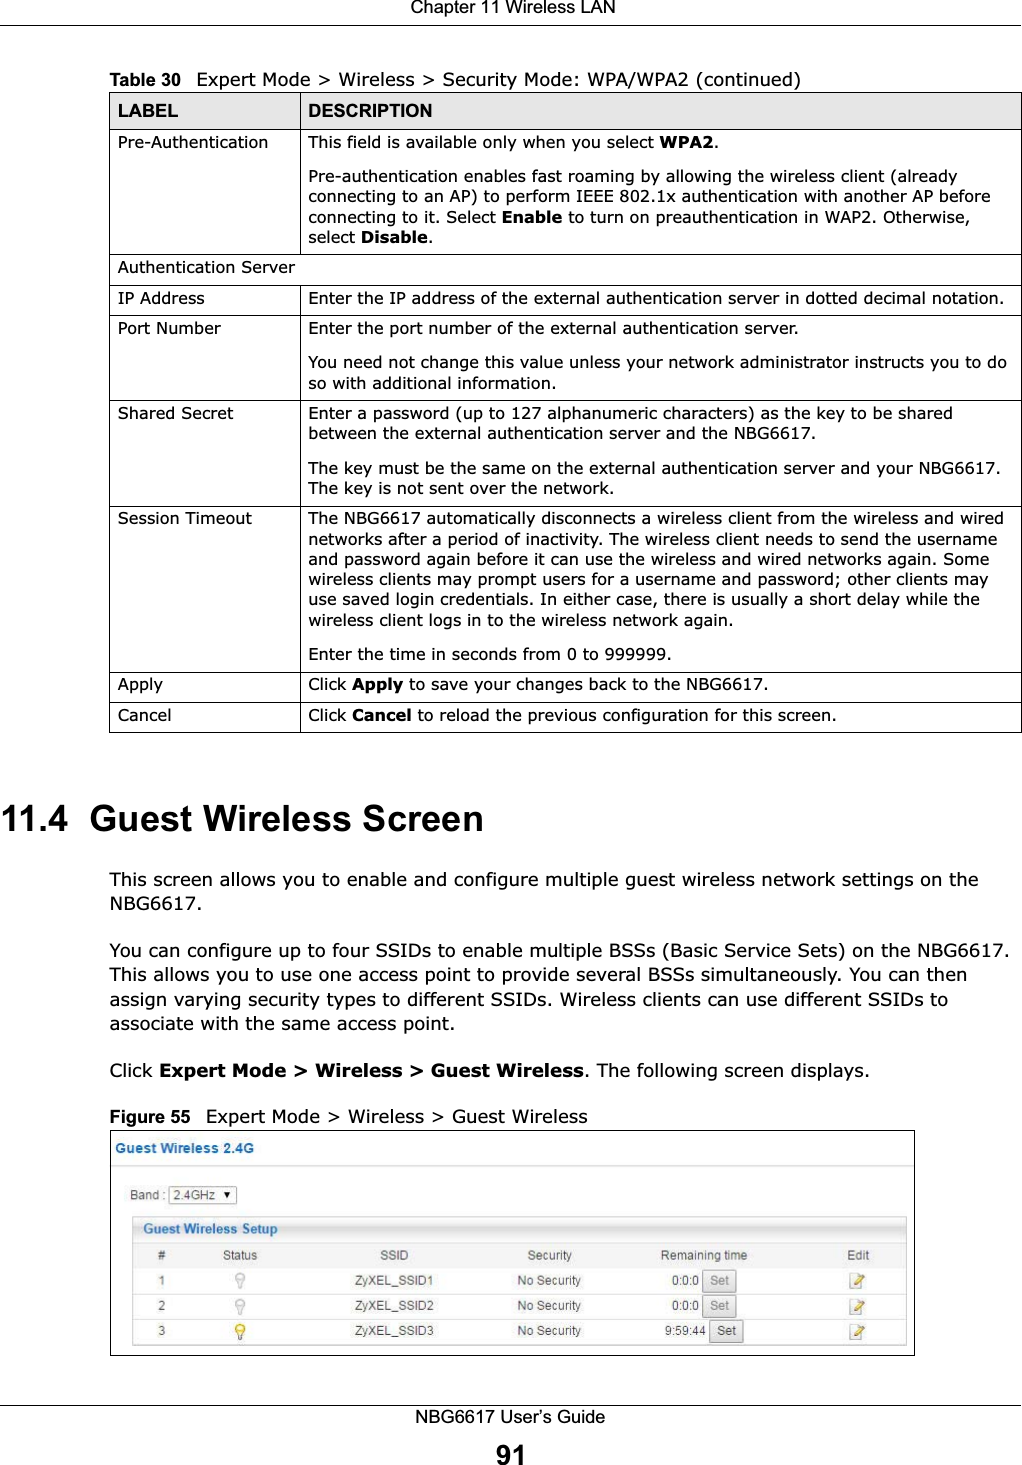
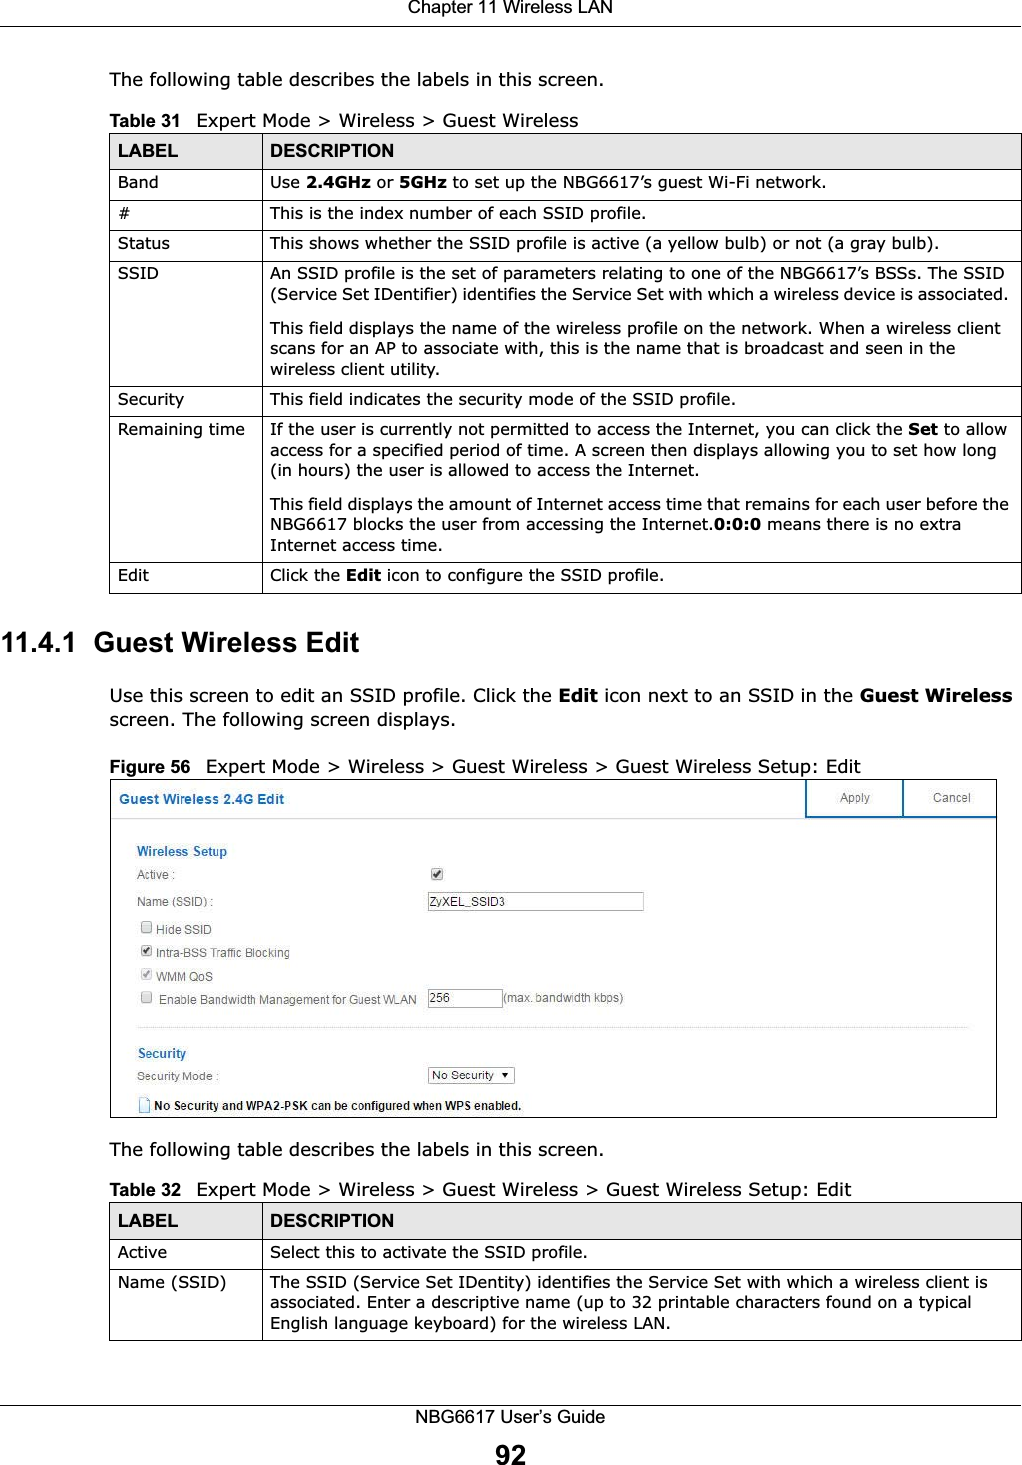
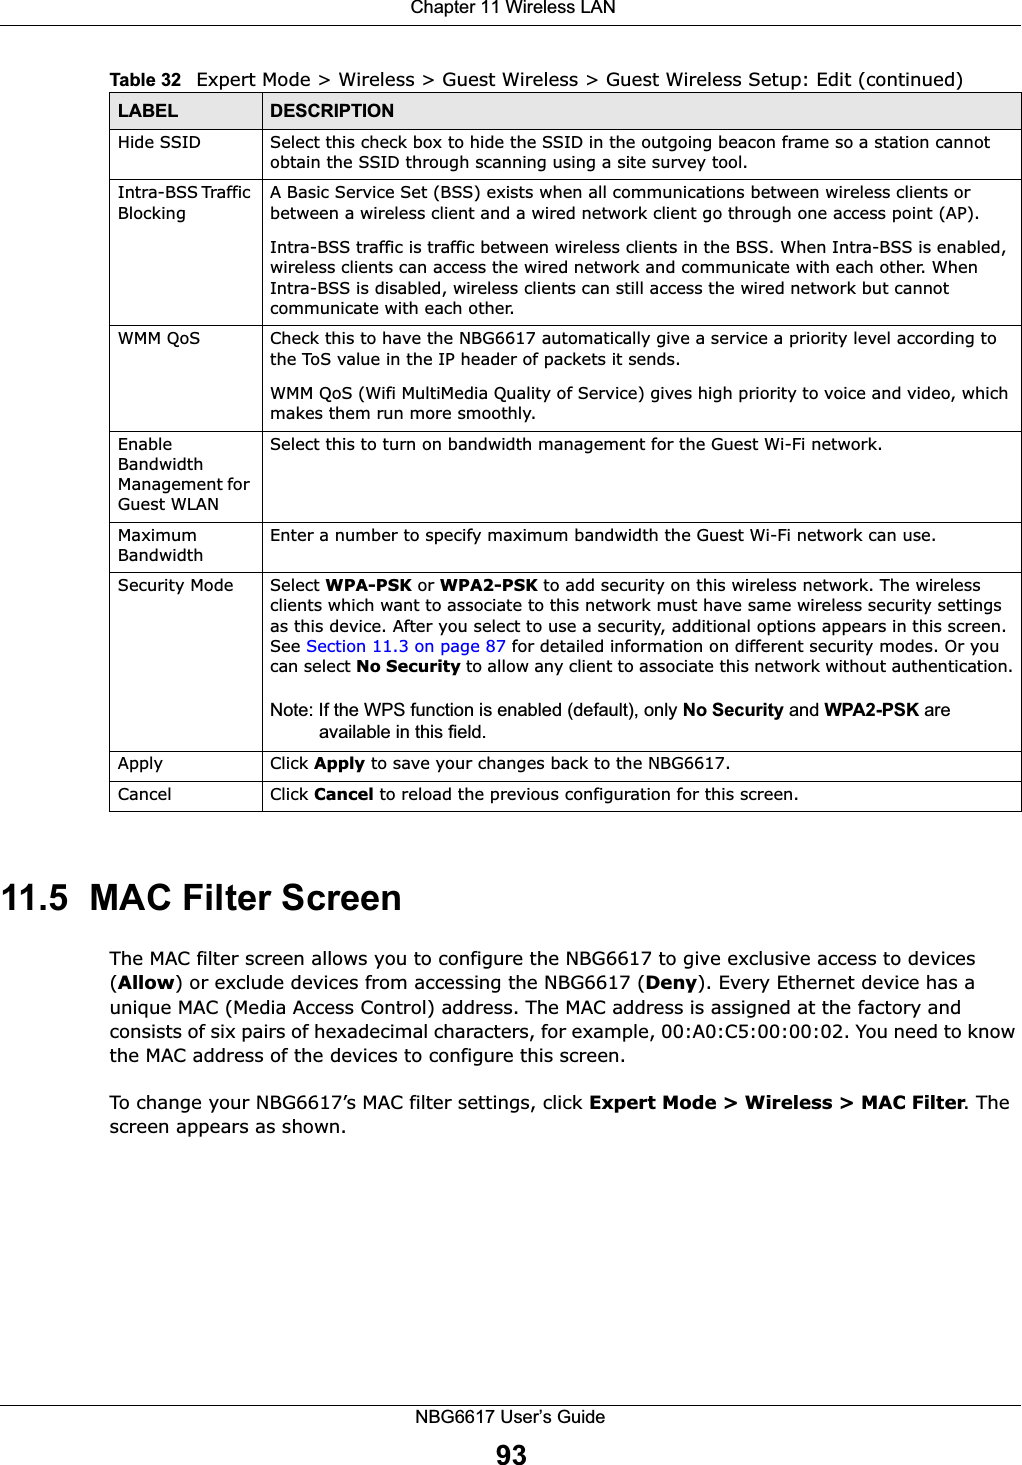
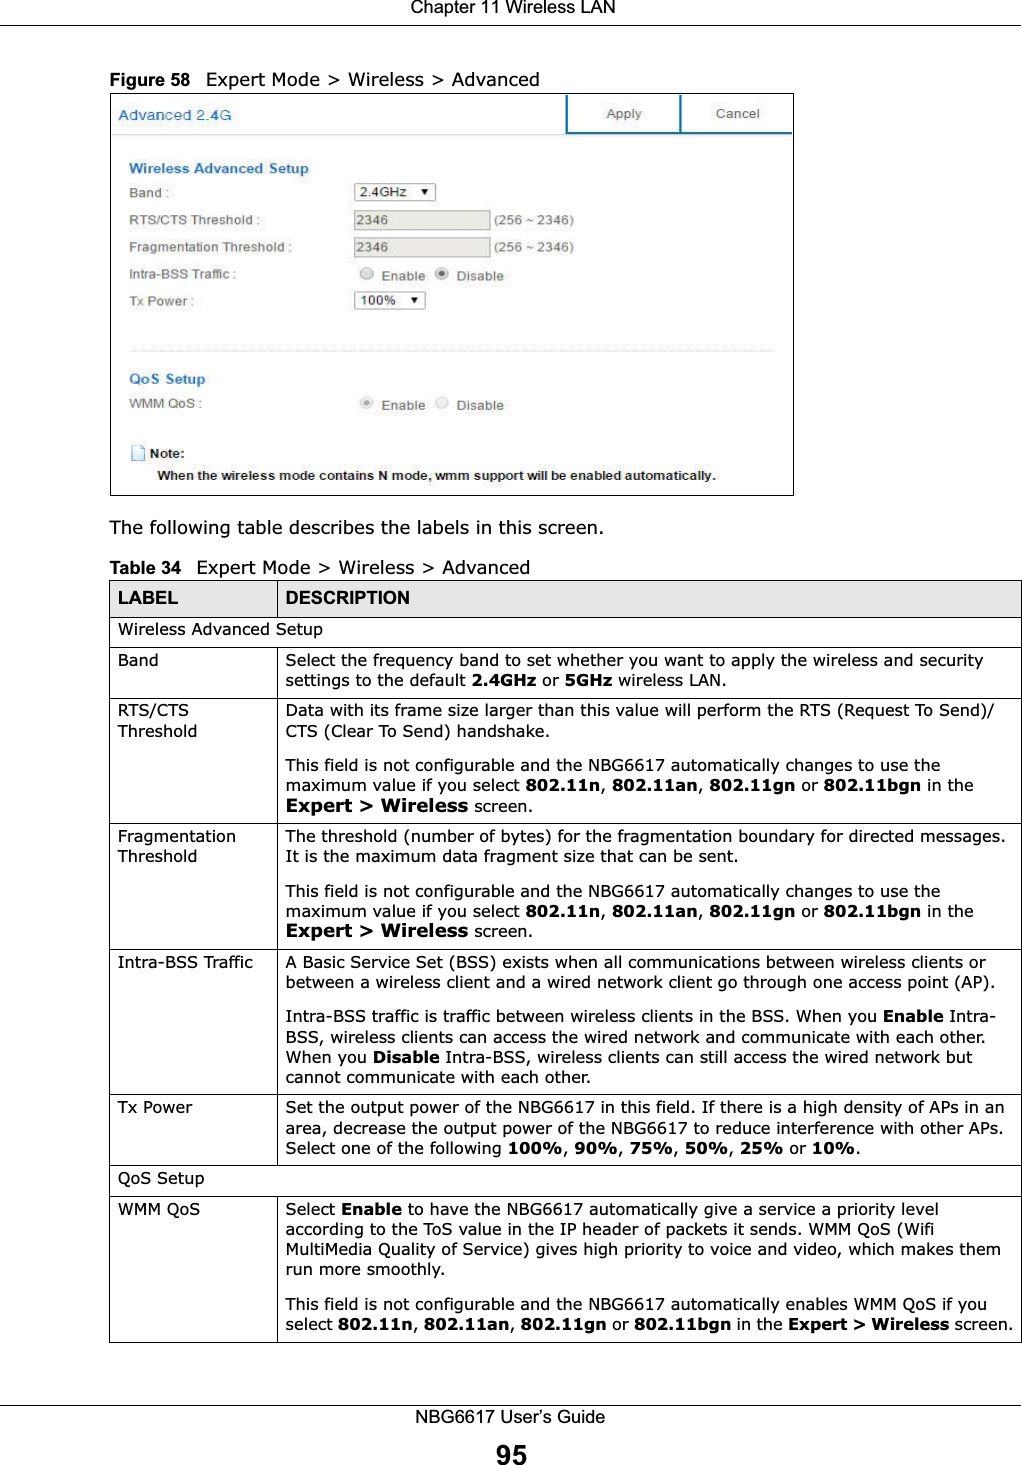
ZyXEL Communications NBG6617 AC1300 MU-MIMO Dual-Band Wireless Gigabit Router User Manual Book

ZyXEL Communications Corporation AC1300 MU-MIMO Dual-Band Wireless Gigabit Router Book

Contents

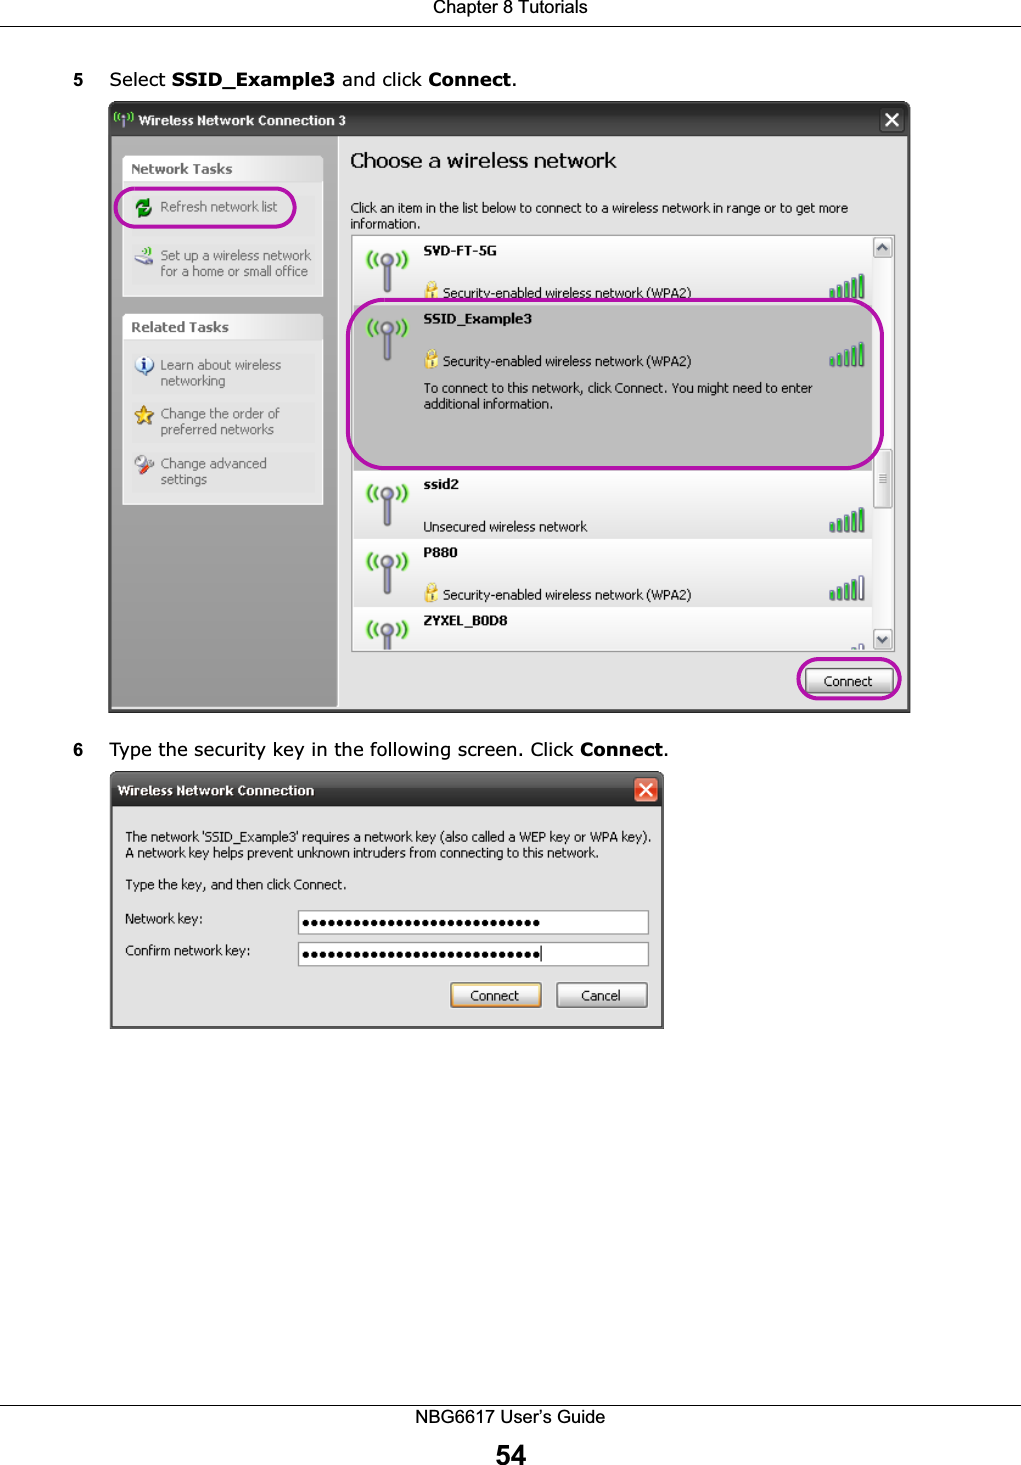
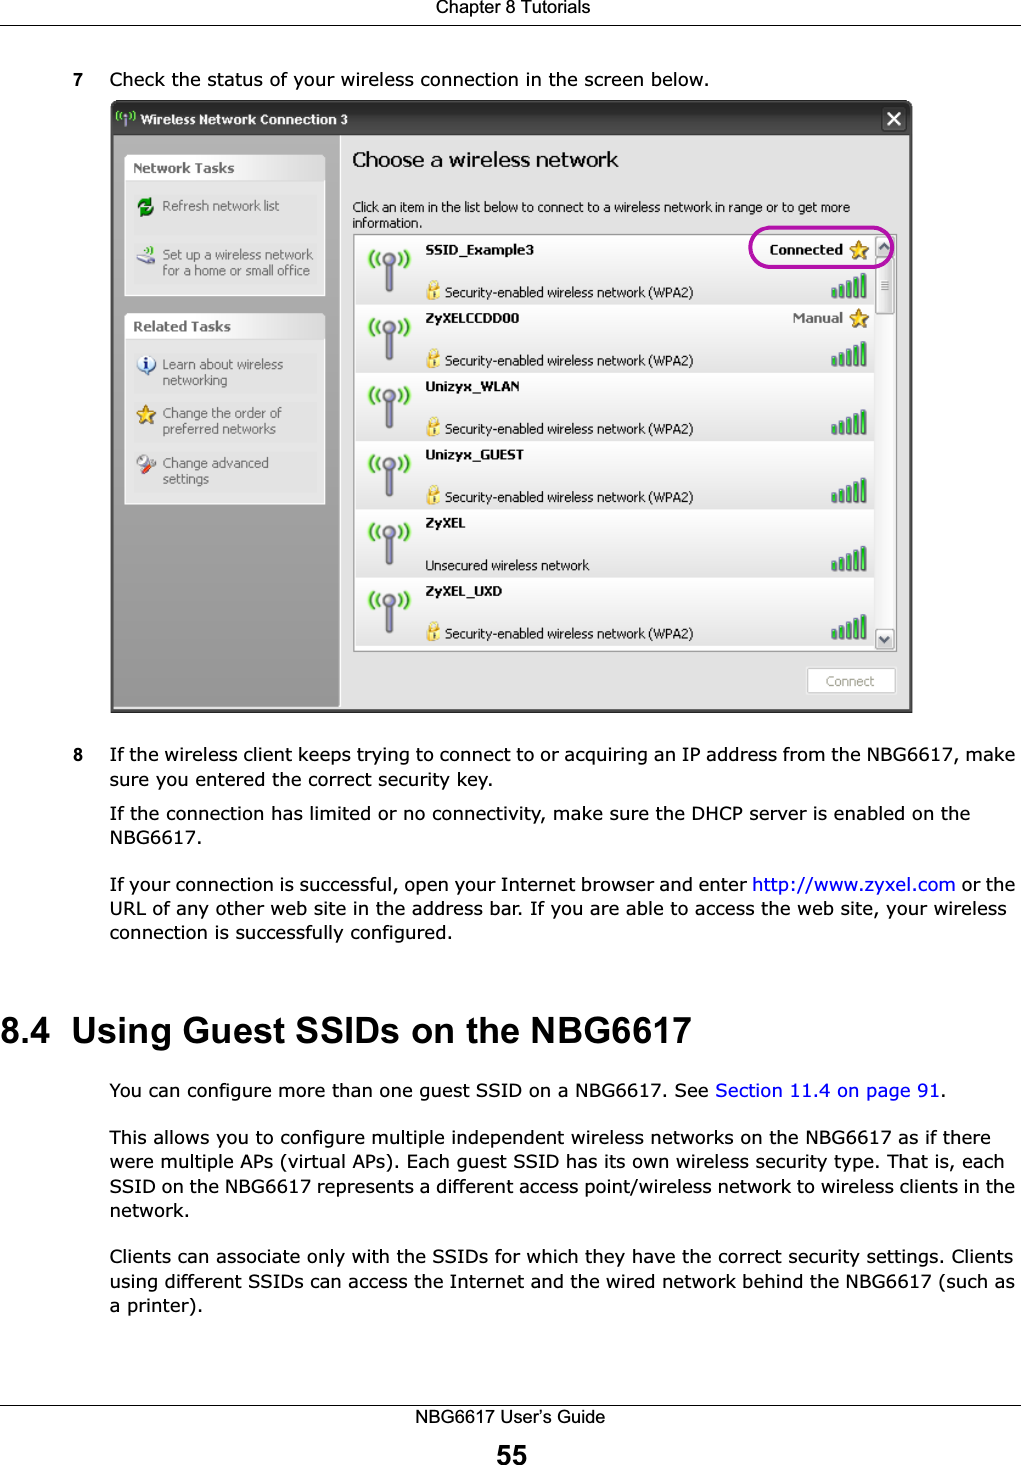
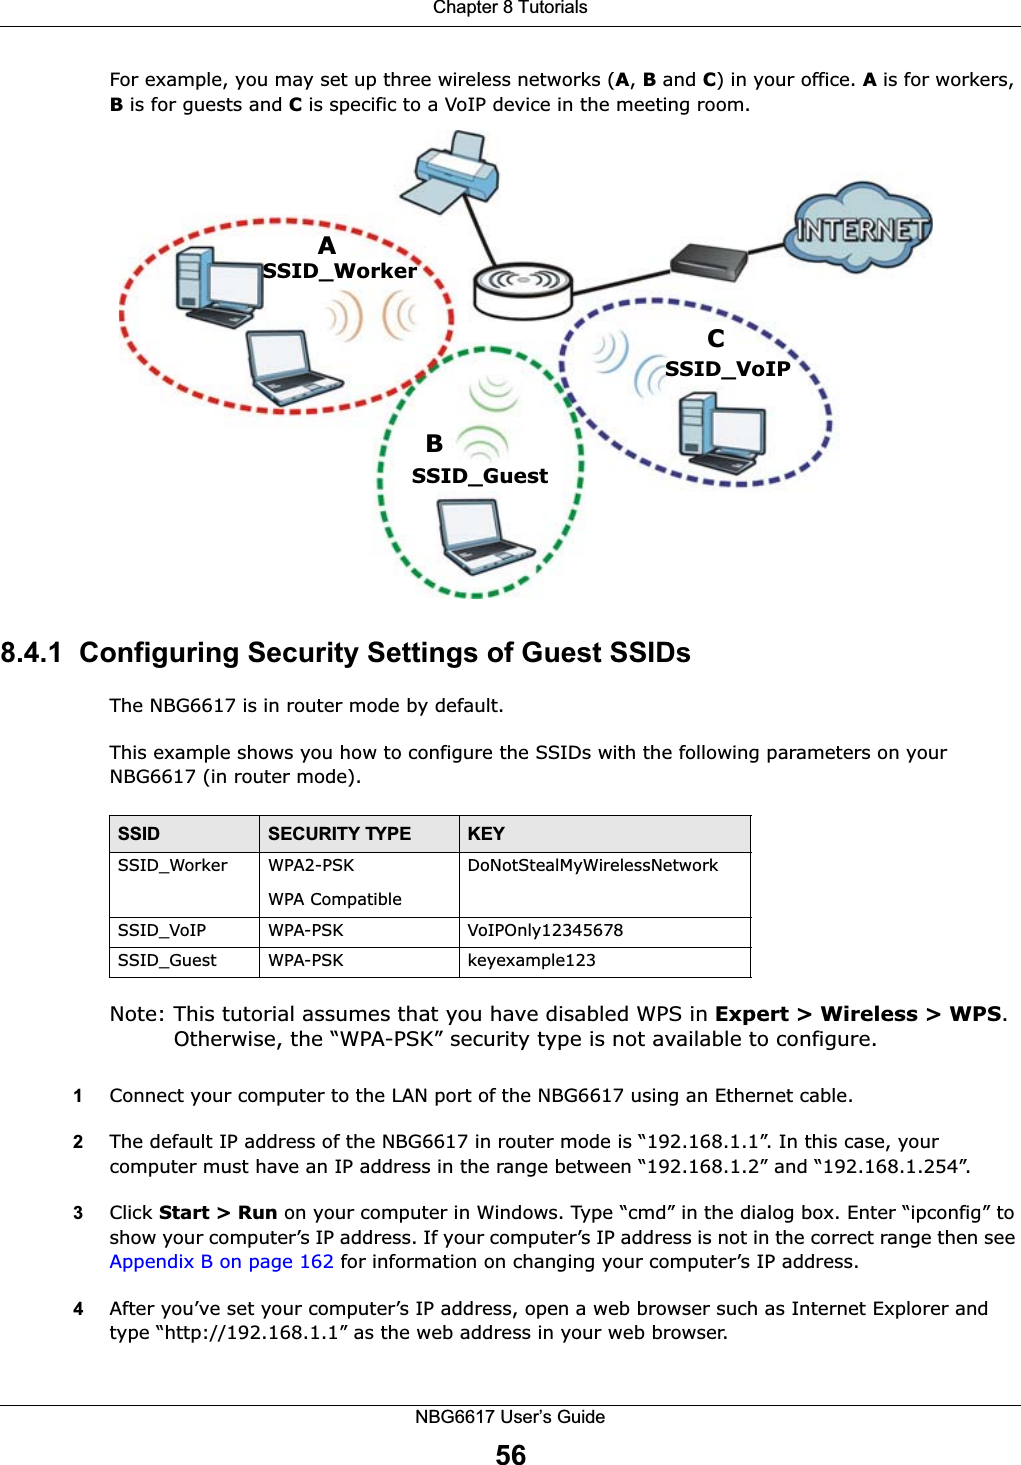
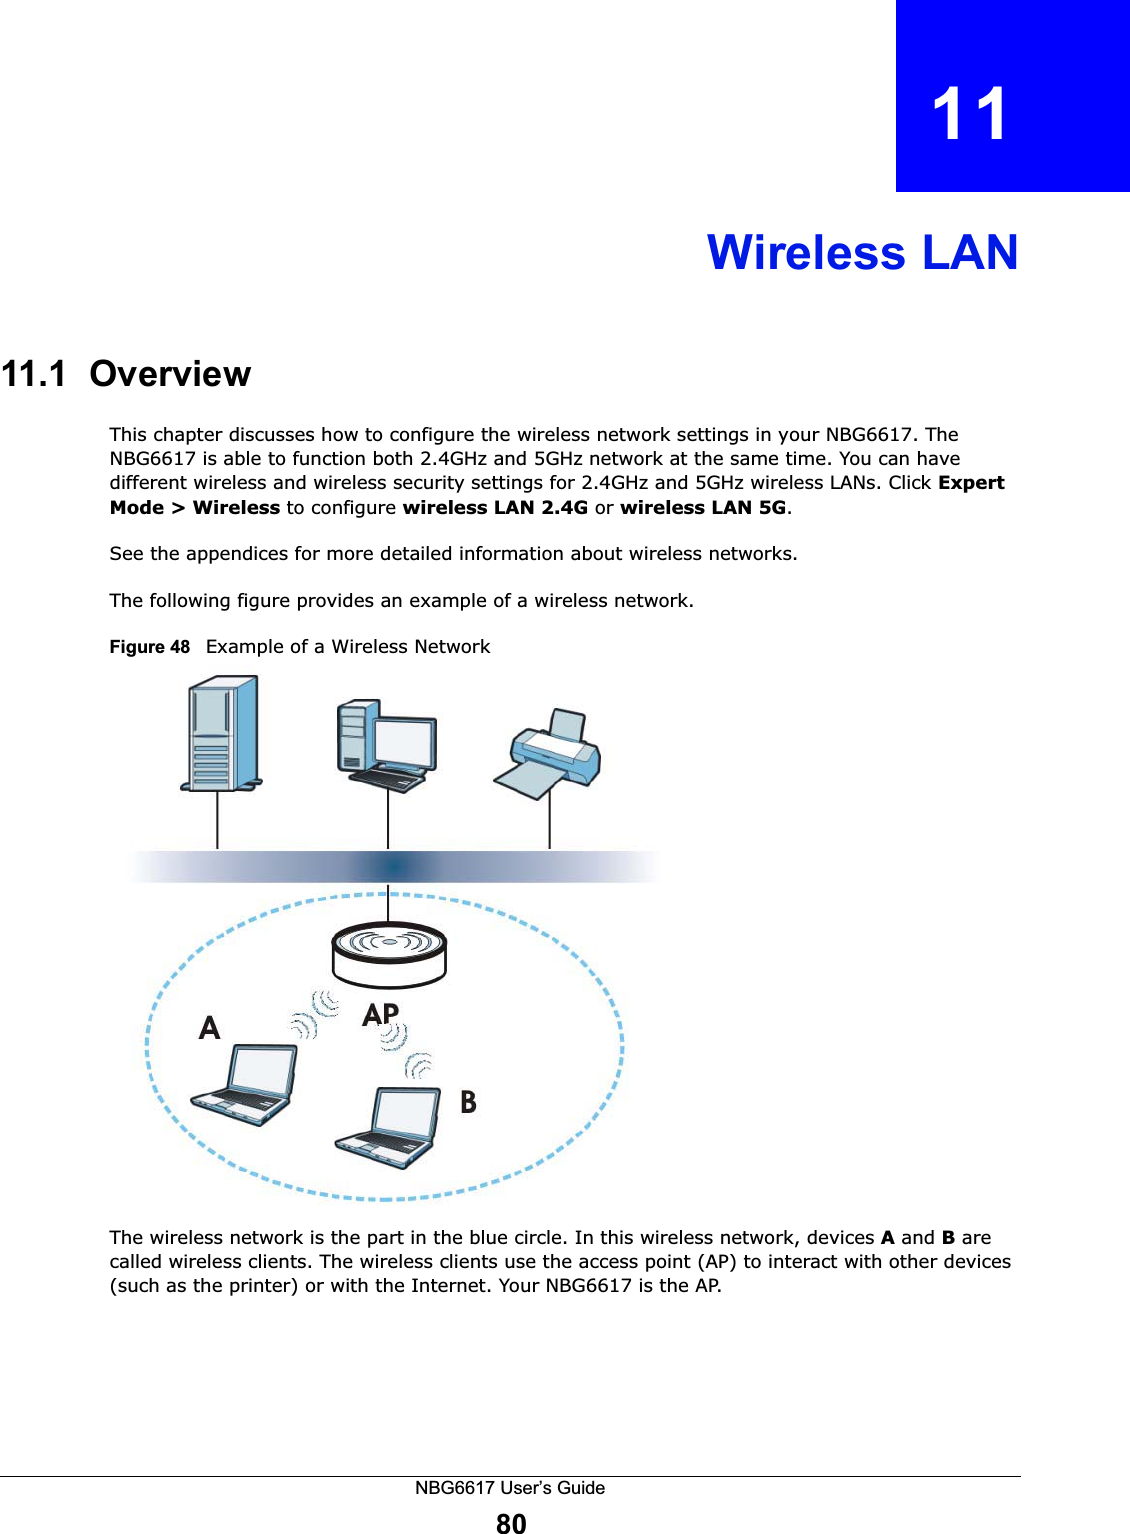
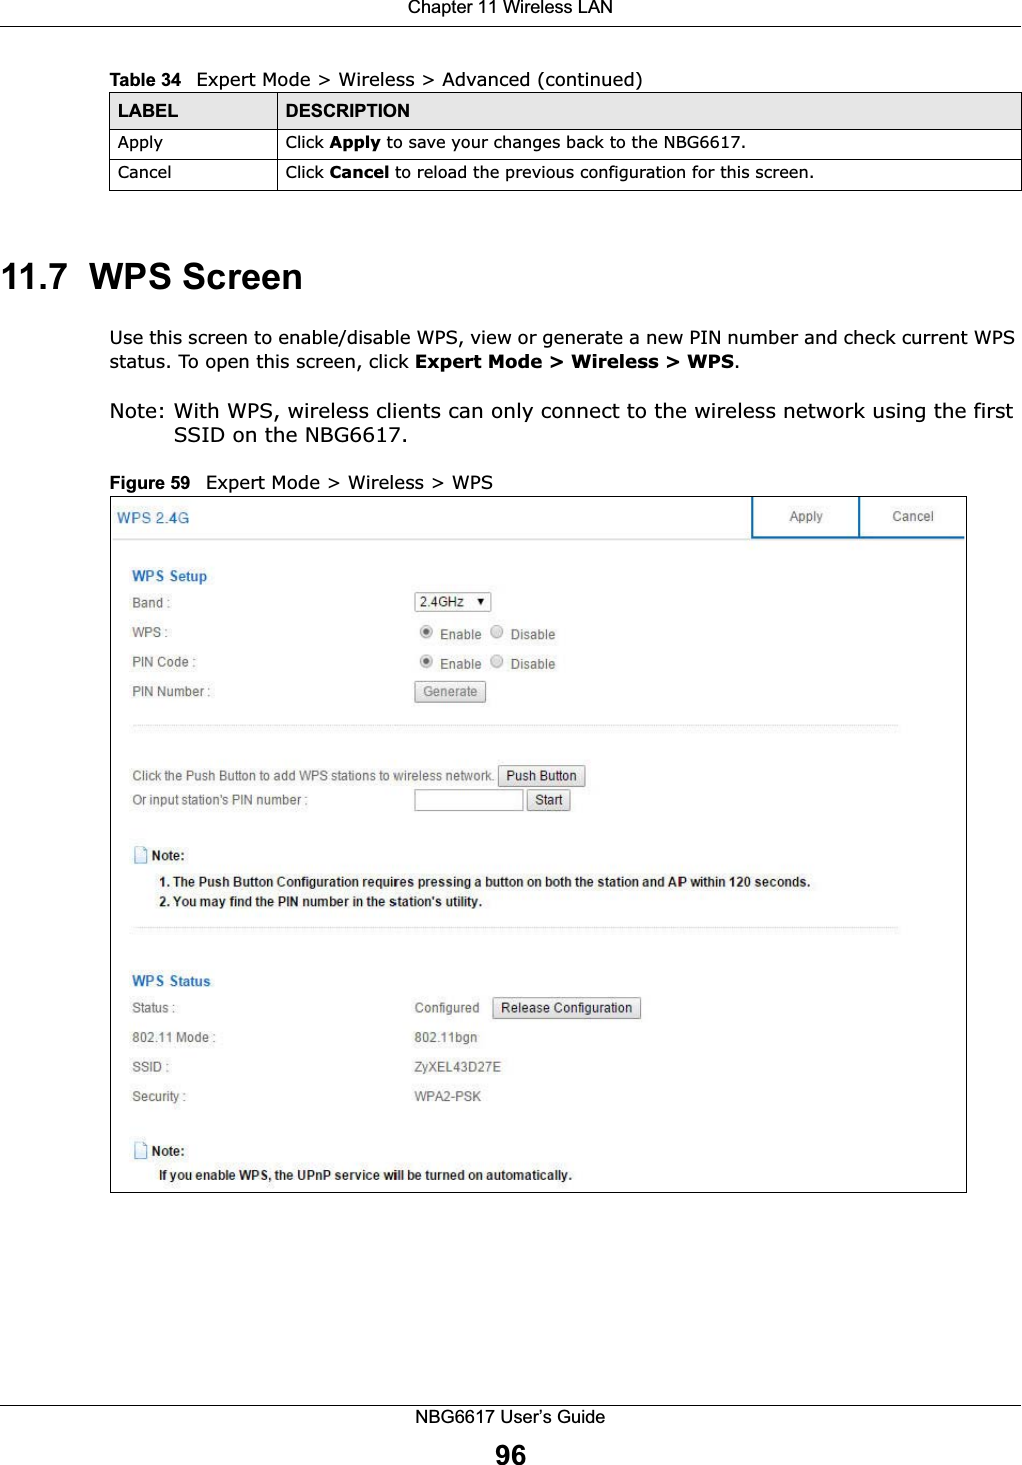
User Manual Part 1 (1-98).pdf

Quick Start Guidewww.zyxel.comNBG6617AC1300 MU-MIMO Dual-Band Wireless Gigabit RouterVersion 1.00Edition 2, 06/2016Copyright © 2016 ZyXEL Communications CorporationUser’s GuideDefault Login DetailsLAN IP Address http://192.168.1.1 (Router Mode)http://192.168.1.2 (Access Point Mode)Password 1234
NBG6617 User’s Guide2IMPORTANT!READ CAREFULLY BEFORE USE.KEEP THIS GUIDE FOR FUTURE REFERENCE.Screenshots and graphics in this book may differ slightly from your product due to differences in your product firmware or your computer operating system. Every effort has been made to ensure that the information in this manual is accurate.Related Documentation• Quick Start Guide The Quick Start Guide shows how to connect the NBG6617 and access the Web Configurator wizards. It contains information on setting up your network and configuring for Internet access.• More InformationGo to support.zyxel.com to find other information on the NBG6617.
 Contents OverviewNBG6617 User’s Guide3Contents OverviewUser’s Guide .........................................................................................................................................9Introduction .............................................................................................................................................10Introducing the Web Configurator  ...........................................................................................................15eaZy 123 Wizard  .....................................................................................................................................18NBG6617 Modes .....................................................................................................................................27Easy Mode  ..............................................................................................................................................28Router Mode  ...........................................................................................................................................36Access Point Mode  .................................................................................................................................42Tutorials ..................................................................................................................................................49Technical Reference  ..........................................................................................................................59Status ......................................................................................................................................................60WAN ........................................................................................................................................................62Wireless LAN  ..........................................................................................................................................80LAN .........................................................................................................................................................99Applications ...........................................................................................................................................104Security .................................................................................................................................................129Maintenance ..........................................................................................................................................135Troubleshooting ....................................................................................................................................149
Table of ContentsNBG6617 User’s Guide4Table of ContentsContents Overview  ..............................................................................................................................3Table of Contents .................................................................................................................................4Part I: User’s Guide ........................................................................................... 9Chapter   1Introduction.........................................................................................................................................101.1 Overview  ...........................................................................................................................................101.2 Applications .......................................................................................................................................101.3 Ways to Manage the NBG6617  ........................................................................................................101.4 Good Habits for Managing the NBG6617  ......................................................................................... 111.5 Resetting the NBG6617  .................................................................................................................... 111.5.1 How to Use the RESET Button ................................................................................................ 111.6 The WPS Button  ............................................................................................................................... 111.7 LEDs  .................................................................................................................................................121.8 Wall Mounting  ...................................................................................................................................13Chapter   2Introducing the Web Configurator ....................................................................................................152.1 Overview  ...........................................................................................................................................152.2 Accessing the Web Configurator .......................................................................................................152.2.1 Login Screen  ...........................................................................................................................162.2.2 Change Default Password Screen  ..........................................................................................16Chapter   3eaZy 123 Wizard..................................................................................................................................183.1 Overview  ...........................................................................................................................................183.2 Accessing the eaZy 123 Wizard ........................................................................................................183.3 Internet Type  .....................................................................................................................................203.3.1 WAN Selection Type: Automatic - DHCP  ................................................................................213.3.2 WAN Selection Type: PPPoE  ..................................................................................................213.3.3 WAN Selection Type: Static  .....................................................................................................223.4 Wireless Network  ..............................................................................................................................23Chapter   4NBG6617 Modes .................................................................................................................................274.1 Overview  ...........................................................................................................................................27
 Table of ContentsNBG6617 User’s Guide54.1.1 Web Configurator Modes .........................................................................................................274.1.2 Device Modes ..........................................................................................................................27Chapter   5Easy Mode ...........................................................................................................................................285.1 Overview  ...........................................................................................................................................285.2 What You Can Do  .............................................................................................................................285.3 What You Need to Know  ...................................................................................................................295.4 Navigation Panel ...............................................................................................................................295.5 Network Map  .....................................................................................................................................295.6 Control Panel  ....................................................................................................................................315.6.1 Wi-Fi  ........................................................................................................................................325.6.2 Guest Wi-Fi ..............................................................................................................................335.6.3 Parental Control .......................................................................................................................345.6.4 Notification ...............................................................................................................................34Chapter   6Router Mode........................................................................................................................................366.1 Overview  ...........................................................................................................................................366.2 Router Mode Status Screen  ..............................................................................................................366.2.1 Navigation Panel  .....................................................................................................................39Chapter   7Access Point Mode.............................................................................................................................427.1 Overview  ...........................................................................................................................................427.2 What You Can Do  .............................................................................................................................427.3 What You Need to Know  ...................................................................................................................427.3.1 Setting your NBG6617 to AP Mode .........................................................................................437.3.2 Accessing the Web Configurator in Access Point Mode ..........................................................437.3.3 Configuring your WLAN and Maintenance Settings  ................................................................447.4 AP Mode Status Screen  ....................................................................................................................447.4.1 Navigation Panel  .....................................................................................................................467.5 LAN Screen .......................................................................................................................................46Chapter   8Tutorials...............................................................................................................................................498.1 Overview  ...........................................................................................................................................498.2 Set Up a Wireless Network Using WPS ............................................................................................498.2.1 Push Button Configuration (PBC) ............................................................................................498.2.2 PIN Configuration  ....................................................................................................................508.3 Connect to NBG6617 Wireless Network without WPS  .....................................................................518.3.1 Configure Your Notebook  ........................................................................................................538.4 Using Guest SSIDs on the NBG6617  ...............................................................................................55
Table of ContentsNBG6617 User’s Guide68.4.1 Configuring Security Settings of Guest SSIDs  ........................................................................56Part II: Technical Reference............................................................................ 59Chapter   9Status ...................................................................................................................................................609.1 Overview  ...........................................................................................................................................609.1.1 What You Can Do  ....................................................................................................................609.2 Client Tables Screen  .........................................................................................................................60Chapter   10WAN .....................................................................................................................................................6210.1 Overview  .........................................................................................................................................6210.2 What You Can Do  ...........................................................................................................................6210.3 What You Need To Know  ................................................................................................................6210.3.1 Configuring Your Internet Connection ....................................................................................6310.4 Internet Connection Screen  ............................................................................................................6510.4.1 IPoE Encapsulation  ...............................................................................................................6510.4.2 PPPoE Encapsulation  ...........................................................................................................7010.5 NAT  .................................................................................................................................................7410.5.1 General Screen  .....................................................................................................................7410.5.2 Port Trigger Screen  ...............................................................................................................7610.5.3 Passthrough Screen  ..............................................................................................................7710.6 Dynamic DNS Screen  .....................................................................................................................78Chapter   11Wireless LAN.......................................................................................................................................8011.1 Overview  .........................................................................................................................................8011.1.1 What You Can Do  ..................................................................................................................8111.1.2 What You Should Know  .........................................................................................................8111.2 Wireless Screen   .............................................................................................................................8511.3 Wireless Security .............................................................................................................................8711.3.1 No Security  ............................................................................................................................8711.3.2 WPA-PSK/WPA2-PSK  ...........................................................................................................8811.3.3 WPA/WPA2  ............................................................................................................................8911.4 Guest Wireless Screen ....................................................................................................................9111.4.1 Guest Wireless Edit  ...............................................................................................................9211.5 MAC Filter Screen   ..........................................................................................................................9311.6 Advanced Screen  ............................................................................................................................9411.7 WPS Screen ....................................................................................................................................9611.8 Scheduling Screen  ..........................................................................................................................97
 Table of ContentsNBG6617 User’s Guide7Chapter   12LAN ......................................................................................................................................................9912.1 Overview  .........................................................................................................................................9912.2 What You Can Do  ...........................................................................................................................9912.3 What You Need To Know  ................................................................................................................9912.4 LAN IP Screen  ..............................................................................................................................10012.5 Static DHCP Screen ......................................................................................................................10112.6 IPv6 LAN Screen ...........................................................................................................................102Chapter   13Applications ......................................................................................................................................10413.1 Overview  .......................................................................................................................................10413.1.1 What You Can Do  ................................................................................................................10413.1.2 What You Need To Know .....................................................................................................10413.1.3 Before You Begin .................................................................................................................10613.2 Parental Control  ............................................................................................................................10613.2.1 General Screen  ...................................................................................................................10613.2.2 Notification Screen  .............................................................................................................. 11013.3 Bandwidth Management  ............................................................................................................... 11213.3.1 General Screen  ................................................................................................................... 11313.3.2 Advanced Screen  ................................................................................................................ 11313.4 USB Media Sharing Screen  .......................................................................................................... 11713.5 UPnP Screen  ................................................................................................................................ 11813.6 File Sharing  ................................................................................................................................... 11913.6.1 SAMBA Server Screen  ........................................................................................................12013.6.2 FTP Server Screen ..............................................................................................................12113.6.3 Example of Accessing Your Shared Files From a Computer ...............................................12313.7 ONE Connect Screen ....................................................................................................................12613.8 Technical Reference ......................................................................................................................127Chapter   14Security..............................................................................................................................................12914.1 Overview    .....................................................................................................................................12914.1.1 What You Can Do  ................................................................................................................12914.1.2 What You Need To Know .....................................................................................................12914.2 IPv4 Firewall Screen   ....................................................................................................................13014.3 IPv6 Firewall Screen  .....................................................................................................................132Chapter   15Maintenance ......................................................................................................................................13515.1 Overview  .......................................................................................................................................13515.2 What You Can Do  .........................................................................................................................13515.3 General Screen  .............................................................................................................................135
Table of ContentsNBG6617 User’s Guide815.4 Password Screen  ..........................................................................................................................13615.5 Time Screen ..................................................................................................................................13715.6 Firmware Upgrade Screen  ............................................................................................................13915.7 Backup/Restore Screen  ................................................................................................................14015.8 Restart Screen  ..............................................................................................................................14115.9 Language Screen ..........................................................................................................................14115.10 Remote Management Screen  .....................................................................................................14215.10.1 Remote Access  .................................................................................................................14215.10.2 Wake On LAN ....................................................................................................................14415.11 Log Screen  ..................................................................................................................................14515.12 System Operation Mode Overview  .............................................................................................14615.13 Operation Mode Screen ..............................................................................................................147Chapter   16Troubleshooting................................................................................................................................14916.1 Overview  .......................................................................................................................................14916.2 Power, Hardware Connections, and LEDs ....................................................................................14916.3 NBG6617 Access and Login  .........................................................................................................15016.4 Internet Access  .............................................................................................................................15116.5 Resetting the NBG6617 to Its Factory Defaults  ............................................................................15316.6 Wireless Connections  ...................................................................................................................15316.7 USB Device Problems ...................................................................................................................155Appendix   A  Customer Support ........................................................................................................156Appendix   B  Setting Up Your Computer’s IP Address ......................................................................162Appendix   C  Common Services........................................................................................................188Appendix   D  Legal Information .........................................................................................................191Index ..................................................................................................................................................200
9PART IUser’s Guide
NBG6617 User’s Guide10CHAPTER   1Introduction1.1  OverviewThis chapter introduces the main features and applications of the NBG6617.The NBG6617 extends the range of your existing wired network without additional wiring, providing easy network access to mobile users. You can set up a wireless network with other IEEE 802.11a/b/g/n/ac compatible devices. The NBG6617 is able to function both 2.4GHz and 5GHz networks at the same time.A range of services such as a firewall and content filtering are also available for secure Internet computing. There is one USB 3.0 port on the side panel of your NBG6617. You can connect USB (version 3.0 or lower) memory sticks, USB hard drives, or USB devices for file sharing. The NBG6617 automatically detects the USB devices. 1.2  ApplicationsYour can have the following networks with the NBG6617:•Wired. You can connect network devices via the Ethernet ports of the NBG6617 so that they can communicate with each other and access the Internet.•Wireless. Wireless clients can connect to the NBG6617 to access network resources. You can use WPS (Wi-Fi Protected Setup) to create an instant network connection with another WPS-compatible device.•WAN. Connect to a broadband modem/router for Internet access.1.3  Ways to Manage the NBG6617Use any of the following methods to manage the NBG6617.• WPS (Wi-Fi Protected Setup). You can use the WPS button or the WPS section of the Web Configurator to set up a wireless network with your NBG6617.• Web Configurator. This is recommended for everyday management of the NBG6617 using a (supported) web browser.
 Chapter 1 IntroductionNBG6617 User’s Guide111.4  Good Habits for Managing the NBG6617Do the following things regularly to make the NBG6617 more secure and to manage the NBG6617 more effectively.• Change the password. Use a password that’s not easy to guess and that consists of different types of characters, such as numbers and letters.• Write down the password and put it in a safe place.• Back up the configuration (and make sure you know how to restore it). Restoring an earlier working configuration may be useful if the device becomes unstable or even crashes. If you forget your password, you will have to reset the NBG6617 to its factory default settings. If you backed up an earlier configuration file, you would not have to totally re-configure the NBG6617. You could simply restore your last configuration.1.5  Resetting the NBG6617If you forget your password or IP address, or you cannot access the Web Configurator, you will need to use the RESET button at the back of the NBG6617 to reload the factory-default configuration file. This means that you will lose all configurations that you had previously saved, the password will be reset to “1234” and the IP address will be reset to “192.168.1.1”.1.5.1  How to Use the RESET Button1Make sure the power LED is on.2Press the RESET button for one to four seconds to restart/reboot the NBG6617.3Press the RESET button for longer than five seconds to set the NBG6617 back to its factory-default configurations.1.6  The WPS ButtonYour NBG6617 supports Wi-Fi Protected Setup (WPS), which is an easy way to set up a secure wireless network. WPS is an industry standard specification, defined by the Wi-Fi Alliance.WPS allows you to quickly set up a wireless network with strong security, without having to configure security settings manually. Each WPS connection works between two devices. Both devices must support WPS (check each device’s documentation to make sure). Depending on the devices you have, you can either press a button (on the device itself, or in its configuration utility) or enter a PIN (a unique Personal Identification Number that allows one device to authenticate the other) in each of the two devices. When WPS is activated on a device, it has two minutes to find another device that also has WPS activated. Then, the two devices connect and set up a secure network by themselves.You can use the WPS button ( ) on the top panel of the NBG6617 to activate WPS in order to quickly set up a wireless network with strong security.
Chapter 1 IntroductionNBG6617 User’s Guide121Make sure the power LED is on (not blinking).2Press the WPS button for more than three seconds and release it. Press the WPS button on another WPS-enabled device within range of the NBG6617. Note: You must activate WPS in the NBG6617 and in another wireless device within two minutes of each other. For more information on using WPS, see Section 8.2 on page 49.1.7  LEDsFigure 1   Top Panel, WPS Button and USB SlotThe following table describes the top panel LEDs.Table 1   Top Panel LEDsLED COLOR STATUS DESCRIPTIONPower Green On The NBG6617 is receiving power and functioning properly. Off The NBG6617 is not receiving power.WAN Green On The NBG6617 has a successful 10/100/1000MB WAN connection.Blinking The NBG6617 is sending/receiving data through the WAN.Off The WAN connection is not ready, or has failed.LAN 1-4 Green On The NBG6617 has a successful 10/100/1000MB Ethernet connection.Blinking The NBG6617 is sending/receiving data through the LAN.Off The LAN is not connected.WLAN 2.4GHz  WLAN 5GHzPowerWANLAN 1-4WPSUSB SlotWPS ButtonUSB
 Chapter 1 IntroductionNBG6617 User’s Guide13Figure 2   Rear Panel1.8  Wall MountingYou may need screw anchors if mounting on a concrete or brick wall.1Select a position free of obstructions on a wall strong enough to hold the weight of the device. WLAN 2.4GHz Green On The NBG6617 is ready, but is not sending/receiving data through the wireless LAN 2.4 GHz band. Blinking The NBG6617 is sending/receiving data through the wireless LAN 2.4 GHz band.Off The wireless LAN 2.4 GHz band is not ready or has failed.WLAN 5GHz Green On The NBG6617 is ready, but is not sending/receiving data through the wireless LAN 5 GHz band. Blinking The NBG6617 is sending/receiving data through the wireless LAN 5 GHz band.Off The wireless LAN 5 GHz band is not ready or has failed.USB Green On The NBG6617 has a USB device installed.Blinking The NBG6617 is transmitting and/or receiving data from routers through an installed USB device.Off There is no USB device connected to the NBG6617.WPS Green On WPS is enabled.Blinking The NBG6617 is negotiating a WPS connection with a wireless client.Off WPS is disabled.Table 1   Top Panel LEDs (continued)LED COLOR STATUS DESCRIPTIONLAN Ports 1-4WAN PortRESET ButtonWIFI Button Power ButtonPower InputTable 2   Wall Mounting InformationDistance between holes 12.356 cmM4 Screws TwoScrew anchors (optional) Two
Chapter 1 IntroductionNBG6617 User’s Guide142Mark two holes on the wall at the appropriate distance apart for the screws.Be careful to avoid damaging pipes or cables located inside the wall when drilling holes for the screws.3If using screw anchors, drill two holes for the screw anchors into the wall. Push the anchors into the full depth of the holes, then insert the screws into the anchors. Do not insert the screws all the way in - leave a small gap of about 0.5 cm.If not using screw anchors, use a screwdriver to insert the screws into the wall. Do not insert the screws all the way in - leave a gap of about 0.5 cm.4Make sure the screws are fastened well enough to hold the weight of the NBG6617 with the connection cables. 5Align the holes on the back of the NBG6617 with the screws on the wall. Hang the NBG6617 on the screws.Figure 3   Wall Mounting Example
NBG6617 User’s Guide15CHAPTER   2Introducing the Web Configurator2.1  OverviewThis chapter describes how to access the NBG6617 Web Configurator and provides an overview of its screens.The Web Configurator is an HTML-based management interface that allows easy setup and management of the NBG6617 via Internet browser. Use a browser that supports HTML5, such as Internet Explorer 9.0 and later versions, Mozilla Firefox 21 and later versions, Safari 6.0 and later versions or Google Chrome 26.0 and later versions. The recommended screen resolution is 1024 by 768 pixels.In order to use the Web Configurator you need to allow:• Web browser pop-up windows from your device. Web pop-up blocking is enabled by default in Windows XP SP (Service Pack) 2.• JavaScript (enabled by default).• Java permissions (enabled by default).Refer to the Troubleshooting chapter (Chapter 16 on page 149) to see how to make sure these functions are allowed in Internet Explorer.2.2  Accessing the Web Configurator1Make sure your NBG6617 hardware is properly connected and prepare your computer or computer network to connect to the NBG6617 (refer to the Quick Start Guide).2Launch your web browser.3The NBG6617 is in router mode by default. Type "http://192.168.1.1" as the website address. If the NBG6617 obtains a WAN IP address or a DNS server IP address in the same subnet as the LAN IP address 192.168.1.1, the default LAN IP address will be changed to 10.0.0.1 automatically. See Auto-IP Change on page 64 for more information.If the NBG6617 is in access point, the IP address is 192.168.1.2. See Chapter 4 on page 27 for more information about the modes of the NBG6617.Your computer must be in the same subnet in order to access this website address.
Chapter 2 Introducing the Web ConfiguratorNBG6617 User’s Guide162.2.1  Login ScreenNote: If this is the first time you are accessing the Web Configurator, you may be redirected to the eaZy123 wizard. Refer to Chapter 3 on page 18 for the eaZy123 setup screens. The Web Configurator initially displays the following login screen.Figure 4   Login screenThe following table describes the labels in this screen.2.2.2  Change Default Password ScreenYou should see a screen asking you to change your password (highly recommended) as shown next. Table 3   Login screenLABEL DESCRIPTIONPlease enter the device’s administrator passwordType "1234" (default) as the password. Click Login.
 Chapter 2 Introducing the Web ConfiguratorNBG6617 User’s Guide17Figure 5   Change Default Password ScreenThe following table describes the labels in this screen.Note: The management session automatically times out when the time period set in the Administrator Inactivity Timer field expires (default five minutes; go to Chapter 15 on page 135 to change this). Simply log back into the NBG6617 if this happens.Table 4   Change Default Password ScreenLABEL DESCRIPTIONEnter your new password hereType a new password. Confirm password Retype the password for confirmation.Change Click Change to save your changes back to the NBG6617.Skip Click Skip if you do not want to change the password this time.
NBG6617 User’s Guide18CHAPTER   3eaZy 123 Wizard3.1  OverviewThis chapter provides information on the eaZy 123 setup screens in the Web Configurator.The Web Configurator’s eaZy 123 setup wizard helps you configure your device to access the Internet. Refer to your ISP for your Internet account information. Leave a field blank if you don’t have that information.3.2  Accessing the eaZy 123 WizardLaunch your web browser and type "http://192.168.1.1" as the website address. Type "1234" (default) as the password and click Login.Note: The eaZy 123 wizard appears automatically when the NBG6617 is accessed for the first time or when you reset the NBG6617 to its default factory settings. If you didn’t configure the wizard screens, you will be redirected to the login page when you connect to the Internet.If you have already configured the wizard screens and want to open it again, click   on the upper right corner of any Web Configurator screen. The eaZy 123 wizard attempts to detect which WAN connection type you are using. If the eaZy 123 wizard does not detect a connection type, you must select one from the drop-down list box. Check with your ISP to make sure you use the correct type.If you do not have the Internet connection, the following screen opens.
 Chapter 3 eaZy 123 WizardNBG6617 User’s Guide19Figure 6   Unable to continue: WANIf you do not press the Wi-Fi button located on the NBG6617’s rear panel, the following screen opens.Figure 7   Unable to continue: Wi-Fi Note: If you get an error message, check your hardware connections. Make sure your Internet connection is up and running.The wizard screen opens.
Chapter 3 eaZy 123 WizardNBG6617 User’s Guide20Figure 8   Detecting your Internet Connection Type  Figure 9   eaZy 123 Setup 3.3  Internet TypeThe NBG6617 offers three WAN selection types. They are Automatic - DHCP, PPPoE or Static. Configure the Internet type settings on your NBG6617 in the first part. The following screen depends on your Internet connection type. Enter the details provided by your Internet Service Provider (ISP) in the fields (if any).Check with your ISP to make sure you use the correct type. This wizard screen varies according to the connection type that you select.
 Chapter 3 eaZy 123 WizardNBG6617 User’s Guide213.3.1  WAN Selection Type: Automatic - DHCPSelect the Automatic - DHCP option if your ISP did not assign you a fixed IP address.Figure 10   WAN Selection Type: Automatic - DHCP3.3.2  WAN Selection Type: PPPoEPoint-to-Point Protocol over Ethernet (PPPoE) functions as a dial-up connection. PPPoE is an IETF (Internet Engineering Task Force) standard specifying how a host personal computer interacts with a broadband modem (for example DSL, cable, wireless, etc.) to achieve access to high-speed data networks.For the service provider, PPPoE offers an access and authentication method that works with existing access control systems (for instance, RADIUS). One of the benefits of PPPoE is the ability to let end users access one of multiple network services, a function known as dynamic service selection. This enables the service provider to easily create and offer new IP services for specific users.Operationally, PPPoE saves significant effort for both the subscriber and the ISP/carrier, as it requires no specific configuration of the broadband modem at the subscriber's site.By implementing PPPoE directly on the NBG6617 (rather than individual computers), the computers on the LAN do not need PPPoE software installed, since the NBG6617 does that part of the task. Furthermore, with NAT, all of the LAN's computers will have Internet access.
Chapter 3 eaZy 123 WizardNBG6617 User’s Guide22Figure 11   WAN Selection Type: PPPoE The following table describes the labels in this screen.Note: If you get an error message, make sure you have entered the correct information provided by your ISP. 3.3.3  WAN Selection Type: StaticChoose Static as the WAN Selection Type when the WAN port is used as a regular Ethernet. Click Next.Table 5   WAN Selection Type: PPPoELABEL DESCRIPTIONWAN Selection Select the PPPoE (Point-to-Point Protocol over Ethernet) option for a dial-up connection.PPPoE Username Type the user name given to you by your ISP. PPPoE Password  Type the password associated with the user name above.Static IP (Optional) Enter the WAN IP address assigned by your ISP.
 Chapter 3 eaZy 123 WizardNBG6617 User’s Guide23Figure 12   WAN Selection Type: StaticThe following table describes the labels in this screen.  Note: If you get an error screen, make sure your Internet connection is working and select the right WAN Selection Type. Contact your ISP if you are not sure of your Internet Connection type.3.4  Wireless NetworkConfigure the wireless network settings on your NBG6617 in the second part. The default wireless security setting is WPA2-PSK.Table 6   WAN Selection Type: StaticLABEL DESCRIPTIONWAN Selection Select the Static option when the WAN port is using a fixed IP address.IP Address Enter the IP address provided by your ISP.Subnet Mask Enter the IP subnet mask in this field.Gateway IP Address (Optional)Enter the gateway IP address in this field.
Chapter 3 eaZy 123 WizardNBG6617 User’s Guide24Figure 13   Wireless NetworkThe following table describes the labels in this screen. Click the Apply button in the third part to save your settings.Table 7   Wireless NetworkLABEL DESCRIPTIONWireless Name (SSID)Enter a descriptive name for the wireless LAN. Note: The setting here applies to 2.4 GHz wireless radios.If you change this field on the NBG6617, make sure all wireless stations use the same SSID in order to access the network. Wireless Password (WPA2)Type from 8 to 63 case-sensitive ASCII characters. You can set up the most secure wireless connection by configuring WPA in the wireless LAN screens.Edit 5 GHz wireless networkSelect this check box to configure different SSID and wireless security settings for the NBG6617’s 5 GHz wireless network.If you do not select this option, the NBG6617 uses the same SSID and Wi-Fi key (you configured above) for the 5 GHz wireless network.5GHz Wireless Name (SSID)Enter a descriptive name for the wireless LAN. If you change this field on the NBG6617, make sure all wireless stations use the same SSID in order to access the network. 5GHz Wireless Password (WPA2)Type from 8 to 63 case-sensitive ASCII characters. You can set up the most secure wireless connection by configuring WPA in the wireless LAN screens.
 Chapter 3 eaZy 123 WizardNBG6617 User’s Guide25Figure 14   Apply your Wi-Fi settingsCongratulations! Open a web browser, such as Internet Explorer, to visit your favorite website. Note: If you cannot access the Internet when your computer is connected to one of the NBG6617’s LAN ports, check your connections. Then turn the NBG6617 off, wait for a few seconds then turn it back on. If that does not work, log in to the web configurator again and check you have typed all information correctly. See the User’s Guide for more suggestions.Figure 15   CongratulationsYou can click the My ZyXEL Cloud Service button to go to https://mycloud.zyxel.com, where you can create an account and register your NBG6617. At the time of writing, you can have free DDNS
Chapter 3 eaZy 123 WizardNBG6617 User’s Guide26service to get a domain name mapped to the NBG6617’s dynamic IP address. With DDNS, you can use the domain name to remotely access the NBG6617’s Web Configurator through the Internet.You have successfully set up your NBG6617 to operate on your network and access the Internet.
NBG6617 User’s Guide27CHAPTER   4NBG6617 Modes4.1  OverviewThis chapter introduces the different modes available on your NBG6617. First, the term “mode” refers to two things in this User’s Guide.•Web Configurator mode. This refers to the Web Configurator interface you want to use for editing NBG6617 features. •Device mode. This is the operating mode of your NBG6617, or simply how the NBG6617 is being used in the network. 4.1.1  Web Configurator ModesThis refers to the configuration interface of the Web Configurator, which has two modes:•Easy: The Web Configurator shows this mode by default. Refer to Chapter 5 on page 28 for more information on the screens in this mode. This interface may be sufficient for users who just want to use the device.•Expert: Advanced users can change to this mode to customize all the functions of the NBG6617. Click > Expert Mode after logging into the Web Configurator. The User’s Guide Chapter 9 on page 60 through Chapter 15 on page 147 discusses the screens in this mode.4.1.2  Device ModesThis refers to the operating mode of the NBG6617, which can act as a:•Router: This is the default device mode of the NBG6617. Use this mode to connect the local network to another network, like the Internet. Go to Section 6.2 on page 36 to view the Status screen in this mode.•Access Point: Use this mode if you want to extend your network by allowing network devices to connect to the NBG6617 wirelessly. Go to Section 7.4 on page 44 to view the Status screen in this mode.For more information on these modes and to change the mode of your NBG6617, refer to Chapter 15 on page 147.The menu for changing device modes is available in Expert Mode only. Note: Choose your device mode carefully to avoid having to change it later.When changing to another mode, the IP address of the NBG6617 changes. The running applications and services of the network devices connected to the NBG6617 can be interrupted.
NBG6617 User’s Guide28CHAPTER   5Easy Mode5.1  OverviewThe Web Configurator is set to Easy Mode by default. You can configure several key features of the NBG6617 in this mode. This mode is useful to users who are not fully familiar with some features that are usually intended for network administrators.When you log in to the Web Configurator, the following screen opens.Figure 16   Easy Mode 5.2  What You Can DoYou can do the following in this mode:• Use this Navigation Panel to open the eaZy123 wizard or log out the NBG6617 (Section 5.4 on page 29).•Use the Network Map screen to check if your NBG6617 is connected to the Internet (Section 5.5 on page 29).•Use the Control Panel to configure and enable NBG6617 features, including guest Wi-Fi, wireless security, parental control and so on (Section 5.6 on page 31).Network MapNavigation PanelControl PanelGo toStatusScreen(ExpertMode)
 Chapter 5 Easy ModeNBG6617 User’s Guide295.3  What You Need to KnowBetween the different device modes, the Control Panel (Section 5.6 on page 31) changes depending on which features are applicable to the mode:•Router Mode: All Control Panel features are available.•Access Point Mode: Parental Control and Notification are not available.5.4  Navigation PanelUse this navigation panel to opt out of the Easy mode.Figure 17   Easy Mode: Navigation PanelThe following table describes the labels in this screen.Figure 18   Easy Mode: Navigation Panel: Firmware Notification5.5  Network MapWhen you log into the Web Configurator, the Network Map is shown as follows.Table 8   Easy Mode: Navigation PanelITEM DESCRIPTION            Firmware Notification Click this icon to open a screen where you can click Check here to redirect your screen to the firmware upgrade page.This icon only displays when new firmware is released. Wizard Click this icon to open the eaZy123 wizard for the NBG6617.   Logout Click this to end the Web Configurator session.
Chapter 5 Easy ModeNBG6617 User’s Guide30Figure 19   Easy Mode: Network Map This screen displays whether the NBG6617 connects to the Internet. It also shows the devices  connected to the NBG6617, including those connecting wirelessly. Click the Refresh button to refresh the network map. The following table describes the icons in this screen. Figure 20   Easy Mode: Network Map: Info  Table 9   Easy Mode: Network MapITEM DESCRIPTIONThis icon shows the NBG6617’s connection status.This icon is grayed out if the user is unable to access the Internet.Click this button to refresh the NBG6617’s connection status and the network map. Info Click this to view the device’s information that is currently connected to the NBG6617. Block Click this to block the device from accessing the Internet through the NBG6617.  Rename / Icon Click this to rename the device or change the device’s icon.
 Chapter 5 Easy ModeNBG6617 User’s Guide31Figure 21   Easy Mode: Network Map: Rename / Icon  Click Apply to save your changes back to the NBG6617. Click Cancel to reload the previous configuration for this screen. 5.6  Control PanelThe features configurable in Easy Mode are shown in the Control Panel.Figure 22   Easy Mode: Control PanelSwitch ON to enable the feature. Otherwise, switch OFF. If the feature is turned on, the green light flashes. If it is turned off, the blue light flashes. Additionally, click the feature to open a screen where you can edit its settings.The following table describes the labels in this screen. Table 10   Easy Mode: Control PanelITEM DESCRIPTIONWi-Fi Switch ON to enable the NBG6617's default Wi-Fi network, and click this to configure its wireless radio, SSID, security mode and wireless password.Refer to Section 5.6.1 on page 32 to see this screen.Guest Wi-Fi Switch ON to enable the guest Wi-Fi network, and click this to configure its wireless security settings.
Chapter 5 Easy ModeNBG6617 User’s Guide325.6.1  Wi-FiUse this screen to configuresecurity for the NBG6617's default wireless LAN. You can enter the SSID and select the wireless security mode in the following screen. See Chapter 14 on page 129 for how to configure wireless network.Note: You can enable the wireless function of your NBG6617 by first turning on the WIFI switch in the rear panel.Figure 23   Easy Mode: Wi-FiThe following table describes the labels in this screen.Parental Control Switch ON to enable parental control, and click this to view the parental control rules. Otherwise, switch OFF.Refer to Section 5.6.3 on page 34 to see this screen.Notification Switch ON to have the NBG6617 send e-mail notifications when the user(s) is connected to the NBG6617 for Internet access during the specified time periods. Otherwise, switch OFF.Refer to Section 5.6.4 on page 34 to see this screen.Table 10   Easy Mode: Control Panel (continued)ITEM DESCRIPTIONTable 11   Easy Mode: Wi-FiLABEL DESCRIPTIONWireless Radio Choose whether you want to apply the wireless security to 2.4G Hz, 5G Hz or Both wireless radios.Network Name (SSID)(Service Set IDentity) The SSID identifies the Service Set with which a wireless station is associated. Wireless stations associating to the access point (AP) must have the same SSID. Enter a descriptive name (up to 32 keyboard characters) for the wireless LAN.
 Chapter 5 Easy ModeNBG6617 User’s Guide335.6.2  Guest Wi-FiThis screen allows you to configure guest wireless network settings on the NBG6617. Users connected to the guest wireless network can access the Internet via the NBG6617, but not other networks connected to the NBG6617. See Chapter 11 on page 80 for how to enable and set up the guest wireless network.Figure 24   Easy Mode: Guest Wi-Fi The following table describes the labels in this screen.Security Mode  Select WPA2-PSK to enable data encryption. Or Select No Security to allow wireless clients to communicate with the access points without any data encryption.Password  This field appears when you choose WPA2-PSK as the security mode.Type a pre-shared key from 8 to 63 case-sensitive keyboard characters.Verify Password Type the password again to confirm.Cancel  Click Cancel to reload the previous configuration for this screen.Apply Click Apply to save your changes back to the NBG6617.Table 11   Easy Mode: Wi-FiLABEL DESCRIPTIONTable 12   Easy Mode: Guest Wi-FiLABEL DESCRIPTIONWireless Radio Choose whether you want to apply the wireless settings to the 2.4G Hz or 5G Hz wireless radio.Network Name (SSID)The SSID (Service Set IDentity) identifies the Service Set with which a wireless client is associated. Enter a descriptive name (up to 32 printable characters found on a typical English language keyboard) for the guest wireless network. Security Mode  Select WPA2-PSK to enable data encryption. Or select No Security to allow wireless clients to communicate with the NBG6617 without any data encryption.
Chapter 5 Easy ModeNBG6617 User’s Guide345.6.3  Parental ControlUse this screen to view the parental control rules configured on the NBG6617. See Section 13.2 on page 106 for how to enable and configure parental control rules.Figure 25   Easy Mode: Parental Control The following table describes the labels in this screen.5.6.4  NotificationUse this screen to view the e-mail notification rules configured on the NBG6617. See Section 13.2.2 on page 110 for how to configure e-mail notification rules and e-mail settings.Password  This field appears when you choose WPA2-PSK as the security mode.Type a pre-shared key from 8 to 63 case-sensitive keyboard characters.Verify Password Type the password again to confirm.Cancel  Click Cancel to reload the previous configuration for this screen.Apply Click Apply to save your changes back to the NBG6617.Table 12   Easy Mode: Guest Wi-FiLABEL DESCRIPTIONTable 13   Easy Mode: Parental ControlLABEL DESCRIPTIONStatus This indicates whether the rule is active or not.A yellow bulb signifies that this rule is active. A gray bulb signifies that this rule is not active.User Name This shows the name of the user to which this rule applies.Schedule This shows whether the user is allowed to access the Internet (Allow) or not (Block). Bonus If the user is currently not permitted to access the Internet, you can click the Bonus to allow access for a specified period of time. A screen then displays allowing you to set how long (in minutes) the user is allowed to access the Internet.This button is grayed out if the user is now able to access the Internet.Remaining time  This field displays the amount of Internet access time that remains for each user before the NBG6617 blocks the user from accessing the Internet.None means there is no extra Internet access time.
 Chapter 5 Easy ModeNBG6617 User’s Guide35Figure 26   Easy Mode: Notification The following table describes the labels in this screen.Table 14   Easy Mode: NotificationLABEL DESCRIPTIONNotificationStatus This indicates whether the rule is active or not.A yellow bulb signifies that this rule is active. A gray bulb signifies that this rule is not active.User Name This shows the name of the user to which this rule applies.Notification This shows the e-mail address to which the notification is sent.
NBG6617 User’s Guide36CHAPTER   6Router Mode6.1  OverviewThe NBG6617 is set to router mode by default. Routers are used to connect the local network to another network (for example, the Internet). In the figure below, the NBG6617 connects the local network (LAN1 ~ LAN4) to the Internet.Figure 27   NBG6617 NetworkNote: After clicking Login, the Easy Mode appears. Refer to Chapter 5 on page 28 for the Easy Mode screens. Change to Expert Mode to see the screens described in the sections following this.6.2  Router Mode Status ScreenClick Expert Mode > Status > System Status to open the status screen. Modem
 Chapter 6 Router ModeNBG6617 User’s Guide37Figure 28   Expert Mode: Status > System Status: Router Mode The following table describes the labels shown in the Status screen.Table 15   Expert Mode: Status > System Status: Router Mode  LABEL DESCRIPTIONDevice InformationItem This column shows the type of data the NBG6617 is recording.Data This column shows the actual data recorded by the NBG6617.Host Name This is the System Name you enter in the Maintenance > General screen. It is for identification purposes.Model Number This is the model name of your device.Firmware Version This is the firmware version. Sys OP Mode This is the device mode (Section 4.1.2 on page 27) to which the NBG6617 is set - Router Mode.WAN InformationMAC Address This shows the WAN Ethernet adapter MAC Address of your device.IP Address This shows the WAN port’s IP address.IP Subnet Mask This shows the WAN port’s subnet mask.Default Gateway This shows the WAN port’s gateway IP address.IPv6 Address This shows the IPv6 address of the NBG6617 on the WAN.LAN InformationMAC Address This shows the LAN Ethernet adapter MAC Address of your device.
Chapter 6 Router ModeNBG6617 User’s Guide38IP Address This shows the LAN port’s IP address.IP Subnet Mask This shows the LAN port’s subnet mask.DHCP This shows the LAN port’s DHCP role - Server or Disable.IPv6 Address This shows the IPv6 address of the NBG6617 on the LAN.WLAN 2.4G InformationWLAN OP Mode This is the device mode (Section 4.1.2 on page 27) to which the NBG6617’s wireless LAN is set - Access Point Mode.MAC Address This shows the 2.4GHz wireless adapter MAC Address of your device.SSID This shows a descriptive name used to identify the NBG6617 in the 2.4GHz wireless LAN. Channel This shows the channel number which you select manually.Security This shows the level of wireless security the NBG6617 is using.WLAN 5G InformationWLAN OP Mode This is the device mode (Section 4.1.2 on page 27) to which the NBG6617’s wireless LAN is set - Access Point Mode.MAC Address This shows the 5GHz wireless adapter MAC Address of your device.SSID This shows a descriptive name used to identify the NBG6617 in the 5GHz wireless LAN. Channel This shows the channel number which you select manually.Security This shows the level of wireless security the NBG6617 is using.Firewall This shows whether the firewall is enabled or not.System StatusSystem Up Time This is the total time the NBG6617 has been on.Current Date/Time This field displays your NBG6617’s present date and time.System Resource- CPU Usage This displays what percentage of the NBG6617’s processing ability is currently used. When this percentage is close to 100%, the NBG6617 is running at full load, and the throughput is not going to improve anymore. If you want some applications to have more throughput, you should turn off other applications (for example, using bandwidth management.)- Memory Usage This shows what percentage of the heap memory the NBG6617 is using. Interface StatusInterface This displays the NBG6617 port types. The port types are: WAN, LAN and WLAN.Status For the LAN and WAN ports, this field displays Down (line is down) or Up (line is up or connected).For the 2.4GHz/5GHz WLAN, it displays Up when the 2.4GHz/5GHz WLAN is enabled or Down when the 2.4G/5G WLAN is disabled.Rate For the LAN ports, this displays the port speed and duplex setting or is left blank when the line is disconnected.For the WAN port, it displays the port speed and duplex setting if you’re using Ethernet encapsulation. This field displays N/A when the line is disconnected.For the 2.4GHz/5GHz WLAN, it displays the maximum transmission rate when the 2.4GHz/5GHz WLAN is enabled and N/A when the WLAN is disabled.Table 15   Expert Mode: Status > System Status: Router Mode (continued) LABEL DESCRIPTION
 Chapter 6 Router ModeNBG6617 User’s Guide396.2.1  Navigation PanelUse the sub-menus on the navigation panel to configure NBG6617 features. Figure 29   Expert Mode: Navigation Panel: Router Mode The following table describes the sub-menus.Printer InformationPrinter Name The NBG6617 can act as a print server and allows you to share a USB printer on your LAN. This displays the name of the printer connected to the NBG6617's USB port.Note: You need to manually install the printer driver in your computer and add the printer to your printer list.Table 15   Expert Mode: Status > System Status: Router Mode (continued) LABEL DESCRIPTIONTable 16   Expert Mode: Navigation Panel: Router ModeLINK TAB FUNCTIONStatusSystem Status This screen shows the NBG6617’s general device, system and interface status information. Use this screen to access the wizard, and summary statistics tables.Client Tables Use this screen to view current DHCP client information.WANInternet ConnectionThis screen allows you to configure ISP parameters, WAN IP address assignment, DNS servers and the WAN MAC address. NAT General Use this screen to enable NAT. Use this screen to configure servers behind the NBG6617 and forward incoming service requests to the server(s) on your local network.Port Trigger Use this screen to change your NBG6617’s port triggering settings.Passthrough Use this screen to enable ALGs (Application Layer Gateway) and VPN pass-through settings.Dynamic DNS Use this screen to set up dynamic DNS.Wireless
Chapter 6 Router ModeNBG6617 User’s Guide40Wireless Use this screen to enable the wireless LAN and configure wireless LAN and wireless security settings.Guest Wireless Use this screen to configure multiple BSSs on the NBG6617.MAC Filter Use the MAC filter screen to configure the NBG6617 to block access to devices or block the devices from accessing the NBG6617.Advanced This screen allows you to configure advanced wireless settings.WPS Use this screen to configure WPS.Scheduling Use this screen to schedule the times the Wireless LAN is enabled.LANLAN IP Use this screen to configure LAN IP address and subnet mask. Use this screen to configure the IPv6 address for the NBG6617 on the LAN.Use this screen to enable the NBG6617’s DHCP server.Static DHCP This screen allows you to assign IP addresses on the LAN to specific individual computers based on their MAC addresses.IPv6 LAN Use this screen to configure the IPv6 address for your NBG6617 on the LAN.ApplicationsParental Control General Use this screen to enable parental control, set parental controls rules/schedules and block web sites containing certain keywords in the URL.Notification Use this screen to send e-mail notifications, configure e-mail notification rules and e-mail settings.Bandwidth ManagementGeneral Use this screen to enable StreamBoost.  Advanced Use this screen to configure the maximum allowable bandwidth and enable automatic update.Use this screen to change the priority of the connected devices.USB Media SharingUse this screen to have the NBG6617 function as a DLNA-compliant media server, that lets DLNA-compliant media clients play video, audio, and photo content files stored on the connected USB storage device.UPnP Use this screen to enable UPnP on the NBG6617. File Sharing SAMBA  Use this screen to enable file sharing through the NBG6617.FTP  Use this screen to have the NBG6617 act as a FTP server.One Connect Use this screen to enable or disable Wi-Fi auto-configuration.SecurityIPv4 Firewall Use this screen to configure IPv4 firewall rules.IPv6 Firewall Use this screen to configure IPv6 firewall rules.MaintenanceGeneral Use this screen to view and change administrative settings such as system and domain names.Password  Use this screen to change the password of your NBG6617. Time  Use this screen to change your NBG6617’s time and date.Firmware UpgradeUse this screen to upload firmware to your NBG6617.Backup/Restore Use this screen to backup and restore the configuration or reset the factory defaults to your NBG6617. Table 16   Expert Mode: Navigation Panel: Router Mode (continued)LINK TAB FUNCTION
 Chapter 6 Router ModeNBG6617 User’s Guide41Restart This screen allows you to reboot the NBG6617 without turning the power off.Language This screen allows you to select the language you prefer.Remote ManagementRemote AccessUse this screen to configure through which interface(s) and from which IP address(es) users can use Telnet and HTTP/HTTPS to manage the NBG6617.Wake On LAN Use this screen to enable Wake on LAN to remotely turn on a device on the local network.Log Use this screen to view the list of activities recorded by your NBG6617.Operation Mode This screen allows you to select whether your device acts as a router, or an access point.Table 16   Expert Mode: Navigation Panel: Router Mode (continued)LINK TAB FUNCTION
NBG6617 User’s Guide42CHAPTER   7Access Point Mode7.1  OverviewUse your NBG6617 as an access point (AP) if you already have a router or gateway on your network. In this mode your NBG6617 bridges a wired network (LAN) and wireless LAN (WLAN) in the same subnet. See the figure below for an example.Figure 30   Wireless Internet Access in Access Point Mode Many screens that are available in Router Mode are not available in Access Point Mode, such as bandwidth management and firewall.7.2  What You Can Do•Use the Status screen to view read-only information about your NBG6617 (Section 7.4 on page 44).•Use the LAN screen to set the IP address for your NBG6617 acting as an access point (Section 7.5 on page 46).7.3  What You Need to KnowSee Chapter 8 on page 49 for a tutorial on setting up a network with the NBG6617 as an access point.
 Chapter 7 Access Point ModeNBG6617 User’s Guide437.3.1  Setting your NBG6617 to AP Mode1Log into the Web Configurator if you haven’t already. See the Quick start Guide for instructions on how to do this.2To use your NBG6617 as an access point, go to Expert Mode > Maintenance > Operation Mode and select Access Point Mode. Figure 31   Changing to Access Point modeNote: You have to log in to the Web Configurator again when you change modes. As soon as you do, your NBG6617 is already in Access Point mode.3When you select Access Point Mode, the following pop-up message window appears.Figure 32   Pop up for Access Point mode Click OK. Then click Apply. The Web Configurator refreshes once the change to Access Point mode is successful.7.3.2  Accessing the Web Configurator in Access Point ModeLog in to the Web Configurator in Access Point mode, do the following:1Connect your computer to the LAN port of the NBG6617. 2The default IP address of the NBG6617 is “192.168.1.2”. In this case, your computer must have an IP address in the range between “192.168.1.3” and “192.168.1.254”.3Click Start > Run on your computer in Windows. Type “cmd” in the dialog box. Enter “ipconfig” to show your computer’s IP address. If your computer’s IP address is not in the correct range then see Appendix B on page 162 for information on changing your computer’s IP address.
Chapter 7 Access Point ModeNBG6617 User’s Guide444After you’ve set your computer’s IP address, open a web browser such as Internet Explorer and type “192.168.1.2” as the web address in your web browser.Note: After clicking Login, the Easy Mode appears. Refer to Chapter 5 on page 28 for the Easy Mode screens. Change to Expert Mode to see the screens described in the sections following this.7.3.3  Configuring your WLAN and Maintenance SettingsThe configuration of wireless and maintenance settings in Access Point Mode is the same as for Router Mode.•See Chapter 11 on page 80 for information on the configuring your wireless network.•See Chapter 15 on page 135 for information on configuring your maintenance settings. 7.4  AP Mode Status ScreenClick Expert Mode > Status to open the Status screen. Figure 33   Expert Mode: Status > System Status: Access Point Mode
 Chapter 7 Access Point ModeNBG6617 User’s Guide45The following table describes the labels shown in the Status screen.  Table 17   Expert Mode: Status > System Status: Access Point Mode  LABEL DESCRIPTIONDevice InformationHost Name This is the System Name you enter in the Maintenance > General screen. It is for identification purposes.Model Number This is the model name of your device.Firmware Version This is the firmware version and the date created. Sys OP Mode This is the device mode (Section 4.1.2 on page 27) to which the NBG6617 is set - AP Mode.LAN InformationMAC Address This shows the LAN Ethernet adapter MAC Address of your device.IP Address This shows the LAN port’s IP address.IP Subnet Mask This shows the LAN port’s subnet mask.DHCP This shows the LAN port’s DHCP role - Client or None.IPv6 Address This shows the IPv6 address of the NBG6617 on the LAN.WLAN 2.4G InformationWLAN OP Mode This is the device mode (Section 4.1.2 on page 27) to which the NBG6617’s wireless LAN is set - Access Point Mode.MAC Address This shows the 2.4GHz wireless adapter MAC Address of your device.SSID This shows a descriptive name used to identify the NBG6617 in the 2.4GHz wireless LAN. Channel This shows the channel number which you select manually.Security This shows the level of wireless security the NBG6617 is using.WLAN 5G InformationWLAN OP Mode This is the device mode (Section 4.1.2 on page 27) to which the NBG6617’s wireless LAN is set - Access Point Mode.MAC Address This shows the 5GHz wireless adapter MAC Address of your device.SSID This shows a descriptive name used to identify the NBG6617 in the 5GHz wireless LAN. Channel This shows the channel number which you select manually.Security This shows the level of wireless security the NBG6617 is using.System StatusItem This column shows the type of data the NBG6617 is recording.Data This column shows the actual data recorded by the NBG6617.System Up Time This is the total time the NBG6617 has been on.Current Date/Time This field displays your NBG6617’s present date and time.System Resource- CPU Usage This displays what percentage of the NBG6617’s processing ability is currently used. When this percentage is close to 100%, the NBG6617 is running at full load, and the throughput is not going to improve anymore. If you want some applications to have more throughput, you should turn off other applications (for example, using bandwidth management.)- Memory Usage This shows what percentage of the heap memory the NBG6617 is using. Interface StatusInterface This displays the NBG6617 port types. The port types are: LAN and WLAN.Status For the LAN ports, this field displays Down (line is down) or Up (line is up or connected).For the 2.4GHz/5GHz WLAN, it displays Up when the 2.4GHz/5GHz WLAN is enabled or Down when the 2.4G/5G WLAN is disabled.
Chapter 7 Access Point ModeNBG6617 User’s Guide467.4.1  Navigation PanelUse the menu in the navigation panel to configure NBG6617 features in Access Point Mode.Figure 34   Expert Mode: Navigation Panel: Access Point Mode Refer to Table 16 on page 39 for descriptions of the labels shown in the navigation panel.7.5  LAN ScreenUse this section to configure your LAN settings while in Access Point Mode. Click Expert Mode > LAN to see the screen below.Note: If you change the IP address of the NBG6617 in the screen below, you will need to log into the NBG6617 again using the new IP address.Rate For the LAN ports, this displays the port speed and duplex setting or is left blank when the line is disconnected.For the 2.4GHz/5GHz WLAN, it displays the maximum transmission rate when the 2.4GHz/5GHz WLAN is enabled and N/A when the WLAN is disabled.Printer InformationPrinter Name The NBG6617 can act as a print server and allows you to share a USB printer on your LAN. This displays the name of the printer connected to the NBG6617's USB port.Note: You need to manually install the printer driver in your computer and add the printer to your printer list.Table 17   Expert Mode: Status > System Status: Access Point Mode (continued) LABEL DESCRIPTION
 Chapter 7 Access Point ModeNBG6617 User’s Guide47Figure 35   LAN > LAN IP   The table below describes the labels in the screen.Table 18   LAN > LAN IPLABEL DESCRIPTIONIP AddressObtain an IP Address AutomaticallyWhen you enable this, the NBG6617 gets its IP address from the network’s DHCP server (for example, your ISP). Users connected to the NBG6617 can now access the network (i.e., the Internet if the IP address is given by the ISP).The Web Configurator may no longer be accessible unless you know the IP address assigned by the DHCP server to the NBG6617. You need to reset the NBG6617 to be able to access the Web Configurator again (see Section 15.7 on page 140 for details on how to reset the NBG6617).Also when you select this, you cannot enter an IP address for your NBG6617 in the field below.Static IP Address Click this if you want to specify the IP address of your NBG6617. Or if your ISP or network administrator gave you a static IP address to access the network or the Internet.IP Address Type the IP address in dotted decimal notation. The default setting is 192.168.1.2. If you change the IP address you will have to log in again with the new IP address.   Subnet Mask The subnet mask specifies the network number portion of an IP address. Your NBG6617 will automatically calculate the subnet mask based on the IP address that you assign. Unless you are implementing subnetting, use the subnet mask computed by the NBG6617.Default Gateway Enter a Default Gateway’s IP address (if your ISP or network administrator gave you one) in this field.DNS ServerFirst DNS ServerSecond DNS ServerThird DNS Server Select Obtained From ISP if your ISP dynamically assigns DNS server information (and the NBG6617's WAN IP address). The field to the right displays the (read-only) DNS server IP address that the ISP assigns. Select User-Defined if you have the IP address of a DNS server. Enter the DNS server's IP address in the field to the right. If you chose User-Defined, but leave the IP address set to 0.0.0.0, User-Defined changes to None after you click Apply. If you set a second choice to User-Defined, and enter the same IP address, the second User-Defined changes to None after you click Apply. Select None if you do not want to configure DNS servers. If you do not configure a DNS server, you must know the IP address of a computer in order to access it.
Chapter 7 Access Point ModeNBG6617 User’s Guide48Apply Click Apply to save your changes to the NBG6617.Cancel Click Cancel to reload the previous configuration for this screen.Table 18   LAN > LAN IP (continued)LABEL DESCRIPTION
NBG6617 User’s Guide49CHAPTER   8Tutorials8.1  OverviewThis chapter provides tutorials for setting up your NBG6617.•Set Up a Wireless Network Using WPS•Connect to NBG6617 Wireless Network without WPS•Using Guest SSIDs on the NBG66178.2  Set Up a Wireless Network Using WPSThis section gives you an example of how to set up wireless network using WPS. This example uses the NBG6617 as the AP and NWD210N as the wireless client which connects to a notebook. Note: The wireless client must be a WPS-aware device (for example, a WPS USB adapter or PCI card).There are two WPS methods for creating a secure connection via the web configurator or utility. This tutorial shows you how to do both.•Push Button Configuration (PBC) - create a secure wireless network simply by pressing a button. See Section 8.2.1 on page 49. This is the easier method.•PIN Configuration - create a secure wireless network simply by entering a wireless client's PIN (Personal Identification Number) in the NBG6617’s interface. See Section 8.2.2 on page 50. This is the more secure method, since one device can authenticate the other.8.2.1  Push Button Configuration (PBC)1Make sure that your NBG6617 is turned on. Make sure the WIFI button (at the rear panel of the NBG6617) is pushed in, and that the device is placed within range of your notebook. 2Make sure that you have installed the wireless client (this example uses the NWD210N) driver and utility in your notebook.3In the wireless client utility, find the WPS settings. Enable WPS and press the WPS button (Start or WPS button)4Log into NBG6617’s Web Configurator and press the Push Button in the Expert > Wireless >  WPS screen.
Chapter 8 TutorialsNBG6617 User’s Guide50Note: Your NBG6617 has a WPS button located on its top panel, as well as a WPS button in its configuration utility. Both buttons have exactly the same function; you can use one or the other.Note: It doesn’t matter which button is pressed first. You must press the second button within two minutes of pressing the first one. The NBG6617 sends the proper configuration settings to the wireless client. This may take up to two minutes. Then the wireless client is able to communicate with the NBG6617 securely. The following figure shows you an example to set up wireless network and security by pressing a button on both NBG6617 and wireless client (the NWD210N in this example).Figure 36   Example WPS Process: PBC Method8.2.2  PIN ConfigurationWhen you use the PIN configuration method, you need to use both NBG6617’s configuration interface and the client’s utilities.1Launch your wireless client’s configuration utility. Go to the WPS settings and select the PIN method to get a PIN number.2Enter the PIN number to the PIN field in the Expert > Wireless > WPS screen on the NBG6617.Wireless Client    Access PointSECURITY INFOCOMMUNICATIONWITHIN 2 MINUTESWPS
 Chapter 8 TutorialsNBG6617 User’s Guide513Click Start buttons (or button next to the PIN field) on both the wireless client utility screen and the NBG6617’s WPS screen within two minutes.The NBG6617 authenticates the wireless client and sends the proper configuration settings to the wireless client. This may take up to two minutes. Then the wireless client is able to communicate with the NBG6617 securely. The following figure shows you the example to set up wireless network and security on NBG6617 and wireless client (ex. NWD210N in this example) by using PIN method. Figure 37   Example WPS Process: PIN Method8.3  Connect to NBG6617 Wireless Network without WPSThis example shows you how to configure wireless security settings with the following parameters on your NBG6617 and connect your computer to the NBG6617 wireless network.Follow the steps below to configure the wireless settings on your NBG6617.WITHIN 2 MINUTESWireless ClientAccess PointBand 2.4GHzSSID SSID_Example3Channel 6Security  WPA2-PSK(Pre-Shared Key: ThisismyWPA-PSKpre-sharedkey)
Chapter 8 TutorialsNBG6617 User’s Guide52The instructions require that your hardware is connected (see the Quick Start Guide) and you are logged into the Web Configurator through your LAN connection (see Section 2.2 on page 15).1Make sure the WIFI switch (at the rear panel of the NBG6617) is set to ON.2Open the Expert > Wireless > Wireless screen in the AP’s Web Configurator. 3Confirm that the wireless LAN is enabled on the NBG6617.4Select to configure the wireless settings for the 2.4GHz wireless radio.5Enter SSID_Example3 as the SSID and select Channel-06 as the channel. Set security mode to WPA2-PSK and enter ThisismyWPA-PSKpre-sharedkey in the Pre-Shared Key field. Click Apply.6Click Expert > Status to open the Status screen. Verify your wireless and wireless security settings under Device Information and check if the WLAN connection is up under Interface Status.
 Chapter 8 TutorialsNBG6617 User’s Guide538.3.1  Configure Your NotebookNote: In this example, we use the ZyXEL NWD6505 wireless adapter as the wireless client and use the Windows built-in utility (Windows Zero Configuration (WZC)) to connect to the wireless netwok.1The NBG6617 supports IEEE 802.11a, IEEE 802.11b, IEEE 802.11g, IEEE 802.11n and IEEE 802.11ac wireless clients. Make sure that your notebook or computer’s wireless adapter supports one of these standards.2Wireless adapters come with software sometimes called a “utility” that you install on your computer. See your wireless adapter’s User’s Guide for information on how to do that.3After you’ve installed the driver and attached the NWD6505 to your computer’s USB port, right-click the Wireless Network Connection icon in your computer’s system tray, select and click View Available Wireless Networks.4The Wireless Network Connection screen displays. Click Refresh network list to view the available wireless APs within range.
Chapter 8 TutorialsNBG6617 User’s Guide545Select SSID_Example3 and click Connect.  6Type the security key in the following screen. Click Connect.
 Chapter 8 TutorialsNBG6617 User’s Guide557Check the status of your wireless connection in the screen below.  8If the wireless client keeps trying to connect to or acquiring an IP address from the NBG6617, make sure you entered the correct security key.If the connection has limited or no connectivity, make sure the DHCP server is enabled on the NBG6617.If your connection is successful, open your Internet browser and enter http://www.zyxel.com or the URL of any other web site in the address bar. If you are able to access the web site, your wireless connection is successfully configured.8.4  Using Guest SSIDs on the NBG6617You can configure more than one guest SSID on a NBG6617. See Section 11.4 on page 91. This allows you to configure multiple independent wireless networks on the NBG6617 as if there were multiple APs (virtual APs). Each guest SSID has its own wireless security type. That is, each SSID on the NBG6617 represents a different access point/wireless network to wireless clients in the network. Clients can associate only with the SSIDs for which they have the correct security settings. Clients using different SSIDs can access the Internet and the wired network behind the NBG6617 (such as a printer).
Chapter 8 TutorialsNBG6617 User’s Guide56For example, you may set up three wireless networks (A, B and C) in your office. A is for workers, B is for guests and C is specific to a VoIP device in the meeting room. 8.4.1  Configuring Security Settings of Guest SSIDsThe NBG6617 is in router mode by default.This example shows you how to configure the SSIDs with the following parameters on your NBG6617 (in router mode).Note: This tutorial assumes that you have disabled WPS in Expert > Wireless > WPS. Otherwise, the “WPA-PSK” security type is not available to configure.1Connect your computer to the LAN port of the NBG6617 using an Ethernet cable. 2The default IP address of the NBG6617 in router mode is “192.168.1.1”. In this case, your computer must have an IP address in the range between “192.168.1.2” and “192.168.1.254”.3Click Start > Run on your computer in Windows. Type “cmd” in the dialog box. Enter “ipconfig” to show your computer’s IP address. If your computer’s IP address is not in the correct range then see Appendix B on page 162 for information on changing your computer’s IP address.4After you’ve set your computer’s IP address, open a web browser such as Internet Explorer and type “http://192.168.1.1” as the web address in your web browser.ABCSSID_GuestSSID_WorkerSSID_VoIPSSID SECURITY TYPE KEYSSID_Worker WPA2-PSKWPA Compatible DoNotStealMyWirelessNetworkSSID_VoIP WPA-PSK VoIPOnly12345678SSID_Guest WPA-PSK keyexample123
 Chapter 8 TutorialsNBG6617 User’s Guide575Enter “1234” (default) as the password and click Login.6Type a new password and retype it to confirm, then click Apply. Otherwise, click Ignore.7The Easy Mode appears. 8Go to Expert > Wireless > Guest Wireless. Click the Edit icon of the first entry to configure wireless and security settings for SSID_Worker.9Configure the screen as follows. In this example, you enable Intra-BSS Traffic for SSID_Worker to allow wireless clients in the same wireless network to communicate with each other. Click Apply.10 Click the Edit icon of the second entry to configure wireless and security settings for SSID_VoIP.
Chapter 8 TutorialsNBG6617 User’s Guide5811 Configure the screen as follows. You do not enable Intra-BSS Traffic for SSID_VoIP. Click Apply.12 Click the Edit icon of the third entry to configure wireless and security settings for SSID_Guest.13 Configure the screen as follows. In this example, you enable Intra-BSS Traffic for SSID_Guest to allow wireless clients in the same wireless network to communicate with each other. Select Enable Guest WLAN to allow clients to access the Internet only. Click Apply.
59PART IITechnical Reference
NBG6617 User’s Guide60CHAPTER   9Status9.1  OverviewThis chapter discusses read-only information related to the device state of the NBG6617.9.1.1  What You Can Do•Use the Client Tables screen to view the current DHCP client information (Section 9.2 on page 60). 9.2  Client Tables ScreenYou can configure the NBG6617’s LAN as a DHCP server or disable it. When configured as a server, the NBG6617 assigns IP addresses to the clients. If DHCP service is disabled, you must have another DHCP server on that network, or else the computer must be manually configured.Use this screen to view current DHCP client information (including MAC Address, and IP Address) of all network clients using the NBG6617’s DHCP server. Click Expert Mode > Status > Client Tables to open the Client Tables screen.Figure 38   Expert Mode > Status > Client TablesThe following table describes the labels in this screen.Table 19   Expert Mode > Status > Client TablesLABEL  DESCRIPTIONInterface Select the interface from the drop-down list box to display current DHCP client information.#  This is the index number of the host computer.Online This field displays whether the connection to the host computer is up (a yellow bulb) or down (a gray bulb).Host Name This field displays the computer host name.IP Address This field displays the IP address relative to the # field listed above.
 Chapter 9 StatusNBG6617 User’s Guide61MAC Address This field shows the MAC address of the computer with the name in the Host Name field.Every Ethernet device has a unique MAC (Media Access Control) address which uniquely identifies a device. The MAC address is assigned at the factory and consists of six pairs of hexadecimal characters, for example, 00:A0:C5:00:00:02.Interface/Rssi This field displays the device’s interface type or received signal strength indicator (RSSI) that is currently connected to the NBG6617.Lease time This field displays the amount of time that the IP address is valid.Reserve Select this if you want to reserve the IP address for this specific MAC address.Apply Click Apply to save your changes back to the NBG6617.Cancel Click Cancel to reload the previous configuration for this screen.Table 19   Expert Mode > Status > Client TablesLABEL  DESCRIPTION
NBG6617 User’s Guide62CHAPTER   10WAN10.1  OverviewThis chapter discusses the NBG6617’s WAN screens. Use these screens to configure your NBG6617 for Internet access.A WAN (Wide Area Network) connection is an outside connection to another network or the Internet. It connects your private networks such as a LAN (Local Area Network) and other networks, so that a computer in one location can communicate with computers in other locations.Figure 39   LAN and WAN10.2  What You Can Do•Use the Internet Connection screen to enter your ISP information and set how the computer acquires its IP, DNS and WAN MAC addresses (Section 10.4 on page 65).••Use the NAT > General screen to enable NAT, set a default server and change your NBG6617’s port forwarding settings (Section 10.5.1 on page 74).•Use the NAT > Port Trigger screen to configure your NBG6617’s trigger port settings (Section 10.5.2 on page 76).•Use the NAT > Passthrough screen to configure your NBG6617’s ALGs and VPN pass-through settings (Section 10.5.3 on page 77).•Use the Dynamic DNS screen to change your NBG6617’s DDNS settings (Section 10.6 on page 78).10.3  What You Need To KnowThe information in this section can help you configure the screens for your WAN connection, as well as enable/disable some advanced features of your NBG6617.
 Chapter 10 WANNBG6617 User’s Guide6310.3.1  Configuring Your Internet ConnectionEncapsulation MethodEncapsulation is used to include data from an upper layer protocol into a lower layer protocol. To set up a WAN connection to the Internet, you need to use the same encapsulation method used by your ISP (Internet Service Provider). If your ISP offers a dial-up Internet connection using PPPoE (PPP over Ethernet) or PPTP (Point-to-Point Tunneling Protocol), they should also provide a username and password (and service name) for user authentication.WAN IP AddressThe WAN IP address is an IP address for the NBG6617, which makes it accessible from an outside network. It is used by the NBG6617 to communicate with other devices in other networks. It can be static (fixed) or dynamically assigned by the ISP each time the NBG6617 tries to access the Internet.If your ISP assigns you a static WAN IP address, they should also assign you the subnet mask and DNS server IP address(es) (and a gateway IP address if you use the Ethernet or ENET ENCAP encapsulation method).DNS Server Address AssignmentUse Domain Name System (DNS) to map a domain name to its corresponding IP address and vice versa, for instance, the IP address of www.zyxel.com is 204.217.0.2. The DNS server is extremely important because without it, you must know the IP address of a computer before you can access it. The NBG6617 can get the DNS server addresses in the following ways.1The ISP tells you the DNS server addresses, usually in the form of an information sheet, when you sign up. If your ISP gives you DNS server addresses, manually enter them in the DNS server fields.2If your ISP dynamically assigns the DNS server IP addresses (along with the NBG6617’s WAN IP address), set the DNS server fields to get the DNS server address from the ISP. WAN MAC AddressThe MAC address screen allows users to configure the WAN port's MAC address by either using the factory default or cloning the MAC address from a computer on your LAN. Choose Factory Default to select the factory assigned default MAC Address.Otherwise, click Clone the computer's MAC address - IP Address and enter the IP address of the computer on the LAN whose MAC you are cloning. Once it is successfully configured, the address will be copied to configuration file. It is recommended that you clone the MAC address prior to hooking up the WAN Port.
Chapter 10 WANNBG6617 User’s Guide64MulticastTraditionally, IP packets are transmitted in one of either two ways - Unicast (1 sender - 1 recipient) or Broadcast (1 sender - everybody on the network). Multicast delivers IP packets to a group of hosts on the network - not everybody and not just 1. Figure 40   Multicast ExampleIn the multicast example above, systems A and D comprise one multicast group. In multicasting, the server only needs to send one data stream and this is delivered to systems A and D. IGMP (Internet Group Multicast Protocol) is a network-layer protocol used to establish membership in a multicast group - it is not used to carry user data. The NBG6617 supports both IGMP version 1 (IGMP-v1) and IGMP version 2 (IGMP-v2). At start up, the NBG6617 queries all directly connected networks to gather group membership. After that, the NBG6617 periodically updates this information. IP multicasting can be enabled/disabled on the NBG6617 WAN interface in the Web Configurator (WAN). Select None to disable IP multicasting on these interfaces.Auto-IP ChangeWhen the NBG6617 gets a WAN IP address or a DNS server IP address which is in the same subnet as the LAN IP address 192.168.1.1, Auto-IP-Change allows the NBG6617 to change its LAN IP address to 10.0.0.1 automatically. If the NBG6617’s original LAN IP address is 10.0.0.1 and the WAN IP address is in the same subnet, such as 10.0.0.3, the NBG6617 switches to use 192.168.1.1 as its LAN IP address.Figure 41   Auto-IP-Change Example192.168.1.1 192.168.1.2310.0.0.1
 Chapter 10 WANNBG6617 User’s Guide65Auto-IP-Change only works under the following conditions:• The NBG6617 must be in Router Mode (see Section 15.12 on page 146 for more information) for Auto-IP-Change to become active.• The NBG6617 is set to receive a dynamic WAN IP address.10.4  Internet Connection ScreenUse this screen to change your NBG6617’s Internet access settings. Click Expert Mode > WAN > Internet Connection. 10.4.1  IPoE EncapsulationThis screen displays when you select IPoE encapsulation.
Chapter 10 WANNBG6617 User’s Guide66Figure 42   Expert Mode > WAN > Internet Connection: IPoE Encapsulation (IPv4 Only)
 Chapter 10 WANNBG6617 User’s Guide67The following table describes the labels in this screen.Table 20   Network > WAN > Internet Connection: IPoE EncapsulationLABEL DESCRIPTIONISP Parameters for Internet AccessEncapsulation You must choose the IPoE option when the WAN port is used as a regular Ethernet.IPv4 / IPv6 Select IPv4 Only if you want the NBG6617 to run IPv4 only. Select Dual Stack to allow the NBG6617 to run IPv4 and IPv6 at the same time.Select IPv6 Only if you want the NBG6617 to run IPv6 only.IP AddressObtain an IP Address Automatically (DHCP)Select this option if your ISP did not assign you a fixed IP address. This is the default selection. Static IP Address  Select this option if the ISP assigned a fixed IP address. IP Address Enter your WAN IP address in this field if you selected Static IP Address. Subnet Mask Enter the Subnet Mask in this field.Default Gateway Enter a gateway IP address (if your ISP gave you one) in this field.MTU Size Enter the MTU (Maximum Transmission Unit) size for each packet. If a larger packet arrives, the NBG6617 divides it into smaller fragments.DNS ServerFirst DNS ServerSecond DNS ServerThird DNS Server Select Obtained From ISP if your ISP dynamically assigns DNS server information (and the NBG6617's WAN IP address). The field to the right displays the (read-only) DNS server IP address that the ISP assigns. Select User-Defined if you have the IP address of a DNS server. Enter the DNS server's IP address in the field to the right.  Select None if you do not want to configure DNS servers. If you do not configure a DNS server, you must know the IP address of a computer in order to access it.WAN MAC AddressOnce the WAN MAC address is successfully configured, the address will be copied to the configuration file. It will not change unless you change the setting or upload a different configuration file. Factory default Select this option to have the WAN interface use the factory assigned default MAC address. By default, the NBG6617 uses the factory assigned MAC address to identify itself.Clone the computer's MAC address - IP AddressSelect this option to have the WAN interface use a different MAC address by cloning the MAC address of another device or computer. Enter the IP address of the device or computer whose MAC you are cloning. Set WAN MAC AddressSelect this option to have the WAN interface use a manually specified MAC address. Enter the MAC address in the fields.IPv6 TunnelingUse IPv6 tunneling when the local network uses IPv6 and the ISP has an IPv4 network. When the NBG6617 has an IPv4 WAN address and you set IPv4/IPv6 mode to IPv4 Only, you can enable IPv6 tunneling to encapsulate IPv6 packets in IPv4 packets to cross the ISP’s IPv4 network.
Chapter 10 WANNBG6617 User’s Guide68IPv6 Tunneling Select None to not allow IPv6 packets to cross IPv4 networks.Select 6RD to enable 6RD. IPv6 Rapid Deployment (6RD) is an IPv6 transitioning process for stateless tunneling of IPv6 over IPv4. Enable 6RD to allow tunneling across an ISP's IPv4 only access network.Select 6to4 to transmit IPv6 packets over an IPv4 network. A 6to4 relay router is required to route 6to4 packets to a native IPv6 network.Select 6in4 if the NBG6617 has a public IPv4 address and you want to transmit your IPv6 packets to one and only one remote site whose LAN network is also an IPv6 network. You must know the WAN IP address of the remote gateway.6RDThe NBG6617 generates a global IPv6 prefix from its IPv4 WAN address and tunnels IPv6 traffic to the ISP’s Border Relay router to connect to the native IPv6 Internet. The local network can also use IPv4 services. The NBG6617 uses its configured IPv4 WAN IP to route IPv4 traffic to the IPv4 Internet.This is available only when you select IPv4 Only in the IPv4/IPv6 field.Automatically configured by DHCPCSelect this to have the NBG6617 detect the relay server’s IP address automatically through DHCP.Manually Configured Select this if you have the IPv4 address of the relay server.Border Relay IPv4 AddressSpecify the relay server’s IPv4 address.Service Provider IPv6 PrefixEnter an IPv6 prefix for tunneling IPv6 traffic to the ISP’s Border Relay router and connecting to the native IPv6 Internet.Service Provider IPv6 Prefix lengthEnter the IPv6 prefix length.An IPv6 prefix length specifies how many most significant bits (starting from the left) in the address compose the network address. IPv4 mask length Enter the subnet mask number (1~32) for the IPv4 network.6to4The NBG6617 should get a public IPv4 address for the WAN. The NBG6617 adds an IPv4 IP header to an IPv6 packet when transmitting the packet to the Internet. In reverse, the NBG6617 removes the IPv4 header from an IPv6 packet when receiving it from the Internet. This is available only when you select IPv4 Only in the IPv4/IPv6 field.Relay Server IPv4 AddressEnter the IPv4 address of a 6to4 relay server which helps forward packets between 6to4 networks and native IPv6 networks.6in4The NBG6617 encapsulates IPv6 packets within IPv4 packets across the Internet. You must know the WAN IP address of the remote gateway device. This mode is normally used for a site-to-site application such as two branch offices.This is available only when you select IPv4 Only in the IPv4/IPv6 field.Remote IPv4 AddressEnter the IPv4 address of the remote gateway to which this interface tunnels traffic.Remote IPv6 AddressEnter the IPv6 address of the remote gateway to which this interface tunnels traffic.Local IPv6 Address Enter the IPv6 address assigned by your ISP.IPv6 Prefix Enter the IPv6 prefix for this interface if you want to use a static IP address.Table 20   Network > WAN > Internet Connection: IPoE Encapsulation (continued)LABEL DESCRIPTION
 Chapter 10 WANNBG6617 User’s Guide69IPv6 DNS ServerThis is available only when you select IPv4 Only in the IPv4/IPv6 field and set IPv6 Tunneling to 6RD, 6in4 or 6to4.First DNS ServerSecond DNS ServerThird DNS ServerSpecify the DNS server IPv6 address assigned by the ISP. IPv6 AddressThis section is NOT available when you select IPv4 Only in the IPv4/IPv6 field.Obtain an IP Address Automatically(DHCP)Select this option if you want to obtain an IPv6 address from a DHCPv6 server.•Select DUID-LL (Default) to have the NBG6617 use DUID-LL (DUID Based on Link-layer Address) for identification when exchanging DHCPv6 messages.•Select DUID-LLT to have the NBG6617 use DUID-LLT (DUID Based on Link-layer Address Plus Time) for identification when exchanging DHCPv6 messages.Static IP Address Select this option if you have a fixed IPv6 address assigned by your ISP.IPv6 Address Enter the IPv6 address assigned by your ISP.Prefix length Enter the address prefix length to specify how many most significant bits in an IPv6 address compose the network address.IPv6 Default Gateway Enter the IPv6 address of the next-hop gateway. The gateway helps forward packets to their destinations.Link Local Only Select this option to use the link-local address which uniquely identifies a device on the local network (the LAN).IPv6 DNS ServerThis is available only when you select Dual Stack or IPv6 Only in the IPv4/IPv6 field.First DNS ServerSecond DNS ServerThird DNS ServerSelect Obtained From ISP to have the NBG6617 get the IPv6 DNS server addresses from the ISP automatically.Select User-Defined and enter the IPv6 DNS server address assigned by the ISP to have the NBG6617 use the IPv6 DNS server addresses you configure manually.Select None if you do not want to configure DNS servers. If you do not configure a DNS server, you must know the IPv6 address of a computer in order to access it.Multicast SetupMulticast Setup Select IGMPv1/v2 to enable multicasting. This applies to traffic routed from the WAN to the LAN.Select None to disable this feature. This may cause incoming traffic to be dropped or sent to all connected network devices.Auto-Subnet ConfigurationEnable Auto-IP-Change ModeSelect this option to have the NBG6617 change its LAN IP address to 10.0.0.1 or 192.168.1.1 accordingly when the NBG6617 gets a dynamic WAN IP address in the same subnet as the LAN IP address.Select this option to have the NBG6617 change its LAN IP address to 10.0.0.1 or 192.168.1.1 accordingly when the NBG6617 gets a DNS server IP address in the same subnet as the LAN IP address.The NAT, DHCP server and firewall functions on the NBG6617 are still available in this mode.Apply Click Apply to save your changes back to the NBG6617.Cancel Click Cancel to begin configuring this screen afresh.Table 20   Network > WAN > Internet Connection: IPoE Encapsulation (continued)LABEL DESCRIPTION
Chapter 10 WANNBG6617 User’s Guide7010.4.2  PPPoE EncapsulationThe NBG6617 supports PPPoE (Point-to-Point Protocol over Ethernet). PPPoE is an IETF standard (RFC 2516) specifying how a personal computer (PC) interacts with a broadband modem (DSL, cable, wireless, etc.) connection. The PPP over Ethernet option is for a dial-up connection using PPPoE.For the service provider, PPPoE offers an access and authentication method that works with existing access control systems (for example Radius).One of the benefits of PPPoE is the ability to let you access one of multiple network services, a function known as dynamic service selection. This enables the service provider to easily create and offer new IP services for individuals.Operationally, PPPoE saves significant effort for both you and the ISP or carrier, as it requires no specific configuration of the broadband modem at the customer site.By implementing PPPoE directly on the NBG6617 (rather than individual computers), the computers on the LAN do not need PPPoE software installed, since the NBG6617 does that part of the task. Furthermore, with NAT, all of the LANs’ computers will have access.
 Chapter 10 WANNBG6617 User’s Guide71This screen displays when you select PPPoE encapsulation.Figure 43   Network > WAN > Internet Connection: PPPoE Encapsulation (IPv4 Only)
Chapter 10 WANNBG6617 User’s Guide72The following table describes the labels in this screen.Table 21   Network > WAN > Internet Connection: PPPoE EncapsulationLABEL DESCRIPTIONISP Parameters for Internet AccessEncapsulation Select PPPoE if you connect to your Internet via dial-up.IPv4 / IPv6 Select IPv4 Only if you want the NBG6617 to run IPv4 only. Select Dual Stack to allow the NBG6617 to run IPv4 and IPv6 at the same time.Select IPv6 Only if you want the NBG6617 to run IPv6 only.PPP InformationPPP Username Type the user name given to you by your ISP.PPP Password Type the password associated with the user name above.MTU Size Enter the Maximum Transmission Unit (MTU) or the largest packet size per frame that your NBG6617 can receive and process.PPP Auto Connect Select this option if you do not want the connection to time out.IDLE Timeout (second)This value specifies the time in minutes that elapses before the router automatically disconnects from the PPPoE server.PPPoE Service Name Enter the PPPoE service name specified in the ISP account.WAN IP Address Assignment Get automatically from ISP Select this option if your ISP did not assign you a fixed IP address. This is the default selection. Use Fixed IP AddressSelect this option and enter your WAN IP address if the ISP assigned a fixed IP address. DNS ServerFirst DNS ServerSecond DNS ServerThird DNS Server Select Obtained From ISP if your ISP dynamically assigns DNS server information (and the NBG6617's WAN IP address). The field to the right displays the (read-only) DNS server IP address that the ISP assigns. Select User-Defined if you have the IP address of a DNS server. Enter the DNS server's IP address in the field to the right.Select None if you do not want to configure DNS servers. If you do not configure a DNS server, you must know the IP address of a computer in order to access it.WAN MAC AddressThe MAC address section allows users to configure the WAN port's MAC address by using the NBG6617’s MAC address, copying the MAC address from a computer on your LAN or manually entering a MAC address. Factory default Select Factory default to use the factory assigned default MAC Address.Clone the computer’s MAC address - IP AddressSelect Clone the computer's MAC address - IP Address and enter the IP address of the computer on the LAN whose MAC you are cloning.Set WAN MAC AddressSelect this option and enter the MAC address you want to use.IPv6 TunnelingUse IPv6 tunneling when the local network uses IPv6 and the ISP has an IPv4 network. When the NBG6617 has an IPv4 WAN address and you set IPv4/IPv6 mode to IPv4 Only, you can enable IPv6 tunneling to encapsulate IPv6 packets in IPv4 packets to cross the ISP’s IPv4 network.
 Chapter 10 WANNBG6617 User’s Guide73IPv6 Tunneling Select None to not allow IPv6 packets to cross IPv4 networks.Select 6RD to enable 6RD. IPv6 Rapid Deployment (6RD) is an IPv6 transitioning process for stateless tunneling of IPv6 over IPv4. Enable 6RD to allow tunneling across an ISP's IPv4 only access network.Select 6to4 to transmit IPv6 packets over an IPv4 network. A 6to4 relay router is required to route 6to4 packets to a native IPv6 network. Select 6in4 if the NBG6617 has a public IPv4 address and you want to transmit your IPv6 packets to one and only one remote site whose LAN network is also an IPv6 network. You must know the WAN IP address of the remote gateway.6RDThe NBG6617 generates a global IPv6 prefix from its IPv4 WAN address and tunnels IPv6 traffic to the ISP’s Border Relay router to connect to the native IPv6 Internet. The local network can also use IPv4 services. The NBG6617 uses its configured IPv4 WAN IP to route IPv4 traffic to the IPv4 Internet.This is available only when you select IPv4 Only in the IPv4/IPv6 field.Automatically configured by DHCPCSelect this to have the NBG6617 detect the relay server’s IP address automatically through DHCP.Manually ConfiguredSelect this if you have the IPv4 address of the relay server.Border Relay IPv4 AddressSpecify the relay server’s IPv4 address.Service Provider IPv6 PrefixEnter an IPv6 prefix for tunneling IPv6 traffic to the ISP’s Border Relay router and connecting to the native IPv6 Internet.Service Provider IPv6 Prefix lengthEnter the IPv6 prefix length.An IPv6 prefix length specifies how many most significant bits (starting from the left) in the address compose the network address. IPv4 mask length Enter the subnet mask number (1~32) for the IPv4 network.6to4The NBG6617 should get a public IPv4 address for the WAN. The NBG6617 adds an IPv4 IP header to an IPv6 packet when transmitting the packet to the Internet. In reverse, the NBG6617 removes the IPv4 header from an IPv6 packet when receiving it from the Internet. This is available only when you select IPv4 Only in the IPv4/IPv6 field.Relay Server IPv4 AddressEnter the IPv4 address of a 6to4 relay server which helps forward packets between 6to4 networks and native IPv6 networks.6in4The NBG6617 encapsulates IPv6 packets within IPv4 packets across the Internet. You must know the WAN IP address of the remote gateway device. This mode is normally used for a site-to-site application such as two branch offices.This is available only when you select IPv4 Only in the IPv4/IPv6 field.Remote IPv4 AddressEnter the IPv4 address of the remote gateway to which this interface tunnels traffic.Remote IPv6 AddressEnter the IPv6 address of the remote gateway to which this interface tunnels traffic.Local IPv6 Address Enter the IPv6 address assigned by your ISP.IPv6 Prefix Enter the IPv6 prefix for this interface if you want to use a static IP address.Table 21   Network > WAN > Internet Connection: PPPoE Encapsulation (continued)LABEL DESCRIPTION
Chapter 10 WANNBG6617 User’s Guide7410.5  NATUse this screen to change your NBG6617’s NAT (Network Address Translation) settings. Click Expert Mode > WAN > NAT. 10.5.1  General ScreenUse this screen to enable NAT, set a default server and configure your NBG6617’s port forwarding settings to forward incoming service requests to the server(s) on your local network. Click Expert Mode > WAN > NAT > General.IPv6 DNS ServerThis is available only when you select IPv4 Only in the IPv4/IPv6 field and set IPv6 Tunneling to 6RD, 6in4 or 6to4.First DNS ServerSecond DNS ServerThird DNS ServerSpecify the DNS server IPv6 address assigned by the ISP. IPv6 DNS ServerThis is available only when you select Dual Stack or IPv6 Only in the IPv4/IPv6 field.First DNS ServerSecond DNS ServerThird DNS ServerSelect Obtained From ISP to have the NBG6617 get the IPv6 DNS server addresses from the ISP automatically.Select User-Defined and enter the IPv6 DNS server address assigned by the ISP to have the NBG6617 use the IPv6 DNS server addresses you configure manually.Select None if you do not want to configure DNS servers. If you do not configure a DNS server, you must know the IPv6 address of a computer in order to access it.Multicast SetupMulticast Setup Select IGMPv1/v2 to enable multicasting. This applies to traffic routed from the WAN to the LAN. Select None to disable this feature. This may cause incoming traffic to be dropped or sent to all connected network devices.Auto-Subnet ConfigurationEnable Auto-IP-Change ModeSelect this option to have the NBG6617 change its LAN IP address to 10.0.0.1 or 192.168.1.1 accordingly when the NBG6617 gets a dynamic WAN IP address in the same subnet as the LAN IP address.Select this option to have the NBG6617 change its LAN IP address to 10.0.0.1 or 192.168.1.1 accordingly when the NBG6617 gets a DNS server IP address in the same subnet as the LAN IP address.The NAT, DHCP server and firewall functions on the NBG6617 are still available in this mode.Apply Click Apply to save your changes back to the NBG6617.Cancel Click Cancel to begin configuring this screen afresh.Table 21   Network > WAN > Internet Connection: PPPoE Encapsulation (continued)LABEL DESCRIPTION
 Chapter 10 WANNBG6617 User’s Guide75Figure 44   Expert Mode > WAN >NAT > General The following table describes the labels in this screen.Table 22   Expert Mode > WAN > NAT > GeneralLABEL DESCRIPTIONGeneralNetwork Address Translation (NAT)Network Address Translation (NAT) allows the translation of an Internet protocol address used within one network (for example a private IP address used in a local network) to a different IP address known within another network (for example a public IP address used on the Internet). Select Enable to activate NAT. Select Disable to turn it off.Default Server SetupDefault Server You can decide whether you want to use the default server or specify a server manually. In addition to the servers for specified services, NAT supports a default server. A default server receives packets from ports that are not specified in the port forwarding summary table below. Select this to use the default server. Change To Server  Select this and manually enter the server’s IP address.Port Forwarding (Max Limit : 32)#This is the number of an individual port forwarding server entry.Name Select a pre-defined service from the drop-down list box. The pre-defined service port number(s) and protocol will be displayed in the port forwarding summary table. Otherwise, select User define to manually enter the Port number(s) and select the  Protocol.Protocol Select the transport layer protocol supported by this virtual server. Choices are TCP, UDP, or TCP_UDP. If you have chosen a pre-defined service in the Name field, the protocol will be configured automatically.Local Port This shows the port number(s) that identifies the service if you select a pre-defined service. If you select User define in the Name field, enter the port number(s) manually.Server IP Address Select User define to manually enter the inside IP address of the virtual server here.Port This shows the port number(s) that identifies the service if you select a pre-defined service. If you select User define in the Name field, enter the port number(s) manually.Name This field displays a name to identify this rule.
Chapter 10 WANNBG6617 User’s Guide7610.5.2  Port Trigger ScreenTo change your NBG6617’s trigger port settings, click Expert Mode > WAN > NAT > Port Trigger. The screen appears as shown.Note: Only one LAN computer can use a trigger port (range) at a time.Figure 45   Expert Mode > WAN > NAT > Port TriggerThe following table describes the labels in this screen.Protocol This is the transport layer protocol used for the service.Local Port This field displays the port number(s). Server IP Address This field displays the inside IP address of the server.Port This field displays the port number(s). Add Click   to add the rule in the port forwarding summary table.Delete Click   to remove a rule.Apply Click Apply to save your changes back to the NBG6617.Cancel Click Cancel to begin configuring this screen afresh.Table 22   Expert Mode > WAN > NAT > General (continued)LABEL DESCRIPTIONTable 23   Expert Mode > WAN > NAT > Port TriggerLABEL DESCRIPTIONPort Trigger Rules (Max Limit : 32)#This is the rule index number (read-only).Name Type a unique name (up to 15 characters) for identification purposes. All characters are permitted - including spaces.Incoming Port Incoming is a port (or a range of ports) that a server on the WAN uses when it sends out a particular service. The NBG6617 forwards the traffic with this port (or range of ports) to the client computer on the LAN that requested the service. Type a port number or the starting port number in a range of port numbers.End Port Type a port number or the ending port number in a range of port numbers.Trigger Port The trigger port is a port (or a range of ports) that causes (or triggers) the NBG6617 to record the IP address of the LAN computer that sent the traffic to a server on the WAN.Type a port number or the starting port number in a range of port numbers.End Port Type a port number or the ending port number in a range of port numbers.Add Click   to add the rule in the port trigger summary table.Delete Click   to remove a rule.
 Chapter 10 WANNBG6617 User’s Guide7710.5.3  Passthrough ScreenALG OverviewApplication Layer Gateway (ALG) allows the following applications to operate properly through the NBG6617’s NAT.• SIP - Session Initiation Protocol (SIP) - An application-layer protocol that can be used to create voice and multimedia sessions over Internet.• H.323 - A teleconferencing protocol suite that provides audio, data and video conferencing.• FTP - File Transfer Protocol - an Internet file transfer service.• SNMP - Simple Network Management Protocol - An application-layer protocol that can be used to exchange management information between network devices.• RTSP - Real Time Streaming Protocol - a remote control for multimedia on the Internet. • IRC - Internet Relay Chat - An application-layer protocol that can be used to communicate in the form of text.The ALG feature is only needed for traffic that goes through the NBG6617’s NAT. To change your NBG6617’s ALGs and VPN pass-through settings, click Expert Mode > WAN > NAT > Passthrough. The screen appears as shown.Figure 46   Expert Mode > WAN > NAT > PassthroughApply Click Apply to save your changes back to the NBG6617.Cancel Click Cancel to begin configuring this screen afresh.Table 23   Expert Mode > WAN > NAT > Port Trigger (continued)LABEL DESCRIPTION
Chapter 10 WANNBG6617 User’s Guide78The following table describes the labels in this screen.10.6  Dynamic DNS ScreenTo change your NBG6617’s DDNS, click Expert Mode > WAN > Dynamic DNS. The screen appears as shown.Table 24   Expert Mode > WAN > NAT > PassthroughLABEL DESCRIPTIONALG SetupFTP Select Enable to allow TCP packets with a specified port destination to pass through.H.323 Select Enable to allow peer-to-peer H.323 calls.SIP Select Enable to make sure SIP (VoIP) works correctly with port-forwarding and address-mapping rules.SNMP Select Enable to allow a manager station to manage and monitor the NBG6617 through the network via SNMP. RTSP RTSP (Real Time Streaming Protocol) is a protocol used to stop, pause or play video and audio applications streaming on the Internet.Select Enable to have the NBG6617 detect RTSP traffic and help build RTSP sessions through its NAT.IRC Select Enable to allow clients to communicate in the form of text.VPN Passthrough PPTP Select Enable to allow VPN clients to make outbound PPTP connections. It is required in order to connect to a PPTP VPN account. If PPTP is disabled, then when a client sends a request to a VPN server, the server will reply to the NBG6617 and the NBG6617 will drop the request. When PPTP is enabled, the NBG6617 will forward the reply from the VPN server to the client that initiated the request, and the connection will establish successfully.L2TP Select Enable to allow VPN clients to make outbound L2TP connections. It is required in order to connect to a L2TP VPN account. If L2TP is disabled, then when a client sends a request to a VPN server, the server will reply to the NBG6617 and the NBG6617 will drop the request. When L2TP is enabled, the NBG6617 will forward the reply from the VPN server to the client that initiated the request, and the connection will establish successfully.IPSEC Select Enable to allow VPN clients to make outbound IPSec connections. It is required in order to connect to a IPSec VPN account. If IPSEC is disabled, then when a client sends a request to a VPN server, the server will reply to the NBG6617 and the NBG6617 will drop the request. When IPSEC is enabled, the NBG6617 will forward the reply from the VPN server to the client that initiated the request, and the connection will establish successfully.Apply Click Apply to save your changes back to the NBG6617.Cancel Click Cancel to begin configuring this screen afresh.
 Chapter 10 WANNBG6617 User’s Guide79Figure 47   Expert Mode > WAN > Dynamic DNS The following table describes the labels in this screen.Table 25   Expert Mode > WAN > Dynamic DNSLABEL DESCRIPTIONDynamic DNS SetupDynamic DNS Select Enable to use dynamic DNS. Select Disable to turn this feature off.Service Provider Select the name of your Dynamic DNS service provider.Host Name Enter a host names in the field provided. You can specify up to two host names in the field separated by a comma (",").Username Enter your user name.Password Enter the password assigned to you.Apply Click Apply to save your changes back to the NBG6617.Cancel Click Cancel to begin configuring this screen afresh.
NBG6617 User’s Guide80CHAPTER   11Wireless LAN11.1  OverviewThis chapter discusses how to configure the wireless network settings in your NBG6617. The NBG6617 is able to function both 2.4GHz and 5GHz network at the same time. You can have different wireless and wireless security settings for 2.4GHz and 5GHz wireless LANs. Click Expert Mode > Wireless to configure wireless LAN 2.4G or wireless LAN 5G.See the appendices for more detailed information about wireless networks.The following figure provides an example of a wireless network.Figure 48   Example of a Wireless NetworkThe wireless network is the part in the blue circle. In this wireless network, devices A and B are called wireless clients. The wireless clients use the access point (AP) to interact with other devices (such as the printer) or with the Internet. Your NBG6617 is the AP.
 Chapter 11 Wireless LANNBG6617 User’s Guide8111.1.1  What You Can Do•Use the Wireless screen to enable or disable the 2.4GHz or 5GHz wireless LAN, set up wireless security between the NBG6617 and the wireless clients, and make other basic configuration changes (Section 11.2 on page 85).•Use the Guest Wireless screen to set up multiple wireless networks on your NBG6617 (Section 11.4 on page 91). •Use the MAC Filter screen to allow or deny wireless stations based on their MAC addresses from connecting to the NBG6617 (Section 11.5 on page 93).• Use the Advanced screen to allow intra-BSS networking and set the RTS/CTS Threshold (Section 11.6 on page 94).•Use the WPS screen to quickly set up a wireless network with strong security, without having to configure security settings manually (Section 11.7 on page 96).•Use the Scheduling screen to set the times your wireless LAN is turned on and off (Section 11.8 on page 97).11.1.2  What You Should KnowEvery wireless network must follow these basic guidelines.• Every wireless client in the same wireless network must use the same SSID.The SSID is the name of the wireless network. It stands for Service Set IDentity.• If two wireless networks overlap, they should use different channels.Like radio stations or television channels, each wireless network uses a specific channel, or frequency, to send and receive information.• Every wireless client in the same wireless network must use security compatible with the AP.Security stops unauthorized devices from using the wireless network. It can also protect the information that is sent in the wireless network.Wireless Security OverviewThe following sections introduce different types of wireless security you can set up in the wireless network.SSIDNormally, the AP acts like a beacon and regularly broadcasts the SSID in the area. You can hide the SSID instead, in which case the AP does not broadcast the SSID. In addition, you should change the default SSID to something that is difficult to guess.This type of security is fairly weak, however, because there are ways for unauthorized devices to get the SSID. In addition, unauthorized devices can still see the information that is sent in the wireless network.MAC Address FilterEvery wireless client has a unique identification number, called a MAC address.1 A MAC address is usually written using twelve hexadecimal characters2; for example, 00A0C5000002 or 00:A0:C5:00:00:02. To get the MAC address for each wireless client, see the appropriate User’s Guide or other documentation.
Chapter 11 Wireless LANNBG6617 User’s Guide82You can use the MAC address filter to tell the AP which wireless clients are allowed or not allowed to use the wireless network. If a wireless client is allowed to use the wireless network, it still has to have the correct settings (SSID, channel, and security). If a wireless client is not allowed to use the wireless network, it does not matter if it has the correct settings.This type of security does not protect the information that is sent in the wireless network. Furthermore, there are ways for unauthorized devices to get the MAC address of an authorized wireless client. Then, they can use that MAC address to use the wireless network.User AuthenticationYou can make every user log in to the wireless network before they can use it. This is called user authentication. However, every wireless client in the wireless network has to support IEEE 802.1x to do this.For wireless networks, there are two typical places to store the user names and passwords for each user.• In the AP: this feature is called a local user database or a local database.• In a RADIUS server: this is a server used in businesses more than in homes.If your AP does not provide a local user database and if you do not have a RADIUS server, you cannot set up user names and passwords for your users.Unauthorized devices can still see the information that is sent in the wireless network, even if they cannot use the wireless network. Furthermore, there are ways for unauthorized wireless users to get a valid user name and password. Then, they can use that user name and password to use the wireless network.Local user databases also have an additional limitation that is explained in the next section.EncryptionWireless networks can use encryption to protect the information that is sent in the wireless network. Encryption is like a secret code. If you do not know the secret code, you cannot understand the message.The types of encryption you can choose depend on the type of user authentication. (See page 82 for information about this.)1. Some wireless devices, such as scanners, can detect wireless networks but cannot use wireless networks. These kinds of wireless devices might not have MAC addresses.2. Hexadecimal characters are 0, 1, 2, 3, 4, 5, 6, 7, 8, 9, A, B, C, D, E, and F.Table 26   Types of Encryption for Each Type of AuthenticationNO AUTHENTICATION RADIUS SERVERWeakest No Security WPAWPA-PSKStrongest WPA2-PSK WPA2
 Chapter 11 Wireless LANNBG6617 User’s Guide83For example, if the wireless network has a RADIUS server, you can choose WPA or WPA2. If users do not log in to the wireless network, you can choose no encryption, WPA-PSK, or WPA2-PSK.Usually, you should set up the strongest encryption that every wireless client in the wireless network supports. For example, suppose the AP does not have a local user database, and you do not have a RADIUS server. Therefore, there is no user authentication. Suppose the wireless network has two wireless clients. Device A only supports WPA, and device B supports WPA and WPA2. Therefore, you should set up WPA or WPA-PSK in the wireless network.Note: It is recommended that wireless networks use WPA-PSK, WPA, or stronger encryption. IEEE 802.1x and WEP encryption are better than none at all, but it is still possible for unauthorized devices to figure out the original information pretty quickly.Note: It is not possible to use WPA-PSK, WPA or stronger encryption with a local user database. In this case, it is better to set up stronger encryption with no authentication than to set up weaker encryption with the local user database.When you select WPA2 or WPA2-PSK in your NBG6617, you can also select an option (WPA/WPA-PSK Compatible) to support WPA/WPA-PSK as well. In this case, if some wireless clients support WPA and some support WPA2, you should set up WPA2-PSK or WPA2 (depending on the type of wireless network login) and select the WPA/WPA-PSK Compatible option in the NBG6617.Many types of encryption use a key to protect the information in the wireless network. The longer the key, the stronger the encryption. Every wireless client in the wireless network must have the same key.Guest WLANGuest WLAN allows you to set up a wireless network where users can access to Internet via the NBG6617 (Z), but not other networks connected to the Z. In the following figure, a guest user can access the Internet from the guest wireless network A via Z but not the home or company network N.Note: The home or company network N and Guest WLAN network are independent networks.Note: Only Router mode supports guest WLAN.
Chapter 11 Wireless LANNBG6617 User’s Guide84Figure 49   Guest Wireless LAN NetworkGuest WLAN BandwidthThe Guest WLAN Bandwidth function allows you to restrict the maximum bandwidth for the guest wireless network. Additionally, you can also define bandwidth for your home or office network. An example is shown next to define maximum bandwidth for your networks (A is Guest WLAN and N is home or company network.)Figure 50   Example: Bandwidth for Different NetworksWPSWiFi Protected Setup (WPS) is an industry standard specification, defined by the WiFi Alliance. WPS allows you to quickly set up a wireless network with strong security, without having to configure security settings manually. Depending on the devices in your network, you can either press a button (on the device itself, or in its configuration utility) or enter a PIN (Personal Identification NAZ600 kbps100 kbps300 kbpsNA
 Chapter 11 Wireless LANNBG6617 User’s Guide85Number) in the devices. Then, they connect and set up a secure network by themselves. See how to set up a secure wireless network using WPS in the Section 8.2 on page 49. 11.2  Wireless Screen Use this screen to configure the SSID and wireless security of the NBG6617’s default wireless LAN.Note: If you are configuring the NBG6617 from a computer connected to the wireless LAN and you change the NBG6617’s SSID, channel or security settings, you will lose your wireless connection when you press Apply to confirm. You must then change the wireless settings of your computer to match the NBG6617’s new settings.Click Expert Mode > Wireless.Figure 51   Expert Mode > WirelessThe following table describes the general wireless LAN labels in this screen.Table 27   Expert Mode > Wireless  LABEL DESCRIPTIONWireless SetupBand Select the frequency band to set whether you want to apply the wireless and security settings to the default 2.4GHz or 5GHz wireless LAN. Wireless LAN Select Enable to activate the 2.4GHz and/or 5GHz wireless LAN. Select Disable to turn it off. You can enable or disable both 2.4GHz and 5GHz wireless LANs by using the WIFI button located on the rear panel of the NBG6617.
Chapter 11 Wireless LANNBG6617 User’s Guide86Name (SSID)  The SSID (Service Set IDentity) identifies the Service Set with which a wireless client is associated. Enter a descriptive name (up to 32 printable characters found on a typical English language keyboard) for the wireless LAN. Hide SSID Select this check box to hide the SSID in the outgoing beacon frame so a station cannot obtain the SSID through scanning using a site survey tool.Channel Selection Select a channel from the drop-down list box. The options vary depending on the frequency band and the country you are in.This option is only available if Auto Channel Selection is disabled.Operating Channel This displays the channel the NBG6617 is currently using.Channel Width Select the wireless channel width used by NBG6617.A standard 20MHz channel offers transfer speeds of up to 144Mbps (2.4GHz) or 217Mbps (5GHZ) whereas a 40MHz channel uses two standard channels and offers speeds of up to 300Mbps (2.4GHz) or 450Mbps (5GHZ). Because not all devices support 40 MHz channels, select Auto 20/40MHz to allow the NBG6617 to adjust the channel bandwidth automatically.40MHz (channel bonding or dual channel) bonds two adjacent radio channels to increase throughput. The wireless clients must also support 40 MHz. It is often better to use the 20 MHz setting in a location where the environment hinders the wireless signal. Select 20MHz if you want to lessen radio interference with other wireless devices in your neighborhood or the wireless clients do not support channel bonding.802.11 Mode If you set Band to 2.4GHz, you can select from the following:•802.11b: allows either IEEE 802.11b or IEEE 802.11g compliant WLAN devices to associate with the NBG6617. In this mode, all wireless devices can only transmit at the data rates supported by IEEE 802.11b.•802.11g: allows IEEE 802.11g compliant WLAN devices to associate with the Device. IEEE 802.11b compliant WLAN devices can associate with the NBG6617 only when they use the short preamble type.•802.11bg: allows either IEEE 802.11b or IEEE 802.11g compliant WLAN devices to associate with the NBG6617. The NBG6617 adjusts the transmission rate automatically according to the wireless standard supported by the wireless devices.•802.11n: allows IEEE 802.11n compliant WLAN devices to associate with the NBG6617. This can increase transmission rates, although IEEE 802.11b or IEEE 802.11g clients will not be able to connect to the NBG6617. •802.11gn: allows either IEEE 802.11g or IEEE 802.11n compliant WLAN devices to associate with the NBG6617. The transmission rate of your NBG6617 might be reduced.•802.11 bgn: allows IEEE802.11b, IEEE802.11g and IEEE802.11n compliant WLAN devices to associate with the NBG6617. The transmission rate of your NBG6617 might be reduced.If you set Band to 5GHz, you can select from the following:•802.11a: allows only IEEE 802.11a compliant WLAN devices to associate with the NBG6617.•802.11a/an: allows both IEEE802.11n and IEEE802.11a compliant WLAN devices to associate with the NBG6617. The transmission rate of your NBG6617 might be reduced.•802.11a/an/ac: allows IEEE802.11n, IEEE802.11a and IEEE 802.11c compliant WLAN devices to associate with the NBG6617.Security Table 27   Expert Mode > Wireless (continued) LABEL DESCRIPTION
 Chapter 11 Wireless LANNBG6617 User’s Guide87See the rest of this chapter for information on the other labels in this screen. 11.3  Wireless SecurityThe screen varies depending on what you select in the Security Mode field.11.3.1  No SecuritySelect No Security to allow wireless clients to communicate with the access points without any data encryption.Note: If you do not enable any wireless security on your NBG6617, your network is accessible to any wireless networking device that is within range.Figure 52   Expert Mode > Wireless > Security Mode: No SecuritySecurity Mode Select WPA2-PSK to add security on this wireless network. The wireless clients which want to associate to this network must have same wireless security settings as this device. After you select to use a security, additional options appears in this screen. See Section 11.3 on page 87 for detailed information on different security modes. Or you can select No Security to allow any client to associate this network without authentication.Note: If the WPS function is enabled (default), only No Security and WPA2-PSK are available in this field.Apply Click Apply to save your changes back to the NBG6617.Cancel Click Cancel to reload the previous configuration for this screen.Table 27   Expert Mode > Wireless (continued) LABEL DESCRIPTION
Chapter 11 Wireless LANNBG6617 User’s Guide88The following table describes the labels in this screen.11.3.2  WPA-PSK/WPA2-PSKSelect WPA-PSK or WPA2-PSK from the Security Mode list.Note: WPA-PSK is not available if you enable WPS before you configure WPA-PSK in the Expert Mode > Wireless > Wireless screen.Figure 53   Expert Mode > Wireless > Security Mode: WPA-PSK/WPA2-PSKThe following table describes the labels in this screen.Table 28   Expert Mode > Wireless > Security Mode: No SecurityLABEL DESCRIPTIONSecurity Mode Choose No Security from the drop-down list box.Apply Click Apply to save your changes back to the NBG6617.Cancel Click Cancel to reload the previous configuration for this screen.Table 29   Expert Mode > Wireless > Security Mode: WPA-PSK/WPA2-PSKLABEL DESCRIPTIONSecurity Mode Select WPA-PSK or WPA2-PSK to enable data encryption.WPA-PSK CompatibleThis field appears when you choose WPA2-PSK as the Security Mode.Check this field to allow wireless devices using WPA-PSK security mode to connect to your NBG6617.
 Chapter 11 Wireless LANNBG6617 User’s Guide8911.3.3  WPA/WPA2Select WPA or WPA2 from the Security Mode list. Note: WPA or WPA2 is not available if you enable WPS before you configure WPA or WPA2 in the Expert Mode > Wireless > Wireless screen.PMF Protected Management Frames (PMF) is a protection mechanism of action management frames.Check this field to allow wireless devices using the PMF protection mechanism to connect to your NBG6617.Pre-Shared Key  WPA-PSK/WPA2-PSK uses a simple common password for authentication.Type a pre-shared key from 8 to 63 case-sensitive keyboard characters.Group Key Update TimerThe Group Key Update Timer is the rate at which the AP sends a new group key out to all clients. The default is 3600 seconds (60 minutes).Apply Click Apply to save your changes back to the NBG6617.Cancel Click Cancel to reload the previous configuration for this screen.Table 29   Expert Mode > Wireless > Security Mode: WPA-PSK/WPA2-PSK (continued)LABEL DESCRIPTION
Chapter 11 Wireless LANNBG6617 User’s Guide90Figure 54   Expert Mode > Wireless > Security Mode: WPA/WPA2The following table describes the labels in this screen.Table 30   Expert Mode > Wireless > Security Mode: WPA/WPA2LABEL DESCRIPTIONSecurity Mode Select WPA or WPA2 to enable data encryption.WPA Compatible This check box is available only when you select WPA2-PSK or WPA2 in the Security Mode field.Select the check box to have both WPA2 and WPA wireless clients be able to communicate with the NBG6617 even when the NBG6617 is using WPA2-PSK or WPA2.Group Key Update TimerThe Group Key Update Timer is the rate at which the AP (if using WPA-PSK/WPA2-PSK key management) or RADIUS server (if using WPA/WPA2 key management) sends a new group key out to all clients. The re-keying process is the WPA/WPA2 equivalent of automatically changing the WEP key for an AP and all stations in a WLAN on a periodic basis. Setting of the Group Key Update Timer is also supported in WPA-PSK/WPA2-PSK mode. PMK Cache Period  This field is available only when you select WPA2.Specify how often wireless clients have to resend usernames and passwords in order to stay connected. Enter a time interval between 10 and 999999 minutes. Note: If wireless client authentication is done using a RADIUS server, the reauthentication timer on the RADIUS server has priority.
 Chapter 11 Wireless LANNBG6617 User’s Guide9111.4  Guest Wireless Screen This screen allows you to enable and configure multiple guest wireless network settings on the NBG6617.You can configure up to four SSIDs to enable multiple BSSs (Basic Service Sets) on the NBG6617. This allows you to use one access point to provide several BSSs simultaneously. You can then assign varying security types to different SSIDs. Wireless clients can use different SSIDs to associate with the same access point.Click Expert Mode > Wireless > Guest Wireless. The following screen displays.Figure 55   Expert Mode > Wireless > Guest WirelessPre-Authentication  This field is available only when you select WPA2.Pre-authentication enables fast roaming by allowing the wireless client (already connecting to an AP) to perform IEEE 802.1x authentication with another AP before connecting to it. Select Enable to turn on preauthentication in WAP2. Otherwise, select Disable.Authentication ServerIP Address Enter the IP address of the external authentication server in dotted decimal notation.Port Number Enter the port number of the external authentication server.  You need not change this value unless your network administrator instructs you to do so with additional information. Shared Secret Enter a password (up to 127 alphanumeric characters) as the key to be shared between the external authentication server and the NBG6617.The key must be the same on the external authentication server and your NBG6617. The key is not sent over the network. Session Timeout The NBG6617 automatically disconnects a wireless client from the wireless and wired networks after a period of inactivity. The wireless client needs to send the username and password again before it can use the wireless and wired networks again. Some wireless clients may prompt users for a username and password; other clients may use saved login credentials. In either case, there is usually a short delay while the wireless client logs in to the wireless network again.Enter the time in seconds from 0 to 999999.Apply Click Apply to save your changes back to the NBG6617.Cancel Click Cancel to reload the previous configuration for this screen.Table 30   Expert Mode > Wireless > Security Mode: WPA/WPA2 (continued)LABEL DESCRIPTION
Chapter 11 Wireless LANNBG6617 User’s Guide92The following table describes the labels in this screen.11.4.1  Guest Wireless EditUse this screen to edit an SSID profile. Click the Edit icon next to an SSID in the Guest Wireless screen. The following screen displays.Figure 56   Expert Mode > Wireless > Guest Wireless > Guest Wireless Setup: Edit The following table describes the labels in this screen.Table 31   Expert Mode > Wireless > Guest WirelessLABEL DESCRIPTIONBand Use 2.4GHz or 5GHz to set up the NBG6617’s guest Wi-Fi network.#This is the index number of each SSID profile. Status This shows whether the SSID profile is active (a yellow bulb) or not (a gray bulb).SSID An SSID profile is the set of parameters relating to one of the NBG6617’s BSSs. The SSID (Service Set IDentifier) identifies the Service Set with which a wireless device is associated. This field displays the name of the wireless profile on the network. When a wireless client scans for an AP to associate with, this is the name that is broadcast and seen in the wireless client utility.Security This field indicates the security mode of the SSID profile.Remaining time If the user is currently not permitted to access the Internet, you can click the Set to allow access for a specified period of time. A screen then displays allowing you to set how long (in hours) the user is allowed to access the Internet.This field displays the amount of Internet access time that remains for each user before the NBG6617 blocks the user from accessing the Internet.0:0:0 means there is no extra Internet access time. Edit Click the Edit icon to configure the SSID profile.Table 32   Expert Mode > Wireless > Guest Wireless > Guest Wireless Setup: EditLABEL DESCRIPTIONActive Select this to activate the SSID profile.Name (SSID)  The SSID (Service Set IDentity) identifies the Service Set with which a wireless client is associated. Enter a descriptive name (up to 32 printable characters found on a typical English language keyboard) for the wireless LAN.
 Chapter 11 Wireless LANNBG6617 User’s Guide9311.5  MAC Filter Screen The MAC filter screen allows you to configure the NBG6617 to give exclusive access to devices (Allow) or exclude devices from accessing the NBG6617 (Deny). Every Ethernet device has a unique MAC (Media Access Control) address. The MAC address is assigned at the factory and consists of six pairs of hexadecimal characters, for example, 00:A0:C5:00:00:02. You need to know the MAC address of the devices to configure this screen.To change your NBG6617’s MAC filter settings, click Expert Mode > Wireless > MAC Filter. The screen appears as shown.Hide SSID Select this check box to hide the SSID in the outgoing beacon frame so a station cannot obtain the SSID through scanning using a site survey tool.Intra-BSS Traffic BlockingA Basic Service Set (BSS) exists when all communications between wireless clients or between a wireless client and a wired network client go through one access point (AP). Intra-BSS traffic is traffic between wireless clients in the BSS. When Intra-BSS is enabled, wireless clients can access the wired network and communicate with each other. When Intra-BSS is disabled, wireless clients can still access the wired network but cannot communicate with each other.WMM QoS Check this to have the NBG6617 automatically give a service a priority level according to the ToS value in the IP header of packets it sends. WMM QoS (Wifi MultiMedia Quality of Service) gives high priority to voice and video, which makes them run more smoothly.Enable Bandwidth Management for Guest WLAN Select this to turn on bandwidth management for the Guest Wi-Fi network.Maximum Bandwidth Enter a number to specify maximum bandwidth the Guest Wi-Fi network can use.Security Mode Select WPA-PSK or WPA2-PSK to add security on this wireless network. The wireless clients which want to associate to this network must have same wireless security settings as this device. After you select to use a security, additional options appears in this screen. See Section 11.3 on page 87 for detailed information on different security modes. Or you can select No Security to allow any client to associate this network without authentication.Note: If the WPS function is enabled (default), only No Security and WPA2-PSK are available in this field.Apply Click Apply to save your changes back to the NBG6617.Cancel Click Cancel to reload the previous configuration for this screen.Table 32   Expert Mode > Wireless > Guest Wireless > Guest Wireless Setup: Edit (continued)LABEL DESCRIPTION
Chapter 11 Wireless LANNBG6617 User’s Guide94Figure 57   Expert Mode > Wireless > MAC FilterThe following table describes the labels in this menu.11.6  Advanced ScreenUse this screen to allow wireless advanced features, such as the output power, RTS/CTS Threshold  settings.Click Expert Mode > Wireless > Advanced. The screen appears as shown.Table 33   Expert Mode > Wireless > MAC FilterLABEL DESCRIPTIONBand Select the frequency band to set whether you want to apply the wireless and security settings to the default 2.4GHz or 5GHz wireless LAN. SSID Select This shows the SSID for which you are configuring MAC filtering.MAC Address FilterSelect to turn on (Enable) or off (Disable) MAC address filtering.Filter Action Define the filter action for the list of MAC addresses in the MAC Filter Summary table.Select Allow to permit access to the NBG6617, MAC addresses not listed will be denied access to the NBG6617. Select Deny to block access to the NBG6617, MAC addresses not listed will be allowed to access the NBG6617. MAC Filter Summary (Max Limit : 64)#This is the index number of the MAC address. Select Auto Detection to automatically detect the MAC address of the wireless station that are allowed or denied access to the NBG6617. Otherwise, select User define to enter the MAC address of the wireless station in the MAC Address field that are allowed or denied access to the NBG6617.MAC Address This field displays the MAC address of the wireless station. If you select User define in the # field, enter the MAC address(es) manually.Add/Delete Click   to add the rule in the MAC filter summary table.Click   to remove a rule.Apply Click Apply to save your changes back to the NBG6617.Cancel Click Cancel to reload the previous configuration for this screen.
 Chapter 11 Wireless LANNBG6617 User’s Guide95Figure 58   Expert Mode > Wireless > AdvancedThe following table describes the labels in this screen. Table 34   Expert Mode > Wireless > AdvancedLABEL DESCRIPTIONWireless Advanced SetupBand Select the frequency band to set whether you want to apply the wireless and security settings to the default 2.4GHz or 5GHz wireless LAN. RTS/CTS ThresholdData with its frame size larger than this value will perform the RTS (Request To Send)/CTS (Clear To Send) handshake. This field is not configurable and the NBG6617 automatically changes to use the maximum value if you select 802.11n, 802.11an, 802.11gn or 802.11bgn in the Expert > Wireless screen.Fragmentation ThresholdThe threshold (number of bytes) for the fragmentation boundary for directed messages. It is the maximum data fragment size that can be sent. This field is not configurable and the NBG6617 automatically changes to use the maximum value if you select 802.11n, 802.11an, 802.11gn or 802.11bgn in the Expert > Wireless screen.Intra-BSS Traffic A Basic Service Set (BSS) exists when all communications between wireless clients or between a wireless client and a wired network client go through one access point (AP). Intra-BSS traffic is traffic between wireless clients in the BSS. When you Enable Intra-BSS, wireless clients can access the wired network and communicate with each other. When you Disable Intra-BSS, wireless clients can still access the wired network but cannot communicate with each other.Tx Power Set the output power of the NBG6617 in this field. If there is a high density of APs in an area, decrease the output power of the NBG6617 to reduce interference with other APs. Select one of the following 100%, 90%, 75%, 50%, 25% or 10%. QoS SetupWMM QoS Select Enable to have the NBG6617 automatically give a service a priority level according to the ToS value in the IP header of packets it sends. WMM QoS (Wifi MultiMedia Quality of Service) gives high priority to voice and video, which makes them run more smoothly.This field is not configurable and the NBG6617 automatically enables WMM QoS if you select 802.11n, 802.11an, 802.11gn or 802.11bgn in the Expert > Wireless screen.
Chapter 11 Wireless LANNBG6617 User’s Guide9611.7  WPS ScreenUse this screen to enable/disable WPS, view or generate a new PIN number and check current WPS status. To open this screen, click Expert Mode > Wireless > WPS.Note: With WPS, wireless clients can only connect to the wireless network using the first SSID on the NBG6617.Figure 59   Expert Mode > Wireless > WPSApply Click Apply to save your changes back to the NBG6617.Cancel Click Cancel to reload the previous configuration for this screen.Table 34   Expert Mode > Wireless > Advanced (continued)LABEL DESCRIPTION
 Chapter 11 Wireless LANNBG6617 User’s Guide97The following table describes the labels in this screen.11.8  Scheduling ScreenUse this screen to set the times your wireless LAN is turned on and off. Wireless LAN scheduling is disabled by default. The wireless LAN can be scheduled to turn on or off on certain days and at certain times. To open this screen, click Expert Mode > Wireless > Scheduling.Table 35   Expert Mode > Wireless > WPSLABEL DESCRIPTIONWPS SetupBand Select the frequency band to set whether you want to apply the wireless and security settings to the default 2.4GHz or 5GHz wireless LAN. WPS Select Enable to turn on the WPS feature. Otherwise, select Disable.PIN Code Select Enable and click Apply to allow the PIN Configuration method. If you select Disable, you cannot create a new PIN number.PIN Number This is the WPS PIN (Personal Identification Number) of the NBG6617. Enter this PIN in the configuration utility of the device you want to connect to the NBG6617 using WPS.The PIN is not necessary when you use WPS push-button method.Click Generate to generate a new PIN number.Push Button Use this button when you use the PBC (Push Button Configuration) method to configure wireless stations’s wireless settings. Click this to start WPS-aware wireless station scanning and the wireless security information synchronization. Or input station’s PIN numberUse this button when you use the PIN Configuration method to configure wireless station’s wireless settings. Type the same PIN number generated in the wireless station’s utility. Then click Start to associate to each other and perform the wireless security information synchronization. WPS StatusStatus This displays Configured when the NBG6617 has connected to a wireless network using WPS or when WPS Enable is selected and wireless or wireless security settings have been changed. The current wireless and wireless security settings also appear in the screen.This displays Unconfigured if WPS is disabled and there are no wireless or wireless security changes on the NBG6617 or you click Release Configuration to remove the configured wireless and wireless security settings.Release ConfigurationThis button is only available when the WPS status displays Configured.Click this button to remove all configured wireless and wireless security settings for WPS connections on the NBG6617.802.11 Mode This is the 802.11 mode used. Only compliant WLAN devices can associate with the NBG6617.SSID This is the name of the wireless network (the NBG6617’s first SSID).Security This is the type of wireless security employed by the network.Apply Click Apply to save your changes back to the NBG6617.Cancel Click Cancel to reload the previous configuration for this screen.
Chapter 11 Wireless LANNBG6617 User’s Guide98Figure 60   Expert Mode > Wireless > SchedulingThe following table describes the labels in this screen.Table 36   Expert Mode > Wireless > SchedulingLABEL DESCRIPTIONBand Select the frequency band to set whether you want to apply the wireless and security settings to the default 2.4GHz or 5GHz wireless LAN. Wireless LAN SchedulingSelect Enable to activate the wireless LAN scheduling feature. Select Disable to turn it off.Internet Access ScheduleThe y-axis shows the time period in days. The x-axis shows the time period in hours.Click Select All or click gray blocks to specify days and times to turn the Wireless LAN on or off. If you click Select All you can not select any specific days and times. Click Clean All to remove all the wireless LAN scheduling.Apply Click Apply to save your changes back to the NBG6617.Cancel Click Cancel to reload the previous configuration for this screen.

Navigation menu