ZyXEL Communications P661HNUF1 802.11n Wireless ADSL2+ 4-port Security Gateway User Manual
ZyXEL Communications Corporation 802.11n Wireless ADSL2+ 4-port Security Gateway Users Manual
user manual
www.zyxel.com
802.11n Wireless ADSL2+ 4-port
Security Gateway
Firmware V3.10
Edition 1, 9/2010
P
-
661HNU
-
Fx
DEFAULT LOGIN DETAILS
IP Address:http://192.168.1.1
User Login:User Name: user
Password: 1234
Administrator
Login:
User Name: admin
Password: 1234
Copyright 2010
ZyXEL Communications Corporation
2
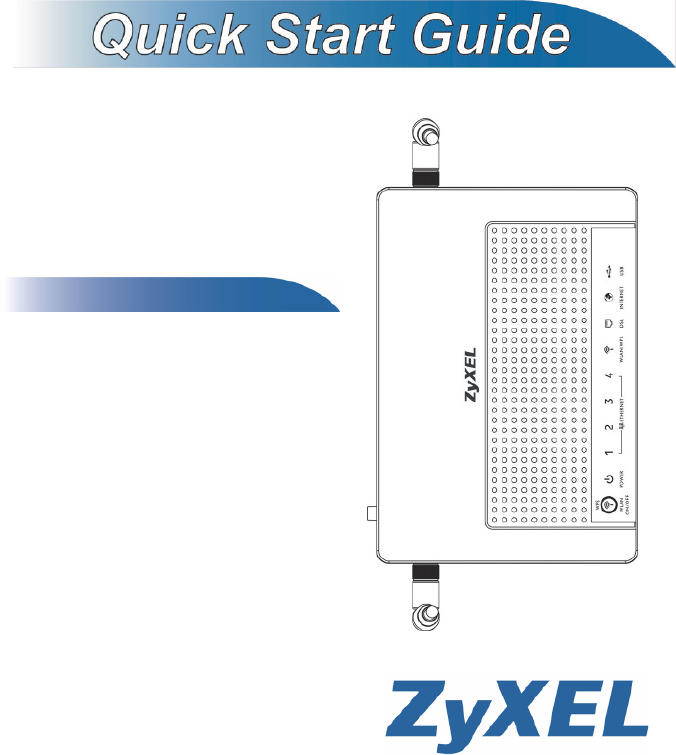
Device Panels
3
Overview
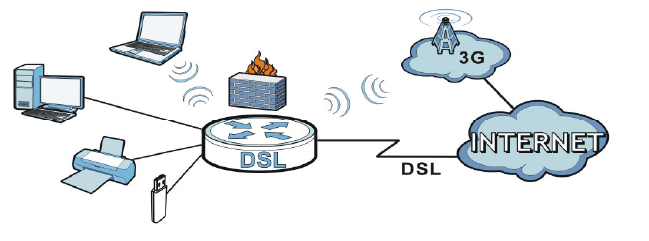
The P-661HNU-Fx series are high performance routers which combine
high-speed ADSL Internet access, a built-in switch, a firewall and high-
speed wireless networking capability. It also comes with a USB 2.0 port
that can be used for file sharing via a USB compatible storage device, or
inserting a 3G wireless adapter to access the internet through a 3G
network. The P-661HNU-Fx can also function as a print server.
Requirements
Make sure you have the following things before you start.
• Internet access - account information provided by your ISP, such as
user name, password, and so on.
• 3G account - if you want to access the Internet through a 3G
network. The P-661HNU-Fx uses this 3G connection as your WAN
or as a backup when the DSL connection fails.
• Internet Explorer 6.0 and later versions, with JavaScript enabled, or
Mozilla Firefox 3 and later versions or Safari 2.0 and later versions.
4
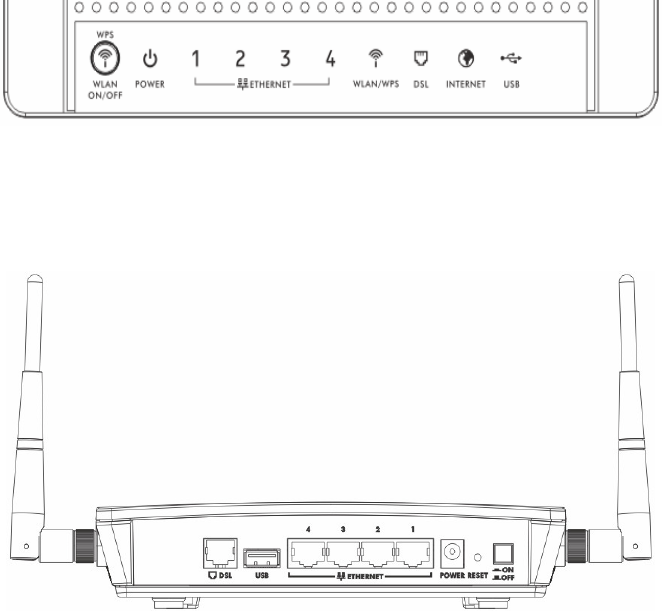
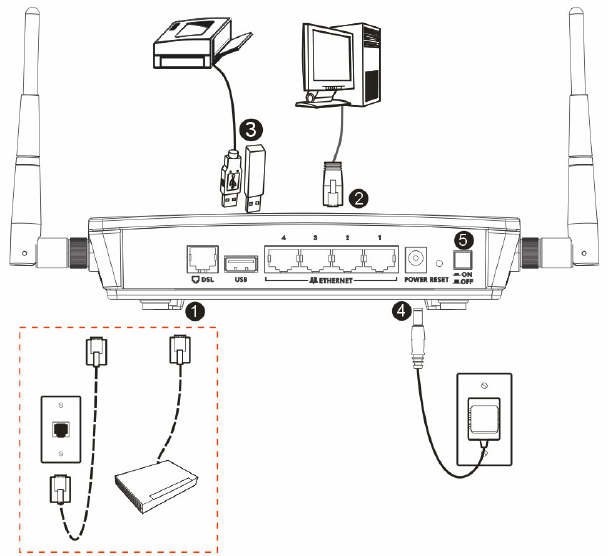
Hardware Connections
Remove the P
-
661HNU
-
Fx’
s plastic cover before using it.
1. DSL: Use a telephone wire to connect this port to a telephone jack (or
the DSL or MODEM jack on a splitter, if you have one).
2. ETHERNET: Use an Ethernet cable to connect a computer to one of
these ports for initial configuration and/or Internet access.
3. USB 2.0: You can do the following:

5
a. Connect a USB (version 2.0 or lower) memory stick or a USB hard
drive for file sharing. The P-661HNU-Fx automatically detects the
USB device. Alternatively, use a USB cable (not provided) to
connect a USB (version 2.0 or lower) printer to this port.
b. Insert a 3G adapter to access the Internet wirelessly via a 3G
network. The P-661HNU-Fx uses this 3G WAN connection as a
backup when the DSL connection fails.
4. POWER: Use the power adaptor provided with your P-661HNU-Fx to
connect an appropriate power source to this socket.
5. Push the power button to the on position.
Look at the LEDs (lights) on the top panel of the P-661HNU-Fx.
• The POWER light blinks during start-up and is green once the P-
661HNU-Fx is ready.
• An ETHERNET light turns on if the corresponding ETHERNET port
is properly connected. An Ethernet port’s light blinks when the P-
661HNU-Fx is sending or receiving data through it.
• The WLAN/WPS light stays green when the wireless LAN is ready.
It blinks when the P-661HNU-Fx is sending/receiving data through
the wireless LAN.
• The DSL light stays on if a physical DSL connection exists and
blinks when attempting to synchronize DSL signal.
• The INTERNET light is solid green when Internet access is
available and blinks when sending or receiving data.
6
• The USB light turns on when there is a USB device (printer or
memory stick) or a 3G adapter connected to the P-661HNU-Fx and
blinks when transmitting data.
If none of the lights are on, check your connections. Make
sure that you have the power adaptor connected to the P-
661HNU-Fx and plugged in to an appropriate power source.
Make sure the power source is turned on. Turn the P
-
661HNU-Fx off, wait for a few seconds and turn it back on. If
the LEDs are still off, contact your local vendor.
If you want to have the P-661HNU-Fx use 3G as your WAN
or as a backup when the DSL connection fails, see your
User’s Guide for how to use the Network Setting >
Broadband > 3G Backup screen to set up the 3G WAN
connection.
Set Up a Wireless Network
To set up a wireless network you need at least one wireless network
card/adapter.
• If you have a desktop computer, use either a wireless USB adapter
or a wireless PCI adapter.
• If you have a laptop, use either a wireless USB adapter or a
wireless CardBus card. These are built into many laptops.

7
Setting Up a Secure Wireless Network with
WPS
If your wireless devices display the WPS logo, you
can use Wi-Fi Protected Setup (WPS) to add
wireless devices to your wireless network. If your
wireless devices do not display the WPS logo, go to
Set Up a Wireless Network Manually on page 10 to manually set up a
wireless network.
The P-661HNU-Fx supports two WPS methods for creating a secure
connection.
• Push Button Configuration - create a secure wireless network
simply by pressing the P-661HNU-Fx’s physical WPS button. See
Push Button Configuration on page 7 to have your wireless devices
join the P
-661HNU-Fx’s wireless network using the Windows
wireless configuration tool.
• PIN Configuration - create a secure wireless network by entering
your wireless device’
s PIN (Personal Identification Number) into the
configuration screen of the P-661HNU-Fx. See PIN Configuration
on page 8.
You must use the same method on the P
-
661HNU
-
Fx and the wireless
client.
Push Button Configuration
1. Place a WPS-enabled device that is installed in your system and
supports the WPS Push Button method within range of the P-
661HNU-Fx.

8
2. Press the WLAN button on the P-661HNU-Fx’s top panel for five
seconds.
3. Use the WPS-enabled device’s WPS button. It can be either a button
in the utility or a physical button. See the device’s documentation if
you cannot locate the WPS button. It doesn’t matter which button is
pressed first. You must press the second button within two minutes of
pressing the first one.
4. The P-661HNU-Fx and the wireless device establish a secure
connection. This can take up to two minutes.
5. Congratulations! Your computer is now ready to connect to the
Internet wirelessly through your P-661HNU-Fx.
PIN Configuration
1. Place a WPS-enabled device that is installed in your computer and
supports the WPS PIN configuration method within range of the P-
661HNU-Fx.
2. Log into the P-661HNU-Fx’s web configurator at http://192.168.1.1
(see The Web Configurator on page 12 for more details on this).
3. In the navigation panel, click Network Setting > Wireless > WPS.
4. Select the Enable check box and click Apply to enable the WPS
function.
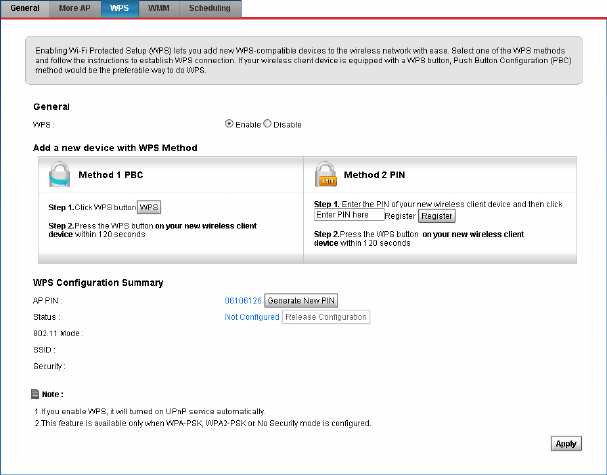
9
5. Enter the PIN of the other WPS-enabled device into the Enter PIN
here text box and click Register. You can locate this PIN number in
the other device’s utility or on the device itself. See the other device’s
documentation if you cannot locate the PIN.
6. Click Start or Apply in the other device’s utility screen within two
minutes of clicking Register in the P-661HNU-Fx web configurator
screen.
7. The P-661HNU-Fx and the other WPS-enabled device establish a
secure connection. This can take up to two minutes.
8. Congratulations! Your computer is now ready to connect to the
Internet wirelessly through your P-661HNU-Fx.
10
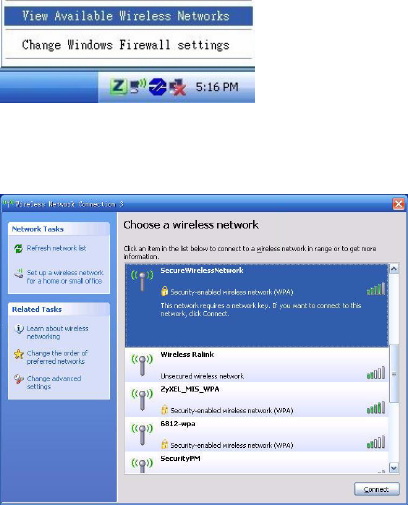
Set Up a Wireless Network Manually
Configure wireless devices to use the same wireless settings as the P-
661HNU-Fx. If you didn’t configure the P-661HNU-Fx’s wireless settings,
use the wireless SSID (network name) and WPA-PSK encryption key on
the P-661HNU-Fx’s rear panel. The connection procedure is shown here
using Windows XP as an example.
1. Right-click the wireless adapter icon which appears in the bottom
right of your computer monitor. Click View Available Wireless
Networks.
2. Select the P-661HNU-Fx’s SSID name and click Connect (A). The
SSID “SecureWirelessNetwork” is given here as an example.
A
11
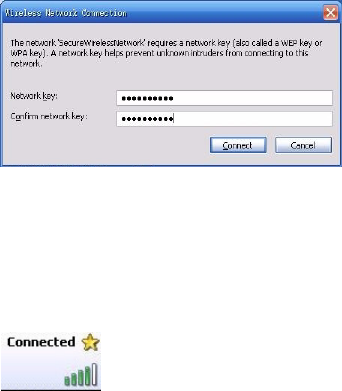
3. You are prompted to enter a password. Enter it and click Connect.
4. You may have to wait several minutes while your computer connects
to the wireless network.
5. You should now be securely connected wirelessly to the P-661HNU-
Fx.
Congratulations! Your computer is now ready to connect to the Internet
wirelessly through your P-661HNU-Fx.
you have selected the correct SSID and entered the correct
security key. If that does not work, ensure your wireless
network adapter is enabled by clicking on the wireless
adapter icon and clicking Enable. See the User’s Guide for
more suggestions.
If you cannot connect wirelessly to the P-661HNU-Fx, check
12
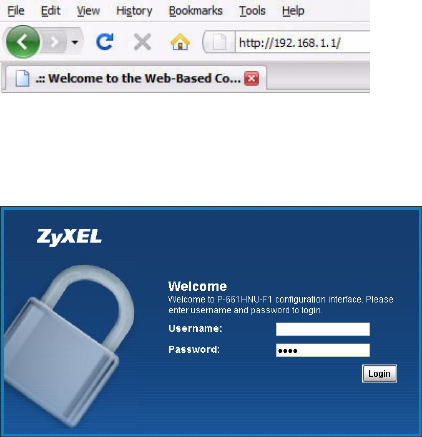
The Web Configurator
1. Open your browser and enter http://192.168.1.1 (the P-661HNU-Fx's
default IP address) as the address.
2. For administrator login, enter username admin and password 1234
(default). For user login, enter user as the username and 1234 as the
password. Click Login.
browser pop-up windows, JavaScript and Java permissions.
Your computer should also be set to get an IP address
automatically from a DHCP server. See your User’s Guide
for more information.
If the login screen does not open, make sure you allow web

13
USB File Sharing
This section shows you how to enable USB file sharing. In order to start
file sharing you need to:
• Connect your USB 2.0 file sharing device to the USB port of the P-
661HNU-Fx (See Hardware Connections). The USB device is
automatically recognized by the P-661HNU-Fx and available for
sharing.
• Enable the file sharing feature.
• Browse to your files using the IP address of the P-661HNU-Fx.
Configure USB File Sharing
1. Click Network Settings > Home Networking > File Sharing.
2. Enable the file sharing function by selecting the Enable check box
next to File Sharing Services(SMB). Then click Apply.
3. Select the check box next to the share and click Apply.

14
Browse to the USB File Share
1. In Windows Explorer’s Address bar type a double backslash “\\”
followed by the IP address of the P-661HNU-Fx (192.168.1.1 is the
default) and hit [ENTER].
2. The files on the USB file sharing device connected to the P-661HNU-
Fx are now part of your file structure and you can manage those files
just like any other files on your computer.
You can also configure share path (optional) for your share. Refer to the
User’s Guide for a detailed information.
Viewing a Product’s Certifications
1. Go to www.zyxel.com.
2. Select your product from the drop-down list box on the ZyXEL
home page to go to that product's page.
3. Select the certification you wish to view from this page.
Customer Information Statement
The information informing the user of his/her and the telephone
company's rights and obligations is outlined on the following pages. This
information will be included in the final version of the manual.
Customer Information
1 This equipment complies with Part 68 of the FCC rules and the
requirements adopted by the ACTA. On bottom of this equipment is a
label that contains, among other information, a product identifier of
P-661HNU-Fx(x stand for 1 or 3) .If requested, this number must be
provided to the telephone company.
2 If this equipment DL causes harm to the telephone network, the
telephone company will notify you in advance that temporary
discontinuance of service may be required. But if advance notice isn't
practical, the telephone company will notify the customer as soon as
possible. Also you will be advised of your right to file a complaint with
the FCC if you believe it is necessary.
3 The telephone company may make changes in its facilities, equipment,
operations or procedures that could affect the operation of the equipment.
If this happens, the telephone company will provide advance notice in
order for you to make necessary modification to maintain uninterrupted
service.
15
4 If you experience trouble with this equipment, you disconnect it from
the network until the problem has been corrected or until you are sure that
the equipment is not malfunctioning.
5 Please follow instructions for repairing if any (e.g. battery replacement
section); otherwise do not alternate or repair any parts of device except
specified.
6 Connection to party line service is subject to state tariffs. Contact the
state public utility commission, public service commission or corporation
commission for information.
7 If your home has specially wired alarm equipment connected to the
telephone line, ensure the installation of this equipment does not disable
alarm equipment, consult your telephone company or a qualified installer.
Certifications
Federal Communications Commission (FCC) Interference Statement
The device complies with Part 15 of FCC rules. Operation is subject to the
following two conditions:
. This device may not cause harmful interference.
. This devic
e must accept any interference received, including interference
that may cause undesired operations.
This device has been tested and found to comply with the limits for a
Class B digital device pursuant to Part 15 of the FCC Rules. These limits
are designed to provide reasonable protection against harmful interference
in a residential installation. This device generates, uses, and can radiate
radio frequency energy, and if not installed and used in accordance with
the instructions, may cause harmful interference to radio communications.
However, there is no guarantee that interference will not occur in a
particular installation.
If this device does cause harmful interference to radio/television reception,
which can be determined by turning the device off and on, the user is
encouraged to try to correct the interference by one or more of the
following measures:
1 Reorient or relocate the receiving antenna.

2 Increase the separation between the equipment and the receiver.
3 Connect the equipment into an outlet on a circuit different from that to
which the receiver is connected.
4 Consult the dealer or an experienced radio/TV technician for help.
FCC Radiation Exposure Statement
.
Simultaneous transmission by using the 3g dongle is intended for this device
. IEEE 802.11b or 802.11g or 802.11n(20MHz) operation of this product
in the U.S.A. is firmware-limited to channels 1 through 11. IEEE
802.11n(40MHz)operation of this product in the U.S.A. is
firmware-limited to channels 3 through 9.
. To comply with FCC RF exposure compliance requirements, (1) this device must
be installed for use with both antenna
s providing a minimum separation distance of
20 cm from users and nearby persons, and (2) this device
must also maintain 20 cm
or more from other transmitters to prevent simultaneous transmission with nearby
devices."
Safety Warnings
. Do NOT use this product near water, for example, in a wet basement or
near a swimming pool.
. Do NOT expose your device to dampness, dust or corrosive liquids.
. Do NOT store things on the device.
. Do NOT install, use, or service this device during a thunderstorm. There
is a remote risk of electric shock from lightning.
. Connect ONLY suitable accessories to the device.
. Do NOT open the device or unit. Opening or removing covers can
expose you to dangerous high voltage points or other risks. ONLY
qualified service personnel should service or disassemble this device.
Please contact your vendor for further information.
. Make sure to connect the cables to the correct ports.
. Place connecting cables carefully so that no one will step on them or
stumble over them.
. Always disconnect all cables from this device before servicing or
disassembling.
. Use ONLY an appropriate power adaptor or cord for your device.
. Connect the power adaptor or cord to the right supply voltage (for
example, 110V AC in North America or 230V AC in Europe).
. Do NOT allow anything to rest on the power adaptor or cord and do
NOT place the product where anyone can walk on the power adaptor or
cord.
. Do NOT use the device if the power adaptor or cord is damaged as it
might cause electrocution.
. If the power adaptor or cord is damaged, remove it from the device and
the power source.
. Do NOT attempt to repair the power adaptor or cord. Contact your local
vendor to
order a new one.
. Do not use the device outside, and make sure all the connections are
indoors. There is a remote risk of electric shock from lightning.
. Do NOT obstruct the device ventilation slots, as insufficient airflow may
harm your device.
. Use only No. 26 AWG (American Wire Gauge) or larger
telecommunication line cord.
. Antenna Warning! This device meets ETSI and FCC certification
requirements when using the included antenna(s). Only use the included
antenna(s).
. If you wall mount your device, make sure that no electrical lines, gas or
water pipes will be damaged.