ZyXEL Communications UAG50 Unified Access Gateway User Manual
ZyXEL Communications Corporation Unified Access Gateway
User manual
UAG50
Unified Access Gateway
Version 1.00
Edition 1, 05/2015
User’s Guide
Login
Details
Login IP
https://
172.16.0.1
User Name
admin
Password
1234
Copyright © 2015 ZyXEL Communications Corporation
UAG50 User’s Guide
2
IMPORTANT!
READ CAREFULLY BEFORE USE.
KEEP THIS GUIDE FOR FUTURE REFERENCE.
Screenshots and graphics in this book may differ slightly from your product due to
differences in your product firmware or your computer operating system. Every effort
has been made to ensure that the information in this manual is accurate.
Related Documentation
• Quick Start Guide
The Quick Start Guide shows how to connect the UAG and access the Web Configurator.
It also contains a connection diagram and package contents list.
UAG50 User’s Guide
3
Contents
1. Introduction ........................................................................................................... 6
1-1 Package Contents ................................................................................... 7
1-2 Features ................................................................................................. 7
1-3 Precautions ............................................................................................ 8
1-4 Outlook .................................................................................................. 8
1-4-1 Printing a test page ...................................................................... 10
1-4-2 How to load paper rolls ................................................................ 10
1-5 Technical Specifications ....................................................................... 11
1-5-1 Hardware Specifications .............................................................. 11
1-5-2 Software Specifications ................................................................ 12
2. Installation ........................................................................................................... 15
2-1 Connecting the Antennas .................................................................... 15
2-2 Installation Requirements .................................................................... 15
2-3 Getting Start ......................................................................................... 17
3. Configuring the UAG50 ........................................................................................ 19
3-1 Setting Wizard ...................................................................................... 19
3-2 Advanced Setup ................................................................................... 32
3-2-1 Authentication ............................................................................. 33
3-2-1-1 Authentication ...................................................................................................... 33
3-2-1-2 RADIUS .................................................................................................................. 35
3-2-2 Billing ............................................................................................ 37
3-2-2-1 Billing ..................................................................................................................... 37
3-2-2-2 Accounting............................................................................................................. 40
3-2-2-3 Credit Card ............................................................................................................ 47
UAG50 User’s Guide
4
3-2-3 Management ................................................................................ 50
3-2-3-1 Syslog ..................................................................................................................... 50
3-2-3-2 Session Trace ........................................................................................................ 57
3-2-3-3 Bandwidth ............................................................................................................. 58
3-2-3-4 SNMP ..................................................................................................................... 60
3-2-4 Security ........................................................................................ 61
3-2-4-1 Pass Through ......................................................................................................... 61
3-2-4-2 Filtering ................................................................................................................. 62
3-2-4-3 Secure Remote ...................................................................................................... 64
3-2-5 System .......................................................................................... 65
3-2-5-1 System ................................................................................................................... 65
3-2-5-2 WAN/LAN .............................................................................................................. 68
3-2-5-3 Server .................................................................................................................... 70
3-2-5-4 Customization ....................................................................................................... 73
3-2-5-5 Portal Page ............................................................................................................ 82
3-2-5-6 Advertisement....................................................................................................... 83
3-2-5-7 Walled Garden ....................................................................................................... 84
3-2-5-8 DDNS ...................................................................................................................... 86
3-2-5-9 Wireless ................................................................................................................. 88
3-2-5-10 USB ...................................................................................................................... 91
3-2-5-11 Registration ......................................................................................................... 91
3-3 System Status ....................................................................................... 92
3-3-1 System .......................................................................................... 92
3-3-2 Account List .................................................................................. 94
3-3-3 Account Log .................................................................................. 95
UAG50 User’s Guide
5
3-3-4 Current User ................................................................................. 95
3-3-5 DHCP Clients ................................................................................ 96
3-3-6 Session List ................................................................................... 96
3-4 System Tools ........................................................................................ 98
3-4-1 Configuration ............................................................................... 98
3-4-2 Firmware Upgrade ....................................................................... 99
3-4-3 Boot Code ................................................................................... 101
3-4-4 Controller Board Firmware ........................................................ 101
3-4-5 System Account .......................................................................... 102
3-4-6 SSL Certificate ............................................................................ 106
3-4-7 Ping Command ........................................................................... 107
3-4-8 Restart ........................................................................................ 107
3-4-9 Logout ........................................................................................ 107
4. QR Code Service ................................................................................................. 108
4-1 QR code setting .................................................................................. 108
4-2 Additional information for QR code use ............................................ 109
4-3 Use QR code to access the Internet ................................................... 110
Appendix A Signal Connection Arrangements ........................................................... 113
Appendix B Legal Information ................................................................................... 114
UAG50 User’s Guide
6
1. Introduction
The UAG50 is a compact intelligent gateway. It provides Plug’ Play Internet access,
advanced security and network management.
The UAG50 is designed for service providers, system integrator or hotspot venue
operator without backend-RADIUS-Server to have integrated solution for rapid
deployment, which can start hotspot service quickly and easily and enhance service
performance.
The UAG50 is an ideal solution for hotel lobbies, coffee bars, airport lounges,
conference facilities and other sites that commonly host business travelers, and
offers instant high-speed Internet connections. With its IP Plug and Play technology,
it accepts any client configuration login, when client open browser the UAG50
immediately recognizes new end-user and redirects their browser to customized
Web pages. There’s no need for end-user to change any of their default network
(Static IP), e-mail (SMTP Server behind firewall), or browser settings (HTTP Proxy) or
load any special software to access hotspot service. It’s completely Plug’ Play with
any browser.
The UAG50 provides QR code service. You can install any QR code APP to your
mobile device, and then scan QR code on the ticket to get access of the Internet! You
could save the time to key in the account and the password.

UAG50 User’s Guide
7
1-1 Package Contents
Please inspect your package. The following items should be included:
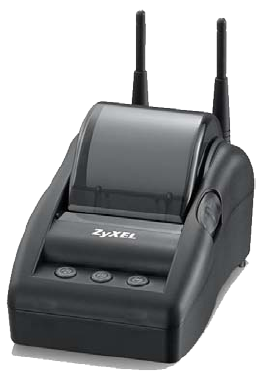
One UAG50
UAG50
One Thermal papers (50 meter)
One Power Adapter (12V DC 1.5A)
One Ethernet Cable (1.5 meter)
One Quick Installation Guide
Two Detachable Antennas (2dBi *2: Dipole,A8-A003-00110 or 5dBi*2: Dipole,A8-A003-00071)
One Micro USB to RJ-45 converter
If any of the above items are damaged or missing, please contact your dealer
immediately.
1-2 Features
Wireless data rates up to 300 Mbps
Supports up to 50 simultaneous Users
IP Plug and Play (iPnP)
Comprehensive security
64/128-bit WEP encryption
WPA encryption
WPA2 Encryption
IP/URL filtering
Intelligent Management
Built-in AAA (Authentication/Accounting/Authorization) and Billing
mechanism
Internet access via QR code scanning
Note: The "iPnP" Function only can be used with TCP/IP-based Network.
UAG50 User’s Guide
8
1-3 Precautions
Never remove or open the cover. You may suffer serious injury if you touch
these parts.
Never install the system in the wet locations.
Use only the original fitting AC power adapter otherwise there is a danger of
severe electrical shock.
Avoid exposing the UAG50 to direct sunlight or another heat source.
Choose a well-ventilated area to position your UAG50.
1-4 Outlook
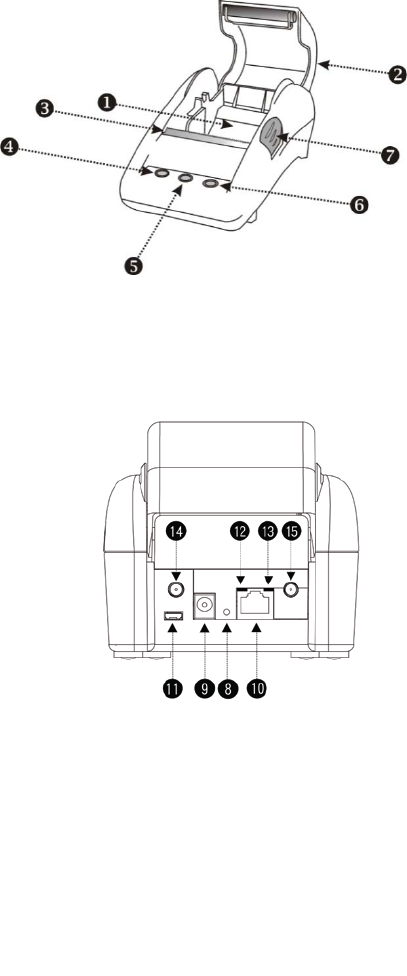
Figure 1-4-1 UAG50
UAG50 User’s Guide
9
Figure 1-4-3 Rear Panel
1. Paper roll housing
2. Printer Cover
3. Tear Bar, for paper cutting
4. Button A
5. Button B
6. Button C
7. Push Button, for printer cover opening
8. Reset Button
9. DC power supply connector
10. RJ45 port
11. Micro USB to RJ-45 LAN Port
12. WLAN LED (Green)
13. WAN LED(Yellow)
14. SMA connector
15. SMA connector
WLAN LED:
Off: The wireless is not ready.
Green light: The UAG50 has established a valid wireless connection.
Green Blinking: The wireless connection is active.
WAN LED:
Figure 1-4-2 Front Panel

UAG50 User’s Guide
10
Off: A port has not established any network connection.
Yellow light: A port has established a valid 10/100 Mbps network
connection.
Yellow Blinking: 10/100 Mbps traffic is traversing the port.
Reset Button: The UAG50 has a reset button at the rear panel of the device.
Use this function to reset the system back to factory defaults.
Power Jack: Used to connect the external power supply with the UAG50.
1-4-1 Printing a test page
After you have installed your printer, you should print a test page to make sure the
printer is functioning properly. To do this act as follows:
1. Turn the printer off.
2. Hold down the button A for approximately five seconds, and then turn the
printer on.
3. The printer will print a test page.
1-4-2 How to load paper rolls
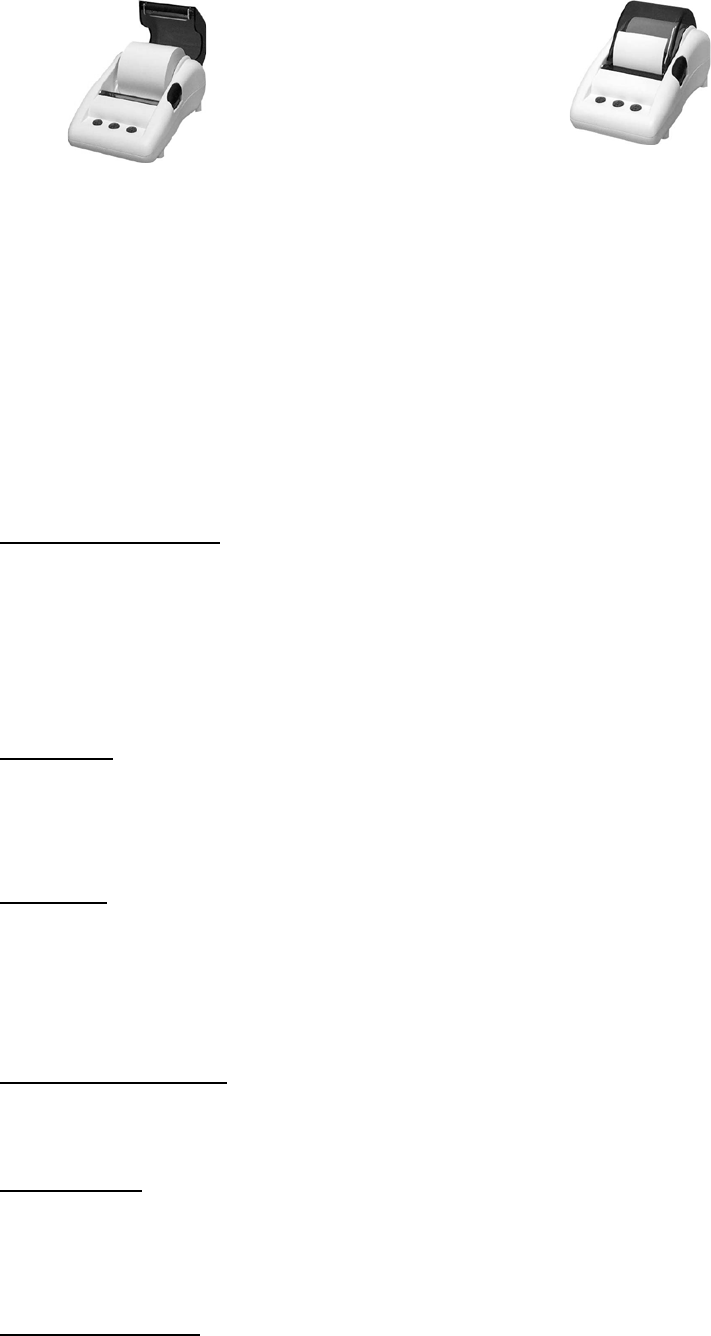
Please follow the steps to correctly load paper rolls.
1
2
UAG50 User’s Guide
11
3
Figure 1-4-4 Paper rolls loading
4
1-5 Technical Specifications
1-5-1 Hardware Specifications
Network Specification
IEEE802.3 10BaseT Ethernet
IEEE802.3u 100BaseTX Fast Ethernet
IEEE802.11b/g/n Wireless LAN
Wi-Fi Compatible
Connectors
One WAN Port (10BaseT/100BaseTX Auto cross-over)
One Micro USB connector
Encryption
WEP (Wired Equivalent Privacy) 64/128-bit RC4
WPA (Wi-Fi Protected Access)
WPA2 (Wi-Fi Protected Access)
External Antenna Type
Dual 2.4GHz detachable diversity antenna with reverse SMA
LED Indicators
One WAN 10/100M Link/Activity LED
One Wireless Link/Activity LED
Power Requirement
External Power Adapter

UAG50 User’s Guide
12
− Input: 100-240 VAC, 50/60 Hz
− Output: 12V, 1.5A
Environment Conditions
Operating Temperature: 0 to 50°C
Storage Temperature: -10 to 60°C
Operating Humidity: 20~80% non-condensing
Storage Humidity: 20% to 95% non-condensing
Certifications
CE, FCC, C-tick, NCC, BSMI
Dimension
Size: 109×155×90 (W×D×H )mm
Weight: About 340g (Net)
Push button: push to open printer cover
Printer Tray
Tear bar: cuts receipt paper
Button A: flashing when printer cover is opened
Paper roll housing: put paper roll here
Paper width: 58 (+0/-1)mm
Paper Roll and Printing
Paper length: 50M (max.)
Paper thickness: 65 um
Paper roll outside diameter: 63 (+2/-2) mm
Paper roll inside diameter: 12 (+0.5/-0) mm
Paper Detection: Photo interrupter
Printing width: 48 mm
Printing Method: Direct thermal
Printing Speed: 25.4 mm/ sec
Dot resolution (dots/ mm): 8 (203 dpi)
Thermal head service life: 108 pulses or 50Km
1-5-2 Software Specifications
Networking
IEEE802.3 10BaseT Ethernet

UAG50 User’s Guide
13
IEEE802.3u 100BaseTX Fast Ethernet
IEEE802.11b Wireless LAN
IEEE802.11g Wireless LAN
IEEE802.11n Wireless LAN
Supports 50 Simultaneous Users
IP Plug and Play (iPnP)
HTTP Proxy Support
WEP64/128bit
WPA-PSK (TKIP)
WPA2-PSK(AES)
WPA/WPA2 Mix mode
SMTP Server Redirection
DHCP Server(RFC 2131)
DHCP Relay(RFC 1542)
Static IP WAN Client
DHCP WAN Client
PPPoE WAN Client(RFC 2516)
PPTP WAN Client
NAT(RFC 1631)
IP Routing
NTP (Network Time Protocol) Support
Local Account: 256
Max Session Number: up to 16384
Marketing Cooperation
Advertisement URL link
Walled garden
Customize login pages
Portal Page
User Accounting and Authentication
Built-in Authentication
Web-based Authentication
RADIUS AAA Support (RFC 2865, 2866)
Secondary RADIUS
User Authentication and Accounting
Logout Window Timer Control

UAG50 User’s Guide
14
Security and Firewall
Layer 2 Isolation Security
SSL User Login page/ Configuration Page
SSL Administration
VPN Pass through (IPSec/PPTP)
Customize SSL Certificate
Pass Through IP/MAC/URL Address
Restricted Destination Filtering IP/URL
VPN (IPSec/PPTP) Pass through
PPTP VPN Client
WEP
WPA
WPA2
WPA/WPA2 Mix mode
Management
Web-based Management Tool
Firmware Upgrade via HTTP/TFTP
Wizard setup for step-by-step Configuration
Backup/Restore/Factory Default Setting
Remote Authorized Management
Real-time Session List
Syslog (System/Subscriber/LAN device)
E-mail logs
SNMP v1/v2 (MIB II)
System Information Table
Status Report (Daily/Monthly/System/Network)
SSL certificate upload

UAG50 User’s Guide
15
2. Installation
2-1 Connecting the Antennas
The UAG50 provides two antenna connectors on the rear of the unit.
2-2 Installation Requirements
Before installing the UAG50, make sure your network meets the following
requirements.
System Requirements
The UAG50 requires one of the following types of software:
Windows 98 Second Edition/NT/2000/XP/Vista
Red Hat Linux 7.3 or later version
MAC OS X 10.2.4 or later version
Any TCP/IP-enabled systems like Mac OS and UNIX (TCP/IP protocol
installed)
Standard phone line for xDSL modem Or Coaxial cable for Cable modem
Web Browser Software (IE 8.0 or later version, Chrome 14.0 or later version,
Firefox 14.0,15.0,16.0, or 17.0, Safari 4.0 or 5.0)
One computer with an installed 10Mbps, 100Mbps or 10/100Mbps Ethernet
card
UTP network Cable with a RJ-45 connection (Package contents)
Note: Prepare twisted-pair cables with RJ-45 plugs. Use Cat.5 cable for all
connections. Make sure each cable not exceed 328 feet (Approximately 100 meters).
ISP Requirements
Verify whether your ISP use fixed or dynamic IP. If it is a fixed IP, be sure to get the IP
from your ISP. For dynamic IP, which is mostly used, the PC will get the IP
automatically whenever it hooks up on the modem.

UAG50 User’s Guide
16
Dynamic IP
Dynamic IP Setting
Fixed IP
Your fixed IP address for the UAG50
Your subnet mask for the UAG50
Your default gateway IP address
Your DNS IP address
PPPoE
Your user name and password from your ISP
PPTP
PPTP Server IP Address from your ISP
PPTP Local IP address from your ISP.
PPTP Local IP subnet mask from your ISP.
Your user name from your ISP
Your password from your ISP
Your PC Requirements
The Static IP settings for the PC
Your PC’s fixed IP address
Your PC’s subnet mask
Your PC’s default gateway IP address
Your PC’s primary DNS IP address
Note:
1. The gateway’s default IP address setting is “172.16.0.1”.
2. The gateway’s default subnet mask setting is “255.255.255.0”.
The Dynamic IP settings for the PC
We recommend that you leave your IP settings as automatically assigned. By default,
the UAG50 is a DHCP server, and it will give your PC the necessary IP settings.
UAG50 User’s Guide
17
2-3 Getting Start
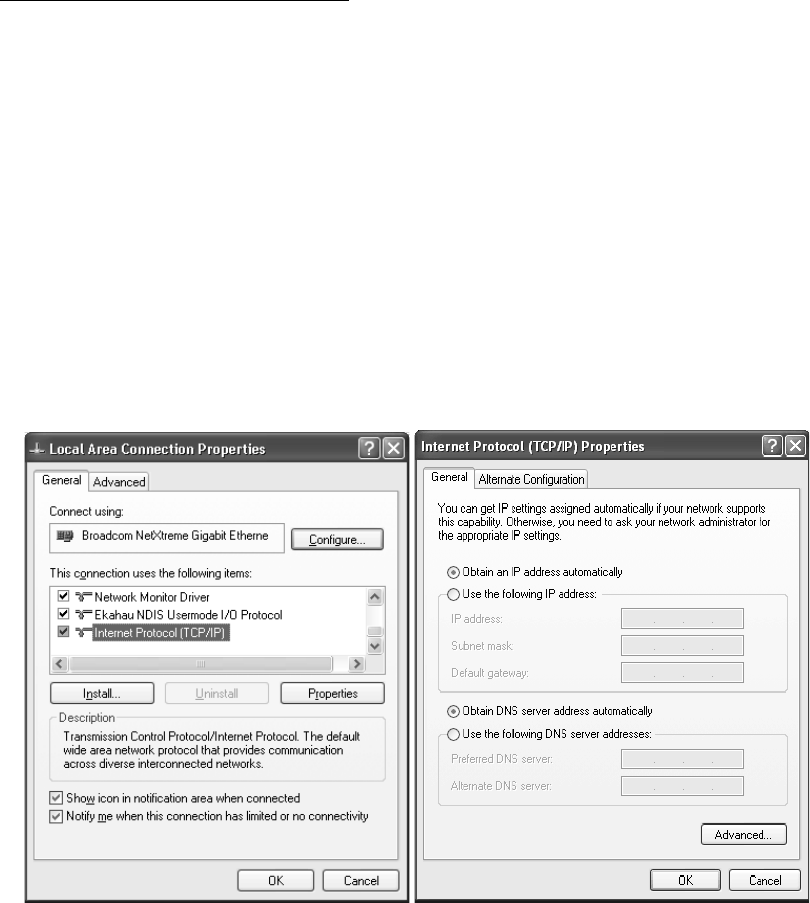
1. Connect the DC power adapter to the UAG50 and plug it into a power socket.
UAG50 Connection
2. Connect UAG50 and xDSL modem with an Ethernet Cable.
Figure 2-3-1 UAG50 Connection
UAG50 User’s Guide
18
For Windows user,
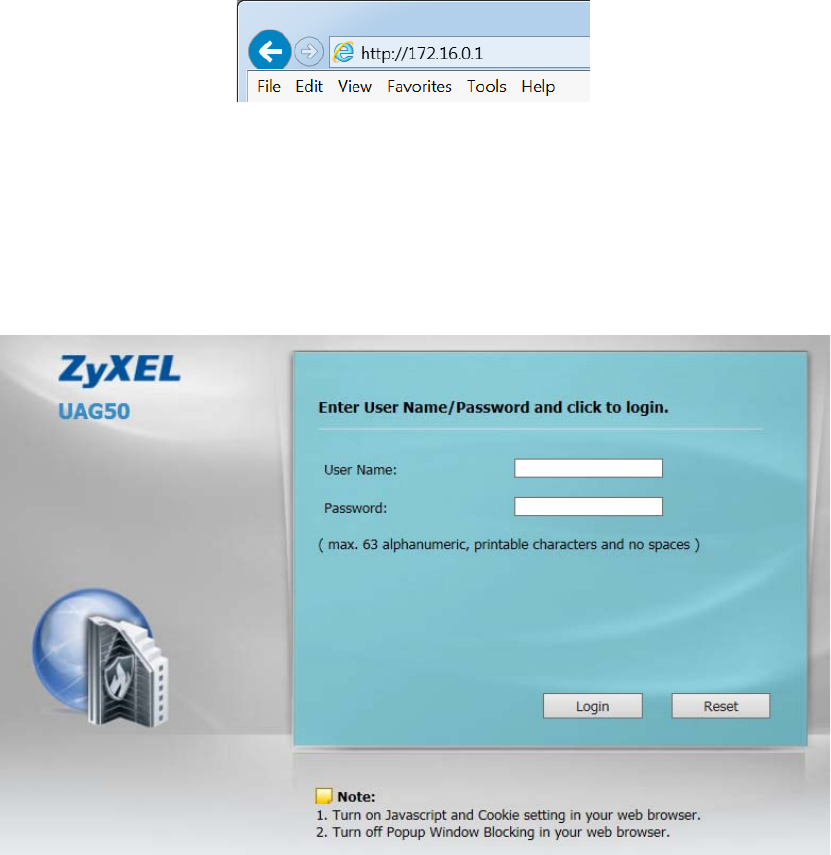
Configure TCP/IP of your computer
1. Click Start > Control Panel, click Switch to Classic View and double click on
Network Connections.
2. Right click on the Local Area Connection and click Properties.
3. Double click Internet Protocol (TCP/IP).
4. Choose Obtain an IP address automatically.
5. Click OK to close the Internet Protocol (TCP/IP) Properties and click OK again to
close the Local Area Connection.
Figure 2-3-2 TCP/IP Setting
UAG50 User’s Guide
19
3. Configuring the UAG50
3-1 Setting Wizard
Step 1: The UAG50’s default ESSID (wireless network name) is “ZyXEL01”. Please
search and connect to the wireless network.
Step 2: Start your browser, and then enter the factory default IP address 172.16.0.1
in your browser’s location box. Press Enter.
Figure 3-1-1 Web Browser Location Field (Factory Default)
Step 3: The UAG50 configuration tools menu will appear. In the Username and
Password field, type the factory default user name admin and password 1234 and
click Login. If you are first time setting the system, the wizard setup screen will
appear. You will be guided, step-by-step, through a basic setup procedure.
Figure 3-1-2 Configuration Tools Menu

UAG50 User’s Guide
20
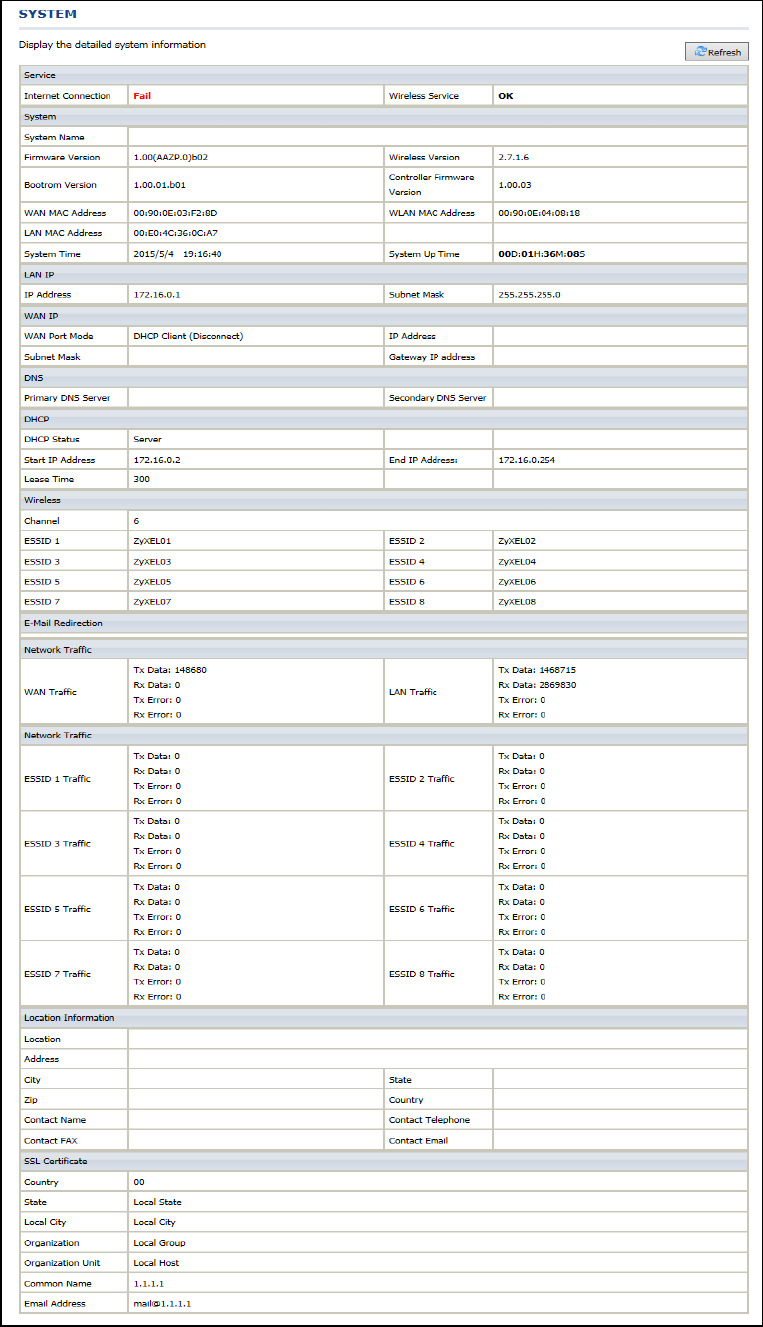
Figure 3-1-3 Wizard Setup Screen
UAG50 User’s Guide
21
Figure 3-1-4 System Quick View
UAG50 User’s Guide
22
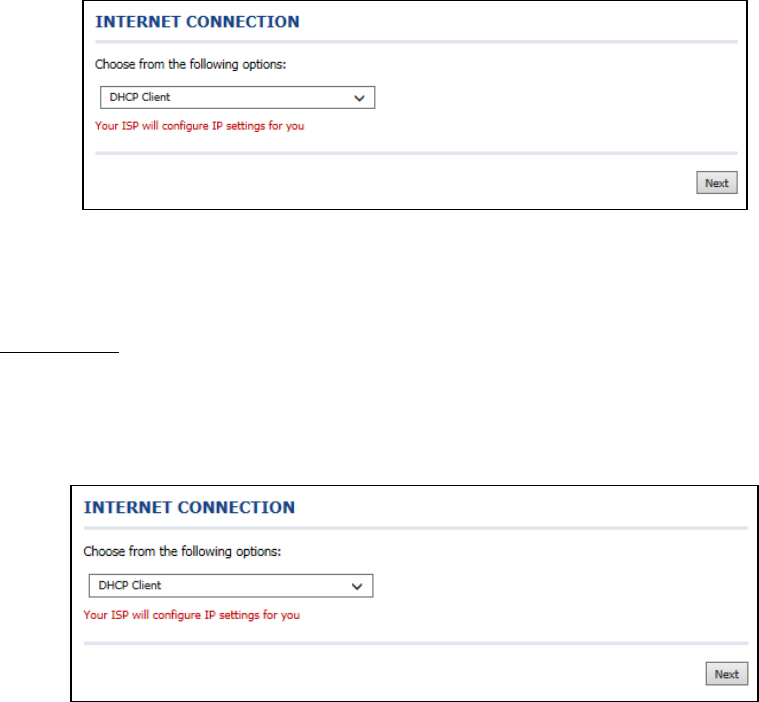
Step 4: Internet Connection Setting
Select the appropriate Internet connection type to connect to your ISP.
Figure 3-1-5 Internet Connection Setting Screen
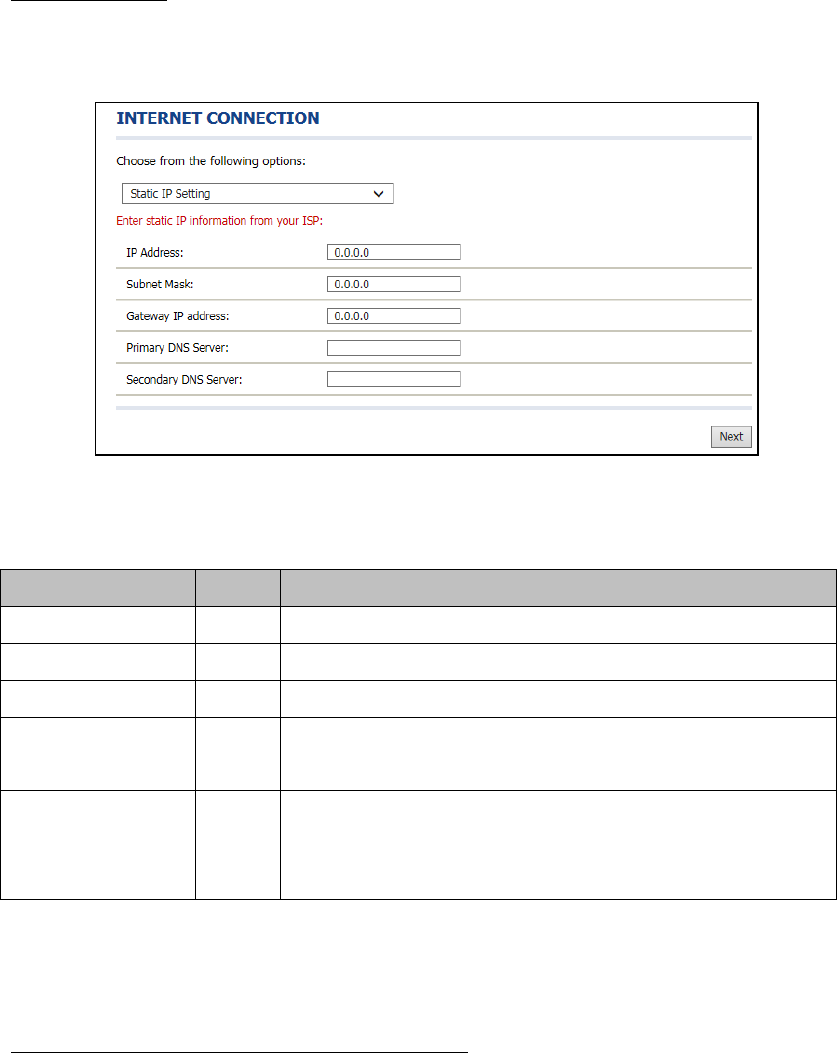
The device can work as a DHCP client. This allows the device to obtain the IP address
and other TCP/IP settings from your ISP. If your xDSL/Cable comes with this feature,
please enable Use DHCP Client.
DHCP Client
Figure 3-1-6 Internet Connection Setting Screen
UAG50 User’s Guide
23
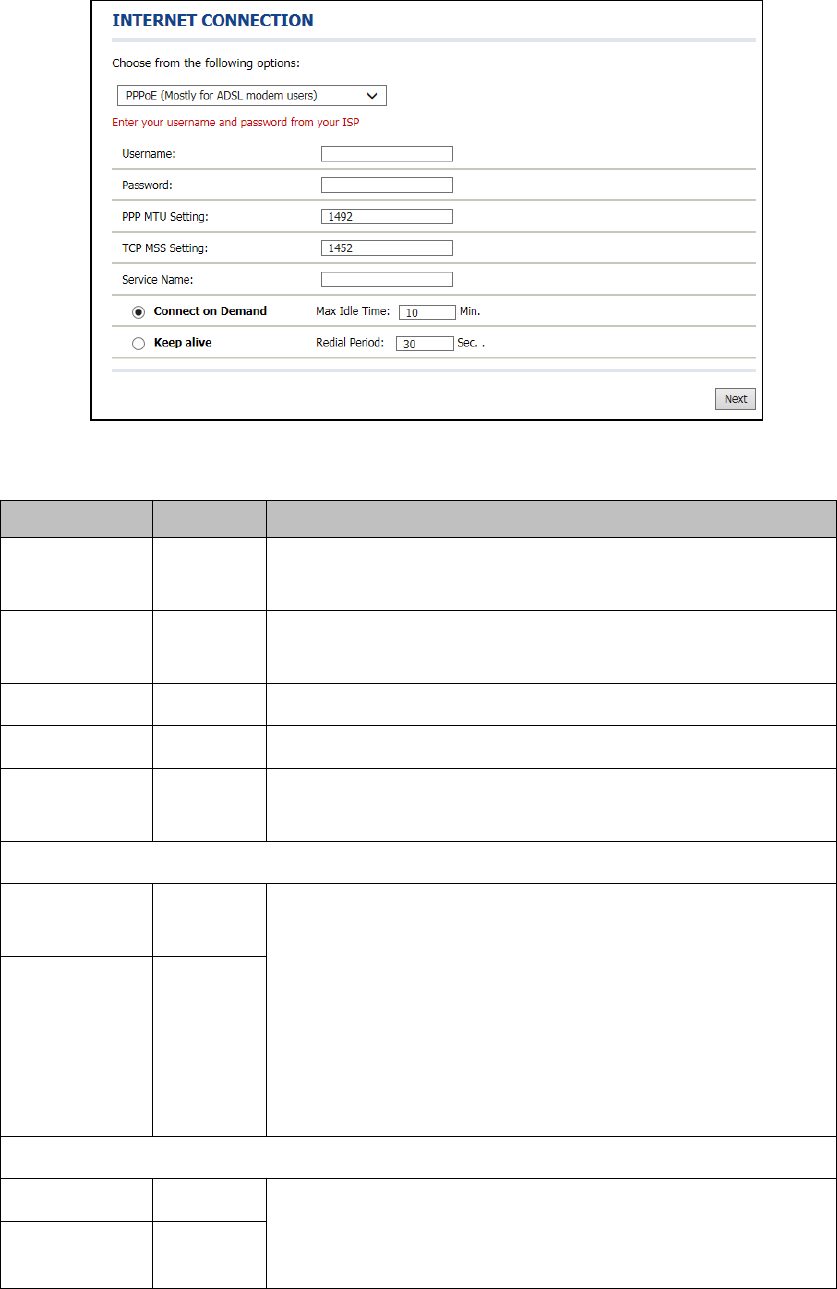
If Static IP Setting is selected, then this screen will appear. Enter the IP address
information provided by your ISP.
Static IP Setting
Figure 3-1-7 Internet Connection Setting Screen—Static IP Setting
Item Default Description
IP Address 0.0.0.0 Enter the IP address provided by your ISP.
Subnet Mask 0.0.0.0 Enter the subnet mask for the IP address.
Gateway IP Address 0.0.0.0 Enter the Gateway IP Address provided by your ISP.
Primary DNS Server Empty Enter the primary DNS server IP address for the xDSL/Cable connection
(provided by your ISP).
Secondary DNS Server Empty Enter the secondary DNS server IP address for the xDSL/Cable connection
(provided by your ISP). If the primary DNS Server IP were not available,
meanwhile, Secondary DNS Server IP would start in the same time.
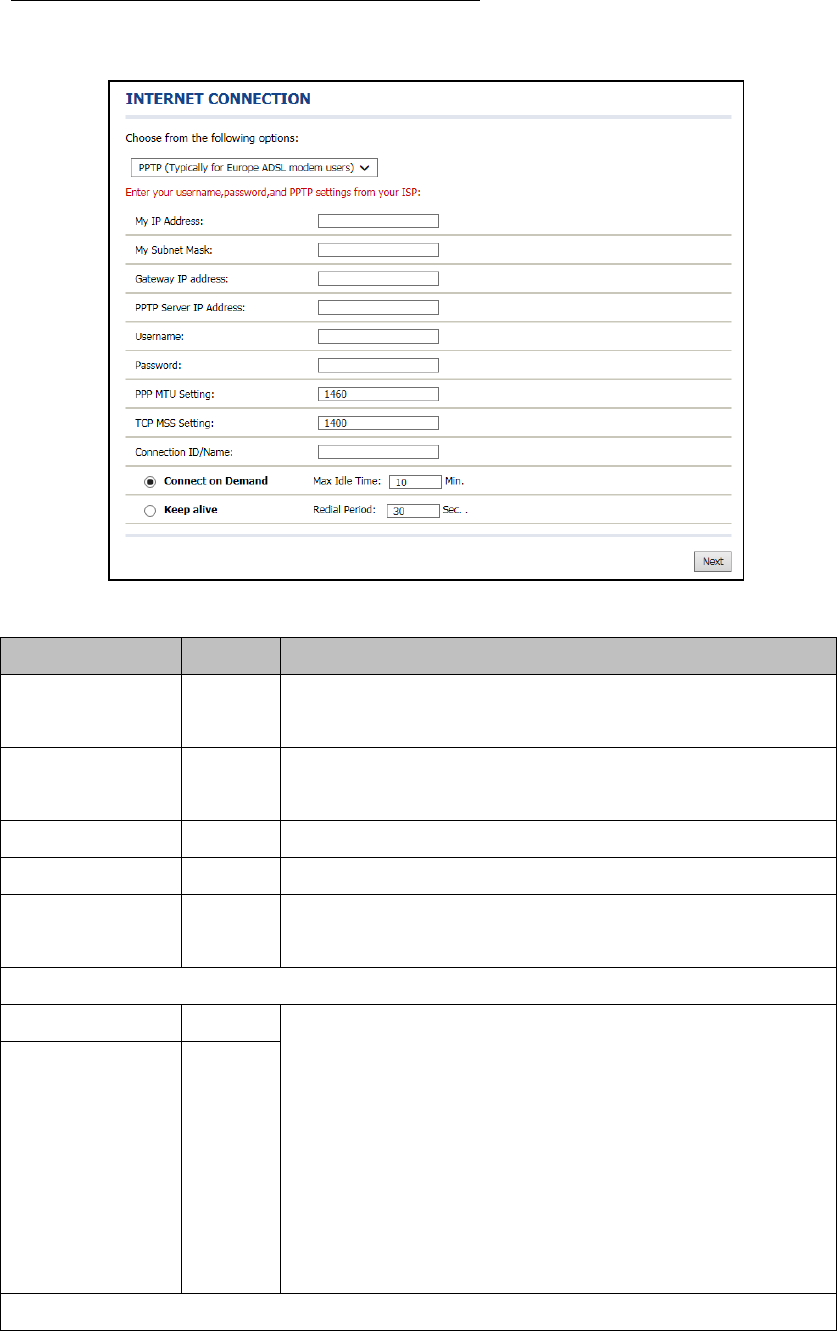
If “PPPoE” is selected, then this screen will appear. Enter the username, password
and other major fields.
PPPoE (Point-to-Point Protocol over Ethernet)
UAG50 User’s Guide
24
Figure 3-1-8 Internet Connection Setting Screen—PPPoE Setting
Item Default Description
Username Empty Enter the user name provided by your ISP. The user name can consist of up
to 80 alphanumeric characters and is case sensitive.
Password Empty Enter the user password provided by your ISP. The password can consist of
up to 80 alphanumeric characters and is case sensitive.
PPP MTU Setting 1492 MTU (Maximum Transfer Unit) specifies maximum transmission unit size.
TCP MSS Setting 1452 MSS (Maximum Segment Size) specifies maximum segment size.
Service Name Empty Enter the service name provided by your ISP. The service name can consist
of up to 64 alphanumeric characters and is case sensitive.
Connect on Demand and Max Idle Time
Connect on
Demand
Enable You can configure your UAG50 to cut your connection with your ISP after a
specified period of time (Max Idle Time). If you have been disconnected due
to inactivity, Connect on Demand enables your UAG50 to automatically
re-establish your connection as soon as you attempt to access the Internet
again. If you wish to activate Connect on Demand, click the radio button. If
you want your Internet connection to remain, click the radio button of keep
alive. The Max Idle Time maximum value is 65535 minutes.
Max Idle Time 10 Minutes
Keep alive and Redial Period
Keep alive Disable This option keeps your PPPoE enabled Internet access connected
indefinitely, even when it sits idle. The Redial Period maximum value is 65535
seconds.
Redial Period 30 Seconds
UAG50 User’s Guide
25
If PPTP Setting is selected, then this screen will appear. Please enter the IP address,
Username and Password provided by your ISP.
PPTP Client (Point-to-Point Tunneling Protocol)
Figure 3-1-9 Internet Connection Setting Screen—PPPoE Setting
Item Default Description
Username Empty Enter the user name provided by your ISP. The user name can consist of up
to 80 alphanumeric characters and is case sensitive.
Password Empty Enter the user password provided by your ISP. The password can consist of
up to 80 alphanumeric characters and is case sensitive.
PPP MTU Setting 1492 MTU (Maximum Transfer Unit) specifies maximum transmission unit size.
TCP MSS Setting 1452 MSS (Maximum Segment Size) specifies maximum segment size.
Service Name Empty Enter the service name provided by your ISP. The service name can consist
of up to 64 alphanumeric characters and is case sensitive.
Connect on Demand and Max Idle Time
Connect on Demand Enable You can configure your UAG50 to cut your connection with your ISP after a
specified period of time (Max Idle
Time). If you have been disconnected due to inactivity, Connect on Demand
enables your UAG50 to automatically re-establish your connection as soon
as you attempt to access the Internet again. If you wish to activate Connect
on Demand, click the radio button. If you want your Internet connection to
remain, click the radio button of keep alive. The Max Idle Time maximum
value is 65535 minutes.
Max Idle Time 10
Minutes
Keep alive and Redial Period
UAG50 User’s Guide
26
Keep alive Disable This option keeps your PPPoE enabled Internet access connected
indefinitely, even when it sits idle. The Redial Period maximum value is
65535 seconds.
Redial Period 30
Seconds
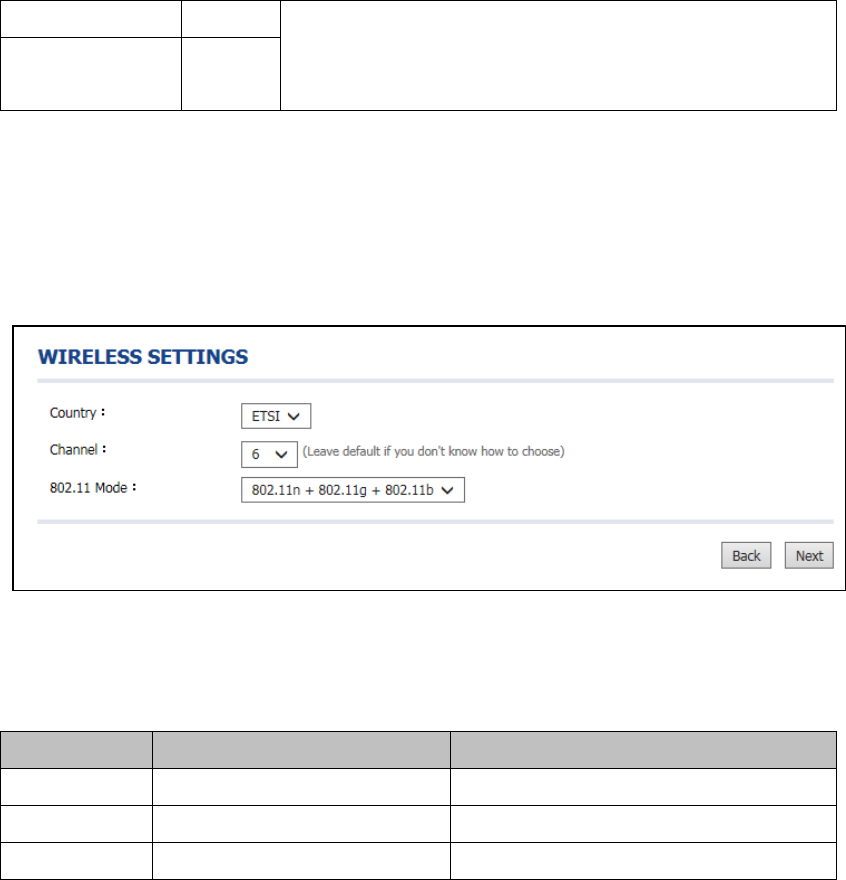
Step 5: Wireless Setting
This page allows you to choose Country, Channel ID and 802.11 Mode for wireless
connection.
Figure 3-1-10 Wireless Setting Screen
Item Default Description
Country ETSI Enter the Country for wireless connection.
Channel 6 Enter the channel ID for wireless connection.
802.11 Mode 802. 11n + 802.11g + 802.11b Enter the 802.11 Mode for wireless connection.
Step 6: Authentication Setting
This page allows you to choose whether the users need to be authenticated before
the Internet access. If users need the account and password to get access of Wi-Fi,
please choose Yes.
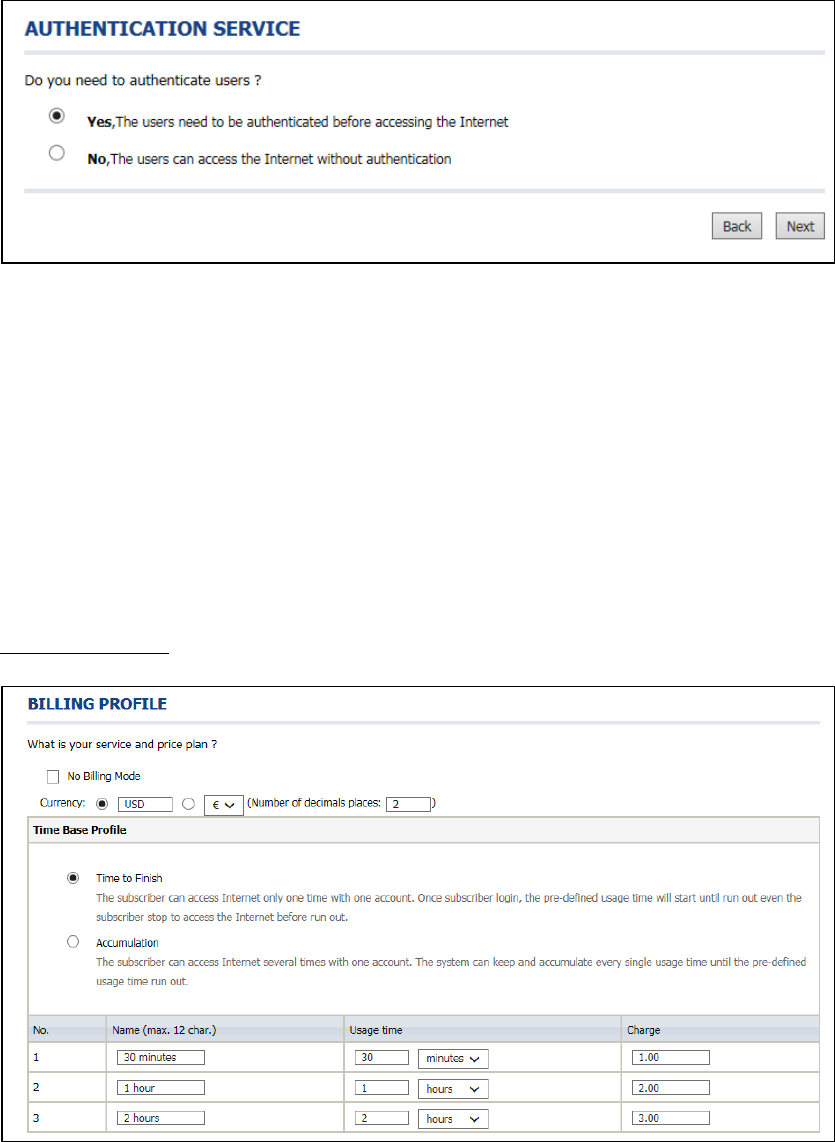
UAG50 User’s Guide
27
Figure 3-1-11 Authentication Service Setting Screen
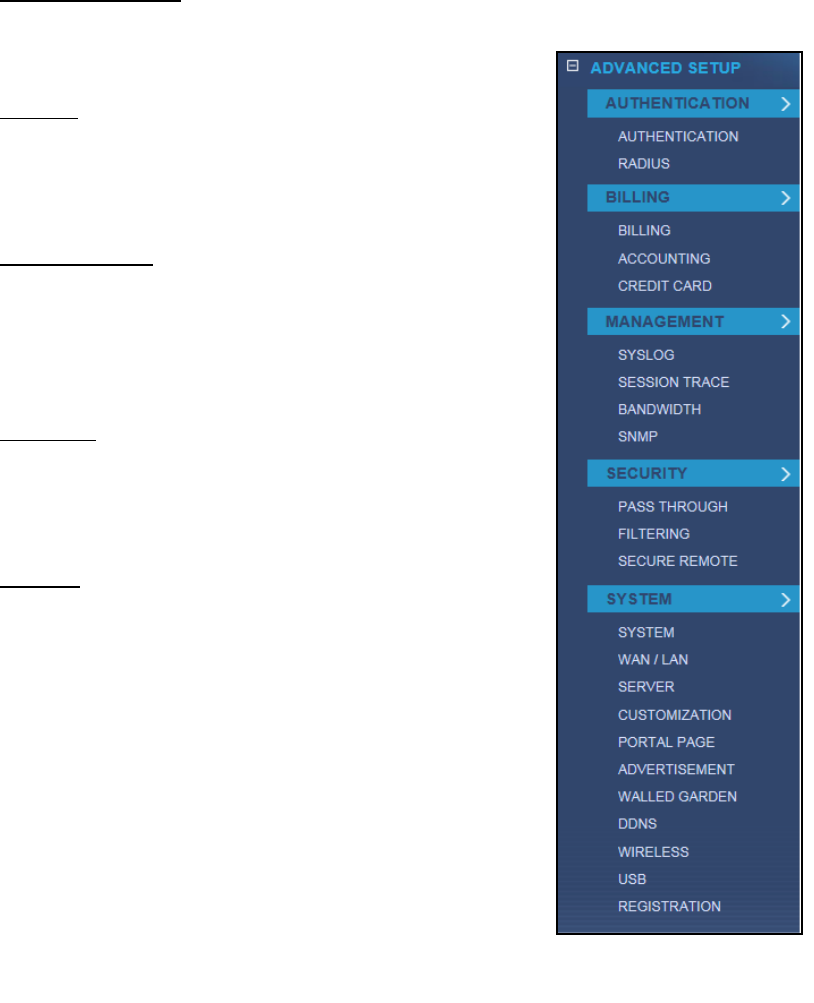
Step 7: Billing Profile Setting
This page allows you to set your service and price plan. If you would like to provide
“FREE” Wi-Fi for users, please activate “No Billing Mode” the price and the tax
won’t be showed on the ticket. The billing type could be set by time based or by
volume based.
Time Base Profile
Figure 3-1-12 Billing Profile Setting

UAG50 User’s Guide
28
Item Default Description
No Billing Mode Disabled If you would like to provide FREE Wi-Fi for users, please activate“No
Billing Mode”the price and the tax won’t be showed on the ticket.
Currency USD The administrator can decide the currency printed out on the ticket.
Service and Price Plan Time to Finish Choose your service and price plan.
Time Base Profile
01/02/03
You could set the profile name, usage time and charge here. You could set 3 different profiles
in this step.
Volume Based Profile
Figure 3-1-13 Billing Profile Setting – Volume base
Item Default Description
Volume Base Profile
01/02/03
You could set the profile name, volume and charge here. You could set 3 different
profiles in this step.
Step 8: Accounting Setting
Following the Billing Profile Setting, the page allows to set the billing profiles for each
button of the printer.
Figure 3-1-14 Accounting Setting

UAG50 User’s Guide
29
Item Default Description
Setting
Button A/Button B/Button C You could choose the billing profile via the dropdown list for each button on the
printer.
Printout
Numbers of copies to print 1 The numbers of the same printed tickets. You can reserve the
copies.
Customize printout ticket You can customize the printout text for the ticket. If you want to
know more, please refer to 3-2-5-4 Customization / Account
Printout.

UAG50 User’s Guide
30
Step 9: System Setting
System Setting: The UAG50 allows changing the administrator’s Username and
Password, and system time setting.
Figure 3-1-15 System Setting Screen
Item Default Description
Username admin Enter the user name. The user name can consist of up to 80
alphanumeric characters and is case sensitive.
Password admin Enter the user password. The password can consist of up to 80
alphanumeric characters and is case sensitive.
Time Zone GMT Enter the Time Zone for the system.
Manual Setting YYYY/MM/DD
HH:MM:SS
Click Manual Setting to set the system date and time.
NTP Setting Click Update button to correct the system date and time.
Secure Administrator
IP Address
All This function allows remote user to management the device. You can
specify one or any IP addresses for remote control the system.
UAG50 User’s Guide
31
Click FINISH button to save the settings then the system will restart.
Note:
1. This Web agent is best viewed with IE 8.0 or later version.
2. Username and Password can consist of up to 20 alphanumeric characters and are
case sensitive.
3. If for some reason your password is lost or you cannot gain access to the UAG50
Configuration Program, please press the reset button to load the device to
manufacturer defaults.
4. If the administrator doesn’t send packet in 5 minutes (default), the UAG50 will
log out automatically.
5. Proxy needs to set disable first when the administrator accesses admin UI.
UAG50 User’s Guide
32
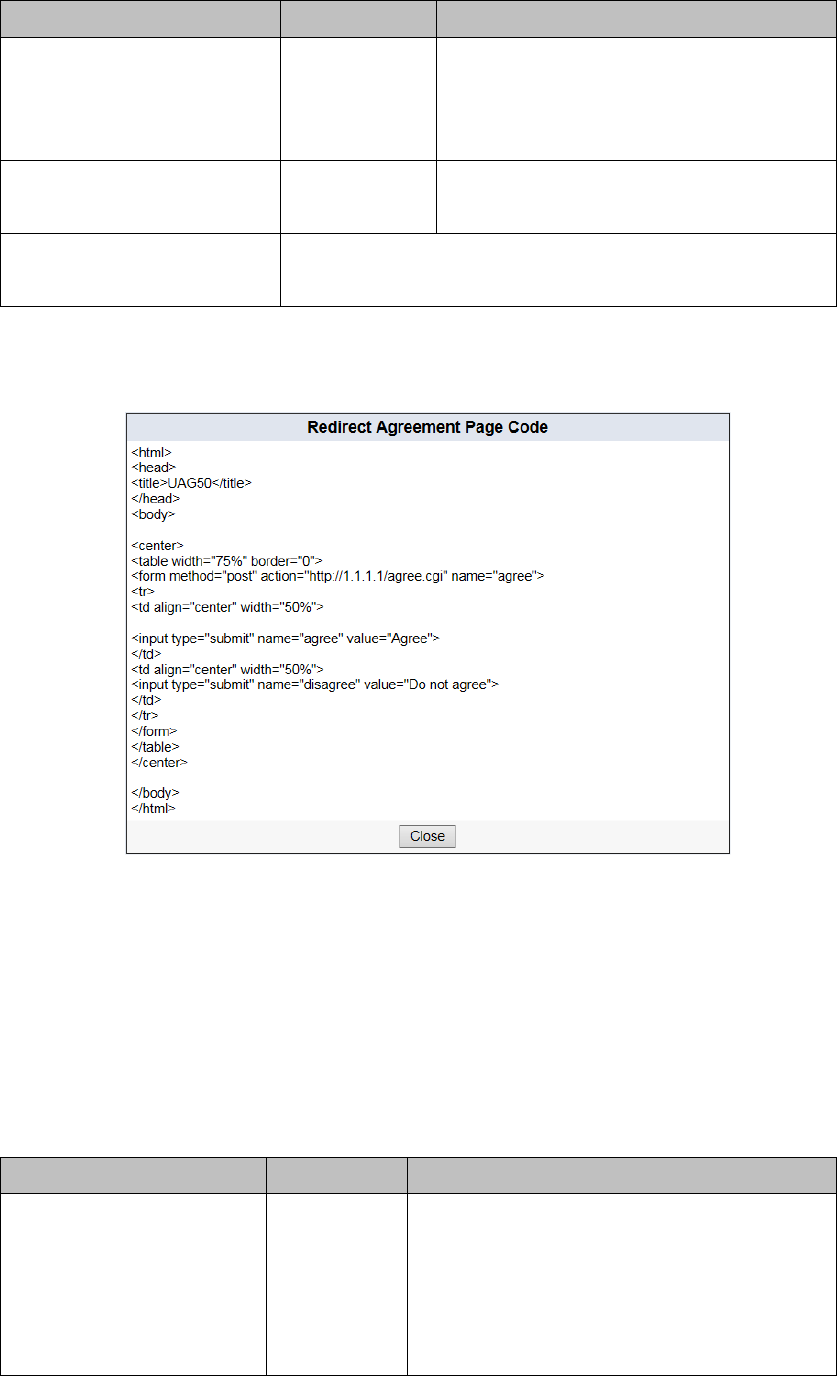
3-2 Advanced Setup
The Advanced Setting enables you to configure advanced settings related to
accessing the Internet, including,
AUTHENTICATION
AUTHENTICATION
RADIUS
BILLING
BILLING
ACCOUNTING
CREDIT CARD
SYSLOG
MANAGEMENT
SESSION TRACE
BANDWIDTH
SNMP
PASS THROUGH
SECURITY
FILTERING
SECURE REMOTE
SYSTEM
SYSTEM
WAN / LAN
SERVER
CUSTOMIZATION
PORTAL PAGE
ADVERTISEMENT
WALLED GARDEN
DDNS
WIRELESS
USB
REGISTRATION
Note: After change the settings of device, please click Apply button to save the new
settings.
Figure 3-2-1 Advanced Setting Item

UAG50 User’s Guide
33
3-2-1 Authentication
3-2-1-1 Authentication
Figure 3-2-2 Authentication
Item Default Description
Authentication Type Built-in
Authentication
Option: No Authentication, Built-in Authentication or
User Agreement.
No Authentication
Subscriber can direct access the Internet without
enter username and password.
Built-in Authentication
UAG50 provides “Built-in
Authentication” for service provider to build up an
Internet service without any extra authentication
software. If “Built-in Authentication” is selected,
service provider can generate the subscriber account
inside the device, and the system will authenticate the
subscriber login according to the generated account.
UAG50 User’s Guide
34
Item Default Description
User Agreement
Subscriber must accept the service usage agreement
before they can access the Internet.
Redirect Login Page URL Empty The input format can be http://www.yahoo.com. The
maximum character of the URL Link is 200.
Code Copy and paste the following HTML Code into your home page to produce
redirect subscriber login page.
Copy and paste the following HTML Code into your home page to produce user
agreement login page.
Figure 3-2-3 Preview Redirect Login Page Code
Item Default Description
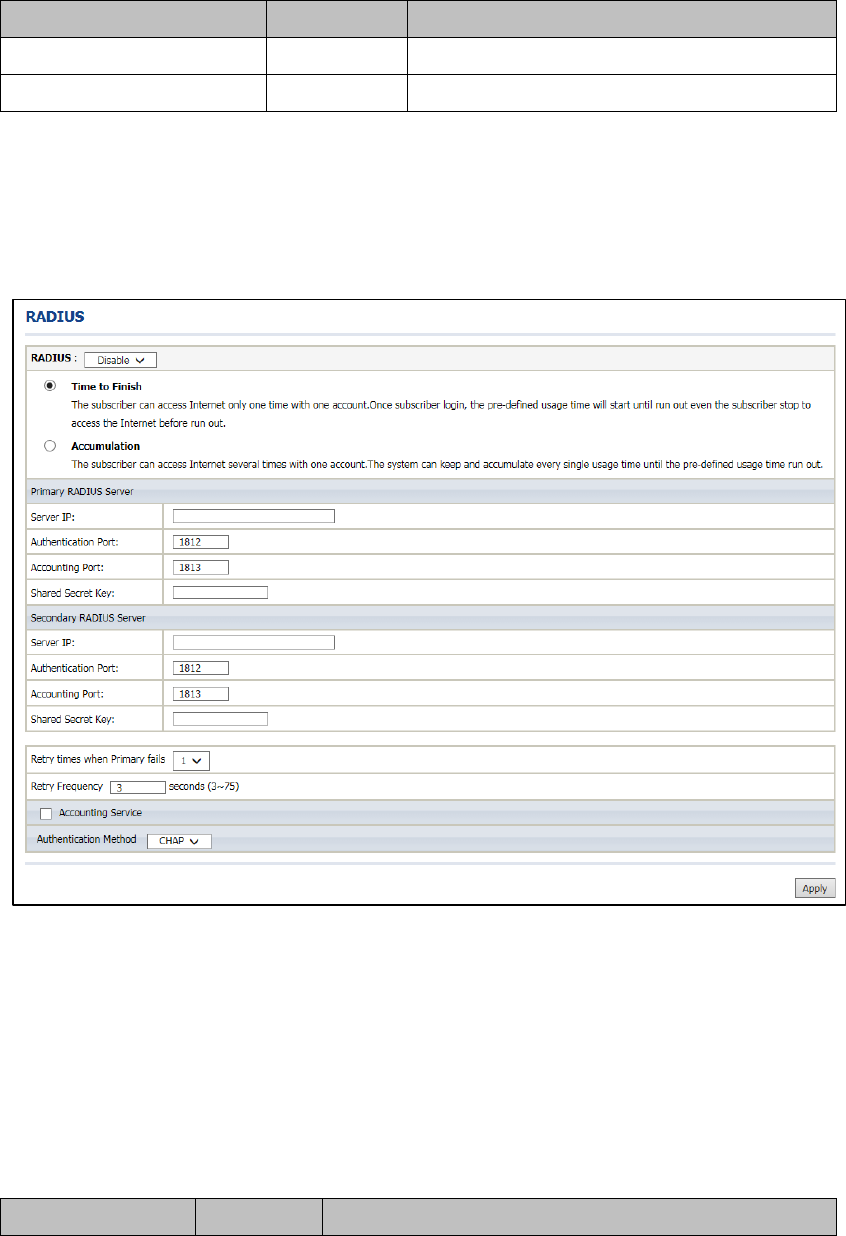
Current User Information Backup 1 Min(s) The system provides automatically backup account
information and unused account to flash ROM. This
function allow administrator to adjust the backup time.
The default value is 1 minute. The Current User
Information Backup valid range is 1 to 1440.
UAG50 User’s Guide
35
Item Default Description
SSL Login Page Disable Enables or disables SSL security of login page.
User Idle Time Out 5 Minutes The user idle time out valid range is 1-1440.
Click Apply button to save the new settings.
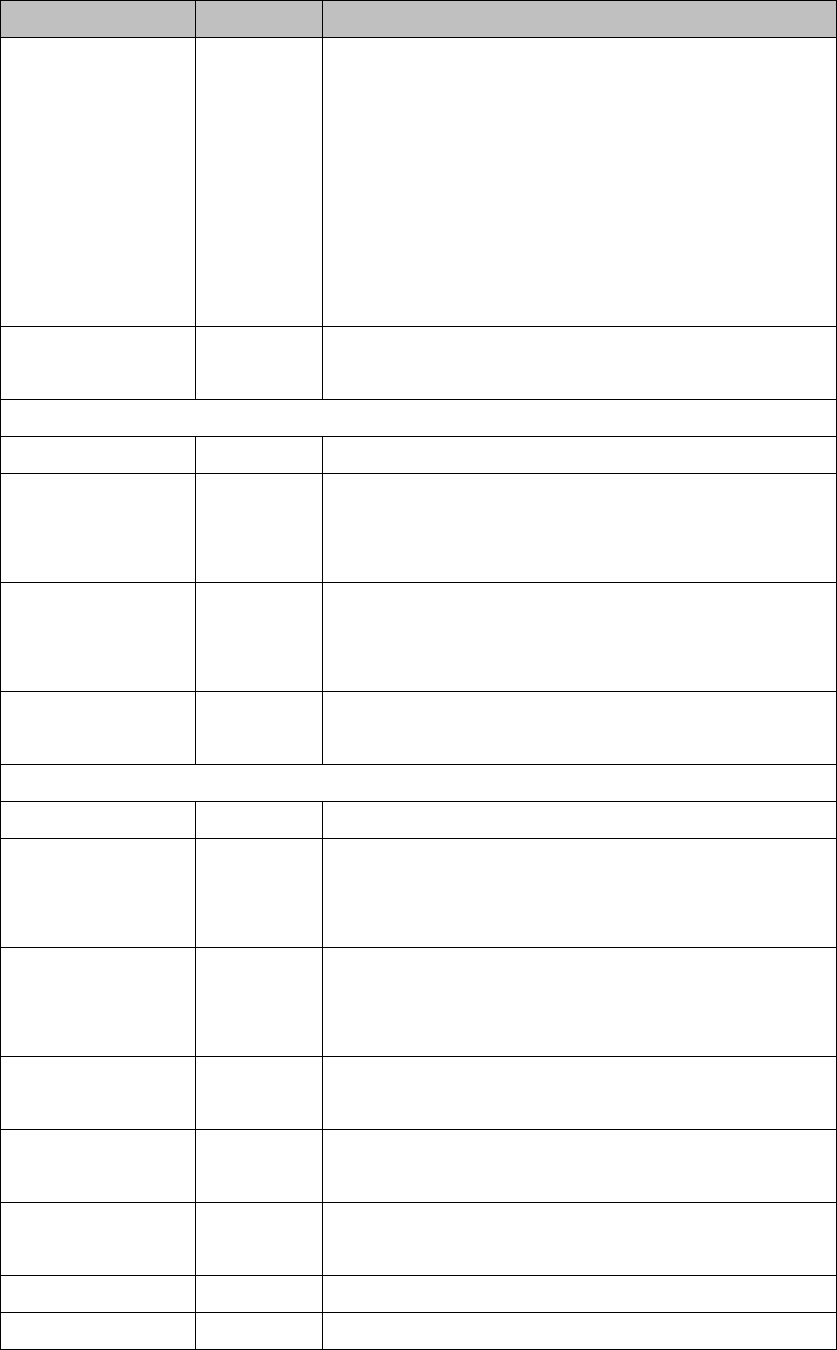
3-2-1-2 RADIUS
Figure 3-2-4 Authentication Setting Screen
Item Default Description
UAG50 User’s Guide
36
Item Default Description
RADIUS Authentication Disable Disable (RADIUS Disable)
Subscriber can direct access the Internet without entering username
and password.
Enable (RADIUS Authentication)
UAG50 provides “RADIUS Authentication” for service provider to build
up an Internet service with RADIUS server. If RADIUS Authentication
is enabled, all subscribers’ authentication will send to RADIUS Server
by RADIUS protocol (RFC 2865, 2866).
Time to Finish /
Accumulation
Enable Service provider provides two different accounting calculate for the
Internet service.
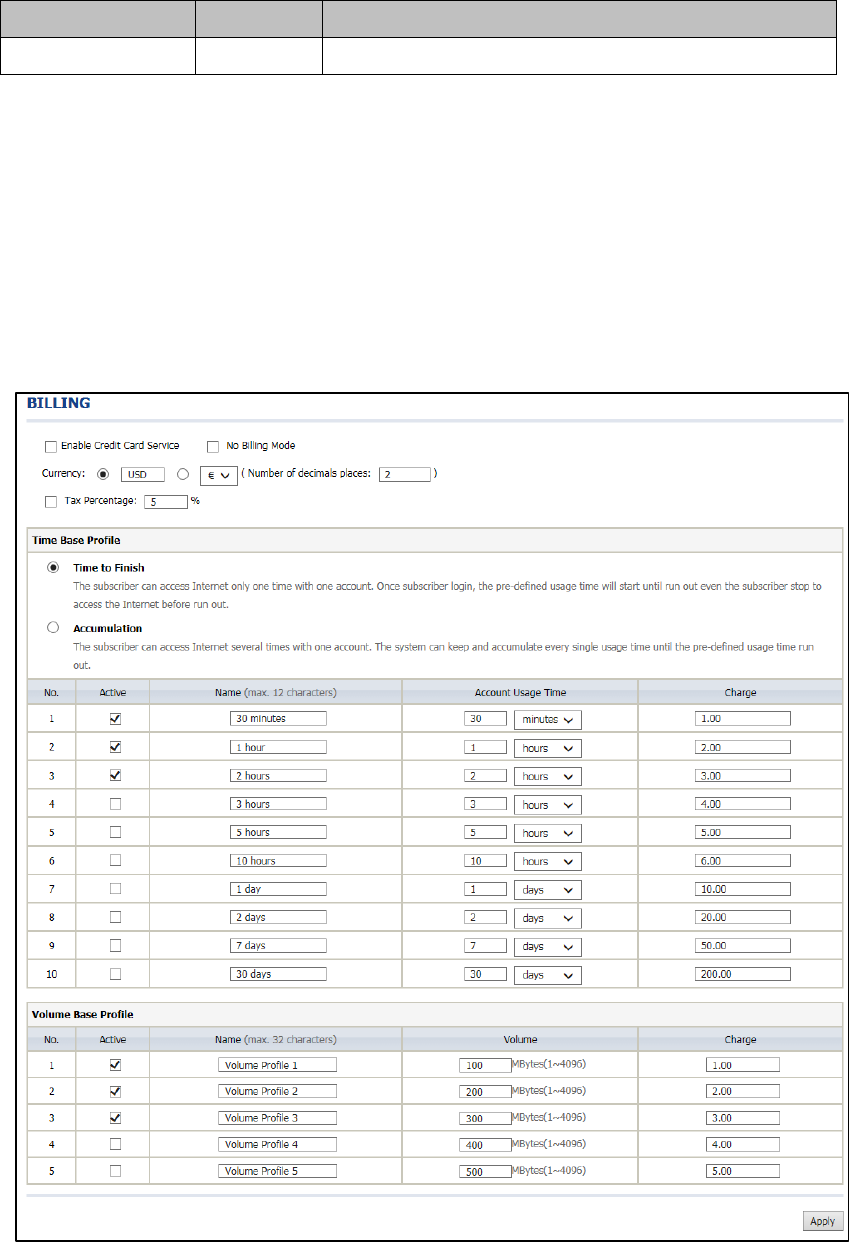
Primary RADIUS Server
Server IP Empty Enter the IP address of RADIUS server.
Authentication Port 1812 Enter the authentication port number; the authentication port number
must match with the RADIUS server setting. The allowed numbers
are from 0 to 65535.
Accounting Port 1813 Enter the accounting port number; the accounting port number must
match with the RADIUS server setting. The allowed numbers are from
0 to 65535.
Share Secret Key Empty The share secret key, the key number also has to match with the
Server setting. Up to 64 characters are allowed.
Secondary RADIUS Server
Server IP Empty Enter the IP address of RADIUS server.
Authentication Port 1812 Enter the authentication port number; the authentication port
number must match with the secondary RADIUS server
setting. The allowed numbers are from 0 to 65535.
Accounting Port 1813 Enter the accounting port number; the accounting port number
must match with the secondary RADIUS server setting. The
allowed numbers are from 0 to 65535.
Share Secret Key Empty The share secret key, the key number also has to match with the
secondary RADIUS Server setting. Up to 64 characters are allowed.
Retry times when
Primary fail
1 Specify the retry times when primary fail.
Retry Frequency ~
Seconds
3 The field default value is 3 seconds.
Accounting Service Disable Enables or disables the accounting service.
Interim Update Time 5 Minutes Specify the interim update time.
UAG50 User’s Guide
37
Item Default Description
Authentication Method CHAP CHAP Enter the authentication method of RADIUS server.
3-2-2 Billing
3-2-2-1 Billing
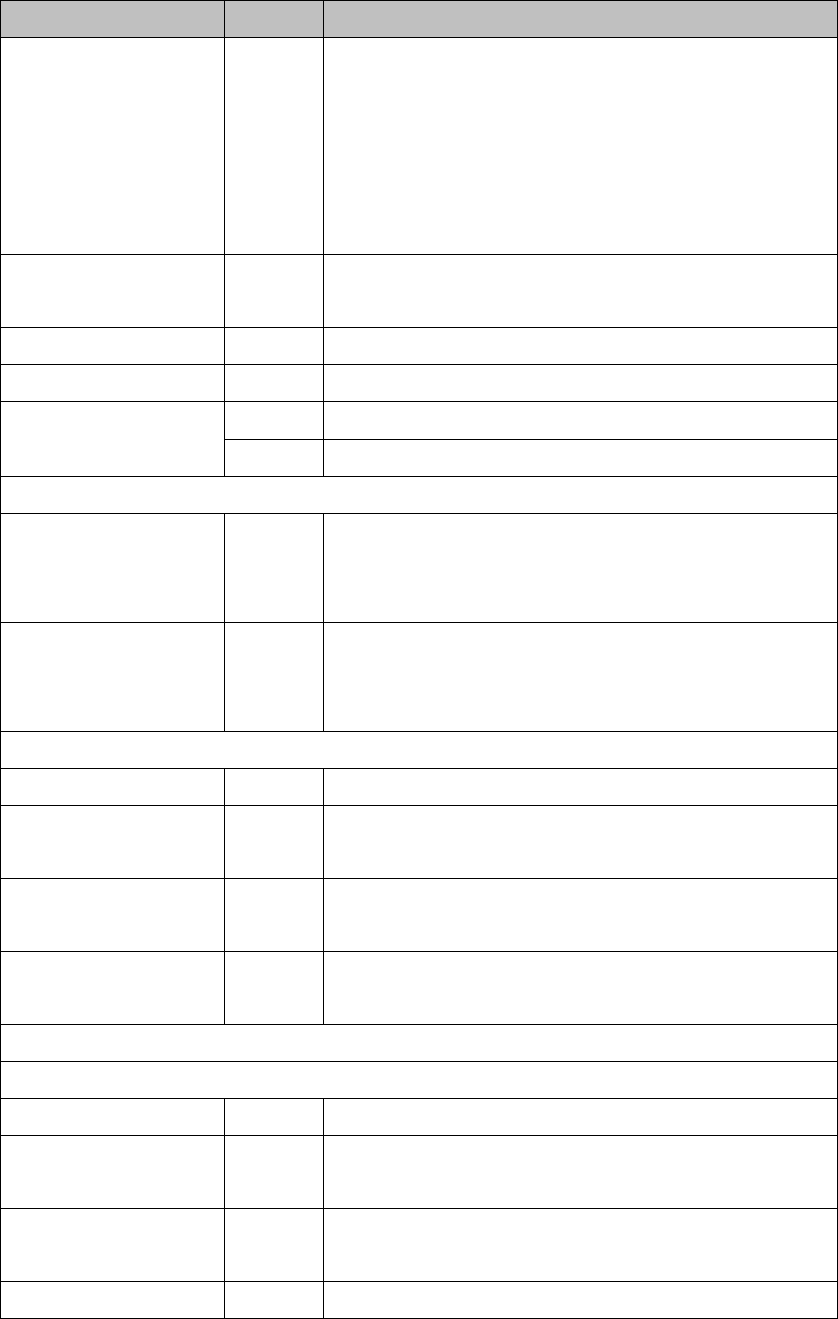
The function is used to setup a billing profile. A billing profile is a description of how
you want to charge your customer.
Figure 3-2-5 Billing Setting Screen
UAG50 User’s Guide
38
Item Default Description
Enable Credit Card Service Disable Enables or disables the credit card service. Before you enable credit
card service, make sure that your credit service is configured to work
and the currency is American dollars. You must be converting all
prices on your billing page into American dollars (U.S. dollars). For
details, see section 3-2-2-3 Credit Card. The credit card function only
supports the American dollars.
No Billing Mode Disable If you would like to provide FREE Wi-Fi for users, please activate“No
Billing Mode”the price and the tax won’t be showed on the ticket.
Currency USD Enter the appropriate currency unit or currency symbol.
Number of decimals places 2 Enter the number. The field maximum value is 3.
Tax Percentage Disable This check box is used to indicate the taxable status of the account.
5% Enter the tax rate (i.e. a 5% sales tax is entered as 5).
Time Base Profile
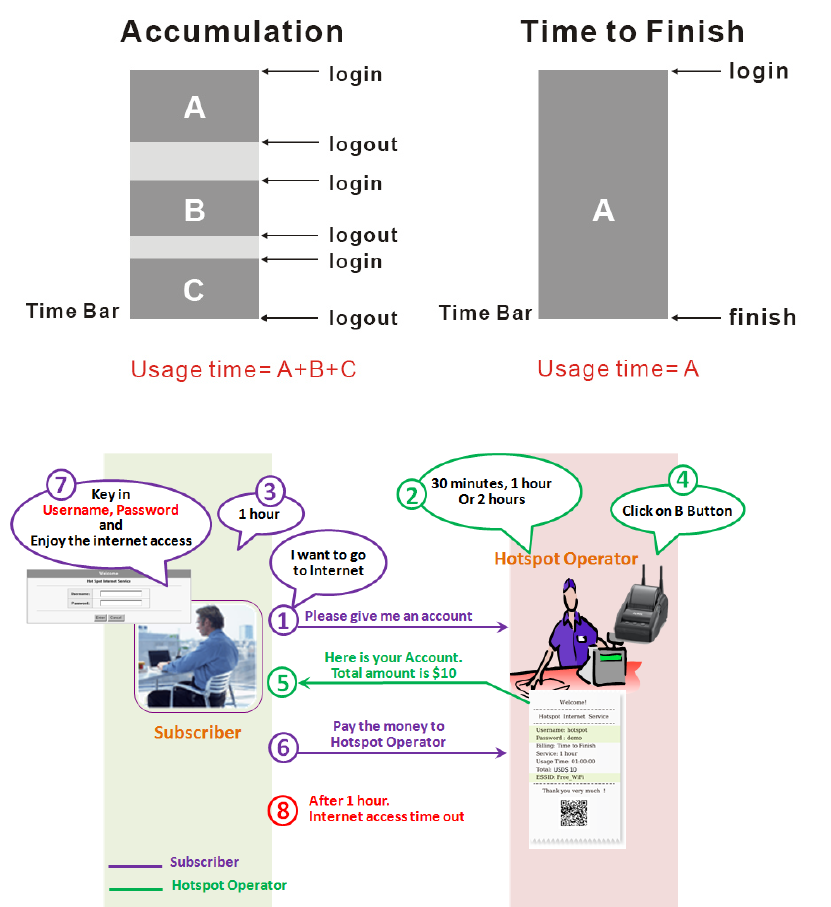
Time to Finish Enable The subscriber can access Internet only one time with one account.
Once subscriber login, the pre-defined usage time will start until run
out even the subscriber stop to access the Internet before run out.
Accumulation Disable The subscriber can access Internet many times with one account. The
system can keep and accumulate every single usage time until the
pre-defined usage time run out.
You are able to set up to 10 records of time base profile in UI.
Active - Click on check box, active or inactive the billing profile.
Name - It is the name of billing profile. The maximum allowed characters
length is 12.
Account Usage time - The duration of the billing period. When this period expires, user
account will be discontinued.
Charge - Enter the unit rate amount (i.e. 35.00) that most of your accounts are
charged for one day of service.
Volume Base Profile
You are able to set up to 5 records of volume base profile in UI.
Active - Click on check box, to active or inactive the billing profile.
Name - It is the name of billing profile. The maximum allowed characters
length is 12.
Account Usage time - Setting the volume of the account. When this volume is run out, user
account will be discontinued.
Charge - Enter the unit rate amount.
UAG50 User’s Guide
39
Figure 3-2-6 Accumulation and Time to Finish
Figure 3-2-7 Pre-paid Procedure Diagram

UAG50 User’s Guide
40
3-2-2-2 Accounting
This function allow service provider to generate the subscriber accounts.
Figure 3-2-8 Accounting Setting Screen
Item Default Description
Expiration
Un-used account will be deleted
after ~hours automatically
24 hours Enter the number of hours/minutes/days. The field maximum
value is 30 hours/minutes/days.
Accumulation account will be
deleted after last logged in ~
3 months Enter the number and select time unit from list box. The field
maximum value is 30 month/ days/ hours.
Printout
Number of copies to print 1 The system allows you to print all your bills. Select one number of
copies by clicking in the list box.
UAG50 User’s Guide
41
Item Default Description
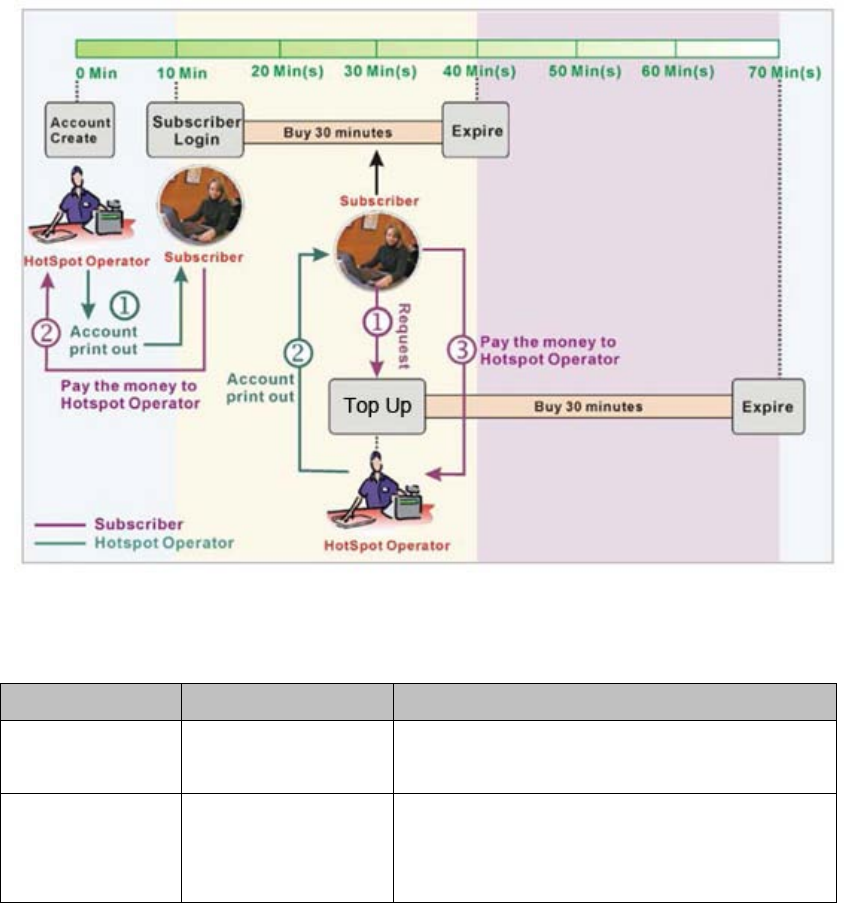
Top Up
Can be replenished by
subscriber
Disable Click the check box to enable the Top Up function.
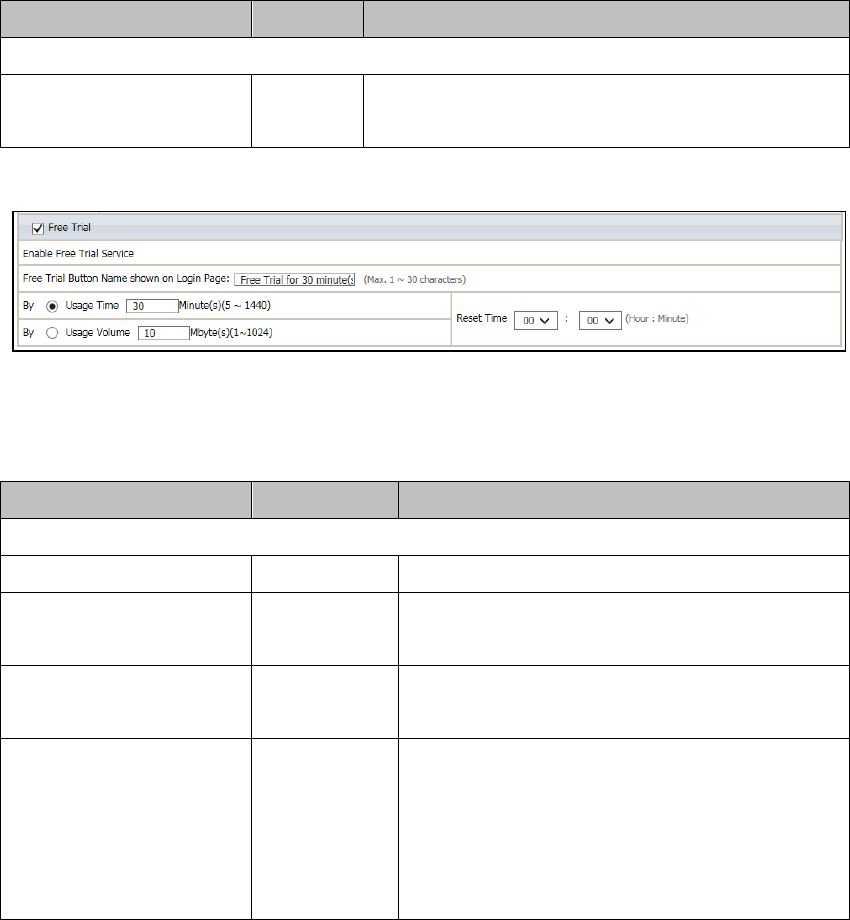
Figure 3-2-9 Accounting Setting Screen_Free Trial
Item Default Description
Free Trial
Enable Free Trial Service Disable You could provide free trial to users by enable this function.
Free Trial Button Name shown
on Login Page
Free Trial for 30
minute(s)
You could customize the text that shown on user login page.
The maximum allowed characters length is 30.
Free Trial base By Usage time You could set the free trial to be based by time or by volume
and you could also define the usage of free trial.
Reset Time 00:00 The gratuitous usage amount of “free Trial” is on a periodic
time basis. The “Reset Time” defines the periodic cycle time.
Based on the configuration, UAG50
grants users the
gratuitous usage amount (time or volume) on each periodic
cycle time.
UAG50 User’s Guide
42
Figure 3-2-10 Account Process Diagram Can be topped up by subscriber=Enable
Item Default Description
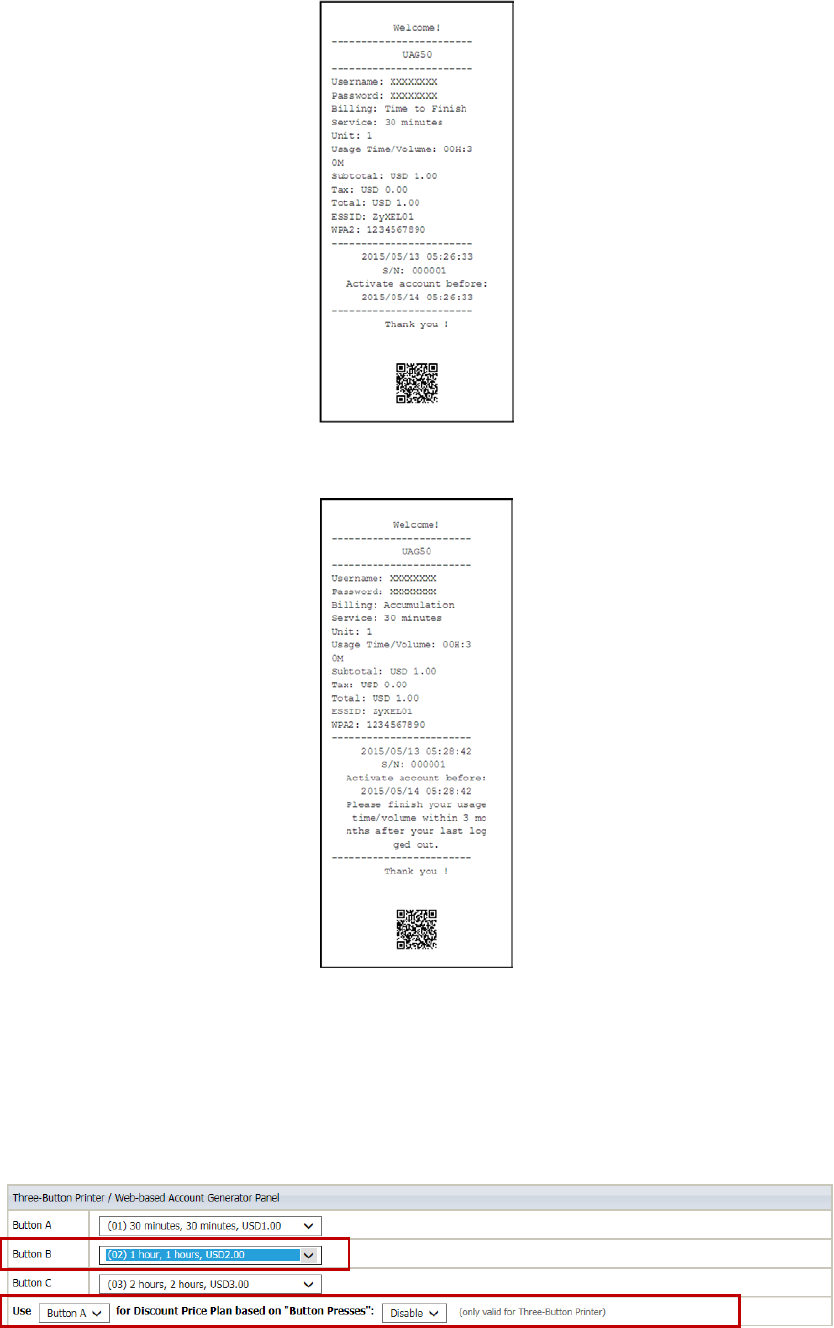
Button A~C Define each button’s billing profile. Select one billing profile
by clicking in the list box.
Use ~ for Discount
Price Plan based on
“Button Presses”
Button A, Disable Select one button (A~C) by clicking in the list box to assign
the base charge and select enable to active the discount
price plan.
UAG50 User’s Guide
43
Figure 3-2-11 Account Generator Printer (Time to Finish)
Figure 3-2-12 Account Generator Printer (Accumulation)
Example: If press 7 times
Discount Price Plan based on “Button Presses” is disabled.
Figure 3-2-13 Example 1

UAG50 User’s Guide
44
Amount: 7 x $2.00= $14.00
Figure 3-2-14 Account Printout
Discount Price Plan based on “Button Presses” is enabled.
The Charge by level is disabled.
Figure 3-2-15 Example 2
Amount: 7 x $ 1 = $ 7.00
Below is an example of the account printout.
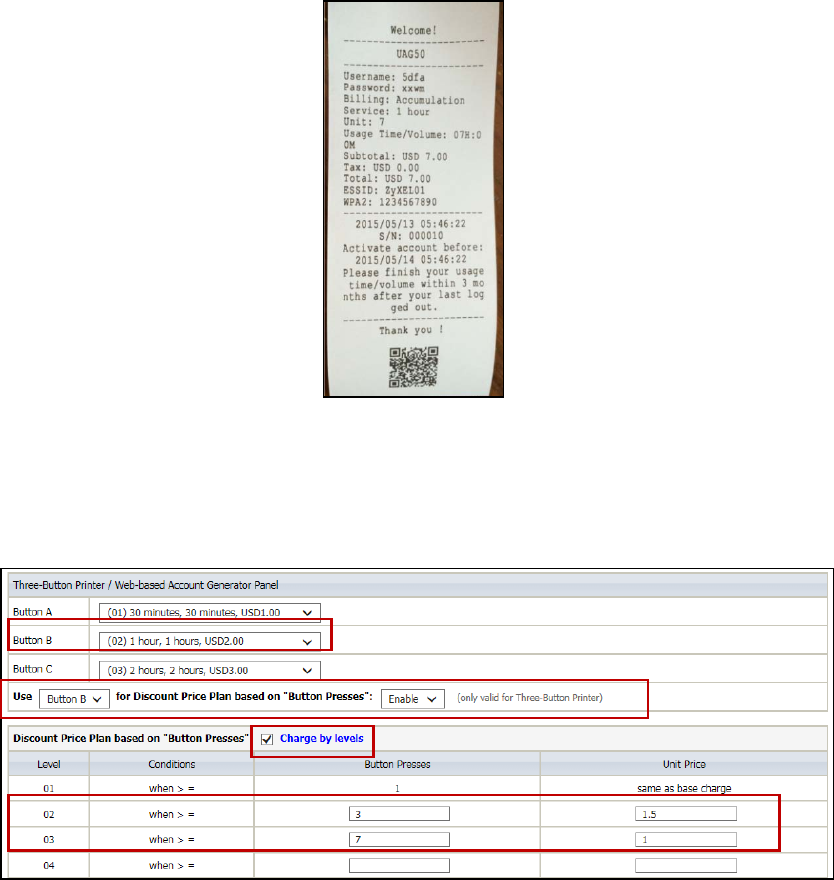
UAG50 User’s Guide
45
Figure 3-2-16 Account Printout
Discount Price Plan based on “Button Presses” is enabled.
Charge by level is enabled.
Figure 3-2-17 Example 3
Amount: 2 x $2.00 + 4 x$ 1.50+1x$1= $11.00
Below is an example of the account printout.
Figure 3-2-18 Account Printout
UAG50 User’s Guide
46
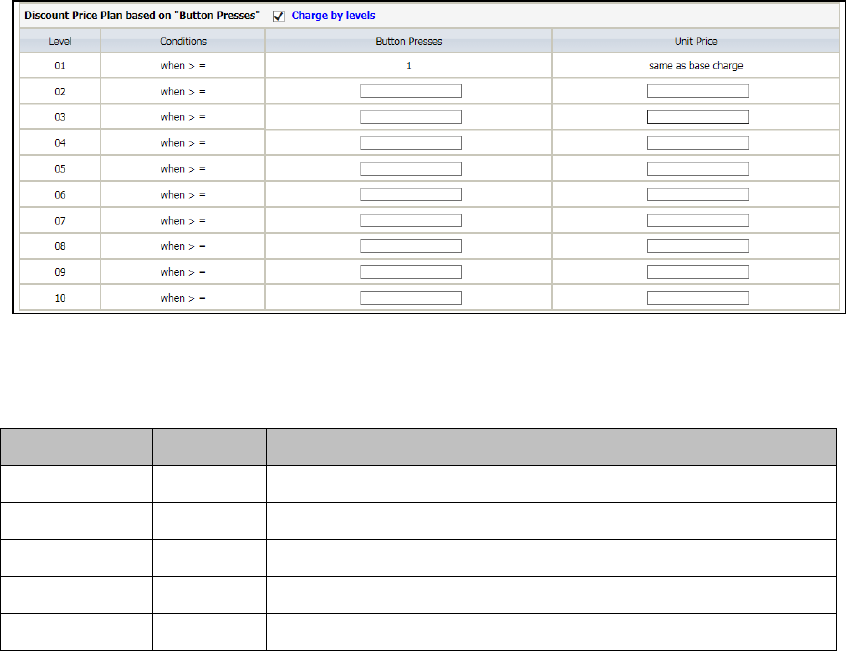
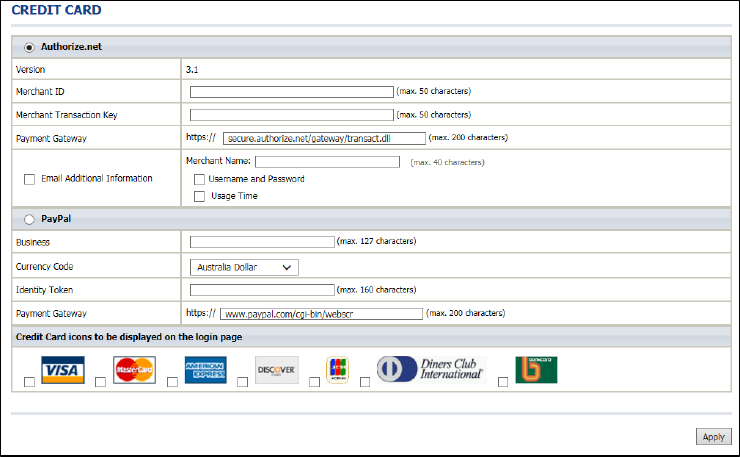
Discount Price Plan based on “Button Presses”
Figure 3-2-19 Discount Price Plan Setting Screen
Item Default Description
Charge by levels Enable Enables or disables the charge by levels function.
Level 1-10 This field displays the level number of charge rate.
Conditions When>= The discount condition
Button Presses - Enter the times of pressing button
Unit Price - Enter the amount of charge level
Click Apply button to save the new settings and the success dialog box appears. Click
on Back to return to Accounting setting screen.
UAG50 User’s Guide
47
3-2-2-3 Credit Card
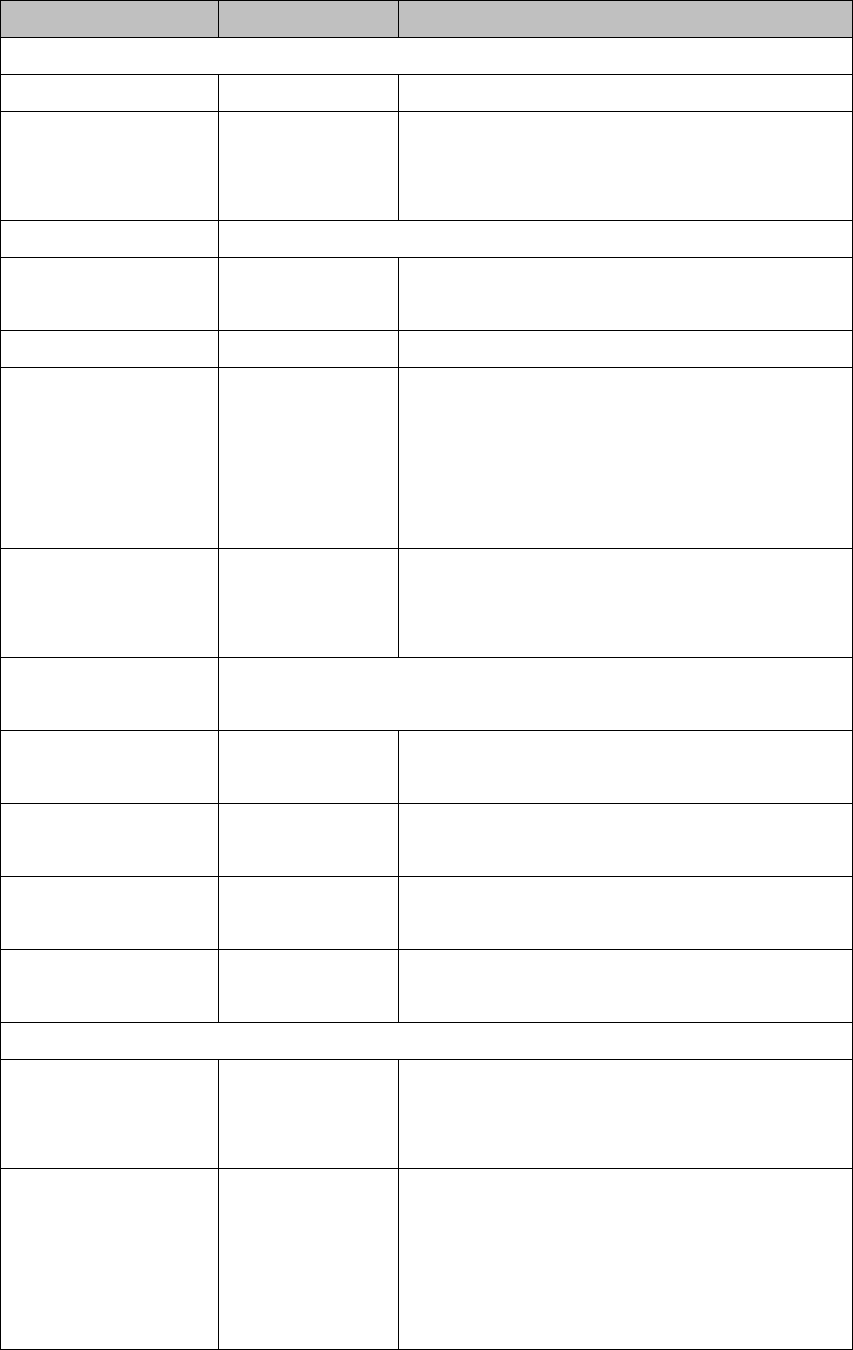
UAG50 provides three credit card services (Authorize.net, iValidate.net, Secure Pay,
Paypal and WorldPay) that allow service provider to authorize, process, and manage
credit transactions directly from Internet.
Figure 3-2-20 Credit Card Setting Screen
UAG50 User’s Guide
48
Item Default Description
Authorize.net
Version 3.1 This field displays the merchant version.
Merchant ID Empty Enter your Merchant ID. This is a Merchant Identification
Number that you’re received from your Merchant Provider.
The maximum character of the Merchant ID is 50.
Merchant Password This is a Merchant password that you’re received from your Merchant Provider.
Need Disable If your Merchant Provider need password to authorize, click
the check box to enable this function.
Password Empty Enter your Merchant password.
Merchant Transaction Key Empty The Merchant Transaction Key can be obtained directly from
“Authorize.net”. The Merchant Transaction Key is similar to a
password and is used by the Payment Gateway to
authenticate transactions. The maximum character of the
Merchant Transaction Key is 50.
Payment Gateway https://secure.authoriz
e.net/gateway/transac
t.dll
Enter the address of Payment Gateway.
Email Additional
Information
The Email Additional Information included subscriber username and password would
be sent to subscriber.
Email Additional
Information
Disable Indicates whether Email additional information should be sent
to the subscriber (customer).
Merchant Name Empty Enter the merchant’s company name. The maximum allowed
characters length is 40.
Username and Password
Enable/Disable
Disable The Email Additional Information included subscriber
username and password would be sent to subscriber.
Usage Time
Enable/Disable
Disable The Email Additional Information included subscriber usage
time would be sent to the subscriber.
Paypal
Business Empty Enter your Merchant PayPal account. This is a Merchant
Identification account that you’re register on PayPal. The
maximum character of the Business is 127.
Currency Code Australia dollar To Drop-down the list. It’s includes Australia dollar, Canadian
Dollar, Euro, Pound Sterling, Japanese Yen , U.S. Dollars,
Czech Koruna, Danish Kroner, Hong Kong Dollars,
Hungarian Forint, New Zealand Dollars, Norwegian Kroner,
Polish Zloty, Singapore Dollars, Swedish Kronor, Swiss
UAG50 User’s Guide
49
Item Default Description
Francs.
Identity Token Empty Enter the Identities token form merchants profile in the
Paypal site. The maximum character of the Identity Token is
160.
Payment Gateway https://www.paypal/cg
i-bin/webscr
Enter the address of Payment Gateway.
The maximum character of the payment gateway is 100.
Credit Card icons to be
displayed on the login page
Click on check box to display credit card icon on the login
page.
Click Apply button to save the new settings and the success dialog box appears. Click
on Back to return to Accounting setting screen.
Note: Please leave the Administrator’s Email address in Advanced/Syslog/Email
portion.
UAG50 User’s Guide
50
3-2-3 Management
3-2-3-1 Syslog
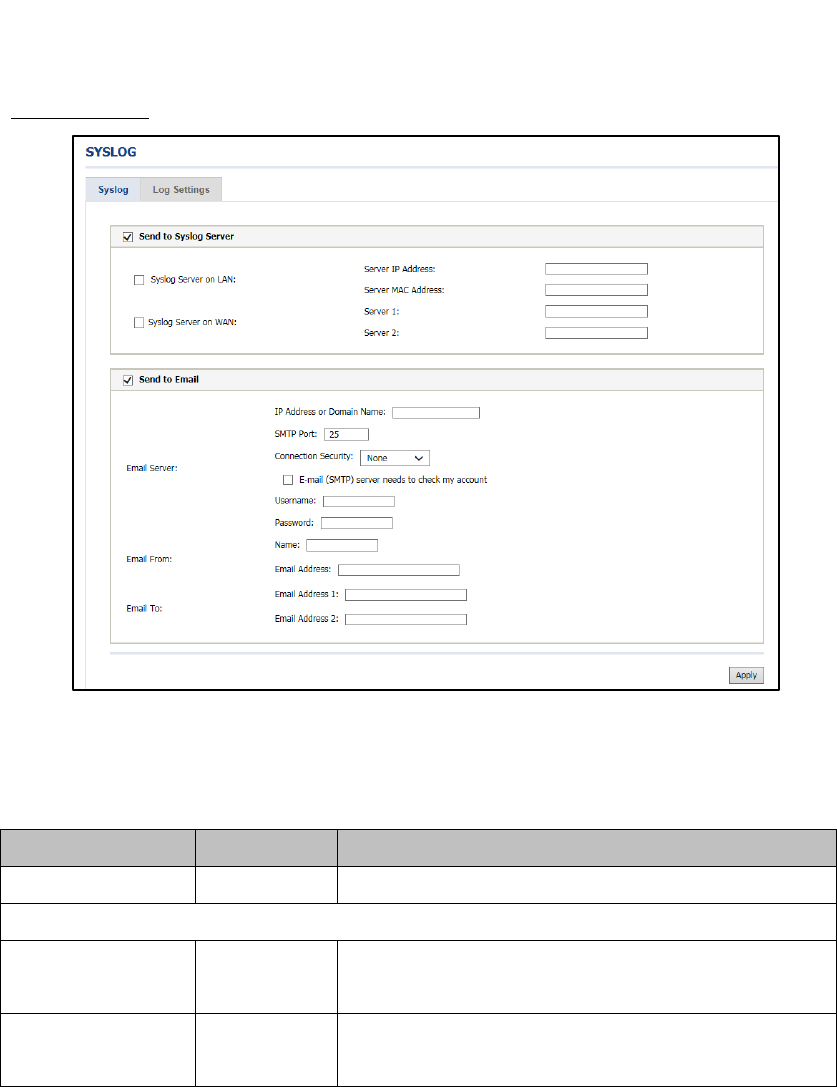
The function allows the device to transmit event messages to your syslog server or
your email address for monitoring and troubleshooting.
Syslog Setting
Figure 3-2-21 Syslog Setting Screen
Item Default Description
Send to Syslog Server Disable Enables or disables the syslog server function.
Syslog on LAN
Server IP Address Empty Enter syslog server’s IP address. The UAG50 will send all of its logs
to the specified syslog server.
Server MAC Address Empty Enter the syslog server’s MAC address. The UAG50 will send all of
its logs to the specified syslog server.
UAG50 User’s Guide
51
Item Default Description
Syslog on WAN
Server 1 IP Address Empty Enter IP address of first syslog server.
Server 2 IP Address Empty Enter IP address of second syslog server.
Send to Email Disable Enables or disables the send to e-mail function.
E-mail Server
IP Address or Domain
Name
Empty Enter the SMTP server IP address or domain name. The maximum
allowed characters length is 50.
SMTP Port 25 The SMTP port allowed range is 25 or 2500 to 2599.
E-mail (SMTP) Server
needs to check my
account
Disable If your SMTP server requires authentication before accepting
e-mail, click on check box. These values (username and password)
are supplied by your network administrator, SMTP server provider
or ISP.
Username Empty Enter the username for the SMTP server. The maximum allowed
characters length is 64.
Password Empty Enter the password for the SMTP server
Email From
Name Empty Enter the name you would like to appear in the “message from” field
of your outgoing message. The maximum allowed characters length
is 20.
Email Address Empty Enter your e-mail address. This is the address others will use to
send email to Email Address 1/Email Address 2.
Email To
Email Address 1 Empty Enter your first e-mail address to receive the logs.
Email Address 2 Empty Enter your second e-mail address to receive the logs.
Click Apply button to save the new settings and the success dialog box appears. Click
on Back to return to Syslog setting screen.
Note: The UAG50 supports sending and receiving of DUT logs using web-based mail
services, such as Yahoo Mail, Gmail and Outlook.com.

UAG50 User’s Guide
52
Log Categories
Figure 3-2-22 Log Settings Screen
Item Default Description
System
Device Information Every 10 minute(s) The range is 5~60 minutes. The log included system information
would be sent according to specified interval time.
Format
:
PRODUCT=UAG50:VER=2.00.00;LOGNAME=DVI;
DATE=07Mar26;TIME=11:30:00;
WANMAC=09-00-0e-00-00-01;LANMAC=09-00-0e-00-00-02;
WLANMAC=09-00-0e-00-00-03;
IP_ADDRESS=210.66.37.21;
SYS_UP_TIME=14D23H34M21S;WANTXOK=99999;
WANRXOK=99999;WANTXERROR=99999;WANRXERROR=9
9999;
LANTXOK=99999;LANRXOK=99999;LANTXERROR=99999;

UAG50 User’s Guide
53
Item Default Description
LANRXERROR=99999;WIRELESSTXOK=99999;WIRELESSR
XOK=99999;
WIRELESSTXERROR=99999;WIRELESSRXERROR=99999;
WAN_QUALITY=5;
System Up Notice When system
rebooted or restarted
If device have been rebooted or restarted, the log would be
sent.
Format
:
PRODUCT=UAG50;VER=2.00.00;LOGNAME=SUN;
DATE=07Mar26;TIME=15:23:32;
WANMAC=09-00-0e-00-00-01;LANMAC=09-00-0e-00-00-02;
WLANMAC=09-00-0e-00-00-03;
IP_ADDRESS=210.66.37.21;
SYS_NAME=Cafehotspot;LOCATION=East;CITY=Taipei;
COUNTRY=Taiwan;
FIRMWARE=v1.01.02;MESSAGE=System_Up;
Message = System_Reboot
System Account Activity
Information
When system
manager login or
logout
A log will be sent if system manager (Administrator) login
to or logout from the device
Format
:
PRODUCT=UAG50;VER=2.00.00;LOGNAME=SUN;
DATE=07Mar26;TIME=15:23:32;
WANMAC=09-00-0e-00-00-01;LANMAC=09-00-0e-00-00-02;
WLANMAC=09-00-0e-00-00-03;
IP_ADDRESS=210.66.37.21;
SYS_NAME=Cafehotspot;LOCATION=East;CITY=Taipei;
COUNTRY=Taiwan;
FIRMWARE=v1.01.02;MESSAGE=System_Up;
Account Name = Admin | Supervisor | Operator
Status= Login | Logout | Idle_Time_Out

UAG50 User’s Guide
54
Item Default Description
Firmware Update Notice When firmware update
completed
A log will be sent if firmware update completed
Format:
PRODUCT=UAG50;VER=2.00.00;LOGNAME=FUN;
DATE=07Mar26;TIME=15:23:32;
WANMAC=09-00-0e-00-00-01;LANMAC=09-00-0e-00-00-02;
WLANMAC=09-00-0e-00-00-03;
IP_ADDRESS=210.66.37.21;
MESSAGE=Success;OLD_FRIMWARE=v1.00.01;
NEW_FIRMWARE=v1.00.02
Message = Success | Fail
Wireless Association
Information
Every 10 minute(s) The range is range 5~60 minutes. A log including wireless users
information will be sent according to specified interval time.
Format:
PRODUCT=UAG50;VER=2.00.00;LOGNAME=WAI;
DATE=07Mar26;TIME=15:23:32;
WANMAC=09-00-0e-00-00-01;LANMAC=09-00-0e-00-00-02;
WLANMAC=09-00-0e-00-00-03;
IP_ADDRESS=210.66.37.21;
USER_NUM=15;SEQ=1-5;USER_MAC=02-34-3e-01-00;
User
User Login When user logged-in A log including users information will be sent when user
logged–in
Format:
PRODUCT=UAG50;VER=2.00.00;LOGNAME=ULI;DATE=07M
ar26;
TIME=15:23:32;WANMAC=09-00-0e-00-00-01;
LANMAC=09-00-0e-00-00-02; WLANMAC=09-00-0e-00-00-03;
IP_ADDRESS=210.66.37.21;USER_NAME=asdfg12;USER_IP
=172.16.0.1;
USER_MAC=02-34-3e-01-00;INTERFACE=Ethernet;
USER_TYPE=Dynamic;
User Type = Dynamic / Super / User Agreement / Radius /
No-Auth
When User Replenish login format:
PRODUCT=UAG50;VER=2.00.00;LOGNAME=URP;DATE=07
Mar26;
TIME=15:23:32; WANMAC=09-00-0e-00-00-01;

UAG50 User’s Guide
55
Item Default Description
LANMAC=09-00-0e-00-00-02; WLANMAC=09-00-0e-00-00-03;
IP_ADDRESS=210.66.37.21;USER_NAME=asdfg12;
REP_USER_NAME=kifm2fs3;USER_IP=172.16.0.1;
USER_MAC=02-34-3e-01-00; INTERFACE=Ethernet;
USER_TYPE=Dynamic;
USED_TIME=24:00:00;TIME_LEFT=24:00:00
User Type = Dynamic / Radius
User Logout When user
logged-out
A log including users information will be sent when user
logged –out
Format:
PRODUCT=UAG50;VER=2.00.00;LOGNAME=ULO;DATE=07
Mar26;
TIME=15:23:32;WANMAC=09-00-0e-00-00-01;
LANMAC=09-00-0e-00-00-02; WLANMAC=09-00-0e-00-00-03;
IP_ADDRESS=210.66.37.21;USER_NAME=asdfg12;USER_IP
=172.16.0.1;
USER_MAC=02-34-3e-01-00;INTERFACE=Ethernet;
USER_TYPE=Dynamic;RXDATA=1234; TXDATA=1234;
USED_TIME=24:00:00;LOGOUT_TYPE=Time_Up;TIME_LEFT
=24:00:00
User Type = Dynamic / Super / User Agreement / Radius /
No-Auth
Current User List Every 10 minute(s) The range is Range 5~60 minutes. A log including logged-in
users information will be sent according to specified interval
time
Format:
PRODUCT=UAG50;VER=2.00.00;LOGNAME=CUL;DATE=07
Mar26;
TIME=15:23:32;WANMAC=09-00-0e-00-00-01;
LANMAC=09-00-0e-00-00-02; WLANMAC=09-00-0e-00-00-03;
IP_ADDRESS=210.66.37.21;USER_NUM=0;SEQ=1-5;
USER_NAME=asdfg12,USER_IP=172.16.0.2,USER_MAC=02-
34-3e-01-00,
INTERFACE=Ethernet,USER_TYPE=Dynamic,RXDATA=1234,
TXDATA=1234,USED_TIME=24:00:00,SESSION=100,WLAN_
SIG=N/A;
USER_NAME=dk6uf2eg,USER_IP=172.16.0.3,USER_MAC=0

UAG50 User’s Guide
56
Item Default Description
2-34-3e-01-02,
INTERFACE=Wireless,USER_TYPE=Dynamic,RXDATA=1234
,
TXDATA=1234,USED_TIME=24:00:00,SESSION=100,WLAN_
SIG=100%;
User Type = Dynamic / Super / User Agreement / Radius /
No-Auth
User Name = If the type of user is Super/User
Agreement/No-Auth , the
username=****
Account and Billing
Account Information When an account is
created
A log will be sent when an account is created
Format:
PRODUCT=UAG50;VER=2.00.00;LOGNAME=ACI;DATE=07M
ar26;
TIME=15:23:32;WANMAC=09-00-0e-00-00-01;
LANMAC=09-00-0e-00-00-02; WLANMAC=09-00-0e-00-00-03;
IP_ADDRESS=210.66.37.21;USER_NAME=asdfg12;
ACCOUNT_TYPE=TimetoFinish;
ACCOUNT_SERIAL=000002;
ACCOUNT_PRICE= USD20.00;
ACCOUNT_USAGE_TIME=10:59:59;
BILLING_INDEX=1;BILLING_UNIT=2;
Account Type = TimeToFinish / Accumulation / PostPaid
Account Price = Currencyxx.xx
Currency = AUD | CHF | EUR | GBP | JPY | RIY | USD
Billing Amount When received
amount
A log will be sent when received amount
Format:
PRODUCT=UAG50;VER=2.00.00;LOGNAME=BLA;
DATE=07Mar26;
TIME=15:23:32;WANMAC=09-00-0e-00-00-01;
LANMAC=09-00-0e-00-00-02; WLANMAC=09-00-0e-00-00-03;
IP_ADDRESS=210.66.37.21;USER_NAME=username;
BILL_TYPE=Cash,
BILL_AMOUNT= USD50.00
Billing Type= Cash | Credit_Card; Billing Amount = xx.xx
Currency = AUD | CHF | EUR | GBP | JPY | RIY | USD……
UAG50 User’s Guide
57
Click Apply button to save the new settings and the success dialog box appears. Click
on Back to return to Logs setting screen.
3-2-3-2 Session Trace
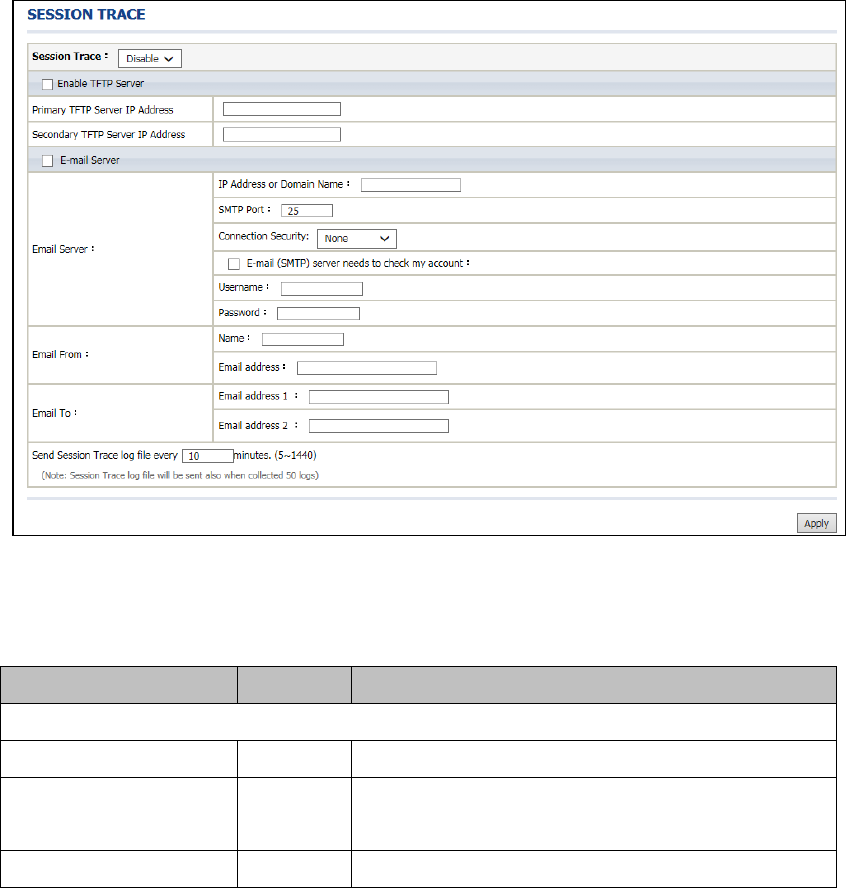
Session Trace is an intelligent function to help service provider to trace every user’s
access behavior. When “session trace” is enable , the system will collect information
such like destination IP, destination port, source IP, source MAC, source port by
every user and send the collected information in text format file to specified TFTP
server or Email Server.
Figure 3-2-23 Session Trace Setting Screen
Item Default Description
TFTP Server
Session Trace Disable Disables or enables session trace function.
Primary TFTP Server IP
Address
Empty Enter the IP address of the primary TFTP server.
Secondary TFTP Server IP Empty Enter the IP address of the second TFTP server.
UAG50 User’s Guide
58
Item Default Description
Address
Send Session Trace log file
every~ minutes.
10 minutes The field means to send the session trace log file every interval
minutes. The value range is 5 to 1440 (minutes).
Send to Email Disable Enables or disables the send to e-mail function.
E-mail Server
IP Address or Domain Name Empty Enter the SMTP server IP address or domain name. The
maximum allowed characters length is 50.
SMTP Port Empty The SMTP port allowed range is 25 or 2500 to 2599.
E-mail (SMTP) Server needs
to check my account
Disable If your SMTP server requires authentication before accepting
e-mail, click on check box. These values (username and
password) are supplied by your network administrator, SMTP
server provider or ISP.
Username Empty Enter the username for the SMTP server. The maximum allowed
characters length is 64.
Password Empty Enter the password for the SMTP server
Email From
Name Empty Enter the name you would like to appear in the “message from”
field of your outgoing message. The maximum allowed characters
length is 20.
Email Address Empty Enter your e-mail address. This is the address others will use to
send email to Email Address 1/Email Address 2.
Email To
Email Address 1 Empty Enter your first e-mail address to receive the logs.
Email Address 2 Empty Enter your second e-mail address to receive the logs.
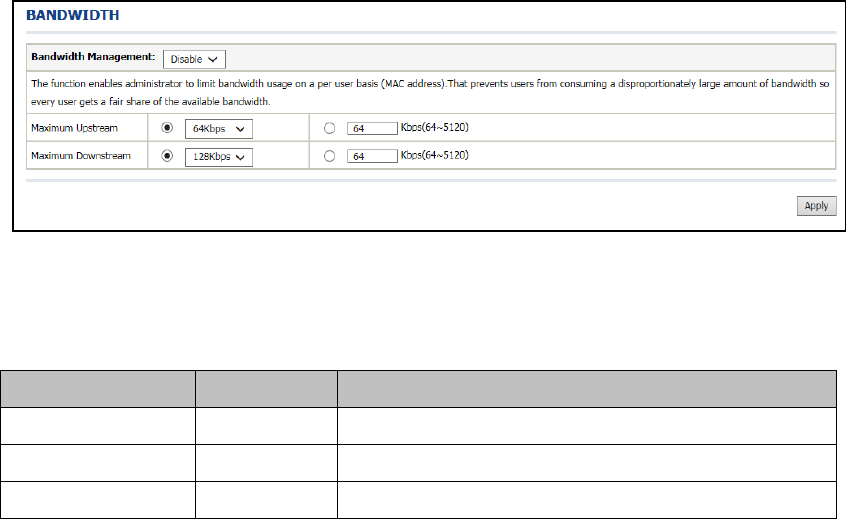
3-2-3-3 Bandwidth
The function enables administrator to limit bandwidth usage on a per user basis
(MAC address). That prevents users from consuming a disproportionately large
amount of bandwidth so every user gets a fair share of the available bandwidth.
UAG50 User’s Guide
59
Figure 3-2-24 Bandwidth Setting Screen
Item Default Description
Bandwidth Enable Enables or disables Bandwidth Management.
Maximum Upstream 64Kbps Specify the amount of upstream bandwidth.
Maximum Downstream 128Kbps Specify the amount of downstream bandwidth.
UAG50 User’s Guide
60
3-2-3-4 SNMP
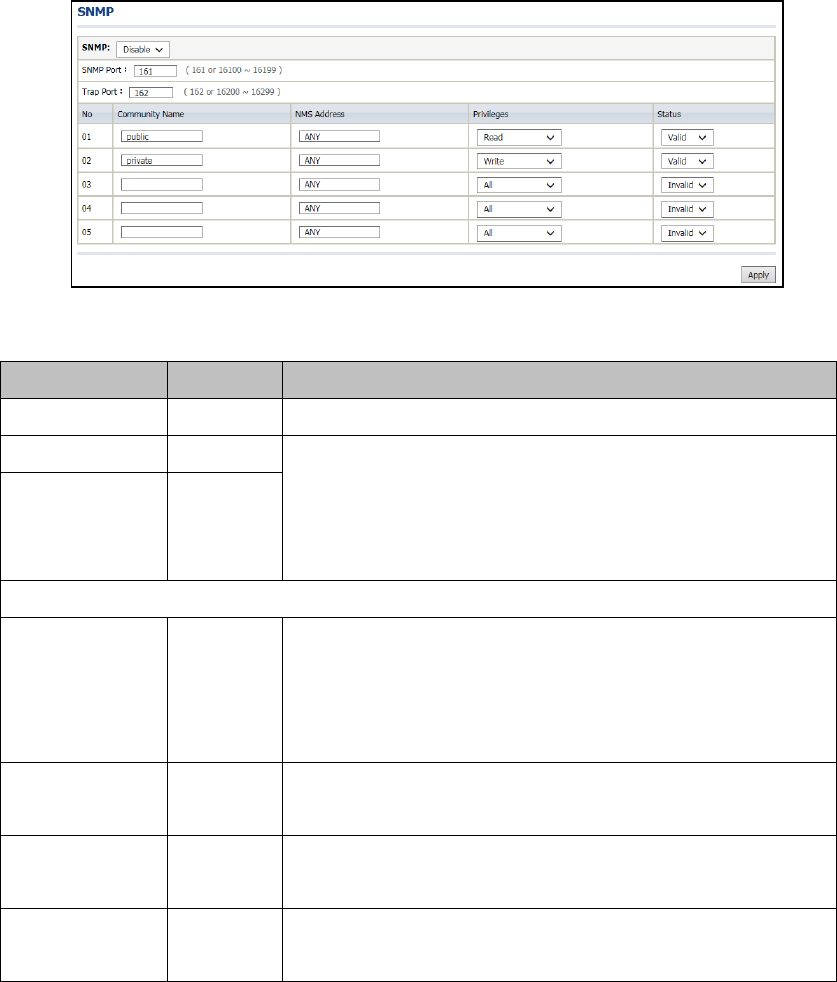
The SNMP Agent Configuration screen enables you to access to your device via
Simple Network Management Protocol. If you are not familiar with SNMP, please
consult your Network Administrator or consult SNMP reference material. You must
first enable SNMP on the SNMP Agent Configuration screen.
Figure 3-2-25 SNMP Setting Screen
Item Default Description
SNMP Disable Disables or enables the SNMP management.
SNMP Port 161 If the SNMP enables, also allowed to specific the SNMP port number via
NAT. The allowed SNMP port numbers are 161(default), 16100-16199 and
Trap port numbers are 162 (default), 16200-16299. This Port setting is
useful for remote control via NAT network.
Trap Port 162
Configuration
Community Name public/private Every unit with SNMP enable must be configured to recognize one or more
community names up to 20 characters. The default setting for the
community of entry 1 is “public” and for the entry 2 is “private” and others
are empty.
NMS Address ANY The address of the NMS. The default settings for the NMS Networking are
“ANY”.
Privileges Read/Write Choose “Read”, “Write”, “Trap Recipients” and “All” for different privileges.
The default setting of the entry 2 is “write” and others are “read”.
Status Valid/Invalid Chosen “Valid” or “Invalid”. The default setting of entry 1, 2 are valid and
others are invalid.
UAG50 User’s Guide
61
3-2-4 Security
3-2-4-1 Pass Through
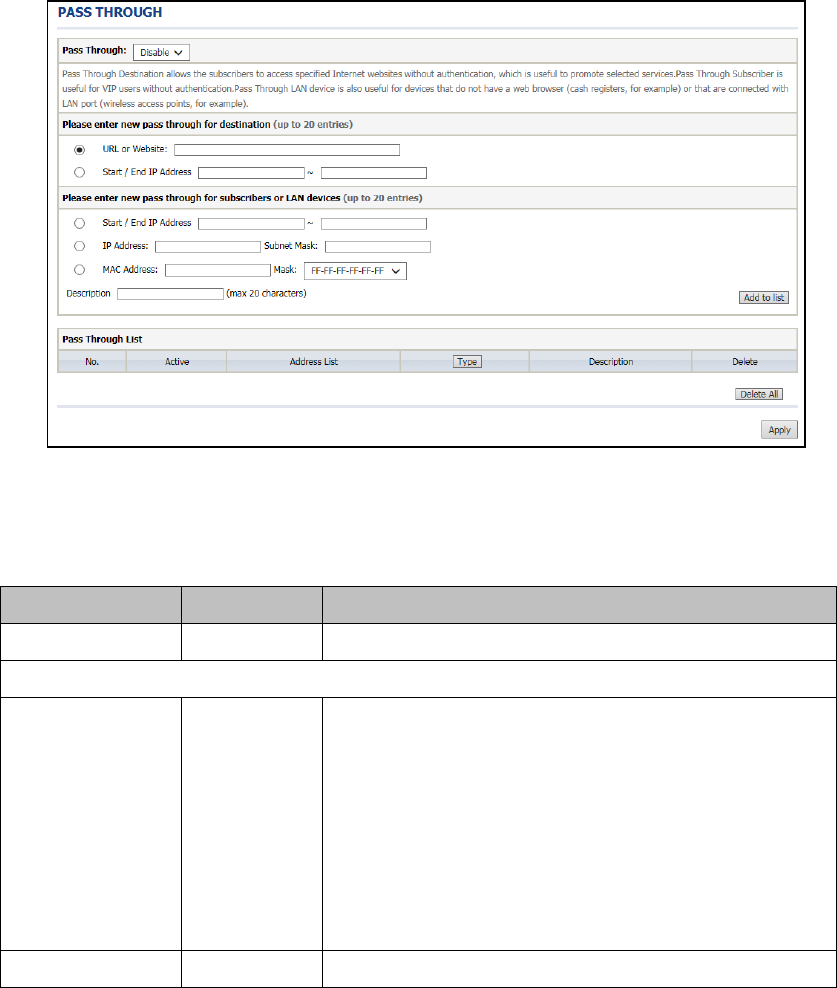
This function allow administrator to set some special devices pass through the
UAG50 system. Because some network devices might be constructed under the
UAG50. However these devices needn’t be checked and authorized. The UAG50
provides a pass through list and the administrator can control which devices can be
pass through with authentication.
Figure 3-2-26 Pass through Setting Screen
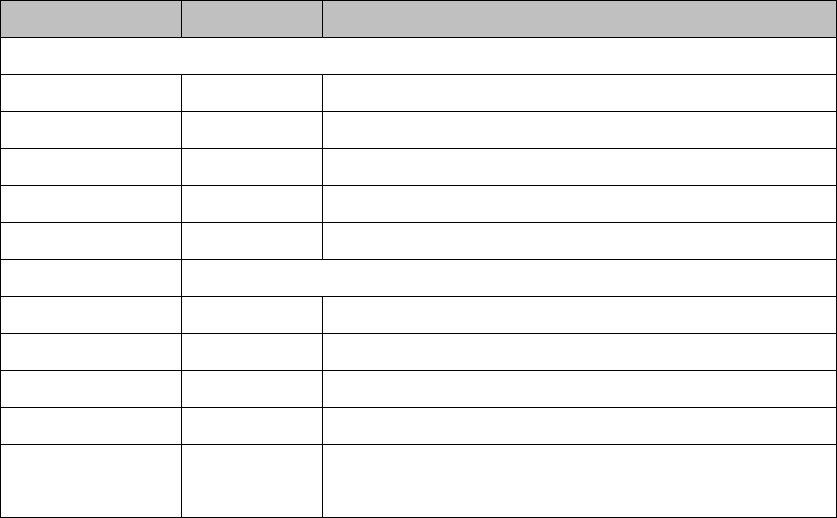
Item Default Description
Pass Through Enable Enables or disables the pass through function.
Destination URL/IP Address Pass Through
URL or Website Empty Enter the URL Page; please use this format such like
“http://www.yahoo.com”. The maximum character of the URL Page
is 50.
Note:
1. Please add www.apple.com
into PASS THROUGH list
in UAG50. (iOS 6 device and later is required.)
2. Please add go.redirectingat.com for certain QR code apps.
Start / End IP Address Empty Enter the start / end IP address of you wants pass through.
UAG50 User’s Guide
62
Item Default Description
Subscriber IP/MAC Address or LAN Device Pass Through
Start / End IP Address Empty Enter the start / end IP address of you wants pass through.
IP Address Empty Enter the IP address of you wants pass through.
Subnet Mask Empty Enter the subnet mask of you wants pass through.
MAC Address Empty Enter the MAC address of you wants pass through.
Mask Empty Enter the subnet mask of you wants pass through.
Pass Through List Display the pass through Information of UAG50.
No. - The index number of pass through address.
Active Disable Click on check box, active or inactive the pass through address.
Address List - Display the pass through address(s).
Type - Display the type of pass through address.
Delete Disable Select the check boxes and click ‘Delete’ to delete the pass through
address(s).
Click Add to List button to add a new entry. Click Apply button to save the new
settings. Click Delete All & Apply button to delete all entries.
Note: The priority of "pass through" is higher than "Filtering".
3-2-4-2 Filtering
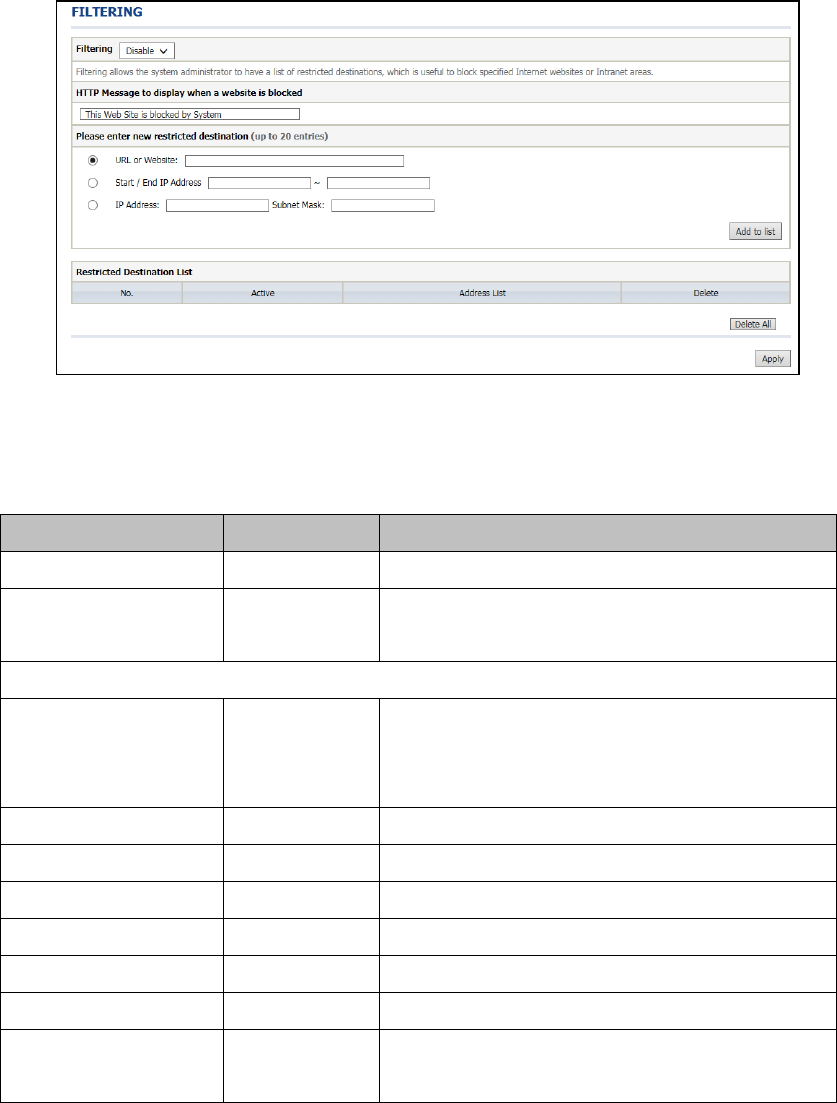
Filtering allows the system administrator to have a list of restricted destinations,
which is useful to block specified Internet websites or Intranet areas.
UAG50 User’s Guide
63
Figure 3-2-27 Filtering Setting Screen
Item Default Description
Filtering Enable Enables or disables filtering function.
HTTP Message to display
when a website is blocked
The Web Site is
blocked by System
Enter the http message. The maximum character of the HTTP
message is 200.
Restrict Destination
URL or Website Empty Enter the URL Page of you wants to filter; please use this
format such like “http://www.yahoo.com”. The maximum
character of the URL Page is 50.
Start IP Address Empty Enter the start IP address of you wants to filter.
IP Address Empty Enter the destination IP address of you wants to filter.
Subnet Mask Empty Enter the destination subnet mask.
No - The index number of filtering address.
Active Disable Click on check box, active or inactive the filtering address.
Address List - Display the filtering address(s).
Delete Disable Select the check boxes and click ‘Delete’ to delete the filtering
address(s).
Click Add to List button to add a new entry.
Click Apply button to save the new settings.
Click Delete All & Apply button to delete all entries.
UAG50 User’s Guide
64
3-2-4-3 Secure Remote
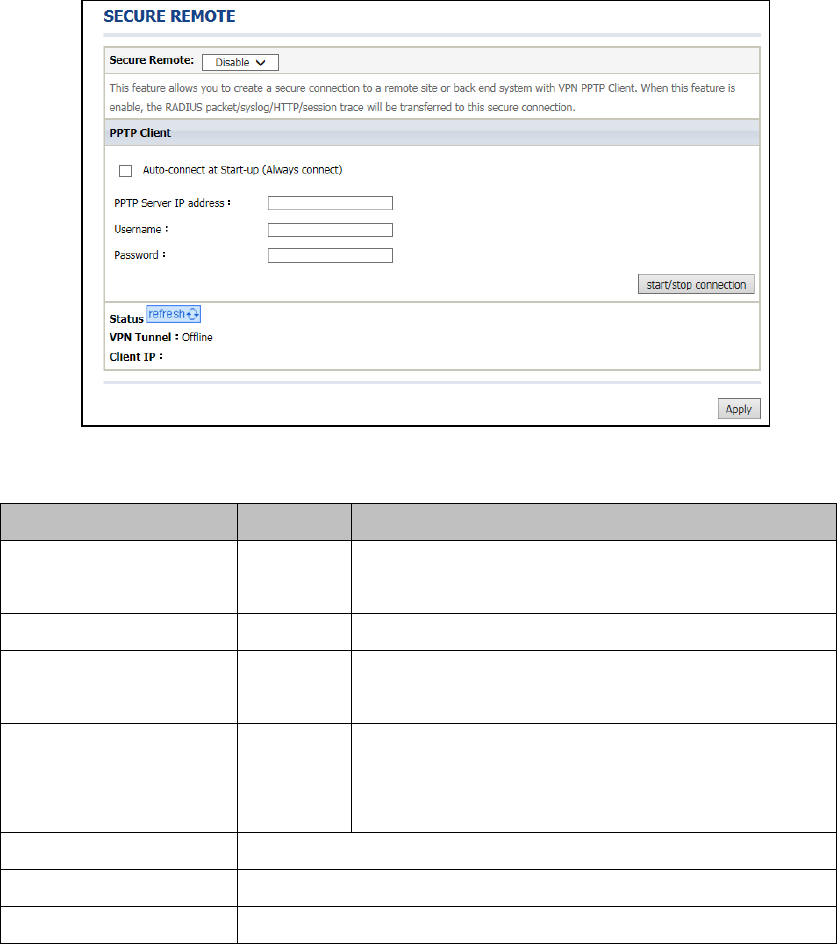
This feature allows you to create a secure connection to a remote site or back end
system with VPN PPTP Client. If “Secure Remote” is enabled, the RADIUS packet/
syslog will be transferred to this secure connection.
Figure 3-2-28 Secure Remote Setting Screen
Item Default Description
Auto-connect at Start-up
(Always connect)
Disable Enable the check box to automatically establish the PPTP
connection.
PPTP Server IP address Empty Enter the PPTP server IP address provided by your ISP.
Username Empty Enter the user name provided by your ISP. The user name can
consist of up to 80 alphanumeric characters and is case sensitive.
Password Empty Enter the user password provided by your ISP. The password
can consist of up to 80 alphanumeric characters and is case
sensitive.
start / stop connection Click on Start/Stop connection button to start/stop PPTP connection.
VPN Tunnel Display the status.
Client IP Display the IP address.
Click refresh button to delete all entries.
UAG50 User’s Guide
65
3-2-5 System
3-2-5-1 System
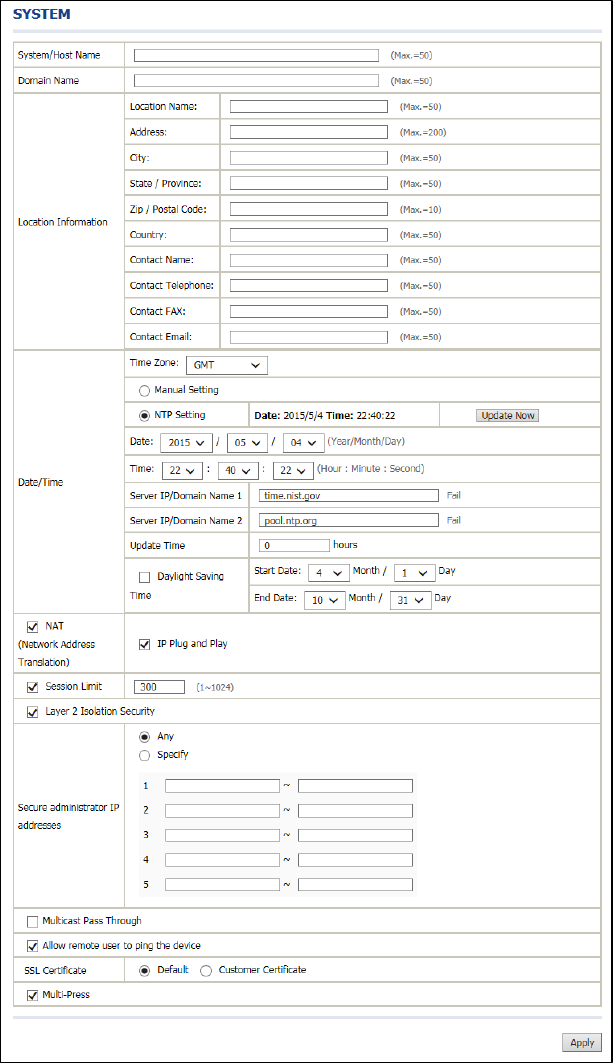
Define the UAG50 System configuration.
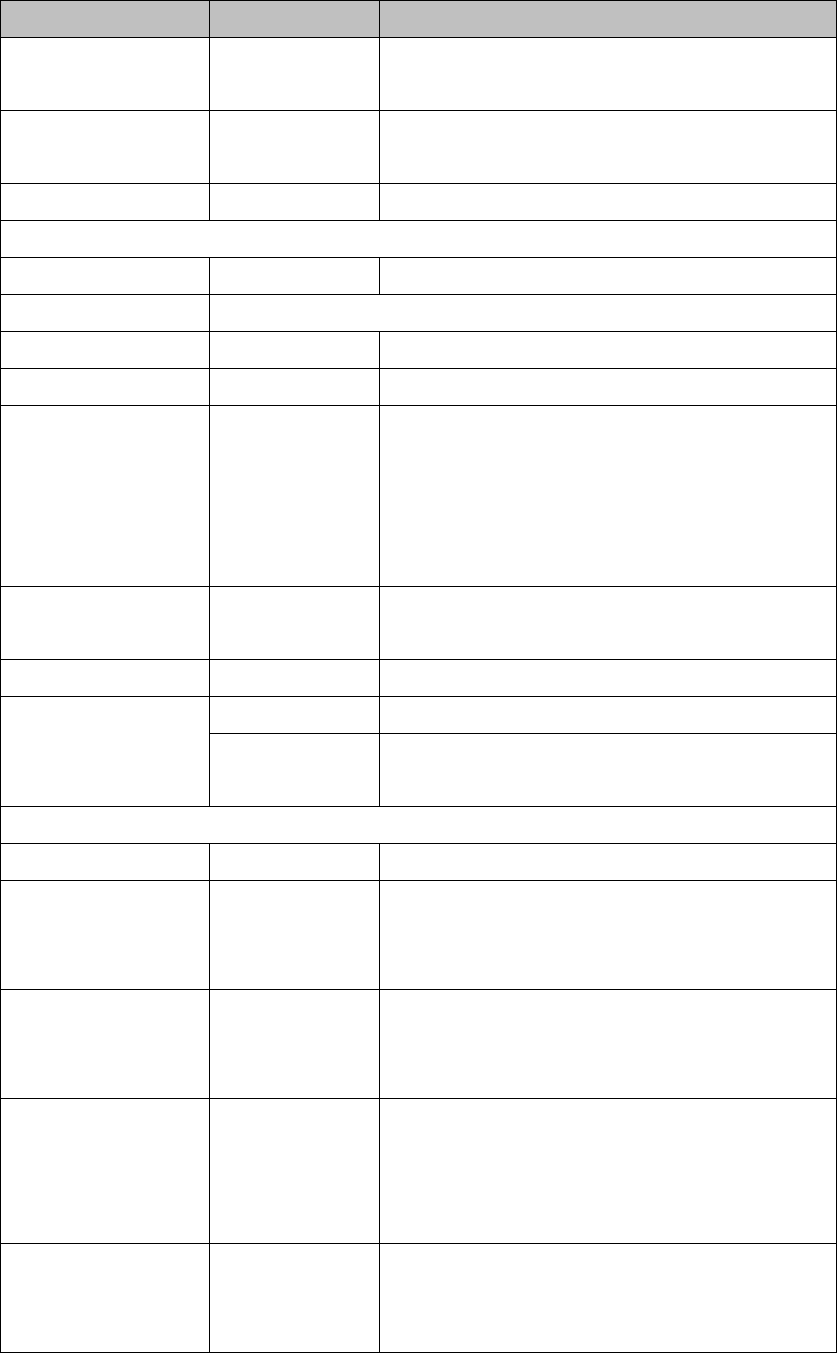
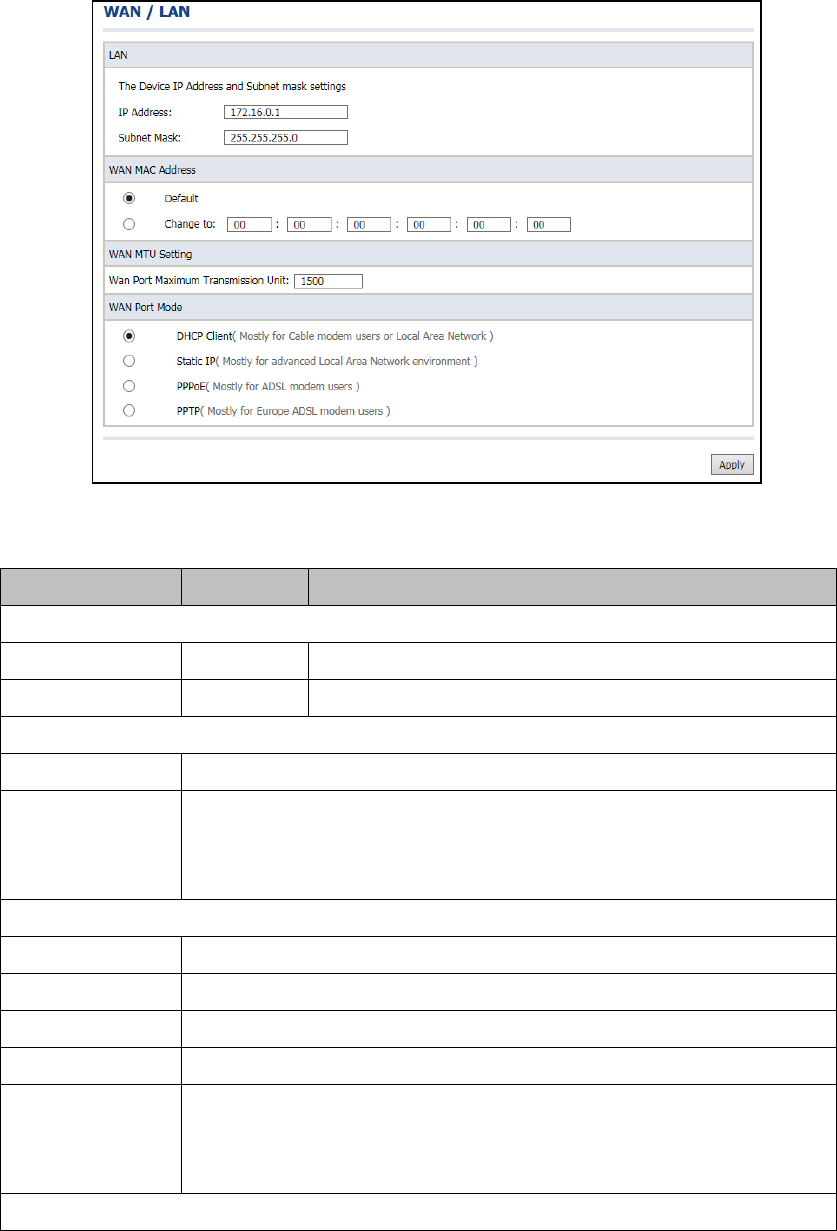
Figure 3-2-29 System Setting Screen
UAG50 User’s Guide
66
Item Default Description
System/Host Name Empty The system name can consist of up to 50 alphanumeric
characters.
Domain Name Empty The Domain name can consist of up to 50 alphanumeric
characters.
Location Information Empty Enter your location information.
Date/Time
Time Zone GMT Select the appropriate time zone for your location.
Manual Setting Click Manual Setting to set the system date and time.
Date Year/Month/Day Enter the Date for the system.
Time Hour:Minute:Second Enter the Time for the system.
NTP Setting Enable Enables or disables NTP (Network Time Protocol) Time
Server. Network Time Protocol can be utilized to synchronize
the time on devices across a network. A NTP Time Server is
utilized to obtain the correct time from a time source and
adjust the local time.
Server IP/Domain Name Empty Enter the IP address/domain name of NTP server. The
maximum allowed characters length is 100.
Update Time 0 hours Enter the number of hours for update time.
Daylight Saving Time Disable Enables or disables Daylight Saving Time (DST).
Month/Day Set the Daylight Saving Time (DST) on the UAG50. Adjust the
begin time and end time.
NAT (Network Address Translation)
NAT Enable Enables or disables NAT Address Translation function.
User Session Limited Enable,300 Enables or disables user session limit function. This feature
provides you an ability to control a number of sessions
allowed for particulars user(s) at the one time.
IP Plug and Play (iPnP
Technology)
Enable Enables or disables plug & play function. When enabled, the
user needn’t change their network configuration to access the
Internet.
Layer 2 Isolation Security Enable If enable plug and play is selected, you can enable Layer 2
Isolation Security function. When the “Layer 2 Isolation
Security” enabled, everyone cannot communicate with each
other.
Secure administrator IP
Addresses
Any Options: Any and Specify. Administrator can specify 5 IP
addresses or a range to allow remote control access from
network.

UAG50 User’s Guide
67
Item Default Description
Multicast Pass Through Disable This function allows for multiple transmissions to specific
recipients at same time.
Allow remote user to ping
the device
Enable This function allows remote user to ping the UAG50 through
Internet. Ping is normally used to test the physical connection
between two devices, to ensure that everything is working
correctly.
SSL Certificate Disable Option: default or customize certificate, These are two ways
to create a certificate, one is purchase a certificate from a
certificate authority (Ex. Verisign or Thawte), and another is
creating a self-certificate (For example: Uses OpenSSL tool).
Multi-Press Enable If the Multi-Press is enabled, the unit on the ticket will equal to
the times of press at one time. So the venue could control the
unit on each ticket by Multi press function.
If the Multi-Press is disabled, The unit on ticket will not be
affected by the times of button pressed. It means no matter
how many times the button has been pressed at one time, the
unit on the ticket will stay as 1.
Click Apply button to save the new settings.
UAG50 User’s Guide
68
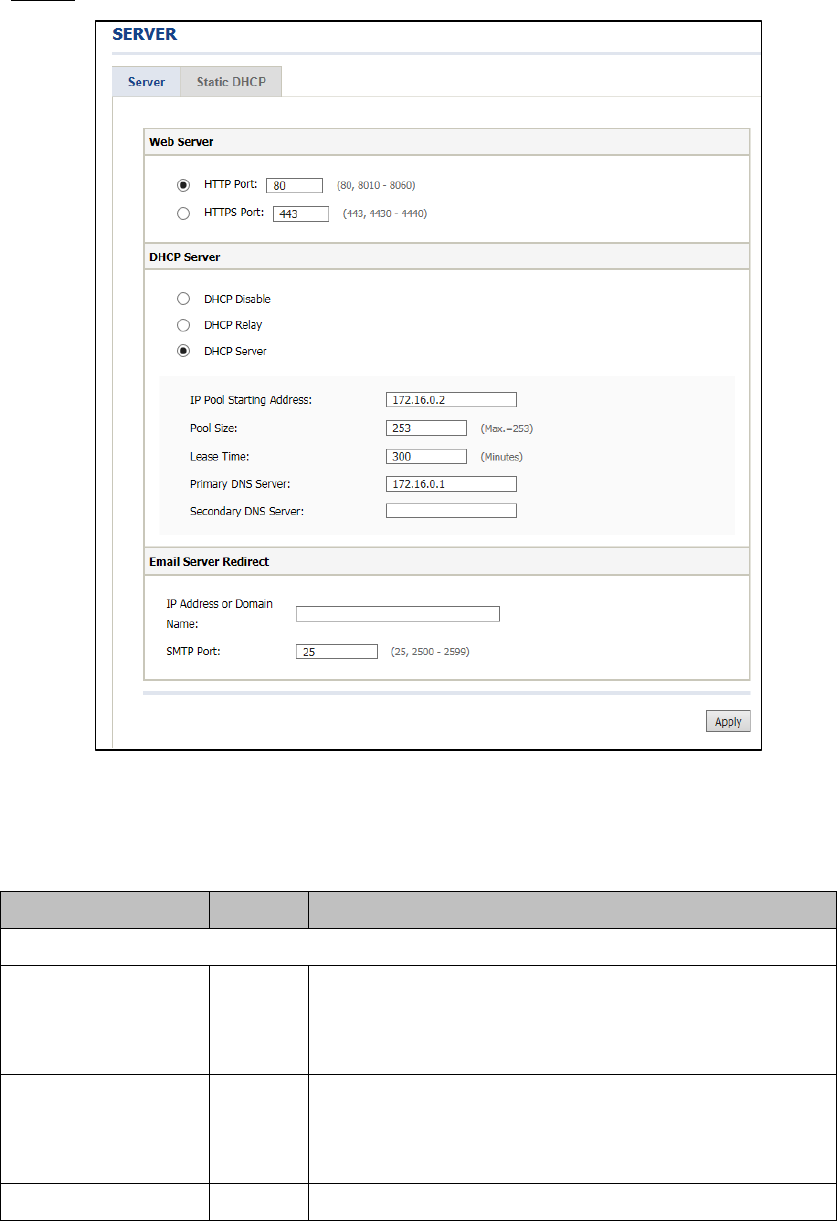
3-2-5-2 WAN/LAN
Figure 3-2-30 WAN/LAN Setting Screen
Item Default Description
LAN
IP Address 172.16.0.1 The internal LAN IP address of your UAG50.
Subnet Mask 255.255.255.0 Enter the subnet mask for the IP address.
WAN MAC Address
IP Address The default MAC address is set to the WAN physical interface on device.
DHCP Client The device can work as a DHCP client. This allows the device to obtain the IP address
and other TCP/IP settings from your ISP. If your xDSL/Cable comes with this feature,
please enable Use DHCP Client.
Static IP
IP Address Enter the IP address for the xDSL/Cable connection (provided by your ISP).
Subnet Mask Enter the subnet mask for the IP address.
Gateway IP Gateway Enter the Gateway IP address for the xDSL/Cable connection (provided by your ISP).
Primary DNS Server A primary DNS server IP address for the xDSL/Cable connection (provided by your ISP).
Secondary DNS
Server
A secondary DNS server IP address for the xDSL/Cable connection (provided by your
ISP). If the primary DNS Server IP were not available, meanwhile, Secondary DNS Server
IP would start in the same time.
PPPoE

UAG50 User’s Guide
69
Item Default Description
User Name Empty Enter your PPPoE account name. The user name can consist of up to
80 alphanumeric characters and is case sensitive.
Password Empty Enter your PPPoE password. The password can consist of up to 80
alphanumeric characters and is case sensitive.
PPP MTU Setting 1492 MTU (Maximum Transfer Unit) specifies maximum transmission unit
size.
TCP MSS Setting 1452 MSS (Maximum Segment Size) specifies maximum segment size.
Service Name Empty Enter the service name provided by your ISP. The service name can
consist of up to 64 alphanumeric characters and is case sensitive.
Connect on Demand Enable You can configure your UAG50 to cut your connection with your ISP
after a specified period of time (Max Idle Time). If you have been
disconnected due to inactivity, Connect on Demand enables your
UAG50 to automatically re-establish your connection as soon as you
attempt to access the Internet again. If you wish to activate Connect on
Demand, click the radio button. If you want your Internet connection to
remain, click the radio button of keep alive. The Max Idle Time
maximum value is 65535 minutes.
Max Idle Time 10 Minutes
Keep alive Disable This option keeps your PPPoE enabled Internet access connected
indefinitely, even when it sits idle. The Redial Period maximum value is
65535 seconds.
Redial Period 30 Seconds
UAG50 User’s Guide
70
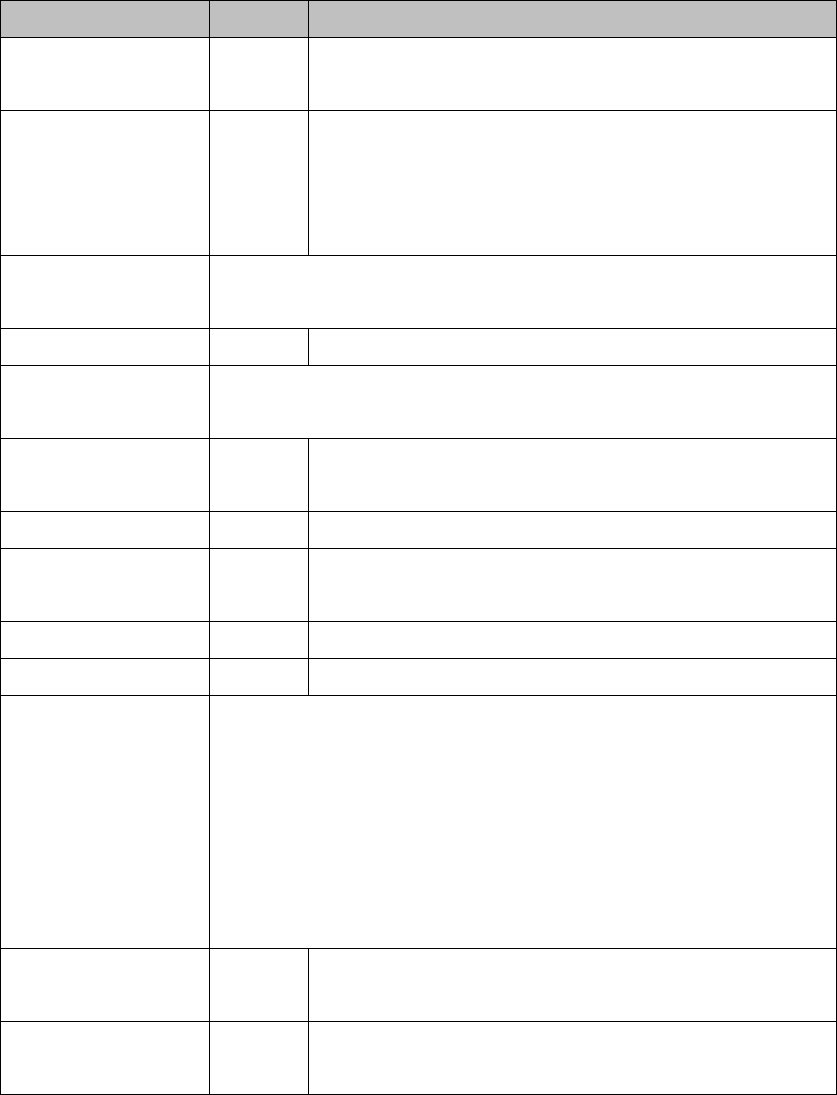
3-2-5-3 Server
Server
Figure 3-2-31 Server Setting Screen
Item Default Description
Web Server
HTTP Port 80 Enter the HTTP port number. The HTTP port allowed range is 80 or
8010 to 8060. For access the UAG50 system under NAT, please tab the
“http://HTTP Port IP Address: Port Number”.
HTTPS Port 443 Enter the HTTPS port number. The HTTPS port allowed range is 443 or
4430 to 4440. For access the UAG50 system, please tab the
“https://HTTPS Port IP Address: Port Number”.
Administrator Idle-Timeout 5 Minutes The idle time out valid range is 1-1440. If the idle time out is set as 5
UAG50 User’s Guide
71
Item Default Description
minutes, it means if the administrator doesn’t send packet in 5 minutes,
the administrator will logout automatically.
DHCP Server Enable There are three types of DHCP Services.
DHCP Disable—Disable the DHCP server function.
DHCP Relay—Enable DHCP Relay function.
DHCP Server—Enable DHCP server function.
DHCP Relay To route DHCP through an external server, the administrator needs to enable the
DHCP relay and assign a valid DHCP server IP address.
DHCP Server IP Address Empty Enter the IP address of DHCP server.
DHCP Server The UAG50's DHCP server is turned on and running by default when you install it in
your network.
DHCP Pool Starting
Address
172.16.0.2 Enter the DHCP Pool Starting IP address.
Pool Size 253 The DHCP pool size range is 1 to 512.
Lease Time 300
Minutes
The DHCP lease time. The DHCP lease time range is 1 to 71582788
minutes.
Primary DNS Server 168.95.1.1 Enter the IP address of the network’s primary DNS server.
Secondary DNS Server Empty Enter the IP address of a second DNS server on the network.
Email Server Redirect To prevent some subscriber’s original Email server may protect by firewall or NAT
network. UAG50 provides an extra Email server parameter to forward the subscriber’s
Email. The UAG50 not only forwards the subscribers’ E-mail via other E-mail server
but also changes the SMTP header. The recipient of your E-mail sees the message as
if you sent it from your local Internet Service Provide, not form the hotel or other place.
Note: Before setting this sever, please make sure the e-mail sever relay function is
opened. It must not exceed 50 characters.
IP Address or Domain
Name
Empty Enter the E-mail server IP address or domain name.
SMTP Port 25 Enter the SMTP port number for mail server. The SMTP port allowed
range is 25 or 2500 to 2599.
Click Apply button to save the new settings.
UAG50 User’s Guide
72
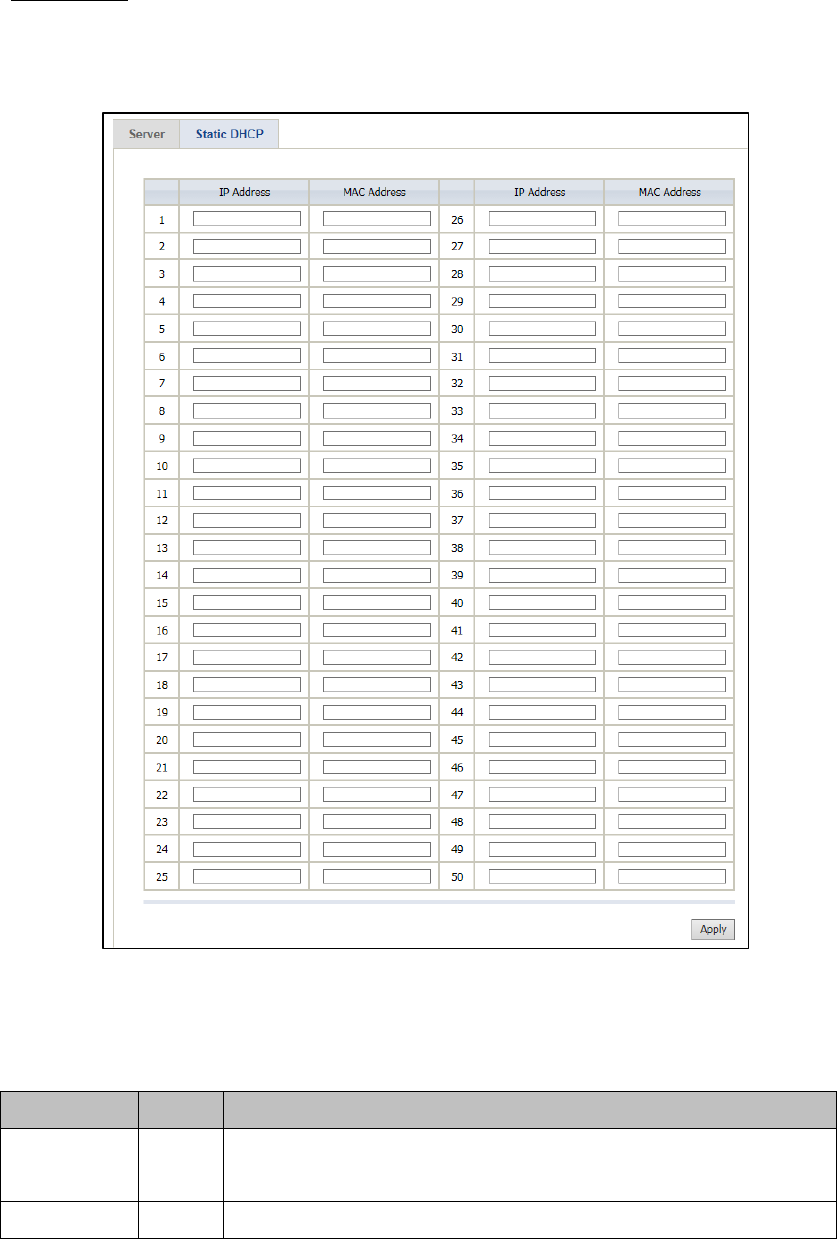
This function allows subscriber to assign IP address on the LAN to specific individual
computers based on their MAC Address.
Static DHCP
Figure 3-2-32 Server Setting Screen
Item Default Description
IP Address Empty Enter the IP address that subscriber want to assign to the computer on LAN with the
MAC address the subscriber will also specify.
MAC Address Empty Enter the MAC address of a computer on your LAN.
Click Apply button to save the new settings.

UAG50 User’s Guide
73
3-2-5-4 Customization
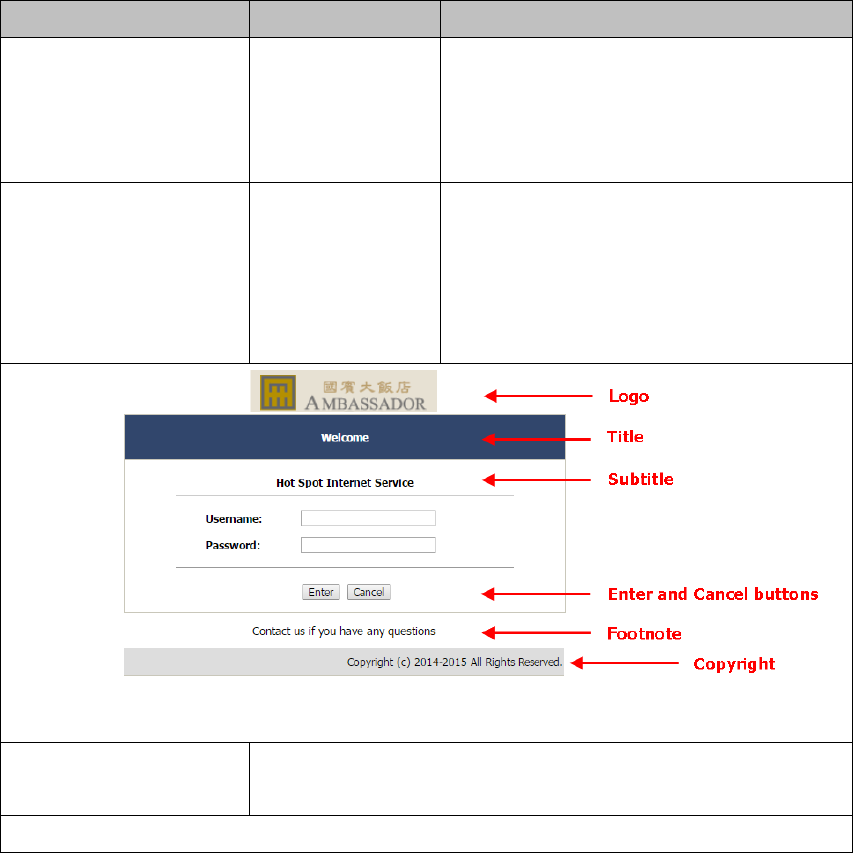
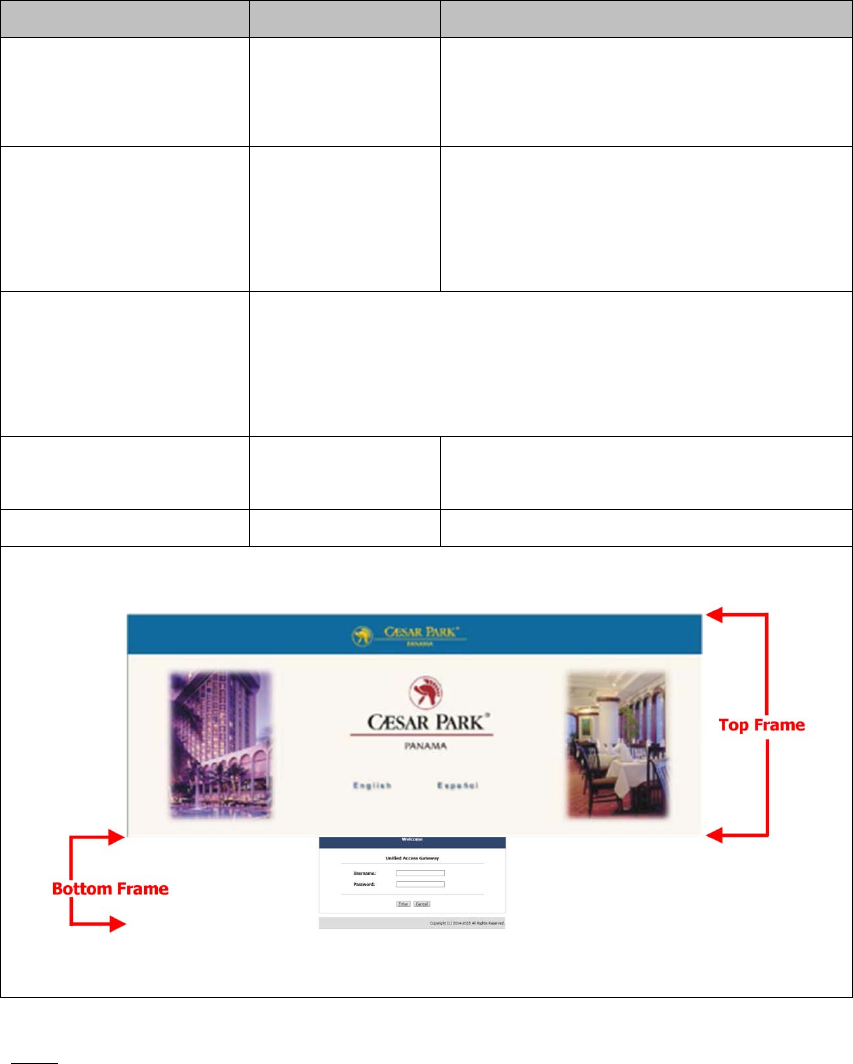
The UAG50 provides three different login page formats, including standard, redirect,
advanced and frame format.
Login Page
Figure 3-2-33 Customization Setting Screen
Item Default Description
Standard For some service providers, they may hope to have a customize subscriber’s login
page to the users. This function helps them to realize the ideal. The page elements
are including login page title, background color, subtitle etc.
Logo Disable Select the check box to display service provider’s logo.
Title Welcome Enter the title name of subscriber login page. The
maximum allowed characters length is 80.
Subtitle Hot Spot Internet
Service
Enter the subtitle name of subscriber login page. The
maximum allowed characters length is 80.
Footnote Disable Allow the administrator to input the footnote such like
“Please Contact to our Customer Service Center, EXT
141”. The maximum character of the footnote is 240.
UAG50 User’s Guide
74
Item Default Description
Copyright Enable The copyright is allowed the administrator to input a
paragraph in
the subscriber login page for copyright information. The
maximum character of the copyright is 80.
Background Color FFFFFF The background text color can be specified color. For
the specified
text color format please views the color grid. The
allowed format is
Hexadecimal.
Figure 3-2-34 Login Page Screen
edirect This allow service provider to redirect the subscriber’s browser to a specified home
page.
Copy and paste the following HTML Code into your home page to produce redirect subscriber login page.

UAG50 User’s Guide
75
Item Default Description
Figure 3-2-35 Preview Redirect Login Page Code
Advanced This function allow user to design login page of UAG50.
Welcome Slogan Welcome The maximum allowed characters length is 80.
Page Background None The page background can be none or specified color.
For the background color format please views the color
grid. The allowed format is Hexadecimal.
Article Empty The article is allowed the administrator to input a
paragraph in the subscriber login page for advisement
or announcement. The maximum character of the
article is 1024.
Article Text Color 000000 The article text color can be specified color. For the
specified text color format please views the color grid.
The allowed format is Hexadecimal.
Article Background
Color
None The article background can be specified color. For the
background color format please views the color grid.
The allowed format is Hexadecimal.
Information Empty Allow the administrator to input the text information
UAG50 User’s Guide
76
Item Default Description
such like address, telephone number and fax
information. The maximum character of the information
is 80.
Comments Empty Allow the administrator to input the text comments such
like “Please Contact to our Customer Service Center,
EXT 141”. The maximum character of the comment is
80.
Frame If “Frame” is selected the subscriber login page will be separate into Top Frame
and Bottom Frame.
Bottom Frame is a default format for username and password input, Top Frame is
allowed to be specified a URL to link.
Top Frame URL Link Empty The input format can be http://www.yahoo.com. The
maximum character of the URL Link is 200.
Bottom Frame - This frame will show the standard login page.
Figure 3-2-36 Example-Login Page Screen
This function allows service provider to upload the customer’s logo image file which
can be shown on the standard login page.
Logo
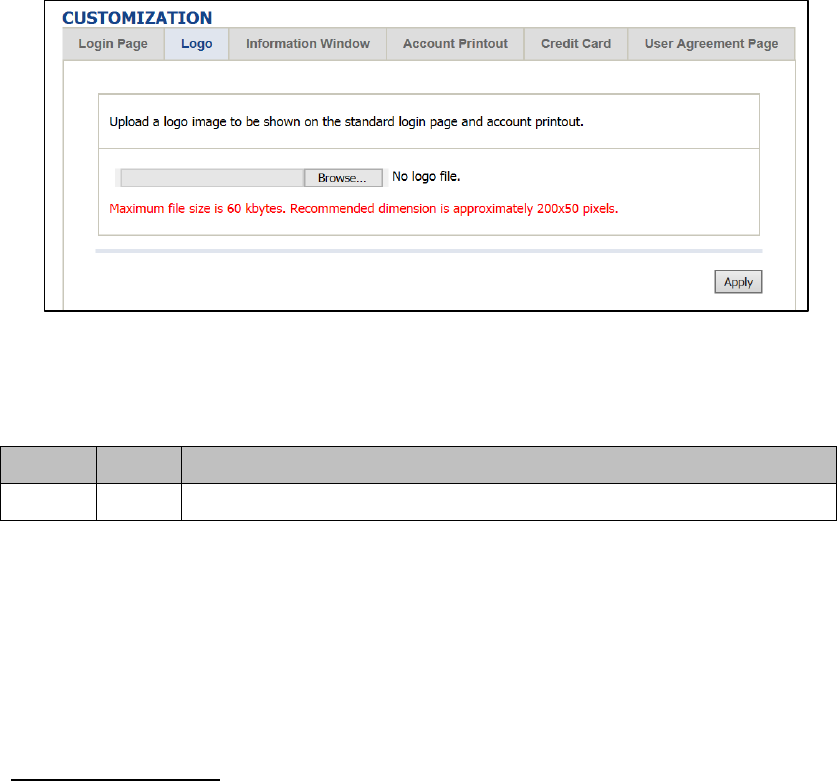
UAG50 User’s Guide
77
Figure 3-2-37 Logo Setting Screen
Item Default Description
File Path Empty Enter the file pathname of the logo file in the File Path field.
Click Apply button to save the logo file to system.
Click Delete button to delete the logo file.
This function allow service provider can decide whether they want an “Information
Window” pop-up on subscriber PC when authenticate successful or not and specified
text of information window. Subscriber can type “http://1.1.1.1/info” to open the
information window again or enter “http://1.1.1.1/logout” to logout immediately if
accumulation billing selected.
Information Window

UAG50 User’s Guide
78
Figure 3-2-38 Example-Login Page Screen
Figure 3-2-39 Information Window
Billing Type=Time to Finish
Can be topped up by subscriber=Enable
Figure 3-2-40 Information Window
Window Name
Main message
Message Description
Time count label
Warning/Alarm message
Notice Message
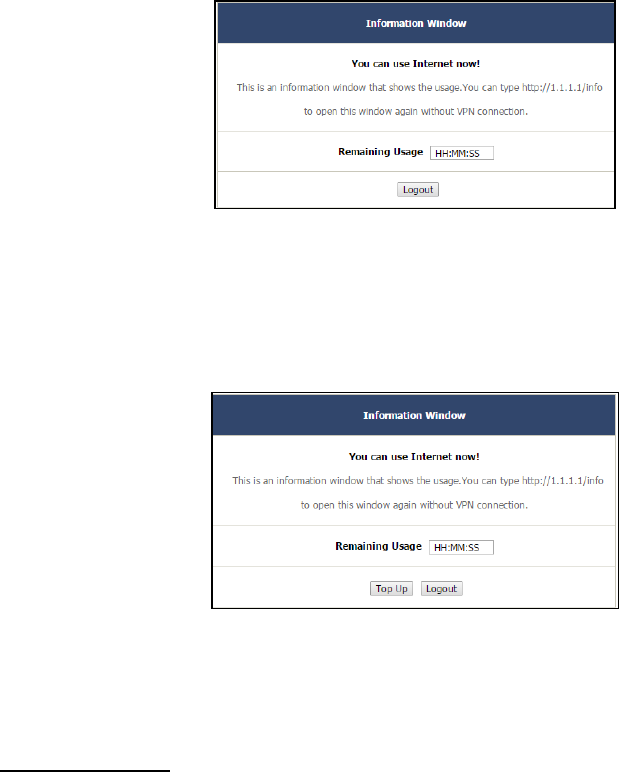
UAG50 User’s Guide
79
Billing Type=Accumulation
Can be topped up by subscriber=Disable
Figure 3-2-41 Information Window
Billing Type=Accumulation
Can be topped up by subscriber=Enable
Figure 3-2-42 Information Window
This function allow service provider to specified text of account printout.
Account Printout
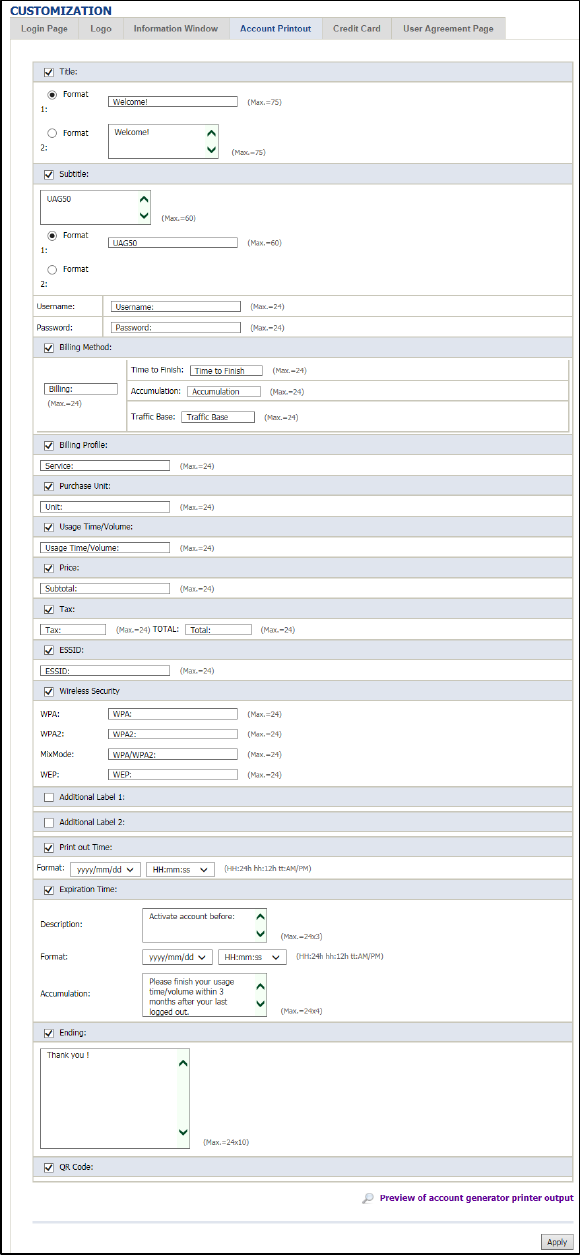
UAG50 User’s Guide
80
Figure 3-2-43 Account Printout Customization Setting Screen
Note: If you don’t print out QR code on the ticket, please disable “QR Code”.

UAG50 User’s Guide
81
Credit Card
Figure 3-2-44 Credit Customization Setting Screen
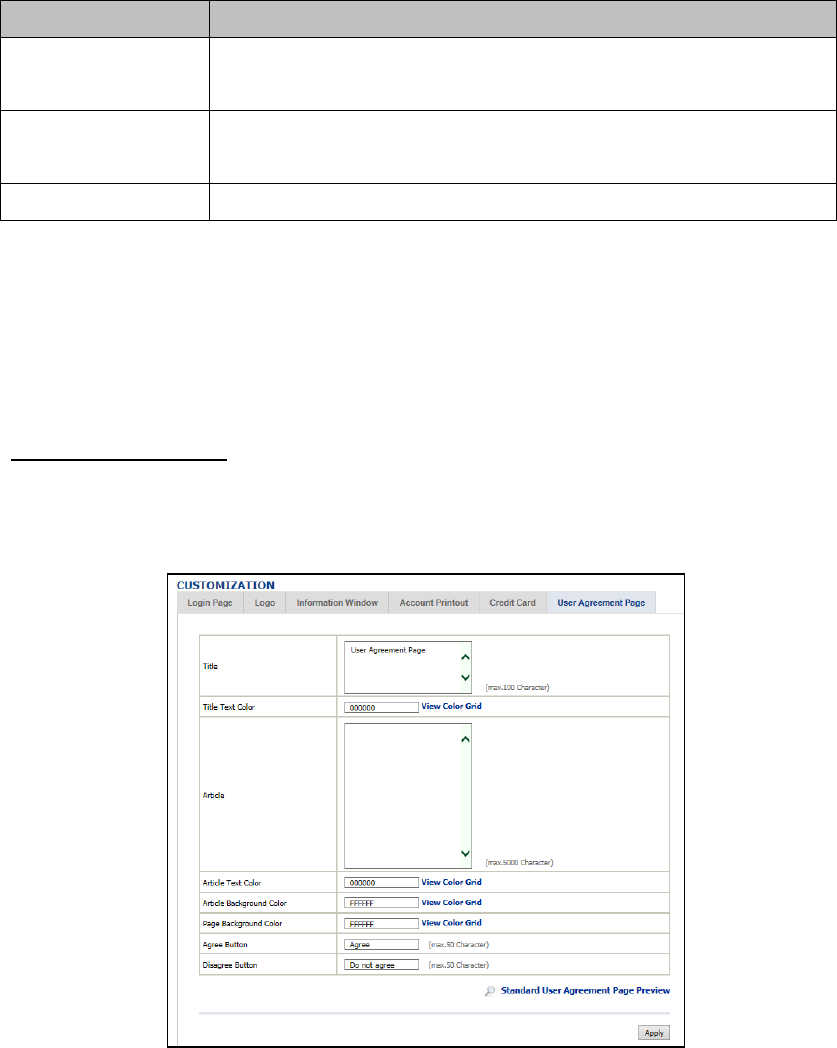
UAG50 User’s Guide
82
Item Description
Standard Login Page This function allow service provider to customize the additional credit card message
for the standard login page.
Service Selection Page This function allow service provider to customize the additional credit card message
for the standard login page.
Fail Page This function allow service provider to customize the message for the fail page.
Click Apply button, the success dialog box appears. Click on Back to return to Credit
Card Customization setting screen.
This function allow user to design user agreement page of Internet Subscriber
Server.
User Agreement Page
Figure 3-2-45 User Agreement Page Setting Screen
3-2-5-5 Portal Page
This feature allows redirecting subscriber’s browser to a specified portal page after
successful login.

UAG50 User’s Guide
83
Figure 3-2-46 Portal Page Setting Screen
Item Default Description
URL Link Empty Enter the URL Link page. The input format can be “http://www.yahoo.com”. The maximum
character of the URL Link is 200.
Click Apply button, the success dialog box appears. Click on Back to return to Portal
Page setting screen.
3-2-5-6 Advertisement
The system allow service provider to input 5 URL links for advertisement link
purpose.
Figure 3-2-47 Advertisement URL Link Setting Screen
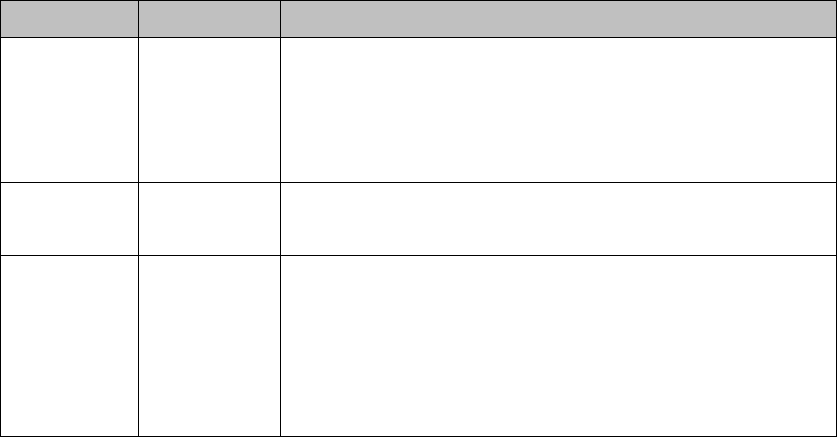
UAG50 User’s Guide
84
Item Default Description
Frequency One Time Only One Time Only—One Time Only means to send the advertisement link
once after the subscriber Login.
Every~Min(s)—The field means to send the advertisement link every
interval minutes. The value range is 1 to 60 (minutes).
Sequence Randomly Randomly—Display the advertisement page in the random order. From 1 to
10 —Display the advertisement page in the order as setting.
URL Link 1~5 Empty This function allows the administrator to input ten different websites in the
table for advertisement. And these 5 websites will display to the subscribers
at random when the subscribers login in the UAG50 system. The input
format can be “http://www.yahoo.com”. The maximum character of the URL
Link # is 200.
Click Apply button, the success dialog box appears. Click on Back to return to
Advertisement URL Link setting screen.
3-2-5-7 Walled Garden
We prepare ten URL links that allows subscriber to access the specific Web pages
even they didn’t have a username or password. It’s free trying and can use for
advertisement.
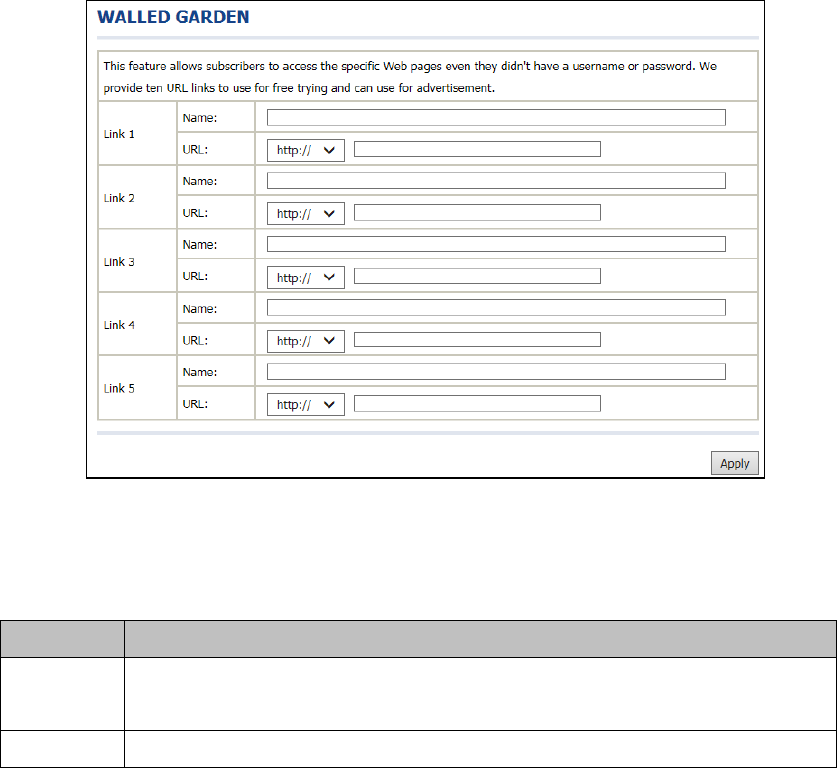
UAG50 User’s Guide
85
Figure 3-2-48 Walled Garden Setting Screen
Item Description
Name The name is allowed user to set the prompt string in user customize login page. The maximum
allowed characters length is 80.
URL 1~5 The input format can be “http://www.yahoo.com”. The maximum character of the Link# is 200.
Click Apply button, the success dialog box appears. Click on Back to return to Walled
Garden setting screen.
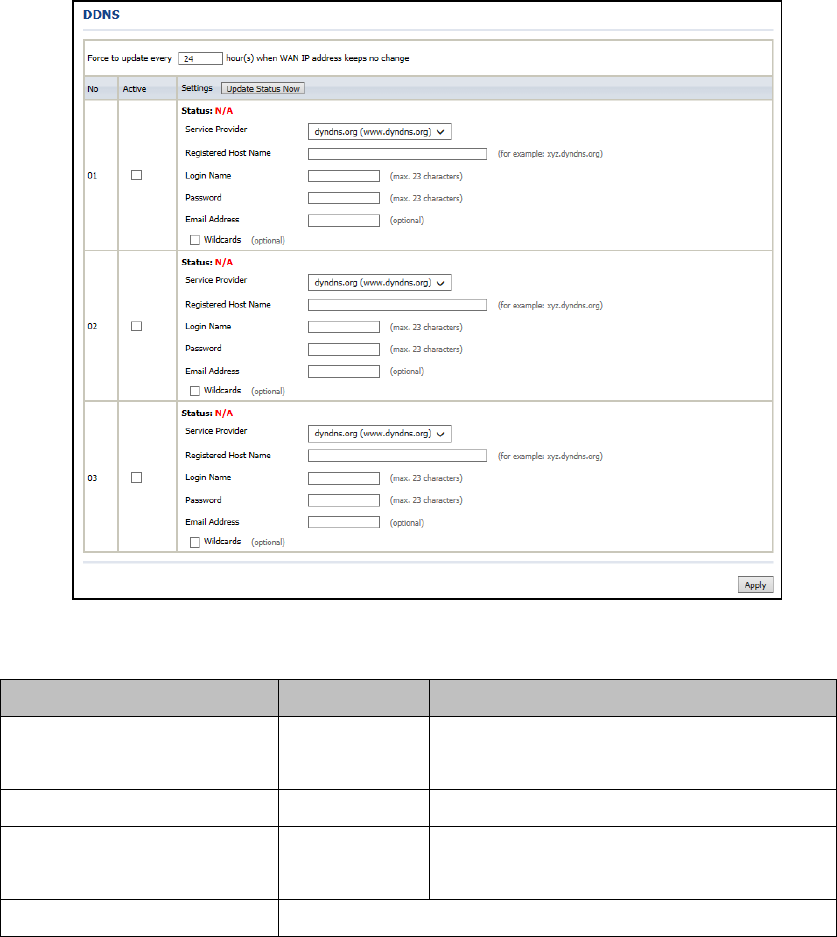
UAG50 User’s Guide
86
3-2-5-8 DDNS
The DDNS service (Dynamic Domain Name Service), an IP Registry provides a public
central database where information such as email addresses, host names, IP
addresses etc. can be stored and retrieved. This solves the problems if your DNS
server uses an IP associated with dynamic IP addresses. When the ISP assigns the
UAG50 a new IP, the UAG50 must inform the DDNS server the change of this IP so
that the server can update its IP-to-DNS entry. Once the IP-to-DNS table in the DDNS
server is updated, the DNS name for your web server (i.e., xyz.dyndns.org) is still
usable.
Figure 3-2-49 DDNS Setting Screen
Item Default Description
Force to update every~day(s) when
WAN IP address keeps no change
1 day Enter a number in the field to set the force update
interval (in days).
No 01~03 The index number of a DDNS account.
Active Disable Click on check box, active or inactive the DDNS
record.
Update Status Now Click the Update Status Now button to do manual update.

UAG50 User’s Guide
87
Item Default Description
Settings Enter the account information of DDNS Server.
Status YY/MM/DD
HH:MM:SS
Display the update date, time and status. The Status
area shows the update time and current state of the
DDNS Client.
N/A—DDNS Client service not installed.
Update Successfully—DDNS Client service installed;
service running.
Update Fail—DDNS Client service installed; service
not running.
Service Provider Dyndns.org
(www.dyndns.org)
Select a DDNS service provider by clicking in the list
box.
Note: Before configuring the DDNS settings, you have
to register a dynamic domain at one of the dynamic
domain service providers’ list box.
Registered Host Name Empty Enter the host name of DDNS server. The maximum
character of the registered host name is 100.
Login Name Empty Enter the user name of DDNS server.
Password Empty Enter the user password of DDNS server.
Email Address Empty Enter your email address. The DDNS Server will
e-mail you important information once your Internet
Name has been successfully registered.
Wildcards (optional) Disable Enable this function to be able to use
*.mydomain.dyndns.org and not only
mydomain.dyndns.org.
Click Apply button, the success dialog box appears. Click on Back to return to DDNS
setting screen.
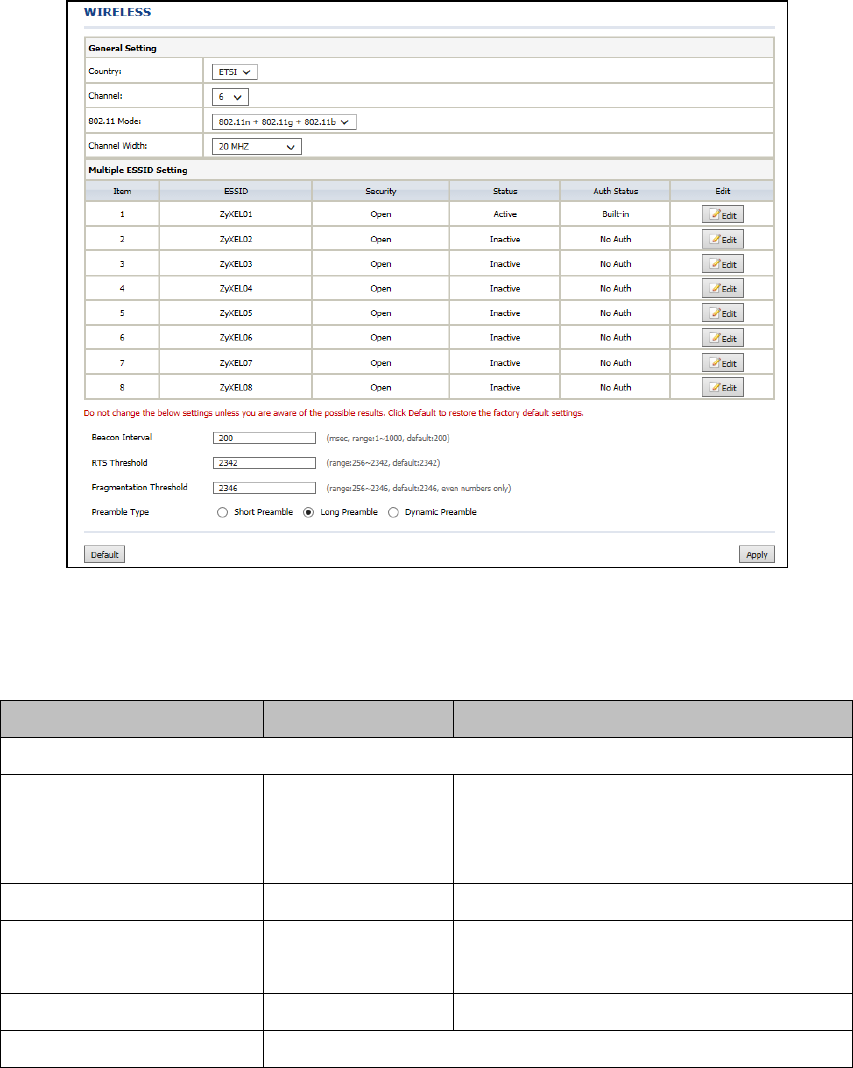
UAG50 User’s Guide
88
3-2-5-9 Wireless
Figure 3-2-50 Wireless Setting Screen
Item Default Description
General Settings
Country ETSI Select the country for wireless connection.
ETSI : Channel 1~13
FCC: Channel 1~11
Channel 6 Select the channel ID for wireless connection.
802.11 Mode 802. 11n + 802.11g +
802.11b
Enter the 802.11 Mode for wireless connection.
Channel Width 20 MHZ Select the Channel Width for wireless connection.
Multiple ESSID Setting Click Edit button for each of 8 ESSID setting.

UAG50 User’s Guide
89
Item Default Description
Figure 3-2-51 ESSID Setting Screen
General Settings
ESSID status Active (ESSID1) ESSID1 is active, and others are inactive by default.
ESSID name The ESSID’s name by default is "ZyXEL01". It is case sensitive and must not
exceed 32 characters.
Broadcast Enable This allows you to show or hide the ESSID name
when users search the Wi-Fi signal.
Security Settings
Security Open Select Open to allow wireless station to communicate
with the device without any data encryption. Select
WPA / WPA2 / MixMode for data encryption.
Group Key Re-Keying 86400 Seconds Enter a number in the field to set the force re-keying
interval.
Use WPA or WPA2 with
Pre-shared Key
Disable
Pre-Shared Key Empty Enter a pre-shared key from 8 to 63 case sensitive
ASCII characters.
Use WPA or WPA2 with 802.1x Disable
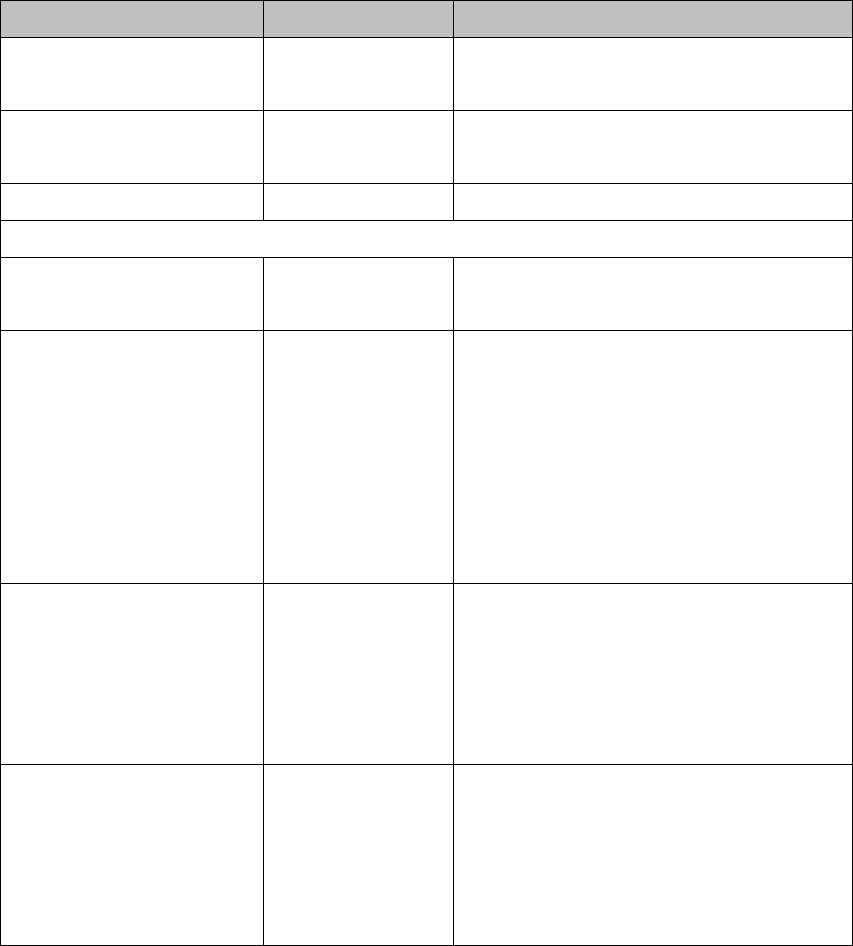
UAG50 User’s Guide
90
Item Default Description
RADIUS Server IP/Domain Empty Enter the RADIUS server IP address or domain
name. The maximum allowed characters length is 15.
Authentication Port 1812 Enter the authentication port number. The allowed
numbers are from 0 to 65535.
Share Secret Key Empty Enter the RADIUS secret key
Beacon Interval 200 This value valid range is 1 to 1000 indicates the
frequency interval of the beacon.
RTS Threshold 2347 This value valid range is 256-2342. This setting
determines the packet size at which the UAG50
issues a request to send (RTS) before sending the
packet. A low RTS Threshold setting can be useful in
areas where many client devices are associating with
the UAG50, or in areas where the clients are far apart
and can detect only the UAG50 and not each other.
Fragmentation
Threshold
2432 This setting determines the size at which packets are
fragmented. Enter a setting ranging from 256 to 2432
bytes. Use a low setting in areas where
communication is poor or where there is a great deal
of radio interference.
Preamble Type Long Preamble The preamble type is a section of data at the head of
a packet that contains information the UAG50 and
client devices need when sending and receiving
packets. The setting menu allows you to select a
long, short or dynamic preamble type.
Click Apply button, the restart dialog box appears. Click on Apply to restart the
system.
Click Default button to load the default manufacturer configuration to the system.
All this page (Wireless) configuration setup will be replaced by default settings.
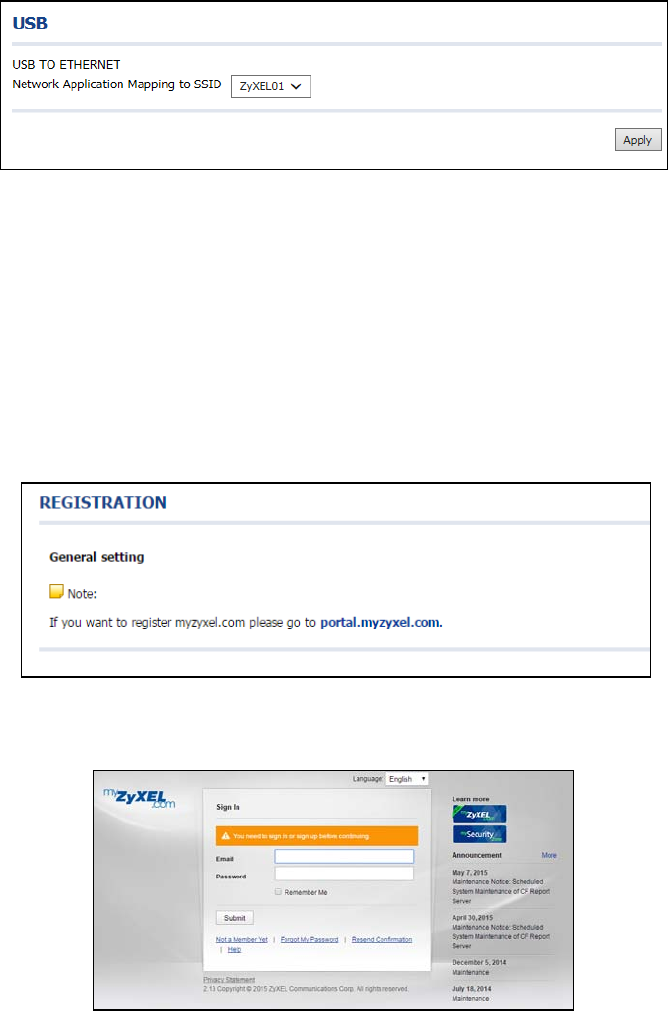
UAG50 User’s Guide
91
3-2-5-10 USB
The UAG50 plugged in a USB to Ethernet adapter can expand the UAG50 Wi-Fi signal
range. The administrator can connect UAG50 USB port to another AP/router
Ethernet port with a USB 2.0 to RJ45 Ethernet network adapter. After the activation,
the administrator can change the ESSID.
Figure 3-2-52 USB Setting Screen
3-2-5-11 Registration
You can register your UAG50 to get further services by clicking the URL link on this
screen.
Figure 3-2-53 Registration Screen
Figure 3-2-54 myzyxel.com Registration Website
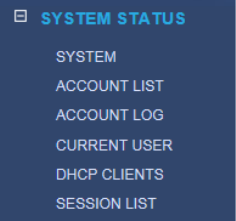
UAG50 User’s Guide
92
3-3 System Status
Display UAG50 system basic status, including,
1. System
2. Account List
3. Account Log
4. Current User
5. DHCP Clients
6. Session List
Figure 3-3-1 System Status Item Screen
3-3-1 System
The System Information Menu displays current system basic information including
the service connection message, host name, LAN, WAN, DHCP Configuration, DNS,
E-mail Redirection, SSL Certificate, network traffic Information and the system
firmware version number.
UAG50 User’s Guide
93
Figure 3-3-2 System Status Screen

UAG50 User’s Guide
94
3-3-2 Account List
You can display a list of all the account information on this device. This table includes
the personal Id, personal Id No, username, usage time/volume, time creted, login
time, time/volume left expiration time and status.
Figure 3-3-3 Account List
Click refresh button to update the account list page.
Click the column button (S/N, Status, Username, ….,etc.) to sort the column in
ascending/descending order.
Select the check boxes and click Delete to delete the accounts.
Click Delete ALL button to delete all accounts in account list.
Note: This page will refresh automatically every 5 minutes.
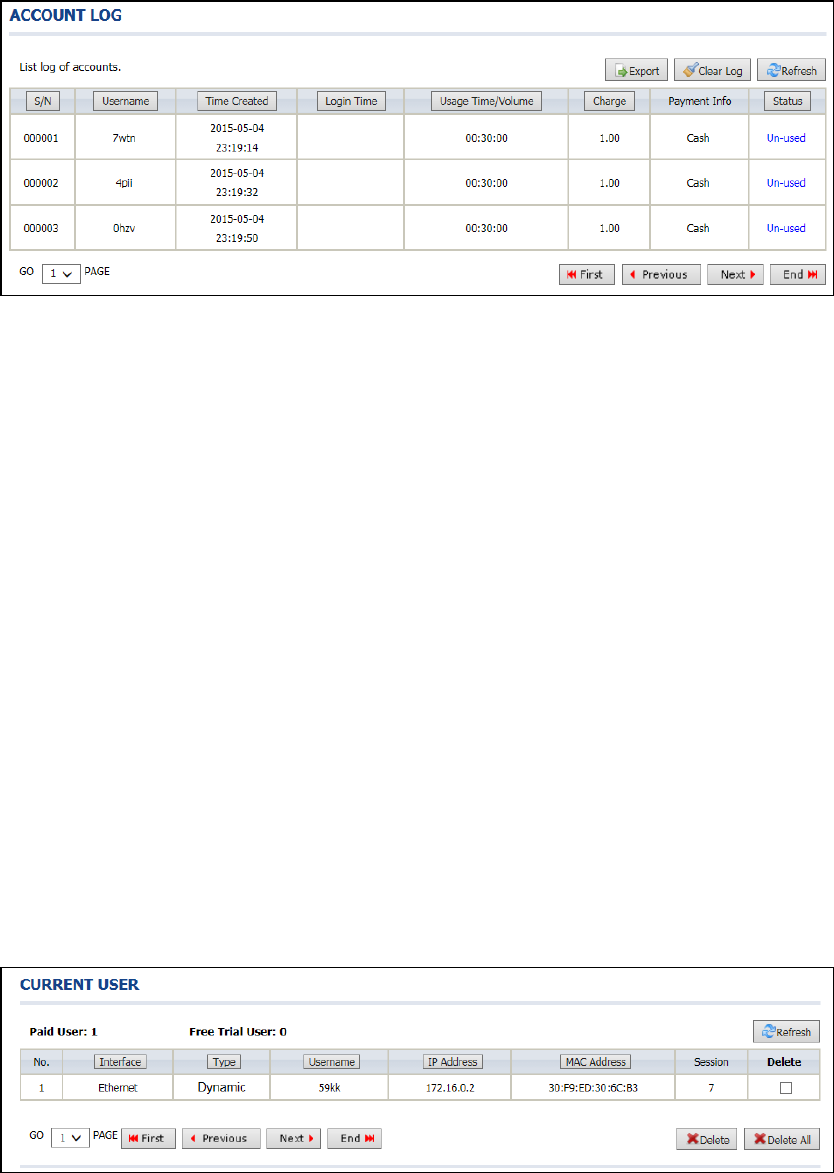
UAG50 User’s Guide
95
3-3-3 Account Log
The account log shows the accounts’ log information.
Figure 3-3-4 Account Log
Click Export to export the account logs to a text file format. (export.log)
Click Clear Log button to remove all account log entries.
Click refresh button to update the account log page.
Click the column button (S/N, Username, Time Created, …,etc.) to sort the column in
ascending/descending order.
3-3-4 Current User
Display the current logged-in subscribers’ status. It allow service provider to
disconnect any subscribers.
Figure 3-3-5 Current User List

UAG50 User’s Guide
96
Click refresh button to update the current user list page.
Click the column button (Interface, Type, Username, IP Address, …, etc.) to sort the
column in ascending/descending order.
Select the check boxes and click ‘Delete’ to delete accounts.
Click Delete ALL to delete all accounts in current user list.
3-3-5 DHCP Clients
The DHCP client table shows the current DHCP users on the LAN.
Figure 3-3-6 Current User Screen
3-3-6 Session List
The remote site administrator could monitor the real time usage status of UAG50 via
this page.
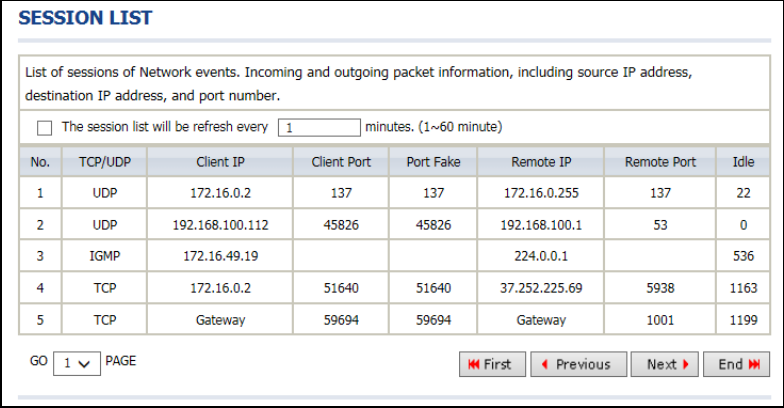
UAG50 User’s Guide
97
Figure 3-3-7 Session List Screen
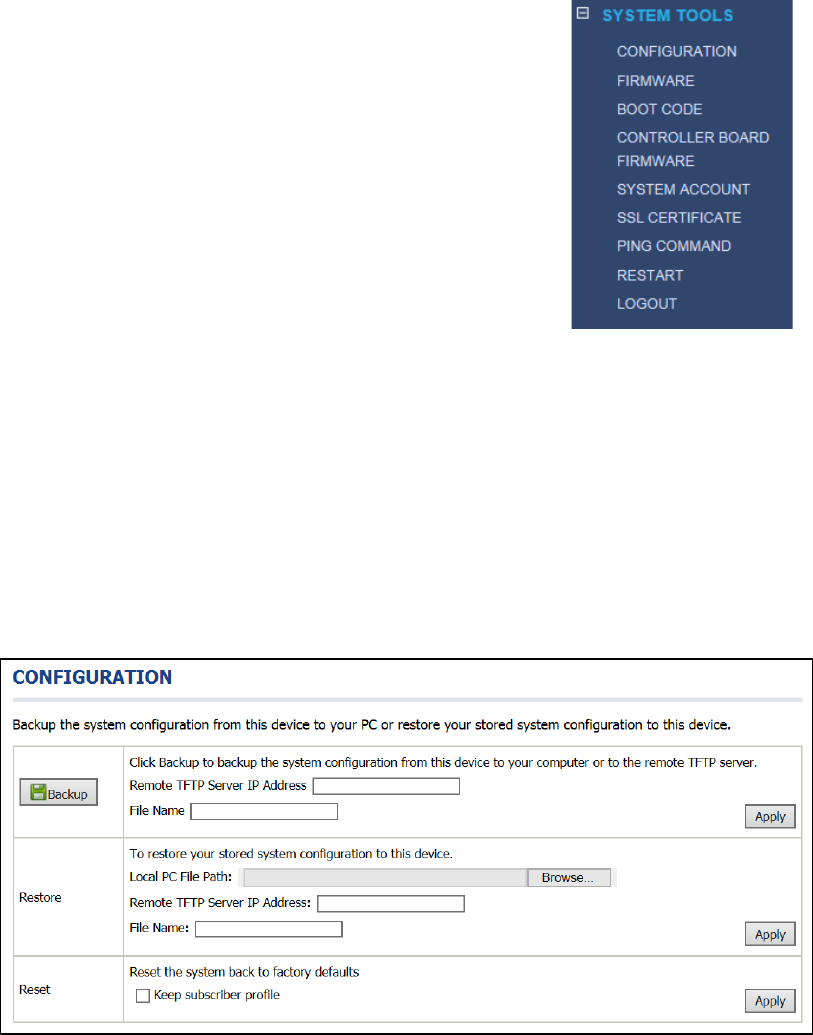
UAG50 User’s Guide
98
3-4 System Tools
This allows service provider or administrator to process Firmware upgrade, change
password and backup or restore configuration.
1. Configuration
2. Firmware
3. Boot Code
4. Controller Board Firmware
5. System Account
6. SSL Certificate
7. Ping Command
8. Restart
9. Logout
Figure 3-4-1 System Tools Item
3-4-1 Configuration
Use the Configuration item to save, restore or reset configuration parameters of the
UAG50.
Figure 3-4-2 Configuration Setting Screen

UAG50 User’s Guide
99
Item Default Description
Backup Click it to save the system configuration to your computer. (export.cfg)
Remote TFTP Server IP
Address
Empty Enter the IP address of TFTP Server.
File Name Empty Enter the file name in the File Name field.
Restore Click it to restore your system configuration.
Local PC File Path Empty Enter the file pathname of the system configuration file in the Local PC
File Path field.
Remote TFTP Server IP
Address
Empty Enter the IP address of TFTP Server.
File Name Empty Enter the file name in the File Name field.
Reset the system back
to factory defaults
Erase all setting and back to factory setting.
Keep subscriber profile Disable Click the keep subscriber profile to change all the parameters into factory
setting but still reserve the subscriber profiles.
3-4-2 Firmware Upgrade
The Firmware Upgrade menu loads updated firmware to be permanent in flash ROM.
The download file should be a binary file from factory; otherwise the agent will not
accept it. After downloading the new firmware, the agent will automatically restart
it.
Manual Firmware Upgrade
Figure 3-4-3 Manual Firmware Upgrade Setting Screen

UAG50 User’s Guide
100
Item Default Description
This allow administrator to upgrade the firmware via HTTP.
Local PC File Path Empty Enter the file name and location in the Local PC File Path field.
This allows administrator use TFTP server to upgrade firmware.
Remote TFTP Server IP Address Empty Enter the IP address of TFTP Server.
File Name Empty Enter the file name in the File Name field.
Note:
1. Before downloading the new firmware, users must save the configuration file for
restore configuration parameters of the device.
2. Do not turn the power off during the upgrade process. This will damage the unit.
Scheduled Firmware Upgrade is a program that enables an automatic upgrade to the
latest firmware version through the TFTP server.
Scheduled Firmware Upgrade
Figure 3-4-4 Scheduled Firmware Upgrade Setting Screen
Item Default Description
Disable/Enable Disables or enables the scheduled firmware upgrade function.
TFTP Server IP Empty Enter the IP address of TFTP Server.
File Synchronization Empty Enter the file name and location in the File
Synchronization field.
View Sample File Click the button to display synchronization file example.

UAG50 User’s Guide
101
Item Default Description
Figure 3-4-5 Synchronization File Sample Code
Frequency Weekly Set the firmware upgrade time. The default value is
“Weekly”.
Note: Do not turn the power off during the upgrade process. This will damage the
unit.
3-4-3 Boot Code
Figure 3-4-6 Boot Code Upgrade Setting Screen
3-4-4 Controller Board Firmware
Figure 3-4-7 Controller Board Firmware Upgrade Setting Screen
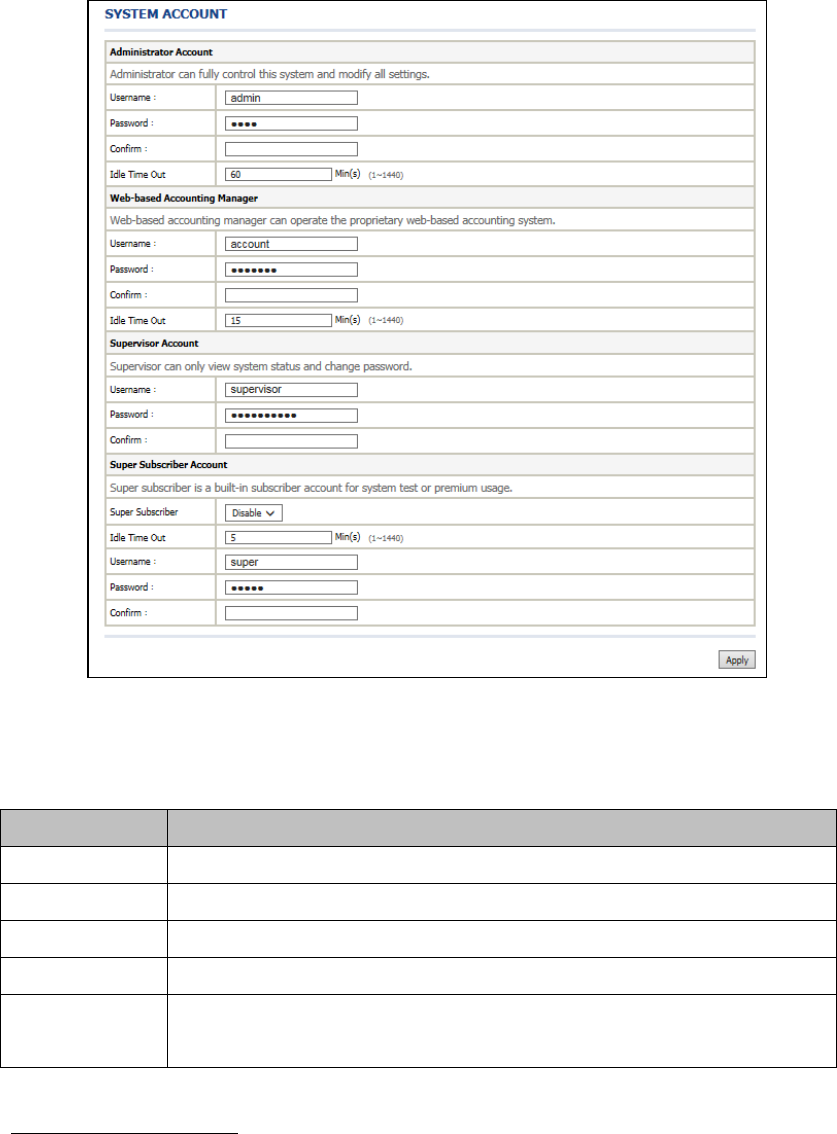
UAG50 User’s Guide
102
3-4-5 System Account
Use the System Account screen to change the system accounts.
Figure 3-4-8 System Account Setting Screen
Item Description
Username The username can consist of up to 20 alphanumeric characters and is sensitive.
Password The password can consist of up to 20 alphanumeric characters and is sensitive.
Confirm The password for confirmation
Super Subscriber Disables or enables the super account function.
Idle Time Out The user idle time out valid is 1 to 1440 minutes. If the idle time out is set as 5 minutes, it
means if the account doesn’t send packet in 5 minutes, the account will logout automatically.
Step 1: Start your Web browser and enter the factory default IP address 172.16.0.1
in your browser’s location box. Press Enter.
Administrator Account
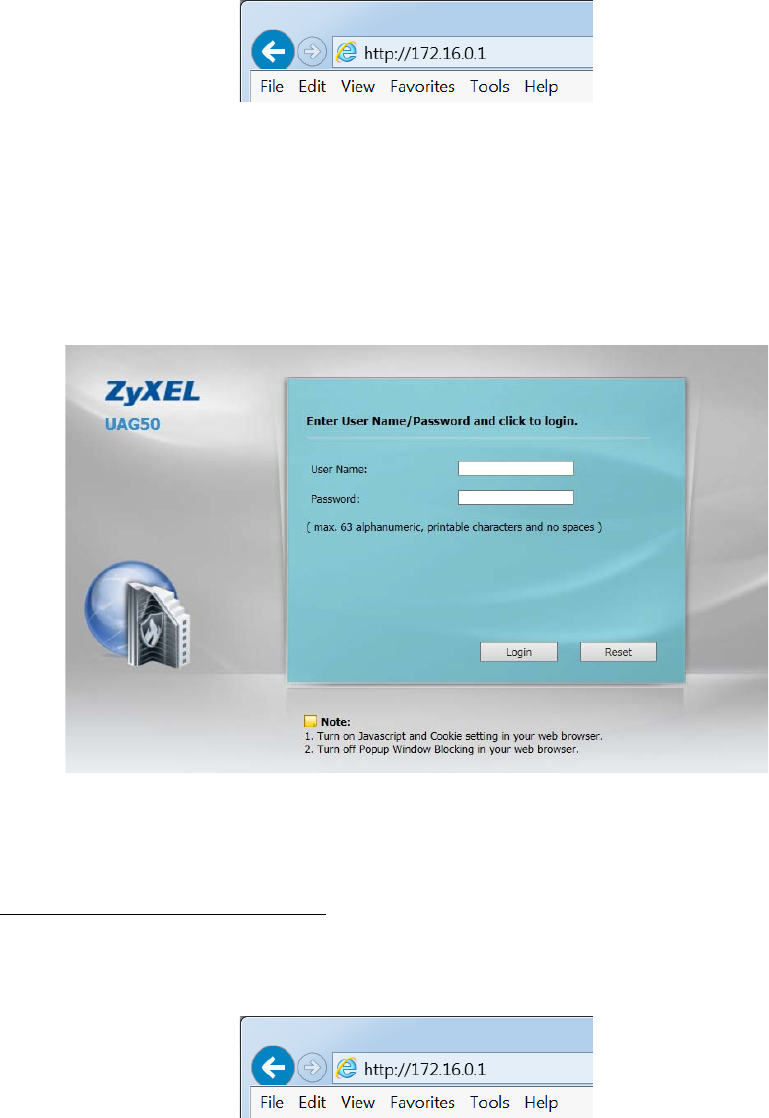
UAG50 User’s Guide
103
Figure 3-4-9 Web Browser Location Field (Factory Default)
Step 2: The UAG50 configuration main menu will appear. Enter admin as the
Username and 1234 as the password and click Login. If you are first time setting the
system, the wizard setup screen will appear.
Figure 3-4-10 Administrator Account Login Screen (First Time)
Step 1: Start your Web browser and enter the factory default IP address 172.16.0.1
in your browser’s location box. Press Enter.
Web-Based Accounting Manager
Figure 3-4-11 Web Browser Location Field (Factory Default)
Step 2: The UAG50 configuration main menu will appear. Enter account as the
Username and account as the password and click Login.
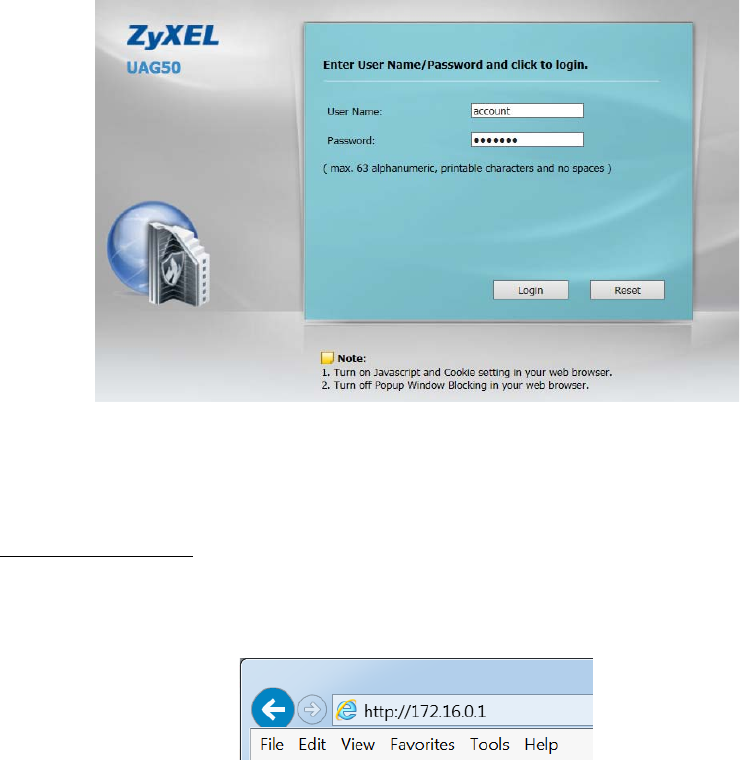
UAG50 User’s Guide
104
Figure 3-4-12 Web-Based Accounting Manager Login Screen
Step 1: Start your Web browser and enter the factory default IP address 172.16.0.1
in your browser’s location box. Press Enter.
Supervisor Account
Figure 3-4-13 Web Browser Location Field (Factory Default)
Step 2: The UAG50 configuration main menu will appear. Enter supervisor as the
Username and supervisor as the password and click Login.
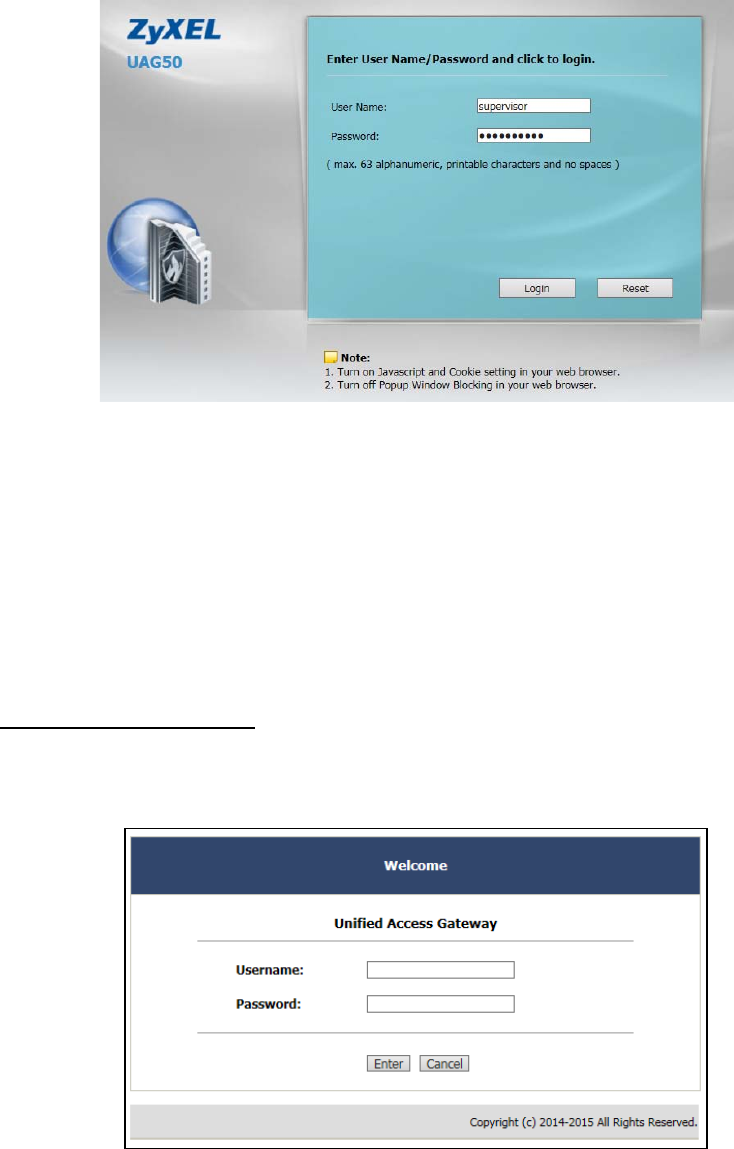
UAG50 User’s Guide
105
Figure 3-4-14 Supervisor Account Login Screen
Step 3: After a valid user name and password have been provided, the UAG50
configuration homepage will appear. “WIZARD SETUP” and “ADVANCED SETUP” are
disabled.
Start your Web Browser; a subscriber login page will appear. Enter super as the
Username and super as the password and click Enter, you can use Internet now.
Super Subscriber Account
Figure 3-4-15 Subscriber Login Page
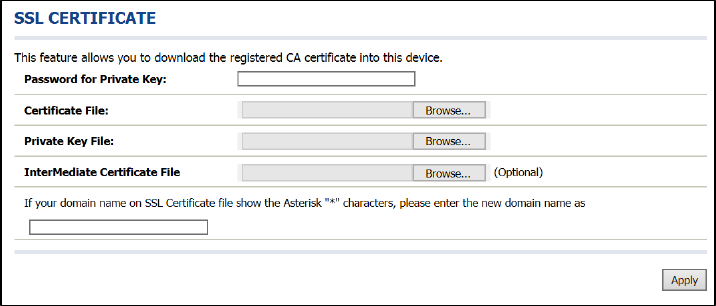
UAG50 User’s Guide
106
3-4-6 SSL Certificate
The function allows you to download the registered CA certificate into the UAG50.
Figure 3-4-16 SSL Certificate Download Setting Screen
Note: The password field must the same as the CA’s registered password.

UAG50 User’s Guide
107
3-4-7 Ping Command
The Ping function can check the UAG50 networking connective or not.
Figure 3-4-17 Ping Command Screen
Item Description
IP or URL Enter the IP address or the URL link.
3-4-8 Restart
If your UAG50 is not operating correctly, you can choose this option to display the
restart UAG50 screen. Clicking the apply button restart the UAG50, with all of your
settings remaining intact.
Figure 3-4-18 Restart Screen
3-4-9 Logout
If you would like to leave the configuration page, please click apply to exit.
Figure 3-4-19 Logout Screen
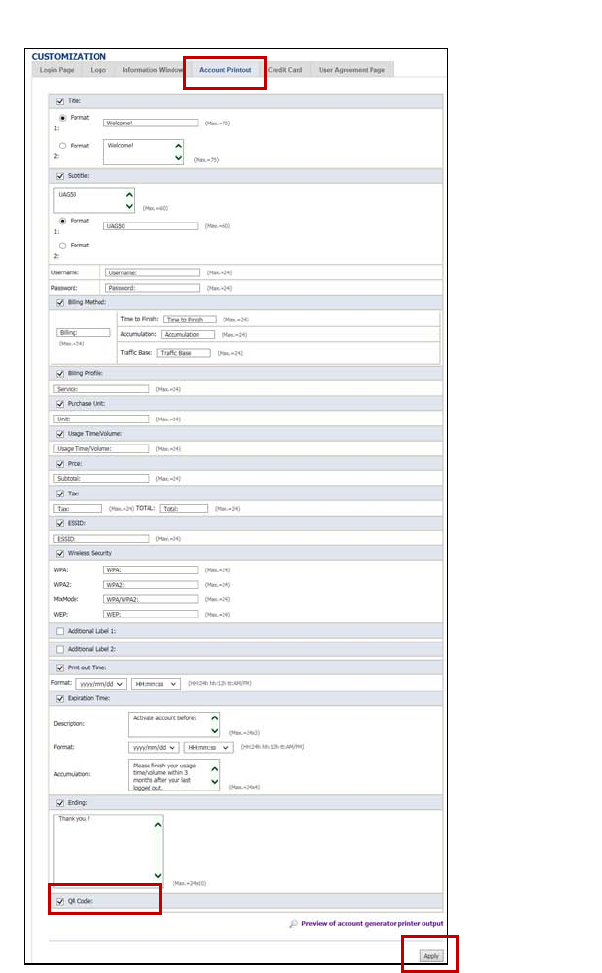
UAG50 User’s Guide
108
4. QR Code Service
4-1 QR code setting
Please find Advance setting > System > Customization > Account Printout > QR code.
If you don’t print out the QR Code on the ticket, please disable it and click Apply
button.
Figure 4-1-1 QR Coding Setting Screen
Step 1
Step 2: Enable QR Code
Step 3: Click Apply
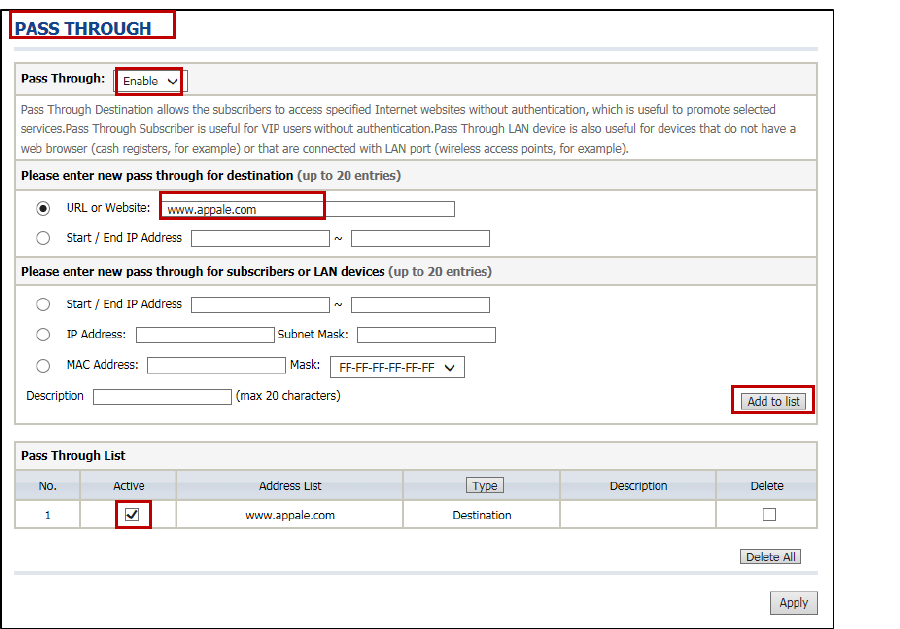
UAG50 User’s Guide
109
4-2 Additional information for QR code use
If you will activate QR code service for Apple iOS 6 device and later,
1. Please find Advance setting > Security > Pass Through.
2. Choose “Enable”.
3. Add www.apple.com into PASS THROUGH list in UAG50 because iOS6 device and
later is required.
4. Click Add to List button.
5. Choose Active on the Pass Through List.
For certain QR code Apps, please add go.redirectingat.com, 54.225.129.12 and
23.23.152.51 (for APP ScanLife) and follow the above steps.
Figure 4-2-1 Pass Through Setting Screen
Step 1
Step 2: Choose Enable
Step 3: Add “www.appale.com”
Step 4: Click Add to List
Step 5: Choose Active
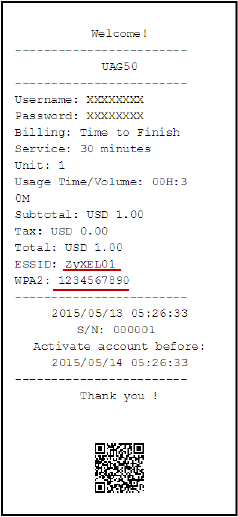
UAG50 User’s Guide
110
4-3 Use QR code to access the Internet
Please follow the steps to access the Internet for clients.
1. Print out the Ticket. You can find the ESSID and WPA/WPA2 printed on the ticket.
Figure 4-3-1 QR Coding Ticket
2. Connect to the ESSID (ex: ZyXEL01 ), input WPA/WPA2 password (ex:
1234567890).
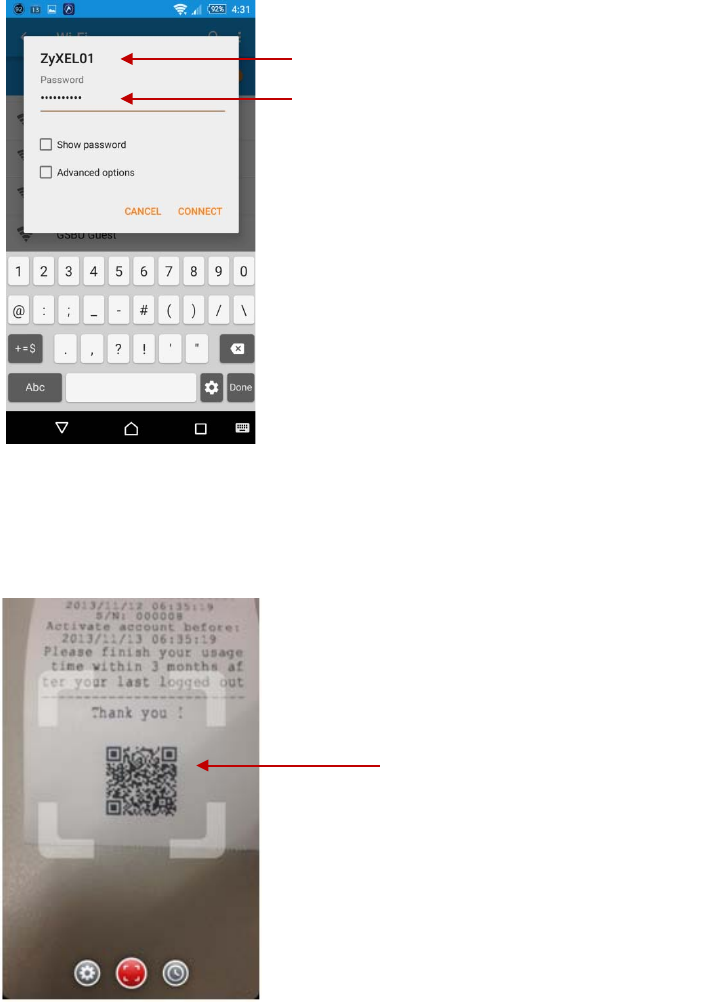
UAG50 User’s Guide
111
Figure 4-3-2 Password Input Screen
3. Open up QR code APP and Scan.
Figure 4-3-3 Scan 1 Screen
4. Some Apps may require user to click "Go to URL".
Verify to connect the correct ESSID
Input the WPA/WPA2 password
Scan QR code
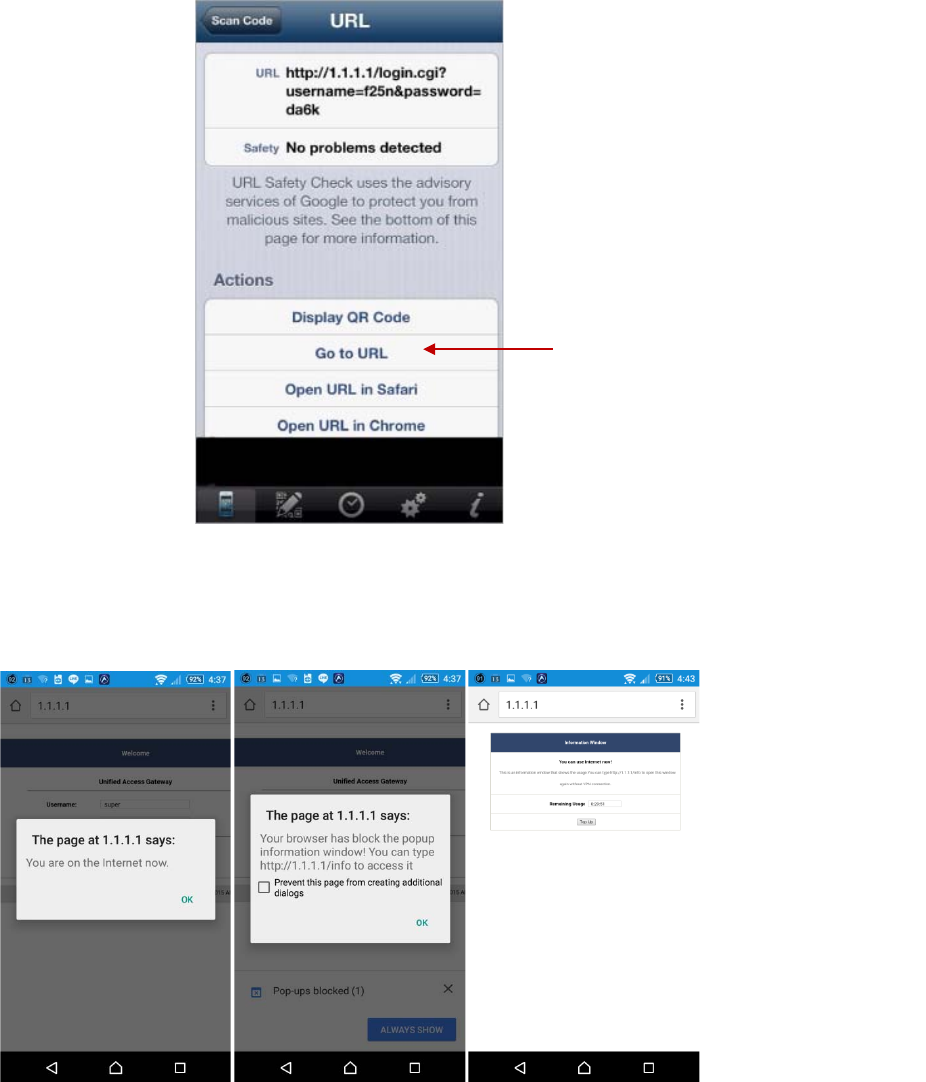
UAG50 User’s Guide
112
Figure 4-3-4 Scan 2 Screen
5. Client can use the Internet now.
Figure 4-3-5 Scan Finish Screen
Click “Go to URL”
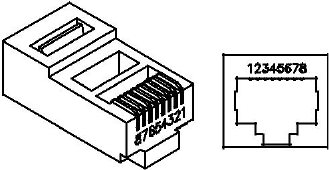
UAG50 User’s Guide
113
Appendix A Signal Connection Arrangements
RJ-45 Ethernet Port
The UAG50 RJ-45 Ethernet port can connect to any networking devices that use a
standard LAN interface, such as a Hub/Switch Hub or Router. Use unshielded
twisted-pair (UTP) or shield twisted-pair (STP) cable to connect the networking
device to the RJ-45 Ethernet port.
Depending on the type of connection, 10Mbps or 100Mbps, use the following
Ethernet cable, as prescribed.
10Mbps: Use EIA/TIA-568-100-Category 3, 4 or 5 cables. 100Mbps: Use
EIA/TIA-568-100-Category 5 cable.
Figure RJ-45 Connector and Cable Pins
Note: To prevent loss of signal, make sure that the length of any twisted-pair
connection does not exceed 100 meters.

UAG50 User’s Guide
114
Appendix B Legal Information
Copyright
Copyright © 2015 by ZyXEL Communications Corporation.
The contents of this publication may not be reproduced in any part or as a whole, transcribed, stored in a retrieval
system, translated into any language, or transmitted in any form or by any means, electronic, mechanical,
magnetic, optical, chemical, photocopying, manual, or otherwise, without the prior written permission of ZyXEL
Communications Corporation.
Published by ZyXEL Communications Corporation. All rights reserved.
Disclaimers
ZyXEL does not assume any liability arising out of the application or use of any products, or software
described herein. Neither does it convey any license under its patent rights nor the patent rights of others.
ZyXEL further reserves the right to make changes in any products described herein without notice. This
publication is subject to change without notice.
Your use of the NWA/WAC is subject to the terms and conditions of any related service providers.
Trademarks
Trademarks mentioned in this publication are used for identification purposes only and may be properties of their
respective owners.
Regulatory Notice and Statement
UNITED STATE AMERICA
The following information applies if you use the product within USA area.
FCC EMC Statement
• This device complies with part 15 of the FCC Rules. Operation is subject to the following two conditions:
1 This device may not cause harmful interference, and
2 this device must accept any interference received, including interference that may cause undesired operation.
• Changes or modifications not expressly approved by the party responsible for compliance could void the
user's authority to operate the equipment.
• This product has been tested and complies with the specifications for a Class B digital device, pursuant to
Part 15 of the FCC Rules.
These limits are designed to provide reasonable protection against harmful interference in a residential
installation. This equipment generates, uses, and can radiate radio frequency energy and, if not installed and
used according to the instructions, may cause harmful interference to radio communications. However, there is
no guarantee that interference will not occur in a particular installation.
• If this equipment does cause harmful interference to radio or television reception, which is found by
turning the equipment off and on, the user is encouraged to try to correct the interference by one or more
of the following measures:
1 Reorient or relocate the receiving antenna.
2 Increase the separation between the equipment or devices.
3 Connect the equipment to an outlet other than the receiver's.
UAG50 User’s Guide
115
4 Consult a dealer or an experienced radio/TV technician for assistance.
FCC Radiation Exposure Statement
• This equipment complies with FCC RF radiation exposure limits set forth for an uncontrolled environment.
• This transmitter must be at least 20 cm from the user and must not be co-located or operating in
conjunction with any other antenna or transmitter.
CANADA
The following information applies if you use the product within Canada area.
Industry Canada ICES statement
CAN ICES-3 (B)/NMB-3(B)
UAG50 User’s Guide
116
Industry Canada RSS-GEN & RSS-210 statement
• This device complies with Industry Canada license-exempt RSS standard(s). Operation is subject to
the following two conditions: (1) this device may not cause interference, and (2) this device must
accept any interference, including interference that may cause undesired operation of the device.
• Under Industry Canada regulations, this radio transmitter may only operate using an antenna of a
type and maximum (or lesser) gain approved for the transmitter by Industry Canada. To reduce
potential radio interference to other users, the antenna type and its gain should be so chosen that the
equivalent isotropically radiated power (e.i.r.p.) is not more than that necessary for successful
communication.
• This radio transmitter has been approved by Industry Canada to operate with the antenna types
listed below with the maximum permissible gain and required antenna impedance for each antenna
type indicated. Antenna types not included in this list, having a gain greater than the maximum gain
indicated for that type, are strictly prohibited for use with this device.
• Le présent appareil est conforme aux CNR d’Industrie Canada applicables aux appareils radio
exempts de licence. L’exploitation est autorisée aux deux conditions suivantes : (1) l’appareil ne doit
pas produire de brouillage, et (2) l’utilisateur de l’appareil doit accepter tout brouillage radioélectrique
subi, même si le brouillage est susceptible d’en compromettre le fonctionnement.
• Conformément à la réglementation d’Industrie Canada, le présent émetteur radio peut fonctionner
avec une antenne d’un type et d’un gain maximal (ou inférieur) approuvé pour l’émetteur par
Industrie Canada. Dans le but de réduire les risques de brouillage radioélectrique à l’intention des
autres utilisateurs, il faut choisir le type d’antenne et son gain de sorte que la puissance isotrope
rayonnée quivalente (p.i.r.e.) ne dépassepas l’intensité nécessaire à l’établissement d’une
communication satisfaisante.
• Le présent émetteur radio de modèle s'il fait partie du matériel de catégorieI) a été approuvé par
Industrie Canada pour fonctionner avec les types d'antenne énumérés ci-dessous et ayant un gain
admissible maximal et l'impédance requise pour chaque type d'antenne. Les types d'antenne non
inclus dans cette liste, ou dont le gain est supérieur au gain maximal indiqué, sont strictement
interdits pour l'exploitation de l'émetteur.
Industry Canada radiation exposure statement
This equipment complies with IC radiation exposure limits set forth for an uncontrolled environment. This equipment
should be installed and operated with a minimum distance of 20cm between the radiator and your body.
Déclaration d’exposition aux radiations:
Cet équipement est conforme aux limites d’exposition aux rayonnements IC établies pour un environnement non
contrôlé.Cet équipement doit être installé et utilisé avec un minimum de 20 cm de distance entre la source de
rayonnement et votre corps.
EUROPEAN UNION
The following information applies if you use the product within the European Union.
Declaration of Conformity with Regard to EU Directive 1999/5/EC (R&TTE
Directive)
Compliance information for 2.4GHz and/or 5GHz wireless products relevant to the EU and other Countries
following the EU Directive 1999/5/EC (R&TTE).
Български
(Bulgarian)
С настоящото ZyXEL декларира, че това оборудване е в съответствие със
съществените изисквания и другите приложими разпоредбите на Директива
1999/5/ЕC.
Español
(Spanish)
Por medio de la presente ZyXEL declara que el equipo cumple con los requisitos
esenciales y cualesquiera otras disposiciones aplicables o exigibles de la Directiva
1999/5/CE.
Čeština
(Czech)
ZyXEL tímto prohlašuje, že tento zařízení je ve shodě se základními požadavky a
dalšími příslušnými ustanoveními směrnice 1999/5/EC.

UAG50 User’s Guide
117
Dansk (Danish)
Undertegnede ZyXEL erklærer herved, at følgende udstyr udstyr overholder de
væsentlige krav og øvrige relevante krav i direktiv 1999/5/EF.
Deutsch
(German)
Hiermit erklärt ZyXEL, dass sich das Gerät Ausstattung in Übereinstimmung mit den
grundlegenden Anforderungen und den übrigen einschlägigen Bestimmungen der
Richtlinie 1999/5/EU befindet.
Eesti keel
(Estonian)
Käesolevaga kinnitab ZyXEL seadme seadmed vastavust direktiivi 1999/5/EÜ
põhinõuetele ja nimetatud direktiivist tulenevatele teistele asjakohastele sätetele.
Ελληνικά
(Greek)
ΜΕ ΤΗΝ ΠΑΡΟΥΣΑ ZyXEL ∆ΗΛΩΝΕΙ ΟΤΙ εξοπλισμός ΣΥΜΜΟΡΦΩΝΕΤΑΙ ΠΡΟΣ ΤΙΣ
ΟΥΣΙΩ∆ΕΙΣ ΑΠΑΙΤΗΣΕΙΣ ΚΑΙ ΤΙΣ ΛΟΙΠΕΣ ΣΧΕΤΙΚΕΣ ∆ΙΑΤΑΞΕΙΣ ΤΗΣ Ο∆ΗΓΙΑΣ
1999/5/ΕC.
English
Hereby, ZyXEL declares that this equipment is in compliance with the essential
requirements and other relevant provisions of Directive 1999/5/EC.
Français
(French)
Par la présente ZyXEL déclare que l'appareil équipements est conforme aux
exigences essentielles et aux autres dispositions pertinentes de la directive
1999/5/EC.
Hrvatski
(Croatian)
ZyXEL ovime izjavljuje da je radijska oprema tipa u skladu s Direktivom 1999/5/EC.
Íslenska
(Icelandic)
Hér með lýsir, ZyXEL því yfir að þessi búnaður er í samræmi við grunnkröfur og önnu
r
viðeigandi ákvæði tilskipunar
Italiano
(Italian)
Con la presente ZyXEL dichiara che questo attrezzatura è conforme ai requisiti
essenziali ed alle altre disposizioni pertinenti stabilite dalla direttiva 1999/5/CE.
Latviešu
valoda
(Latvian)
Ar šo ZyXEL deklarē, ka iekārtas atbilst Direktīvas 1999/5/EK būtiskajām
prasībām un citiem ar to saistītajiem noteikumiem.
Lietuvių kalba
(Lithuanian)
Šiuo ZyXEL deklaruoja, kad šis įranga atitinka esminius reikalavimus ir kitas 1999/5/E
B
Direktyvos nuostatas.
Magyar
(Hungarian)
Alulírott, ZyXEL nyilatkozom, hogy a berendezés megfelel a vonatkozó alapve
tõ
követelményeknek és az 1999/5/EK
Malti (Maltese)
Hawnhekk, ZyXEL, jiddikjara li dan tagħmir jikkonforma mal-ħtiġijiet essenzjali u ma
provvedimenti oħrajn relevanti li hemm fid-Dirrettiva 1999/5/EC.
Nederlands
(Dutch)
Hierbij verklaart ZyXEL dat het toestel uitrusting in overeenstemming is met de
essentiële eisen en de andere relevante bepalingen van richtlijn 1999/5/EC.
Polski (Polish)
Niniejszym ZyXEL oświadcza, że sprzęt jest zgodny z zasadniczymi wymogami
oraz pozostałymi stosownymi postanowieniami Dyrektywy 1999/5/EC.
Português
(Portuguese)
ZyXEL declara que este equipamento está conforme com os requisitos essenciais e outra
s
disposições da Directiva
Română
(Romanian)
Prin prezenta, ZyXEL declară că acest echipament este în conformitate cu
cerinţele esenţiale şi alte prevederi relevante ale Directivei 1999/5/EC.
Slovenčina
(Slovak)
ZyXEL týmto vyhlasuje, že zariadenia spĺňa základné požiadavky a všetky príslušn
é
ustanovenia Smernice 1999/5/EC.
Slovenščina
(Slovene)
ZyXEL izjavlja, da je ta oprema v skladu z bistvenimi zahtevami in ostalimi relevantni
mi
določili direktive 1999/5/EC.
Suomi
(Finnish)
ZyXEL vakuuttaa täten että laitteet tyyppinen laite on direktiivin 1999/5/EY oleellisten
vaatimusten ja sitä koskevien direktiivin muiden ehtojen mukainen.
Svenska
(Swedish)
Härmed intygar ZyXEL att denna utrustning står I överensstämmelse med de
väsentliga egenskapskrav och övriga relevanta bestämmelser som framgår av direktiv
1999/5/EC.
Norsk
(Norwegian)
Erklærer herved ZyXEL at dette utstyret er I samsvar med de grunnleggende
kravene og andre relevante bestemmelser I direktiv 1999/5/EF.

UAG50 User’s Guide
118
National Restrictions
This product may be used in all EU countries (and other countries following the EU Directive 2014/53/EU)
without any limitation except for the countries mentioned below:
Ce produit peut être utilisé dans tous les pays de l’UE (et dans tous les pays ayant transposés la
directive 2014/53/UE) sans aucune limitation, excepté pour les pays mentionnés ci-dessous:
Questo prodotto è utilizzabile in tutte i paesi EU (ed in tutti gli altri paesi che seguono le direttiva
2014/53/UE) senza nessuna limitazione, eccetto per i paesii menzionati di seguito:
Das Produkt kann in allen EU Staaten ohne Einschränkungen eingesetzt werden (sowie in anderen Staaten
die der Richtlinie 2014/53/EU folgen) mit Außnahme der folgenden aufgeführten Staaten:
In the majority of the EU and other European countries, the 2.4GHz and 5GHz bands have been made
available for the use of wireless local area networks (LANs). Later in this document you will find an
overview of countries in which additional restrictions or requirements or both are applicable.
The requirements for any country may evolve. ZyXEL recommends that you check with the local
authorities for the latest status of their national regulations for both the 2.4GHz and 5GHz wireless
LANs.
The following countries have restrictions and/or requirements in addition to those given in the table labeled
“Overview of Regulatory Requirements for Wireless LANs”:.
Belgium
The Belgian Institute for Postal Services and Telecommunications (BIPT) must be notified of any
outdoor wireless link having a range exceeding 300 meters. Please check http://www.bipt.be for
more details.
Draadloze verbindingen voor buitengebruik en met een reikwijdte van meer dan 300 meter dienen
aangemeld te worden bij het Belgisch
Instituut voor postdiensten en telecommunicatie (BIPT). Zie http://www.bipt.be voor meer gegevens.
Les liaisons sans fil pour une utilisation en extérieur d’une distance supérieure à 300 mètres doivent
être notifiées à l’Institut Belge des services Postaux et des Télécommunications (IBPT). Visitez
http://www.ibpt.be pour de plus amples détails.
Denmark
In Denmark, the band 5150 - 5350 MHz zs also allowed for outdoor
usage. I
Danmark må frekvensbåndet
5150 - 5350 også anvendes udendørs.
Italy
This product meets the National Radio Interface and the requirements specified in the National Frequency
Allocation Table for Italy. Unless this wireless LAN product is operating within the boundaries of the
owner's property, its use requires a “general authorization.” Please check
http://www.sviluppoeconomico.gov.it/
for more details.
Questo prodotto è conforme alla specifiche di Interfaccia Radio Nazionali e rispetta il Piano Nazionale
di ripartizione delle frequenze in Italia. Se non viene installato all 'interno del proprio fondo, l'utilizzo
di prodotti Wireless LAN richiede una “Autorizzazione Generale”. Consultare
http://www.sviluppoeconomico.gov.it/
per maggiori dettagli.
Latvia
The outdoor usage of the 2.4 GHz band requires an authorization from the Electronic Communications Office.
Please check http://www.esd.lv for more details.
2.4 GHz frekvenèu joslas izmantoðanai ârpus telpâm nepiecieðama atïauja no Elektronisko sakaru
direkcijas. Vairâk informâcijas: http://www.esd.lv.
Notes:
1. Although Norway, Switzerland and Liechtenstein are not EU member states, the EU Directive
2014/53/EU has also been implemented in those countries.
2. The regulatory limits for maximum output power are specified in EIRP. The EIRP level (in dBm) of a
device can be calculated by adding the gain of the antenna used(specified in dBi) to the output power
available at the connector (specified in dBm).
List of national codes
COUNTRY
ISO 3166 2 LETTER CODE
COUNTRY
ISO 3166 2 LETTER CODE
Austria
AT
Liechtenstein
LI
Belgium
BE
Lithuania
LT
UAG50 User’s Guide
119
Bulgaria
BG
Luxembourg
LU
Croatia
HR
Malta
MT
Cyprus
CY
Netherlands
NL
Czech Republic
CR
Norway
NO
Denmark
DK
Poland
PL
Estonia
EE
Portugal
PT
Finland
FI
Romania
RO
France
FR
Serbia
RS
Germany
DE
Slovakia
SK
Greece
GR
Slovenia
SI
Hungary
HU
Spain
ES
Iceland
IS
Sweden
SE
Ireland
IE
Switzerland
CH
Italy
IT
Turkey
TR
Latvia
LV
United Kingdom
GB
Safety Warnings
• Do NOT use this product near water, for example, in a wet basement or near a swimming pool.
• Do NOT expose your device to dampness, dust or corrosive liquids.
• Do NOT store things on the device.
• Do NOT install, use, or service this device during a thunderstorm. There is a remote risk of electric
shock from lightning.
• Connect ONLY suitable accessories to the device.
• Do NOT open the device or unit. Opening or removing covers can expose you to dangerous high voltage
points or other risks. ONLY qualified service personnel should service or disassemble this device. Please
contact your vendor for further information.
• Make sure to connect the cables to the correct ports.
• Place connecting cables carefully so that no one will step on them or stumble over them.
• Always disconnect all cables from this device before servicing or disassembling.
• Use ONLY an appropriate power adaptor or cord for your device. Connect it to the right supply voltage
(for example, 110V AC in North America or 230V AC in Europe).
• Do NOT allow anything to rest on the power adaptor or cord and do NOT place the product where
anyone can walk on the power adaptor or cord.
• Do NOT use the device if the power adaptor or cord is damaged as it might cause electrocution.
• If the power adaptor or cord is damaged, remove it from the device and the power source.
• Do NOT attempt to repair the power adaptor or cord. Contact your local vendor to order a new one.
• Do not use the device outside, and make sure all the connections are indoors. There is a remote risk of
electric shock from lightning.
• Do NOT obstruct the device ventilation slots, as insufficient airflow may harm your device.
• Antenna Warning! This device meets ETSI and FCC certification requirements when using the
included antenna(s). Only use the included antenna(s).
• If you wall mount your device, make sure that no electrical lines, gas or water pipes will be damaged.
• The PoE (Power over Ethernet) devices that supply or receive power and their connected
Ethernet cables must all be completely indoors.
• This product is for indoor use only (utilisation intérieure exclusivement).
• FOR COUNTRY CODE SELECTION USAGE (WLAN DEVICES)
Note: The country code selection is for non-US model only and is not available to all US model. Per
FCC regulation, all Wi-Fi product marketed in US must fixed to US operation channels only.

UAG50 User’s Guide
120
Environment statement
ErP (Energy-related Products)
ZyXEL products put on the EU market in compliance with the requirement of the European Parliament and
the Council published
Directive 2009/125/EC establishing a framework for the setting of ecodesign requirements for
energy-related products (recast), so called as "ErP Directive (Energy-related Products directive) as well as
ecodesign requirement laid down in applicable implementing measures,power consumption has satisfied
regulation requirements which are:
Network standby power consumption < 12W, and/or
Off mode power consumption < 0.5W, and/or
Standby mode power consumption < 0.5W.
Wireless setting, please refer to "Wireless" chapter for more detail.
WEEE Directive
Your product is marked with this symbol, which is known as the WEEE mark. WEEE
stands for Waste Electronics and Electrical Equipment. It means that used electrical
and electronic products should not be mixed with general waste. Used electrical and
electronic equipment should be treated separately.
"INFORMAZIONI AGLI UTENTI"
Ai sensi della Direttiva 2012/19/UE del Parlamento europeo e del Consiglio, del 4 luglio 2012, sui rifiuti
di apparecchiature elettriche ed elettroniche (RAEE)
Il simbolo del cassonetto barrato riportato sull’apparecchiatura o sulla sua confezione indica che il
prodotto alla fine della propria vita utile deve essere raccolto separatamente dagli altri rifiuti.
La raccolta differenziata della presente apparecchiatura giunta a fine vita e organizzata e gestita dal
produttore. L’utente che vorra disfarsi della presente apparecchiatura dovra quindi contattare il produttore
e seguire il sistema che questo ha adottato per consentire la raccolta separata dell’apparecchiatura giunta
a fine vita.
L’adeguata raccolta differenziata per l’avvio successivo dell’apparecchiatura dismessa al riciclaggio, al
trattamento e allo smaltimento ambientalmente compatibile contribuisce ad evitare possibili effetti
negativi sull’ambiente e sulla salute e favorisce il reimpiego e/o riciclo dei materiali di cui e composta
l’apparecchiatura.
Lo smaltimento abusivo del prodotto da parte del detentore comporta l’applicazione delle sanzioni
amministrative previste dalla normativa vigente."
121
Environmental Product Declaration

122
台灣
以下訊息僅適用於產品銷售至台灣地區
第十二條 經型式認證合格之低功率射頻電機,非經許可,公司、商號或使用者均不得擅自變更頻率、加大功率或變更原設計
之特性及功能。
第十四條 低功率射頻電機之使用不得影響飛航安全及干擾合法通信;經發現有干擾現象時,應立即停用,並改善至無干擾時
方得繼續使用。
前項合法通信,指依電信法規定作業之無線電通信。低功率射頻電機須忍受合法通信或工業、科學及醫療用電波輻射性電機設
備之干擾。
Viewing Certifications
Go to http://www.zyxel.com to view this product’s documentation and certifications.
ZyXEL Limited Warranty
ZyXEL warrants to the original end user (purchaser) that this product is free from any defects in material or
workmanship for a specific period (the Warranty Period) from the date of purchase. The Warranty Period
varies by region. Check with your vendor and/or the authorized ZyXEL local distributor for details about the
Warranty Period of this product. During the warranty period, and upon proof of purchase, should the product
have indications of failure due to faulty workmanship and/or materials, ZyXEL will, at its discretion, repair or
replace the defective products or components without charge for either parts or labor, and to whatever extent
it shall deem necessary to restore the product or components to proper operating condition. Any
replacement will consist of a new or re-manufactured functionally equivalent product of equal or higher value,
and will be solely at the discretion of ZyXEL. This warranty shall not apply if the product has been modified,
misused, tampered with, damaged by an act of God, or subjected to abnormal working conditions.
Note
Repair or replacement, as provided under this warranty, is the exclusive remedy of the purchaser. This
warranty is in lieu of all other warranties, express or implied, including any implied warranty of
merchantability or fitness for a particular use or purpose. ZyXEL shall in no event be held liable for indirect or
consequential damages of any kind to the purchaser.
To obtain the services of this warranty, contact your vendor. You may also refer to the warranty policy for the
region in which you bought the device at http://www.zyxel.com/web/support_warranty_info.php.
Registration
Register your product online to receive e-mail notices of firmware upgrades and information at
www.zyxel.com.
Open Source Licenses
This product contains in part some free software distributed under GPL license terms and/or GPL like
licenses. Open source licenses are provided with the firmware package. You can download the latest
firmware at www.zyxel.com. If you cannot find it there, contact your vendor or ZyXEL Technical Support at
support@zyxel.com.tw.
To obtain the source code covered under those Licenses, please contact your vendor or ZyXEL Technical Support
at support@zyxel.com.tw.