Apple Keynote Quick Reference (Manual) Qsg
User Manual: apple Keynote - Quick Reference Free User Guide for Apple Keynote Software, Manual
Open the PDF directly: View PDF ![]() .
.
Page Count: 8
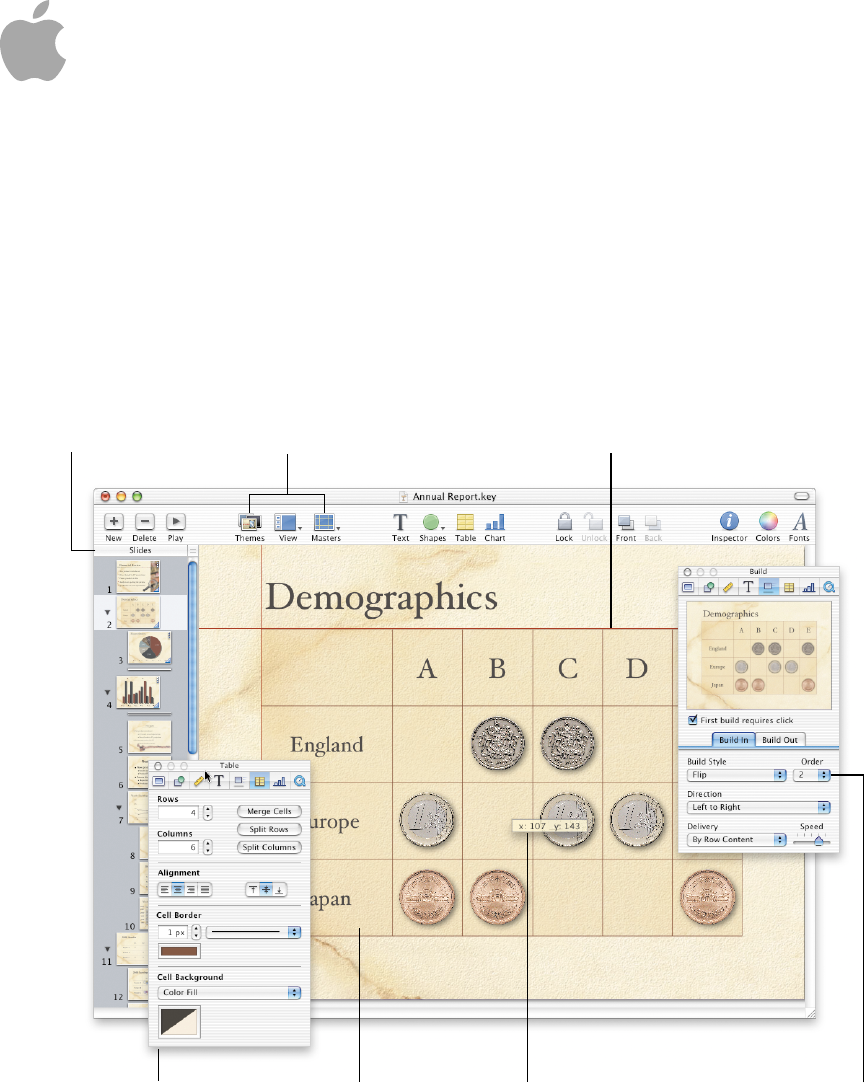
Object builds create a
dynamic presentation. You set
the order in which you want
items to appear on the slide.
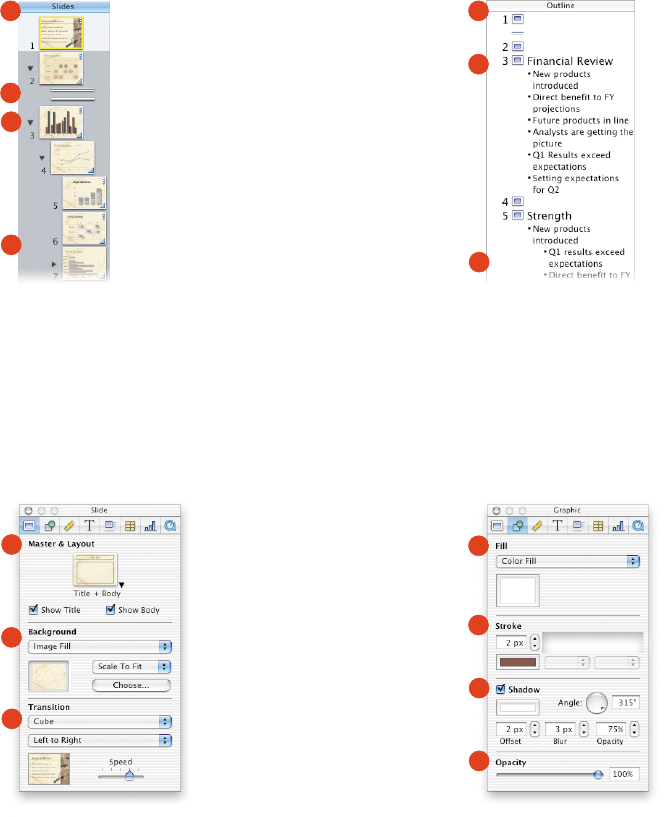
The slide organizer lets you
group slides or hide the ones
you don’t need.
Dynamic alignment guides allow you
to align objects perfectly.
Stunning tables and
charts help present
data more clearly.
Position tags help you
place objects precisely
on the slide.
Themes and master slides make
it easy to get started creating a
well-designed presentation.
Format tables, charts, text,
shapes, and more using
the eight inspector panes.
Keynote
Quick Reference
AW.034-2169A-BoomerangQRC 11/22/02 10:06 AM Page 1 (4,1)
Create your masterpiece.
Different views help you organize your presentation.
apple.com
© 2003 Apple Computer, Inc. All rights reserved. Apple, the Apple logo, and Mac are trademarks of
Apple Computer, Inc., registered in the U.S. and other countries. Keynote is a trademark of Apple Computer, Inc.
034-2169-A
Printed in U.S.A.
Slide Inspector
Set the slide background and the transition style.
Graphic Inspector
Change fill and line style for objects; set opacity and shadow.
ASelect a new master slide.
BSet background color, gradient
fill, or image fill.
CChose a transition to move
into the next slide.
ASet color, image fill, or gradient
fill for an object.
BChoose a line style and color.
Set line end points.
CAdd a shadow for any selected
object. Use offset, blur, and
opacity to create different
shadow effects.
DChange the opacity of any
object. A lower opacity makes
the object more transparent.
A
B
C
A
B
C
D
ADrag the handle at the top of
the navigator view window
to reveal the master slide
organizer above.
BSkipped slides do not appear
in your slideshow.
CDisclosure triangles show or
hide indented slides.
DDrag slides to indent them.
AIn outline view, you can see an
outline of your bulleted text.
BDrag bullets to the left to
promote them to a higher
outline level.
CDrag bullet points to the right
to make them sub-bullets.
Navigator View
Organize your slideshow at a glance.
Outline View
View and arrange the bullet points on all your slides.
Customize your visual effects with the inspectors.
A
B
C
D
A
B
C
AW.034-2169A-BoomerangQRC 12/3/02 2:24 PM Page 1
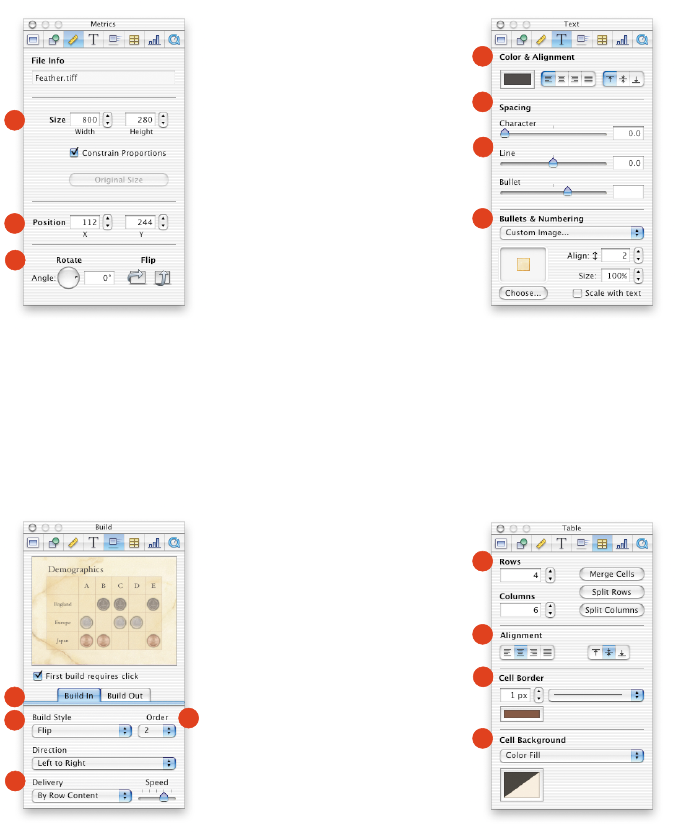
Metrics Inspector
Place text and graphic elements exactly where you want them.
Text Inspector
Select settings for bullets, characters, lines, and paragraphs.
AResize any object to exact
dimensions. Set measurement
units to pixels, centimeters, or
inches in Keynote Preferences.
BAlign the top left corner of any
object using an X, Y coordinate
system. (0,0 is the upper-left
corner of the slide.)
CRotate an object to any
angle, or flip it horizontally
or vertically.
AChange text color. Set text
justification.
BIncrease or decrease space
between letters (kerning).
CIncrease or decrease space
between lines (leading)
or bullets.
DChoose a bullet style or select
your own image to create
custom bullets.
Build Inspector
Animate the entry of text and graphic elements onto a slide.
Table Inspector
Format cell borders, alignment, and backgrounds.
ASet styles, direction, and order
for elements to move on or
off the screen.
BChoose an animation style.
CMake text, table, and chart
data appear all at once, or
piece by piece.
DChoose the order in
which elements appear
on the screen.
ASpecify the number of rows
and columns. Combine table
cells or split them apart for
interesting table layouts.
BSet vertical or horizontal
alignment of text in each cell.
CChoose line style and color for
cell borders or remove borders.
DAdd a color fill, gradient fill, or
image to cells.
A
B
C
A
B
C
D
A
B
C
D
A
B
C
D
AW.034-2169A-BoomerangQRC 11/22/02 10:06 AM Page 1 (2,1)
Chart Inspector: Axis
Select a chart type and attributes.
Media Inspector
Set playing preferences for movies and sound.
AChoose from a variety of
charts, including bar charts,
line charts, area charts, or
a pie chart.
BAdd or remove reference
markings and labels from
the X and Y axis.
CDefine chart grid values and
units.
DEdit chart data in a
spreadsheet.
ASelect a frame to display until
the movie begins playing.
BPlay media through once or
loop during the slideshow.
CSet the playing volume.
DPreview your movie while
creating the slide.
AD
B
C
A
B
C
D
Master Slide Inspector
Set default styles for master slides.
Chart Inspector: Series
Label data points and format chart elements.
ASet up master slide text
box layouts.
BLayer objects on the slide with
objects on the background.
CChoose the master slide
background colors or
image fill.
DSet a default transition style to
move into the next slide.
AShow or hide the chart legend.
BFormat and place data series
labels on the chart.
CFormat data point elements.
A
B
C
A
B
C
D
AW.034-2169A-BoomerangQRC 11/25/02 12:47 PM Page 1 (3,1)

Step-by-step instructions are in Keynote Help.
Open Keynote Help in any of the following ways:
mPress x-? (question mark).
mChoose Help > Keynote Help.
mPress the help key (available on many keyboards).
To see help tags for an item in the toolbar or
Inspector window, let the pointer rest over the item.
Keynote Help Getting around the slide canvas
Cycle through objects on canvas Tab
Cycle backward through objects Shift-Tab
on canvas
Move object by 1 pixel Arrow keys
Move object by 10 pixels Shift-arrow keys
Add (or remove) selected object Shift-click, x-click
to previously selected objects
Add (or remove) selected range Shift-drag, x-drag
to previously selected range
Constrain movement of object Shift-drag
Duplicate object Option-drag
Disable alignment guides x-drag
Rotate object x-drag handle
Rotate object 45˚ x-Shift-drag handle
Constrain aspect ratio when Shift-drag handle
resizing object
Resize object from center Option-drag handle
Constrain aspect ratio when resizing Option-Shift-
object from center drag handle
Move to next slide Page Down
(scroll page down)
Move to previous slide Page Up
Move to first slide Home
Move to last slide End
Open shortcut menus for selection Control-click
Copy selected object or text x-C
Paste selected object or text x-V
Cut selected object or text x-X
Playing a slideshow
Play next slide Space, click, Right
Arrow, Down Arrow,
Page Down
Play previous slide Left Arrow,
Up Arrow, Page Up
End show Escape, x-., Q
Black screen B
First slide Home
Last slide End
AW.034-2169A-BoomerangQRC 11/22/02 10:06 AM Page 2 (1,1)

Editing text
Move one character to the right Right Arrow
Move one character to the left Left Arrow
Extend selection one character Shift-Right Arrow
to the right
Extend selection one character Shift-Left Arrow
to the left
Move to end of current word Option-Right Arrow
Move to beginning of current word Option-Left Arrow
Extend selection to end of Shift-Option-
current word Right Arrow
Extend selection to beginning Shift-Option-Left
of current word Arrow
Move to end of current line x-Right Arrow
Move to beginning of current line x-Left Arrow
Extend selection to end of Shift-x-Right Arrow
current line
Extend selection to beginning Shift-x-Left Arrow
of current line
Move to the line above Up Arrow
Move to the line below Down Arrow
Extend selection to the line above Shift-Up Arrow
Extend selection to the line below Shift-Down Arrow
Move to beginning of current Option-Up Arrow
paragraph
Move to end of current paragraph Option-Down Arrow
Extend selection to beginning of Shift-Option-Up Arrow
current paragraph
Extend selection to end of current Shift-Option-
paragraph Down Arrow
Move to beginning of text x-Up Arrow
Move to end of text x-Down Arrow
Extend selection to beginning Shift-x-Up Arrow
of text
Extend selection to end of text Shift-x-Down Arrow
Delete previous character or selection Delete
Delete the part of the word to the Option-Delete
left of the insertion point
Scroll to top of canvas Page Up, Home
Scroll to bottom of canvas Page Down, End
Stop editing text and x-Return
select the text box
Select bullet and text, all Drag bullet
sub-bullets and text, and move
AW.034-2169A-BoomerangQRC 11/22/02 10:06 AM Page 2 (2,1)

Using the slide organizer
Create new slide at same level Return, Enter
as last selected slide
Indent slides to the right Tab
Move indented slides to the left Shift-Tab
Extend selection to the Shift-click
selected slide
Add the selected range to Shift-drag
previously selected slides
Add (or remove) selected slide x-click, Shift-click
to previously selected slides
Add (or remove) selected range x-drag
to previously selected slides
Duplicate slide Option-drag
Select next slide Down Arrow
Extend selection to next slide Shift-Down Arrow
Select last slide x-Down Arrow
Extend selection to last slide Shift-x-Down Arrow
Select previous slide Up Arrow
Extend selection to previous slide Shift-Up Arrow
Select first slide x-Up Arrow
Extend selection to first slide Shift-x-Up Arrow
Delete selected slides Delete
Scroll to first slide without Home
changing the selection
Scroll to last slide without End
changing the selection
Scroll down a “page” of slides Page Down
without changing the selection
Scroll up a “page” of slides Page Up
without changing the selection
Editing chart data
Complete a cell entry and Return
move the selection down
Complete a cell entry and Shift-Return
move the selection up
Complete a cell entry and move Tab
the selection to the right
Complete a cell entry and move Shift-Tab
the selection to the left
Delete the character to the left/right Delete
of the insertion point, or delete
the selection
Move one character left, right, to Arrow keys
the beginning of text (up) or the (in edit mode)
end of text (down)
Complete a cell entry and Enter
select the cell
Move one cell in a given direction Arrow keys (in cell
selection mode)
Move to the beginning of the row Home
Move to the last non-blank cell End
to the right in the current row
Extend the selection by one cell Shift-Arrow keys
Extend the selection to the Shift-Home
beginning of the row
Extend the selection to the Shift-End
end of the row
AW.034-2169A-BoomerangQRC 11/22/02 10:06 AM Page 2 (3,1)

Select all table cells, borders, or cell x-A
content, depending on initial selection
Copy contents of selected cells or x-C
whole table, if table is selected
Cut contents of selected cells or x-X
whole table, if table is selected
Paste the selection x-V
that was last copied
Delete selection, either whole table, Delete
border or border segment, or
contents of selected cells
Constrain the movement of the Shift-drag table
table and snap to guides
Duplicate table on move Option-drag table
Switch contents of selected cell Drag selected cell to
with contents of destination cell another cell
Copy contents of selected cell Option-drag selected
into destination cell cell to another cell
Extend selection from selected Shift-click
cell to destination cell
Add/remove selected cell x-click selected
to/from selection or unselected cell
Stop editing text and select cell x-Return, x-click cell
(in text edit mode)
Select text first, then multiple Click-drag cell
cells, depending on extent (in text edit mode)
of drag
Select entire row or column border Click border of
selected table
Getting around tables
Move row or column border, or Click-drag border, or
border segment, to new position border segment, of
selected cell
Select/deselect border segment Shift-click, x-click
to select discontinuous border segment of
segments selected border
Add/remove row/column to Option-drag outside
selected edge of table border of table
Move selected table one pixel Arrow keys
Move selected table ten pixels Shift-arrow keys
Select next cell to the right, Arrow keys
left, up, or down (in cell selection mode)
Extend cell selection by one cell Shift-Arrow keys
(in cell selection mode)
Select text in next cell Tab
Select text in previous cell Shift-Tab
Insert a Tab at insertion point Control-Tab
in the selected cell (in text edit mode)
Stop editing cell x-Return
and select the table (in cell selection mode)
AW.034-2169A-BoomerangQRC 11/22/02 10:06 AM Page 2 (4,1)
