eInstruction BTMP MeetingPad 300 User Manual Welcome
eInstruction Corporation MeetingPad 300 Welcome
manual

Welcome Page 1 of 54
file://C:\TEMP\~hhA856.htm 8/12/02
Guide to this help file
If you are already using InterWrite Software, check What's new?.
What's new?
Here are some of the new features added to InterWrite Software’s Interactive Mode since version 3.1:
Welcome to comprehensive help for
interwritetm
MEETING SUITE interwritetm
SCHOOL SUITE
from GTCO CalComp Inc.
Enter
Meeting Suite tools for workplace collaboration
About Meeting Suite
Installing your system
Basic operations
School Suite tools for interactive classrooms
About School Suite
Installing your system
Basic operations
InterWrite Software for electronic annotation
Guide to InterWrite Software
Using Interactive Mode
Using PC Whiteboard Mode
Using InterWrite Viewer

Welcome Page 2 of 54
file://C:\TEMP\~hhA856.htm 8/12/02
n Annotate window appears when you are using Annotation Mode. It contains an image of the screen, and can be moved, resized,
minimized, maximized and closed just like any standard window. Make annotations in the Annotate window, then instantly switch to
any other application. Use the new Pan and Scroll tool to move the screen image within the Annotate window.
n Erasing entirely through a freehand annotation splits it into two or more independent parts.
n Resize freehand annotations by dragging any handle.
n Add pictures to annotations. See Other annotation functions.
n Hide any part of the screen. See Other annotation functions.
n PowerPoint presentations can now be easily annotated. New Page Down and Page Up buttons move through presentation pages
and automatically save annotations. See Other annotation functions.
n Grid Line Page provides a blank page with horizontal and/or vertical lines. Create via new Blank Page menu. Set up via Edit >
Preferences.
n Image Page provides a page with any image. Create via new Blank Page menu. Set up via Edit > Preferences.
n Create, save and restore custom Control Bar configurations. See Customize the Control Bar.
n Program updates are easily available over the Internet. Use Help > Check for Updates command (also available via the InterWrite
icon in the Task Bar). If a new version of the program is available, you can install it immediately with the click of a button.
Technical support
For additional help in installing, configuring and using Meeting Suite products, contact GTCO CalComp Technical Service & Support:
U.S. West Coast
GTCO CalComp Inc.
14555 North 82nd Street
Scottsdale, AZ 85260
n E-mail: CalComp.support@gtcocalcomp.com
n Phone: 1-480-443-2214
n Fax: 1-480-948-5508
U.S. East Coast
GTCO CalComp Inc.
7125 Riverwood Drive
Columbia, MD 21046
n E-mail: gtco.support@gtcocalcomp.com
n Phone: 1-410-312-9221
n Fax: 1-410-290-9065
Europe
GTCO CalComp
World Trade Center
A-1300 Vienna -- Airport
Austria
n Phone: +43 1 7007 36450
n Fax: +43 1 7007 36458
Web
www.gtcocalcomp.com
About Meeting Suite
Meeting Suite is a set of electronic tools that make collaboration in the workplace efficient and simple. Products in the Meeting Suite
family include:
n MeetingBoard: a versatile electronic whiteboard.

Welcome Page 3 of 54
file://C:\TEMP\~hhA856.htm 8/12/02
n MeetingBoard LX: a version of MeetingBoard for cost-sensitive applications.
n MeetingPad 100: an electronic tablet, which communicates with a Meeting Suite system through a serial port or USB port.
n MeetingPad 300: a cordless electronic tablet, which communicates with a Meeting Suite system though a Bluetooth wireless
networking hub.
n InterWrite Software: a Windows-based program for electronic collaboration. InterWrite tools include:
l Interactive Mode: Operate and annotate any application, then save and e-mail the results. Used with MeetingBoard or
MeetingBoard LX and a video projector.
l PC Whiteboard Mode: Write on a MeetingBoard using electronically-enhanced dry erase marker pens, then save, print and e-mail
the images. Used with a MeetingBoard or MeetingBoard LX.
l InterWrite Reader: View files created by InterWrite in Interactive Mode or PC Whiteboard Mode.
Also available: InterWrite Meeting Services, that enable users to log into and hold meetings that anyone in the world with an Internet
connection can participate in.
Additionally, MeetingBoard offers Color Copyboard Mode: Write using electronically-enhanced dry erase marker pens, then
immediately print the results on an ink jet printer.
For the latest product information, check the GTCO CalComp Web site.
Getting started
Here's a summary of how to get your Meeting Suite system up and running. Follow the links for more details.
First, be certain you have everything not supplied with the Meeting Suite system.
Next, install the system:
A. Unpack the products and make certain you received everything.
B. Install InterWrite software on your Windows PC.
C. If your system includes a MeetingPad 300, charge the batteries (charging takes about 3 hours and is required before you can use a
new MeetingPad 300).
D. Assemble the MeetingBoard (you can mount it on a wall or on the optional floor stand).
E. Connect the components. How you connect the system depends on which mode you want to use.
Once you have completed these steps, your Meeting Suite system is ready to use. To start a session, review the information in the
"Meeting Suite > Basic operations" section in this help file.
What you need to provide
You will need to provide these items, which are not supplied as part of the Meeting Suite system:
n For Interactive Mode or PC Whiteboard Mode: A personal computer running Microsoft Windows. Recommended: Internet access.
Note: InterWrite Software is compatible with Windows 95, 98, ME, NT, 2000 and XP.
Note: You cannot use USB or Bluetooth on Windows 95 or NT computers.
n For Interactive Mode: a video presentation projector, with a cable for connecting it to the PC.
n For Color Copyboard Mode: a color ink jet printer and a standard parallel printer cable.
Note: In Color Copyboard Mode, MeetingBoard supports three printer formats: Hewlett-Packard PCL3, Epson Stylus Color P2
and Canon BJR Color. Only color ink jet printers using these command sets work with MeetingBoard.
Wondering which mode you should use? Check the brief descriptions or the details.
A. Unpack the products
1. Look for damage.
Welcome Page 4 of 54
file://C:\TEMP\~hhA856.htm 8/12/02
Before unpacking, examine the shipping cartons for damage. If a carton is damaged, notify the shipper immediately.
Note: Save all shipping materials. If you need to ship a tablet later, you should repack it in the original materials.
2. Carefully unpack the products.
CAUTION: To avoid damage to the controller, do not rest the MeetingBoard tablet on the controller housing (located on the
rear of the tablet near one corner). Do not scratch or damage the tablet's writing surface.
3. Compare the parts with the appropriate parts checklist.
n Parts checklist for MeetingBoard and MeetingBoard LX.
n Parts checklist for MeetingPad 100
n Parts checklist for MeetingPad 300.
4. If anything is missing...
Immediately contact your GTCO CalComp supplier.
5. Activate your product warranty.
Complete the warranty registration card and mail it to GTCO CalComp If your product needs service, the card should be on file at
GTCO CalComp.
Next: Install InterWrite Software.
B. Install InterWrite Software
Note: InterWrite Software is compatible with Windows 95, 98, ME, NT, 2000 and XP.
1. Remove any graphic tablet drivers installed on the PC.
2. Insert the InterWrite Software CD into the computer’s CD drive.
3. Wait for the installation program to launch.
Note: If the installation program does not start on its own, use Windows Explorer to locate and launch setup.exe on the CD-
ROM.
4. Follow the on-screen instructions.
5. Check the Task Bar. If you don't see the InterWrite icon, restart the computer.
6. Click the InterWrite icon in the Task Bar, then click Check for Updates in the pop-up menu. If an update is available, download it
now.
Tip: Check for updates periodically.
Note: The first time you run InterWrite Software, you must enter the authorization code from the InterWrite Software License
Certificate.
Next:
If your system includes one or more MeetingPad 300s, recharge them now.
or
If your system doesn't include MeetingPads, Assemble MeetingBoard.
MeetingPad 300: recharge the tablet
Before initial use, recharge the MeetingPad 300 tablet for at least 3 hours.
1. Connect the charger’s cable to the POWER jack on the tablet.
2. Plug the charger into an AC power outlet.
Note: Do not operate the tablet while it is charging.
3. When charging is complete, unplug the charger from the power outlet, then disconnect the charger’s cable from the tablet.
Welcome Page 5 of 54
file://C:\TEMP\~hhA856.htm 8/12/02
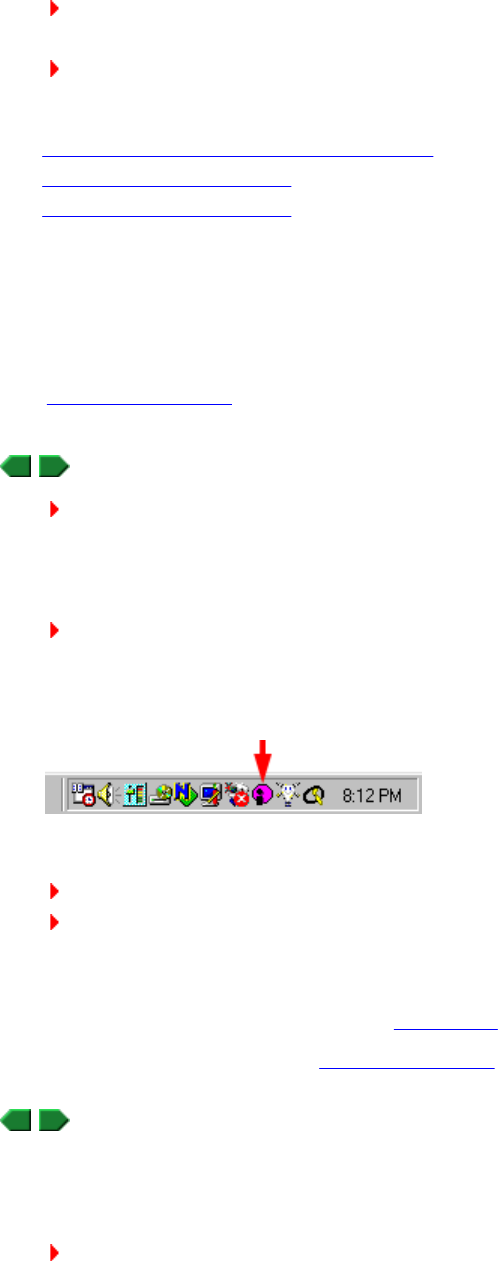
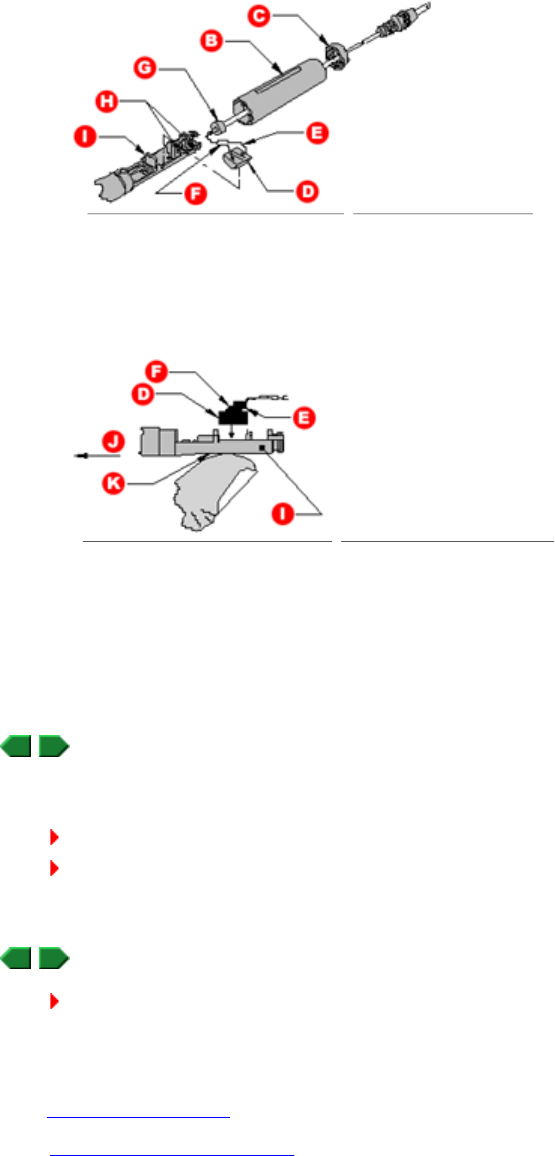
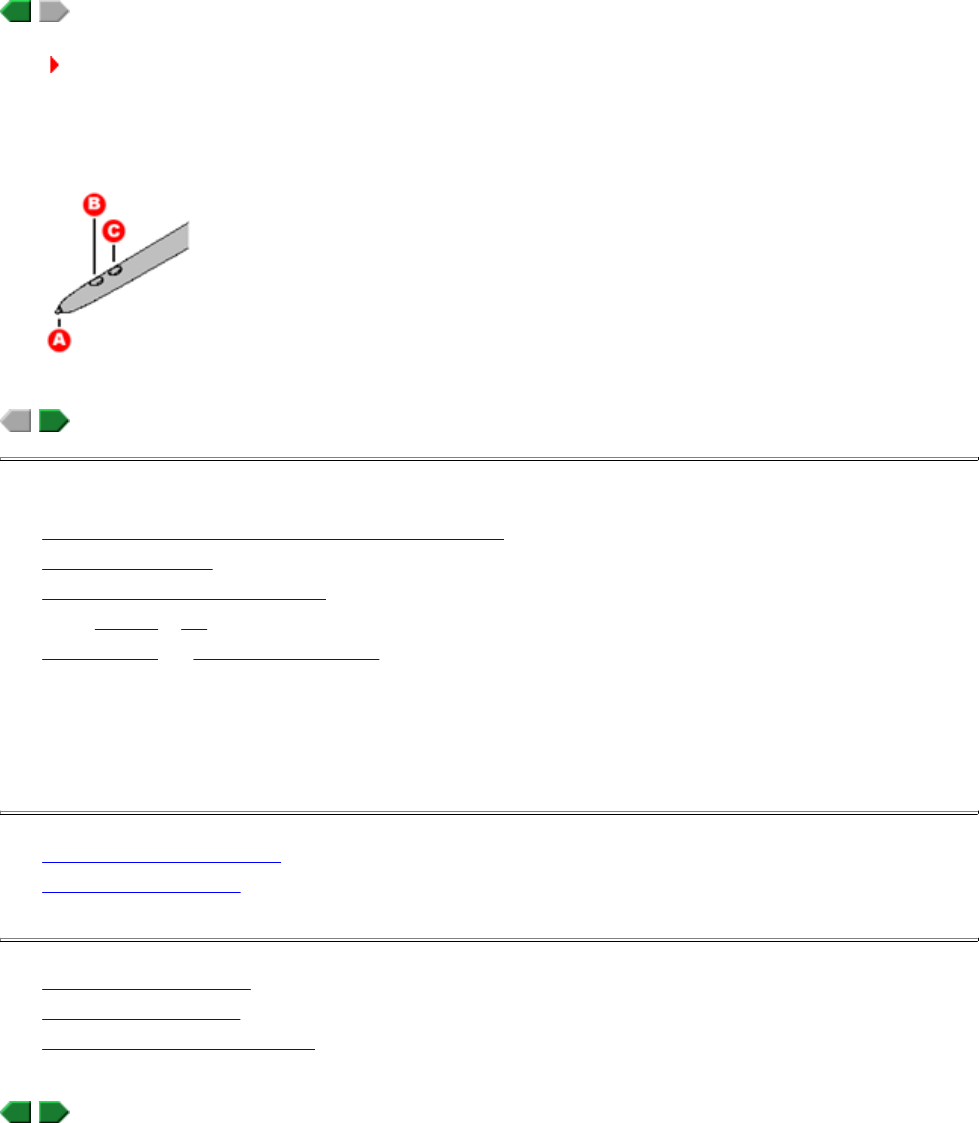
MeetingPad 300: (optional) install the pen cord
The pen cord enables the MeetingPad 300 pen to operate without batteries. The cord also keeps the pen tethered to the tablet, making it
less likely to be lost. To install the pen cord:
1. Remove the pen cap, cover and batteries.
2. Feed black battery replacement end through cover.
3. Feed yellow and black wires through notches in inner housing.
4. Push black battery replacement end of cord into area where batteries were (see below), making sure the yellow wire is toward the pen
tip for correct polarity. Hold silver battery contact located on underside of inner housing with thumb while pushing black battery
replacement into place.
5. Push strain relief into hole at end of inner housing. Do not push all the way through.
6. Replace pen cover and cap.
7. Plug the cord into the POINTER jack on the tablet.
MeetingPad 300: install the Bluetooth hub
Install the Bluetooth hub according to instructions provided on the Bluetooth CD-ROM. The Bluetooth hub enables MeetingPad 300s to
communicate with the PC.
Note: Up to 7 MeetingPad 300s can communicate with one Bluetooth hub.
A Batteries
B Cover
C Cap
B Cover
C Cap
D Black battery replacement
E Black wire
F Yellow wire
G Strain relief
H Notches
I Inner housing
D Black battery replacement
E Black wire
F Yellow wire
I Inner housing
J Pen tip
K Silver battery contact
Welcome Page 6 of 54
file://C:\TEMP\~hhA856.htm 8/12/02
Note: Each MeetingPad 300 must be within 25 feet (7m) of its intended Bluetooth hub. Reception depends on local
conditions, and performance may vary in your facility.
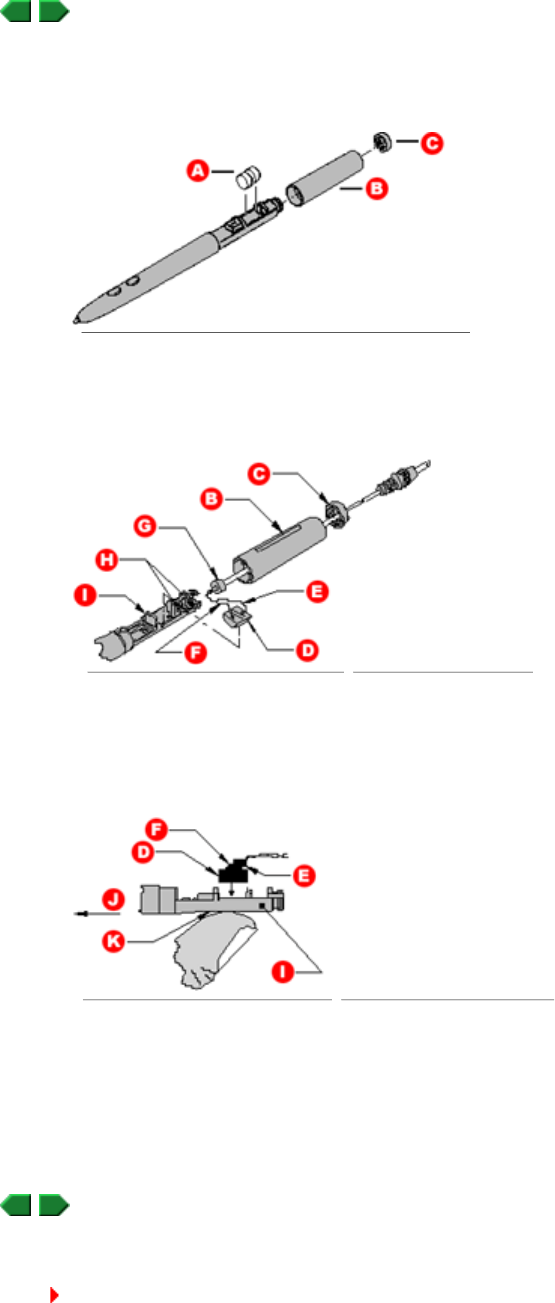
1. Attach the pen tray to the tablet
CAUTION: To avoid damage to the controller, do not rest the MeetingBoard tablet on the controller housing (located on the
rear of the tablet near one corner). Do not scratch or damage the tablet's writing surface.
Attach the tray brackets to the bottom rear of the tablet using Phillips screws as shown below.
Next: Mount the tablet on a wall.
or
Mount the tablet on the floor stand.
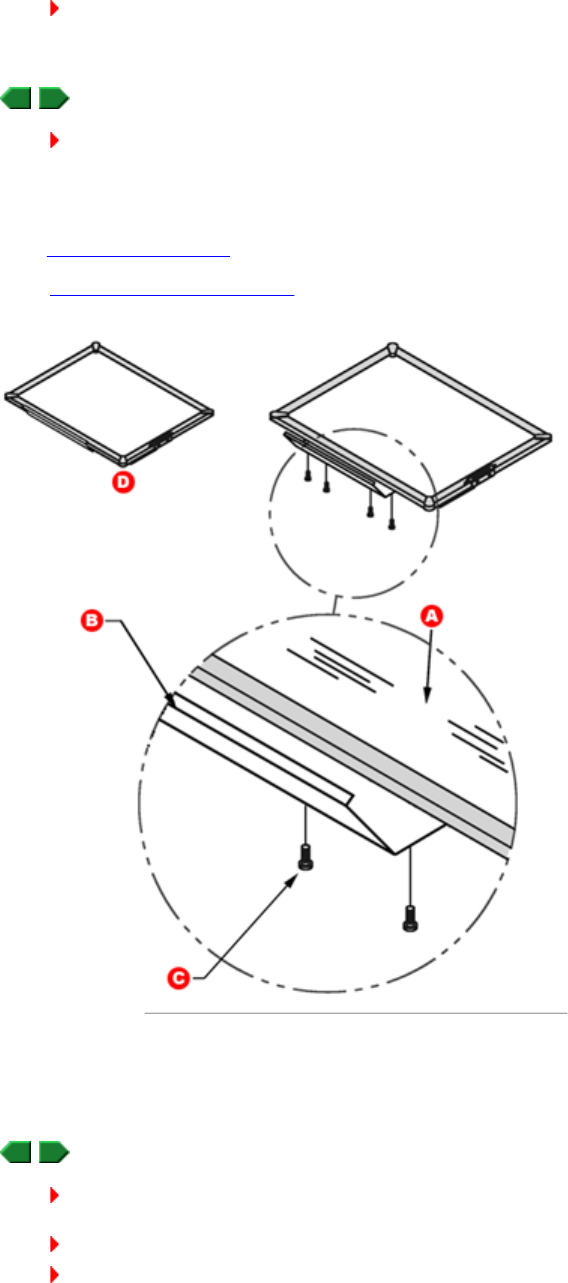
2a. Mount the tablet on a wall
CAUTION: To avoid damage to the controller, do not rest the MeetingBoard tablet on the controller housing (located on the
rear of the tablet near one corner). Do not scratch or damage the tablet's writing surface.
WARNING: Never nail or drill the MeetingBoard tablet. Doing so will damage the unit and void your warranty.
IMPORTANT: To avoid damage to the tablet or injury, two people should carry out this mounting procedure.
a. Remove the protective backing from the adhesive on the two tablet levelers. Press the tablet levelers into place in the approximate
locations (C) shown below.
A Tablet
B Pen tray
C Phillips screw (4)
D Assembled view
Welcome Page 7 of 54
file://C:\TEMP\~hhA856.htm 8/12/02
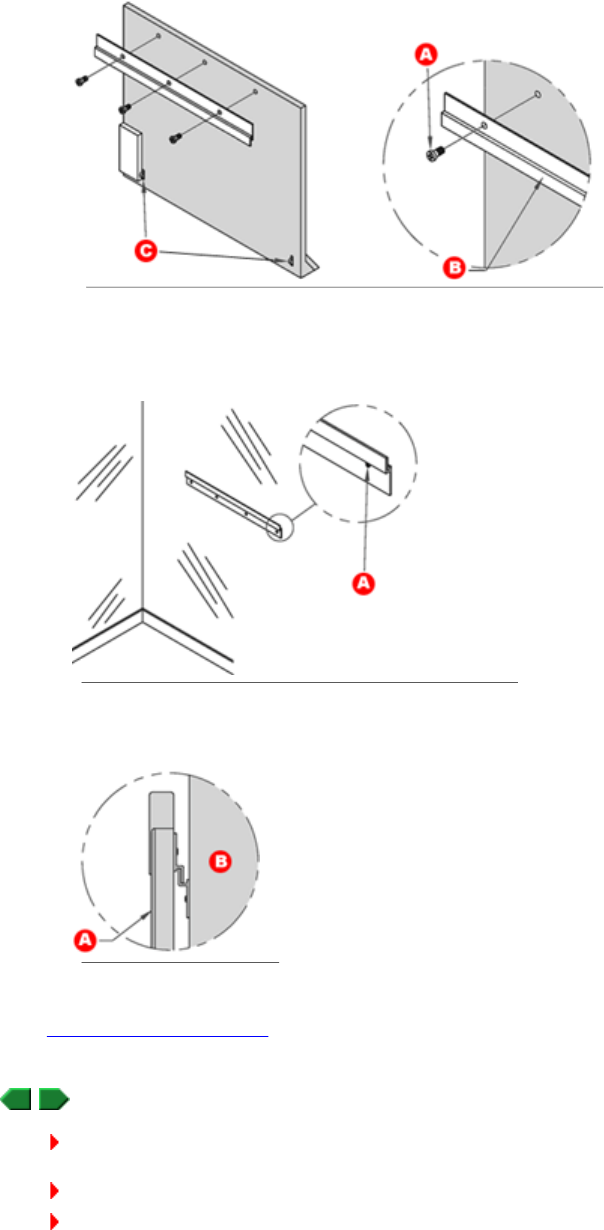
b. Attach one mounting bracket (B) to the back of the MeetingBoard tablet using Phillips screws (A) as shown below.
c. Attach the other mounting bracket to the wall using hardware appropriate for the wall structure (this hardware is not included) as
shown below.
d. Hang the tablet by interlocking the mounting brackets as shown below.
Next: Assemble the electronic pen(s).
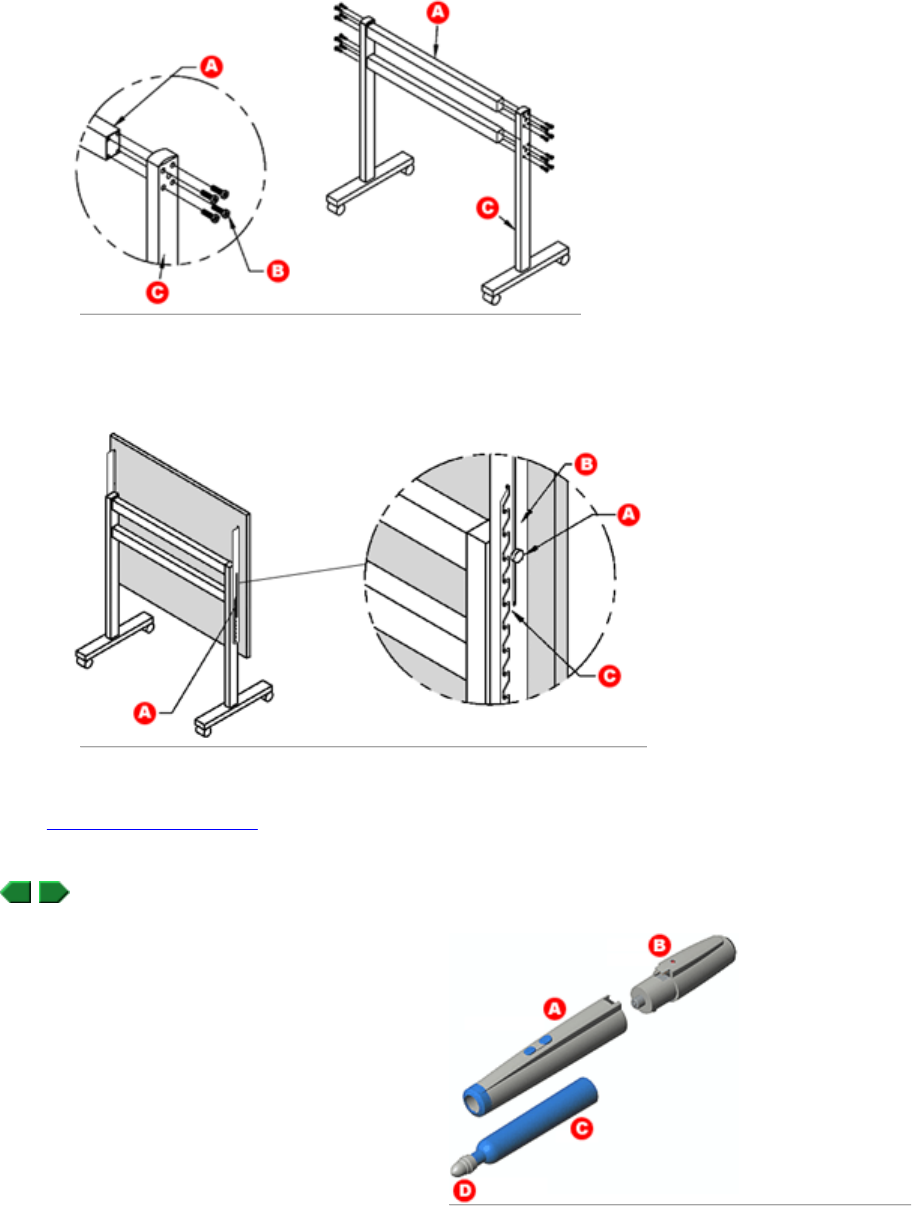
2b. Mount the tablet on the optional floor stand
CAUTION: To avoid damage to the controller, do not rest the MeetingBoard tablet on the controller housing (located on the
rear of the tablet near one corner). Do not scratch or damage the tablet's writing surface.
WARNING: Never nail or drill the MeetingBoard tablet. Doing so will damage the unit and void your warranty.
IMPORTANT: To avoid damage to the tablet or injury, two people should carry out this mounting procedure.
a. Attach each mounting bracket to the back of the tablet using Phillips screws as shown below.
A Screw, M4-0.7x10mm pan head w/internal tooth washer
B Mounting bracket
C Tablet levelers
A Note: This hardware not included. Hole spacing on
bracket matches 16" and 24" wall stud spacing.
A Tablet
B Wall

Welcome Page 8 of 54
file://C:\TEMP\~hhA856.htm 8/12/02
b. Using four screws, attach one foot to the bottom end of one leg (the end without crossbar holes). Attach two casters to each
foot. Insert three end caps (two on the foot and one on the leg). Repeat for the other foot and leg.
c. IMPORTANT: Examine the leg assemblies: one side of each assembly has 10 holes (2 groups of 5) and the other side has 8 holes (2
groups of 4). In this step, the sides with 10 holes must face away from the crossbars.
Attach both crossbars to one leg assembly using eight screws as shown below. The screws pass through the 4 outermost holes in
each group of 5 holes. Attach the other leg assembly to the crossbars in the same way.
d. Thread two thumbscrews (A) into each leg as shown below. Hang the MeetingBoard tablet at the desired height by sliding the
mounting bracket slots over the loose thumbscrews. Tighten the thumbscrews.
A Mounting bracket (2)
B Screw, M4-0.7x10mm pan head with internal tooth washer
C Back of tablet
A Foot
B Leg
C End caps (6)
D Lock washer (4)
E Caster (4)
F Screw, 1/4
-
20 x 2" flat head
A Crossbar
B Screw, 1/4-20 x 2" flat head
C Leg assembly

Welcome Page 9 of 54
file://C:\TEMP\~hhA856.htm 8/12/02
Next: Assemble the electronic pens.
3. Assemble the MeetingBoard pen(s)
A Thumbscrew (2)
B Mounting bracket
C T
-
slot (typical)
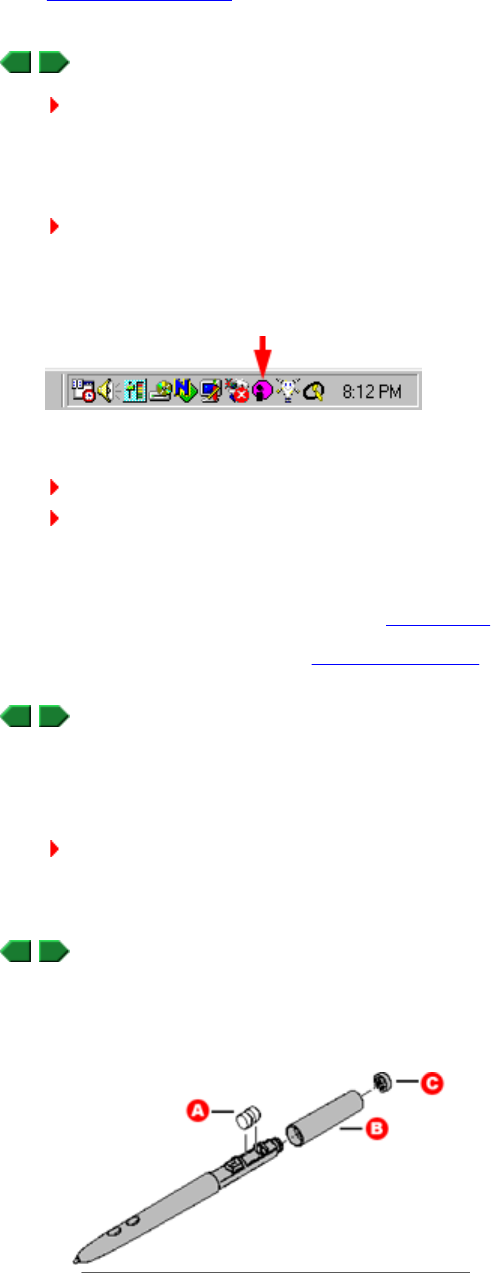
a. Locate the marker holders, electronics modules,
batteries, pen caps and markers supplied.
The pens are electronically coded to match the plastic
colors: black, blue, red and green.
b. Remove the marker's cap and replace it with a
MeetingBoard pen cap.
c. Insert a marker into the pen housing with the matching
color (e.g., red marker goes in red housing)
A Marker holder
B Electronics module
C Marker
D Pen cap
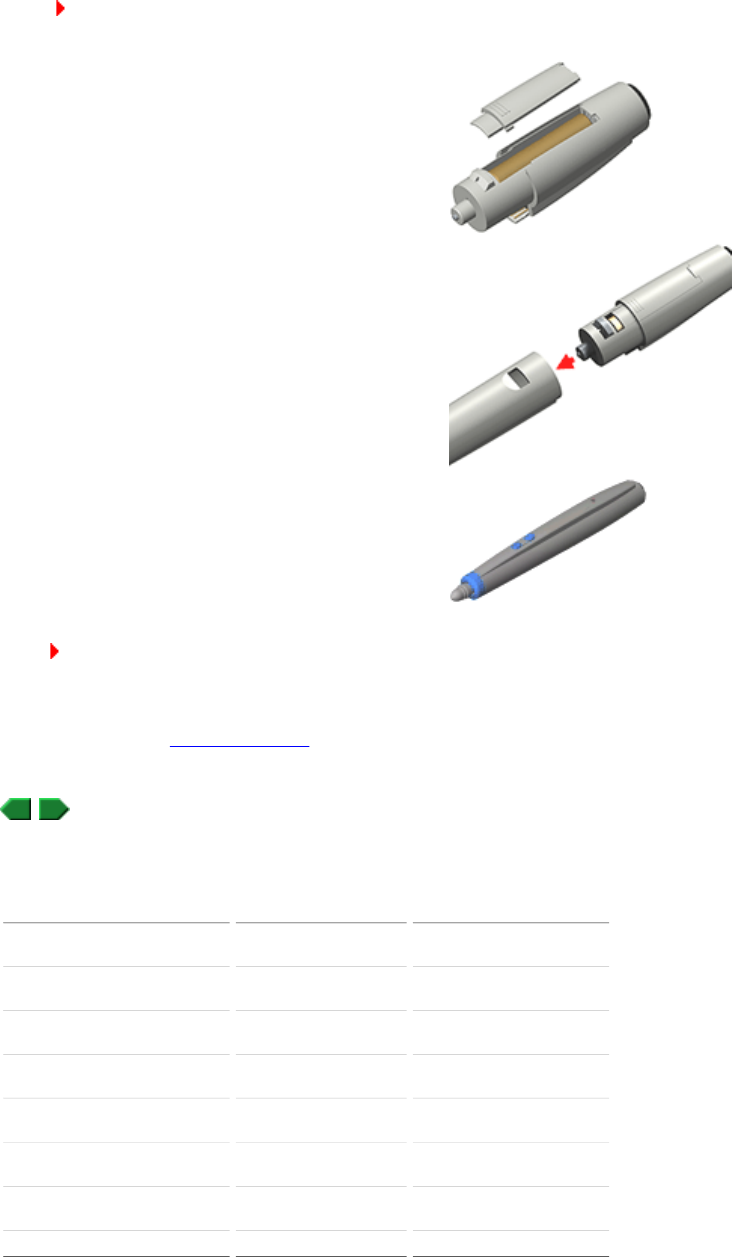
Note: Keep the markers capped as much as possible to prevent them from drying out. The caps enable the electronic pens
to be used in Interactive Mode without leaving ink on the tablet.
d. Remove the battery cover from a pen electronics
module. Insert a battery into the module (assure polarity
is correct!). Replace the battery cover.
e. Snap the pen electronics module into a marker housing
(any module can be used with any marker housing).

Welcome Page 10 of 54
file://C:\TEMP\~hhA856.htm 8/12/02
To disassemble the pen: Press the latch on the underside of the pen, then pull the pen apart. The two modules should
separate easily---excessive force is not required and should not be used. If the modules don't separate easily, press the latch
farther inward.
Next: You are ready to connect the system.
Which mode should you use?
The mode you use depends on what you want to do with the Meeting Suite system, as well as what hardware you have.
*Requires MeetingPad 300 and Bluetooth hub.
f. The LED should flash four times, indicating the pen is
working correctly.
MeetingBoard electronic pen, assembled
What can you do? Interactive Mode PC Whiteboard Mode Color Copyboard Mode
Write using electronic ink ü
Write from a wireless remote
tablet ü*
Write with dry erase markers in
electronic pens ü ü
Annotate PC screens ü
Write meeting notes on a
"blank page" ü ü ü
Review, rearrange or delete
annotation images ü ü
Distribute annotation images
electronically ü ü
Print notes Optional Optional Required
**Ink jet printer must support HP PCL3, Epson Stylus Color P2 or Canon BJR Color protocol.
What do you need? Interactive Mode PC Whiteboard Mode Color Copyboard Mode
Windows computer Required Required ---
Video projector Required --- ---
Printer Optional Optional Ink jet printer required**
Main tablet MeetingBoard or
MeetingBoard LX MeetingBoard or
MeetingBoard LX MeetingBoard only
Remote tablet (optional) MeetingPad 100 or
MeetingPad 300 --- ---
1. Connect MeetingBoard
It is recommended that you connect using the PC's USB port. If the PC doesn't have a USB port, then connect using its serial
port.
Welcome Page 11 of 54
file://C:\TEMP\~hhA856.htm 8/12/02
c. For USB connections:
a. Plug one end of the USB cable into a USB port on the computer (or plug it into a USB hub connected to the computer).
b. Plug the other end of the USB cable into the MeetingBoard USB port.
or
For serial connections:
a. Plug one end of the serial cable into the serial port on the computer.
b. Plug the other end of the serial cable into the MeetingBoard serial port.
d. Connect a video cable between the 15-pin video port on the computer and the video projector.
e. Connect the MeetingBoard power supply cable to the power port on the MeetingBoard controller.
Next: Connect MeetingPad 100.
2. Connect MeetingPad 100
Skip this step if your system does not include a MeetingPad 100.
a. Connect the tablet to the computer:
a. Shut down and turn off the computer.
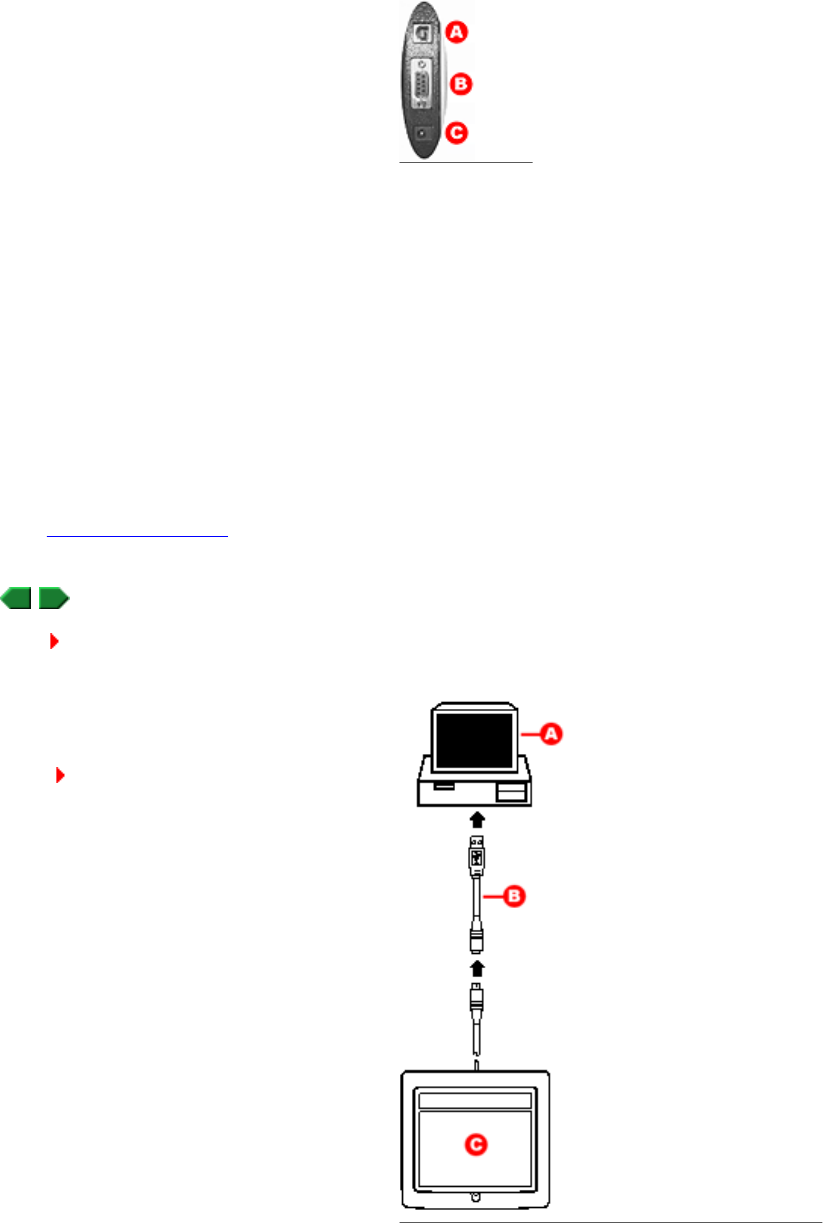
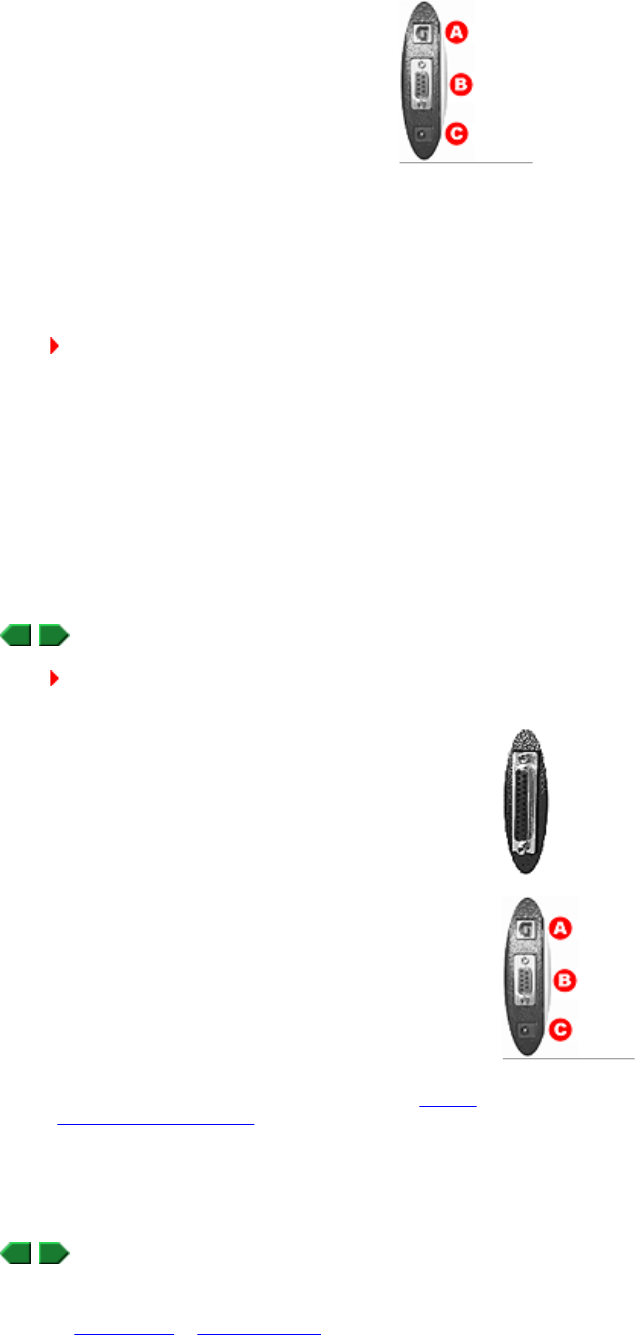
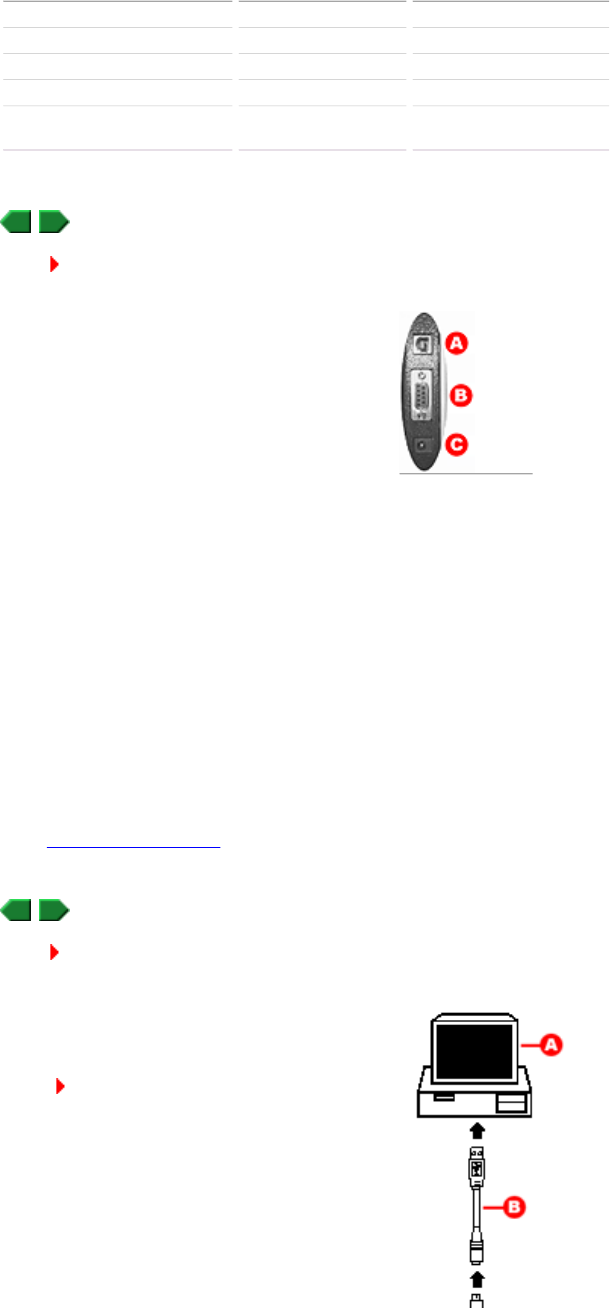
b. Locate and identify the ports on the MeetingBoard
controller (shown at right).
A USB port
B Serial port
C Power port
n For USB connection: With computer ON,
connect tablet to computer's USB port using
the USB adapter (as shown at right).
You cannot use USB connections with a
Windows 95 or NT computer.
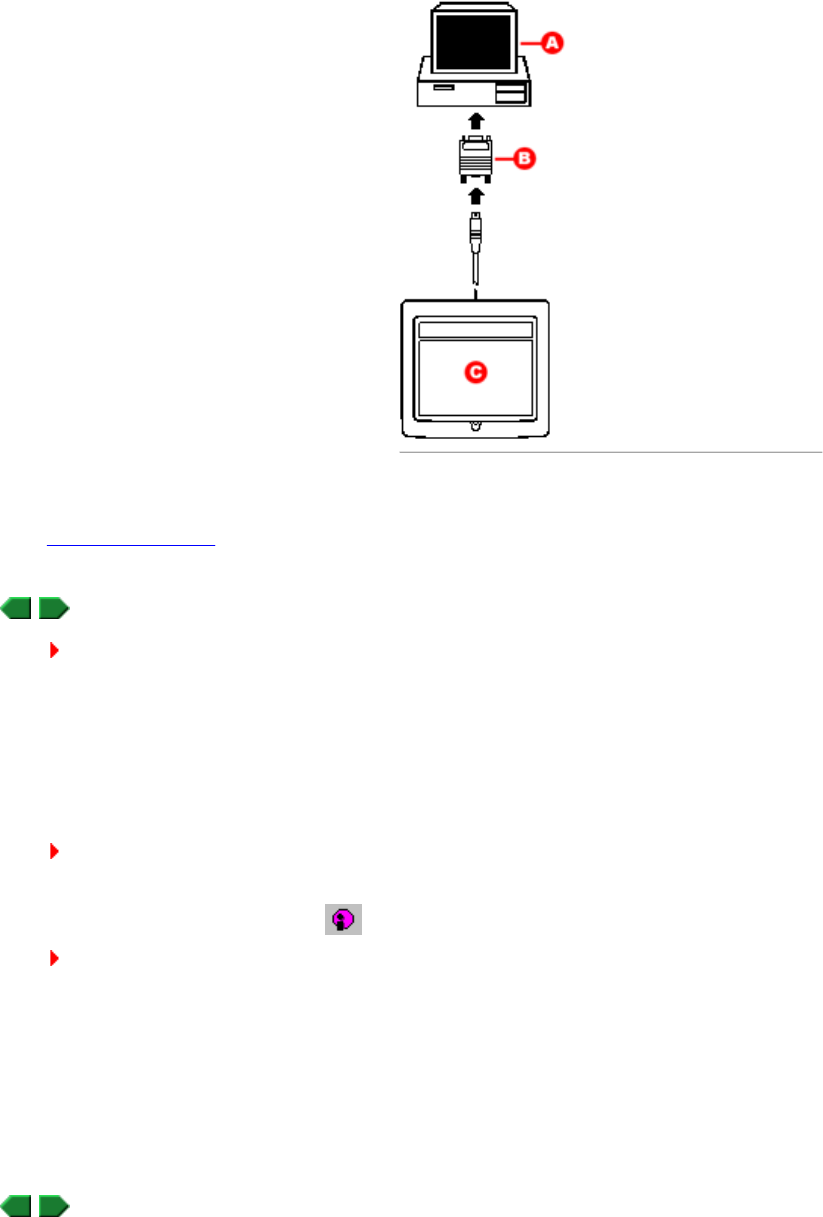
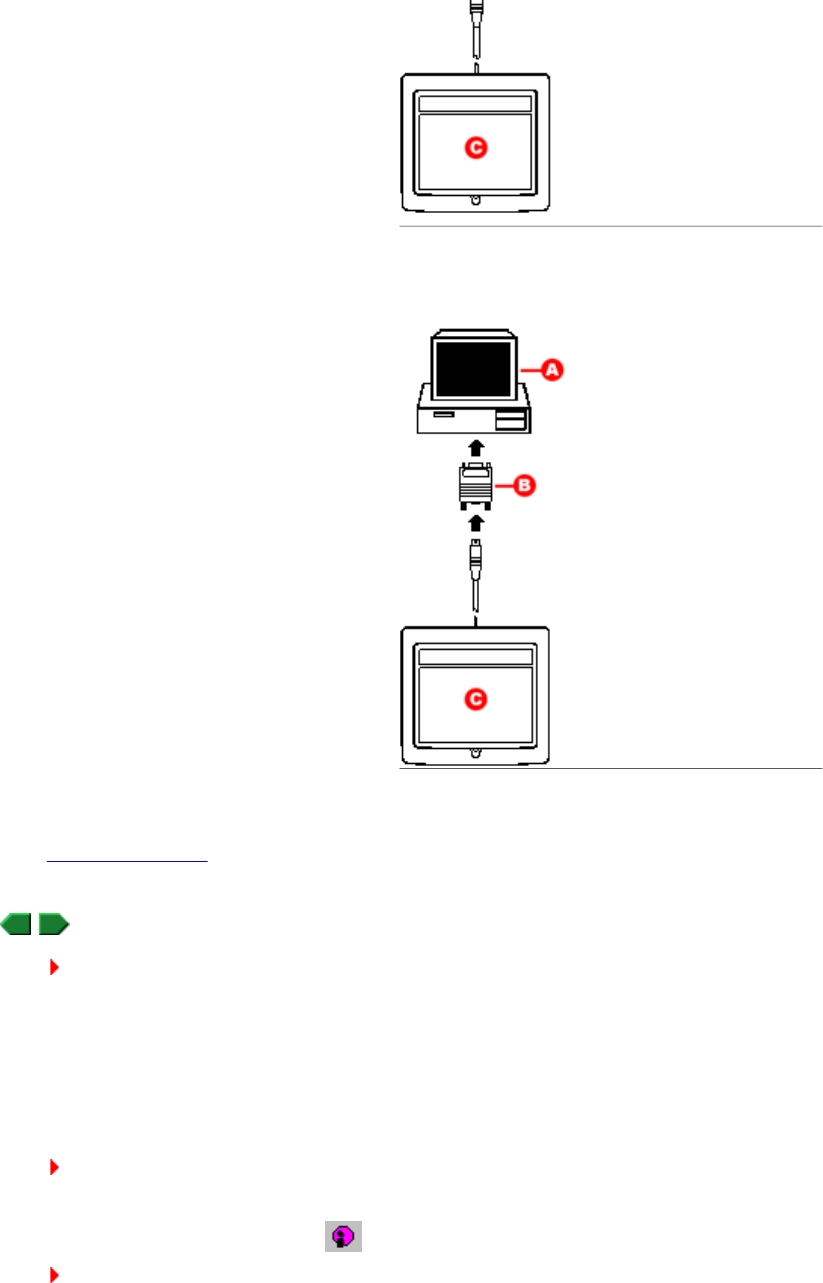
A Win 98/ME/2000/XP computer
B USB adapter
C MeetingPad 100
Welcome Page 12 of 54
file://C:\TEMP\~hhA856.htm 8/12/02
Next: Calibrate MeetingBoard.
3. Calibrate MeetingBoard
Tip: To assure the electronic ink is properly aligned, always recalibrate after moving the table or projector.
a. Plug the MeetingBoard power supply into an electrical outlet.
You should hear at least four beeps from the MeetingBoard.
b. Turn on the computer.
c. Turn on the projector.
d. Aim the projector at the MeetingBoard's writing area, and size the projected image to fit within the writing area.
Note: Make certain the image from the PC is properly projected before continuing.
e. Start > GTCO CalComp InterWrite > Interactive Mode.
f. In the Control Bar, click the InterWrite icon , then Tools > Calibrate.
Tip: If an error occurs during calibration, simply cancel and start over.
g. The calibration screen will be projected on the tablet. As prompted by the software, click each of the calibration points using the
MeetingBoard electronic pen.
h. When calibration is complete, the InterWrite Control Bar will appear. This menu, which remains in front of all applications, enables
you to control programs, edit documents and add annotations.
Installation for Interactive Mode is complete. You can now use the system.
Connect for PC Whiteboard Mode
n For serial connection: With computer OFF,
connect tablet to computer's serial port using
the serial adapter (as shown at right). Turn
computer ON. You will be prompted to install
drivers.
A Win 95/98/ME/2000/XP computer
B Serial adapter
C MeetingPad 100
Welcome Page 13 of 54
file://C:\TEMP\~hhA856.htm 8/12/02
3. Using the USB cable, connect the MeetingBoard's USB port (A) to the computer's USB port (or to a port on a USB hub connected to
the computer).
or
Using the serial cable, connect the MeetingBoard's serial port (B) to the computer's serial port.
CAUTION: DO NOT connect both USB and serial cables at the same time.
4. Connect the MeetingBoard power supply cable to the MeetingBoard's power port (C).
5. Plug the MeetingBoard power supply into an electrical outlet.
You should hear at least four beeps from the MeetingBoard.
6. Turn on the computer. If you are using a USB connection to the MeetingBoard, Windows will find the MeetingBoard and complete the
installation.
Installation for PC Whiteboard Mode is complete. You can now use the system.
Connect for Color Copyboard Mode
Note: This mode is not available on MeetingBoard LX.
Installation for Color Copyboard is complete. You can now use the system.
Overview of basic operations
First, you need to launch InterWrite Software. You can launch Interactive Mode or PC Whiteboard Mode from:
n The MeetingBoard or MeetingBoard LX.
1. Shut down and turn off the computer.
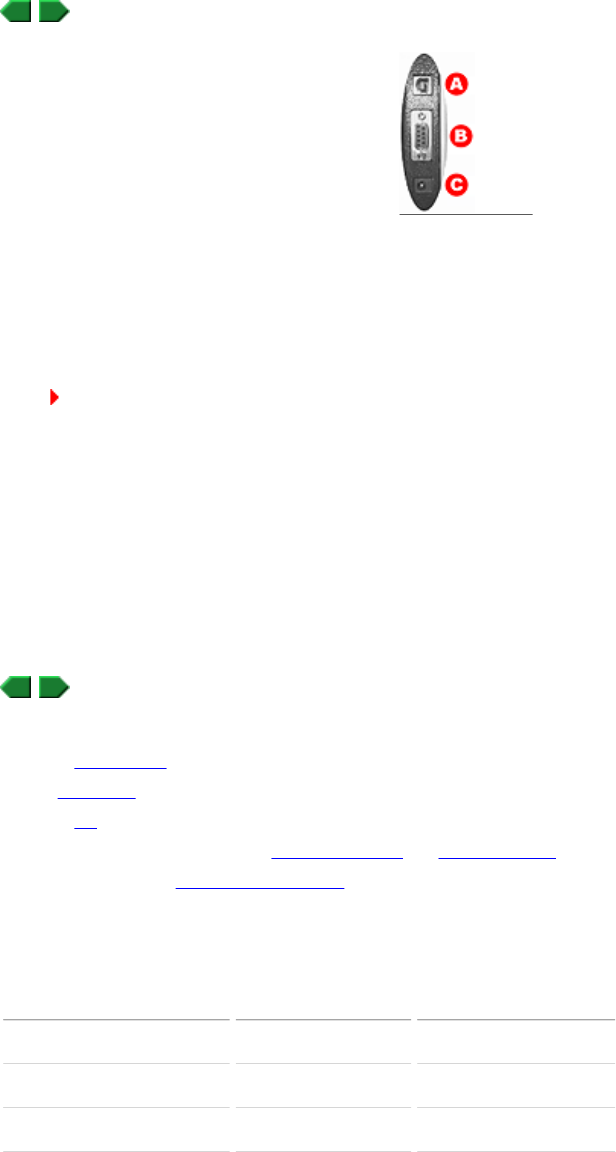
2. Locate and identify the ports on the MeetingBoard
controller (shown at right).
A USB port
B Serial port
C Power port
1. Using your printer cable, connect the ink jet printer to the parallel
port on the MeetingBoard controller --->
2. Connect the MeetingBoard power supply cable to the power port
(C) on the MeetingBoard controller.
3. Turn on the printer.
4. Turn on the MeetingBoard. Count the beeps:
n Four beeps indicates that the MeetingBoard successfully
started and found the printer.
n More than four beeps indicates that the MeetingBoard did
not find the printer. Check to assure the printer is ON, is
properly connected to the parallel port, and uses a protocol
supported by MeetingBoard.
C Power port
Welcome Page 14 of 54
file://C:\TEMP\~hhA856.htm 8/12/02
n A MeetingPad.
n The PC.
Note: Color Copyboard Mode functions without InterWrite Software.
Next, review instructions for using the MeetingBoard pens and MeetingPad pens.
Finally, you are ready to use InterWrite Software.
The InterWrite Software mode you use depends on what you want to do with the Meeting Suite system.
*Requires MeetingPad 300 and Bluetooth hub.
What can you do? Interactive Mode PC Whiteboard Mode Color Copyboard Mode**
Write using electronic ink ü
Write from a wireless remote
tablet ü*
Write with dry erase markers in
electronic pens ü ü
Annotate PC screens ü
Write meeting notes on a
"blank page" ü ü ü
Review, rearrange or delete
annotation images ü ü
Distribute annotation images
electronically ü ü
Print notes Optional Optional Required
**Not available on MeetingBoard LX.
Starting from MeetingBoard
1. Assure the MeetingBoard is on.
2. Assure other components are on:
n For Interactive Mode or PC Whiteboard Mode: Assure the computer is on.
n For Interactive Mode: Assure the video projector is on and is projecting the computer's screen onto the MeetingBoard writing
surface.
n For Color Copyboard Mode: Assure the printer is on.
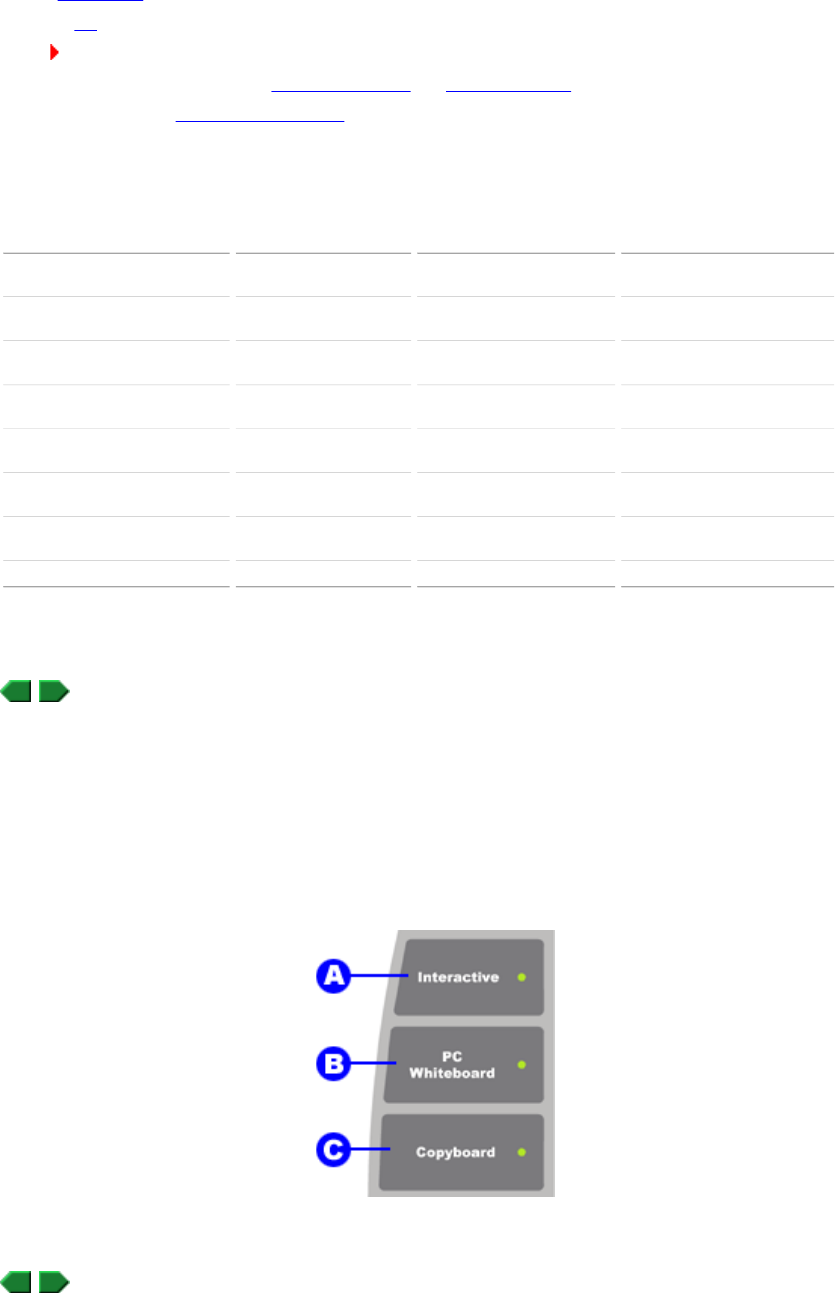
3. On the MeetingBoard control panel...
Starting from MeetingBoard LX
1. Assure the MeetingBoard LX is on.
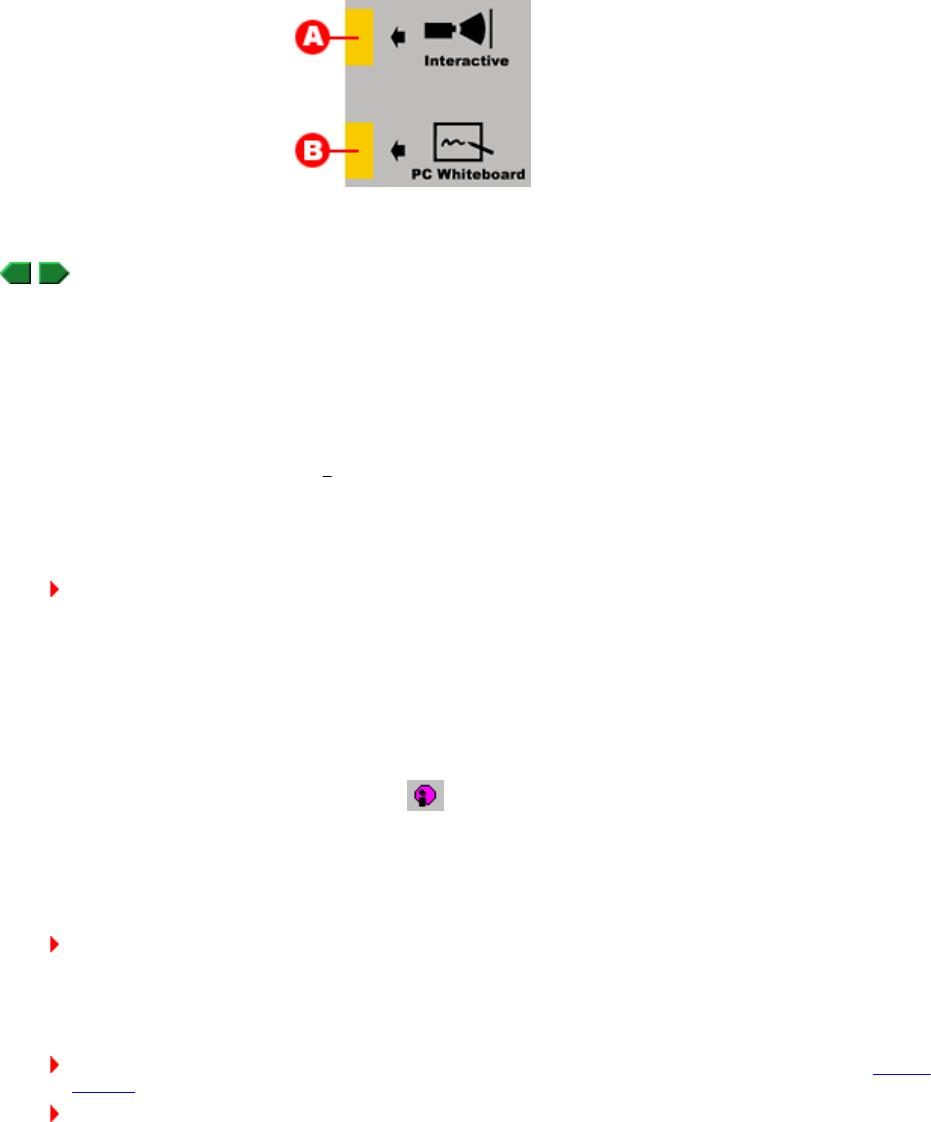
Press A for Interactive Mode.
Press B for PC Whiteboard Mode.
Press C for Color Copyboard Mode,
then press Clear twice.
Welcome Page 15 of 54
file://C:\TEMP\~hhA856.htm 8/12/02
2. Assure other components are on:
n For Interactive Mode or PC Whiteboard Mode: Assure the computer is on.
n For Interactive Mode: Assure the video projector is on and is projecting the computer's screen onto the MeetingBoard writing
surface.
3. On the MeetingBoard LX control panel, use the electronic pen to...
Starting from a MeetingPad
Starting from a MeetingPad 100
1. Assure the MeetingBoard is on.
2. Assure the computer is on.
3. Using the pen, click the LAUNCH InterWrite spot in the upper right corner of the MeetingPad 100 tablet.
4. Choose a user profile:
a. Using the pen, click the e (in "InterWrite") in the upper left corner of the MeetingPad 100 tablet.
b. Click Yes in the dialog window, then select a user profile and log in.
Starting from a MeetingPad 300
Note:
n Up to 7 MeetingPad 300s can communicate with one Bluetooth hub.
n Each MeetingPad 300 must be within 25 feet (7m) of its intended Bluetooth hub. Reception depends on local conditions, and
performance may vary in your facility.
1. Assure the MeetingBoard is on.
2. Assure the computer is on.
3. Press the ON button on the MeetingPad 300. The discovery process will only find units that are on.
4. Using the computer's mouse, click the InterWrite icon in the Task Bar, then click Device Manager in the pop-up menu.
5. In the Bluetooth Device Discovery window, click the Discover Devices button. A list of found devices will appear.
6. For each device associated with the hub in this system, select the desired action for the device.
7. On the back of the MeetingPad 300, find the unit's address. In the Bluetooth Device Discovery window, open the list of found
devices, then click the corresponding device address.
Tip: To give a unit a unique name, select the unit in the list of found devices, then click the Properties button.
8. Choose a user profile:
a. Press the MeetingPad 300's LINK button.
b. Select a user profile and log in.
Tip: Once a MeetingPad 300 has been added via the Device Manager, it can be easily connected later from the Session
Manager (which reduces the number of steps needed to connect).
Note: If there is no pen activity for 30 minutes, the MeetingPad 300 will turn itself off to conserve its batteries. To begin using
the MeetingPad 300 again, press the ON button. You may need to use the device manager or session manager to relink the
tablet.
Starting from the PC
Click A for Interactive Mode.
Click B for PC Whiteboard Mode.
Welcome Page 16 of 54
file://C:\TEMP\~hhA856.htm 8/12/02
1. Assure the MeetingBoard is on.
2. Assure other components are on:
n For Interactive Mode or PC Whiteboard Mode: Assure the computer is on.
n For Interactive Mode: Assure the video projector is on and is projecting the computer's screen onto the MeetingBoard writing
surface.
3. Then...
Using MeetingBoard pens
How you use a pen depends on which mode you are using:
IMPORTANT: Store pens horizontally for maximum battery life.
Pen buttons function as mouse buttons in Interactive Mode:
n Pen tip is the same as a mouse's left button. Use it to click and drag.
n Lower button (nearest the pen tip) is the same as a mouse's left button. Use it to click and drag.
n Upper button (farthest from the pen tip) is the same as a mouse's right button.
Sleep mode assures pens operate over the longest time. After 20 seconds of inactivity, a pen automatically enters sleep mode. This
enables its battery to provide several months of service.
Using MeetingPad pens
Note: MeetingPad functions are available only when using InterWrite Software's Interactive Mode.
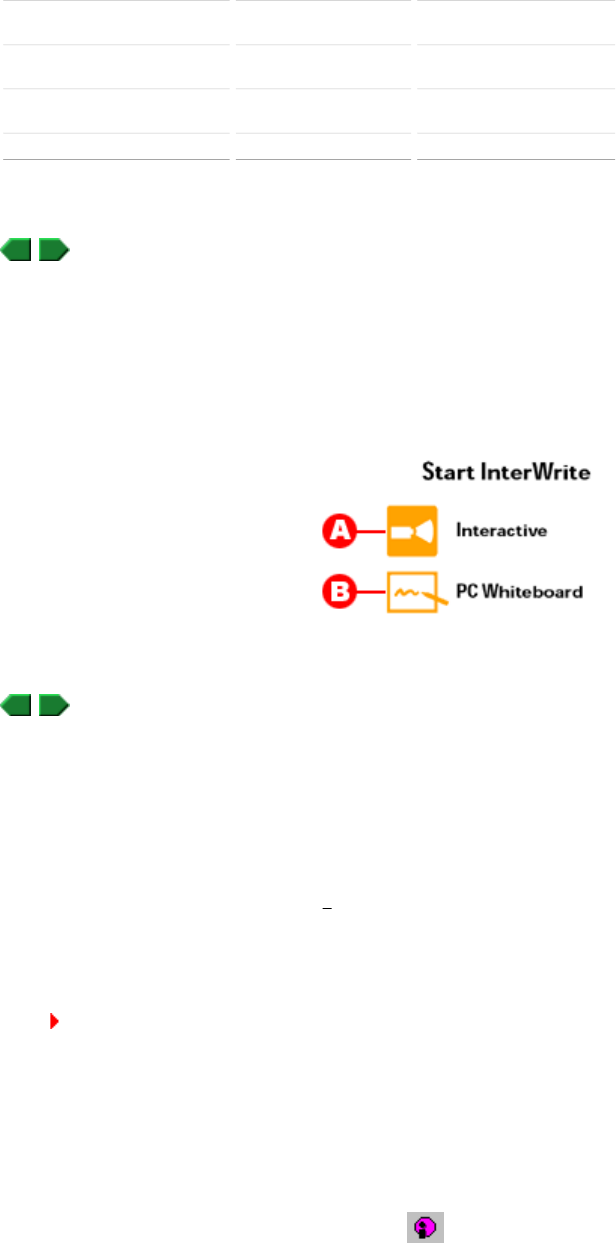
n To start from PC's Start menu Click Start > Programs > GTCO CalComp InterWrite > Interactive Mode.
or
Click Start > Programs > GTCO CalComp InterWrite > Whiteboard Mode.
n To start from PC's Task Bar Click , then click Launch InterWrite > Interactive Mode.
or
Click , then click Launch InterWrite > Whiteboard Mode.
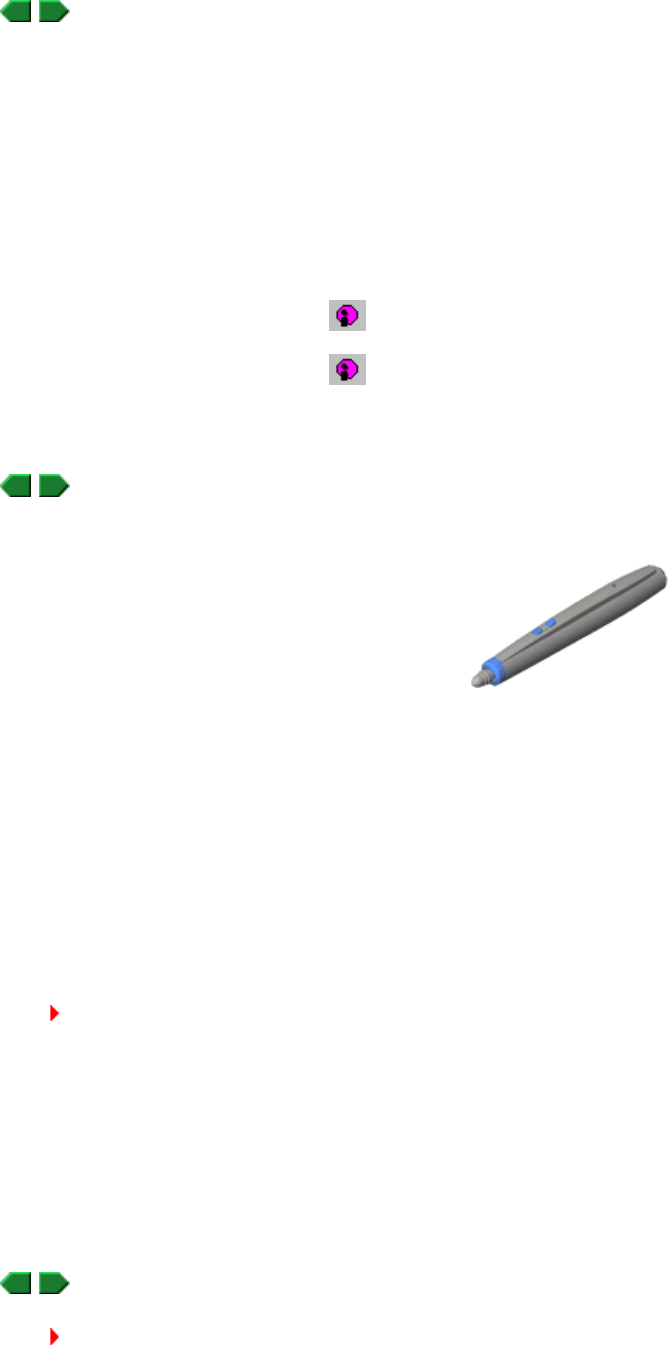
The MeetingBoard electronic pens provide multiple functions:
n The pens work with InterWrite software in Interactive Mode to
control programs, edit documents and annotate screens
using "electronic ink."
n The pens have buttons that act as mouse buttons in
Interactive Mode.
n By incorporating standard Expo or Pilot dry-erase markers,
the pens can mark directly on the MeetingBoard writing
surface in PC Whiteboard Mode and Color Copyboard Mode.
n In Interactive Mode Keep the cap in place. To write, draw or interact with the system, press
the pen's tip on the MeetingPad's surface, then move the pen across the
surface. Marks you make are projected as "electronic ink" onto the
MeetingBoard surface. Use the pen buttons as you would use mouse
buttons (see below).
n In PC Whiteboard Mode Remove the cap and use the pen as a dry-erase marker.
n In Color Copyboard mode Remove the cap and use the pen as a dry-erase marker.
Welcome Page 17 of 54
file://C:\TEMP\~hhA856.htm 8/12/02
To write, draw or interact with the system, press the pen's tip on the MeetingPad's surface, then move the pen across the surface.
About the pen buttons:
Color Copyboard Mode
Copyboard Mode is MeetingBoard’s simplest mode of operation. When using Copyboard Mode, the tablet acts as an electronic dry-erase
board---information written on the MeetingBoard tablet is captured as an electronic image, which can be printed on a color ink jet printer.
Tip: To start Color Copyboard Mode, see Starting from MeetingBoard. It's always good to clear the buffer (press Clear twice)
before starting to use Color Copyboard Mode. This assures that you are starting with a blank "page."
Note: Color Copyboard Mode is not available on the MeetingBoard LX.
Note: MeetingBoard does not store files in Copyboard Mode.
About School Suite
School Suite is a set of electronic tools that make collaboration in classrooms efficient and simple. Products in the School Suite family
include:
n SchoolBoard: a versatile electronic whiteboard.
n SchoolPad 100: an electronic tablet, which communicates with a School Suite system through a serial port or USB port.
n SchoolPad 300: a cordless electronic tablet, which communicates with a School Suite system though a Bluetooth wireless networking
hub.
n InterWrite Software: a Windows-based program for electronic collaboration. InterWrite tools include:
l Interactive Mode: Operate and annotate any application, then save and e-mail the results. Used with SchoolBoard and a video
projector.
l PC Whiteboard Mode: Write on a MeetingBoard using electronically-enhanced dry erase marker pens, then save, print and e-mail
the images. Used with a MeetingBoard or MeetingBoard LX.
l InterWrite Reader: View files created by InterWrite in Interactive Mode or PC Whiteboard Mode.
Also available: InterWrite Meeting Services, that enable users to log into and hold meetings that anyone in the world with an Internet
connection can participate in.
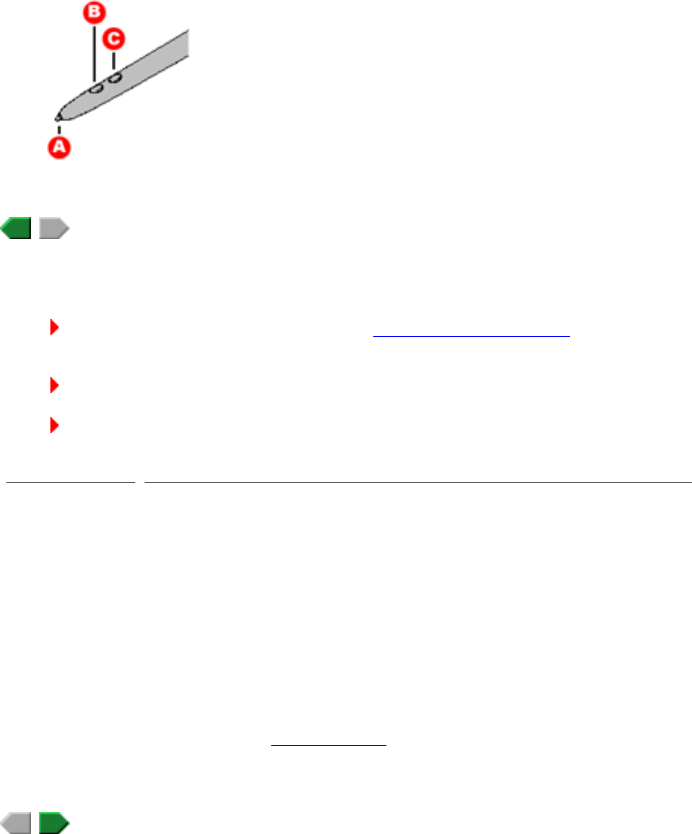
A Tip (same as pressing mouse's left button)
B Left-double-click (same as pressing mouse's left button twice)
C Right-click (same as pressing mouse's right button)
To do this... Do this...
Write or draw 1. Remove cap from electronic pen, exposing the dry-erase marker tip.
2. Write or draw on the MeetingBoard writing surface.
Erase... both marker ink and corresponding parts of the electronic image: Use the
large eraser, or use the small eraser on the back of the pen.
Erase... electronic image only: On the MeetingBoard control panel, press the Clear
button twice. This will not erase the marker ink. Erase the marker ink with a
standard eraser or cloth.
Print an image On the MeetingBoard control panel, press the Print button.
The image will print on the attached printer. You can continue
writing/drawing on the MeetingBoard while the image is being printed. The
print buffer can store up to three pages for printing. Note: If the image
doesn't print, see Troubleshooting.

Welcome Page 18 of 54
file://C:\TEMP\~hhA856.htm 8/12/02
For the latest product information, check the GTCO CalComp Web site.
Getting started
Here's a summary of how to get your School Suite system up and running. Follow the links for more details.
First, be certain you have everything not supplied with the School Suite system.
Next, install the system:
A. Unpack the products and make certain you received everything.
B. Install InterWrite software on your Windows PC.
C. If your system includes a SchoolPad 300, charge the batteries (charging takes about 3 hours and is required before you can use a
new SchoolPad 300).
D. Assemble the SchoolBoard (you can mount it on a wall or on the optional floor stand).
E. Connect the components. How you connect the system depends on which mode you want to use.
Once you have completed these steps, your School Suite system is ready to use. To start a session, review the information in the
"School Suite > Basic operations" section in this help file.
What you need to provide
You will need to provide these items, which are not supplied as part of the School Suite system:
n For Interactive Mode or PC Whiteboard Mode: A personal computer running Microsoft Windows. Recommended: Internet access.
Note: InterWrite Software is compatible with Windows 95, 98, ME, NT, 2000 and XP.
Note: You cannot use USB or Bluetooth on Windows 95 or NT computers.
n For Interactive Mode: a video presentation projector, with a cable for connecting it to the PC.
Wondering which mode you should use? Check the brief descriptions or the details.
A. Unpack the products
1. Look for damage.
Before unpacking, examine the shipping cartons for damage. If a carton is damaged, notify the shipper immediately.
Note: Save all shipping materials. If you need to ship a tablet later, you should repack it in the original materials.
2. Carefully unpack the products.
CAUTION: To avoid damage to the controller, do not rest the SchoolBoard tablet on the controller housing (located on the rear
of the tablet near one corner). Do not scratch or damage the tablet's writing surface.
3. Compare the parts with the appropriate parts checklist.
n Parts checklist for SchoolBoard.
n Parts checklist for SchoolPad 100
n Parts checklist for SchoolPad 300.
4. If anything is missing...
Immediately contact your GTCO CalComp supplier.
5. Activate your product warranty.
Complete the warranty registration card and mail it to GTCO CalComp If your product needs service, the card should be on file at
GTCO CalComp.
Welcome Page 19 of 54
file://C:\TEMP\~hhA856.htm 8/12/02
Next: Install InterWrite Software.
B. Install InterWrite Software
Note: InterWrite Software is compatible with Windows 95, 98, ME, NT, 2000 and XP.
1. Remove any graphic tablet drivers installed on the PC.
2. Insert the InterWrite Software CD into the computer’s CD drive.
3. Wait for the installation program to launch.
Note: If the installation program does not start on its own, use Windows Explorer to locate and launch setup.exe on the CD-
ROM.
4. Follow the on-screen instructions.
5. Check the Task Bar. If you don't see the InterWrite icon, restart the computer.
6. Click the InterWrite icon in the Task Bar, then click Check for Updates in the pop-up menu. If an update is available, download it
now.
Tip: Check for updates periodically.
Note: The first time you run InterWrite Software, you must enter the authorization code from the InterWrite Software License
Certificate.
Next:
If your system includes one or more SchoolPad 300s, recharge them now.
or
If your system doesn't include SchoolPads, Assemble SchoolBoard.
SchoolPad 300: recharge the tablet
Before initial use, recharge the SchoolPad 300 tablet for at least 3 hours.
1. Connect the charger’s cable to the POWER jack on the tablet.
2. Plug the charger into an AC power outlet.
Note: Do not operate the tablet while it is charging.
3. When charging is complete, unplug the charger from the power outlet, then disconnect the charger’s cable from the tablet.
SchoolPad 300: (optional) install the pen cord
The pen cord enables the SchoolPad 300 pen to operate without batteries. The cord also keeps the pen tethered to the tablet, making it
less likely to be lost. To install the pen cord:
1. Remove the pen cap, cover and batteries.
A Batteries
B Cover
C Cap
Welcome Page 20 of 54
file://C:\TEMP\~hhA856.htm 8/12/02
2. Feed black battery replacement end through cover.
3. Feed yellow and black wires through notches in inner housing.
4. Push black battery replacement end of cord into area where batteries were (see below), making sure the yellow wire is toward the pen
tip for correct polarity. Hold silver battery contact located on underside of inner housing with thumb while pushing black battery
replacement into place.
5. Push strain relief into hole at end of inner housing. Do not push all the way through.
6. Replace pen cover and cap.
7. Plug the cord into the POINTER jack on the tablet.
SchoolPad 300: install the Bluetooth hub
Install the Bluetooth hub according to instructions provided on the Bluetooth CD-ROM. The Bluetooth hub enables SchoolPad 300s to
communicate with the PC.
Note: Up to 7 SchoolPad 300s can communicate with one Bluetooth hub.
Note: Each SchoolPad 300 must be within 25 feet (7m) of its intended Bluetooth hub. Reception depends on local conditions,
and performance may vary in your facility.
1. Attach the pen tray to the tablet
CAUTION: To avoid damage to the controller, do not rest the SchoolBoard tablet on the controller housing (located on the rear
of the tablet near one corner). Do not scratch or damage the tablet's writing surface.
Attach the tray brackets to the bottom rear of the tablet using Phillips screws as shown below.
Next: Mount the tablet on a wall.
or
Mount the tablet on the floor stand.
B Cover
C Cap
D Black battery replacement
E Black wire
F Yellow wire
G Strain relief
H Notches
I Inner housing
D Black battery replacement
E Black wire
F Yellow wire
I Inner housing
J Pen tip
K Silver battery contact
Welcome Page 21 of 54
file://C:\TEMP\~hhA856.htm 8/12/02
2a. Mount the tablet on a wall
CAUTION: To avoid damage to the controller, do not rest the SchoolBoard tablet on the controller housing (located on the rear
of the tablet near one corner). Do not scratch or damage the tablet's writing surface.
WARNING: Never nail or drill the SchoolBoard tablet. Doing so will damage the unit and void your warranty.
IMPORTANT: To avoid damage to the tablet or injury, two people should carry out this mounting procedure.
a. Attach the mounting bracket to the wall using hardware appropriate for the wall structure (this hardware is not included) as shown
below.
A Tablet
B Pen tray
C Phillips screw (4)
D Assembled view
A Note: This hardware not included. Hole spacing on
bracket matches 16" and 24" wall stud spacing.

Welcome Page 22 of 54
file://C:\TEMP\~hhA856.htm 8/12/02
b. Hang the tablet by interlocking the mounting brackets as shown below.
Next: Assemble the electronic pen(s).
2b. Mount the tablet on the optional floor stand
CAUTION: To avoid damage to the controller, do not rest the SchoolBoard tablet on the controller housing (located on the rear
of the tablet near one corner). Do not scratch or damage the tablet's writing surface.
WARNING: Never nail or drill the SchoolBoard tablet. Doing so will damage the unit and void your warranty.
IMPORTANT: To avoid damage to the tablet or injury, two people should carry out this mounting procedure.
a. Attach each mounting bracket to the back of the tablet using four small screws and nuts as shown below.
b. Using four screws, attach one foot to the bottom end of one leg (the end without crossbar holes). Attach two casters to each
foot. Insert three end caps (two on the foot and one on the leg). Repeat for the other foot and leg.
A Tablet
B Wall
A Screw
B Nut
C Mounting bracket
D Tablet
A Foot
B Leg
C End caps (6)
D Lock washer (4)
E Caster (4)
F Screw, 1/4
-
20 x 2" flat head
Welcome Page 23 of 54
file://C:\TEMP\~hhA856.htm 8/12/02
c. IMPORTANT: Examine the leg assemblies: one side of each assembly has 10 holes (2 groups of 5) and the other side has 8 holes (2
groups of 4). In this step, the sides with 10 holes must face away from the crossbars.
Attach both crossbars to one leg assembly using eight screws as shown below. The screws pass through the 4 outermost holes in
each group of 5 holes. Attach the other leg assembly to the crossbars in the same way.
d. Thread two Knob Screws into each leg through the mounting bracket. The lower Know Screw should go toward the rear of the
stand. Screw the Knob Screws all the way into the leg. Adjust tablet to desired height by lifting tablet from front.
Next: Assemble the electronic pens.
3. Assemble the SchoolBoard pen(s)
A Crossbar
B Screw, 1/4-20 x 2" flat head
C Leg assembly
A Knob Screw (4)
B Mounting bracket
C Slot
a. Locate the marker holders, electronics modules,
batteries, pen caps and markers supplied.
The pens are electronically coded to match the plastic
colors: black, blue, red and green.
b. Remove the marker's cap and replace it with a
MeetingBoard pen cap.
c. Insert a marker into the pen housing with the matching
color (e.g., red marker goes in red housing)
A Marker holder
B Electronics module
C Marker
D Pen cap
Welcome Page 24 of 54
file://C:\TEMP\~hhA856.htm 8/12/02
To disassemble the pen: Press the latch on the underside of the pen, then pull the pen apart. The two modules should
separate easily---excessive force is not required and should not be used. If the modules don't separate easily, press the latch
farther inward.
Next: You are ready to connect the system.
Which mode should you use?
The mode you use depends on what you want to do with the School Suite system, as well as what hardware you have.
*Requires SchoolPad 300 and Bluetooth hub.
D Pen cap
Note: Keep the markers capped as much as possible to prevent them from drying out. The caps enable the electronic pens
to be used in Interactive Mode without leaving ink on the tablet.
d. Remove the battery cover from a pen electronics
module. Insert a battery into the module (assure polarity
is correct!). Replace the battery cover.
e. Snap the pen electronics module into a marker housing
(any module can be used with any marker housing).
f. The LED should flash four times, indicating the pen is
working correctly.
MeetingBoard electronic pen, assembled
What can you do? Interactive Mode PC Whiteboard Mode
Write using electronic ink ü
Write from a wireless remote
tablet ü*
Write with dry erase markers in
electronic pens ü
Annotate PC screens ü
Write meeting notes on a
"blank page" ü ü
Review, rearrange or delete
annotation images ü ü
Distribute annotation images
electronically ü ü
Print notes Optional Optional
Welcome Page 25 of 54
file://C:\TEMP\~hhA856.htm 8/12/02
1. Connect SchoolBoard
It is recommended that you connect using the PC's USB port. If the PC doesn't have a USB port, then connect using its serial
port.
c. For USB connections:
a. Plug one end of the USB cable into a USB port on the computer (or plug it into a USB hub connected to the computer).
b. Plug the other end of the USB cable into the SchoolBoard USB port.
or
For serial connections:
a. Plug one end of the serial cable into the serial port on the computer.
b. Plug the other end of the serial cable into the SchoolBoard serial port.
d. Connect a video cable between the 15-pin video port on the computer and the video projector.
e. Connect the SchoolBoard power supply cable to the power port on the MeetingBoard controller.
Next: Connect SchoolPad 100.
2. Connect SchoolPad 100
Skip this step if your system does not include a SchoolPad 100.
a. Connect the tablet to the computer:
What do you need? Interactive Mode PC Whiteboard Mode
Windows computer Required Required
Video projector Required ---
Printer Optional Optional
Main tablet SchoolBoard SchoolBoard
Remote tablet (optional) SchoolPad 100 or
MeetingPad 300 ---
a. Shut down and turn off the computer.
b. Locate and identify the ports on the SchoolBoard
controller (shown at right).
A USB port
B Serial port
C Power port
n For USB connection: With computer ON,
connect tablet to computer's USB port using
the USB adapter (as shown at right).
You cannot use USB connections with a
Windows 95 or NT computer.
Welcome Page 26 of 54
file://C:\TEMP\~hhA856.htm 8/12/02
Next: Calibrate SchoolBoard.
3. Calibrate SchoolBoard
Tip: To assure the electronic ink is properly aligned, always recalibrate after moving the table or projector.
a. Plug the SchoolBoard power supply into an electrical outlet.
You should hear at least four beeps from the SchoolBoard.
b. Turn on the computer.
c. Turn on the projector.
d. Aim the projector at the SchoolBoard's writing area, and size the projected image to fit within the writing area.
Note: Make certain the image from the PC is properly projected before continuing.
e. Start > GTCO CalComp InterWrite > Interactive Mode.
f. In the Control Bar, click the InterWrite icon , then Tools > Calibrate.
Tip: If an error occurs during calibration, simply cancel and start over.
g. The calibration screen will be projected on the tablet. As prompted by the software, click each of the calibration points using the
SchoolBoard electronic pen.
h. When calibration is complete, the InterWrite Control Bar will appear. This menu, which remains in front of all applications, enables
A Win 98/ME/2000/XP computer
B USB adapter
C SchoolPad 100
n For serial connection: With computer OFF,
connect tablet to computer's serial port using
the serial adapter (as shown at right). Turn
computer ON. You will be prompted to install
drivers.
A Win 95/98/ME/2000/XP computer
B Serial adapter
C SchoolPad 100
Welcome Page 27 of 54
file://C:\TEMP\~hhA856.htm 8/12/02
you to control programs, edit documents and add annotations.
Installation for Interactive Mode is complete. You can now use the system.
Connect for PC Whiteboard Mode
3. Using the USB cable, connect the SchoolBoard's USB port (A) to the computer's USB port (or to a port on a USB hub connected to the
computer).
or
Using the serial cable, connect the SchoolBoard's serial port (B) to the computer's serial port.
CAUTION: DO NOT connect both USB and serial cables at the same time.
4. Connect the SchoolBoard power supply cable to the SchoolBoard's power port (C).
5. Plug the SchoolBoard power supply into an electrical outlet.
You should hear at least four beeps from the SchoolBoard.
6. Turn on the computer. If you are using a USB connection to the SchoolBoard, Windows will find the SchoolBoard and complete the
installation.
Installation for PC Whiteboard Mode is complete. You can now use the system.
Overview of basic operations
First, you need to launch InterWrite Software. You can launch Interactive Mode or PC Whiteboard Mode from:
n The SchoolBoard.
n A SchoolPad.
n The PC.
Next, review instructions for using the SchoolBoard pens and SchoolPad pens.
Finally, you are ready to use InterWrite Software.
The mode you use depends on what you want to do with the School Suite system.
1. Shut down and turn off the computer.
2. Locate and identify the ports on the SchoolBoard
controller (shown at right).
A USB port
B Serial port
C Power port
What can you do? Interactive Mode PC Whiteboard Mode
Write using electronic ink ü
Write from a wireless remote
tablet ü*
Write with dry erase markers in
electronic pens ü
Annotate PC screens ü
Welcome Page 28 of 54
file://C:\TEMP\~hhA856.htm 8/12/02
*Requires SchoolPad 300 and Bluetooth hub.
Write meeting notes on a
"blank page" ü ü
Review, rearrange or delete
annotation images ü ü
Distribute annotation images
electronically ü ü
Print notes Optional Optional
Starting from SchoolBoard
1. Assure the SchoolBoard is on.
2. Assure other components are on:
n For Interactive Mode or PC Whiteboard Mode: Assure the computer is on.
n For Interactive Mode: Assure the video projector is on and is projecting the computer's screen onto the SchoolBoard writing
surface.
3. On the SchoolBoardcontrol panel, use the electronic pen to...
Starting from a SchoolPad
Starting from a SchoolPad 100
1. Assure the SchoolBoard is on.
2. Assure the computer is on.
3. Using the pen, click the LAUNCH InterWrite spot in the upper right corner of the SchoolPad 100 tablet.
4. Choose a user profile:
a. Using the pen, click the e (in "InterWrite") in the upper left corner of the SchoolPad 100 tablet.
b. Click Yes in the dialog window, then select a user profile and log in.
Starting from a SchoolPad 300
Note:
n Up to 7 SchoolPad 300s can communicate with one Bluetooth hub.
n Each SchoolPad 300 must be within 25 feet (7m) of its intended Bluetooth hub. Reception depends on local conditions, and
performance may vary in your facility.
1. Assure the SchoolBoard is on.
2. Assure the computer is on.
3. Press the ON button on the SchoolPad 300. The discovery process will only find units that are on.
4. Using the computer's mouse, click the InterWrite icon in the Task Bar, then click Device Manager in the pop-up menu.
5. In the Bluetooth Device Discovery window, click the Discover Devices button. A list of found devices will appear.
6. For each device associated with the hub in this system, select the desired action for the device.
7. On the back of the SchoolPad 300, find the unit's address. In the Bluetooth Device Discovery window, open the list of found
devices, then click the corresponding device address.
Click A for Interactive Mode.
Click B for PC Whiteboard Mode.

Welcome Page 29 of 54
file://C:\TEMP\~hhA856.htm 8/12/02
Tip: To give a unit a unique name, select the unit in the list of found devices, then click the Properties button.
8. Choose a user profile:
a. Press the SchoolPad 300's LINK button.
b. Select a user profile and log in.
Tip: Once a SchoolPad 300 has been added via the Device Manager, it can be easily connected later from the Session
Manager (which reduces the number of steps needed to connect).
Note: If there is no pen activity for 30 minutes, the SchoolPad 300 will turn itself off to conserve its batteries. To begin using
the SchoolPad 300 again, press the ON button. You may need to use the device manager or session manager to relink the
tablet.
Starting from the PC
1. Assure the SchoolBoard is on.
2. Assure other components are on:
n For Interactive Mode or PC Whiteboard Mode: Assure the computer is on.
n For Interactive Mode: Assure the video projector is on and is projecting the computer's screen onto the SchoolBoard writing
surface.
3. Then...
Using SchoolBoard pens
How you use a pen depends on which mode you are using:
IMPORTANT: Store pens horizontally for maximum battery life.
Pen buttons function as mouse buttons in Interactive Mode:
n To start from PC's Start menu Click Start > Programs > GTCO CalComp InterWrite > Interactive Mode.
or
Click Start > Programs > GTCO CalComp InterWrite > Whiteboard Mode.
n To start from PC's Task Bar Click , then click Launch InterWrite > Interactive Mode.
or
Click , then click Launch InterWrite > Whiteboard Mode.
The SchoolBoard electronic pens provide multiple functions:
n The pens work with InterWrite software in Interactive Mode to
control programs, edit documents and annotate screens
using "electronic ink."
n The pens have buttons that act as mouse buttons in
Interactive Mode.
n By incorporating standard Expo or Pilot dry-erase markers,
the pens can mark directly on the SchoolBoard writing
surface in PC Whiteboard Mode and Color Copyboard Mode.
n In Interactive Mode Keep the cap in place. To write, draw or interact with the system, press
the pen's tip on the MeetingPad's surface, then move the pen across the
surface. Marks you make are projected as "electronic ink" onto the
SchoolBoard surface. Use the pen buttons as you would use mouse
buttons (see below).
n In PC Whiteboard Mode Remove the cap and use the pen as a dry-erase marker.
n In Color Copyboard mode Remove the cap and use the pen as a dry-erase marker.
Welcome Page 30 of 54
file://C:\TEMP\~hhA856.htm 8/12/02
n Pen tip is the same as a mouse's left button. Use it to click and drag.
n Lower button (nearest the pen tip) is the same as a mouse's left button. Use it to click and drag.
n Upper button (farthest from the pen tip) is the same as a mouse's right button.
Sleep mode assures pens operate over the longest time. After 20 seconds of inactivity, a pen automatically enters sleep mode. This
enables its battery to provide several months of service.
Using SchoolPad pens
Note: SchoolPad functions are available only when using InterWrite Software's Interactive Mode.
To write, draw or interact with the system, press the pen's tip on the SchoolPad's surface, then move the pen across the surface.
About the pen buttons:
Guide to InterWrite Software
Interactive Mode
Here are a few basic topics to get you started:
n Learn the difference between Annotation Mode and Mouse Mode, as you will frequently switch from one to the other.
n Review annotation tools, so you'll know what capabilities are available.
n Calibrate MeetingBoard or SchoolBoard to assure the tablet is correctly aligned with the projected image.
n Create freehand or text annotations.
n Edit annotations and manage annotation pages.
For more information, see the topics under "InterWrite Software > Using Interactive Mode > How to..." in the Contents tab in the left
panel of this window.
or
Use the green buttons above to move through topics in sequence.
PC Whiteboard Mode
n How to use PC Whiteboard Mode.
n What the toolbar buttons do.
InterWrite Viewer
n How to use InterWrite Viewer.
n What the Viewer buttons do.
n How InterWrite names annotation files.
Annotation Mode versus Mouse Mode
Within Interactive Mode, there are two additional modes:
A Tip (same as pressing mouse's left button)
B Left-double-click (same as pressing mouse's left button twice)
C Right-click (same as pressing mouse's right button)
Welcome Page 31 of 54
file://C:\TEMP\~hhA856.htm 8/12/02
n Annotation Mode captures the current screen image and enables you to draw on it using the electronic pens.
To enter Annotation Mode:
Click any pen button ,
or click the Highlighter button ,
or click the Eraser button
or click the Pointer button .
When you enter Annotation Mode, InterWrite opens the Annotate window, which contains an image of the screen at that moment.
n Make all your freehand and text annotations in the Annotate window.
n Resize and move the Annotate window as needed.
n Switch to other applications at any time.
n Move the image within the Annotate window using the Pan and Scroll tool.
n Mouse Mode allows you to control---using the electronic pen as a mouse---any applications on the PC.
To enter Mouse Mode: Click the Mouse Mode button .
When you enter Mouse Mode, you may be prompted to save the current screen and annotations. Once in Mouse Mode, you cannot
add or save annotations (until you return to Annotation Mode).
Tip: To prevent loss of annotations when switching to Mouse Mode, open the preferences window (Edit > Preferences) and
activate the option to warn about possible data loss.
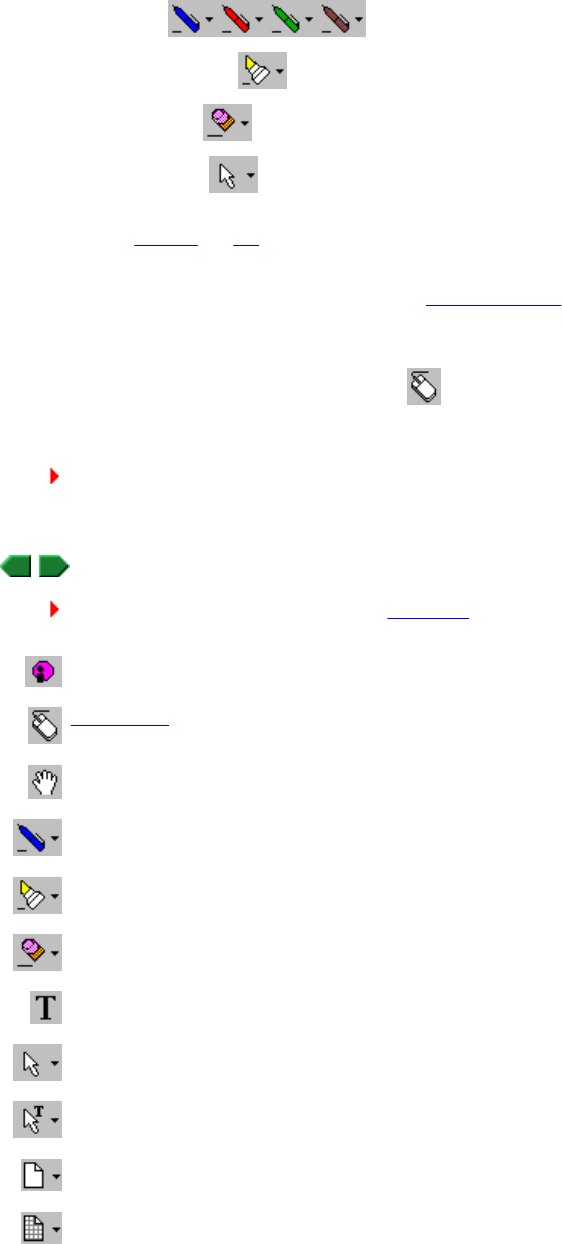
Annotation tools
Note: Depending on how the Control Bar is customized, tools shown below may or may not be present, and may be in a
different order. Some tools can be in the Control Bar or in the InterWrite Toolbox menu.
InterWrite Menu
Mouse Mode (pen used like a mouse to control applications)
Pan and Scroll to move image within Annotate window
Pen (one of four) for freehand annotation
Highlighter for annotation
Eraser to remove parts of freehand and highlighter annotations
Typed Text to add typed text annotations
Pointer to select annotations (for moving, deleting and copying)
Text Pointer to select freehand text for conversion to typed text
Create Blank Page for free form writing and drawing
Create Grid Line Page horizontal and/or vertical lines
Welcome Page 32 of 54
file://C:\TEMP\~hhA856.htm 8/12/02
Calibrate MeetingBoard/SchoolBoard
Tip: To assure the electronic ink is properly aligned, always recalibrate after moving the table or projector.
a. Assure the tablet, computer and projector are on.
b. Aim the projector at the tablet's writing area, and size the projected image to fit within the writing area.
Note: Make certain the image from the PC is properly projected before continuing.
c. Start > GTCO CalComp InterWrite > Interactive Mode.
d. In the Control Bar, click the InterWrite icon , then Tools > Calibrate.
Tip: If an error occurs during calibration, simply cancel and start over.
e. The calibration screen will be projected on the tablet. As prompted by the software, click each of the calibration points using the
MeetingBoard or SchoolBoard electronic pen.
f. When calibration is complete, the InterWrite Control Bar will appear. This menu, which remains in front of all applications, enables you
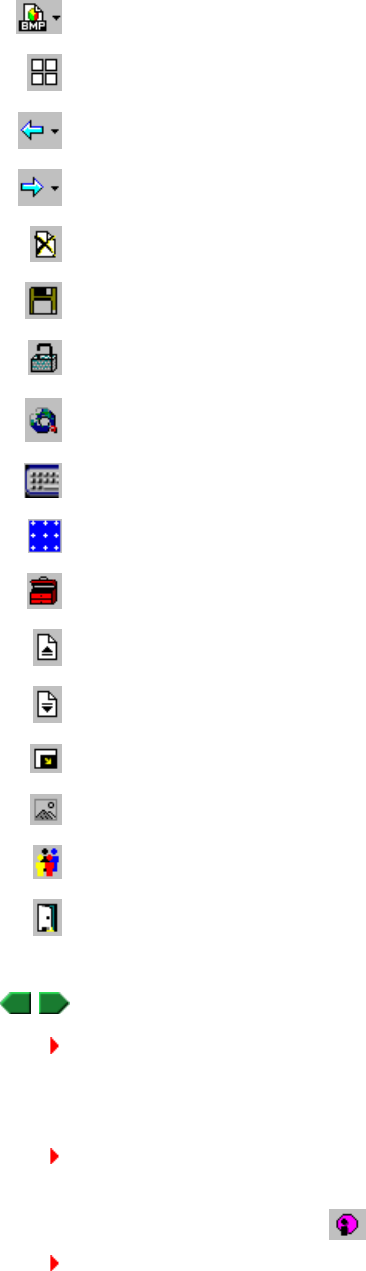
Create Image Page containing imported picture
Open GWB File Viewer to view images contained in an annotation file
View Previous Image in currently open file
View Next Image in currently open file
Clear all annotations from the current screen
Save current screen image (with annotations) in currently open image file
Control MeetingPad Input for allowing or preventing annotations using
MeetingPads or SchoolPads
Start Internet Browser and open page designated in Preferences window
Display Virtual Keyboard for creating and editing text annotations
Calibrate MeetingBoard tablet
InterWrite Toolbox containing other tools
Page Up to display previous PowerPoint page and save current annotations
Page Down to display next PowerPoint page and save current annotations
Display Reveal Curtain to hide portions of the screen
Insert picture as an annotation
Session Manager
Exit InterWrite

Welcome Page 33 of 54
file://C:\TEMP\~hhA856.htm 8/12/02
to control programs, edit documents and add annotations.
Position and resize the Control Bar
Position the Control Bar
The Control Bar has two configurations: floating and docked. You can easily change from one configuration to another:
n To dock the Control Bar when it is floating: Drag the Control Bar's title bar to an edge, then release it when it snaps to the edge. (If the
Control Bar doesn't snap to an edge, there is already a docked tool bar at that edge; try another edge.)
n To float the Control Bar when it is docked: Move the cursor to the edge where the Control Bar is docked (to make it visible), then drag
the part of the Control Bar with no tools away from the edge.
n To move the Control Bar anywhere on the screen: Drag its title bar.
Resize the control bar
Resize the Control Bar to match your requirements:
n When docked: Move the cursor over the edge where the Control Bar is docked (to make it visible), then drag the edge of the Control
Bar farthest from the edge of the display. Two widths are available when docked along vertical edges and two heights when docked
along horizontal edges.
n When floating: Drag any side or corner of the Control Bar. Two heights are available for horizontal orientation and three widths for
vertical orientation.
Select tools and options
Tip: The little lines next to each tool indicate the tool's current width. One line indicates the narrowest width, while four lines
indicates the widest. To customize widths, see Define pen and highlighter widths.
Create freehand annotations
To do this... Do this...
Select drawing tool Click tool in Control Bar (tool retains previously-selected color/width).
Configure drawing tool Open tool palette, click desired color/width.
Configure tool when Control Bar
is docked Click tool options in Control Bar. (If Display Tool Preferences on Control Bar is activated in
Customize Control Bar window.)
Configure tool or select another
tool Right-click anywhere in screen, then click tool, color or width in pop-up menu.
Select pen color based on pen
used Use color-coded pen. (The option for automatically sensing pen change must be activated in the
InterWrite preferences window.)
To do this... Do this...
Write or draw Use an electronic pen on the tablet. (Annotations do not alter underlying programs or documents.)
Select a pen color Click a pen button in the Control Bar. (This overrides the electronic pen's assigned color.)
or
In Annotation Mode, right-click anywhere, then select the pen color in the pop-up menu.
Highlight areas Click the Highlighter button. (Highlighting is transparent.)
or
In Annotation Mode, right-click anywhere, then select the highlighter in the pop-up menu.
Draw lines or
shapes Open any Pen Preferences menu (click arrow next to any pen), then click the line, square or oval button.

Welcome Page 34 of 54
file://C:\TEMP\~hhA856.htm 8/12/02
Tip: Use the eraser to split a freehand annotation into two or more independent parts.
Create text annotations
Tip: More details are available about the Virtual Keyboard.
Use other annotation functions
When annotating PowerPoint presentations:
Edit annotations
Erase annotations Click the Eraser button, then move the electronic pen over the annotations you want to erase.
or
In Annotation Mode, right-click anywhere, then select the eraser in the pop-up menu.
or
Use the small eraser on the back of the electronic pen.
or
Use the large electronic eraser.
To do this... Do this...
Type text using PC
keyboard Click the Typed Text button. Click anywhere, then type using PC keyboard.
Type text using Virtual
Keyboard Click the Typed Text button. Open Virtual Keyboard (click Virtual Keyboard button or click Virtual
Keyboard icon in system tray). Click anywhere, then type using Virtual Keyboard.
Type uppercase letters with Virtual Keyboard:
To type one uppercase letter: Click SHIFT button, then type letter.
To type multiple uppercase letters: Click LOCK button, then type letters. When done, click LOCK button
again.
Convert freehand letters
to text 1. Using pen, write letters.
2. Click Text Pointer button, then drag to select all letters.
3. In handwriting recognition pop-up window, edit and format as needed (click arrow button for more
formatting options, click keyboard button for virtual keyboard).
4. When done, click convert button to convert to text.
Edit/format text
annotation 1. Click the Pointer button.
2. Click text annotation.
3. Open Selection Preferences menu (at Pointer button), then click Edit.
4. In window, edit text or change font, size, style or color.
5. When done, click OK.
To do this... Do this...
Insert a picture Click the Insert Picture button, then select picture.
or
Drag an image file from another application (such as Windows Explorer) and drop it in the Annotate window.
or
Copy an image in another application, then File > Paste in the Annotate window.
Hide part of screen Click the Display Reveal Curtain button. Resize curtain as needed.
To do this... Do this...
Save current annotation, display next
PowerPoint page and start new
annotation page
Click the Page Down button.
Save current annotation, display
previous PowerPoint page and start
new annotation page
Click the Page Up button.

Welcome Page 35 of 54
file://C:\TEMP\~hhA856.htm 8/12/02
Tip: Use cut, copy and paste to move annotations from one InterWrite page to another, and to move annotations between
InterWrite pages and other applications.
Tip: Instead of a blank page, you can create a grid line page or an image page. Open the menu from the page button for
options.
Manage annotation pages
Log in from a MeetingPad or SchoolPad
Note: The Control MeetingPad Input button must be unlocked to enable logging in and annotating from
MeetingPads/SchoolPads.
Note: Only one MeetingPad can log in at a time. If the login window is displayed, clear it to enable another
MeetingPad/SchoolPad to link.
Log in from a MeetingPad 100 / SchoolPad 100
1. Using the pen, click the LAUNCH InterWrite spot in the upper right corner of the MeetingPad 100 / SchoolPad 100 tablet.
2. Then:
To do this... Do this...
Move annotations Click the Pointer button. Click one or more annotations, then drag.
Resize annotations Click one or more annotations, then drag any handle.
Copy or cut
annotations Click the Pointer button. Click one or more annotations, then Edit > Copy (CTRL-C) or Edit > Cut (CTRL-X).
Delete annotations Click the Pointer button. Click one or more annotations, then press DELETE.
Open a blank page Click the Blank Page button. (Use a blank page when your annotations aren't related to an underlying document
or program.)
To do this... Do this...
Resize Annotate window Drag any side.
Reposition Annotate
window Drag title bar.
Minimize Annotate
window Click Minimize button in title bar.
Scroll image in Annotate
window Click Pan and scroll button, then drag image. (This enables you to view any part of the image when the
Annotate window has been made smaller.)
Save the current screen Click the Save button, or File > Save. If you haven't created an image file, InterWrite Software automatically
creates one using the current date (see File naming for details).
View previous annotation
page Click the Previous Image button. (Not available if you are currently viewing the first page, or if there is only
one page saved.)
View next annotation
page Click the Next Image button. (Not available if you are currently viewing the last page, or if there is only one
page saved.)
View annotation pages Click the Image Viewer button. (See also Using InterWrite Viewer: How to... and Viewer buttons.)
Close current image file File > Close.
Start new image file File > New... .
Welcome Page 36 of 54
file://C:\TEMP\~hhA856.htm 8/12/02
n For a registered user:
1. Click the user's name in the Existing User Profiles list.
2. Click OK.
n For an unregistered user:
1. Click the Edit Profiles button.
2. In the Edit User Profiles window:
a. Type the new user's name.
b. Select a pointer identifier, default pen color and default line width for this user.
c. Click Add User to complete registration and return to the login window.
Note: User profiles set the default pen color and width, and enable users to be identified by different cursor shapes.
Log in from a MeetingPad 300 / SchoolPad 300
Note:
n Up to 7 MeetingPad 300s / SchoolPad 300s can communicate with one Bluetooth hub.
n Each MeetingPad 300 / SchoolPad 300 must be within 25 feet (7m) of its intended Bluetooth hub. Reception depends on
local conditions, and performance may vary in your facility.
1. Press the ON button on the MeetingPad 300 / SchoolPad 300. The discovery process will only find units that are on.
2. Using the computer's mouse, click the InterWrite icon in the Task Bar, then click Device Manager in the pop-up menu.
3. In the Bluetooth Device Discovery window, click the Discover Devices button. A list of found devices will appear.
4. For each device associated with the hub in this system, select the desired action for the device.
5. On the back of the MeetingPad 300 / SchoolPad 300, find the unit's address. In the Bluetooth Device Discovery window, open the
list of found devices, then click the corresponding device address.
Tip: To give a unit a unique name, select the unit in the list of found devices, then click the Properties button.
6. Press the MeetingPad/SchoolPad 300's LINK button, then:
n For a registered user:
1. Click the user's name in the Existing User Profiles list.
2. Click OK.
n For an unregistered user:
1. Click the Edit Profiles button.
2. In the Edit User Profiles window:
a. Type the new user's name.
b. Select a pointer identifier, default pen color and default line width for this user.
c. Click Add User to complete registration and return to the login window.
Note: User profiles set the default pen color and width, and enable users to be identified by different cursor shapes.
Tip: Once a MeetingPad 300 / SchoolPad 300 has been added via the Device Manager, it can be easily connected later from
the Session Manager (which reduces the number of steps needed to connect).
Use the Session Manager
The Session Manager enables you to control which devices can use InterWrite. Once a device has logged in, it can be easily connected
or disconnected using the Session Manager.
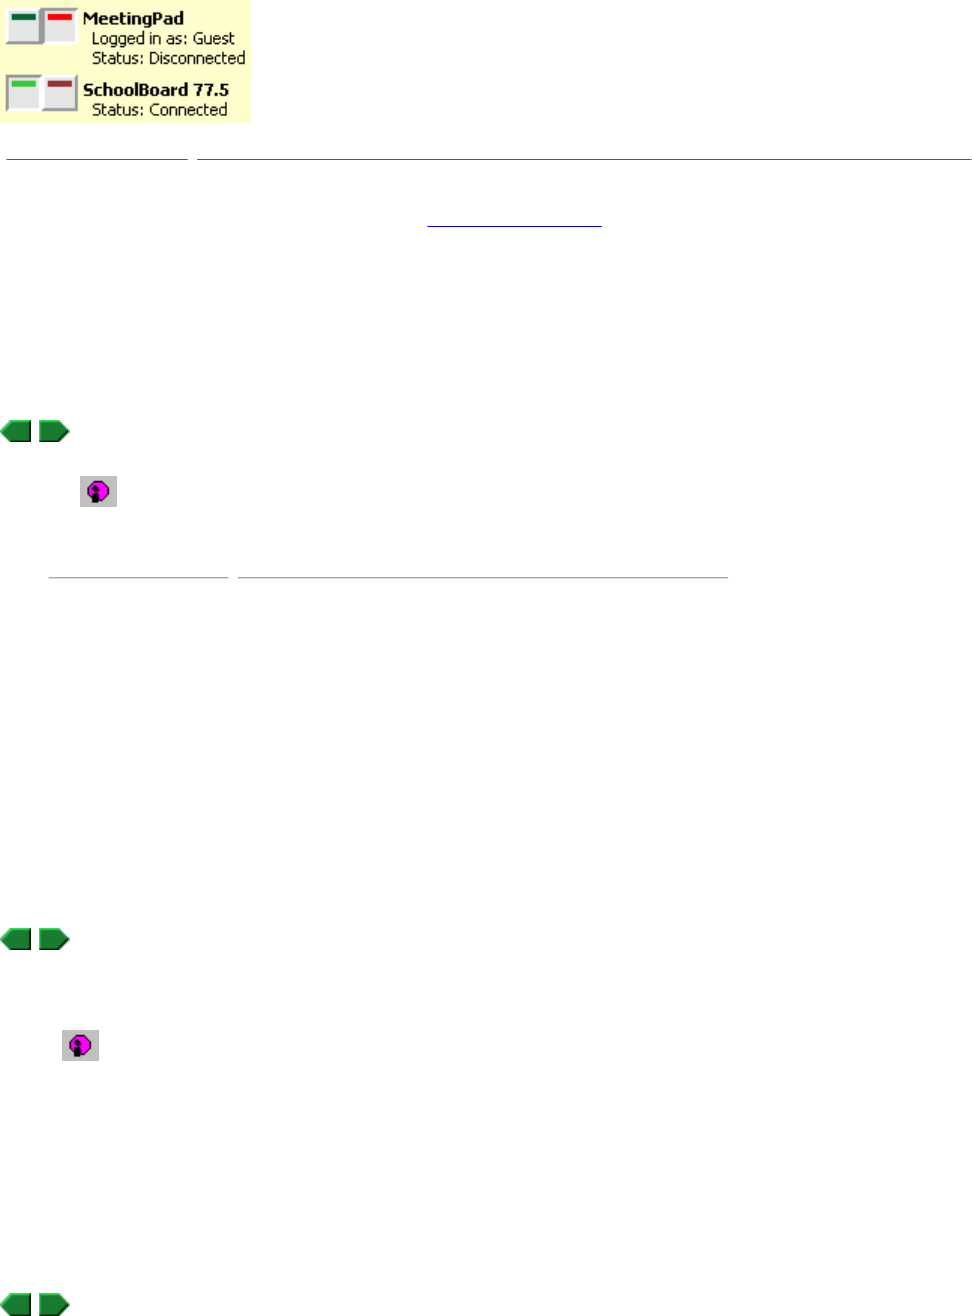
As shown here, the Session Manager lists each device---and its status---that has logged in to the system:
Welcome Page 37 of 54
file://C:\TEMP\~hhA856.htm 8/12/02
Set InterWrite preferences
1. Click in the Control Bar to open the InterWrite menu, then Edit > Preferences... .
2. Set preferences as desired:
3. When done, click OK.
Define pen and highlighter widths
Pens and the highlighter can be set to any of four widths via the Control Bar or pop-up menus. Those tool widths are associated with
definitions you can change. Widths can be set to any value from 1 to 32 pixels.
1. Click in the Control Bar to open the InterWrite menu, then Edit > Preferences... .
2. In the Preferences window, click the Line Widths tab
The top width in each column corresponds to the smallest width that can be selected in a tool's palette. The bottom width
corresponds to the largest width.
3. Set pen and highlighter widths as desired (however, settings must be ordered from smallest at the top to largest at the bottom).
or
Click either Defaults button to restore the default widths.
4. Click OK.
Customize the Control Bar
To do this... Do this...
Open the Session
Manager Click the InterWrite icon in the Task Bar, then click Session Manager in the pop-up menu.
or
If InterWrite is running, click the Session Manager button.
To connect a device Click its green button. The device can now use InterWrite.
To connect a device that
is off Turn on the device, then click its green button. The device can now use InterWrite
To disconnect a device Click its red button. The device cannot use InterWrite.
Use the... To...
Files tab Set default directory for saving image files.
Options tab Set control options, cursor orientation and default Internet address.
Image Controls tab Select option for handling new annotation pages.
Line Widths tab Set pen and highlighter widths.
Text Annotation tab Set default font, size, style and color for text annotations.
Grid Line Page tab Set color and other characteristics of Grid Line page.
Image Page tab Select image to appear on Image page.
Annotation Window tab Control whether Annotate window can be resized, and availability of
scroll bars.

Welcome Page 38 of 54
file://C:\TEMP\~hhA856.htm 8/12/02
Customizing enables you to:
n Change the Control Bar's behavior.
n Add or remove tools.
n Save and select Control Bar configurations.
1. Click in the Control Bar to open the InterWrite menu, then click Customize... in the menu.
2. In the Toolbar Settings tab, set options as desired.
3. In the Customize Toolbar tab:
To select a scheme: Open the Current Toolbar Scheme list and click the scheme name.
To customize a scheme: Add or remove buttons.
To save the current scheme: Type a name in the Current Toolbar Scheme box, then click Save Scheme.
To delete the current scheme: Click Delete Scheme.
4. Click OK.
Tip: You can also open this window by right-clicking anywhere on the Control Bar, then clicking Customize... in the pop-up
menu.
Set up programmable menu buttons
The menus on MeetingBoard LX and SchoolBoard tablets have three programmable buttons (Programmable 1, Prgrammable 2 and
Programmable 3). These buttons can be set up to launch frequently-used applications or documents.
1. Click the InterWrite icon in the Task Bar, then click Device Manager in the pop-up menu.
2. In the Device Manager window, click the tablet name in the Recognized Devices list, then click the Device Properties button.
3. In the Device Properties window, click the SoftKeys tab.
4. For each programmable button:
a. Click the ... button, then select the application or document you want to associate with this programmable button.
b. Active or deactivate the Beep option, as desired. (When Beep is activated, you will hear a beep when you click the programmable
button.)
5. Click OK.
Use other pointing devices
InterWrite Software recognizes standard mouse events (left click and right click) as follows:
Mouse Mode
n Left click: For other programs, functions as in Windows. If cursor is left-clicked over a Control Bar button, InterWrite enters Annotation
Mode with the selected tool active.
n Right click: For other programs, functions as in Windows. If cursor is right-clicked over Control Bar, InterWrite menu opens.
Annotation Mode
n Left click: If cursor is not over Control Bar, applies tool (pen, highlighter, eraser or pointer) to image.
or
If cursor is over Control Bar, selects tool.
n Right click: If cursor is not over Control Bar, opens palette for selecting color, width and tool (see Select tools and options).
or
If cursor is over Control Bar, opens InterWrite menu.
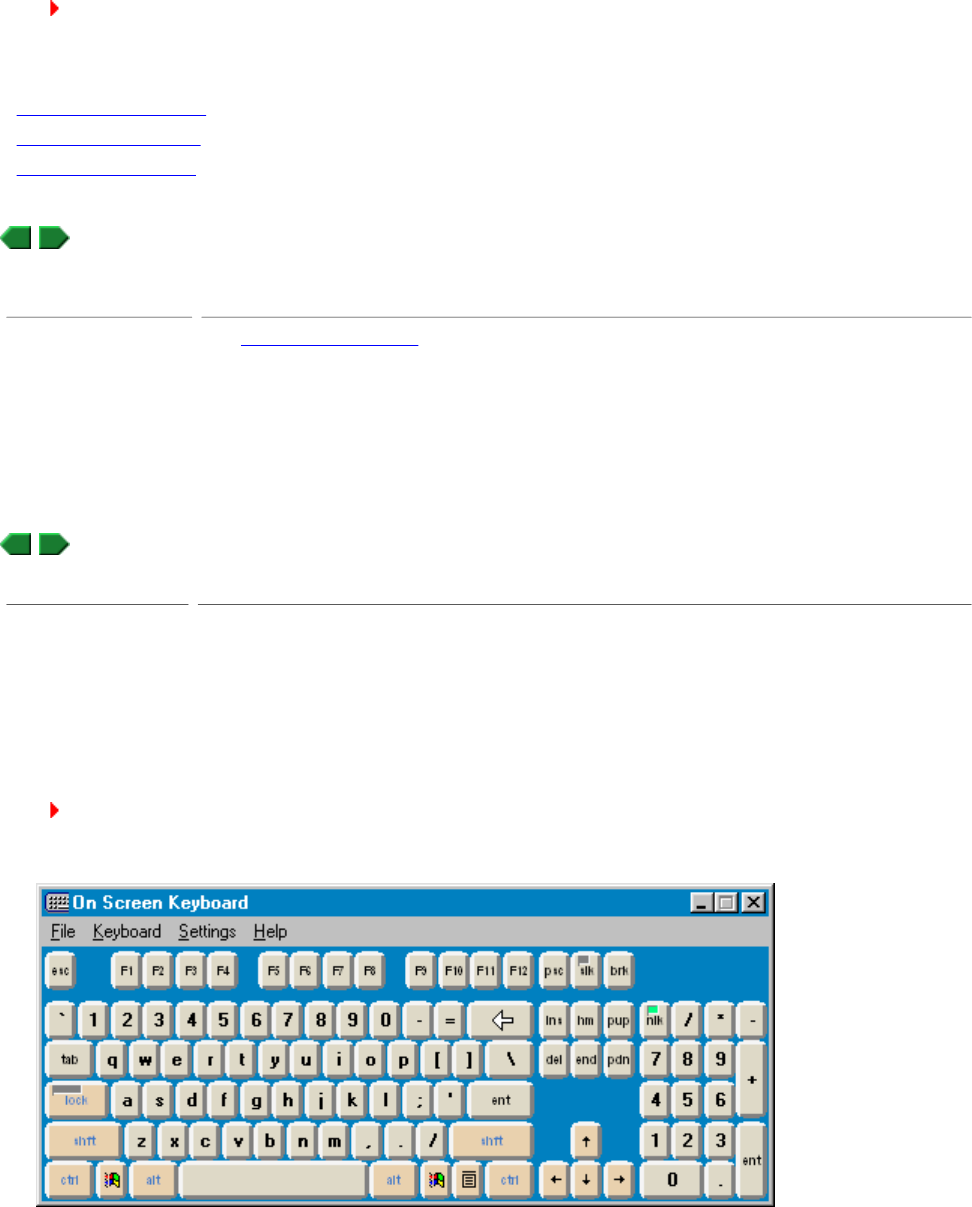
About the Virtual Keyboard
Welcome Page 39 of 54
file://C:\TEMP\~hhA856.htm 8/12/02
The Virtual Keyboard is an on-screen substitute for the physical keyboard attached to the PC supporting Meeting Suite. It enables you to
do anything in Interactive Mode that you can do from the physical keyboard. The Virtual Keyboard is convenient because you can "type"
while keeping your focus on the MeetingBoard. Additionally, the Virtual Keyboard lets MeetingPad users "type" from anywhere in the
room.
Tip: The Virtual Keyboard works with any program, not just InterWrite. After opening the Virtual Keyboard, switch to another
program and "type" using the Virtual Keyboard to enter text and keyboard shortcuts.
To learn more, see:
n Basic keyboard operations.
n Selecting keyboard layout.
n Configuring the keyboard.
Basic Virtual Keyboard operations
Selecting keyboard layout
Tip: Resize the keyboard by dragging any side or corner.
Enhanced keyboard: provides all the keys you would find on a physical keyboard for a desktop computer.
Standard keyboard: provides fewer keys, similar to the keyboard for a laptop computer.
To do this... Do this...
Open the Virtual
Keyboard Click Virtual Keyboard button or click Virtual Keyboard icon in system tray.
Type one uppercase
letter Click SHIFT button, then type letter.
Type multiple uppercase
letters Click LOCK button, then type letters. When done, click LOCK button again.
To do this... Do this...
Display standard
keyboard Keyboard > Standard Keyboard.
Display enhanced
keyboard Keyboard > Enhanced Keyboard.
Display numeric keypad Keyboard > Number Pad.
Select English, European
or Japanese layout Keyboard > [layout type]
. (European and Japanese layouts provide additional keys needed to display extra
characters. English Block simplifies layout by aligning keys in a grid. Kiosk is a minimal 85-key layout.)
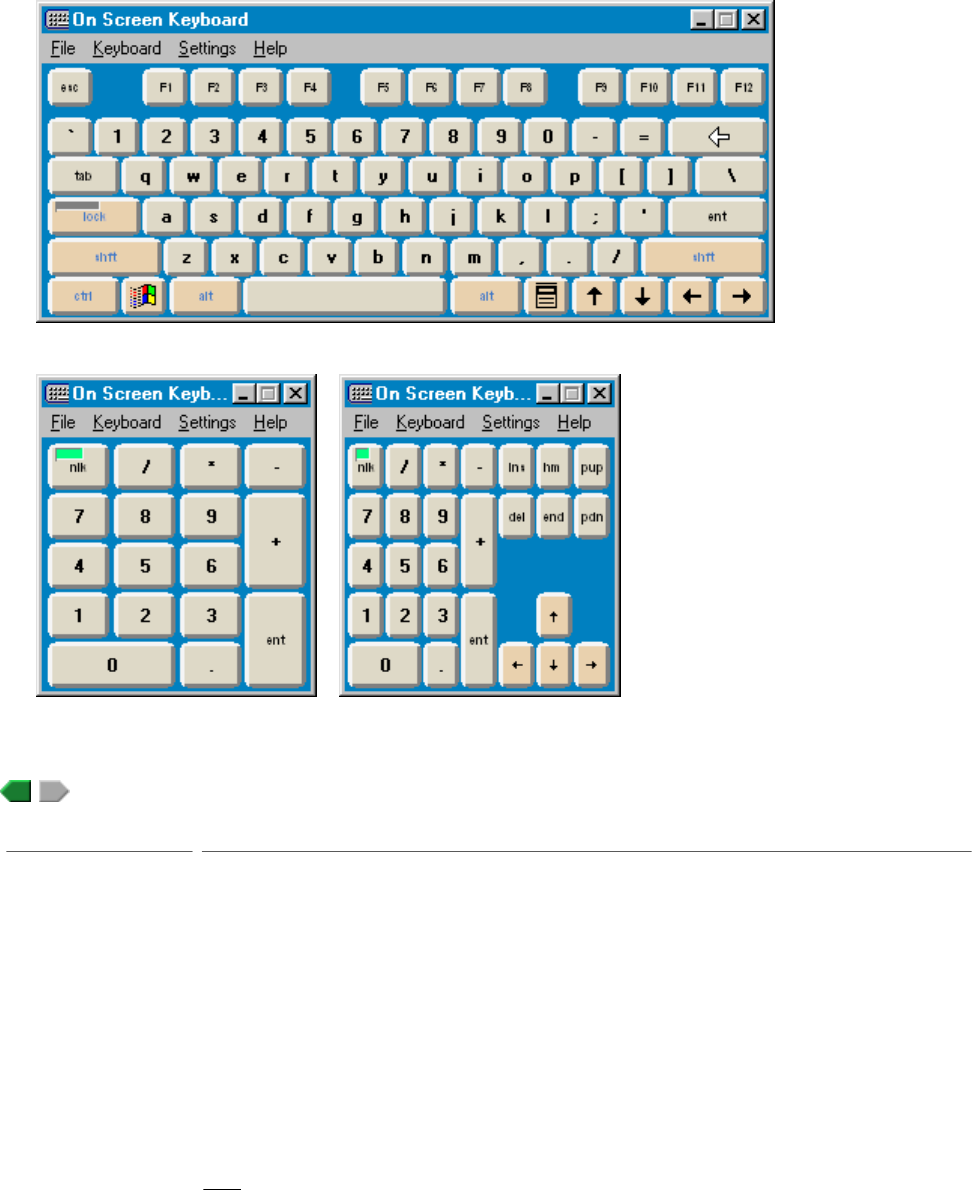
Welcome Page 40 of 54
file://C:\TEMP\~hhA856.htm 8/12/02
Numeric keypad: numbers and related keys, available in both standard and enhanced layouts.
Configuring the keyboard
How to... (PC Whiteboard Mode)
To do this... Do this...
Hide the keyboard Deactivate Settings > Keyboard Visible.
Show hidden keyboard Click Virtual Keyboard icon in the Task Bar.
Switch between 2D and
3D keys Settings > 3D Keys.
Allow keyboard to move
behind other windows Deactivate Settings > Always on Top.
Turn "click" sound on or
off Settings > Use Click Sound.
Set time needed to
activate repeating
characters
Activate Settings > Dwell Select. Move cursor over key, then quickly click to indicate delay before
activating repeat characters. When done deactivate Settings > Dwell Select.
Hide keyboard's menu
bar Activate Settings > Hide Top Menu.
Access menu when menu
bar is hidden Right-click anywhere in keyboard window.
Change font appearing on
keys Settings > Font... , then select font, style and size.
Customize keyboard
colors Settings > Color. In Select Custom Colors window, activate Use Custom Colors, then change colors as
desired.

Welcome Page 41 of 54
file://C:\TEMP\~hhA856.htm 8/12/02
Tip: To start PC Whiteboard Mode in a Meeting Suite system, see Starting from MeetingBoard, Starting from MeetingBoard LX
and Starting from the PC.
Tip: To start PC Whiteboard Mode in a School Suite system, see Starting from SchoolBoard and Starting from the PC.
Toolbar buttons (PC Whiteboard Mode)
How to... (InterWrite Viewer)
To do this... Do this...
Start a new image file Click or File > New Image File... .
Save annotation to current file Click or File > Save As... .
Save image under a new name Click or File > Save As... , then enter a new name for the new file.
Write or draw Remove tip from electronic pen, then write or draw on electronic whiteboard writing surface.
Select a pen color Open the Pens menu and click the desired color.
Erase Use the small eraser on the back of the electronic pen.
or
Use the large electronic eraser.
Print current image Click or File > Print... .
Clear annotations Click or Edit > Clear All.
Manage images Click or File > Image Viewer... . (See also Using InterWrite Viewer: How to... and Viewer
buttons.)
Exit PC Whiteboard Mode Click or File > Exit.
Start new image file
Save image file
Save image file under new name
Print current image
Open InterWrite Viewer
Clear annotations from image
Exit PC Whiteboard Mode
To do this... Do this...
Open the Viewer In Interactive Mode, click the Image Viewer button in the Control Bar.
or
In PC Whiteboard Mode, click the Image Viewer button in the tool bar.
Rearrange images Click an image, then drag to a new location (watch for the bar indicating where it will be
placed).
Cut an image Click the Cut button or Edit > Cut. The image is placed in the clipboard, and can be
pasted into this file or another file.
Copy an image Click the Copy button or Edit > Copy. The image is copied to the clipboard, and can be
pasted into this file or another file.
Welcome Page 42 of 54
file://C:\TEMP\~hhA856.htm 8/12/02
Viewer buttons
File naming
n How InterWrite names files: The default file name is mmddyy.gwb , where mmddyy is today's date (month, day and year). You can
change an InterWrite file's name, but you should retain its gwb extension.
If InterWrite creates more than one file on the same day, files after the first include a two digit sequential number, as in
mmddyyNN.gwb , where NN is the sequential number.
Example: For the first meeting on November 9, 2002, InterWrite saves screens in the file 110902.gwb . For the second meeting on
that day, InterWrite saves screens in file 11090201.gwb . The third meeting goes in 11090202.gwb , and so forth.
n Where InterWrite saves files: The default directory is specified in the Preferences window (Edit > Preferences in the InterWrite
menu).
Contact information
For additional help in installing, configuring and using Meeting Suite and School Suite products, contact GTCO CalComp Technical
Service & Support:
U.S. West Coast
GTCO CalComp Inc.
Paste an image Click the Paste button or Edit > Paste. A previously cut or copied image is pasted into the
current file.
Zoom Click the Zoom button (repeated clicking cycles through all zoom levels).
Zoom in or out View > 25%, View > 33%, View > 50%, View > 66%, View > 75% or View > 100%.
Print image(s) Click the Print button or File > Print... . In the Print Setup window, you can choose to
print all images, a range of images or the currently selected image.
Export images File > Export... . Select an export format, enter a name for the new files, then click Save.
(Each image's name will include a sequential number.)
E-mail the current file Click the Send button or File > Send To... . In the dialog window, choose to send the file
only (recipient must have the InterWrite Viewer or InterWrite Reader) or to send the file
with a reader (any recipient can open and view the file). Click the Mail button to open your
default e-mail program with the image file attached.
Tip: Recipients can download the InterWrite Reader from
www.gtcocalcomp.com/interwriteviewer.htm. This may be necessary if you
cannot send executable files from your system, or if the recipient cannot receive
executable files.
Close the viewer Click the Exit button or File > Exit.
Open previously saved InterWrite file
Save current file
Print current file
Cut selected image
Copy selected image
Paste image from clipboard
Cycle through zoom settings
E-mail current file
Exit InterWrite Viewer
Welcome Page 43 of 54
file://C:\TEMP\~hhA856.htm 8/12/02
14555 North 82nd Street
Scottsdale, AZ 85260
n E-mail: CalComp.support@gtcocalcomp.com
n Phone: 1-480-443-2214
n Fax: 1-480-948-5508
U.S. East Coast
GTCO CalComp Inc.
7125 Riverwood Drive
Columbia, MD 21046
n E-mail: gtco.support@gtcocalcomp.com
n Phone: 1-410-312-9221
n Fax: 1-410-290-9065
Europe
GTCO CalComp
World Trade Center
A-1300 Vienna -- Airport
Austria
n Phone: +43 1 7007 36450
n Fax: +43 1 7007 36458
Web
www.gtcocalcomp.com
Troubleshooting
InterWrite Software
MeetingBoard: Color Copyboard mode
Problem: Image doesn't print.
Things to check:
n Assure the printer is turned on.
n Assure all cable connections are secure.
n Assure printer cartridges are properly installed.
n Assure printer cartridges have sufficient ink.
n Assure a compatible printer is attached:
l Epson Stylus Color (ESC P2 commands at 180 lpi).
l Canon BJC (Canon BJR Color commands at 180 lpi).
l HP Deskjet (PCL3 commands at 150 lpi) not host-based.
MeetingBoard/SchoolBoard care and cleaning
Replacing MeetingBoard/SchoolBoard pen batteries
General tablet care
Cleaning the tablet
Problem: Your system doesn't allow you to send a self-extracting (.exe ) image file (which includes InterWrite Reader).
or
Recipient's system doesn't allow recipient to receive or open self-extracting (.exe ) image file (which includes InterWrite
Reader).
Solution: Send standard image file (.gwb ). Have user download InterWrite Reader from
www.gtcocalcomp.com/interwriteviewer.htm. After downloading and installing reader, recipient can open your image file.

Welcome Page 44 of 54
file://C:\TEMP\~hhA856.htm 8/12/02
MeetingPad/SchoolPad care and cleaning
Replacing MeetingPad/SchoolPad 300 pen batteries
General care
Cleaning the tablet
Specifications for MeetingBoard
Product specifications
Tablet Physical Dimensions (measurements include pen tray and control box)
Specifications for MeetingBoard LX
Product specifications
Platform Support PC
Software Drivers Windows 95/98/ME/NT/2000/XP
Hardware Interface RS232 and Universal Serial Bus (USB) standard
Resolution 1,000 lines per inch (39.5 lines per mm)
Baud Rate Up to 9600
Technology Non-touch patented electromagnetic position-sensing
Operating Modes Interactive, PC Whiteboard, Copyboard
Power Supply Wall Mount
Power Requirements 9VDC@1A
Battery Life (pens) Approximately 200 hours of continuous use
Certification FCC Part 15 Subpart B (Class B) and Subpart C, EN55022, ETS
300 683 (1997), ETS 300 220 (2000-09)
Operating Temperature 40 to 115°F (5 to 40°C)
Warranty One year
Model 70 inch MeetingBoard
Active Area 70 in (178 cm) diagonal
42 in H x 56 in W (106.68 cm H x 142.24 cm W)
Width 60.56 in (154 cm)
Height 46.46 in (118 cm)
Depth 6.232 in (15.8 cm)
Weight 32 lb (14.5 kg)
Shipping Dimensions 68 in (172.72 cm) x 6 in (15.24 cm) x 54 in (137.16 cm)
Model 50 inch MeetingBoard
Active Area 50 in (127cm) diagonal
30 in H x 40 in W (76.3 cm H x 101.7 cm W)
Width 44.7 in (113.7 cm)
Height 34.7 in (88.2 cm)
Depth
Weight 19 lb (8.6 kg)
Shipping Dimensions 51 in x 41 in x 5.8 in (129.7 cm x 104.3 cm x 14.7 cm

Welcome Page 45 of 54
file://C:\TEMP\~hhA856.htm 8/12/02
Tablet Physical Dimensions (measurements include pen tray and control box)
Specifications for SchoolBoard
Product specifications
Platform Support PC
Software Drivers Windows 95/98/ME/NT/2000/XP
Hardware Interface RS232 and Universal Serial Bus (USB) standard
Resolution 1,000 lines per inch (39.5 lines per mm)
Baud Rate Up to 9600
Technology Non-touch patented electromagnetic position-sensing
Operating Modes Interactive, PC Whiteboard
Power Supply Wall Mount
Power Requirements 9VDC@1A
Battery Life (pens) Approximately 200 hours of continuous use
Certification FCC-B, DCO-B, EN55022-A, EN55024:1998
Operating Temperature 40 to 115°F (5 to 40°C)
Warranty One year
Model 70 inch MeetingBoard LX
Active Area 70 in (178 cm) diagonal
42 in H x 56 in W (106.68 cm H x 142.24 cm W)
Width 60.56 in (154 cm)
Height 46.46 in (118 cm)
Depth 6.232 in (15.8 cm)
Weight 32 lb (14.5 kg)
Shipping Dimensions 68 in x 6 in x 54 in (172.72 cm x 137.16 cm x15.24 cm)
Model 50 inch MeetingBoard LX
Active Area 50 in (127cm) diagonal
30 in H x 40 in W (76.3 cm H x 101.7 cm W)
Width 44.7 in (113.7 cm)
Height 34.7 in (88.2 cm)
Depth
Weight 19 lb (8.6 kg)
Shipping Dimensions 51 in x 41 in x 5.8 in (129.7 cm x 104.3 cm x 14.7 cm
Platform Support PC
Software Drivers Windows 95/98/ME/NT/2000/XP
Hardware Interface RS232 and Universal Serial Bus (USB) standard
Resolution 1,000 lines per inch (39.5 lines per mm)
Baud Rate Up to 9600
Technology Non-touch patented electromagnetic position-sensing
Operating Modes Interactive, PC Whiteboard
Power Supply Wall Mount
Power Requirements 9VDC@1A
Battery Life (pens) Approximately 200 hours of continuous use
Certification FCC Part 15 Subpart B (Class B) and Subpart C, EN55022, ETS
300 683 (1997), ETS 300 220 (2000-09)

Welcome Page 46 of 54
file://C:\TEMP\~hhA856.htm 8/12/02
Tablet Physical Dimensions (measurements include pen tray and control box)
Specifications for MeetingPad 100 / SchoolPad 100
Product specifications
Tablet Physical Dimensions
Specifications for MeetingPad 300 / SchoolPad 300
Product specifications
Operating Temperature 40 to 115°F (5 to 40°C)
Warranty Three years
Model 1060 and 1060B
Active Area 60 in (1524 mm) diagonal
Width 54 in (1372 mm)
Height 41.75 in (1060 mm)
Weight 36 lb (16.3 kg)
Model 1077 and 1077B
Active Area 77.5 in (1968 mm) diagonal
Width 68 in (1727 mm)
Height 52.25 in (1327 mm)
Weight 53 lb (24 kg)
Platform Support PC
Software Drivers Windows 95/98/ME/NT/2000/XP
Interface USB and RS-232 serial (serial only for Windows 95 and NT)
Resolution 1,000 lines per inch (150 lines per mm)
Sensing Proximity 0.25 in (10 mm) above writing surface
Baud Rate Up to 38,400
Data Rate Up to 200 coordinate pairs per second
Technology Patented electromagnetic position-sensing
Operating Modes Interactive
Power Supply None required
Battery Life (pen) Approximately 200 hours of continuous use
Certification FCC Part 15 Subpart B (Class B) and Subpart C
EN55022, ETS 300 683 (1997), ETS 300 220-1 (2000-09)
Operating Temperature 50 to 104°F (10 to 40°C)
Warranty One year
Active Area 10.0 in (25.4 cm) diagonal
6.0 in H x 9.0 in W (15.2 cm H x 22.9 cm W)
Width 12 in (30.5 cm)
Height 11.25 in (28.6 cm)
Depth 0.6 in (1.5 cm)
Weight 1 lb (0.45 kg)

Welcome Page 47 of 54
file://C:\TEMP\~hhA856.htm 8/12/02
Tablet Physical Dimensions
CE Certification for MeetingBoard
Declaration of conformity according to ISO/IEC Guide 22 and EN 45014
declares, that the product
conforms to the following product specifications:
Supplementary Information
The product herewith complies with the requirements of the EMC Directive 89/336/EEC.
Platform Support PC
Software Drivers Windows 98/ME/2000/XP
Interface Bluetooth
Resolution 1,000 lines per inch (39.5 lines per mm)
Sensing Proximity 0.25 in (6 mm) above writing surface
Baud Rate Up to 9600
Technology Patented electromagnetic position-sensing
Operating Modes Interactive
Power Supply Internal rechargeable batteries, with external charger
Battery Life (pen) Approximately 200 hours of continuous use
Battery Life (tablet) Approximately 16 hours of continuous use per charge
Certification FCC Part 15 Subpart B (Class B) and Subpart C
EN55022, ETS 300 683 (1997), ETS 300 220-1 (2000-09)
Operating Temperature 40 to 115°F (5 to 40°C)
Warranty One year
Active Area 10.0 in (25.4 cm) diagonal
6.0 in H x 8.0 in W (15.2 cm H x 20.3 cm W)
Width 11.9 in (30.2 cm)
Height 11.2 in (28.4 cm)
Depth 1.6 in (4.1 cm)
Weight 2 lb, 2 oz (0.96 kg)
Manufacturer’s Name GTCO CalComp, Inc.
Manufacturer’s Address: 14555 N. 82nd Street
Scottsdale, Arizona 85260
U.S.A.
Product Name: MeetingBoard
Model Numbers: DBI 4256
Product Options: All
Safety: Not applicable to any standard.
EMC: CISPR 22:1985/EN55022:1988-Class B
EN55024:1998
ETS 300 683 (1997)
ETS 300 220 (2000-09)

Welcome Page 48 of 54
file://C:\TEMP\~hhA856.htm 8/12/02
European Contact
GTCO CalComp
World Trade Center
A-1300 Vienna -- Airport
Austria
Tel: + 43 1 7007 36450
Fax: + 43 1 7007 36458
European Union-emission directive
This product is in conformity with the protection requirements of EU Council Directive 89/366/ECC on the approximation of the laws of the
Member States relating to electromagnetic compatibility.
This product has been tested and found to comply with the limits for Class B Information Technology Equipment according to CISPR
22/European Standard EN55022. The limits for Class B equipment were derived for typical industrial environments to provide reasonable
protection against interference with licensed communication devices.
CE Certification for MeetingBoard LX
Declaration of conformity according to ISO/IEC Guide 22 and EN 45014
declares, that the product
conforms to the following product specifications:
Supplementary Information
The product herewith complies with the requirements of the EMC Directive 89/336/EEC.
European Contact
GTCO CalComp
World Trade Center
A-1300 Vienna -- Airport
Austria
Scottsdale, Arizona, U.S.A. 6-18-2000 Mike Truscio
Location Date Vice President of Engineering
Manufacturer’s Name GTCO CalComp, Inc.
Manufacturer’s Address: 14555 N. 82nd Street
Scottsdale, Arizona 85260
U.S.A.
Product Name: MeetingBoard LX
Model Numbers:
Product Options: All
Safety: Not applicable to any standard.
EMC: CISPR 22:1985/EN55022:1988-Class B
EN55024:1998
Scottsdale, Arizona, U.S.A. Mike Truscio
Location Date Vice President of Engineering

Welcome Page 49 of 54
file://C:\TEMP\~hhA856.htm 8/12/02
Tel: + 43 1 7007 36450
Fax: + 43 1 7007 36458
European Union-emission directive
This product is in conformity with the protection requirements of EU Council Directive 89/366/ECC on the approximation of the laws of the
Member States relating to electromagnetic compatibility.
This product has been tested and found to comply with the limits for Class A Information Technology Equipment according to CISPR
22/European Standard EN55022. The limits for Class A equipment were derived for typical industrial environments to provide reasonable
protection against interference with licensed communication devices.
CE Certification for SchoolBoard
Declaration of conformity according to ISO/IEC Guide 22 and EN 45014
declares, that the product
conforms to the following product specifications:
Supplementary Information
The product herewith complies with the requirements of the EMC Directive 89/336/EEC.
European Contact
GTCO CalComp
World Trade Center
A-1300 Vienna -- Airport
Austria
Tel: + 43 1 7007 36450
Fax: + 43 1 7007 36458
European Union-emission directive
This product is in conformity with the protection requirements of EU Council Directive 89/366/ECC on the approximation of the laws of the
Member States relating to electromagnetic compatibility.
This product has been tested and found to comply with the limits for Class A Information Technology Equipment according to CISPR
22/European Standard EN55022. The limits for Class A equipment were derived for typical industrial environments to provide reasonable
protection against interference with licensed communication devices.
Manufacturer’s Name GTCO CalComp, Inc.
Manufacturer’s Address: 14555 N. 82nd Street
Scottsdale, Arizona 85260
U.S.A.
Product Name: SchoolBoard
Model Numbers:
Product Options: All
Safety: Not applicable to any standard.
EMC: CISPR 22:1985/EN55022:1988-Class B
EN55024:1998
Scottsdale, Arizona, U.S.A. Mike Truscio
Location Date Vice President of Engineering

Welcome Page 50 of 54
file://C:\TEMP\~hhA856.htm 8/12/02
CE Certification for MeetingPad 100 / SchoolPad 100
Declaration of conformity according to ISO/IEC Guide 22 and EN 45014
declares, that the product
conforms to the following product specifications:
Supplementary Information
The product herewith complies with the requirements of the EMC Directive 89/336/EEC.
European Contact
GTCO CalComp
World Trade Center
A-1300 Vienna -- Airport
Austria
Tel: + 43 1 7007 36450
Fax: + 43 1 7007 36458
European Union-emission directive
This product is in conformity with the protection requirements of EU Council Directive 89/366/ECC on the approximation of the laws of the
Member States relating to electromagnetic compatibility.
This product has been tested and found to comply with the limits for Class A Information Technology Equipment according to CISPR
22/European Standard EN55022. The limits for Class A equipment were derived for typical industrial environments to provide reasonable
protection against interference with licensed communication devices.
CE Certification for MeetingPad 300 / SchoolPad 300
Declaration of conformity according to ISO/IEC Guide 22 and EN 45014
Manufacturer’s Name GTCO CalComp, Inc.
Manufacturer’s Address: 14555 N. 82nd Street
Scottsdale, Arizona 85260
U.S.A.
Product Name: MeetingPad 100, SchoolPad 100
Model Numbers: 36081, 36082
Product Options: All
Safety: Not applicable to any standard.
EMC: CISPR 22:1985/EN55022:1988-Class B
EN55024:1998
Scottsdale, Arizona, U.S.A. Mike Truscio
Location Date Vice President of Engineering
Manufacturer’s Name GTCO CalComp, Inc.
Manufacturer’s Address: 14555 N. 82nd Street
Scottsdale, Arizona 85260
U.S.A.

Welcome Page 51 of 54
file://C:\TEMP\~hhA856.htm 8/12/02
declares, that the product
conforms to the following product specifications:
Supplementary Information
The product herewith complies with the requirements of the EMC Directive 89/336/EEC.
European Contact
GTCO CalComp
World Trade Center
A-1300 Vienna -- Airport
Austria
Tel: + 43 1 7007 36450
Fax: + 43 1 7007 36458
European Union-emission directive
This product is in conformity with the protection requirements of EU Council Directive 89/366/ECC on the approximation of the laws of the
Member States relating to electromagnetic compatibility.
This product has been tested and found to comply with the limits for Class B Information Technology Equipment according to CISPR
22/European Standard EN55022. The limits for Class B equipment were derived for typical industrial environments to provide reasonable
protection against interference with licensed communication devices.
Radio frequency emissions notices for MeetingBoard
This equipment has been tested and found to comply with the limits for a Class B digital device, pursuant to part 15 of the FCC
Rules. These limits are designed to provide reasonable protection against harmful interference in a residential installation. This
equipment generates, uses and can radiate radio frequency energy and, if not installed and used in accordance with the instructions, may
cause harmful interference to radio communications. However, there is no guarantee that interference will not occur in a particular
installation. If this equipment does cause harmful interference to radio or television reception, which can be determined by turning the
equipment off and on, the user is encouraged to try to correct the interference by one or more of the following measures:
n Reorient or relocate the receiving antenna.
n Increase the separation between the equipment and receiver.
n Connect the equipment into an outlet on a circuit different from that to which the receiver is connected.
n Reorient or coil cables.
n If necessary, consult the dealer or an experienced radio/television technician for additional suggestions.
Any cables the user adds to the device must be shielded to be in compliance with the FCC standards. Any unauthorized modification to
this device could result in the revocation of the end user’s authority to operate this device.
Electronic pen and eraser
Product Name: MeetingPad 300, SchoolPad 300
Model Numbers:
Product Options: All
Safety: Not applicable to any standard.
EMC: CISPR 22:1985/EN55022:1988-Class B
EN55024:1998
ETS 300 683 (1997)
ETS 300 220 (2000-09)
Scottsdale, Arizona, U.S.A. Mike Truscio
Location Date Vice President of Engineering

Welcome Page 52 of 54
file://C:\TEMP\~hhA856.htm 8/12/02
These devices comply with Part 15 of FCC rules. Operation is subject to the following two conditions: (1) This device may not cause
harmful interference, and (2) This device must accept any interference received, including interference that may cause undesired
operation.
Canada
Industry Canada Class B emission compliance statement. This Class B digital apparatus complies with Canadian ICES-003.
Avis de conformite' a' la re'glementation d'Industrie Canada. Cet appareil nume'rique de classe A est conforme a' la norme NMB-003 du
Canada.
Radio frequency emissions notices for MeetingBoard LX
This equipment has been tested and found to comply with the limits for a Class A digital device, pursuant to part 15 of the FCC
Rules. These limits are designed to provide reasonable protection against harmful interference in a residential installation. This
equipment generates, uses and can radiate radio frequency energy and, if not installed and used in accordance with the instructions, may
cause harmful interference to radio communications. However, there is no guarantee that interference will not occur in a particular
installation. If this equipment does cause harmful interference to radio or television reception, which can be determined by turning the
equipment off and on, the user is encouraged to try to correct the interference by one or more of the following measures:
n Reorient or relocate the receiving antenna.
n Increase the separation between the equipment and receiver.
n Connect the equipment into an outlet on a circuit different from that to which the receiver is connected.
n Reorient or coil cables.
n If necessary, consult the dealer or an experienced radio/television technician for additional suggestions.
Any cables the user adds to the device must be shielded to be in compliance with the FCC standards. Any unauthorized modification to
this device could result in the revocation of the end user’s authority to operate this device.
Electronic pen
This device complies with Part 15 of FCC rules. Operation is subject to the following two conditions: (1) This device may not cause
harmful interference, and (2) This device must accept any interference received, including interference that may cause undesired
operation.
Canada
Industry Canada Class A emission compliance statement. This Class A digital apparatus complies with Canadian ICES-003.
Avis de conformite' a' la re'glementation d'Industrie Canada. Cet appareil nume'rique de classe A est conforme a' la norme NMB-003 du
Canada.
Radio frequency emissions notices for SchoolBoard
This equipment has been tested and found to comply with the limits for a Class A digital device, pursuant to part 15 of the FCC
Rules. These limits are designed to provide reasonable protection against harmful interference in a residential installation. This
equipment generates, uses and can radiate radio frequency energy and, if not installed and used in accordance with the instructions, may
cause harmful interference to radio communications. However, there is no guarantee that interference will not occur in a particular
installation. If this equipment does cause harmful interference to radio or television reception, which can be determined by turning the
equipment off and on, the user is encouraged to try to correct the interference by one or more of the following measures:
n Reorient or relocate the receiving antenna.
n Increase the separation between the equipment and receiver.
n Connect the equipment into an outlet on a circuit different from that to which the receiver is connected.
n Reorient or coil cables.
n If necessary, consult the dealer or an experienced radio/television technician for additional suggestions.
Any cables the user adds to the device must be shielded to be in compliance with the FCC standards. Any unauthorized modification to
this device could result in the revocation of the end user’s authority to operate this device.
Electronic pen

Welcome Page 53 of 54
file://C:\TEMP\~hhA856.htm 8/12/02
This device complies with Part 15 of FCC rules. Operation is subject to the following two conditions: (1) This device may not cause
harmful interference, and (2) This device must accept any interference received, including interference that may cause undesired
operation.
Canada
Industry Canada Class A emission compliance statement. This Class A digital apparatus complies with Canadian ICES-003.
Avis de conformite' a' la re'glementation d'Industrie Canada. Cet appareil nume'rique de classe A est conforme a' la norme NMB-003 du
Canada.
Radio frequency emissions notices for MeetingPad 100 / SchoolPad 100
This equipment has been tested and found to comply with the limits for a Class B digital device, pursuant to part 15 of the FCC
Rules. These limits are designed to provide reasonable protection against harmful interference in a residential installation. This
equipment generates, uses and can radiate radio frequency energy and, if not installed and used in accordance with the instructions, may
cause harmful interference to radio communications. However, there is no guarantee that interference will not occur in a particular
installation. If this equipment does cause harmful interference to radio or television reception, which can be determined by turning the
equipment off and on, the user is encouraged to try to correct the interference by one or more of the following measures:
n Reorient or relocate the receiving antenna.
n Increase the separation between the equipment and receiver.
n Connect the equipment into an outlet on a circuit different from that to which the receiver is connected.
n Reorient or coil cables.
n If necessary, consult the dealer or an experienced radio/television technician for additional suggestions.
Any cables the user adds to the device must be shielded to be in compliance with the FCC standards. Any unauthorized modification to
this device could result in the revocation of the end user’s authority to operate this device.
Electronic pen
This device complies with Part 15 of FCC rules. Operation is subject to the following two conditions: (1) This device may not cause
harmful interference, and (2) This device must accept any interference received, including interference that may cause undesired
operation.
Canada
Industry Canada Class B emission compliance statement. This Class B digital apparatus complies with Canadian ICES-003.
Avis de conformite' a' la re'glementation d'Industrie Canada. Cet appareil nume'rique de classe A est conforme a' la norme NMB-003 du
Canada.
Radio frequency emissions notices for MeetingPad 300 / SchoolPad 300
This equipment has been tested and found to comply with the limits for a Class B digital device, pursuant to part 15 of the FCC
Rules. These limits are designed to provide reasonable protection against harmful interference in a residential installation. This
equipment generates, uses and can radiate radio frequency energy and, if not installed and used in accordance with the instructions, may
cause harmful interference to radio communications. However, there is no guarantee that interference will not occur in a particular
installation. If this equipment does cause harmful interference to radio or television reception, which can be determined by turning the
equipment off and on, the user is encouraged to try to correct the interference by one or more of the following measures:
n Reorient or relocate the receiving antenna.
n Increase the separation between the equipment and receiver.
n Connect the equipment into an outlet on a circuit different from that to which the receiver is connected.
n Reorient or coil cables.
n If necessary, consult the dealer or an experienced radio/television technician for additional suggestions.
Any cables the user adds to the device must be shielded to be in compliance with the FCC standards. Any unauthorized modification to
this device could result in the revocation of the end user’s authority to operate this device.
Electronic pen

Welcome Page 54 of 54
file://C:\TEMP\~hhA856.htm 8/12/02
This device complies with Part 15 of FCC rules. Operation is subject to the following two conditions: (1) This device may not cause
harmful interference, and (2) This device must accept any interference received, including interference that may cause undesired
operation.
Canada
Industry Canada Class B emission compliance statement. This Class B digital apparatus complies with Canadian ICES-003.
Avis de conformite' a' la re'glementation d'Industrie Canada. Cet appareil nume'rique de classe A est conforme a' la norme NMB-003 du
Canada.
About this help file
Meeting Suite help, Rev. C 8-4-02
For InterWrite Software version 3.21
© 2002 GTCO CalComp, Inc. All rights reserved.
MeetingBoard, MeetingPad, SchoolBoard, SchoolPad and InterWrite are trademarks of GTCO CalComp, Inc. GTCO is a registered
trademark of GTCO CalComp, Inc.
Virtual Keyboard © Madentec Limited. All rights reserved.
Bluetooth trademarks are owned by Bluetooth SIG, Inc., U.S.A. and are licensed to GTCO CalComp Inc.