Foxit PDF Compressor Manual Operating Instructions EN
User Manual: foxit PDF Compressor - Operating Instructions Free User Guide for Foxit PDF Compressor Software, Manual
Open the PDF directly: View PDF ![]() .
.
Page Count: 108 [warning: Documents this large are best viewed by clicking the View PDF Link!]
- PDF Compressor Manual
- Table of Contents
- Chapter 1. Introduction
- Chapter 2. Installation
- Chapter 3. Concept of PDF Compressor
- Chapter 4. Getting Started
- Chapter 5. Setting up Job Entries
- Chapter 6. Managing the Job List
- Chapter 7. Automatic Job List Processing
- Chapter 8. Submitting Jobs via the PDF Compressor API
- Chapter 9. Administration and Licensing
- Chapter 10. Tips and Tricks
- Chapter 11. Troubleshooting
- Chapter 12. License Agreement
- Chapter 13. Support and Contact

PDF Compressor Manual
Foxit Europe GmbH

PDF Compressor Manual
PDF Compressor Manual
Foxit Europe GmbH

PDF Compressor Manual
www.foxitsoftware.com
info@luratech.com PDF Compressor Manual: iii
Table of Contents
1. Introduction ............................................................................................................ 1
2. Installation ............................................................................................................. 2
System Requirements ......................................................................................... 2
Requirements of the Born Digital Conversion Option ............................................ 2
Network Requirements ....................................................................................... 3
Service Requirements for OCR ............................................................................. 3
Additional OCR Languages ................................................................................... 3
Custom OCR Dictionary ....................................................................................... 4
Location of temporary files ................................................................................. 4
3. Concept of PDF Compressor .................................................................................... 5
Graphical User Interface ..................................................................................... 5
Job List ....................................................................................................... 5
Job Entry and its Properties ........................................................................ 6
Default Properties ....................................................................................... 6
PDF Compressor Service ..................................................................................... 6
Born Digital Conversion ...................................................................................... 6
4. Getting Started ....................................................................................................... 8
Starting the GUI .................................................................................................. 8
Adding Entries to the List .................................................................................... 8
Running Jobs ...................................................................................................... 9
Removing List Entries .......................................................................................... 9
5. Setting up Job Entries ........................................................................................... 10
Configuring General Job Properties .................................................................... 10
Job List Processing Order .......................................................................... 11
Priority Processing Order .......................................................................... 11
List Processing Order ................................................................................ 12
Job List Processing .................................................................................... 12
Time Scheduled Processing and Processing Timeout ................................... 12
Configuring Advanced Job Options ............................................................ 13
Configuring Input Data ...................................................................................... 13
Input Filter Options ................................................................................... 17
Configuring Advanced Input Options .......................................................... 20
Configuring Data Output ................................................................................... 25
Configuring E-Mail Conversion Options ...................................................... 28
Configuring Advanced Output Options ....................................................... 30
Configuring Post-Processing ............................................................................... 37
Actions upon Successful Processing ........................................................... 38
Actions upon Processing Failure ................................................................ 39
Post-processing command execution .......................................................... 40
Configuring OCR and Barcode Recognition ......................................................... 43
Advanced OCR Options ............................................................................. 45
Barcode Options ....................................................................................... 48
Configuring File and Data Embedding ................................................................ 49
Options for Embedding XMP-Metadata ...................................................... 51
Options for Embedding Bookmarks ............................................................ 52
Options for Embedding XML OCR results ................................................... 52
Options for File Embedding ....................................................................... 53
Configuring Header and Footer ................................................................. 55
Embedding Watermarks ............................................................................ 56
Configuring Document Compression .................................................................. 58

PDF Compressor Manual
www.foxitsoftware.com
info@luratech.com PDF Compressor Manual: iv
Configuring Advanced Compression Options .............................................. 60
Setting up the Default Properties ...................................................................... 63
Template String Syntax Description ................................................................... 64
Escape Sequences ............................................................................................. 65
Modifiers .................................................................................................. 66
Modifier Examples .................................................................................... 67
Examples .................................................................................................. 67
Conditional Substitution ............................................................................ 67
Examples .................................................................................................. 68
Regular Expression Substitution ................................................................. 68
Regular Expression Substitution Example ................................................... 69
6. Managing the Job List ........................................................................................... 70
Adding, Deleting and Copying Entries ................................................................ 70
Changing the Sequence of Job Entries ............................................................... 71
Starting and Stopping Job Entries ...................................................................... 71
Individual Entries ...................................................................................... 71
All Entries ................................................................................................. 71
Monitoring Jobs ................................................................................................ 71
Importing and Exporting Job settings ................................................................. 72
7. Automatic Job List Processing ................................................................................ 73
Finding and Processing Job Lists ........................................................................ 73
Job List File Priorities ................................................................................ 74
Job List File Syntax ............................................................................................ 74
8. Submitting Jobs via the PDF Compressor API .......................................................... 77
API Job Lifecycle ............................................................................................... 78
The C/C++ API .................................................................................................. 78
The .NET API ..................................................................................................... 78
API Demo Applications ...................................................................................... 79
9. Administration and Licensing ................................................................................. 80
General Configuration Settings .......................................................................... 80
Log Files ................................................................................................... 80
Log File Analysis ........................................................................................ 81
Online check for updates .......................................................................... 82
Job List Processing .................................................................................... 82
Priority Processing .................................................................................... 82
Language .................................................................................................. 83
Managing Licenses ............................................................................................ 83
Trial Mode ........................................................................................................ 84
License ............................................................................................................. 84
Caveats ..................................................................................................... 85
Updating Licenses ..................................................................................... 85
Moving Licenses ....................................................................................... 85
External License Monitoring ...................................................................... 86
Managing the PDF Compressor Service .............................................................. 87
Needed Privileges ..................................................................................... 88
Choosing the Service Account ................................................................... 88
Setting up the Service Priority ................................................................... 89
Taskbar Status Icon ................................................................................... 89
CPU Configuration .................................................................................... 89
Born Digital Options .................................................................................. 90
10. Tips and Tricks .................................................................................................... 93
11. Troubleshooting .................................................................................................. 94

PDF Compressor Manual
www.foxitsoftware.com
info@luratech.com PDF Compressor Manual: v
12. License Agreement .............................................................................................. 96
13. Support and Contact ......................................................................................... 102

PDF Compressor Manual
www.foxitsoftware.com
info@luratech.com Introduction: 1
Chapter 1. Introduction
PDF Compressor is an industrial strength solution for automated document conversion and
compression. Through its scalability it is suited for processing small amounts of data as well
as large quantities of input.
The PDF Compressor compresses and converts scanned documents to PDF or PDF/A. Using
the Born Digital Module further digital input formats such as MS Office™ documents, PDF
and e-mails in MSG or EML format including attachments can be converted to PDF/A.
The outstanding document compression provided by the PDF Compressor greatly reduces
file sizes while ensuring prime document quality in an ISO standard compliant format suit-
able for long-term archiving.
The fully integrated OCR engine provides for full-text searchable PDF compression results.
Created documents can automatically be handed over to downstream systems for various
further business processes.
PDF Compressor can generate PDF files for different requirements, e.g. without using newer
PDF features in order to be compatible to Adobe™ Reader™ 5.0 (or other older viewers) or
archivable documents that meet the PDF/A standard (PDF/A-1, PDF/A-2, PDF/A-3).
PDF Compressor offers the following features:
• Scalable high quality compression of color document images
• Applying OCR to create full-text searchable PDFs from scanned pages
• Conversion from PDF to PDF/A
• Optimization of images or scanned pages inside existing PDF documents
• Merging, splitting and renaming of documents
• 1D- and 2D-Barcode recognition and splitting, renaming and PDF bookmark creation by
barcode
• Combining digital documents with scanned pages, e.g. appending certificates and cre-
dentials to an online application
• Unified conversion of digitally created and scanned documents to PDF/A for long term
archiving
• Automatic input ingestion from watched input folders
• Time-triggered starting and stopping of jobs
• Fully automated processing in Job List Processing mode

PDF Compressor Manual
www.foxitsoftware.com
info@luratech.com Installation: 2
Chapter 2. Installation
Run the self-extracting installer and follow the installer instructions. The installer should
be named PDFC_Setup_<xXX>_v<N.N.NN.NNN>.exe, where xXX corresponds to the system
architecture, either "x86" or "x64" and N.N.NN.NNN corresponds to the product’s version
number, e.g. 7.0.0.156).
Note: You need Administrator rights to install PDF Compressor.
System Requirements
• Windows™ 32 Bit or 64 Bit, Vista / Windows 7 / Windows 8 / Server 2008 / Server 2012
• CPU: Intel / AMD or compatible x86- or x64 processors, single core and multi core proces-
sors supported
• CPU Speed: Minimum 1 GHz, 2 GHz or more recommended
• RAM: Minimum 1 GB per licensed processor core, 2 GB per core recommended, more
than 2 GB for conversion of very large documents on 64 bit systems
• Disk space required for installation: 1 GB
• Microsoft™ .NET Framework 4.0
Note: These are minimum installation requirements. Required resources for production en-
vironments should be clarified with Foxit Europe.
Requirements of the Born Digital Conversion Option
In addition to the general system requirements, the following conditions must be met for
Born Digital document conversion of the PDF Compressor standard version.
To convert PDF to PDF/A no preparations are necessary.
For successful conversion of other born digital file formats the following conditions must
be met:
1. Windows™ 64 Bit, Windows 7 / Windows 8 / Server 2008 R2 / Server 2012
2. The necessary office applications have to be installed.
• For conversion of Microsoft Office™ Documents the appropriate components of Office
2007 or higher must be installed such that all Office document types submitted to
conversion can be opened. Ensure that the Microsoft Office applications can save as
PDF (the 'Microsoft Save as PDF or XPS' Add-In must be installed for Office 2007 prior
SP2).
• For conversion of ODF documents (Open Document Format) the appropriate compo-
nents of OpenOffice.org 3.2 must be installed.
3. The service "PDF Compressor" must run under a dedicated user account.
• Use the button "Configure system for office conversion" in File→Options→Conversion
Options to set the logon settings and necessary system configurations.

PDF Compressor Manual
www.foxitsoftware.com
info@luratech.com Installation: 3
• The account can be a local or a domain user account, but it should have administrative
privileges on the computer.
• The account must have sufficient permissions to access the actual files to convert and
to access the office applications via (D)COM interface.
4. Manual preparation before first automatic conversion:
• Log in with the dedicated user account (set up for the service) and start each of the
Office applications used for conversion.
• Verify that all required input file types can be opened properly in Microsoft Office™
and/or OpenOffice.org. This procedure is required to complete the Office installation
and to ensure its completeness.
• For Microsoft Office™ test the "Save as PDF" feature.
• Ensure that all startup dialogs requiring user input are deactivated.
• In the office application options the trust center settings should disable macros and
other active elements (ActiveX) without notification.
• Automatic updates of references, fields and external content during document
opening or printing must be deactivated.
• For some conversions it is necessary to have a default printer installed.
Network Requirements
PDF Compressor can run as a stand-alone application without any network, but typically it
will access net shares by reading and/or writing files. The system administrator must ensure
that the account used to run the PDF Compressor’s service has the corresponding access
rights. See “Managing the PDF Compressor Service” (p. 87) for more details.
Service Requirements for OCR
The OCR function is implemented by using the ABBYY™ FineReader™ Engine SDK. To use the
OCR function it is necessary that the ABBYY SDK 11 Licensing Service is running. The service
is set up during installation and should not be disabled.
Additional OCR Languages
In addition to the languages installed there are more OCR languages available. Please con-
tact Foxit Europe Support (support@luratech.com [mailto:support@luratech.com]) to re-
ceive the files neccessary for the installation of additional OCR languages. PDF Compressor
supports OCR for almost any language with latin script as well as some languages with Greek
and Cyrillic characters. With an additional license the recognition of Asian languages (Chi-
nese, Japanese, Korean) and Arabic or Gothic text type is also available.
There is a separate setup package for the additional OCR languages. It provides a num-
ber feature add-ons and language bundles to choose from. Please note that the additional
OCR languages must match the version of the OCR engine of the installed PDF Compressor.
Therefore, when updating PDF Compressor to a version with a newer OCR engine, a warning

PDF Compressor Manual
www.foxitsoftware.com
info@luratech.com Installation: 4
is shown that the installed additional OCR languages must also be updated. Please contact
the support in that case to get the new package.
Custom OCR Dictionary
In addition to the standard OCR languages PDF Compressor supports a user-supplied custom
dirctionary. This dictionary can e.g. contain words not directly pertaining to any language
such as place or brand names. A custom dirctionary has to be provided in the form of an
ABBYY .amd file. The Foxit Europe support can assist you with creating such a file.
If a file "PDFCUserDictionary.amd" is present in the "ocr\Data\ExtendedDictionaries" direc-
tory in the PDF Compressor’s installation folder it is ingested as a custom dictionary and will
be applied to all jobs for which OCR is activated. As a consequence special words contained
in this dictionary shold be recogized better by the OCR. Nevertheless, you have to select
one or more of the standard OCR languages for each job with OCR.
In case an additional file "PDFCUserAlphabet.txt" is present in the "ocr\Data\ExtendedDic-
tionaries" folder its contents are taken as additional characters for the custom dictionary. In
this way recognition of special characters - e.g. letters with diacritic marks - that are not part
of the base language, but appear in the custom dictionary, can be enabled. This alphabet
need not contain the standard letters of the base language(s) - only the additional charac-
ters. The "PDFCUserAlphabet.txt" file must be UTF-8 encoded.
Location of temporary files
PDF Compressor may store temporary files during processing. These files will be located in
a subfolder "LT_PDF_Compressor" in the temporary folder of the service account. The path
of the temporary folder is specified by the following environment variables: TMP, TEMP or
USERPROFILE. If none of these variables is specified for the user or system the Windows
directory is used instead. Alternatively the environment variable LT_PDFCOMP_TMP may
be used to specify a temporary folder for PDF Compressor.
PDF Compressor Manual
www.foxitsoftware.com
info@luratech.com Concept of PDF Compressor: 5
Chapter 3. Concept of PDF Compressor
The PDF Compressor is designed to convert files automatically without any user interaction.
The PDF Compressor, after being configured, will run in the background. You do not need
to be logged in on the system any longer. Even after a shutdown and reboot of your system,
PDF Compressor will continue to process its jobs.
This kind of functionality results from PDF Compressor consisting of two basic components:
• A graphical user interface (GUI) that allows you to configure and monitor the system.
• An underlying Windows™ service, which performs the conversion jobs.
However, the GUI can be used as any ordinary Windows™ based application without even
noticing the underlying Windows™ service.
Graphical User Interface
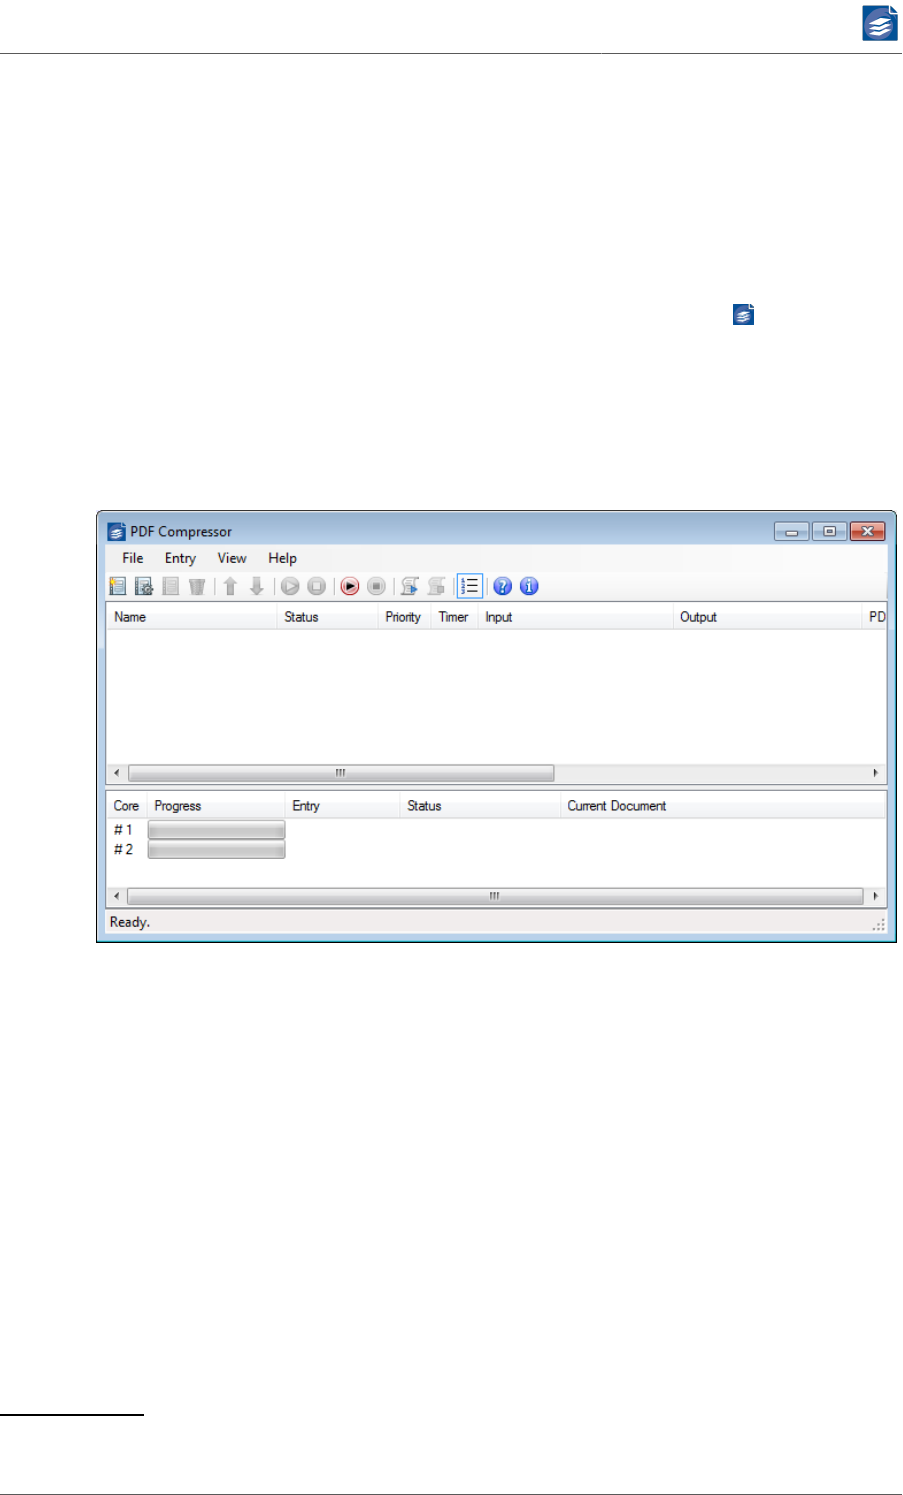
Job List
The job list is the main element of the GUI. When you first start the PDF Compressor you
will see an empty list. Before you can do anything you need to add an entry to this list. This
can be done by creating a new entry or by simply dragging & dropping files or folders onto
the list window (compare “Adding Entries to the List” (p. 8)).
An entry has many properties. One of them is the input file or folder you want to process,
others include all the parameters that can be configured for the file conversion. Since you
have a list with a virtually unlimited number of entries, you can setup different types of file
conversions, each with its own, independent set of parameters.
You can configure entries to access different net shares within your network, or you might
use them to create different versions of PDF files (high resolution, high quality up to low
resolution, high compression) from the same input files.

PDF Compressor Manual
www.foxitsoftware.com
info@luratech.com Concept of PDF Compressor: 6
The complete job list can be stored to a file or restored from a file to enable backup func-
tionality or the management of completely different setups.
Job Entry and its Properties
Within each entry you define its properties:
• what kind of input is accessed (a file, all files within a folder, what file types, etc.),
• how it is accessed (once or frequently to make a folder a hot folder),
• where to put the output,
• what to do in case of an error,
• what additional data (metadata) is to be added,
• how to compress the data (quality, resolution, PDF compatibility, etc.).
Each entry can be started and stopped individually allowing you to run individual file con-
versions to your needs.
Default Properties
Since most of the time you will not want to create job entries with completely different
settings, you can configure Default Properties for new entries. Whenever you create a new
entry the settings of the default entry will be used as a template.
With a properly chosen set of default properties, converting files to PDF is achieved by sim-
ply dragging & dropping files onto the list and pressing the start button.
PDF Compressor Service
Normally you will not notice the underlying Windows™ service. It just processes the files
you setup within the GUI. Since the GUI is independent from the service, you can configure
and start one or more job entries, close the GUI and log off if you want. When you open the
GUI again, you will be informed of the progress of your running jobs.
Born Digital Conversion
The standard version of PDF Compressor comprises an optional component for conversion
of Born Digital files, such as Microsoft Office™ and OpenOffice™ documents and e-mail mes-
sages. You can choose whether to install this component, since using this component re-
quires an additional license.
An installed and licensed Born Digital component provides for the following types of con-
versions:
1. Microsoft Office™, OpenOffice™, RTF, HTML and plain text documents are converted to
PDF or PDF/A. The distinction between these input formats is specified via the options
on the Input tab of the Properties dialog (see “Configuring Input Data” (p. 13)).
The exact list of format types depends on your installation and configuration of the MS
Office and OpenOffice applications. Generally supported applications and formats in-

PDF Compressor Manual
www.foxitsoftware.com
info@luratech.com Concept of PDF Compressor: 7
clude Microsoft Word, Excel, PowerPoint and Outlook as well as OpenOffice Writer, Calc
and Impress.
2. PDF Compressor also supports the conversion of e-mail messages saved in the EML and
MSG formats. Attachments of the supported input file types are extracted and convert-
ed, as well.
3. PDF documents can be converted to PDF or PDF/A. Again, the distinction between these
output formats is specified via the options on the Output tab of the Properties dialog
(see “Configuring Data Output” (p. 25)). Note that the conversion of PDF does not
involve the MS Office or OpenOffice applications.
Certain options are available to improve the stability of the Born Digital conversion, e.g. by
restarting it automatically. For details see “Born Digital Options” (p. 90).
PDF Compressor Manual
www.foxitsoftware.com
info@luratech.com Getting Started: 8
Chapter 4. Getting Started
This section describes the basic steps to convert scanned document files to PDF files. More
details can be found under Chapter 5, Setting up Job Entries (p. 10).
Starting the GUI
To start the GUI, either double click the PDF Compressor taskbar icon or use the Win-
dows™ start menu entry
Foxit → PDF Compressor → PDF Compressor.
When you start the GUI for the first time you will see an empty list:
Adding Entries to the List
There are several ways to add new entries. The most straightforward one is opening the
Windows™ Explorer and dragging & dropping a file or a folder onto the list window. The
new entry will be set up to convert the given file (or all files within the given folder) to PDF.
This output will be placed next to the corresponding input file.1
1Changing the default properties can change this behavior. The explanations given here are related to the Factory Default set-
tings.
PDF Compressor Manual
www.foxitsoftware.com
info@luratech.com Getting Started: 9
Running Jobs
There are several ways to start jobs represented by the list entries. Here we merely describe
one of them:
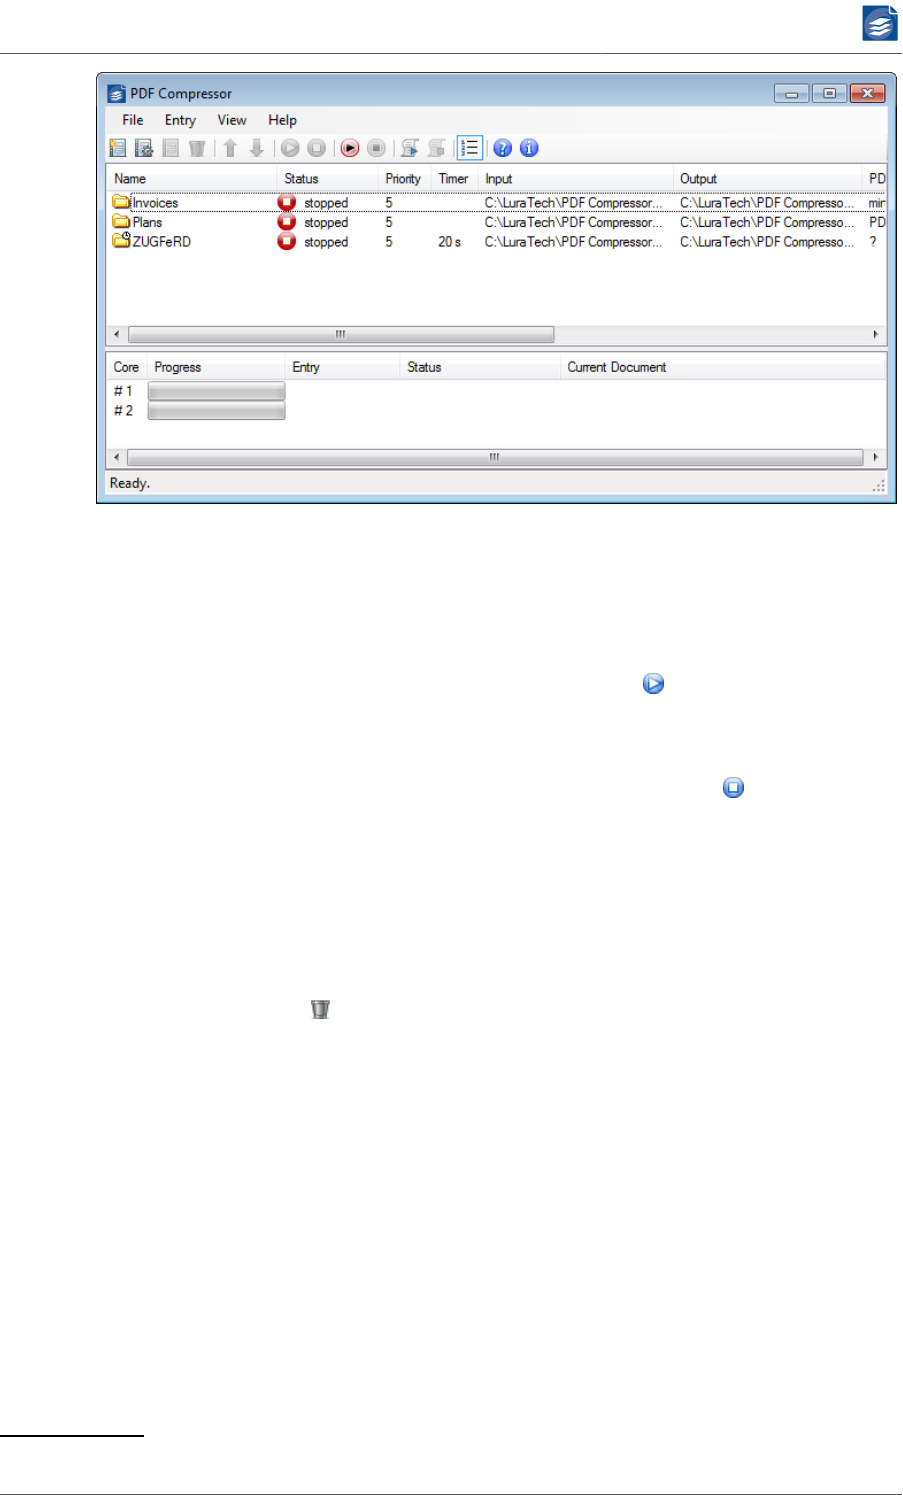
Select the entry you want to start and press the start button on the toolbar. The status
of the entry will change from stopped via starting to working, and back to stopped when
the job is finished.
While the job is running, you can abort it by pressing the stop button on the toolbar. It
may take some seconds until the conversion has been aborted. Any incomplete PDF output
file will be removed.
Removing List Entries
You can close the GUI without saving your current job list. The list will re-appear in exactly
the same way when you open the GUI again2. To remove an entry from the list, select it and
press the delete button on the toolbar.
2The current list is instantly stored within the system to make it available to the underlying PDF Compressor service.
PDF Compressor Manual
www.foxitsoftware.com
info@luratech.com Setting up Job Entries: 10
Chapter 5. Setting up Job Entries
You can edit a job entry’s properties once it has been added to the list (see “Adding Entries to
the List” (p. 8)). The properties dialog window can be opened by any of the following actions:
• Double-click the corresponding entry within the list.
• Use the right-click context menu associated with the list entry.
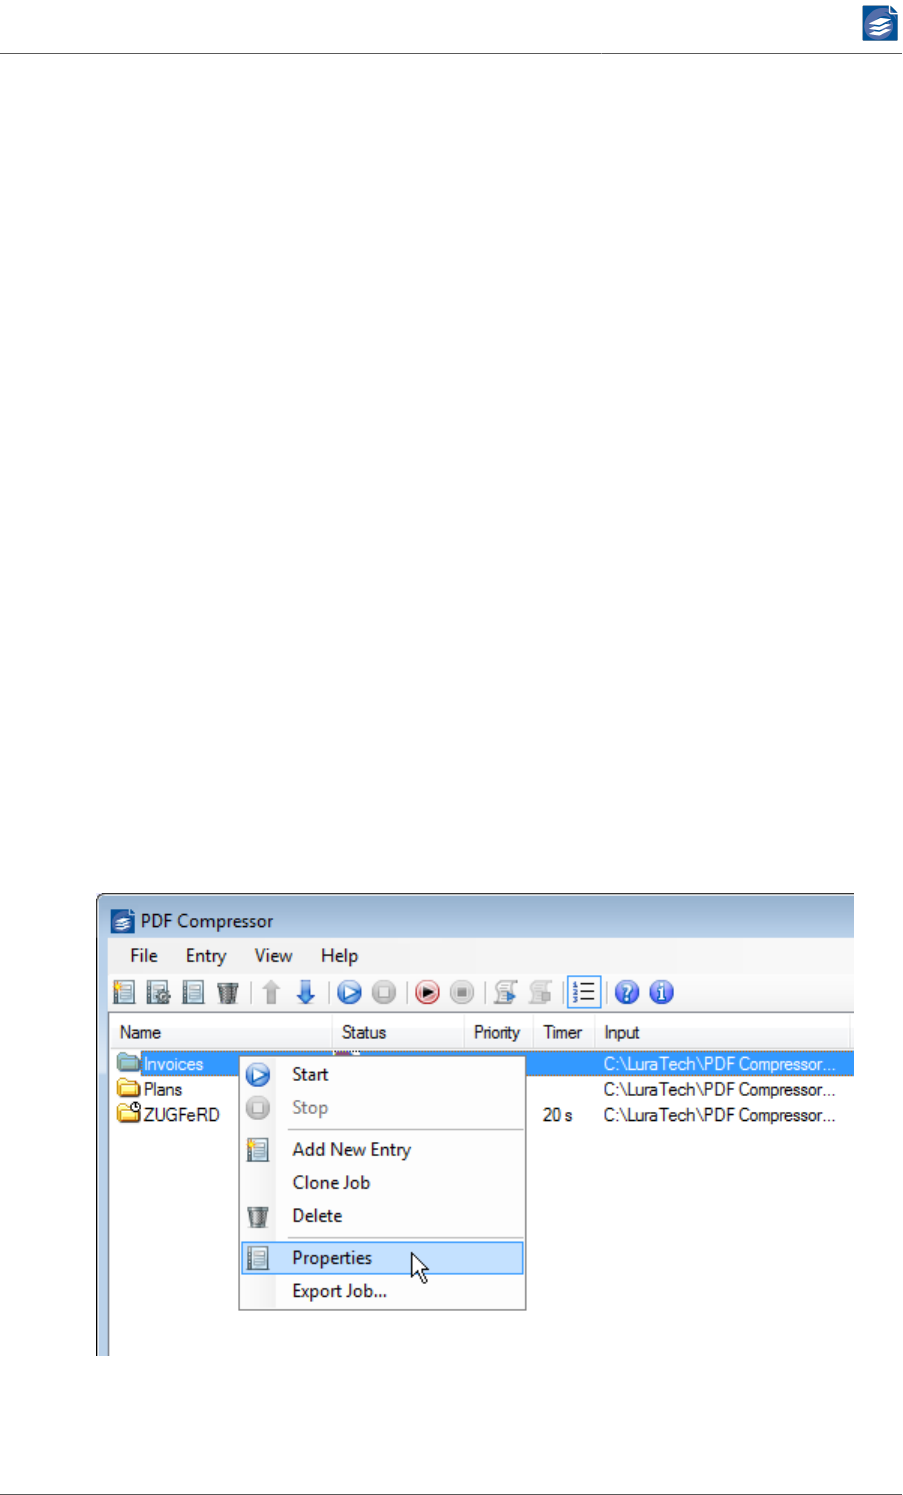
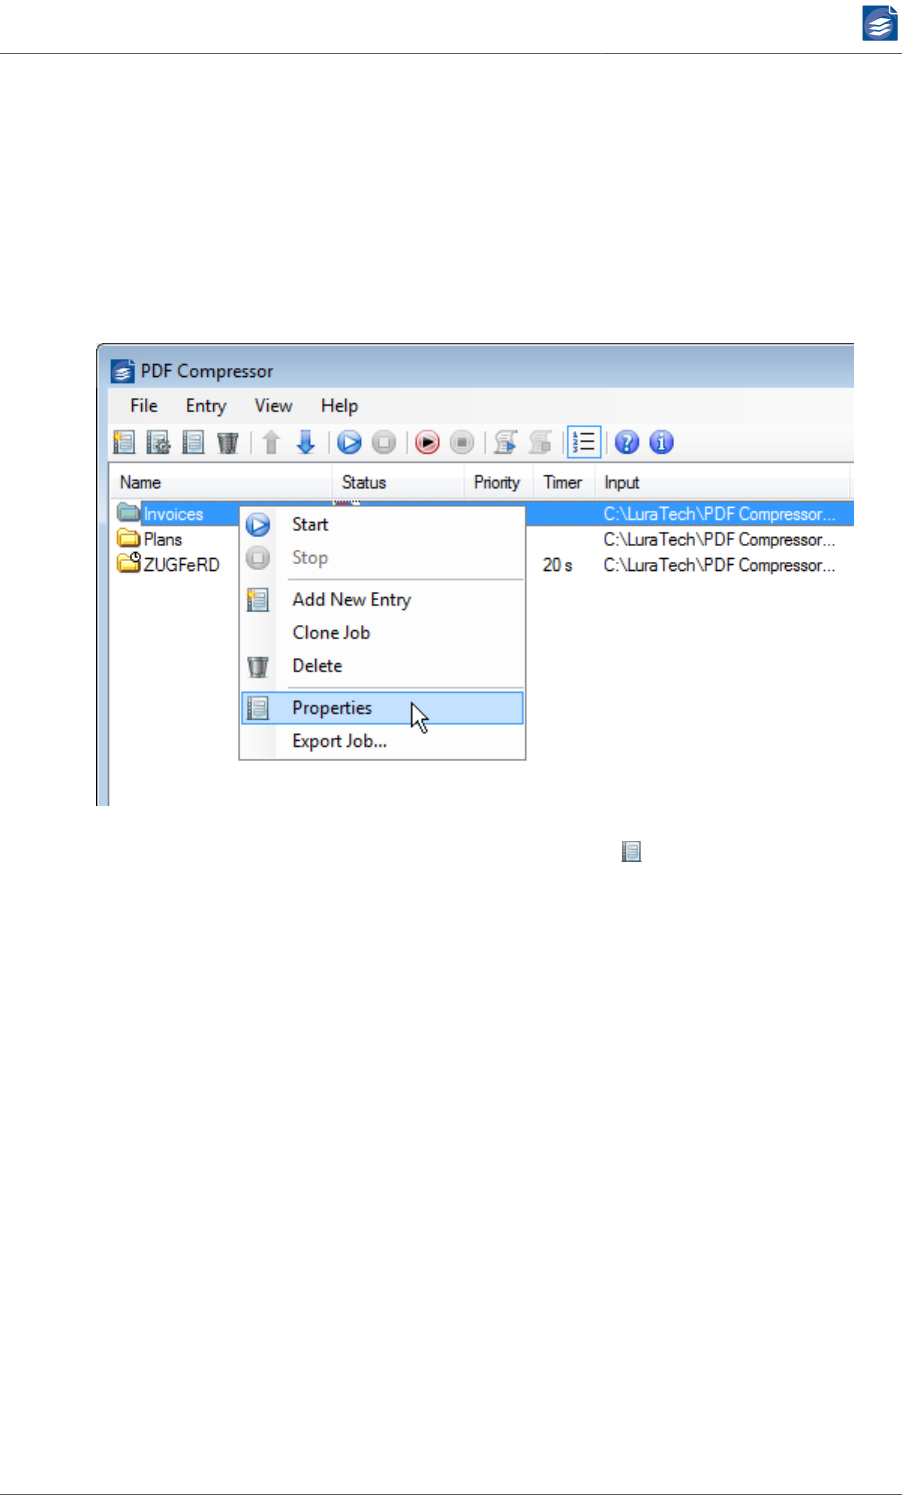
•Select the entry and use the toolbar’s properties button .
• Select the entry and use the menu Entry → Properties.
Within the properties dialog you can change the name of the entry to make it easier for you
to identify the corresponding job. The entry name is also used within the log file (see “Log
Files” (p. 80)) to identify information, warnings and errors.
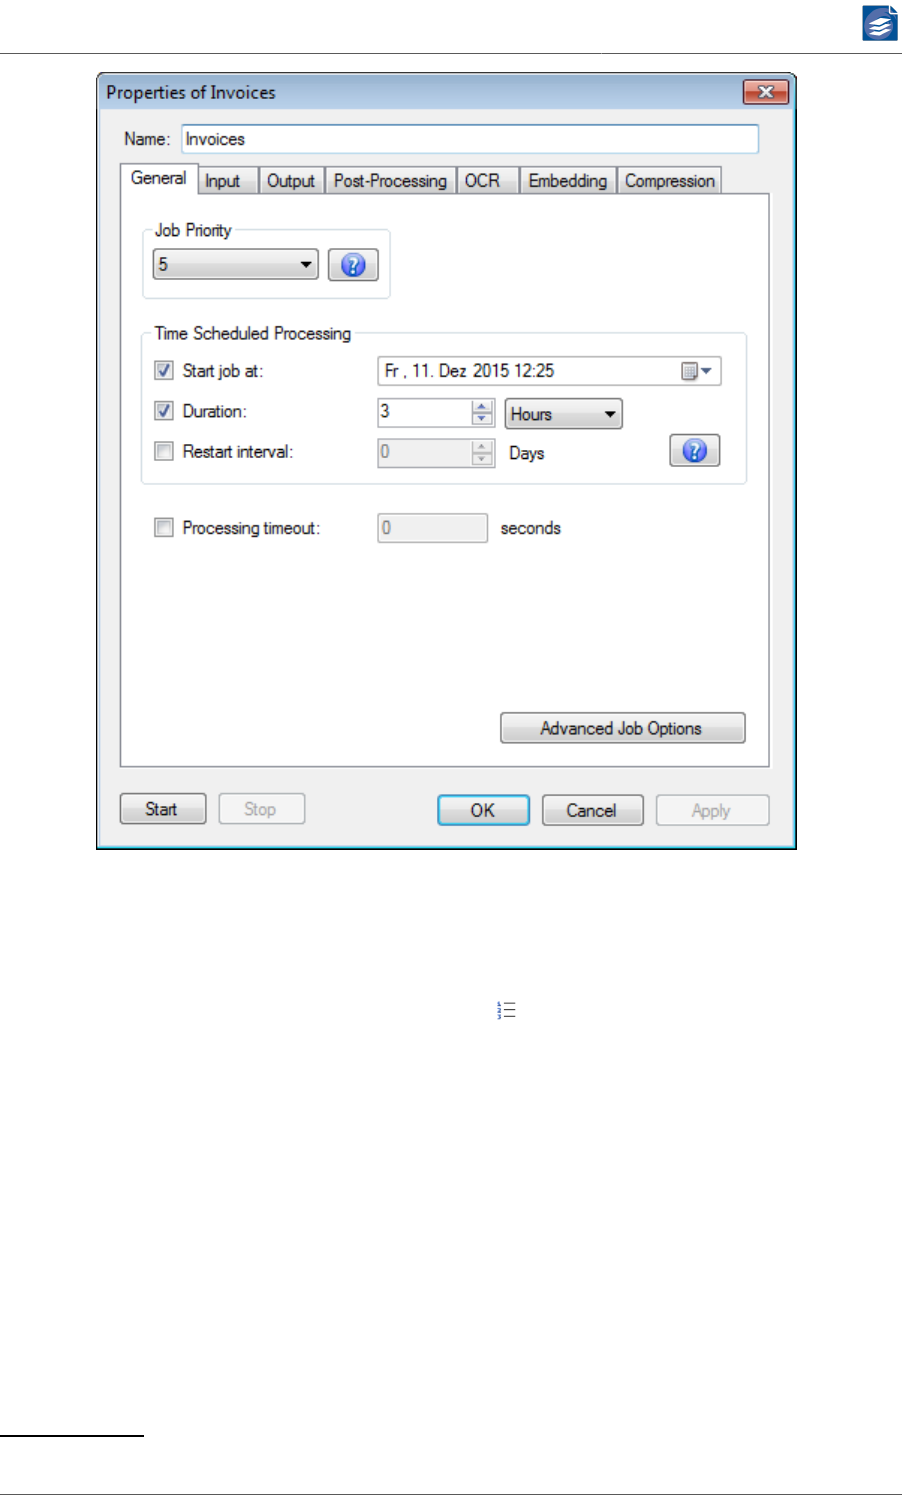
Configuring General Job Properties
The General tab lets you configure general properties of the selected job. You can define
the priority of the job here and you can configure a delayed start and periodical stop and
restart of the job.
PDF Compressor Manual
www.foxitsoftware.com
info@luratech.com Setting up Job Entries: 11
Job List Processing Order
The Job priority can be set to values from 1 (highest) to 10 (lowest). Lower numbers corre-
spond to higher priority. This setting is only available when the menu File → Priority Pro-
cessing Order is enabled. The toolbar button can also be used to switch Priority Process-
ing mode on and off.1
Priority Processing Order
If Priority Processing Order is enabled, jobs with higher priorities are processed before lower
priority jobs. All jobs with the same priority are executed concurrently by processing its
job units in interleaved order: Once a unit is done, the next unit of the next job with same
priority is processed. When more than one CPU core is licensed and enabled, more than one
job unit will be processed at the same time. The list of progress bars located in the lower
part of the main window shows information for each CPU core, including the job units that
are currently processed.
1All entries of the job list must be stopped to change the Priority Processing mode.

PDF Compressor Manual
www.foxitsoftware.com
info@luratech.com Setting up Job Entries: 12
A job unit contains all input files that contribute to one output PDF document2. If input
merging is enabled (see “Configuring Input Data” (p. 13)), this includes all files that are
merged into a single document, otherwise it is just one single input file.
Hot folder jobs (see “Configuring Input Data” (p. 13)) are considered done when their
input folder is empty. Once new input files are detected, a hot folder job becomes active
again and is processed according to its priority setting.
Priority Processing Order allows setting up complex job dependencies. High priority hot fold-
er jobs can be used to dynamically suspend other lower priority jobs. The priority of a job
can be changed at any time, even when it is running. Thus it allows you to start an interim
job to be processed immediately without stopping a currently running job.
Please find more information on priority processing options under “Priority Process-
ing” (p. 82).
List Processing Order
Priority Processing Order is the preferred way to control the order in which jobs are
processed. For backward compatibility List Processing Order is still available. To enable List
Processing Order, disable Priority Processing Order from the File menu.
In List Processing Order mode, all jobs are processed in the order they appear in the job list.
Priorities are ignored and jobs are executed sequentially. There is no way to dynamically
suspend a running job.
Job List Processing
In Job List Processing mode (see Chapter 7, Automatic Job List Processing (p. 73)) PDF
Compressor dynamically reads job lists from the job list folder. In API Mode, jobs can be
passed via a programmatic interface (see Chapter 8, Submitting Jobs via the PDF Compressor
API (p. 77)). These modes permit controlling PDF Compressor externally in a workflow
setup.
For Job List Processing, the List Processing Order mode can be used to enforce sequential
processing of the job lists and the jobs contained. In normal Priority Processing Order mode
the jobs are processed in parallel and new job lists are added as soon as at least one proces-
sor core becomes idle and there are no more jobs pending.
Time Scheduled Processing and Processing Timeout
Settings for Time Scheduled Processing are enabled by selecting their check boxes. The fol-
lowing parameters can then be set for a time-scheduled job:
1. The desired start time is entered in the Start job at field. You can either type in a date
and time or pick it from the calendar widget, which appears when clicking on the arrow
to the right of the entry. The job is then started at this point in time.
2. The Duration specifies the time span for which the job should run. You can select days,
hours or minutes to specify the duration. Once this time has elapsed the job is stopped.
2Please note that a PDF input file might be split into multiple output files. For further information, see “Configuring Data Out-
put” (p. 25).
PDF Compressor Manual
www.foxitsoftware.com
info@luratech.com Setting up Job Entries: 13
3. The Restart interval denotes a second time span, after which the stopped job is started
again for the given duration. This value can only be given in days. Once the job has been
started, such re-starts occur periodically, unless the configuration is changed.
Note: The Duration and Restart interval settings can be enabled independently. This means
that a job can run just once for a given duration without restart. And on the other hand a
job can be periodically restarted, without a fixed duration, assuming that it will finish once
it has processed all its current input.
With the Processing Timeout option you can set a maximum duration for the processing of a
job unit. (The definition of job unit is given above under “Priority Processing” (p. 82).) If
processing of a job unit takes longer than the specified duration, the processing of this unit
is aborted. Such an abort is considered an error, which is recorded in the log file. Concerning
optionally configured post-processing steps an abort is also treated as an error.
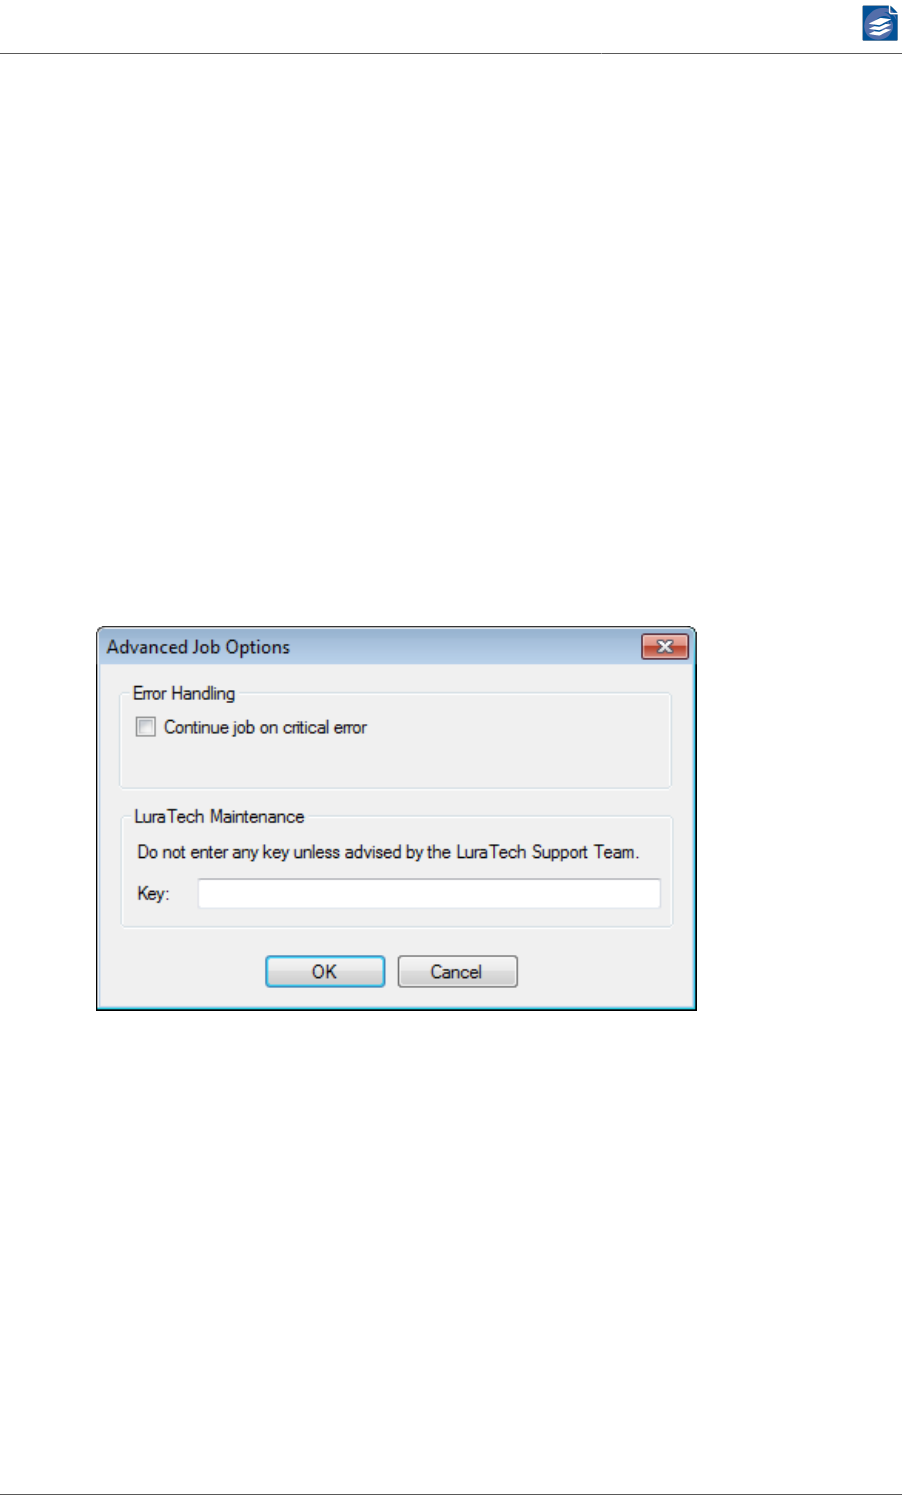
Configuring Advanced Job Options
The Advanced Job Options dialog lets you configure additional error handling and Foxit Eu-
rope maintenance settings.
1. If the option Continue job on critical error is turned on, PDF Compressor will not stop a
hot folder when a critical error occurs (such as "input folder does not exist" or "output
folder cannot be created") but to go idle instead and try again later.
2. The Foxit Maintenance entry should not be used unless advised by the Foxit Europe Sup-
port Team. The Key must be left blank for normal processing.
Configuring Input Data
The Input tab lets you configure which input documents should be converted to PDF format.

PDF Compressor Manual
www.foxitsoftware.com
info@luratech.com Setting up Job Entries: 14
Currently TIFF, JPEG, JP2 (JPEG 2000), BMP, PNM, GIF, PNG, PDF and JPM (JPEG 2000 part 6)
formats are accepted for input files. With the optional Born Digital Module, additional input
formats - such as Microsoft Office and saved e-mail messages - can be converted.
Multipage TIFF and PDF files are recognized and converted to multipage PDF documents.
Moreover you can set up input resampling to adjust the resolution of your data.
1. Choose File if you want to convert a single file, or Directory if you want to convert all files
within the given folder. The browse button lets you select the file or directory.
You cannot use mapped network drives to specify the input file or directory. The under-
lying PDF Compressor Service has no knowledge on mapped network drives. Instead you
can specify the network share using the syntax \\host\share\dir. See “Choosing the
Service Account” (p. 88), for setting access rights in this case.
2. When Directory is selected, you have the following options:
a. Enable Include subfolders if the whole directory sub tree should be converted. Other-
wise only files directly within the given folder will be processed.
b. Enable Delete empty folders if you have selected Include subfolders and want to clean
up the input sub tree. This can be useful if you configure a setup that moves or deletes
all processed input files (see also “Configuring Post-Processing” (p. 37)). Once all

PDF Compressor Manual
www.foxitsoftware.com
info@luratech.com Setting up Job Entries: 15
files of the given job have been processed, the output folder will be examined and all
empty subfolders will be deleted. If the input folder is a hot folder (see next item), the
cleanup process will be performed whenever the hot folder becomes idle, i.e. when
no more files are found to be processed at the moment.
c. Enable Check every <number> seconds to make the given folder a hot folder, i.e. to
let the job check that folder frequently for newly generated files (e.g. by an external
scanner or capture software). A job that has this options enabled will never stop auto-
matically, since it keeps on monitoring the given folder. You have to stop it manually.
Note: This option only makes sense, if you delete successfully converted input files,
or move them into another folder. See also “Configuring Post-Processing” (p. 37).
d. Enable Merge all pages if all pages from all processed files of a folder should
be converted to a single PDF output document. The output file will be named
<name_of_the_input_folder>.pdf. The input files of a folder will be processed in al-
phabetical, case-sensitive order. This defines the page order of the output PDF.
This option can be used to merge pages from scanners that put numbered single page
files (such as page000.tif, page001.tif, etc.) into a single folder.
e. Input file formats can be selected from the given list. The format is derived from the
file’s extension.
•TIFF enables the conversion of *.tif and *.tiff files. Currently PDF Compressor sup-
ports bilevel, grayscale and RGB images. CMYK and CIELab color as well as palletized
images are not supported yet.
•JPEG enables the conversion of *.jpg files.
•JPEG 2000 enables the conversion of JPEG 2000 files. The extensions *.jp2, *.jpf,
*.jpx. *.j2k, *.jpc and *.j2c are recognized.
•PDF enables the conversion of PDF files. If Always is chosen under Rasterize PDF
Input, the input will be rasterized to the resolution specified on the Advanced
tab of the Advanced Input Options dialog (see “Configuring Advanced Input Op-
tions” (p. 20)) before applying the MRC compression technique. If Automatic
has been chosen for Rasterize PDF Input, PDF files may be rasterized, e.g. if conver-
sion to PDF/A is not possible otherwise.
•BMP enables the conversion of *.bmp files. Palletized images as well as some exotic
variants are not supported yet.
•PNM enables the conversion of *.ppm and *.pgm files.
•GIF enables the conversion of *.gif files. For animated GIF files only the first frame
is converted and a warning is logged.
•PNG enables the conversion of *.png files.
• The formats below Born Digital are only available if the Born Digital conversion op-
tion is installed. Any combination of these input document types can be converted
to PDF or PDF/A. Refer to “Born Digital Conversion” (p. 6) and “Requirements of the
Born Digital Conversion Option” (p. 2) for details on Born Digital Conversion. The
following list shows the file extensions matching the input formats.

PDF Compressor Manual
www.foxitsoftware.com
info@luratech.com Setting up Job Entries: 16
•MS Word : *.rtf, *.doc, *.docx, *.docm
•MS Excel : *.xls, *.xlsx, *.xlsm
•MS PowerPoint : *.ppt, *.pps, *.pptx, *.pptm, *.ppsx
•MS Project : *.mpp
•MS Visio : *.vsd, *.vdx, *.vsw
•E-Mail : *.msg, *.eml, *.emlx
•OpenOffice Writer : *.odt, *.sxw
•OpenOffice Calc : *.ods, *.sxc
•OpenOffice Impress : *.odp, *.sxi
•Textdateien : *.txt
•HTML : *.htm, *.html
•Extra Extensions List serves to supply a list of additional file extensions to process.
This entry is only enabled, when Born Digital Conversion is installed. The individual
extensions entered must be separated by blank spaces.
3. The Advanced Input Options button opens a dialog for configuring more input options.
See “Configuring Advanced Input Options” (p. 20) for details.
4. If you configure multiple PDF Compressor installations to work with the same input di-
rectory (typically a net share), you need to enable Use lock files for PDF Compressor syn-
chronization. This ensures that input files currently processed by one PDF Compressor
are not accessed by another PDF Compressor. This is implemented by the use of lock
files *.lock and *.dlock that PDF Compressor uses to lock certain input files or all files of
a directory (when Merge all pages is enabled).
Note: The PDF Compressor Service must have write access to the input directories when
using lock files.
Important note: Files ending with *.lock and *.dlock will be overwritten without notice
when using lock files. You should not use these extensions for your own files.
Note: A file PDF_Compressor.ulock can be used as a user defined lock for all files of a
directory. In contrast to the lock files *.lock and *.dlock, this file can be managed by the
user. If Use lock files for PDF Compressor synchronization is enabled, PDF Compressor
will never process any file it finds within a directory that contains a file PDF_Compres-
sor.ulock.
This can be used to configure a hot folder with Merge all pages enabled: The external
process creates a new directory underneath the PDF Compressor hot folder containing a
file PDF_Compressor.ulock and copies all files that need to be merged afterwards. When
the last file copy is done, the external process removes PDF_Compressor.ulock. Next time
PDF Compressor inspects the hot folder, the processing of the given files begins.
5. The Rasterize PDF Input setting offers different modes for handling PDF input documents:
PDF Compressor Manual
www.foxitsoftware.com
info@luratech.com Setting up Job Entries: 17
a. Automatic is the default setting. In this mode PDF Compressor will automatically de-
termine in which cases to convert typeset or vector contents of PDF input files into
raster graphics. It will try to avoid such conversions, but will resort to them as a fall-
back option for documents that cannot be converted otherwise.
b. Always - this mode will convert all pages of all PDF input documents to raster graphics
before compressing or converting them. For PDF input this mode is equivalent to the
former MRC Compression mode.
c. With the Never setting the PDF Compressor will not try to rasterize any non-raster
input. In this way you avoid unintentional conversion of typeset or vector content into
raster graphics. On the other hand, this may result in failure to convert certain kinds
of PDF input files to PDF/A.
Note: With the Automatic or Never setting chosen, raster graphics already present in
the input documents may still be resampled or compressed, if Color image optimiza-
tion or Bitonal image optimization are selected on the Compression tab. (Such graph-
ics may e.g. be scanned pages or large images inside a PDF document.)
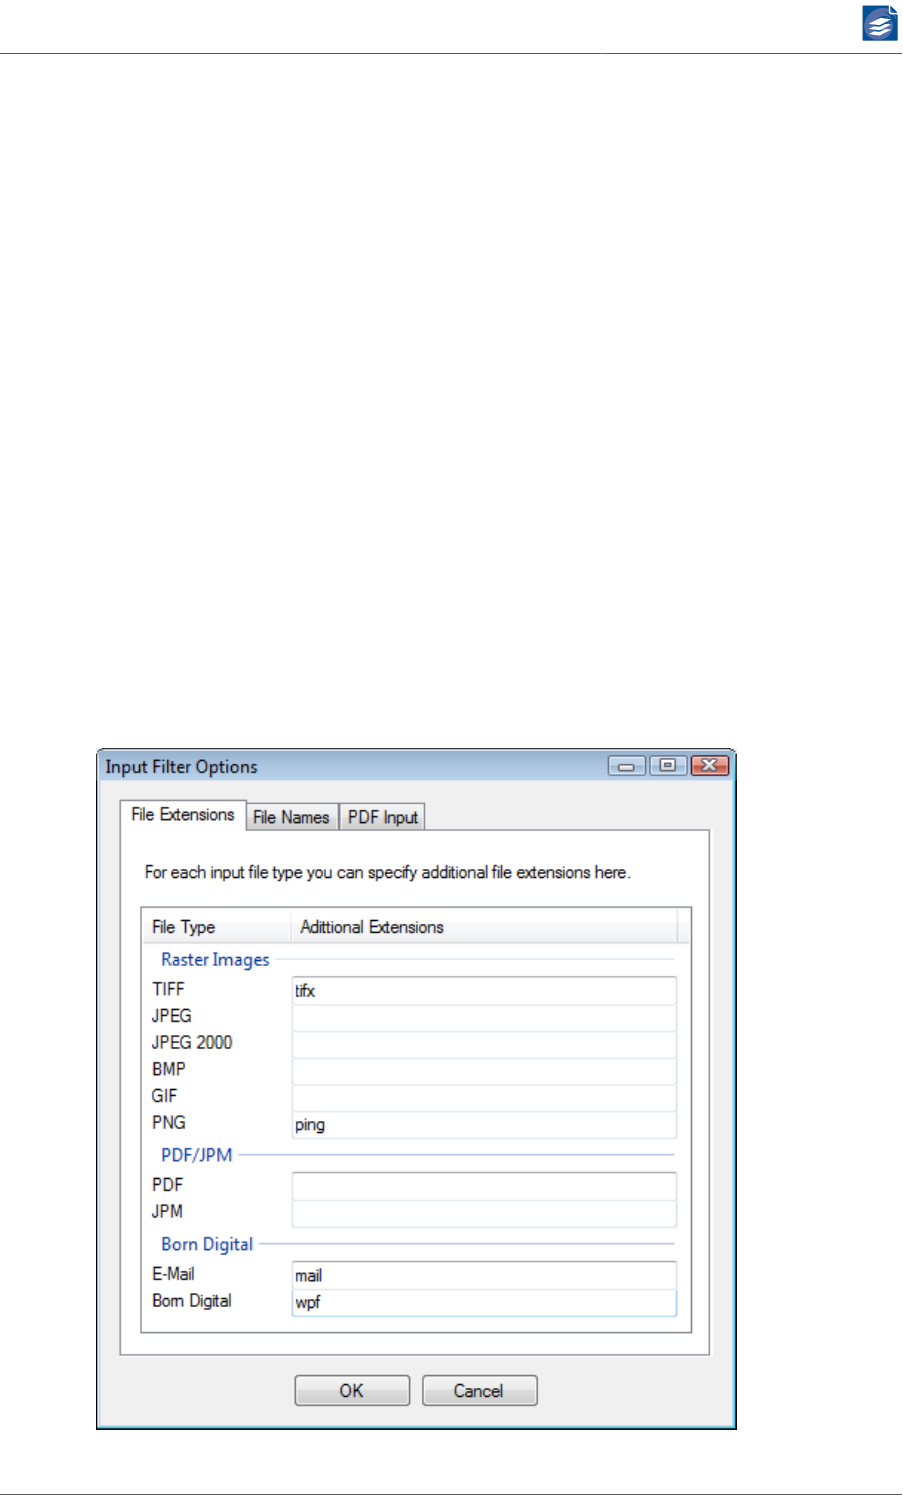
Input Filter Options
File Extensions
On the File Extensions tab of the Input Filter Options dialog you can specify additional input
file extensions, such that files these non-standard extensions are processed by PDF Com-
pressor, too.
PDF Compressor Manual
www.foxitsoftware.com
info@luratech.com Setting up Job Entries: 18
Each line of the list widget on the File Extensions tab shows one of PDF Compressor’s input
file types. You can find the file extensions configured by default for each of these types
under “Configuring Input Data” (p. 13). For the selected job additional file extensions
can be associated with each file type in the list’s right hand column. For the selected job
each additional extension may only be associated with one input file type.
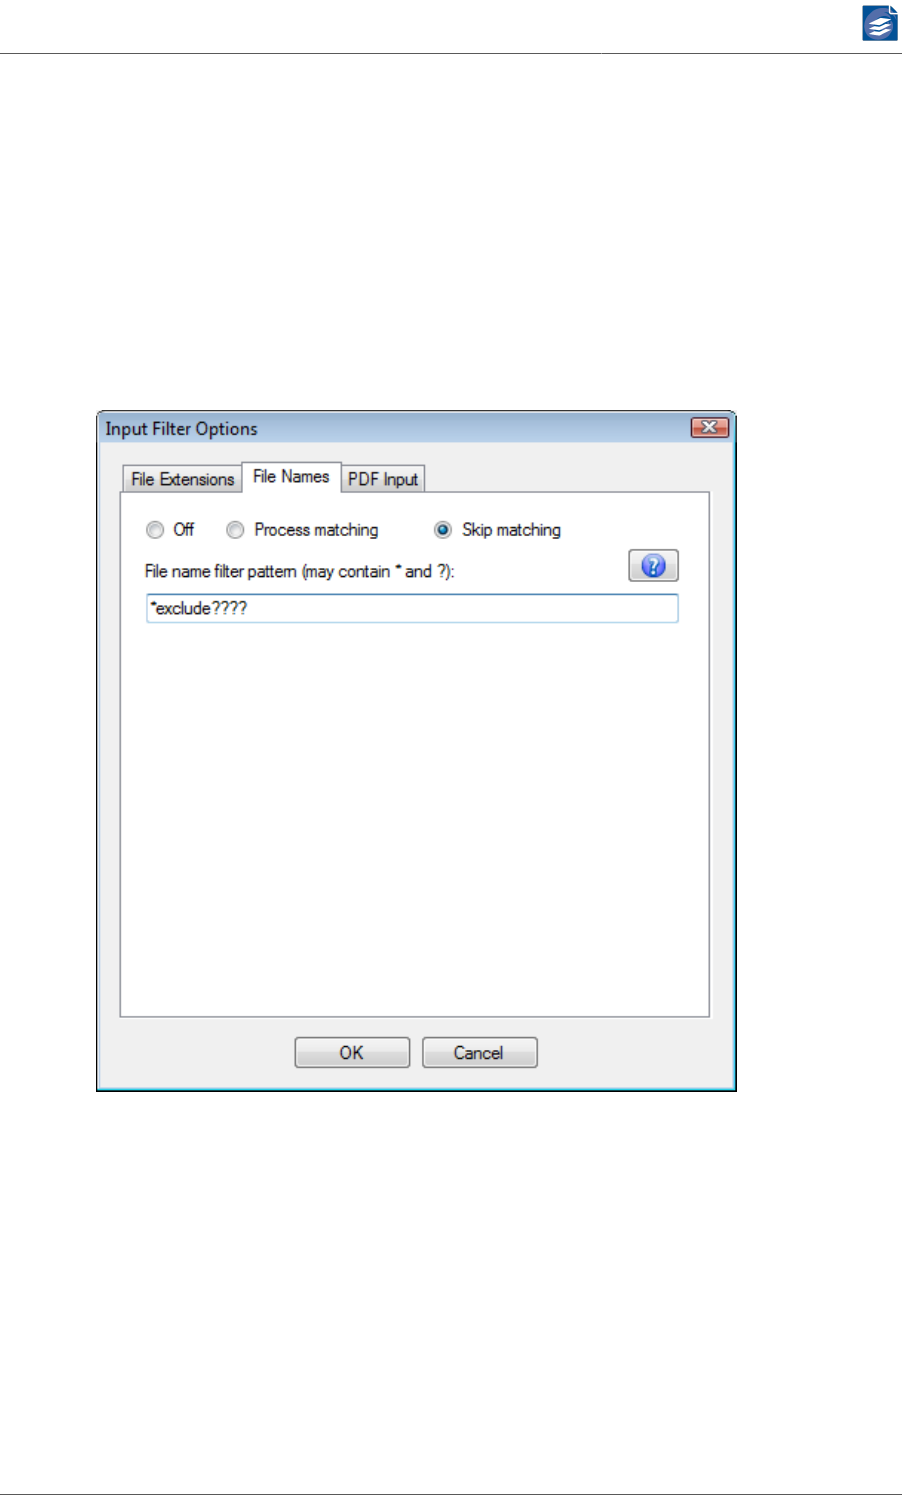
File Names
On the File Names tab of the Input Filter Options dialog you can specify a file name pattern
to include only input files with matching names in the processing by PDF Compressor. Al-
ternatively, you can exclude the matched files from processing.
1. Depending on the selection of either Process matching or Skip matching potential input
files that match the filter criteria are either included in the processing or skipped.
2. In the File Name Filter Pattern (may contain * and ?) entry you specify a filter pattern,
against which the names of all potential input files are matched. This pattern may contain
the special characters '*' and '?'.
These characters have the same significance as with the Windows™ file search. The ques-
tion mark '?' matches an arbitrary single character and the asterisk '*' matches an arbi-
trary sequence of characters, which may be empty. The pattern is matched only against
the file’s base name, i.e. without the file extension and all alphabetical characters are
matched in a case-insensitive fashion.
PDF Compressor Manual
www.foxitsoftware.com
info@luratech.com Setting up Job Entries: 19
Examples: The filter pattern 'Client-????-??' matches the file names 'Client-0000-12.jpeg',
'Client-9900-00.jpeg' and 'client-ABCD-XY.jpg'. It will not match the names 'Clien-
t-0000-1.jpg' or 'Client-ABC-XY.jpeg'.
The filter pattern 'File*' matches the file names 'file.jpg', 'File_0123.jpg', 'FILE-A-B-C-D.jpg'
and 'File-2016-08.jpg'. It will not match the names 'Fille.jp2', 'Fil.jpeg' or '2016_File.jpg'.
The filter pattern '??_scan*' matches the file names '00_SCAN.TIF', 'ab_Scan.jpg',
'09_scan_2014.jpg' and 'XY_Scan_2014.jpeg'. It will not match the names 'scan2014.jpg' or
'00_SCA.jpeg'.
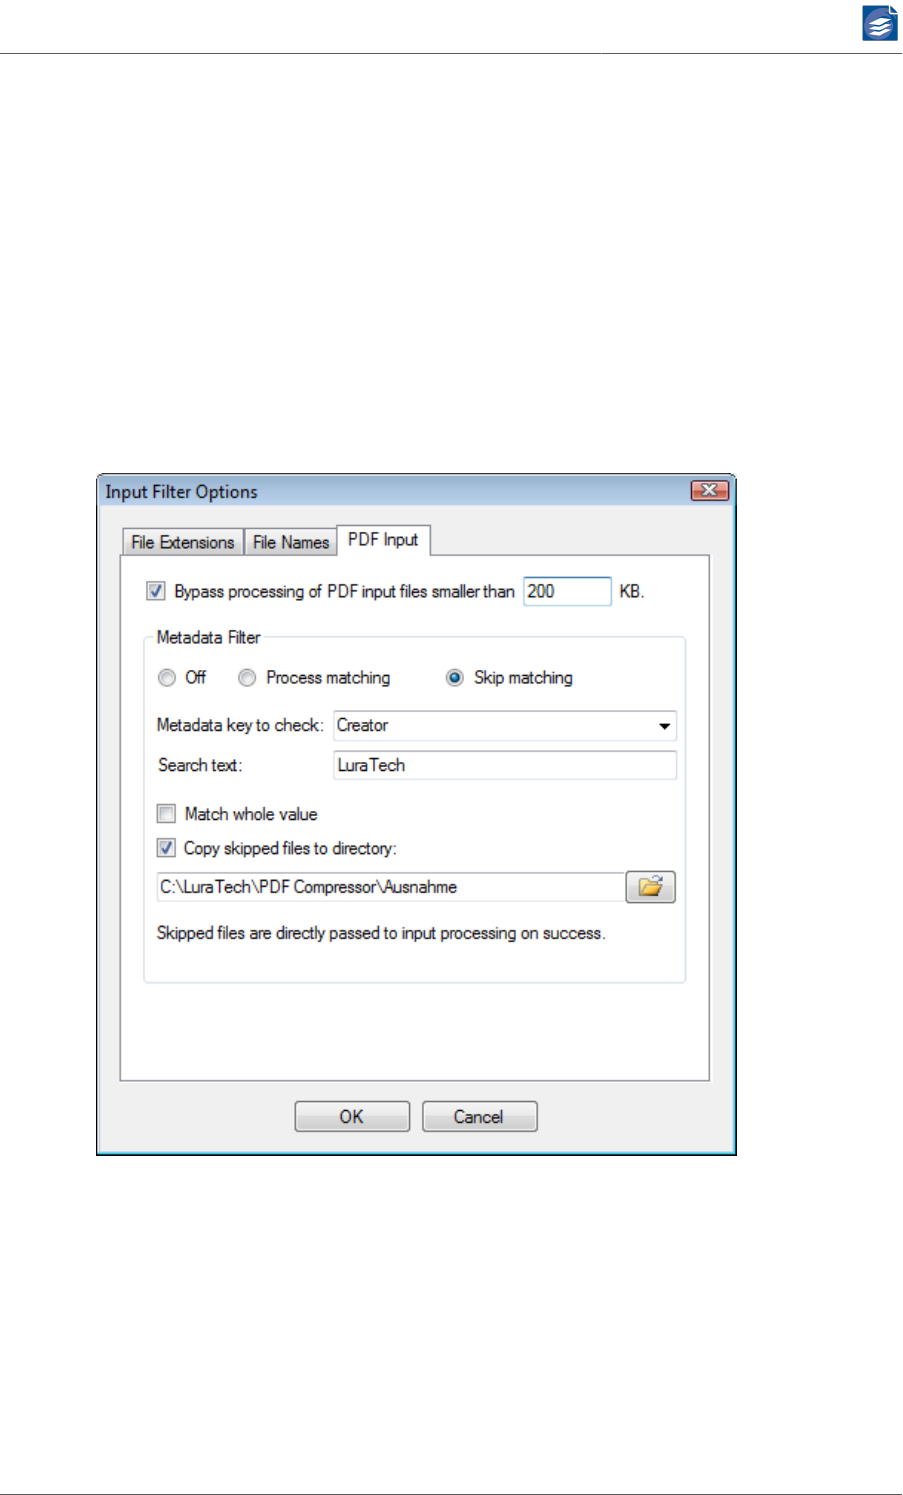
PDF Input Options
On the Input Filter tab of the Input Filter Options dialog you can configure options that ex-
clude certain input files from being processed by PDF Compressor.
1. The Bypass PDF files smaller than … kB option serves to skip the processing of input files
smaller than the given file size. This can e.g. be used to suppress the processing of already
compressed PDF files.
2. The Metadata Filter options allow you to skip processing of PDF input files depend-
ing on the PDF metadata. Skipped files will not be processed to output files. Instead
they are passed directly to input file post-processing (see “Configuring Post-Process-
ing” (p. 37)).
a. Depending on the selection of either Process matching or Skip matching PDF files that
match the filter criteria are either omitted from or included in the processing.
PDF Compressor Manual
www.foxitsoftware.com
info@luratech.com Setting up Job Entries: 20
b. The filter criterion is matched in case the Metadata key to check is found in the PDF
Metadata and its value matches the Search text below.
c. Depending on the option Match whole value the Search text is either compared to the
complete value or searched as part of the metadata value.
d. Skipped input files can be copied to a directory by enabling Copy skipped files to di-
rectory.
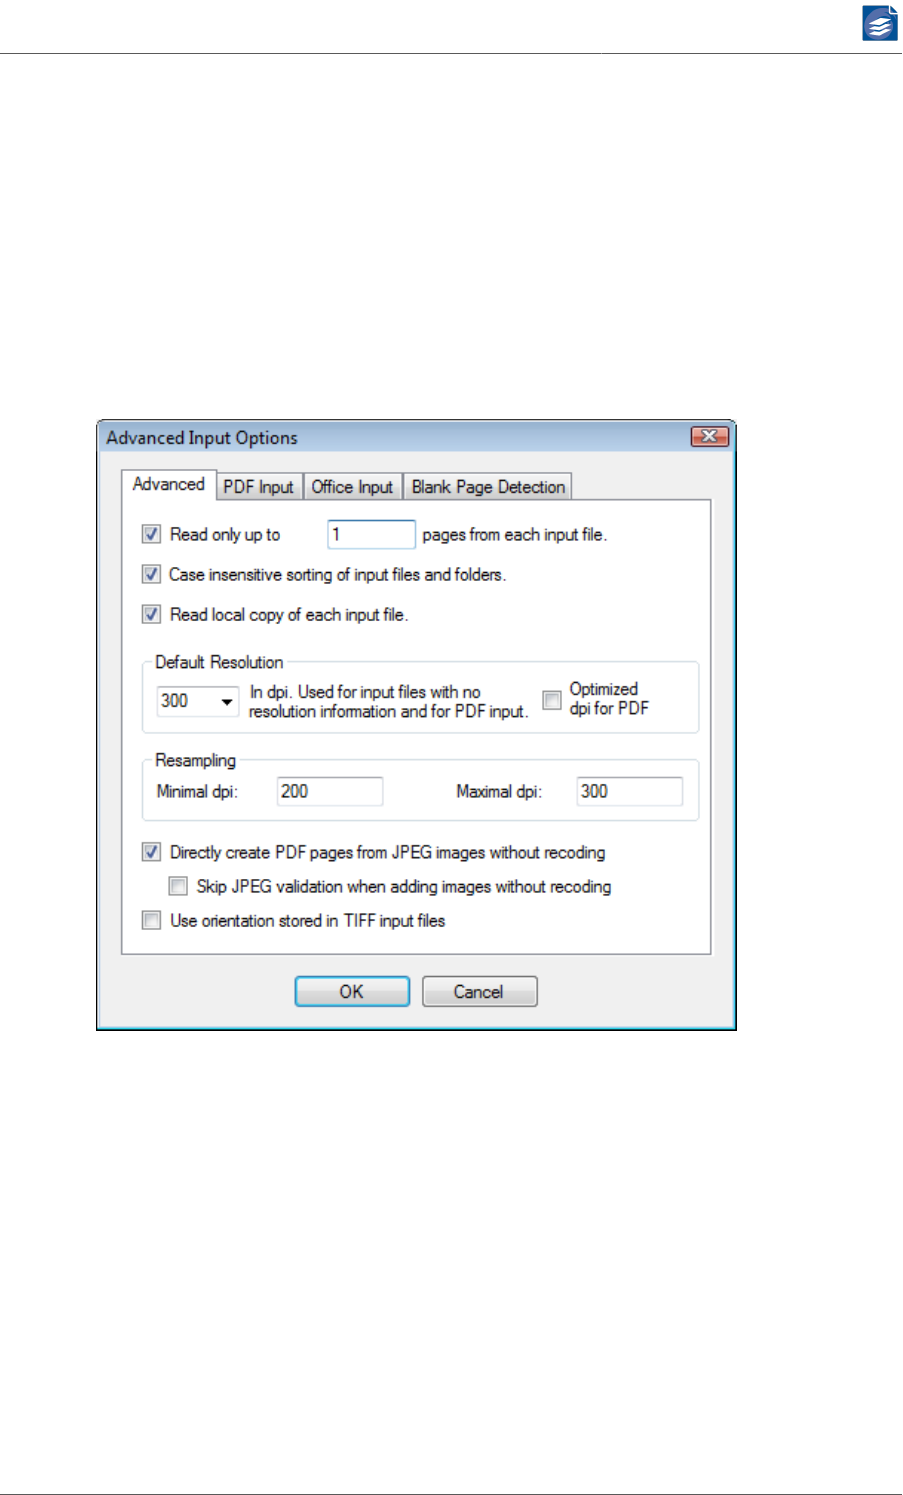
Configuring Advanced Input Options
Clicking the Advanced Input Options button brings up a dialog with further settings concern-
ing input options.
Advanced Input Options
1. Enable Read only up to <number> pages from input file to restrict the number of pages
read from each input file to the given limit. When you merge all files from an input di-
rectory (see “Configuring Input Data” (p. 13)) to a single PDF output file, setting the
maximum number of input pages to 1 can be used to create documents that only contain
the cover pages of these files.
2. Select Case insensitive sorting of files and folders if you want the input file processing to
be in case insensitive alphanumeric order. Otherwise, the ordering will be case sensitive
(with capital letters lexically smaller than lower case letters and therefore "Ac" coming
before "ab").
3. Enable Read local copy of each input file to solve problems related to the location of input
files on a network share. The files will be temporarily copied to the local temporary folder

PDF Compressor Manual
www.foxitsoftware.com
info@luratech.com Setting up Job Entries: 21
where they will be opened and read. This is especially useful when the performance for
transmitting small parts of data in the network is low.
4. Default Resolution: If the input image file does not contain any resolution information,
the value (in dpi) given here will be used. In addition this value is used when an input
PDF file is rasterized (PDF files do not have specific resolution information in general).
a. Enable Optimized dpi for PDF input to automatically choose an optimal dpi value for
the rendering of each PDF input page. The optimal value is calculated from the reso-
lutions of all images embedded in the PDF input page. If there are no images on the
page, the setting of the Default Resolution will be used. Otherwise the highest reso-
lution of the detected images is calculated and clipped to the resolution range given
by the Resampling option of the Input tab. We recommend enabling this option only
when the input PDF documents originate from a scan process.
b. Born digital born PDF documents may contain images of small physical size (e.g. less
than an inch in either dimension) but containing many pixels (e.g. 1000 x 1000 pixels)
and thus yielding a non-realistic resolution (more than 1000 dpi in the example). For
born digital documents you should either use a fixed Default Resolution value with-
out enabling Optimized dpi for PDF input, or specify a narrow resolution range in the
Resampling settings.
5. Resampling lets you change the input’s resolution. There are two reasons, why you might
want to change the input’s resolution:
a. If the input resolution is too low (below 150 dpi), the PDF Compressor output might
have a quality that is too low for your needs (although the file size will be extremely
small). Changing the resolution e.g. to 300 dpi will produce better results.
b. If your original scans are high resolution (e.g. more than 600 dpi), you might want to
produce a lower resolution PDF output.
The Minimal and Maximal dpi settings address these requirements. Whenever the
resolution of the input files is outside the given [min, max] range, the resolution will
be changed by resampling to the minimum value or the maximum value.
Note: Please bear in mind that the Resampling setting only affects grayscale and color
images. The resolution of bilevel or B/W images will not be changed.
In case of JPEG 2000 input, the ability to decode a JPEG 2000 file to a lower resolution
will be used. This enables fast access to huge JPEG 2000 images, when only a lower
resolution is needed.
6. When Directly create PDF pages from JPEG input without recoding is enabled, JPEG input
images are not submitted to MRC or JPEG 2000 compression but are directly embedded
as pages in the PDF output document. In this fashion repeated compression of such input
documents is avoided. On the other hand these pages are not reduced in size.
7. Skip JPEG validation when adding images without recoding omits all integrity checks for
JPEG images directly to embed into PDF pages. This involves the risk of creating corrupt
PDF output by incorporating corrupt JPEG input images.
8. With the Use orientation stored in TIFF input files option the orientation information
optionally contained in TIFF input files determines the orientation of the corresponding
pages in the PDF output document.
PDF Compressor Manual
www.foxitsoftware.com
info@luratech.com Setting up Job Entries: 22
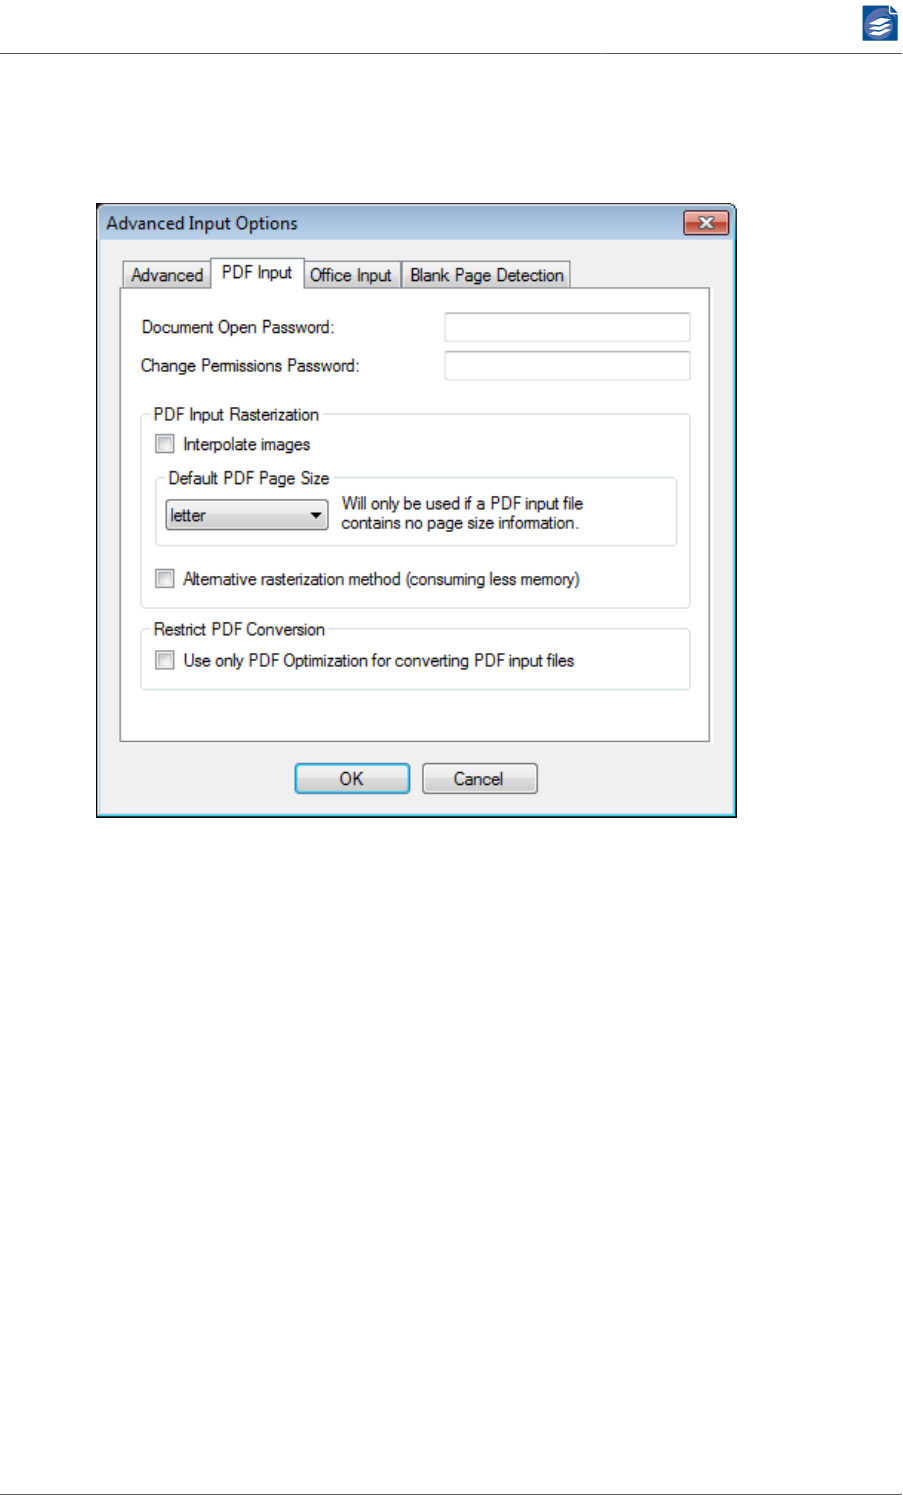
PDF Input Options
The PDF Input tab of the Advanced Input Options dialog lets you configure options that are
relevant for opening PDF input files.
1. The Document Open Password is used to open password protected PDF files. The given
password is stored within PDF Compressor in an encrypted way. Note that this encryption
does not meet the highest security demands. The given password is ignored, when the
input PDF file is not password protected.
2. In addition to a password needed to open the PDF document, it can be protected by a
Change Permissions Password. This password is used whenever the PDF access permis-
sions need to be changed.
3. PDF input rasterization options are available unless Rasterize PDF Input has been set to
Never:
a. The Interpolate images switch influences the rasterization of PDF input files. PDF in-
put files may contain embedded images that need to be scaled for rasterization. In-
terpolate images should be turned on to obtain best image quality. However if an
input PDF file contains only bitonal image content, and this PDF is rasterized to the
same resolution as the embedded images' resolution, the image interpolation can be
turned off to speed up an OCR process.
b. Default PDF Page Size lets you select a page size that is used only if the input file is a
PDF file that is missing its page size information, but has to be rasterized. Normally all
pages of a PDF file carry page size information. However some applications create ill-
formed PDF files without page size information. This option has been added to deal
with such malformed PDF files.
PDF Compressor Manual
www.foxitsoftware.com
info@luratech.com Setting up Job Entries: 23
Select user defined at the very end of the list to enter a user defined page size by
specifying the width and the height of a page.
c. Selecting the Alternative rasterization method can be useful when input PDF files con-
tain very large pages which lead to out-of-memory errors. The alternative rasteriza-
tion method consumes significantly less memory but is slower.
4. The option Restrict PDF Conversion - Use only PDF Optimization for converting PDF input
files is only enabled when the Born Digital Module is installed. If selected it serves to
suppress the attempt to use Born Digital Conversion functionality when converting PDF
input files. Instead these files are only processed using PDF Optimization features.
Note: This option primarily serves to guarantee backward compatibility with jobs set up
with pre-7.0 versions of PDF Compressor, which used the PDF Optimization mode for
converting PDF input. In general it is preferable to use the conversion provided by the
Born Digital Module.
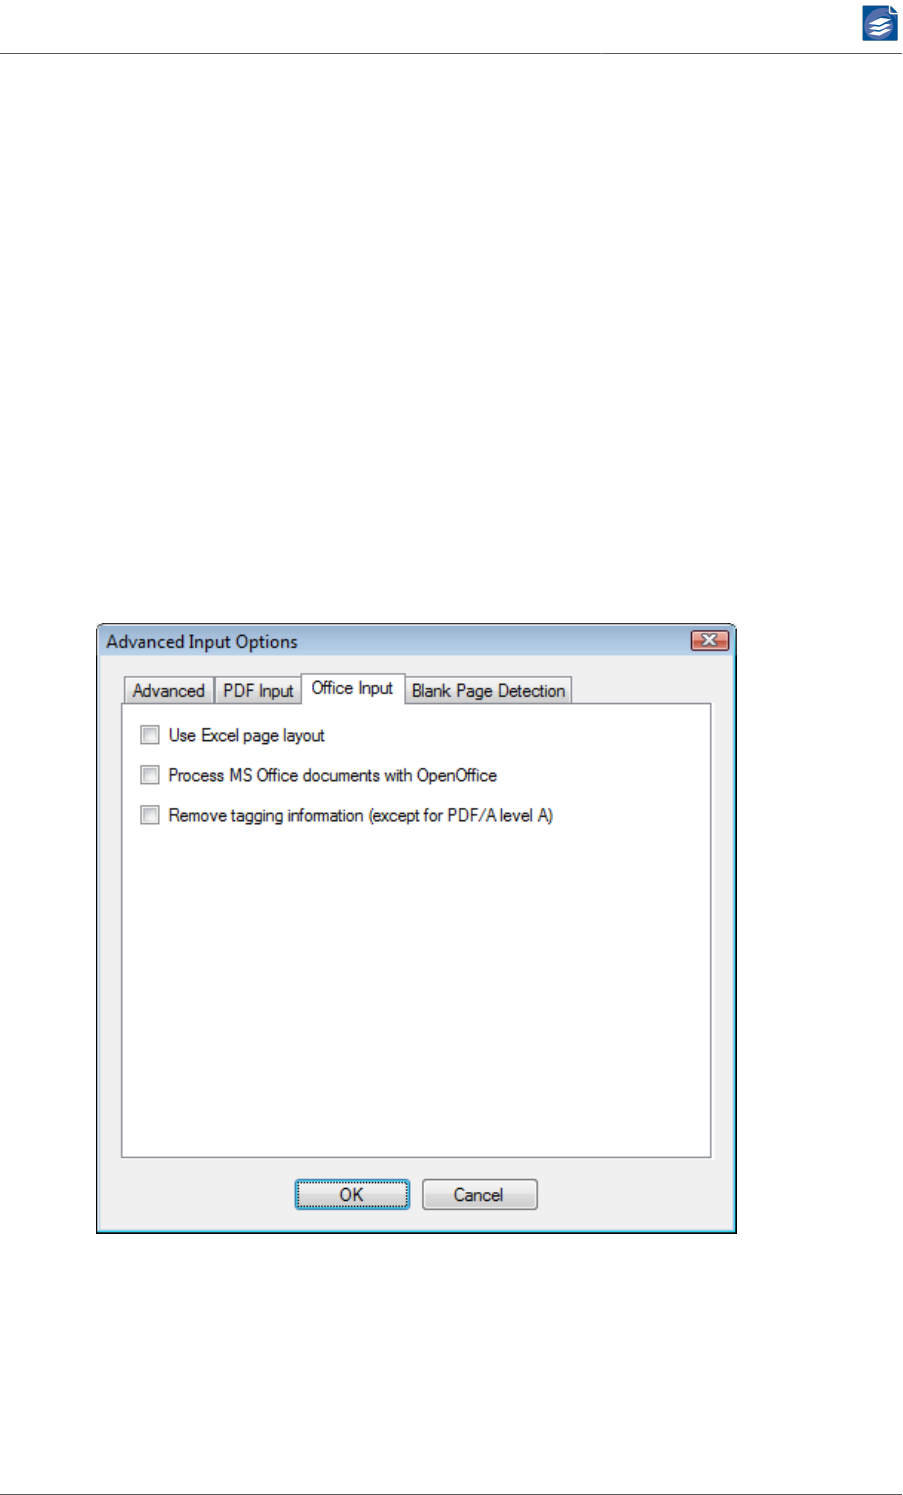
Office Input Options
On the Office Input tab you can configure options for the Born Digital conversion of Mi-
crosoft Office input files.
1. If the Use Excel page layout option is selected, the print page layout as specified inside
the Excel input files is used when converting this file to PDF. This option is disabled by
default, such that each non-empty sheet inside an Excel input file is converted to one
PDF output page.
2. When Process MS Office documents with OpenOffice is chosen, all office input files are
converted using OpenOffice. Obviously, an OpenOffice installation must be present in

PDF Compressor Manual
www.foxitsoftware.com
info@luratech.com Setting up Job Entries: 24
this case. This option is switched off by default and each input document is processed
using its native application.
3. The option Remove tagging information ensures that structure information generated
by office applications during PDF export is disposed. Structure information is important
for accessible documents and should generally be kept. However, if file size is critical this
option can help to create smaller PDF output.
Blank Page Detection Options
On the Blank Page Detection tab you can configure options for the Blank Page Detection of
input files. Pages that are detected as blank are always exempt from text recognition (OCR).
1. The option Detect blank pages serves to enable or disable blank page detection.
2. In the Excluded margins box, you can choose how much of the margins of all pages should
not be part of the blank page detection. This way, it is possible to exclude invariable page
headers or footers or punched holes, for example. You can also choose between the units
millimeter (mm) and hundredths of an inch (1/100 inch).
3. The blank page detection segments the area of the page to be worked on into tiles of
configurable size. The detection is done tile per tile. If in the end all tiles are classified
as blank the whole page is considered blank. The unit for the Tile size value is 'pt', which
is equal to 1/72 inch.
4. The analysis of a tile’s content is block-based. The size of a block should be set to the size
of the smallest meaningful symbol, e.g. the size of a punctuation dot. Depending on the
page image’s resolution a block spans multiple pixels. The unit for the Block size is 'pt'
which is equal to 1/72 inch.
PDF Compressor Manual
www.foxitsoftware.com
info@luratech.com Setting up Job Entries: 25
5. For each block a value is calculated that represents how much the block’s color intensity
differs from other blocks in the tile. Each block that has a deviance that exceeds a certain
value is considered non-blank. This value is influenced by the Sensitivity property. The
sensitivity is a value in the range of 1 through 100. A low sensitivity causes only strong
colored structures to be counted as being non-blank. In contrast, a high sensitivity also
takes pale textures into account.
6. A tile is considered non-blank if the number of non-blank blocks exceeds a certain thresh-
old. The Threshold is given in per mill (one tenth of a percent) defining the maximum
fraction of non-blank blocks in relation to blank blocks for a full size tile to still be clas-
sified as blank.
7. The option Exclude blank pages from output defines whether detected blank pages are
included in the output. Checking this option results in the exclusion of detected blank
pages.
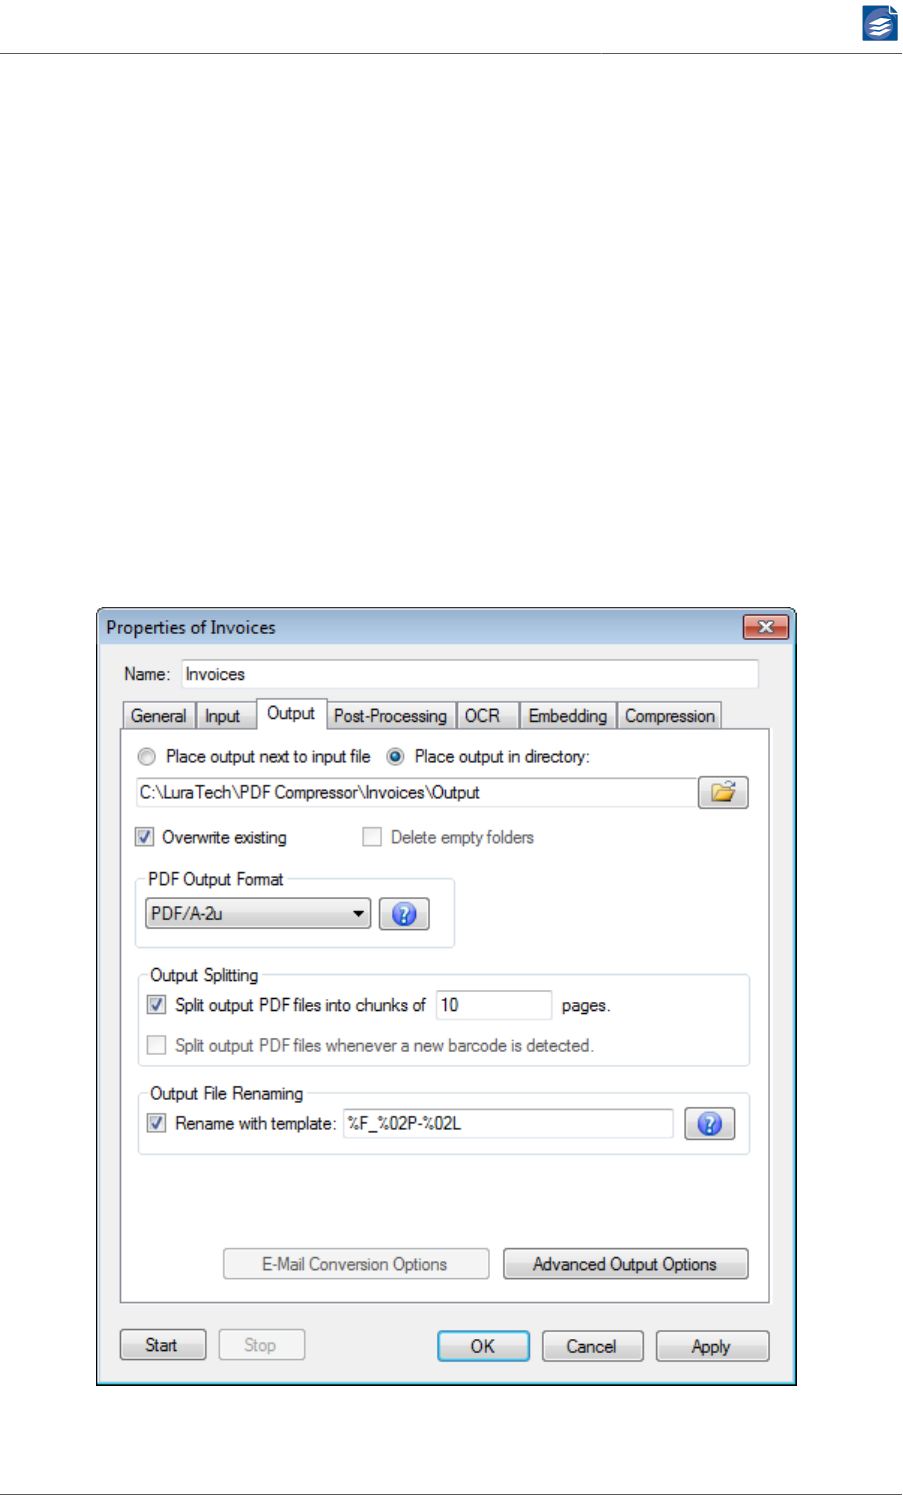
Configuring Data Output
The Output tab lets you configure PDF output options including the exact version of PDF to
generate and the location where generated PDF files are placed.
1. Select Place output next to input file, and the generated PDF file will be placed into the
same directory as the input file. Select Place output in directory and specify a folder by

PDF Compressor Manual
www.foxitsoftware.com
info@luratech.com Setting up Job Entries: 26
use of the browse button to put the output somewhere else3. See “Managing the PDF
Compressor Service” (p. 87) for the use of network shares.
2. Overwrite existing lets you select the behavior of PDF Compressor when it attempts to
write an output file that is already present at the respective location: Either the out-
put file will not be written (and you will find an error message in the log file, see “Log
Files” (p. 80)) or the existing file will be overwritten.
3. Select Delete empty folders if you want to clean up the output directory sub tree. This
option is only available if you select Include subfolders for the input processing (see “Con-
figuring Input Data” (p. 13)). PDF Compressor always creates required output folders
in advance, i.e. before any file is processed whose output has to be placed in that folder.
On error conditions certain output files may be deleted resulting in empty folders. Delete
empty folders helps to remove unneeded folders after a job has been finished (or after
a hot folder has become idle).
4. The option PDF Output Format lets you choose the exact version of PDF to create.
PDF Compressor can create PDF documents conforming with different versions of the
PDF standard or different so-called conformance levels of PDF/A. These formats and their
differences are briefly explained here.
The general recommended default is PDF/A-2u.
a. Adobe™ Reader™ 5.0 (PDF 1.4)
The decomposition of images into different layers and masks is supported in a usable
way since Adobe™ Reader™ 5.0 (PDF 1.4). PDF documents produced by PDF Compres-
sor require a viewer to support at least PDF 1.4 to be displayed properly.
b. Adobe™ Reader™ 6.0 (PDF 1.5)
Adobe™ Reader™ 6.0 (PDF 1.5) is able to handle JPEG 2000 image compression. If you
choose this format, foreground and text color images of MRC compressed pages will
be stored in JPEG 2000/Part1 format. This results in better image quality and smaller
file sizes. But files created in this format require a viewer to support at least PDF 1.5
to be properly displayed.
c. Adobe™ Reader™ 7.0 (PDF 1.6)
The Adobe™ Reader™ 7.0 compatibility mode uses the same PDF features as for
Adobe™ Reader™ 6.0 with the only exception that larger page sizes are supported.
With Adobe™ Reader™ 6.0 compatibility the page size is limited to 200 by 200 inches.
With Adobe™ Reader™ 7.0 compatibility there is no such limit.
d. PDF/A-1a (ISO 19005-1)
Same as PDF/A-1b, but with automatically inserted rudimentary tagging information
to conform to basic requirements of PDF/A-1a. This is the accessible variant of PDF/
A-1. Therefore it is strongly recommended to activate OCR in order to generate docu-
ments with textual content and structure information that can be processed by screen
reader applications.
3The text edit window for the output folder accepts file drag & drop: Just drag & drop a folder from the Windows™ Explorer
into this window.

PDF Compressor Manual
www.foxitsoftware.com
info@luratech.com Setting up Job Entries: 27
e. PDF/A-1b (ISO 19005-1)
This is the basic compliance level of the original PDF/A document standard for long-
term preservation. It is based on PDF 1.5 with further restrictions regarding e.g. meta-
data, encryption and transparency.
f. PDF/A-2a (ISO 19005-2)
Same as PDF/A-2b, but with automatically inserted rudimentary tagging information
to conform to basic requirements of PDF/A-2a. This is the accessible variant of PDF/
A-2. Therefore it is strongly recommended to activate OCR in order to generate docu-
ments with textual content and structure information that can be processed by screen
reader applications.
g. PDF/A-2b (ISO 19005-2)
PDF/A-2 is a revision of the original PDF/A-1 standard, allowing for some additional
types of content, such as images compressed using JPEG2000 and other PDF/A files
embedded as attachments.
h. PDF/A-2u (ISO 19005-2)
This is the general recommended default. The format is the same as PDF/A-2b with
the additional advantage that all text within the PDF must have a consistent Unicode
mapping.
i. PDF/A-3a (ISO 19005-3)
Same as PDF/A-3b, but with automatically inserted rudimentary tagging information
to conform to basic requirements of PDF/A-3a. This is the accessible variant of PDF/
A-3. Therefore it is strongly recommended to activate OCR in order to generate docu-
ments with textual content and structure information that can be processed by screen
reader applications.
j. PDF/A-3b (ISO 19005-3)
The PDF/A-3 standard is equivalent to PDF/A-2 with the only difference that it allows
files of arbitrary type to be embedded as attachment to the PDF/A-3 documents.
k. PDF/A-3u (ISO 19005-3)
Corresponds to PDF/A-3b, again with the additional requirement for text within the
PDF to have a consistent Unicode mapping.
5. Output Splitting can be activated in two ways:
a. Split output PDF files into chunks of <number> pages lets you limit the number of
pages output to a single PDF document. Instead of writing huge PDF documents with
many pages, a series of output files can be created, each with the specified number
of pages. (Depending on the number of input pages, the last file of the output series
will contain less pages.) This mode is typically used with Output File Renaming using
a template string with %P, %L, or %C escape sequences (see item 6 below).

PDF Compressor Manual
www.foxitsoftware.com
info@luratech.com Setting up Job Entries: 28
b. Split output PDF files when new barcode is detected is only available when the bar-
code detection is turned on at the OCR tab (see also “Configuring Post-Process-
ing” (p. 37)). If enabled, this function splits the output into multiple documents,
whenever a new barcode is detected on a page. (The next document begins with the
first page that contains a new barcode.)
This mode is typically used with Output File Renaming using a template string with %V
escape sequence representing the value of the detected barcode (see item 6 below).
Both Output Splitting modes imply the Output File Renaming to be turned on.
6. Output File Renaming can be used to customize the naming of PDF output files. The file
name template is used to form the output file names. It uses escape sequences as speci-
fied in “Template String Syntax Description” (p. 64). If Output Splitting is enabled you
need to enter escape sequences to distinguish the output names of the different chunks.
A typical example for page number based splitting is %F_%P-%L, were %F is substituted
by the input file name, %P by the first page number within the chunk, and %L by the last
page number. See “Template String Syntax Description” (p. 64) for details and more
examples, or press the help button next to the entry.
Configuring E-Mail Conversion Options
Clicking the E-Mail Conversion Options button brings up a dialog with further options re-
garding the conversion of attachments to e-mail messages.
Note: These options are only available if the Born Digital Conversion Option is installed,
since otherwise no e-mails can be converted.
Note: It is essential to understand, that both e-mail message formats such as MSG and EML
and the PDF format support the concept of attachments. These attachments are files of
arbitrary formats embedded in the overall file, which acts as a container.
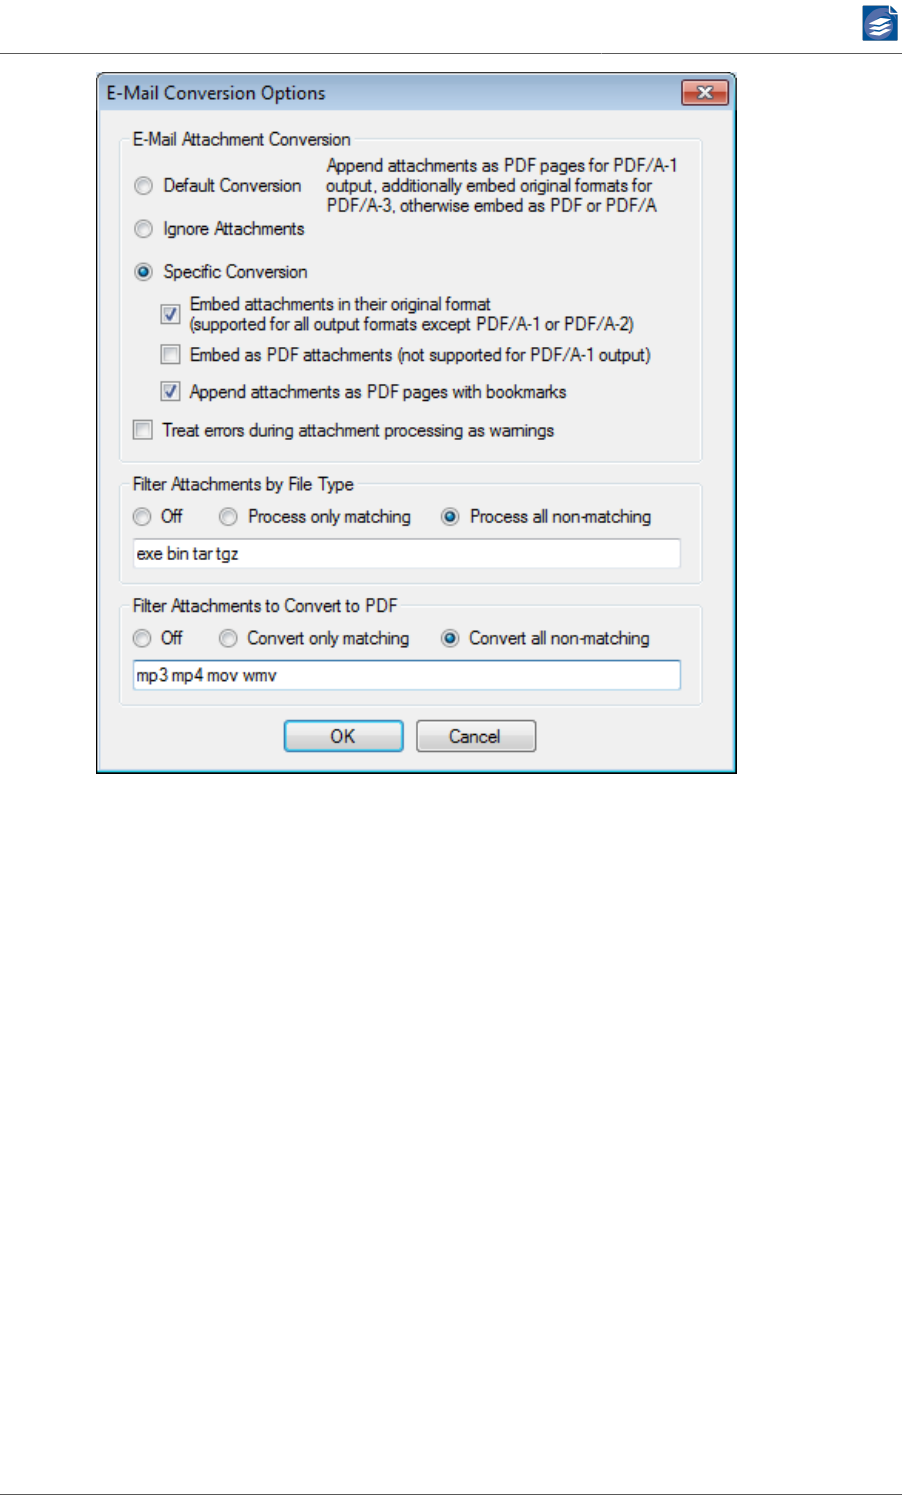
PDF Compressor Manual
www.foxitsoftware.com
info@luratech.com Setting up Job Entries: 29
1. PDF Compressor offers the following options for converting the attachments of e-mail
input files.
a. The Default Conversion option chooses the best conversion available for the selected
PDF Output Format (see “Configuring Data Output” (p. 25))
• When converting to PDF/A-1 the e-mail attachments of all supported input file
types are converted to PDF/A-1 and appended as pages to the PDF output docu-
ment, since PDF/A-1 does not allow for PDF attachments. A bookmark bearing the
file name of the e-mail attachment points to the beginning its contents within the
PDF output document.
• PDF/A-2 permits attachments in PDF/A format. Therefore the default here is con-
verting each e-mail attachment to a PDF/A-2 document and then to attach it to the
output document as a PDF attachment.
• Since PDF/A-3 additionally allows PDF attachments of arbitrary file format, the de-
fault here is to convert e-mail attachments to PDF/A and append them as pages
to the PDF output document. In addition the e-mail attachments are embedded as
PDF attachments in their original format.
• In all other cases - i.e. when generating Reader™ 5.0, 6.0 or 7.0 compatible PDF -
each e-mail attachment is converted to a PDF document and then embedded as an
attachment to the PDF output document.

PDF Compressor Manual
www.foxitsoftware.com
info@luratech.com Setting up Job Entries: 30
b. Ignore Attachments simply discards all e-mail attachments and merely converts the
message bodies.
c. The Specific Conversion setting lets you specify in detail how attachments should be
processed. Conforming to the selected PDF Output Format you may choose an ar-
bitrary combination of appending e-mail attachments as pages or embedding them
as PDF attachments in their original format or converted to PDF(/A). The options de-
scribed below serve to configure this specific conversion.
d. The option Treat errors during attachment processing as warnings causes PDF Com-
pressor to continue processing even if it failed to process one or more e-mail attach-
ments. Otherwise this is considered an error and processing the corresponding job
is halted.
2. Filter Attachments by File Type - If settings chosen under E-Mail Attachment Conversion
Options require the conversion of an e-mail attachment to PDF(/A) the PDF Compressor
will try to convert attachments of all supported input file types. Embedding e-mail at-
tachments as PDF attachments in their respective original format works for any file type.
The Filter Attachments by File Type option serves to discriminate among e-mail attach-
ment types by specifying a list of file extensions.
• If Off is chosen here, PDF Compressor will process attachments as described in the
previous paragraph.
• If Process only matching is selected only e-mail attachments with the specified file
extensions will be processed; all others will be ignored.
• If Process all non-matching is chosen e-mail attachments with the specified file exten-
sions will be ignored and all others will be processed.
The file extensions must be separated by spaces, either with or without leading dot -
i.e. both "mpeg mpg jpeg jpg" and ".mpeg .mpg .jpeg .jpg" are valid.
3. Filter Attachments to Convert to PDF - This set of options further restricts the set of e-
mail attachment types specified by the Filter Attachments by File Type options regarding
the types of files to convert to PDF(/A).
• If Off is chosen here, PDF Compressor will convert all attachments of supported input
file types which have passed the previous filter.
• If Convert only matching is selected only e-mail attachments with the specified file ex-
tensions will be converted to PDF(/A); all others will be excluded from the conversion.
• If Convert all non-matching is chosen e-mail attachments with the specified file exten-
sions will be excluded and all others will be converted to PDF(/A).
Configuring Advanced Output Options
Clicking the Advanced Output Options button brings up a dialog with further settings con-
cerning output generation.
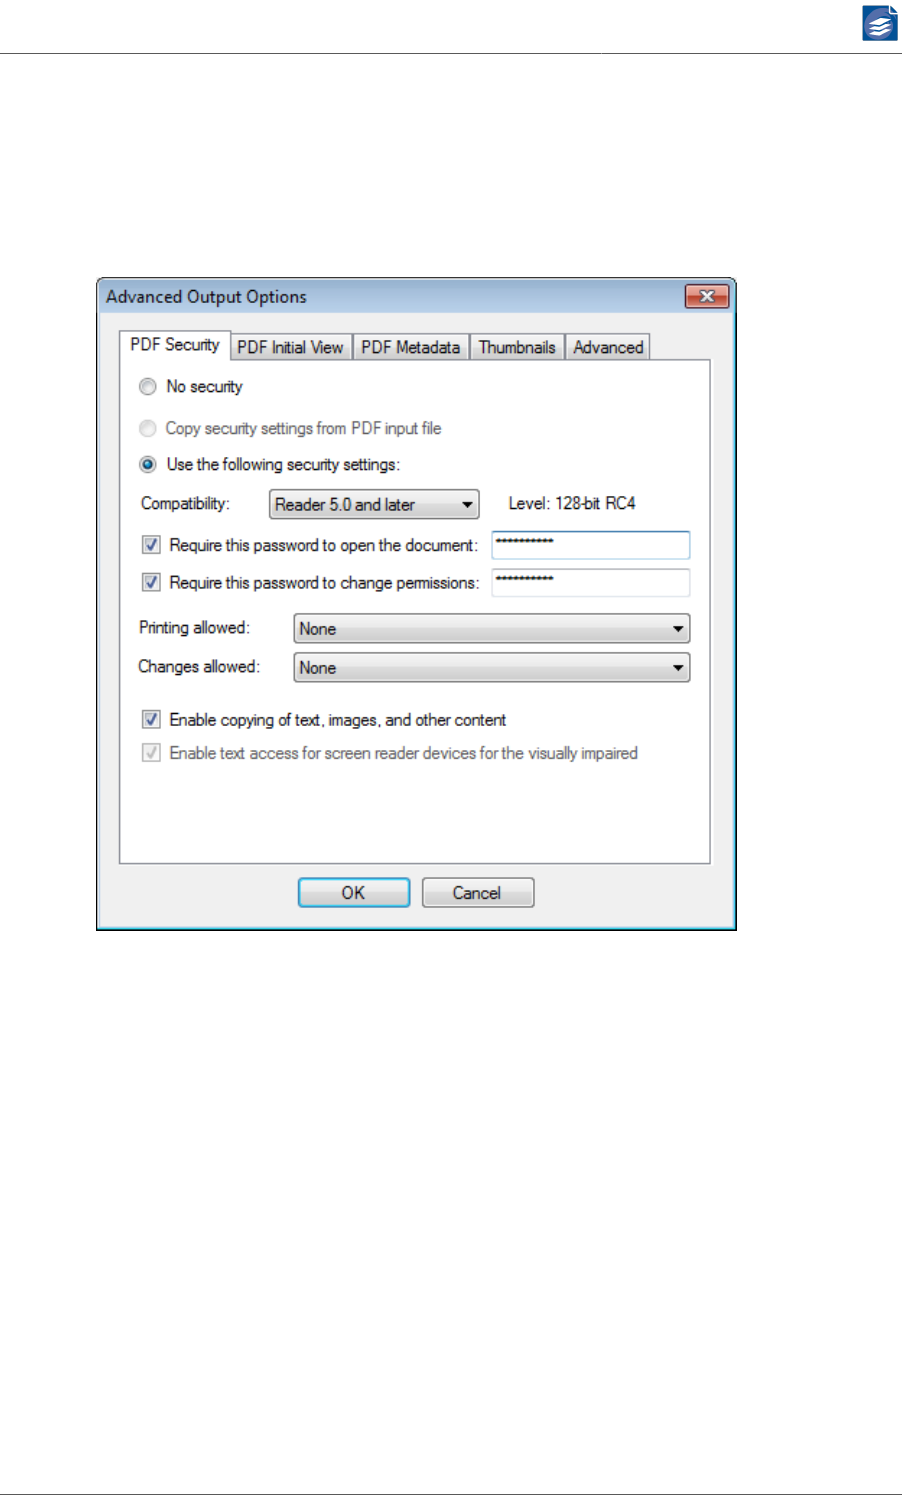
PDF Compressor Manual
www.foxitsoftware.com
info@luratech.com Setting up Job Entries: 31
PDF Security
The PDF Security tab lets you configure the security features of the output PDF documents.
Currently only security compatibility for Adobe™ Reader™ 3.0 and higher, and Adobe™
Reader™ 5.0 and higher is supported. Please also note, that PDF Security is disallowed for
PDF/A compatibility.
1. You can either specify to not use any security on output PDF documents (No security),
copy the settings from the input files (Copy security settings), or use the settings given
by this dialog (Use the following security settings). Copying security settings from input
files is only possible in PDF optimization mode.
2. Compatibility lets you select Reader™ 3.0 or Reader™ 5.0 security compatibility. Depend-
ing on this setting, the following access permission options will slightly differ. See the
PDF Reference document available from Adobe for details.
3. A password needed to open the PDF document can be set. If this option is selected when
copying security settings from the PDF input file, the corresponding password of the in-
put file, regardless if any is needed, will be replaced by the password given here. The
given password is stored within PDF Compressor in an encrypted way. Note that this en-
cryption does not meet the highest security demands.
4. A password needed to change permissions of the PDF document can be set. If this option
is selected when copying security settings from the PDF input file, the corresponding
password of the input file, regardless if any is needed, will be replaced by the password
given here. Please note that the change permissions password can be bypassed by third-
PDF Compressor Manual
www.foxitsoftware.com
info@luratech.com Setting up Job Entries: 32
party products that do not fully support and respect the access permissions settings.
The given password is stored within PDF Compressor in an encrypted way. Note that this
encryption does not meet the highest security demands.
If a change permissions password is given, and Use the following security settings is cho-
sen, the access permissions can be specified by the following options. a. Printing allowed
can be set to None, Low resolution (with Reader™ 5.0 security compatibility), and Full
resolution. b. Changes allowed can be set to various restrictions depending on the PDF
security compatibility. Please refer to the PDF Reference document available from Adobe
for details. c. Enable copying of text, images, and other content allows these operations
on the protected PDF documents. If the security compatibility is Reader™ 3.0, this in-
cludes the access for the visually impaired.
With Reader 5.0 and later security compatibility, the text access for screen reader devices
for the visually impaired can be selected independently from the access given under 7.
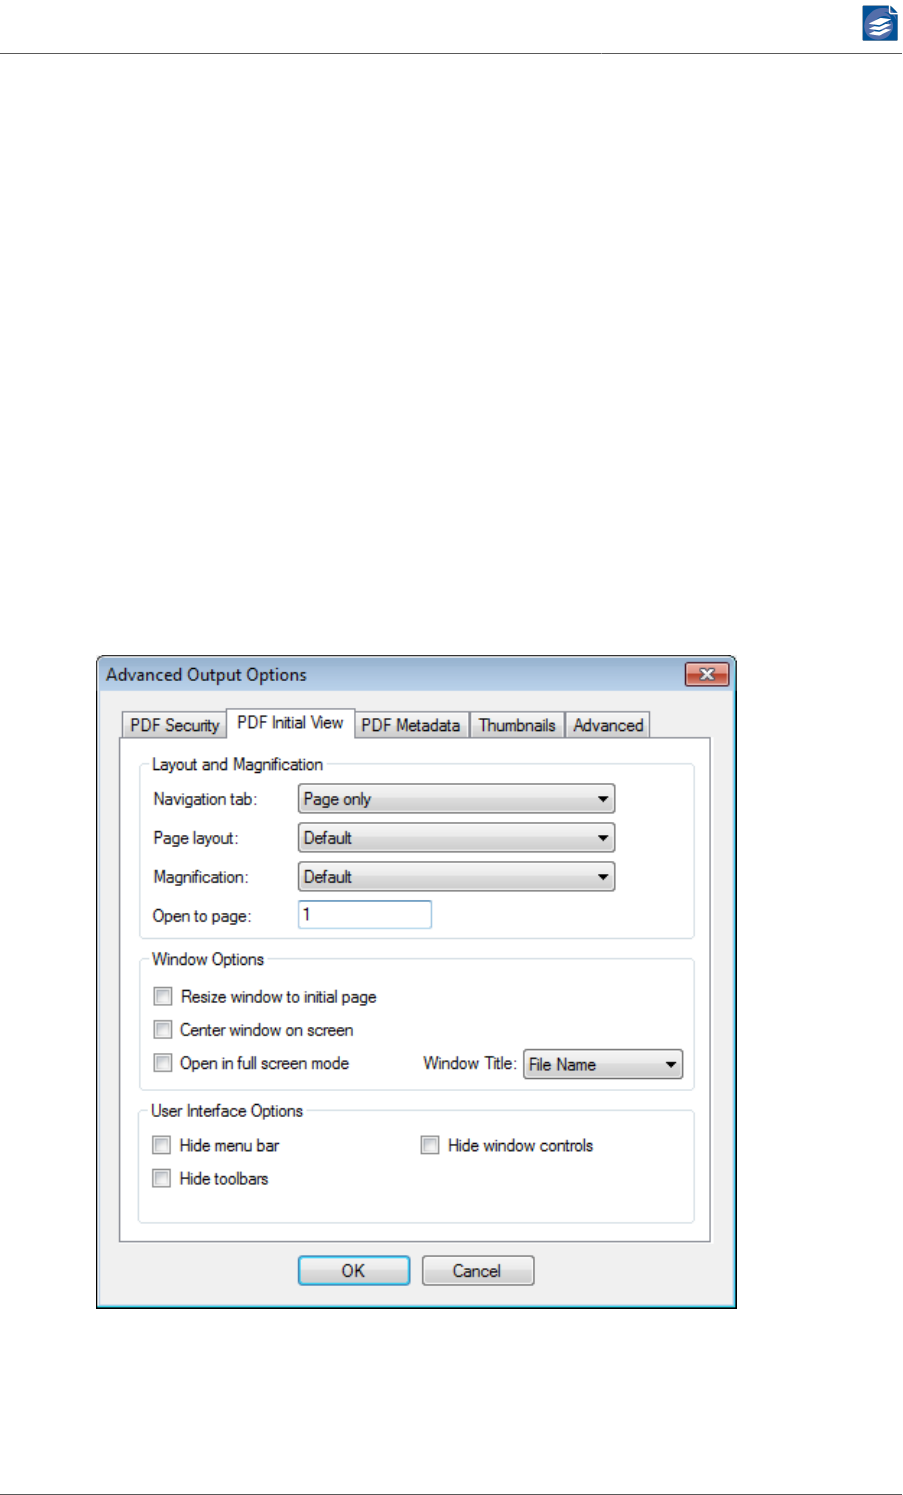
PDF Initial View
The PDF Initial View tab lets you configure the initial view of a PDF document when it is
opened with the Adobe™ Reader™. In addition the appearance of the Adobe™ Reader™
itself can be influenced.
1. Layout and Magnification sets the appearance of the opened PDF document
a. Navigation tab lets you select the panel that is opened at the left hand side of the
Adobe™ Reader™ window. It can be bookmarks, the pages, or the layout panel, or no
panel at all (Page Only).

PDF Compressor Manual
www.foxitsoftware.com
info@luratech.com Setting up Job Entries: 33
b. Page layout sets the appearance (and number) of pages that will be shown in the
Adobe™ Reader™ page window. There are settings for individual pages, a continuous
page flow, and various options for two page display.
c. Magnification sets the initial magnification of the document. It can be either a specific
zoom level or an option to fit the page, its width or its height into the Adobe™ Reader™
window. Actual Size is an synonym for a zoom level of 100%.
d. The initially opened page of a document can be set by Open to page. If the given page
is greater than the number of pages of the document, the initial opened page will be
the last page of the document.
2. Window Options influence the appearance of the Adobe™ Reader™ window when a doc-
ument is opened.
a. The Adobe™ Reader™ window can be resized such that the initial page fits to the
window.
b. The Adobe™ Reader™ window can be centered on the screen.
c. The Adobe™ Reader™ can go into Full Screen mode when a PDF document is opened.
d. You can select if the PDF file name or its title is shown in the Adobe™ Reader™ title bar.
3. User Interface Options can be used to hide various elements of the Adobe™ Reader™
window. You can hide the menu bar, the tool bars, and the window controls.
PDF Metadata
The data entered in the fields of PDF Metadata will be embedded in the output PDF docu-
ment. You can find that information within Adobe™ Reader™ under the menu File → Doc-
ument Properties → Description.
It is possible to put certain escape sequences into the PDF Metadata fields that will be sub-
stituted by information such as file name, number of pages, date, time, etc. The help but-
ton displays a list of all possible substitutions. See also “Template String Syntax Descrip-
tion” (p. 64).
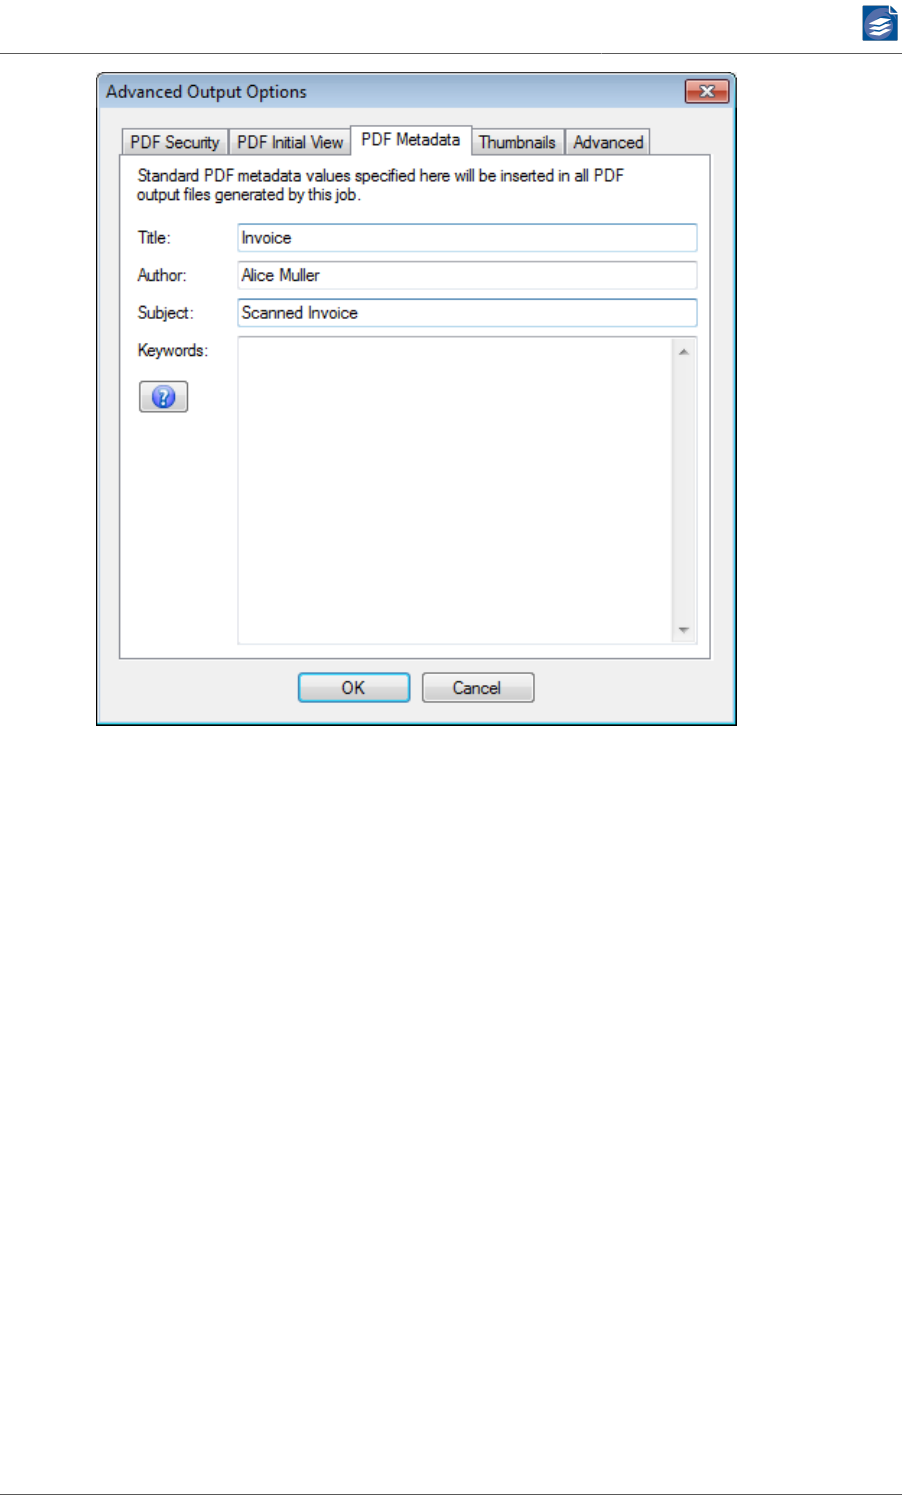
PDF Compressor Manual
www.foxitsoftware.com
info@luratech.com Setting up Job Entries: 34
Thumbnails
The Thumbnails tab is used to enable and configure the output of additional thumbnail
images containing page views of the input documents. Thumbnails are output as JPEG files
next to the PDF output file.
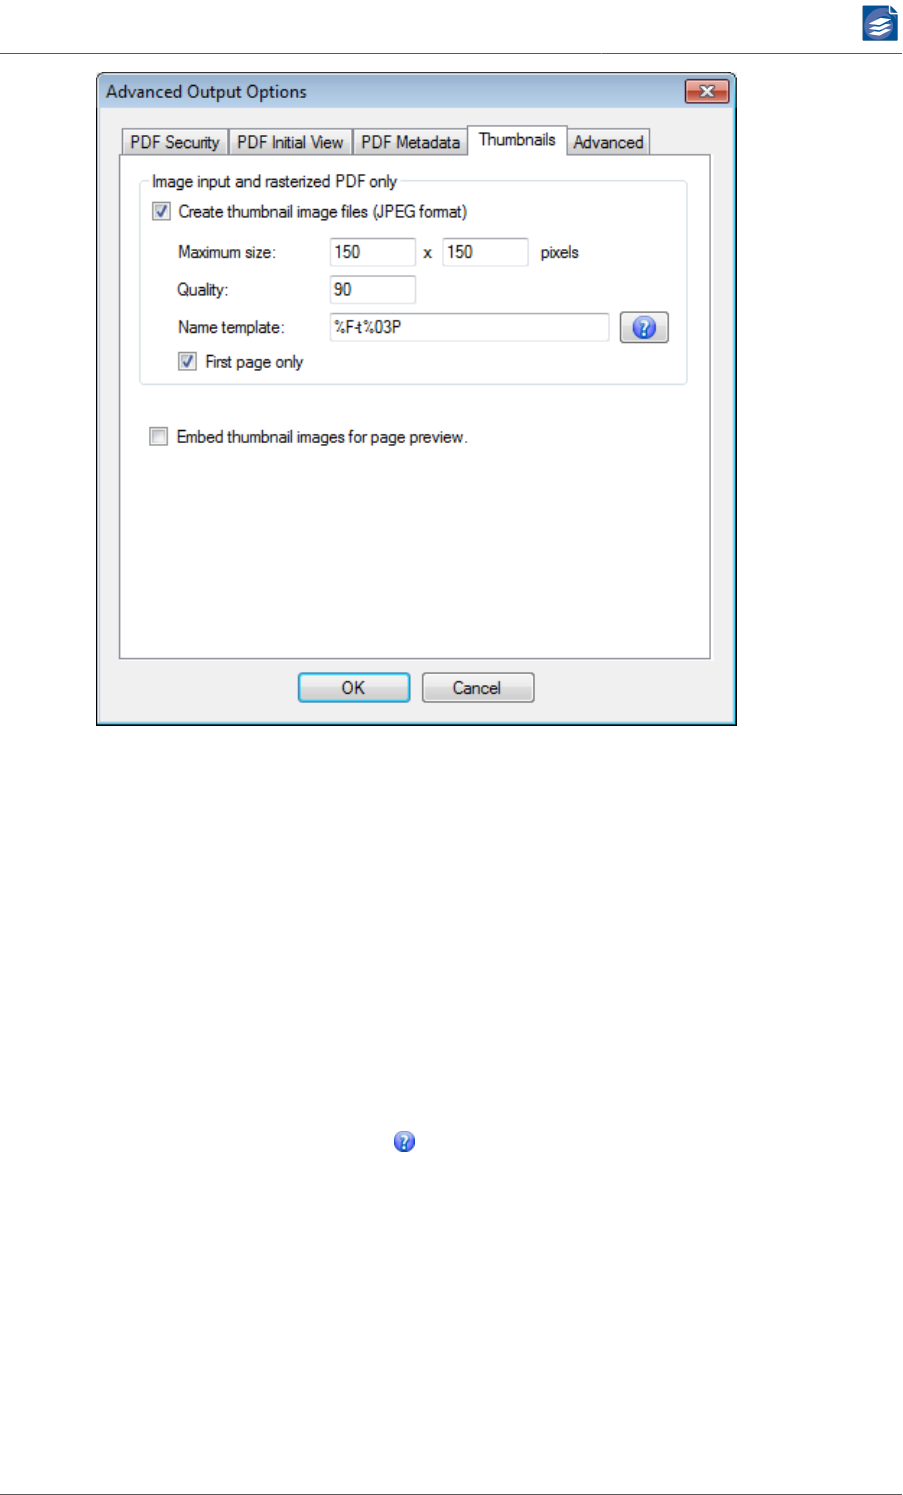
PDF Compressor Manual
www.foxitsoftware.com
info@luratech.com Setting up Job Entries: 35
1. Enable Create thumbnail image files (JPEG format) to turn the thumbnail output on.
2. Maximum size contains the maximal dimensions of the output thumbnail images in pix-
els. The first number is the horizontal size, the second is the vertical size. The aspect ratio
of a page will not be changed.
Example: Assume Max size is set to 150 x 150. a. A 20 x 30 cm sized page will be scaled to 100
x 150 pixels. b. A 30 x 20 cm sized page will be scaled to 150 x 100 pixels. 3. Set Quality to any
value between 1 and 100. This is used to specify the image quality of the output JPEG files.
Higher qualities result in larger file size. 4. The Name template is used to define the thumb-
nail file naming convention. It uses escape sequences as specified in Template String Syntax
Description,“Template String Syntax Description” (p. 64). A typical sequence contains %F
as a substitute for the input file name, and %P as a substitute for the current page number.
See “Template String Syntax Description” (p. 64), for details and examples on output file
naming, or press the help button within the PDF Compressor application. 5. Enable First
page only if you only want to output a thumbnail for the first page of a document. Other-
wise thumbnails for all the document pages will be output. 6. If Embed thumbnail images
for page preview is activated, thumbnail images for each page will be embedded into the
output PDF file. This results in a larger size of the PDF file, but speeds up the display of page
images within the Pages panel of the Adobe™ Reader™. Note that these thumbnail images
do not include any imprints (see “Configuring Header and Footer” (p. 55)) or watermark
images (see “Embedding Watermarks” (p. 56)).
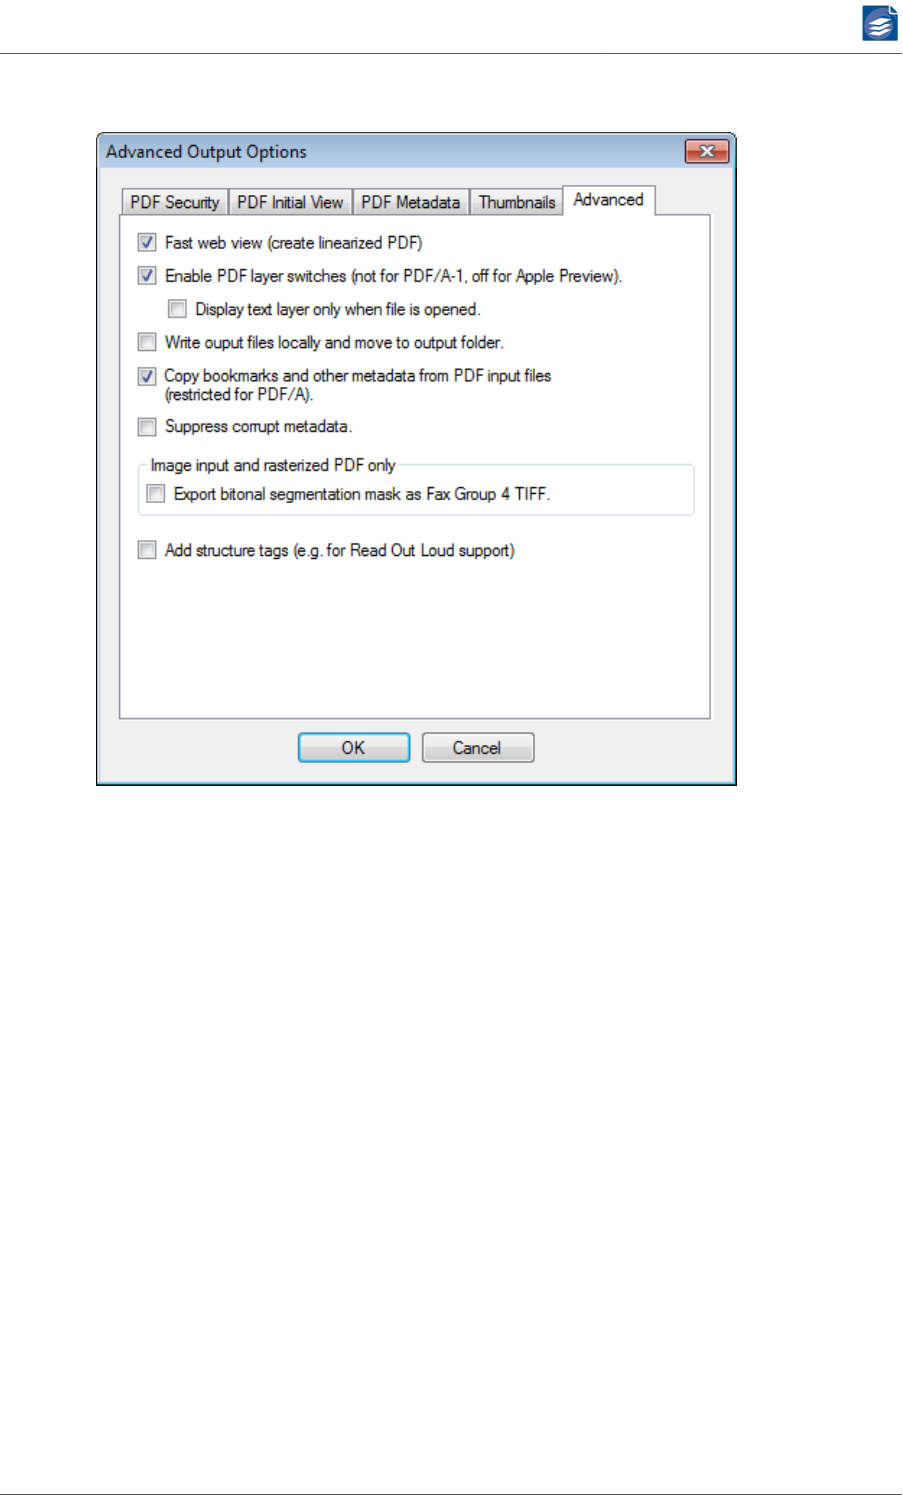
PDF Compressor Manual
www.foxitsoftware.com
info@luratech.com Setting up Job Entries: 36
Advanced
1. Enabling Fast web view will optimize the output PDF documents for viewing them within
a web browser. Standard PDF documents need to be downloaded completely before
the very first page is displayed within a web browser. This can take a significant amount
of time, if the internet connection is slow or if the document contains a lot of pages.
Web optimized PDF documents will show the first page immediately when this portion of
the data is downloaded. Moreover you can quickly jump to other document pages. The
Adobe™ Reader™ plug-in will just download the page you selected. Depending on your
Adobe™ Reader™ settings, the remaining pages will be downloaded in the background.
2. Enable PDF layer switches… lets you enable or disable the embedding of PDF layer switch-
es within the output PDF document. When this feature is turned on, the Adobe™ Read-
er™ will show you switches within its layers tab that let you control the rendering of the
internal layers:
a. When the PDF Output Format (see “Configuring Data Output” (p. 25)) is set to
min. Reader™ 6.0: The Background switch lets you turn on and off the display of the
background image. Turning off the background may increase the readability of poor
document scans in some cases. The Text Color switch lets you turn on and off the
color of the text layer. When it is turned off, all text will be rendered in back. This may
increase the readability of text, when the original text has very low contrast.
b. When the PDF Output Format (see “Configuring Data Output” (p. 25)) is set to
min. Reader™ 5.0: Only the Background switch will be present. PDF layer switches are
not available for PDF/A-1 output compatibility. PDF/A-1 disallows the use of optional
content. By default, all layer switches are turned on when the PDF file is opened in

PDF Compressor Manual
www.foxitsoftware.com
info@luratech.com Setting up Job Entries: 37
Adobe™ Reader™. If you want to display the text layer only when a file is opened in
Acrobat™, enable Display text layer only when file is opened.
3. Write file locally and move to output folder may be enabled to solve problems when
the output file is located in the network. Especially useful when the performance for
transmitting small parts of data in the network is low.
4. You can optionally Copy bookmarks and other metadata from PDF input files. If config-
ured accordingly under Rasterize PDF Input, PDF input files can be rasterized. In that case,
all meta information contained in the PDF input files is lost, unless the Copy bookmarks
and other metadata option has been selected.
With this option all bookmarks, XMP metadata, and data of the PDF information dictio-
nary from the input file are copied to the corresponding PDF output file. PDF Metadata
set in the Advanced Output Options dialog (i.e. non-empty strings) will overwrite any
value copied from the input files. In case of PDF/A compliant output, only bookmarks that
contain PDF/A-compliant actions are copied (e.g. go to page is allowed, whereas execute
JavaScript is disallowed). Moreover only XMP data from the schemas predefined in the
XMP Specification are copied. PDF Compressor does not perform any schema validation.
It is the responsibility of the user to ensure that the input files contain properly formed
XMP when this option is used.
5. The option Suppress corrupt metadata permits the suppression of corrupt metadata.
Processing of the input document will not be aborted - instead PDF Compressor contin-
ues and handles the document as if it did not contain the problematic metadata at all.
6. If the Export bitonal segmentation mask as Fax Group 4 TIFF is enabled the mask layer of
the MRC Compression - sometimes referred to as text layer - is exported as a separate
bitonal TIFF file. These TIFF files will be placed in the PDF output folder and will be named
according to the PDF files. Multipage TIFF images are generated for multipage PDF output
files.
7. To support tag based interpretation of text by PDF software you can enable Add struc-
ture tags…. Tags are for example necessary to successfully read the PDF result using the
"Read Out Loud" feature in Adobe™ Software. When creating PDF/A-1a output it is not
necessary to enable this feature. Structure tags are always created in case of PDF/A con-
formance level 'a' output, even in case the option is disabled.
Configuring Post-Processing
The Post-Processing tab lets you configure additional actions to be performed on input files
once they have been processed.
The two sections On Success and On Failure allow to define actions to be applied either if
the processing of the input file was successful (a PDF document could be created), or if it
failed (no PDF output). If the job was aborted by the user before the processing of an input
file has been finished, the input file will not be moved or deleted (as a user abort is neither
considered a success nor a failure).
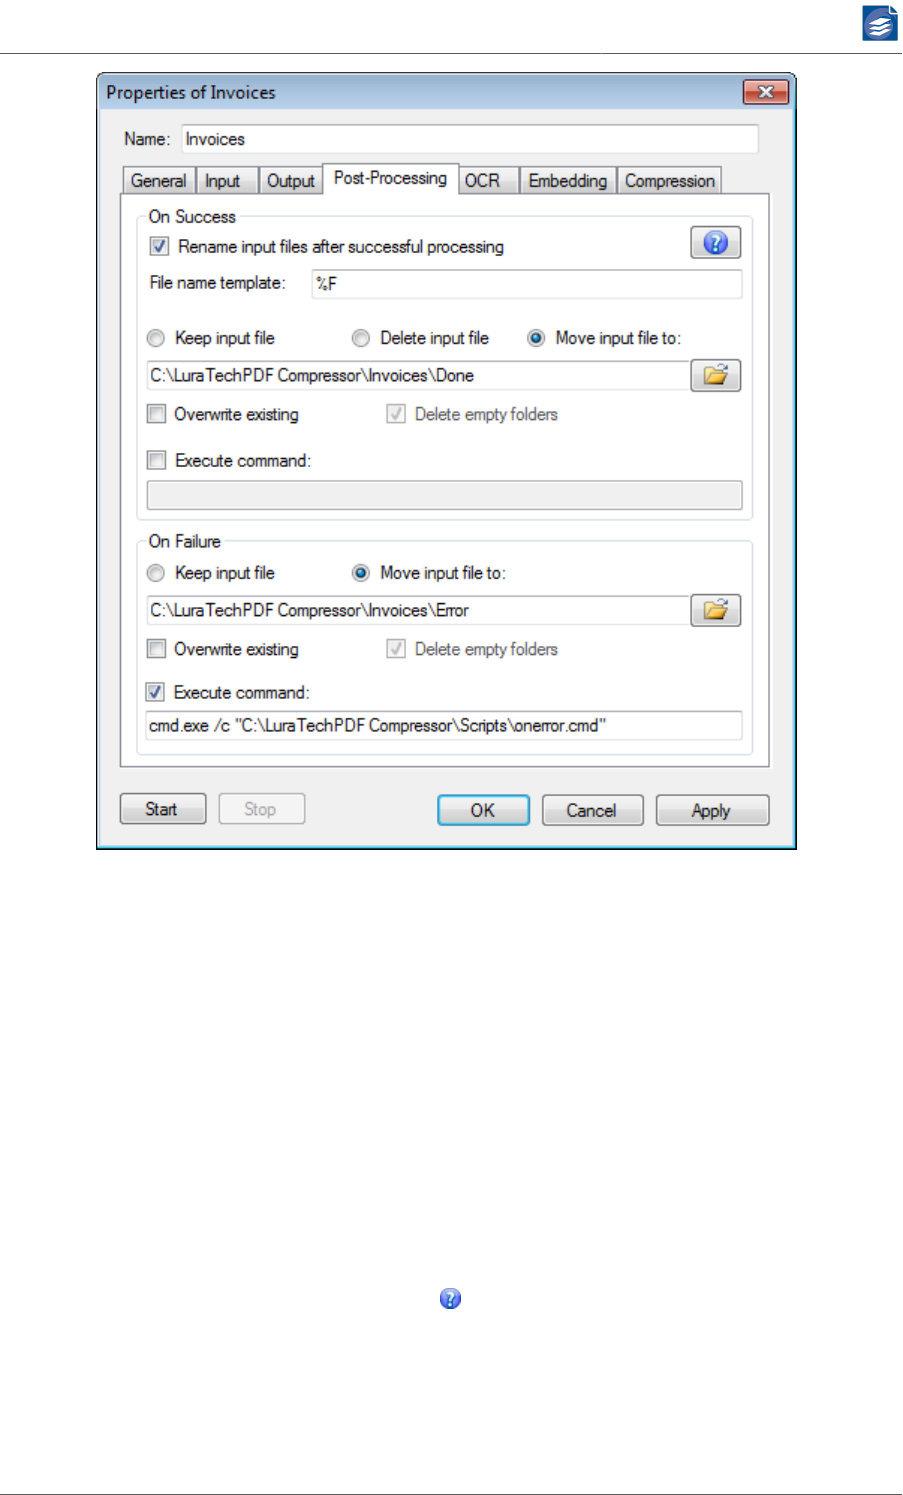
PDF Compressor Manual
www.foxitsoftware.com
info@luratech.com Setting up Job Entries: 38
There are many possible reasons why a PDF file cannot be generated. The error message
written to the log file (see “Log Files” (p. 80)) will give a detailed explanation. Common
reasons are:
• The input file does not exist, or has not the needed access rights.
• The output files already exists, but overwriting is not allowed.
• The output folder does not give the right to create new files.
• The input file is corrupted, or its format is not supported.
Actions upon Successful Processing
1. Rename input files changes the filenames of the input files according to the given File
name template. See “Template String Syntax Description” (p. 64), for a list of possible
escape sequences. The help button will display such a list within the PDF Compressor
application.
2. Input file handling:
a. Keep input file: The file is just left at its location, but may be renamed according to
the Rename input files setting.

PDF Compressor Manual
www.foxitsoftware.com
info@luratech.com Setting up Job Entries: 39
Note: Be careful when using this option. If you use Check every <number> seconds
and overwrite existing output, you end up converting the same documents over and
over. Each conversion will decrease the number of remaining pages in your license
(see “Managing Licenses” (p. 83)).
b. Delete input file: After the PDF file is generated, the input file is deleted. Files used as
input for embedding as file, bookmarks, metadata or hidden text are also deleted in
case the option General input directory and name modifier (%F) are used. Be careful
with this option! If you note later, that the output PDF does not fit your needs, e.g.
you need another quality, than you have lost your original data.
Note: With this option, input data is irretrievably deleted. Upon processing failure,
the input data will not be available for another processing run!
c. Move input file to a folder: Use the browse button to select the destination directo-
ry where all successfully processed input files should go to. In case the input directory
is scanned recursively, a corresponding directory sub tree will be generated to hold
the moved input files. Files used as input for embedding as file, bookmarks, metadata
or hidden text are also moved in case the option General input directory and a name
modifier (%F) are used. See “Choosing the Service Account” (p. 88), for hints con-
cerning the use of network shares.
For this option you can select the behavior in case the destination directory already
contains a file with same name as the input file: Either the input file is not moved, or
the file within the destination directory will be overwritten.
•Delete empty folders: This option is only available if you select Move input file
and Include subfolders for the input processing (compare “Configuring Input Da-
ta” (p. 13)). It will clean up the directory sub tree of the moved input files once
a job has been finished (or a hot folder becomes idle). PDF Compressor always cre-
ates required folders in advance, i.e. before any file is processed that needs to be
moved into that folder on success. If errors occur such a folder may remain empty.
Delete empty folders serves to remove unneeded folders resulting in a more com-
pact file structure.
3. Execute command: allows specifying a custom command line to be executed. See section
Post-processing command execution below for details.
Actions upon Processing Failure
1. Input file handling:
a. Keep input file: The file is just left at its location (no action on input file).
b. Move input file to a folder: Use the browse button to select the destination directo-
ry where all failed input files should go to. If the input directory is scanned recursively,
a corresponding directory sub tree will be generated to hold the moved input files.
Files used as input for embedding as file, bookmarks, metadata or hidden text are also
moved in case the option General input directory and a name modifier (%F) are used.
See “Choosing the Service Account” (p. 88) for the use of network shares.

PDF Compressor Manual
www.foxitsoftware.com
info@luratech.com Setting up Job Entries: 40
For this option you can select the behavior when the destination directory already
contains a file with same name as the input file: Either the input file is not moved, or
the file within the destination directory will be overwritten.
•Delete empty folders: This option is only available if you select Move input file
and Include subfolders for the input processing (compare “Choosing the Service Ac-
count” (p. 88), and “Configuring Post-Processing” (p. 37)). It will clean up
the directory sub tree of the moved input files once a job has been finished (or a hot
folder becomes idle). PDF Compressor always creates required folders in advance,
i.e. before any file is processed that needs to be moved into that folder on error.
If no error occurs such a folder may remain empty. Delete empty folders serves to
remove unneeded folders making it easier to locate files in the error folder.
2. Execute command: allows specifying a custom command line to be executed. See section
Post-processing command execution below for details.
Post-processing command execution
PDF Compressor is able to run a custom command after the successful or unsuccessful pro-
cessing of an input file (or multiple files in case of merging). This is a great feature to cus-
tomize PDF Compressor Jobs in a way to address requirements beyond the built-in post-
processing features. Some common use cases are:
• Copy additional files from input folder to output folder.
• Take custom action on processing errors, e.g. sending e-mail.
• Access the recognized barcode values.
• Custom verification or validation tasks.
The PDF Compressor creates a new process for the command. This process runs with the
same credentials and permissions as the PDF Compressor service and in the same context,
namely in the Session 0 of the Windows Operating System. So the same restrictions apply
as for the PDF Compressor itself.
The process for the command inherits the environment of the PDF Compressor process. Ad-
ditionally the environment is extended with a set of special variables that provide access to
the input and output files and other information (see section Environment variables below).
The PDF Compressor redirects the standard output and standard error streams of the
process. Any console output written by the command will be appended to the PDF Com-
pressor log file.
Usage
The command must specify the fully qualified path to a valid executable file, optionally with
arguments. Ensure to enclose the path in quotes if it contains any blanks.
It is possible to use the special environment variables (see Environment variables) directly
in the command line. Ensure proper quoting because the values may contain blanks. Before
execution the PDF Compressor expands any symbols that match the format %Name%. If the
variable name is not known it is replaced with an empty string. To use the percent sign (%)
in the command line it must be escaped by another percent sign (%%).

PDF Compressor Manual
www.foxitsoftware.com
info@luratech.com Setting up Job Entries: 41
The PDF Compressor evaluates the exit code of the process. Any value different from 0 is
considered as error and will be notified in the log file. Please note: Since the command is
executed after the complete processing in all its aspects an error in the post-processing
command will NOT change the processing status to "Failed". In other words a successful
processing will still be considered successful even if the post-processing command fails.
Examples
The following examples should help getting started with a custom post-processing com-
mand.
cmd.exe /c "C:\MyScripts\postproc.bat"
This line executes a batch script as a custom command.
powershell.exe "C:\MyScripts\postproc.ps1"
This line executes a Windows PowerShell script as a custom command.
C:\ToolDir\MyTool.exe "%LT_OutputFilePath0%"
This line runs the MyTool.exe as custom command and passes the output file as the first
argument.
cmd.exe /c set
This line prints the whole set of environment variables to the log file. This can be useful to
get an idea how the environment looks for the command.
cmd.exe /c "echo %LT_BarcodeValue0% > %%LT_OutputFilePath0:
~0,-4%%.txt"
This might be the simplest way to store a recognized barcode in a text file next to the regular
output file. Note the use of double percent characters to ensure that the LT_OutputFilePath
variable is not already expanded by PDF Compressor but later by the command interpreter
(cmd.exe) to be able to use the substring syntax (:~0,-4).
For production it might be better to add some error checking, e.g. if a barcode was detected
at all, and to put everything in a reusable batch script.
Environment variables
The following table lists the environment variables that are provided by the PDF Compressor
to the command.
Variable name Description
%LT_ProcessingStatus% Success or Failure. The value is set to Success if the pro-
cessing of the input file(s) succeeded or to the value Fail-
ure if an error occurred.
%LT_ErrorMessage% This variable is only available if the processing failed. It
contains a description for the error that happened.
%LT_JobName% The name of the Job that is processed.
%LT_InputFileCount% The number of input files that were processed. Typically
the value is 1 unless the job has the "Merge all pages of a
folder to a single PDF document" flag set or additional in-
put files specified on the "Embedding" tab.

PDF Compressor Manual
www.foxitsoftware.com
info@luratech.com Setting up Job Entries: 42
Variable name Description
%LT_InputFilePath0%
%LT_InputFilePath1% …
The fully qualified paths to the processed input files.
There will be %LT_InputFileCount% many entries, counted
from 0 to (%LT_InputFileCount% - 1). The order in the list is
the processing order of the files. Additional input files (e.g.
for embedding) are listed directly after the main input file
they belong to.
Note: The command is executed after the complete pro-
cessing which includes the built-in post-processing. Thus
the provided paths can be different from the original input
paths when move or renaming actions where applied. If
the job is configured to delete the input files after success-
ful processing the custom command will be provided with
the original input file paths but at the time the command is
executed these files have already been deleted.
Note: For standard jobs there is exactly one input file and
the variable %LT_InputFilePath0% contains the fully quali-
fied path (see also description of %LT_InputFileCount%).
%LT_OutputFileCount% The number of output files that were generated. Typical-
ly the value is 1 unless the job produces additional output
files like OCR results as XML or TXT, thumbnail images, or
the output splitting option is enabled.
If the processing failed the number of output files is always
0 because the PDF Compressor removes incomplete out-
put.
%LT_OutputFilePath0%
%LT_OutputFilePath1% …
The fully qualified paths to the generated output files.
There will be %LT_OutputFileCount% many entries, count-
ed from 0 to (%LT_OutputFileCount% - 1). The order in the
list is the order of generation. Additional output files (e.g.
OCR results) are listed directly after the main output file
they belong to.
If the processing failed there are no output files at all be-
cause the PDF Compressor removes incomplete output.
Note: For standard jobs there is exactly one output file
and the variable %LT_OutputFilePath0% contains the ful-
ly qualified path (see also description of %LT_OutputFile-
Count%).
%LT_OutputPageCount% The number of pages of the output files that were generat-
ed.
If the processing failed the number of pages of the output
files is always 0 because the PDF Compressor removes in-
complete output.
%LT_BarcodeCount% The number of recognized barcode values. This variable is
only set if barcode recognition was activated.
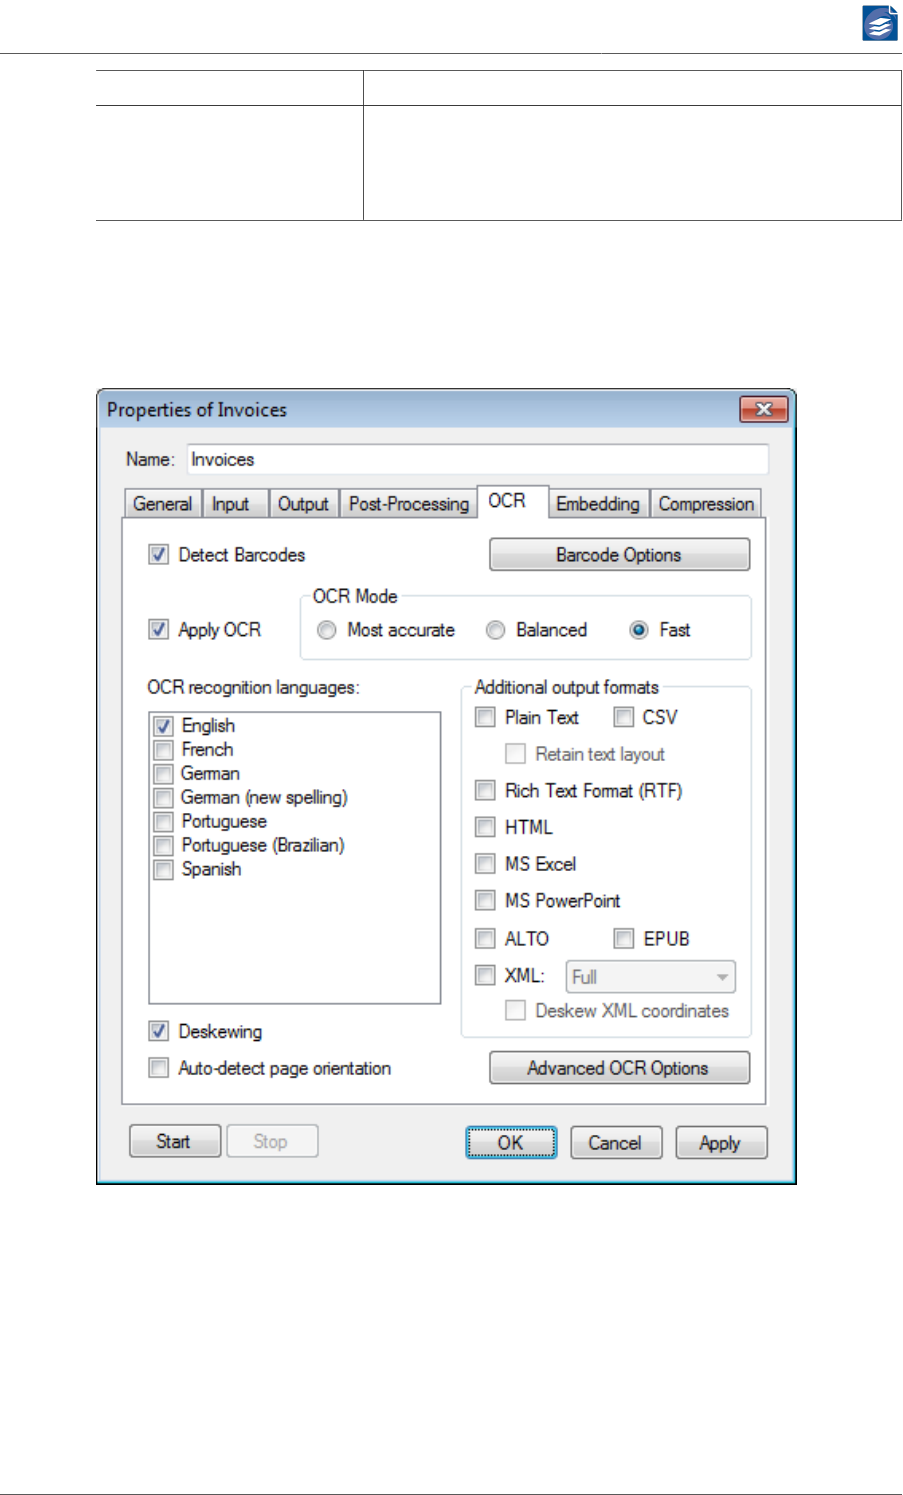
PDF Compressor Manual
www.foxitsoftware.com
info@luratech.com Setting up Job Entries: 43
Variable name Description
%LT_BarcodeValue0%
%LT_BarcodeValue1% …
The list of recognized barcode values. There will be %LT_
BarcodeCount% many entries, counted from 0 to (%LT_
BarcodeCount% - 1). The order in the list is the order of de-
tection.
Configuring OCR and Barcode Recognition
The OCR tab contains options for configuring the optional OCR - i.e. text recognition from
raster input documents - and barcode recognition.
1. The Mode section lets you control the tradeoff between OCR accuracy and speed.
a. Most accurate is the mode which gives the highest accuracy in character recognition.
It should be used when the input image quality or resolution is low, and recognition
time is not that critical.
b. Balanced is an intermediate mode between most accurate and fast mode.
c. Fast provides 2 - 2.5 times faster recognition speed at the cost of a moderately in-
creased error rate (1.5 - 2 times more errors). On good print quality texts, the OCR

PDF Compressor Manual
www.foxitsoftware.com
info@luratech.com Setting up Job Entries: 44
engine makes an average of 1 - 2 errors per page, and such moderate increase in error
rate can be tolerated in most cases.
2. Select the OCR recognition languages from the list. Text recognition will be more accurate
if you select exactly those languages that appear in your documents. More languages
are available upon request (please send e-mail to support@luratech.com [mailto:sup-
port@luratech.com]).
Note: Under “Additional OCR Languages” (p. 3) and “Custom OCR Dictionary” (p. 4) you
will find more information regarding additional languages and the use of a custom dic-
tionary. OCR for Chinese, Japanese and Korean (CJK) languages is available, but requires
a dedicated license.
3. You may choose Additional Output Formats to export the OCR results in various formats
in addition to the PDF output.
Note: Whenever you select an additional OCR output, the overwrite protection (see
Overwrite existing within the Output tab under “Configuring Data Output” (p. 25))
is extended to the additional file formats. Example: The output name is outfile.pdf, you
select additional Plain Text OCR output, and Overwrite existing is disabled. If any of the
files outfile.pdf or outfile.txt already exist, the PDF Compressor will not process the cor-
responding input file. You need to enable Overwrite existing if you want to overwrite
existing files.
Important Note: Some of the additional OCR output formats may create auxiliary files
(e.g. JPEG images to be used within an output HTML file). These auxiliary files are not
subject to overwrite protection. Thus an existing file that has the same name as an aux-
iliary file will be overwritten regardless of the setting for Overwrite existing. See the list
below for what formats create what auxiliary files.
a. Plain Text exports OCR results as unformatted text (ANSI code page). Extension is *.txt.
No auxiliary files.
b. CSV exports OCR results as comma separated values in plain text (ANSI code page).
This mainly makes sense when the input document contains tables that should be
imported into some other application. Extension is *.csv. No auxiliary files.
c. Rich Text Format exports OCR results in Microsoft RTF format (to be opened with Mi-
crosoft Word). Extension is *.rtf. No auxiliary files.
d. HTML exports OCR results in HTML format. Extension is *.htm. Embedded images
are stored as auxiliary files with naming convention <output-name>-<image-num-
ber>.jpg.
e. MS Excel exports OCR results in Microsoft Excel format. Extension is *.xls. No auxiliary
files.
f. MS PowerPoint exports OCR results in Microsoft PowerPoint™ format. Extension is
*.ppt. An auxiliary directory <output-name>_files is created. It contains various files
used by the PowerPoint document.
g. ALTO exports OCR results in the open XML standard ALTO (Analyzed Layout and Text
Object).
h. EPUB exports OCR results in the EPUB format for electronic books.

PDF Compressor Manual
www.foxitsoftware.com
info@luratech.com Setting up Job Entries: 45
i. XML exports OCR results in XML format. Extension is *.xml. The XML style can be
chosen from the list next to the XML option.
i. Full - all possible XML attributes will be written (large XML files)
ii. Simplified - some optional attributes will be suppressed (smaller XML files)
iii. Word-level - detailed character related information is suppressed. The recognized
text is set as direct content of the formatting element. Resulting XML files are very
small (much smaller than simplified), they are human readable and easier to post
process.
iv. Line-level - similar to word-level, but without any formatting information.
v. ABBYY - corresponds to the default XML format written by the FineReader Engine.
Contents are written as lines of text surrounded by additional XML formatting tags.
vi. ABBYY extended - corresponds to the full range of paragraph, line and character at-
tributes and formatting information available in the ABBYY XML format, but with-
out word or character recognition variants.
Note: If the Deskewing option was chosen along with the ABBYY or ABBYY extend-
ed XML format the additional Deskew XML coordinates option lets you choose,
whether coordinates written to the XML files refer to the original image or the
deskewed results.
With the Full, Simplified, Word-level and Line-level formats the coordinates given
within the XML files always relate to the resampled and not deskewed input image
(compare “Configuring Advanced Input Options” (p. 20)).
4. Enable Deskewing if you want the OCR engine to deskew (align) your pages. This option
only applies to raster input documents or PDFs which have been rasterized.
5. Auto-detect page orientation rotates the page images in steps of 90 degrees to ensure
that the text is correctly oriented. This is a useful feature when pages have been scanned
with wrong orientation, but it only works for raster input documents or PDFs which have
been rasterized.
Advanced OCR Options
The Advanced OCR Options dialog is opened via the Advanced OCR Options button of the
OCR tab.
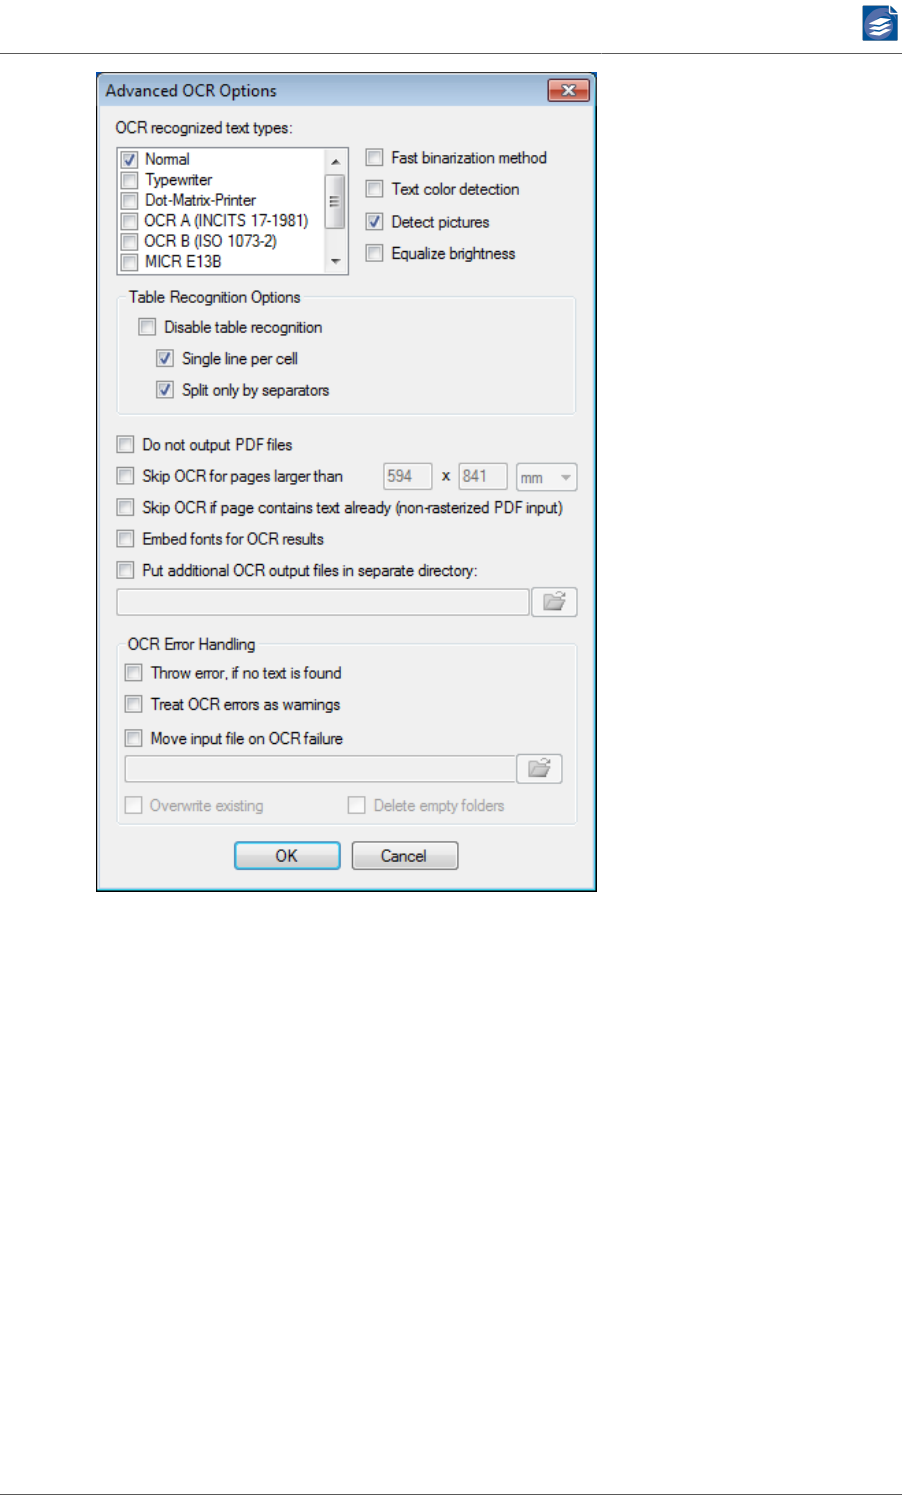
PDF Compressor Manual
www.foxitsoftware.com
info@luratech.com Setting up Job Entries: 46
1. Unless you have special requirements for the detection of specific typographical fonts,
the OCR recognized text types list should only contain a selection for the text type Normal.
This refers to a common typographic type of text.
Note: Whenever you select more than one entry at once, the OCR process can slow down,
since it triggers an automatic text type detection among the selected text types. In some
cases the OCR might even be run several times for the given text types.
Note: Whenever you select something different from Normal, ordinary text might not
be detected with an appropriate accuracy.
If your documents exclusively use a special typographic font given in the list, you should
select this and only this font from the list to obtain better OCR results.
If your documents contain a mixture of normal and special typographical fonts, you might
want to select multiple fonts from the list. OCR will be running slower in this case.
a. Normal: This selection corresponds to a common typographic type of text.
b. Typewriter: This selection tells the OCR engine to presume that the text on the recog-
nized page is typed on a typewriter.

PDF Compressor Manual
www.foxitsoftware.com
info@luratech.com Setting up Job Entries: 47
c. Dot matrix printer: This selection tells the OCR engine to presume that the text on the
recognized page is printed on a dot matrix printer.
d. OCR A: This selection corresponds to a mono-spaced font, designed for Optical Char-
acter Recognition. Largely used by banks, credit card companies and similar business-
es. It is specified in ANSI INCITS 17-1981.
e. OCR B: This selection corresponds to a font designed for Optical Character Recogni-
tion. It is the successor of OCR A and standardized in ISO 1073-2.
f. MICR E13B: This selection corresponds to a special set of numeric characters printed
with special magnetic inks. MICR (Magnetic Ink Character Recognition) characters are
found in a variety of places, including personal checks.
g. MICR CMC7: This selection corresponds to the special MICR barcode font (CMC-7).
h. Gothic: This selection enables recognition of Gothic letters. The additional file package
for Gothic and a dedicated license is also neccessary for recognition of Gothic script.
2. Use the Fast binarization method to have the OCR use algorithms for fast image bina-
rization. In most cases this leads to noticeable (in special cases dramatically) faster OCR
processing but can also go along with lower recognition quality.
3. Text color detection enables the detection of text and background colors. This is only
relevant, when Additional Output Formats are used, that can carry text and background
color information (Rich Text Format, HTML, MS Excel, MS PowerPoint, and XML). Detect-
ing text and background colors slightly reduces the recognition speed.
4. Detect pictures is enabled for faster recognition ignoring areas that are recognized as
images during page analysis. Disable the option to recognize all text on a page even inside
pictures.
5. Enable the Equalize brightness option to speed up recognition of input pages with low
contrast or noisy backgrounds.
6. Performance and text structure are also affected by Table Recognition Options. Disabling
table recognition may result in slightly faster recognition. The Single line per cell and Split
only by separators options define the table structure to recognize.
7. The option Do not output PDF files disables the output of the compressed PDF file. This
only makes sense if you are exclusively interested in OCR results output to some of the
Additional Output Formats as described above. You cannot disable PDF output without
choosing at least one of the additional output formats.
8. The OCR can take a long time or even fail on very large pages, especially if these pages
do not mostly have textual content. So it makes sense not to do OCR on such pages.
Select Skip OCR for pages larger than option if you have mixed input that includes normal
textual pages as well as very large sheets. The maximum dimensions of pages that should
be run through the OCR can be given in millimeter or inch.
9. When processing PDF input without rasterizing there is an option to Skip OCR if page
contains text already. Please note that the OCR is suppressed for all pages that have any
kind and amount of real text (set with fonts) on it. It is in no way ensured that the text
covers any raster images that would be processed by OCR otherwise.
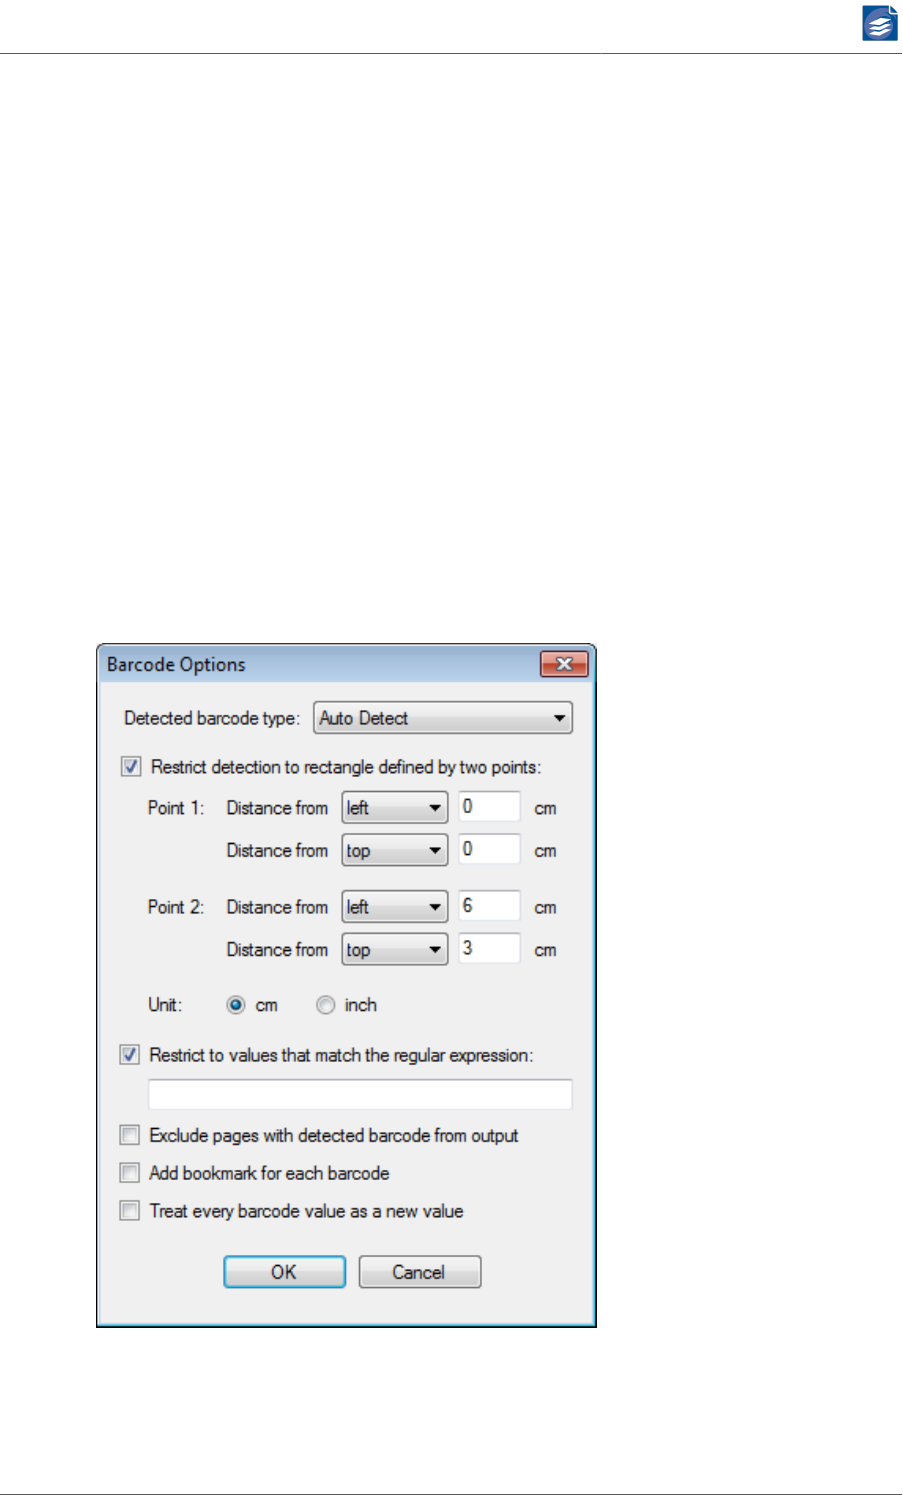
PDF Compressor Manual
www.foxitsoftware.com
info@luratech.com Setting up Job Entries: 48
10.Some regulations for PDF documents require all fonts to embedded, even those used
only for hidden text. PDF and PDF/A do not require this and the default behavior of PDF
Compressor is not to embed these fonts. To comply with the more restrictive rules, select
Embed fonts for OCR results.
11.To detect that no text was found in the input document the option Throw error, if no text
is found may be enabled.
12.Treat OCR errors as warnings means that errors during OCR are only reported as warning
but will not stop the processing of the affected document.
13.Select Put additional OCR output files in separate directory if you want the additional OCR
output files not to be placed next to the output PDF files, but into its own directory. The
browse button lets you select the directory9. When processing a whole input directory
tree (see “Configuring Input Data” (p. 13)), a corresponding subdirectory tree will be
created under the specified OCR output directory.
Barcode Options
The Barcode Options dialog is opened via the Barcode Options buttons of the OCR tab.
Recognized barcode values can be added to the PDF metadata (see “PDF Meta-
data” (p. 33)), used to specify an output filename (see “Configuring Data Out-
put” (p. 25)), and it can trigger the start of a new output document (output splitting by
barcode detection, “Configuring Data Output” (p. 25)).

PDF Compressor Manual
www.foxitsoftware.com
info@luratech.com Setting up Job Entries: 49
1. The Detected barcode type can be selected from the drop down list. Auto Detect will
recognize all supported barcode types. Many 1D barcodes as well as 2D barcodes are
supported.
2. Select Restrict detection to rectangle if you do not want to detect barcodes from the
whole page area, but want to specify a certain region, where barcodes are going to be
detected.
The rectangular region is defined by specifying two points (e.g. the upper left corner and
the lower right corner of the rectangle). A point is given by its distance from the left or
right edge of the page, and by its distance from the top or bottom edge of the page. Use
the drop down selectors to set left or right for the horizontal distance, and top or bottom
for the vertical distance. The distances can by specified in cm or inch.
3. The detection of barcodes can be restricted to barcode values that match a given regular
expression. Enable Restrict to values that match the regular expression and enter the cor-
responding expression into the given field. For a definition of regular expressions see the
<regexp> part of the syntax defined under “Regular Expression Substitution” (p. 68).
Example: If you only want to detect barcodes that begin with the digit 4, followed by any
number of digits, use the regular expression 4[0-9]*
4. Enable Exclude pages with detected barcode to not output pages that contain a barcode
that is recognized with respect to the restrictions given above. This is typically used when
multiple input documents are separated by a plain page with barcode for reference.
5. Enable Add bookmark for each barcode to add a bookmark pointing to the page of the
barcode for each barcode that matches the restrictions given above. If page exclusion
is activated, the bookmark will point to the next page. The bookmark value is used as
the title.
6. The option Treat every barcode value as a new value changes the behavior with respect
to recurring barcode values. The default behavior is to ignore barcode occurrences if
their value equals the value of the directly preceding barcode. When Treat every barcode
value as a new value is selected, every barcode instance is treated as if its value were
found for the first time.
Configuring File and Data Embedding
The Embedding tab of the Properties dialog lets you configure options for several types of
embedding files or supplementary data into your PDF output files. Configuring Data Em-
bedding The three buttons under Data Embedding serve to configure the embedding three
different kinds of supplementary data in your PDF output files.

PDF Compressor Manual
www.foxitsoftware.com
info@luratech.com Setting up Job Entries: 50
All three kinds of data - XMP metadata, PDF bookmarks and XML OCR results - are read from
files containing XML of a corresponding dialect. The XML encoding must be UTF-8.
Note: Input processing as configured for the job (see “Configuring Post-Process-
ing” (p. 37)) to move or delete the input files after processing is applied to these files
only, if they are located next to the main input files (General input directory) and have non-
static file names (escape sequences in their file name templates).
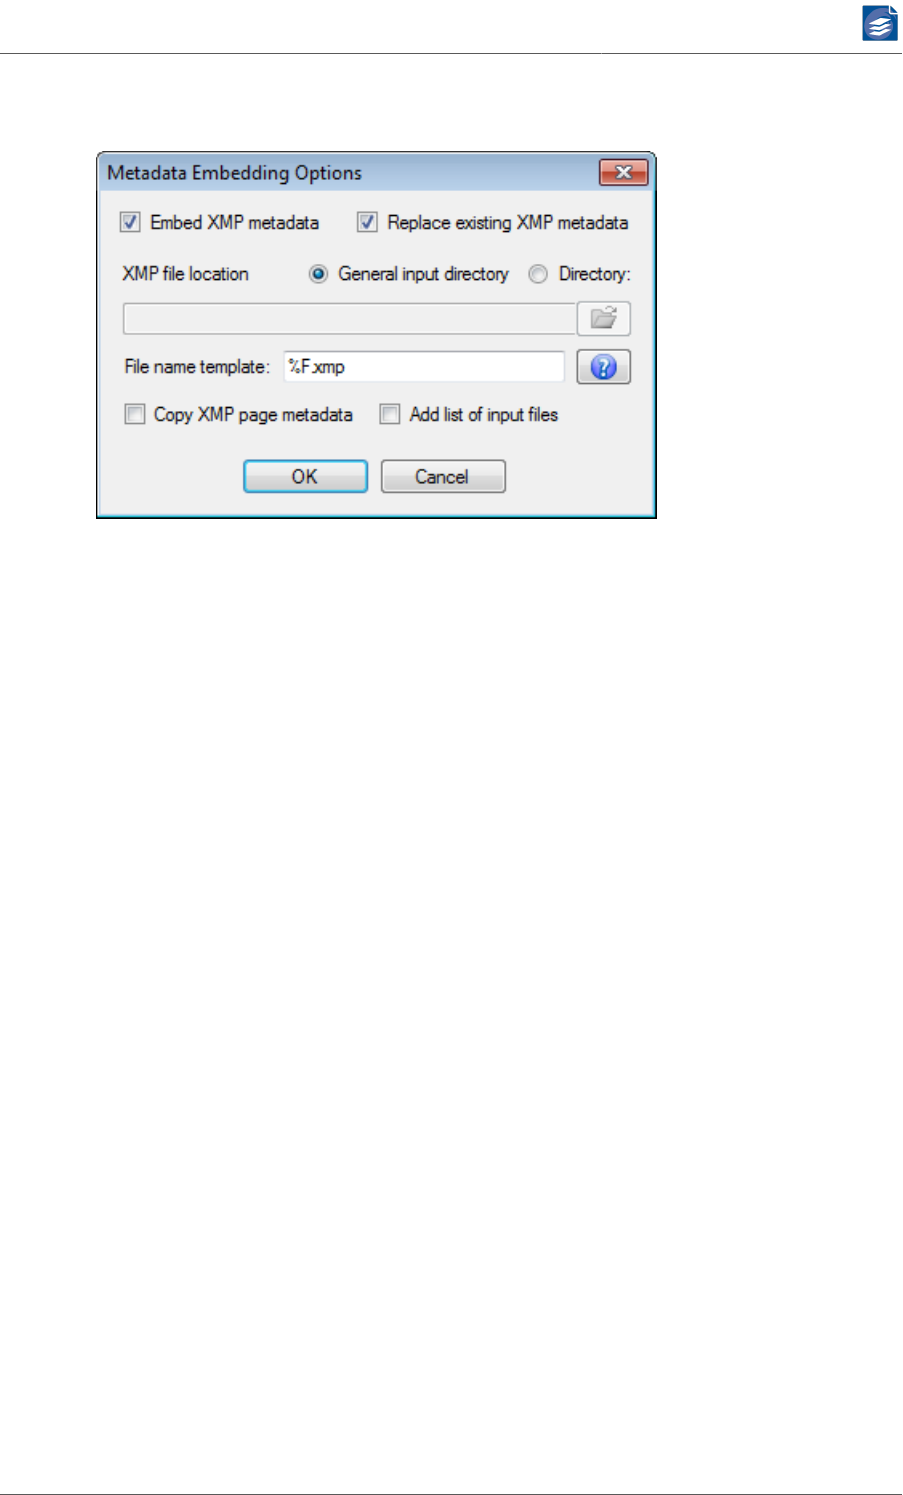
PDF Compressor Manual
www.foxitsoftware.com
info@luratech.com Setting up Job Entries: 51
Options for Embedding XMP-Metadata
1. Select Embed XMP metadata to embed existing metadata in XMP XML format into your
output PDFs.
a. Select Replace existing XMP metadata to replace metadata already present in PDF
input files. Otherwise, these data will be preserved and the additional metadata will
be appended. This setting has no effect on input files in formats other than PDF.
b. Select General input directory to read XMP metadata files from the same directory as
the input files for compression. Alternatively, choose Directory and specify a different
source directory.
c. Under File name template you can specify a template to derive the name of each XMP
metadata input file from the name of the corresponding input file for compression.
See “Configuring Post-Processing” (p. 37), for more information on template syn-
tax.
d. Enable Copy XMP page metadata to copy XMP metadata embedded in TIFF files to
the metadata associated to the resulting PDF page.
e. Add list of input files may be selected to add the full path of every input file to a list
in the XMP document metadata.
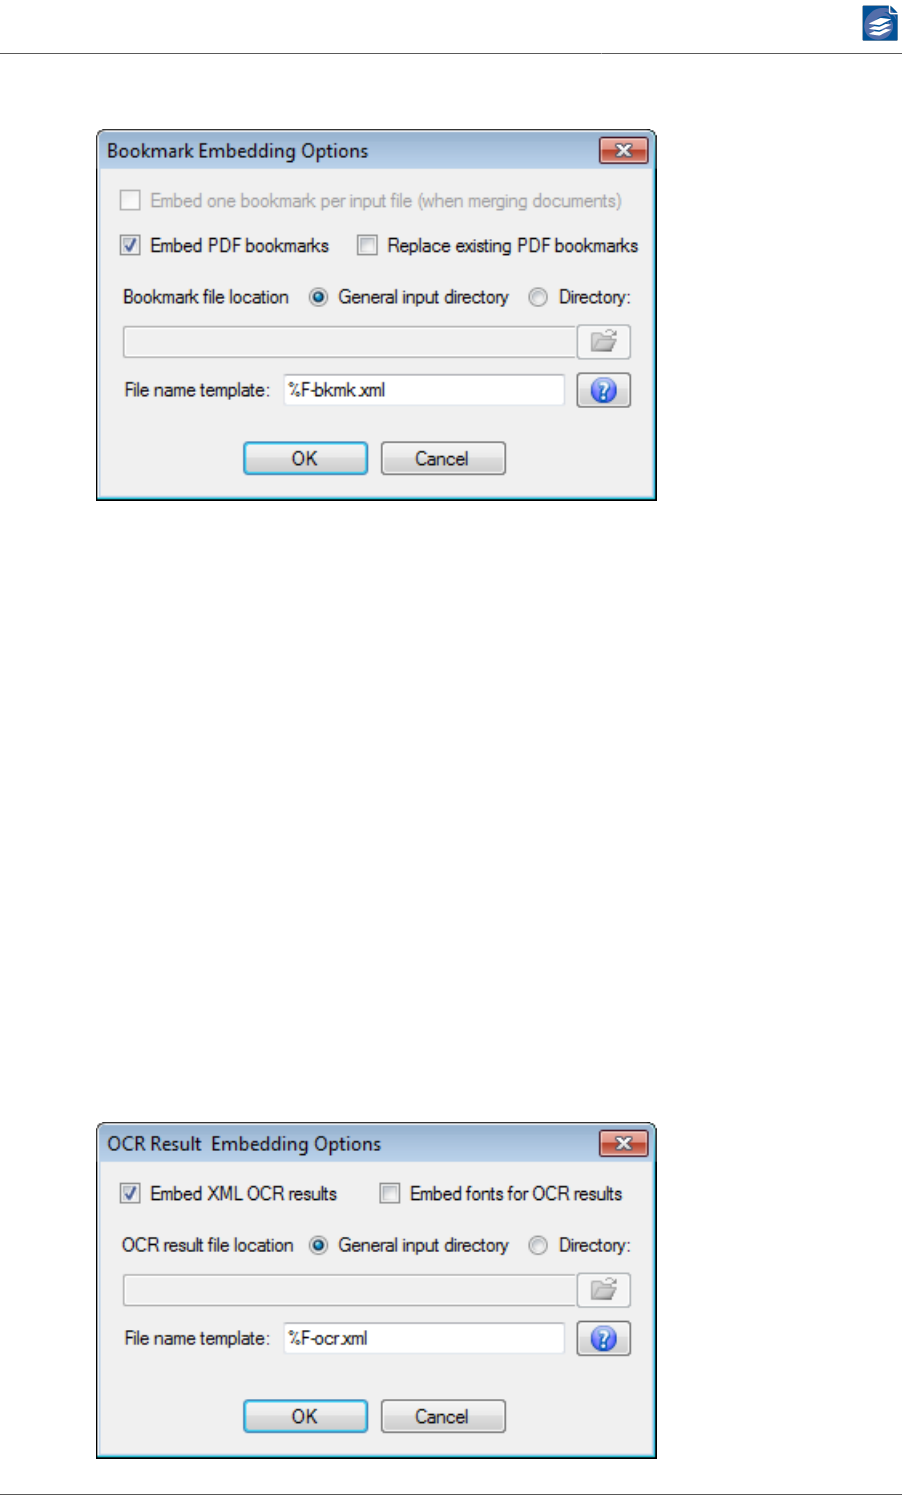
PDF Compressor Manual
www.foxitsoftware.com
info@luratech.com Setting up Job Entries: 52
Options for Embedding Bookmarks
1. The option Embed one bookmark per input file (…) is only enabled when merging input
documents. In that case, it will insert a bookmark for each input file, pointing to the
location of its original first page in the output file.
2. Select Embed PDF bookmarks to embed existing bookmarks in XML format into your out-
put PDFs. The XML encoding must be utf-8. A XML sample file and the schema definition
can be found in the examples subfolder of the installation.
a. Select Replace existing PDF bookmarks to replace bookmarks already present in PDF
input files. Otherwise, these entries will be preserved and the additional metadata
will be appended. This setting has no effect on input files in formats other than PDF.
b. Select General input directory to read PDF bookmark files from the same directory as
the input files for compression. Alternatively, choose Directory and specify a different
source directory.
c. Under File name template you can specify a template to derive the name of each PDF
bookmark input file from the name of the corresponding input file for compression.
See “Configuring Post-Processing” (p. 37), for more information on template syn-
tax.
Options for Embedding XML OCR results

PDF Compressor Manual
www.foxitsoftware.com
info@luratech.com Setting up Job Entries: 53
1. Select Embed XML OCR results to insert OCR results in ABBYY XML format into your out-
put PDF files. If such OCR results for your documents already exist, this is an alterna-
tive way to embed them as hidden text without submitting the files to OCR again. The
XML encoding must be UTF-8 and the XML schema location for the ABBYY XML format is
http://www.abbyy.com/FineReader_xml/FineReader6-schema-v1.xml.
Note: OCR results written to separate XML files by the PDF Compressor can only be em-
bedded later if they were created either with the full or simplified option.
Note: If PDF input files already contain hidden text and are processed in PDF optimiza-
tion mode, Embed XML OCR results will not remove or replace this text. Instead, PDF
Compressor will add an additional layer for further hidden text it embeds.
a. Some regulations for PDF documents require all fonts to embedded, even those used
only for hidden text. PDF and PDF/A do not require this and the default behavior of
PDF Compressor is not to embed these fonts. To comply with the more restrictive
rules, select Embed fonts for OCR results.
b. Select General input directory to read XML OCR result files from the same directory as
the input files for compression. Alternatively, choose Directory and specify a different
source directory.
c. Under File name template you can specify a template to derive the name of each read
XML OCR result file from the name of the corresponding input file for compression.
See “Configuring Post-Processing” (p. 37), for more information on template syn-
tax.
Options for File Embedding
The File Embedding group of the File Embedding Options dialog lets you configure options
for adding files as attachments to your PDF output files.
Note: This feature is not available for PDF/A-1 output. PDF/A-2 documents are restricted to
embed PDF/A-1 or PDF/A-2 only. If you want to create PDF/A documents and attach files
of any type or create ZUGFeRD compliant invoices the PDF Output Format has to be set to
PDF/A-3 (see “Configuring Data Output” (p. 25)).
Note: If input post-processing configured for the job (see also “Configuring Data Out-
put” (p. 25)) results in moving or deleting input files after processing is applied to files
to embed only, if they are single files, located next to the main input files (General input
directory), and have non-static file names (escape sequences in their file name templates).
1. Select Embed input file to embed the original source file(s) into your output PDFs.
2. The Embed ZUGFeRD XML option refers to a German national standard for embedding
XML invoice data as attachments into PDF/A-3 files. If this option is selected, PDF Com-
pressor automatically checks and complies with the constraints required by the ZUGFeRD
standard.
3. The button ZUGFeRD Embedding brings up the following dialog to configure the XML
invoice data embedding.
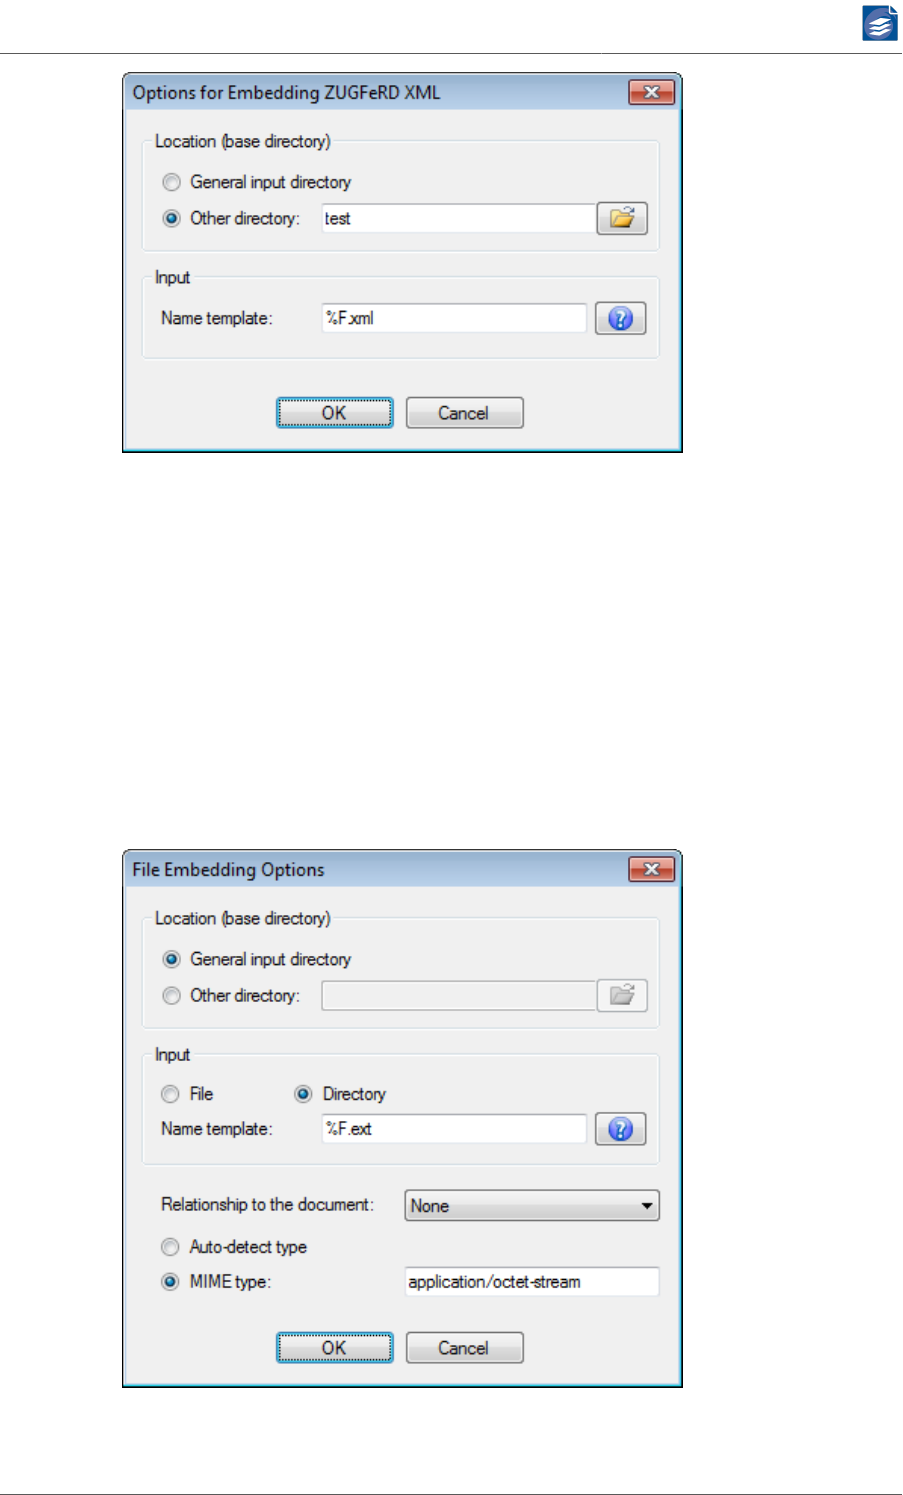
PDF Compressor Manual
www.foxitsoftware.com
info@luratech.com Setting up Job Entries: 54
a. Select General input directory to read the XML invoice data files from the same direc-
tory as the input files. Alternatively, choose Other directory and specify a different
source directory.
b. Under Input you can adapt the Name template to derive the name of each XML data
file attachment from the name of the corresponding input file. See “Template String
Syntax Description” (p. 64), for more information on template syntax.
4. Select Embed other file(s) to embed any other file as attachment into your output PDFs.
5. Clicking on File Embedding Options brings up the following dialog with more configura-
tion settings.

PDF Compressor Manual
www.foxitsoftware.com
info@luratech.com Setting up Job Entries: 55
a. Select General input directory to read the attachment files from the same directory
as the input files for compression. Alternatively, choose Other directory and specify
a different source directory.
b. Under Input select File to embed a single specific file per input file. Otherwise select
Directory to let PDF Compressor embed all files contained in one specific directory per
input file. The file or directory name must be configured via the Name template.
c. The Name template lets you specify a template to derive the name of each attach-
ment input file or directory from the name of the corresponding input file for com-
pression. See “Template String Syntax Description” (p. 64), for more information
on template syntax.
d. Select the Relationship to the document from the drop down list. The following values
are available:
i. None: Do not add any relationship information to the output PDFs. Note: PDF/A-3
requires a relationship be specified for each embedded file. Thus PDF Compressor
automatically sets the relationship to Unspecified when this option is selected and
compatibility is set to PDF/A-3.
ii. Unspecified: To be used when the relationship is not known or can’t be described
using one of the other values below.
iii. Source: To be used if the attachment is the original source material for the docu-
ment.
iv. Data: To be used if the attachment represents information used to derive a visual
presentation - such as for a table or a graph.
v. Alternative: To be used if the attachment is an alternative representation of con-
tent, for example audio.
vi. Supplement: To be used if the attachment represents a supplemental represen-
tation of the original source or data that may be more easily consumable (e.g. A
MathML version of an equation).
e. PDF Compressor can auto-detect the type of the attachment file for many common
formats like image files, office files etc. Alternatively you can explicitly specify the
MIME type for the attachment. Please use the correct syntax: type/subtype.
Configuring Header and Footer
The Header Options and Footer Options buttons let you configure additional text that is
added to each output PDF page. This can be used to add labels, e.g. "Draft", page numbers,
date and time of the conversion, and other information. The given text can be customized
concerning font, font face, color size and position. The Header Options and Footer Options
dialogs are identical except for their titles. Therefore we only describe the Header dialog
here.
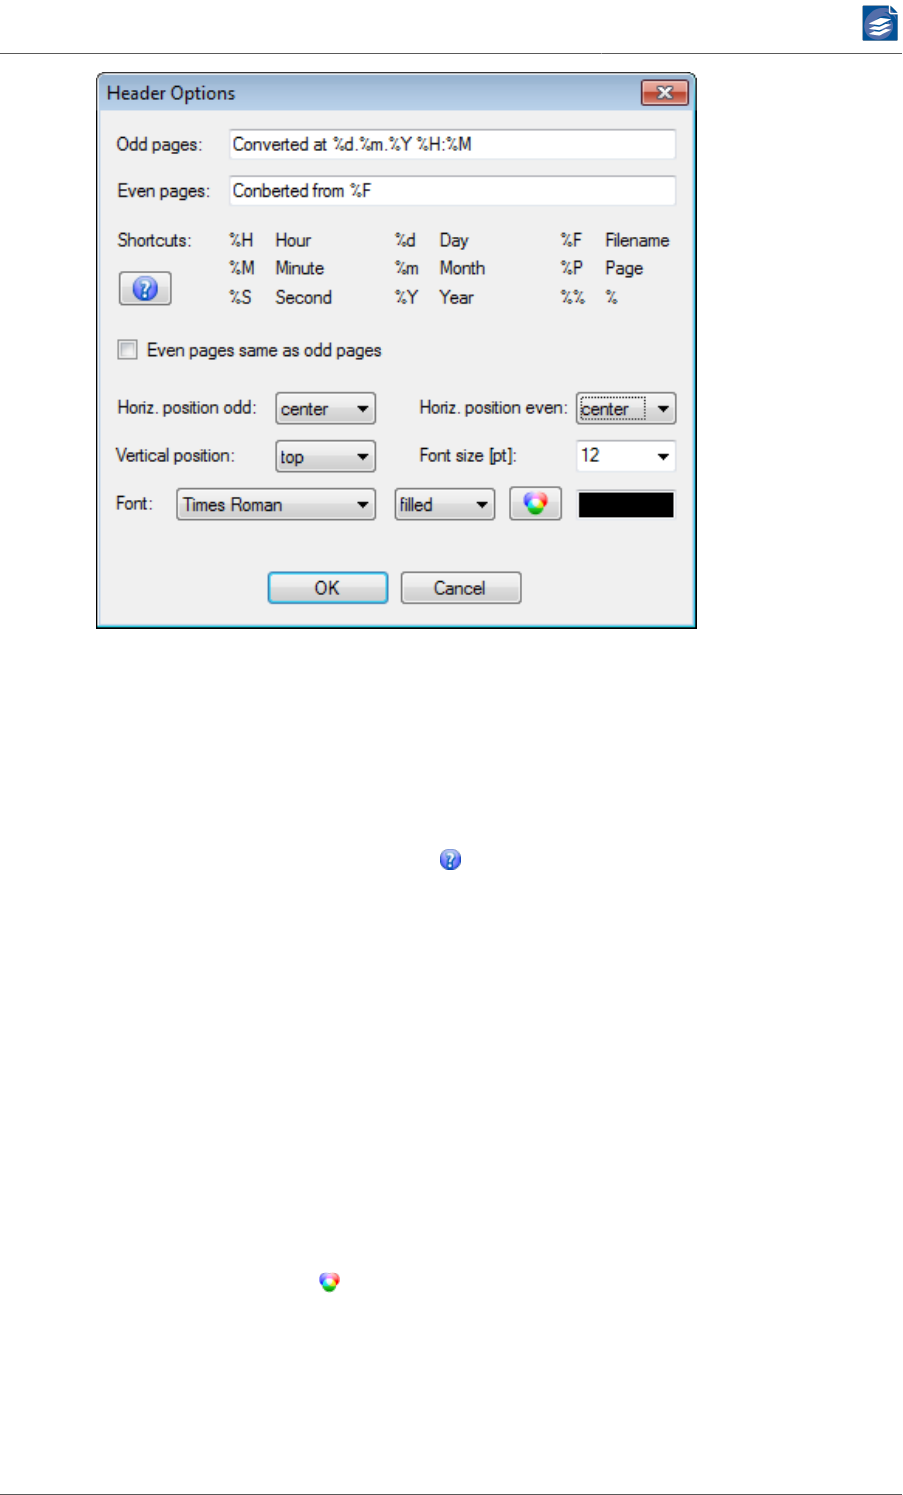
PDF Compressor Manual
www.foxitsoftware.com
info@luratech.com Setting up Job Entries: 56
For odd and even pages different text and horizontal position can be specified. If the cor-
responding text field is empty, no such text will be added. Enable Even pages same as odd
pages, if you want the same text to be added to each page.
1. Enter your text at Odd pages and/or Even pages. The entered string may contain escape
sequences that are replaced by corresponding substitute text once the header or footer
is printed onto the page. See “Configuring Data Output” (p. 25), for a list of possible
escape sequences. The help button will display such a list within the PDF Compressor
application.
2. The horizontal position can be set to right, center or left.
3. The vertical position can be set to top, middle or bottom.
4. The font size can be set to any positive number.
5. The three fonts Times, Helvetica and Courier can be chosen with font faces roman, bold,
italic and bold italic each.
6. Printed characters can be filled or outlined with the given color, or they can be invisible.
Invisible text might be used to allow text searching within the output PDF without chang-
ing the original document’s appearance.
7. Click the color button to select the font color.
Embedding Watermarks
The Watermark Options button displays a dialog which lets you add an additional image (e.g.
a company logo) to each of the output pages. The position, size, scaling and transparency
can be specified for the image to add.
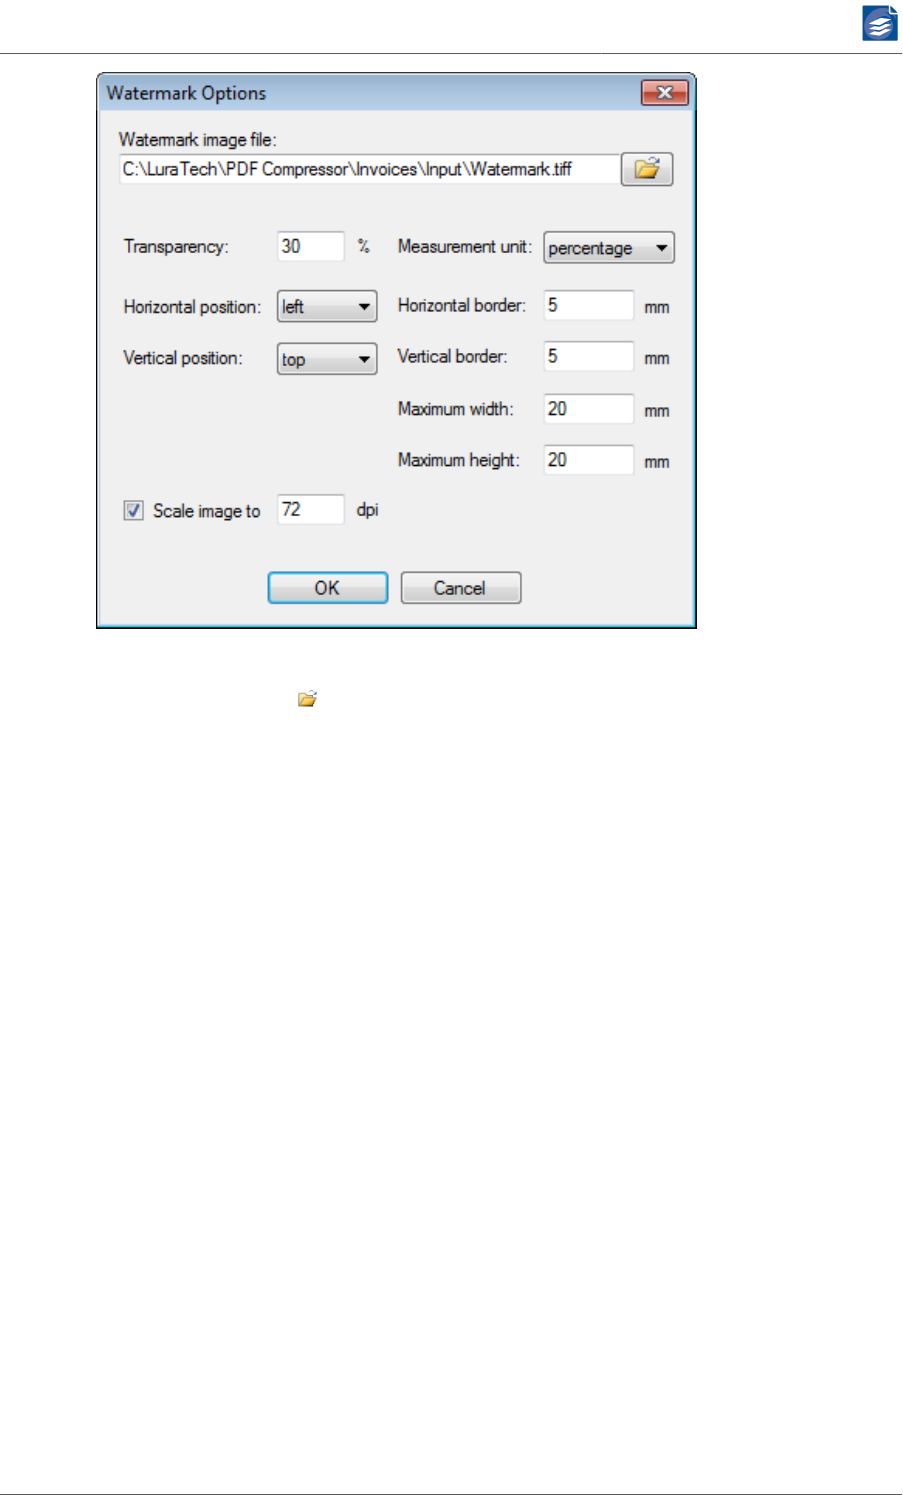
PDF Compressor Manual
www.foxitsoftware.com
info@luratech.com Setting up Job Entries: 57
1. Select the Watermark image file to be added to each output page of the PDF file. Use
the browse button to select the file. See “Choosing the Service Account” (p. 88) for
hints concerning the use of network shares. No watermark will be added if no filename
is given. Supported image file formats are the same as listed on the Input tab.
2. Set the Transparency to a value in the range of 0% (opaque) to 100% (invisible).
3. Select the Horizontal and Vertical position to place the image at any edge, any corner or
at the center of the page.
4. Set the Horizontal and Vertical Border to specify the distance between the image and
the page’s edges.
5. Set the Maximum width and height of the image. Keeping the aspect ratio of the original
image, the image will be scaled to fit into a box of the given maximum width and height.
6. Image dimensions and border length can be set in absolute Measurement units (select
mm), or as a percentage of the page’s dimensions. (Horizontal border and maximum
width as a percentage of the page width, vertical border and maximum height as a per-
centage of the page height.)
7. If the watermark image has high resolution, but is added with reduced size, then this may
cause unnecessary overhead and larger output file sizes than necessary. If the watermark
image is larger than necessary then it is best to reduce its resolution by selecting Scale
image to with an appropriate dpi value.
Example: logo.tif is a 4 by 2 inch image in 300 dpi (1200 x 600 pixels). It is added to the
output pages at a size of 1 x 0.5 inch. The resulting effective resolution would be 4 x 300
= 1200 dpi. You should set Scale image to 75 dpi to get an effective resolution of 300
dpi. The embedded image will only be 300 x 150 pixels, thus causing smaller output files
than without scaling.
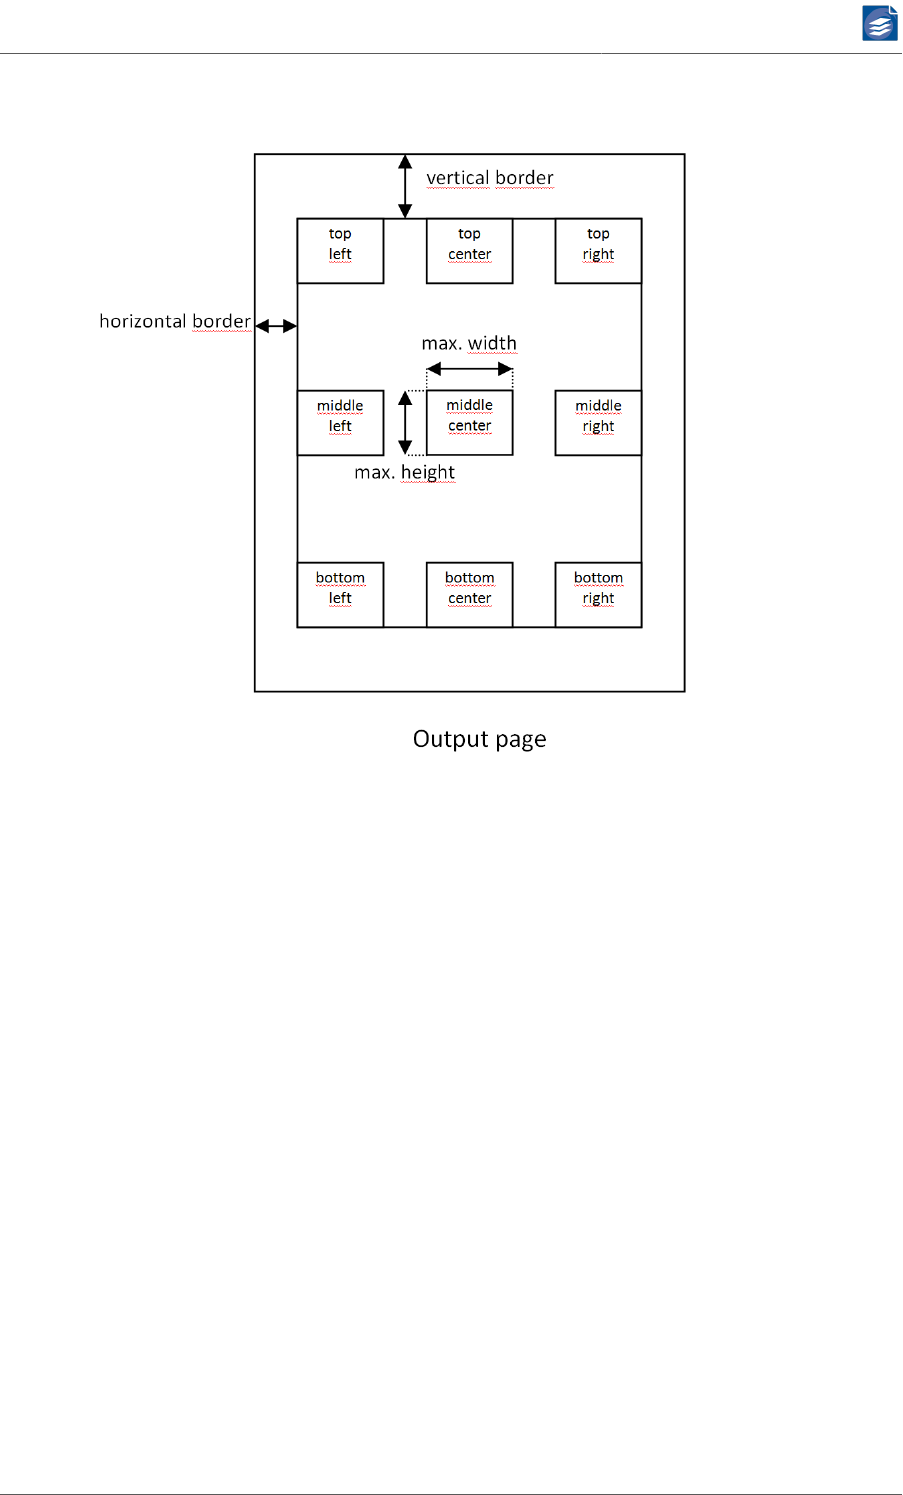
PDF Compressor Manual
www.foxitsoftware.com
info@luratech.com Setting up Job Entries: 58
The following diagram shows how the watermark image placement is calculated:
Configuring Document Compression
The Compression tab lets you configure the options for the image compression. These in-
clude the overall quality setting, adoption to special input document types and other op-
tions.
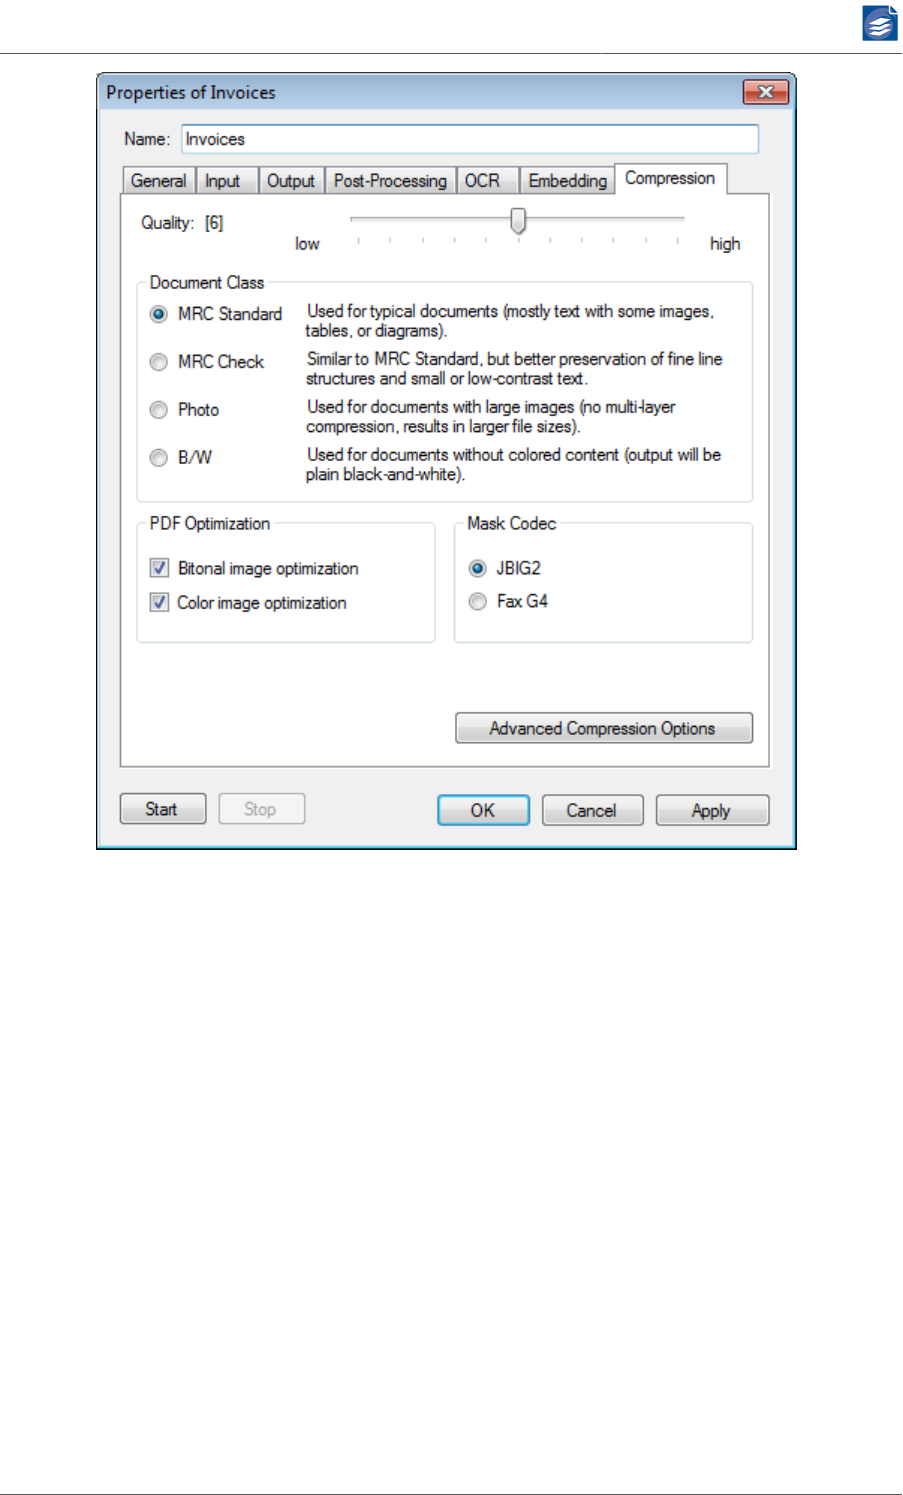
PDF Compressor Manual
www.foxitsoftware.com
info@luratech.com Setting up Job Entries: 59
1. Quality: Affects the compression of grayscale and color images in the PDF. A higher qual-
ity value results in higher PDF image quality, but PDF file sizes will increase. A lower qual-
ity value corresponds to higher image compression ratios and thus to smaller file sizes.
2. Document Class: You can use different classes to optimize the compression results for
specific input document types:
a. MRC Standard should be used for all purpose input documents. This is the default
setting.
b. MRC Check should be used to obtain better quality if the input document contains a
lot of fine structures like lines, thin graphical drawings, etc.
c. Photo turns off the segmentation into layers. Everything is put into the background
image layer. This should be only used if your input consists of images with no or little
text and/or graphics.
d. B/W (black & white) turns off image color. Your documents are stored in black and
white color, as if they had been transmitted by a b/w fax machine.
3. PDF Optimization: Optimization recodes bitonal and/or color images in the PDF docu-
ment using more efficient compression algorithms. This optimization will always be per-

PDF Compressor Manual
www.foxitsoftware.com
info@luratech.com Setting up Job Entries: 60
formed unless you set the Rasterize PDF Input setting to Always (compare “Configuring
Input Data” (p. 13)).
a. Enable Bitonal image optimization to apply recoding of bitonal images using advanced
JBIG2 compression. The JBIG2 options described under “Configuring Advanced Com-
pression Options” (p. 60) will be used for this recoding.
b. Enable Color image optimization to apply recoding of color images found within the
PDF document. The color images will be analyzed and, depending on their size and
resolution, be replaced by an MRC compressed version (JPEG 2000, if Reader™ 6.0 or
7.0 or PDF/A-2 or PDF/A-3 compatibility has been chosen). The compression options
described above apply here, too.
4. Mask Codec: You can choose between JBIG2 and Fax G4 compression for the text mask.
Fax G4 uses lossless image compression, whereas JBIG2 can be used for lossless and lossy
compression (further JBIG2 options can be set within the Advanced Compression Options
dialog, see Configuring Advanced Compression Options below). In lossless mode JBIG2
has a better compression performance than to Fax G4, resulting in smaller file sizes with
the same visual quality.
Configuring Advanced Compression Options
Use the Advanced Compression Options button on the Compression tab to access the ad-
vanced compression options dialog.
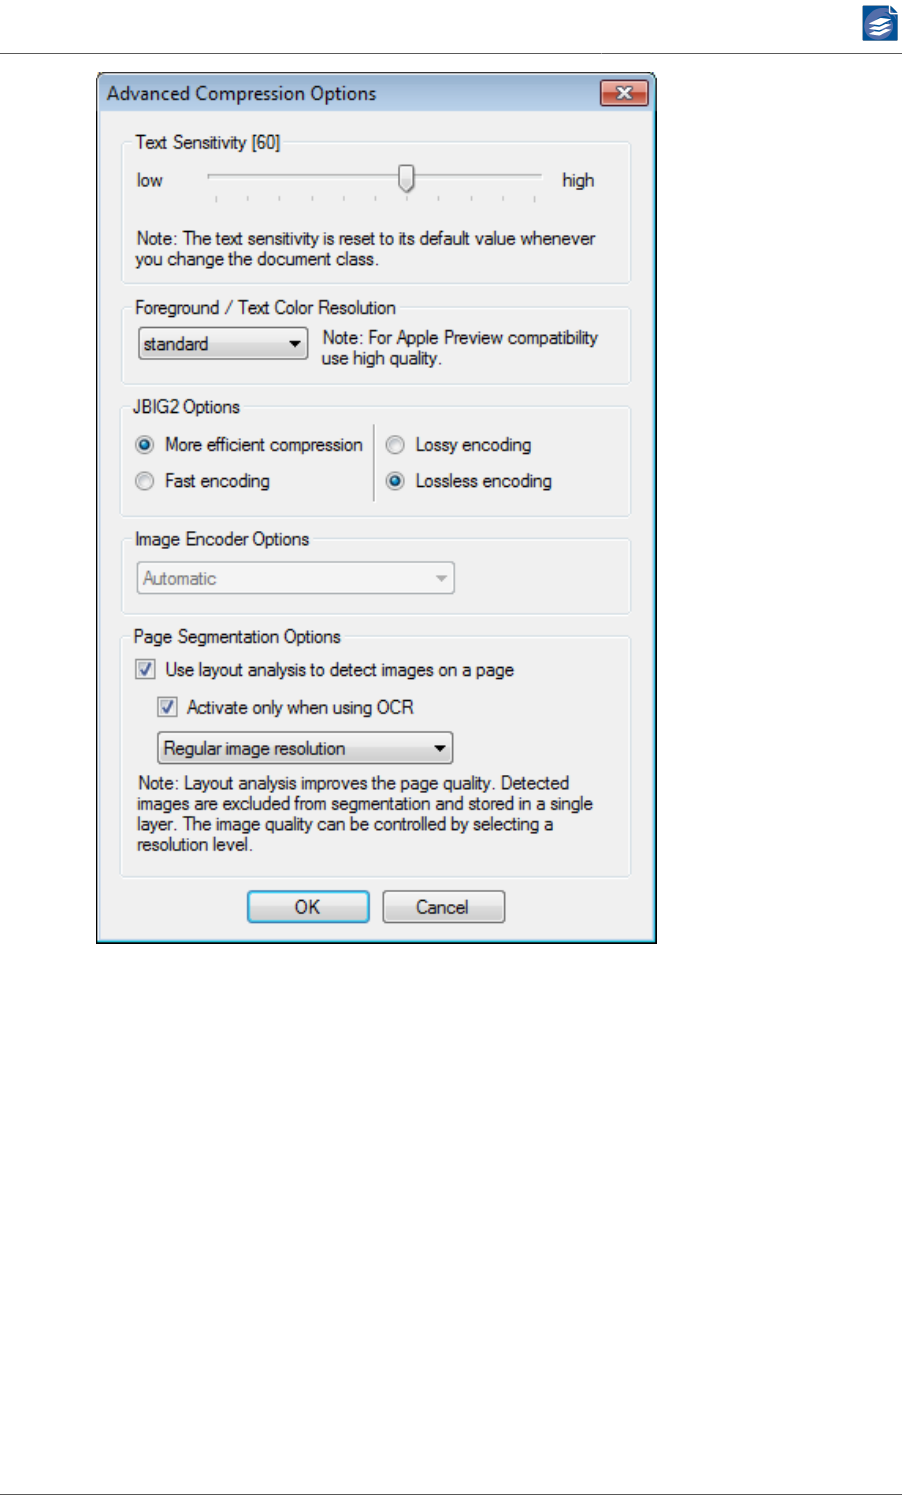
PDF Compressor Manual
www.foxitsoftware.com
info@luratech.com Setting up Job Entries: 61
1. The Text sensitivity parameter controls how much of the text will be put into the text
mask. A higher value for the text sensitivity may make the text appear bolder, whereas
a lower value may make it appear thinner. Normally values in the range 60 to 70 achieve
best results. However if the input images has low contrast, an adjustment of the text
sensitivity from its default value may give better results.
Note: Whenever you change the document class in the Encoder tab, the text sensitivity
is reset to its default value which depends on the document class.
2. The Foreground / Text Color Resolution affects the visual quality of colored text or lines
and the compatibility with some insufficient PDF Viewer applications. Some PDF Viewer
applications do not render pages in full quality in case the resolution of the foreground
image is lower than the foreground mask (standard). The following options are available:
a. Use standard foreground sub sampling for minimal file size.
b. increased quality will improve the visual quality of colored text and lines. The fore-
ground sub sampling is decreased at the cost of increased file size.

PDF Compressor Manual
www.foxitsoftware.com
info@luratech.com Setting up Job Entries: 62
c. high quality switches foreground sub sampling off. Additionally a higher foreground
image compression ratio is used to limit the increase in file size. Color reproduction for
text and lines is further improved. This option may be used to work around problems
with PDF Viewer applications that do not render the standard sub sampled foreground
in full quality.
d. max quality results in maximum text and line color quality at significantly increased
output file size. (No foreground sub sampling and standard compression ratio)
3. There are two JBIG2 Options: The first one selects from two different compression
schemes:
a. More efficient compression uses a sophisticated symbol matching algorithm that ob-
tains very high compression results, especially if the input image contains a lot of sim-
ilar patterns (like characters of a font). This option should normally be used.
b. Fast encoding disables the symbol matching, resulting in a slightly faster compression,
but also in larger file sizes. The second option is only available for high compression
efficiency:
c. Lossy encoding gives the smallest file sizes.
d. Lossless encoding gives larger file sizes, but does not change the text mask. Use this
option for 100% quality and to prevent symbol mismatches in case of low resolution
or low symbol quality.
4. Image Encoder Options determine which image codec is used for color images embedded
into the layers of the created PDF documents (e.g. text color and background image layer
when page segmentation is applied):
a. JPEG 2000 selects the newer JPEG 2000 compression.
b. JPEG selects the older DCT-based JPEG compression.
c. Automatic determines the selection of JPEG 2000 or JPEG compression based on the
size (in pixels) of the encoded image. Using Adobe™ Reader™, the display of document
pages with large JPEG 2000 images can become very slow or even faulty, depending
on the user interaction such as zooming or panning. To overcome this problem, the
Automatic mode uses JPEG instead of JPEG 2000 compression whenever the width or
height of an image is greater than 5120 pixels.
Note: This option is not available for Reader™ 5 or PDF/A-1 compatibility. These com-
patibility modes must use JPEG compression by definition.
Note: This option is not available for Reader™ 6, Reader™ 7, PDF/A-2, or PDF/A-3
compatibility when the Document Class is set to Photo with Quality 11 (lossless). This
special setting features a lossless compression for the page image. Since lossless com-
pression is not possible with JPEG, this mode always uses lossless JPEG 2000 compres-
sion.
5. Page Segmentation Options let you configure advanced options for the page segmenta-
tion. These options are only available when page segmentation is actually part of the
processing, i.e. for document classes MRC Standard or MRC Check.

PDF Compressor Manual
www.foxitsoftware.com
info@luratech.com Setting up Job Entries: 63
Enable Use layout analysis to detect images on a page to improve the visual quality of a
page. Detected images are excluded from the segmentation process and stored in a single
layer. This gives images a better appearance without any disturbances by segmentation
artifacts. The resolution of the detected images can be controlled as follows:
a. Regular image resolution sets the image resolution identical to the resolution used
for the background image. This obtains the highest compression rates.
b. Increased image resolution sets the image resolution slightly higher than the regular
background resolution. Images become sharper, but file sizes slightly increase.
c. High image resolution sets the image resolution to the maximum possible value to
obtain the best image quality. Compared to increased image resolution the file sizes
are even larger, but still smaller compared to the document class Photo, where no
segmentation is used.
This option is only available in either of the MRC compression modes. The detection
of images on a page does not increase the processing time if OCR is enabled. If the
compression is done without OCR, the detection of images adds a certain amount
to the overall processing time. Enable activate only when using OCR to only use this
feature when OCR is enabled. (So there is no increase in processing time, but advanced
image detection will not be used for job list entries without OCR.)
Note: The PDF layers option present in older versions of PDF Compressor has been moved
to the Advanced Output Options dialog described under “Configuring Advanced Output Op-
tions” (p. 30).
Note: The PDF input rasterization option present in older versions of PDF Compressor has
been moved to the Advanced Input Options dialog described under “Configuring Advanced
Input Options” (p. 20).
Setting up the Default Properties
Each job list entry has its own properties settings. There is one additional set of properties
that is not related to any specific job list entry. This set is called default properties. They are
used as a template whenever you create a new entry in the list. You can open the Default
Properties dialog by any of the following actions:
•Use the toolbar’s default properties button .
• Use the menu Entry → Edit Default Properties.
• When an entry’s properties dialog is already opened: Unselect the currently selected en-
try by clicking within the list window outside any entry.
The Default Properties dialog is similar to an entry’s Properties dialog. Only the few differ-
ences are described here.
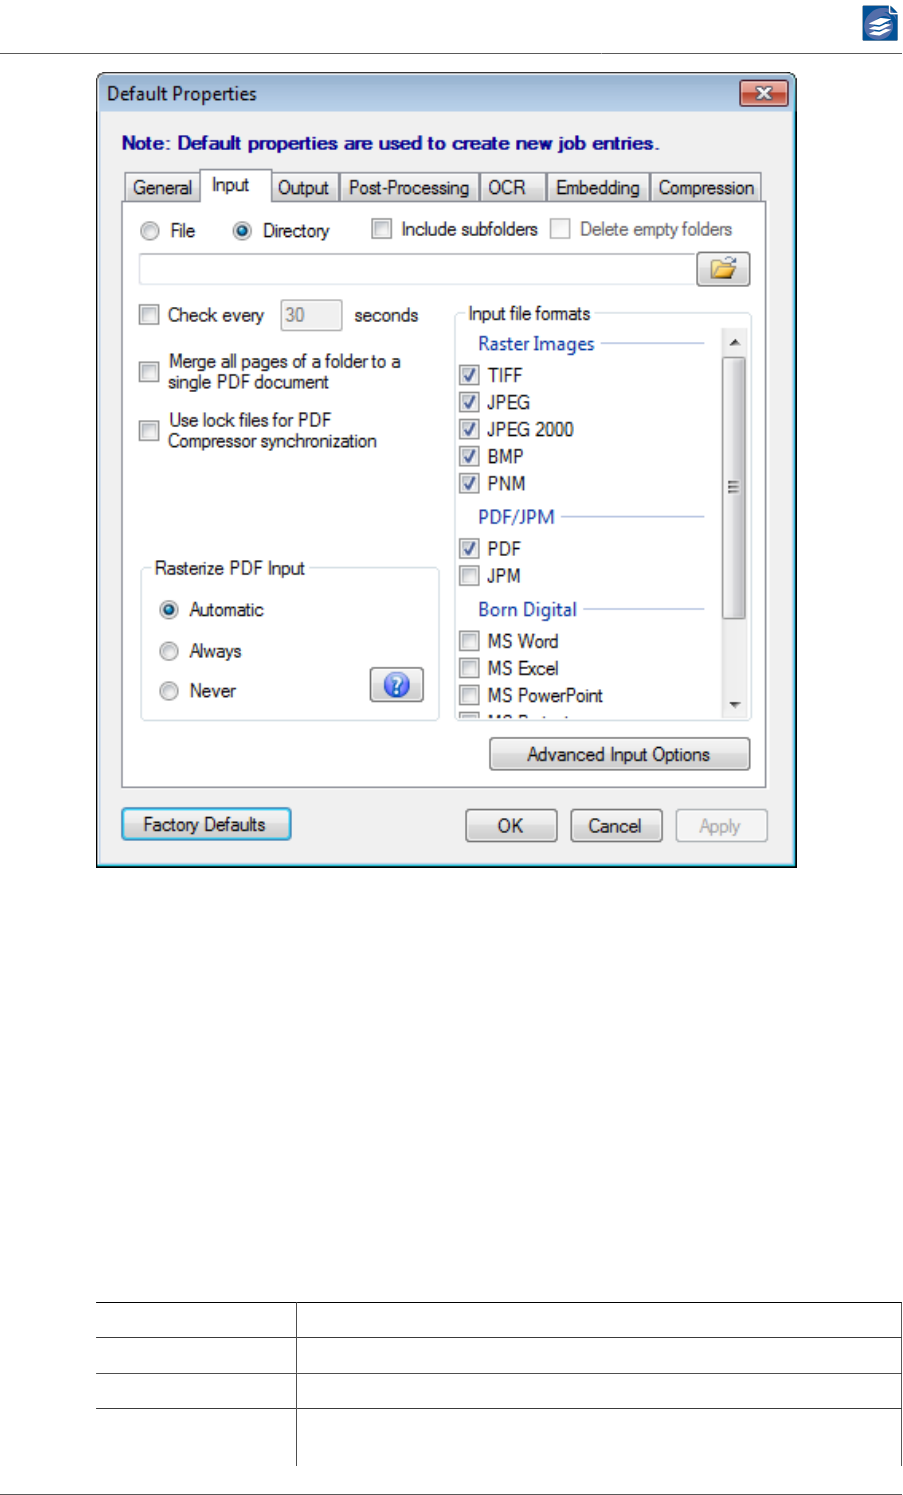
PDF Compressor Manual
www.foxitsoftware.com
info@luratech.com Setting up Job Entries: 64
•Default Properties has no name that can be edited.
• The Start and Stop buttons are missing (there is no related job to run). Instead you can
reset all parameters to the Factory Default values.
Template String Syntax Description
Template strings are used for PDF metadata (see “PDF Metadata” (p. 33)), headers
and footers (see “Configuring Header and Footer” (p. 55)), input file renaming (see also
“Configuring Post-Processing” (p. 37)), output file naming (see “Configuring Data Out-
put” (p. 25)), thumbnail file naming (see “Thumbnails” (p. 34)), data embedding and
file embedding (“Configuring File and Data Embedding” (p. 49)).
Restrictions
Used in Restriction
PDF Metadata Must not contain %Q or its versions with modifiers.
Header and Footer Must not contain %L, %N, %C, %V or its versions with modifiers.
Input file renaming Must contain %F or its version with modifiers, or regular expres-
sion substitution for F. Must not contain %P, %Q, %L, %N, %C, %V

PDF Compressor Manual
www.foxitsoftware.com
info@luratech.com Setting up Job Entries: 65
Used in Restriction
or its versions with modifiers. Must not contain any characters dis-
allowed for file names.
XMP metadata, PDF
bookmarks, XML
OCR results, file at-
tachments:
Must not contain %Q or its versions with modifiers. Must not con-
tain any characters disallowed for file names. May be constant
strings without any % escape sequences.
Output file naming Must at least contain one of %P, %L, %C or its versions with mod-
ifiers when page based output splitting is enabled. Must at least
contain one of %P, %L, %C, %V or its versions with modifiers when
barcode triggered output splitting is enabled. Must not contain
%Q or its versions with modifiers. Must not contain any characters
disallowed for file names.
Thumbnail file nam-
ing
Must not contain %L, %N or its versions with modifiers. Must not
contain any characters disallowed for file names.
Escape Sequences
Escape
Sequence
Substitution
%% Percent sign "%"
%F Input file or directory name.
File name in case of single file input processing. When merging files from
a folder it may also represent the folder name. In header and footer as
well as in file name templates for additional input %F always prints the file
name and not the name of the folder.
The file name is printed without extender in file name templates and PDF
metadata.
%P First page number that is output to the PDF file (metadata or output file
name) or
Current page number in output document (header, footer, or thumbnail
output)
%Q Current page number in output chunk
%L Last page number that is output to the PDF file
%N Number of pages output to the PDF file
%C Number of PDF file when using output splitting
%V Value of the last detected barcode
%a Abbreviated weekday name
%A Full weekday name
%b Abbreviated month name
%B Full month name
%c Date and time representation appropriate for locale
%d Day of month as decimal number (01 - 31)
%H Hour in 24-hour format (00 - 23)
%I Hour in 12-hour format (01 - 12)
PDF Compressor Manual
www.foxitsoftware.com
info@luratech.com Setting up Job Entries: 66
Escape
Sequence
Substitution
%j Day of year as decimal number (001 - 366)
%m Month as decimal number (01 - 12)
%M Minute as decimal number (00 - 59)
%p Current locale’s A.M./P.M. indicator for 12-hour clock
%S Second as decimal number (00 - 59)
%U Week of year as decimal number, with Sunday as first day of week (00 -
53)
%w Weekday as decimal number (0 - 6; Sunday is 0)
%W Week of year as decimal number, with Monday as first day of week (00 -
53)
%x Date representation for current locale
%X Time representation for current locale
%y Year without century, as decimal number (00 - 99)
%Y Year with century, as decimal number
%z, %Z Time-zone name or abbreviation; no characters if time zone is unknown
%#c Long date and time representation, appropriate for current locale. For ex-
ample: "Tuesday, March 14, 1995, 12:41:29".
%#x Long date representation, appropriate to current locale. For example:
"Tuesday, March 14, 1995".
%[, %], %?,
%:
Used for conditional and regular expression substitutions. See “Con-
ditional Substitution” (p. 67) and “Regular Expression Substitu-
tion” (p. 68).
Moreover adding the character '#' to shortcuts that output numbers, will remove leading
zeros in most cases.
Modifiers
Escape
Sequence
Modifier Function
%P %0<number>P
%Q %0<number>Q
%L %0<number>L
%N %0<number>N
%C %0<number>C
Minimal number of output characters.
This modifier defines the number of preced-
ing zeros used to format a page number.
The modifier starts with the digit '0' and is
followed by one or more digits, representing
the minimal number of output characters as
a decimal number.
%F %<number>-<number>F Defines a substring of the given file name
This modifier is composed by two integer
numbers separated by a minus sign '-'. If the
modifier is present, only a substring of the
filename will be substituted. The numbers
represent the first and the last character in-
dex (counting from 0) of the substring. Any
PDF Compressor Manual
www.foxitsoftware.com
info@luratech.com Setting up Job Entries: 67
Escape
Sequence
Modifier Function
number greater or equal to the string length
will be adjusted to represent the last charac-
ter of the string.
Modifier Examples
Escape
Sequence
Page Number Substitution
%02P 1 01
%02P 9 09
%02P 10 10
%02P 100 100
Escape File name Substitution
%3-10F 01_myfile01_xyz.tif myfile01.pdf
%3-99F 01_myfile01_xyz.tif myfile01_xyz.pdf
%50-60 01_myfile01_xyz.tif z.pdf
%10-3F 01_myfile01_xyz.tif considered as an error
Examples
When a 10 pages document "MyFile.tif" is output into chunks of 4 pages, the output file
template
"%F, Part %C, Pages %02P - %02L"
will output the files
"MyFile, Part 1, Pages 01 - 04.pdf"
"MyFile, Part 2, Pages 05 - 08.pdf"
"MyFile, Part 3, Pages 09 - 10.pdf"
Conditional Substitution
The following syntax can be used to make a template string substitution dependent from
a condition:
Condition Syntax Substitution
%[<condition>%?<string1>%:<string2>%] <string1> if <condition> is true,
<string2> otherwise
Currently the following conditions are defined:
<condition> Description
C True if the number of output chunks is greater than 1 or unknown.
False otherwise.
V True if the value of the last detected barcode (%V) is not empty (a bar-
code was detected).

PDF Compressor Manual
www.foxitsoftware.com
info@luratech.com Setting up Job Entries: 68
Examples
Output Chunks
The template
"%F, %[C%?Part %C, %:%]Pages %02P - %02L"
outputs the 10 pages document "MyFile.tif" with a chunk size of 5 pages to
"MyFile, Part 1, Pages 01 - 05.pdf"
"MyFile, Part 2, Pages 06 - 10.pdf"
and the 5 pages document "MyShortFile.tif" with the same chunk size to
"MyShortFile, Pages 01 - 05.pdf"
Barcode Renaming
The template
"%[V%?%V%:%F%]"
names the output file according to the value of the barcode found in the document (%V).
If barcode detection fails for a document however, the output is named like the input file
(%F) as a fallback.
Barcode Splitting
The template
"%F - %[V%?%V%:PREFIX%] (%02P - %02L)"
outputs for a document "MyFile.tif" with barcodes "Chapter 1" on page 3 and "Chapter 2"
on page 7 the following chunks:
"MyFile - PREFIX (01 - 02).pdf"
"MyFile - Chapter 1 (03 - 06).pdf"
"MyFile - Chapter 2 (07 - 10).pdf"
Regular Expression Substitution
The regular expression substitution syntax is defined by:
%[<input>%?<regexp>%:<replacement>%]
<input> identifies the input string the regular expression substitution is applied to:
<input> Description
F Input file (or directory) name. File name for single file input process-
ing, directory name when merging files from a directory into a single
PDF output file. The file name is printed without file extension for PDF
metadata, input file renaming, and output file renaming.
<regexp> is the regular expression. It implements the commonly used syntax for regular
expressions defined as follows:
PDF Compressor Manual
www.foxitsoftware.com
info@luratech.com Setting up Job Entries: 69
A regular expression is zero or more branches, separated by '|'. It matches anything that
matches one of the branches.
A branch is zero or more pieces, concatenated. It matches a match for the first, followed
by a match for the second, etc.
A piece is an atom possibly followed by '*', '+' or '?'. An atom followed by '*' matches a
sequence of 0 or more matches of the atom. An atom followed by '+' matches a sequence
of 1 or more matches of the atom. An atom followed by '?' matches a match of the atom,
or the null string.
An atom is a regular expression in parentheses (matching a match for the regular expres-
sion), a range (see below), '.' (matching any single character), '^' (matching the null string at
the beginning of the input string), '$' (matching the null string at the end of the input string),
a '\' followed by a single character (matching that character), or a single character with no
other significance (matching that character).
A range is a sequence of characters enclosed in '[ ]'. It normally matches any single charac-
ter from the sequence. If the sequence begins with '^', it matches any single character not
from the rest of the sequence. If two characters in the sequence are separated by '-', this is
shorthand for the full list of ASCII characters between them (e.g. '[0-9]' matches any decimal
digit). To include a literal ']' in the sequence, make it the first character (following a possible
'^'). To include a literal '-', make it the first or last character.
<replacement> is the replacement string to be used to build up the output string if the
regular expression found a successful match. (If the regular expression has no match, the
output string will be a copy of the input string.) In case of a successful match, each character
in the replacement string will be copied to the output string except for the following special
characters:
Sequence Output
& The complete matched string
\1 Matched sub-string 1
and so on until …
\9 Matched sub-string 9
Regular Expression Substitution Example
The template
"%[F%?(.*)_From_[0-9]+_To_[0-9]+$%:\1%]_%P_To_%L"
outputs the 10 pages document "MyFile_From_1_To_10.tif" with a chunk size of 5 pages to
"MyFile_ 1_To_5.pdf"
"MyFile_ 6_To_10.pdf"
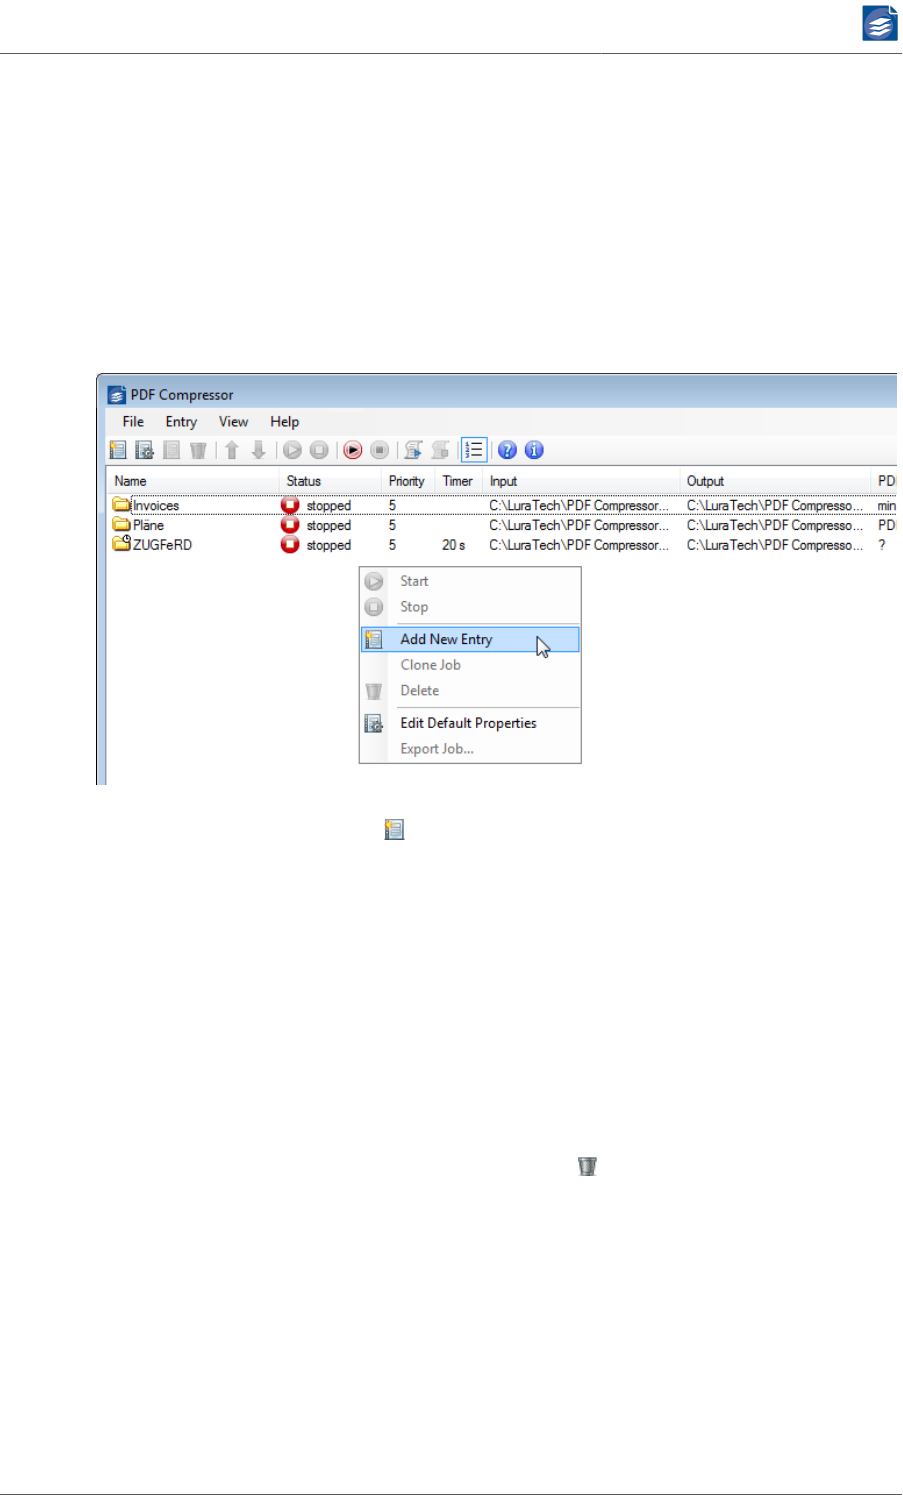
PDF Compressor Manual
www.foxitsoftware.com
info@luratech.com Managing the Job List: 70
Chapter 6. Managing the Job List
This section describes in detail all operations that can be performed on the job list.
Adding, Deleting and Copying Entries
New entries can be added by any of the following actions:
• Using the context menu within an area of the list that is outside any existing entry.
•Use the toolbar’s new button .
• Use the menu Entry → Add New Entry.
• Drag & drop files and/or folders from the Windows™ Explorer to the list window.
When a new entry is created, all settings from the Default Properties are copied to the
new entry. The name is set to "Entry <num>", where <num> is the first available number.
When the entry is created by drag & drop the input path is set accordingly. The output path
defaults to the input path in this case. Entries can be deleted by any of the following actions:
• Use the context menu on top of the entry to be deleted. Choose Delete.
•Select an entry and use the toolbar’s delete button .
• Select an entry and use the menu Entry → Delete.
All entries can be deleted by use of the menu File → Delete All Job Entries. Sometimes it
is useful to create a copy of an existing entry (e.g. you might only want to change the com-
pression quality and output folder for comparison reasons). An entry can be copied by any
of the following actions:
• Use the context menu on top of the entry to be deleted. Choose Insert Copy.
• Select an entry and use the menu Entry → Insert Copy.
PDF Compressor Manual
www.foxitsoftware.com
info@luratech.com Managing the Job List: 71
Changing the Sequence of Job Entries
To change the order of the list, you can move entries up and down:
•Select an entry and use the toolbar’s up and down buttons.
• Select an entry and use the menu Entry → Move Up or Entry → Move Down.
See “Priority Processing” (p. 82), for details on the processing order of job list entries.
Starting and Stopping Job Entries
Individual Entries
A selected entry can be started and stopped (aborted) by any of the following actions:
• Use the context menu of the entry to be started or stopped. Choose Start or Stop.
•Select an entry and use the toolbar’s start and stop buttons.
• Select an entry and use the menu Entry → Start or Entry → Stop.
• Use the Start and Stop buttons of the entries Properties dialog.
All Entries
All entries can be started or stopped simultaneously by any of the following actions:
•Use the toolbar buttons or .
• Use the menu File → Start All Job Entries or File → Stop All Job Entries.
• Use the context menu of the PDF Compressor’s taskbar icon (right mouse click) and
choose Start All or Stop All Job Entries.
Monitoring Jobs
The status of all jobs is listed within the job list. It can be one of the following:
Status Description
no service
The underlying PDF Compressor service is stopped or has not been
installed. See “Managing the PDF Compressor Service” (p. 87)
for details.

PDF Compressor Manual
www.foxitsoftware.com
info@luratech.com Managing the Job List: 72
Status Description
stopped The job is stopped. No file conversion will take place.
starting
A signal has been sent from the GUI to the PDF Compressor ser-
vice to start the job. The status will soon change to started or
working.
working The job has been started, and a file conversion is currently per-
formed.
working The job has been started and is within the group of same priority
jobs that are about to be processed in an interleaved order.
monitoring The job is a hot folder that is idle and waiting for new files to ap-
pear.
started The job has been started and is waiting for other higher priority
jobs to finish before it becomes working itself.a
stopping A signal has been sent from the GUI to the PDF Compressor ser-
vice to stop the job. The status will soon change to stopped.
aIn case priority processing is switched off, the job is waiting for preceeding jobs to finish working. The job will start
after all preceeding jobs in the list are finished. See also “Priority Processing Order” (p. 11).
Importing and Exporting Job settings
The settings of entries within a job list can be exported to a file or restored from a file by
use of the menus:
•Entry → Export job… (single entry)
•File → Export job list… (all entries)
•File → Import job list… (overwrites existing)
•File → Append job list… (imports a job list by appending its entries to the current list)
This can be used for backup purposes. Append job list can be used to merge multiple job
lists into a single list. Settings of a single job can also be exported by right-clicking on the job
entry and selecting Export Job… from the context menu.
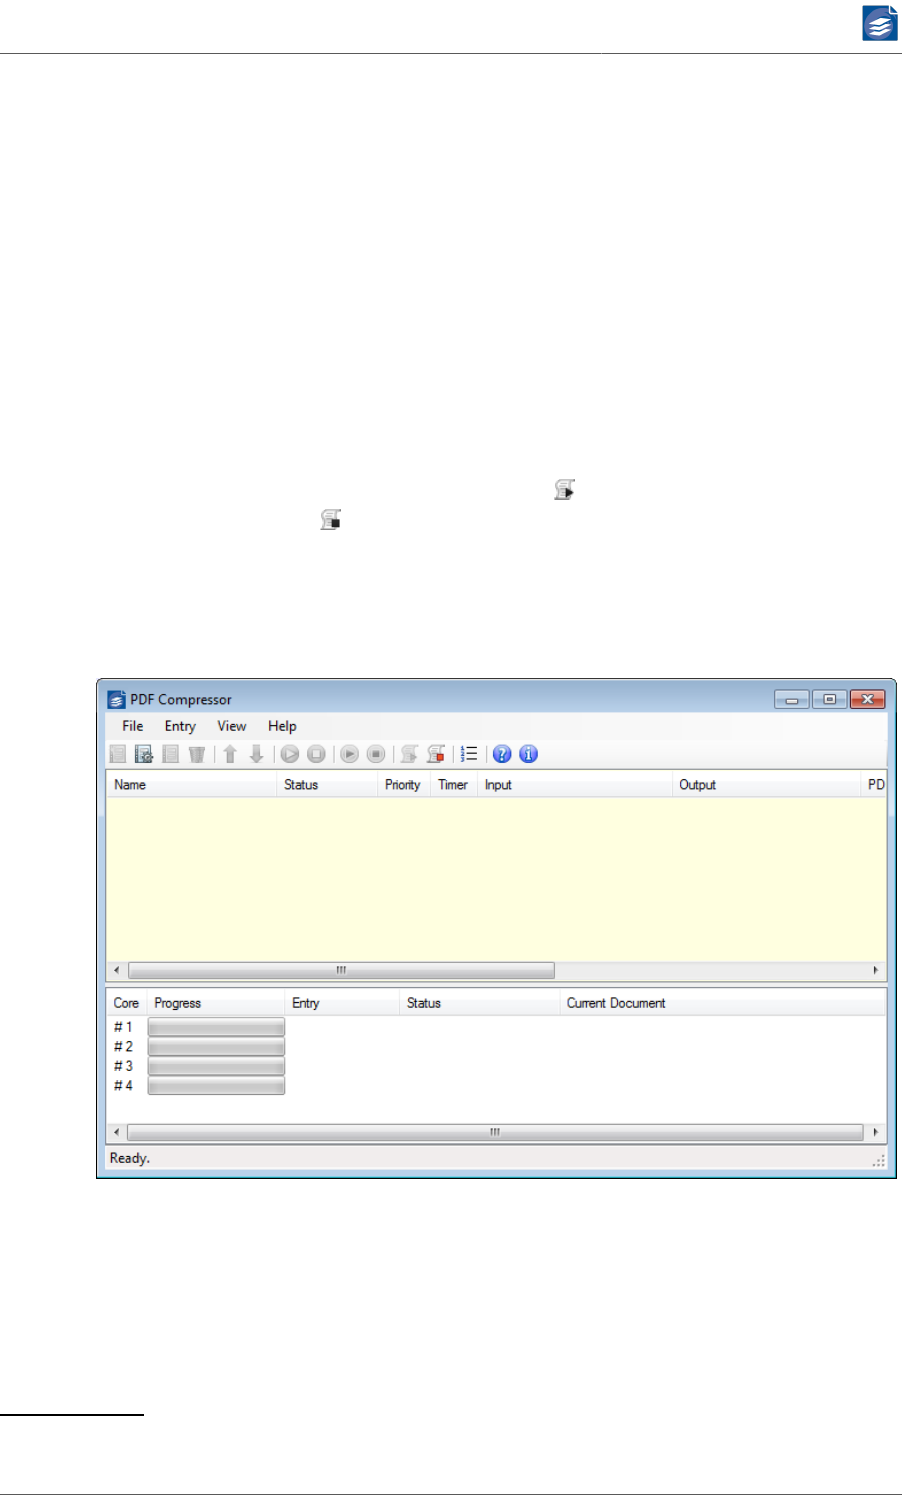
PDF Compressor Manual
www.foxitsoftware.com
info@luratech.com Automatic Job List Processing: 73
Chapter 7. Automatic Job List Processing
PDF Compressor can automatically load and process predefined job lists. Job lists are read
from simple text files that can be created by external applications. Please refer to “Job List
File Syntax” (p. 74), for a description of the syntax. Together with corresponding control
files this enables PDF Compressor to integrate with many different workflows.
After a list has been loaded, all its entries are automatically started. As soon as an entry
has been finished (and is shown as stopped) it is removed from the list.1 The next job list
is loaded when at least one processor core becomes idle and there are no jobs left waiting
to get processed - so jobs of different lists can be processed in parallel. This ensures that all
available processor cores run at full capacity as far as possible. Please find more details on
scheduling priorities in the section “Finding and Processing Job Lists” (p. 73).
The automatic job list processing is started by the menu File → Start Automatic Processing
→ Start Job List Processing or the toolbar button . Use the menu File → Stop Job List
Processing or the button to leave the job list processing mode.
Job list processing is indicated by a yellow background color of the list window. This color
reminds you that in this mode almost all operations on job lists are prohibited. You cannot
add or delete entries, nor can you edit any property of an entry. It is the PDF Compressor
service that loads, processes and unloads the job lists.
Finding and Processing Job Lists
The PDF Compressor service is looking for job list files and its associated control files with-
in the folder that is specified by the Options dialog (see “Job List Processing” (p. 82)).
Whenever it finds one or more control files *.go it starts to process the oldest of these files.
This implements a first in, first out strategy. It is also possible to set priorities for very im-
portant jobs. (see “Job List File Priorities” (p. 74) for details).
1Hotfolder jobs will run as normal jobs and only check for input files once at start. Jobs need to stop automatically for automatic
processing.

PDF Compressor Manual
www.foxitsoftware.com
info@luratech.com Automatic Job List Processing: 74
When a file
list0001.go [signal a job list to be processed]
is going to be processed, PDF Compressor tries to load a job list from the file
list0001.dat [the job list to be processed]
You will see the corresponding jobs in the PDF Compressor’s list window. The format of the
*.dat files is the same as used for job list import and export.
During processing, the control file *.go is renamed to *.wrk. When all the entries of a list
have been processed without any error, the control file *.wrk is renamed to *.rdy:
list0001.rdy [processing is ready, all files succeeded]
If an error occurred with any of the processed files, the control file is renamed to *.err:
list0001.err [processing is ready, an error or abort occurred]
If the stop button is pressed while there are still running entries in the list, all entries are
aborted immediately, and the control file signals an error (*.err). This ensures that you will
only find list0001.rdy if all files has been successfully processed.
Job List File Priorities
After a list has been loaded, all its entries are automatically started. As soon as an entry has
finished it is removed from the list. The next job list is loaded when at least one processor
core becomes idle and there are no jobs left waiting to get processed - so jobs of different
lists can be processed in parallel. This ensures that all available processor cores run at full
capacity as far as possible.
To enforce pure sequential processing of job lists and the contained jobs, the processing
order can be set to List Processing Order mode (compare “Job List Processing” (p. 82)).
If this option is chosen, the next job list file is not loaded until processing all jobs from the
previous file has been completed.
In job list processing mode priorities assigned to individual job entries within a job list file
will not work. Priorities have to be assigned to the job list file as a whole using file extensions.
To this end file extensions ".go1" (highest priority) through ".go10" (lowest) can be used for
the job list files. Among files of the same priority the oldest ones are processed first. Any
file with a plain ".go" extension is given a priority between ".go5" and ".go6".
The option Complete all jobs of highest priority before starting further jobs does not affect
job list processing.
Job List File Syntax
Job list files *.dat are plain text files. You can view and edit them in a simple text editor. It is
recommended to work with automatically generated job list files as follows:
Set up your job list within PDF Compressor first. Export the job list to a file. Modify only the
basic entries explained in the list at the end of this section.
A job list file has the following structure:

PDF Compressor Manual
www.foxitsoftware.com
info@luratech.com Automatic Job List Processing: 75
A line with the keyword
FOXIT_PDF_COMPRESSOR_ENTRY_START_UTF8 <num>
starts a new entry in the list. <num> is the number of the entry counting from zero. This
number is written when exporting a list, but is ignored for import. The "_UTF8" bit serves
to clarify the text encoding. We highly recommend using Unicode UTF8 encoding, since it
will properly represent all sorts of special characters - such as accented vowels, German
umlauts and Slavic or Cyrillic characters - in paths, file names and other text strings.
As a fallback, the keyword
FOXIT_PDF_COMPRESSOR_ENTRY_START_ANSI <num>
can be used in cases where use of a Unicode compliant encoding is impossible and an ANSI
encoding must be used instead. The properties of a job list entry are given by a number of
lines, each of the form
<property_name> <value>
A <property_name> is an ASCII string defined by PDF Compressor. It does not contain
any white space. PDF Compressor reads known names, and it ignores lines with unknown
names.
A <value> is either a decimal integer like 300 or a string in quotation marks like "Entry 01".
Note that strings do not escape any contained quotation character ". A string begins after
the first occurrence of the character " in a line and ends just before the last occurrence of
the character ". Examples:
name "Entry 01" # set the name of the entry to Entry 01
name "Entry "01"" # set the name of the entry to Entry "01"
Line feeds (hex 0A), carriage returns (hex 0D) and the character # are escaped by the fol-
lowing sequences: #0A, #0D, and ##. No other substitutions occur. Example:
keywords "Key ##1#0D#0AKey ##2"
sets the keyword metadata field to two lines Key #1 and Key #2 using a carriage return /
line feed for the line separator.
A job list entry within a job list file doesn’t have to contain all the defined <property_name>
keywords. When loading an entry, the value of a property is calculated as follows:
1. Use the default value. See Section “Setting up the Default Properties” (p. 63), on how
to setup the general default values. For a single job list file with several jobs/entries the
general default can be overwritten by a file specific default. Every job list entry containing
the property listdefault with a value of 1 overwrites the default with its own property
values.
2. If a corresponding <property_name> is found, use the specified value instead of the de-
fault.
The following list contains the most important keywords used to create custom job list files:
<proper-
ty_name>
Type <value>
name string Name of the entry

PDF Compressor Manual
www.foxitsoftware.com
info@luratech.com Automatic Job List Processing: 76
<proper-
ty_name>
Type <value>
pathIn string Path of the input directory or file (see also isDir)
isDir integer 0 = pathIn is a file
1 = pathIn is a directory
recurse integer 0 = do not scan input directories recursively
1 = scan input directories recursively
pathOut string Path of the output directory (see also outNext)
outNext integer 0 = place output files in the directory specified by
pathOut
1 = place output files next to input files
pathMove string Path where to move input files after successful pro-
cessing (see also modeIn)
modeIn integer 0 = do not move input files
1 = delete input files
2 = move input files to the directory specified in
pathMove
pathErr string Path where to move input files after an error oc-
curred during processing (see also moveOnErr)
moveOnErr integer 0 = do not move input files on error
1 = move input files on error to the directory speci-
fied in pathErr
title string PDF metadata "title"
author string PDF metadata "author"
subject string PDF metadata "subject"
keywords string PDF metadata "keywords"
New property names and/or more possible values of existing names will be added in future
releases of PDF Compressor. However, Foxit Europe will keep existing names, values and
semantics compatible as far as possible.
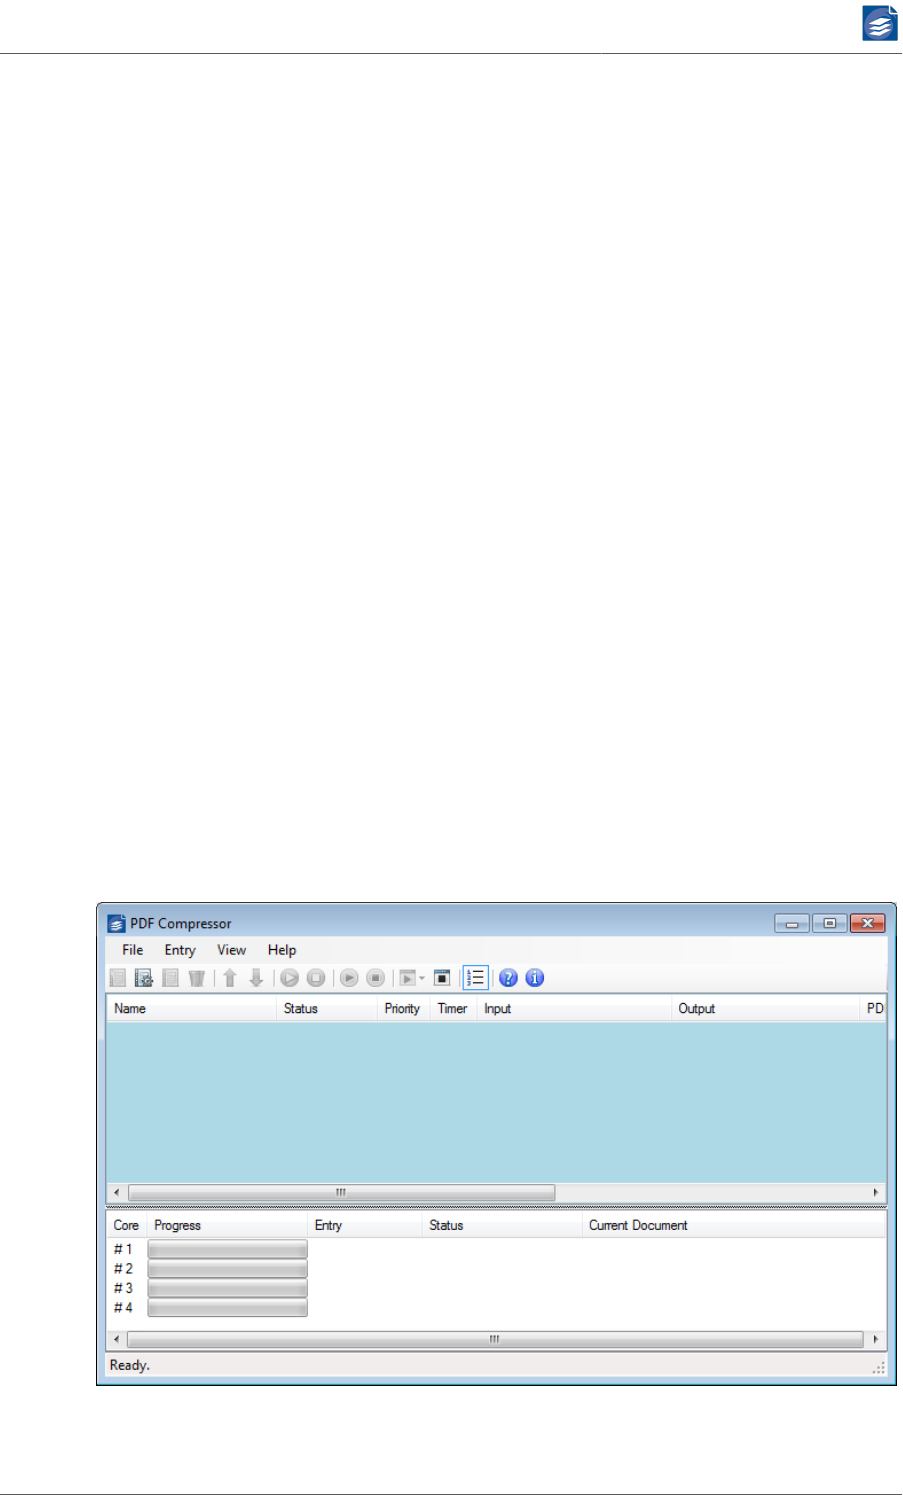
PDF Compressor Manual
www.foxitsoftware.com
info@luratech.com Submitting Jobs via the PDF Compressor API: 77
Chapter 8. Submitting Jobs via the PDF
Compressor API
The PDF Compressor API (for Application Programming Interface) is an additional interface
to the PDF Compressor Service introduced with version 7.2. Using this interface 3rd party
Windows™ applications and services can programmatically submit jobs to a PDF CE instance
running on the same computer.
To make use of the API an external program must link against a DLL distributed with the
regular PDF Compressor installation. No restrictions or extra licenses apply. The API DLL
comes in three different flavors
• a native 32 bit DLL with a C programming interface,
• a native 64 bit DLL with a C programming interface,
• a .NET 2.0 Assembly for both 32 and 64 bit environments, which will internally load the
appropriate native version.
As all three interfaces offer equivalent functionality we refer to them collectively as API DLL
here. An application that has incorporated the PDF Compressor API DLL becomes an API
client. It can then create job configurations and submit them to the PDF Compressor via
synchronous or asynchronous function calls. The progress of these jobs can then be moni-
tored via callback functions and the caller can directly receive success or error messages.
In order to accept jobs submitted via the API the PDF Compressor Service must be put in API
Processing Mode. Similar to the Job List Processing Mode covered in the previous chapter
Chapter 7, Automatic Job List Processing (p. 73) it is a separate mode in which the PDF
Compressor solely accepts jobs issued through the API. The API Processing Mode is mutually
exclusive with standard processing and Job List Processing Mode.
The blue background color reminds that PDF Compressor is running in API Mode. Most in-
teractive operations on job lists are disabled. You cannot add or delete entries, nor can you

PDF Compressor Manual
www.foxitsoftware.com
info@luratech.com Submitting Jobs via the PDF Compressor API: 78
edit any property of an entry. It is the PDF Compressor service that loads and processes job
entries as submitted by the API clients and unloads them, once they have been completed.
API Job Lifecycle
In contrast to the rather persistent job entries of the PDF Compressor’s standard mode
in API Mode jobs have a more limited lifespan. An API client creates an instance of a job
configuration, either from default settings or by loading a configuration from a *.dat file
(compare “Job List File Syntax” (p. 74)).
An API Client can then access and modify all individual settings in this job configuration via
set and get functions. The entire scope of options of standard and Job List Processing mode
is available in API Mode, as well.
Once properly configured, the job can be submitted to the PDF Compressor for processing.
This, of course, requires a PDF Compressor service running in API Mode on the same com-
puter. For now, the API does not provide for remote access.
Note also, that input and output files are referenced through file system paths. For an API
job to succeed, these paths must be accessible by the PDF Compressor service. The API
does neither provide for passing the entire content of an input file programmatically to the
service, nor for receiving the result in a similar fashion. File input and output are performed
via the file system.
API jobs can be submitted either synchronously - meaning the call will only return when
the job has been completed - or asynchronously, where the function call will return imme-
diately.
The API client can provide a callback function to receive progress and status information re-
garding the submitted job. This information can also generally be retrieved using the client’s
reference handle to a submitted job.
A client can also prompt the server to abort a running job. Jobs can be submitted in a mul-
tithreaded and asynchronous fashion. If all processor cores on the server side are busy the
PDF Compressor service will queue the submitted jobs and process them according to pri-
ority (“Priority Processing Order” (p. 11)) and submission time.
The C/C++ API
The two native API DLLs reside in the api subfolder of the PDF Compressor’s installation fold-
er as PDF_CompApi_32.dll and PDF_CompApi_64.dll. The C header and library files required
to incorporate them in an API client can be found in the api\include folder. The api folder
also contains a PDF manual for the API and sample source code in the api\samples\ApiDe-
mo sub folder.
The .NET API
The api subfolder of the PDF Compressor’s installation also contains the .NET version of
the API DLL as PDF_CompApi.NET.dll. It is also accompanied by documentation and sample
source code in the api\samples\ApiDemo.NET. The API Assembly itself requires .NET 2.0,
but can be used with higher versions. The assembly is strongly named and can therefore be
installed in the Global Assembly Cache (GAC).
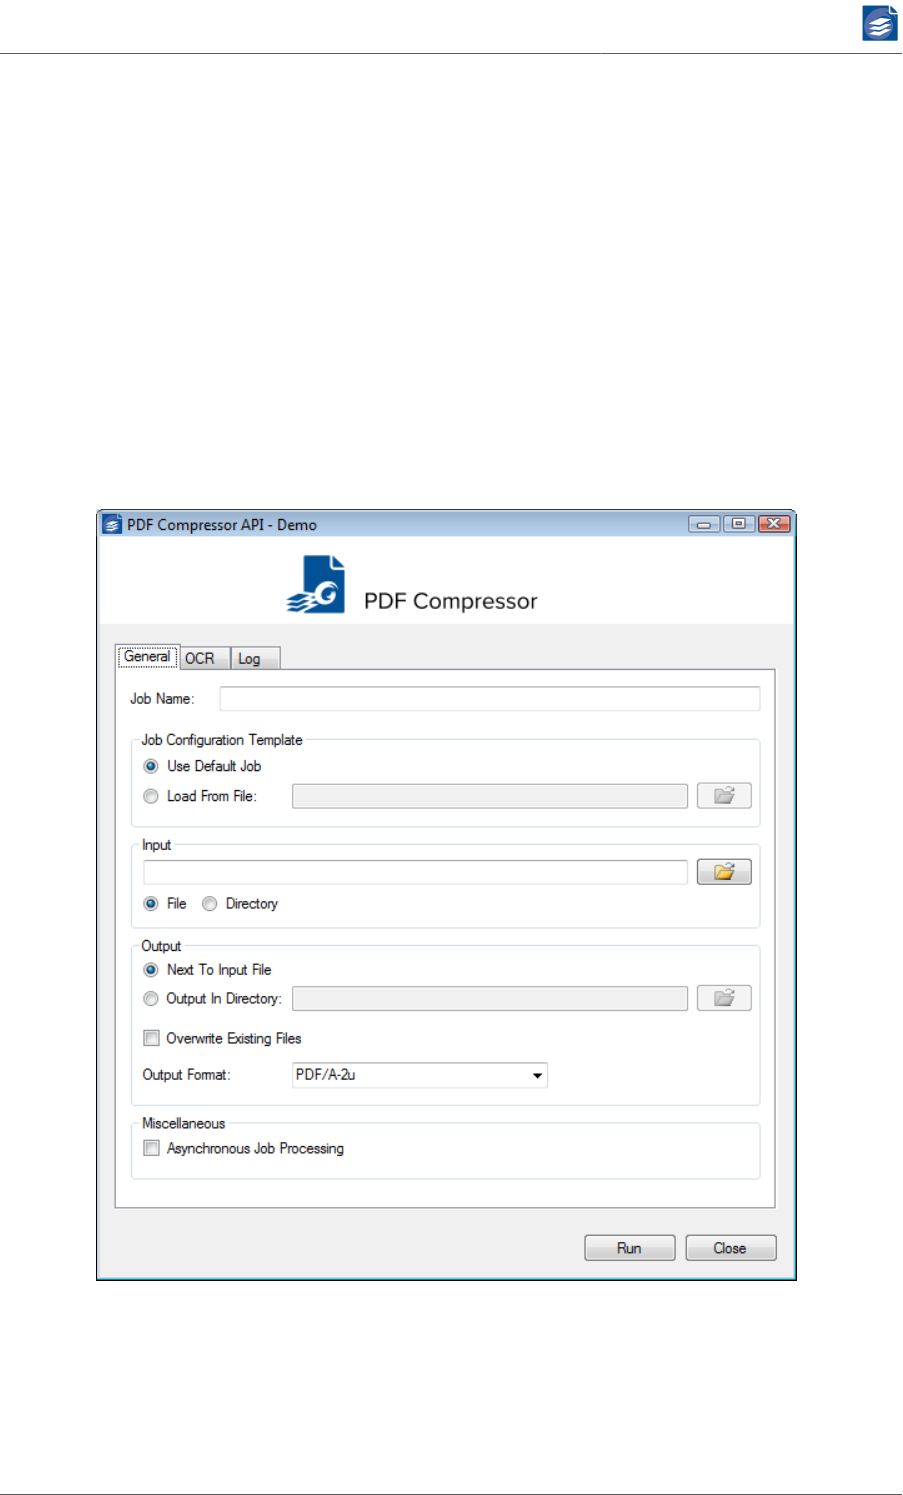
PDF Compressor Manual
www.foxitsoftware.com
info@luratech.com Submitting Jobs via the PDF Compressor API: 79
Note: The .NET API Assembly comprises a wrapper around the native API DLLs, therefore all
three DLLs are required by a .NET API client at runtime.
API Demo Applications
Two sample demo applications are deployed with PDF Compressor
•PDF_CompApi_Demo.exe is a simple command-line client using the native C DLL (it uses
the DLL version matching the operating system).
•PDF_CompApi_DemoGUI.exe comprises a simple WinForms™ user interface, permitting
a user to interactively configure a handful of common job settings and then to launch the
corresponding job and receive its progress messages.
These two applications correspond to the compiled versions of the sample source code
projects found under api\samples in the PDF Compressor’s installation folder.
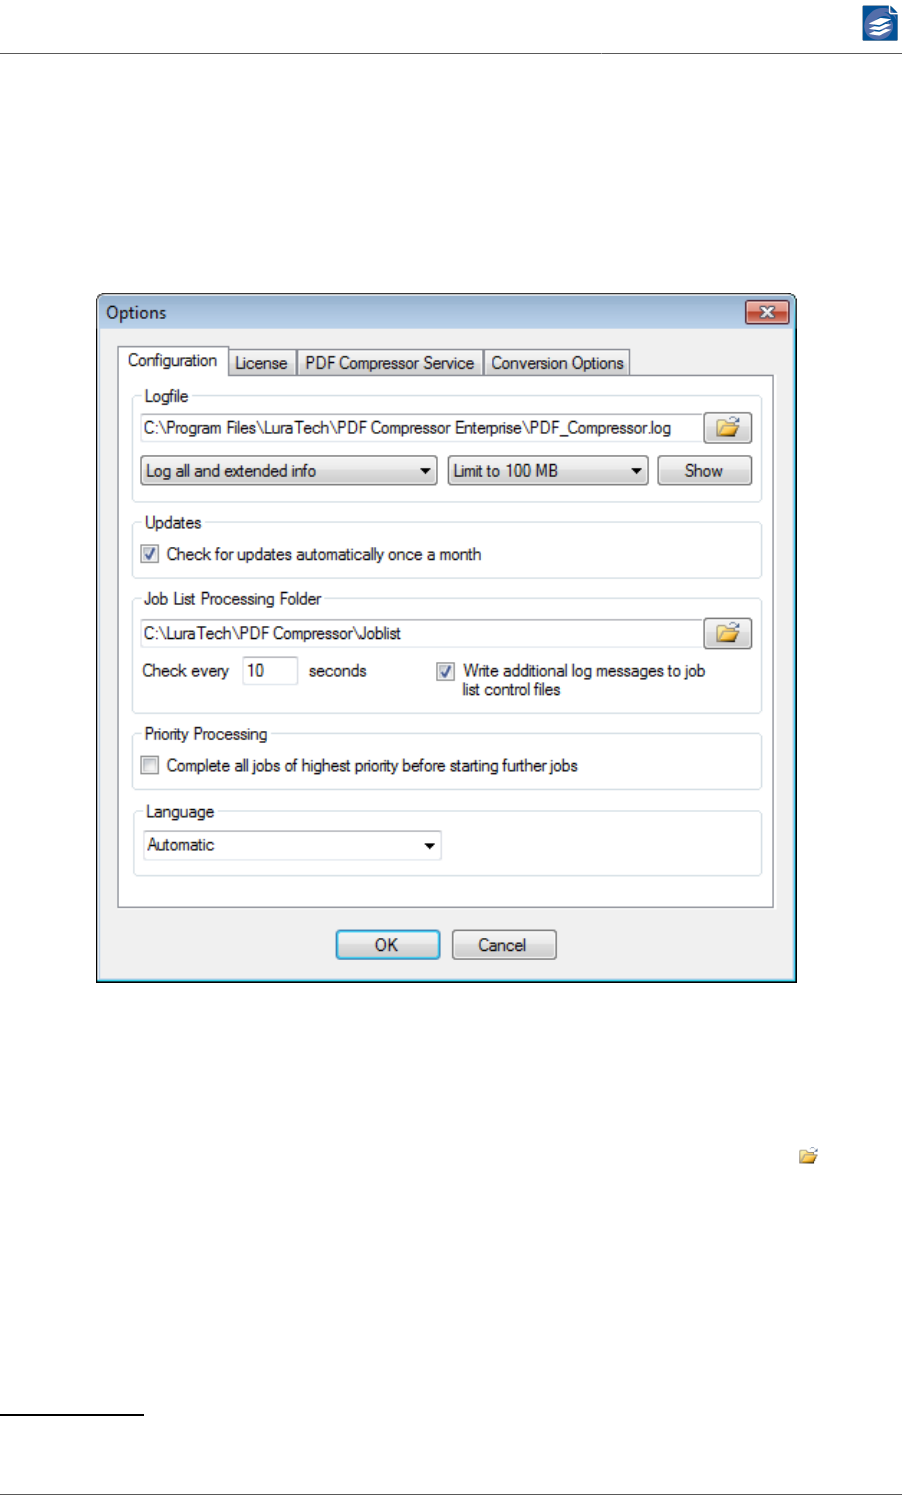
PDF Compressor Manual
www.foxitsoftware.com
info@luratech.com Administration and Licensing: 80
Chapter 9. Administration and Licensing
Administration and license management can be performed via the File → Options menu.
The Options dialog has several tabs which are described in the following sub sections.
General Configuration Settings
Log Files
The section Logfile of the Options dialog lets you configure PDF Compressor’s logging sys-
tem.
1. You can specify path and file name of the log file. Use the browse button to select
the log file 1.
2. The type of logged information can be selected by the corresponding drop down box:
a. Log all and extended info includes extended information about the input and output
(resolution, size etc.). Apart from that it works like Log errors, warnings and info.
b. Log errors, warnings and info is the recommended setting. It logs errors, warnings and
other basic information. With this setting the log file will give you detailed information
1The text edit window for the log file accepts file drag & drop: Just drag & drop a file from the Windows™ Explorer into this
window.

PDF Compressor Manual
www.foxitsoftware.com
info@luratech.com Administration and Licensing: 81
on what files have been converted and how many pages from the license have been
used.
c. Log errors and warnings will not log the additional conversion information.
d. Log error messages only will log only errors.
3. The size of the log file can be limited or set to unlimited by the corresponding drop down
box:
a. Unlimited logfile size will enable the log file to grow until all your disk space is used.
This gives you the full history of all your conversions. It is the default setting. When
your server is performing high volume conversions, and when it is not frequently mon-
itored, it is recommended to limit the log file size by any of the other settings.
b. Limit to <num> MB limits the log file size to the given amount. Once a log message
is written that lets the log file size reach its limit, the file <log_file>.log is renamed
to <log_file>.log.bak within the same directory, overwriting any present file of that
name. A new, empty log file <log_file>.log is created. This ensures that at least the
given number of bytes is always present as the logging history.
4. The Show button starts your default text editor application to show the content of the
current log file.
Log File Analysis
Each line within the log file represents one message. It consists of the following fields:
1. Date and time of message followed by a colon
2. An optional core number followed by a colon2
3. Type of message (Error, Warning, Info, InfoEx [extended information])
4. If the message is related to a job entry: Name of the entry as shown in the job list, fol-
lowed by a colon.
5. Clear text message (error description, warning reason, information) Often related files
are given with their full path in quotation marks. Some errors are directly shown by a
popup box when the GUI is opened:
2If such a number is present, the message was issued by the PDF Compressor responsible to handle processing assigned to the
given core number. Otherwise the message was issued by the PDF Compressor Windows™ service.
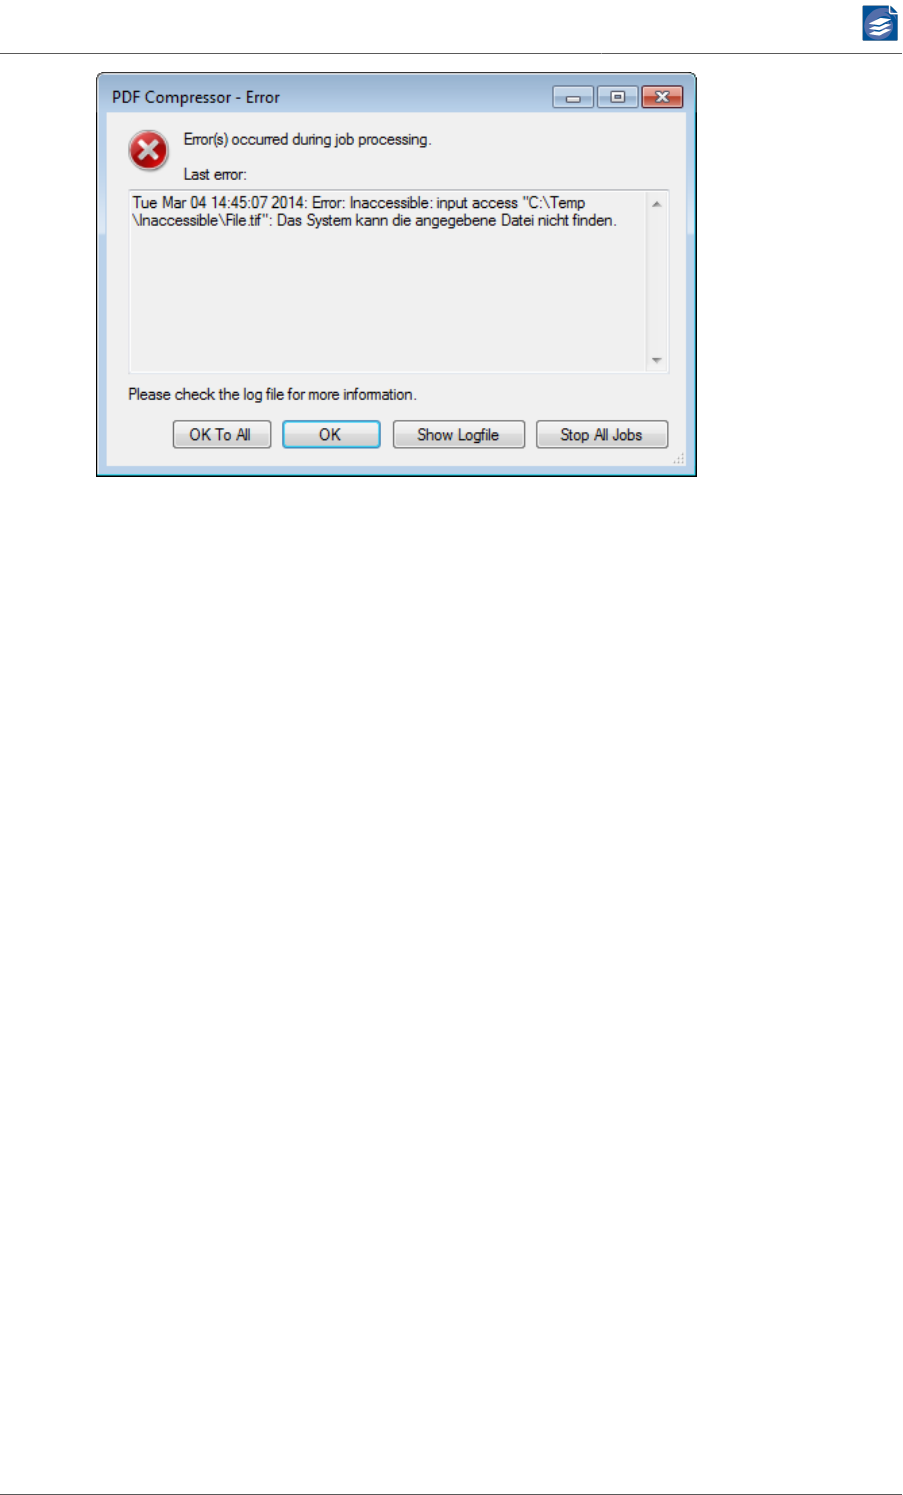
PDF Compressor Manual
www.foxitsoftware.com
info@luratech.com Administration and Licensing: 82
Online check for updates
If your computer is connected to the Internet, you can perform an online check for the avail-
ability of PDF Compressor updates. Use the Help → C_heck for Updates…_ menu to display
the installed and the most recent version of PDF Compressor. Click Browse Release Histo-
ry to view a list of release notes. If you like to get an updated version, please contact sup-
port@luratech.com [mailto:support@luratech.com]. The File → Options… menu lets you
configure to Check for updates automatically once a month. If this function is enabled, PDF
Compressor will contact the Foxit server once a month to get update information. If a newer
version is available, an Update Information dialog box will show up.
Job List Processing
See Chapter 7, Automatic Job List Processing (p. 73), for further details regarding job list
processing.
In the Options dialog you can configure the job list processing input folder, where PDF Com-
pressor picks up the job lists to process. You can set the polling interval that applies when
PDF Compressor runs out of job lists. It then waits the specified amount of time before
checking again for job lists ready to go. The value 0 (zero) is valid and tells PDF Compressor
to use the minimal possible waiting time (approx. 500 milliseconds).
PDF Compressor can collect all log messages that apply to jobs of the same job list and write
these messages to the associated job list control file (Write additional log messages in job
list control files).
Priority Processing
The option Complete all jobs of highest priority before starting further jobs only takes effect
if Priority Processing Order is chosen as the general processing order. For more information
on priority processing please compare “Job List Processing Order” (p. 11) .
By default the option Complete all jobs of highest priority before starting further jobs is
selected. This means, that no jobs of lower priority than the ones currently being processed
until all jobs of this highest priority have been finished.
This may be desirable in some situations, but may lead to unnecessary idle times with two
or more licensed processor cores. If the option is disabled, PDF Compressor will still start
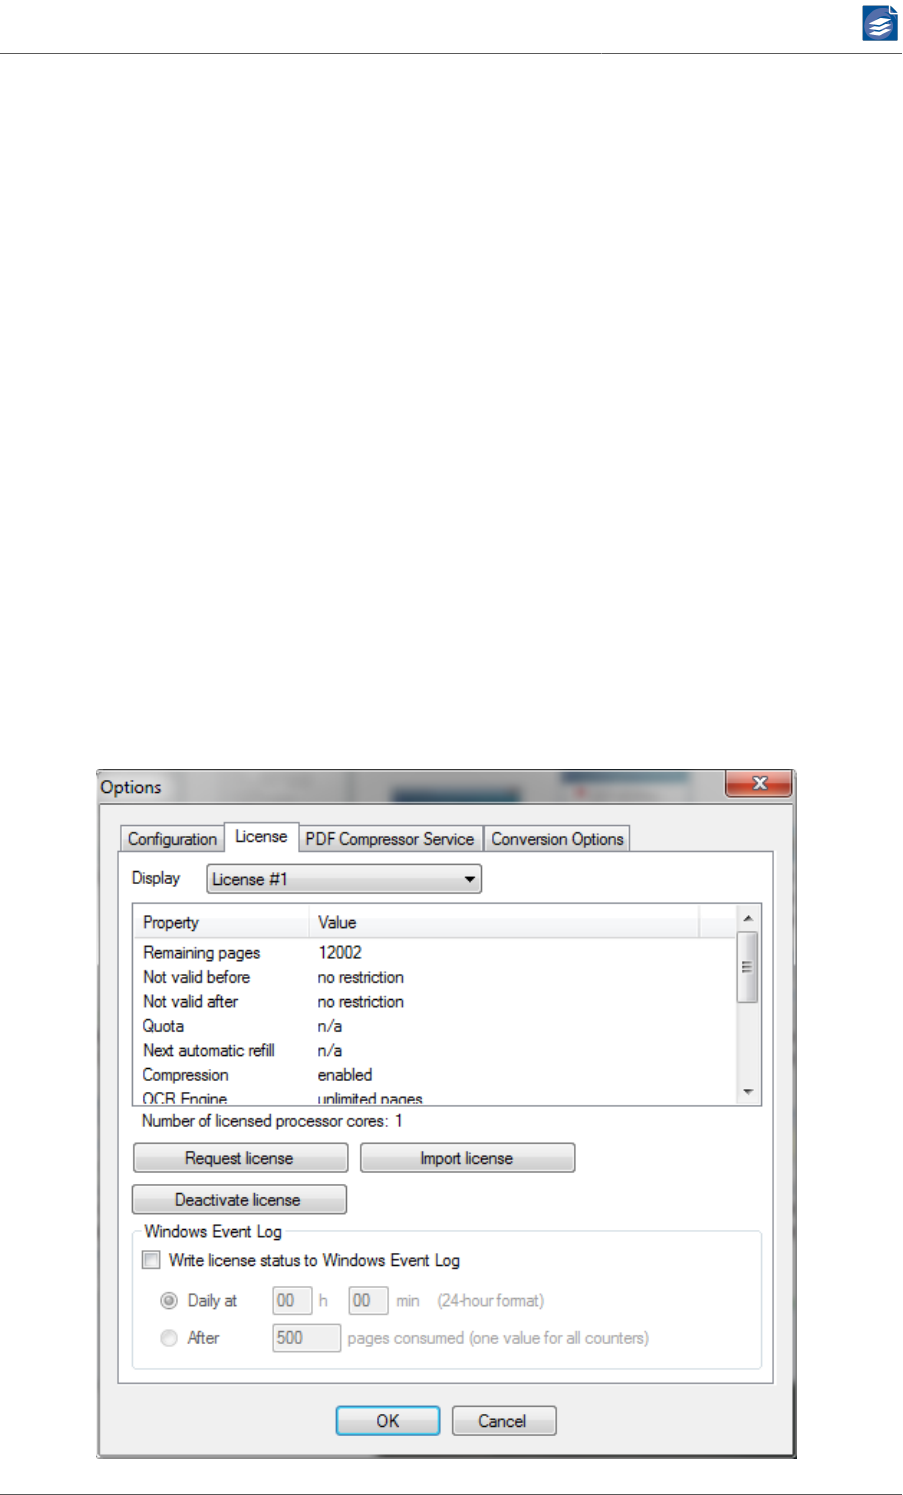
PDF Compressor Manual
www.foxitsoftware.com
info@luratech.com Administration and Licensing: 83
jobs in order of their priorities, but will allow for jobs of different priorities to run at the
same time, thereby using the full capacity of all available cores.
In either case, newly started jobs of higher priority will take precedence over the currently
running ones (as soon as any active processor core has finished creating its current output
file). If the Complete all jobs (…) setting is changed, it will immediately take effect, but will
not cause cancellation of any current processing.
Language
The user interface language default is Automatic. PDF Compressor uses the system language
if files with translations are available or English in case suitable language files are missing.
The language option allows changing this and setting a language explicitly. A change in lan-
guage will only be effective after restarting the user interface. To do so, the PDF Compressor
window must be closed and the symbol must be removed from task bar.
Managing Licenses
PDF Compressor uses page-based licenses which may restrict the compression, or other
features to a certain number of pages. It can maintain multiple licenses, each providing a
contingent of remaining pages for certain set of features. A license can also be limited in
time, thus be valid only during a certain period (Not valid before, Not valid after). The page
contingent can be limited or unlimited. And there is also a license type that has a refilling
page quota, e.g. the remaining pages count fills up to 5000 pages each month.
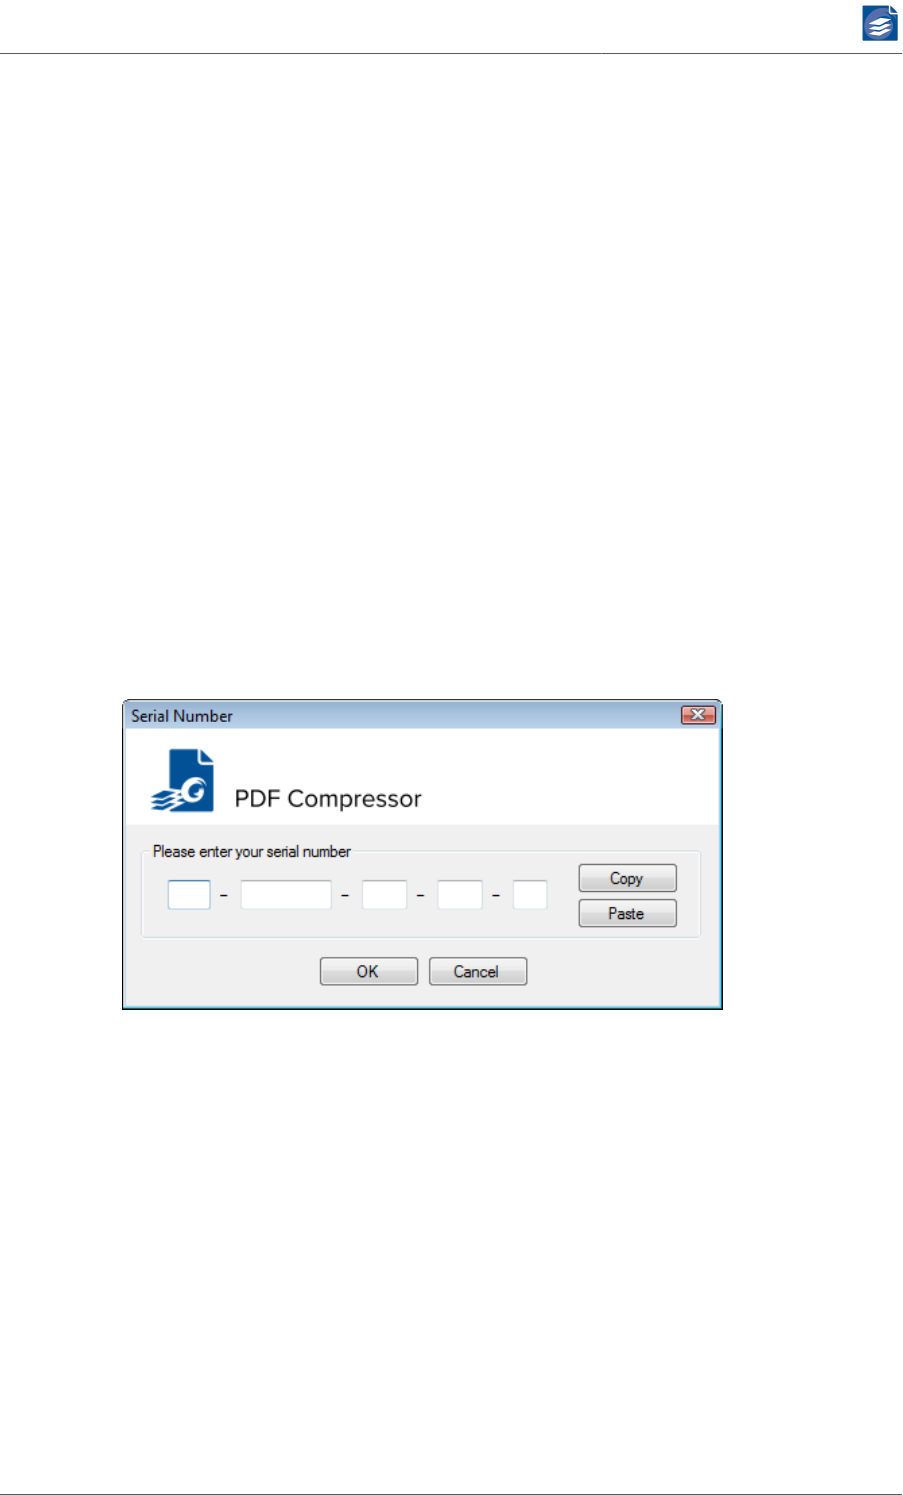
PDF Compressor Manual
www.foxitsoftware.com
info@luratech.com Administration and Licensing: 84
Trial Mode
When the PDF Compressor is installed for the first time it is running in trial mode, which
causes all output document pages to contain a visible watermark. OCR is possible in trial
mode, but you are not allowed to output the OCR results in additional formats such as XML,
HTML, etc. (see also “Configuring Post-Processing” (p. 37)). Since this mode is meant for
evaluation purposes, it is sometimes also called evaluation mode.
This mode automatically ends after 30 days.
If you need a longer evaluation period, please contact our sales team (sales@luratech.com
[mailto:sales@luratech.com]).
License
The purchased PDF Compressor application includes a license (Server = unlimited, Basic =
limited to a certain number of pages, Advanced = limited to a certain number of pages per
year). You have to order the license by e-mail. This is done as follows:
1. Use the Request license button to save a license request file. You can use an arbitrary file
name such as request.txt. To generate the request, you must enter the serial number as
received with your invoice or along with the download link for PDF Compressor.
If you cannot determine your license number, please contact Foxit Europe’s support.
2. Send the file request.txt via e-mail to license@luratech.com [mailto:license@lurate-
ch.com]. Please also state the invoice number or the company which purchased the li-
cense.
3. We will reply by sending a license file license.txt.
4. Use the Import license button to open the file license.txt.
After that you will see the number of remaining pages (which can be unlimited), and the
license capacity within the Options dialog. For a limited license the number of remaining
pages will decrease when you generate PDF output. When it reaches zero you have to order
a new license by redoing steps 1 to 4 as shown above.
PDF Compressor will not fall back into trial mode once your license is empty. It will just stop
creating further PDF output. A corresponding message will be displayed and written into

PDF Compressor Manual
www.foxitsoftware.com
info@luratech.com Administration and Licensing: 85
the log file. This is to prevent you from generating PDF output with visible watermark by
accident.
Depending on your license (special Gothic OCR) an activation of the OCR engine’s license
may be necessary. If an activation is required, a corresponding dialog box will pop up once
you have imported the PDF Compressor’s license. Please follow the given instructions for
OCR activation. The activation can be performed online (recommended method, internet
connection required), or by e-mail exchange (if your host is not connected to the internet,
or a firewall prohibits an online activation). The OCR activation is bound to a single host.
You do not need to activate OCR immediately. The Activate OCR button will be enabled as
long as an activation is needed.
Depending on the purchased license Born Digital Conversion can be enabled or disabled.
The current status is shown in the License section of the Options dialog. The Number of
licensed processor cores is shown in the License section of the Options dialog. You can con-
figure the actually used number of processor cores (up to the licensed maximum) in the PDF
Compressor Service section of the Options dialog.
Caveats
Your license is bound to a single installation.
To transfer the license to a different system or to restore it after re-installing the system,
it is necessary to deactivate the existing license first, and to send the confirmation which
is created in this process to our support department support@luratech.com [mailto:sup-
port@luratech.com]. Please do not deinstall the software before you do this. You can find
further information about this process at “Moving Licenses” (p. 85).
In case this is not possible, for instance due to hardware malfunction, please consult with
the support department support@luratech.com [mailto:support@luratech.com]; we will
inform you how to proceed. Under rare circumstances (e.g. after a system crash) it might be
possible that your license becomes invalid. If this happens, please send a license request file
to license@luratech.com [mailto:license@luratech.com]. We will reply with a special repair
license.
Updating Licenses
If you replace the PDF Compressor application by a newer version, an existing page-based
license will remain valid. However, depending on the updated version of the PDF Compres-
sor, you might need an update license for the new application. In such a case the Options
Dialog will show an additional button Set update license which allows you to set the update
license.
Moving Licenses
The existing license needs to be deactivated before it can be issued again for a different
machine. To do this, click the button "Deactivate license". This will deactivate the license and
write a file with proof. This file will also contain information about the number of unused
pages. Then create a license request from the new installation. To receive a new license,
you can send us a license request from the new installation, together with the proof of
the deactivation, via license@luratech.com [mailto:license@luratech.com]. Please mention
that you want to move the license.
Useful hints:
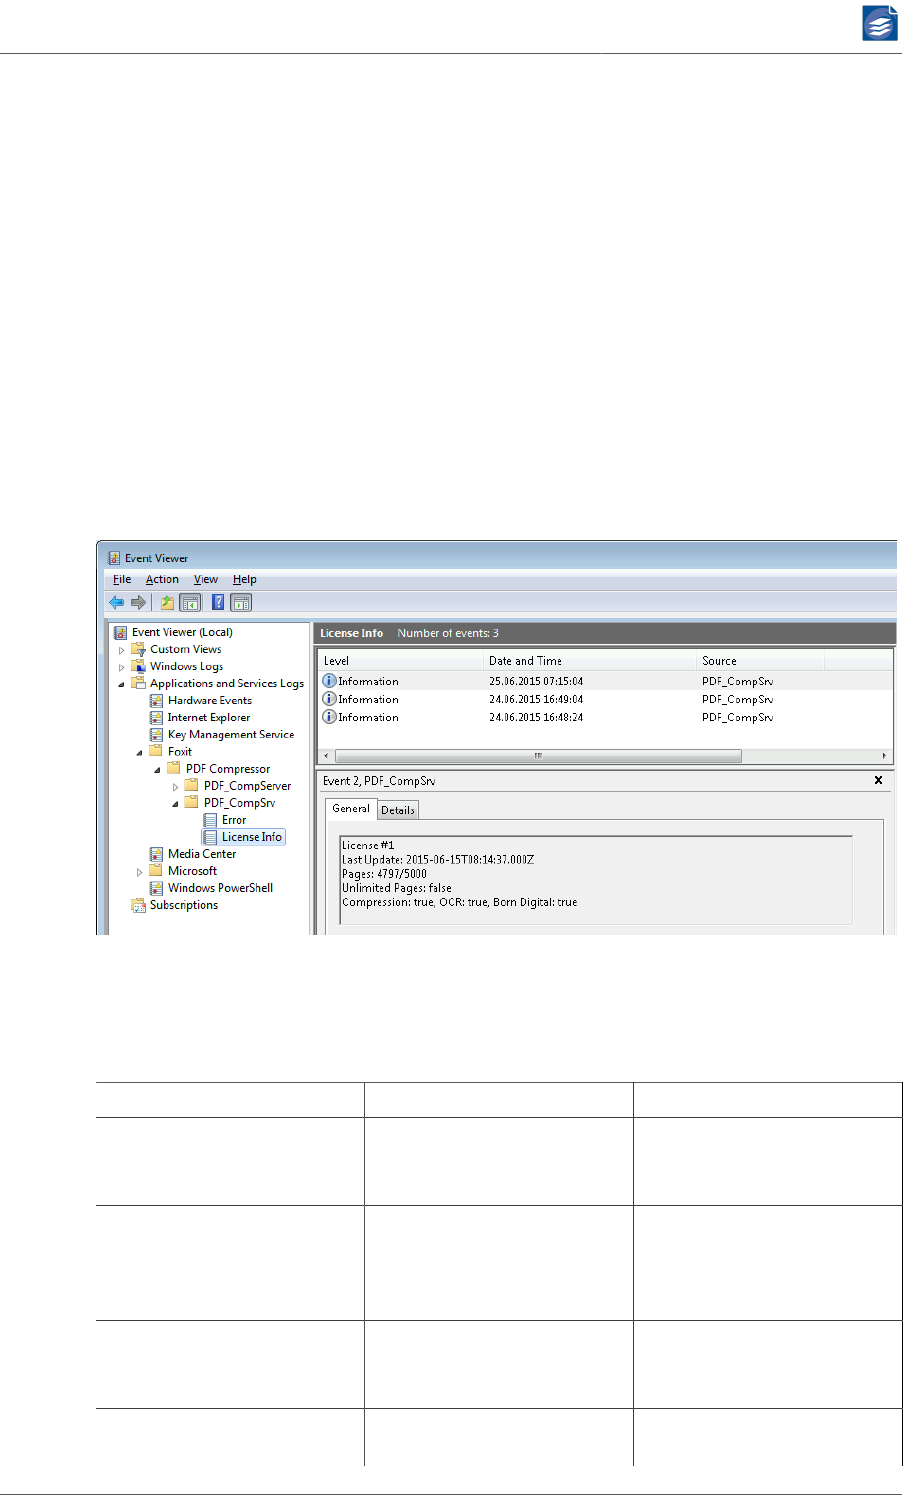
PDF Compressor Manual
www.foxitsoftware.com
info@luratech.com Administration and Licensing: 86
• Remember the account used to start the PDF Compressor service
• Export the settings using File → Export Job List… and import them into the new system
External License Monitoring
The PDF Compressor can be configured to write license status information to the Windows
Event Log in a regular manner. This can help to ensure continuous PDF Compressor opera-
tion when dealing with limited page contingents. In the License section of the Options di-
alog activate the option Write license status to windows event log. You can configure the
trigger when to write the updated license status to the event log: either in a daily manner
at certain time, or based on page consumption.
The license status events are written to the protocol:
Foxit-PDF Compressor-PDF_CompSrv/License Info
If your license contains sub-licenses you will see a single event for each sub-license.
You can use the Windows Event Viewer to check the events but more likely you will use
system management or monitoring tools to evaluate the data.
Each license status event contains the following details.
Name Type Description
LicenseIndex Int The index of the license. This
corresponds to the index
shown in the Options dialog.
LastUpdateTime DateTime The time when the page
contingent was last changed
by importing a license, e.g.
installing a new cartridge.
LastUpdatePages UnsignedInt The value of the page
counter at the LastUpdate-
Time.
CurrentPages UnsignedInt The current value of the
page counter, in other
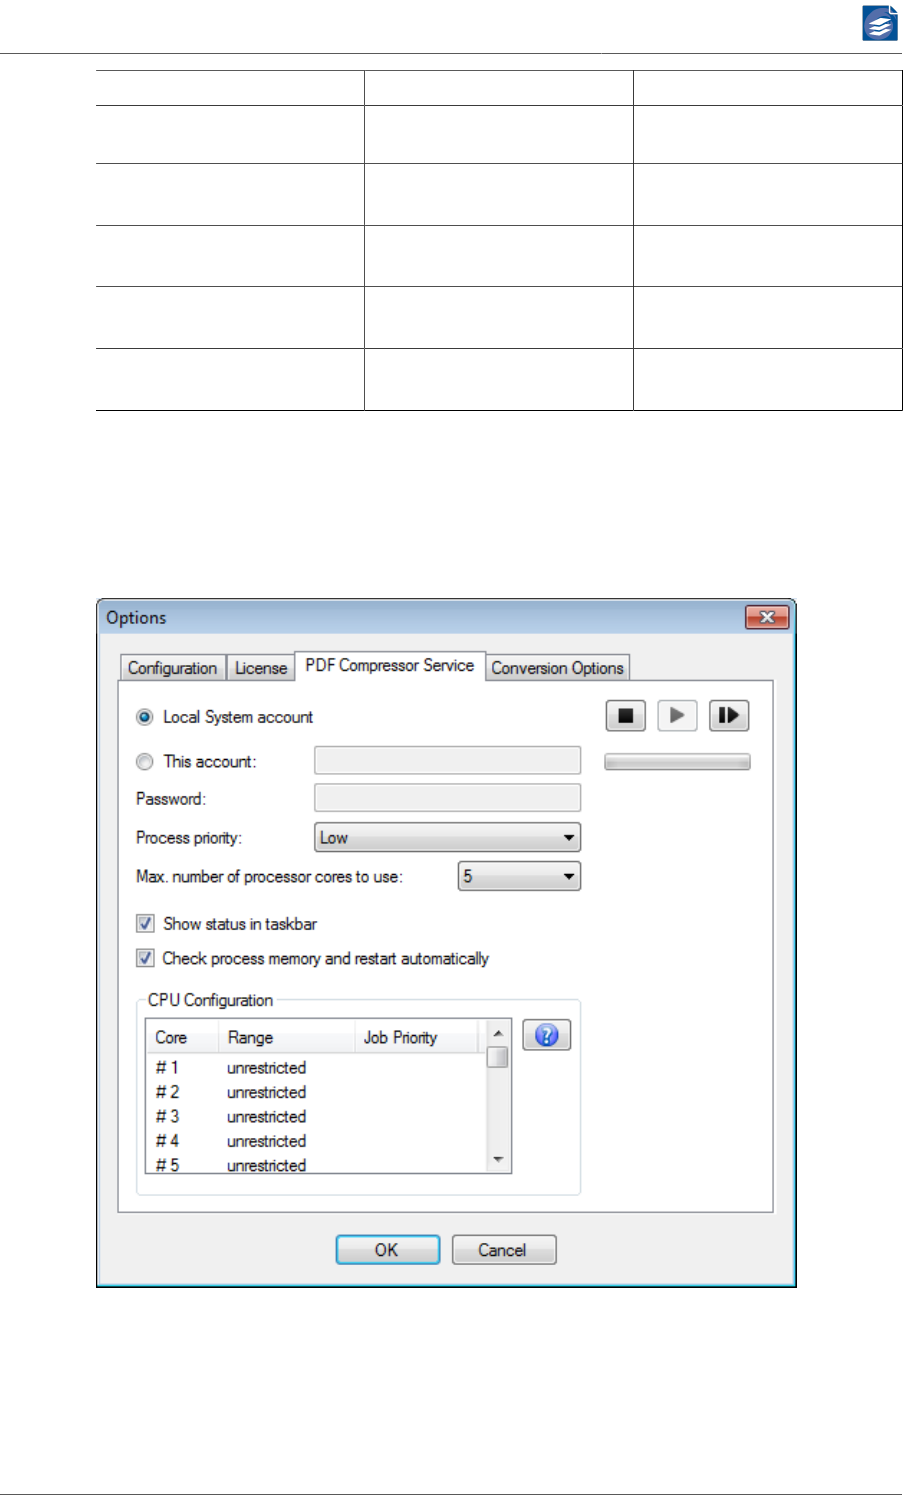
PDF Compressor Manual
www.foxitsoftware.com
info@luratech.com Administration and Licensing: 87
Name Type Description
words: the remaining pages
of this license.
HasUnlimitedPages Boolean True if the license has unlim-
ited pages, False otherwise.
HasCompression Boolean True if the license contains
the compression feature.
HasOcr Boolean True if the license contains
the OCR feature.
HasBornDigital Boolean True if the license contains
the Born Digital feature.
Managing the PDF Compressor Service
The PDF Compressor Service can be directly administrated from the Options dialog of the
PDF Compressor GUI. Alternatively the Windows™ service™ administration tools can be
used. Here we describe only administration using the using the PDF Compressor GUI.
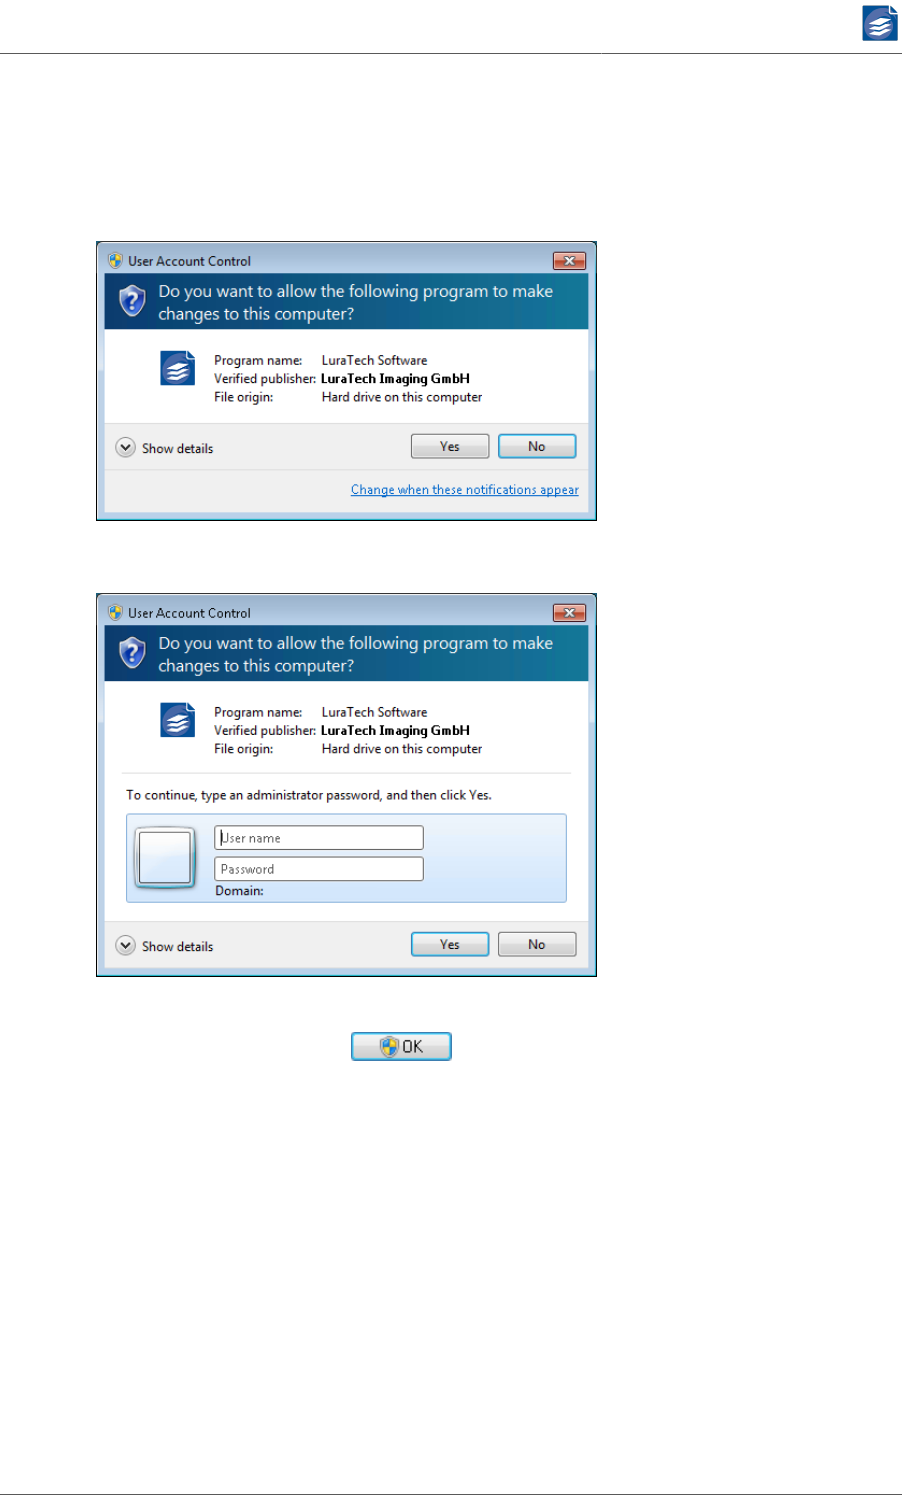
PDF Compressor Manual
www.foxitsoftware.com
info@luratech.com Administration and Licensing: 88
Needed Privileges
The administration of a Windows™ service needs administrative privileges. If you haven’t
started the GUI with such privileges, these are requested if necessary.
You can grant them yourself:
Or, if you don’t have the privileges yourself, by an administrator:
If the confirmation of the Options dialog will require such privileges, this will be indicated
to you by the shield symbol:
Choosing the Service Account
The PDF Compressor Service tab of the Options dialog shows the current status of the ser-
vice (normally running) and the current service account (Local System after installation).
The power of PDF Compressor lies in its ability to do automatic PDF conversions even if no
user is logged in. This also enables PDF Compressor to do conversions on remote computers
by use of network shares. The default service account Local System typically does not have
the right to access files on remote machines of a Windows™ domain. You can change the
service account by use of the Options dialog. When you select a new account, make sure
that it has access to:
• the PDF Compressor installation directory,
• the input folders of the jobs you want to run,

PDF Compressor Manual
www.foxitsoftware.com
info@luratech.com Administration and Licensing: 89
• the output folders of the jobs you want to run,
• the log file.
If you have changed the account, the OK button triggers a restart of the service. If the given
password is not correct, you will get an error message. Starting, stopping and restarting the
service can be also done by the corresponding buttons within the Options dialog.
Please mind that the PDF Compressor user interface must run with administrative privileges
to change and restart the service. Alternatively you can use the Windows™ service manager
instead.
Important Note: When configuring a network share for input or output files, make sure that
you use the syntax \\host\share\directory to specify the location within the Input,
Output, and Options tabs. Mapped network drives like Y:\directory cannot be used,
since they are not available to the PDF Compressor Service even when you have changed
the service account.
Setting up the Service Priority
Depending on your workflow you might want to change the process priority of the PDF
Compressor service. When your workflow is designed to run PDF Compressor on its own PC
that is only used for document processing, it is best to set Process priority to Normal. When
your PC has only a single CPU core, and you are working with the PC while PDF Compressor
processes its jobs in the background, it may help to set the Process priority to Low. This will
cause PDF Compressor not to interfere too much with your work. You should keep in mind
that the priority Low is typically the same priority as of a screen saver. You should, therefore,
turn off any screen saver when PDF Compressor priority is set to Low, so as not to waste
your processing power.
Taskbar Status Icon
When you log in, a PDF Compressor icon will be shown in the Windows™ taskbar. Its color
reflects the status of the PDF Compressor, and it can be used to open the GUI (double-click
or context menu). If you want the icon to disappear, please disable the check box Show
status in taskbar of the Options dialog.
CPU Configuration
The PDF Compressor can process multiple jobs in parallel when Priority Processing Order is
enabled (see “Priority Processing Order” (p. 11)). Jobs with the same priority will be sched-
uled in a circular order (round-robin scheduling). Jobs with a higher priority take precedence
over jobs with a lower priority. The job priority is a value in the range of 1 (highest) to 10
(lowest). A lower number represents a higher priority.
The PDF Compressor is built to operate at the full capacity of the available resources, namely
the available and licensed processor cores, to reach the highest throughput possible. And
this is the right thing for most use cases. However, there are scenarios where you want to
save some resources during normal processing to have power at hand for high priority tasks
at any time. Or you want your jobs to not share the resources and run on dedicated cores
instead. All this is possible by means of the CPU Configuration.
In the table CPU Configuration you will find one row per licensed processor core. By clicking
a row, the entry switches to edit mode and lets you modify the settings for the selected core.
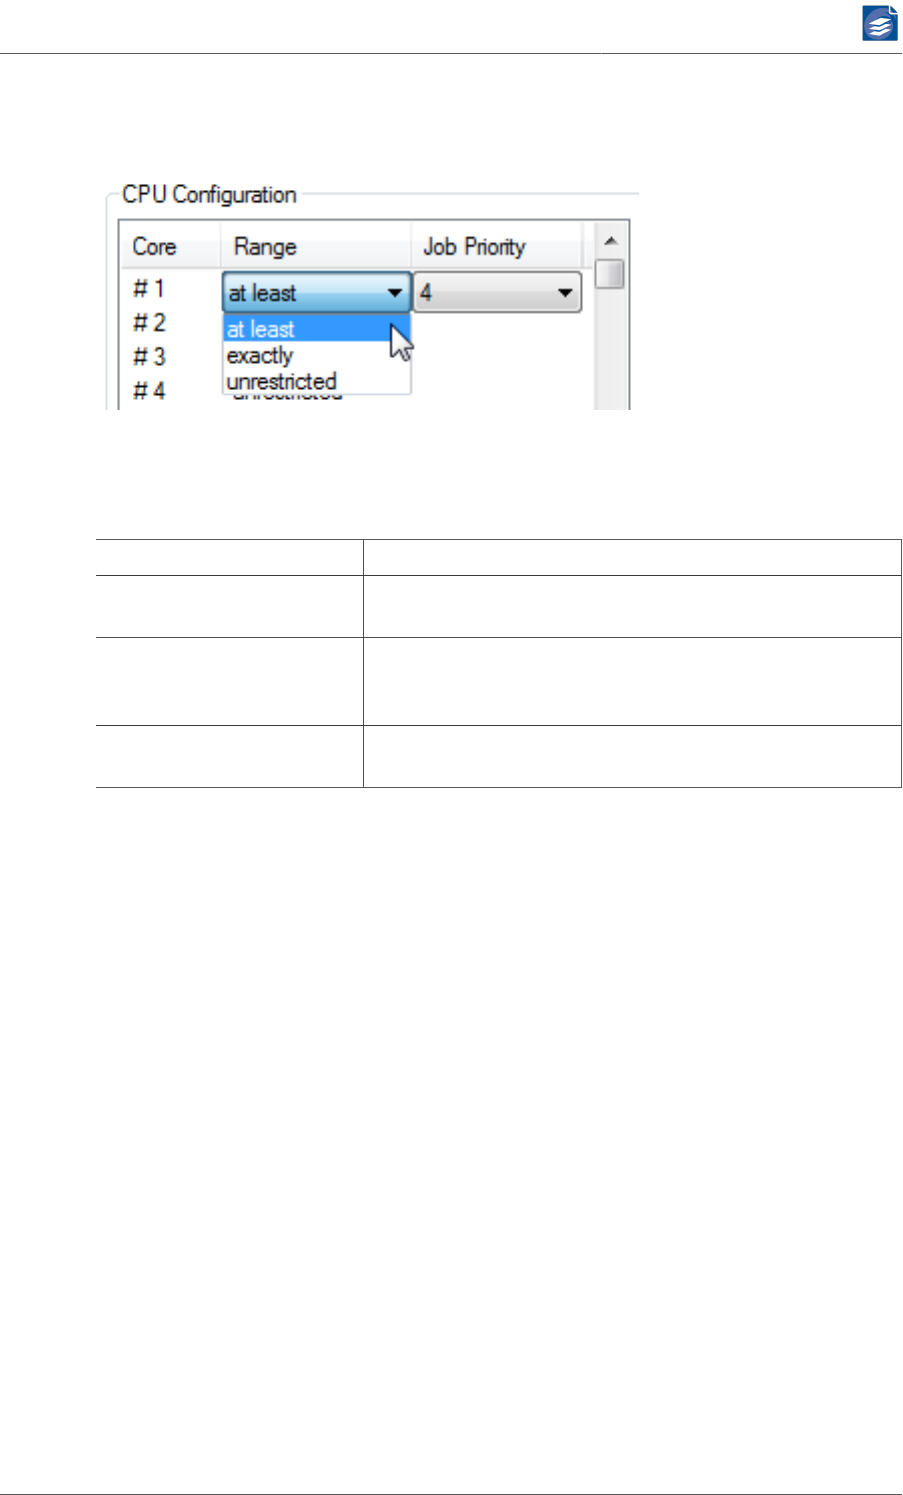
PDF Compressor Manual
www.foxitsoftware.com
info@luratech.com Administration and Licensing: 90
Note: The CPU Configuration is read-only as long as there are jobs running. You need to stop
all running jobs in order to edit the CPU Configuration.
The CPU Configuration allows you to specify restrictions for single cores on the basis of the
job priority. The column Range offers three different settings.
Setting Description
unrestricted This is the default setting. The core will be used to process
jobs of any priority.
at least <priority> The core will be used to process jobs with a priority of <pri-
ority> or higher. So a setting like "at least 3" will restrict
the core to only run jobs with priority 1, 2, or 3.
exactly <priority> The core will be used to only process jobs with a priority of
<priority>.
Examples
1. To dedicate one core for important jobs:
Change the configuration for core #1 to "at least 4", to have PDF Compressor to run only
jobs with a higher than standard priority (1 to 4) on that core. Leave the configuration
of all the other cores "unrestricted".
2. To share four cores between two jobs:
Give the two jobs different priority values, e.g. 1 and 2. In the CPU Configuration setup
cores #1 and #2 for "exactly 1" and set up cores #3 and #4 for "exactly 2". This way both
jobs will run on two cores each exclusively.
Born Digital Options
If the Born Digital Converion Option is installed, the Options dialog contains an extra tab for
administering options specific to the PDF(/A) conversion.
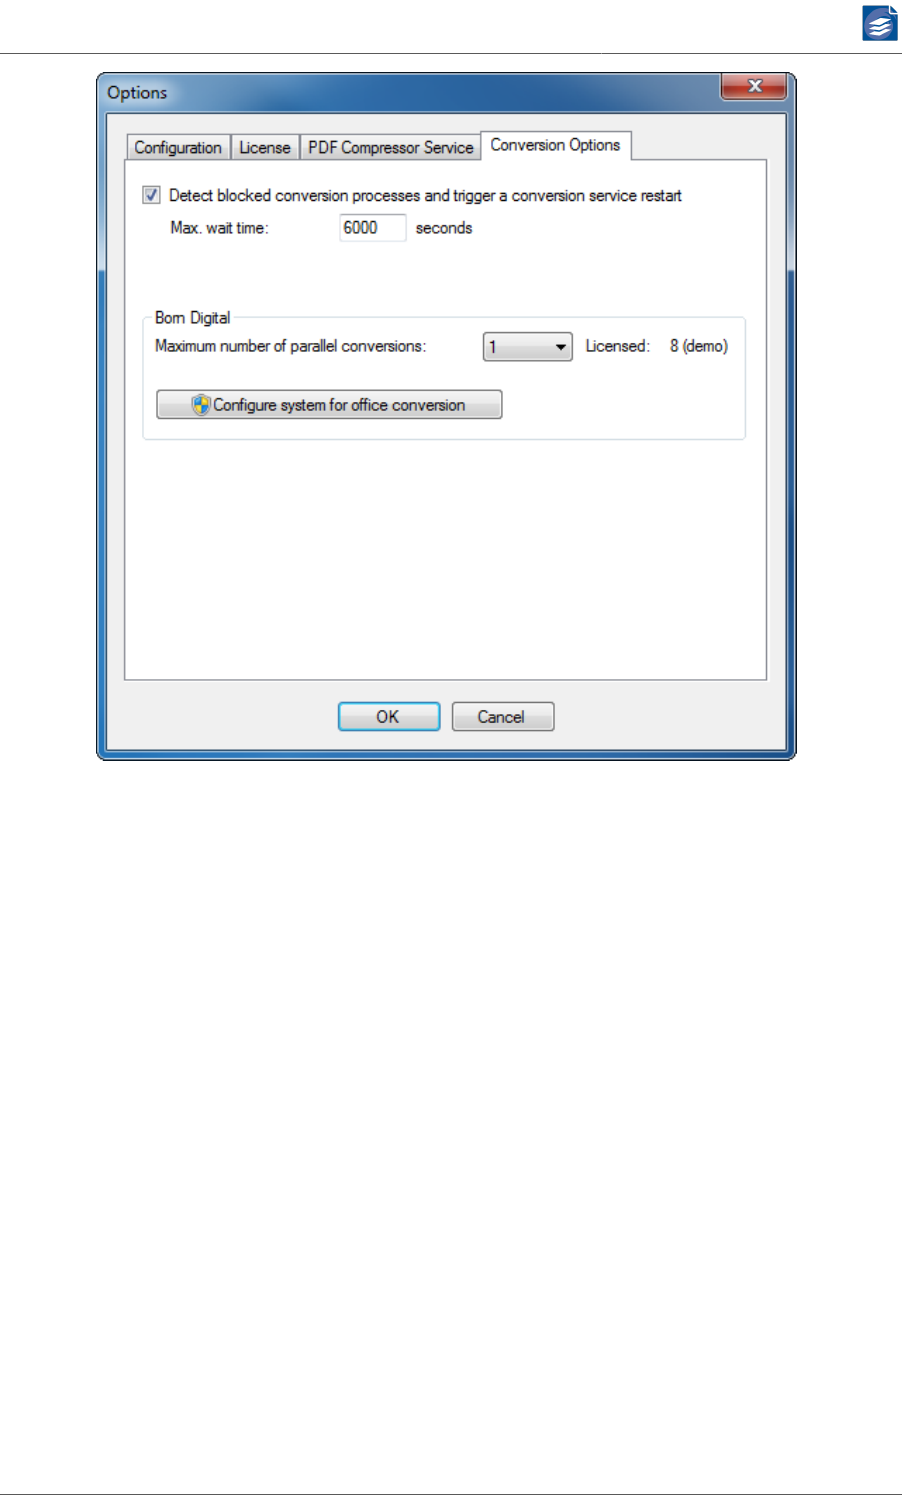
PDF Compressor Manual
www.foxitsoftware.com
info@luratech.com Administration and Licensing: 91
The born digital conversion service utilizes third-party applications (e.g. Microsoft Office™)
during the conversion process. It can happen that these applications become unavailable
or get stuck so that the conversion process cannot finish. To avoid such situations to block
the whole conversion service there are some options for automatic clean restarting.
Note: In order to enable PDF Compressor to successfully restart the conversion service the
PDF Compressor service user account must be set to LocalSystem or to an account which is
member of the local Administrators group (see “Choosing the Service Account” (p. 88) ).
1. Detect blocked conversion processes: Define how long the service waits for an ongoing
conversion process to send any feed back at maximum. The default value of 43200 sec-
onds means 12 hours. So if the system gets stuck and the situation is not noticed at least
after half a day the conversion service will be recovered. Usually a single conversion takes
much less time, so that a value of 600 (10 minutes) might be more convenient.
The Max. wait time does not define the maximum overall processing time. Instead it
defines how long the service waits for an external task to get finished, e.g. Microsoft
Office™, that does not feed back any progress. This means that the overall processing
time can be much longer than the max. wait time e.g. when processing an e-mail with
multiple attachments.
2. Maximum number of parallel conversions specifies how many Born Digital conversion
processes PDF Compressor should attempt to run in parallel. The maximum available
number is the number of processor cores licensed for Born Digital conversion.
3. Use the button Configure system for office conversion to run a special configuration tool.
The tool can be used to change the PDF Compressor service account. Additionally it sets


PDF Compressor Manual
www.foxitsoftware.com
info@luratech.com Tips and Tricks: 93
Chapter 10. Tips and Tricks
This section contains some hints you may find useful.
• The easiest way to create a new entry in the job list is to drag & drop files or folders from
the Windows™ Explorer to the list window.
•All text fields that represent file or folder names accept the dragging & dropping of files
or folders.
• There are more valid shortcuts for header and footer text than shown in the GUI. Please
refer to “Template String Syntax Description” (p. 64), for more details.
•Header Options and Footer Options are merely the captions of the corresponding buttons
on the Properties → Embedding tab. You can configure these imprints e.g. to set left and
right bounded text in the header, or to a large outlined text at the center of a page.
• To create different variants of output (e.g. high resolution, low resolution and bitonal
versions) from the same input file, you can configure several job list entries in a cascade:
1. Use Entry A to make Version A at Destination A, after processing move the input to
the input folder of Entry B.
2. Use Entry B to make Version B at Destination B, after processing move the input to
the input folder of Entry C.
3. Use Entry C to make Version C at Destination C, after processing move the input to the
final destination folder (which could be the input of Entry A).
• You can duplicate job list entries (see “Adding, Deleting and Copying Entries” (p. 70)).
This lets you quickly set up two entries that only differ in a few parameters (e.g. encoder
quality), and can be useful for comparison purposes.

PDF Compressor Manual
www.foxitsoftware.com
info@luratech.com Troubleshooting: 94
Chapter 11. Troubleshooting
Problem Possible Reason / Solution
The output PDF has a
visible watermark.
PDF Compressor is running in trial (evaluation) mode. Please order
and install a license or an update license (see “Managing Licens-
es” (p. 83)).
The output PDF looks
strange within Mozil-
la™ Firefox™ or oth-
er applications with
PDF rendering capa-
bilities.
Unfortunately, some viewers do not properly render and display
PDF layers and transparencies as generated by PDF Compressor.
In order to verify the integrity of your documents try viewing them
with an Adobe™ Reader™ 7.0 or higher or the Foxit™ Reader.
Adobe™ Reader™
displays an error
message when open-
ing the PDF file.
PDF Compressor can generate PDF output compliant with differ-
ent versions of for Adobe™ Reader™ (see “Configuring Data Out-
put” (p. 25)). There are settings for Adobe™ Reader™ 5.0, 6.0 and
7.0 or higher. Make sure to use only corresponding Reader™ ver-
sions when opening PDF files generated by PDF Compressor.
Has your license expired, i.e. the number of remaining pages is ze-
ro and you are not running in trial (evaluation) mode? Please or-
der and install a license (see “Managing Licenses” (p. 83)).
Did you select the corresponding input file format? The Input tab
(see “Configuring Input Data” (p. 13)) lets you choose among sev-
eral input file formats.
Is your input file of a supported file format? PDF Compressor only
accepts TIFF, JPEG, JPEG 2000, PDF, BMP or PNM as input format.
See Configuring Input Data, p. 15, for further formats and options.
Moreover, TIFF has a large variety of sub formats. Currently we
support bilevel, grayscale or RGB color TIFF images. CMYK or CIE-
Lab color, as well as palletized images are not supported.
Is the underlying PDF Compressor service running? Check the sta-
tus text within the PDF Compressor job list and/or the Options di-
alog. See Managing the PDF “Managing the PDF Compressor Ser-
vice” (p. 87).
Is your input folder a network share where the underlying PDF
Compressor service has no access rights? See “Choosing the Ser-
vice Account” (p. 88) for details.
The input document
is not converted into
PDF.
Did you use a mapped network drive letter to specify the input lo-
cation? You cannot use mapped network drives. Use the syntax \
\host\share\ instead. See “Configuring Input Data” (p. 13) for
details.
The overwrite option is not set, and a file of the same name al-
ready exists at the destination? Please check the log file (see “Log
File Analysis” (p. 81)).
Processed input files
are not moved to
the given destination
folder. The overwrite option is set, but a file with the same file name at
the destination cannot be deleted, because it is write protected or
opened and locked by another application. Try to delete the file in
the destination folder using the Windows™ Explorer. Please check
the log file (see “Log File Analysis” (p. 81)).

PDF Compressor Manual
www.foxitsoftware.com
info@luratech.com Troubleshooting: 95
Problem Possible Reason / Solution
Is your destination directory a network share where the underly-
ing PDF Compressor service has no access rights? See “Choosing
the Service Account” (p. 88) for details.
Processed input files
are not deleted, even
if you use the delete
option.
Is the input file write protected?
Try to delete the file by use of the Windows™ Explorer. Please also
check the log file (see “Log File Analysis” (p. 81)).
The output PDF file
seems to be an old
version from a for-
mer PDF conversion,
but you are using the
overwrite option.
Is the output file write protected or opened by another appli-
cation? Try to delete the file by use of the Windows™ Explorer.
Please check the log file (see “Log File Analysis” (p. 81)).
Check if the configured log file destination really exists. If it exists,
does it have write rights? Is it opened and locked by another appli-
cation? Try to move the log file out of the way by use of the Win-
dows™ Explorer.
No log file is written,
or the existing log
file is not appended.
Is the log file located on a network share where the underlying
PDF Compressor service has no access rights? See Choosing the
“Choosing the Service Account” (p. 88), for details.
Does the underlying PDF Compressor service have full access
rights to its installation folder? Within the Options dialog, try to
stop and restart the service (compare “Managing the PDF Com-
pressor Service” (p. 87)). Does a message box tell you that the ser-
vice has not the rights mentioned above? Change the service’s ac-
count (as described under Choosing the Service Account, p. 85), or
the access rights of the installation directory to meet the above re-
quirements.
PDF Compressor dis-
plays a message "In-
valid license".
Please send a license request file to support@luratech.com [mail-
to:support@luratech.com] (see “Managing Licenses” (p. 83)).
A job configured for
converting born dig-
ital input (e.g. Mi-
crosoft™ Office™
documents) does not
finish and there is no
processing notice-
able for a long time.
It can happen that a born digital conversion process gets stuck
(see “Born Digital Options” (p. 90)). If you are in the described sit-
uation, but did not configure an applicable timeout in advance you
can do this right away. Within the Options dialog, change the Max.
conversion time to e.g. 600 seconds (10 minutes). The new val-
ue will be evaluated instantly and the cleaning up and restarting
process is initiated. Please note that this process may take a con-
siderable amount of time.

PDF Compressor Manual
www.foxitsoftware.com
info@luratech.com License Agreement: 96
Chapter 12. License Agreement
Foxit Europe Software License
PLEASE READ THIS SOFTWARE LICENSE AGREEMENT ("LICENSE") CAREFULLY.
THE "FOXIT EUROPE SOFTWARE PRODUCT" INCLUDES COMPUTER SOFTWARE AS WELL AS
ACCOMPANYING PRINTED MATERIAL AND "ONLINE" OR ELECTRONIC DOCUMENTATION.
BY INSTALLING, COPYING OR USING THE FOXIT EUROPE SOFTWARE PRODUCT IN ANY WAY,
YOU ARE AGREEING TO BE BOUND BY THE TERMS OF THE FOLLOWING LICENSE. YOU NEED
NOT NOTIFY FOXIT EUROPE OR YOUR DEALER IF YOU AGREE TO THIS LICENSE. IF YOU DO
NOT AGREE TO THE TERMS OF THIS LICENSE, DESTROY THE SOFTWARE OR RETURN THE
SOFTWARE TO THE PLACE WHERE YOU OBTAINED IT.
1. Copyright
The license issuer is Foxit Europe GmbH, or its local subsidiary. The Foxit Europe Software
Product is protected by national and international copyright law. You are obliged to treat the
Foxit Europe Software Product in the same way as any other material protected by copyright
law.
2. License
The Foxit Europe Software Products are licensed to users, not sold. The license issuer retains
the right of use of the enclosed software and any accompanying fonts (collectively referred
to as Foxit Europe Software Product) whether on disk, in read only memory, or on any other
media. You own the media on which the Foxit Europe Software Product is recorded but Foxit
Europe and/or LuraTech’s licensor(s) retain title to the Foxit Europe Software Product. The
Foxit Europe Software Product in this package and any copies which this license authorises
you to make are subject to this license.
Using the Foxit Europe Software Product for creating a commercial or non commercial soft-
ware solution that enables either the creation or display files in the LuraWave or LuraDocu-
ment File Formats requires that a Runtime-License-Contract has be concluded. This applies
among other, but not limited to, the integration into other software application or to the
distribution of images or documents on electronical data carrier devices (e.g. CD) or in the
internet.
To receive an offer or to enter into a run-time license agreement please contact the head
office: Ulmenstraße 22
42855 Remscheid
GERMANY
Tel.: +49 2191 / 58960 - 0
Email: info@luratech.com [mailto:info@luratech.com]
or one of its local subsidiaries.
3. Usage
This license allows you to install and use the Foxit Europe Software Product on a single
computer. This license does not allow the Foxit Europe software to exist on more than one
computer at a time. You may make one copy of the Foxit Europe Software Product in ma-
chine-readable form for backup purposes only. The backup copy must include all copyright

PDF Compressor Manual
www.foxitsoftware.com
info@luratech.com License Agreement: 97
information contained on the original. All other rights and title to the Foxit Europe Software
Product are reserved.
4. Transfer of Rights
You may only transfer your rights under this license with written consent from Foxit Europe
and only to a party who agrees to accept the terms of this license. After transferring your
rights you must destroy any other copies of the Foxit-Europe-Software-Product you have
in your possession. You may not rent, lease, loan or distribute the Foxit Europe Software
Product.
5. Restrictions
You may not (i) decompile, reverse engineer or disassemble the Foxit Europe Software Prod-
uct in any way, (ii) modify, adapt or create derivatives from the Foxit Europe Software, or
(iii) sell, rent, lease, loan or distribute the Foxit Europe Software Product. Your rights under
this license, and your rights to use the Foxit Europe Software Product, will terminate auto-
matically, without notice from Foxit Europe, if you fail to comply with any of term(s) of this
license.
6. Updates
If this Foxit Europe Software Product is marked as an update then you must have a licensed
version of the appropriate full software product. The Foxit Europe Software Product sup-
plements the licensed version of the full product. All updates are liable for cost.
7. Demo Version
Foxit Europe demo software, shareware and the associated documentation are copyright
protected. Foxit Europe allows the license holder of the demo software/shareware version
to make as many copies of the software as required. The license holder is forbidden from
using the demo software/shareware for commercial purposes or to distribute for a fee.
8. Student Version
If this Foxit Europe Software Product is marked as a student version then the license holder
must have the status of a registered student to have the right to use the product.
9. Special Conditions
The product "LuraWave OCX-SDK" contains a license file "lurawave.lic". This file must be
kept secure and not be accessible or given out to third parties
The license holders access codes must be kept secure and not be accessible or given out
to third parties.
Foxit Europe Software Products may include the TIFF-library. Copyright reference for the
TIFF-library:
Copyright © 1988 - 1996 Sam Leffler
Copyright © 1991 - 1996 Silicon Graphics, Inc.
Foxit Europe Software Products may include the JPEG library of the Independent JPEG group.
Copyright reference for the JPEG-library (libJPEG 6b, 27-Mar-1998):
Copyright (c) 1998 - Thomas G. Lane

PDF Compressor Manual
www.foxitsoftware.com
info@luratech.com License Agreement: 98
Permission to use, copy, modify, distribute, and sell this software and is documentation for
any purpose is hereby granted without fee, provided that (i) the above copyright notices
and this permission notice appear in all copies of the software and related documentation,
and (ii) the names of Sam Leffler and Silicon Graphics may not be used in any advertising
or publicity relating to the software without the specific, prior written permission of Sam
Leffler and Silicon Graphics.
Foxit Europe Software Products may include Ghostscript. Copyright reference for Ghost-
script:
Portions Copyright © 2001 artofcode LLC.
This software is based in part on the work of the Independent JPEG Group.
This software is based in part on the work of the Freetype Team.
Portions Copyright © 2001 URW++.
All Rights Reserved.
Foxit Europe Software Products may include ABBYY FineReader 8, 10 or 11. Copyright ref-
erence for ABBYY:
ABBYY™ FineReader™ Engine 11.0 © 2014 ABBYY Production LLC. All rights reserved. AB-
BYY, FINEREADER, and ABBYY FineReader are either registered trademarks or trademarks
of ABBYY Software Ltd.
The End User is granted a Runtime License for the ABBYY SDK contained in the APPLICATION
on condition that the End User complies with the terms and conditions of the EULA which
apply to the ABBYY SDK or to the APPLICATION as a whole. The Runtime License may be
time-, performance- or function-limited and protected from unauthorized copying by means
of a hardware or software protection key which is an integral part of the ABBYY SDK.
The End User may not perform or make it possible for other persons to perform any activities
included in the list below:
Disassemble or decompile (i.e. extract the source code from the object code) the ABBYY SDK
(applications, databases, and other ABBYY SDK components), except, and only to the extent,
that such activity is expressly permitted by applicable law notwithstanding this limitation.
Modify the ABBYY SDK, including making changes to the object code of the applications and
databases contained in the ABBYY SDK other than those provided for by the ABBYY SDK and
described in the documentation.
Transfer any rights granted to the End User hereby and other rights related to the ABBYY SDK
to any other person, not authorized to use the ABBYY SDK. Make it possible for any person
not entitled to use the ABBYY SDK and working in the same multi-user system as the End
User to use the ABBYY SDK. ABBYY SDK is supplied "as is." ABBYY does not guarantee that the
ABBYY SDK will carry no errors, nor will it be liable for any damages, either direct or indirect,
including, without limitation, damages for loss of business profits, business interruption,
loss of business information, or any other pecuniary loss resulting from the use of ABBYY
SDK, or damages caused by possible errors or misprints in the ABBYY SDK.
Export Rules. If purchased in the United States, the ABBYY SDK shall not be exported or re-
exported in violation of any export provisions of the United States or any other applicable
legislation.
If any part of the EULA is found void and unenforceable, it will not affect the validity of the
balance of the EULA, which shall remain valid and enforceable according to its terms. The
EULA shall not prejudice the statutory rights of any party dealing as a consumer.

PDF Compressor Manual
www.foxitsoftware.com
info@luratech.com License Agreement: 99
Foxit Europe Software Products may include Adobe "PDF Open". Copyright reference for
Adobe:
© 1987-2003 Adobe Systems Incorporated. Adobe™ PDF Library licensed from Adobe Sys-
tems Incorporated.
Adobe PDF Library™. "Adobe Software" means Adobe PDF Library™ for Windows NT, 2000,
XP, 98, Me and related documentation, and any upgrades, modified versions, updates, ad-
ditions, and copies thereof. ABBYY FineReader uses the Adobe Software for converting PDF
files into image files.
License Grant and Restrictions. ABBYY grants you a non-exclusive right to use the Adobe
Software incorporated into ABBYY FineReader SDK under the terms of this EULA. You may
make one backup copy of the Adobe Software incorporated into the SOFTWARE, provided
the backup copy is not installed or used on any computer.
Intellectual Property Rights. The Adobe Software incorporated into the SOFTWARE is owned
by Adobe and its suppliers, and its structure, organization and code are the valuable trade
secrets of Adobe and it suppliers. The Adobe Software is also protected by United States
Copyright Law and International Treaty provisions. You may not copy the Adobe Software
incorporated into the SOFTWARE, except as provided in this EULA. Any copies that you are
permitted to make pursuant to this EULA must contain the same copyright and other pro-
prietary notices that appear on or in the SOFTWARE. You agree not to modify, adapt, trans-
late, reverse engineer, decompile, disassemble or otherwise attempt to discover the source
code of the Adobe Software incorporated into the SOFTWARE. Except as stated above, this
EULA does not grant you any intellectual property rights to the Adobe Software.
Font License. If the SOFTWARE or Adobe Software incorporated into the SOFTWARE in-
cludes font software, you may embed the font software, or outlines of the font software,
into your electronic documents to the extent that the font vendor copyright owner allows
for such embedding. The fonts contained in this package may contain both Adobe and non-
Adobe owned fonts. You may fully embed any font owned by Adobe.
Warranty. ABBYY AND ITS SUPPLIERS DO NOT AND CANNOT WARRANT THE PERFORMANCE
RESULTS YOU MAY OBTAIN BY USING THE ADOBE SOFTWARE INCORPORATED INTO THE
SOFTWARE. THE FOREGOING STATES THE SOLE AND EXCLUSIVE REMEDIES FOR ABBYY’S
BREACH OF WARRANTY. EXCEPT FOR THE LIMITED WARRANTY INDICATED IN SECTION 13
OF THIS EULA, ADOBE AND ITS SUPPLIERS MAKE NO WARRANTY, EXPRESS OR IMPLIED, AS
TO MERCHANTABILITY, FITNESS FOR ANY PARTICULAR PURPOSE, OR NON-INFRINGEMENT.
IN NO EVENT WILL ADOBE OR ITS SUPPLIERS BE LIABLE TO YOU FOR ANY CONSEQUENTIAL,
INCIDENTAL OR SPECIAL DAMAGES, INCLUDING ANY LOST PROFITS OR LOST SAVINGS, EVEN
IF AN ADOBE REPRESENTATIVE HAS BEEN ADVISED OF THE POSSIBILITY OF SUCH DAMAGES,
OR FOR ANY CLAIM BY ANY THIRD PARTY.
Some countries, states or jurisdictions do not allow the exclusion or limitation of incidental,
consequential or special damages, or the exclusion of implied warranties, or limitations on
how long an implied warranty may last, so the above limitations may not apply to you. To
the extent permissible, any implied warranties are limited to thirty (30) days. This warranty
gives you specific legal rights. You may have other rights, which vary from state to state or
jurisdiction to jurisdiction.
Export Rules. You agree that the Adobe Software incorporated into the SOFTWARE will not
be shipped, transferred or exported into any country or used in any manner prohibited by
the United States Export Administration Act or any other export laws, restrictions or regu-

PDF Compressor Manual
www.foxitsoftware.com
info@luratech.com License Agreement: 100
lations (collectively the "Export Laws"). In addition, if the Adobe Software incorporated into
the SOFTWARE is identified as export controlled items under the Export Laws, you represent
and warrant that you are not a citizen, or otherwise located within, an embargoed nation
and that you are not otherwise prohibited under the Export Laws from receiving the Adobe
Software incorporated into the SOFTWARE. All rights to use the Adobe Software incorpo-
rated into the SOFTWARE are granted on condition that such rights are forfeited if you fail
to comply with the terms of this EULA.
Trademarks. Adobe and Adobe PDF Library are either registered trademarks or trademarks
of Adobe Systems Incorporated in the United States and/or other countries.
10. Duration
The agreement runs for an indefinite time. The right of the license holder to use the Foxit
Europe Software Products are terminated automatically, without notice from Foxit Europe,
if the licensee fails to comply with any term(s) of this license. On termination of the license
the license holder is obliged destroy the original version of the product, together with any
copies and documentation.
11. Warranty
The license issuer gives a warranty only in within the scope of the law. The Foxit Europe
Software Products are under warranty for twelve months from the date of delivery. The
warranty covers only product redelivery or product improvement. If these remedies are un-
successful then the license fee may be reduced or the contract cancelled. Altered, modified,
changed or extended Foxit Europe Software Products are not covered by the warranty.
12. Disclaimer of Warranty
Foxit Europe calls your attention to the fact that you are liable for all damage to Foxit Europe
arising from copyright violation. Foxit Europe shall not be liable for any damage incurred by
the use of Foxit Europe Software Products including loss of profit, loss of information, loss
of data or any financial loss. No damages shall be paid by Foxit Europe unless instructed
to by law.
13. Export
If you wish to export the Foxit Europe Software Product then you are responsible for obeying
all export regulations for the country of purchase.
14. Controlling Law and Severability
If there is a local subsidiary of Foxit Europe in the country in which the Foxit Europe Soft-
ware Product was purchased, then the local law in which the subsidiary sits shall govern
this license. Otherwise, the license shall be governed by the German Law. If for any reason a
court of competent jurisdiction finds any provision, or portion thereof, to be unenforceable,
the remainder of this license shall continue in full force and effect.
15. Complete Agreement
This license constitutes the entire agreement between the parties with respect to the use
of the Foxit Europe Software Product and supersedes all prior or contemporaneous under-
standings regarding such subject matter. No amendment to or modification of this license
will be binding unless in writing and signed by Foxit Europe.
16. Additional Items

PDF Compressor Manual
www.foxitsoftware.com
info@luratech.com License Agreement: 101
Only the product sold under the name "C-SDK incl. Runtime-License" can be acquired as a
flat-rate package. It consists of a LuraWave JP2 C-SDK and a runtime license which is valid no
matter how many copies you make of the target product or how long you keep the license.
However, the runtime license is limited to the use of just a single target product. Only for
the above-named product no additional runtime licensing agreement is necessary if in your
order you indicate a clearly decipherable product name for the target product into which
you will integrate the LuraWave JP2 with the C-SDK.
© 2013
Foxit Europe GmbH
Ulmenstr. 22
42855 Remscheid
GERMANY
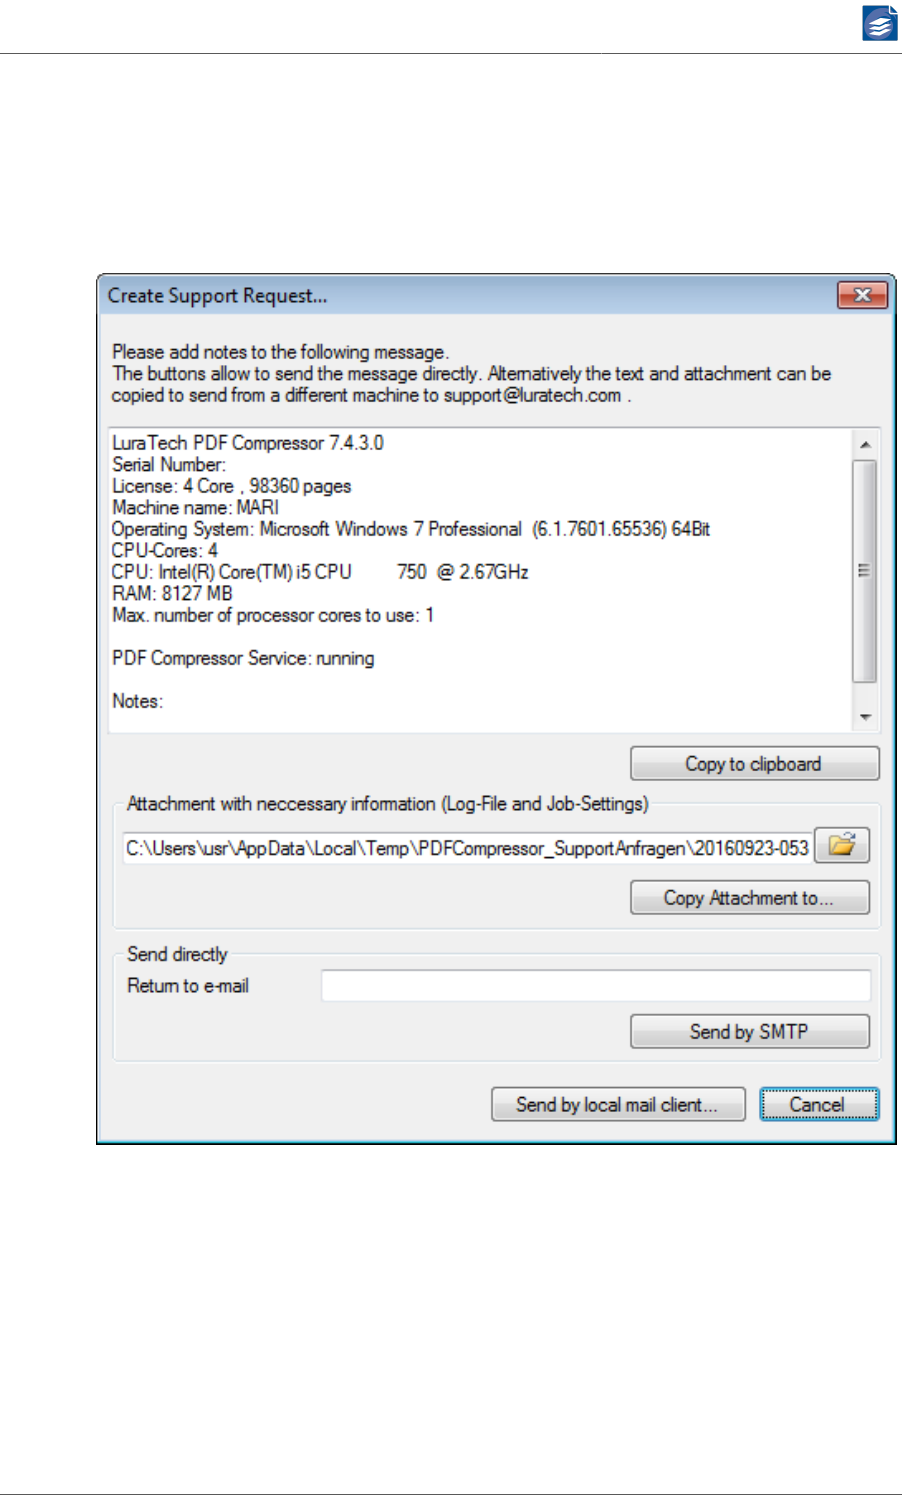
PDF Compressor Manual
www.foxitsoftware.com
info@luratech.com Support and Contact: 102
Chapter 13. Support and Contact
If you incur any problems installing or using PDF Compressor you can contact Foxit Europe’s
support via e-mail. Please use the option Create Support Request… in menu Help or in the
error dialog.
Please add some notes regarding the error or problem in the text field. By opening the
support request dialog a zip file is created including necessary files like job settings and log.
The dialog displays the zip file path in the attachment field. In case the machine is connected
to the internet, you can enter a reply address in Return to e-mail: and use the Send by SMTP
button to directly send the message including attachment. Alternatively a local e-mail client
can be used for sending with button Send by local mail client…. In case of failure or missing
internet connection please copy the message and attachment to a machine with internet
connection and send using an e-mail client.
If you don’t use the option to send a support request, please include the following infor-
mation:

PDF Compressor Manual
www.foxitsoftware.com
info@luratech.com Support and Contact: 103
1. The version number of PDF Compressor, e.g. 7.5.0.1. This number is shown in the About…
dialog available through the button in the main window’s toolbar.
2. The computer’s operating system, e.g. Windows 8.
3. A description of the error and the logfile as specified under File → Options → Log file.
Please send all support requests to: support@luratech.com [mailto:support@lurate-
ch.com]
You can find further information and contact data on our web page: http://www.lurate-
ch.com
Version 7.7
Date 2017-04-05
The specifications contained herein are subject to change without notice. Foxit Europe shall
not be liable for errors contained herein or for incidental or consequential damages (in-
cluding lost profits) in connection with the furnishing, performance or use of this material
whether based on warranty, contract, or other legal theory.
© 2016 Foxit Europe GmbH
Neue Kantstr. 14
14057 Berlin
Germany
