i SENS ISMART300A Blood Gas Analyzer User Manual i Smart 300 VET Analyzer draft 3
i-SENS, Inc. Blood Gas Analyzer i Smart 300 VET Analyzer draft 3
i SENS >
Contents
- 1. i-Smart 300 Analyzer user manual draft(3)
- 2. i-Smart 300 VET Analyzer user manual draft(3)
i-Smart 300 VET Analyzer user manual draft(3)

Operator’s Manual
Software version 1.0.0.0
Draft
July 2015
Copyright © 2015 i-SENS, Inc. All Rights Reserved
Operators should read the entire manual
before installing and operating the analyzer.

Contents
Contents
1 Introduction
Safety ··························································································· 1-1
Symbols and Terms ············································································· 1-3
Product Description ············································································ 1-5
2 Installation
Installation Requirements ······································································ 2-1
Power Cable Connection ······································································· 2-2
Power-On ······················································································· 2-3
Printer Paper Installation ······································································· 2-5
Cartridge Installation ··········································································· 2-7
3 Analyzer Settings
Screen Menus ··················································································· 3-1
Sample Setup ·················································································· 3-11
QC Setup ······················································································ 3-14
Instrument Setup ·············································································· 3-16
Interface Setup················································································· 3-20
Species Type Setup ············································································ 3-22
4 Sample Analysis
Blood Samples·················································································· 4-1
QC Samples ···················································································· 4-8
5 Database
Blood Sample Data ············································································· 5-1
QC Data ························································································ 5-5
Calibration Data ················································································ 5-9
Cartridge Data ················································································· 5-12

Contents
6 Shutdown
Analyzer Shutdown ············································································· 6-1
Cartridge Restart ················································································ 6-3
7 Maintenance
Calibration ······················································································· 7-1
Cartridge Removal ·············································································· 7-4
System Information ············································································· 7-6
Analyzer Status ············································································· 7-7
Cleaning ···················································································· 7-8
8 Troubleshooting
Troubleshooting ················································································· 8-1
Error Code ······················································································· 8-6
9 Specification
Operating Specification ····································································· 9-1
Analyzer Specification ····································································· 9-2
Cartridge Specification ····································································· 9-3
Measuring Principles ······································································· 9-4
Appendices
Appendics A: Sample Collection and Handling ·············································· 10-1
Appendics B: Order Information ····························································· 10-2
Appendics C: Warranty ······································································· 10-3

1. Introduction
1. Introduction
Safety ··················································································· 1-1
Symbols and Terms···································································· 1-3
Product Description ··································································· 1-5

1. Introduction
1-1 i-Smart 300 Blood Gas Analyzer
Safety
General
Warnings
Use only the provided power cord and adapter.
Do not use damaged power cord, adapter, or loose outlet.
Never touch the power supply accessories with wet hands.
Keep dust away from the outlet and power cord.
Do not use or store any hot equipment or flammable material
near the analyzer or power supply accessories.
Do not allow water or foreign substances to get into the analyzer
or power supply accessories.
Do not directly look at the red light emitting from the barcode
scanner as direct eye exposure to this light can damage vision.
General
Caution
Power cord must be plugged into a grounded outlet.
The rear vent of the analyzer must be free of obstruction and not
covered by cloth or any other material.
Do not install or operate the analyzer in an area where
ferromagnetic fields are generated (e.g., the MRI room).
Before long term storage of the analyzer, remove the cartridge,
turn off the power, and clean any contamination from the
analyzer.
There are no operator seviceable parts inside the product.
Do not disassemble, repair, or modify the product.
If electromechanical problems are suspected, call a service
engineer to report the problems.
When disposing the analyzer and provided electrical accessories,
contact your local distributor where you purchased them.
You must not discard this electrical/electronic product in
domestic household waste.
Changes or modifications not expressly approved by i-SENS, Inc.
could void the purchaser’s authority to operate the equipment.

1. Introduction
Operator’s Manual 1-2
Safety, continued
Biohazard
Caution
All materials used in collecting blood and/or other samples from
humans should be treated as biohazardous materials with the
potential carrying infectious agents capable of producing disease.
All biohazardous materials should be handled and disposed of in
accordance with applicable rules and regulations of the hospital,
laboratory, or other testing facility.
Wear appropriate personal protective clothing (lab coat, gloves,
goggles, etc.) before operating the analyzer.
Be careful not to let the sample and/or collecting tools directly
touch the mouth, eyes, mucus membranes, or any area with
broken skin.
Wash hands after collecting the sample or using the analyzer.
1. Introduction
1-3 i-Smart 300 Blood Gas Analyzer
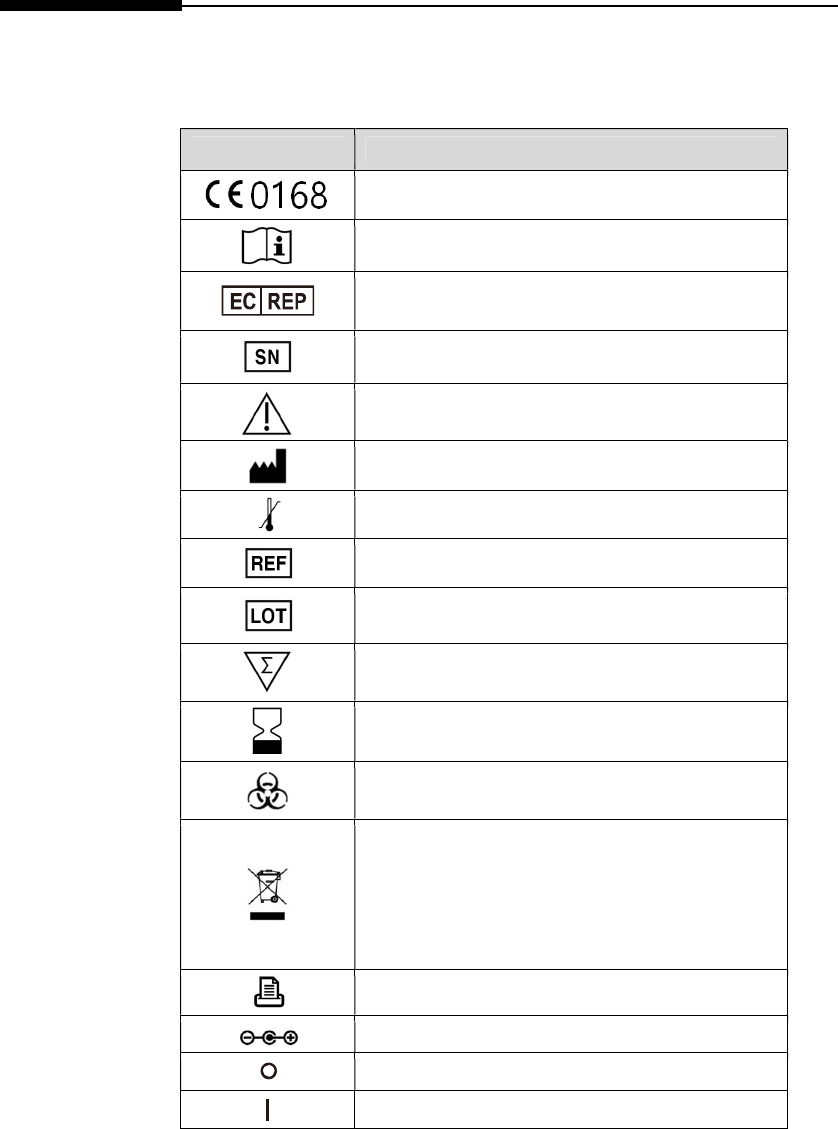
Symbols and Terms
Symbols
Symbol Description
CE mark
Consult operating instructions
Authorized representative in the European
community
Serial number
Caution: Attention, see operating instructions
Manufacturer
Temperature limitation
Catalogue number
Batch code
Contains sufficient for <n> tests
Use by
Biological risk
This marking indicates that you must not discard
this electrical/electronic product in domestic
household waste. Distributors of this product
within the EU have taken the necessary step to
comply with the Waste Electrical and Electronic
Equipment (WEEE), Directive 2002/96/EC.
Printer
DC power port
Off (power)
On (power)

1. Introduction
Operator’s Manual 1-4
Symbols and Terms, continued
Terms
Term Description
pH Negative log of the hydrogen ion activity
pCO2 Partial pressure of carbon dioxide
pO2 Partial pressure of oxygen
cNa+ Concentration of sodium ion
cK+ Concentration of potassium ion
cCa2+ Concentration of calcium ion (ionized calcium)
cCl- Concentration of chloride ion
Hct Hematocrit
Cal Calibration
Cal 1 1-Point calibration
Cal 2 2-Point calibration
QC Quality control
Warning
A statement that alerts the operator to the
possibility of injury, death, or other serious
adverse reactions associated with the use or
misuse of the device.
Caution
A statement that alerts the operator to the
possibility of device malfunction, device failure,
damage to the device or damage to other
property associated with the use or misuse of the
device.
1. Introduction
1-5 i-Smart 300 Blood Gas Analyzer
Product Description
Intended Use
Analyzer
i-Smart 300 is an automated system that measures pH, pCO2, pO2,
cNa+, cK+, cCl-, cCa2+, and hematocrit in whole blood.
It is for in vitro Veterinary Diagnostic Use only.
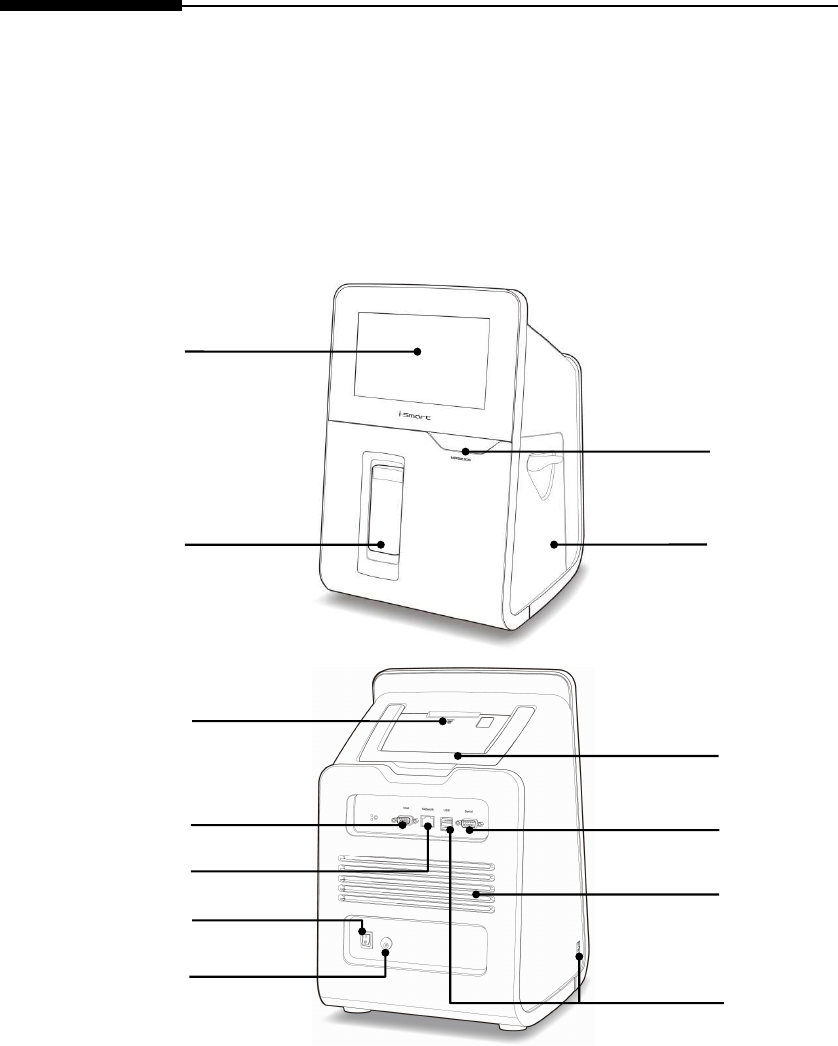
Touchscreen
Sampler
cover
Cartridge
door
Barcode
scanner
Printer
Power switch
Power port
LAN port
Serial port
USB ports
Vent
Handle
VGA port
i-Smart 300 VET Analyzer
1. Introduction
Operator’s Manual 1-6
Product Description, continued
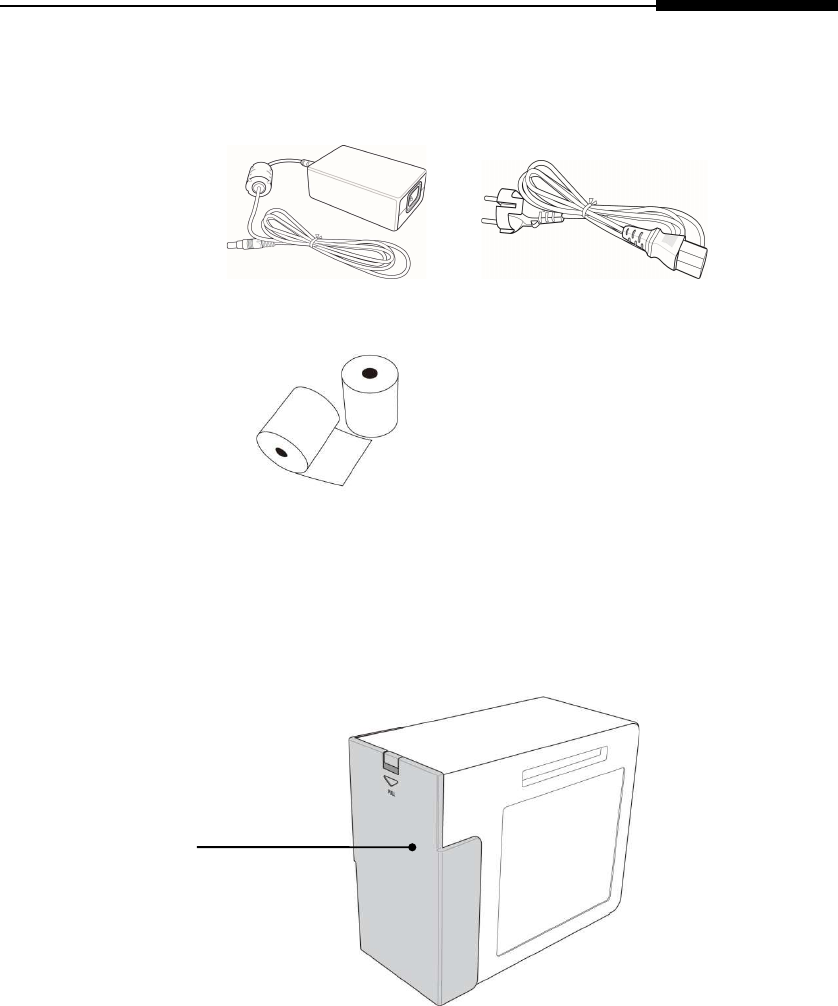
Accessories of
analyzer
Power adapter Power code
Printer papers
Cartridge
Cartridge cover
i-Smart 300 VET Cartridge

1. Introduction
1-7 i-Smart 300 Blood Gas Analyzer
This page is intentionally left blank.

2. Installation
2. Installation
Installation Requirements ··························································· 2-1
Power Cable Connection ···························································· 2-2
Power-On ············································································· 2-3
Printer Paper Installation ····························································· 2-5
Cartridge Installation ·································································· 2-7

2. Installation
2-1 i-Smart 300 VET Blood Gas Analyzer
Installation Requirements
Unpacking Inspect the shipping package of the product for any signs of
damage from shipment.
Ensure all listed components are included in the package.
Environmental
Requirements
Location : indoors
Temperature : 15 ~ 35°C
Humidity : 5 ~ 85%, relative humidity
Altitude : under 3,000 m
Note:
The analyzer should be installed on a horizontal, stable surface in
a well-ventilated area without direct sunlight or heat.
Allow enough space for the cartridge door of the analyzer to
open.
Allow at least 10 cm of space from the back of the analyzer for
adequate ventilation.
This equipment has been tested and found to comply with the
limits for a Class A digital device, pursuant to part 15 of the FCC
Rules. These limits are designed to provide reasonable protection
against harmful interference when the equipment is operated in a
commercial environment. This equipment generates, uses, and
can radiate radio frequency energy and, if not installed and used
in accordance with the instruction manual, may cause harmful
interference to radio communications. Operation of this
equipment in a residential area is likely to cause harmful
interference in which case the user will be required to correct the
interference at his own expense.
Electrical
Requirements
Volt AC : 100 ~ 240 Va.c., grounded electrical supply
Amp : 1.5 A
Frequency : 50/60 Hz
Power cord : 3-wire, approved
Power adapter : +24 Vd.c., 2.7 A (Output)
2. Installation
Operator’s Manual 2-2
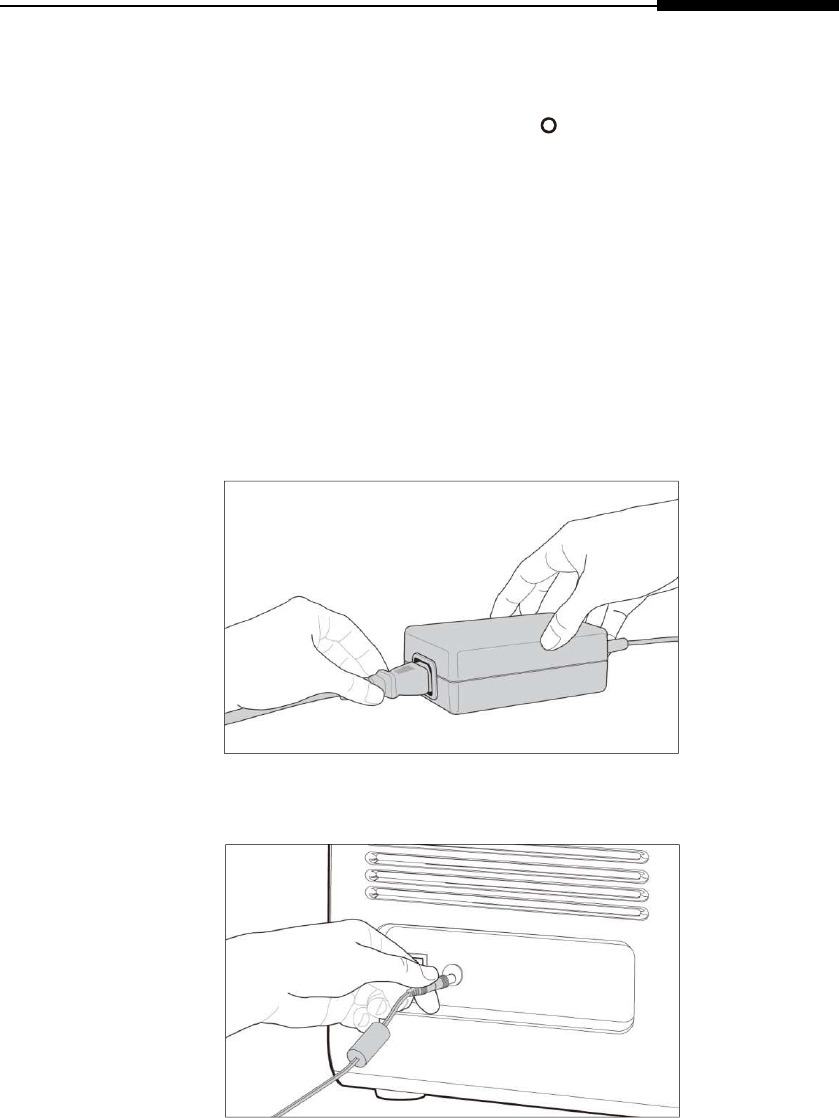
Power Cable Connection
Caution Check that the power switch is in “ ” (OFF) position.
Always connect the power according to the steps described in
this manual.
Always use a grounded electrical outlet.
Use only the power cord and power adapter provided by the
manufacture.
Electrical plugs and sockets vary by countries. If necessary, use
appropriate power plug or power strips to connect the provided
power cord to the outlet.
Connect Power
Cable
1. Plug the power cord into the socket of the power adapter.
2. Plug the power adapter into the power port on the back of the
analyzer.
3. Plug the power cord into an electrical outlet.
2. Installation
2-3 i-Smart 300 Blood Gas Analyzer
Power-On
Caution Remove any attached USB memory device or network cable
from the analyzer before turning the power switch on.
Turn Power
Switch On
2. Facing the back of the analyzer, flip the black power switch on
the lower left side, marked “ ” to the “ ” position.
3. The screen will turn on and the analyzer will boot.
4. If the boot is completed, the message of the last shutdown
information will appear.

2. Installation
Operator’s Manual 2-4
Power-On, continued
Turn Power
Switch On,
continued
5. Check that the power cord icon 이 appears at the bottom
row of the screen.
Note:
If the power cord icon does not appear on the screen,
check for any loose power connections between the analyzer and
the electrical outlet.
If no loose power connection is found and the power cord icon
still does not appear, call a service engineer immediately.
6. Check the date and time of the analyzer and, if necessary, change
date and/or time. Refer to 3. Analyzer Settings
Note:
Changing the date and time of the analyzer is only allowed
before cartridge is installed on the analyzer. Once the cartridge
is installed, the date and time cannot be changed until the
cartridge is removed.

2. Installation
2-5 i-Smart 300 Blood Gas Analyzer
Printer Paper Installation
Install Printer
Paper
1. Facing the back of the analyzer, push the PUSH button and flip
down the printer cover.
2. Place the paper roll into the paper compartment and place the
end of the paper in parallel with the printer slot.
2. Installation
Operator’s Manual 2-6
Printer Paper Installation, continued
Install Printer
Paper, continued
3. Close the printer cover.
Note:
The printer will cut the paper exposed to the outside
automatically.
2. Installation
2-7 i-Smart 300 Blood Gas Analyzer
Cartridge Installation
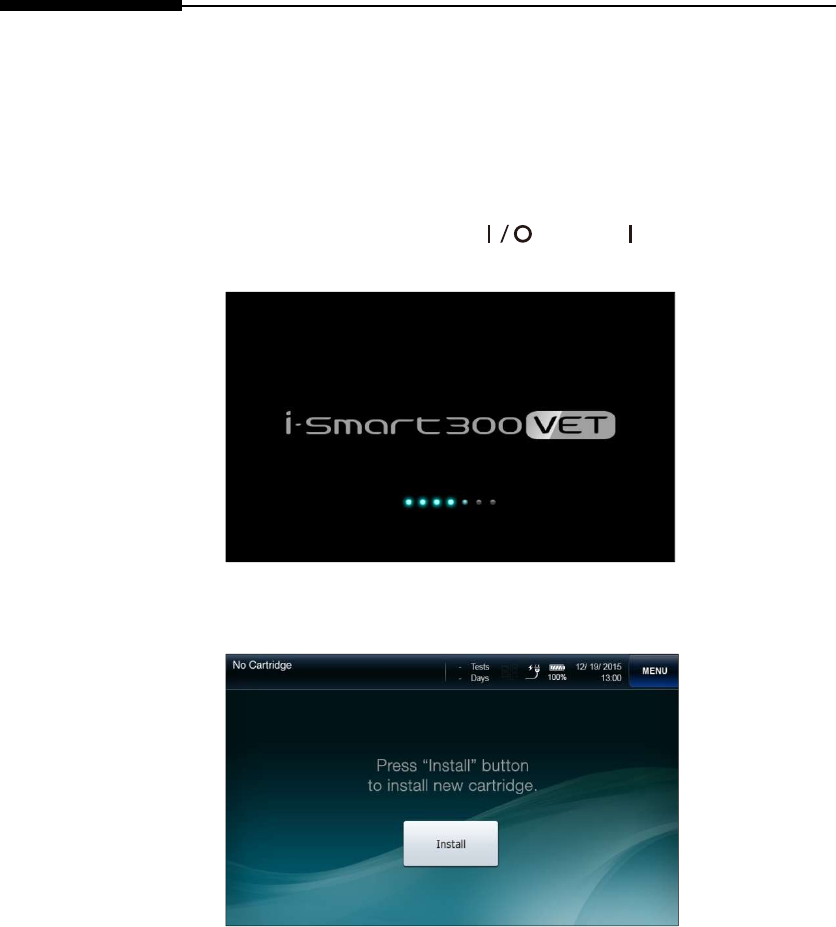
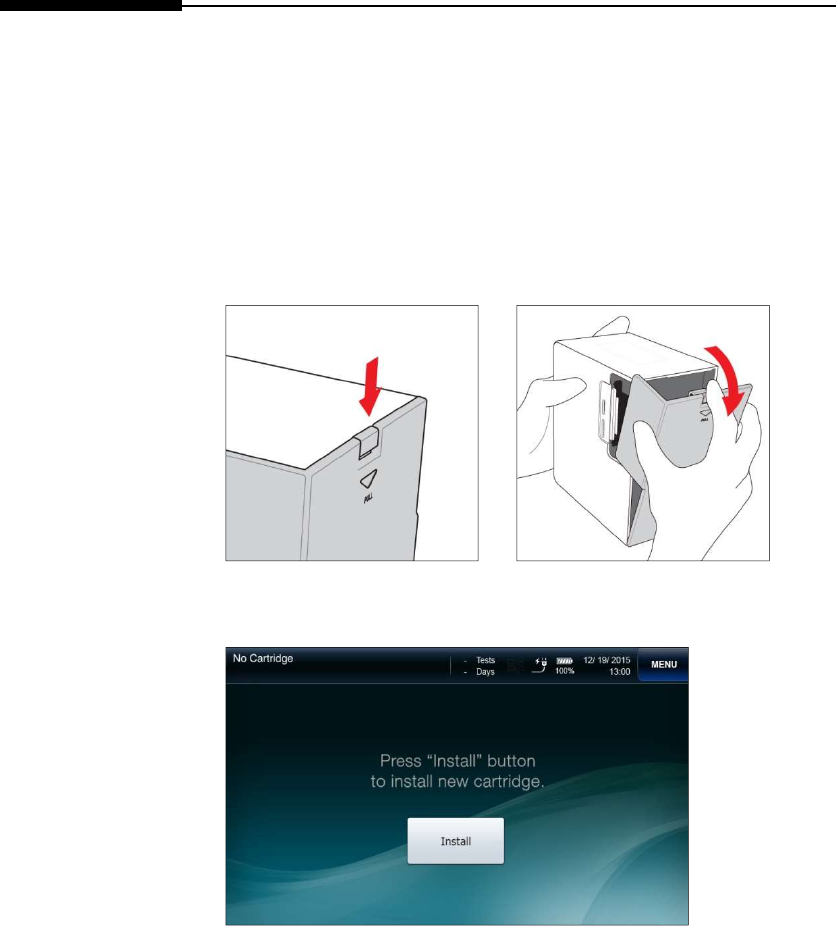
Install Cartridge Note:
After opening the cartridge, it must be installed directly to the
analyzer.
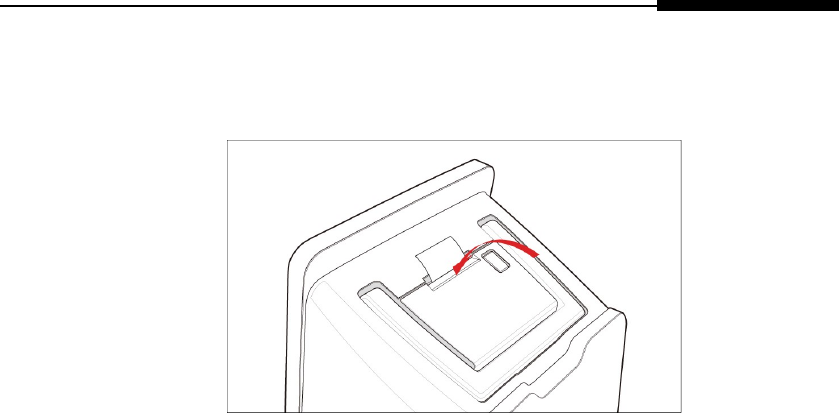
1. Take out the cartridge from the cartridge box.
2. Press down the cover lock and remove the cartridge cover.
3. Press Install at the following screen
4. Slide down the lever on the cartridge door, open the cartridge
door.
2. Installation
Operator’s Manual 2-8
Cartridge Installation, continued
Install Cartridge,
continued
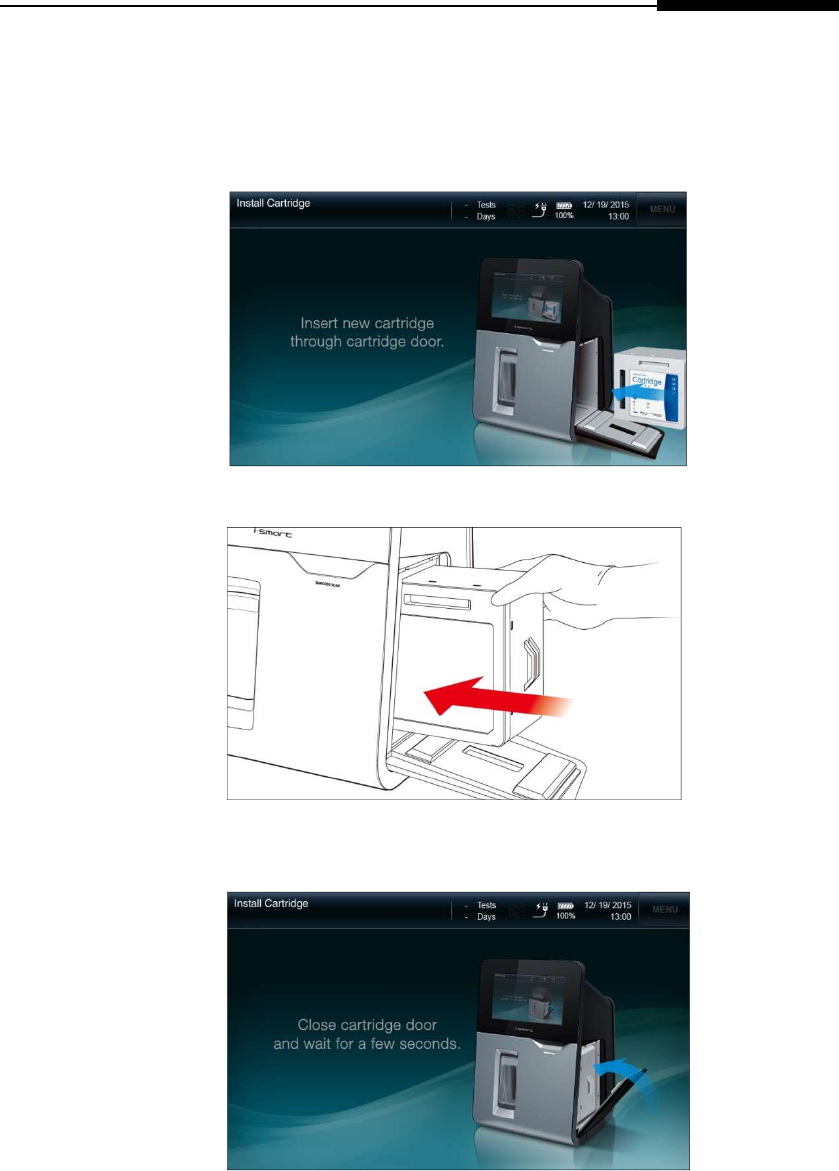
5. Insert the new cartridge into the analyzer, follow the instructions
on the screen.
6. Facing the cartridge label, insert the cartridge into the analyzer.
7. Close the cartridge door and slide up the lever on the cartridge
door. If the door is properly locked, it will make a clicking sound.
2. Installation
2-9 i-Smart 300 Blood Gas Analyzer
Cartridge Installation, continued
Install Cartridge,
continued
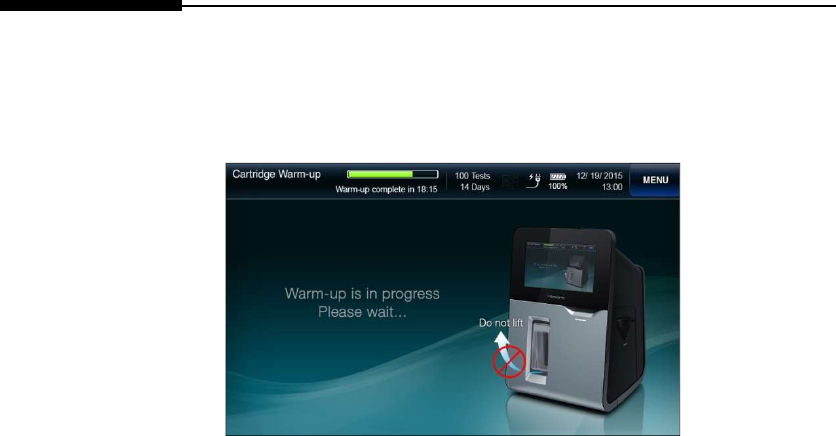
8. If the RFID tag information of the cartridge is valid, the analyzer
will change to the Cartridge Warming-Up screen.
9. The cartridge warming-up will take approximately 25 minutes.
Note:
Once the cartridge cover is removed, be careful with sharp edges
of the cartridge parts inside.

3. Analyzer Setting
3. Analyzer Setting
Screen Menus ·················································································· 3-1
Sample Setup ·················································································· 3-11
QC Setup ······················································································· 3-14
Instrument Setup ············································································· 3-16
Interface Setup ················································································ 3-20
Species Type Setup ·········································································· 3-22
3. Analyzer Setting
3-1 i-Smart 300 Blood Gas Analyzer
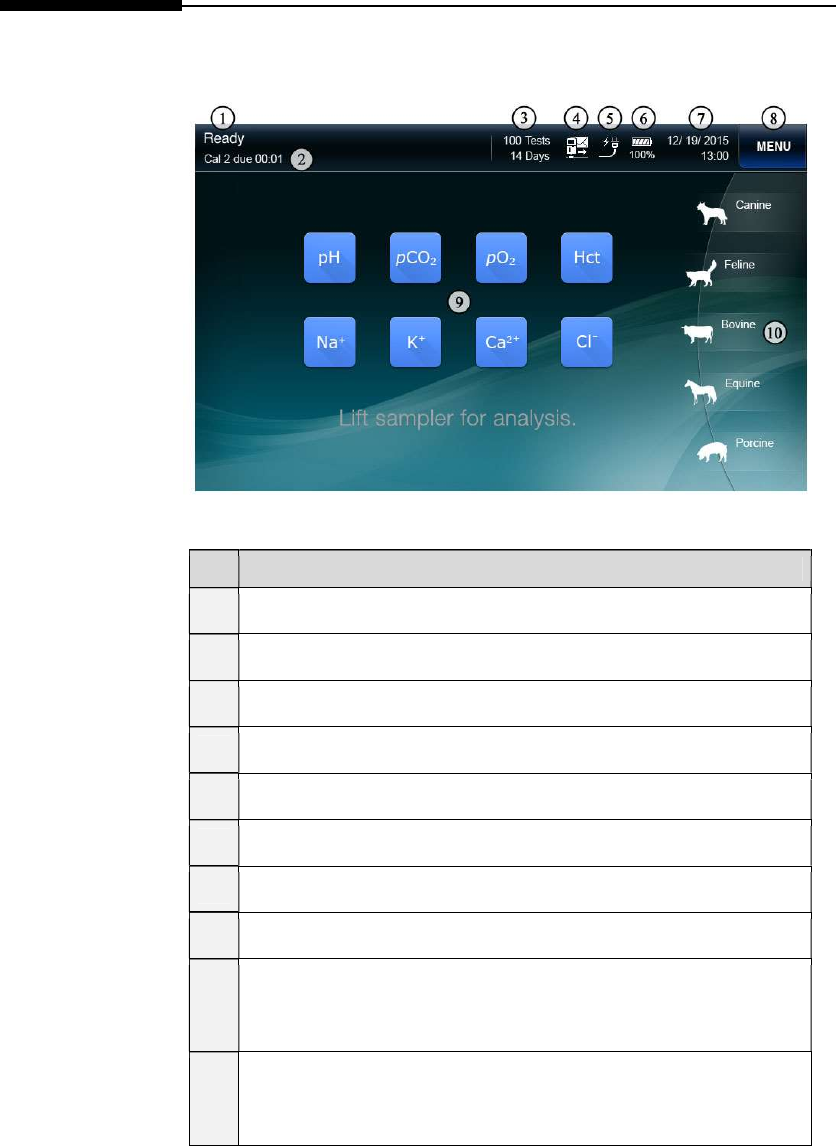
Screen Menus
Ready Screen
No.
Description
①
Screen naming
②
Analyzer operation schedule
③
Remaining sample number and date of the installed cartridge
④
Current state of interface setup
⑤
Current state of power connection
⑥
Current state of and battery recharge level
⑦
Current date and time of the analyzer
⑧
Menu access
⑨
Current state of each sensor:
Pressing each button twice will display the latest slope of the
sensor.
⑩
Species that is selected to be analyzed.
3. Analyzer Setting
Operator’s Manual 3-2
Screen Menus, continued
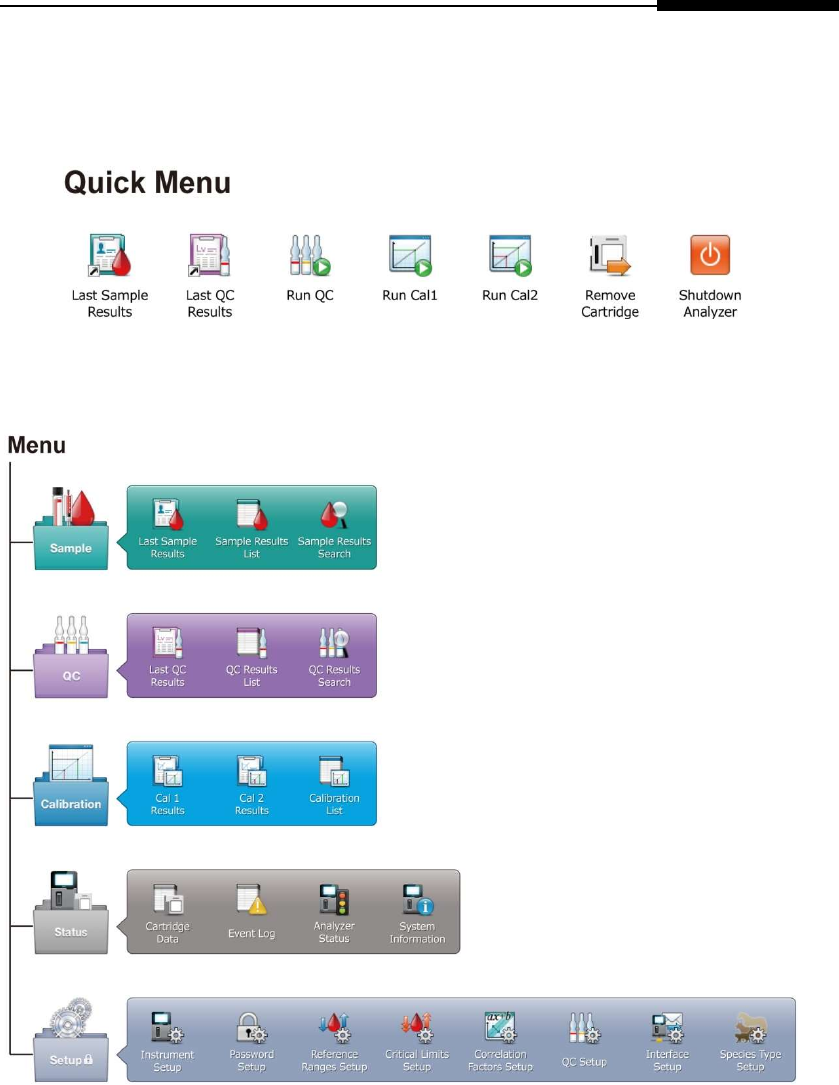
Menu options
3. Analyzer Setting
3-3 i-Smart 300 Blood Gas Analyzer
Screen Menus, continued
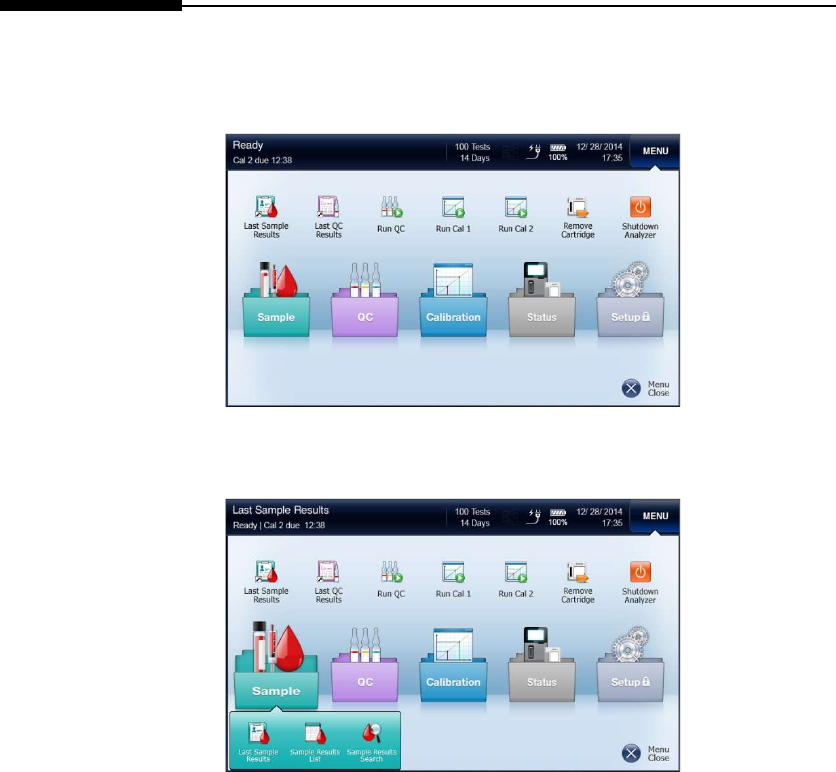
Menu Access 1. Press Menu. The quick menus and the category menus will appear.
2. Press the current screen box at the top right corner to show the
current menu options.
Note:
The Menu button is disabled on the following screens:
- Install Cartridge, Remove Cartridge
- Introduce Sample, Sample Information, Sample Results
- Introduce QC Sample, QC Information, QC Results
3. Analyzer Setting
Operator’s Manual 3-4
Screen Menus, continued
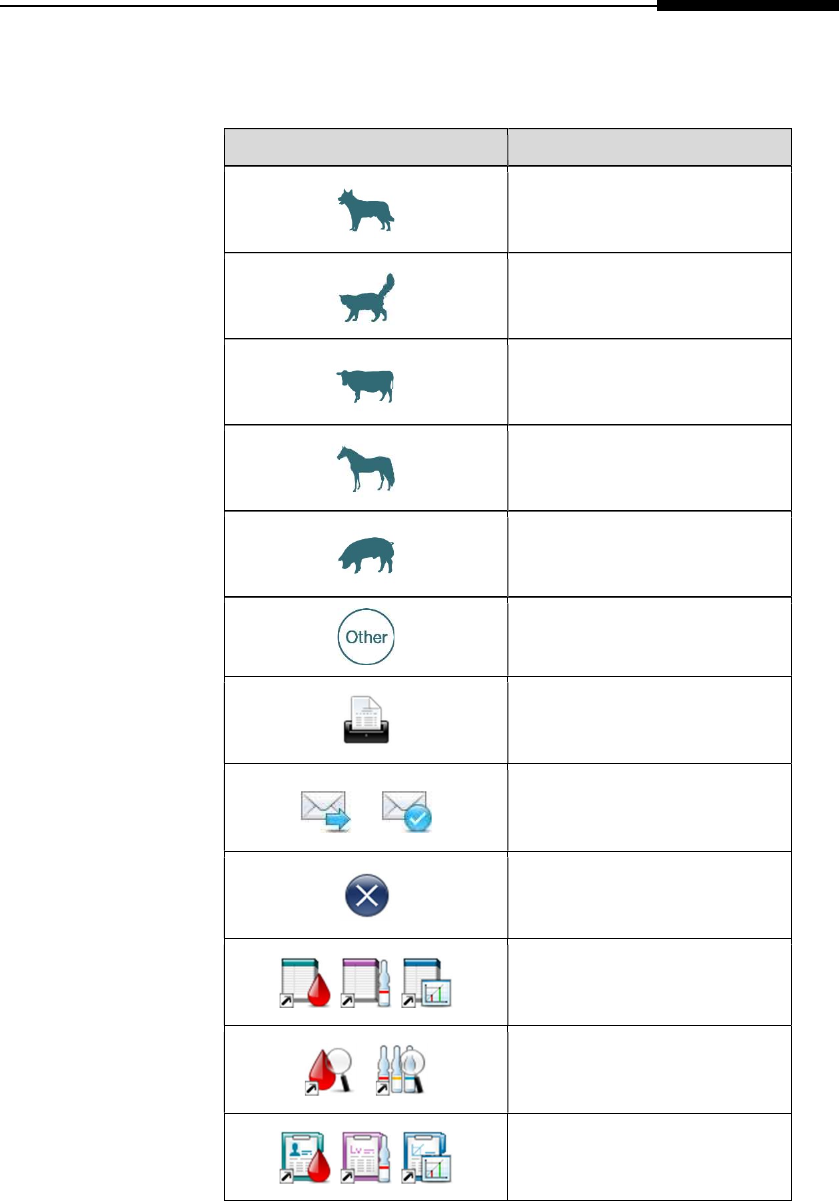
Icons and
Buttons
Icons and Buttons Description
Canine icon
Feline icon
Bovine icon
Equine icon
Porcine icon
Other Species icon
Print results or settings on
screen
Transmit results to LIS/HIS /
Transfer complete
Close current screen
Go to list screen
Go to search screen
View result screen
3. Analyzer Setting
3-3 i-Smart 300 혈액가스분석기
Screen Menus, continued
Icons and
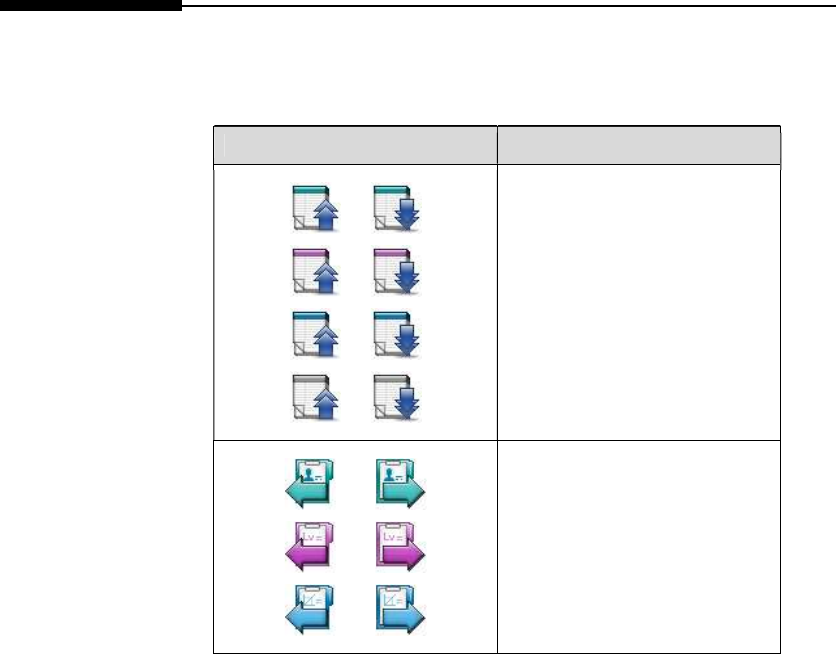
Buttons Icons and Buttons Description
Scroll to previous or next page
Go to previous or next result
screen
3. Analyzer Setting
Operator’s Manual 3-4
Screen Menus, continued
Icons and
Buttons,
continued
Icons and Buttons Description
Execute search
Run 1-point calibration or
2-point calibration
Run QC
Accept or discard QC results
Add or delete QC lot
information
Delete entered data on current
tab
Okay or accept
Save
Go to previous screen
Copy cartridge data to USB
memory
3. Analyzer Setting
3-5 i-Smart 300 Blood Gas Analyzer
Screen Menus, continued
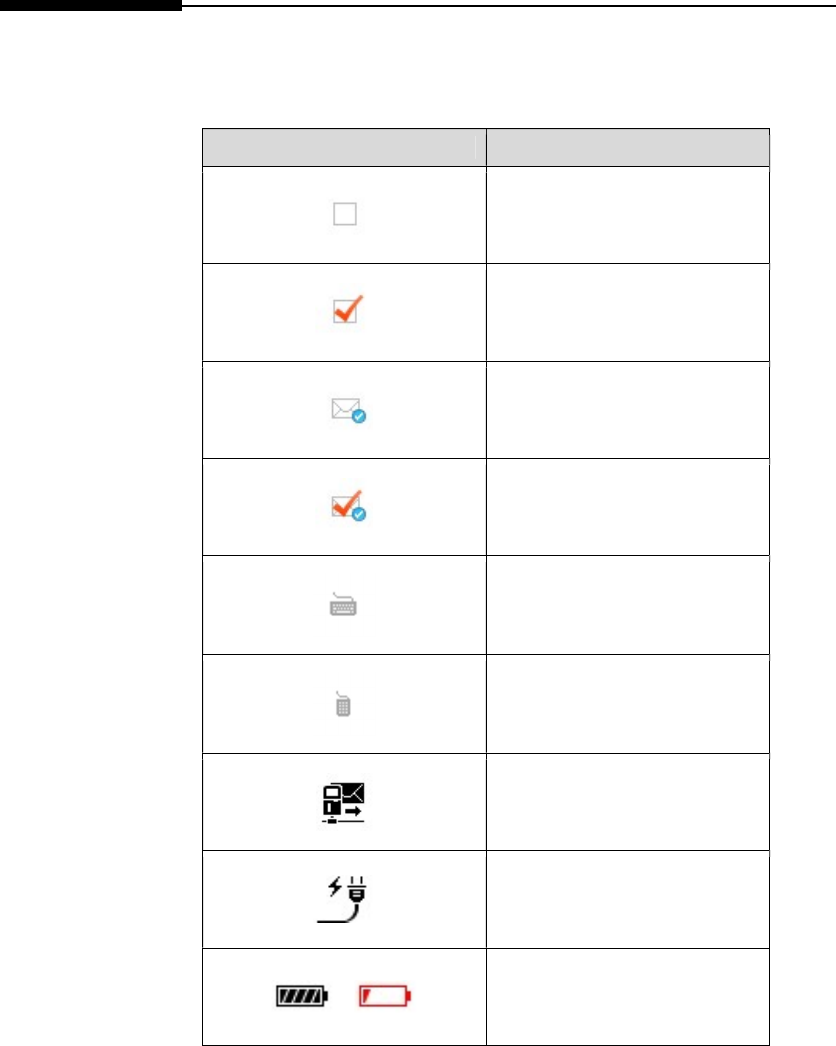
Icons and
Buttons,
continued
Icons and Buttons Description
Unselected item
Selected item
Item that were transmitted to
LIS/HIS
Selected item that were
transmitted to LIS/HIS
Show keyboard for data entry
Show keyboard for numeric
entry
Interface was enabled
Analyzer is on AC power
Battery level
3. Analyzer Setting
사용 설명서 3-6
Screen Menus, continued
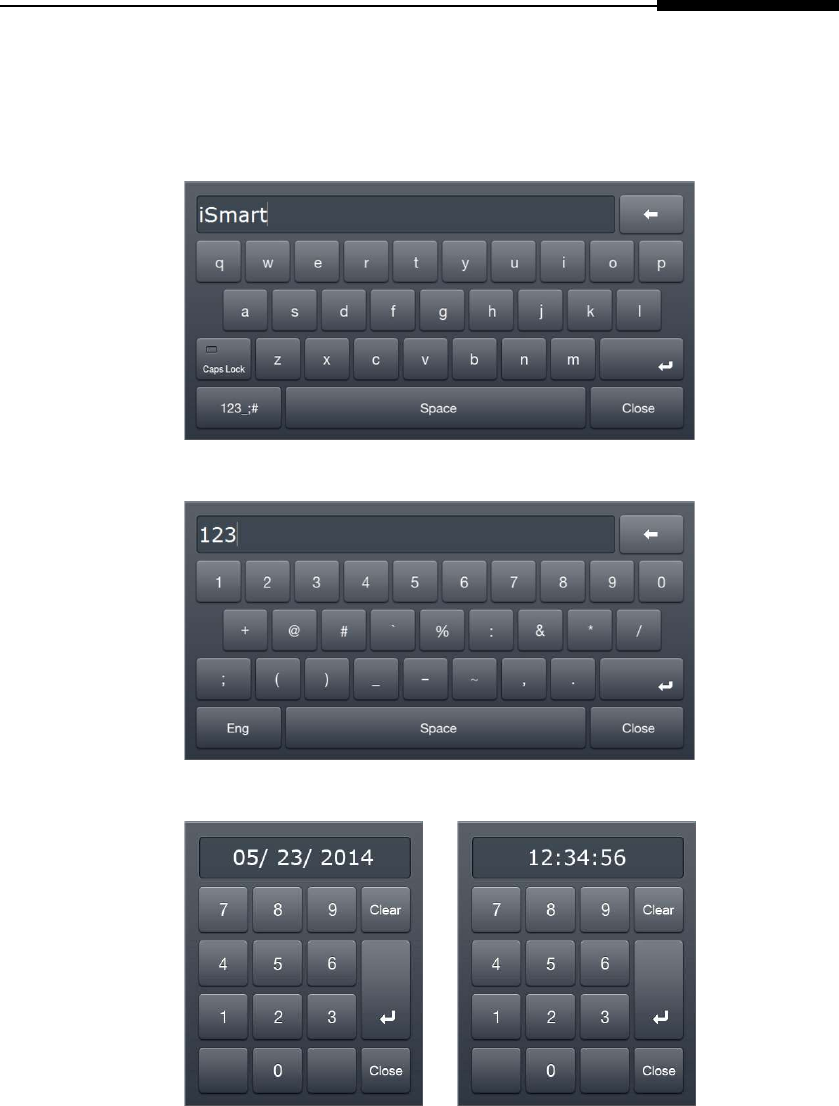
Keyboards The analyzer offers following keyboards for data entry.
Alphabetic Keyboard
Numeric & Special Character Keyboard
Date and Time Entry Keyboards

3. Analyzer Setting
3-7 i-Smart 300 혈액가스분석기
Screen Menus, continued
Keyboards,
continued
Numerical Keyboard

3. Analyzer Setting
사용 설명서 3-8
Screen Menus, continued
LCD Brightness When the analyzer has not been in use for more than 10 minutes, the
screen turns to screensaver.
Note:
The screensaver does not apply to the Sample Results screen
and the QC Results screen.
Message A message box on the screen informs following information:
A current task that is about to begin or in-progress.
Action to take in operating the analyzer, such as introducing
sample or replacing cartridge.
An error that needs an attention or action.
Voice Guide In addition to message boxes, the analyzer plays sound playbacks for
following operations:
Blood sample introduction
QC sample introduction
Cartridge removal
Cartridge installation
Cartridge data copy
Battery alarm:: “The battery is low”
3. Analyzer Setting
3-11 i-Smart 300 Blood Gas Analyzer
Sample Setup
Reference
Ranges
1. Go to Menu > Setup (Setup menu is protected by password.) >
Reference Ranges Setup. The following screen will appear.
2. Press each box and enter low and high limits of the reference range
for each parameter.

3. Analyzer Setting
사용 설명서 3-10
Sample Setup, continued
Reference
Ranges,
continued
Note:
To delete the entered data, press Current Tab Clear.
Before saving the setup, the analyzer will validate the entered
values to confirm that:
- Values for both low and high limits are entered.
- Low limit value is lower than high limit value.
If any of the entered values are not valid, the analyzer will not
save the setup and ask to correct the invalid value at the setup
screen.
3. Press Save to save the setup and go back to the main screen.
To exit to main screen without saving the changed setting, press
Close.

3. Analyzer Setting
3-11 i-Smart 300 혈액가스분석기
Sample Setup, continued
Reference
Ranges,
continued
Note:
Reference ranges should be established by individual institutions.
The reference ranges in the table below are shown only as general
guidelines.
Parameter Unit Reference Range
pH - 7.350 ~ 7.450
pCO2 mmHg 35.0 ~ 48.0
pO2 mmHg 83 ~ 108
cNa+ mmol/L 136 ~ 145
cK+ mmol/L 3.4 ~ 4.5
cCa2+ mmol/L 1.15 ~ 1.35
cCl- mmol/L 98 ~ 106
Hct % 35 ~ 51
3. Analyzer Setting
사용 설명서 3-12
Sample Setup, continued
Critical Limits 1. Go to Menu > Setup (Setup menu is protected by password.) >
Critical Limits Setup. The following screen will appear.
2. Press each box and enter low and high values of the critical
limits range for each parameter.
Note:
To delete the entered data, press Current Tab Clear.
Before saving the setup, the analyzer will validate the entered
values to confirm that:
- Values for both low and high limits are entered.
- Low limit value is lower than high limit value.
If any of the entered values are not valid, the analyzer will not
save the setup and ask to correct the invalid value at the setup
screen.
3. Press Save to save the setup and go back to the main screen.
To exit to main screen without saving the changed setting, press
Close.

3. Analyzer Setting
3-13 i-Smart 300 혈액가스분석기
Sample Setup, continued
Critical Limits,
continued
Note:
High limit value is high than high limits of the reference range.
Low limit value is low than low limits of the reference range.
3. Analyzer Setting
사용 설명서 3-14
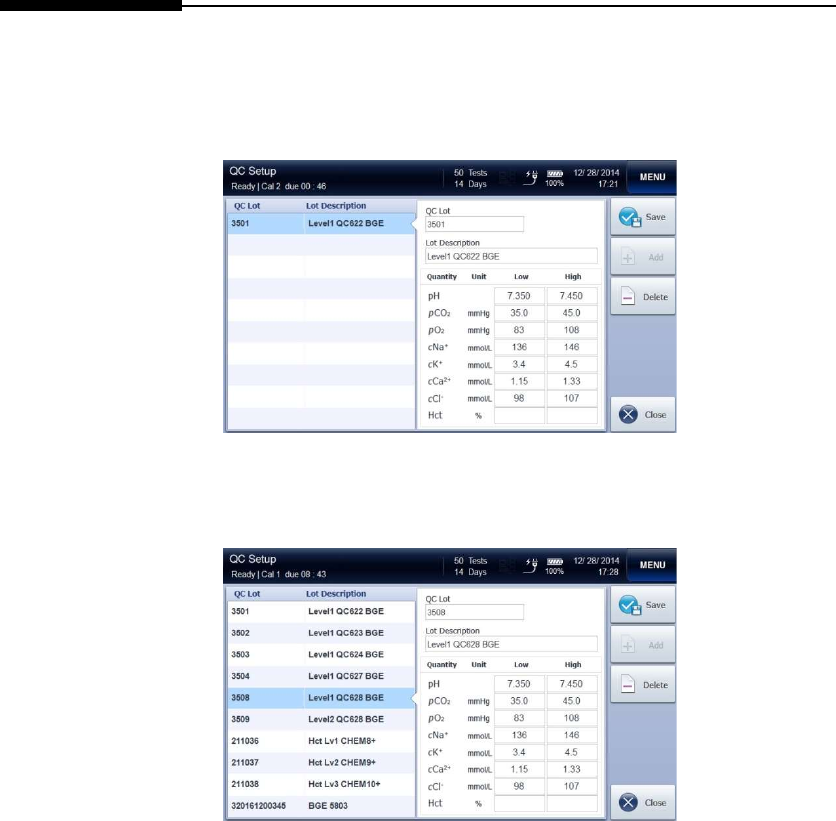
QC Setup
QC Lot Setup 1. Go to Menu > Setup (Setup menu is protected by password.) >
QC Setup. The following screen will appear.
2. Select the empty list on the left column. Entry tabs to enter QC
lot information is activated on the right side as follow.
3. Press each entry tab, and enter QC lot information using the
keyboard.
3. Analyzer Setting
3-15 i-Smart 300 혈액가스분석기
QC Setup, continued
QC Lot Setup,
continued
4. Press Add after entering QC lot information. The entered QC lot
will be added to the list on the left column.
Note:
Continue to select the empty list on the left column and add desired
QC lot information.
5. To delete the previously saved QC lot information, press the desired
QC lot on the left column and press Delete.
6. To modify the previously saved QC lot information, delete the saved
QC lot on the left column and newly add the modified QC lot.
Note:
The newly added or modified QC lot is shown in bold.
7. Press Save to save the setup and go back to the main screen.
To exit to main screen without saving the changed setting, press
Close.
3. Analyzer Setting
Operator’s Manual 3-16
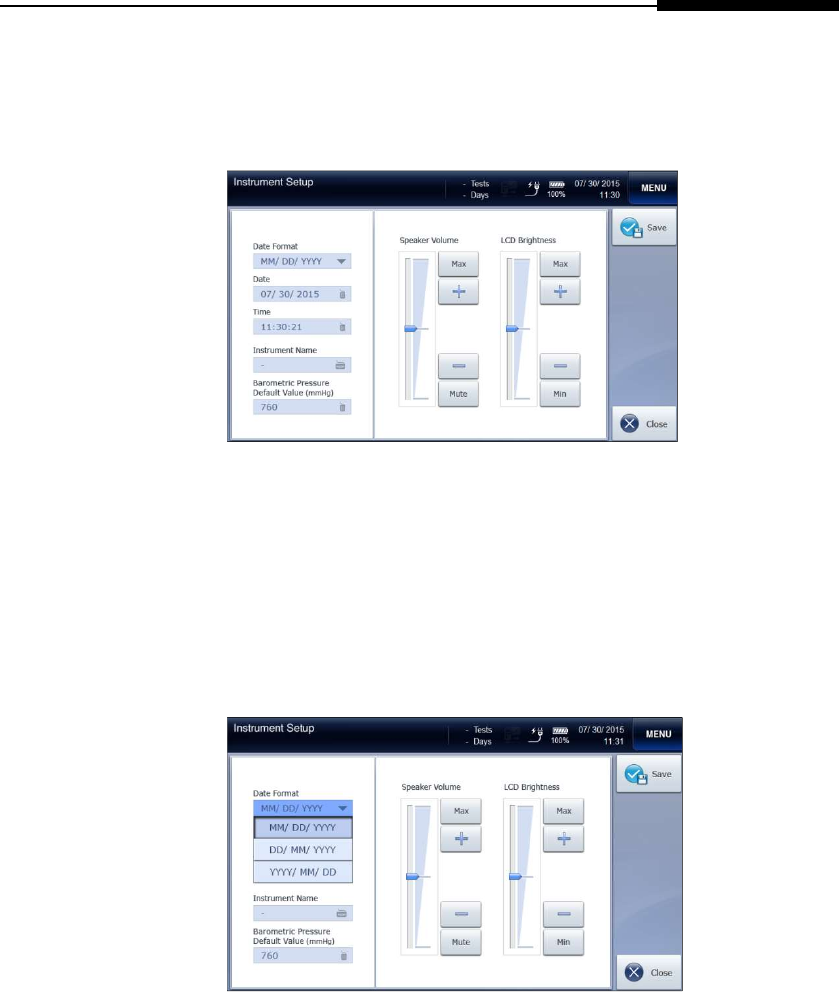
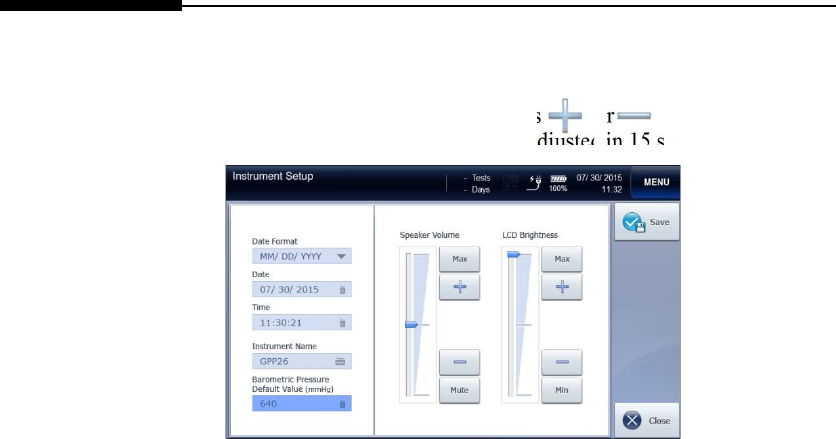
Instrument Setup
Date and Time 1. Go to Menu > Setup (Setup menu is protected by password.) >
Instrument Setup. The following screen will appear.
Note:
Changing the Time, Date and Date Format of the analyzer is only
allowed before cartridge is installed on the analyzer. Once the
cartridge is installed, the time, date and date format cannot be
changed until the cartridge is removed.
2. Press Date Format box and select the desired date format from the
drop-down list.
3. Analyzer Setting
3-17 i-Smart 300 Blood Gas Analyzer
Instrument Setup, continued
Date and Time,
continued
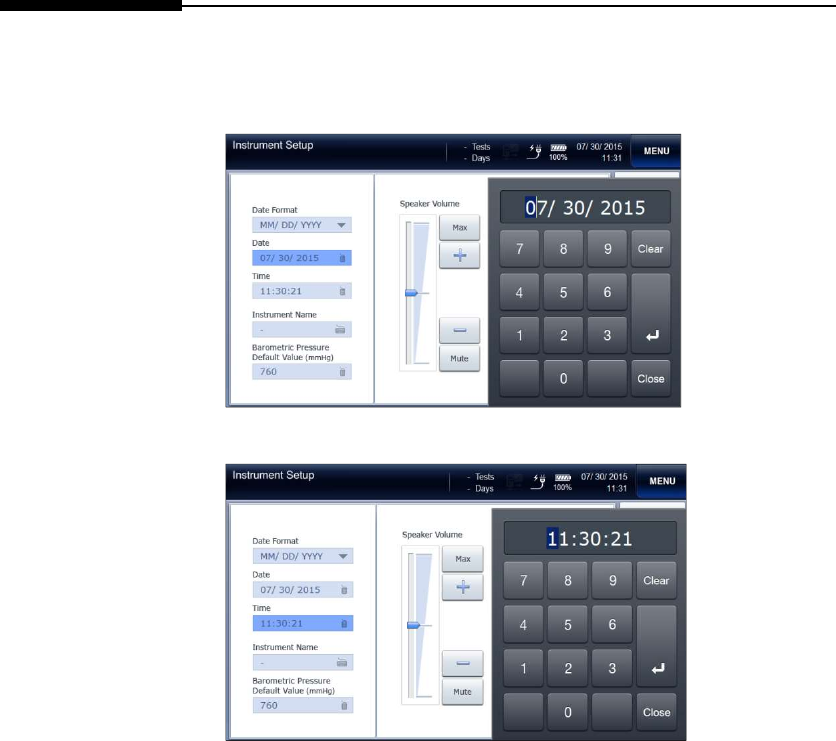
3. Press Date box and enter the current date using the keyboard.
4. Press Time box and enter the current local time using the keyboard.
3. Analyzer Setting
사용 설명서 3-18
Instrument Setup, continued
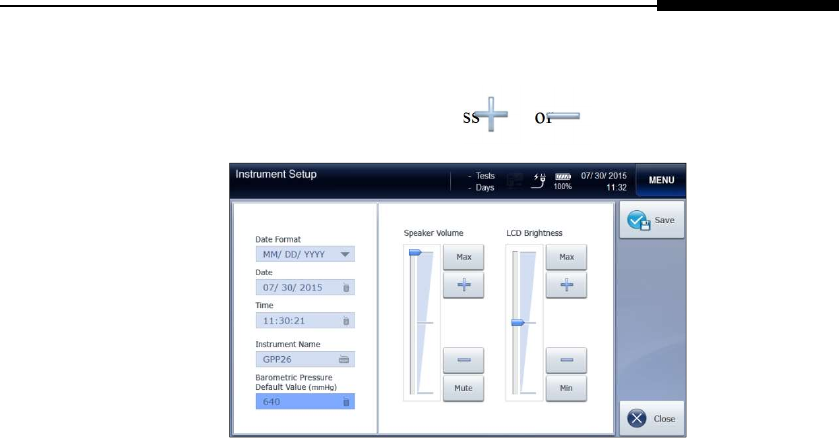
Volume 1. To adjust the volume, press or button of the Speaker
Volume.
2. To turn off sound playback, press Mute. To turn to maximum
volume, press Max.
3. Analyzer Setting
3-21 i-Smart 300 혈액가스분석기
Instrument Setup, continued
LCD Brightness 1. To adjust the LCD brightness, press or button of the LCD
Brightness. Brightness can be adjusted in 15 steps.
Note:
To turn to minimum or maximum brightness, press Min or Max.
2. Press Save to save the setup and go back to the main screen.
To exit to main screen without saving the changed setting, press
Close.
3. Analyzer Setting
Operator’s Manual 3-20
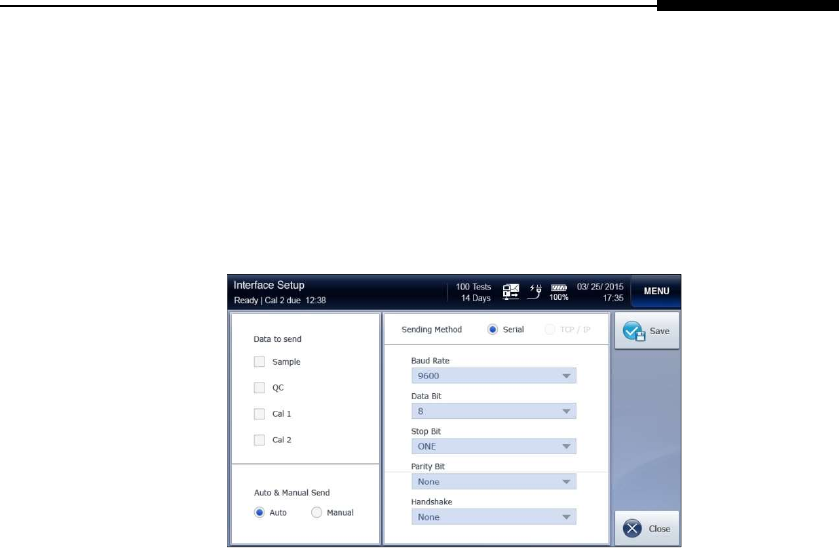
Interface Setup
Option Setup Note:
Make sure that network cable(s) is appropriately connected to the
analyzer before starting interface setup.
1. Go to Menu > Setup (Setup menu is protected by password.) >
Interface Setup. The following screen will appear.
2. Check Sample, QC, Cal 1, and/or Cal 2 to transmit.
3. Select Auto or Manual from Auto & Manual Send to
automatically or manually transmit the data.
4. Select Serial from Sending Method.

3. Analyzer Setting
3-21 i-Smart 300 Blood Gas Analyzer
Interface Setup, continued
Serial Setup 1. Press Baud Rate and select the desired option from the drop-down
list. Default is 9600.
2. Press Data Bit and select the desired option from the drop-down list.
Default is 8.
3. Press Stop Bit and select the desired option from the drop-down list.
Default is ONE.
4. Press Parity and select the desired option from the drop-down list.
Default is None.
5. Press Handshake and select the desired option from the drop-down
list. Default is None.
6. If serial setup is completed, press Save to save the setup and return
to the previous screen. To exit to main screen without saving the
changed setting, press Close.
3. Analyzer Setting
Operator’s Manual 3-22
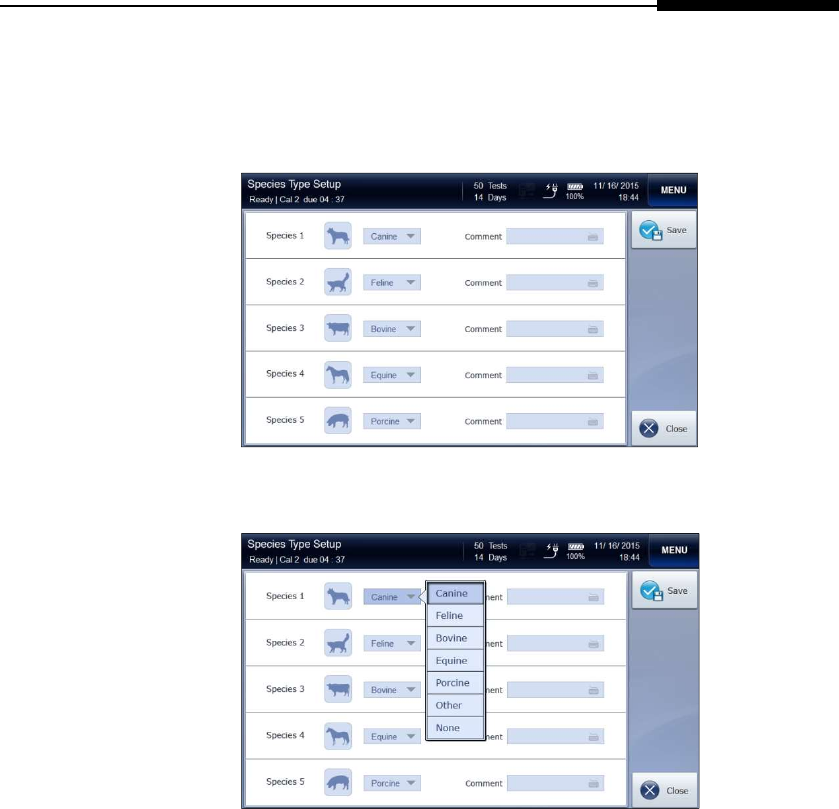
Species Type Setup
Species Type
Setup
1. Go to Menu > Setup > Species type Setup. The following screen
will appear.
2. Select the species that will be analyzed its blood sample from the
drop-down list.

3. Analyzer Setting
3-23 i-Smart 300 Blood Gas Analyzer
This page is intentionally left blank.

4. Sample Analysis
4. Sample Analysis
Blood Samples ········································································· 4-1
QC Samples ············································································ 4-8
4. Sample Analysis
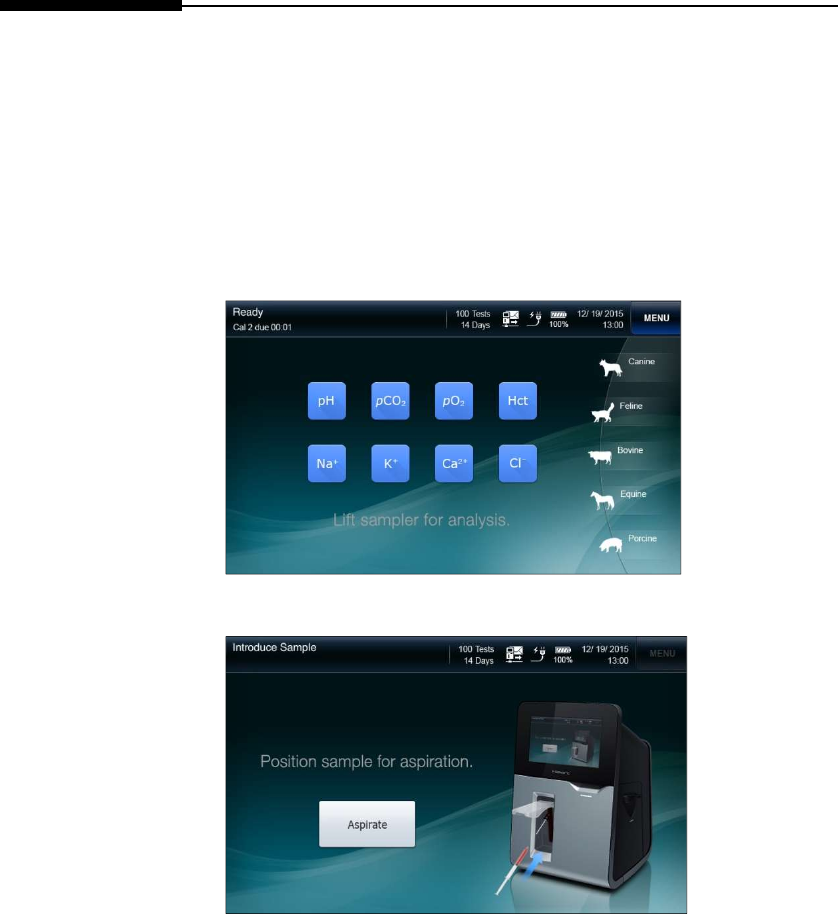
4-1 i-Smart 300 Blood Gas Analyzer
Blood Samples
Introduce
Sample
Note:
Sample analysis is available only when the analyzer is in Ready
state. When the analyzer is not in Ready state, the sampler
cover cannot be lifted because it is locked.
1. Check that the analyzer is in Ready state.
2. Lift up the sampler cover. The following message will appear.
Note:
To cancel sampling, lower the sampler cover to the original
position before pressing Aspirate.
Once Aspirate is pressed, the sample analysis cannot be
cancelled.

4. Sample Analysis
Operator’s Manual 4-2
Blood Samples, continued
Introduce
Sample,
continued
3. For a syringe sample, immerse the end of the sampler probe into the
sample container.
Note:
Be careful not to introduce air bubbles, clots, or foreign substances
along with sample to the analyzer.
4. For a capillary sample, lift the sampler cover all the way up.
Carefully insert the capillary into the septum.
Note:
Do not allow any gap between the capillary and the septum to avoid
air flow in with the sample.

4. Sample Analysis
4-3 i-Smart 300 Blood Gas Analyzer
Blood Samples, continued
Introduce
Sample,
continued
5. If the sampler probe is adequately immersed in the sample, press
Aspirate to begin aspiration.
6. The “Aspirating sample... Please wait” message will appear.
7. If the aspiration is completed, the “Remove sample now”
message will appear. Remove sample from sampler probe.
8. Wait a second until the “Close sampler cover ” message will
appear.
9. Lower the sampler cover to close.
4. Sample Analysis
Operator’s Manual 4-4
Blood Samples, continued
Enter Sample
Information
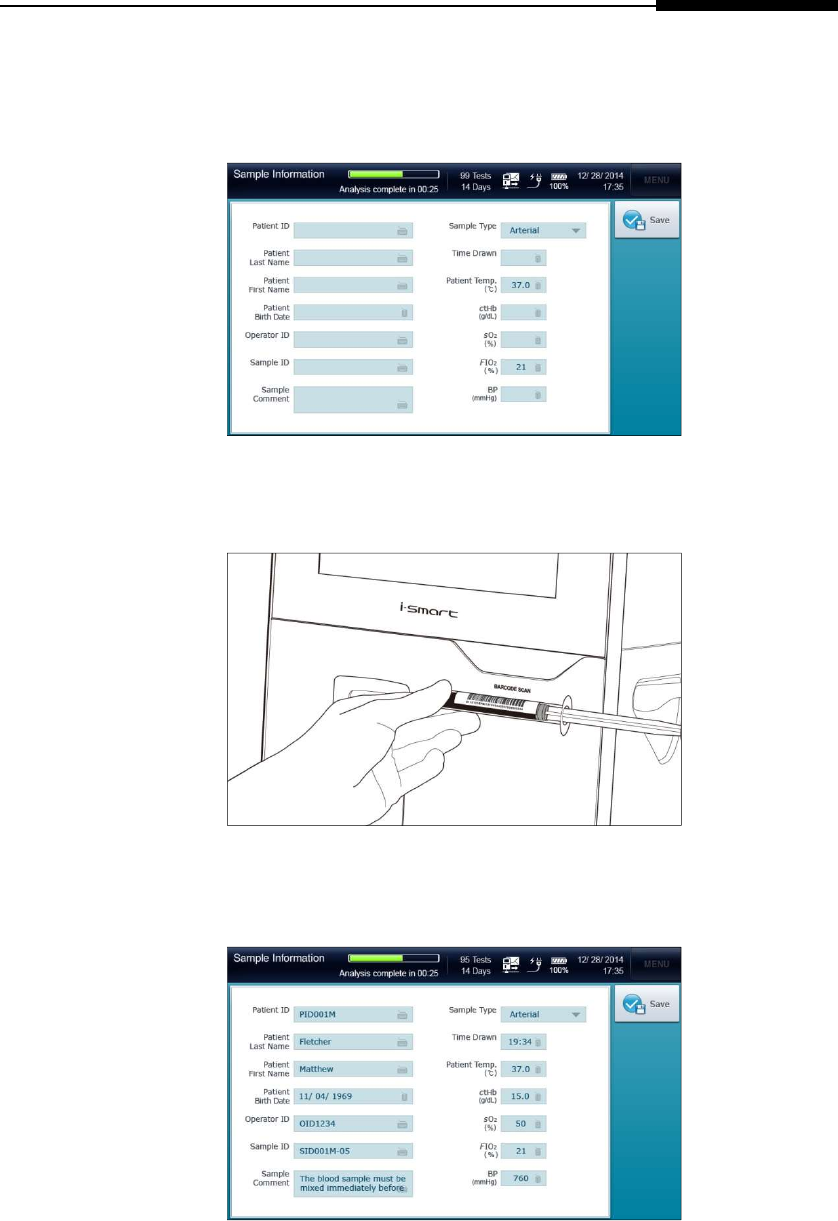
1. Once the sampler cover is closed, the Sample Information
screen will appear.
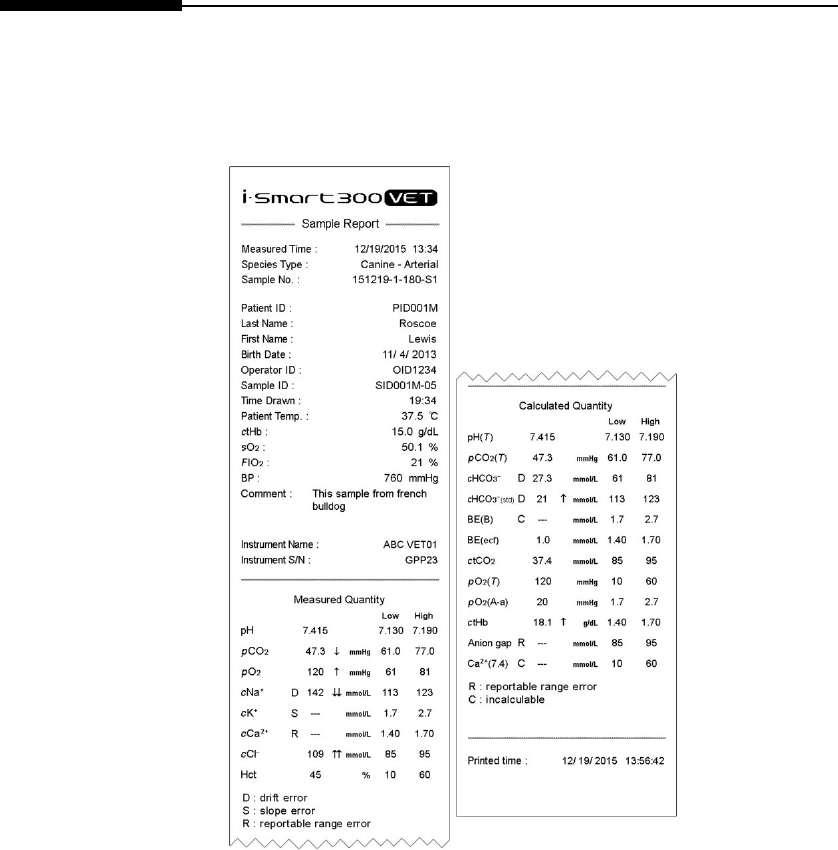
2. If the sample information is available in barcode, scan the
barcode using the barcode scanner that is located in front of the
analyzer.
3. To manually enter the sample information, press each of the
input boxes and enter the sample information using the screen
keyboard.

4. Sample Analysis
4-5 i-Smart 300 Blood Gas Analyzer
Blood Samples, continued
View Sample
Results
1. When the sample analysis is completed, the sample results will
appear at the Measured Quantity tab of the Sample Results
screen.
2. The result values will appear in blue color if the reference ranges
have not been setup in the analyzer.
3. If the reference ranges have been setup in the analyzer and a
result is within the reference range, the value will appear in
blue color.
Note:
If a result is above reference range, the value will appear in blue
color along with an up arrow .
If a result is below reference range, the value will appear in red
color along with a down arrow .

4. Sample Analysis
Operator’s Manual 4-6
Blood Samples, continued
View Sample
Results
4. If any result falls outside of the Critical Limit, the value will
appear in red color. The phrase will be accompanied by a
double arrow or , to indicate above the upper limit or
below the lower limit.
5. If the drift error of a sensor has occurred, the corresponding
result will be accompanied by “D” in red color.
6. If any result falls outside of the reportable range, the
corresponding result will not be reported. Instead “R” will
appear in red color.
7. If the slope error of a sensor has occurred, the corresponding
result will not be reported. Instead “S” will appear in red color.
8. Select the Calculated Quantity tab. The calculated values will
appear.
Note:
If a value cannot be calculated, the value will not be reported.
Instead “C” will appear in red color.
4. Sample Analysis
4-7 i-Smart 300 Blood Gas Analyzer
Blood Samples, continued
View Sample
Results
9. Press Print to print out the results. A printout similar to following
will be printed.
Note:
If the analyzer is on battery power, the printout is only available in more
than 50% battery levels.
10. If the analyzer has been set to auto print, the analyzer will print the
results as soon as they are reported.
11. To transmit the results to the LIS/HIS, press Send.
12. Press Close to save the results and exit to main screen.
13. The analyzer will go through Rinse and Cal 1 process before
returning to the Ready state for a next sample.
4. Sample Analysis
Operator’s Manual 4-8
QC Samples
Introduce QC
Sample
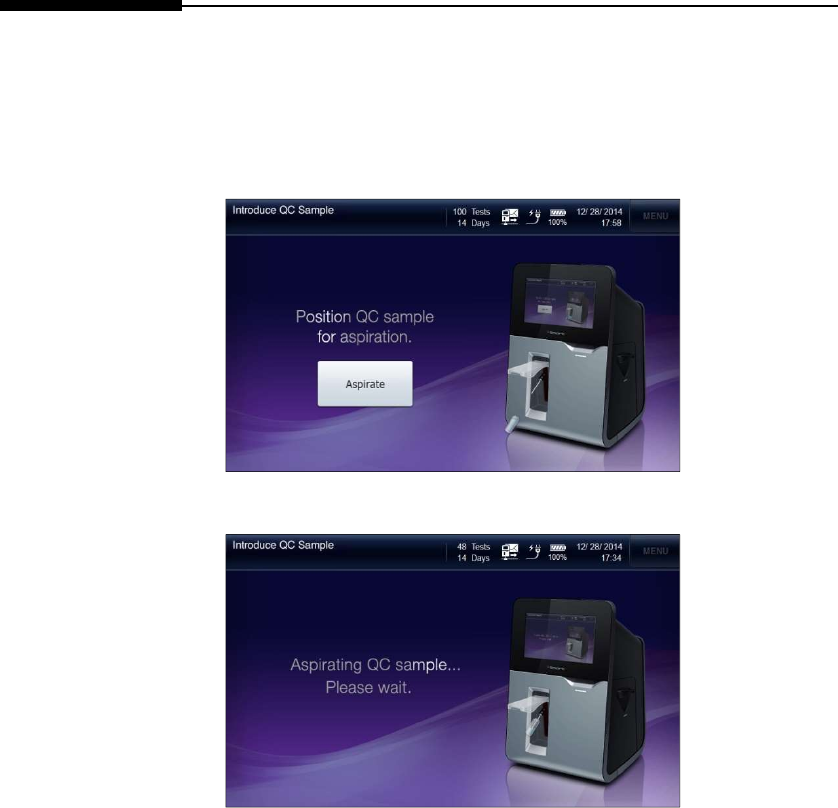
1. Press Menu and select Run QC. The following screen will appear.
2. Press Yes. The following screen will appear.
Note:
The Run QC menu will be available only when the QC lot(s) has
been setup at QC Setup menu.
3. When the “Lift sampler cover for QC sampling” message appears,
lift up the sampler cover.
4. Sample Analysis
4-9 i-Smart 300 Blood Gas Analyzer
QC Samples, continued
Introduce QC
sample,
continued
4. When “Position QC sample for aspiration” message appears,
immerse the end of the sampler probe into the QC sample and
press Aspirate.
5. The “Aspirating QC sample... Please wait” message will appear.
Note:
To cancel QC sample, lower the sampler cover to the original
position before pressing Aspirate.
Once Aspirate is pressed, the sample analysis cannot be
cancelled.
4. Sample Analysis
Operator’s Manual 4-10
QC Samples, continued
Introduce QC
sample,
continued
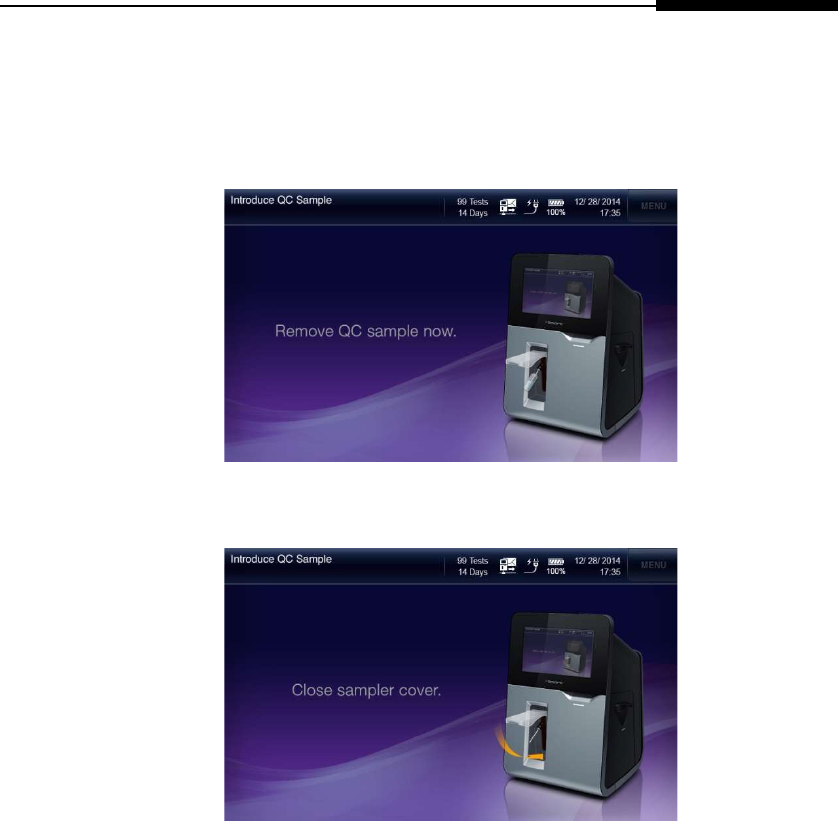
6. If the aspiration is completed, the “Remove QC sample now”
message will appear. Remove QC sample from the sampler
probe.
7. Wait a second until the “Close sampler cover” message will
appear.
8. Push down the sampler cover to the original position.
4. Sample Analysis
4-11 i-Smart 300 Blood Gas Analyzer
QC Samples, continued
Enter QC
Information
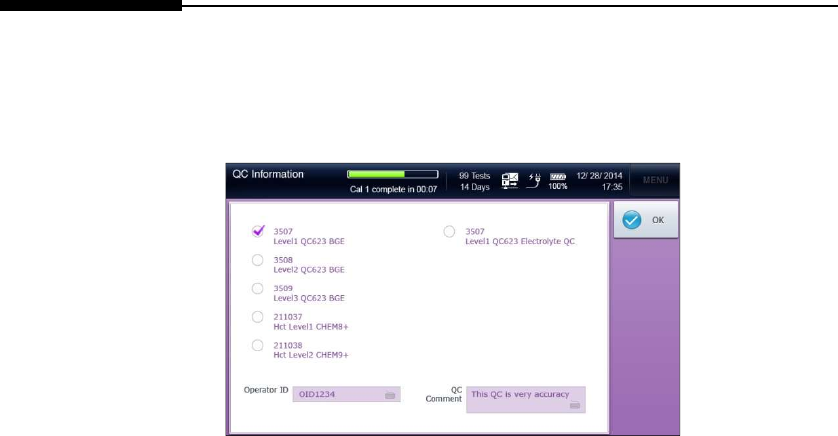
1. Once the sampler cover is closed, the QC Information screen will
appear.
2. Select the QC lot of the QC sample.
3. If necessary, enter Operator ID and QC Comment using the screen
keyboard.
4. Press OK. QC Results screen will appear.
4. Sample Analysis
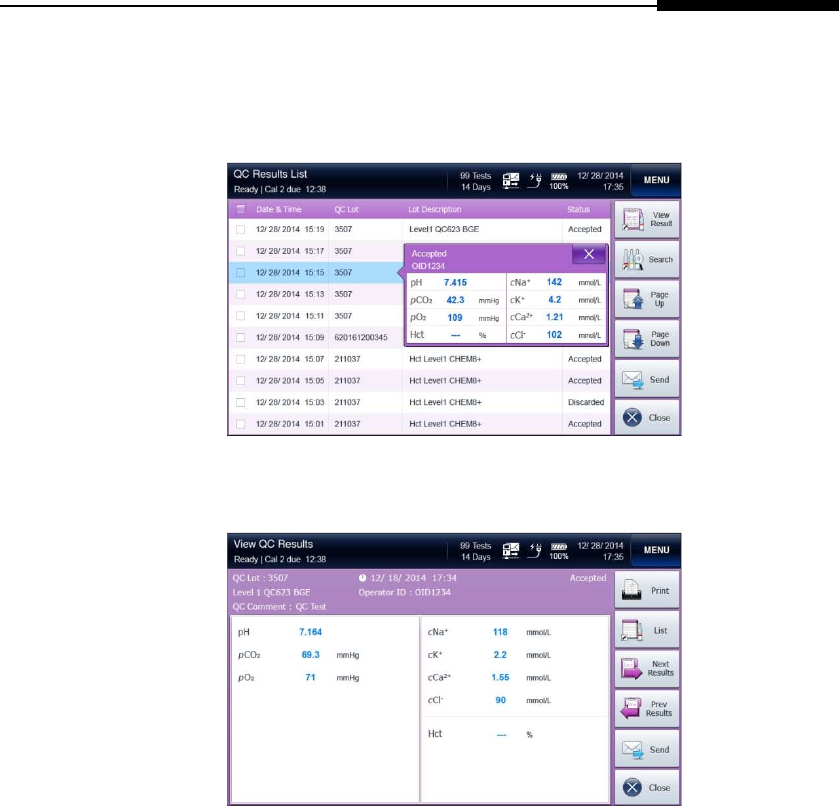
Operator’s Manual 4-12
QC Samples, continued
View QC Results
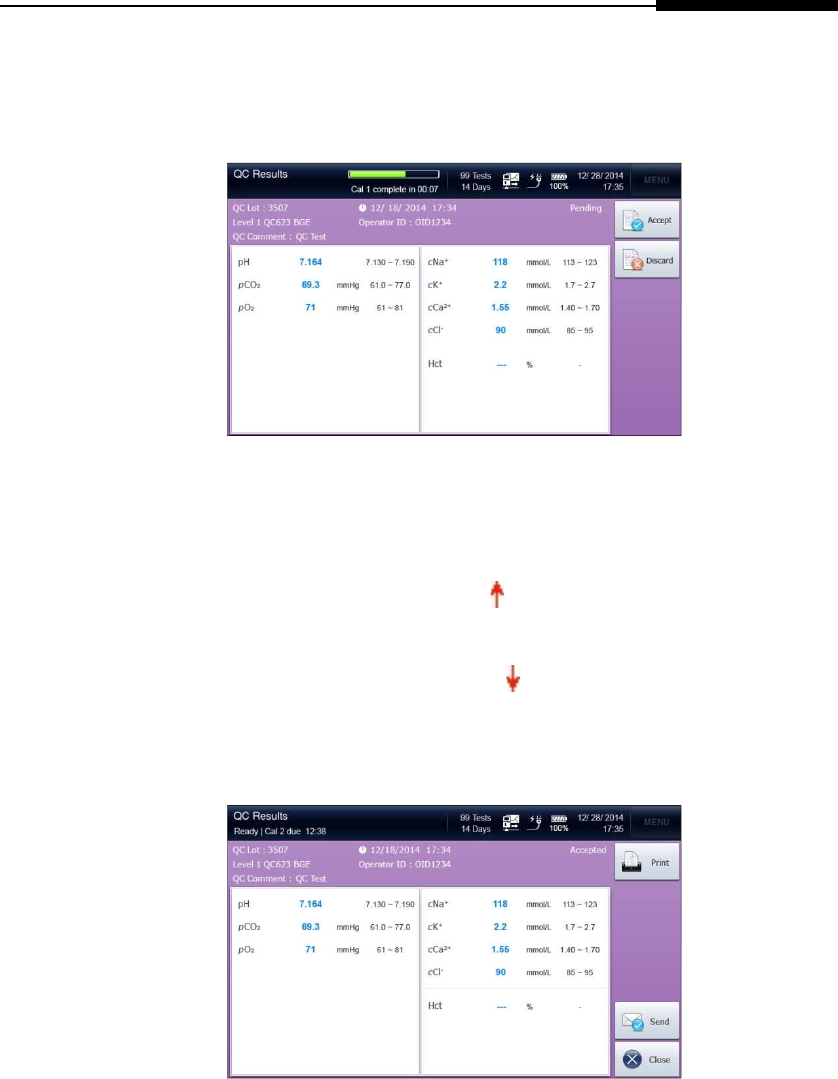
1. When the QC sample analysis is completed, the QC results will
appear at the QC Results screen as following.
Note:
If a result is within the QC range, the value will appear in blue
color.
If a result is above the QC range, the value will appear in red
color along with an up arrow .
If a result is below the QC range, the value will appear in red
color along with a down arrow .
2. Press Accept or Discard to accept or discard the QC results.
The state will switch from Pending to Accepted or Discard.
4. Sample Analysis
4-13 i-Smart 300 Blood Gas Analyzer
QC Samples, continued
View QC Results,
continued
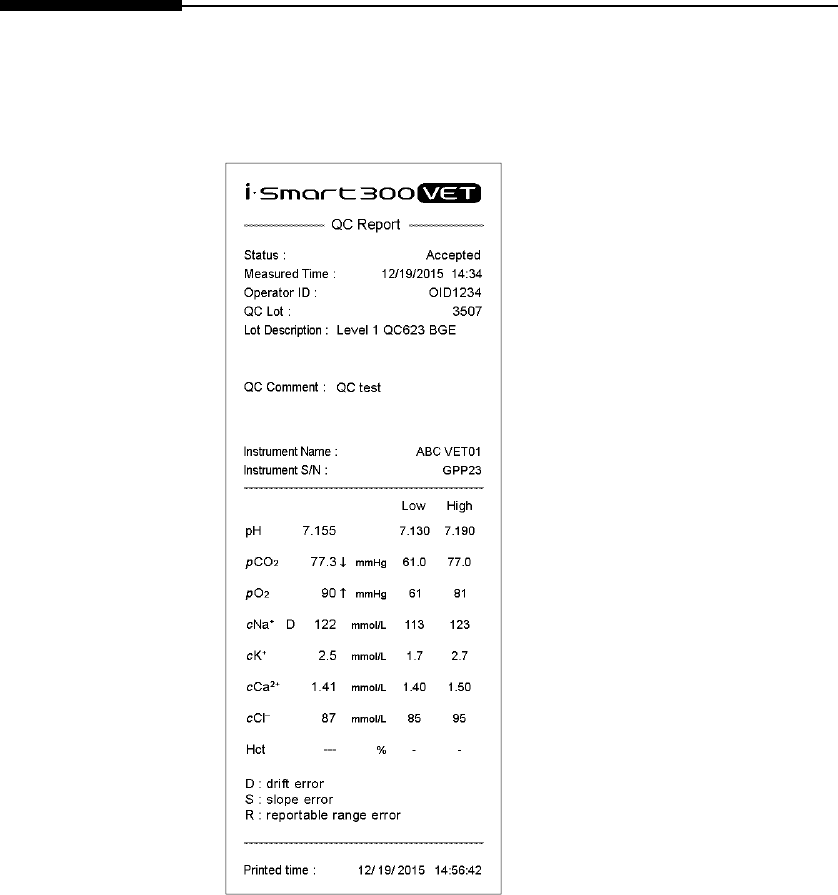
3. Press Print to print out the results. A printout similar to
following will be printed.
Note:
If the analyzer is on battery power, the printout is only available in more
than 50% battery levels.
4. To transmit the results to the LIS/HIS, press Send.
5. Press Close to save the results and exit to main screen.

5. Database
5. Database
Blood Sample Data ········································································· 5-1
QC Data ······················································································· 5-5
Calibration Data ············································································· 5-9
Cartridge Data ·············································································· 5-12
5. Database
5-1 i-Smart 300 Blood Gas Analyzer
Blood Sample Data
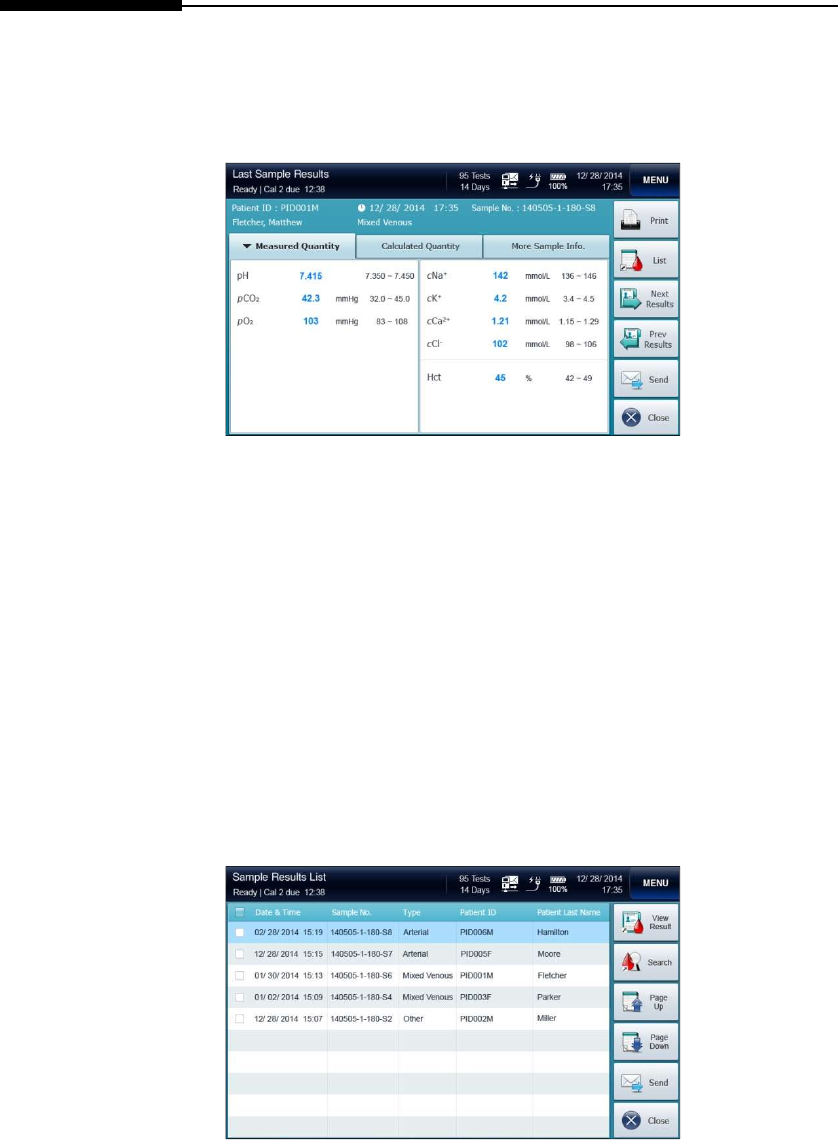
Last Sample
Analysis Results
1. Go to Menu > Sample >Last Sample Results.
The following screen will appear.
Note:
The same screen can be accessed through Menu > Last Sample
Results.
2. To view the screen of the next blood sample results or the
previous blood sample results, press Next Results or Prev
Results.
3. To go to the list of blood sample results, press List.
4. To transmit the results to the LIS/HIS, press Send.
5. Press Close to exit to main screen.
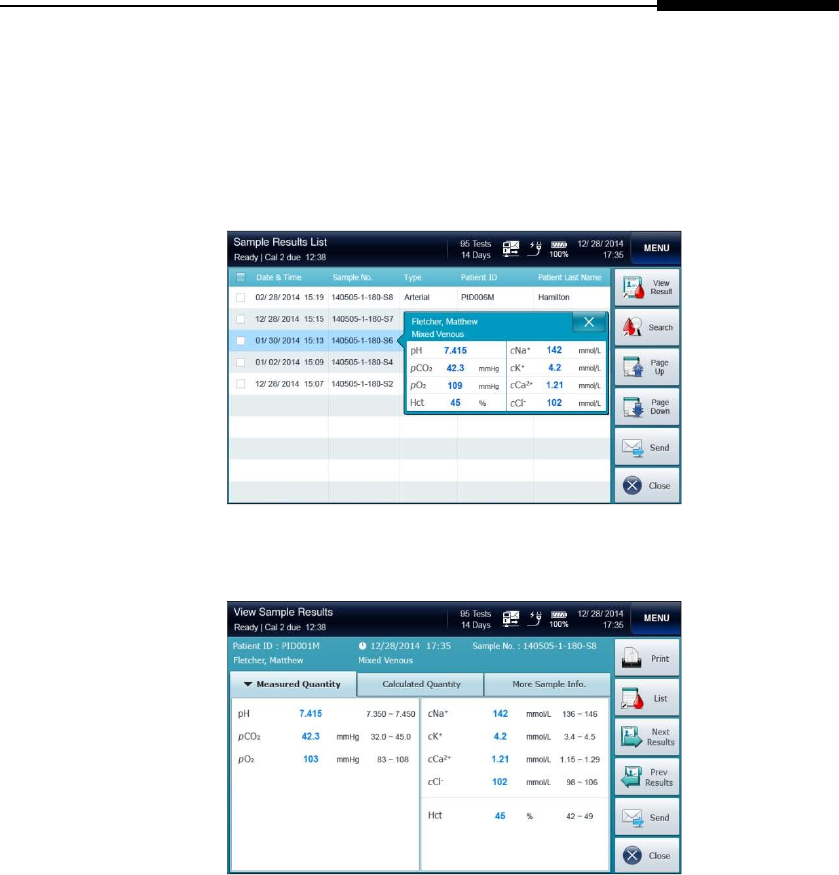
Sample Results
List
1. Go to Menu > Sample > Sample Results List.
The following screen will appear.
5. Database
Operator’s Manual 5-2
Blood Sample Data, continued
Sample Results
List, continued
2. The latest blood sample data are listed on the top.
Use Page UP or Page Down to scroll the list of analysis
results.
3. To view a blood sample results, select a desired row from the list.
4. To view more the desired sample results, press View Result.
The corresponding blood sample results screen will appear.
5. To search blood sample results, press Search on the Sample
Results List screen. Refer to the Sample Results Search
section below.
5. Database
5-3 i-Smart 300 Blood Gas Analyzer
Blood Sample Data, continued
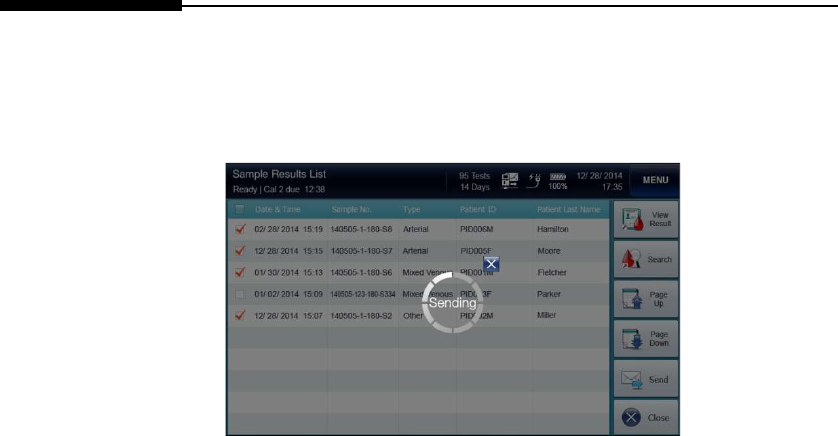
Sample Results
List, continued
6. To transmit blood sample results to the LIS/HIS, select desired
results from the list and press Send.
7. Press Close to exit to main screen.
5. Database
Operator’s Manual 5-4
Blood Sample Data, continued
Sample Results
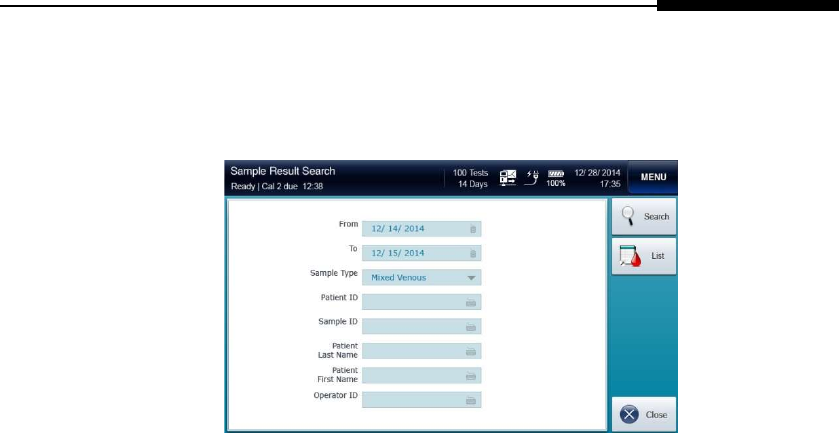
Search
1. Go to Menu > Sample > Sample Results Search.
The following screen will appear.
Note:
Search criteria for blood results are as following:
From & To
Species Type
Patient ID
Sample ID
Patient Last Name
Patient First Name
Operator ID
2. Enter desired search criteria in appropriate boxes.
3. Press Search. The searched analysis results will appear.
4. To go to the list of blood samples, press List.
5. Press Close to exit to main screen.
5. Database
5-5 i-Smart 300 Blood Gas Analyzer
QC Data
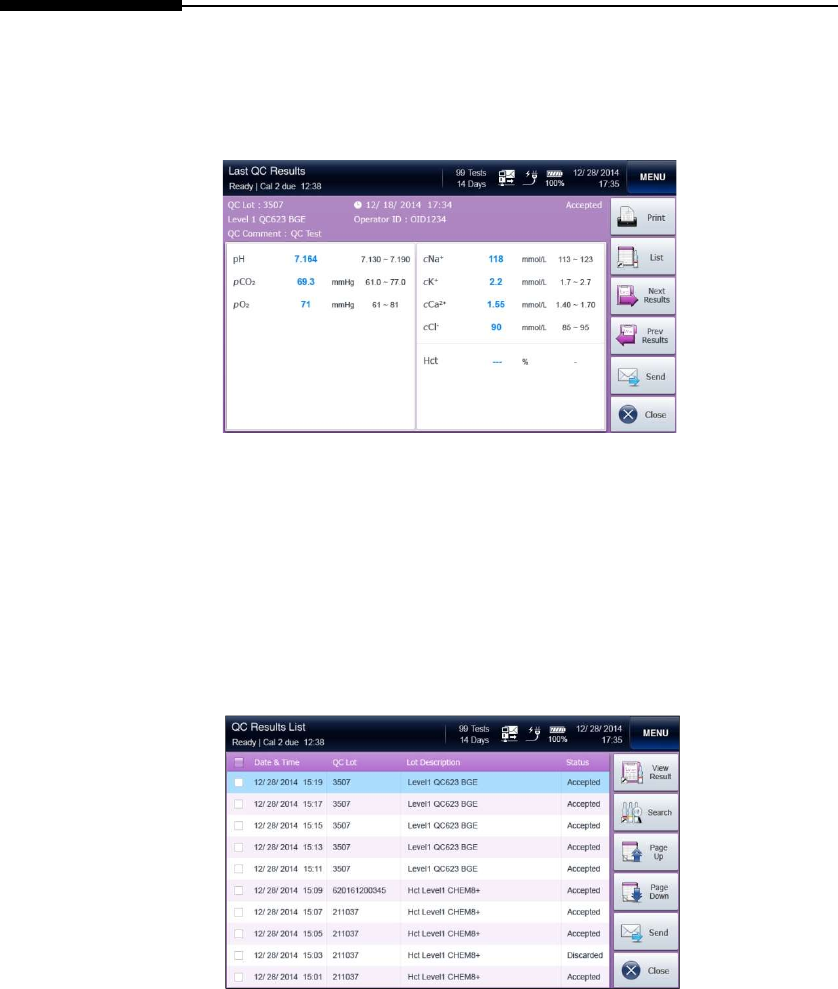
Last QC Results 1. Go to Menu > QC > Last QC Results.
The following screen will appear.
2. Press List to go to the list of QC results.
3. To view the screen of the next QC results or the previous QC
results, press Next Results or Prev Results.
4. To transmit the results to the LIS/HIS, press Send.
5. Press Close to exit to main screen.
QC Results List
1. Go to Menu > QC > QC Results List.
The following screen will appear.
2. The latest QC results are listed on the top. Use Page Up or
Page Down to scroll the list of QC results.
5. Database
Operator’s Manual 5-6
QC Data, continued
QC Results List,
continued
3. To view a QC results screen, select a desired row from the list and
press View Result.
4. The corresponding QC results screen will appear.
5. Database
5-7 i-Smart 300 Blood Gas Analyzer
QC Data, continued
QC Results List,
continued
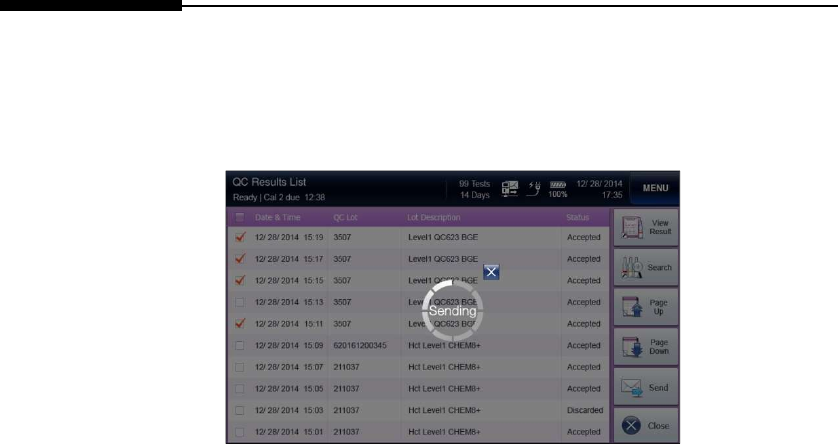
5. To transmit blood sample results to the LIS/HIS, select desired
results from the list and press Send.
6. To search QC results, press Search on the QC Results List
screen. Refer to the QC Results Search section below.
7. Press Close to exit to main screen.
5. Database
Operator’s Manual 5-8
QC Data, continued
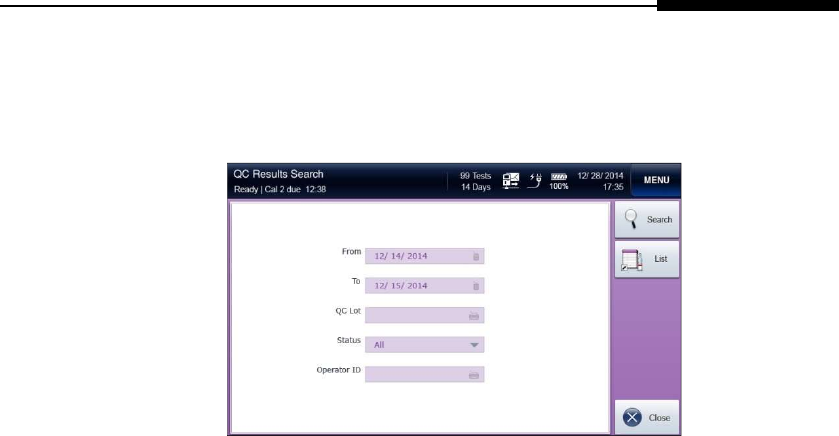
QC Results
Search
1. Go to Menu > QC > QC Results Search.
The following screen will appear.
Note:
Search criteria for QC results are as following:
From & To
QC Lot
Either Accepted or Discarded QC results only or all results
Operator ID
2. Enter desired search criteria in appropriate boxes.
3. Press Search. The searched QC results will appear.
4. To go to the list of QC results, press QC List.
5. Press Close to exit to main screen.
5. Database
5-9 i-Smart 300 Blood Gas Analyzer
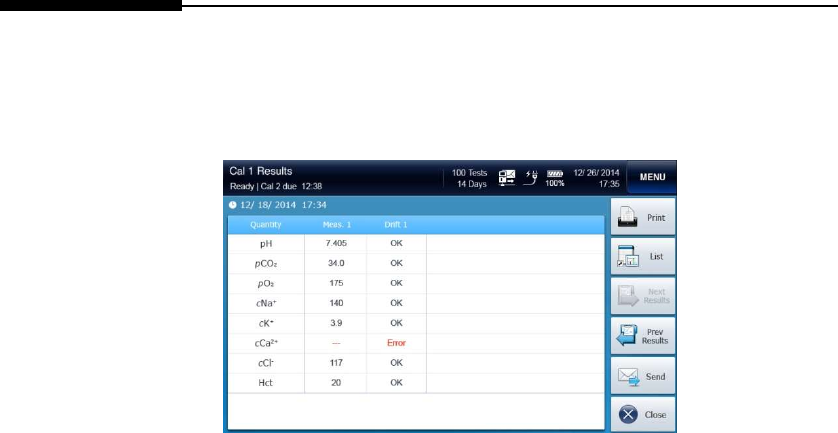
Calibration Data
Cal 1 Results
1. Go to Menu > Calibration > Cal 1 Results.
The following screen will appear.
2. To view the screen of the next Cal 1 results or the previous Cal 1
results, press Next Results or Prev Results.
3. To transmit the results to the LIS/HIS, press Send.
4. To print out the results, press Print.
5. To go to the list of calibration, press List.
Note:
If the analyzer is on battery power, the printout is only available in more
than 50% battery levels.
6. Press Close to exit to main screen.

5. Database
Operator’s Manual 5-10
Calibration Data, continued
Cal 2 Results
1. Go to Menu > Calibration > Cal 2 Results.
The following screen will appear.
2. To view the screen of the next Cal 2 results or the previous Cal 2
results, press Next Results or Prev Results.
3. To transmit the results to the LIS/HIS, press Send.
4. To print out the results, press Print.
Note:
If the analyzer is on battery power, the printout is only available in more
than 50% battery levels.
5. To go to the list of calibration, press List.
6. Press Close to exit to main screen.
5. Database
5-11 i-Smart 300 Blood Gas Analyzer
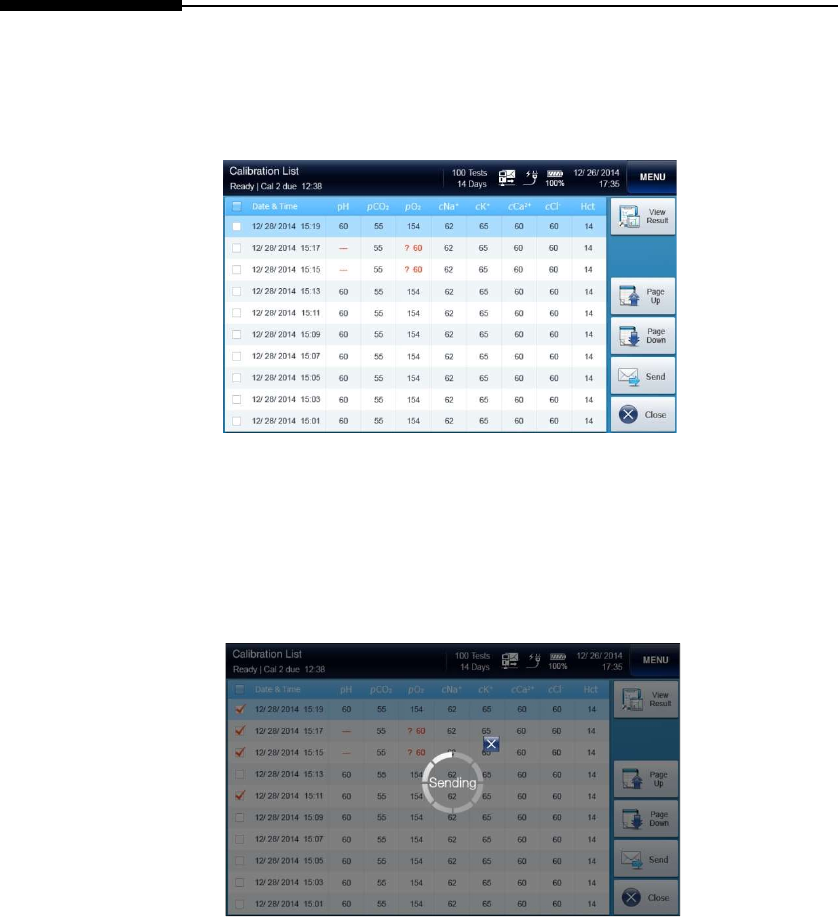
Calibration Data, continued
Calibration List 1. Go to Menu > Calibration > Calibration List.
The following screen will appear.
2. The latest Cal 2 results are listed on the top. Use Page Up or
Page Down to scroll the list of Cal 2 results.
3. To view a Cal 2 results screen, select a desired row from the list
and press View Result.
4. To transmit the results to the LIS/HIS, press Send.
5. Press Close to exit to main screen.
5. Database
Operator’s Manual 5-12
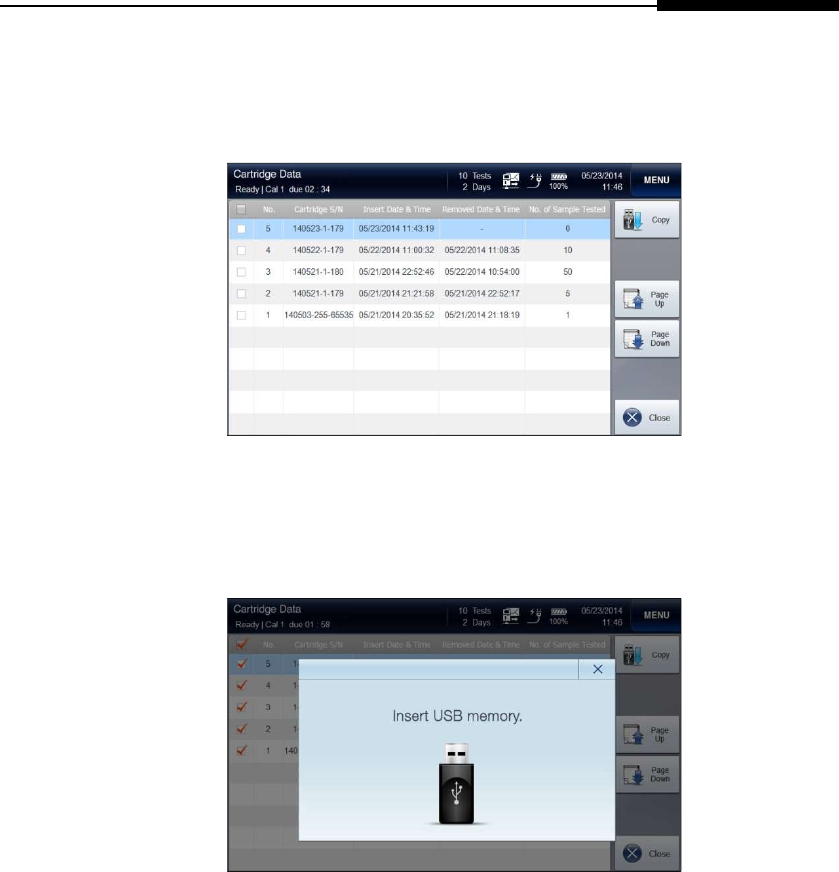
Cartridge Data
Cartridge Data
Copy
1. Go to Menu > Status > Cartridge Data.
The following screen will appear.
2. The latest cartridge data will appear on the top. Use Page Up or
Page Down to scroll the list of cartridge data.
3. Select desired cartridge data and press Copy.
The following screen will appear.
4. Insert an USB memory into any of available USB ports on the
analyzer.
5. The “Data copy in progress. Please wait” message will appear
along with the copy progress bar.
6. When the data copy is completed, the “Cartridge data copy has
completed. Remove USB memory” message will appear.
7. Remove the USB memory from the USB port.

5. Database
5-13 i-Smart 300 Blood Gas Analyzer
This page is intentionally left blank.

6. Shutdown
6. Shutdown
Analyzer Shutdown ··········································································· 6-1
Cartridge Restart ·············································································· 6-3
6. Shutdown
6-1 i-Smart 300 Blood Gas Analyzer
Analyzer Shutdown
Caution
The power of the analyzer should be turned off according to the
shutdown procedure as described in this manual. Failure to
follow the described shutdown procedure can cause damage to
the data or the analyzer.
To disconnect the power cables from the analyzer, first unplug
the power cord from the outlet. Then, unplug the adapter from
the analyzer.
The cartridge cannot be removed once the shutdown process
begins or after the analyzer is turned off.
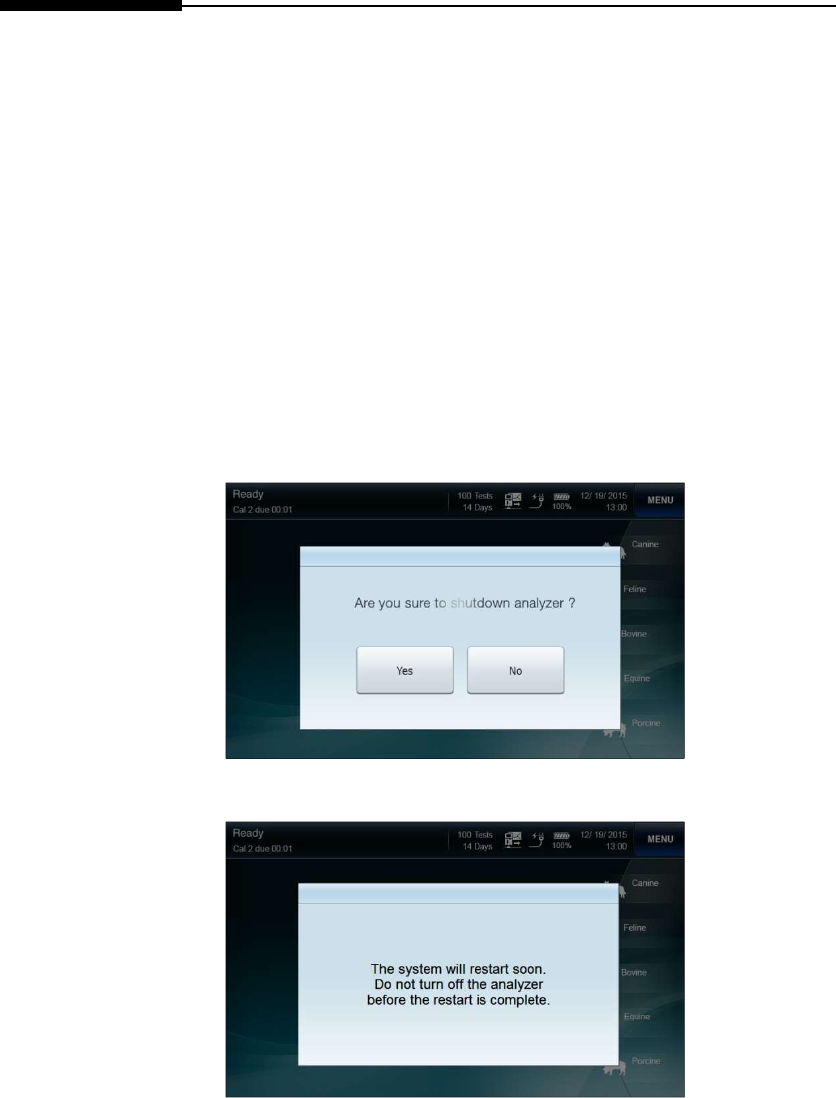
Shutdown
Analyzer
1. Go to Menu > Shutdown Analyzer.
The following screen will appear.
2. Press Yes to continue. The following message will appear.
6. Shutdown
Operator’s Manual 6-2
Analyzer Shutdown, continued
Shutdown
Analyzer,
continued
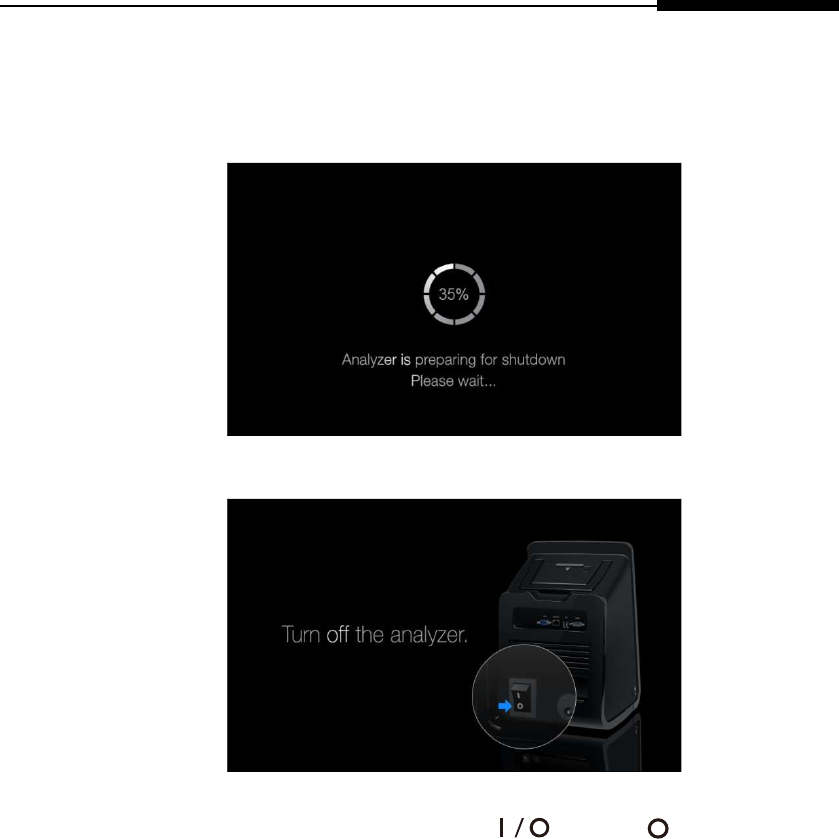
3. Wait until the analyzer completes a power cycle and the
following screen appears.
4. Wait until the progress circle reaches 100%.
5. Facing the back of the analyzer, flip the black power switch on
the lower left side, marked “ ”, to the “ ” position.
6. Shutdown
6-3 i-Smart 300 Blood Gas Analyzer
Cartridge Restart
Power Recovery When the analyzer recovers from power interruption, the
cartridge inside the analyzer can be continuously used, only if:
The analyzer was in Ready state or in process of calibration
when the power was interrupted and the power returns
within 1 hour.
The analyzer was analyzing a sample when the power was
interrupted and the power returns within 20 minutes.
The analyzer was analyzing a QC sample when the power
was interrupted and the power returns within 1 hour.
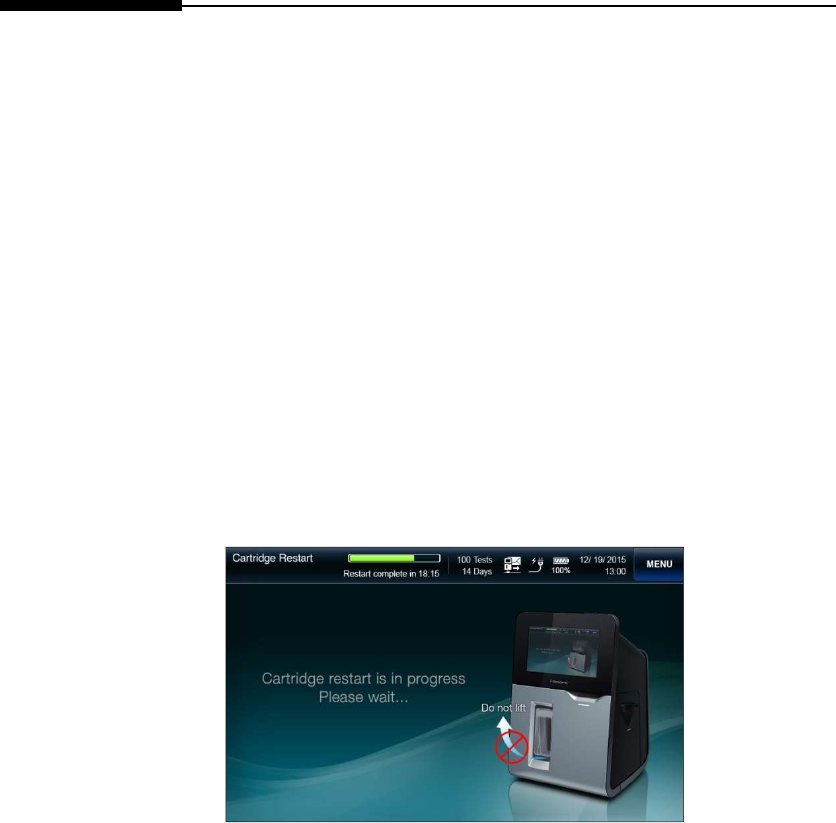
1. When the analyzer recovers from power interruption with the
cartridge inside, one of following Cartridge Restart screens
will appear.
2. The Cartridge Restart from power recovery will take about 10
minutes.
3. After the Cartridge Restart, the analyzer will return to the
Ready state.

7. Maintenance
7. Maintenance
Calibration ······················································································ 7-1
Cartridge Removal ············································································ 7-4
Analyzer Information ········································································ 7-6
Analyzer Diagnosis ··········································································· 7-7
Cleaning ························································································· 7-8
7. Maintenance
7-1 i-Smart 300 Blood Gas Analyzer
Calibration
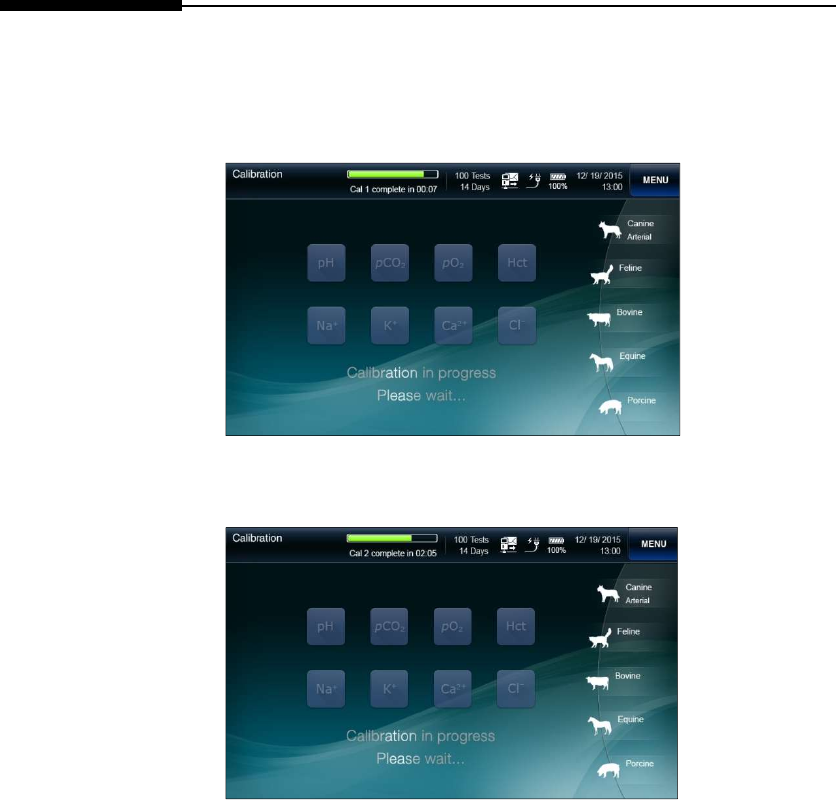
Run Cal 1. Go to Menu > Run Cal 1.
The following screen will appear.
2. Go to Menu > Run Cal 2.
The following screen will appear.
7. Maintenance
Operator’s Manual 7-2
Calibration, continued
Cal 1 Auto
Repeat
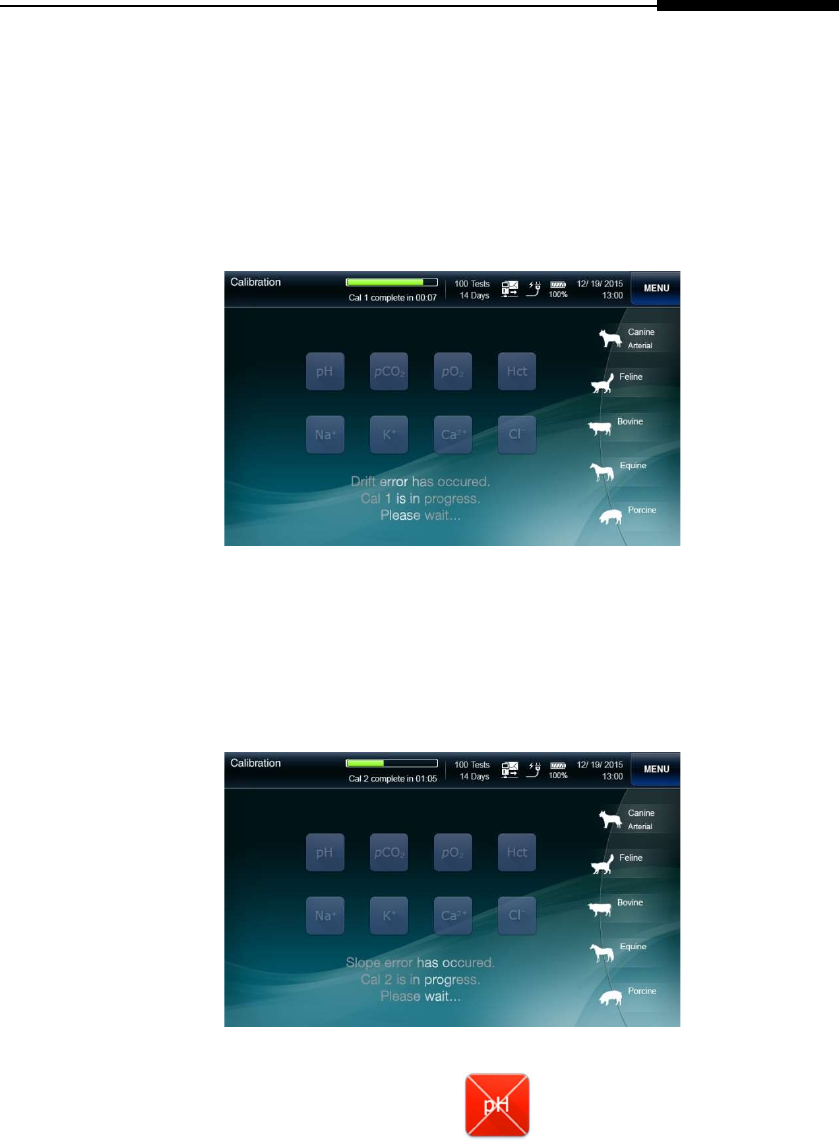
If the drift error of a sensor has occurred in the previous Cal 1,
the analyzer will automatically repeat Cal 1 up to three times.
While the Cal 2 repeat is in progress, the “Drift error has
occured. Cal 1 is in progress. Please wait...” message will
appear.
Cal 2 Auto
Repeat
If the slope error of a sensor has occurred in the previous Cal 2,
the analyzer will automatically repeat Cal 2 up to two times.
While the Cal 2 repeat is in progress, the “Slope error has
occured. Cal 2 is in progress. Please wait...” message will
appear.
If the same sensor fails in Cal 2 three times in succession, the
sensor state will appear as on the main screen.
7. Maintenance
7-3 i-Smart 300 Blood Gas Analyzer
Calibration, continued
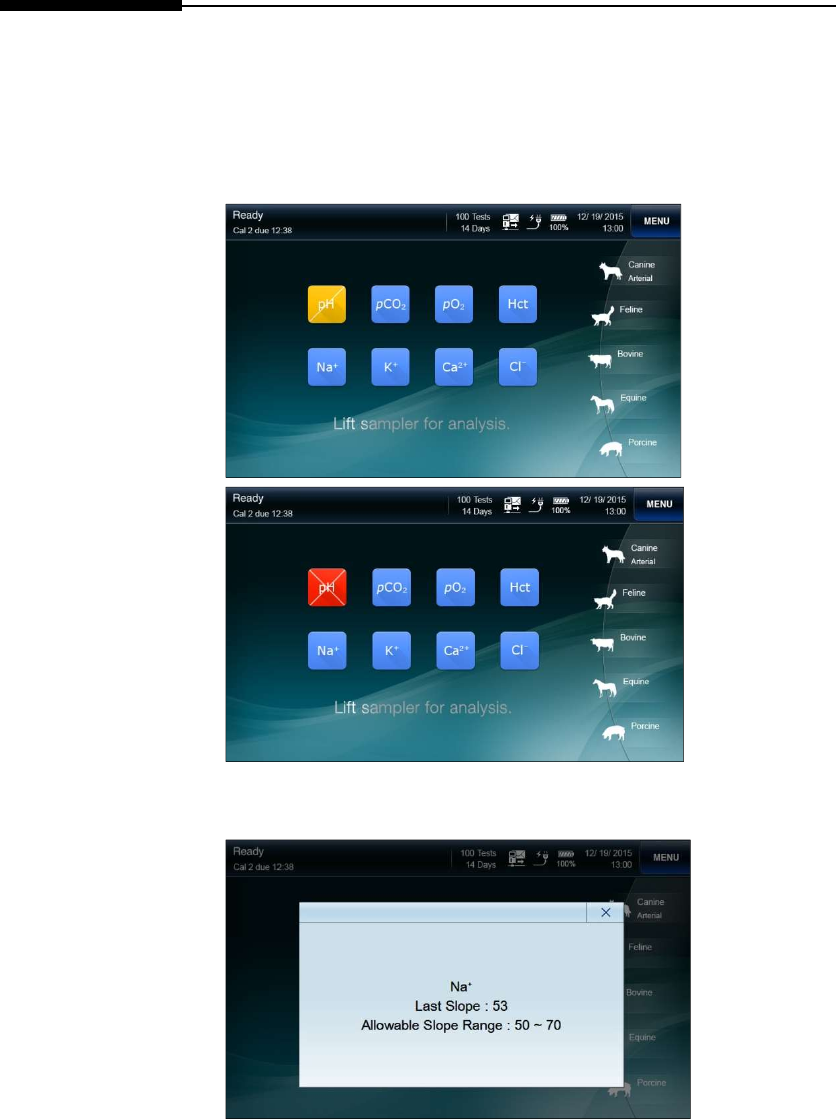
Sensor State 1. State of each sensor will appear as okay in blue background, drift
error in yellow background or slope error in red background at
the main screen based on the results of the last calibration.
2. Press the Sensor State icon twice quickly. The last slope and
the allowable slope range of the sensor will appear.
7. Maintenance
Operator’s Manual 7-4
Cartridge Removal
Caution Treat the used cartridge as biohazard material.
Dispose of the used cartridge in accordance with the laboratory’s
established procedures for disposing of biohazardous materials.
Before removing the used cartridge, wear appropriate personal
protective clothing to protect from biohazard materials.
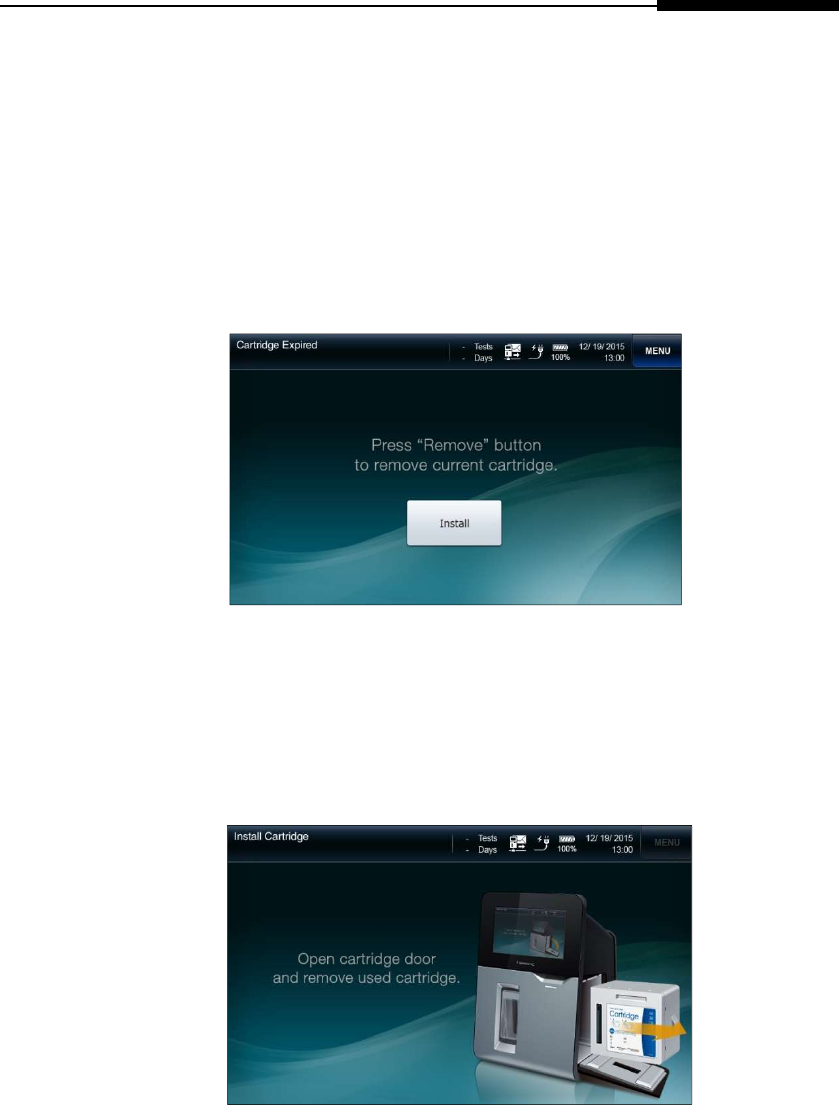
Remove Expired
Cartridge
1. The analyzer will automatically display the Cartridge Expired
screen in one of following situations:
The uselife of the cartridge has expired.
All tests of the cartridge have been used up.
The analyzer has been without power for more than the
allowable time limit to restore the cartridge.
2. Press Remove to remove the current cartridge.
The following screen will appear.
3. Remove the cartridge in accordance with the instructions on the
screen.
4. To install a new cartridge, refer to the Cartridge Installation (2.
Installation) section.
7. Maintenance
7-5 i-Smart 300 Blood Gas Analyzer
Cartridge Removal, continued
Remove
Cartridge in Use
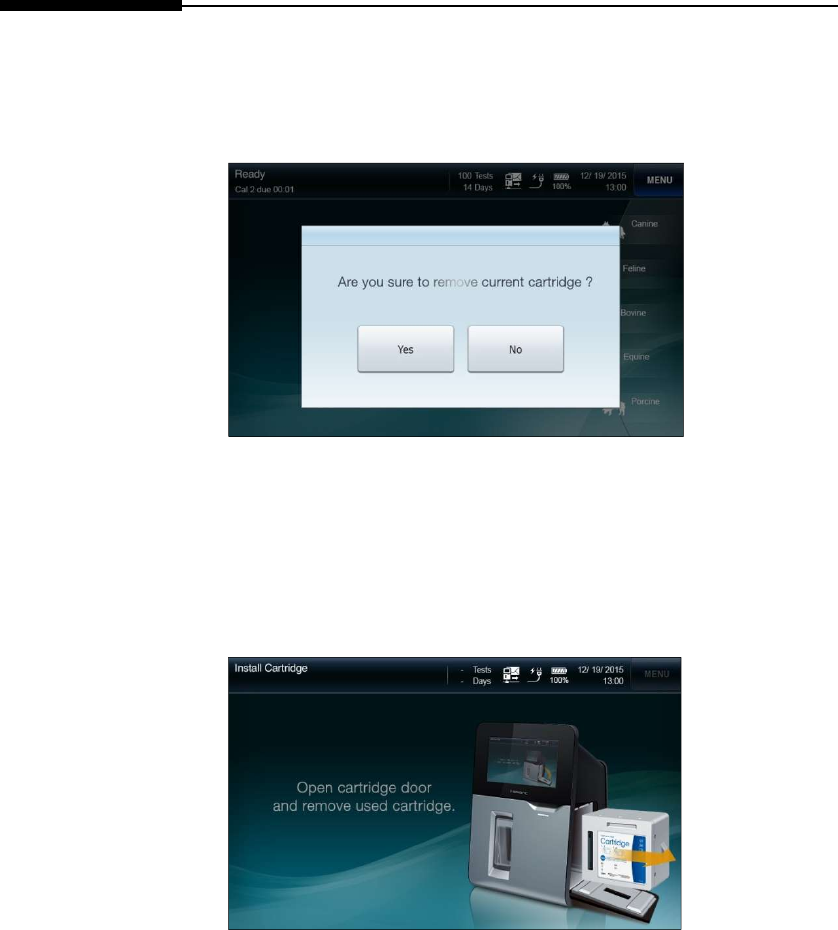
1. Go to Menu > Remove Cartridge to remove a cartridge in use.
The following screen will appear.
Note:
To cancel the cartridge removal, press No.
The removed cartridge cannot be reused.
2. Press Yes. The following screen will appear.
3. Remove the cartridge in accordance with the instructions on the
screen.
4. To install a new cartridge, refer to the Cartridge Installation (2.
Installation) section.
7. Maintenance
Operator’s Manual 7-6
System Information
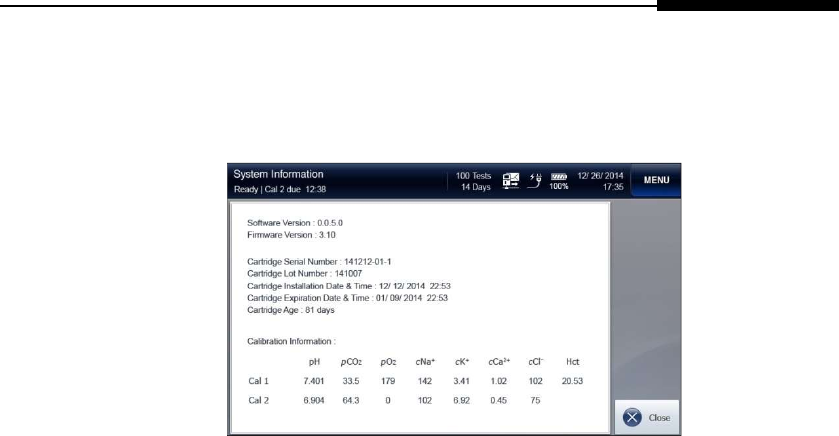
1. Go to Menu > Status > System Information.
The following screen will appear.
2. The following information will appear:
Software Version and Firmware Version
Cartridge: Serial Number, Lot Number, Installation Date & Time,
Expiration Date & Time, Age
Calibration Information
Note:
The information of the removed cartridge is not shown.
3. Press Close to exit to main screen.
7. Maintenance
7-5 i-Smart 300 Blood Gas Analyzer
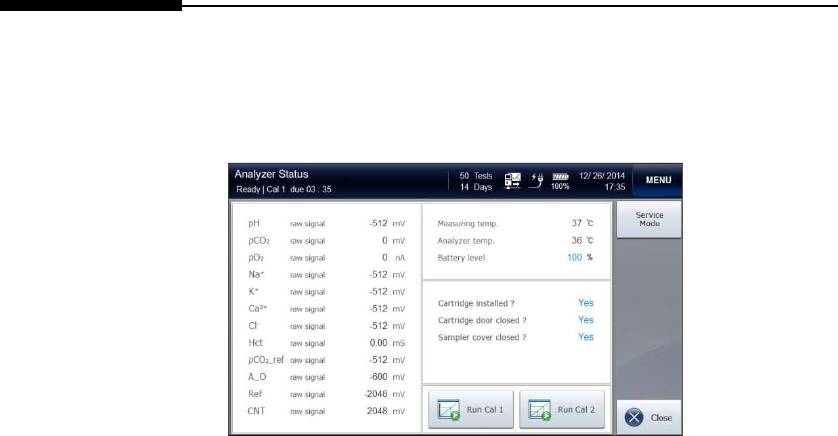
Analyzer Status
1. Go to Menu > Status > Analyzer Status.
The following screen will appear.
2. The following information will appear:
Raw Signals
Measuring temperature
Analyzer temperature
Battery level
States of Cartridge installation, Cartridge door, and Sampler
cover
3. Press Run Cal 1 or Run Cal 2 to initiate Cal 1 or Cal 2 on the
current screen.
4. Press Close to exit to main screen.
Note:
If the cartridge is properly installed, Cartridge, Cartridge Door,
and Sampler Cover states will appear as Yes.
The Service Mode is for service engineers ONLY and protected by
password.

7. Maintenance
Operator’s Manual 7-8
Cleaning
Caution Wear appropriate personal protective clothing to prevent
infection when cleaning.
Clean the analyzer after use or periodically.
Do not spray cleaning solution directly onto the analyzer.
Do not allow cleaning solution to enter the analyzer.
Do not use force to wipe the screen.
Prepare 0.5% hypochlorite cleaning solution immediately before
use.
Dispose of all waste after cleaning in accordance with the
laboratory’s established procedures for disposing of biohazardous
materials.
Cleaning
Procedure
1. Use 0.5% hypochlorite cleaning solution.
Note:
Commercial Clorox contains approximately 5% sodium
hypochlorite.
To prepare 0.5% hypochlorite solution, mix 1 part of Clorox
and 9 parts of water.
2. Dampen a soft cloth with the cleaning solution.
3. Using a dampened soft cloth, wipe sampler cover, screen, and
other contaminated areas on the analyzer.
4. Allow to air-dry for about 10 minutes.
Using a soft cloth dampened with water, wipe the analyzer.
5. Using a dry cloth, dry the surface of the analyzer.

7. Maintenance
7-9 i-Smart 300 Blood Gas Analyzer
This page is intentionally left blank.

8. Troubleshooting
8. Troubleshooting
Troubleshooting ··············································································· 8-1
Error Code ······················································································ 8-6

8. Troubleshooting
8-1 i-Smart 300 Blood Gas Analyzer
Troubleshooting
Guideline If the problems described below are encountered during
installation and/or operation of the analyzer, try the suggested
solutions as described in this manual.
If the problem persists, please call a service engineer for further
assistance.
Barcode
Scanner
When scanning barcode, the scanner does not emit the red light:
1. Move the barcodes to be scanned in front of the marking
“ BARCODE SCAN”.
2. If there does not show a red light beam, press the “SCAN”
button on the rear of the analyzer by a sharp object like a needle.
Then, retry to read the barcodes. It may not be able to read the
barcodes at a dark place. In this case, please enhance the
brightness of the light in around.
3. If the same problem occurs, turn off and on the power switch of
the analyzer.
Screen If one of following situations applies:
The screen does not respond.
The screen is frozen.
Abnormal screen appears.
1. Turn off the power switch of the analyzer.
2. Wait 10 seconds.
3. Turn on the power switch of the analyzer.

8. Troubleshooting
Operator’s Manual 8-2
Troubleshooting, continued
Battery If one of following situations applies:
The analyzer was turned off immediately upon disconnection
from the outlet.
The analyzer was turned off during brief power outages.
The battery does not recharge.
1. If not already done, turn off the power switch of the analyzer.
2. Check for loose power connections between the analyzer and the
outlet. Tighten any loose power connections.
3. Turn on the power switch of the analyzer.
4. The analyzer will turn on and the battery will begin to recharge.
5. If the analyzer does not turn on, turn off the power switch of the
analyzer.
6. Recharge the battery for 10 minutes.
7. Turn on the power switch of the analyzer again.
8. While the analyzer is turned, if the battery level stays low and
does not increase at all over the time, call a service engineer for
help.
9. Until the battery is replaced, the analyzer will operate normally
as long as the power is supplied from the outlet.
If the “Battery is low” appears,
1. Check for loose power connections between the analyzer and
the outlet.
2. Tighten any loose power connections.

8. Troubleshooting
8-3 i-Smart 300 Blood Gas Analyzer
Troubleshooting, continued
Calibration If the sensor state appears as slope error in red background,
1. Run Cal 2.
2. If needed, repeat additional Cal 2 a few times more.
Cartridge Data
Copy
If the analyzer fails to detect a USB memory,
1. Remove the USB memory from the USB port.
2. Insert the USB memory into a different USB port.
3. If it still doesn’t work, try a different USB memory.
If “Cartridge data copy has failed” message appears during data
copy,
1. Close the message and try again from the beginning.
2. Select desired cartridge data and press Copy.
Cartridge
Installation
If the analyzer does not change to the warming-up screen after the
cartridge is inserted into the analyzer,
1. Check that the cartridge is an i-Smart 300 cartridge.
2. Check that the cartridge is not past its expiration date.
3. Check that the cartridge has not been previously used.
4. Open and close the cartridge door.

8. Troubleshooting
Operator’s Manual 8-4
Troubleshooting, continued
Power While the analyzer is connected to the outlet, the power cord icon
does not appear:
1. Check for loose power connections between the analyzer and
the outlet.
2. Tighten any loose power connections.
If one of following situations applies:
The analyzer has turned off.
The analyzer does not turn on.
1. If not already done, turn off the power switch of the analyzer.
2. Check for loose power connections between the analyzer and
the outlet. Tighten any loose power connections.
3. Turn on the power switch of the analyzer.
4. If the analyzer does not turn on, turn off the power switch of the
analyzer.
5. Recharge the battery for 10 minutes.
6. Turn on the power switch of the analyzer again.
Printer If one of following situations applies:
The printer does not print.
The printer does not feed the paper.
1. Check for loose power connections between the analyzer and
the outlet. If the analyzer is on battery power, the printout is only
available in more than 50% battery levels.
2. Open the printer cover.
3. Replace a roll of print paper if the paper has run out.
4. Lift up the printer head and check for paper jam. If jammed,
remove the jam. Then, press the RESET switch on the left
side of the printer and close the printer head.

8. Troubleshooting
8-5 i-Smart 300 Blood Gas Analyzer
Troubleshooting, continued
Sample Analysis If one of following situations applies:
The “Insufficient sample error” appears on the result screen.
The “Out of range” appears on the results screen.
A result is suspicious.
1. Try sample analysis again with the same sample.
2. If the same error is repeated, run Cal 2.
3. Try sample analysis again.
4. Repeat Cal 2 a few times if the same problem occurs.
5. Try QC solutions for analysis. If the QC results are within the
QC range, the analyzer is okay for sample analysis.
6. Check the sample collection and handling method.
8. Troubleshooting
Operator’s Manual 8-6
Error Code
1. If the analyzer encounters an error during operation, the
following error code will appear on the screen.
Error Code Description
ESYS001 ~ ESYS
999
Hardware error
EDB001 ~ EDB
999
Database error
ESW001 ~ ESW
999
Software error
2. Memo the error code.
3. Turn off the power switch of the analyzer.
4. Wait 10 seconds.
5. Turn on the power switch of the analyzer.

8. Troubleshooting
8-7 i-Smart 300 Blood Gas Analyzer
This page is intentionally left blank.

9. Specification
9. Specifications
Operating Specifications ···································································· 9-1
Analyzer Specifications ····································································· 9-2
Cartridge Specifications ····································································· 9-3
Measuring Principles ········································································· 9-4
9. Specification
9-1 i-Smart 300 Blood Gas Analyzer
Operating Specifications
Measured
Parameters
Measured Parameters
Parameter Unit Reportable
Range
Measuring
Range
Resolution
pH 6.500 ~ 8.000 6.000 ~ 8.500 0.001
pCO2 mmHg 5.0 ~ 150.0 0.0 ~ 250.0 0.1
pO2 mmHg 5 ~ 700 0 ~ 800 1
cNa+ mmol/L
80 ~ 200 20 ~ 250 1
cK+ mmol/L
1.0 ~ 20.0 1.0 ~ 60.0 0.1
cCa2+ mmol/L
0.25 ~ 5.00 0.25 ~ 15.00 0.01
cCl- mmol/L
50 ~ 150 20 ~ 250 1
Hct % 10 ~ 70 5 ~ 75 1
Sample types: whole blood
Anticoagulant: heparin
Sample volume: 80 μL
Sample introduction method: aspiration
Sample analysis time: 50 seconds
Sample analysis temperature: 37.0 ± 0.2°C
Measuring principle: electrochemical (potentiometry,
amperometry, conductometry)
Calibration : automatic or manual
Environmental
Conditions
Operating location: indoors on a flat surface
Operating temperature: 15 ~ 35°C
Operating humidity: 5 ~ 85% (relative humidity)
Operating altitude: under 3,000 m
Power supply: 100 ~ 240 Va.c., 50/60 Hz

9. Specification
Operator’s Manual 9-2
Analyzer Specifications
Internal PC: 1.6 GHz processor / 2 GB RAM / 8 GB flash storage
Operating system: Windows® Embedded Standard 7
Display: 8 inch TFT-LCD, touch screen
Printer: 2 inch thermal printer (built-in)
Printer paper: thermal paper (width: 57 mm, diameter: 50 mm)
Barcode scanner: visible red 630 nm LED laser (built-in)
RFID reader: 13.56MHz ISO 15693 read/write (built-in)
Port: USB (4 ports), Serial (RS-232), LAN (RJ45 Ethernet),
VGA
Power adapter:
- AC-DC power supplies (IEC/EN 60950-1 approved)
- Input: 100 ~ 240 V a.c., 1.5 A, 50/60 Hz
- Output: + 24 V d.c., 2.7 A
Input power: + 24 V d.c., 2.7 A
Internal battery: 14.8 V d.c., 4.4 Ah (Lithium-ion cells: 4S2P)
- Discharge time: maximum two hours
Battery life:
- 20% reduced capacity for charging/discharging for 300 times.
- Replace when the capacity drops below 50% (discharging
time is less than one hour).
- The life and replacement cycle of the battery can vary
depending on operating conditions.
Storage temperature: -20 ~ 50°C
Storage humidity: 0 ~ 90% (relative humidity)
Size (HxWxD): 394 mm x 257 mm x 252 mm
Weight: 5.5kg (without accessories)
FCC Regulatory Domain : compiled with Part 15 of FCC Rules.
Note: Operation is subject to the following two conditions;
1) this device may not cause harmful interference, and
2) this device must accept any interference received,
including interference that may cause undesired
operation.

9. Specification
9-3 i-Smart 300 VET Blood Gas Analyzer
Cartridge Specifications
Unit: 1 cartridge
Uselife: maximum 2 weeks
Shelf life: 6 months from manufactured date
Storage temperature: 15 ~ 25°C
Components:
- Sensors
- Sampler
- Waste bag
- Valve and tubing
- Solution bag
- Cal 1solution, approx. 500 g
- Cal 2 solution, approx. 100 g
- Reference solution, approx. 100 g
Size (HxWxD): 148 mm x 182 mm x 100 mm
Weight: 1.4 kg

9. Specification
Operator’s Manual 9-4
Measuring Principles
Electrochemical
Potentiometry
(ion selective
electrode)
Amperometry Conductometry
pH and
Gases pH, pCO2 pO2
Electrolytes
cNa
+
, cK
+
,
cCa2+, cCl-
Hematocrit
Hct
The i-Smart 300 blood gas analyzer calibrates the sensors using Cal 1
and Cal 2 solutions according to the pre-determined two-point
calibration schedule during the lifetime of the cartridge. In addition,
the analyzer performs one-point calibrations using Cal 1 solution
between two-point calibration intervals to correct the baseline drift of
the sensors.

9. Specification
9-5 i-Smart 300 Blood Gas Analyzer
This page is intentionally left blank.

Appendices
Operator’s Manual 10-1
Appendix A: Sample Collection and Handling
Caution
Observe the general cautions required of the hospital, laboratory,
or other testing facility.
All biohazardous materials should be handled and disposed of in
accordance with applicable rules and regulations.
The blood and/or collecting tools, and used cartridges should be
treated as biohazardous materials.
Wear appropriate personal protective clothing (lab coat, gloves,
goggles, etc.). And Be careful not to let the blood and/or
collecting tools directly touch the mouth, eyes, mucus
membranes, or any area with broken skin.
Wash hands after collecting the sample or using the analyzer.
Sample
preparation
Use whole blood to a blood gas test.
To draw blood samples, use containers (syringe, capillary, blood
collection tube) treated with heparin. We recommend using a
dry-sprayed heparin tube or a solid heparin tube. We do not
recommend using a tube treated with anticoagulants such as
Citrate, EDTA, Oxalate, NaF, etc., except heparin, since the
blood-sampling tube containing such anticoagulants besides
heparin can drop the performance of the sensors and/or can
influence the analysis result.
Make sure there are no small air bubbles trapped in the collected
sample. Small bubbles in the sample can affect the results.
Samples containing clots and/or samples in which hemolysis is
present or suspected must not be used.
Use whole blood samples for blood gas analysis should be
analyzed as soon as possible. If immediately analysis is not
possible, the sealed blood container must be placed in a bath
containing ice and water. Ice-water stored samples at 1 to 4°C
may give reliable results for up to 30 minutes.
Appendices
10-2 i-Smart 300 Blood Gas Analyzer
Appendix B: Order Information
1. i-Smart 300 Cartridge
Available Test number & Uselife REF Order unit
200 Tests / 2 weeks 6510 1
2. Quality Control
Product Description REF Order unit
QC 623 Level 1 (blood gas/electrolyte) 6200 1 box (30 ampuls)
QC 623 Level 2 (blood gas/electrolyte) 6201 1 box (30 ampuls)
QC 623 Level 3 (blood gas/electrolyte) 6202 1 box (30 ampuls)
QC 623 Multi-Level (blood gas/electrolyte),
6204 1 box (30 ampuls,
10 ampuls each levels)
QC 900 HIGH/LOW (hematocrit) 6203 1 box (20 ampules,
10 ampuls each levels)
3. Accessories of analyzer
Description REF Order unit
Power adapter 3152 1
Power cord 3153 1
Printer papers 3331 1 pack (5 rolls)

Appendices
Operator’s Manual 10-3
Appendix C: Warranty
The product warranty for the analyzer and its components excluding the cartridge is one
year from the product purchase date on the VAT invoice.
Product quality assurance applies only if the product has been properly handled and
used under normal conditions and appropriately maintained according to the operator's
manual.
Responsibility for the charged service (charged on the customer).
Failure caused by consumer error.
When the product was broken by external shock or fall.
When the product was broken by using components or optional items that are
not specified by the manufacturer.
When the user did not read and understand the precautions, the installation, and
operation methods of the instrument in the operator's manual.
When the analyzer was disassembled, modified, and/or repaired by a person
who is not authorized by i-SENS, Inc.
When the product was broken by using incorrect power capacity.
When the product was broken by the operator's lack of attention or skill.
When the product was broken by natural disaster (lighting, fire, flood damage,
etc.).
When the consumable parts reached the end of their life spans (battery, etc.).
Please call a service engineer responsible for the product if you have any questions.