lemega Technology FK-M5 M5+ HiFi MUSIC SYSTEM User Manual M5 english 20170510
Shenzhen lemega Technology Co., Ltd M5+ HiFi MUSIC SYSTEM M5 english 20170510
Contents
- 1. User manual part 1
- 2. User manual part 2
- 3. User manual part 3
User manual part 2
13 of 38
12 of 38
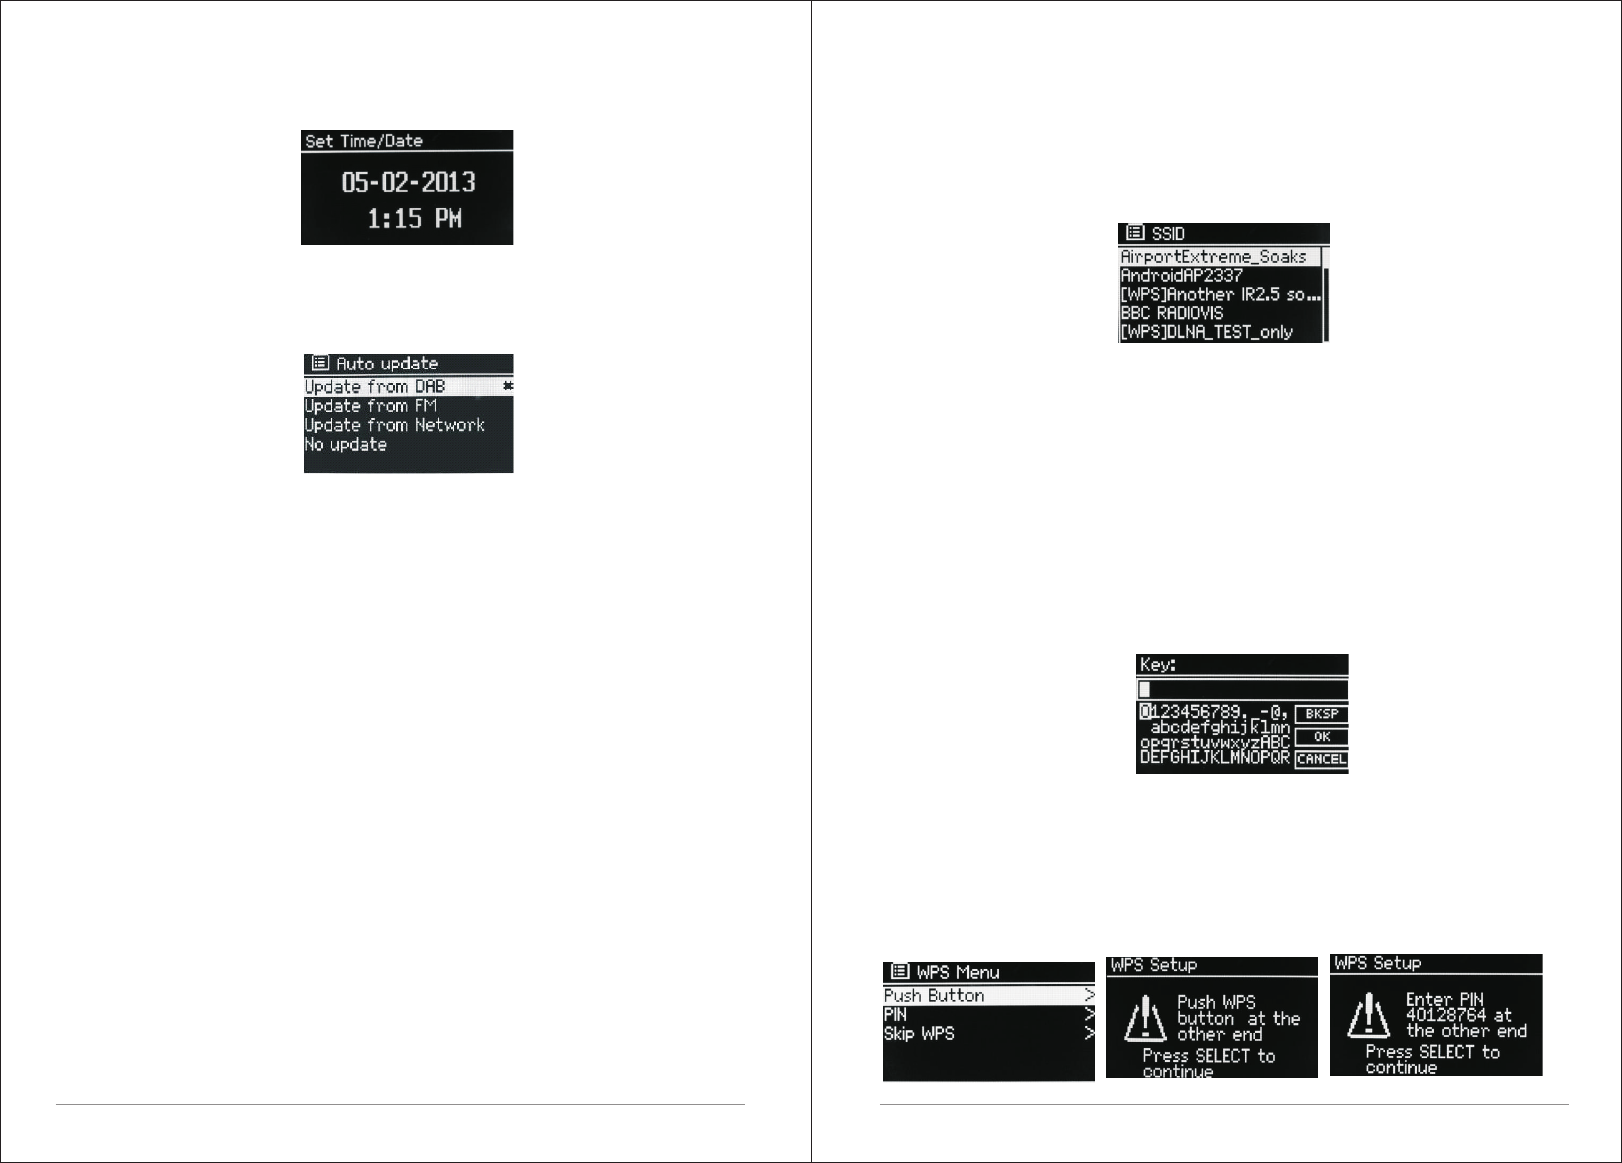
Adjust each value with the Select control. As each value is set by pressing the
Select control, the next value becomes active ready for adjustment.
Auto-update
Auto-update works with data sent over DAB, FM or the Internet. The clock is
only updated when in a corresponding mode, so it is best to select a mode you
use regularly.
DAB and FM use time signals broadcast with radio transmissions.
Network uses a time signal sent from the Internet radio portal when in any
network-connected mode.
1.Select Update from DAB, Update from FM, Update from Network or No
update.
2. If you are updating from the network, set your time zone.
3. If your country uses daylight saving, the automatically updated time from
the network may be wrong by one hour. When daylight savings are in effect
(during the winter), turn on the Daylight savings option to rectify this.
Note that if you are updating the time from DAB or FM, the Daylight savings
option has no effect on the clock's time.
M5+ will auto-update from the selected source when time information is
available.
Manual set
If you set No update, the wizard now prompts you to set the time and date
manually.
The date and time are displayed as dd-mm-yyyy and hh:mm AM/PM with the
first value, dd, active (flashing).
Adjust each value with the Select control.
As each value is set, the next value becomes active and flashes.
3.1.3 Network
M5+ is compatible with all common network protocols and encryption
methods, including Wi-Fi Protected Setup (WPS).
To connect M5+ to your network, you need a Wi-Fi wireless router, together
with password key if set Select WLAN region/country >Wi-Fi network (SSID),
and then select a network from the list.
If the network is open (non-encrypted), M5+ connects and no further details
are required; see Completion below.
Standard encrypted network
To enter the network’s key (password), use the Select control to highlight the
next relevant character and press to select each character in turn. As each
character is selected, the key is built up near the top of the display.
The three options – Backspace, OK and Cancel are included in the selection
loop.
These can be accessed just using the Select control, or, a short cut Is
available, pressing the Info key, which moves the selection highlight to the
Back Space option.
WPS setup
WPS encrypted networks are identified by ‘[WPS]’ at the start of the network
name, and have two methods of connection. Select one and follow the
prompts. When using the network wizard an additional option to Skip WPS is
available.
Select one and follow the prompts:
14 of 38 15 of 38
ŸPush Button
M5+ prompts you to press the connect button on the router. It then press the
select control.
ŸPin > (code number)
M5+ generates an 8-digit code number which you enter into the wireless
router, access point.
ŸSkip WPS >
Enter key as for a standard encrypted network, above. For more information
on setting up a WPS encrypted network, see your WPS router’s instructions.
On completion
M5+ connects to the selected network.
If connecting fails, M5+ returns to a previous screen to try again. To exit the
process use the Back/Menu button.
3.2 Other settings
Sections for those modes. Common settings are covered below.
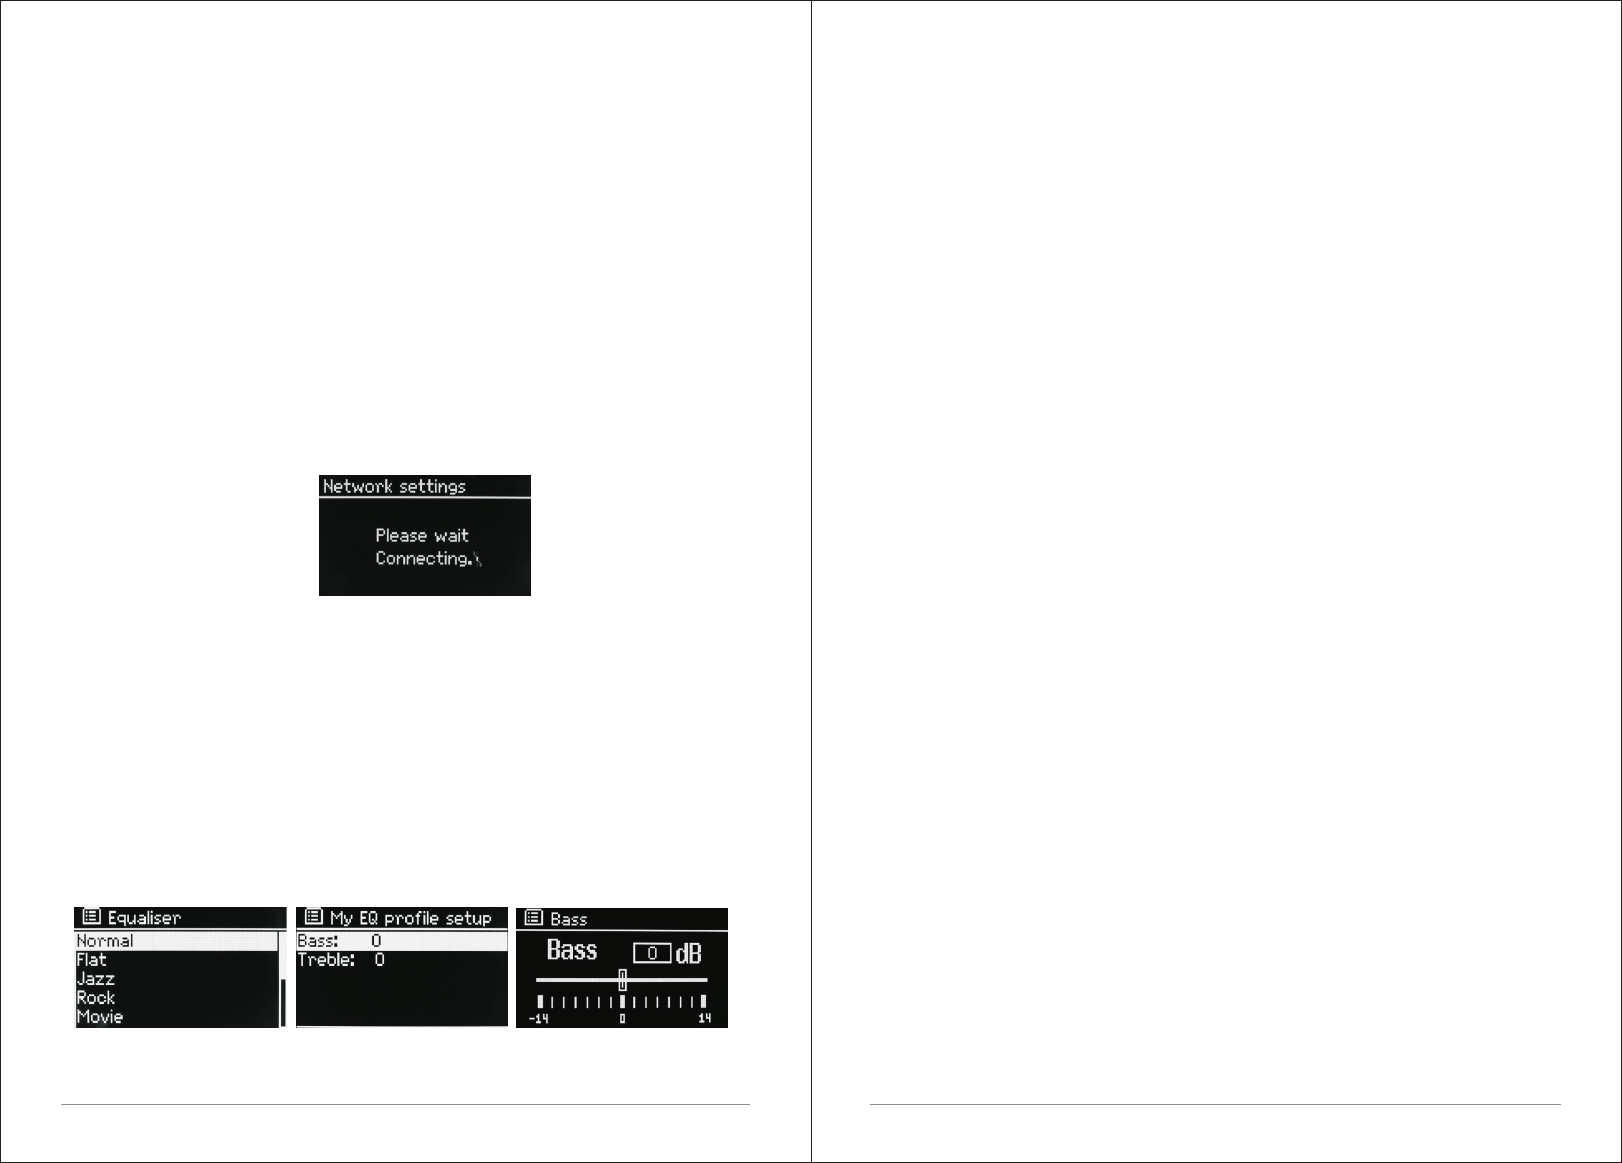
3.2.1 Equalizer
Several preset EQ modes are available; also a user-defined setting (My EQ).
To choose an EQ setting, select Menu >System settings > Equalizer. You can
then choose from a variety of preset modes and My EQ
The last option ‘My EQ profile setup’ allows you to define your own settings
for the ‘My EQ’ option, with custom bass, and treble settings.
3.2.2 Network
M5+ remembers the last four wireless networks it has connected to, and
automatically tries to connect to whichever one of them it can find. You can
3.2.3 Language
The default language is English. To change, select Menu > System settings
> Language >then select your language.
3.2.4 Connection your smartphone with the radio via UNDOK APP
To connect your Smartphone with M5+ you need to download the free app
“UNDOK“ from Apple Store or Google Play Store. IMPORTANT: The phone
must be in the same wireless network as the music system.
ŸDownload the app and open it.
ŸThe app automatically searches for available devices. Select “LEMEGA
M5+” from the list.
ŸOpen SOURCE to choose between different input signals.
ŸOpen BROWSE to get a list of available stations. Select the desired station.
ŸOpen NOW PLAYING to get more information about the channel.
ŸOpen the settings to adjust the equalizer, set sleep timer and other
functions easily.
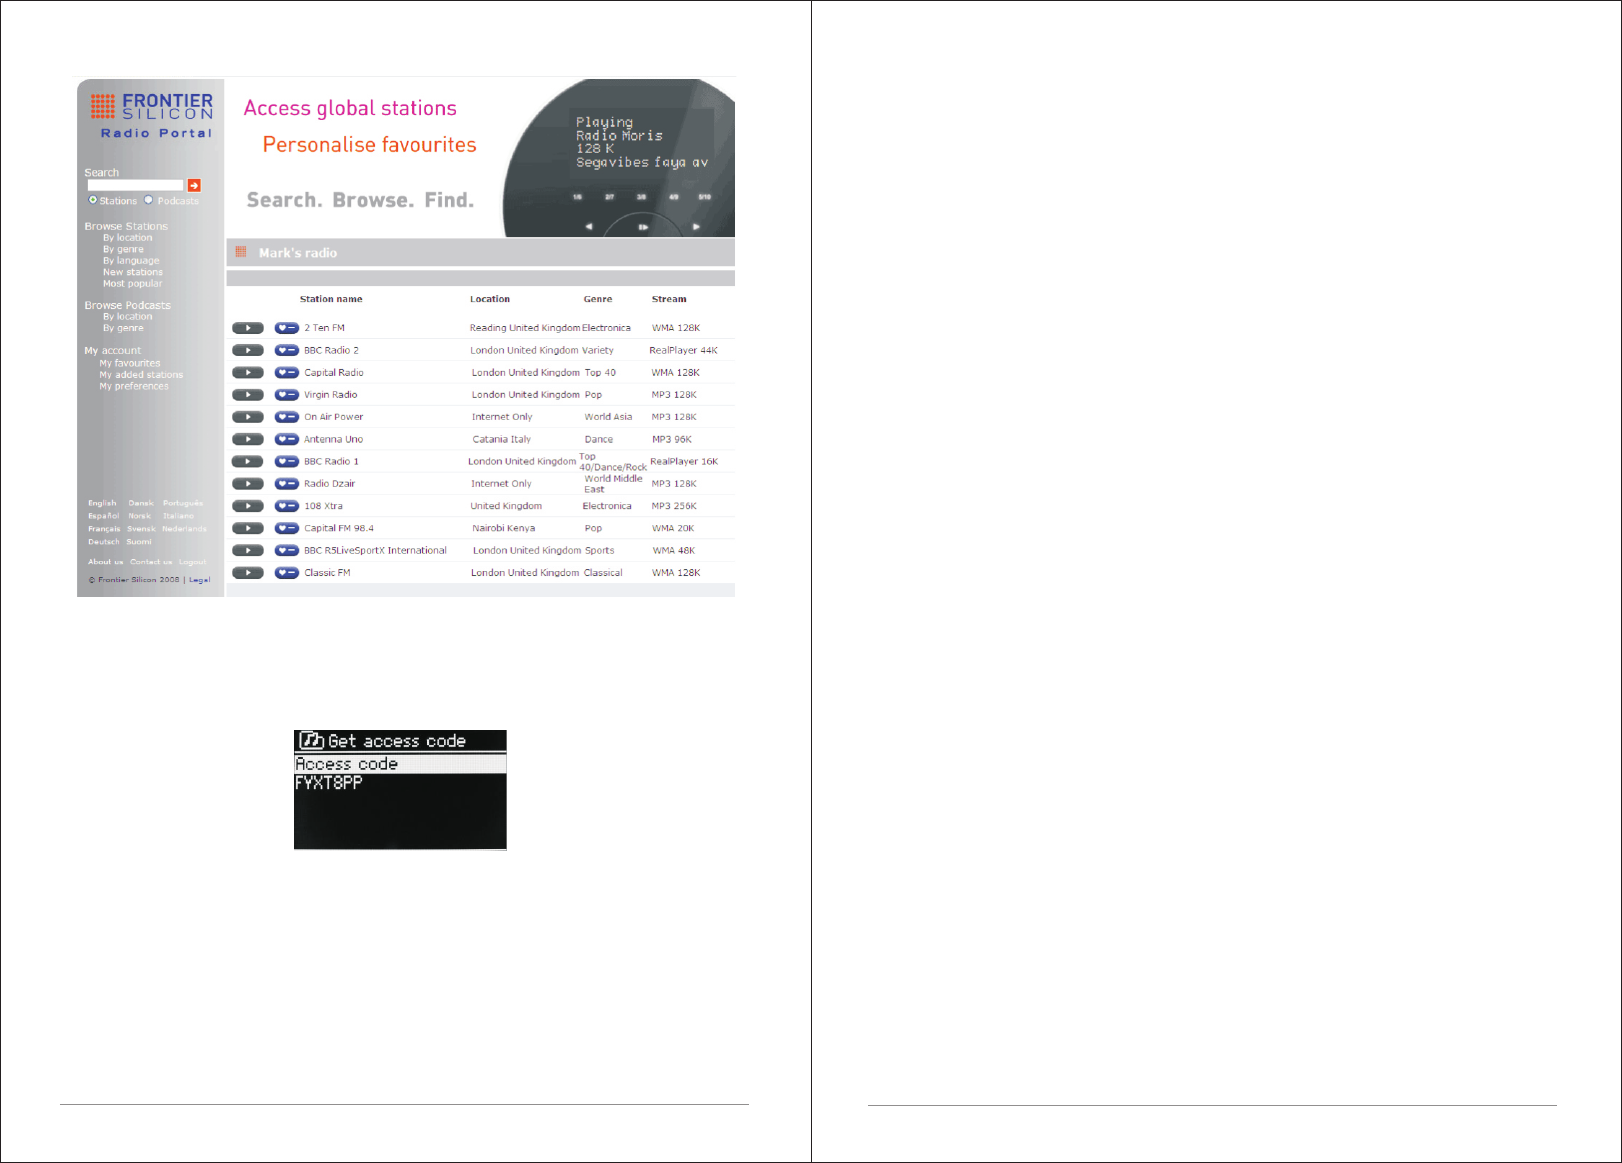
3.3 Internet radio portal registration
M5+ uses the Frontier Silicon Internet radio portal website that allows you to
organize your favorite's lists and also listen to Internet radio on a computer.
see the list of registered networks through Menu > System settings >Network
> Network profile >From here you can delete unwanted networks by turning
and pressing Select then confirming delete Yes.
There are also other options for viewing and manually altering network
settings from Menu > System settings > Network > (for example setting up a
wired network).
Users experienced with networking may find these options useful for
diagnosing and fixing network problems.
16 of 38 17 of 38
Ÿaccess code,
Ÿ
Ÿyour e-mail address,
Ÿ
Ÿpassphrase,
Ÿ
Ÿradio model (M5+).
If you already have an account and wish to add an additional radio, log in to
your account and select My preferences > Add another Wi-Fi radio.
Once your radio is registered with the portal, you can immediately use the
Internet radio favorites and added stations features.
3.4 Setting up a music server
In order for M5+ to play music files from a computer, the computer must be set
up to share files or media.
UPnP media sharing allows devices like M5+ to play music from a shared
media library navigating through tag menus such as Artist, Album or Genre. If
you are running a suitable server system such as a PC with Windows Media
Player 10 or later (WMP), and your music library is well-tagged, then it is
recommended to use media sharing. Only the UPnP server needs to be set
up.
Notice: iTunes does not currently work as a UPnP media server, but there are
add-ons available to work with an iTunes library.
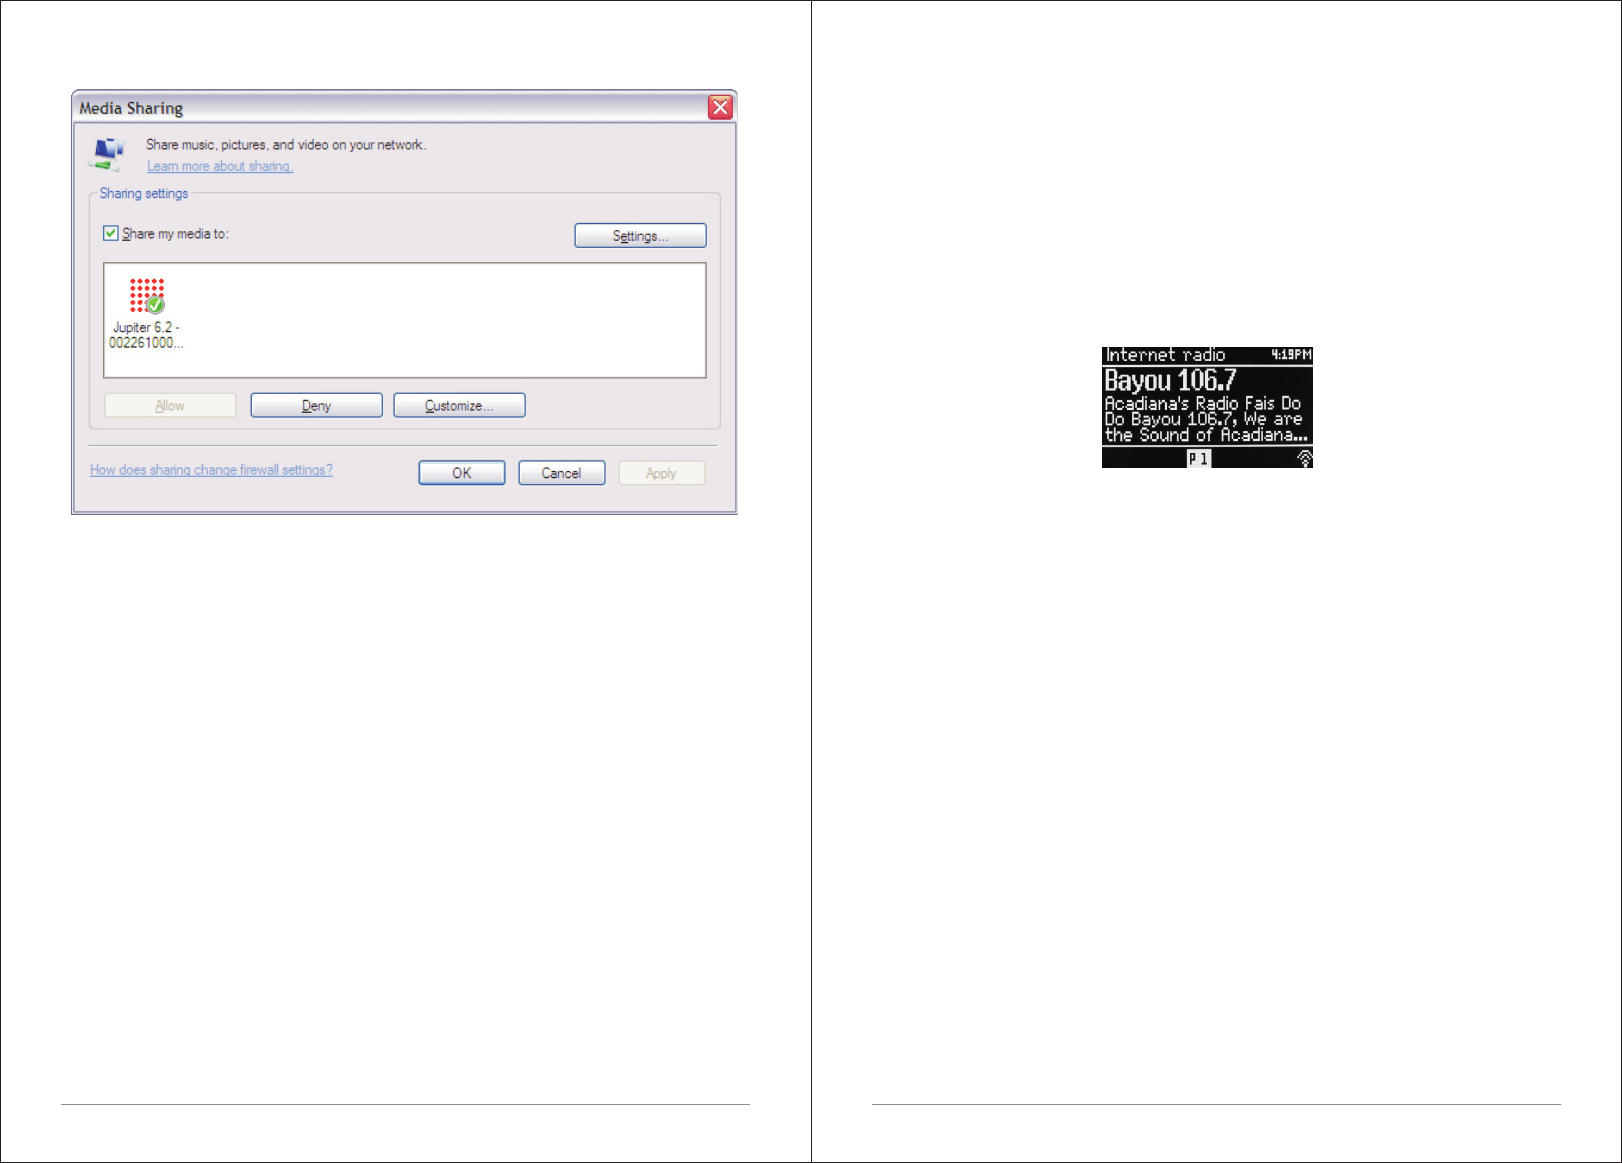
3.5 Sharing media with Windows Media Player
The most common UPnP server is Windows Media Player (10 or later).
Alternatively, other UPnP platforms and servers may be used. To set up WMP
for media sharing, perform the following steps:
1.Ensure that the PC is connected to the network.
2.Ensure that the radio is powered on and connected to the same network.
3.In WMP, add to the media library the audio files and folders you want to
share with M5+ (Library > Add to Library…).
4.In WMP, enable media sharing (Library > Media sharing…).
Notice: setup can differ depending on which version of WMP you have.
Notice: it may show; M5+, “Unknown device”, “Frontier Silicon” or the Jupiter
logo as shown below.
To register your M5+ with the portal, switch to Internet radio mode and then
obtain your radio's unique portal access code by selecting Menu >Station list
> Help > Get access code >Write down the access code.
Note: The displayed access code is only valid for a few minutes. If you fail to
register your radio within the time window you will need to repeat the above
step to get a new access code and try again. Do not confuse the portal access
code with the Radio ID (from Menu > System settings > Info.)
Visit the portal website at www.wifiradio-frontier.com.
If this is your first visit to the portal, register for a new account, entering the
following information:
18 of 38 19 of 38
Make sure that the radio has access to the shared media by selecting it and
clicking Allow.
You can also set a name for the shared media in Settings… Click OK to close
the dialogue boxes.
The PC is now ready to stream the music to the radio. The WMP UPnP service
runs in the background; there is no need to start WMP explicitly.
3.6 Setting up M5+ for “Play To” Windows 7 streaming media feature.
To set-up M5+ to be controlled and to stream music via Windows Media Player
12 (Windows 7 only), perform the following steps:
1. Ensure that the PC is connected to the network.
2. Ensure that M5+ is powered on and connected to the same network.
Note: M5+ must be in an Internet radio mode to be detected
3. From the Windows 7 main screen, select Start > Devices and Printers.
4. Select the Add a device tab in the top left of the Devices and Printers
window and follow the instruction prompts given by the wizard.
In the Devices and Printers window a icon *) will appear and you are now
ready to stream your Windows media music files to M5+.
*) To change the name of your device, right click on icon and choose
properties. Then choose UPnP and click on “device webpage”.
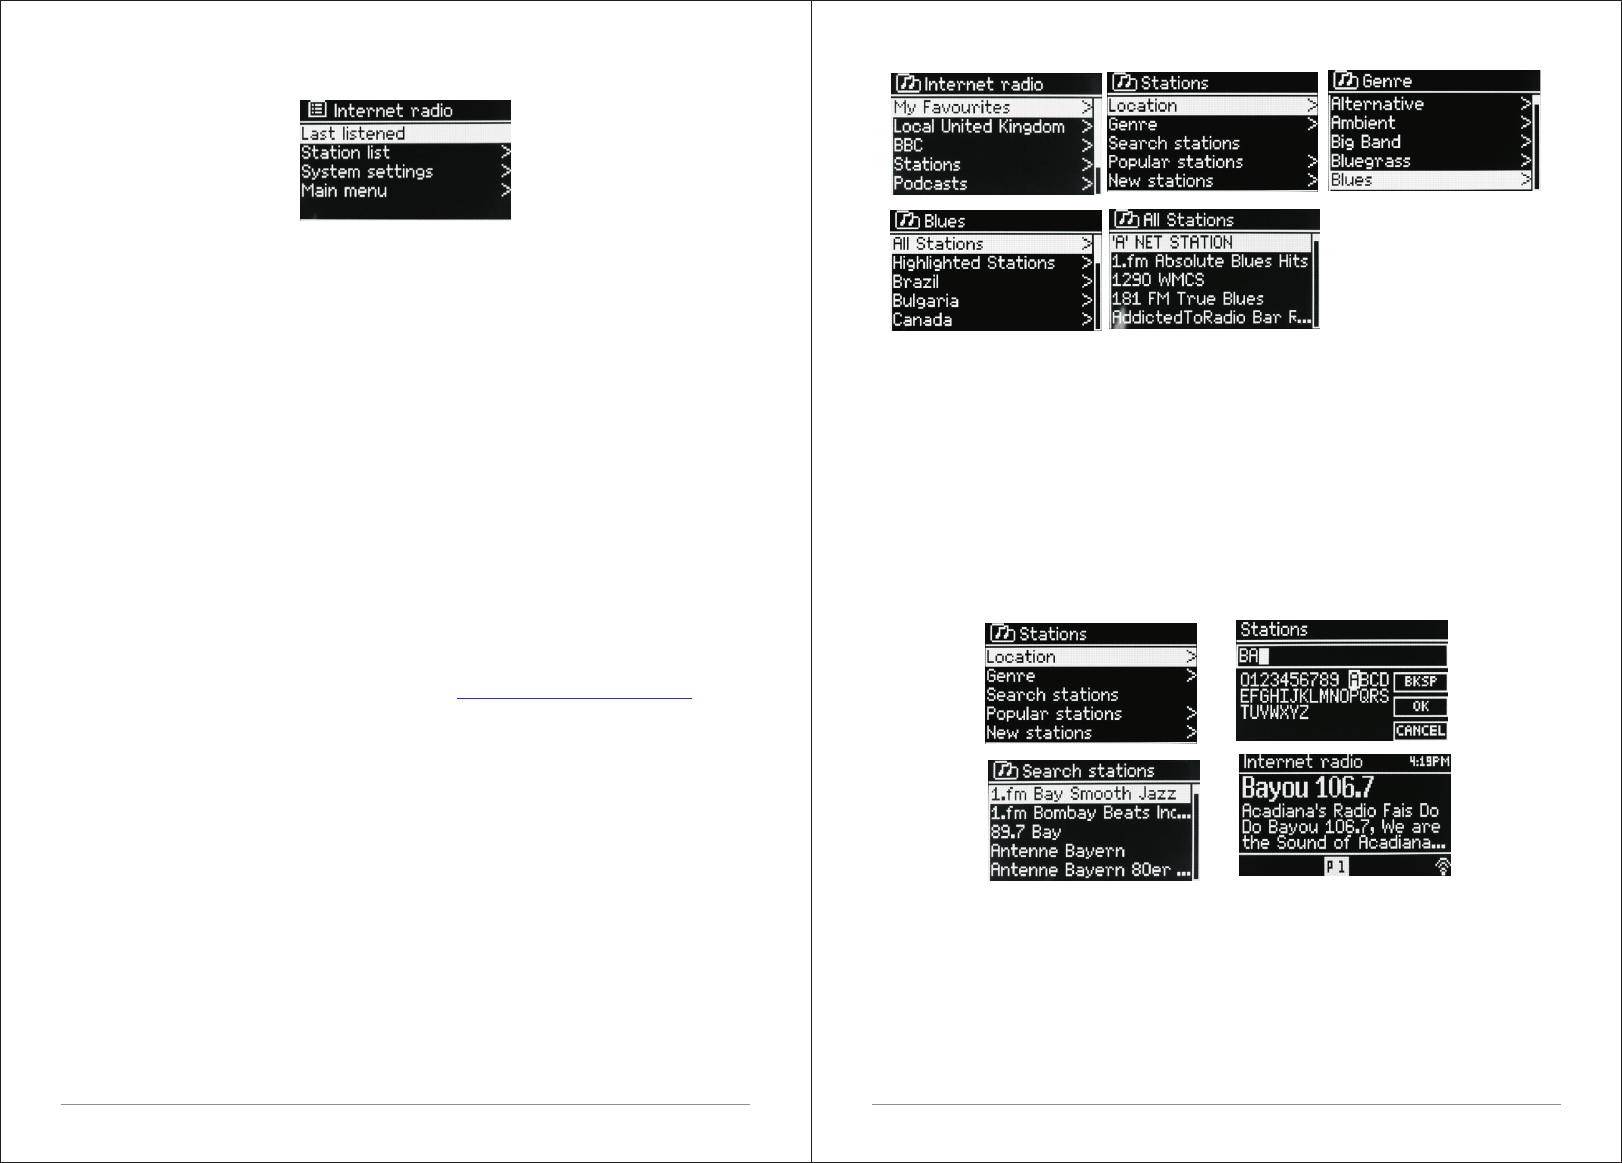
4. Internet radio mode
M5+ can play thousands of radio stations and podcasts from around the world
though a broadband Internet connection.
When you select Internet radio mode, M5+ contacts the Frontier Silicon
Internet radio portal to get a list of stations, organized into different
categories like Country, Most popular and Genre.
Once you select a station, M5+ connects directly to that station.
The portal also enables multiple lists of favourite stations that you can
personalise, for example Andy's stations, Jo's favourites, Talkshows. To use
the favourites feature, register your radio with the portal website. If you have
several Frontier Silicon radios, you can register them all on the same account
so that each radio has access to your favourite's lists. It is possible to add
favourites either directly through M5+ or through any computer with a web
browser.
To enter Internet Radio mode, either press Mode until the display shows
Internet Radio or select Menu >Main menu > Internet Radio.
Note: The station list menu is provided from the Internet radio portal, so it is
only accessible when M5+ is connected to the Internet. Station lists and
submenus may change from time to time.
There are several ways of selecting stations.
Directly from the radio:
ŸLast listened
ŸPresets
From the portal through the Menu > Station list> menu:
ŸFavourites lists
ŸBrowse by Country, Genre, Most popular, Newest
ŸSearch by keyword
ŸMy added stations
20 of 38 21 of 38
4.1 Last listened
When Internet radio mode restarts, the last-listened station is selected. To
select another recently used station, select Menu > Last listened then one of
the stations listed. Most recent stations appear at the top of the list.
4.2 Presets
Presets are stored in the radio and cannot be accessed from other radios.
To store an Internet radio preset, press and hold Preset until the display
shows the Save preset screen. Select one of the presets to save the currently
playing station.
To select a preset, press Preset briefly, then select one of the listed preset
stations.
When a preset station is playing, it shows ☆1,2,3 etc in the bottom middle of
the screen. Note: Operation of presets is identical for Internet radio, DAB and
FM.
4.3 Favourites
Favourites are stored on the Internet radio portal. Before you set up an
account on the portal from its Web interface ( ), the
favourites are associated solely with the radio on which you set them. After
you set up a portal account, all the favourites from your different radios are
merged into a combined favourites list. This combined list is available to all
the radios on your account.
To store a playing station as a favourite, press and hold Select until the
display shows 'Favourite added'. The station appears in the default favourites
list Stations.
To select a favourite, select Menu > Station list > My favourites > [Favourites
list] > [Station].
4.4 Browse
To browse Internet broadcasts, select Menu> Station list> then either
Stations > or Podcasts >Browse through the menus to find broadcasts.
www.wifiradio-frontier.com
4. 5 Search
You can also search through Internet broadcasts for stations or podcasts
with particular keywords in their title.
To search, select Menu > Station list > then either Stations > or Podcasts >
Enter a keyword by selecting characters then OK. The search entry screens
are similar in operation to the Wi-Fi password entry screen.
Select a broadcast from the list.
For podcasts, you may be able to select a particular episode.
4.6 My added stations
Even though the Internet radio portal contains thousands of stations, you may
want to listen to stations not listed. You can add your own s tations via the
portal. These added stations are accessible from M5+ by selecting Menu >
Station list > My added stations > [Station].

22 of 38 23 of 38
4.7 Now playing information
While the stream is playing, the screen shows its name and description. If
artist and track information is available, this is also shown. To view further
information, press Info .
Each time you press Info, another set of information is displayed, cycling
through the following details:
ŸArtist and track name (default; where available)
ŸDescription
ŸGenre and show country
ŸReliability
ŸBit rate and Codec and Sampling
ŸPlayback buffer
ŸToday's Date
5.
Connect your M5+ and Spotify control device to your home Wi-Fi
All devices need to be on the same Wi-Fi.
Get the Spotify app/Premium free trial
Download the Spotify app for your mobile or tablet from your app store, and
take the Premium free trial. Log in to Spotify and start playing a track.
Play millions of songs on your M5+.
To start with, your mobile/tablet and M5+ need to be on the same Wi-Fi. Tap
on the Now Playing bar to reveal extra controls, and select the Speaker icon.
On the Connect screen, Just choose your M5+ and it'll start playing. Adjust the
volume at the volume bar below on the Connect screen.
Spotify Connect
With Spotify you get millions of songs easily accessible. The artists you like,
the latest hit songs and new discoveries, just for you.
With Spotify Connect feature lets you play and control all your music
wirelessly. Select music on your smartphone or tablet and hear on the radio.
Your radio has Spotify Connect built. This allows you to control the music
playing on the radio using the Spotify app on your smartphone or tablet.
Listen Nobody is seamless - you can call, play games, watch movies, and
even turn off the phone without interfering music. There is a better way to hear
music at home.
* For availability in your region, see www.spotify.com.
Spotify Connect
You must have a Spotify Premium account to get full access to millions of
songs from Spotify archive, all with adequate sound quality.
If you do not have it, you can go to www.spotify.com/freetrial for a 30 - day trial.
To use Spotify Connect
1. Download Spotify app for your Smartphone or tablet ( iOS or Android) .
2. Connect the radio to the same wireless network as your Smartphone or
tablet, and then press the MODE button repeatedly to select Spotify Connect
mode.
3. Open Spotify app on your Smartphone or tablet and play a song.
4. Touch the picture of the album at the bottom left of the screen. Then press
Connect icon
5. Press M5+ to select your radio and it will start playing from you M5+.
Note that radio is that " LEMEGAxxxxxxxxxxxx " ( 12-digit number is the MAC
address of the radio ) in Spotify app.
6. Music player mode (network)
Music player mode plays audio files such as MP3s, AACs, WMAs or FLACs
from a computer on the local network.
To enter Music player mode, either press Mode until the display shows Music
player, or select Menu > Main menu > Music player Once in music player
mode, press Menu , then select Shared media.
If you are already playing a music file, you can press Back to quickly return to
the last visited branch of the menu tree. For example, suppose you were
listening to the track Heat by the artist 50 Cent through browsing shared
media as described in section 0 below. Pressing Back would return you to the
track listing for the album Get Rich or Die Tryin'. Pressing Back again would
list all 50 Cent albums. Pressing Back again would list all album artists, and
so on.
24 of 38 25 of 38
You can use << and >> to move through tracks. Press and hold to rewind or
fast forward and press quickly to select previous or next track.
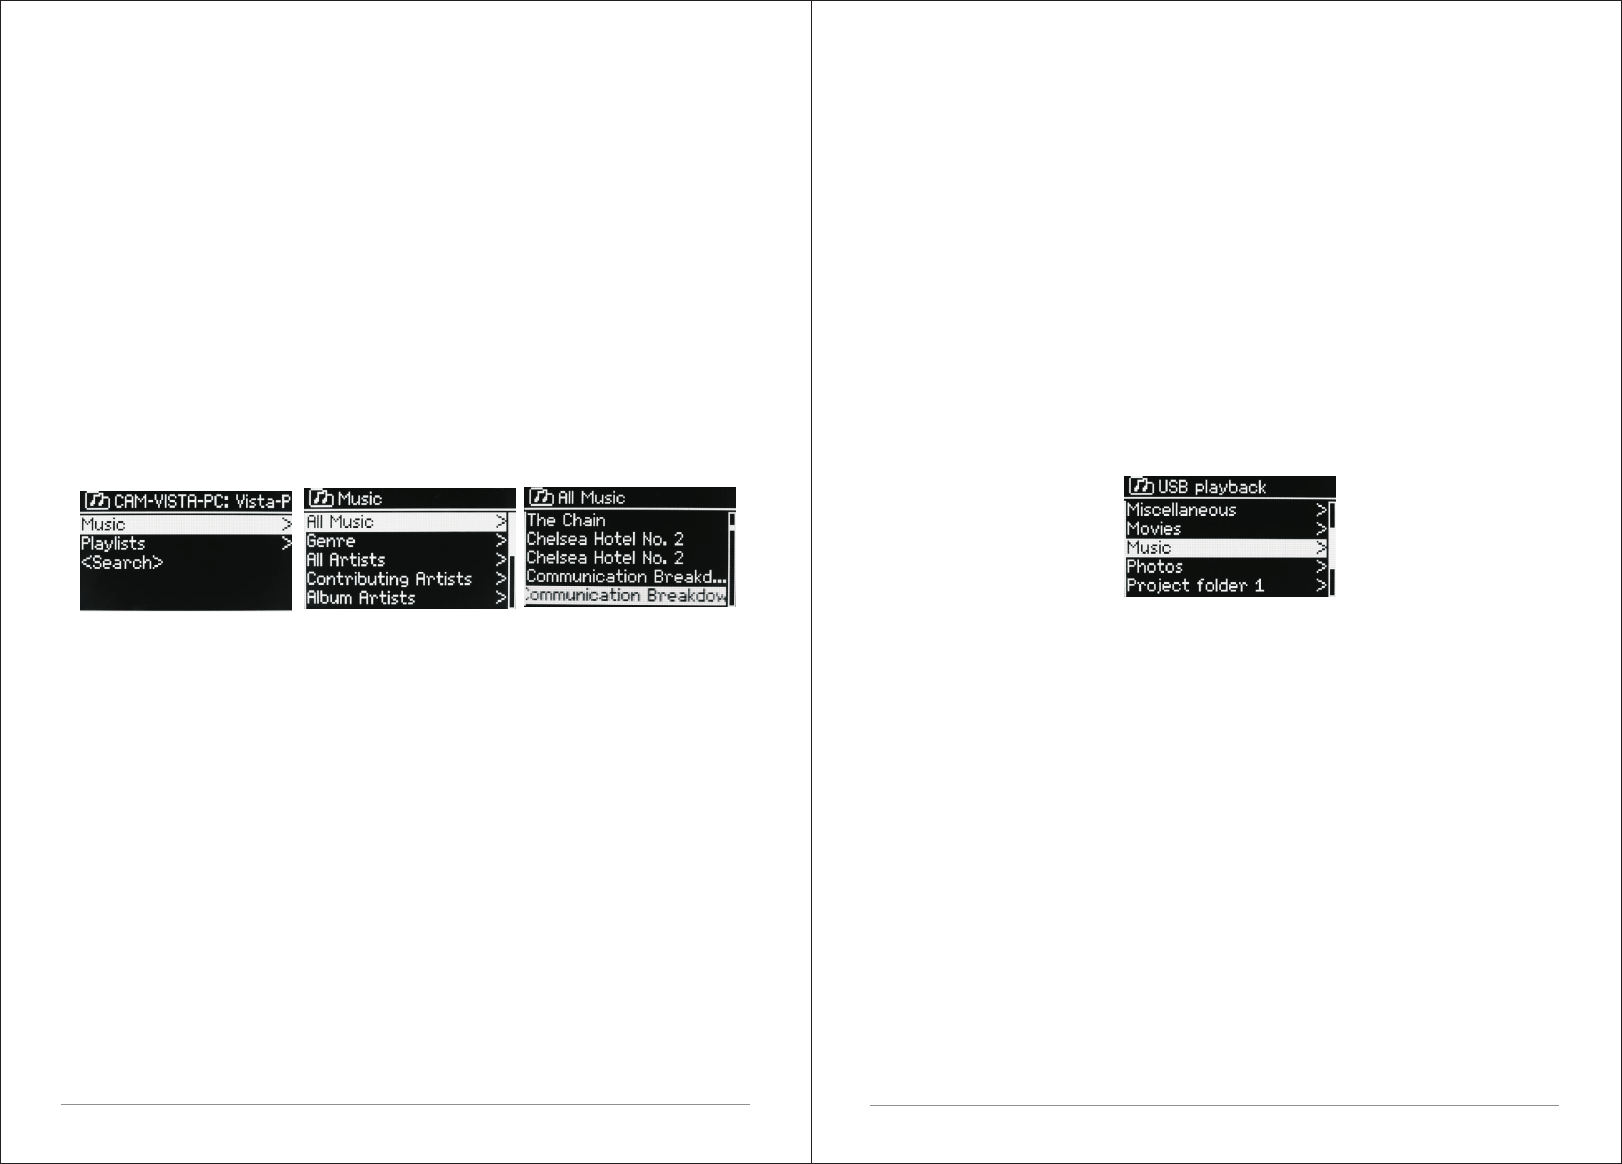
6.1 Shared media (from UPnP media server)
Select Menu > Shared media >
If you have set up shared media, you should see an entry consisting of
<computer name>: <Shared media name>, for example JB-Laptop: Audio. If
you have more than one computer sharing media, the alternatives are listed.
Select the shared media you want to play.
From this point on, the menus are generated from the shared media server
(typically Windows Media Player).
The first menu shows a list of media types, for example Music, Video, Pictures
and Playlists. M5+ can only play music and playlists.
There is also a search function, which finds tracks in a similar way to Internet
radio search
From Music, there are numerous ways of selecting tracks, including:
ŸGenre
ŸArtist
ŸAlbum
ŸComposer
ŸRating
Once you have found a track you want to play, press Select. A short press
plays the track immediately and a long press adds the track to the playlist. You
can also add entire albums to the playlist.
M5+ plays either the selected track or the playlist.
6.1.1 Wake-on-LAN
If shared media is selected a list of available music servers will be displayed.
If a question mark appears before the server name, this indicates that the
server has been seen before and supports Wake-on-LAN functionality, but
cannot currently be found on the network.
If a server with a question mark is selected by the user, the device will try to
.
wake the server up and connect to it. In some instances this may not be
possible as the server may not be connected to the network any more or may
be switched off.
6.1.2 Prune servers
From time to time it may be necessary to remove servers displaying question
marks in front of the server name from the server list. For example,
if the device is moved to a new network or if a Wake-on-LAN server is
removed from your current network.
To perform this function go to Menu > Prune servers > Yes
6.2 USB PLAYBACK
To play audio from a USB mass-storage device such as a USB Flash stick or
USB hard drive, Select Menu > USB playback.
Browsing folders From this point on, menus are generated from the folders
on the USB device. Browse folders with the Select control and Back
button. The display shows folder and file names ( not necessarily track
names).
Once you have found a track that you want to play, press Select . A short press
plays the track immediately.
A long press (at any time while the track is displayed or playing) adds the track
to My playlist. You can also add entire folders to My playlist.
6.3 Playlists
M5+ holds a queue of up to 200 tracks in the playlist.
Playlist tracks can be mixed from multiple UPnP servers.
To manage the playlist, select Menu > My playlist.
To view the playlist, scroll though it by turning Select . UPnP tracks show their
track name.
To play the playlist from a certain track, quick Select .
To erase a track from the playlist, long Select .then confirm YES.
If you select a track/album/folder for instant playback (without using the
playlist), the playlist is preserved. The playlist is also preserved during
standby.