User Manual
Precautions
- The sum of the power output of the appliances used with the timer switch should not exceed the specified power rating of the timer switch.
- Please use the timer in a dry, indoor environment.
- Please charge the timer if the symbols appear strange or faint on the display.
- If you experience any kind of malfunction, you can push the Reset button to restore the device.
- Only one mode can be selected at a time. You cannot use different modes simultaneously or it won't be switched between modes automatically. The last mode that has been set is the current working mode.
Tips
- If you press and hold the "HOUR" or "MIN" for three seconds, you can move through the numbers more quickly.
- When setting the time, you could press "RES/RCL" button to clear the current time setting (except "clock setting").
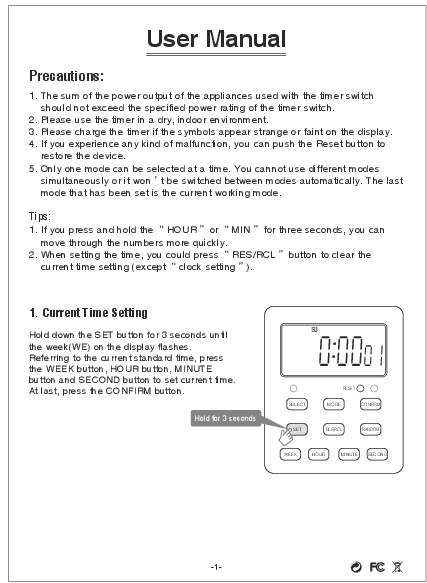
1. Current Time Setting
Hold down the SET button for 3 seconds until the week (WE) on the display flashes. Referring to the current standard time, press the WEEK button, HOUR button, MINUTE button and SECOND button to set current time. At last, press the CONFIRM button.
Diagram Description: A digital timer display shows 'SU' (Sunday) and time '0:00:01'. Below the display are buttons arranged in rows: SELECT, MODE, CONFIRM on the top row; SET, RES/RCL, RANDOM on the middle row; WEEK, HOUR, MINUTE, SECOND on the bottom row. An annotation near the SET button indicates 'Hold for 3 seconds'.
2. Tips for Always ON/Off and Setting Time Groups
The timer has 3 main functions:
- 1. Always ON
- 2. Always OFF
- 3. Setting One or More Time Groups
Diagram Description: A flowchart illustrates timer functions. Starting with SELECT (timer1, timer2, or timer1&2), it branches to MODE ('always on/off') or SET (1st group: set 'on' time). The SET branch continues to another SET (1st group: set 'off' time). Both branches can lead to '2 or more groups' or 'RANDOM (optional on/off)' before reaching CONFIRM.
3. Detailed Steps for Setting One or More Time Groups
Step 1: Select Timer
Short press the SELECT button to select TIMER1, TIMER2 or TIMER1&TIMER2, and make it or them to work. (Note: TIMER1 indicates the socket on the left side and TIMER2 indicates the socket on the right side)
Diagram Description: Timer display shows 'TIMERS1 SU' and 'TIMERS2' with time '18:00:00' and status 'ON'. Buttons are visible.
Step 2: Set First Group 'On' Time
Short press the SET button, then press WEEK, HOUR, MINUTE, SECOND to set the required boot time of the first group. (Note: When setting, you could press RES/RCL to clear the current data and set again. If your data is cleared by mistake, please press RES/RCL to restore)
Diagram Description: Timer display shows 'TIMERS1 SU MO TU WE TH FR SA' and 'TIMERS2' with time '18:00:00' and status 'ON'. Buttons are visible.
Step 3: Set First Group 'Off' Time
Short press the SET button again to set power cut time of the first group. The setting method is the same as Step 2. After setting the first group, you can continue to press the SET button to set the open/close time of the second group, third groups or even more groups. (Note: TIMER1 and TIMER2 can be set to different states or different timings respectively, and you can also choose whether you use RANDOM mode separately.)
Diagram Description: Timer display shows 'TIMERS1 SU MO TU WE TH FR SA' and 'TIMERS2' with time '18:00:00' and status 'OFF'. Buttons are visible.
Step 4: Select RANDOM Mode (Optional)
During setup, you can press the RANDOM button to select whether you use the RND holiday mode. (Note: The RND mode can only be selected when the timing is set. After pressing the CONFIRM button and it starts to work, you can't select RND again. You need to go back to the timing setting state to select RND)
Diagram Description: Timer display shows 'TIMERS1 SU MO TU WE TH FR SA' and 'TIMERS2' with time '18:00:00' and status 'OFF', with 'RND' indicators visible on the display. Buttons are visible.
Step 5: Confirm and Start
After setting, press CONFIRM button, the device will start to work according to the set time of the timer. If you do not press CONFIRM, you can continue to set the timer for the second group and the third group, or even more groups.
Diagram Description: Timer display shows 'TIMERS1 SU' and 'TIMERS2' with time '18:00:00' and status 'AUTO', with 'RND' indicators visible. Buttons are visible.
SET TIMER 2
When you finish the setting of timer 1, press the CONFIRM button and timer 1 enters the working state, and then press the SELECT button to enter the setting state of timer 2, but at the same time timer 1 will also stop working. The setting steps of timer 2 is the same as time 1. When timer 2's setting is finished, press the CONFIRM button, both timer 1 and timer 2 would enter working state.
Other Functions
1. 12/24 Hours Time System Switching
Press SET + HOUR buttons together to switch between 24H time system and 12H time system. AM/PM symbol will show up on the middle left of the screen when 12 hour time system is on.
2. Summer Time Switching
Press SET + MINUTE buttons together to switch between normal time and summer time. DST symbol will show up on the bottom right of the screen when summer time mode is on.
3. Lock Button
Press SET + WEEK buttons together to lock/unlock the button. A lock symbol will show up when buttons are locked, and pressing any button does not work except the Reset button.
4. Always On/Off Function
If you need your electric appliance to work all the time, you can set the mode as "Always On". If you don't need to use your electric appliance any more, you can set the mode as "Always off".
Notes
- TIMER 1 and TIMER 2 can be set separately, each timer allows 9 groups of working time.
- When setting the time groups, if you only set the on time but no off time, it can be confirmed but won't work.
- RANDOM function can be set for timer 1 and time 2 separately, but it cannot be set only for one exact time group or several groups. If you set timer1 or timer2 as RANDOM, then all the time groups of the timer 1 or timer 2 will random.
- If the screen appears like scratching and hard to see the numbers, you can peel off the screen protector.
Support
Any questions, please contact us: support@nearpow.com
