Milestone MHT-L1081 Thermal Label Printer
Quick Installation Guide
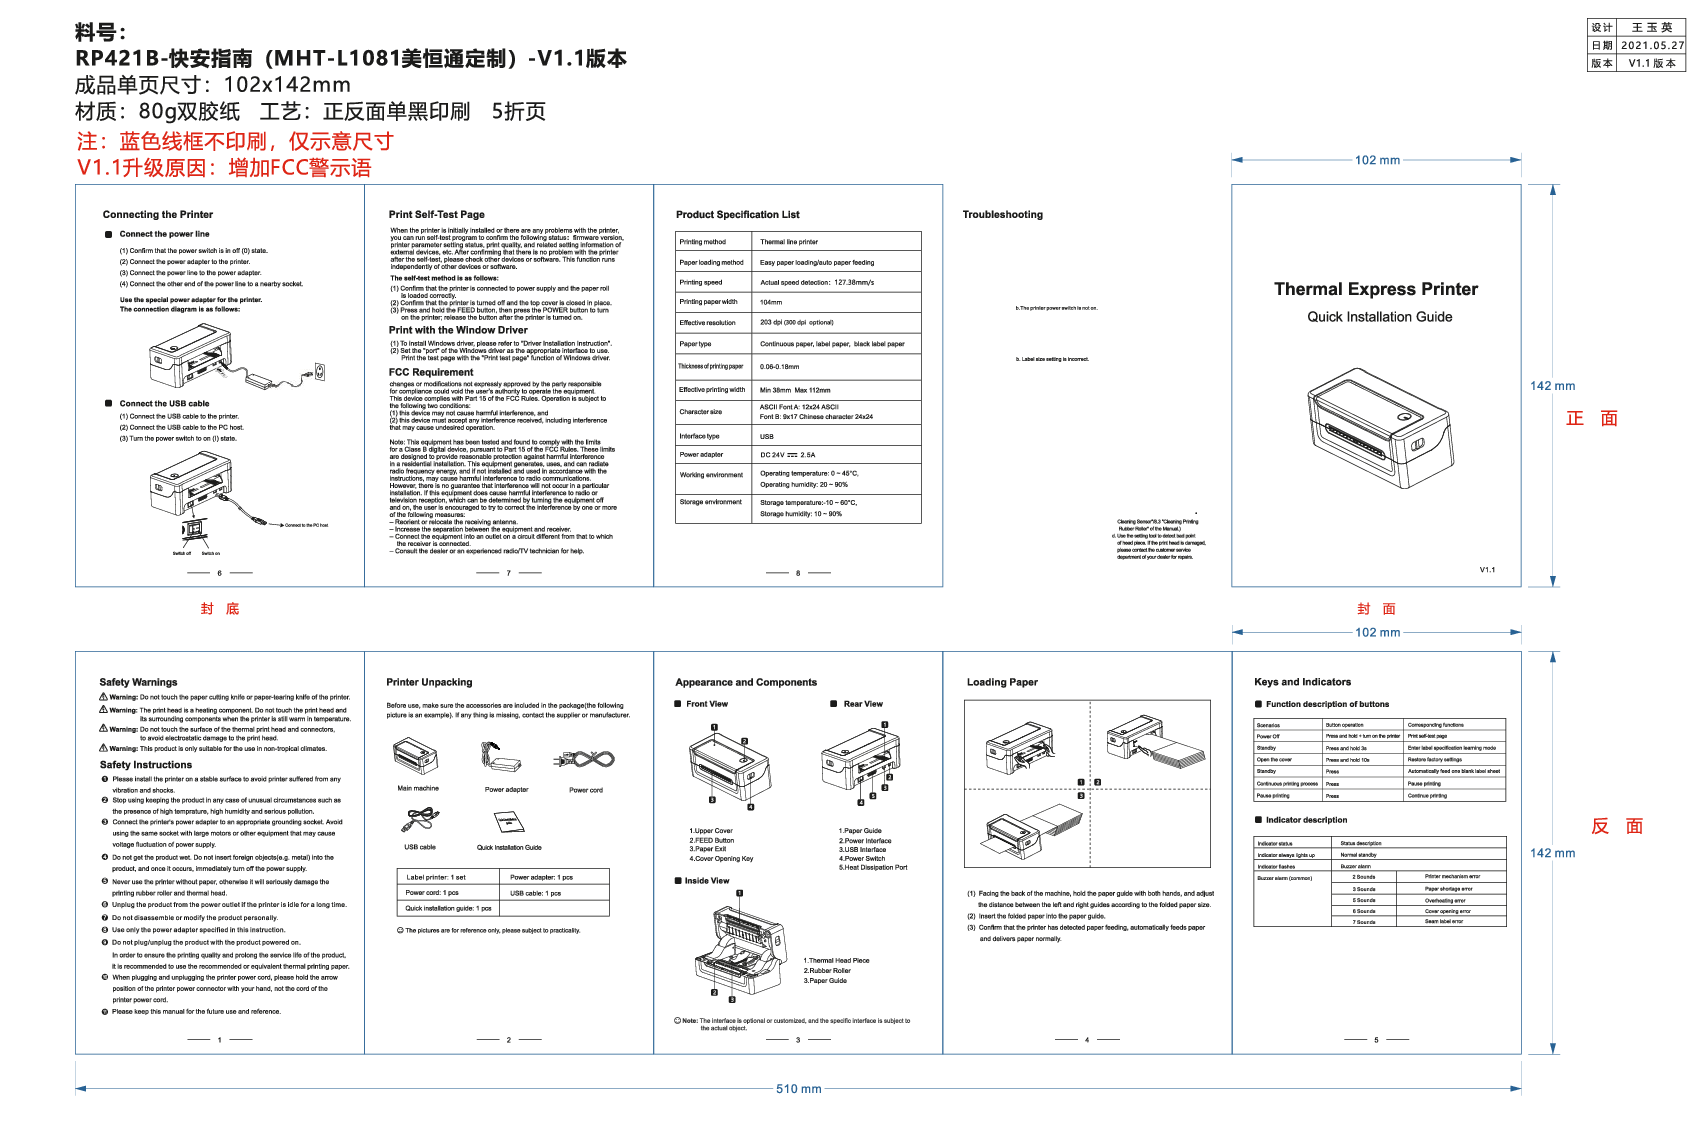
Product Overview
This document provides instructions for the quick installation of the Milestone MHT-L1081 Thermal Label Printer. It covers connecting the printer, installing drivers for Windows and macOS, loading paper, and basic troubleshooting.
Printer Unpacking
Before use, ensure all accessories are included in the package:
- Main machine
- Power adapter
- Power cord
- USB cable
- Quick Installation Guide
The package contents are for reference only; please refer to the actual product.
Connecting the Printer
Connect the power line:
- Confirm the power switch is in the off (0) state.
- Connect the power adapter to the printer.
- Connect the power line to the power adapter.
- Connect the other end of the power line to a nearby socket. Use the special power adapter provided with the printer.
A diagram shows the power connection.
Connect the USB cable:
- Connect the USB cable to the printer.
- Connect the USB cable to the PC host.
- Turn the power switch to the on (I) state.
A diagram illustrates connecting the USB cable to the printer and PC.
Loading Paper
- Facing the back of the machine, hold the paper guide with both hands and adjust the distance between the left and right guides according to the folded paper size.
- Insert the folded paper into the paper guide.
- Confirm that the printer has detected paper feeding, automatically feeds paper, and delivers paper normally.
Diagrams illustrate the paper loading process.
Windows Driver Installation
- Connect the printer and the computer, and turn on the printer power.
- Open the printer driver installer (e.g., MHTLabelPrinterDriverInstall_V1.01(3).exe).
- Follow the on-screen prompts to install the driver.
- After installation, click 'Finish'.
- Open computer settings, navigate to 'Devices' > 'Devices and printers'.
- Find the MHT-L1081 printer and set it as the default printer. Adjust printer properties, such as paper size (4x6" or 100*150mm recommended).
- Open a document (e.g., 'USPS Test1.pdf') and try printing a test page, ensuring the correct paper size is selected. If unable to print, turn off and restart the printer.
Mac OS Driver Installation
- Open the printer driver installer (e.g., MHTLabelPrinterDriverInstall_ForMac_V1.2.pkg).
- If prompted that the document cannot be verified, open 'Security & Privacy' in System Preferences, allow installation from identified developers, and click 'Open Anyway'.
- Click 'Open' to proceed.
- Back to the installation step, enter your computer password or fingerprint to continue.
- The driver installation is successful. Close the interface.
- Open 'Printers & Scanners' from System Preferences.
- Click '+' to add a printer.
- Select the MHT-L1081 printer and click 'Add'.
- The printer is now installed.
- Open a document and try printing a test page, ensuring the correct paper size (4x6" or 100*150mm) is selected. If unable to print, turn off and restart the printer.
Print Self-Test Page
To confirm printer status (firmware version, parameter settings, print quality), perform a self-test:
- Ensure the printer is connected to power and has paper loaded correctly.
- Turn off the printer and close the top cover.
- Press and hold the FEED button, then press the POWER button to turn on the printer. Release the FEED button after the printer is on.
Troubleshooting
| Fault Phenomenon | Cause | Solution |
|---|---|---|
| POWER indicator is off | a. AC plug and power supply plug not properly connected. b. Printer power switch is off. |
a. Check power connection. b. Turn on the printer. |
| Unable to print | a. Communication cable not properly connected. b. Communication interface setting error. c. Print status error. |
a. Reconnect the communication cable. b. Check interface settings. c. Check print status. |
| Incomplete print content | a. Paper not centered. b. Label size setting incorrect. |
a. Adjust paper position. b. Set correct label size. |
| Incorrect positioning | a. Label learning not performed. b. Seam label detection photocoupler offset. c. Wrong mode selected. |
a. Perform label learning. b. Adjust seam label detection component. c. Select correct mode. |
| Poor print result | a. Paper loading error. b. Print density/speed setting error. c. Print head/rubber roller has dust or adhesive. d. Print head damaged. |
a. Reload paper. b. Readjust density/speed. c. Clean print head/rubber roller. d. Contact customer service if print head is damaged. |
Frequently Asked Questions
Q. How to install Windows & Mac Driver?
A. The package contains a USB-disk with instructions and driver files.
Q. Why did I print blank labels or print labels incompletely?
A. 1. Ensure the printing side is up.
2. Check if labels are thermal material.
3. Change paper size in printer properties (e.g., 4x6" or 100*150mm).
4. When printing PDFs, preview and adjust printing scale. Use Acrobat Reader DC to edit if content is A4 size.
Q. How to download [Acrobat Reader DC] software?
A. Download from https://get.adobe.com/reader/.
Q. How to identify the label paper size?
A. Place label paper correctly, press and hold the Feed button (Green light) for 3 seconds for auto-detection.
Q. How to change the label size?
A. 1. In 'Printer and Scanner' settings, click 'Print Preferences'.
2. In Acrobat Reader DC, click 'Page Setup'.
Q. Why can't print after installing the driver?
A. 1. Print port may be occupied; change to a different USB port (e.g., USB001-USB005).
2. Driver may not be installed successfully; recheck installation or contact support.
FCC Requirement
This device complies with Part 15 of the FCC Rules. Operation is subject to the following two conditions: (1) this device may not cause harmful interference, and (2) this device must accept any interference received. This equipment has been tested and found to comply with the limits for a Class B digital device, designed to provide reasonable protection against harmful interference in a residential installation.
If interference occurs, try the following measures:
- Reorient or relocate the receiving antenna.
- Increase the separation between the equipment and receiver.
- Connect the equipment to a different circuit.
- Consult the dealer or an experienced radio/TV technician.
Product Specification List
| Printing method | Thermal line printer |
|---|---|
| Paper loading method | Easy paper loading/auto paper feeding |
| Printing speed | Actual speed detection: 150mm/s |
| Printing paper width | 104mm |
| Effective resolution | 203 dpi (300 dpi optional) |
| Paper type | Continuous paper, label paper, black label paper |
| Thickness of printing paper | 0.06-0.18mm |
| Effective printing width | Min 38mm Max 112mm |
| Character size | ASCII Font A: 12x24 ASCII, Font B: 9x17 Chinese character 24x24 |
| Interface type | USB |
| Power adapter | DC 24V 2.5A |
| Working environment | Operating temperature: 0 ~ 45°C, Operating humidity: 20 ~ 90% |
| Storage environment | Storage temperature: -10 ~ 60°C, Storage humidity: 10 ~ 90% |
Keys and Indicators
Function description of buttons:
| Scenarios | Button operation | Corresponding functions |
|---|---|---|
| Power Off | Press and hold + turn on the printer | Print self-test page |
| Standby | Press and hold 3s | Enter label specification learning mode |
| Open the cover | Press and hold 10s | Restore factory settings |
| Standby | Press | Automatically feed one blank label sheet |
| Continuous printing process | Press | Pause printing |
| Pause printing | Press | Continue printing |
Indicator description:
| Indicator status | Status description |
|---|---|
| Indicator always lights up | Normal standby |
| Indicator flashes | Buzzer alarm |
| Buzzer alarm (common) | 2 Sounds: Printer mechanism error 3 Sounds: Paper shortage error 5 Sounds: Overheating error 6 Sounds: Cover opening error 7 Sounds: Seam label error |
Safety Warnings
- Warning: Do not touch the paper cutting knife or paper-tearing knife.
- Warning: The print head is a heating component; do not touch it or surrounding components when warm.
- Warning: Do not touch the surface of the thermal print head and connectors to avoid electrostatic damage.
- Warning: This product is suitable for use in non-tropical climates only.
Safety Instructions
- Install the printer on a stable surface, away from vibration and shocks.
- Stop using if the product is in unusual circumstances (high temperature, humidity, pollution).
- Connect the power adapter to a grounded socket, avoiding sockets with large motors or equipment causing voltage fluctuations.
- Do not get the product wet. Do not insert foreign objects (e.g., metal). If this occurs, turn off the power immediately.
- Never use the printer without paper, as it can damage the rubber roller and thermal head.
- Unplug the product if idle for a long time.
- Do not disassemble or modify the product.
- Use only the specified power adapter.
- Do not plug/unplug the product while it is powered on.
- Use recommended or equivalent thermal printing paper for best quality and longevity.
- When plugging/unplugging the power cord, hold the connector, not the cord itself.
- Keep this manual for future reference.
Promotional Gift Information
Milestone is offering a gift to new customers: Milestone 4x6 inch Thermal labels paper or 2in1 Rolls and stack label holders. Please contact Service@gzmht.com with your Order ID and preferred gift to receive it. For after-sales service, contact us via email.
Milestone Tel: +1 (205) 325-9790
Milestone Whatsapp: +1 (205) 325-9790
Visit us at: www.milestoneiot.com
