ALIGNING PHILCO RECEIVERS
Rider-Aligning-Philco-Radio-Receivers-1937 You should have all the
RIDER MANUALS
to use in conjunction with this book
Volume VII
1600 pages
Volume VI
1240 pages
Volume V
1200 pages
Volume IV
1060 pages
Volume Ill
1070 pages
Volume II
800 pages
Volume I
1000 pages
$10.00 $ 7.50 $ 7.50 $ 7.50 $ 7.50 $ 6.50 $ 7.50
.14- 0 111°
c.,
Li 14INC
PH ILCO
RECEIVER
JOHN F.
By JOHN F. RIDER
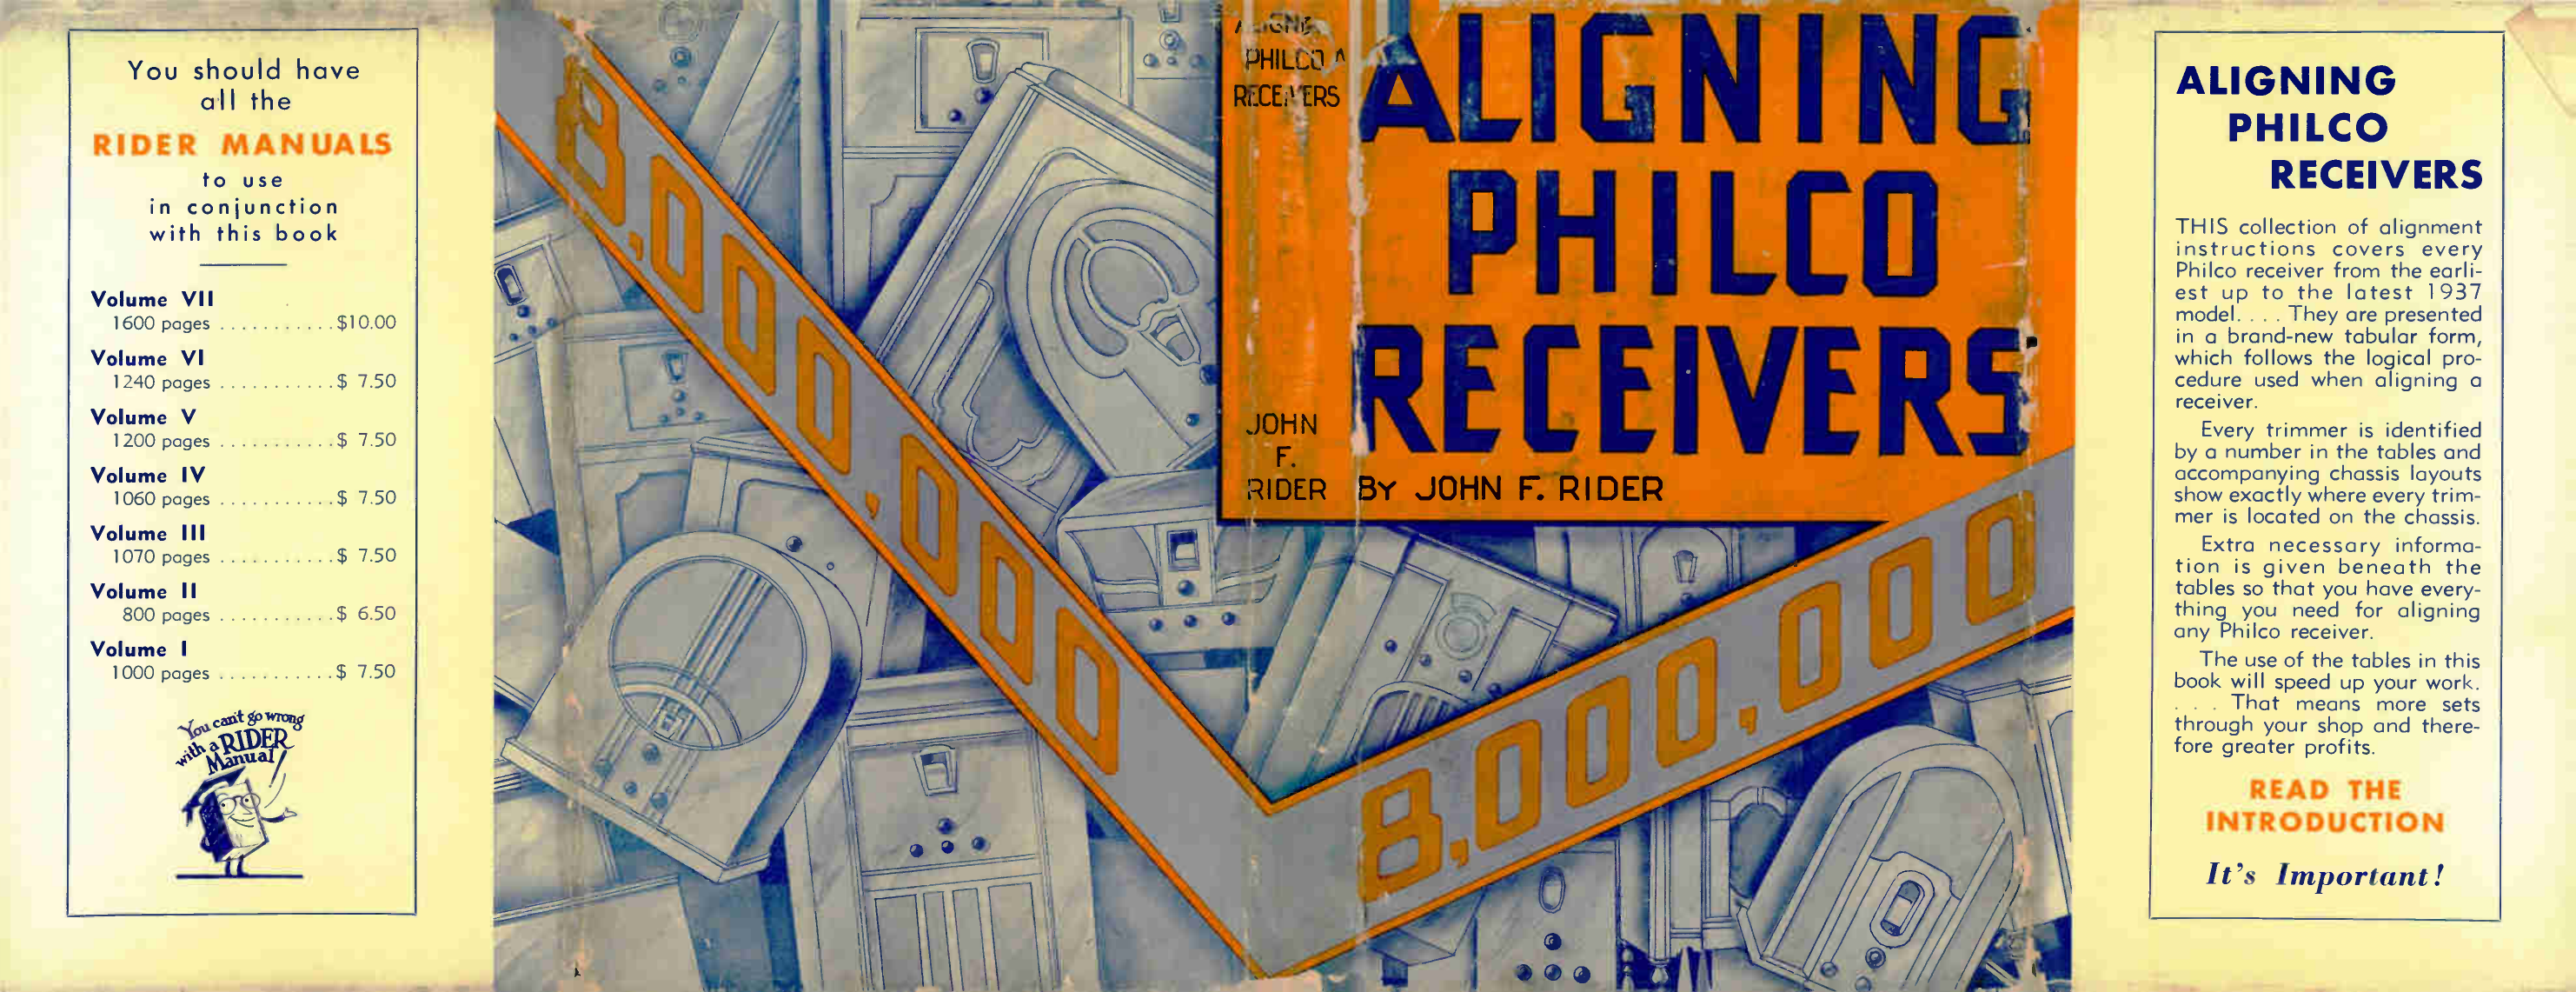
ALIGNING PHILCO RECEIVERS
THIS collection of alignment instructions covers every Philco receiver from the earliest up to the latest 1937 model. ...They are presented in a brand-new tabular form, which follows the logical procedure used when aligning a receiver.
Every trimmer is identified by a number in the tables and accompanying chassis layouts show exactly where every trimmer is located on the chassis.
Extra necessary information is given beneath the tables so that you have everything you need for aligning any Philco receiver.
The use of the tables in this book will speed up your work. ...That means more sets through your shop and therefore greater profits.
4
4
\\
3 j
READ THE INTRODUCTION
It's Important!
�ALIGNING PHILCO
RECEIVERS
BY JOHN F.RIDER
�ALIGNING PHILCO
RECEIVERS
�Other Books by
JOHN F. RIDER
THE CATHODE-RAY TUBE AT WORK SERVICING SUPERH ETERODYN ES PRACTICAL TESTING SYSTEMS
SPECIALIZED AUTO RADIO MANUAL
Volume I Volume II
PERPETUAL TROUBLE
Volume I Volume II Volume Ill Volume IV Volume V Volume VI Volume VII
SHOOTER'S
MANUAL
SERVICING RECEIVERS BY MEANS OF RESISTANCE MEASUREMENT
AN HOUR A DAY WITH RIDER on
AUTOMATIC VOLUME CONTROL RESONANCE AND ALIGNMENT D-C. VOLTAGE DISTRIBUTION IN RADIO RECEIVERS ALTERNATING CURRENTS IN RADIO RECEIVERS
�ALIGNING PHILCO
RECEIVERS
by
JOHN F. RIDER
Author of "Perpetual Trouble Shooter's Manual,"
"The Cathode-Ray Tube at Work," "An Hour A Day With Rider" Series,
and Other Books for the Service Industry
·
Published by
JOHN F. RIDER, Publisher
1440 Broadway
New York City
�Copyright, 1937, by JOHN F. RIDER
Copyright, 1936, 1937, by PHILCO RADIO AND TELEVISION CORPORATION
Philadelphia, Pa. All rights reserved, including that of translation into the Scandinavian and other foreign languages. Certain of the material herein contained has been copyrighted by the Philco Radio and Television Corporation. Permission to reproduce this material in this book has been granted to John F. Rider.
Printed in the United States of America
�Dedicated to Janet who is
approaching her fifth birthday
��INDEX
Model
Page
a
1
4
2
5
3
6, 9, 12 (122), A, B
4
7, 8, 12 (121)
5
8-See Model 7
5
9-See Model 6
4
10 (121, 122), 800 (121), C (121, 122), D (121, 122), E (121,
122), H (121)
6
11 (121, 122), 700, J, Q, R
7
12 (121)-See Model 7
5
12 (122)-See Model 6
4
14 (121, 122, 123)
8
14 (221, 222)-See Model 91
86
15, 111, 112, 211, 212
9
16 (121, 122, 123)
10
16 (125, 126, 127)
11
17 (121, 122, 123)
12
18 (121-124), 503
13
19, 26, 27, 32, 89
14
20, 21, 50, 220
1
21-See Model 20
1
22, 22L, Phono-See Model 71
80
23, 23X, Phono-See Model 91
86
24 Phono-See Model 51
71
25 Phono-See Model 43
65
26 Phono-See Model 19
14
27 Phono-See Model 19
14
28
15
29, 29TX
16
30, 95, 96, 296
17
32-See Model 19
14
34, 34A
18
35, 36
19
36-See Model 35
19
37
20
vii
�Model
37-9 37-10, 37-11 (121)
37-33
37-34 37-38 37-60 37-61 37-84
37-89 37-116
37-600 37-602 37-604 37-610 (121, 122) 37-611
37-620 37-623
37-624 37-630 37-640
37-641 (121) 37-643
37-650 37-660 37-665 37-670 37-675, (121, 122) 37-690 37-2620 38, 38A, (121, 122, 123)
39, 39A 40, 41, 42
41--See Model 40 42--See Model 40
43, 25
44, 504 45 46 47 48
49 50--See Model 20
51, 52, 24, 551
52--See Model 51 53
54
Evin I
Page
21 22
24
25 26 27 28 29
30 31
34 35 36 37 38
39 41
41 42 43
45 46
48 50 52 54 56 59 62 63
64 17
17 17
65
66 67 17 68 69
70 1
71
71 72
73
�Model
57, 58
58--See Model 57 59
60, 505 65 66 70 (Below Serial No. B22,000), 270, 370, 570 70 (Above Serial No. B22,000)--See Model 71 71, 22, 22L, 70 (Above Serial No. B22,000), 270, 370, 570 76, 77
77--See Model 76 80 81
82, 86, 87 84 86--See Model 82 87--See Model 82 89--See Model 19 90, 90A, (2-45)
90, 90A, (1-47) 90, 90A, (2-47) 91, 14 (221, 222), 23, 23X 95--See Model 30
96--See Model 30 97 111--See Model 15 112--See Model 15 116 (121, 122) 118 (121, 123), 507 144, 506 200 201, 509 211--See Model 15 212--See Model 15
220--See Model 20 270--See Model 70 296--See Model 30 370--See Model 70 470--See Model 4 Converter
and Model 70 Receiver
490--See Model 4 Converter and Model 90 Receiver
503--See Model 18 504 See Model 44 505--See Model 60
506--See Model 144
ix
Page
74 74 75 76 77 78 79 80 80 77 77 81 82 77 83 77 77 14 84 84 85 86 17 17 87
9 88 89 90 91 92
9 9 1 79 17 79 2 79 2 84 13 66 76 90
�Model
507--See Model 118
509 See Model 201
511
551--See Model 51 570--See Model 70 600 602 604
610 611
620, 625, 630, 635
623, 623A 624 625--See Model 620 630 (Early and Late)--See Model 620 635--See Model 620 640, 650 641 642 643, 643A 645
650--See Model 640 651 655 660, 665 665--See Model 660 680 700--See Model 11 800 (121)--See. Model 10 800 (122), 802, H (122) 802--See Model 800 (122)
805 806, 808, 809, T7, T8 808--See Model 806 809--See Model 806 810PA, 810PB 810PV 811PA, 811PB 811PV 816 817, 818
818, 818K--See Model 817 819, 81911
P-1417, G-1418, N-1418 G-1418--See Model P-1417 N-1418--See Model P-1417
Ex)
Page
89
92
94
71 79 95 96 97
98 99
100
101 102 100 100 100 103 104 105 106 107
103 108 109 110 110 111
7 6 113 113
114 115 115 115 116 118 120 119 122 123
123 124
125 125 125
�Model
P-1421, TIO P-1430, S-1431, N-1433, G-1436
S-1431--See Model P-1430 N-1433---See Model P-1430 G-1436--See Model P-1430 2620
A-PAD, PAL--See Model 6 B-PBD--See Model 6
C-SCD, NCD--See Model 10 C (122)--SCD--See Model 10 D-NDD, SDD, CDS--See Model 10
D (122)--NDD--See Model 10 E-MED--See Model 10
G (121)--CGD
G (122)--CGD; N-FND H-HHD--See Model 10
H (122)--HHD, PEID--See Model 800 (122) J-SJD, NJD--See Model 11 N-FND--See Model G (122)
Q-NQD, SQD--See Model 11
R-CRD, HRD--See Model 11 DPV T2-CT2, HT2; T5-CT5, PT5 T3-MT3, RT3, ST3
T5-CT5, PT5--See Model T2 T6, FT6 T7, T8,-NT7, ST7, NTS--See Model 806
T9-FT9, FT9X; T11, T12, T14, T15
T10-CTIO--See Model P-1421 TII*CT11, HT11X--See Model T9 T12-NT12X, NT12X2, ST12--See Model T9 T14-LT14X3, MT14X4, PTI4, RT14X--See Model T9 T15-NT15, ST15--See Model T9
Page
126 127
127 127 127 128
4 4
6 6 6
6 6
129
130 6
113 7
130
7
7 131 132 133
132 134 115
135
126 135 135 135 135
[X1 ]
��AUTHOR 'S FOREWORD
THE arrangement of the alignment instructions in this book will be found to be a radical departure from the conventional form in which they are usually prepared. It is our belief that the tabular form can be more easily followed by the serviceman working at the bench and so will save him time.
We can not stress too strongly the fact that the serviceman should read the Introduction before using the tables to align asingle set. The unique form of the instructions make it imperative that he do this, so that he will be able to use them to the greatest advantage.
We wish to take this opportunity of thanking those of the Philco Service and Engineering Divisions who so kindly cooperated with the author in collecting the servicing data used in this book.
JOHN F.RIDER.
��INTRODUCTION
THIS book contains all the necessary information to enable you to align every Philco receiver quickly and accurately. In every case you will find that the location of all the compensating condensers is identified and that the frequencies at which the several adjustments are made are indicated in the accompanying text. These instructions have been prepared in collaboration with the Philco Engineering Department, and are therefore authentic and complete in every respect.
Tabular Arrangement
In looking through this book you will be impressed by the convenient arrangement of the alignment tables. We have avery definite reason for having arranged the data in this form. The alignment of areceiver is essentially a series of operations which must be performed in acertain sequence. You can see therefore that atabular form is peculiarly adapted to indicate the operations to be performed. Thus for each adjustment it is necessary that the signal generator be connected to acertain section of the receiver. This may be the grid of the first detector tube, the antenna post, etc., and the particular signal generator connection which is called for is in every case indicated in the first column. The frequency setting of the signal generator is indicated in the second column, while the corresponding setting of the receiver dial is tabulated in the third column.
Not only must the receiver dial be adjusted to acertain position or dial reading, but it is also important that the wave-band switch be set at the correct position--broadcast, police, short-wave, etc. This data is contained in the fourth column, where the receiver has more than one band.
[xv ]
�When the items mentioned above have been taken care of, the adjustment of the appropriate trimmer follows. The trimmer in question is identified in the next to the last column. Using the identification number which is listed in this column, reference to the accompanying layout will show the position of the trimmer on the chassis.
The last column indicates whether the adjustment is to be made for maximum or minimum output. Thus the notation "Max." in this column indicates adjustment for maximum output, while "Min." indicates that the adjustment must be made for minimum output.
Notes
In anumber of cases the alignment procedure calls for instructions which cannot conveniently be included in the table. In these cases the pertinent information is indicated in the form of afootnote, which is identified either by the form "Note 1" or "550 k.c.1"--to cite two particular examples. Both these types of representation indicate that reference is to be made at this point in the procedure to Note 1, contained at the bottom of the table.
The use of this tabular form effects an economy in the amount of time required for you to align a receiver by eliminating the need for continually referring back and forth to previous instructions especially in the alignment of multiband receivers. In this same connection, and for the same reasons, the simplicity of the arrangement makes for accuracy and goes far toward eliminating errors in alignment.
General Observations
It is not our intention in this book to explain the reason for every adjustment which is indicated. We take it for granted that you are familiar with the them behind the operation of superheterodynes, with resonant circuits, and their behavior. Lack of space prevents us from tak-
[xvi ]
�ing up these things in detail here, but you will find these subjects adequately covered in two other books by the author, "Servicing Superheterodynes" and "An Hour a Day with Rider on Resonance and Alignment." We shall confine ourselves in this introduction to general observations, which are of extreme practical importance and are not to be neglected even when the theoretical aspects of alignment are understood.
Need for Alignment
When does areceiver need alignment? This is aquestion which is quite difficult to answer in some cases without actually carrying out the alignment first. As ageneral rule, however, this much can be said--that in entirely too many cases there is atendency to blame poor operation of a receiver upon the alignment without first investigating other obvious defects.
In general, an incorrect alignment condition in a receiver causes low sensitivity, poor selectivity, and faulty dial calibration. Low sensitivity is afault which can be caused by many other factors besides improper alignment. Therefore the fact that the sensitivity of a receiver is low is not sufficient in itself to throw suspicion upon the alignment. However, when acondition of low sensitivity is accompanied by poor selectivity and inaccurate dial calibration, then you can quite definitely be certain that realignment of the receiver is needed.
If, as often occurs in practice, an all-wave receiver shows normal sensitivity and operation on one or more bands, and fails to perform properly on the other bands, then the first step should be to check the adjustments common to that band only. That is, it is quite unnecessary to check the alignment of the i-f. amplifier, since the fact that the receiver performs properly on at least one band is direct evidence that the i-f. amplifier is doing its job.
[xvii ]
�So much for the observations on when alignment is called for. We brought up the discussion to emphasize the point that it is not wise to tamper with the alignment just because the receiver is not performing as it should. Remember that there are other reasons which can prevent areceiver from producing the peak performance of which it is capable.
Correct Equipment is Essential
The alignment of all the receivers, and all procedures given in these instructions, were based on the use of the Philco All-Wave Signal Generator (Model 088) and the Philco Combination Output Meter and Circuit Tester (Model 025). The combination of these two units (088 and 025) in asingle case, is known as the Philco Model 099, which meets the necessary requirements equally well.
Through the use of the above equipment the serviceman can be assured that every adjustment necessary on any Philco receiver can be correctly made so as to restore 100% original performance.
There are very few tools which are necessary when aligning areceiver. A fiber hexagon socket wrench and a fiber screw driver are absolutely essential. The use of metallic tools is undesirable because of the increased capacity and losses which they introduce into the tuned circuit. Alignment tools of the proper type can be obtained from your nearest Philco distributor.
General Notes
Let us say that you are about to begin the alignment of areceiver. What are some of the precautions which you should take? In so far as it is possible for you to do so, you should make certain that the receiver is in normal operating condition; apart from its alignment. It is important that the tube shields be in place and that the r-f. and i-f. wiring be undisturbed after alignment is begun.
[xviii ]
�In the case of all-wave receivers it is of special importance that you allow the receiver to warm up for 15 or 20 minutes before beginning the alignment. This is to prevent oscillator drift from destroying the alignment. By waiting aperiod of time before beginning the alignment, you allow the oscillator circuits to reach astable operating condition and thus avoid errors from this source.
Alignment Tool Reaction
In the course of aligning areceiver, you will observe that although a compensator is adjusted for maximum reading on the output meter, this reading falls as the alignment tool is removed. This occurs because the tool introduces a certain amount of capacity into the tuned circuit and consequently the circuit is detuned when the tool is removed. This is especially noticeable in the case of the oscillator adjustments on the short-wave bands.
Experience is of great assistance in overcoming this effect. You will find that if you adjust the trimmer for maximum output and then increase the adjustment slightly (clockwise) that the output will rise to its previous maximum value as the tool is withdrawn. If you do not obtain the correct adjustment the first time, you should repeat the adjustment until the output rises to approximately the same value when the tool is removed, that it had when you adjusted for maximum output with the tool on the trimmer.
Signal Generator Connection
The signal generator should be connected to the appropriate point in the receiver through a shielded wire. A suitable shielded lead is part of the equipment of the Philco Model 088 Signal Generator. It is very important that the shield be grounded to the receiver chassis and that in addition a good ground be used on the receiver chassis.
�In some cases you will observe that the grid clip is not removed from the tube to which the signal generator lead is applied. In these cases the tables invariably call for the signal generator connection to be made through a condenser which generally has acapacity of .1 mfd. This condenser may be connected directly at the signal generator or at the tube, depending upon which point is more convenient.
In other cases the instructions call for the removal of the grid clip and the connection of the signal generator directly to the grid of the tube. In these cases it is very important that there be no blocking condenser used. The presence of acondenser in the output of the signal generator will leave the grid of the tube free, since no d-c. return path is provided for the grid. It is very important that you determine whether the output of your signal generator already contains a condenser. This can be done by measuring the resistance between the output and ground terminals of the signal generator. If this measurement shows that there is no d-c. path, you should connect aresistor, about 500 ohms in value, across these two terminals. This will provide the required d-c. path for those cases in which the grid clip is removed. Failure to provide this d-c. path may lead to improper alignment because of the instability created by leaving the grid of atube free.
As aprotective measure in aligning AC-DC or DC sets, there should always be a condenser in series with the signal generator.
Dummy Antenna
The correct alignment of the antenna tuned circuits calls for the use of adummy antenna. As ageneral rule, this takes the form of a100- or 200-mmfd. condenser, or a400-ohm resistor. This condenser or resistor, constituting the dummy antenna, should be connected in series with the high side of the signal generator output at the
[XX ]
�receiver antenna post. The correct value for the different models and the several wave bands is indicated in the alignment tables.
In the majority of the "37" Philco models a terminal panel is provided at the rear of the chassis for connection of the antenna (transmission line) and ground. This panel contains four terminals, numbered 1to 4. The antenna lead from the signal generator should be connected to terminal No. 1 and the ground lead to No. 2 The metal connecting link on the terminal panel should be placed across terminals Nos. 2 and 3. Where the notes in the tabulated instructions call for connection to the "transmission line" terminals, make the connections as outlined above.
Unless otherwise specified in the alignment instructions, a 100-ohm resistor should be connected between the signal generator output and the set antenna terminal where using the latest type of Philco 088 signal generator.
Signal Strength
There are certain general practices which you should follow with regard to the strength of the signal which is used for alignment. As ageneral rule--unless otherwise stated in the instructions--you should make the input signal as weak as possible and at the same time strong enough to obtain areadable indication. This means that you will have to adjust the attenuator constantly during the course of the alignment so as to keep the output meter reading at about middle scale. Thus, as the set is brought into alignment, its sensitivity naturally increases and a smaller value of input signal is required. You should never attempt to prevent the output meter from going off scale by shifting to ahigher output meter range, or by turning down the volume. Failure to observe this procedure will result in apoor alignment job.
The reason for keeping the signal input at alow level is to prevent the a.v.c. system from interfering with the
[xxi ]
�proper peaking of the tuned circuits. When the signal input is high enough so that the a.v.c. system tends to keep the output at aconstant level, it becomes very difficult to peak the trimmers properly.
Output Meter
With but a few exceptions, all Philco receivers are aligned with the conventional type of output meter which is connected so as to measure the audio output of the receiver. For receivers which have but a single output stage it is convenient to connect the output meter from the plate terminal of the output tube to the cathode. It is, of course, assumed that the output meter contains ablocking condenser so as to prevent the d-c. plate voltage from burning out the meter. In the case of pushpull output stages, the meter can be connected in the same way if it is so desired. It is also possible to connect the output meter across the plates of the push-pull tubes. This latter type of connection does not subject the blocking condenser in the output meter to ahigh plate voltage. However it should not be used where one terminal on the output meter is grounded to the case because of possibility of shock.
It is important that the proper scale range be used on the output meter. For general purposes the 0-30 or 0-50 volt scale range is quite satisfactory. If the signal input is constantly adjusted so as to keep the meter at half scale setting, there will be no danger of the a.v.c. action introducing error as was previously explained.
I. F. Alignment
With these general ideas in mind, we can proceed to a consideration of the points which you should observe as the alignment procedure gets under way. As you know the first step in the alignment of asuperheterodyne receiver is the alignment of the i-f. amplifier. The in-
[xxii
�structions given in the following pages are specific as to the manner in which the signal generator is to be connected. In most cases you will find it possible to drive a signal through the i-f. amplifier with the signal generator connected to the grid of the first detector. Where this is not possible, it is advisable to connect the signal generator lead to the grid of the first i-f. stage. After the trimmers for the last stage are aligned, you should shift the signal generator to the grid of the first detector and align the remaining i-f. trimmers. As ageneral rule, you should start the i-f. adjustments with the trimmer nearest the second detector and work towards the first detector. However, in some cases this order is not followed and in these cases you should carefully follow the procedure outlined for the specific model.
While the position of the tuning condenser and the waveband switch are not directly involved while the i-f. amplifier is being aligned, it is good practice to set the waveband switch to the broadcast band position and the dial to the low frequency end of the band in the neighborhood of 550 k.c. If instructions are given in the alignment tables--follow these instructions. Inability to drive asignal through the i-f. amplifier can often be traced to the short circuiting effect of the first detector tuned circuit. This effect is minimized by tuning the receiver to the low frequency end of the broadcast band. When the grid clip of the first detector is removed, the positions of the waveband switch and the tuning dial are of no importance.
Change of I. F. Peak
In certain localities it has been found advisable to align two and three-gang Philco receivers at some i-f. peak other than the one for which they were designed, i.e. 470 k.c. This change has been found necessary because of certain types of interference peculiar to these
[xxiii
�localities, among which are Portland, Maine; Miami, Florida; New Haven, Connecticut; San Diego, California; the northern one third of Long Island; Newark; and Southern New Jersey.
When interference is experienced in any one of these places, it is advisable to realign the i-f. amplifier at 456 k.c., 465 k.c., or 480 k.c. The i-f. peak which is furthest away from the interference should be used. The wave trap should not be aligned at the i-f. peak, but preferably to give maximum attenuation of the interference.
Dial Alignment
Following the alignment of the intermediate-frequency amplifier, the next step is to check the relative position of the dial with respect to the condenser shaft. Instructions for the proper dial alignment vary considerably in the earlier Philco receivers, but in the later models, you will find that the proper dial alignment is secured by completely meshing the plates and setting the dial so that the glowing beam indicator falls on or between two index marks at the low frequency end of the broadcast scale.
In other models you will find that proper dial alignment is secured by inserting athin gauge--generally .006" thick--between the stator and rotor plates and with the condenser shaft in this position adjusting the dial so that it reads say 1500 k.c. (the exact value is different for different receivers and is specified in the notes accompanying the alignment instructions). You should make it a practice to recheck the dial alignment after the set screws are finally tightened to insure against error due to possible movement of the shaft or dial while tightening the set screws.
In still other cases the final adjustment of the dial is made in the middle of the band at 1000 k.c. after the entire alignment of the receiver has been made; but unless otherwise stated the dial alignment operation should be carried out directly following the i-f. alignment. This
[xxiv
�operation is very important and failure to carry it out (where it is necessary) will result in poor alignment and calibration.
Wave Trap Alignment
Following the alignment of the i-f. amplifier and the check on the dial alignment, the next operation is the adjustment of the wave trap. Of course not all receivers have a wave trap but when they have, the wave trap should be adjusted so as to prevent interaction between the wave trap and the r-f. adjustments. This is avoided by carrying out the wave trap adjustment before the r-f. adjustments. The initial adjustment of the wave trap is made with the signal generator connected to the antenna post of the receiver.
Unlike practically all other adjustments, the wave trap trimmer is adjusted for minimum output with the signal generator frequency set to the i-f. peak. In general it will not be necessary to change this adjustment again. However, if after the receiver is installed, interference in the neighborhood of the intermediate frequency is present, then you should readjust the wave trap trimmer slightly. This readjustment should be made while the receiver is connected to the antenna and tuned to the point on the dial where the interference is most pronounced. With the receiver in this condition and the volume control fully advanced, you should adjust the wave trap trimmer so as to minimize this noise. This is the proper adjustment even though the wave trap is resonated to a frequency slightly different from the intermediate frequency.
Oscillator Adjustments
By far the most important of the adjustments which follow are those located in the oscillator circuit. They
[xxv
�are of extreme importance because the frequency of the oscillator determines whether the beat frequency produced in the first detector is above, below, or exactly at the i-f. peak. Improper adjustment of the oscillator impairs the sensitivity, selectivity and the dial calibration to a marked extent. On the other hand, the other adjustments which are made at radio frequencies affect the performance to amuch smaller degree. The dial calibration in particular is controlled almost entirely by the oscillator adjustment.
High Frequency End of Band
As ageneral rule the adjustment of the high-frequency oscillator trimmer is the first radio-frequency adjustment. This is carried out with the signal generator tuned to the high frequency end of the band--generally 1400 k.c. for the broadcast band. In general the receiver should be tuned to the same frequency at which the signal generator is set and an attempt should be made to pick up the signal. If the receiver is out of alignment appreciably, it will be impossible to pick up the signal at the correct point on the dial--but you will find that the signal comes in somewhere near the required point--perhaps as much as 100 k.c. on either side. If for example the signal generator is set at 1400 k.o. and the signal appears at 1300 k.c. on the receiver dial, then the high frequency oscillator trimmer should be turned clockwise slowly (increasing the capacity) until it is possible to hear the signal with the dial set at the proper frequency, which is 1400 k.c. in this example. You should now adjust the trimmer accurately for maximum output--both the signal generator and the dial reading exactly the same frequency. Following this adjustment the r-f. and antenna compensators (generally located on the top of the tuning condenser gang) are adjusted for maximum output.
�Low Frequency Oscillator-Rocking
Just as the high frequency oscillator adjustment determines the performance of the receiver over the high frequency portion of the band, so the low frequency oscillator compensator determines the performance over the low frequency end of the band.
The procedure for making this adjustment is different from the usual manner in which the other compensating condensers in the receivers are adjusted, and is generally known as "rocking."
This rocking adjustment is carried out as follows: The receiver and signal generator are tuned to that point near the low frequency end of the band which is specified in the table of instructions. To make this discussion more definite and easier to follow, we shall assume that the operation is being carried out for the broadcast band, in which case the signal generator would be set at about 600 k.c. The next step is to tune the receiver so that the maximum output is obtained. In general, the dial reading will not be 600 k.c. but may be off by as much as 10 or more kilocycles on either side. That is the dial reading may be 590 k.c. or perhaps 610 k.c. Whatever the dial reading, however, the next step is to try to increase the output by adjusting the low frequency compensating condenser. After adjusting this for maximum output, rotate the dial of the receiver slightly in both directions and leave it in that position which gives the greatest output.
Then readjust the compensating condenser for maximum output and following this, reset the dial for maximum output. You should continue this alternate readjustment of the low frequency compensating condenser and the dial position until readjustment no longer raises the out-
put. To put it very briefly, the purpose of this so called
rocking adjustment, the need for which is indicated in
this book by an asterisk (e), is to secure the best possible alignment by tuning the r-f. and detector circuits exactly
[xxvii
�to the signal and at the same time making the oscillator frequency higher than the signal by the amount of the intermediate frequency.
In the case of some receivers, you will observe that a slightly different method is indicated for the adjustment of low frequency compensating condensers. This different method is called for because the selectivity of the r-f. tuned circuits is purposely lowered so as to prevent sideband cutting and permit high fidelity reception. In those cases where this procedure is called for, the instructions explain the method.
Image Check
The basic procedure for making the adjustments of the r-f. and oscillator compensating condensers is the same for the short-wave bands as for the broadcast bands. However, somewhat greater care must be exercised because of the possibility of error due to the image response of the receiver. This possibility of error arises since there are two settings of the oscillator frequency which will give the same output at the specific frequency at which the set is being aligned. In spite of the fact that two adjustments of the oscillator trimmer are possible, only one of these is correct and will produce good performance over the entire dial.
As you know, a superheterodyne receiver can operate with the oscillator frequency either above or below the intermediate frequency. For this reason as you decrease the capacity of the oscillator trimmer, starting from the maximum capacity position, you will in general encounter two peaks. The first of these peaks occurs when the oscillator frequency is less than the signal frequency by the amount of the i-f. peak. As the capacity is further decreased, the second peak occurs and this is the correct setting at which the oscillator frequency is higher than the signal frequency. This is the correct setting of the
[xxviii ]
�oscillator compensating condenser for all the receivers listed in this book.
In some cases you will find that only the correct peak can be obtained. This means that the range of the trimmer capacity is not large enough to drop the oscillator frequency to the peak below the signal frequency.
On all the short-wave bands you should make the following check to guard against the possibility of oscillator misalignment. We shall illustrate the method for aspecific case and the general procedure for checking the
image response will then be clear. Suppose that the receiver is being aligned at 18 m.c. With the dial and
signal generator set at 18 m.c., the oscillator trimmer is adjusted for maximum output. After this is done, the
receiver is slowly detuned below 18 m.c. and at a dial reading of about 17.08 m.c. it should be possible to pick up the image response. For this condition the oscillator
frequency is below the signal frequency by the amount of the i-f. peak, but the r-f. and detector circuits are detuned. For this reason you will find it necessary to raise the output of the signal generator in order to find the image.
In cases where the oscillator has been incorrectly aligned, it will be impossible to find any image response (that is to pick up the 18-m.c. signal) at a point lower
in frequency than the signal. However in these cases you will find the image above the signal frequency instead of
below. To continue with this same example, the image would be found by tuning the receiver to about 18.92 m.c. If the image is found above the signal frequency rather than below, it means that the oscillator has been aligned to the "greater capacity peak" instead of the "smaller
capacity peak." Repeat the adjustment and this time set the oscillator trimmer to the correct peak so that the image response occurs below the signal frequency, as ex-
plained above. The above figures have been given for an i-f. peak of
460 k.c. For any i-f. peak the image should be found at
[xxix ]
�apoint below the signal frequency by an amount equal to twice the i-f. peak. Thus for an i-f. peak of 260 k.c. and a frequency of 18 m.c., the two image points are 18.520 and 17.480 m.c. The first of those points is the incorrect image point and indicates an error in adjustment to the wrong peak. When the image is found at the second point (17.480 m.c.), this indicates that the alignment has been made correctly and you can then proceed with the remaining r-f. adjustments.
Detector and R. F. Alignment
As far as the broadcast band and the lower frequency short-wave bands are concerned, the alignment of the detector and antenna tuned circuits does not present any particular problem and is made in the ordinary manner, as indicated in the instructions. However, for certain receivers, a modified procedure is indicated, which we shall now explain.
When an attempt is made to adjust the antenna and r-f. trimmers in the usual way, poor alignment occurs because of the interaction between the r-f. tuned circuits and the oscillator; that is, achange in the oscillator compensator affects the r-f. adjustments and makes it difficult to secure accurate alignment.
To get around this difficulty you will observe that the instructions call for placing avariable condenser having acapacity of about 350 mmf. and having agood vernier drive across the oscillator tuned circuit. The procedure is as follows: The receiver and signal generator are first tuned to the value indicated in the tables, which we shall assume to be 18 m.c. The oscillator trimmer is next adjusted to maximum output and the image check made, as we explained in the previous section. The next step is to connect the external variable condenser across the oscillator tuned circuit and to adjust this condenser so that asignal is again received. (You should be careful not to disturb the dial setting while the condenser is be-
[ao:x ]
�ing connected and adjusted.) When this is done the oscillator is working at half of its normal operating frequency. In other words, the second harmonic, rather than the fundamental, of the oscillator mixes with the incoming signal. In this way the interaction between the several circuits is reduced so as to make possible an accurate adjustment of the r-f. and detector compensating condensers.
Wherever this method is necessary, the instructions are specific as to the procedure. We have brought up this point here because it is frequently used and it is desirable that you understand why this apparently complicated procedure is used. In this same connection, the external variable condenser must be connected across the entire oscillator tuned circuit for those models which employ a series condenser to accomplish electrical band spread. If the external variable condenser is connected across the oscillator section of the variable condenser for these models, it will be impossible to reduce the oscillator frequency to asufficiently low value.
Magnetic Tuning Alignment
The Magnetic Tuning System employed in some Philco receivers is asystem of automatic frequency control designed to make possible quick and accurate tuning and to compensate for the effects of oscillator drift. It is composed of two principal units; (1) the discriminator, which determines whether the set is mistuned and which provides control voltages whose magnitude and polarity indicate the extent and direction of the mistuning, and (2) the control circuit, which, in response to the control voltages, changes or shifts the oscillator frequency accordingly.
The control circuit does not present any problem from the point of view of alignment since there are no adjustments required. However, it is extremely important that the discriminator transformer be accurately aligned at
[xxxi ]
�the intermediate frequency. As you will observe by glancing through the alignment instructions for any one of the receivers equipped with aMagnetic Tuning system, the receiver is first aligned in the usual manner with the Magnetic Tuning switch in the off position. This includes the complete i-f., oscillator, and r-f. adjustments and also the primary winding of the discriminator transformer, since this winding feeds the second detector. We repeat: these adjustments must be made with the Magnetic Tuning switch in the "off" position.
With these adjustments completed, it remains to adjust the secondary trimmer of the discriminator transformer. This is accomplished in the following manner: Couple the signal generator to the antenna of the receiver and set the frequency at 1000 k.c. Tune in the signal very carefully for maximum output. A strong value of input signal must be used. Without disturbing any of the settings, the Magnetic Tuning switch should be turned to the "on" position and the secondary trimmer of the discriminator transformer adjusted for maximum output.
When the Magnetic Tuning system is functioning properly, there will be no hiss or change in tone as the automatic tuning switch is shifted on and off. If there is achange in tone or ahiss, it indicates that afrequency shift has taken place, and the adjustment of the secondary discriminator trimmer should be repeated.
Regenerative Receivers
The alignment procedure for anumber of regenerative receivers is described in this book. In this connection there are some general observations which are of interest.
For this type of receiver it is advisable to make the preliminary adjustment of the receiver with the regeneration control set near minimum, so that there is no tendency toward oscillation. When the complete adjustment of the receiver has been made with the regeneration control in this position, the regeneration control should be
[XXXii
�advanced to the point where the receiver goes into oscillation as evidenced by ahissing or squealing sound. You should then back off this adjustment slightly and make certain that the receiver does not go into oscillation at any point in the band.
With the regeneration control in this position, the entire adjustment of the receiver should be repeated so as to secure the greatest possible sensitivity. The final adjustment of the regeneration control should in every case be made with the receiver connected to the antenna with which it is to be used. In general, the control should be backed off sufficiently so that there is no tendency toward oscillation at any point in the band. Unless extreme sensitivity is desired, the regeneration control should be backed off at least one turn beyond the point at which oscillation begins. This tolerance is necessary to prevent changes in circuit conditions due to temperature, humidity, etc., from throwing the receiver into oscillation. However, where the maximum sensitivity is necessary, the control will have to be left near the point of oscillation and may require more or less frequent readj ustment.
Neutralizing Adjustments
As a general rule, the alignment operation should be carried out before the receiver is neutralized. Only a comparatively few receivers require this type of adjustment, but nevertheless it is in order to mention afew of the points which should be observed during this process. After the receiver is aligned, the last r-f. tube should be removed and replaced with a"dummy" tube--that is, a tube of the same type as the r-f. tube, but with an open filament or with one filament prong cut off. With this tube in the socket, the volume control at maximum, and the receiver tuned sharply to the signal, you should adjust the neutralizing condenser associated with the last r-f. stage until the output drops to amimimum value. It
[xxxiii ]
�will be necessary to raise the output of the signal generator in order to carry out this adjustment accurately.
The same process is then repeated for each of the remaining r-f. stages, working from the last r-f. stage to the antenna stage. If you find that it is necessary to change any of the neutralizing adjustments appreciably, then the alignment should be repeated because of the interaction between the alignment and the neutralization.
10-KC Filter Adjustment
A number of Philco receivers incorporate an audio filter which should be adjusted to cut off at 10 k.c. This filter will seldom require adjustment unless it has been tampered with.
In the event that adjustment proves to be necessary, it is best carried out with an audio oscillator, which should be set to generate afrequency of 10 k.c. The output of the audio signal generator should be connected across the audio volume control. With the output meter connected as usual, the 10 k.c. filter adjustment should be made for minimum output.
Where an audio oscillator is not available, the following procedure can be used to effect an adjustment. Connect the signal generator to the grid of the first detector through a .0001-mfd. condenser and set the frequency at the i-f. peak of the receiver. (The fidelity or selectivity switch for this adjustment should be in the "broad" position.) The next step is to tune in a local station and to adjust the output of the signal generator so that a beat (whistle) is obtained between the local station and the signal generator. Then adjust the receiver dial carefully so that zero beat is obtained.
The object of the next step is to obtain a10 k.c. beat. This is done by advancing the setting of the signal generator by 10 k.c. That is, for example, if the i-f. peak is 260 k.c., then the signal generator should be advanced to 270 k.c. Having advanced the frequency of the signal
[xxxiv ]
�generator by this amount, a10-k.c. whistle will be heard and the adjustment of the filter is completed when the compensating condenser across the 10-k.c. tuned circuit is adjusted so that the output is aminimum.
Repetition of Adjustments
As ageneral rule it will be quite unnecessary to go over the compensating condensers to agreater extent than that indicated in the instructions. The exception to this rule occurs when the receiver is initially very badly out of line. When this is the case, you will find that an appreciable change in the capacity of the trimmer condensers is necessary on the first adjustment. The final adjustment in these cases will be considerably improved if the entire alignment procedure is repeated.
In this same connection, the final adjustment of the i-f. amplifier can be made before the r-f. alignment is attempted. The only exception to this rule is in the case where acomposite oscillator-detector circuit is used. In this case there is some interaction between the r-f. adjustments and the adjustment of the first i-f. transformer. For this type of receiver, the final adjustment of the i-f. amplifier should be made after apreliminary adjustment of the r-f. and oscillator circuits.
��MODEL NO. 3
Signal Generator Connection
Signal Generator Frequency
Dial Position
Wave Band Switch Position
Trimmer Number
Output Signal
Ant.'. 4
le
1000-1200 k.c. Note 2
if
4!
3rd 3 r.f. 2nd 3 r.f. 1st 3 r.f.
Max. Max. Max.
Note 1.--Through a 150 mmfd. condenser.
Note 2.--Tune sharply to signal before adjusting.
Note 3.--Mounted on tuning-condenser housing. Accessible with special fibre wrench through holes in bottom of receiver, after removing cover plate.
Note 4.--When the antenna-stage adjustment is made with the receiver installed in the car, the receiver must be connected to the car antenna in the usual manner. Connect the signal-generator output to a wire placed near the car antenna but not connected to it.
MODEL NO. 20, 21, 50, 220
Signal Generator Connection
Signal Generator Frequency
Dial Position
Trimmer Number
Output Signal
Ant.*
1400 k.c.
140
Det.1 R.F. 1 Ant?
Max. Max. Max.
·Connect a 200-mmf. condenser between signal generator and antenna post of set, at the antenna post.
Note 1.--Mounted on right aide of frame of tuning-condenser assembly and leached from rear and top of chassis.
�MODEL NO. 4
Signal Generator Connection
Converter Ant. ``
(1 4t 41
It
Signal Generator Frequency
3.5 m.c.
1.6 m.c. 7 m.c. 3.5 m.c. 18 m.c. 8.8 m.c. 1000 k.c.
Dial Position
Wave Band Switch Position
Trimmer Number
33 m.c. 3.5 m.c.band 7
1.6 m.c.
«(
14
7 m.c. 7 m.c. band
6
33 m.c.
13
18 m.c. 18 m.c. band
53
8.8 m.c.
if
11 4
17 5
Output Signal
Max. 2
Max. Max. Max. Max. Max. Min.
Note 1.--Connect converter to receiver in the usual manner. Set the receiver dial at 1000 k.c.
Note 2.--Output meter connected to receiver. Note 3.--Turn all the way in. Then back off until second signal is heard.
Adjust to maximum on this peak. This adjustment is critical.
Note 4.--On early production only. Later production used a fixed 1800 mmfd. condenser.
Note 5.--This wave-trap adjustment is made to eliminate interference from stations broadcasting at or near 1000 k.c.
[2]
�MODEL NO. 5
Signal Generator Connection
Signal Generator Frequency
Dial Position
Wave Band Switch Position
Trimmer Number
Output Signal
Remove grid clip from 6A7
Control grid of 6A7 tube
460 k.c.
gi
it
if
if
di
di
di
Connect grid clip to 6A7
g 1
4
Max.
3
Max.
2
Max.
1
Max.
Ant.2.7
gi If
1500 k.c. 1400 k.c.
600 k.c. 1400 k.c.
Note 3 1400 k.c.5 600 k.c. 1400 k.c.
Osc.4 section Ant.6 section
8 Ant. 6 section
Max. Max. Max. Max.
Note 1.--Turn in until tight. Then "back off" one full turn. Leave at this setting until later adjustment.
Note 2.--Through a 150 mmfd. condenser. Note 3.--Unmesh plates as wide as possible. Place piece of paper on stator
plates and then turn rotor out until it just strikes paper. This gives the 1500 k.c. setting of the receiver dial.
Note 4.--Located on second section of tuning-condenser gang nearest drive mechanism.
Note 5.--Remove paper (mentioned in Note 3) from tuning condenser. Note 6.--Located on tuning condenser section. Note 7.--When the antenna-stage adjustment is made with the receiver in-
stalled in the car, the receiver must be connected to the car antenna in the usual manner. Connect the signal-generator output to a wire placed near the car antenna but not connected to it.
[3]
�MODEL NOS. 6, 9, 12 (122), A, B
Signal Generator Connection
Signal Generator Frequency
Dial Position
Wave Band Switch Position
Trimmer Number
Output Signal
Remove grid clip from det-.osc. tube
Control
260 k.c.
...
grid of
det.-osc.
11
it
41
2
Max.
4
Max.
3
Max.
Connect grid clip to det.-osc. tube
Anti. 4
1400 k.c.
140
di
Id
di
di
di
700 k.c.
70
di
1400 k.c.
140
Note 1.--Through a 150 mmfd. condenser.
Third 2 section Second S section First 3 section
8 Third 2 aection
Max. Max. Max. Max.* Max.
Note 2.--Located on extreme left of tuning condenser.
Note 3.--Located on tuning condenser.
Note 4.--When the antenna-stage adjustment is made with the receiver installed in the car, the receiver must be connected to the car antenna in the usual manner. Connect the signal-generator output to a wire placed near the car antenna but not connected to it.
·While rocking.
.II01;c12", I.F.
IF. SECONDARY()
0 -
Z3. L.F.
I. F. PRIMARY
I.F. - 260 K.C.
[4 ]
�MODEL NOS. 7, 8, 12 (121)
Signal Generator Connection
Signal Generator Frequency
Dial Position
Wave Band Switch Position
Trimmer Number
Output Signal
Remove grid clip from det.-osc. tube
Control grid of det.-osc.
tube It if
175 k.c.
14
· · ·
2
Max.
4
Max.
3
Max.
Connect grid clip to det.-osc. tube
Ano, 4
1400 k.c.
140
If
f(
Third 2 section Seconde
Max. Max.
it
it
``
700 k.c.
70
section First section
8
Max. Max.*
1400 k.c.
140
Note 1.--Through a 150 inrcifd. condenser.
Third 2 Max. section
Note 2.--Located on extreme left of tuning condenser.
Note 3.--Located on tuning condenser.
Note 4.--When the antenna-stage adjustment is made with the receiver installed in the car, the receiver must be connected to the car antenna in the usual manner. Connect the signal-generator output to a wire plaCed near the car antenna but not connected to it.
·While rocking.
e9=0D0 I. F. SECONDARY
0P', o o D.
IFPRIMARY
I.F. - 175 K.C. [5]
�MODEL NOS. 10 (121, 122), 800 (121), C (121, 122), D (121, 122), E (121, 122), H (121)
Signal
Generator Connection
Signal
Generator Frequency
Dial Position
Wave Band Switch Position
Trimmer Number
Output Signal
Remove grid clip from det.-osc.
Control grid of det.-osc.
di 44 if di di
260 k.c.
...
di di if di di
Connect grid clip to det.-osc.
1 1
22
Max.
13
Max.
31
42
Max.
33
Max.
Ant.4, 6
If If
1500 k.c. 1400 k.c.
et
Note 5 140
ee
7
Max.
6
Max.
5
Max.
600 k.c.
60
140"0 k.c.
140
8
Max.*
6
Max.
5
Max.
Note 1.--Screw adjustment. Turn all the way in.
Note 2.--Nut adjustment.
Note 3.--This is a critical adjustment. Note the maximum reading, then turn
screw in again and slowly bring adjustment to this maximum reading.
Do not pass this point. If you do, repeat the adjustment.
Note 4.--Through a 150 mmfd. condenser. Note 5.--Using a piece of paper approximately
.008"
thick
as
a gauge
between
the heel of the plates until they
rotor strike
aplgaatiensst
and the
the stator plates, paper. This is the
turn the rotor correct adjust-
ment for 1500 k.c.-150 on the dial scale.
Note 8.--When the antenna-stage adjustment is made with the receiver in-
stalled in the car, the receiver must be connected to the car antenna
in the usual manner. Connect the signal-generator output to a wire
placed near the car antenna but not connected to it.
·While rocking.
--0 ANTENNA PADDER
-0 R.F. PADDER
10 HIGH FREQUENCY PAPER
ü
t4.30ELS
79BTOUOB.BE02O·USOTNPIUY)T
6-A-7 TUDE PET. OSC. LOW FREQUENCY PADDER C f IST I. F. TRAN SFORM E
r4TITF--.11SE'
.15 Tu BE IOrUcTOPiUUTaCTOU,BIE DET. 31 TUBE AUDIO
Iran. 60o,mnie...4
[6]
FtECT1FIER,
�MODEL NOS. 11 (121, 122), 700, J, Q, R
Signal Generator Connection
Signal Generator Frequency
Dial Position
Wave Band Switch Position
Trimmer Number
Output Signal
Remove grid clip from det.-osc. tube
Control grid of det.osc. tube
41
260 k.c. ...
It
di
14
a
a
gi
u
u u
· · ·
Connect grid clip to det.-osc. tube
1 1
2 2
Max.
31 1
Max.
42 3 a
Max..
Max.
Ant.. 6
1580 k.c.
aa1400a k.c.
Note 5 1a40
7
M ax .
6
Max.
5
Max.
Note 1.--This is a screw adjustment. Turn all way in. Note 2.--This is a nut adjustment. Note 3.--This adjustment is critical. Note maximum reading obtainable and
then turn the screw in again, just bringing it up to the maximum reading. Do not pass this point. If you do, repeat complete operation. Note 4.--Through a 150 nunfd. condenser. Note 5.--Using a piece of paper approximately .008" thick as a gauge between the heel of the rotor plates and the stator plates, turn the rotor plates until they strike against the paper. This is the correct adjustment for 1580 k.c.-158 on the dial scale. Note IL--When the antenna-stage adjustment is made with the receiver installed in the car, the receiver must be connected to the car antenna in the usual manner. Connect the signal-generator output to a wire placed near the car antenna but not connected to it.
--(5D ANTENNA RAWER _63R.F. UDDER
NIGH FREQUENCY PADDER
[ 7
�MODEL NO. 14 (121, 122, 123)
Signal Generator Connection
Signal Generator Frequency
Dial Position
Disconnect grid clip from 6A7
Control
175 k.c.
55
grid of
6A7
it
4!
ff
di
if
4f
it
Connect grid clip to 6A7
Ant.**
1400 k.c.
140
iitc
`iif
fti
600 k.c.
60
i`
1400 k.c.
140
Wave Band Switch Position
Trimmer Number
Output Signal
Broadcast
1
Max.
If
2
Max.
di if
4
MMaaxx..
Osc.H.F. 1 Max.
di`f
Det.1 5
Max. Max.
«
6
Max.*
it
Osc.H.F.1 Max.
Note 1.--Located on tuning-condenser assembly and accessible from above. ·While rocking.
·· Connect 200-mmf. condenser between signal generator and antenna post. at the antenna post.
[8 ]
�MODEL NOS. 15, 111, 112, 211, 212
Signal Generator Connection
Signal Generator Frequency
Dial Position
Wave Band Switch Position
Trimmer Number
Output Signal
Remove grid clip from 1st det.
1st det.
175 k.c.
55
44
If
44
It
44
Connect grid clip to 1st det.
Ant.**
1400 k.c.
if
140
a
a
a
a
600 k.c.
60
il
1400 k.c.
140
1
Max.
2
Max.
3
Max.
4
Max.
5
Max.
6
Max.
7
Max.
8
Max.
9
Max.*
5
Max.
·While rocking. **Connect 200-nimf. condenser between signal generator and antenna post,
at the antenna post.
C.00 KC.
PRI PrI.F. 175 K.C.
DC. 1400 K.C. ·
42 PUSHPULL oUTPUT
37-2NOADDIO sEc.-v 40 1.F. 175 K.C.
37- 1el" AUDIO
80 RECT.
44 37 R.F. 05C. ANT. 1400K.C.
44 IST 0E7.
44 II.SFT.
H.F. 1400Kc.
44 37
2I..F4.e
PET. REc7.
3 5E._l5nIF.
115 K.C.
SEC. -35°1.F. 175 K.C.
[9 ]
�MODEL NO. 16 (121, 122, 123)
Signal Generator Connection
Signal Generator Frequency
Dial Position
Wave Band Switch Position
Trimmer Number
Output Signal
Remove grid clip from 1st det. tube
Control grid of 1st det.
di
U U
460 k.c. 520 k.c. 520-1500k.c. 7
it
id
di
8
ii
a
ic
9
ic
ii
a
10
ti
ic
u
di
11
a
di
a
li
12
Max. Max. Max. Max. Max. Max.
Connect grid clip to 1st det.
Ant.' gi
If di di
di
di
gi
460 k.c. 520 k.c. 520-1500 k.c. 13
11 m.c.
11 m.c. 5.8-12 m.c. 1
11 m.c.
22 m.c.
11-23 ni.c. ..
5.2 m.c. 52 m.c. 32-6.0 m.c. 2
3.5 m.c. 3.5 m.c. 1.5-4.0 m.c. 3
1.6 m.c. 1.6 m.c.
di
4
1400 k.c. 1400 k.c. 520-1500k.c. 5
520 k.c. 520 k.c.
di
6
Min. Max. Note 2 Max. Max. Max. Max. Max.
Note 1.--Use dummy antenna of 200-mmf. condenser in series on broadcast band and a 400-ohm carbon resistor on shortwave bands.
Note 2.--If signal is not heard within a reasonable distance (100 k.c.) on either side of the 22 m.c. point, slightly change previous 11 m.c. adjustment until signal is heard. This causes a slight error in the 11 me. setting. The error at the two points (11 m.c. and 22 m.c.) must be split in proportion to the frequencies. Do not mistake the image frequency of 22 roc. Which can be heard at approximately 21.1 m.c.
[10 ]
�MODEL NO. 16 (125, 126, 127)
Signal Generator Connection
Signal Generator Frequency
Dial Position
Wave Band Switch Position
Trimmer Number
Output Signal
Remove grid clip from 1st det.
Control grid of 1st det.
U
U
a
460 k.c. 550 k.c. Range 1
if
id
U
if
a
di
CC
if
U
U
if
dI
If
il
fi
U
il
fi
if
u
il
Replace grid clip on 1st det.
Ant.*
«
if
18 m.c.
18 m.c.
if
if
ii
if
Range 4
If
ii
ii
4!
lé
72 m.c. 72 m.c. Range 3
ii
fi
fi
if
Ci
if
if
If
3.5 m.c. 3.5 m.c. Range 2
il
42
if
Ci
fi
f C
if
if
1500 k.c.
1.5 m.c.
if
`Iel
`dé`
1500 k.c.
fi
Range 1
If
It
22
il
il
IC
600 k.c. 600 k.c.
1 2 3 4 5 6 7 8 9 10 11 12 13 14 2 15 16 17 18 3 19 20 21 22 4
Max. Max. Max. Max. Max. Max. Max. Min. Max. Max. Max. Max. Max. Max. Max. Max. Max. Max. Max. Max. Max. Max.
·Use 200-mmf. condenser dummy antenna on broadcast band and 400-ohm carbon resistor on shortwave bands.
Note I.--To insure proper adjustment, check image at 17.08 m.c. on dial. Note 2.--Check dial calibration by tuning in 11.0 m.c. image near 10.08 on dial.
If there is appreciable error at this point, readjust padder (12) for maximum output. Then return dial to 7.2 m.c. position, tuning for maximum output and then readjust padders (13) and (14). Note 3.--Nut adjustment. Note 4.--Screw adjustment.
ICscant RAME ULM OSC,L.F. R.FRaNGEEI.
O RE RARCE4
05C.RAN 6E4 2" "M.F. TERTIARY
elten RANGEZ
8Allt RAME S eART.RANGE 1 (5)ANT. RANGE 4
pe..f.: ut -22544 Ibo Ver.
(S)2",O.F. SEC.
TRANWORIIE0. OSCTRANSFORMER 8 WAVETRAP
-011t.I.E 6, IIV.E SEC.
.COSC. RANGE 2 OSC RANGES
�MODEL NO. 17 (121, 122, 123)
Signal Generator Connection
Signal Generator Frequency
Dial Position
Wave Band Switch Position
Trimmer Number
Output Signal
Remove grid clip from 6A7
Control
175 k.c.
55
grid of
6A7 1
if
if
u
it
It
it
it
if
if
it
it
it
Broadcast
1
u
2
if
3
di
4
it
5
Max. Max. Max. Max. Max.
Connect grid clip to 6A7
Ant.2 it
1400 k.c. it
if
it
i`
600 k.c.
`«
1400 k.c.
``
1600 k.c.
140
it it
60 140
1.6
fi 4i
` S.WV.
6 7
MMaAxX..
8
Max.
9
Max.*
6
Max.
10
Max.*
·While rocking. Note 1.--Connect 0.1-mf, condenser between grid clip and ground. Note 2.--Connect a 200-nunf. condenser between signal generator and an-
tenna post of set, at the antenna post.
sk".0iiterky©
essulVdFiv
It75 K.c.
re,\.
157.1.F. e N PRIMARY
175 K.C.
igeocà të,,%e (si.6) 00 K.c.
05C.; L.F.;
(POLICE ANDAIRCRAFT)
tc00 K.c.
2. 0 IF. pRIMARY 175 K.C.
SECONDARY 0175 K.C.
pell·-·-····· OSC.;N.F.01400 K.c.
Li
DET01 400 K.C.
ANT. 0 1400 K.C.
[12 1
�MODEL NOS. 18 (121-124), 503
Signal Generator Connection
Signal Generator Frequency
Dial Position
Wave Band Switch Position
Trimmer Number
Output Signal
Remove grid clip from 6A7
Control
260 k.c.
55
grid of
6A7
g.
a
gg
a
Connect grid clip to 6A7
3
Max.
2
Max.
1
Max.
Ant.**
gg
it 41
1500 k.c.
150
1400 k.c.
140
1400 k.c.
44
600 k.c.
60
1500 k.c.
150
6
Max.
5
Max.
4
Max.
7
Max.*
6
Max.
WII ile rocking. ** Connect a 200-mmf. condenser between signal generator and antenna post
of set, at antenna post.
[13 ]
�MODEL NOS. 19, 26, 27, 32, 89
Signal Generator Connection
Signal Generator Frequency
Remove grid clip from det.-osc.
Control grid of det.-osc.
260 k.c.
a
IC
Dial Position
55
It
Trimmer Number
1 2 3
Output Signal
Max. Max. Max.
Connect grid clip to det.-osc.
Ant.**
1400 k.c.
140
14
41
650 k.c.
65
41
1400 k.c.
140
4
Max.
5
Max.
6
Max.
7
Max.*
4
Max.
·While rocking. **Connect a 200-mmf. condenser between signal generator and antenna post
of set, at antenna post.
erA IST I.F. w PRIMARY
260 K.C.
1ST LF. SECONDARY Z60 K.C.
2NO I. F. rà
PRIMARY w 260 K.C.
LOW FREQUENCY Cs 650 K.C.
HIGH DETECTOR ANTENNA FREQUENCY IMOOK.C. INCIO K.C.
1400 K.0
[14 ]
�MODEL NO. 28
Signal Generator Connection
Signal Generator Frequency
Dial Position
Wave Band Switch Position
Trimmer Number
Output Signal
Remove grid clip from 6A7
Control grid of
6A7 ff
460 k.c. 600 k.c.
it
if
it
if
it
4C
it
it
if
it
if
if
it
it
Connect grid clip to 6A7
Ant .4
it
it
a
ti
1500 k.c.
it
600 k.c.
540 k.c. 1500 k.c.
e4
600 k.c.
Broadcast
it 44 il it ti
it it a it
61
52 41 32 21 12
7 8 9
10 8
Max.
Max. Max. Max. Max. Max.
Min. MMaaxx.. Max.
Note 1.--Nut adjustment. Note 2.--Screw adjustment. Note 3.--Accessible through hole from top of chassis. Note 4.--Use a 200-mmf. condenser as dummy antenna for broadcast band and
a 400-ohm carbon resistor on the shortwave band.
WAVETRAP 442b0 K.0 ·
[15
�MODEL NOS. 29, 29TX
Signal Generator Connection
Signal Generator Frequency
Dial Position
Wave Band Switch Position
Trimmer Number
Output Signal
Remove grid clip from 6A7
Control grid of
6A7 id
460 k.c. 600 k.c.
a
it
If
a
a
a
a
a
a
a
a
a
a
a
Connect grid clip to 6A7
Ant.*
di
1500 k.c.
it
540 k.c.
1500 k.c.
if
600 k.c. 600 k.c.
Broadcast
(I IC
¿I
1 1
22 31 42 51 62
7 8 9 10 3
Max.
Max. Max. Max. Max. Max.
Min. Max. Max. Max.
Note I.--Nut adjustment. Note 2.--Screw adjustment.
Note 3.--Accessible through hole from top of chassis. Note 4.--Use a 200-rnmf. condenser as dummy antenna on the broadcast wave-
band and a 400-ohm carbon resistor on the shortwave band.
141-,
Art,
erode, -29 Sotto", Vet»
,WAWE TRAP TI
4e0
la
41:1 lEr 1500K.C.
ANTENNA
1500 K.C.
Voll.F.10®
460 K.C.
3141ell·F·00 460 K.C.
[16 ]
Model 29 To Veew
�MODEL NOS. 30, 95, 96, 296
Signal Generator Connection
Signal Generator Frequency
Dial Position
Trimmer Number
Output Signal
Ant.*
id
If
`i
1300 k.c.
II
if
130
ti
3Dredt.11
MMaaxx..
R.F.
4 f
2nd 1
Max.
R.F. Ant.'
Max.
Note 1.--Located on top of chassis, behind gang condenser and between r.f. coil shields.
·Connect a 200-mmf. condenser between the signal generator and the antenna post of the set, at the antenna post.
MODEL NOS. 40, 41, 42
Signal Generator Connection
Signal Generator Frequency
Dial Position
Trimmer Number
Output Signal
Ant.*
di
1300 k.c.
130
Ant.1, 2
if
1st r.f.2
Max.
Ant.2
Max.
Note 1.--Turn all the way in so as to purposely unbalance the first stage and permit accurate alignment of the second stage.
Note 2.--Located at the right of the gang condenser in front of the lit r.f. transformer--accessible from top of chassis.
·Connect a 200-mmf. condenser between the signal generator and the antenna post of the set, at the antenna post.
MODEL NO. 46
Signal Generator Connection
Signal Generator Frequency
Dial Position
Wave Band Switch Position
Trimmer Number
Output Signal
Ant.*
ti
if
1200-1400 k.c 120-140
if
if
uff
RD.eFt..'1 Ant.'
MMaaxx.. Max.
·Connect a 200-mmf. condenser between signal generator and antenna post of set, at the antenna post.
Note 1.--These trimmers are located on the sections of the variable-condenser gang. Adjust from above.
[ ]
�MODEL NOS. 34, 34A
Signal Generator Connection
Signal Generator Frequency
Dial Position
Wave Band Switch Position
Trimmer Number
Output Signal
Remove grid clip from 106
Grid of 'co
460 k.c. 520 k.c. Broadcast
7
di
di
di
Connect grid clip to 1C8
8
it
9
10
11 12
Max. Max. Max. Max. Max. Max.
Ant.*
if 14
520 k.c.
20 m.c.
29 m.c. Range 4
10.8 m.c. 10.8 m.c. Range 3
3.5 m.c. 3.5 m.c. Range 2
1500 k.c.
1.5 m.c.
id
1400 k.c. 1400 k.c. Broadcast
520 k.c. 520 k.c.
13 1 2 31 41 51 61
Min. Max. Max. Max. Max. Max. Max.
Note I.--Accessible from underneath chassis. ·Use a 200-mmf. condenser as dummy antenna on the broadcast waveband and a 400-ohm carbon resistor on the shortwave band.
te [18
�MODEL NOS. 35, 36
Signal Generator Connection
Signal Generator Frequency
Dial Position
Trimmer Number
Output Signal
Remove grid clip from 1st det.
Control
260 k.c.
55
grid of
1st det.
de
it
et
di
de
Connect grid clip to 1st det.
1400 k.c.
140
if
600 k.c.
60
1400 k.c.
140
1 1
Max.
21
Max.
31
Max.
4
Max.
5
Max.
6
Max.
72
Max.**
4
Max.
Note l.--(l), (2), and (3) are accessible at rear of chassis. Note 2.--(7) is accessible through hole from top of chassis.
·Connect a 200-mmf. condenser between signal generator and antenna post of set, at the antenna post.
·" While rocking.
92 -R.F.
32 I3T DET.
L. F. GOOK-C.
32 -05C.
32 -I.F.
30- 2.° DET.
15* I.F. PR I.
2GOK.C.
FRONT
1A4NT0.0 K.C.
DIT. 1400 K.C. G- BALLAST 33 OUTPUT H. F. 140014C.
30 -AUDIO
BACK
23
[19 ]
�MODEL NO. 37
Signal Generator Connection
Signal Generator Frequency
Dial Position
Trimmer Number
Outuut Signal
Remove grid clip from 1st det.
Control
175 k.c.
55
grid of
1st det.
Connect grid clip to 1st det.
1
Max.
2
Max.
3
Max.
Ant.* it
1400 k.c.
140
it
it
``
ei
600 k.c.
60
1400 k.c.
140
4
Max.
5
Max.
6
Max.
7
Max.**
4
Max.
·Connect a 200-mmf. condenser between the signal generator and the antenna post of the set, at the antenna post.
While rocking.
OIST
WNtosz y
PRILMEARY W ON
11 5KC 115 KC
FSF.TeN SECONDARY 175 KC
LOW FREQUENCY 0600 KC
ANTENNA fr..,% 1400 KC. vr-· DETECTOR (2% 1400 Kt. W'
HIGH FREQUENCY es
1400 KC.
[20 ]
�MODEL NO. 37-9
Signal Generator Connection
Signal Generator Frequency
Dial Position
Wave Band Switch Position
Trimmer Number
Output Signal
Control grid 2 of 6A8G
dé H 44
Ant.term.8 gl
14
4d
if if
di
if de
il
if
fi di
470 k.c. 580 k.c. Broadcast
if
it
if
a
it
fi
li
it
1600 k.c. 1600 k.c.
4f
if
,d 580 k.c. 1600 k.c. 1500 k.c.
6 m.c.
18 m.c.
té
lé if
1000 k.c.
If
<4
it
d(
580 k.c.
d`
1600 k.c.
dd
1500 k.c.
di
if
6 m.c.
18 m.c.
17.06 18 m.c.
a
Range 2 2.3-7.4 m.c.
Range 3 7.35-22 m.c.
di
le
t`
if
tt
1000 k.c.4 Broadcast
54
Max.
53P 43S 43P 21
36B 36A 22 21 36A 36B 21A
Max. Max. Max. Max.
Max. Max. Max.* Max. Max. Max. Max.
21B Max.
Image check
10
Max.*
4
Max.
21B
Max.
53S
Max. 5
Note 1.--Through a .1 mfd. condenser. Note 2.--Set controls as follows: Magnetic tuning--"off"; bass compensation--
minimum. Note 3.--Through a .1 mfd. condenser. Link terminals 2 and 3. Note 4.--The receiver dial must be adjusted very accurately for maximum
output. Note 5.--The magnetic tuning control should be turned to the "on" position
before adjusting trimmer 53S. When the adjustment is completed, there should be no change in tone or hiss, when the magnetic tuning control is switched "on" and "off." A change indicates a shift in frequency and means that the adjustment should be repeated. ·While rocking.
[e»9 DE, IS' Au0.0 6074
& 61456
0 (:)53 54 o o1
Pe
0·4' 1:1117G
22
580 K.C. 1600 K.C. 6141.0 18 IA
°Sc.
10 1500S.C.4
afs.C.
RS
n'otse)
ANT.
1500K
COMPINSATORS 314055 DOTTED ARE MOUNTED ON TOP or TUNING CONO.
[21 ]
�MODEL NOS. 37-10, 37-11
Signal Generator Connection
Signal Generator Frequency
Dial Position
Wave Band Switch Position
Trimmer Number
Output Signal
Control grid 2 of 6K7G Control grid of 6A8G Ant. term.5
ft fi if if if if fi
fi if if if
470 k.c. 580 k.c. Broadcast
if
di
di
C'
if
18 m.c.
fi 14
18 m.c.
Range 3
7.35-22 m.c.
17.06 m.c.
ié
18 m.c.5
18 m.c.6 if 7 m.c.
6 m.c.
if
if
17.06 m.c.
7 m.c.
Range 2
2.3-7.4 m.c.
6 m.c.
Ci
if
1600`` k.c. g£
1600`` k.c.
Ce
Broadcast C' fi
580 k.c. 580 k.c.
if
1600 k.c. 1600 k.c.
if
1500 k.c. 150`0i k.c.
fi Id
1000 k.c. 1000 k.c.7
fi
59
Max.
48P Max. 54S Max.
54P Max. 24B Max.*
Image check 10B Max.
2B Max. 24B Max. Image check 24A Max.
10A 2A 24 10 2 25 24 10 2 48S
Max. Max. Max. Max. Max. Max.* Max. Max. Max. Note 8
Note 1.--To align the dial to track properly with the tuning condenser, proceed as follows: Loosen the shaft coupling set screws, turn the tuning condenser fully closed and the dial to the first index line. Now tighten the set screws, and rotate the dial until the 520 k.c, mark is midway between the index line and the glowing beam indicator. With the condenser in this position, loosen the set screws and turn the dial until the glowing beam indicator is centered on the index line. Be careful that the tuning condenser is not disturbed while turning the dial. Now retighten the set screws.
Note 2.--Through a .1 mfd. condenser. Controls as follows: Magnetic tuning--"off"; Bass compensation--minimum.
Note 3.--Through a .1 mfd. condenser. Link terminals 2 and 3.
[22 ]
�Note 4.--The lower capacity Betting should be used. Note 5.--Connect a variable tuning condenser (Piffle.) part No. 45-2325) from
the oscillator compensator to ground. Tune the added condenser so that the second harmonic of the oscillator beats against the signal to produce maximum output. Then adjust 10B for maximum output.
Note 6.--Remove external variable condenser. Noto 7.--The receiver dial must be adjusted very carefully for maximum
output. Note 8.--The magnetic tuning control must he turned to the "on" position
before adjusting trimmer 488 for maximum output. When the adjustment is completed there should be no change in tone or hiss when the magnetic tuning control is switched "on" and "off." A change indicates a shift in frequency and the adjustment should be repeated.
·While rocking.
ISI AUDIO 6K6G
IN MODEL 37-11
?gG 2ND DEI
MOOCL 37- 1
I DISCR.HINAT
6N6G
2ND DEI 1ST AUDIO
607G 37-10 \.
;ItO8P4°8W5i , Ah, 6K7G o 59
18 M.C.
M.C. 1600 K.C.
110
580 K.0 OSC.
45))
çIO541 TOP
(11 . TTO3M
18M.C.
6M.C.
ANT.
[23 ]
�MODEL NO. 37-33
Signal Generator Connection
Signal Generator Frequency
Dial Position
Trimmer Number
Output Signal
Control 1 grid of 1C7G
id di
id
Ant?
id
«
a
di
id
470 k.c.
di if di
1700 k.c.
580 k.c. 1700 k.c.
di
1500 k.c.
550 k.c.
di it it
Note 3
580 k.c. Note 3
di
1500 k.c.
138
13P 11228P 4B 4A 7 4B 4A 4A
Max.
Max. MMaaxx.. Max. Max. Max.* Max. Max. Max.
Note I.--Through a .1 mfd. condenser. Note 2.--Connect signal generator direct to transmission line terminals.
Note 3.--Turn tuning condenser gang to minimum capacity position (clockwise), then place a .008" gauge horizontally between the rotor and stator plates (left side of tuning condenser facing front of chassis), and turn condenser until rotor and stator plates touch gauge. Then remove gauge without disturbing this setting of the plates and proceed to adjust (4A) and (4B). Follow this same procedure to readjust (4A) and (4B) after adjustment of (7) at 580 k.c.
·While rocking.
[24 1
�MODEL NO. 37-34
Signal Generator Connection
Signal Generator Frequency
Dial Position
Wave Band Switch Position
Trimmer Number
Output Signal
Grid of 1.2 1D7G
"
470 k.c.
it
580 k.c. a
Ant. 8
1600 k.c. 580 k.c. 1600 k.c. 1500 k.c.
1600 k.c. 580 k.c. 1600 k.c. 1500 k.c.
18S
Max.
18P
Max.
17S
Max.
17P
Max.
5A
Max.
5
Max.
12
Max.*
5A
Max.
5
Max.
Note 1.--Dial adjustment: Set the tuning condenser in the maximum capacity poaition. Loosen the set screw of dial hub and set dial with glowing indicator centered between the first and second index lines at the low frequency end of the scale.
Note 2.--Through a .1 mfd. condenser.
Note 3.--Through a 200 mmfd. condenser. While rocking.
2nm OCT. AMC, 1si. AUDIO
1116G
0ET.-OSC. 107G
osc.rn./22 -110 s0t
OSC.GAID 7011. 0.C.
OSC:1600 K.C.
ft_
2n 5r.
IS. AMP.
105G
/11
PR1,470K.0 SDL-470A.C. IS. AMP. loss
SED,4-101le.n
1pqt-4,o
room or c.v.-re
70i
lasvor.
Ctoscumts-seox.c.,
ALL VOLTAGES MEASURED FROM »CHET CONTACTS TO GROUND. EXCEPT AS Maria
2No.DET. lar. AUDIO
1116G
SIX D
[25 ]
�MODEL NO. 37-38
Signal Generator Connection
Signal Generator Frequency
Dial Position
Wave Band Switch Position
Trimmer Number
Output Signal
Control 1.2 grid of 1C7G
it it
Ant. 2
it
4 di
it if di
470 k.c. 580 k.c. Broadcast
it
it
it
ti
if
ti
if
7.0 m.c. 6.0 m.c.
7.0 m.c. Short Wave
6.0 m.c.
44
1600 k.c. 1600 k.c. Broadcast
if
580 k.c. 580 k.c.
`c
1600 k.c. 1600 k.c.
`c
1500 k.c. 1500 k.c.
28S
28P 15S 15P 12 5A 14 5 14A 5 14 4 5
Max.
Max. Max. Max. Max. Max. Max. Max. Max.* Max. Max.
Note I.--Dial adjustment--Set tuning condenser at maximum capacity. Loosen set screw of dial hub and set dial so that the glowing indicator is centered between the first and second index lines at the low frequency end of the scale.
Note 2.--Connect signal generator direct to transmission line terminals. Note 3.--Through a 200-mrnfd. condenser. Note 4.--Screw adjustment.
Note 5.--Nut adjustment. ·While rocking.
PR1.-470KC SEC.-470 KC
1D5G - I.F.AMP. SEC.-470 KC PR I. -470 KC
Cyisclati.c.MY re,
SCREW 050.1600 KC
NUT 05C.580 K.C.
1H 4 G 2ND DET. -A.V.C-
2
1
[261
�MODEL NO. 37-60
Signal Generator Connection
Signal Generator Frequency
Dial Position
Wave Band Switch Position
Trimmer Number
Output Signal
Grid of 1.2 6A8G
id IC a
Ant.3
a
if
a
a a
470 k.c. 600 k.c. Broadcast
I(
it
it
di
di
it
if
7.0 m.c. 7.0 m.c. Short Wave
6.0 m.c. 6.0 m.c.
"
1600 k.c. 1500 k.c.
1600 k.c.
li
Broadcast
tC
600 k.c. 600 k.c.
a
1600 k.c. 1600 k.c.
a
1500 k.c. 1500 k.c.
a
26A
26 14A 14 7 3A 8 3 8A 8 3
Max.
Max. Max. Max. Max. Max. Max. Max. Max.* Max. Max.
Note 1.--Set tuning condenser to maximum capacity position, by turning knob counter-clockwise. Loosen set screw of dial hub, and set dial, with glowing beam indicator centered between the last two index lines at the low-frequency end of broadcast scale. Retighten set screw.
Note 2.--Through .1 mfd. condenser. Note 3.--Connect signal generator direct to transmission line terminals.
·While rocking.
TRANS.
443U:470 U.
gPRV47
Zap.' TRANS Q.0 PRI.-47011.L 4g/.
4_
6K 7G
AMP.
607G
2 air.
1.1:21./_010
C)cisc.
et.,,1.7 *4 ·te. -
6ABG r.f. T- OSC.
(C)screrw-osc.1600 N.C.
C )NUT-OSC. 60()K.C.)
(D.4--,1050A0NTK..C.
--4
=11°
10A/47.6M C.
27
[27]
�MODEL NO. 37-61
Signal Generator Connection
Signal Generator Frequency
Dial Position
Wave Band Switch Position
Trimmer Number
Output Signal
Grid of
6A8G 1, 2 4i
di
It
Ant.3
64 IC
u
a u
4i
il
470 k.c. 600 k.c. Broadcast 26A
44
di
it
li
44
CC
I<
,IC
18 m.c.
di IC
18 m.c. Short Wave
18 m.c.4
18 m.c.*
a
1600 k.c. 1600 k.c. Broadcast
600 k.c. 600 k.c.
a
1600 k.c. 1600 k.c.
4C
1500 k.c. 1500 k.c.
a
26 14A 14
7 3A 5 7
8 3 8A
8
3
Max.
Max. Max. Max. Max.
Max.
Note 7 Max. Max. Max.*
Max.
Max.
Note 1.--Set tuning condenser to maximum capacity position, by turning knob enunter-clockwise. Loosen set screw of dial hub, and set dial with glowing beam indicator centered between the last two index lines at low-frequency end of broadcast scale.
Note 2.--Through .1 mfd. condenser. Note 3.--Connect signal generator direct to transmission line terminals. Note 4.--Tc overcome detuning effect caused by adjustment of (7) in previous
step, connect variable condenser (350 mmfd. with good vernier drive) across oscillator section of tuning condenser, tuning this so that second harmonic of receiver oscillator will beat against the signal from the signal generator. Note 5.--This adjustment is made under the conditions described in Note 4 above. Note 5.--Remove external condenser mentioned in Note 4. Note 7.--Turn counter-clockwise from maximum capacity position until a second peak is reached--adjust to maximum on this peak only. Neglect first peak which is caused by image response.
·While rocking.
g;$hStE1CF-.4T7R0ANI.
0
8
>elf. TRANS p41:4704,C,
6A8G
Ot T.-0 SC
i6rKA7MPG
OSCREN-05C, 1600NX.\
@NUT-0$C. 600 N.C./
I ANT. .6--®
illlt.al
1500K.C.
6Q7G T. 111:4
ANT 18M C
at
[28 ]
�MODEL NO. 37-84
Signal Generator Connection
Signal Generator Frequency
Dial Position
Wave Band Switch Position
Trimmer Number
Output Signal
Grid of 6J7G
if di
Ant.*
di if
470 k.c. di
di
1700 k.c.
1400 k.c. 1000 k.c.
.0. 540 k.c.
Note 5 Note 6 Note 7
17
Note 2
11
Max.
15
Max.
17
Note 3
13
Max.
5
Max.
5
Max.
Max.
Note 1.--Through a .1 mfd. condenser. Note 2.--Turn clockwise to maximum capacity position and then release 114
turns (counter-clockwise).
Note 3.--Turn clockwise until oscillation (hiss) is heard. Then turn counterclockwise until hiss ceases--continue for U, turn more.
Note 4.--Through a 100-mmfd. condenser. Note 5.--Turn gang condenser to minimum capacity position (extreme clock-
wise). Place .008" gauge between stator and rotor plates. Turn gang condenser counter-clockwise until stator and rotor plates touch gauge. Then remove gauge. Note 8.--Tune gang condenser for maximum output.
Note 7.--Tune gang condenser for maximum output. Relocate pointer (if necessary) to indicate 1000 k.c. Dial indications will then be correct for all stations.
@CSC. 1700K
®ANT. 1700 Kt
6r6G TP
21aOtt IszAU010.
4G
0 PRI. 470NC.
RECTIFIER (31g C. 470 KC.
[29 ]
6J7G
otr.-osc,
ez,SENSITNITY
ql) CONTROL
�MODEL NO. 37-89
Signal Generator Connection
Signal Generator Frequency
Dial Position
Wave Band Switch Position
Trimmer Number
Output Signal
Grid of 1,2 6A8G
di di di
Ants
di
di
470 k.c.
di di id
1500 k.c.
id
600 k.c. 1500 k.c.
4é it
600 k.c.
ii it ii
1500 k.c.
if
600 k.c. 1500 k.c.
Broadcast (left)
ii if
,e
If di
ii a
if di
20S
20P 19S 19P 12 2 10 12A 12
10
2
Max.
Max. Max. Max. Max. Max. Max. Max.* Max. Max. Max.4
Note 1.--To check dial adjustment, tuning-condenser gang is set at maximumcapacity position by turning control knob clockwise. Loosen set-screw of dial hub and set dial with glowing beam indicator centered between the first and second index lines at the low-frequency end of scale.
Note 2.--Through a .1 mfd. condenser. Note 3.--Connect signal generator direct to transmission line terminals. Note 4.--No adjustments are necessary for the short-wave band.
*While rocking.
FRONT OF CHASSIS
2no.DET. let AUDIO. 607G
10001 OF C.,4S ,3
[30]
�MODEL NO. 37-116 (121, 122)
Signal Generator Connection
Signal Generator Frequency
Dial Position
Wave Band Switch Position
Trimmer Number
Output Signal
Grid of 1.2 6L7G
di di
a
it
it
it
" .Ant.6
if
di
It
it ti
it
"
di
"
it
"
id
a
"
U if
it if
a
"
"
ii
id "
if ii
«
if ii
d,
it di
it
470 k.c. 580 k.c.
di
di
if
if
a
di
4 f
fi
di
Note 3 470 k.c.
18 m.c.
it
if
if
12 m.c.
it
it
di
580 k.c.4 18 m.c.6 18 m.c.8
if
18 m.c.° 12 m.c.
id
it
18 m.c.
id
it
18 m.c. 18 m.c.8
ii di
11.0 m.c.
id
di
18 m.c .9 11.0 m.c. 10.06 m.c. 11id.0 m.c.18
it
75 m.c.
id
if
11 m.c.
II di It
" 7.0 m.c.
a 5.0 m.c.
if
7.0 m.c.
it if
4.5 m.c
ii it
1.7 m.c.
11.0 M.C.11
7.5 m.c.
it
it
11 m.c. 10.06 m.c. 11 in.c.io
it
11 m.c.11 7.0 m.c.
di
di 5.0 m.c.
if
If
7.0 m.c.
di
di
4.5 m.c.
if
it
1.7 M .C.
Range 1
di it
di if
it
ff
Range 5
CC
,, ,,
it
ii
,,
di if
,, Range 4
if
didf
di
di it a
di if
`` di a Range 3
ti it
d,
it it
,,
fi if
Range 2
a if
it
64B Max.
64A 64D
640 71S 71P 71S 81P 43D
7D 25D
43D 4235EE
7E
Max. Max.
Max. Max. Max. Note 3 Min. Note 7 Max. Max.
Note 7 MMaaxx.. Max.
43D 7D
25D 43D
Note 7 Max. Max. Note 7
43B
Max.
Image check
275BB
MMaaxx..
43B
Max.
430 250
70
Max. ]>/Inx. Max.
43B
Max.
Image check
7B
Max.
25B
Max.
43B 43 25
7
Max. Max. Max. Max.
43A 25A
7A 43 25
7 42B 24A
6A
Max. Max. Max. Max. Max. Max. Max. Max. Max.
42C Max.*
[31]
�MODEL NO. 37-116 (121, 122) Cont.
Signal Generator Connection
Signal Generator Frequency
Dial Position
Wave Band Switch Position
Trimmer Number
Output Signal
Ant. 5 a uOd
dd
di
di
4.5 m.c. 4.5 m.c.
di
it
éé
u
1500 k.c. 1500 k.c.
él
éé
580 k.c. 1500 k.c. 1400 k.c.
di
1000 k.c.
it
if
580 k.c. 1500 k.c. 1400 k.c. Note 12 Note 13 Note 14
Range 2
if
té Range 1
u éé
éé
di
4224BA 6A
42 24
6 42A 42 24
6
gi
818
di
MMaaxx.. Max. Max. Max. Max. Max.* Max. Max. Max.
Max. Max. · · ·
Note I.--The receiver should be allowed to heat for at least 15 minutes before adjusting the compensators. Dial adjustment--Loosen set screws on shaft coupling of tuning condenser, and turn until plates are in maximum-capacity position. Set glowing beam indicator on index line at low-frequency end of the broadcast band and tighten set screws. Turn tuning-condenser control until indicator is on first division from index line and again loosen set screws on shaft coupling. Without disturbing position of variable condenser, turn dial until indicator is again on index line. Carefully tighten set-screws in this position. Set receiver volume control in maximum position. Turn fidelity-selectivity control clockwise and magnetic tuning control in "off" position (counter-clockwise).
Note 2.--Through .1 mid, condenser. Note 8.--Turn fidelity-selectivity control to the expanded position (counter-
clockwise). Check i-f. curve for symmetry as follows: Slowly shift signal-generator dial between 480 k.c. and 480 k.c. As dial is turned, two peaks will be indicated on output meter--one at about 485 k.c. and the other at about 475 k.c. These peaks should both give the same deflection on the output meter. If they are unequal, adjust (7IS) slightly to right or left--depending upon which peak gives the lower reading--until they are equal. Each time (71S) is set in another position, rotate signal-generator dial through 480 k.c. to 480 k.c. and note output-meter reading of each peak. If peaks become more equal when (71S) is turned to left, continue in this direction until they are equal. If they become more unequal, turn (71S) to right. Continue this adjustment in either direction until the peaks become eq ual. Note 4.--Turn fidelity-selectivity control clockwise (selective position) and set signal generator to give highest output at this step.
[32
�Note 5.--Connect signal generator direct to transmission line terminals. Note 'I.--Set magnetic-tuning control in "off" position and fidelity-selectivity
control in extreme clockwise position. Note 7.--Turn screw clockwise to maximum-capacity position, then slowly turn
counter-clockwise until a second peak is reached on output meter. First peak from maximum capacity is image response and receiver must not be adjusted at this point. On some receivers, only one peak will be found, therefore adjust (43D) on this peak. If above procedure is correctly followed, the image signal will be found at 17.080 m.c. by advancing signal-generator output and tuning receiver dial to this frequency mark on the scale. Note 8.--Connect variable condenser (Philco part :45-2325) across (43D) contact (first contact from left side of receiver, facing rear underside view of chassis) and ground. Tune this external condenser until second harmonic of receiver oscillator beats against signal from signal-generator, resulting in a maximum indication on output meter. Increase signal-generator output if necessary. Note 9.--Remove external variable condenser (Philco Part No. 45-2325) mentioned in note 8 before readjustment of (43D). Note 10.--Connect external variable-condenser (Philco Part 345-2325) across
(43B) contact (third contact from left side of receiver facing rear underside view of chassis) and ground. Tune this added condenser for maximum output before adjusting (7B) and (25B). Note 11.--Remove external variable condenser of note 10 before readjustment of (43B). Note 12.--Adjustment of magnetic control--Set fidelity-selectivity control in "selective" position (clockwise) and magnetic tuning control in "off" (out) position. Then adjust receiver tuning condenser for maximum output as accurately as possible--setting signal generator to give highest output. Note 13.--Turn magnetic-tuning control to "on" position (clockwise) before adjusting (81S). Note 14.--To cheek adjustment--Turn magnetic tuning control to "off": when this is done, there should be no change in tone of receiver signal. If either a change of tone or a hiss develops, it indicates a shift in frequency and the adjustment must be made again. ·While rocking.
OSC.-1.0 Kt. 08C.- 114.0
jesc,ie m.c. 30
OSC.-12M.C.
room?' or CHASSIS
05 Ce 4.5 M.C.
K.C. 42 OSC:1500 GOSC.-580K.C.
OOSSCC..-A.55.0MM.CC..
M.C.
R.F.-1BM.C. RF.-12 N.C.
R.F.-1.5 MC.
ANT.- 1BM.C. M .C.
ANT.-1.5M ANT.-5.0 M.C. ANT.-/.0 M.C. ANT-It M.C.
R.F.- 140 0K.C. R.F.-4.5PA.C. ANT.- 1400 B.C. ANT.- 4.5 M.C.
[33]
�MODEL NO. 37-600
Signal Generator Connection
Signal Generator Frequency
Dial Position
Wave Band Switch Position
Trimmer Number
Output Signal
Control i grid of 6A8G
id it 14
Aniti .4
IC id
a di
470 k.c.
IC II 44
1800 k.c.
If
600 k.c. 1800 k.c. 1400 k.c. 1000 k.c.
600 k.c.
a CI CC
Note 5
if
600 k.c. Note 5 1400 k.c. Note6
23
Note 2
18
Max.
20
Max.
23
Note 3
6
Max.
5
Max.
16
Max.*
6
Max.
5
Max.
Max.
Note 1.--Through .1 mfd. condenser.
Note 2.--Turn to maximum capacity position (clockwise). Then turn counter clockwise 11 /2 turns.
Note 3.--Turn clockwise until a hiss (oscillation) is heard--Then turn counter clockwise until hiss ceases and continue for % turn more.
Note 4.--Through 100 mmfd. condenser. Note 5.--Turn variable-condenser gang all the way out of mesh. Place .006"
gauge between stator and rotor plates. Turn rotor plates until gauge touches both stator and rotor plates. Then remove gauge. Note O.--After installing chassis in cabinet, tune the variable-condenser gang for maximum output and set pointer to read 1000 k.c. This operation will correct the dial calibration. ·While rocking.
[34 ]
�MODEL NO. 37-602
Signal Generator Connection
Signal Generator Frequency
Dial Position
Wave Band Switch Position
Trimmer Number
Output Signal
Control grid ,
of 6iK« 7G Control
grid 2 of 6A8G
it
Ant.8
ti
it
if
470 k.c. 550 k.c.
ic
di
1800 k.c.
di
600 k.c. 1800 k.c. 1400 k.c. 1000 k.c.
it
Note 4
If
600 k.c. Note 4 1400 k.c. Note 5
27
Max.
29
Max.
21
Max.
23 6A 3 8 6A 3
Max. Max. Max.
Max.* Max. Max. Max.
Note 1, 2.--Through .1 mfd. condenser. Note 3.--Through 100 mmfd. condenser. Note 4.--Turn gang condenser counter clockwise to minimum-capacity position
and place .008" gauge between stator and rotor plates. Turn gang condenser clockwise until stator and rotor plates both touch gauge. Then remove gauge. Note 5.--After installing chassis in cabinet, tune the variable-condenser gang for maximum output and set dial pointer to read 1000 k.c. This operation corrects the dial calibration. *While rocking.
25A6G
OUTPUT
6VG
2,01,DETAT.AUDIO
.O®SEPRCI..447700KKCG.
OSEC.470 KC. OPRI.470 KC.
O
OSC 600KC
I. F.
I. F.
\:)
6A6G
CIET,OSC.
25Z6G
RECTIFIER
le*
15 KA'p7i
"VOONL-OUFMFE"CSOWINTTCRHOL ..i. SSTEALTEICOTNOR
[35 ]
AN11800 OSCI8001%.,
�MODEL NO. 37-604
Signal Generator Connection
Signal Generator Frequency
Dial Position
Wave Band Switch Position
Trimmer Number
Output Signal
Control grid 1, 2 of 6K7G
if
470 k.c. 550 k.c.
Broadcast
Control grid 2
of 6« A8G«u
a««
Ant.8
dl di fi
i«
fi if di ti
18 m.c. 18 m.c. Short Wave
if
18 m.c.4
fi
18 M.C.5
18 m.c.7 17.060 m.c.
6 m.c.
6 m.c.
18 m.c. 18 m.c.4
if
if
18 m.c.5
fi
18 m.c.7 17.060 m.c.
fi
1600 k.c. 1600 k.c.
Broadcast
fi
i<
it
600 k.c. 600 k.c.
1600 k.c. 1600 k.c.
if
if
fi
1400 k.c. 1400 k.c.
24A Max.
24 18A
Max. Max.
18
Max.
3C Max.
3A Max.
3C Note 6
Image check
6A Max.*
3A Max.
3C Note 6
Image check
3B Max.
3
Max.
6
Max.*
3B Max.
3
Max.
3
Max.
Note 1.--Dial adjustment--Turn tuning condenser counter clockwise to extreme maximum-capacity end. Loosen set screw of dial hub, then turn dial until glowing beam indicator is centered on the first index line of dial scale and retighten set screw.
Note 2.--Through .1 rad. condenser. Note 3.--Connect signal generator direct to transmission line terminals. Note 4.--Connect vernier-drive variable condenser of about 350 mmfd. across
oscillator section of receiver variable condenser (bottom section). Tune until second harmonie of receiver oscillator beats against signal from signal-generator. 3A is adjusted under these conditions. Note 5.--Remove external variable condenser mentioned in Note 4 above. Note 8.--Turn to maximum-capacity position, and then turn counter clockwise until a second peak is reached. Adjust to maximum on this peak only. Do not use first peak which is caused by image response. Note 7.--Increase signal-generator output to a value great enough to clearly indicate the image signal nt this step. ·While rocking.
[36]
�MODEL NO. 37-610 (121, 122)
Signal CGoennneercattioor n
Signal Generator Frequency
Dial Position
Wave Band Switch Position
Trimmer Number
Output Signal
Control 1, 2 grid of 6A8G
fi If
Ant.* it
if
.`
it it 41
a
di if
ig
470 k.c.
550 k.c.
Range 1 (broadcast)
if
ii
ii
it
di
18.0 me. 18.0 m.c.
it
if
14
if
7.0 m.c. 6.0 m.c. 800 k.c.
18.0 m.c. 4 18.0 m.o.*
7A m.c. 6.0 m.c. 1600 k.c.
a
14
600 k.c. 600 k.c. 800 k.c. 1600 k.c.
fiU
750 k.c. 1500 k.c.
Range 3 It
if
`` Range 2
" Range 1
a
g(
if U
U
29
28 26 25 169
6 196 15 5 144 13 144 4
Max.
Max. Max. Max. MMaaxx.. Max. Max. Max. Max. MMaaxx.. Max.* MMaaxx.. Max.
Note 1.--Dial adjustment. Turn variable-condenser gang to maximum capacity.
Loosen set screw of dial hub and turn dial until glowing-beam indi-
cator is centered between index lines on dial scale. Then retighten set
screw.
Note 2.--Through .1 mfd. condenser.
Note 3.--Connect signal generator direct to transmission line terminals.
Note 4.--Connect vernier-drive variable condenser, 350 mmfd., across oscillator
section of receiver condenser gang. Tune this condenser so that sec-
ond harmonic of receiver oscillator will beat against signal from
signal-generator. (8) is adjusted on this beat.
Note Note
5.--Remove O.--Turn to
mexatxerinmaul mvacraipaabcliet-yco(ncdleoncskewrismee)n--ttihoennedbacikn-onfofte(c4ouanbtoevre.clock-
wise) until a second peak is reached. Adjust to maximum on this
peak only. ·While rocking.
btLF.TRAN3.
1 Do not use first peak (caused by image-frequency signal).
PRI..470K 0
W06.M0.o»7tG.t
[37]
�MODEL NO. 37-611
Signal Generator Connection
Signal Generator Frequency
Dial Position
Wave Band Switch Position
Trimmer Number
Output Signal
Control 7.2 grid of 6A8G
di di
a Ant.8
id di di
a
if
470 k.c.
550 k.c.
Range 1
(broadcast)
U
id
a U
U
di
18 m.c. 18 m.c.5 18 m.c.
14
18 m.c.5 7.0 m.c. 6.0 m.c.
18 m.c. 17.06 m.c. 18 m.c.8 18 m.c.7 17.06 m.c.
7.0 m.c. 6.0 m.c.
1600 k.c. 1600 k.c.
di
di
id
U
Range 3 « "
di
U
Range 2
di
Range 1
23S Max.
23P Max.
2200SP MMaaxx..
9B Note 4
Image check 5B Max. 9B Note 4
Image check 9A Max. 5A Max.
9 5
MMaaxx..
600 k.c. 600 k.c.
·
10
Max.*
1600 k.c. 1600 k.c.
9 Max.
tt
1500 k.c. 1500 k.c.
5 Max.
Note I.--Dial adjustment--Turn variable condenser to maximum -capacity posi-
tion. Loosen set screw of dial hub and turn dial until glowing beam indicator is centered between index lines on dial scale. Then retighten set screw. Note 2.--Through .1 mfd. condenser. Note 3.--Connect signal generator direct to transmission line terminals. Note 4.--Turn clockwise to maximum-capacity position, then slowly turn back until a second peak is reached. Adjust to maximum on this peak only. Do not use first peak which is caused by image response. Note 5.--Increase signal-generator output to a value great enough to clearly indicate the image at this step. Note 6.--Connect a vernier drive variable condenser (about 350 mmfd.) across oscillator section of receiver variable condenser gang. Tune from maximum capacity point until second harmonic of receiver oscillator beats against signal-generator. Adjust (5B) under these conditions. Note 7.--Remove external variable condenser mentioned in note 6. ·While rocking.
ibste..AO.EuDTi.e briG
[38 1
�Signal Generator Connection
Control grid 1, 2 of 6A8G
a a a
Ant.3 a a
a a
a
MODEL NO. 37-620
Signal Generator Frequency
Dial Position
Wave Band Switch Position
Trimmer Number
Output Signal
470 k.c.
550 k.c.
Range 1 37A
(broadcast)
Max.
a a a
18 m.c. a a
if if
if
IC a a
IS m.c.
a
18 m.c.4
18 m.c.5
a a a
Range 3
a
a a
(Continued on page 40)
37 31A 31 23B
8B 4B 4B 8B 23B
Max. Max. Max. Max. Max. Max. Max. Max. Note 6
Pt tr. TRANS SEC- 470itt
GLOWING BEAM INDICATOR
3
6Q76 2110 DET.-Vm AUDIO
[39 1
�MODEL NO. 37-620 Cont.
Signal Generator Connection
Signal Generator Frequency
Dial Position
Wave Band Switch Position
Trimmer Number
Output Signal
Ant.8 fi i4 ii il
il
ci gi
a
a
a 14
7.0 m.c. 6.0 m.c.
4/
1600 k.c.
il
lé
600 k.c. 1600 k.c.
a
a
1500 k.c.
a
7.0 m.c. 6.0 m.c.
li
1600 k.c.
I<
li
600 k.c. 1600 k.c.
a
a
1500 k.c.
Range 2 lé
di
Range 1
4.
I/
· ·
a a
a a
23A 8A 4A
23 8 4
21 23
8 4 4 8
Max. Max. Max. Max. Max. Max. Max.* Max. Max. Max. Max. Max.
Note 1.--Dial adjustment--Turn variable condenser gang to maximum-capacity position. Loosen set screw of dial hub and turn dial until glowing beam indicator is centered on first index line of dial scale. Then retighten set screw.
Note 2.--Through .1 mfd. condenser. Noto 3.--Connect signal generator direct to transmission line terminals. Note 4.--Connect vernier-drive variable condenser (about 350 =nid.) across
oscillator section of tuning condenser gang. Tune no that second harmonie of receiver oscillator will beat against signal from signalgenerator. Adjust (4B) and (8B) under these conditions. Note 5.--Remove external variable condenser mentioned in note 4 above. Note 6.--Turn clockwise to maximum-capacity position, then back off counter clockwise until a second peak is reached on output meter. Adjust to maximum on this peak only. Do not use first peak which is caused by image response. *While rocking.
18 M.C.
· o
&OSC. 7.0M.C.
OSC. SERIES 600 KC.
OSC.1600K.C.
o
R.F. 18 M.C.
R.F. 1500 KC. R.F. 6.0 M.C.
a>+®ANT. 1500 K.C.
®ANT. I8M.C.
37,4
AANT. 6.0 M.C.
[40 ]
�Signal Generator Connection
Control gr id 1, 2 of 1C7G
.Ant.5
Id de
fi 4I di Cd Cd C' if
if Ci
MODEL NOS. 37-623, 37-624
Signal Generator Frequency
Dial Position
Wave Band Switch Position
Trimmer Number
470 k.c.
550 k.c.
Range 1 30S (broadcast)
Output Signal
Max.
di
20 m.c. 20 m.c.5 20 m.c.
di de
20 m.c.5 7.0 m.c. 6.0 m.c.
diU
``
20 m.c.
Range 3
19.060 m.c.
20 m.c.5
a
fi
20 m.c.7
«
19.060 m.c.
a
7.0 m.c. Range 2
6.0 m.c.
di
1600a k.c.
fi
1600a k.c.
Il
Range 1
Id
di
580 k.c. 580 k.c.
1600 k.c. 1600 k.c.
1500 k.c. 1500 k.c.
dl
di
dé
le
30P Max. 28S Max.
28P Max.
20B Note 4
Image check 4B Max.
16B Max. 20B Note 4 Image check
20A 4A
16A
Max. Max. Max.
20
Max.
146
MMaaxx..
19
Max.*
20
Max.
4
Max.
16
Max.
@PR1-470ICC
SEC.-470K C
OSC.
2O MC
OSC .5ERIE!
580 KC
1056 I.F. AMP. PM.- 470 K.C.
17G 2so. DET. A.V.C:lsT. AUDIO
[41]
�Note 1.--Dial adjustment--Turn variable condenser to maximum-capacity position. Loosen set screw of dial hub and turn dial until glowing beam indicator is centered between first and second index lines at low-frequency end of broadcast scale. Then retighten set screw.
Note 2.--Through .1 mfd. condenser. Note 3.--Connect signal generator direct to transmission line terminals. Note 4.--Turn clockwise to maximum-capacity position, then slowly turn back
until a second peak is reached on the output meter. Adjust to maximum on this peak only. Do not use first peak which is caused by image response. On some receivers, only one peak will be observed --use this peak. Note 5.--Advance signal-generator output to a value great enough to clearly indicate the image signal at this step. Note 8.--Connect a variable condenser (Philco Part 245-2325) across oscillator compensator (20B) contact (first contact from left side of receiver facing rear underside of chassis) and ground. Tune this condenser so that second harmonie of receiver oscillator beats against the signal from the signal-generator giving a maximum indication on the output meter. It may be necessary to increase signal-generator output to get a readable indication. Adjust (4B) and (18B) under these conditions. Note 7.--Remove variable condenser mentioned in note 8 above. ·While rocking.
MODEL NO. 37-630
Signal Generator Connection
Signal Generator Frequency
Dial Position
Wave Band Switch Position
Trimmer Number
Output Signal
Control grid 1, 2 of 6A8G
a
cc
if
Anitc . 3 44 «c
U
cc
a
cc
ti
Uic
it
fi
fiit cc
a
470 k.c.
550 k.c. Range 1
ft
a
a
18 m.c. a cc ce a ci 7.0 m.c. 6.0 m.c. If
1600 k.c.
a
0
a
a
18 m.c. 0 44
18 m.c.4
a
18 m.c.5 7.0 m.c. 6.0 m.c.
a
1600 k.c.
a
0
600 k.c. 160«04 k.c.
a
600 k.c. 160044 k.c.
a
1500 k.c.
a
1500 k.c.
a
a a
Range 3 44 44
a
44 44 Range 2 i. 4« Range 1
ft
cc 4c.c
a
«444
37A
37 31A. 31 283BB
4B 4B 8B 23B 23A 8A 4A 23 8 4 21 23 8 4 4 8
Max.
Max. Max. Max. MMaaxx.. Max. Max. Max. Note 6 Max. Max. Max. Max. MMaaxx.. Max.* Max. MMaaxx.. Max. Max.
Note 1.--Dial adjustment--turn variable condenser to maximum-capacity position. Loosen set screw of dial hub and turn dial until glowing beam indicator is centered on first index line of dial scale. Then retighten set screw. (See illustration page 39)
Note 2.--Through .1 mfd. condenser.
[42]
�Note 3.--Connect signal-generator direct to transmission line terminals. Note 4.--Connect a vernier-drive variable-condenser (about 350 trunfd.) across
oscillator section of tuning-condenser gang. Tune so that second harmonic of receiver oscillator will beat against signal from signalgenerator. Adjust (4B) and (8B) under these conditions. Note 5.--Remove external variable condenser mentioned in note 4 above. Note 6.--Turn clockwise to maximum-capacity position, then back off counter clockwise until a second peak is reached on output meter. Adjust to maximum on this peak only. Do not use first peak which is caused by image response. "While rocking.
ris SEC,. 470K.C.
006 IF. AMP.
18 N.C.
OSC. SERIES 600 M.C.
OSC. 160011.C,
RI: 1500 M.C.
6Q7C 2...00T.-MA/MO
04 -(ANT.
(ANT. I8M.0
ANT.60MC
Signal Generator Connection
Control grid 1, 2 of 6A8G
id
MODEL NO. 37-640
Signal Generator Frequency
470 k.e.
Dial Position 550 k..
Wave Band Switch Position
R ange 1
(I)ToadCaST)
Trimmer Number
34S
Output Signal
Max.
if
(Continued on page 41)
34P Max. 33S Max. 33P Max.
6K7G
470 KC
470 KC. 2M °.D - 4.
[43 1
�MODEL NO. 37-640 Con't.
Signal Generator Connection
Signal Generator Frequency
Dial Position
Wave Band Switch Position
Trimmer Number
Output Signal
Ant.3
té
fi it if
if
fi
cg
if
igfg
fl
gg gggg
te
if
18 m.c.
if
18 m.c.
fi
if
fi
fi
18 M .C. 4
fi
if
7.0 m.c. 6.0 m.c.
If
18 M .C.5 7.0 m.c. 6.0 m.c.
fi
1600gg k.c.
if
1600 k.c.
ie
f f
600 k.c. 1600 k.c.
ii
if
600 k.c. 1600 k.c.
i4
fi
1500 k.c. If
iC
1500 k.c. té
Range 3
If
id
if fi
il
Range 2
if If
Range 1
if
fi
gg
if il
iC
gg
a
283BB 4B 4B 8B
23B 23A
8A 4A 23 8 4 21 23 8 4
4 8
MMaaxx.. Max. Max. Max. Note 6 Max. Max. Max. Max. MMaaxx.. Max.* Max. Max. Max.
Max. Max.
Note 1.--Dial adjustment.. Turn variable condenser to maximum-capacity position. Loosen set screw of dial hub and turn dial until glowing beam indicator is centered on first index line of dial scab. Then retighten set screw.
Note 2.--Through .1 mfd. condenser. Note 3.--Connect signal-generator direct to transmission line terminals. Note 4.--Connect vernier-drive variable condenser (about 350 nimfd.) across
oscillator section of tuning condenser. Tune so that second harmonie of receiver oscillator will beat against signal from signal-generator. Adjust (4B) and (8B) under these conditions. Note 5.--Remove externat variable condenser mentioned in note 4 above. Note (1.--Turn clockwise to maximum-capacity position, then back off counter clockwise until a second peak is reached on output meter. Adjust to maximum on this peak only. Do not use first peak which is caused by image response. ·While rocking.
OSC. 18M.C.
FROWT or
StgS
OSC. 600 K.C.
OSC-1M.C. rfa iRs.MEC.
OSC.-1600 K.C. RI-1500 K.C.
rAph AN
1.0 zn8M.C.
R.F".-6.0 M.C. ANT:1500 K.C.
ANT.-6.0 M.C.
[44 1
�MODEL NO. 37-641 (121)
Signal Generator Connection
Signal Generator Frequency
Dial Position
Wave Band Switch Position
Trimmer Number
Output Signal
Control grid 1 of 6A8G «
ii
«
470 k.c.
(`
4!
((
580 k.c.
(`
Cl
(é
Broadcast
de
if
(`
38P 38S 35P 35S
Max. Max Max Max
Ant. term.2 #1
if id di
18 m.c.
if id le
18 m.c. Range 3
7.35-22 m.c.
17.06 m.c.
(`
18 m.c.4
dl
4i
44
18B
Max. 3
Image check
11B
Max.
2B
Max.
«
18 m.c.5 é(
(`
18B
Max.
44
7m.c. 7m.c.
Range 2 18A
Max.
2.3-7.4 m.c.
((``
6 m.c.
6 m.c.
IC
fi
fi
fl
11A
Max.
2A
Max.
(`
1600 k.c. 1600 k.c. Broadcast 18
Max.
«
ri
44
44
11
Max.
(`
ri
(`
a
2
Max.
If
580 k.c. 580 k.c.
a
20
Max.*
(`
1600 k.c. 1600 k.c.
ét
18
Max.
44
1500 k.c. 1500 k.c.
«
11
Max.
if
it
té
Ci
2
Max.
Note 1.--Through a .1 mfd. condenser.
NNoottee 32..----UTsheroulogwherac.a1pamcfidt.y cpoenadke.nser. Link terminals 2 and 3 together. Note 4.--Connect an external variable condenser (Philco Part No. 45-2325) from
the oscillator compensator (18B) to ground. Tune the added condenser from the minimum capacity position until the second harmonie of the oscillator beats against the signal to produce maximum output. Note 5.--Remove the external variable condenser. ·While rocking.
[45 ]
�MODEL NO. 37-643
Signai Generator Connection
Signal Generator Frequency
Dial Position
Wave Band Switch Position
Trimmer Number
Output Signal
Control grid 1, 2
470 k.c.
580 k.c.
Broadcast 34S
Max.
of 1C7G
fi
fi
4t
fi
a
il
``
it
a
it
34P
Max.
tg
33S
Max.
fi
33P Max.
Ant. term.8 el
di
``
it
18 m.c.
18 m.c. 18 m.c.8
té
18 m.c.
Range 4
11.5-182 m.c.
17.06 m.c.
di
18 m.c.
`i
a
té
25A Max.*
Image check
166AA
MMaaxx..
.`
12 m.c.8 12 m.c.
il
25B Max.
it
if
a
dl
16B
Max.
it
tt
If
if
6B Max.
.`
18 m.c.
18 m.c.
di
25A Max.
``
18 m.c.8
fi
it
6A Max.
U
if
il
il
16A Max.
fi
11 m.c.8 11 m.c.
Range 3 25
Max.
725-11.6 m.c.
di
11 m.c.
10.06 m.c.
41
Image check
if
11 m.c.8 11 m.c.
if
16
Max.
.`
.`
..
di
6
Max.
,`
11 m.c.8
``
d(
25
Max.
.`
4.5 m.c. 4.5 m.c. Range 2 22B Max.
4.7-7.4 m.c.
te
tt
15A Max.
d«
«f
5A Max.
.«
1.7 m.c. 1.7 m.c.
et
22C Max.
45 m.c. 4.5 m.c.
if
tt
ce
22B 15A.
Max. Max.
5A Max.
1500 k.c. 1500 k.c.
Broadcast 22
Max.
té
té
té
15
Max.
il
a
id
5
Max.
37
580 k.c. 580 k.c.
ii
22A Max.*
1500 k.c. 1500 k.c.
Of
1400 k.c. 1400 k.c. `i
st
fi
22
Max.
il
15
Max.
ic
5
Max.
"While rocking. Note 1.--Dial alignment: Rotate the tuning control to the extreme counter-
clockwise position (maximum capacity). Loosen the set screw of the dial hub, then turn dial until glowing beam indicator is centered on the second index line of dial scale. Now tighten the dial hub set screw in this position. Note 2.--Through a .1 mfd. condenser. Note 3.--Through a .1 mfd. condenser. Link antenne terminals 2 and 3 together. Note 4.--Use the lower capacity peak. Note 5.--Connect a variable tuning condenser (Philco Part No. 45-2325) from the oscillator compensator to ground. (First lug from left side of r.f. unit.) Note 6.--Remove the external variable condenser. Note 7.--Connect the same external variable tuning condenser from the oscillator compensator to ground (third lug from left side of r.f. unit).
[46]
�1st AUDIO 1E5G
2mti.DET, A.V. C. 1H4G
GLOWING BEAM INDICATOR
g05c. Ii.mc. OSe. IB MC OSC. SERIES I2MC
®R.F. II.MC R.F. 18 MC
@R.F. 12 MC
0 ANT. 18 MC BB ANT. I2MC
FRONT Or CHASSIS
-kV>
kg Li
OSC.4.5MC OSC. 1.5 00 KC OSC.SERIES SW KC OSC.SERIES1.111C
R.F.1400 KC
isp 11 F4.51,1C
ANT. 11.1W
0ANT.1400 KC ANT. 4.smc
113
[47 1
�MODEL NO. 37-650
Signal Generator Connection
Signal Generator Frequency
Dial Position
Wave Band Switch Position
Trimmer Number
Output Signal
Control grid 1.2 of 6A8G
fi il
fi
Ant.5
di
a
fi
il if
a a a a a
Cl
`c
fi
Il
a
if
a ``
a
afi a
a a
ai
a
fi
ae«
470 k.c. 550 k.c.
Range 1 28S Max.
di
a
if
il
il
if
if
U
di
18 m.c. 18 m.c.5 18 m.c.
18.0 m.c. Range 3
17.060 m.c. "
18.0 m.c.5
ii
id
fi
ii
a
18.0 m.c.7
u
12 m.c. 12 m.c.
fi
a
a
if
a
a
if
18 m.c. a a
di
18 m.c.5 11 m.c. 11 m.c.5 11 m.c.
il
a 6 m.c.
di
18.0 m.c.
a
18.0 m.c.6
fi
"
fi
18.0 me.7
fi
17.060 m.c. a
11.0 m.c. Range 2
10.06 m.c.
"
11.0 m.c.5
il
di
te
11.0 m.c.5
a
6 m.c.
a
dé
if
" 11 m.c.
a "
1600 k.c.
U
if
11.0 m.c.
11.0 m.c.5
i`f`
a
il
11.0 m.c.5
((
10.06 m.c.
fi
1600 k.c.
Range 1
if
lf
14
U
U
if
580 k.c. 580 k.c.
a
1600 k.c. 1600 k.c.
a
1500 k.c. 1500 k.c.
a
fi
fi
ii
28P 268 26P
Max. Max. Max.
16D Note 4 Image check
40 Max. 10C Max.
16D 16E 1013 413
Note 4 Max. Max. Max.
16D 4C 100
Note 4 Max. Max.
16D Note 4
Image check 16B Note 4
Image check
10A Max. 4A Max.
16B Note 4
16C Max.
140BB
MMaaxx..
16B Note 4 10A Max.
4A Max.
16B Note 4
Image check
16
Max.
10
Max.
4
Max.
16A Max.
16
Max.
140
MMaaxx..
Note 1.--Dial calibration. Turn variable condenser gang to maximum-capacity position. Loosen set screw of dial hub and turn dial until glowing beam indicator is centered on second index line of dial scale. Then retighten set screw.
Note 2.--Through .1 mfd. condenser. Note 3.--Connect signal generator direct to transmission fine terminals. Note 4.--Turn clockwise to maximum-capacity position, then slowly turn
counter clockwise until a second peak is indicated on output meter. Adjust to maximum on this peak. Do not use first peak which is caused by image response. Note 5.--Advance signal-generator output at this step to value high enough to give clear indication on output-meter. Note 8.--Connect vernier-drive variable condenser (about 350 mmfd.) across oscillator compensator (15D) contact (first contact from left side of receiver, facing rear underside view 02 chassis) and ground. Tune so
[48
�that second harmonic of receiver oscillator beats against signal from signal-generator to give indication on output meter. Increase signalgenerator output if necessary. Adjust (40) and (100) under these conditions. Note 7.--Remove external variable-condenser mentioned in note 6 above. Note 8.--Connect external variable condenser (same as in note 8) from (18B) contact (third contact from left side of receiver, facing rear underside view of chassis) and ground. Tune this condenser as in Note and follow same procedure to adjust (10A) and (4A). Note 9.--Remove external variable condenser mentioned in note 8 above. *While rocking.
4!
10 AUDIO
61(56
Zna.0(T. A.V.C.
6J 5G
GLOWING BEAM
Cel0oSsCc..--1128M.mC..c
R.F.-18M.C.
CANT.- 11 MC. CDANT.-18 M.C.
gANT.-12 M.C.
OSC.-11M.C.
FPONT OF- CHASSIS
®OSC.-1600K.C. OSC.- 58 01 K.C.
[49]
OSC.-6 M.C. R.F.-1500 K.C.
NOT Acomr;TAati
R.F.-6 M.C. ANT.-15O0K.C.
A,01 Al-1J uT AA'
g
�MODEL NO. 37-660
Signal Generator
Connection
Signal Generator Frequency
Dial Position
Wave Band Switch Position
Trimmer Number
Output Signal
Control grid 1, 2 of 6dAd 8G
di dd Andtd .8
fi
470 k.c.
580 k.c.
Range 1 47S (broadcast)
Max.
di 18 m.c. 17.06 m.c. 18 na.c.8
18 m.c.
if
11 m.c.
Cf fi if
75 m.c. de 11di m.c.
7.0 m.c.
fi ff
25 m.c. 7.0 m.c. 6dd.0 m.c. 1600dd k.c. dd 580 k.c. 1600 k.c. 1500dd k.c.
18 m.c.8 12 m.c.
dd 18 m.c. 18 m.c.8
4I
18 17.06111.c. 11 ni.e. 10.06 m.c. 11 111.c?
fi
11 m.c.8 7.5 m.c. di
11 m.c. 11`c m.c.7 11 m.c.8 10.06 m.c. 7.0 m.c.
2.5 m.c. 7.0 m.c. 6.0 m.c.
6.
1600 k.c. te
580 k.c. 1600 k.c. 1500 k.c.
if
Range 4
if if
Range 3
lf
Range 3 dd
if
if
Range 2
le
fi
Range 1 if
47P Max.
32S Max.
32P Max.
31B Note 4
Image check
6B Max.
17B Max.
31B Note 4
3IC Max.
17C Max.
6C Max.
31B Note 4
6B Max.
17B Max.
31B Note 4
Image check
31
Note 4
Image check
17
Max.
6 Max.
31
Note 4
31A Max.
17A Max.
6A Max.
31
Note 4
17
Max.
6 Max.
31
Note 4
Image check
30B Max.
16A Max.
5A Max.
30C Max.*
30B Max.
16A Max.
5A Max.
30
Max.
16
Max.
5 Max.
30A Max.*
30
Max.
16
Max.
5 Max.
Note 1.--Dial calibration. Turn variable condenser gang to maximum-capacity position. Loosen set screw of dial hub and turn dial until glowing beam indicator is centered between first and second index lines of dial scale. Then retighten set screw.
[50
�Note 2.--Through .1 1i:dd. condenser. Note 3.--Connect signal generator direct to transmission line terminals. Note 4.--Turn clockwise to maximum capacity position, then slowly turn
counter clockwise until a second peak is indicated on output meter. Adjust to maximum on this peak. Do not use first peak which is caused by image response. If only one peak can be observed on some receivers, adjust on that peak.
Note 5.--Connect vernier-drive variable condenser (about 350 mmfd.) across oscillator compensator (31B) contact (first contact from left side of receiver, facing rear underside view of chassis) and ground. Tune the external condenser so that second harmonic of receiver oscillator beats against signal from signal-generator. Adjust (6B) and (17B) under these conditions.
Note 6.--Remove external variable condenser. Note 7.--Connect external variable-condenser (same as in Note 6) from (31)
contact (third contact from left side of receiver, facing rear underside view of chassis) and ground. Tune this condenser as in Note 5 and follow same procedure to adjust (17) and (6).
16n.5A5UGSIO
·2a
2maINT. .
6A.JV5.CG.
GLOWING BEAM INDICATOR
(3005C. II. MC. e05C. 16 MC
-1-. 1)5C. SERIES 12 MC @O5C.SERIES 7.5 MC
....(íi)R.F. II. MC
l'R.F. 18 MC R.F. 1211C
17 R.F. 7.5 MC
@ANT. 181W
ANT. 12 MC
eANT. '7.5 MC
iltONT DF. CUSS'S
[51]
Ilepod· CO' C.15.4
@OSC.7.0 MC 80SC.1806KC @O5C.5ERIES 560KC
OSC.SERIES 2.5MC R.F.I500 KC
RI 6.0 MC 6 ANT. II.MC
ANT. 1500 KC
OANT. 6.0 MC
42
�MODEL NO. 37-665
Signal Generator Connection
Signal Generator Frequency
Dial Position
Wave Band Switch Position
Trimmer Number
Output Signal
Control grid 1, 2 of 6A8G
il
44
44
Ant.term.8 #1 a
di
di U
««
di
a
470 k.c.
de ii il
13 m.c. "
de de
u
if té
18 m.c.
di
fi
di
18 M.C. 5
di
7 m.c.
di
di
di
di
Ji
2.35 m.c.
di
7 m.c.
««
6 m.c.
di
44
di
1600 k.c.
Ci
4e
fi
de
fi
580 k.c.
e«
1600 k.c.
di
1500 k.c.
di
ee
580 k.c. Broadcast
ii
di
"
il
"
ii
39 m.c. Range 4
28-42 m.c.
38.06 m.c.
ti
39 m.c.
u
26 m.c.
a
a
a
39 m.c.
4d
44
i4
18 m.c. Range 3
7.35-22 m.c.
17.06 m.c.
««
18 m.c.
««
If
7 m.c.
Ci
Range 2 2.3-7.4 m.c.
id
44
el
2.35 m.c.
««
7 m.c.
««
6 m.c.
et
44
if
1600 k.c.
té
Broadcast
if
id
de
580 k.c.
u
1600 k.c.
Ci
1500 k.c.
le
et
di
39P
Max.
39S 40P 40S
Max. Max. Max.
23
Max.4
Image check
9
Max.*
23A 9A
23 9
Max. Max. Max.+ Max.*
23B
Max.
Image check
9B
Max.
4B
Max.
29
Max.
18A 4A
29A 29 18A
4A 29B 18
4 29C 29B 18
4
Max. Max. Max. Max. Max. Max. Max. Max. Max. Max.* Max. Max. Max.
Note 1.--Dial calibration: Rotate the tuning control to the extreme counterclockwise position (maximum capacity). Loosen the set screw of the dial hub, then turn the dial until the glowing indicator is centered on the middle index line of dial scale. Now tighten the set screw in this position.
Note 2.--Through a .1 mfd. condenser. Note 3.--Link terminals 2 and 3 together. Note 4.--Use the lower capacity peak. Note 3.--Connect an external variable condenser (Philco Part No. 43-2323)
from the oscillator compensator (23B) to ground. Tune the added condenser from the maximum capacity position until the second harmonie of the oscillator beata against the signal to produce maximum output. Note 6.--Remove the external variable condenser. ·While rocking.
[52 ]
�6K5G 1st AUDIO
6J5G 2ND. DE T.- A.V.C.
/
GLOWING BEAM INDICATOR
18 M.C.
.-- --40SG,........
(40P...ec-) *f-o-7)--470K.C.
6K7G I.F. -1-
39 -e---i\-:----\:
y ( e
39PG
-47,0K.C.
il4A
1.0 M.C.
II
1600 K.C. ii
580 K.C.
R.F. UNIT
ANT. UNIT
114
[53 ]
�Signal Generator Connection
Control grid 2 of 6A8G
ll
a el
Ant.li
le
a a
a
le
ce
de
a a a
ll t4
a «« a a a
Cd ee
a
a
a
a
«« a a a it a
a a
et CC if
«« a a a
fi el
««.«
te
g C
MODEL NO. 37-670
Signal Generator Frequency
Dial Position
Wave Band Switch Position
Trimmer Number
Output Signal
470 k.c.
580 k.c.
Range 1 42S (broadcast)
Max.
le
CC
a
18 m.c.
44
a
a
a 12 m.c.
``
di
18 m.c.
a
il
44
fi
11 m.c. «« a a u 75 m£.
if
44
11 m.c.
44 a
a
a
7a.0 m.c.
a 5.0 m.c.
a
a
7.0 m.c.
a
a
4.5 m.c.
a
a 1.7 m.c. 4.5 m.c.
et
1500 k.c.
fi
U
580 k.c. 1500 k.c. 1400 k£.
Id
a
a
18 m.c. 17.06 m.c. 18 m.c.5
a
18 m.c.6 12 m£.
a
a
18 m.c. 18 m£.5
il
18 m.c.6 17.06 m.c. 11 m.c. 10.06 m.c. 11 m.c.
a 11 m.c.6 7.5 m.c.
fi
el
11 m.c. 11 m.c.7
a
11 m.c.6 10.06 m.c. 7a.0 m.c.
Ci
5.0 m.c.
a
di
7.0 m.c.
a
dl
4.5 m.c.
CC
a 1.7 m.c. 4.5 m.c.
te
te
1500 k.c.
580 k.c. 1500 k.c. 1400 k.c.
[54]
ei a
a
Range 5
il ef
a
te 4t di
a
ee le il le
ii
Range 4 " a U "
ei et a
a a
di le
" Range 3
di il a 4i
le a il
Range 2
.« a
a te
Range 1
et
id
42P Max.
41S
Max.
41P Max.
29D Note 4 Image check 7D Max. 19D Max.
29D 29E 19E
7E
Note 4 Max. Max. Max.
29D 19D
MNoatxe. 4 Max.
29D Note 4 Image check
29B Note 4 Image check
19B Max. 7B Max.
29B Max. 29C Max. 190 Max.
70 Max.
29B Note 4 190 Max.
70 Max.
29B Note 4 Image check
29 19 7 29A 19A 7A
Max. Max. Max. Max. Max. Max.
29
Max.
19
Max.
7
Max.
27B 18A 6A
Max. Max. Max.
270 27B 18A.
6A
Max.* Max. Max. Max.
2178
MMaaxx..
6
Max.
27A 27 18
Max.* Max. Max.
6
Max.
�Note 1.--Dial calibration. Turn variable condenser gang to maximum-capacity position. Loosen set screw of dial hub and turn dial until glowing beam indicator is centered on second index line of dial scale. Then retighten set screw.
Note 2.--Through .1 mfd. condenser.
Note 3.--Connect signal generator direct to transmission line terminals.
Note 4.--Turn clockwise to maximum capacity position, then slowly turn counter clockwise until a second peak is indicated on output meter. Adjust to maximum on this peak. Do not use first peak which is caused by image response. If only one peak can be observed on some receivers, adjust on that peak.
Note
5.--Cr.o4n5n-2e3c2t5)
a variable condenser (about 350 across oscillator compensator
mmfd. such as Philco Part (29D) contact (first contact
from left side of receiver, facing rear underside of chassis) and
ground. Tune the external condenser so that second harmonic of
receiver oscillator beats against signal from signal generator. Adjust
(7D) and (19D) under these conditions.
Note 6.--Remove external variable condenser.
Note 7.--Connect external variable condenser (same as in note 5) from oscillator compensator (29B) (third contact from left side of receiver) to ground. Tune this condenser as in note 5 and follow same procedure to adjust (19B) and (7B).
·While rocking.
[55]
�MODEL NO. 37-675 (121, 122)
Signal Generator Connection
Signal Generator Frequency
Dial Position
Wave Band Switch Position
Trimmer Number
Output Signal
Control grid 1.2 470 k.c.
of 2nd i.f.
6K7G
Control grid 2
L'
of 1st i.f.
6K7G
di
11
it
it
Control grid 2
f f
of 6L7G
fi
18 m.c. 11
L' L'
12 m.c.
580 k.c.
Range 1 Broadcast
tt
id dl
18 m.c. 5 17.06 m.c. 18 m.c.7 18 m.c.8 12 m.c.
18
44 if 41
11.0 m.c. de if di
7.5 m.c.
if
18 m.c. 18 ra.c.7 18 m.c.8 17.06 m.c. 11.0 m.c. Range 4 10.06 m.c. 11.0 m.c.8 11.0 m.c.8 7.5 m.c.
fi
if
11.0 m.c.
44
11.0 m.c. 10.06 m.c. 11.0 m.c.8
fi
11.0 m.c.8
CI-70 KC
84P Max.
69T Note 3
68 69S 69T 64P
Max. Max. Max. Max.
64S Max. 44D Note 6 Image check
7D Max. 25D Max. 44D Note 6 44E Max. 25E Max.
7E Max. 44D Note 6
7D Max. 25D Max. 44D Note 6 Image check 44B Max. Image check 7B Max. 25B Max. 44B Max. 44C Max. 25C Max. 7C Max. 44B Max. Image check 7B Max. 25B Max. 44B Max.
[56 ]
�MODEL 37-675 (121, 122) Cont.
Signal Generator Connection
Ant.*
IdCe
a If
u " u
u
li
"
IC if
u u u
41
idgt u u u
Signal Generator Frequency
Dial Position
Wave Band Switch Position
Trimmer Number
',I:0 m.c.
a
,.0 m.c.
di
Z*0 m.c. u
7".0 m.c.
ii
5.0 m.c.
lé
iC
7".0 m.c.
Ran"ge 3
di
u
it if
iigi
42457
44A 25A
7A 42547
.!*5 m.c.
" 1.7 m.c. 4.5 m.c.
4.5 m.c.
ii
ii
1.7 M.C. 4.5 m.c.
" 1500 k.c.
41 IC
580 k.c. 1500 k.c. 1400 k.c.
1000 k.c.
it
ic 1500 k.c.
44
ii
580 k.c. 1500 k.c. 1400 k.c.
(4
Note 10 Note 12
Range 2
it
it
ec u u Range 1
di it
it
di u
Si
4224BA 6A
42C 42B 24A
6A 4224
6 42A 42 246
84S · · ·
Output Signal
Max. MMMaaaxxx... Max. Max. Max. MMaaxx.. MMaaxx.. Max. Max.* Max. Max. Max. MMaaxx..
MMaaxx..* Max. MMaaxx.. Max?' · · ·
OS C.-1.0 MC OSC· 11M.C.G 0.SC,113 M.C. OSC.-I2M.C.
OSC.- -1.5 0$C.- 50M.C.
/woe, 01 C.A,55/5
ost- 4.5 M.C.
OSC:1500 K.C.
osc -sao x.c.
005C.-1.71A.C.
R.F-SOM.C. C
R.F-12
R F-12 M.0
ORR..F--41.40S0M Cc..
M.0
ANT.- 18 M.0 ANT.-11 M C.
®ANT.- a400 K C
I 40 ANT.- 4.5 M.C.
ANT.-1SM. ANT: S OMC ANT.-1.0M.C. 0/ ANT:12 M.C.
[57]
�Note 1.--Allow the receiver to heat for at least 15 minutes before adjusting compensators. Dial scale adjustment: Loosen set screws on shaft coupling of tuning condenser, and turn until plates are in maximumcapacity position. Set glowing beam indicator on index line at lowfrequency end of broadcast band, and tighten set screws. Turn tuning-condenser control until indicator is on first division from index line, and again loosen set screws on shaft-coupling. Without disturbing position of variable-condenser plates, turn dial until indicator is again on index line and retighten set screws in this position. Set receiver volume control at maximum position; tone control counter clockwise; magnetic-tuning switch "off" (counter clockwise); bass-compensation switch on first tap from "off" position.
Note 2.--Through .1 mfd. condenser. Note 3.--Turn clockwise until tight before adjusting (88) and (89S). Note 4.--Connect signal generator direct to transmission line terminals. Note 5.--Set magnetic-tuning control in the "off" position. Note 8.--Turn clockwise to maximum-capacity position, then slowly counter
clockwise until output meter indicates a second peak. Adjust to maximum on this peak. Do not use first peak (due to imagefrequency response). If only one peak can be observed on some receivers, adjust on that peak. Note 7.--Connect a variable condenser (such as Philco Part 245 2325) across oscillator compensator 44D contact (first contact from side of receiver, facing rear underside view of chassis) and ground. Tune this condenser until second harmonic of receiver oscillator beats against the signal from the signal-generator to give a maximum indication on the output meter. Adjust (71)) and (25D) under these conditions. Note 8.--Remove external variable condenser. Note 9.--Connect external variable-condenser (same as in Note 7) across oscillator-compensator (44B) contact (third contact from left side of receiver, facing near underside view of chassis) and ground. Tune this condenser as in Note 7, and follow same procedure to adjust (7B) and (25B). Note 10.--Set magnetic-tuning switch in "off" position. For adjustment of
magnetic-tuning control, carefully tune receiver at 1000 k.c. for maximum indication on output meter. Adjust signal-generator output to a high level. Note 11.--Turn magnetic-tuning control to "on" position (clockwise) before adjusting (84S). Note 12.--To check adjustment, turn magnetic-tuning control to "off." When this is done, there should be no change in tone of the receiver signal. If either a change of tone, or a hiss develops, it indicates a frequency shift and readjustment is necessary. ·While rocking.
[58}
�Signal Generator Connection
Control grid of 2nd if.
Control grid of 1st il.
a a a
Control grid of 1st det.
·
Ant.6
44
·
MODEL NO. 37-690
Signal Generator Frequency
470 k.c.
Dial Position
Wave Band Switch Position
580 k.c.i Range 1
Broadcast
·
Trimmer Number
94S
94P 85S
Output Signal
Max.
Max. Max.
a
44
li
a
a
44
44
de
44
85P Max.
44
81S Max.
a
81P Max.
a
73S Max.
44
Note 2,3 470 k.c.
1500 k.c.
580 k.c. 580 k.c.4 1500 k.c.
44
44
580 k.c. 580 k.c.
1500 k.c. 1500 k.c.
1400 k.c. 1400 k.c.
44
7.0 m.c. 5.0 rn.c. 7.0 m.c.
7.0 m.c. Range 3 5.0 m.c. 7.0 m.c.
5.0 m.c. 5.0 m.c.
7.0 m.c. 7.0 m.c.
(Continued on page 60)
73P 94S 94P 94P 119P 35 51
2 35A 35 51
2 28 28A 28 15
5 28A 15A
5A 28 15
5
Max. Max. Max. Note 3 Min. Max. Max. Max. Max.* Max. Max. Max. Max. Max. Max. Max. Max. Max. Max. Max. Max. Max. Max.
GIc G BASS AMP.
--4
G...r3G 1ST A.F
_
-- 0
SKR.7F.G AMP.
G.15G 2NO.DET.
5 470K.C.
4,34P
MGIOXEGR
fer SJS
47014.C.
e e"G
SI-IGG DISC.
SJ SG IF.-AV.0
II9P ly ©
GK7G A.V. C. AMP
5A8G 05C. o
6N7G
ONTROL
e e 819 8113 470K. C.
SK7G IST. i. F.
o
1 IIP 470(.C.
SEI 8G " RCFr.a
o
[59]
�MODEL NO. 37-690 Cont.
Signal Generator Connection
Signal Generator Frequency
Dial Position
Wave Band Switch Position
Trimmer Number
Output Signal
Ant:3
it dri 14
44
di It it
di it
di
41 di
if
gi
It It
ii
It di it hi
it
it
IC
44 it
ge
it
Note 13
11.0 m.c. 73 m.c. 11.0 m.c.
11.0 m.c. 73 m.c. 11.0 m.c.
Range 4 `.
if
14
11.0 M.C.6
a
If
41
if
73 m.c. 7.5 m.c.T
I!
IC
II
IC
it
if
44
11.0 M.C.
43 m.c.
di
1.7 m.c. 43 m.c.
If it
18.0 m.c.
12.0 m.c. 18.0 m.c.
li
c£ 12.0 m.c.
it
11.0 M.C.6
44
d4
a
43 m.c.7 Range 2
4.
if
ii
1.7 m.c.
di
43 m.c.
44
it
if
18.0 m.c. 17.06 m.c. 12.0 m.c. 18.0 m.c. 18.0 m.c.9
i; 12.0 m.c.T
ti
Range 5
4e If
`c
it
di
it
if
if
if
18.0 m.c.
if If
u
18.0 m.c. 17.06 m.c. 18.0 m.c.9
It
Note 10 Note 11
10,000
cycles
44
44 44
ic
tf
Range 1 · · ·
28B 28C 28B 15B
5B
Max. Max. Max. Max. Max.
28C 15C
5C
Max. Max. Max.
15B Max. 5B Max.
35B 51A
2A
Max. Max. Max.
350 35B 51A
2A
Max.* Max. Max. Max.
28D Note 8 Image check
28E Max. 28D Max. 15D Max.
5D Max.
28E 15E
5E
Max. Max. Max.
28D Note 8 Image check
15D Max. 513 Max.?
119S ...
Max. 12 Min.
Note 1.-Adjust hum control for minimum hum with volume control counter clockwise. Then set selectivity-fidelity control clockwise; bassamplifier control at minimum (counter clockwise), volume control full clockwise; magnetic-tuning control "off."
Note 2.-Set fidelity-control in expanded position. Note 3.-Definite peak indications (on output meter) will appear when signal-
generator output passes through 485 k.c. and 475 k.c. If both are not the same, alight readjustment of (94P) will equalize them. Note 4.-Turn fidelity-selectivity control clockwise (selective position). Note S.-Connect signal generator direct to transmission line terminals. Note 6.-Connect a variable-condenser (such as Phi'co 345-2325) front oscillator compensator (28B) (third contact from left, rear underside view of r.f. unit) and ground. Tune this condenser until second harmonic of receiver oscillator beats against signal from signalgenerator to give maximum indication on output meter. Adjust (I5B) and (5B) under these conditions. Note 7.-Remove external variable condenser.
[60 ]
�Note 8.--Turn clockwise to maximum-capacity position, then slowly counter clockwise until output meter indicates a second peak. Adjust to maximum on this peak. Do not use first peak (caused by image response).
Note 9.--Connect external variable condenser (same as in note 13) across oscillator compensator (28D) (first contact from left, rear underside view of r.f. unit) and ground. Tune this condenser as in Note 13, and follow same procedure to adjust (15D) and (5D).
Note 10.--Set signal-generator output to any frequency in the broadcast band and tune receiver accurately to this same frequency.
Note 11.--Set magnetic-tuning control to "on" position (clockwise) before adjusting (119S).
Note 12.--To check adjustment, turn magnetic-tuning control "off" and "on." There should be no change in tone of received signal. If change of tone or hiss develops, it indicates frequency shift, and readjustment is necessary.
Note 13.--Reset 10 k.c. filter adjustment only if tampered with or parts are changed. Use an accurately calibrated audio oscillator. Connect the high side of the audio oscillator to the variable tap on the volume control and adjust the compensator for minimum output.
·While rocking.
OSC 7.0 M.C.
035C.11.0M.C.
05C. 18 MC
@O5C.12M.C. o
005C 75M C
@OSC.5.0M.0
OR.F.7.0M.C. 0
R.F.11.0M.C.
R.F.I8M.C.
OR.F. MC.- o
R.F. 7.5 M.C.
C(2I)) AANNTT..I81M2.CM..C.--111>.,0 C())AANNTT.755MM..CC..
(.;
OSC4.5M.CC1 04----OSC1500K.0 35 mihm I CSC. 580K.0
1
R.RF..F.1440.C5IMK.C0. 0
R.F. 5.0 M.C.
AN T.11.0 M.C. ANT.1400K.0
0
IAANNTT. 74..05MM C C
[61]
�Signal
Generator Connection
Control grid
of 6A8G le
fi
de
Ant. terna.2 SI
U
"
de
ii
14
14
II
de
di di
41
"
te
Ant.Itnerm.6 id
MODEL NO. 37-2620
Signal Generator Frequency
470 k.c.
Dial Position
580 k.c.
Wave Band Switch Position
Trimmer Number
Broadcast 37A
Output Signal
Max.
44
fi
de
If
a
et
de
``
18 m.c.
Id
18 m.c.4
18 m.c. Range 3
5.7-18 m.c.
17.06 m.c.
``
18 M.C.
el
Id
de
di
18 m.c.5
If
ii
1600 k.c. 1600 k.c. Broadcast
44
44
Id
44
44
580 k.c. 580 k.c.
de
1600 k.c. 1600 k.c.
de
et
dé
4t
4t
et
II
1500 k.c. 1500 k.c.
ii
Id
it
de
300 k.c.
di
300 k.c.
if
Range 1 150-350 k.c.
4t
44
U
160 k.c. 300 k.c.
160 k.c. 300 k.c.
Id
160 k.c. 300 k.c.
44 11
160 k.c. 300 k.c.
44 14
37 31A 31 23B
Max. Max. Max. Max.5
Image check
8B
Max.
4B
Max.
23B
Max.
283AA
MMaaxx..
4A
Max.
25
Max.*
23A 8A
Max. Max.
4A
Max.
84AA
MMaaxx..
23
Max.
8
Max.
4
Max.
21
Max.*
23
Max.
8
Max.
4
Max.
21
Max.*
23
Max.
8
Max.
4
Max.
2. DET. I,,AuOOOSC:
I e
6LITEG
r 160K.C. ieues.1.._1
OSC. .300 KG.
If mis
6K Tt&
1 S CI
NT. 300K.t
[62 ]
�Note 1.--Through a .1 mfd. condenser. Note 2.--Link terminals 2 and 3 together. Note 3.--Use lower capacity peak. Note 4.--Connect an external variable condenser. (Phileo Part No. 45-2323)
from the oscillator compensator to ground (First contact from left rear underside view of r.f. unit). Tune the added condenser from the minimum capacity position until the second harmonic of the oscillator beats against the signal to produce maximum output. Note 5.--Remove the external variable condenser. Note 6.--Through a 250 namfd. condenser. ·While rocking.
MODEL NOS. 38, 38A, (121, 122, 123)
Signal Generator Connection
Signal Generator Frequency
Dial Position
Wave Band Switch Position
Trimmer Number
Output Signal
Remove grid clip from det.-osc.
Control
460 k.c.
55
grid of
det.-osc.
t(
di
It
id
St
Connect grid clip to det.-osc.
Ant.2
1500 k.c.
150
600 k.c.
60
(I
2000 k.c.
2.0
a
1500 k.c.
1.5
Broadcast (left)
4f
if
ig
If
Police (right)
ti
4 Max.
3 Max.
2 1
MMaaxx..
8 Max. 5 Max. 7 Max. 81 Max. 91 Max.
Note I.--(8) and (9) are reached through holes from top of chassis gang. Note 2.--Connect a 200-mmf. condenser between the signal generator and the
antenna post of set, at the antenna post.
A
A
A
ISTO.FPRI. ISIM.ESEC.
460 KC
4.60 KC
[63]
�MODEL NOS. 39, 39A
Signal Generator Connection
Signal Generator Frequency
Dial Position
Wave Band Switch Position
Trimmer Number
Output Signal
Remove grid clip from 106
Control
grid of
460 k.c.
5«:5
106
it
if
ef
if
11
it
44
Broadcast (left)
If
if
If
41
Max.
32
Max.
21
Max.
1 2
Max.
Connect grid clip to 106
Ant.* u ei
If
1500 k.c.
él
a
600 k.c.
«g
15 m.c.
44
7 m.c.
le
a
150
,`
it
It
60
``
15 m.c. Short wave
(right)
7 m.c.
5 7 8 8 9 a
10
Min. Max. Max. Max. Max.
Max.
Note 1.--Nut adjustment. Note 2.--Screw adjustment. Note 3.--Reached from underneath chassis.
·Use a 200-mmf. condenser as dummy antenna for broadcast band and a 400-ohm carbon resistor for the shortwave bend.
no I)
03.tWs.m0.mcx..)
0ATNATN.DAHR.cFe. 1500 KO
(0sT5ACNo.A.HR.oF).
1500 KC
SHORT WAVE (MINIM.) 7 M.C·
WAVI TRAP
4Go KC
[64
Goob(c
(SERIES)
(9, ANDARD)
2"DI. F.
04 460 KC.
TMOoPdaVlie3w9
�MODEL NOS. 43, 25
Signal Generator Connection
Signal Generator Frequency
Dial Position
Wave Band Switch Position
Trimmer Number
Output Signal
Remove grid clip from 1st det.
Control
grid of 1st det.
ef
460 k.c. 550 k.c.
te
le
id
de
fi
de
U
U
el
if
le
de
ed
de
Broadcast
«I
ic
le di Id
1
Max.
2
Max.
3 4
Max. Max.
5 6
Max. Max.
Connect grid clip to 1st det.
Ant.*
a
fe
le
7
14
700 k.c. 700 k.c.
ic
8
``
1400 k.c. 1400 k.c.
t`
9
if
le
1400 k.c. Short Wave 10
Min.
Max. Max. Max.
·Use a 200-mmf. condenser as dummy antenna on broadcast band and a 400-ohm carbon resistor on shortwave band.
Note: Never attempt readjustment of other compensating condensers in shortwave range. These are of special construction and will never require such readjustment.
700 K.C.
1400 K.C. SECOND BAND
I'400 K.C. BROADCAST BAND
2ND IF. SEC. 460 K.C.
1ST I.F. PRI. 460 K.C.
1ST IF. SEC. 460 K.C.
3RD I.F. SEC. 460 K.C.
3RD I.F. PRI. 460 K.C.
2ND I.F. PRI. 460 K.C.
[65 1
WAVE TRAP -4+60 K.C.
�MODEL NOS. 44, 504
Signal Generator Connection
Signal Generator Frequency
Dial Position
Wave Band Switch Position
Trimmer Number
Output Signal
Remove grid clip from 6A7
Control grid of
6A7
460 k.c. 520 k.c. a
it
it
II
di
li
it
di
it
It
di
Range 1
7 1
it
98 1 2
It
10 2
it
11
it
12
Max. Max. Max. Max. Max. Max.
Connect grid clip to 6A7
Ant.* `c
44
20 m.c.
it
if
13
20 m.c. Range 4
1
10.8 m.c. 10.8 m.c. Range 3
2
3.6 m.c. 3.6 m.c. Range 2
3
1500 k.c.
1.5 m.c.
4
1400 k.c. 1400 k.c. Range 1 5
520 k.c. 520 k.c.
6
Min. Max. Max. Max. Max. Max. Max.
·Use a 200-rrunf. condenser as dummy antenna on broadcast band and a 400-ohm carbon resistor on shortwave band.
Note 1.--Nut adjustment. Note 2.--Screw adjustment. Caution: The two trimmers on the rear sections of the tuning condenser gang
are correctly adjusted and sealed at the factory. Do not change this adjustment.
if
0 4G-0 ICC
I1, ,,I. F. PRIMARY
IS' IF C CARY
0 400 KC
Fee.,
DO NOT ADJObt
--() 10.0 MC 20.0 MC
3.
1400 KG
$20 KC
�MODEL NO. 45
Signal Generator Connection
Signal Generator Frequency
Dial Position
Wave Band Switch Position
Trimmer Number
Output Signal
Remove grid clip from 6A7
Control grid of
6A7 té
it IC iC
460 k.c.
CC if
CC
CC il
540 k.c. Broadcast (left)
it
IC
i,
i.
d,
CC
iC
it
it
CC
1 1
22 3 42 62
Max. Max. Max. Max. Max. Max.
Connect grid clip to 6A7
Ant.*
ic
540 k.c.
it
Li
1500 k.c. 1500 k.c.
li
if
it
it
dt
it
600 k.c.
600 k.c.
<`
7
Min.
8
Max.
9
Max.
10 3
Max.
·Use a 200-mmf. condenser as dummy antenna on broadcast band and a 400-ohmn resistor on the shortwave band.
Note 1.--Nut adjustment. Note 2.--Screw adjustment. Note 3.--(10) is reached through hole from top of chassis, between the two
electrolytic condensers (left hand end of chassis when facing rear).
[67]
�MODEL NO. 47
Signal Generator Connection
Signal Generator Frequency
Dial Position
Wave Band Switch Position
Trimmer Number
OSuitgnpault
Remove grid clip from det.-osc.
Control
260 k.c.
60
grid of
det.-osc.
it
it
it
4«
it
it
41
it
Connect grid clip to det.-osc.
Ant.*
1400 k.c.
140
if
it
41
it
If
di
600 k.c.
60
di
1400 k.c.
140
1 1
Max.
21
Max.
31
Max.
41
Max.
5
Max.
6
Max.
7
Max.
81
Max.**
5
Max.
Note 1.--Accessible through holes in rear of chassis.
Note 2.--Accessible through hole from top of chassis.
·Connect a 200-nunf. condenser between signal generator and antenna post
of set, at the antenna post. **Adjust while rocking.
44 R.F.
36 DT.-05C.
L. F. GOO K.C.
44-I.F. 37
OEM- RECT.
FRONT
37 IsTAUDIO
37 Z.DAUDIO
ANT1400 K.C. DET. 1400 KC. 43 OUTPUT
H. F. 400 KC. BALLAST
BACK
[68]
�MODEL NO. 48
Signal Generator Connection
Signal Generator Frequency
Dial Position
Trimmer Number
Output Signal
Remove grid clip from det.-osc.
Control
175 k.c.
60
grid of
det.-osc.
IC
If
if
IC
Connect grid clip to det.-osc.
Ant.*
1400 k.c.
140
if
if
IC
it
IC
4`
600 k.c.
60
If
1400 k.c.
140
1
Max.
2
Max.
3
Max.
4
Max.
5 6
Max.
7
Max.
4
Max.
·Connect a 200-mnif. condenser between signal generator and antenna post of set, at the antenna post.
SF/
1511.F. PRIMARY 175 KC
IST.I.F. SECONDARY
I75._KC.
2ND IF.
LOW FREQUENÇY
SECONDARY C1600 KC
175 K.C.
0
I( D
®
[69]
lit Ant. 0 1400 KC
2nd. Ant. 0 1400 KC
High
0
Frequency
1400 K.Ç.
�MODEL NO. 49
Signal Generator Connection
Signal Generator Frequency
Dial Position
Wave Band Switch Position
Trimmer Number
Output Signal
Remove grid clip from 6A7
Control grid of
6A7
260 k.c.
55
dd
Broadcast (Left) cc
it
CC
di
it
it
di
Connect grid clip to 6A7
Ant.*
1500 k.c. 150
cc
it
"
it
a
té
ii
cc
a
a
600
60
cc
11 m.c.
11 m.c. Short Wave
a
dd
(right) di
4
3 2 1
5 6 7 81 91 10 2
Max.
Max. Max. Max.
Max. MMaaxx.. Max. Max. Max.
Note 1.--Located and accessible underneath chassis. Note 2.--Accessible through hole from top of chassis.
·lise a 200-mmf. condenser dummy antenna for broadcast band and a 400ohm carbon resistor for shortwave band.
1st, I.F.
sciy[C®=>SNCURTEW 250 KC
ilodai 49 /be Oeue
C_1O2tirckS, IC.FR.EW C>NUT 2.40 KC
05C.11.F.
1500 KC
DETECTOR 1500 KC
ANTENNA
1500 KC
V" [t70er1 tr
�MODEL NOS. 51, 52, 551, 24
Signal Generator Connection
Signal Generator Frequency
Remove grid clip from det.-osc.
Control grid of det.-osc.
175 k.c.
a
it
di
Connect grid clip to det.-osc.
An4t4 .*
1400 k.c.
`i
600 k.c.
It
1400 k.e.
Dial Position
55
it if
140 60 140
Trimmer Number
Output
Signal
1 1
Max.
21
Max.
3 1
Max.
4
Max.
5
Max.
6
Max.
71
Max.**
4
Max.
Note I.--Accessible through holes in rear of chassis.
·Connect a 200-mmf. condenser between signal generator and antenna post of set, at the antenna post.
·· While rocking.
2. 0 OEM 35 -
24 OM 05C.
COUPLING 175 ICC.
FRONT
1ST ANT. 1400 K.C. ,O-RECT. 2.'"ANT. 1400 K.C.
4/-OUTPUT H. F. 05C. 1400 K.C.
"0 I. F. 175 K.C.
1aSsT
I.F. K.C.
BACK
ea
L. F.05C. 600 K.C.
[71 ]
�MODEL NO. 53
Signal Generator Connection
Signal Generator Frequency
Dial Position
Trimmer Number
Output Signal
Remove grid clip from det.-osc.
Control
460 k.c.
55
grid of
det.osc.
a
41
44
Connect grid clip to det.-osc.
Note 1
1400 k.c.
140
II
600 k.c.
60
II
1400 k.c.
140
it
«
1
Max.
2
Max.
3
Max.
4
Max.
3
Max.
5
Max.
6
Note2
Note I.--Connect receiver to antenna and ground in the usual manner. Connect the signal generator to a wire which is placed near the antenna lead but not connected to it. This procedure is for the purpose of obtaining maximum sensitivity from the receiver.
Note 2.--Turn to right as far as possible without causing an oscillation or squeal. Check for oscillation at all points in band. If set oscillates at any point in the band, back off (6) until squeal disappears.
00 0
A
A
A
LOW
SENSITIVITY IF.
FREQUENCY 1400 Kt. PRIMARY
600 KC.
460 K.C.
0 \® I.F. SECONDARY
460 K.C.
HIGH
1400 K.C. Q.)
ANTENIWAr,-N 1400 KC.V.)
[72 1
�MODEL NO. 54
Signal Generator Connection
Signal Generator Frequency
Dial Position
Wave Band Switch Position
Trimmer Number
Output Signal
Remove grid clip from 6A7
Control grid of
6A7
44
460 k.c.
II
55
Broadcast
1
Max.
li
gi
2
Max.
44
If
3
Max.
41
it
4
Max.
Connect grid clip to 6A7
Ant.*
1400 k.c.
140
a
it
14
600 k.c.
60
1400 k.c.
140
di
51 Max.
It
1
Max.
té
7 2
Max.**
it
51 Max.
Note 1.--Padders (5) and (6) are accessible through the top grille of cabinet. N·otUese2.-- aP1a00d-dmemrf.(7)coinsdeancsceesrsiabsledfurmommyreaanrteonfnac.abinet. ** While rocking.
LOW FREQUENCY OSCILLATOR GOO KC
1ST 1.F.
PRIMARY 046K0 C
151. 1.F
SECONDARY 0 4K6C0
2.N 0 1.F. PRIMARY
4K6C0
VI I.F SECONDARY (\",_;t) .4-KcCo
:73]
HIGH 0 FREQUENCY OSCILLATOR 14 00 KC
HIGH FREQUENCY R.F.
1400 KC
�MODEL NOS. 57, 58
Signal Generator Connection
Signal Generator Frequency
Dial Position
Trimmer Number
Output Signal
Remove grid clip from det.-osc.
Control
460 k.c.
55
grid of
det.-osc.
a
ii
if
1
Max.
2
Max.
Connect grid clip to det.-ose.
Ant.*
1400 k.c.
140
di
éi
u
600 k.c.
60
di
1400 k.c.
140
if
if
dd
460 k.c.
if
d;
ii
if
di
1400 k.c.
dd
3
Max.
4
Max.
5
Max.*
3
Max.
6
Note 1
1
Max.
2
Max.
6
Note 1
Note I.--Turn fibre screw in clockwise direction until receiver goes into oscil-
lation, giving a squeal when various stations are passed with the station selector. Then turn screw counter-clockwise until the "swishing" sound just ceases. Continue to turn in the same direction about 14, revolution beyond this point. Tune to different stations over the dial, noting if squeal is present at any point. If so, turn screw further counter-clockwise until squeal ceases. For best average operation, this screw should be turned back from % to I turn, except where extreme selectivity is required. When the 2nd det. tube is replaced, this adjustment should be repeated. Use a 100-minf. condenser as dummy antenna. **While rocking.
® OSC. 1400 KC
() ANT. 1400 KC
®PRIMARY 4G0 KC
LOW FREQUENCY ® 600
KG
I.F. SECONDARY
0 460 KO
[74
REGENERATION 6 1400
KC
�MODEL NO. 59
Signal Generator Connection
Signal Generator Frequency
Dial Poaition
Trimmer Number
Output Signal
Remove grid clip from det.-osc.
Cgornitdroofl det.-«osc.
460 k.c. «
Connect grid clip to det.-osc.
Ant.*
1400 k.c. Id
Note 3
Note 3
60 « Note 1 gg Note 3
2
Max.
1
Max.
32
Max.
42
Max.
5
Note 4
·Use a 100-mmf. condenser as dummy antenna.
Note 1.--Remove chassis from cabinet (removing base-plate, knobs, pointer,
settca.t)i.onaTruyrpnlatveasr.iable condenser until rotor plates barely mesh with
Note 2.--These trimmers are located on the tuning-condenser gang. Be sure
to replace dial-pointer exactly as it was removed.
Note 3.--Connect antenna to receiver and tune in a signal near 1300 k.c.
Note
4.--Turn fibre Then turn stations on
dbhiaefcfxke-rhee%nat dproesivcnortlseuwtailoconlnogucnkttwihilesesscqauulneeta,illinnosgteitnsgtoospicfsi.lslqautTeesualnoeirs
squeals. in other present.
If so, turn back slightly until all squealing ceases. Readjust this con-
denser whenever the det.-ose, tube is changed.
[75]
�MODEL NOS. 60, 505
Signal Generator Connection
Signal Generator Frequency
Dial Position
Wave Band Switch Position
Trimmer Number
Output Signal
Remove grid clip from 6A7
Control
460 k.c.
55
grid of
6A7
if
44
di
di
Connect grid clip to 6A7 Ant.*
IC
1400 k.c.
140
44
de
600 k.c.
60
1400 k.c.
140
C'
Note 3 Low-freq.
end
Broadcast
1 Max.
di
2 Max.
Id
3 Max.
i`
if t. 4(
i` Police
Wave 1 Min. Trap
H.F. Om= Max. Ant.= Max. 4 Max.**
H.F.Osc. Max.
5 Max.
Note 1.--Wave trap in series with antenna was not used on early production. Note 2.--H.F. osc. and ant, trimmers are located on tuning-condenser frame--
the ant, trimmer is nearest front of chassis. Note 3.--Set signal generator frequency to same as point on dial chosen near
low frequency end. Adjustment of (5) will correct the dial calibration.
·Connect a 200-mmf. condenser between signal generator and antenna post of set, at the antenna post.
While rocking.
2" I.F. PRI. 460 KC
ISTO.F. SEC. 0 460 KC
I.F. PRI. 0460 KC
L.F.(POLICE) L.F. GOO KC
[76 ]
�MODEL NO. 65
Signal Generator Connection
Signal Generator Frequency
Dial Position
Wave Band Switch Position
Trimmer Number
Output Signal
Ant.*
di
1400 k.c.
it
140 1
tf
Ant.= R.F.2 Ant.=
Note 3 Max. Max.
Note 1.--Tune for maximum output. Note 2.--Located on inside back of tuning-condenser gang--accessible through
opening in back of frame. Note 3.--Turn trimmer all-in to purposely upset alignment. ·Connect a 200-mmf. condenser between signal generator and antenna post of
set, at the antenna post,
MODEL NOS. 76, 77
Signal Generator Connection
Signal Generator Frequency
Dial Position
Wave Band Switch Position
Trimmer Number
Output Signal
Antté .*
140`0, k.c. ``
140 1 g;
Ant.= R.F. 2 Ant.=
MNoatxe. 3 Max.
*Connect a 200-mmf. condenser between the signal generator and the antenna post of set, at the antenna post.
Note I.--Tune for maxinium output. Note 2.--Located behind the right-hand end of gang-condenser assembly and
accessible from top of chassis. Note 3.--Turn all the way in to upset alignment. CAUTION: Do not attempt to adjust the other two trirnmers located on 3rd
r.f. and det. coils. These are set at factory with special signalgenerator equipment and sealed.
MODEL NOS. 82, 86, 87
Signal Generator Connection
Signal Generator Frequency
Dial Position
Wave Band Switch Position
Trimmer Number
Output Signal
Anitg .*
4C
di
if
de
1300 k.c.
0 0
di
0
di
Note 1
0 0 a
di
NOie 3
0 ir
RD.nF..=2 R.F. 3rd R.F. neut. 2nd R.F.4 1snteRu.tF..
neut.
MMaaxx.. Max. Min.
Min.
Min.
·Connect a 200-mmf. condenser between the signal generator and the antenna post of set, at the antenna post.
Note 1.--Advance volume control and tune sharply for maximum output. Note 2.--Located in front of the tuning-condenser gang. Note 3.--Use "dummy" 226 tube-1 filament prong cut-off. Note 4.--Neutralizing condensers are in back of condenser gang. These adjust-
ments are critical--use extreme care, and have volume control on full.
[77 ]
�MODEL NO. 66
Signal Generator Connection
Signal Generator Frequency
Dial Position
Wave Band Switch Position
Trimmer Number
Output Signal
Remove grid clip from 6A7
Control grid of
6A7
460 k.c.
If td IC
55
Broadcast
4
Max.
(left)
Id
di
3
Max.
di
di
2
Max.
id
di
1
Max.
Connect grid clip to 6A7
Ant.*
di
5
Min.
I<
1700 k.c.
170
7
Max.
It
id
6
Max.
di
600 k.c.
60
C'
8
Max.
Use a 200-mmf. condenser as dummy antenna for broadcast band and a 400-ohm carbon resistor for shortwave band.
Note 1.--Accessible from underneath chassis.
I.E EEC 2,
4K6C 0
PRI.
4K4C 0
1`; I.F.SEO.
® 4 OKC
(p.m IST,LFPR.1.
WAVE TRAP 0460 KC
77efr«.1Fee».
[78 ]
Model 66
Bottorff W U)
�eB22,000), MODEL NOS. 70 (below ser.
270, 370, 570
Signal Generator Connection
Signal Generator Frequency
Dial Position
Wave Band Switch Position
Trimmer Number
Output Signal
Remove grid clip from 1st det.
Control
260 k.c.
55
grid of
1st det.
44
it
I!
Connect grid clip to 1st det.
Ant.*
1400 k.c.
140
44
44
«i
it
44
600 k.c.
60
1400 k.c.
140
1 Max. 2 Max. 3 Max. 4 Max. 5 Max. 6 Max. 7 Max.** 4 Max.
·Connect a 200-mmf. condenser between signal generator and antenna post of set, at the antenna post.
·· While rocking.
24 -R.F.
L.P. OC. GOO K. C.
FRONT
24 IST PET. 27-05C
24 1s'T I.F.
24-2"DIDET.9 4'7-OUTPUT
R.F. 1400 K.C. _(J' 0E7. `;:./1400K.C. SO-RECT. \I-1.F. 05C. \::*) 1400 K.C·
i
lS2T
I.F. 40
PR1. K.C.
BAC bc.
IST I.F.SEC Z.60 K.C.
2.. Der SEC. 2.GO K.C.
[79 ]
�MODEL NOS. 71, 70 (above serial #B22,000), 270. 370, 570, 22, 22L
Signal Generator Connection
Signal Generator Frequency
Dial Position
Remove grid clip from det.-osc.
Control
260 k.c.
55
grid of
det.-osc.
di
di
di
di
di
di
di
Connect grid clip to det.-osc.
Ant. di
1400 k.c.
140
di
di
di
600 k.c.
60
di
1400 k.c.
140
Wave Band Switch Position
Trimmer Number
Output Signal
1 Max.
· · ·
2 Max. 3 Max. 4 Max.
5 Max. 6 Max. 7 Max. 8 Max.** 5 Max.
·Connect a 200-mmf. condenser between signal generator and antenna post of set, at the antenna post.
·· While rocking.
44 -R.F.
DETÓSC. --00 10.%?<5.g..0
44 - 1. F. 37- 2.00ET
1"1.F.SEC .¡,;\ 240 K.C. IsTLF FRI. 2.60 K.C.
L IEI jr-FRONT
..;\ R.F. O\LO)C14T0.0K.C.
0
o- 1400 K.C. BO-RECT.
Q0-
BACK
Î,lià0. 1.CC.. 4Z- OUTPUT
O44-1 ST AUDIO 2Z"GOI.F. PR'
02..I.F. SEC. 260 K.C.
[80 ]
�MODEL NO. 80
Signal Generator Connection
Signal Generator Frequency
Dial Position
Wave Band Switch Position
Trimmer Number
Output Signal
Remove grid clip from det.-osc.
Control
460 k.c.
55
grid of
det.-osc.
de
it
if
Connect grid clip to det.-osc.
Ant.*
1400 k.c.
140
it
C
a Note 1
ilIt
600 k.c.
60
1400 k.c.
140
Note 1
Note 1
1 Max.
2 Max.
3 4
MMaaxx..
5 Max.**
3 Max.
6 Note 1
Use a 100-mmf. condenser as dummy antenna. While rocking.
Note 1.--Connect antenna to receiver. Tune in station, first at about 130 and adjust (6) to a point just before squealing nails. Tune in stations along other points on dial. If squealing is present at any point readjust (13) slightly until there is none at any point along dial. This adjustment may have to be changed if set is moved to different location or if antenna length or 2nd det. tube is changed.
o
® LOW FREQUENCY
GOO KC
0 I.F. PRIMARY 460 K.C.
1F @ SECONDARY
460 K.C.
? SENSITWITYCZ)
0 ANTENNA
1400 K.C. NIGH 0
FREQUENCY 1400 K.C.
[81 ]
�MODEL NO. 81
Signal Generator Connection
Signal Generator Frequency
Dial Position
Wave Band Switch Position
Trimmer Number
Output Signal
Remove grid clip from det.-osc.
Control grid of det.-osc.
460 k.c.
55
if
Broadcast
Connect grid Ant.*
44 it
a
Note 1
clip to det.-osc.
1400 k.c.
140
if
if
600 k.c. 1400 k.c. 2400 k.c. 1700 k.c. Note 1
60 140 2400 k.c. 1700 k.c. Note 1
if it fi it
Police ot
Broadcast
1 Max. 2 Max. 3 Max. 4 Max. 5 Max.** 3 Max. 6 Max. 7 Max. 8 Note 1
Uso a 100-rnmf. condenser as dummy antenna. While rocking. Note 1.--Connect antenna to receiver. Tune in station, first at about 130 and
adjust (8) to a point just before squealing starts. Tune in stations along other points on dial. If squealing is still present, back off (8) slightly until there is none at any point along dial. This adjustment may have to be changed if antenna length or 2nd det, tube are changed.
0 ANTENNA
1400 K.C. HIGH
FREQUENCY 14-00 K.C.
o F(DOUCE)
eco -- j_JJ
1700 KC CI
fr
1.F. SECO
460 KC
IF PRLO
460 n
SENSITIVITY
[82]
�MODEL NO. 84
Signal Generator Connection
Signal Generator Frequency
Dial Position
Wave Band Switch Position
Trimmer Number
Output Signal
Remove grid clip from det.-osc.
Control
460 k.c.
60
grid of
de t.-osc.
44
4(
it
2
Max.
1
Max.
Connect grid clip to det.-osc.
Ant.*
1500 k.c.
150
``
600 k.c.
60
i(fg
1400 k.c.
140
44
3
Note 1
3
Note 2
4
Max.
5
Max.
·Use a 100-mmf. condenser as dummy antenna.
Note 1.--Turn fibre nut clockwise until squealing starts. Then turn back 1/2
Note
turn to left. 2.--If squealing is
present,
turn
nut
back
half-turn
from
squealing
point.
Note 3.--The final adjustment of (3) should be made with the receiver con-
nected to the antenna. Adjust (3) so that the receiver does not
squeal at any point in the band.
Node 84 Tbe eau
[83]
�MODEL NOS. 90, 90A, (with 2-45), (with 1-47)
Signal Generator Connection
Signal Generator Frequency
Dial Position
Remove grid clip from 1st det.
Control grid of let det.
4(
Note 1
55
it
té
if
if
Connect grid clip to 1st det.
Ant.*
1400 k.c.
140
I(
6i
ig
et
it
if
If
``
600 k.c.
60
ii
1400 k.c.
140
Wave Band Switch Position
Trimmer Number
Output Signal
1 Max.
2 Max. 3 Max.
5 4
MMaaxx..
6 Max.
7 Max.
8 Max.**
5 Max.
·Connect a 200-mmf. condenser between signal generator and antenna post of set, at the antenna post.
'1 While rocking. Note 1.- 175 k.c, for models with two 453 and 260 k.c. for models with one 47.
MODEL 90(1-41) I.F. PEAK 260 K.C. MODEL 90(Z-45) 1.F. PEAK 175 K.C.
r-- FRONT
teo.g. a. 0
1sTI.F.P121. 0
o
0
O11s4T0A0NKT..C.
aN0000
OZ1.4"0A0NKT..C.
(Z\ H.F. OW`..;:y 1400 K.C.
.2.10sLF. 5EC.C)
0
0
/70 " DEI. V.1.-) 1400 KC.
BACK
72
[84 1
�MODEL NOS. 90, 90A (with 2-47)
Signal Generator Connection
Signal Generator Frequency
Dial Position
Wave Band Switch Position
Trimmer Number
Output Signal
Remove grid clip from det.-osc.
Control
260 k.c.
55
grid of
det.-osc.
di
II
ii
it
if
if
ii
Connect grid clip to det.-osc.
Ant.*
1400 k.c.
140
it
if
IC
·I4
it
600 k.c.
60
1400 k.c.
140
1 Max.
2 Max. 3 Max. 4 Max.
5 Max. 6 Max. 7 Max.
8 Max.**
5 Max.
·Connect a 200-mmf. condenser between signal generator and antenna post of set, at the antenna post.
·· While rocking.
IsTI.F. PR1. 260 K.C.
35 -R F.
24 DT. -OSC.
Z"0 /.F. PRI. ZGO g.c.
I
SEC·
ZGO K·C·
35 - I.F.
VT PET.- RECT.
FRONT
400 KO. CET. 1400 K.C.
ao RECT.
47'3-OUTPUT
Z7- AMPL
27-AMP. 11. F. 05C. 1400K-C.
73
I.F. SEC. 260 K.C.
[85 ]
�MODEL NOS. 91, 14 (221, 222), 23, 23X
Signal Generator Connection
Signal Generator Frequency
Dial Position
Wave Band Switch Position
Trimmer Number
Output Signal
Remove grid clip from det.-osc. tube
Control
260 k.c.
55
Broadcast
grid of
det.-osc.
tuibg e
a
i£
et
U
"
ii
g4
``
"
4£
de
1 Max.
2 Max.
3 4
MMaaxx..
Connect grid clip to det.-osc. tube
Ant.* if
if Ci
1400 k.c.
140
it
if
CC
600 k.c.
60
1400 k.c.
140
5
Max.
6
Max.
7
Max.
CC
8
Max.**
5
Max.
"Connect a 200-mmf. condenser between signal generator and antenna past of set, at the antenna post.
"" While rocking.
44 R. DET.3-G05C.
PR1.-1wf 1.F 260 K.C.
0ZFRGIO.-Ka.C".0 1.. F.
SEC.- 167 I.F. ZGO K.C.
44 I.F.
FRONT
37 OCT.- RECT.
37 DET.-AMPL.
R.F. 1400 KZ. DET. 1400 KZ. H. F. 1400 K.C. 80 RECT.
42 OUTPUT 42 OUTPUT
37 ·Isl'Auoi0
L. F. GOO K.C.
BACK 74
SEC.-2 4eL. F. 240 KC.
[86 ]
�MODEL NO. 97
Signal Generator Connection
Signal Generator Frequency
Dial Position
Wave Band Switch Position
Trimmer Number
Output Signal
Remove grid clip from 6A7
Control grid of
6A7
if
it
`i
460 k.c.
550 k.c.
Range 1
39
(left)
it
37
it
tt
34
if
it
32
Max.
Max. Max. Max.
Connect grid clip to 6A7
Ant.*
it
18.0 m.c.
it
di
if
18.0 m.c. Range 3
(right)
di
it
it
it
3600 k.c.
3.6 m.c. Range 2
(center)
if
it
li
if
it
id
1800 k.c. 1600 k.c.
it
1.8 m.c. 1600 k.c.
di
ii
Range 1 (left)
it
tt
it
600 k.c.
600 k.c.
``
2 21
14 6
22
15 5
23 24
16 4
25
Min.
Max.
Max. Max. Max.
Max. Max. Max. Max.
Max. Max. Max.
·Use a 200-mmf. condenser dummy antenna for broadcast band and a 400ohm carbon resistor for the shortwave band.
GROUND,
6.A.7
ANTENNA
05C. Hf. STANDARD
1600 KC
05C.H.E POLICE 3600 KC
AVE TRAP
460 KC
LE.STANDARD(sc Inv) GOO KC
LE POLICE (muT) 1800 KC
3600 KC
A T.
poucE,
SHORT WAVE
18 M C
3600KC
R E POLICE
RF. 1600n ANDARD
P.E SHORT WAVE ?,s mc
�MODEL NO. 116 (121, 122)
Signal Generator Connection
Signal Generator Frequency
Dial Position
Wave Band Switch Position
Trimmer Number
Output Signal
Remove grid clip from 1st det.
Control
460 k.c.
55
grid of 1st det.
If
Range 2
id
IC
CC
CC
dC
fi
id
fi
id
d!
di
if
Connect grid clip to 1st det.
Ant.*
If
18.0 m.c. 18.0 m.c.
d<
ft
9.5 m.c.
9.5 m.c.
Range 5 lC
Ran`.ge 4
4.0 m.c.
4.0 m.c. Range 3
CC
1600 k.c. 1500 k.c.
600 k.c. 340 k.c. 175 k.c.
f.
1.6 m.c. 1500 k.c.
600 k.c. 340 k.c. 175 k.c.
it
Range 2 di if di
Range 1 If
54 1 59 57 53 51 50 48 54
1 28
9 18 29 10 19 30 11 20 30A 31 12 21 31A 32 32A
Max. Max. Max. Max. Max. Max. Max. Min. Max. Max. Max. Max. Max. Max. Max. Max. Max. Max. Max. Max. Max. Max. Max. Max.
·Use a 200-mmf. condenser dummy antenna on broadcast band and a 400ohm resistor on the shortwave band.
Note I.--Turn all the way down.
r.lE TE_RRE/
'17'
11
Il
mil
riete.C,,,A.STI
SEcI25112
POUCE--
(MUT)
OSC.SER1E
(SCREW Hf. NnUiTo.nsL.)F.
[88 ]
�MODEL NOS. 118 (121, 123), 507
Signal Generator Connection
Signal Generator Frequency
Dial Position
Wave Band Switch Position
Trimmer Number
Output Signal
Remove grid clip from 6A7
Control
260 k.c.
55
grid of
6A7
it
it
it
di
It
it
it
it
it
Broadcast (left)
it ft it
Connect grid clip to 6A7 Ant.* 1500 k.c.
IC
it
it
600 k.c.
ic
11 m.c.
di
150
it
if
it
60
if
11 m.c. Short Wave
(right)
41
32 2
12
5 6 7 8 9 10
11
Max.
Max. Max. Max.
Min. MMaaxx.. Max. Max. Max. Max.
·Use a 200-mmt. condenser dummy antenna on broadcast band and a 400ohm carbon resistor on shortwave band.
Note 1.--Nut adjustment. Note 2.--Screw adjustment.
[89 ]
�MODEL NOS. 144, 506
Signal Generator Connection
Signal Generator Frequency
Dial Position
Wave Band Switch Position
Trimmer Number
Output Signal
Remove grid clip from 6A7
Control
460 k.c. 520 k.c.
grid of 6A7
CC
if
t4
IC
it
CC
CC
CC
IC
CC
it
Range 1 71
CC
g 2
CC
91
IC
10 2
CI
11 1
it
12 2
Max. Max. Max. Max. Max. Max.
Connect grid clip to 6A7
Ant.*
ig
de
it
13
CC
20.0 m.c. 20.0 m.c. Range 4 1
e«
11.0 m.c. 11.0 m.c. Range 3 2
g«
3.5 m.c. 3.5 m.c. Range 2
3
CC
1500 k.c.
1.5 m.c.
a
4
e«
1400 k.c. 1400 k.c. Range 1 5
le
520 k.c. 520 k.c.
IC
6
Min. Max. Max. Max. Max. Max. Max.
Do not attempt to adjust the two end trimmers shown on tep -view. These
have been adjusted and sealed at the factory.
·Use a 200-mmf. condenser dummy antenna on broadcast band and a 400-
ohm carbon resistor on the shortwave band.
Note 1.--Nut adjustment.
Note 2.--Screw adjustment.
A
A
A
2ND. 1.F.
PRIMARY-SCREW SECONDARY- NUT 00 AGO AC
PRIMARY-SCREW CONDARY-MUT 440 NC
Ossoac
DO NOT ADJUST
[90 1
11.0 MC RANGE 3
20.011C RANGE4 Th. wew
�MODEL NO. 200
Signal Generator Connection
Signal Generator Frequency
Dia/ Position
Wave Band Switch Position
Trimmer Number
Output Signal
Remove grid clip from 6A7
Control grid of
6A7
it
di it
175 k.c.'
di di ii
it
U
di
U
it
di
if
U
di
U
tt
U
ii
Note 7
Connect grid clip to 6A7
550 k.c.
it it il
tt if
ii
u
di if et
Note2
...
Isitiie 4 Note 5 Note 6
1
Min.8
2 Min. 3 Min.
4 5
MMiinn..
6 5
MMiinn..
6 Min.
7 Max.
8 Max.
6 Note 7
Ant.*
it
"
id
It
``
1500 k.c.8
ti
u
If
té
600 k.c.
1500 k.c.
if
u
It
it
600 k.c.
Note 9 ... ···
9 10
11 1112 n 13 12
Min. Min.
Note 10 Mmiinn.. min.
Note 14
10 k.c.
14
Note 13
15
Min.
·Connect a 200-mmf. condenser between signal generator and antenna post of set, at the antenna post.
Note 1.--Adjust signal-generator to give an unmodulated output, which should be regulated to give a reading of about two volts on the voltmeter scale (see note 3) during the first six i-f. adjustments.
Note 2.--Turn fidelity-selectivity control all the way to the left. Note 3.--The usual output meter cannot be used with an unmodulated signal.
Use indirect indication through a.v.c. system (for all adjustments unless otherwise noted) by connecting a high-resistance voltmeter (scale 0-5 or 0-10 volts) across the r.f. cathode resistor. This method will give minimum scale reading for maximum receiver output, and vice-versa. The voltmeter will indicate about 3 volts bias when no soifgnsailgnails. applied to the antenna and will decrease upon application Note 4.--Connect 250-mmfd. condenser from plate of second i-f. tube to ground. This increases voltmeter reading to about 2.5 volts. Note 3.--Remove the 250 mmfd. condenser (note 4). Do not touch the grid padder (5) again.
m1E1 PRI0MARY I;Ii SECONDUY
[91 ]
�Note 6.--Turn fidelity-selectivity control all the way to the right. Note 7.--When varying the frequency of signal-generator, two definite dips
will appear in the voltmeter reading--one at 167 k.c. and the other at 182 k.c., indicating peaks in the tuning curve. The amplitude of both peaks should be equal (same voltage reading at each frequency). Variations can be corrected by slight readjustments of trimmer (8). If peak at 187 k.c. is higher than that at 182 k.c. turn (6) out (decrease capacity), and vice-versa. Note 8.--Regulate signal generator output to maintain voltmeter reading of 2 volts during adjustment of (9) and (10). Note 9.--Turn fidelity-selectivity control all the way to the left. Note 10.--Turn "in" until voltmeter reads 2.5 volts. Note 11.--After this adjustment, do not touch trimmer (12) again. Note 12.--Since the r.f. tuning is broad, there will be considerable range on
dial that gives same output when (13) is adjusted for maximum receiver output. Adjust trimmer (13) at the middle of this range as follows: Start with the usual 2 volt reading, and slowly turn receiver dial toward low-frequency end, while at the saine time readjusting (13) for maximum receiver output, until a point is reached where voltmeter indicates 2.5 volts. Carefully note dial reading at this point. Follow same procedure while turning the receiver dial in the opposite direction until voltmeter again indicates 2.5 volts. Set the dial in the exact center between these two points for the final adjustment of trimmer (13). Note I3.--Adjust (14) to give minimum width on shadow-tuning meter of the receiver. Note I4.--The accurate adjustment of the 10 k.c. audio filter requires a calibrated audio oscillator. Connect the low side of the audio oscillator to ground and the high side to the variable tap on the receiver volume control.
MODEL NOS. 201, 509
Signal Generator Connection
Signal Generator Frequency
Dial Position
Wave Band Switch Position
Trimmer Number
Output Signal
Remove grid clip from 6A7
Control grid of
6A7
260 k.c.i 550 k.c.
di
if
44
a
`1
0
Broadcast 2 (left)
4i Il
di
di
di
id
Ii
di
id
ii
ii
l4
a
260 k.c.e
0
``
dl
260 k.c.e. 9
di
ii
U
ii
ii
di
if
Note 10
di
a
Connect grid clip to 6A7
Ant.
260 k.c.11,
0
di
Ant.12
1500 k.c. 1500 k.c.
0
id
ii
ii
If
g( Ant.ie
44
It
600 k.c. 11.0 m.c.
0
li
di
600 k.c.
Id
11.0 m.c. Short Wave
(right) 10.48 m.c.
a
Note 16
U
11.0 M.C.
U
10 k.c.
· · ·
[92 ]
1
MM. 5
2 Min. 3 Min. 4 Min. 54 Min. 65 Min. 7 Note 7 8 Max. 9 llfax. 8 Note 10
10 11 12 13
14 15 14
Max. Min. Min. Min.
Min.* Max.15
Image check
16
Max.
17 Min.
�Note I.--Adjust signal generator to give an unmodulated output, which should be regulated to give a reading of about two volts on the voltmeter scale (see note 3) during the first four i-f. adjustments.
Note S.--Turn fidelity-selectivity control all the way to the left. Note 3.--The usual output meter cannot be used with an unmodulated signal.
Use indirect indication through a.v.c. system (for all adjustments unless otherwise noted) by connecting a high-resistance d.c. voltmeter (scale 0-5 or 0-10 volts) across the r.f. cathode resistor. This method will give minimum acole reading for maximum receiver output, and vice-versa. The voltmeter will indicate about 3.5 volts bias when no signal is applied to the antenna and will decrease upon application of signal. Note 4.--Connect 500 nunfd. condenser from plate of second i-f. tube to ground. Note 5.--Remove 500 mmfd. condenser (note 4) from plate of second i-f. tube and connect across the third i-f. secondary. Remove this condenser after adjustment is completed. Note 8.--Set signal-generator for maximum output. Note 7.--Acedijvuers.t (7) to give minimum width on shadow-tuning meter of reNote 8.--Set signal-generator output to give reading of 2 volts on voltmeter. Note 9.--Turn fidelity-selectivity control all the way to the right. Note 10.--When varying signal-generator frequency through 253 k.c. and 287 k.c., a definite peak on the voltmeter should be noted for each. If these two readings are not the same, they can be equalized by slight readjustment of (8). Note 11.--Turn fidelity-selectivity control all the way to the left. Note I2.--Through 250 mmfd. condenser. Note 13.--Through 400 ohm resistance. Note 14.--Remove voltmeter from r.f. cathode resistor and connect regular output meter to plates of output tubes in the usual manner for adjustment of (15), (18) and (17). Note 15.--Use "lower capacity peak" for adjustment of (15) to maximum indication on output meter. Neglect "higher-capacity peak." Note 113.--The accurate adjustment of the 10 k.c. audio filter (17) requires a calibrated audio oscillator. Connect the low side of the audio oscillator to ground and the high side to the variable tap on the receiver volume control. ·While rocking.
ISTLF.TERTIARY e£1,
PRI. 9T.I.F. SEC. 0 05C.L.F. 2"0 IF PR'.
21`1.FSEC 2.··LFTERTIARY 10 KCFILTER Sim I.F. SEC. 32De F. PRI.
[93]
C S1141 OSC.H.F.
�MODEL NO. 511
Signal Generator Connection
Signal Generator Frequency
Dial Position
Wave Band Switch Position
Trimmer Number
Output Signal
Ant.*
If If
If if Ii
1300 k.c.
Ii 14
If if If
Note 1
44 If
If di If
1 2
MMaaxx..
3
Max.
42
Min.
52
Min.
6 2
Min.
·Connect a 200-mmf. condenser between eignal generator and antenna post of set, at the antenna post.
Note 1.--Leave volume control full on. Tune sharply for maximum output. Note 2.--The a dummy 226 tube (one filament prong cut off) in the stage
being neutralized. Neutralizing adjustments are critical and must be accurately made.
[94 ]
�MODEL NO. 600
Signal
Signal
Generator
Generator
Dial
Connection
Frequency
Position
Remove grid clip from se
Wave Band Switch Position
Trimmer Number
Output Signal
Control grid of
6A7
ie
460 k.c. 550 k.c. ``
Connect grid clip to 6»
23
Note 1
18
Max.
20
Max.
23
Note 2
Ant.* it it
1800 k.c. 600 k.c.
Note 3
ft
600 k.c.
· · ·
5
Max.
6
Max.
16
Max.
·Use a 100-mtnf. condenser as dummy antenna.
Note l.--Adjust to about 11 /2 turns counter clockwise from "tight" position. Note 2.--Turn clockwise until a hiss (oscillation) is heard. Then turn counter
clockwise until hiss ceases and continue for 1/2 turn more. Note 3.--Turn variable-condenser gang all the way out of mesh. Place .008"
gauge between stator and rotor plates. 'Turn rotor plates until gauge touches both stator and rotor plates. Reset dial pointer (if necessary) to read 1800 k.c. at this step. Then remove gauge.
[95 ]
�MODEL NO. 602
Signal Generator Connection
Control grid 1 of i.f.
id
Control
grid 1 of 6A7
di
Ant.* `i
U
``
Signal Generator Frequency
460 k.c.
Dial Position
Wave Band Switch Position
550 k.c.
Trimmer Number
28
Output Signal
Max.
di
di
di
di
29
Max.
21
Max.
di
ii
1800 k.c.
a
600 k.c.
di di
Note 2
GOO k.c.
...
23
... Wave trap
...
4A
. . .
6A
8
Max. Min. Max. Max. Max.
·Use a 100-mmf. condenser as dummy antenna.
Note 1.--Through .00025 mid. condenser. Note 2.--Place .006" gauge between stator and rotor plates (after turning
condenser gang to minimum capacity position). Then turn condenser gang until stator and rotor plates both touch the gauge. Reset dial pointer (if necessary) to read 1800 k.c. at this step. Remove gauge.
O4UT3PUT
2"D.O7ET5 ,IFT MON OlPsRtI.c44660oKKC4.
©56C.460KC. OPRI.460 KC.
GA-7
DET,O3C.
41E, R2E5CT-I7F:IE5R
I.7F 8AMR 'VOONL-UOMFFE-CSOWNITTRCHOL SSTEALTEICOTNOR.
SCI800KC.
[96
�MODEL NO. 604
Signal Generator Connection
Signal Generator Frequency
Dial Position
Wave Band Switch Position
Trimmer Number
Output Signal
Control grid 1 of ii.
44
Control grid of
6A7
II
Ant.*
if
id
44
di
it de di
460 k.c. 550 k.c. Broadcast 33 (left)
it
it
it
35
23
Max.
Max. Max.
di
CI
u
if
CI
a
18 m.c.
18 m.c.2 Short Wave
(right)
td
18 m.c.2
18 m.c.4 17.1 m.c.
If
6.0 m.c. 6.0 m.c.
18.0 m.c. 18.0 m.c.
CC
1600 k.c. 1600 k.c. Broadcast
(left)
CC
IC
1400 k.c. 1400 k.c.
580 k.c. 580 k.c.
it
25
Max.
2 Min.
17
Max.
9 Max.
Image check
11
Max.
9 Max. 8 Max.
16
Max.
16
Max.
10
Max.
·Use a 200-mmf. condenser dummy antenna for broadcast band and a 400ohm carbon resistor for shortwave band.
Note 1.--Through .00025 mfd. condenser. Note 2.--Connect variable condenser (about .00025 mid.) across oscillator
section of receiver variable-condenser gang, and tune external condenser so that the second harmonic of the receiver oscillator beats with the 18 m.c. signal from the signal-generator. Adjust (17) under these conditions. Note 3.--Disconnect condenser mentioned in note 2 above. Note 4.--Increase signal-generator output to check for image signal.
25Z5 6A7
RECTIFIER DET.05C.
�MODEL NO. 610
Signal Generator Connection
Signal Generator Frequency
Dial Position
Wave Band Switch Position
Trimmer Number
Output Signal
Remove grid clip from 6A7
Control grid of
6A7
460 k.c. 550 k.c.
id
a
it
a
a
a
U
gg
a
Broadcast (left)
it
gg gg
26 Max. 28 Max. 20 Max. 22 Max.
Connect grid clip to 6A7
Ant.*
gg
gg
if
1600 k.c. 1600 k.c.
if
gg
600 k.c. 600 k.c.
it
18.0 m.c. 18.0 m.c.
if
if
if
gg
72 m.c. 7.2 m.c.
gg
a
gg Short Wave
(right)
if if
1 11 5 10 1 12
Min. Max. Max. Max. Max.
6 Max. 13 2 Max.
·Ilse a 200-mmf. condenser dummy antenna on broadcast band and a 400ohm carbon resistor on shortwave band.
Note 1.--Screw adjustment.
Note 2.--Nut adjustment.
78F
P6E-TA:.S1C.
WAVE TRAP TENNA
TRANLSF..
72"R.DEL
Ou4Tp2u,
OSC.L.F.sluneadIsen.1
6VO"L01U4M-EOFCFO'SNYT4R1OTCLH WASVWEITSCAHND SSETLAEICOTNOR !CONTEROL [98 ]
NS ANT. *on %wee
.(baCeT »via
OSCOJSOMeàil
�MODEL NO. 611
Signal Generator Connection
Signal Generator Frequency
Dial Position
Wave Band Switch Position
Trimmer Number
Output Signal
Remove grid clip from 6A7
Control grid of
460 k.c. 550 k.c. Broadcast
29
6A7
id
di
U
a
31
di
di
di
4d
23
ii
di
di
di
25
Connect grid clip to 6A7
Ant.*
a
a
a
id
1500 k.c. 1500 k.c.
a
131
gt
ti
ii
ilr
7
Id
600 k.c. 600 k.c.
a
12
a
18.0 m.c. 18.0 m.c. Short Wave 14
it
a
di
6.0 m.c. 6.0 m.c.
di
8 15
Max.
Max. Max. Max.
MMianx.. Max. Max. Max. Max. Max.
·Use a 200-mmf. condenser as dummy antenna for broadcast band and a 400ohm carbon resistor for shortwave bands.
Lie
[99 ]
�MODEL NOS. 620, 625, 630, 635
Signal Generator Connection
Signal Generator Frequency
Dial Position
Wave Band Switch Position
Trimmer Number
Output Signal
Remove grid clip from 6A7
Control grid of
6A7
460 k.c. 550 k.c.
it
a
Connect grid clip to 6A7
Range 1 (left)
35 1
35 2
31 33
1 2
Max. Max. Max. Max.
Ant.* `i
460 k.c. 550 k.c.
it
1700 k.c. 1700 k.c.
600 k.c. 3.6 m.c.
600 k.c. 3.6 m.c. Range 2 (center)
1800 k.c. 18.0 m.c.
1.8 m.c. 18.0 m.c.
Range 3 (ri`giht)
Note 3 Min.
14
Max.
6
Max.
10
Max.
17 1
Max.
13
Max.
5
Max.
9
Max.
16 2
Max.
15
Max.
4
Max.
8
Max.
·Use a 200-mmf. condenser dummy antenna on broadcast band and a d00ohm carbon resistor on the shortwave band.
Note 1.--Screw adjustment. Note 2.--Nut adjustment. Note 3.--Wave trap adjustment--accessible through hole in rear of chassis
near antenna terminal.
GA7'"
RFtSoToANtiDcARD GROUND NTENNA
RsR.Ra OMUCCE
@°158eZI W. 00SC.ROLICE
5.6 MC
9 .ic e`I KC
75 (4)1,b1
42 ougreE
R F. Vi. 18 MC
80 '78
PO1OS8UC0C0IE(--KNRCuTI 05C LR STANbARD
Otttfw) 600 KC
*ON-0 R.SWITCH iSVOWME CONTROL
WAVE-SAND STATION
SWITCH
SELECTOR.
[100 ]
TO E CONTROL
�MODEL NOS. 623, 623A
Signal Generator Connection
Signal Generator Frequency
Dial Position
Wave Band Switch Position
Trimmer Number
Output Signal
Remove grid clip from 106
Control grid of
106 it
460 k.c. 550 k.c.
if
it
it
it
if
tt
it
``
Connect grid clip to 106
Ant.*
if
di
``
1500 k.c. 1500 k.c.
Broadcast
It it it
it
600 k.c. 600 k.c.
18.0 m.c. 18.0 m.c. Short Wave
iC
It
6.0 m.c. 6.0 m.c.
27
Max.
29 22 24
1 13 6 11 1 12 7 14 2
Max. Max. Max.
Min. Max. Max. Max. Max. Max. Max.
·Use a 200-mmf. condenser as dummy antenna on broadcast band and a 400-ohm carbon resistor on shortwave bands.
Note 1.--Screw adjustment. Note 2.--Nut adjustment.
34»
FC6
ANTENNA Aco NC WAVE TRAP
ROUND
@SEC. 440 KC
@PRI
30
19
05C.H.F. Sn moo be OSC.S.W. ishic
(D.KDANT. STQi
eff.se Go
30
32
GOO NC
gs.cSc ST.D. SERIES (SCUM cSW SSR1E54.1.111
'ON-OFFSwftai 3. WAVE 4A140
VOLunE CONTROL INDICATOR.
STATION SELECTOR
6 TYPE
TORE CONTROL
MED MT tri molt-823A DRYWOAITERY NOVEL)
[101 ]
�MODEL NO. 624
Signal Generator Connection
Signal Generator Frequency
Dial Position
Wave Band Switch Position
Trimmer Number
Output Signal
Control
460 k.c.
551
grid of
i.f.
if
If
di
Range 3
27
(left)
it
29
Max. Max.
Remove grid clip from 106
Control
it
if
grid of
106
if
If
ii
It
24
Max.
if
26
Max.
Connect grid clip to 106
Ant.*
if
if
18 m.c.
di
a
de
18 m.c.4
a
6.0 m.c.
de
18 m.c.
ii
1500 k.c.
di
18 m.c. 2
18 m.c.s 17.1 m.c. 6.0 m.c. 18 m.c. 150
fiU
600 k.c.
60
di
Range 1 (right)
it if
a Range 3
(left)
gi
1
Min.
6
Max.
16
Max.
Image check
17
Max.
16
Max.
14
Max.
5
Max.
19
Max.
·Use a 200-mmf. condenser dummy antenna for broadcast band and a 100ohm carbon resistor for shortwave band.
Note 1.--Advance receiver volume control to just below the point at which oscillator hiss becomes noticeable.
Note 2.--Connect variable condenser (about .00025 tnfd.) across oscillator section of gang condenser (front section). Tune this condenser so that the second harmonic of the oscillator beats against the signal from the signal generator. Adjust (6) under these conditions.
Note 3.--Remove variable condenser mentioned in note 2 above. Note 4.--Advance signal-generator output to level sufficiently high to give
clear indication on output meter at this step. Note 5.--No adjustments are necessary for the alignment of Range 2.
I-M- 30 I-C-6 Wet 19 WAVE TRAP
eleo. I.P. PR I.
30
32
ANT. SHORT WAVE IR NC ANT. STD. 11. POLICE IsOon 05C SHORT WAVE us MC 05C.STD &POLICE ISOM
(Dgeosc sruPoia sun s
®NUeTM-.OG.SC
SHORTWAVE
SERIES *OVNO-LUMPESWCIOTNCTHRO·L
WAVE·SAND INDICATOR
ST TION SELECIDR
TON CONTROL
[102 ]
�MODEL NOS. 640, 650
Signal Generator Connection
Signal Generator Frequency
Dial Position
Wave Band Switch Position
Trimmer Number
Output Signal
Remove grid clip from 6A7
Control grid of
6A7
f t
it
if
460 k.c. 550 k.c. Range 2
it
it
if
If
it
u
if
it
if
Connect grid clip to 6A7
Ant.*
gg
a
18.0 m.c.
a
tf
it
18.0 m.c.
it
ti
It
it
6.0 m.c. 6.0 m.c.
gg
1500 k.c. 1500 k.c.
if
if
tt
if
if
600 k.c. 600 k.c.
gg
2400 k.c.
2.4 m.c.
a
if
a
350 k.c. 350 k.c.
If
If
tt
iti
Range 4
if If
a Range 2
if di
it
Range 3
le
Range 1
if
46
Max.
48 38 40
1 23 15
7 28 1 25 13
5 27 2
4 14 24 12
Max. Max. Max.
Min. Max. Max. Max. Max. Max. Max. Max. Max. Max. Max. Max. Max.
170 k.c. 170 k.c.
44
6 26 3
Max. Max.
·Use a 200-mmf. condenser as dummy antenna on broadcast band and a 400ohm carbon resistor on shortwave band.
Note 1.--Accessible from underneath chassis near middle-front. Note 2.--Nut adjustment. Note 3.--Screw adjustment.
OSC(VSeH«O11R.TeWuA.mV.EsSeERIES (a«tirr wawa
[103
�MODEL NO. 641
Signal Generator Connection
Signal Generator Frequency
Dial Position
Wave Band Switch Position
Trimmer Number
Output Signal
Remove grid clip from i.f.
Control grid of
i.f.
if
460 k.c. 550 k.c. Range 1
38
II
U
41
40
Max. Max.
Connect grid clip to i.f. and remove
grid clip from 6A7
Control
it
it
it
grid of
6A7
``
a
«
ii
32
Max.
34
Max.
Connect grid clip to 6A7
Ant.* dUi
If
it
if a it it f( If
"
4
a
it
Wave trap Min.
18``.0 m.c.
18.0 m.c.I Range 3
it
it
4 15
Max. Max.
18.0 m.c.2 `c
23
Max.
6.0 m.c. 6.0 m.c.
a
17
Max.
18.0 m.c. 18.0 m.c.
it
23
Max.
1400 k.c. moo k.c. Range 1
5
Max.
ii
di
W
if
it
1184
MMaaxx..
580 k.c. 580 k.c.
``
1400 k.c. 1400 k.c.
if
19
Max.
18
Max.
2400,` k.c. 2400`` k.c. Range 2
6 13
Max. Max.
·Use a 200-mmf. condenser as dummy antenna for broadcast band and a 400-ohm carbon resistor for shortwave bands.
Note 1.--Connect a variable condenser across the oscillator section of the receiver tuning condenser gang. Tune this variable condenser for maximum indication on output meter. Then adjust (4) and (15).
Note 2.--Remove variable condenser mentioned in note I above.
43
pow
ANTENN
78 6·Pa
LAST R F. VET. 05C,
76
e%Og0FOCAST @POLICE CeeRv wAvE
ArDEI::
01),FNOADCAU
..········
1011E CONTROL
WAVE SAND TUNING
SWITCH
COMM&
[104 ]
VOLUME CONTROL
78
F
·gAtole
OR MARY ItAly
2..1. F.
"t. stconoury 1ilD8erz5tcoriejt
�MODEL NO. 642
Signal Generator Connection
Signal Generator Frequency
Dial Position
Wave Band Switch Position
Trimmer Number
Output Signal
Remove grid clip from 6F7
Control grid of
460 k.c. 600 k.c.i Range 1
55
(broadcast)
6F7 fi
If
fi
a
57
Max. Max.
Connect grid clip to 6F7 and remove grid clip from 6A7
Control
u
If
4f
34
grid of
6Ade 7
ce
u
if
36
Max. Max.
Connect grid clip to 6A7
Ant.
If
if
fi
Note 2 Min.
Remove grid clip from 78 r.f.
Control
18.0 m.c. 18.0 m.c. Range 3
10 3
grid of
78 ri.
if
ii
fi
if
14
Max.
il
6.0 m.c. 6.0 m.c.
di
10
Max.
Connect grid clip to 78 ri.
Ant.*
If
if
fi
18.0 m.c. 18.0 m.c.* 5.5 m.c.
18.0 m.c. 17.1 m.c. 5.5 m.c.
f f
If
fi
II
if
1800 k.c. 1800 k.c.
if
5.5 m.c. 5.5 m.c.
if
1500 k.c. 1500 k.c.
id
fi
if
if
II
ft
ft
580 k.c. 580 k.c.
ft
1500 k.c. 1500 k.c.
`,
di
Range 2 id If
if fi
Range 1
if if I'
6
Max.
Image check
5
Max.
9
Max.
13
Max.
16
Max.
13
Max.
4
Max.
8
Max.
12
Max.
17
Max.
12
Max.
(&DxIsL,
"-E7 7,8
6-F-7
I.F.
STANDAO42
071),4ORT raWE. ICC
-16
05C.
SHORT VONE
48
POWER
.85
M.DET P·Pà/Pe
(i)POLIEE 05103RT MYE 10.2e>4_2
VOtvil CONTROL '011-0Fr OIIIITCII
rikvE.EIMO tUmoiG
SeitTO4
CONTROL
[105
TOME COKTOAL
�·Use a 200-rmnf. condenser as dummy antenna for broadcast band and a 400-ohm carbon resistor for shortwave band.
Note I.--Advance receiver volume control to just below the point at which oscillator hiss becomes noticeable.
Note 2.--Wave trap adjustment--accessible through hole from rear of chassis near antenna terminal.
Note 3.--Set to 1 /2 turn back from tight position. Note 4.--It will be necessary to increase the signal-generator output to check
for the image response.
MODEL NOS. 643, 643A
Signal Generator Connection
Signal Generator Frequency
Dial Position
Wave Band Switch Position
Trimmer Number
Output Signal
Remove grid clip from 34 i.f.
Control grid of 34 i.f.
fi
460 k.c.
55 1
Range 2 44 (broadcast;
te
45
Max. Max.
Connect grid clip to 34 il, and remove grid clip from 106
Control
if
if
grid of
106
it
a
Il
a
40
Max.
14
41
Max.
Connect grid clip to 106
Ant.*
fi
a a
18a.0 m.c.
a
a
if
18.0 m.c.4
f 4
6.0 m.c.
fi
5500 k.c.
fi
44
id
il
Ci
1800 k.c.
a a
1500 k.c. di
44
14
4I
600 k.c.
a a
350a k.c.
170 k.c.
fi
18a.0 m.c.2 18.0 m.c.s 17.1 m.c. 6.0 m.c. 5.5 m.c.
f 4
li
1.8 m.c. 150
id
té
60 35
fi
17
dé
Ran"ge 4
ife
a
if
Range 3
Id
di
a Range 2
ii
id
a Range 1
if
fi
``
1
Min.
20
Max.
8
Max.
23
Max.
Image check
30 5 26
Max. Max.
19
Max.
7
Max.
29
Max.
24
Max.
18
Max.
6
Max.
29A
Max.
25
Max.
17
Max.
5
Max.
30A
Max.
[106 1
�·Use a 200-mmf. condenser as dummy antenna on broadcast band and a 400ohm carbon resistor on shortwave band.
Note 1.--Adjust receiver volume control to near maximum position--just before the point at which oscillator hiss becomes noticeable.
Note 2.--Connect external variable condenser across oscillator section of receiver tuning condenser. Tune the external condenser so that second harmonie of receiver oscillator will beat against signal from signal-generator. Adjust (20) and (8) under these conditions.
Note 3.--Remove external variable condenser mentioned in note 2 above. Note 4.--Advance signal-generator output to level high enough to give a clear
indication on output meter at this step. Note 5.--Accessible from underneath chassis (near middle-front).
MODEL NO. 645
Signal Generator Connection
Signal Generator Frequency
Dial Position
Wave Band Switch Position
Control grid 1
of78 i..f. di
Control grid of 6A7
Id
Ant.*
dl
if
460 k.c.
55
Range 3
dg
if
If
If
fi
if
dl
di
il
`i
`«
a
18.0 m.c. id
if
18.0 m.c.4 6.0 m.c. 18.0 m.c. 5500 k.c. a
18.0 m.c.2 Range 1
If
18.0 m.c.3 17.1 m.c. 6.0 m.c. 18.0 m.c. 5.5 m.c.
il
a a ,c a Range 2
di
Id
fi
1800 k.c. 1500 k.c.
a
fi
1.8 m.c. 150
if
a Range 3
a
If
fi
C'
600 k.c.
60
a
6ROONO
42 ANTEN 78 80 MYE TRAP
Trimmer Number
31
Output Signal
Max.
33
Max.
26
Max.
28
Max.
2
Min.
153
MMaaxx..
20
Max.
Image check
22
Max.
20
Max.
19
Max.
4
Max.
12
Max.
23
Max.
18
Max.
3
Max.
11
Max.
24
Max.
42.
VIts
POUCE
1«.15.1,91.
FSEC
78
6A7
2.1S.Peti 2.I.F SEC
85
@muet C)swisme esoutt
ACRONMTARIOSL INSSWVIET·SCAHNO SSETLAETCITOONR
[107 ]
'VOONLOUFMFE-SWCIOTNCTHROL
�·Use a 200-nunf. condenser in series as dummy antenna for broadcast band and a 400-ohm carbon resistor on the shortwave band.
Note 1.--Through .001 mfd. condenser. Note 2.--Connect external variable condenser (about .00025 mfd.) across oscil-
lator section of receiver tuning condenser (front section). Tune the external condenser so that second harmonic of receiver oscillator will beat against the signal from signal-generator. Adjust (5) and (13) under these conditions. Note 3.--Disconnect external variable condenser mentioned in note 2 above. Note 4.--Advance signal-generator output to level high enough to give a clear indication on output meter at this step.
Signal Generator Connection
Control grid I
of 78 i.f. CI
Control grid 3 of 6A7
CC
Ant.* a
a
if IC id id di
di id CI CC di ft ft
MODEL NO. 651
Signal Generator Frequency
460 k.c.
IC If
Dial Position
55
a it
Wave Band Switch Position
Range 3 (left)
CC IC
Trimmer Number
58
60 54
Output Signal
Max.
Max. Max.
U di
18 m.c.
a
it
CC
6.0 m.c. 18 m.c. 5500 k.c.
if CC
1800 k.c. 1500 k.c.
CC IC
580 k.c.
CC
ii
di
Cl
18 m.c.2 Range 1
(right) a
18 m.c.3
CC
17.1 m.c.
a
6.0 m.c.
a
18 m.c.
a
5.5 m.c. Range 2
(center)
CC
1.8 m.c.
``
150
Range 3
CC
di
58
iC
56
Max.
5
Min.
6
Max.
13
Max.
18
Max.
Image check
21
Max.
18
Max.
7
Max.
12
Max.
17
Max.
20
Max.
16
Max.
11
Max.
8
Max.
19
Max.
[108 ]
�· Use a 200-mrnf. condenser in series as a dummy antenna on broadcast band and a 400-ohm carbon resistor on the shortwave band.
Note 1.--Through .001 mfd. condenser. Note 2.--Connect a variable condenser (about .00023 mfd.) serons oscillator
(front) section of receiver tuning-condenser gang. Tune the external condenser so that second harmonie of receiver oscillator beats against signal from signal-generator. Adjust (6) and (13) under these conditions. Note 3.--Remove externat variable condenser mentioned in Note 2 above.
MODEL NO. 655
Signal Generator Connection
Control grid 1
of 78 il. if
Control grid of 6A7
if
Ant.*
If
fi
il if
if Ci if .If if
a
If fi id Cf
Signal Generator Frequency
460 k.c.
if IC
Dial Position
55
iC di
Wave Band Switch Position
Range 3 (left)
Trimmer Number
29
Output Signal
Max.
1C
31
Max.
ft
24
Max.
II
tC
18 m.c.
ti
it
18 m.c.2
if
if it
6.0 m.c. 18.0 m.c. 5500 k.c.
Cf
if
18 m.c.8 17.1 m.c.
6.0 M .C. 18.0 m.c. 5.5 m.c.
tf
if
1800 k.c. 1500 k.c.
it
te
1.8 M .C. 150
it
if
600 k.c. 60
if
U
Range 1 (right)
II
If ft
If If
Range 2 if il
di
Range 3 ii if
26
Max.
2
Min.
6
Max.
13
Max.
19
Max.
Image check
20
Max.
19
Max.
18
Max.
5
Max.
12
Max.
21
Max.
17
Max.
4
Max.
11
Max.
22
Max.
42 osouto 42
ANTENNA 78 80
Mât TRAP
42
PROGRAM Gente*.
WPRE.GIIMO STATION row-on'sercma
SWITCH
SELECTOR v0EWE CONTROI.
[109 ]
75
�·Use a 200-mmf. condenser in series as dummy antenna for broadcast band and a 400-ohm carbon resistor for shortwave band.
Note 1.--Through .001 mfd. condenser. Note 2.--Connect variable condenser (about .00025 mid.) across oscillator
(front) section of receiver tuning-condenser gang. Tune the external condenser so that second harmonic of receiver oscillator beats against signal from signal-generator. Adjust (3) and (13) under these conditions. Note S.--Remove external variable condenser mentioned in note 2 above.
MODEL NOS. 660, 665
Signal Generator Connection
Signal Generator Frequency
Dial Position
Wave Band Switch Position
Trimmer Number
Remove grid clip from lot det.
Control
460 k.c.
60
grid of
1st det.
if
if
if if
Connect grid clip to 1st det.
44
it
18 m.c. 44
18.0 m.c.
4.5 m.c. 4.5 m.c.
44
1800 k.c. 1500 k.c.
di
600 k.c. 340 k.c.
175 k.c.
di
1.8 m.c. 1500 k.c.
44 di
600 k.c. 340 k.c.
44 if
175 k.c.
Broadcast 1
``
if di
it
if
Short Wave 3
4;
Police 4
di
Broadcast
Long Wave 5 `` ``
51 2
57 55 52 49 42 40 51
24 21 13
7 29 12
6 18 27 10 4 16 28 11 5 17
Output Signal
Max. Max. Max. Max. Max. Max. Max.
Min. Max. Max. Max. Max. Max. Max. Max. Max. Max. Max. Max. Max. Max. Max. Max.
C. SW.
POUCE
R.F. POLICE
tibia»
[110 ]
SGEMODSEPIESficsiie POU SERIES Igor ·
WAVE SEPJElituurt OWNdElleratuodUclOPO4
�·Use a 200-mmf. condenser in series as dummy antenna for broadcast band and a 400-ohm carbon resistor for shortwave band.
Note l.--Second position from left. Note 2.--Turn all the way down before adjusting other i-f. compensators. Note 3.--Extreme right position. Note 4.--Third position from left. Note 5.--Extreme left position.
Signal Generator Connection
Control grid of 2nd i.f.
de
Ie
di if
Control grid of 1st i.f.
le
Control grid of Ist det.
14
le
Ant.9 Control grid
of 1st det. Ant?
id
"
el
di
it
a
le
di
a de
id
`« a «« Ant?'
di
U
CC
a ««
CC
de le
Note 12
MODEL NO. 680
Signal Generator Frequency
Dial Position
Wave Band Switch Position
460 k.c.
Note 1
Note 2
IC
550 k.c. Broadcast
CC
CI
IC
IC
CC
ii
di
di
IC
di
iC
It
It
If
de
di
U
U
It
el
el
il
Ii
a
if
Note 6
a
a
18 m.c.
If
a
di
8 m.c. 18 m.c. 6 m.c.
le
18 m.c. 17.1 m.c.
Range
li
1 8
18 m.c.9
IC
id
8 M.C.1° 18 m.c.
6 m.c.
IC
CC
le
IC
Range 2
if
2.4 m.c. 6 m.c. 1500 k.c. «« a «« 580 k.c. 340 k.c.
a
2.4 m.c. 6 m.c. 1500 k.c. ««
if
il
580 k.c. 340 k.c.
id
" a Range 3
if id
a Range 4
if
a
de
175 k.c. 340 k.c. 580 k.c. 1500 k.c.
le
175 k.c. 340 k.c. 580 k.c. 1500 k.c.
el
a
id
Range3
di
IC
U
a
10,000 cycles
Trimmer Output Number Signal
133 Note 3
136 Max. 128 Max. 131 Max. 133 Min. 96 Max.
94 89
87 133
1 131
Max. Max.
Max. Note 4 Min. Note 6
56 Max. Image check
9 Max. 38 Max.
42 Max. 56 Max.
8 Max.
3575
MMaaxx..
44 Max. 55 Max.
7 Max. 26 Max. 38 Max. 54 Max.
46 Max. 6 Max.
35 Max. 51 Max.
48 Max. 51 Max. 46 Max. 54 Max. 36 Max. 153 Min.
�Note 1.--Glowing arrow should be between the two vertical lines at extreme left of the low-frequency calibration with the plates fully meshed.
Note 2.--Turn bass control off (to left) and fidelity control to selective position (left). Adjust hum control for minimum hum and volume control to maximum (right).
Note S.--Turn four turns to left. Note 5.--Turn down volume control and increase signal-generator output level
--for this step only--until shadow meter width decreases to onehalf. Adjust (133) for minimum shadow meter width. Note 5.--Through 200-minfd. condenser. Note 6.--Turn fidelity-selectivity control to extreme right for this step. Definite peaks (on output-meter indication) appear when signal-generator output passes through 452 k.c. and 468 k.c. Both should be equal. If 452 k.c, peak is higher, turn (131) out (decrease capacity), and, vice-versa. Note 7.--Through 400-ohm carbon resistor. Note &--Turn fidelity control back to extreme left. Note 9.--Connect variable condenser (about 250 rnmfd.) across oscillator section (second from front) of variable condenser gang. Turn this condenser until 18 tn.c. signal gives indication on output meter. Adjust (9) and (38) on this setting. Note 10.--Remove external variable condenser (mentioned in Note 9 above). Note 11.--Remove 400-ohm resistor from antenna lead (mentioned in note 7
above). Note 12.--Reset 10 k.c. filter adjustment only if tampered with or parts are
changed. Use an accurately calibrated audio oscillator. Connect the high side of the audio oscillator to the variable tap on the volume control and adjust (153) for maximum output.
[112 ]
�MODEL NOS. 800 (122), 802, H (122)
Signal Generator Connection
Signal Generator Frequency
Dial Position
Wave Band Switch Position
Trimmer Number
Output Signal
Remove grid clip from det.-osc. tube
Control grid of det.-osc.
tube it
260 k.c.
if
Note 1
di
di
if
Connect grid clip to det.-osc. tube
Ant.e· e
di it
1500 k.c. 1400 k.c.
if
Note 5 140
if
«g
600 k.c.
60
di
1400 k.c.
140
if
it
it
1 2
Max.
2 3
Max.
32
Max.
43
Max.
7
Max.
6
Max.
5
Max.
8
Max.*
6
Max.
5
Max.
Note 1.--PHXD only--Set sensitivity switch to "distance" position and tone control to "brilliant."
Note 2.--This is a screw adjustment. Note 3.--This is a nut adjustment. Note 4.--Through a 150 mmfd. condenser. Note 5.--Using a piece of paper approximately .006" thick as a gauge between
the heel of the rotor plates and the stator plates, turn the rotor plates until they strike the paper. This gives the correct adjustment for 1500 k.c.-150 on the dial scale. Note 6.--When the antenna-stage adjustment is made with the receiver installed in the car, the receiver must be connected to the car antenna in the usual manner. Connect the signal-generator output to a wire placed near the car antenna but not connected to it. ·While rocking.
--0 ANTENNA PAr»tit
R.F. ODDER
0 HIGH FREQUENCY MOM
LI
LI
eLOW FREQUENCY MEIER 1ST. I.F.TRANSFORNER
44 TUBE IF.
0 Rg .5c..Tudi
rO-UTPUT TUBE El
[113 ]
5' RECTIFIER
�MODEL NO. 805
Signal Generator Connection
Signal Generator Frequency
Dial Position
Wave Band Switch Position
Trinuner Number
Output Signal
Remove grid clip from det.-osc. tube
Control grid of det.-osc.
tube
Ci ei
260 k.c. 44
1 1
Max.
22
Max.
31
Max.
42
Max.
Connect grid clip to det.-osc. tube
Ants. 5
44,, «, 4,
CC
1600 k.c. 1400 k.c.
4, 600 k.c. 1400 k.c.
Note 4 140 44 60 140
It
7
Max.
6
Max.
5
Max.
8
Max.*
6
Max.
5
Max.
Note 1.-- This is a screw adjustment.
Note 2.--This is a nut adjustment.
Note 3.--Through a 150 mmfd. condenser. Note 4.--Turn the tuning condenser plates wide open.
This gives the correct
adjustment for 1600 k.c.-160 on the dial scale.
Note 5.--When the antenna-stage adjustment is made with the receiver WI-
stalled in the car, the receiver must be connected to the car antenna
in the usual manner. Connect the signal-generator output to a wire
placed near the car antenna but not connected to it.
·While rocking.
LOW FREQUENCY Truce
PADDEN.
I.F.
to IF. TRANSFORMER
75 TUBE 2" DET.
--0 ANTENNA PADDER --(0. R.F.WOOER.
F.PADDER
pUTPUT
a18c4rTeUlBEEa'
�MODEL NOS. 806, 808, 809, T7, T8
Signal Generator Connection
Signal Generator Frequency
Dial Position
Wave Band Switch Position
Trimmer Number
Output Signal
Remove grid clip from det.-osc. tube Control grid 260 k.c.
of det.-osc. tube
t'
It tt
· · ·
1 1
Max.
22
Max.
31
Max.
42
Max.
Connect grid clip to det-osc. tube
Ant.2, 8
4C
1600 k.c. 1400 k.c.
Note 4 140
tt
tC
id
If
600 k.c.
60
di
1400 k.c.
140
it
It
``
7
Max.
6
Max.
5
Max.
8
Max.*
6 5
MMaaxx..
Note 1.--This is a screw adjustment.
Note 2.--This is a nut adjustment.
Note 3.--Through a 150 mmfd. condenser.
Note 4.--Turn the tuning condenser plates wide open This gives the correct
adjustment for 1600 k.c.-160 on the dial scale.
Note 5.--When the antenna-stage adjustment is made with the receiver in-
stalled in the car, the receiver must be connected to the car antenna
in the usual manner. Connect the signal-generator output to a wire
eleOWEEIEQUDICY placed near the car antenna but not connected to it.
·While rocking. 78TUBE 75TUBE
IF.
VID.OET. TRANSFORMER
$ I.I.F.
64,7 TUBE
·TRANSFORMER DET. 05C.
76TUBE . DRIVER_ tt*Se btt.it."( /
R.F. PADDER --OH.F.PADDER
"T7f-117B-E' R.F.
[115
¡OUTPUT TUBE
84 T=U11E` RECTIFIER.
�MODEL NOS. 810 PA-810 PB
Signal Generator Connection
Signal Generator Frequency
Dial Position
Wave Band Switch Position
Trimmer Number
Output Signal
Remove grid clip from il. tube
Control grid Note 1 Note 2
24 3
Max.
of i.f. tube
«4
«
it
...
26 4
Max.
Connect grid clip to i.f. tube and remove grid clip from det-osc. tube
Control grid of det-osc.
tube
a u
It II
a
Ante
a
Note 12 gg gg
ge
ti
Note 1
a a
44 a
u
Note 6
Note 2
u te
if a
lc
Note 7
gg gg
44
gg dgig igfg
19 3
Max.
· · ·
21* 24 26 19 21
68
17 10 8 9, 11
13 10, 11
6 10
13 10
17 24
9
2169
21
Max. Max. Max. Max. Max. Max. Max.
Max .
Max. Max. Max.
Max. Max. Max.
MMaaxx..
Max.
Caution: Do not open crystal holder. If it has been opened, crystal and plates should be carefully cleaned with carbon tetrachloride, and afterward must not be touched by the fingers. Use clean cloth for handling.
Note I.--The intermediate frequency is the difference between the frequency of the receiver crystal and the transmitter frequency.
Model 810-P A
Range of Receiver
1565-1665 k.c. 1660-1760 k.c.
Crystal Frequency
1875 k.c. 1970 k.c.
Crystal Part No.
45-2101 45-2102
Model 810-P B
2100-2200 k.c. 2200-2300 k.c. 2300-2400 k.c. 2400-2500 k.c.
2410 k.c. 2510 k.c. 2610 k.c. 2710 k.c.
45-2103 45-2104 45-2105 45-2106
Adjust signal-generator output level to give low indication on output meter. Signal should not be strong enough to operate receiver automatic volume control.
[116 ]
�Note 2.--Allow receiver to "warm-up" before adjustment, and readjust after it has operated for several hours. Turn receiver "Q" switch to "off."
Note 3.--Screw adjustment. Note 4.--Nut adjustment. Note S.--Through 200 mmfd. condenser. Note 6.--Signal-generator frequency same as transmitter frequency. Note 7.--Unlock the variable-condenser gang by adjusting its two set screws,
and tune it to the input frequency. If crystal-oscillator circuit does not function, loosen (13) on the oscillator section of the tuning condenser and (17). The receiver-oscillator output can he increased, if necessary, by adjusting (13) for the higher frequencies and (17) for the lower frequencies. Note 8.-1f (6) or (10) are too loose after the adjustment, back out the tuning-condenser slightly--if too tight, turn the tuning-condenser in slightly. Then readjust (6) and (10). Note 9.--On Model 810 PA (lower frequency band). Note 10.--For Model 810 PB (higher frequency band). Note 11.--This adjustment will not give a sharp peak, but it is possible to
adjust for maximum output. Then hack off adjusting nut 1/ 2 turn. Note 12.--Recheck using a test tone from the police transmitter, connected to
the antenna lead through a 200 mmfd. condenser.
1ST% I. F.
78TUBE 6-A7TUBE 75TUBE 75 TUBE eAD,
TRANSFORMER, I. F. DET 05C. 2.".DET. IsT.A.UDIO
'77,V-rinBE 2.).°,1 F. R.F. TRANSFORMER
41 TUBE
r8VW-Fr
OUTPUT i VI-- BRA7R RECTIFIER
[117 ]
�MODEL NO .810 PV
Signal Generator Connection
Signal Generator Frequency
Dial Position
Wave Band Switch Position
Trimmer Output Number Signal
Remove grid clip from il. tube
Control grid 260 k.c.' of i.f. tube
Note 2
24 3 Max.
se ...
26 4
Connect grid clip to il. tube and remove grid clip from
Max.
Control grid
«i
ge
of 6A7
if
If
ii
19 3 21 4
Max. Max.
Control grid 2600 k.c. of ri. tube
it
Li
Note 5
if
10
Max.
13
Max.
a
1600 k.c. 1600 k.c.
it
2600 k.c.
Note 5
Ant.*
il
if
...
17
Max.*
13
Max.
6
Max.
Note 1.--Adjust signal-generator output level to give low indication on output meter. Signal should not be strong enough to operate receiver automatic volume control.
Note 2.--Set receiver "Q" switch to "off." Note 3.--Screw adjustment. Note 4.--Nut adjustment. Note 5.--Turn tuning-condenser gang to minimum-capacity position, using a
strip of bond paper as a gauge between the stator and the heel of the rotor plates. This gives the correct setting for 2800 k.c.-2.8 on the dial scale. Note 6.--Through a 200 mmfd. condenser. ·While rocking.
78TUBE 6-A1TUBE '75 TUBE 75 TUBE (FA
TRANSFORMER IF PETOSC 2..e0DET In AUDIO
4.F3-ii1--BE` 12,9 F. R.F. TRANSFORMER
[118 ]
VY1- 1B1 E
rtidif1--1BE`
OUTPUT I--VIORWt RECTIFIER
�MODEL NO. 811 PV
Signal Generator Connection
Signal Generator Frequency
Dial Position
Wave Band Switch Position
Trimmer Number
Output Signal
Control grid 1 260 k.c.2 of il. tube
Control grid 1 of det.-osc.
tube it
Control grid 1 2600 k.c.
of r.f. tube
if
if
it di
Ant.5
1600 k.c. 2600 k.c.
if
Note 3 gi
Note 4
it
1600 k.c. Note 4
it
22
Max.
24
Max.
19
Max.
21
Max.
10
Max.
13
Max.
17
Max.*
13
Max.
6 Max.
Note I.--Through .1 mfd. condenser. Note 2.--Adjust signal-generator output level to give low indication on output
meter. Signal should not be strong enough to operate receiver automatic-volume control. Note 3.--Set receiver "Q" switch to "off." Note 4.--Turn tuning-condenser gang to minimum capacity position, using a strip of bond paper as a gauge between stator and heel of rotor plates. This gives the true setting for 2600 k.c.-2.6 on the dial scale. Note S.--Through 200 mmfd. condenser. IMPORTANT: All adjustments should be repeated after the receiver has been operated at 8 volts for about 8 hours. ·While rocking.
VIBRATOk '/5TUBE 75TUBE 8TUBE 84TUBE 6-k7TUBE IsT:AUDIO ZH IDEL IF. RECTIFIER DET-OSC.
O
O
pADDER,TUNING CONTROL MOD.81IPV
11)54 52. ONLY)
OUTPUT
ZO
18 TUBE
Ve.LETRANS.` '15T)I.F.TRANS.'
R.F.
[119 ]
R.F PADDER
'cV.OI h LTUROEL
�MODEL NOS. 811 PA-811 PB
Signal Generator Connection
Signal Generator Frequency
Dial Position
Wave Band Switch Position
Trimmer Number
Output Signal
Control grid 1 of il. tube
fi
Control grid of det.-osc. tube
id if de CC
Ant.4
Note 2
di di if O
Note 5 CC
CI
CC
Note 11
Cl
id di
Note 3
di
di if fi
Note 6
I(
``
it fi
22
Max.
24
Max.
19
Max.
21 22
24 19
21
6 7
10 17
7
8,
10
13 9, 19 6 10
13 9 17 8 22
24
19
21
Max. Max. Max. Max. Max. Max. Max. Max. Max. Mex. Max. Max. Max. Max. Max. Max. Max.
IMPORTANT: These adjustments should be repeated after the receiver has been operated at 8 volts for about 8 hours.
CAUTION: Do not open crystal holder. .If it has been opened, crystal and plates should be carefully cleaned with carbon tetrachloride and must not be touched by the fingers afterwards. Use clean cloth for handling.
Note 1.--Through .1 mfd. condenser. Note 2.--The intermediate frequency is the difference between the frequency
of the receiver crystal and the transmitter frequency.
Range of Receiver
Model {1630-1634-1642-1650-1658-1666 k.c. 811 PA 1674-1682-1690-1698-1706-1712 k.c.
Crystal Frequency
1908 k.c. 1953 k.c.
Crystal Part No.
45-2194 45-2195
2382-2390-2398-2406-2414 k.c. Model 2422-2430-2442-2450 k.c. 811 PB 2458-2466-2474-2482-2490 k.c.
2658 k.c. 2696 k.c. 2734 k.c.
45-2196 45-2197 45-2198
Adjust signal-generator output level to give low indication on output meter. Signal should not be strong enough to operate receiver automaticvolume control.
[120
�Note 3.--Allow receiver to warm-up before adjusting. Turn receiver "Q" switch to "off."
Note 4.--Through 200 mmfd. condenser. Note 5.--Signal-generator frequency same as transmitter frequency. Note 6.--Unlock variable-condenser gang by adjusting its two set screws and
tune it to the input frequency. If crystal oscillator circuit does not function, loosen (13) on oscillator section of tuning condenser gang and (17). Receiver-oscillator output can be increased, if necessary, by adjusting (13) for the higher frequencies and (17) for the lower frequencies. Note 7.-1f (6) or (10) are too loose after the adjustment, back out tuningcondenser slightly--if too tight, turn tuning-condenser in slightly. Then readjust (6) and (10).
Note 8.--On Model 811 PA (lower frequency band). Note 9.--On Model 811 PB (higher frequency band). Note 10.--This adjustment will not give a sharp peak, but it is possible to
adjust for maximum output. Then back off adjusting nut 1/ 2 turn. Note 11.--Recheck using a test tone from the police transmitter, connected to
the antenna lead through a 200 mmfd. condenser.
VIBRKRIR
'75TUBE ·I5TAUDIO
75TUBE 713TUBE 841U15E I.F. RECTIFIER
@
@
6-baTUBE DET-05C.
*A-LEAD,
q3.6
OUTPUT
H. FPADDER
rieSTUBE
'2.e.I.EIRAN5.15T,I.F.TRAN5.s
R.F.
ANT PANER PADDER
'VOLUME CONTROL
[121 ]
�MODEL NO. 816
Signal Generator Connection
Signal Generator Frequency
Dial Position
Wave Band Switch Position
Trimmer Number
Output Signal
Control grid 1 of i.f. tube
it
Control grid 1 of det.-osc. tube
li
Control grid 1 of r.f. tube
it
,c it Ant.s. 4 4t
4`
260 k.c.
if Ill
ti
1550 k.c.
if
580 k.c. 1550 k.c.
580 k.c. 1400 k.c.
it
14iiie 2
it
58 155
58 140
1 Max. 2 Max. 3 Max.
4 Max. 7 Max. 6 Max. 8 Max.* 7 Max. 9 Max. 6 Max. 5 Max.
Note 1.--Through a .1 mfd. condenser. Do not remove the grid clip. Note 2.--Turn tuning-condenser plates out of mesh as far as they will go.
This adjustment gives the true setting for 15.50 k.c.-155 on the dial scale. Note 3.--Connect the signal-generator lead to the antenna cable assembly (made up of Part No. L 1915 loom, 1-27-7133 terminal and 40 inches of 18 strand 930 wire) through a 200 mmfd. condenser. Place the connector plug in the antenna socket on the receiver. Plug the cable into the antenna socket. Note 4.--When the antenna stage adjustment is made with the receiver installed in the car, the receiver antenna lead must be connected to the car antenna in the usual manner. The signal-generator output lead should be connected to a wire placed near the car antenna but not connected to it. ·While rocking.
V7o5.TDUETB.E %TIU.EBE
IsT,AUDIO
6en TUBE
DEI 05C.
L PADOER ·
ANTENNA COUPLING CONDENSER D't
o
41 TUBE OUTPUT
0
T'R-AVNSiFgORiMrERn TRANSFORMER R.F.
ANT. PADDERO
KEEADDER (6> <f)H.E PADDER
[122 ]
�MODEL NOS. 817, 818
Signal CGoennneercattioor n
Signal FGreeneqruaetnocry
PoDsiiatlion
Wave Band
PSowsiittcihon
TNruimmbmeerr OSuitgnpault
Control grid 1 260 k.c.
of i.f. tube
"
a
Control gHd 1
a
of det-osc.
tube
if
a
Control grid 1 1550 k.c.
of r.fa. tube
a
a
580 k.c.
a
1550 k.c.
Ant.s. 4 a a
580 k.c. 1400 k.c.
it
INTo..te. 2
`` 58 155 58 140
dé
1
Max.
2
Max.
3
Max.
4
Max.
7
Max.
6
Max.
8
Max.*
7
Max.
9
Max.
6
Max.
5
Max.
NNoottee
21..----TThurronugthuniang.-1 comnfdde.nsceorndpelnasteers. oDuto onfotmersehmovaes This adjustment gives the true setting for 1550
tfhaer garsidthcleiyp. will k.c.-155 on the
dgioa.l
Note 3.--Cscoanlne.ect the signal-generator lead to the antenna cable assembly
co(ofmnan1de6ectsoutrpraponlfdugP2a3ir0nt twNhioer.e)anLtteh1nr9no1a5ugslhoocoakme,t201o0-n27mt-mh7f1ed33.recteceiorvnmediren.naslePral.nudg Pt4lh0aeciecnactbhhleese into the antenna socket. Note 4.--sltWtehhaaeldelnecsdahrtoihunaelndttahenbenteneacncanori,annnetstchthteaeegderuestcaueodaijlvauesrmwtaimanrennenteterpn.lniasaceTmdlhaeeadndeeasrmiwguintstahthle-gbcteeahnreecraoarntnetocnereeincvtnoeeaurdtbpiuutntt-o not connected to it.
·While rocking.
_
VIBRATOR, MVoU.SlS.F.., IMSKTUTB.E 4OIUT1UPBuET TIRITA,NI.SF.. (·-r--A' LEpADDER
MAW°
0
701TUF.BE
REctineR
,7.Teiec ANT.PAOPER 180 e- ,ft.F.PADDER [123 ]
ANT. PIING CONDENSER.
�MODEL NOS. 819, 819H
Signal Generator Connection
Signal Generator Frequency
Dial Position
Wave Band Switch Position
Trimmer Number
Output Signal
Control grid 1 260 k.c. of ii. tube
Control grid 1 of det-osc. tu"be
Control grid 1 of ri. tube
di
id
a
Ant.s. 4 «
a
1550 k.c.
U
580 k.c. 1550 k.c.
580 k.c. 1400 k.c.
dIC
Isfoi.e 2
te
58 155 58 140
ii
1
Max.
2
Max.
3
Max.
4
Max.
7
Max.
6
Max.
8
Max.*
7
Max.
9
Max.
6
Max.
5
Max.
Note I.--Through a .1 mfd. condenser. Do not remove the grid clip. Note 2.--Turn tuning-condenser plates out of mesh as far as they will go.
This adjustment gives the true setting for 1550 k.c.-155 on the dial scale. Note 3.--Connect the signal-generator lead to the antenna cable assembly (made up of Part No. L 1915 loom, 1-27-7133 terminal and 40 inches of 16 strand 530 wire) through a 200 mmfd. condenser. Place the connector plug in the antenna socket on the receiver. Plug the cable into the antenna socket. Note 4.--When the antenna stage adjustment is made with the receiver installed in the car, the receiver antenna lead must be connected to the car antenna in the usual manner. The signal-generator output lead should be connected to a wire placed near the car antenna but not connected to it. ·While rocking.
VleRMOR
-15TUBE
411USE lOTUDE
2.).DET. TRANS. eLiT2191,
AUDIO
L.F PADDER 4ITUDE
TPUT
RECTIFIER
18RT.UEDE
ANT PADDED
svi rubs% c.
'le LF TRANS. DEI. OSC.
(2).
[124 ]
�MODEL NOS. P-1417, G-1418, N-1418
Signal Generator Connection
Signal Generator Frequency
Dial Position
Wave nand
Switch Position
Trimmer Number
Output Signal
Control grid 1 of i.f. tube
li
Control grid 1 of det.-osc. tube
di
260 k.c.
di
it
di
id
di
Control grid 1550 k.c. of r.f. tube
di
di Ant. 3.
id it
600 k.c. 1550 k.c.
600 k.c. 1400 k.c.
di
I·1;Oie 2
id
60 155 60 140
if
1
Max.
2
Max.
3
Max.
4
Max.
1
Max.
2
Max.
7
Max.
6
Max.
8
Max.*
7
Max.
9
Max.
6
Max.
5
Max.
Note 1.--Through a .1 mfd. condenser. Note 2.--Turn the tuning-condenser plates out of mesh as far as they will go.
This adjustment gives the true setting for 1550 k.c.-155 on the dial scale. Note 3.--For G-1418 and N-1418: Connect the signal-generator lead to the antenna cable assembly (made up of Part No. 38-7295 cable) through a 155 mmfd. condenser. Plug the cable into the antenna receptacle on the bottom of the receiver. For P-1417: Connect the signal-generator to the antenna through a 280 mmfd. condenser. This value must be used. Note 4.--When the antenna-stage adjustment is made with the receiver installed in the car, the receiver antenna lead must be connected to the car antenna in the usual manner. Connect the signal-generator output lead to a wire placed near the car antenna but not connected to it. ·While rocking.
.v_itd320_011,
15TURE r.IFIRAN5 41TU DE 1ST FTRANS /emu r¡N_ mock
2. CET
, I sZ,
1,T.AUDIÚ
RECTIFIER
1t5rier -K5-Te.i0l5eC.` R ef" RUDER
[125
�MODEL NOS. P-1421, T10
Signal Generator Connection
Signal Generator Frequency
Dial Position
Wave Band Switch Position
Trimmer Number
Output Signal
Control grid 1 of i.f. tube
a
Control 1 grid of det.-osc. tube
IC (C CC
Control 1 grid of r.f. tube if
Ant.s· 4 it
260 k.c.
a IC
IC CC
1550 k.c.
CI
600 k.c. 1550 k.c. 1400`é k.c.
14Cie 2
it
60 155 1`4i 0
1
Max.
2
Max.
3
Max.
4
Max.
1
Max.
2
Max.
7
Max.
6
Max.
8
Max.*
7
Max.
6
Max.
5
Max.
Note 1.--Through a .1 mfd. condenser. Note 2.--Turn the tuning-condenser plates out of mesh. Insert a strip of paper
about .006" thick as a gauge between the heel of the rotor plates and the stator plates; then turn the rotor plates until they strike against this paper strip. This adjustment gives the true setting for 1550 Lc.155 on dial scale. Note 3.--For P-1421: through a 280 mmfd. condenser. .For T10: through a 2100 mmfd. condenser. Note 4.--When the antenna-stage adjustment is made with the receiver installed in the car, the receiver antenna lead must be connected to the car antenna in the usual manner. Connect the signal-generator output lead to a wire placed near the car antenna, but not connected to it. 'While rocking.
V
R 19TU8E .041TDDT ,
751UBE DE/
e8rA.1TUBE
ynüBE ,NuveR
se* Avow
O
O
O
O
(eeg
133.1r
0
7.R.8F.E
met lsr LE mud LEPOODER
r 126 I
ANT PACOER WF.PA000R
H.F.PADDERO--
�MODEL NOS. P-1430, S-1431, N-1433, G-1436
Signal Generator Connection
Signal Generator Frequency
Dial Position
Wave Band Switch Position
Trimmer Output Number Signal
Control grid l of iI.atube
Control grid 1. of det.-osc.
260 k.c.
`c a
1
Max.
2
Max.
3
Max.
tube
it if it
Control grid of r.f. tube
if It it
1550 k.c.
/4Oie 2
4
Max.
1
Max.
2
Max.
7
Max.
CC
600 k.c.
60
1550 k.c.
155
1400 k.c.
140
CC
4i
6
Max.
8
Max.*
7
Max.
6
Max.
5
Max.
Note 1.--Through a .1 mfd. condenser. Note 2.--Turn the tuning-condenser plates out of mesh. Insert a strip of
paper about .006" thick as a gauge between the heel of the rotor plates and the stator plates; then turn the rotor plates until they strike against this paper strip. This adjustment gives the true setting for 1550 k.c.-155 on the dial scale. Note 3.--For P-1430: Through a 280 namfd. condenser. This value must be used. For S-1431 and N-1433: Connect the signal-generator lead to the antenna cable Part No. L-2520 through a 84 mmfd. condenser. Plug the cable into the roof-antenna connector on the end of the receiver. For 0-1436: Connect the signal-generator lead to the antenna cable Part No. 38-7295 through a 1650 mmfd. condenser. Plug the cable into the antenna-lead connector on the end of receiver. Note 4.--When the antenna-stage adjustment is made with the receiver installed in the car, the receiver antenna lead must be connected to the car antenna in the usual manner. Connect the signal-generator output-lead to a wire placed near the car antenna but not connected to it. *While rocking.
4111.1« IS TUIX 15 Me010
84.7TURC MIVIK
IF Be
TRANS
[127 ]
APO PAD
�MODEL NO. 2620
Signal Generator Connection
Signal Generator Frequency
Dial Position
Wave Band Switch Position
Trimmer Output Number Signal
Remove grid clip from i.f.
Control grid 460 k.c. 550 k.c. Range 2
48
Max.
of,`if.
i`
a
(left)
44
50
Max.
Connect grid clip to if. and disconnect grid clip from 6A7
Control grid
c`
a
a
39
Max.
of 6A7
a
CI
if
il
41
Max.
Connect grid clip to se
Ant.*
g`
``
18.0 m.c.
a
a
18.0 m.c.2 Range 3 (right)
a
a
a
"
a
ff
18.0 m.c.3 a
a
a
17.1 m.c.
a
a
1500 k.c. 1500 k.c. Range 2
(left)
a
4.
a
a
di
a
a
a
1
Min.
22
Max.
28
Max.
8
Max.
Image check
11
Max.
21
Mex.
26
Max.
id
580 k.c. 580 k.c.
i`
7
Max.
it
1500 k.c. 1500 k.c.
4i
11
Max.
le
350 k.c. 350 k.c. Range 1
10
Max.
(center)
a
It
44
l.
20
Max.
gi
a
a
a
27
Max.
«g
170 k.c. 170 k.c.
a
6
Max.
·Use a 200-mmf. condenser in series as dummy antenna for broadcast band
and a 400-ohm carbon resistor for shortwave band. Note I.--Set tone control to counter clockwise position. Note 2.--Connect an external variable condenser across oscillator section of
receiver tuning condenser gang and tune this external condenser to give maximum indication on output meter. Note 3.--Remove external variable condenser mentioned in note 2 above.
[128 ]
�MODEL NO. G (121)
Signal Generator Connection
Signal Generator Frequency
Dial Position
Wave Band Switch Position
Trimmer Number
Output Signal
Remove grid clip from det.-osc. tube Control grid 260 k.c. of det.-osc.
tube if
it
di
4!
di
4i
di
di
Connect grid clip to det.-osc. tube
Ant.4.e `, `i `` ii U
1500 k.c. 1400 k.c.
4t
600 k.c. 1400 k.c.
``
Note 5 140
it
60 140
``
1 1
22
Max.
31 3 1
Max.
42
Max.
33
Max.
7
Max.
6
Max.
5
Max.
8
Max.*
6
Max.
5
Max.
Note 1.--Screw adjustment. Turn all the way in. Note 2.--Nut adjustment. Note 3.--This is a critical adjustment. Note the maximum reading, then turn
screw in again and slowly bring adjustment to this maximum reading. Do not pass this point. If you do, repeat the adjustment. Note 4.--Through a 150 mmfd. condenser. Note 5.--Using a piece of paper approximately .006" thick as a gauge between the heel of the rotor plates and the stator plates, turn the rotor plates until they strike the papers. This is the correct adjustment for 1500 k.c.-150 on the dial scale. Note 6.--When the antenna stage adjustment is made with the receiver installed in the car, the receiver must be connected to the car antenna in the usual manner. Connect the signal-generator output to a wire placed near the car antenna but not connected to it. ·While rocking.
LOW 9
fRPEAQDUDEENRC
(MODELS Tell" ONLY)
---C) HIGH FREQUENCY DAUER R.F. PADDER
ANTENNA PADDER
I.F.TRANSFORMER 39,44 TUBE
1ST.. I.F. TRANSFORMER
0
Q
*LOW FREQUENCY PADOER s trooni.orszt ONLY1
39-4·TUB R E
DEI. 05C TUBE
[129 ]
OUTPUT TUBE
751U6E
2.0L.DEt
�MODEL NOS. G (122), N
Signal Generator Connection
Signal Generator Frequency
Dial Position
Wave Band Switch Position
Trimmer Number
Output Signal
Remove grid clip from det.-osc. tube
Control grid of det.-
osc. tube
260 k.c.
di
u
it
a
Connect grid clip to det.-osc. tube
Ant.4.6 ``
1580 k.c. 1400 k.c.
Note 5 140
id
it
1 2
22
Max.
13
Max.
31
· · ·
42
Max.
33
Max.
7
M ax.
6
Max.
5
Max.
Note 1.--This is screw adjustment. Turn all way in. Note 2.--This is a nut adjustment. Note 3.--This adjustment is critical. Note maximum reading obtainable and
then turn the screw in again, just bringing it up to the maximum Orpeeardaintgi.on. Do not pass this point. If you do, repeat complete Note 4.--Through a 150 mmfd. condenser. Note 5.--Using a piece of paper approximately .008" thick as a gauge between the heel of the rotor plates and the stator plates, turn the rotor plates until they strike against the paper. This is the correct adjustment for 1580 k.c.-158 on the dial scale. Note 6.--When the antenna-stage adjustment is made with the receiver installed in the car, the receiver must be connected to the ear antenna in the usual manner. Connect the signal-generator output to a wire placed near the car antenna but not connected to it.
LOW FREQUENCY
PADDER
(MODELS TZYS.T6 ONLY)
HIGH FREQUENCY PADDE9, -- (E"D R.F. PADDER
ANTEN Ha PADDER
· LF,TRANSFORMER 3944 TUBE
rdil-WEQUENCY PADDER Otonate-11,1 grim
39-4-4TUB R E
TUBE
[130 ]
eO-- UTT TUBE
�MODEL NO. DPV
Signal Generator Connection
Signal Generator Frequency
Dial Position
Wave Band Switch Position
Trimmer Output Number signal
Remove grid clip from det.-osc. tube
Control grid of det.-osc.
tube
260 k.c.
a
1 1
22 1 3 31
Max. Max.
le
Connect grid clip to det.-osc. tube
42
Max.
33
Max.
Ant.*
IC
«i
3500 k.c. 4£ de
1600 k.c.
Note 5
it
1.6
7
Max.
6
Max.
5
Max.
8°
Max.*
Note 1.--Screw adjustment. Turn all the way in. Note 2.--Nut adjustment. Note 3.--This is a critical adjustment. Note the maximum reading, then turn
screw in again and slowly bring adjustment to this maximum reading. Do not pass this point. If you do, repeat the adjustment. Note 4.--Through a 150 =lid. condenser. Note 5.--Using a piece of paper approximately .008" thick as a gauge between the heel of the rotor plates and the stator plates, turn the rotor plates until they strike against the paper. This is the correct adjustment for 3500 k.c.-3.5 on the dial scale. Note 6.--Fixed Frequencies--When used as a fixed-frequency receiver, follow the procedure given above first, and then lock the tuning condenser at the desired frequency. If possible, (5), (8), (7) and (8) should be adjusted while using the police-transmitter signal. ·While rocking.
ANTENNA PAODER
-0 R.F. PADDER MOH FREQUENCY PADDER ,IMBM·l·
LI
LI
MODELS
79TUS5E05O6U5TaPeLUaT
LOW FREQUENCY PADDER I.F.TRANSFORMER IF. TRANSFORMER
44TUbE IF.
15 Tut( DET.
[131
OUTPUT TUBE
1.00.t1ne.a
TU5E AUDIO
84TUBE RECTIFIER
�MODEL NOS. T2, T5
Signal Generator Connection
Signal Generator Frequency
Dial Position
Wave Band Switch Position
Trimmer Output Number Signal
Remove grid clip from deteosc. tube
Control grid of det.-osc.
260 k.c.
tube
II
II
· · ·
Connect grid clip to det-osc. tube
Ants ,5 idfi
1600 k.c. 1400I« k.c.
Note 4 1«40
de
600 k.c.
60
iui
1400u k.c.
1u40
1 1
Max.
22
Max.
31
Max.
42
Max.
7
Max.
6 5
MMaaxx..
9
Max.*
6
Max.
5
Max.
Note I.--This is a screw adjustment. Note 2.--This is a nut adjustment. Note 3.--Through a 150 mmfd. condenser. Note 4.--Turn the tuning condenser plates wide open This gives the correct
adjustment for 1600 k.c.-180 on the dial scale.
Note 5.--When the antenna-stage adjustment is made with the receiver installed in the car, the receiver must be connected to the car antenna in the usual manner. Connect the signal-generator output to a wire placed near the car antenna but not connected to it.
·While rocking.
LOW -FREQUENCY
PADDER MODELS
T2:11,760NLY)
HIGH FREQUENCY PADDER R.F. PADDER ANTENNA PADDER
VID. I.F.TRANSFORMER 3944 TUBE
e'iTUBE' DET.05C
LOW FREQUENCY ()ADDER'
RE
TUBE
(Hoottatztoona)
[132 ]
OUTPUT TUBE
r7-5-T-O--MN 2". DU
�MODEL NO. T3
Signal Generator Connection
Signal Generator Frequency
Dial Position
Wave Band Switch Position
Trimmer Number
Output Signal
Remove grid clip from det.-osc. tube
Control grid 260 k.c.
of det.-osc.
tube
it
If
it
Id
if
Connect grid clip to det-osc. tube
Ants. 5
it
1600 k.c. 1400 k.c.
Note 4 140
it
if
di
id
600 k.c.
60
di
1400 k.c.
140
1 1
Max.
22
Max.
31
Max.
42
Max.
7
Max.
6
Max.
5
Max.
8
Max.*
6
Max.
5
Max.
Note 1.--This is a screw adjustment. Note 2.--This is a nut adjustment. Note 3.--Through a 150 mmfd. condenser. Note 4.--Turn the tuning condenser plates wide open This gives the correct
adjustment for 1600 k.c.-160 on the dial scale. Note 5.--When the antenna-stage adjustment is made with the receiver in-
stalled in the car, the receiver must be connected to the car antenna in the usual manner. Connect the signal-generator output to a wire placed near the car antenna but not connected to it.
·While rocking.
,OH.F.PADDER
0 R.F. PADDER 0 ANT. PADDER
(ra.t \ LEM/ FREQUENCY M.-fl PA DD ER
36 TUBE R.F 77TUBE DE T. OSC.
VIBRATOR
TRANSFORMER
44TUBE
&C
F
75TUBE
TRANSFORMER 2",DET.
[133 ]
42 TUBE OUTPUT
84TUBE RECTIFIER
�MODEL NOS. T6, FT6
Signal Generator Connection
Signal Generator Frequency
Dial Position
Wave Band Switch Position
Trimmer Output Number Signal
Remove grid clip from det.-osc. tube
Control grid 260 k.c.
1 1
of r.f .tube
di
tt
it
It
``
it
it
Connect grid clip to det.-osc. tube
Ant.. 6
1600 k.c.
Note 5
22
Max.
3
Max.
3
42
Max.
33
Max.
7
Max.
``
1400 k.c.
140
6
Max.
it
it
it
ii
600 k.c.
60
5 9
MMaaxx..*
it
1600 k.c.
160
``
1400 k.c.
140
7
Max.
6
Max.
it
It
if
5
Max.
Note 1.--Screw adjustment. Turn all the way in. Note 2.--Nut adjustment.
Note 3.--This is a critical adjustment. Note the maximum reading, then turn
the screw in again and slowly bring the adjustment to this maximum Note 4.--rTehardoiungg.h aDo15n0otmmpiadss. tchoinsdepnosientr.. If you do, repeat the adjustment.
Note 5.--Turn the tuning-condenser plates wide open. This adjustment gives the true setting for 1600 k.c.-160 on the dial scale.
Note 6.--When the antenna-stage adjustment is made with the receiver installed in the car, the receiver must be connected to the car antenna in the usual manner. Connect the signal-generator output to a wire
·While prloacckeidng.near the car antenna but not connected to it.
A..0w FREQUE
PADDER *loom
TeTIMONLY)
HIGH FREQUENCY PADDElk R.F. PADDER ANTENNA PADDER
I.F,TRANSFORMER 39-44 TUBE
LOW FREQUENCY PADDER OiOnaLii-mioesei
'3944TUEit ['ET. OSE
R E
TUBE
[134 ]
gITT-FU7 TUBE
�MODEL NOS. T9, T11, T12, T14, T15
Signal Generator Connection
Signal Generator Frequency
Control grid 1 of i.f.atube
260 k.c. a
Control grid 1 a
of det.-osc.
tube
if
IC
Control grid 1 of r.f. tube
if
IC
di
Ant.4, 5
a
1600 k.c.
ii
580 k.c. 1600 k.c. 1400 k.c.
if
Dial Position
Note 2
Wave Band Switch Position
Trimmer Number
1
2 3
Output Signal
Max.
Max. Max.
No.t.e3
U
58 160 1,40
ié
4
Max.
7
Max.
6
Max.
8
Max.*
7
Max.
6 5
MMaaxx..
Note 1.--Through a .1 mfd. condenser. Note 2.--Por TIP, TI 4: Set the sensitivity switch to the "distance" position
and the tone control to the "brilliant" position. Note 3.--Turn the tuning-condenser plates out of mesh as far as they will go.
This adjustment gives the true setting for 1600 k.c.-160 on the dial scale.
15TUBE '78 TUBE Z".DET. I.F. IsT.Aul)10
GDAE'TT. T0U5BCE.
Q LE PADDER
OUTPUT TRANSFORMER TRANSFORMER R.F. R.F.PADDER
[135
�Note 4.--For T9: Through a 125 mmfd. condenser. For TU: Connect the signal-generator lead to the antenna cable assembly (made up of Part No. L 1915 loom and 40 inches of 18 strand :30 wire) through a 110 mmfd. condenser. Plug the cable into the antenna socket marked "Fabric Top." For NTILIC and ST12: Connect the signal-generator lead to the antenna cable assembly (made up of Part No. L 1915 loom, 1-27-7133 terminal and 40 inches of 16 strand $30 wire) through a 200 tnmfd. condenser. Plug the cable into the antenna socket. For NTI2X2: Connect the signal-generator lead to the antenna lead, using a 1250 mmfd. condenser and a 50 ohm non-inductive resistor as a dummy antenna. Plug the antenna lead into the antenna socket. For TI4: Connect the signal-generator lead to the antenna lead, using a 230 mmfd. condenser in series between the two leads and the .1 mfd. condenser. For LTI4X3: Connect the signal-generator lead to the antenna cable assembly (made up of Part No. L 1963 loom, 1-27-7133 terminal and 84 inches of 16 strand 530 wire) through a 530 nunfd. condenser. Plug the cable into the antenna socket. For Tie: Connect the signal-generator lead to the antenna cable assembly (made up of Part No. L 1915 loom, 1-27-7133 terminal and 40 inches of 16 strand 530 wire) through a 200 mmfd. condenser. Plug the cable into the antenna socket.
Note 5.--When the antenna-stage adjustment is made with the receiver installed in the ear, the receiver antenna lead must be connected to the car antenna in the usual manner. The signal-generator output-lead should be connected to a wire placed near the car antenna but not connected to it.
·While rocking.
[136 1
��41-
�Foxit FXPDFA 1.2 PDF Compressor 8.2.04.21