Nikon D7500 Menu Guide D7500MG En
User Manual: nikon D7500 - Menu Guide Free User Guide for Nikon D Series Camera, Manual - page3
Open the PDF directly: View PDF ![]() .
.
Page Count: 238 [warning: Documents this large are best viewed by clicking the View PDF Link!]
- Table of Contents
- Menu Guide
- Defaults
- The Playback Menu: Managing Images
- The Photo Shooting Menu: Shooting Options
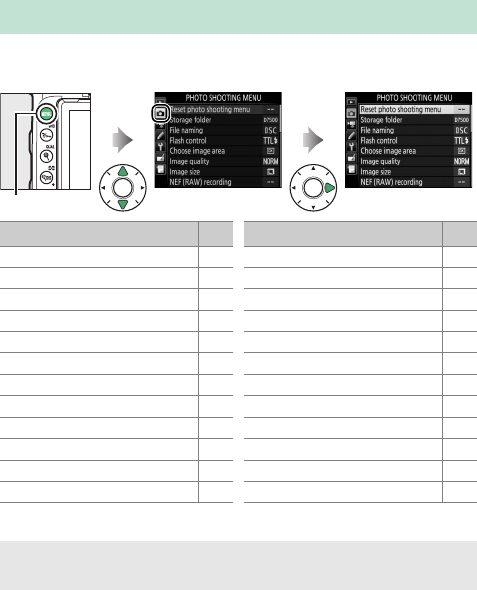
- Reset Photo Shooting Menu
- Storage Folder
- File Naming
- Flash Control
- Choose Image Area
- Image Quality
- Image Size
- NEF (RAW) Recording
- ISO Sensitivity Settings
- White Balance
- Set Picture Control
- Manage Picture Control
- Color Space
- Active D-Lighting
- Long Exposure NR (Long Exposure Noise Reduction)
- High ISO NR
- Vignette Control
- Auto Distortion Control
- Flicker Reduction
- Remote Control Mode (ML-L3)
- Auto Bracketing Set
- Multiple Exposure
- HDR (High Dynamic Range)
- Interval Timer Shooting
- The Movie Shooting Menu: Movie Shooting Options
- Reset Movie Shooting Menu
- File Naming
- Choose Image Area
- Frame Size/Frame Rate
- Movie Quality
- Movie File Type
- ISO Sensitivity Settings
- White Balance
- Set Picture Control
- Manage Picture Control
- Active D-Lighting
- High ISO NR
- Flicker Reduction
- Microphone Sensitivity
- Frequency Response
- Wind Noise Reduction
- Electronic VR
- Time-Lapse Movie
- Custom Settings: Fine-Tuning Camera Settings
- The Setup Menu: Camera Setup
- Format Memory Card
- Save User Settings
- Reset User Settings
- Language
- Time Zone and Date
- Monitor Brightness
- Monitor Color Balance
- Virtual Horizon
- Information Display
- Auto Info Display
- Info Display Auto Off
- AF Fine-Tune
- Clean Image Sensor
- Lock Mirror up for Cleaning
- Image Dust Off Ref Photo
- Image Comment
- Copyright Information
- Beep Options
- Touch Controls
- Flash Warning
- HDMI
- Location Data
- Wireless Remote (WR) Options
- Assign Remote (WR) Fn Button
- Airplane Mode
- Connect to Smart Device
- Send to Smart Device (Auto)
- Wi-Fi
- Bluetooth
- Eye-Fi Upload
- Conformity Marking
- Battery Info
- Slot Empty Release Lock
- Save/Load Settings
- Reset All Settings
- Firmware Version
- The Retouch Menu: Creating Retouched Copies
- My Menu/Recent Settings
- Optional Flash Units
- Technical Notes
This manual details menu options and provides
information on accessories and connecting the camera to
other devices.
• Read this manual thoroughly before using the camera.
• After reading this manual, keep it in a readily accessible
place for future reference.
DIGITAL CAMERA
Menu Guide
En

2
Menu Guide 9
Defaults .......................................................................................... 9
DThe Playback Menu: Managing Images............................ 18
Delete ............................................................................................. 19
Playback Folder........................................................................... 19
Hide Image ................................................................................... 20
Playback Display Options........................................................ 22
Image Review .............................................................................. 22
After Delete .................................................................................. 22
Auto Image Rotation................................................................. 23
Rotate Tall ..................................................................................... 23
Slide Show .................................................................................... 24
Rating ............................................................................................. 25
Select to Send to Smart Device............................................. 25
CThe Photo Shooting Menu: Shooting Options................ 26
Reset Photo Shooting Menu.................................................. 27
Storage Folder............................................................................. 27
File Naming .................................................................................. 31
Flash Control................................................................................ 32
Choose Image Area ................................................................... 35
Image Quality .............................................................................. 36
Image Size..................................................................................... 37
NEF (RAW) Recording ............................................................... 37
ISO Sensitivity Settings ............................................................ 38
White Balance.............................................................................. 39
Set Picture Control..................................................................... 40
Manage Picture Control........................................................... 41
Color Space .................................................................................. 44
Table of Contents
3
Active D-Lighting....................................................................... 44
Long Exposure NR
(Long Exposure Noise Reduction)................................... 45
High ISO NR ................................................................................. 45
Vignette Control ........................................................................ 46
Auto Distortion Control........................................................... 46
Flicker Reduction ....................................................................... 47
Remote Control Mode (ML-L3) ............................................. 49
Auto Bracketing Set.................................................................. 49
Multiple Exposure ..................................................................... 50
HDR (High Dynamic Range)................................................... 57
Interval Timer Shooting .......................................................... 58
1The Movie Shooting Menu: Movie Shooting Options .... 66
Reset Movie Shooting Menu ................................................. 67
File Naming.................................................................................. 67
Choose Image Area................................................................... 67
Frame Size/Frame Rate............................................................ 68
Movie Quality.............................................................................. 68
Movie File Type .......................................................................... 69
ISO Sensitivity Settings............................................................ 69
White Balance ............................................................................. 70
Set Picture Control .................................................................... 70
Manage Picture Control .......................................................... 70
Active D-Lighting....................................................................... 70
High ISO NR ................................................................................. 71
Flicker Reduction ....................................................................... 71
Microphone Sensitivity............................................................ 72
Frequency Response ................................................................ 73
Wind Noise Reduction ............................................................. 73
Electronic VR................................................................................ 73
Time-Lapse Movie ..................................................................... 74
4
ACustom Settings: Fine-Tuning Camera Settings.............. 81
Reset Custom Settings ............................................................. 84
a: Autofocus.......................................................................................84
a1: AF-C Priority Selection....................................................... 84
a2: AF-S Priority Selection ....................................................... 85
a3: Focus Tracking with Lock-On.......................................... 86
a4: Number of Focus Points ................................................... 86
a5: Store Points by Orientation ............................................. 87
a6: AF Activation......................................................................... 88
a7: Focus Point Wrap-Around................................................ 89
a8: Focus Point Options........................................................... 90
a9: Built-in AF-assist Illuminator ........................................... 91
a10: Manual Focus Ring in AF Mode ................................... 92
b: Metering/Exposure ....................................................................93
b1: ISO Sensitivity Step Value ................................................ 93
b2: EV Steps for Exposure Cntrl............................................. 93
b3: Easy Exposure Compensation........................................ 94
b4: Matrix Metering................................................................... 95
b5: Center-Weighted Area...................................................... 95
b6: Fine-Tune Optimal Exposure.......................................... 95
c: Timers/AE Lock.............................................................................96
c1: Shutter-Release Button AE-L ........................................... 96
c2: Standby Timer ...................................................................... 96
c3: Self-Timer ............................................................................... 97
c4: Monitor off Delay................................................................. 97
c5: Remote on Duration (ML-L3)........................................... 97
d: Shooting/Display ........................................................................98
d1: CL Mode Shooting Speed ................................................ 98
d2: Max. Continuous Release................................................. 98
d3: Exposure Delay Mode ....................................................... 98
5
d4: Electronic Front-Curtain Shutter................................... 99
d5: File Number Sequence................................................... 100
d6: Viewfinder Grid Display ................................................. 101
d7: ISO Display.......................................................................... 101
d8: LCD Illumination............................................................... 101
d9: Optical VR............................................................................ 101
e: Bracketing/Flash .......................................................................102
e1: Flash Sync Speed .............................................................. 102
e2: Flash Shutter Speed......................................................... 104
e3: Exposure Comp. for Flash.............................................. 104
e4: Auto M ISO Sensitivity Control...................................... 105
e5: Bracketing Order............................................................... 105
f: Controls.........................................................................................106
f1: Custom Control Assignment......................................... 106
f2: OK Button............................................................................. 114
f3: Customize Command Dials............................................ 115
f4: Release Button to Use Dial ............................................. 117
f5: Reverse Indicators ............................................................. 117
g: Movie ............................................................................................118
g1: Custom Control Assignment........................................ 118
BThe Setup Menu: Camera Setup......................................... 122
Format Memory Card............................................................. 123
Save User Settings................................................................... 123
Reset User Settings ................................................................. 125
Language.................................................................................... 125
Time Zone and Date ............................................................... 126
Monitor Brightness ................................................................. 127
Monitor Color Balance........................................................... 127
Virtual Horizon.......................................................................... 128
6
Information Display................................................................ 129
Auto Info Display..................................................................... 129
Info Display Auto Off.............................................................. 130
AF Fine-Tune............................................................................. 130
Clean Image Sensor................................................................ 134
Lock Mirror up for Cleaning................................................. 135
Image Dust Off Ref Photo .................................................... 138
Image Comment ..................................................................... 140
Copyright Information .......................................................... 141
Beep Options ............................................................................ 142
Touch Controls......................................................................... 143
Flash Warning........................................................................... 143
HDMI............................................................................................ 143
Location Data ........................................................................... 144
Wireless Remote (WR) Options .......................................... 145
Assign Remote (WR) Fn Button.......................................... 147
Airplane Mode.......................................................................... 147
Connect to Smart Device ..................................................... 148
Send to Smart Device (Auto)............................................... 149
Wi-Fi ............................................................................................. 149
Bluetooth ................................................................................... 150
Eye-Fi Upload............................................................................ 151
Conformity Marking............................................................... 152
Battery Info................................................................................ 153
Slot Empty Release Lock....................................................... 153
Save/Load Settings................................................................. 154
Reset All Settings..................................................................... 156
Firmware Version .................................................................... 156
7
NThe Retouch Menu: Creating Retouched Copies .......... 157
NEF (RAW) Processing............................................................ 160
Trim............................................................................................... 163
Resize ........................................................................................... 164
D-Lighting .................................................................................. 166
Quick Retouch .......................................................................... 166
Red-Eye Correction ................................................................. 167
Straighten................................................................................... 167
Distortion Control.................................................................... 168
Perspective Control ................................................................ 169
Fisheye......................................................................................... 169
Filter Effects ............................................................................... 170
Monochrome ............................................................................ 171
Image Overlay........................................................................... 172
Color Outline............................................................................. 175
Photo Illustration..................................................................... 175
Color Sketch .............................................................................. 176
Miniature Effect........................................................................ 177
Selective Color.......................................................................... 178
Painting....................................................................................... 180
Edit Movie................................................................................... 180
Side-by-Side Comparison..................................................... 181
OMy Menu/mRecent Settings ............................................. 183

8
Optional Flash Units 188
Flash Control Options............................................................. 188
Built-in or Camera-Mounted Flash............................................. 188
Remote Flash Photography.......................................................... 189
Optical AWL .............................................................................. 190
Built-in Flash/SB-500....................................................................... 190
Other Flash Units.............................................................................. 193
Radio AWL Using the Controls on an SB-5000................... 194
Establishing a Wireless Connection........................................... 194
Taking Photographs........................................................................ 196
Optical/Radio AWL .................................................................. 198
Radio AWL................................................................................. 199
Viewing Flash Information .................................................... 200
The Nikon Creative Lighting System (CLS) ......................... 203
Technical Notes 211
Connections.............................................................................. 211
Installing ViewNX-i........................................................................... 211
Copying Pictures to the Computer............................................ 212
Printing Photographs ..................................................................... 215
Viewing Photographs on TV......................................................... 219
Other Accessories.................................................................... 222
Attaching a Power Connector and AC Adapter .................... 227
Available Settings.................................................................... 229
Lenses That May Block the Built-in Flash and AF-Assist
Illuminator........................................................................... 232
9Menu Guide
Menu Guide
The default settings for the options in the camera menus are
listed below.
❚❚ Playback Menu Defaults
Defaults
Option Default
Playback folder (019) All
Image review (022) Off
After delete (022) Show next
Auto image rotation (023) On
Rotate tall (023) On
Slide show (024)
Image type Still images and movies
Frame interval 2 s

10 Menu Guide
❚❚ Photo Shooting Menu Defaults
Option Default
Storage folder (027)
Rename D7500
Select folder by number 100
File naming (031) DSC
Flash control (032)
Flash control mode (built-in)/Flash control mode
(external) TTL
Wireless flash options Off
Choose image area (035) DX (24×16)
Image quality (036) JPEG normal
Image size (037) Large
NEF (RAW) recording (037)
NEF (RAW) compression Lossless compressed
NEF (RAW) bit depth 14-bit
ISO sensitivity settings (038)
ISO sensitivity 100
Auto ISO sensitivity control Off
White balance (039) Auto > Normal
Fine-tuning A-B: 0, G-M: 0
Choose color temp. 5000 K
Preset manual d-1
Set Picture Control (040) Auto
Color space (044) sRGB
Active D-Lighting (044) Off
Long exposure NR (045) Off
High ISO NR (045) Normal
Vignette control (046) Normal

11Menu Guide
Auto distortion control (046) Off
Flicker reduction (047)
Flicker reduction setting Disable
Flicker reduction indicator On
Remote control mode (ML-L3) (049) Off
Auto bracketing set (049) AE & flash bracketing
Multiple exposure (050)*
Multiple exposure mode Off
Number of shots 2
Overlay mode Average
Keep all exposures On
HDR (high dynamic range) (057)
HDR mode Off
HDR strength Auto
Interval timer shooting (058) Off
Start options Now
Interval 1 minute
No. of intervals×shots/interval 0001×1
Exposure smoothing Off
* Photo shooting menu reset is not available while shooting is in progress.
Option Default

12 Menu Guide
❚❚ Movie Shooting Menu Defaults
Option Default
File naming (067) DSC
Choose image area (067) DX
Frame size/frame rate (068) 1920×1080; 60p
Movie quality (068) High quality
Movie file type (068) MOV
ISO sensitivity settings (069)
Maximum sensitivity 51200
Auto ISO control (mode M) Off
ISO sensitivity (mode M) 100
White balance (070) Same as photo settings
Fine-tuning A-B: 0, G-M: 0
Choose color temp. 5000 K
Preset manual d-1
Set Picture Control (070) Same as photo settings
Active D-Lighting (070) Off
High ISO NR (071) Normal
Flicker reduction (071) Auto
Microphone sensitivity (072) Auto sensitivity
Frequency response (073) Wide range
Wind noise reduction (073) Off
Electronic VR (073) Off
Time-lapse movie (074) Off
Interval 5 s
Shooting time 25 minutes
Exposure smoothing On

13Menu Guide
❚❚ Custom Settings Menu Defaults
Option Default
a1 AF-C priority selection (084) Release
a2 AF-S priority selection (085) Focus
a3 Focus tracking with lock-on (086) 3 (Normal)
a4 Number of focus points (086) 51 points
a5 Store points by orientation (087) Off
a6 AF activation (088) Shutter/AF-ON
a7 Focus point wrap-around (089) No wrap
a8 Focus point options (090)
Focus point illumination Auto
Manual focus mode On
a9 Built-in AF-assist illuminator (091) On
a10 Manual focus ring in AF mode (092) Enable
b1 ISO sensitivity step value (093) 1/3 step
b2 EV steps for exposure cntrl (093) 1/3 step
b3 Easy exposure compensation (094) Off
b4 Matrix metering (095) Face detection on
b5 Center-weighted area (095) ø 8 mm
b6 Fine-tune optimal exposure (095)
Matrix metering 0
Center-weighted metering 0
Spot metering 0
Highlight-weighted metering 0
c1 Shutter-release button AE-L (096) Off
c2 Standby timer (096) 6 s
c3 Self-timer (097)
Self-timer delay 10 s
Number of shots 1
Interval between shots 0.5 s

14 Menu Guide
c4 Monitor off delay (097)
Playback 10 s
Menus 1 min
Information display 4 s
Image review 4 s
Live view 10 min
c5 Remote on duration (ML-L3) (097) 1 min
d1 CL mode shooting speed (098) 3 fps
d2 Max. continuous release (098) 100
d3 Exposure delay mode (098) Off
d4 Electronic front-curtain shutter (099) Disable
d5 File number sequence (0100) On
d6 Viewfinder grid display (0101) Off
d7 ISO display (0101) Show frame count
d8 LCD illumination (0101) Off
d9 Optical VR (0101) On
e1 Flash sync speed (0102) 1/250 s
e2 Flash shutter speed (0104) 1/60 s
e3 Exposure comp. for flash (0104) Entire frame
e4 Auto M ISO sensitivity control (0105) Subject and background
e5 Bracketing order (0105) MTR > under > over
Option Default
15Menu Guide
f1 Custom control assignment (0106)
Fn1 button Viewfinder virtual horizon
Fn1 button + yNone
Fn2 button None
Fn2 button + yChoose image area
AE-L/AF-L button AE/AF lock
AE-L/AF-L button + yNone
BKT button + yAuto bracketing
Movie record button + yNone
f2 OK button (0114)
Shooting mode Select center focus point
Playback mode Thumbnail on/off
Live view Select center focus point
f3 Customize command dials (0115)
Reverse rotation Exposure compensation: U
Shutter speed/aperture: U
Change main/sub Exposure setting: Off
Autofocus setting: Off
Menus and playback Off
Sub-dial frame advance 10 frames
f4 Release button to use dial (0117) No
f5 Reverse indicators (0117)
g1 Custom control assignment (0118)
Fn1 button Index marking
Fn2 button Index marking
AE-L/AF-L button AE/AF lock
Shutter-release button Take photos
Option Default

16 Menu Guide
❚❚ Setup Menu Defaults
Option Default
Save user settings (0123)
Save to U1 Shooting mode defaults to P
Save to U2
Time zone and date (0126)
Sync with smart device Off
Daylight saving time Off
Monitor brightness (0127)
Menus/playback 0
Live view 0
Monitor color balance (0127) A-B: 0, G-M: 0
Information display (0129) Auto
Auto info display (0129) On
Info display auto off (0130) On
AF fine-tune (0130)
AF fine-tune (On/Off) Off
Clean image sensor (0134)
Clean at startup/shutdown Clean at startup & shutdown
Beep options (0142)
Beep on/off Off
Volume 2
Pitch Low
Touch controls (0143)
Enable/disable touch controls Enable
Full-frame playback flicks Left V Right
Flash warning On

17Menu Guide
HDMI (0143)
Output resolution Auto
Advanced
Output range Auto
Output display size 100%
Live view on-screen display On
Dual monitor On
Location data (0144)
Download from smart device No
External GPS device options
Standby timer Enable
Set clock from satellite Yes
Wireless remote (WR) options (0145)
LED lamp On
Link mode Pairing
Assign remote (WR) Fn button (0147) None
Airplane mode (0147) Disable
Send to smart device (auto) (0149) Off
Bluetooth (0150)
Network connection Disable
Send while off On
Eye-Fi upload (0151) Enable
Slot empty release lock (0153) Enable release
Option Default

18 Menu Guide
To display the playback menu, press G and select the
K(playback menu) tab.
DThe Playback Menu: Managing Images
G button
Option 0
Delete 19
Playback folder 19
Hide image 20
Playback display options 22
Image review 22
After delete 22
Auto image rotation 23
Rotate tall 23
Slide show 24
Rating 25
Select to send to smart device 25
Option 0
ASee Also
For menu defaults, see “Playback Menu Defaults” (09).

19Menu Guide
Delete multiple images.
Choose a folder for playback.
Delete
G button ➜Dplayback menu
Option Description
QSelected Delete selected pictures.
nSelect
date Delete all pictures taken on a selected date.
RAll Delete all pictures in the folder currently selected for
playback.
Playback Folder
G button ➜Dplayback menu
Option Description
(Folder name)
Pictures in all folders created with the D7500 will be
visible during playback. Folders can be renamed using
the Storage folder > Rename option in the photo
shooting menu.
All Pictures in all folders will be visible during playback.
Current Only pictures in the current folder will be visible during
playback.
20 Menu Guide
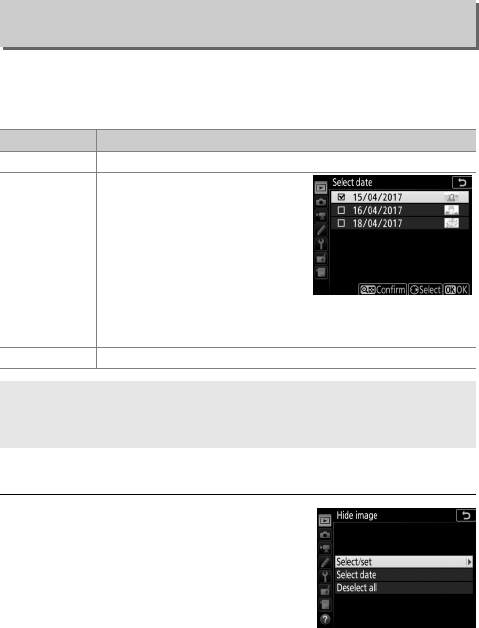
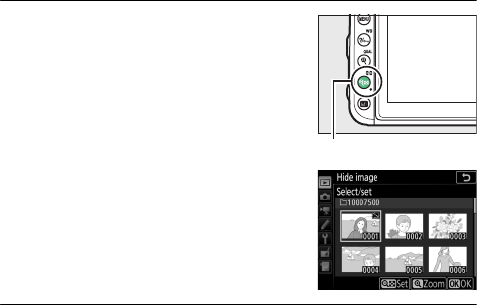
Hide or reveal pictures. Hidden pictures are visible only in the
Hide image menu and can only be deleted by formatting the
memory card.
Follow the steps below to hide or reveal selected pictures.
1Choose Select/set.
Highlight Select/set and press 2.
Hide Image
G button ➜Dplayback menu
Option Description
Select/set Hide or reveal selected pictures.
Select date
Selecting this option displays
a list of dates. To hide all
pictures taken on a date,
highlight the date and press
2. Selected dates are marked
by a L; to reveal all pictures
taken on a selected date,
highlight it and press 2. Press J to complete the
operation.
Deselect all Reveal all pictures.
DProtected and Hidden Images
Revealing a protected image will also remove protection from the
image.
21Menu Guide
2Select pictures.
Use the multi selector to scroll
through the pictures on the memory
card (to view the highlighted picture
full screen, press and hold the X/T
button) and press W (Z) to select the
current picture. Selected pictures are
marked by a R icon; to deselect a
picture, highlight it and press W (Z)
again. Continue until all the desired
pictures have been selected.
3Press J.
Press J to complete the operation.
W (Z) button

22 Menu Guide
Choose the information available in the playback photo
information display. Press 1 or 3 to highlight an option, then
press 2 to select the option for the photo information display. A
L appears next to selected items; to deselect, highlight an item
and press 2. To return to the playback menu, press J.
Choose whether pictures are automatically displayed in the
monitor immediately after shooting. If Off is selected, pictures
can only be displayed by pressing the K button.
Choose the picture displayed after an image is deleted.
Playback Display Options
G button ➜Dplayback menu
Image Review
G button ➜Dplayback menu
After Delete
G button ➜Dplayback menu
Option Description
SShow next Display following picture. If deleted picture was last
frame, previous picture will be displayed.
TShow
previous
Display previous picture. If deleted picture was first
frame, following picture will be displayed.
UContinue as
before
If user was scrolling through pictures in order
recorded, following picture will be displayed as
described for Show next. If user was scrolling through
pictures in reverse order, previous picture will be
displayed as described for Show previous.
23Menu Guide
Photographs taken while On is selected contain information on
camera orientation, allowing them to be rotated automatically
during playback or when viewed in ViewNX-i or in Capture NX-D.
The following orientations are recorded:
Camera orientation is not recorded when Off is selected. Choose
this option when panning or taking photographs with the lens
pointing up or down.
If On is selected, “tall” (portrait-orientation) pictures taken with
On selected for Auto image rotation will be automatically
rotated for display in the monitor. Pictures taken with Off
selected for Auto image rotation will be displayed in “wide”
(landscape orientation). Note that because the camera itself is
already in the appropriate orientation during shooting, images
are not rotated automatically during image review.
Auto Image Rotation
G button ➜Dplayback menu
Landscape (wide)
orientation
Camera rotated 90°
clockwise
Camera rotated 90°
counter-clockwise
Rotate Tall
G button ➜Dplayback menu
24 Menu Guide
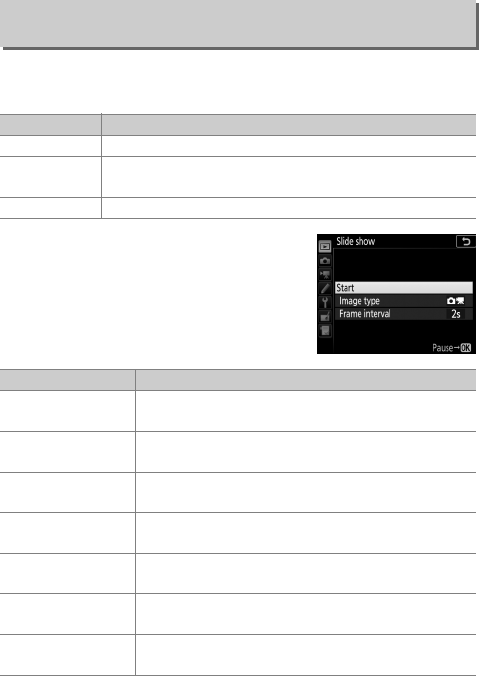
Create a slide show of the pictures in the current playback folder
(019). Hidden images (020) are not displayed.
To start the slide show, highlight Start
and press J. The following operations
can be performed while the slide show is
in progress:
Slide Show
G button ➜Dplayback menu
Option Description
Start Start slide show.
Image type Choose type of image displayed from Still images and
movies, Still images only, and Movies only.
Frame interval Choose how long each picture will be displayed.
To Description
Skip back/skip ahead Press 4 to return to the previous frame, 2 to skip
to the next frame.
View additional photo
info
Press 1 or 3 to change or hide the photo info
displayed (still images only).
Pause Press J to pause the slide show. To restart,
highlight Restart and press J.
Adjust volume Press X (T) during movie playback to increase
volume, W (Z) to decrease.
Exit to playback menu Press G to end the slide show and return to the
playback menu.
Exit to playback mode Press K to end the slide show and exit to playback
mode.
Exit to shooting mode Press the shutter-release button halfway to return
to shooting mode.
25Menu Guide
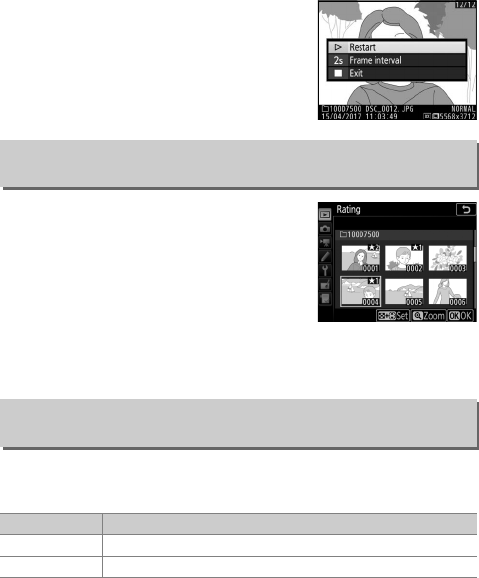
A dialog is displayed when the show
ends. Select Restart to restart or Exit to
return to the playback menu.
Highlight pictures using the multi
selector and press and hold the W (Z)
while pressing 1 or 3 to choose ratings
of from zero to five stars, or select ) to
mark the picture as a candidate for later
deletion. To view the highlighted picture
full frame, press and hold the X (T).
Press J to put your selection into effect.
Select photos for upload to the smart device. Movies can not be
selected for upload.
Rating
G button ➜Dplayback menu
Select to Send to Smart Device
G button ➜Dplayback menu
Option Description
Select image(s) Mark pictures for upload to the smart device.
Deselect all Remove the upload markings from all pictures.
26 Menu Guide
To display the photo shooting menu, press G and select the
C(photo shooting menu) tab.
* Not included in the settings saved to U1 or U2 (0123).
CThe Photo Shooting Menu: Shooting Options
G button
Option 0
Reset photo shooting menu * 27
Storage folder * 27
File naming 31
Flash control 32
Choose image area * 35
Image quality 36
Image size 37
NEF (RAW) recording 37
ISO sensitivity settings 38
White balance 39
Set Picture Control 40
Manage Picture Control * 41
Color space 44
Active D-Lighting 44
Long exposure NR 45
High ISO NR 45
Vignette control 46
Auto distortion control 46
Flicker reduction 47
Remote control mode (ML-L3) * 49
Auto bracketing set 49
Multiple exposure * 50
HDR (high dynamic range) 57
Interval timer shooting * 58
Option 0
ASee Also
For menu defaults, see “Photo Shooting Menu Defaults” (010).

27Menu Guide
Select Ye s to restore photo shooting menu options to their
default values (010).
Rename folders and select the folder in
which subsequent images will be stored.
❚❚ Rename
Folders are identified by a 5-character folder name preceded by
a 3-digit folder number assigned automatically by the camera.
The default folder name is “D7500”; to change the name
assigned to new folders, select Rename and rename the folder
as described in “Text Entry” (028). If desired, the default name
can be restored by pressing and holding the O (Q) button while
the keyboard is displayed. Existing folders can not be renamed.
Reset Photo Shooting Menu
G button ➜Cphoto shooting menu
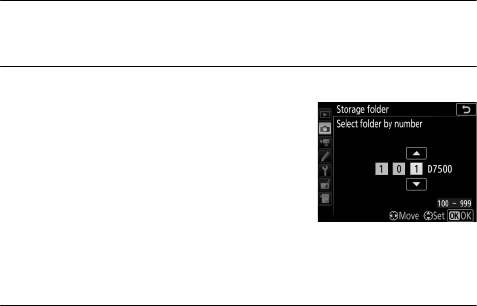
Storage Folder
G button ➜Cphoto shooting menu
Folder
Folder
number
Folder
name

28 Menu Guide
AText Entry
A dialog is displayed when text entry is
required. Tap the letters on the touch-screen
keyboard. You can also use the multi selector
to highlight the desired character in the
keyboard area and press J to insert the
highlighted character at the current cursor
position (note that if a character is entered
when the field is full, the last character in the
field will be deleted). To delete the character
under the cursor, press the O (Q) button. To
move the cursor to a new position, tap the
display or hold the W (Z) button and press 4 or 2. To complete
entry and return to the previous menu, press the X(T) button. To
exit without completing text entry, press G.
Text display area
Keyboard area
29Menu Guide
❚❚ Select Folder by Number
To select folders by number or create a new folder with the
current folder name and a new folder number:
1Choose Select folder by number.
Highlight Select folder by number and press 2.
2Choose a folder number.
Press 4 or 2 to highlight a digit, press
1 or 3 to change. If a folder with the
selected number already exists, a W,
X, or Y icon will be displayed to the
left of the folder number:
•W: Folder is empty.
•X: Folder is partially full.
•Y: Folder contains 999 pictures or a picture numbered
9999. No further pictures can be stored in this folder.
3Save changes and exit.
Press J to complete the operation and return to the main
menu (to exit without changing the storage folder, press the
G button). If a folder with the specified number does not
already exist, a new folder will be created. Subsequent
photographs will be stored in the selected folder unless it is
already full.
30 Menu Guide
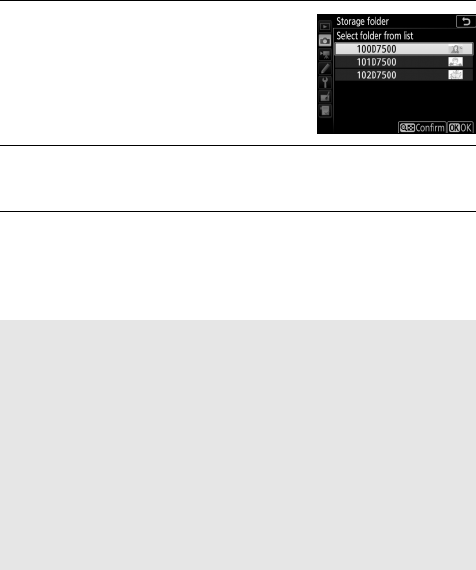
❚❚ Select Folder from List
To choose from a list of existing folders:
1Choose Select folder from list.
Highlight Select folder from list and
press 2.
2Highlight a folder.
Press 1 or 3 to highlight a folder.
3Select the highlighted folder.
Press J to select the highlighted folder and return to the
main menu. Subsequent photographs will be stored in the
selected folder.
DFolder and File Numbers
If the current folder is numbered 999 and contains 999 pictures or a
photo numbered 9999, the shutter-release will be disabled and no
further photographs can be taken (in addition, movie recording may
be disabled if the current folder is numbered 999 and the next file
would be the 992nd or numbered 9992 or higher). To continue
shooting, create a folder with a number less than 999 or try changing
the options selected for Frame size/frame rate and Movie quality
(068).
AStartup Time
Additional time may be required for camera startup if the memory card
contains a very large number of files or folders.

31Menu Guide
Photographs are saved using file names consisting of “DSC_” or,
in the case of images that use the Adobe RGB color space (044),
“_DSC”, followed by a four-digit number and a three-letter
extension (e.g., “DSC_0001.JPG”). The File naming option is
used to select three letters to replace the “DSC” portion of the
file name.
File Naming
G button ➜Cphoto shooting menu
AExtensions
The following extensions are used: “.NEF” for NEF (RAW) images, “.JPG”
for JPEG images, “.MOV” for MOV movies, “.MP4” for MP4 movies, and
“.NDF” for dust off reference data. In each pair of photographs recorded
at image-quality settings of NEF (RAW)+JPEG, the NEF and JPEG
images have the same file names but different extensions.
32 Menu Guide
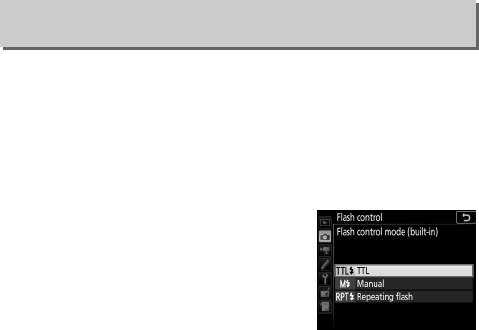
Choose the flash control mode for the built-in flash and for
optional flash units mounted on the camera accessory shoe and
adjust settings for off-camera flash photography. For more
information on using optional flash units, see “Optional Flash
Units” (0188).
❚❚ Flash Control Mode (Built-in)
The flash control mode for the built-in
flash can be selected using the Flash
control > Flash control mode (built-in)
option in the photo shooting menu. The
options available vary with the item
selected.
•TTL: Flash level is adjusted automatically in response to
shooting conditions.
•Manual: Flash level is selected using Manual output amount.
•Repeating flash: The flash fires repeatedly while the shutter is
open, producing a multiple-exposure effect. Choose the flash
level (Output), the maximum number of times the unit fires
(Times), and the number of times the flash fires per second
(Frequency, measured in Hertz). The options available for
Times vary with the option selected for Output; the number of
times the flash actually fires may be less at fast shutter speeds
or lower frequencies.
Flash Control
G button ➜Cphoto shooting menu

33Menu Guide
A“Times“
The options available for Repeating Flash > Times are determined by
flash output.
Output Options available for “Times” Output Options available for “Times”
1/4 21/32 2–10, 15
1/8 2–5 1/64 2–10, 15, 20, 25
1/16 2–10 1/128 2–10, 15, 20, 25, 30, 35
AFlash Control for Optional Flash Units
When an optional SB-500, SB-400, or SB-300 flash unit is connected,
the Flash control > Flash control mode (built-in) option in the photo
shooting menu changes to Flash control mode (external) and the
Repeating flash option is unavailable. Settings for other flash units
can be adjusted using the controls on the device.

34 Menu Guide
❚❚ Wireless Flash Options
Adjust settings for simultaneous wireless control of multiple
remote flash units. When an option other than Off is selected,
Group flash options can be used to choose the flash mode and
flash level for the flash units in each group.
❚❚ Group Flash Options
Adjust settings for the flash units in each
group when using optional flash units
(0188).
❚❚ Radio Remote Flash Info
View the flash units currently controlled
using radio AWL when Optical/radio
AWL is selected for Wireless flash
options.
Option Description
Optical AWL
The remote flash units are controlled using low-intensity
flashes emitted by the master flash. Available only when
the built-in flash is raised or with an SB-500 mounted on
the camera accessory shoe.
Optical/
radio AWL
This option is for flash photography using both optically-
and radio-controlled flash units and is available when an
optional WR-R10 is attached and the built-in flash is raised.
Off Remote flash photography disabled.
AThe WR-R10 Wireless Remote Controller
Be sure to update the WR-R10 firmware to the latest version; for
information on firmware updates, see the Nikon website for your area.

35Menu Guide
Choose an image area from DX (24×16) and 1.3× (18×12).
Choose Image Area
G button ➜Cphoto shooting menu
Option Description
aDX (24×16) Pictures are recorded using a 23.5 × 15.7 mm
image area (DX format).
Z1.3× (18×12)
Pictures are recorded using a 18.0 × 12.0 mm
image area, producing a telephoto effect
without the need to change lenses.

36 Menu Guide
Choose a file format and compression ratio (image quality).
Image Quality
G button ➜Cphoto shooting menu
Option File type Description
NEF (RAW) NEF
RAW data from the image sensor are saved
without additional processing. Settings such as
white balance and contrast can be adjusted
after shooting.
NEF (RAW)+
JPEG fine★/
NEF (RAW)+
JPEG fine
NEF/
JPEG
Two images are recorded, one NEF (RAW)
image and one fine-quality JPEG image.
NEF (RAW)+
JPEG normal★/
NEF (RAW)+
JPEG normal
Two images are recorded, one NEF (RAW)
image and one normal-quality JPEG image.
NEF (RAW)+
JPEG basic★/
NEF (RAW)+
JPEG basic
Two images are recorded, one NEF (RAW)
image and one basic-quality JPEG image.
JPEG fine★/
JPEG fine
JPEG
Record JPEG images at a compression ratio of
roughly 1 : 4 (fine quality).
JPEG normal★/
JPEG normal
Record JPEG images at a compression ratio of
roughly 1 : 8 (normal quality).
JPEG basic★/
JPEG basic
Record JPEG images at a compression ratio of
roughly 1 : 16 (basic quality).
AJPEG Compression
Image quality options with a star (“★”) use compression intended to
ensure maximum quality; the size of the files varies with the scene.
Options without a star use a type of compression designed to produce
smaller files; files tend to be roughly the same size regardless of the
scene recorded.

37Menu Guide
Image size is measured in pixels. Choose from # Large,
$Medium, or % Small (note that image size varies depending
on the option selected for Choose image area):
* Approximate size when printed at 300 dpi. Print size in inches equals image size in pixels
divided by printer resolution in dots per inch (dpi; 1 inch = approximately 2.54 cm).
Choose a compression type and bit depth for NEF (RAW)
photographs.
❚❚ NEF (RAW) Compression
Image Size
G button ➜Cphoto shooting menu
Image area Option Size (pixels) Print size (cm/in.)*
DX (24×16)
Large 5568 × 3712 47.1 × 31.4/18.6 × 12.4
Medium 4176 × 2784 35.4 × 23.6/13.9 × 9.3
Small 2784 × 1856 23.6 × 15.7/ 9.3 × 6.2
1.3× (18×12)
Large 4272 × 2848 36.2 × 24.1/14.2 × 9.5
Medium 3200 × 2136 27.1 × 18.1/10.7 × 7.1
Small 2128 × 1424 18.0 × 12.1/ 7.1 × 4.7
NEF (RAW) Recording
G button ➜Cphoto shooting menu
Option Description
NLossless
compressed
NEF images are compressed using a reversible
algorithm, reducing file size by about 20–40% with
no effect on image quality.
OCompressed
NEF images are compressed using a non-reversible
algorithm, reducing file size by about 35–55% with
almost no effect on image quality.

38 Menu Guide
❚❚ NEF (RAW) Bit Depth
Adjust ISO sensitivity settings for photographs.
Option Description
q12-bit NEF (RAW) images are recorded at a bit-depth of
12 bits.
r14-bit
NEF (RAW) images are recorded at a bit depth of
14 bits, producing files larger than those with a bit
depth of 12 bits but increasing the color data
recorded.
ISO Sensitivity Settings
G button ➜Cphoto shooting menu
Option Description
ISO sensitivity
Adjust ISO sensitivity. Select from values between
ISO 100 and 51200. Settings of from about 0.3 to 1 EV
below ISO 100 and 0.3 to 5 EV above ISO 51200 are
also available for special situations.
Auto ISO sensitivity
control
If On is selected, the camera will automatically adjust
ISO sensitivity when optimal exposure can not be
achieved at the value selected for ISO sensitivity.
You can choose the maximum sensitivity to prevent
ISO sensitivity being raised too high and the shutter
speed below which auto ISO sensitivity control will
kick in to prevent under exposure in modes P and A
(the minimum shutter speed; choose from values
between 1
/
4000 s and 30 s). The maximum ISO
sensitivity for photos taken with a flash can be
selected using Maximum sensitivity with M.

39Menu Guide
Match white balance to the light source.
White Balance
G button ➜Cphoto shooting menu
Option Description
vAuto White balance is adjusted automatically.
For best results, use type G, E or D lens. If
built-in or optional flash fires, results are
adjusted appropriately.
Normal
Keep warm lighting colors
JIncandescent Use under incandescent lighting.
IFluorescent Use with:
Sodium-vapor lamps •Sodium-vapor lighting (found in sports
venues).
Warm-white fluorescent •Warm-white fluorescent lights.
White fluorescent •White fluorescent lights.
Cool-white fluorescent •Cool-white fluorescent lights.
Day white fluorescent •Daylight white fluorescent lights.
Daylight fluorescent •Daylight fluorescent lights.
High temp. mercury-vapor •High color temperature light sources
(e.g. mercury-vapor lamps).
HDirect sunlight Use with subjects lit by direct sunlight.
NFlash Use with built-in or optional flash.
GCloudy Use in daylight under overcast skies.
MShade Use in daylight with subjects in the shade.
KChoose color temp. Choose color temperature from list of
values.
LPreset manual
Use subject, light source, or existing
photograph as reference for white
balance.

40 Menu Guide
Choose how new photos will be processed. Select according to
the type of scene or your creative intent.
Set Picture Control
G button ➜Cphoto shooting menu
Option Description
nAuto
The camera automatically adjusts hues and tones
based on the Standard Picture Control. The
complexions of portrait subjects will appear softer,
and the foliage and sky in outdoor shots more
vivid, than in pictures taken with the Standard
Picture Control.
QStandard Standard processing for balanced results.
Recommended for most situations.
RNeutral
Minimal processing for natural results. Choose for
photographs that will later be processed or
retouched.
SVivid
Pictures are enhanced for a vivid, photoprint effect.
Choose for photographs that emphasize primary
colors.
TMonochrome Take monochrome photographs.
ePortrait Process portraits for skin with natural texture and a
rounded feel.
fLandscape Produces vibrant landscapes and cityscapes.
qFlat
Details are preserved over a wide tone range, from
highlights to shadows. Choose for photographs
that will later be extensively processed or
retouched.
41Menu Guide
Create custom Picture Controls.
❚❚ Creating Custom Picture Controls
The Picture Controls supplied with the camera can be modified
and saved as custom Picture Controls.
1Select Save/edit.
Highlight Save/edit and press 2.
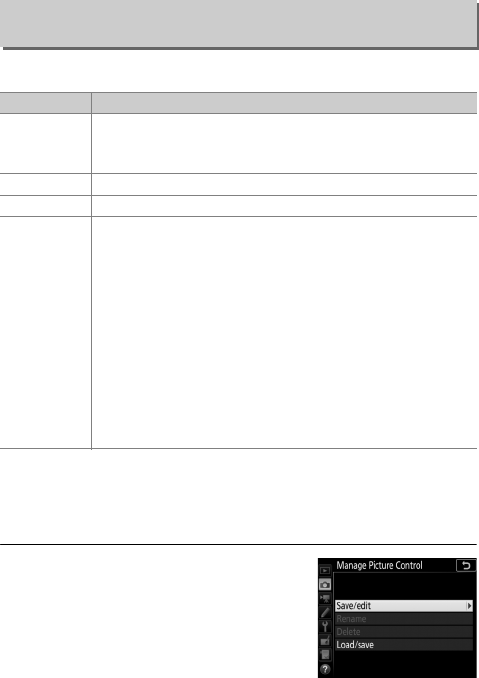
Manage Picture Control
G button ➜Cphoto shooting menu
Option Description
Save/edit
Create a new custom Picture Control based on an existing
preset or custom Picture Control, or edit existing custom
Picture Controls (041).
Rename Rename a selected Picture Control.
Delete Delete a selected Picture Control.
Load/save
Use the following options to copy custom Picture
Controls to and from memory cards. Once copied to
memory cards, Picture Controls can be used with other
cameras or compatible software.
•Copy to card: Copy a custom Picture Control (C-1 through
C-9) from the camera to a selected destination
(1 through 99) on the memory card.
•Copy to camera: Copy custom Picture Controls from the
memory card to custom Picture Controls C-1 through
C-9 on the camera and name them as desired.
•Delete from card: Delete selected custom Picture Controls
from the memory card.

42 Menu Guide
2Select a Picture Control.
Highlight an existing Picture Control
and press 2, or press J to proceed to
Step 4 to save a copy of the
highlighted Picture Control without
further modification.
3Edit the selected Picture Control.
To abandon any changes and start
over from default settings, press the
O(Q) button. Press J when settings
are complete.
4Select a destination.
Choose a destination for the custom
Picture Control (C-1 through C-9) and
press 2.
43Menu Guide
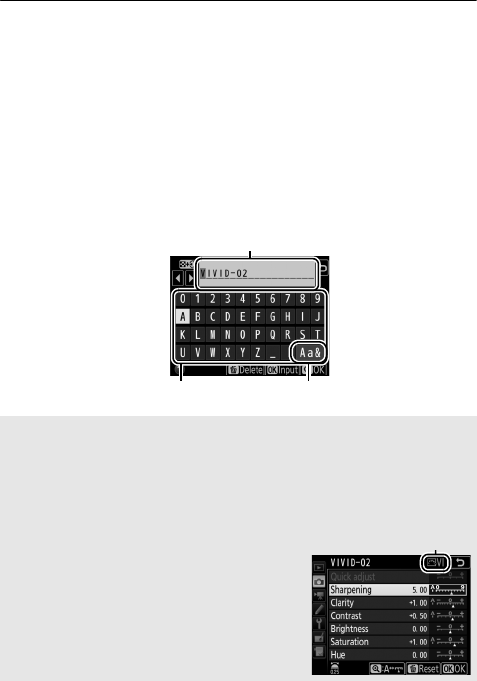
5Name the Picture Control.
A text-entry dialog will be displayed. By default, new Picture
Controls are named by adding a two-digit number (assigned
automatically) to the name of the existing Picture Control; to
choose a different name, rename the Picture Control as
described in “Text Entry” (028). Tap the keyboard selection
button to cycle through the upper-case, lower-case, and
symbol keyboards. Custom Picture Control names can be up
to nineteen characters long. Any characters after the
nineteenth will be deleted.
Name area
Keyboard area Keyboard selection
ACustom Picture Control Options
The options available with custom Picture Controls are the same as
those on which the custom Picture Control was based.
AThe Original Picture Control Icon
The original preset Picture Control on which
the custom Picture Control is based is
indicated by an icon in the top right corner
of the edit display.
Original Picture
Control icon

44 Menu Guide
The color space determines the gamut of colors available for
color reproduction. sRGB is recommended for general-purpose
printing and display, Adobe RGB, with its broader gamut of
colors, for professional publication and commercial printing.
Preserve details in highlights and shadows, creating
photographs with natural contrast.
Color Space
G button ➜Cphoto shooting menu
AAdobe RGB
For accurate color reproduction, Adobe RGB images require
applications, displays, and printers that support color management.
AColor Space
ViewNX-i and Capture NX-D automatically select the correct color
space when opening photographs created with this camera. Results
can not be guaranteed with third-party software.
Active D-Lighting
G button ➜Cphoto shooting menu
Option Description
Auto The camera automatically adjusts Active D-Lighting
according to shooting conditions.
Extra high/
High/Normal/
Low
Choose the Active D-Lighting level.
Off Active D-Lighting off.
45Menu Guide
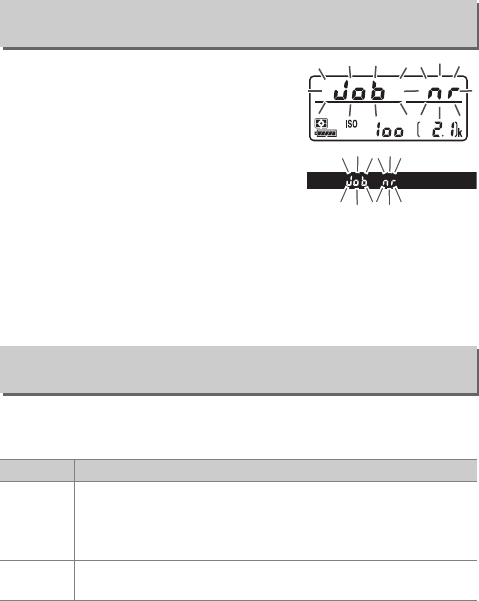
If On is selected, photographs taken at
shutter speeds slower than 1 s will be
processed to reduce noise (bright spots
or fog). The time required for
processing roughly doubles; during
processing, “lm” will flash in the
shutter speed/aperture displays and
pictures can not be taken (if the camera
is turned off before processing is complete, the picture will be
saved but noise reduction will not be performed). In continuous
release mode, frame rates will slow and while photographs are
being processed, the capacity of the memory buffer will drop.
Photographs taken at high ISO sensitivities can be processed to
reduce “noise”.
Long Exposure NR
(Long Exposure Noise Reduction)
G button ➜Cphoto shooting menu
High ISO NR
G button ➜Cphoto shooting menu
Option Description
High/
Normal/
Low
Reduce noise (randomly-spaced bright pixels), particularly
in pictures taken at high ISO sensitivities. Choose the
amount of noise reduction performed from High, Normal,
and Low.
Off Noise reduction is performed only as required and never at
an amount as high as when Low is selected.

46 Menu Guide
“Vignetting” is a drop in brightness at the edges of a
photograph. Vignette control reduces vignetting for type G, E,
and D lenses (PC lenses excluded). Its effects vary from lens to
lens and are most noticeable at maximum aperture. Choose
from High, Normal, Low, and Off.
Select On to reduce barrel distortion when shooting with wide-
angle lenses and to reduce pin-cushion distortion when
shooting with long lenses (note that the edges of the area visible
in the viewfinder may be cropped out of the final photograph,
and that the time needed to process photographs before
recording begins may increase). This option does not apply to
movies and is available only with type G, E, and D lenses (PC,
fisheye, and certain other lenses excluded); results are not
guaranteed with other lenses.
Vignette Control
G button ➜Cphoto shooting menu
DVignette Control
Depending on the scene, shooting conditions, and type of lens, JPEG
images may exhibit noise (fog) or variations in peripheral brightness,
while custom Picture Controls and preset Picture Controls that have
been modified from default settings may not produce the desired
effect. Take test shots and view the results in the monitor. Vignette
control does not apply to movies or multiple exposures.
Auto Distortion Control
G button ➜Cphoto shooting menu
ARetouch: Distortion Control
For information on creating copies of existing photographs with
reduced barrel and pin-cushion distortion, see “Distortion Control”
(0168).
47Menu Guide
Reduce banding or (in photographs taken in continuous release
modes) uneven exposure or coloration caused by the flicker of
such light sources as fluorescent or mercury-vapor lamps during
viewfinder photography.
Flicker Reduction
G button ➜Cphoto shooting menu
Option Description
Flicker reduction
setting
When Enable is selected, the camera will time
photographs to reduce the effects of flicker. Note that
the frame rate may drop while flicker reduction is in
effect.
Flicker reduction
indicator
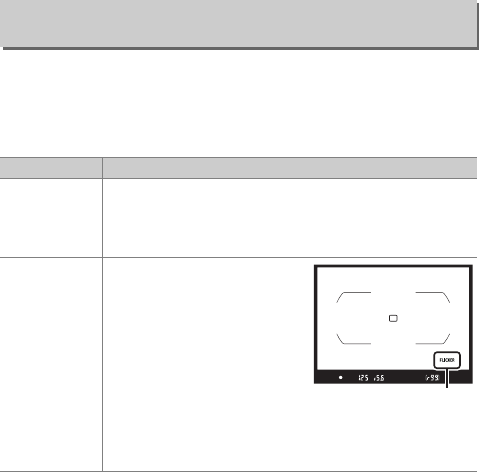
When On is selected, a FLICKER
icon will be displayed in the
viewfinder if flicker is
detected when the shutter-
release button is pressed
halfway. If flicker is detected
when Disable is selected for
Flicker reduction setting,
the icon will flash; to enable
flicker reduction, select Enable for Flicker reduction
setting.
FLICKER icon

48 Menu Guide
AFlicker Reduction in the Photo Shooting Menu
Take a test shot and view the results before taking additional
photographs. Flicker reduction can detect flicker at 100 and 120 Hz
(associated respectively with AC power supplies of 50 and 60 Hz).
Flicker may not be detected or the desired results may not be achieved
with dark backgrounds, bright light sources, or decorative lighting
displays and other non-standard lighting. Depending on the light
source, there may be a slight delay before the shutter is released.
During burst shooting, the frame rate may slow or become erratic; in
addition, the desired results may not be achieved if the frequency of
the power supply changes during shooting.
Flicker detection will not take effect at shutter speeds slower than
1
/
100 s (including Bulb and Time) or when MUP is selected for release
mode or exposure delay mode is on. Flicker reduction is available
during flash photography but can not be used with remote wireless
flash units.

49Menu Guide
Choose how the camera behaves when used with an optional
ML-L3 remote control (0222).
Choose the setting or settings bracketed when auto bracketing
is in effect. Choose AE & flash bracketing (j) to perform both
exposure and flash-level bracketing, AE bracketing (k) to
bracket only exposure, Flash bracketing (l) to perform only
flash-level bracketing, WB bracketing (m) to perform white-
balance bracketing, or ADL bracketing (y) to perform
bracketing using Active D-Lighting. Note that white balance
bracketing is not available at image quality settings of NEF
(RAW) or NEF (RAW) + JPEG.
Remote Control Mode (ML-L3)
G button ➜Cphoto shooting menu
Option Description
%Delayed remote Shutter is released 2 s after ML-L3 shutter-release
button is pressed.
$Quick-response
remote
Shutter is released when ML-L3 shutter-release
button is pressed.
&Remote
mirror-up
Press ML-L3 shutter-release button once to raise
mirror, again to release shutter and take
photograph. Prevents blur caused by camera
moving when mirror is raised.
7Off The shutter can not be released using the ML-L3.
Auto Bracketing Set
G button ➜Cphoto shooting menu
50 Menu Guide
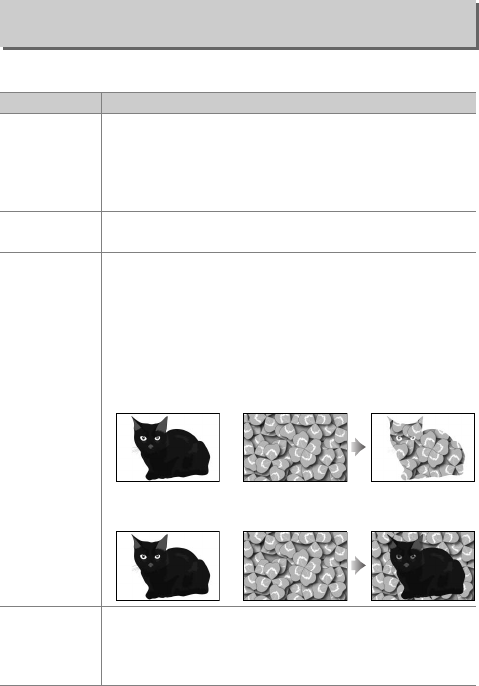
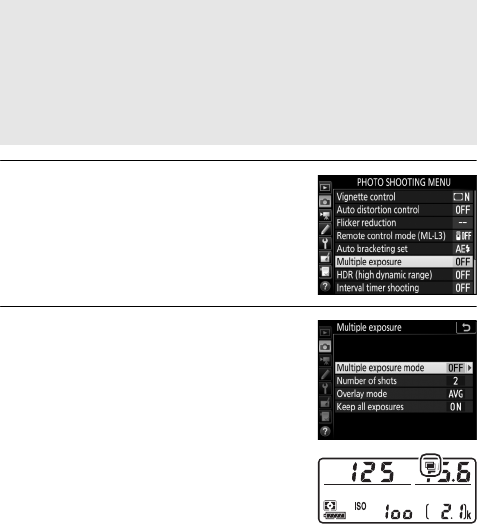
Record two to ten NEF (RAW) exposures as a single photograph.
Multiple Exposure
G button ➜Cphoto shooting menu
Option Description
Multiple
exposure mode
•6On (series): Take a series of multiple exposures.
Select Off to resume normal shooting.
•On (single photo): Take one multiple exposure.
•Off: Exit without creating additional multiple
exposures.
Number of shots Choose the number of exposures that will be combined
to form a single photograph.
Overlay mode
•Add: The exposures are overlaid without modification;
gain is not adjusted.
•Average: Before the exposures are overlaid, the gain for
each is divided by the total number of exposures
taken (gain for each exposure is set to 1
/
2 for 2
exposures, 1
/
3 for 3 exposures, etc).
•Lighten: The camera compares the pixels in each
exposure and uses only the brightest.
•Darken: The camera compares the pixels in each
exposure and uses only the darkest.
Keep all
exposures
•On: Save the individual shots that make up each
multiple exposure.
•Off: Discard the individual shots and save only the
multiple exposure.
+
+
51Menu Guide
❚❚ Creating a Multiple Exposure
Multiple exposures can not be recorded in live view. Exit live
view before proceeding.
1Select Multiple exposure.
Highlight Multiple exposure in the
photo shooting menu and press 2.
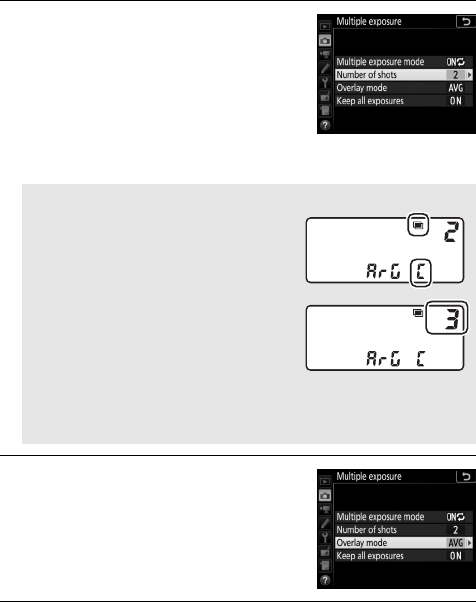
2Select a mode.
Highlight Multiple exposure mode
and press 2, then press 1 or 3 to
choose the desired mode and press J
to select.
If On (series) or On (single photo) is
selected, a n icon will be displayed in
the control panel.
AExtended Recording Times
If the monitor turns off during playback or menu operations and no
operations are performed for about 30 s, shooting will end and a
multiple exposure will be created from the exposures that have been
recorded to that point. The time available to record the next exposure
can be extended by choosing longer times for Custom Setting c2
(Standby timer, 096).
52 Menu Guide
3Choose the number of shots.
Highlight Number of shots and
press 2.
Press 1 or 3 to choose the number of
exposures that will be combined to
form a single photograph and
press J.
4Choose the overlay mode.
Highlight Overlay mode and press 2,
then press 1 or 3 to choose the
desired mode and press J to select.
5Choose whether to keep individual exposures.
To choose whether to keep or delete the individual shots that
make up the multiple exposure, highlight Keep all
exposures and press 2, then press 1 or 3 to choose the
desired option and press J to select.
AThe BKT Button
If Multiple exposure is selected for
Custom Setting f1 (Custom control
assignment) > BKT button + y
(0106), you can select the multiple
exposure mode by pressing the BKT
button and rotating the main command
dial and the number of shots by
pressing the BKT button and rotating the
sub-command dial. The mode and
number of shots are shown in the control panel: the icons
representing the mode are 5 for Off, B for On (single photo), and
6 for On (series).
53Menu Guide
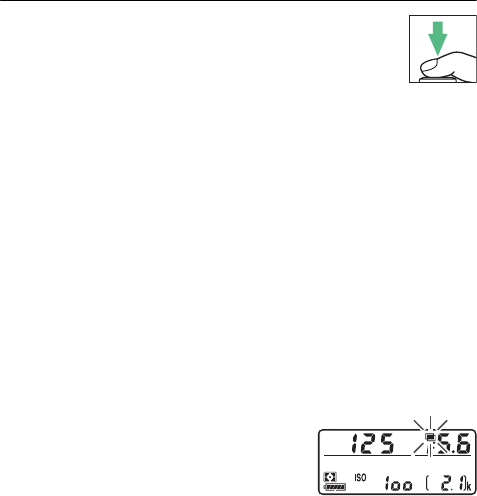
6Frame a photograph, focus, and shoot.
In continuous release modes, the camera records
all exposures in a single burst. If On (series) is
selected, the camera will continue to record
multiple exposures while the shutter-release button is
pressed; if On (single photo) is selected, multiple exposure
shooting will end after the first photograph. In self-timer
mode, the camera will automatically record the number of
exposures selected in Step 3, regardless of the option
selected for Custom Setting c3 (Self-timer) > Number of
shots (097); the interval between shots is however
controlled by Custom Setting c3 (Self-timer) > Interval
between shots. In other release modes, one photograph will
be taken each time the shutter-release button is pressed;
continue shooting until all exposures have been recorded.
For information on interrupting a multiple exposure before
all photographs are recorded, see “Ending Multiple
Exposures” (055).
The n icon will flash until shooting
ends. If On (series) is selected,
multiple exposure shooting will only
end when Off is selected for multiple
exposure mode; if On (single photo)
is selected, multiple exposure shooting ends automatically
when the multiple exposure is complete. The n icon clears
from the display when multiple exposure shooting ends.
54 Menu Guide
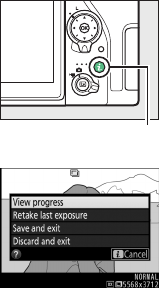
❚❚ Using the i Button
The options listed below can be accessed
by pressing the K button during a
multiple exposure and then pressing the
i button. Use the touch screen or
navigate the menu using the multi
selector, pressing 1 or 3 to highlight
items and pressing J to select.
•View progress: View a preview created
from the exposures recorded to the
current point.
•Retake last exposure: Retake the most
recent exposure.
•Save and exit: Create a multiple exposure
from the exposures taken to current
point.
•Discard and exit: Exit without recording a multiple exposure.
i button

55Menu Guide
❚❚ Ending Multiple Exposures
To end a multiple exposure before the
specified number of exposures have
been taken, select Off for multiple
exposure mode or press the K button
followed by the i button and select
either Save and exit or Discard and exit.
If shooting ends or you select Save and
exit before the specified number of exposures have been taken,
a multiple exposure will be created from the exposures that have
been recorded to that point. If Average is selected for Overlay
mode, gain will be adjusted to reflect the number of exposures
actually recorded. Note that shooting will end automatically if:
•A two-button reset is performed
•The camera is turned off
•The battery is exhausted
DMultiple Exposure
Multiple exposures may be affected by noise (randomly-spaced bright
pixels, fog, or lines).
Do not remove or replace the memory card while recording a multiple
exposure.
Live view is not available while shooting is in progress. Selecting live
view resets Multiple exposure mode to Off.
The shooting information listed in the playback photo information
display (including metering, exposure, shooting mode, focal length,
date and time of recording, and camera orientation) is for the first shot
in the multiple exposure.

56 Menu Guide
AInterval Timer Photography
If interval timer photography is activated before the first exposure is
taken, the camera will record exposures at the selected interval until
the number of exposures specified in the multiple exposure menu
have been taken (the number of shots listed in the interval timer
shooting menu is ignored). These exposures will then be recorded as a
single photograph and interval timer shooting will end (if On (single
photo) is selected for multiple exposure mode, multiple exposure
shooting will also end automatically).
AOther Settings
While a multiple exposure is being shot, memory cards can not be
formatted and some menu items are grayed out and can not be
changed.

57Menu Guide
Used with high contrast subjects, High Dynamic Range (HDR)
preserves details in highlights and shadows by combining two
shots taken at different exposures.
HDR (High Dynamic Range)
G button ➜Cphoto shooting menu
Option Description
HDR mode
•6On (series): Take a series of HDR photographs.
Select Off to resume normal shooting.
•On (single photo): Take one HDR photograph.
•Off: Exit without taking additional HDR photographs.
HDR strength
Choose the HDR strength. If Auto is selected, the
camera will automatically adjust HDR strength to suit
the scene.

58 Menu Guide
Take photographs at the selected interval until the specified
number of shots has been recorded. Select a release mode other
than self-timer (E) and mirror up (MUP) when using the interval
timer.
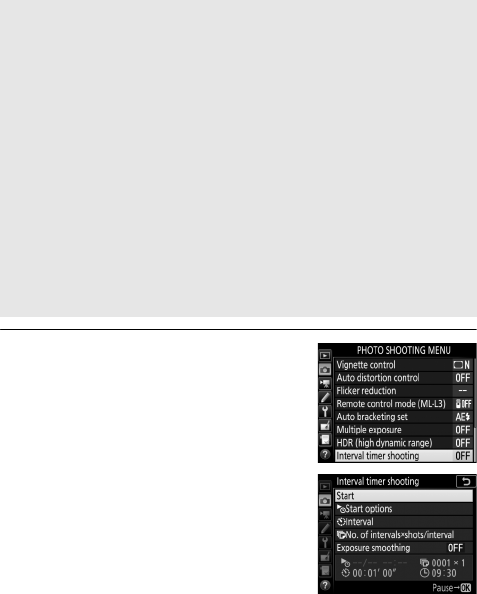
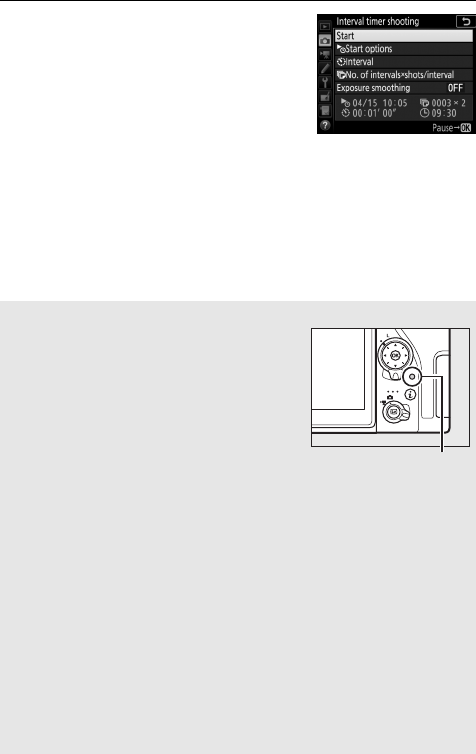
Interval Timer Shooting
G button ➜Cphoto shooting menu
Option Description
Start
Start interval timer shooting, either after 3 s (Now
selected for Start options) or at a selected date and
time (Choose start day and start time). Shooting will
continue at the selected interval until all shots have
been taken.
Start options
Choose a start option. To start shooting immediately,
select Now. To start shooting at a chosen date and
time, select Choose start day and start time.
Interval Choose the interval (hours, minutes, and seconds)
between shots.
No. of intervals ×
shots/interval
Choose the number of intervals and the number of
shots per interval.
Exposure
smoothing
Selecting On allows the camera to adjust exposure to
match previous shot in modes other than M (note that
exposure smoothing only takes effect in mode M if
auto ISO sensitivity control is on).
59Menu Guide
❚❚ Interval Timer Photography
1Select Interval timer shooting.
Highlight Interval timer shooting in
the photo shooting menu and
press 2 to display interval timer
settings.
DBefore Shooting
Before beginning interval timer photography, take a test shot at
current settings and view the results in the monitor. Once settings
have been adjusted to your satisfaction, remove the rubber eyecup
and cover the viewfinder with the supplied eyepiece cap to prevent
light entering via the viewfinder interfering with photographs and
exposure.
Before choosing a starting time, select Time zone and date in the
setup menu and make sure that the camera clock is set to the correct
time and date (0126).
Use of a tripod is recommended. Mount the camera on a tripod before
shooting begins. To ensure that shooting is not interrupted, be sure
the camera battery is fully charged. If in doubt, charge the battery
before use or use an AC adapter and power connector (available
separately).
60 Menu Guide
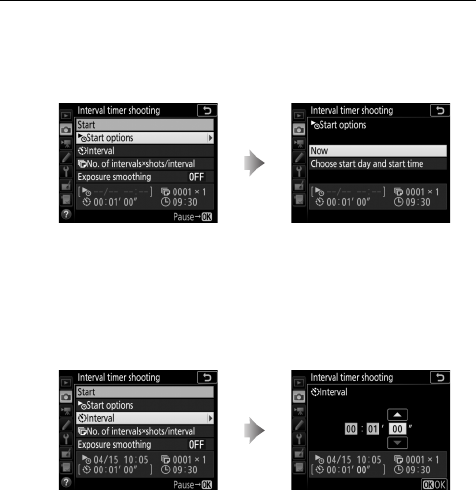
2Adjust interval timer settings.
Choose a start option, interval, number of shots per interval,
and exposure smoothing option.
•To choose a start option:
To start shooting immediately, select Now. To start shooting
at a chosen date and time, select Choose start day and
start time, then choose the date and time and press J.
•To choose the interval between shots:
Highlight Start options and
press 2.
Highlight an option and
press J.
Highlight Interval and
press 2.
Choose an interval (hours,
minutes, and seconds) and
press J.
61Menu Guide
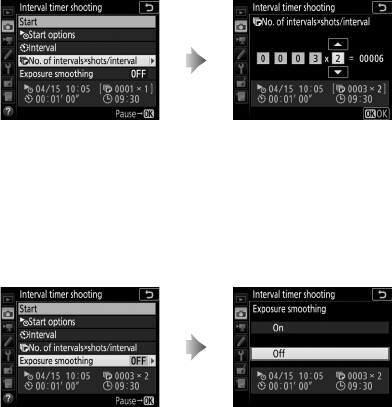
•To choose the number of shots per interval:
In S (single frame) mode, the photographs for each interval
will be taken at the rate chosen for Custom Setting d1 (CL
mode shooting speed; 098).
•To enable or disable exposure smoothing:
Highlight No. of intervals ×
shots/interval and press 2.
Choose the number of intervals
and the number of shots per
interval and press J.
Highlight Exposure
smoothing and press 2.
Highlight an option and
press J.
62 Menu Guide
3Start shooting.
Highlight Start and press J. The first
series of shots will be taken at the
specified starting time, or after about
3s if Now was selected for Start
options in Step 2. Shooting will
continue at the selected interval until
all shots have been taken.
ADuring Shooting
During interval timer photography, the
memory card access lamp will flash.
Immediately before the next shooting
interval begins, the shutter speed display
will show the number of intervals remaining,
and the aperture display will show the
number of shots remaining in the current
interval. At other times, the number of
intervals remaining and the number of shots
in each interval can be viewed by pressing
the shutter-release button halfway (once the button is released, the
shutter speed and aperture will be displayed until the standby timer
expires).
Settings can be adjusted, the menus used, and pictures played back
while interval timer photography is in progress. The monitor will turn
off automatically about four seconds before each interval. Note that
changing camera settings while the interval timer is active may cause
shooting to end.
ARelease Mode
Regardless of the release mode selected, the camera will take the
specified number of shots at each interval.
Memory card
access lamp
63Menu Guide
❚❚ Pausing Interval Timer Photography
Interval timer photography can be paused between intervals by
pressing J or selecting Pause in the interval timer menu.
❚❚ Resuming Interval Timer Shooting
To resume shooting immediately, select Restart.
To resume shooting at a specified time:
❚❚ Ending Interval Timer Shooting
To end interval timer photography before all the photos are
taken, select Off in the interval timer menu.
Highlight Restart and
press J.
For Start options,
highlight Choose start
day and start time
and press 2.
Choose a starting date
and time and press J.
Highlight Restart and
press J.

64 Menu Guide
❚❚ No Photograph
The camera will skip the current interval if any of the following
situations persist for eight seconds or more after the interval was
due to start: the photograph or photographs for the previous
interval have yet to be taken, the memory card is full, or the
camera is unable to focus using single-servo autofocus (AF-S or
single-servo autofocus selected for AF-A) or when Focus is
selected for Custom Setting a1 (AF-C priority selection) in AF-C
(note that the camera focuses again before each shot). Shooting
will resume with the next interval.
DOut of Memory
If the memory card is full, the interval timer will remain active but no
pictures will be taken. Resume shooting (063) after deleting some
pictures or turning the camera off and inserting another memory card.

65Menu Guide
AInterval Timer Photography
Choose an interval longer than the time needed to take the selected
number of shots and, if you are using a flash, the time needed for the
flash to charge. If the interval is too short, the number of photos taken
may be less than the total listed in Step 2 (the number of intervals
multiplied by the number of shots per interval) or the flash may fire at
less than the power needed for full exposure. Interval timer
photography can not be combined with long time-exposures (bulb or
time photography) or time-lapse movies (074) and is not available in
live view or when Record movies is selected for Custom Setting g1
(Custom control assignment) > Shutter-release button (0118).
Note that because the shutter speed, frame rate, and time needed to
record images may vary from one interval to the next, the time
between the end of one interval and the beginning of the next may
vary. If shooting can not proceed at current settings (for example, if a
shutter speed of A or % is currently selected in mode M, the
interval is zero, or the start time is in less than a minute), a warning will
be displayed in the monitor.
Interval timer shooting will pause when E (self-timer) is selected or if
the camera is turned off and then on again (when the camera is off,
batteries and memory cards can be replaced without ending interval
timer photography). Pausing shooting does not affect interval timer
settings.
ABracketing
Adjust bracketing settings before starting interval timer photography.
If exposure, flash, or ADL bracketing is active while interval timer
photography is in effect, the camera will take the number of shots in
the bracketing program at each interval, regardless of the number of
shots specified in the interval timer menu. If white balance bracketing
is active while interval timer photography is in effect, the camera will
take one shot at each interval and process it to create the number of
copies specified in the bracketing program.
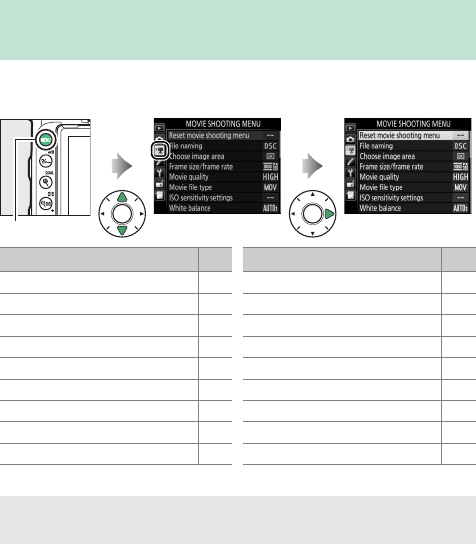
66 Menu Guide
To display the movie shooting menu, press G and select the
1(movie shooting menu) tab.
* Not included in the settings saved to U1 or U2 (0123).
1The Movie Shooting Menu: Movie Shooting
Options
G button
Option 0
Reset movie shooting menu * 67
File naming 67
Choose image area * 67
Frame size/frame rate 68
Movie quality 68
Movie file type 69
ISO sensitivity settings 69
White balance 70
Set Picture Control 70
Manage Picture Control * 70
Active D-Lighting 70
High ISO NR 71
Flicker reduction 71
Microphone sensitivity 72
Frequency response 73
Wind noise reduction 73
Electronic VR 73
Time-lapse movie * 74
Option 0
ASee Also
For menu defaults, see “Movie Shooting Menu Defaults” (012).

67Menu Guide
Highlight Ye s and press J to restore movie shooting menu
options to their default values (012).
Choose the three-letter prefix used in naming the image files in
which movies are stored. The default prefix is “DSC” (031).
Choose the image area for movies from DX and 1.3×.
Reset Movie Shooting Menu
G button ➜1movie shooting menu
File Naming
G button ➜1movie shooting menu
Choose Image Area
G button ➜1movie shooting menu

68 Menu Guide
Choose the movie frame size (in pixels) and frame rate.
Choose from High quality and Normal.
Frame Size/Frame Rate
G button ➜1movie shooting menu
Option 1
Maximum bit rate (Mbps)
(★ high quality/Normal) Maximum length
r3840 × 2160 (4K UHD);
30p 2
144
29 min. 59 s 3
s3840 × 2160 (4K UHD);
25p 2
t3840 × 2160 (4K UHD);
24p 2
y/y1920 × 1080; 60p 48/24
z/z1920 × 1080; 50p
1/11920 × 1080; 30p
24/12
2/21920 × 1080; 25p
3/31920 × 1080; 24p
4/41280 × 720; 60p
5/51280 × 720; 50p
1Actual frame rate is 29.97 fps for values listed as 30p, 23.976 fps for values listed as 24p, and
59.94 fps for values listed as 60p.
2 When this option is selected, k is displayed in the monitor and movie quality is fixed at
“high”.
3 Each movie will be recorded across up to 8 files of up to 4 GB each. The number of files and the
length of each file vary with the options selected for Frame size/frame rate and
Movie quality.
Movie Quality
G button ➜1movie shooting menu
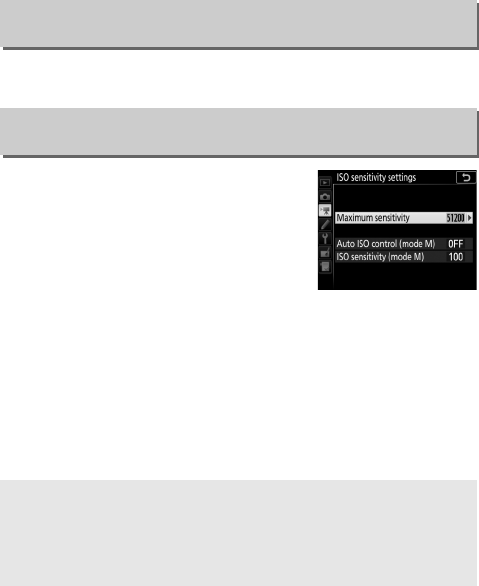
69Menu Guide
Choose the file format for movies from MOV and MP4.
Adjust the following ISO sensitivity
settings.
•Maximum sensitivity: Choose the upper
limit for auto ISO sensitivity control
from values between ISO 200 and Hi 5.
Auto ISO sensitivity control is used in
modes P, S, and A and when On is
selected for Auto ISO control (mode M) in mode M.
•Auto ISO control (mode M): Select On for auto ISO sensitivity control
in mode M, Off to use the value selected for ISO sensitivity
(mode M).
•ISO sensitivity (mode M): Choose the ISO sensitivity for mode M
from values between ISO 100 and Hi 5. Auto ISO sensitivity
control is used in other modes.
Movie File Type
G button ➜1movie shooting menu
ISO Sensitivity Settings
G button ➜1movie shooting menu
AAuto ISO Sensitivity Control
At high ISO sensitivities, the camera may have difficulty focusing and
noise (randomly-spaced bright pixels, fog, or lines) may increase. This
can be prevented by choosing a lower value for ISO sensitivity
settings > Maximum sensitivity.
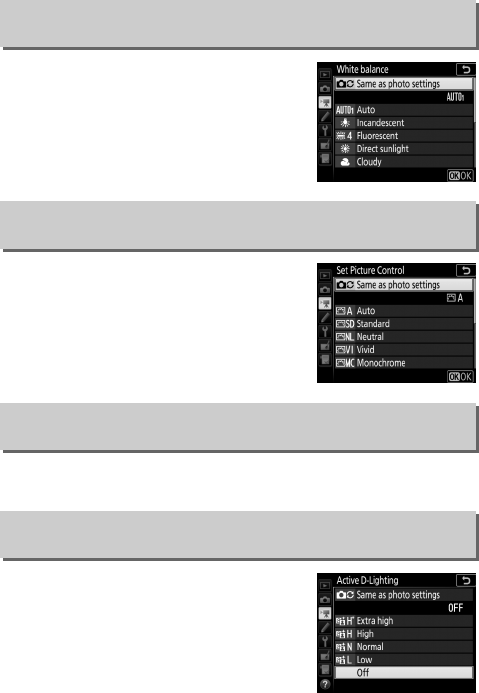
70 Menu Guide
Choose the white balance for movies
(039). Select Same as photo settings
to use the option currently selected for
photos.
Choose a Picture Control for movies
(040). Select Same as photo settings
to use the option currently selected for
photos.
Create custom Picture Controls (041).
Preserve details in highlights and
shadows, creating movies with natural
contrast. Select Same as photo settings
to use the option currently selected for
photos (044).
White Balance
G button ➜1movie shooting menu
Set Picture Control
G button ➜1movie shooting menu
Manage Picture Control
G button ➜1movie shooting menu
Active D-Lighting
G button ➜1movie shooting menu

71Menu Guide
Reduce “noise” (randomly-spaced bright pixels) in movies
recorded at high ISO sensitivities (045).
Reduce flicker and banding when shooting under fluorescent or
mercury-vapor lighting during live view or movie recording.
Choose Auto to allow the camera to automatically choose the
correct frequency, or manually match the frequency to that of
the local AC power supply.
High ISO NR
G button ➜1movie shooting menu
Flicker Reduction
G button ➜1movie shooting menu
DFlicker Reduction in the Movie Shooting Menu
If
Auto
fails to produce the desired results and you are unsure as to the
frequency of the local power supply, test both the 50 and 60 Hz options
and choose the one that produces the best results. Flicker reduction
may not produce the desired results if the subject is very bright, in
which case you should try choosing a smaller aperture (higher
f-number). To prevent flicker, select mode
M
and choose a shutter speed
adapted to the frequency of the local power supply:
1
/
125
s,
1
/
60
s, or
1
/
30
s
for 60 Hz;
1
/
100
s,
1
/
50
s, or
1
/
25
s for 50 Hz.

72 Menu Guide
Turn the built-in or external microphones
(0224) on or off or adjust microphone
sensitivity. Choose Auto sensitivity to
adjust sensitivity automatically,
Microphone off to turn sound recording
off; to select microphone sensitivity
manually, select Manual sensitivity and
choose a sensitivity.
Microphone Sensitivity
G button ➜1movie shooting menu
AThe 2 Icon
2
is displayed in full-frame and movie
playback if the movie was recorded without
sound.

73Menu Guide
If K Wide range is selected, the built-in and external
microphones (0224) will respond to a wide range of
frequencies, from music to the bustling hum of a city street.
Choose L Vocal range to bring out human voices.
Select On to enable the low-cut filter for the built-in microphone
(optional stereo microphones are unaffected), reducing noise
produced by wind blowing over the microphone (note that
other sounds may also be affected). Wind-noise reduction for
optional stereo microphones that support this feature can be
enabled or disabled using microphone controls.
Choose whether to enable electronic vibration reduction in
movie mode.
Frequency Response
G button ➜1movie shooting menu
Wind Noise Reduction
G button ➜1movie shooting menu
Electronic VR
G button ➜1movie shooting menu

74 Menu Guide
The camera automatically takes photos at selected intervals to
create a silent time-lapse movie with the frame size, frame rate,
movie quality, and image area currently selected in the movie
shooting menu. Time-lapse recording is available in i, j, P, S, A,
M, and SCENE modes.
Time-Lapse Movie
G button ➜1movie shooting menu
Option Description
Start
Start time-lapse recording. Shooting starts after about 3 s
and continues at the selected interval for the selected
shooting time.
Interval Choose the interval between shots in minutes and
seconds.
Shooting time Choose the shooting time (hours and minutes) .
Exposure
smoothing
Selecting On smooths abrupt changes in exposure in
modes other than M (note that exposure smoothing only
takes effect in mode M if auto ISO sensitivity control is on).
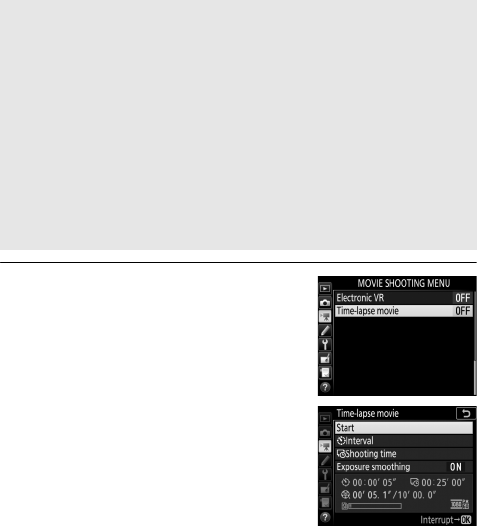
75Menu Guide
❚❚ Recording Time-Lapse Movies
1Select Time-lapse movie.
Highlight Time-lapse movie in the
movie shooting menu and press 2 to
display time-lapse movie settings.
ABefore Shooting
Before shooting a time-lapse movie, take a test shot at current settings
and view the results in the monitor (time-lapse movies are shot using
the movie crop; use live view so that you can check the composition).
For consistent coloration, choose a white balance setting other than
auto (039). Once settings have been adjusted to your satisfaction,
remove the rubber eyecup and cover the viewfinder with the supplied
eyepiece cap to prevent light entering via the viewfinder interfering
with photographs and exposure.
Use of a tripod is recommended. Mount the camera on a tripod before
shooting begins. To ensure that shooting is not interrupted, use an
optional AC adapter and power connector or a fully-charged battery.
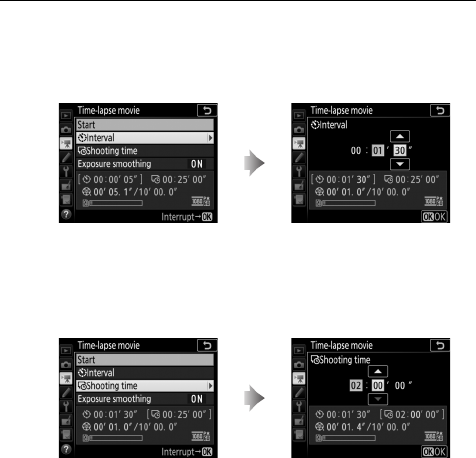
76 Menu Guide
2Adjust time-lapse movie settings.
Choose an interval, total shooting time, and exposure
smoothing option.
•To choose the interval between frames:
•To choose the total shooting time:
Highlight Interval and
press 2.
Choose an interval longer than
the slowest anticipated shutter
speed (minutes and seconds)
and press J.
Highlight Shooting time and
press 2.
Choose shooting time (up to
7 hours 59 minutes) and
press J.
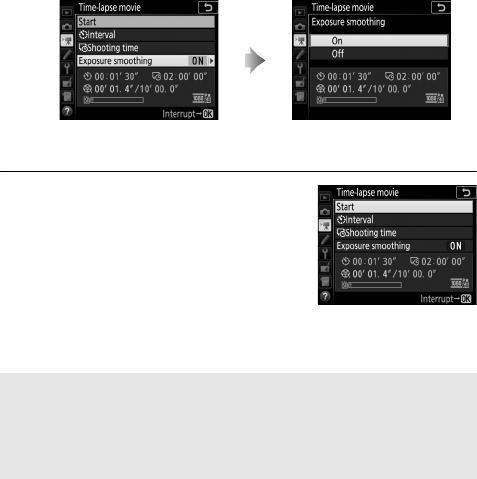
77Menu Guide
•To enable or disable exposure smoothing:
3Start shooting.
Highlight Start and press J.
Shooting starts after about 3 s. The
camera takes photographs at the
selected interval for the selected
shooting time. When complete, time-
lapse movies are recorded to the
memory card.
Highlight Exposure
smoothing and press 2.
Highlight an option and
press J.
A3840 × 2160
If an option with a frame size 3840 × 2160 is selected for Frame size/
frame rate in the movie shooting menu, the 1.3× DX crop indicator
and 1.3× DX crop will be displayed in the viewfinder; rotate the live
view selector to 1 and frame the shot in live view.

78 Menu Guide
❚❚ Ending Shooting
To end shooting before all the photos are taken, highlight Off in
the time-lapse movie menu and press J, or press J between
frames or immediately after a frame is recorded. A movie will be
created from the frames shot to the point where shooting
ended. Note that shooting will end and no movie will be
recorded if the power source is removed or disconnected or the
memory card is ejected.
❚❚ No Photograph
The camera will skip the current frame if it is unable to focus
using single-servo autofocus (AF-S or single-servo autofocus
selected for AF-A) or with Focus selected for Custom Setting a1
(AF-C priority selection) in AF-C (note that the camera focuses
again before each shot). Shooting will resume with the next
frame.
DTime-Lapse Movies
Time-lapse is not available during live view or movie recording, at a
shutter speed of A or %, in special effects mode, or when the self-
timer, bracketing (049), High Dynamic Range (HDR, 057), multiple
exposure (050), or interval timer photography (058) is active. Note
that because shutter speed and the time needed to record the image
to the memory card may vary from shot to shot, the interval between
a shot being recorded and the start of the next shot may vary.
Shooting will not begin if a time-lapse movie can not be recorded at
current settings (for example, if the memory card is full, the interval or
shooting time is zero, or the interval is longer than the shooting time).
Shooting may end if camera controls are used or settings are changed
or HDMI cable is connected. A movie will be created from the frames
shot to the point where shooting ended. To end shooting and record a
photograph, press the shutter-release button all the way down.
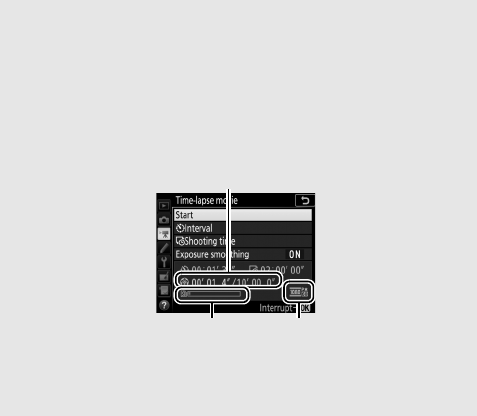
79Menu Guide
ACalculating the Length of the Final Movie
The total number of frames in the final movie can be calculated by
dividing the shooting time by the interval and rounding up. The length
of the final movie can then be calculated by dividing the number of
shots by the frame rate selected for Frame size/frame rate in movie
shooting menu (068). A 48 frame movie recorded at 1920 × 1080;
24p, for example, will be about two seconds long. The maximum
length for time-lapse movies is 20 minutes.
Length recorded/maximum length
Memory card indicator Frame size/frame rate
AFlash Photography
To use the flash during time-lapse recording, select mode P, S, A, or M
and press the M (Y) button to raise the flash before shooting begins.

80 Menu Guide
ADuring Shooting
During shooting, the memory card access
lamp will light and the time-lapse recording
indicator will be displayed in the control
panel. The time remaining (in hours and
minutes) appears in the shutter-speed
display immediately before each frame is
recorded. At other times, the time remaining
can be viewed by pressing the shutter-
release button halfway. Regardless of the
option selected for Custom Setting c2
(Standby timer, 096), the standby timer
will not expire during shooting.
To view current time-lapse movie settings
or end shooting (078), press the G
button between shots. While shooting is in
progress, the time-lapse movie menu will
show exposure smoothing, the interval,
and the time remaining. These settings can
not be changed while shooting is in
progress, nor can pictures be played back or other menu settings
adjusted.
AImage Review
The K button can not be used to view pictures while shooting is in
progress, but the current frame will be displayed for a few seconds
after each shot if On is selected for Image review in the playback
menu (022). Other playback operations can not be performed while
the frame is displayed.
ASee Also
For information on the beep that sounds when shooting is complete,
see B > Beep options (0142).
Memory card access
lamp
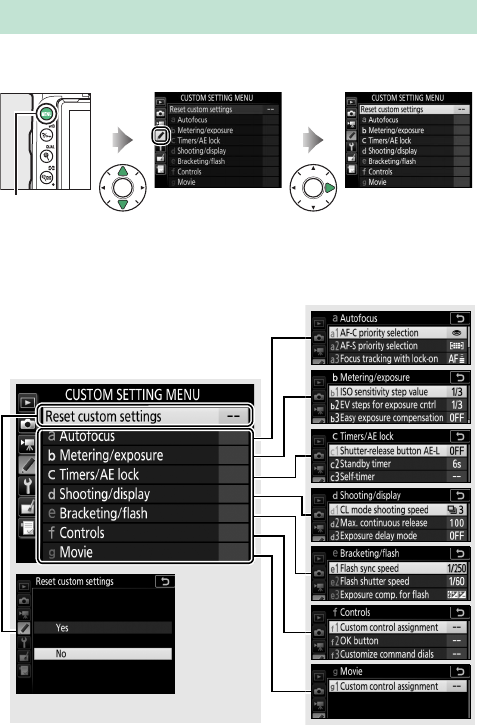

82 Menu Guide
The following Custom Settings are available:
Custom Setting 0
Reset custom settings 84
aAutofocus
a1 AF-C priority selection 84
a2 AF-S priority selection 85
a3 Focus tracking with lock-on 86
a4 Number of focus points 86
a5 Store points by orientation 87
a6 AF activation 88
a7 Focus point wrap-around 89
a8 Focus point options 90
a9 Built-in AF-assist illuminator 91
a10 Manual focus ring in AF mode *92
bMetering/exposure
b1 ISO sensitivity step value 93
b2 EV steps for exposure cntrl 93
b3 Easy exposure compensation 94
b4 Matrix metering 95
b5 Center-weighted area 95
b6 Fine-tune optimal exposure 95
cTimers/AE lock
c1 Shutter-release button AE-L 96
c2 Standby timer 96
c3 Self-timer 97
c4 Monitor off delay 97
c5 Remote on duration (ML-L3) 97

83Menu Guide
Note: If settings have been modified from default values (013), an
asterisk will be displayed adjacent to the altered settings in the second
level of the Custom Settings menu.
dShooting/display
d1 CL mode shooting speed 98
d2 Max. continuous release 98
d3 Exposure delay mode 98
d4 Electronic front-curtain shutter 99
d5 File number sequence 100
d6 Viewfinder grid display 101
d7 ISO display 101
d8 LCD illumination 101
d9 Optical VR *101
eBracketing/flash
e1 Flash sync speed 102
e2 Flash shutter speed 104
e3 Exposure comp. for flash 104
e4 Auto M ISO sensitivity control 105
e5 Bracketing order 105
fControls
f1 Custom control assignment 106
f2 OK button 114
f3 Customize command dials 115
f4 Release button to use dial 117
f5 Reverse indicators 117
gMovie
g1 Custom control assignment 118
* Available only with lenses that support this item.
Custom Setting 0

84 Menu Guide
Select Ye s to restore Custom Settings to their default values
(013).
When AF-C is selected for viewfinder photography, this option
controls whether photographs can be taken whenever the
shutter-release button is pressed (release priority) or only when
the camera is in focus (focus priority).
Regardless of the option selected, focus will not lock when AF-C is
selected for autofocus mode. The camera will continue to adjust
focus until the shutter is released.
Reset Custom Settings
G button ➜ACustom Settings menu
a: Autofocus
a1: AF-C Priority Selection
G button ➜ACustom Settings menu
Option Description
GRelease Photos can be taken whenever the shutter-release
button is pressed.
FFocus Photos can only be taken when the in-focus
indicator (I) is displayed.

85Menu Guide
When AF-S is selected for viewfinder photography, this option
controls whether photographs can be taken only when the
camera is in focus (focus priority) or whenever the shutter-release
button is pressed (release priority).
Regardless of the option selected, if the in-focus indicator (I) is
displayed when AF-S is selected for autofocus mode, focus will
lock while the shutter-release button is pressed halfway. Focus
lock continues until the shutter is released.
a2: AF-S Priority Selection
G button ➜ACustom Settings menu
Option Description
GRelease Photos can be taken whenever the shutter-release
button is pressed.
FFocus Photos can only be taken when the in-focus indicator
(I) is displayed.

86 Menu Guide
This option controls how autofocus adjusts to sudden large
changes in the distance to the subject when AF-C is selected or
continuous-servo autofocus is selected when the camera is in
AF-A mode for viewfinder photography.
Choose the number of focus points available for manual focus-
point selection.
a3: Focus Tracking with Lock-On
G button ➜ACustom Settings menu
Option Description
C5 (Long)/
(4/
D3(Normal)/
)2/
E1(Short)
When the distance to the subject changes abruptly,
the camera waits for the specified period before
adjusting the distance to the subject. This prevents
the camera from refocusing when the subject is
briefly obscured by objects passing through the
frame. Note that 2, 1 (Short), and Off are equivalent
to 3 (Normal) when 3D-tracking or auto-area AF is
selected for AF-area mode.
Off
The camera immediately adjusts focus when the
distance to the subject changes. Use when
photographing a series of subjects at varying
distances in quick succession.
a4: Number of Focus Points
G button ➜ACustom Settings menu
Option Description
B51 points Choose from 51 focus points.
A11 points Choose from 11 focus points. Use for
quick focus-point selection.
87Menu Guide
Choose whether separate focus points can be selected for
“wide” (landscape) orientation, for “tall” (portrait) orientation
with the camera rotated 90° clockwise, and for “tall” orientation
with the camera rotated 90° counterclockwise.
Select Off to use the same focus point regardless of camera
orientation.
a5: Store Points by Orientation
G button ➜ACustom Settings menu
Camera rotated
90°counter-clockwise
Landscape (wide)
orientation
Camera rotated
90°clockwise
88 Menu Guide
Choose Yes to enable separate focus-point selection.
Choose whether the camera focuses when the shutter-release
button is pressed halfway. If AF-ON only is selected, the camera
will not focus when the shutter-release button is pressed
halfway; focus using a button that has been assigned the AF-ON
role in the Custom Settings menu (0106).
Camera rotated
90°counter-clockwise
Landscape (wide)
orientation
Camera rotated
90°clockwise
a6: AF Activation
G button ➜ACustom Settings menu
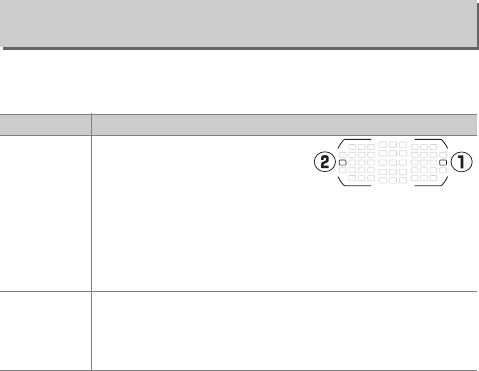
89Menu Guide
Choose whether focus-point selection “wraps around” from one
edge of the viewfinder to another.
a7: Focus Point Wrap-Around
G button ➜ACustom Settings menu
Option Description
Wrap
Focus-point selection “wraps
around” from top to bottom,
bottom to top, right to left, and
left to right, so that, for
example, pressing 2 when a focus point at the right edge
of the viewfinder display is highlighted (q) selects the
corresponding focus point at the left edge of the display
(w).
No wrap
The focus-point display is bounded by the outermost
focus points so that, for example, pressing 2 when a
focus point at the right edge of the display is selected has
no effect.

90 Menu Guide
Choose from the following focus point display options.
a8: Focus Point Options
G button ➜ACustom Settings menu
Option Description
Focus point
illumination
Choose whether the active focus point is highlighted in
red in the viewfinder.
•Auto: The selected focus point is automatically
highlighted as needed to establish contrast with the
background.
•On: The selected focus point is always highlighted,
regardless of the brightness of the background.
Depending on the brightness of the background, the
selected focus point may be difficult to see.
•Off: The selected focus point is not highlighted.
Manual focus
mode
Choose On to display the active focus point in manual
focus mode, Off to display the focus point only during
focus point selection.
91Menu Guide
Choose whether the built-in AF-assist
illuminator lights to assist the focus
operation when lighting is poor.
a9: Built-in AF-assist Illuminator
G button ➜ACustom Settings menu
Option Description
On
The AF-assist illuminator lights when lighting is poor
(viewfinder photography only). AF-assist illumination is
only available when both of the following conditions are
met:
1. AF-S is selected for autofocus mode or single-servo
autofocus is selected when the camera is in AF-A mode.
2. Auto-area AF is chosen for AF-area mode, or an option
other than auto-area AF is chosen and the center focus
point is selected.
Off
The AF-assist illuminator does not light to assist the focus
operation. The camera may not be able to focus using
autofocus when lighting is poor.
AThe AF-Assist Illuminator
The AF-assist illuminator has a range of about 0.5–3.0 m (1 ft 8 in.–9 ft
10 in.); when using the illuminator, remove the lens hood.

92 Menu Guide
This item is displayed only with lenses that support it. Selecting
Enable allows the lens focus ring to be used for manual focus
when the camera is in autofocus mode. After pressing the
shutter-release button halfway to focus, keep the button
pressed halfway and adjust focus using the focus ring. To refocus
using autofocus, lift your finger from the shutter-release button
and then press it halfway again. To prevent the lens focus ring
being used for manual focus when the camera is in autofocus
mode, select Disable.
a10: Manual Focus Ring in AF Mode
G button ➜ACustom Settings menu

93Menu Guide
Select the increments used when making adjustments to ISO
sensitivity. If possible, the current ISO sensitivity setting is
maintained when the step value is changed. If the current ISO
sensitivity setting is not available at the new step value, ISO
sensitivity will be rounded to the nearest available setting.
Select the increments used when making adjustments to shutter
speed, aperture, exposure and flash compensation, and
bracketing.
b: Metering/Exposure
b1: ISO Sensitivity Step Value
G button ➜ACustom Settings menu
b2: EV Steps for Exposure Cntrl
G button ➜ACustom Settings menu

94 Menu Guide
This option controls whether the E button is needed to set
exposure compensation. If On (Auto reset) or On is selected, the
0 at the center of the exposure display will flash even when
exposure compensation is set to ±0.
b3:
Easy Exposure Compensation
G button ➜ACustom Settings menu
Option Description
On (Auto reset)
Exposure compensation is set by rotating one of the
command dials (see note below). The setting selected
using the command dial is reset when the camera turns
off or the standby timer expires (exposure compensation
settings selected using the E button are not reset).
On
As above, except that the exposure compensation value
selected using the command dial is not reset when the
camera turns off or the standby timer expires.
Off Exposure compensation is set by pressing the E button
and rotating the main command dial.
AChange Main/Sub
The dial used to set exposure compensation when On (Auto reset) or
On is selected for Custom Setting b3 (Easy exposure compensation)
depends on the option selected for Custom Setting f3 (Customize
command dials)> Change main/sub (0115).
Customize command dials > Change main/sub
Off On
Mode
PSub-command dial Sub-command dial
SSub-command dial Main command dial
AMain command dial Sub-command dial
MN/A
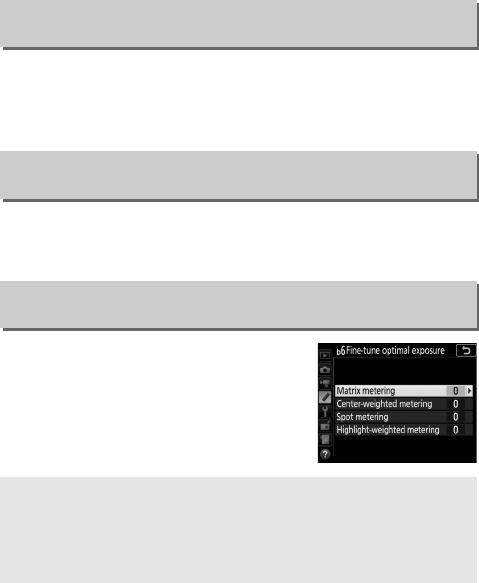
95Menu Guide
Choose M Face detection on to enable face detection when
shooting portraits with matrix metering during viewfinder
photography.
Choose the size of the area given the most weight in center-
weighted metering.
Use this option to fine-tune the exposure
value selected by the camera. Exposure
can be fine-tuned separately for each
metering method by from +1 to –1 EV in
steps of 1
/
6EV.
b4: Matrix Metering
G button ➜ACustom Settings menu
b5: Center-Weighted Area
G button ➜ACustom Settings menu
b6: Fine-Tune Optimal Exposure
G button ➜ACustom Settings menu
DFine-Tuning Exposure
Exposure fine-tuning is not affected by two-button resets. Note that as
the exposure compensation (E) icon is not displayed, the only way to
determine how much exposure has been altered is to view the amount
in the fine-tuning menu.

96 Menu Guide
Choose whether exposure locks when the shutter-release
button is pressed.
Choose how long the camera continues to meter exposure
when no operations are performed. The shutter-speed and
aperture displays in the control panel and viewfinder turn off
automatically when the standby timer expires.
Choose a shorter standby timer delay for longer battery life.
c: Timers/AE Lock
c1: Shutter-Release Button AE-L
G button ➜ACustom Settings menu
Option Description
OOn (half press) Pressing the shutter-release button halfway locks
exposure.
POn (burst mode) Exposure only locks while the shutter-release
button is pressed all the way down.
Off Pressing the shutter-release button does not lock
exposure.
c2: Standby Timer
G button ➜ACustom Settings menu

97Menu Guide
Choose the length of the shutter release delay, the number of
shots taken, and the interval between shots in self-timer mode.
•Self-timer delay: Choose the length of the shutter-release delay.
•Number of shots: Press 1 and 3 to choose the number of shots
taken each time the shutter-release button is pressed.
•Interval between shots: Choose the interval between shots when
the Number of shots is more than 1.
Choose how long the monitor remains on when no operations
are performed during playback (Playback; defaults to 10 s) and
image review (Image review; defaults to 4 s), when menus
(Menus; defaults to 1 minute) or information (Information
display; defaults to 4 s) are displayed, or during live view and
movie recording (Live view; defaults to 10 minutes). Choose a
shorter monitor-off delay for longer battery life.
Choose how long the camera will remain on stand-by in remote
release mode (049). If no operations are performed for the
selected period, remote shooting will end and Off will
automatically be selected for Remote control mode (ML-L3) in
the photo shooting menu. Choose shorter times for longer
battery life.
c3: Self-Timer
G button ➜ACustom Settings menu
c4: Monitor off Delay
G button ➜ACustom Settings menu
c5: Remote on Duration (ML-L3)
G button ➜ACustom Settings menu

98 Menu Guide
Choose the maximum frame advance rate in CL (continuous low
speed) mode.
The maximum number of shots that can be taken in a single
burst in continuous mode can be set to any value between 1 and
100. Note that regardless of the option selected, there is no limit
to the number of photos that can be taken in a single burst when
a shutter speed of 4 s or slower is selected in mode S or M.
In situations where the slightest camera movement can blur
pictures, select 1 s, 2 s, or 3s to delay shutter release until one,
two, or three seconds after the mirror is raised.
d: Shooting/Display
d1: CL Mode Shooting Speed
G button ➜ACustom Settings menu
d2: Max. Continuous Release
G button ➜ACustom Settings menu
AThe Memory Buffer
Regardless of the option selected for Custom Setting d2, shooting will
slow when the memory buffer fills (tAA).
d3: Exposure Delay Mode
G button ➜ACustom Settings menu

99Menu Guide
Select Enable to enable the electronic front-curtain shutter in
MUP mode, eliminating blur caused by shutter motion.
A mechanical shutter is used in other release modes.
d4: Electronic Front-Curtain Shutter
G button ➜ACustom Settings menu
AThe Electronic Front-Curtain Shutter
A type G, E, or D lens is recommended; select Disable if you notice lines
or fog when shooting with other lenses. The fastest shutter speed and
maximum ISO sensitivity available with the electronic front-curtain
shutter are 1
/
2000 s and ISO 51200, respectively.

100 Menu Guide
When a picture is taken, the camera names the file by adding
one to the last file number used. This option controls whether
file numbering continues from the last number used when a
new folder is created, the memory card is formatted, or a new
memory card is inserted in the camera.
d5: File Number Sequence
G button ➜ACustom Settings menu
Option Description
On
When a new folder is created, the memory card formatted,
or a new memory card inserted in the camera, file
numbering continues from the last number used or from
the largest file number in the current folder, whichever is
higher. If a photograph is taken when the current folder
contains a photograph numbered 9999, a new folder will
be created automatically and file numbering will begin
again from 0001.
Off
File numbering is reset to 0001 when a new folder is
created, the memory card is formatted, or a new memory
card is inserted in the camera. Note that a new folder is
created automatically if a picture is taken when the current
folder contains 999 pictures.
Reset
As for On, except that the next picture taken is assigned a
file number by adding one to the largest file number in the
current folder. If the folder is empty, file numbering is reset
to 0001.
DFile Number Sequence
If the current folder is numbered 999 and contains either 999 pictures
or a photograph numbered 9999, the shutter-release button will be
disabled and no further pictures can be taken (in addition, movie
recording may be disabled if the current folder is numbered 999 and
the next file would be the 992nd or numbered 9992 or higher). Choose
Reset for Custom Setting d5 (File number sequence) and then either
format the current memory card or insert a new memory card.

101Menu Guide
Choose On to display on-demand grid lines in the viewfinder for
reference when composing photographs.
Choose whether the viewfinder shows ISO sensitivity (Show ISO
sensitivity) or the number of exposures remaining (Show
frame count).
If Off is selected, the control panel backlight (LCD illuminator)
will only light while the power switch is rotated toward D. If On
is selected, the control panel will be illuminated whenever the
standby timer is active (096). Select Off for increased battery
life.
This item is displayed only with lenses that support it. Selecting
On enables vibration reduction, which takes effect whenever
the shutter-release button is pressed halfway. Select Off to
disable vibration reduction.
d6: Viewfinder Grid Display
G button ➜ACustom Settings menu
d7: ISO Display
G button ➜ACustom Settings menu
d8: LCD Illumination
G button ➜ACustom Settings menu
d9: Optical VR
G button ➜ACustom Settings menu

102 Menu Guide
This option controls flash sync speed.
e: Bracketing/Flash
e1: Flash Sync Speed
G button ➜ACustom Settings menu
Option Description
1/320 s
(Auto FP)
Auto FP high-speed sync is used when a compatible flash
unit is attached. If the built-in flash or other flash units are
used, shutter speed is set to 1
/
320 s. When the camera
shows a shutter speed of 1
/
320 s in mode P or A, auto FP
high-speed sync will be activated if the actual shutter
speed is faster than 1
/
320 s.
1/250 s
(Auto FP)
Auto FP high-speed sync is used when a compatible flash
unit is attached. If the built-in flash or other flash units are
used, shutter speed is set to 1
/
250 s. When the camera
shows a shutter speed of 1
/
250 s in mode P or A, auto FP
high-speed sync will be activated if the actual shutter
speed is faster than 1
/
250 s.
1/250s–1/60s Flash sync speed set to selected value.
AFixing Shutter Speed at the Flash Sync Speed Limit
To fix shutter speed at the sync speed limit in mode S or M, select the
next shutter speed after the slowest possible shutter speed (30 s or
%). An X (flash sync indicator) will be displayed in the viewfinder and
control panel together with the flash sync speed.
AAuto FP High-Speed Sync
Auto FP high-speed sync allows the flash to be used at the highest
shutter speed supported by the camera, making it possible to choose
the maximum aperture for reduced depth of field even when the
subject is backlit in bright sunlight. The information display flash mode
indicator shows “FP” when auto FP high-speed sync is active.

103Menu Guide
❚❚ Auto FP High-Speed Sync
When 1/320 s (Auto FP) or 1/250 s (Auto FP) is selected for
Custom Setting e1 (Flash sync speed, 0102), the built-in flash
can be used at shutter speeds as fast as 1
/
320 s or 1
/
250 s, while
compatible optional flash units can be used at any shutter speed
(Auto FP High-Speed Sync).
Flash sync speed 1/320 s (Auto FP) 1/250 s (Auto FP) 1/250 s
Shutter speed
Built-in
flash
Optional
flash
unit
Built-in
flash
Optional
flash
unit
Built-in
flash
Optional
flash
unit
From 1
/
8000 to but not
including 1
/
320 s— Auto FP — Auto FP — —
From 1
/
320 to but not
including 1
/
250 sFlash sync*— Auto FP — —
1
/
250–30 s Flash sync
* Flash range drops as shutter speed increases. Flash range will nevertheless be greater than that
obtained at the same speeds with Auto FP.

104 Menu Guide
This option determines the slowest shutter speed available
when using front- or rear-curtain sync or red-eye reduction in
mode P or A (regardless of the setting chosen, shutter speeds can
be as slow as 30 s in S and M modes or at flash settings of slow
sync, slow rear-curtain sync, or red-eye reduction with slow
sync).
Choose how the camera adjusts flash level when exposure
compensation is used.
e2: Flash Shutter Speed
G button ➜ACustom Settings menu
e3: Exposure Comp. for Flash
G button ➜ACustom Settings menu
Option Description
YE Entire frame
Both flash level and exposure compensation are
adjusted to modify exposure over the entire
frame.
EBackground only Exposure compensation applies to background
only.

105Menu Guide
Choose the reference used to set exposure when a flash is used
with auto ISO sensitivity control.
At the default setting of MTR > under > over (H), exposure,
flash, and white balance bracketing are performed in the
following order: the unmodified shot is taken first, followed by
the shot with the lowest value, followed by the shot with the
highest value. If Under > MTR > over (I) is selected, shooting
will proceed in order from the lowest to the highest value. This
setting has no effect on ADL bracketing.
e4: Auto M ISO Sensitivity Control
G button ➜ACustom Settings menu
Option Description
WSubject and
background
The camera takes both the main subject and
background lighting into account when adjusting ISO
sensitivity.
XSubject only ISO sensitivity is adjusted only to ensure that the main
subject is correctly exposed.
e5: Bracketing Order
G button ➜ACustom Settings menu
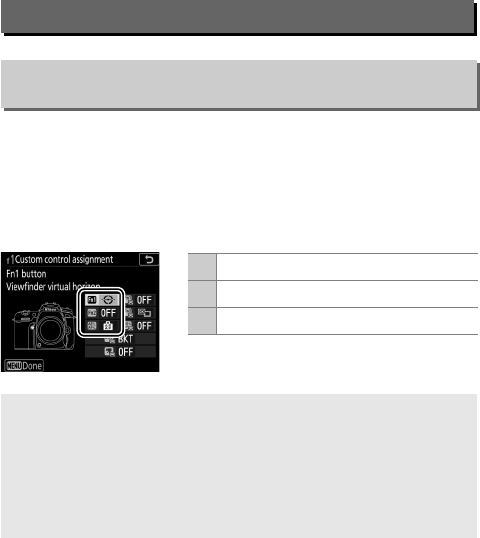
106 Menu Guide
Choose the functions assigned to camera controls, whether
used individually or in combination with the command dials.
❚❚ Press
Choose the roles played by the following controls, highlight the
desired option and press the J:
f: Controls
f1: Custom Control Assignment
G button ➜ACustom Settings menu
2Fn1 button
5Fn2 button
4AE-L/AF-L button
A“Press” and “Press + Command Dials”
Certain roles can not be assigned simultaneously to both the “press”
and “press + command” functions for some controls. Assigning such a
role to “press” when it is already assigned to “press + command dial”
sets the “press + command dial” option None, while assigning such a
role to “press + command dials” when it is already assigned to “press”
sets the “press” option None.

107Menu Guide
The functions that can be assigned to these controls are as
follows:
Option 2/54
rFV lock ✔✔
BAE/AF lock ✔✔
CAE lock only ✔✔
DAE lock (Reset on release) ✔✔
EAE lock (Hold) ✔✔
FAF lock only ✔✔
AAF-ON ✔✔
$Modeling flash ✔—
hFlash off ✔—
tBracketing burst ✔—
e+ NEF (RAW) ✔—
LMatrix metering ✔—
MCenter-weighted metering ✔—
NSpot metering ✔—
4Highlight-weighted metering ✔—
9Viewfinder grid display ✔—
mViewfinder virtual horizon ✔—
nMY MENU ✔—
6Access top item in MY MENU ✔—
KPlayback ✔—
None ✔✔

108 Menu Guide
The following options are available:
Option Description
rFV lock Press the control to lock flash value. Press again to
cancel FV lock.
BAE/AF lock Focus and exposure lock while the control is
pressed.
CAE lock only Exposure locks while the control is pressed.
DAE lock (Reset
on release)
Exposure locks when the control is pressed, and
remains locked until the control is pressed a
second time, the shutter is released, or the
standby timer expires.
EAE lock (Hold)
Exposure locks when the control is pressed, and
remains locked until the control is pressed a
second time or the standby timer expires.
FAF lock only Focus locks while the control is pressed.
AAF-ON Pressing the control initiates autofocus.
$Modeling
flash
Press the control to test-fire the flash and check for
shadows.
hFlash off The flash will not fire in photos taken while the
control is pressed.
tBracketing
burst
If the control is pressed while exposure, flash, or
ADL bracketing is active in single frame or quiet
shutter-release mode, all shots in the current
bracketing program will be taken each time the
shutter-release button is pressed. If white balance
bracketing is active or a continuous release mode
(mode CH, CL, or QC) is selected, the camera will
repeat the bracketing burst while the shutter-
release button is held down.

109Menu Guide
e+ NEF (RAW)
If a JPEG option is currently selected for image
quality, “RAW” will be displayed in the control
panel and an NEF (RAW) copy will be recorded
with the next picture taken after the control is
pressed (the original image quality setting will be
restored when you remove your finger from the
shutter-release button). NEF (RAW) copies are
recorded at the settings currently selected for NEF
(RAW) recording in the photo shooting menu
(037). To exit without recording an NEF (RAW)
copy, press the control again.
LMatrix
metering
Matrix metering is activated while the control is
pressed.
M
Center-
weighted
metering
Center-weighted metering is activated while the
control is pressed.
NSpot metering Spot metering is activated while the control is
pressed.
4
Highlight-
weighted
metering
Highlight-weighted metering is activated while
the control is pressed.
9Viewfinder
grid display
Press the control to turn the framing grid display in
the viewfinder on or off.
m
Viewfinder
virtual
horizon
Press the control to view a virtual horizon display
in the viewfinder (0110).
nMY MENU Pressing the control displays “MY MENU” (0183).
6
Access top
item in
MY MENU
Press the control to jump to the top item in “MY
MENU.” Select this option for quick access to a
frequently-used menu item.
KPlayback
The control performs same function as the K
button. Select when using a telephoto lens or in
other circumstances in which it is difficult to
operate the K button with your left hand.
None Pressing the control has no effect.
Option Description
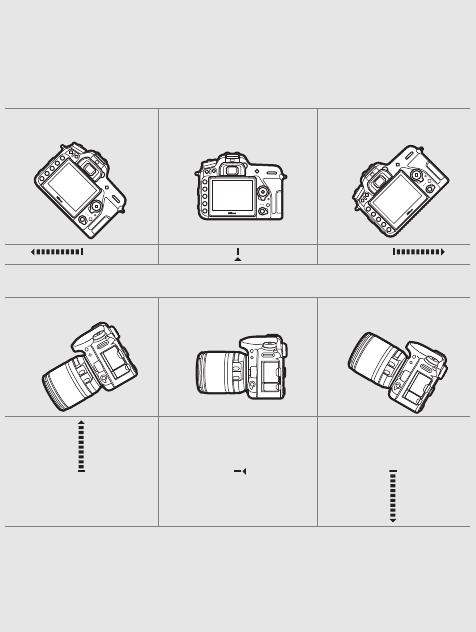
110 Menu Guide
AVirtual Horizon
Pressing a control to which Viewfinder virtual horizon has been
assigned displays pitch and roll indicators in the viewfinder. Press the
control a second time to clear the indicators from display.
Roll
Camera tilted right Camera level Camera tilted left
Pitch
Camera tilted forward Camera level Camera tilted back
The roles of the pitch and roll indicators are reversed when the camera
is rotated to take pictures in “tall” (portrait) orientation. Note that the
display may not be accurate when the camera is tilted at a sharp angle
forward or back. If the camera is unable to measure tilt, the amount of
tilt will not be displayed.
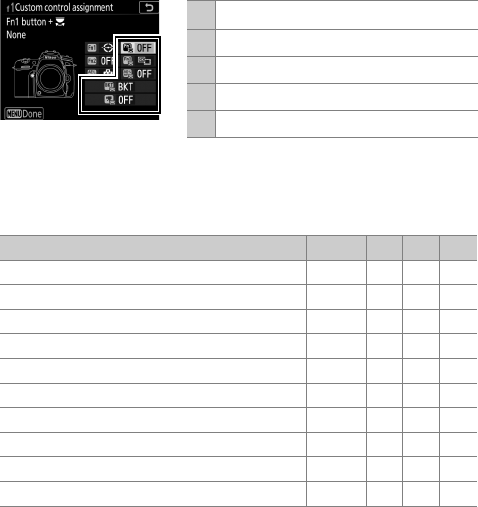
111Menu Guide
❚❚ Press + Command Dials
To choose the roles played by the following controls in
combination with the command dials, highlight the desired
option and press the J:
* Choose the role played by the movie-record button in combination with the command dials
when the live view selector is rotated to C.
The functions that can be assigned to these controls are as
follows:
3Fn1 button + y
!Fn2 button + y
DAE-L/AF-L button + y
nBKT button + y
fMovie record button + y*
Option 3/! D n f
5Choose image area ✔✔—✔
v1 step spd/aperture ✔———
yActive D-Lighting ✔———
zExposure delay mode ✔———
DAuto bracketing ——✔—
IMultiple exposure ——✔—
2HDR (high dynamic range) ——✔—
mWhite balance ———✔
OMetering ———✔
None ✔✔✔✔

112 Menu Guide
The following options are available:
Option Description
5Choose image
area
Press the control and rotate a command dial to
choose an image area.
v1 step spd/
aperture
If the control is pressed when the command dials
are rotated, changes to shutter speed (modes S
and M) and aperture (modes A and M) are made in
increments of 1 EV, regardless of the option
selected for Custom Setting b2 (EV steps for
exposure cntrl, 093).
yActive
D-Lighting
Press the control and rotate the command dials to
adjust Active D-Lighting (044).
zExposure delay
mode
Press the control and rotate a command dial to
choose an exposure delay mode (098).
DAuto
bracketing
Press the control and rotate the main command
dial to choose the number of shots in the
bracketing sequence and the sub-command dial
to choose the bracketing increment (049).
IMultiple
exposure
Press the control and rotate the main command
dial to choose the mode and the sub-command
dial to choose the number of shots (050).
2
HDR (high
dynamic
range)
Press the control and rotate the main command
dial to choose an HDR mode and the sub-
command dial to choose HDR strength (057).
mWhite balance
Press the control and rotate the main command
dial to choose a white balance option and the sub-
command dial to fine-tune white balance (039).
OMetering Press the control and rotate the main command
dial to choose a metering option.
None No operation is performed when the command
dials are rotated while the control is pressed.

113Menu Guide
AThe BKT Button
If high dynamic range or multiple exposure is active while another
function is assigned to the BKT button, the BKT button can not be used
in combination with a command dial until high dynamic range or
multiple exposure photography ends.
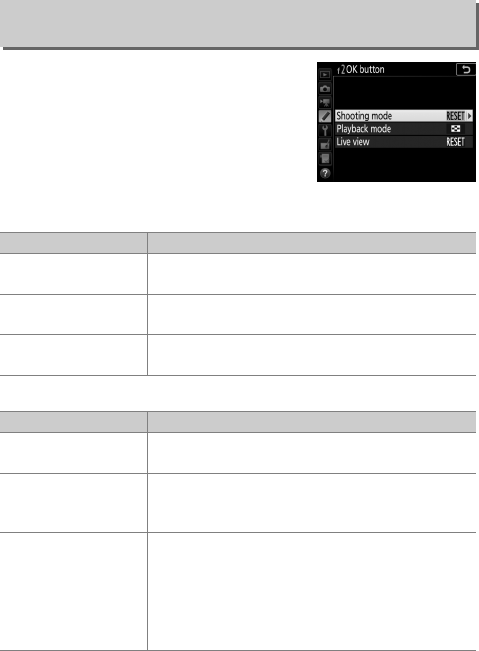
114 Menu Guide
This option determines the role assigned
to the J button during viewfinder
photography, playback, and live view
(regardless of the option selected,
pressing J when a movie is displayed
full frame starts movie playback).
❚❚ Shooting Mode
❚❚ Playback Mode
f2: OK Button
G button ➜ACustom Settings menu
Option Role assigned to J button
JSelect center
focus point Select the center focus point.
KHighlight active
focus point Highlight the active focus point.
None Pressing the J button has no effect in
viewfinder photography.
Option Role assigned to J button
QThumbnail on/off Toggle between full-frame and thumbnail
playback.
RView histograms
In both full-frame and thumbnail playback,
a histogram is displayed while the J button is
pressed.
pZoom on/off
Toggle between full-frame or thumbnail
playback and playback zoom. Choose the initial
zoom setting from Low magnification (50%),
1 : 1 (100%), and High magnification (200%).
The zoom display will center on the active focus
point.
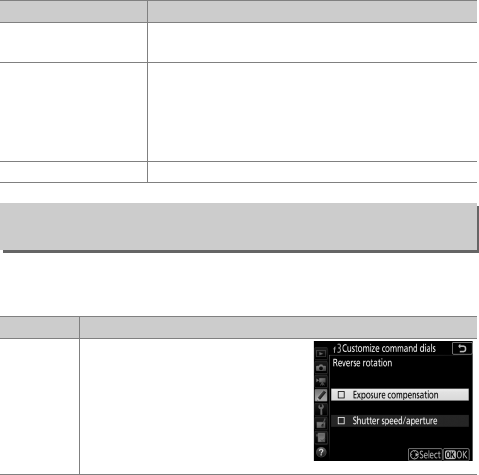
115Menu Guide
❚❚ Live View
This option controls the operation of the main and sub-
command dials.
Option Role assigned to J button
JSelect center
focus point
Pressing the J button in live view selects the
center focus point.
pZoom on/off
Press the J button to toggle zoom on and off.
Choose the initial zoom setting from Low
magnification (50%), 1 : 1 (100%), and High
magnification (200%). The zoom display will
center on the active focus point.
None Pressing the J button has no effect in live view.
f3: Customize Command Dials
G button ➜ACustom Settings menu
Option Description
Reverse
rotation
Reverse the direction of rotation
of the command dials when they
are used to make adjustments to
Exposure compensation and/
or Shutter speed/aperture.
Highlight options and press 2 to
select or deselect, then press J.

116 Menu Guide
Change
main/sub
Exposure setting: If Off is selected,
the main command dial controls
shutter speed and the sub-
command dial controls aperture.
If On is selected, the main
command dial will control
aperture and the sub-command
dial shutter speed. If On (Mode A) is selected, the main
command dial will be used to set aperture in shooting
mode A only.
Autofocus setting: If On is selected, autofocus mode can be
selected by keeping the AF-mode button pressed and
rotating the sub-command dial, AF-area mode by keeping
the AF-mode button pressed and rotating the main
command dial.
Menus and
playback
If Off is selected, the multi selector is used to choose the
picture displayed during full-frame playback, highlight
thumbnails, and navigate menus. If On or On (image
review excluded) is selected, the main command dial can
be used to choose the picture displayed during full-frame
playback, move the cursor left or right during thumbnail
playback, and move the menu highlight bar up or down.
The sub-command dial is used in full-frame playback to
skip forward or back according to the option selected for
Sub-dial frame advance and in thumbnail playback to
page up or down. While menus are displayed, rotating the
sub-command dial right displays the sub-menu for the
selected option, while rotating it left displays the previous
menu. To make a selection, press 2 or J. Select On (image
review excluded) to prevent the command dials from
being used for playback during image review.
Sub-dial
frame
advance
When On or On (image review excluded) is selected for
Menus and playback, the sub-command dial can be
rotated during full-frame playback to select a folder, to skip
forward or back 10 or 50 frames at a time, or to skip to the
next or previous protected image, photo, or movie.
Option Description

117Menu Guide
Selecting Yes allows adjustments that are normally made by
holding the E, S (Q), BKT, M (Y), L (U), X (T), W (Z),
or AF-mode button and rotating a command dial to be made by
rotating the command dial after the button is released. This also
applies to controls to which Active D-Lighting, Exposure delay
mode, White balance, or Metering has been assigned as a
“press + command dial” option for Custom Setting f1 (Custom
control assignment, 0106). Setting ends when any of the
affected buttons is pressed again, the shutter-release button is
pressed halfway, or the standby timer expires.
If (W) is selected, the exposure indicators
in the control panel, viewfinder, and information display are
displayed with negative values on the left and positive values
on the right. Select (V) to display positive
values on the left and negative values on the right.
f4: Release Button to Use Dial
G button ➜ACustom Settings menu
f5: Reverse Indicators
G button ➜ACustom Settings menu
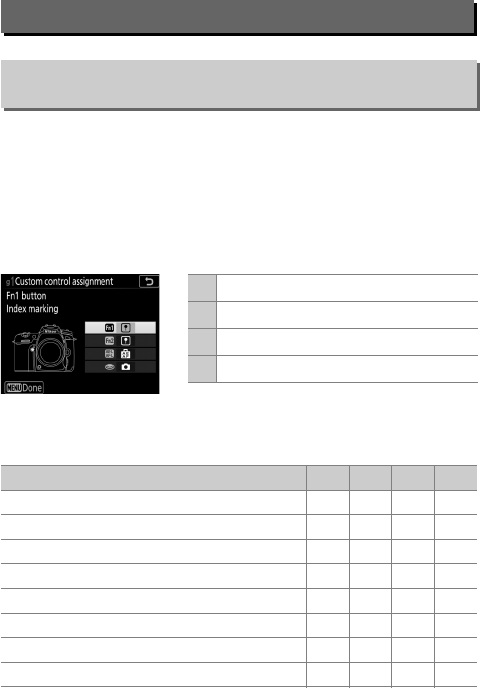
118 Menu Guide
Choose the functions assigned to camera controls, whether
used individually or in combination with the command dials,
when the live view selector is rotated to 1 in live view.
❚❚ Press
To choose the roles played by the following controls, highlight
an option and press J:
The functions that can be assigned to these controls are as
follows:
g: Movie
g1: Custom Control Assignment
G button ➜ACustom Settings menu
2Fn1 button
5Fn2 button
4AE-L/AF-L button
GShutter-release button
Option 254G
tPower aperture (open) ✔———
qPower aperture (close) —✔——
iExposure compensation + ✔———
hExposure compensation – —✔——
rIndex marking ✔✔✔—
sView photo shooting info ✔✔✔—
BAE/AF lock ✔✔✔—
CAE lock only ✔✔✔—

119Menu Guide
The following options are available:
EAE lock (Hold) ✔✔✔—
FAF lock only ✔✔✔—
AAF-ON ✔✔✔—
CTake photos ———✔
1Record movies ———✔
None ✔✔✔—
Option Description
tPower aperture
(open)
Aperture widens while the Fn1 button is pressed.
Use in combination with Custom Setting g1
(Custom control assignment) > Fn2 button >
Power aperture (close) for button-controlled
aperture adjustment.
qPower aperture
(close)
Aperture narrows while the Fn2 button is pressed.
Use in combination with Custom Setting g1
(Custom control assignment) > Fn1 button >
Power aperture (open) for button-controlled
aperture adjustment.
iExposure
compensation +
Exposure compensation increases while the Fn1
button is pressed. Use in combination with
Custom Setting g1 (Custom control
assignment) > Fn2 button > Exposure
compensation – for button-controlled exposure
compensation.
hExposure
compensation –
Exposure compensation decreases while the Fn2
button is pressed. Use in combination with
Custom Setting g1 (Custom control
assignment) > Fn1 button > Exposure
compensation + for button-controlled exposure
compensation.
Option 2 5 4 G

120 Menu Guide
rIndex marking
Press the control during movie recording to add
an index at the current position. Indices can be
used when viewing and editing movies.
sView photo
shooting info
Press the control to display photo shooting data
in place of movie recording information. Press
again to return to the movie recording display.
BAE/AF lock Focus and exposure lock while the control is
pressed.
CAE lock only Exposure locks while the control is pressed.
EAE lock (Hold)
Exposure locks when the control is pressed, and
remains locked until the control is pressed a
second time or the standby timer expires.
FAF lock only Focus locks while the control is pressed.
AAF-ON Pressing the control initiates autofocus.
CTake photos
Press the shutter-release button all the way down
to end movie recording and take a photograph
with an aspect ratio of 16 : 9.
1Record movies
Press the shutter-release button halfway to start
live view. You can then press the shutter-release
button halfway to focus (autofocus mode only)
and press it all the way down to start or end
movie recording. The shutter-release button can
not be used for other purposes while the live view
selector is rotated to 1. To end live view, press the
a button. The shutter-release button on an
optional wireless remote controller or remote
cord (0222) functions in the same way as the
camera shutter-release button; the optional
ML-L3 remote control, however, can not be used
to record movies; the shutter-release button on
the ML-L3 has no effect.
None Pressing the control has no effect.
Option Description

121Menu Guide
APower Aperture
Power aperture is available only in modes A and M and can not be used
while photo shooting info is displayed (a 6 icon indicates that power
aperture can not be used). The display may flicker while aperture is
adjusted.
D“Record Movies”
When Record movies is selected for Shutter-release button, interval
timer photography is not available.
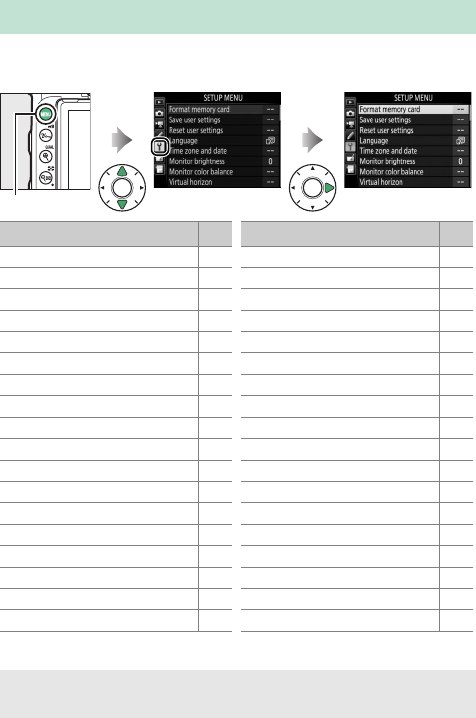
122 Menu Guide
To display the setup menu, press G and select the B (setup
menu) tab.
* Not available when battery is low.
BThe Setup Menu: Camera Setup
G button
Option 0
Format memory card 123
Save user settings 123
Reset user settings 125
Language 125
Time zone and date 126
Monitor brightness 127
Monitor color balance 127
Virtual horizon 128
Information display 129
Auto info display 129
Info display auto off 130
AF fine-tune 130
Clean image sensor 134
Lock mirror up for cleaning*135
Image Dust Off ref photo 138
Image comment 140
Copyright information 141
Beep options 142
Touch controls 143
Flash warning 143
HDMI 143
Location data 144
Wireless remote (WR) options 145
Assign remote (WR) Fn button 147
Airplane mode 147
Connect to smart device 148
Send to smart device (auto) 149
Wi-Fi 149
Bluetooth 150
Eye-Fi upload 151
Conformity marking 152
Battery info 153
Slot empty release lock 153
Save/load settings 154
Reset all settings 156
Firmware version 156
Option 0
ASee Also
For menu defaults, see “Setup Menu Defaults” (016).

123Menu Guide
Memory cards must be formatted before first use or after being
formatted in other devices. To begin formatting, highlight Yes
and press J. Note that formatting permanently deletes all pictures
and other data on the card. Before formatting, be sure to make
backup copies as required.
Assign frequently-used settings to the U1 and U2 positions on the
mode dial.
❚❚ Saving User Settings
1Select a mode.
Rotate the mode dial to the
desired mode.
Format Memory Card
G button ➜Bsetup menu
DDuring Formatting
Do not turn the camera off or remove memory cards during formatting.
ATwo-Button Format
Memory cards can also be formatted by pressing the O (Q) and
S(Q) buttons for more than two seconds.
Save User Settings
G button ➜Bsetup menu
Mode dial
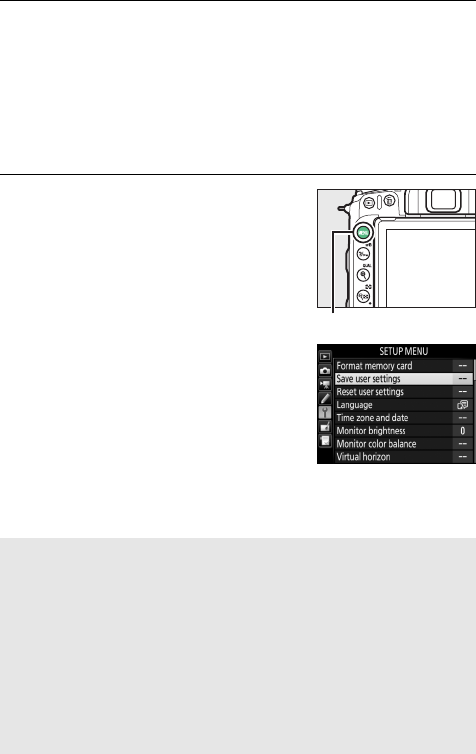
124 Menu Guide
2Adjust settings.
Make the desired adjustments to flexible program (mode P),
shutter speed (modes S and M), aperture (modes A and M),
exposure and flash compensation, flash mode, focus point,
metering, autofocus and AF-area modes, bracketing, and
settings in the photo shooting, movie shooting, and Custom
Settings menus (026, 66, 81).
3Select Save user settings.
Press the G button to display the
menus. Highlight Save user settings
in the setup menu and press 2.
AUser Settings
The following can not be saved to U1 or U2.
Photo shooting menu:
•Storage folder
•Choose image area
•Manage Picture Control
•Remote control mode (ML-L3)
•Multiple exposure
•Interval timer shooting
Movie shooting menu:
•Choose image area
•Manage Picture Control
•Time-lapse movie
Custom Settings menu:
•a10 (Manual focus ring in AF
mode)
•d9 (Optical VR)
G button
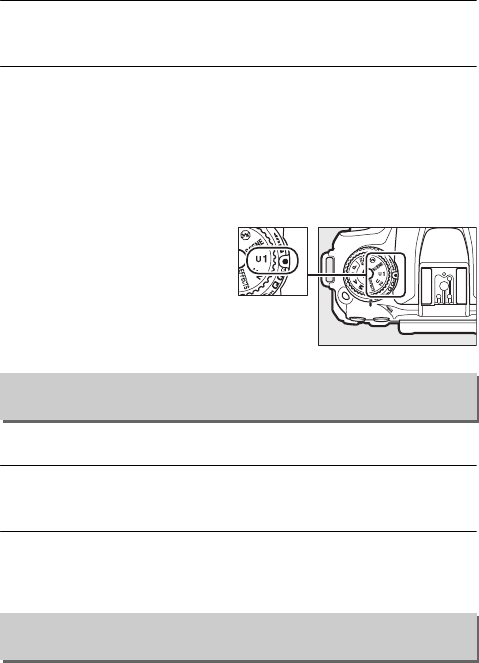
125Menu Guide
4Select Save to U1 or Save to U2.
Highlight Save to U1 or Save to U2 and press 2.
5Save user settings.
Highlight Save settings and press J to assign the settings
selected in Steps 1 and 2 to the mode dial position selected in
Step 4.
❚❚ Recalling User Settings
Simply rotate the mode dial to
U1 to recall the settings
assigned to Save to U1, or to
U2 to recall the settings
assigned to Save to U2.
To reset settings for U1 or U2 to default values.
1Select Reset U1 or Reset U2.
Highlight Reset U1 or Reset U2 and press 2.
2Reset user settings.
Highlight Reset and press J.
Choose a language for camera menus and messages.
Reset User Settings
G button ➜Bsetup menu
Language
G button ➜Bsetup menu
Mode dial

126 Menu Guide
Change time zones, set the camera clock, synchronize the clock
with the clock on a smart device, choose the date display order,
and turn daylight saving time on or off.
If the clock is reset, a flashing Y indicator will appear in the
information display.
Time Zone and Date
G button ➜Bsetup menu
Option Description
Time zone Choose a time zone. The camera clock is automatically
set to the time in the new time zone.
Date and time Set the camera clock.
Sync with smart
device
Choose whether the camera clock is updated to the
time (Coordinated Universal Time, or UTC), time zone,
and standard or daylight saving time supplied by the
smart device. The camera clock can not be
synchronized with the smart device during interval
timer photography or if a GPS device is connected with
Yes selected for Location data > External GPS device
options > Set clock from satellite (0144).
Date format Choose the order in which the day, month, and year are
displayed.
Daylight saving
time
Turn daylight saving time on or off. The camera clock
will automatically be advanced or set back one hour.
The default setting is Off.
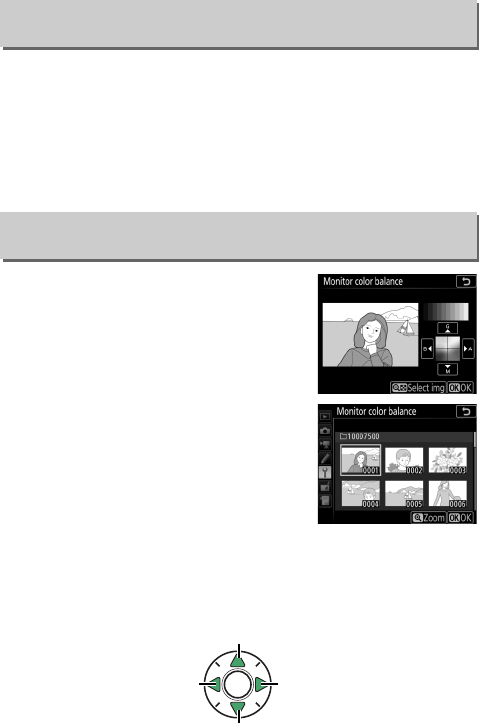
127Menu Guide
Press 1 or 3 to adjust monitor brightness. Choose higher values
for increased brightness, lower values for reduced brightness.
Brightness can be adjusted separately for:
•Menus/playback: Adjust the brightness of the menu, information,
and playback displays.
•Live view: Adjust the brightness of the live view display.
Use the multi selector as shown below to
adjust monitor color balance with
reference to a sample image. The sample
image is the last photograph taken or, in
playback mode, the last photograph
displayed; to choose a different image,
press the
W
(
Z
) button and select an
image from a thumbnail list (to view the
highlighted image full frame, press and
hold
X
/
T
). If the memory card
contains no photographs, an empty frame
with a gray border will be displayed in
place of the sample image. Press
J
to exit
when adjustments are complete. Monitor color balance applies
only to menus, playback, and the view through the lens displayed
during live view; pictures taken with the camera are not affected.
Monitor Brightness
G button ➜Bsetup menu
Monitor Color Balance
G button ➜Bsetup menu
Increase amount of green
Increase amount of blue Increase amount of amber
Increase amount of magenta
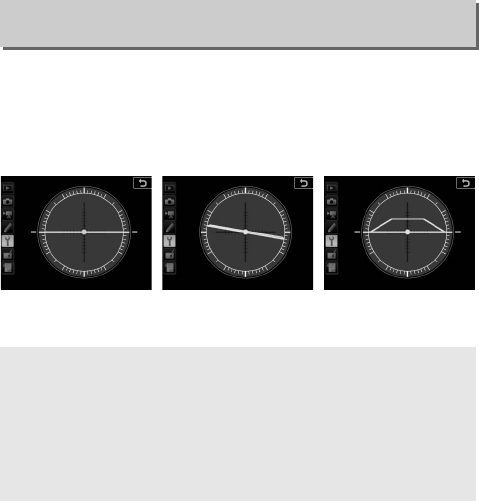
128 Menu Guide
Display roll and pitch information based on information from
the camera tilt sensor. If the camera is tilted neither left nor right,
the roll reference line will turn green, while if the camera is tilted
neither forward nor back, the dot in the center of the display will
turn green. Each division is equivalent to 5°.
Virtual Horizon
G button ➜Bsetup menu
Camera level Camera tilted left or
right
Camera tilted forward
or back
DTilting the Camera
The virtual horizon display is not accurate when the camera is tilted at
a sharp angle forward or back. If the camera is unable to measure tilt,
the amount of tilt will not be displayed.
ASee Also
For information on viewing a virtual horizon display in the viewfinder,
see A > Custom Setting f1 (Custom control assignment; 0106, 110).
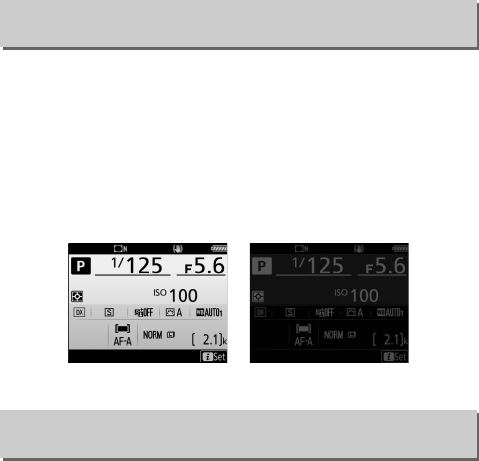
129Menu Guide
If Auto (AUTO) is selected, the color of the lettering in the
information display will automatically change from black to
white or white to black to maintain contrast with the
background. To always use the same color lettering, select
Manual and choose Dark on light (B; black lettering) or Light
on dark (W; white lettering). Monitor brightness will
automatically be adjusted for maximum contrast with the
selected text color.
If On is selected, the information display will appear in the
monitor when the camera is turned on. If no operations are
performed for the time selected for Custom Setting c4 (Monitor
off delay) > Information display, the display will turn off but
can be restored by pressing halfway and then releasing the
shutter-release button. If Off is selected, the information display
can be viewed by pressing the R button.
Information Display
G button ➜Bsetup menu
Dark on light Light on dark
Auto Info Display
G button ➜Bsetup menu
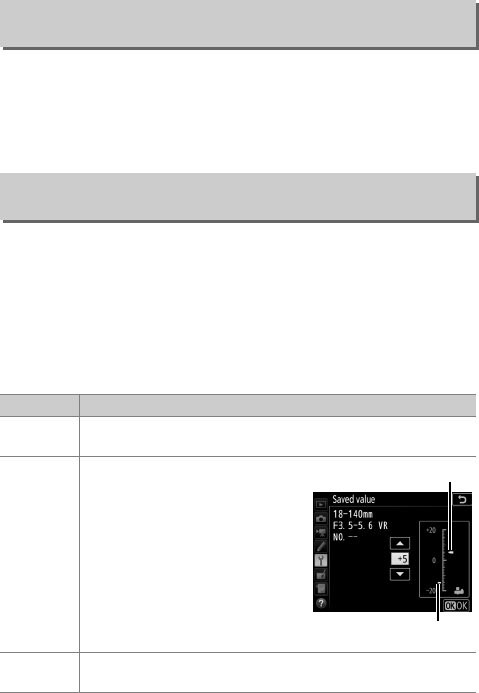
130 Menu Guide
If On is selected, the eye sensor will turn the information display
off when you put your eye to the viewfinder. Selecting Off
prevents the display turning off when you look through the
viewfinder, but also increases the drain on the battery.
Fine-tune focus for up to 20 lens types. Use only as required; AF
tuning is not recommended in most situations and may interfere
with normal focus. Auto fine-tuning is available in live view
(0132). We recommend that you perform fine-tuning at a focus
distance you use frequently; if you perform focus-tuning at a
short focus distance, for example, you may find it less effective at
longer distances.
Info Display Auto Off
G button ➜Bsetup menu
AF Fine-Tune
G button ➜Bsetup menu
Option Description
AF fine-tune
(On/Off)
•On: Turn AF tuning on.
•Off: Turn AF tuning off.
Saved value
Tune AF for the current lens
(CPU lenses only). Press 1 to
move focal point away from
camera or 3 to move focal
point toward camera; choose
from values between +20 and
–20. Values for up to 20 lens
types can be stored. Only one
value can be stored for each
type of lens.
Default
Choose the AF tuning value used when no previously saved
value exists for the current lens (CPU lenses only).
Current value
Previous value
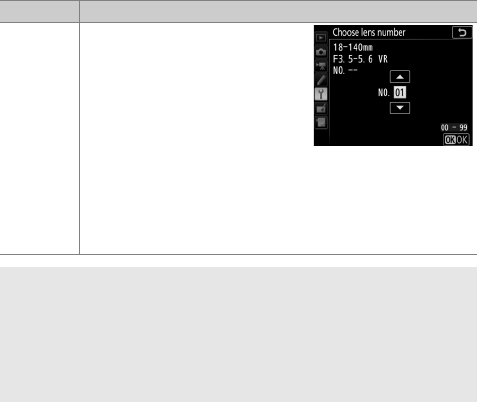
131Menu Guide
List saved
values
List previously saved AF tuning
values. To delete a lens from the
list, highlight the desired lens
and press O (Q). To change a
lens identifier (for example, to
choose an identifier that is the
same as the last two digits of the
lens serial number to distinguish it from other lenses of the
same type in light of the fact that Saved value can be used
with only one lens of each type), highlight the desired lens
and press 2. A menu will be displayed; press 1 or 3 to
choose an identifier and press J to save changes and exit.
DLive View Photography
Tuning is not applied to autofocus during live view photography.
ASaved Value
Only one value can be stored for each type of lens. If a teleconverter is
used, separate values can be stored for each combination of lens and
teleconverter.
Option Description
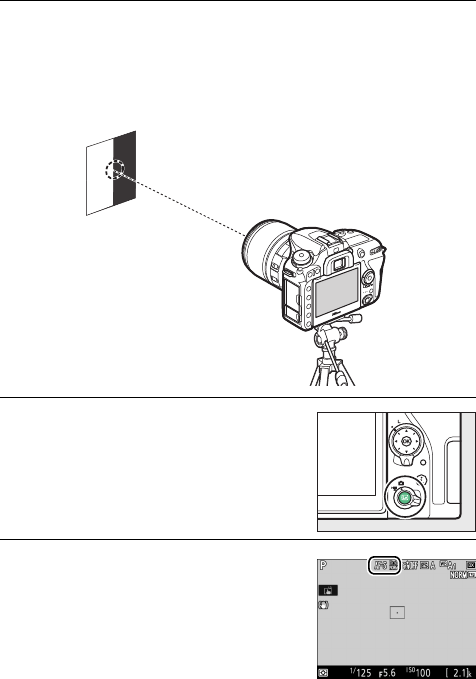
132 Menu Guide
❚❚ Auto AF Fine-Tuning
Auto AF fine-tuning is performed as described below.
1Ready the camera.
Mount the camera on a tripod and aim the camera at a flat,
high-contrast subject parallel to the camera focal plane. Note
that auto AF fine-tuning works best at maximum aperture
and may not function in dark surroundings.
2Start live view.
Rotate the live view selector to C and
press the a button.
3Adjust focus settings.
Rotate the focus-mode selector to
AF
and use the AF-mode button and
command dials to select the following:
•Autofocus mode: AF-S
•AF-area mode: $ (wide) or % (normal)
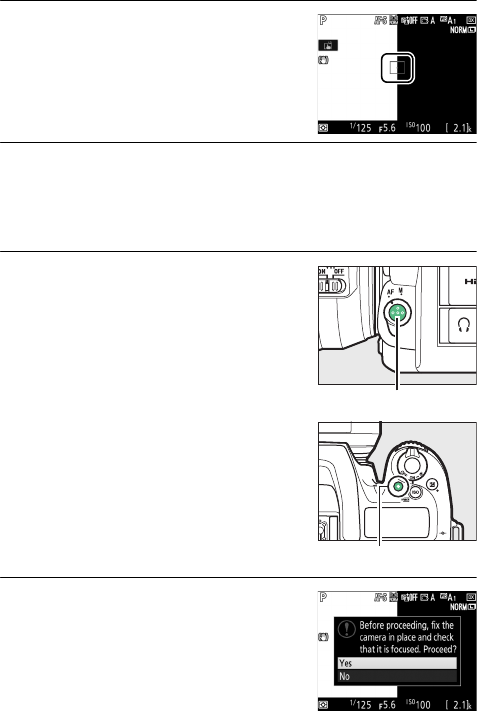
133Menu Guide
4Select the center focus point.
Press J to select the center focus
point.
5Focus.
Press the shutter-release button halfway to focus, then zoom
in on the view through the lens to confirm that the subject is
in focus. Focus can be adjusted manually if necessary.
6Perform auto AF fine-tuning.
Press the AF-mode and movie-record
buttons simultaneously and keep
them pressed until the dialog shown
in Step 7 is displayed (this should take
slightly over two seconds).
7Save the new value.
Highlight Ye s and press J to add the
AF fine-tuning value for the current
lens to the saved values list (CPU
lenses only). Note that only one value
can be stored for each type of lens.
AF-mode button
Movie-record button
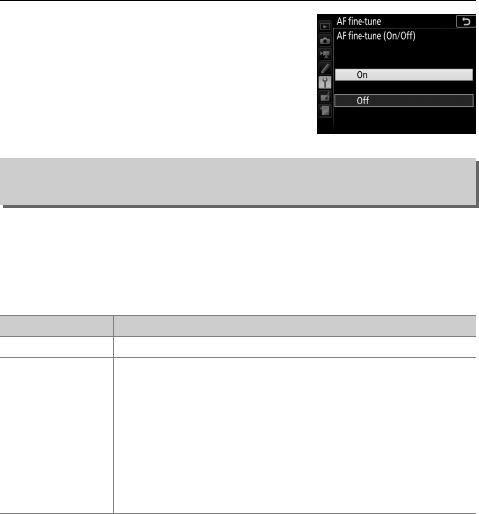
134 Menu Guide
8Enable AF fine-tuning.
In the camera setup menu, select AF
fine-tune> AF fine-tune (On/Off),
then highlight On and press J.
Dirt or dust entering the camera when lenses are exchanged or
the body cap is removed may adhere to the image sensor and
affect your photographs. The Clean image sensor option
vibrates the sensor to remove dust.
Clean Image Sensor
G button ➜Bsetup menu
Option Description
Clean now Perform image sensor cleaning immediately.
Clean at startup/
shutdown
•5Clean at startup: The image sensor is automatically
cleaned each time the camera is turned on.
•6Clean at shutdown: The image sensor is
automatically cleaned during shutdown each time
the camera is turned off.
•7Clean at startup & shutdown: The image sensor is
cleaned automatically at startup and at shutdown.
•Cleaning off: Automatic image sensor cleaning off.

135Menu Guide
Use this option to lock the mirror up so that dust that can not be
removed using Clean image sensor can be removed manually.
Note, however, that because the image sensor is easily
damaged, we recommend that manual cleaning be performed
only by a Nikon-authorized service representative.
❚❚ Manual Cleaning
The sensor can be cleaned manually as described below.
1Charge the battery or connect an AC adapter.
A reliable power source is required when inspecting or
cleaning the image sensor. Turn the camera off and insert a
fully-charged battery or connect an optional AC adapter and
power connector. The Lock mirror up for cleaning option is
only available in the setup menu if the camera is not
connected to a smart device via Bluetooth and the battery
level is over J.
2Remove the lens.
Turn the camera off and remove the lens.
3Select Lock mirror up for cleaning.
Turn the camera on and highlight
Lock mirror up for cleaning in the
setup menu and press 2.
Lock Mirror up for Cleaning
G button ➜Bsetup menu
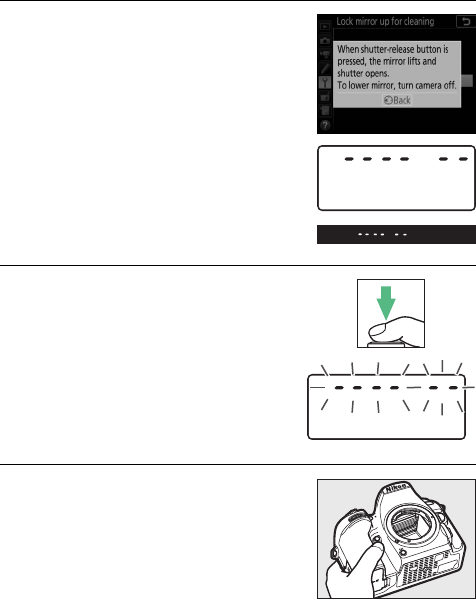
136 Menu Guide
4Press J.
A message will be displayed in the
monitor and a row of dashes will
appear in the control panel and
viewfinder. To restore normal
operation without inspecting the
image sensor, turn the camera off.
5Raise the mirror.
Press the shutter-release button all
the way down. The mirror will be
raised and the shutter curtain will
open, revealing the image sensor.
The display in the viewfinder will
turn off and the row of dashes in the
control panel will flash.
6Examine the image sensor.
Holding the camera so that light falls
on the image sensor, examine the
sensor for dust or lint. If no foreign
objects are present, proceed to Step 8.

137Menu Guide
7Clean the sensor.
Remove any dust and lint from the
sensor with a blower. Do not use a
blower-brush, as the bristles could
damage the sensor. Dirt that can not
be removed with a blower can only be
removed by Nikon-authorized service
personnel. Under no circumstances should you touch or wipe
the sensor.
8Turn the camera off.
The mirror will return to the down position and the shutter
curtain will close. Replace the lens or body cap.
AUse a Reliable Power Source
The shutter curtain is delicate and easily damaged. If the camera
powers off while the mirror is raised, the curtain will close
automatically. To prevent damage to the curtain, observe the
following precautions:
•Do not turn the camera off or remove or disconnect the power source
while the mirror is raised.
•If the battery runs low while the mirror is raised, a beep will sound
and the self-timer lamp will flash to warn that the shutter curtain will
close and the mirror will be lowered after about two minutes. End
cleaning or inspection immediately.
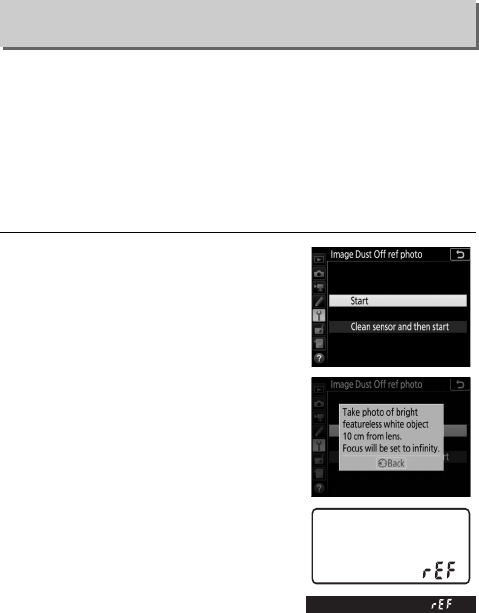
138 Menu Guide
Acquire reference data for the Image Dust Off option in
Capture NX-D (for more information, refer to Capture NX-D on-
line help).
Image Dust Off ref photo is available only when a CPU lens is
mounted on the camera. A lens with a focal length of at least
50 mm is recommended. When using a zoom lens, zoom all the
way in.
1Choose a start option.
Highlight one of the following
options and press J. To exit without
acquiring image dust off data, press
G.
•Start: A message will be displayed
and “rEF” will appear in the
viewfinder and control panel
displays.
•Clean sensor and then start: Select this
option to clean the image sensor
before starting. A message will be
displayed and “rEF” will appear in
the viewfinder and control panel
displays when cleaning is
complete.
Image Dust Off Ref Photo
G button ➜Bsetup menu
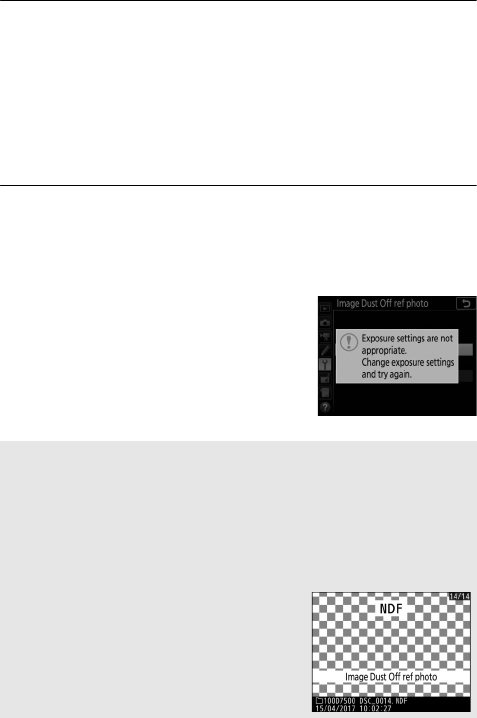
139Menu Guide
2Frame a featureless white object in the viewfinder.
With the lens about ten centimeters (four inches) from a well-
lit, featureless white object, frame the object so that it fills the
viewfinder and then press the shutter-release button
halfway.
In autofocus mode, focus will automatically be set to infinity;
in manual focus mode, set focus to infinity manually.
3Acquire dust off reference data.
Press the shutter-release button the rest of the way down to
acquire Image Dust Off reference data. The monitor turns off
when the shutter-release button is pressed.
If the reference object is too bright or
too dark, the camera may be unable
to acquire Image Dust Off reference
data and a message will be displayed.
Choose another reference object and
repeat the process from Step 1.
DImage Sensor Cleaning
Dust off reference data recorded before image sensor cleaning is
performed can not be used with photographs taken after image
sensor cleaning is performed. Select Clean sensor and then start only
if the dust off reference data will not be used with existing
photographs.
AImage Dust Off Reference Data
The same reference data can be used for
photographs taken with different lenses or
at different apertures. Reference images can
not be viewed using computer imaging
software. A grid pattern is displayed when
reference images are viewed on the camera.
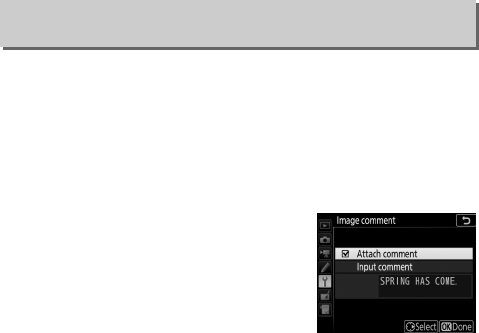
140 Menu Guide
Add a comment to new photographs as they are taken.
Comments can be viewed as metadata in ViewNX-i or
Capture NX-D. The comment is also visible on the shooting data
page in the photo information display. The following options are
available:
•Input comment: Input a comment as described in “Text Entry”
(028). Comments can be up to 36 characters long.
•Attach comment: Select this option to
attach the comment to all subsequent
photographs. Attach comment can be
turned on and off by highlighting it and
pressing 2. After choosing the desired
setting, press J to exit.
Image Comment
G button ➜Bsetup menu
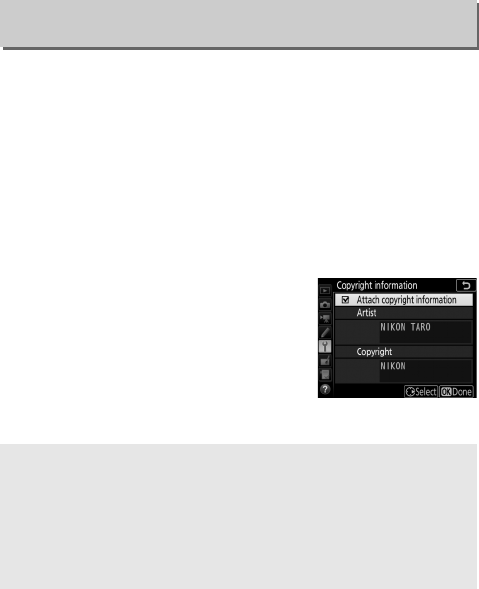
141Menu Guide
Add copyright information to new photographs as they are
taken. Copyright information is included in the shooting data
shown in the photo information display and can be viewed as
metadata in ViewNX-i or in Capture NX-D. The following options
are available:
•Artist: Enter a photographer name as described in “Text Entry”
(028). Photographer names can be up to 36 characters long.
•Copyright: Enter the name of the copyright holder as described
in “Text Entry” (028). Copyright holder names can be up to 54
characters long.
•Attach copyright information: Select this
option to attach copyright information
to all subsequent photographs. Attach
copyright information can be turned
on and off by highlighting it and
pressing 2. After choosing the desired
setting, press J to exit.
Copyright Information
G button ➜Bsetup menu
DCopyright Information
To prevent unauthorized use of the artist or copyright holder names,
make sure that Attach copyright information is not selected and that
the Artist and Copyright fields are blank before lending or
transferring the camera to another person. Nikon does not accept
liability for any damages or disputes arising from the use of the
Copyright information option.
142 Menu Guide
Choose the pitch and volume of the beep that sounds when the
camera focuses using single-servo AF (AF-S or when single-servo
AF is selected for AF-A), when focus locks during live view
photography, while the release timer is counting down in self-
timer and delayed remote release modes (049), when a
photograph is taken in quick-response remote or remote mirror-
up mode (049), if the shutter-release button is pressed when a
write-protected memory card is inserted, or when the shutter-
release button is pressed for a second time during mirror-up
photography, time-lapse shooting ends, or the touch-screen is
used for keyboard entry (028). Note that regardless of the
option selected, a beep will not sound in movie mode or quiet-
shutter release modes (modes Q and QC). A beep will not sound
when the camera focuses using single-servo AF if Release is
selected for Custom Setting a2 (AF-S priority selection, 085).
❚❚ Beep On/Off
Select Off (touch controls only) to mute
the sounds the camera makes in
response to touch-screen controls, or
choose Off to prevent beeps from
sounding altogether. When an option
other than Off is selected, c appears in
the information display.
❚❚ Volume
Adjust beep volume.
❚❚ Pitch
Choose the pitch of the beep from High and Low.
Beep Options
G button ➜Bsetup menu

143Menu Guide
Adjust monitor touch control settings.
❚❚ Enable/Disable Touch Controls
Select Disable to prevent accidental use of touch-screen
controls, or Playback only to enable touch-screen controls in
playback mode only.
❚❚ Full-Frame Playback Flicks
Choose the gesture used to display the next image in full-frame
playback: a flick from right to left or a flick from left to right.
If On is selected, the flash-ready indicator (M) will blink if the flash
is required to ensure optimal exposure.
Adjust settings for connection to HDMI devices (0220).
Touch Controls
G button ➜Bsetup menu
Flash Warning
G button ➜Bsetup menu
HDMI
G button ➜Bsetup menu

144 Menu Guide
Adjust location data settings for use when the camera is
connected to a GPS or smart device.
Location Data
G button ➜Bsetup menu
Option Description
Download
from smart
device
Select Ye s to download location data from the smart
device and embed them in pictures taken over the next
two hours. If the camera is connected to both a smart
device and a GPS unit, location data will be downloaded
from the GPS unit. Location data can not be acquired if
the camera is off or the standby timer has expired.
Position View the location data supplied by the GPS or smart
device (the items displayed vary with the device).
External GPS
device options
Adjust settings for connection to optional GPS devices.
•Standby timer: Choose whether the standby timer
remains active while a GPS device is connected. If
Enable is selected, the exposure meters will turn off
automatically if no operations are performed for the
period specified in Custom Setting c2 (Standby timer,
096), reducing the drain on the battery. If a GP-1 or
GP-1A unit is connected, the unit will remain active for a
set period after the timer expires; to allow the camera
time to acquire location data, the delay is extended by
up to one minute after exposure meters are activated or
the camera is turned on. Select Disable to disable the
standby timer when a GPS device is connected.
•Set clock from satellite: Select Ye s to synchronize the
camera clock with the time reported by the GPS device.

145Menu Guide
Adjust settings for optional WR-R10 wireless remote controllers
and for optional radio-controlled flash units that support
Advanced Wireless Lighting.
❚❚ LED Lamp
Enable or disable the status LEDs on a WR-R10 wireless remote
controller mounted on the camera. For more information, see
the documentation supplied with the wireless remote controller.
Wireless Remote (WR) Options
G button ➜Bsetup menu

146 Menu Guide
❚❚ Link Mode
Choose a link mode for WR-R10 wireless remote controllers
mounted on other cameras or radio-controlled flash units that
support Advanced Wireless lighting. Be sure that the same mode
is selected for the other devices.
Regardless of the option selected for Link mode, signals from
paired wireless remote controllers will always be received by the
WR-R10. Users of the WR-1 remote controller will need to select
pairing as the WR-1 link mode.
Option Description
Pairing To pair the camera with a WR-R10, mount the WR-R10 on the
camera and press the pairing button.
PIN
Connect by entering the device
PIN code. Press 4 or 2 to
highlight digits and press 1 or 3
to change, then press J to enter
and display the selected PIN.
AThe WR-R10 Wireless Remote Controller
Be sure the firmware for the WR-R10 has been updated to the latest
version. For information on firmware updates, see the Nikon website
for your area.

147Menu Guide
Choose the role played by the Fn button on optional wireless
remote controllers equipped with an Fn button. See Custom
Setting f1 (Custom control assignment, 0106) for more
information.
* Performs the same function as the camera a button.
Select Enable to disable the wireless features of Eye-Fi cards and
Bluetooth and Wi-Fi connections to smart devices. Connections
to other devices using a wireless transmitter can only be
disabled by removing the transmitter from the camera.
Assign Remote (WR) Fn Button
G button ➜Bsetup menu
Airplane Mode
G button ➜Bsetup menu
rFV lock
BAE/AF lock
CAE lock only
DAE lock (Reset on release)
FAF lock only
AAF-ON
$Modeling flash
hFlash off
e+ NEF (RAW)
aLive view*
xSame as camera Fn1 button
0Same as camera Fn2 button
zSame as camera A button
None
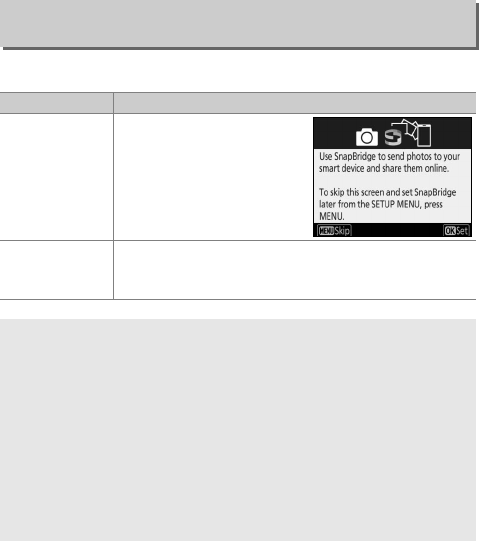
148 Menu Guide
Adjust settings for connection to smart devices.
Connect to Smart Device
G button ➜Bsetup menu
Option Description
Start
Follow on-screen
instructions to connect to
the smart device.
Password
protection
Choose a password for smart device connections and
turn password protection on or off. For information on
typing passwords, see “Text Entry” (028).
ASecurity
Although one of the benefits of this product is that it allows others to
freely connect for the wireless exchange of data anywhere within its
range, the following may occur if security is not enabled:
•Data theft: Malicious third-parties may intercept wireless
transmissions to steal user IDs, passwords, and other personal
information.
•Unauthorized access: Unauthorized users may gain access to the
network and alter data or perform other malicious actions. Note that
due to the design of wireless networks, specialized attacks may allow
unauthorized access even when security is enabled.

149Menu Guide
If On is selected, new photos will automatically be uploaded to
the smart device (if the camera is not currently connected to the
smart device, the photos will be marked for upload and
uploaded the next time a wireless connection is established).
Movies are not uploaded. If you select Off when images are
selected for upload, a confirmation dialog will be displayed; to
remove upload marking from all images, highlight Yes and press
J.
Adjust Wi-Fi (wireless LAN) settings.
Send to Smart Device (Auto)
G button ➜Bsetup menu
AUpload Marking
No more than 1000 photos can be marked for upload at a time.
Before changing the rating of photos that are marked for upload,
select Disable for Bluetooth > Network connection or switch
wireless off by selecting Enable for Airplane mode.
Wi-Fi
G button ➜Bsetup menu
Option Description
Network settings Adjust settings for Wi-Fi connections.
Current settings View current Wi-Fi settings.
Reset connection
settings Restore Wi-Fi settings to their default values.

150 Menu Guide
List paired devices and adjust settings for connection to smart
devices.
Bluetooth
G button ➜Bsetup menu
Option Description
Network
connection Enable or disable Bluetooth.
Paired devices View paired devices.
Send while off Select Off to suspend wireless transmissions when
the camera is turned off or the standby timer expires.

151Menu Guide
This option is displayed only when an Eye-Fi memory card
(available separately from third-party suppliers) is inserted in the
camera. Choose Enable to upload photographs to a preselected
destination. Note that pictures will not be uploaded if signal
strength is insufficient. Before uploading pictures via Eye-Fi,
select Disable for Airplane mode (0147) and Bluetooth >
Network connection (0150).
Observe all local laws concerning wireless devices and choose
Disable where wireless devices are prohibited.
Eye-Fi Upload
G button ➜Bsetup menu
DEye-Fi Cards
Eye-Fi cards may emit wireless signals when Disable is selected.
A g icon displayed when Disable is selected indicates that the camera
is unable to control the Eye-Fi card (0152); turn the camera off and
remove the card.
Select longer values for Custom Setting c2 (Standby timer, 096)
when using an Eye-Fi card.
See the manual provided with the Eye-Fi card, and direct any inquiries
to the manufacturer. The camera can be used to turn Eye-Fi cards on
and off, but may not support other Eye-Fi functions.
DAirplane Mode (0147)
Enabling airplane mode disables Eye-Fi upload. To resume Eye-Fi
upload, select Disable for Airplane mode before selecting Enable for
Eye-Fi upload.
152 Menu Guide
When an Eye-Fi card is inserted, its status
is indicated by an icon in the information
display:
•d: Eye-Fi upload disabled.
•e: Eye-Fi upload enabled but no
pictures available for upload.
•f (static): Eye-Fi upload enabled;
waiting to begin upload.
•f (animated): Eye-Fi upload enabled; uploading data.
•g: Error — camera can not control Eye-Fi card. If a flashing
W appears in the control panel or viewfinder, check that
the Eye-Fi card firmware is up-to-date; if the error persists after
the card firmware has been updated, insert a different card or
format the card in the camera after copying any pictures it
contains to a computer or other storage device. If the W
indicator is not flashing, pictures can be taken normally but
you may be unable to change Eye-Fi settings.
View a selection of the standards with which the camera
complies.
ASupported Eye-Fi Cards
Some cards may not be available in some countries or regions; consult
the manufacturer for more information. Eye-Fi cards are for use only in
the country of purchase. Be sure the Eye-Fi card firmware has been
updated to the latest version.
Conformity Marking
G button ➜Bsetup menu
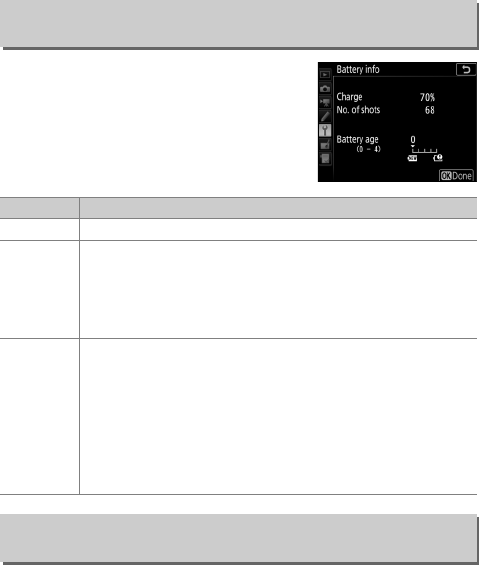
153Menu Guide
View information on the battery
currently inserted in the camera.
Selecting Enable release allows the shutter to be released when
no memory card is inserted, although no pictures will be
recorded (they will however be displayed in the monitor in
demo mode). If Release locked is selected, the shutter-release
button is only enabled when a memory card is inserted in the
camera.
Battery Info
G button ➜Bsetup menu
Item Description
Charge The current battery level expressed as a percentage.
No. of shots
The number of times the shutter has been released with
the current battery since the battery was last charged. Note
that the camera may sometimes release the shutter
without recording a photograph, for example when
measuring preset white balance.
Battery age
A five-level display showing battery age. 0 (k) indicates
that battery performance is unimpaired, 4 (l) that the
battery has reached the end of its charging life and should
be replaced. Note that fresh batteries charged at
temperatures under about 5 °C (41 °F) may show a
temporary drop in charging life; the battery age display will
however return to normal once the battery has been
recharged at a temperature of about 20 °C (68 °F) or higher.
Slot Empty Release Lock
G button ➜Bsetup menu

154 Menu Guide
Select Save settings to save the following settings to the
memory card (if the card is full, an error will be displayed). Use
this option to share settings among D7500 cameras.
Save/Load Settings
G button ➜Bsetup menu
Menu Option
Playback
Playback display options
Image review
After delete
Auto image rotation
Rotate tall
Photo shooting
File naming
Flash control
Choose image area
Image quality
Image size
NEF (RAW) recording
ISO sensitivity settings
White balance (with fine-tuning and presets d-1–d-6)
Set Picture Control (Custom Picture Controls are
saved as Auto)
Color space
Active D-Lighting
Long exposure NR
High ISO NR
Vignette control
Auto distortion control
Flicker reduction
Remote control mode (ML-L3)
Auto bracketing set

155Menu Guide
Movie shooting
File naming
Choose image area
Frame size/frame rate
Movie quality
Movie file type
ISO sensitivity settings
White balance (with fine-tuning and presets d-1–d-6)
Set Picture Control (Custom Picture Controls are
saved as Auto)
Active D-Lighting
High ISO NR
Flicker reduction
Microphone sensitivity
Frequency response
Wind noise reduction
Electronic VR
Custom settings All Custom Settings
Setup
Language
Time zone and date (excepting Date and time and
Sync with smart device)
Information display
Auto info display
Info display auto off
Clean image sensor
Image comment
Copyright information
Beep options
Flash warning
Touch controls
HDMI
Location data (excepting the option chosen for
Download from smart device)
Menu Option

156 Menu Guide
Settings saved using the D7500 can be restored by selecting
Load settings. Note that Save/load settings is only available
when a memory card is inserted in the camera, and that the
Load settings option is only available if the card contains saved
settings.
Reset all settings except Language and Time zone and date to
their default values (09). Copyright information and other user-
generated entries are also reset. We recommend that you save
settings using the Save/load settings option in the setup menu
before performing a reset (0154).
View the current camera firmware version.
Setup
Wireless remote (WR) options
Assign remote (WR) Fn button
Eye-Fi upload
Slot empty release lock
My Menu/
Recent Settings
All My Menu items
All recent settings
Choose tab
ASaved Settings
Settings are saved in a file with a name beginning with “NCSETUP” and
ending with two characters that differ from camera to camera. The
camera will not be able to load settings if the file name is changed.
Reset All Settings
G button ➜Bsetup menu
Firmware Version
G button ➜Bsetup menu
Menu Option
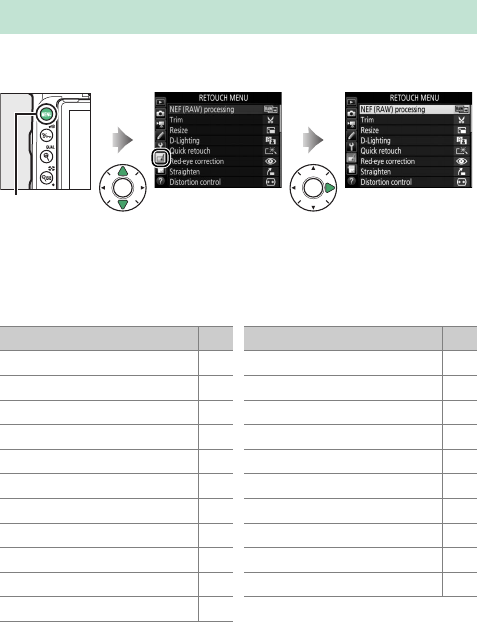
157Menu Guide
To display the retouch menu, press G and select the N
(retouch menu) tab.
The options in the retouch menu are used to create trimmed or
retouched copies of existing pictures. The retouch menu is only
displayed when a memory card containing photographs is
inserted in the camera.
1 Can only be selected by pressing G and selecting N tab.
2 Available only if retouch menu is displayed by pressing i and selecting Retouch when a
retouched image or original is displayed in full-frame playback.
NThe Retouch Menu: Creating Retouched Copies
G button
Option 0
7NEF (RAW) processing 160
kTrim 163
8Resize 164
iD-Lighting 166
&Quick retouch 166
jRed-eye correction 167
eStraighten 167
(Distortion control 168
hPerspective control 169
)Fisheye 169
mFilter effects 170
lMonochrome 171
oImage overlay1172
fColor outline 175
ePhoto illustration 175
gColor sketch 176
iMiniature effect 177
uSelective color 178
)Painting 180
9Edit movie 180
pSide-by-side comparison 2181
Option 0
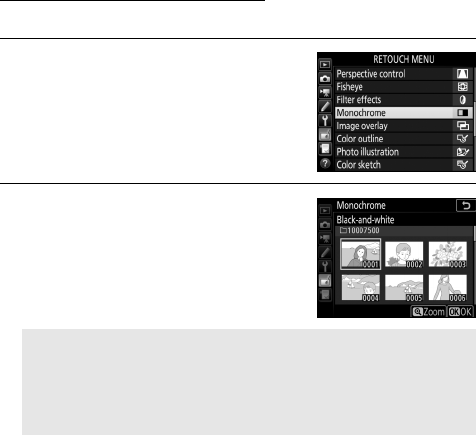
158 Menu Guide
Creating Retouched Copies
To create a retouched copy:
1Select an item in the retouch menu.
Press 1 or 3 to highlight an item, 2
to select.
2Select a picture.
Highlight a picture and press J. To
view the highlighted picture full
screen, press and hold the X (T)
button.
ARetouch
In the case of images recorded at image quality settings of NEF +
JPEG, only the NEF (RAW) image will be retouched. The camera may
not be able to display or retouch images created with other
devices.
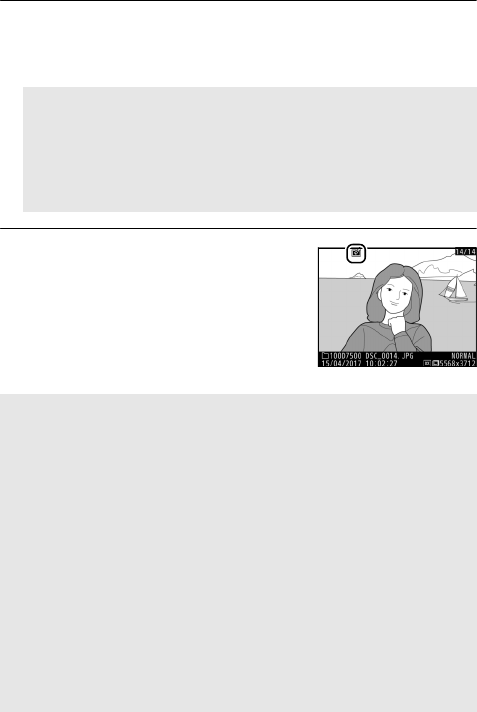
159Menu Guide
3Select retouch options.
For more information, see the section for the selected item.
To exit without creating a retouched copy, press G.
4Create a retouched copy.
Press J to create a retouched copy.
Retouched copies are indicated by a
Z icon.
AMonitor off Delay
The monitor will turn off and the operation will be cancelled if no
actions are performed for a brief period. Any unsaved changes will
be lost. To increase the time the monitor remains on, choose a
longer menu display time for Custom Setting c4 (Monitor off
delay, 097).
ARetouching the Current Image
To create a retouched copy of the current image, press i and select
Retouch.
DRetouching Copies
Most options can be applied to copies created using other retouch
options, although (with the exceptions of Image overlay and Edit
movie > Choose start/end point) each option can be applied only
once (note that multiple edits may result in loss of detail). Options that
can not be applied to the current image are grayed out and
unavailable.
AImage Quality and Size
Except in the case of copies created with Trim and Resize, copies
created from JPEG images are the same size as the original, while
copies created from NEF (RAW) photos are saved as large fine★-quality
JPEG images.
160 Menu Guide
Create JPEG copies of NEF (RAW) photographs. If pressed the
G button to display the retouch menu, you can use this option
to copy multiple images.
1Select NEF (RAW) processing.
Highlight NEF (RAW) processing in
the retouch menu and press 2.
2Choose how images are selected.
Choose from the following options:
•Select image(s): Select one or more
images manually.
•Select date: Create JPEG copies of all
the NEF (RAW) images taken on
selected dates.
•Select all images: Create JPEG copies of all the NEF (RAW)
images on the memory card. If you selected this option,
proceed to Step 4.
NEF (RAW) Processing
G button ➜Nretouch menu
161Menu Guide
3Select photographs.
If you chose Select image(s) in Step 2,
a picture selection dialog will be
displayed listing only NEF (RAW)
images created with this camera.
Highlight images using the multi
selector and press W (Z) to select or
deselect; selected images are indicated by a L icon. To view
the highlighted image full screen, press and hold the
X(T) button. Press J to proceed to Step 4 when your
selection is complete.
If you chose Select date in Step 2, a
list of dates will be displayed.
Highlight dates using the multi
selector and press 2 to select or
deselect. Press J to select all NEF
(RAW) pictures taken on the chosen
dates and proceed to Step 4.
162 Menu Guide
4Choose settings for the JPEG copies.
Adjust the settings listed below, or select Original to use the
setting in effect when the photograph was taken (the original
settings are listed below the preview). Note that white
balance and vignette control are not available with multiple
exposures or pictures created with image overlay and that
exposure compensation can only be set to values between
–2 and +2 EV.
5Copy the photographs.
Highlight EXE and press J to create a
JPEG copy of the selected photograph
(if multiple photos are selected, a
confirmation dialog will be displayed;
highlight Yes and press J to create
JPEG copies of the selected photos).
To exit without copying the photographs, press the G
button.
1
2
3
4
5
6
7
8
9
1Image quality (036)
2Image size (037)
3White balance (039)
4Exposure compensation
5Set Picture Control (040)
6High ISO NR (045)
7Color space (044)
8Vignette control (046)
9Active D-Lighting (0166)
163Menu Guide
Create a cropped copy of the selected photograph. The selected
photograph is displayed with the selected crop shown in yellow;
create a cropped copy as described below.
Trim
G button ➜Nretouch menu
To Description
Reduce size of crop Press W (Z) to reduce the size of the crop.
Increase size of
crop Press X (T) to increase the size of the crop.
Change crop
aspect ratio
Rotate the main command dial to choose the aspect
ratio.
Position crop Use multi selector to position the crop. Press and hold
to move the crop rapidly to the desired position.
Create copy Press J to save the current crop as a separate file.
ATrim: Image Quality and Size
Copies created from NEF (RAW) or NEF
(RAW) + JPEG photos have an image quality
(036) of JPEG fine★; cropped copies
created from JPEG photos have the same
image quality as the original. The size of the
copy varies with crop size and aspect ratio
and appears at upper left in the crop
display.
AViewing Cropped Copies
Playback zoom may not be available when cropped copies are
displayed.
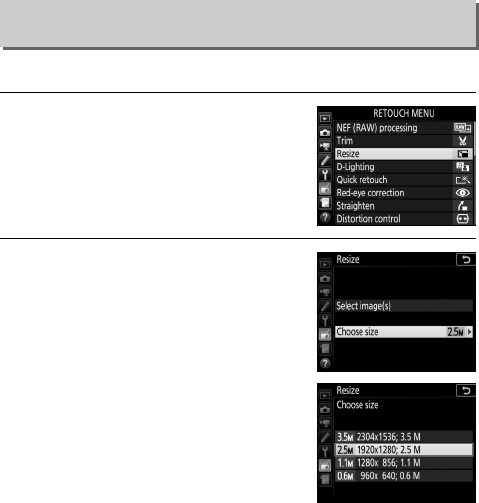
164 Menu Guide
Create small copies of selected photographs.
1Select Resize.
To resize selected images, highlight
Resize in the retouch menu and press
2.
2Choose a size.
Highlight Choose size and press 2.
Resize options will be displayed;
highlight an option and press J.
Resize
G button ➜Nretouch menu
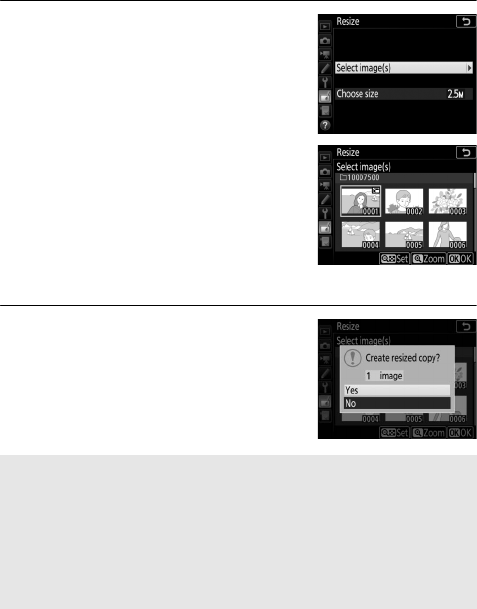
165Menu Guide
3Choose pictures.
Highlight Select image(s) and press
2.
Highlight pictures and press the
W(Z) button to select or deselect
(to view the highlighted picture full
screen, press and hold the X/T
button). Selected pictures are marked
by a 8 icon. Press J when the
selection is complete.
4Save the resized copies.
A confirmation dialog will be
displayed. Highlight Yes and press J
to save the resized copies.
AViewing Resized Copies
Playback zoom may not be available when resized copies are
displayed.
AImage Quality
Copies created from NEF (RAW) or NEF (RAW) + JPEG photos have an
image quality (036) of JPEG fine★; copies created from JPEG photos
have the same image quality as the original.
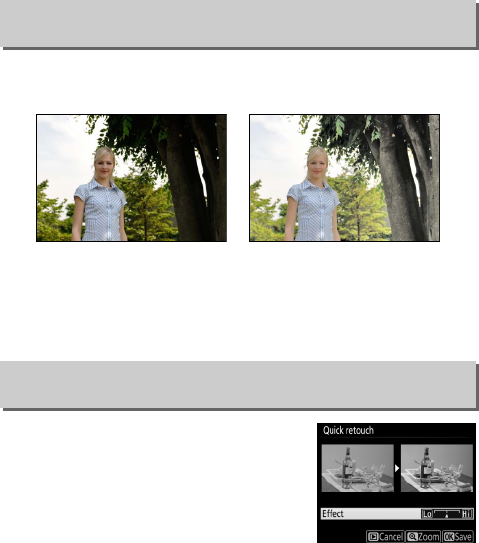
166 Menu Guide
D-Lighting brightens shadows, making it ideal for dark or backlit
photographs.
Press 4 or 2 to choose the amount of correction performed.
The effect can be previewed in the edit display. Press J to save
the retouched copy.
Create copies with enhanced saturation
and contrast. D-Lighting is applied as
required to brighten dark or backlit
subjects.
Press 4 or 2 to choose the amount of
enhancement. Press J to copy the
photograph.
D-Lighting
G button ➜Nretouch menu
Before After
Quick Retouch
G button ➜Nretouch menu
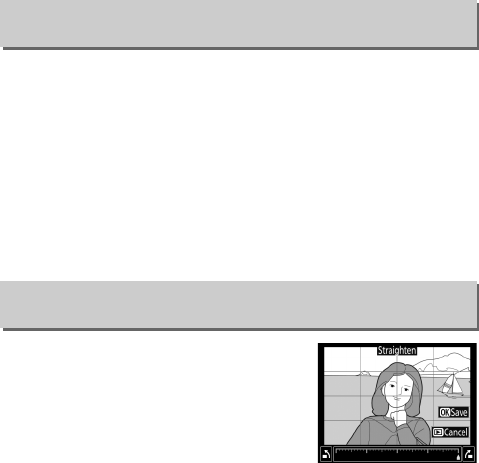
167Menu Guide
This option is used to correct “red-eye” caused by the flash, and
is available only with photographs taken using the flash. The
photograph selected for red-eye correction can be previewed in
the edit display. Confirm the effects of red-eye correction and
press J to create a copy. Note that red-eye correction may not
always produce the expected results and may in very rare
circumstances be applied to portions of the image that are not
affected by red-eye; check the preview thoroughly before
proceeding.
Create a straightened copy of the
selected image. Press 2 to rotate the
image clockwise by up to five degrees in
increments of approximately 0.25
degrees, 4 to rotate it counterclockwise
(the effect can be previewed in the edit
display; note that edges of the image will
be trimmed to create a square copy). Press J to save the
retouched copy.
Red-Eye Correction
G button ➜Nretouch menu
Straighten
G button ➜Nretouch menu
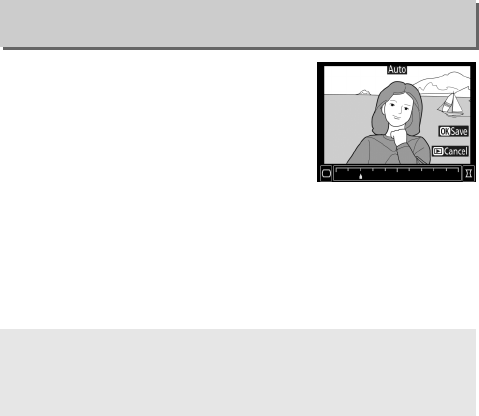
168 Menu Guide
Create copies with reduced peripheral
distortion. Select Auto to let the camera
correct distortion automatically and then
make fine adjustments using the multi
selector, or select Manual to reduce
distortion manually. Note that Auto is
not available with photos taken using
auto distortion control; see “Auto Distortion Control” (046).
Press 2 to reduce barrel distortion, 4 to reduce pincushion
distortion (the effect can be previewed in the edit display; note
that greater amounts of distortion control result in more of the
edges being cropped out). Press J to save the retouched copy.
Distortion Control
G button ➜Nretouch menu
AAuto
Auto is for use only with pictures taken with type G, E, and D lenses
(PC, fisheye, and certain other lenses excluded). Results are not
guaranteed with other lenses.
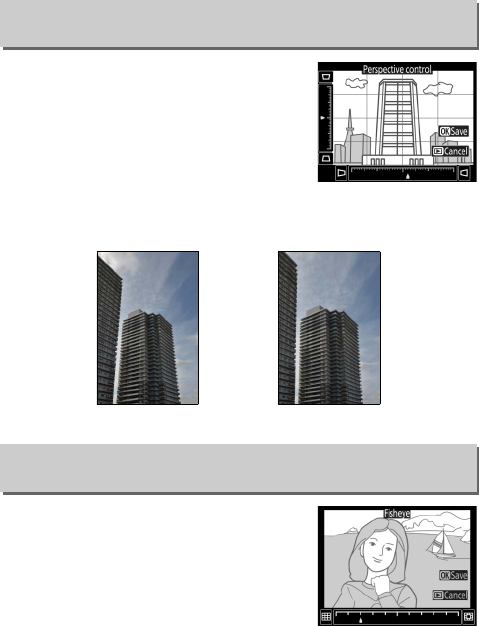
169Menu Guide
Create copies that reduce the effects of
perspective taken from the base of a tall
object. Use the multi selector to adjust
perspective (note that greater amounts
of perspective control result in more of
the edges being cropped out). The
results can be previewed in the edit
display. Press J to save the retouched copy.
Create copies that appear to have been
taken with a fisheye lens. Press 2 to
increase the effect (this also increases the
amount that will be cropped out at the
edges of the image), 4 to reduce it. Press
J to save the retouched copy.
Perspective Control
G button ➜Nretouch menu
Before After
Fisheye
G button ➜Nretouch menu
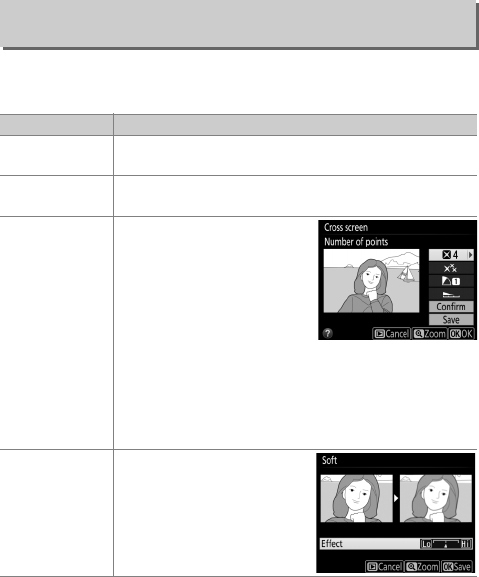
170 Menu Guide
After adjusting filter effects as described below, press J to copy
the photograph.
Filter Effects
G button ➜Nretouch menu
Option Description
Skylight Creates the effect of a skylight filter, making the
picture less blue.
Warm filter Creates a copy with warm tone filter effects, giving the
copy a “warm” red cast.
Cross screen
Add starburst effects to light
sources.
•Number of points: Choose
from four, six, or eight.
•Filter amount: Choose the
brightness of the light
sources affected.
•Filter angle: Choose the angle of the points.
•Length of points: Choose the length of points.
•Confirm: Preview the effects of the filter. Press
X(T) to preview the copy full frame.
•Save: Create a retouched copy.
Soft
Add a soft filter effect. Press
4 or 2 to choose the filter
strength.
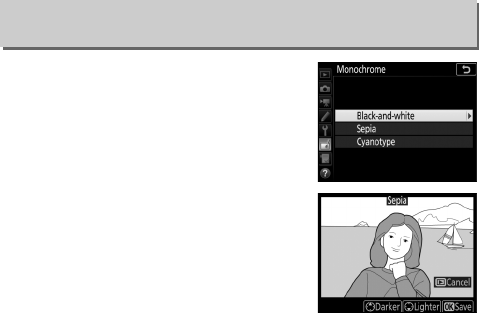
171Menu Guide
Copy photographs in Black-and-white,
Sepia, or Cyanotype (blue and white
monochrome).
Selecting Sepia or Cyanotype displays a
preview of the selected image; press 1
to increase color saturation, 3 to
decrease. Press J to create a
monochrome copy.
Monochrome
G button ➜Nretouch menu
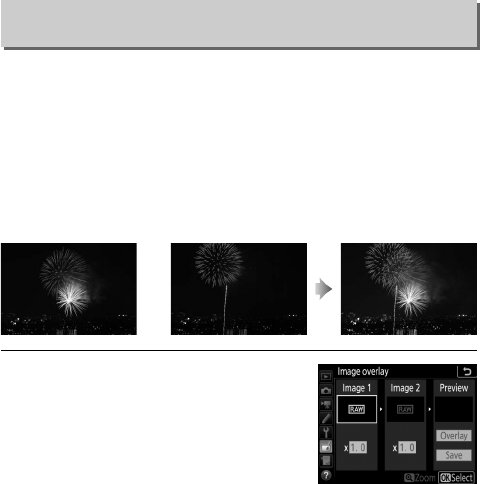
172 Menu Guide
Image overlay combines two existing NEF (RAW) photographs to
create a single picture that is saved separately from the originals;
the results, which make use of RAW data from the camera image
sensor, are noticeably better than photographs combined in an
imaging application. The new picture is saved at current image
quality and size settings; before creating an overlay, set image
quality and size (036, 37; all options are available). To create an
NEF (RAW) copy, choose an image quality of NEF (RAW).
1Select Image overlay.
Highlight Image overlay in the
retouch menu and press 2. Image
overlay options will be displayed, with
Image 1 highlighted; press J to
display a list of the NEF (RAW) pictures
created with this camera.
Image Overlay
G button ➜Nretouch menu
+
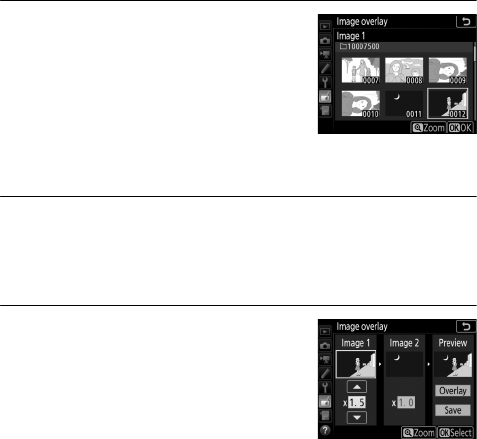
173Menu Guide
2Select the first image.
Use the multi selector to highlight the
first photograph in the overlay. To
view the highlighted photograph full
frame, press and hold the X (T)
button. Press J to select the
highlighted photograph and return to
the preview display.
3Select the second image.
The selected image will appear as Image 1. Highlight Image
2 and press J, then select the second photo as described in
Step 2.
4Adjust gain.
Highlight Image 1 or Image 2 and
optimize exposure for the overlay by
pressing 1 or 3 to select the gain
from values between 0.1 and 2.0.
Repeat for the second image. The
default value is 1.0; select 0.5 to halve
gain or 2.0 to double it. The effects of gain are visible in the
Preview column.
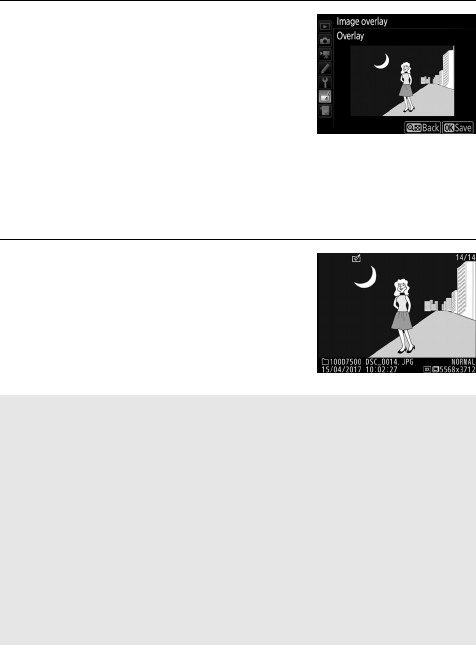
174 Menu Guide
5Preview the overlay.
To preview the composition, press 4
or 2 to place the cursor in the
Preview column, then press 1 or 3
to highlight Overlay and press J
(note that colors and brightness in the
preview may differ from the final
image). To save the overlay without displaying a preview,
select Save. To return to Step 4 and select new photos or
adjust gain, press W (Z).
6Save the overlay.
Press J while the preview is
displayed to save the overlay. After an
overlay is created, the resulting image
will be displayed full-frame in the
monitor.
DImage Overlay
Only NEF (RAW) photographs with the same image area and bit depth
can be combined.
The overlay has the same photo info (including date of recording,
metering, shutter speed, aperture, shooting mode, exposure
compensation, focal length, and image orientation) and values for
white balance and Picture Control as the photograph selected for
Image 1. The current image comment is appended to the overlay
when it is saved; copyright information, however, are not copied.
Overlays saved in NEF (RAW) format use the compression selected for
NEF (RAW) compression in the NEF (RAW) recording menu and have
the same bit depth as the original images.
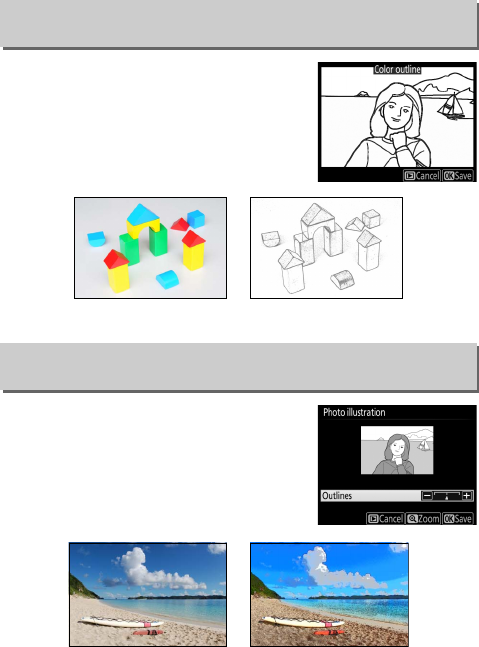
175Menu Guide
Create an outline copy of a photograph
to use as a base for painting. Press J to
save the retouched copy.
Sharpen outlines and simplify coloring
for a poster effect. Press 2 or 4 to make
outlines thicker or thinner. Press J to
save the retouched copy.
Color Outline
G button ➜Nretouch menu
Before After
Photo Illustration
G button ➜Nretouch menu
Before After

176 Menu Guide
Create a copy of a photograph that
resembles a sketch made with colored
pencils. Press 1 or 3 to highlight
Vividness or Outlines and press 4 or 2
to change. Vividness can be increased to
make colors more saturated, or
decreased for a washed-out,
monochromatic effect, while outlines can be made thicker or
thinner. Thicker outlines make colors more saturated. Press J to
save the retouched copy.
Color Sketch
G button ➜Nretouch menu
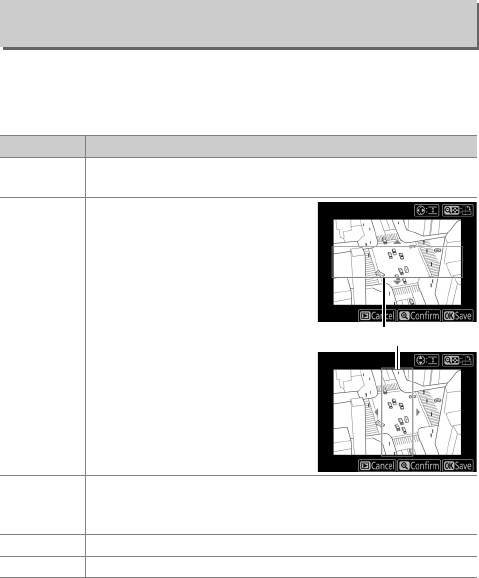
177Menu Guide
Create a copy that appears to be a photo of a diorama. Works
best with photos taken from a high vantage point. The area that
will be in focus in the copy is indicated by a yellow frame.
Miniature Effect
G button ➜Nretouch menu
To Description
Choose
orientation
Press W (Z) to choose the orientation of the area that will
be in focus in the copy.
Choose
position
Press 1 or 3 (wide orientation)
or 4 or 2 (tall orientation) to
position the frame showing the
area that will be in focus in the
copy.
Choose size
Press 4 or 2 to choose the height (wide orientation) or 1
or 3 to choose the width (tall orientation) of the area that
will be in focus in the copy.
Preview copy Press X (T) to preview the copy.
Create copy Press J to create the copy.
Area in focus
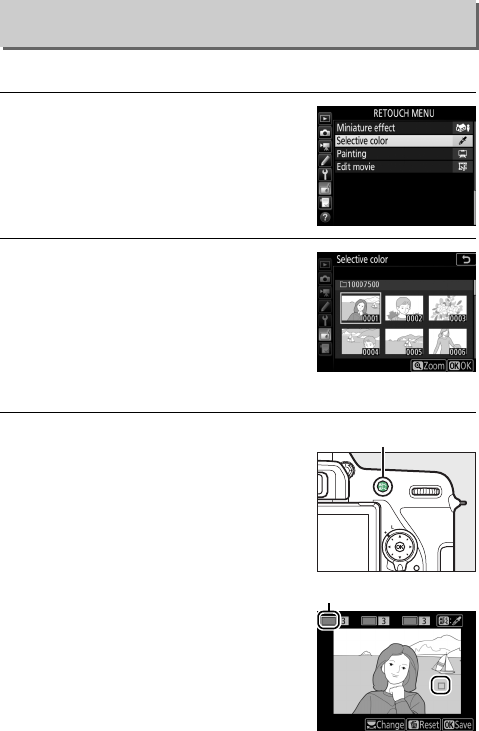
178 Menu Guide
Create a copy in which only selected hues appear in color.
1Select Selective color.
Highlight Selective color in the
retouch menu and press 2 to display
a picture selection dialog.
2Select a photograph.
Use the multi selector to highlight a
photograph (to view the highlighted
photograph full frame, press and hold
the X/T button). Press J to select
the highlighted photograph and
proceed to the next step.
3Select a color.
Use the multi selector to position the
cursor over an object and press the
AAE-L/AF-L button to select the color
of the object as one that will remain in
the final copy (the camera may have
difficulty detecting unsaturated
colors; choose a saturated color). To
zoom in on the picture for precise
color selection, press X (T). Press
W (Z) to zoom out.
Selective Color
G button ➜Nretouch menu
AAE-L/AF-L button
Selected color
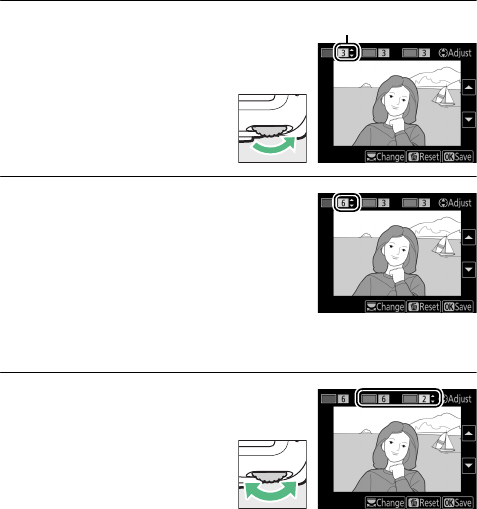
179Menu Guide
4Highlight the color range.
Rotate the main command
dial to highlight the color
range for the selected
color.
5Choose the color range.
Press 1 or 3 to increase or decrease
the range of similar hues that will be
included in the final photograph.
Choose from values between 1 and 7;
note that higher values may include
hues from other colors. The effect can
be previewed in the edit display.
6Select additional colors.
To select additional colors,
rotate the main command
dial to highlight another of
the three color boxes at the
top of the display and
repeat Steps 3–5 to select
another color. Repeat for a third color if desired. To deselect
the highlighted color, press O (Q); to remove all colors, press
and hold O (Q). A confirmation dialog will be displayed;
select Yes.
Color range
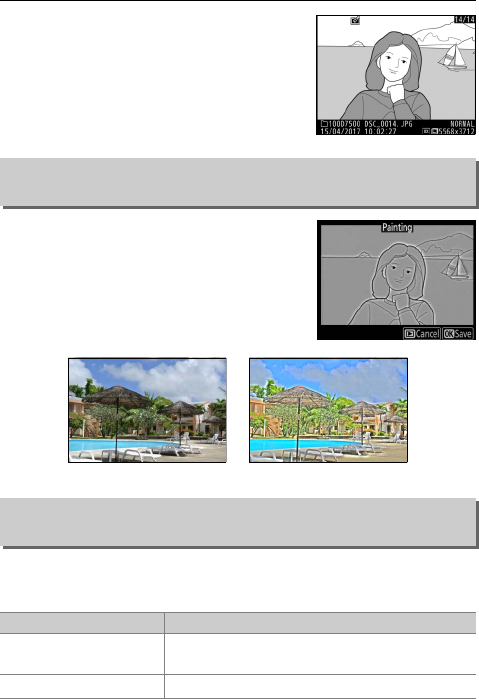
180 Menu Guide
7Save the edited copy.
Press J to save the retouched copy.
Create a copy which emphasizes detail
and color for a painterly effect. Press J to
save the retouched copy.
Trim footage to create edited copies of movies or save selected
frames as JPEG stills.
Painting
G button ➜Nretouch menu
Before After
Edit Movie
G button ➜Nretouch menu
Option Description
9Choose start/end point Create a copy from which unwanted footage
has been removed.
4Save selected frame Save a selected frame as a JPEG still.
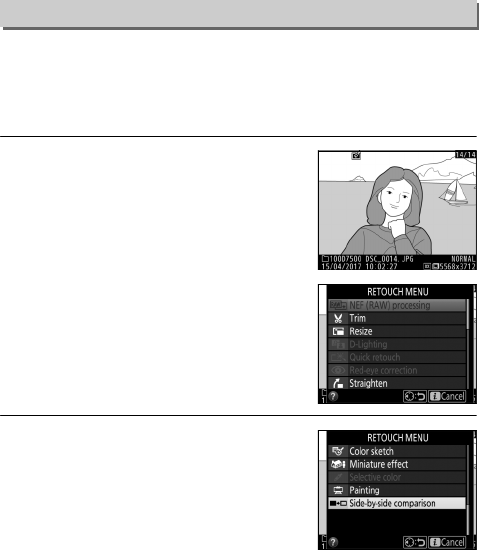
181Menu Guide
Compare retouched copies to the original photographs. This
option is only available if the retouch menu is displayed by
pressing the i button and selecting Retouch when a copy or
original is played back full frame.
1Select a picture.
Select a retouched copy (shown by a
Z icon) or a photograph that has
been retouched in full-frame
playback. Press i, then highlight
Retouch and press J.
2Select Side-by-side comparison.
Highlight Side-by-side comparison
and press J.
Side-by-Side Comparison
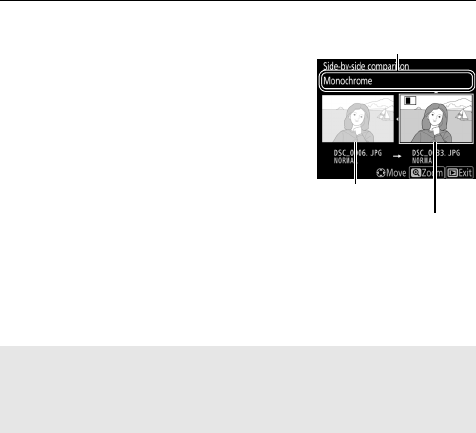
182 Menu Guide
3Compare the copy with the original.
The source image is displayed on the
left, the retouched copy on the right,
with the options used to create the
copy listed at the top of the display.
Press 4 or 2 to switch between the
source image and the retouched copy.
To view the highlighted picture full
frame, press and hold the X(T)
button. If the copy was created from
two source images using Image
overlay, or if the source has been copied multiple times,
press 1 or 3 to view the other source image. To exit to
playback, press the K button, or press J to exit to playback
with the highlighted image selected.
DSide-by-Side Comparison
The source image will not be displayed if the copy was created from a
photograph that was protected or has since been deleted or hidden
(020).
Options used to create
copy
Retouched copy
Source image
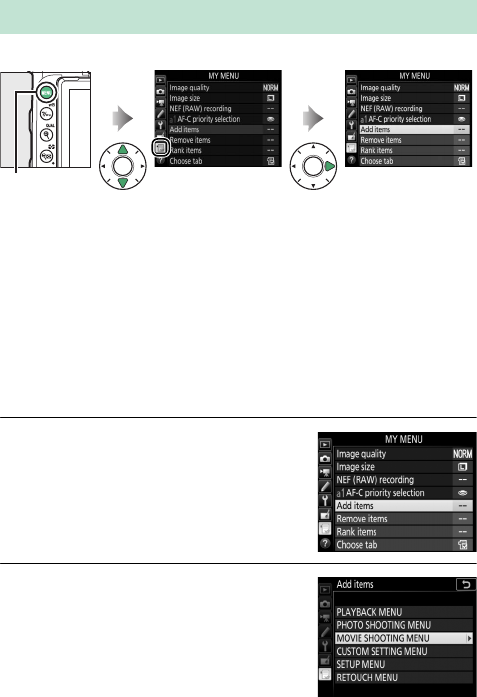
183Menu Guide
To display My Menu, press G and select the O (My Menu) tab.
The MY MENU option can be used to create and edit a
customized list of options from the playback, photo shooting,
movie shooting, Custom Settings, setup, and retouch menus for
quick access (up to 20 items). If desired, recent settings can be
displayed in place of My Menu (0187).
Options can be added, deleted, and reordered as described
below.
❚❚ Adding Options to My Menu
1Select Add items.
In My Menu (O), highlight Add items
and press 2.
2Select a menu.
Highlight the name of the menu
containing the option you wish to add
and press 2.
OMy Menu/mRecent Settings
G button
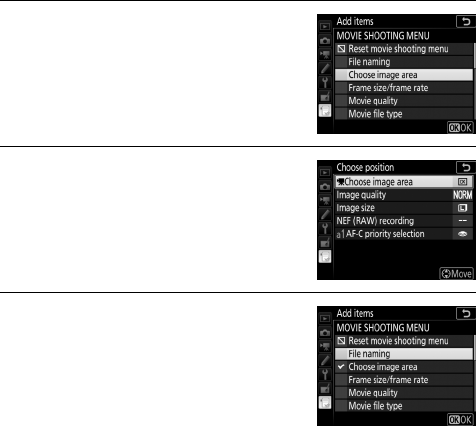
184 Menu Guide
3Select an item.
Highlight the desired menu item and
press J.
4Position the new item.
Press 1 or 3 to move the new item up
or down in My Menu. Press J to add
the new item.
5Add more items.
The items currently displayed in My
Menu are indicated by a check mark.
Items indicated by a V icon can not be
selected. Repeat steps 1–4 to select
additional items.
185Menu Guide
❚❚ Deleting Options from My Menu
1Select Remove items.
In My Menu (O), highlight Remove items and press 2.
2Select items.
Highlight items and press 2 to select
or deselect. Selected items are
indicated by a check mark.
3Delete the selected items.
Press J. A confirmation dialog will be
displayed; press J again to delete the
selected items.
ADeleting Items in My Menu
To delete the item currently highlighted in My Menu, press the O (Q)
button. A confirmation dialog will be displayed; press O (Q) again to
remove the selected item from My Menu.
186 Menu Guide
❚❚ Reordering Options in My Menu
1Select Rank items.
In My Menu (O), highlight Rank items and press 2.
2Select an item.
Highlight the item you wish to move
and press J.
3Position the item.
Press 1 or 3 to move the item up or
down in My Menu and press J.
Repeat Steps 2–3 to reposition
additional items.
4Exit to My Menu.
Press the G button to return to My
Menu.
G button
187Menu Guide
Recent Settings
To display the twenty most recently used settings, select
mRECENT SETTINGS for OMY MENU > Choose tab.
1Select Choose tab.
In My Menu (O), highlight Choose
tab and press 2.
2Select mRECENT SETTINGS.
Highlight mRECENT SETTINGS and
press J. The name of the menu will
change from “MY MENU” to “RECENT
SETTINGS.”
Menu items will be added to the top of the recent settings menu
as they are used. To view My Menu again, select OMY MENU for
mRECENT SETTINGS > Choose tab.
ARemoving Items from the Recent Settings Menu
To remove an item from the recent settings menu, highlight it and
press the O (Q) button. A confirmation dialog will be displayed; press
O (Q) again to delete the selected item.
188 Optional Flash Units
Optional Flash Units
The camera can be used with optional external flash units in
addition to the built-in flash.
You can take pictures using the built-in flash, a flash unit
mounted on the camera accessory shoe, or one or more remote
flash units.
Built-in or Camera-Mounted Flash
Take pictures using:
•The built-in flash (see the camera manual)
•A flash unit mounted on the camera accessory shoe
(see the manual provided with the flash unit)
Throughout this chapter, operations involving the built-in flash or a
flash unit mounted on the camera accessory shoe are indicated by C,
operations involving remote flash units by f. For more information on
f, see the manual provided with the flash unit.
Flash Control Options
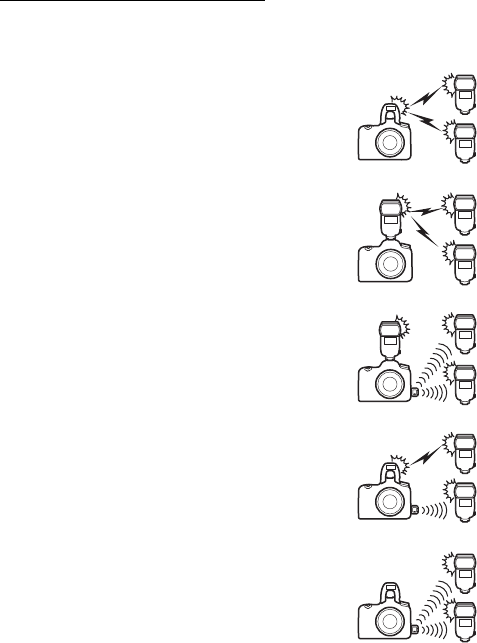
189Optional Flash Units
Remote Flash Photography
The following types of wireless flash control (Advanced Wireless
Lighting, or AWL) can be used with one or more remote flash
units:
•Optical AWL via the built-in flash (0190)
•Optical AWL via a shoe-mounted flash unit (0190,
193)
•Radio AWL using settings chosen with the SB-5000
(0194)
•Radio AWL combined with optical AWL via the
camera’s built-in flash (0198)
•Radio AWL (0199)
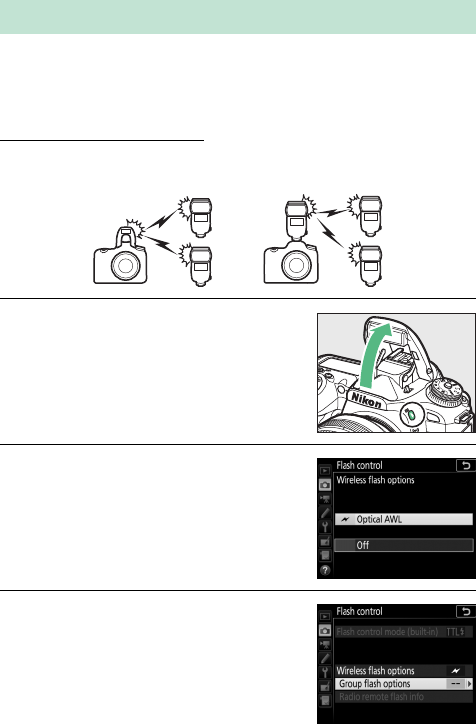
190 Optional Flash Units
Remote flash units can be controlled via optical signals (optical
AWL) from the built-in flash or an optional flash unit mounted on
the camera accessory shoe.
Built-in Flash/SB-500
Use the built-in flash or an optional SB-500 as a master flash
controlling remote flash units.
1C: Raise the built-in flash.
Press the M (Y) button to raise the
built-in flash. If you will be using an
SB-500 as the master flash, mount it
on the camera accessory shoe.
2C: Enable optical AWL.
In the photo shooting menu, select
Optical AWL for Flash control>
Wireless flash options.
3C: Select Group flash options.
Select Flash controlin the photo
shooting menu, then highlight Group
flash options and press 2.
Optical AWL
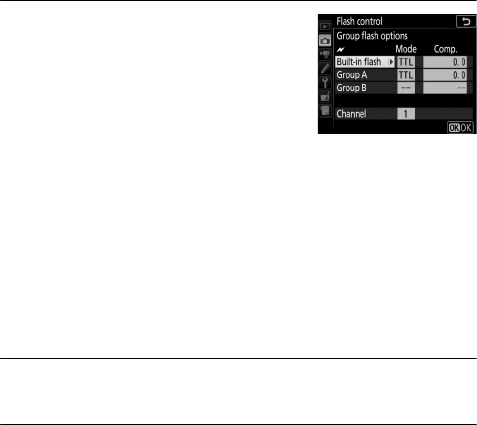
191Optional Flash Units
4C: Choose the flash control mode.
Choose the flash control mode and
flash level for the master flash and the
flash units in each group:
•TTL: i-TTL flash control.
•qA: Auto aperture (available only
with compatible flash units; note
that the built-in flash and SB-500 are not compatible with
auto aperture).
•M: Choose the flash level manually.
•– – (off): The units do not fire and the flash level can not be
adjusted.
Choose a channel for the master flash. If the remote flash
units include an SB-500, you must choose channel 3, but
otherwise you can choose any channel between 1 and 4.
5f: Set the channel.
Set the remote flash units to the channel selected in Step 4.
6f: Group the remote flash units.
Choose a group (A or B) for each remote flash unit. Although
there is no limit on the number of remote flash units that may
be used, the practical maximum is three per group. With
more than this number, the light emitted by the remote flash
units will interfere with performance.

192 Optional Flash Units
7C/f: Compose the shot.
Compose the shot and arrange the flash units. See the
documentation provided with the flash units for more
information. After arranging the units, press the test buttons
on the flash units to confirm that all flash units are
functioning.
8C/f: Take photographs.
Confirm that the ready lamps on all flash units are lit before
each shot.

193Optional Flash Units
Other Flash Units
For information on using optical AWL with
other flash units, see the manual provided
with the flash unit.
AOptical AWL
Position the sensor windows on the remote flash units to pick up the
light from the master flash (particular care is required if the camera is
not mounted on a tripod). Be sure that direct light or strong reflections
from the remote flash units do not enter the camera lens (in TTL mode)
or the photocells on the remote flash units (qA mode), as this may
interfere with exposure. To prevent low-intensity flashes emitted by
the master flash from appearing in photographs taken at short range,
choose low ISO sensitivities or small apertures (high f-numbers). After
positioning the remote flash units, take a test shot and view the results
in the camera monitor.
AFlash Compensation
The flash compensation value selected with the M (Y) button and
sub-command dial is added to the flash compensation values selected
in the wireless flash options menu. Y icons are displayed in the
control panel and viewfinder when a flash compensation value other
than ±0 is selected for the master or remote flash units in TTL or qA
mode.

194 Optional Flash Units
When an SB-5000 is mounted on the camera
accessory shoe as a master unit for radio flash
control, compatible remote flash units can be
controlled by radio signals (radio AWL) from a
WR-R10 wireless remote controller.
Establishing a Wireless Connection
Before using radio AWL, establish a wireless connection
between the WR-R10 and the remote flash units.
1C: Connect the WR-R10.
Connect the WR-R10 to the camera. For more information,
see the documentation provided with the WR-R10.
2C: Choose a channel.
Set the WR-R10 channel selector to
the desired channel.
Radio AWL Using the Controls on an
SB-5000
AThe WR-R10
Be sure to update the WR-R10 firmware to the latest version; for
information on firmware updates, see the Nikon website for your area.

195Optional Flash Units
3C: Choose a link mode.
Select Wireless remote (WR)
options> Link mode in the setup
menu (0145) and choose from the
following options:
•Pairing: Pair the remote flash units
with the WR-R10.
•PIN: Connect the camera and remote flash units using a four-
digit PIN.
4f: Establish a wireless connection.
Set the remote flash units to radio AWL remote mode and set
the devices to the channel you selected in Step 2, then pair
each of the remote units with the WR-R10 according to the
option selected in Step 3:
•Pairing: Initiate pairing on the remote unit and press the
WR-R10 pairing button. Pairing is complete when the LINK
lamps on the WR-R10 and flash unit flash orange and green;
once a connection is established, the LINK lamp on the
remote flash unit will light green.
•PIN: Use the controls on the remote flash unit to enter the
PIN you selected in Step 3. The LINK lamp on the remote unit
will light green once a connection is established.
AReconnecting
As long as the channel, link mode, and other settings remain the same,
the WR-R10 will automatically connect to previously paired flash units
when you select remote mode and Steps 2–4 can be omitted. The flash
unit LINK lamp lights green when a connection is established.

196 Optional Flash Units
Taking Photographs
Settings for the remote units must be adjusted using the
controls on each unit. See the flash unit manuals for more
information.
1C: Adjust settings for the master flash.
Using the controls on the master flash, choose the flash mode
and flash level for the master flash.
2C: Adjust settings for the remote flash units.
Using the controls on the master flash, choose the flash mode
and flash level for the remote flash units in each group.
3f: Group the remote flash units.
Choose a group (A–F) for each of the remote flash units. The
master flash can control up to 18 flash units in any
combination.
4C/f: Compose the shot.
Compose the shot and arrange the flash units. See the
documentation provided with the flash units for more
information. After arranging the flash units, perform a firing
test to confirm that all flash units are functioning.
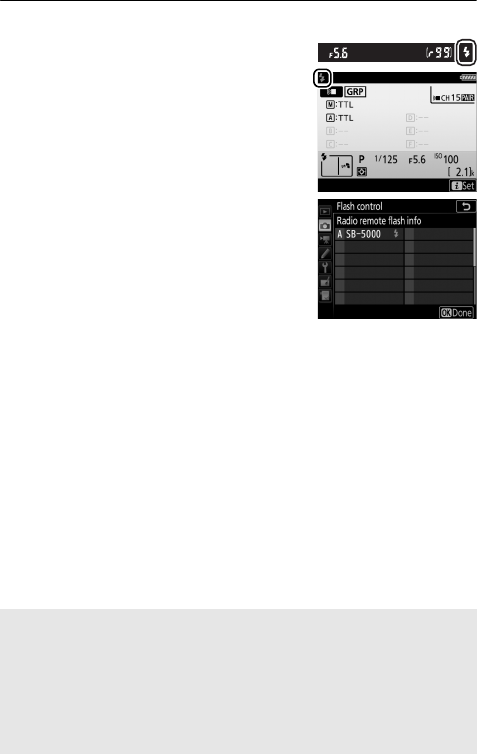
197Optional Flash Units
5C/f: Take photographs.
The flash-ready indicator will light in
the camera viewfinder or flash
information display when all flash
units are ready.
The status of radio-controlled flash
units can also be viewed by pressing
the i button in the flash information
display.
AFlash Compensation
The flash compensation value selected with the M (Y) button and
sub-command dial is added to the flash compensation values selected
in the wireless flash options menu. Y icons are displayed in the
control panel and viewfinder when a flash compensation value other
than ±0 is selected for the master or remote flash units in TTL or qA
mode.
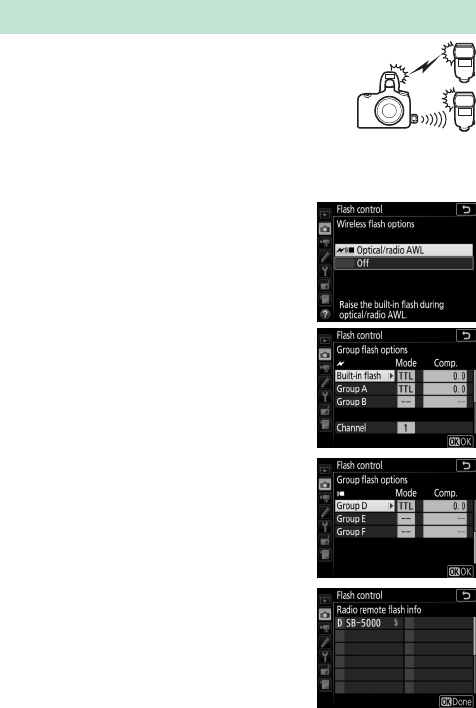
198 Optional Flash Units
For remote flash lighting that incorporates
both optically- and radio-controlled flash
units, raise the built-in flash and then attach a
WR-R10 wireless remote controller and
establish a wireless connection between the
WR-10 and any radio-controlled flash units
(0194).
In the photo shooting menu, select
Optical/radio AWL for Flash control>
Wireless flash options and configure
the built-in flash and remote flash units
using Flash control> Group flash
options. Place optically-controlled units
in group A or B.
In Group flash options, press 1 or 3 to
place radio-controlled units in group D, E,
or F.
The status of radio-controlled flash units
can also be viewed by pressing the
ibutton in the flash information display.
Optical/Radio AWL
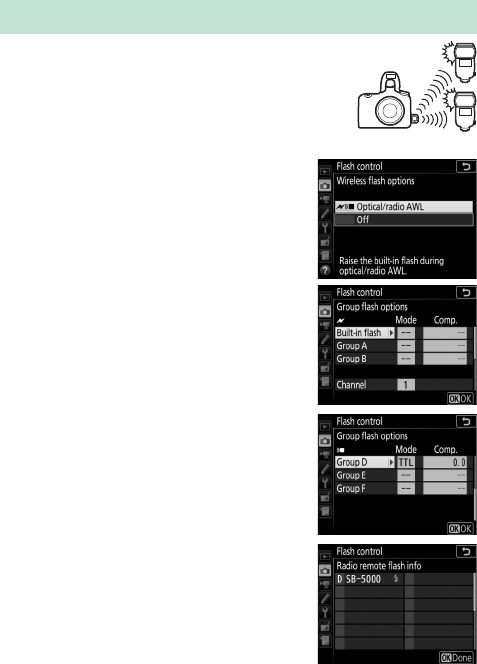
199Optional Flash Units
To use radio AWL with compatible flash units,
raise the built-in flash and then attach a
WR-R10 wireless remote controller and
establish a wireless connection between the
flash units and the WR-R10 (0194).
In the photo shooting menu, select
Optical/radio AWL for Flash control >
Wireless flash options and configure
the built-in flash and remote flash units
using Flash control > Group flash
options, being sure to select -- (off) as
the flash control mode for the built-in
flash and the flash units in groups A and
B.
In Group flash options, press 1 or 3 to
place radio-controlled units in group D, E,
or F.
The status of radio-controlled flash units
can also be viewed by pressing the
ibutton in the flash information display.
Radio AWL
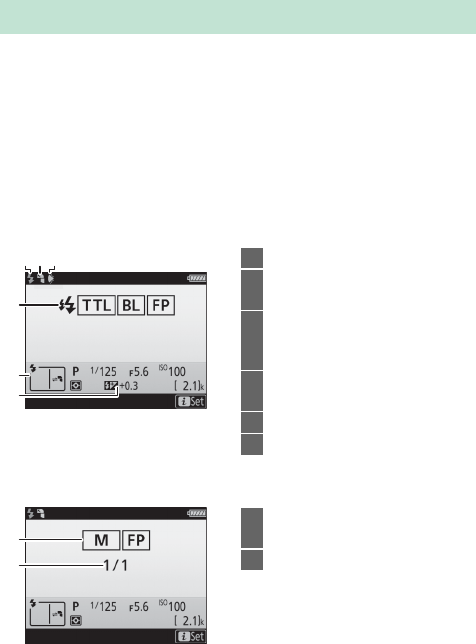
200 Optional Flash Units
In modes P, S, A, and M, you can press the R button to view flash
info in the camera information display when any of the following
apply:
•An SB-500, SB-400, or SB-300 is mounted on the accessory shoe
•A WR-R10 is used to control an SB-5000 via radio AWL
•The built-in flash is raised for remote flash photography
The information displayed varies with the flash control mode.
❚❚ TTL
❚❚ Manual
Viewing Flash Information
6
5
4
213
1Flash-ready indicator................. 196
2Bounce icon (displayed if flash
head is tilted)
3Flash angle warning (displayed if
angle of illumination is sub-
optimal)
4Flash control mode .......................32
FP indicator.................................. 102
5Flash mode
6Flash compensation .................. 193
1
2
1Flash control mode .......................32
FP indicator.................................. 102
2Flash level........................................32
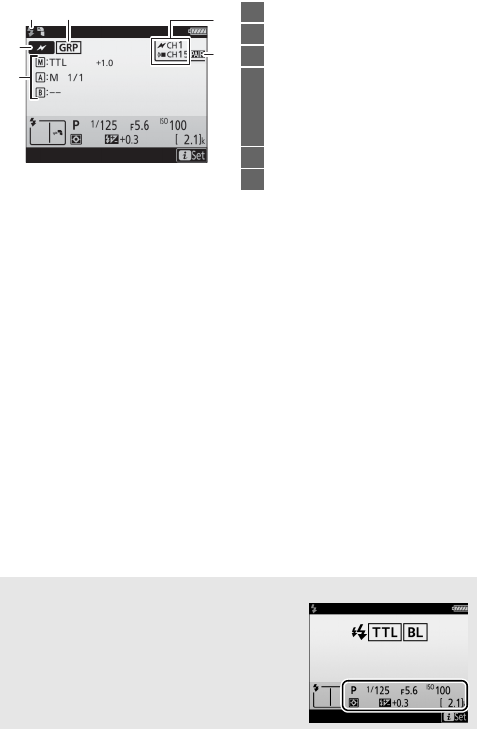
201Optional Flash Units
❚❚ Group Flash
1 Displayed in radio AWL when all flash units are ready.
2 Optical AWL is indicated by Y, radio AWL by Z, joint optical and radio AWL by Y and Z.
3 Icons are displayed for each group when joint optical and radio AWL is used.
5
36
4
21
1Flash-ready indicator 1............... 196
2Remote flash control .................203
3Remote flash control mode2..... 34
4Group flash control mode2, 3
Group flash mode......................... 32
Flash level/
flash compensation ........... 32, 193
5Channel2.............................. 190, 194
6Link mode..................................... 146
AFlash Info and Camera Settings
The flash information display shows
selected camera settings, including
shooting mode, shutter speed, aperture,
and ISO sensitivity.
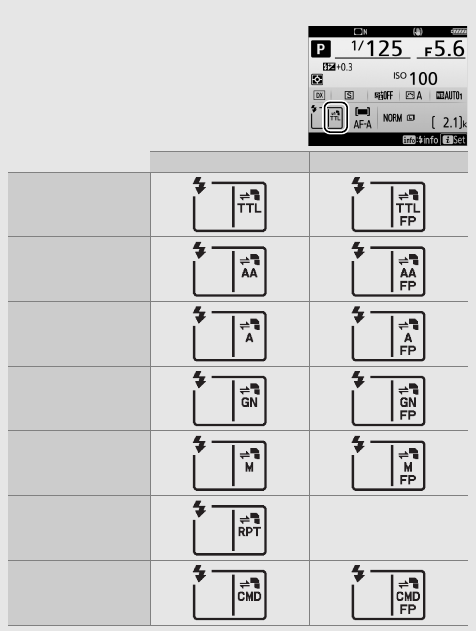
202 Optional Flash Units
AFlash Control Mode
The information display shows the flash
control mode for optional flash units
attached to the camera accessory shoe as
follows:
Flash sync Auto FP (0102)
i-TTL
Auto aperture (qA)
Non-TTL auto flash (A)
Distance-priority
manual (GN)
Manual
Repeating flash —
Advanced wireless
lighting

203Optional Flash Units
Nikon’s advanced Creative Lighting System (CLS) offers
improved communication between the camera and compatible
flash units for improved flash photography.
❚❚ CLS-Compatible Flash Units
The following features are available with CLS-compatible flash
units:
The Nikon Creative Lighting System (CLS)
SB-5000
SB-910, SB-900,
SB-800
SB-700
SB-600
SB-500
SU-800
SB-R200
SB-400
SB-300
Single flash
i-TTL
i-TTL balanced
fill-flash for
digital SLR1
✔ ✔ ✔✔✔——✔✔
Standard i-TTL
fill-flash for
digital SLR
✔2✔2✔✔
2✔——✔✔
qAAuto aperture ✔✔
3———————
A Non-TTL auto —4✔3———————
GN
Distance-
priority
manual
✔✔✔——————
M Manual ✔✔✔✔✔
5——✔5✔5
RPT Repeating
flash ✔✔———————

204 Optional Flash Units
Optical Advanced
Wireless Lighting
Master
Remote flash control ✔✔✔—✔5✔———
i-TTL i-TTL ✔✔✔—✔5————
[A:B] Quick wireless
flash control ✔—✔——✔6———
qA Auto aperture ✔✔———————
ANon-TTL auto——
7———————
M Manual ✔✔✔—✔5————
RPT Repeating
flash ✔✔———————
Remote
i-TTL i-TTL ✔✔✔✔✔—✔——
[A:B] Quick wireless
flash control ✔✔✔✔✔—✔——
q
A/A
Auto aperture/
Non-TTL auto
✔8✔8———————
M Manual ✔✔✔✔✔—✔——
RPT Repeating
flash ✔✔✔✔✔————
Radio-controlled Advanced Wireless
Lighting ✔9— ———————
Color Information Communication
(flash) ✔✔✔✔✔——✔✔
Color Information Communication
(LED light) ————✔————
SB-5000
SB-910, SB-900,
SB-800
SB-700
SB-600
SB-500
SU-800
SB-R200
SB-400
SB-300

205Optional Flash Units
1 Not available with spot metering.
2 Can also be selected with flash unit.
3qA/A mode selection performed on flash unit using custom settings. “A” will be selected
when a non-CPU lens is used.
4 Non-TTL auto will be selected when a non-CPU lens is used.
5 Can only be selected using camera Flash control option.
6 Available only during close-up photography.
7 Non-TTL auto (A) is used with non-CPU lenses, regardless of mode selected with flash unit.
8Choice of qA and A depends on the option selected with master flash.
9 Supports the same features as remote flash units with optical AWL.
10 Available only in i-TTL, qA, A, GN, and M flash-control modes.
11 Available only in i-TTL flash control mode or when flash is set to emit monitor pre-flashes in
qA or A flash control mode.
12 Available only in commander mode.
13 Firmware updates for the SB-910 and SB-900 can be performed from the camera.
Auto FP High-Speed Sync10 ✔ ✔ ✔✔✔✔✔——
FV lock11 ✔ ✔ ✔✔✔✔✔✔✔
AF-assist for multi-area AF ✔✔✔✔—✔12 ———
Red-eye reduction ✔ ✔ ✔✔✔——✔—
Camera modeling illumination ✔ ✔ ✔✔✔✔✔——
Camera flash unit firmware update ✔✔
13 ✔—✔———✔
SB-5000
SB-910, SB-900,
SB-800
SB-700
SB-600
SB-500
SU-800
SB-R200
SB-400
SB-300

206 Optional Flash Units
The SU-800 Wireless Speedlight Commander: When mounted on a CLS-
compatible camera, the SU-800 can be used as a commander for
SB-5000, SB-910, SB-900, SB-800, SB-700, SB-600, SB-500, or
SB-R200 flash units in up to three groups. The SU-800 itself is not
equipped with a flash.
AFlash Mode Selection for Optional Flash Units
The flash mode for optional flash units can be selected in the same way
as the flash mode for the built-in flash, namely by holding the M (Y)
button and rotating the main command dial.
AModeling Illumination
CLS-compatible flash units emit a modeling flash when you press the
control to which Modeling flash has been assigned using Custom
Setting f1 (Custom control assignment). This feature can be used
with Advanced Wireless Lighting to preview the total lighting effect
achieved with multiple flash units.

207Optional Flash Units
❚❚ Other Flash Units
The following flash units can be used in non-TTL auto and
manual modes.
Flash unit SB-80DX,
SB-28DX,
SB-28, SB-26,
SB-25, SB-24 SB-50DX1
SB-30, SB-27 2,
SB-22S, SB-22,
SB-20, SB-16B,
SB-15
SB-23,
SB-293,
SB-21B3,
SB-29S3
Flash mode
ANon-TTL auto ✔—✔—
MManual ✔✔✔✔
GRepeating flash ✔———
REAR Rear-curtain sync4✔✔✔✔
1 Select mode P, S, A, or M, lower built-in flash, and use optional flash unit only.
2 Flash mode is automatically set to TTL and shutter-release is disabled. Set flash unit to A (non-
TTL auto flash).
3 Autofocus is available with AF-S VR Micro-Nikkor 105mm f/2.8G IF-ED and AF-S Micro NIKKOR
60mm f/2.8G ED lenses only.
4 Available when camera is used to select flash mode.
AUsing FV Lock with Optional Flash Units
FV lock is available with optional flash units (0203) in i-TTL and
(where supported) monitor pre-flash qA and monitor pre-flash A flash
control modes (see the manual provided with the flash unit for more
information). Note that when Advanced Wireless Lighting is used to
control remote flash units, you will need to set the flash control mode
for the master or at least one remote group to TTL, qA, or A.
AMetering
The metering areas for FV lock when using optional flash unit are as
follows:
Flash unit Flash mode Metered area
Stand-alone flash
unit
i-TTL 4-mm circle in center of frame
qAArea metered by flash
exposure meter
Used with other flash
units (Advanced
Wireless Lighting)
i-TTL Entire frame
qAArea metered by flash
exposure meter
A

208 Optional Flash Units
DNotes on Optional Flash Units
Refer to the flash unit manual for detailed instructions. If the flash unit
supports CLS, refer to the section on CLS-compatible digital SLR
cameras. The D7500 is not included in the “digital SLR” category in the
SB-80DX, SB-28DX, and SB-50DX manuals.
If an optional flash unit is attached in shooting modes other than j, %,
and u, the flash will fire with every shot, even in modes in which the
built-in flash can not be used.
i-TTL flash control can be used at ISO sensitivities between 100 and
12800. At values over 12800, the desired results may not be achieved
at some ranges or aperture settings. If the flash-ready indicator (M)
flashes for about three seconds after a photograph is taken in i-TTL or
non-TTL auto mode, the flash has fired at full power and the
photograph may be underexposed (CLS-compatible flash units only;
for information on the exposure and flash charge indicators on other
units, see the manual provided with the flash).
In i-TTL and auto aperture (qA) flash control modes, the flash
compensation selected with the optional flash unit or the Flash
control option in the photo shooting menu is added to the flash
compensation selected with the M (Y) button and command dial.
When an SC-series 17, 28, or 29 sync cable is used for off-camera flash
photography, correct exposure may not be achieved in i-TTL mode. We
recommend that you select standard i-TTL fill-flash control. Take a test
shot and view the results in the monitor.
In i-TTL, use the flash panel or bounce adapter provided with the flash
unit. Do not use other panels such as diffusion panels, as this may
produce incorrect exposure.
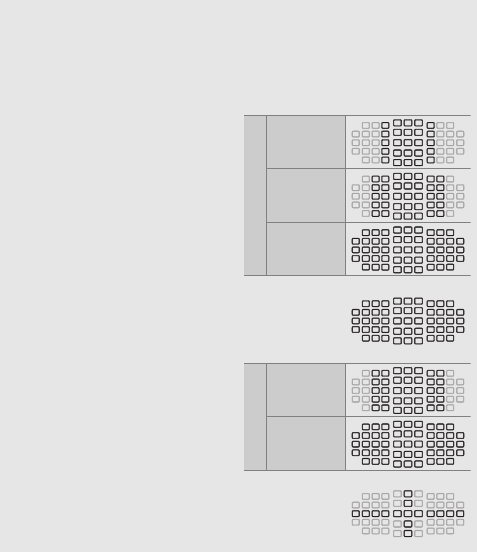
209Optional Flash Units
DNotes on Optional Flash Units (Continued)
The SB-5000, SB-910, SB-900, SB-800, SB-700, SB-600, SB-500, and
SB-400 provide red-eye reduction, while the SB-5000, SB-910, SB-900,
SB-800, SB-700, SB-600, and SU-800 provide AF-assist illumination with
the following restrictions:
•SB-5000: AF-assist illumination is
available when 24–135 mm AF
lenses are used with the focus
points shown.
•SB-910 and SB-900: AF-assist illumination is
available when 17–135 mm AF lenses are used
with the focus points shown.
•SB-800, SB-600, and SU-800: AF-assist
illumination is available when
24–105 mm AF lenses are used
with the focus points shown.
•SB-700: AF-assist illumination is available when
24–135 mm AF lenses are used with the focus
points shown.
Focal length
24–30 mm
31–48 mm
49–135 mm
Focal length
24–31 mm
32–105 mm

210 Optional Flash Units
Depending on the lens used and scene recorded, the in-focus indicator
(I) may be displayed when the subject is not in focus, or the camera
may be unable to focus and the shutter release will be disabled.
In mode P, the maximum aperture (minimum f-number) is limited
according to ISO sensitivity, as shown below:
Maximum aperture at ISO equivalent of:
100 200 400 800 1600 3200 6400 12800
44.8 5.6 6.7 89.5 11 13
If the maximum aperture of the lens is smaller than given above, the
maximum value for aperture will be the maximum aperture of the lens.
Noise in the form of lines may appear in flash photographs taken with
an SD-9 or SD-8A high-performance battery pack attached directly to
the camera. Reduce ISO sensitivity or increase the distance between
the camera and the power pack.
AThe AS-15 Sync Terminal Adapter
When the AS-15 sync terminal adapter (available separately) is
mounted on the camera accessory shoe, flash accessories can be
connected via a sync terminal.
DUse Only Nikon Flash Accessories
Use only Nikon flash units. Negative voltages or voltages over 250 V
applied to the accessory shoe could not only prevent normal
operation, but damage the sync circuitry of the camera or flash. Before
using a Nikon flash unit not listed in this section, contact a Nikon-
authorized service representative for more information.

211Technical Notes
Technical Notes
Read this chapter for information on connecting to other
devices and on compatible accessories.
Installing ViewNX-i
To fine-tune photos and upload and view pictures, download
the latest version of the ViewNX-i installer from the following
website and follow the on-screen instructions to complete
installation. An Internet connection is required. For system
requirements and other information, see the Nikon website for
your region.
http://downloadcenter.nikonimglib.com/
Connections
ACapture NX-D
Use Nikon’s Capture NX-D software to fine-tune photos or to change
settings for NEF (RAW) pictures and save them in other formats.
Capture NX-D is available for download from:
http://downloadcenter.nikonimglib.com/
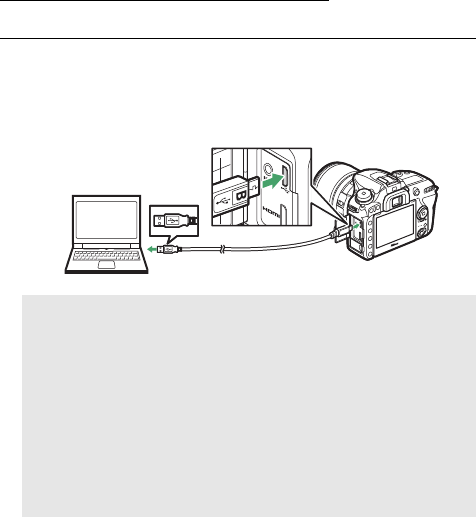
212 Technical Notes
Copying Pictures to the Computer
Before proceeding, be sure you have installed ViewNX-i (0211).
1Connect the USB cable.
After turning the camera off and ensuring that a memory
card is inserted, connect the supplied USB cable as shown
and then turn the camera on.
DUSB Hubs
Connect the camera directly to the computer; do not connect the
cable via a USB hub or keyboard.
AUse a Reliable Power Source
To ensure that data transfer is not interrupted, be sure the camera
battery is fully charged.
AConnecting Cables
Be sure the camera is off when connecting or disconnecting
interface cables. Do not use force or attempt to insert the
connectors at an angle.
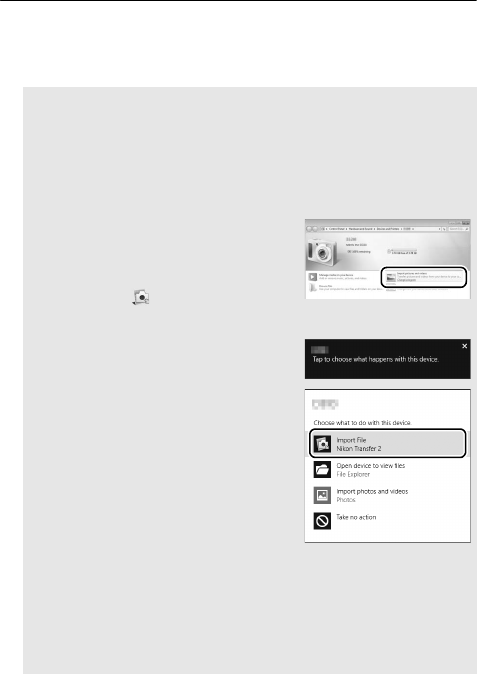
213Technical Notes
2Start Nikon Transfer 2 component of ViewNX-i.
If a message is displayed prompting you to choose a
program, select Nikon Transfer 2.
DDuring Transfer
Do not turn the camera off or disconnect the USB cable while
transfer is in progress.
AWindows 7
If the following dialog is displayed, select Nikon Transfer 2 as
described below.
1Under Import pictures and videos,
click Change program. A program
selection dialog will be displayed;
select Nikon Transfer 2 and click OK.
2Double-click .
AWindows 10 and Windows 8.1
Windows 10 and Windows 8.1 may
display an AutoPlay prompt when the
camera is connected. Tap or click the
dialog and then tap or click
Nikon Transfer 2 to select
Nikon Transfer 2.
AmacOS/OS X
If Nikon Transfer 2 does not start automatically, confirm that the
camera is connected and then launch Image Capture (an
application that comes with macOS or OS X) and select
Nikon Transfer 2 as the application that opens when the camera is
detected.
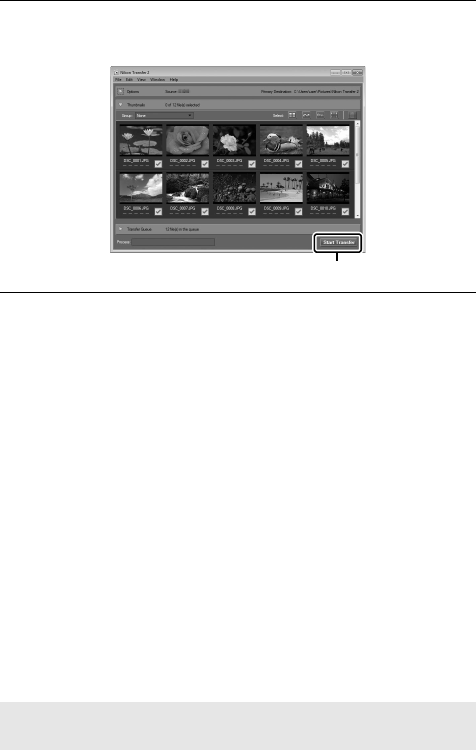
214 Technical Notes
3Click Start Transfer.
Pictures on the memory card will be copied to the computer.
4Terminate the connection.
When transfer is complete, turn the camera off and
disconnect the USB cable.
Start Transfer
AFor More Information
Consult online help for more information on using ViewNX-i.
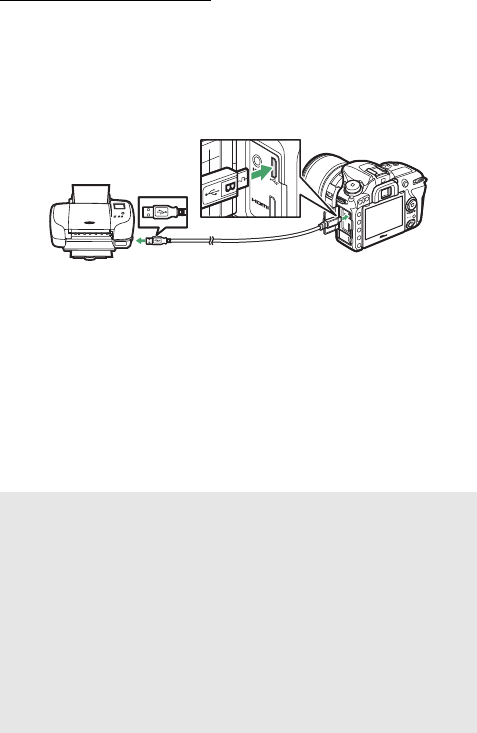
215Technical Notes
Printing Photographs
Selected JPEG images can be printed on a PictBridge printer
connected directly to the camera.
❚❚ Connecting the Printer
Connect the camera using the supplied USB cable. Do not use
force or attempt to insert the connectors at an angle.
When the camera and printer are turned on, a welcome screen
will be displayed in the monitor, followed by a PictBridge
playback display.
DSelecting Photographs for Printing
NEF (RAW) photographs (036) can not be selected for printing. JPEG
copies of NEF (RAW) images can be created using the NEF (RAW)
processing option in the retouch menu (0160).
APrinting Via Direct USB Connection
Be sure the battery is fully charged or use an optional AC adapter and
power connector. When taking photographs to be printed via direct
USB connection, set Color space to sRGB (044).
ASee Also
See the User's Manual for information on what to do if an error occurs
during printing.

216 Technical Notes
❚❚ Printing Pictures One at a Time
1Display the desired picture.
Press 4 or 2 to view additional pictures. Press the X(T)
button to zoom in on the current frame (press K to exit
zoom). To view six pictures at a time, press the W(Z)
button. Use the multi selector to highlight pictures, or press
the X(T) button to display the highlighted picture full
frame.
2Adjust printing options.
Press J to display the following items, then press 1 or 3 to
highlight an item and press 2 to view options (only options
supported by the current printer are listed; to use the default
option, select Printer default). After selecting an option,
press J to return to the printer settings menu.
Option Description
Page size Choose a page size.
No. of copies
This option is listed only when pictures are printed
one at a time. Press 1 or 3 to choose number of
copies (maximum 99).
Border Choose whether to frame photos in white borders.
Print date Choose whether to print the times and dates of
recordings on photos.
Cropping
This option is listed only when pictures are printed
one at a time. To exit without cropping, highlight No
cropping and press J. To crop the current picture,
highlight Crop and press 2. A crop selection dialog
will be displayed; press X(T) to increase the size
of the crop, W (Z) to decrease, and use the multi
selector to position the crop. Note that print quality
may drop if small crops are printed at large sizes.

217Technical Notes
3Start printing.
Select Start printing and press J to start printing. To cancel
before all copies have been printed, press J.
❚❚ Printing Multiple Pictures
1Display the PictBridge menu.
Press the G button in the PictBridge playback display.
2Choose an option.
Highlight one of the following options and press 2.
•Print select: Select pictures for printing. Use the multi selector
to highlight pictures (to display the current picture full
screen, press and hold the X/T button) and, keeping the
W(Z) button pressed, press 1 or 3 to choose the number
of prints (maximum 99). To deselect a picture, set the
number of prints to zero.
•Select date: Print one copy of all the pictures taken on a
selected date. Press 1 or 3 to highlight a date and press 2
to select or deselect. To view the pictures taken on the
selected date, press W (Z). Use the multi selector to scroll
through the pictures, or press and hold X (T) to view
the current picture full screen. Press W (Z) again to return
to the date selection dialog.
•Index print: To create an index print of all JPEG pictures on the
memory card, proceed to Step 3. Note that if the memory
card contains more than 256 pictures, only the first 256
images will be printed. A warning will be displayed if the
page size selected in Step 3 is too small for an index print.

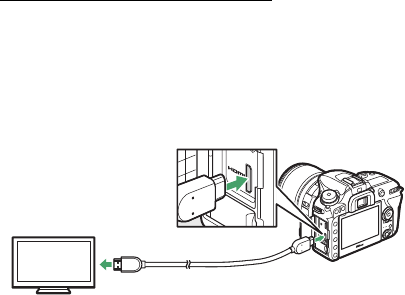
219Technical Notes
Viewing Photographs on TV
The optional High-Definition Multimedia Interface (HDMI) cable
(0222) or a type C HDMI cable (available separately from third-
party suppliers) can be used to connect the camera to high-
definition video devices. Always turn the camera off before
connecting or disconnecting an HDMI cable.
Tune the device to the HDMI channel, then turn the camera on
and press the K button. During playback, images will be
displayed on the television screen. Volume can be adjusted
using television controls; the camera controls can not be used.
Connect to high-definition device
(choose cable with connector for HDMI device)
Connect to camera
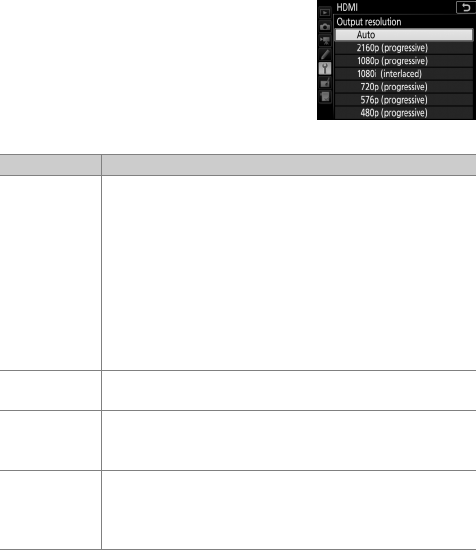
220 Technical Notes
❚❚ HDMI Options
The HDMI option in the setup menu (0143) controls output
resolution and other advanced HDMI options.
Output Resolution
Choose the format for images output to
the HDMI device. If Auto is selected, the
camera will automatically select the
appropriate format.
Advanced
Option Description
Output range
Auto is recommended in most situations. If the camera
is unable to determine the correct RGB video signal
output range for the HDMI device, you can choose from
the following options:
•Limited range: For devices with an RGB video signal
input range of 16 to 235. Choose this option if you
notice loss of detail in shadows.
•Full range: For devices with an RGB video signal input
range of 0 to 255. Choose this option if shadows are
“washed out” or too bright.
Output display
size
Choose horizontal and vertical frame coverage for
HDMI output from 95% or 100%.
Live view on-
screen display
If Off is selected when the camera is connected to an
HDMI device, shooting information will not be
displayed in the monitor during live view photography.
Dual monitor
Choose On to mirror the HDMI display on the camera
monitor, Off to turn the camera monitor off to save
power. Dual monitor turns on automatically when Live
view on-screen display is Off.

221Technical Notes
ATelevision Playback
Use of an AC adapter and power connector (available separately) is
recommended for extended playback. If the edges of photographs are
not visible in the television display, select 95% for HDMI > Advanced
> Output display size (0220).
ASlide Shows
The Slide show option in the playback menu can be used for
automated playback (024).
AHDMI and Live View
When the camera is connected via an HDMI cable, HDMI displays can
be used for live view photography and movie recording.
AUsing Third-Party Recording Devices
The following settings are recommended when using third-party
recorders:
•HDMI > Advanced > Output display size: 100%
•HDMI > Advanced > Live view on-screen display: Off

222 Technical Notes
At the time of writing, the following accessories were available
for the D7500.
Other Accessories
Power sources •EN-EL15a Rechargeable Li-ion Battery (0153): Additional
EN-EL15a batteries are available from local retailers and
Nikon service representatives. EN-EL15 batteries can
also be used.
•MH-25a Battery Charger: The MH-25a can be used to
recharge EN-EL15a batteries. MH-25 battery chargers
can also be used.
•EP-5B Power Connector, EH-5b/EH-5c AC Adapter: These
accessories can be used to power the camera for
extended periods. The EP-5B is required to connect the
camera to the EH-5b/EH-5c; see “Attaching a Power
Connector and AC Adapter” (0227) for details.
Accessory shoe
covers
BS-3 Accessory Shoe Cover/BS-1 Accessory Shoe Cover: A cover
protecting the accessory shoe. The accessory shoe is used
for optional flash units.
Body caps BF-1B Body Cap/BF-1A Body Cap: The body cap keeps the
mirror, viewfinder screen, and image sensor free of dust
when a lens is not in place.
Viewfinder
eyepiece
accessories
•DK-28 Rubber Eyecup: A rubber eyecup that attaches to the
viewfinder eyepiece, reducing fatigue by making the
image in the viewfinder easier to see.
•DK-5 Eyepiece Cap: Prevents light entering via the
viewfinder from appearing in the photograph or
interfering with exposure.

223Technical Notes
Viewfinder
eyepiece
accessories
•DK-20C Eyepiece Correction Lenses: Lenses are available with
diopters of –5, –4, –3, –2, 0, +0.5, +1, +2, and +3 m–1
when the camera diopter adjustment control is in the
neutral position (–1 m–1). Use eyepiece correction
lenses only if the desired focus can not be achieved with
the built in diopter adjustment control (–2 to +1 m–1).
Test eyepiece correction lenses before purchase to
ensure that the desired focus can be achieved. The
rubber eyecup can not be used with eyepiece
correction lenses.
•DK-21M Magnifying Eyepiece: The DK-21M magnifies the
view through the viewfinder by approximately 1.17×
(50 mm f/1.4 lens at infinity; –1.0 m–1) for greater
precision when framing.
•DG-2 Magnifier: The DG-2 magnifies the scene displayed in
the center of the viewfinder for greater precision during
focusing. Eyepiece adapter required (available
separately). Note that because the DG-2 interferes with
the eye sensor, you may find it necessary to select Off
for the Info display auto off item in the setup menu
(0130) when this accessory is attached.
•DK-22 Eyepiece Adapter: The DK-22 is used when attaching
the DG-2 magnifier.
•DR-6 Right-Angle Viewing Attachment: The DR-6 attaches at a
right angle to the viewfinder eyepiece, allowing the
image in the viewfinder to be viewed at right angles to
the lens (for example, from directly above when the
camera is horizontal). In addition, because the DR-6
interferes with the eye sensor, you may find it necessary
to select Off for the Info display auto off item in the
setup menu when this accessory is attached.

224 Technical Notes
Filters •Filters intended for special-effects photography may
interfere with autofocus or the electronic rangefinder.
•The D7500 can not be used with linear polarizing filters.
Use the C-PL or C-PLII circular polarizing filter instead.
•Neutral Color (NC) filters are recommended for
protecting the lens.
•To prevent ghosting, use of a filter is not recommended
when the subject is framed against a bright light, or
when a bright light source is in the frame.
•Center-weighted metering is recommended with filters
with exposure factors (filter factors) over 1× (Y44, Y48,
Y52, O56, R60, X0, X1, C-PL, ND2S, ND4, ND4S, ND8,
ND8S, ND400, A2, A12, B2, B8, B12). See the filter manual
for details.
Microphones •ME-1 Stereo Microphone: Connect the ME-1 to the camera
microphone jack to record stereo sound and reduce the
chance of picking up equipment noise (such as the
sounds produced by the lens during autofocusing).
•ME-W1 Wireless Microphone: Use this wireless Bluetooth
microphone for off-camera recording.
•UF-8 Connector Cover for Stereo Mini-Plug Cables: Prevents
accidental disconnection of mini-plug cables for
optional ME-1 stereo microphones.

225Technical Notes
Remote
controls/
wireless
remote
controller/
remote cords
•ML-L3 Wireless Remote Control: The ML-L3 uses a 3 V CR2025
battery.
Pressing the battery-chamber latch to the right (q),
insert a fingernail into the gap and open the battery
chamber (w). Ensure that the battery is inserted in the
correct orientation (r).
•WR-R10 Wireless Remote Controller/WR-T10 Wireless Remote
Controller (0145, 147): When a WR-R10 wireless remote
controller is attached, the camera can be controlled
wirelessly using a WR-T10 wireless remote controller.
The WR-R10 can also be used to control radio-controlled
flash units.
•WR-1 Wireless Remote Controller (0147): The WR-1 can
function as either a transmitter or a receiver and is used
in combination either with another WR-1 or a WR-R10 or
WR-T10 wireless remote controller. For example, a WR-1
can be connected to the accessory terminal for use as a
receiver, allowing camera settings to be changed or the
shutter to be released remotely by another WR-1 acting
as a transmitter.
Note: Be sure the firmware for the WR-R10 and WR-1 has been updated to
the latest version. For information on firmware updates, see the Nikon
website for your area.
•MC-DC2 Remote Cord: Attach this 1 m (3 ft 3 in.) cord to the
camera accessory terminal to release the shutter
remotely.

226 Technical Notes
GPS units GP-1 GPS Unit/GP-1A GPS Unit: Connect to the camera
accessory terminal to record the current latitude,
longitude, altitude, and UTC (Coordinated Universal
Time) with pictures taken with the camera (0144).
USB cables UC-E20 USB Cable (0212, 215): A USB cable with a Micro-B
connector for connection to the camera.
HDMI cables
(0219)
HC-E1 HDMI Cable: An HDMI cable with a type C connector
for connection to the camera and a type A connector for
connection to HDMI devices.
Software Camera Control Pro 2: Control the camera remotely from a
computer and save photographs directly to the
computer hard disk. When Camera Control Pro 2 is used
to capture photographs directly to the computer, a PC
connection indicator (c) will appear in the control
panel.
Note: Use the latest versions of Nikon software; see the Nikon website for
your region for the latest information on supported operating systems. At
default settings, Nikon Message Center 2 will periodically check for updates to
Nikon software and firmware while you are logged in to an account on the
computer and the computer is connected to the Internet. A message is
automatically displayed when an update is found.
Availability may vary with country or region. See our website or brochures for the latest
information.
AUsing the Accessory Terminal
Connect accessories as shown, with the H
mark on the connector aligned with the F
next to the accessory terminal. To prevent
malfunction caused by foreign matter on the
terminal, close the camera connector cover
when the terminal is not in use.
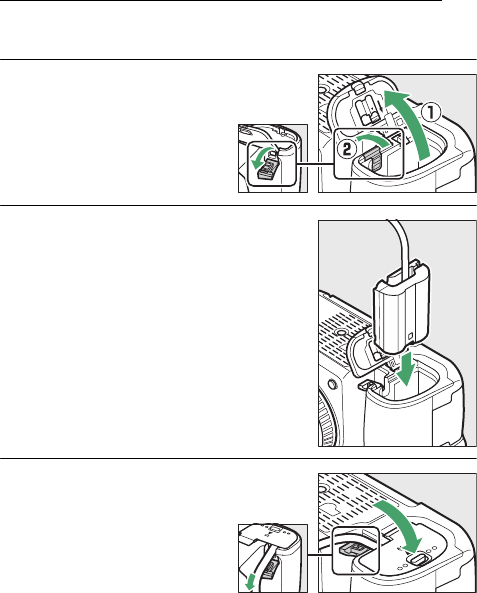
227Technical Notes
Attaching a Power Connector and AC Adapter
Turn the camera off before attaching an optional power
connector and AC adapter.
1Ready the camera.
Open the battery-chamber
(q) and power connector
(w) covers.
2Insert the EP-5B power connector.
Be sure to insert the connector in the
orientation shown, using the
connector to keep the orange battery
latch pressed to one side. The latch
locks the connector in place when the
connector is fully inserted.
3Close the battery-
chamber cover.
Position the power
connector cable so that it
passes through the power
connector slot and close
the battery-chamber cover.
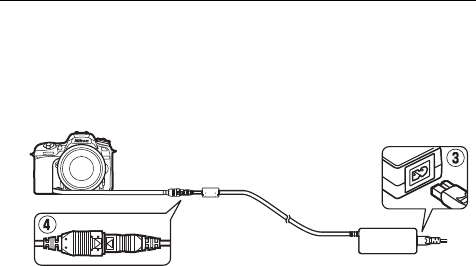
228 Technical Notes
4Connect the EH-5b/EH-5c AC adapter.
Connect the AC adapter power cable to the AC socket on AC
adapter (e) and the power cable to the DC socket (r). A V
icon is displayed in the monitor when the camera is powered
by the AC adapter and power connector.

229Technical Notes
The following table lists the settings that can be adjusted in each
mode. Note that some settings may be unavailable depending
on the options selected.
Available Settings
i j
P,
S,
A,
M
k,
p,
n,
o,
s,
w,
0
l,
m,
r,
t,
u,
v,
x,
y,
z%
f,
de ' i u
1,
2,
3
Photo shooting menu/movie shooting menu
Flash control — — ✔— ————————
ISO sensitivity settings
(photos) ✔
1
✔
1
✔✔
1
✔
1
—✔
1
✔
1
✔
1
✔
1
✔
1
✔
1
ISO sensitivity settings
(movies) ——✔—————————
White balance — — ✔—————————
Set Picture Control — — ✔—————————
Active D-Lighting — — ✔————
—
—
———
Long exposure NR ✔✔✔✔✔—✔✔✔✔✔✔
High ISO NR ✔✔✔✔✔—✔✔✔✔✔✔
Auto bracketing set — — ✔— ————————
Multiple exposure — — ✔—————————
HDR (high dynamic
range) ——✔—————————
Electronic VR ✔✔✔✔✔———————
Time-lapse movie ✔✔✔✔✔———————

230 Technical Notes
Other settings
Metering — — ✔ — ————————
Exposure compensation — — ✔ ✔ ✔ ✔ ✔ ✔ ✔ ✔ ✔ ✔
Bracketing — — ✔ — ————————
Flash mode (built-in
flash) ✔—✔ ✔——✔✔✔———
Flash mode (optional
flash units) ✔—✔ ✔✔—✔✔✔✔—✔
Flash compensation
(built-in flash) ——✔ ✔————————
Flash compensation
(optional flash units) ——✔✔✔———————
FV lock (built-in flash) ✔ —✔ ✔ ——✔✔✔———
FV lock (optional flash
units) ✔—✔ ✔✔—✔✔✔✔—✔
Autofocus mode
(viewfinder) ✔ ✔✔✔ ✔✔✔✔✔——✔
AF-area mode
(viewfinder) ✔✔✔✔✔—✔✔✔—✔✔
AF mode (Live view) ✔✔✔✔✔✔✔———✔✔
AF-area mode
(Live view) ✔✔✔✔✔✔
2 ✔✔
2 ✔ 2 —✔ 2 ✔
i j
P,
S,
A,
M
k,
p,
n,
o,
s,
w,
0
l,
m,
r,
t,
u,
v,
x,
y,
z%
f,
de ' i u
1,
2,
3

231Technical Notes
1Auto ISO sensitivity control is not available.
2 Subject-tracking AF is not available.
3Not available in w mode.
4Available only in x, y, and z modes.
Custom Settings
a9: Built-in AF-assist
illuminator ✔✔✔✔
3 ✔ 4 ✔✔✔✔—✔✔
b3: Easy exposure
compensation ——✔—————————
b4: Matrix metering — — ✔— ————————
b5: Center-weighted
area ——✔—————————
d4: Electronic front-
curtain shutter ——✔—————————
e2: Flash shutter speed — — ✔—————————
e3: Exposure comp. for
flash ——✔—————————
e4: Auto M ISO
sensitivity control ——✔—————————
e5: Bracketing order — — ✔—————————
i j
P,
S,
A,
M
k,
p,
n,
o,
s,
w,
0
l,
m,
r,
t,
u,
v,
x,
y,
z%
f,
de ' i u
1,
2,
3

232 Technical Notes
The lenses listed in this section may block the built-in flash or
AF-assist illuminator under some conditions.
❚❚ AF-Assist Illumination
The AF-assist illuminator has a range of about 0.5–3.0 m (1 ft
8 in.–9 ft 10 in.); when using the illuminator, use a lens with a
focal length of 18–200 mm. Some lenses may block the
illuminator at certain focus distances. Remove lens hoods when
using the illuminator.
AF-assist illumination is not available with the following lenses:
•AF-S NIKKOR 14–24mm f/2.8G ED
•AF-S NIKKOR 200mm f/2G ED VR II
•AF-S VR Nikkor 200mm f/2G IF-ED
•AF-S VR Zoom-Nikkor 200–400mm f/4G IF-ED
•AF-S NIKKOR 200–400mm f/4G ED VR II
•AF-S NIKKOR 200–500mm f/5.6E ED VR
At a range of 0.7 m (2 ft 4 in.) or less, the following lenses may
block the AF-assist illuminator and interfere with autofocus
when lighting is poor:
•AF-S Zoom-Nikkor 17–35mm f/2.8D IF-ED
•AF-S DX Zoom-Nikkor 17–55mm f/2.8G IF-ED
•AF-S DX NIKKOR 18–140mm f/3.5–5.6G ED VR
•AF-S DX NIKKOR 18–300mm f/3.5–6.3G ED VR
•AF Zoom-Nikkor 20–35mm f/2.8D IF
•AF Zoom-Nikkor 24–85mm f/2.8–4D IF
•AF-S NIKKOR 24–85mm f/3.5–4.5G ED VR
•AF-S VR Zoom-Nikkor 24–120mm f/3.5–5.6G IF-ED
•AF-S NIKKOR 35mm f/1.4G
•AF Micro-Nikkor 200mm f/4D IF-ED
Lenses That May Block the Built-in Flash
and AF-Assist Illuminator
233Technical Notes
At a range of 1.0 m (3 ft 4 in.) or less, the following lenses may
block the AF-assist illuminator and interfere with autofocus
when lighting is poor:
•AF-S DX VR Zoom-Nikkor 18–200mm f/3.5–5.6G IF-ED
•AF-S NIKKOR 24–70mm f/2.8G ED
•AF-S NIKKOR 24–70mm f/2.8E ED VR
•AF Zoom-Nikkor 24–120mm f/3.5–5.6D IF
•AF-S Zoom-Nikkor 28–70mm f/2.8D IF-ED
•AF Zoom Micro Nikkor ED 70–180mm f/4.5–5.6D
•AF-S VR Micro-Nikkor 105mm f/2.8G IF-ED
At a range of 1.5 m (4 ft 12 in.) or less, the following lenses may
block the AF-assist illuminator and interfere with autofocus
when lighting is poor:
•AF-S DX NIKKOR 18–300mm f/3.5–5.6G ED VR
•AF-S NIKKOR 24–120mm f/4G ED VR
•AF-S NIKKOR 28–300mm f/3.5–5.6G ED VR
•AF-S DX NIKKOR 55–300mm f/4.5–5.6G ED VR
•AF-S NIKKOR 70–200mm f/2.8G ED VR II
•AF Zoom-Nikkor 80–200mm f/2.8D ED
At a range of 2.0 m (6 ft 7 in.) or less, the following lenses may
block the AF-assist illuminator and interfere with autofocus
when lighting is poor:
•AF-S VR Zoom-Nikkor ED 70–200mm f/2.8G (IF)
•AF-S NIKKOR 70–200mm f/4G ED VR
•AF-S Zoom Nikkor ED 80–200mm f/2.8D (IF)
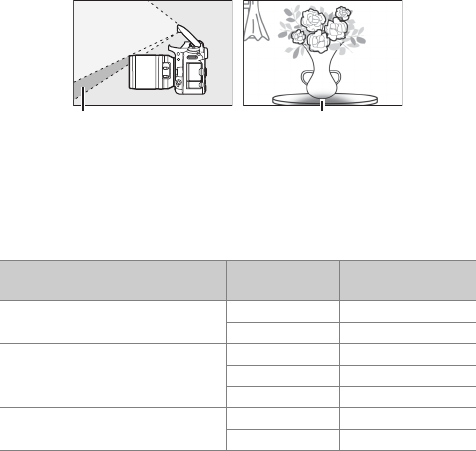
234 Technical Notes
❚❚ The Built-in Flash
The built-in flash can be used with lenses with focal lengths of
16–300 mm, although in some cases the flash may be unable to
entirely light the subject at some ranges or focal lengths due to
shadows cast by the lens (see the illustration below), while
lenses that block the subject’s view of the red-eye reduction
lamp may interfere with red-eye reduction. Peripheral
illumination may drop at focal lengths under 16 mm. Remove
lens hoods to prevent shadows.
The flash has a minimum range of about 0.6 m and can not be
used in the macro range of macro zoom lenses. When DX
(24×16) is selected for Choose image area, the flash may be
unable to light the entire subject with the following lenses at
ranges less than those given below:
Shadow Vignetting
Lens Zoom position Minimum distance
without vignetting
AF-S DX NIKKOR 10–24mm
f/3.5–4.5G ED
20 mm 1.0 m/3 ft 4 in.
24 mm No vignetting
AF-S DX Zoom-Nikkor 12–24mm
f/4G IF-ED
18 mm 1.5 m/5 ft
20 mm 1.0 m/3 ft 4 in.
24 mm No vignetting
AF-S DX NIKKOR 16–80mm
f/2.8–4E ED VR
16 mm 1.5 m/5 ft
24–80 mm No vignetting

235Technical Notes
AF-S DX Zoom-Nikkor 17–55mm
f/2.8G IF-ED
24 mm 1.0 m/3 ft 4 in.
28–55 mm No vignetting
AF-S DX NIKKOR 18–140mm
f/3.5–5.6G ED VR
18 mm 1.0 m/3 ft 4 in.
24–140 mm No vignetting
AF-S DX VR Zoom-Nikkor
18–200mm f/3.5–5.6G IF-ED
AF-S DX NIKKOR 18–200mm
f/3.5–5.6G ED VR II
18 mm 1.0 m/3 ft 4 in.
24–200 mm No vignetting
AF-S DX NIKKOR 18–300mm
f/3.5–5.6G ED VR
28 mm 1.5 m/5 ft
50–300 mm No vignetting
AF-S DX NIKKOR 18–300mm
f/3.5–6.3G ED VR 35 mm No vignetting
AF-S NIKKOR 16–35mm f/4G ED
VR
24 mm 1.5 m/5 ft
28 mm 1.0 m/3 ft 4 in.
35 mm No vignetting
AF-S Zoom-Nikkor 17–35mm
f/2.8D IF-ED
20 mm 3.0 m/9 ft 11 in.
24 mm 1.0 m/3 ft 4 in.
28–35 mm No vignetting
AF Zoom-Nikkor 18–35mm
f/3.5–4.5D IF-ED
18 mm 1.5 m/5 ft
24–35 mm No vignetting
AF-S NIKKOR 24–70mm f/2.8G ED
28 mm 1.5 m/5 ft
35 mm 1.0 m/3 ft 4 in.
50–70 mm No vignetting
AF-S NIKKOR 24–70mm f/2.8E ED
VR
35 mm 1.5 m/5 ft
50 mm 1.0 m/3 ft 4 in.
70 mm No vignetting
AF-S Zoom-Nikkor 28–70mm
f/2.8D IF-ED
28 mm 1.5 m/5 ft
35–70 mm No vignetting
AF-S NIKKOR 14–24mm f/2.8G ED
When DX (24×16) is selected for
Choose image area, the flash will be
unable to light the entire subject at
all ranges.
Lens Zoom position Minimum distance
without vignetting

236 Technical Notes
When 1.3× (18×12) is selected for Choose image area, the flash
may be unable to light the entire subject with the following
lenses at ranges less than those given below.
Lens Zoom position Minimum distance
without vignetting
AF-S DX NIKKOR 10–24mm
f/3.5–4.5G ED 15–24 mm No vignetting
AF-S DX Zoom-Nikkor 12–24mm
f/4G IF-ED
15 mm 1.0 m/3 ft 4 in.
18–24 mm No vignetting
AF-S DX Zoom-Nikkor 17–55mm
f/2.8G IF-ED
20 mm 1.0 m/3 ft 4 in.
24–55 mm No vignetting
AF-S DX NIKKOR 18–300mm
f/3.5–5.6G ED VR
28 mm 1.0 m/3 ft 4 in.
50–300 mm No vignetting
AF-S NIKKOR 14–24mm f/2.8G ED 24 mm 3.0 m/9 ft 11 in.
AF-S NIKKOR 16–35mm f/4G ED
VR
20 mm 1.5 m/5 ft
24 mm 1.0 m/3 ft 4 in.
28–35 mm No vignetting
AF-S Zoom-Nikkor 17–35mm
f/2.8D IF-ED
17 mm 1.5 m/5 ft
20 mm 1.0 m/3 ft 4 in.
24–35 mm No vignetting
AF-S NIKKOR 24–70mm f/2.8G ED
24 mm 1.5 m/5 ft
28 mm 1.0 m/3 ft 4 in.
35–70 mm No vignetting
AF-S NIKKOR 24–70mm f/2.8E ED
VR
28 mm 1.5 m/5 ft
35 mm 1.0 m/3 ft 4 in.
50–70 mm No vignetting
237Technical Notes
The built-in flash can also be used with the following non-CPU
lenses: Nikon Series E and 16–300 mm NIKKOR (AI-S, AI-, and AI-
modifed). AI 50–300mm f/4.5, modified AI 50–300mm f/4.5, AI-S
50–300mm f/4.5 ED, and AI 50–300mm f/4.5 ED lenses must be
used at a zoom position of 70 mm or above.

No reproduction in any form of this manual, in whole or in part (except
for brief quotation in critical articles or reviews), may be made without
written authorization from NIKON CORPORATION.
SB7E01(11)
6MB39011-01
