testo Instruments 05600420 Flowhood User Manual 0970 4200 en 01 i Zertifizierung
testo Instruments (Shenzhen) Co., Ltd Flowhood 0970 4200 en 01 i Zertifizierung
UserManual.wiki
>
testo Instruments
>
05600420 User Manual
Users Manual
Navigation menu
Upload a User Manual
Namespaces
Wiki Guide
HTML
PDF
Info
Views
User Manual
Discussion / Help
Navigation
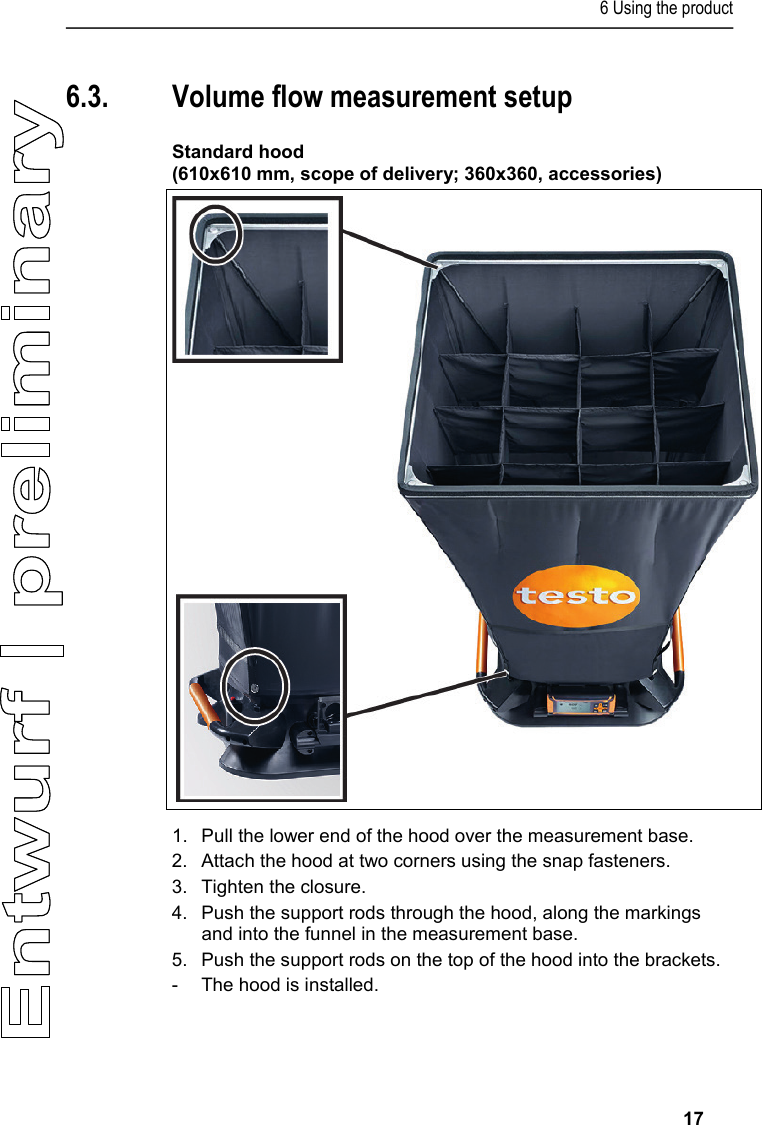
![2 Safety and the environment 4 2 Safety and the environment 2.1. About this document Use > Please read this documentation through carefully and familiarize yourself with the product before putting it to use. Pay particular attention to the safety instructions and warning advice in order to prevent injuries and damage to the products. > Keep this document to hand so that you can refer to it when necessary. > Hand this documentation on to any subsequent users of the product. Symbols and writing standards Representation Explanation Warning advice, risk level according to the signal word: Warning! Serious physical injury may occur. Caution! Slight physical injury or damage to the equipment may occur. > Implement the specified precautionary measures. Note: Basic or further information. 1. ... 2. ... Action: more steps, the sequence must be followed. > ... Action: a step or an optional step. - ... Result of an action. Menu Elements of the instrument, the instrument display or the program interface. [OK] Control keys of the instrument or buttons of the program interface. ... | ... Functions/paths within a menu. “...” Example entries](https://usermanual.wiki/testo-Instruments/05600420/User-Guide-2681066-Page-3.png)
![4 Product description 12 Icon Meaning Standard Standard volume flow: The standard settings for temperature and barometric pressure (21 °C / 1013 hPa) are used to calculate the volume flow. K-factor Factor by which the current reading is multiplied. Depends on which outlet measurements are being taken at. Pitot Tube factor The Pitot tube factor for Pitot tubes is generally the same and must be entered: • Pitot tubes from Testo: 1.00 • Pitot tubes from other manufacturers: the Pitot tube factor can be found in the instruction manual or you should ask your supplier. Control keys Key Function Menu [►, ■] Holds / starts / stops a measurement [ESC] Switches to the previous view / to the measurement view Saves the measured values [►, ▲, ▼,◄] Navigation within the menu [ ] Confirms a selection Switch instrument on/off (press and hold down) Switch illumination on/off (press briefly)](https://usermanual.wiki/testo-Instruments/05600420/User-Guide-2681066-Page-11.png)