DM Technology DM-P200 DIGITAL PRESENTATION DEVICE User Manual
DM Technology Co., Ltd. DIGITAL PRESENTATION DEVICE Users Manual
UserManual.wiki
>
DM Technology
>
DM-P200 User Manual
>
MANUAL 1
Contents
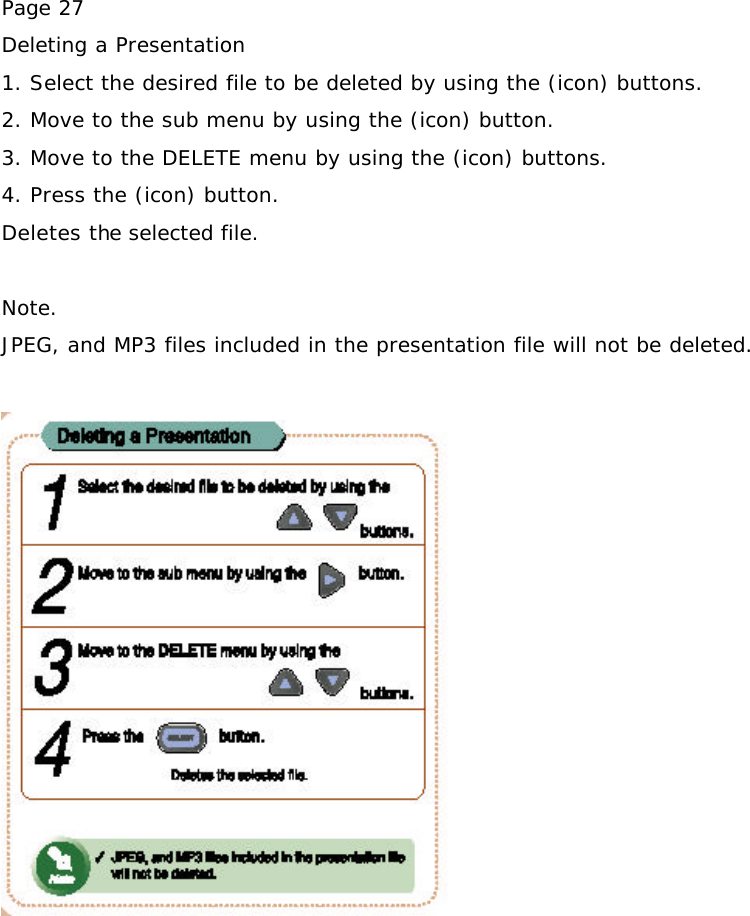
1.
MANUAL 1
2.
MANUAL 2
MANUAL 1
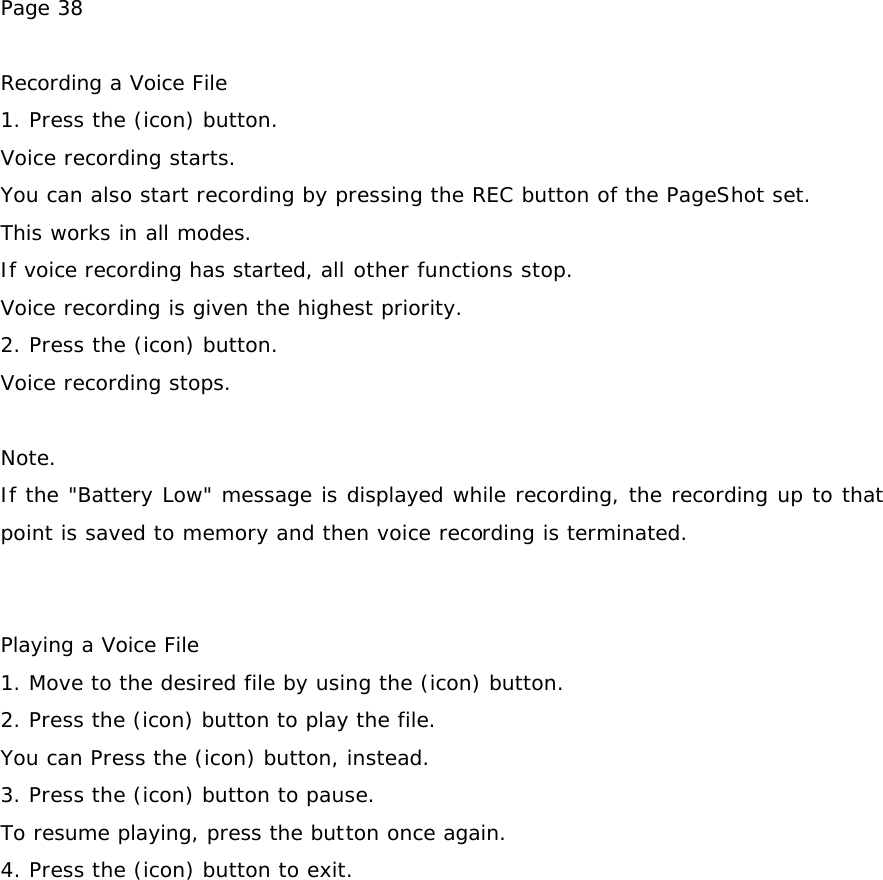
Navigation menu
Upload a User Manual
Namespaces
Wiki Guide
HTML
PDF
Info
Views
User Manual
Discussion / Help
Navigation
![Page 8 Part Names Front View [LCD Display Panel]: This displays the operating status [Main Body] [Remote Control] Back View - CARD EJECT: Removing Compact Flash Memory.](https://usermanual.wiki/DM-Technology/DM-P200.MANUAL-1/User-Guide-338478-Page-7.png)


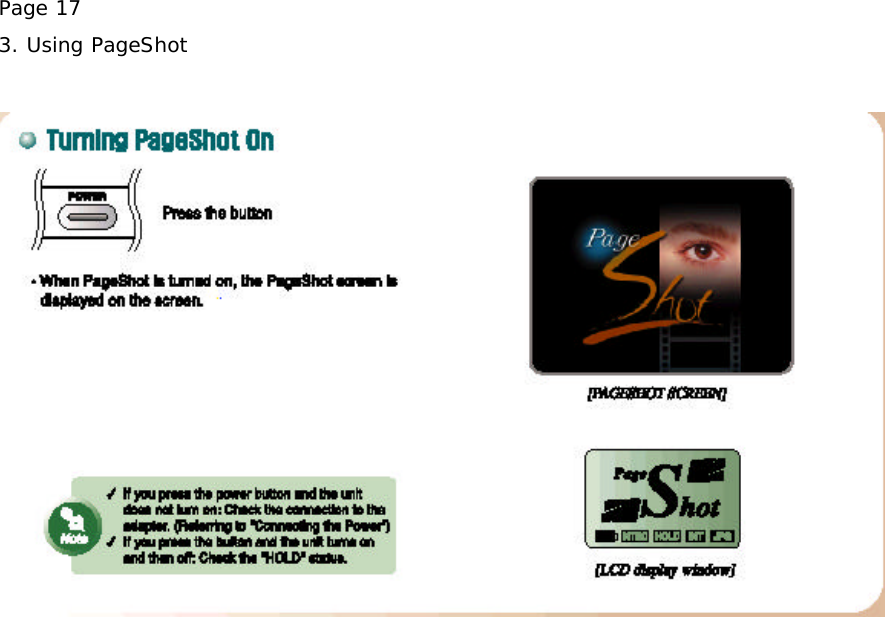
![Page 18 Turning PageShot On Press the (icon) button. When PageShot is turned on, the PageShot screen is displayed on the screen. Note. If you press the power button and the unit does not turn on: Check the connection to the adapter. (Referring to “Connecting the Power”) If you press the button and the unit turns on and then off: Check the “HOLD” status. [LCD display window]](https://usermanual.wiki/DM-Technology/DM-P200.MANUAL-1/User-Guide-338478-Page-18.png)
![Page 19 Configuring NTSC / PAL Depending on the TV used, configure the video signal type by using the (icon) button on the remote control. Whenever you press this button, the NTSC or PAL video signal icon is displayed on the LCD panel of PageShot. The NTSC or PAL icon is displayed only on the LCD panel of PageShot.※ [LCD Display Panel] Note. NTSC (National Television System Committee) This standard is used in Korea, the United States, Japan, Taiwan, Canada, Mexico, etc.. PAL (Phase Alternation Line) This standard is used in European countries such as Germany, England, etc., and other countries such as China, Brazil, etc. Holding Remote Control Operations (HOLD Button) You can lock in the current settings by disabling the operation of the remote control buttons. Disabling the Video Out While Playing MP3’s MP3 No video output signal is sent. Only the audio signal is emitted (output). This function is useful for listening to MP3’s. VIDEO Both the video and audio signals are set to output.](https://usermanual.wiki/DM-Technology/DM-P200.MANUAL-1/User-Guide-338478-Page-19.png)
![Page 20 Selecting the PageShot Menu 1. Press the (icon) button to display the menu. 2. Press the (icon) button to move to the desired menu. 3. Press the (icon) button to launch the selected menu. [PageShot Menu] Selected menu name Selected menu is inversed Remaining battery charge Video out signal (NTSC / PAL) Voice recording or internal / external memory type Current output mode HOLD button status [Menus on PageShot LCD]](https://usermanual.wiki/DM-Technology/DM-P200.MANUAL-1/User-Guide-338478-Page-20.png)
![Page 21 The PageShot Menu Icons PRESENTATION Plays presentation file - consists of JPEG and MP3 files. JPEG Displays a JPEG file in STILL CUT, SLIDE SHOW, or as a THUMBNAIL image. MP3 Plays an MP3 file. VOICE Plays a voice file. SETUP Configures PageShot related functions. Using PRESENTATIONS You can play a presentation file consisting of JPEG and MP3 files. The name of the file currently selected by the cursor Sub menus [PRESENTATION Menu Screen] The name of the current folder. The name of the file currently selected by the cursor. It indicates if there are more files or folders that are not displayed on the current screen. [PRESENTATION Menu LCD Screen]](https://usermanual.wiki/DM-Technology/DM-P200.MANUAL-1/User-Guide-338478-Page-21.png)
![Page 22 Playing a Presentation 1. Press the (icon) button to move to the desired file. 2. Press the (icon) button to start playback. You can press the (icon) button instead. The first JPEG, MP3, and description included in the presentation file are played. (Manual Mode) [TV Screen] [LCD Screen] Moves to the previous page. Moves to the next page. Stops playback. Switches to Automatic mode. In automatic mode, the next page is displayed when the configured time (Slide Delay) has passed. Pauses playback in automatic mode.](https://usermanual.wiki/DM-Technology/DM-P200.MANUAL-1/User-Guide-338478-Page-22.png)
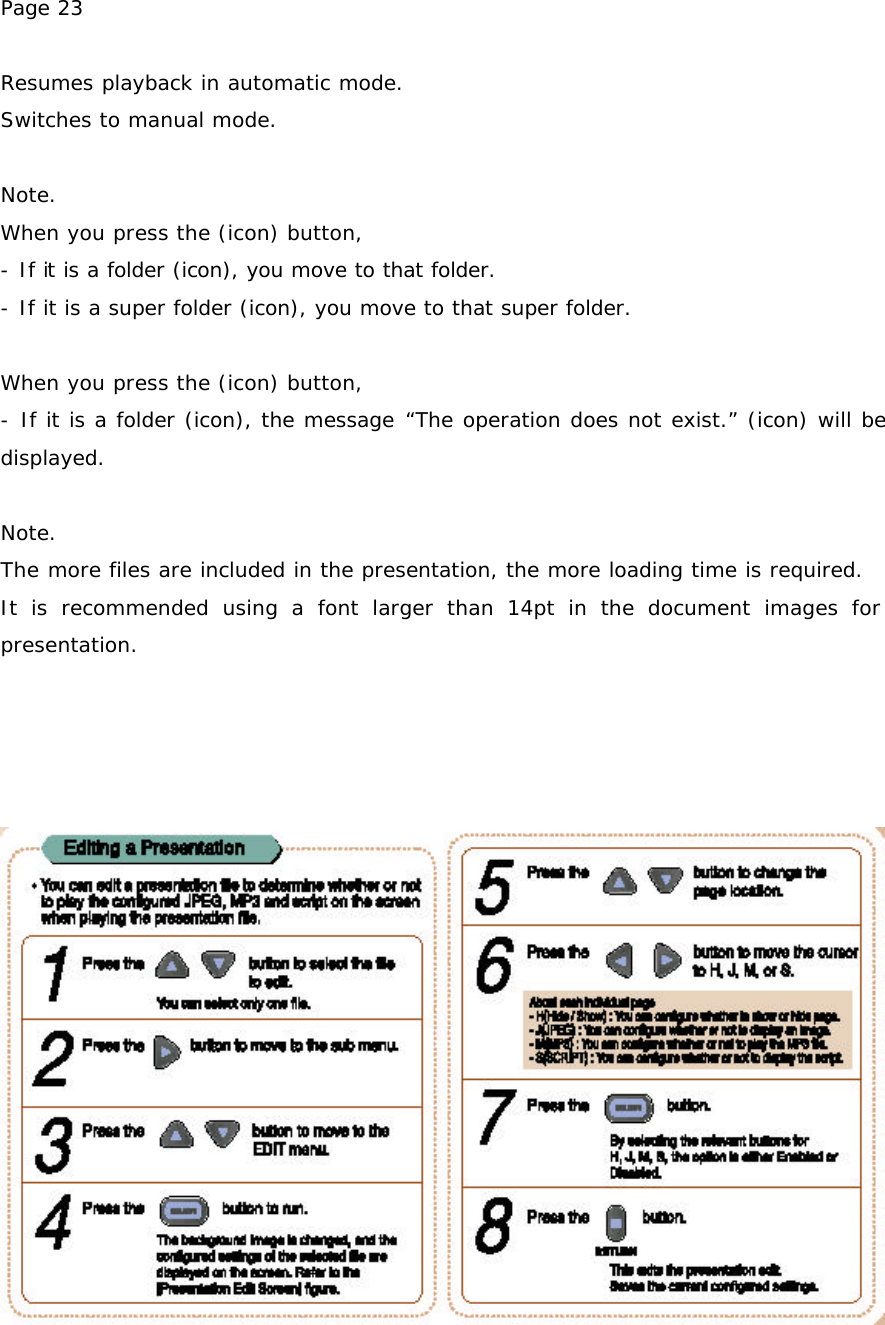
![Page 24 Editing a Presentation You can edit a presentation file to determine whether or not to play the configured JPEG, MP3 and script on the screen when playing the presentation file. 1. Press the (icon) button to select the file to edit. You can select only one file. 2. Press the (icon) button to move to the sub menu. 3. Press the (icon) button to move to the EDIT menu. 4. Press the (icon) button to run. The background image is changed, and the configured settings of the selected file are displayed on the screen. Refer to the [Presentation Edit Screen] figure. 5. Press the (icon) button to change the page location. 6. Press the (icon) button to move the cursor to H, J, M, or S. About each individual page - H(Hide / Show) : You can configure whether to show or hide page. - J(JPEG) : You can configure whether or not to display an image. - M(MP3) : You can configure whether or not to play the MP3 file. - S(SCRIPT) : You can configure whether or not to display the script. 7. Press the (icon) button. By selecting the relevant buttons for H, J, M, S, the option is either Enabled or Disabled. 8. Press the (icon) button. This exits the presentation edit. Saves the current configured settings.](https://usermanual.wiki/DM-Technology/DM-P200.MANUAL-1/User-Guide-338478-Page-24.png)
![Page 25 Presentation File Name Page Configuration JPEG Image MP3 Audio Contents of the Script [Presentation Edit Screen] Presentation File Name Page Configuration JPEG Image MP3 Audio Current Page / Total Page [Presentation Edit LCD Screen] Previewing the Presentation File Images This is convenient to use when the content of the JPEG file is unclear from the name when editing a presentation. 1. Move to the presentation edit screen. Refer to “Editing Presentations”. 2. Press the (icon) button. The 9 images included in the presentation are displayed in a screen. [TV Screen] [LCD Screen]](https://usermanual.wiki/DM-Technology/DM-P200.MANUAL-1/User-Guide-338478-Page-25.png)
![Page 28 Using JPEG You can display the desired JPEG images in STILL CUT, SLIDE SHOW, and THUMBNAIL views. Path of the current location Preview [JPEG Menu Screen] The name of the selected file Sub menu Path of the current location [JPEG Menu LCD Screen] 1. Move to the file you wish to run by using the (icon) buttons. If your mouse pointer rests over a file name for more than 2 seconds, the image of the file will be displayed in the Preview window. Only images whose size are less than 1200 x 1100 will be displayed. 2. Move to the sub menu by using the (icon) button. 3. Move to the desired menu by using the (icon) buttons. STILL CUT Displays images one by one. SLIDE SHOW Displays images in sequence. THUMBNAIL Displays 9 images in thumbnail view (at a time). DELETE Deletes the selected file.](https://usermanual.wiki/DM-Technology/DM-P200.MANUAL-1/User-Guide-338478-Page-28.png)
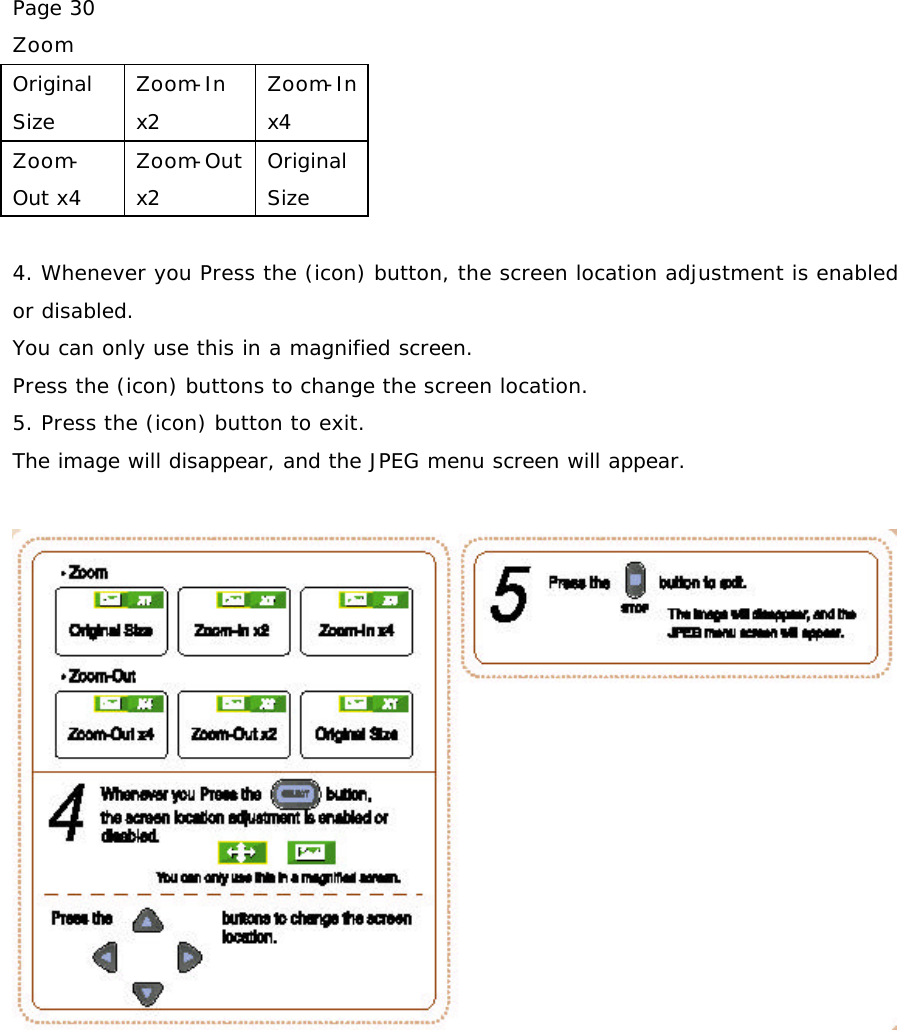
![Page 29 4. Press the (icon) button to run. Note. If you Press the (icon) button on a folder (icon), the path is changed to that folder. Note. Only images whose size are less than 640 x 500 are displayed. JPEG images whose compression method is other than "Base Line" will not be properly displayed. (Initial screen output) If the image is not displayed, convert the type of the image using the "PAGESHOT File Manager" and try again. Viewing JPEG images in STILL CUT 1. Press the (icon) button in STILL CUT. [TV Screen] [LCD Screen] 2. Press the (icon) buttons to display the previous or next page. 3. Press the (icon) buttons to zoom in or out of an image.](https://usermanual.wiki/DM-Technology/DM-P200.MANUAL-1/User-Guide-338478-Page-29.png)
![Page 31 Viewing JPEG images in SLIDE SHOW You can display images one by one after a configurable time interval. 1. Press the (icon) button in the SLIDE SHOW. [TV Screen] [LCD Screen] 2. Whenever you Press the (icon) button, the slide show is either paused or resumed. While paused, the image is displayed in STILL CUT and you can perform the same operation. [Pause TV Screen] 3. Press the (icon) button to exit. The image disappears, and the JPEG menu screen will appear. Note. For information on the interval configuration, refer to "Configuring the SLIDE SHOW Page Interval" in “Using SETUP”. (icon)](https://usermanual.wiki/DM-Technology/DM-P200.MANUAL-1/User-Guide-338478-Page-31.png)
![Page 32 Viewing JPEG images in THUMBNAIL 1. Press the (icon) button in THUMBNAIL. [THUMBNAIL TV Screen] [THUMBNAIL LCD Screen] 2. Move to the desired image by using the (icon) buttons. If you press the (icon) in the highest row, the previous 9 images are displayed. If you press the (icon) in the lowest row, the next 9 images are displayed. 3. Press the (icon) button to maximize the image to the entire screen. In the maximized screen, the image is displayed in STILL CUT and you can perform the same operation. If the selected target is a folder, the images in the folder are displayed in THUMBNAIL. Press the (icon) button to return to the previous THUMBNAIL screen. 4. Press the (icon) button to exit. The image disappears, and the JPEG menu screen will appear.](https://usermanual.wiki/DM-Technology/DM-P200.MANUAL-1/User-Guide-338478-Page-32.png)
![Page 34 Using MP3 You can playback stored MP3 files. [MP3 Menu Screen] Volume Adjustment Bar The name of the file being played Play Status (PLAY) Play Time / Total Time Repeat Mode (OFF) Volume [MP3 LCD Screen] Playing MP3 Files 1. Move to the desired music file you wish to play by using the (icon) buttons. 2. Press the (icon) button to play the music file. You can Press the (icon) button instead. 3. Press the (icon) button to pause. To resume playback, press the button again. 4. Press the (icon) button to exit.](https://usermanual.wiki/DM-Technology/DM-P200.MANUAL-1/User-Guide-338478-Page-34.png)

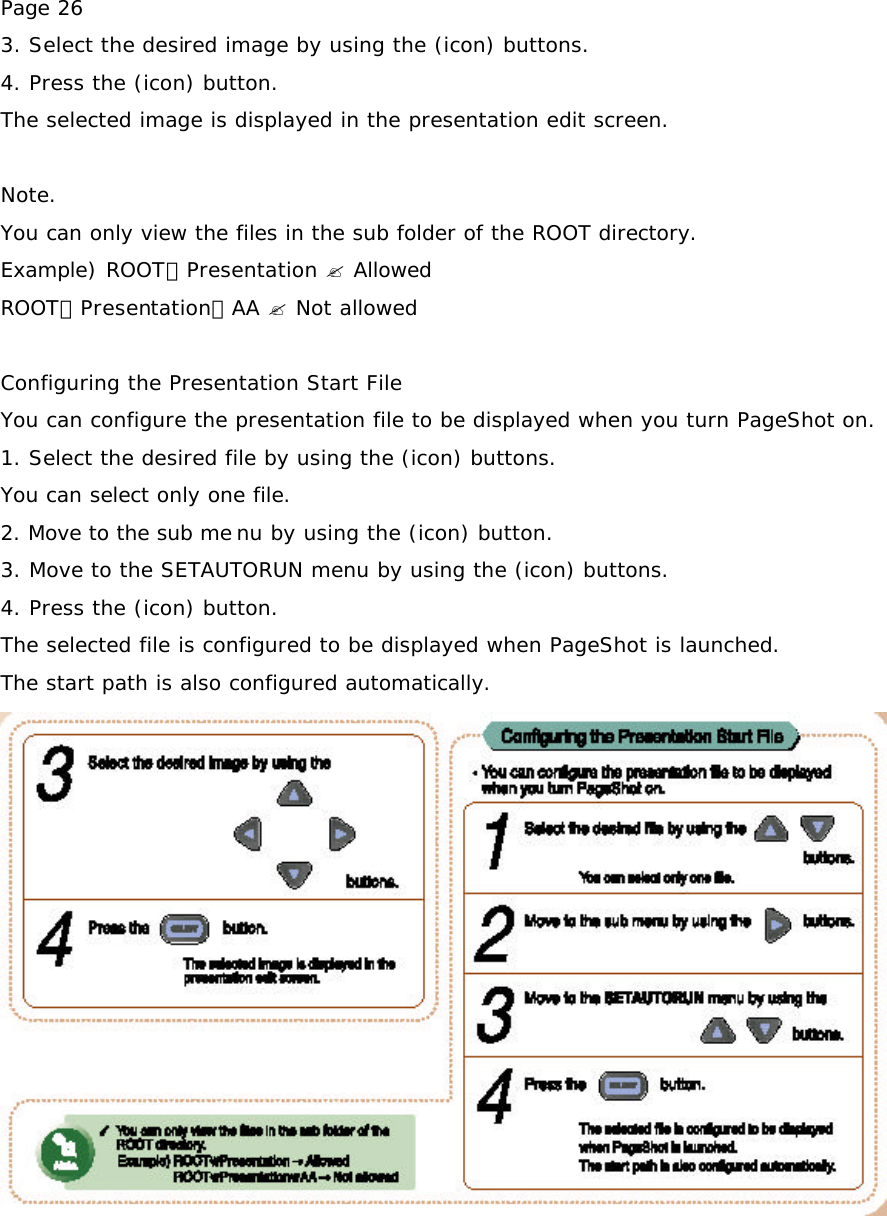
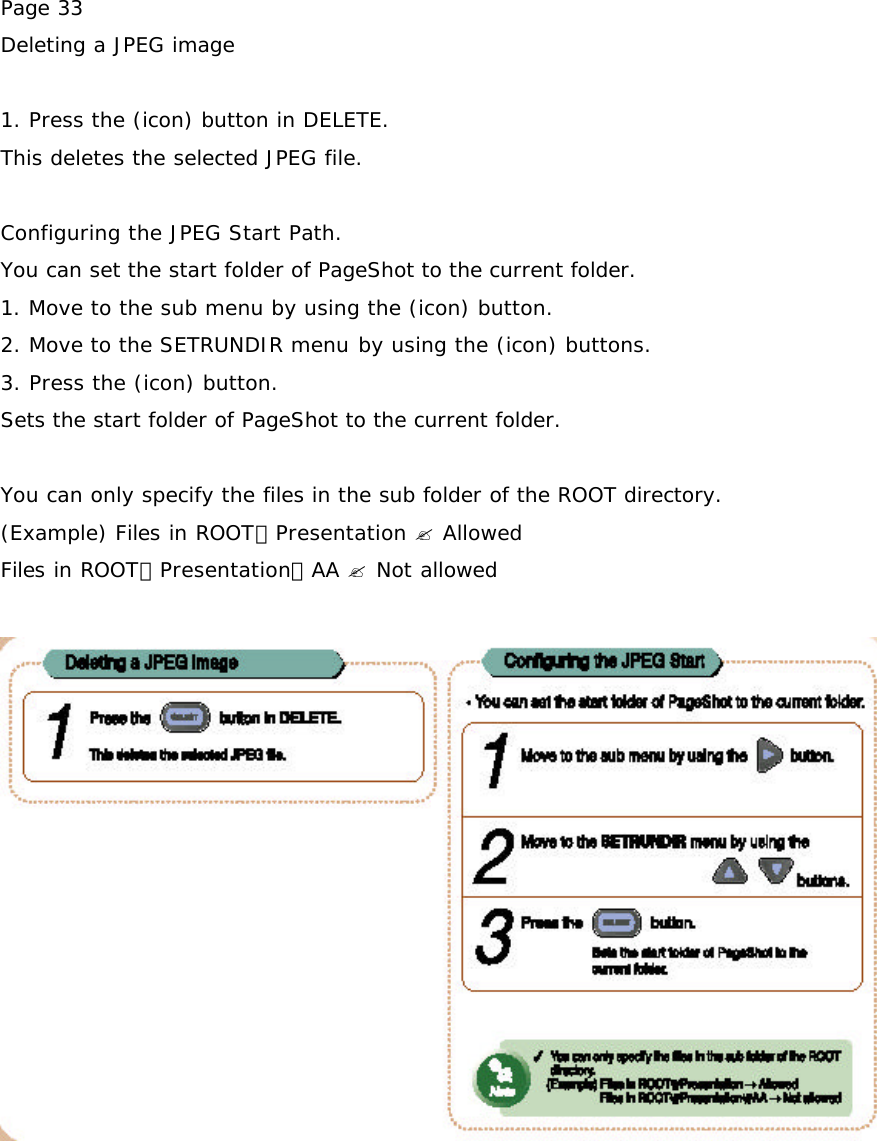
![Page 37 Configuring the MP3 Start Path You can set the start folder of PageShot to the current folder. 1. Move to the sub menu by using the (icon) button. 2. Move to the SETRUNDIR menu by using the (icon) buttons. 3. Press the (icon) button. This sets the start folder of PageShot to the current folder. Note. You can only specify the sub folder of the ROOT directory. Example) ROOT₩Presentation ? Allowed ROOT₩Presentation₩AA ? Not allowed Using VOICE You can record voice and then play the recorded clip back. The voice file being played. Playback status (PLAY) Play Time / Total Time Repeat Mode (OFF) Volume Adjustment Bar Volume [VOICE Menu Screen] The voice file being played. Play status (PLAY) Play Time / Total Time Repeat Mode (OFF) Volume Volume [VOICE Menu LCD Screen]](https://usermanual.wiki/DM-Technology/DM-P200.MANUAL-1/User-Guide-338478-Page-37.png)
![Page 41 Configuring the Start Path You can set the start folder of PageShot to the current folder. 1. Move to the sub menu by using the (icon) button. 2. Move to the SETRUNDIR menu by using the (icon) buttons. 3. Press the (icon) button. Sets the start folder of PageShot to the current folder. Note. You can only specify the sub folder of the ROOT directory. Example) ROOT₩Presentation ?Allowed ROOT₩Presentation₩AA ( Not allowed Using SETUP You can change the related function configurations of PageShot. [SETUP Menu Screen] [SETUP Menu LCD Screen]](https://usermanual.wiki/DM-Technology/DM-P200.MANUAL-1/User-Guide-338478-Page-41.png)
![Page 42 PageShot Menu Icons FIRMWARE UPGRADE Upgrades the firmware of PageShot. FORMAT FLASH Initializes the Flash Memory. INFORMATION Shows configured settings. You cannot make changes in this menu. SETUP SCREEN Adjusts the horizontal and vertical location of the screen. SETUP DEVICE Shows the configurable settings and allows changes. Upgrading the Firmware You can upgrade the firmware of PageShot. 1. In the Firmware Upgrade menu, Press the (icon) button. If you press the button in the Firmware Upgrade menu, the firmware file list will be displayed. [Firmware File List Screen]](https://usermanual.wiki/DM-Technology/DM-P200.MANUAL-1/User-Guide-338478-Page-42.png)
![Page 43 [Firmware File List LCD Screen] 1. Move to the desired firmware file you wish to upgrade by using the (icon) button. 2. Press the (icon) button. A message box appears asking you for confirmation to apply the selected firmware. Filename [TV, LCD Screen] 3. Select “YES” or “NO” using the (icon) button. 4. Press the (icon) button. YES: Starts the upgrade. NO: Cancels the upgrade. When the upgrade has been completed successfully, the system is restarted. The “UPGRADE FAIL” message appears when the upgrade has failed. In this case, press the (icon) button to return to the firmware file list screen. 5. Press the (icon) button. This moves to the SETUP menu. Note. If the firmware file is damaged, the "UPGRADE FAIL" message will be displayed. In this case, delete the firmware file, copy the file again, and retry the upgrade. Notice. Applying a different version of the firmware may disable some operations. Check before upgrading the firmware.](https://usermanual.wiki/DM-Technology/DM-P200.MANUAL-1/User-Guide-338478-Page-43.png)
![Page 44 Formatting the Memory You can initialize (format) the embedded memory (Flash memory) or the additionally installed memory (Compact Flash Memory). 1. In ‘Format Flash’, Press the (icon) button. If you press the button in Format Flash, a message box appears asking you to confirm the format. [TV, LCD Screen] 2. Press the (icon) button to select "YES" or "NO". 3. Press the (icon) button. YES: Performs the format NO: Cancels the format (SETUP menu) Depending on the amount of memory, the time required may vary. When the format has been completed, the SETUP menu screen will appear. Warning When you format the memory, you will lose ALL saved data. CHECK before formatting.](https://usermanual.wiki/DM-Technology/DM-P200.MANUAL-1/User-Guide-338478-Page-44.png)
![Page 45 Viewing Information You can view the startup settings for PageShot. You cannot change the settings in this menu. [Information Screen] [Information LCD Screen] 1. In Information, Press the (icon) button. If you press the button in Information, the Information screen appears. The entire settings are displayed on the TV, and a single item is displayed on the LCD. 2. Press the (icon) button to check the other item. This works for LCD output only. 1. TITLE IMAGE : The background image (JPEG) to be displayed when the power is turned on. 2. TITLE AUDIO : The background audio (MP3) to be played when the power is turned on. 3. RUN DIR : The Start folder location when the power is turned on. 4. AUTO RUN FILE : The Presentation file (PRJ) to be played when the power is turned on. 5. FIRMWARE VERSION : The Current Version of the firmware. 6. MEMORY : memory usage / total amount of memory 3. Press the (icon) button. This moves to the SETUP menu. Note. The TITLE IMAGE and TITLE AUDIO appear when Start mode is "N/A". The AUTO RUN FILE appears when Start mode is "PJT". For information on Start mode, refer to "SETUP DEVICE".](https://usermanual.wiki/DM-Technology/DM-P200.MANUAL-1/User-Guide-338478-Page-45.png)