DM Technology DM-P200 DIGITAL PRESENTATION DEVICE User Manual
DM Technology Co., Ltd. DIGITAL PRESENTATION DEVICE Users Manual
Contents
- 1. MANUAL 1
- 2. MANUAL 2
MANUAL 1

This device complies with Part 15 of the FCC Rules. Operation is
subject to the following two conditions:(1)this device may not cause
harmful interference, and (2)this device must accept any interference
received, including interference that may cause undesired operation.
Note :This equipment has been tested and found to comply with the
limits for a Class B digital device, pursuant to part 15 of the FCC Rules.
These limits are designed to provide reasonable protection against
harmful interference in a residential installation. This equipment
generates, uses and can radiate radio frequency energy and, if not
installed and used in accordance with the instructions, may cause harmful
interference to radio communications. However, there is no guarantee
that interference will not occur in a particular installation. If this
equipment does cause harmful interference to radio or television
reception,which can be determined by turning the equipment off and on,
the user is encouraged to try to correct the interference by one or more
of the following measures :
-Reorient or relocate the receiving antenna.
-Increase the separation between the equipment and receiver.
-Connect the equipment into an outlet on a circuit different from that
to which the receiver is connected.
-Consult the dealer or an experienced radio/TV technician for help.
NOTE:THE MANUFACTURER IS NOT RESPONSIBLE FOR ANY RADIO OR TV
INTERFERENCE CAUSED BY UNAUTHORIZED MODIFICATIONS TO THIS
EQUIPMENT.SUCH MODIFICATIONS COULD VOID THE USER'S AUTHORITY TO
OPERATE THE EQUIPMENT.
Content
PageShot
1. PageShot Overview
Overview 6
Package Contents 7
Part Names 8-11
Product Features 12
System Requirements 12
PageShot Specifications 12
2. Connecting PageShot
Connecting the Power 14
- Installing 14
- Using the Adaptor 14
Connecting the Earphones 14
Connecting PageShot to a TV/(Projector) 15
Connecting PageShot to a Computer 15
3. Using PageShot
Turning PageShot On 18~19
- Configuring NTSC/PAL 19
Holding Remote Control Operations (HOLD Button) 19
Disabling Video Out While Playing MP3’s 19
Selecting the PageShot Menu 20-21
- The PageShot Menu Icons 21
Using PRESENTATIONS 21-27
- Playing a Presentation 22
- Editing a Presentation 24-25
- Previewing Presentation File Images, Configuring the Presentation Start File 25-26
- Deleting a Presentation, Configuring the Start Path 27
Using JPEG 28-33
- Viewing JPEG Images in STILL CUT 29-30
- Viewing JPEG Images in SLIDE SHOW 31
- Viewing JPEG Images in STILL CUT 29-30
- Viewing JPEG Images in THUMBNAIL 32
- Deleting a JPEG image, Configuring the JPEG Start Path 33
Using MP3 33-37
- Playing MP3 Files 35
- Skipping a Music File, Adjusting the Volume 35
- Repeating, Deleting, Configuring the MP3 Start Path 36-37
Using VOICE 37-41
- Recording a Voice File, Playing a Voice File 38
- Exploring the Playback Location in a Voice File, Adjusting the Volume 39
- Repeating, Deleting a Voice File 40
- Configuring the Start Path 41
Using SETUP 41-53
- The PageShot Menu Icons 42
- Upgrading the Firmware 42-43
- Formatting the Memory 44
- Viewing Information 45
- Adjusting the Horizontal/Vertical Location of the Screen 46
- Configuring the PageShot Device 46
- Configuring the Start mode 47-48
- Muting the Sound 48-49
- Configuring the SLIDE SHOW Page Interval 49
- Configuring POWER SAVE 50
- Configuring Internal and External Memory 51
- Configuring the Video Out Signal (NTSC/PAL) 52
- Using External Memory 53
4. Using Applications
Installing the USB Driver 56-61
- Windows 98 Second Edition 56-58
- Windows Millennium Edition 58
- Windows 2000 59-61
- Windows XP 61
Checking the Connectivity 62-63
Safely Removing PageShot After Use 63-64
Installing the PAGESHOT File Manager 65-66
Using the PAGESHOT File Manager 66-84
- Running the PAGESHOT File Manager 67
- Icon Functions 68
- Detailed Description of Functions 69-84
FORMATTING PAGESHOT 69
CONVERTING A POWERPOINT FILE TO JPEG 69-70
IMAGE FORMAT CONVERSION AND RESIZING 71-72
SCREEN CAPTURING 73-74
PLAYING A VOICE FILE 75
EDITING THE INITIALIZATION FILE 76-77
EDITING A PRESENTATION FILE 78-81
VIEWING THE DETAIL LIST 81
VIEWING THE THUMBNAIL LIST 81
INFORMATION 81
Copying Files to PageShot 82
Renaming a File 83
Deleting a File 84
Configuring the Language 84
Configuring the Image Size Depending on the TV Output 84
5. Using PAGESHOT File2 JPEG 85
- Running PAGESHOT File2 JPEG 85
- Icon Functions 86
- Detailed Description of Functions 87
Selecting the File Format 87
Downloading 87
Uploading 88
Deleting 89
Updating 89
Formatting PageShot 89

Page 6
PageShot Overview Package Contents Part Names
Product Features System
Requirements
PageShot Specifications
1. PageShot Overview
Overview
PageShot is a portable presentation device that enables the giving of presentations
without the need for other equipment such as a laptop computer.
Using PageShot, a presentation can be held anywhere that a display device such as
a TV or projector is present.
PageShot provides functions for playing presentations created on a computer,
playing MP3 files, and recording. By connecting to a computer via USB, you can
easily create, edit, and save presentation files.
It will greatly enhance your efficiency and add value to your business
Page 7
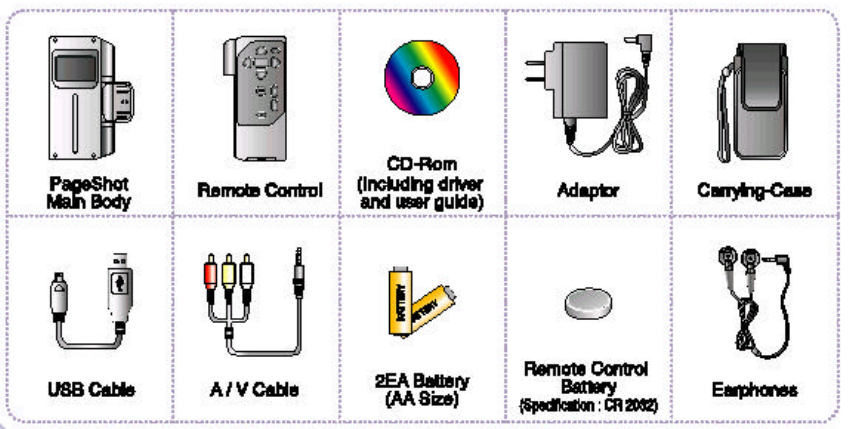
Package Contents
Page 8
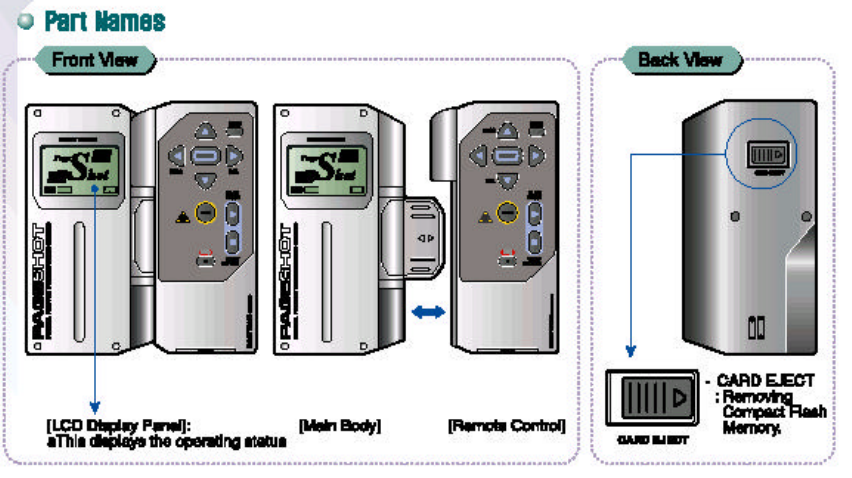
Part Names
Front View
[LCD Display Panel]: This displays the operating status
[Main Body]
[Remote Control]
Back View
- CARD EJECT: Removing Compact Flash Memory.
Page 9
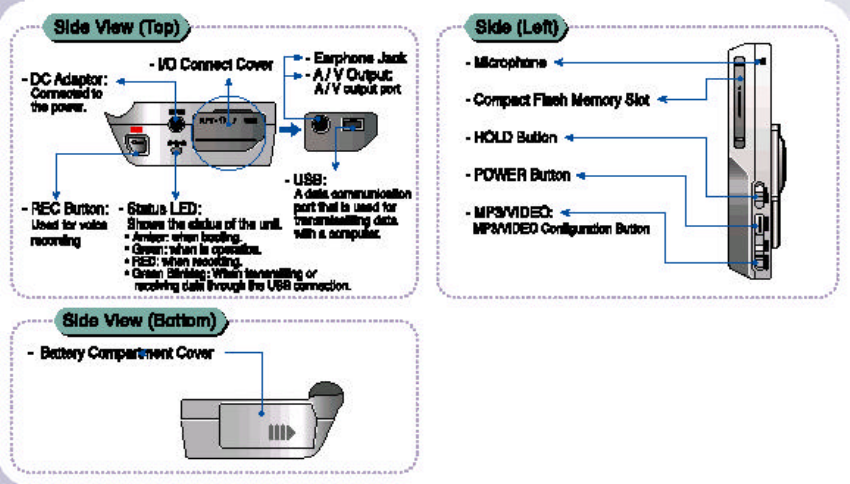
Side View (Top)
- DC Adaptor: Connected to the power.
- REC Button: Used for voice recording
- I/O Connect Cover
- Status LED: Shows the status of the unit.
* Amber: when booting.
* Green: when in operation.
* RED: when recording.
* Green Blinking: When transmitting or receiving data through the USB connection.
- Earphone Jack
- A / V Output: A / V output port
- USB: A data communication port that is used for transmissitting data with a
computer.
Side View (Bottom)
- Battery Compartment Cover
Side (Left)
- Microphone
- Compact Flash Memory Slot
- HOLD Button
- POWER Button
- MP3/VIDEO: MP3/VIDEO Configuration Button
Page 10
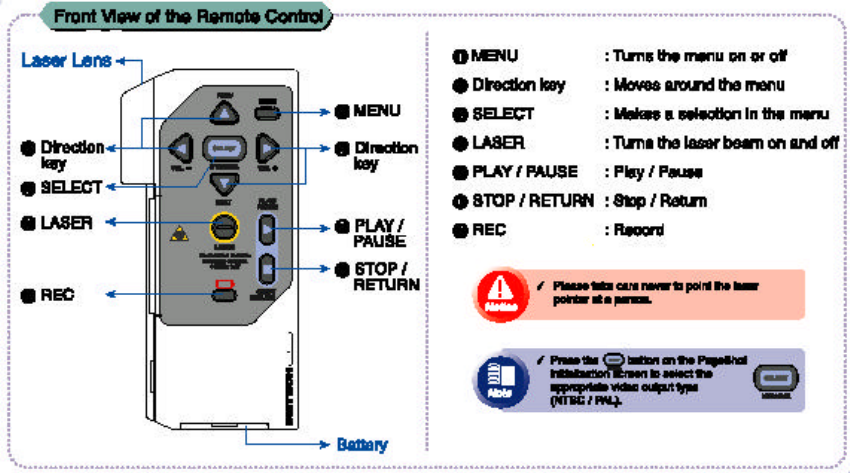
Front View of the Remote Control
Laser Lens
Direction key
SELECT
LASER
REC
MENU
Direction key
PLAY / PAUSE
STOP / RETURN
Battery
MENU: Turns the menu on or off
Direction key: Moves around the menu
SELECT: Makes a selection in the menu
LASER: Turns the laser beam on and off
PLAY / PAUSE: Play / Pause
STOP / RETURN: Stop / Return
REC: Record
Notice. Please take care never to point the laser pointer at a person.
Note. Press the (icon) button on the PageShot initialization screen to select the
appropriate video output type (NTSC / PAL).

Page 11
Using the remote control for the first time:
1. Open the battery door by pulling the under-side of the remote control to open
the battery compartment cover.
2. Insert and align the battery with the + and - symbols in the battery
compartment.
3. Slide and close the battery compartment cover.
Note. The remote control battery is a CR2032 3 Volt Lithium Cell.
Page 12
Product Features
- Windows 98, ME, 2000, and XP compatible
- Automatic conversion of PowerPoint slides into the PageShot presentation format
- USB plug-in support
- Multi image folder support
- Slide preview function support
- Extended memory support
- MP3 player function support
- Recording function function
System Requirements
CPU : Pentium
Memory : 64M
OS : Windows 98, ME, 2000, and XP
Peripheral I / O : USB Port
PageShot Specifications
Image Resolution 640 * 440 (NTSC)
640 * 500 (PAL)
Image Format JPEG
Audio Format MP3
Voice Format G.723
Storage Capacity Image – About 1000 image files
MP3 –
About 12 music files (when the
length of a music clip is about 4
minutes)
Voice Recording – About 6 hours
Storage Media Internal Memory 64M
External Memory Compact Flash
LCD
(Liquid Crystal
Display)
128 * 64 Black-and-white Graphic LCD
Interface PC USB1.1
TV RCA Cable NTSC/PAL; Stereo Audio
Pointing Laser Pointer (1mW)
OS Windows 98SE, ME, 2000, and XP

Power DC 3V Adapter
2 AA-type Alkaline Batteries
Power Consumption
0.85W
Security
Specification
Dimension 114 * 56.6 * 27.5mm
Weight About 100g (without)
Page 13
2. Connecting PageShot
Page 14
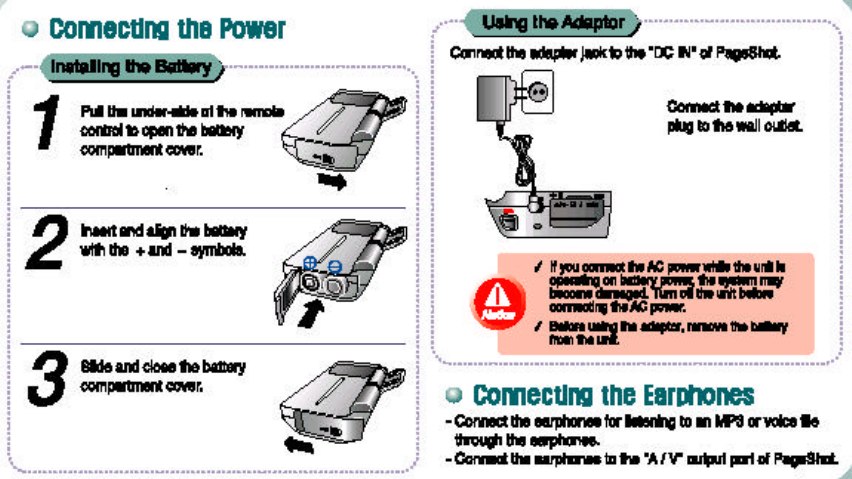
Connecting the Power
Installing the Battery
1. Pull the under-side of the remote control to open the battery compartment cover.
2. Insert and align the battery with the + and – symbols.
3. Slide and close the battery compartment cover.
Using the Adaptor
Connect the adapter jack to the “DC IN” of PageShot.
Connect the adapter plug to the wall outlet.
If you connect the AC power while the unit is operating on battery power, the
system may become damaged. Turn off the unit before connecting the AC power.
Before using the adaptor, remove the battery from the unit.
Connecting the Earphones
- Connect the earphones for listening to an MP3 or voice file through the earphones.
- Connect the earphones to the “A / V” output port of PageShot.
Page 15
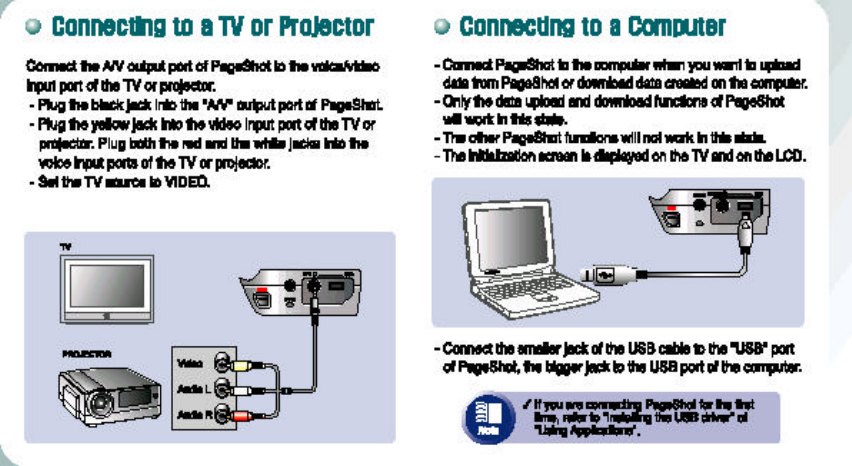
Connecting to a TV or Projector
Connect the “A/V” output port of PageShot to the voice/video input port of the TV
or projector.
- Plug the black jack into the “A/V” output port of PageShot.
- Plug the yellow jack into the video input port of the TV or projector. Plug both the
red and the white jacks into the voice input ports of the TV or projector.
- Set the TV source to VIDEO.
Connecting to a Computer
- Connect PageShot to the computer when you want to upload data from PageShot
or download data created on the computer.
- Only the data upload and download functions of PageShot will work in this state.
- The other PageShot functions will not work in this state.
- The initialization screen is displayed on the TV and on the LCD.
- Connect the smaller jack of the USB cable to the “USB” port of PageShot, the
bigger jack to the USB port of the computer.
Note. If you are connecting PageShot for the first time, refer to “Installing the
USB driver” of “Using Applications”.
Page 17
3. Using PageShot
Page 18
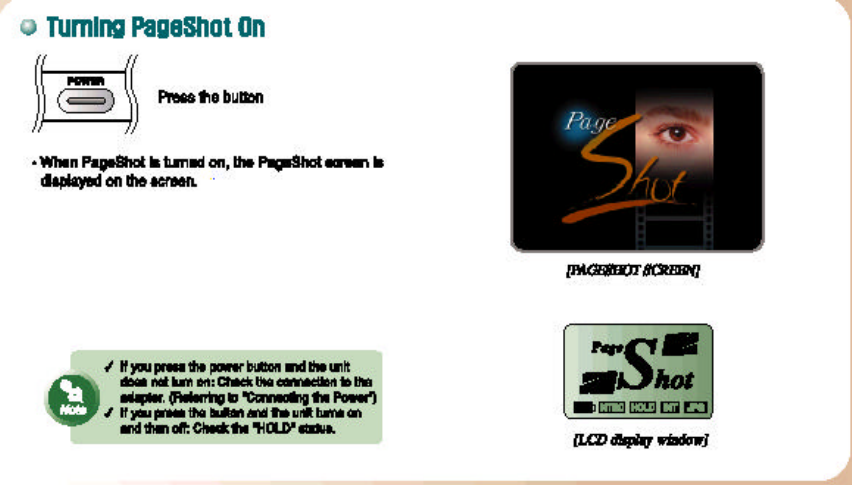
Turning PageShot On
Press the (icon) button.
When PageShot is turned on, the PageShot screen is displayed on the screen.
Note.
If you press the power button and the unit does not turn on: Check the connection
to the adapter. (Referring to “Connecting the Power”)
If you press the button and the unit turns on and then off: Check the “HOLD” status.
[LCD display window]
Page 19
Configuring NTSC / PAL
Depending on the TV used, configure the video signal type by using the (icon)
button on the remote control.
Whenever you press this button, the NTSC or PAL video signal icon is displayed on
the LCD panel of PageShot.
The NTSC or PAL icon is displayed only on the LCD panel of PageShot.※
[LCD Display Panel]
Note.
NTSC (National Television System Committee)
This standard is used in Korea, the United States, Japan, Taiwan, Canada, Mexico,
etc..
PAL (Phase Alternation Line)
This standard is used in European countries such as Germany, England, etc., and
other countries such as China, Brazil, etc.
Holding Remote Control Operations (HOLD Button)
You can lock in the current settings by disabling the operation of the remote control
buttons.
Disabling the Video Out While Playing MP3’s
MP3
No video output signal is sent. Only the audio signal is emitted (output).
This function is useful for listening to MP3’s.
VIDEO
Both the video and audio signals are set to output.
Page 20
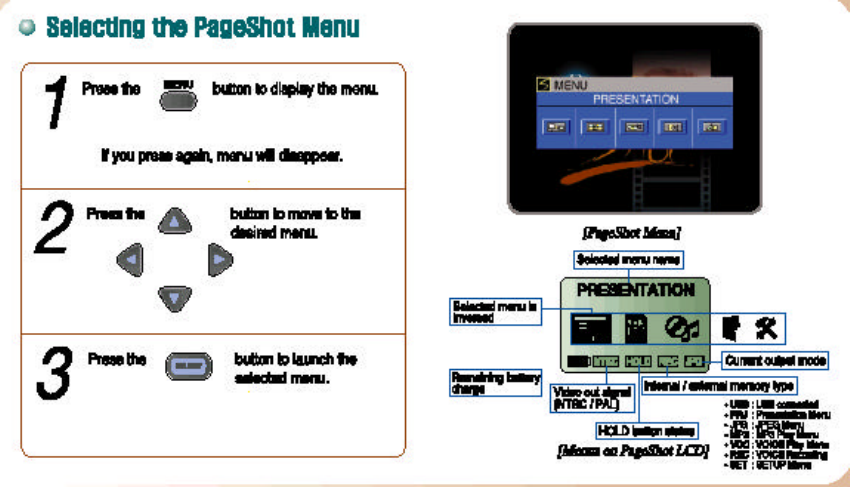
Selecting the PageShot Menu
1. Press the (icon) button to display the menu.
2. Press the (icon) button to move to the desired menu.
3. Press the (icon) button to launch the selected menu.
[PageShot Menu]
Selected menu name
Selected menu is inversed
Remaining battery charge
Video out signal (NTSC / PAL)
Voice recording or internal / external memory type
Current output mode
HOLD button status
[Menus on PageShot LCD]
Page 21
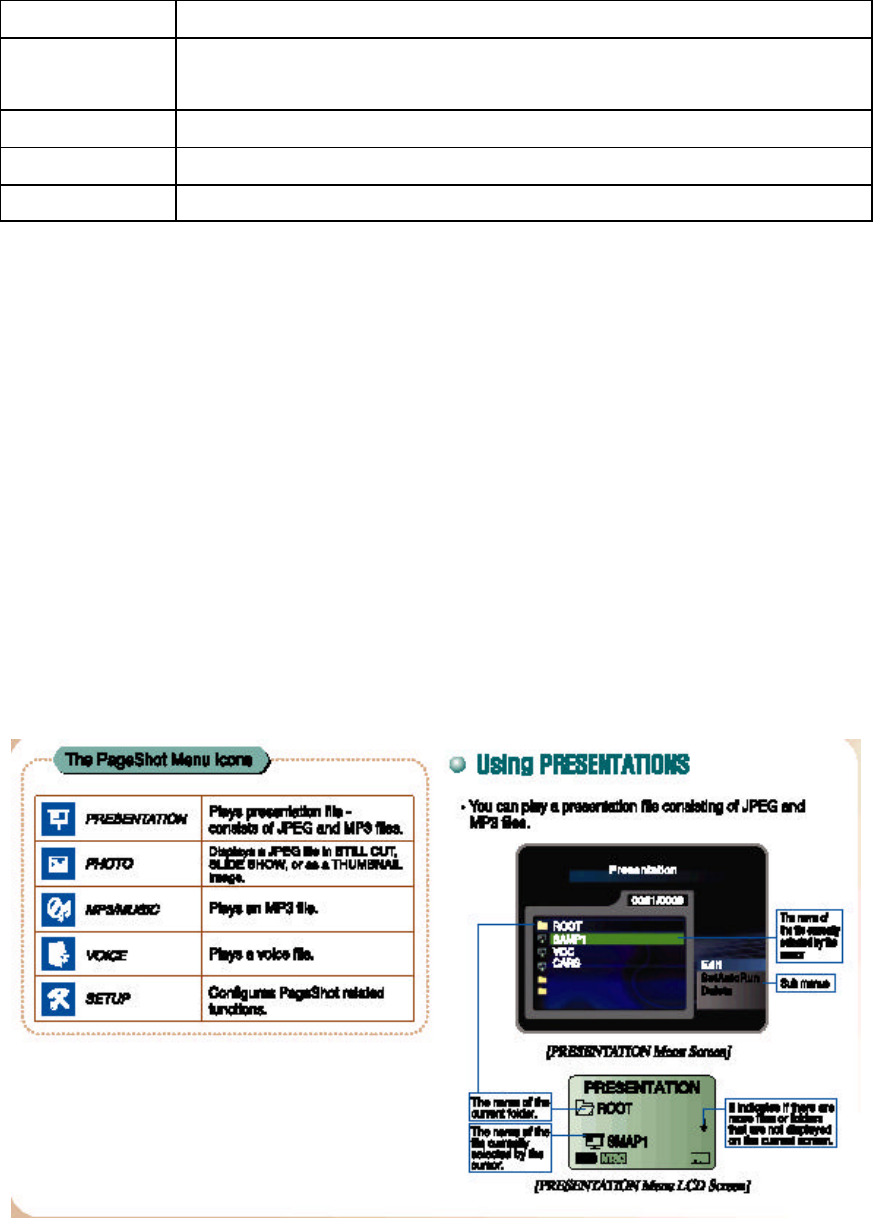
The PageShot Menu Icons
PRESENTATION
Plays presentation file - consists of JPEG and MP3 files.
JPEG Displays a JPEG file in STILL CUT, SLIDE SHOW, or as a
THUMBNAIL image.
MP3 Plays an MP3 file.
VOICE Plays a voice file.
SETUP Configures PageShot related functions.
Using PRESENTATIONS
You can play a presentation file consisting of JPEG and MP3 files.
The name of the file currently selected by the cursor
Sub menus
[PRESENTATION Menu Screen]
The name of the current folder.
The name of the file currently selected by the cursor.
It indicates if there are more files or folders that are not displayed on the current
screen.
[PRESENTATION Menu LCD Screen]
Page 22
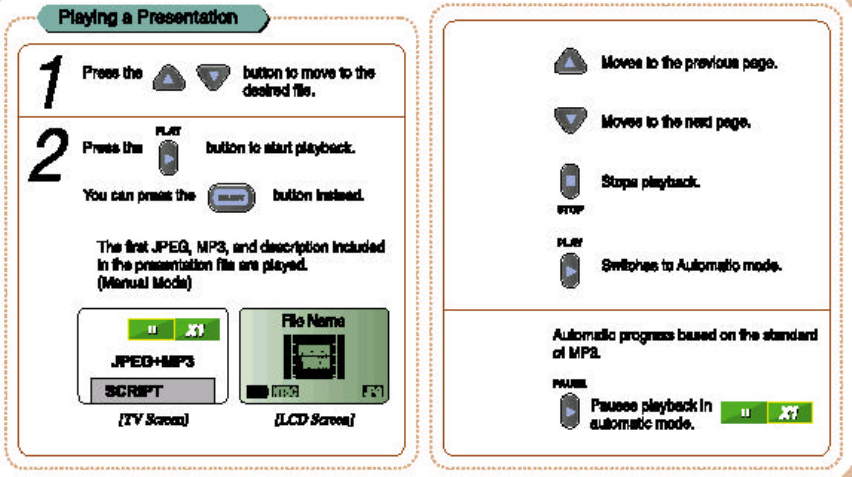
Playing a Presentation
1. Press the (icon) button to move to the desired file.
2. Press the (icon) button to start playback.
You can press the (icon) button instead.
The first JPEG, MP3, and description included in the presentation file are played.
(Manual Mode)
[TV Screen]
[LCD Screen]
Moves to the previous page.
Moves to the next page.
Stops playback.
Switches to Automatic mode.
In automatic mode, the next page is displayed when the configured time (Slide
Delay) has passed.
Pauses playback in automatic mode.
Page 23
Resumes playback in automatic mode.
Switches to manual mode.
Note.
When you press the (icon) button,
- If it is a folder (icon), you move to that folder.
- If it is a super folder (icon), you move to that super folder.
When you press the (icon) button,
- If it is a folder (icon), the message “The operation does not exist.” (icon) will be
displayed.
Note.
The more files are included in the presentation, the more loading time is required.
It is recommended using a font larger than 14pt in the document images for
presentation.

Page 24
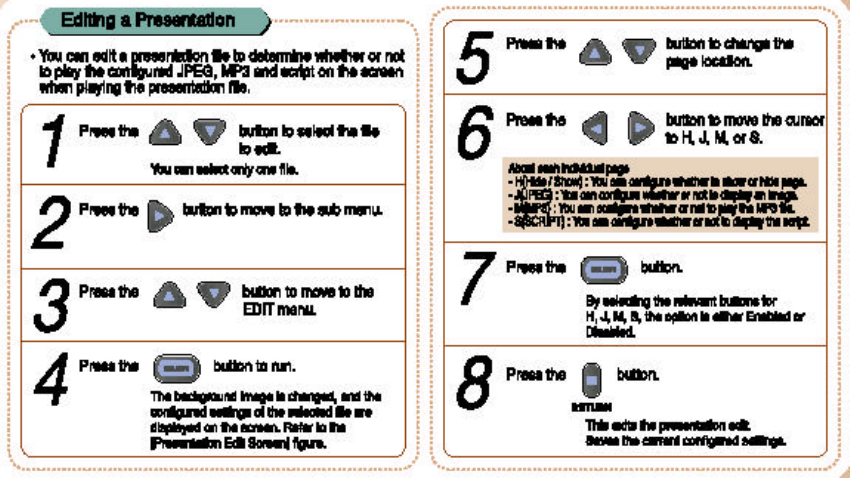
Editing a Presentation
You can edit a presentation file to determine whether or not to play the configured
JPEG, MP3 and script on the screen when playing the presentation file.
1. Press the (icon) button to select the file to edit.
You can select only one file.
2. Press the (icon) button to move to the sub menu.
3. Press the (icon) button to move to the EDIT menu.
4. Press the (icon) button to run.
The background image is changed, and the configured settings of the selected file
are displayed on the screen.
Refer to the [Presentation Edit Screen] figure.
5. Press the (icon) button to change the page location.
6. Press the (icon) button to move the cursor to H, J, M, or S.
About each individual page
- H(Hide / Show) : You can configure whether to show or hide page.
- J(JPEG) : You can configure whether or not to display an image.
- M(MP3) : You can configure whether or not to play the MP3 file.
- S(SCRIPT) : You can configure whether or not to display the script.
7. Press the (icon) button.
By selecting the relevant buttons for H, J, M, S, the option is either Enabled or
Disabled.
8. Press the (icon) button.
This exits the presentation edit.
Saves the current configured settings.
Page 25
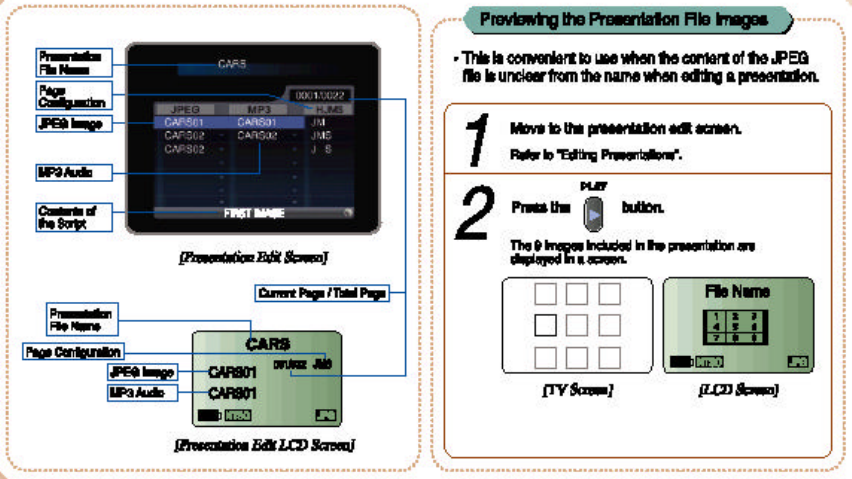
Presentation File Name
Page Configuration
JPEG Image
MP3 Audio
Contents of the Script
[Presentation Edit Screen]
Presentation File Name
Page Configuration
JPEG Image
MP3 Audio
Current Page / Total Page
[Presentation Edit LCD Screen]
Previewing the Presentation File Images
This is convenient to use when the content of the JPEG file is unclear from the
name when editing a presentation.
1. Move to the presentation edit screen.
Refer to “Editing Presentations”.
2. Press the (icon) button.
The 9 images included in the presentation are displayed in a screen.
[TV Screen]
[LCD Screen]
Page 26
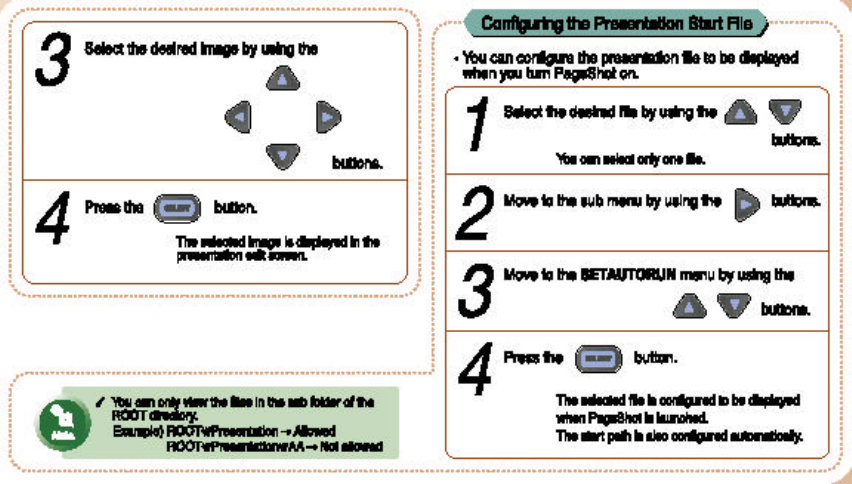
3. Select the desired image by using the (icon) buttons.
4. Press the (icon) button.
The selected image is displayed in the presentation edit screen.
Note.
You can only view the files in the sub folder of the ROOT directory.
Example) ROOT₩Presentation ? Allowed
ROOT₩Presentation₩AA ? Not allowed
Configuring the Presentation Start File
You can configure the presentation file to be displayed when you turn PageShot on.
1. Select the desired file by using the (icon) buttons.
You can select only one file.
2. Move to the sub me nu by using the (icon) button.
3. Move to the SETAUTORUN menu by using the (icon) buttons.
4. Press the (icon) button.
The selected file is configured to be displayed when PageShot is launched.
The start path is also configured automatically.
Page 27
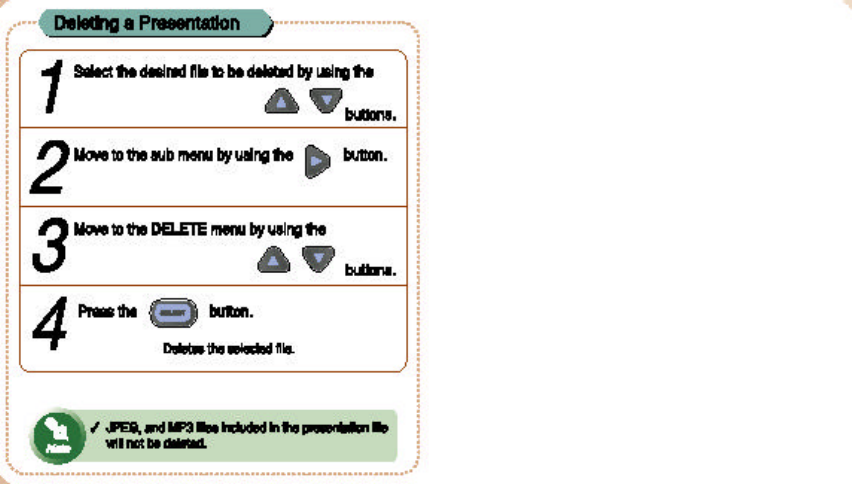
Deleting a Presentation
1. Select the desired file to be deleted by using the (icon) buttons.
2. Move to the sub menu by using the (icon) button.
3. Move to the DELETE menu by using the (icon) buttons.
4. Press the (icon) button.
Deletes the selected file.
Note.
JPEG, and MP3 files included in the presentation file will not be deleted.
Page 28
Using JPEG
You can display the desired JPEG images in STILL CUT, SLIDE SHOW, and
THUMBNAIL views.
Path of the current location
Preview
[JPEG Menu Screen]
The name of the selected file
Sub menu
Path of the current location
[JPEG Menu LCD Screen]
1. Move to the file you wish to run by using the (icon) buttons.
If your mouse pointer rests over a file name for more than 2 seconds, the image of
the file will be displayed in the Preview window.
Only images whose size are less than 1200 x 1100 will be displayed.
2. Move to the sub menu by using the (icon) button.
3. Move to the desired menu by using the (icon) buttons.
STILL CUT
Displays images one by one.
SLIDE SHOW
Displays images in sequence.
THUMBNAIL
Displays 9 images in thumbnail view (at a time).
DELETE
Deletes the selected file.
Page 29
4. Press the (icon) button to run.
Note.
If you Press the (icon) button on a folder (icon), the path is changed to that folder.
Note.
Only images whose size are less than 640 x 500 are displayed.
JPEG images whose compression method is other than "Base Line" will not be
properly displayed. (Initial screen output)
If the image is not displayed, convert the type of the image using the "PAGESHOT
File Manager" and try again.
Viewing JPEG images in STILL CUT
1. Press the (icon) button in STILL CUT.
[TV Screen]
[LCD Screen]
2. Press the (icon) buttons to display the previous or next page.
3. Press the (icon) buttons to zoom in or out of an image.
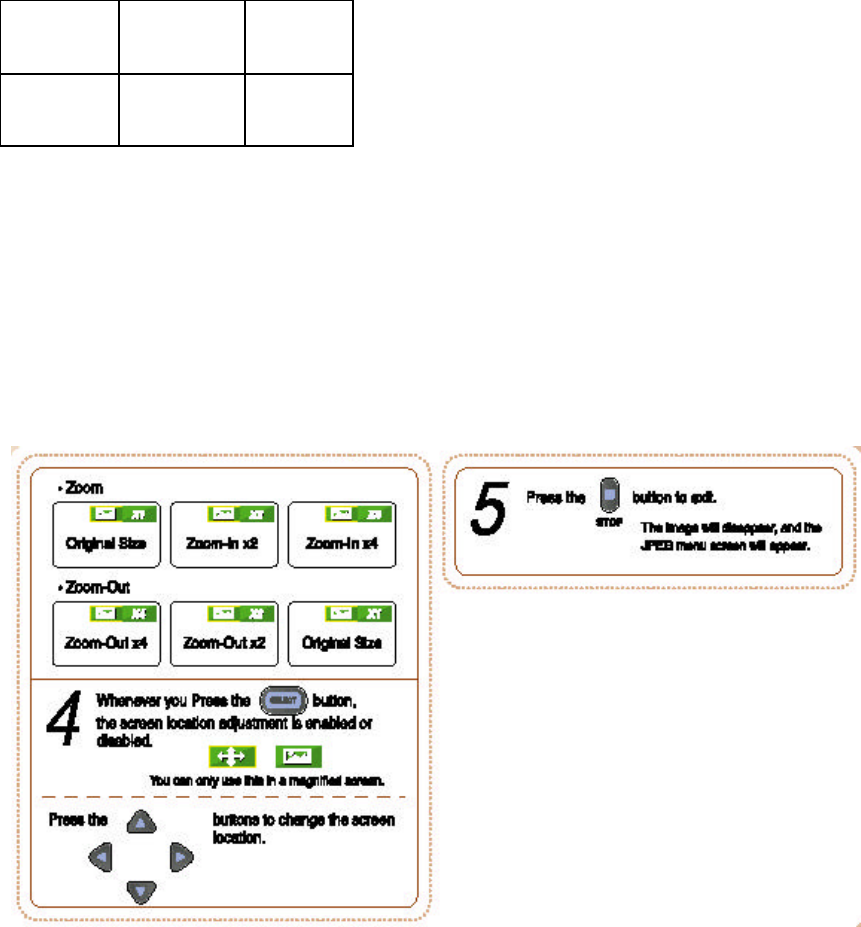
Page 30
Zoom
Original
Size
Zoom-In
x2
Zoom-In
x4
Zoom-
Out x4
Zoom-Out
x2
Original
Size
4. Whenever you Press the (icon) button, the screen location adjustment is enabled
or disabled.
You can only use this in a magnified screen.
Press the (icon) buttons to change the screen location.
5. Press the (icon) button to exit.
The image will disappear, and the JPEG menu screen will appear.
Page 31
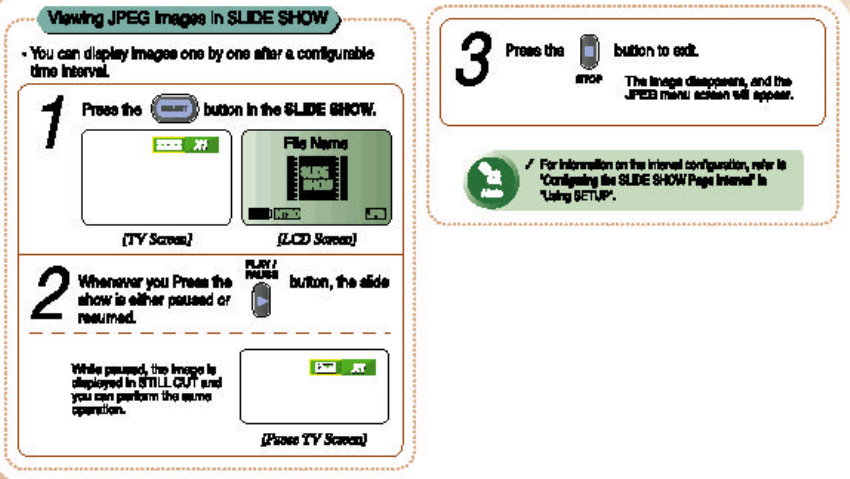
Viewing JPEG images in SLIDE SHOW
You can display images one by one after a configurable time interval.
1. Press the (icon) button in the SLIDE SHOW.
[TV Screen]
[LCD Screen]
2. Whenever you Press the (icon) button, the slide show is either paused or
resumed.
While paused, the image is displayed in STILL CUT and you can perform the same
operation.
[Pause TV Screen]
3. Press the (icon) button to exit.
The image disappears, and the JPEG menu screen will appear.
Note.
For information on the interval configuration, refer to "Configuring the SLIDE SHOW
Page Interval" in “Using SETUP”.
(icon)
Page 32
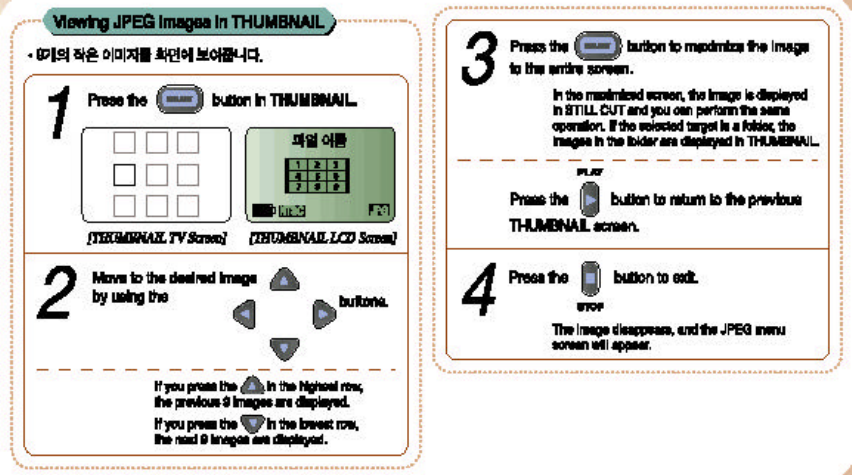
Viewing JPEG images in THUMBNAIL
1. Press the (icon) button in THUMBNAIL.
[THUMBNAIL TV Screen]
[THUMBNAIL LCD Screen]
2. Move to the desired image by using the (icon) buttons.
If you press the (icon) in the highest row, the previous 9 images are displayed.
If you press the (icon) in the lowest row, the next 9 images are displayed.
3. Press the (icon) button to maximize the image to the entire screen.
In the maximized screen, the image is displayed in STILL CUT and you can perform
the same operation.
If the selected target is a folder, the images in the folder are displayed in
THUMBNAIL.
Press the (icon) button to return to the previous THUMBNAIL screen.
4. Press the (icon) button to exit.
The image disappears, and the JPEG menu screen will appear.
Page 33
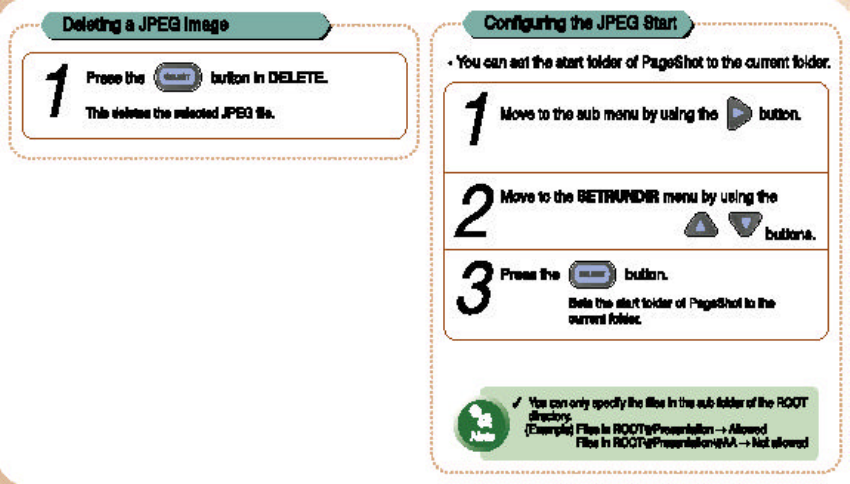
Deleting a JPEG image
1. Press the (icon) button in DELETE.
This deletes the selected JPEG file.
Configuring the JPEG Start Path.
You can set the start folder of PageShot to the current folder.
1. Move to the sub menu by using the (icon) button.
2. Move to the SETRUNDIR menu by using the (icon) buttons.
3. Press the (icon) button.
Sets the start folder of PageShot to the current folder.
You can only specify the files in the sub folder of the ROOT directory.
(Example) Files in ROOT₩Presentation ? Allowed
Files in ROOT₩Presentation₩AA ? Not allowed
Page 34
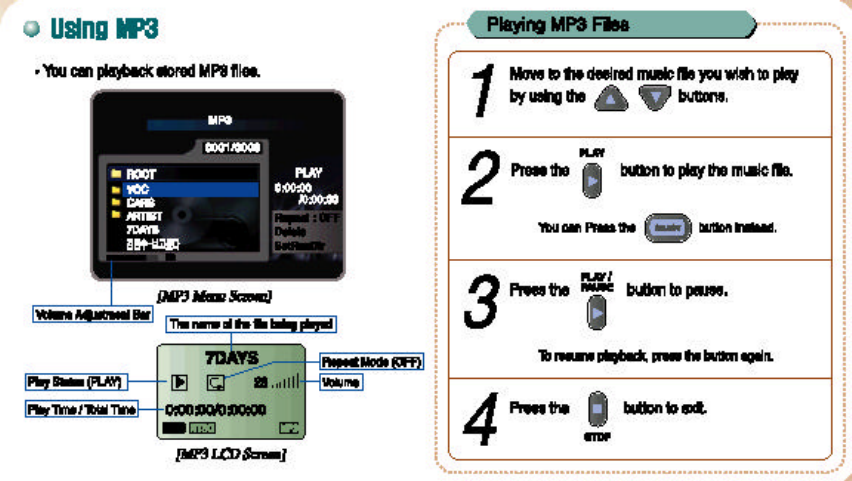
Using MP3
You can playback stored MP3 files.
[MP3 Menu Screen]
Volume Adjustment Bar
The name of the file being played
Play Status (PLAY)
Play Time / Total Time
Repeat Mode (OFF)
Volume
[MP3 LCD Screen]
Playing MP3 Files
1. Move to the desired music file you wish to play by using the (icon) buttons.
2. Press the (icon) button to play the music file.
You can Press the (icon) button instead.
3. Press the (icon) button to pause.
To resume playback, press the button again.
4. Press the (icon) button to exit.
Page 35
Note.
If the size of an MP3 file is larger than 9MB, the part exceeding 9MB will not be
played.
Note.
When you Press the (icon) button,
- If it is a folder (icon), you move to the folder.
- If it is a super folder (icon), you move to the super folder.
When you Press the (icon) button,
Skipping a Music File
1. Press the (icon) button to move to the next music file.
2. Press the (icon) button to move to the previous music file.
Note.
If the previous or next music file is a folder, playback will exit.
Adjusting the Volume
You can only adjust the volume when a file is playing.
1. Press the (icon) button.
You can control the volume level from 0 to 100.
If the sound is very low despite the volume being turned up to maximum, adjust
the TV volume.

Page 36
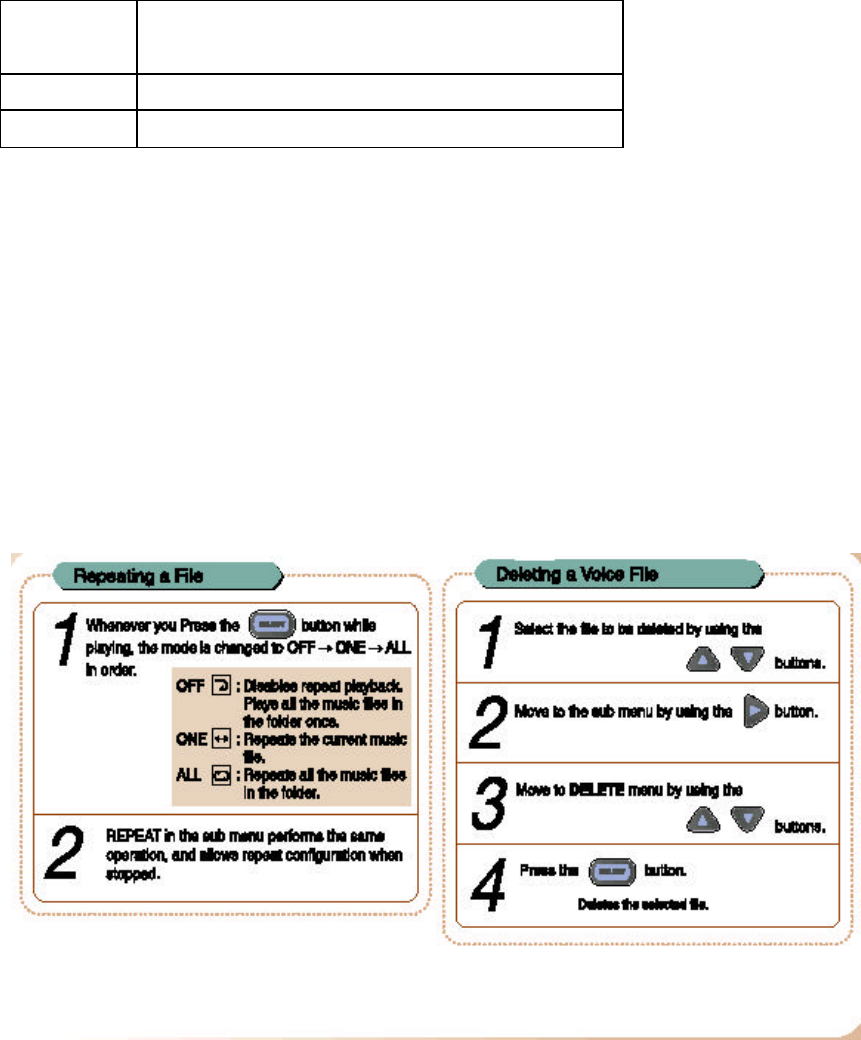
Repeating a File
1. Whenever you Press the (icon) button while playing, the mode is changed to OFF
? ONE ? ALL in order.
OFF Disables repeat playback.
Plays all the music files in the folder once.
ONE Repeats the current music file.
ALL Repeats all the music files in the folder.
2. REPEAT in the sub menu performs the same operation, and allows repeat
configuration when stopped.
Deleting an MP3 File
1. Select the file to be deleted by using the (icon) buttons.
2. Move to the sub menu by using the (icon) button.
3. Move to the DELETE menu by using the (icon) buttons.
4. Press the (icon) button.
This deletes the selected file.
Page 37
Configuring the MP3 Start Path
You can set the start folder of PageShot to the current folder.
1. Move to the sub menu by using the (icon) button.
2. Move to the SETRUNDIR menu by using the (icon) buttons.
3. Press the (icon) button.
This sets the start folder of PageShot to the current folder.
Note.
You can only specify the sub folder of the ROOT directory.
Example) ROOT₩Presentation ? Allowed
ROOT₩Presentation₩AA ? Not allowed
Using VOICE
You can record voice and then play the recorded clip back.
The voice file being played.
Playback status (PLAY)
Play Time / Total Time
Repeat Mode (OFF)
Volume Adjustment Bar
Volume
[VOICE Menu Screen]
The voice file being played.
Play status (PLAY)
Play Time / Total Time
Repeat Mode (OFF)
Volume
Volume
[VOICE Menu LCD Screen]
Page 38
Recording a Voice File
1. Press the (icon) button.
Voice recording starts.
You can also start recording by pressing the REC button of the PageShot set.
This works in all modes.
If voice recording has started, all other functions stop.
Voice recording is given the highest priority.
2. Press the (icon) button.
Voice recording stops.
Note.
If the "Battery Low" message is displayed while recording, the recording up to that
point is saved to memory and then voice recording is terminated.
Playing a Voice File
1. Move to the desired file by using the (icon) button.
2. Press the (icon) button to play the file.
You can Press the (icon) button, instead.
3. Press the (icon) button to pause.
To resume playing, press the button once again.
4. Press the (icon) button to exit.
Page 39
Note.
When you press the (icon) button,
- If it is a folder (icon), you move to the folder.
- If it is a super folder (icon), you move to the super folder.
When you press the (icon) button,
- If it is a folder (icon), the message “The operation does not exist.” (icon) will be
displayed.
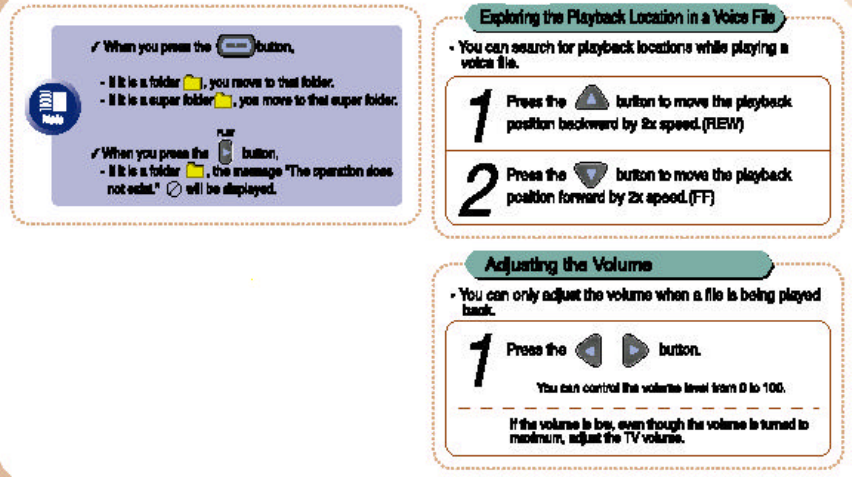
Exploring the Playback Location in a Voice File
You can search for playback locations while playing a voice file.
1. Press the (icon) button to rewind the file at twice the speed (REW).
2. Press the (icon) button to fast forward the file at twice the speed (FF).
Adjusting the Volume
You can only adjust the volume when a file is being played back.
1. Press the (icon) button.
You can control the volume level from 0 to 100.
If the volume is low, even though the volume is turned to maximum, adjust the TV
volume.
Page 40
Repeating a File
1. Whenever you press the (icon) button while playing, the mode is changed to OFF
? ONE ? ALL in this order.
OFF Disables repeat playback.
Plays all the music files in the folder once.
ONE Repeats the current music file.
ALL Repeats all the music files in the folder.
2. REPEAT in the sub menu performs the same operation, and allows the repeat
configuration while stopped.
Deleting a Voice File
1. Select the file to delete by using the (icon) buttons.
2. Move to the sub menu by using the (icon) button.
3. Move to DELETE menu by using the (icon) buttons.
4. Press the (icon) button.
Deletes the selected file.
Page 41
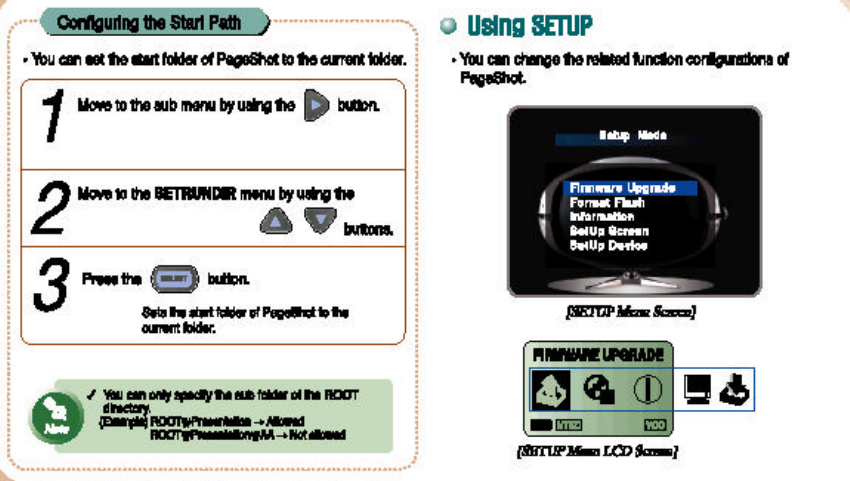
Configuring the Start Path
You can set the start folder of PageShot to the current folder.
1. Move to the sub menu by using the (icon) button.
2. Move to the SETRUNDIR menu by using the (icon) buttons.
3. Press the (icon) button.
Sets the start folder of PageShot to the current folder.
Note.
You can only specify the sub folder of the ROOT directory.
Example) ROOT₩Presentation ?Allowed
ROOT₩Presentation₩AA ( Not allowed
Using SETUP
You can change the related function configurations of PageShot.
[SETUP Menu Screen]
[SETUP Menu LCD Screen]
Page 42
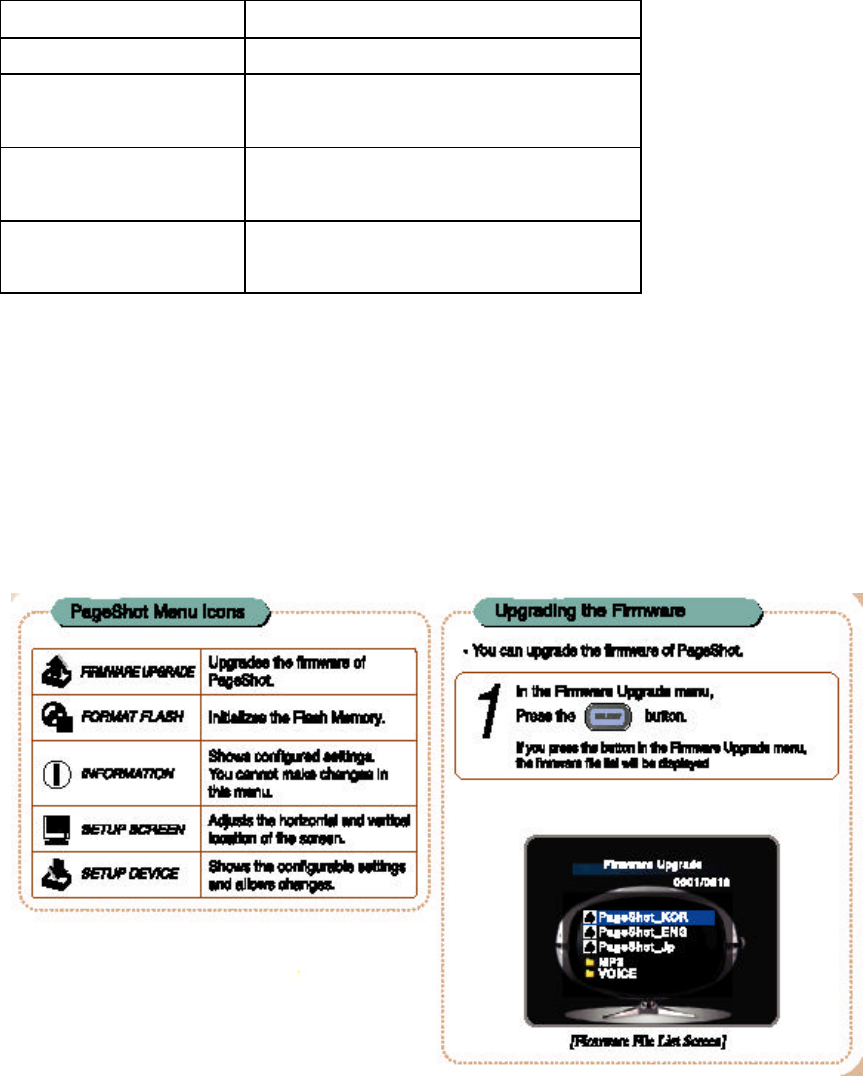
PageShot Menu Icons
FIRMWARE UPGRADE Upgrades the firmware of PageShot.
FORMAT FLASH Initializes the Flash Memory.
INFORMATION Shows configured settings. You
cannot make changes in this menu.
SETUP SCREEN
Adjusts the horizontal and vertical
location of the screen.
SETUP DEVICE Shows t
he configurable settings and
allows changes.
Upgrading the Firmware
You can upgrade the firmware of PageShot.
1. In the Firmware Upgrade menu, Press the (icon) button.
If you press the button in the Firmware Upgrade menu, the firmware file list will be
displayed.
[Firmware File List Screen]
Page 43
[Firmware File List LCD Screen]
1. Move to the desired firmware file you wish to upgrade by using the (icon)
button.
2. Press the (icon) button.
A message box appears asking you for confirmation to apply the selected firmware.
Filename
[TV, LCD Screen]
3. Select “YES” or “NO” using the (icon) button.
4. Press the (icon) button.
YES: Starts the upgrade.
NO: Cancels the upgrade.
When the upgrade has been completed successfully, the system is restarted.
The “UPGRADE FAIL” message appears when the upgrade has failed. In this case,
press the (icon) button to return to the firmware file list screen.
5. Press the (icon) button.
This moves to the SETUP menu.
Note.
If the firmware file is damaged, the "UPGRADE FAIL" message will be displayed.
In this case, delete the firmware file, copy the file again, and retry the upgrade.
Notice.
Applying a different version of the firmware may disable some operations. Check
before upgrading the firmware.
Page 44
Formatting the Memory
You can initialize (format) the embedded memory (Flash memory) or the
additionally installed memory (Compact Flash Memory).
1. In ‘Format Flash’, Press the (icon) button.
If you press the button in Format Flash, a message box appears asking you to
confirm the format.
[TV, LCD Screen]
2. Press the (icon) button to select "YES" or "NO".
3. Press the (icon) button.
YES: Performs the format
NO: Cancels the format (SETUP menu)
Depending on the amount of memory, the time required may vary.
When the format has been completed, the SETUP menu screen will appear.
Warning
When you format the memory, you will lose ALL saved data.
CHECK before formatting.

Page 45
Viewing Information
You can view the startup settings for PageShot.
You cannot change the settings in this menu.
[Information Screen]
[Information LCD Screen]
1. In Information, Press the (icon) button.
If you press the button in Information, the Information screen appears.
The entire settings are displayed on the TV, and a single item is displayed on the
LCD.
2. Press the (icon) button to check the other item.
This works for LCD output only.
1. TITLE IMAGE :
The background image (JPEG) to be displayed
when the power is turned on.
2. TITLE AUDIO : The background audio (MP3) to
be played when
the power is turned on.
3. RUN DIR : The Start folder location when the power is
turned on.
4. AUTO RUN FILE :
The Presentation file (PRJ) to be played when
the power is turned on.
5. FIRMWARE
VERSION :
The Current Version of the firmware.
6. MEMORY : memory usage / total amount of memory
3. Press the (icon) button.
This moves to the SETUP menu.
Note.
The TITLE IMAGE and TITLE AUDIO appear when Start mode is "N/A".
The AUTO RUN FILE appears when Start mode is "PJT".
For information on Start mode, refer to "SETUP DEVICE".