DM Technology DM-P200 DIGITAL PRESENTATION DEVICE User Manual
DM Technology Co., Ltd. DIGITAL PRESENTATION DEVICE Users Manual
Contents
- 1. MANUAL 1
- 2. MANUAL 2
MANUAL 2
Page 46
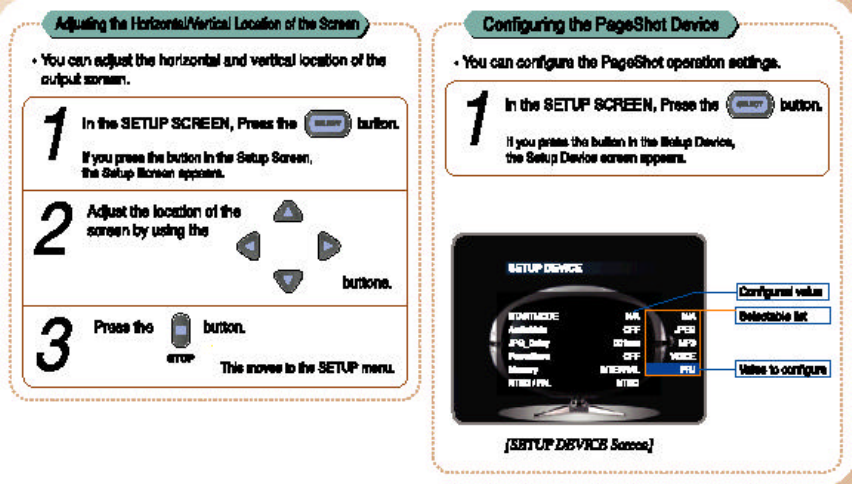
Adjusting the Horizontal/Vertical Location of the Screen
You can adjust the horizontal and vertical location of the output screen.
1. In the SETUP SCREEN, Press the (icon) button.
If you press the button in the Setup Screen, the Setup Screen appears.
2. Adjust the location of the screen by using the (icon) buttons.
3. Press the (icon) button.
This moves to the SETUP menu.
Configuring the PageShot Device
You can configure the PageShot operation settings.
1. In SETUP DEVICE, Press the (icon) button.
If you press the button in the Setup Device, the Setup Device screen appears.
Configured value
Selectable list
Value to configure
[SETUP DEVICE Screen]
Page 47
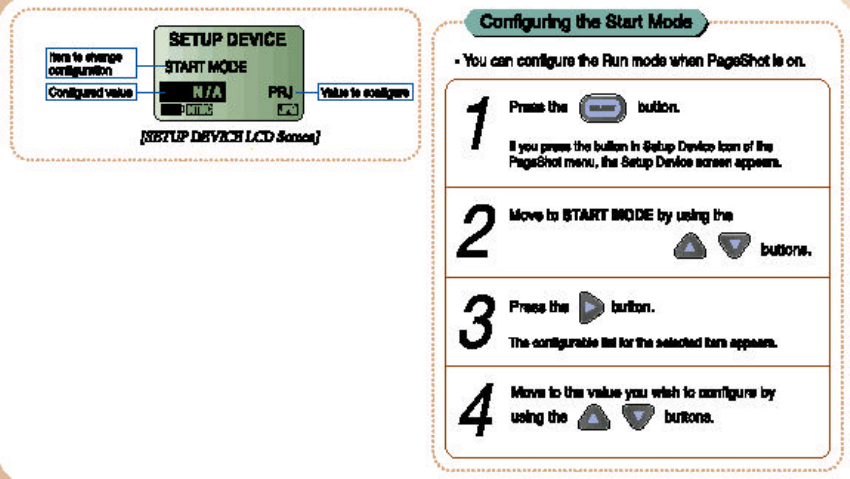
Item to change configuration
Configured value
Value to configure
[SETUP DEVICE LCD Screen]
Configuring the Start Mode
You can configure the Run mode when PageShot is on.
1. Press the (icon) button.
If you press the button in Setup Device icon of the PageShot menu, the Setup
Device screen appears.
2. Move to START MODE by using the (icon) buttons.
3. Press the (icon) button.
The configurable list for the selected item appears.
4. Move to the value you wish to configure by using the (icon) buttons.

Page 48
1. N/A :
Plays the TITLE IMAGE, and the
TITLE AUDIO
2. JPEG : Plays a JPEG slide show.
3. MP3 : Plays an MP3 file.
4. VOICE :
Plays a Voice file.
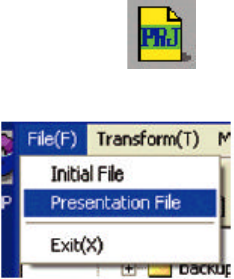
5. PRJ : Plays the presentation file.
5. Press the (icon) button to configure.
If you press the (icon) button, the item list disappears.
6. Press the (icon) button to save the changes and return to the SETUP menu.
When you select JPEG, MP3, and VOICE, the files in the configured Start path are
played.
When you select PRJ, the configured presentation file is played.
For information on the path and file configuration, refer to "Configuring the Start
Path" in each corresponding chapter and "Configuring the Presentation Start File ".
Muting the Sound
You can decide whether to play a configured MP3 file while playing a presentation.
1. Press the (icon) button.
If you press the button in the Setup Device icon of the PageShot menu, the Setup
Device screen appears.
2. Move to AUDIO MUTE by using the (icon) buttons.
3. Press the (icon) button.
The configurable list for the selected item appears.
4. Select the value to configure by using the (icon) buttons.
1. ON Plays the configured MP3 file.
2. OFF Does not play the configured MP3 file.
Page 49
5. Press the (icon) button to make the selection.
If you press the (icon) button, the item list disappears.
6. Press the (icon) button to save the changes and return to the SETUP menu.
Note.
This configuration is not relevant to playing MP3 and VOICE files.
Configuring the SLIDE SHOW Page Interval
You can configure the period of time for displaying an image while running the JPEG
SLIDE SHOW.
1. Press the (icon) button.
If you press the button in Setup Device icon in the PageShot menu, the Setup
Device screen appears.
2. Move to JPG_DELAY by using the (icon) buttons.
3. Press the (icon) button.
You can change the time interval between pages.
(from 1 to 59 seconds)
4. Press the (icon) button to save the changes and return to the SETUP menu.
Page 50.
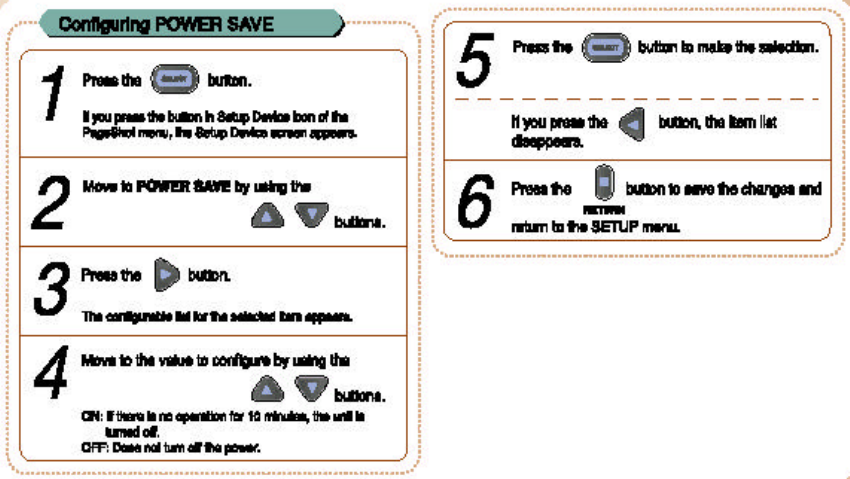
Configuring POWER SAVE
1. Press the (icon) button.
If you press the button in Setup Device icon of the PageShot menu, the Setup
Device screen appears.
2. Move to POWER SAVE by using the (icon) buttons.
3. Press the (icon) button.
The configurable list for the selected item appears.
4. Move to the value to configure by using the (icon) button.
ON: Turns off the power when there has been no operation for a predetermined
time.
OFF: Does not turn off the power.
5. Press the (icon) button to select.
If you press the (icon) button, the item list disappears.
6. Press the (icon) button to save the changes and return to the SETUP menu.
Page 51.
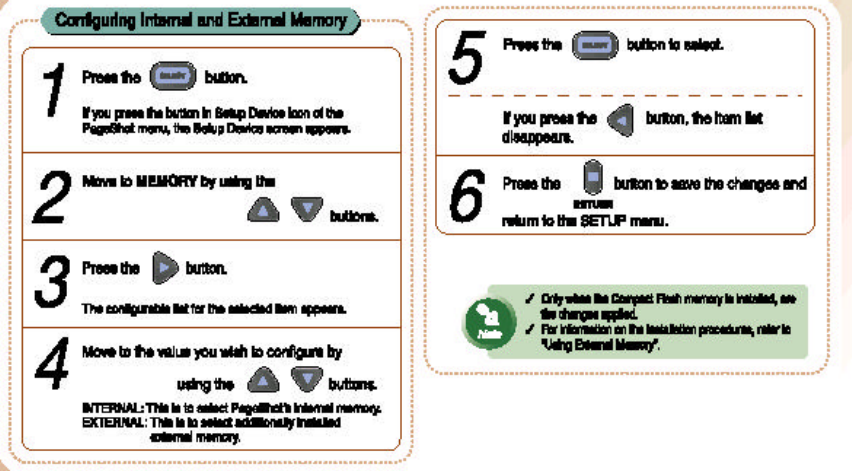
Configuring Internal and External Memory
You can determine which memory type to use.
1. Press the (icon) button.
If you press the button in the Setup Device icon of the PageShot menu, the Setup
Device screen appears.
2. Move to MEMORY by using the (icon) buttons.
3. Press the (icon) button. The configurable list for the selected item appears.
4. Move to the value you wish to configure by using the (icon) buttons.
INTERNAL: This is to select PageShot’s internal memory.
EXTERNAL: This is to select additionally installed external memory.
5. Press the (icon) button to select.
When you select EXTERNAL configuration, it may take some time depending on the
size of the external memory.
If you press the (icon) button, the item list disappears.
6. Press the (icon) button to save the changes and return to the SETUP menu.
Note.
Only when the Compact Flash memory is installed, are the changes applied.
For information on the installation procedures, refer to “Using External Memory”.
Page 52.
Configuring the Video Out Signal (NTSC/PAL)
You can change the video signal according to the TV utilised.
1. Press the (icon) button.
If you press the button in the Setup Device icon of the PageShot menu, the Setup
Device screen appears.
2. Move to NTSC/PAL by using the (icon) buttons.
3. Press the (icon) button.
The configurable list for the selected item appears.
4. Move to the value you wish to configure by using the (icon) buttons.
NTSC: Change to NTSC type. (For the countries such as Korea, the United States,
Japan, Canada, etc.)
PAL: Change to PAL type. (For the Europe countries such as Germany, England, etc.
as well as other countries such as China, Brazil etc.)
5. Press the (icon) button to select.
If you press the (icon) button, the item list disappears.
6. Press the (icon) button to save the changes and return to the SETUP menu.
Page 53.
Using External Memory
You can install additional memory by installing a Compact Flash (CF) card.
1. Installing External Memory
Insert the card completely.
Notice.
If the card is inserted in the wrong way, the card will not be able to be inserted
completely. Do not use force to insert the card.
2. Changing the Memory
Changing the memory type from internal memory to the inserted external memory.
Refer to "Configuring Internal and External Memory".
When you have changed the memory selection, a read and write operation is
performed on the Compact Flash memory.
3. Removing the External Memory
Before removing, change the memory type to INTERNAL.
Notice.
If you remove without changing the memory type, an unexpected operation may
occur.
Page 55
4. Using Applications
Page 56
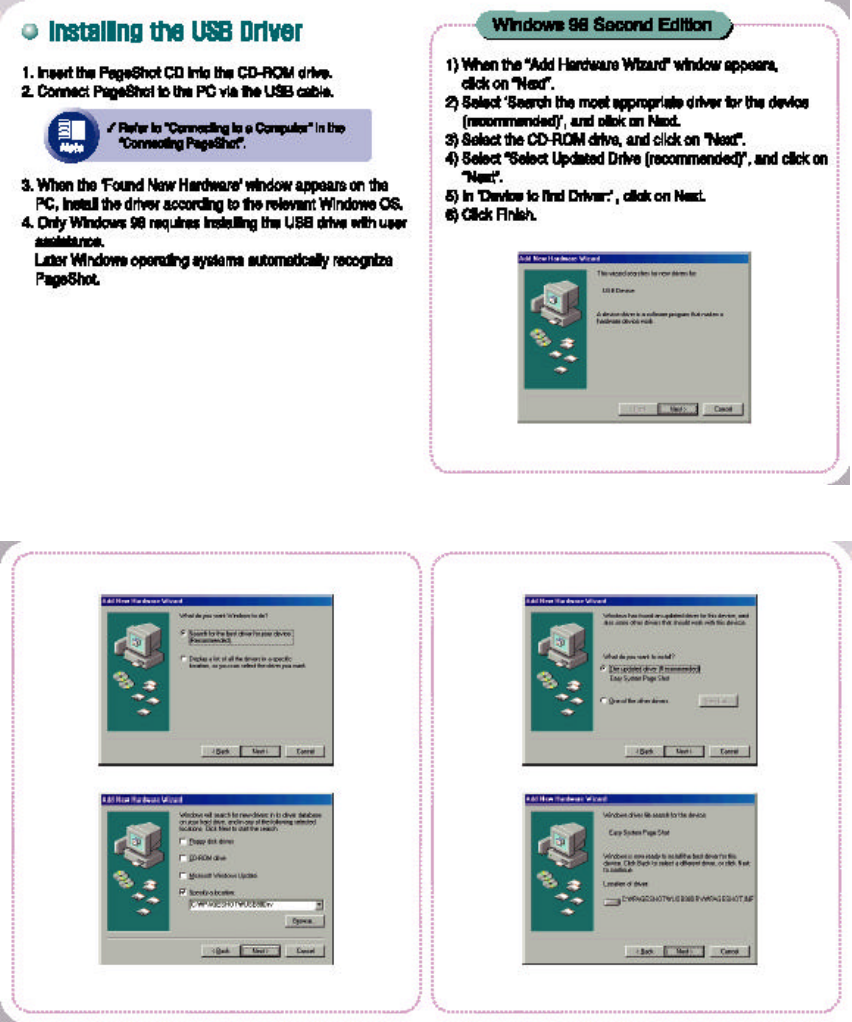
Installing a USB Drive
1. Insert the PageShot CD into the CD-ROM drive.
Note.
Refer to "Connecting to a Computer" in the “Connecting PageShot”.
2. Connect PageShot to the PC via the USB cable.
3. When the ‘Found New Hardware’ window appears on the PC, install the driver
according to the relevant Windows OS.
4. Only Windows 98 requires installing the USB drive with user assistance.
Later Windows operating systems automatically recognize PageShot.
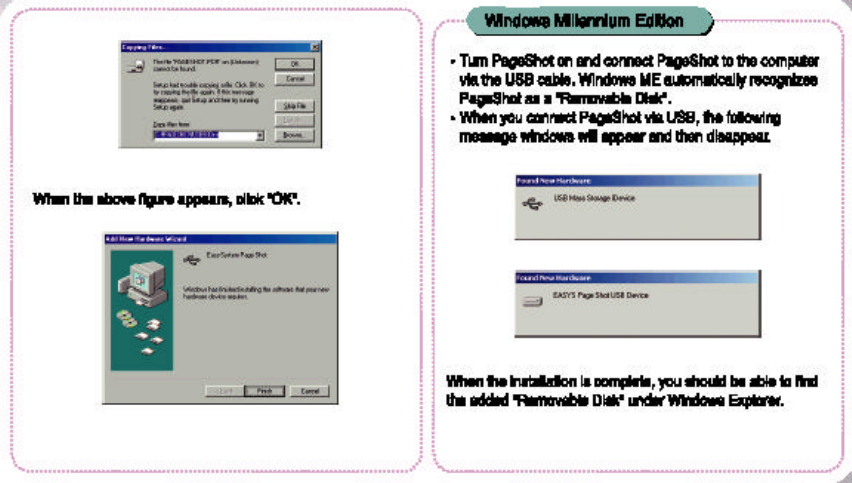
Windows 98 Second Edition
1) When the “Add Hardware Wizard” window appears, click on “Next”.
2) Select ‘Search the most appropriate driver for the device (recommended)’, and
click on Next.
3) Select the CD-ROM drive, and click on “Next”.
4) Select “Select Updated Drive (recommended)”, and click on “Next”.
5) In ‘Device to find Driver:’ , click on Next.
6) Click Finish.
Page 57.
Page 58.
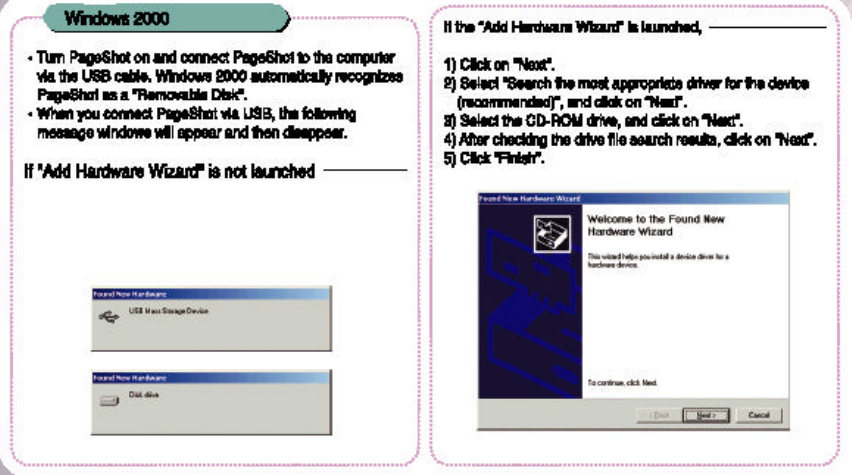
When the above figure appears, click "OK".
Windows Millennium Edition
Turn PageShot on and connect PageShot to the computer via the USB cable.
Windows ME automatically recognizes PageShot as a "Removable Disk".
When you connect PageShot via USB, the following message windows will appear
and then disappear.
When the installation is complete, you should be able to find the added "Removable
Disk" under Windows Explorer.
Page 59.
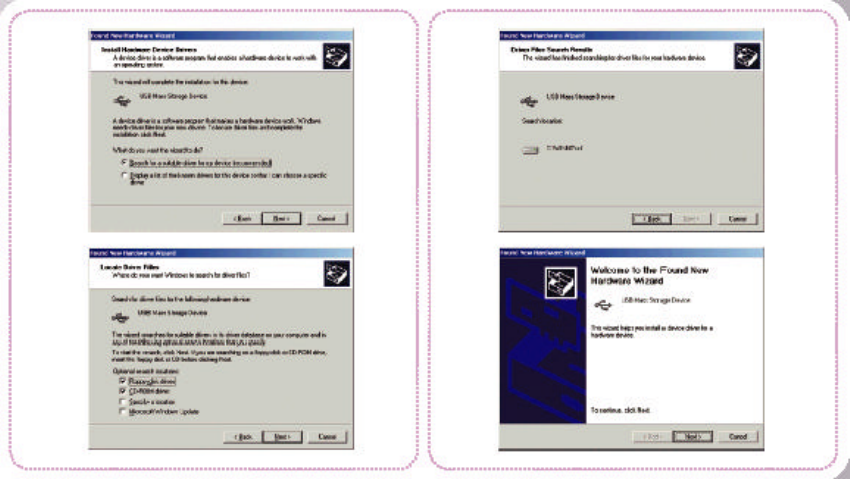
Windows 2000
Turn PageShot on and connect PageShot to the computer via the USB cable.
Windows 2000 automatically recognizes PageShot as a "Removable Disk".
When you connect PageShot via USB, the following message windows will appear
and then disappear.
If the “Add Hardware Wizard” is launched,
1) Click on “Next”.
2) Select “Search the most appropriate driver for the device (recommended)”, and
click on “Next”.
3) Select the CD-ROM drive, and click on “Next”.
4) After checking the drive file search results, click on “Next”.
5) Click “Finish”.
Page 60.
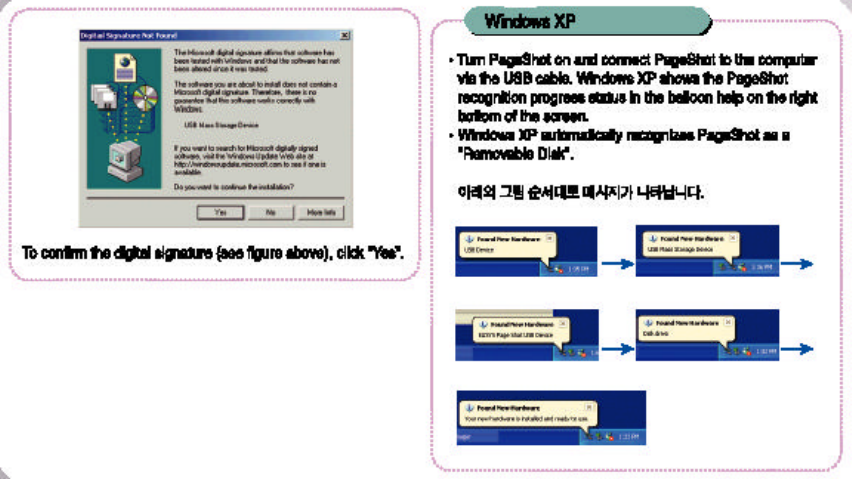
Page 61.
To confirm the digital signature (see figure above), click "Yes".
Windows XP
Turn PageShot on and connect PageShot to the computer via the USB cable.
Windows XP shows the PageShot recognition progress status in the balloon help on
the right bottom of the screen.
Windows XP automatically recognizes PageShot as a "Removable Disk".
Page 62.
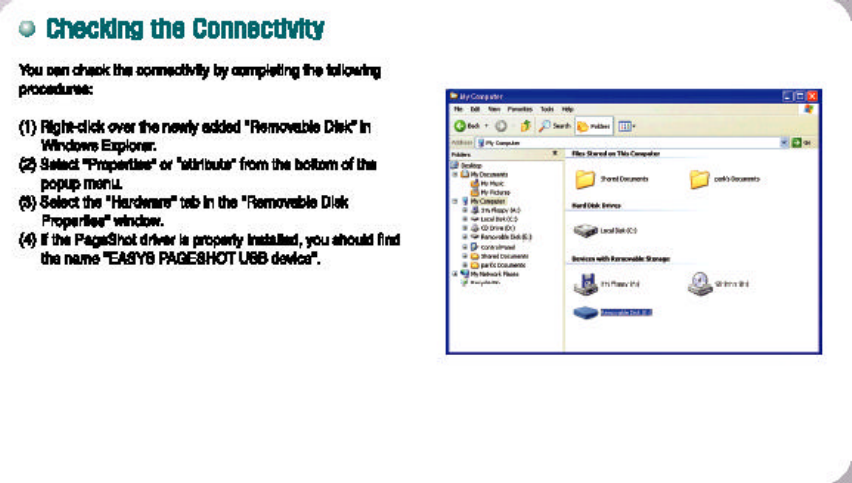
Checking the Connectivity
You can check the connectivity by completing the following procedures:
(1) Right-click over the newly added "Removable Disk" in Windows Explorer.
(2) Select "Properties" or “attribute” from the bottom of the popup menu.
(3) Select the "Hardware" tab in the "Removable Disk Properties" window.
(4) If the PageShot driver is properly installed, you should find the name "EASYS
PAGESHOT USB device".
Page 63.
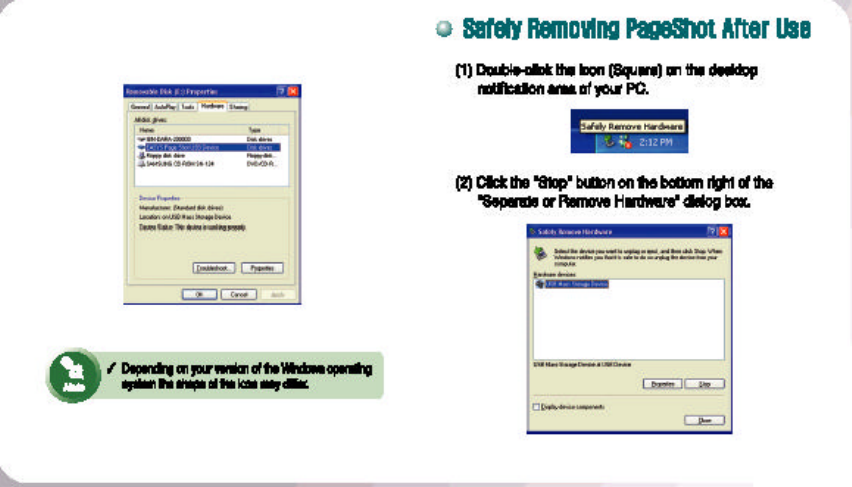
Please Note:
Depending on your version of the Windows operating system the shape of the icon
may differ.
Safely Removing PageShot After Use
(1) Double-click the icon (Square) on the desktop notification area of your PC.
(2) Click the "Stop" button on the bottom right of the "Separate or Remove
Hardware” dialog box.
Page 64.
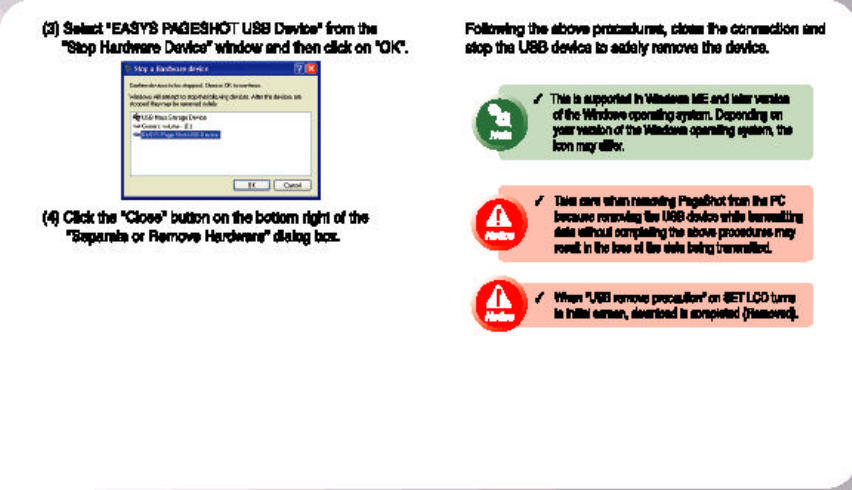
(3) Select "EASYS PAGESHOT USB Device" from the "Stop Hardware Device”
window and then click on "OK".
(4) Click the "Close" button on the bottom right of the "Separate or Remove
Hardware” dialog box.
Following the above procedures, close the connection and stop the USB device to
safely remove the device.
Note.
This is supported in Windows ME and later version of the Windows operating system.
Depending on your version of the Windows operating system, the icon may differ.
Notice.
Take care when removing PageShot from the PC because removing the USB device
while transmitting data without completing the above procedures may result in the
loss of the data being transmitted.
Page 65.
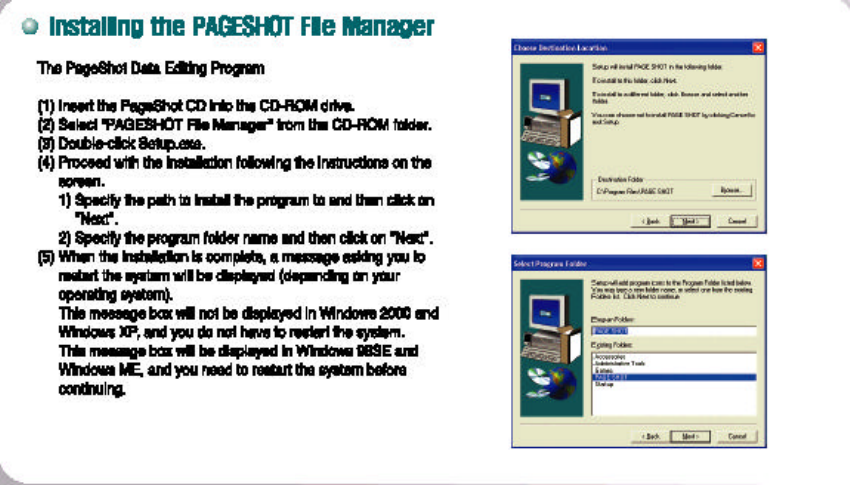
Installing the PAGESHOT File Manager
The PageShot Data Editing Program
(1) Insert the PageShot CD into the CD-ROM drive.
(2) Select "PAGESHOT File Manager" from the CD-ROM folder.
(3) Double-click Setup.exe.
(4) Proceed with the installation following the instructions on the screen.
1) Specify the path to install the program to and then click on "Next".
2) Specify the program folder name and then click on "Next".
(5) When the installation is complete, a message asking you to restart the system
will be displayed (depending on your operating system).
This message box will not be displayed in Windows 2000 and Windows XP,
and you do not have to restart the system.
This message box will be displayed in Windows 98SE and Windows ME, and you
need to restart the system before continuing.
Page 66.
Notice.
If you launch the program without restarting the system in Windows 98, you will
see the "Win98 Running : Error Loading Driver EasyAcc.Vxd" error message box.
In order to send data to PageShot, you have to restart the system after installation.
Using the PAGESHOT File Manager
The PAGESHOT File Manager enables the conversion of a PowerPoint file (.ppt) into
JPEG images of the appropriate PageShot size.
The PAGESHOT File Manager provides a screen capture function that enables the
conversion of screen shot images into JPEG images appropriate to PageShot.
The PAGESHOT File Manager provides image size conversion functions.
The PAGESHOT File Manager provides audio file (MP3, VOICE) recording and
playback functions.
The PAGESHOT File Manager provides an easy-to-use Windows Explorer interface.
The PAGESHOT File Manager supports USB communication with PageShot.
The PAGESHOT File Manager provides PageShot presentation file edit and preview
functions.
Note.
Depending on your version of the Windows operating system, the icon used in this
document may differ.
Page 67.
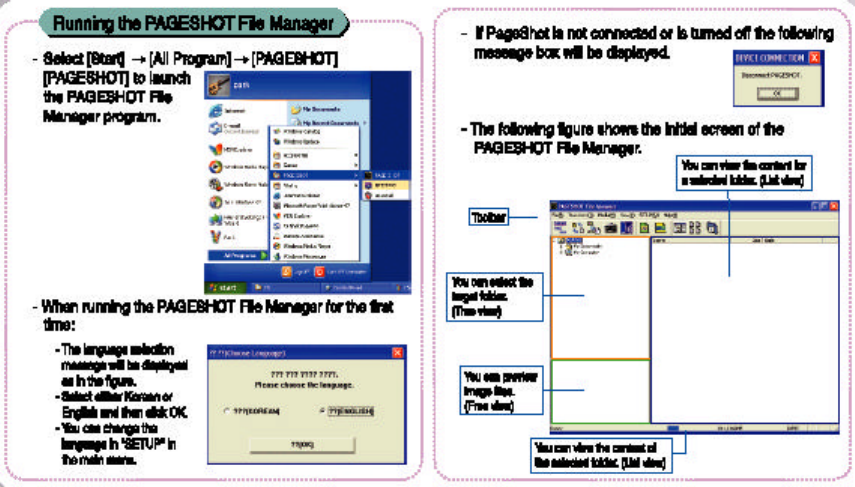
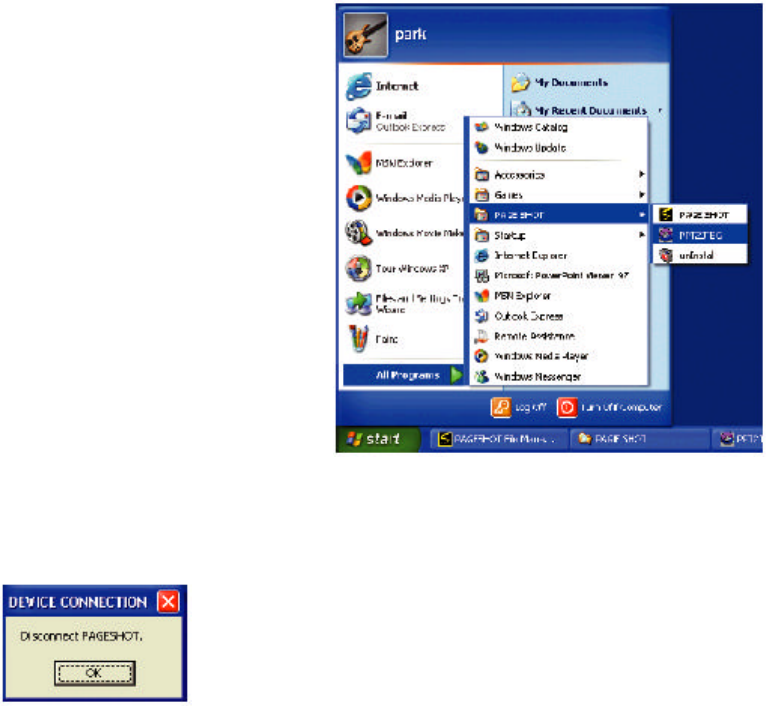
Running the PAGESHOT File Manager
Select [Start] ? [All Program] ? [PAGESHOT] ( [PAGESHOT] to launch the
PAGESHOT File Manager program.
When running the PAGESHOT File Manager for the first time:
The language selection message will be displayed as in the figure.
Select either Korean or English and then click OK.
You can change the language in "SETUP" in the main menu.
If PageShot is not connected or is turned off the following message box will be
displayed.
The following figure shows the initial screen of the PAGESHOT File Manager.
You can view the content for a selected folder. (List view)
Toolbar
You can select the target folder. (Tree view)
You can preview image files. (Free view)
You can view the content of the selected folder. (List view)
Page 68.
The Tree view and the List view is the same as in Windows Explorer.
Not all files are displayed, and only PageShot related files
(.ppt, .prj, .ini, .mp3, .voc, .jpg, .bmp, .gif) are displayed in the List view.
<Icon Functions>
FORMAT PAGESHOT
Shows the connection status of PageShot and formats the PageShot memory.
CONVERTING A POWERPOINT FILE TO JPEG
Enables you to select a PowerPoint file to convert into images and convert an
individual PowerPoint slide into a jpeg image.
IMAGE FORMAT CONVERSION AND RESIZING
Converts .bmp, .gif, and .jpg files into JPEG images of a user-defined size
(640*(500 or 440)).
SCREEN CAPTURING
Captures the computer monitor screen and saves it as a .jpg file.
PLAYING A VOICE FILE
Plays the voice file recorded on PageShot.
EDITING THE INITIALIZATION FILE
Allows the editing of the initialization file(.ini) that is applied when turning on
PageShot.
EDITING THE PRESENTATION FILE
Allows the editing of the presentation file(.prj) to be used in PageShot.
VIEWING THE DETAIL LIST
Displays detailed information of the files in the List view.
VIEWING THE THUMBNAIL LIST
Displays previews of the files in the List view.
INFORMATION
Displays information on the current program.
Page 69.
Detailed Description of Functions
(1) FORMATTING PAGESHOT
Displays the current connectivity status of PageShot.
When PageShot is connected (Enabled):
When PageShot is not connected (Disabled):
If you click when the button is enabled, the information window to format the
PageShot memory appears.
1. Displays the PageShot memory size. (Internal 64M)
2. Select either FAT or FAT 16 file system that is to be used for PageShot.
3. Specify the PageShot disk name.
4. Performs the Format
Notice.
You have to select either the "FAT" or "FAT16" file system.
If you select "FAT32" and format, PageShot will not recognize files.
(2) CONVERTING A POWERPOINT FILE TO JPEG
You can convert a PowerPoint file into JPEG images of the appropriate size
(640X500) to PageShot.
<Procedures>
1) Select the (icon) icon from the toolbar.
2) Select [Convert] ? [PowerPoint to Image...] from the menu.
3) Right-click over the desired PowerPoint file in the List view. Select [Convert into
Image] from the popup menu. (The selected PowerPoint information is configured
automatically).
Note.
It is recommended using a font larger than 14pt when you create a PowerPoint
document.
If the font size is less than 14pt, the font may not be distinguishable on the
PageShot set.
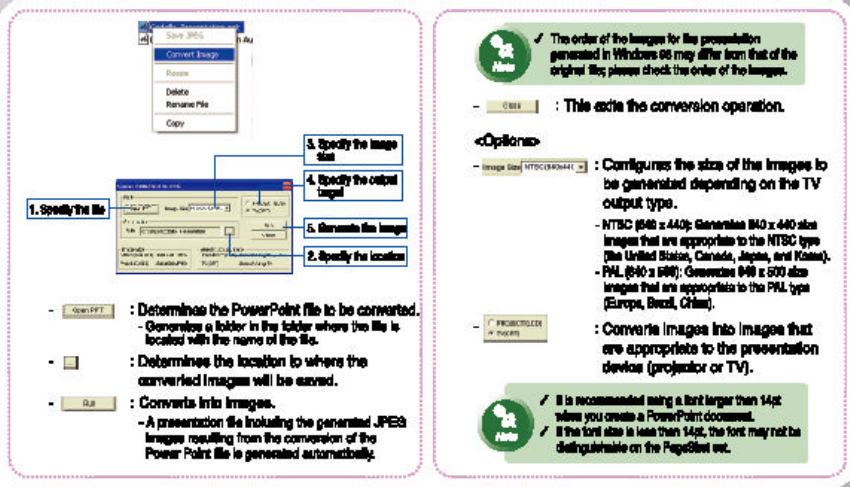
Page 70.
1. Specify the file
2. Specify the location
3. Specify the image size
4. Specify the output target
5. Generate the Image
(icon): Determines the PowerPoint file to be converted.
Generates a folder in the folder where the file is located with the name of the file.
(icon): Determines the location to where the converted images will be saved.
(icon): Converts into images.
A presentation file including the generated JPEG images resulting from the
conversion of thePowerPoint file is generated automatically.
Note.
The order of the images for the presentation generated in Windows 98 may differ
from that of the original file; please check the order of the images.
(icon): This exits the conversion operation.
<Options>
(icon): Configures the size of the images to be generated depending on the TV
output type.
NTSC (640 x 440): Generates 640 x 440 size images that are appropriate to the
NTSC type (the United States, Canada, Japan, and Korea).
PAL (640 x 500): Generates 640 x 500 size images that are appropriate to the PAL
type (Europe, Brazil, China).
(icon): Converts images into images that are appropriate to the presentation device
(projector or TV).
Note.
It is recommended using a font larger than 14pt when you create a PowerPoint
document.
If the font size is less than 14pt, the font may not be distinguishable on the
PageShot set.
Page 71.
(3) IMAGE FORMAT CONVERSION AND RESIZING
If the format of the image to be displayed through PageShot is GIF or BMP, or the
size of the file is larger than 640*500, you need to convert the format to JPEG or
change the size of the file to 640*500 in order to display the file.
<Procedures>
1) Click the (icon) icon on the toolbar.
2) Select [Convert] ? [Convert Image] from the menu.
3) Right-click over the image file in the List view. Select [Change Image Size]. (The
selected image information is configured automatically)
1. Open the file: Select the original source image file (BMP, GIF, JPG)(icon) from
which to change the format or the size, and open the target file.
2. Input image information: Displays the input image information.
Page 72.
Save file: Specify the converted image file. If you select an input image, an output
image file is created whose name is the same as the original file. However the
extension is changed to ".jpg".
Select (icon) to configure the target image file name path to save the file.
Image conversion information: displays the size and conversion properties of the
target image.
(icon): Activates the width and height input window. You can change the size in the
window.
(icon): Configures the generated data appropriate to the output device (projector or
TV) as a result of the image conversion.
(icon): Performs the conversion. If the image size is not specified, the converted
image is saved as the default size (640*500). If the ratio of width to length of the
input image is not 4:3, the 4:3 ratio is maintained based on the longer side. The
remaining part is left as a black blank.
Exit: Select (icon) on the top right of the dialog box.
<Changing the size of multiple images>
Select the image files to be changed.
Proceed, following the same procedure to that of "Changing the Format and Size of
an Image".
Click (icon) and the following dialog box appears.
- If you click "Yes", the same settings to that of previous selected images are
applied.
- If you select "No", you can apply different settings for each individual image.
Page 73.
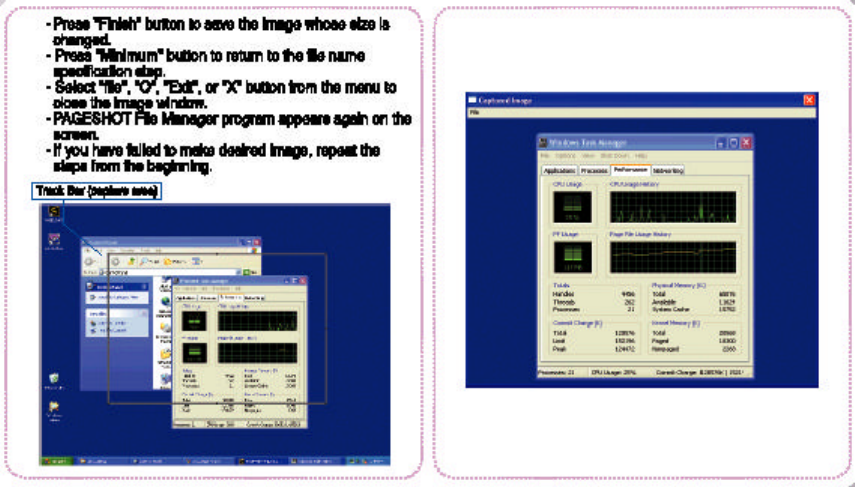
(4) SCREEN CAPTURE
You can capture the screen image, and save it as an image file.
<Procedures>
1) Click the (icon) icon on the toolbar.
2) Select [capture] ? [Screen] from the menu.
- If you launch screen capture, the PAGESHOT File Manager program is
automatically minimized to the bottom of the screen.
- Select the image on the screen you wish to save.
- Right-click for the Track Bar with the specified size (640 x 440 or 640 x 500) to
appear.
Note.
This may take about 1 second to appear in Windows 98.
- Move the Track Bar over the part of the screen you wish to capture, or adjust its
size.
- If you move the cursor over the Track Bar, the shape of the cursor is changed.
- (icon): Moves the Track Bar.
- (icon): Adjusts the size of the Track Bar.
- If you right-click again, the captured image of the specified area appears in the
new window.
- Confirm the captured image. If the image you want has been captured properly,
select "File"("Save As …" from the menu to save the captured image as a JPEG file.
- Select "File" ( "Exit" from the menu or click the “X" button to close the image
window.
- The PAGESHOT File Manager program will appear on the screen again.
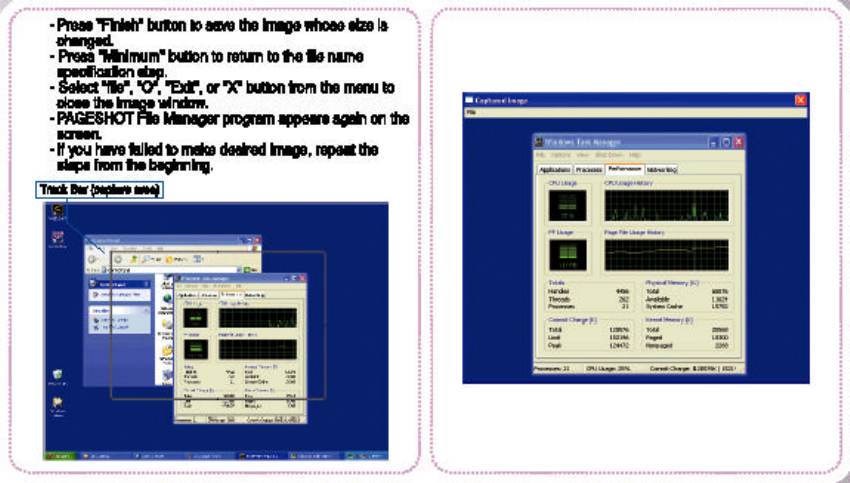
Page 74.
- If you have failed to create the desired image, restart from the beginning.
Track Bar (capture area)
Page 75.
(5) PLAYING A VOICE FILE
You can play the voice file (.voc) recorded with PageShot on your computer.
<Procedures>
1) Click the (icon) icon on the toolbar.
2) Select [Media] ( [Voice Playback] from the menu.
File name that is being played
Progress bar (You can specify the playback location with this bar)
Time display
(icon) : Determines the voice file to be played.
(icon) : Plays the specified voice file.
You can specify the playback location by adjusting the location of the progress bar
while playing a voice file.
(icon) : Exits playback.
<Time Display>
(icon) : Displays the current elapsed time/total play time.
(icon) : Exits voice file playback.
Page 76
(6) EDITING THE INITIALIZATION FILE
You can configure the operations to be performed when PageShot is turned on.
<Procedures>
1) Click the (icon) icon on the toolbar.
2) Select [File] ? [Initialization File] from the menu.
1. File name
The Initialization file name. PageShot only recognizes "pageshot.ini" file as an
initialization file.
2. Initialization information
Initial image: PageShot initial image. Only a JPEG file is allowed.
Initial music: PageShot initial music. Only an MP3 file is allowed.
This is applied only when Start mode is "NONE".
Page 77
3. Automatic Run
Start path: The start path of PageShot. The default value is ROOT.
Automatic run file: the presentation file to be played when PageShot is turned on.
Only PRJ files are allowed.
This is only applied when Start mode is "PRESENTATION".
4. Power
PowerSave: If there has been no operation on PageShot for a configured period of
time, the power is shut down.
5. Audio
AudioMute: When displaying a presentation, the sound is off.
6. Slide
Slide Delay: Determines the time interval between pages of the PageShot slide
function. The configuration range is between 0 and 59 seconds.
7. Firmware information
Version: Displays the version of the current Firmware.
Users cannot change this field.
8. Storage Media
Memory type: Determines the memory type to be used in PageShot.
1) INTERNAL: Internal memory 64Mbyte.
2) EXTERNAL: External memory 16M ~ 1024Mbyte available.
9. Start Mode
Start mode: Determines the initial mode of PageShot.
1) NONE: Plays the configured initial image and music.
2) JPEG: If the Slide Delay time is 0, it is in STILL CUT mode.
If the Slide Delay time has been configured, the JPEG Slide mode is set.
3) MP3: Plays an MP3 file. REPEAT MODE is OFF.
4) VOICE: Plays a voice file.
5) PRESENTATION: If the "Automatic run file" is configured, it runs the file.
Otherwise, the presentation menu screen will be displayed.
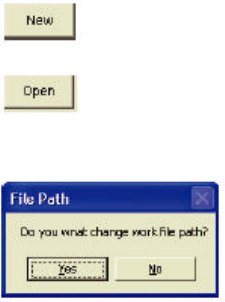
10. "New File" Button
Creates a new initialization file.
11. "Open" Button
Opens the existing initialization file and displays its contents.
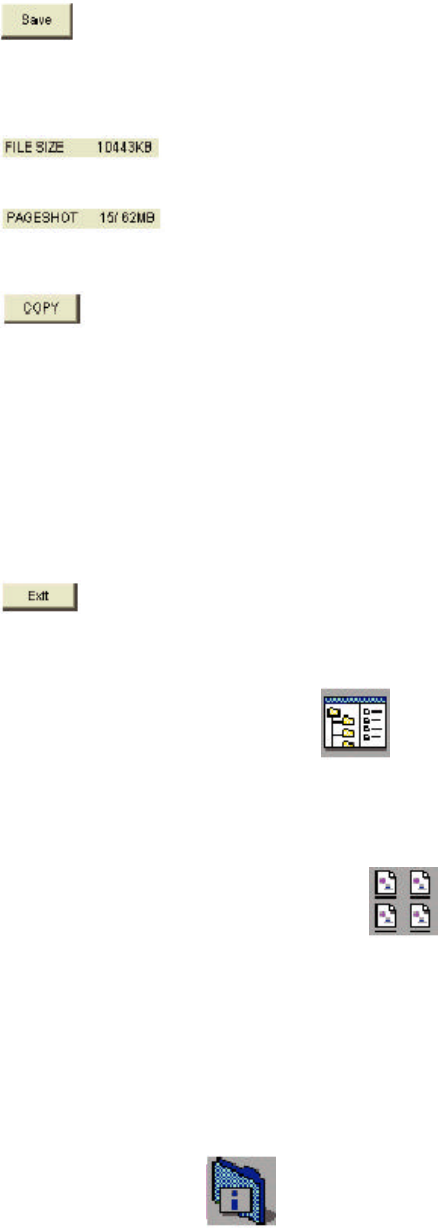
12. "Save" Button
Saves the configured initialization file.
Page78
(7) EDITING A PRESENTATION FILE
-The PAGESHOT File Manager provides functions to create, change, and save the
presentation file including JPEG and MP3 files for PageShot.
- The PAGESHOT File Manager provides preview functions that are the same as the
PageShot presentation functions.
- The PAGESHOT File Manager provides a function that copies all presentation file
related data to PageShot in one go. (When PageShot is connected)
<Procedures>
1) Click the icon on the toolbar.
2) Select [File] ? [Project File] from the menu.
Image list
Image list
You can listen to the selected music file(s).
Page information
Image window
Page mobile
Disk information
1) File
- File name: the presentation file name that is being edited or opened.
- Edit location: path to which the image and audio files included the presentation
file are saved.

Page 79
- Path button: You can change the path to which the image and audio files are
saved.
Notice.
If the presentation file location and the target file (JPEG, MP3) location is incorrect,
the file is not displayed in the image and audio list. In this case, check the path.
2) Image
-Image list: Displays JPEG images in the configured path. An image selected from
the list is displayed in the following large window.
3) Changing the Page
: Displays the current and total number of pages included in the presentation
file. If you click this icon, you can view the page information.
: Moves to the first page.
: Moves to the previous page.
: Moves to the next page.
: Moves to the last page.
: Runs the presentation preview.
-Preview: the selected image is displayed in the center of the screen.
- Next page: Left-click to view.
- Previous page: Right-click to view.
- Exit: Press the "Esc" button on the keyboard.
[Preview Figure]

Page80
4) Slide Delay Between Pages
Slide Delay: You can configure the time interval between pages.
5) Music
Path: You can specify the path including the MP3 files to be applied to the
presentation.
Audio list: Displays the MP3 files in the configured music path.
: Plays the MP3 files selected from the Audio list.
: Exits MP3 playback.
: Starts MP3 voice recording.
: Saves the recorded voice as another name.
6) Page Information
You can configure the behavior of each individual page when running presentations.
: Asks whether to display the current page.
: Asks whether to display the image.
The file selected from the image list is automatically specified.
: Asks whether to play audio.
The file selected from the audio list is automatically specified.
: Asks whether to display the script.
You can specify a script whose length is less than 20 characters.
: Adds a newly configured page. (The total number of pages are increased)
: Changes the page information to the current information. (Total number
of pages are not changed)
Notice.
If you do not save the file, changes are not saved to the file.
: Removes the page. (The total number of pages are decreased)
7) Presentation File
: Creates a new presentation file.
: Opens the presentation file.
Yes(Y) : User specifies the path of the JPEG and MP3 files.
No(N) : Use the presentation path.
Page 81
: Saves created or changed presentation files.
8) Disk Information
: The total size of the image and audio files included in the
presentation file.
: Displays the current memory usage of PageShot.
"Current memory/Total memory"
: Copies the presentation file as well as the data (JPEG and MP3) to
PageShot.
Note.
'Disk', and 'Copy' are only enabled when PageShot is connected.
9) Exit
: Closes the presentation edit window.
(8) VIEWING THE DETAIL LIST
-screen the information of the file on the right side of the list view.
(9) VIEWING THE THUMBNAIL LIST
-screen the preview icon of the image on the right side of the list view.
[View Detail List Screen]
[View Thumbnail List Screen]
(10) INFORMATION
-Displays the PPTConvert program information.

Page82
(11) Copying Files to PageShot
-You can copy the data you created on your computer to PageShot.
1) Drag & Drop
- Select the file or folder to copy from the List view.
- Right-click, and move the selected file or folder holding the button down.
- Drag & drop over the Tree view of the PageShot drive.
- The Popup menu appears. Select [Copy] from the popup menu to start copying.
2) [Copy], [Paste]
- Select the file or folder to copy from the List view.
- Right-click over the selected file or folder.
- Select [Copy] from the popup menu.
- Right-click over the Tree view of the PageShot drive.
- Select [Paste] or [Copy] to start copying the file or folder.

page83
(12) Renaming a File
1) Renaming a File
-You can change the file name as under Windows Explorer.
-Right-click over the file to change the name.
-Select [Rename] from the popup me nu.
-Enter the new name.
2) Renaming Multiple Files
-The names of the image files created in "Converting PowerPoint File To JPEG
Image" step are determined by a rule.
Example) The files are saved as "slide**.jpg" in the Korean version of Windows XP,
and MS Office. The File Manager provides a function that enables the simultaneous
renaming of all files whose name includes the same string.
-Run
- Right-click over the bottom of the List view.
- [Rename].
- Before changing: Enter the name of the file to be renamed.
- After change: Enter the new file name.
- : Renames the file to the new name.
If you rename all the files whose name includes the "slide" string to "SLIDE", then:
(slide01.jpg ?SLIDE01.jpg
slide02.jpg ? SLIDE02.jpg)
Page 84
(13) Deleting a File
Select the files to be deleted ( Press the [Delete] key on the keyboard.)
Otherwise, select the files to be deleted ( Right-click ( Click [Delete].
(14) Configuring the Language
-You can configure the language for the program.
If you change the language configuration, you have to restart the system again.
Select [configuration] ( [language] ( [Korean] or [English] from the menu.
When the configuration has been changed, the following confirmation message box
will be displayed.
"Yes" applies the language change.
Exits the program.
"No" cancels the language change.
Note.
If your computer does not support the configured language, characters may be
displayed abnormally.
(15) Configuring the Image Size Depending on the TV Output
-You can change the image size to be applied to PageShot depending on your TV
output type.
Select [Settings] ( [TV Mode] ( either [NTSC] or [PAL] from the menu.
NTSC : Configures the default image size to 640x440.
PAL : Configures the default image size to 640x500.
Note.
NTSC(National Television System Committee)
? used in Korea, the United States, Japan, Taiwan, Canada, Mexico, etc..
PAL(Phase Alternation Line)
? Used in European countries such as Germany, England, etc., and China, North
Korea, Brazil, etc..
Page 85
Using PAGESHOT File2 JPEG
PAGESHOT File2 JPEG provides a data communication function between a PC and
PAGESHOT via a USB connection.
PAGESHOT File2 JPEG enables the conversion of a PowerPoint file (.ppt) into JPEG
images of a size appropriate to PageShot.
PAGESHOT File2 JPEG enables the conversion of JPEG images into appropriate JPEG
images of the correct size for PageShot.
Running PAGESHOT File2 JPEG
Select [Start] ? [All Programs] ( [PAGESHOT] ( [PAGESHOT File2 JPEG] to run the
"PageShot File2 JPEG" program.
If PageShot is not connected, or is turned off, a message box will be displayed.
Page 86
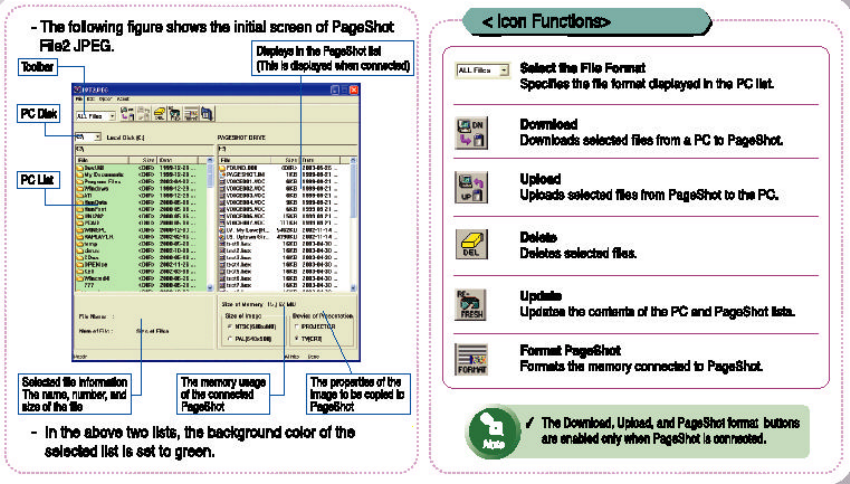
The following figure shows the initial screen of PageShot File2 JPEG.
Displays in the PageShot list (This is displayed when connected)
Toolbar
PC Disk
PC List
Selected file information
The name, number, and size of the file
The memory usage of the connected PageShot
The properties of the image to be copied to PageShot
In the above two lists, the background color of the selected list is set to green.
< Icon Functions>
Select the File Format
Specifies the file format displayed in the PC list.
Download
Downloads selected files from a PC to PageShot.
Upload
Uploads selected files from PageShot to the PC.
Delete
Deletes selected files.
Update
Updates the contents of the PC and PageShot lists.
Format PageShot
Formats the memory connected to PageShot.
Note.
The Download, Upload, and PageShot format buttons are enabled only when
PageShot is connected.
Page 87
Detailed Description of Functions
(1) Selecting the File Format
You can configure the format of the file displayed in the PC list on the left.
PPT Files: Shows only PowerPoint files.
JPEG Files: Shows only JPEG files.
ALL Files: Shows all files.
(2) Downloading
Copies the files selected from the PC list on the left of the window to PageShot.
This button is enabled only when PageShot is connected, and the PC list is selected.
Depending on the file format selected in function (1), the Download operation may
differ.
<PPT Files>
When downloading a file, you can download the selected PowerPoint file after
converting it to the JPEG images appropriate to PageShot.
When you select Download, the above message box appears.
Yes(Y) : Converts the PowerPoint file to JPEG images appropriate to PageShot, and
copies them to PageShot,.
No(N) : Copies the PowerPoint file to PageShot as is.
cancel : Cancels the Download operation.
<JPEG Files>
When downloading a file, you can download the selected PowerPoint file after
converting it to the JPEG images appropriate to PageShot.
When you select Download, the above message box appears.
Yes(Y): Converts JPEG images appropriate to PageShot, and copies them to
PageShot depending on the image size, and the presentation device options.
No(N) : Copies the JPEG file to PageShot as is.
cancel : Cancels the Download operation.
Page 88
Note.
If you apply this operation to the images that are already converted, the resolution
of the image may be degraded.
Therefore, keep this in mind when applying this operation.
<ALL Files>
Copies all the selected files and folders to PageShot.
<Converting PowerPoint and JPEG files into data appropriate to PageShot>
When you convert PowerPoint and JPEG files into data appropriate to PageShot,
different data may be generated depending on the following options.
Image Size
Configure the optimum JPEG image size depending on the TV output signal type to
display the presentation.
NTSC (640 x 440): Generates 640 x 440 size images that are appropriate to the
NTSC type (the United States, Canada, Japan, and Korea).
PAL (640 x 500): Generates 640 x 500 size images that are appropriate to the PAL
type (Europe, China & Brazil).
Presentation Media
Configure the appropriate JPEG resolution depending on the device displaying the
presentation.
PROJECTOR: Generates optimum data for displaying on a projector or LCD TV.
TV (CRT): Generates optimum data so that flickering on a CRT TV is minimized.
It is recommended using a font larger than 14pt when you create a PowerPoint
document.
If the font size is less than 14pt, the font may not be distinguishable on the
PageShot set.
(3) Uploading
Copies the files selected from the PageShot list on the right side of the window to
the PC. This button is only enabled when PageShot is connected, and the PC list is
selected.
The Upload function only performs copy operations regardless of the file format
while the Download function performs format conversions.
Page 89
(4) Deleting
You can delete files selected from the file list.
(5) Updating
Updates the data for each list changed after performing Download, Upload, or
Delete operations.
(6) Formatting PageShot
You can format a connected PageShot device.
This button is enabled only when PageShot is connected.
Displays the PageShot memory size. (Internal 64M)
Select the file system to be used for PageShot
Select either FAT or FAT 16
PAGESHOT disk name configuration
Performs Format
Notice.
You have to select either "FAT" or "FAT16" file system.
If you select "FAT32" and format, PageShot will not recognize files.