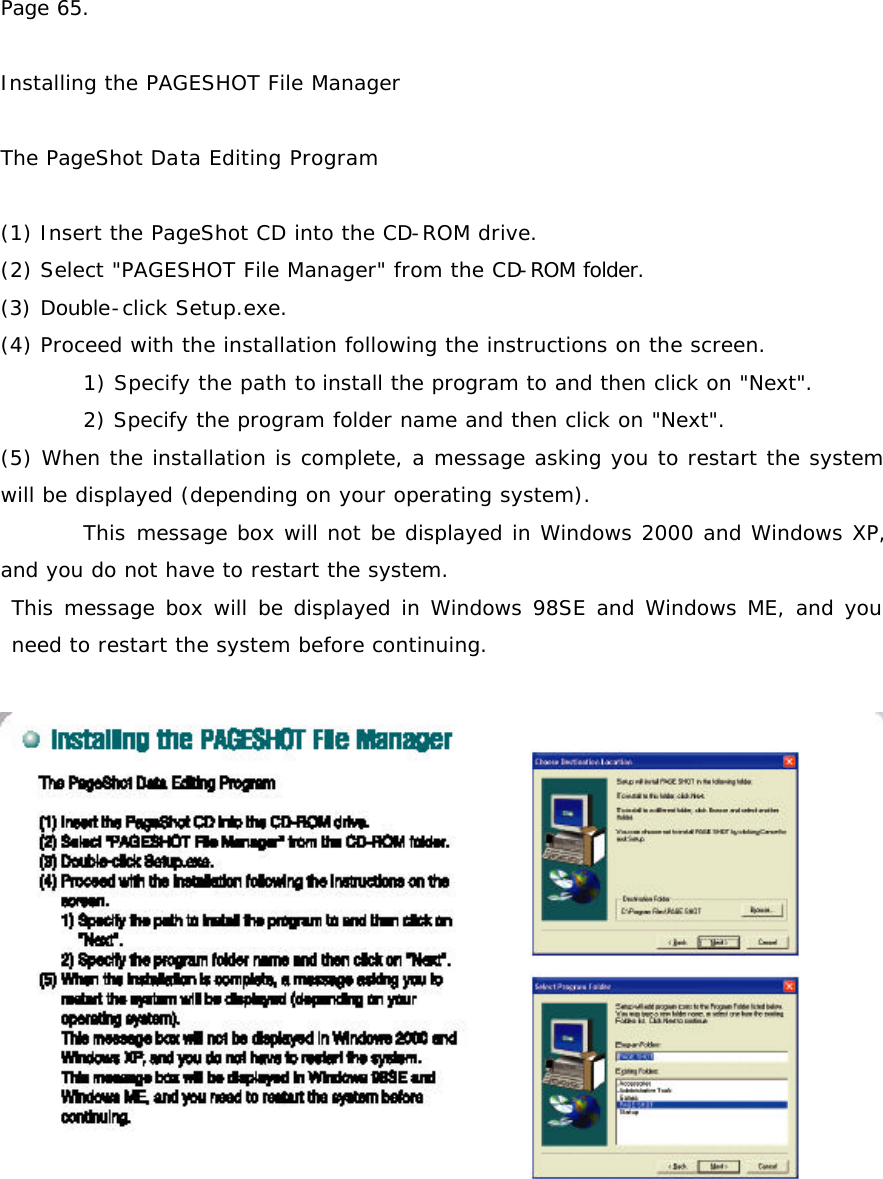
DM Technology DM-P200 DIGITAL PRESENTATION DEVICE User Manual
DM Technology Co., Ltd. DIGITAL PRESENTATION DEVICE Users Manual
UserManual.wiki
>
DM Technology
>
DM-P200 User Manual
>
MANUAL 2
Contents
1.
MANUAL 1
2.
MANUAL 2
MANUAL 2
Navigation menu
Upload a User Manual
Namespaces
Wiki Guide
HTML
PDF
Info
Views
User Manual
Discussion / Help
Navigation
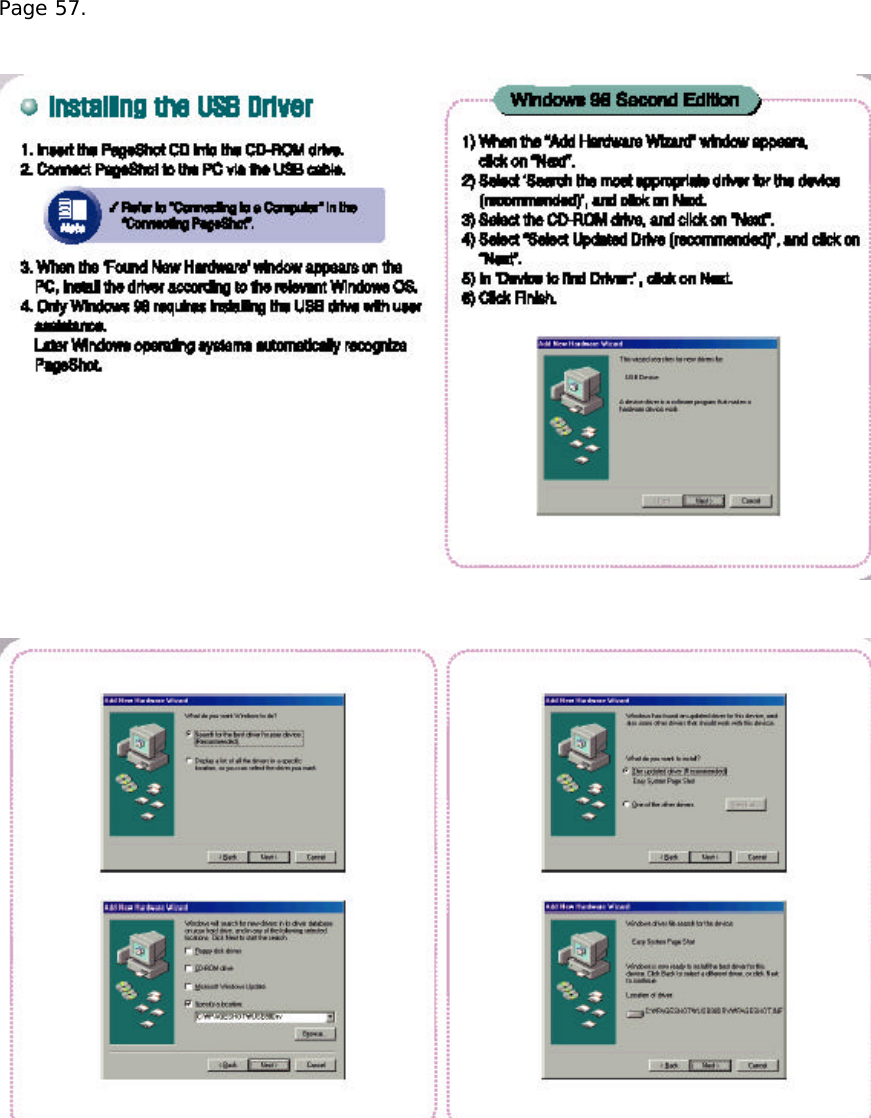
![Page 46 Adjusting the Horizontal/Vertical Location of the Screen You can adjust the horizontal and vertical location of the output screen. 1. In the SETUP SCREEN, Press the (icon) button. If you press the button in the Setup Screen, the Setup Screen appears. 2. Adjust the location of the screen by using the (icon) buttons. 3. Press the (icon) button. This moves to the SETUP menu. Configuring the PageShot Device You can configure the PageShot operation settings. 1. In SETUP DEVICE, Press the (icon) button. If you press the button in the Setup Device, the Setup Device screen appears. Configured value Selectable list Value to configure [SETUP DEVICE Screen]](https://usermanual.wiki/DM-Technology/DM-P200.MANUAL-2/User-Guide-338479-Page-1.png)
![Page 47 Item to change configuration Configured value Value to configure [SETUP DEVICE LCD Screen] Configuring the Start Mode You can configure the Run mode when PageShot is on. 1. Press the (icon) button. If you press the button in Setup Device icon of the PageShot menu, the Setup Device screen appears. 2. Move to START MODE by using the (icon) buttons. 3. Press the (icon) button. The configurable list for the selected item appears. 4. Move to the value you wish to configure by using the (icon) buttons.](https://usermanual.wiki/DM-Technology/DM-P200.MANUAL-2/User-Guide-338479-Page-2.png)


![Page 67. Running the PAGESHOT File Manager Select [Start] ? [All Program] ? [PAGESHOT] ( [PAGESHOT] to launch the PAGESHOT File Manager program. When running the PAGESHOT File Manager for the first time: The language selection message will be displayed as in the figure. Select either Korean or English and then click OK. You can change the language in "SETUP" in the main menu. If PageShot is not connected or is turned off the following message box will be displayed. The following figure shows the initial screen of the PAGESHOT File Manager. You can view the content for a selected folder. (List view) Toolbar You can select the target folder. (Tree view) You can preview image files. (Free view) You can view the content of the selected folder. (List view)](https://usermanual.wiki/DM-Technology/DM-P200.MANUAL-2/User-Guide-338479-Page-21.png)
![Page 69. Detailed Description of Functions (1) FORMATTING PAGESHOT Displays the current connectivity status of PageShot. When PageShot is connected (Enabled): When PageShot is not connected (Disabled): If you click when the button is enabled, the information window to format the PageShot memory appears. 1. Displays the PageShot memory size. (Internal 64M) 2. Select either FAT or FAT 16 file system that is to be used for PageShot. 3. Specify the PageShot disk name. 4. Performs the Format Notice. You have to select either the "FAT" or "FAT16" file system. If you select "FAT32" and format, PageShot will not recognize files. (2) CONVERTING A POWERPOINT FILE TO JPEG You can convert a PowerPoint file into JPEG images of the appropriate size (640X500) to PageShot. <Procedures> 1) Select the (icon) icon from the toolbar. 2) Select [Convert] ? [PowerPoint to Image...] from the menu. 3) Right-click over the desired PowerPoint file in the List view. Select [Convert into Image] from the popup menu. (The selected PowerPoint information is configured automatically). Note. It is recommended using a font larger than 14pt when you create a PowerPoint document. If the font size is less than 14pt, the font may not be distinguishable on the PageShot set.](https://usermanual.wiki/DM-Technology/DM-P200.MANUAL-2/User-Guide-338479-Page-23.png)
![Page 71. (3) IMAGE FORMAT CONVERSION AND RESIZING If the format of the image to be displayed through PageShot is GIF or BMP, or the size of the file is larger than 640*500, you need to convert the format to JPEG or change the size of the file to 640*500 in order to display the file. <Procedures> 1) Click the (icon) icon on the toolbar. 2) Select [Convert] ? [Convert Image] from the menu. 3) Right-click over the image file in the List view. Select [Change Image Size]. (The selected image information is configured automatically) 1. Open the file: Select the original source image file (BMP, GIF, JPG)(icon) from which to change the format or the size, and open the target file. 2. Input image information: Displays the input image information.](https://usermanual.wiki/DM-Technology/DM-P200.MANUAL-2/User-Guide-338479-Page-25.png)
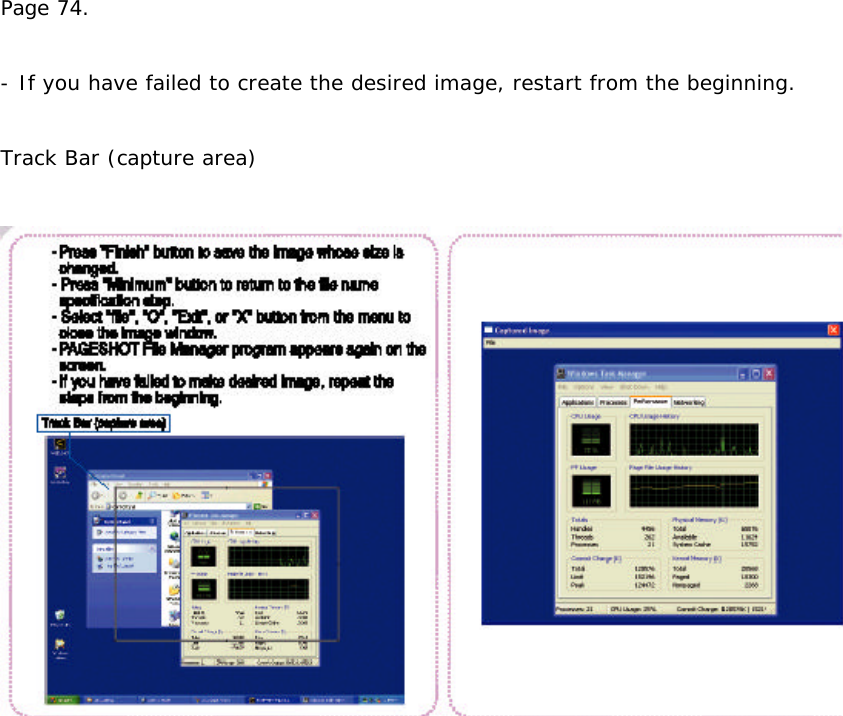
![Page 73. (4) SCREEN CAPTURE You can capture the screen image, and save it as an image file. <Procedures> 1) Click the (icon) icon on the toolbar. 2) Select [capture] ? [Screen] from the menu. - If you launch screen capture, the PAGESHOT File Manager program is automatically minimized to the bottom of the screen. - Select the image on the screen you wish to save. - Right-click for the Track Bar with the specified size (640 x 440 or 640 x 500) to appear. Note. This may take about 1 second to appear in Windows 98. - Move the Track Bar over the part of the screen you wish to capture, or adjust its size. - If you move the cursor over the Track Bar, the shape of the cursor is changed. - (icon): Moves the Track Bar. - (icon): Adjusts the size of the Track Bar. - If you right-click again, the captured image of the specified area appears in the new window. - Confirm the captured image. If the image you want has been captured properly, select "File"("Save As …" from the menu to save the captured image as a JPEG file. - Select "File" ( "Exit" from the menu or click the “X" button to close the image window. - The PAGESHOT File Manager program will appear on the screen again.](https://usermanual.wiki/DM-Technology/DM-P200.MANUAL-2/User-Guide-338479-Page-27.png)
![Page 75. (5) PLAYING A VOICE FILE You can play the voice file (.voc) recorded with PageShot on your computer. <Procedures> 1) Click the (icon) icon on the toolbar. 2) Select [Media] ( [Voice Playback] from the menu. File name that is being played Progress bar (You can specify the playback location with this bar) Time display (icon) : Determines the voice file to be played. (icon) : Plays the specified voice file. You can specify the playback location by adjusting the location of the progress bar while playing a voice file. (icon) : Exits playback. <Time Display> (icon) : Displays the current elapsed time/total play time. (icon) : Exits voice file playback.](https://usermanual.wiki/DM-Technology/DM-P200.MANUAL-2/User-Guide-338479-Page-29.png)
![Page 76 (6) EDITING THE INITIALIZATION FILE You can configure the operations to be performed when PageShot is turned on. <Procedures> 1) Click the (icon) icon on the toolbar. 2) Select [File] ? [Initialization File] from the menu. 1. File name The Initialization file name. PageShot only recognizes "pageshot.ini" file as an initialization file. 2. Initialization information Initial image: PageShot initial image. Only a JPEG file is allowed. Initial music: PageShot initial music. Only an MP3 file is allowed. This is applied only when Start mode is "NONE".](https://usermanual.wiki/DM-Technology/DM-P200.MANUAL-2/User-Guide-338479-Page-30.png)
![Page78 (7) EDITING A PRESENTATION FILE -The PAGESHOT File Manager provides functions to create, change, and save the presentation file including JPEG and MP3 files for PageShot. - The PAGESHOT File Manager provides preview functions that are the same as the PageShot presentation functions. - The PAGESHOT File Manager provides a function that copies all presentation file related data to PageShot in one go. (When PageShot is connected) <Procedures> 1) Click the icon on the toolbar. 2) Select [File] ? [Project File] from the menu. Image list Image list You can listen to the selected music file(s). Page information Image window Page mobile Disk information 1) File - File name: the presentation file name that is being edited or opened. - Edit location: path to which the image and audio files included the presentation file are saved.](https://usermanual.wiki/DM-Technology/DM-P200.MANUAL-2/User-Guide-338479-Page-33.png)
![Page 79 - Path button: You can change the path to which the image and audio files are saved. Notice. If the presentation file location and the target file (JPEG, MP3) location is incorrect, the file is not displayed in the image and audio list. In this case, check the path. 2) Image -Image list: Displays JPEG images in the configured path. An image selected from the list is displayed in the following large window. 3) Changing the Page : Displays the current and total number of pages included in the presentation file. If you click this icon, you can view the page information. : Moves to the first page. : Moves to the previous page. : Moves to the next page. : Moves to the last page. : Runs the presentation preview. -Preview: the selected image is displayed in the center of the screen. - Next page: Left-click to view. - Previous page: Right-click to view. - Exit: Press the "Esc" button on the keyboard. [Preview Figure]](https://usermanual.wiki/DM-Technology/DM-P200.MANUAL-2/User-Guide-338479-Page-34.png)
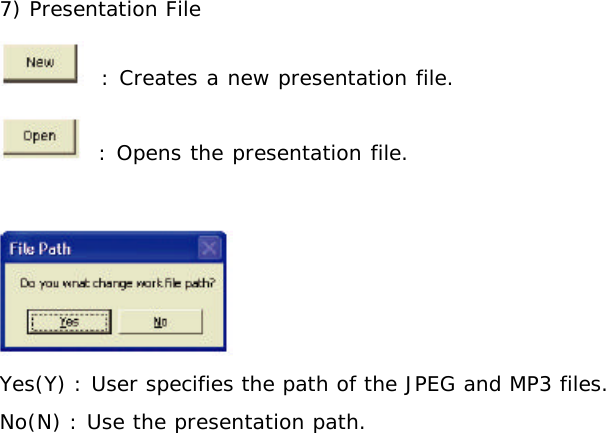
![Page 81 : Saves created or changed presentation files. 8) Disk Information : The total size of the image and audio files included in the presentation file. : Displays the current memory usage of PageShot. "Current memory/Total memory" : Copies the presentation file as well as the data (JPEG and MP3) to PageShot. Note. 'Disk', and 'Copy' are only enabled when PageShot is connected. 9) Exit : Closes the presentation edit window. (8) VIEWING THE DETAIL LIST -screen the information of the file on the right side of the list view. (9) VIEWING THE THUMBNAIL LIST -screen the preview icon of the image on the right side of the list view. [View Detail List Screen] [View Thumbnail List Screen] (10) INFORMATION -Displays the PPTConvert program information.](https://usermanual.wiki/DM-Technology/DM-P200.MANUAL-2/User-Guide-338479-Page-37.png)
![Page82 (11) Copying Files to PageShot -You can copy the data you created on your computer to PageShot. 1) Drag & Drop - Select the file or folder to copy from the List view. - Right-click, and move the selected file or folder holding the button down. - Drag & drop over the Tree view of the PageShot drive. - The Popup menu appears. Select [Copy] from the popup menu to start copying. 2) [Copy], [Paste] - Select the file or folder to copy from the List view. - Right-click over the selected file or folder. - Select [Copy] from the popup menu. - Right-click over the Tree view of the PageShot drive. - Select [Paste] or [Copy] to start copying the file or folder.](https://usermanual.wiki/DM-Technology/DM-P200.MANUAL-2/User-Guide-338479-Page-38.png)
![page83 (12) Renaming a File 1) Renaming a File -You can change the file name as under Windows Explorer. -Right-click over the file to change the name. -Select [Rename] from the popup me nu. -Enter the new name. 2) Renaming Multiple Files -The names of the image files created in "Converting PowerPoint File To JPEG Image" step are determined by a rule. Example) The files are saved as "slide**.jpg" in the Korean version of Windows XP, and MS Office. The File Manager provides a function that enables the simultaneous renaming of all files whose name includes the same string. -Run - Right-click over the bottom of the List view. - [Rename]. - Before changing: Enter the name of the file to be renamed. - After change: Enter the new file name. - : Renames the file to the new name. If you rename all the files whose name includes the "slide" string to "SLIDE", then: (slide01.jpg ?SLIDE01.jpg slide02.jpg ? SLIDE02.jpg)](https://usermanual.wiki/DM-Technology/DM-P200.MANUAL-2/User-Guide-338479-Page-39.png)
![Page 84 (13) Deleting a File Select the files to be deleted ( Press the [Delete] key on the keyboard.) Otherwise, select the files to be deleted ( Right-click ( Click [Delete]. (14) Configuring the Language -You can configure the language for the program. If you change the language configuration, you have to restart the system again. Select [configuration] ( [language] ( [Korean] or [English] from the menu. When the configuration has been changed, the following confirmation message box will be displayed. "Yes" applies the language change. Exits the program. "No" cancels the language change. Note. If your computer does not support the configured language, characters may be displayed abnormally. (15) Configuring the Image Size Depending on the TV Output -You can change the image size to be applied to PageShot depending on your TV output type. Select [Settings] ( [TV Mode] ( either [NTSC] or [PAL] from the menu. NTSC : Configures the default image size to 640x440. PAL : Configures the default image size to 640x500. Note. NTSC(National Television System Committee) ? used in Korea, the United States, Japan, Taiwan, Canada, Mexico, etc.. PAL(Phase Alternation Line) ? Used in European countries such as Germany, England, etc., and China, North Korea, Brazil, etc..](https://usermanual.wiki/DM-Technology/DM-P200.MANUAL-2/User-Guide-338479-Page-40.png)
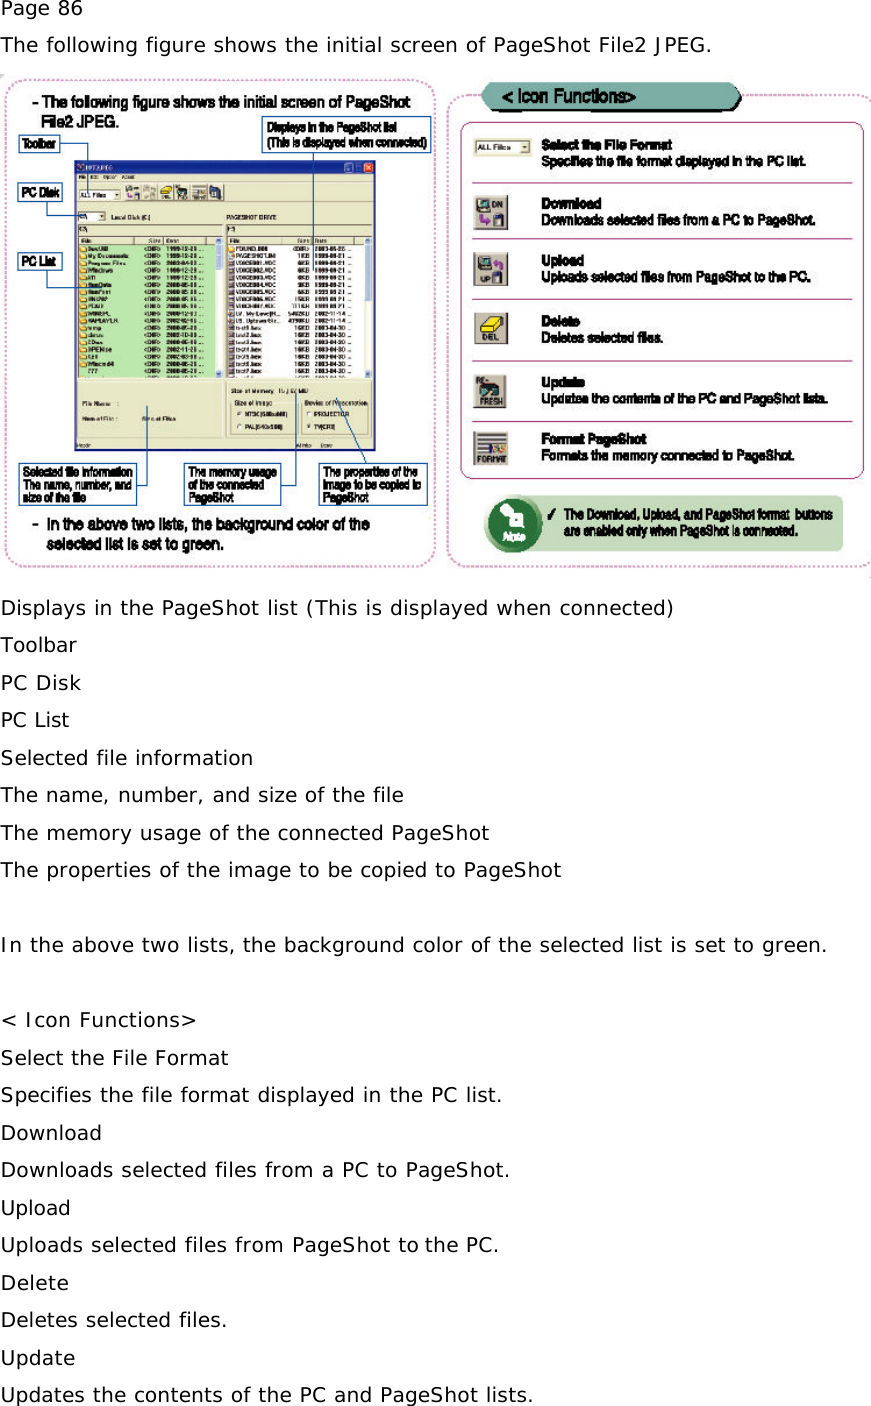
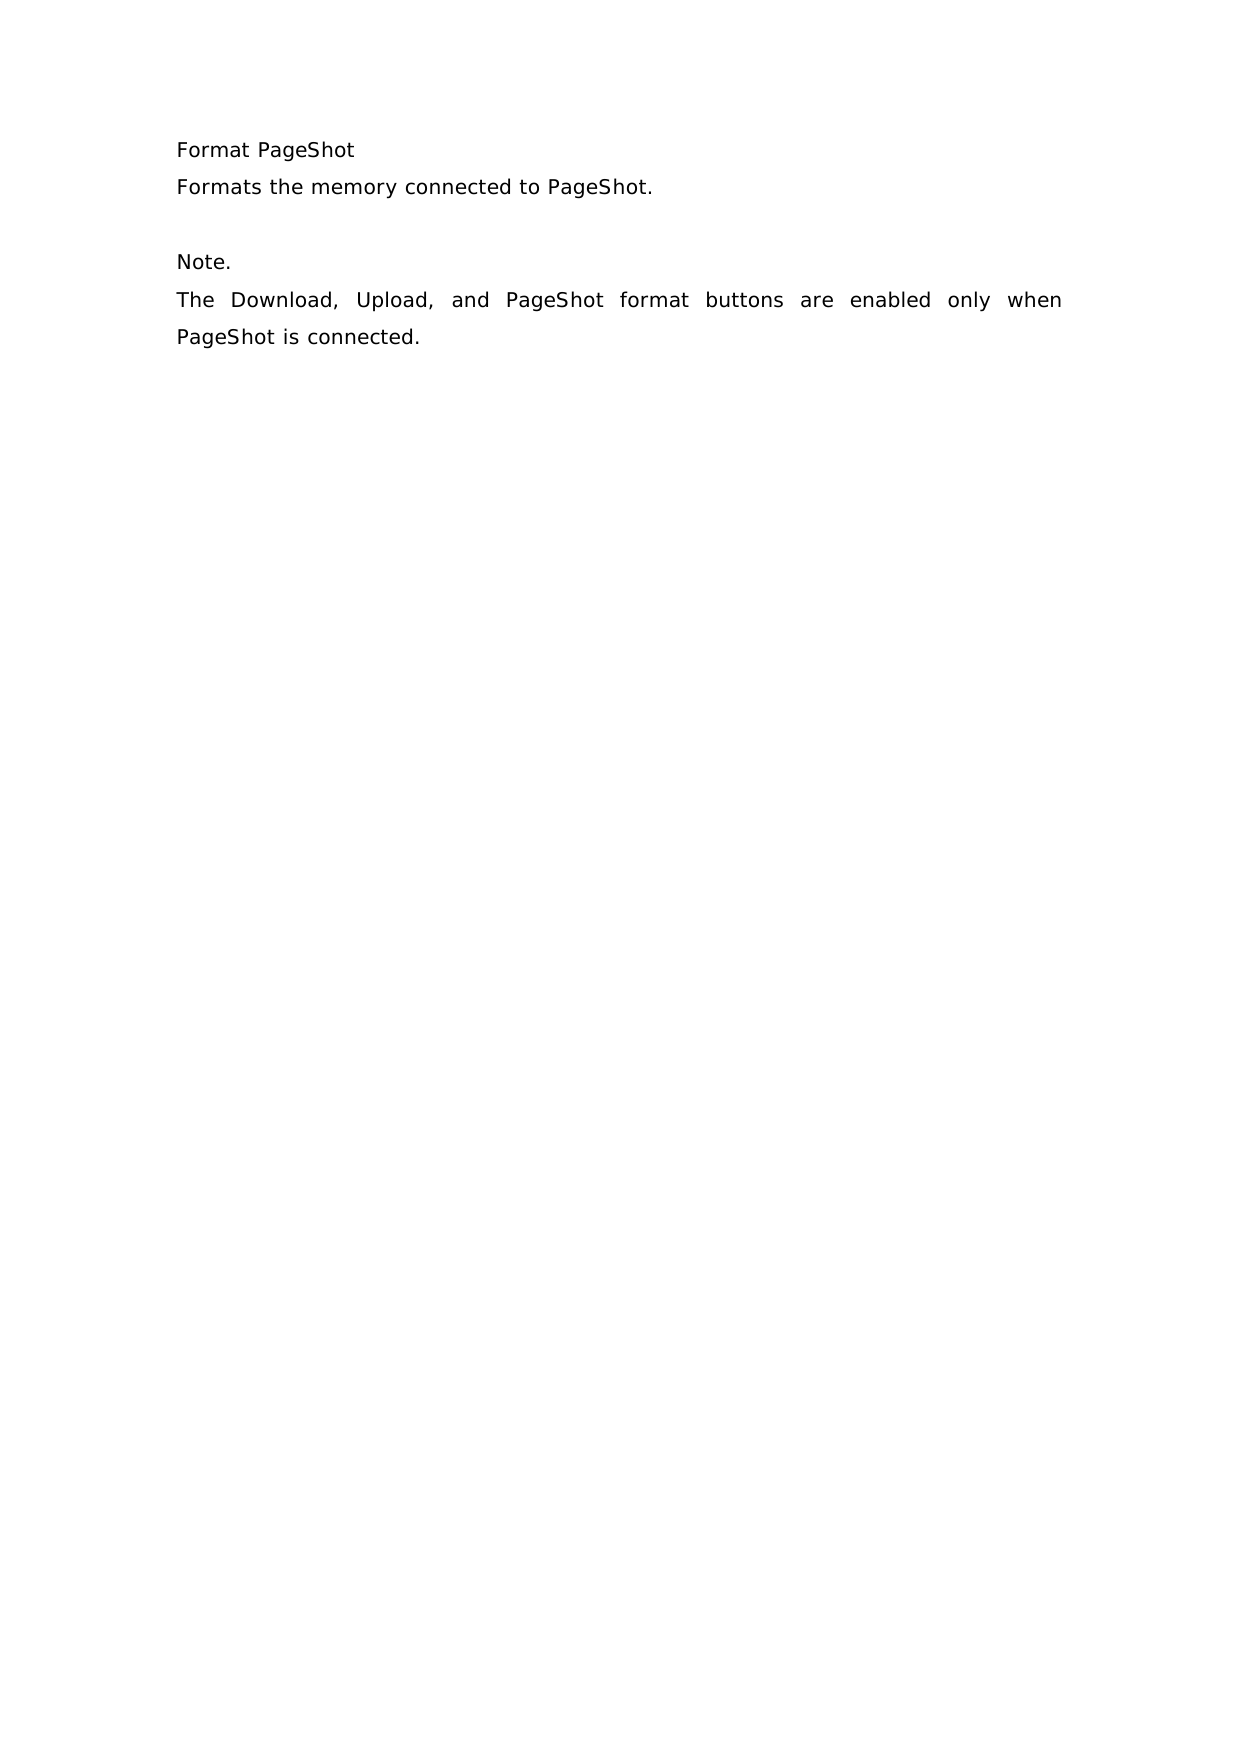
![Page 85 Using PAGESHOT File2 JPEG PAGESHOT File2 JPEG provides a data communication function between a PC and PAGESHOT via a USB connection. PAGESHOT File2 JPEG enables the conversion of a PowerPoint file (.ppt) into JPEG images of a size appropriate to PageShot. PAGESHOT File2 JPEG enables the conversion of JPEG images into appropriate JPEG images of the correct size for PageShot. Running PAGESHOT File2 JPEG Select [Start] ? [All Programs] ( [PAGESHOT] ( [PAGESHOT File2 JPEG] to run the "PageShot File2 JPEG" program. If PageShot is not connected, or is turned off, a message box will be displayed.](https://usermanual.wiki/DM-Technology/DM-P200.MANUAL-2/User-Guide-338479-Page-41.png)